Table of Contents for
Mastering PostCSS for Web Design
 Mastering PostCSS for Web Design
Published by
Packt Publishing, 2016
Mastering PostCSS for Web Design
Published by
Packt Publishing, 2016
- Cover
- Table of Contents
- Mastering PostCSS for Web Design
- Mastering PostCSS for Web Design
- Credits
- About the Author
- About the Reviewer
- www.PacktPub.com
- Preface
- What you need for this book
- Who this book is for
- Conventions
- Reader feedback
- Customer support
- 1. Introducing PostCSS
- Introducing PostCSS
- Setting up a development environment
- Creating a simple example using PostCSS
- Linting code using plugins
- Exploring how PostCSS works
- Summary
- 2. Creating Variables and Mixins
- Creating a hover effect example
- Transitioning to using PostCSS
- Adding variable support to PostCSS
- Updating our hover effect demo
- Setting the order of plugins
- Creating mixins with PostCSS
- Looping content with PostCSS
- Summary
- 3. Nesting Rules
- Navigating through pages
- Transitioning to using PostCSS plugins
- Exploring the pitfalls of nesting
- Making the switch to BEM
- Exploring our changes in more detail
- Summary
- 4. Building Media Queries
- Exploring custom media queries in PostCSS
- Making images responsive
- Adding responsive text support
- Optimizing media queries
- Retrofitting support for older browsers
- Moving away from responsive design
- Taking things further with CSS4
- Summary
- 5. Managing Colors, Images, and Fonts
- Managing fonts with PostCSS
- Creating image sprites
- Working with SVG in PostCSS
- Adding support for WebP images
- Manipulating colors and color palettes
- Creating color functions with PostCSS
- Summary
- 6. Creating Grids
- Creating an example with Bourbon Neat
- Exploring the grid plugins in PostCSS
- Transitioning to using PostCSS-Neat
- Creating a site using Neat and PostCSS
- Adding responsive capabilities
- Summary
- 7. Animating Elements
- Moving away from jQuery
- Making use of pre-built libraries
- Switching to using SASS
- Making the switch to PostCSS
- Exploring plugin options within PostCSS
- Updating code to use PostCSS
- Creating a demo in PostCSS
- Optimizing our animations
- Using our own animation plugin
- Summary
- 8. Creating PostCSS Plugins
- Dissecting the architecture of a standard plugin
- Creating an transition plugin
- Building a custom font plugin
- Simplifying the development process
- Guidelines for plugin building
- Making the plugin available for use
- Summary
- 9. Working with Shortcuts, Fallbacks, and Packs
- Exploring plugin packs for PostCSS
- Adding shortcuts with Rucksack
- Linting and optimizing your code
- Providing fallback support
- Summary
- 10. Building a Custom Processor
- Exploring our processor
- Dissecting issues with our processor
- Optimizing the output
- Adding reload capabilities
- Extending our processor further
- Testing the final pre-processor
- Getting started with some hints and tips
- Introducing the CSStyle library
- Summary
- 11. Manipulating Custom Syntaxes
- Preparing our environment
- Implementing custom syntax plugins
- Parsing CSS
- Formatting the output with the API
- Highlighting our syntax code
- Summary
- 12. Mixing Preprocessors
- Exploring the conversion process
- Introducing the Pleeease library
- Compiling with other preprocessors
- Using the PreCSS library
- Converting a WordPress installation
- Setting up our environment
- Considering the conversion process
- Making changes to our code
- Compiling and testing the changes
- Summary
- 13. Troubleshooting PostCSS Issues
- Exploring some common issues
- Getting help from others
- Summary
- 14. Preparing for the Future
- Converting CSS4 styles for use
- Supporting future syntax with cssnext
- Creating plugins to provide extra CSS4 support
- Summary
- Index
A question: how often have you created components such as buttons, where you've used very similar colors multiple times throughout your code? It's a real pain to manually alter. Using a preprocessor such as SASS or Less makes it easier, but with the overhead of a full-sized library.
Can we do it differently? Absolutely; throughout the next few chapters, we'll explore different elements of PostCSS, before pulling it all together to produce a preprocessor application later in the book. We'll begin our journey with a look at using variables and mixins; we'll explore the basics of creating them first, before transitioning to support using PostCSS. In this chapter, we'll cover the following topics:
- An overview of creating variables and mixins using existing preprocessors
- Transitioning to using PostCSS equivalents
- Adding mixin support to PostCSS
- Examining the differences between standard preprocessors and PostCSS
Let's get cracking!
So far, we've covered the basics of installing and configuring PostCSS—although there are a few steps involved, it's an easy process to get started with using the processor. To really get to know it though, there is no substitute for using it in anger; it's amazing how much you can automate, with just a little care and planning!
Let's put that to the test and use it to create a couple of simple examples using variables, functions, and mixins. We'll start with creating the original version using SASS, before converting it to use PostCSS plugins. The demos do assume a level of prior knowledge around using SASS, so if you are at all unfamiliar, then you may like to refer to my book, SASS Essentials, available from Packt Publishing.
Note
A word of note: we will make good use of the project folders we created back in Chapter 1, Introducing PostCSS, where src will be our in-tray, and dest will contain the compiled code. Make sure you have this open in a window somewhere on your desktop!
Okay, the first step in this process is to get SASS installed, so let's take a look at that now.
Setting up SASS is really easy when using Gulp; we can use the same format of command to install it as we do for other plugins. The source code for the plugin is available at https://github.com/dlmanning/gulp-sass; it's a lightweight frontend for node-sass, which in turn is a Node binding for the C+ library, libsass.
Let's dive in and take a look at getting it installed:
- We start, as usual, with Node. Fire up a Node.js command prompt session, then change to the working directory.
- At the command prompt, enter the following, then press Enter:
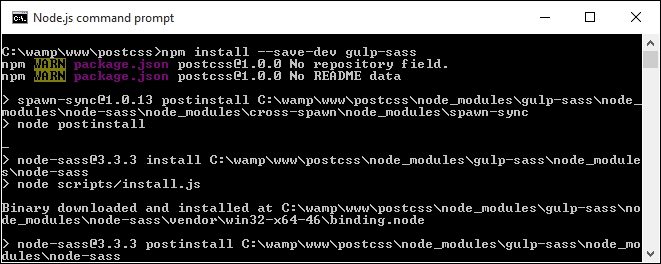
npm install --save-dev gulp-sass - If all is well, we should see something akin to this screenshot:
Before we continue, though, I would recommend clearing out or saving the contents of the dest folder elsewhere for safe keeping, after each exercise:
- Next up, open a copy of
gulpfile.jsin Sublime Text; we need to make a number of changes, beginning with adding a reference to thegulp-sassplugin (as highlighted):var reporter = require('postcss-reporter'); var sass = require('gulp-sass');SASS will, by default, produce code in unminified format; the addition of
{outputStyle: 'compressed'}in the task will automatically compress the output code. This makes this line redundant, so go ahead and remove it:var cssnano = require('cssnano'); - We also need to remove the reference to
cssnanoon or around line 19, so go ahead and remove this line:.pipe(postcss([ cssnano ]))
- On or around line 10, change the name of the styles task to
autoprefixerand the dependency name tolint-styles:gulp.task('autoprefixer', ['lint-styles'], function() { return gulp.src('src/*.css')Then remove these two lines:
.pipe(sourcemaps.init()) .pipe(sourcemaps.write('maps/')) - In the rename task, modify the
renametask to match this:gulp.task('rename', ['lint-styles'], function () { return gulp.src('dest/*.css') .pipe(rename('style.min.css')) .pipe(sourcemaps.init()) .pipe(sourcemaps.write('maps/')) .pipe(gulp.dest("dest/")); }); - On or around line 25, we need to add in the
lint-stylestask—go ahead and add in this block of code, which will check our styles for consistency:gulp.task("lint-styles", ['sass'], function() { return gulp.src("src/*.css") .pipe(postcss([ stylelint({ "rules": { "color-no-invalid-hex": 2, "declaration-colon-space-before": [2, "never"], "indentation": [2, 2], "number-leading-zero": [2, "always"] } }), reporter({ clearMessages: true, }) ])) }); - We're almost done. Add in the next task; this tells Gulp about how we should compile any SASS files presented to the task runner:
gulp.task('sass', function () { gulp.src('src/*.scss') .pipe(sass({outputStyle: 'compressed'}).on('error', sass.logError)) .pipe(gulp.dest('src/')); }); - We need to make a couple more changes. The key task that fires off a call to each of the sub tasks needs to be updated, to reflect the changes to our tasks:
gulp.task('default', ['sass', 'lint-styles', 'autoprefixer', 'rename']); - Our last change is to alter the watch facility to check for SASS files, and not pure CSS; go ahead and change the configuration object as shown:
var watcher = gulp.watch('src/*.scss', ['default']);
At this point, we have set up our processor to compile SASS files to valid CSS. We can prove this by compiling any SASS file. If all is well, our processor will produce valid style sheets and accompanying source map files automatically. Let's put this to the test as part of our next exercise, where we create an intriguing hover effect for images.