Table of Contents for
OpenLayers 3.x Cookbook - Second Edition
 OpenLayers 3.x Cookbook - Second Edition
Published by
Packt Publishing, 2016
OpenLayers 3.x Cookbook - Second Edition
Published by
Packt Publishing, 2016
- Cover
- Table of Contents
- OpenLayers 3.x Cookbook Second Edition
- OpenLayers 3.x Cookbook Second Edition
- Credits
- About the Authors
- About the Reviewer
- www.PacktPub.com
- Preface
- What you need for this book
- Who this book is for
- Sections
- Conventions
- Reader feedback
- Customer support
- 1. Web Mapping Basics
- Creating a simple fullscreen map
- Playing with the map's options
- Managing the map's stack layers
- Managing the map's controls
- Moving around the map view
- Restricting the map's extent
- 2. Adding Raster Layers
- Using Bing imagery
- Using OpenStreetMap imagery
- Adding WMS layers
- Changing the zoom effect
- Changing layer opacity
- Buffering the layer data to improve map navigation
- Creating an image layer
- Setting the tile size in WMS layers
- 3. Working with Vector Layers
- Adding a GML layer
- Adding a KML layer
- Creating features programmatically
- Exporting features as GeoJSON
- Reading and creating features from a WKT
- Using point features as markers
- Removing or cloning features using overlays
- Zooming to the extent of a layer
- Adding text labels to geometry points
- Adding features from a WFS server
- Using the cluster strategy
- Reading features directly using AJAX
- Creating a heat map
- 4. Working with Events
- Creating a side-by-side map comparator
- Implementing a work-in-progress indicator for map layers
- Listening for the vector layer features' events
- Listening for mouse or touch events
- Using the keyboard to pan or zoom
- 5. Adding Controls
- Adding and removing controls
- Working with geolocation
- Placing controls outside the map
- Drawing features across multiple vector layers
- Modifying features
- Measuring distances and areas
- Getting feature information from a data source
- Getting information from a WMS server
- 6. Styling Features
- Styling layers
- Styling features based on geometry type
- Styling based on feature attributes
- Styling interaction render intents
- Styling clustered features
- 7. Beyond the Basics
- Working with projections
- Creating a custom control
- Selecting features by dragging out a selection area
- Transitioning between weather forecast imagery
- Using the custom OpenLayers library build
- Drawing in freehand mode
- Modifying layer appearance
- Adding features to the vector layer by dragging and dropping them
- Making use of map permalinks
- Index
In this book, we demonstrated many ways to add features to the map, such as with the Reading features directly using AJAX recipe in Chapter 3, Working with Vector Layers. We also saw an example of exporting features from a vector layer in the GeoJSON format and displaying the result inside a textbox in the Exporting features as GeoJSON recipe in Chapter 3, Working with Vector Layers. For this recipe, we'll show you how to import a file containing GeoJSON to the map by dragging a file from your computer and dropping it in the web application.
Dragging and dropping is a part of the HTML5 API, an ability, which now has good cross browser support. To read more about the specifications, refer to https://html.spec.whatwg.org/multipage/interaction.html#dnd. For a quick run down of browser support, refer to http://caniuse.com/#search=drag.
Although there are alternative ways that you can import a file from the user's computer to the map, it's convenient to handle the file import client-side in the browser. For this recipe, the user will be able to drag a file from their computer to the map view. On doing this, they'll be prompted as to whether or not they'd like to proceed with the import, where they can decide to cancel or continue. They'll be shown some details of the import in a modal.
The source code can be found in ch07/ch07-drag-and-drop-import, and here's a screenshot of the stage when the user has dragged a file on the map:
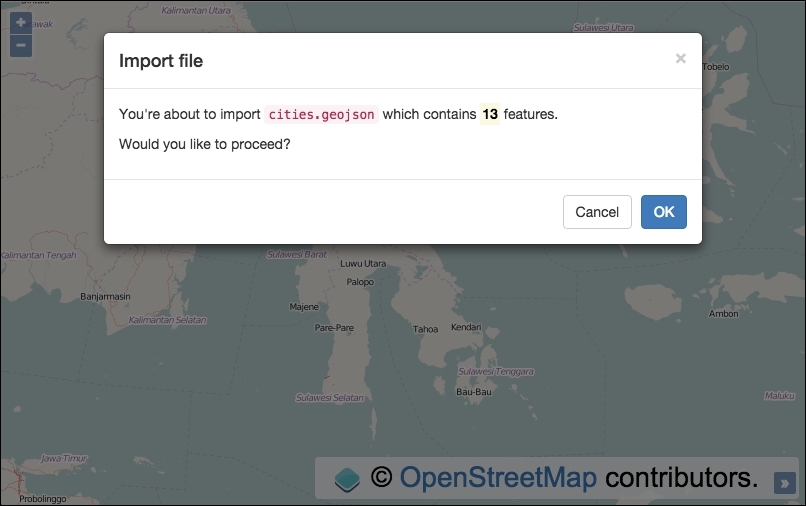
For the modal effect in the screenshot, we used the Bootstrap CSS and JavaScript library. Please download a copy at http://getbootstrap.com/getting-started or view the accompanying source code for copies of the dependencies.
Bootstrap has its own dependency, jQuery. So, we'll need to pull this in the HTML file too.
- Create an HTML file and include all the OpenLayers dependencies, jQuery, and a
divelement to hold the map. As mentioned in the Getting ready section of this recipe, include the Bootstrap CSS and JavaScript dependencies. In particular, some of the markup for the modal is as follows:<div class="modal-body"> <p>You're about to import <code id="js-filename"></code> which contains <mark><strong id="js-count"></strong></mark> features.</p> <p>Would you like to proceed?</p> </div> <div class="modal-footer"> <button type="button" data-dismiss="modal">Cancel</button> <button id="js-confirmed" type="button" data-dismiss="modal">OK</button> </div>
- Create a custom JavaScript file and instantiate the
mapinstance with aviewinstance and a raster layer:var map = new ol.Map({ view: new ol.View({ zoom: 6, center: [13484714, -266612] }), target: 'js-map', layers: [ new ol.layer.Tile({source: new ol.source.OSM()}) ] }); - Set up the drag and drop interaction and add it to
map:var dragDrop = new ol.interaction.DragAndDrop({ formatConstructors: [ol.format.GeoJSON] }); map.addInteraction(dragDrop); - Subscribe to the
clickevent on theOKmodal button and add the imported features to a new vector layer:$('#js-confirmed').on('click', function() { var vectorSource = new ol.source.Vector({ features: featuresToImport }); map.addLayer(new ol.layer.Vector({ source: vectorSource })); map.getView().fit( vectorSource.getExtent(), map.getSize() ); }); - Finally, subscribe to the
addfeaturesevent from the interaction, update some values for display in the modal, and then present the modal onscreen:var featuresToImport; dragDrop.on('addfeatures', function(event) { featuresToImport = event.features; $('#js-filename').text(event.file.name); $('#js-count').text(featuresToImport.length); $('#js-modal').modal(); });
Some of the HTML has been omitted for brevity, so please view the accompanying source code for full details of the implementation.
Let's take a look at the newly introduced OpenLayers interaction and the supporting logic:
var dragDrop = new ol.interaction.DragAndDrop({
  formatConstructors: [ol.format.GeoJSON]
});
map.addInteraction(dragDrop);We've instantiated a new instance of the DragAndDrop interaction from OpenLayers. Behind the scenes, when the ol.interaction.DragAndDrop interaction is added to the map, OpenLayers uses the Google Closure library to construct a handler for drag and drop events detected from the map's viewport with the goog.events.FileDropHandler constructor. This constructor takes a single argument of the element to listen for drag and drop event types. OpenLayers passes in the map's div element to the constructor (map.getViewport()).
The formatConstructors property takes an array of file format types you wish to accept. Note that you're passing in the format constructor here without calling it. OpenLayers will call the format constructor for you as part of the underlying interaction code when it's processing the imported file.
$('#js-confirmed').on('click', function() {
  var vectorSource = new ol.source.Vector({
    features: featuresToImport
  });

  map.addLayer(new ol.layer.Vector({
    source: vectorSource
  }));

  map.getView().fit(
    vectorSource.getExtent(),
    map.getSize()
  );
});We subscribe to the click event on the modal OK button. Our handler creates a new vector source and assigns the featuresToImport value to the features property. The featuresToImport variable is populated in the addfeatures interaction event handler, which we'll discuss momentarily.
A new vector layer is then created with the new source from earlier and then added to the map.
For user convenience, we recenter the map to the extent of the newly imported features. The fit method from ol.View takes a first argument of extent, which we derive from the vector source. The second argument is the size (width, height) which we fit the extent into. We provide the total size of the map for these dimensions, as we want it to make use of all the available space.
dragDrop.on('addfeatures', function(event) {
  featuresToImport = event.features;
  $('#js-filename').text(event.file.name);
  $('#js-count').text(featuresToImport.length);
  $('#js-modal').modal();
});
OpenLayers loops over the list of files that have been dropped on the map's viewport, creates an array of features from the file, and dispatches the ol.interaction.DragAndDropEventType.ADD_FEATURES event, which we subscribe to. The event object contains the list of features and also some other information, such as the name of the file.
We store the features in the featuresToImport variable, as it's referenced in the modal OK click handler. The name of the file (event.file.name) is inserted in the DOM, as well as the calculated length of the features to be imported. These values form a part of the modal content.
Finally, we trigger the Bootstrap modal to be displayed. If the user exits the modal without clicking on OK, the features are not imported. However, if they click on OK, the logic in the click event handler executes, adding the features to a new vector layer.