Table of Contents for
OpenLayers 3.x Cookbook - Second Edition
 OpenLayers 3.x Cookbook - Second Edition
Published by
Packt Publishing, 2016
OpenLayers 3.x Cookbook - Second Edition
Published by
Packt Publishing, 2016
- Cover
- Table of Contents
- OpenLayers 3.x Cookbook Second Edition
- OpenLayers 3.x Cookbook Second Edition
- Credits
- About the Authors
- About the Reviewer
- www.PacktPub.com
- Preface
- What you need for this book
- Who this book is for
- Sections
- Conventions
- Reader feedback
- Customer support
- 1. Web Mapping Basics
- Creating a simple fullscreen map
- Playing with the map's options
- Managing the map's stack layers
- Managing the map's controls
- Moving around the map view
- Restricting the map's extent
- 2. Adding Raster Layers
- Using Bing imagery
- Using OpenStreetMap imagery
- Adding WMS layers
- Changing the zoom effect
- Changing layer opacity
- Buffering the layer data to improve map navigation
- Creating an image layer
- Setting the tile size in WMS layers
- 3. Working with Vector Layers
- Adding a GML layer
- Adding a KML layer
- Creating features programmatically
- Exporting features as GeoJSON
- Reading and creating features from a WKT
- Using point features as markers
- Removing or cloning features using overlays
- Zooming to the extent of a layer
- Adding text labels to geometry points
- Adding features from a WFS server
- Using the cluster strategy
- Reading features directly using AJAX
- Creating a heat map
- 4. Working with Events
- Creating a side-by-side map comparator
- Implementing a work-in-progress indicator for map layers
- Listening for the vector layer features' events
- Listening for mouse or touch events
- Using the keyboard to pan or zoom
- 5. Adding Controls
- Adding and removing controls
- Working with geolocation
- Placing controls outside the map
- Drawing features across multiple vector layers
- Modifying features
- Measuring distances and areas
- Getting feature information from a data source
- Getting information from a WMS server
- 6. Styling Features
- Styling layers
- Styling features based on geometry type
- Styling based on feature attributes
- Styling interaction render intents
- Styling clustered features
- 7. Beyond the Basics
- Working with projections
- Creating a custom control
- Selecting features by dragging out a selection area
- Transitioning between weather forecast imagery
- Using the custom OpenLayers library build
- Drawing in freehand mode
- Modifying layer appearance
- Adding features to the vector layer by dragging and dropping them
- Making use of map permalinks
- Index
A common characteristic of web mapping applications is their ability to display information or perform actions that are related to the features on the map. By features, we mean any real phenomenon or aspect that we can visually represent with points, lines, polygons, and so on.
We can select a feature, retrieve its associated information, and choose to display it anywhere in our application layout. A common way to do this is using overlays.
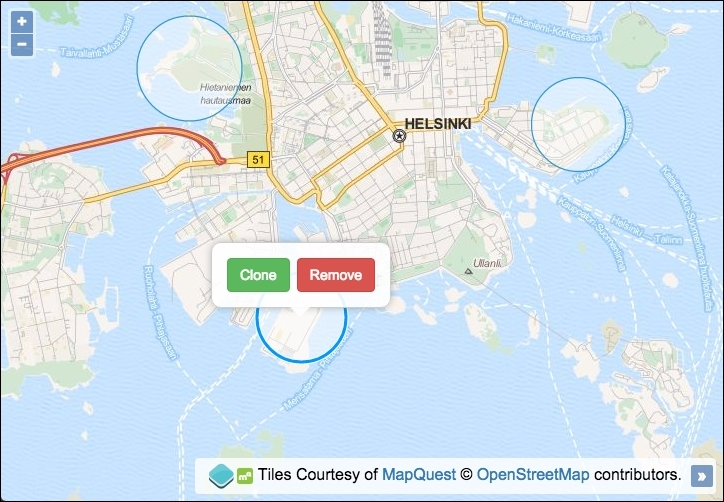
In this recipe, we'll make it possible to clone and remove a feature from an overlay bubble that is displayed when clicking on a feature attached to the map. The source code can be found in ch03/ch03-removing-cloning-feature-overlay. This will look like the following screenshot:
We will perform some feature manipulation from map overlays using the following instructions:
- Create an HTML file with OpenLayers dependencies, a
divelement to hold the map, and also the overlay and content, as follows:<div id="js-map"></div> <div id="js-overlay"> <button id="js-clone">Clone</button> <button id="js-remove">Remove</button> </div>
- Create a custom JavaScript file and instantiate a new vector layer with three circle features, as follows:
var vectorLayer = new ol.layer.Vector({ source: new ol.source.Vector({ features: [ new ol.Feature(new ol.geom.Circle([2780119, 8437147], 900)), new ol.Feature(new ol.geom.Circle([2774826, 8433459], 850)), new ol.Feature(new ol.geom.Circle([2772686, 8438217], 999)) ] }) }); - Instantiate a map instance with
viewandlayers, including our custom vector layer:var map = new ol.Map({ view: new ol.View({ zoom: 13, center: [2775906, 8433717] }), target: 'js-map', layers: [ new ol.layer.Tile({ source: new ol.source.MapQuest({layer: 'osm'}) }), vectorLayer ] }); - Create an OpenLayers overlay from our custom HTML and add it to the
map. Also, define a variable that we'll use throughout the code to reference the selected feature:var overlay = new ol.Overlay({ element: document.getElementById('js-overlay') }); map.addOverlay(overlay); var selectedFeature; - Create an OpenLayers interaction to allow the selection of features:
var select = new ol.interaction.Select({ condition: ol.events.condition.click, layers: [vectorLayer] }); map.addInteraction(select); - Subscribe to the
selectevent on the interaction and toggle theoverlayaccordingly:select.on('select', function(event) { selectedFeature = event.selected[0]; if (selectedFeature) { overlay.setPosition(selectedFeature.getGeometry().getCenter()) } else { overlay.setPosition(undefined); } }); - For the
clonebutton, attach aclickevent handler and clone the circle:document.getElementById('js-clone') .addEventListener('click', function() { var circle = selectedFeature.clone(); var circleGeometry = circle.getGeometry(); var circleCenter = circleGeometry.getCenter(); circleGeometry.setCenter([ circleCenter[0] + circleGeometry.getRadius() * 2, circleCenter[1] ]); vectorLayer.getSource().addFeature(circle); overlay.setPosition(undefined); select.getFeatures().clear(); }); - Finally, for the
removebutton, attach aclickevent handler and remove the feature:document.getElementById('js-remove') .addEventListener('click', function() { vectorLayer.getSource().removeFeature(selectedFeature); overlay.setPosition(undefined); select.getFeatures().clear(); });
We've omitted showing the CSS that styles the overlay as seen in the screenshot so that we can focus on the OpenLayers code. The complete code can be found within the accompanying source code for this book.
The map uses a raster base layer from MapQuest and the vector layer contains three arbitrary circle geometries of varying size. We will spend the rest of this section looking at the newly introduced concepts:
var overlay = new ol.Overlay({
  element: document.getElementById('js-overlay')
});
map.addOverlay(overlay);
OpenLayers provides a mechanism in order to display overlays or popups over a map at designated coordinates. This differs from controls, such as the zoom buttons, which are statically located on the viewport.
The ol.Overlay constructor is used to create our custom overlay bubble. We provide minimal configuration by passing in the DOM element that is used for the overlay content. OpenLayers wraps this content in an absolutely positioned div over the map. We finish off by assigning this overlay to the map with the addOverlay map method.
The overlay can be configured with other properties, such as autoPan and position. Map instances also contain a method to remove overlays, namely removeOverlay.
var select = new ol.interaction.Select({
  condition: ol.events.condition.click,
  layers: [vectorLayer]
});
map.addInteraction(select);
In order to make features (un)selectable, we use the OpenLayers interaction method called ol.interaction.Select. Some interactions are already enabled on the map by default, such as ol.interaction.MouseWheelZoom, among many others.
The interaction type expects a condition that is used to trigger the event. We used the click event here, which has a type of ol.MapBrowserEvent. The ol.events.condition object provides many other events, such as the ol.events.condition.singleClick event, which is the default for the select interaction. We avoided the default singleClick event because it has a delay of 250 ms (to ensure that it's not a double-click) in favor of the snapper click event that fires without any delay.
We restricted the layer coverage to just the vector layer containing the circles via the layers property. We finish by adding the interaction to the map via the addInteraction map method.
Using the select interaction has the benefit of automatically styling selected features differently, so that it's apparent they've been selected. You can customize the styling that's rendered on the map through the style property.
select.on('select', function(event) {
  selectedFeature = event.selected[0];
  if (selectedFeature) {
    overlay.setPosition(selectedFeature.getGeometry().getCenter());
  } else {
    overlay.setPosition(undefined);
  }
});
Although the select interaction has been added to the map, we can't respond to the actions without first subscribing to some of its published events. We forge a subscription by using the on method to create an event handler for the select event.
When this event gets published, the event object contains the selected features (if there are any) inside the selected array. If applicable, it also contains any previously unselected features inside the deselected array. We store the first selected feature (as we're only expecting one to be selected at a time for this recipe) in the selectedFeature variable.
If a feature has been selected, then the overlay is positioned in the center of the circle geometry using the setPosition method. If there is no feature selected, then we ensure that the overlay is not visible. This is accomplished by passing undefined to setPosition.
var circle = selectedFeature.clone();
var circleGeometry = circle.getGeometry();
var circleCenter = circleGeometry.getCenter();

circleGeometry.setCenter([
  circleCenter[0] + circleGeometry.getRadius() * 2,
  circleCenter[1]
]);
vectorLayer.getSource().addFeature(circle);
overlay.setPosition(undefined);
select.getFeatures().clear();
There's a fair amount going on inside the click handler for the clone button. You'll see that we use many methods that are available from the ol.Feature instance.
We begin by cloning the selected circle with the clone method. With our copy of the circle, we cache the geometry (getGeometry) and center coordinates (getCenter) to variables that we reference later on.
The new circle geometry is centered at a different location via the setCenter method. The method expects an array of type ol.Coordinate. When we populate this array, we modify the x coordinate (circleCenter[0]) so that it's a full diameter width (of the original circle) away from the circle that we're cloning. The y coordinate remains untouched, resulting in the new circle horizontally adjacent to the original.
This new circle is then added to the vector layer source. To do this, we access the vector layer source through the getSource method from the vector layer, and then we chain on the addFeature vector source method passing in our circle. Once this feature has been added to the vector source, we close the overlay by setting the position to undefined.
The select interaction temporarily adds a copy of the circle feature, which provides the 'selected' style. To remove this feature from the map, we retrieve the selected features (getFeatures) from the select interaction, which returns an ol.Collection of features. We remove all these features from the collection using the clear method.
vectorLayer.getSource().removeFeature(selectedFeature);
overlay.setPosition(undefined);
select.getFeatures().clear();
Within the less complicated click event handler for the remove button, we gain access to the vector layer source (getSource) and remove the currently selected feature (stored in selectedFeature during the select event handler). As seen in the clone handler, we reset the overlay position in order to hide it from the map, and we also clear any temporary features that were held in the select interaction collection.
We covered some important ground here by introducing map interactions and some of the powerful benefits that they can provide to a mapping application. We'll get to explore other map interactions as this book progresses.