Table of Contents for
OpenLayers 3.x Cookbook - Second Edition
 OpenLayers 3.x Cookbook - Second Edition
Published by
Packt Publishing, 2016
OpenLayers 3.x Cookbook - Second Edition
Published by
Packt Publishing, 2016
- Cover
- Table of Contents
- OpenLayers 3.x Cookbook Second Edition
- OpenLayers 3.x Cookbook Second Edition
- Credits
- About the Authors
- About the Reviewer
- www.PacktPub.com
- Preface
- What you need for this book
- Who this book is for
- Sections
- Conventions
- Reader feedback
- Customer support
- 1. Web Mapping Basics
- Creating a simple fullscreen map
- Playing with the map's options
- Managing the map's stack layers
- Managing the map's controls
- Moving around the map view
- Restricting the map's extent
- 2. Adding Raster Layers
- Using Bing imagery
- Using OpenStreetMap imagery
- Adding WMS layers
- Changing the zoom effect
- Changing layer opacity
- Buffering the layer data to improve map navigation
- Creating an image layer
- Setting the tile size in WMS layers
- 3. Working with Vector Layers
- Adding a GML layer
- Adding a KML layer
- Creating features programmatically
- Exporting features as GeoJSON
- Reading and creating features from a WKT
- Using point features as markers
- Removing or cloning features using overlays
- Zooming to the extent of a layer
- Adding text labels to geometry points
- Adding features from a WFS server
- Using the cluster strategy
- Reading features directly using AJAX
- Creating a heat map
- 4. Working with Events
- Creating a side-by-side map comparator
- Implementing a work-in-progress indicator for map layers
- Listening for the vector layer features' events
- Listening for mouse or touch events
- Using the keyboard to pan or zoom
- 5. Adding Controls
- Adding and removing controls
- Working with geolocation
- Placing controls outside the map
- Drawing features across multiple vector layers
- Modifying features
- Measuring distances and areas
- Getting feature information from a data source
- Getting information from a WMS server
- 6. Styling Features
- Styling layers
- Styling features based on geometry type
- Styling based on feature attributes
- Styling interaction render intents
- Styling clustered features
- 7. Beyond the Basics
- Working with projections
- Creating a custom control
- Selecting features by dragging out a selection area
- Transitioning between weather forecast imagery
- Using the custom OpenLayers library build
- Drawing in freehand mode
- Modifying layer appearance
- Adding features to the vector layer by dragging and dropping them
- Making use of map permalinks
- Index
OpenLayers comes with lots of controls to interact with the map, such as pan, zoom, show overview map, edit features, and so on.
In the same way as layers, the ol.Map class has methods to manage the controls that are attached to the map.
We're going to create a way to toggle map controls on or off. The source code can be found in ch01/ch01-map-controls/. Here's what we'll end up with:
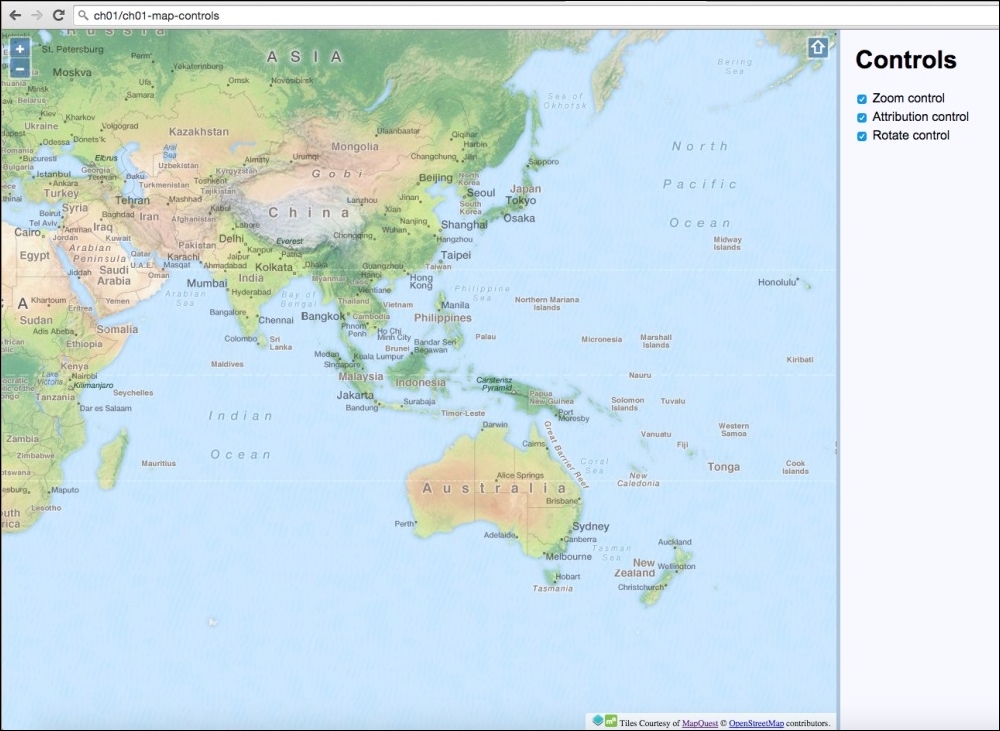
- Create a new HTML file and add the OpenLayers dependencies as well as the jQuery library. In particular, add the following markup to the body:
<div id="js-map" class="map"></div> <div class="pane"> <h1>Controls</h1> <ul id="js-controls"> <li> <label> <input type="checkbox" checked value="zoomControl"> <span>Zoom control</span> </label> </li> <li> <label> <input type="checkbox" checked value="attributionControl"> <span>Attribution control</span> </label> </li> <li> <label> <input type="checkbox" checked value="rotateControl"> <span>Rotate control</span> </label> </li> </ul> </div> - Create a new CSS file and add the following:
.map { position: absolute; top: 0; bottom: 0; left: 0; right: 20%; } .pane { position: absolute; top: 0; bottom: 0; right: 0; width: 20%; background: ghostwhite; border-left: 5px solid lightsteelblue; box-sizing: border-box; padding: 0 20px; } - Create a new script file and create the map, as follows:
var map = new ol.Map({ layers: [ new ol.layer.Tile({ source: new ol.source.MapQuest({ layer: 'osm' }) }) ], view: new ol.View({ center: [12930000, -78000], zoom: 3 }), target: 'js-map', controls: [] }); - Create some controls and add them to the map, as follows:
var zoomControl = new ol.control.Zoom({ zoomInTipLabel: 'Zoom closer in', zoomOutTipLabel: 'Zoom further out', className: 'ol-zoom custom-zoom-control' }); var attributionControl = new ol.control.Attribution({ collapsible: false, collapsed: false }); var rotateControl = new ol.control.Rotate({ autoHide: false }); map.addControl(zoomControl); map.addControl(attributionControl); map.addControl(rotateControl); - Finally, enable the control toggle logic:
$('#js-controls').on('change', function(event) {
  var target = $(event.target);
  var control = target.val();

  if (target.prop('checked')) {
    map.addControl(window[control]);
  } else {
    map.removeControl(window[control]);
  }
});
Our HTML and CSS divide up the page so that it contains the map and a control panel. Within this panel are three checkboxes that correspond to the three controls that will be added to the map. Toggling the checkboxes will, in turn, add or remove the selected controls.
It's important to note that the value of the checkboxes match up with the variable names of the controls in the JavaScript. For example, value="zoomControl" will link to the map control variable named zoomControl.
Let's pick apart the OpenLayers code to find out how this works:
var map = new ol.Map({

// ...
  controls: []
});
This map instantiation code will be familiar from the previous recipes, but note that because we don't want OpenLayers to set any default controls on the map, we explicitly pass an empty array to the controls property.
var zoomControl = new ol.control.Zoom({
  zoomInTipLabel: 'Zoom closer in',
  zoomOutTipLabel: 'Zoom further out',
  className: 'ol-zoom custom-zoom-control'
});
We store a reference to the zoom control inside the zoomControl variable. We've decided to customize the tool tips that appear for the plus and minus buttons. The className property has also been modified to include both the default class name for the zoom control (ol-zoom) in order to inherit the default OpenLayers styling and a custom class of custom-zoom-control. We can use this custom class name as a CSS hook for any of our own styles that override the defaults.
var attributionControl = new ol.control.Attribution({
  collapsible: false,
  collapsed: false
});
We store a reference to the attribution control inside the attributionControl variable. This control normally allows the user to collapse the attribution, and it's initial state is collapsed by default. By specifying these two properties, we have inverted the defaults.
var rotateControl = new ol.control.Rotate({
  autoHide: false
});
We store a reference to the rotate control inside the rotateControl variable. Normally, this control is only displayed when the map rotation is anything other than 0. We explicitly set this control to not automatically hide itself.
map.addControl(zoomControl);
map.addControl(attributionControl);
map.addControl(rotateControl);
All three controls are added to the map instance.
$('#js-controls').on('change', function(event) {
  var target = $(event.target);
  var control = target.val();

  if (target.prop('checked')) {
    map.addControl(window[control]);
  } else {
    map.removeControl(window[control]);
  }
});
We take advantage of event bubbling in JavaScript and attach a single change event listener to the HTML containing the list of layers; this is more efficient than attaching an event listener to each input element.
When a checkbox is toggled, this event handler is executed. The event target (the checkbox) is cached inside the target variable as it's used more than once. The value of the checkbox (which is also the name of the map control) is stored inside the control variable.
The new state of the checkbox for this control is passed into the if statement. If this is enabled, we add the control to the map with the ol.Map method, addControl. Otherwise, we remove the control from the map with the opposite ol.Map method, removeControl.
We use the checkbox value to select the matching OpenLayers control from the window object using array notation. The control's variable name (for example, zoomControl) will be the same as the checkbox value (for example, zoomControl), which is how this link is forged.
Note
All controls are a subclass of ol.control.Control. This means that any controls extended off this class will inherit the ol.Object methods (such as get and set), as well as other functions, such as getMap, which informs you which map this control is attached to. The ol.control.Control class makes creating custom controls much easier—a recipe that's covered later on in this book.