Table of Contents for
OpenLayers 3.x Cookbook - Second Edition
 OpenLayers 3.x Cookbook - Second Edition
Published by
Packt Publishing, 2016
OpenLayers 3.x Cookbook - Second Edition
Published by
Packt Publishing, 2016
- Cover
- Table of Contents
- OpenLayers 3.x Cookbook Second Edition
- OpenLayers 3.x Cookbook Second Edition
- Credits
- About the Authors
- About the Reviewer
- www.PacktPub.com
- Preface
- What you need for this book
- Who this book is for
- Sections
- Conventions
- Reader feedback
- Customer support
- 1. Web Mapping Basics
- Creating a simple fullscreen map
- Playing with the map's options
- Managing the map's stack layers
- Managing the map's controls
- Moving around the map view
- Restricting the map's extent
- 2. Adding Raster Layers
- Using Bing imagery
- Using OpenStreetMap imagery
- Adding WMS layers
- Changing the zoom effect
- Changing layer opacity
- Buffering the layer data to improve map navigation
- Creating an image layer
- Setting the tile size in WMS layers
- 3. Working with Vector Layers
- Adding a GML layer
- Adding a KML layer
- Creating features programmatically
- Exporting features as GeoJSON
- Reading and creating features from a WKT
- Using point features as markers
- Removing or cloning features using overlays
- Zooming to the extent of a layer
- Adding text labels to geometry points
- Adding features from a WFS server
- Using the cluster strategy
- Reading features directly using AJAX
- Creating a heat map
- 4. Working with Events
- Creating a side-by-side map comparator
- Implementing a work-in-progress indicator for map layers
- Listening for the vector layer features' events
- Listening for mouse or touch events
- Using the keyboard to pan or zoom
- 5. Adding Controls
- Adding and removing controls
- Working with geolocation
- Placing controls outside the map
- Drawing features across multiple vector layers
- Modifying features
- Measuring distances and areas
- Getting feature information from a data source
- Getting information from a WMS server
- 6. Styling Features
- Styling layers
- Styling features based on geometry type
- Styling based on feature attributes
- Styling interaction render intents
- Styling clustered features
- 7. Beyond the Basics
- Working with projections
- Creating a custom control
- Selecting features by dragging out a selection area
- Transitioning between weather forecast imagery
- Using the custom OpenLayers library build
- Drawing in freehand mode
- Modifying layer appearance
- Adding features to the vector layer by dragging and dropping them
- Making use of map permalinks
- Index
Loading data from an external source is not the only way to work with vector layers. Imagine a web-mapping application where the user can create new features on the fly, such as landing zones, perimeters, areas of interest, and so on, and add them to a vector layer with some style. This scenario requires the ability to create and add the features programmatically.
In this recipe, we will take a look at some ways to create a selection of features programmatically. The source code can be found in ch03/ch03-creating-features/. The following screenshot shows some features that are created programmatically:
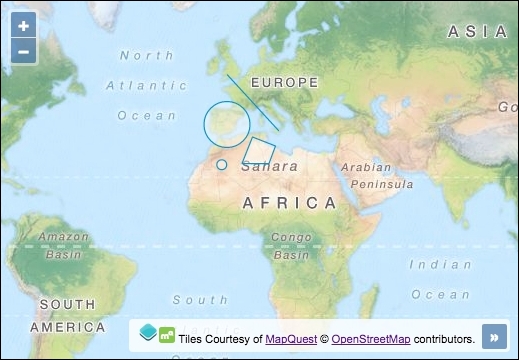
Here, we'll create some features programmatically, without any file importing. Follow these instructions to find out how this is done:
- Start by creating a new HTML file with the required OpenLayers dependencies. In particular, add the
divelement to hold the map:<div id="js-map"></div>
- Create an empty JavaScript file and instantiate a
mapwith a background raster layer:var map = new ol.Map({ view: new ol.View({ zoom: 3, center: [-2719935, 3385243] }), target: 'js-map', layers: [ new ol.layer.Tile({ source: new ol.source.MapQuest({layer: 'osm'}) }) ] }); - Create the
pointandcirclefeatures, as follows:var point = new ol.Feature({ geometry: new ol.geom.Point([-606604, 3228700]) }); var circle = new ol.Feature( new ol.geom.Circle([-391357, 4774562], 9e5) ); - Create the
lineandpolygonfeatures:var line = new ol.Feature( new ol.geom.LineString([ [-371789, 6711782], [1624133, 4539747] ]) ); var polygon = new ol.Feature( new ol.geom.Polygon([[ [606604, 4285365], [1506726, 3933143], [1252344, 3248267], [195678, 3248267] ]]) ); - Create the vector layer and add
featuresto this layer:map.addLayer(new ol.layer.Vector({ source: new ol.source.Vector({ features: [point, circle, line, polygon] }) }));
Although we've created some random features for this recipe, features in mapping applications would normally represent some phenomenon of the real world with an appropriate geometry and style associated with it.
Let's go over the programmatic feature creation and how it is added to a vector layer:
var point = new ol.Feature({
geometry: new ol.geom.Point([-606604, 3228700])
});Features are instances of ol.Feature. This constructor contains many useful methods, such as clone, setGeometry, getStyle, and others. When creating an instance of ol.Feature, we must either pass in a geometry of type ol.geom.Geometry, or an object containing properties. We demonstrate both variations throughout this recipe.
For the point feature, we pass in a configuration object. The only property that we supply is geometry. There are other properties available, such as style, and the use of custom properties to set the feature attributes ourselves, which come with getters and setters.
The geometry instance belongs to ol.geom.Point. The ol.geom class provides a variety of other feature types that we don't get to see in this recipe, such as MultiLineString and MultiPoint. The point geometry type simply requires an ol.Coordinate type array (xy coordinates).
var circle = new ol.Feature( new ol.geom.Circle([-391357, 4774562], 9e5) );
The circle feature follows almost the same structure as the point feature. This time, however, we don't pass in a configuration object to ol.Feature, but instead, we directly instantiate an ol.geom.Geometry type of Circle. The constructor takes an array of coordinates and a second parameter for the radius. 9e5 or 9e+5 is exponential notation for 900,000.
The circle geometry also has useful methods, such as getCenter, and setRadius.
var line = new ol.Feature(
new ol.geom.LineString([
[-371789, 6711782], [1624133, 4539747]
])
);Note
Remember to express the coordinates in the appropriate projection, the one used by the view, or translate the coordinates yourself. We will cover working with feature styles in Chapter 6, Styling Features. For now, all features will be rendered with the default OpenLayers styling.
The only noticeable difference with the LineString feature is that ol.geom.LineString expects an array of coordinate arrays. For more advanced line strings, use the ol.geom.MultiLineString geometry type (more information can be found in the OpenLayers API documentation at http://openlayers.org/en/v3.13.0/apidoc/).
The LineString feature also has useful methods, such as getLength.
var polygon = new ol.Feature(
new ol.geom.Polygon([[
[606604, 4285365], [1506726, 3933143],
[1252344, 3248267], [195678, 3248267]
]])
);The final feature, a Polygon geometry type, differs slightly from the LineString feature in that it expects an ol.Coordinate type array within an array within another wrapping array. This is because the constructor (ol.geom.Polygon) expects an array of rings, with each ring being represented as an array of coordinates. Ideally, each ring should be closed.
The polygon feature also has useful methods, such as getArea, and getLinearRing.
map.addLayer(new ol.layer.Vector({
  source: new ol.source.Vector({
    features: [point, circle, line, polygon]
  })
}));Note
The OGC's Simple Feature Access specification (http://www.opengeospatial.org/standards/sfa) contains an in-depth description of the standard. It also contains a UML class diagram where you can see all the geometry classes and hierarchy.
Finally, we create the vector layer with a vector source instance and add all four features to an array and pass it to the features property.
All the features that we've created are subclasses of ol.geom.SimpleGeometry. This class provides useful base methods, such as getExtent and getFirstCoordinate.
All features have a getType method that can be used to identify the type of feature, for example, 'Point', or 'LineString'.
Sometimes, the polygon features may represent a region with a hole in it. To create a hollow part of a polygon, we use the LinearRing geometry. The outcome is best explained with the following screenshot:
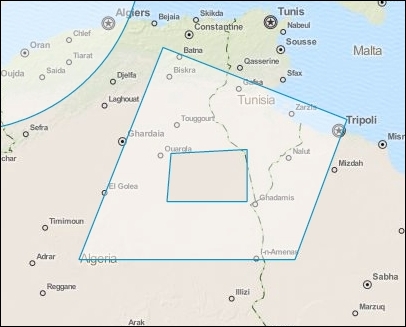
You can see that the polygon has a section cut out of it. To achieve this geometry, we must create the polygon in a slightly different way. Here are the steps:
- Create the
polygongeometry, as follows:var polygon = new ol.geom.Polygon([[ [606604, 4285365], [1506726, 3933143], [1252344, 3248267], [195678, 3248267] ]]);
- Create and add the linear ring to the
polygongeometry:polygon.appendLinearRing( new ol.geom.LinearRing([ [645740, 3766816], [1017529, 3786384], [1017529, 3532002], [626172, 3532002] ]) ); - Create the completed feature, as follows:
var polygonFeature = new ol.Feature(polygon);
- Finish off by adding the polygon feature to the vector layer:
vectorLayer.getSource().addFeature(polygonFeature);
We won't break this logic down any further, as it's quite self-explanatory now that we're comfortable with geometry creation.
- The Adding markers to the map recipe
- The Reading and creating features from a WKT recipe
- The Styling features based on geometry type recipe in Chapter 6, Styling Features