Table of Contents for
OpenLayers 3.x Cookbook - Second Edition
 OpenLayers 3.x Cookbook - Second Edition
Published by
Packt Publishing, 2016
OpenLayers 3.x Cookbook - Second Edition
Published by
Packt Publishing, 2016
- Cover
- Table of Contents
- OpenLayers 3.x Cookbook Second Edition
- OpenLayers 3.x Cookbook Second Edition
- Credits
- About the Authors
- About the Reviewer
- www.PacktPub.com
- Preface
- What you need for this book
- Who this book is for
- Sections
- Conventions
- Reader feedback
- Customer support
- 1. Web Mapping Basics
- Creating a simple fullscreen map
- Playing with the map's options
- Managing the map's stack layers
- Managing the map's controls
- Moving around the map view
- Restricting the map's extent
- 2. Adding Raster Layers
- Using Bing imagery
- Using OpenStreetMap imagery
- Adding WMS layers
- Changing the zoom effect
- Changing layer opacity
- Buffering the layer data to improve map navigation
- Creating an image layer
- Setting the tile size in WMS layers
- 3. Working with Vector Layers
- Adding a GML layer
- Adding a KML layer
- Creating features programmatically
- Exporting features as GeoJSON
- Reading and creating features from a WKT
- Using point features as markers
- Removing or cloning features using overlays
- Zooming to the extent of a layer
- Adding text labels to geometry points
- Adding features from a WFS server
- Using the cluster strategy
- Reading features directly using AJAX
- Creating a heat map
- 4. Working with Events
- Creating a side-by-side map comparator
- Implementing a work-in-progress indicator for map layers
- Listening for the vector layer features' events
- Listening for mouse or touch events
- Using the keyboard to pan or zoom
- 5. Adding Controls
- Adding and removing controls
- Working with geolocation
- Placing controls outside the map
- Drawing features across multiple vector layers
- Modifying features
- Measuring distances and areas
- Getting feature information from a data source
- Getting information from a WMS server
- 6. Styling Features
- Styling layers
- Styling features based on geometry type
- Styling based on feature attributes
- Styling interaction render intents
- Styling clustered features
- 7. Beyond the Basics
- Working with projections
- Creating a custom control
- Selecting features by dragging out a selection area
- Transitioning between weather forecast imagery
- Using the custom OpenLayers library build
- Drawing in freehand mode
- Modifying layer appearance
- Adding features to the vector layer by dragging and dropping them
- Making use of map permalinks
- Index
We've seen in earlier recipes that we can query external services for map tiles (WMS) and also for features (WFS). In addition to this, WMS servers can implement the GetFeatureInfo request. This type of request allows us to, given a point and some layer names that are configured at the WMS server, retrieve information from a feature; that is, we can get feature attributes from a layer, which is rendered as a raster image.
For example, there could be a WMS layer containing parking zones across your region, which can be drawn out as polygons over the map as part of the returned raster tiles. You could listen for a click event on the map and retrieve information from the WMS server in regards to the location that you clicked on. This may return data, such as parking fees, the name of the car park, how many spaces are still available, and so on.
OpenLayers makes this type of feature information request simple with a method called getGetFeatureInfoUrl, which is available on the source classes, ol.source.TileWMS and ol.source.ImageWMS.
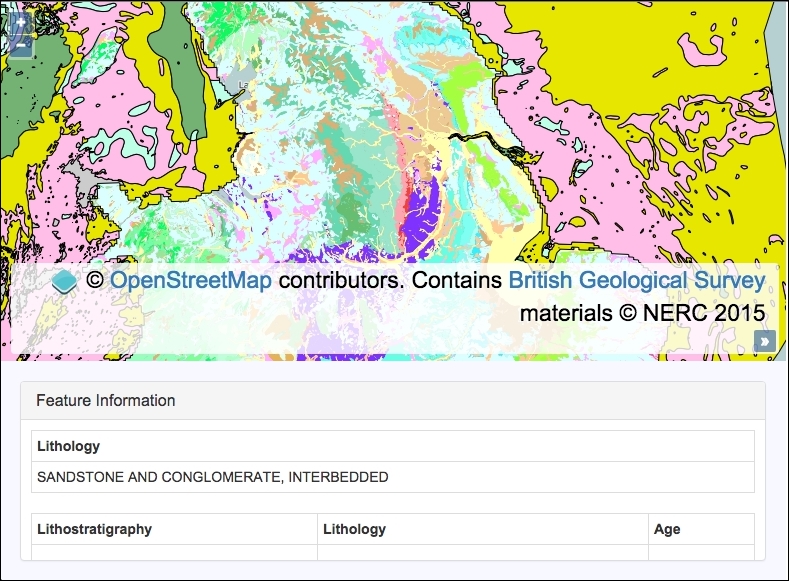
We are going to create a map with a base layer and a raster layer containing data from a WMS server. When the user clicks or taps on an area of the map, we will make a feature information request to the WMS server and render the returned information below the map. The source code can be found in ch05/ch05-wms-feature-info, and we'll end up with something that looks like the following screenshot:
In order to query for feature information from a WMS server, follow these instructions:
- Let's start by creating the HTML file with the OpenLayers dependencies and also jQuery. In particular, add the HTML for
divto contain the feature information response:<div id="js-feature-info"></div>
- Create a custom JavaScript file and set up the WMS source instance:
var bgsSource = new ol.source.TileWMS({ url: 'http://ogc.bgs.ac.uk/cgi-bin/' + 'BGS_Bedrock_and_Superficial_Geology/wms', params: { LAYERS: 'BGS_EN_Bedrock_and_Superficial_Geology' }, attributions: [ new ol.Attribution({ html: 'Contains <a href="http://bgs.ac.uk">' + 'British Geological Survey</a> ' + 'materials © NERC 2015' })] }); - Initialize
mapwith a base layer, a WMS raster layer, andview:var map = new ol.Map({ view: new ol.View({ zoom: 7, center: [-146759, 7060335] }), target: 'js-map', layers: [ new ol.layer.Tile({source: new ol.source.OSM()}), new ol.layer.Tile({source: bgsSource}) ] }); - Cache the DOM element to a variable that'll be used to display the returned feature information:
var $featureInfo = $('#js-feature-info'); - Subscribe to click events on the map, compose the URL, make the feature information request, and display the returned data on the page:
map.on('singleclick', function(event) {
  var url = bgsSource.getGetFeatureInfoUrl(
    event.coordinate,
    map.getView().getResolution(),
    map.getView().getProjection(),
    {INFO_FORMAT: 'text/html'}
  );

  $.ajax({
    type: 'GET',
    url: url
  }).done(function(data) {
    $featureInfo.html(data.match(/<body>([\s\S]+)<\/body>/)[1]);
  });
});
This recipe contains HTML and CSS that have been excluded for brevity. Please take a look at the accompanying source code for the full implementation.
We've seen how to connect and request map tiles from a WMS server before in the Adding WMS layer recipe in Chapter 2, Adding Raster Layers, so let's focus on the map click handler, which contains some newly-introduced concepts:
map.on('singleclick', function(event) {
  var url = bgsSource.getGetFeatureInfoUrl(
    event.coordinate,
    map.getView().getResolution(),
    map.getView().getProjection(),
    {INFO_FORMAT: 'text/html'}
  );
We subscribed to the singleclick event on the map instance. Within our handler, we determine how the request URL will be structured. The WMS source instance (bgsSource) has the getGetFeatureInfoUrl method that expects the following four parameters:
- Coordinate: This is acquired from the click event object (
event.coordinate). - Resolution: This is acquired from the map's view via the
getResolutionmethod. - Projection: This is retrieved from the map's view via the
getProjectionmethod. - Parameters: This an object of key/value pairs to forge the request parameters. We have specified a supported format (from the WMS server) of
text/html.
This method will return a string that we can use for the AJAX request coming up next:
$.ajax({
    type: 'GET',
    url: url
  }).done(function(data) {
    $featureInfo.html(data.match(/<body>([\s\S]+)<\/body>/)[1]);
  });
Note
A WMS server implements different request types, such as tile map requests that contain the parameter and value REQUEST=GetMap, respectively, as well as other parameters, such as a bounding box, layer name, and so on. It's important to know that the feature information differentiates requests with the following key/value parameter: REQUEST=GetFeatureInfo. Have a look at the network requests in any modern browser's development tools for more details.
Once we have the URL, we make the AJAX request using the jQuery ajax method. When the WMS server responds to the request, the done method is called and contains the response within the data argument.
We requested for a response to come back as media type text/html, as the content is conveniently structured in HTML tables that we can easily insert into our page without much further intervention. We are, however, only interested in the content of the body element from the response, so we extract only this using a JavaScript regular expression.
For example, here's what could be returned in raw form:
<!doctype html>
<head>
<title>Feature Info</title>
</head>
<body>
<table>...</table>
</body>
</html>
As per this example, we are only interested in the table element (within the body), as this contains all the feature information that we want.
We set up a regular expression to search for the opening and closing body tags and capture any characters in between, across multiple lines, which is what the [\s\S]+ part of the regular expression does. There's a great resource from Mozilla if you'd like to become more accustomed with JavaScript regular expressions at https://developer.mozilla.org/en/docs/Web/JavaScript/Guide/Regular_Expressions.
The JavaScript method match returns an array containing the matched elements. As the regular expression captures the content between the opening and closing body tags (that's what the surrounding parentheses do), we access the second item in the returned array (index of 1). Undesirably, the zero index of the array returned from match contains the text, including the body tags.
The content is populated inside the div feature information on our page (refer to the recipe screenshot for an example of this output) via the html jQuery method.