Table of Contents for
OpenLayers 3.x Cookbook - Second Edition
 OpenLayers 3.x Cookbook - Second Edition
Published by
Packt Publishing, 2016
OpenLayers 3.x Cookbook - Second Edition
Published by
Packt Publishing, 2016
- Cover
- Table of Contents
- OpenLayers 3.x Cookbook Second Edition
- OpenLayers 3.x Cookbook Second Edition
- Credits
- About the Authors
- About the Reviewer
- www.PacktPub.com
- Preface
- What you need for this book
- Who this book is for
- Sections
- Conventions
- Reader feedback
- Customer support
- 1. Web Mapping Basics
- Creating a simple fullscreen map
- Playing with the map's options
- Managing the map's stack layers
- Managing the map's controls
- Moving around the map view
- Restricting the map's extent
- 2. Adding Raster Layers
- Using Bing imagery
- Using OpenStreetMap imagery
- Adding WMS layers
- Changing the zoom effect
- Changing layer opacity
- Buffering the layer data to improve map navigation
- Creating an image layer
- Setting the tile size in WMS layers
- 3. Working with Vector Layers
- Adding a GML layer
- Adding a KML layer
- Creating features programmatically
- Exporting features as GeoJSON
- Reading and creating features from a WKT
- Using point features as markers
- Removing or cloning features using overlays
- Zooming to the extent of a layer
- Adding text labels to geometry points
- Adding features from a WFS server
- Using the cluster strategy
- Reading features directly using AJAX
- Creating a heat map
- 4. Working with Events
- Creating a side-by-side map comparator
- Implementing a work-in-progress indicator for map layers
- Listening for the vector layer features' events
- Listening for mouse or touch events
- Using the keyboard to pan or zoom
- 5. Adding Controls
- Adding and removing controls
- Working with geolocation
- Placing controls outside the map
- Drawing features across multiple vector layers
- Modifying features
- Measuring distances and areas
- Getting feature information from a data source
- Getting information from a WMS server
- 6. Styling Features
- Styling layers
- Styling features based on geometry type
- Styling based on feature attributes
- Styling interaction render intents
- Styling clustered features
- 7. Beyond the Basics
- Working with projections
- Creating a custom control
- Selecting features by dragging out a selection area
- Transitioning between weather forecast imagery
- Using the custom OpenLayers library build
- Drawing in freehand mode
- Modifying layer appearance
- Adding features to the vector layer by dragging and dropping them
- Making use of map permalinks
- Index
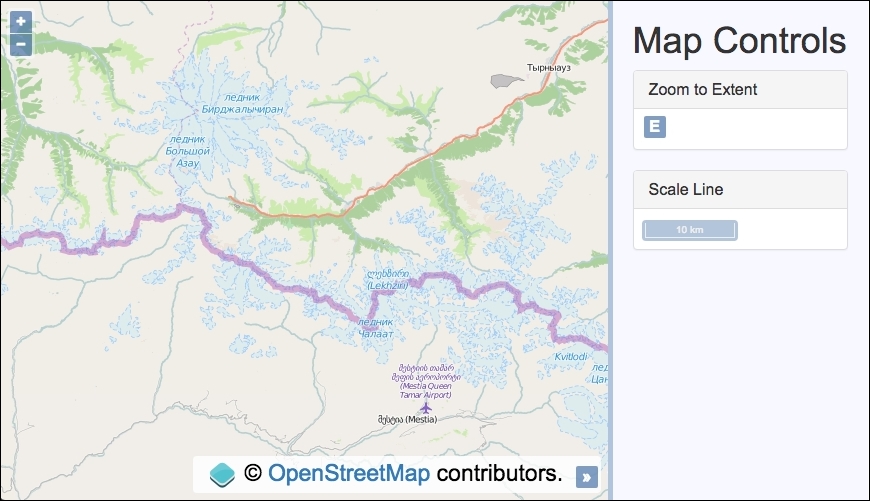
By default, all the controls are placed on the map. This way, controls, such as Zoom, Attribution, or MousePosition, are rendered on top of the map and over any layer. This is the default behavior, but OpenLayers is flexible enough to allow us to put controls outside the map. In this recipe (source code in ch05/ch05-controls-outside-map), we are going to create a map where the Zoom to Extent and Scale Line controls are placed outside the map and within the sidebar, as you can see in the following screenshot:
To learn how to customize where the map controls are placed, follow these steps:
- Create an HTML file and add the OpenLayers dependencies and
divto hold the map. In particular, create adivelement for each control within the sidebar markup:<div id="js-zoom-extent"></div> <div id="js-scale-line"></div>
- Create a custom JavaScript file and instantiate the
mapinstance withviewand a raster tile layer with the Open Street Map source:var map = new ol.Map({ view: new ol.View({ zoom: 10, center: [4740318, 5344324] }), target: 'js-map', layers: [ new ol.layer.Tile({source: new ol.source.OSM()}) ] }); - Create and add the Scale Line control to the sidebar:
map.addControl(new ol.control.ScaleLine({ target: document.getElementById('js-scale-line') })); - Create and add the Zoom to Extent control to the sidebar:
var zoomToExtent = new ol.control.ZoomToExtent({
  extent: [4684596, 5306182, 4796041, 5382466]
});
zoomToExtent.setTarget('js-zoom-extent');
map.addControl(zoomToExtent);
We've used the Bootstrap CSS framework to style the sidebar content, and much of the HTML has been omitted for brevity. Please take a look at the source code for the complete implementation.
As you can see, adding controls outside of the map is straightforward. We've demonstrated two ways of achieving this. One method is with the target property on the control settings on instantiation, the other way is to use the control's setTarget method. Let's take a closer look at both:
map.addControl(new ol.control.ScaleLine({
  target: document.getElementById('js-scale-line')
}));
The Scale Line control displays rough X-axis distances from the center of view. The target property is used to render the control in a particular area of the web page. The property expects a DOM element, rather than an ID string (which the target property for a map instance would accept). If a target isn't provided, OpenLayers will add the control to the map's overlay container.
var zoomToExtent = new ol.control.ZoomToExtent({
  extent: [4684596, 5306182, 4796041, 5382466]
});
In order to demonstrate a different method of setting target, we need to assign the Zoom to Extent control to a variable, namely zoomToExtent, so that it can be accessed later. By default, the Zoom to Extent control will zoom the map out to the extent property of the view projection. However, we've chosen an arbitrary extent by passing an array of type ol.Extent to the extent property. The ol.Extent array has the following format: [minX, minY, maxX, maxY].
zoomToExtent.setTarget('js-zoom-extent');Each control has a setTarget method that's inherited from ol.control.Control (the base class for controls). We use this method to set the DOM element that the control will render within. Unlike the target property, you can alternatively provide an ID string like we've done if you prefer to do so.
When using the setTarget method, you must call it before adding the control to the map, or else OpenLayers will render the control to the map's overlay container instead.
We purposely haven't adjusted the class names of these controls, as we wanted to inherit the default CSS styles. However, because these controls are naturally positioned within the map's container, they have some CSS rules that use absolute positioning, so be aware that you'll probably need to modify some styling.
The Scale Line and Zoom to Extent controls have the CSS class names, .ol-scale-line and .ol-zoom-extent, respectively. Use these CSS hooks to override any styling rules as desired. It's most sensible to do this from within a separate CSS file of your own in order to keep the original styling intact (better for reference, maintainability, and extensibility).
- The Adding and removing controls recipe
- The Creating a custom control recipe in Chapter 7, Beyond the Basics