Table of Contents for
OpenLayers 3.x Cookbook - Second Edition
 OpenLayers 3.x Cookbook - Second Edition
Published by
Packt Publishing, 2016
OpenLayers 3.x Cookbook - Second Edition
Published by
Packt Publishing, 2016
- Cover
- Table of Contents
- OpenLayers 3.x Cookbook Second Edition
- OpenLayers 3.x Cookbook Second Edition
- Credits
- About the Authors
- About the Reviewer
- www.PacktPub.com
- Preface
- What you need for this book
- Who this book is for
- Sections
- Conventions
- Reader feedback
- Customer support
- 1. Web Mapping Basics
- Creating a simple fullscreen map
- Playing with the map's options
- Managing the map's stack layers
- Managing the map's controls
- Moving around the map view
- Restricting the map's extent
- 2. Adding Raster Layers
- Using Bing imagery
- Using OpenStreetMap imagery
- Adding WMS layers
- Changing the zoom effect
- Changing layer opacity
- Buffering the layer data to improve map navigation
- Creating an image layer
- Setting the tile size in WMS layers
- 3. Working with Vector Layers
- Adding a GML layer
- Adding a KML layer
- Creating features programmatically
- Exporting features as GeoJSON
- Reading and creating features from a WKT
- Using point features as markers
- Removing or cloning features using overlays
- Zooming to the extent of a layer
- Adding text labels to geometry points
- Adding features from a WFS server
- Using the cluster strategy
- Reading features directly using AJAX
- Creating a heat map
- 4. Working with Events
- Creating a side-by-side map comparator
- Implementing a work-in-progress indicator for map layers
- Listening for the vector layer features' events
- Listening for mouse or touch events
- Using the keyboard to pan or zoom
- 5. Adding Controls
- Adding and removing controls
- Working with geolocation
- Placing controls outside the map
- Drawing features across multiple vector layers
- Modifying features
- Measuring distances and areas
- Getting feature information from a data source
- Getting information from a WMS server
- 6. Styling Features
- Styling layers
- Styling features based on geometry type
- Styling based on feature attributes
- Styling interaction render intents
- Styling clustered features
- 7. Beyond the Basics
- Working with projections
- Creating a custom control
- Selecting features by dragging out a selection area
- Transitioning between weather forecast imagery
- Using the custom OpenLayers library build
- Drawing in freehand mode
- Modifying layer appearance
- Adding features to the vector layer by dragging and dropping them
- Making use of map permalinks
- Index
One common action when working with features within a vector layer is its selection, and, of course, OpenLayers has some feature selection controls that are available to us. We've already seen this demonstrated in earlier recipes, such as the Removing or cloning features using overlays recipe in Chapter 3, Working with Vector Layers. This recipe showed us how to select one feature at a time with a click or tap gesture.
This recipe will show you how to select multiple features at once using a combination of interactions. The ol.interaction.Select class is for the render intent and grouping of selected features, and the other is ol.interaction.DragBox, which is used to enable the user to drag out a rectangle over the map. The joint effort of these two controls will produce a multiselect capability.
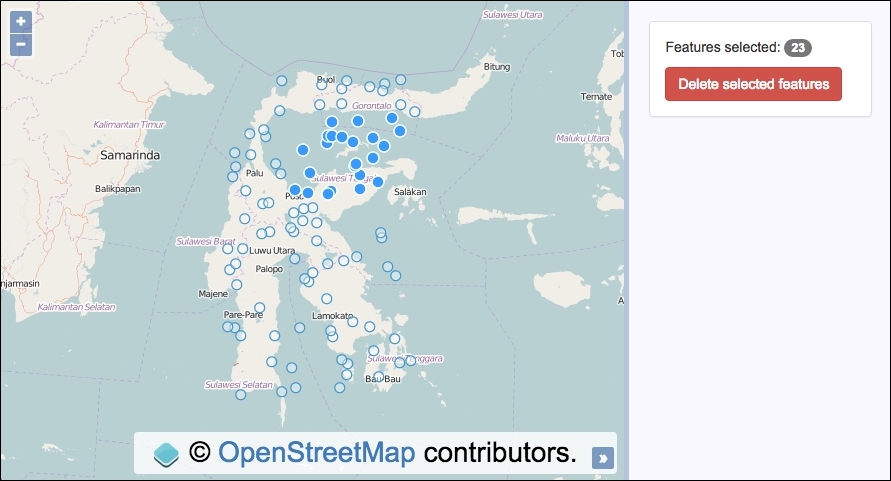
Once these features have been selected, we'll display the selected count and enable the user to delete the selected features from the sidebar.
The source code can be found in ch07/ch07-dragbox-selection, and this will look like the following screenshot:
Without further ado, let's put this functionality all together.
- Create an HTML file and add the OpenLayers library dependencies and a
divelement. In particular, ensure that you've got the following markup, which will be used to display the selected feature count, as well as a delete button:<p>Features selected: <span id="js-selected">0</span></p> <button id="js-delete" disabled="disabled">Delete selected features</button>
- Create a custom JavaScript file and instantiate the
mapinstance with aviewinstance and a raster layer:var map = new ol.Map({ view: new ol.View({ zoom: 6, minZoom: 6, maxZoom: 6, center: [13484714, -266612] }), target: 'js-map', layers: [ new ol.layer.Tile({source: new ol.source.OSM()}) ] }); - Next, set up a vector layer with a source that fetches a local GeoJSON file and add it to the
mapinstance:var vectorLayer = new ol.layer.Vector({ source: new ol.source.Vector({ url: 'points.geojson', format: new ol.format.GeoJSON({ defaultDataProjection: 'EPSG:3857' }) }) }); map.addLayer(vectorLayer); - Cache some DOM elements that could be frequently accessed, as follows:
var selectedCount = document.getElementById('js-selected'); var deleteButton = document.getElementById('js-delete'); - Instantiate the instances of our two interactions and add them to the
mapinstance:var select = new ol.interaction.Select(); map.addInteraction(select); var dragbox = new ol.interaction.DragBox(); map.addInteraction(dragbox);
- Create a reusable function that'll reset some UI state and clear the feature selection down:
var reset = function() { select.getFeatures().clear(); selectedCount.innerHTML = 0; deleteButton.setAttribute('disabled', 'disabled'); }; - Subscribe to some events from the
DragBoxinteraction and update the UI when there's a selection of features:dragbox.on('boxstart', reset); dragbox.on('boxend', function() { var extent = dragbox.getGeometry().getExtent(); var count = 0; vectorLayer.getSource() .forEachFeatureIntersectingExtent(extent, function(feature) { select.getFeatures().push(feature); count++; }); selectedCount.innerHTML = count; if(count > 0) { deleteButton.removeAttribute('disabled'); } else { deleteButton.setAttribute('disabled', 'disabled'); } }); - Subscribe to the
clickevent on the delete button element and remove any features that have been selected:deleteButton.addEventListener('click', function() { select.getFeatures().forEach(function(feature) { vectorLayer.getSource().removeFeature(feature); }); reset(); });
We've used the Bootstrap CSS framework to handle the styling of this recipe, but much of the HTML and all the CSS have been omitted. Please view the accompanying source code for the complete implementation.
Let's turn our attention towards the newly introduced concepts of this code:
var select = new ol.interaction.Select();
map.addInteraction(select);
var dragbox = new ol.interaction.DragBox();
map.addInteraction(dragbox);
We've created the two interactions that will perform their duties in unison. Both of them are sub-classes of the ol.interaction class. Remember that interactions in OpenLayers don't come with a physical DOM element that's placed over the map.
var reset = function() {
  select.getFeatures().clear();
  selectedCount.innerHTML = 0;
  deleteButton.setAttribute('disabled', 'disabled');
};When this reset function is called, any features stored within the select interaction (select) are retrieved (getFeatures) and then thrown away via the clear method from the ol.Collection array.
The UI is then updated to put the count of features back to zero and to disable the delete button (as no features are selected). The UI will reflect that the user can select more features again. This function will make more sense when you view it in the context of the code execution flow.
dragbox.on('boxstart', reset);When the users begin dragging a box over the map, the interaction publishes the boxstart event. We subscribe to this event and ensure that the UI is returned to the reset state by assigning our reset function as the handler.
dragbox.on('boxend', function() {
var extent = dragbox.getGeometry().getExtent();
var count = 0;
vectorLayer.getSource()
.forEachFeatureIntersectingExtent(extent, function(feature) {
select.getFeatures().push(feature);
count++;
});
selectedCount.innerHTML = count;Here's the first half of the boxend event subscription handler. This event is published when the user releases the mouse button. We retrieve the geometry of the last drawn box from the interaction instance and get the extent (dragbox.getGeometry().getExtent()). This is especially useful, as it allows us to construct a query against the vector source.
We're about to see how many features reside within the bounding box of the dragged out rectangle, so we set the count to zero.
The vector source has a method called forEachFeatureIntersectingExtent that (rather in a self-explanatory fashion) queries the source and returns any features that intersect with the extent. There's also a similar method available called forEachFeatureInExtent that behaves slightly differently, in that it returns true if a feature's bounding box is within the extent, rather than whether or not the feature's geometry actually intersects with the extent. You can read more about the differences over at the OpenLayers documentation (http://openlayers.org/).
The forEachFeatureIntersectingExtent method expects the first parameter to be the extent (the extent of our drag box) and the second parameter to be the iterator function that is passed the feature in iteration as its first parameter. We add the feature into the selection array of the select interaction (select.getFeatures().push(feature)). By doing this, the select interaction keeps track of the selected features and also styles them with the appropriate render intent.
As the count variable has been incremented on every run of the loop (count++), we inject the final sum of selected features in the DOM for display.
if(count > 0) {
deleteButton.removeAttribute('disabled');
} else {
deleteButton.setAttribute('disabled', 'disabled');
}The final half of the event handler checks whether count exceeds 0. If this does, this infers a selection of features has been successful, so the delete button is enabled by removing the disabled attribute from the HTML. If the user wants to, they can negate the removal of the features from the vector source.
On the contrary, if the count does not exceed 0, we ensure that the disabled attribute on the button is set (as the user can't delete anything).
deleteButton.addEventListener('click', function() {
  select.getFeatures().forEach(function(feature) {
    vectorLayer.getSource().removeFeature(feature);
  });
  reset();
});Finally, we subscribe to the click event on the button. When clicked, we fetch the features held within the select control and then loop over each feature in the collection. For each feature, we retrieve the vector source and chain on the removeFeature method, passing in feature during iteration. This instructs the vector source layer to remove feature.
After the looping and removing feature, we update the UI to the reset state to reflect the changes, and are then ready for the next selection to take place.
You may notice that the DragBox interaction is activated as soon as you click on the map. This is probably an undesirable default behavior for most applications. To trigger the activation or deactivation of the interaction from a UI element (for example, a button), you can call the setActive interaction method and pass in true/false (or remove or add the interaction from the map) to toggle the interaction.
Alternatively, you can decide to enable dragging only when a particular key on the keyboard is being pressed in combination with a click gesture. For example, as in the following interaction:
var dragbox = new ol.interaction.DragBox({
  condition: ol.events.condition.shiftKeyOnly
});
The preceding DragBox interaction is only activated when the Shift key is held down in conjunction with a click event.
- The Creating a custom control recipe
- The Styling interaction render intents recipe in Chapter 6, Styling Features