Table of Contents for
OpenLayers 3.x Cookbook - Second Edition
 OpenLayers 3.x Cookbook - Second Edition
Published by
Packt Publishing, 2016
OpenLayers 3.x Cookbook - Second Edition
Published by
Packt Publishing, 2016
- Cover
- Table of Contents
- OpenLayers 3.x Cookbook Second Edition
- OpenLayers 3.x Cookbook Second Edition
- Credits
- About the Authors
- About the Reviewer
- www.PacktPub.com
- Preface
- What you need for this book
- Who this book is for
- Sections
- Conventions
- Reader feedback
- Customer support
- 1. Web Mapping Basics
- Creating a simple fullscreen map
- Playing with the map's options
- Managing the map's stack layers
- Managing the map's controls
- Moving around the map view
- Restricting the map's extent
- 2. Adding Raster Layers
- Using Bing imagery
- Using OpenStreetMap imagery
- Adding WMS layers
- Changing the zoom effect
- Changing layer opacity
- Buffering the layer data to improve map navigation
- Creating an image layer
- Setting the tile size in WMS layers
- 3. Working with Vector Layers
- Adding a GML layer
- Adding a KML layer
- Creating features programmatically
- Exporting features as GeoJSON
- Reading and creating features from a WKT
- Using point features as markers
- Removing or cloning features using overlays
- Zooming to the extent of a layer
- Adding text labels to geometry points
- Adding features from a WFS server
- Using the cluster strategy
- Reading features directly using AJAX
- Creating a heat map
- 4. Working with Events
- Creating a side-by-side map comparator
- Implementing a work-in-progress indicator for map layers
- Listening for the vector layer features' events
- Listening for mouse or touch events
- Using the keyboard to pan or zoom
- 5. Adding Controls
- Adding and removing controls
- Working with geolocation
- Placing controls outside the map
- Drawing features across multiple vector layers
- Modifying features
- Measuring distances and areas
- Getting feature information from a data source
- Getting information from a WMS server
- 6. Styling Features
- Styling layers
- Styling features based on geometry type
- Styling based on feature attributes
- Styling interaction render intents
- Styling clustered features
- 7. Beyond the Basics
- Working with projections
- Creating a custom control
- Selecting features by dragging out a selection area
- Transitioning between weather forecast imagery
- Using the custom OpenLayers library build
- Drawing in freehand mode
- Modifying layer appearance
- Adding features to the vector layer by dragging and dropping them
- Making use of map permalinks
- Index
As we've learned in previous recipes in this book, OpenLayers has built-in support for the EPSG:4326 and EPSG:3857 projections. Of course, this is very useful, but it is also rather limited when you need to work with other projections worldwide. Offering more built-in projections would add bloat to the library, and transforming between projections is not a simple task.
Instead, OpenLayers outsources this task to other libraries dedicated to transforming projections from one to another. One such library is called Proj4js (http://proj4js.org), which OpenLayers integrates with seamlessly.
So, when we want to work with projections other than EPSG:4326 and EPSG:3857, we look to the help of Proj4js.
For this recipe, we'll show you how to integrate Proj4js with OpenLayers and how easy it is to make use of it. The idea is to create an application that shows the coordinates of the location that's been clicked or tapped. The source code can be found in ch07/ch07-projections, and we'll end up with something that looks similar to the following screenshot:
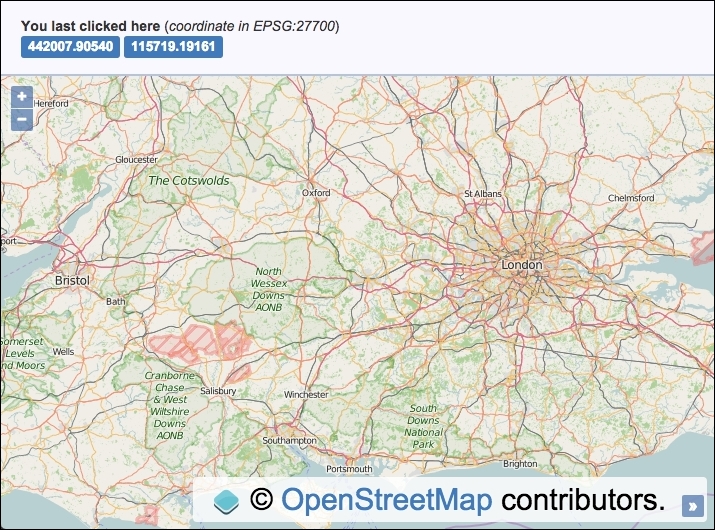
We must, of course, include the Proj4js library, which can be found at http://proj4js.org. Download a copy of this library via the website, or link to a CDN copy (for example, http://www.cdnjs.com/libraries/proj4js), or through other means, and include this in your HTML file.
- Create an HTML file and add the OpenLayers dependencies, the Proj4js library (as explained in the Getting ready section of this recipe), and a
divelement to hold the map. In particular, add the following markup in order to display the coordinate after a click or a tap:<span id="js-coordX">n/a</span> <span id="js-coordY">n/a</span>
- Create a custom JavaScript file and define the Proj4js string definition for our chosen projection, which will be
EPSG:27700:proj4.defs( 'EPSG:27700', '+proj=tmerc +lat_0=49 +lon_0=-2 ' + '+k=0.9996012717 +x_0=400000 +y_0=-100000 ' + '+ellps=airy ' + '+towgs84=446.448,-125.157,542.06,0.15,0.247,0.842,-20.489 ' + '+units=m +no_defs' );
- Create an
extentinstance, which covers the range of theEPSG:27700projection:var extent = ol.proj.transformExtent( [-8.74, 49.81, 1.84, 60.9], 'EPSG:4326', 'EPSG:3857' );
- Initialize the
mapinstance with aviewinstance and a raster layer and restrict the view'sextentto the bounds of theEPSG:27700projection validity:var map = new ol.Map({ view: new ol.View({ zoom: 8, center: [-177333, 6626173], extent: extent }), target: 'js-map', layers: [ new ol.layer.Tile({source: new ol.source.OSM()}) ] }); - Cache the DOM elements that'll be used to display the transformed coordinate:
var coordXElem = document.getElementById('js-coordX'); var coordYElem = document.getElementById('js-coordY'); - Finally, subscribe to the map's
clickevent,transformthe coordinate, and display this in the HTML:map.on('click', function(event) { var coordinate = ol.proj.transform( event.coordinate, 'EPSG:3857', 'EPSG:27700' ); coordXElem.innerHTML = coordinate[0].toFixed(5); coordYElem.innerHTML = coordinate[1].toFixed(5); });
As we've often done, the complete CSS and HTML implementation has been omitted for brevity, but please view this book's source code to see it in full.
Let's jump into the JavaScript to see how we've used our chosen projection:
proj4.defs( 'EPSG:27700', '+proj=tmerc +lat_0=49 +lon_0=-2 ' + ... );
When we include the external Proj4js library in our web page, the library exposes the proj4 global namespace to work with. Proj4js isn't yet aware of our chosen projection, so we must first define it. This particular projection definition string can be found at the useful resource, http://epsg.io/27700. This website contains many other projections too; it's a great resource to bookmark.
Alternatively, you can link directly to the definition setup from a script tag at this URL: http://epsg.io/27700.js. Now that the definition is set up (using the library's defs method), we've successfully enabled Proj4js to be utilized so that it can convert this projection to or from other projections.
var extent = ol.proj.transformExtent(
  [-8.74, 49.81, 1.84, 60.9], 'EPSG:4326', 'EPSG:3857'
);
As the EPSG:27700 projection isn't a worldwide projection but a projection that is only accurate for the UK, we set up an extent that covers this region, which we will later apply to the view in order to restrict the panning appropriately.
The extent variable of the projection validity is provided in EPSG:4326. Our view, however, will use the EPSG:3857 projection as the default, which we want to retain. So that it's compatible, we use the ol.proj.transformExtent method. This method expects an array of the ol.Extent type, which follows the pattern [minX, minY, maxX, maxY]. The second and third parameters are the source and destination projections, respectively.
This successfully provides us with an extent in the EPSG:3857 projection.
map.on('click', function(event) {
  var coordinate = ol.proj.transform(
    event.coordinate, 'EPSG:3857', 'EPSG:27700'
  );
  coordXElem.innerHTML = coordinate[0].toFixed(5);
  coordYElem.innerHTML = coordinate[1].toFixed(5);
});We subscribe to the map's click event and convert the view coordinate (event.coordinate) currently in the EPSG:3857 projection to our desired projection of EPSG:27700. We saw that we defined EPSG:27700 with Proj4js, but how does this magically work with OpenLayers?
Well, OpenLayers makes use of the Proj4js code internally if it's available on demand. When the ol.proj.transform method is called for the first time (via click or tap), OpenLayers calls the ol.proj.get method. Our EPSG:27700 projection isn't known by OpenLayers yet, so OpenLayers checks the Proj4js library for the definition by referencing the code. If it's been defined with Proj4js, which it has been, a new projection instance is created via the ol.proj.Projection constructor. This stores the projection internally in the ol.proj.projections object. This means that the projection won't need to be reinstantiated the next time that its usage is required.
The ol.proj.transform method works just as we've seen in earlier recipes, taking the parameters of the source coordinate, the source projection, and, finally, the destination projection to transform into. The result is stored in the coordinate variable.
We finish by adding the coordinate variable to the HTML, restricting the number of decimal places to 5, with the JavaScript toFixed method.
As we saw in this recipe, OpenLayers implicitly created the EPSG:27700 projection object for us on demand. However, there may be times where you need to explicitly set up the projection yourself, with an extent array too. When you provide an extent array to the projection, OpenLayers can determine the view resolution for zoom level 0, which could be valuable in some scenarios.
Here's how we'd set up the EPSG:27700 projection ourselves (after setting up the definition with Proj4js first):
var proj27700 = ol.proj.get('EPSG:27700');
proj27700.setExtent([0, 0, 700000, 1300000]);
Or for whatever reason, if you want to call the projection constructor yourself, you can do the following:
var proj27700 = new ol.proj.Projection({
  code: 'EPSG:27700',
  extent: [0, 0, 700000, 1300000]
});