Table of Contents for
OpenLayers 3.x Cookbook - Second Edition
 OpenLayers 3.x Cookbook - Second Edition
Published by
Packt Publishing, 2016
OpenLayers 3.x Cookbook - Second Edition
Published by
Packt Publishing, 2016
- Cover
- Table of Contents
- OpenLayers 3.x Cookbook Second Edition
- OpenLayers 3.x Cookbook Second Edition
- Credits
- About the Authors
- About the Reviewer
- www.PacktPub.com
- Preface
- What you need for this book
- Who this book is for
- Sections
- Conventions
- Reader feedback
- Customer support
- 1. Web Mapping Basics
- Creating a simple fullscreen map
- Playing with the map's options
- Managing the map's stack layers
- Managing the map's controls
- Moving around the map view
- Restricting the map's extent
- 2. Adding Raster Layers
- Using Bing imagery
- Using OpenStreetMap imagery
- Adding WMS layers
- Changing the zoom effect
- Changing layer opacity
- Buffering the layer data to improve map navigation
- Creating an image layer
- Setting the tile size in WMS layers
- 3. Working with Vector Layers
- Adding a GML layer
- Adding a KML layer
- Creating features programmatically
- Exporting features as GeoJSON
- Reading and creating features from a WKT
- Using point features as markers
- Removing or cloning features using overlays
- Zooming to the extent of a layer
- Adding text labels to geometry points
- Adding features from a WFS server
- Using the cluster strategy
- Reading features directly using AJAX
- Creating a heat map
- 4. Working with Events
- Creating a side-by-side map comparator
- Implementing a work-in-progress indicator for map layers
- Listening for the vector layer features' events
- Listening for mouse or touch events
- Using the keyboard to pan or zoom
- 5. Adding Controls
- Adding and removing controls
- Working with geolocation
- Placing controls outside the map
- Drawing features across multiple vector layers
- Modifying features
- Measuring distances and areas
- Getting feature information from a data source
- Getting information from a WMS server
- 6. Styling Features
- Styling layers
- Styling features based on geometry type
- Styling based on feature attributes
- Styling interaction render intents
- Styling clustered features
- 7. Beyond the Basics
- Working with projections
- Creating a custom control
- Selecting features by dragging out a selection area
- Transitioning between weather forecast imagery
- Using the custom OpenLayers library build
- Drawing in freehand mode
- Modifying layer appearance
- Adding features to the vector layer by dragging and dropping them
- Making use of map permalinks
- Index
When working with vector layers, it is common to find a situation where you need to respond to something that's occurred on the layer, such as when a new feature is added, modified, deleted, and so on. Fortunately, these types of events are available from the vector source, and we can easily subscribe to them.
The goal of this recipe is to show you how simple it is to listen for events on a vector source and perform some actions with this information.
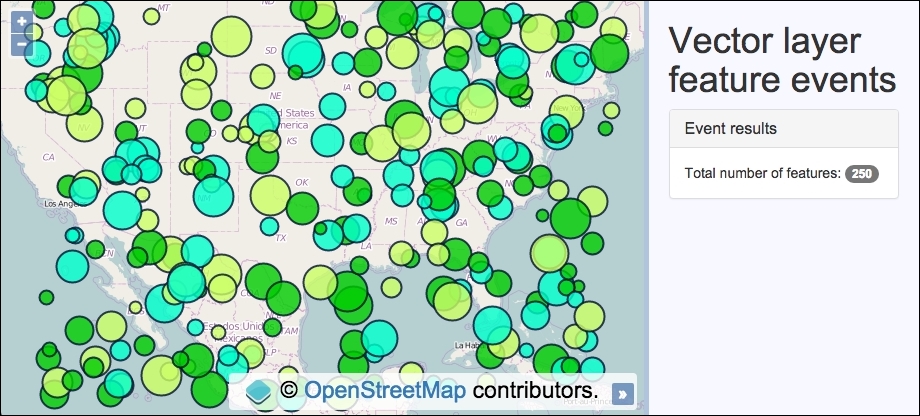
We are going to load an external GeoJSON file of geometry points, and we will style the fill color and radius depending on the feature attributes. We will also track how many features are on the vector source layer and allow the user to delete a feature by clicking on it, subsequently updating the feature count. The source code can be found in ch04/ch04-vector-feature-events, and here's what we'll end up with:
In order to understand how vector layer feature events work, code this recipe yourself by using the following instructions:
- Create an HTML file and add the OpenLayers dependencies. In particular, add a
divelement to hold themapinstance and the markup for the side panel and content:<div id="js-map"></div> <div class="pane"> <h1>Vector layer feature events</h1> <div class="panel panel-default"> <h3 class="panel-title">Event results</h3> Total number of features: <span id="js-feature-count">0</span> </div> </div> - Initialize the
mapinstance with a base layer andview:var map = new ol.Map({ view: new ol.View({ zoom: 4, center: [-10703629, 2984101] }), target: 'js-map', layers: [ new ol.layer.Tile({source: new ol.source.OSM()}) ] }); - Create a vector layer and read in the GeoJSON file:
var vectorLayer = new ol.layer.Vector({ source: new ol.source.Vector({ url: 'points.geojson', format: new ol.format.GeoJSON({ defaultDataProjection: 'EPSG:3857' }) }) }); - Create the map select interaction so that features can be selected for removal. Also cache the DOM element that displays the total feature count:
var select = new ol.interaction.Select({ condition: ol.events.condition.click, layers: [vectorLayer] }); map.addInteraction(select); select.on('select', function(event) { if (event.selected[0]) { vectorLayer.getSource().removeFeature(event.selected[0]); select.getFeatures().clear(); } }); var featureCount = document.getElementById('js-feature-count'); - Subscribe to the add feature event and style the feature based on the feature's attributes. Update the feature count display, too:
vectorLayer.getSource().on('addfeature', function(event) { event.feature.setStyle(new ol.style.Style({ image: new ol.style.Circle({ fill: new ol.style.Fill({ color: event.feature.get('colour') }), stroke: new ol.style.Stroke({ color: [0, 13, 51, 0.8], width: 2 }), radius: event.feature.get('size') }) })); featureCount.innerHTML = vectorLayer.getSource().getFeatures().length; }); - Subscribe to the remove feature event and update the feature count. Finish off by adding the vector layer to the map:
vectorLayer.getSource().on('removefeature', function() {
    featureCount.innerHTML =
      vectorLayer.getSource().getFeatures().length;
});
map.addLayer(vectorLayer);
We've used the CSS framework Bootstrap to help with the side-panel styling. Please view the book's source code for full details of the implementation. Let's move on to the OpenLayers code:
select.on('select', function(event) {
  if (event.selected[0]) {
    vectorLayer.getSource().removeFeature(event.selected[0]);
    select.getFeatures().clear();
  }
});
We've previously used the select interaction in Chapter 3, Working with Vector Layers, in the Removing or cloning features using overlays recipe, so we won't go into details here. When a feature is selected (clicked or tapped), it is immediately removed from the vector source (removeFeature) and the selection is cleared down. This action will result in a vector layer feature event being published, namely removefeature, which we subscribe to. We will cover this handler later on.
vectorLayer.getSource().on('addfeature', function(event) {
  event.feature.setStyle(new ol.style.Style({
    image: new ol.style.Circle({
      fill: new ol.style.Fill({
        color: event.feature.get('colour')
      }),
      stroke: new ol.style.Stroke({
        color: [0, 13, 51, 0.8],
        width: 2
      }),
      radius: event.feature.get('size')
    })
  }));
  featureCount.innerHTML =
    vectorLayer.getSource().getFeatures().length;
});
We used the on method of the vector source to subscribe to the addfeature event. Once the vector source retrieves and parses the GeoJSON file, it'll add each feature on to the map, one at a time. This provides us a with a window of opportunity to manipulate the feature before it's added to the layer.
Each geometry point from the file has two custom attributes, namely color and size. We use this embedded information to style the feature accordingly.
The event object contains a reference to the feature (event.feature) that's about to be added to the layer. The feature, of type ol.Feature, has a setStyle method, which is used to individually style each feature as desired. The fill color of the image is derived from the feature's colour attribute (event.feature.get('colour')), and the radius is determined from the feature's size attribute (event.feature.get('size')).
The last bit of work that we do inside the handler is to update the new feature count. This is achieved using the getFeatures method of the vector source, which returns an array of all the features. We can get the new length (getFeatures().length) and use this number to replace the HTML content with the JavaScript method innerHTML on the DOM element.
vectorLayer.getSource().on('removefeature', function() {
    featureCount.innerHTML =
      vectorLayer.getSource().getFeatures().length;
});
Thankfully, there's not as much work to do when the removefeature event is published. All we need to do is update the DOM element with the new feature count, just like before.
Vector source events are under a namespace of ol.source.VectorEvent. Apart from the two events that we looked over during this recipe, there are others such as changefeature and clear. These are published when a feature is updated (such as setting a new style) and when all features are cleared from a vector source, respectively.
A vector layer (not vector source) also publishes events, such as change:extent, change:opacity, and change:minResolution. Some of these may become useful when working with vector layers. I encourage you to look over the documentation and/or OpenLayers source code to discover what events are available that could enhance the user's experience.