Table of Contents for
OpenLayers 3.x Cookbook - Second Edition
 OpenLayers 3.x Cookbook - Second Edition
Published by
Packt Publishing, 2016
OpenLayers 3.x Cookbook - Second Edition
Published by
Packt Publishing, 2016
- Cover
- Table of Contents
- OpenLayers 3.x Cookbook Second Edition
- OpenLayers 3.x Cookbook Second Edition
- Credits
- About the Authors
- About the Reviewer
- www.PacktPub.com
- Preface
- What you need for this book
- Who this book is for
- Sections
- Conventions
- Reader feedback
- Customer support
- 1. Web Mapping Basics
- Creating a simple fullscreen map
- Playing with the map's options
- Managing the map's stack layers
- Managing the map's controls
- Moving around the map view
- Restricting the map's extent
- 2. Adding Raster Layers
- Using Bing imagery
- Using OpenStreetMap imagery
- Adding WMS layers
- Changing the zoom effect
- Changing layer opacity
- Buffering the layer data to improve map navigation
- Creating an image layer
- Setting the tile size in WMS layers
- 3. Working with Vector Layers
- Adding a GML layer
- Adding a KML layer
- Creating features programmatically
- Exporting features as GeoJSON
- Reading and creating features from a WKT
- Using point features as markers
- Removing or cloning features using overlays
- Zooming to the extent of a layer
- Adding text labels to geometry points
- Adding features from a WFS server
- Using the cluster strategy
- Reading features directly using AJAX
- Creating a heat map
- 4. Working with Events
- Creating a side-by-side map comparator
- Implementing a work-in-progress indicator for map layers
- Listening for the vector layer features' events
- Listening for mouse or touch events
- Using the keyboard to pan or zoom
- 5. Adding Controls
- Adding and removing controls
- Working with geolocation
- Placing controls outside the map
- Drawing features across multiple vector layers
- Modifying features
- Measuring distances and areas
- Getting feature information from a data source
- Getting information from a WMS server
- 6. Styling Features
- Styling layers
- Styling features based on geometry type
- Styling based on feature attributes
- Styling interaction render intents
- Styling clustered features
- 7. Beyond the Basics
- Working with projections
- Creating a custom control
- Selecting features by dragging out a selection area
- Transitioning between weather forecast imagery
- Using the custom OpenLayers library build
- Drawing in freehand mode
- Modifying layer appearance
- Adding features to the vector layer by dragging and dropping them
- Making use of map permalinks
- Index
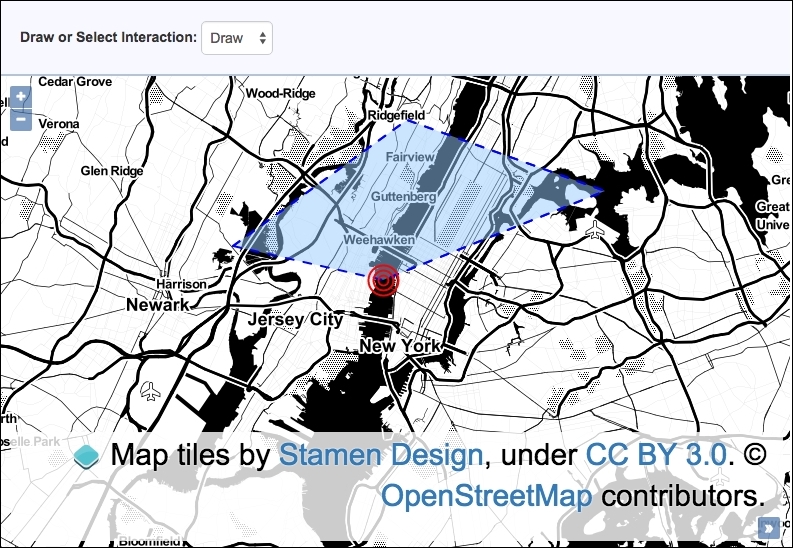
There are some map interactions, such as Draw and Select, which change the style of the feature depending on its current state, that is, if it is currently being drawn or selected. There are also other interactions that create temporary geometries, such as the DragZoom interaction, which draws out a rectangle over the map representing the extent that you wish to view.
This recipe shows us how we can modify the styles used for each of these render intents to change the look of our applications.
We will create a panel above the map that allows the user to enable the draw or select interactions. They will be able to perform DragZoom whenever they like. The source code can be found in ch06/ch06-styling-interaction-render-intents, and the styling for the Draw interaction render intent will look like the following screenshot:
Find out how to style interaction render intents by following these instructions:
- Create a new HTML file and add the OpenLayers dependencies, including the
divelement to hold themapinstance. In particular, create theselectmenu that the JavaScript will be accessing, as follows:<select id="js-draw-or-select"> <option value="draw" selected>Draw</option> <option value="select">Select</option> </select>
- In a separate CSS file, add the following declaration to customize the style of the
DragZoominteraction:.ol-dragzoom { border: 3px dotted white; background: rgba(50, 186, 132, 0.5); } - Set up the vector layer and the
mapinstance, as follows:var vectorLayer = new ol.layer.Vector({ source: new ol.source.Vector() }); var map = new ol.Map({ view: new ol.View({ zoom: 11, center: [-8238306, 4987133] }), target: 'js-map', layers: [ new ol.layer.Tile({ source: new ol.source.Stamen({layer: 'toner'}) }), vectorLayer ] }); - Create a function that will generate an instance of
ol.style.Circlewith a dynamicradius:var imageCircle = function(radius) { return new ol.style.Circle({ stroke: new ol.style.Stroke({ color: 'red', width: 2 }), radius: radius }); }; - Create the draw interaction with custom styling, as follows:
var drawInteraction = new ol.interaction.Draw({ style: [ new ol.style.Style({ fill: new ol.style.Fill({ color: 'rgba(153, 202, 255, 0.5)' }), stroke: new ol.style.Stroke({ color: 'blue', width: 2, lineDash: [8, 10] }), image: imageCircle(15) }), new ol.style.Style({ image: imageCircle(10) }), new ol.style.Style({ image: imageCircle(5) }) ], type: 'Polygon', source: vectorLayer.getSource() }); - Create the select interaction with custom styling, as follows:
var selectInteraction = new ol.interaction.Select({ style: new ol.style.Style({ fill: new ol.style.Fill({ color: 'rgba(255, 255, 31, 0.8)' }), stroke: new ol.style.Stroke({ color: 'rgba(255, 154, 31, 0.9)', width: 4 }) }) }); - Add the following
DrawandDragZoominteractions to the map:map.addInteraction(new ol.interaction.DragZoom()); map.addInteraction(drawInteraction);
- Subscribe to the
changeevent on theselectmenu and remove or add theDraworSelectinteractions, accordingly:document.getElementById('js-draw-or-select') .addEventListener('change', function() { var oldInteraction = (this.value === 'draw') ? 'select' : 'draw'; map.removeInteraction(window[oldInteraction + 'Interaction']); map.addInteraction(window[this.value + 'Interaction']); });
We've excluded showing all the CSS and HTML, but please view the book source code for the complete implementation. The parts that have been included should offer enough in isolation in order to follow along just fine.
You may have observed that the DragZoom interaction (ol.interaction.DragZoom) does not have a style property like the other two interactions in this example. This is because when the DragZoom interaction draws out an extent over the map to zoom to, the rectangle is actually an HTML element rather than part of the map canvas. With this in mind, it should make sense as to why the box is styled with the following CSS:
.ol-dragzoom {
  border: 3px dotted white;
  background: rgba(50, 186, 132, 0.5);
}We chose to style the border as a dotted white line and applied a semitransparent turquoise color for the background. It's a good idea to put custom CSS that overrides the OpenLayers defaults within a separate style sheet for easier maintenance down the line.
Unlike DragZoom, the Draw and Select interactions do have a style property that we must take advantage of in order to customize the style of the render intent. Let's take a closer look at how they're implemented:
var imageCircle = function(radius) {
  return new ol.style.Circle({
    stroke: new ol.style.Stroke({
      color: 'red', width: 2
    }), radius: radius
  });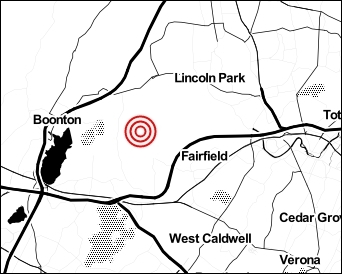
};For the Draw interaction, we decided to construct the point image (the point is used to identify where the next geometry point in the feature is going to be placed) with a combination of three circles so that it looks like a target. As the ol.style.Circle constructor will be called multiple times but with a varying radius size, we've captured it within a reusable function, namely imageCircle. Each circle image contains a simple red-colored stroke with no fill color. The result of this is displayed in the following screenshot:
var drawInteraction = new ol.interaction.Draw({
style: [
new ol.style.Style({
fill: new ol.style.Fill({
color: 'rgba(153, 202, 255, 0.5)'
}),
stroke: new ol.style.Stroke({
color: 'blue', width: 2,
lineDash: [8, 10]
}),
image: imageCircle(15)
}),
new ol.style.Style({
image: imageCircle(10)
}),
new ol.style.Style({
image: imageCircle(5)
})
]We chopped off the last few properties of the Draw interaction instantiation in this code, as it will look familiar to other recipes. We want to draw your attention to what we assigned to the style property.
We actually created three ol.style.Style instances within the array. The first main style contains the styling for the polygon fill and stroke and also the first outmost ring of the point styling, which is generated from our imageCircle function. The fill color property is a string in the form of RGBA—another variate that OpenLayers accepts.
The following two styles in the array create the other inner rings of the point. All image properties are assigned the result of our imageCircle function; each passes in a differently-sized radius, producing the target effect that we wish to achieve.
It's useful to understand that styles can be built up within an array. You can design some very creative styles should you ever have the need or desire to do so.
The Select interaction is also supplied with some of its own styles via the style property in order to color selected polygons with a bright yellow fill and a thick dark orange stroke.
document.getElementById('js-draw-or-select')
  .addEventListener('change', function() {
    var oldInteraction = (this.value === 'draw')
      ? 'select' : 'draw';
    map.removeInteraction(window[oldInteraction + 'Interaction']);
    map.addInteraction(window[this.value + 'Interaction']);
});This last piece of code that we'll discuss in this recipe does the grunt work behind switching the active interactions to or from Draw or Select.
When the select menu option changes, the new value is one of two possibilities: draw or select. From this, we can ascertain what the previously active interaction was on the map. We remove this interaction using the map's removeInteraction method, as the two interfere with one another.
The interaction variables are properties of the window object, either window.drawInteraction or window.selectInteraction. Using array notation for the object lookup, we can dynamically remove or add the applicable interaction. For example, if the user switches to the Select interaction from the select menu, then the oldInteraction variable will contain the 'drawInteraction' string and the interaction to be applied becomes 'selectInteraction'. So, window['selectInteraction'] is the same as window[this.value + 'Interaction'] in this scenario.
In case it's not immediately obvious, the DragZoom interaction is activated when you hold down the Shift key on the keyboard and then left click to start dragging.
The DragZoom interaction has a property called condition that can be provided with a different event in order to enable dragging instead of using the Shift key. The default condition value is ol.events.condition.shiftKeyOnly, but feel free to explore others that may suit your application better.
- The Styling features based on geometry type recipe
- The Modifying features recipe in Chapter 5, Adding Controls
- The Styling layers recipe