Table of Contents for
OpenLayers 3.x Cookbook - Second Edition
 OpenLayers 3.x Cookbook - Second Edition
Published by
Packt Publishing, 2016
OpenLayers 3.x Cookbook - Second Edition
Published by
Packt Publishing, 2016
- Cover
- Table of Contents
- OpenLayers 3.x Cookbook Second Edition
- OpenLayers 3.x Cookbook Second Edition
- Credits
- About the Authors
- About the Reviewer
- www.PacktPub.com
- Preface
- What you need for this book
- Who this book is for
- Sections
- Conventions
- Reader feedback
- Customer support
- 1. Web Mapping Basics
- Creating a simple fullscreen map
- Playing with the map's options
- Managing the map's stack layers
- Managing the map's controls
- Moving around the map view
- Restricting the map's extent
- 2. Adding Raster Layers
- Using Bing imagery
- Using OpenStreetMap imagery
- Adding WMS layers
- Changing the zoom effect
- Changing layer opacity
- Buffering the layer data to improve map navigation
- Creating an image layer
- Setting the tile size in WMS layers
- 3. Working with Vector Layers
- Adding a GML layer
- Adding a KML layer
- Creating features programmatically
- Exporting features as GeoJSON
- Reading and creating features from a WKT
- Using point features as markers
- Removing or cloning features using overlays
- Zooming to the extent of a layer
- Adding text labels to geometry points
- Adding features from a WFS server
- Using the cluster strategy
- Reading features directly using AJAX
- Creating a heat map
- 4. Working with Events
- Creating a side-by-side map comparator
- Implementing a work-in-progress indicator for map layers
- Listening for the vector layer features' events
- Listening for mouse or touch events
- Using the keyboard to pan or zoom
- 5. Adding Controls
- Adding and removing controls
- Working with geolocation
- Placing controls outside the map
- Drawing features across multiple vector layers
- Modifying features
- Measuring distances and areas
- Getting feature information from a data source
- Getting information from a WMS server
- 6. Styling Features
- Styling layers
- Styling features based on geometry type
- Styling based on feature attributes
- Styling interaction render intents
- Styling clustered features
- 7. Beyond the Basics
- Working with projections
- Creating a custom control
- Selecting features by dragging out a selection area
- Transitioning between weather forecast imagery
- Using the custom OpenLayers library build
- Drawing in freehand mode
- Modifying layer appearance
- Adding features to the vector layer by dragging and dropping them
- Making use of map permalinks
- Index
OpenLayers has plenty of controls and interactions that address a broad range of needs. However, the requirements that we could have to build a new web application inevitably demand the creation of a new one or the extension of an existing one.
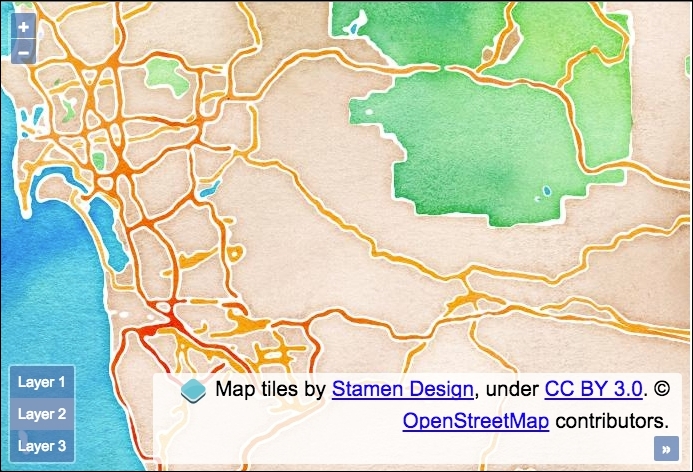
OpenLayers 2 came with a layer switcher control that's not made it to OpenLayers 3. This is not a problem, as for this recipe, we're going to create our own layer switcher control. Apart from enabling the user to switch between a list of layers, this control will demonstrate how to extend the base control class (ol.control.Control) to utilize some default control behavior and then build on top of the base control to deliver an interactive control the user can click or tap to change the layer.
The source code for this recipe can be found in ch07/ch07-custom-control, and here's a preview of our custom control placed at the bottom-left of the map:
- Create an HTML file with the OpenLayers dependencies and a
divelement to hold the map. - Create a custom CSS file and add the following to style the control:
.ol-layer-switcher { bottom: 0.5em; left: 0.5em; } .ol-layer-switcher ul { background-color: rgba(0,60,136,0.5); border: none; border-radius: 2px; color: #fff; margin: 0; padding: 0; list-style: none; font-size: 0.9em; } .ol-layer-switcher li { display: block; padding: 8px; } .ol-layer-switcher li:hover { background: #7b98bc; cursor: pointer; } .ol-layer-switcher .active { background: #7b98bc; } - Create a custom JavaScript file and set up our custom control constructor:
var LayerSwitcher = function(options) { options = options || {}; var className = options.className ? options.className : 'ol-layer-switcher'; var cssClasses = className + ' ' + ol.css.CLASS_UNSELECTABLE + ' ' + ol.css.CLASS_CONTROL; var layers = options.layers; var list = document.createElement('ul'); layers.forEach(function(layer, index, layers) { var li = document.createElement('li'); li.setAttribute('data-layer-ref', ++index); li.innerHTML = 'Layer ' + index; if (index === layers.length) li.className = 'active'; list.appendChild(li); }); var controlDiv = goog.dom.createDom('div', cssClasses, list); controlDiv.addEventListener('click', function(event) { if (event.target.nodeName.toLowerCase() === 'li') { var itemNumber = parseInt( event.target.getAttribute('data-layer-ref'), 10); list.querySelector('.active').className = ''; list.querySelector('[data-layer-ref="' + itemNumber + '"]') .className = 'active'; itemNumber--; layers.forEach(function(layer, index) { layers.item(index).setVisible(index === itemNumber); }); } }); ol.control.Control.call(this, { element: controlDiv }); }; - Have our custom control inherit the base control class, as follows:
ol.inherits(LayerSwitcher, ol.control.Control);
- Set up a
mapinstance with aviewinstance and three raster tile layers to switch between, as follows:var map = new ol.Map({ view: new ol.View({ zoom: 10, center: [-12987415, 3851814] }), target: 'js-map', layers: [ new ol.layer.Tile({source: new ol.source.Stamen({ layer: 'terrain' })}), new ol.layer.Tile({source: new ol.source.Stamen({ layer: 'watercolor' })}), new ol.layer.Tile({source: new ol.source.Stamen({ layer: 'toner' })}) ] }); - Instantiate our control, passing in some layers, and add it to the
mapinstance:map.addControl(new LayerSwitcher({ layers: map.getLayers() }));
Apart from a div element to hold the map, the HTML remains very basic because the control markup is generated from our JavaScript. We've shown you a small amount of CSS that's needed to style our control, demonstrating how easily this can be achieved. You'll notice that we've inherited a lot of the default styling that OpenLayers provides.
As should be expected, the heart of this code surrounds the custom control setup, spanning around 30 lines, so let's split it into chunks for explanation purposes:
var LayerSwitcher = function(options) {
options = options || {};
var className = options.className ?
options.className : 'ol-layer-switcher';
var cssClasses = className + ' ' + ol.css.CLASS_UNSELECTABLE +
' ' + ol.css.CLASS_CONTROL;
var layers = options.layers;
var list = document.createElement('ul');Like any other OpenLayers control, we have designed this to be somewhat customizable. Any user-defined options for this control will be present inside the options argument.
The first of the customizable options can be the class name, which will be used as the styling hook for CSS rules. If a class name has been provided, use it; otherwise, we default to our own class name of ol-layer-switcher.
When we create our control HTML wrapping element, we will combine the custom class name with a few defaults from OpenLayers that are used with other controls. It's useful to know about ol.css.CLASS_UNSELECTABLE and ol.css.CLASS_CONTROL, which respectively reference the ol-unselectable and ol-control strings, which apply some essential CSS rules to our control.
We store a reference of options.layers in a variable named layers, create an unordered list (ul) DOM element, and store this in the list variable.
layers.forEach(function(layer, index, layers) {
var li = document.createElement('li');
li.setAttribute('data-layer-ref', ++index);
li.innerHTML = 'Layer ' + index;
if (index === layers.length) li.className = 'active';
list.appendChild(li);
});For each layer that is supplied to our control, we create an li DOM element for it. We set an attribute of data-layer-ref that identifies the layer with a number, and then we add some text to the element in conjunction with the index array, for example, layer 1.
If this is the final iteration of the loop, we set the last layer with a class name of active by default. We finish within the loop by adding this list item to the parent list element. We've successfully converted our list of layers into an HTML list that will shortly be ready to be switched.
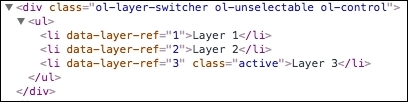
var controlDiv = goog.dom.createDom('div', cssClasses, list);For demonstration purposes, we've used the Google Closure library to create our wrapping div element with the previous method. Remember that OpenLayers ships with many utility methods from Google Closure that you may find useful to exercise yourself.
This method takes the type of element that it has to create as its first parameter, then the CSS classes to apply to this element, and then a variable number of child elements to append to the parent element. In our case, this is the list of layers.
The controlDiv variable ends up with the following content (the following is a screenshot from the browser dev tools):
We then bring our control to life by adding some interaction capabilities:
controlDiv.addEventListener('click', function(event) {
if (event.target.nodeName.toLowerCase() === 'li') {
var itemNumber = parseInt(
event.target.getAttribute('data-layer-ref'), 10);
list.querySelector('.active').className = '';
list.querySelector('[data-layer-ref="' + itemNumber + '"]')
.className = 'active';
itemNumber--;
layers.forEach(function(layer, index) {
layers.item(index).setVisible(index === itemNumber);
});We begin by checking whether one of our li elements was the source of the click event before taking any action. Once this has been affirmed, we store the layer reference in the itemNumber variable.
We reset the list by removing the active class from the currently active list item. Then, we query the list again via an attribute selector so that we select the layer li item that's been clicked, and we set this item with the class name of active.
The itemNumber number is then decremented, as the index values in the array of layers we're about to iterate over start at index 0. For example, layer 1 from the list correctly becomes associated with index 0 from the list of layers.
When we loop over the list of layers (an ol.Collection), we use the item method to select the layer. We then set visibility to true or false by evaluation of whether or not the layer in iteration corresponds to the selected layer.
ol.control.Control.call(this, {
element: controlDiv
});Finally, when this control gets instantiated, as in the last step, we call the base control class with our custom element assigned to the configuration object. This calls the base control constructor in order to set up our control with the OpenLayers defaults.
ol.inherits(LayerSwitcher, ol.control.Control);
The ol.inherits class is just an alias for goog.inherits, which inherits the prototype from the base ol.control.Control constructor in our custom LayerSwitcher constructor. For example, one such prototype method that's inherited is ol.control.Control.prototype.getMap, which gets the instance of the map that the control is attached to.
We are ensuring that our custom control closely resembles the default OpenLayers control behaviors that developers may be accustomed to, making our control familiar, extendable, and easy to work with.
We'll skip over the section that creates the map, as this will look very familiar. After this comes the instantiation of our custom control:
map.addControl(new LayerSwitcher({
  layers: map.getLayers()
}));While adding this to the map instance, we instantiate our control with a configuration object and set the layers property to the value of all the layers from the map (our three raster layers from the Stamen source).
This layer switcher certainly isn't foolproof. However, with the help of this boilerplate, you'll be able to invest quality time in your own custom controls for OpenLayers.
Here's an open source layer switcher implementation that you may find interesting for OpenLayers 3: https://github.com/walkermatt/ol3-layerswitcher.