Table of Contents for
React and React Native - Second Edition

Version ebook / Retour

Cover image for bash Cookbook, 2nd Edition React and React Native - Second Edition by Adam Boduch Published by Packt Publishing, 2018
  1. React and React Native, Second Edition
  2. Title Page
  3. Copyright and Credits
  4. React and React Native Second Edition
  5. Packt Upsell
  6. Why subscribe?
  7. www.packt.com
  8. Contributors
  9. About the author
  10. About the reviewer
  11. Packt is searching for authors like you
  12. Dedication
  13. Table of Contents
  14. Preface
  15. Who this book is for
  16. What this book covers
  17. Part I: React
  18. Part II: React Native
  19. Part III: React Architecture
  20. To get the most out of this book
  21. Download the example code files
  22. Conventions used
  23. Get in touch
  24. Reviews
  25. Why React?
  26. What is React?
  27. React is just the view
  28. Simplicity is good
  29. Declarative UI structure
  30. Time and data
  31. Performance matters
  32. The right level of abstraction
  33. What's new in React 16
  34. Core architecture revamped
  35. Lifecycle methods
  36. Context API
  37. Rendering fragments
  38. Portals
  39. Rendering lists and strings
  40. Handling errors
  41. Server-side rendering
  42. Summary
  43. Test your knowledge
  44. Further reading
  45. Rendering with JSX
  46. What is JSX?
  47. Hello JSX
  48. Declarative UI structure
  49. Just like HTML
  50. Built-in HTML tags
  51. HTML tag conventions
  52. Describing UI structures
  53. Creating your own JSX elements
  54. Encapsulating HTML
  55. Nested elements
  56. Namespaced components
  57. Using JavaScript expressions
  58. Dynamic property values and text
  59. Mapping collections to elements
  60. Fragments of JSX
  61. Wrapper elements
  62. Avoiding unnecessary tags using fragments
  63. Summary
  64. Test your knowledge
  65. Further reading
  66. Component Properties, State, and Context
  67. What is component state?
  68. What are component properties?
  69. Setting component state
  70. Initial component state
  71. Setting component state
  72. Merging component state
  73. Passing property values
  74. Default property values
  75. Setting property values
  76. Stateless components
  77. Pure functional components
  78. Defaults in functional components
  79. Container components
  80. Providing and consuming context
  81. Summary
  82. Test your knowledge
  83. Further reading
  84. Event Handling, the React Way
  85. Declaring event handlers
  86. Declaring handler functions
  87. Multiple event handlers
  88. Importing generic handlers
  89. Event handler context and parameters
  90. Getting component data
  91. Higher-order event handlers
  92. Inline event handlers
  93. Binding handlers to elements
  94. Synthetic event objects
  95. Event pooling
  96. Summary
  97. Test your knowledge
  98. Further reading
  99. Crafting Reusable Components
  100. Reusable HTML elements
  101. The difficulty with monolithic components
  102. The JSX markup
  103. Initial state and state helpers
  104. Event handler implementation
  105. Refactoring component structures
  106. Start with the JSX
  107. Implementing an article list component
  108. Implementing an article item component
  109. Implementing an add article component
  110. Making components functional
  111. Leveraging render props
  112. Rendering component trees
  113. Feature components and utility components
  114. Summary
  115. Test your knowledge 
  116. Further Reading
  117. The React Component Lifecycle
  118. Why components need a lifecycle
  119. Initializing properties and state
  120. Fetching component data
  121. Initializing state with properties
  122. Updating state with properties
  123. Optimize rendering efficiency
  124. To render or not to render
  125. Using metadata to optimize rendering
  126. Rendering imperative components
  127. Rendering jQuery UI widgets
  128. Cleaning up after components
  129. Cleaning up asynchronous calls
  130. Containing errors with error boundaries
  131. Summary
  132. Test your knowledge
  133. Further Reading
  134. Validating Component Properties
  135. Knowing what to expect
  136. Promoting portable components
  137. Simple property validators
  138. Basic type validation
  139. Requiring values
  140. Any property value
  141. Type and value validators
  142. Things that can be rendered
  143. Requiring specific types
  144. Requiring specific values
  145. Writing custom property validators
  146. Summary
  147. Test your knowledge
  148. Further reading
  149. Extending Components
  150. Component inheritance
  151. Inheriting state
  152. Inheriting properties
  153. Inheriting JSX and event handlers
  154. Composition with higher-order components
  155. Conditional component rendering
  156. Providing data sources
  157. Summary
  158. Test your knowledge
  159. Further reading
  160. Handling Navigation with Routes
  161. Declaring routes
  162. Hello route
  163. Decoupling route declarations
  164. Parent and child routes
  165. Handling route parameters
  166. Resource IDs in routes
  167. Optional parameters
  168. Using link components
  169. Basic linking
  170. URL and query parameters
  171. Summary
  172. Test your knowledge
  173. Further reading
  174. Server-Side React Components
  175. What is isomorphic JavaScript?
  176. The server is a render target
  177. Initial load performance
  178. Sharing code between the server and the browser
  179. Rendering to strings
  180. Backend routing
  181. Frontend reconciliation
  182. Fetching data
  183. Summary
  184. Test your knowledege
  185. Further reading
  186. Mobile-First React Components
  187. The rationale behind mobile-first design
  188. Using react-bootstrap components
  189. Implementing navigation
  190. Lists
  191. Forms
  192. Summary
  193. Test your knowledge
  194. Further reading
  195. Why React Native?
  196. What is React Native?
  197. React and JSX are familiar
  198. The mobile browser experience
  199. Android and iOS, different yet the same
  200. The case for mobile web apps
  201. Summary
  202. Test your knowledge
  203. Further reading
  204. Kickstarting React Native Projects
  205. Installing and using the create-react-native-app
  206. Creating a React Native app
  207. Running your app
  208. Installing and using Expo
  209. Using simulators
  210. iOS simulators
  211. Android simulators
  212. Summary
  213. Test your knowledge
  214. Further reading
  215. Building Responsive Layouts with Flexbox
  216. Flexbox is the new layout standard
  217. Introducing React Native styles
  218. Building flexbox layouts
  219. Simple three column layout
  220. Improved three column layout
  221. Flexible rows
  222. Flexible grids
  223. Flexible rows and columns
  224. Summary
  225. Test your knowledge
  226. Further reading
  227. Navigating Between Screens
  228. Navigation basics
  229. Route parameters
  230. The navigation header
  231. Tab and drawer navigation
  232. Handling state
  233. Summary
  234. Test your knowledege
  235. Further reading
  236. Rendering Item Lists
  237. Rendering data collections
  238. Sorting and filtering lists
  239. Fetching list data
  240. Lazy list loading
  241. Summary
  242. Test your knowledege
  243. Further reading
  244. Showing Progress
  245. Progress and usability
  246. Indicating progress
  247. Measuring progress
  248. Navigation indicators
  249. Step progress
  250. Summary
  251. Test your knowledge
  252. Further reading
  253. Geolocation and Maps
  254. Where am I?
  255. What's around me?
  256. Annotating points of interest
  257. Plotting points
  258. Plotting overlays
  259. Summary
  260. Test your knowledge
  261. Further reading
  262. Collecting User Input
  263. Collecting text input
  264. Selecting from a list of options
  265. Toggling between off and on
  266. Collecting date/time input
  267. Summary
  268. Test your knowledge
  269. Further reading
  270. Alerts, Notifications, and Confirmation
  271. Important information
  272. Getting user confirmation
  273. Success confirmation
  274. Error confirmation
  275. Passive notifications
  276. Activity modals
  277. Summary
  278. Test your knowledge
  279. Further reading
  280. Responding to User Gestures
  281. Scrolling with your fingers
  282. Giving touch feedback
  283. Swipeable and cancellable
  284. Summary
  285. Test your knowledge
  286. Further reading
  287. Controlling Image Display
  288. Loading images
  289. Resizing images
  290. Lazy image loading
  291. Rendering icons
  292. Summary
  293. Test your knowledge
  294. Further reading
  295. Going Offline
  296. Detecting the state of the network
  297. Storing application data
  298. Synchronizing application data
  299. Summary
  300. Test your knowledge
  301. Further reading
  302. Handling Application State
  303. Information architecture and Flux
  304. Unidirectionality
  305. Synchronous update rounds
  306. Predictable state transformations
  307. Unified information architecture
  308. Implementing Redux
  309. Initial application state
  310. Creating the store
  311. Store provider and routes
  312. The App component
  313. The Home component
  314. State in mobile apps
  315. Scaling the architecture
  316. Summary
  317. Test your knowledge
  318. Further reading
  319. Why Relay and GraphQL?
  320. Yet another approach?
  321. Verbose vernacular
  322. Declarative data dependencies
  323. Mutating application state
  324. The GraphQL backend and microservices
  325. Summary
  326. Test your knowledge
  327. Further reading
  328. Building a Relay React App
  329. TodoMVC and Relay
  330. The GraphQL schema
  331. Bootstrapping Relay
  332. Adding todo items
  333. Rendering todo items
  334. Completing todo items
  335. Summary
  336. Test Your Knowledge Answers
  337. Chapter 1
  338. Chapter 2
  339. Chapter 3
  340. Chapter 4
  341. Chapter 5
  342. Chapter 6 
  343. Chapter 7
  344. Chapter 8
  345. Chapter 9
  346. Chapter 10
  347. Chapter 11
  348. Chapter 12
  349. Chapter 13
  350. Chapter 14
  351. Chapter 15
  352. Chapter 16
  353. Chapter 17
  354. Chapter 18
  355. Chapter 19
  356. Chapter 20
  357. Chapter 21
  358. Chapter 22
  359. Chapter 23
  360. Chapter 24
  361. Chapter 25
  362. Other Books You May Enjoy
  363. Leave a review - let other readers know what you think

Sorting and filtering lists

Now that you have learned the basics of FlatList components, including how to pass them data, let's add some controls to the list that you just implemented in the previous section. The FlatList component helps you render fixed-position content for list controls. You'll also see how to manipulate the data source, which ultimately drives what's rendered on the screen.

Before implementing list control components, it might be helpful to review the high-level structure of these components so that the code has more context. Here's an illustration of the component structure that you're going to implement:

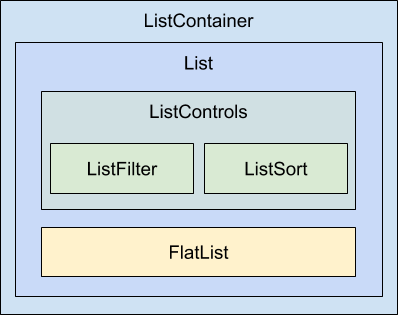
Here's what each of these components is responsible for:

  • ListContainer: The overall container for the list; it follows the familiar React container pattern
  • List: A stateless component that passes the relevant pieces of state into the ListControls and the React Native ListView component
  • ListControls: A component that holds the various controls that change the state of the list
  • ListFilter: A control for filtering the item list
  • ListSort: A control for changing the sort order of the list
  • FlatList: The actual React Native component that renders items


In some cases, splitting apart the implementation of a list like this is overkill. However, I think that if your list needs controls in the first place, you're probably implementing something that will stand to benefit from having a well-thought-out component architecture.

Now, let's drill down into the implementation of this list, starting with the ListContainer component:

import React, { Component } from 'react';

import List from './List';

const mapItems = items =>
items.map((value, i) => ({ key: i.toString(), value }));

// Performs sorting and filtering on the given "data".
const filterAndSort = (data, text, asc) =>
data
.filter(
i =>
// Items that include the filter "text" are returned.
// Unless the "text" argument is an empty string,
// then everything is included.
text.length === 0 || i.includes(text)
)
.sort(
// Sorts either ascending or descending based on "asc".
asc
? (a, b) => (b > a ? -1 : a === b ? 0 : 1)
: (a, b) => (a > b ? -1 : a === b ? 0 : 1)
);

class ListContainer extends Component {
state = {
data: filterAndSort(
new Array(100).fill(null).map((v, i) => `Item ${i}`),
'',
true
),
asc: true,
filter: ''
};

render() {
return (
<List
data={mapItems(this.state.data)}
asc={this.state.asc}
onFilter={text => {
// Updates the "filter" state, the actualy filter text,
// and the "source" of the list. The "data" state is
// never actually touched - "filterAndSort()" doesn't
// mutate anything.
this.setState({
filter: text,
data: filterAndSort(this.state.data, text, this.state.asc)
});
}}
onSort={() => {
this.setState({
// Updates the "asc" state in order to change the
// order of the list. The same principles as used
// in the "onFilter()" handler are applied here,
// only with diferent arguments passed to
// "filterAndSort()"
asc: !this.state.asc,
data: filterAndSort(
this.state.data,
this.state.filter,
!this.state.asc
)
});
}}
/>
);
}
}

export default ListContainer;

If this seems like a bit much, it's because it is. This container component has a lot of state to handle. It also has some nontrivial behavior that it needs to make available to its children. If you look at it from the perspective of encapsulating state, it will be more approachable. Its job is to populate the list with state data and provide functions that operate on this state.

In an ideal world, child components of this container should be nice and simple since they don't have to directly interface with state. Let's take a look at the List component next:

import React from 'react';
import PropTypes from 'prop-types';
import { Text, FlatList } from 'react-native';

import styles from './styles';
import ListControls from './ListControls';

const List = ({ Controls, data, onFilter, onSort, asc }) => (
<FlatList
data={data}
ListHeaderComponent={<Controls {...{ onFilter, onSort, asc }} />}
renderItem={({ item }) => (
<Text style={styles.item}>{item.value}</Text>
)}
/>
);

List.propTypes = {
Controls: PropTypes.func.isRequired,
data: PropTypes.array.isRequired,
onFilter: PropTypes.func.isRequired,
onSort: PropTypes.func.isRequired,
asc: PropTypes.bool.isRequired
};

List.defaultProps = {
Controls: ListControls
};

export default List;

This component takes state from the ListContainer component as properties and renders a FlatList component. The main difference here, relative to the previous example, is the ListHeaderComponent property. This renders the controls for your list. What's especially useful about this property is that it renders the controls outside the scrollable list content, ensuring that the controls are always visible.

Also, notice that you're specifying your own ListControls component as a default value for the controls property. This makes it easy for others to pass in their own list controls. Let's take a look at the ListControls component next:

import React from 'react';
import PropTypes from 'prop-types';
import { View } from 'react-native';

import styles from './styles';
import ListFilter from './ListFilter';
import ListSort from './ListSort';

// Renders the "<ListFilter>" and "<ListSort>"
// components within a "<View>". The
// "styles.controls" style lays out the controls
// horizontally.
const ListControls = ({ onFilter, onSort, asc }) => (
<View style={styles.controls}>
<ListFilter onFilter={onFilter} />
<ListSort onSort={onSort} asc={asc} />
</View>
);

ListControls.propTypes = {
onFilter: PropTypes.func.isRequired,
onSort: PropTypes.func.isRequired,
asc: PropTypes.bool.isRequired
};

export default ListControls;

This component brings together the ListFilter and ListSort controls. So, if you were to add another list control, you would add it here. Let's take a look at the ListFilter implementation now:

import React from 'react';
import PropTypes from 'prop-types';
import { View, TextInput } from 'react-native';

import styles from './styles';

// Renders a "<TextInput>" component which allows the
// user to type in their filter text. This causes
// the "onFilter()" event handler to be called.
// This handler comes from "ListContainer" and changes
// the state of the list data source.
const ListFilter = ({ onFilter }) => (
<View>
<TextInput
autoFocus
placeholder="Search"
style={styles.filter}
onChangeText={onFilter}
/>
</View>
);

ListFilter.propTypes = {
onFilter: PropTypes.func.isRequired
};

export default ListFilter;

The filter control is a simple text input that filters the list of items as user types. The onChange function that handles this comes from the ListContainer component.

Let's look at the ListSort component next:

import React from 'react';
import PropTypes from 'prop-types';
import { Text } from 'react-native';

// The arrows to render based on the state of
// the "asc" property. Using a Map let's us
// stay declarative, rather than introducing
// logic into the JSX.
const arrows = new Map([[true, '▼'], [false, '▲']]);

// Renders the arrow text. When clicked, the
// "onSort()" function that's passed down from
// the container.
const ListSort = ({ onSort, asc }) => (
<Text onPress={onSort}>{arrows.get(asc)}</Text>
);

ListSort.propTypes = {
onSort: PropTypes.func.isRequired,
asc: PropTypes.bool.isRequired
};

export default ListSort;


Here's a look at the resulting list:

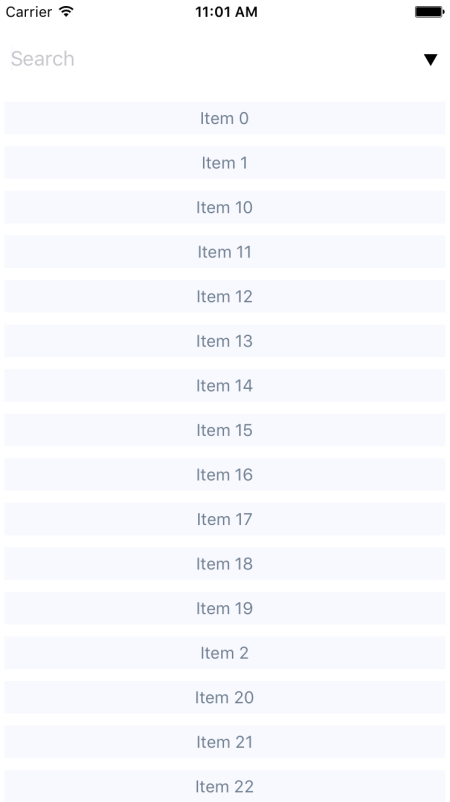
By default, the entire list is rendered in ascending order. You can see the placeholder text Search when the user hasn't provided anything yet. Let's see how this looks when you enter a filter and change the sort order:

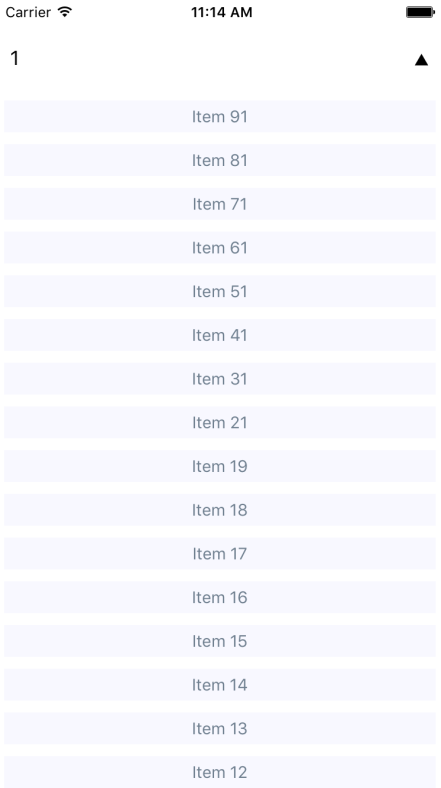
This search includes items with a 1 in it, and sorts the results in descending order. Note that you can either change the order first or enter the filter first. Both the filter and the sort order are part of the ListContainer state.