Table of Contents for
Mastering OpenLayers 3
 Mastering OpenLayers 3
Published by
Packt Publishing, 2016
Mastering OpenLayers 3
Published by
Packt Publishing, 2016
- Cover
- Table of Contents
- Mastering OpenLayers 3
- Mastering OpenLayers 3
- Credits
- About the Author
- About the Reviewer
- www.PacktPub.com
- Preface
- What you need for this book
- Who this book is for
- Conventions
- Reader feedback
- Customer support
- 1. Creating Simple Maps with OpenLayers 3
- Structure of OpenLayers 3
- Building the layout
- Using the API documentation
- Debugging the code
- Summary
- 2. Applying Custom Styles
- Customizing the default appearance
- Styling vector layers
- Customizing the appearance with JavaScript
- Creating a WebGIS client layout
- Summary
- 3. Working with Layers
- Building a layer tree
- Adding layers dynamically
- Adding vector layers with the File API
- Adding vector layers with a library
- Removing layers dynamically
- Changing layer attributes
- Changing the layer order with the Drag and Drop API
- Clearing the message bar
- Summary
- 4. Using Vector Data
- Accessing attributes
- Setting attributes
- Validating attributes
- Creating thematic layers
- Saving vector data
- Saving with WFS-T
- Modifying the geometry
- Summary
- 5. Creating Responsive Applications with Interactions and Controls
- Building the toolbar
- Mapping interactions to controls
- Building a set of feature selection controls
- Adding new vector layers
- Building a set of drawing tools
- Modifying and snapping to features
- Creating new interactions
- Building a measuring control
- Summary
- 6. Controlling the Map – View and Projection
- Customizing a view
- Constraining a view
- Creating a navigation history
- Working with extents
- Rotating a view
- Changing the map's projection
- Creating custom animations
- Summary
- 7. Mastering Renderers
- Using different renderers
- Creating a WebGL map
- Drawing lines and polygons with WebGL
- Blending layers
- Clipping layers
- Exporting a map
- Creating a raster calculator
- Creating a convolution matrix
- Clipping a layer with WebGL
- Summary
- 8. OpenLayers 3 for Mobile
- Responsive styling with CSS
- Generating geocaches
- Adding device-dependent controls
- Vectorizing the mobile version
- Making the mobile application interactive
- Summary
- 9. Tools of the Trade – Integrating Third-Party Applications
- Exporting a QGIS project
- Importing shapefiles
- Spatial analysis with Turf
- Spatial analysis with JSTS
- 3D rendering with Cesium
- Summary
- 10. Compiling Custom Builds with Closure
- Configuring Node JS
- Compiling OpenLayers 3
- Bundling an application with OpenLayers 3
- Extending OpenLayers 3
- Creating rich documentation with JSDoc
- Summary
- Index
In our last example, we will automatically create documentation for OpenLayers 3. As we saw in ellipsoid.js, the headers resemble to the structure of the API documentation. The explanation is simple: Closure Compiler and JSDoc use the same headers to compile the library and create documentation for them. When we extended the constructor and the vincentyDsitance method with the @api tag, we not only make them exportable but also define that they should appear in the API documentation.
JSDoc is defined as an OpenLayers 3 dependency; therefore, it can be found in the node_modules folder. We will use it to generate documentation for our customized version. It also needs a configuration file, which is different from the one used for compiling. The default JSDoc configuration file can also be found in the config folder (config/jsdoc/api/conf.json). First, let's create a documentation with the default configuration file. For this, type the following command into the terminal:
node node_modules/jsdoc-fork/jsdoc.js -c config/jsdoc/api/conf.json
If you wait for the program to be completed, you will notice that there is a new folder in the directory, called out. This is the default output directory for JSDoc. If you open index.html inside this folder, you will see the generated API documentation with the ol.Ellispoid constructor and its vincentyDistance method:
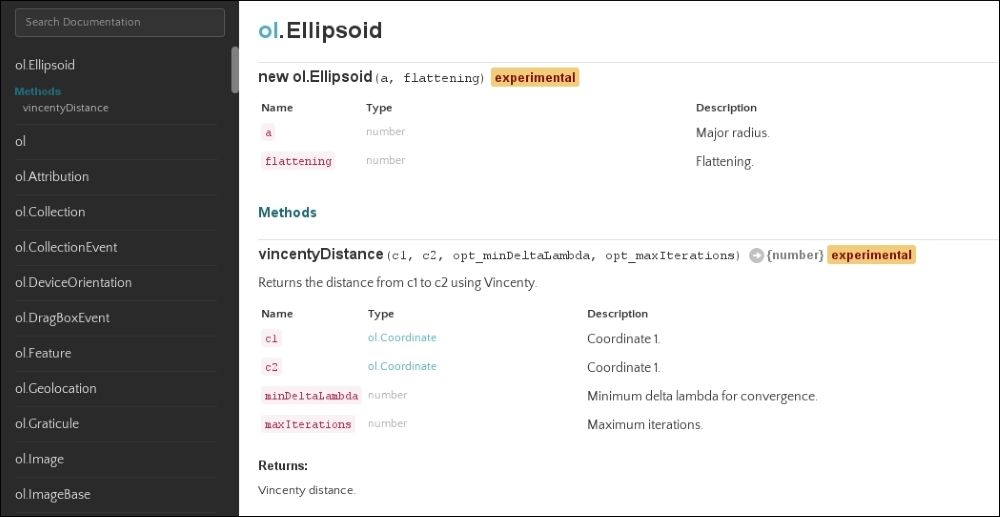
We can tell from the first API documentation export that JSDoc uses the same headers, just like Closure. However, it uses a different syntax in the configuration file and command line. Now, we customize the documentation template a little bit, starting with a few simple steps. First, let's add a little description to the ol.Ellipsoid constructor in ellipsoid.js:
/**
 * @classdesc
 * Class to create an ellipsoid to measure accurate geodesic distances,
 * where accuracy is more important, than performance.
 *
 * To create the WGS84 ellipsoid:
 *
 * ```js
 * var ellipsoid = new ol.Ellipsoid(6378137, 1 / 298.257223563);
 * ```
 *
 * @constructor
 * @param {number} a Major radius.
 * @param {number} flattening Flattening.
 * @api
 */
With the @classdesc tag, we can write an extensive class description for a symbol. The content marked by this tag gets a different class name in the generated documentation, and, thus, it can be distinguished from other descriptions with the help of CSS. With a special syntax, we can also embed a code snippet, which is not only displayed as a code in the documentation but also syntax that's highlighted based on the language we define.
Next, we modify the default template of OpenLayers 3. The library uses a modified version of the Jaguar template (https://github.com/davidshimjs/jaguarjs/tree/master/docs/templates/jaguar). First, we navigate to the template in the source code (config/jsdoc/api/template). In this folder, there are two folders of interest. First, let's navigate to the tmpl folder, which contains the skeleton of various parts of the API documentation. The main template is called layout.tmpl, which is our main target. When you open that template, you will see that there are two main parts in the body of the skeleton. The first one describes the navigation bar, while the second one is for the content. The horizontal navigation bar is a custom OpenLayers 3 feature; therefore, we remove it. To also add something to the documentation, we add an attribute footer with a timestamp:
<body>
    <div id="wrap" class="clearfix">
        <?js= this.partial('navigation.tmpl', this) ?>
        <div class="main">
            <h1 class="page-title" data-filename="<?js= filename ?>"><?js= title ?></h1>
            <?js= content ?>
            <footer>
                Documentation generated by <a href="https://github.com/jsdoc3/jsdoc">JSDoc <?js= env.version.number ?></a> on <?js= (new Date()) ?>
            </footer>
        </div>
    </div>
    <script>prettyPrint();</script>
    <script src="scripts/linenumber.js"></script>
    <script src="scripts/main.js"></script>
</body>Now, we've gotten rid of the horizontal navigation bar, but we also lost the name of the application. Without a horizontal navigation bar, the best fixed place to put such an annotation is in the vertical navigation bar. To do this, we have to modify navigation.tmpl a little bit:
<div class="navigation">
    <p class="applicationName"><a href="index.html"><?js= env.conf.templates.applicationName ?></a></p>
    <div class="search">
        <input id="search" type="text" class="form-control input-sm" placeholder="Search Documentation">
    </div>
    […]
With this extension, our application's name, which is read out from the configuration file and stored in the env.conf.templates.applicationName variable at the time of being generated, will always appear on the top of the vertical navigation bar.
If we'd like to generate our modified API documentation now, we would notice that everything is working nice, aside from the white space in the place of the horizontal navigation bar. As both of the navigation bars are in a fixed position, the body of the document has a padding of 50px. This way, the horizontal navigation bar fits nicely at the top of the documentation. To fix this, we have to modify one of the template's CSS files. This can be found in the other folder of interest under the static/styles/jaguar.css path. In this CSS file, we only have to remove the padding from the body element:
body {
  padding-top: 50px;
}
Finally, before generating the new API documentation, let's change the configuration file a little bit. Most of the options are good to go; we only need to change the name of the application and the outputSourceFiles parameter. If this parameter is set to true, the source files get bundled along with the documentation and will be accessible from the corresponding symbol. The configuration file that we modify is located in the parent of the template folder (config/jsdoc/api/conf.json from the source code's root directory):
{
    […]
    "templates": {
        […]
        "default": {
            "outputSourceFiles": true
        },
        "applicationName": "OL3 with Ellipsoid"
    },
Now, at last, we run JSDoc again. This time, we specify another parameter: the output directory. We can do this with the -d argument. Don't forget to run this command from the source code's root directory:
node node_modules/jsdoc-fork/jsdoc.js -c config/jsdoc/api/conf.json -d apidoc
If we wait for the program to finish and look at the newly created apidoc folder, we can take a look at our new documentation:
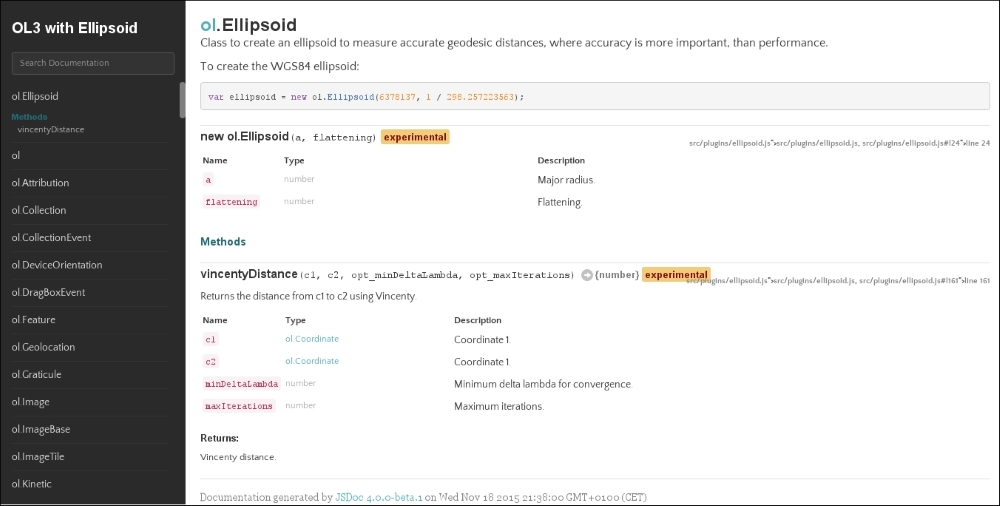
The new API documentation is customized with a class description added to the ol.Ellipsoid constructor, and there is a source code page associated with every class. This is very nice; however, if we check the size of this new, extended documentation, it's the double of the one without the source code included. It seems like linking everything to the appropriate GitHub source file is a good practice.