Table of Contents for
Mastering OpenLayers 3
 Mastering OpenLayers 3
Published by
Packt Publishing, 2016
Mastering OpenLayers 3
Published by
Packt Publishing, 2016
- Cover
- Table of Contents
- Mastering OpenLayers 3
- Mastering OpenLayers 3
- Credits
- About the Author
- About the Reviewer
- www.PacktPub.com
- Preface
- What you need for this book
- Who this book is for
- Conventions
- Reader feedback
- Customer support
- 1. Creating Simple Maps with OpenLayers 3
- Structure of OpenLayers 3
- Building the layout
- Using the API documentation
- Debugging the code
- Summary
- 2. Applying Custom Styles
- Customizing the default appearance
- Styling vector layers
- Customizing the appearance with JavaScript
- Creating a WebGIS client layout
- Summary
- 3. Working with Layers
- Building a layer tree
- Adding layers dynamically
- Adding vector layers with the File API
- Adding vector layers with a library
- Removing layers dynamically
- Changing layer attributes
- Changing the layer order with the Drag and Drop API
- Clearing the message bar
- Summary
- 4. Using Vector Data
- Accessing attributes
- Setting attributes
- Validating attributes
- Creating thematic layers
- Saving vector data
- Saving with WFS-T
- Modifying the geometry
- Summary
- 5. Creating Responsive Applications with Interactions and Controls
- Building the toolbar
- Mapping interactions to controls
- Building a set of feature selection controls
- Adding new vector layers
- Building a set of drawing tools
- Modifying and snapping to features
- Creating new interactions
- Building a measuring control
- Summary
- 6. Controlling the Map – View and Projection
- Customizing a view
- Constraining a view
- Creating a navigation history
- Working with extents
- Rotating a view
- Changing the map's projection
- Creating custom animations
- Summary
- 7. Mastering Renderers
- Using different renderers
- Creating a WebGL map
- Drawing lines and polygons with WebGL
- Blending layers
- Clipping layers
- Exporting a map
- Creating a raster calculator
- Creating a convolution matrix
- Clipping a layer with WebGL
- Summary
- 8. OpenLayers 3 for Mobile
- Responsive styling with CSS
- Generating geocaches
- Adding device-dependent controls
- Vectorizing the mobile version
- Making the mobile application interactive
- Summary
- 9. Tools of the Trade – Integrating Third-Party Applications
- Exporting a QGIS project
- Importing shapefiles
- Spatial analysis with Turf
- Spatial analysis with JSTS
- 3D rendering with Cesium
- Summary
- 10. Compiling Custom Builds with Closure
- Configuring Node JS
- Compiling OpenLayers 3
- Bundling an application with OpenLayers 3
- Extending OpenLayers 3
- Creating rich documentation with JSDoc
- Summary
- Index
Object-oriented databases lack one very important thing that relational databases have: consistency. As consistent data handling and relational database support is a very important consideration in GIS software (at least to support a server-side spatial database), we need to implement some restrictions in our data management system. In this example, called ch04_validation, we will extend our application with typed attributes and validation.
As we are using a form for attribute management, we can harness its validating capability as we use typed attributes. For numeric fields, we will use a number input, which does not process strings. In non-Microsoft browsers, numeric fields also prevent us from submitting the form if it detects a string in such an input. As a first step, we modify our CSS to extend our rules to numeric inputs, too:
.popup input[type=text], .popup input[type=number] {
    width: 60%;
    box-sizing: border-box;
}An easy way to store the types associated with the attributes is using headers like relational databases do. In our implementation, headers are objects stored in the layer object that contain the attribute names as keys and the types as values. For added convenience, we extend the OpenLayers 3 vector layer with a header builder method outside the init function:
ol.layer.Vector.prototype.buildHeaders = function () {
    var headers = this.get('headers') || {};
    var features = this.getSource().getFeatures();
    for (var i = 0; i < features.length; i += 1) {
        var attributes = features[i].getProperties();
        for (var j in attributes) {
            if (typeof attributes[j] !== 'object' && !(j in headers)) {
                headers[j] = 'string';
            }
        }
    }
    this.set('headers', headers);
    return this;
};
It simply grabs the
headers property of the layer object, if it has one, and checks every feature's attributes; if it finds a missing attribute from the header object, it defaults the attribute's type to the string. This way, we have to provide every numeric attribute at layer construction.
This is one of the rare cases when we head from a complicated to a more simple example. As we manage our attributes at a higher level now, we cannot do local changes to them.
In this step, we modify our click event on the map. We have to alter our createRow function and the forEachFeatureAtPixel method's callback function:
map.on('click', function (evt) {
    […]
    function createRow (attributeName, attributeValue, type) {
        var rowElem = document.createElement('div');
        var attributeSpan = document.createElement('span');
        attributeSpan.textContent = attributeName + ': ';
        rowElem.appendChild(attributeSpan);
        var attributeInput = document.createElement('input');
        attributeInput.name = attributeName;
        attributeInput.type = 'text';
        if (type !== 'string') {
            attributeInput.type = 'number';
            attributeInput.step = (type === 'float') ? 1e-6 : 1;
        }
        attributeInput.value = attributeValue;
        rowElem.appendChild(attributeInput);
        return rowElem;
    }
In this rewritten function, we don't have to deal with new attributes. We only check the type of the attribute that we have to create the row for. If it is not a string, we create a numeric input element for it and check further. If it is a float, we set the precision to six decimal places. If it is an integer, we set the step attribute to 1.
Next, we modify our main function to add validating capabilities:
    this.forEachFeatureAtPixel(pixel, function (feature, layer) {
        […]
            for (var i in attributes) {
                if (typeof attributes[i] !== 'object' && i in headers) {
                    attributeForm.appendChild(createRow(i, attributes[i], headers[i]));
                }
            }
            […]
                attributeForm.addEventListener('submit', function (evt) {
                    evt.preventDefault();
                    var attributeList = {};
                    var inputList = [].slice.call(this.querySelectorAll('input[type=text], input[type=number]'));
                    for (var i = 0; i < inputList.length; i += 1) {
                        switch (headers[inputList[i].name]) {
                            case 'string':
                                attributeList[inputList[i].name] = inputList[i].value.toString();
                                break;
                            case 'integer':
                                attributeList[inputList[i].name] = parseInt(inputList[i].value);
                                break;
                            case 'float':
                                attributeList[inputList[i].name] = parseFloat(inputList[i].value);
                                break;
                        }
                    }
                    […]
});
The first part of the modification only maps out attributes that are present in the headers object of the layer. The second part is a lot more interesting. It collects all the form elements that can represent an attribute in an array. Based on the type of the attribute stored in the headers object, it parses the attribute accordingly. As inputs propagate their values as strings, converting them to numbers is a necessity. Converting them to text when we have to deal with a string type is just an extra layer of defense. Finally, we add some extra parameters and an event listener to invoke our new mechanism correctly:
var map = new ol.Map({
    […]
        new ol.layer.Vector({
            […]
            headers: {
               pop_est: 'integer',
                gdp_md_est: 'integer'
            }
        })
    […]
});
[…]
map.getLayers().item(1).getSource().on('change', function (evt) {
    if (this.getState() === 'ready') {
        map.getLayers().item(1).buildHeaders();
    }
});
Note
As you can see, the event is just a hack for our logic to work. In a product, it should be implemented into the layer tree's most appropriate section. Furthermore, the manual initialization of the headers object is also hacky; however, doing it right would expand the code far beyond the scope of this book.
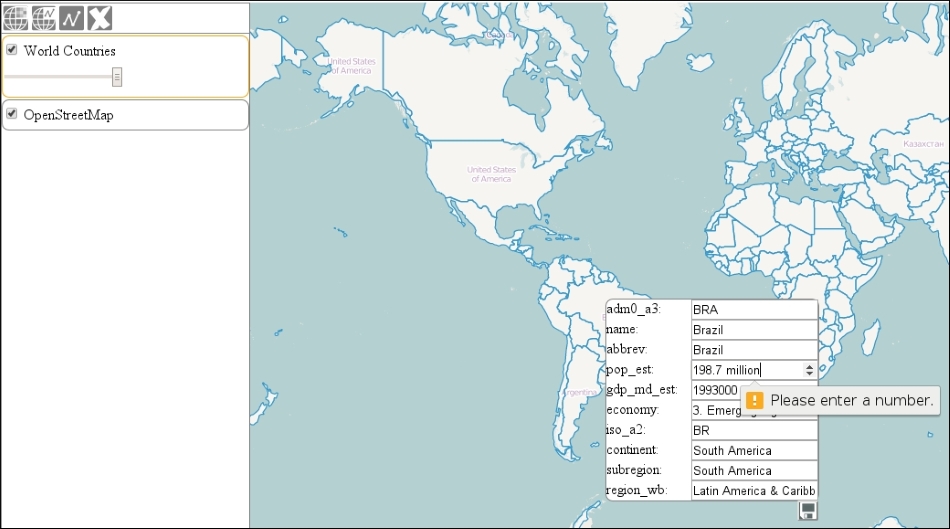
If you save the code and load it up, you will see our validating mechanism in action. Note that the numeric input's UI widgets do not work in Microsoft browsers: