Table of Contents for
Mastering OpenLayers 3
 Mastering OpenLayers 3
Published by
Packt Publishing, 2016
Mastering OpenLayers 3
Published by
Packt Publishing, 2016
- Cover
- Table of Contents
- Mastering OpenLayers 3
- Mastering OpenLayers 3
- Credits
- About the Author
- About the Reviewer
- www.PacktPub.com
- Preface
- What you need for this book
- Who this book is for
- Conventions
- Reader feedback
- Customer support
- 1. Creating Simple Maps with OpenLayers 3
- Structure of OpenLayers 3
- Building the layout
- Using the API documentation
- Debugging the code
- Summary
- 2. Applying Custom Styles
- Customizing the default appearance
- Styling vector layers
- Customizing the appearance with JavaScript
- Creating a WebGIS client layout
- Summary
- 3. Working with Layers
- Building a layer tree
- Adding layers dynamically
- Adding vector layers with the File API
- Adding vector layers with a library
- Removing layers dynamically
- Changing layer attributes
- Changing the layer order with the Drag and Drop API
- Clearing the message bar
- Summary
- 4. Using Vector Data
- Accessing attributes
- Setting attributes
- Validating attributes
- Creating thematic layers
- Saving vector data
- Saving with WFS-T
- Modifying the geometry
- Summary
- 5. Creating Responsive Applications with Interactions and Controls
- Building the toolbar
- Mapping interactions to controls
- Building a set of feature selection controls
- Adding new vector layers
- Building a set of drawing tools
- Modifying and snapping to features
- Creating new interactions
- Building a measuring control
- Summary
- 6. Controlling the Map – View and Projection
- Customizing a view
- Constraining a view
- Creating a navigation history
- Working with extents
- Rotating a view
- Changing the map's projection
- Creating custom animations
- Summary
- 7. Mastering Renderers
- Using different renderers
- Creating a WebGL map
- Drawing lines and polygons with WebGL
- Blending layers
- Clipping layers
- Exporting a map
- Creating a raster calculator
- Creating a convolution matrix
- Clipping a layer with WebGL
- Summary
- 8. OpenLayers 3 for Mobile
- Responsive styling with CSS
- Generating geocaches
- Adding device-dependent controls
- Vectorizing the mobile version
- Making the mobile application interactive
- Summary
- 9. Tools of the Trade – Integrating Third-Party Applications
- Exporting a QGIS project
- Importing shapefiles
- Spatial analysis with Turf
- Spatial analysis with JSTS
- 3D rendering with Cesium
- Summary
- 10. Compiling Custom Builds with Closure
- Configuring Node JS
- Compiling OpenLayers 3
- Bundling an application with OpenLayers 3
- Extending OpenLayers 3
- Creating rich documentation with JSDoc
- Summary
- Index
Now that we have resolved every dependency, let's build some versions of the library. First, we will build the minified and debug versions of the library just to see whether everything works fine. In the tasks folder, we can see a bunch of JavaScript files used in various stages of development. There are some test programs, serve commands, and the command that we will use to compile the library: build.js. This program requires two parameters to run. The first is a configuration file, while the second is the name of the result.
As the Closure Compiler is a quite complex library built in Java and Python, OpenLayers 3's developers created some utilities to make our lives easier. With build.js, we do not have to directly parameterize the Closure Compiler, we just have to write a configuration file in the JSON format. The program reads our configuration file and writes every exportable symbol (constructor, method, and so on) from the src folder to a file named info.json. This file can be located in the build folder. Then it goes on to parameterize the Closure Compiler based on the parameters of our configuration file's compile section and builds the library.
Note
There is another utility called closure-utils. This program contains all the programs from the tasks folder in one place. It uses a slightly different syntax from build.js. You can watch a great tutorial to use this program on the OpenLayers 3 official site at http://openlayers.org/en/master/doc/tutorials/closure.html. It covers everything from creating a new Node project with OpenLayers 3 as a dependency to creating debug builds.
Next, as we now know how to use the build.js program, we can build the default versions of OpenLayers 3. For this, we only need the default configuration files, which are located in the config folder. From the source directory, we can build the two versions with the following commands:
node tasks/build.js config/ol.json ol.js
node tasks/build.js config/ol-debug.json ol-debug.js
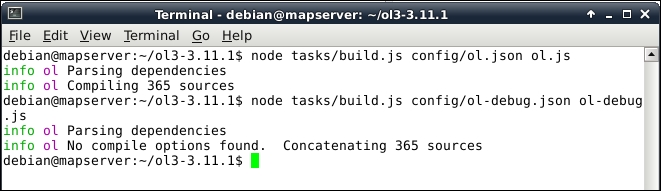
In the examples for this chapter, you will find an example named ch10_test. It is a simple copy of the simple map example from the first chapter. If you copy your freshly compiled library to this example and link it to the HTML file, you will see the map show up. You can test your debug version in a similar manner.
Before we create a smaller build, let's take a look at the configuration file first. Open the ol.json file from the config folder of the source code in a text editor. We can see that there are three parameters in the file. The first one is called exports. It defines an array of symbols which we would like to export. Every other symbol will be obfuscated in the compiled library. The second one is umd. UMD stands for Universal Module Definition, and it should be used when we would like to use our library in a modular way, for example, with Browserify or ReactJS. The third symbol is compile, which contains the Closure Compiler-related parameters.
There is one extra parameter that we should discuss. It is called src, and it contains an array of paths. The JavaScript files under these paths are used in the compilation process. For now, its default value is sufficient; however, if we have some files outside the src folder, it has to be defined.
In the configuration file, we saw that the exports parameter had a single member: *. This means that every exportable symbol should be exported and there is no filter applied. To compile only the necessary features for a project, we can define an array of features in this parameter. In this example, we will compile a small library with only the features needed for our geocaching application from Chapter 8, OpenLayers 3 for Mobile. First, there is a configuration file called ch10_geocaching_conf.json. If we open this configuration file, we can see that every feature of it is used in a mobile application in the order of occurrence. The other thing that we recognize instantly is that we have to export methods besides constructors. Methods are annotated after a corresponding constructor that is delimited by #:
{
  "exports": [
    "ol.Map",
    "ol.layer.Tile",
    "ol.source.OSM",
    "ol.control.Zoom",
    "ol.View",
    "ol.Geolocation",
    "ol.Map#getView",
    "ol.View#getProjection",
    "ol.layer.Vector",
    "ol.source.Vector",
    "ol.Map#addLayer",
    "ol.Geolocation#once",
    "ol.Geolocation#getAltitude",
    "ol.Geolocation#getPosition",
    […]
Now that we have a nice list of features to export, we can compile a smaller library. We copy this configuration file to the config folder of the source code and build a new version of it with the following command:
node tasks/build.js config/ch10_geocaching_conf.json ol-geocaching.js
If we examine the resulting library, we will see that it's only 205.6 kilobytes. This is a great result compared to the original library, which is 497.3 kilobytes. Finally, we test our custom version. There is an example, called ch10_geocaching, which we use for testing purposes. Let's link this version in the example's HTML file and check whether it works:
Note
We could get such a small library with a defined set of exports because Closure Compiler checks for the exported symbols in the advanced mode. It exports the unchanged symbols and packs every other related code next to them in an obfuscated form. If a piece of code is entirely unrelated to the exported symbols, Closure removes it from the resulting library.