Table of Contents for
Mastering OpenLayers 3
 Mastering OpenLayers 3
Published by
Packt Publishing, 2016
Mastering OpenLayers 3
Published by
Packt Publishing, 2016
- Cover
- Table of Contents
- Mastering OpenLayers 3
- Mastering OpenLayers 3
- Credits
- About the Author
- About the Reviewer
- www.PacktPub.com
- Preface
- What you need for this book
- Who this book is for
- Conventions
- Reader feedback
- Customer support
- 1. Creating Simple Maps with OpenLayers 3
- Structure of OpenLayers 3
- Building the layout
- Using the API documentation
- Debugging the code
- Summary
- 2. Applying Custom Styles
- Customizing the default appearance
- Styling vector layers
- Customizing the appearance with JavaScript
- Creating a WebGIS client layout
- Summary
- 3. Working with Layers
- Building a layer tree
- Adding layers dynamically
- Adding vector layers with the File API
- Adding vector layers with a library
- Removing layers dynamically
- Changing layer attributes
- Changing the layer order with the Drag and Drop API
- Clearing the message bar
- Summary
- 4. Using Vector Data
- Accessing attributes
- Setting attributes
- Validating attributes
- Creating thematic layers
- Saving vector data
- Saving with WFS-T
- Modifying the geometry
- Summary
- 5. Creating Responsive Applications with Interactions and Controls
- Building the toolbar
- Mapping interactions to controls
- Building a set of feature selection controls
- Adding new vector layers
- Building a set of drawing tools
- Modifying and snapping to features
- Creating new interactions
- Building a measuring control
- Summary
- 6. Controlling the Map – View and Projection
- Customizing a view
- Constraining a view
- Creating a navigation history
- Working with extents
- Rotating a view
- Changing the map's projection
- Creating custom animations
- Summary
- 7. Mastering Renderers
- Using different renderers
- Creating a WebGL map
- Drawing lines and polygons with WebGL
- Blending layers
- Clipping layers
- Exporting a map
- Creating a raster calculator
- Creating a convolution matrix
- Clipping a layer with WebGL
- Summary
- 8. OpenLayers 3 for Mobile
- Responsive styling with CSS
- Generating geocaches
- Adding device-dependent controls
- Vectorizing the mobile version
- Making the mobile application interactive
- Summary
- 9. Tools of the Trade – Integrating Third-Party Applications
- Exporting a QGIS project
- Importing shapefiles
- Spatial analysis with Turf
- Spatial analysis with JSTS
- 3D rendering with Cesium
- Summary
- 10. Compiling Custom Builds with Closure
- Configuring Node JS
- Compiling OpenLayers 3
- Bundling an application with OpenLayers 3
- Extending OpenLayers 3
- Creating rich documentation with JSDoc
- Summary
- Index
As you must have wondered, setting attributes requires much more consideration than simply mapping them to an element. In this example, called ch04_setattributes, we will create a form with the existing attributes. In the form, the user will be able to change the attribute values, add new ones to the feature, and remove them. We will extend the previous example to achieve our goal.
Our form can have multiple possible layouts. A row with attributes will surely contain the attribute name, the attribute value, and a remove button. However, depending on the attribute's state, the name can be a span or a text input element. Besides the rows, the form will have the add and save buttons. As we will create a new div element for every row, we can create some simple CSS logic for these different cases:
.popup span {
    display: inline-block;
    width: 5%;
}
.popup span:first-child {
    float: left;
    width: 40%;
}
.popup input[type=text] {
    width: 50%;
    box-sizing: border-box;
}
.popup input[type=text]:first-child {
    width: 35%;
    box-sizing: border-box;
}
.popup input[type=button], .popup input[type=submit] {
    width: 10%;
    float: right;
    […]
}
.popup .delete {
    background-image: url(../../res/button_delete.png);
}
.popup .save {
    background-image: url(../../res/button_save.png);
}Firstly, unlike the previous example, we create a form element. Basically, as we create the possibility to rewrite and append attributes, we take advantage of the form element's submitting capability. We also dedicate a function to build rows based on some arguments:
map.on('click', function (evt) {
    […]
    var attributeForm = document.createElement('form');
    […]
    var deletedAttributes = [];
    var firstFeature = true;
    function createRow (attributeName, attributeValue, isNew) {
        var rowElem = document.createElement('div');
        if (isNew) {
            var nameInput = document.createElement('input');
            nameInput.type = 'text';
            rowElem.appendChild(nameInput);
        }
        var attributeSpan = document.createElement('span');
        attributeSpan.textContent = isNew ? ': ' : attributeName + ': ';
        rowElem.appendChild(attributeSpan);
        var attributeInput = document.createElement('input');
        attributeInput.name = attributeName;
        attributeInput.type = 'text';
        attributeInput.value = attributeValue;
        rowElem.appendChild(attributeInput);
        var removeButton = document.createElement('input');
        removeButton.type = 'button';
        removeButton.className = 'delete';
        removeButton.addEventListener('click', function () {
            rowElem.parentNode.removeChild(rowElem);
            deletedAttributes.push(attributeName);
        });
        rowElem.appendChild(removeButton);
        return rowElem;
    }
We store the deleted attribute names, so we can remove them from the feature on form submission. We use a firstFeature Boolean variable for a trick to limit the queried features to the first one in the given pixel. The createRow function creates a row based on the attribute's name and value. If it has to create an empty row, it creates a text input for the attribute's name, too.
Next, we modify our forEachFeatureAtPixel method's callback function. Firstly, we create the rows based on the feature's attributes and append the add and save buttons to the end of the element:
    this.forEachFeatureAtPixel(pixel, function (feature, layer) {
        if (firstFeature) {
            var attributes = feature.getProperties();
            for (var i in attributes) {
                if (typeof attributes[i] !== 'object') {
                    attributeForm.appendChild(createRow(i, attributes[i]));
                }
            }
            if (attributeForm.children.length > 0) {
                var addAttribute = document.createElement('input');
                addAttribute.type = 'button';
                addAttribute.value = '+';
                addAttribute.addEventListener('click', function () {
                    attributeForm.insertBefore(createRow('', '', true), this);
                });
                attributeForm.appendChild(addAttribute);
                var saveAttributes = document.createElement('input');
                saveAttributes.type = 'submit';
                saveAttributes.value = '';
                saveAttributes.className = 'save';
If the user clicks on the add button, we can simply create a new row with two empty strings and insert the new row before the buttons. This way, the new attributes' elements will be nameless, which is required for the next part of our logic. As the final step, we add a submit event listener to the form and close our function:
                attributeForm.addEventListener('submit', function (evt) {
                    evt.preventDefault();
                    var attributeList = {};
                    var inputList = [].slice.call(this.querySelectorAll('input[type=text]'));
                    while (inputList.length > 0 && inputList[0].name !== '') {
                        attributeList[inputList[0].name] = inputList[0].value;
                        inputList.splice(0,1);
                    }
                    for (i = 0; i < inputList.length; i += 2) {
                        if (inputList[i].value !== '') {
                            attributeList[inputList[i].value] = inputList[i + 1].value;
                        }
                   }
                   feature.setProperties(attributeList);
                   for (i = 0; i < deletedAttributes.length; i += 1) {
                        feature.unset(deletedAttributes[i]);
                   }
                    map.getOverlays().clear();
                });
                attributeForm.appendChild(saveAttributes);
                this.addOverlay(new ol.Overlay({
                    element: attributeForm,
                    position: coord
                }));
                firstFeature = false;
            }
        }
}On form submission, we grab all the text inputs from the form. We convert them to a regular array and create an attribute object based on some regularities. As we get an ordered array, we first check all the named inputs. If there are no named inputs left, we clearly have only new attributes in the array that come in pairs: one for the name and one for the value. If we are at the end of the list, we can move on and remove the unwanted attributes with OpenLayers 3's unset method. Finally, we set the firstFeature variable to false, ensuring that the function won't check any further features.
If you save the example and load it up, you will see the new attribute management interface at work:
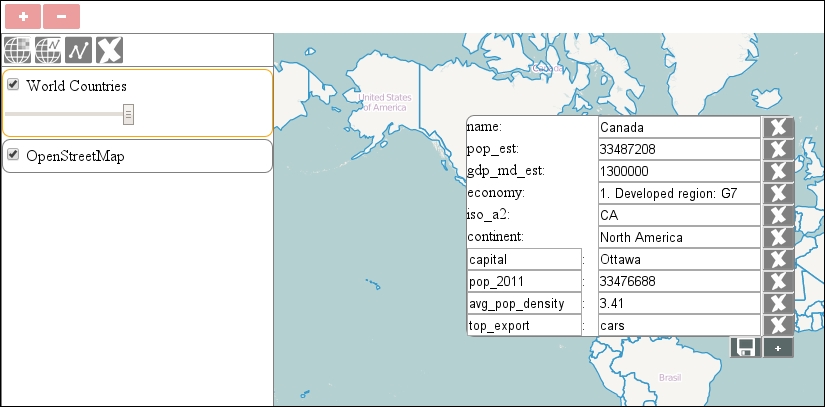
Feeling the power of modifying attributes as you like? This is one of the perks of object-oriented data management. As most of the ASCII formats used by web mapping libraries store their data as independent objects, and JavaScript is a purely object-oriented language, supporting this schema is a necessity in a WebGIS application.