Table of Contents for
Mastering OpenLayers 3
 Mastering OpenLayers 3
Published by
Packt Publishing, 2016
Mastering OpenLayers 3
Published by
Packt Publishing, 2016
- Cover
- Table of Contents
- Mastering OpenLayers 3
- Mastering OpenLayers 3
- Credits
- About the Author
- About the Reviewer
- www.PacktPub.com
- Preface
- What you need for this book
- Who this book is for
- Conventions
- Reader feedback
- Customer support
- 1. Creating Simple Maps with OpenLayers 3
- Structure of OpenLayers 3
- Building the layout
- Using the API documentation
- Debugging the code
- Summary
- 2. Applying Custom Styles
- Customizing the default appearance
- Styling vector layers
- Customizing the appearance with JavaScript
- Creating a WebGIS client layout
- Summary
- 3. Working with Layers
- Building a layer tree
- Adding layers dynamically
- Adding vector layers with the File API
- Adding vector layers with a library
- Removing layers dynamically
- Changing layer attributes
- Changing the layer order with the Drag and Drop API
- Clearing the message bar
- Summary
- 4. Using Vector Data
- Accessing attributes
- Setting attributes
- Validating attributes
- Creating thematic layers
- Saving vector data
- Saving with WFS-T
- Modifying the geometry
- Summary
- 5. Creating Responsive Applications with Interactions and Controls
- Building the toolbar
- Mapping interactions to controls
- Building a set of feature selection controls
- Adding new vector layers
- Building a set of drawing tools
- Modifying and snapping to features
- Creating new interactions
- Building a measuring control
- Summary
- 6. Controlling the Map – View and Projection
- Customizing a view
- Constraining a view
- Creating a navigation history
- Working with extents
- Rotating a view
- Changing the map's projection
- Creating custom animations
- Summary
- 7. Mastering Renderers
- Using different renderers
- Creating a WebGL map
- Drawing lines and polygons with WebGL
- Blending layers
- Clipping layers
- Exporting a map
- Creating a raster calculator
- Creating a convolution matrix
- Clipping a layer with WebGL
- Summary
- 8. OpenLayers 3 for Mobile
- Responsive styling with CSS
- Generating geocaches
- Adding device-dependent controls
- Vectorizing the mobile version
- Making the mobile application interactive
- Summary
- 9. Tools of the Trade – Integrating Third-Party Applications
- Exporting a QGIS project
- Importing shapefiles
- Spatial analysis with Turf
- Spatial analysis with JSTS
- 3D rendering with Cesium
- Summary
- 10. Compiling Custom Builds with Closure
- Configuring Node JS
- Compiling OpenLayers 3
- Bundling an application with OpenLayers 3
- Extending OpenLayers 3
- Creating rich documentation with JSDoc
- Summary
- Index
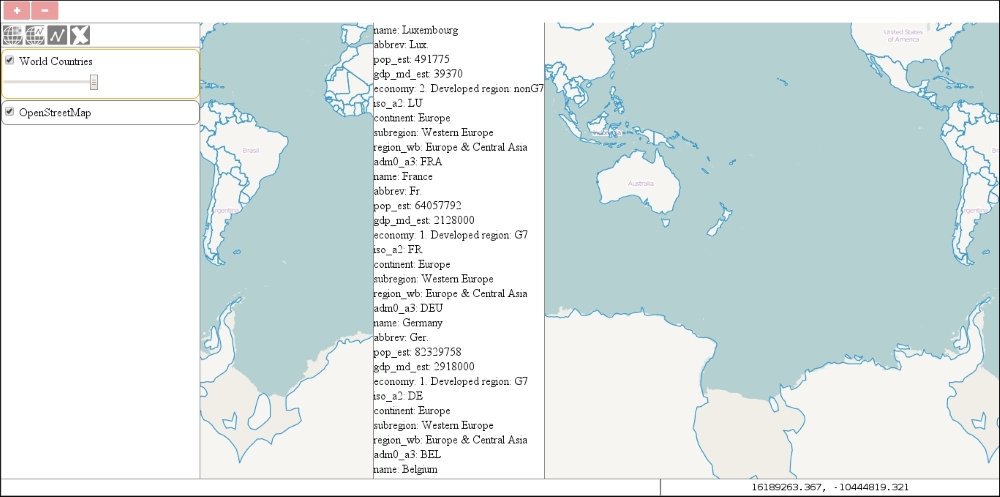
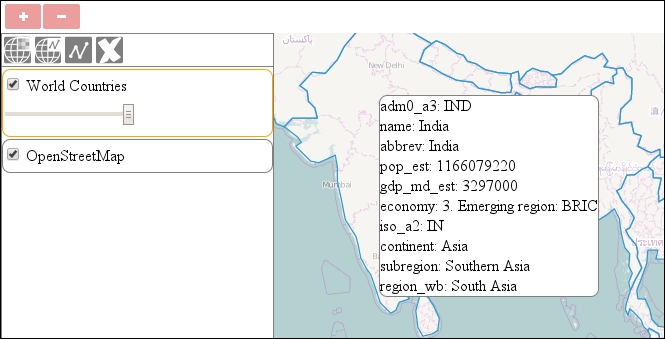
In the first example (ch04_getattribute), we will learn how to access attribute data stored in the features and communicate them to the user. We will use a very particular feature of OpenLayers 3: the overlay. As a first step, we will create some simple rules to be applied on our overlays:
.popup {
    border: 1px solid grey;
    background-color: rgba(255,255,255,1);
    border-radius: .5em;
}For this task, we simply register a click event to our map, querying the underlying vector layers:
map.on('click', function (evt) {
    var pixel = evt.pixel;
    var coord = evt.coordinate;
    var attributeDiv = document.createElement('div');
    attributeDiv.className = 'popup';
    this.getOverlays().clear();
Firstly, we store the pointer's pixel and map coordinate value; then, we create a div element to store our attributes. Next, we clear out the existing overlays, implementing a lazy cancel effect. If the user opens a new overlay, the previous one disappears:
    this.forEachFeatureAtPixel(pixel, function (feature, layer) {
        var attributes = feature.getProperties();
        for (var i in attributes) {
            if (typeof attributes[i] !== 'object') {
                var attributeSpan = document.createElement('span');
                attributeSpan.textContent = i + ': ' + attributes[i];
                attributeDiv.appendChild(attributeSpan);
                attributeDiv.appendChild(document.createElement('br'));
            }
        }
        if (attributeDiv.children.length > 0) {
            this.addOverlay(new ol.Overlay({
                element: attributeDiv,
                position: coord
            }));
        }
    }, map, function (layerCandidate) {
        if (this.selectedLayer !== null && layerCandidate.get('id') === this.selectedLayer.id) {
            return true;
        }
        return false;
    }, tree);
});
Tip
The geometry of a feature is stored as a property; therefore, the getProperties method returns it. It can also return style objects related to a given feature. To avoid falsely mapping out these objects, you can type check every attribute if it is a primitive value with the JavaScript's typeof operator.
Next, we use the map's forEachFeatureAtPixel method to query the vector layers under a given pixel. The method is not an easy one; it requires five parameters from which two are functions. In order to have a better understanding in the method, you can set some break points in the method using the developer tools of your browser.
Note
The method's syntax is forEachFeatureAtPixel(pixel, callback, this for callback, layer filter, this for layer filter). It calls the layer filter function on all visible layers. If the filter function returns true, it queries the layer for features at the given pixel. Finally, it returns all the matched features and applies the callback function on them one by one.
In our callback function, we query the feature's attributes. Next, we iterate through its attributes object and append the attributes to our container element. If we have at least one attribute in our container in the end, we display it as an overlay. For the callback function, we specify this as the map object.
Next, we create our layer filter. As we only want to get features from the selected layer in the layer tree, we simply query every layer candidate against the layer tree's selectedLayer property. To make things more simple, we specify our layer tree object as the function's context. If you save the code and load the example, you can query features for their attributes. Don't forget to select the vector layer first:
The only drawback of this method is that you can select multiple features if they are under the same pixel. How many features can you select at once?