Table of Contents for
Mastering OpenLayers 3
 Mastering OpenLayers 3
Published by
Packt Publishing, 2016
Mastering OpenLayers 3
Published by
Packt Publishing, 2016
- Cover
- Table of Contents
- Mastering OpenLayers 3
- Mastering OpenLayers 3
- Credits
- About the Author
- About the Reviewer
- www.PacktPub.com
- Preface
- What you need for this book
- Who this book is for
- Conventions
- Reader feedback
- Customer support
- 1. Creating Simple Maps with OpenLayers 3
- Structure of OpenLayers 3
- Building the layout
- Using the API documentation
- Debugging the code
- Summary
- 2. Applying Custom Styles
- Customizing the default appearance
- Styling vector layers
- Customizing the appearance with JavaScript
- Creating a WebGIS client layout
- Summary
- 3. Working with Layers
- Building a layer tree
- Adding layers dynamically
- Adding vector layers with the File API
- Adding vector layers with a library
- Removing layers dynamically
- Changing layer attributes
- Changing the layer order with the Drag and Drop API
- Clearing the message bar
- Summary
- 4. Using Vector Data
- Accessing attributes
- Setting attributes
- Validating attributes
- Creating thematic layers
- Saving vector data
- Saving with WFS-T
- Modifying the geometry
- Summary
- 5. Creating Responsive Applications with Interactions and Controls
- Building the toolbar
- Mapping interactions to controls
- Building a set of feature selection controls
- Adding new vector layers
- Building a set of drawing tools
- Modifying and snapping to features
- Creating new interactions
- Building a measuring control
- Summary
- 6. Controlling the Map – View and Projection
- Customizing a view
- Constraining a view
- Creating a navigation history
- Working with extents
- Rotating a view
- Changing the map's projection
- Creating custom animations
- Summary
- 7. Mastering Renderers
- Using different renderers
- Creating a WebGL map
- Drawing lines and polygons with WebGL
- Blending layers
- Clipping layers
- Exporting a map
- Creating a raster calculator
- Creating a convolution matrix
- Clipping a layer with WebGL
- Summary
- 8. OpenLayers 3 for Mobile
- Responsive styling with CSS
- Generating geocaches
- Adding device-dependent controls
- Vectorizing the mobile version
- Making the mobile application interactive
- Summary
- 9. Tools of the Trade – Integrating Third-Party Applications
- Exporting a QGIS project
- Importing shapefiles
- Spatial analysis with Turf
- Spatial analysis with JSTS
- 3D rendering with Cesium
- Summary
- 10. Compiling Custom Builds with Closure
- Configuring Node JS
- Compiling OpenLayers 3
- Bundling an application with OpenLayers 3
- Extending OpenLayers 3
- Creating rich documentation with JSDoc
- Summary
- Index
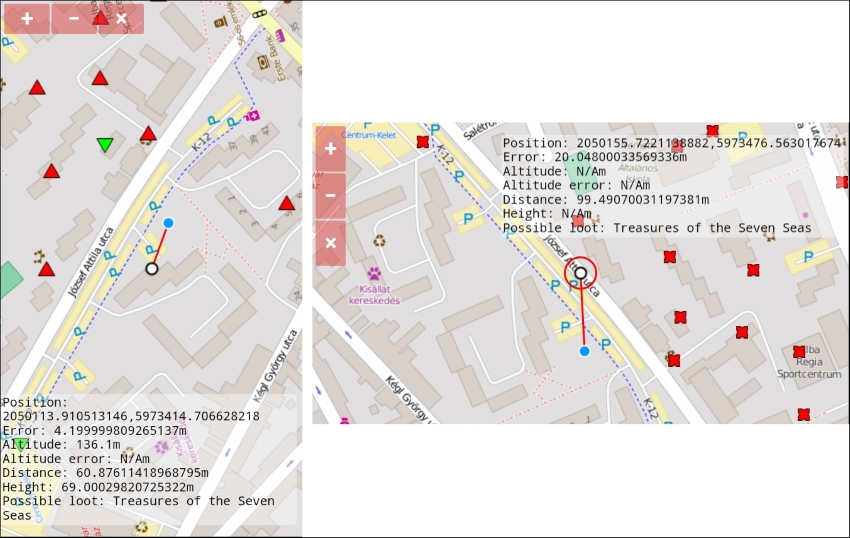
In the final example, called ch08_interact, we extend the touch device part of our application and make it more interactive. We want to know our heading when we search for geocaches. Furthermore, it would be a nice feature if our application could give some extra information about a given cache that we could select manually.
Firstly, we extend our listener on the Geolocation object's change event with some necessary modifications. As we would like to track our position and heading, we modify our map's view on every change:
geoloc.on('change', function (evt) {
        […]
        map.getView().setCenter(this.getPosition());
        if (this.getHeading()) {
            map.getView().setRotation(this.getHeading());
        }
Tip
Just like an altitude value, heading is also a GPS-only feature. As receiving a heading is not guaranteed, you should always put the code responsible for rotating the map in an if clause. You can provide the heading to the map's view directly, as it is already in radians that are measured clockwise from north.
Next, we check whether we have a selected feature. Don't worry about the selectInteraction object; we will add it to the map just after this part. If we have a selected cache, we grab its coordinates. As our caches have a Z coordinate, we can calculate an elevation delta from it and also our position's altitude data. However, we cannot create a geometry with coordinates having different strides. To solve this problem, we simply remove the Z coordinate from our cache's position after we calculate the height difference:
        if (selectInteraction.getFeatures().getLength() === 1) {
            var selectedFeat = selectInteraction.getFeatures().item(0);
            var selectedCoords = selectedFeat.getGeometry().getCoordinates();
            var height = selectedCoords[2] - this.getAltitude();
            selectedCoords.pop();
Now, we are ready to create a new line between our position and the selected cache, representing the as-the-crow-flies distance between the two locations. We don't have to worry about the styling of our new feature, as we symbolize everything other than a point with a red line:
            positionSrc.addFeature(new ol.Feature({
                geometry: new ol.geom.LineString([evt.target.getPosition(), selectedCoords])
            }));
Next, we give some more feedback about the cache by extending our output with some new lines. We display the distance between the two locations, the height difference, and the possible loot of the given cache. If we can't get an altitude value, we change the resulting NaN to N/A for added consistency:
            var extDataString = '\nDistance: ' + positionSrc.getFeatures()[2].getGeometry().getLength() + 'm\nHeight: ' + height + 'm\nPossible loot: ' + selectedFeat.get('loot');
            geolocData.textContent += extDataString.replace(/NaN/g, 'N/A');
        }
    });
Finally, we add a select interaction to our map, so we can select arbitrary caches from the cache layer:
    var selectInteraction = new ol.interaction.Select({
        layers: [geoCaching]
    });
    map.addInteraction(selectInteraction);
If you save and load up the code, you will be able to select caches and get some information about them: