Table of Contents for
Mastering OpenLayers 3
 Mastering OpenLayers 3
Published by
Packt Publishing, 2016
Mastering OpenLayers 3
Published by
Packt Publishing, 2016
- Cover
- Table of Contents
- Mastering OpenLayers 3
- Mastering OpenLayers 3
- Credits
- About the Author
- About the Reviewer
- www.PacktPub.com
- Preface
- What you need for this book
- Who this book is for
- Conventions
- Reader feedback
- Customer support
- 1. Creating Simple Maps with OpenLayers 3
- Structure of OpenLayers 3
- Building the layout
- Using the API documentation
- Debugging the code
- Summary
- 2. Applying Custom Styles
- Customizing the default appearance
- Styling vector layers
- Customizing the appearance with JavaScript
- Creating a WebGIS client layout
- Summary
- 3. Working with Layers
- Building a layer tree
- Adding layers dynamically
- Adding vector layers with the File API
- Adding vector layers with a library
- Removing layers dynamically
- Changing layer attributes
- Changing the layer order with the Drag and Drop API
- Clearing the message bar
- Summary
- 4. Using Vector Data
- Accessing attributes
- Setting attributes
- Validating attributes
- Creating thematic layers
- Saving vector data
- Saving with WFS-T
- Modifying the geometry
- Summary
- 5. Creating Responsive Applications with Interactions and Controls
- Building the toolbar
- Mapping interactions to controls
- Building a set of feature selection controls
- Adding new vector layers
- Building a set of drawing tools
- Modifying and snapping to features
- Creating new interactions
- Building a measuring control
- Summary
- 6. Controlling the Map – View and Projection
- Customizing a view
- Constraining a view
- Creating a navigation history
- Working with extents
- Rotating a view
- Changing the map's projection
- Creating custom animations
- Summary
- 7. Mastering Renderers
- Using different renderers
- Creating a WebGL map
- Drawing lines and polygons with WebGL
- Blending layers
- Clipping layers
- Exporting a map
- Creating a raster calculator
- Creating a convolution matrix
- Clipping a layer with WebGL
- Summary
- 8. OpenLayers 3 for Mobile
- Responsive styling with CSS
- Generating geocaches
- Adding device-dependent controls
- Vectorizing the mobile version
- Making the mobile application interactive
- Summary
- 9. Tools of the Trade – Integrating Third-Party Applications
- Exporting a QGIS project
- Importing shapefiles
- Spatial analysis with Turf
- Spatial analysis with JSTS
- 3D rendering with Cesium
- Summary
- 10. Compiling Custom Builds with Closure
- Configuring Node JS
- Compiling OpenLayers 3
- Bundling an application with OpenLayers 3
- Extending OpenLayers 3
- Creating rich documentation with JSDoc
- Summary
- Index
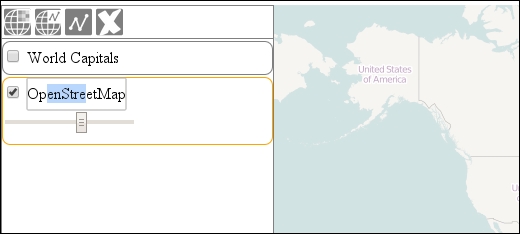
We've almost reached the state of a fully operational layer tree. The next step in the process is to add the capabilities of changing layer attributes. In this example, we will make sure that we can change any layer's visibility, opacity, and its name from the GUI. The example files are named ch03_attributes. As we are only adding further parts to the layer element, we mostly have to extend our createRegistry method.
In our concept, only active layers can be modified. With this consideration, only the active layer element's options are exposed. The other layers will have the same nice, uniform height that shows only the layer's name and the visibility checkbox. We can easily implement this behavior with CSS:
.layercontainer .layer.active {
    border-color: orange;
    min-height: 2em;
    height: auto;
}
.layer div {
    display: none;
}
.layer.active div {
    display: block;
}Now that the styling of the elements is complete, we can create logic to manage the layer attributes. First, we add some listeners to the layer's name element so that we can change it by double-clicking on it:
this.createRegistry = function (layer, buffer) {
    […]
    layerSpan.addEventListener('dblclick', function () {
        this.contentEditable = true;
        layerDiv.classList.remove('ol-unselectable');
        this.focus();
    });
    layerSpan.addEventListener('blur', function () {
        if (this.contentEditable) {
            this.contentEditable = false;
            layer.set('name', this.textContent);
            layerDiv.classList.add('ol-unselectable');
            layerDiv.title = this.textContent;
            this.scrollTo(0, 0);
        }
    });
If we double-click on the layer name, our code changes its content to be editable, makes it selectable (otherwise, the editable attribute just wouldn't work on some browsers), and gives focus to it. If the element loses focus (the blur event), we restore the element's original status and update everything with the layer's new name. In the last step, we scroll to the start of the text as Firefox won't do it automatically.
Tip
Making an element's content editable is an easy solution, but it is not stable (add some line breaks to the layer name and see for yourself). As a more stable solution, you can add a hidden text input to the element, make it visible when it's double-clicked, bind it to the layer name and layer object correctly, and make it disappear on losing focus.
Next, we create a checkbox that controls the visibility of the layer. We control the top of it with CSS, and then bind it to the layer. We also gather its initial value from the layer object (luckily, both of them operate with Booleans):
    var visibleBox = document.createElement('input');
    visibleBox.type = 'checkbox';
    visibleBox.className = 'visible';
    visibleBox.checked = layer.getVisible();
    visibleBox.addEventListener('change', function () {
        if (this.checked) {
            layer.setVisible(true);
        } else {
            layer.setVisible(false);
        }
    });
    layerDiv.appendChild(this.stopPropagationOnEvent(visibleBox, 'click'));
    […]
With the layer object given to the method, we only have to toggle its visibility based on the status of the checkbox. However, we are faced with a new issue. If we click on the checkbox, we trigger the selection event, making our code select the checkbox and messing up our entire logic. To prevent this behavior, we create a stopPropagationOnEvent utility method, which has a quite meaningful name:
layerTree.prototype.stopPropagationOnEvent = function (node, event) {
    node.addEventListener(event, function (evt) {
        evt.stopPropagation();
    });
    return node;
};
In the last step, we return to the createRegistry method and define a slider, which we use to control the layer's opacity. We create a div element to store future controls and make sure that we can't deselect a layer by clicking on it. Next, we append the slider to it. Its initial value depends on the layer's current opacity, and it has a direct binding to the layer. Similar to the checkbox, we have to stop the slider from propagating, too:
    var layerControls = document.createElement('div');
    this.addSelectEvent(layerControls, true);
    var opacityHandler = document.createElement('input');
    opacityHandler.type = 'range';
    opacityHandler.min = 0;
    opacityHandler.max = 1;
    opacityHandler.step = 0.1;
    opacityHandler.value = layer.getOpacity();
    opacityHandler.addEventListener('input', function () {
        layer.setOpacity(this.value);
    });
    opacityHandler.addEventListener('change', function () {
        layer.setOpacity(this.value);
    });
    layerControls.appendChild(this.stopPropagationOnEvent(opacityHandler, 'click'));
    layerDiv.appendChild(layerControls);
    […]
};If you save the code and load the example, you will see the attribute controls working. If you want to map other attributes to the GUI, you can easily do so by creating elements for them and appending them to layerControls: