Table of Contents for
Mastering OpenLayers 3
 Mastering OpenLayers 3
Published by
Packt Publishing, 2016
Mastering OpenLayers 3
Published by
Packt Publishing, 2016
- Cover
- Table of Contents
- Mastering OpenLayers 3
- Mastering OpenLayers 3
- Credits
- About the Author
- About the Reviewer
- www.PacktPub.com
- Preface
- What you need for this book
- Who this book is for
- Conventions
- Reader feedback
- Customer support
- 1. Creating Simple Maps with OpenLayers 3
- Structure of OpenLayers 3
- Building the layout
- Using the API documentation
- Debugging the code
- Summary
- 2. Applying Custom Styles
- Customizing the default appearance
- Styling vector layers
- Customizing the appearance with JavaScript
- Creating a WebGIS client layout
- Summary
- 3. Working with Layers
- Building a layer tree
- Adding layers dynamically
- Adding vector layers with the File API
- Adding vector layers with a library
- Removing layers dynamically
- Changing layer attributes
- Changing the layer order with the Drag and Drop API
- Clearing the message bar
- Summary
- 4. Using Vector Data
- Accessing attributes
- Setting attributes
- Validating attributes
- Creating thematic layers
- Saving vector data
- Saving with WFS-T
- Modifying the geometry
- Summary
- 5. Creating Responsive Applications with Interactions and Controls
- Building the toolbar
- Mapping interactions to controls
- Building a set of feature selection controls
- Adding new vector layers
- Building a set of drawing tools
- Modifying and snapping to features
- Creating new interactions
- Building a measuring control
- Summary
- 6. Controlling the Map – View and Projection
- Customizing a view
- Constraining a view
- Creating a navigation history
- Working with extents
- Rotating a view
- Changing the map's projection
- Creating custom animations
- Summary
- 7. Mastering Renderers
- Using different renderers
- Creating a WebGL map
- Drawing lines and polygons with WebGL
- Blending layers
- Clipping layers
- Exporting a map
- Creating a raster calculator
- Creating a convolution matrix
- Clipping a layer with WebGL
- Summary
- 8. OpenLayers 3 for Mobile
- Responsive styling with CSS
- Generating geocaches
- Adding device-dependent controls
- Vectorizing the mobile version
- Making the mobile application interactive
- Summary
- 9. Tools of the Trade – Integrating Third-Party Applications
- Exporting a QGIS project
- Importing shapefiles
- Spatial analysis with Turf
- Spatial analysis with JSTS
- 3D rendering with Cesium
- Summary
- 10. Compiling Custom Builds with Closure
- Configuring Node JS
- Compiling OpenLayers 3
- Bundling an application with OpenLayers 3
- Extending OpenLayers 3
- Creating rich documentation with JSDoc
- Summary
- Index
Now, as we know how to build custom libraries, let's take a step forward and learn how to compile our application with OpenLayers 3. This process has two steps. First, we have to edit our application as it has to be compatible with the Closure Compiler. Next, we have to create a custom configuration file, which can create a library with just the features that our application needs.
To make our application Closure-compatible, we have to make two modifications to it. You can either make these modifications in the JavaScript file of the previous example, called ch10_geocaching.js, or open the provided modified file to check the result. The modified version is called ch10_geocaching_reworked.js. First, we have to provide a namespace for our application. In this example, that namespace will be geocaching. Next, we provide that namespace to the Closure Compiler using the Closure Library:
goog.provide('geocaching');
Next, we build the dependencies of the application using the Closure Library. Similar to the previous syntax, we will also require some symbols. These dependencies will be parsed and resolved by the Closure Compiler:
goog.require('ol.Map');
goog.require('ol.layer.Tile');
goog.require('ol.source.OSM');
goog.require('ol.control.Zoom');
goog.require('ol.View');
goog.require('ol.Geolocation');
goog.require('ol.layer.Vector');
goog.require('ol.source.Vector');
goog.require('ol.Feature');
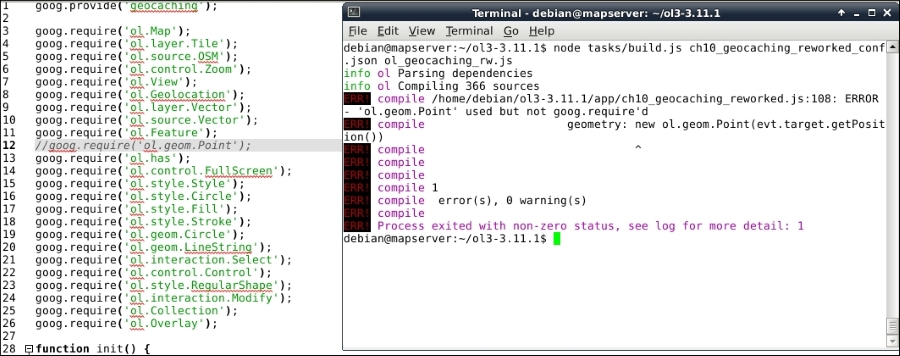
goog.require('ol.geom.Point');
goog.require('ol.has');
goog.require('ol.control.FullScreen');
goog.require('ol.style.Style');
goog.require('ol.style.Circle');
goog.require('ol.style.Fill');
goog.require('ol.style.Stroke');
goog.require('ol.geom.Circle');
goog.require('ol.geom.LineString');
goog.require('ol.interaction.Select');
goog.require('ol.control.Control');
goog.require('ol.style.RegularShape');
goog.require('ol.interaction.Modify');
goog.require('ol.Collection');
goog.require('ol.Overlay');As we can see, the number of dependencies are lower than the number of exports from the previous example. As we wouldn't like to export anything now, we only have to provide the constructors that our application uses. The methods of these constructors get included automatically if they are used. Finally, let's add the main parts of our application to the provided geocaching namespace:
 function init() {
    document.removeEventListener('DOMContentLoaded', init);
    geocaching.map = new ol.Map({
        […]
    });
    var map = geocaching.map;
    geocaching.geoloc = new ol.Geolocation({
        […]
    });
    var geoloc = geocaching.geoloc;
    geocaching.geoCaching = new ol.layer.Vector({
        source: new ol.source.Vector()
    });
var geoCaching = geocaching.geoCaching;The only thing left is building a new configuration file for our application. First, create a folder, called app, in the source code's directory. Next, move the modified JavaScript file (ch10_geocaching_reworked.js) to this folder. If you look at the examples, you will see a file named ch10_geocaching_reworked_conf.json. This will be our new configuration file, which we will discuss in the following lines. You can either create your own or use this file. The first thing we can see in the modified configuration file is the new src parameter. If we override the default parameter with our own array, we have to provide the two default values. Additionally, we provide the path to our application:
{
  "src": [
    "src/**/*.js",
    "build/ol.ext/**/*.js",
    "app/**/*.js"
  ],
The next change we can notice is that the exports parameter is an empty array. That's right: we do not export any symbol, just make a big compiled JavaScript application:
"exports": [],
We did not discuss the compile parameter before, but as we have to change the parameters of the Closure Compiler, we should do it now. First of all, there is a new parameter called closure_entry_point. It defines the namespace and whether the Closure Compiler should resolve the dependencies recursively. The goog.provide function must be called on it:
  "compile": {
    "closure_entry_point": "geocaching",
There are some slight changes in the defines property. This property contains every variable that can be changed at the time of compilation. These are some of the configuration options built in the library. As we compile a mobile application with a Canvas renderer, we do not need WebGL or DOM support:
    "define": [
      "goog.array.ASSUME_NATIVE_FUNCTIONS=true",
      "goog.dom.ASSUME_STANDARDS_MODE=true",
      "goog.json.USE_NATIVE_JSON=true",
      "goog.DEBUG=false",
      "ol.ENABLE_DOM=false",
      "ol.ENABLE_WEBGL=false"
],Next, you will notice quite an extensive list of values under the jscomp_warning, jscomp_error and jscomp_off parameters. These important parameters instruct the compiler on whether it should throw an error for various check types. As we did not make any effort to structure our application in the Closure syntax, we define most of the checks as warnings. Closure will only throw an error if we do not require or provide appropriate classes. Furthermore, we will disable the error checks that are disabled in the default configuration file:
    "jscomp_warning": [
      "accessControls",
      "ambiguousFunctionDecl",
      "checkEventfulObjectDisposal",
      "checkRegExp",
      "checkTypes",
      "checkVars",
      "const",
      […]
    ],
    "jscomp_error": [
      "missingRequire",
      "missingProvide"
    ],
    "jscomp_off": [
      "useOfGoogBase",
      "unnecessaryCasts",
      "lintChecks"
    ],
    […]
  }
}
Tip
You can find every valid Closure Compiler parameter on the closure-utils GitHub page at https://github.com/openlayers/closure-util/blob/master/compiler-options.txt.
This way, the Closure Compiler will not run if we've missed out a dependency but specifies it in the error statement. It will also tell us about every other error in our code from the aspect of Closure but compiles the code anyway. As our application worked before the compilation, it will work after it as well. Or won't it? Let's copy the configuration file into the source code's config directory, and make a custom build with the following command:
node tasks/build.js config/ch10_geocaching_reworked_conf.json ol_geocaching_rw.js
If everything is in place, the compiler creates a build with some warnings. Those warnings are the result of the poor structure of our application. However, our new library is only 178 kilobytes, which is great:
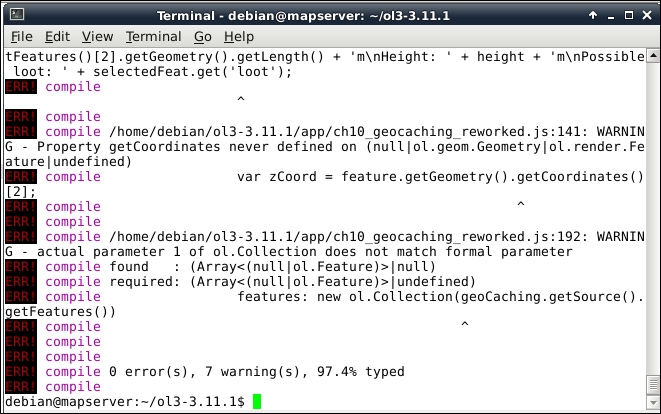
Finally, let's test the application in the example, named ch10_geocaching, by linking the new library in the HTML file. Don't forget to replace the OpenLayers 3 library with our new one, and remove the link to ch10_geocaching.js. As you can see, everything works well, except for the functionalities related to the loot attribute.
So, what could go wrong in our application? Let's put ourselves in a compiler's shoes. It shrinks the library aggressively by replacing every variable in it with a few letter representations. When it comes to the part where we've declared the loot property, it sees the following:
            geoCaching.getSource().addFeature(new ol.Feature({
                […]
                loot: 'Treasures of the Seven Seas'
            }));
It replaces loot with a shorter representation and goes on. When it comes to the part of calling this attribute, it sees the following:
                    saveButton.addEventListener('click', function (evt) {
                        feature.set('loot', lootElem.value);
                        map.removeOverlay(overlay);
                    });
It's also loot, but as a string. The compiler cannot find a shorthand for 'loot'; therefore, it shortens it as another variable. Thus, when we run our application, it declares loot as variable A and calls 'loot' variable B. To fix our application, we simply have to declare loot as a string:
            geoCaching.getSource().addFeature(new ol.Feature({
                […]
                'loot': 'Treasures of the Seven Seas'
            }));
If you recompile the library with the fixed application, you will see that everything works fine. The global scope is filled with some obfuscated functions, but it is also the result of the poor structure of our application.
As the last check, let's take a look at how error handling works in Closure. Modify the application and remove one or more of the dependencies. If you run the compiler, you will see that it does not fill the terminal with warnings, it just throws the errors. This way, you can resolve the missing dependencies quite easily: