Table of Contents for
Kali Linux 2018: Assuring Security by Penetration Testing - Fourth Edition

Version ebook / Retour

Cover image for bash Cookbook, 2nd Edition Kali Linux 2018: Assuring Security by Penetration Testing - Fourth Edition by Shakeel Ali Published by Packt Publishing, 2018
  1. Kali Linux Assuring Security by Penetration Testing, Fourth Edition
  2. Title Page
  3. Copyright and Credits
  4. Kali Linux 2018: Assuring Security by Penetration Testing Fourth Edition
  5. Dedication
  6. Packt Upsell
  7. Why subscribe?
  8. Packt.com
  9. Contributors
  10. About the authors
  11. About the reviewers
  12. Packt is searching for authors like you
  13. Table of Contents
  14. Preface
  15. Who this book is for
  16. What this book covers
  17. To get the most out of this book
  18. Conventions used
  19. Get in touch
  20. Reviews
  21. Installing and Configuring Kali Linux
  22. Technical requirements
  23. Kali Linux tool categories
  24. Downloading Kali Linux
  25. Using Kali Linux
  26. Running Kali using a Live DVD
  27. Installing on a hard disk
  28. Installing Kali on a physical machine
  29. Installing Kali on a virtual machine
  30. Installing Kali on a virtual machine from the ISO image
  31. Installing Kali Linux on a virtual machine using the Kali Linux VM image provided
  32. Saving or moving the virtual machine
  33. Installing Kali on a USB disk
  34. Configuring the virtual machine
  35. VirtualBox guest additions
  36. Setting up networking
  37. Setting up a wired connection
  38. Setting up a wireless connection
  39. Updating Kali Linux
  40. Setting up Kali Linux AMI on Amazon AWS Cloud
  41. Summary
  42. Questions
  43. Further reading
  44. Setting Up Your Test Lab
  45. Technical requirements
  46. Physical or virtual?
  47. Setting up a Windows environment in a VM
  48. Installing vulnerable servers
  49. Setting up Metasploitable 2 in a VM
  50. Setting up Metasploitable 3 in a VM
  51. Installing Packer
  52. Installing Vagrant
  53. Pre-built Metasploit 3
  54. Setting up BadStore in a VM
  55. Installing additional tools in Kali Linux
  56. Network services in Kali Linux
  57. HTTP
  58. MySQL
  59. SSH
  60. Additional labs and resources
  61. Summary
  62. Questions
  63. Further reading
  64. Penetration Testing Methodology
  65. Technical requirements
  66. Penetration testing methodology
  67. OWASP testing guide
  68. PCI penetration testing guide
  69. Penetration Testing Execution Standard
  70. NIST 800-115
  71. Open Source Security Testing Methodology Manual 
  72. General penetration testing framework
  73. Reconnaissance
  74. Scanning and enumeration
  75. Scanning
  76. ARP scanning
  77. The network mapper (Nmap)
  78. Nmap port scanner/TCP scan
  79. Nmap half-open/stealth scan
  80. Nmap OS-detection
  81. Nmap service-detection
  82. Nmap ping sweeps
  83. Enumeration
  84. SMB shares
  85. DNS zone transfer
  86. DNSRecon
  87. SNMP devices
  88. Packet captures
  89. tcpdump
  90. Wireshark
  91. Gaining access
  92. Exploits
  93. Exploits for Linux
  94. Exploits for Windows
  95. Escalating privileges
  96. Maintaining access
  97. Covering your tracks
  98. Reporting
  99. Summary
  100. Footprinting and Information Gathering
  101. Open Source Intelligence
  102. Using public resources
  103. Querying the domain registration information
  104. Analyzing the DNS records
  105. Host
  106. dig
  107. DMitry
  108. Maltego
  109. Getting network routing information
  110. tcptraceroute
  111. tctrace
  112. Utilizing the search engine
  113. SimplyEmail
  114. Google Hacking Database (GHDB)
  115. Metagoofil
  116. Automated footprinting and information gathering tools
  117. Devploit
  118. Red Hawk v2
  119. Using Shodan to find internet connected devices
  120. Search queries in Shodan
  121. Blue-Thunder-IP-Locator
  122. Summary
  123. Questions
  124. Further reading
  125. Scanning and Evasion Techniques
  126. Technical requirements
  127. Starting off with target discovery
  128. Identifying the target machine
  129. ping
  130. fping
  131. hping3
  132. OS fingerprinting
  133. p0f
  134. Introducing port scanning
  135. Understanding TCP/IP protocol
  136. Understanding TCP and UDP message formats
  137. The network scanner
  138. Nmap
  139. Nmap target specification
  140. Nmap TCP scan options
  141. Nmap UDP scan options
  142. Nmap port specification
  143. Nmap output options
  144. Nmap timing options
  145. Useful Nmap options
  146. Service version detection
  147. Operating system detection
  148. Disabling host discovery
  149. Aggressive scan
  150. Nmap for scanning the IPv6 target
  151. The Nmap scripting engine
  152. Nmap options for firewall/IDS evasion
  153. Scanning with Netdiscover
  154. Automated scanning with Striker
  155. Anonymity using Nipe
  156. Summary
  157. Questions
  158. Further Reading
  159. Vulnerability Scanning
  160. Technical requirements
  161. Types of vulnerabilities
  162. Local vulnerability
  163. Remote vulnerability
  164. Vulnerability taxonomy
  165. Automated vulnerability scanning
  166. Vulnerability scanning with Nessus 7
  167. Installing the Nessus vulnerability scanner
  168. Vulnerability scanning with OpenVAS
  169. Linux vulnerability scanning with Lynis
  170. Vulnerability scanning and enumeration using SPARTA
  171. Summary
  172. Questions
  173. Further reading
  174. Social Engineering
  175. Technical requirements
  176. Modeling human psychology
  177. Attack process
  178. Attack methods
  179. Impersonation
  180. Reciprocation
  181. Influential authority
  182. Scarcity
  183. Social relationships
  184. Curiosity
  185. Social Engineering Toolkit
  186. Anonymous USB attack
  187. Credential-harvesting
  188. Malicious Java applet
  189. Summary
  190. Target Exploitation
  191. Vulnerability research
  192. Vulnerability and exploit repositories
  193. Advanced exploitation toolkit
  194. MSFConsole
  195. MSFCLI
  196. Ninja 101 drills
  197. Scenario 1
  198. Scenario 2
  199. SMB usernames
  200. VNC blank authentication scanners
  201. PostGRESQL logins
  202. Scenario 3
  203. Bind shells
  204. Reverse shells
  205. Meterpreters
  206. Writing exploit modules
  207. Summary
  208. Privilege Escalation and Maintaining Access
  209. Technical requirements
  210. Privilege-escalation
  211. Local escalation
  212. Password-attack tools
  213. Offline attack tools
  214. John the Ripper
  215. Ophcrack
  216. samdump2
  217. Online attack tools
  218. CeWL
  219. Hydra
  220. Mimikatz
  221. Maintaining access
  222. Operating-system backdoors
  223. Cymothoa
  224. The Meterpreter backdoor
  225. Summary
  226. Web Application Testing
  227. Technical requirements
  228. Web analysis
  229. Nikto
  230. OWASP ZAP
  231. Burp Suite
  232. Paros proxy
  233. W3AF
  234. WebScarab
  235. Cross-Site Scripting
  236. Testing for XSS
  237. SQL injection
  238. Manual SQL injection
  239. Automated SQL injection
  240. sqlmap
  241. Command-execution, directory-traversal, and file-inclusion
  242. Directory-traversal and file-inclusion
  243. Command execution
  244. Summary
  245. Further reading
  246. Wireless Penetration Testing
  247. Technical requirements
  248. Wireless networking
  249. Overview of 802.11
  250. The Wired Equivalent Privacy standard
  251. Wi-Fi Protected Access (WPA)
  252. Wireless network reconnaissance
  253. Antennas
  254. Iwlist
  255. Kismet
  256. WAIDPS
  257. Wireless testing tools
  258. Aircrack-ng
  259. WPA pre-shared key-cracking
  260. WEP-cracking
  261. PixieWPS
  262. Wifite
  263. Fern Wifi-Cracker
  264. Evil Twin attack
  265. Post cracking
  266. MAC-spoofing
  267. Persistence
  268. Sniffing wireless traffic
  269. Sniffing WLAN traffic
  270. Passive sniffing
  271. Summary
  272. Mobile Penetration Testing with Kali NetHunter
  273. Technical requirements
  274. Kali NetHunter
  275. Deployment
  276. Network deployment
  277. Wireless deployment
  278. Host deployment
  279. Installing Kali NetHunter
  280. NetHunter icons
  281. NetHunter tools
  282. Nmap
  283. Metasploit
  284. MAC changer
  285. Third-party Android applications
  286. The NetHunter Terminal Application
  287. DriveDroid
  288. USB Keyboard
  289. Shodan
  290. Router Keygen
  291. cSploit
  292. Wireless attacks
  293. Wireless scanning
  294. WPA/WPA2 cracking
  295. WPS cracking
  296. Evil AP attack
  297. Mana evil AP
  298. HID attacks
  299. DuckHunter HID attacks
  300. Summary
  301. Questions
  302. Further reading
  303. PCI DSS Scanning and Penetration Testing
  304. PCI DSS v3.2.1 requirement 11.3
  305. Scoping the PCI DSS penetration test
  306. Gathering client requirements
  307. Creating the customer requirements form
  308. Preparing the test plan
  309. The test plan checklist
  310. Profiling test boundaries
  311. Defining business objectives
  312. Project management and scheduling
  313. Tools for executing the PCI DSS penetration test
  314. Summary
  315. Questions
  316. Further reading
  317. Tools for Penetration Testing Reporting
  318. Technical requirements
  319. Documentation and results verification
  320. Types of reports
  321. The executive report
  322. The management report
  323. The technical report
  324. Network penetration testing report
  325. Preparing your presentation
  326. Post-testing procedures
  327. Using the Dradis framework for penetration testing reporting
  328. Penetration testing reporting tools
  329. Faraday IDE
  330. MagicTree
  331. Summary
  332. Questions
  333. Further reading
  334. Assessments
  335. Chapter 1 – Assessment answers
  336. Chapter 2 – Assessment answers
  337. Chapter 4 – Assessment answers
  338. Chapter 5 – Assessment answers
  339. Chapter 6 – Assessment answers
  340. Chapter 12 – Assessment answers
  341. Chapter 13 – Assessment answers
  342. Chapter 14 – Assessment answers
  343. Other Books You May Enjoy
  344. Leave a review - let other readers know what you think

Setting up Kali Linux AMI on Amazon AWS Cloud

Kali Linux can also be set up in the cloud as an Amazon Machine Image (AMI) in the Amazon Web Services platform, as a cloud computing service. Although listed with a cost of $0.046 per hour, it can be used for free if specifically configured as a basic service with the user not exceeding certain set limits. Although a credit card is required for sign-up and configuration, you will be notified before you are charged, should said limits be crossed.

Before we begin setting up Kali Linux in the cloud, you can first visit the Amazon Marketplace to view the details of the AMI at this link: https://aws.amazon.com/marketplace/pp/B01M26MMTT. Notice that it is listed as Free Tier.

To begin our setup and to configure Kali Linux in the cloud, we must perform the following steps:

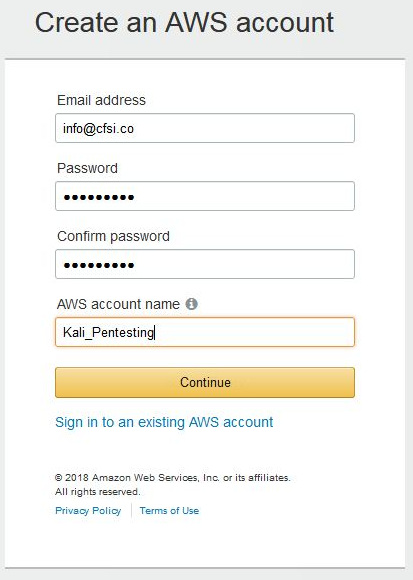
  1. First, create an account at Amazon's AWS portal. Visit https://aws.amazon.com/ and click on Create a new account. Be sure to remember the credentials used as well as the AWA Name you created, as seen in the screenshot:
  1. After clicking on Continue, complete the additional required details. When entering your credit card details, you may be prompted to have Amazon call you and have you enter a code for verification and security purposes. Once completed, you will be greeted with the AWS Console.
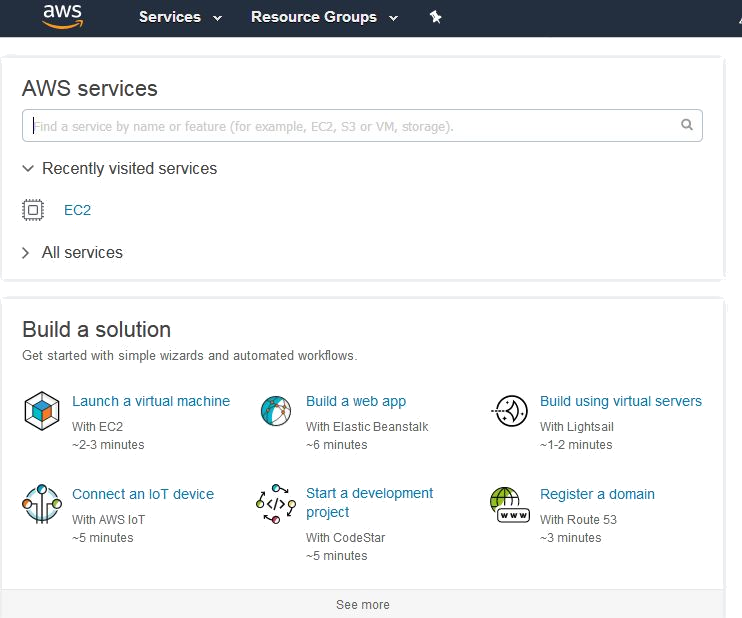
  1. You should also receive an email notification informing you that your account has been successfully created. You may now log in to the AWS console where you will be able to complete your configuration. Under the Build a solution section, click on Launch a virtual machine:
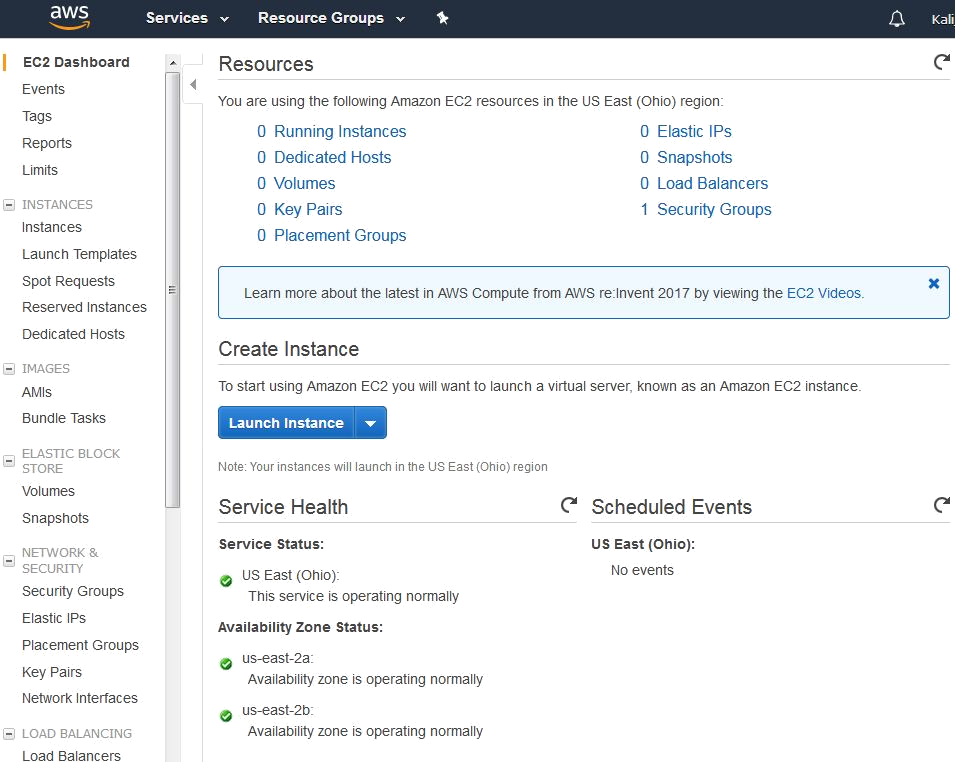
  1. Within the EC2 Dashboard of the AWS Console, on the left pane, click on Key pairs under the Network & Security category:

Next, click on Create Key Pair.

When prompted, type a name for your key pair. It is recommended that you choose a name and location that are easy to remember as you will need this Key Pair for authentication and verification:

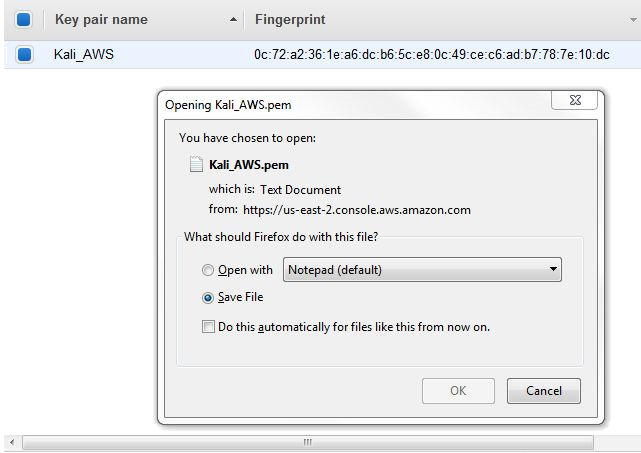
Save your Key Pair to a destination of your choice. Note that the key pair extension is listed as .pem and it also has a digital fingerprint in hexadecimal format, as seen here:

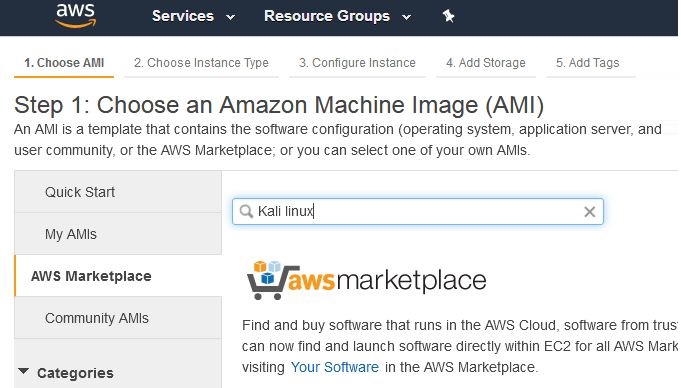
Once your key pair has been saved, return to the AWS console and click on Resource Groups at the top of the console and then choose Launch a Virtual Machine. In the menu at the left of the console, click on AWS Marketplace and enter Kali Linux in the search bar as seen here:

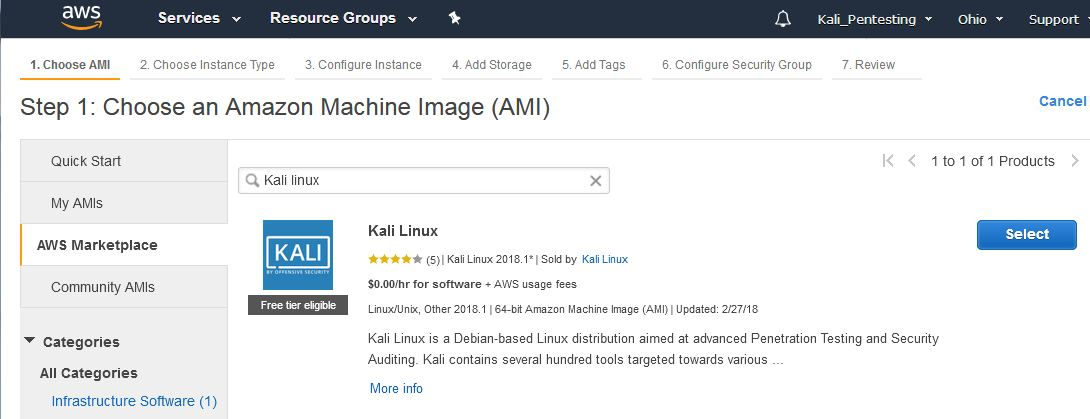
There is currently only once instance of a Kali Linux AMI in the marketplace. Notice that it is listed as Free tier eligible under the Kali logo. Click on Select to use this AMI:

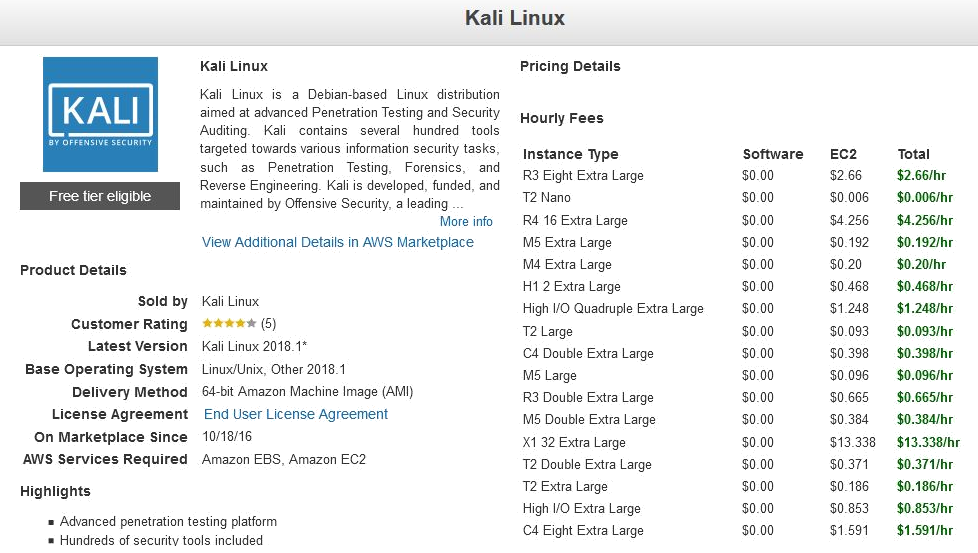
This brings us to the pricing details of the various Instance Types for AMIs, which package the specifications such as memory and processor usage available to the AMI, with T2 Nano having the lowest hourly rate of $0.006/hr. Once finished viewing the Instance Types, scroll to the bottom of the page and click on Continue:

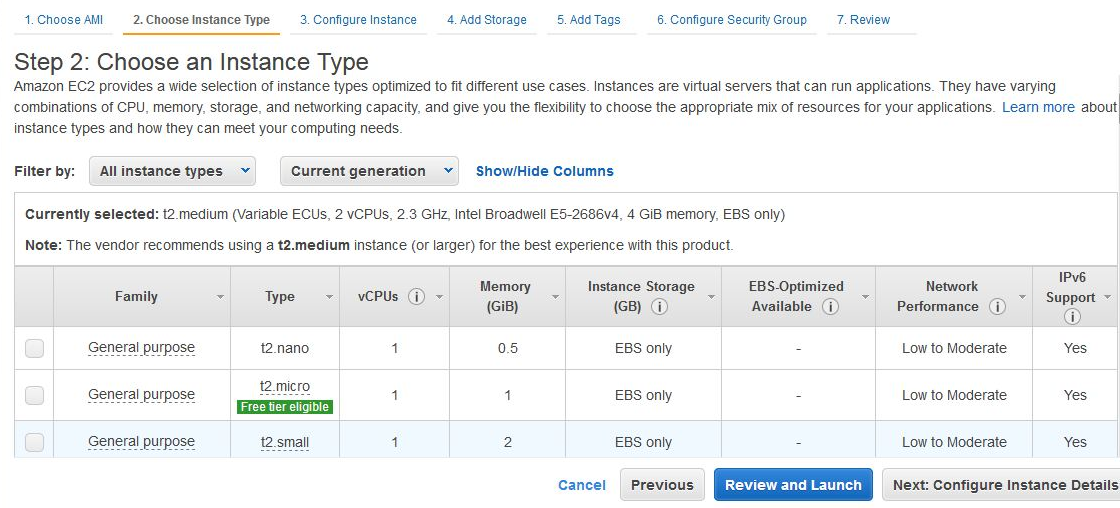
For the free version, select the t2 micro type as this is for general purpose use and is eligible for the Free Tier:

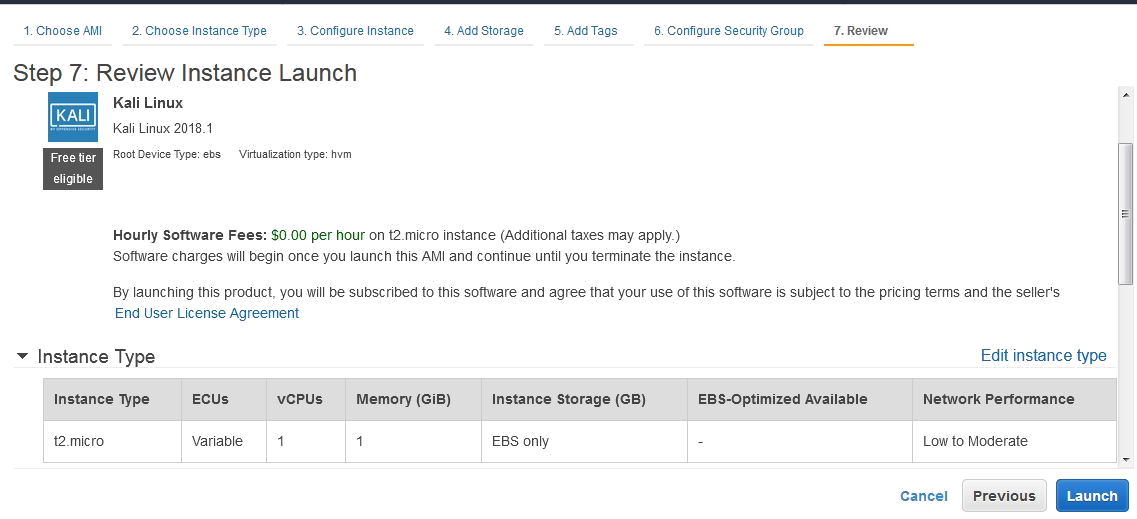
Click on the Review and Launch button. Confirm that the Instance Type chosen is t2.micro and click on Launch:

You should now be prompted to use your previously saved key pair. In the first drop-menu, select Choose and existing key pair. In the Select a key pair menu, browse to the location of your saved key pair. Click on the checkbox to acknowledge the terms and then lastly click on Launch Instances.

You should now be notified of the Launch Status of the Kali Linux AMI. You can also create billing alerts in the event that you exceed AWS's Free Tier usage:

Scroll down and click on View Usage Instructions:

Return to the Launch Status page and click on Open Your Software on AWS Marketplace. In the Software Subscriptions and AMI tab, click on View Instances.

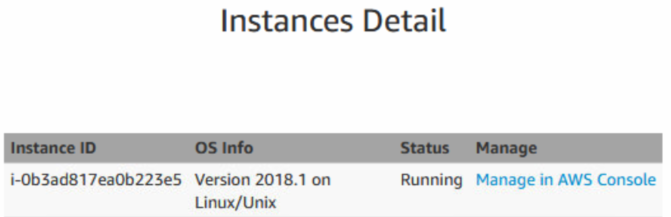
This presents a pop-up box displaying the details of the instance including the ID, OS Info, and Status. Click on Manage in the AWS Console:

Click on the Connect button:

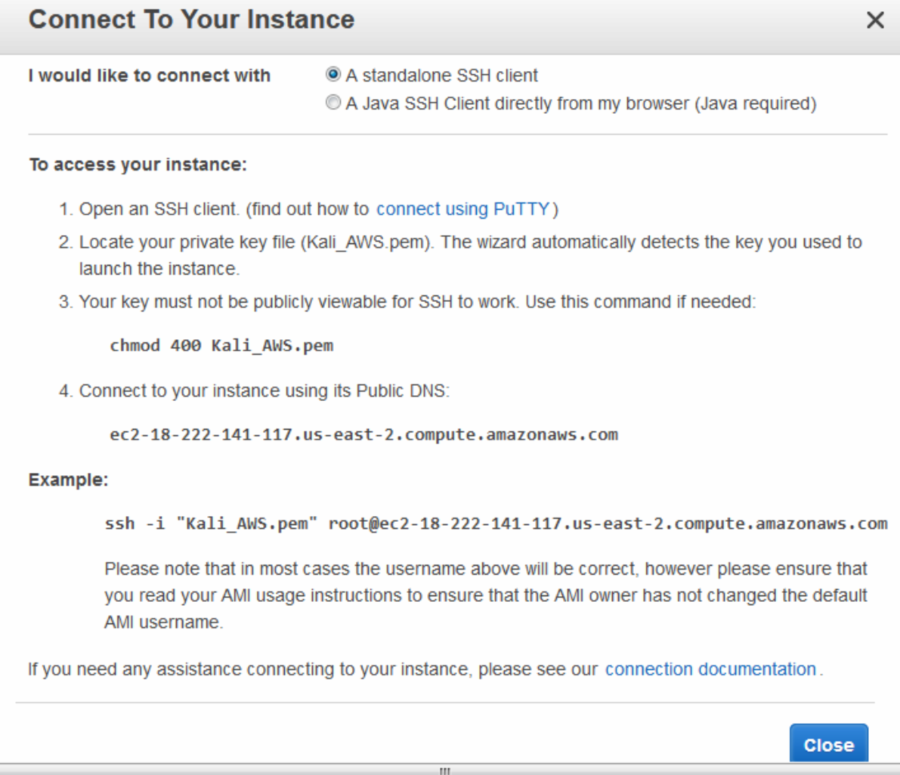
We are then presented with the options available to connect to our Instance, as well as instructions on how to do so using an SSH client such as PuTTY. Note that in the example listed, the name of the key pair is Kali_AWS.pem. When connecting via an SSH client, be sure to use the key pair name you chose in the previous steps:

Now we need a standalone Secure Shell (SSH) client to be able to connect to our Kali Linux instance in the cloud. We'll be using Putty as our standalone client and we will also require Puttygen to be able to authenticate with our cloud instance using our previously downloaded key pair. Both Putty and Puttygen come in 32-bit and 64-bit versions and can be downloaded from the following link: https://www.chiark.greenend.org.uk/~sgtatham/putty/latest.html?.

Be sure to download both putty.exe and puttygen.exe which are Windows executables. The machine I am using is of 64-bit architecture, therefore I'll be using the 64-bit versions.

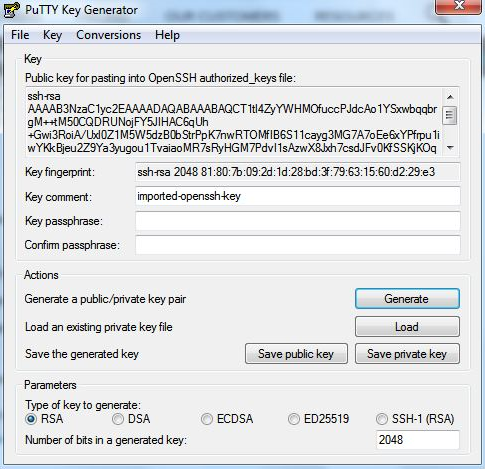
Once they are downloaded, run puttygen.exe first. Click on File and then click on Load Private Key. Now, browse to the key pair file you downloaded earlier. You may have to change the file type from PFF to All Files as the key file is in the older .pem format.

Once selected, you should be prompted to Save private key to be able to save it in Putty's format.

Once the Key has been located, click on the Save private key button:

Now, we can run and configure Putty.exe with the necessary settings to connect to our Kali instance in the AWS cloud.

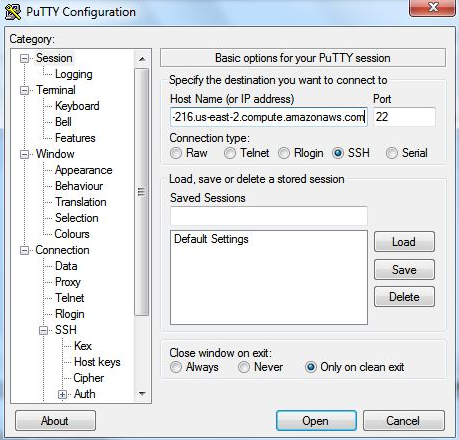
In the Session category in the left pane of Putty, enter the Public DNS URL shown in the Instances category in the dashboard. It should look like the URL in this screenshot:

Enter the Public DNS address into the Host Name area in Putty, as seen in the screenshot:

Next, scroll down to the SSH category in the left pane and click on the Auth sub-category. Click on the Browse button on the right pane to browse to the saved .ppk private key.

For the username, we will be using Ec2-user:

Click on the Open button and you should now be able to log in to your Kali instance in the cloud. Once connected, remember to update Kali.