Table of Contents for
Kali Linux 2018: Assuring Security by Penetration Testing - Fourth Edition

Version ebook / Retour

Cover image for bash Cookbook, 2nd Edition Kali Linux 2018: Assuring Security by Penetration Testing - Fourth Edition by Shakeel Ali Published by Packt Publishing, 2018
  1. Kali Linux Assuring Security by Penetration Testing, Fourth Edition
  2. Title Page
  3. Copyright and Credits
  4. Kali Linux 2018: Assuring Security by Penetration Testing Fourth Edition
  5. Dedication
  6. Packt Upsell
  7. Why subscribe?
  8. Packt.com
  9. Contributors
  10. About the authors
  11. About the reviewers
  12. Packt is searching for authors like you
  13. Table of Contents
  14. Preface
  15. Who this book is for
  16. What this book covers
  17. To get the most out of this book
  18. Conventions used
  19. Get in touch
  20. Reviews
  21. Installing and Configuring Kali Linux
  22. Technical requirements
  23. Kali Linux tool categories
  24. Downloading Kali Linux
  25. Using Kali Linux
  26. Running Kali using a Live DVD
  27. Installing on a hard disk
  28. Installing Kali on a physical machine
  29. Installing Kali on a virtual machine
  30. Installing Kali on a virtual machine from the ISO image
  31. Installing Kali Linux on a virtual machine using the Kali Linux VM image provided
  32. Saving or moving the virtual machine
  33. Installing Kali on a USB disk
  34. Configuring the virtual machine
  35. VirtualBox guest additions
  36. Setting up networking
  37. Setting up a wired connection
  38. Setting up a wireless connection
  39. Updating Kali Linux
  40. Setting up Kali Linux AMI on Amazon AWS Cloud
  41. Summary
  42. Questions
  43. Further reading
  44. Setting Up Your Test Lab
  45. Technical requirements
  46. Physical or virtual?
  47. Setting up a Windows environment in a VM
  48. Installing vulnerable servers
  49. Setting up Metasploitable 2 in a VM
  50. Setting up Metasploitable 3 in a VM
  51. Installing Packer
  52. Installing Vagrant
  53. Pre-built Metasploit 3
  54. Setting up BadStore in a VM
  55. Installing additional tools in Kali Linux
  56. Network services in Kali Linux
  57. HTTP
  58. MySQL
  59. SSH
  60. Additional labs and resources
  61. Summary
  62. Questions
  63. Further reading
  64. Penetration Testing Methodology
  65. Technical requirements
  66. Penetration testing methodology
  67. OWASP testing guide
  68. PCI penetration testing guide
  69. Penetration Testing Execution Standard
  70. NIST 800-115
  71. Open Source Security Testing Methodology Manual 
  72. General penetration testing framework
  73. Reconnaissance
  74. Scanning and enumeration
  75. Scanning
  76. ARP scanning
  77. The network mapper (Nmap)
  78. Nmap port scanner/TCP scan
  79. Nmap half-open/stealth scan
  80. Nmap OS-detection
  81. Nmap service-detection
  82. Nmap ping sweeps
  83. Enumeration
  84. SMB shares
  85. DNS zone transfer
  86. DNSRecon
  87. SNMP devices
  88. Packet captures
  89. tcpdump
  90. Wireshark
  91. Gaining access
  92. Exploits
  93. Exploits for Linux
  94. Exploits for Windows
  95. Escalating privileges
  96. Maintaining access
  97. Covering your tracks
  98. Reporting
  99. Summary
  100. Footprinting and Information Gathering
  101. Open Source Intelligence
  102. Using public resources
  103. Querying the domain registration information
  104. Analyzing the DNS records
  105. Host
  106. dig
  107. DMitry
  108. Maltego
  109. Getting network routing information
  110. tcptraceroute
  111. tctrace
  112. Utilizing the search engine
  113. SimplyEmail
  114. Google Hacking Database (GHDB)
  115. Metagoofil
  116. Automated footprinting and information gathering tools
  117. Devploit
  118. Red Hawk v2
  119. Using Shodan to find internet connected devices
  120. Search queries in Shodan
  121. Blue-Thunder-IP-Locator
  122. Summary
  123. Questions
  124. Further reading
  125. Scanning and Evasion Techniques
  126. Technical requirements
  127. Starting off with target discovery
  128. Identifying the target machine
  129. ping
  130. fping
  131. hping3
  132. OS fingerprinting
  133. p0f
  134. Introducing port scanning
  135. Understanding TCP/IP protocol
  136. Understanding TCP and UDP message formats
  137. The network scanner
  138. Nmap
  139. Nmap target specification
  140. Nmap TCP scan options
  141. Nmap UDP scan options
  142. Nmap port specification
  143. Nmap output options
  144. Nmap timing options
  145. Useful Nmap options
  146. Service version detection
  147. Operating system detection
  148. Disabling host discovery
  149. Aggressive scan
  150. Nmap for scanning the IPv6 target
  151. The Nmap scripting engine
  152. Nmap options for firewall/IDS evasion
  153. Scanning with Netdiscover
  154. Automated scanning with Striker
  155. Anonymity using Nipe
  156. Summary
  157. Questions
  158. Further Reading
  159. Vulnerability Scanning
  160. Technical requirements
  161. Types of vulnerabilities
  162. Local vulnerability
  163. Remote vulnerability
  164. Vulnerability taxonomy
  165. Automated vulnerability scanning
  166. Vulnerability scanning with Nessus 7
  167. Installing the Nessus vulnerability scanner
  168. Vulnerability scanning with OpenVAS
  169. Linux vulnerability scanning with Lynis
  170. Vulnerability scanning and enumeration using SPARTA
  171. Summary
  172. Questions
  173. Further reading
  174. Social Engineering
  175. Technical requirements
  176. Modeling human psychology
  177. Attack process
  178. Attack methods
  179. Impersonation
  180. Reciprocation
  181. Influential authority
  182. Scarcity
  183. Social relationships
  184. Curiosity
  185. Social Engineering Toolkit
  186. Anonymous USB attack
  187. Credential-harvesting
  188. Malicious Java applet
  189. Summary
  190. Target Exploitation
  191. Vulnerability research
  192. Vulnerability and exploit repositories
  193. Advanced exploitation toolkit
  194. MSFConsole
  195. MSFCLI
  196. Ninja 101 drills
  197. Scenario 1
  198. Scenario 2
  199. SMB usernames
  200. VNC blank authentication scanners
  201. PostGRESQL logins
  202. Scenario 3
  203. Bind shells
  204. Reverse shells
  205. Meterpreters
  206. Writing exploit modules
  207. Summary
  208. Privilege Escalation and Maintaining Access
  209. Technical requirements
  210. Privilege-escalation
  211. Local escalation
  212. Password-attack tools
  213. Offline attack tools
  214. John the Ripper
  215. Ophcrack
  216. samdump2
  217. Online attack tools
  218. CeWL
  219. Hydra
  220. Mimikatz
  221. Maintaining access
  222. Operating-system backdoors
  223. Cymothoa
  224. The Meterpreter backdoor
  225. Summary
  226. Web Application Testing
  227. Technical requirements
  228. Web analysis
  229. Nikto
  230. OWASP ZAP
  231. Burp Suite
  232. Paros proxy
  233. W3AF
  234. WebScarab
  235. Cross-Site Scripting
  236. Testing for XSS
  237. SQL injection
  238. Manual SQL injection
  239. Automated SQL injection
  240. sqlmap
  241. Command-execution, directory-traversal, and file-inclusion
  242. Directory-traversal and file-inclusion
  243. Command execution
  244. Summary
  245. Further reading
  246. Wireless Penetration Testing
  247. Technical requirements
  248. Wireless networking
  249. Overview of 802.11
  250. The Wired Equivalent Privacy standard
  251. Wi-Fi Protected Access (WPA)
  252. Wireless network reconnaissance
  253. Antennas
  254. Iwlist
  255. Kismet
  256. WAIDPS
  257. Wireless testing tools
  258. Aircrack-ng
  259. WPA pre-shared key-cracking
  260. WEP-cracking
  261. PixieWPS
  262. Wifite
  263. Fern Wifi-Cracker
  264. Evil Twin attack
  265. Post cracking
  266. MAC-spoofing
  267. Persistence
  268. Sniffing wireless traffic
  269. Sniffing WLAN traffic
  270. Passive sniffing
  271. Summary
  272. Mobile Penetration Testing with Kali NetHunter
  273. Technical requirements
  274. Kali NetHunter
  275. Deployment
  276. Network deployment
  277. Wireless deployment
  278. Host deployment
  279. Installing Kali NetHunter
  280. NetHunter icons
  281. NetHunter tools
  282. Nmap
  283. Metasploit
  284. MAC changer
  285. Third-party Android applications
  286. The NetHunter Terminal Application
  287. DriveDroid
  288. USB Keyboard
  289. Shodan
  290. Router Keygen
  291. cSploit
  292. Wireless attacks
  293. Wireless scanning
  294. WPA/WPA2 cracking
  295. WPS cracking
  296. Evil AP attack
  297. Mana evil AP
  298. HID attacks
  299. DuckHunter HID attacks
  300. Summary
  301. Questions
  302. Further reading
  303. PCI DSS Scanning and Penetration Testing
  304. PCI DSS v3.2.1 requirement 11.3
  305. Scoping the PCI DSS penetration test
  306. Gathering client requirements
  307. Creating the customer requirements form
  308. Preparing the test plan
  309. The test plan checklist
  310. Profiling test boundaries
  311. Defining business objectives
  312. Project management and scheduling
  313. Tools for executing the PCI DSS penetration test
  314. Summary
  315. Questions
  316. Further reading
  317. Tools for Penetration Testing Reporting
  318. Technical requirements
  319. Documentation and results verification
  320. Types of reports
  321. The executive report
  322. The management report
  323. The technical report
  324. Network penetration testing report
  325. Preparing your presentation
  326. Post-testing procedures
  327. Using the Dradis framework for penetration testing reporting
  328. Penetration testing reporting tools
  329. Faraday IDE
  330. MagicTree
  331. Summary
  332. Questions
  333. Further reading
  334. Assessments
  335. Chapter 1 – Assessment answers
  336. Chapter 2 – Assessment answers
  337. Chapter 4 – Assessment answers
  338. Chapter 5 – Assessment answers
  339. Chapter 6 – Assessment answers
  340. Chapter 12 – Assessment answers
  341. Chapter 13 – Assessment answers
  342. Chapter 14 – Assessment answers
  343. Other Books You May Enjoy
  344. Leave a review - let other readers know what you think

John the Ripper

John the Ripper (http://www.openwall.com/john/) is a tool that can be used to crack the password hash. Currently, it can crack more than 40 password hash types, such as DES, MD5, LM, NT, crypt, NETLM, and NETNTLM. One of the reasons to use John instead of the other password-cracking tools described in this chapter is that John is able to work with the DES and crypt encryption algorithms.

To start the John tool, use the console to execute the following command:

 # john

This will display the John usage instructions on your screen.

John supports the following four password-cracking modes:

  • Wordlist mode: In this mode, you only need to supply the wordlist file and the password file to be cracked. A wordlist file is a text file containing the possible passwords. There is only one word on each line. You can also use a rule to instruct John to modify the words contained in the wordlist according to the rule. To use wordlist, just use the --wordlist=<wordlist_name> option. You can create your own wordlist or you can obtain one from other people. There are many sites that provide wordlists. For example, there is the wordlist from the Openwall Project, which can be downloaded from http://download.openwall.net/pub/wordlists/.
  • Single-crack mode: This mode has been suggested by the author of John and is to be tried first. In this mode, John will use the login names, Full Name field, and user's home directory as the password candidates. These password candidates are then used to crack the password of the account they were taken from or to crack the password hash with the same salt. As a result, it is much faster than the wordlist mode.
  • Incremental mode: In this mode, John will try all of the possible character combinations as the password. Although it is the most powerful cracking method, if you don't set the termination condition, the process will take a very long time. Examples of termination conditions are setting a short password limit and using a small character set. To use this mode, you need to assign the incremental mode in the configuration file of John. The predefined modes are All, Alnum, Alpha, Digits, and Lanman or you can define your own mode.
  • External mode: With this mode, you can use the external cracking mode used by John. You need to create a configuration file section called [List.External:MODE], where MODE is the name you assign. This section should contain functions programmed in a subset the of the C programming language. Later, John will compile and use this mode. You can read more about this mode at http://www.openwall.com/john/doc/EXTERNAL.shtml.

If you don't give the cracking mode as an argument to John in the command line, it will use the default order. First, it will use the single-crack mode, then the wordlist mode, and after that it will use the incremental mode.

Before you can use John, you need to obtain the password files. In the Unix world, most systems use the shadow and passwd files. You may need to log in as root to be able to read the shadow file.

After you get the password files, you need to combine these files so that John can use them. To help you, John provides you with a tool called unshadow.

The following is the command to combine the shadow and passwd files. For this, I use the /etc/shadow and /etc/passwd files from the Metasploitable 2 virtual machine and put them in a directory called pwd with the names etc-shadow and etc-passwd, respectively:

# unshadow etc-passwd etc-shadow > pass

The following is a snippet of the pass file content:

root:$1$/avpfBJ1$x0z8w5UF9Iv./DR9E9Lid.:0:0:root:/root:/bin/bash
sys:$1$fUX6BPOt$Miyc3UpOzQJqz4s5wFD9l0:3:3:sys:/dev:/bin/sh
klog:$1$f2ZVMS4K$R9XkI.CmLdHhdUE3X9jqP0:103:104::/home/klog:/bin/false
msfadmin:$1$XN10Zj2c$Rt/zzCW3mLtUWA.ihZjA5/:1000:1000:msfadmin,,,:/home/msfadmin:/bin/bash
postgres:$1$Rw35ik.x$MgQgZUuO5pAoUvfJhfcYe/:108:117:PostgreSQL administrator,,,:/var/lib/postgresql:/bin/bash
user:$1$HESu9xrH$k.o3G93DGoXIiQKkPmUgZ0:1001:1001:just a user,111,,:/home/user:/bin/bash
service:$1$kR3ue7JZ$7GxELDupr5Ohp6cjZ3Bu//:1002:1002:,,,:/home/service:/bin/bash

To crack the password file, just give the following command, where pass is the password list file you have just generated:

john pass

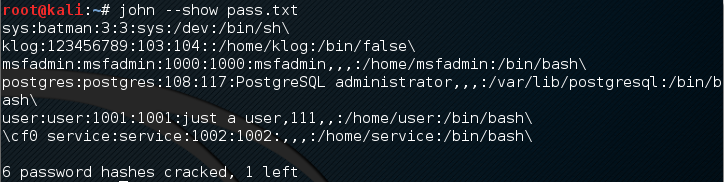
If John managed to crack the passwords, it will store those passwords in the john.pot file. To see the passwords, you can issue the following command:

john --show pass

In this case, John cracks the passwords quickly, as shown in the following screenshot:

The following table is the list of cracked passwords:

Username

Password

postgres

postgres

user

user

msfadmin

msfadmin

service

service

klog

123456789

sys

batman


Of the seven passwords listed in the pass file, John managed to crack six passwords. Only the password of root cannot be cracked instantly.

If you want to crack the Windows password, first you need to extract the Windows password hashes (LM and/or NTLM) in the pwdump output format from the Windows system and SAM files. You can consult http://www.openwall.com/passwords/microsoft-windows-nt-2000-xp-2003-vista-7#pwdump to see several of these utilities. One of them is samdump2, provided in Kali Linux.

To crack the Windows hash obtained from samdump2 using a password.lst wordlist, you can use the following command and the obtained output is displayed on the following screenshot:

    # john test-sam.txt --wordlist=password.lst --format=nt

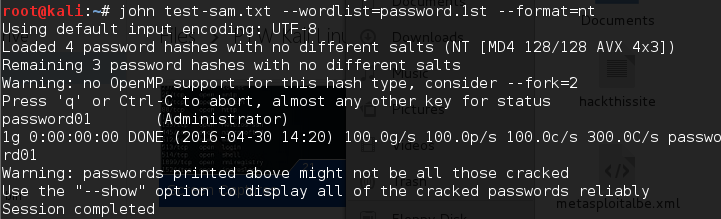
The password.lst file content is as follows:

password01 

To see the result, give the following command:

    # john test-sam.txt --format=nt --show 

The following screenshot shows a snippet of the password obtained:

John was able to obtain the administrator password of a Windows machine, but was unable to crack the password for the tedi user.

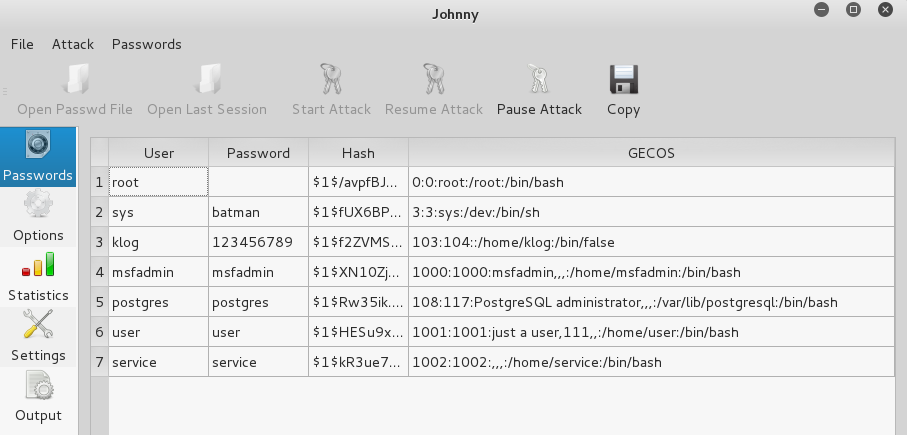
If a GUI is more your thing, there's a graphical interface for John and it's called Johnny.

To start Johnny, open a console and type the following command:

# johnny

You will then see the Johnny window.

The following screenshot shows the result of cracking the same Metasploitable 2 hashes: