Table of Contents for
Magento 2 - Build World-Class online stores
 Magento 2 - Build World-Class online stores
Published by
Packt Publishing, 2017
Magento 2 - Build World-Class online stores
Published by
Packt Publishing, 2017
- Cover
- Table of Contents
- Magento 2 - Build World-Class online stores
- Magento 2 - Build World-Class online stores
- Credits
- Preface
- 1. Module 1
- 1. Magento Fundamentals
- XAMPP installation
- Magento
- Summary
- 2. Magento 2.0 Features
- An introduction to the Magento order management system
- Magento 2.0 command-line configuration
- The command-line utility
- Summary
- 3. Working with Search Engine Optimization
- Store configuration
- SEO and searching
- SEO catalog configuration
- Google Analytics tracking code
- Optimizing Magento pages
- Summary
- 4. Magento 2.0 Theme Development – the Developers' Holy Grail
- Magento 2.0 theme structure
- The Magento Luma theme
- Magento theme inheritance
- CMS blocks and pages
- Custom variables
- Creating a basic Magento 2.0 theme
- Summary
- 5. Creating a Responsive Magento 2.0 Theme
- Composer – the PHP dependency manager
- Building the CompStore theme
- CSS preprocessing with LESS
- Applying new CSS to the CompStore theme
- Creating the CompStore logo
- Applying the theme
- Creating CompStore content
- Customizing Magento 2.0 templates
- Summary
- 6. Write Magento 2.0 Extensions – a Great Place to Go
- Using the Zend framework
- Magento 2.0 extension structure
- Developing your first Magento extension
- The Twitter REST API
- The TweetsAbout module structure
- Using TwitterOAuth to authenticate our extension
- Developing the module
- Summary
- 7. Go Mobile with Magento 2.0!
- Adjusting the CompStore theme for mobile devices
- The Magento 2.0 responsive design
- The Magento UI
- Implementing a new CSS mixin media query
- Adjusting tweets about extensions for mobile devices
- Summary
- 8. Speeding up Your Magento 2.0
- Indexing and caching Magento
- Indexing and re-indexing data
- The Magento cron job
- Caching
- Fine-tuning the Magento hosting server
- Selecting the right Magento hosting service
- Apache web server deflation
- Enabling the expires header
- Minifying scripts
- Summary
- 9. Improving Your Magento Skills
- Magento knowledge center
- Improving your Magento skills
- Summary
- 2. Module 2
- 1. Magento 2 System Tools
- Installing Magento 2 sample data via GUI
- Installing Magento 2 sample data via the command line
- Managing Magento 2 indexes via the command line
- Managing Magento 2 cache via the command line
- Managing Magento 2 backup via the command line
- Managing Magento 2 set mode (MAGE_MODE)
- Transferring your Magento 1 database to Magento 2
- 2. Enabling Performance in Magento 2
- Configuring Redis for backend cache
- Configuring Memcached for session caching
- Configuring Varnish as the Full Page Cache
- Configuring Magento 2 with CloudFlare
- Configuring optimized images in Magento 2
- Configuring Magento 2 with HTTP/2
- Configuring Magento 2 performance testing
- 3. Creating Catalogs and Categories
- Create a Root Catalog
- Create subcategories
- Manage attribute sets
- Create products
- Manage products in a catalog grid
- 4. Managing Your Store
- Creating shipping and tax rules
- Managing customer groups
- Configuring inventories
- Configuring currency rates
- Managing advanced pricing
- 5. Creating Magento 2 Extensions – the Basics
- Initializing extension basics
- Working with database models
- Creating tables using setup scripts
- Creating a web route and controller to display data
- Creating system configuration fields
- Creating a backend data grid
- Creating a backend form to add/edit data
- 6. Creating Magento 2 Extensions – Advanced
- Using dependency injection to pass classes to your own class
- Modifying functions with the use of plugins – Interception
- Creating your own XML module configuration file
- Creating your own product type
- Working with service layers/contracts
- Creating a Magento CLI command option
- 3. Module 3
- 1. Planning for Magento
- Technical considerations
- Global-Website-Store methodology
- Planning for multiple stores
- Summary
- 2. Managing Products
- Managing products the customer focused way
- Creating products
- Managing inventory
- Pricing tools
- Autosettings
- Related products, up-sells, and cross-sells
- Importing products
- Summary
- 3. Designs and Themes
- The concept of theme inheritance
- Default installation of design packages and themes
- Installing third-party themes
- Inline translations
- Working with theme variants
- Customizing themes
- Customizing layouts
- Summary
- 4. Configuring to Sell
- Payment methods
- Shipping methods
- Managing taxes
- Transactional e-mails
- Summary
- 5. Managing Non-Product Content
- Summary
- 6. Marketing Tools
- Promotions
- Newsletters
- Using sitemaps
- Optimizing for search engines
- Summary
- 7. Extending Magento
- The new Magento module architecture
- Extending Magento functionality with Magento plugins
- Building your own extensions
- Summary
- 8. Optimizing Magento
- Indexing and caching
- Caching in Magento 2 – not just FPC
- Tuning your server for speed
- Summary
- 9. Advanced Techniques
- Version control
- Magento cron
- Backing up your database
- Upgrading Magento
- Summary
- 10. Pre-Launch Checklist
- System configurations
- Design configurations
- Search engine optimization
- Sales configurations
- Product configurations
- Maintenance configurations
- Summary
- Index
If you're not up on Unix lingo, a cron job is a scheduled action that occurs at preset intervals on your server. For instance, Magento can create a new sitemap for your store according to the time interval you configure in the backend.
What is confounding to many new to Magento is that configuring cron intervals for various Magento functions doesn't actually cause anything to happen. The reason is that your server must still be told to run the configured tasks.
Cron jobs are configured by using what are called crontabs. These are expressions that dictate how often the server is to run the particular task.
There are a few inherent functions included with Magento that can be run periodically, including:
- Catalog pricing rules
- Sending out scheduled newsletters
- Customer alerts for product price changes and availability
- Retrieval of currency exchange rates
- Creating sitemaps
- Log cleanup
Some third-party modules also include scheduled tasks, such as Google Product feeds. The frequency of most of these can be configured in your Magento backend. For those that aren't, you can find the crontab-style setting for each in the config.xml file of each module.
For example, the following is the cron schedule for the function that sends out scheduled newsletters, from app/code/Mage/Newsletter/etc/config.xml:
    <crontab>
        <jobs>
            <newsletter_send_all>
                <schedule><cron_expr>*/5 * * * *</cron_expr></schedule>
                <run><model>newsletter/observer::scheduledSend</model></run>
            </newsletter_send_all>
        </jobs>
    </crontab>
According to this crontab, Magento looks every 5 minutes to see if any newsletters need to be sent out.
|
Module |
Cron job |
Default frequency |
Active? |
|---|---|---|---|
|
Catalog |
Reindex pricing |
Every day at 2am |
Yes |
|
CatalogIndex |
Reindex the entire catalog |
Every day at 2am |
No |
|
CatalogIndex |
Run queued indexing |
Every minute |
No |
|
CatalogRule |
Daily catalog update |
Every day at 1am |
Yes |
|
Directory |
Update currency rates |
Controlled by Currency Setup | Scheduled Import Settings |
Yes |
|
Log |
Clean logs |
Every 10 minutes |
No |
|
Newsletter |
Send scheduled newsletters |
Every 5 minutes |
Yes |
|
PayPal |
Fetch settlement reports |
Controlled by PayPal | Settlement Report Settings |
Yes |
|
ProductAlert |
Controlled by Catalog | Product Alerts Run Settings |
Yes | |
|
Sales |
Clean expired quotes |
Every day at midnight |
Yes |
|
Sales |
Generate aggregate reports (there are actually five configured) |
Every day at midnight |
Yes |
|
SalesRule |
Generate aggregate coupon data report |
Every day at midnight |
Yes |
|
Sitemap |
Generate sitemaps |
Controlled by Google Sitemap | Generation Settings |
Yes |
|
Tax |
Generate aggregate tax report |
Every day at midnight |
Yes |
Many of Magentos core modules contain crontab scripts, although some are commented out. The following is a list of Magento Community 1.5 crontabs I have found within Magento, indicating for each whether the script is active or not. To make a script active, simply remove the comment tags surrounding the <crontab> code in the appropriate config.xml file.
For your staging environment, you may want to keep cron jobs from running automatically. Rather, you may wish to have Magento run through its list of scheduled tasks at your command so you can watch for any problems or errors.
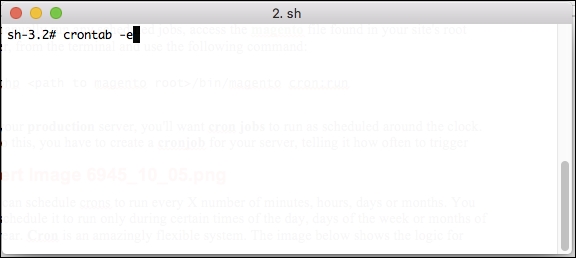
A wrinkle in Magento 2.0 is that there's no longer a cron.php, so Magento's cron can no longer be triggered from the command line (manually).
To manually run any scheduled jobs, access the magento file found in your site's root folder from the terminal and use the following command:
php <path to magento root>/bin/magento cron:run
For your production server, you'll want cron jobs to run as scheduled around the clock. To do this, you have to create a cronjob for your server, telling it how often to trigger Magento's cron tasks. For most servers — Unix and Linux — the cron program operates as a continuous daemon, waiting to take some action according to any programmed crontabs. In this case, we want to have the magento binary (also in our Magento root folder) run by the server every few minutes or so.
The most straightforward way to schedule a cron job is to do so from the command line. Start by opening up a command prompt as the root user and typing in the following command:
crontab –e
This command will take you to a screen where you can add entries to schedule the cron. To automate the Magento cron, you'll want to add entries that look like this:
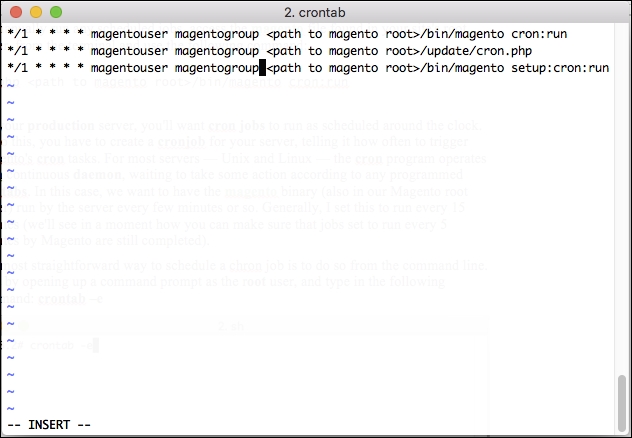
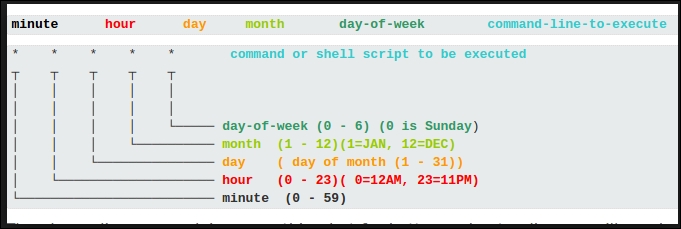
You can schedule crons to run every X number of minutes, hours, days, or months. You can schedule them to run only during certain times of the day, days of the week, or months of the year. Cron is an amazingly flexible system. The following screenshot shows the logic for scheduling crons:
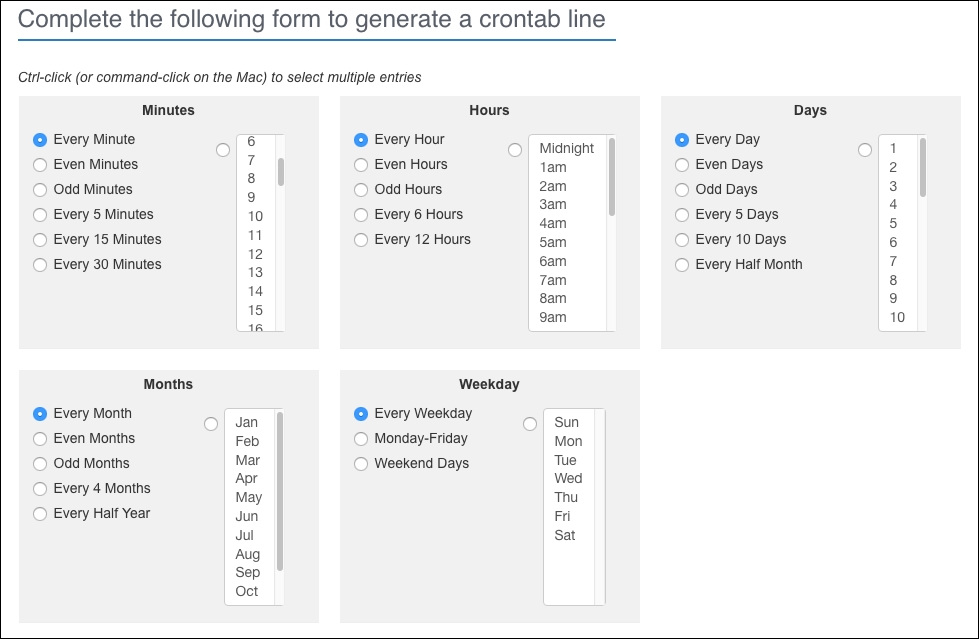
This can be a bit obtuse to understand, though; if you want a quick way to sort out timing for a cron job, you can visit one of the many crontab generating websites. One example is http://crontab-generator.org/. As you can see, this site provides assistance and makes it a bit easier to generate the desired schedule:
The Magento binary does a number of things when your server cron job runs:
- It executes any scheduled tasks
- The script generates schedules for any future tasks
- Finally, the script cleans up any history of scheduled tasks
The parameters that control this behavior are configured in your Magento backend:
- Go to Stores | Configuration | Advanced | System.
- Expand the Cron (Scheduled Tasks) panel.
- For each item, fill in the number of minutes.
- Click on Save Config.
Each field in this panel controls the timing actions of the cron script, as follows:
- Generate Schedules Every means that new schedules will not be created more frequently than the number of minutes configured.
- Schedule Ahead for is the number of minutes that will be generated in future schedules.
- Missed if Not Run Within tells the script to run any tasks that were scheduled within the indicated number of minutes before the script ran, but which haven't run already.
- History Cleanup Every deletes old history entries in the
cron_scheduledatabase table. This will help keep the table from growing too large. - Success History Lifetime similarly purges successful entries from the
cron_scheduletable. - Failure History Lifetime does just what you imagine: purges failure entries.
There remains considerable debate among bloggers on what values are ideal for this configuration. However, from my observations, there are some principles I follow when configuring Magento cron jobs.
Decide the frequency of your server cron job. If you configure your server cron to run every 15 minutes, then you do not need any Magento crontab or cron configuration to be set at anything less than 15 minutes. For example, the Send Newsletter crontab, as shown in the earlier table, is configured by default to run every 5 minutes.
If your system cron task runs every 15 minutes, then when cron.php is executed, the send newsletter task is actually run three times, since Magento schedules ahead and looks back to run any scheduled tasks. In order words, if your system cron runs at 10:00 am, it will run any tasks that were scheduled to run between 9:45 am (the last time it ran) and 10:00 am. Since the send newsletter task was scheduled to run every 5 minutes, at 9:45 am, Magento scheduled it to run at 9:50, 9:55, and 10:00. The task did not run at those times, but instead were all run at once at 10:00 when your system cron ran.
Therefore, you may want to go back through the various module config.xml files (such as the ones in the earlier table) and set the frequency of the jobs to match or be less frequent than your system cron.
Once you have modified any crontabs to match your system cron job frequency, you should now configure the Store | Configuration | Advanced | Cron (Scheduled Tasks) panel:
- Use the same number of minutes as your system cron job frequency for Generate Schedules Every.
- Use the same value for Schedule Ahead For. In this way, you are capturing all the upcoming cron jobs Magento intends before your next system cron runs.
- Use the same value for Missed If Not Run Within to run any scheduled tasks that did not run during the last system cron.
- Use the same value for History Cleanup Every. You can use a larger interval if you wish, as this is not a critical function to running the necessary cron jobs for your store.
- For Success History Lifetime and Failure History Lifetime, you can use whatever settings you feel are most important. Generally, when launching a new Magento store, I set the Failure History Lifetime for a long time (as much as 3 days, or 4320 minutes) so that if something seems amiss, I can go into the
cron_scheduledatabase table and see if there are any failure messages that can help me diagnose the problem. In fact, even if your store is running smoothly, keeping this number large should not grow your database, as there will be no failure messages to record.
So, for example, if I set my system cron job to run every 15 minutes, my Cron (Scheduled Tasks) panel might look like this:
