Table of Contents for
Magento 2 - Build World-Class online stores
 Magento 2 - Build World-Class online stores
Published by
Packt Publishing, 2017
Magento 2 - Build World-Class online stores
Published by
Packt Publishing, 2017
- Cover
- Table of Contents
- Magento 2 - Build World-Class online stores
- Magento 2 - Build World-Class online stores
- Credits
- Preface
- 1. Module 1
- 1. Magento Fundamentals
- XAMPP installation
- Magento
- Summary
- 2. Magento 2.0 Features
- An introduction to the Magento order management system
- Magento 2.0 command-line configuration
- The command-line utility
- Summary
- 3. Working with Search Engine Optimization
- Store configuration
- SEO and searching
- SEO catalog configuration
- Google Analytics tracking code
- Optimizing Magento pages
- Summary
- 4. Magento 2.0 Theme Development – the Developers' Holy Grail
- Magento 2.0 theme structure
- The Magento Luma theme
- Magento theme inheritance
- CMS blocks and pages
- Custom variables
- Creating a basic Magento 2.0 theme
- Summary
- 5. Creating a Responsive Magento 2.0 Theme
- Composer – the PHP dependency manager
- Building the CompStore theme
- CSS preprocessing with LESS
- Applying new CSS to the CompStore theme
- Creating the CompStore logo
- Applying the theme
- Creating CompStore content
- Customizing Magento 2.0 templates
- Summary
- 6. Write Magento 2.0 Extensions – a Great Place to Go
- Using the Zend framework
- Magento 2.0 extension structure
- Developing your first Magento extension
- The Twitter REST API
- The TweetsAbout module structure
- Using TwitterOAuth to authenticate our extension
- Developing the module
- Summary
- 7. Go Mobile with Magento 2.0!
- Adjusting the CompStore theme for mobile devices
- The Magento 2.0 responsive design
- The Magento UI
- Implementing a new CSS mixin media query
- Adjusting tweets about extensions for mobile devices
- Summary
- 8. Speeding up Your Magento 2.0
- Indexing and caching Magento
- Indexing and re-indexing data
- The Magento cron job
- Caching
- Fine-tuning the Magento hosting server
- Selecting the right Magento hosting service
- Apache web server deflation
- Enabling the expires header
- Minifying scripts
- Summary
- 9. Improving Your Magento Skills
- Magento knowledge center
- Improving your Magento skills
- Summary
- 2. Module 2
- 1. Magento 2 System Tools
- Installing Magento 2 sample data via GUI
- Installing Magento 2 sample data via the command line
- Managing Magento 2 indexes via the command line
- Managing Magento 2 cache via the command line
- Managing Magento 2 backup via the command line
- Managing Magento 2 set mode (MAGE_MODE)
- Transferring your Magento 1 database to Magento 2
- 2. Enabling Performance in Magento 2
- Configuring Redis for backend cache
- Configuring Memcached for session caching
- Configuring Varnish as the Full Page Cache
- Configuring Magento 2 with CloudFlare
- Configuring optimized images in Magento 2
- Configuring Magento 2 with HTTP/2
- Configuring Magento 2 performance testing
- 3. Creating Catalogs and Categories
- Create a Root Catalog
- Create subcategories
- Manage attribute sets
- Create products
- Manage products in a catalog grid
- 4. Managing Your Store
- Creating shipping and tax rules
- Managing customer groups
- Configuring inventories
- Configuring currency rates
- Managing advanced pricing
- 5. Creating Magento 2 Extensions – the Basics
- Initializing extension basics
- Working with database models
- Creating tables using setup scripts
- Creating a web route and controller to display data
- Creating system configuration fields
- Creating a backend data grid
- Creating a backend form to add/edit data
- 6. Creating Magento 2 Extensions – Advanced
- Using dependency injection to pass classes to your own class
- Modifying functions with the use of plugins – Interception
- Creating your own XML module configuration file
- Creating your own product type
- Working with service layers/contracts
- Creating a Magento CLI command option
- 3. Module 3
- 1. Planning for Magento
- Technical considerations
- Global-Website-Store methodology
- Planning for multiple stores
- Summary
- 2. Managing Products
- Managing products the customer focused way
- Creating products
- Managing inventory
- Pricing tools
- Autosettings
- Related products, up-sells, and cross-sells
- Importing products
- Summary
- 3. Designs and Themes
- The concept of theme inheritance
- Default installation of design packages and themes
- Installing third-party themes
- Inline translations
- Working with theme variants
- Customizing themes
- Customizing layouts
- Summary
- 4. Configuring to Sell
- Payment methods
- Shipping methods
- Managing taxes
- Transactional e-mails
- Summary
- 5. Managing Non-Product Content
- Summary
- 6. Marketing Tools
- Promotions
- Newsletters
- Using sitemaps
- Optimizing for search engines
- Summary
- 7. Extending Magento
- The new Magento module architecture
- Extending Magento functionality with Magento plugins
- Building your own extensions
- Summary
- 8. Optimizing Magento
- Indexing and caching
- Caching in Magento 2 – not just FPC
- Tuning your server for speed
- Summary
- 9. Advanced Techniques
- Version control
- Magento cron
- Backing up your database
- Upgrading Magento
- Summary
- 10. Pre-Launch Checklist
- System configurations
- Design configurations
- Search engine optimization
- Sales configurations
- Product configurations
- Maintenance configurations
- Summary
- Index
Let's assume we have created a new design package called sportswear_package. Within this design package, create a new theme and call it sportswear_theme. Our new design package file hierarchy, in /app/design/, might resemble the following hierarchy:
app/
  design/
    frontend/
      Magento/
        blank/
        luma/
      sportswear_package/
        sportswear_theme/
Because we want to use the blank theme as a starting point, the theme.xml in the root directory of our theme will look something like this:
<theme xmlns:xsi="http://www.w3.org/2001/XMLSchema-instance" xsi:noNamespaceSchemaLocation="../../../../../lib/internal/Magento/Framework/Config/etc/theme.xsd">
    <title>Sportswear Theme</title>
    <parent>Magento/blank</parent>
    <media>
        <preview_image>media/preview.jpg</preview_image>
    </media>
</theme>
However, let's also take one more customization step here. We can create variations of a theme that are simply controlled by CSS and images by creating more than one skin. For "Sportswear", we might want to have our English language store in a blue color scheme, but our French language store in a green color scheme. We could take the sportswear_theme/ directory and duplicate it, renaming both for the new colors:
app/
  design/
    frontend/
      Magento/
        blank/
        luma/
      sportswear_package/
        sportswear_theme/
        sportswear_blue_theme/
        sportswear_green_theme/
Before we continue, let's go over something that is especially relevant to what we have just created.
For our sportswear theme, we created two skin variants: blue and green. However, what if the difference between the two is only one or two files? If we make changes to other files that would affect both color schemes, but which are otherwise the same for both, this would create more work to keep both color variations in sync, right?
Remember, with the Magento fallback method, if your site calls on a file, it first looks into the assigned theme, then the parent theme, the blank theme, and finally, the module-specific theme files. Therefore, in this example, you could use the sportswear_theme as a common parent to contain all files common to both blue and green. You would only need to include files or CSS impacting the color of these themes.
As mentioned earlier, you can assign design packages and themes at any level of the GWS hierarchy. As with any configuration, the choice depends on the level you wish to assign control. Global configurations affect the entire Magento installation. Website level choices set the default for all subordinate Store Views, which can also have their own theme specifics, if desired.
Let's walk through the process of assigning a custom design package and themes. For the sake of this exercise, let's continue with our sportswear theme, as described earlier. We created a sportswear website and store, with two Store Views for English and French:
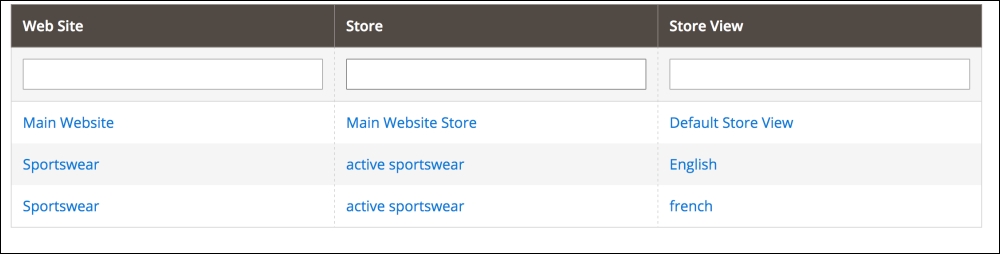
We're going to now assign our sportswear theme to the sportswear Website and Store View. Our first task is to assign the design package and theme to the Website as the default for all subordinate Store View:
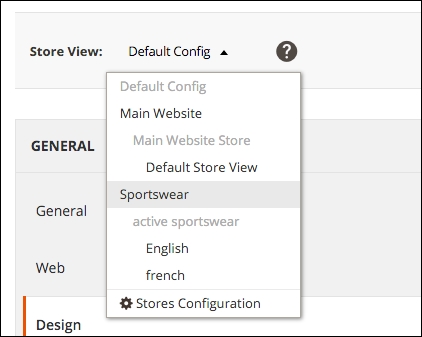
- Go to Stores | Configuration | Design in your Magento backend.
- In the Current Configuration Scope dropdown menu, choose Sportswear:
- As shown in the following screenshot, enter the name of your design package, template, layout, and skin. You will have to uncheck the boxes labeled Use Default beside each field you wish to use.
- Click Save Config:
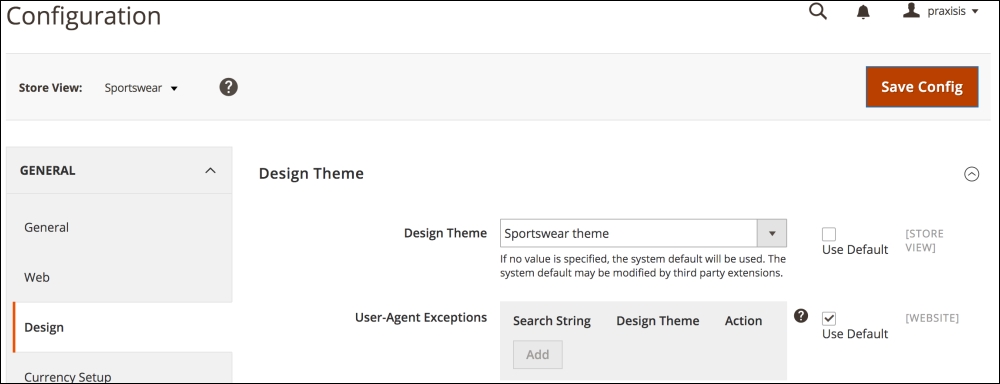
The reason you enter default in the fields as shown above is to provide the fallback protection we described earlier. Magento needs to know where to look for any files that may be missing from your theme files.
Besides the obvious use of different themes within a package for different looks among Store Views, theme variants can be used to provide alternative frontend layouts based on date, such as holiday shopping season, or device, such as smartphone or tablet.
It would be painful if changes that affect your public site content had to be manually turned on at the exact date and time you wished. For products, you can schedule price changes to automatically take effect between any two dates and times (you could have a one-hour sale price!) simply by adding the date/time configuration in the product detail screen.
Likewise, you can schedule changes in your stores' themes to take effect while you sleep! To schedule a theme variant based on a date:
- Go to Content | Design | Schedule in your Magento backend.
- Click on Add Design Change.
- Select the Store View you wish to change.
- Choose from the Custom Design drop-down for the theme variant you want.
- Enter the Date From and Date To dates and times for the period of time you want the change to take effect.
- Click on Save.