Table of Contents for
Magento 2 - Build World-Class online stores
 Magento 2 - Build World-Class online stores
Published by
Packt Publishing, 2017
Magento 2 - Build World-Class online stores
Published by
Packt Publishing, 2017
- Cover
- Table of Contents
- Magento 2 - Build World-Class online stores
- Magento 2 - Build World-Class online stores
- Credits
- Preface
- 1. Module 1
- 1. Magento Fundamentals
- XAMPP installation
- Magento
- Summary
- 2. Magento 2.0 Features
- An introduction to the Magento order management system
- Magento 2.0 command-line configuration
- The command-line utility
- Summary
- 3. Working with Search Engine Optimization
- Store configuration
- SEO and searching
- SEO catalog configuration
- Google Analytics tracking code
- Optimizing Magento pages
- Summary
- 4. Magento 2.0 Theme Development – the Developers' Holy Grail
- Magento 2.0 theme structure
- The Magento Luma theme
- Magento theme inheritance
- CMS blocks and pages
- Custom variables
- Creating a basic Magento 2.0 theme
- Summary
- 5. Creating a Responsive Magento 2.0 Theme
- Composer – the PHP dependency manager
- Building the CompStore theme
- CSS preprocessing with LESS
- Applying new CSS to the CompStore theme
- Creating the CompStore logo
- Applying the theme
- Creating CompStore content
- Customizing Magento 2.0 templates
- Summary
- 6. Write Magento 2.0 Extensions – a Great Place to Go
- Using the Zend framework
- Magento 2.0 extension structure
- Developing your first Magento extension
- The Twitter REST API
- The TweetsAbout module structure
- Using TwitterOAuth to authenticate our extension
- Developing the module
- Summary
- 7. Go Mobile with Magento 2.0!
- Adjusting the CompStore theme for mobile devices
- The Magento 2.0 responsive design
- The Magento UI
- Implementing a new CSS mixin media query
- Adjusting tweets about extensions for mobile devices
- Summary
- 8. Speeding up Your Magento 2.0
- Indexing and caching Magento
- Indexing and re-indexing data
- The Magento cron job
- Caching
- Fine-tuning the Magento hosting server
- Selecting the right Magento hosting service
- Apache web server deflation
- Enabling the expires header
- Minifying scripts
- Summary
- 9. Improving Your Magento Skills
- Magento knowledge center
- Improving your Magento skills
- Summary
- 2. Module 2
- 1. Magento 2 System Tools
- Installing Magento 2 sample data via GUI
- Installing Magento 2 sample data via the command line
- Managing Magento 2 indexes via the command line
- Managing Magento 2 cache via the command line
- Managing Magento 2 backup via the command line
- Managing Magento 2 set mode (MAGE_MODE)
- Transferring your Magento 1 database to Magento 2
- 2. Enabling Performance in Magento 2
- Configuring Redis for backend cache
- Configuring Memcached for session caching
- Configuring Varnish as the Full Page Cache
- Configuring Magento 2 with CloudFlare
- Configuring optimized images in Magento 2
- Configuring Magento 2 with HTTP/2
- Configuring Magento 2 performance testing
- 3. Creating Catalogs and Categories
- Create a Root Catalog
- Create subcategories
- Manage attribute sets
- Create products
- Manage products in a catalog grid
- 4. Managing Your Store
- Creating shipping and tax rules
- Managing customer groups
- Configuring inventories
- Configuring currency rates
- Managing advanced pricing
- 5. Creating Magento 2 Extensions – the Basics
- Initializing extension basics
- Working with database models
- Creating tables using setup scripts
- Creating a web route and controller to display data
- Creating system configuration fields
- Creating a backend data grid
- Creating a backend form to add/edit data
- 6. Creating Magento 2 Extensions – Advanced
- Using dependency injection to pass classes to your own class
- Modifying functions with the use of plugins – Interception
- Creating your own XML module configuration file
- Creating your own product type
- Working with service layers/contracts
- Creating a Magento CLI command option
- 3. Module 3
- 1. Planning for Magento
- Technical considerations
- Global-Website-Store methodology
- Planning for multiple stores
- Summary
- 2. Managing Products
- Managing products the customer focused way
- Creating products
- Managing inventory
- Pricing tools
- Autosettings
- Related products, up-sells, and cross-sells
- Importing products
- Summary
- 3. Designs and Themes
- The concept of theme inheritance
- Default installation of design packages and themes
- Installing third-party themes
- Inline translations
- Working with theme variants
- Customizing themes
- Customizing layouts
- Summary
- 4. Configuring to Sell
- Payment methods
- Shipping methods
- Managing taxes
- Transactional e-mails
- Summary
- 5. Managing Non-Product Content
- Summary
- 6. Marketing Tools
- Promotions
- Newsletters
- Using sitemaps
- Optimizing for search engines
- Summary
- 7. Extending Magento
- The new Magento module architecture
- Extending Magento functionality with Magento plugins
- Building your own extensions
- Summary
- 8. Optimizing Magento
- Indexing and caching
- Caching in Magento 2 – not just FPC
- Tuning your server for speed
- Summary
- 9. Advanced Techniques
- Version control
- Magento cron
- Backing up your database
- Upgrading Magento
- Summary
- 10. Pre-Launch Checklist
- System configurations
- Design configurations
- Search engine optimization
- Sales configurations
- Product configurations
- Maintenance configurations
- Summary
- Index
Every retailer with whom we work finds it beneficial to offer promotions from time to time. From free shipping to coupons, promotions can help consumers choose your products over competitors, particularly if they feel they're getting a great bargain in the process.
As with sales tax, promotions are rule-based, meaning that the application and calculation of a promotion are based on rules you create. In Magento, there are two types of promotion rules:
- Catalog price rules apply to any product that meets certain criteria. The discount is applied automatically.
- Cart price rules, on the other hand, can be set to be only applied when a valid coupon is entered by the customer during checkout. Shopping cart rules can also be applied automatically. Furthermore, shopping cart rules — or coupons — can be publicized by adding them to an RSS feed for your site.
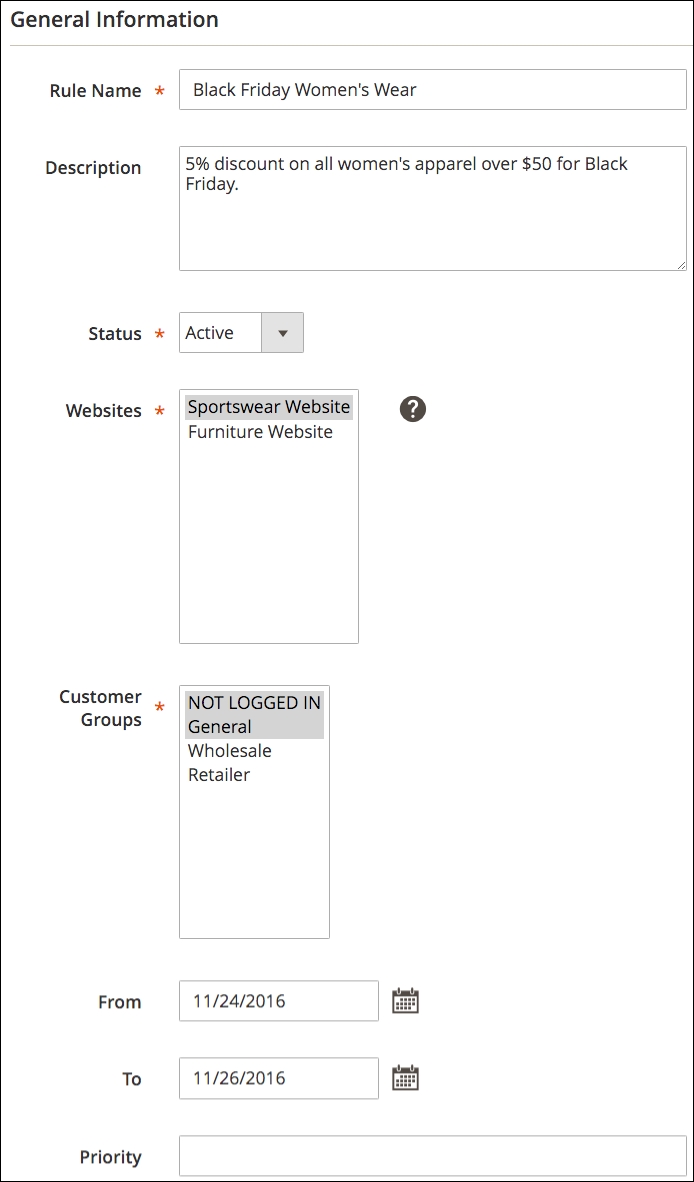
As described, a catalog price rule is a discount that is applied to selected products automatically. For example, let's assume you wish to provide a 5% discount on all women's apparel priced over $50 sold between November 24, 2016 through November 26, 2016, as a special Black Friday promotion.
Tip
Black Friday and Cyber Monday
For years in the United States, the day after Thanksgiving — the last Friday of November, Black Friday — has been one of the busiest shopping days of the Christmas season. Retailers offer huge discounts and shoppers begin lining up well before dawn just to be the first one in the door. To counter the brick and mortar retailers, online retailers created Cyber Monday, the Monday following Black Friday, likewise offering huge discounts and special offers. Personally, we like the sound of Cyber Monday over the morbid moniker of Black Friday. We also like e-commerce!
To create a catalog price rule, you need to perform the following steps:
- Go to Marketing | Catalog Price Rules.
- Click on Add New Rule.
- Enter the following in the Rule Information screen:
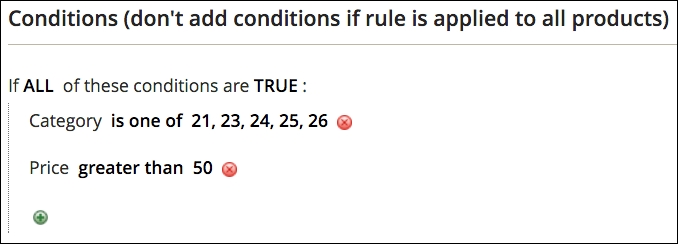
- Click on Conditions in the left tab menu. Now, here's where it gets interesting!
- Click the green plus sign to add a condition to your rule.
- In the drop-down menu that appears, choose Category.
- Click on is and select is one of.
- Click the ellipsis (…).
- Click the small, square icon to the right to reveal a hierarchy of categories. Select the categories you wish to apply the discount to. Your selections will add the category IDs into the empty field.
- Click on the green checkmark icon to save your category selections.
- Click on the green plus sign again and choose Price from the drop-down menu.
- Click on is. Select greater than from the drop-down menu.
- Click the following ellipsis. Enter 50.00 in the field and click outside the field.
Now, we need to create the discount calculation:
- Click on the Actions menu tab.
- Since we're going to apply a percentage discount to the price of the product, we can leave Apply as is.
- By Percentage of the Original Price reduces the price of the product by the percentage specified, such as 15%off the price.
- By Fixed Amount will reduce the product's price by a specified amount, such as 50 dollars off.
- To Percentage of the Original Price, by contrast to By Percentage of the Original Price, sets the price at the percentage you enter. For example, if you enter 75, the price of the product would be 75% of its original price.
- Likewise, To Fixed Amount, sets the price of the product at the price you enter instead of reducing the price by a fixed amount.
- In Discount Amount, enter 5.
- If you want the discounts to apply to not only a complex product type (for example, configurable, bundle, or group) but to their associated products as well, set Subproduct discounts to Yes and configure the amount of discount to apply to any subproducts.
- If we do not want to apply any other promotion rules to these applicable products, choose Yes for Discard subsequent rules. For example, you may not want a customer to receive multiple discounts on the same product.
- Click on Save Rule.
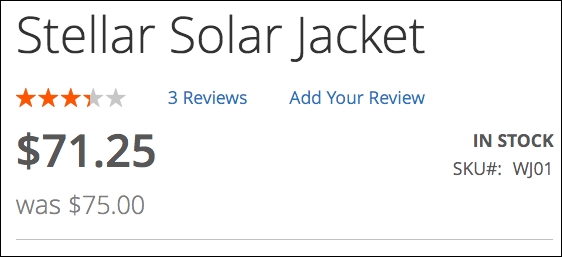
You now have a new rule that will automatically take effect at 12:01 AM on Friday, November 24th and run until 11:59 PM on Sunday, November 26th. However, there is one final action to take!
Before your new rule can take effect, click on Apply Rules at the top of the Catalog Price Rules page. Magento needs to set itself to apply the rules to the applicable products.
Magento has some very powerful and flexible tools for creating discounts that can be applied once the customer has reached the shopping cart part of their visit. In fact, we have found it difficult to identify a single discount scenario we could not accommodate in Magento.
The key features of cart price rules for which you should be aware are:
- You can create rules for any or all of your websites. Rules apply to all store views within a website.
- You can allow discounts for only selected customer groups. You could offer coupons to wholesalers, for instance, that could not be used for retail customers.
- You do not have to use a coupon code. Your rules can be applied automatically as long as the shopping cart meets the required criteria.
- You can limit the number of times a coupon is used. Or you can allow a coupon code to be used multiple times by a given customer.
- Product attributes can be used as criteria. As noted in Chapter 3, Managing Products, a product attribute can be configured so that you can apply a discount based on the value of that attribute within one or more products in the customer's shopping cart.
- You can apply the discount to the entire cart or to only select products in the cart. For instance, if you are giving a 20% discount to shirts only, but customers put other types of products in their cart, you can configure the discount so that it deducts 20% from the price of the shirts in the cart and not from any other product.
- Magento can generate coupon codes. Some e-commerce systems require that you contrive the coupon codes you wish to use. In Magento, you have the ability to generate and manage as many codes as you need.
Let's use a specific example to learn how to create a cart price rule:
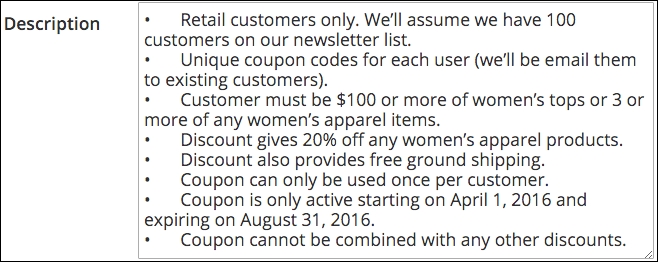
- Retail customers only. We'll assume we have 100 customers on our newsletter list.
- Unique coupon codes for each user (we'll email them to existing customers).
- Customer must buy $100 or more of women's tops or three or more of any women's apparel items.
- Discount gives 20% off on women's apparel.
- Discount also provides free ground shipping.
- Coupon can only be used once per customer.
- Coupon is only active starting on April 1, 2016 and expiring on August 31, 2016.
- Coupon cannot be combined with any other discounts.
The process of building our rule will follow these steps:
- Adding the new rule.
- Defining the rule's conditions.
- Defining the rule's actions.
- Modifying the rule's labels.
- Generating coupon codes (if needed).
- Testing the rule.
To begin building our cart price rule, go to Marketing | Cart Price Rules in your Magento 2 backend. Click on Add New Rule.
The Rule Information panel for our new rule has several fields to use to set up the rule:
- Rule Name: Enter Free Shipping & 20% off Women's Apparel as the name of your rule. This will be shown in your list of rules.

- Description: You can use this field to fully describe the rule. In our example, we will enter the coupon specifics we outlined for this example.
- Status: Select Active when you wish for the coupon to be available for use.
- Websites: Select Sportswear Website, since our example rule only applies to products purchased in that store. You can select any number (or all) of the websites shown. Our selection also means that visitors to all three sportswear store views (English, French, and German) can use the code.
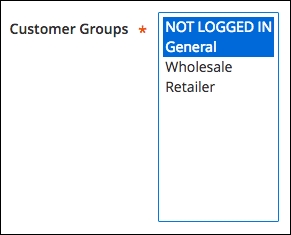
- Customer Groups: Since we only want our coupon to be used for retail customers, we would select NOT LOGGED IN and General. If we only want logged in retail customers, we would only select General.
- Coupon: We will be using a coupon code; therefore, select Specific Coupon.
- Coupon Code: Our goal is to create 100 unique codes to distribute. This may help us track code usage by customer, and it will allow us to restrict the usage of the code to only one use, since we will be distributing to customers that are not logged in. Instead of entering a specific coupon code, check the box labeled Use Auto Generation. (We will be managing the generation of codes in a moment.)
- Uses per Coupon: Enter 1, as we want to only allow a customer to use it once before expiring.
- Uses per Customer: This value only applies to logged in customers. We will also enter 1 in this field.
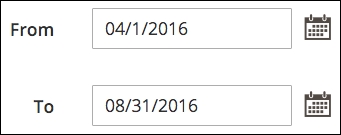
- From/To: These are the first and last dates the coupon can be used. If you leave FROM blank, the coupon will be immediately available (if "Active"); if TO is blank, the coupon code will never expire. Using the calendar pop-up (click the small icon to the right), choose April 1, 2016 for From and August 31, 2016 for To.
- Priority: If you have more than one active rule, they will be applied in an order based on this field. The order is numeric, descending, with 1 being the highest priority.
- Public In RSS Feed: If you want to publicize your discount in your store's RSS field, set this option to Yes. Since ours requires a specific coupon code and we wish to limit to known newsletter subscribers, we will select No for this field.
A rule's conditions can be considered as minimum requirements. In other words, what is necessary about a customer's shopping cart for the rule to be valid?
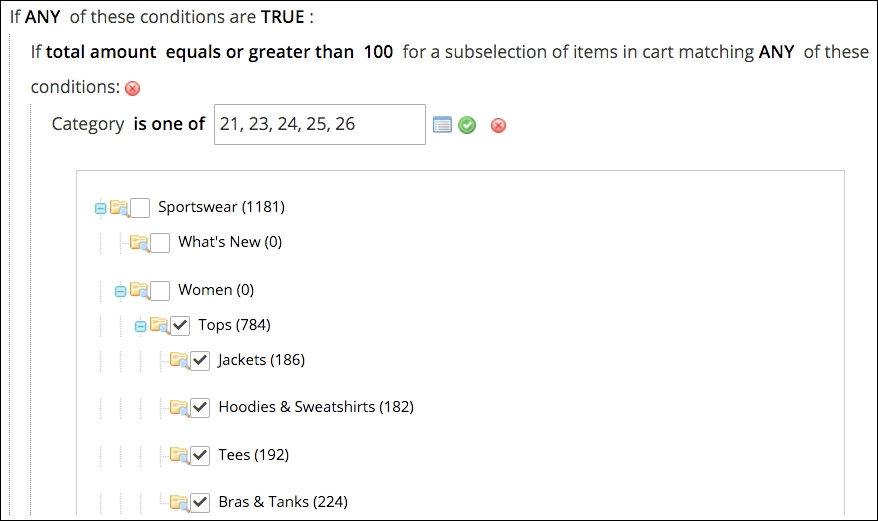
In our example, a coupon code can only be used if the shopping cart contains $100 or more of women's tops or 3 or more women's apparel items. To create this condition, go to the Conditions panel.
Since we have two conditions, both of which are valid, click the ALL in In ALL of these conditions are TRUE. It will allow you to select ANY. These creates an "or" condition.
Our first condition will test whether the customer has $100 or more of women's tops in their shopping cart:
- Click the green + icon to create your first condition.
- In the dropdown, choose Products subselection. We are creating a rule that will apply to only a particular selection of qualifying products.
- Click on the words total quantity is and select total amount.
- Click the word is and select equals or greater than.
- Click the following ellipsis (…) and enter 100. Hit your Enter key.
- Change ALL to ANY in the condition description.
- Click the green + icon nested within this condition.
- Select Category from the dropdown menu.
- Click is and select is one of from the dropdown menu.
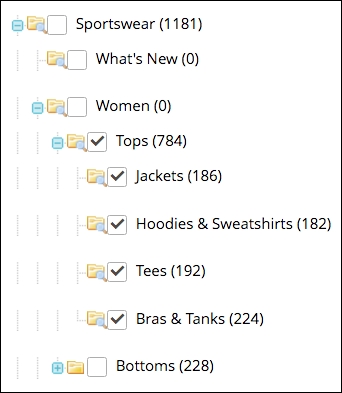
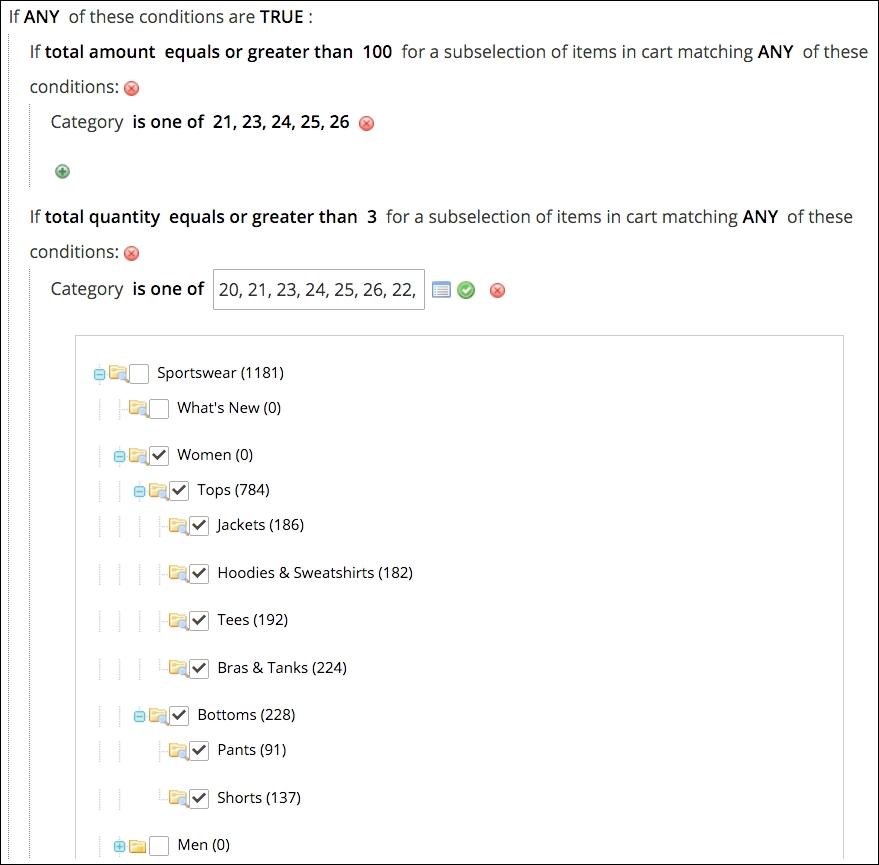
- Click the following ellipsis (…), and by either using the list icon or by typing the category IDs of the categories you wish to use, choose the Tops category and all sub-categories within, as shown in the following screenshot:
- Once you have selected your categories, click the green checkmark icon to save your choices.
Next, we need to add the or condition that tests whether the customer has three or more women's apparel items into their cart:
- Click the left-most green + icon.
- Select Products subselection in the resulting dropdown.
- Select equals or greater than for the comparison value.
- Enter 3 for the amount.
- Change ALL to ANY in the condition description.
- Click the nested green + icon.
- Select Category from the dropdown.
- Click is and select is one of from the dropdown choices.
- Click the ellipsis (…) and select all categories within the women's apparel section, as you can see in the following image.
- Click Save and Continue Edit to save your work to this point.
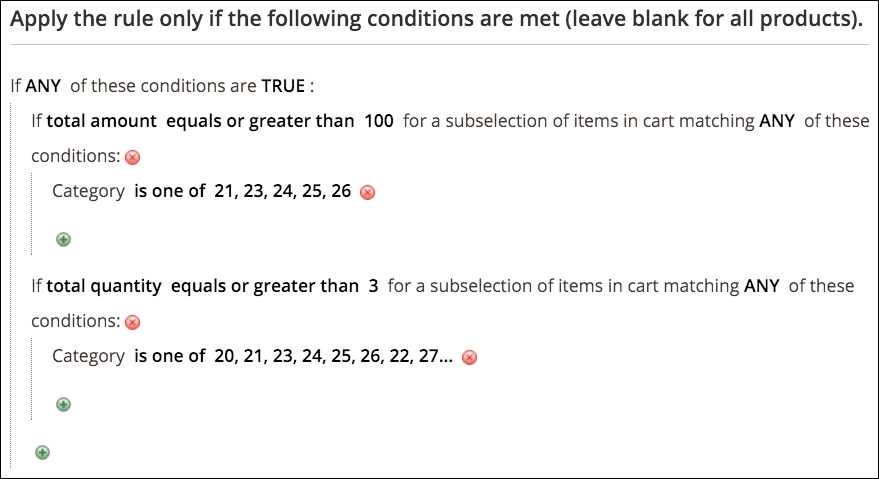
Once your conditions are set, your Conditions panel should look like the following image.
Now we can move on to specifying the actions that will take place for shopping carts that match our conditions.
There are two parts to a rule's actions:
- The amount discounted
- For which products the discount is to be applied
This is important to understand, as many are confused by the fact that action conditions appear very similar to the rule conditions that we created before. The conditions in this panel dictate which products qualify for the discounts.
In other words — as in our case — we're using one set of conditions to qualify the shopping cart and another set, within the Actions panel, to identify to which products the discount will be applied. These conditions are different. If they were the same — for example, you're discounting a shopping cart containing $100 or more in products — then you do not have to add any conditions to the Actions panel.
Let's now configure our Actions panel for our needs:
- For Apply, select the default: Percent of product price discount.
Let's go over the various choices here, so you have an idea as to which discount will work best with your purposes. Any value that is required will be entered into the Discount Amount field.
- Percent of product price discount: Subtracts a percentage discount from the price of the applicable products.
- Fixed amount discount: Subtracts a fixed amount from the price of the products.
- Fixed amount discount for whole cart: The fixed amount entered here will be discounted from the entire cart total (you can specify whether the discount applies to shipping elsewhere on this panel).
- Buy X Get Y Free (discount amount is Y): You can specify that if a customer buys X quantity of a product (entered into the Discount Qty Step (Buy X) field), they will receive Y quantity of the same product for free.
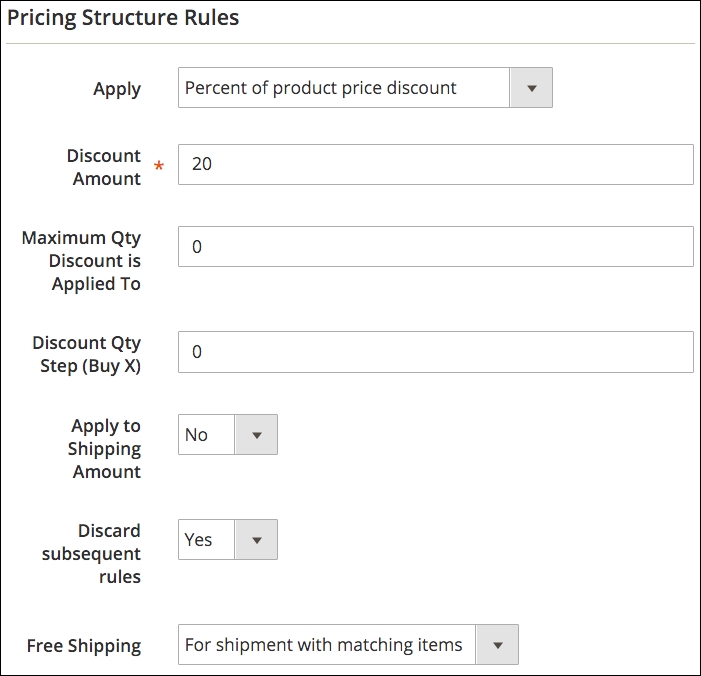
- Enter 20 into the Discount Amount field. You do not need to enter % for percentage discounts.
- Since we are not limiting the number of the same item to which the discount may be applied, we will set Maximum Qty Discount is Applied To as 0.
- The Discount Qty Step (Buy X) does not apply for our case (see above regarding the Buy X Get Y Free discount choice).
- Set Leave Apply to Shipping Amount as No.
- Set Discard subsequent rules to Yes. We do not want other offers to apply if this discount is used.
- Set Free Shipping to For shipment with matching items, as our example discount also gives the customer free shipping for the entire qualifying order.
Note
For free shipping to work, you have to have at least one free shipping method configured. See Chapter 4, Configuring to Sell, for more information on shipping.
- Click on Save and Continue Edit to save your settings so far.
The fields mentioned above can be visualized in the following screenshot:
The next part of our actions configuration is to designate to which products the discount will be applied. In our case, any women's apparel (up to the three we set in the top part of the panel).
Using the same methodology we use in the Conditions panel, our Actions panel rules, when completed, will look like the following:

While you could use the name of the rule as what displays to customers, it's probably more prudent to compose a discount label that more succinctly describes the discount. Furthermore, as in our example, we need different labels for each of the foreign language sites on which we sell sportswear.
For our example, we're going to label our discount for our customers as Save 20% & Free Shipping!
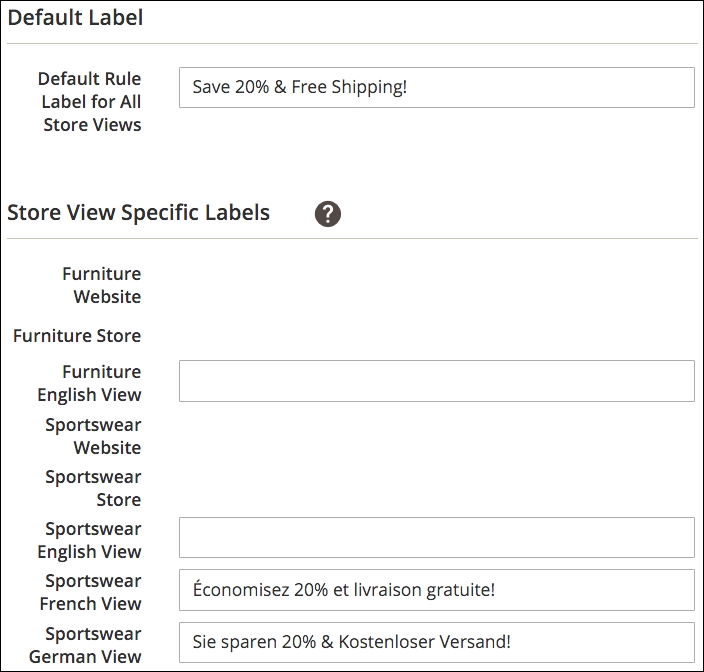
- In the Labels panel, enter Save 20% & Free Shipping! in Default Rule Label for All Store Views.
- Since we can use this same label for our English store view, we can leave Sportswear English View blank.
- For Sportswear French View, we might enter (and, again, our French and German are not polished at all!) Économisez 20% et livraison gratuite!
- In the Sportswear German View, we might use Sie sparen 20% & Kostenloser Versand!
And, of course, we click on Save and Continue Edit. Our Labels panel now looks like the following screenshot:
In our example, we want to create 100 unique coupon codes that we can send to our selected customers. Magento does an amazing job of helping you generate codes and also keeps track of how many times specific codes have been used.
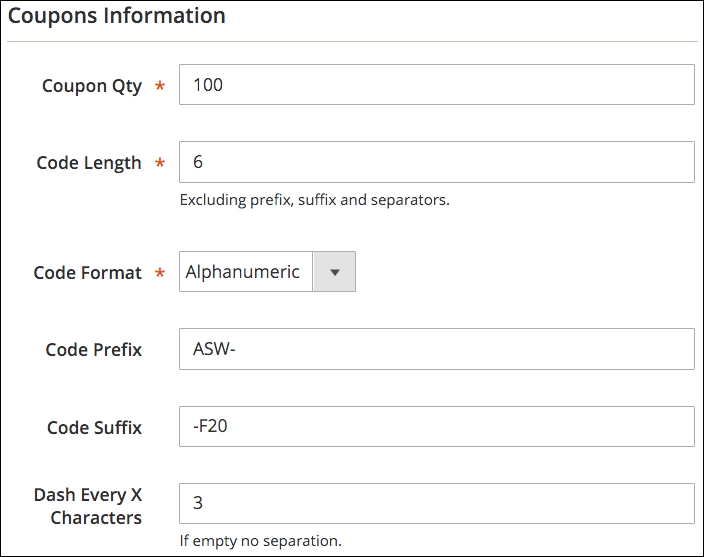
To begin, go to the Manage Coupon Codes panel. Let's assume we want to create codes that are alphanumeric (both letters and numbers), 12 characters long, and have a prefix of ASW and a suffix of F20. Our coupon pattern would be ASW-XXX-XXX-F20, where "XXX" is a unique alphanumeric code. To configure this, we set up the parameters for the codes and then click on Generate to allow Magento to create the 100 unique codes we need:
- In Coupon Qty, enter 100.
- Our Code Length is 6 (we do not count the hyphens or the prefix and suffix, as we specify those a bit later).
- For Code Format, select Alphanumeric.
- In Code Prefix, enter ASW- (we're using this for Acme Sportswear).
- In Code Suffix, enter -F20 (for Free and 20% off).
Note
The use of a prefix and/or suffix is purely optional. If you're using unique coupon codes, you may want to use some designators that will help you identify that the code is a valid code for the order. When an order is viewed in your backend, it will show what codes, if any, were applied to the order. If you only use randomly generated codes without other designators, you might not be able to easily determine what actual discount rule was applied. If you want hyphens before or after a prefix/suffix, you need to include it in the appropriate fields.
- Since we want a hyphen inserted into our codes, we can enter 3 in Dash Every X Characters.
The fields mentioned above can be visualized in the following screenshot:
Now, we can click on Generate to create our 100 unique codes. Once generated, you should see 100 records created in the lower portion of the panel. Although your codes will be different (they are randomly generated, after all), your list should look similar to ours.
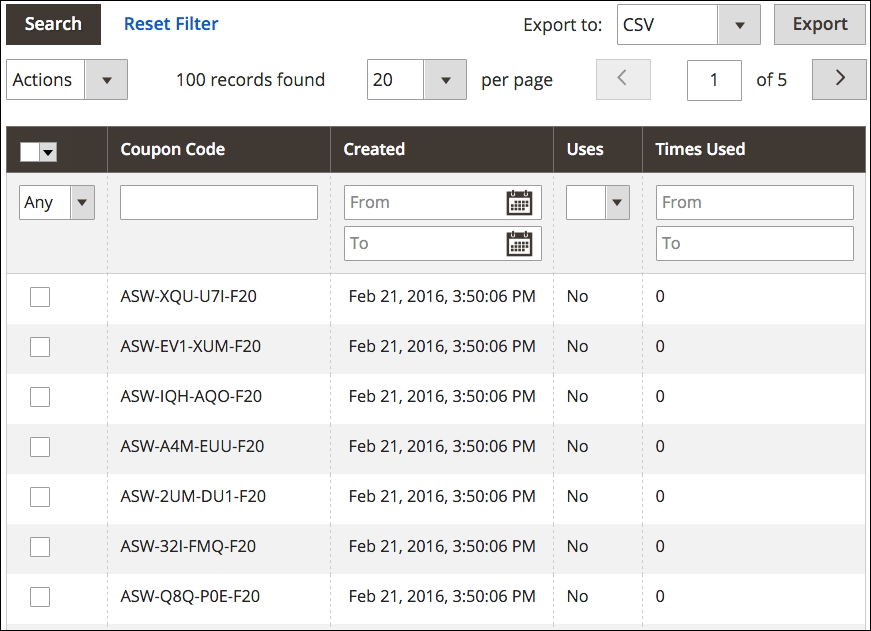
Using the export tool at the top of your list, you can now export your codes and use them with your email program to send these codes to your customers.