Table of Contents for
Magento 2 - Build World-Class online stores
 Magento 2 - Build World-Class online stores
Published by
Packt Publishing, 2017
Magento 2 - Build World-Class online stores
Published by
Packt Publishing, 2017
- Cover
- Table of Contents
- Magento 2 - Build World-Class online stores
- Magento 2 - Build World-Class online stores
- Credits
- Preface
- 1. Module 1
- 1. Magento Fundamentals
- XAMPP installation
- Magento
- Summary
- 2. Magento 2.0 Features
- An introduction to the Magento order management system
- Magento 2.0 command-line configuration
- The command-line utility
- Summary
- 3. Working with Search Engine Optimization
- Store configuration
- SEO and searching
- SEO catalog configuration
- Google Analytics tracking code
- Optimizing Magento pages
- Summary
- 4. Magento 2.0 Theme Development – the Developers' Holy Grail
- Magento 2.0 theme structure
- The Magento Luma theme
- Magento theme inheritance
- CMS blocks and pages
- Custom variables
- Creating a basic Magento 2.0 theme
- Summary
- 5. Creating a Responsive Magento 2.0 Theme
- Composer – the PHP dependency manager
- Building the CompStore theme
- CSS preprocessing with LESS
- Applying new CSS to the CompStore theme
- Creating the CompStore logo
- Applying the theme
- Creating CompStore content
- Customizing Magento 2.0 templates
- Summary
- 6. Write Magento 2.0 Extensions – a Great Place to Go
- Using the Zend framework
- Magento 2.0 extension structure
- Developing your first Magento extension
- The Twitter REST API
- The TweetsAbout module structure
- Using TwitterOAuth to authenticate our extension
- Developing the module
- Summary
- 7. Go Mobile with Magento 2.0!
- Adjusting the CompStore theme for mobile devices
- The Magento 2.0 responsive design
- The Magento UI
- Implementing a new CSS mixin media query
- Adjusting tweets about extensions for mobile devices
- Summary
- 8. Speeding up Your Magento 2.0
- Indexing and caching Magento
- Indexing and re-indexing data
- The Magento cron job
- Caching
- Fine-tuning the Magento hosting server
- Selecting the right Magento hosting service
- Apache web server deflation
- Enabling the expires header
- Minifying scripts
- Summary
- 9. Improving Your Magento Skills
- Magento knowledge center
- Improving your Magento skills
- Summary
- 2. Module 2
- 1. Magento 2 System Tools
- Installing Magento 2 sample data via GUI
- Installing Magento 2 sample data via the command line
- Managing Magento 2 indexes via the command line
- Managing Magento 2 cache via the command line
- Managing Magento 2 backup via the command line
- Managing Magento 2 set mode (MAGE_MODE)
- Transferring your Magento 1 database to Magento 2
- 2. Enabling Performance in Magento 2
- Configuring Redis for backend cache
- Configuring Memcached for session caching
- Configuring Varnish as the Full Page Cache
- Configuring Magento 2 with CloudFlare
- Configuring optimized images in Magento 2
- Configuring Magento 2 with HTTP/2
- Configuring Magento 2 performance testing
- 3. Creating Catalogs and Categories
- Create a Root Catalog
- Create subcategories
- Manage attribute sets
- Create products
- Manage products in a catalog grid
- 4. Managing Your Store
- Creating shipping and tax rules
- Managing customer groups
- Configuring inventories
- Configuring currency rates
- Managing advanced pricing
- 5. Creating Magento 2 Extensions – the Basics
- Initializing extension basics
- Working with database models
- Creating tables using setup scripts
- Creating a web route and controller to display data
- Creating system configuration fields
- Creating a backend data grid
- Creating a backend form to add/edit data
- 6. Creating Magento 2 Extensions – Advanced
- Using dependency injection to pass classes to your own class
- Modifying functions with the use of plugins – Interception
- Creating your own XML module configuration file
- Creating your own product type
- Working with service layers/contracts
- Creating a Magento CLI command option
- 3. Module 3
- 1. Planning for Magento
- Technical considerations
- Global-Website-Store methodology
- Planning for multiple stores
- Summary
- 2. Managing Products
- Managing products the customer focused way
- Creating products
- Managing inventory
- Pricing tools
- Autosettings
- Related products, up-sells, and cross-sells
- Importing products
- Summary
- 3. Designs and Themes
- The concept of theme inheritance
- Default installation of design packages and themes
- Installing third-party themes
- Inline translations
- Working with theme variants
- Customizing themes
- Customizing layouts
- Summary
- 4. Configuring to Sell
- Payment methods
- Shipping methods
- Managing taxes
- Transactional e-mails
- Summary
- 5. Managing Non-Product Content
- Summary
- 6. Marketing Tools
- Promotions
- Newsletters
- Using sitemaps
- Optimizing for search engines
- Summary
- 7. Extending Magento
- The new Magento module architecture
- Extending Magento functionality with Magento plugins
- Building your own extensions
- Summary
- 8. Optimizing Magento
- Indexing and caching
- Caching in Magento 2 – not just FPC
- Tuning your server for speed
- Summary
- 9. Advanced Techniques
- Version control
- Magento cron
- Backing up your database
- Upgrading Magento
- Summary
- 10. Pre-Launch Checklist
- System configurations
- Design configurations
- Search engine optimization
- Sales configurations
- Product configurations
- Maintenance configurations
- Summary
- Index
Redis may be one of the best improvements since we used Memcache(d) or Alternative PHP Cache (APC). For the last couple of years, Redis is available in Magento 1 and has a big performance benefit.
What is Redis and why is it important for Magento? Well, Redis is not new; its initial release dates to the beginning of 2009—almost as young as Magento 1. Redis is a key-value storage database that stores the data in-memory of your web server. Besides this, the in-memory caches are fast and also have a persistence feature that is really important when a server reboots. All caches are not flushed during a reboot and are available in-memory when the web server is up again.
In the beginning of the Magento 1 area, we used Memcache(d) or APC, which worked very well but not as well as Redis. In Magento 1, Redis was used for a backend cache and session storage most of the time. Some websites also used it as a Full Page Cache (FPC) storage.
One other great advantage of Redis is that it has multiple database containers, one for the default cache and the other for the FPC. Although the Redis performance is better in a lot of cases, it is not the Holy Grail. There are drawbacks to its architecture.
For this recipe, we will use a Droplet created in Chapter 1, Magento 2 System Tools, at DigitalOcean, https://www.digitalocean.com/. We will be using NGINX, PHP-FPM, and a Composer-based setup, including sample data connected to a Redis server. No other prerequisites are required.
For the purpose of this recipe, let's assume that we need to create a Magento 2 Redis setup. The following steps will guide you through this:
- First, we need to install the Redis server and Redis PHP client before we can connect it to Magento. Follow the next step on the shell:
cd /opt
wget http://download.redis.io/releases/redis-3.0.5.tar.gz
tar xzf redis-3.0.5.tar.gz
cd redis-3.0.5
make && make install
Change the version number of the current one if needed.
- Go to the
/opt/redis-3.0.5/utilsdirectory and run the following script:./install-server.sh - Commit to the following questions: (Press Enter to all of them; the default is just fine.)
Welcome to the redis service installer
This script will help you easily set up a running redis server

Please select the redis port for this instance: [6379]
Selecting default: 6379
Please select the redis config file name [/etc/redis/6379.conf]
Selected default - /etc/redis/6379.conf
Please select the redis log file name [/var/log/redis_6379.log]
Selected default - /var/log/redis_6379.log
Please select the data directory for this instance [/var/lib/redis/6379]
Selected default - /var/lib/redis/6379
Please select the redis executable path [/usr/local/bin/redis-server]
Selected config:
Port           : 6379
Config file    : /etc/redis/6379.conf
Log file       : /var/log/redis_6379.log
Data dir       : /var/lib/redis/6379
Executable     : /usr/local/bin/redis-server
Cli Executable : /usr/local/bin/redis-cli
Is this ok? Then press ENTER to go on or Ctrl-C to abort.
Copied /tmp/6379.conf => /etc/init.d/redis_6379
Installing service...
Success!
Starting Redis server...
Installation successful!
- Now let's test our Redis server using the following command:
redis-cli –version
service redis_6379 status
netstat –anp | grep redis
As you can see, the Redis server is running under port 6379.
- The next important element is installing a PHP module that can communicate with the Redis server. We will use PHP Redis here (https://github.com/phpredis/phpredis).
Use the following command to install PHP Redis:
cd /opt
git clone https://github.com/phpredis/phpredis.git
cd phpredis
phpize
./configure
make && make install
- Now, we need to let PHP know there is a Redis extension available that we can use. Run the following command:
echo "extension=redis.so" | sudo tee /etc/php5/mods-available/redis.iniDepending on whether you are using PHP 5 or PHP 7, you may want to change the PHP path.
- Now we need to link the Redis PHP extension to PHP-FPM and PHP CLI. Run the following commands:
cd /
ln -s /etc/php5/mods-available/redis.ini /etc/php5/fpm/conf.d/20-redis.ini
ln -s /etc/php5/mods-available/redis.ini /etc/php5/cli/conf.d/20-redis.ini
- If everything is correct, we can restart the PHP-FPM server to activate the Redis PHP extension. Run the following command:
service php5-fpm restart - To make sure that the Redis PHP and Redis server are running together, we can use the following command:
php -r "if (new Redis() == true){ echo \"\r\n OK \r\n\"; }"By default, creating a
phpinfo.phppage in the root directory in Magento 2 will not work. First, you need to create thephpinfo.phpfile in the/pubdirectory. Then, you need to change the NGINX configuration (nginx.conf.sample) fromlocation ~ (index|get|static|report|404|503)\.php$ {tolocation ~ (index|get|static|report|404|503|phpinfo)\.php$ {, which is located at the bottom of the file. In Apache, we don't have an issue like this; it works by default. - Congratulations, you just finished the Redis server and PHP Redis setup. Now let's continue with the Magento 2 part.
- Open the
env.phpfile in Magento 2 located at/app/etcand add the following code at the top: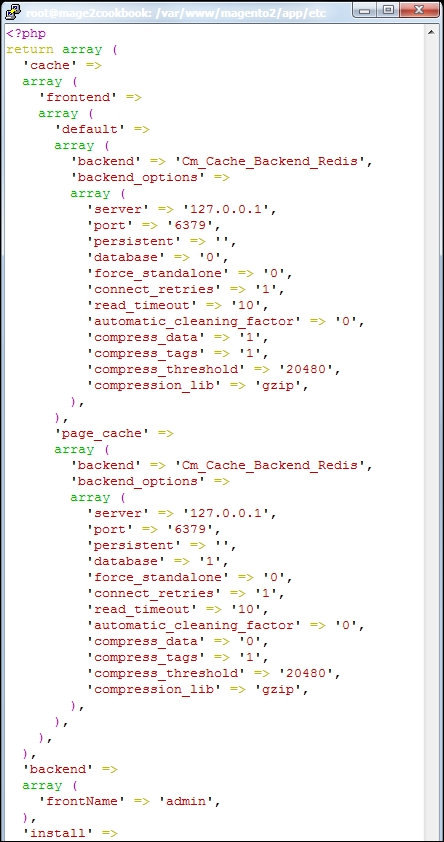
- As you can see, we are using two databases—one for the default cache and one for page_cache (Full Page Cache). Now, save your file and remove any cache in
/var/page_cacheand/var/cache. Let's open up your browser and refresh your website.If everything is configured correctly in the
env.phpfile, you should not get any errors and thear/page_cacheandvar/cachedirectories should be empty. - To check how many keys Redis received, we can run the following command from the shell:
redis-cliOn the prompt, continue with
INFO; this will give you a list of the following details: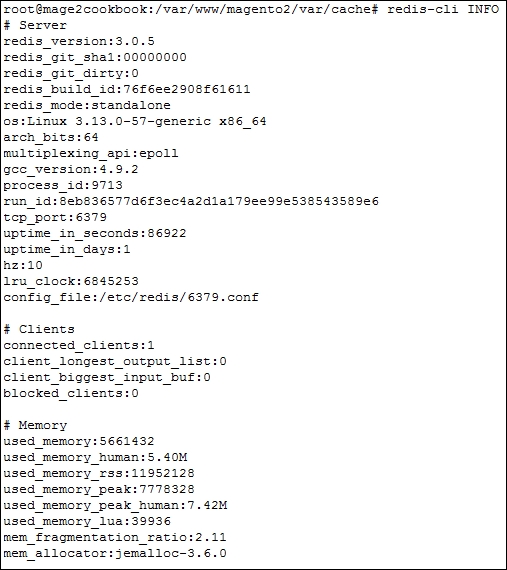
To close the Redis terminal, use
exit. - Congratulations, you just finished configuring the Redis server and PHP Redis with Magento 2.
Let's recap and find out what we did throughout this recipe. In steps 1 through 13, we installed a Redis server and configured Magento 2 to store the backend cache.
In step 1, we installed Redis from source and compiled the code. This version is more stable than the default one available in Ubuntu. After compiling the code, we are able to use an install script to create a working setup running on port 6379.
After installing and testing the code in steps 3 and 4, we start installing the PHP Redis module. This code is pulled from GitHub and compiled from source.
In step 6, we created a redis.ini file, which is linked in step 7 with the correct PHP module directory. Before we can test it, we need to restart the PHP-FPM server and use a simple PHP command to test if everything is working fine.
In step 11, we added an additional piece of code to the env.php file, which will tell Magento 2 to store all of the cache in Redis as of now.
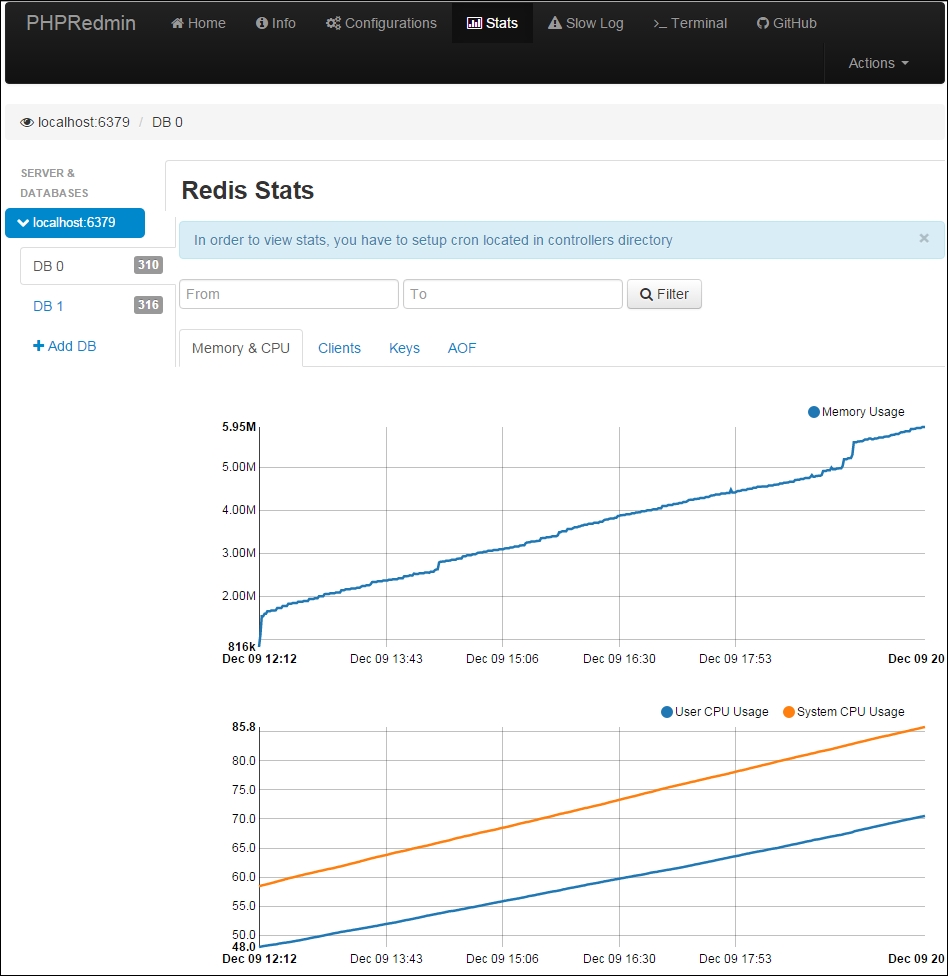
If you are interested in monitoring your Redis server, the next step is interesting. Clone PHPRedMin (https://github.com/sasanrose/phpredmin) in your Magento 2 root directory, /var/www/html. Make sure to change the ownership to www-data for the owner and group.
Go to your /var/www/html/pub directory and create a symbolic link using the following command:
ln –s ../phpredmin/public phpredmin
Chown the ownership of the symbolic link with the following command:
chown -h www-data:www-data phpredmin
Go to to your NGINX configuration directory, /etc/nginx/conf.d, open the default.conf file, and including the following content below error_log:
location ~ ^/phpredmin/.+\.php {
  fastcgi_split_path_info ^(.+\.php)(/.+)$;

  set $fsn /index.php;
  if (-f $document_root$fastcgi_script_name) {
    set $fsn $fastcgi_script_name;
  }

  # php5-fpm
  fastcgi_pass fastcgi_backend;
  fastcgi_index  index.php;

  fastcgi_param  SCRIPT_FILENAME  $document_root$fsn;
  fastcgi_param  PATH_INFO  $fastcgi_path_info;
  fastcgi_param  PATH_TRANSLATED  $document_root$fsn;

  include fastcgi_params;
}
Now save and restart your NGINX server with service nginx restart.
Before we can continue, we need to add a cronjob rule to gather our Redis data and show it in PHPRedMin. Add the following rule to your crontab.
Open crontab using crontab –e:
* * * * * cd /var/www/html/pub/phpredmin && php index.php cron/index
Open your browser and surf to http://yourdomain.com/phpredmin, and press Stats in the top menu. Now you should see the following information: