Table of Contents for
Magento 2 - Build World-Class online stores
 Magento 2 - Build World-Class online stores
Published by
Packt Publishing, 2017
Magento 2 - Build World-Class online stores
Published by
Packt Publishing, 2017
- Cover
- Table of Contents
- Magento 2 - Build World-Class online stores
- Magento 2 - Build World-Class online stores
- Credits
- Preface
- 1. Module 1
- 1. Magento Fundamentals
- XAMPP installation
- Magento
- Summary
- 2. Magento 2.0 Features
- An introduction to the Magento order management system
- Magento 2.0 command-line configuration
- The command-line utility
- Summary
- 3. Working with Search Engine Optimization
- Store configuration
- SEO and searching
- SEO catalog configuration
- Google Analytics tracking code
- Optimizing Magento pages
- Summary
- 4. Magento 2.0 Theme Development – the Developers' Holy Grail
- Magento 2.0 theme structure
- The Magento Luma theme
- Magento theme inheritance
- CMS blocks and pages
- Custom variables
- Creating a basic Magento 2.0 theme
- Summary
- 5. Creating a Responsive Magento 2.0 Theme
- Composer – the PHP dependency manager
- Building the CompStore theme
- CSS preprocessing with LESS
- Applying new CSS to the CompStore theme
- Creating the CompStore logo
- Applying the theme
- Creating CompStore content
- Customizing Magento 2.0 templates
- Summary
- 6. Write Magento 2.0 Extensions – a Great Place to Go
- Using the Zend framework
- Magento 2.0 extension structure
- Developing your first Magento extension
- The Twitter REST API
- The TweetsAbout module structure
- Using TwitterOAuth to authenticate our extension
- Developing the module
- Summary
- 7. Go Mobile with Magento 2.0!
- Adjusting the CompStore theme for mobile devices
- The Magento 2.0 responsive design
- The Magento UI
- Implementing a new CSS mixin media query
- Adjusting tweets about extensions for mobile devices
- Summary
- 8. Speeding up Your Magento 2.0
- Indexing and caching Magento
- Indexing and re-indexing data
- The Magento cron job
- Caching
- Fine-tuning the Magento hosting server
- Selecting the right Magento hosting service
- Apache web server deflation
- Enabling the expires header
- Minifying scripts
- Summary
- 9. Improving Your Magento Skills
- Magento knowledge center
- Improving your Magento skills
- Summary
- 2. Module 2
- 1. Magento 2 System Tools
- Installing Magento 2 sample data via GUI
- Installing Magento 2 sample data via the command line
- Managing Magento 2 indexes via the command line
- Managing Magento 2 cache via the command line
- Managing Magento 2 backup via the command line
- Managing Magento 2 set mode (MAGE_MODE)
- Transferring your Magento 1 database to Magento 2
- 2. Enabling Performance in Magento 2
- Configuring Redis for backend cache
- Configuring Memcached for session caching
- Configuring Varnish as the Full Page Cache
- Configuring Magento 2 with CloudFlare
- Configuring optimized images in Magento 2
- Configuring Magento 2 with HTTP/2
- Configuring Magento 2 performance testing
- 3. Creating Catalogs and Categories
- Create a Root Catalog
- Create subcategories
- Manage attribute sets
- Create products
- Manage products in a catalog grid
- 4. Managing Your Store
- Creating shipping and tax rules
- Managing customer groups
- Configuring inventories
- Configuring currency rates
- Managing advanced pricing
- 5. Creating Magento 2 Extensions – the Basics
- Initializing extension basics
- Working with database models
- Creating tables using setup scripts
- Creating a web route and controller to display data
- Creating system configuration fields
- Creating a backend data grid
- Creating a backend form to add/edit data
- 6. Creating Magento 2 Extensions – Advanced
- Using dependency injection to pass classes to your own class
- Modifying functions with the use of plugins – Interception
- Creating your own XML module configuration file
- Creating your own product type
- Working with service layers/contracts
- Creating a Magento CLI command option
- 3. Module 3
- 1. Planning for Magento
- Technical considerations
- Global-Website-Store methodology
- Planning for multiple stores
- Summary
- 2. Managing Products
- Managing products the customer focused way
- Creating products
- Managing inventory
- Pricing tools
- Autosettings
- Related products, up-sells, and cross-sells
- Importing products
- Summary
- 3. Designs and Themes
- The concept of theme inheritance
- Default installation of design packages and themes
- Installing third-party themes
- Inline translations
- Working with theme variants
- Customizing themes
- Customizing layouts
- Summary
- 4. Configuring to Sell
- Payment methods
- Shipping methods
- Managing taxes
- Transactional e-mails
- Summary
- 5. Managing Non-Product Content
- Summary
- 6. Marketing Tools
- Promotions
- Newsletters
- Using sitemaps
- Optimizing for search engines
- Summary
- 7. Extending Magento
- The new Magento module architecture
- Extending Magento functionality with Magento plugins
- Building your own extensions
- Summary
- 8. Optimizing Magento
- Indexing and caching
- Caching in Magento 2 – not just FPC
- Tuning your server for speed
- Summary
- 9. Advanced Techniques
- Version control
- Magento cron
- Backing up your database
- Upgrading Magento
- Summary
- 10. Pre-Launch Checklist
- System configurations
- Design configurations
- Search engine optimization
- Sales configurations
- Product configurations
- Maintenance configurations
- Summary
- Index
The heart of any online store is the selection of products offered to visiting customers. Yet, as simple as that may sound, creating online stores to present the vast array of products and product types has proven to be one of the most challenging quests for platform programmers.
If all stores sold each product as an individual item without different colors, sizes, or add-ons, e-commerce would be much simpler. But that's not how the real world works. If you sell t-shirts (the classic example for this discussion), you might sell each color as a separate item, especially if you only offer a few shirts. However, it would make shopping very cumbersome to your customers if you also had each size of each color listed as a separate product.
People shop by product style, then decide upon variations such as size and color. To reflect this shopping "workflow," we need to create products in our store that are presented in the most convenient and logical manner possible.
If you shop online for a golf putter, you could well find a list of putters sold online where each style is a separate product. The individual putter products would be considered simple products.
In Magento, we think of a simple product as one for which there is a single stock keeping unit (SKU), or if the putter has a SKU of PUT1234, then we would build it in Magento as a simple product.
Simple products can have custom options, though. For instance, we could offer this putter in different shaft lengths, but with a simple product, we cannot manage inventory for each option. Therefore, if we are stocking each putter in different shafts, then we would need to create simple products for each variant.
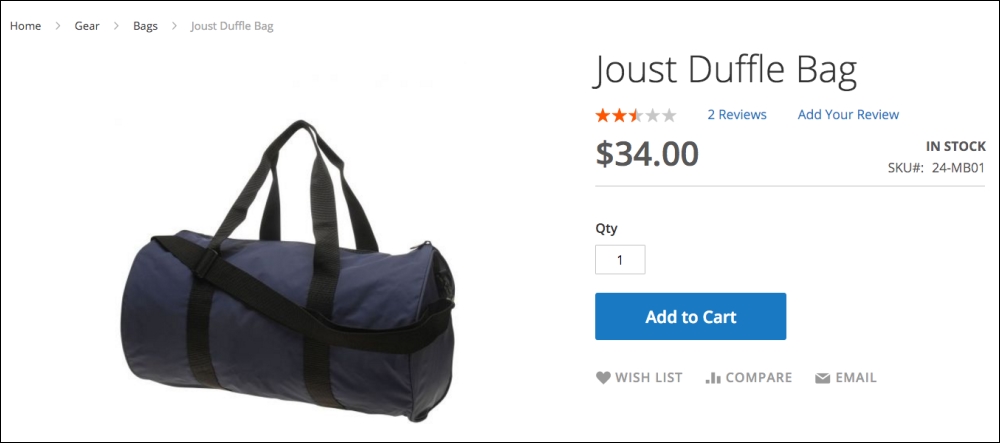
The preceding figure illustrates a simple product. It has no other sizes or colors and is not a bundle or group of products.
Simple products in Magento become the basis for all other tangible complex product types, which we'll discuss in the next section. The important concept to learn here is that all tangible products begin with the simple product.
When two or more simple products are combined in a single product representation, we are creating a complex product type. In Magento, we also consider virtual and downloadable products as "complex" because of the additional considerations needed to manage non-tangible products.
Perhaps the most popular complex product type is the configurable product type. This type is used when you sell an item that comes in different sizes, colors, and so on. The most common example is clothing.
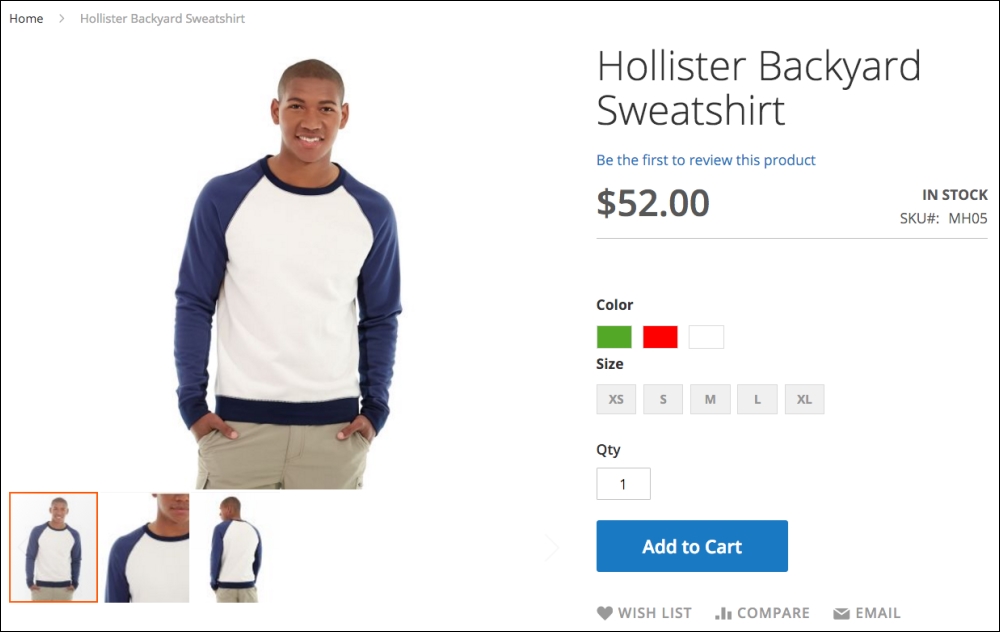
As shown in the preceding screenshot, this sweatshirt comes in three different colors and five different sizes. In Magento, there are actually two ways you can build out this product:
- You can build a simple product and create options for the colors and sizes
- You can build simple products for each combination of color and size (for example, Red-Small, Red-Medium, White-Small, and so on) and present all the variations as a single configurable product
The key to which method to use boils down to how you answer the following questions:
- Do you need to track inventory for each variant?
- For all the colors and sizes of this item, will any of the possible combinations not be available (for example, you might not be able to source White-XL sweatshirts)?
If you answer Yes to either question, then you should use a configurable product. You cannot track inventory on Custom Options (which we'll go into in more detail later in this chapter), and for whatever Custom Options you create, customers will be able to choose all possible combinations.
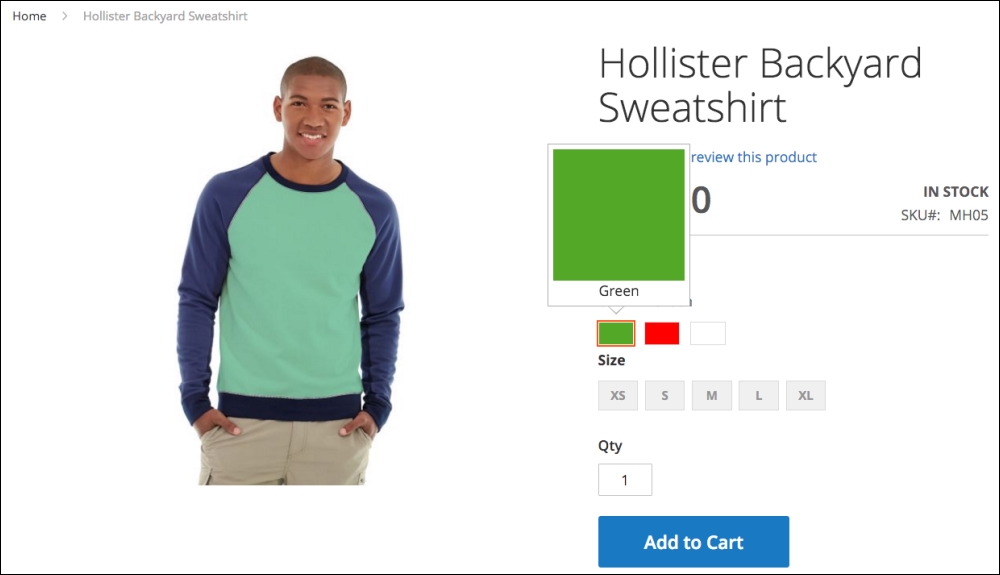
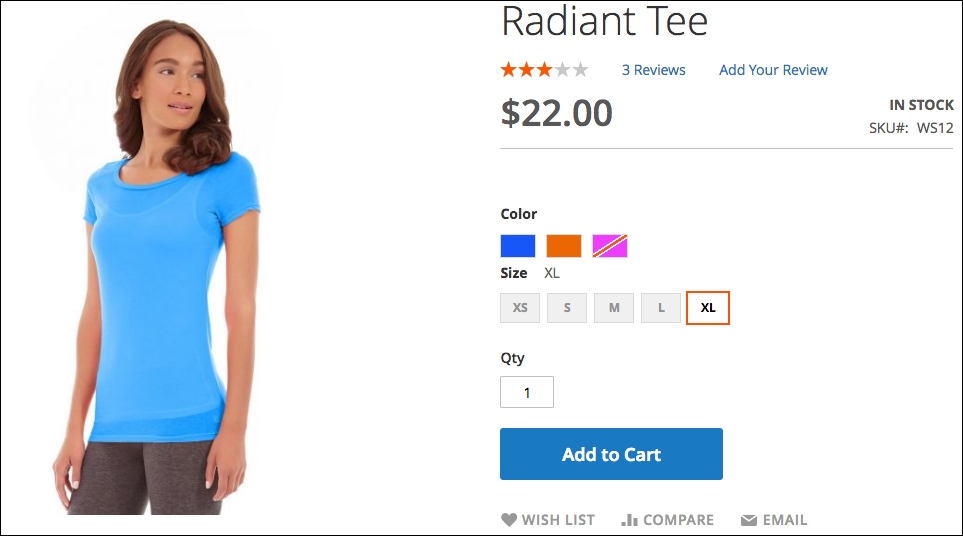
Configurable products also give you tremendous content versatility as well. For example, in the sweatshirt product (included in the Magento 2 Sample Data), as the customer selects a different color, the main image changes to that of the associated simple product image.
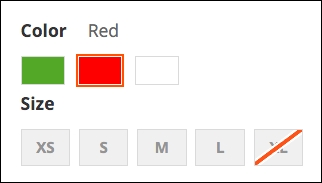
Additionally, the stock available for each combination selected is shown to the customer. Any associated simple product that is not available will be indicated, as shown in the following screenshot: when Red is selected, the XL size is not available.
As we'll see when we create a configurable product type later, Magento 2 introduces new tools for rapidly creating the needed variants.
Sometimes it's helpful to display several different products as a related group to make it easier for customers to choose one or more products. The grouped product type associates simple or virtual product types into one complex product.
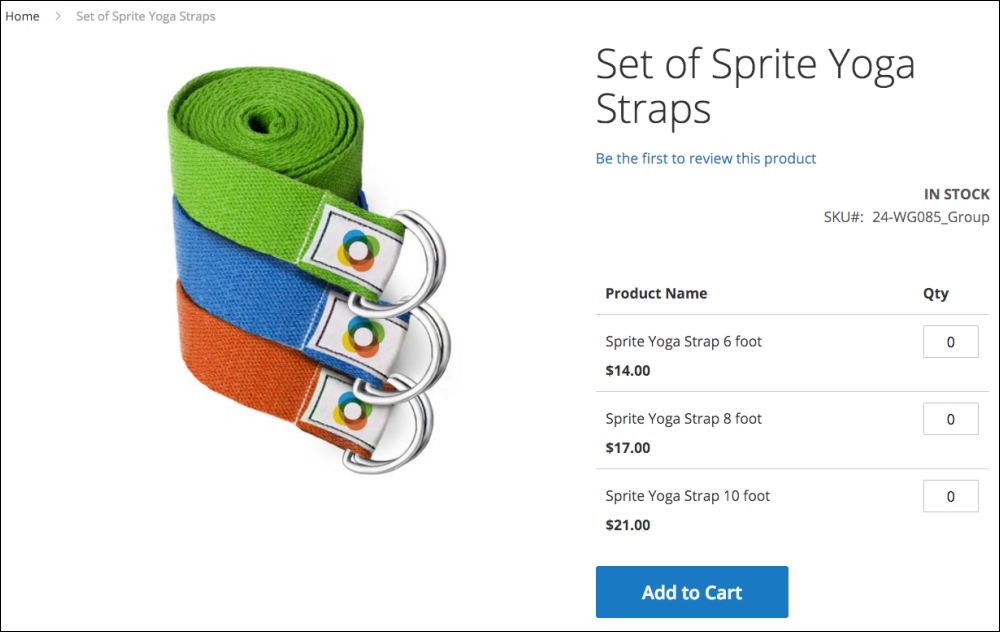
As shown in the sample Yoga Straps, the customer can choose any quantity of any of the products, which exist as simple products in your catalog. Each product chosen will appear separately in the customer's shopping cart.
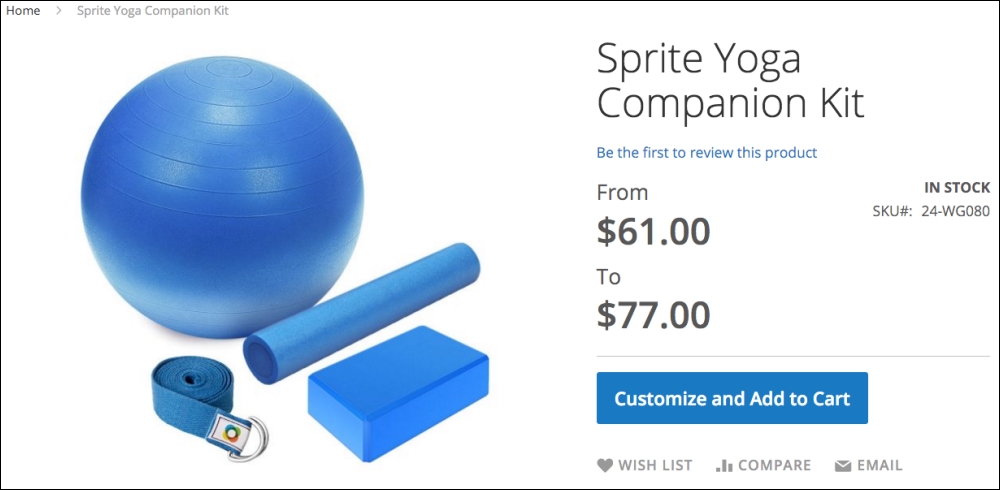
A complex product similar to the grouped product is the bundle product type. It is similar in that it associates simple or virtual products that do not have Custom Options, but different in that you can create a base collection of products for the bundle and set a price for the combined items. You can also create additional options for the user to choose and allow the pricing to be determined dynamically.
If it's the latter, the product listing will show a range of pricing based on the least expensive and most expensive possible configurations. There's a lot of versatility to the bundle product type.
Although not completely supported, the bundle product can be used to create what is often called a kit. As we use this term, it refers to the assembling of various individual products into a single presented product, usually priced at a discount from the sum of the individual product prices. Let's explore a possible scenario to better understand the concept of a kit.
We have a client who sells dictation-related products. He wants to combine a digital recorder that retails for $500 with a transcription kit that retails for $400 and offer this combined "kit" for a special discounted price of $800, saving the customer $100 if purchased separately. In addition, he needs to maintain inventory counts for both items, so that if one goes out of stock, the bundle is, therefore, not in stock.
Using a bundle product, our client can build this kit — or bundle — assigning its special price, yet maintain each one separately for inventory and shipping purposes.
Note
The big "issue" with using the bundle product type for kits is that, by default, the customer must still click to Customize the bundle before adding it to their cart. Even though you may not have any options available for the customer, this extra step is still required. Look for innovative developers to create modifications that will modify this behavior.
Just as the name implies, a virtual product type is an intangible product. Typical virtual products include subscriptions, memberships, and warranties.
Unlike tangible products, virtual products have no shipping weight and no shipping options will appear during the checkout process, unless a tangible product is also included in the customer's order.
We live in a world of digital distribution. Books, music, and software are more commonly downloaded today than sent on CDs or — anyone remember these? — floppy disks.
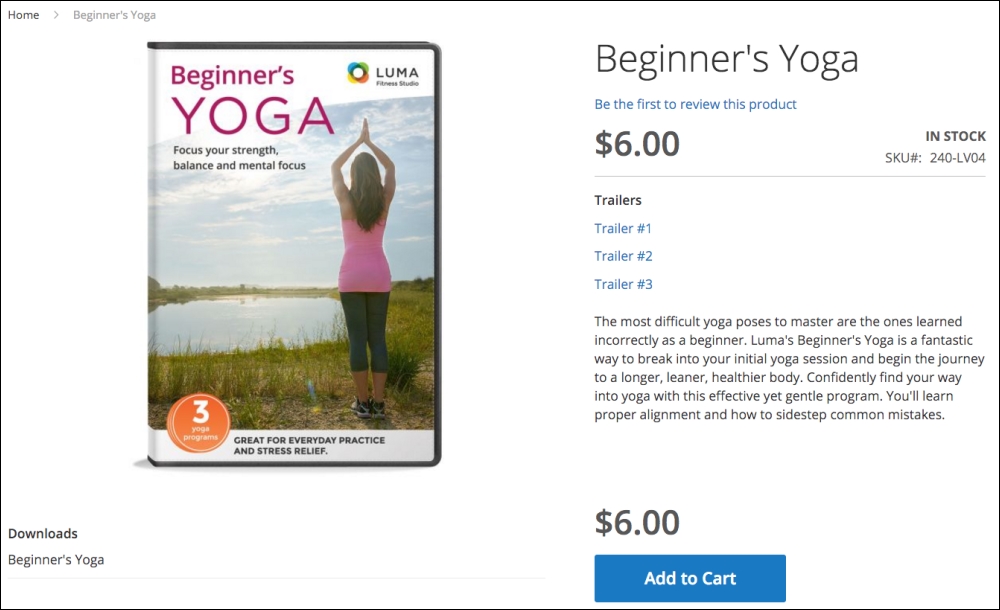
In Magento, you can sell and distribute digital products using the downloadable product type. When customers purchase the product, they are emailed links to files on your server or on another server. Customers can also access their downloadable products when they log into their account in your store.
With a downloadable product, you can set the maximum number of downloads you will allow a customer and whether the link is "shareable" with others.
Before diving into the creation of products, we need to explore a very important — and powerful — feature of Magento: product attributes. We have yet to find another common platform that provides the level of sophistication for product attributes as well as Magento.
Every field related to a product is called, in Magento, an attribute. The description, price, weight, and SKU are attributes. In fact, all the fields that appear by default on a product detail screen are attributes.
But the real power comes in those attributes when you can add to your product screens to capture more granular aspects of your products, such as color, size, kHz, and screen size. Obviously, not all attributes are relevant to all products. For instance, t-shirt size would not be applicable to your furniture products. Fabric would not be a useful attribute for computer monitors, and that's where Magento really shines!
If you view the More Information tab under the Sample Data product Montana Wind Jacket, for example, you will see four attributes listed.
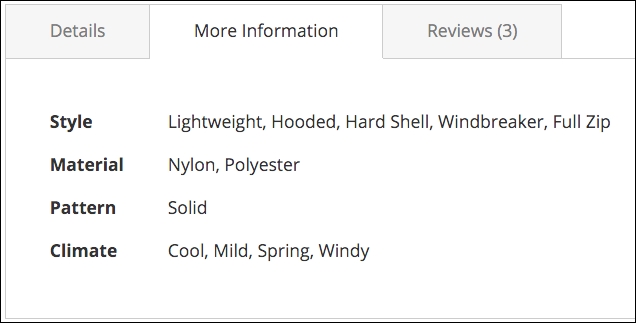
Each of these relevant attributes helps your customers get a better understanding of your products. You can certainly include this information in your product description field, but by creating attributes your customers can use them for comparison purposes, and it makes it easier for you to make sure you have included all product specifications when creating new products in your store.
Furthermore, attributes can be used to create the layered navigation that appears in the sidebar on your category pages (if Is Anchor is set to Yes; see Chapter 3, Designs and Themes).
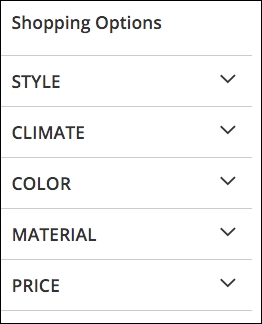
In your Magento 2 backend, go to Stores | Product (under the Attributes group heading).
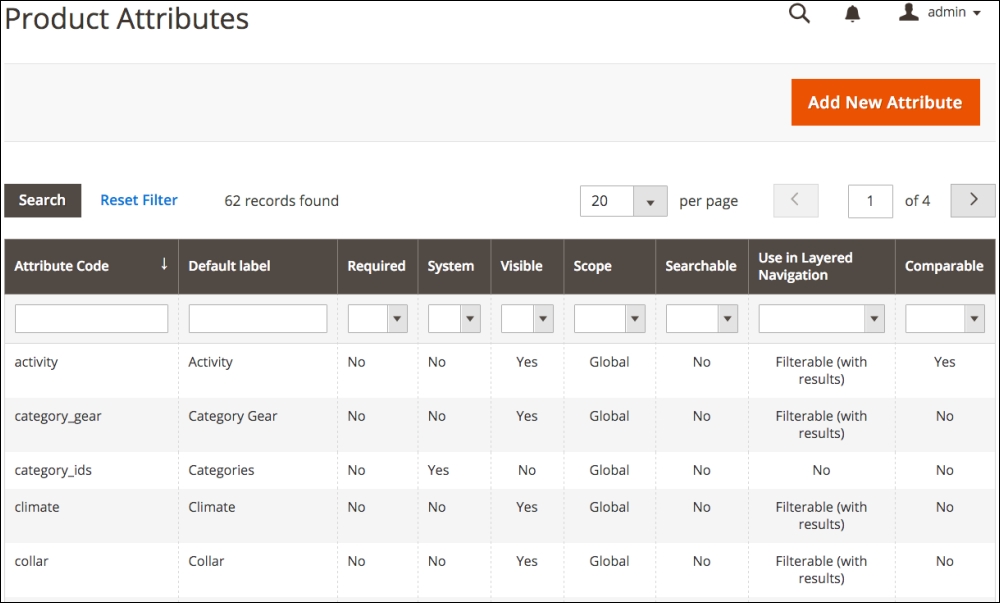
Here, you will see a listing of all the product attributes, both default and user-added, that are available for your products.
To use attributes for creating products, you create attribute sets (also referred to as product templates in Magento 2) to group attributes into meaningful sets relevant to the various products you are offering. We'll explore attribute sets in a moment, once we learn how to create individual attributes.
Before we begin building or editing product attributes, let's learn about the different attribute types accommodated in Magento 2. Each has its own considerations and features.
Attributes are considered name-value pairs, meaning that for each attribute there is a name, such as "Size," and one or more values, such as "Small, Medium, Large." The values you need for each attribute — and how you wish to use the attribute — is what helps you determine the type of attribute to create.
- Text field: As the name implies, this attribute allows you to enter any text information you wish to describe the feature.
- Text area: Similar to a text field, the text area field allows for a larger entry. Plus, you can use the WYSIWYG editor to style the content, insert HTML tags, or use other editing features.
- Date: You might have a product with a release date (such as a music album) or another date-specific feature. Use the date field to allow you to easily input a date using a pop-up calendar.
- Yes/No: As the name implies, it allows you to simply choose between "Yes" and "No" as values. This might be useful for question type features, such as "Includes Power Cord?" or "Eligible for Extended Warranty?"
- Multiple select: This field type presents you with a list of choices for the attribute. You can choose one or more from the list. You have full control over the items in the value list (as we'll see a bit later in this section).
- Dropdown: Similar to the multiple select, except that you can only choose one from a list of possible choices.
- Price: You can create additional price fields for your products in addition to the Price, Special Price, Tier Prices, and Cost fields already in Magento. While additional price fields aren't used during the checkout process, you could create fields to present prices for other reasons, such as "Compare At" or "Sold in Stores At."
- Media image: You can add additional image fields to your products in addition to the base, small, and thumbnail images. You can exclude this new image from the thumbnail gallery or allow it to be included.
- Fixed product tax: If you have a product that has a fixed tax amount, you could use this attribute type. The values entered would be included in any tax reporting or display based on your general tax settings (see Chapter 3, Designs and Themes).
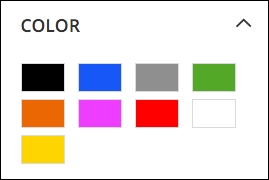
- Visual swatch: A new feature in Magento 2, this field allows you to present the attribute as a color or image, such as a texture or cloth.
- Text swatch: This new Magento 2 attribute type displays text as a button. You could use this for things such as shoe sizes or kHz.
Before you begin creating attributes, it's important to understand the implication of using one attribute type over another. Each type has its own particular abilities.
The one ability that is usually the most important is whether or not the attribute can be used in layered navigation (as described earlier). For an attribute to be used as a layered attribute, it has to have fixed values. Magento indexes attributes and it makes sense that it cannot provide layered navigation on free-form fields. Therefore, if you wish to use an attribute in layered navigation, it must be a multiple select, dropdown, price, visual swatch, or text swatch attribute type. Eligible attribute types can also be designated for use in the layered navigation of search results.
Another ability commonly considered for attributes is whether the attribute will be used when customers compare products. In the comparison display, only those attributes chosen for comparison will be shown side-by-side. All attribute types, except for media image and fixed product tax, are eligible for use in comparisons.
We're going to create a new attribute to use for our furniture products called "fabric," which will help us learn how to add new attributes. We want to use this value in layered navigation and for comparison purposes.
To begin, click Add New Attribute at the top of the attribute list.
On the first panel, you'll find the following fields:
- Default label: Regardless of what you wish to have the attribute labeled as on your store (which we'll discuss a bit later), you can name it for your backend use. In our example, we would enter Fabric.
- Catalog Input Type for Store Owner: Use this to select the type of attribute you wish to create (see the previous section for more on attribute types).
- Values Required: If you wish to require that a value be entered or selected, choose Yes.
- Update Product Preview Image: For applicable attribute types, this will allow the main product image on a catalog listing page to display the related swatch value (applies only to the backend catalog listing).
- Use Product Image for Swatch if Possible: When using swatches in configurable products, the product will display the swatches as selectors. When a swatch is selected, the main image can be replaced with the base image of the associated product.

This section will only appear if you select Multiple Select or Dropdown as your attribute type (Catalog Input Type for Store Owner). For these attribute types, you have to provide the possible value choices. Let's take t-shirt size as an example. If you use a Dropdown type, you can enter all possible size choices — make sure they're presented and spelled as you would like them to appear.
To create an option, click on Add Option. Enter the value you want for the option in the Admin column. If you want different displayed values for your multiple stores, enter those into the other fields. Any store views without a value will use the admin column value.
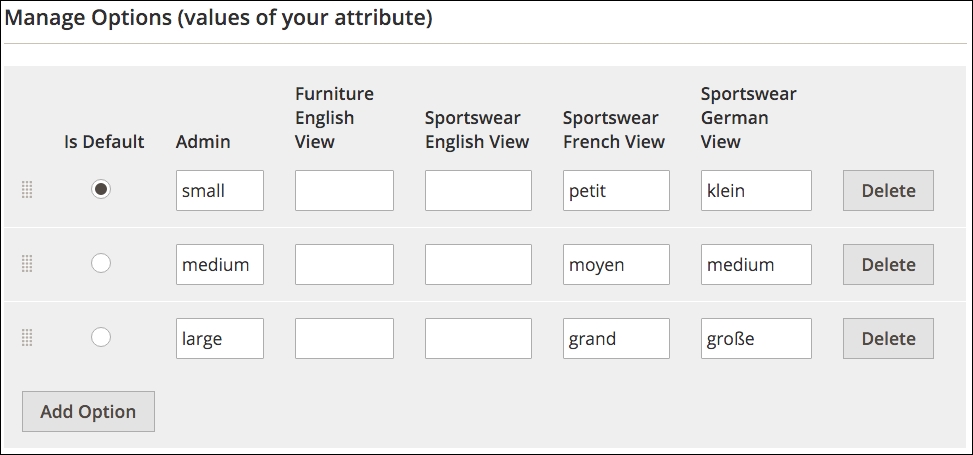
Once you have more than one value, you can choose which will be the default value when creating a new product by clicking the Is Default radio button. You can also re-arrange the order of the values by clicking and dragging the handle on the left end of an option row.
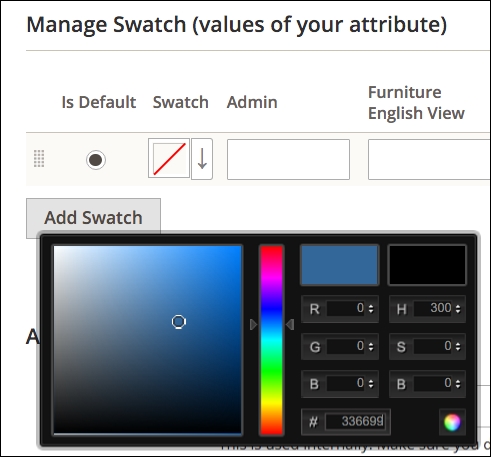
If you choose a Visual or Text Swatch attribute type, this section will be available. Adding swatch options works very similarly to the Options described before, except that you are working with swatches instead of option values.
Visual swatches are configured by selecting either a color value or uploading an image of the swatch. Using the down-arrow menu, select Choose a Color to reveal a color selector pop-up. You can move your mouse across the color spectrums, enter RGB or HSB numerical values, or enter a hexadecimal value to choose your color. Once you make your selection, click the small, round rainbow-colored button in the lower right-hand color of the selector.
If you choose Upload a File for your swatch, you can select a swatch image on your computer to upload.
Text swatches will display the values you enter as a "button." The swatches will show all available values and if any are out of stock or not available, it will appear as crossed out.
Expand this panel to reveal the following field choices:
- Attribute Code: This is an internal code used by Magento (and perhaps your developer if they customize your installation). Similar to a URL path, the key should be all lowercase and not include spaces. If you don't enter one, Magento will create one automatically.
- Scope: Use this to decide whether the entry should apply to all products at the Global, Website, or Store level. For instance, if you select Global, then whatever is entered in your attribute for a product will apply at all scope levels and cannot be changed at the website or store level.
- Default Value: If you want to have a default value displayed when the field is presented in a product edit screen, enter it here.
- Unique Value: There may be certain times you want a value to only apply to one product.
- Input Validation for Store Owner: You can have Magento validate whether a value entered meets certain requirements: decimal number (such as 12.43 — a number with a decimal point), integer value (for example, 2 or 77 — no decimal point), email address, a URL (web address containing "http" or "https"), letters (a through z), or letters and numbers (a-z and 0-9). If the entry does not match the validation selection, the user will receive an error message.
- Add to Column Options: You can elect to have an attribute appear in the list of products when viewing the catalog.
- Use in Filter Options: In addition, you can allow the backend user to filter listed products using your new attribute.
By default, your attribute will be named by the value you enter in the Default label field. However, if you want to display the name of your attribute on your store frontend, you may want to supply alternatives for each of your store views. For instance, if you create an attribute called "screen size," you will probably want to translate it for stores you build in other languages.
This is the section that allows you to affect how your attribute can be used by your customers.
- Use in Search: When customers search for products on your site, you can include the values of this attribute as a search value. For example, you may have customers that often search for "halogen light bulbs." If all your products have "halogen" in their title, no problem, but what if many of your products do not include "halogen" in the title? You could create an attribute called "Bulb Type" with "halogen" as one of the values. By setting this attribute field to Yes, if someone searches for "halogen light bulbs," products with this attribute set to "halogen" would be included in the search results.
- Comparable on Storefront: You can select attributes to be included in the side-by-side product comparisons for your customers.
- Use in Layered Navigation: For applicable attribute types, you can choose to use them in the frontend layered navigation.
- Use in Search Results Layered Navigation: Likewise for layered navigation in search results.
- Position: If you do use an attribute in layered navigation, you can command its position relative to other attributes by entering a number in this field. Attributes will be shown in ascending order (lowest to highest) according to this field.
- Use for Promo Rule Conditions: As we will discuss in Chapter 7, Extending Magento, you can construct discounts and promotions based on the values of attributes for which this field is set to Yes.
- Allow HTML Tags on Storefront: For applicable attribute types, you can allow the use of HTML tags in the field value. For instance, you might want to bold part of a value, such as Contains <strong>EPA-Approved</strong> cleaners.
- Visible on Catalog Pages on Storefront: Setting to Yes will display this attribute on the product detail page.
- Used in Product Listing: Depending on your theme, setting this to Yes may allow the attribute to be shown on the category listing pages.
- Used for Sorting in Product Listing: Also dependent on your theme, this may allow your attribute to be included as a sorting criteria, much as price, position and name are used by default.
In order to have attributes available for use when creating a product, it should belong in an attribute set. Attribute sets also allow you to make available similar attributes across similar products.
To view existing attribute sets, go to Stores | Attribute Sets.
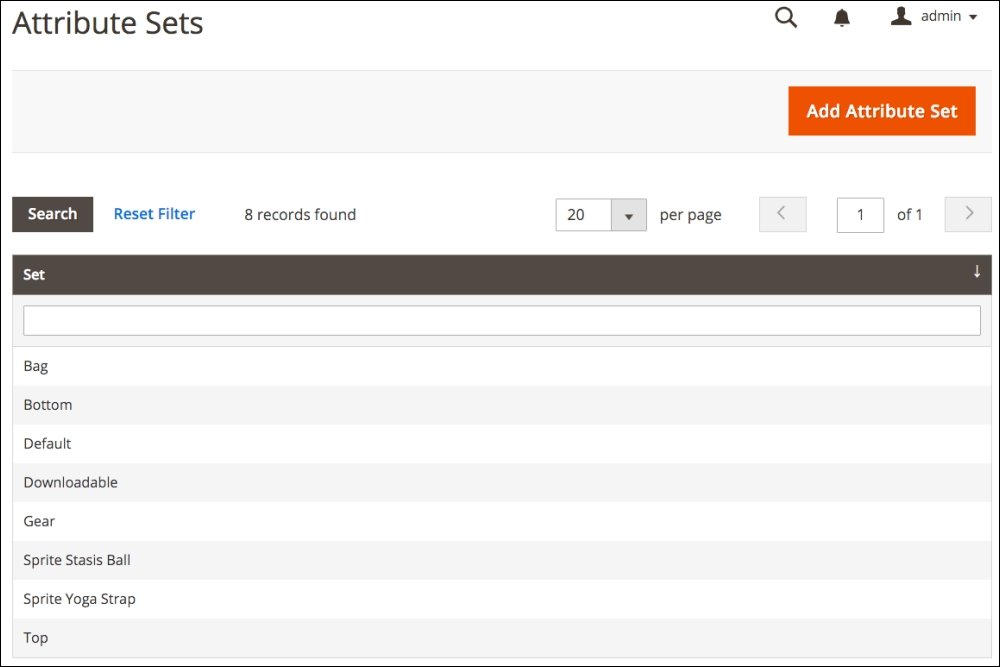
Each existing attribute set (the default will appear if you have not created any sets) contains attributes assigned to that set. Let's create a new attribute set for our furniture products.
For this exercise, we have already created one new attribute: fabric.
- To begin creating our new attribute set, click on Add Attribute Set.
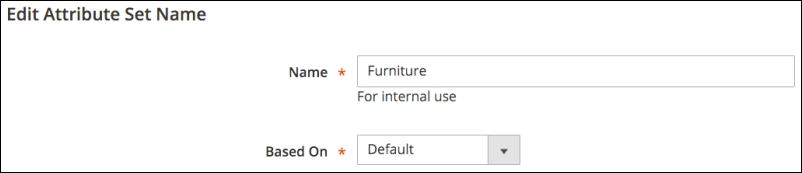
- On the first screen, enter the name of your attribute set as you would like it to appear in the backend (your customers will never see attribute sets).
- If you wish, you can base your new set on an existing attribute set, which can help reduce your configuration time if an existing set has most of the attributes you wish to use. For our example, we're going to select Default.
- Click on Save to advance to the next screen.
- To add fabric to our new attribute set, we need to drag it from the right Unassigned Attributes column and place it where we want it to appear on the Product Detail screen. We can place and move attributes into any order or group within the attribute set. A "Group" is noted by the folders in the Groups column.

- If you wish, you can create additional groups within an attribute set by clicking Add New at the top of the Groups column.
- Click Save to commit your new attribute set.
Tip
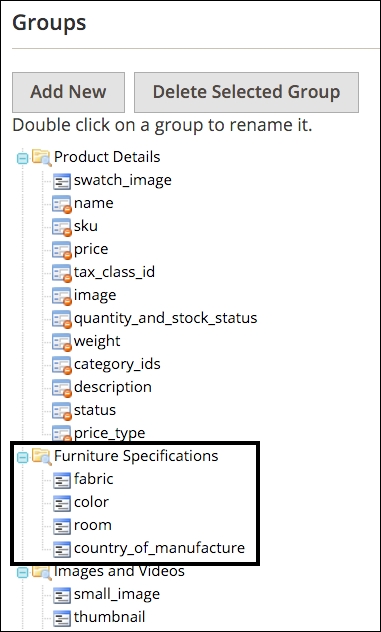
We often create a group within an attribute set to contain special, related attributes. For instance, we could create a group called "Furniture Specifications" and drag "fabric" and any other new, related attributes into this new group, as seen in the following screenshot. This can help focus attention on these special attributes when creating or editing products. The order and groups of attributes have no effect on the front end presentation nor will they change any programmatic aspects of Magento 2.
Now that we have created a new "Furniture" attribute set, we can add additional attributes as needed to help describe our furniture offerings. We can also use this attribute set when adding new furniture products so we have just the attributes related to our needs.
Note
A new and powerful feature of Magento 2 is the ability to add existing attributes within the Product Edit screen. This means that as you create products, you can add attributes you need without having to leave your current work. These attributes will also be added to the attribute set you have applied to your current product, which means the attribute will also be added to all products using the same attribute set.