Table of Contents for
Magento 2 - Build World-Class online stores
 Magento 2 - Build World-Class online stores
Published by
Packt Publishing, 2017
Magento 2 - Build World-Class online stores
Published by
Packt Publishing, 2017
- Cover
- Table of Contents
- Magento 2 - Build World-Class online stores
- Magento 2 - Build World-Class online stores
- Credits
- Preface
- 1. Module 1
- 1. Magento Fundamentals
- XAMPP installation
- Magento
- Summary
- 2. Magento 2.0 Features
- An introduction to the Magento order management system
- Magento 2.0 command-line configuration
- The command-line utility
- Summary
- 3. Working with Search Engine Optimization
- Store configuration
- SEO and searching
- SEO catalog configuration
- Google Analytics tracking code
- Optimizing Magento pages
- Summary
- 4. Magento 2.0 Theme Development – the Developers' Holy Grail
- Magento 2.0 theme structure
- The Magento Luma theme
- Magento theme inheritance
- CMS blocks and pages
- Custom variables
- Creating a basic Magento 2.0 theme
- Summary
- 5. Creating a Responsive Magento 2.0 Theme
- Composer – the PHP dependency manager
- Building the CompStore theme
- CSS preprocessing with LESS
- Applying new CSS to the CompStore theme
- Creating the CompStore logo
- Applying the theme
- Creating CompStore content
- Customizing Magento 2.0 templates
- Summary
- 6. Write Magento 2.0 Extensions – a Great Place to Go
- Using the Zend framework
- Magento 2.0 extension structure
- Developing your first Magento extension
- The Twitter REST API
- The TweetsAbout module structure
- Using TwitterOAuth to authenticate our extension
- Developing the module
- Summary
- 7. Go Mobile with Magento 2.0!
- Adjusting the CompStore theme for mobile devices
- The Magento 2.0 responsive design
- The Magento UI
- Implementing a new CSS mixin media query
- Adjusting tweets about extensions for mobile devices
- Summary
- 8. Speeding up Your Magento 2.0
- Indexing and caching Magento
- Indexing and re-indexing data
- The Magento cron job
- Caching
- Fine-tuning the Magento hosting server
- Selecting the right Magento hosting service
- Apache web server deflation
- Enabling the expires header
- Minifying scripts
- Summary
- 9. Improving Your Magento Skills
- Magento knowledge center
- Improving your Magento skills
- Summary
- 2. Module 2
- 1. Magento 2 System Tools
- Installing Magento 2 sample data via GUI
- Installing Magento 2 sample data via the command line
- Managing Magento 2 indexes via the command line
- Managing Magento 2 cache via the command line
- Managing Magento 2 backup via the command line
- Managing Magento 2 set mode (MAGE_MODE)
- Transferring your Magento 1 database to Magento 2
- 2. Enabling Performance in Magento 2
- Configuring Redis for backend cache
- Configuring Memcached for session caching
- Configuring Varnish as the Full Page Cache
- Configuring Magento 2 with CloudFlare
- Configuring optimized images in Magento 2
- Configuring Magento 2 with HTTP/2
- Configuring Magento 2 performance testing
- 3. Creating Catalogs and Categories
- Create a Root Catalog
- Create subcategories
- Manage attribute sets
- Create products
- Manage products in a catalog grid
- 4. Managing Your Store
- Creating shipping and tax rules
- Managing customer groups
- Configuring inventories
- Configuring currency rates
- Managing advanced pricing
- 5. Creating Magento 2 Extensions – the Basics
- Initializing extension basics
- Working with database models
- Creating tables using setup scripts
- Creating a web route and controller to display data
- Creating system configuration fields
- Creating a backend data grid
- Creating a backend form to add/edit data
- 6. Creating Magento 2 Extensions – Advanced
- Using dependency injection to pass classes to your own class
- Modifying functions with the use of plugins – Interception
- Creating your own XML module configuration file
- Creating your own product type
- Working with service layers/contracts
- Creating a Magento CLI command option
- 3. Module 3
- 1. Planning for Magento
- Technical considerations
- Global-Website-Store methodology
- Planning for multiple stores
- Summary
- 2. Managing Products
- Managing products the customer focused way
- Creating products
- Managing inventory
- Pricing tools
- Autosettings
- Related products, up-sells, and cross-sells
- Importing products
- Summary
- 3. Designs and Themes
- The concept of theme inheritance
- Default installation of design packages and themes
- Installing third-party themes
- Inline translations
- Working with theme variants
- Customizing themes
- Customizing layouts
- Summary
- 4. Configuring to Sell
- Payment methods
- Shipping methods
- Managing taxes
- Transactional e-mails
- Summary
- 5. Managing Non-Product Content
- Summary
- 6. Marketing Tools
- Promotions
- Newsletters
- Using sitemaps
- Optimizing for search engines
- Summary
- 7. Extending Magento
- The new Magento module architecture
- Extending Magento functionality with Magento plugins
- Building your own extensions
- Summary
- 8. Optimizing Magento
- Indexing and caching
- Caching in Magento 2 – not just FPC
- Tuning your server for speed
- Summary
- 9. Advanced Techniques
- Version control
- Magento cron
- Backing up your database
- Upgrading Magento
- Summary
- 10. Pre-Launch Checklist
- System configurations
- Design configurations
- Search engine optimization
- Sales configurations
- Product configurations
- Maintenance configurations
- Summary
- Index
Adding a page to the backend requires, just like the frontend, a configured route, controller, and layout file. In order to display a grid page to show data from a table, there are currently three ways available:
- Creating a grid container and specifying the fields to display and data source to use in the grid class. This method is similar to how a grid is built in Magento 1 and is not really flexible/easy to extend. An example of how this is used can be found in the CMS
Pagemodule:Magento\Cms\Block\Adminhtml\PageMagento\Cms\Block\Adminhtml\Page\Grid - Using this method, there is only a grid container
Blockclass created. The grid fields and options are defined in the layout XML file. This makes it possible to extend the grid easily by adding extra fields to the XML. An example of this can be found in the Customer Group code in the following:Magento\Customer\view\adminhtml\layout\customer_group_index.xml - The last option is fully configured through XML and gives the option to specify the data source, quick search, available advanced filters, mass actions, row actions, and columns to show. It also gives you the option to customize the columns shown in the backend by the user.
In this example, we will use the last option to build a grid. As this option uses quite a large set of files and long XML listings, the complete code can be found on GitHub (https://github.com/Genmato/M2_Sample).
The following steps will describe how to add a backend data grid:
- Configure routes for use in the
adminhtmlarea:etc/adminhtml/routes.xml<?xml version="1.0"?> <config xmlns:xsi="http://www.w3.org/2001/XMLSchema-instance" xsi:noNamespaceSchemaLocation="urn:magento:framework:App/etc/routes.xsd"> <router id="
admin"> <route id="sample" frontName="sample"> <module name="Genmato_Sample" before="Magento_Backend" /> </route> </router> </config> - Create the Controller for the backend:
Controller/Adminhtml/Demolist/Index.php<?php namespace Genmato\Sample\Controller\Adminhtml\Demolist; use Magento\Backend\App\Action\Context; use Magento\Framework\View\Result\PageFactory; use Magento\Backend\App\Action as BackendAction; class Index extends BackendAction { /** * @var PageFactory */ protected $resultPageFactory; /** * @param Context $context * @param PageFactory $resultPageFactory */ public function __construct( Context $context, PageFactory $resultPageFactory ) { parent::__construct($context); $this->resultPageFactory = $resultPageFactory; } /** * Check the permission to run it * * @return bool */ protected function _isAllowed() { return $this->_authorization->isAllowed('Genmato_Sample::demolist'); } /** * Index action * * @return \Magento\Backend\Model\View\Result\Page */ public function execute() { /** @var \Magento\Backend\Model\View\Result\Page $resultPage */ $resultPage = $this->resultPageFactory->create(); $resultPage->setActiveMenu('Genmato_Sample::demolist'); $resultPage->addBreadcrumb(__('CMS'), __('CMS')); $resultPage->addBreadcrumb(__('Demo List'), __('Demo List')); $resultPage->getConfig()->getTitle()->prepend(__('Demo List')); return $resultPage; } } - Control the access to the page through the ACL:
etc/acl.xml<?xml version="1.0"?> <config xmlns:xsi="http://www.w3.org/2001/XMLSchema-instance" xsi:noNamespaceSchemaLocation="urn:magento:framework:Acl/etc/acl.xsd"> <acl> <resources> <resource id="Magento_Backend::admin"> <resource id="Magento_Backend::content"> <resource id="Magento_Backend::content_elements"> <resource id="Genmato_Sample::demolist" title="Demo List" sortOrder="10" /> </resource> </resource> </resource> </resources> </acl> </config> - The following is the
layoutfile to specify the griduiComponentused:view/adminhtml/layout/sample_demolist_index.xml<?xml version="1.0"?> <page xmlns:xsi="http://www.w3.org/2001/XMLSchema-instance" xsi:noNamespaceSchemaLocation="urn:magento:framework:View/Layout/etc/page_configuration.xsd"> <update handle="styles"/> <body> <referenceContainer name="content"> <uiComponent name="sample_demolist_listing"/> </referenceContainer> </body> </page> - Create the
uiComponentconfiguration:The referenced
uiComponentconfiguration is quite large. In the sample code (on GitHub), this file can be found at the following: - Add resources used in
uiComponentto the dependency injection configuration:etc/di.xml<?xml version="1.0"?> <config xmlns:xsi="http://www.w3.org/2001/XMLSchema-instance" xsi:noNamespaceSchemaLocation="urn:magento:framework:ObjectManager/etc/config.xsd"> <preference for="Genmato\Sample\Model\DemoInterface" type="Genmato\Sample\Model\Demo" /> <type name="Magento\Framework\View\Element\UiComponent\DataProvider\CollectionFactory"> <arguments> <argument name="collections" xsi:type="array"> <item name="sample_demolist_listing_data_source" xsi:type="string">Genmato\Sample\Model\ResourceModel\Demo\Grid\Collection</item> </argument> </arguments> </type> <type name="Genmato\Sample\Model\ResourceModel\Demo\Grid\Collection"> <arguments> <argument name="mainTable" xsi:type="string">genmato_demo</argument> <argument name="eventPrefix" xsi:type="string">sample_demolist_grid_collection</argument> <argument name="eventObject" xsi:type="string">sample_demolist_collection</argument> <argument name="resourceModel" xsi:type="string">Genmato\Sample\Model\ResourceModel\Demo</argument> </arguments> </type> <virtualType name="DemoGridFilterPool" type="Magento\Framework\View\Element\UiComponent\DataProvider\FilterPool"> <arguments> <argument name="appliers" xsi:type="array"> <item name="regular" xsi:type="object">Magento\Framework\View\Element\UiComponent\DataProvider\RegularFilter</item> <item name="fulltext" xsi:type="object">Magento\Framework\View\Element\UiComponent\DataProvider\FulltextFilter</item> </argument> </arguments> </virtualType> <virtualType name="DemoGridDataProvider" type="Magento\Framework\View\Element\UiComponent\DataProvider\DataProvider"> <arguments> <argument name="collection" xsi:type="object" shared="false">Genmato\Sample\Model\ResourceModel\Demo\Collection</argument> <argument name="filterPool" xsi:type="object" shared="false">DemoGridFilterPool</argument> </arguments> </virtualType> </config> - Add the mass action controller:
Controller/Adminhtml/Demolist/MassDelete.php<?php namespace Genmato\Sample\Controller\Adminhtml\Demolist; use Magento\Framework\Controller\ResultFactory; use Magento\Backend\App\Action\Context; use Magento\Ui\Component\MassAction\Filter; use Genmato\Sample\Model\ResourceModel\Demo\CollectionFactory; use Magento\Backend\App\Action; class MassDelete extends Action { /** * @var CollectionFactory */ protected $collectionFactory; /** * @param Context $context * @param Filter $filter * @param CollectionFactory $collectionFactory */ public function __construct(Context $context, Filter $filter, CollectionFactory $collectionFactory) { $this->filter = $filter; $this->collectionFactory = $collectionFactory; parent::__construct($context); } /** * Execute action * * @return \Magento\Backend\Model\View\Result\Redirect */ public function execute() { $collection = $this->filter->getCollection($this->collectionFactory->create()); $collectionSize = $collection->getSize(); foreach ($collection as $item) { $item->delete(); } $this->messageManager->addSuccess(__('A total of %1 record(s) have been deleted.', $collectionSize)); /** @var \Magento\Backend\Model\View\Result\Redirect $resultRedirect */ $resultRedirect = $this->resultFactory->create(ResultFactory::TYPE_REDIRECT); return $resultRedirect->setPath('*/*/'); } } - Add options to the menu:
etc/adminhtml/menu.xml<?xml version="1.0"?> <config xmlns:xsi="http://www.w3.org/2001/XMLSchema-instance" xsi:noNamespaceSchemaLocation="urn:magento:module:Magento_Backend:etc/menu.xsd"> <menu> <add id="Genmato_Sample::demolist" title="Demo List" module="Genmato_Sample" sortOrder="10" parent="Magento_Backend::content_elements" action="sample/demolist" resource="Genmato_Sample::demolist"/> </menu> </config>
The controller and layout file are the same for the frontend, only the backend is protected through an ACL. This allows administrators to create specific user rules and allow access only to the selected pages.
The resource access is checked in the controller in the following function:
protected function _isAllowed()
As the complete configuration through uiComponent results in a large XML file, we will explain some parts on how they are configured and hook in to the system.
The data source is specified through the XML node:
<listing>
<dataSource name="sample_demolist_listing_data_source">
<argument name="dataProvider" xsi:type="configurableObject">
<argument name="class" xsi:type="string">DemoGridDataProvider</argument>
The specified data class, DemoGridDataProvider, is configured through dependency injection and specified in the etc/di.xml file. Here, DemoGridDataProvider corresponds to the Genmato\Sample\Model\ResourceModel\Demo\Collection collection. Additionally, DemoGridFilterPool and the collection are configured through this file to load the data.
It is also easy to specify multiple mass actions to be used in the grid; you can specify the title, action to execute, and optional message alert box:
<massaction name="listing_massaction">
  <argument name="data" xsi:type="array">
    <item name="config" xsi:type="array">
      <item name="selectProvider" xsi:type="string">sample_demolist_listing.sample_demolist_listing.sample_demolist_columns.ids</item>
      <item name="indexField" xsi:type="string">demo_id</item>
    </item>
  </argument>
  <action name="delete">
    <argument name="data" xsi:type="array">
      <item name="config" xsi:type="array">
        <item name="type" xsi:type="string">delete</item>
        <item name="label" xsi:type="string" translate="true">Delete</item>
        <item name="url" xsi:type="url" path="sample/demolist/massDelete"/>
        <item name="confirm" xsi:type="array">
          <item name="title" xsi:type="string" translate="true">Delete items</item>
          <item name="message" xsi:type="string" translate="true">Are you sure you want to delete selected items?</item>
        </item>
      </item>
    </argument>
  </action>
</massaction>
In this example, we add an option to delete records from the database. In order to delete the records from the database, you need to create a controller that handles the removal of the records. You need to create a Controller class for every action you specify, this controller contains your custom code to be executed.
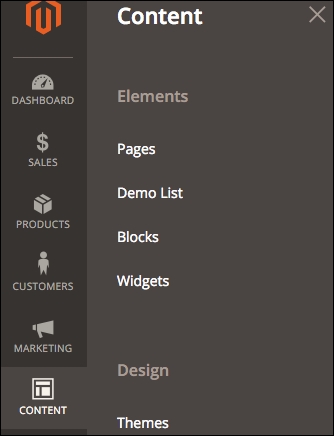
By adding the menu option in the Content menu below the Pages menu item, the page can be accessed through the backend. This link action will go to the specified sample/demolist URL that will result in the full URL:
http://example.com/admin/sample/demolist/
The resource argument defines the ACL that is used to show/hide the menu option depending on the user rights:
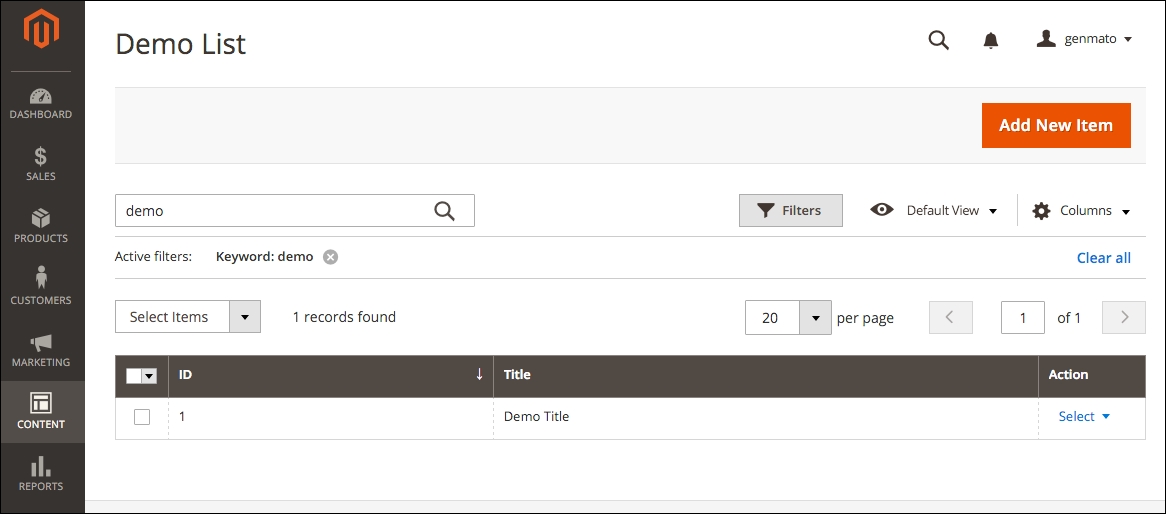
When clicking on the menu option, the resulting page will look as follows:
For more information about uiComponents that are available, you can refer to the following:
http://devdocs.magento.com/guides/v2.0/ui-components/ui-component.html