Table of Contents for
Magento 2 - Build World-Class online stores
 Magento 2 - Build World-Class online stores
Published by
Packt Publishing, 2017
Magento 2 - Build World-Class online stores
Published by
Packt Publishing, 2017
- Cover
- Table of Contents
- Magento 2 - Build World-Class online stores
- Magento 2 - Build World-Class online stores
- Credits
- Preface
- 1. Module 1
- 1. Magento Fundamentals
- XAMPP installation
- Magento
- Summary
- 2. Magento 2.0 Features
- An introduction to the Magento order management system
- Magento 2.0 command-line configuration
- The command-line utility
- Summary
- 3. Working with Search Engine Optimization
- Store configuration
- SEO and searching
- SEO catalog configuration
- Google Analytics tracking code
- Optimizing Magento pages
- Summary
- 4. Magento 2.0 Theme Development – the Developers' Holy Grail
- Magento 2.0 theme structure
- The Magento Luma theme
- Magento theme inheritance
- CMS blocks and pages
- Custom variables
- Creating a basic Magento 2.0 theme
- Summary
- 5. Creating a Responsive Magento 2.0 Theme
- Composer – the PHP dependency manager
- Building the CompStore theme
- CSS preprocessing with LESS
- Applying new CSS to the CompStore theme
- Creating the CompStore logo
- Applying the theme
- Creating CompStore content
- Customizing Magento 2.0 templates
- Summary
- 6. Write Magento 2.0 Extensions – a Great Place to Go
- Using the Zend framework
- Magento 2.0 extension structure
- Developing your first Magento extension
- The Twitter REST API
- The TweetsAbout module structure
- Using TwitterOAuth to authenticate our extension
- Developing the module
- Summary
- 7. Go Mobile with Magento 2.0!
- Adjusting the CompStore theme for mobile devices
- The Magento 2.0 responsive design
- The Magento UI
- Implementing a new CSS mixin media query
- Adjusting tweets about extensions for mobile devices
- Summary
- 8. Speeding up Your Magento 2.0
- Indexing and caching Magento
- Indexing and re-indexing data
- The Magento cron job
- Caching
- Fine-tuning the Magento hosting server
- Selecting the right Magento hosting service
- Apache web server deflation
- Enabling the expires header
- Minifying scripts
- Summary
- 9. Improving Your Magento Skills
- Magento knowledge center
- Improving your Magento skills
- Summary
- 2. Module 2
- 1. Magento 2 System Tools
- Installing Magento 2 sample data via GUI
- Installing Magento 2 sample data via the command line
- Managing Magento 2 indexes via the command line
- Managing Magento 2 cache via the command line
- Managing Magento 2 backup via the command line
- Managing Magento 2 set mode (MAGE_MODE)
- Transferring your Magento 1 database to Magento 2
- 2. Enabling Performance in Magento 2
- Configuring Redis for backend cache
- Configuring Memcached for session caching
- Configuring Varnish as the Full Page Cache
- Configuring Magento 2 with CloudFlare
- Configuring optimized images in Magento 2
- Configuring Magento 2 with HTTP/2
- Configuring Magento 2 performance testing
- 3. Creating Catalogs and Categories
- Create a Root Catalog
- Create subcategories
- Manage attribute sets
- Create products
- Manage products in a catalog grid
- 4. Managing Your Store
- Creating shipping and tax rules
- Managing customer groups
- Configuring inventories
- Configuring currency rates
- Managing advanced pricing
- 5. Creating Magento 2 Extensions – the Basics
- Initializing extension basics
- Working with database models
- Creating tables using setup scripts
- Creating a web route and controller to display data
- Creating system configuration fields
- Creating a backend data grid
- Creating a backend form to add/edit data
- 6. Creating Magento 2 Extensions – Advanced
- Using dependency injection to pass classes to your own class
- Modifying functions with the use of plugins – Interception
- Creating your own XML module configuration file
- Creating your own product type
- Working with service layers/contracts
- Creating a Magento CLI command option
- 3. Module 3
- 1. Planning for Magento
- Technical considerations
- Global-Website-Store methodology
- Planning for multiple stores
- Summary
- 2. Managing Products
- Managing products the customer focused way
- Creating products
- Managing inventory
- Pricing tools
- Autosettings
- Related products, up-sells, and cross-sells
- Importing products
- Summary
- 3. Designs and Themes
- The concept of theme inheritance
- Default installation of design packages and themes
- Installing third-party themes
- Inline translations
- Working with theme variants
- Customizing themes
- Customizing layouts
- Summary
- 4. Configuring to Sell
- Payment methods
- Shipping methods
- Managing taxes
- Transactional e-mails
- Summary
- 5. Managing Non-Product Content
- Summary
- 6. Marketing Tools
- Promotions
- Newsletters
- Using sitemaps
- Optimizing for search engines
- Summary
- 7. Extending Magento
- The new Magento module architecture
- Extending Magento functionality with Magento plugins
- Building your own extensions
- Summary
- 8. Optimizing Magento
- Indexing and caching
- Caching in Magento 2 – not just FPC
- Tuning your server for speed
- Summary
- 9. Advanced Techniques
- Version control
- Magento cron
- Backing up your database
- Upgrading Magento
- Summary
- 10. Pre-Launch Checklist
- System configurations
- Design configurations
- Search engine optimization
- Sales configurations
- Product configurations
- Maintenance configurations
- Summary
- Index
To start the module development, we will declare the basic module configurations. Open your favorite code editor, create a new file called module.xml, and save the file in app/code/Packt/TweetsAbout/etc. Enter this code in the file:
<?xml version="1.0"?>
  <config xmlns:xsi="http://www.w3.org/2001/XMLSchema-instance" xsi:noNamespaceSchemaLocation="urn:magento:framework:Module/etc/module.xsd">
      <module name="Packt_TweetsAbout" setup_version="2.0.0"/>
  </config>
Magento 2.0 works with Uniform Resource Names (URN) schema validation to reference XML declarations, as you can observe in the <config> tag. The module.xsd file works by validating whether your module declaration follows the module declaration schema.
The <module> tag contains the vendor and module name. Always follow this example of module name declaration: Vendor_Module.
Under app/code/Packt/TweetsAbout/etc/frontend, create two new files, as follows:
routes.xmlevents.xml
The routes.xml file contains the following code:
<?xml version="1.0"?>
<config xmlns:xsi="http://www.w3.org/2001/XMLSchema-instance" xsi:noNamespaceSchemaLocation="urn:magento:framework:App/etc/routes.xsd">
    <router id="standard">
        <route id="tweetsabout" frontName="tweetsabout">
            <module name="Packt_TweetsAbout" />
        </route>
    </router>
</config>
The routes.xml file tells Magento where to look for the controllers (TweetsAbout/Controller) when the URL http://localhost/packt/tweetsabout is accessed (MVC).
The events.xml file contains the following code:
<?xml version="1.0"?>
<config xmlns:xsi="http://www.w3.org/2001/XMLSchema-instance" xsi:noNamespaceSchemaLocation="urn:magento:framework:Event/etc/events.xsd">
    <event name="page_block_html_topmenu_gethtml_before">
        <observer name="Packt_TweetsAbout_observer" instance="Packt\TweetsAbout\Observer\Topmenu" />
    </event>
</config>
The events.xml file declares an Observer event handler in the module, and this file has the mission of configuring a new TweetsAbout top menu link to access the module in the frontend. Observer listens to events triggered by the user or system. The <event> tag gets basic information of the top menu Block to be handled later in the PHP code, and the <observer> tag declares the Topmenu observer class. In this chapter, we will take a look at how the Topmenu class works. For now, it's important to declare this option.
For further information about Observer, access the Magento official documentation at http://goo.gl/0CTzmn.
Now, it is time to create the registration.php file under the root directory of TweetsAbout. Run the following code:
<?php
\Magento\Framework\Component\ComponentRegistrar::register(
    \Magento\Framework\Component\ComponentRegistrar::MODULE,
    'Packt_TweetsAbout',
    __DIR__
);
The registration.php file has the same role as that of theme registration in Magento System.
Create the composer.json file under the root directory of TweetsAbout via the following code:
{
  "name": "packt/tweets-about",
  "description": "Example of Magento Module - Packt Publishing",
  "type": "magento2-module",
  "version": "1.0.0",
  "license": [
    "OSL-3.0",
    "AFL-3.0"
  ],
  "require": {
    "php": "~5.5.0|~5.6.0|~7.0.0",
    "magento/framework": "~100.0",
    "abraham/twitteroauth": "^0.6.2"
  },
  "autoload": {
    "files": [ "registration.php" ],
    "psr-4": {
      "Packt\\TweetsAbout\\": ""
    }
  },
  "extra": {
        "installer-paths": {
            "app/code/Packt/TweetsAbout/Api": ["abraham/twitteroauth"]
        }
    }
}
You can observe in the composer.json file the declaration of the TwitterOAuth project as a required package to our extension. Also, the file defines the installation directory.
Note
For further information about Composer packages, refer to the link https://packagist.org/.
You can copy the LICENSE.txt and LICENSE_AFL.txt files from the Magento root directory to your Packt/TweetsAbout directory. The README.md file is responsible for storing information about the module's scope and some considerations for the purposes of publishing on GitHub (http://github.com/). You can feel free to create the README.md file as you wish.
For now, we have the module declaration and registration files. It's time to create the controllers to start giving some life to the TweetsAbout module.
First, let's create a new file named Index.php. This file will control the access to the initial page of the module. Save it under app/code/Packt/TweetsAbout/Controller/Index/ with the following code:
<?php

  namespace Packt\TweetsAbout\Controller\Index;

  class Index extends \Magento\Framework\App\Action\Action{

      protected $resultPageFactory;

      public function __construct(
          \Magento\Framework\App\Action\Context $context,
          \Magento\Framework\View\Result\PageFactory $resultPageFactory
      ) {
          $this->resultPageFactory = $resultPageFactory;
          parent::__construct($context);
      }

      public function execute(){
          return $this->resultPageFactory->create();
      }
  }
Create another file named Index.php under app/code/Packt/TweetsAbout/Controller/Magento/. This file will control the access to the Magento Tweets page of the module. Save it with the following code:
<?php

  namespace Packt\TweetsAbout\Controller\Magento;

  class Index extends \Magento\Framework\App\Action\Action{

      protected $resultPageFactory;

      public function __construct(
          \Magento\Framework\App\Action\Context $context,
          \Magento\Framework\View\Result\PageFactory $resultPageFactory
      ) {
          $this->resultPageFactory = $resultPageFactory;
          parent::__construct($context);
      }

      public function execute(){
          return $this->resultPageFactory->create();
      }
  }
Create another file named Index.php under app/code/Packt/TweetsAbout/Controller/Packt/. This file will control the access to the Packt tweets page of the module. Save it with the following code:
<?php

  namespace Packt\TweetsAbout\Controller\Packt;

  class Index extends \Magento\Framework\App\Action\Action{

      protected $resultPageFactory;

      public function __construct(
          \Magento\Framework\App\Action\Context $context,
          \Magento\Framework\View\Result\PageFactory $resultPageFactory
      ) {
          $this->resultPageFactory = $resultPageFactory;
          parent::__construct($context);
      }

      public function execute(){
          return $this->resultPageFactory->create();
      }
  }
Create another file named Index.php under app/code/Packt/TweetsAbout/Controller/Php/. This file will control the access to the PHP tweets page of the module. Save it with the following code:
<?php

  namespace Packt\TweetsAbout\Controller\Php;

  class Index extends \Magento\Framework\App\Action\Action{
      protected $resultPageFactory;

      public function __construct(
          \Magento\Framework\App\Action\Context $context,
          \Magento\Framework\View\Result\PageFactory $resultPageFactory
      ) {
          $this->resultPageFactory = $resultPageFactory;
          parent::__construct($context);
      }

      public function execute()
      {
          return $this->resultPageFactory->create();
      }
  }
Magento 2.0 uses namespaces as a PHP standard recommendation (http://www.php-fig.org/psr/) to avoid name collisions between classes and to improve the readability of the code. So, in the namespace instruction, we will declare the class path to follow the PSR-4 pattern (http://www.php-fig.org/psr/psr-4/).
The extends functionality (inheritance) of \Magento\Framework\App\Action\Action provides a functionality to handle actions triggered by the URL access. For example, when the user enters the URL http://<magento_url>/tweetsabout, the routes.xml file redirects to the Index/Index.php controller to treat the user request made by accessing the URL.
The dependency injection of the __construct() method—\Magento\Framework\App\Action\Context $context and \Magento\Framework\View\Result\PageFactory $resultPageFactory—declares the initial construct of the Action class and the view layer to work with the template file.
Note
For further information about the dependency injection, access the Magento official documentation at http://goo.gl/jHFPTr.
Finally, the execute() method renders the layout. We will declare the layout files later on.
At this point, it's important to be familiar with PHP object-oriented programming (http://php.net/manual/en/language.oop5.php). I strongly suggest that you study the main concepts to increase the understanding of the book.
Blocks in Magento 2.0 provide presentation logic for your view templates. In the TweetsAbout project, we will use two blocks to process the view template files.
Under the app/code/Packt/TweetsAbout/Block directory, create a file named Index.php with the following code:
<?php

  namespace Packt\TweetsAbout\Block;

  class Index extends \Magento\Framework\View\Element\Template{

      public function getMagentoUrl(){
          return $this->getData('urlMagento');
      }

      public function getPHPUrl(){
          return $this->getData('urlPHP');
      }

      public function getPacktUrl(){
          return $this->getData('urlPackt');
      }
  }
The three methods, getMagentoUrl(), getPHPUrl(), and getPacktUrl(), get data from layout declaration files to define a URL for each kind of controller and give it to the initial layout of the module.
Now, under the app/code/Packt/TweetsAbout/Block directory, create a file named Tweets.php with the following code:
<?php
  namespace Packt\TweetsAbout\Block;

  require $_SERVER['DOCUMENT_ROOT'] . "/packt/app/code/Packt/TweetsAbout/Api/vendor/autoload.php";
  use Abraham\TwitterOAuth\TwitterOAuth;

  class Tweets extends \Magento\Framework\View\Element\Template{

      private $consumerKey;
      private $consumerSecret;
      private $accessToken;
      private $accessTokenSecret;

    public function searchTweets(){
      $connection = $this->twitterDevAuth();
      $result = $connection->get("search/tweets", array("q" =>$this->getData('hashtag'), "result_type"=>"recent", "count" => 10));

      return $result->statuses;
    }

    private function twitterDevAuth(){
      $this->consumerKey = YOUR_CONSUMER_KEY;
      $this->consumerSecret = YOUR_CONSUMER_SECRET;
      $this->accessToken = YOUR_ACCESS_TOKEN;
      $this->accessTokenSecret  = YOUR_ACCESS_TOKEN_SECRET;

      return new TwitterOAuth($this->consumerKey, $this->consumerSecret, $this->accessToken, $this->accessTokenSecret);
    }
  }
Here are some things to consider about the Tweets.php code:
- The required instruction is to call the autoload, and the use is to append the namespace of the
TwitterOAuthlibrary to work on our extension - In the
twitterDevAuth()method, you must enter the Twitter API credentials - In the
searchTweets()method, the$connection->get("search/tweets", array("q" =>$this->getData('hashtag'), "result_type"=>"recent", "count" => 10))instruction works with the Twitter search API, getting the last 10 results of Twitter posts
Under the app/code/Packt/TweetsAbout/Observer directory, create the Topmenu.php file with the following code:
<?php
namespace Packt\TweetsAbout\Observer;
use Magento\Framework\Event\Observer as EventObserver;
use Magento\Framework\Data\Tree\Node;
use Magento\Framework\Event\ObserverInterface;

class Topmenu implements ObserverInterface{

    /**
     * @param EventObserver $observer
     * @return $this
     */
    public function execute(EventObserver $observer)
    {

      $urlInterface = \Magento\Framework\App\ObjectManager::getInstance()->get('Magento\Framework\UrlInterface');

      $active = strpos($urlInterface->getCurrentUrl(), "tweetsabout");


        /** @var \Magento\Framework\Data\Tree\Node $menu */
        $menu = $observer->getMenu();
        $tree = $menu->getTree();
        $data = [
            'name'      => __("TweetsAbout"),
            'id'        => 'tweetsmenu',
            'url'       => $urlInterface->getBaseUrl() . 'tweetsabout',
            'is_active' => $active
        ];
        $node = new Node($data, 'id', $tree, $menu);
        $menu->addChild($node);
        return $this;
    }
}
The Topmenu.php file dynamically creates a new top menu item for the TweetsAbout module by adding a node in the top menu link schema. The \Magento\Framework\App\ObjectManager::getInstance()->get('Magento\Framework\UrlInterface') instruction gets the base URL and the current URL to create a specific link to the TweetsAbout module. The Topmenu observer works with the Document Object Model (DOM) concept of nodes and trees dynamically.
It's time to handle the presentation layer of the project. First, we will create the layout files (.xml) to handle template behavior and to pass arguments to the template via blocks. Every layout file is assigned by following this pattern: <module_name>_<controller>_<controller_file>.xml. This pattern allows the Magento system to assign the correct files according to its controller automatically.
Under the app/code/Packt/TweetsAbout/view/frontend/layout path, create the tweetsabout_index_index.xml file with the following code:
<?xml version="1.0"?>
<page xmlns:xsi="http://www.w3.org/2001/XMLSchema-instance" layout="1column" xsi:noNamespaceSchemaLocation="urn:magento:framework:View/Layout/etc/page_configuration.xsd">
    <head>
        <title>
            TweetsAbout Module
        </title>
    </head>
    <body>
        <referenceContainer name="content">
            <block class="Packt\TweetsAbout\Block\Index" template="Packt_TweetsAbout::index.phtml">
                <arguments>
                    <argument name="urlMagento" xsi:type="url" path="tweetsabout/magento" />
                    <argument name="urlPHP" xsi:type="url" path="tweetsabout/php" />
                    <argument name="urlPackt" xsi:type="url" path="tweetsabout/packt" />
                </arguments>
            </block>
        </referenceContainer>
    </body>
</page>
The <block> tag binds the Index.php Block to the index.phtml template, and the <arguments> tag transports three URL parameters to the Block. These parameters will be used in the index.phtml file.
Under the app/code/Packt/TweetsAbout/view/frontend/layout path, create the tweetsabout_magento_index.xml file with the following code:
<?xml version="1.0"?>
<page xmlns:xsi="http://www.w3.org/2001/XMLSchema-instance" layout="1column" xsi:noNamespaceSchemaLocation="urn:magento:framework:View/Layout/etc/page_configuration.xsd">
    <head>
        <title>
            TweetsAbout #Magento
        </title>
        <css src="Packt_TweetsAbout::css/source/module.css"/>
    </head>
    <body>
        <referenceContainer name="content">
            <block class="Packt\TweetsAbout\Block\Tweets" template="Packt_TweetsAbout::tweets.phtml">
                <arguments>
                    <argument name="hashtag" xsi:type="string">#magento</argument>
                </arguments>
            </block>
        </referenceContainer>
    </body>
</page>
Under the app/code/Packt/TweetsAbout/view/frontend/layout path, create the tweetsabout_packt_index.xml file with the following code:
<?xml version="1.0"?>
<page xmlns:xsi="http://www.w3.org/2001/XMLSchema-instance" layout="1column" xsi:noNamespaceSchemaLocation="urn:magento:framework:View/Layout/etc/page_configuration.xsd">
    <head>
        <title>
            TweetsAbout #Packtpub
        </title>
        <css src="Packt_TweetsAbout::css/source/module.css"/>
    </head>
    <body>
        <referenceContainer name="content">
            <block class="Packt\TweetsAbout\Block\Tweets" template="Packt_TweetsAbout::tweets.phtml">
                <arguments>
                    <argument name="hashtag" xsi:type="string">#packtpub</argument>
                </arguments>
            </block>
        </referenceContainer>
    </body>
</page>
Under the app/code/Packt/TweetsAbout/view/frontend/layout path, create the tweetsabout_php_index.xml file with the following code:
<?xml version="1.0"?>
<page xmlns:xsi="http://www.w3.org/2001/XMLSchema-instance" layout="1column" xsi:noNamespaceSchemaLocation="urn:magento:framework:View/Layout/etc/page_configuration.xsd">
    <head>
        <title>
            TweetsAbout #PHP
        </title>
        <css src="Packt_TweetsAbout::css/source/module.css"/>
    </head>
    <body>
        <referenceContainer name="content">
            <block class="Packt\TweetsAbout\Block\Tweets" template="Packt_TweetsAbout::tweets.phtml">
                <arguments>
                    <argument name="hashtag" xsi:type="string">#php</argument>
                </arguments>
            </block>
        </referenceContainer>
    </body>
</page>
The <css> tag loads the CSS rules of the template. The <block> tag binds the Tweets.php Block to the tweets.phtml file. The <argument name="hashtag"> tag transports the hashtag parameter to the Tweets.php Block to search the latest mentions of the specific hashtag in the Twitter database.
Now, let's create the template files.
Under the app/code/Packt/TweetsAbout/view/frontend/templates path, create the index.phtml file with the following code:
<h2>Recent TweetsAbout: </h2>
<ul>
  <li>
    <a href="<?php echo $block->escapeHtml($block->getMagentoUrl()) ?>">
      <span><?php echo __('Magento')?></span>
    </a>
  </li>
  <li>
    <a href="<?php echo $block->escapeHtml($block->getPacktUrl()) ?>">
      <span><?php echo __('Packtpub')?></span>
    </a>
  </li>
  <li>
    <a href="<?php echo $block->escapeHtml($block->getPHPUrl()) ?>">
      <span><?php echo __('PHP')?></span>
    </a>
  </li>
</ul>
The $block object has access to the methods of Block/Index.php, and the URL of the pages build dynamically.
Under the app/code/Packt/TweetsAbout/view/frontend/templates path, create the tweets.phtml file with the following code:
<?php
  $tweets = $block->searchTweets();
?>

<?php foreach ($tweets as $tweet){ ?>
  <p class="tweet">
    <a href="<?php echo $tweet->user->url; ?>">
      <img src="<?php echo $tweet->user->profile_image_url; ?>" alt="profile">
    </a>
    <b>Created: </b><?php echo $tweet->created_at; ?>
    <br />
    <br />

    <a href="<?php echo isset($tweet->entities->urls[0]->url) ? $tweet->entities->urls[0]->url : "#"; ?>" target="_blank"><?php echo $tweet->text;?></a>

  </p>
  <hr />
<?php } ?>
The searchTweets() method loads tweets according to the URL accessed, and PHP processes the data to show the results to the user.
Under the app/code/Packt/TweetsAbout/view/frontend/web/css/source path, create the module.less file with the following code:
 .tweet {background-color: #878787; padding:15px; border:1px dotted}
.tweet a {color: #ffffff}
.tweet a:hover {text-decoration: underline;}To deploy the module, follow this recipe:
- Open the terminal or command prompt.
- Access the
packt/bindirectory. - Then, run the
php magento module:enable --clear-static-content Packt_TweetsAboutcommand. - Run the
php magento setup:upgradecommand. - Next, run the
php magento setup:static-content:deploycommand. - In some cases, it is necessary to give
writepermissions again to the directories.
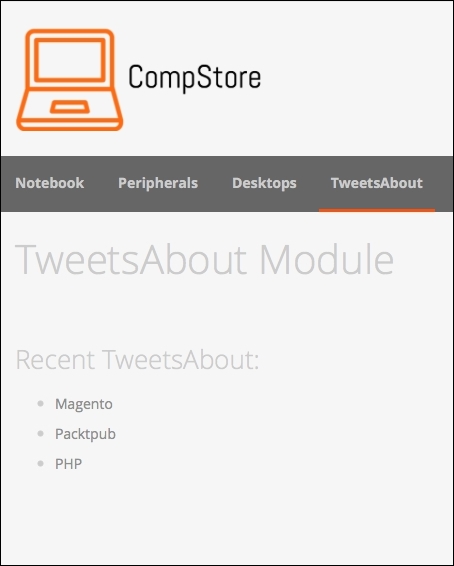
If everything goes alright, when you access the URL http://localhost/packt, you will see one link for the TweetsAbout extension in the topmost menu. Just click on it to see how the extension works. Take a look at the following screenshot:
You can navigate to the links to see how the pages work, as in the following screenshot:
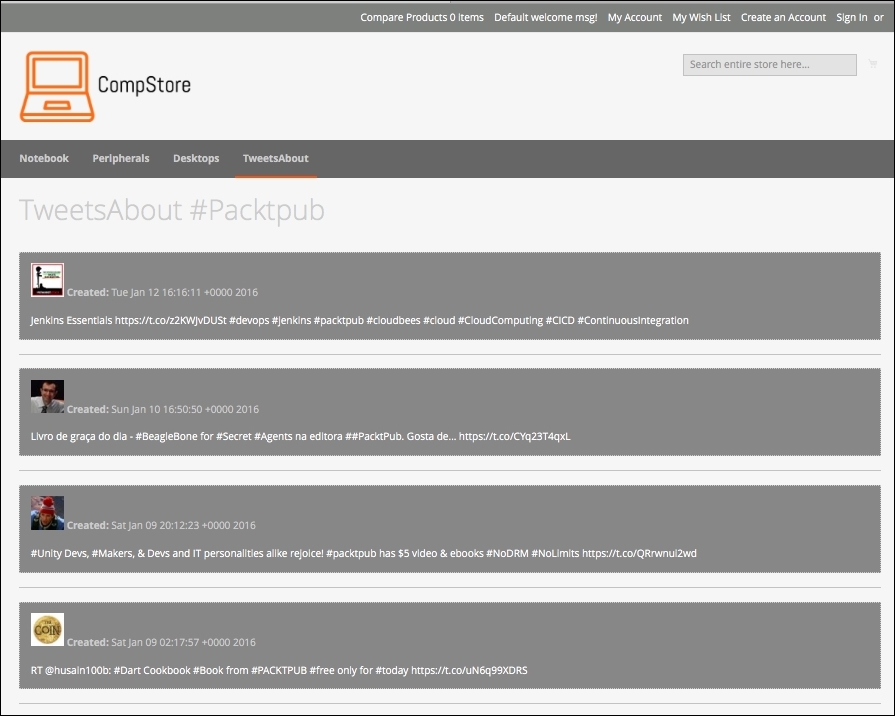
The extension gets the ten last tweets in real time with the date, picture, and post. It's really awesome to watch our work running!
For sure, this extension can get a lot better, but it is only a starting point for big achievements.
Once you have your extension ready to work, you can publish it in the Magento Connect service (http://www.magentocommerce.com/magento-connect). Magento Connect is a service in which Magento members can share their open source or commercial extensions with Magento Community. The main contributions are generally based on the following:
- Modules
- Language packs
- Design interfaces
- Themes
Once you have the composer.json file configured, you can package your module by compacting it as a .zip file in the vendor-name_package-name-1.0.0.zip format.
Upload the module in your personal account in GitHub, and Magento can retrieve it to publish.
For further information, it's strongly recommended that you to access the official documentation available on the Magento Developers official site at http://devdocs.magento.com/guides/v2.0/extension-dev-guide/package_module.html.