Table of Contents for
Magento 2 - Build World-Class online stores
 Magento 2 - Build World-Class online stores
Published by
Packt Publishing, 2017
Magento 2 - Build World-Class online stores
Published by
Packt Publishing, 2017
- Cover
- Table of Contents
- Magento 2 - Build World-Class online stores
- Magento 2 - Build World-Class online stores
- Credits
- Preface
- 1. Module 1
- 1. Magento Fundamentals
- XAMPP installation
- Magento
- Summary
- 2. Magento 2.0 Features
- An introduction to the Magento order management system
- Magento 2.0 command-line configuration
- The command-line utility
- Summary
- 3. Working with Search Engine Optimization
- Store configuration
- SEO and searching
- SEO catalog configuration
- Google Analytics tracking code
- Optimizing Magento pages
- Summary
- 4. Magento 2.0 Theme Development – the Developers' Holy Grail
- Magento 2.0 theme structure
- The Magento Luma theme
- Magento theme inheritance
- CMS blocks and pages
- Custom variables
- Creating a basic Magento 2.0 theme
- Summary
- 5. Creating a Responsive Magento 2.0 Theme
- Composer – the PHP dependency manager
- Building the CompStore theme
- CSS preprocessing with LESS
- Applying new CSS to the CompStore theme
- Creating the CompStore logo
- Applying the theme
- Creating CompStore content
- Customizing Magento 2.0 templates
- Summary
- 6. Write Magento 2.0 Extensions – a Great Place to Go
- Using the Zend framework
- Magento 2.0 extension structure
- Developing your first Magento extension
- The Twitter REST API
- The TweetsAbout module structure
- Using TwitterOAuth to authenticate our extension
- Developing the module
- Summary
- 7. Go Mobile with Magento 2.0!
- Adjusting the CompStore theme for mobile devices
- The Magento 2.0 responsive design
- The Magento UI
- Implementing a new CSS mixin media query
- Adjusting tweets about extensions for mobile devices
- Summary
- 8. Speeding up Your Magento 2.0
- Indexing and caching Magento
- Indexing and re-indexing data
- The Magento cron job
- Caching
- Fine-tuning the Magento hosting server
- Selecting the right Magento hosting service
- Apache web server deflation
- Enabling the expires header
- Minifying scripts
- Summary
- 9. Improving Your Magento Skills
- Magento knowledge center
- Improving your Magento skills
- Summary
- 2. Module 2
- 1. Magento 2 System Tools
- Installing Magento 2 sample data via GUI
- Installing Magento 2 sample data via the command line
- Managing Magento 2 indexes via the command line
- Managing Magento 2 cache via the command line
- Managing Magento 2 backup via the command line
- Managing Magento 2 set mode (MAGE_MODE)
- Transferring your Magento 1 database to Magento 2
- 2. Enabling Performance in Magento 2
- Configuring Redis for backend cache
- Configuring Memcached for session caching
- Configuring Varnish as the Full Page Cache
- Configuring Magento 2 with CloudFlare
- Configuring optimized images in Magento 2
- Configuring Magento 2 with HTTP/2
- Configuring Magento 2 performance testing
- 3. Creating Catalogs and Categories
- Create a Root Catalog
- Create subcategories
- Manage attribute sets
- Create products
- Manage products in a catalog grid
- 4. Managing Your Store
- Creating shipping and tax rules
- Managing customer groups
- Configuring inventories
- Configuring currency rates
- Managing advanced pricing
- 5. Creating Magento 2 Extensions – the Basics
- Initializing extension basics
- Working with database models
- Creating tables using setup scripts
- Creating a web route and controller to display data
- Creating system configuration fields
- Creating a backend data grid
- Creating a backend form to add/edit data
- 6. Creating Magento 2 Extensions – Advanced
- Using dependency injection to pass classes to your own class
- Modifying functions with the use of plugins – Interception
- Creating your own XML module configuration file
- Creating your own product type
- Working with service layers/contracts
- Creating a Magento CLI command option
- 3. Module 3
- 1. Planning for Magento
- Technical considerations
- Global-Website-Store methodology
- Planning for multiple stores
- Summary
- 2. Managing Products
- Managing products the customer focused way
- Creating products
- Managing inventory
- Pricing tools
- Autosettings
- Related products, up-sells, and cross-sells
- Importing products
- Summary
- 3. Designs and Themes
- The concept of theme inheritance
- Default installation of design packages and themes
- Installing third-party themes
- Inline translations
- Working with theme variants
- Customizing themes
- Customizing layouts
- Summary
- 4. Configuring to Sell
- Payment methods
- Shipping methods
- Managing taxes
- Transactional e-mails
- Summary
- 5. Managing Non-Product Content
- Summary
- 6. Marketing Tools
- Promotions
- Newsletters
- Using sitemaps
- Optimizing for search engines
- Summary
- 7. Extending Magento
- The new Magento module architecture
- Extending Magento functionality with Magento plugins
- Building your own extensions
- Summary
- 8. Optimizing Magento
- Indexing and caching
- Caching in Magento 2 – not just FPC
- Tuning your server for speed
- Summary
- 9. Advanced Techniques
- Version control
- Magento cron
- Backing up your database
- Upgrading Magento
- Summary
- 10. Pre-Launch Checklist
- System configurations
- Design configurations
- Search engine optimization
- Sales configurations
- Product configurations
- Maintenance configurations
- Summary
- Index
Running a Magento store can be difficult—configuring the server, creating store views, and adding categories and products. Everyone knows that every product needs at least one product image. In some setups, we even have more than one. From this single master image, multiple thumbs are created, such as base image, small image, swatch image, and thumbnail.
By default, images are not optimized for the web when saving them in Photoshop. Images shown on a website are not exactly the same as images for print. The Exchangeable Image File (EXIF) data, for example, is not needed, and by removing this metadata, you can save lots of bytes. The smaller the image, the faster it's shown in the browser of the customer.
Here is an example of EXIF data (not optimized). The current file size is 620,888 bytes:
EXIF Data

File:
  ExifByteOrder: Big-endian (Motorola, MM)
  CurrentIPTCDigest: 50bb6030364fbdfb1842e98de0e81efe
  ImageWidth: 1024
  ImageHeight: 768
  EncodingProcess: Baseline DCT, Huffman coding
  BitsPerSample: 8
  ColorComponents: 3
  YCbCrSubSampling: YCbCr4:4:4 (1 1)
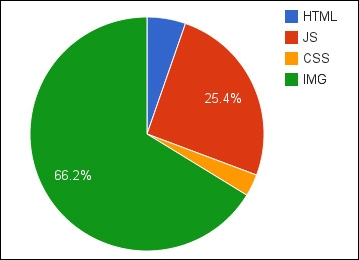
Storing all these images on your Magento server will result in slower pages and slower rendering of them. Almost 70% of all the content from a single page is filled with images:
So, optimizing images is not only important for desktop users, but also for mobile users. The less data they need to download, the better the user experience. Besides this, it's great for your search ranking optimization, battery consumption, and bandwidth/data plan.
Tip
By default, Magento 1 did not optimize the created catalog and CMS images. This could be optimized using software binaries such as jpegtran, jpegoptim, and OptiPNG.
If you don't have the option to install these, you could use Rapido image optimizer (https://www.rapido.nu/), which is a SaaS-based image optimizer for Magento. It is also the only optimizer that checks for the best available optimization per image and tunes all the images in the image cache directory on a daily basis.
For this recipe, we will use a Droplet created in Chapter 1, Magento 2 System Tools, at DigitalOcean, https://www.digitalocean.com/. We will be using NGINX, PHP-FPM, and a Composer-based setup including sample data for image optimization. No other prerequisites are required.
For the purpose of this recipe, let's assume that we need to optimize all Magento 2 images. The following steps will guide you through this:
- By default, Magento 2 now uses an optimized GD2 PHP library, which is installed during the installation. The following command should be used during installation:
apt-get install php5-gdInstead, we can also use the following command:
apt-get install php7.0-gdTo make sure that GD is installed correctly, run the following command:
php -i | grep gdRun the following command to test which version of GD you are running:
echo '<?php var_dump(gd_info()); ?>' > gd.php
php gd.php
The output looks as follows:
root@mage2cookbook:/var/www/magento2/pub# php gd.php
array(13) {
  ["GD Version"]=>
  string(9) "2.1.1-dev"
- Now let's log in to the backend of your Magento 2 control panel and navigate to the Stores | Configuration | Advanced | Developer section.
Here, you will find the following options:
- Template Settings
- JavaScript Settings
- CSS Settings
- Image Processing Settings
- Static Files Settings
We first make sure that our
Image Adapteris set toPHP GD2. We don't use the ImageMagick setting here. In the There's more… section of this recipe, you can find more information on this. - Next, we change the CSS Settings, JavaScript Settings, Static Files Settings, and Template Settings. In the Template Settings, adjust Minify HTML to YES.
Next, enable JavaScript Bundling, Merge JavaScript, and Minify JavaScript to YES.
Next, enable Merge CSS and Minify CSS to YES.
Last but not least, enable Static Files to YES. Save all the settings.
- Before we have all the optimized code available, we need to recompile all static assets. Let's assume that we are preparing for production. Run the following code on the shell:
php bin/magento deploy:mode:set productionBefore running the code, make sure to change your Apache or NGINX configuration to
set $MAGE_MODE production;(Nginx)orSetEnv MAGE_MODE production (Apache). In Managing Magento 2, set mode (MAGE_MODE) recipe of Chapter 1, Magento 2 System Tools, we covered everything in detail.After running this code, make sure to change your user and group permissions. Run the following command:
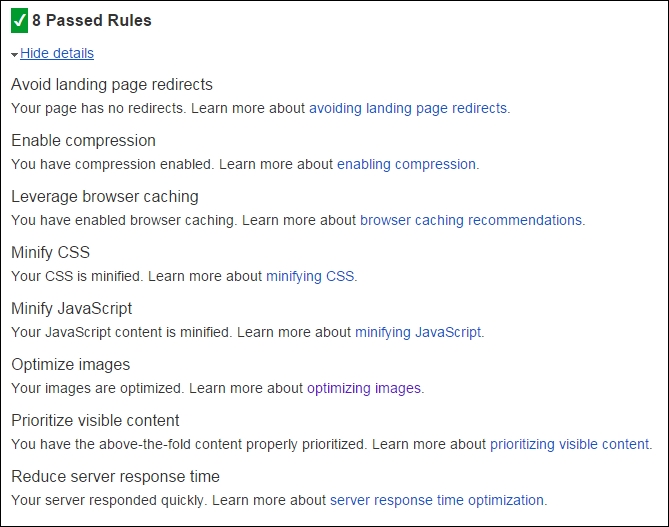
chown –R www-data:www-data * - Congratulations, you just finished configuring optimized images, JavaScript, and CSS with Magento 2. The following image is a screenshot from the Google PageSpeed insight page (https://developers.google.com/speed/pagespeed/insights/), where you can test your own pages:
Let's recap and find out what we did throughout this recipe. In steps 1 through 5, we configured the image optimizing technique, which is now by default available in Magento 2.
In step 1, we installed the PHP GD library and tested it. In step 2, we configured the Magento backend to start using the optimization by selecting the GD option and additional merging for JS and CSS.
In step 4, we ran the bin/magento production mode to start optimizing all of the code.
Besides the PHP GD2 library, Magento 2 offers the option to switch to the ImageMagick library (http://www.imagemagick.org/). In basis, this library works great for image optimization, but during some tests, we found out that the GD2 had a smaller output. Besides the difference in size, ImageMagick generated files in the baseline (renders top-down) format instead of the progressive (renders from blurry to sharp) format that GD2 does.
Using progressive is the best commonly used format for web pages. It starts as a blurry image and turns sharp when done. It improves the user experience by loading the images incrementally.
If you still want to use ImageMagick, here are some basic commands. Run the following code on your shell. Then, switch to ImageMagick in your Magento configuration backend:
apt-get install -y imagemagick --fix-missing
apt-get install -y php5-imagick
service php-fpm restart
php -i | grep imagick