Copyright © 2016 Packt Publishing
All rights reserved. No part of this course may be reproduced, stored in a retrieval system, or transmitted in any form or by any means, without the prior written permission of the publisher, except in the case of brief quotations embedded in critical articles or reviews.
Every effort has been made in the preparation of this course to ensure the accuracy of the information presented. However, the information contained in this course is sold without warranty, either express or implied. Neither the authors, nor Packt Publishing, and its dealers and distributors will be held liable for any damages caused or alleged to be caused directly or indirectly by this course.
Packt Publishing has endeavored to provide trademark information about all of the companies and products mentioned in this course by the appropriate use of capitals. However, Packt Publishing cannot guarantee the accuracy of this information.
Published on: March 2017
Production reference: 1210317
Published by Packt Publishing Ltd.
Livery Place
35 Livery Street
Birmingham B3 2PB, UK.
ISBN 978-1-84719-752-8
Magento is the leading e-commerce software trusted by world`s leading organizations. Used by thousands of merchants for their transactions worth billions, it provides the flexibility to customize the content and functionality of your website. Our Magento Couse will help you gain knowledge and skills that are required to design & develop world class online stores.
Module 1, Magento 2 Development Essentials - This fast-paced tutorial will provide you with skills you need to successfully create themes, extensions, and solutions to Magento 2 projects. This book begins by setting up Magento 2 before gradually moving onto setting the basic options of the Sell System. You will take advantage of Search Engine Optimization aspects, create design and customize theme layout, develop new extensions, and adjust the Magento System to achieve great performance. By sequentially working through the steps in each chapter, you will quickly explore all the features of Magento 2 to create a great solution.
Module 2, Magento 2 Cookbook – This guide will provide you with the necessary insights to get a better understanding on what is needed to build powerful commerce platform. The book is divided into several recipes, which show you which steps to take to complete a specific action. In each recipe, we have a section that explains how everything works. It will cover configuring your categories and products, performance tuning, creating a theme, developing a module, and much more. At the end of this book, you will gain the knowledge to start building a success website.
Module 3, Magento 2 Cookbook – This guide will provide you with the necessary insights to get a better understanding on what is needed to build powerful commerce platform. The book is divided into several recipes, which show you which steps to take to complete a specific action. In each recipe, we have a section that explains how everything works. It will cover configuring your categories and products, performance tuning, creating a theme, developing a module, and much more. At the end of this book, you will gain the knowledge to start building a success website.
This course is for anyone who wants to mould their skills in building amazing e-commerce websites using Magento. We begin right from getting you started with Magento to becoming an expert at building your own online stores with it.
Feedback from our readers is always welcome. Let us know what you think about this course—what you liked or disliked. Reader feedback is important for us as it helps us develop titles that you will really get the most out of.
To send us general feedback, simply e-mail feedback@packtpub.com, and mention the course's title in the subject of your message.
If there is a topic that you have expertise in and you are interested in either writing or contributing to a book, see our author guide at www.packtpub.com/authors.
Now that you are the proud owner of a Packt course, we have a number of things to help you to get the most from your purchase.
You can download the example code files for this course from your account at http://www.packtpub.com. If you purchased this course elsewhere, you can visit http://www.packtpub.com/support and register to have the files e-mailed directly to you.
You can download the code files by following these steps:
You can also download the code files by clicking on the Code Files button on the course's webpage at the Packt Publishing website. This page can be accessed by entering the course's name in the Search box. Please note that you need to be logged in to your Packt account.
Once the file is downloaded, please make sure that you unzip or extract the folder using the latest version of:
The code bundle for the course is also hosted on GitHub at https://github.com/PacktPublishing/Magento-2-Build-World-Class-online-stores/. We also have other code bundles from our rich catalog of books, videos, and courses available at https://github.com/PacktPublishing/. Check them out!
Although we have taken every care to ensure the accuracy of our content, mistakes do happen. If you find a mistake in one of our courses—maybe a mistake in the text or the code—we would be grateful if you could report this to us. By doing so, you can save other readers from frustration and help us improve subsequent versions of this course. If you find any errata, please report them by visiting http://www.packtpub.com/submit-errata, selecting your course, clicking on the Errata Submission Form link, and entering the details of your errata. Once your errata are verified, your submission will be accepted and the errata will be uploaded to our website or added to any list of existing errata under the Errata section of that title.
To view the previously submitted errata, go to https://www.packtpub.com/books/content/support and enter the name of the course in the search field. The required information will appear under the Errata section.
Piracy of copyrighted material on the Internet is an ongoing problem across all media. At Packt, we take the protection of our copyright and licenses very seriously. If you come across any illegal copies of our works in any form on the Internet, please provide us with the location address or website name immediately so that we can pursue a remedy.
Please contact us at copyright@packtpub.com with a link to the suspected pirated material.
We appreciate your help in protecting our authors and our ability to bring you valuable content.
Magento is a highly customizable e-commerce platform and content management system. Magento is one of the most used e-commerce systems to create online stores around the world by providing management of inventory, orders, customers, payments, and much more. It has a powerful scalable architecture.
Are you ready to start on the world of Magento development?
First of all, we will need to set up our environment. In this book, we will cover how to set up a local environment. It is very important to have this local ecosystem development to work smoothly and in an agile way.
In every chapter of this book, we will work with a mini project. It's kind of a sprint to learn the path. In this chapter, our mission is to create a work environment and understand the basic concepts of Magento (http://magento.com/).
After setting up the environment, you'll study the Magento folder structure and work on a basic Model View Controller (MVC) software architecture pattern and Magento basic setup.
Basically, we will work on this chapter with the following topics:
Are you ready for fun some? Let's go!
The XAMPP is a complete web development environment. On its install package, we can find Apache, MySQL, PHP, and Perl. This is everything that you will want to develop your solutions!
At this time, you can imagine the meaning of XAMPP, but the X before the AMPP has the meaning of cross or cross-platform. So, we have XAMMP: (X) Cross-platform, Apache, Maria DB, PHP, and Perl.
The goal of XAMPP is to build an easy-to-install distribution for developers to get into the world of Apache. XAMPP is a project of Apache Friends (Apache Friends is a non-profit project to promote the Apache web server).
Why we are working with this software? Let's find out:
So far so good, but how about doing some action?
First of all, let's access the XAMPP website on https://www.apachefriends.org/.
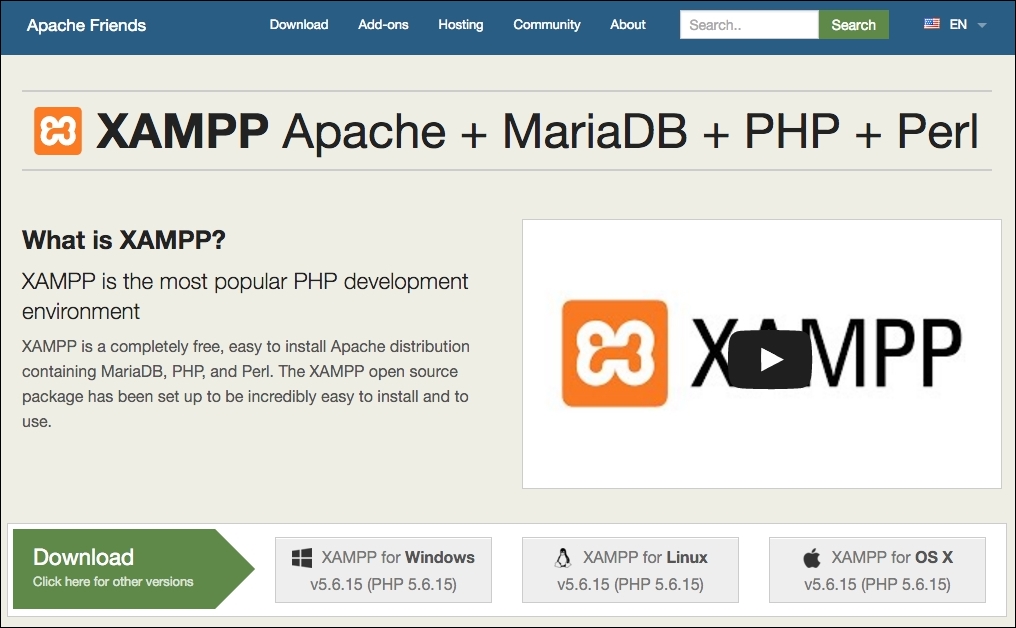
XAMPP has three distinct versions for different operating systems (OS): Windows, Linux, and OS X. Choose your preferred version to download, and start the installation process.
XAMPP for Windows has three different kinds of installation files:
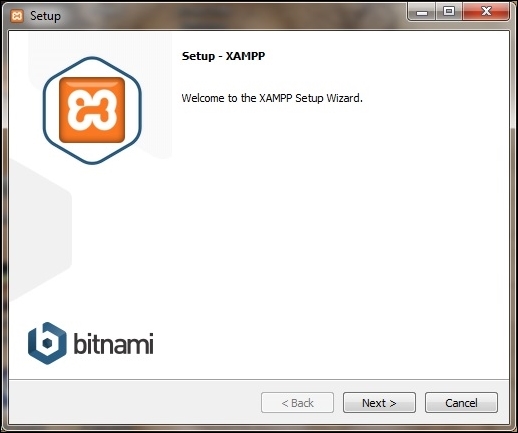
The (.exe) installer is the most popular process to install. Download it and execute to start the installation process, shown as follows:
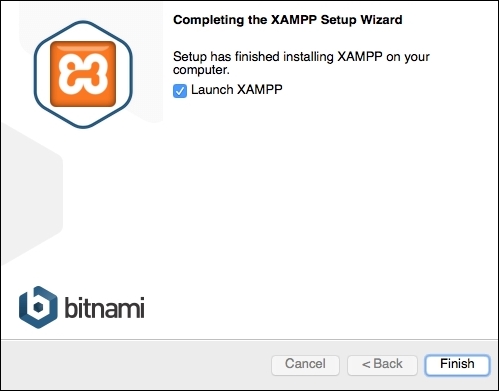
xampp-control.exe and start the Apache web server.http://localhosturl in your favorite web browser. You will see the XAMPP start page: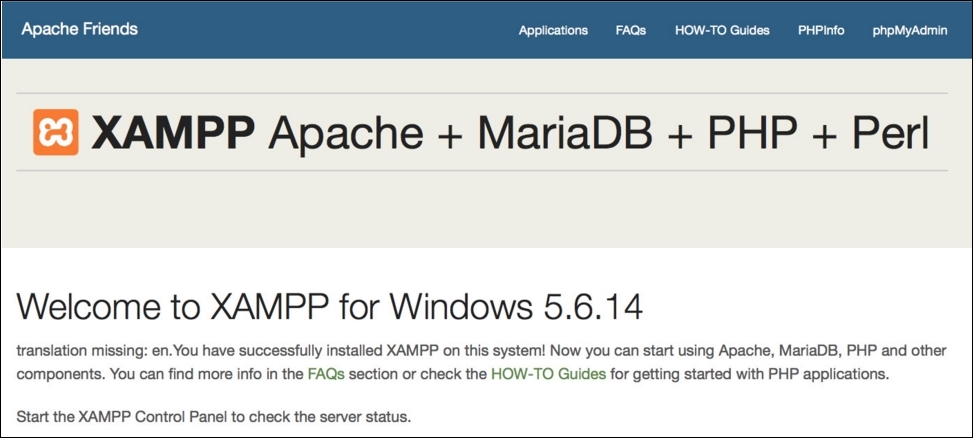
XAMPP for Linux has two main versions of installation files:
Choose the file according to your architecture and follow these steps:
chmod 755 xampp-linux-*-installer.run
sudo ./xampp-linux-*-installer.run
XAMPP is now installed below the /opt/lampp directory.
sudo /opt/lampp/lampp start
http://localhost URL in your favorite web browser. You will see the XAMPP start page: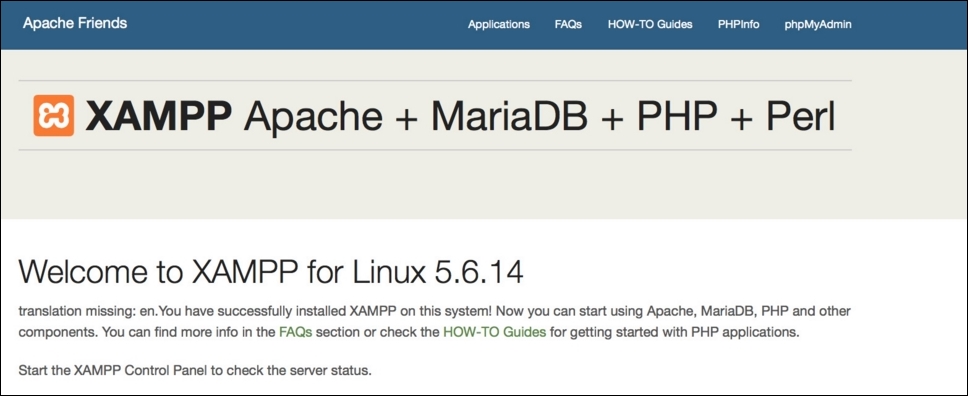
To install XAMPP for OS X, you simply need to follow these steps:
http://localhost URL in your favorite web browser. You will see the XAMPP start page: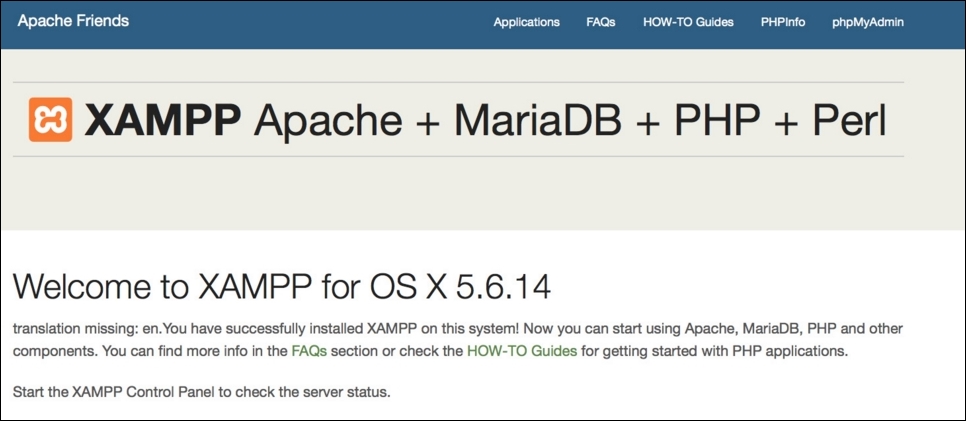
The XAMPP htdocs folder is the docroot folder of your server. Everything that you save on htdocs can be accessed via any browser. For example, if you save index.php inside the htdocs root, you can access this script by entering http://localhost/index.php. If you save your file in the packt folder, you can access it by http://localhost/packt/index.php. Piece of cake!
Magento is an open source content management system for e-commerce websites. It's one of the most important e-commerce systems, which has grown fast since its launch in 2008.
Basically, Magento works with two different types of Magento: Community Edition (CE) and Enterprise Edition (EE). In this book, we will cover CE.
On a study provided by aheadWorks (https://aheadworks.com/) in October 2014, Magento CE has taken the leading position among examined e-commerce platforms.

Now, we have solid concepts about "where we are going". It's very important to have solids concepts about every aspect that you are working on in this moment. Globally, e-commerce shows a remarkable potential market and Magento professionals are welcome.
First of all, we need to create a user account on the Magento website (http://www.magento.com) to download Magento CE. Click on the top-menu link My Account and after clicking the button labeled Register, fill out the form and confirm your registration.
Once registered, you gain access to download Magento CE. You can access the Products | Open Source/CE and VIEW AVAILABLE DOWNLOADS menus.
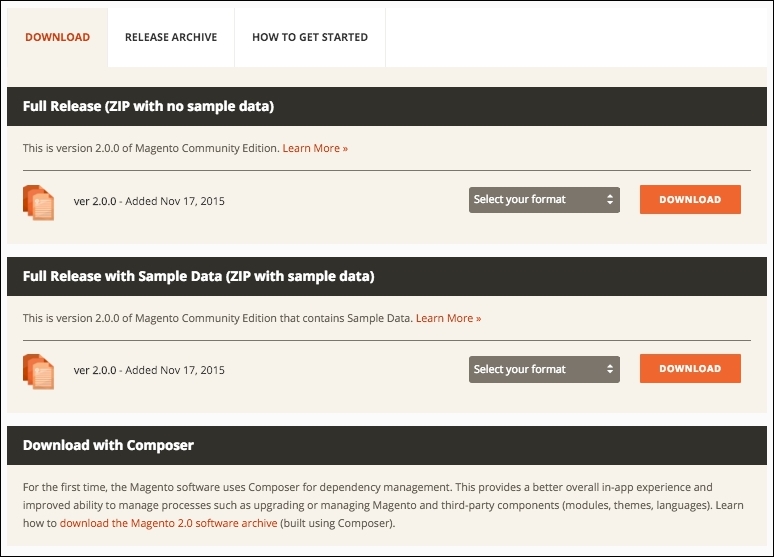
On this page, we have three important options:
Choose the
Full Release with Sample Data (ZIP with sample data) option for downloading Magento. Extract the compressed files in the XAMPP htdocsfolder and rename the folder to packt.
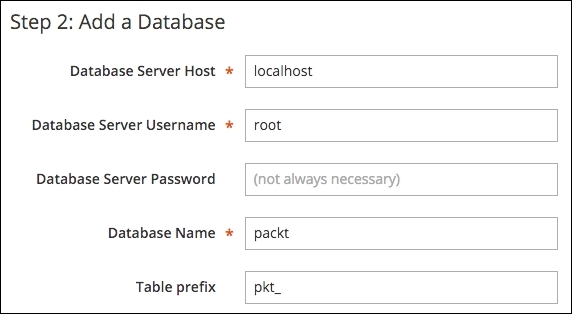
Before starting the Magento installation, we'll need to create a new MySQL database instance to store the Magento data. phpMyAdmin is a MySQL web app to manage your database and can be accessed at http://localhost/phpmyadmin/.
Click on the Databases menu and the Create database option to create the packt database.

Now, let's start our Magento installation. On your browser, access http://localhost/packt/setup.
By now, you will see this installation page on your browser:

Let's start the Magento installation by following these steps:
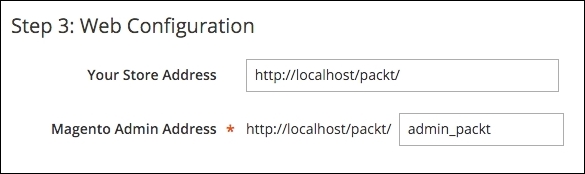
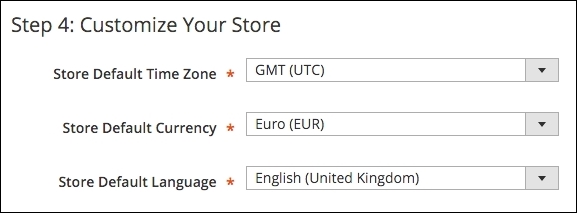
packt-admin.After all these steps, we are done! Congratulations! We have our first Magento installation!
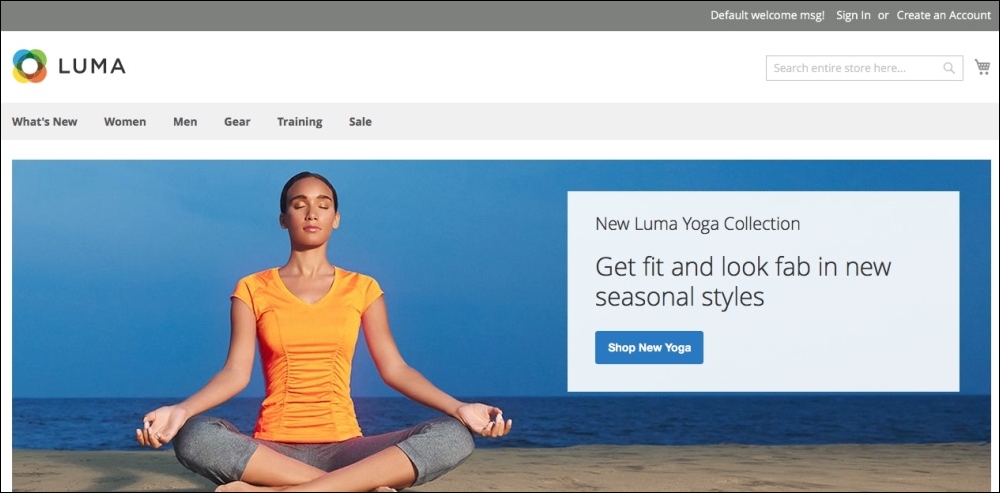
You can access your new site by accessing the URL at http://localhost/packt:
And you can access the admin area by accessing the URL at http://localhost/packt/admin-packt:
For more information about Magento installation, access http://devdocs.magento.com/guides/v2.0/install-gde/bk-install-guide.html.
MVC is an architectural software pattern that works with three different but interconnected parts. Its principal mission is to abstract the development work into interdependent layers providing the best practices to documentation and organization of software projects.
The Magento e-commerce solution is written with the PHP Zend framework, which is one of the most powerful PHP frameworks. For more information, access http://framework.zend.com/.
Magento is a configuration-based MVC System. For example, when you develop a module (we will check this in the next chapters), besides creating new files and classes to your module, you need to also create a config.xml file. This file contains all the configuration data for Magento module. These practices abstract some important information that you can easily edit to set the module as you need.
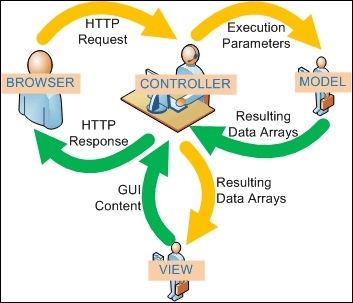
In this book, we will cover only the very basic Magento software architecture concepts, but it's highly recommended that you to study more software design patterns, especially in our case MVC software architecture needs to be understood well to best experience the field of software development.
You've now seen what Magento can do; you have installed Magento too. You started to understand the basic concepts of Magento, and certainly, you'll get more experience in developing your own Magento solutions by working in the projects of this book.
In the next chapter, we'll work with some Magento Sell System features.
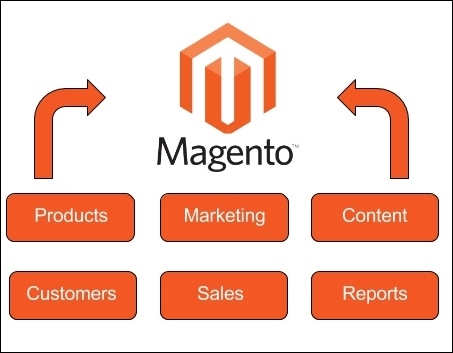
Magento has many features to provide a great experience to the users and developers. Understanding what Magento can provide is the key to success in the development of Magento. All Magento developers seek for improvements in this area.
On the Magento Connect site (https://www.magentocommerce.com/magento-connect/), you can search for uncountable extensions to improve your Magento solution: Checkout, Cart, Order Management, Gifting, Pricing, and Promotion, and a lot more. At this point, it is crucial to understand that Magento has a native solution and how its features can help you think of some great solutions for development.
In the previous chapter, you learned the fundamentals to create a basic local Magento environment to work with book projects. In this chapter, you will learn how Magento manages and improves system sell processes.
The following topics will be covered in this chapter:
Have fun!
Magento Commerce has promoted important changes between its 1.x and 2.0 versions. Some usual problems of the Magento 1.x version were fixed in this new version. The following processes/modules have received improvements in Magento 2.0:
All good software or systems pass through incremental improvements for evolving according to its production environment; it couldn't be different with a commerce platform that powers over 250,000 online stores worldwide.
Magento 2.0 CE has a flexible architecture and a modular code base; it has a modern theming and an extensive Application Programming Interface (API). To get a better performance, Magento 2.0 compresses JavaScript files and images and gives support to Apache Varnish integration on the server side to enable faster performance.
Security is another subject treated in the Magento 2.0 system. According to its official documentation (http://goo.gl/E7sPm3), Magento 2.0 has had substantial enhancements in its security layer:
Extensibility and modularity allow Magento to be highly customizable. As an objected-oriented solution, Magento follows good architectural principles and coding standards that provide high cohesion and loose coupling.
The following diagram illustrates Magento's architecture and how the components are integrated:
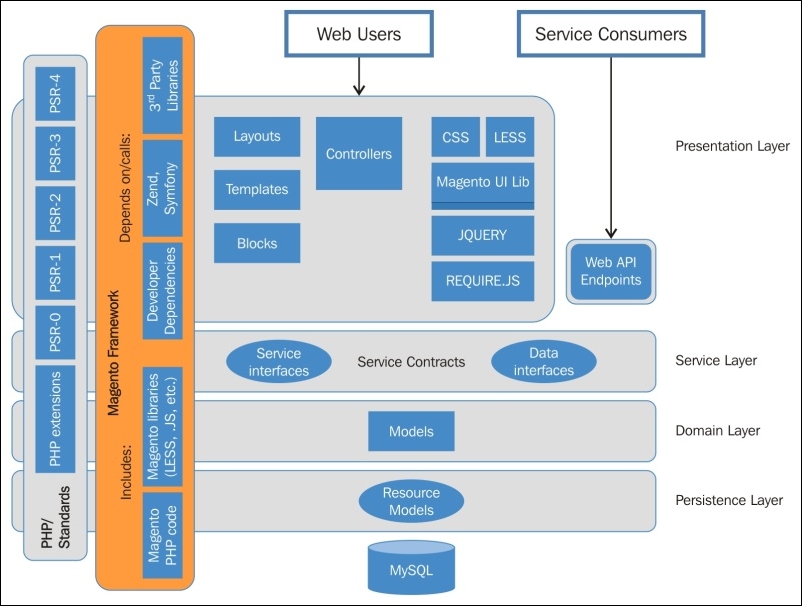
Magento works with PHP Standards Recommendations (PSR). The PSR establishes the following good programming practices:
debug, info, notice, warning, error, critical, alert, and emergency).To know more about this, access http://www.php-fig.org/psr/.
On Magento Framework, we have some libraries and dependencies of this architecture. Zend Framework (ZF) is a very important layer of this architecture; once Magento was written in ZF; as we saw earlier.
Finally, we have Web Users (frontend/backend), Service Consumers (API and endpoints), Service Layers (interfaces/contracts), and Models (resources and database).
On the Web Users layer, we can define Magento's main processes as:
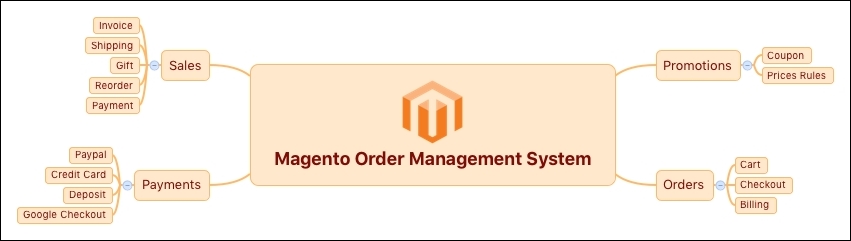
We will discuss these topics in the coming chapters, but now, I'd like to introduce to you one of the most important processes of any kind of e-commerce: the Sales layer or Magento Order Management. This is one of the most important things to understand the Magento development core.
On the e-commerce systems, the sell process is one of the most important features of every online business, providing a good e-commerce life cycle.
Some processes will be triggered when a customer confirms his order. Magento collects all the customer data and processes the request turning it into an order. This book will only cover the basic concepts of this process, but it's very important to understand them to develop consistent Magento extension solutions (we will see about this in Chapter 6, Write Magento 2.0 Extensions – a Great Place to Go).
Let's take a look at the Magento sales operations basics.
Let's play with the Magento admin area. In your favorite browser, enter the URL http://localhost/packt/admin-packt. Now, enter with your login credentials to access the admin area:
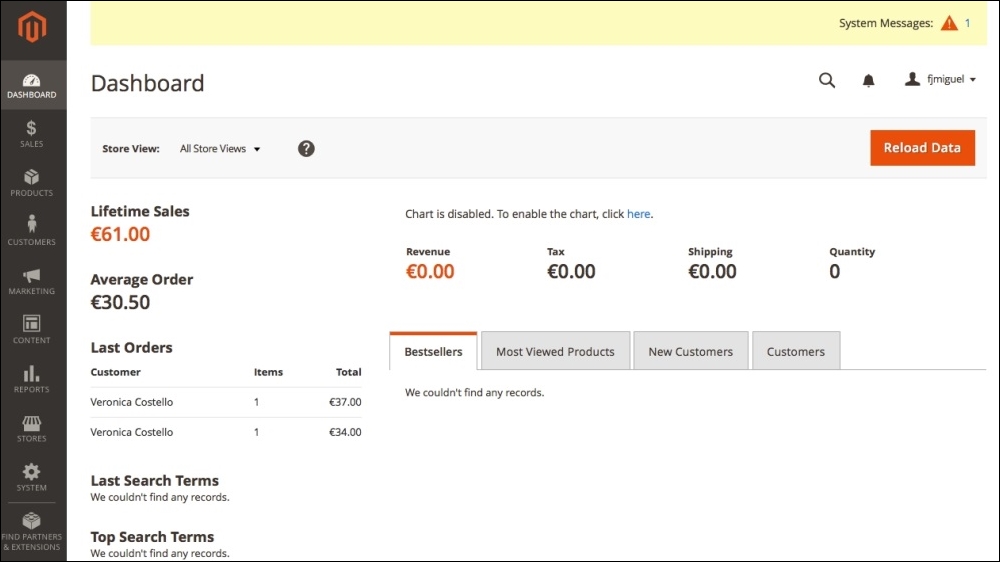
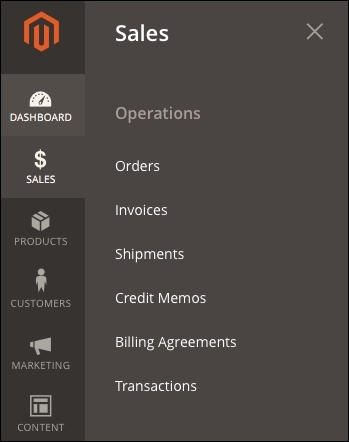
In Magento 2.0, you can manage sales operations by accessing the Sales menu in the admin area. Magento gives you the possibility to configure the following Sales options:
These options give you the power to manage your sales system as you want. Though it's, it's important to explore some Magento tools, extensions, and techniques to take full advantage and make improvements on your sales system to gather techniques to develop your own solution:
We have many options to make improvements on sales operations. You can configure up-sells and cross-sells features, for example, to give your customer more ways to order on your store. To do so, take advantage of a search engine optimization, work with a multilingual store, a geo-targeting, responsive design, and a simplified checkout process.
In this section, we'll see how to implement a simplified checkout process on our store.
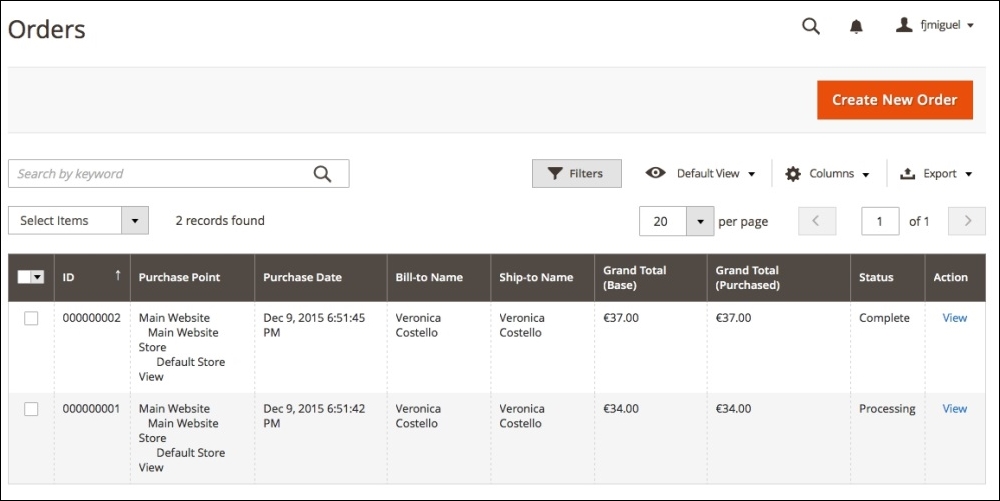
As a system administrator, you can access the admin area (http://localhost/mymagento/admin) to get all the customer order information, generate the product tracking code, invoices, and send a message to your customer. Magento stores all the order data on the admin area | Sales | Orders.
As an admin, Magento gives you the option to order products directly for your customer. On Magento, we have a persistent cart, print invoices, credit memo, and transactions.
You have a few options of payment methods in Magento. Magento has a native support to Google Checkout and PayPal. They both are payment gateways that provide the entire sell transaction environment to your store.
Basically, you choose your payment method and choose how you will pay for your product: credit card or deposit.
With the products prices defined, you can set up promotions in advance. Promotion systems are very useful to establish a solid relationship with the customer.
In Magento, it is possible to define catalog price rules and shopping cart rules. Basically, you can define price behavior according to your promotions and customer defined rules, such as postal code, and certain value of discount.
You can provide coupon codes for your customers to raise Magento sells.
Magento 2.0 has a command-line utility to help developers manage installation and configuration tasks. The new command-line interface can do the following:
To work with this tool, you will need to open a terminal (Linux, OS X) or command prompt (Windows) and access the <your Magento install dir>/bin directory. Then, enter with the php magento command to see all the available commands of the command-line utility:
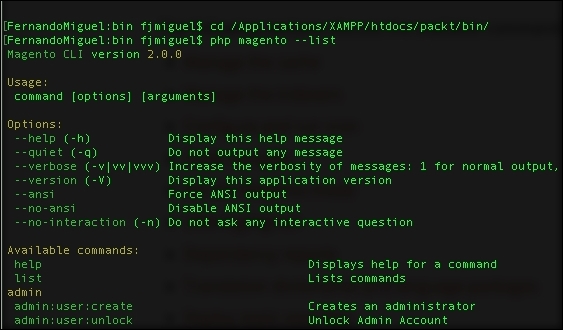
Remember to configure the PHP path to the system environment variable to execute the command. For further information, access http://php.net/manual/en/faq.installation.php.
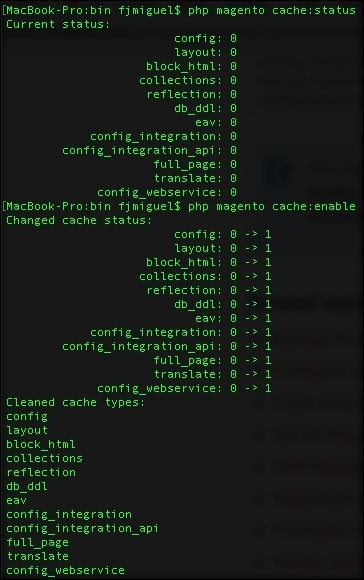
Let's play a little bit with the utility by disabling your Magento system cache:
php magento cache:status command. The cache will probably be enabled.php magento cache:disable command to disable any cache system.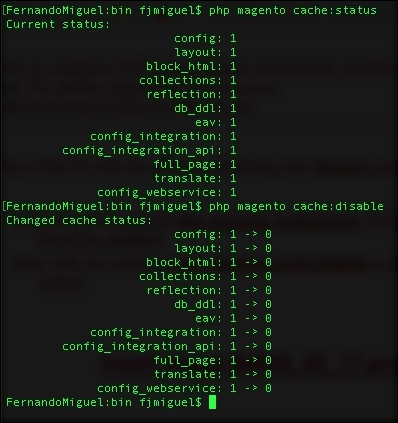
To know more about cache management in command-utility tools, access http://goo.gl/c5ivCY.
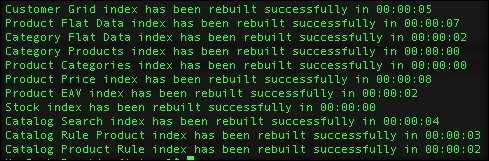
Now let's try to manage Magento indexing. Magento indexing transforms the data to improve the performance of your system by executing the following commands. Indexing technique optimizes the price calculations process, for example, and it has an important role to play in the Magento performance:
php magento indexer:info command to view the lists of indexersphp magento indexer:status command to view the real-time statusphp magento indexer:reindex command to rebuild the indexation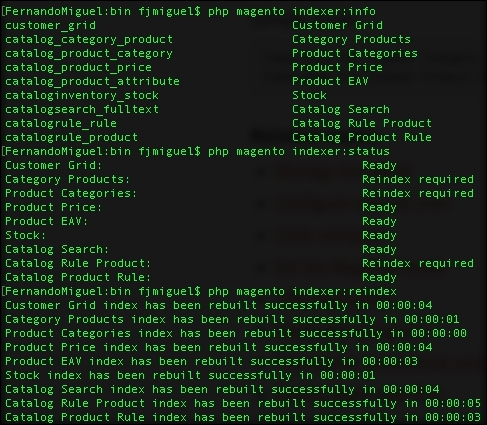
Magento indexing was successfully rebuilt, thanks to the command-line utility actions!
You can build cron jobs in a remote server to automate some Magento actions. For example, create an automation routine to re-index Magento periodically.
I strongly advise you to play more with the command-line utility. You can consult the online documentation available at http://goo.gl/iVnQSn.
We started this chapter to get the real bases of Magento power. It's important to get solid concepts, before you eagerly jump and begin developing Magento solutions. Take a moment to understand the scope of your project. This will make Magento development a much more rewarding experience.
Magento has a solid structure to develop your own solutions. You can automate some tasks using the Magento command-line utility and optimize Magento resources to get better results.
In the next chapter, we will work with Magento search engine optimization.
Search Engine Optimization (SEO) is a technique to build your site following good practices established by W3C Consortium and search engines, such as Google, to increase your site's visitation and ranking. On Magento, we need to configure the system properly to take advantage of this feature. Nowadays, SEO is a prerequisite on every website on the Internet.
Magento has a great variety of tools to configure the store of SEO and allows SEO adjustment for products, categories and CMS page titles, metainformation, and headings.
SEO application is a constant job; it never ends. Basically, you need to know how Magento SEO works and what options you have to optimize its working. Magento is a search engine-friendly e-commerce platform, and you will discover its main concepts in this chapter.
In this book, you will learn some good techniques and apply them by configuring the default installation.
The following topics will be covered in this chapter:
SEO is the technique of developing a site according to the high standards defined by the World Wide Web Consortium and search engine companies, such as Google, in order to provide good content visualization to the users and rank the site in organic searches.
Magento provides the user with some significant tools for SEO. Let's take a look at some of these techniques and tools.
By default, Magento's basic installation has the title Magento Commerce on the header settings. It is very important to choose a strong main title to get the right amount of traffic on your site. For example, if you are working on the SEO of a sports store, you can set the main title as My Sports Store to increase the traffic through the title. When people search for something, they always notice the earlier words first.
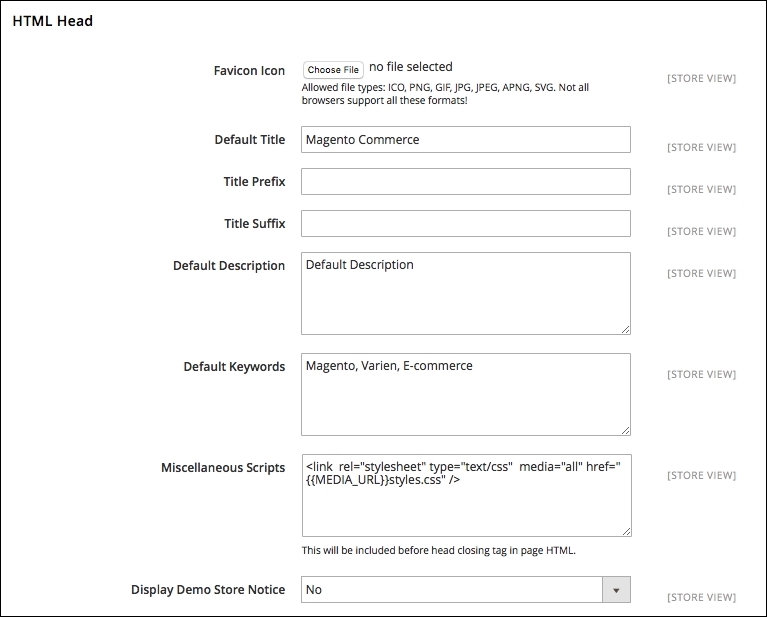
To adjust your store settings, you need to navigate to Stores | Configuration | Design | HTML Head in the Magento admin area (http://localhost/packt/admin-packt).
Choose a good descriptive title for your Magento commerce. It is possible and recommended to name all your page titles, including categories and products, by entering the site title in the Title Suffix field. To give density to the content for SEO engines by configuring the SEO on CMS pages and products, keep Default Description and Default Keywords empty.
For a local and nonproduction environment, prevent the indexing of the site by setting Default Robots to NOINDEX, NOFOLLOW. Otherwise, it is recommended to set it to INDEX, FOLLOW.
By working on this configuration, you will find that the main SEO parameters of the <head> tag are automatically fulfilled to be run on Magento commerce.
Magento has a specific SEO configuration panel for multiple sections. To access the main Magento SEO configuration, enter in the Magento admin area (http://localhost/packt/admin-packt), and you will find the panel by clicking on the menu at Marketing | SEO & Search:

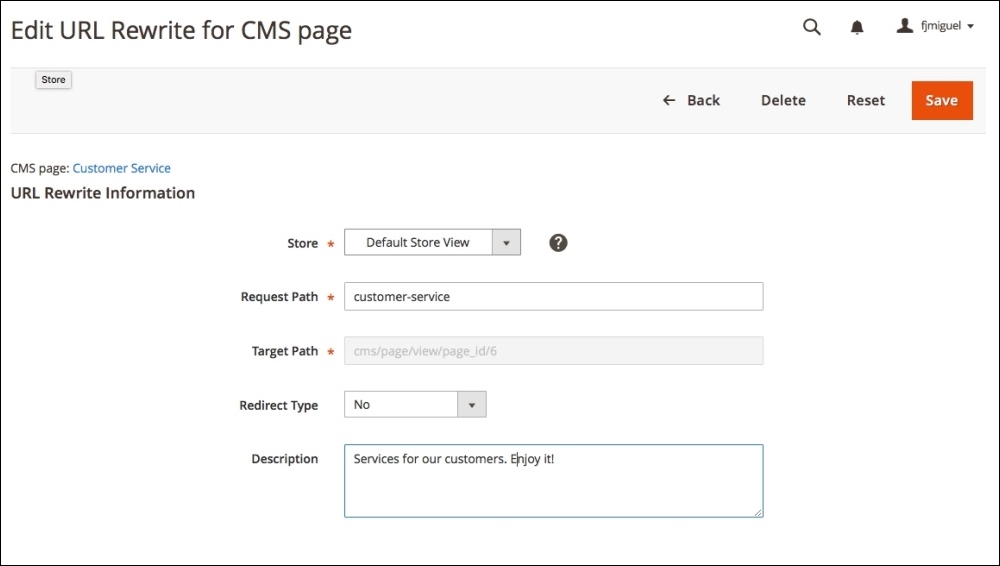
Magento 2.0 changed some functionality in comparison with its previous version. For example, in the URL Rewrites menu, you can manage and define all the URL addresses of Magento in order to increase the SEO's friendly URLs.
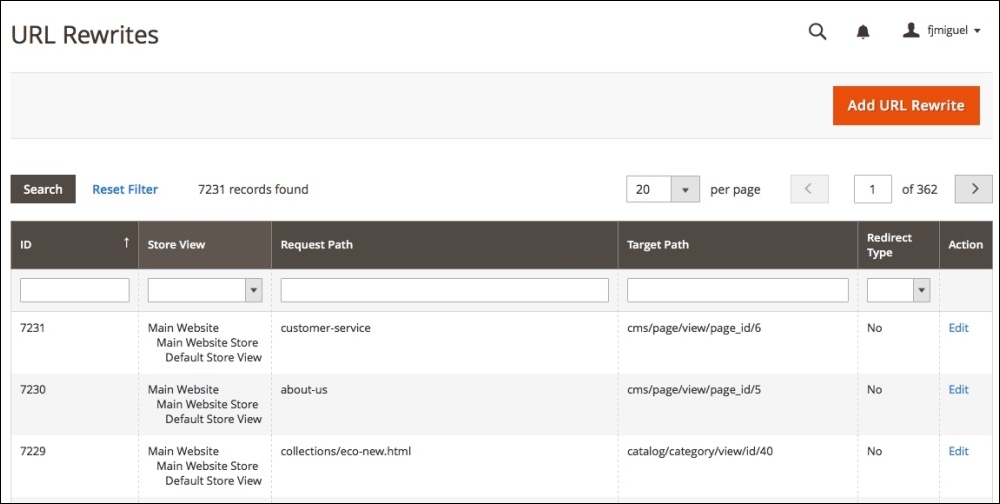
Here, you can simply choose Request Path to edit and enter a description for each of them, as shown in the following screenshot:
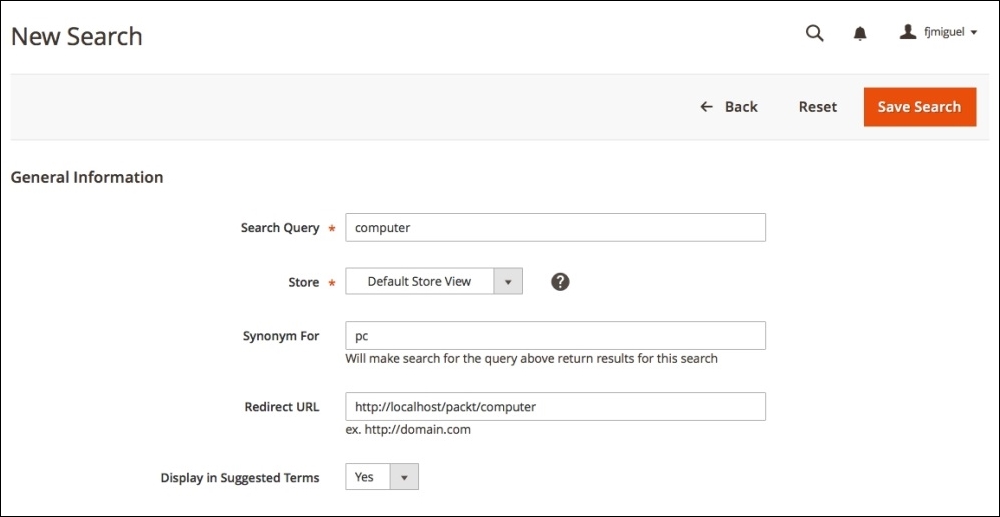
In Search Terms, you can define and redirect the URL according to the search made by the user by adding a new search term:
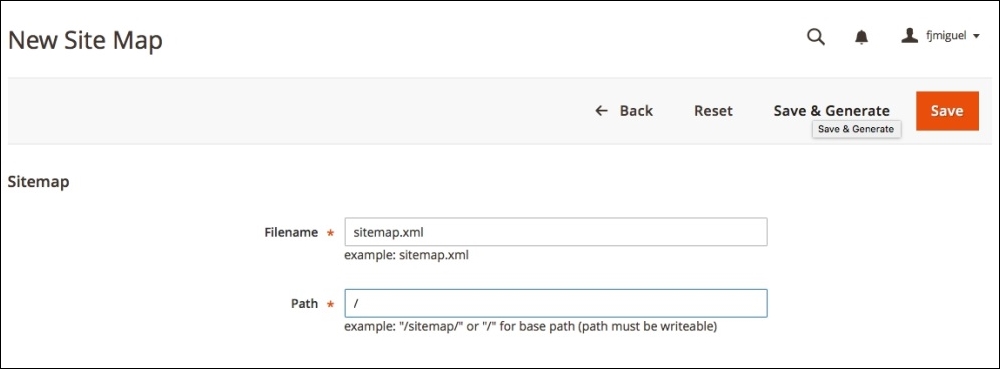
Finally, in the New Site Map section, you can generate Sitemap of your Magento installation as shown in the following screenshot:
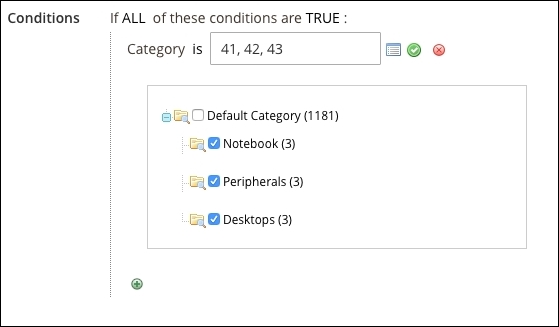
Magento has a special panel to take care of the catalog categories of SEO. To access this panel, navigate to Stores | Configuration | Catalog | Search Engine Optimization, as follows:
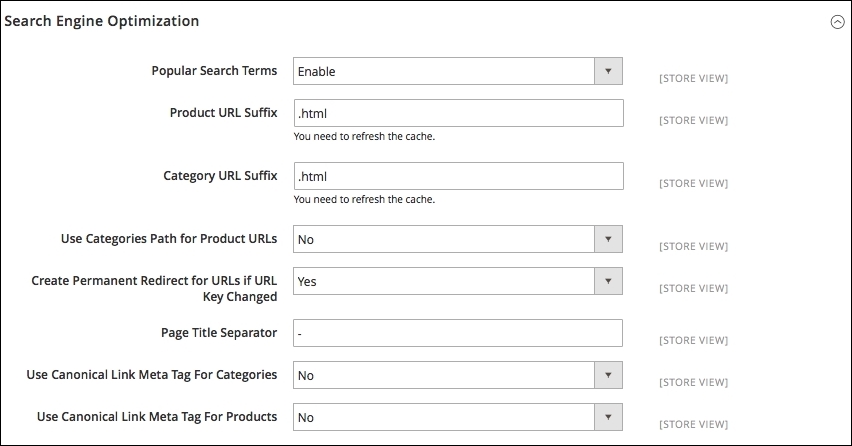
This panel has the following options:
With these options, you can choose the best strategy for SEO on catalog's default options. Magenta gives the administrator the opportunity to tune these options on catalog pages. We will work this out later in this chapter.
Magento automatically generates an XML sitemap for your store and also keeps it up to date. In order to enable this, navigate to Stores | Configuration | Catalog | XML Sitemap. Magento has the following options for this section:

Basically, with these options, it is possible to choose the frequency and priority of updates. You may set additional options, such as Start Time and Error Notifications, only in the GENERAL settings tab. It's important to configure the cron job functionality in your web server to enable this feature.
Google Analytics helps track all the statistics for your site. To add Google Analytics on Magento, generate a tracking code on your Google Analytics account (http://analytics.google.com) first of all. After this, navigate to System | Configuration | Google API.
This option works only on hosted Magento sites (that is, the remote server). Take note of this for when you work on a remote production Magento site. For the purposes of this book, it isn't necessary, but you need to keep this option in mind when you start to work on remote projects.
Once you make Magento SEO system configurations, it's time to set specific options directly on Magento pages. This Magento SEO flow gives the user the flexibility to focus on content and page ranking.
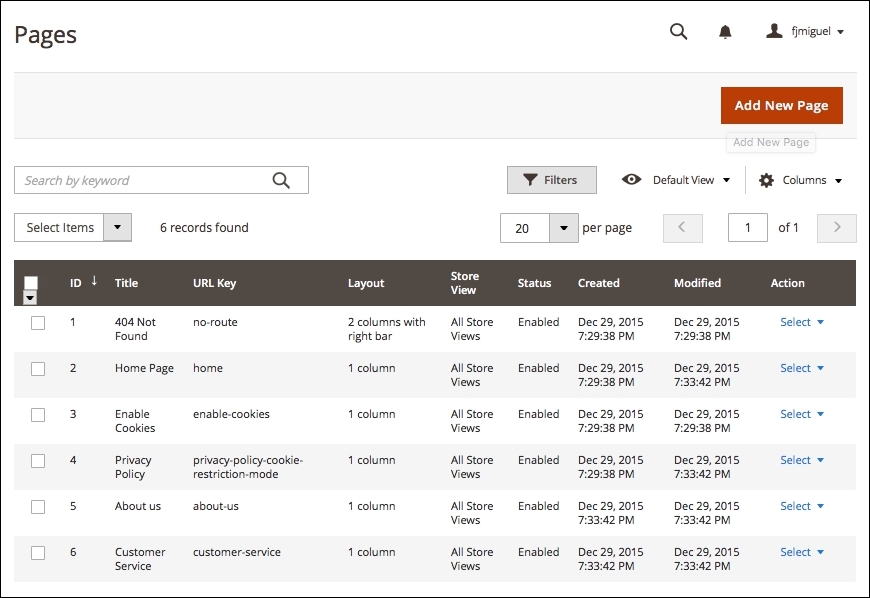
The Magento Content Management System (CMS) manager is a very simple but powerful tool that provides us with control over each aspect of the Magento page. To access Magento CMS pages configuration in the admin area, go to Content | Pages, as shown in the following screenshot:
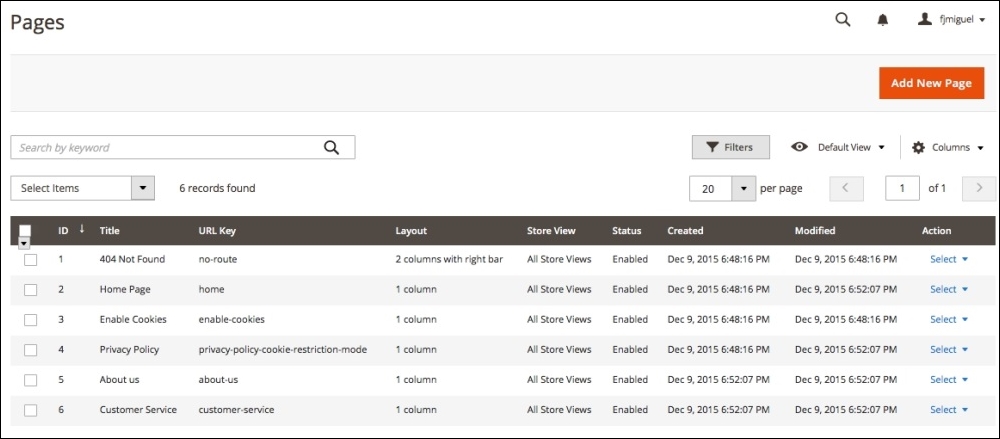
Magento's default installation provides some demo content to test CMS pages. Check the Home Page content by selecting the Edit option.
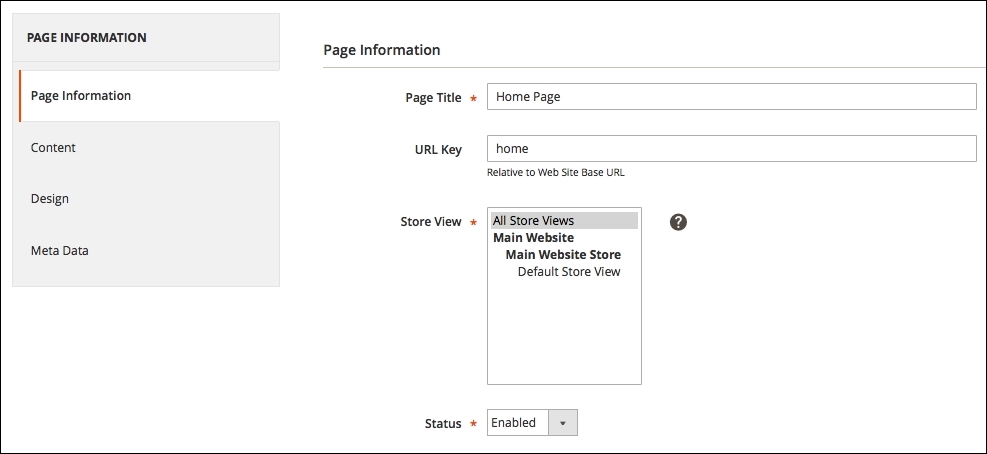
For the purpose of SEO, Magento's CMS page administration has two main SEO side menus: Page Information and Meta Data.
In Page Information, you can set the following options:
In Meta Data, you can set the following options:
The content of your page must be aligned with the metadata for a good SEO implementation.
This is the most important layer in a Magento store. Besides providing a lot of options to configure the product to be sold, this also makes it possible to tune the SEO configuration to increase sales through the search engine page ranking system. In order to access Product options, navigate to Products | Catalog, as shown in the following screenshot:

Click on the first product of the list to take a look at the SEO options. For the purpose of SEO, Product Details has the following options:
Search Engine Optimization has the following options:
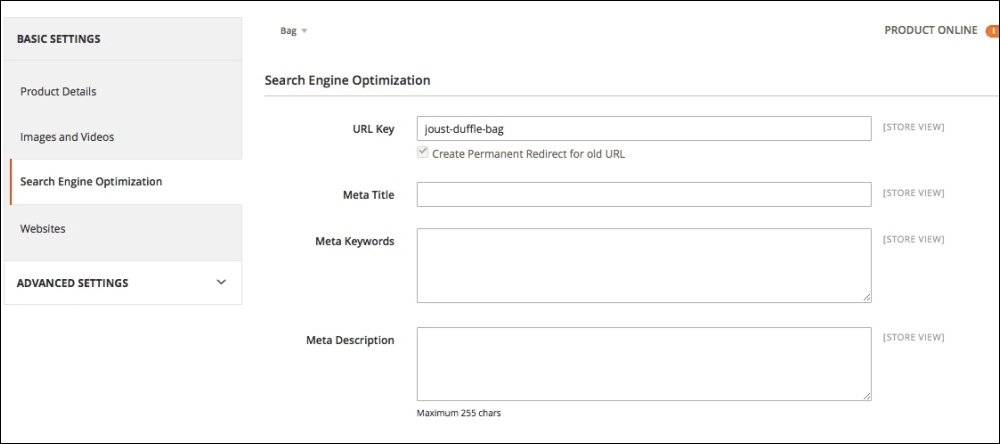
Every single product gives the administrator these options to tune SEO on a Magento website.
Magento category pages have great SEO options. As you can note, all the content pages on Magento give us administration options to manage SEO. Every aspect on Magento configuration is integrated to provide the user with the best experience.
To access the Categories configuration, navigate to Products | Categories on the admin dashboard, as shown in the following screenshot:
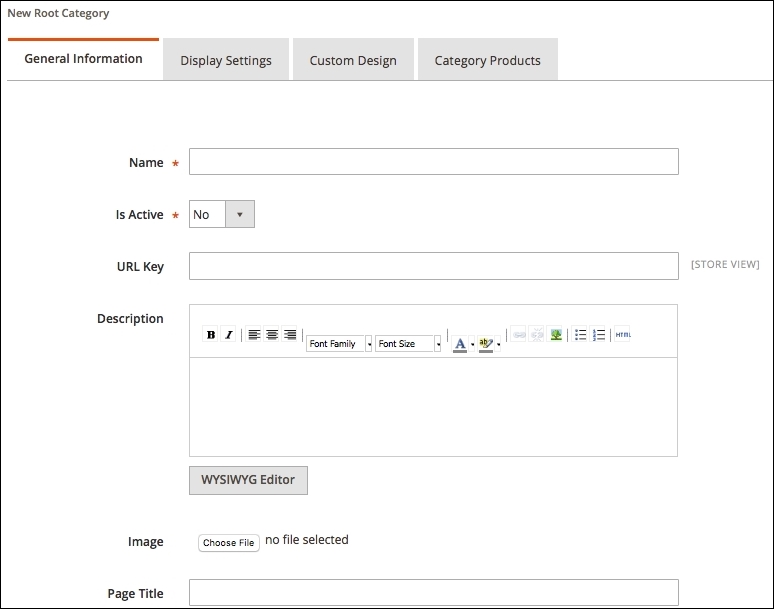
This will provide an option to create a new category, and in the side menu, it is possible to check all the categories registered on Magento. For the purpose of SEO, Magento has the following options in this section:
Make sure to follow a pattern in your content referring to SEO.
Magento SEO is a powerful tool to increase sales. As a developer, it is very important to keep these options and techniques in mind to create mechanisms that would get better results for Magento users through new extensions and customizations.
In this chapter, we discussed the following:
In the next chapter, we will cover Magento theme development and customization. We have a lot of work coming up!
Magento 2.0 has a complex control of its themes. It works with multiple directories to generate the final result for the user on its frontend.
In this chapter we will consolidate the basic concepts that you need to create your very first example of Magento theme and activate it.
At the end of this chapter, you will be able to create the basic structure of your own theme. The following topics are covered in this chapter:
According to the official documentation available at http://goo.gl/D4oxO1, a Magento theme is a component that provides the visual design for an entire application area using a combination of custom templates, layouts, styles, or images. Themes are implemented by different vendors (frontend developers) and intended to be distributed as additional packages for Magento systems similar to other components.
Magento has its own particularities because it is based on Zend Framework and consequently adopts the MVC architecture as a software design pattern. When the Magento theme process flow becomes a subject, you have some concerns to worry about when you plan to create your own theme. Let's focus on these concepts to create our own theme by the end of this chapter.
Magento 2.0 has a new approach toward managing its themes. Generally, the Magento 2.0 themes are located in the app/design/frontend/<Vendor>/ directory. This location differs according to the built-in themes, such as the
Luma theme, which is located in vendor/magento/theme-frontend-luma.
The different themes are stored in separate directories, as in the following screenshot:
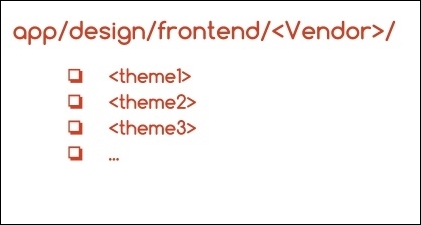
Each vendor can have one or more themes attached to it. So, you can develop different themes inside the same vendor.
The theme structure of Magento 2.0 is illustrated as follows:
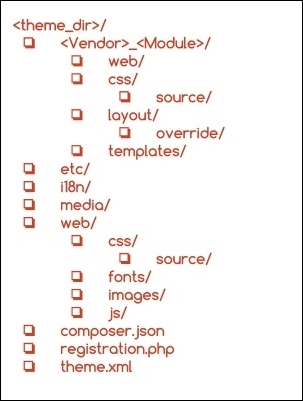
How the Magento theme structure works is quite simple to understand: each <Vendor>_<Module> directory corresponds to a specific module or functionality of your theme. For example, Magento_Customer has specific .css and .html files to handle the Customer module of the Magento vendor. Magento handles a significant number of modules. So, I strongly suggest that you navigate to the vendor/magento/theme-frontend-luma folder to take a look at the available modules for the default theme.
In the Magento 2.0 structure, we have three main files that manage the theme behavior, which are as follows:
composer.json: This file describes the dependencies and meta informationregistration.php: This file registers your theme in the systemtheme.xml: This file declares the theme in system and is used by the Magento system to recognize the themeAll the theme files inside the structure explained previously can be divided into static view files and dynamic view files. The static view files have no processing by the server (images, fonts, and .js files), and the dynamic view files are processed by the server before delivering the content to the user (template and layout files).
Static files are generally published in the following folders:
/pub/static/frontend/<Vendor>/<theme>/<language><theme_dir>/media/<theme_dir>/webFor further information, please access the official Magento theme structure documentation at http://goo.gl/ov3IUJ.
The Magento CE 2.0 version comes with a new theme named Luma that implements Responsive Web Design (RWD) practices.
The Luma theme style is based on the Magento user interface (UI) library and uses CSS3 media queries to work with screen width, adapting the layout according to device access.
The Magento UI is a great toolbox for theme development in Magento 2.0 and provides the following components to customize and reuse user interface elements:
The Luma theme uses some of the
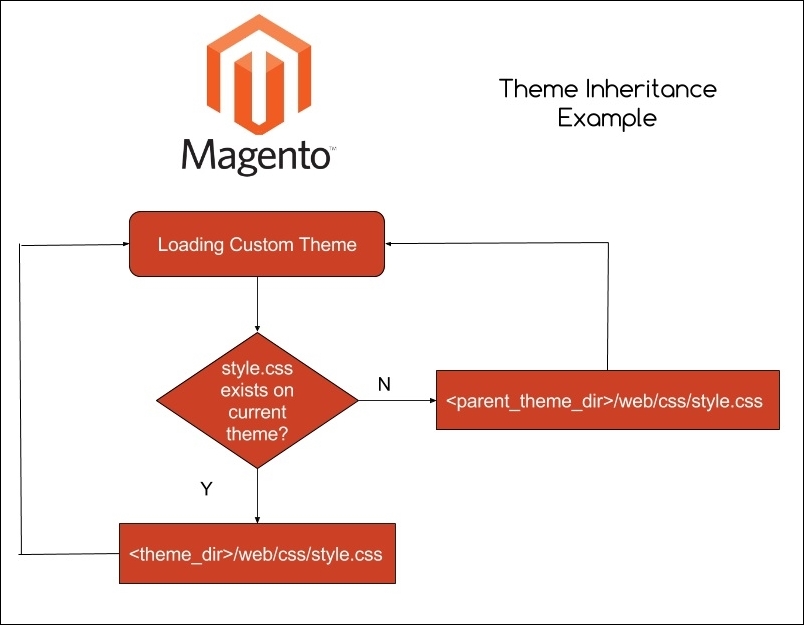
blank theme features to be functional. The Magento 2.0 blank theme, available in the vendor/magento/theme-frontend-blank folder, is the basic Magento theme and is declared as the parent theme of Luma. How is this possible? Logically, Magento has distinct folders for every theme, but Magento is too smart to reuse code; it takes advantage of theme inheritance. Let's take a look at how this works.
The frontend of Magento allows designers to create new themes based on the basic blank theme, reusing the main code without changing its structure. The fallback system is a theme's inheritance mechanism and allows developers to create only the files that are necessary for customization.
The Luma theme, for example, uses the fallback system by inheriting the blank theme basic structure. The Luma theme parent is declared in its theme.xml file as follows:
<theme xmlns:xsi="http://www.w3.org/2001/XMLSchema-instance" xsi:noNamespaceSchemaLocation="urn:magento:framework:Config/etc/theme.xsd">
    <title>Magento Luma</title>
    <parent>Magento/blank</parent>
    <media>
        <preview_image>media/preview.jpg</preview_image>
    </media>
</theme>
Inheritance works similar to an override system. You can create new themes using the existent ones (parents) and by replacing (that is, overriding) an existing file with the same name but in your specific theme folder (child).
For example, if you create a new theme in the app/design/frontend/<Vendor>/<theme>/ folder and declare Magento/blank as a parent theme, the theme.xml file and registration.php, you have the entire blank theme structure ready to work in your new theme, including RWD layouts and styles.
Let's say that you have a specific .css file available in the <theme_dir>/web/css folder. If you delete this file, the fallback system will search the file in the <parent_theme_dir>/web/css folder, as shown in the following figure:
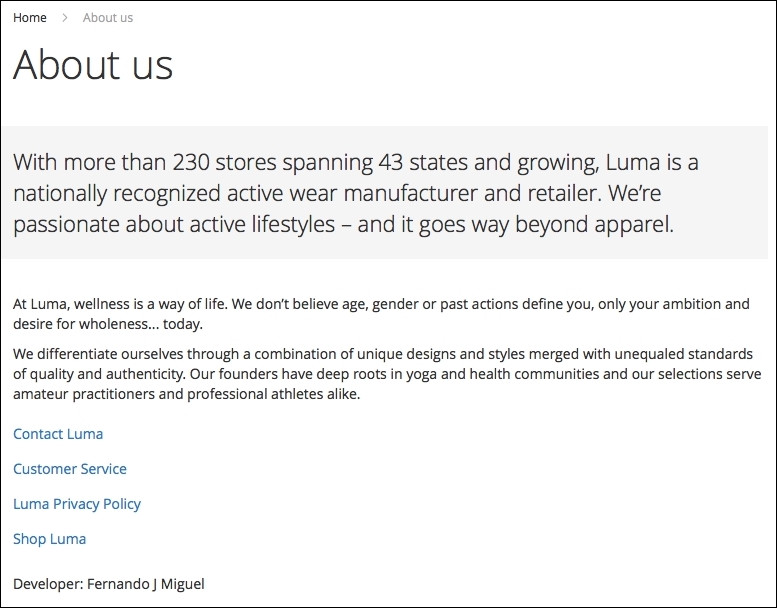
Magento has a flexible theme system. Beyond Magento code customization, the admin can create blocks and content on the Magento admin panel, such as Home Page, About us, or any static page that you want to create. CMS pages and blocks on Magento give you the power to embed HTML code in your page.
You can create or edit pages and blocks by accessing the Admin area (http://localhost/packt/admin_packt) by navigating to Content | Pages.
Custom variables are pieces of HTML code that contain specific values as programming variables. By creating a custom variable, you can apply it to multiple areas on your site. An example of the custom variable structure is shown here:
{{config path="web/unsecure/base_url"}}This variable shows the URL of the store.
Now, let's create a custom variable to see how it works. Perform the following steps:
http://localhost/packt/admin_packt.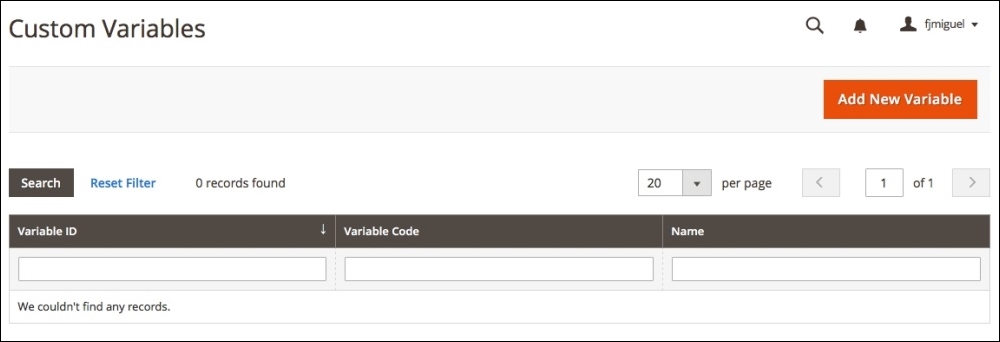
dev_name.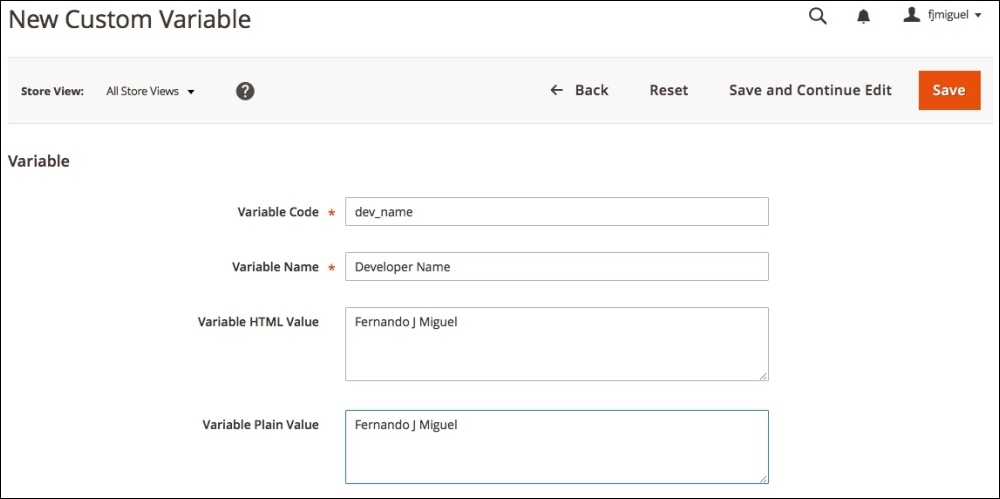
Now, we have a custom variable that stores the developer's name. Let's use this variable inside the CMS About Us page via the following steps:
{{CustomVar code="dev_name"}}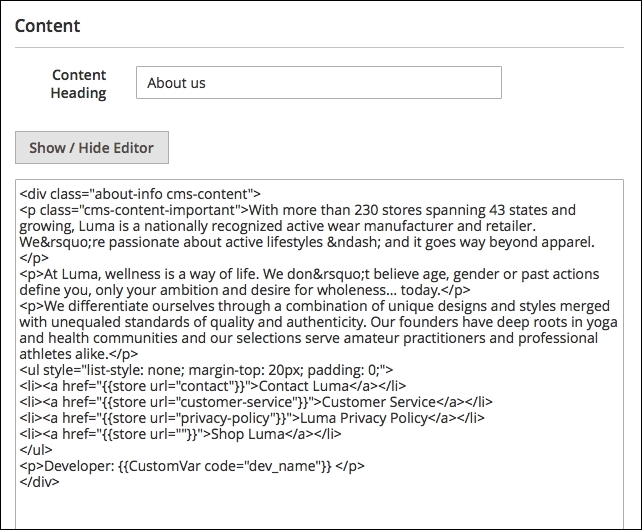
Let's take a look at the result in the following screenshot:
After understanding the basic Magento 2.0 theme structure, you have the right credentials to go to the next level: creating your own theme. In this chapter, we will develop a simple theme and activate it on the Magento Admin panel. The basic idea is to give you the right directions to Magento theme development and provide you with the tools to let your imagination fly around the creation of various Magento themes!
Before starting the creation, let's disable Magento cache management. It is important when you work with Magento development to get updates in real time. You learned about cache management in Chapter 2, Magento 2.0 Features:
<your Magento install dir>/bin directory.php magento cache:disable command to disable all the cache systems.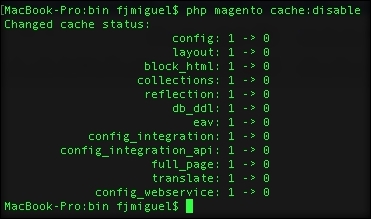
To create a basic theme structure, follow these steps:
The next step is to declare the theme information for Magento to recognize it as a new theme. Perform the following:
theme.xml under your theme directory (app/design/frontend/Packt/basic/theme.xml).theme.xml file and save the file:<theme xmlns:xsi="http://www.w3.org/2001/XMLSchema-instance" xsi:noNamespaceSchemaLocation="urn:magento:framework:Config/etc/theme.xsd">
<title>Basic theme</title>
<parent>Magento/blank</parent>
<!-- <media>
<preview_image>media/preview.jpg</preview_image>
</media>-->
</theme>This is a basic declaration for the Magento system to recognize our theme as an official theme. This code configures the theme name, parent, and preview image. The preview image is a preview for basic visualization purposes. We don't have a preview image right now, which is the why the code is commented; avoid unnecessary errors.
Once we have the basic configurations, we need to register the theme in the Magento system:
registration.php under your theme directory (app/design/frontend/Packt/basic/registration.php).<?php
/**
* Copyright © 2016 Magento. All rights reserved.
* See COPYING.txt for license details.
*/
\Magento\Framework\Component\ComponentRegistrar::register(
\Magento\Framework\Component\ComponentRegistrar::THEME,
'frontend/Packt/basic',
__DIR__
);This code simply registers our theme in the Magento system by passing a parameter of your new theme's structure directory.
In your theme, you can configure the image properties of the products in the Magento Catalog module by creating the view.xml file. You can control this specific configuration using the id attribute of every product's HTML5 element:
etc under your theme directory (app/design/frontend/Packt/basic/etc).view.xml under your etc directory (app/design/frontend/Packt/basic/etc/view.xml).view.xml and save the file:<image id="category_page_grid" type="small_image">
<width>250</width>
<height>250</height>
</image>In the view.xml file, we declared the values of the width and height of the product image. The id and type attributes specified the kind of image that this rule will be applied to.
For further information, visit http://goo.gl/73IQSz.
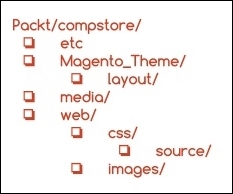
The static files (images, .js files, .css files, and fonts) will be stored in the web directory. Inside the web directory, we will organize our static files according to its scope. Create a new directory named web under your directory app/design/frontend/Packt/basic/web theme and create the following directory structure:
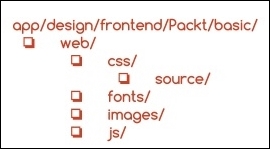
With this simple structure, you can manage all the static files of your custom theme.
By default in Magento 2.0, the theme logo is always recognized by the system by the name logo.svg. Magento 2.0 also recognizes the logo's default directory as <theme_dir>/web/images/logo.svg. So, if you have a logo.svg file, you can simply put the file in the right directory.
However, if you want to work with a different logo's name with a different format, you have to declare it in the Magento system. We will make a declaration with this new logo in the Magento_Theme directory because the new logo is a customization of the Magento_Theme module. We will override this module by taking advantage of the fallback system. As you may note, Magento has a specific pattern of declaring elements. This is the way in which Magento organizes its life cycle.
Let's declare a new theme logo by performing the following steps:
logo.png in the app/design/frontend/Packt/basic/Magento_Theme/web/images directory.default.xml under your layout directory (app/design/frontend/Packt/basic/Magento_Theme/layout).default.xml and save the file:<page xmlns:xsi="http://www.w3.org/2001/XMLSchema-instance" xsi:noNamespaceSchemaLocation="urn:magento:framework:View/Layout/etc/page_configuration.xsd">
<body>
<referenceBlock name="logo">
<arguments>
<argument name="logo_file" xsi:type="string">
Magento_Theme/images/logo.png
</argument>
<argument name="logo_img_width" xsi:type="number">
your_logo_width
</argument>
<argument name="logo_img_height" xsi:type="number">
your_logo_height
</argument>
</arguments>
</referenceBlock>
</body>
</page>This declaration has three different arguments to manage three attributes of your new logo: filename, width, and height. Don't forget to replace the your_logo_width and your_logo_height attributes with the correct size of the logo that you choose.
The logo_file argument seems to be wrong because we created our image in the Magento_Theme/web/images directory; however, thank God this is not true. I'll explain: when we activate the new theme, Magento processes the static files and copies them to the pub/static directory. This occurs because static files can be cached by Magento, and the correct directory for this is pub. So, we need to create the web directory for Magento to recognize the files as static files.
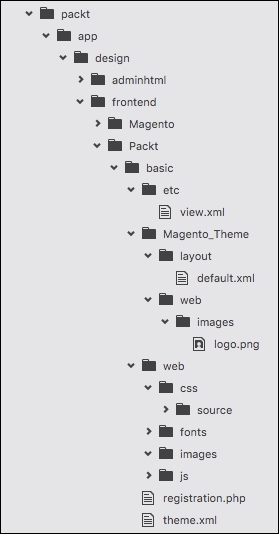
The final theme directory structure is illustrated as follows:
Once we have the theme ready to launch, we need to activate it in the Magento admin dashboard:
http://localhost/packt/admin_packt) in your favorite browser.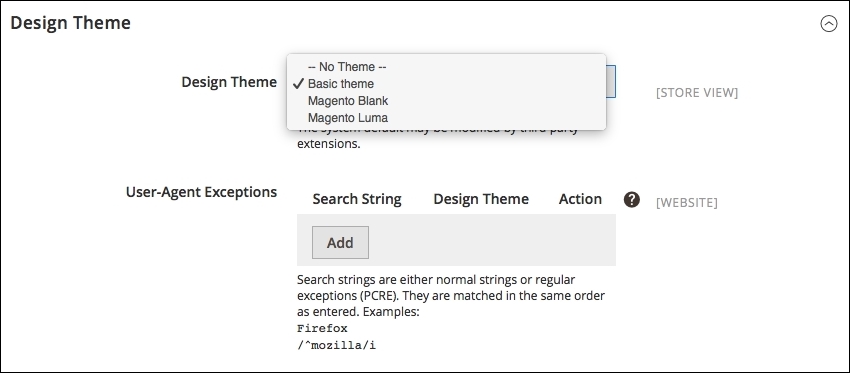
Navigate to the home page of your site by accessing the http://localhost/packt URL to see the final result:
Now, you have all the basic concepts to create a custom theme for Magento and all the information to think in terms of the Magento structure when an idea for your new design comes to mind.
In this chapter, you learned the basic concepts of Magento 2.0 themes, how theme inheritance (that is, the fallback system) works, and which directories Magento uses to create its themes according to the admin area configurations. Finally, you created your own basic theme with these examples.
However, what about creating a quality theme? Is it possible with the knowledge acquired in this chapter? Of course! We will go to the next level in the next chapter and create a responsive theme by example.
In the previous chapter, you learned the fundamentals of creating a custom Magento 2.0 theme, and we created the basic structure by example. In this chapter, we will create our own theme project called the CompStore theme.
The following topics will be covered in this chapter:
The CompStore theme project is the new Magento 2.0 theme that you will develop for a hypothetical computer store client or for a theme marketplace such as http://themeforest.net/. I strongly suggest you to take a look at the Become an author page at http://themeforest.net/become_an_author in order to explore the options to monetize your Magento theme development expertise. Logically, you have to work harder before publishing and selling your own theme solution, but it will be worth it!
Magento 2.0 themes and modules work with the
Composer (https://getcomposer.org/) dependency manager for PHP to generate a reliable deployment of Magento components. This is a great evolution in the Magento universe because this management can provide a powerful environment for the deployment of modules and themes. So, we will create a composer file for our new theme solution.
Before we start the theme development, let's take a look at Composer.
Inspired by
npm (https://www.npmjs.com/) and
bundler (http://bundler.io/), Composer (https://getcomposer.org/) manages the dependencies of your project and installs packages in predetermined directories (for example, vendor) using the composer.json file in the Magento module or theme. This kind of management is very useful once each library has your specific dependency. Composer doesn't let you waste your time by connecting the dependencies to every deployment that you want to do.
In the next chapters, we will use Composer to install components on Magento. However, first, we will start the development of our theme; it is necessary to declare our composer.json file. For now, let's install Composer on the operating system.
To install Composer on Unix-like systems (such as Unix, Linux, and OS X), you simply need to run these two commands in the terminal:
$ curl -s https://getcomposer.org/installer | php
$ sudo mv composer.phar /usr/local/bin/composer
The first command downloads the composer.phar installation file. The second command moves the file to the bin directory to install Composer globally on your computer.
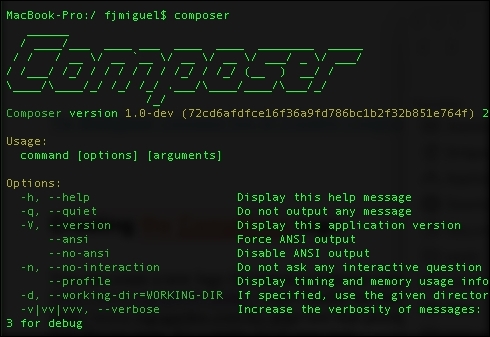
Run the following command to check whether Composer was successfully installed:
$ composer
The $ composer command lists all the available Composer commands and their descriptions:
To install Composer on Windows, you simply have to download and execute Composer-Setup.exe, which is available on https://getcomposer.org/Composer-Setup.exe.
This executable file will install the latest Composer version and set up your path to use the composer command in the command prompt window. Open the command prompt window and run command composer to get the list of available commands of Composer.
As you noted in the previous chapter, Magento can store different themes inside the same vendor scope. The proposal project called CompStore will be a template of the Packt vendor. This is the same vendor created in the previous chapter.
First of all, it is important to build the theme directory in the Packt vendor directory (<Magento root directory>/app/design/frontend/Packt/compstore). Create this folder as the following image suggests:
The etc directory usually handles the XML configuration of some components. The Magento_Theme directory will override the native Magento_Theme module by adding new functionalities. The media directory will store the preview image of the CompStore theme. Meanwhile, the web directory would have store CSS and image files by now.
The Compstore theme will have Luma as the parent theme. This example shows you the power of the abstraction used in Magento theme projects. Create the theme.xml file in the Packt/compstore directory with the following code:
<theme xmlns:xsi="http://www.w3.org/2001/XMLSchema-instance" xsi:noNamespaceSchemaLocation="urn:magento:framework:Config/etc/theme.xsd">
    <title>CompStore Electronics</title>
    <parent>Magento/luma</parent>
    <media>
        <preview_image>media/preview.jpg</preview_image>
    </media>
</theme>
The theme.xml file declares the title and parent of the CompStore theme. Create a simple preview.jpg image with a size of 800 x 800 and save it in the Packt/compstore/media directory. For example, the Magento logo is centered at the image size of 800 x 800.
This image shows the preview of the new theme, but as you don't have a preview yet, you can create a placeholder for now.
The next step is creating the registration.php file in the Packt/compstore directory with the following code:
<?php

\Magento\Framework\Component\ComponentRegistrar::register(
    \Magento\Framework\Component\ComponentRegistrar::THEME,
    'frontend/Packt/compstore',
    __DIR__
);
In the registration.php file, the CompStore theme of the Packt vendor registers the new theme of the Magento system.
The theme.xml and registration.php files were created earlier. By now, I think you are very comfortable with the structure of these files because you worked with them in the basic theme and now in the CompStore theme. This point forward, you will be introduced to some new concepts of theme development in Magento 2.0, starting with the creation of the composer.json file. Create the composer.json file in the Packt/compstore directory with the following code:
{
    "name": "packt/compstore",
    "description": "CompStore electronics theme",
    "require": {
        "php": "~5.5.0|~5.6.0|~7.0.0",
        "magento/theme-frontend-luma": "~100.0",
        "magento/framework": "~100.0"
    },
    "type": "magento2-theme",
    "version": "1.0.0",
    "license": [
        "OSL-3.0",
        "AFL-3.0"
    ],
    "autoload": {
        "files": [ "registration.php" ]
    }
}
This file has the .json (http://www.json.org/) format and handles important information of the project and its dependencies. As we discussed earlier, this kind of control is crucial because it generates more organization for your project. Let's navigate to the principal parameters of the composer.json file:
Before applying CSS in the CompStore Magento theme, it is important to study CSS behavior in the Magento system. The stylesheets in Magento 2.0 are preprocessed and compiled to CSS using the LESS technology. LESS (http://lesscss.org/) is a CSS preprocessor that extends the CSS traditional features by including variables and functions to generate a powerful CSS code and saves the time in maintaining the code.
All the .less files that you will save in your theme are compiled by the LESS engine but you will always declare .css in the Magento theme frontend. Here are a couple of examples:
css src="css/styles.css" /><Magento _theme_dir>/web/css/styles.lessFor further information, access the Magento 2.0 official documentation at http://goo.gl/XLkOcQ.
A CompStore theme inherits the Luma theme, which in turn inherits a blank theme, as shown here:
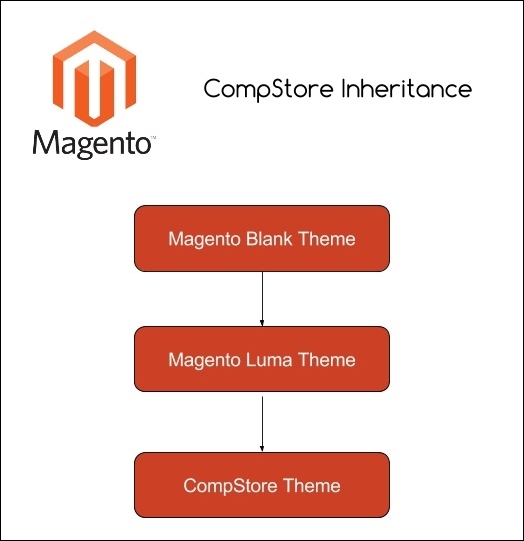
Once you have to make changes in CompStore in order to customize the new theme, you can think about the functionalities already available in the other themes to apply your changes.
The vendor directory under the Magento 2.0 root directory handles all the native Magento modules and themes. The Magento blank and Luma themes, which you have been working on until now, are available in vendor/magento/theme-frontend-blank and vendor/magento/theme-frontend-luma, respectively. So, the CompStore theme "receives" all the features of the themes under these folders. It's important to fix these basic concepts to understand the context that you inserted when you developed a Magento theme solution.
Once you have a solid concept about the behavior, let's create a custom .css file for the CompStore theme:
packt/vendor/magento/theme-frontend-blank/web/css/_styles.less file to the packt/app/design/frontend/Packt/compstore/web/css locationimport command as the following example:@import 'source/lib/_lib.less'; @import 'source/_sources.less'; @import 'source/_components.less'; @import 'source/compstore.less';
compstore.less file under the packt/app/design/frontend/compstore/web/css/source directory and type this code:@color-compstore: #F6F6F6;
body{
background: @color-compstore;
}_theme.less file under the packt/app/design/frontend/compstore/web/css/source directory. Execute the following://Change color of elements in Product Page @color-catalog: #4A96AD; @page__background-color: @color-catalog; @sidebar__background-color: @color-gray40; @primary__color: @color-gray80; @border-color__base: @color-gray76; @link__color: @color-gray56; @link__hover__color: @color-gray60; @button__color: @color-gray20; @button__background: @color-gray80; @button__border: 1px solid @border-color__base; @button-primary__background: @color-orange-red1; @button-primary__border: 1px solid @color-orange-red2; @button-primary__color: @color-white; @button-primary__hover__background: darken(@color-orange-red1, 5%); @button-primary__hover__border: 1px solid @color-orange-red2; @button-primary__hover__color: @color-white; @navigation-level0-item__color: @color-gray80; @submenu-item__color: @color-gray80; @navigation__background: @color-gray40; @navigation-desktop-level0-item__color: @color-gray80; @navigation-desktop-level0-item__hover__color: @color-gray34; @navigation-desktop-level0-item__active__color: @navigation-desktop-level0-item__color; @tab-control__background-color: @page__background-color; @form-element-input__background: @color-gray89; @form-element-input-placeholder__color: @color-gray60; @header-icons-color: @color-gray89; @header-icons-color-hover: @color-gray60;
With the compstore.less and _theme.less files, the background and product page colors will change according to the new proposal of the CompStore theme.
You can create a new logo for learning purposes using the Logomakr free online service (http://logomakr.com/). It's a pretty easy tool.
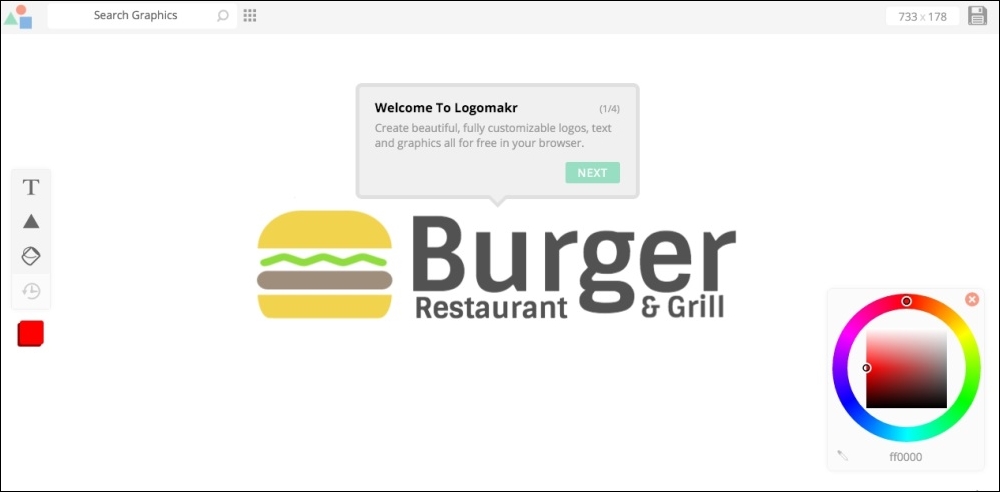
I created this logo for the CompStore theme using Logomakr:

My CompStore proposal of the logo was made in Logomakr, which is a solution developed by Webalys (http://www.streamlineicons.com) and FlatIcon (http://www.flaticon.com) and licensed under Creative Commons by 3.0 (http://creativecommons.org/licenses/by/3.0). If you use this solution for other projects, don't forget to give the due credit to Logomakr.
After finishing the logo, save it under the app/design/frontend/Packt/compstore/Magento_Theme/web/images/logo.png path.
You can feel free to use your own solution for logo instead of using Logomakr.
As you learned in the previous chapter, it's time to activate the new theme. Activate the CompStore Electronics theme in the Admin area (http://localhost/packt/admin_packt) to see the following result:

Sometimes, when you update in the Magento structure or activate a new theme, you need to deploy the theme and module changes. If you want to deploy your changes, follow these steps:
packt/pub/static/frontend/<Vendor>/<theme>/<locale> directory.var/cache directory.var/view_preprocessed directory.packt/bin directory.magento setup:static-content:deploy command.write permissions again to the directories.Once the new theme is activated, it's time to handle the content by creating some options and configuring the products and categories.
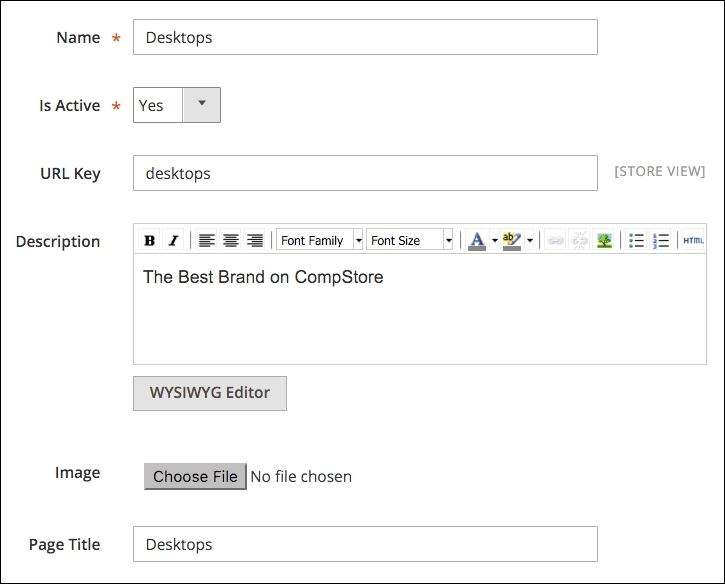
To create new categories, you will need access the Admin area (http://localhost/packt/admin_packt) and follow this recipe:
In the Add Category option, you have option to fill the Description, Page Title, and Meta Information areas for SEO purposes, as shown in the following screenshot:
To create new products, you will need access to the Admin area (http://localhost/packt/admin_packt) and follow this recipe:
http://localhost/packt/admin_packt) and navigate to Products | Catalog.
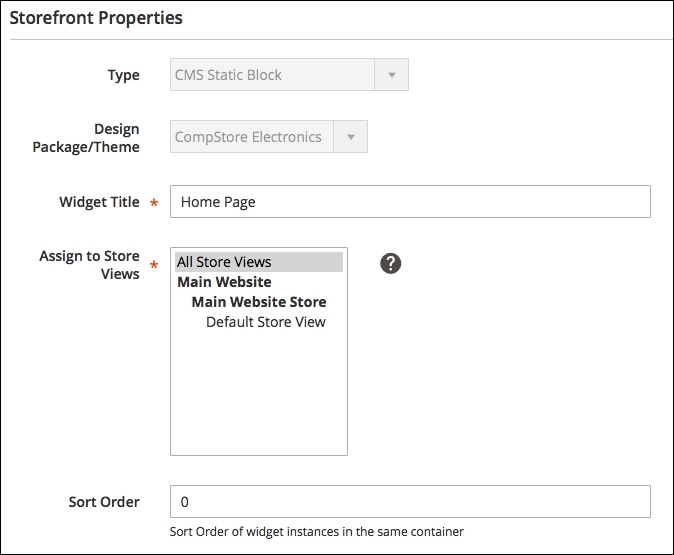
Magento has a widget management system that allows the flexibility of the content. The widget helps create a specific list of new products in the home page. To create a new widget, follow these steps:
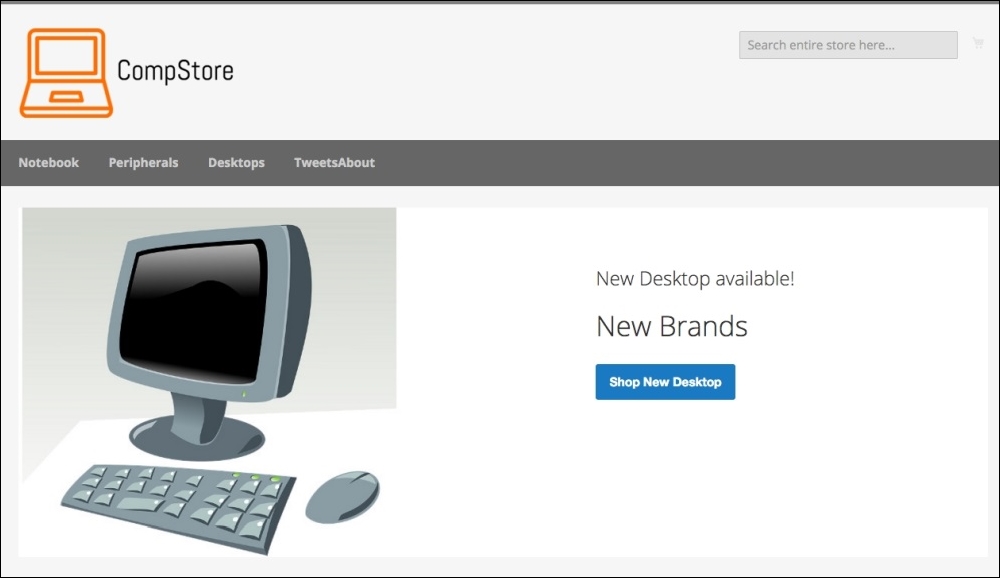
The default block configuration contains the images and products of the Luma theme. Let's change it via the following steps:
<div class="blocks-promo">
<a class="block-promo home-main" href="{{store url=""}}notebook.html">
<img src="{{media url="wysiwyg/home-main.jpg"}}" alt="" />
<span class="content bg-white"><span class="info">New Desktop available!</span>
<strong class="title">New Brands</strong>
<span class="action more button">Shop New Desktop</span> </span> </a>
</div>
<div class="content-heading">
<h2 class="title">New Products</h2>
<p class="info">Here is what`s trending on CompStore now</p>
Go to the Home page to see the final result:
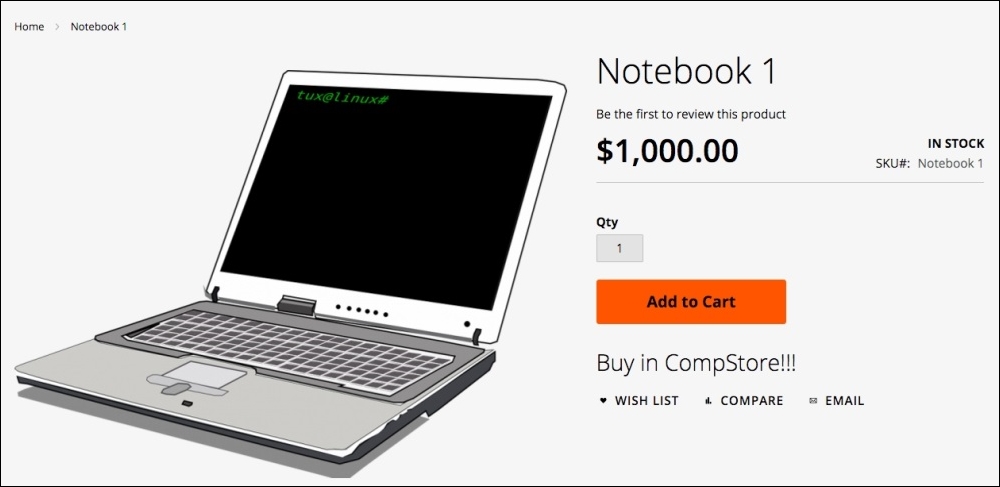
Magento works with .phtml template files to generate the view layer for the users. The modules and themes in Magento have its specific group of .phtml files to show data to the users. Let's create a custom template example in the CompStore theme to see how it works:
Magento_Catalog directory under the compstore theme directory.vendor/magento/module_catalog/view/frontend/templates to app/design/frontend/Packt/compstore/Magento_Catalog/templates.app/design/frontend/Packt/compstore/Magento_Catalog/templates/product/view/addto.phtml file in your favorite code editor.<div><h2>Buy in CompStore!!!</h2></div>
var/view_preprocessed/ and pub/static/frontend/Packt/compstore/ directories.php magento setup:static-content:deploy command.write permission to the pub directory.Navigate to the product page to see the result, as in the following screenshot:
With the content learned in this chapter, you can now develop your own themes and customize solutions. The modern developer creates tools that can maximize the quality and minimize the effort to develop.
As a suggestion, try to read Chapter 4, Magento 2.0 Theme Development – the Developers' Holy Grail, again to create specific Magento pages and layout rules for the CompStore theme. You have uncountable possibilities to develop quality themes for Magento e-commerce and a great solid path to specialize more and more.
Now that you have all the tools to develop a theme for Magento, we will start discovering how to write Magento extensions by programming specific solutions in the next chapter.
In the previous chapter, we created a custom Magento 2.0 theme called CompStore. However, what do you think about extending our Magento expertise by creating our own extension? In this chapter, we will create a new extension called TweetsAbout, add a brand new functionality in our theme, learn the main concepts of Magento extension development, and take a look at how the extension packaging process works.
The following topics will be covered in this chapter:
Magento is an MVC-based application divided into modules. Each module has a specific job inside Magento, following a mature software pattern. For example, Magento has a specific module to control product shipping. This kind of approach is very important to create new functionalities and have the flexibility and modularity to extend its power.
According to Zend Framework Case Study available at https://www.zend.com/topics/Magento-CS.pdf, the Magento project chose to go with industry-standard PHP and the Zend framework because of the extremely simple, object-oriented, and flexible solution that encapsulates best practices and agile testing methodologies and that would result in a very rapid development of enterprise-grade web applications.
Using the Zend framework as the main pillar in the Magento project definitely includes the following advantages:
With the Zend framework, Magento has great flexibility in creating and customizing modules, developing new features for the system, and maintaining the core code.
A basic understanding of Zend components could be interesting for developers to take advantage of this great MVC framework.
You can learn more about Zend framework at http://framework.zend.com/.
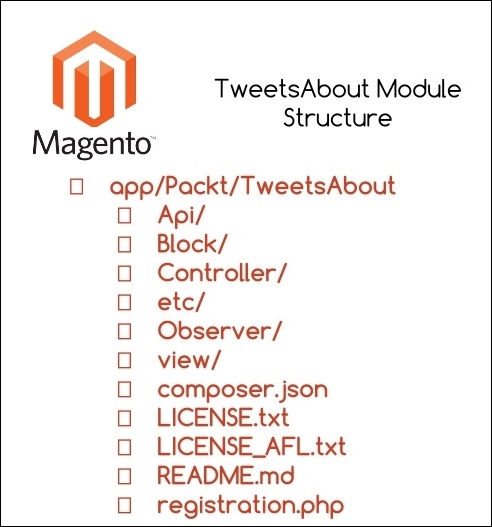
Magento 2.0 is a modular system as you can see. That is why it is important to maintain all the code organized, and it couldn't be different with Magento extensions. In previous chapters you saw all the directory structure of Magento, but now let's give special attention to the basic Magento module file structure:
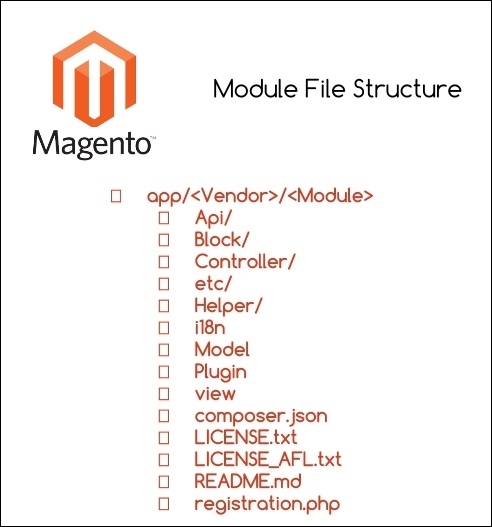
In order to create a new extension according to the preceding image, we must create the same directory structure. However, how will they interact with the Magento system?
Some of these directories have an important role to play in the Magento system. They are directories that are responsible for providing basic functionalities and coupling between modules and the Magento system:
Block: Blocks are View classes that are responsible for providing visualization layers between the logical and frontend layer.Controller: These control all the actions of the Magento. Web servers process the requests and Controller redirects them to specific modules according to the URL.etc: This stores all the module XML configuration files.Helper: This stores auxiliary classes that provide forms, validators, and formatters, which are commonly used in business logic.Model: This stores all business logic and the access layer to the data.Setup: Setup classes are classes that control installation and upgrading functionalities.The other directories support additional configurations and implementations of the module; these are as follows:
The files presented in the root directory are files on which you worked before. The LICENSES and README files are those available for extension distribution purposes.
Now, you have a general concept of creating a new extension for Magento. As a scenario to our development, we will create a simple extension called TweetsAbout to communicate with Twitter via the API and get the latest tweets with the #magento, #packtpub, and #php hashtags.
We will have two simple pages; the first will show a link to the results, and the second will show the tweets.
Let's get to work!
Representational State Transfer (REST) is an architecture created to provide a simple communication channel between different applications over the Internet using mainly the HTTP protocol. It is the hottest data technology nowadays. Facebook, Google, Twitter, and a lot of huge companies have adopted REST applications. With REST APIs, you can read, post, and delete data.
Twitter has a specific format to spread its data on the Web in order to create great integration with different kinds of applications that consume its service. According to Twitter Developers Documentation available at https://dev.twitter.com/rest/public, Twitter REST APIs provide programmatic access to read and write Twitter data. You can author a new Tweet, read an author profile or follower data, and more. The REST API identifies Twitter applications and users using Oauth, and the responses are available in JSON.
Before beginning to code the Magento extension, let's create an account on Twitter Developer to authenticate our new application on the Twitter platform.
Create a new account in Twitter (https://twitter.com/) if you don't have one and access the Twitter Developer page (https://dev.twitter.com/), as in the following screenshot:

We have a lot of options on the developer's website, such as gathering real-time data, crashlytics, and mopub. I strongly suggest that you take a good look at these tools later.
So, let's create a new application to consume Twitter services. Access the URL https://apps.twitter.com/ to create a new Twitter application. In order to use Twitter's public API services, you need to identify your application by generating a token and a secret key.
You can create a new application by clicking on the Create New App button and filling in the form with the following required fields:
Accept the Developer Agreement to finish your app registration and click on the Create your Twitter Application button.
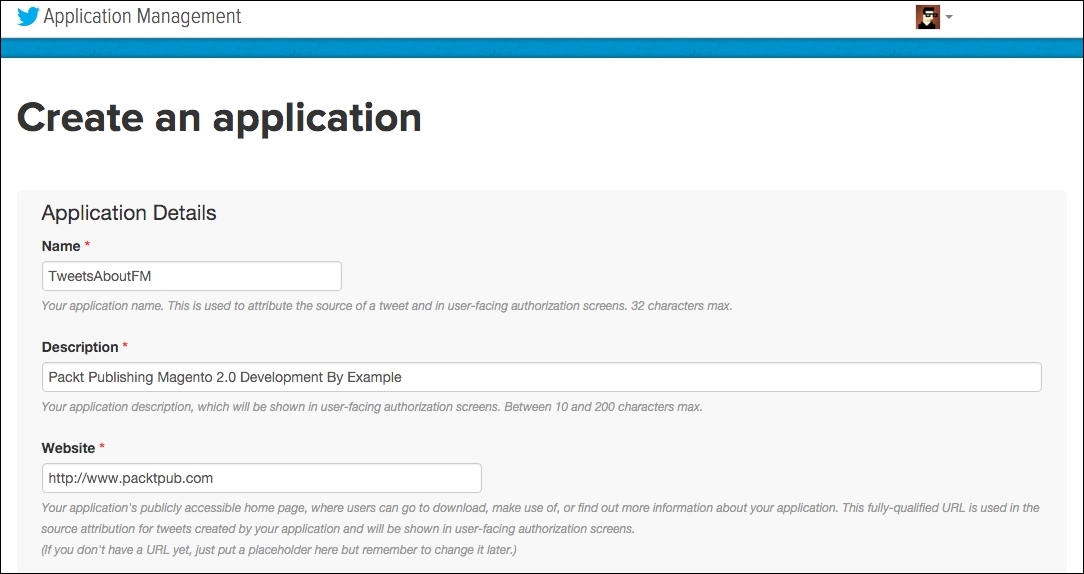
You can access your application's configurations by clicking on the name of your application. Later on in this chapter, we will discuss how to get the right credentials to integrate our application with Twitter.
Now, we can finally start our Magento 2.0 extension solution.
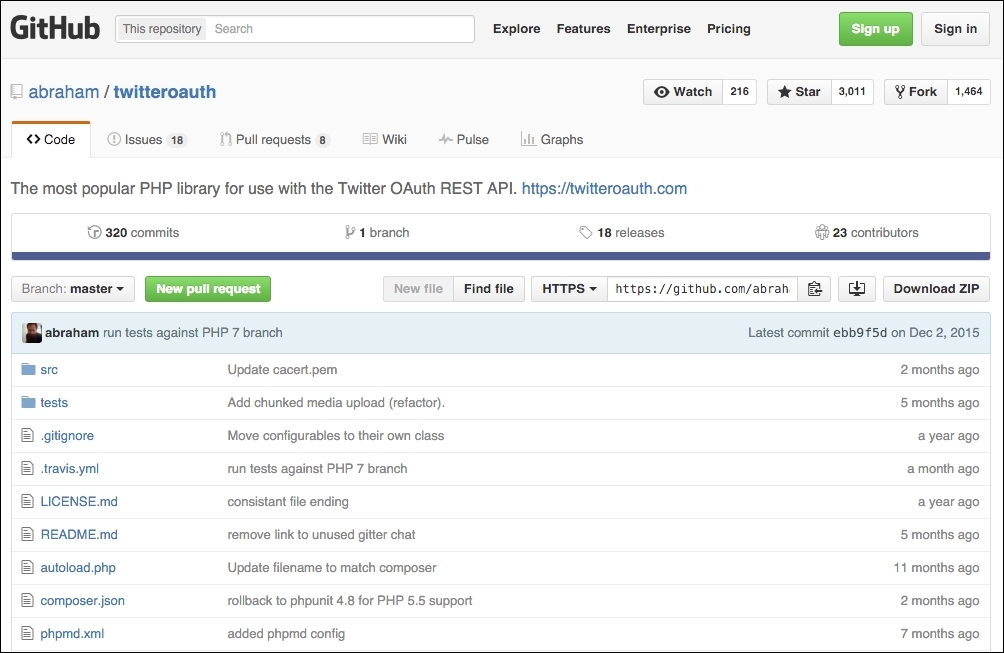
The TwitterOAuth (https://twitteroauth.com/) library provides communication with Twitter via an API. In the TweetsAbout project, this kind of communication is essential for the final proposal of our extension solution. TwitterOAuth is the most popular PHP library to use with the TwitterOAuth REST API.
This project is also available on GitHub (https://github.com/abraham/twitteroauth), as shown in the following screenshot:
To install TwitterOAuth on the TweetsAbout extension, follow this recipe:
packt/app/code/Packt/TweetsAbout/Api directory, run the composer require abraham/twitteroauth command.We'll need these credentials to use on our extension later.
To start the module development, we will declare the basic module configurations. Open your favorite code editor, create a new file called module.xml, and save the file in app/code/Packt/TweetsAbout/etc. Enter this code in the file:
<?xml version="1.0"?>
<config xmlns:xsi="http://www.w3.org/2001/XMLSchema-instance" xsi:noNamespaceSchemaLocation="urn:magento:framework:Module/etc/module.xsd">
<module name="Packt_TweetsAbout" setup_version="2.0.0"/>
</config>Magento 2.0 works with Uniform Resource Names (URN) schema validation to reference XML declarations, as you can observe in the <config> tag. The module.xsd file works by validating whether your module declaration follows the module declaration schema.
The <module> tag contains the vendor and module name. Always follow this example of module name declaration: Vendor_Module.
Under app/code/Packt/TweetsAbout/etc/frontend, create two new files, as follows:
routes.xmlevents.xmlThe routes.xml file contains the following code:
<?xml version="1.0"?>
<config xmlns:xsi="http://www.w3.org/2001/XMLSchema-instance" xsi:noNamespaceSchemaLocation="urn:magento:framework:App/etc/routes.xsd">
<router id="standard">
<route id="tweetsabout" frontName="tweetsabout">
<module name="Packt_TweetsAbout" />
</route>
</router>
</config>The routes.xml file tells Magento where to look for the controllers (TweetsAbout/Controller) when the URL http://localhost/packt/tweetsabout is accessed (MVC).
The events.xml file contains the following code:
<?xml version="1.0"?>
<config xmlns:xsi="http://www.w3.org/2001/XMLSchema-instance" xsi:noNamespaceSchemaLocation="urn:magento:framework:Event/etc/events.xsd">
<event name="page_block_html_topmenu_gethtml_before">
<observer name="Packt_TweetsAbout_observer" instance="Packt\TweetsAbout\Observer\Topmenu" />
</event>
</config>The events.xml file declares an Observer event handler in the module, and this file has the mission of configuring a new TweetsAbout top menu link to access the module in the frontend. Observer listens to events triggered by the user or system. The <event> tag gets basic information of the top menu Block to be handled later in the PHP code, and the <observer> tag declares the Topmenu observer class. In this chapter, we will take a look at how the Topmenu class works. For now, it's important to declare this option.
For further information about Observer, access the Magento official documentation at http://goo.gl/0CTzmn.
Now, it is time to create the registration.php file under the root directory of TweetsAbout. Run the following code:
<?php
\Magento\Framework\Component\ComponentRegistrar::register(
\Magento\Framework\Component\ComponentRegistrar::MODULE,
'Packt_TweetsAbout',
__DIR__
);The registration.php file has the same role as that of theme registration in Magento System.
Create the composer.json file under the root directory of TweetsAbout via the following code:
{
"name": "packt/tweets-about",
"description": "Example of Magento Module - Packt Publishing",
"type": "magento2-module",
"version": "1.0.0",
"license": [
"OSL-3.0",
"AFL-3.0"
],
"require": {
"php": "~5.5.0|~5.6.0|~7.0.0",
"magento/framework": "~100.0",
"abraham/twitteroauth": "^0.6.2"
},
"autoload": {
"files": [ "registration.php" ],
"psr-4": {
"Packt\\TweetsAbout\\": ""
}
},
"extra": {
"installer-paths": {
"app/code/Packt/TweetsAbout/Api": ["abraham/twitteroauth"]
}
}
}You can observe in the composer.json file the declaration of the TwitterOAuth project as a required package to our extension. Also, the file defines the installation directory.
For further information about Composer packages, refer to the link https://packagist.org/.
You can copy the LICENSE.txt and LICENSE_AFL.txt files from the Magento root directory to your Packt/TweetsAbout directory. The README.md file is responsible for storing information about the module's scope and some considerations for the purposes of publishing on GitHub (http://github.com/). You can feel free to create the README.md file as you wish.
For now, we have the module declaration and registration files. It's time to create the controllers to start giving some life to the TweetsAbout module.
First, let's create a new file named Index.php. This file will control the access to the initial page of the module. Save it under app/code/Packt/TweetsAbout/Controller/Index/ with the following code:
<?php
namespace Packt\TweetsAbout\Controller\Index;
class Index extends \Magento\Framework\App\Action\Action{
protected $resultPageFactory;
public function __construct(
\Magento\Framework\App\Action\Context $context,
\Magento\Framework\View\Result\PageFactory $resultPageFactory
) {
$this->resultPageFactory = $resultPageFactory;
parent::__construct($context);
}
public function execute(){
return $this->resultPageFactory->create();
}
}Create another file named Index.php under app/code/Packt/TweetsAbout/Controller/Magento/. This file will control the access to the Magento Tweets page of the module. Save it with the following code:
<?php
namespace Packt\TweetsAbout\Controller\Magento;
class Index extends \Magento\Framework\App\Action\Action{
protected $resultPageFactory;
public function __construct(
\Magento\Framework\App\Action\Context $context,
\Magento\Framework\View\Result\PageFactory $resultPageFactory
) {
$this->resultPageFactory = $resultPageFactory;
parent::__construct($context);
}
public function execute(){
return $this->resultPageFactory->create();
}
}Create another file named Index.php under app/code/Packt/TweetsAbout/Controller/Packt/. This file will control the access to the Packt tweets page of the module. Save it with the following code:
<?php
namespace Packt\TweetsAbout\Controller\Packt;
class Index extends \Magento\Framework\App\Action\Action{
protected $resultPageFactory;
public function __construct(
\Magento\Framework\App\Action\Context $context,
\Magento\Framework\View\Result\PageFactory $resultPageFactory
) {
$this->resultPageFactory = $resultPageFactory;
parent::__construct($context);
}
public function execute(){
return $this->resultPageFactory->create();
}
}Create another file named Index.php under app/code/Packt/TweetsAbout/Controller/Php/. This file will control the access to the PHP tweets page of the module. Save it with the following code:
<?php
namespace Packt\TweetsAbout\Controller\Php;
class Index extends \Magento\Framework\App\Action\Action{
protected $resultPageFactory;
public function __construct(
\Magento\Framework\App\Action\Context $context,
\Magento\Framework\View\Result\PageFactory $resultPageFactory
) {
$this->resultPageFactory = $resultPageFactory;
parent::__construct($context);
}
public function execute()
{
return $this->resultPageFactory->create();
}
}Magento 2.0 uses namespaces as a PHP standard recommendation (http://www.php-fig.org/psr/) to avoid name collisions between classes and to improve the readability of the code. So, in the namespace instruction, we will declare the class path to follow the PSR-4 pattern (http://www.php-fig.org/psr/psr-4/).
The extends functionality (inheritance) of \Magento\Framework\App\Action\Action provides a functionality to handle actions triggered by the URL access. For example, when the user enters the URL http://<magento_url>/tweetsabout, the routes.xml file redirects to the Index/Index.php controller to treat the user request made by accessing the URL.
The dependency injection of the __construct() method—\Magento\Framework\App\Action\Context $context and \Magento\Framework\View\Result\PageFactory $resultPageFactory—declares the initial construct of the Action class and the view layer to work with the template file.
For further information about the dependency injection, access the Magento official documentation at http://goo.gl/jHFPTr.
Finally, the execute() method renders the layout. We will declare the layout files later on.
At this point, it's important to be familiar with PHP object-oriented programming (http://php.net/manual/en/language.oop5.php). I strongly suggest that you study the main concepts to increase the understanding of the book.
Blocks in Magento 2.0 provide presentation logic for your view templates. In the TweetsAbout project, we will use two blocks to process the view template files.
Under the app/code/Packt/TweetsAbout/Block directory, create a file named Index.php with the following code:
<?php
namespace Packt\TweetsAbout\Block;
class Index extends \Magento\Framework\View\Element\Template{
public function getMagentoUrl(){
return $this->getData('urlMagento');
}
public function getPHPUrl(){
return $this->getData('urlPHP');
}
public function getPacktUrl(){
return $this->getData('urlPackt');
}
}The three methods, getMagentoUrl(), getPHPUrl(), and getPacktUrl(), get data from layout declaration files to define a URL for each kind of controller and give it to the initial layout of the module.
Now, under the app/code/Packt/TweetsAbout/Block directory, create a file named Tweets.php with the following code:
<?php
namespace Packt\TweetsAbout\Block;
require $_SERVER['DOCUMENT_ROOT'] . "/packt/app/code/Packt/TweetsAbout/Api/vendor/autoload.php";
use Abraham\TwitterOAuth\TwitterOAuth;
class Tweets extends \Magento\Framework\View\Element\Template{
private $consumerKey;
private $consumerSecret;
private $accessToken;
private $accessTokenSecret;
public function searchTweets(){
$connection = $this->twitterDevAuth();
$result = $connection->get("search/tweets", array("q" =>$this->getData('hashtag'), "result_type"=>"recent", "count" => 10));
return $result->statuses;
}
private function twitterDevAuth(){
$this->consumerKey = YOUR_CONSUMER_KEY;
$this->consumerSecret = YOUR_CONSUMER_SECRET;
$this->accessToken = YOUR_ACCESS_TOKEN;
$this->accessTokenSecret = YOUR_ACCESS_TOKEN_SECRET;
return new TwitterOAuth($this->consumerKey, $this->consumerSecret, $this->accessToken, $this->accessTokenSecret);
}
}Here are some things to consider about the Tweets.php code:
TwitterOAuth library to work on our extensiontwitterDevAuth() method, you must enter the Twitter API credentialssearchTweets() method, the $connection->get("search/tweets", array("q" =>$this->getData('hashtag'), "result_type"=>"recent", "count" => 10)) instruction works with the Twitter search API, getting the last 10 results of Twitter postsUnder the app/code/Packt/TweetsAbout/Observer directory, create the Topmenu.php file with the following code:
<?php
namespace Packt\TweetsAbout\Observer;
use Magento\Framework\Event\Observer as EventObserver;
use Magento\Framework\Data\Tree\Node;
use Magento\Framework\Event\ObserverInterface;
class Topmenu implements ObserverInterface{
/**
* @param EventObserver $observer
* @return $this
*/
public function execute(EventObserver $observer)
{
$urlInterface = \Magento\Framework\App\ObjectManager::getInstance()->get('Magento\Framework\UrlInterface');
$active = strpos($urlInterface->getCurrentUrl(), "tweetsabout");
/** @var \Magento\Framework\Data\Tree\Node $menu */
$menu = $observer->getMenu();
$tree = $menu->getTree();
$data = [
'name' => __("TweetsAbout"),
'id' => 'tweetsmenu',
'url' => $urlInterface->getBaseUrl() . 'tweetsabout',
'is_active' => $active
];
$node = new Node($data, 'id', $tree, $menu);
$menu->addChild($node);
return $this;
}
}The Topmenu.php file dynamically creates a new top menu item for the TweetsAbout module by adding a node in the top menu link schema. The \Magento\Framework\App\ObjectManager::getInstance()->get('Magento\Framework\UrlInterface') instruction gets the base URL and the current URL to create a specific link to the TweetsAbout module. The Topmenu observer works with the Document Object Model (DOM) concept of nodes and trees dynamically.
It's time to handle the presentation layer of the project. First, we will create the layout files (.xml) to handle template behavior and to pass arguments to the template via blocks. Every layout file is assigned by following this pattern: <module_name>_<controller>_<controller_file>.xml. This pattern allows the Magento system to assign the correct files according to its controller automatically.
Under the app/code/Packt/TweetsAbout/view/frontend/layout path, create the tweetsabout_index_index.xml file with the following code:
<?xml version="1.0"?>
<page xmlns:xsi="http://www.w3.org/2001/XMLSchema-instance" layout="1column" xsi:noNamespaceSchemaLocation="urn:magento:framework:View/Layout/etc/page_configuration.xsd">
<head>
<title>
TweetsAbout Module
</title>
</head>
<body>
<referenceContainer name="content">
<block class="Packt\TweetsAbout\Block\Index" template="Packt_TweetsAbout::index.phtml">
<arguments>
<argument name="urlMagento" xsi:type="url" path="tweetsabout/magento" />
<argument name="urlPHP" xsi:type="url" path="tweetsabout/php" />
<argument name="urlPackt" xsi:type="url" path="tweetsabout/packt" />
</arguments>
</block>
</referenceContainer>
</body>
</page>The <block> tag binds the Index.php Block to the index.phtml template, and the <arguments> tag transports three URL parameters to the Block. These parameters will be used in the index.phtml file.
Under the app/code/Packt/TweetsAbout/view/frontend/layout path, create the tweetsabout_magento_index.xml file with the following code:
<?xml version="1.0"?>
<page xmlns:xsi="http://www.w3.org/2001/XMLSchema-instance" layout="1column" xsi:noNamespaceSchemaLocation="urn:magento:framework:View/Layout/etc/page_configuration.xsd">
<head>
<title>
TweetsAbout #Magento
</title>
<css src="Packt_TweetsAbout::css/source/module.css"/>
</head>
<body>
<referenceContainer name="content">
<block class="Packt\TweetsAbout\Block\Tweets" template="Packt_TweetsAbout::tweets.phtml">
<arguments>
<argument name="hashtag" xsi:type="string">#magento</argument>
</arguments>
</block>
</referenceContainer>
</body>
</page>Under the app/code/Packt/TweetsAbout/view/frontend/layout path, create the tweetsabout_packt_index.xml file with the following code:
<?xml version="1.0"?>
<page xmlns:xsi="http://www.w3.org/2001/XMLSchema-instance" layout="1column" xsi:noNamespaceSchemaLocation="urn:magento:framework:View/Layout/etc/page_configuration.xsd">
<head>
<title>
TweetsAbout #Packtpub
</title>
<css src="Packt_TweetsAbout::css/source/module.css"/>
</head>
<body>
<referenceContainer name="content">
<block class="Packt\TweetsAbout\Block\Tweets" template="Packt_TweetsAbout::tweets.phtml">
<arguments>
<argument name="hashtag" xsi:type="string">#packtpub</argument>
</arguments>
</block>
</referenceContainer>
</body>
</page>Under the app/code/Packt/TweetsAbout/view/frontend/layout path, create the tweetsabout_php_index.xml file with the following code:
<?xml version="1.0"?>
<page xmlns:xsi="http://www.w3.org/2001/XMLSchema-instance" layout="1column" xsi:noNamespaceSchemaLocation="urn:magento:framework:View/Layout/etc/page_configuration.xsd">
<head>
<title>
TweetsAbout #PHP
</title>
<css src="Packt_TweetsAbout::css/source/module.css"/>
</head>
<body>
<referenceContainer name="content">
<block class="Packt\TweetsAbout\Block\Tweets" template="Packt_TweetsAbout::tweets.phtml">
<arguments>
<argument name="hashtag" xsi:type="string">#php</argument>
</arguments>
</block>
</referenceContainer>
</body>
</page>The <css> tag loads the CSS rules of the template. The <block> tag binds the Tweets.php Block to the tweets.phtml file. The <argument name="hashtag"> tag transports the hashtag parameter to the Tweets.php Block to search the latest mentions of the specific hashtag in the Twitter database.
Now, let's create the template files.
Under the app/code/Packt/TweetsAbout/view/frontend/templates path, create the index.phtml file with the following code:
<h2>Recent TweetsAbout: </h2>
<ul>
<li>
<a href="<?php echo $block->escapeHtml($block->getMagentoUrl()) ?>">
<span><?php echo __('Magento')?></span>
</a>
</li>
<li>
<a href="<?php echo $block->escapeHtml($block->getPacktUrl()) ?>">
<span><?php echo __('Packtpub')?></span>
</a>
</li>
<li>
<a href="<?php echo $block->escapeHtml($block->getPHPUrl()) ?>">
<span><?php echo __('PHP')?></span>
</a>
</li>
</ul>The $block object has access to the methods of Block/Index.php, and the URL of the pages build dynamically.
Under the app/code/Packt/TweetsAbout/view/frontend/templates path, create the tweets.phtml file with the following code:
<?php
$tweets = $block->searchTweets();
?>
<?php foreach ($tweets as $tweet){ ?>
<p class="tweet">
<a href="<?php echo $tweet->user->url; ?>">
<img src="<?php echo $tweet->user->profile_image_url; ?>" alt="profile">
</a>
<b>Created: </b><?php echo $tweet->created_at; ?>
<br />
<br />
<a href="<?php echo isset($tweet->entities->urls[0]->url) ? $tweet->entities->urls[0]->url : "#"; ?>" target="_blank"><?php echo $tweet->text;?></a>
</p>
<hr />
<?php } ?>The searchTweets() method loads tweets according to the URL accessed, and PHP processes the data to show the results to the user.
Under the app/code/Packt/TweetsAbout/view/frontend/web/css/source path, create the module.less file with the following code:
.tweet {background-color: #878787; padding:15px; border:1px dotted}
.tweet a {color: #ffffff}
.tweet a:hover {text-decoration: underline;}To deploy the module, follow this recipe:
packt/bin directory.php magento module:enable --clear-static-content Packt_TweetsAbout command.php magento setup:upgrade command.php magento setup:static-content:deploy command.write permissions again to the directories.If everything goes alright, when you access the URL http://localhost/packt, you will see one link for the TweetsAbout extension in the topmost menu. Just click on it to see how the extension works. Take a look at the following screenshot:
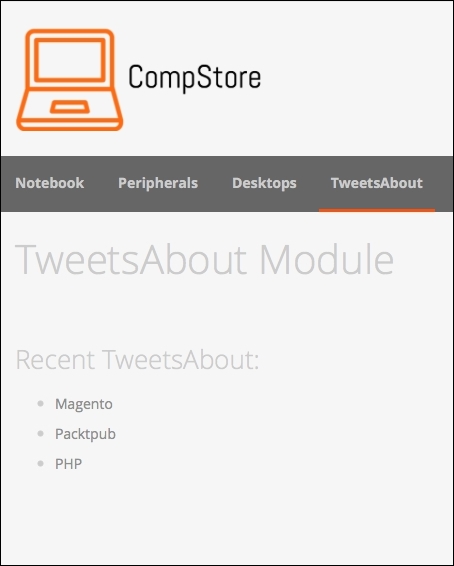
You can navigate to the links to see how the pages work, as in the following screenshot:
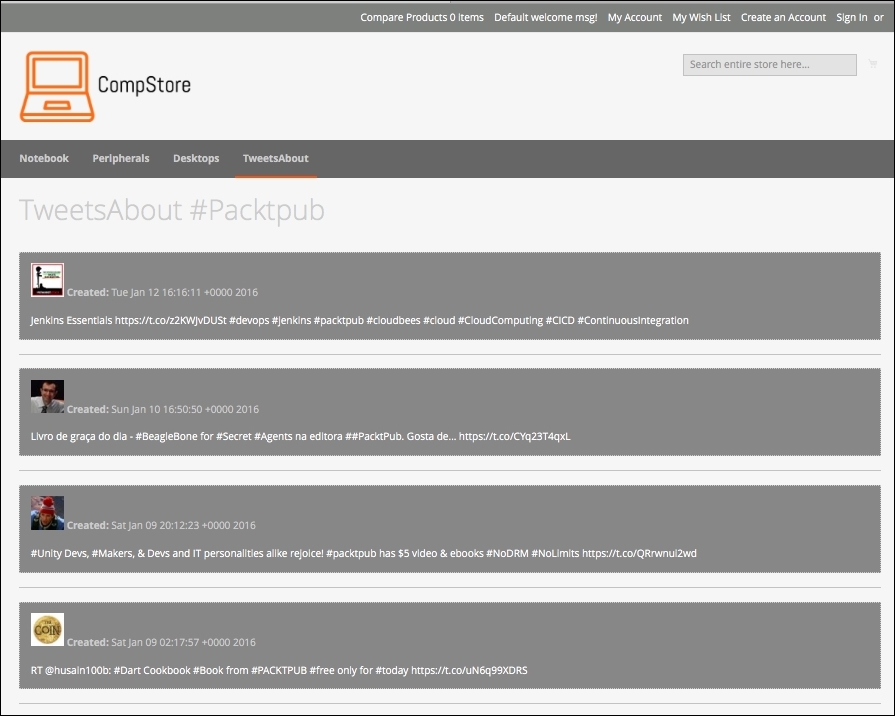
The extension gets the ten last tweets in real time with the date, picture, and post. It's really awesome to watch our work running!
For sure, this extension can get a lot better, but it is only a starting point for big achievements.
Once you have your extension ready to work, you can publish it in the Magento Connect service (http://www.magentocommerce.com/magento-connect). Magento Connect is a service in which Magento members can share their open source or commercial extensions with Magento Community. The main contributions are generally based on the following:
Once you have the composer.json file configured, you can package your module by compacting it as a .zip file in the vendor-name_package-name-1.0.0.zip format.
Upload the module in your personal account in GitHub, and Magento can retrieve it to publish.
For further information, it's strongly recommended that you to access the official documentation available on the Magento Developers official site at http://devdocs.magento.com/guides/v2.0/extension-dev-guide/package_module.html.
You worked on a lot in this chapter! Congratulations. Now, you have solid grasp of the concept in Magento 2.0 extension development. You can note that Magento development has strict rules, but once you learn the basics, you can master Magento with hard work and study. Keep the good work going!
As a suggestion, try to read the official documentation and do projects that demand more user interaction, such as the admin panel and development of dynamic formularies. You can even increase the power of TweetsAbout. The sky is the limit!
In the next chapter, we will start to work with Magento mobile by testing and configuring some great options. See you!
Nowadays e-commerce stores must be responsive and mobile friendly to increase sales according to the huge number of people using mobile devices to buy products and services. It's very important to know the right tools to provide a mobile-friendly Magento theme for your project. Let's go mobile with Magento!
The following topics will be covered in this chapter:
According to a research called State of Mobile Commerce Growing like a weed Q1 2015 conducted by Criteo (http://www.criteo.com/), a digital marketing company, mobile accounts for 29% of e-commerce transactions in the US and 34% globally. By the end of 2015, mobile share is forecast to reach 33% in the US and 40% globally. This research is available at http://www.criteo.com/media/1894/criteo-state-of-mobile-commerce-q1-2015-ppt.pdf.
This is one of the main reasons for which all Magento developers must create responsive designs. We started this process indirectly by creating a new theme with Webcomm Magento Boilerplate. Despite its basic mobile support, we have to make some adjustments to create a completely responsive Magento theme. Let's return to work!
In order to test your website in different devices and, consequently, different screen sizes, it is recommended to use a specific software or service to simulate the screen sizes of devices. If you perform a search on the web, you may find a great number of online test tools, but these tools work only with published websites. Our Magento site works, for now, on our local development environment.
To take advantage of our local development environment, let's work with the Google Chrome DevTools Device Mode and the Responsive Web Designer Tester extensions. In this book, we'll have two options to work with mobile theme development. You choose both of them!
If you don't have Google Chrome installed, download it from the URL https://www.google.com/intl/en/chrome/browser/desktop/ to install it on your operating system.
Google Chrome DevTools is a native tool of Google Chrome that provides a bunch of tools for web developers. By working with DevTools, you can optimize your frontend code, including HTML, CSS, and JavaScript.
Before accessing the DevTools extensions, access your Magento CompStore website at the http://localhost/packt URL.
To access DevTools, in the Google Chrome browser, follow these steps:
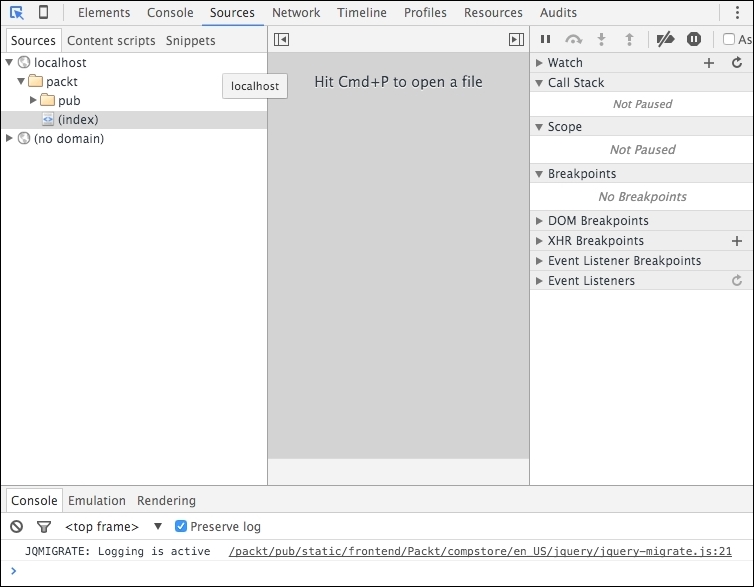
Now, you can see the DevTools window, as in the preceding screenshot.
To activate Device Mode, click on the smartphone icon next to the Elements menu item. Now, you can see the page rendering with different options, as in the following screenshot:
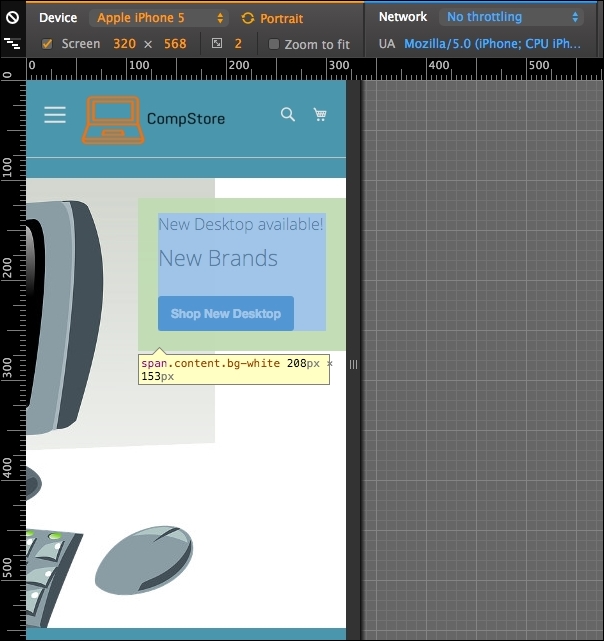
According to the Google DevTools official page available at https://developers.google.com/web/tools/chrome-devtools/iterate/device-mode/, you can use the DevTools device mode to do the following:
The DevTools extension has the following options to enhance developer experience:
To change the device preset, click on the Device options:

You can choose from among iPhone, Google Nexus, Samsung Galaxy, and Blackberry, and you can create custom devices to test the screen size.
The media queries are responsible for defining the CSS rule for each screen size. You can access all of these using DevTools. To access media queries, click on the icon in the upper-left corner:
Now, open the Google Chrome browser and navigate to the address https://chrome.google.com/webstore/category/apps to access Chrome Web Store. Conduct a search to find the Responsive Web Designer Tester extension and then add the extension to Google Chrome, as follows:
Great work! Now, let's take a look at how this extension works. On your browser, go to your Magento local site, also known as CompStore, by accessing http://localhost/packt. Remember that you have to turn on Apache Service in XAMMP to test the local website.
Click on the button of the Responsive Web Designer Tester extension shown on the right-hand side of your screen (generally near the end of the browser address bar) and select the iPhone 5—Portrait option for the first test:

After you select the device, you will see a pop-up window having the size of iPhone 5 screen. Navigating on the page, you will see also that the layout is not fully responsive. We have some issues in the home page presentation:
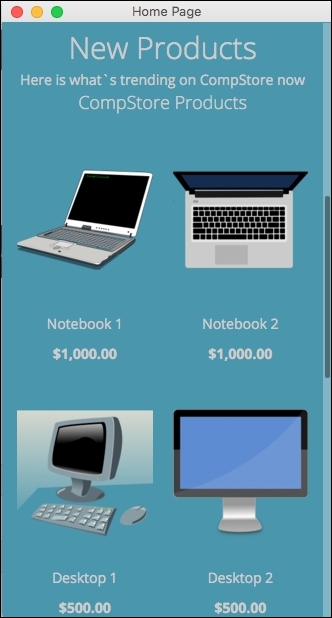
Now we have a tool to test site behavior between the different devices. It is time to make our CompStore theme 100% compatible with multiple devices!
Both the Magento 2.0 native themes, Blank and Luma, use Responsive Web Design (RWD) to provide good visualization in different devices, such as desktops, tablets, and mobiles.
In spite of the fact that the CompStore theme inherited the Luma theme, you can customize the template and CSS codes, as we discussed in Chapter 6, Write Magento 2.0 Extensions – a Great Place to Go. So, what do you think about improving the CompStore theme to make it more user friendly?
The actual mobile version of CompStore has some differences in the desktop version, including colors, elements positioning, and image size. Before creating some mobile standards for the CompStore theme, it's important to fix some CSS responsive design concepts of Magento. Let's get to work!
To handle accessibility for different devices, the Magento 2.0 native themes (Blank and Luma) work with an RWD engine, as we discussed in the Chapter 4, Magento 2.0 Theme Development – the Developers' Holy Grail, and Chapter 5, Creating a Responsive Magento 2.0 Theme. The stylesheets engine provided by the LESS preprocessor is the main utility responsible for this design approach.
The Magento 2.0 native themes were built based on the Magento UI library. The Magento UI library works with CSS 3 media queries to render a page with predefined rules according to the device, which requests the page. An example of media queries would be one that applies a specific rule for screens with a maximum width of 640 px; take a look at the following code:
@media only screen and (max-width: 640px) {
…
}With media queries, the themes apply breakpoints to handle different screen-width rules for different screen sizes of devices in a progression scale of pixels, as follows:
For further information about media queries, refer to the W3C official documentation available at https://www.w3.org/TR/css3-mediaqueries/.
The Magento 2.0 system works with the LESS CSS preprocessor to extend the features of CSS and enable the opportunity to create theme inheritance with minimal and organized effort. With this premise, to help theme developers, we have the Magento UI library in Magento 2.0.
The Magento UI library is based on LESS and provides a set of components to develop themes and frontend solutions:
Another important resource of the Magento UI and of LESS is the mixin capability. The mixin allows developers to group style rules to work with different devices.
For example, consider that you declared the following CSS code in one determined file:
.media-width(@extremum, @break) when (@extremum = 'max') and (@break = @screen__m) {
.example-responsive-block {
background: #ffc;
}
.example-responsive-block:before {
content: 'Mobile styles ';
font-weight: bold;
}
}Then, you executed this CSS code in a different file:
.media-width(@extremum, @break) when (@extremum = 'min') and (@break = @screen__m) {
.example-responsive-block {
background: #ccf;
}
.example-responsive-block:before {
content: 'Desktop styles ';
font-weight: bold;
}
}In spite of the two files declaring a mixin named .media-width to the .example-responsive-block class in different files, the mixin allows LESS to make a single query, grouping the rules instead of making multiple calls according to the device rule applied.
You can access the local Magento UI documentation by accessing the URL http://<magento_local_url>/pub/static/frontend/Magento/blank/en_US/css/docs/responsive.html.
For further information about the Magento UI, take a look at the Magento official readme.md file available at https://github.com/magento/magento2/blob/2.0.0/lib/web/css/docs/source/README.md.
First of all, let's take a look at the current mobile version of the CompStore theme. Using Chrome DevTools or Responsive Web Designer Tester, select an Apple iPhone 5 (portrait) device to test the site. You will probably be redirected to home page:
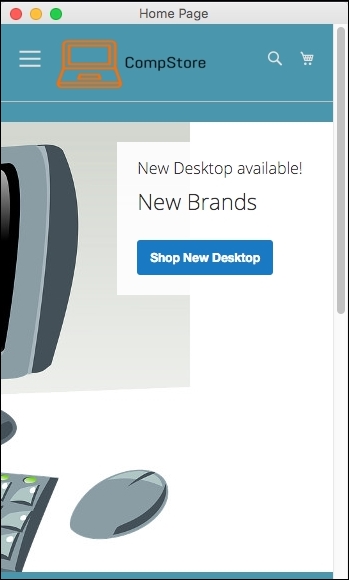
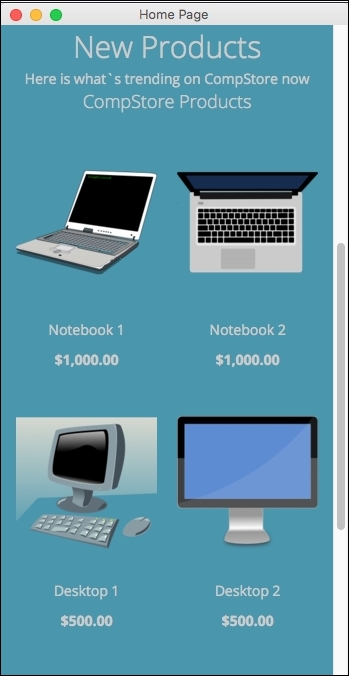
In spite of the previous adjustment in the CompStore theme, when a mobile device accesses a theme, CSS rules don't apply some important features, such as colors and the positioning of elements. As a suggestion, let's create a standard declaration of color approach and configure CSS to show only one product when the mobile device accesses the site. How can we implement these new features? Using media queries, of course!
In your favorite code editor, open the compstore.less file available under the app/design/frontend/Packt/compstore/web/css/source directory and use the following CSS 3 code:
@color-compstore: #F6F6F6;

body{
background: @color-compstore;
}
.media-width(@extremum, @break) when (@extremum = 'max') and (@break = @screen__s) {
body{
background: @color-compstore;
}
.widget .block-promo img{
height: 600px;
}
.products-grid .product-item {
width: 100%;
display: inline-block;
}
}
.media-width(@extremum, @break) when (@extremum = 'min') and (@break = @screen__s) {
body{
background: @color-compstore;
}
.widget .block-promo img{
height: 600px;
}
.products-grid .product-item {
width: 100%;
display: inline-block;
}
}The Magento UI break points predefined variables to identify the scope of media queries, which are as follows:
@screen__xxs: 320 px@screen__xs: 480 px@screen__s: 640 px@screen__m: 768 px@screen__l: 1024 px@screen__xl: 1440 pxSo, in the CSS 3 new proposal, the media queries use the @screen_s variable to define the application of new rules. We will propose via mixin to change the background color, promo image size, and product size inside mobile rules for portrait and landscape purposes.
To apply the changes, follow this recipe:
packt/pub/static/frontend/<Vendor>/<theme>/<locale> directory.var/cache directory.var/view_preprocessed directory.packt/bin directory.php magento setup:static-content:deploy command.write permissions again to the directories.Test the site again to get the new home page, as in the following screenshot:
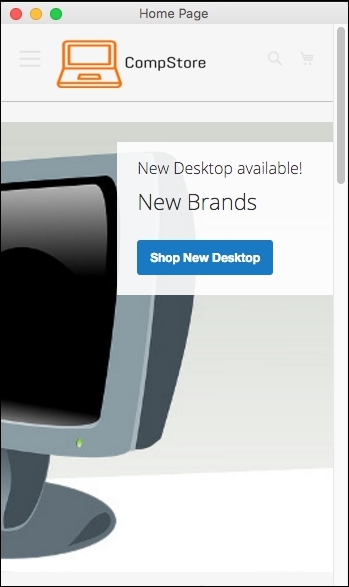
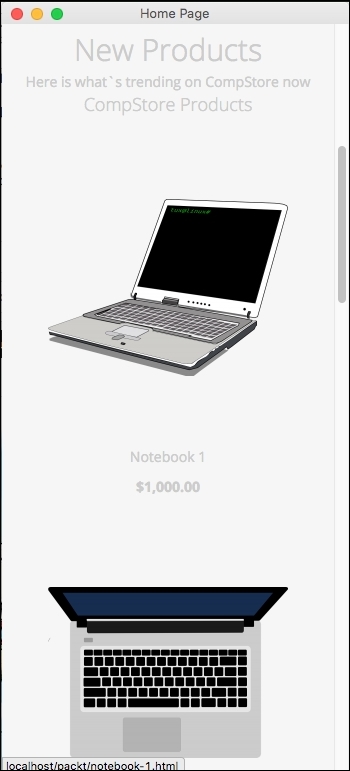
The extension that we created in Chapter 6, Write Magento 2.0 Extensions – a Great Place to Go, tweets about extension and has the following appearance:
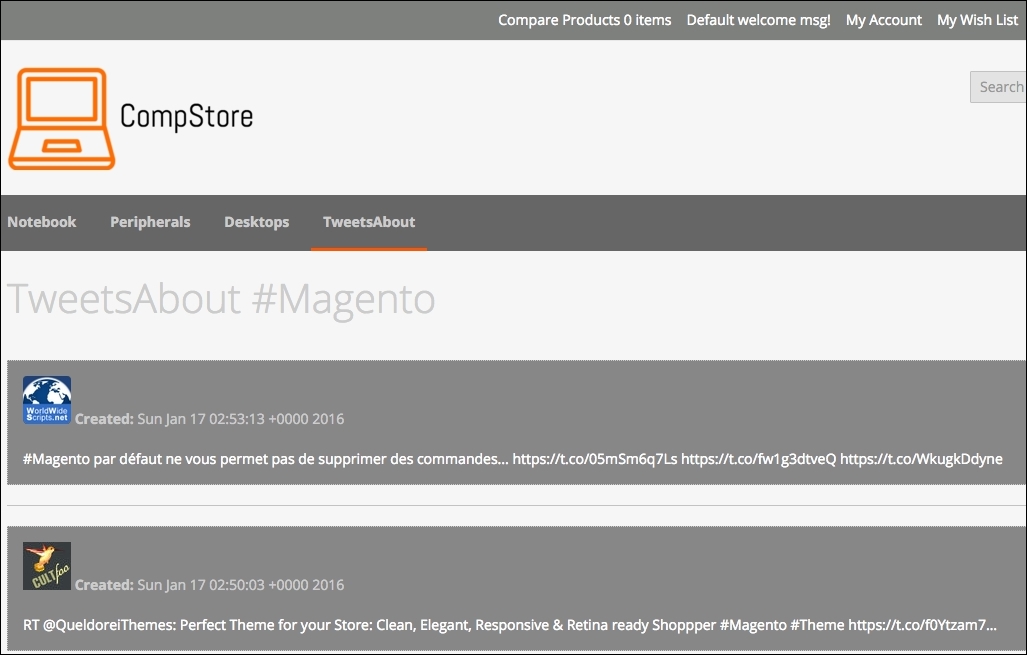
Let's improve the CSS extension rules to turn it into a mobile-friendly one.
Using Chrome DevTools or Responsive Web Designer Tester, select an Apple iPhone 5—portrait device to test our code optimization.
Open the module.less file available under the packt/app/code/Packt/TweetsAbout/view/frontend/web/css/source directory and add the following code:
/*Tweets About Style*/
@media (min-width: 960px){
#wrapper {
width: 90%;
max-width: 1100px;
min-width: 800px;
margin: 50px auto;
}
#columns {
-webkit-column-count: 3;
-webkit-column-gap: 10px;
-webkit-column-fill: auto;
-moz-column-count: 3;
-moz-column-gap: 10px;
-moz-column-fill: auto;
column-count: 3;
column-gap: 15px;
column-fill: auto;
}
}
.tweet {
display: inline-block;
background: #FEFEFE;
border: 2px solid #FAFAFA;
box-shadow: 0 1px 2px rgba(34, 25, 25, 0.4);
margin: 0 2px 15px;
-webkit-column-break-inside: avoid;
-moz-column-break-inside: avoid;
column-break-inside: avoid;
padding: 15px;
padding-bottom: 5px;
background: -webkit-linear-gradient(45deg, #FFF, #F9F9F9);
opacity: 1;
-webkit-transition: all .2s ease;
-moz-transition: all .2s ease;
-o-transition: all .2s ease;
transition: all .2s ease;
}
.tweetimg {
width: 15%;
display:block;
float:left;
margin: 0px 5px 0px 0px;
}
.tweet p {
font: 12px/18px Arial, sans-serif;
color: #333;
margin: 0;
}
#columns:hover .img:not(:hover) {
opacity: 0.4;
}After saving the module.less file, change the tweets.phtml code available under packt/app/code/Packt/TweetsAbout/view/frontend/templates, change the file with this new code, and save it, as follows:
<?php
$tweets = $block->searchTweets();
?>
<div id="wrapper">
<div id="columns">
<?php foreach ($tweets as $tweet){ ?>
<div class="tweet">
<p>
<a href="https://twitter.com/intent/user?user_id=<?php echo $tweet->user->id; ?>" target="_blank">
<img src="<?php echo $tweets->user->profile_image_url; ?>" alt="profile">
<?php echo $tweet->user->name; ?>
</a>
<br />
Created: <?php echo $tweets->created_at; ?>
<br /><br />
<a href="<?php echo isset($tweet->entities->urls[0]->url) ? $tweet->entities->urls[0]->url : "#"; ?>" target="_blank"><?php echo $tweet->text;?></a>
<?php echo $tweets->text;?>
</a>
</p>
</div>
<?php } ?>
</div>
</div>To deploy the module update, follow this recipe:
packt/bin directory.php magento module:enable --clear-static-content Packt_TweetsAbout command.php magento setup:upgrade command.php magento setup:static-content:deploy command.write permissions again to the directories (var and pub).Now, test the tweets about extension by accessing http://localhost/packt/tweetsabout to see the new responsive look, as shown in the following screenshot:
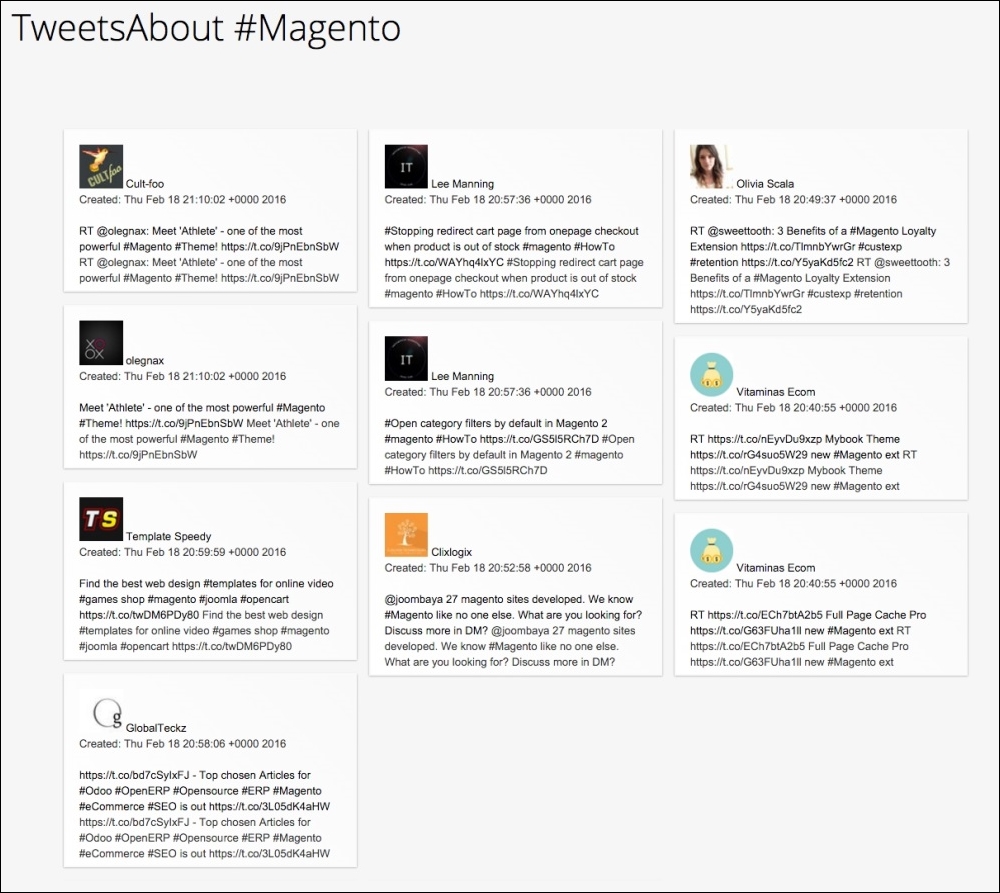
If you activate DevTools and choose an iPhone 5 device, you will see a result similar to the following screenshot:
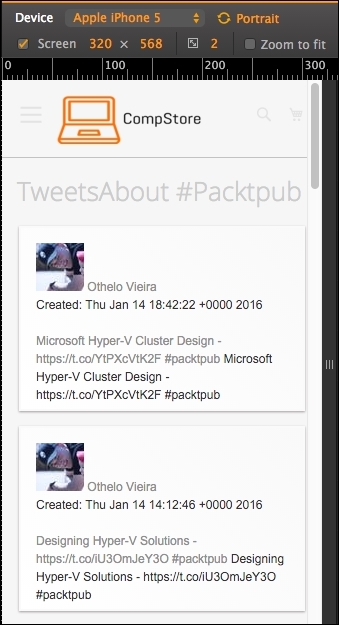
In this chapter, you learned about tools that provide you with a great environment to develop Magento frontend themes.
You also increased the power of CompStore CSS to handle access from specific mobile devices. Of course, you can modify the code constantly to have a better experience by fine-tuning in your code. However, this is only the beginning.
In the next chapter, we will start configuring our Magento software, on which we have been working until now, to improve its speed. We will installing solutions and configure the already native Magento options.
Despite the existence of a great solution such as Zend Framework for its system, Magento 2.0 needs some fine tuning to get the best performance in order to provide the users with a better shopping experience. As you noted in the previous chapters, it is very important to focus on every aspect for successful e-commerce.
The following topics will be covered in this chapter:
expires headerWith a complex system architecture, Magento developers realized that a traditional development approach could be counterproductive for a scalable idea to implement an e-commerce solution.
Developers, therefore, decided to adopt the Entity-Attribute-Value (EAV) architecture approach.
This database structure embraces the Magento 2.0 complexity processes and variables and allows an unlimited numbers of attributes to any item, such as categories, products, costumers, addresses, and more.
The three main points of EAV can be described as follows:
This book is a hands–on guide to Magento, but I strongly suggest you to read more about EAV in the Magento official documentation at http://devdocs.magento.com/guides/v2.0/extension-dev-guide/attributes.html.
With the increase in content, images, and script demands for a better experience in e-commerce, we have to handle network consumption in order to provide fast access to our system. Search engines measure some technical points with their algorithms, and fast access is, of course, one of the requisites validated.
Magento has a complex architecture and works with MySQL database constant queries to show specific products information, render pages, and process checkouts. This high process volume demand can slow the download speed when your Magento 2.0 solution is in a production environment.
To improve the Magento 2.0 performance, we can use two important tools: indexing and caching.
In the Magento 2.0 life cycle, at a determined point, we will have considerable megabytes of data on the MySQL database, including information regarding products, orders, customers, and payments. To improve its performance, Magento uses indexed tables to provide faster lookups.
However, as your Magento 2.0 e-commerce grows, the indexation feature starts to lose performance too.
In order to correct this issue, you can precompile database relationships using the flat table option in Magento. This technique combines EAV relationships for categories and products in one table to increase the speed of queries. To enable this feature, you can follow these instructions:
http://localhost/packt/admin_packt).

If you make changes to your catalog, product, or some page that has a relationship with indexers, the Magento system needs to re-index the information to keep the flat table schema working. You can manage the indexers with the Magento command-line tool, as follows:
The reindex command rebuilds all the product, catalog, customer, and stock information. The index feature enables a fast return of data once the system has no need to process any basic data, such as product price, every single time that the user accesses the store.
Did you notice in the preceding system message one issue about Magento cron job? Cron job allows you to automate this task and others to improve your efficiency. Let's take a look at how cron job works.
For further information about Magento indexing, take a look at the official Magento documentation at http://devdocs.magento.com/guides/v2.0/extension-dev-guide/indexing.html.
Magento has important system processes that are very important to maintain the system's working at its full potential. These processes need automated executions to handle the updates made by the user and administrator. That is the why this feature is critical to Magento.
Cron job works with UNIX systems and can schedule specific tasks to be executed in a predetermined time on the server. The following activities can be scheduled to execute on the Magento 2.0 system:
To configure the cron job, follow this recipe.
Find the php.ini file path.
If you use XAMPP, as was suggested for a web server solution at the beginning of the book, you simply can use the XAMPP/xamppfiles/etc/php.ini path. If you use a Unix-based terminal, you can use the command to find the PHP configuration file. Perform the following steps:
sudo crontab -u magento_user –e command; here, magento_user refers to your system's owner.*/1 * * * * php -c <php-ini-file-path> <your Magento install dir>/bin/magento cron:run */1 * * * * php -c <php-ini-file-path> <your Magento install dir>/update/cron.php */1 * * * * php -c <php-file-path> <your Magento install dir>/bin/magento setup:cron:run
Here's an example:
*/1 * * * * php -c /Applications/XAMPP/xamppfiles/etc/php.ini /Applications/XAMPP/xamppfiles/etc/php.ini /Applications/XAMPP/htdocs/packt/bin/magento cron:run */1 * * * * php -c /Applications/XAMPP/xamppfiles/etc/php.ini /Applications/XAMPP/xamppfiles/etc/php.ini /Applications/XAMPP/htdocs/packt/update/cron.php */1 * * * * php -c /Applications/XAMPP/xamppfiles/etc/php.ini /Applications/XAMPP/htdocs/packt/bin/magento setup:cron:run
sudo crontab -u fjmiguel –l command to take a look at your new cron job configuration.In some cases, it is necessary to give write permissions again to the directories.
The */1 * * * * configuration specifies that the cron job will be executed every minute. The cron job will now run in the background every minute. To manually execute the cron job, you can run the php magento cron:run command on the Magento command-line tool, as shown in the following figure:
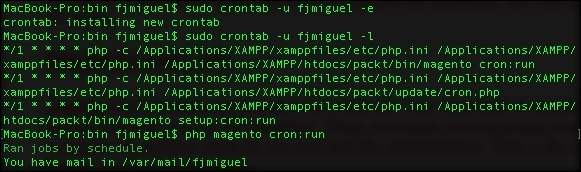
For further information about the cron job, follow the link at https://help.ubuntu.com/community/CronHowto.
For Magento cron, take a look at the official Magento documentation http://devdocs.magento.com/guides/v2.0/config-guide/cli/config-cli-subcommands-cron.html.
While the indexing technique works on database layer, the caching feature does the same for the HTML page components to increase fast access to the frontend. Caching stores this kind of data in order to provide the visitors with access to faster download.
To enable caching, you need to perform the following steps:
For further information about cache configuration, follow the link at http://devdocs.magento.com/guides/v2.0/config-guide/cli/config-cli-subcommands-cache.html.
You can work with third-party cache solutions to provide a better performance. Some of this solution has support and works very well with the Magento 2.0 solution. This book doesn't cover server configurations, but I strongly suggest you to take a look at the following:
Magento 2.0 has a complex structure, but it follows the good practices of software development, which gives the administrators and the developers of this fantastic e-commerce solution the real possibility to implement a scalable system to conquer a great site traffic and constantly increase the sales.
Despite this advantage, all the scalable systems need a great server infrastructure to provide fast content access through the Internet.
As a developer, you need to always think about all the stages that a successful software needs to go through in an order to aggregate the real value to its administrator and to its users. Try to always see the big picture of your project.
Let's take a look at some techniques and tips to increase your Magento server's capability.
First of all, we need to conduct a deep research on the existent solutions. We will try to gather information about clients of these solutions and test Magento's performance by accessing the Magento website as a visitor.
The Magento official project website provides you with an online tool to search for Magento. You can use this tool by accessing the URL at http://partners.magento.com/partner_locator/search.aspx.
Magento hosting services generally use Apache as a web server solution. Magento is written in PHP, and Apache has a mature environment to handle PHP processes.
In order to give fast response to visitors' requests, we will use Apache's mod_deflate to speed up server response.
According to Apache's official documentation (http://httpd.apache.org/docs/2.2/mod/mod_deflate.html), this module provides the deflate output filter that allows output from your server to be compressed before being sent to the client over the network.
To enable this feature on your server, you need to create the .htaccess file and enter the following code:
<IfModule mod_deflate.c>
############################################
## enable apache served files compression
## http://developer.yahoo.com/performance/rules.html#gzip
# Insert filter on all content
SetOutputFilter DEFLATE
# Insert filter on selected content types only
AddOutputFilterByType DEFLATE text/html text/plain text/xml text/css text/javascript
# Netscape 4.x has some problems...
BrowserMatch ^Mozilla/4 gzip-only-text/html
# Netscape 4.06-4.08 have some more problems
BrowserMatch ^Mozilla/4\.0[678] no-gzip
# MSIE masquerades as Netscape, but it is fine
BrowserMatch \bMSIE !no-gzip !gzip-only-text/html
# Don't compress images
SetEnvIfNoCase Request_URI \.(?:gif|jpe?g|png)$ no-gzip dont-vary
# Make sure proxies don't deliver the wrong content
Header append Vary User-Agent env=!dont-vary
</IfModule>This adjustment reduces about 70% of the amount of data delivered.
For further information about the .htaccess and mod_deflate configurations, take a look at the links at http://httpd.apache.org/docs/current/howto/htaccess.html and http://httpd.apache.org/docs/2.2/mod/mod_deflate.html.
Continuing to take advantage of the Apache web server, we will activate the mod_expires module. This module sends a message to the client machine about the document's validity, and the client can store a cache of the site until the client receives a new message from the server expiration of data. This technique increases the speed of download.
To activate this feature, you can open the .htaccess file available in the Magento root directory and enter this block of code:
<IfModule mod_expires.c>
############################################
## Add default Expires header
## http://developer.yahoo.com/performance/rules.html#expires
ExpiresActive On
ExpiresDefault "access plus 1 year"
</IfModule>For further information about the .htaccess configuration, follow the link at http://httpd.apache.org/docs/2.2/mod/mod_expires.html.
Increasing PHP memory by host configuration has a direct relationship with your contracted hosting service. Some shared hosting services do not give this option to the developers. This is one of the main reasons to choose a specialized Magento hosting service.
Generally, this configuration can be done by adding the following code to the .htaccess file available in the Magento root directory:
<IfModule mod_php5.c> ############################################ ## adjust memory limit php_value memory_limit 256M php_value max_execution_time 18000 </IfModule>
MySQL has the query cache feature to provide fast queries on a database. Once again, you need to conduct deep research on your possible hosting services before contracting any to make sure you have all the services you need for a great production environment.
Before starting the optimization, refer to the PHP and MySQL documentations of your hosting service to check the availability of these changes.
Open the php.ini hosting service file and place these configurations:
;;;;;;;;;;;;;;;;;;;
; Resource Limits ;
;;;;;;;;;;;;;;;;;;;
max_execution_time = 30 ; Maximum execution time of each script, in seconds
max_input_time = 60 ; Maximum amount of time each script may spend parsing request data
memory_limit = 512M ; Maximum amount of memory a script may consume (8MB)
query_cache_size = 64M
[MySQLi]
; Please refer to http://php.net/manual/en/mysqli.configuration.php for further information
; Maximum number of persistent links. -1 means no limit.
mysqli.max_persistent = -1
; Allow accessing, from PHP's perspective, local files with LOAD DATA statements
;mysqli.allow_local_infile = On
; Allow or prevent persistent links.
mysqli.allow_persistent = On
; Maximum number of links. -1 means no limit.
mysqli.max_links = -1
; If mysqlnd is used: Number of cache slots for the internal result set cache
mysqli.cache_size = 2000
; Default port number for mysqli_connect(). If unset, mysqli_connect() will use
; the $MYSQL_TCP_PORT or the mysql-tcp entry in /etc/services or the
; compile-time value defined MYSQL_PORT (in that order). Win32 will only look
; at MYSQL_PORT.
mysqli.default_port = 3306
; Default socket name for local MySQL connects. If empty, uses the built-in
; MySQL defaults.
mysqli.default_socket =
; Default host for mysql_connect() (doesn't apply in safe mode).
mysqli.default_host =
; Default user for mysql_connect() (doesn't apply in safe mode).
mysqli.default_user =
; Default password for mysqli_connect() (doesn't apply in safe mode).
; Note that this is generally a *bad* idea to store passwords in this file.
; *Any* user with PHP access can run 'echo get_cfg_var("mysqli.default_pw")
; and reveal this password! And of course, any users with read access to this
; file will be able to reveal the password as well.
mysqli.default_pw =
; Allow or prevent reconnect
mysqli.reconnect = OffNow, let's configure the query_cache_size variable directly on the MySQL database.
Open the phpMyAdmin web SQL console, and execute the SHOW VARIABLES LIKE 'query_cache_size'; query without selecting a database. The query will probably return the 0 value for the query_cache_size variable.
Execute the SET GLOBAL query_cache_size = 1048576; query and execute SHOW VARIABLES LIKE 'query_cache_size'; again.
The query will probably return the following information:
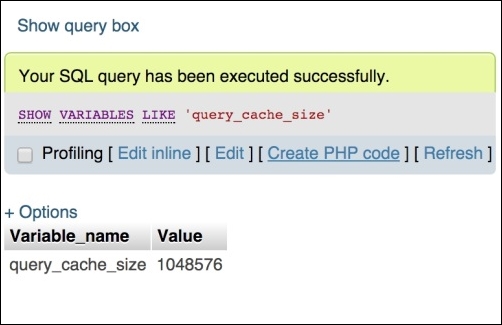
The query_cache_size variable was activated with success!
For further information about the MySQL cache size configuration, follow the link at https://dev.mysql.com/doc/refman/5.0/en/query-cache-configuration.html.
Even by testing these configurations in your localhost environment, you can feel the huge positive difference between the first access in your Magento installation and the last access after the configuration. This is really awesome!
Code minification is a technique to remove unnecessary characters from the source code. Minify your JavaScript (.js) and stylesheets (.css) files and improve the load time of your site by compressing the files.
In order to activate this process in Magento, navigate to the admin area (http://localhost/packt/admin_packt) and follow these instructions:
Content Delivery Networks, also known as CDN, are servers of fast access for your static or non-dynamic content. JavaScript files and images are examples of files hosted on CDN servers.
The main idea behind the use of CDN is saving the process time of your Magento server using a CDN solution.
I suggest you to conduct research on hosting services that provide this integration. For example, Nexcess as a Magento partner company provides specific documentation about CDN integration on the URL https://docs.nexcess.net/article/how-to-configure-cdn-access-for-magento.html.
For JavaScript CDN, we have a free-of-charge service available on the Internet! This is thanks to Google for providing us with this amazing feature at https://developers.google.com/speed/libraries/.
In this chapter, you learned important lessons about how to improve Magento performance and pay attention to all the aspects that can make a positive difference in Magento development, including how to create a full-speed environment for Magento System.
I invite you to think in this very for now. We are progressing and walking through all the aspects of Magento: design, development, marketing, and performance. I feel comfortable to say to you, dear reader, that you have the tools to elevate your Magento professional career. Just keep continuing to study hard.
In this chapter, you learned how to:
In the final chapter, we will explore some tools and ways to improve your Magento skills. See you!
We are at the end of the book, but this only the beginning of your walk through the Magento training. It's important to know some Magento extension options, but it is more important to build your own path in the Magento world by studying for a certification and achieving a new professional level.
The following topics will be covered in this chapter:
The Magento 2.0 architecture allows a natural improvement of native resources and the addition of new ones. Magento 2.0 is built based on the best software development practices. Its architecture is modular, which allows the development of extensions, as we discussed in an earlier chapter.
Magento Commerce maintains a marketplace to provide Magento extensions known as Magento Connect (https://www.magentocommerce.com/magento-connect). Magento Connect includes extensions that provide new functionalities, such as modules, add-ons, language packs, design interfaces, and themes to extend the power of your store.
I strongly suggest that you visit Magento Connect to get some ideas for personal projects and follow the extension development tendency in the marketplace.
Besides the Magento Connect marketplace, to search for Magento extension solutions, you can access the extension options through your admin area. To access Magento extension options in your admin area, perform the following steps:
http://localhost/admin_packt.
To install the extensions via Composer, you need to configure composer.json to work with the Magento 2 Composer repository (http://packages.magento.com/) as a repository solution for Magento Core extensions. The composer already has the Packagist (https://packagist.org/) configuration. To proceed with this configuration, perform the following:
composer config repositories.magento composer http://packages.magento.com command.To install a Magento extension via composer, do the following:
composer require <vendor>/<module> command.composer require Packt/TweetsAbout.composer update command.php bin/magento setup:upgrade command.To install a Magento extension manually, perform the following steps:
.zip file of the module.<magento_root_directory>/app/code directory.php bin/magento setup:upgrade command.var directory)As you noted in the previous chapters, for every change that you apply in a Magento extension or theme styles, you need to clean the static files directory and deploy it to see the effect. This process takes time and unnecessary effort. So, what if you have a tool to automate this process?
Grunt.js (http://gruntjs.com/) is a task runner to automate tasks; for example, it provides productivity in Magento development by automating CSS changes. To install Grunt, follow these steps:
npm install -g grunt-cli command to install the Grunt command-line interface.packt/ Magento root directory and run the npm install grunt --save-dev command.packt directory, run the npm install command.npm update command.packt/dev/tools/grunt/configs/theme.js file, add the following code, and save it:'use strict';
module.exports = {
blank: {
area: 'frontend',
name: 'Magento/blank',
locale: 'en_US',
files: [
'css/styles-m',
'css/styles-l',
'css/email',
'css/email-inline'
],
dsl: 'less'
},
luma: {
area: 'frontend',
name: 'Magento/luma',
locale: 'en_US',
files: [
'css/styles-m',
'css/styles-l'
],
dsl: 'less'
},
backend: {
area: 'adminhtml',
name: 'Magento/backend',
locale: 'en_US',
files: [
'css/styles-old',
'css/styles'
],
dsl: 'less'
},
compstore: {
area: 'frontend',
name: 'Packt/compstore',
locale: 'en_US',
files: [
'css/styles-m',
'css/styles-l',
'css/source/compstore'
],
dsl: 'less'
}
};Once the Grunt environment is configured, it's time to test Grunt. Perform the following steps:
grunt exec:compstore command.grunt less:compstore command.grunt watch command.
These commands will create a direct channel with the possibility to edit your .CSS files on the fly. The grunt watch command shows you the update in real time. With "grunt watch" still active in your terminal/prompt window, try to edit and save the body's background color in the app/design/frontend/Packt/compstore/web/css/source/compstore.less file to see the result in the browser by accessing your base URL:
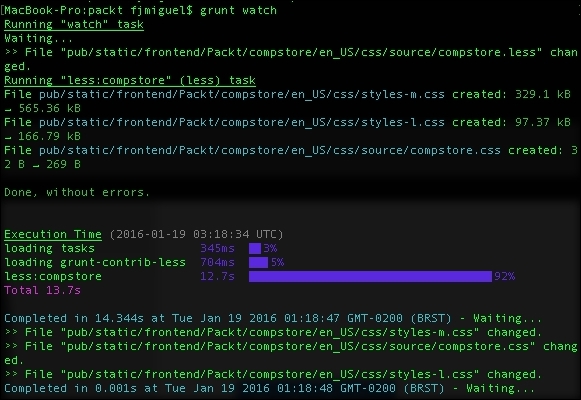
The Magento team provides great resources of documentation in order to increase the Magento developer's knowledge.
In the Magento documentation (http://magento.com/help/documentation), the user can access the USER GUIDES section for ENTERPRISE EDITION, COMMUNITY EDITION, DESIGNER'S GUIDE, and DEVELOPER DOCUMENTATION.
I strongly suggest that you, dear reader, study Magento's COMMUNITY EDITION, DESIGNER'S GUIDE, and DEVELOPER DOCUMENTATION in the first instance. These three documentations have solid concepts, and you can certainly take advantage by building your Magento concepts.

Welcome to the world of information technology! The professionals of this area need to study harder every single day. It's totally crazy how technology is always in mutation. New technologies and solutions come in a short period of time, and professionals must be prepared all the time to keep an open mind, absorbing this situation assertively.
Magento provides an official training program available at http://magento.com/training/overview. You can access information about courses, and I strongly suggest that you think about Magento certification. Certifications can boost your career.
To learn more about Magento certification, refer to http://magento.com/training/catalog/certification. You can download a free Magento study guide by visiting http://magento.com/training/free-study-guide.
You have a lot of options, such as books, articles, and blogs, to train and improve your Magento skills. Be persistent on your objectives!
Congratulations! You won one more challenge; first, you acquired this great book, and then you completed the reading with merits. It was not easy, but I'm certain it was worth it.
In this chapter, you learned how to:
Thank you so much. I know you can climb the highest mountains; never lose faith in yourself. Good luck!
In this chapter, we will cover the basic tasks related to managing the system tools of Magento 2. You will learn the following recipes:
This chapter explains how to install and manage Magento 2 on a production-like environment. We will be installing a new Magento 2 instance via the shell command with and without sample data. Besides the setup, managing Magento 2 is different from the current Magento version. We will be using a lot of tools from the command line so basic shell knowledge is advised. The command-line tool in the /bin directory is similar to the current Swiss
army knife tool in the current Magento version known as n98-magerun.
Using bin/magento and
Composer is one of the new key features in Magento 2 that will rock your world.
The recipes in this chapter will focus primarily on a more advanced setup of how to install Magento 2 and manage it. However, in some situations, we will dive in deeper related to the subject.
Here is an overview of all the command-line tools in Magento 2:
root@mage2cookbook:/var/www/html# bin/magento Magento CLI version 2.0.0 Usage: command [options] [arguments] Options: --help (-h) Display this help message --quiet (-q) Do not output any message --verbose (-v|vv|vvv) Increase the verbosity of messages: 1 for normal output, 2 for more verbose output and 3 for debug --version (-V) Display this application version --ansi Force ANSI output --no-ansi Disable ANSI output --no-interaction (-n) Do not ask any interactive question
The following commands are available in the command-line tools in Magento 2:
|
Commands |
Description |
|---|---|
|
|
This displays help for a command |
|
|
This lists the commands |
|
admin | |
|
|
This creates an administrator |
|
|
This unlocks the administrator account |
|
cache | |
|
|
This cleans the cache type(s) |
|
|
This disables the cache type(s) |
|
|
This enables the cache type(s) |
|
|
This flushes the cache storage used by the cache type(s) |
|
|
This checks the cache status |
|
catalog | |
|
|
This creates resized product images |
|
cron | |
|
|
This runs jobs by schedule |
|
customer | |
|
|
This upgrades the customer's hash according to the latest algorithm |
|
deploy | |
|
|
This sets the application mode |
|
|
This displays the current application mode |
|
dev | |
|
|
This collects and publishes source files for a theme |
|
|
This runs tests |
|
|
This generates the catalog of URNs to |
|
|
This converts XML files using XSL style sheets |
|
i18n | |
|
|
This discovers phrases in the code base |
|
|
This saves language packages |
|
|
This uninstalls language packages |
|
indexer | |
|
|
This shows allowed indexers |
|
|
This reindexes data |
|
|
This sets the index mode type |
|
|
This shows the index mode |
|
|
This shows the status of an indexer |
|
maintenance | |
|
|
This sets the maintenance mode exempt IPs |
|
|
This disables the maintenance mode |
|
|
This enables the maintenance mode |
|
|
This displays the maintenance mode status |
|
module | |
|
|
This disables specified modules |
|
|
This enables specified modules |
|
|
This displays the status of modules |
|
|
This uninstalls modules installed by Composer |
|
sampledata | |
|
|
This deploys sample data modules |
|
|
This removes all sample data from |
|
|
This resets sample data modules for reinstallation |
|
theme | |
|
|
This uninstalls the theme |
|
info | |
|
|
This displays the Magento Admin URI |
|
|
This prints a list of available backup files |
|
|
This displays the list of available currencies |
|
|
This shows the number of dependencies on the Magento framework |
|
|
This shows the number of dependencies between modules |
|
|
This shows the number of circular dependencies between modules |
|
|
This displays a list of available language locales |
|
|
This displays a list of available time zones |
|
setup | |
|
|
This takes a backup of the Magento Application code base, media, and database |
|
|
This creates or modifies the deployment configuration |
|
|
This runs a cron job scheduled for the setup application |
|
|
This installs and upgrades data in the DB |
|
|
This installs and upgrades the DB schema |
|
|
This checks whether the DB schema or data require an upgrade |
|
|
This generates the DI configuration and all non-existing interceptors and factories |
|
|
This generates all non-existing proxies and factories and precompiles class definitions, inheritance information, and plugin definitions |
|
|
This installs the Magento application |
|
|
This generates fixtures |
|
|
This rolls back the Magento application code base, media, and database |
|
|
This deploys static view files |
|
|
This installs the store configuration |
|
|
This uninstalls the Magento application |
|
|
This upgrades the Magento application, DB data, and schema |
We will be using an NGINX-based setup. The Apache setup is pretty straightforward; when needed, we will address specified configuration settings when they occur.
Installing Magento 2 via the graphical user interface (GUI) is not new. Now, we will be installing a new clean version including the sample data.
The sample data can be installed during and at the end of the procedure. We will be using a composer.json file for our setup prerequisites. First, we will be installing a clean version with sample data, and later, I will show you how to install it at the end in case you already have a preinstalled version.
For this recipe, we will use a Droplet and NGINX, at DigitalOcean, https://www.digitalocean.com/. We will be using NGINX, PHP-FPM, and a Composer-based setup. No other prerequisites are required.
For the first step, you can either create a new Droplet or rebuild a clean Droplet based on a Ubuntu or RedHat DigitalOcean image.
The option to rebuild is located in the DigitalOcean control panel in the Destroy menu and then rebuild Droplet:
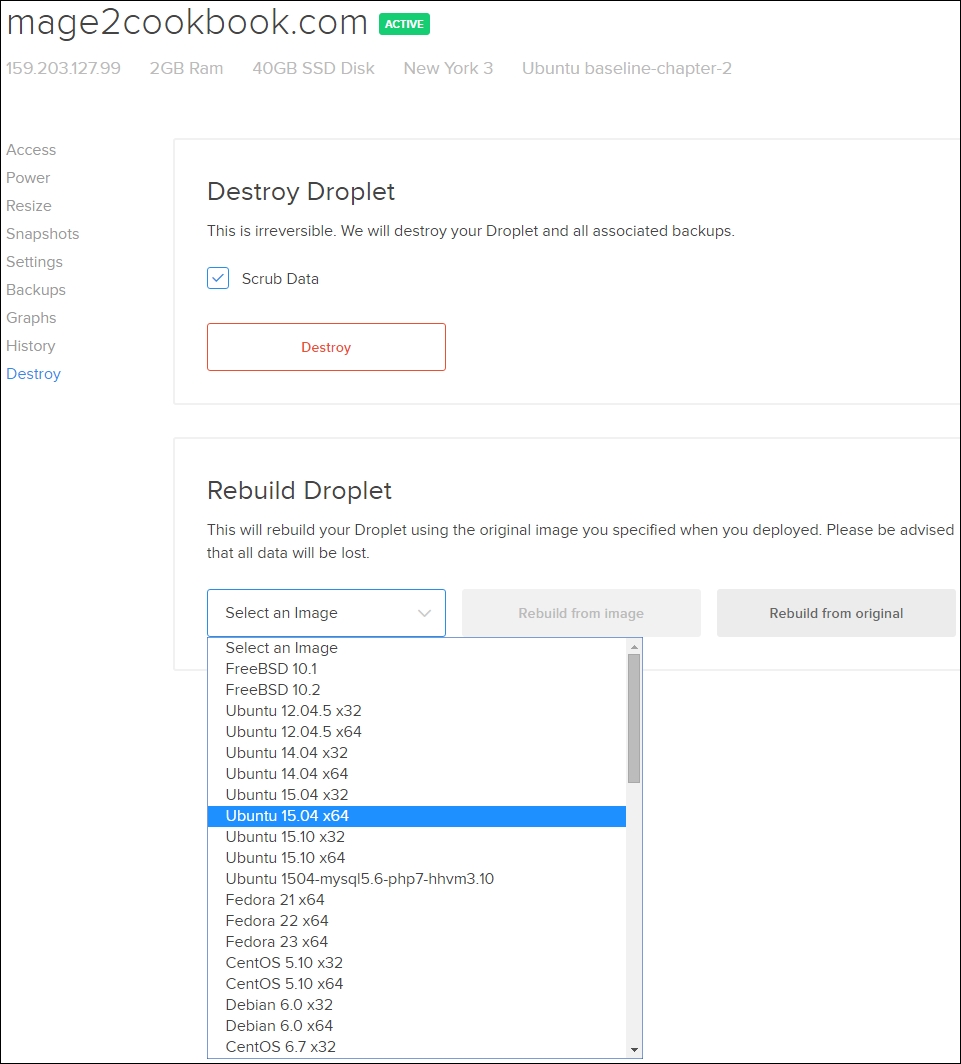
The steps to install Magento 2 sample data via GUI are as follows:
/var/www/html in this recipe.If you are using a ZIP package, make sure that you install the unzip package first, running the following command on the shell:
apt-get install unzip
chown -R www-data:www-data /var/www/html find . -type d -exec chmod 770 {} \; && find . -type f -exec chmod 660 {} \; && chmod u+x bin/magento
cd /var/www/html/ && composer install
During the installation process, you will get a notice to create a GitHub OAuth token. The download rate limit is pretty small. Copy the URL from your shell window in your browser, log in at GitHub or create an account, and create the token.
http://yourdomain.com/setup
Continue your flow until Step 4: Customize Your Store. As we have chosen a Magento 2 package including sample data, all software modules are preinstalled and listed in the advanced modules configurations list.
Here is an overview of all the modules selected by Magento that can be managed during installation:
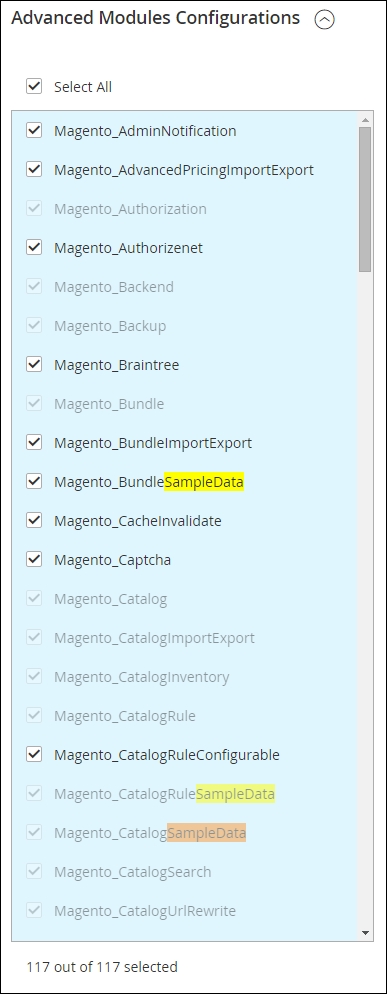
The progress bar and console log will share all details regarding the current status:
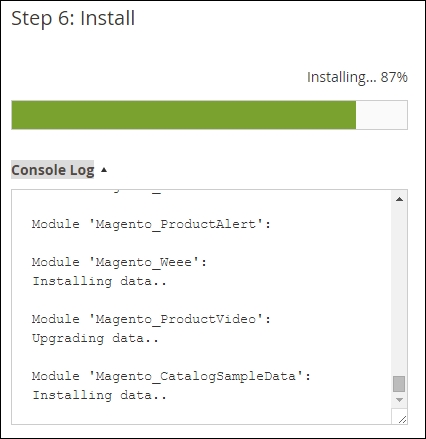
Congratulations, you just finished the installation of Magento 2 including sample data. Now go to your browser using yourdomain.com; you will see the default Magento 2 layout theme called
Luma, as follows:
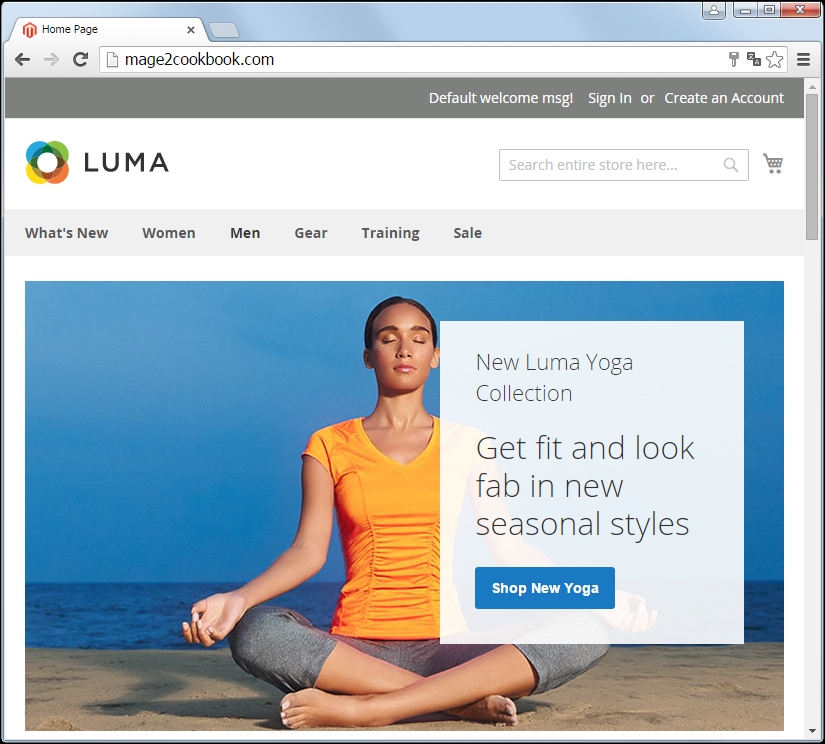
Let's recap and find out what we did throughout this recipe. In steps 1 through 6, we created a Magento 2 version including sample data. The process is almost the same as we did in the previous chapter. The most important change is that we downloaded a full version including sample data. In this build, Magento submitted all of the media files and data sample packages that we need to complete the process. During the graphical setup, we were able to choose which sample data packages are needed. This process could take some time to complete.
In the /var directory, you can find the following hidden file with the current state of the installed sample data:
less /var/www/html/var/.sample-data-state.flag
Want to start all over again? Magento 2 has a magic uninstall option that cleans everything on the fly, cache, and database. You can use the php bin/magento setup:uninstall command on the shell, as shown here:
root@mage2cookbook:/var/www/html# php bin/magento setup:uninstall Are you sure you want to uninstall Magento?[y/N]y Starting Magento uninstallation: Cache cleared successfully Cleaning up database `magento2` File system cleanup: /var/www/html/pub/static/_requirejs /var/www/html/pub/static/adminhtml /var/www/html/pub/static/frontend /var/www/html/var/cache /var/www/html/var/composer_home /var/www/html/var/di /var/www/html/var/generation /var/www/html/var/log /var/www/html/var/page_cache /var/www/html/var/tmp /var/www/html/var/view_preprocessed /var/www/html/app/etc/config.php /var/www/html/app/etc/env.php
Installing Magento 2 via the shell is not new. In the current Magento version, it was already possible using the install.php file. The configuration looked like this:
/usr/local/bin/php -f install.php -- \ --license_agreement_accepted "yes" \ --locale "en_US" \ --timezone "America/Los_Angeles" \ --default_currency "USD" \ --db_host "mysql.example.com" \ --db_name "your_db_name" \ --db_user "your_db_username" \ --db_pass "your_db_password" \ --db_prefix "" \ --admin_frontname "admin" \ --url "http://www.examplesite.com/store" \ --use_rewrites "yes" \ --use_secure "no" \ --secure_base_url "" \ --use_secure_admin "no" \ --admin_firstname "your_first_name" \ --admin_lastname "your_last_name" \ --admin_email "your_email@example.com" \ --admin_username "your_admin_username" \ --admin_password "your_admin_password"
It was very easy to script and use multiple times on any given environment.
In Magento 2, the logic stayed the same but now, it's much easier to use. We will be using a composer.json file for our setup prerequisites.
For this recipe, we will use a Droplet created in Chapter 1, Magento 2 System Tools, at DigitalOcean, https://www.digitalocean.com/. We will be using NGINX, PHP-FPM, and a Composer-based setup. No other prerequisites are required.
For the purpose of this recipe, let's assume that we need to create a Magento 2 hosting environment including sample data. The following steps will guide you through this:
/root/.composer/auth.json file if you have a Magento of GitHub repository token, username, and password. If not, create them. Here is an example (the username and password are dummies):{
"http-basic": {
"repo.magento.com": {
"username": "256e8f49b66689ecf18b07bc3cc2ca2d",
"password": "cb1c7ef2e14b666d8a4e99fe40c8393a"
}
},
"github-oauth": {
"github.com": "e960f7000803e2832ce5f7a637d58a666"
}
}You can create a Magento authentication key in the user section of the Magento connect portal. Go to http://www.magentocommerce.com/magento-connect/, navigate to the Developers | Secure Keys menu item, and create one. Public Key is your username and Private Key is your password.
The GitHub token can be created under the tokens section of your GitHub account. Go to https://github.com/settings/tokens and press Generate new token. Copy the token in your auth.json file of your home or root directory.
/var/www/html directory and use the following command:
composer create-project "magento/project-community-edition" /var/www/html --prefer-dist --repository-url https://repo.magento.com/
composer.json file.
php bin/magento sampledata:deploy
You may get the following error notice; ignore this once you set up the auth.json file:
[Composer\Downloader\TransportException] The 'https://repo.magento.com/packages.json' URL required authentication. You must be using the interactive console to authenticate
composer update
chown -R www-data:www-data /var/www/html
The easy way to continue is to visit our setup page from the browser as we did in the Installing Magento 2 sample data via GUI recipe of this chapter using the http://yourdomain.com/setup URL.
bin/magento setup:install \
--db-host=localhost \
--db-name=<your-db-name> \
--db-user="<db-user>" \
--db-password="<db-password>" \
--backend-frontname=<admin-path> \
--base-url=http://yourdomain.com/ \
--admin-lastname=<your-lastname> \
--admin-firstname=<your-firstname> \
--admin-email=<your-email> \
--admin-user=<your-admin-user> \
--admin-password=<your-password> \Congratulations, you just finished the installation of Magento 2 including sample data. Now go to your browser using yourdomain.com, and you will see the default Magento 2 layout theme called Luma.
Let's recap and find out what we did throughout this recipe. In steps 1 through 6, we installed Magento 2 via the command shell. Before we could continue, we needed to create an auth.json file that stores our Magento and GitHub tokens. Without them, we may not be able to install the software easily due to download restrictions or dependencies.
In step 2, we used one line of code to trigger the whole download process of Magento 2. Depending on whether this is your first call, the process can take some time. Once you install Magento for the second time, the process installs much faster because of the locally stored cache files.
In step 3, we used bin/magento to update the composer.json file including the sample data packages. Then we needed to update Composer before we could install Magento 2 from the shell; otherwise, the sample data would not be included.
In step 6, we used the bin/magento setup:install parameter to commit all of the database, URL admin path, domain name, and user credentials to the setup of Magento 2.
In the current version of Magento, using indexes is one of the most important key features. Without the correct indexes, we will not be able to use Magento properly.
What do the indexes do, and why are they so important? One of the key elements is to make things run faster. Without indexing, Magento 2 would have to calculate data on the fly. In Magento 2, we will be using the following nine indexes:
adminhtml backend pages.catalog_product_index_price_*) and makes the selects (sorting and filtering) much easier.The database table looks as follows:
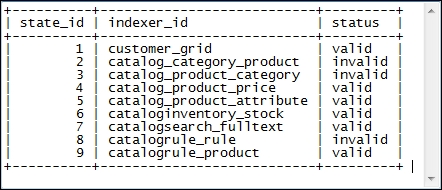
The control panel of the backend looks like this:
For this recipe, we will use a Droplet created in Chapter 1, Magento 2 System Tools, at DigitalOcean, https://www.digitalocean.com/. We will be using NGINX, PHP-FPM, and a Composer-based setup. A working Magento 2 setup is required.
The following are the steps to implement the recipe:
Update on Save: Index tables are updated immediately after the dictionary data is changed
Update by Schedule: Index tables are updated by cron job according to the configured schedule
php bin/magento indexer:info
We now get an overview of all the indexers.
php bin/magento indexer:status; this will give us an up-to-date status of the current indexes.php bin/magento indexer:show-mode; this information is related to the Update on Save or Update by Schedule modes.
php bin/magento indexer:info realtime customer_grid
Using the mode option realtime (Update on Save) or schedule (Update by Schedule) may set the indexer.
php bin/magento indexer:reindex
This will reindex all the indexers. However, you can also reindex them individually using the following command:
php bin/magento indexer:reindex customer_grid
We can also use the following command:
php bin/magento indexer:reindex customer_grid catalog_category_product etc…
indexer:status to check whether all the indexers are up to date.Let's recap and find out what we did throughout this recipe. In steps 1 through 7, you learned how to use the bin/magento indexer.
In step 5, you learned how to check what the current status is of all the indexes. In step 4, we saw how to switch from the realtime Update on Save to the schedule Update on Schedule modes.
In step 6, you learned how to reindex them individually.
Cache management is one of the new optimized key features in Magento 2. We will be using the following cache types:
By default, we will be using Full Page Cache now in the community version, which is a great improvement next to the web services (API) caches.
Depending on the current development, default, and production state, caches will be different.
In the next recipes of this chapter, we will dive deeper into the use of different states.
When cleaning or flushing your cache, Magento will flush its content from either the var/cache or var/full_page directory. In this recipe, we will refer to the bin/magento cache:enable, bin/magento cache:disable, bin/magento cache:clean, or bin/magento cache:flush options.
For the purpose of this recipe, let's assume that we need to manage the Magento 2 cache setup. The following steps will guide you through this:
php bin/magento cache:status
The output looks like this:
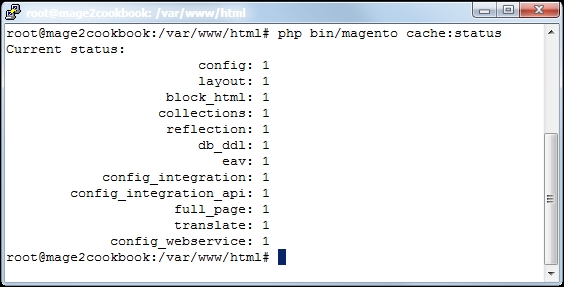
php bin/magento cache:disable config
This will disable the cache for only config. You may pick any cache type code name. To enable the config cache back, use the following command:
php bin/magento cache:enable config
When skipping the cache type code name behind the command, we will be able to enable or disable the caches all at once. It will look like this when we disable the cache:

php bin/magento cache:enable. As you can see now, after enabling the caches, they are cleaned as well: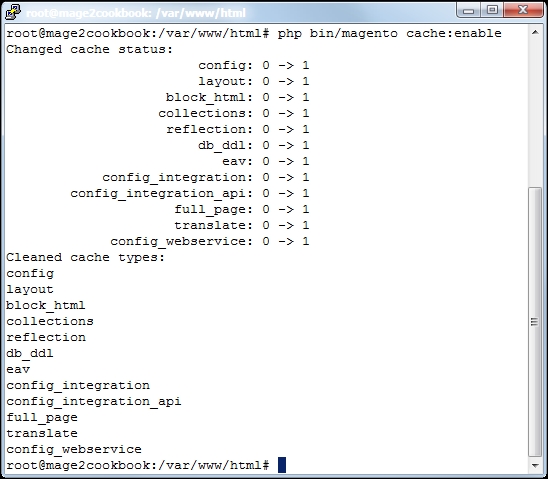
php bin/magento cache:clean config. By removing the cache type code name, we will be able to clean all of them at once.php bin/magentocache:flush config. By removing the cache type code name, we will be able to clean all of them at once.Cleaning a cache type deletes all items from enabled Magento cache types only. In other words, this option does not affect other processes or applications because it cleans only the cache that Magento uses.
Disabled cache types are not cleaned.
Flushing a cache type purges the cache storage (such as Redis, Memcache, and so on), which might affect other process' applications that are using the same storage.
Let's recap and find out what we did throughout this recipe. In steps 1 through 5, you learned how to manage the cache in Magento 2.
In step 1, you learned how to use the status option to check what the current cache status is. In step 2, we were able to enable or disable the caches individually.
In steps 4 and 5, you learned how to flush and clean the caches individually.
Every production environment needs a proper backup plan. By default, Magento 2 has a complete set of options to create and roll back backups.
When creating a backup, we can use one of the following options:
|
Option |
Meaning |
Backup file name |
|---|---|---|
|
|
This creates a backup from the filesystem (excluding |
|
|
|
This creates a backup from the |
|
|
|
This creates a backup from the current database |
|
When creating a backup, Magento will store it in the var/backups directory. In this recipe, we will refer to the bin/magento setup:backup and bin/magento setup:rollback options.
For the purpose of this recipe, let's assume that we need to manage the Magento 2 backup setup. The following steps will guide you through this:
php bin/magento setup:backup --code
Once Magento sets the maintenance code flag, the web shop is offline for everybody. Creating a code backup takes some time. The backup will be stored in var/backups. A clean Magento 2 code backup is around 123 MB.
php bin/magento setup:backup --db
A clean Magento 2 database backup is around 14 MB.
php bin/magento setup:backup --media
A clean Magento 2 media backup with sample data is around 153 MB.
php bin/magento info:backup:list
This will give us an overview of what's available:
Showing backup files in /var/www/html/var/backups. +---------------------------------+-------------+ | Backup Filename | Backup Type | +---------------------------------+-------------+ | 1448480907_filesystem_code.tgz | code | | 1448481232_db.gz | db | | 1448481295_filesystem_media.tgz | media | +---------------------------------+-------------+
php bin/magento setup:rollback [-c|--code-file="<name>"] [-m|--media-file="<name>"] [-d|--db-file="<name>"]
For example, to restore a database backup, we can use the following command:
php bin/magento setup:rollback -d 1448481232_db.gz
You will get the following notification to confirm your action:
You are about to remove current code and/or database tables. Are you sure?[y/N]
crontab -e */1 * * * * php /var/www/html/bin/magento cron:run
This command will create a cron schedule in the Magento 2 database.
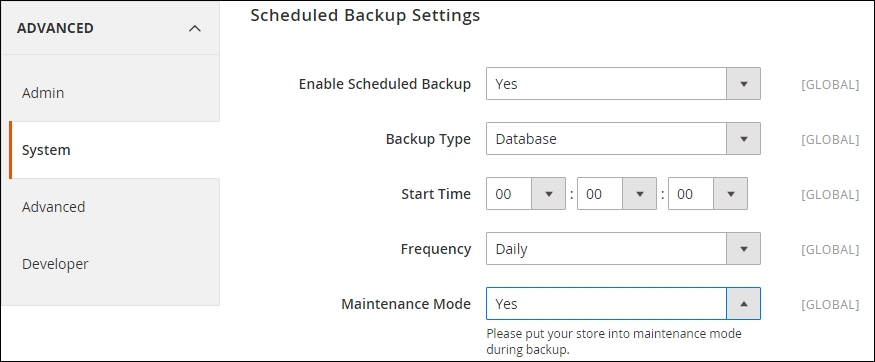
Let's recap and find out what we did throughout this recipe. In steps 1 through 8, you learned how to create rollbacks and manage backups via the command line.
In step 1, we created a backup for our code base only. In step 2, we created a backup for the database and in step 3, for all the media files.
In step 4, we listed all the created backups that are located in var/backups.
The process in step 5 is related to the rollback scenario. Depending on the backup size, rolling back could take some time.
In steps 7 and 8, we configured a cron job to schedule our daily backup process automatically.
Magento 2 comes with a new feature set called MAGE_MODE. This option gives you the configuration to run Magento in either developer, default, or production mode.
This feature is very important during development and product phases. It gives a developer the tool to debug or created optimized caches for high performance needs.
By default, the default mode is set.
The following table describes the modes in which we can run Magento:
|
Mode name |
Description |
|---|---|
|
|
When no given mode is given, this is explicitly set and has the following benefits:
|
|
|
It has the following benefits:
|
|
|
It has the following benefits:
|
Always check what web server you are using; the settings for Apache and NGINX are not the same. In this recipe, we will be showing you how to set this on both of them.
For the purpose of this recipe, let's assume that we need to manage the Magento 2 production or development setup. The following steps will guide you through this:
.htaccess file or configure this in the vhost file. We will first look into the Apache setup. While all recipes of this chapter are based on NGINX, it's best to skip this part and continue to the next listed topic or retrieve an DigitalOcean Droplet.Go to the .htaccess file in your web root directory and remove the # (hash or pound sign) at the fifth line from the top:
SetEnv MAGE_MODE developer
Change it to the following:
SetEnv MAGE_MODE production
If you are using a server-based configuration instead of the .htaccess file, use the following then:
SetEnv MAGE_MODE "developer"
The following code is for the current 000-default.conf:
<VirtualHost *:80>
ServerAdmin webmaster@localhost
DocumentRoot /var/www/html
SetEnv MAGE_MODE "developer"
<Directory /var/www/html>
Options Indexes FollowSymLinks
AllowOverride All
Order allow,deny
allow from all
</Directory>
ErrorLog ${APACHE_LOG_DIR}/error.log
CustomLog ${APACHE_LOG_DIR}/access.log combined
ProxyPassMatch ^/(.*\.php(/.*)?)$ fcgi://127.0.0.1:9000/var/www/html/$1
</VirtualHost>Now continue to step 3.
vhost file. you will find it in /etc/nginx/conf.d/default.conf.Open the default.conf file and go to the following rule:
set $MAGE_MODE developer;Change this to the following:
set $MAGE_MODE production;Restart your NGINX server now using the following command:
service nginx restart
php bin/magento deploy:mode:show
By default, it shows the default status. We now switch the status using the following:
php bin/magento deploy:mode:set production
We can also use the following command:
php bin/magento deploy:mode:set developer
This will trigger the maintenance mode and start creating all necessary optimized static files needed.
pub/static directory. Run the following command on the shell:
php bin/magento setup:static-content:deploy
--skip-compilation option, as shown in the following command:
php bin/magento deploy:mode:set developer --skip-compilation
Let's recap and find out what we did throughout this recipe. In steps 1 through 6, you learned configuring the development and production modes in Magento 2.
In step 1, we configured the SetEnv parameter in the .htaccess file of Apache to set the correct mode. There is also an option to configure this in the Apache configuration file instead.
In step 2, we configured the set $MAGE_MODE parameter in NGINX to use the correct mode.
In step 3, we used the bin/magento deploy option to tell Magento to start using the selected mode in NGINX or Apache, and create additional static files when running in production mode or show the correct debug headers in the developer mode.
In step 4, you learned how to deploy static content in the pub/static directory when running in production mode. This option will trigger the whole process of merging and compiling the correct code in the public folder.
Use curl to check your HTTP response header to see what current state you are running, as shown in the following:
curl -I http://mage2cookbook.com/ HTTP/1.1 200 OK Server: nginx/1.9.6 X-Magento-Cache-Debug: HIT
Always check the current status in your HTTP header and Magento shell. Only setting the web server configuration will not automatically trigger the Magento configuration and can mislead you.
Moving your Magento 1 to Magento 2 may be one of the most challenging things out there. Luckily, Magento supported us with a database migration option.
The Magento 2 Data Migration Tool is here to help you convert your products, customers, order/sales data, store configuration, promotions/sales rules, and more to move to a clean Magento 2 setup.
Custom code, Extensions, and Themes are out of the current scope of the Data Migration Tool.
The currently supported migrations are the Community Edition (CE) versions 1.6.x, 1.7.x, 1.8.x, and 1.9.x and Enterprise Edition (EE) versions 1.11.x, 1.12.x, 1.14.x, and 1.14.x.
Before we can start migrating our system, we need to check the following:
A migration of Magento 1 to Magento 2 has the following five phases that are important to follow in the correct order:
The command is php bin/magento migrate:settings.
The command is php bin/magento migrate:data.
The command is php bin/magento migrate:delta.
/media to /pub/media.For the purpose of this recipe, let's assume that we need to manage a Magento 1 to Magento 2 migration setup. The following steps will guide you through this:
data-migration-tool to your current Composer setup:composer config repositories.data-migration-tool git https://github.com/magento/data-migration-tool-ce composer require magento/data-migration-tool:dev-master
Wait while all dependencies are updated.
bin/magento shell tool:|
Commands |
Description |
|---|---|
|
migrate | |
|
|
Main migration of data |
|
|
Migration of the data that is added to Magento after the main migration |
|
|
Migration of the system configuration |
php bin/magento setup:uninstall
Go to /var/www/html/vendor/magento/data-migration-tool/etc/ce-to-ce and pick the correct database version mentioned in the directory. If correct, you will see two files called config.xml.dist and map.xml.dist.
config.xml.dist to config.xml using the cp command:
cp config.xml.dist config.xml
config.xml and look for the <source> tag (line 94). Change it accurately with the database username and password:<source> <database host="localhost" name="magento1" user="root" password="mypassword"/> </source> <destination> <database host="localhost" name="magento2" user="root" password="mypassword"/> </destination> <options> <source_prefix>myprefix-from-magento1</source_prefix> <crypt_key>mycrypt-key-from-magento1</crypt_key> </options>
If you are using a custom prefix in your database or you wish to use your encryption key on your Magento 2 setup, you can add this to the <options> section, as shown in the previous code.
php bin/magento migrate:settings /var/www/magento2/vendor/magento/data-migration-tool/etc/ce-to-ce/1.9.2.2/config.xml
As you can see, here we are using the 1.9.2.2 version. Depending on your version, you may change this before running the command.
The output result looks like this:
[2015-12-02 20:28:56][INFO][mode: settings][stage: integrity check][step: Settings Step]: started 100% [============================] Remaining Time: 1 sec [2015-12-02 20:28:56][INFO][mode: settings][stage: integrity check][step: Stores Step]: started 100% [============================] Remaining Time: 1 sec [2015-12-02 20:28:56][INFO][mode: settings][stage: data migration][step: Settings Step]: started 100% [============================] Remaining Time: 1 sec [2015-12-02 20:28:59][INFO][mode: settings][stage: data migration][step: Stores Step]: started 100% [============================] Remaining Time: 1 sec [2015-12-02 20:28:59][INFO][mode: settings][stage: volume check][step: Stores Step]: started 100% [============================] Remaining Time: 1 sec [2015-12-02 20:28:59][INFO][mode: settings][stage: volume check][step: Stores Step]: Migration completed
php bin/magento migrate:data /var/www/magento2/vendor/magento/data-migration-tool/etc/ce-to-ce/1.9.2.2/config.xml
The output result looks like this:
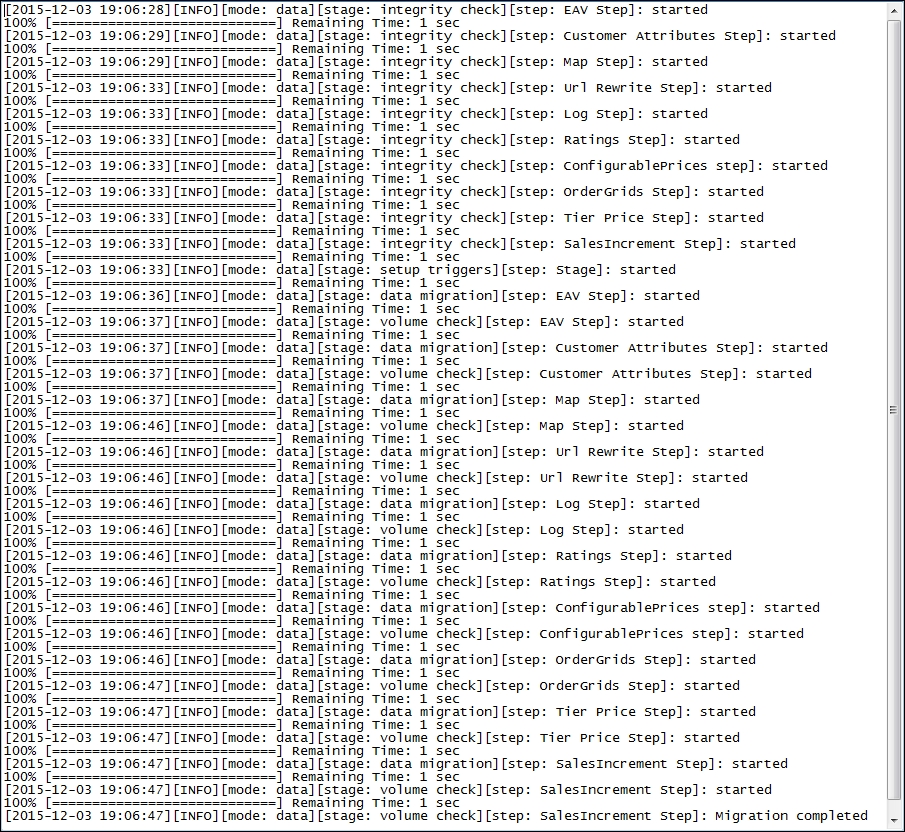
php bin/magento indexer:reindex php bin/magento cache:clean php bin/magento cache:flush
migration.log file located in /var.delta option, we push the data to Magento 2 using the following command:
php bin/magento migrate:delta /var/www/magento2/vendor/magento/data-migration-tool/etc/ce-to-ce/1.9.2.2/config.xml
The output result looks like this:
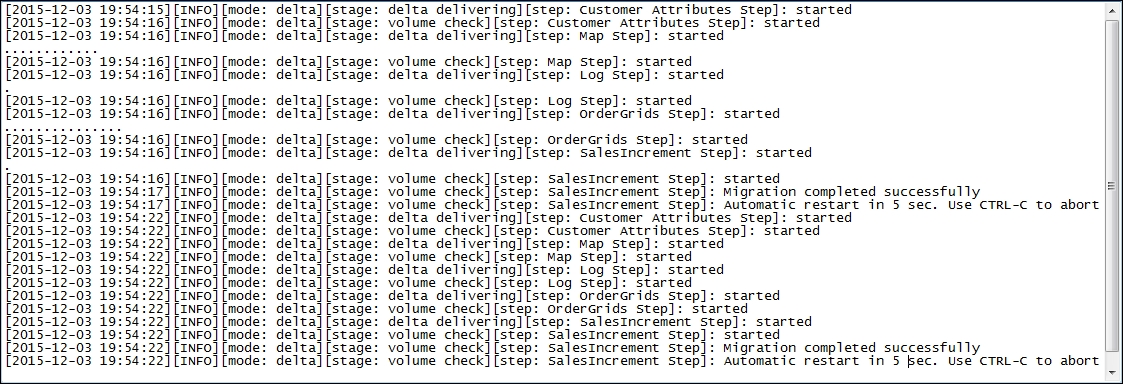
Let's recap and find out what we did throughout this recipe. In steps 1 through 14, you learned how to use the Magento 2 migration tool.
In step 1, we used Composer to add an additional repository for data migration. After installing all of the packages, they are available in the bin/magento tool. In this setup example, we used a clean Magento 1.9.x database.
In step 4, we made sure to run on a clean Magento 2 setup. Depending on your setup, go to vendor/magento/data-migration-tool/etc and select the correct version. Magento 2 supports the migration option for CE and EE. Once we configured the config.xml file with the Magento 1 database information in step 6, we were ready to go.
In step 7, we used the bin/magento migration setting to start the whole process. We started with the setting parameter and continued with the data and delta parameters in steps 7 through 13. We must not forget the reindexing and updating of our caches before using them. The delta parameter option can be run multiple times as it only updates the latest information, which is helpful before going live and switching to production.
As every Magento setup is unique, migrating from Magento 1 to Magento 2 can be hard sometimes. In some situations, you may need to change your tables in the mapping configuration located in vendor/magento/data-migration-tool/etc/ce-to-ce/<version>map.xml.dist.
Resetting your setting, data, and delta migration is easy using the [-r|--reset] parameter in your command. This allows you to rerun all migration scripts from the beginning.
Always check for the currently supported versions on the Magento GitHub Data Migration Tool page at the following link:
https://github.com/magento/data-migration-tool-ce
There is also an alternative Data Migration Tool available by UberTheme at https://github.com/ubertheme/magento2_data_migration.
In this chapter, we will cover the basic tasks related to optimizing your performance in Magento 2. You will learn the following recipes:
This chapter explains one of the most important elements of Magento. From the early Magento days, performance has been a hard topic to cover. Many setups out there in the e-commerce world are performance-great, but most of the time, the majority are having issues. Magento 1 may not be the best performance platform out there.
However, now we have Magento 2, a brand new platform designed for performance. From the very first day, the main Magento developers focused on a better framework and the outcome is great. According to the latest information, Magento focused on a Google PageSpeed ranking of 90% or more.
In this chapter, we will dive in deeper on how to configure Redis caching and Memcached sessions. By default, Magento 2 supports Varnish, and we will manage all of the steps on how to set it up.
Serving the correct catalog or product images is very important, and will save lots of bandwidth on a desktop but most of all on a mobile device, which will have a better user experience.
The new HTTP/2 protocol is a very new important element in the web server configuration. We will set up a full-force HTTP/2 configuration, including SSL.
For a high-demanding Magento 2 website serving customers all over the globe, we introduce CloudFlare, which is a CDN provider optimized for Magento.
Without performance testing, Magento 2 will not perform well. You will learn how to create a company-like profile, including websites, stores, catalogs, products, orders, and much more.
Redis may be one of the best improvements since we used Memcache(d) or Alternative PHP Cache (APC). For the last couple of years, Redis is available in Magento 1 and has a big performance benefit.
What is Redis and why is it important for Magento? Well, Redis is not new; its initial release dates to the beginning of 2009—almost as young as Magento 1. Redis is a key-value storage database that stores the data in-memory of your web server. Besides this, the in-memory caches are fast and also have a persistence feature that is really important when a server reboots. All caches are not flushed during a reboot and are available in-memory when the web server is up again.
In the beginning of the Magento 1 area, we used Memcache(d) or APC, which worked very well but not as well as Redis. In Magento 1, Redis was used for a backend cache and session storage most of the time. Some websites also used it as a Full Page Cache (FPC) storage.
One other great advantage of Redis is that it has multiple database containers, one for the default cache and the other for the FPC. Although the Redis performance is better in a lot of cases, it is not the Holy Grail. There are drawbacks to its architecture.
For this recipe, we will use a Droplet created in Chapter 1, Magento 2 System Tools, at DigitalOcean, https://www.digitalocean.com/. We will be using NGINX, PHP-FPM, and a Composer-based setup, including sample data connected to a Redis server. No other prerequisites are required.
For the purpose of this recipe, let's assume that we need to create a Magento 2 Redis setup. The following steps will guide you through this:
cd /opt wget http://download.redis.io/releases/redis-3.0.5.tar.gz tar xzf redis-3.0.5.tar.gz cd redis-3.0.5 make && make install
Change the version number of the current one if needed.
/opt/redis-3.0.5/utils directory and run the following script:
./install-server.sh
Welcome to the redis service installer This script will help you easily set up a running redis server Please select the redis port for this instance: [6379] Selecting default: 6379 Please select the redis config file name [/etc/redis/6379.conf] Selected default - /etc/redis/6379.conf Please select the redis log file name [/var/log/redis_6379.log] Selected default - /var/log/redis_6379.log Please select the data directory for this instance [/var/lib/redis/6379] Selected default - /var/lib/redis/6379 Please select the redis executable path [/usr/local/bin/redis-server] Selected config: Port : 6379 Config file : /etc/redis/6379.conf Log file : /var/log/redis_6379.log Data dir : /var/lib/redis/6379 Executable : /usr/local/bin/redis-server Cli Executable : /usr/local/bin/redis-cli Is this ok? Then press ENTER to go on or Ctrl-C to abort. Copied /tmp/6379.conf => /etc/init.d/redis_6379 Installing service... Success! Starting Redis server... Installation successful!
redis-cli –version service redis_6379 status netstat –anp | grep redis
As you can see, the Redis server is running under port 6379.
Use the following command to install PHP Redis:
cd /opt git clone https://github.com/phpredis/phpredis.git cd phpredis phpize ./configure make && make install
echo "extension=redis.so" | sudo tee /etc/php5/mods-available/redis.ini
Depending on whether you are using PHP 5 or PHP 7, you may want to change the PHP path.
cd / ln -s /etc/php5/mods-available/redis.ini /etc/php5/fpm/conf.d/20-redis.ini ln -s /etc/php5/mods-available/redis.ini /etc/php5/cli/conf.d/20-redis.ini
service php5-fpm restart
php -r "if (new Redis() == true){ echo \"\r\n OK \r\n\"; }"
By default, creating a phpinfo.php page in the root directory in Magento 2 will not work. First, you need to create the phpinfo.php file in the /pub directory. Then, you need to change the NGINX configuration (nginx.conf.sample) from location ~ (index|get|static|report|404|503)\.php$ { to location ~ (index|get|static|report|404|503|phpinfo)\.php$ {, which is located at the bottom of the file. In Apache, we don't have an issue like this; it works by default.
env.php file in Magento 2 located at /app/etc and add the following code at the top: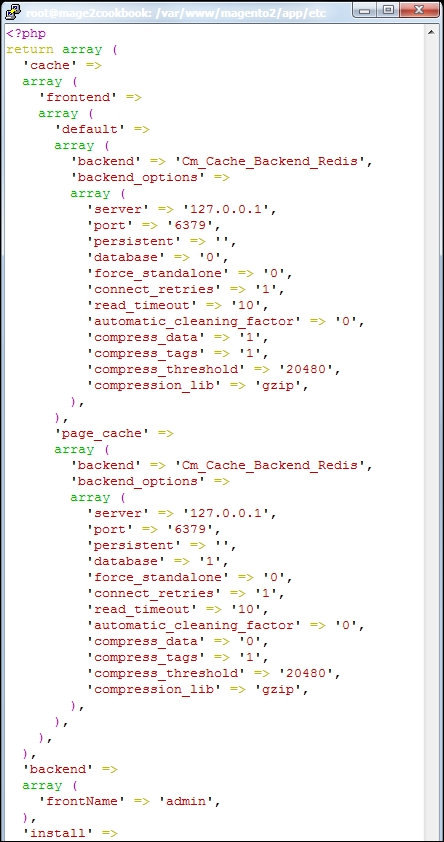
/var/page_cache and /var/cache. Let's open up your browser and refresh your website.If everything is configured correctly in the env.php file, you should not get any errors and the ar/page_cache and var/cache directories should be empty.
redis-cli
On the prompt, continue with INFO; this will give you a list of the following details:
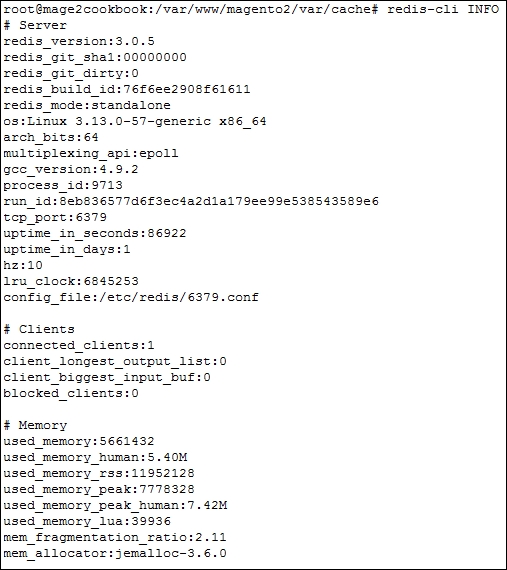
To close the Redis terminal, use exit.
Let's recap and find out what we did throughout this recipe. In steps 1 through 13, we installed a Redis server and configured Magento 2 to store the backend cache.
In step 1, we installed Redis from source and compiled the code. This version is more stable than the default one available in Ubuntu. After compiling the code, we are able to use an install script to create a working setup running on port 6379.
After installing and testing the code in steps 3 and 4, we start installing the PHP Redis module. This code is pulled from GitHub and compiled from source.
In step 6, we created a redis.ini file, which is linked in step 7 with the correct PHP module directory. Before we can test it, we need to restart the PHP-FPM server and use a simple PHP command to test if everything is working fine.
In step 11, we added an additional piece of code to the env.php file, which will tell Magento 2 to store all of the cache in Redis as of now.
If you are interested in monitoring your Redis server, the next step is interesting. Clone PHPRedMin (https://github.com/sasanrose/phpredmin) in your Magento 2 root directory, /var/www/html. Make sure to change the ownership to www-data for the owner and group.
Go to your /var/www/html/pub directory and create a symbolic link using the following command:
ln –s ../phpredmin/public phpredmin
Chown the ownership of the symbolic link with the following command:
chown -h www-data:www-data phpredmin
Go to to your NGINX configuration directory, /etc/nginx/conf.d, open the default.conf file, and including the following content below error_log:
location ~ ^/phpredmin/.+\.php {
fastcgi_split_path_info ^(.+\.php)(/.+)$;
set $fsn /index.php;
if (-f $document_root$fastcgi_script_name) {
set $fsn $fastcgi_script_name;
}
# php5-fpm
fastcgi_pass fastcgi_backend;
fastcgi_index index.php;
fastcgi_param SCRIPT_FILENAME $document_root$fsn;
fastcgi_param PATH_INFO $fastcgi_path_info;
fastcgi_param PATH_TRANSLATED $document_root$fsn;
include fastcgi_params;
}Now save and restart your NGINX server with service nginx restart.
Before we can continue, we need to add a cronjob rule to gather our Redis data and show it in PHPRedMin. Add the following rule to your crontab.
Open crontab using crontab –e:
* * * * * cd /var/www/html/pub/phpredmin && php index.php cron/index
Open your browser and surf to http://yourdomain.com/phpredmin, and press Stats in the top menu. Now you should see the following information:
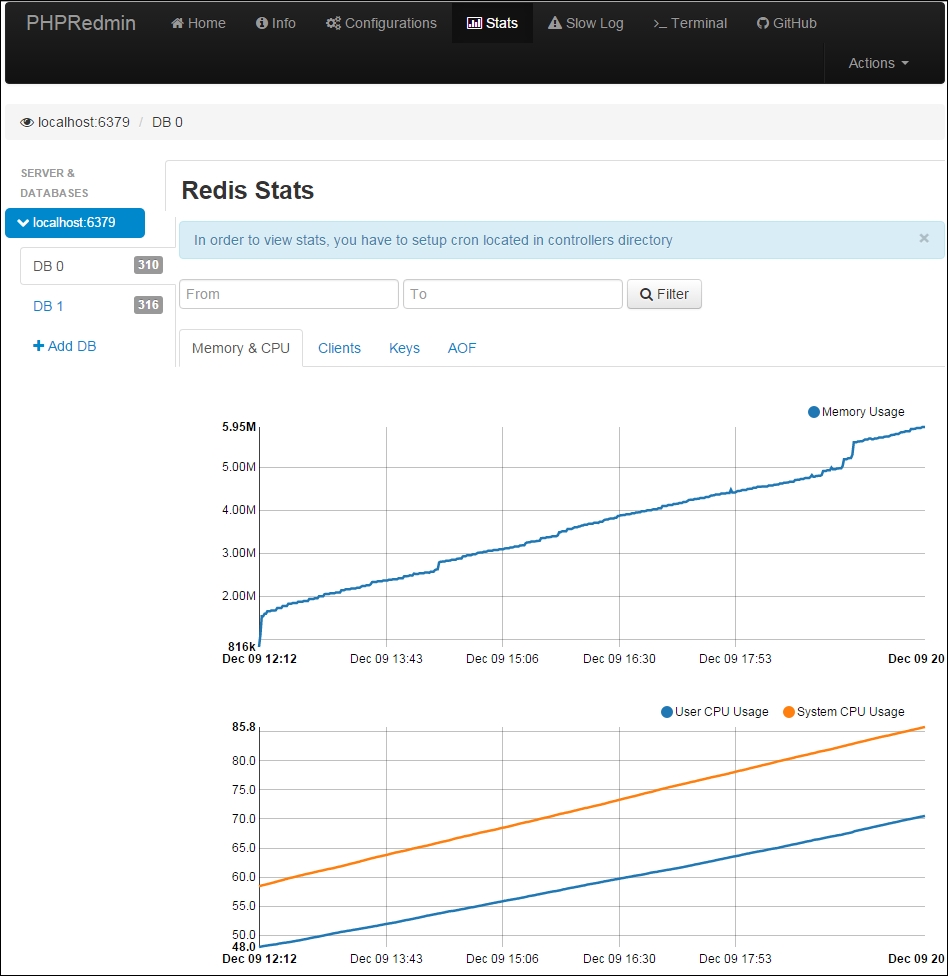
As Magento 2 does not support Redis session caching from the beginning, we need to use Memcached instead. Memcached has been around for a long time and was used in Magento 1, since the beginning, as backend and session caching.
Memcached is a distributed memory caching system. It is a flexible in-memory storage container to cache data. As the session handler in the PHP Redis does not support session locking, we use Memcached instead. Keep in mind that Memcached is not persisted, so after restarting the server or daemon, all the data is gone. This could have an impact on a production environment—lost sessions or baskets.
For this recipe, we will use a Droplet created in Chapter 1, Magento 2 System Tools, at DigitalOcean, https://www.digitalocean.com/. We will be using NGINX, PHP-FPM, and a Composer-based setup including sample data connected to a Memcached server. No other prerequisites are required.
For the purpose of this recipe, let's assume that we need to create a Magento 2 Memcached setup. The following steps will guide you through this:
apt-get install -y libevent-dev apt-get install –y memcached
memcached –V service memcached status netstat –anp | grep memcached
As you can see, the Memcached server is running under port 11211.
Use the following command to install PHP Memcached:
apt-get install php5-memcached
We can also use the following command to install it:
apt-get install php-memcached (php7)
cat /etc/php5/mods-available/memcached.ini
Now you should see the Memcached extension called extension=memcached.so.
Depending on whether you are using PHP 5 or PHP 7, you may want to change the PHP path.
service php5-fpm restart
php -r "if (new Memcached() == true){ echo \"\r\n OK \r\n\"; }"
It can also be checked using the following command:
echo "stats settings" | nc localhost 11211
By default, creating a phpinfo.php page in the root directory in Magento 2 will not work. First, you need to create the phpinfo.php file in the /pub directory. Then, you need to change the NGINX configuration from location ~ (index|get|static|report|404|503)\.php$ { to location ~ (index|get|static|report|404|503|phpinfo)\.php$ {, which is located at the bottom of the file. In Apache, we don't have an issue like this; it works by default.
env.php file in Magento 2 located at /app/etc and change the following code in the session section:'session' =>
array (
'save' => 'files',
),Change the preceding code to the following:
'session' =>
array (
'save' => 'memcached',
'save_path' => 'localhost:11211'
),This is shown in the following screenshot:
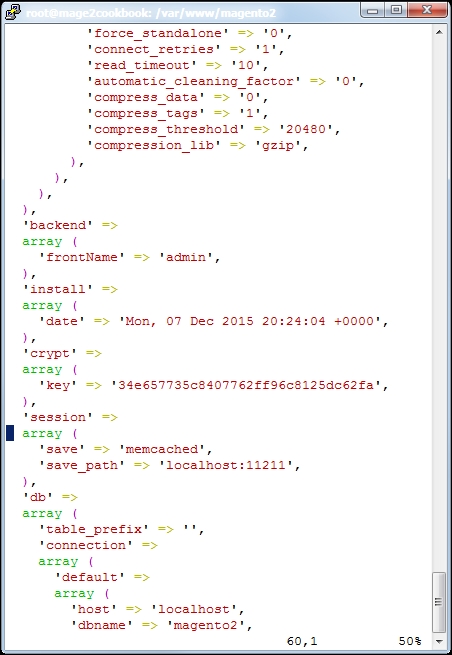
var/page_cache, var/cache and var/session. Restart your website using the following command:
service nginx restart && service php-fpm restart
Let's open up your browser and refresh your website.
If everything is configured correctly in the env.php file, you should not get any errors and the /var/session directory should be empty.
echo "stats items" | nc localhost 11211
Let's recap and find out what we did throughout this recipe. In steps 1 through 11, we installed a Memcached server and configured Magento 2 to store the sessions.
In steps 1 through 3, we installed the default Ubuntu Memcached server and PHP Memcached client modules. Depending on whether we are using PHP 5 or 7, we pick a different one. Before this, we make sure to restart the PHP-FPM server and test if everything is working correctly.
In step 8, we added an additional piece of code to the env.php file, which will tell Magento 2 to store all of the sessions in Memcached as of now.
If you are interested in monitoring your Memcached server, the next step is interesting. Clone the
memcached.php file from the GitHub Gist (https://gist.github.com/raybogman/b8b7b4d21bf34ed9dd76) in your Magento 2 root directory, /var/www/html/pub. Make sure to change the ownership to www-data for the owner and group.
By default, creating a memcached.php page in the root directory in Magento 2 will not work. First, you need to store the memcached.php file in the /pub directory. Then, you need to change the NGINX configuration from location ~ (index|get|static|report|404|503)\.php$ { to location ~ (index|get|static|report|404|503|memcached)\.php$ {, which is located at the bottom of the file. In Apache, we don't have an issue like this; it works by default.
Once installed correctly, the page will look as follows:
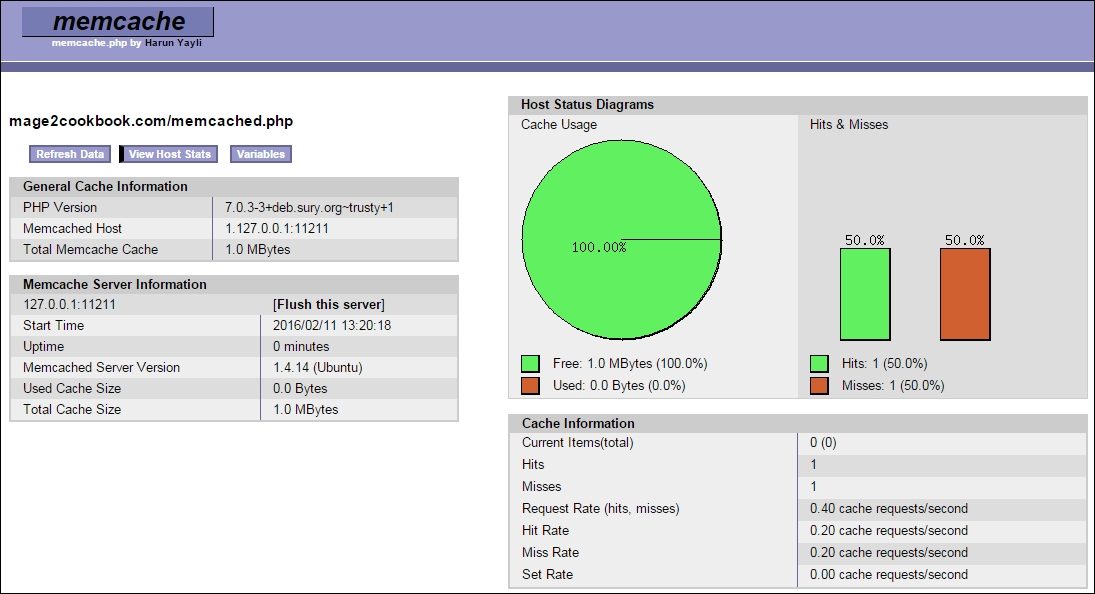
Note that this Memcached viewer is an outdated version created in 2008 by Harun Yayli and is not maintained anymore. Use it wisely.
As an alternative, you can also use https://github.com/clickalicious/phpMemAdmin.
Varnish may be one of the most interesting elements described in this book, besides Magento 2, of course. What is Varnish and why is it that important? Well, Varnish is like a Ferrari, very fast on the track but hard to maintain or tune. In technical terms, Varnish is an HTTP accelerator designed for heavy websites. Magento users love fast websites.
By default, Varnish support is now included in Magento 2. In Magento 1, we commonly used Turpentine by Nexcess (https://github.com/nexcess/magento-turpentine). The configuration of Varnish is not for the faint-hearted. Varnish includes a Varnish Configuration Language (VCL) file, which holds all the elements to be cached or not.
Setting up a Varnish server may be simple; configuring the VCL is not. Magento 2 provides a default VCL file that works out of the box, but be aware of any custom extensions or layout updates. Any customization has to be added manually in the VCL file before Varnish can cache them.
For this recipe, we will use a Droplet created in Chapter 1, Magento 2 System Tools, at DigitalOcean, https://www.digitalocean.com/. We will be using NGINX, PHP-FPM, and a Composer-based setup including sample data connected to a Varnish server. No other prerequisites are required.
For the purpose of this recipe, let's assume that we need to create a Magento 2 Varnish setup. The following steps will guide you through this:
apt-get install –y apt-transport-https
By default, all current Ubuntu versions support apt-transport-https.
echo "deb https://repo.varnish-cache.org/ubuntu/ trusty varnish-4.1" | sudo tee -a /etc/apt/sources.list.d/varnish-cache.list
curl https://repo.varnish-cache.org/GPG-key.txt | apt-key add -
apt-get update && apt-get install -y varnish service varnish start
varnishd –V service varnish status netstat –anp | grep varnish
As you can see, the Varnish server is running under ports 6081 and 6082.
sed -i 's/80/8080/' /etc/nginx/conf.d/default.conf
We are using port 8080 as an internal port.
Your configuration file could look as follows:
server {
listen 8080;
server_name yourdomain.com;6081 to 80. Use the following command to change the /etc/default/varnish file:
sed -i 's/6081/80/' /etc/default/varnish
systemd setup. The systemd servers will not update their configuration script after a restart or reboot. Let's update this manually using the following command:
sed -i 's/6081/80/' /lib/systemd/system/varnish.service
Update the systemd process with the following code:
systemctl daemon-reload
service varnish restart && service nginx restart
netstat -upnlt | egrep 'varnish|nginx'
Always make sure that Magento is running in the developer mode when setting up Varnish. When ready to launch, we can switch to the production mode:
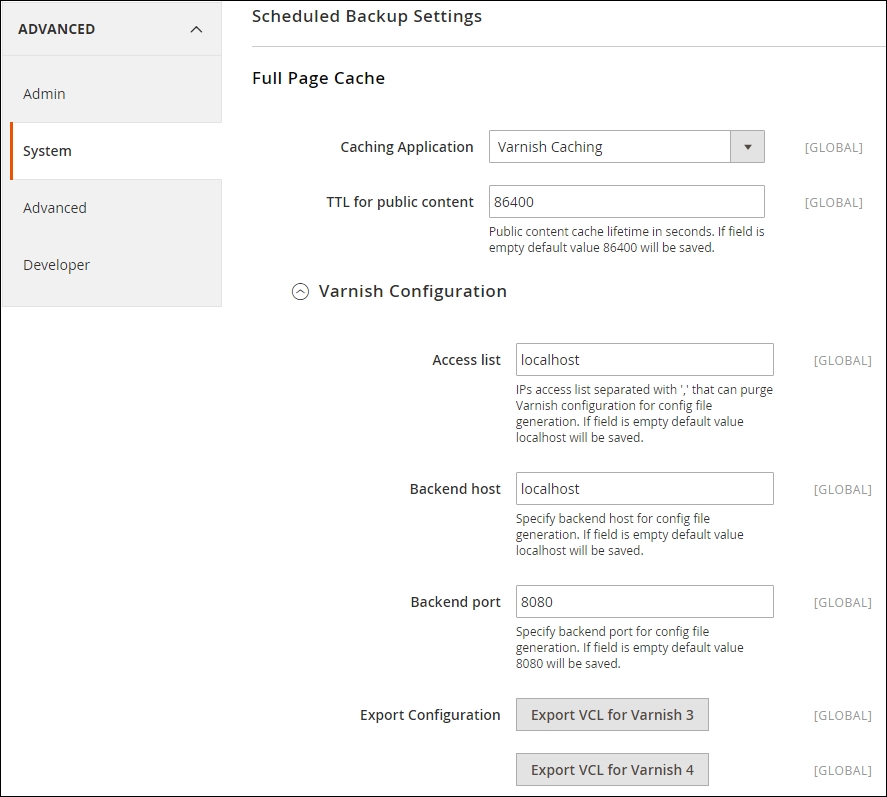
/etc/varnish/default.vcl file. Now open the file and change backend default to the following:backend default {
.host = "127.0.0.1";
.port = "8080";
}service varnish restart php bin/magento cache:clean php bin/magento cache:flush
curl -I http://yourdomain.com
The output of this command should be as follows:
root@mage2cookbook:~# curl -I http://mage2cookbook.com HTTP/1.1 200 OK Date: Mon, 14 Dec 2015 19:15:40 GMT Content-Type: text/html; charset=UTF-8 X-Frame-Options: SAMEORIGIN X-Content-Type-Options: nosniff X-XSS-Protection: 1; mode=block X-Magento-Cache-Control: max-age=86400, public, s-maxage=86400 Pragma: no-cache Expires: -1 Cache-Control: no-store, no-cache, must-revalidate, max-age=0 Vary: Accept-Encoding Age: 1127 X-Magento-Cache-Debug: HIT Accept-Ranges: bytes Connection: keep-alive
Let's recap and find out what we did throughout this recipe. In steps 1 through 16, we installed and configured Varnish to speed up the full page caching.
In steps 1 through 4, we added the official repository to our system and installed Varnish.
In steps 6 and 7, we changed the NGINX port to 8080 instead of 80, and the Varnish port to 80. Now, Varnish will be our gatekeeper after restarting the NGINX and Varnish servers.
In step 12, we told Magento to start communicating with the Varnish server so that all frontend cacheable data is stored here.
The current lifetime of the cache is 86,400 seconds, which is one day. So, installing a cache warmer will speed up your pages after an automatic cache flush by Magento. Always keep in mind that by default, all the pages are cold (without a cache hit) and the first GET (page view) can take longer. Varnish needs to build up the cache before customers can benefit from it.
Check out the following Varnish tools to monitor all the incoming data live:
varnishstat
The output of this command will be as follows:
Now, let's execute the following command:
Varnishlog
The output of this command will be as follows:

Are you managing an international-based brand-serving customer all over the globe? Then, using a Content Delivery Network (CDN) is the best idea. CDNs are a well-known technique to manage high-traffic websites. It is commonly used to distribute static assets such as images, CSS, and JavaScript as quickly as possible to the nearest location of the customers, which decreases the download times of the website.
The modern CDNs have much more to offer than just serving the assets to the customer. Currently, they improve the user experience with optimized HTML output, merging and deferring JavaScript, TCP optimization, and much more. Basic or advanced security is also top-of-mind, such as (D)DoS protection, SSL, Web Application Firewall (WAF), and much more.
For this recipe, we will use a Droplet created in Chapter 1, Magento 2 System Tools, at DigitalOcean, https://www.digitalocean.com/. We will be using NGINX, PHP-FPM, and a Composer-based setup including sample data connected to the CloudFlare CDN. No other prerequisites are required.
For the purpose of this recipe, let's assume that we need to create a Magento 2 Varnish setup. The following steps will guide you through this:
Changing your records in this screen will not change anything in production yet. We still need to adjust the primary and secondary Nameservers before everything works. We will do this as shown in the following screenshot:
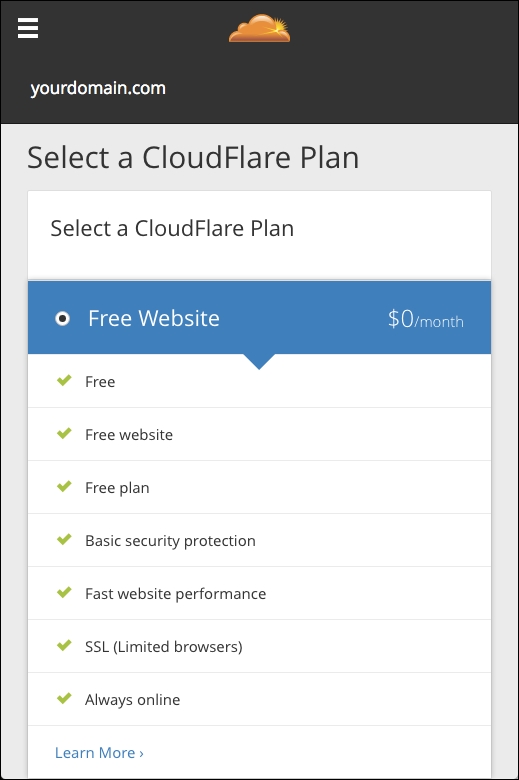
Depending on your current DNS provider, this could be a simple or hard step. Changing the Nameservers is not always allowed by your provider.
You can check your e-mail or refresh the CloudFlare dashboard to check whether your domain is Active:
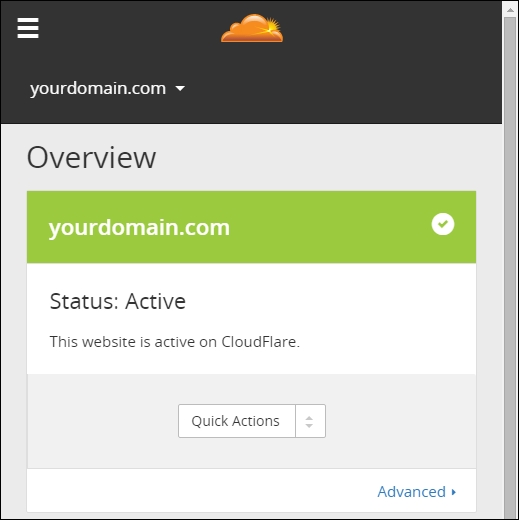
Once the cloud is orange, including an arrow passing through, then you are connected. Click on the cloud icon to change it:
dig yourdomain.com NS +short
The output looks as follows:
root@mage2cookbook:~# dig mage2cookbook.com NS +short rocky.ns.cloudflare.com. kate.ns.cloudflare.com.
You can also use the following command to check the IPs:
dig yourdomain.com +short
root@mage2cookbook:~# dig mage2cookbook.com +short 104.18.56.216 104.18.57.216
Let's recap and find out what we did throughout this recipe. In steps 1 through 9, we installed CloudFlare as a CDN to optimize our worldwide performance.
In steps 1 through 8, we created an account and moved our domain to the CloudFlare DNS. In step 7, we activated the orange cloud in DNS to start using the CDN optimization.
If you are interested in how to test the performance of the CloudFlare setup, stay put. Here are some basic commands that you can use:
time curl --I http://yourdomain.com
The output looks as follows:
time curl -I http://mage2cookbook.com HTTP/1.1 200 OK X-Magento-Cache-Debug: HIT Server: cloudflare-nginx CF-RAY: 257330a8444d2bd6-AMS real 0m0.198s user 0m0.006s sys 0m0.005s
Without CloudFlare, it looks as follows:
time curl -I http://mage2cookbook.com HTTP/1.1 200 OK X-Magento-Cache-Debug: HIT real 0m0.253s user 0m0.011s sys 0m0.010s
Keep in mind that this current website is using Varnish. Our Magento 2 server is located in New York while our test server is located in Amsterdam. As you can see, in this test, we save 0.055s. This test is done from server to server. Doing a test from server to real browser clients on a desktop, or mobile device, will result in larger numbers. Larger numbers result in slower connections, which will result in lesser user experience.
Another great load testing tool is Siege. Using Siege helps you to understand how many concurrent clients can visit your website during high loads. We will just cover the basics of Siege here. Install Siege on another Droplet somewhere else in the world. Use the following command to install Siege:
apt-get install siege
Now let's run the following command. We will simulate 50 concurrent users for a period of three minutes. The –d option is the internal delay, in seconds, for which the users sleeps:
siege -c50 -d10 -t3M http://yourdomain.com
Without CloudFlare, the output looks as follows:
siege -c50 -d10 -t3M http://mage2cookbook.com Transactions: 1732 hits Availability: 100.00 % Elapsed time: 179.79 secs Data transferred: 15.47 MB Response time: 0.18 secs Transaction rate: 9.63 trans/sec Throughput: 0.09 MB/sec Concurrency: 1.71 Successful transactions: 1732 Failed transactions: 0 Longest transaction: 0.34 Shortest transaction: 0.15
With CloudFlare, the output looks as follows:
siege -c50 -d10 -t3M http://mage2cookbook.com Transactions: 1716 hits Availability: 100.00 % Elapsed time: 179.74 secs Data transferred: 14.05 MB Response time: 0.10 secs Transaction rate: 9.55 trans/sec Throughput: 0.08 MB/sec Concurrency: 0.96 Successful transactions: 1716 Failed transactions: 0 Longest transaction: 0.62 Shortest transaction: 0.08
In the last test, we can see that the Response time is 0.10 seconds compared to 0.18 seconds.
The test Droplet that we used was located in Amsterdam using two CPUs and 4 GB memory. For a real browser test, it is best to use tools such as Chrome developer tools. Those timings are more accurate and give you a better idea of the real user experience. Testing on a mobile device is a totally different ball game and is out of the scope of this book.
Running a Magento store can be difficult—configuring the server, creating store views, and adding categories and products. Everyone knows that every product needs at least one product image. In some setups, we even have more than one. From this single master image, multiple thumbs are created, such as base image, small image, swatch image, and thumbnail.
By default, images are not optimized for the web when saving them in Photoshop. Images shown on a website are not exactly the same as images for print. The Exchangeable Image File (EXIF) data, for example, is not needed, and by removing this metadata, you can save lots of bytes. The smaller the image, the faster it's shown in the browser of the customer.
Here is an example of EXIF data (not optimized). The current file size is 620,888 bytes:
EXIF Data File: ExifByteOrder: Big-endian (Motorola, MM) CurrentIPTCDigest: 50bb6030364fbdfb1842e98de0e81efe ImageWidth: 1024 ImageHeight: 768 EncodingProcess: Baseline DCT, Huffman coding BitsPerSample: 8 ColorComponents: 3 YCbCrSubSampling: YCbCr4:4:4 (1 1)
Storing all these images on your Magento server will result in slower pages and slower rendering of them. Almost 70% of all the content from a single page is filled with images:
So, optimizing images is not only important for desktop users, but also for mobile users. The less data they need to download, the better the user experience. Besides this, it's great for your search ranking optimization, battery consumption, and bandwidth/data plan.
By default, Magento 1 did not optimize the created catalog and CMS images. This could be optimized using software binaries such as jpegtran, jpegoptim, and OptiPNG.
If you don't have the option to install these, you could use Rapido image optimizer (https://www.rapido.nu/), which is a SaaS-based image optimizer for Magento. It is also the only optimizer that checks for the best available optimization per image and tunes all the images in the image cache directory on a daily basis.
For this recipe, we will use a Droplet created in Chapter 1, Magento 2 System Tools, at DigitalOcean, https://www.digitalocean.com/. We will be using NGINX, PHP-FPM, and a Composer-based setup including sample data for image optimization. No other prerequisites are required.
For the purpose of this recipe, let's assume that we need to optimize all Magento 2 images. The following steps will guide you through this:
apt-get install php5-gd
Instead, we can also use the following command:
apt-get install php7.0-gd
To make sure that GD is installed correctly, run the following command:
php -i | grep gd
Run the following command to test which version of GD you are running:
echo '<?php var_dump(gd_info()); ?>' > gd.php php gd.php
The output looks as follows:
root@mage2cookbook:/var/www/magento2/pub# php gd.php array(13) { ["GD Version"]=> string(9) "2.1.1-dev"
Here, you will find the following options:
We first make sure that our Image Adapter is set to PHP GD2. We don't use the ImageMagick setting here. In the There's more… section of this recipe, you can find more information on this.
Next, enable JavaScript Bundling, Merge JavaScript, and Minify JavaScript to YES.
Next, enable Merge CSS and Minify CSS to YES.
Last but not least, enable Static Files to YES. Save all the settings.
php bin/magento deploy:mode:set production
Before running the code, make sure to change your Apache or NGINX configuration to set $MAGE_MODE production;(Nginx) or SetEnv MAGE_MODE production (Apache). In Managing Magento 2, set mode (MAGE_MODE) recipe of Chapter 1, Magento 2 System Tools, we covered everything in detail.
After running this code, make sure to change your user and group permissions. Run the following command:
chown –R www-data:www-data *
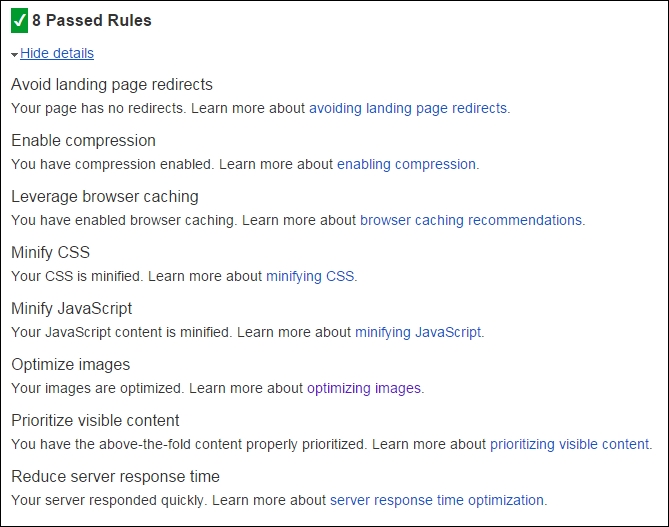
Let's recap and find out what we did throughout this recipe. In steps 1 through 5, we configured the image optimizing technique, which is now by default available in Magento 2.
In step 1, we installed the PHP GD library and tested it. In step 2, we configured the Magento backend to start using the optimization by selecting the GD option and additional merging for JS and CSS.
In step 4, we ran the bin/magento production mode to start optimizing all of the code.
Besides the PHP GD2 library, Magento 2 offers the option to switch to the ImageMagick library (http://www.imagemagick.org/). In basis, this library works great for image optimization, but during some tests, we found out that the GD2 had a smaller output. Besides the difference in size, ImageMagick generated files in the baseline (renders top-down) format instead of the progressive (renders from blurry to sharp) format that GD2 does.
Using progressive is the best commonly used format for web pages. It starts as a blurry image and turns sharp when done. It improves the user experience by loading the images incrementally.
If you still want to use ImageMagick, here are some basic commands. Run the following code on your shell. Then, switch to ImageMagick in your Magento configuration backend:
apt-get install -y imagemagick --fix-missing apt-get install -y php5-imagick service php-fpm restart php -i | grep imagick
December 17, 2015, is the day Google mentioned that HTTPS pages have top priority by default. Many Magento websites still use the default SSL pages or, even worse, don't use SSL at all.
Well, this will change now if your website depends on Google's search ranking. Using HTTP/2 in your setup is a must for high-performing and secure websites. The new protocol will be the new standard for fast and secure browsing.
HTTP/2 has many new benefits such as multiple TCP connections, cache pushing (server push), data compression, and much more. By default, HTTP/2 does not need SSL, but many browsers out there will support it only when configured using SSL. NGINX, for example, supports HTTP/2 only when configured including SSL; Apache, on the other hand, supports both, with or without SSL.
So, it is mandatory that we start using HTTP/2 including SSL for a safer and faster web.
For this recipe, we will use a Droplet created in Chapter 1, Magento 2 System Tools, at DigitalOcean, https://www.digitalocean.com/. We will be using NGINX, PHP-FPM, and a Composer-based setup including sample data for HTTP/2. No other prerequisites are required.
For the purpose of this recipe, let's assume that we need to create a Magento 2 using HTTP/2 including SSL. The following steps will guide you through this:
openssl.conf located in /etc/ssl with your favorite editor:
vi /etc/ssl/openssl.conf
Go to line 127 [ req_distinguished_name ] and change or add the settings regarding your company and domain. Change the following lines; here is an example:
countryName_default = Some-CountryName stateOrProvinceName_default = Some-State localityName_default = Some-CityName 0.organizationName_default = Some-CompanyName organizationalUnitName_default = Some-DepartmentName commonName_default = Some-DomainName emailAddress_default = Some-Email
The following screenshot depicts an example of the same:
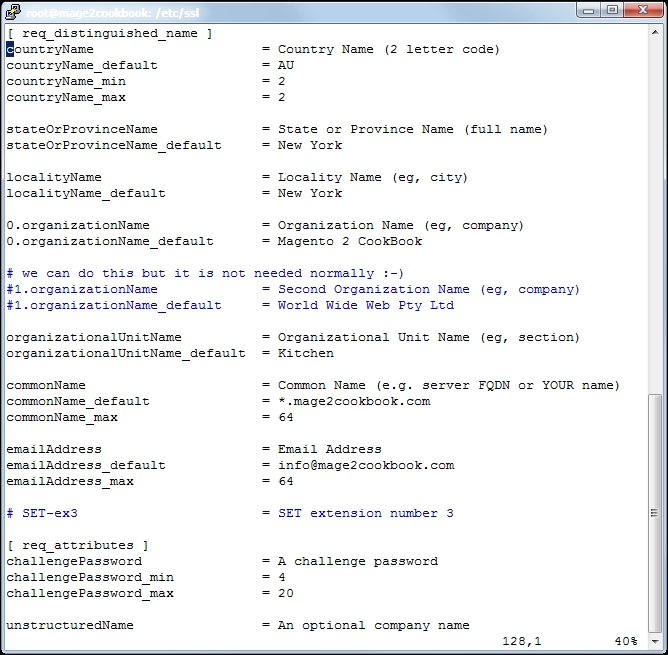
openssl.conf file, we can create the *.csr and *.key files. We need the *.csr file and send it to our SSL provider. You may pick any SSL provider. Run the following command to generate them:
openssl req -new -newkey rsa:2048 -nodes -keyout yourname.key -out yourname.csr
Change yourname with any given name. When running the command, questions will be asked; hit enter to prompt when the default is okay. Here is a screenshot of the process:
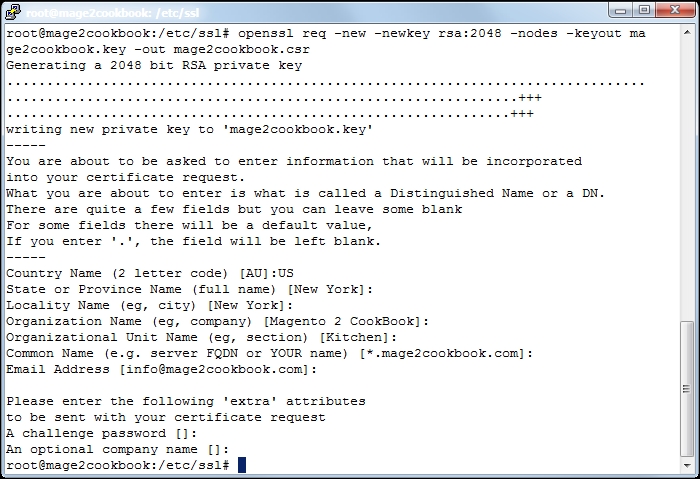
Check your certificate before you submit it. Run the following code to confirm your settings:
openssl req -in yourname.csr -text -noout
In this example, we used a wildcard SSL certificate. The wildcard starts with *.yourdomain.com. We use a wildcard to create unlimited subdomain names, which we will use later to create localized domain names such as de.yourdomain.com or fr.yourdomain.com.
If you don't need a wildcard domain and would rather use www.yourdomain.com or a naked domain such as yourdomain.com, commit this in your openssl.conf file.
*.csr file to your SSL provider and continue all the steps necessary. Depending on your provider, it can take minutes or hours. For the purpose of demonstration, we used https://www.buy-certificate.com/. On this website, there is an option to create a 30-day free SSL certificate. The whole process takes two to three minutes.yourdomain-com.zip file by running the following command:
unzip mage2cookbook-com.zip
Archive: mage2cookbook-com.zip inflating: mage2cookbook-com.cer inflating: readme.txt inflating: RapidSSLSHA256CA-G3.cer inflating: GeoTrustGlobalCA.cer inflating: siteseal_nw4all.html
cat mage2cookbook-com.cer RapidSSLSHA256CA-G3.cer > mage2cookbook-com-2015.cert
mage2cookbook-com-2015.cert file to /etc/ssl/cert using the following command:
cp mage2cookbook-com-2015.cert /etc/ssl/cert
mage2cookbook.key to /etc/ssl/private using the following command: (Let's assume that you are running the openssl reg command in the /etc/ssl directory.)
mv /etc/ssl/mage2cookbook.key /etc/ssl/private
ln -s /etc/ssl/private/mage2cookbook-com.key /etc/ssl/mage2cookbook-com.key ln -s /etc/ssl/certs/mage2cookbook-com-2015.cer /etc/ssl/mage2cookbook-com.cert
Try to list all the files in the /etc/ssl directory using the following command. You should see the names of the files that we linked:
ll /etc/ssl
default.conf in /etc/nginx/conf.d. Open the default.conf file and change it with the following settings:upstream fastcgi_backend {
server 127.0.0.1:9000;
}
server {
listen 80;
listen 443 ssl http2;
server_name yourdomain.com;
set $MAGE_ROOT /var/www/html;
set $MAGE_MODE developer;
ssl_certificate /etc/ssl/yourdomain-com.cert;
ssl_certificate_key /etc/ssl/yourdomain-com.key;
include /var/www/html/nginx.conf.sample;
access_log /var/log/nginx/access.log;
error_log /var/log/nginx/error.log;
location ~ /\.ht {
deny all;
}
}As you can see, we created a new listen 443 ssl http2 section. Besides the listen section, we also created ssl_certificate and ssl_certificate_key.
The
http2 flag in the listen section covers the entire HTTP/2 configuration.
service nginx restart
php bin/magento setup:store-config:set --base-url-secure=" https://yourdomain.com/" php bin/magento setup:store-config:set --use-secure-admin="1" php bin/magento setup:store-config:set --use-secure="1" php bin/magento setup:static-content:deploy php bin/magento cache:clean php bin/magento cache:flush
Next, we go to https://www.sslshopper.com/ssl-checker.html and check our setup. Commit your domain name in the box and submit. If everything is configured correctly, the output should look as follows:
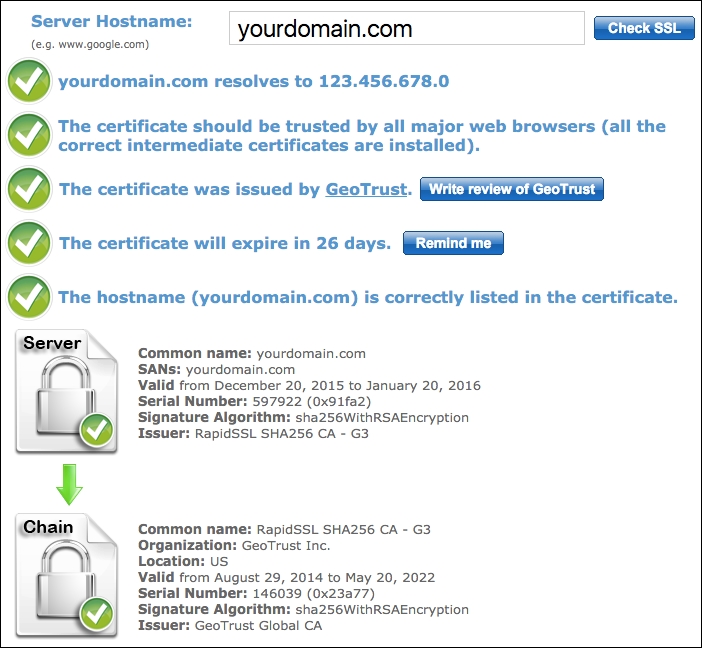
yourdomain.com.Let's recap and find out what we did throughout this recipe. In steps 1 through 13, we created an SSL certificate, which we need to configure HTTP/2 in NGINX.
In step 1, we configured the openssl.conf file with our domain and business data. In step 2, we created a certificate request that we will be sending to the SSL provider.
In step 4, we downloaded the provided certificate file and unzipped the content. In step 6, we merged the domain certificate and certificate authority file into a single one. This file was then copied to the SSL directory.
In step 6, we copied the private key to the SSL private directory before we started creating a symlink of the private key and merge certificate in the /etc/ssl directory. The main reason why we stored the files in the private and cert directory is maintenance. When replacing or updating keys or certificates in the future, we only need to create a new symlink while our NGINX or Apache configuration can stay the same.
In step 10, we updated the NGINX configuration and added the ssl_certificate parameter including the correct SSL directory. In the listen parameter, we added the http2 flag behind the 443 ssl flag and restarted the NGINX server.
In step 12, we configured the HTTPS domains using the bin/magento setup:store-config:set option.
Setting up Magento 2 including SSL and HTTP/2 is pretty straightforward. However, by default, the only URLs that serve HTTPS are customer/account/login/, customer/account/create/, checkout/, checkout/cart/, contact/, and sales/guest/form/. Currently, it's mandatory to have a full HTTPS website (Google: HTTPS as a ranking signal).
It is easy to update the Magento configuration to serve every URL on HTTPS using the following command:
php bin/magento setup:store-config:set --base-url="https://yourdomain.com/" php bin/magento setup:static-content:deploy php bin/magento cache:clean php bin/magento cache:flush
Performance, performance, performance! This may be one of the most used words in the Magento 1 period. Every Magento website benefits from a great performing platform, and every customer loves it.
However, before we can create a great performing website, all sorts of elements have to be conquered. One of the missing elements in Magento 1 was creating sample data based on a company profile. As every Magento website is unique, so is performance testing based on their profile. Some companies have only one website, store catalog, and store view. Others have 800 websites and are converting one million orders per day.
Magento 2 now provides us with the option to run a profile that creates sample data based on your company profile. By default, there are four sample data profiles. Depending on the profile, creating the sample data may take a long time, so keep this in mind.
After creating the sample data based on your profile, you can start doing performance-based testing. Based on this profile, you may need to scale up or tune one of the components before going into production.
For this recipe, we will use a Droplet created in Chapter 1, Magento 2 System Tools, at DigitalOcean, https://www.digitalocean.com/. We will be using NGINX, PHP-FPM, and a Composer-based setup including Magento 2 (without sample data). No other prerequisites are required.
For the purpose of this recipe, let's assume that we need to run a Magento 2 performance test. The following steps will guide you through this:
rm -rf * /var/www/html composer create-project --repository-url=https://repo.magento.com/ magento/project-community-edition /var/www/html --prefer-dist chown -R www-data:www-data /var/www/html
bin/magento setup:install \
--db-host=localhost \
--db-name=<your-db-name> \
--db-user="<db-user>" \
--db-password="<db-password>" \
--backend-frontname=<admin-path> \
--base-url=http://yourdomain.com/ \
--admin-lastname=<your-lastname> \
--admin-firstname=<your-firstname> \
--admin-email=<your-email> \
--admin-user=<your-admin-user> \
--admin-password=<your-password> \--use-rewrites=1 \
--cleanup-database \php bin/magento setup:di:compile-multi-tenant chown -R www-data:www-data /var/www/html
php bin/magento setup:perf:generate-fixtures /var/www/html/setup/performance-toolkit/profiles/ce/small.xml
setup/performance-toolkit/profiles/ directory. Depending on whether you are running CE or EE, you need to choose one of the subdirectories.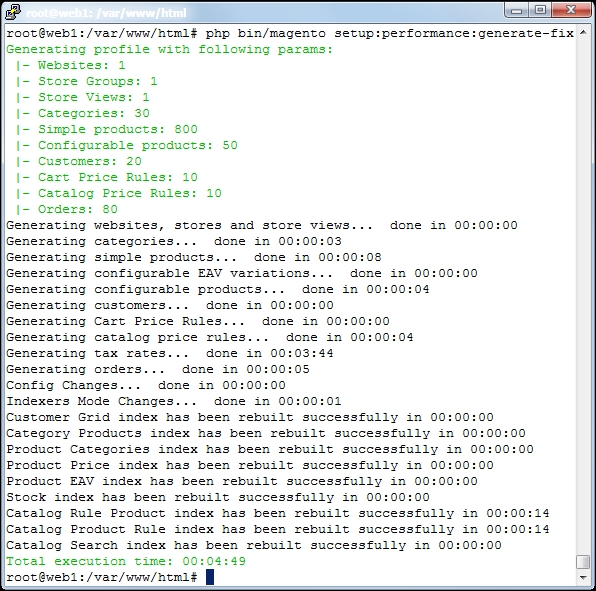
yourdomain.com, and check whether everything is correct. You can also log in to the backend of your Magento website and check all the created settings.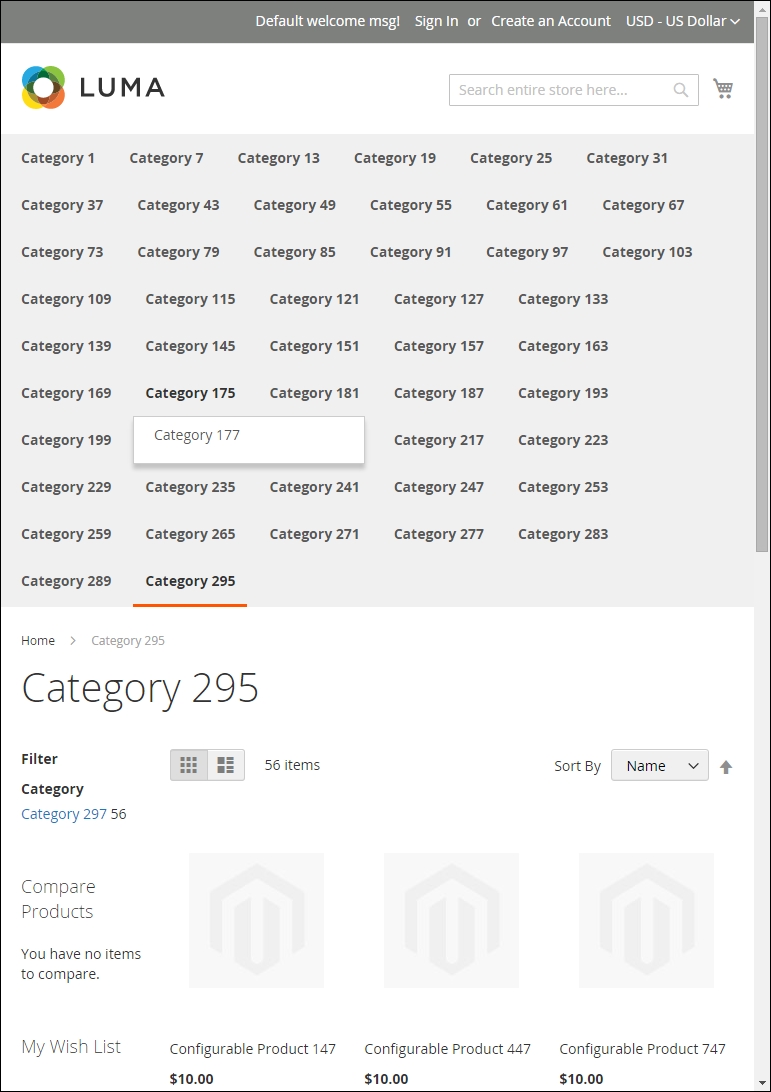
Let's recap and find out what we did throughout this recipe. In steps 1 through 8, we created sample data to test the performance of the Magento 2 website.
In steps 1 and 2, we started with a clean Magento 2 setup using Composer and bin/magento setup:install.
In step 3, we needed to compile our Magento code base before we could input the sample data.
In step 4, we ran a generated fixture profile using the bin/magento setup:perf option. Depending on the profile, Magento will start creating all of the required data. Running a large profile set can take up to several hours. Adjusting the profile is self-explanatory.
If the default profile does not fit your needs, you can create a custom profile. For example, copy the small.xml file to mycustom.xml in the same directory and open the file in your favorite editor. Run the following command on the shell:
cd /var/www/html/setup/performance-toolkit/profiles/ce/small.xml cp small.xml mycustom.xml vi mycustom.xml
Now you can change data such as websites, store_groups, store_views, simple_products, configurable_products, categories, categories_nesting_level, catalog_price_rules, catalog_target_rules, cart_price_rules, cart_price_rules_floor, customers, tax_rates_file, and orders:
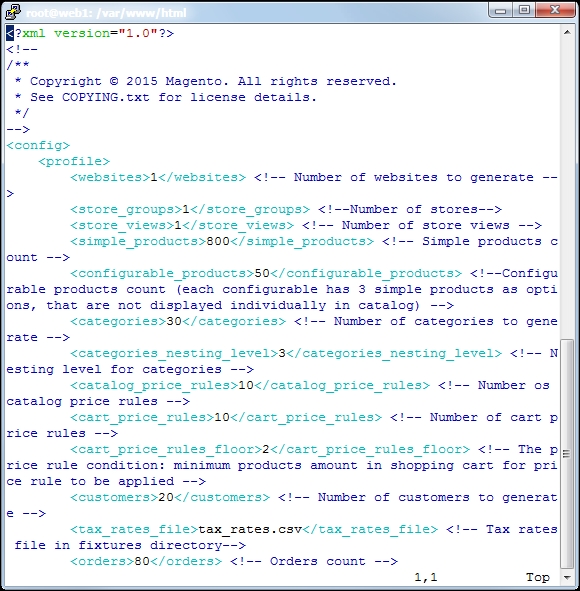
Save your file, and use the following command:
Esc + :wq
Before we start, you need to check whether your setup is clean. Otherwise, start with step 1 of the recipe.
Now we can run the
mycustom.xml file with the following command:
php bin/magento setup:perf:generate-fixtures /var/www/html/setup/performance-toolkit/profiles/ce/mycustom.xml
In this chapter, we will cover the basic tasks related to creating a catalog and products in Magento 2. You will learn how to:
This chapter explains how to set up a vanilla Magento 2 store. If Magento 2 is totally new to you, then lots of new basic whereabouts are pointed out. Are you currently working with Magento 1? If so, not much has changed since then.
The new backend of Magento 2 is the biggest improvement of them all. The design is built responsively and has a great user experience. Compared to Magento 1, this is a great improvement. The menu is located vertically on the left of the screen and works great on desktop and mobile environments:
Within this chapter, we will learn how to set up a website with multiple domains using different catalogs and products. Depending on the website, store, and store view setup, we can create different subcategories, URLs, and products for any domain name.
There are a number of different ways customers can browse your store, but one of the most effective is layered navigation. Layered navigation is located in your catalog and holds product features to sort or filter. We will learn how to create product attributes for use in layered navigation.
Every website benefits from great search engine optimization (SEO). We will learn how to define catalog URLs for catalogs.
Without products, the most important element of the website is missing. We will be creating different types of product in our multi-website setup.
The first thing we need to do when setting up a vanilla Magento 2 website is define our website, store, and store view structure.
So what is the difference between website, store, and store view, and why is it important?
noindex and nofollow), and so on. The option where we use the Base Link URL, for example, (yourdomain.com/myhiddenpage) is easy to set up.The website, store, and store view structure is shown in the following image:
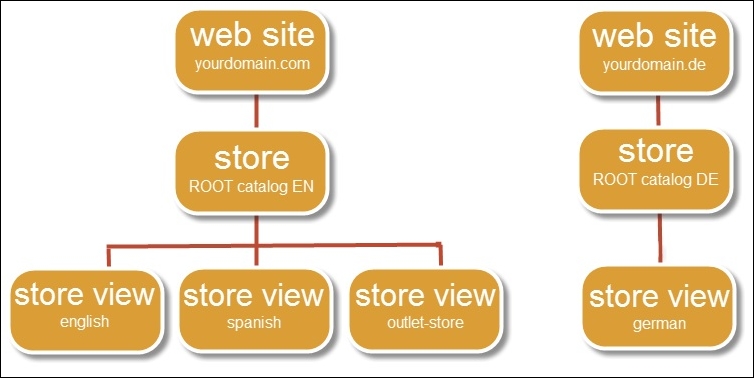
To step through this recipe, you will use a Droplet created in Chapter 1, Magento 2 System Tools, at DigitalOcean (https://www.digitalocean.com/). We will be using an NGINX, PHP-FPM, Composer-based setup with Magento 2 preinstalled. No other prerequisites are required.
For the purpose of this recipe, let's assume that we need to create a multi-website setup including three domains (yourdomain.com, yourdomain.de, and yourdomain.fr) and separated Root Catalogs. The following steps will guide you through this:
Go to /etc/nginx/conf.d, open the default.conf file, and include the following content at the top of your file:
map $http_host $magecode {
hostnames;
default base;
yourdomain.de de;
yourdomain.fr fr;
}map $http_host $magecode {
hostnames;
default base;
yourdomain.de de;
yourdomain.fr fr;
}
upstream fastcgi_backend {
server 127.0.0.1:9000;
}
server {
listen 80;
listen 443 ssl http2;
server_name yourdomain.com;
set $MAGE_ROOT /var/www/html;
set $MAGE_MODE developer;
ssl_certificate /etc/ssl/yourdomain-com.cert;
ssl_certificate_key /etc/ssl/yourdomain-com.key;
include /var/www/html/nginx.conf.sample;
access_log /var/log/nginx/access.log;
error_log /var/log/nginx/error.log;
location ~ /\.ht {
deny all;
}
}/var/www/html/ and open the nginx.conf.sample file. Go to the bottom and look for:location ~ (index|get|static|report|404|503)\.php$
Now we add the following lines to the file under fastcgi_pass fastcgi_backend;:
fastcgi_param MAGE_RUN_TYPE website; fastcgi_param MAGE_RUN_CODE $magecode;
location ~ (index|get|static|report|404|503)\.php$ {
try_files $uri =404;
fastcgi_pass fastcgi_backend;
fastcgi_param MAGE_RUN_TYPE website;
fastcgi_param MAGE_RUN_CODE $magecode;
fastcgi_param PHP_FLAG "session.auto_start=off \n suhosin.session.cryptua=off";
fastcgi_param PHP_VALUE "memory_limit=256M \n max_execution_time=600";
fastcgi_read_timeout 600s;
fastcgi_connect_timeout 600s;
fastcgi_param MAGE_MODE $MAGE_MODE;
fastcgi_index index.php;
fastcgi_param SCRIPT_FILENAME $document_root$fastcgi_script_name;
include fastcgi_params;
}The current setup uses the MAGE_RUN_TYPE website variable. You may change website to store, depending on your setup preferences. When changing the variable, you need your default.conf mapping codes as well.
service nginx restart && service php-fpm restart
var/www/html/pub echo "<?php header("Content-type: text/plain"); print_r($_SERVER); ?>" > magecode.php
Don't forget to update your nginx.conf.sample file with the new magecode code. It's located on the bottom of your file and should look like this:
location ~ (index|get|static|report|404|503|magecode)\.php$ {Restart NGINX and open the file in your browser. The output should look as follows. As you can see, the created MAGE_RUN variables are available:

|
Name |
|
|
Code |
|
Next, click on Create Store and commit the following details:
|
Website |
|
|
Name |
|
|
Root Category |
|
Next, click on Create Store View and commit the following details:
|
Store |
|
|
Name |
|
|
Code |
|
|
Status |
|
Repeat the same steps for the French domain. Make sure that the Code in Website and Store View is fr.
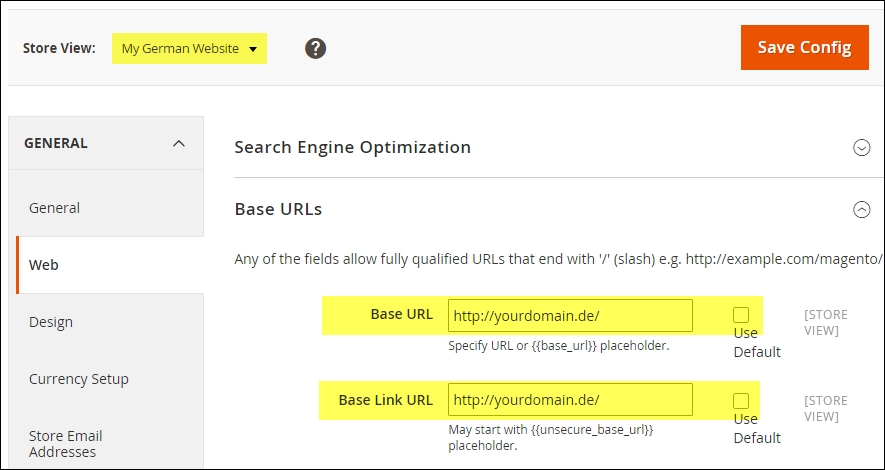
|
Name |
|
|
Is Active |
|
|
Page Title |
|
Perform the same steps for the French domain. You may add additional information here but it is not needed. Changing the current Root Category called Default Category to Root English is also optional but advised.
Save your configuration and go to Stores | All Stores and change all of the stores to the appropriate Root Catalog we just created. Every Root Category should now have a dedicated Root Catalog.
yourdomain.com, yourdomain.de, and yourdomain.fr.Let's recap and find out what we did throughout this recipe. In steps 1 through 11, we created a multi-store setup for .com, .de, and .fr domains using a separate Root Catalog.
In steps 1 through 4, we configured the domain mapping in the NGINX default.conf file. Then we added the fastcgi_param MAGE_RUN code to the nginx.conf.sample file; this will manage which website or store view to request within Magento.
In step 6, we used an easy test method to check if all domains run the correct MAGE_RUN code.
In steps 7 through 9, we configure the website, store, and store view names and codes for the given domain names.
In step 10, we created additional Root Catalogs for the remaining German and French stores. They are then connected to the previously created store configuration. All stores have their own Root Catalog now.
Are you able to buy additional domain names, but would like to try setting up a multi-store? Here are some tips to create one. Depending on whether you are using Windows, Mac OS, or Linux, the following options apply:
C:\Windows\System32\drivers\etc and open up the hosts file as an administrator. Add the following (change the IP and domain name accordingly):123.456.789.0 yourdomain.de 123.456.789.0 yourdomain.fr 123.456.789.0 www.yourdomain.de 123.456.789.0 www.yourdomain.fr
Save the file and click on the Start button. Search then for cmd.exe and commit the following:
ipconfig /flushdns
/etc/ directory, open up the hosts file as a superuser, and add the following (change the IP and domain name accordingly):123.456.789.0 yourdomain.de 123.456.789.0 yourdomain.fr 123.456.789.0 www.yourdomain.de 123.456.789.0 www.yourdomain.fr
Save the file and run the following command on the shell:
dscacheutil -flushcache
Depending on your Mac version, check out the different commands here: http://www.hongkiat.com/blog/how-to-clear-flush-dns-cache-in-os-x-yosemite/
/etc/ directory, open up the hosts file as a root user, and add the following (change the IP and domain name accordingly):123.456.789.0 yourdomain.de 123.456.789.0 yourdomain.fr 123.456.789.0 www.yourdomain.de 123.456.789.0 www.yourdomain.fr
Save the file and run the following command on the shell:
service nscd restart
Depending on your Linux version, check out the different commands here: http://www.cyberciti.biz/faq/rhel-debian-ubuntu-flush-clear-dns-cache/
Open up your browser and surf to the custom domains.
After creating the foundation of the website, we need to set up a catalog structure. Setting up a catalog structure is not difficult but needs to be well thought out.
Some websites have an easy setup using two levels, while others sometimes use five or more subcategories. Always keep in mind user experience: your customer needs to crawl the pages easily. Keep it simple! The following image shows a simple catalog structure:

To step through this recipe, you will use a Droplet created in Chapter 1, Magento 2 System Tools, at DigitalOcean (https://www.digitalocean.com/). We will be using an NGINX, PHP-FPM, Composer-based setup with Magento 2 preinstalled. No other prerequisites are required.
For the purpose of this recipe, let's assume that we need to set up a catalog including subcategories. The following steps will guide you through this:
Since we have already created Root Catalogs, we start with using the Root English catalog first.
|
Name |
|
|
Is Active |
|
|
Page Title |
|
|
Name |
|
|
Is Active |
|
|
Page Title |
|
|
Name |
|
|
Is Active |
|
|
Page Title |
|
|
Name |
|
|
Is Active |
|
|
Page Title |
|
yourdomain.com, yourdomain.de, and yourdomain.fr. Your categories should now look as follows: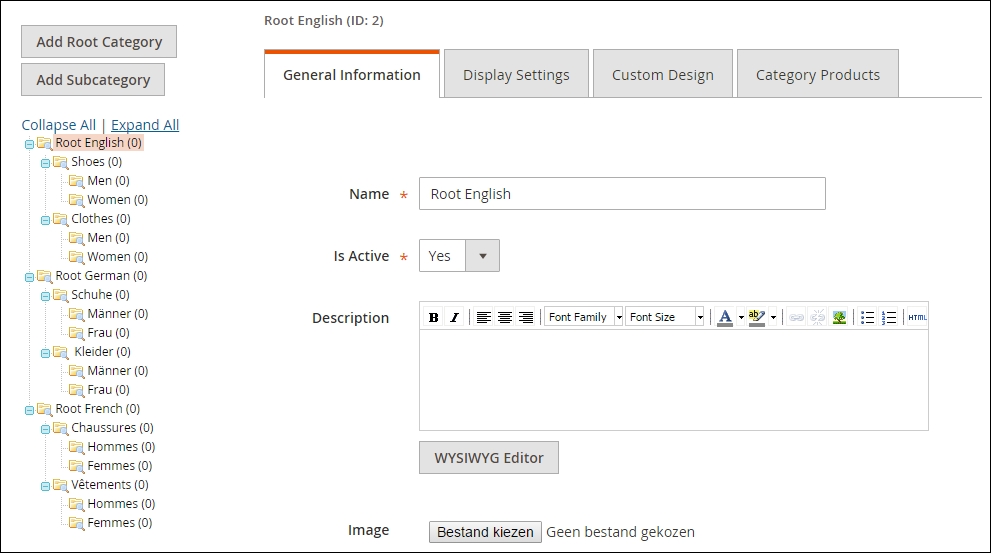
Let's recap and find out what we did throughout this recipe. In steps 1 through 4, we created subcategories for the English, German, and French stores. In this recipe, we created a dedicated Root Catalog for every website. This way, every store can be configured using their own tax and shipping rules.
In our example, we only submitted Name, Is Active, and Page Title. You may continue to commit the Description, Image, Meta Keywords, and Meta Description fields. By default, the URL key is similar to the Name field; you can change this depending on your SEO needs.
Every category or subcategory has a default page layout defined by the theme. You may need to override this. Go to the Custom Design tab and click the Page Layout drop-down menu. We can choose from the following options: 1 column, 2 columns with left bar, 2 columns with right bar, 3 columns, and Empty layout.
Every product has a unique DNA; some, such as shoes, could have different colors, brands, and sizes, while a snowboard could have weight, length, torsion, manufacturer, and style.
Setting up a website with all the attributes does not make sense. Depending on the products you sell, you should create attributes specific to each website.
When creating products for your website, attributes are the key element and need to be thought through. What and how many attributes do you need? And how many values do you need? These are all types of question that could have a great impact on your website; and don't forget performance. Creating an attribute such as color and having 100,000 of different key values stored will not improve your overall speed and user experience. Always think things through.
After creating the attributes, we combine them in attribute sets, which can be picked when starting to create a product. Some attributes can be used more than once, while others are unique to one product or attribute set.
To step through this recipe, you will use a Droplet created in Chapter 1, Magento 2 System Tools, at DigitalOcean (https://www.digitalocean.com/). We will be using an NGINX, PHP-FPM, Composer-based setup with Magento 2 preinstalled. No other prerequisites are required.
For the purpose of this recipe, let's assume that we need to create product attributes and sets. The following steps will guide you through them:
Since we are using a vanilla setup, only system attributes and one attribute set are installed. Now click on Add New Attribute and commit the following data in the Properties tab:
|
Attribute Properties | |||
|---|---|---|---|
|
Default label |
| ||
|
Catalog Input Type for Store Owners |
Drop-down | ||
|
Values Required |
No | ||
|
Manage Options (values of your attribute) | |||
|
English |
Admin |
French |
German |
|
4 |
4 |
35 |
35 |
|
4.5 |
4.5 |
35 |
35 |
|
5 |
5 |
35-36 |
35-36 |
|
5.5 |
5.5 |
36 |
36 |
|
6 |
6 |
36-37 |
36-37 |
|
6.5 |
6.5 |
37 |
37 |
|
7 |
7 |
37-38 |
37-38 |
|
7.5 |
7.5 |
38 |
38 |
|
8 |
8 |
38-39 |
38-39 |
|
8.5 |
8.5 |
39 |
39 |
|
Advanced Attribute Properties | |||
|
Scope |
Global | ||
|
Unique Value |
No | ||
|
Add to Column Options |
Yes | ||
|
Use in Filer Options |
Yes | ||
Continue the rest of the chart accordingly (http://www.shoesizingcharts.com).
|
Manage Titles (Size, Color, and so on) | ||
|---|---|---|
|
English |
French |
German |
|
Size |
Taille |
Größe |
|
Storefront Properties | |
|---|---|
|
Use in Search |
No |
|
Comparable in Storefront |
No |
|
Use in Layered Navigation |
Filterable (with result) |
|
Use in Search Result Layered Navigation |
No |
|
Position |
0 |
|
Use for Promo Rule Conditions |
No |
|
Allow HTML Tags on Storefront |
Yes |
|
Visible on Catalog Pages on Storefront |
Yes |
|
Used in Product Listing |
No |
|
Used for Sorting in Product Listing |
No |
cronjob, it will automatically update the newly created attribute.shoe_type, width, color, gender, and occasion attributes can be downloaded at https://github.com/mage2cookbook/chapter4.Shoes. Go to Stores | Attribute Set, click Add Attribute Set, and commit the following data:|
Edit Attribute Set Name | |
|---|---|
|
Name |
|
|
Based On |
|
shoe_size, shoe_type, width, color, gender, and occasion attributes in the group and save the configuration. The cronjob notice is automatically updated, depending on your settings.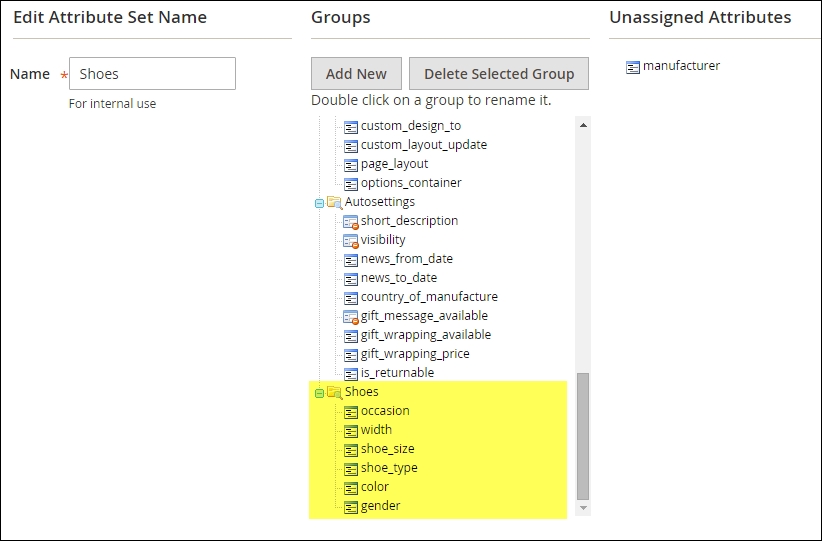
Let's recap and find out what we did throughout this recipe. In steps 1 through 10, we created attributes that will be used in an attribute set. The attributes and sets are the fundamentals for every website.
In steps 1 through 5, we created multiple attributes to define all details about the shoes and clothes we would like to sell. Some attributes are later used as configurable values on the frontend while others only indicate the gender or occasion.
In steps 6 through 9, we connect the attributes to the related attribute set. Thus, when creating a product, all the correct elements are available.
After creating the Shoe attribute set, continue by creating an attribute set for Clothes.
Use the following attributes to create the set: color, occasion, apparel_type, sleeve_length, fit, size, length, and gender.
Follow the same steps we performed before to create a new attribute set. You may reuse the color, occasion, and
gender attributes. Details of all the attributes can be found here: https://github.com/mage2cookbook/chapter4#clothes-set.
The following screenshot shows the Clothes attribute set:
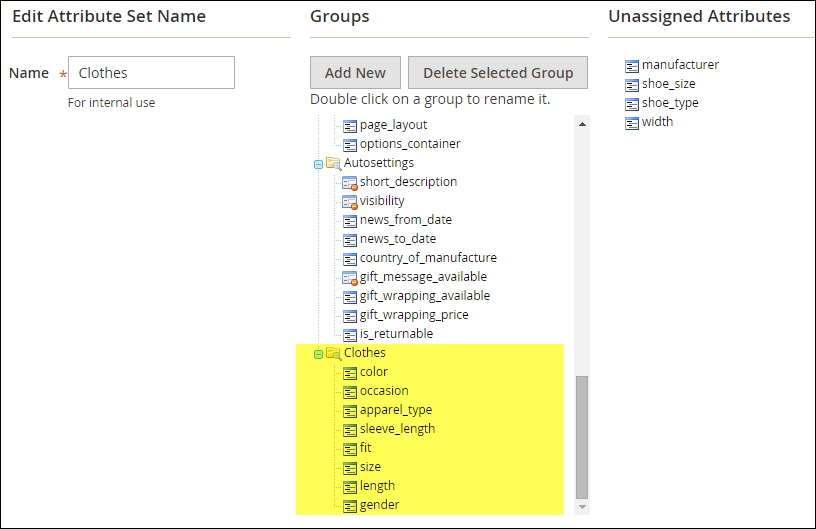
Eventually, after creating attributes and sets, it comes down to adding products. Magento 2 uses the same types of product as Magento 1. This also includes Magento 2 Enterprise.
The product types we can choose from are: Simple Product, Configurable Product, Grouped Product, Virtual Product, Bundle Product, Downloadable Product, and, for the Enterprise Edition (EE), Gift Card.
Depending on the products you would like to sell, you may use one or two of the types. The most used types are Simple and Configurable Products because they rely on one another when you sell shoes, for example.
Product type definitions are as follows:
Besides the regular ones, it is possible you may need extra options, depending on your product base. In Magento 1, additional third-party modules, such as Configurable Bundles, Events, Training, Rental, and Recurring, could be bought and installed to manage this.
Using product types is now easier than ever. Magento 2 created a user-friendly flow for configuring Configurable Products on the fly.
To step through this recipe, you will use a Droplet created in Chapter 1, Magento 2 System Tools, at DigitalOcean (https://www.digitalocean.com/). We will be using an NGINX, PHP-FPM, Composer-based setup with a single Magento 2 website, Root Catalog, store view, categories, and attributes preinstalled. No other prerequisites are required.
For the purpose of this recipe, let's assume that we need to create Configurable Product for Magento 2. The following steps will guide you through them:
|
Product Details | |
|---|---|
|
Name |
Ellis Flat |
|
SKU |
shw005 |
|
Price |
250.00 |
|
Tax Class |
Taxable Goods |
|
Images and Videos |
Download the images here: https://github.com/mage2cookbook/chapter4 |
|
Quantity |
100 |
|
Weight |
Yes |
|
Categories |
Shoes |
|
Description |
Suede upper. Rubber 0.5" heel. Domestic. |
Now let's go back to our backend and open up the newly created product. Next we are going to set our attribute set we created earlier in this chapter. This option is located above the Product Details title. Here we choose the Shoes attribute set, as shown in the following screenshot:
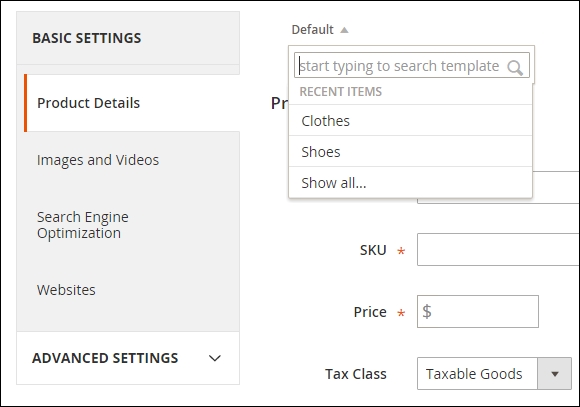
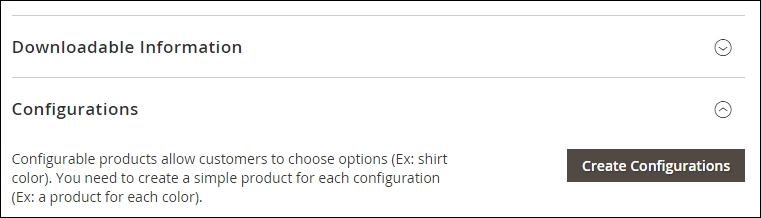
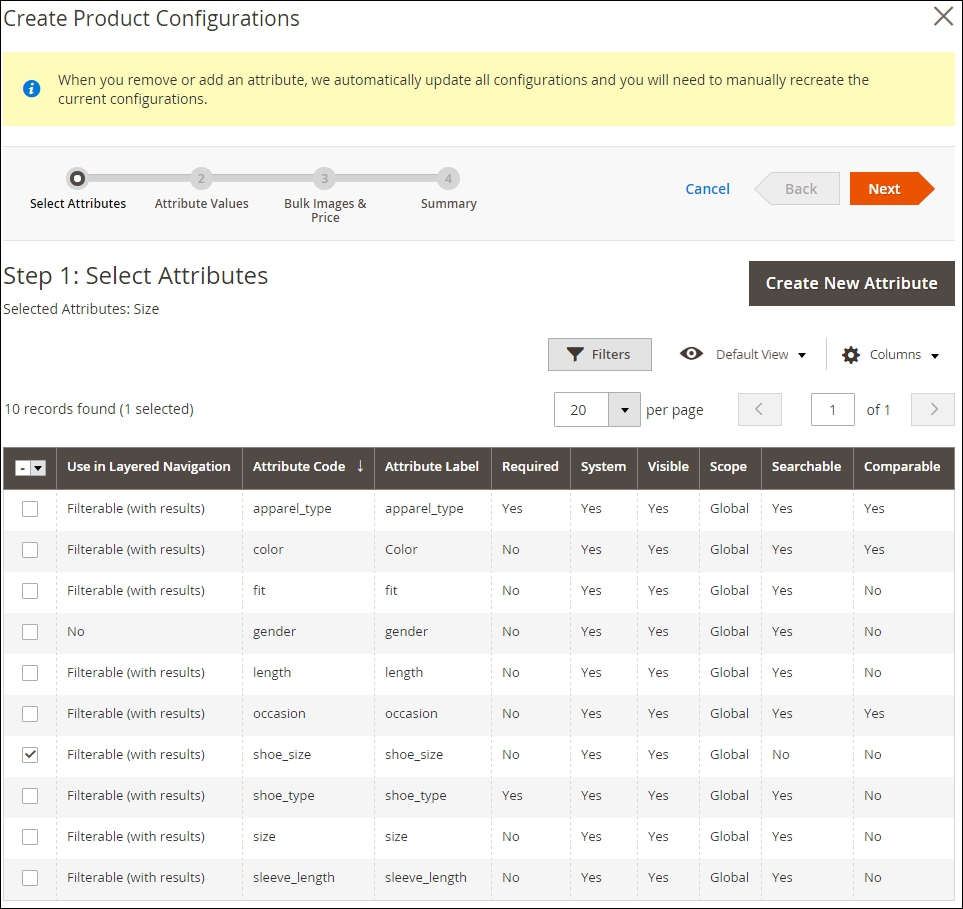
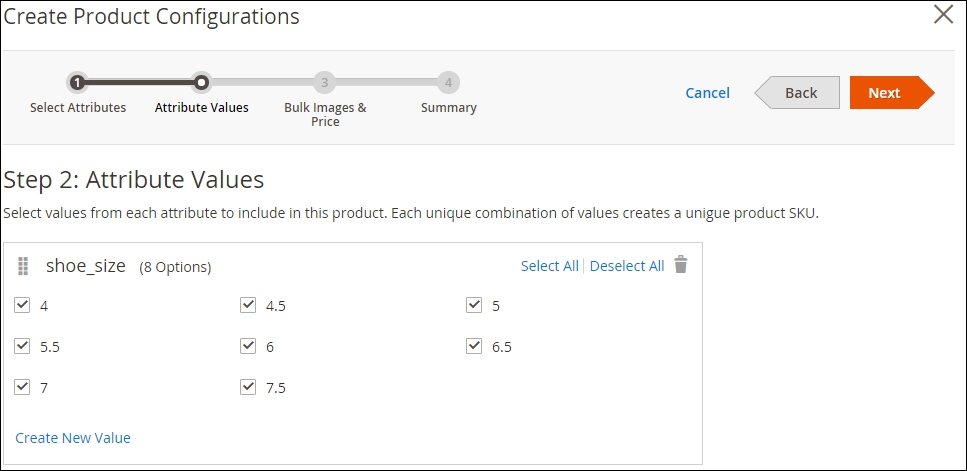
250 for the Price and 100 for the Quantity. Continue to the next step, as shown in the following screenshot: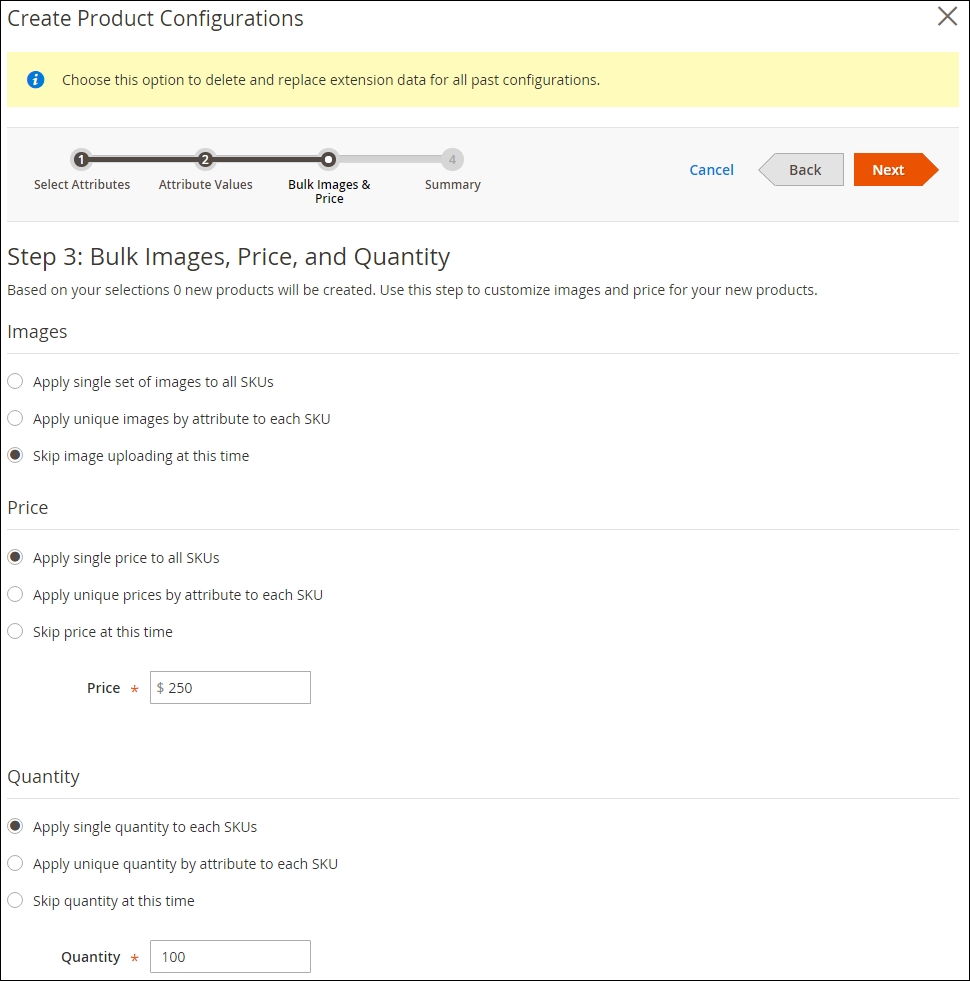
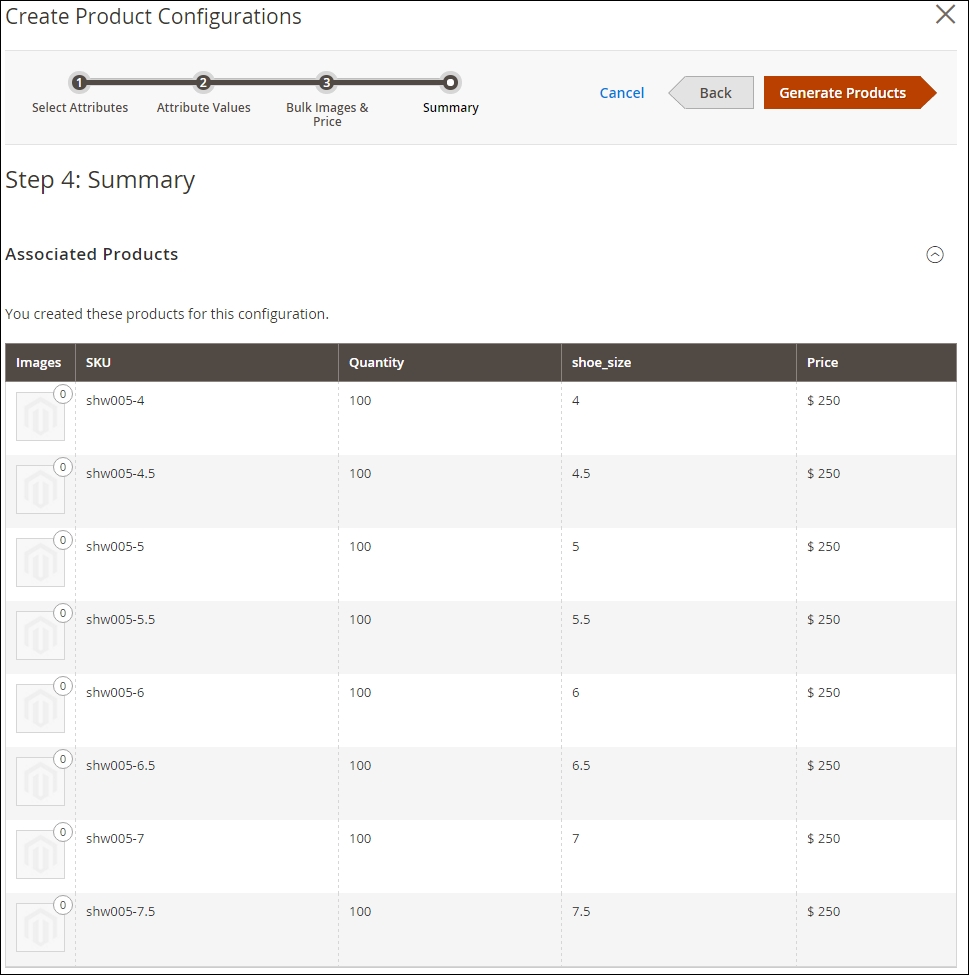
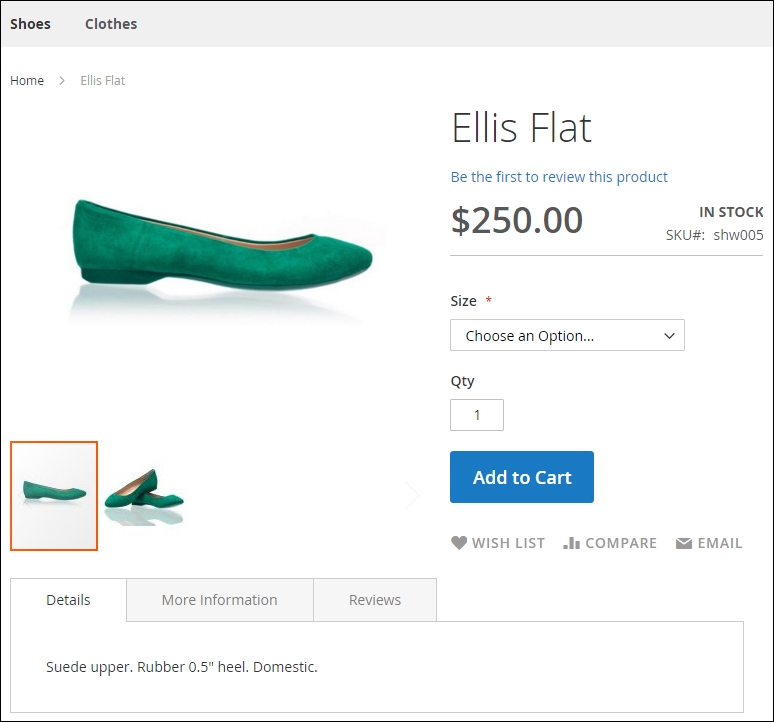
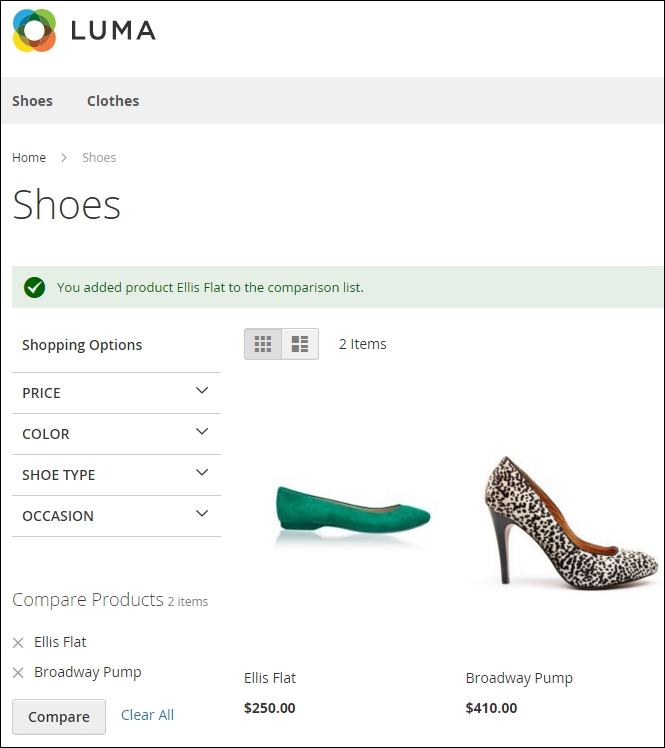
Let's recap and find out what we did throughout this recipe. In steps 1 through 13, we created a Configurable Product using the new Magento workflow.
In steps 1 through 4, we created a Simple Product and connected it to the attribute set. This product will be the starting point for creating a Configurable Product.
In steps 8 through 11, we used the configurations workflow to select the attributes related to this product and set its values. Depending on the setup, we can apply a single price, image, or quantity to all of the Simple Products created during this process.
By default, when creating a product, Magento 2 starts with a Virtual Product. When changing settings such as Weight (Does this have a weight?) to Yes, the product switches to a Simple Product. The same goes for Downloadable and Configurable Product.
This new technique is stunning and a great benefit for store owners. Everybody can now create and change products on the fly.
Bundle and Grouped Products, on the other hand, are more like Magento 1. You first need to choose the product type using the drop-down arrow in the Add Product button and then continue the same flow, as shown in the following screenshot:
Managing products on a daily basis may not be one of the most entertaining tasks. The product grid in Magento 1 is, out of the box, not the best tool. Lots of merchants install a third-party extension for better use and configuration. Depending on the extension, it is possible to tune the grid accordingly.
Now the new Magento 2 catalog grid is better than ever. Every backend user can create their own view and select the appropriate attributes for the best view ever.
Besides all the fancy features, the product grid loads asynchronously, which means that the page refreshes its data in the background. This is great for performance and user experience.
To step through this recipe, you will use a Droplet created in Chapter 1, Magento 2 System Tools, at DigitalOcean (https://www.digitalocean.com/). We will be using an NGINX, PHP-FPM, Composer-based setup including a single Magento 2 website, Root Catalog, store view, categories, and attributes and four configurable products preinstalled. No other prerequisites are required.
For the purpose of this recipe, let's assume that we need to a create a custom product grid in Magento 2. The following steps will guide you through this:
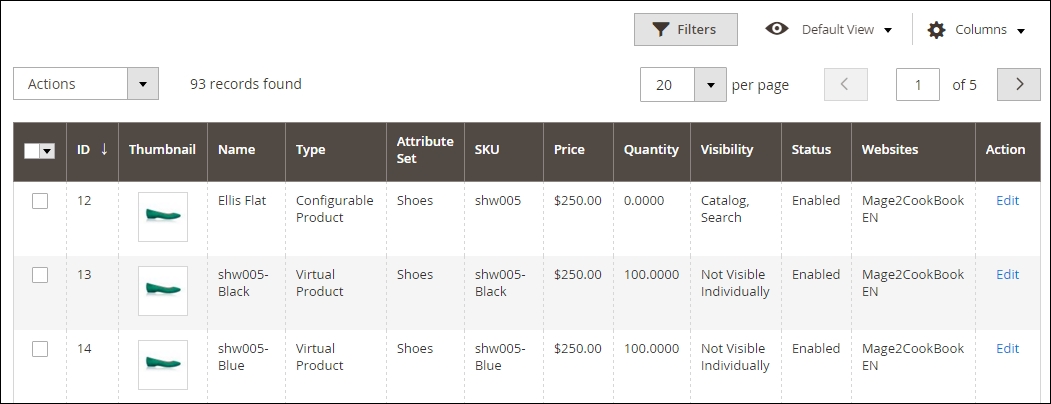
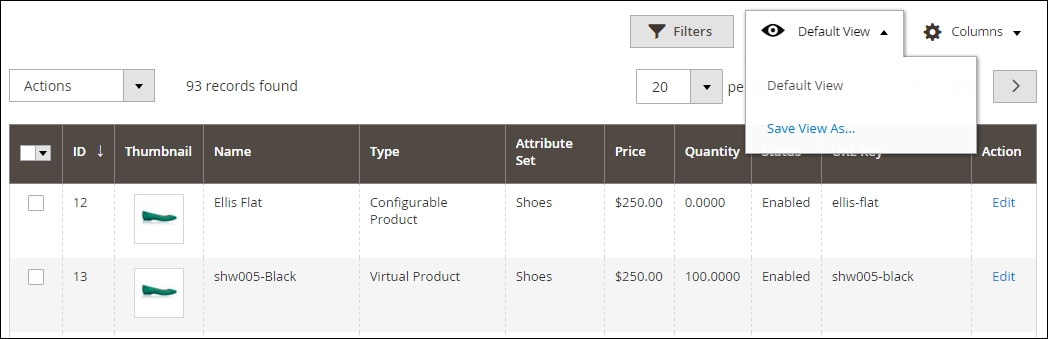
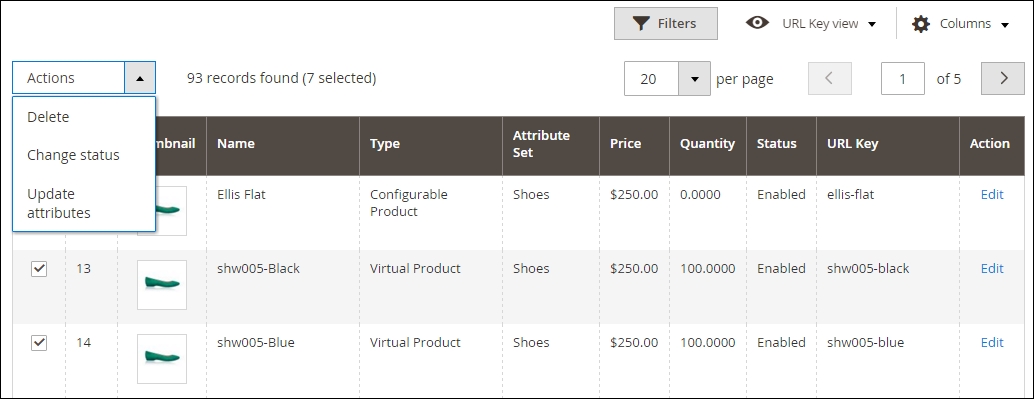
Let's recap and find out what we did throughout this recipe. In steps 1 through 8, we created a custom grid for the catalog view. You can create as many grids as you like and select your preferred attributes in it. Saving the new grid views is straightforward.
In this chapter, we will cover the basic tasks related to creating a catalog and products in Magento 2. You will learn the following:
Although we've created categories and products, we are not yet ready to go online. Depending on the country or state we live in and ship to, we have to levy additional charges such as VAT and shipping fees.
These shipping fees and tax rates need to be configured correctly according to the website or store view. Shipping options can be straightforward from free shipping to advanced calculations. But keep in mind that, depending on the situation, it is not as easy as it looks and could take some time to set up.
Besides shipping and tax, we should not forget the inventory. Without the correct inventory setup, we could create issues when it comes to stock management. Magento 2 uses the same inventory setup as Magento 1, and is straightforward to configure out of the box.
Are you selling products overseas and need to use different currency rates? Magento 2 is your best friend. This functionality in a multi-store setup is easy to configure.
Some products may depend on special prices related to customer groups. Creating B2C or B2B groups is straightforward and can be connected to advanced pricing within the product types. These prices will be shown after login or store view.
The topic of shipping is so huge that you could write a book about it. The options related, for example, to width, length and height, breakable, edible, and so on, are endless.
After configuring these attributes for a product, we can start relating them to our shipping setup and shipping vendor. Magento has a huge selection of shipping vendors to choose from. It's important to choose the right vendor and the correct Magento extension. This could be challenging. Do not immediately pick the cheapest shipping vendor. Check the quality of their service, their specialty when it comes to shipping your products, and their Magento extension.
Creating the correct tax rules is not for the fainthearted. Are you in the USA, Europe, Asia, or somewhere else? Every country has its own tax rules. Always check with the local authorities to find out which rules to apply.
To step through this recipe, you will use a Droplet created in Chapter 1, Magento 2 System Tools at DigitalOcean https://www.digitalocean.com/. We will be using an NGINX, PHP-FPM, Composer-based setup including sample data. No other prerequisites are required.
For the purpose of this recipe, let's assume that we need to create shipping and tax rules for the European Union. The shipping rules apply to a Table Rates setup using a local shipping vendor. The following steps will guide you through them.
Now complete the entire field set related to your company. This is the starting point. When using the Shipping Policy, just mark it Yes and commit your policy. Here is an example of how a policy could look:
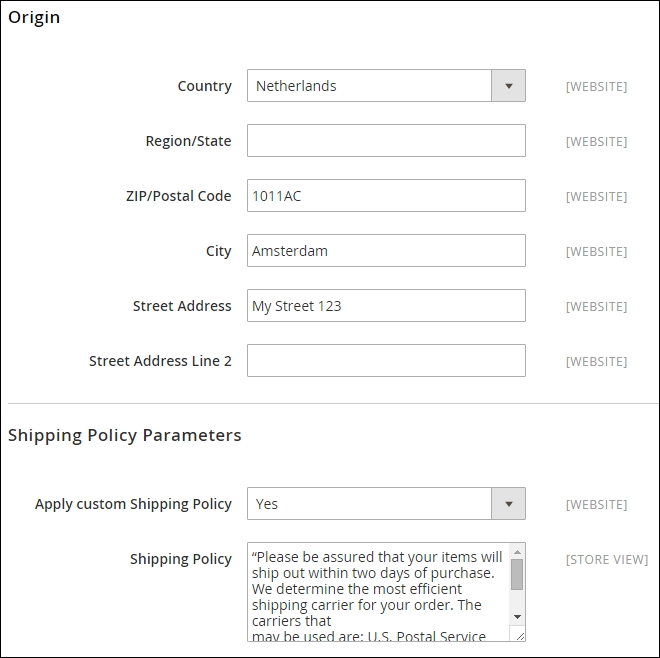
Since the scope of this recipe is Table Rates, using Free Shipping and Flat Rate is pretty straightforward.
Now click on the Table Rates drop-down arrow, and commit the following information:
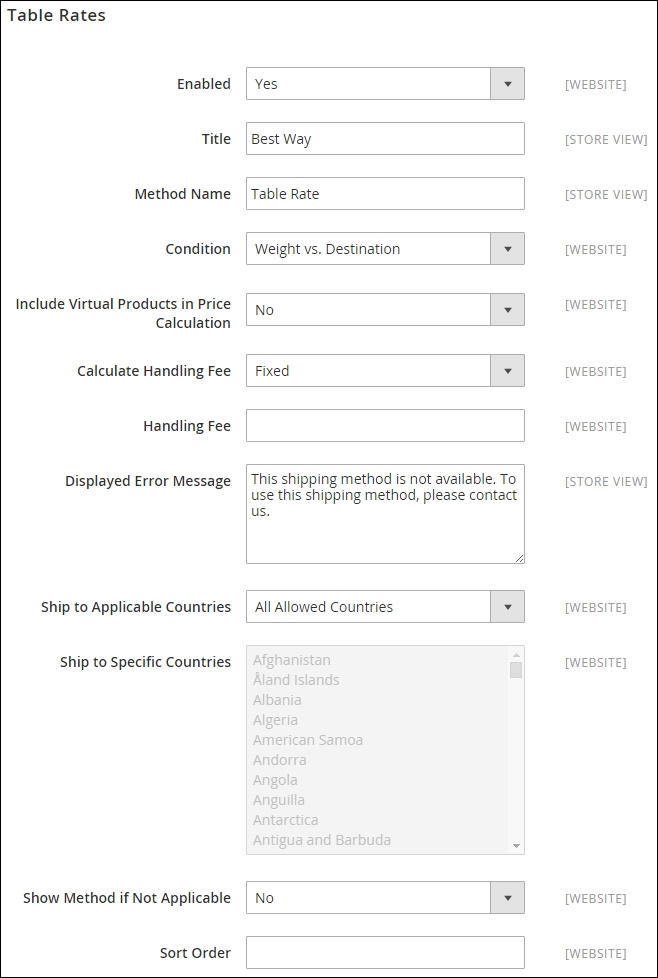
In the Condition drop-down menu we use the Weight vs. Destination option. Beside this option we also can choose from Price vs. Destination or # (number) of items vs. Destination. Depending on your needs, pick one of them. Since we are using the Weight option, we need to make sure that our entire product set has the correct weight configured.
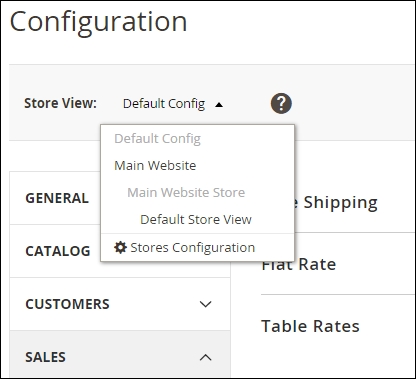
tablesrates.csv that we need to complete. Download the file and open up a spreadsheet editor, such as MS Excel, OpenOffice Calc, or Google Docs Spreadsheet.Since we are using the Weight vs. Destination option, the CSV schema looks as follows:
|
Country |
Region/State |
Zip/Postal Code |
Weight (and above) |
Shipping Price |
|---|---|---|---|---|
|
NLD |
* |
* |
0 |
6.95 |
|
NLD |
* |
* |
50 |
9.95 |
|
NLD |
* |
* |
100 |
14.50 |
|
DEU |
* |
* |
0 |
10.50 |
|
DEU |
* |
* |
50 |
17.50 |
|
DEU |
* |
* |
100 |
22.50 |
|
FRA |
* |
* |
0 |
10.50 |
|
FRA |
* |
* |
50 |
17.50 |
|
FRA |
* |
* |
100 |
22.50 |
In this example, we use a wildcard for the Region/State and Zip/Postal Code. You can replace this wildcard with the appropriate value. Upload your saved tablesrates.csv file in the Import section and click Save Config, and clean the cache:
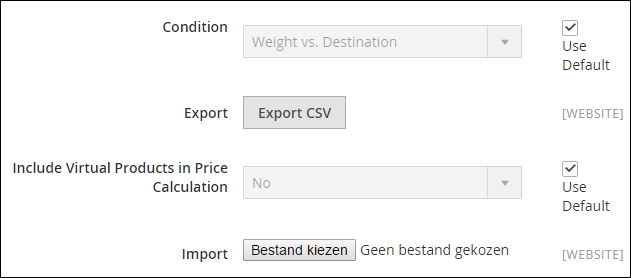
50 and click Save & Close. Do the same for Strive Shoulder Pack (49) and Crown Summit Backpack (51). Your product grid should now look as follows: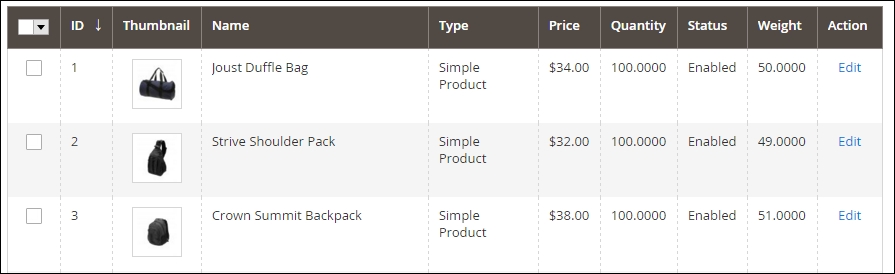
We only used German, French, and Dutch codes in this example. If you want to have your country shipping fees in the Table Rate CSV file, update them accordingly:
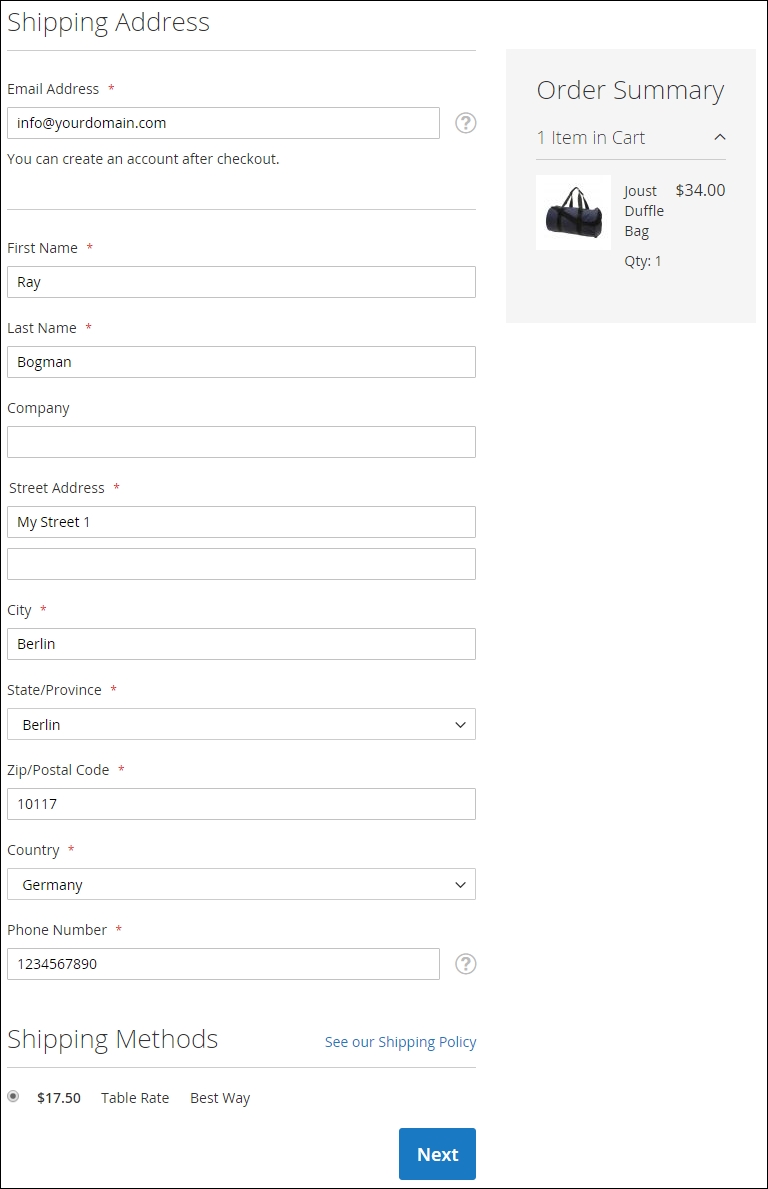
EU Customers. Now let's select all the EU countries with the (standard) tax Rate and click Save Rule: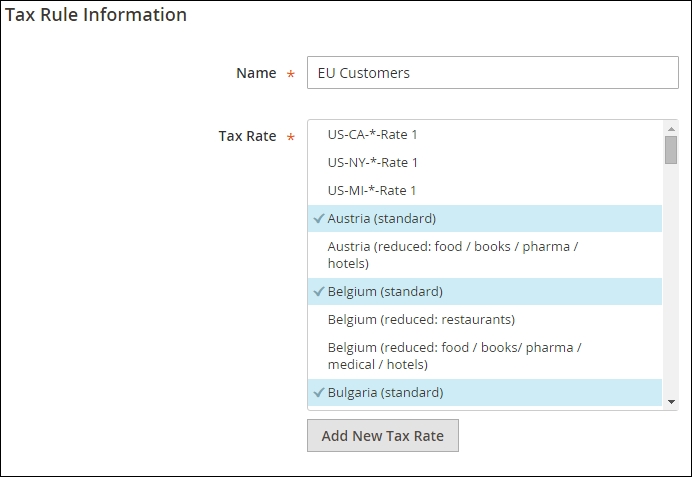
In this example we set the default rule to the high tax rate. Create a new rule when you are selling services or products that have a lower tax rate. But don't forget to create a new Product Tax Class in the Additional Settings. This class can then be used in every product type where it applies.
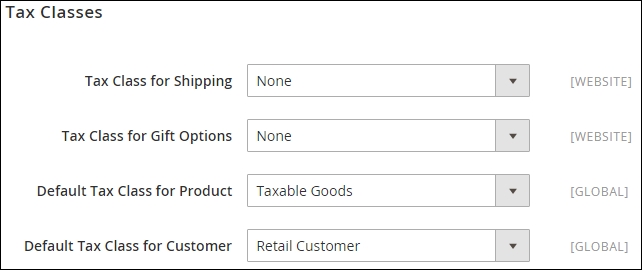
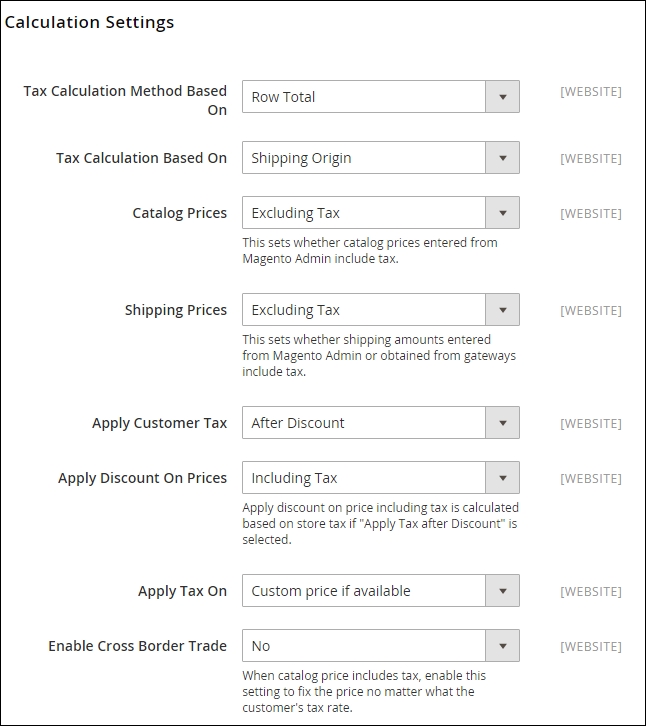
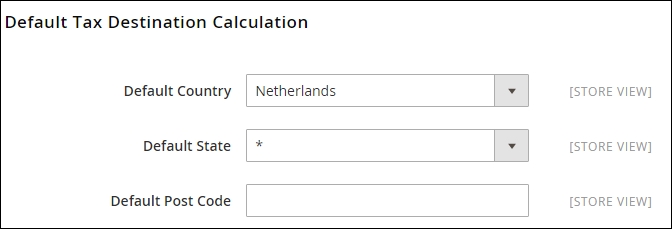
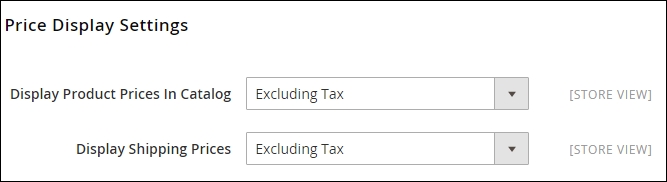
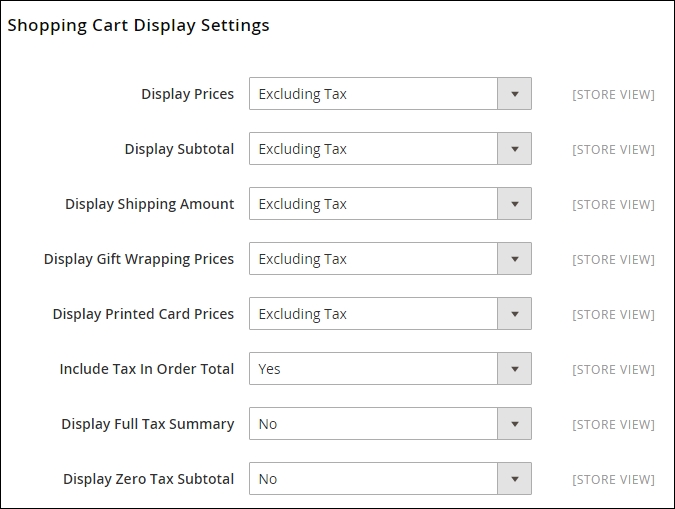
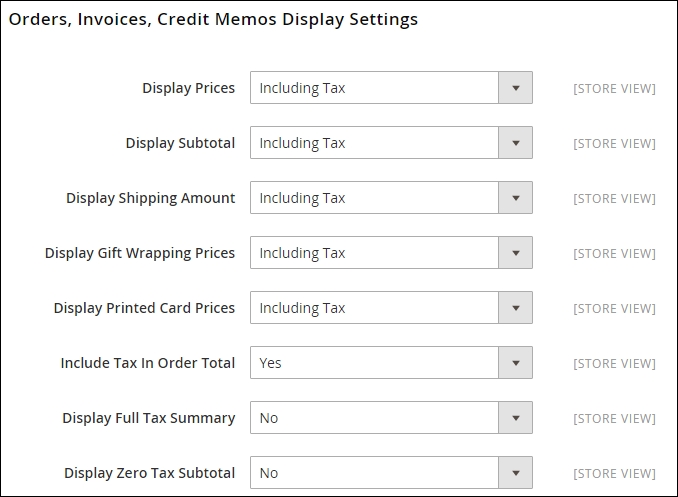
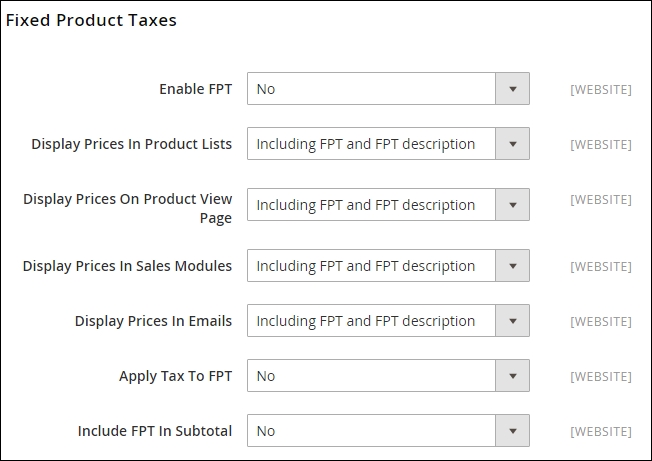

Let's recap and find out what we did throughout the preceding recipe. In Steps 1 through 10, we configured a shipping method called Table Rates to handle all the shipping. We used the Weight vs. Destination option. Using this option we needed to update all our products with the correct weight attribute value.
In Steps 12 through 18, we configured tax rules for the European Union using a tax_rates.csv file from GitHub. By using this file, it was easy to configure the appropriate tax rule. In Step 15, we gave an example of how a system configuration for a store view could look.
Depending on where you live or are sending products to, using the correct measuring units in Magento 2 is important. This new feature helps us to configure whether we calculate the weight in lbs (pounds) or kgs (kilograms). We can find this new option in Stores | Configuration | General | Locale Options. Here is an example showing the Weight Unit field:
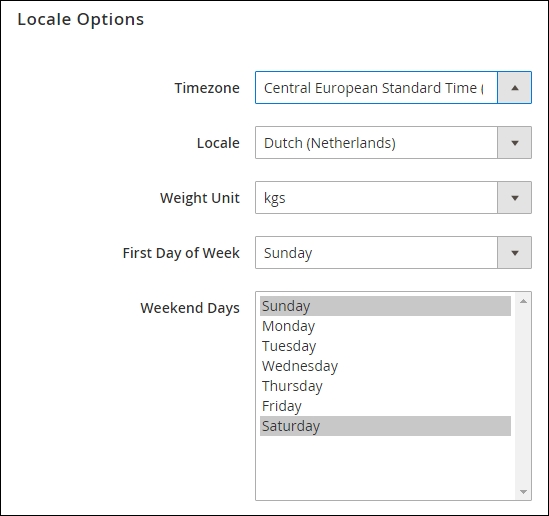
Everybody knows that every website is different. Some sites only sell products to Business to Consumer (B2C) while others sell to Business to Business (B2B) or both.
In the B2C market it is pretty common to only have one customer group called Retailer. While the B2B market is related to the Wholesaler. Beside these two, we could also have groups such as Platinum, Gold, Silver, Special members, or groups based on their location. So the options are unlimited. Setting up the correct infrastructure for your customers helps you to segment these groups and offer them different prices.
Magento offers by default the following groups: General, NOT LOGGED IN, Retailer, and Wholesale.
To step through this recipe, you will use a Droplet created in Chapter 1, Magento 2 System Tools at DigitalOcean https://www.digitalocean.com/. We will be using an NGINX, PHP-FPM, Composer-based setup including sample data. No other prerequisites are required.
For the purpose of this recipe, let's assume that we need to add additional customer groups. We want to create the following groups: Platinum, Gold, and Silver. The following steps will guide you through this.
crontab configured correctly, you do not have to worry about this. Magento 2 will update this for you every minute.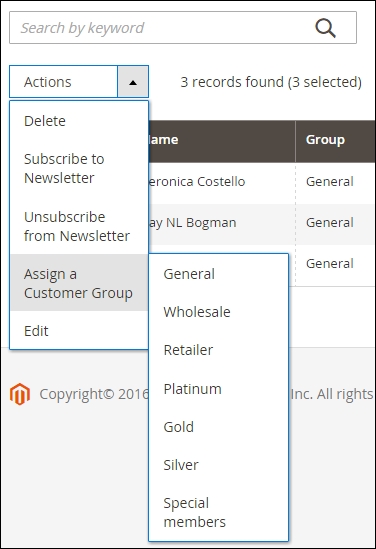
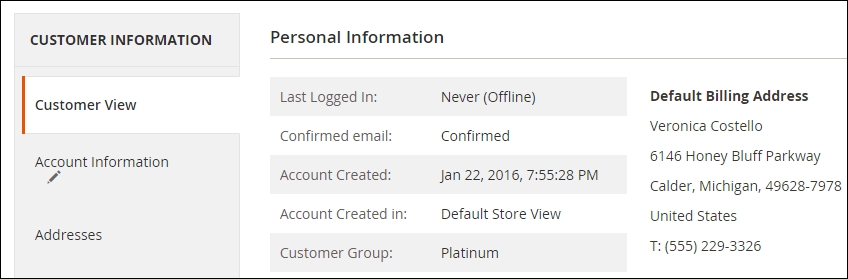
Let's recap and find out what we did throughout the preceding recipe. In Steps 1 through 6, we configured different Customer Groups and connected them to the appropriate customer.
Creating customers groups basically does nothing. It is the relation to marketing or segmentation that makes the difference. In Magento 2, we got Catalog and Cart Price Rules. When combining them with the Customers Group we are able to create member discounts.
Go to Marketing | Promotions | Catalog Price Rules, or Cart Price Rules and click Add New Rule. In the General Information section we see the Customer Groups list.
Now go ahead and create a new rule and use one of the groups. Here is an example. Create a new rule called Platinum 25%, and select the Customer Groups Platinum. Now go to the Actions tab menu and choose the Apply rule: Percent of product price discount. In the Discount Amount commit 25. This is the amount of percent the Platinum member gets discounted from the total of his shopping cart.
Make sure when testing that the customer login is in this group.
When selling physical products, it makes sense that every product in the warehouse is related to inventory or stock management. Configuring and managing stock is a day-to-day job. A basic inventory setup in Magento 2 is straightforward and comparable to Magento 1. With growth, a product inventory management (PIM) system will be needed.
To step through this recipe, you will use a Droplet created in Chapter 1, Magento 2 System Tools at DigitalOcean https://www.digitalocean.com/. We will be using an NGINX, PHP-FPM, Composer-based setup including sample data. No other prerequisites are required.
For the purpose of this recipe, let's assume that we need to configure an inventory for a Magento 2 setup. The following steps will guide you through this.
In Stock Options you can configure the following:
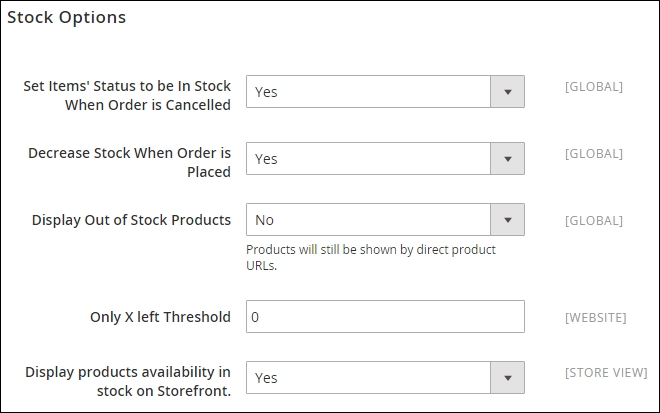
All options are self-explanatory. One of the more interesting options is Display Out of Stock Products. This can be used to show the product even when it is currently not available. Some websites have a limited stock amount; by using this, the product is not always removed from the web, which is bad for search engine optimization (SEO).
The Out-of-Stock Threshold is set as Global, which means that it is related to all the products. Minimum Qty Allowed in Shopping Cart is related to the Customer Groups we created in the Managing customer groups recipe. Configuring the correct Minimum Qty amount helps to set the default before the discount rule applies. Automatically Return Credit Memo Item to Stock is helpful in managing credit orders. After creating a credit order, all items are updated in the current stock:
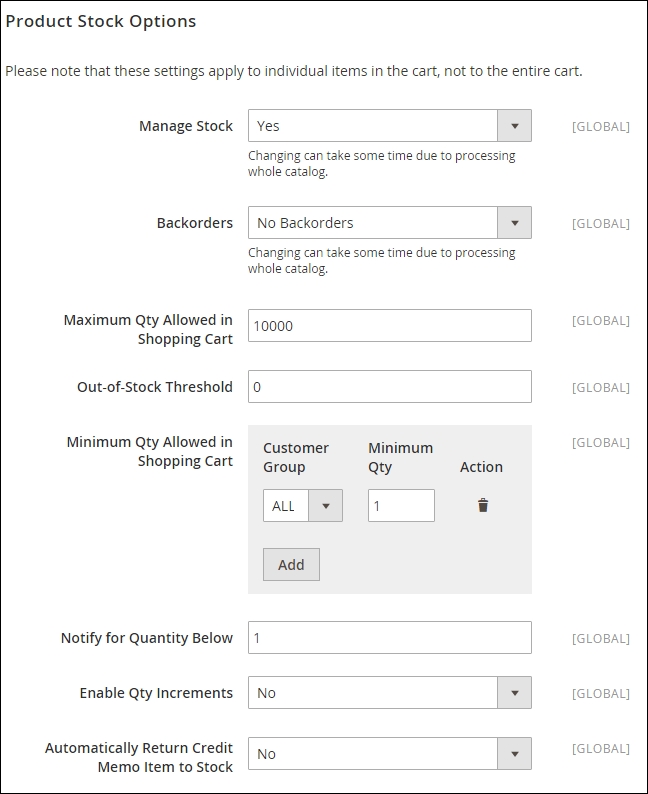
In Advanced Inventory you can configure the following. All options are self-explanatory. Interesting options are Qty Uses Decimals and Allow Multiple Boxes for Shipping.
The Qty Uses Decimals setting determines whether decimals will be used in the quantity field for the product (for example, 3.5 yards) or not.
The Allow Multiple Boxes for Shipping setting determines whether multiple boxes will be used for the product during shipping (for example, custom build computer incl. monitor) or not:
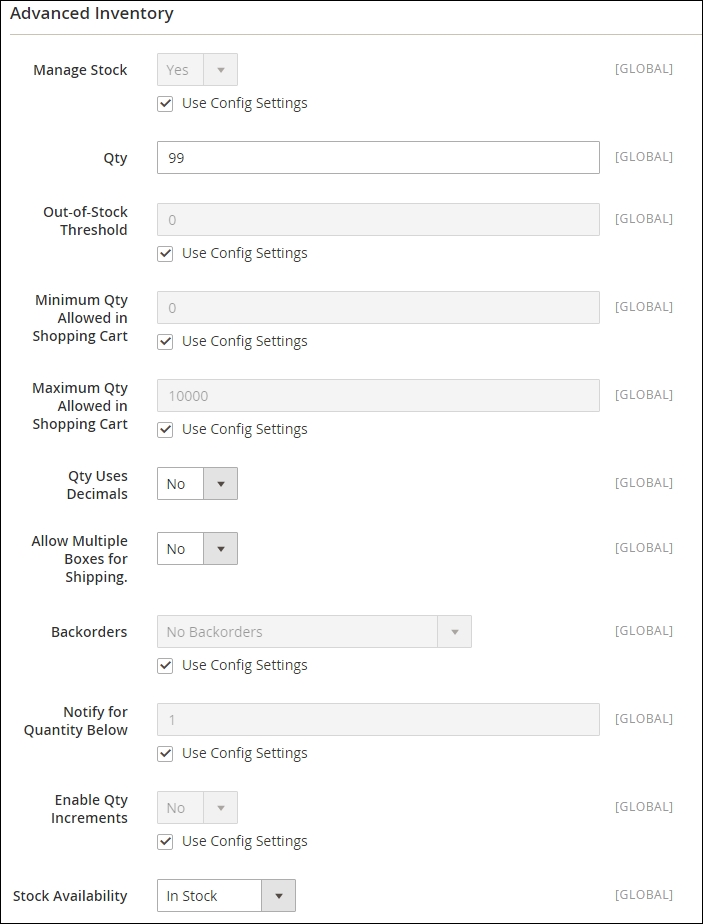
Every website selling products uses some kind of currency. Without a valid currency things would start to get messy.
Configuring these currencies is pretty straightforward. The most interesting part is the currency rate exchange. Every day this rate needs to be checked and updated. Decreases in value are important on the product you sell. So choosing the correct default currency needs to be considered appropriately.
To step through this recipe, you will use a Droplet created in Chapter 1, Magento 2 System Tools at DigitalOcean https://www.digitalocean.com/. We will be using an NGINX, PHP-FPM, Composer-based setup including sample data. No other prerequisites are required.
For the purpose of this recipe, let's assume that we need to configure three currencies—US Dollar, Euro, and Pound Sterling—with Magento 2. The following steps will guide you through this.
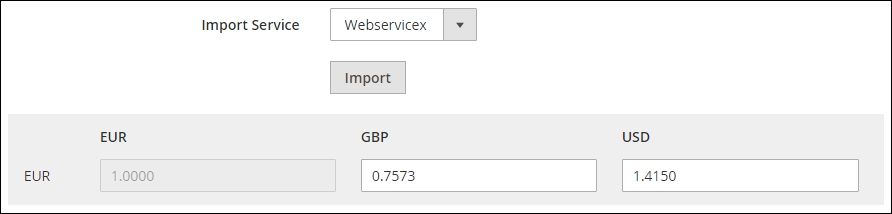
Let's recap and find out what we did throughout the preceding recipe. In Steps 1 through 5, we configured additional currency for our website. Depending on the currencies you are selling, this can be updated in the backend. On the frontend, customers can easily switch and buy in their preferred currency.
Selling products can be hard. Lots of websites are selling the same product. But how can we attract new customers and persuade them to buy our goods?
Many websites have the same default retail price shown on their site. When using advanced pricing we can show special prices within a particular date range, or display tier prices for our beloved platinum members.
Another option could be using a minimum advertised price (MAP). This feature is useful if your product manufacturer has established a Manufacturer's Suggested Retail Price (MSRP), and you want to sell the product at a price lower than the MSRP. What this feature basically does is hide the product price display in your catalog and only shows this during product purchase.
To step through this recipe, you will use a Droplet created in Chapter 1, Magento 2 System Tools at DigitalOcean https://www.digitalocean.com/. We will be using an NGINX, PHP-FPM, Composer-based setup including sample data. No other prerequisites are required.
For the purpose of this recipe, let's assume that we need to create advanced pricing for some of our products in Magento 2. The following steps will guide you through this.
You can choose from Use Config, On Gesture, In Cart, and Before Order Confirmation.
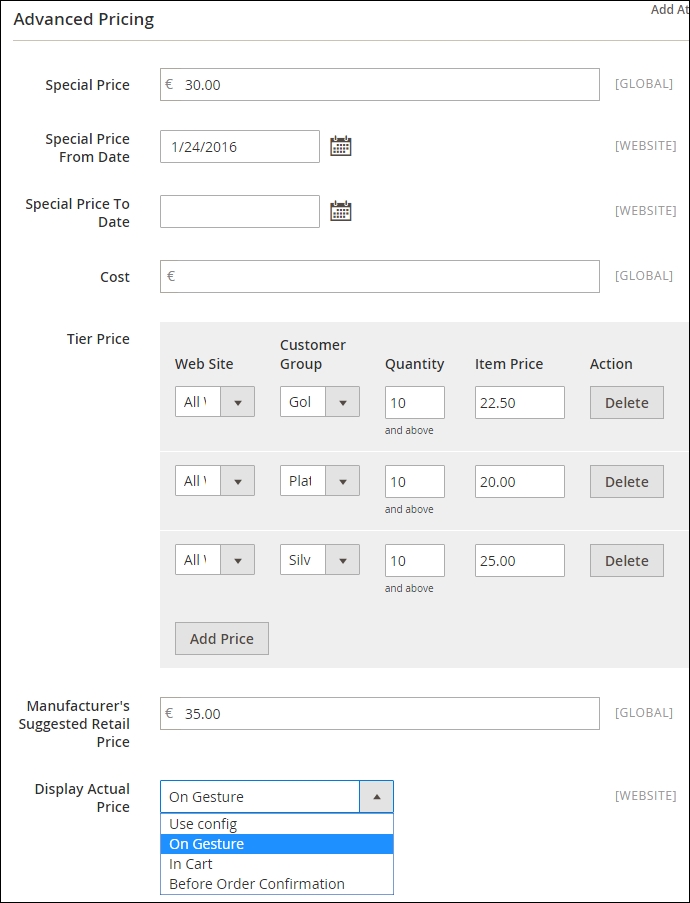
http://yourdomain.com/joust-duffle-bag.html. Depending on your configuration, it should look as follows:
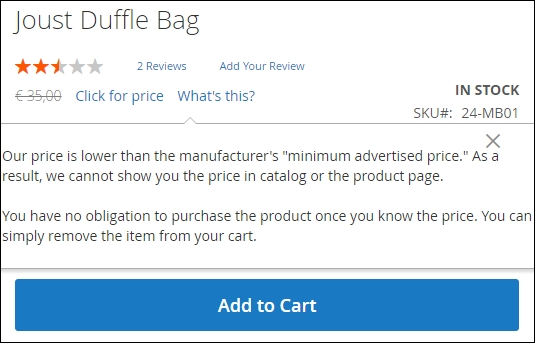
In this chapter, we will cover the basics on how to create your own Magento 2 extensions with the following recipes:
Now that we have installed and configured Magento 2, we will see the basics on how to create a new Magento 2 extension. If you are familiar with creating an extension for Magento 1.x, you will notice that there are some concepts that look a lot like how it is done in Magento 1. However, as the code is a completely new framework, there are also lots of changes in the module structure and necessary files.
Some of the major changes that change the way a extension is created are as follows:
Mage::getModel() (or similar functions), but injected into your class through a dependency injection.The way in which a new extension is built in Magento 2 is a bit different than it was in Magento 1. The major change is that all files are now included in the extension directory. This makes it easier to manage and remove.
The location of an extension is also different; there are no longer separate codepools as used in Magento 1 (core, community, and local). Depending on the way the extension is installed, the extension will be running from the vender directory when installed through Composer. For project-specific extensions, it is also possible to place them in app/code.
When developing an extension, it is advised to run Magento 2 in developer mode as this will give better error messages explaining what went wrong and make debugging a lot easier.
To display all PHP errors and activate developer mode, activate the display_errors setting in app/bootstrap.php and run the following command:
bin/magento deploy:mode:set developer
The code used in this chapter is based on naming the module Genmato_Sample and all files will be placed in the following:
app/code/Genmato/Sample/
Follow these steps to initialize a new extension:
etc/module.xml:
<?xml version="1.0"?>
<config xmlns:xsi="http://www.w3.org/2001/XMLSchema-instance" xsi:noNamespaceSchemaLocation="urn:magento:framework:Module/etc/module.xsd">
<module name="Genmato_Sample" setup_version="0.1.3">
<sequence>
<module name="Magento_Store"/>
</sequence>
</module>
</config>registration.php
<?php \Magento\Framework\Component\ComponentRegistrar::register( \Magento\Framework\Component\ComponentRegistrar::MODULE, 'Genmato_Sample', __DIR__ );
composer.json file:composer.json
{
"name": "genmato/sample",
"description": "Genmato Magento2 Sample extension",
"keywords": ["magento2", "genmato", "m2sample"],
"type": "magento2-module",
"license": "OSL-3.0",
"require": {
"php": "~5.5.0|~5.6.0|~7.0.0"
},
"autoload": {
"files": [ "registration.php" ],
"psr-4": {
"Genmato\\Sample\\": ""
}
}
}
bin/magento module:enable Genmato_Sample
bin/magento setup:upgrade
The module declaration in step 1 registers the module in Magento; here, the version number and dependencies are also specified to manipulate the load order. The following XML nodes are available:
Genmato_Sample0.1.3 is used for the setup/upgrade scripts creating database schemasWith the use of Composer, modules can be placed in two locations currently. In order for the autoloader to know what file to load when a class is instantiated, the path needs to be registered. Through registration.php from step 2, the (__DIR__) location is stored for a specified package. The registration can be done for the following types of packages:
MODULE: This is for extensions/modulesLIBRARY: This is for extensions that are used as a libraryTHEME: This is for themesLANGUAGE: This is for language packsIn order to use Composer to install the module, it is required to add a composer.json file to the module. The most important elements in this file are as follows:
Name: The extension package name is in the format of <vendor name>/<extension name>; it is important to only use lowercase letters. This name is also used to install the extension through Composer.Type: This defines the package type; the possible options are as follows:magento2-module: Extensions/modulesmagento2-theme: Themesmagento2-language: Language packagesrequire: This defines the packages needed to be installed on the system for this package to work. During installation of the package, Composer will check the requirements and try to install the missing packages. When it's not possible to install them, the installation will fail.Autoload: This element is to specify information that needs to be loaded through the Composer autoloader.In order to install packages in your project, they have to be available for Composer to install. There are a few options available to install packages from:
composer.json file located in your Magento 2 installation root:{
"repositories": [
{
"type": "vcs",
"url": "https://github.com/[github account]/[package]"
}
]
}On Packagist, you can submit your package by specifying your extension repository URL:
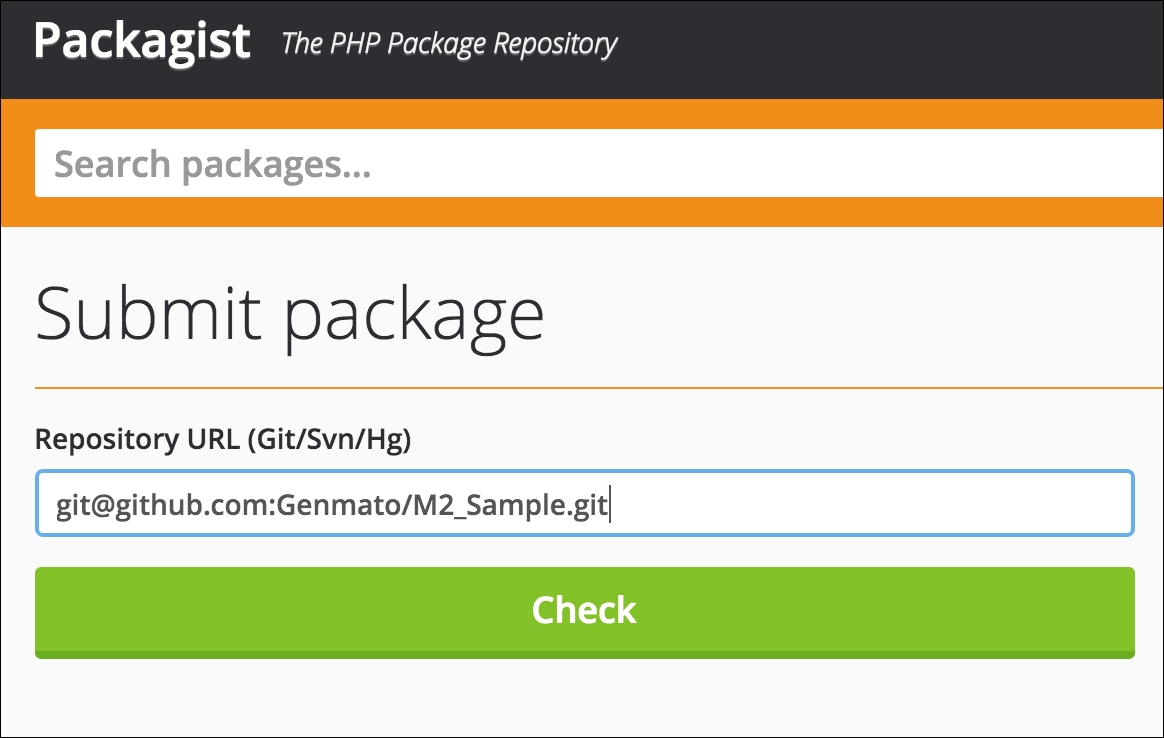
Every package is now installable by running the following command in your Magento 2 installation root:
composer require <vendor-name>/<module-name>
Storing data in a database table is handled through a Model class; this model holds the data. While saving the data, a ResourceModel is used, and this class is the link between the Model and database table, and all CRUD operations go through the ResourceModel. When loading a set of records, a Collection is used; it is possible to apply filters to this collection.
Using database models requires that the module configuration is done correctly; otherwise, the autoloader won't be able to find the files to load.
The following steps in this recipe will add the database models to your module:
Model class:Model/Demo.php
<?php namespace Genmato\Sample\Model; use Magento\Framework\Model\AbstractModel; class Demo extends AbstractModel { /** * Initialize resource model * @return void */ protected function _construct() { $this->_init('Genmato\Sample\Model\ResourceModel\Demo'); } }
ResourceModel class:Model/ResourceModel/Demo.php
<?php namespace Genmato\Sample\Model\ResourceModel; use Magento\Framework\Model\ResourceModel\Db\AbstractDb; class Demo extends AbstractDb { /** * Initialize resource model * @return void */ protected function _construct() { $this->_init('genmato_demo', 'demo_id'); } }
Collection class:Model/ResourceModel/Demo/Collection.php
<?php namespace Genmato\Sample\Model\ResourceModel\Demo; use Magento\Framework\Model\ResourceModel\Db\Collection\AbstractCollection; class Collection extends AbstractCollection { /** * @var string */ protected $_idFieldName = 'demo_id'; /** * Define resource model * @return void */ protected function _construct() { $this->_init('Genmato\Sample\Model\Demo', 'Genmato\Sample\Model\ResourceModel\Demo'); } }
The Model class specifies the used ResourceModel in the constructor through the _init() function. When the save() function is called on a Model, it will call the save() function on the ResourceModel; see the save() function in AbstractModel that is extended:
/**
* Save object data
*
* @return $this
* @throws \Exception
*/
public function save()
{
$this->_getResource()->save($this);
return $this;
}Here, _getResource() returns an instance of the class specified in the _init() function.
In the ResourceModel class constructor, the _init() function is called to specify the genmato_demo database table and primary key in the demo_id table. This will be used when creating the queries necessary to load or save the data. Depending on the action performed (save new, save existing, or delete), a corresponding query is generated using an INSERT, UPDATE, or DELETE query. This is handled by the framework and is built (currently) on the Zend_Db_Adapter_Pdo_Mysql class.
In the Collection class, both Model and ResourceModel are specified in the _init() function. ResourceModel is necessary to connect to the database and load the records from the right database table, allowing you to use filters to select the records necessary. The collection is then represented as an array of Models to allow all functionality available to models (magic getters/setters, adding data, and delete/save).
When using database models, as explained in the previous recipe, the corresponding tables needs to be created during setup. These operations are placed in setup scripts and executed during the installation of an extension.
While running the installation of a module, there are four files executed to create schemas and insert data. To create schemas, the files used are as follows:
Setup/InstallSchema.php
Setup/UpgradeSchema.php
The installation file is executed only when there is no record in the setup_module table for the module. The upgrade file is executed only when the current version number in the setup_module table is lower than the version configured in your etc/module.xml file.
When it's necessary to insert default values into a table or new EAV attributes need to be created, these actions need to be configured in the following files:
Setup/InstallData.php
Setup/UpgradeData.php
Magento keeps track of which version is installed for an extension in the setup_module table; here, the current installed version for the schema and data is stored:
Follow these steps to create your database tables:
Setup/InstallSchema.php
<?php
namespace Genmato\Sample\Setup;
use Magento\Framework\Setup\InstallSchemaInterface;
use Magento\Framework\Setup\ModuleContextInterface;
use Magento\Framework\Setup\SchemaSetupInterface;
use Magento\Framework\DB\Adapter\AdapterInterface;
class InstallSchema implements InstallSchemaInterface
{
public function install(SchemaSetupInterface $setup, ModuleContextInterface $context)
{
$installer = $setup;
$installer->startSetup();
/**
* Create table 'genmato_demo'
*/
$table = $installer->getConnection()->newTable(
$installer->getTable('genmato_demo')
)->addColumn(
'demo_id',
\Magento\Framework\DB\Ddl\Table::TYPE_SMALLINT,
null,
['identity' => true, 'nullable' => false, 'primary' => true],
'Demo ID'
)->addColumn(
'title',
\Magento\Framework\DB\Ddl\Table::TYPE_TEXT,
255,
['nullable' => false],
'Demo Title'
)->addColumn(
'creation_time',
\Magento\Framework\DB\Ddl\Table::TYPE_TIMESTAMP,
null,
[],
'Creation Time'
)->addColumn(
'update_time',
\Magento\Framework\DB\Ddl\Table::TYPE_TIMESTAMP,
null,
[],
'Modification Time'
)->addColumn(
'is_active',
\Magento\Framework\DB\Ddl\Table::TYPE_SMALLINT,
null,
['nullable' => false, 'default' => '1'],
'Is Active'
)->addIndex(
$setup->getIdxName(
$installer->getTable('genmato_demo'),
['title'],
AdapterInterface::INDEX_TYPE_FULLTEXT
),
['title'],
['type' => AdapterInterface::INDEX_TYPE_FULLTEXT]
)->setComment(
'Demo Table'
);
$installer->getConnection()->createTable($table);
$installer->endSetup();
}
}
bin/magento setup:upgrade
In Magento 2, the running of the setup scripts is no longer triggered by the first request after flushing the cache; to initiate the running of these scripts, run the command specified in step 2. When running the upgrade command, all modules are evaluated on their current version and module version in the configuration file. First, all schema installations/updates are executed, and next, the data installations/updates are processed.
The InstallData and InstallSchema files are executed only when there is no prior registration of the extension in the setup_module table. To run the installation files during testing, it is possible to remove the module row from the table and run the bin/magento setup:upgrade command.
The available methods to create a new table are defined in the Magento\Framework\DB\Adapter\AdapterInterface\Table class and are as follows:
addColumn: This adds a new column to the table; this method has the following parameters:name: This is the name of the tabletype: This is the table type; the available column types are defined as constants in the Magento\Framework\DB\Adapter\AdapterInterface\Table class as TYPE_*:TYPE_BOOLEAN
TYPE_SMALLINT
TYPE_INTEGER
TYPE_BIGINT
TYPE_FLOAT
TYPE_NUMERIC
TYPE_DECIMAL
TYPE_DATE
TYPE_TIMESTAMP
TYPE_DATETIME
TYPE_TEXT
TYPE_BLOB
TYPE_VARBINARY
size: This specifies the size of the columnoptions: This is used to specify extra column options; the available options are as follows:unsigned: This is only for number types; allows True/False (default: False)
precision: This is only for decimal and numeric types (default: calculated from size parameter or 0 if not set)
scale: This is only for decimal and numeric types (default: calculated from size parameter or 10 if not set)
default: The default value is used when creating a new record
nullable: In case a column is NULL (default: True)
primary: This makes a column a primary key
primary_position: This is only for primary keys and sets the sort order for the primary keys
identity/auto_increment: This auto-increments a column on inserting a new record (used to identify a unique record ID)
comment: This is the description of the columnaddForeignKey: This adds a foreign key relation to another table; the parameters allowed are as follows:fkName: This is the name of the foreign keycolumn: This is the column used as the foreign keyrefTable: This is the table where the key references torefColumn: This is the column name in the referenced tableonDelete: This sets the action to be performed when deleting a record; the available options are (constants as defined in Magento\Framework\DB\Adapter\AdapterInterface\Table):ACTION_CASCADE
ACTION_RESTRICT
ACTION_SET_DEFAULT
ACTION_SET_NULL
ACTION_NO_ACTION
addIndex: This adds a column to the search index; the available parameters are as follows:indexName: This is the name used for the indexfields: These are the column(s) used for the index (can be a single column or an array of columns)options: This is an array with extra options; currently, only the option type is used to specify the index typeWhen changing an existing table, it is possible to use the following methods; these are the methods that can be used directly on the $installer->getConnection() class:
dropTable: This removes a table from the database; the available parameters are as follows:tableName: This is the name of the table to deleteschemaName: This is the optional schema name usedrenameTable: This renames a table from the database; the available parameters are as follows:oldTableName: This is the current name of the tablenewTableName: This is the new name for the tableschemaName: This is the optional schema nameaddColumn: This adds an extra column to a table; the available parameters are as follows:tableName: This is the name of the table to altercolumnName: This is the name of the new columndefinition: This is an array with the following parameters:Type: Column type
Length: Column size
Default: Default value
Nullable: If a column can be NULL
Identify/Auto_Increment: Used as an identity column
Comment: Column description
After: Specify where to add the column
schemaName: This is the optional schema namechangeColumn: This changes the column name and definition; the available parameters are as follows:tableName: This is the name of the table to changeoldColumnName: This is the current column namenewColumnName: This is the new name for the columndefinition: This is the table definition; see addColumn for available valuesflushData: This flushes the table cacheschemaName: This is the optional schema namemodifyColumn: This changes the column definition; the available parameters are as follows:dropColumn: This removes a column from the table; the available parameters are as follows:tableName: This is the name of the columncolumnName: This is the name of the column to removeschemaName: This is the optional schema nameaddIndex: This adds a new index; the available parameters are as follows:tableName: This is the name of the table to changeindexName: This is the name of the index to addfields: These are the columns to be used as the indexindexType: This is the type of index; the available options (constants defined in (Magento\Framework\DB\Ddl\Table\AdapterInterface) are as follows:INDEX_TYPE_PRIMARY
INDEX_TYPE_UNIQUE
INDEX_TYPE_INDEX
INDEX_TYPE_FULLTEXT
schemaName: This is the optional schema namedropIndex: This removes an index from a table; the available parameters are as follows:tableName: This is the name of the columnindexName: This is the name of the indexschemaName: This is the optional schema nameaddForeignKey: This adds a new foreign key; the available parameters are as follows:fkName: This is the name of the foreign keytableName: This is the name of the tablecolumnName: This is the name of the column used in the foreign keyrefTableName: This is the name of the referenced tablerefColumnName: This is the name of the referenced columnonDelete: This is the action to perform on delete (see the preceding addForeignKey description for available options)purge: This removes invalid data (default: false)schemaName: This is the optional schema namerefSchemaName: This is the option-referenced schema nameWhen, in a later version of the extension, there are extra fields necessary (or the current fields need to be changed), this is handled through the UpgradeSchema function, upgrade:
Setup/UpgradeSchema.php
<?php
namespace Genmato\Sample\Setup;
use Magento\Framework\DB\Ddl\Table;
use Magento\Framework\Setup\UpgradeSchemaInterface;
use Magento\Framework\Setup\ModuleContextInterface;
use Magento\Framework\Setup\SchemaSetupInterface;
class UpgradeSchema implements UpgradeSchemaInterface
{
public function upgrade(SchemaSetupInterface $setup, ModuleContextInterface $context)
{
$setup->startSetup();
if (version_compare($context->getVersion(), '0.1.1', '<')) {
$connection = $setup->getConnection();
$column = [
'type' => Table::TYPE_SMALLINT,
'length' => 6,
'nullable' => false,
'comment' => 'Is Visible',
'default' => '1'
];
$connection->addColumn($setup->getTable('genmato_demo'), 'is_visible', $column);
}
$setup->endSetup();
}
}As this file is run every time the module version is different than the currently installed version, it is necessary to check the current version that is installed to execute only the updates necessary:
if (version_compare($context->getVersion(), '0.1.1', '<')) {The preceding statement will make sure that the schema changes are executed only if the current version is less than 0.1.1.
In order to provide default content during installation (this can be records in a table or adding extra attributes to some entity), the data installation function is used:
Setup/InstallData.php
<?php
namespace Genmato\Sample\Setup;
use Genmato\Sample\Model\Demo;
use Genmato\Sample\Model\DemoFactory;
use Magento\Framework\Setup\InstallDataInterface;
use Magento\Framework\Setup\ModuleContextInterface;
use Magento\Framework\Setup\ModuleDataSetupInterface;
class InstallData implements InstallDataInterface
{
/**
* Demo factory
*
* @var DemoFactory
*/
private $demoFactory;
/**
* Init
*
* @param DemoFactory $demoFactory
*/
public function __construct(DemoFactory $demoFactory)
{
$this->demoFactory = $demoFactory;
}
/**
* {@inheritdoc}
* @SuppressWarnings(PHPMD.ExcessiveMethodLength)
*/
public function install(ModuleDataSetupInterface $setup, ModuleContextInterface $context)
{
$demoData = [
'title' => 'Demo Title',
'is_active' => 1,
];
/**
* Insert demo data
*/
$this->createDemo()->setData($demoData)->save();
}
/**
* Create demo
*
* @return Demo
*/
public function createDemo()
{
return $this->demoFactory->create();
}
}In this example, there is one record created in the table created during setup. For this, the DemoFactory class is injected through dependency injection into the constructor function of this class. DemoFactory is an automatically created class that allows you to instantiate a class (in this case, Genmato\Sample\Model\Demo) without injecting this directly into the constructor. Here, this is done in the createDemo function:
$this->demoFactory->create();
Similar to SchemaUpgrade, there is also a DataUpgrade option to insert data while upgrading to a newer version.
In order to display data from your extension on the frontend (the public part of the website), the following is necessary:
Follow these steps to extend your module with a frontend web route and output data from a template file:
etc/frontend/routes.xml
<?xml version="1.0"?>
<config xmlns:xsi="http://www.w3.org/2001/XMLSchema-instance" xsi:noNamespaceSchemaLocation="urn:magento:framework:App/etc/routes.xsd">
<router id="standard">
<route id="sample" frontName="sample">
<module name="Genmato_Sample" />
</route>
</router>
</config>Controller/Index/Index.php
<?php
namespace Genmato\Sample\Controller\Index;
use Magento\Framework\App\Action\Action;
class Index extends Action
{
/**
* @var \Magento\Framework\View\Result\PageFactory
*/
protected $resultPageFactory;
/**
* @param \Magento\Framework\App\Action\Context $context
* @param \Magento\Framework\View\Result\PageFactory resultPageFactory
*/
public function __construct(
\Magento\Framework\App\Action\Context $context,
\Magento\Framework\View\Result\PageFactory $resultPageFactory
)
{
$this->resultPageFactory = $resultPageFactory;
parent::__construct($context);
}
/**
* Renders Sample Index
*/
public function execute()
{
return $this->resultPageFactory->create();
}
}view/frontend/layout/sample_index_index.xml
<?xml version="1.0"?>
<page xmlns:xsi="http://www.w3.org/2001/XMLSchema-instance" layout="1column" xsi:noNamespaceSchemaLocation="urn:magento:framework:View/Layout/etc/page_configuration.xsd">
<head>
<title>Sample DemoList</title>
</head>
<body>
<referenceContainer name="content">
<block class="Genmato\Sample\Block\DemoList" name="demoList" template="Genmato_Sample::list.phtml" />
</referenceContainer>
</body>
</page>Block class is called to render the template specified:Block/DemoList.php
<?php
namespace Genmato\Sample\Block;
use Magento\Framework\View\Element\Template;
use Genmato\Sample\Model\ResourceModel\Demo\Collection as DemoCollection;
use Magento\Store\Model\ScopeInterface;
class DemoList extends Template
{
/**
* Demo collection
*
* @var DemoCollection
*/
protected $_demoCollection;
/**
* Demo resource model
*
* @var \Genmato\Sample\Model\ResourceModel\Demo\CollectionFactory
*/
protected $_demoColFactory;
/**
* @param Template\Context $context
* @param \Genmato\Sample\Model\ResourceModel\Demo\CollectionFactory $collectionFactory
* @param array $data
* @SuppressWarnings(PHPMD.ExcessiveParameterList)
*/
public function __construct(
Template\Context $context,
\Genmato\Sample\Model\ResourceModel\Demo\CollectionFactory $collectionFactory,
array $data = []
) {
$this->_demoColFactory = $collectionFactory;
parent::__construct(
$context,
$data
);
}
/**
* Get Demo Items Collection
* @return DemoCollection
*/
public function getDemoItems()
{
if (null === $this->_demoCollection) {
$this->_demoCollection = $this->_demoColFactory->create();
}
return $this->_demoCollection;
}
}Block class can be used to build the page:view/frontend/templates/list.phtml
<table>
<tr>
<td>ID</td>
<td>Title</td>
</tr>
<?php foreach($block->getDemoItems() as $item): ?>
<tr>
<td><?php echo $item->getId(); ?></td>
<td><?php echo $item->getTitle();?></td>
</tr>
<?php endforeach; ?>
</table>bin/magento cache:clean
In your browser, open http://[your hostname]/sample/index/index/. This will result in the following page when you access the URL:
When a request is received in the application, the path is evaluated and executed in the following order:
index.php.index.php file creates a bootstrap:$bootstrap = \Magento\Framework\App\Bootstrap::create(BP, $_SERVER);
bootstrap creates a new HTTP application:$app = $bootstrap->createApplication('Magento\Framework\App\Http');bootstrap application is started:$bootstrap->run($app);
run function of the bootstrap class, the created application is launched:$response = $application->launch();
frontcontroller and dispatch the request:$frontController = $this->_objectManager->get('Magento\Framework\App\FrontControllerInterface');
$result = $frontController->dispatch($this->_request);frontcontroller loops through all the available configured controllers and checks whether there is a match. When a match is found, the controller is instantiated and the execute method is called:$result = $actionInstance->execute();
To activate a route on the frontend, it needs to be configured by specifying the first part of the URL. This first part maps the request to the extension that will handle the request.
Here, frontName (sample) is mapped to the extension, Genmato_Sample, allowing it to handle all requests on the frontend.
In order to handle the request to a URL, there needs to be a controller. In Magento 2, the controller now handles only one action (whereas Magento 1 has a controller that has the option to handle multiple actions). Every request consists of three parts:
[route]/[controller]/[action]
[route]: This is the configured frontName
[controller]: This is the path to identify the controller
[action]: This is the action that is executed (the PHP class)
In this case, a request is made to the following:
http://example.com/sample/
This will result with a request to the following:
http://example.com/sample/index/index
This will load the following file:
Genmato\Sample\Controller\Index\Index.php
The executed controller relies on the layout file to render the page by including the specified blocks in the page. Just like the controllers, the layout files are now separate files per page handle. The name of the file is built in the same way as the controllers:
[route]_[controller]_[action].xml
This makes it easier to change a specific page handle in a theme.
The loaded
Block class is the location to handle the collection of the data necessary to be shown in the template (just like in Magento 1). Here, we load the collection from the database so that it can be used in the template.
In Magento, it is possible to store configuration values for global/website or store in the backend. These values can be used to store simple module settings such as API -keys, module enable/disable options, or any setting that you might require for your module. The data is stored in the core_config_data table.
As the configuration fields are only accessible through the backend web pages, the configuration file is stored in the etc/adminhtml directory.
Create your own configuration options with the following step:
etc/adminhtml/system.xml
<?xml version="1.0"?>
<config xmlns:xsi="http://www.w3.org/2001/XMLSchema-instance" xsi:noNamespaceSchemaLocation="urn:magento:module:Magento_Config:etc/system_file.xsd">
<system>
<section id="sample" translate="label" type="text" sortOrder="2000" showInDefault="1" showInWebsite="1" showInStore="1">
<label>Sample Configuration</label>
<tab>general</tab>
<resource>Genmato_Sample::config_sample</resource>
<group id="demo" translate="label" type="text" sortOrder="100" showInDefault="1" showInWebsite="1" showInStore="1">
<label>Sample</label>
<field id="header" translate="label" type="text" sortOrder="1" showInDefault="1" showInWebsite="1" showInStore="1">
<label>Header Title</label>
</field>
<field id="selectsample" translate="label" type="select" sortOrder="2" showInDefault="1" showInWebsite="1" showInStore="1">
<label>Sample Select</label>
<source_model>Genmato\Sample\Model\Config\Source\DemoList</source_model>
</field>
</group>
</section>
</system>
</config>The Magento store configuration is divided in separate sections and contains multiple groups of configuration fields. Every section is assigned to a main tab that is displayed above the sections.
When the configuration options that you want to add can't fit in one of the existing tabs, it is possible to add your own through the system.xml file. For this, add the following to your system configuration file:
<tab id="<unique tab name>" translate="label" sortOrder="<sort order>" class="<class>"> <label>[label]</label> </tab>
In the configuration, you can use the following attributes:
id: This is a unique identifier for the tab, which is also used to reference to the tab in your sectionstranslate: This specifies the elements that need to be available for translation (in this case, only the label field is available)sortOrder: This is the numeric value to use to sort the tabsclass: This is the optional class name for your tabThe label element is used as the visible name of the tab in the configuration; it is important to make it as descriptive as possible for customers to understand.
Every section is shown below the tab referenced in the configuration. In every section, multiple groups can be configured that can hold multiple fields. Adding a new section can be done by adding the following to your system.xml file:
<section id="<unique_section_name>" translate="label" type="<text>" sortOrder="<sort order>" showInDefault="<0/1>" showInWebsite="<0/1>" showInStore="<0/1>"> <class>[class]</class> <header_css>[header_css]</header_css> <label>[label]</label> <tab>[tab]</tab> <resource>[resource]</resource> </section>
The attributes used are as follows:
id: This is the unique section identifiertranslate: This specifies the elements that need to be available for translation (in this case, only the label field is available)type: This is the type of field used (normally text)sortOrder: This is the numeric value to use to sort the sectionsshowInDefault: This shows sections in the default store configurationshowInWebsite: This displays sections in the website configurationshowInStore: This displays sections in the store configurationThe available elements in this configuration are as follows:
class: This is the class used for the sectionheader_css: This is the CSS class to use in the text header for the sectionlabel: This is the text to display in the sectiontab: This is the reference to the tab where the section should be addedresource: This is the access control list (ACL) resource referenced, which is used to check whether the user logged in has access to the sectionIn a section, it is possible to create multiple groups; they are displayed as separate fieldsets that can be expanded/collapsed and can hold one or multiple fields. To create a new group, add the following (in the section to hold the group) to the system.xml file:
<group id="<group_id>" translate="label" type="text" sortOrder="<sort order>" showInDefault="<0/1>" showInWebsite="<0/1>" showInStore="<0/1>"> <label>[label]</label> </group>
The attributes to configure a group are as follows:
id: This is the unique ID for the group (in the section)translate: These are the fields that needs to be translated, in this case, only the label optiontype: This is the field type (text in this case)sortOrder: This is the numeric value used to sort the groupsshowInDefault: This shows a group in the default store configurationshowInWebsite: This shows a group in the website configurationshowInStore: This shows a group in the store configurationEvery group can have one or multiple fields. In the database, the configuration is stored as a path build, <section>/<group>/<field>. A new config field can be one of the following types: text input, textarea, select, multiselect, or a custom data renderer. To add a field, add the following to a group:
<field id="<field_id>" translate="label" type="<type>" sortOrder="<sort order>" showInDefault="<0/1>" showInWebsite="<0/1>" showInStore="<0/1>"> <label>[comment]</label> <comment>[comment]</comment> </field>
The attributes used for the field configuration are as follows:
id: This is the unique ID of the field in the grouptranslate: These are the fields that need to be translated (can be the label, comment, tooltip, or hint elements)type: This is the input type, which can be the following:text: Default text input fieldtextarea: Text area inputobscure: Password inputselect: Drop-down selectThis needs a source_model element to specify the available options to select.
multiselect: This is the multiple item select box. This needs a source_model element to specify the available options to select.
image: This is the image upload with a preview if the file is uploaded. This needs different backend_model (to store the uploaded file), upload_dir (to specify where to save the file), and base_url (path used to build the URL to access from the frontend) elements.
sortOrder: This is the numeric value used to sort the fields in the groupshowInDefault: This shows fields in the default store configurationshowInWebsite: This shows fields in the website configurationshowInStore: This shows fields in the store configurationThere are also some extra elements available to configure the field:
label: This is the label, which shows in front of the input fieldcomment: This is the comment shown below the input fieldtooltip: This is the text shown when hovering the question markfrontend_class: This is the class used for the fieldfrontend_model: This is the custom frontend model (block) that will be used to render the input areabackend_model: This is the backend model used when saving the data to process inserted valuessource_model: This is the data source used for select and multiselect fieldsdepends: This is the option to hide/show a field based on a value used by another field, for example:<depends> <field id="[field_name_to_check]">[value_to show]</field> </depends>
When [field_name_to_check] has the [value_to_show] value, the field will be visible, if it contains a different value, then the field is hidden for the user.
To get the data stored in the sample/demo/header field, add the following to the template Block class in our template block:
Block/DemoList.php
/**
* Get Header from configuration value
* @return string
*/
public function getHeader()
{
return $this->_scopeConfig->getValue('sample/demo/header', ScopeInterface::SCOPE_STORE);
}The _scopeConfig class is injected through dependency injection (DI) into the Block class in the constructor and allows us to read data stored in the configuration.
Next, we want to display the data in our template by adding the following line at the top of the file:
view/frontend/templates/list.phtml
<p><?php echo $this->getHeader();?></p>
Adding a page to the backend requires, just like the frontend, a configured route, controller, and layout file. In order to display a grid page to show data from a table, there are currently three ways available:
Page module:Magento\Cms\Block\Adminhtml\Page
Magento\Cms\Block\Adminhtml\Page\Grid
Block class created. The grid fields and options are defined in the layout XML file. This makes it possible to extend the grid easily by adding extra fields to the XML. An example of this can be found in the Customer Group code in the following:Magento\Customer\view\adminhtml\layout\customer_group_index.xml
In this example, we will use the last option to build a grid. As this option uses quite a large set of files and long XML listings, the complete code can be found on GitHub (https://github.com/Genmato/M2_Sample).
The following steps will describe how to add a backend data grid:
adminhtml area:etc/adminhtml/routes.xml
<?xml version="1.0"?> <config xmlns:xsi="http://www.w3.org/2001/XMLSchema-instance" xsi:noNamespaceSchemaLocation="urn:magento:framework:App/etc/routes.xsd"> <router id="admin"> <route id="sample" frontName="sample"> <module name="Genmato_Sample" before="Magento_Backend" /> </route> </router> </config>
Controller/Adminhtml/Demolist/Index.php
<?php
namespace Genmato\Sample\Controller\Adminhtml\Demolist;
use Magento\Backend\App\Action\Context;
use Magento\Framework\View\Result\PageFactory;
use Magento\Backend\App\Action as BackendAction;
class Index extends BackendAction
{
/**
* @var PageFactory
*/
protected $resultPageFactory;
/**
* @param Context $context
* @param PageFactory $resultPageFactory
*/
public function __construct(
Context $context,
PageFactory $resultPageFactory
) {
parent::__construct($context);
$this->resultPageFactory = $resultPageFactory;
}
/**
* Check the permission to run it
*
* @return bool
*/
protected function _isAllowed()
{
return $this->_authorization->isAllowed('Genmato_Sample::demolist');
}
/**
* Index action
*
* @return \Magento\Backend\Model\View\Result\Page
*/
public function execute()
{
/** @var \Magento\Backend\Model\View\Result\Page $resultPage */
$resultPage = $this->resultPageFactory->create();
$resultPage->setActiveMenu('Genmato_Sample::demolist');
$resultPage->addBreadcrumb(__('CMS'), __('CMS'));
$resultPage->addBreadcrumb(__('Demo List'), __('Demo List'));
$resultPage->getConfig()->getTitle()->prepend(__('Demo List'));
return $resultPage;
}
}etc/acl.xml
<?xml version="1.0"?>
<config xmlns:xsi="http://www.w3.org/2001/XMLSchema-instance" xsi:noNamespaceSchemaLocation="urn:magento:framework:Acl/etc/acl.xsd">
<acl>
<resources>
<resource id="Magento_Backend::admin">
<resource id="Magento_Backend::content">
<resource id="Magento_Backend::content_elements">
<resource id="Genmato_Sample::demolist" title="Demo List" sortOrder="10" />
</resource>
</resource>
</resource>
</resources>
</acl>
</config>layout file to specify the grid uiComponent used:view/adminhtml/layout/sample_demolist_index.xml
<?xml version="1.0"?>
<page xmlns:xsi="http://www.w3.org/2001/XMLSchema-instance" xsi:noNamespaceSchemaLocation="urn:magento:framework:View/Layout/etc/page_configuration.xsd">
<update handle="styles"/>
<body>
<referenceContainer name="content">
<uiComponent name="sample_demolist_listing"/>
</referenceContainer>
</body>
</page>uiComponent configuration:The referenced
uiComponent configuration is quite large. In the sample code (on GitHub), this file can be found at the following:
uiComponent to the dependency injection configuration:etc/di.xml
<?xml version="1.0"?>
<config xmlns:xsi="http://www.w3.org/2001/XMLSchema-instance" xsi:noNamespaceSchemaLocation="urn:magento:framework:ObjectManager/etc/config.xsd">
<preference for="Genmato\Sample\Model\DemoInterface" type="Genmato\Sample\Model\Demo" />
<type name="Magento\Framework\View\Element\UiComponent\DataProvider\CollectionFactory">
<arguments>
<argument name="collections" xsi:type="array">
<item name="sample_demolist_listing_data_source" xsi:type="string">Genmato\Sample\Model\ResourceModel\Demo\Grid\Collection</item>
</argument>
</arguments>
</type>
<type name="Genmato\Sample\Model\ResourceModel\Demo\Grid\Collection">
<arguments>
<argument name="mainTable" xsi:type="string">genmato_demo</argument>
<argument name="eventPrefix" xsi:type="string">sample_demolist_grid_collection</argument>
<argument name="eventObject" xsi:type="string">sample_demolist_collection</argument>
<argument name="resourceModel" xsi:type="string">Genmato\Sample\Model\ResourceModel\Demo</argument>
</arguments>
</type>
<virtualType name="DemoGridFilterPool" type="Magento\Framework\View\Element\UiComponent\DataProvider\FilterPool">
<arguments>
<argument name="appliers" xsi:type="array">
<item name="regular" xsi:type="object">Magento\Framework\View\Element\UiComponent\DataProvider\RegularFilter</item>
<item name="fulltext" xsi:type="object">Magento\Framework\View\Element\UiComponent\DataProvider\FulltextFilter</item>
</argument>
</arguments>
</virtualType>
<virtualType name="DemoGridDataProvider" type="Magento\Framework\View\Element\UiComponent\DataProvider\DataProvider">
<arguments>
<argument name="collection" xsi:type="object" shared="false">Genmato\Sample\Model\ResourceModel\Demo\Collection</argument>
<argument name="filterPool" xsi:type="object" shared="false">DemoGridFilterPool</argument>
</arguments>
</virtualType>
</config>Controller/Adminhtml/Demolist/MassDelete.php
<?php
namespace Genmato\Sample\Controller\Adminhtml\Demolist;
use Magento\Framework\Controller\ResultFactory;
use Magento\Backend\App\Action\Context;
use Magento\Ui\Component\MassAction\Filter;
use Genmato\Sample\Model\ResourceModel\Demo\CollectionFactory;
use Magento\Backend\App\Action;
class MassDelete extends Action
{
/**
* @var CollectionFactory
*/
protected $collectionFactory;
/**
* @param Context $context
* @param Filter $filter
* @param CollectionFactory $collectionFactory
*/
public function __construct(Context $context, Filter $filter, CollectionFactory $collectionFactory)
{
$this->filter = $filter;
$this->collectionFactory = $collectionFactory;
parent::__construct($context);
}
/**
* Execute action
*
* @return \Magento\Backend\Model\View\Result\Redirect
*/
public function execute()
{
$collection = $this->filter->getCollection($this->collectionFactory->create());
$collectionSize = $collection->getSize();
foreach ($collection as $item) {
$item->delete();
}
$this->messageManager->addSuccess(__('A total of %1 record(s) have been deleted.', $collectionSize));
/** @var \Magento\Backend\Model\View\Result\Redirect $resultRedirect */
$resultRedirect = $this->resultFactory->create(ResultFactory::TYPE_REDIRECT);
return $resultRedirect->setPath('*/*/');
}
}etc/adminhtml/menu.xml
<?xml version="1.0"?>
<config xmlns:xsi="http://www.w3.org/2001/XMLSchema-instance" xsi:noNamespaceSchemaLocation="urn:magento:module:Magento_Backend:etc/menu.xsd">
<menu>
<add id="Genmato_Sample::demolist" title="Demo List" module="Genmato_Sample" sortOrder="10" parent="Magento_Backend::content_elements" action="sample/demolist" resource="Genmato_Sample::demolist"/>
</menu>
</config>The controller and layout file are the same for the frontend, only the backend is protected through an ACL. This allows administrators to create specific user rules and allow access only to the selected pages.
The resource access is checked in the controller in the following function:
protected function _isAllowed()
As the complete configuration through uiComponent results in a large XML file, we will explain some parts on how they are configured and hook in to the system.
The data source is specified through the XML node:
<listing>
<dataSource name="sample_demolist_listing_data_source">
<argument name="dataProvider" xsi:type="configurableObject">
<argument name="class" xsi:type="string">DemoGridDataProvider</argument>The specified data class, DemoGridDataProvider, is configured through dependency injection and specified in the etc/di.xml file. Here, DemoGridDataProvider corresponds to the Genmato\Sample\Model\ResourceModel\Demo\Collection collection. Additionally, DemoGridFilterPool and the collection are configured through this file to load the data.
It is also easy to specify multiple mass actions to be used in the grid; you can specify the title, action to execute, and optional message alert box:
<massaction name="listing_massaction">
<argument name="data" xsi:type="array">
<item name="config" xsi:type="array">
<item name="selectProvider" xsi:type="string">sample_demolist_listing.sample_demolist_listing.sample_demolist_columns.ids</item>
<item name="indexField" xsi:type="string">demo_id</item>
</item>
</argument>
<action name="delete">
<argument name="data" xsi:type="array">
<item name="config" xsi:type="array">
<item name="type" xsi:type="string">delete</item>
<item name="label" xsi:type="string" translate="true">Delete</item>
<item name="url" xsi:type="url" path="sample/demolist/massDelete"/>
<item name="confirm" xsi:type="array">
<item name="title" xsi:type="string" translate="true">Delete items</item>
<item name="message" xsi:type="string" translate="true">Are you sure you want to delete selected items?</item>
</item>
</item>
</argument>
</action>
</massaction>In this example, we add an option to delete records from the database. In order to delete the records from the database, you need to create a controller that handles the removal of the records. You need to create a Controller class for every action you specify, this controller contains your custom code to be executed.
By adding the menu option in the Content menu below the Pages menu item, the page can be accessed through the backend. This link action will go to the specified sample/demolist URL that will result in the full URL:
http://example.com/admin/sample/demolist/
The resource argument defines the ACL that is used to show/hide the menu option depending on the user rights:
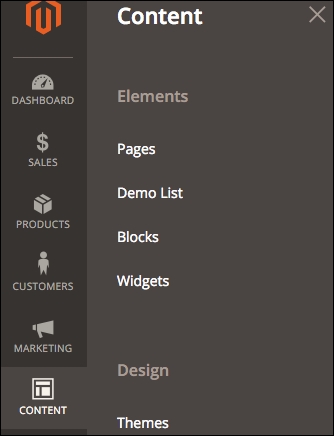
When clicking on the menu option, the resulting page will look as follows:
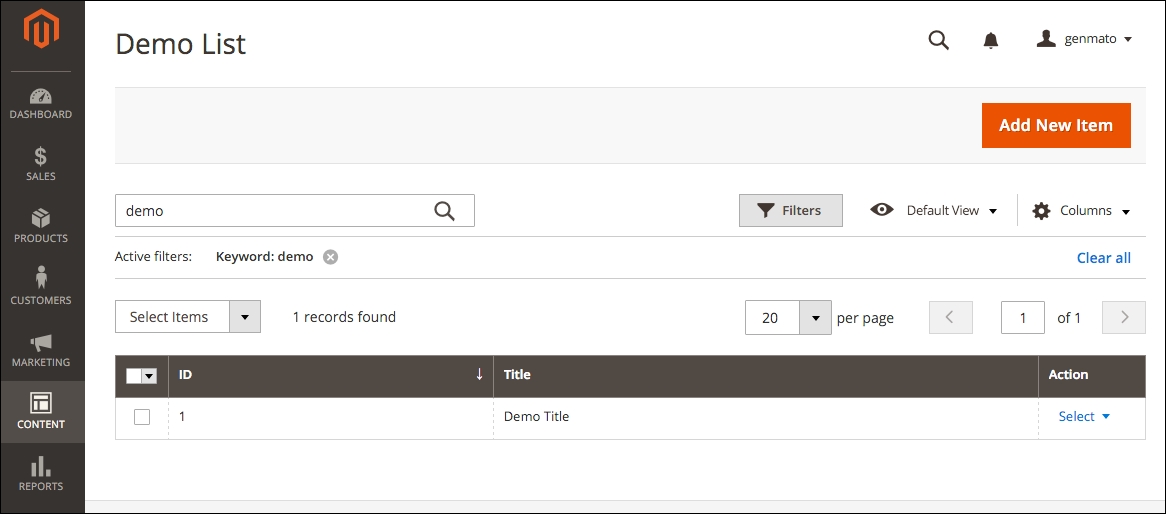
For more information about uiComponents that are available, you can refer to the following:
http://devdocs.magento.com/guides/v2.0/ui-components/ui-component.html
If you want to add a new record or edit an existing record, it is possible to create a form to have a user friendly way to process the data. In this example, we will see how to create a form to edit an existing record. The path used to add a record will be as follows:
http://example.com/admin/sample/demolist/new/
This will require the controller name to be new, but as this is a reserved word in PHP, the class name used will be newAction. The execute function is not only used to add a new record, but it can also be used to edit an existing record. In the following code, only the execute action is shown; see the sample code for the complete source.
In this recipe, we will add the option to add or edit records; for this, the route used in the previous chapter is used, only new controllers and blocks are shown.
Follow these steps to add a form to your module:
Controller/Adminhtml/Demolist/NewAction.php
<?php
namespace Genmato\Sample\Controller\Adminhtml\Demolist;
use Magento\Backend\App\Action;
class NewAction extends Action
{
public function execute()
{
$demoId = $this->getRequest()->getParam('demo_id');
$this->_coreRegistry->register('current_demo_id', $demoId);
/** @var \Magento\Backend\Model\View\Result\Page $resultPage */
$resultPage = $this->resultPageFactory->create();
if ($demoId === null) {
$resultPage->addBreadcrumb(__('New DemoList'), __('New DemoList'));
$resultPage->getConfig()->getTitle()->prepend(__('New DemoList'));
} else {
$resultPage->addBreadcrumb(__('Edit DemoList'), __('Edit DemoList'));
$resultPage->getConfig()->getTitle()->prepend(__('Edit DemoList'));
}
// Build the edit form
$resultPage->getLayout()->addBlock('Genmato\Sample\Block\Adminhtml\Demo\Edit', 'demolist', 'content')
->setEditMode((bool)$demoId);
return $resultPage;
}
}Form container:Block/Adminhtml/Demo/Edit.php
<?php
namespace Genmato\Sample\Block\Adminhtml\Demo;
use Magento\Backend\Block\Widget\Form\Container;
class Edit extends Container
{
/**
* Remove Delete button if record can't be deleted.
*
* @return void
*/
protected function _construct()
{
$this->_objectId = 'demo_id';
$this->_controller = 'adminhtml_demo';
$this->_blockGroup = 'Genmato_Sample';
parent::_construct();
$demoId = $this->getDemoId();
if (!$demoId) {
$this->buttonList->remove('delete');
}
}
/**
* Retrieve the header text, either editing an existing record or creating a new one.
*
* @return \Magento\Framework\Phrase
*/
public function getHeaderText()
{
$demoId = $this->getDemoId();
if (!$demoId) {
return __('New DemoList Item');
} else {
return __('Edit DemoList Item');
}
}
public function getDemoId()
{
if (!$this->demoId) {
$this->demoId=$this->coreRegistry->registry('current_demo_id');
}
return $this->demoId;
}
}Block/Adminhtml/Demo/Edit/Form.php
<?php
namespace Genmato\Sample\Block\Adminhtml\Demo\Edit;
use Magento\Customer\Controller\RegistryConstants;
use Magento\Backend\Block\Widget\Form\Generic;
class Form extends Generic
{
/**
* Prepare form for render
*
* @return void
*/
protected function _prepareLayout()
{
parent::_prepareLayout();
/** @var \Magento\Framework\Data\Form $form */
$form = $this->_formFactory->create();
$demoId = $this->_coreRegistry->registry('current_demo_id');
/** @var \Genmato\Sample\Model\DemoFactory $demoData */
if ($demoId === null) {
$demoData = $this->demoDataFactory->create();
} else {
$demoData = $this->demoDataFactory->create()->load($demoId);
}
$yesNo = [];
$yesNo[0] = 'No';
$yesNo[1] = 'Yes';
$fieldset = $form->addFieldset('base_fieldset', ['legend' => __('Basic Information')]);
$fieldset->addField(
'title',
'text',
[
'name' => 'title',
'label' => __('Title'),
'title' => __('Title'),
'required' => true
]
);
$fieldset->addField(
'is_active',
'select',
[
'name' => 'is_active',
'label' => __('Active'),
'title' => __('Active'),
'class' => 'required-entry',
'required' => true,
'values' => $yesNo,
]
);
$fieldset->addField(
'is_visible',
'select',
[
'name' => 'is_visible',
'label' => __('Visible'),
'title' => __('Visible'),
'class' => 'required-entry',
'required' => true,
'values' => $yesNo,
]
);
if ($demoData->getId() !== null) {
// If edit add id
$form->addField('demo_id', 'hidden', ['name' => 'demo_id', 'value' => $demoData->getId()]);
}
if ($this->_backendSession->getDemoData()) {
$form->addValues($this->_backendSession->getDemoData());
$this->_backendSession->setDemoData(null);
} else {
$form->addValues(
[
'id' => $demoData->getId(),
'title' => $demoData->getTitle(),
'is_active' => $demoData->getIsActive(),
'is_visible' => $demoData->getIsVisible(),
]
);
}
$form->setUseContainer(true);
$form->setId('edit_form');
$form->setAction($this->getUrl('*/*/save'));
$form->setMethod('post');
$this->setForm($form);
}
}Save action controller, which is called when pressing the Submit button:Controller/Adminhtml/Demolist/Save.php
<?php
namespace Genmato\Sample\Controller\Adminhtml\Demolist;
use Magento\Backend\App\Action;
class Save extends Action
{
/**
* Save DemoList item.
*
* @return \Magento\Backend\Model\View\Result\Page|\Magento\Backend\Model\View\Result\Redirect
*/
public function execute()
{
$id = $this->getRequest()->getParam('demo_id');
$resultRedirect = $this->resultRedirectFactory->create();
try {
if ($id !== null) {
$demoData = $this->demoFactory->create()->load((int)$id);
} else {
$demoData = $this->demoFactory->create();
}
$data = $this->getRequest()->getParams();
$demoData->setData($data)->save();
$this->messageManager->addSuccess(__('Saved DemoList item.'));
$resultRedirect->setPath('sample/demolist');
} catch (\Exception $e) {
$this->messageManager->addError($e->getMessage());
$this->_getSession()->setDemoData($data);
$resultRedirect->setPath('sample/demolist/edit', ['demo_id' => $id]);
}
return $resultRedirect;
}
}In the controller, the demo_id parameter is stored in the Magento registry; this makes the data available to retrieve in the same request in other blocks/models to do further processing with it. Additionally, the Genmato\Sample\Block\Adminhtml\Demo\Edit class is loaded. This class will generate the container for the form and load the Genmato\Sample\Block\Adminhtml\Demo\Edit\Form class that will generate the form to be shown.
Every form is built from the following:
$form = $this->_formFactory->create();
As it is not possible to add fields to a form directly, you need to create a fieldset first. It is possible to add multiple fieldsets to a single form and assign multiple form fields to a fieldset. To create a fieldset, use the following command:
$fieldset = $form->addFieldset('[name]', ['legend' => __([heading])]);Adding a form field to the fieldset is done as follows:
$fieldset->addField([elementId], [type], [config], [after]);
This method has the following parameters:
elementId: This is the unique name of the form field element.type: This defines the type of element that is used as the input field. This can be your own class that implements the Magento\Framework\Data\Form\Element\AbstractElement class or one of the following:These input types are rendered from the classes found under the Magento\Framework\Data\Form\Element\ directory.
config: This is an array of extra configuration data; some of the options are as follows:name: This is the name of the element from the data model that holds the datalabel: This is the text that is used as a labeltitle: This is the text that is used as the field title parameterclass: This is the optional class for the input field, which can be used for form validationrequired: This is optional. This is set if a field is required to have data.value: This is the value used for select/multiselectafter: This is the optional parameter to specify where the form field needs to be placed; use elementId of the form field that you want to place this field after.In order to display the data currently stored for the record that we want to edit, the stored demo_id is retrieved from the registry:
$demoId = $this->_coreRegistry->registry('current_demo_id');Next, we check whether there is a valid value stored as demoId and load the data from the database (or just set an empty object):
/** @var \Genmato\Sample\Model\DemoFactory $demoData */
if ($demoId === null) {
$demoData = $this->demoDataFactory->create();
} else {
$demoData = $this->demoDataFactory->create()->load($demoId);
}Now that the data is loaded, it is possible to set this data to the form fields:
$form->addValues(
[
'id' => $demoData->getId(),
'title' => $demoData->getTitle(),
'is_active' => $demoData->getIsActive(),
'is_visible' => $demoData->getIsVisible(),
]
);When submitting the form to save the data, the action and method should be set to the URL that handles the save action:
$form->setAction($this->getUrl('*/*/save'));
$form->setMethod('post');The URL */*/save maps to the Controller/Adminhtml/Demolist/Save controller and will handle the save action.
In the controller, we first load the current record to load all the current values:
if ($id !== null) {
$demoData = $this->demoFactory->create()->load((int)$id);
} else {
$demoData = $this->demoFactory->create();
}Next, we retrieve the submitted data, store it in the loaded object, and save the object:
$data = $this->getRequest()->getParams(); $demoData->setData($data)->save();
In this chapter, we will cover some of the more advanced features when building Magento 2 extensions in the following recipes:
In the previous chapter, we explained the basics on how to create a Magento 2 extension/module, including how to store data in a database and create a frontend page and backend grid with a form to add/edit data. In this chapter, we will explain some more advanced functions that can be used while developing custom extensions. The first two recipes are informational and describe the basic usage of dependency injection and plugins. The other recipes are examples on how to add your custom XML configuration file and commands to the Magento CLI tool.
In Magento 2, they introduced the usage of dependency injection, which is a well-known design pattern that changes the way you use resources in the code. Using dependency injection, all the required resources are created when the class is instantiated instead of creating an object (through the Magento 1.x Mage class) when necessary. The benefit of this is that it is easier to use unit testing as it is possible to mock the required objects.
In this example, we will see how to create a new record in the demolist model created in the previous chapter. The record is created using an observer on the sales_order_place_after event that is dispatched after a new order is saved.
Follow these steps on how to use dependency injection:
Observer to listen to the event that we want:etc/events.xml:
<config xmlns:xsi="http://www.w3.org/2001/XMLSchema-instance" xsi:noNamespaceSchemaLocation="urn:magento:framework:Event/etc/events.xsd"> <event name="sales_order_place_after"> <observer name="sample" instance="Genmato\Sample\Observer\PlaceOrder"/> </event> </config>
Observer class as defined in step 1:Observer/PlaceOrder.php:
<?php namespace Genmato\Sample\Observer; use Magento\Framework\Event\ObserverInterface; use Magento\Framework\Event\Observer as EventObserver; use Genmato\Sample\Model\DemoFactory; class PlaceOrder implements ObserverInterface { /** * @var DemoFactory */ protected $demoFactory; /** * @param DemoFactory $demoFactory */ public function __construct(DemoFactory $demoFactory) { $this->demoFactory = $demoFactory; } /** * Add record to demoList when new order is placed * * @param EventObserver $observer * @return void */ public function execute(EventObserver $observer) { /** @var \Magento\Sales\Model\Order $order */ $order = $observer->getEvent()->getOrder(); $demoList = $this->demoFactory->create(); $demoList->setTitle(__('New order (%1) placed!', $order->getIncrementId())); try { $demoList->save(); } catch (\Exception $ex) { // Process error here.... } } }
bin/magento cache:clean
In the Observer class defined in step 2, the object that we need to create a new record in is injected into the constructor function:
public function __construct(DemoFactory $demoFactory)
During the instantiation of the class, the necessary classes are injected by the Magento 2 dependency injection (DI) framework. In this case, it adds the Genmato\Sample\Model\DemoFactory class to the constructor. This class is not a real existing class; this is because the class that we want to use is a non-injectable class. A non-injectable class is a class that you create yourself through the new [classname] command or the Mage::getModel() call in Magento 1.x. With the use of dependency injection, creating a new object should be handled by the object manager, but in order to be able to use unit testing, it is not advisable to create the object directly in the code. To solve this, the Magento framework uses autogenerated classes. In this example, the generated class is stored in var/generation/Genmato/Sample/Model/DemoFactory.php:
<?php
namespace Genmato\Sample\Model;
/**
* Factory class for @see \Genmato\Sample\Model\Demo
*/
class DemoFactory
{
/**
* Object Manager instance
*
* @var \Magento\Framework\ObjectManagerInterface
*/
protected $_objectManager = null;
/**
* Instance name to create
*
* @var string
*/
protected $_instanceName = null;
/**
* Factory constructor
*
* @param \Magento\Framework\ObjectManagerInterface $objectManager
* @param string $instanceName
*/
public function __construct(\Magento\Framework\ObjectManagerInterface $objectManager, $instanceName = '\\Genmato\\Sample\\Model\\Demo')
{
$this->_objectManager = $objectManager;
$this->_instanceName = $instanceName;
}
/**
* Create class instance with specified parameters
*
* @param array $data
* @return \Genmato\Sample\Model\Demo
*/
public function create(array $data = array())
{
return $this->_objectManager->create($this->_instanceName, $data);
}
}In this case, the autogenerated class is a Factory class that has only the create() function available. In the create function, the object manager is used to instantiate the Genmato\Sample\Model\Demo class; this object can then be used to load an existing record or create a new record and save the data stored in the object.
One of the biggest problems in Magento 1.x was that changing the behavior of a function in a class that didn't have an event trigger had to be rewritten. This works fine if only a single rewrite for a class was used, but when using a large number of extensions, there is a risk that multiple extensions rewrite the same class, which can result in unpredictable results.
In Magento 2, this problem is partly solved by introducing Interception in the form of plugins. With the use of plugins, it is possible to modify a function in three places:
The use of plugins is controlled through di.xml. It is possible to use the global from etc/ or the area specific from etc/[area]; in this case, we will use the global, which means that it is used in all areas.
Create the following files in this recipe to try the use of plugins:
di.xml:etc/di.xml
<type name="Magento\Cms\Model\Page"> <plugin name="sample_before" type="Genmato\Sample\Plugin\BeforePage" sortOrder="1"/> </type> <type name="Magento\Catalog\Model\Product"> <plugin name="sample_around" type="Genmato\Sample\Plugin\AroundProduct" sortOrder="1"/> </type> <type name="Magento\Cms\Model\Page"> <plugin name="sample_after" type="Genmato\Sample\Plugin\AfterPage" sortOrder="1"/> </type>
Plugin/BeforePage.php
<?php
namespace Genmato\Sample\Plugin;
use Magento\Cms\Model\Page;
class BeforePage
{
public function beforeSetContent(Page $subject, $content)
{
return $subject->setContent('<!--'.$content.'-->');
}
}Plugin/AroundProduct.php
<?php
namespace Genmato\Sample\Plugin;
use Magento\Catalog\Model\Product;
class AroundProduct
{
public function aroundSave(Product $subject, \Closure $proceed)
{
$subject->setMyCustomAttribute('sample');
$return = $proceed();
$subject->setMyCustomAttribute('');
return $return;
}
}Plugin/AfterPage.php
<?php
namespace Genmato\Sample\Plugin;
use Magento\Cms\Model\Page;
class AfterPage
{
public function afterGetTitle(Page $subject, $result)
{
return 'SAMPLE: '.$result;
}
}
bin/magento cache:clean
All configured interceptors/plugins are evaluated during initialization. When a call is made to a function that is extended through a plugin, all plugin functions are executed based on the configured sortOrder as configured in di.xml. If there are multiple plugins that extend the same original function, they are executed in the following sequence:
sortOrdersortOrdersortOrder)sortOrder)sortOrdersortOrder)There are some limitations on where you can use plugins; it is not possible to use plugins for the following:
__constructIf you need to modify one of these types listed, the only option to do this is to rewrite (preference) your class through di.xml.
In Magento 1.x, it was possible to use the .xml file to include custom configuration options that might be necessary for an extension. This is no longer possible with Magento 2 because the XML files are all validated against a schema and anything other than predefined options are not allowed. To solve this, it is possible to generate your own custom XML file to set up the parameters that you need. This also allows other extensions to define settings as the output is generated from all modules that have this file configured.
In order to use your own XML configuration file, it is important that you generate a valid schema (XSD) file that will be used to validate the XML files when they are merged.
The following steps show you how to define a custom XML configuration file for your module:
Reader for the XML file and define the name of the file that should be read from all modules:Model/Sample/Reader.php
<?php
namespace Genmato\Sample\Model\Sample;
use Magento\Framework\Config\Reader\Filesystem;
use Magento\Framework\Config\FileResolverInterface;
use Magento\Framework\Config\ConverterInterface;
use Genmato\Sample\Model\Sample\SchemaLocator;
use Magento\Framework\Config\ValidationStateInterface;
class Reader extends Filesystem
{
protected $_idAttributes = [
'/table/row' => 'id',
'/table/row/column' => 'id',
];
/**
* @param FileResolverInterface $fileResolver
* @param ConverterInterface $converter
* @param SchemaLocator $schemaLocator
* @param ValidationStateInterface $validationState
* @param string $fileName
* @param array $idAttributes
* @param string $domDocumentClass
* @param string $defaultScope
*/
public function __construct(
FileResolverInterface $fileResolver,
ConverterInterface $converter,
SchemaLocator $schemaLocator,
ValidationStateInterface $validationState,
$fileName = 'sample.xml',
$idAttributes = [],
$domDocumentClass = 'Magento\Framework\Config\Dom',
$defaultScope = 'global'
) {
parent::__construct(
$fileResolver,
$converter,
$schemaLocator,
$validationState,
$fileName,
$idAttributes,
$domDocumentClass,
$defaultScope
);
}
}Reader must know where to find the schema file:Model/Sample/SchemaLocator.php
<?php
namespace Genmato\Sample\Model\Sample;
use Magento\Framework\Config\SchemaLocatorInterface;
use Magento\Framework\Config\Dom\UrnResolver;
class SchemaLocator implements SchemaLocatorInterface
{
/** @var UrnResolver */
protected $urnResolver;
public function __construct(UrnResolver $urnResolver)
{
$this->urnResolver = $urnResolver;
}
/**
* Get path to merged config schema
*
* @return string
*/
public function getSchema()
{
return $this->urnResolver->getRealPath('urn:genmato:module:Genmato_Sample:/etc/sample.xsd');
}
/**
* Get path to pre file validation schema
*
* @return string
*/
public function getPerFileSchema()
{
return $this->urnResolver->getRealPath('urn:genmato:module:Genmato_Sample:/etc/sample.xsd');
}
}Model/Sample/Data.php
<?php
namespace Genmato\Sample\Model\Sample;
use Magento\Framework\Config\Data\Scoped;
use Genmato\Sample\Model\Sample\Reader;
use Magento\Framework\Config\ScopeInterface;
use Magento\Framework\Config\CacheInterface;
class Data extends Scoped
{
/**
* Scope priority loading scheme
*
* @var array
*/
protected $_scopePriorityScheme = ['global'];
/**
* @param Reader $reader
* @param ScopeInterface $configScope
* @param CacheInterface $cache
* @param string $cacheId
*/
public function __construct(
Reader $reader,
ScopeInterface $configScope,
CacheInterface $cache,
$cacheId = 'sample_config_cache'
) {
parent::__construct($reader, $configScope, $cache, $cacheId);
}
}etc/sample.xsd
<?xml version="1.0" encoding="UTF-8"?>
<xs:schema xmlns:xs="http://www.w3.org/2001/XMLSchema">
<xs:element name="table">
<xs:complexType>
<xs:sequence>
<xs:element name="row" maxOccurs="unbounded" minOccurs="0">
<xs:complexType>
<xs:sequence>
<xs:element name="column" maxOccurs="unbounded" minOccurs="0">
<xs:complexType>
<xs:sequence>
<xs:element type="xs:string" name="label">
<xs:annotation>
<xs:documentation>from first xml from second xmlthey apear in both xmls with the same path and id and second one overrides the value for `attr1` from first xml from first xml</xs:documentation>
</xs:annotation>
</xs:element>
</xs:sequence>
<xs:attribute type="xs:string" name="id" use="optional"/>
<xs:attribute type="xs:byte" name="sort" use="optional"/>
<xs:attribute type="xs:string" name="attr1" use="optional"/>
<xs:attribute type="xs:string" name="disabled" use="optional"/>
</xs:complexType>
</xs:element>
</xs:sequence>
<xs:attribute type="xs:string" name="id" use="optional"/>
</xs:complexType>
</xs:element>
</xs:sequence>
</xs:complexType>
</xs:element>
</xs:schema>etc/sample.xml
<?xml version="1.0"?>
<table xmlns:xsi="http://www.w3.org/2001/XMLSchema-instance" xsi:noNamespaceSchemaLocation="urn:genmato:module:Genmato_Sample:/etc/sample.xsd">
<row id="row1">
<column id="col1" sort="10" attr1="val1">
<label>Col 1</label>
</column>
</row>
<row id="row2">
<column id="col1" sort="10" attr1="val1">
<label>Col 1</label>
</column>
<column id="col2" sort="20" disabled="true" attr1="val2" >
<label>Col 2</label>
</column>
<column id="col3" sort="15" attr1="val1">
<label>Col 3</label>
</column>
</row>
</table>Controller/Index/Sample.php
<?php
namespace Genmato\Sample\Controller\Index;
use Magento\Framework\App\Action\Action;
use Magento\Framework\App\Action\Context;
use Magento\Framework\View\Result\PageFactory;
use Genmato\Sample\Model\Sample\DataFactory;
class Sample extends Action
{
/**
* @var PageFactory
*/
private $resultPageFactory;
/** @var DataFactory $dataReader */
private $dataReader;
/**
* @param Context $context
* @param PageFactory $resultPageFactory
* @param DataFactory $dataReader
*/
public function __construct(
Context $context,
PageFactory $resultPageFactory,
DataFactory $dataReader
)
{
$this->dataReader = $dataReader;
parent::__construct($context);
}
/**
* Renders Sample
*/
public function execute()
{
$myConfig = $this->dataReader->create();
print_r($myConfig->get());
}
}
bin/magento cache:clean
http://example.com/sample/index/sample/
The configuration reader defines the file that is used in the ($fileName = 'sample.xml') constructor. Make sure that the filename used is unique; otherwise, configuration data from another module will be merged and validation will fail as it won't match the schema that you defined. A solution could be to use <vendor>_<module>.xml as the filename.
In the constructor, SchemaLocator is also defined; this will define the schema (XSD file) that is used to validate the XML. To be able to get the schema file independent from where the module is installed (vendor/ or app/code), the schema location is built from the defined URN: urn:genmato:module:Genmato_Sample:/etc/sample.xsd. This URN is parsed and translated to the directory where the module is installed, which is done through ComponentRegistrar, and the module location is registered in registration.php as described in Chapter 6, Creating Magento 2 Extensions – the Basics.
It is possible to get all data using the read() method on the Reader class, this will result in re-reading and merging all XML files, which will impact every request. This can delay the website; therefore, the Data class is added. Here, Reader is injected through the constructor. To get the data, you can call the get() method of the Data class. This will read and merge all XML files if they are not cached and return the cached version when available. If you don't supply an argument to the get() method, it will return all data, but it's also possible to specify a node that you would like.
The Data class can be added everywhere that you need to get your configuration data; for this, you add Genmato\Sample\Model\Sample\DataFactory to the constructor. This autogenerated class allows you to instantiate your configuration data class:
$myConfig = $this->dataReader->create();
This gets a value from the configuration:
$myConfig->get('<node>');
In Magento 2, it is easy to add your own product type, which can be useful when you want to add some special features that are not available through the default product types. In this recipe, we will see a minimal new product type that calculates the price based on the cost of the product; you can easily extend it further to fit your own needs.
Every product type has its own unique code specified, and it's important to use a short code to identify your product type.
The following steps in this recipe show you how to create a (minimal) new product type:
etc/product_types.xml
<?xml version="1.0"?>
<config xmlns:xsi="http://www.w3.org/2001/XMLSchema-instance" xsi:noNamespaceSchemaLocation="urn:magento:module:Magento_Catalog:etc/product_types.xsd">
<type name="demo" label="Demo Product" modelInstance="Genmato\Sample\Model\Product\Type\Demo" indexPriority="80" sortOrder="80">
<priceModel instance="Genmato\Sample\Model\Product\Type\Demo\Price" />
<customAttributes>
<attribute name="refundable" value="true"/>
<attribute name="taxable" value="true"/>
</customAttributes>
</type>
</config>modelInstance as configured in the product type definition; this is the minimal product type code definition. You can add your own functions that would be necessary to your product here:Model/Product/Type/Demo.php
<?php
namespace Genmato\Sample\Model\Product\Type;
use Magento\Catalog\Model\Product\Type\AbstractType;
class Demo extends AbstractType
{
/**
* Product-type code
*/
const TYPE_CODE = 'demo';
/**
* Delete data specific for Simple product-type
*
* @param \Magento\Catalog\Model\Product $product
* @return void
*/
public function deleteTypeSpecificData(\Magento\Catalog\Model\Product $product)
{
}
}priceModel is specified. This class holds the code to get the price of a product. Here, we use a fixed value of 1.25*cost attribute. It is also possible to get this value from another attribute or system configuration field:Model/Product/Type/Demo/Price.php
<?php
namespace Genmato\Sample\Model\Product\Type\Demo;
use Magento\Catalog\Model\Product\Type\Price as ProductPrice;
class Price extends ProductPrice
{
/**
* Default action to get price of product
*
* @param Product $product
* @return float
*/
public function getPrice($product)
{
return $product->getData('cost')*1.25;
}
}apply_to field of the cost attribute. This will be done through an UpgradeData script:Setup/UpgradeData.php
<?php
namespace Genmato\Sample\Setup;
use Magento\Eav\Setup\EavSetup;
use Magento\Eav\Setup\EavSetupFactory;
use Magento\Framework\Setup\UpgradeDataInterface;
use Magento\Framework\Setup\ModuleContextInterface;
use Magento\Framework\Setup\ModuleDataSetupInterface;
use Magento\Catalog\Model\Product;
/**
* @codeCoverageIgnore
*/
class UpgradeData implements UpgradeDataInterface
{
/**
* EAV setup factory
*
* @var EavSetupFactory
*/
private $eavSetupFactory;
/**
* Init
*
* @param EavSetupFactory $eavSetupFactory
*/
public function __construct(EavSetupFactory $eavSetupFactory)
{
$this->eavSetupFactory = $eavSetupFactory;
}
/**
* {@inheritdoc}
* @SuppressWarnings(PHPMD.ExcessiveMethodLength)
*/
public function upgrade(ModuleDataSetupInterface $setup, ModuleContextInterface $context)
{
if (version_compare($context->getVersion(), '0.8.4', '<')) {
/** @var EavSetup $eavSetup */
$eavSetup = $this->eavSetupFactory->create(['setup' => $setup]);
$fieldList = [
'price',
'special_price',
'special_from_date',
'special_to_date',
'minimal_price',
'cost',
'tier_price',
'weight',
];
// make these attributes applicable to demo product
foreach ($fieldList as $field) {
$applyTo = explode(
',',
$eavSetup->getAttribute(Product::ENTITY, $field, 'apply_to')
);
if (!in_array('demo', $applyTo)) {
$applyTo[] = 'demo';
$eavSetup->updateAttribute(
Product::ENTITY,
$field,
'apply_to',
implode(',', $applyTo)
);
}
}
}
}
}etc/sales.xml
<?xml version="1.0"?>
<config xmlns:xsi="http://www.w3.org/2001/XMLSchema-instance" xsi:noNamespaceSchemaLocation="urn:magento:module:Magento_Sales:etc/sales.xsd">
<order>
<available_product_type name="demo"/>
</order>
</config>Invoice and Creditmemo PDF documents:etc/pdf.xml
<?xml version="1.0"?>
<config xmlns:xsi="http://www.w3.org/2001/XMLSchema-instance" xsi:noNamespaceSchemaLocation="urn:magento:module:Magento_Sales:etc/pdf_file.xsd">
<renderers>
<page type="invoice">
<renderer product_type="demo">Magento\Sales\Model\Order\Pdf\Items\Invoice\DefaultInvoice</renderer>
</page>
<page type="creditmemo">
<renderer product_type="demo">Magento\Sales\Model\Order\Pdf\Items\Creditmemo\DefaultCreditmemo</renderer>
</page>
</renderers>
</config>setup_version in the module configuration. In this case, the version has been updated from 0.8.3 to 0.8.4. This is used in the upgrade script to execute only if the installed version is lower than the new version.etc/module.xml
<?xml version="1.0"?>
<config xmlns:xsi="http://www.w3.org/2001/XMLSchema-instance" xsi:noNamespaceSchemaLocation="urn:magento:framework:Module/etc/module.xsd">
<module name="Genmato_Sample" setup_version="0.8.4">
<sequence>
<module name="Magento_Store"/>
</sequence>
</module>
</config>upgrade command to update the attributes specified in the upgrade command. The cache is flushed at the same time to read the updated configuration.The new defined product type is now available in the backend to create a new product. The attributes used are similar to a simple product, and you can add your own fields if necessary. The priceModel instance specified will calculate the product price on rendering on the frontend; in this case, the cost attribute is used and multiplied by 1.25.
While creating the product, it is possible to set the Cost attribute in the Advanced Pricing tab. In this example, we used a product cost of €25.00:
When the product is saved and requested on the frontend, the price will be calculated based on the preceding values and result in a final price of €31.25:
In the configuration of the new product type (in product_types.xml), it is also possible to specify the following items:
A service layer/contract is a fixed interface to get and store data without knowing the underlying layer. It is possible to swap the way the data is stored without changing the service layer.
A service layer consists of three interface types:
getList: This returns a list of records based on the (optionally) provided search parametersget: This loads the data from the database and returns a data interface for the specified IDsave: This saves the record specified in the data interfacedelete: This deletes the record specified in the data interfacedeleteById: This deletes the record specified by the IDUsing a service layer also makes it easy to extend your module to access the web API; you only need to add a declaration in the appropriate XML to configure the link from the API command to the right interface.
In this recipe, we will add the option to read, create, or delete a record through a service layer contract:
Api/DemoRepositoryInterface.php
<?php
namespace Genmato\Sample\Api;
interface DemoRepositoryInterface
{
/**
* Save demo list item.
*
* @api
* @param \Genmato\Sample\Api\Data\DemoInterface $demo
* @return \Magento\Customer\Api\Data\GroupInterface
* @throws \Magento\Framework\Exception\InputException If there is a problem with the input
* @throws \Magento\Framework\Exception\NoSuchEntityException If a group ID is sent but the group does not exist
* @throws \Magento\Framework\Exception\State\InvalidTransitionException
*If saving customer group with customer group code that is used by an existing customer group
* @throws \Magento\Framework\Exception\LocalizedException
*/
public function save(\Genmato\Sample\Api\Data\DemoInterface $demo);
/**
* Get demo list item by ID.
*
* @api
* @param int $id
* @return \Genmato\Sample\Api\Data\DemoInterface
* @throws \Magento\Framework\Exception\NoSuchEntityException If $groupId is not found
* @throws \Magento\Framework\Exception\LocalizedException
*/
public function getById($id);
/**
* Retrieve demo list items.
*
* The list of demo items can be filtered
*
* @api
* @param \Magento\Framework\Api\SearchCriteriaInterface $searchCriteria
* @return \Genmato\Sample\Api\Data\DemoSearchResultsInterface
* @throws \Magento\Framework\Exception\LocalizedException
*/
public function getList(\Magento\Framework\Api\SearchCriteriaInterface $searchCriteria);
/**
* Delete demo list item.
*
* @api
* @param \Genmato\Sample\Api\Data\DemoInterface $demo
* @return bool true on success
* @throws \Magento\Framework\Exception\StateException If customer group cannot be deleted
* @throws \Magento\Framework\Exception\LocalizedException
*/
public function delete(\Genmato\Sample\Api\Data\DemoInterface $demo);
/**
* Delete demolist by ID.
*
* @api
* @param int $id
* @return bool true on success
* @throws \Magento\Framework\Exception\NoSuchEntityException
* @throws \Magento\Framework\Exception\StateException If customer group cannot be deleted
* @throws \Magento\Framework\Exception\LocalizedException
*/
public function deleteById($id);
}Model/ResourceModel/DemoRepository.php
<?php
namespace Genmato\Sample\Model\ResourceModel;
use Genmato\Sample\Model\DemoRegistry;
use Genmato\Sample\Model\DemoFactory;
use Genmato\Sample\Api\Data\DemoInterface;
use Genmato\Sample\Api\Data\DemoInterfaceFactory;
use Genmato\Sample\Api\Data\DemoExtensionInterface;
use Genmato\Sample\Api\Data\DemoSearchResultsInterfaceFactory;
use Genmato\Sample\Model\Demo;
use Genmato\Sample\Model\ResourceModel\Demo as DemoResource;
use Genmato\Sample\Model\ResourceModel\Demo\Collection;
use Genmato\Sample\Api\DemoRepositoryInterface;
use Magento\Framework\Exception\CouldNotDeleteException;
use Magento\Framework\Exception\CouldNotSaveException;
use Magento\Framework\Exception\NoSuchEntityException;
use Magento\Framework\Api\SearchCriteriaInterface;
use Magento\Framework\Reflection\DataObjectProcessor;
use Magento\Framework\Api\ExtensionAttribute\JoinProcessorInterface;
class DemoRepository implements DemoRepositoryInterface
{
/** @var DemoRegistry */
private $demoRegistry;
/** @var DemoFactory */
private $demoFactory;
/** @var DemoInterfaceFactory */
private $demoDataFactory;
/** @var Demo */
private $demoResourceModel;
/**
* @var DataObjectProcessor
*/
private $dataObjectProcessor;
/**
* @var DemoSearchResultsInterfaceFactory
*/
protected $searchResultsFactory;
/**
* @var JoinProcessorInterface
*/
protected $extensionAttributesJoinProcessor;
/**
* @param DemoRegistry $demoRegistry
* @param DemoFactory $demoFactory
* @param DemoInterfaceFactory $demoDataFactory
* @param DemoResource $demoResourceModel
* @param DataObjectProcessor $dataObjectProcessor
* @param DemoSearchResultsInterfaceFactory $searchResultsFactory
* @param JoinProcessorInterface $extensionAttributesJoinProcessor
*/
public function __construct(
DemoRegistry $demoRegistry,
DemoFactory $demoFactory,
DemoInterfaceFactory $demoDataFactory,
DemoResource $demoResourceModel,
DataObjectProcessor $dataObjectProcessor,
DemoSearchResultsInterfaceFactory $searchResultsFactory,
JoinProcessorInterface $extensionAttributesJoinProcessor
) {
$this->demoRegistry = $demoRegistry;
$this->demoFactory = $demoFactory;
$this->demoDataFactory = $demoDataFactory;
$this->demoResourceModel = $demoResourceModel;
$this->dataObjectProcessor = $dataObjectProcessor;
$this->searchResultsFactory = $searchResultsFactory;
$this->extensionAttributesJoinProcessor = $extensionAttributesJoinProcessor;
}
/**
* {@inheritdoc}
*/
public function save(DemoInterface $demo)
{
/** @var Demo $demoModel */
$demoModel = $this->demoFactory->create();
if ($demo->getId()) {
$demoModel->load($demo->getId());
}
$demoModel
->setTitle($demo->getTitle())
->setIsVisible($demo->getIsVisible())
->setIsActive($demo->getIsActive());
try {
$demoModel->save();
} catch (\Exception $exception) {
throw new CouldNotSaveException(__($exception->getMessage()));
}
return $demoModel->getData();
}
/**
* {@inheritdoc}
*/
public function getById($id)
{
$demoModel = $this->demoRegistry->retrieve($id);
$demoDataObject = $this->demoDataFactory->create()
->setId($demoModel->getId())
->setTitle($demoModel->getTitle())
->setCreationTime($demoModel->getCreationTime())
->setUpdateTime($demoModel->getUpdateTime())
->setIsVisible($demoModel->getIsVisible())
->setIsActive($demoModel->getIsActive());
return $demoDataObject;
}
/**
* {@inheritdoc}
*/
public function getList(SearchCriteriaInterface $searchCriteria)
{
$searchResults = $this->searchResultsFactory->create();
$searchResults->setSearchCriteria($searchCriteria);
/** @var Collection $collection */
$collection = $this->demoFactory->create()->getCollection();
foreach ($searchCriteria->getFilterGroups() as $filterGroup) {
foreach ($filterGroup->getFilters() as $filter) {
$condition = $filter->getConditionType() ?: 'eq';
$collection->addFieldToFilter($filter->getField(), [$condition => $filter->getValue()]);
}
}
$searchResults->setTotalCount($collection->getSize());
$sortOrders = $searchCriteria->getSortOrders();
if ($sortOrders) {
/** @var SortOrder $sortOrder */
foreach ($sortOrders as $sortOrder) {
$collection->addOrder(
$sortOrder->getField(),
($sortOrder->getDirection() == SortOrder::SORT_ASC) ? 'ASC' : 'DESC'
);
}
}
$collection->setCurPage($searchCriteria->getCurrentPage());
$collection->setPageSize($searchCriteria->getPageSize());
/** @var DemoInterface[] $demos */
$demos = [];
/** @var Demo $demo */
foreach ($collection as $demo) {
/** @var DemoInterface $demoDataObject */
$demoDataObject = $this->demoDataFactory->create()
->setId($demo->getId())
->setTitle($demo->getTitle())
->setCreationTime($demo->getCreationTime())
->setUpdateTime($demo->getUpdateTime())
->setIsVisible($demo->getIsVisible())
->setIsActive($demo->getIsActive());
$demos[] = $demoDataObject;
}
$searchResults->setTotalCount($collection->getSize());
return $searchResults->setItems($demos);
}
/**
* Delete demo list item.
*
* @param DemoInterface $demo
* @return bool true on success
* @throws \Magento\Framework\Exception\StateException If customer group cannot be deleted
* @throws \Magento\Framework\Exception\LocalizedException
*/
public function delete(DemoInterface $demo)
{
return $this->deleteById($demo->getId());
}
/**
* Delete demo list item by ID.
*
* @param int $id
* @return bool true on success
* @throws \Magento\Framework\Exception\NoSuchEntityException
* @throws \Magento\Framework\Exception\StateException If customer group cannot be deleted
* @throws \Magento\Framework\Exception\LocalizedException
*/
public function deleteById($id)
{
$demoModel = $this->demoRegistry->retrieve($id);
if ($id <= 0) {
throw new \Magento\Framework\Exception\StateException(__('Cannot delete demo item.'));
}
$demoModel->delete();
$this->demoRegistry->remove($id);
return true;
}
}Model/DemoRegistry.php
<?php
/**
* Sample
*
* @package Genmato_Sample
* @author Vladimir Kerkhoff <support@genmato.com>
* @created 2015-12-23
* @copyright Copyright (c) 2015 Genmato BV, https://genmato.com.
*/
namespace Genmato\Sample\Model;
use Genmato\Sample\Api\Data\DemoInterface;
use Magento\Framework\Exception\NoSuchEntityException;
class DemoRegistry
{
/**
* @var array
*/
protected $registry = [];
/**
* @var DemoFactory
*/
protected $demoFactory;
/**
* @param DemoFactory $demoFactory
*/
public function __construct(DemoFactory $demoFactory)
{
$this->demoFactory = $demoFactory;
}
/**
* Get instance of the Demo Model identified by an id
*
* @param int $demoId
* @return Demo
* @throws NoSuchEntityException
*/
public function retrieve($demoId)
{
if (isset($this->registry[$demoId])) {
return $this->registry[$demoId];
}
$demo = $this->demoFactory->create();
$demo->load($demoId);
if ($demo->getId() === null || $demo->getId() != $demoId)
{
throw NoSuchEntityException::singleField(DemoInterface::ID, $demoId);
}
$this->registry[$demoId] = $demo;
return $demo;
}
/**
* Remove an instance of the Demo Model from the registry
*
* @param int $demoId
* @return void
*/
public function remove($demoId)
{
unset($this->registry[$demoId]);
}
}Api/Data/DemoInterface.php
<?php
namespace Genmato\Sample\Api\Data;
use Genmato\Sample\Api\Data\DemoExtensionInterface;
use Magento\Framework\Api\ExtensibleDataInterface;
interface DemoInterface extends ExtensibleDataInterface
{
const ID = 'id';
const TITLE = 'title';
const CREATION_TIME = 'creation_time';
const UPDATE_TIME = 'update_time';
const IS_ACTIVE = 'is_active';
const IS_VISIBLE = 'is_visible';
/**
* Get id
*
* @api
* @return int|null
*/
public function getId();
/**
* Set id
*
* @api
* @param int $id
* @return $this
*/
public function setId($id);
/**
* Get Title
*
* @api
* @return string
*/
public function getTitle();
/**
* Set Title
*
* @api
* @param string $title
* @return $this
*/
public function setTitle($title);
/**
* Get Is Active
*
* @api
* @return bool
*/
public function getIsActive();
/**
* Set Is Active
*
* @api
* @param bool $isActive
* @return $this
*/
public function setIsActive($isActive);
/**
* Get Is Visible
*
* @api
* @return bool
*/
public function getIsVisible();
/**
* Set Is Active
*
* @api
* @param bool $isVisible
* @return $this
*/
public function setIsVisible($isVisible);
/**
* Get creation time
*
* @api
* @return string
*/
public function getCreationTime();
/**
* Set creation time
*
* @api
* @param string $creationTime
* @return $this
*/
public function setCreationTime($creationTime);
/**
* Get update time
*
* @api
* @return string
*/
public function getUpdateTime();
/**
* Set update time
*
* @api
* @param string $updateTime
* @return $this
*/
public function setUpdateTime($updateTime);
/**
* Retrieve existing extension attributes object or create a new one.
*
* @api
* @return DemoExtensionInterface|null
*/
public function getExtensionAttributes();
/**
* Set an extension attributes object.
*
* @api
* @param DemoExtensionInterface $extensionAttributes
* @return $this
*/
public function setExtensionAttributes(DemoExtensionInterface $extensionAttributes);
}Model/Data/Demo.php
<?php
namespace Genmato\Sample\Model\Data;
use Magento\Framework\Api\AbstractExtensibleObject;
use Genmato\Sample\Api\Data\DemoInterface;
use Genmato\Sample\Api\Data\DemoExtensionInterface;
class Demo extends AbstractExtensibleObject implements DemoInterface
{
/**
* Get id
*
* @return int|null
*/
public function getId()
{
return $this->_get(self::ID);
}
/**
* Set id
*
* @param int $id
* @return $this
*/
public function setId($id)
{
return $this->setData(self::ID, $id);
}
/**
* Get code
*
* @return string
*/
public function getTitle()
{
return $this->_get(self::TITLE);
}
/**
* Set code
*
* @param string $title
* @return $this
*/
public function setTitle($title)
{
return $this->setData(self::TITLE, $title);
}
/**
* Get Is Active
*
* @return bool
*/
public function getIsActive()
{
return $this->_get(self::IS_ACTIVE);
}
/**
* Set Is Active
*
* @param bool $isActive
* @return $this
*/
public function setIsActive($isActive)
{
return $this->setData(self::IS_ACTIVE, $isActive);
}
/**
* Get Is Visible
*
* @return bool
*/
public function getIsVisible()
{
return $this->_get(self::IS_VISIBLE);
}
/**
* Set Is Active
*
* @param bool $isVisible
* @return $this
*/
public function setIsVisible($isVisible)
{
return $this->setData(self::IS_VISIBLE, $isVisible);
}
/**
* Get creation time
*
* @return string
*/
public function getCreationTime()
{
return $this->_get(self::CREATION_TIME);
}
/**
* Set creation time
*
* @param string $creationTime
* @return $this
*/
public function setCreationTime($creationTime)
{
return $this->setData(self::CREATION_TIME, $creationTime);
}
/**
* Get update time
*
* @return string
*/
public function getUpdateTime()
{
return $this->_get(self::UPDATE_TIME);
}
/**
* Set update time
*
* @param string $updateTime
* @return $this
*/
public function setUpdateTime($updateTime)
{
return $this->setData(self::UPDATE_TIME, $updateTime);
}
/**
* {@inheritdoc}
*
* @return DemoExtensionInterface|null
*/
public function getExtensionAttributes()
{
return $this->_getExtensionAttributes();
}
/**
* {@inheritdoc}
*
* @param DemoExtensionInterface $extensionAttributes
* @return $this
*/
public function setExtensionAttributes(DemoExtensionInterface $extensionAttributes)
{
return $this->_setExtensionAttributes($extensionAttributes);
}
}getList command:Api/Data/DemoSearchResultsInterface.php
<?php
namespace Genmato\Sample\Api\Data;
use Genmato\Sample\Api\Data\DemoInterface;
use Magento\Framework\Api\SearchResultsInterface;
interface DemoSearchResultsInterface extends SearchResultsInterface
{
/**
* Get demo item list.
*
* @api
* @return DemoInterface[]
*/
public function getItems();
/**
* Set demo item list.
*
* @api
* @param DemoInterface[] $items
* @return $this
*/
public function setItems(array $items);
}di.xml by adding the following lines:etc/di.xml
<preference for="Genmato\Sample\Api\DemoRepositoryInterface"
type="Genmato\Sample\Model\ResourceModel\DemoRepository" />
<preference for="Genmato\Sample\Api\Data\DemoInterface" type="Genmato\Sample\Model\Data\Demo" />
<preference for="Genmato\Sample\Api\Data\DemoSearchResultsInterface"
type="Magento\Framework\Api\SearchResults" />Test controller; here, we test the working of the service layer: (This is optional.)Controller/Index/Test.php
<?php
namespace Genmato\Sample\Controller\Index;
use Magento\Framework\App\Action\Action;
use Magento\Framework\App\Action\Context;
use Magento\Framework\View\Result\PageFactory;
use Magento\Framework\Api\SearchCriteriaBuilder;
use Genmato\Sample\Api\DemoRepositoryInterface;
use Genmato\Sample\Model\Data\DemoFactory;
use Genmato\Sample\Api\Data\DemoInterface;
class Test extends Action
{
/**
* @var PageFactory
*/
private $resultPageFactory;
/** @var DemoRepositoryInterface */
private $demoRepository;
/** @var DemoFactory */
private $demo;
/**
* @var SearchCriteriaBuilder
*/
private $searchCriteriaBuilder;
/**
* @param Context $context
* @param PageFactory $resultPageFactory
* @param DemoRepositoryInterface $demoRepository
* @param SearchCriteriaBuilder $searchCriteriaBuilder
* @param DemoFactory $demoFactory
*/
public function __construct(
Context $context,
PageFactory $resultPageFactory,
DemoRepositoryInterface $demoRepository,
SearchCriteriaBuilder $searchCriteriaBuilder,
DemoFactory $demoFactory
)
{
$this->demoRepository = $demoRepository;
$this->searchCriteriaBuilder = $searchCriteriaBuilder;
$this->demo = $demoFactory;
parent::__construct($context);
}
/**
* Renders Sample
*/
public function execute()
{
echo '<pre>';
// Create new record through service layer/contract
/** @var DemoInterface $demoRecord */
$demoRecord = $this->demo->create();
$demoRecord->setIsActive(1)
->setIsVisible(1)
->setTitle('Test through Service Layer');
$demo = $this->demoRepository->save($demoRecord);
print_r($demo);
// Get list of available records
$searchCriteria = $this->searchCriteriaBuilder->create();
$searchResult = $this->demoRepository->getList($searchCriteria);
foreach ($searchResult->getItems() as $item) {
echo $item->getId().' => '.$item->getTitle().'<br>';
}
}
}
bin/magento setup:upgrade
http://example.com/sample/index/test/
The service layer/contract defines the methods and data format through these interfaces.
This interface describes the available methods, input, and output that is expected. The actual logic for the methods is done by the Model\ResourceModel\ DemoRepository class. In di.xml, there is a preference created that will use DemoRepository instead of the Interface class:
<preference for="Genmato\Sample\Api\DemoRepositoryInterface" type="Genmato\Sample\Model\ResourceModel\DemoRepository" />
With Magento 2, there is a command-line interface (CLI) available to run several tasks. The bin/magento command replaces the separate shell scripts that were used in Magento 1. This command is based on the Symfony Console component and looks just like n98-magerun that is available for Magento 1. Just like the rest of Magento 2, it's possible to extend the CLI tool with your own commands.
Adding commands to the CLI script requires some knowledge of the Symfony Console component. This recipe also uses the service layer created in the previous recipe.
In this recipe, we will add four options to the bin/magento CLI command with the following steps:
AddCommand class; this is used to create a new record through the CLI:Console/Command/AddCommand.php
<?php
namespace Genmato\Sample\Console\Command;
use Genmato\Sample\Api\DemoRepositoryInterface;
use Genmato\Sample\Model\Data\DemoFactory;
use Genmato\Sample\Api\Data\DemoInterface;
use Symfony\Component\Console\Input\InputOption;
use Symfony\Component\Console\Input\InputArgument;
use Symfony\Component\Console\Command\Command;
use Symfony\Component\Console\Input\InputInterface;
use Symfony\Component\Console\Output\OutputInterface;
use Symfony\Component\Console\Question\ConfirmationQuestion;
class AddCommand extends Command
{
/** @var DemoRepositoryInterface */
private $demoRepository;
/** @var DemoFactory */
private $demoFactory;
/**
* AddCommand constructor.
* @param DemoRepositoryInterface $demoRepository
* @param DemoFactory $demoFactory
* @param null $name
*/
public function __construct(
DemoRepositoryInterface $demoRepository,
DemoFactory $demoFactory,
$name = null)
{
parent::__construct($name);
$this->demoRepository = $demoRepository;
$this->demoFactory = $demoFactory;
}
/**
* {@inheritdoc}
*/
protected function configure()
{
$this->setName('demo:add')
->setDescription('Add demo record')
->addArgument('title',InputArgument::OPTIONAL, 'Title')
->addOption('active', null, InputOption::VALUE_NONE, 'Active')
->addOption('visible', null, InputOption::VALUE_NONE, 'Visible')
;
}
/**
* {@inheritdoc}
*/
protected function execute(InputInterface $input, OutputInterface $output)
{
$title = $input->getArgument('title');
$active = $input->getOption('active')? 1:0;
$visible = $input->getOption('visible')? 1:0;
if (!$title) {
$dialog = $this->getHelper('dialog');
$title = $dialog->ask($output, '<question>Enter the Title:</question> ',false);
$active = $dialog->ask($output, '<question>Should record be active: [Y/n]</question> ','y');
$active = (strtolower($active) == 'y') ? 1:0;
$visible = $dialog->ask($output, '<question>Should record be visible: [Y/n]</question> ','y');
$visible = (strtolower($visible) == 'y') ? 1:0;
}
/** @var DemoInterface $demoRecord */
$demoRecord = $this->demoFactory->create();
$demoRecord->setIsActive($active)
->setIsVisible($visible)
->setTitle($title);
try {
$demo = $this->demoRepository->save($demoRecord);
$output->writeln('New record created (id='.$demo->getId().')');
}catch (\Exception $ex) {
$output->writeln('<error>'.$ex->getMessage().'</error>');
}
}
}Console/Command/DeleteCommand.php
<?php
namespace Genmato\Sample\Console\Command;
use Genmato\Sample\Api\DemoRepositoryInterface;
use Symfony\Component\Console\Input\InputOption;
use Symfony\Component\Console\Command\Command;
use Symfony\Component\Console\Input\InputInterface;
use Symfony\Component\Console\Output\OutputInterface;
use Symfony\Component\Console\Question\ConfirmationQuestion;
class DeleteCommand extends Command
{
/** @var DemoRepositoryInterface */
private $demoRepository;
public function __construct(
DemoRepositoryInterface $demoRepository,
$name = null)
{
parent::__construct($name);
$this->demoRepository = $demoRepository;
}
/**
* {@inheritdoc}
*/
protected function configure()
{
$this->setName('demo:delete')
->setDescription('Delete demo record')
->addOption(
'id',
null,
InputOption::VALUE_REQUIRED,
'Demo record ID to delete'
)
->addOption(
'force',
null,
InputOption::VALUE_NONE,
'Force delete without confirmation'
);
}
/**
* {@inheritdoc}
*/
protected function execute(InputInterface $input, OutputInterface $output)
{
$helper = $this->getHelper('question');
$id = $input->getOption('id');
try {
if (!$input->getOption('force')) {
$data = $this->demoRepository->getById($id);
$output->writeln('Id :' . $data->getId());
$output->writeln('Title :' . $data->getTitle());
$question = new ConfirmationQuestion('Are you sure you want to delete this record? ', false);
if (!$helper->ask($input, $output, $question)) {
return;
}
}
$data = $this->demoRepository->deleteById($id);
if ($data) {
$output->writeln('<info>Record deleted!</info>');
} else {
$output->writeln('<error>Unable to delete record!</error>');
}
} catch (\Exception $ex) {
$output->writeln('<error>'.$ex->
getMessage().'</error>');
}
}
}Console/Command/GetCommand.php
<?php
namespace Genmato\Sample\Console\Command;
use Genmato\Sample\Api\DemoRepositoryInterface;
use Symfony\Component\Console\Command\Command;
use Symfony\Component\Console\Input\InputArgument;
use Symfony\Component\Console\Input\InputOption;
use Symfony\Component\Console\Input\InputInterface;
use Symfony\Component\Console\Output\OutputInterface;
class GetCommand extends Command
{
/** @var DemoRepositoryInterface */
private $demoRepository;
public function __construct(
DemoRepositoryInterface $demoRepository,
$name = null)
{
parent::__construct($name);
$this->demoRepository = $demoRepository;
}
/**
* {@inheritdoc}
*/
protected function configure()
{
$this->setName('demo:get')
->setDescription('Get demo records')
->addOption(
'id',
null,
InputOption::VALUE_REQUIRED,
'Demo record ID to display'
);
}
/**
* {@inheritdoc}
*/
protected function execute(InputInterface $input, OutputInterface $output)
{
$id = $input->getOption('id');
try {
$data = $this->demoRepository->getById($id);
$table = $this->getHelper('table');
$table
->setHeaders(array(__('ID'), __('Title'), __('Created'), __('Updated'), __('Visible'), __('Active')))
->setRows([[
$data->getId(),
$data->getTitle(),
$data->getCreationTime(),
$data->getUpdateTime(),
$data->getIsVisible() ? __('Yes') : __('No'),
$data->getIsActive() ? __('Yes') : __('No')
]]);
$table->render($output);
} catch (\Exception $ex) {
$output->writeln('<error>'.$ex->getMessage().'</error>');
}
}
}Console/Command/ListCommand.php
<?php
namespace Genmato\Sample\Console\Command;
use Magento\Framework\Api\SearchCriteriaBuilder;
use Genmato\Sample\Api\DemoRepositoryInterface;
use Symfony\Component\Console\Command\Command;
use Symfony\Component\Console\Input\InputInterface;
use Symfony\Component\Console\Output\OutputInterface;
class ListCommand extends Command
{
/** @var DemoRepositoryInterface */
private $demoRepository;
/**
* @var SearchCriteriaBuilder
*/
private $searchCriteriaBuilder;
public function __construct(
DemoRepositoryInterface $demoRepository,
SearchCriteriaBuilder $searchCriteriaBuilder,
$name = null)
{
parent::__construct($name);
$this->demoRepository = $demoRepository;
$this->searchCriteriaBuilder = $searchCriteriaBuilder;
}
/**
* {@inheritdoc}
*/
protected function configure()
{
$this->setName('demo:list')->setDescription('List demo records');
}
/**
* {@inheritdoc}
*/
protected function execute(InputInterface $input, OutputInterface $output)
{
// Get list of available records
$searchCriteria = $this->searchCriteriaBuilder->create();
$searchResult = $this->demoRepository->getList($searchCriteria);
$rows = [];
foreach ($searchResult->getItems() as $item) {
$rows[] = [$item->getId(), $item->getTitle()];
}
$table = $this->getHelper('table');
$table
->setHeaders(array(__('ID'), __('Title')))
->setRows($rows)
;
$table->render($output);
}
}di.xml configuration file:etc/di.xml
<type name="Magento\Framework\Console\CommandList">
<arguments>
<argument name="commands" xsi:type="array">
<item name="demoadd" xsi:type="object">Genmato\Sample\Console\Command\AddCommand</item>
<item name="demolist" xsi:type="object">Genmato\Sample\Console\Command\ListCommand</item>
<item name="demoget" xsi:type="object">Genmato\Sample\Console\Command\GetCommand</item>
<item name="demodelete" xsi:type="object">Genmato\Sample\Console\Command\DeleteCommand</item>
</argument>
</arguments>
</type>
bin/magento setup:upgrade
bin/magento
Registering new commands works by registering new items through di.xml with the Magento\Framework\Console\CommandList class. In the XML file, every item that we want to add is listed with a unique name and the class that is used for this command.
In the class listed, there are two methods that are used:
configure: In the configure method, the command is added with the following parameters:setName: This is the option used for the commandsetDesciption: This is a short description of the command, which is shown in the command listingsetArgument (optional): This sets arguments necessary for the commandsetOption (optional): This sets options necessary for the commandexecute: This is the actual method that is executed; here, the logic that you want to perform is locatedIt's not difficult to download Magento 2. With some hosting companies, it only takes a simple request or "one-click" to do an initial installation of this powerful e-commerce platform. The question now becomes, "where do you go from here?"
Before you even download and install Magento, it's important that you take some time to plan. The temptation to dive right in and get your feet wet is strong – especially for those of us who enjoy exploring new technologies. However, this is perhaps the primary reason why many people abandon Magento even before they get off the ground. Not only are there lots of wonderful features and configurations to tackle, there are significant installation issues to consider even before you download the installer.
In this chapter, the following topics will be covered:
There are three important areas to consider when defining your e-commerce project:
It is never wise to skimp on defining and analyzing any of these, as they all play crucial roles in the successful implementation of any e-commerce project (or any web project). Let's look at each of them in detail.
Magento is a powerful, full-featured e-commerce platform. With that power comes a certain degree of complexity (one very good reason to keep this book handy!). It's important to take your analysis of how to leverage this power one step at a time. As you discover the many facets of Magento, it's easy to become overwhelmed. Don't worry. With proper planning, you'll soon find that Magento is quite manageable for whatever e-commerce project you have in mind.
It is very likely that your e-commerce project is ideal for Magento, particularly if you intend to grow the online business well beyond its initial design and configuration – and who doesn't? Magento's expandability and continued development insures that, as an open source platform, Magento is the ideal technology for both start-up and mature stores.
When considering Magento as a platform, here's what Magneto offers that makes it shine:
Where you might find Magento to be more than required is if you have only a small handful of products to offer or expect very few sales.
If you think that Magento might be too complicated to use as an e-commerce platform, think again. Power always involves some level of complexity. With Mastering Magento 2, we feel the challenge of using Magento will quickly become an appreciation for all the ways you can sell more products online.
How are you going to be using your Magento installation? This list will help you focus on particular areas of interest in this book. Answer these questions, as they pertain to your single Magento installation:
Whatever you can conceive for an e-commerce store, it can almost always be accommodated with Magento!
The second stage to defining your scope is to think about "users" – those who will be actually interacting with Magento: customers and store staff. These are people who have no technical expertise, and for whom using the site should be straightforward and intuitive.
Designers and developers may use Magento's administration screens to configure an installation, but it's the ones actually interacting with Magento on a daily basis for which designers and developers must plan. As you use this book to craft a successful Magento store, always keep the end-user in mind.
Who are your users? Basically, your users are divided into two segments: staff and customers.
Staff refers to those who will be using the Magento administration screens on a daily basis. Magento's administration screens are elegant and fairly easy to use, although you'll want to pay close attention to how you create user permissions. Some users won't need access to all the backend features. By turning off certain features, you can make the administration area much more user-friendly and less overwhelming. Of course, regarding staff managers, additional permissions can give them access to reports, marketing tools, and content management sections. In short, as you work with staff, you can fine tune their back-end experience and maximize their effectiveness.
One key staff user should be designated as the "Administrator". If you're the one who will be responsible for managing the Magento configurations on an ongoing basis, congratulations! You now have at your fingertips the power to adjust your online business in ways both significant and subtle. You also have in front of you the guidebook to give you a full appreciation of your capabilities.
For store administrators, Packt Publishing offers a companion book, Learning Magento 2 Administration. This book, authored by Bret and Cyndi Williams, is the perfect training and reference book for your staff.
There are several types of customers, and they are based on their relationship to the vendor: retail and wholesale. Among these customers, you can also have customers that are members of the site – and therefore privy to certain pricing and promotions – both on the retail and wholesale level. You can also subdivide wholesalers into many other levels of manufacturers, jobbers, distributors, and dealers, all operating through the supply chain.
Magento has the ability to handle a variety of different users and user types, including all the ones mentioned above.
The one caveat to consider when scoping users is that if you are going to use a single Magento installation to operate more than one business – which can certainly be done – you cannot create unique permissions for staff users which restrict them to managing the content, customers, and orders of any one business.
As reviewed in the Preface, there are basically three different types of people who will be involved in any Magento installation: the Administrator, the Designer, and the Developer. Which one, or ones, are you?
As a complete, installable platform, make sure you have sufficient technical resources to handle all aspects of web server configuration and administration. It is not uncommon to find one or maybe two people tackling the installation, configuration, and management of a Magento installation. The web industry is well populated with "Jacks-of-all-Trades." As you analyze your own technical abilities, you may find it necessary to hire outside help. These are the disciplines that can help you maximize your Magento success:
When hiring a developer for your Magento store, make sure you find someone with specific experience with Magento 2. The new architecture and coding standards require particular knowledge. Magento provides a list of certified Magento developers at http://www.magentocommerce.com/certification/directory. Be sure to inquire about Magento 2 qualifications.
Fortunately, many Magento-friendly hosting providers offer assistance and expertise when it comes to optimizing your Magento installation. In Chapter 8, Optimizing Magento, we explain ways you can perform many of the optimization functions yourself, but don't hesitate to have frank discussions with potential hosting providers to find out just how much and how well they can help you with your installation.
If you choose to host the installation on your own in-house servers, note that Magento does require certain "tweaks" for performance and reliability, which we cover in Chapter 8, Optimizing Magento.
You have assessed the technical knowledge and experience of yourself and others with whom you may be working, now it is important that you understand the technical requirements of installing and managing a Magento installation.
If you're new to Magento, I certainly recommend that you find a capable hosting provider with specific Magento experience. There are many hosting companies that provide hosting suitable for Magento, but far fewer who invest resources toward supporting their clients with specific Magento-related needs. Keep these points in mind as you research possible hosting candidates:
You may already be hosting PHP based websites, have a robust server setup, or manage racked servers at a hosting facility. In these instances, you might well be capable of managing all aspects of hosting a Magento installation. In this book, you will find considerable information to help you configure and manage the server aspects of your Magento installation. We do repeat the advice that if you're new to Magento, an experienced hosting provider could be your best friend.
Due to Magento's complex architecture, your servers should be powerful. The architecture, indexing, and caching schemas of Magento require considerable resources. While we will attack these issues in Chapter 8, Optimizing Magento, the more horsepower you have, the better your store will perform.
To host your own Magento installation, your server must have the following minimum requirements:
mod_rewrite module must be enabled.Magento 2 can also use Redis 3.0 or Varnish 3.5/4.x for page caching and memcached for session storage.
Most Magento Community users we know (and there are lots!) opt for a hosted solution. Even with our own experience managing web servers, we too use a third-party hosting provider. It's easier, safer, and in most cases, far less expensive than duplicating the same degree of service in-house.
However, we do enjoy installing and testing open source platforms in-house, rather than setting up another hosting account. This is especially true when working with new platforms. Setting up an in-house installation can also allow you to test modifications, extensions, and updates before installing them on your live production server.
You can set up a complete Magento environment with PHP and MySQL on your own desktop computer or a local server in your office. In Chapter 9, Advanced Techniques, we'll provide detailed instructions for several different methods that can be used to install Magento on a local machine.
Now you're probably itching to install your first Magento store. In fact, you probably have done that already and have been fumbling through the vast labyrinth of configuration menus and screens. If you're like so many first-time Magento installers, you might feel ready to uninstall and reinstall; to start all over.
Most of the time, this "restart" happens when users try to take advantage of one of Magento's most powerful features: managing multiple stores. It seems easy when you look at the store management screen until you begin setting up stores, configuring URLs, and assigning specific configurations to each frontend website.
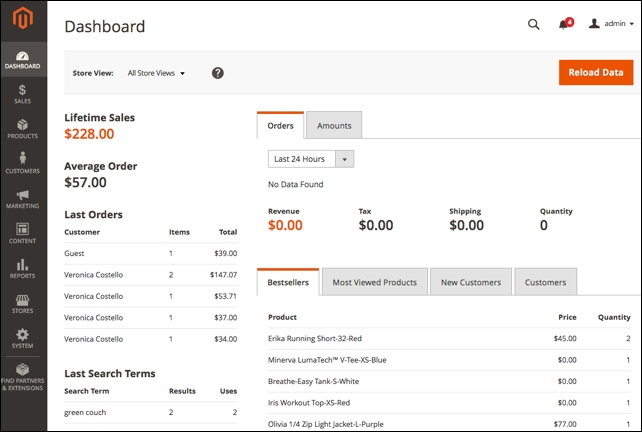
Before you begin laying out your master plan for the various websites and stores you intend to create (and even if you're only beginning with one website), you need to master the Magento methodology for multiple stores. Magento describes this as "GWS," which stands for "Global, Website, Store." Each Magento installation automatically includes one of each part of this hierarchy, plus one more for "Store View."
The following diagram shows how each part of GWS is related to one another:
Global refers to settings (for example, stock management rules) and values (for example, product price) for the entire installation. Throughout your Magento installation, you'll find Global displayed next to various form fields.
In terms of installation planning, your Global considerations should include:
In general, we recommend that you consider a single Magento installation only for multiple websites and stores that are similar in concept. For example, if your online business is selling drop-shipped furniture through several differently branded websites, then a single Magento installation is ideal. However, if you have two or more different businesses, each with a different product focus, company name, banking, and so on, it is best to use a separate Magento installation for each discrete business.
The website is the "root" of a Magento store. From the website, multiple stores are created that can each represent different products and focus. However, it is at the website level that certain configurations are applied that control common functions among its children stores and Store Views.
As described above, one of the most important considerations at the website level is whether or not customer data can be shared among websites. The decision to share this information is a Global configuration; however, remember that you cannot elect to share customer data among some websites and not others: it's an all or nothing configuration.
What can sometimes be confusing is that "Store" for Magento is used to describe both a store structure as well as a Store View. When configuring your hierarchal structure, "Store" is used to associate different product catalogs to different stores under a single "Website," whereas "Store Views" can be created to display a "Store" in multiple languages or styles, each with their own URL or path. Each Store View can be assigned different themes, content, logos, and so on.
Yet, throughout Magento's many administration screens, you will see that "Store" is used to define the scope of a particular value or setting. In these instances, entered values will affect all Views under a Store hierarchy. We know this can be confusing; it was to us, too. However, by following the processes in this book, you'll quickly come to not only understand how a Store and Store View is referred within Magento, but also appreciate the tremendous flexibility this gives you.
How you utilize GWS in your particular case depends on the purpose of your Magento installation. With GWS, you have an enormous number of configuration possibilities to explore. That said, your configuration planning would generally fall within three major categories: multiple domains, multiple businesses, and multiple languages. Of course, in the real world, a Magento installation may include aspects of all three.
It's becoming more popular in e-commerce to create multiple storefronts selling the same or similar products, each having a different domain name, branding design, and content. In this way, merchants can extend their marketing by appealing to different market segments, not just having one website trying to satisfy all consumers.
For example, let's assume you want to sell shoes online. You have a great distribution source where you can source all kinds of shoes, from dress to casual, running to flip-flops. While you can certainly have a comprehensive, "all types available" online shoe store, you might elect to secure different domain names focused on different segments of the shoe market. www.runningshoes4you.com would cater to joggers, while www.highheelsemporium.com features designer-quality dress shoes for women.
In Magento, you would create one website but create at least two stores, one for each of your domains. You might also create a third as an overall retail store for all your shoes. Each store could either share the same product catalog or each have its own separate catalog. By having all stores assigned to the same website, you have the ability to control certain configurations that apply to all stores. For example, if all the stores belong to the same retailer, as in this example, all would offer the same payment methods, such as PayPal.com or Authorize.Net. Most likely, the shipping methods you offer would be the same as well as your policies for returns and shipping.
In short, if all the domains belong to the same retail business, it may make sense to have one website with multiple stores, rather than to create entire website-store hierarchies for each product-focused domain. As you can see in the following diagram, this makes for a slimmer, more manageable structure:
In contrast, if your installation will be used to manage multiple businesses, you will need to create multiple websites. The reason for this is that actual, separate business entities will have separate payment system accounts (for example, PayPal, credit card merchant accounts, shipping), and therefore need to be able to segregate these between different websites.
To extend our example, let's assume your shoe retailer also owns a sideline business selling women's sportswear. This other business exists under a separate legal entity (for example, corporation, partnership), and therefore has different bank accounts, distributors, and customers. With Magento, you should create separate websites for each, even if they are to share certain products.
For instance, the sportswear site might also feature women's casual shoes, which are also offered by the shoe website. The same product can be assigned to multiple product catalogs (and therefore different stores) even if the catalogs belong to separate businesses. And somehow, through a complex database architecture, Magento succeeds in keeping all this straight for you. Amazing.
Even among some of Magento's top competitors in the open source e-commerce arena, very few provide the ability to create multiple language views of a website. Multiple language views are not simple matters for several reasons:
Magento has several tools to help you create multiple languages and currencies for retailers wanting to sell globally (or just provide multiple languages to users within a single country). It all begins with creating multiple views for a given store.
In our example, our running shoe website needs to be available in both English and French, so you would create two views within the running shoe store, one for each language. In your Magento-powered website, you can easily include a small drop-down selector which allows a visitor to choose their preferred language based on the views you have created.
In fact, in most Magento theme designs, this dropdown is automatic whenever there are multiple views created for any given store.
Another interesting use of multiple views could be to segment your customer market within a store. For example, if you wanted your shoe store to have a different overall look for men versus women versus children, you could create multiple views for each customer segment, and then allow the visitor to choose their desired view.
The power of Magento can also be a curse, particularly if you're like many of us: eager to jump in and begin building an online store. However – and this comes from the experience of investing lots of hours – taking a moment to understand the scope of your undertaking will make navigating the intricacies of Magento a much more rewarding experience.
In this chapter, we outlined the key areas to consider when planning our Magento installation. We also learned about the powerful Global-Website-Store methodology for managing multiple web stores in a single installation. In addition, we looked at the possibilities of introducing multiple languages, businesses, and domains for effective market segmentation.
As we go forward in this book, we'll learn how each decision we make in installing, configuring, and managing Magento traces back to what we covered in this chapter. In the next chapter, we will be taking your plans from this chapter and applying them to a new Magento installation.
After successfully installing Magento, you can now take on the task of creating and configuring your store. You could begin by crafting the design that reflects your store's brand, or you could start configuring the many settings that will direct how your customers will interact with your online store.
However, selling online really boils down to the products you are selling. Additionally, many of Magento's configurations are dependent on the products you're offering and how they are arranged into categories.
Therefore, when we create a new Magento-powered store, we begin at the root, so to speak: the products.
In this chapter, we will tackle:
The use of the terms catalogs and categories in Magento used to be a bit confusing, as Magento tended to use these terms with some inconsistency. In Magento 2, the distinction is better defined.
In Magento, the catalog is the full collection of products within your Magento installation. Looking under Products | Catalog in the backend, you can view all your products regardless of to which Website or categories they may be assigned.
Categories in Magento 2 are just that: categories of products. Let us delve a bit deeper into this.
Categories needed for our new stores. Now, we need to learn how to create sub-categories that will allow us to assign products and display them in logical groups on our store.
For our furniture store, we want to create a new subcategory for sofas:
Sofas.Yes.This is how the additional subcategory would then appear:
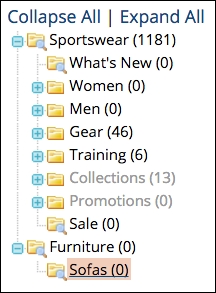
You can, of course, add additional subcategories, as well as subcategories of subcategories. But, before you go to too much trouble building a huge category hierarchy, be sure to read through the section on Attributes and Attribute Sets later in this chapter.
Let's now explore the other panels and fields in the category detail screen.
Don't be afraid to experiment! While this book provides a considerable amount of detail and helpful advice, the power of Magento can only truly be appreciated the more you work with it. Test various setting combinations. You may well come up with a particular configuration that helps you better connect with your shoppers.
As you will noticed, there are only two required fields when creating a category (Name and Is Active). But others, as shown below, on this tab are important as well.
As you build out your category schema, you may decide that you don't want products displayed on all category pages. For example, a top-level "Furniture" category might display graphics for each subcategory (for example, "Sofas", "Chairs", "Tables"). However, within those subcategories, you probably do want to display the list of products available. Let us have a look at the various attributes within this tab:
Unless your theme is configured otherwise, the description and image you add in the General Information tab will still show even if you choose Products only for Display Mode.
Why use a static block if you can simply add a category description? Good question, and one we're often asked. Static blocks are very useful for displaying the same content in many places. For instance, you may want to use a static block to regularly display a new product announcement or discount. By using a static block, you can update this information in one place and have it instantly appear throughout your site wherever it is referenced.
In this tab, you can control specific display configurations for your category.
For more on themes, see Chapter 3, Designs and Themes.
When you create products in your Magento store, you can assign the product to a category. Alternatively, you can assign multiple products to a category within this tab. Use the search features to find your products.
Once you have identified the products you wish to add, select the ones you wish to add. Be sure to click Save Category in order to complete your assignments.
We mentioned it earlier, but it deserves repeating: you can re-arrange the order of your categories — and how they will appear in navigation menus — by dragging and dropping your categories in the sidebar display. The order in which they appear can be set differently for each website or store view.
Re-arranging categories is a very intensive computing operation owing to the work that Magento has to perform in order to update its data tables and re-index. If you intend to make several changes, you may want to disable caching until you complete your work, although each change may still take some time. Be patient. After each re-arrangement, make sure Magento has completed its work before making the next change. Otherwise, your data tables may become "confused."
Magento provides some inherent tools for grouping products for special display purposes. For example, by designating New From and New To dates in the Advanced Settings | Autosetting panel of a product detail screen, as shown in the following screenshot, Magento will display a product within a New Products block if today's date falls within the range of these dates.
However, in some cases, you may want to display groups of products for other reasons. It's not uncommon to show Featured products on an e-commerce website. You might even want to show products grouped by family or purpose.
Let's take the case of creating a Featured products section for our homepage. Let's also assume that you don't want Featured as a category in your navigation bar just as a "special" category.
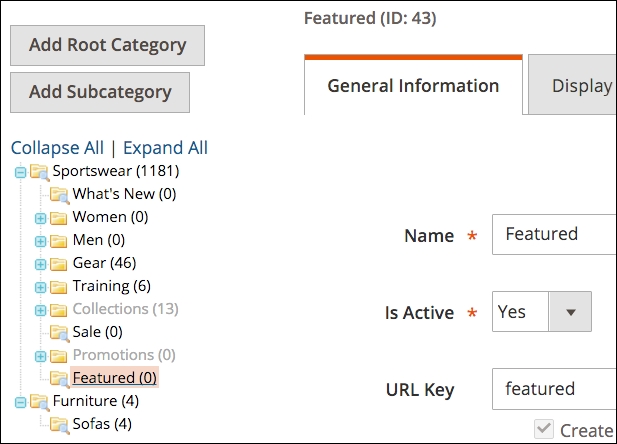
You've now created a new category called Featured and added some products. Now we need to add a block to the homepage that will display your Featured Products.
{{widget type="Magento\CatalogWidget\Block\Product\ProductsList" title="Featured" products_count="10" template="product/widget/content/grid.phtml"}}When you view the homepage, you should see a section displaying the featured items you assigned to this special category:
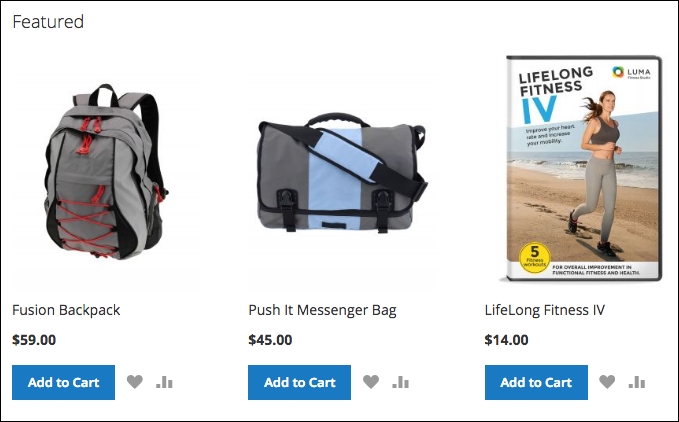
Furthermore, you can access this category and its products by appending the name of your special category to your store URL. For example, to see the entire Featured product category, you can go to http://www.yourstoredomain.com/featured.html.
In Chapter 5, Managing Non-Product Content, we'll go into more detail about blocks and how to use them in creative ways, giving your online store more features and functionality.
The heart of any online store is the selection of products offered to visiting customers. Yet, as simple as that may sound, creating online stores to present the vast array of products and product types has proven to be one of the most challenging quests for platform programmers.
If all stores sold each product as an individual item without different colors, sizes, or add-ons, e-commerce would be much simpler. But that's not how the real world works. If you sell t-shirts (the classic example for this discussion), you might sell each color as a separate item, especially if you only offer a few shirts. However, it would make shopping very cumbersome to your customers if you also had each size of each color listed as a separate product.
People shop by product style, then decide upon variations such as size and color. To reflect this shopping "workflow," we need to create products in our store that are presented in the most convenient and logical manner possible.
If you shop online for a golf putter, you could well find a list of putters sold online where each style is a separate product. The individual putter products would be considered simple products.
In Magento, we think of a simple product as one for which there is a single stock keeping unit (SKU), or if the putter has a SKU of PUT1234, then we would build it in Magento as a simple product.
Simple products can have custom options, though. For instance, we could offer this putter in different shaft lengths, but with a simple product, we cannot manage inventory for each option. Therefore, if we are stocking each putter in different shafts, then we would need to create simple products for each variant.
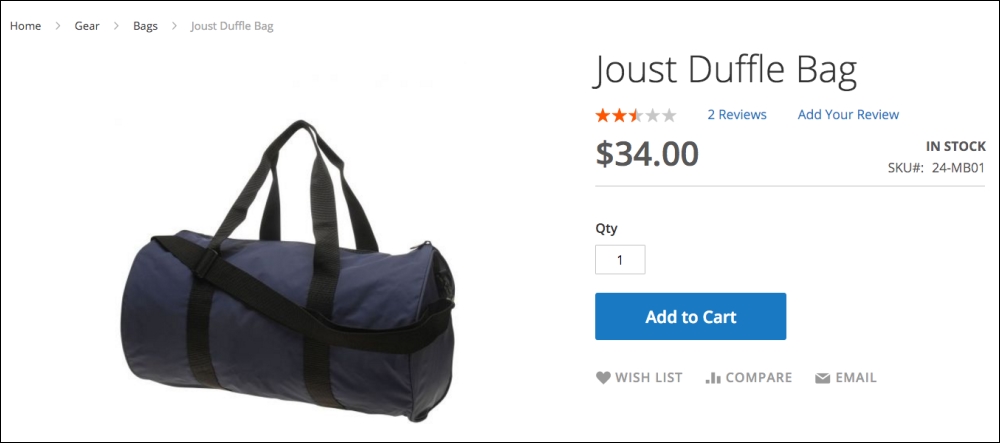
The preceding figure illustrates a simple product. It has no other sizes or colors and is not a bundle or group of products.
Simple products in Magento become the basis for all other tangible complex product types, which we'll discuss in the next section. The important concept to learn here is that all tangible products begin with the simple product.
When two or more simple products are combined in a single product representation, we are creating a complex product type. In Magento, we also consider virtual and downloadable products as "complex" because of the additional considerations needed to manage non-tangible products.
Perhaps the most popular complex product type is the configurable product type. This type is used when you sell an item that comes in different sizes, colors, and so on. The most common example is clothing.
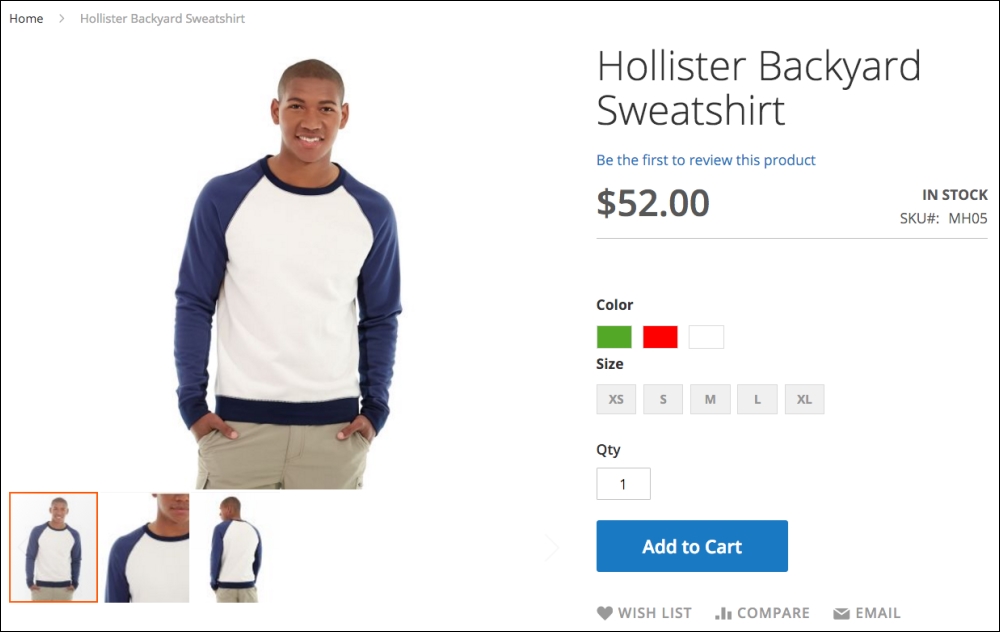
As shown in the preceding screenshot, this sweatshirt comes in three different colors and five different sizes. In Magento, there are actually two ways you can build out this product:
The key to which method to use boils down to how you answer the following questions:
If you answer Yes to either question, then you should use a configurable product. You cannot track inventory on Custom Options (which we'll go into in more detail later in this chapter), and for whatever Custom Options you create, customers will be able to choose all possible combinations.
Configurable products also give you tremendous content versatility as well. For example, in the sweatshirt product (included in the Magento 2 Sample Data), as the customer selects a different color, the main image changes to that of the associated simple product image.
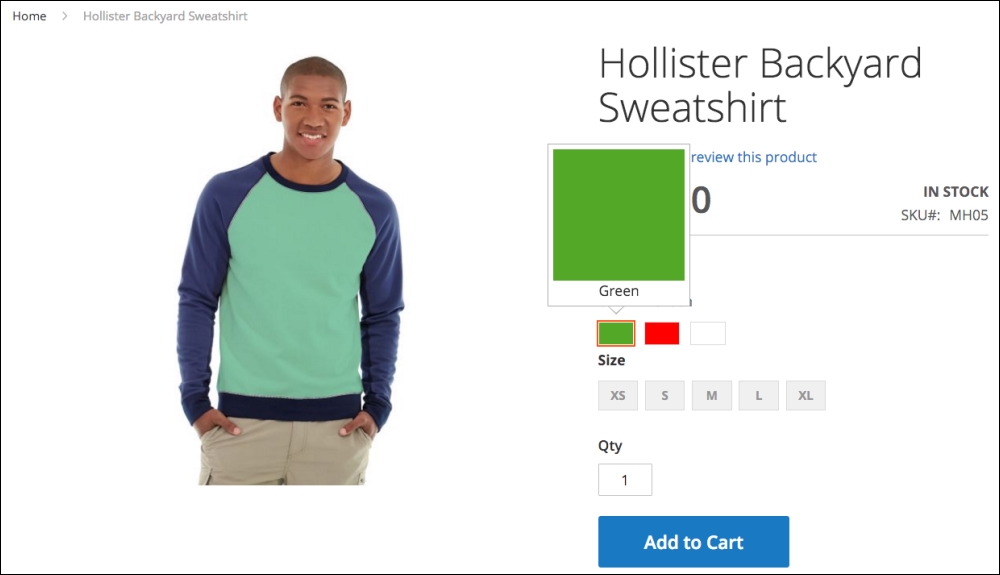
Additionally, the stock available for each combination selected is shown to the customer. Any associated simple product that is not available will be indicated, as shown in the following screenshot: when Red is selected, the XL size is not available.
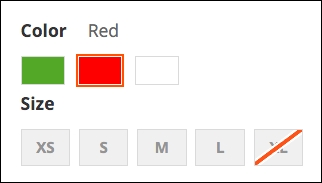
As we'll see when we create a configurable product type later, Magento 2 introduces new tools for rapidly creating the needed variants.
Sometimes it's helpful to display several different products as a related group to make it easier for customers to choose one or more products. The grouped product type associates simple or virtual product types into one complex product.
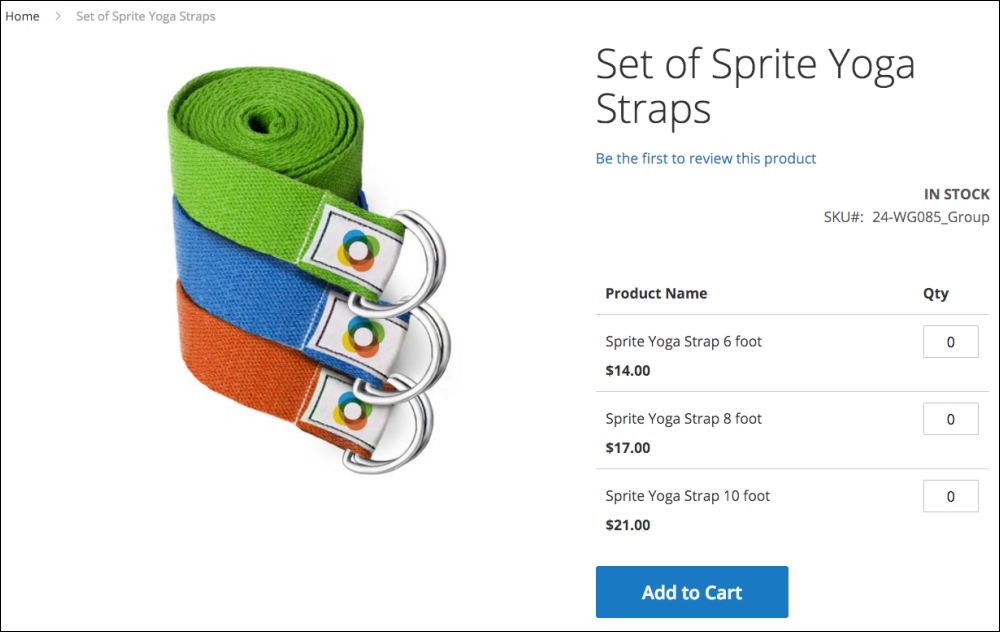
As shown in the sample Yoga Straps, the customer can choose any quantity of any of the products, which exist as simple products in your catalog. Each product chosen will appear separately in the customer's shopping cart.
A complex product similar to the grouped product is the bundle product type. It is similar in that it associates simple or virtual products that do not have Custom Options, but different in that you can create a base collection of products for the bundle and set a price for the combined items. You can also create additional options for the user to choose and allow the pricing to be determined dynamically.
If it's the latter, the product listing will show a range of pricing based on the least expensive and most expensive possible configurations. There's a lot of versatility to the bundle product type.
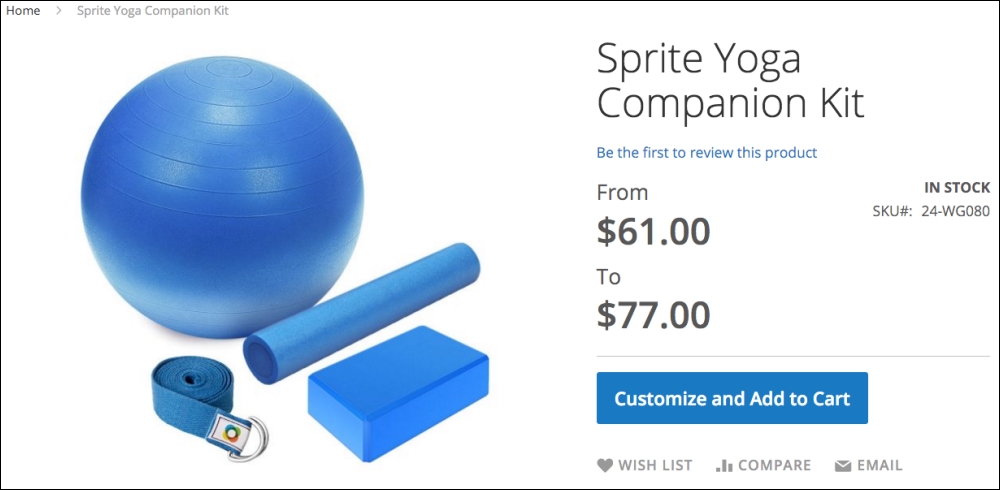
Although not completely supported, the bundle product can be used to create what is often called a kit. As we use this term, it refers to the assembling of various individual products into a single presented product, usually priced at a discount from the sum of the individual product prices. Let's explore a possible scenario to better understand the concept of a kit.
We have a client who sells dictation-related products. He wants to combine a digital recorder that retails for $500 with a transcription kit that retails for $400 and offer this combined "kit" for a special discounted price of $800, saving the customer $100 if purchased separately. In addition, he needs to maintain inventory counts for both items, so that if one goes out of stock, the bundle is, therefore, not in stock.
Using a bundle product, our client can build this kit — or bundle — assigning its special price, yet maintain each one separately for inventory and shipping purposes.
The big "issue" with using the bundle product type for kits is that, by default, the customer must still click to Customize the bundle before adding it to their cart. Even though you may not have any options available for the customer, this extra step is still required. Look for innovative developers to create modifications that will modify this behavior.
Just as the name implies, a virtual product type is an intangible product. Typical virtual products include subscriptions, memberships, and warranties.
Unlike tangible products, virtual products have no shipping weight and no shipping options will appear during the checkout process, unless a tangible product is also included in the customer's order.
We live in a world of digital distribution. Books, music, and software are more commonly downloaded today than sent on CDs or — anyone remember these? — floppy disks.
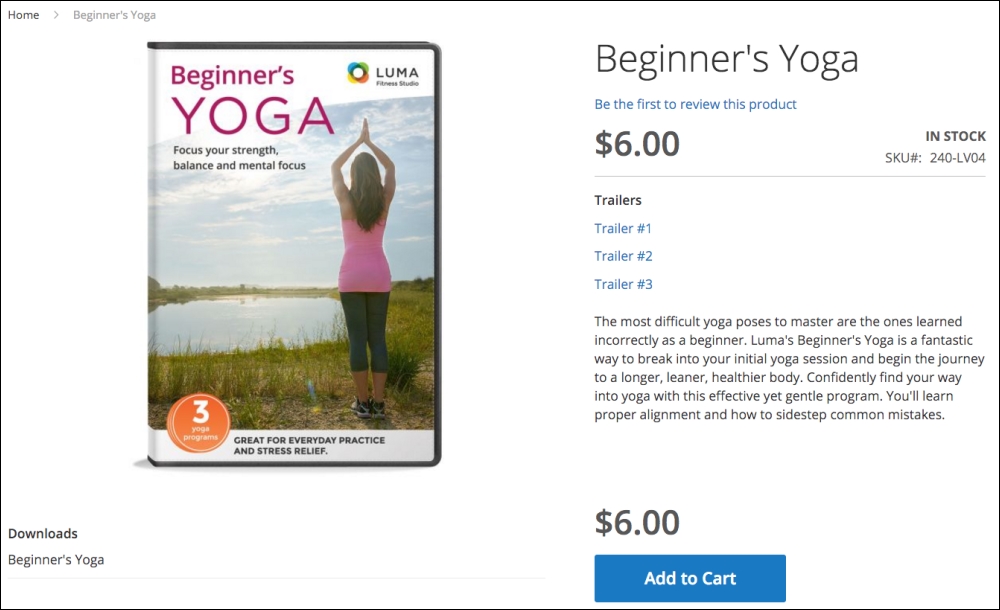
In Magento, you can sell and distribute digital products using the downloadable product type. When customers purchase the product, they are emailed links to files on your server or on another server. Customers can also access their downloadable products when they log into their account in your store.
With a downloadable product, you can set the maximum number of downloads you will allow a customer and whether the link is "shareable" with others.
Before diving into the creation of products, we need to explore a very important — and powerful — feature of Magento: product attributes. We have yet to find another common platform that provides the level of sophistication for product attributes as well as Magento.
Every field related to a product is called, in Magento, an attribute. The description, price, weight, and SKU are attributes. In fact, all the fields that appear by default on a product detail screen are attributes.
But the real power comes in those attributes when you can add to your product screens to capture more granular aspects of your products, such as color, size, kHz, and screen size. Obviously, not all attributes are relevant to all products. For instance, t-shirt size would not be applicable to your furniture products. Fabric would not be a useful attribute for computer monitors, and that's where Magento really shines!
If you view the More Information tab under the Sample Data product Montana Wind Jacket, for example, you will see four attributes listed.
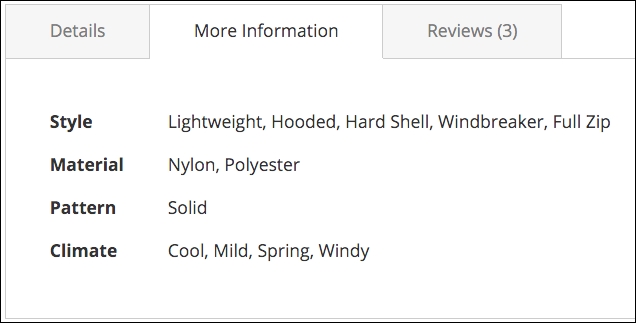
Each of these relevant attributes helps your customers get a better understanding of your products. You can certainly include this information in your product description field, but by creating attributes your customers can use them for comparison purposes, and it makes it easier for you to make sure you have included all product specifications when creating new products in your store.
Furthermore, attributes can be used to create the layered navigation that appears in the sidebar on your category pages (if Is Anchor is set to Yes; see Chapter 3, Designs and Themes).
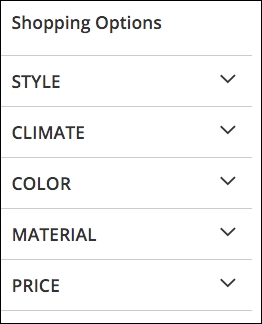
In your Magento 2 backend, go to Stores | Product (under the Attributes group heading).
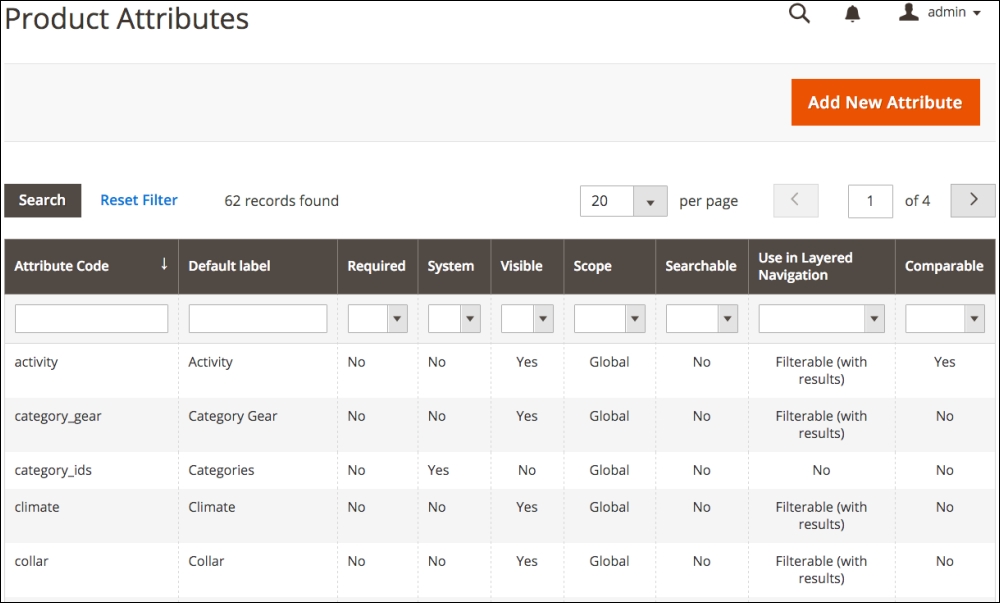
Here, you will see a listing of all the product attributes, both default and user-added, that are available for your products.
To use attributes for creating products, you create attribute sets (also referred to as product templates in Magento 2) to group attributes into meaningful sets relevant to the various products you are offering. We'll explore attribute sets in a moment, once we learn how to create individual attributes.
Before we begin building or editing product attributes, let's learn about the different attribute types accommodated in Magento 2. Each has its own considerations and features.
Attributes are considered name-value pairs, meaning that for each attribute there is a name, such as "Size," and one or more values, such as "Small, Medium, Large." The values you need for each attribute — and how you wish to use the attribute — is what helps you determine the type of attribute to create.
Before you begin creating attributes, it's important to understand the implication of using one attribute type over another. Each type has its own particular abilities.
The one ability that is usually the most important is whether or not the attribute can be used in layered navigation (as described earlier). For an attribute to be used as a layered attribute, it has to have fixed values. Magento indexes attributes and it makes sense that it cannot provide layered navigation on free-form fields. Therefore, if you wish to use an attribute in layered navigation, it must be a multiple select, dropdown, price, visual swatch, or text swatch attribute type. Eligible attribute types can also be designated for use in the layered navigation of search results.
Another ability commonly considered for attributes is whether the attribute will be used when customers compare products. In the comparison display, only those attributes chosen for comparison will be shown side-by-side. All attribute types, except for media image and fixed product tax, are eligible for use in comparisons.
We're going to create a new attribute to use for our furniture products called "fabric," which will help us learn how to add new attributes. We want to use this value in layered navigation and for comparison purposes.
To begin, click Add New Attribute at the top of the attribute list.
On the first panel, you'll find the following fields:

This section will only appear if you select Multiple Select or Dropdown as your attribute type (Catalog Input Type for Store Owner). For these attribute types, you have to provide the possible value choices. Let's take t-shirt size as an example. If you use a Dropdown type, you can enter all possible size choices — make sure they're presented and spelled as you would like them to appear.
To create an option, click on Add Option. Enter the value you want for the option in the Admin column. If you want different displayed values for your multiple stores, enter those into the other fields. Any store views without a value will use the admin column value.
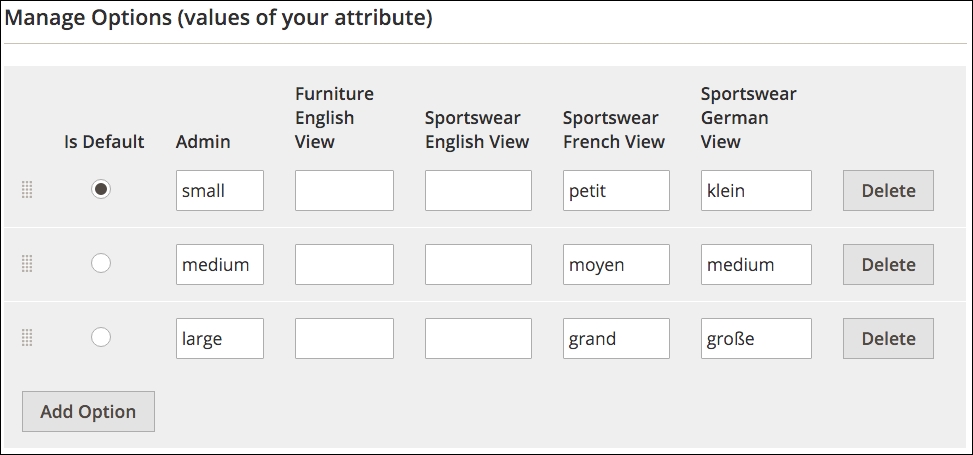
Once you have more than one value, you can choose which will be the default value when creating a new product by clicking the Is Default radio button. You can also re-arrange the order of the values by clicking and dragging the handle on the left end of an option row.
If you choose a Visual or Text Swatch attribute type, this section will be available. Adding swatch options works very similarly to the Options described before, except that you are working with swatches instead of option values.
Visual swatches are configured by selecting either a color value or uploading an image of the swatch. Using the down-arrow menu, select Choose a Color to reveal a color selector pop-up. You can move your mouse across the color spectrums, enter RGB or HSB numerical values, or enter a hexadecimal value to choose your color. Once you make your selection, click the small, round rainbow-colored button in the lower right-hand color of the selector.
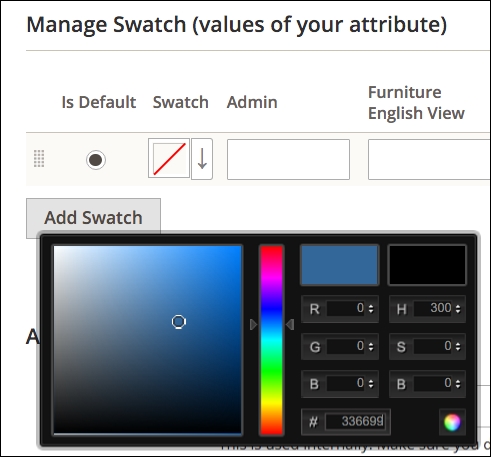
If you choose Upload a File for your swatch, you can select a swatch image on your computer to upload.
Text swatches will display the values you enter as a "button." The swatches will show all available values and if any are out of stock or not available, it will appear as crossed out.
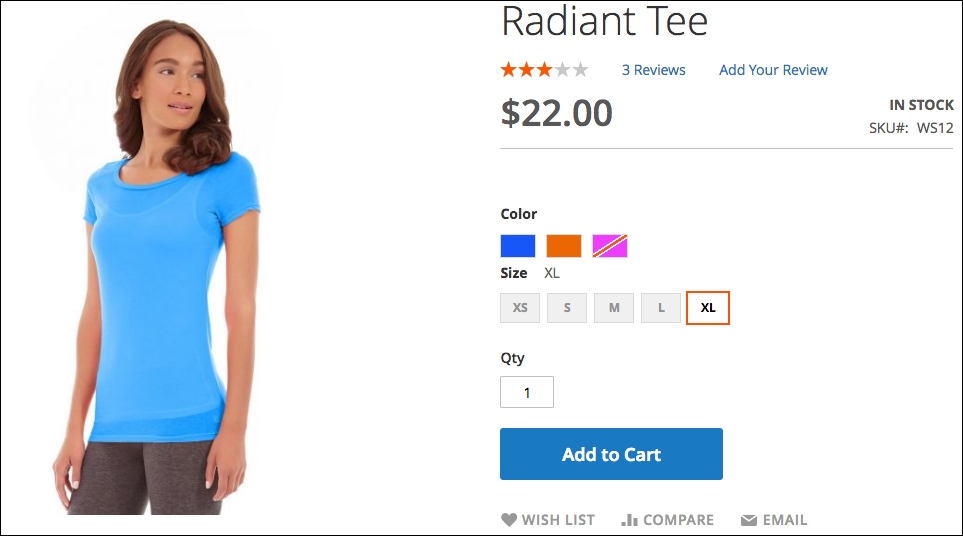
Expand this panel to reveal the following field choices:
By default, your attribute will be named by the value you enter in the Default label field. However, if you want to display the name of your attribute on your store frontend, you may want to supply alternatives for each of your store views. For instance, if you create an attribute called "screen size," you will probably want to translate it for stores you build in other languages.
This is the section that allows you to affect how your attribute can be used by your customers.
In order to have attributes available for use when creating a product, it should belong in an attribute set. Attribute sets also allow you to make available similar attributes across similar products.
To view existing attribute sets, go to Stores | Attribute Sets.
Each existing attribute set (the default will appear if you have not created any sets) contains attributes assigned to that set. Let's create a new attribute set for our furniture products.
For this exercise, we have already created one new attribute: fabric.
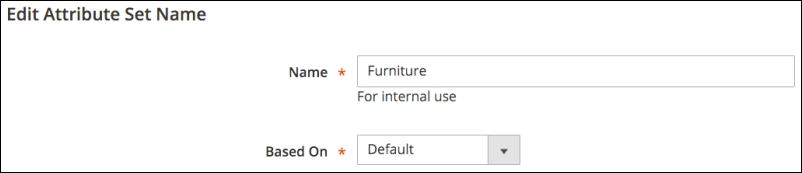

We often create a group within an attribute set to contain special, related attributes. For instance, we could create a group called "Furniture Specifications" and drag "fabric" and any other new, related attributes into this new group, as seen in the following screenshot. This can help focus attention on these special attributes when creating or editing products. The order and groups of attributes have no effect on the front end presentation nor will they change any programmatic aspects of Magento 2.
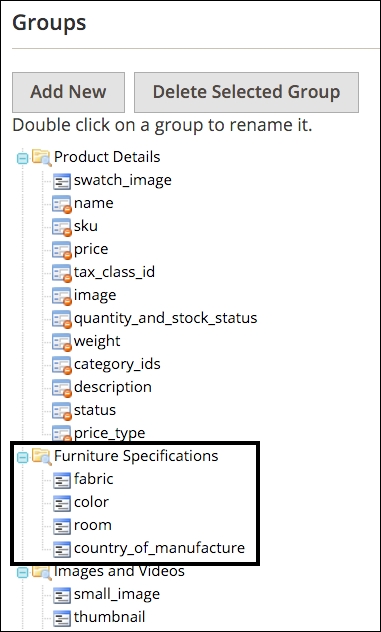
Now that we have created a new "Furniture" attribute set, we can add additional attributes as needed to help describe our furniture offerings. We can also use this attribute set when adding new furniture products so we have just the attributes related to our needs.
A new and powerful feature of Magento 2 is the ability to add existing attributes within the Product Edit screen. This means that as you create products, you can add attributes you need without having to leave your current work. These attributes will also be added to the attribute set you have applied to your current product, which means the attribute will also be added to all products using the same attribute set.
Now that we've discussed the various Magento product types, let's go over the process of creating a new product in the Magento 2 backend. While there are some differences based on product type, the overall process and options are very similar.
After you go to Products | Catalog in the backend, you will see a list of the products in your catalog. In the upper right-hand corner is an orange button, titled Add Product. If you click on Add Product, you can create a simple, configurable, virtual, or downloadable product. For all types — including the bundled and grouped product types — you can also click the button menu (the down arrow on the right side of the button) and choose a specific product type.
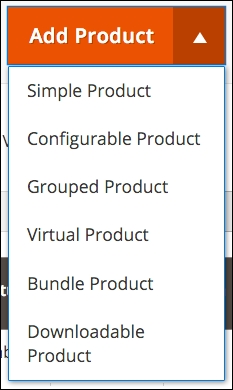
The configurable, virtual, and downloadable product types can be created simply by changing settings within the simple product detail panel. For example, you can start with a simple product, add configurations, and the product type will automatically change to a configurable product type.
As we go through the product creation process, you'll learn that Magento has really upped their game in Magento 2, making it much easier for you to manage your products. For instance, you can start out adding all the various t-shirt styles you sell as simple products, and then go back and create the various size and color variants within those products. In Magento 1.x, you could not change the type of an existing product without first deleting the product, then re-adding it.
So, let's begin by building a simple product and then exploring how to create the other complex product types. For our example, we'll start with a red couch.
To begin, click on Add Product button on the Products | Catalog screen.
We're going to fill in the fields in the Product Details section as follows:
Save your product now before proceeding.
Next, we want to click the small down arrow to the right of Default at the top of the screen and type Furniture to select the Furniture Attribute Set we created earlier.
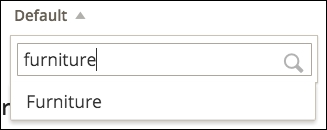
After the screen refreshes, you'll see an additional attribute group you created in the left sidebar, and any attributes you added to the attribute set will be available to you.
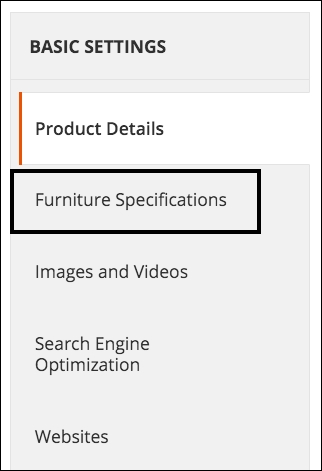
In the Furniture Specifications panel, we will enter the following values:
Under the Websites panel, we need to select Furniture Website so that the new product will appear in the stores within the furniture website.
We're going to leave all the other settings as they are for now and click on Save.
When we view the product on the website and click on the More Information tab, we can see the values of the attributes we have selected.
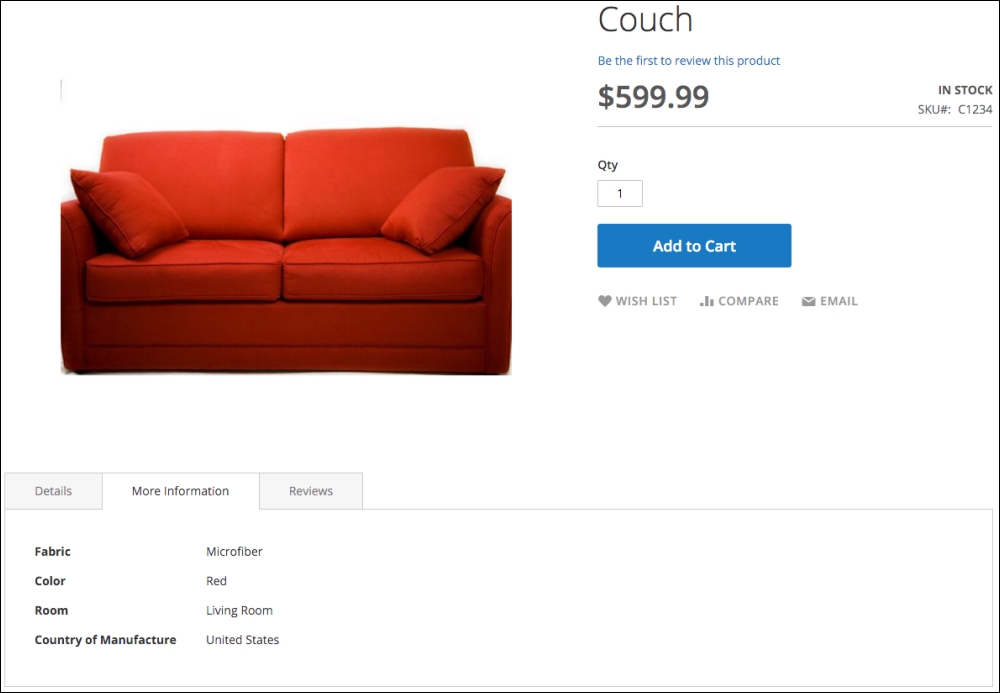
Let's say we have our couch available in three colors: red, blue, and green. How would we present all three choices as a single product yet allow the customer to select their desired color?
The simplest way would be to add colors as an option in our simple product. However, if we manage inventory separately for each color (let's say we have 100 red, 50 blue, and 30 green sofas in the warehouse), we have to, in essence, create three simple products and associate them to a single configurable product.
To do that, we have two options: auto-create the associated products from the configurable product or create the three individual simple products then associate them to a new, configurable product.
First, let's try method one using the couch simple product we just created:
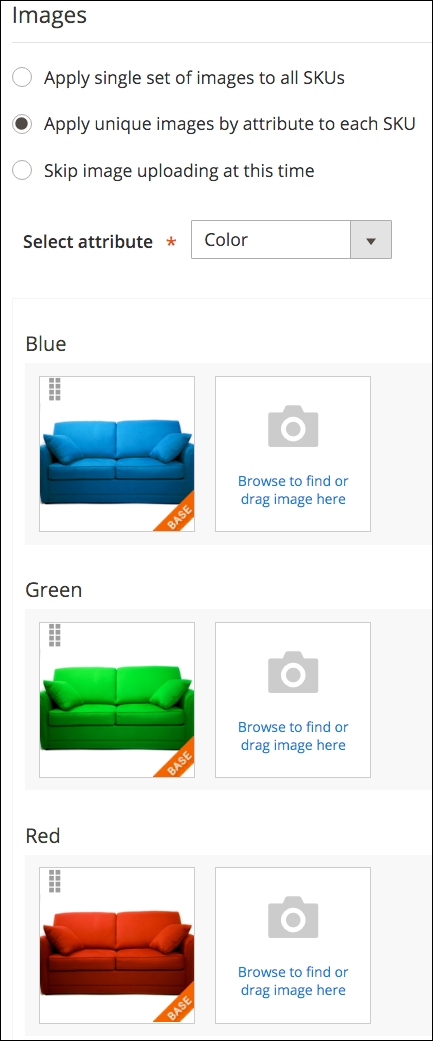
First, you are allowed to choose whether to use the same images for all variants, or assign unique images to each. As with any of these choices, you can also opt to skip this for later.
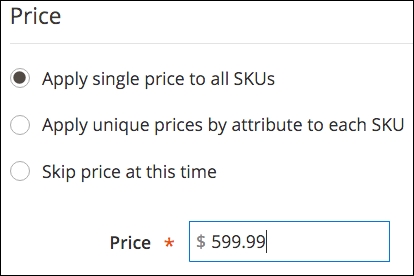
Alternatively, within the Price box, you can assign the same or unique prices to all variations.
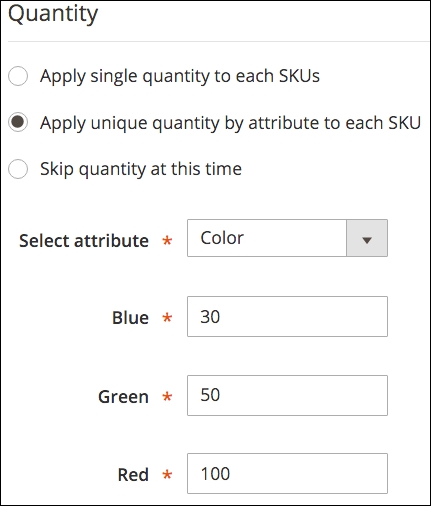
Finally, if you wish, you can assign inventory quantities for the associated products.
Having completed creating the configurable product, the product on the frontend now displays the color swatches for each variant (and removes the Color field from the More Information tab contents). As you click on each swatch, the main image will also change to reflect the image you uploaded for the particular variant.
In the backend, under Products | Catalog, you'll find four products now: the Configurable Product and the three new associated Simple Products.
Alternatively, if you already have the Simple Products added to your store, you can create the configurable product and add the associated products manually instead of creating them automatically, as we just did.
If you have a collection of related products, such as yoga straps (included in the Magento 2 Sample Data set), you can present them as a group. Customers can then select which individual items they want by entering a quantity for each associated product.
To create a grouped product, choose Grouped Product in the Add Product dropdown menu, as shown in the following screenshot:
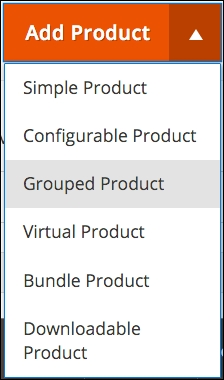
At the bottom of the Product Details screen, under Grouped Products, you add products to the group and any default quantity you wish to set (customers can always override any default).
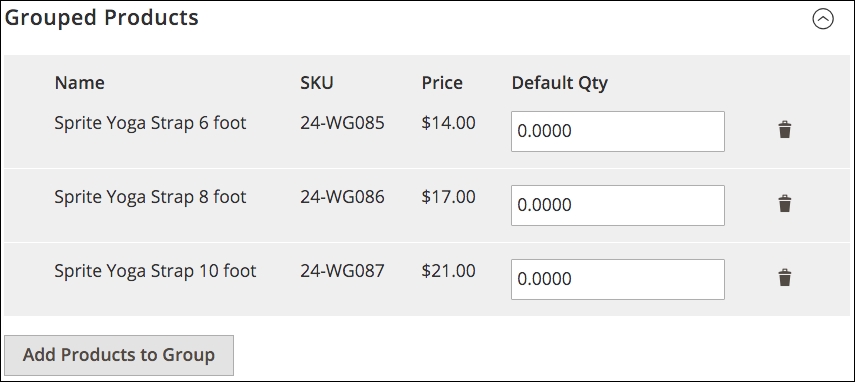
Grouped products are not really products at all but simply a virtual grouping of products you wish to present together.
Bundled products are similar to grouped products but with some differences. The biggest difference is that you are creating a bundle of products presented to the customer as one "set" or "bundle." Furthermore, you can configure the product so that the customer can select options of each product, if they wish.
Let's look at the Sprite Yoga Companion Kit product provided in the Magento 2 Sample Data. This is a bundle of yoga equipment that has been configured to include four required products: a Stasis Ball, a Foam Yoga Brick, a Yoga Strap, and a Foam Roller. Customers can select larger balls and longer straps. The price of the bundle is automatically calculated based on their selections.
When the customer clicks on Customize and Add to Cart, the choices available for the bundle are revealed.
First are the choices for the Stasis Ball:
As customers select alternative sizes, the total cost of the bundle will adjust accordingly.
Bundled products are created in two steps: creating the options for each bundle component, then attaching simple products to those options.
Let's build the Sprite Stasis Ball bundle option, as shown, in the Product Detail screen to illustrate this two-step process.
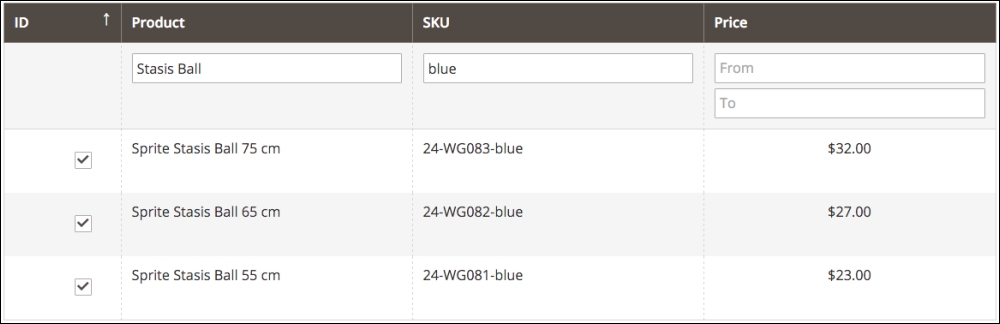
Once you have created your options and attached the associated products, you can save your product.
In today's digital world, many online retailers offer files that can be purchased and downloaded, such as books, music, and software. Creating a downloadable product is achieved by attaching the files to the product. Once purchased, the customer will receive a link they can click to download their purchase to their computer.
Note that many downloadable products cannot be redeemed on mobile devices. Music, for example, may not always be able to be downloaded and played on a mobile device by clicking the redemption link. Please experiment and test your offerings so you know how to communicate any restrictions to your customers.
A downloadable product is created by making two initial selections:
In the Downloadable Information panel, there are two sections: Links and Samples. The Links section allows you to attach files that will be provided to customers once they purchase your products. The Samples section will provide linked files for shoppers to download as examples of what they will get when they buy the product. You can also use this section to attach files to promote the product.
When creating a downloadable product, you have controls over how easily it is for the customer to share their download link and how many times they can download their purchase. While these are not foolproof, they can help restrict the distribution of your digital products.
A virtual product is just as it sounds: a product that doesn't actually exist, but can be purchased by the customer. Basically, a virtual product is one that has no weight and therefore cannot be shipped.
What kinds of product fall into this type? We've used the virtual product type for extended warranties, training courses, and hosting packages.
If you sell actual products, you no doubt have inventory stock. Except in cases where you are having products drop-shipped from a distributor and have no means of monitoring inventory availability, you need to make sure you have enough inventory on hand to fulfill your orders. Furthermore, you may want to restrict customers' ability to order products that are out-of-stock — or, alternatively, allow customers to place backorders.
Magento has a host of configurations to help you establish your inventory rules and policies. Most can be overridden at the product level, too, giving you even more granular control over your product inventory needs.
Here, let's discuss some additional tools in Magento that can help you manage your inventory.
One of the inventory configurations, is that of Notify for Quantity Below. This value sets the threshold whereby Magento will send you an email notification if a product's inventory falls below this quantity. This notification will only come once each day for a given product. Using this feature can help you avoid running out of stock.
Under the Reports menu in your Magento backend are several reports under the Products section. Use these reports regularly to help you monitor your inventory movements and plan your stock purchases. Let's have a look at these reports in brief:
Many times we're faced with needing to manage special pricing for different customer groups or based on quantities purchased. Flexibility in pricing can help you meet the needs of your market and Magento gives you the tools necessary to accommodate those considerations.
In Chapter 3, Designs and Themes, we learned how to create customer groups. You may, for instance, wish to offer discounted pricing for your wholesale customers — those who buy from you for resell to their customers. At the same time, you want to sell products at regular retail prices for your regular customers.
By creating a customer group — say "Wholesale" — and assigning select customers to that group, you can set up specific pricing for a product that will appear to customers who are logged into your store and are assigned to the particular customer group.
Let's use our green couch we created earlier as an example of how to configure pricing for a customer group. If we go to the Product Detail screen for this product and click on Advanced Pricing under the Advanced Settings menu in the left sidebar menu, we see a section called Tier Price (we will also refer to this section later when we discuss quantity-based pricing).

To add pricing for a customer group, click on Add Price. If we wish to set the price for this couch — normally selling for $599.99 — at $350.00 for our wholesale customer, we might configure this new entry as shown in the following screenshot:

With this configuration, any logged in customer who belongs to the wholesale customer group will see this couch priced at $350.00 on your store.
It's probably quite obvious now how you can create quantity-based — or tiered—pricing for your products using the same configuration tool. By adding additional pricing tiers and setting a new quantity value, you can create pricing that changes based on the number of items a customer purchases.
As an example, let's configure the pricing to show a price of $550.00 if a customer buys two-five couches and a price of $500.00 if they buy six or more. We will apply this to all customer groups.
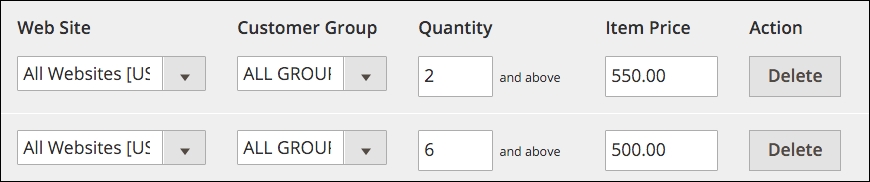
If we commit this pricing scheme, then when viewing the green couch in the store, we would see this pricing notice:
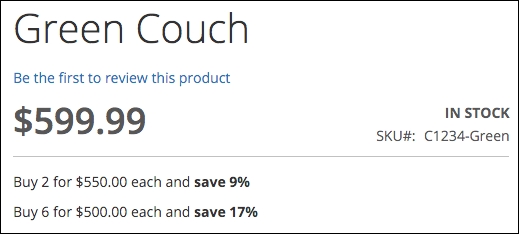
This notice may help stimulate higher purchased quantities by showing customers how much they can save buying more!
Before we leave our discussion of product creation and management, we need to discuss a special panel in the Product Detail screen: Autosettings. This panel is found in the Advanced Settings submenu.
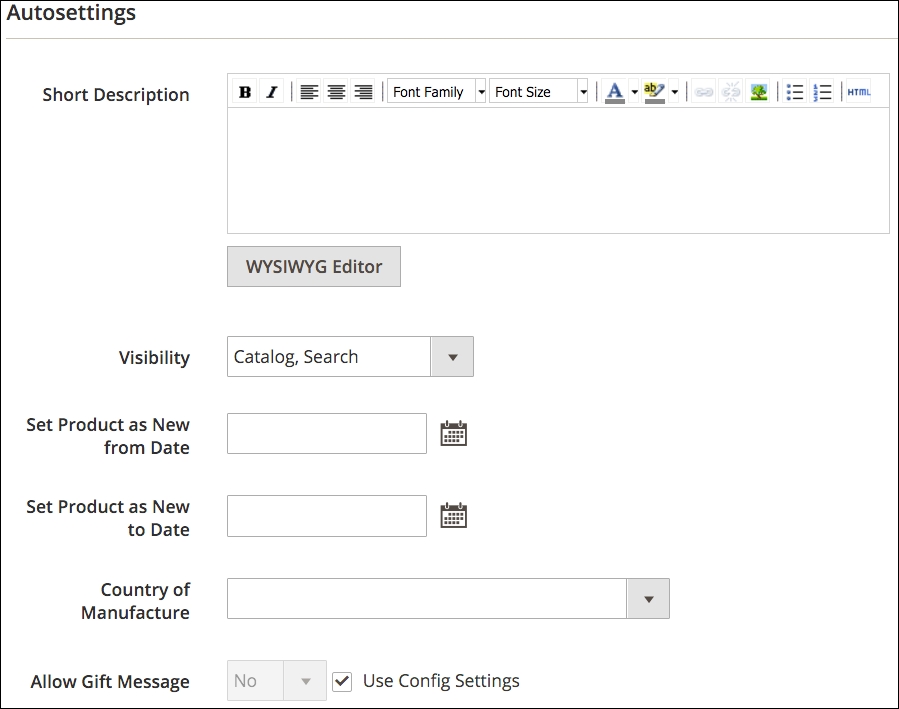
Let's go over the particular settings found on this panel. You'll find these can be valuable to your product presentation efforts.
For each product you create in Magento, you have the opportunity to attract additional purchases from customers by linking products together. These crosslinks allow you to encourage shoppers to consider buying more products than the one they're reviewing. In the bricks-and-mortar world we're constantly bombarded with similar promotions. For instance, if you go into the grocery store, you'll often find small, red coupon machines hanging off the shelves, encouraging you by their flashing red light to pull a coupon out while you're reaching for the canned peaches you came for. Throughout the store, placards and banners promote "2-for-1" specials or "buy 1, get 1 free." The area around the checkout lane is crowded with magazines, razor blades, batteries and gum, put there to catch your eye just as you're about to leave the store.
In a similar fashion, Magento allows you, the store administrator, to encourage shoppers to spend more during their online visit using related products, up-sells, and cross-sells. All three types are managed within the Product Detail screen.
Each of the following product selling features are configured in the Product Detail screen under the Advanced Settings section. Each one has particular features and purposes.
Related products are those which you wish to present to customers as additional purchases to include when adding a viewed product to their shopping cart. In other words, if a customer is interested in product A, they may also want to purchase product B and product C at the same time.
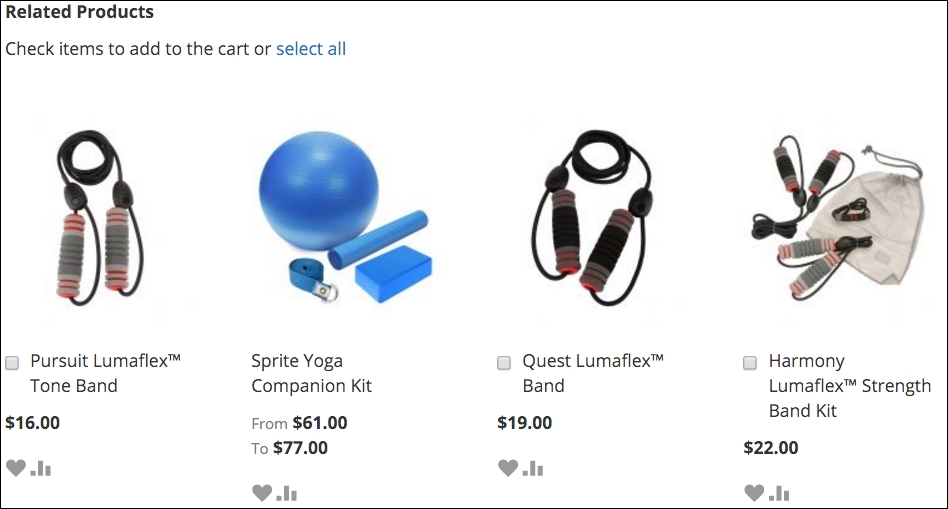
As you can see, a customer may select one or more related items to include with the product they are currently viewing.
By contrast, upsell products are those to be considered as alternatives to the product the customer is viewing. That is, if the customer is interested in product A, they might instead consider product B. Not as an additional purchase, but instead of purchasing product A.
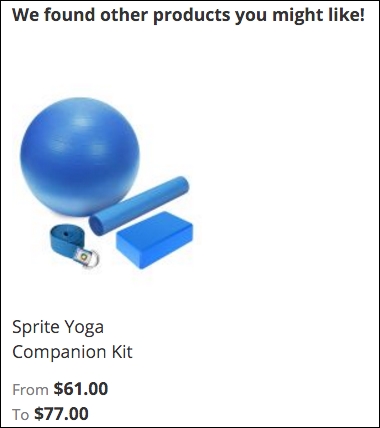
Cross-sell products are presented to your customer on the shopping cart page. For instance, if you want to encourage the purchase of an extended warranty, you could add it as a cross-sell product and it would be presented on the shopping cart. Your customer can add it to their order directly from the shopping cart.
Creating products one-by-one is fine if you're only selling a few products, but many people choose Magento as a platform to sell hundreds and thousands of different products. Entering each product individually can take a long time, especially if you're writing unique product descriptions, uploading photos, and adding crosslinked products.
With Version 2.0.1, Magento has greatly improved the performance of product imports. In previous versions, importing thousands of products could take hours – literally. We once tried to import 19,000 products and the job took 20 hours to complete! The improvements to Magento importing have greatly decreased that time.
After spending hundreds of hours wrestling with the importing schemas of Magento over several versions of the platform, I'm happy to say that, starting with Version 2.0.1, there is one shortcut to helping you import products successfully.
Magento imports CSV files according to a specific layout scheme. Trying to configure an import file to accurately import a variety of different products, product types, attribute sets, and so on, will lead to many, many failed attempts as you try different ways of configuring the CSV to meet your needs. Therefore, my best advice is:
Now you can easily see how each type of product is configured in the export file. Using this format, you can easily add additional products, simply by following a similar pattern.
In the Magento 2.0.1 import interface, there is an option to download a sample file. This is a great step in the right direction and can be very helpful as a reference. Because this file only covers default products, though, we would suggest entering the type of product(s) you intend to sell into your store as described above to generate a more specific reference template.
Notice that for products with various options, particularly configurable products, only the differences between each iteration are included on the rows below the main product row. Never repeat any other fields that are the same between variations. A unique SKU is required of each product, though. For configurable products, you'll need to include a pipe delimited list of the configurable SKUS and the attribute they vary by (in the example below, this is the Color attribute).
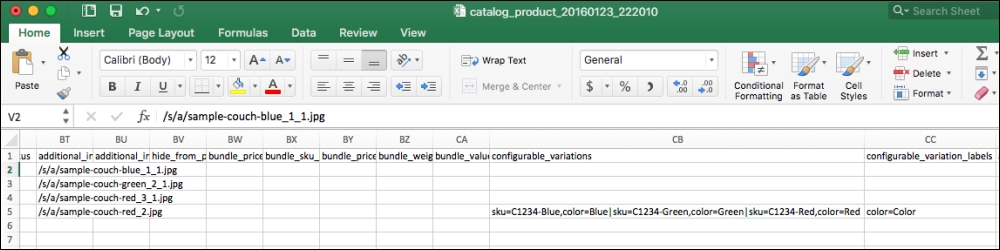
You don't need to worry about this for simple products, but if you do have a batch of configurable products it will really help to have a sample configurable product export file as a starting point.
To import images, you must upload the images to your server in the /var/import folder. If the /var/import folder doesn't exist, you can create it (or another of your directory) and specify it as part of the import process.
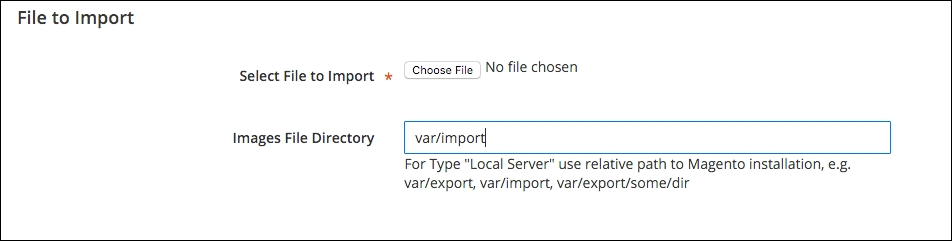
Put the name of the image file in the image columns of your import CSV file (don't include any path). Magento will pick the image out of the /var/import folder, resize it as needed, and store it within the images/catalog folder hierarchy. Never use capitals, spaces, or other strange characters in your image names; only the letters a through z, the numbers 0 through 9, and the underscore.
The most important thing to remember is to remove any unused columns before importing. For example, if you are not going to include categories in your import, leave that column out. This is especially important if you are re-importing or importing product updates. If you leave a column blank, then Magento will enter a blank value for that column in your product record. Oops!
Selling online begins with your products. Your products have to be presented well and in logical categories. Furthermore, Magento gives you additional, powerful tools for promoting your products to potential customers.
In this chapter, we learned how catalogs and categories relate to each other, and to your stores, and the different types of products that can be sold in a Magento store. We also went in-depth into how to create and manage attributes and attribute sets and discussed inventory management configurations. Finally, we learned a shortcut for configuring product imports.
Getting a handle on how the complexity of categories and products in Magento work is actually one of its greatest strengths and puts you in a better position to leverage the remaining topics in this book towards encouraging more sales from your visiting customers. Next, we turn our attention to grabbing attention: how to theme your Magento store.
Selling online, as with brick-and-mortar retailing, is more than simply having products to offer to customers. Buyers make purchases based on many things apart from the item itself. Customers want to understand the purpose of the retailer and have confidence that the seller is legitimate, safe, and honest. Corporations have spent billions over the years creating this understanding among their active and potential customers, through logos, design, copy, and service. Creating this understanding is called branding.
For an online store, branding is very important. However, unlike the offline shopper who drives to a store, parks, and enters the store to spend several minutes shopping; an online shopper may click to your online store, spend a few seconds to determine if they wish to remain, and leave to visit another website. Therefore, your store's brand—it's graphics, copy and function—must address the following in a matter of seconds:
Magento gives you, or your client, the functional tools and systems to provide a powerfully rich shopping experience for your customers. It cannot, however, provide the branding aspects relating to design. You have to craft the outward appearance that will communicate to the potential buyer feelings of convenience, product selection, and security.
In this chapter, we will teach you:
In Chapter 2, Managing Products, we discussed the Global-Website-Store, or GWS, methodology. As we have learned, Magento allows you to customize many store aspects at some, or all, of the GWS levels.
The same holds true for themes. You can specify the look and feel of your stores at the Global, Website, or Store View levels (themes can be applied for individual Store Views relating to a store) by assigning a specific theme.
In Magento, a group of related themes is referred to as a design package. Design packages contain files that control various functional elements common among the themes within the package. By default, Magento Community installs one design package with two themes.
Themes within a design package contain the various elements that determine the look and feel of the site: layout files, templates, CSS, images, and JavaScript. Each design package must have at least one theme, but can contain other theme variants. You can include any number of theme variants within a design package and use them, for example, for seasonal purposes (such as holidays or back-to-school).
The following graphic shows the relationship between design packages and themes:
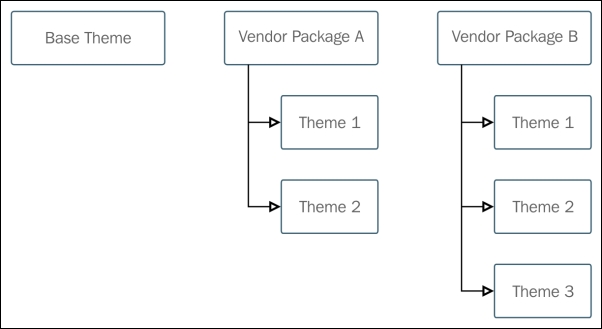
A design package and theme can be specified at the Global, Website, or Store levels.
Most Magento users will use the same design package for a website and all descendant stores. Usually, related stores within a website business share very similar functional elements, as well as similar style features. This is not mandatory; you're free to specify a completely different design package and theme for each store view within your website hierarchy.
A design package and theme can also be specified based on a per browser basis at the global and website level, by providing a User-Agent Exception. In the following example, the string for the Firefox browser is provided:
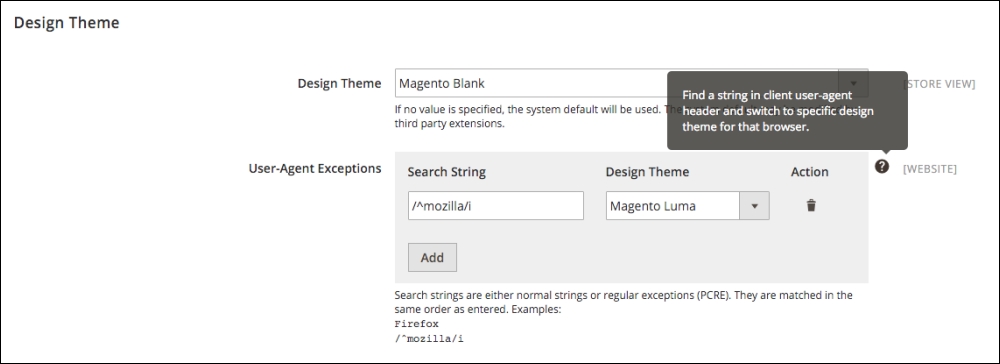
To be certain about the string used in the User-Agent Header, you can check http://whatsmyua.com/ from the browser in question. This site will provide a very specific string you can use for the Search String field.
Magento 2 is a departure from Magento 1.x in that the skin directory used in Magento 1.x is absent, and the structure has been simplified. All files have been consolidated into one location, stored under the /app directory. Additionally, the layout and template directories from Magento 1.x have moved. Now, every module has its own layout and template directories in which you can access all template, layout, JS, and CSS/Less files.
Let's take a closer look at the new structure of a theme for Magento 2.0. The theme directory will typically include the files and directories visible in the following image:
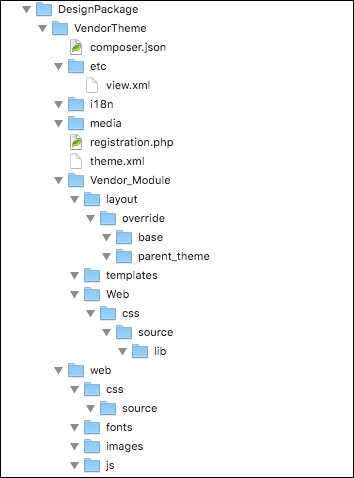
The theme directory
You may notice that in some default Magento 2.x builds, some themes are found in the vendor/ directory. This indicates that a theme has been added via a composer dependency. We'll cover packaging your theme via composer later in the chapter. While Magento does check the vendor/ directory for themes, you should never add a theme directly to this directory. When creating a new theme, always start in the app/design/frontend/ directory.
In the new theme structure for Magento 2, all of the files related to design are in the preceding layout, under the VendorTheme directory. To clarify this new layout, we've provided a brief description of the role of each of the files and directories here:
/composer.json: This file is not a required file, but you'll use it to describe the dependencies your theme has and metadata for your theme. This file is essentially for use if you intend your theme to be a composer package./etc/view.xml: This file is required for a theme, but only if it doesn't already exist in a parent theme. We'll review parent themes later in this chapter as well. It includes information about product images and thumbnails./i18n: This directory includes CSV translation files./media: The /media directory contains a theme thumbnail, typically a screenshot of the theme that serves as a preview of the theme when it's being installed in the admin. This directory is required./registration.php: This file is required; it registers your theme within the system./theme.xml: Also mandatory, the theme.xml file declares the theme as a system component. It contains information about the theme like the theme name, the parent theme name, and so on./Vendor_Module: This directory is the parent for module specific styles, and the naming convention is important. Magento will use it to determine which module it needs to apply the styles, layouts and templates to. If the module being overridden was the Catalog module, the directory would be Magento_Catalog. It is only required for modules that are being overridden./Vendor_Module/layout: This directory contains files that extend or establish module layouts. Layout files are XML that determines the position of blocks and containers on any given Magento page. We'll go into additional detail around layout files and the elements in them in the customizing themes section of this chapter./Vendor_Module/layout/override/base: Files in this directory specifically override the default layouts for the module in question./Vendor_Module/layout/override/parent_theme: Layout files in this directory specifically override the parent theme layouts for the module specified./Vendor_Module/templates: This directory contains template files that override either default or parent templates in place for this module. If there are custom templates for this module, they're stored in this directory as well. We'll review template files in greater detail in the customizing themes section./web: This directory contains static files that can be loaded directly from the frontend. For example, if you wanted to reference a specific image, you could include it here, and you would be able to refer to it in a template file./web/css/source: This is the location where Less CSS configuration files for the theme are stored. Less is a CSS pre-processor that allows for variables and functions, making CSS for the theme more maintainable and extensible./web/css/source/lib: This directory contains files that extend or establish module layouts. Layout files are XML that determine the position of blocks and containers on any given Magento page. We'll go into additional detail around layout files and the elements in them in the using themes to create your own look and feel section of this chapter./web/fonts: This contains fonts specific to this theme. Everything in the web directory is static, so this folder is simply here for organizational purposes./web/images: This directory stores images specific to this theme./web/js: This location contains JavaScript specific to this theme. We'll talk more about how to insert JavaScript into a template in the using themes to create your own look and feel section.A very important aspect of Magento theming is the fallback model. Theme inheritance in Magento 2.x has been completely redesigned. The primary upshot of this is that unlimited fallbacks are supported and the default directory is no longer a part of the fallback mechanism.
The fallback order is slightly different for static assets (JavaScript, Less CSS, CSS) and templates, so we'll review both of these cases in detail. Before we explain the fallback order though, we'll need to begin with how parent themes are established in theme.xml.
This is new and central to the new theme fallback model. In any given theme, you have the option of identifying the parent theme. This is done in the theme.xml file, in the root directory of the theme. The following is an example of what text from a sample theme.xml file might look like:
<theme xmlns:xsi="http://www.w3.org/2001/XMLSchema-instance" xsi:noNamespaceSchemaLocation="urn:magento:framework:Config/etc/theme.xsd">
<title>Vendor Theme</title>
<parent>Magento/luma</parent>
<media>
<preview_image>media/vendorpreview.jpg</preview_image>
</media>
</theme>As you can see, the parent theme is specified explicitly, and in this case it's the Magento Luma theme. That means that any files not found in the "Vendor Theme" theme will be pulled from the Luma theme. Any files not found there will, by default, be pulled from the Magento "Blank" theme, and if they're not found there, they'll be pulled from the module theme files.
Static assets are content such as JavaScript files, CSS, images, fonts, and Less CSS files. Even though Less CSS files are not, technically speaking, static files, they produce the final CSS, so are categorized as such:
web directory, <theme_directory>/web/imagename.jpg.lib/web/.<module_dir>/view/frontend/web/.<module_dir>/view/base/web/.The fallback mechanism for theme files is simpler, because the module context is always known for them.
<theme_dir>/<Namespace>_<Module>/templates.<parent_theme_dir>/<Namespace>_<Module>/templates.<module_dir>/view/frontend/templates.Here's a pictorial representation of the new fallback model in Magento 2.0. It's a little bit tricky, so we'll walk through each scenario represented here:
theme.xml, and there are no module_override files and there are no static override files. In this case, requests to the theme will fall back to the module theme files.magento_blank, and subsequently the module theme files.theme.xml, and have CSS overrides. In these cases, requests to the CSS will fall back to Vendor_Theme_2, and then Magento_Blank: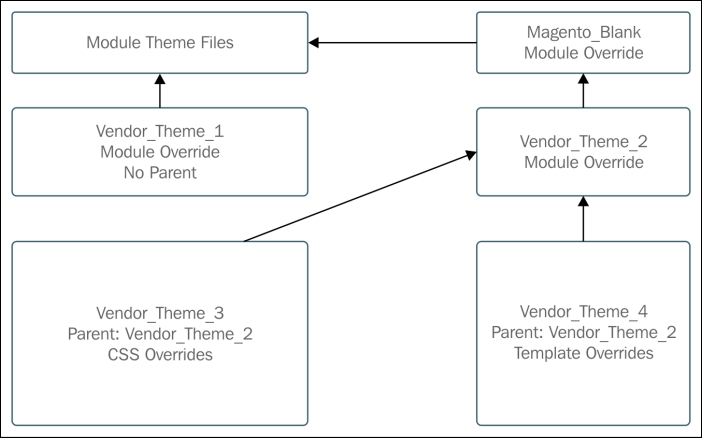
The fallback model is a tremendous shortcut for developers. When a new theme is created, it only has to contain those elements that are different from what is provided by the Parent or Module package files. For example, if all parts of a desired site design are similar to the Parent theme, except for the graphic appearance of the site, a new theme can be created simply by adding new CSS and image files to a new theme. Any new CSS files will need to be included in the local.xml file for your theme (we discuss the local.xml file later in this chapter). If the design requires different layout structures, only the changed layout and template files need to be created; everything that remains the same need not be duplicated.
If you're careful not to alter the magento_blank theme and default module theme files, then future upgrades to the core functionality of Magento will not break your installation. You will have access to the new improvements based on your custom design package or theme, making your installation virtually upgrade proof.
In a new, clean Magento Community installation, you are provided with the following design packages and themes:
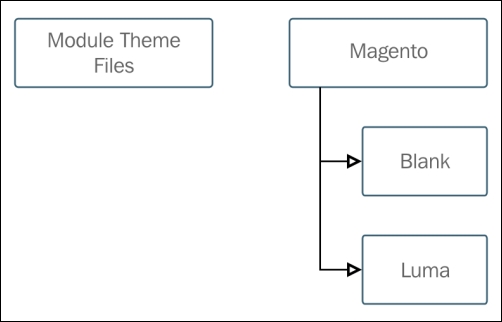
Depending on your needs, you could add additional custom design packages, or custom themes within the Magento design package:
We like to make sure that whatever we customize can be "undone" if necessary. It's difficult for us to make changes to the core, installed files; we prefer to work on duplicate copies, preserving the originals in case we need to revert back. After re-installing Magento for the umpteenth time because we had altered too many core files, we learned this the hard way!
Your new theme hierarchy might now look like this:
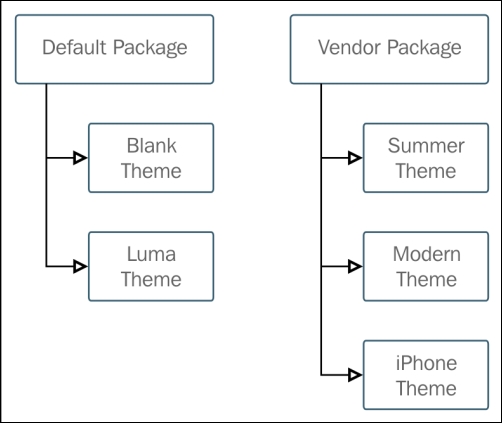
If you decide to use one of the installed default themes as the basis for designing a new, custom theme, duplicate and rename the theme to preserve the original as your fallback.
The Blank Theme
A default installed theme is called Blank. If the customization to your Magento stores is primarily one of colors and graphics, this is not a bad theme to use as a starting point. As the name implies, it's a pretty stark layout, as shown in the following screenshot. However, it does give you all the basic structures and components.
Stark layout
In most cases, beginner level Magento users will explore the many available Magento themes created by third-party designers. While there are many free themes available, most are sold by dedicated designers.
Shopping for themes
One of the great good/bad aspects of Magento is third-party themes. The architecture of the Magento theme model gives knowledgeable theme designers tremendous abilities to construct themes that are virtually upgrade proof, while possessing powerful enhancements. Unfortunately, not all designers have either upgraded older themes properly or create new themes fully honoring the new 2.0 fallback model. If the older fallback model is still used for current Magento versions, upgrades to the base package could adversely affect your theme.
Therefore, as you review third-party themes, take time to investigate how the designer constructs their themes. Most provide some type of site demo. As you learn more about using themes, you'll find it easier to analyze third-party themes.
Most themes require that you install the necessary files manually, by FTP or SFTP, to your server. Every third-party theme I've ever used has included some instructions on how to install the files to your server. However, allow us to offer the following helpful guidelines:
We learned how to create Store Views in different languages. There's another very powerful tool available to store owners as well, whereby it's possible to provide translations manually. To enable the mode for editing/translating text, log into the administrative interface and visit Store | Configuration | Advanced | Developer. You'll see the option to translate inline, for the storefront and for the backend:
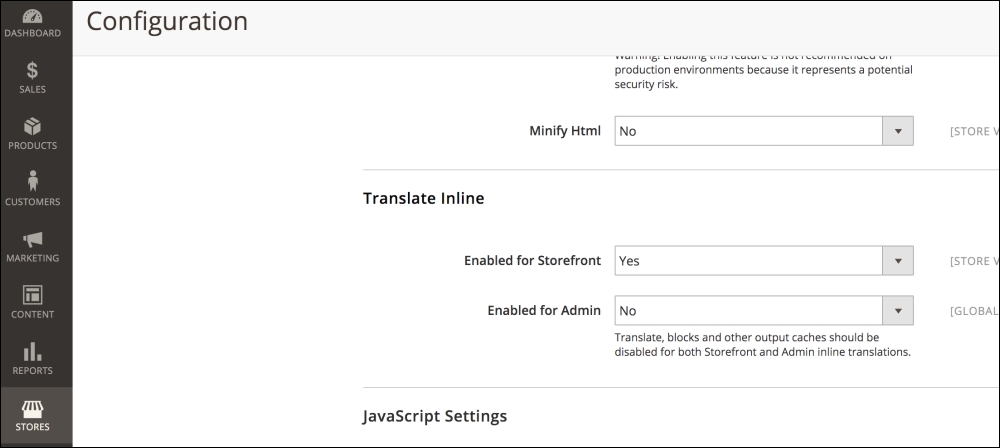
Enable this, and you'll be prompted to clear the cache, with a link to System | Cache Management to do so. Once the cache has been cleared, visit the front page of the site. You'll see red boxes around certain portions of the page. When you hover over these boxes, a dictionary will appear. When you click on this dictionary icon, you can provide inline translation that will be stored in Magento's translation database:
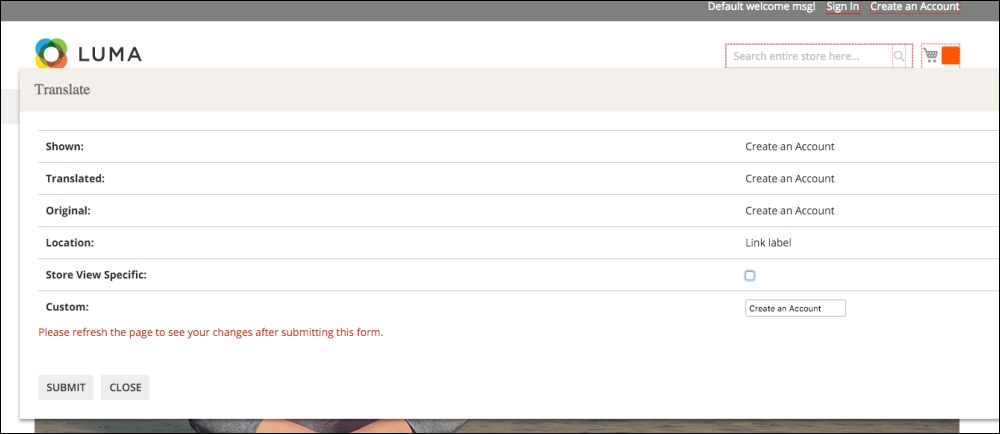
Let's assume we have created a new design package called sportswear_package. Within this design package, create a new theme and call it sportswear_theme. Our new design package file hierarchy, in /app/design/, might resemble the following hierarchy:
app/
design/
frontend/
Magento/
blank/
luma/
sportswear_package/
sportswear_theme/Because we want to use the blank theme as a starting point, the theme.xml in the root directory of our theme will look something like this:
<theme xmlns:xsi="http://www.w3.org/2001/XMLSchema-instance" xsi:noNamespaceSchemaLocation="../../../../../lib/internal/Magento/Framework/Config/etc/theme.xsd">
<title>Sportswear Theme</title>
<parent>Magento/blank</parent>
<media>
<preview_image>media/preview.jpg</preview_image>
</media>
</theme>However, let's also take one more customization step here. We can create variations of a theme that are simply controlled by CSS and images by creating more than one skin. For "Sportswear", we might want to have our English language store in a blue color scheme, but our French language store in a green color scheme. We could take the sportswear_theme/ directory and duplicate it, renaming both for the new colors:
app/
design/
frontend/
Magento/
blank/
luma/
sportswear_package/
sportswear_theme/
sportswear_blue_theme/
sportswear_green_theme/Before we continue, let's go over something that is especially relevant to what we have just created.
For our sportswear theme, we created two skin variants: blue and green. However, what if the difference between the two is only one or two files? If we make changes to other files that would affect both color schemes, but which are otherwise the same for both, this would create more work to keep both color variations in sync, right?
Remember, with the Magento fallback method, if your site calls on a file, it first looks into the assigned theme, then the parent theme, the blank theme, and finally, the module-specific theme files. Therefore, in this example, you could use the sportswear_theme as a common parent to contain all files common to both blue and green. You would only need to include files or CSS impacting the color of these themes.
As mentioned earlier, you can assign design packages and themes at any level of the GWS hierarchy. As with any configuration, the choice depends on the level you wish to assign control. Global configurations affect the entire Magento installation. Website level choices set the default for all subordinate Store Views, which can also have their own theme specifics, if desired.
Let's walk through the process of assigning a custom design package and themes. For the sake of this exercise, let's continue with our sportswear theme, as described earlier. We created a sportswear website and store, with two Store Views for English and French:
We're going to now assign our sportswear theme to the sportswear Website and Store View. Our first task is to assign the design package and theme to the Website as the default for all subordinate Store View:
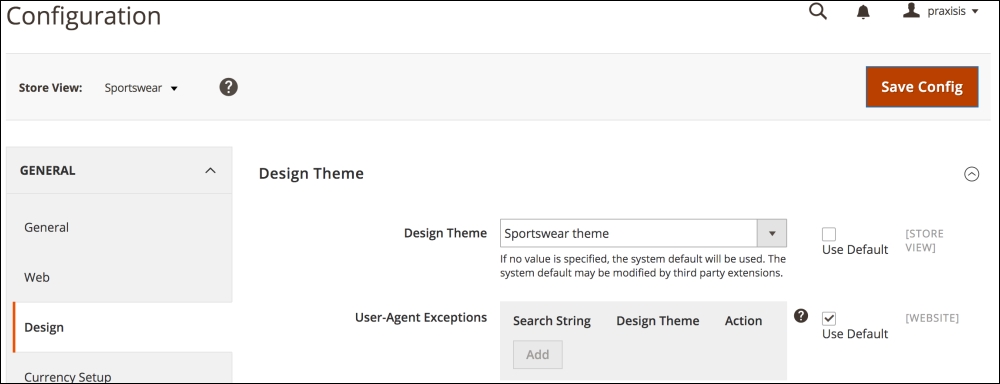
The reason you enter default in the fields as shown above is to provide the fallback protection we described earlier. Magento needs to know where to look for any files that may be missing from your theme files.
Besides the obvious use of different themes within a package for different looks among Store Views, theme variants can be used to provide alternative frontend layouts based on date, such as holiday shopping season, or device, such as smartphone or tablet.
It would be painful if changes that affect your public site content had to be manually turned on at the exact date and time you wished. For products, you can schedule price changes to automatically take effect between any two dates and times (you could have a one-hour sale price!) simply by adding the date/time configuration in the product detail screen.
Likewise, you can schedule changes in your stores' themes to take effect while you sleep! To schedule a theme variant based on a date:
I've never met a person yet that installed a theme and was ready to launch their Magento store without wanting or even needing changes made to the store design. It's natural, as a store needs to have its own personality and its own brand. In this section, we hope to uncover many of the mysteries of how Magento controls a store's look and feel through layered components that, once you understand how they work together, will give you a tremendous ability to make your Magento store a unique, productive online retail destination.
Finding CSS
While you can view the source code of a webpage in any browser, there are better ways of identifying not only the HTML elements of a page, but the exact CSS style(s) that are controlling how that component appears.
For Firefox browsers, you can install the Firebug plugin (http://getfirebug.com). For Safari and Chrome users, this functionality is included with the browser. Another great tool for Firefox users is the Web developer add-on (https://addons.mozilla.org/pt-br/firefox/addon/web-developer/). These tools allow you to select an element on the page and view in another window, what the styling rules are that apply to the element. Once you know that, you can easily find the CSS style statement in the theme's CSS stylesheets and make any changes you wish.
Page layouts in Magento are managed by XML files that control how the various components on a page are to be assembled. Think of layout files as the blueprints of your site, in that they contain the instructions that direct how various content blocks and template files are combined to produce the structural blocks that define the final output.
Blocks are elements in Magento that are responsible for rendering a discreet piece of content to the page. For example, a product display, category list, user login area, all would likely have their own blocks. These blocks in turn reference template files to generate the HTML for any given area.
Let's take a visual look at how structural blocks and content blocks are combined on a typical page, by analyzing a category page captured from our sample data default installation:
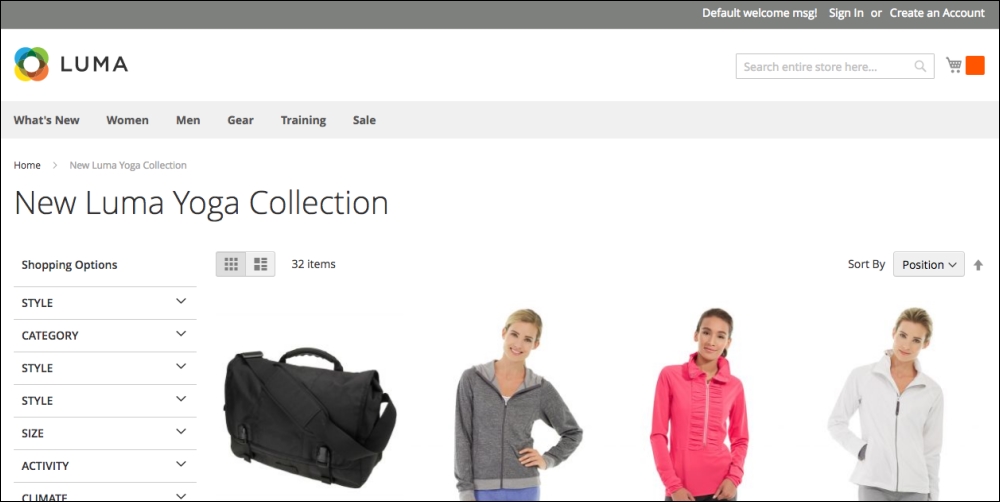
Now, let's look at this page with the structural blocks and content blocks shown inline:
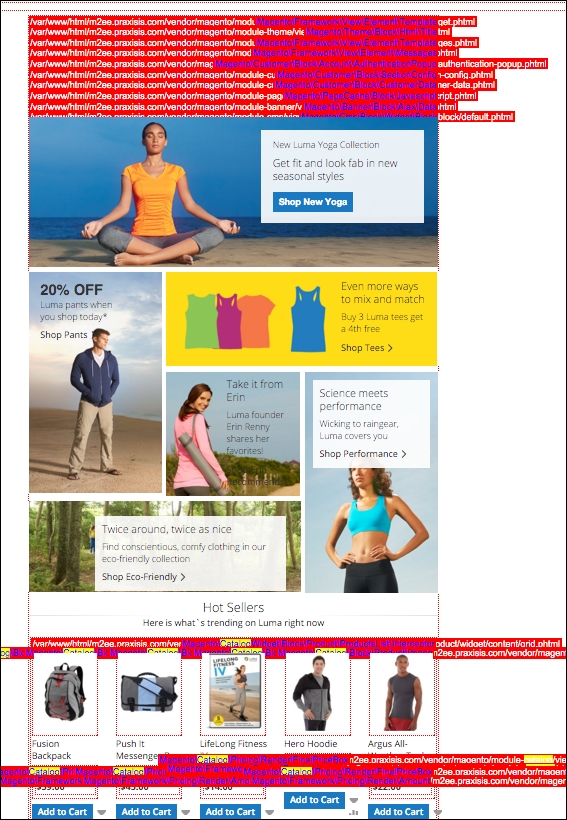
To enable a view like this, that shows which blocks are being rendered on a page, you can visit Stores | Configuration | Advanced | Developer and enable template hints in the debug section:
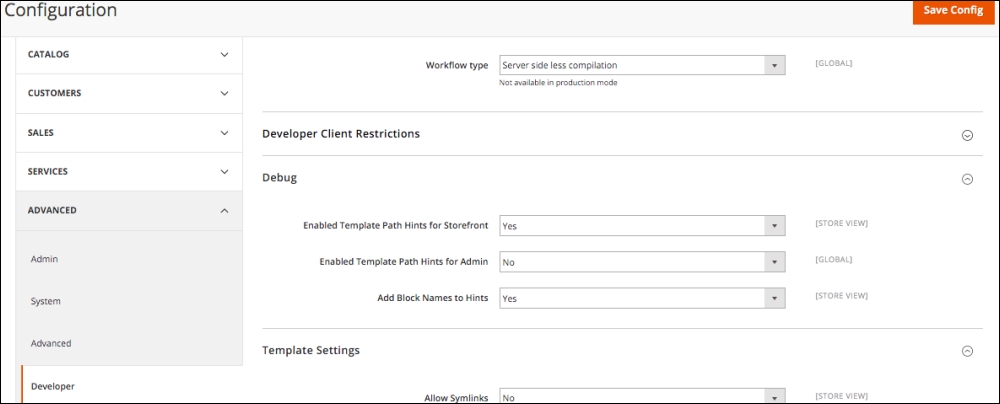
Enabling template path hints in Debug section
Another less cluttered way to view which blocks and templates are included in any given page is to install the commerce bug extension for Magento 2.0. The extension was written by the exceptional Alan Storm, and can be found here: http://store.pulsestorm.net/products/commerce-bug-3/. As you can see in the following screenshot, the tabular section at the bottom of the page provides a much cleaner account of the blocks and templates being used on a page. If you plan to do any significant work with Magento 2 theming, this extension is well worth its cost.
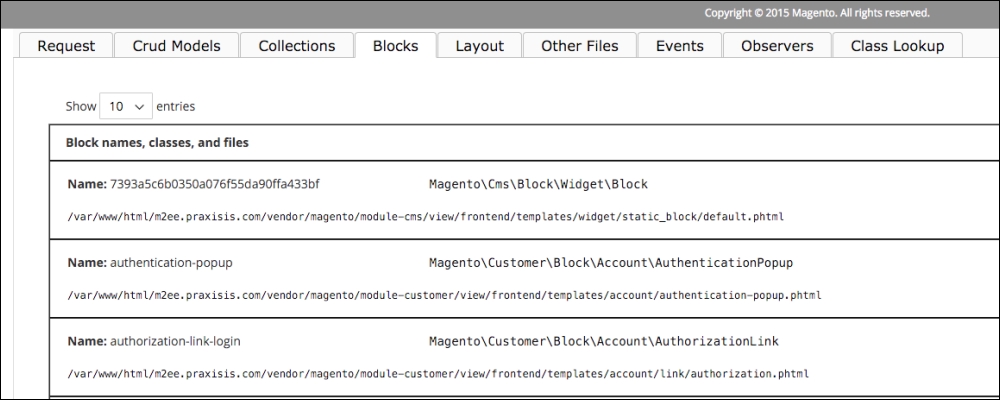
Magento newcomers, particularly designers, feel a bit lost among the many layout and template files that comprise a Magento theme. However, with a bit of study (this book!) and adherence to a few best practices, anyone can become a Magento design aficionado.
First, keep in mind the concept of the Magento fallback method we previously covered. Layouts are dictated by the most forward layer. This means that if the chosen theme lacks a needed layout or template file, Magento will look into the default directory for the design package, then into the blank theme where, unless you've been naughty and changed anything, Magento will at last find any missing components.
As a designer, this means that you can change layout structures and blocks by creating or editing files within your theme directory, and focus on overriding any base theme behaviors. In short, a theme only has to have only those components that are different from the base design package.
I want to emphasize the enormity of this concept. When I wear my designer's hat, I don't have to replicate all the many layout and template files when creating a theme; I only have to include those most likely few files that will define the delta or difference between the base package and my new theme.
This more robust fallback method (when compared to previous Magento versions) has not been completely absorbed by third-party theme producers. You may find some themes that have many files that really define no difference from the base package. This practice does not conform to Magento's best practices, as it can cause core Magento updates to not be properly reflected in the theme files. In general, we look for themes structures—whether third-party or home-grown—to add only those files necessary to provide the differences between the default layouts and the customized design.
When looking for a file to edit for your intended change, first look into your theme directory. If the file is not there, look to the parent or blank theme directories. If you find the file there, copy it into the same relative position within your theme directory.
Layout files control the various Magento modules, such as Sales, Customers, and Catalog, by using a layout XML file defining their structural blocks, content blocks, and functional components. Page layouts can be located in one of two spots:
<module_dir>/view/frontend/page_layout directory:<theme_dir>/<Namespace>_<Module>/page_layout directory:Now, here's where it may get just a bit complex: each layout file contains Layout Handles, groups of block definitions that generally correspond with a type of page produced by Magento. Handles fall into three categories:
catalog_product_view.catalog_product_view_type_simple_id_128.To get a better understanding of handles, let's review an example handle. This is a handle from /layout/catalog_category_view_type_default.xml.
<page xmlns:xsi="http://www.w3.org/2001/XMLSchema-instance" xsi:noNamespaceSchemaLocation="urn:magento:framework:View/Layout/etc/page_configuration.xsd">
<body>
<referenceContainer name="sidebar.main">
<block class="Magento\Catalog\Block\Navigation" name="catalog.leftnav" before="-" template="navigation/left.phtml"/>
</referenceContainer>
</body>
</page>From this code snippet, we can find out quite a bit about what it does to affect your layout:
<referenceContainer> tells us in what container the enclosed content is to be defined. For example, <referenceContainer name="footer_links"> suggests that the output generated by the enclosed code will be placed within a block defined elsewhere as footer_links. We can use these references to modify where various elements may appear on a page, as we will explore a little later in this chapter.
As you look within each <referenceContainer> or <referenceBlock> tag, you'll typically find a <block> tag and corresponding <argument> tags. Here's the block reference from the preceding handle:
<block class="Magento\Catalog\Block\Navigation" name="catalog.leftnav" before="-" template="navigation/left.phtml"/>
While it may appear to be a bit "inside-out", it is the <block> tag we are most interested in. The <block> defines the content. The <referenceBlock> tag merely designates where the content block is to be placed. We can change the <referenceBlock> tag without affecting the output of the content block.
The <block> tag also specifies a template file, in this case left.phtml that contains the HTML and PHP code defining the visual output for this block (not all blocks have related .phtml files, though).
The attributes for the <block> tag include:
type: Defines the functional purpose of the block. Do not modify this.name: Used by other blocks as a reference to which the block is to be assigned.before and after: this attribute can be used to position the block before or after other referenced blocks that will be placed within the same referenced block. before="-" and after="-" position the block at the very top or very bottom of the referenced block.template: calls the template file that supplies the output functionality of the block.action: a subordinate tag that controls functionality, such as setting values, loading or unloading JavaScript, and more.as: the name which is used by templates to call the block. For example, getChildHtml('left.permanent.callout') would include the block within the template file.In our previous example, the graphic callout defined by the catalog.leftnav block was designed to be placed within the left structural block, not by the name of the block, but rather by the <referenceBlock name="left"> tag. The block could be named just about anything; it's the reference tag that dictates into which structural block on the page the block will be rendered.
If we wanted this block to be positioned within the right structural block, we simply change the reference tag to <referenceBlock name="right">. By using reference tags, we can position our content blocks into the general areas of the page. To refine the placement, we can use the block attributes of before and after, or call the block from within a template file using the as attribute.
Up to this point, we've discussed how, by copying and modifying a few files for your theme, you can change the appearance of various blocks within your layout file. This often-overlooked feature is perhaps one of the most powerful layout tools in your arsenal.
By creating a file called default.xml and placing it within the corresponding module directory of your theme, you can alter your layout by turning off any blocks defined by the base package default.xml file. In other words, if you don't need or want a specific block, you can simply tell Magento to ignore it or, in Magento-ese, remove it. You can also use the default layout file to reposition blocks (as we described previously) or re-define specific handles. In short, it's a great way to make changes to your layouts without having to get deep into the various layout files we discussed earlier.
The first step is to create a default.xml file, if one doesn't already exist, and place it within the /app/design/frontend/[design package]/[design theme]/[module name]/view/frontend/layout/ directory. Add the following code to this text file:
<?xml version="1.0" ?> <page> <!-- Put block overrides here --> </page>
Within this small collection of code, you can add blocks and handles, as well as specialized statements. For example, to remove the callout block with which we have been working, add the following code between the <page> and </page> tags of your default.xml file:
<remove name="[block_name]" />
Just like that, the block is no longer appearing on your site.
The scope of possibilities for using the default layout file is quite extensive. As you begin exploring the use of this file, I would offer the following advice:
<remove> tag to completely disable blocks rather than removing them from layout files. If you don't have any other use for the layout file that contains the block, then you won't even have the need to copy it from the base package into your theme.<action method="unsetChild"> to simply disable the block from the current layout, but allow it to be used in another position.default.xml file. Then make the changes you want to make. Again, this negates the need for replicating layout files, and it gives you a much quicker ability to make modifications and test them to see if they are behaving as you expected.Creating the look and feel of a new Magento store is, for those designers among us, one of the most exciting aspects of creating a new website. However, as we have seen, to give store owners the level of power and functionality that Magento affords, designers can no longer build static HTML pages, slap in a bit of PHP, and upload to the server. With high levels of functionality come higher levels of architectural complexity.
Fortunately, the complexity of Magento is not nearly as daunting once you understand the methodologies of how pages are built, rendered, and styled. I struggled initially to fully understand this system. However, today I feel very comfortable navigating the design-related components of Magento, after taking the time to understand how it all pieces together. Today, you have the added advantage of a much improved architecture, as well as this book in your hands.
Hopefully, I've also shown you that in most cases, if you want an extensively customized theme, you really don't have to start from scratch. By using the existing default themes, or using a third-party theme, you can do some quite extensive customizations simply by modifying a few key files.
Experiment and have fun!
In this chapter, we explored the Magento theme architecture, learning how the Magento Fallback Method works to ensure our pages always have something to show. We also covered the installation and configuration of themes in the Magento 2 store structure and learned how to modify our themes by understanding the use of layouts, handles, and blocks. Finally, we were introduced to a very powerful tool—the default layout file.
You'll no doubt want to spend some time exploring the concepts of this chapter. I don't blame you. Just writing this chapter makes me want to dig into a new design!
When you're ready to move on, we will begin the process of configuring your store for what it is intended: to sell.
If you've been following along, chapter by chapter, you've created a working, accessible online store front by now. Are you ready to take orders now?
Not just yet. There's still more to do before you can swing open the virtual doors to your new Magento store. Specifically, we need to:
If you're the developer or designer of a Magento powered site, this is usually the time when you consult with your client – the store owner – to learn how they want to take payments, charge for shipping, and offer promotional discounts. Once you understand the concepts in this chapter, you'll be well prepared to ask the right questions.
For store owners and administrators, this chapter will give you insights into what can be managed with Magento. Fortunately, there are few limitations to Magento; however, we are consistently amazed at the various ways retailers price and vend their products. Hopefully, whatever unique selling programs you currently employ can be replicated online with your Magento store. We're betting they can.
If you've shopped online before, you no doubt have some understanding of the usual online sales process:
Magento duplicates this sales process in pretty much the same way. For our purposes, though, we need to understand what happens after the customer commits to the order, for that is when the store administrator's participation is required.
The following chart illustrates both the frontend and backend steps of the Magento sales process:
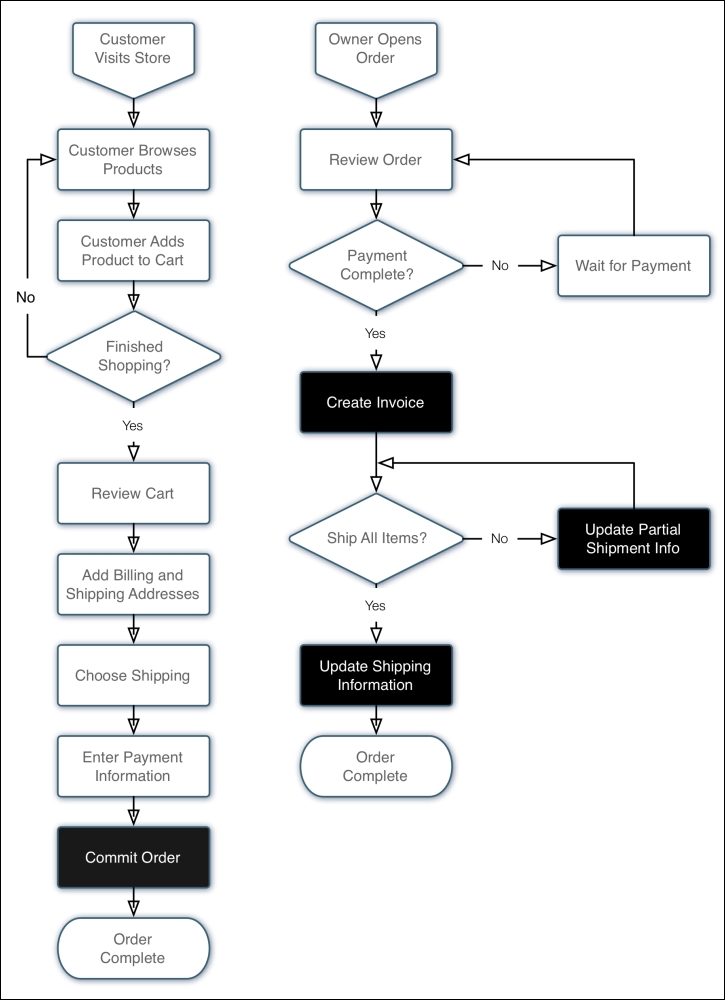
The black boxes with white type are steps that generally create an e-mail to the customer.
As we'll see in this chapter, there are occasional variations to this process, but in general, the Magento sales process is pretty straightforward. What you'll find impressive is the scope of Magento's ability to give you a wider latitude on adjusting the sales process to meet your particular needs. For instance, if you're selling downloadable products, such as e-books, music or software, you don't need the shipping process steps. Yet, if you sell proprietary digital media, you will need to manage the distribution of the products to your customers. For instance, to prevent unlimited downloads.
Before mapping out the business rules that you will use to configure Magento, it's helpful to see and understand how orders are processed in the Magento backend. Many times, developers and administrators new to Magento rush to configure the myriad of settings (which we will be covering in this chapter) without fully realizing how those choices might impact on the overall sales process. It's understandable because most will want to test the ordering system with all the settings in place. It's a bit of a catch-22: you have no orders to use to understand the configurations, yet without the configurations, you can't test the ordering process.
Fortunately, a basic Magento 2 install with the sample data (again with the sample data? Yes!) gives you the basic configurations to allow you to place some sample orders and review the order process.
Give it a whirl!
If you've installed the sample data, or you have a store already configured to accept some type of test payments, you should spend time placing and processing orders. Try any number of different combinations. Ask your colleagues to place dummy orders, imagining that they are actual shoppers. You'll soon get a real handle on the process, and if you're a developer, your client will certainly appreciate the added insight you have to the Magento ordering process. This is incredibly important to your client, so it should be important to you!
Logging into the Magento backend, we can see our latest orders listed in the left sidebar of the dashboard:
From here we can click on the order we wish to process, or we can go to Sales | Orders in the top navigation bar and then select the order from the list of all orders. Either way, we end up with a detailed view of the order.
Let's take each section of this screen separately and explain what each contributes to the ordering process.
The first section, shown in the preceding image on the left, summarizes key order information, including the timestamp of the order (date and time), the current status (which by default is pending), and from which Magento store the purchase was made.
New orders, by default, are marked as pending. This means the order is awaiting your attention. The customer has already been charged and has received an e-mail confirmation of their order, but it's now up to you to complete the order, eventually taking it to a stage of complete.
The box on the right tells us the name of the customer, their e-mail address, and the fact that they checked out without registering (more on customer groups later in this chapter).

The next row of boxes shows the billing and shipping addresses for the purchaser. Notice that these are editable. Sometimes a customer, upon receiving their e-mail receipt, will see that they made an error in either or both of these. If the customer contacts you with corrected information, you can easily make the changes here.
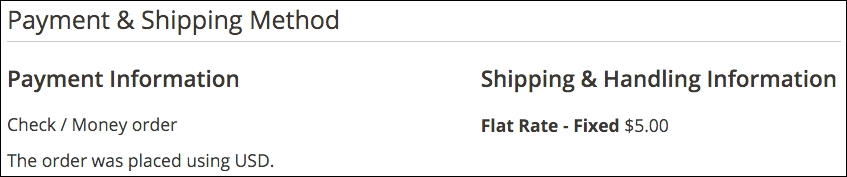
The third row of boxes give you information about the payment method and the buyer's choice of shipping for the order.

On row four, you'll find the list of products ordered by the customer, the amount charged and the amount of sales tax applicable for each line item.
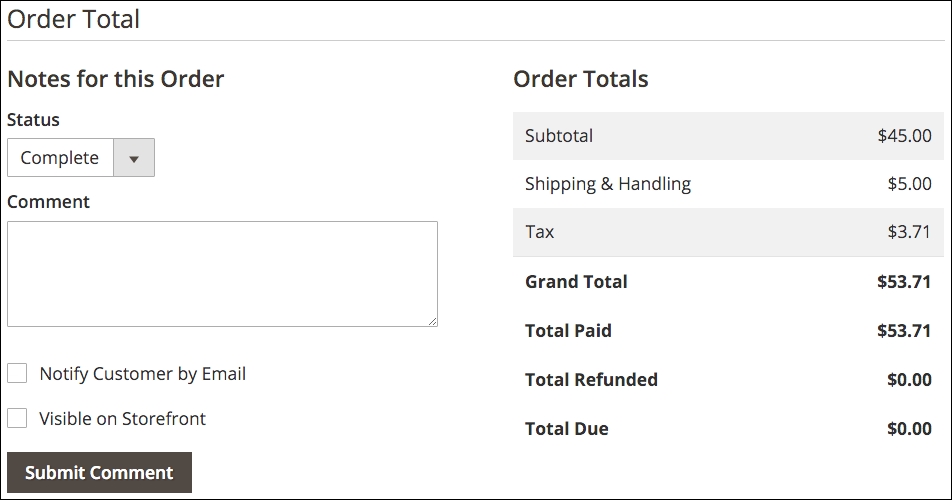
The final row of boxes are quite interesting and important. First, on the left in the preceding image, is how you can keep notes on an order and update the customer. Let's say, as in this case, that you have discovered that you only have one remaining chair and that more chairs won't arrive for another two weeks. By filling in this information here, and checking the Notify Customer by Email box, you can update the customer ("Would you like us to hold your order, or cancel it?") and have the update sent automatically to the buyer. Furthermore, by checking the Visible on Storefront box, the customer – if they are registered – can view the update in the Account Information section of your store.
All comments entered will be appended to the list at the bottom of the box.
The box to the right is the transaction summary of the order.
The next step for you, as the person who is processing orders, is to invoice this order. In Magento, this means that you are confirming the order, and proceeding with processing.
To convert an order into an invoice, click the button at the top of the page labeled Invoice. The resulting page is similar to the order page, except that it allows you to perform certain additional functions:
Once you have made any of the preceding changes, you can click on Submit Invoice, which will convert the order to an invoice, and record the order as an actual sale. This is key, as your analysis of sales for your store rely on the analysis of invoices, not orders. If you have not shipped the items yet, the status of the order is now shown as Processing.
Now that we have converted an order into an invoice, the box on the Dashboard screen, titled Lifetime Sales, is now updated showing the total sales for the chosen period, less shipping and sales taxes, as shown in the following screenshot.
Now that we have created our invoice, and once we have shipped the purchased products, we can create one or more shipments. To do this, open the order as before and click the Ship button near the top of the screen.
On this screen, you can add tracking numbers for your shipments, as well as indicate the quantity of each product shipped. In the following image, I have added a sample UPS tracking number. You can add as many as required (you may need to ship an order in more than one box, for instance).
Lower on the page, you will find each line item of the order, with a field allowing you to change the number of products shipped, as shown in the following screenshot:
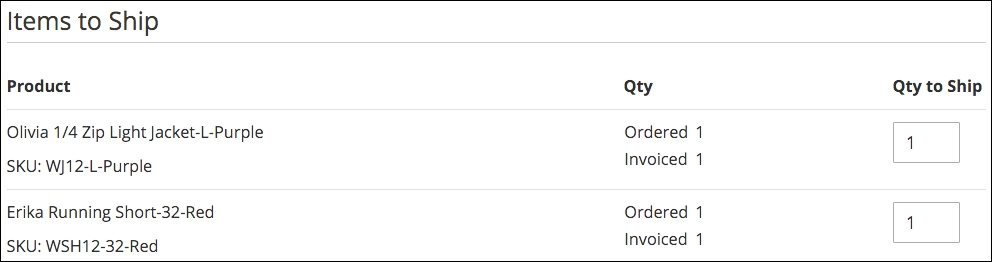
Once you have made any changes, including adding any comments, you can click Submit Shipment. If you ship all ordered items, the status of the order will change to Complete; otherwise, the order will remain Processing.
Once you become familiar with the sales process, you'll have a much better understanding of how various system configurations affect how orders are moved through Magento.
In today's online retailing world, most purchasers use credit cards (or debit cards) as payment currency. Nothing new there. However, the process of taking someone's credit card online, verifying the card for available purchasing limit, and drawing the amount of the purchase from the buyer's account and into your bank account is one that remains a mystery to many. Of all the components that comprise online commerce, the process of moving money – in this case from the credit card account of the buyer to your bank account – remains one of the most complex of them all.
Without the ease of credit cards, online e-commerce might well be growing at a much slower pace. However, the use of credit cards – and the potential for misuse – concerns your shoppers, particularly when the press relates stories of hackers breaking into retailer databases. What is important is that online purchases have never been "hacked." That is, no one has been prosecuted for stealing credit card information used to buy online as long as the store is using SSL encryption. To ease consumers' fears, several payment systems have evolved over the past decade, each designed to help you process the financial transactions for your store, while providing the increased security and processes necessary to give both you and your buyer a safer, easier transaction process.
As a Magento administrator, you have within Magento, several default payment systems available based on your own needs. Each one requires that the store owner enrolls and qualifies, but, having done so, allows the store to provide buyers with a convenient, secure means of paying for their purchase.
In this section, we will cover the most common, popular payment systems and how they work with Magento. This is intended to familiarize you with how each system interacts with Magento, the buyer, and the store owner. Once you understand how they work, you will be able to decide on which system(s) you want to employ, which also makes configuring Magento easier.
The protection of your customer's payment information is extremely important. Not only would a breach of security cause damage to your customer's credit and financial accounts, but the publicity of such a breach could be devastating to your business.
Merchant account providers will require that your store meet stringent guidelines for PCI compliance, a set of security requirements called Payment Card Industry Data Security Standard (PCI DSS). Your ability to be PCI compliant is based on the integrity of your hosting environment and by which methods you allow customers to enter credit card information on your site.
Magento 2 no longer offers a "stored credit card" payment method. It is highly unlikely that you could — or would want to — provide a server configuration secure enough to meet PCI DSS requirements for storing credit card information. You probably don't want the liability exposure, either.
You can, however, provide SSL encryption that could satisfy PCI compliance as long as the credit card information is encrypted before being sent to your server, and then from your server to the credit card processor. As long as you're not storing the customer's credit card information on your server, you can meet PCI compliance as long as your hosting provider can assure compliance for server and database security.
Therefore, you should decide whether to provide onsite or offsite credit card payments. In other words, do you want to take payment information within your Magento checkout page or redirect the user to a payment service, such as PayPal, to complete their transaction?
There are pros and cons of each method. Onsite transactions may be perceived as less secure and you do have to prove PCI compliance to your merchant account provider on an ongoing basis. However, onsite transactions mean that the customer can complete their transaction without leaving your website. This helps to preserve your brand experience for your customers.
Fortunately, Magento is versatile enough to allow you to provide both options to your customers. Personally, we feel that offering multiple payment methods means you're more likely to complete a sale, while also showing your customers that you want to provide the most convenience in purchasing.
Let's now review the various payment methods offered by default in Magento 2.
Magento 2 comes with a host of the most popular and common payment methods. However, you should review other possibilities, such as Amazon Payments, Stripe, and Moneybookers, depending on your target market. We anticipate that developers will be offering add-ons for these and other payment methods.
The determination of which payment system to utilize in your Magento store is driven by a comparison of pros and cons (isn't everything in life?). In terms of credit card sales, there are two basic classifications of payment systems: off-site and on-site.
Off-site systems allow buyers to make purchase choices, but pay for their order on another website which offers the buyer a sense of greater security and fraud protection. The buyer is actually paying the off-site payment provider, who in turn pays the store owner once there is sufficient verification that the order has been processed and shipped. Each system has different degrees of verification based on the type of products sold, the history of the merchant (for example, has there been previous problems with the merchant's reliability?), and the amount of the purchase.
The pros of this type of payment method are as follows:
Many buyers prefer these systems because of the added layer of protection against merchants who fail to deliver the expected results.
Additionally, the off-site system qualifies the merchant as opposed to a merchant account provider or bank. For first-time e-commerce merchants, this qualification is usually easier to obtain, as no credit report is required.
The cons of this type of payment method are as follows:
The dominant off-site systems are PayPal Express, PayPal Standard, and Authorize.net Direct Post.
Almost any well-developed e-commerce store will allow buyers to pay directly on the site without having to go off-site to another payment system. While most will also provide off-site payment alternatives, by providing an on-site payment process, the merchant eliminates any reluctance the buyer may have to enroll in a third-party payment system.
The pros of this type of payment method are as follows:
In order to succeed with on-site payment systems, merchants need to consider design elements and payment system brands that will help buyers have confidence in the security of the payment process. Most buyers have no history with new merchants; therefore, merchants, if they wish to offer on-site payments, should pay special attention to methods of communicating the security of the buyer's information.
The cons of this type of payment method are as follows:
Off-site payments are processed through gateways. Gateways accept the customer payment information, as well as the order total, by means of a secure connection between your store server and the gateway's servers. The gateway validates the buyer's information and returns a result of success or error, which your store platform processes accordingly.
Today, PayPal remains one of the most popular payment systems in the world because it does allow for global purchases. You can sell to buyers in other countries, as long as they have a PayPal account, knowing that you will receive payment. Most regular merchant accounts, such as those used by bricks and mortar retailers, restrict sales to only buyers with cards issued by US banks.
In the past, the downside to using PayPal was that buyers would have to sign up for PayPal if you, the merchant, offered it as a payment system. That changed some years ago: today your buyers don't have to sign up for PayPal. They can purchase using a credit card without enrolling.
While PayPal is commonly known for their quick and easy PayPal Express, PayPal can provide you with credit and debit card solutions that allow customers to use their cards without needing a PayPal account. To the customer, the Magento checkout appears no different than if they were using a normal credit card checkout process.
The big difference is that you have to set up a business account with PayPal before you can begin accepting non-PayPal account payments. Proceeds will go almost immediately into your PayPal account (you have to have a PayPal account), but your customers can pay by using a credit/debit card or their own PayPal account.
With the all-in-one solution, PayPal approves your application for a merchant account and allows you to accept all popular cards, including American Express, at a flat 2.9% rate, plus $0.30/transaction. PayPal payments incur normal per transaction PayPal charges.
PayPal provide two ways to incorporate credit card payment capture on your website:
The difference to your customer is that for Advanced, there is a slight delay while the credit card form is inserted into the checkout page. You may also have some limitations in terms of styling.
PayPal Standard, also a part of the all-in-one solution, takes your customer to a PayPal site for payment. Unlike PayPal Express, however, you can style this page to better reflect your brand image. Plus, customers do not have to have a PayPal account in order to use this checkout method.
If you already have a merchant account for collecting online payments, you can still utilize the integration of PayPal and Magento by setting up a PayPal business account that is linked to your merchant account. Instead of paying PayPal a percentage of each transaction — you would pay this to your merchant account provider — you simply pay a small per transaction fee.
Offering PayPal Express is as easy as having a PayPal account. It does require some configurations of API credentials, but it does provide the simplest means of offering payment services without setting up a merchant account.
PayPal Express will add Buy Now buttons to your product pages and the cart page of your store, giving shoppers quick and immediate ability to checkout using their PayPal account.
PayPal recently acquired Braintree, a payment services company that adds additional services to merchants. While many of their offerings appear to overlap PayPal's, Braintree brings additional features to the marketplace such as Bitcoin, Venmo, Android Pay, and Apple Pay payment methods, recurring billing, and fraud protection. Like PayPal Payments, Braintree charges 2.9% + $0.30/transaction.
If you have customers for whom you will accept payment by check and/or money order, you can enable this payment method. Be sure to enter all the information fields, especially Make Check Payable to and Send Check to. You will most likely want to keep the New Order Status as Pending, which means the order is not ready for fulfillment until you receive payment and update the order as Paid.
As with any payment method, be sure to edit the Title of the method to reflect how you wish to communicate it to your customers. If you only wish to accept money orders, for instance, you might change Title to Money Orders (sorry, no checks).
As with check/money order, you can allow customers to wire money to your account by providing information to your customers who choose this method.
Likewise, you can offer COD payments. We still see this method being made available on wholesale shipments, but very rarely on B2C (business-to-consumer) sales. COD shipments usually cost more, so you will need to accommodate this added fee in your pricing or shipping methods. At present, there is no ability to add a COD fee using this payment method panel.
If your customer, by use of discounts or credits, or selecting free items, owes nothing at the checkout, enabling this method will cause Magento to hide payment methods during checkout. The content in the Title field will be displayed in these cases.
In B2B (business-to-business) sales, it's quite common to accept purchase orders (PO's) for customers with approved credit. If you enable this payment method, an additional field is presented to customers for entering their PO number when ordering.
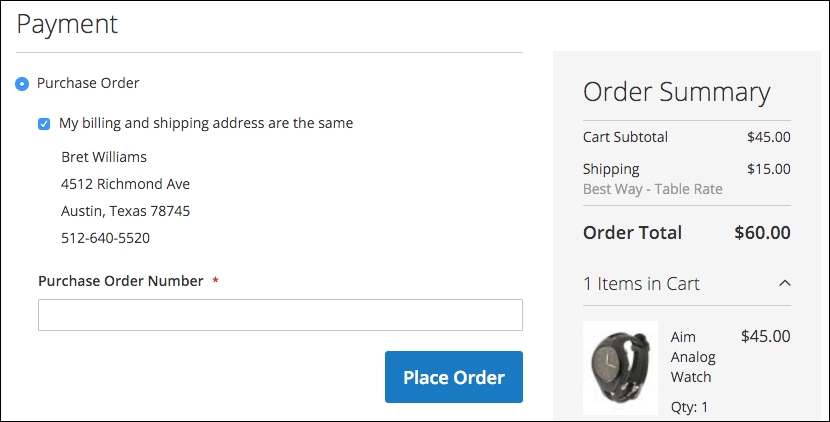
Authorize.net — perhaps the largest payment gateway provider in the USA — provides an integrated payment capture mechanism that gives your customers the convenience of entering credit/debit card information on your site, but the actual form submission bypasses your server and goes directly to Authorize.net. This mechanism, as with PayPal Payments Advanced, lessens your responsibility for PCI compliance as the data is communicated directly between your customer and Authorize.net instead of passing through the Magento programming.
Once you get paid for a sale, you need to fulfill the order and that means you have to ship the items purchased. How you ship products is largely a function of what shipping methods you make available to your customers.
Shipping is one of the most complex aspects of e-commerce, and one where you can lose money if you're not careful. As you work through your shipping configurations, it's important to keep in mind the following:
Dimensional shipping refers to a recent change by UPS, FedEx, and others to charge you the greater of two rates: the cost based on weight or the cost based on a formula to determine the equivalent weight of a package based on its size: (Length x Width x Height) ÷ 166 (for US domestic shipments; other factors apply for other countries and exports). Therefore, if you have a large package that doesn't weigh much, the live rate quoted in Magento might not be reflective of your actual cost once the dimensional weight is calculated. If your packages may be large and lightweight, consult your carrier representative or shipping fulfillment partner for guidance.
WebShopApps (http://webshopapps.com) is perhaps the pre-eminent Magento shipping add-on provider. More recently, they have created a hosted shipping configuration system called ShipperHQ (https://shipperhq.com), which we have used to configure some rather complex shipping rules. If your shipping rules are more than Magento can natively accommodate, you may want to check these out.
Keeping these insights in mind, let's explore the various shipping methods available by default in Magento 2.
Before we go over the shipping methods, let's go over some basic concepts that will apply to most, if not all, shipping methods.
Where you ship your products from will determine shipping rates, especially for carrier rates (for example, UPS, FedEx). To set your origin, go to Stores | Configuration | Sales | Shipping Settings and expand the Origin panel. At the very least, enter the Country, Region/State and ZIP/Postal Code field. The others are optional for rate calculation purposes.
At the bottom of this panel is the choice to Apply Custom Shipping Policy. If enabled, a field will appear where you can enter text about your overall shipping policy. For instance, you may want to enter Orders placed by 12:00 PM CT will be processed for shipping on the same day. Applies only to orders placed Monday-Friday, excluding shipping holidays.
You can add an invisible handling fee to all shipping rate calculations. Invisible in that it does not appear as a separate line item charge to your customers. To add a handling fee to a shipping method:
As you configure your shipping methods, don't forget to designate to which countries you will ship. If you only ship to the US and Canada, for instance, be sure to have only those countries selected. Otherwise, you'll have customers from other countries placing orders you will have to cancel and refund.
In some cases, the method you configured may not be applicable to a customer based on destination, type of product, weight, or any number of factors. For these instances, you can choose to:
There are several ways to offer free shipping to your customers. If you want to display a Free Shipping option to all customers whose carts meet a minimum order amount (not including taxes or shipping), enable this panel.
However, you may want to be more judicious in how and when you offer free shipping. Other alternatives include:
If you choose to use this panel, note that it will apply to all orders. Therefore, if you want to be more selective, consider one of the above methods.
As with free shipping, above, the Flat Rate panel allows you to charge one, singular flat rate for all orders regardless of weight or destination. You can apply the rate on a per item or per order basis, as well.
While using live carrier rates can provide more accurate shipping quotes for your customers, you may find it more convenient to offer a series of rates for your customers at certain break points.
For example, you might only need something as simple as follows, for any domestic destination:
Let's assume you're a US-based shipper. While these rates will work for you when shipping to any of the contiguous 48 states, you need to charge more for shipments to Alaska and Hawaii. For our example, let's assume tiered pricing of $7.99, $11.99, and $14.99 at the same weight breaks.
All of these conditions can be handled using the table rates shipping method. Based on our example, we would first start by creating a spreadsheet (in Excel or Numbers) similar to the following:
|
Country |
Region/State |
Zip/Postal code |
Weight (and above) |
Shipping price |
|---|---|---|---|---|
|
USA |
* |
* |
0 |
5.99 |
|
USA |
* |
* |
6 |
8.99 |
|
USA |
* |
* |
11 |
10.99 |
|
USA |
AK |
* |
0 |
7.99 |
|
USA |
AK |
* |
6 |
11.99 |
|
USA |
AK |
* |
11 |
14.99 |
|
USA |
HI |
* |
0 |
7.99 |
|
USA |
HI |
* |
6 |
11.99 |
|
USA |
HI |
* |
11 |
14.99 |
Let's review the columns in this chart:
Now, let's discuss the asterisk (*) and how to limit the scope of your rates. As you can see in the chart, we have only indicated rates for US destinations. That's because there are no rows for any other countries. We could easily add rates for all other countries, simply by adding rows with an asterisk in the first column. By adding those rows, we're telling Magento to use the US rates if the customer's ship-to address is in the US, and to use other rates for all other country destinations.
Likewise for the Region/State column, Magento will first look for matches for any state codes listed. If it can't find any, then it will look for any rates with an asterisk. If no asterisk is present for a qualifying weight, then no applicable rate will be provided to the customer.
The asterisk in the Zip/Postal code column means that the rates apply to all postal codes for all states.
In the above example, we used the weight of the items in the cart to determine shipping rates. You can also configure table rates to use calculations based on the number of items in the cart or the total price of all items (less taxes and shipping).
To set up your chart, simply rename the fourth column Quantity (and above) or Subtotal (and above).
To upload your table rates, you'll need to save/export your spreadsheet as a CSV file. You can name it whatever you like. Save it to your computer where you can find it for the next steps.
Before you upload your new rates, you should first set your table rates configurations. To do so, you can set your default settings at the default configuration scope. However, to upload your CSV file, you will need to switch your store view to the appropriate website scope.
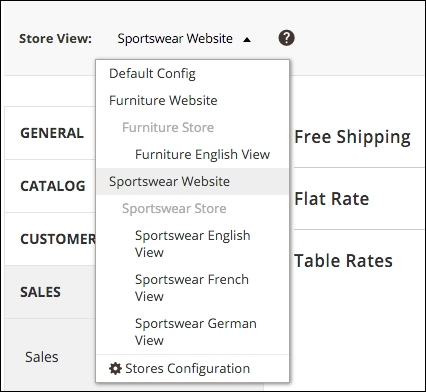
When changing to a website scope, you will see the Export CSV button and the ability to upload your rate table file. You'll note that all other settings may have Use Default checked. You can, of course, uncheck this box beside any field and adjust the settings according to your preferences.
Let's review the unique fields in this panel:
You should probably change the default Table Rate to something more descriptive, as this term is likely irrelevant to customers. We have used terms Standard Ground, Economy, or Saver as names. The Title should probably be the same, as well, so that the customer, during checkout, has a visual confirmation of their shipping choice.
The remaining shipping methods involve configuring UPS, USPS, FedEx, and/or DHL to provide "live" rate calculations. UPS is the only one that is set to query for live rates without the need for you to have an account with the carrier. This is both good and bad. It's good, as you only have to enable the shipping method to have it begin querying rates for your customers. On the flip side, the rates that are returned are not negotiated rates. Negotiated rates are those you may have been offered as discounted rates based on your shipping volume.
FedEx, USPS, and DHL require account-specific information in order to activate. This connection with your account should provide rates based on any discounts you have established with your carrier. If you wish to use negotiated rates for UPS, you may have to find a Magento add-on that will provide a modified rate query.
The great unavoidable factor: taxes. If you're a retailer — and even as a wholesaler in some jurisdictions — you will need to master the management of tax rates and rules in your Magento store. We've had to deal with this issue on many other platforms, and while some do provide some cool features, none, in our opinion, offer as much flexibility for taxes as Magento; especially when it comes to VAT taxes.
You'll appreciate as you go through this section, that taxes can be quite complicated. Before configuring taxes in your online store, you should consult your tax professional. Making errors in taxes can not only present legal issues for your business, but also erode consumer confidence if the customers feel they're being inappropriately taxed on purchases.
Taxes are applied to products based on assigned tax classes. Tax classes are combined with tax zones and rates to create tax rules. Tax rules are what are applied to each product or shopping cart to determine the amount of tax charged in a transaction.
Here's a flow chart on how Magento calculates sales taxes based on a tax rule:
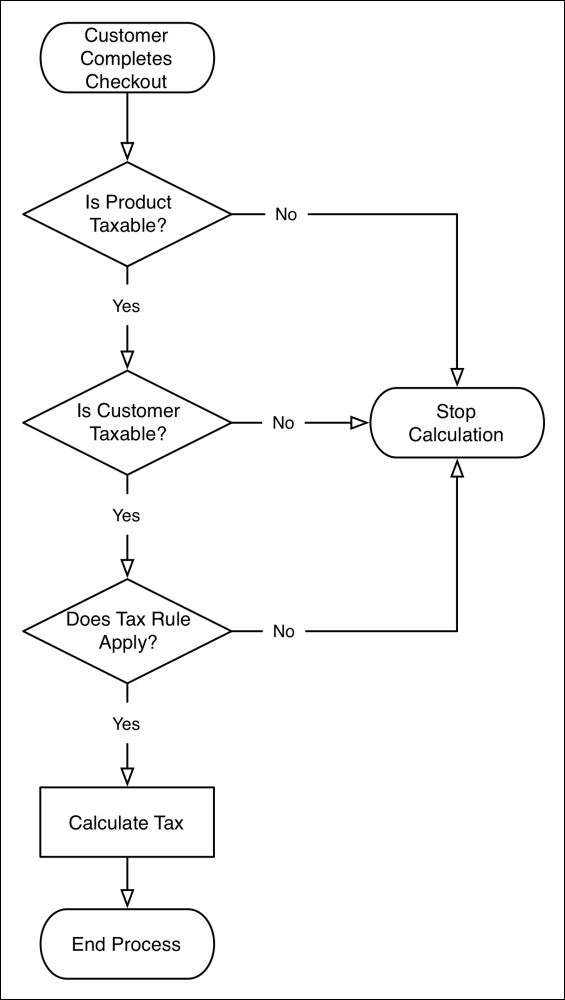
There are two types of tax classes in Magento:
Tax rules are created based on jurisdiction and rate: creating a zone for a country, state, and/or zip code, and a percentage used to calculate the tax.
To illustrate, let's review a tax rule included in the default installation for Magento 2:
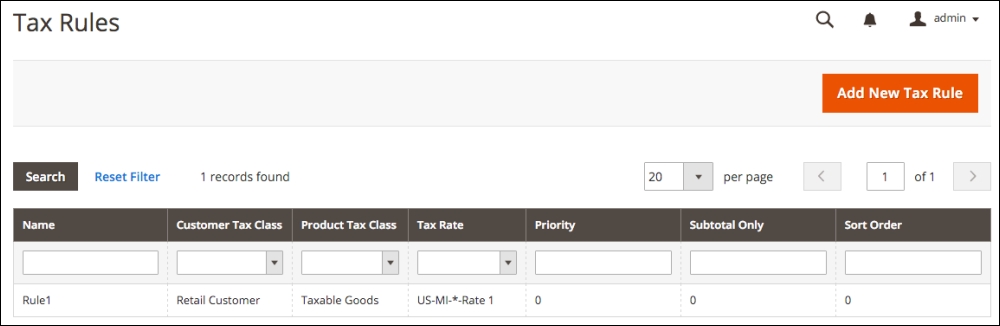
Let's now take a look at the layout of a tax rule:
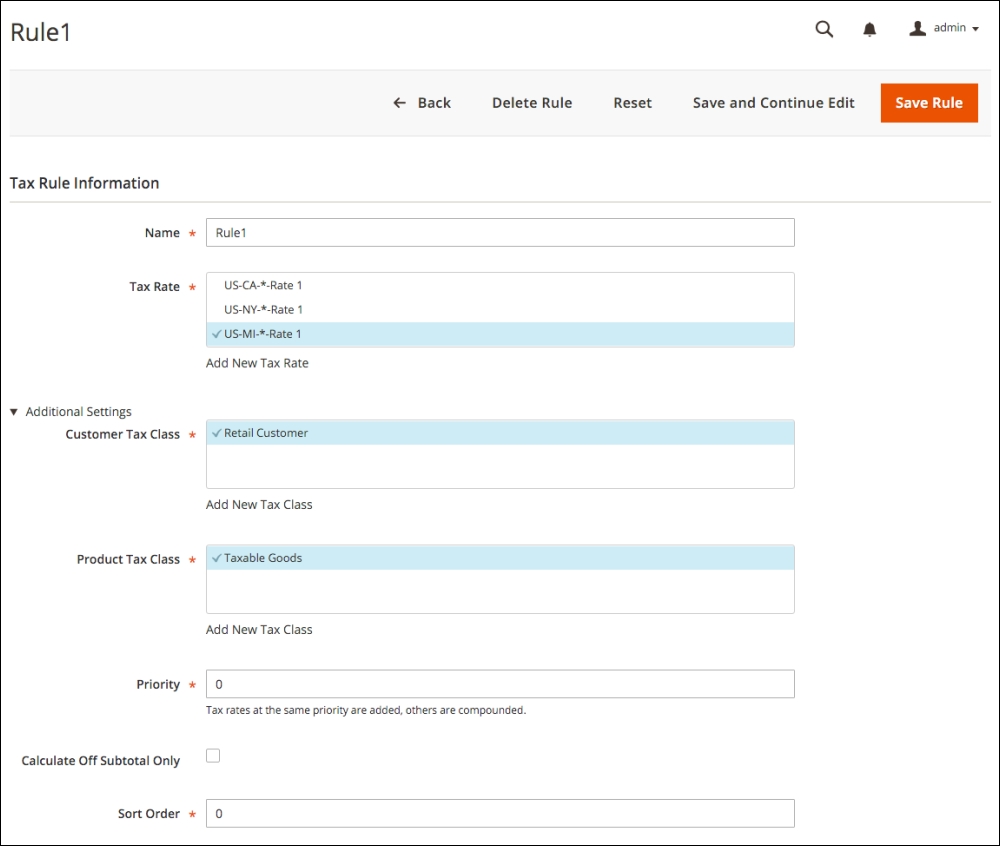
A nexus is generally considered if you have an active business in a particular state or locality. For instance, if your office is in Texas and you ship your products from a warehouse in Illinois, then, for taxing purposes, you're considered to have a nexus in Texas and Illinois. Therefore, as it stands at this moment, you are required to collect sales tax on any sales to buyers in Texas and Illinois. However, there are efforts in the United States Congress to radically change taxing laws on online sales transactions. Some state legislatures are also grappling with this issue. We know you're used to hearing this, but you do need to consult a tax professional to make sure you're correctly charging sales tax.
A leader in e-commerce sale tax is TaxJar (https://www.taxjar.com), a company that can provide integration with your store to precisely calculate required sales taxes and help with reporting to the various taxing jurisdictions. Using a tool such as TaxJar could greatly reduce your tax configuration time, while providing greater sales tax accuracy.
You can add or edit tax rates here or under Stores | Tax Zones and Rates. Let's edit the California tax rate here to understand the process:

To the right of the US-CA-*-Rate 1 item name, when you hover your mouse over the item, you will see a pencil icon. Click this to reveal the tax rate modal dialogue.
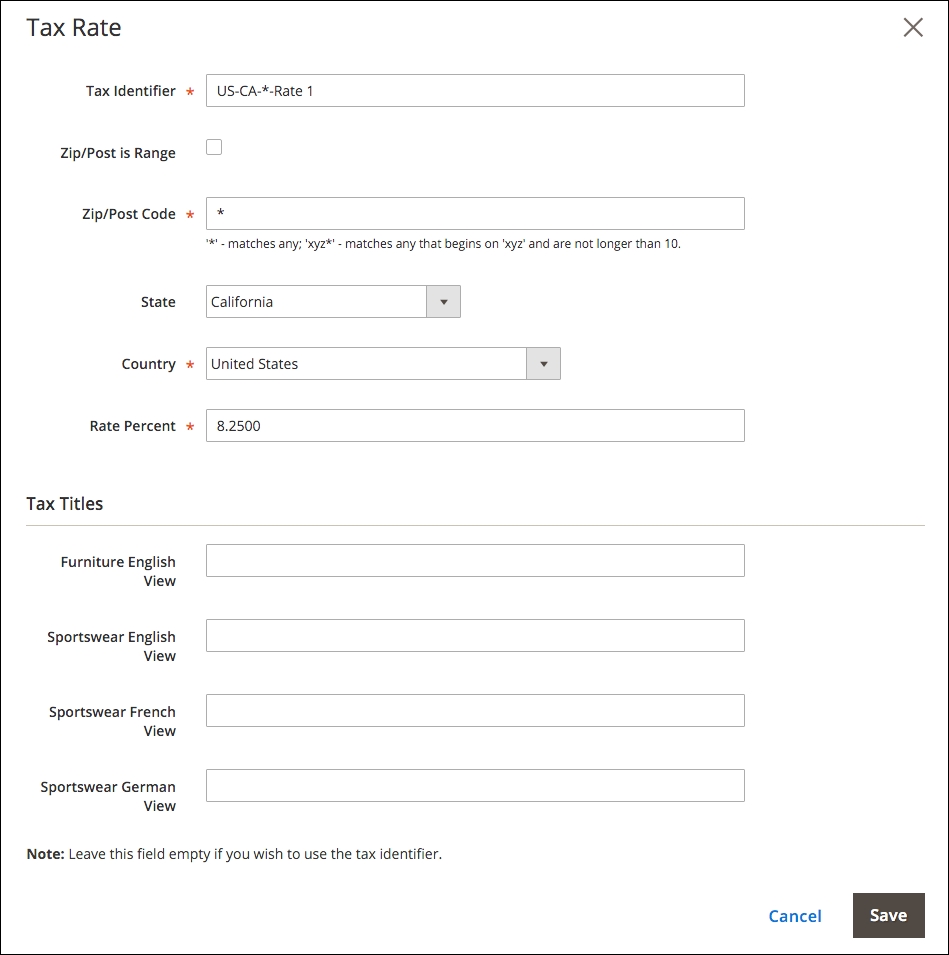
Let's have a look at the various fields here:
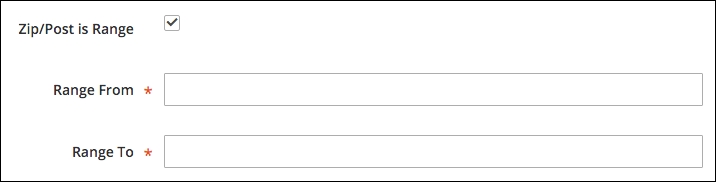
You can use the same field specifics for creating a new tax rate by clicking Add New Tax Rate at the bottom of the Tax Rate list field.
To view the remaining fields, expand the Additional Settings section.
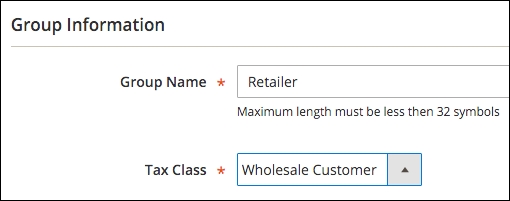
While you can't import tax rules, you can import tax rates, which may be a time saver, particularly where you have multiple taxing jurisdictions to whom you have to report tax collections.
As with many importing capabilities in Magento 2, the easiest way to begin is by exporting the current tax rules and expanding on the CSV file, then importing your changes. To import tax rates, view any tax rule. At the bottom of the screen are buttons to import and export tax rates. Export the current tax rate file, add or edit your rates, then re-import.
In some countries, goods and services are taxed in a means similar to sales tax, but calculated and managed differently. These Value-Added Taxes (VAT) are made even more complex due to varying rates among countries, different rules for registration, and rules for taxation based on the type of product or service sold.
As usual, we can't begin to counsel you on taxes. VAT rules can be complicated, especially for non-EU countries selling into EU countries. We highly suggest you consult with your tax professionals. If you doubt the complexity of EU VAT taxes, see http://goo.gl/y07Pb.
The VAT process in Magento involves three basic components — the needs of them are based on your location:
In Magento, VAT is charged if both the seller and customer are located in the same EU country. If both are EU-registered businesses, no VAT tax is collected if the seller and customer are in different countries.
When selling to consumers in EU countries, the amount of VAT collected is based on what country the seller is located (if the seller is an EU country). These are called intra-EU sales.
One exception (there's always one, yes?) is that when selling digital goods (for example, music, software), the VAT rate to be charged is that of the destination country, not the source country.
The key to effectively managing this complexity is the creation of multiple customer groups that can be automatically assigned during the checkout or registration process based on the VAT ID validation of the buyer.
It would be so easy for us to stop here, call it a day, and leave VAT tax configuration to your imagination. After all, we can play the "too complex for a book" card, correct?
The truth is that VAT taxes can be quite complex. If you're an EU business or exporting to the EU countries, you already understand the complexities. However, we do want you to get the most from Magento 2 and demonstrate its incredible ability to fulfill your tax calculation needs.
To that end — and perhaps the best way to demonstrate the process — we're going to set up VAT taxes as if we were a business based in France (we love Paris!).
Since we're considered, in this example, as an EU member country, we will need to provide for VAT ID validation of our customers and classify them accordingly.
Earlier in this chapter, we added four additional customer groups, specifically for VAT tax use. If we look under Stores | Customer Groups, based on our example Magento install, we should see the following:
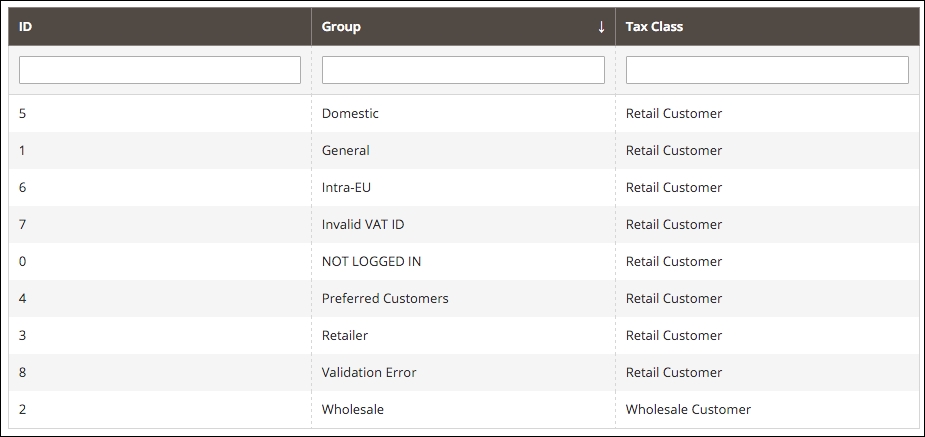
Next, we want to create the product classes that we will need for applying the appropriate French VAT tax rates. France groups products into four rate categories, each of which should have a different product class added for taxing purposes:
We now have to consider that for customers living in other EU countries, we will charge our VAT tax rate on purchases of physical products, but charge the buyer's VAT tax rate for digital or virtual purchases.
That means that if we are selling digital products (for example, music, software, and so on) to other EU customers, we have to charge VAT tax at the rate in their country, not France. In order to do that, we have to add tax rates in Magento for every other EU country. As you can imagine, setting up all those tax rates and rules can be quite time consuming.
We have created a CSV file of all EU countries with their standard VAT tax rates (as of the time of writing). You can use this to upload the tax rates to your Magento 2 install.
For France, we need to create the four tax rates described above. After adding these under Stores | Tax Zones and Rates in our Magento 2 backend, the list of tax rates looks like this:

Our next chore is to create the product tax classes that are needed to separate our products according to the taxes we have to apply. For our France-based example, we will need five product tax classes:
While you may not currently sell products that fall into all of these classes, you may want to go ahead and set them up so they're available to you.
Remember, to create additional product tax classes; just click to edit any tax rule, expand Additional Settings, and add your new classes. After adding the above classes, this section will look like the following screenshot:
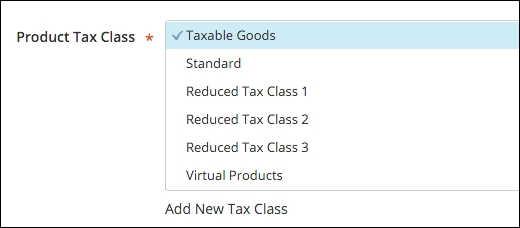
With the preceding preparation completed, we can now create the tax rules that will be used to calculate VAT taxes on purchases. We need to create the following tax rules to meet our needs as a French online business:
Once entered into our Magento 2 example, our Tax Rules screen would include the following:
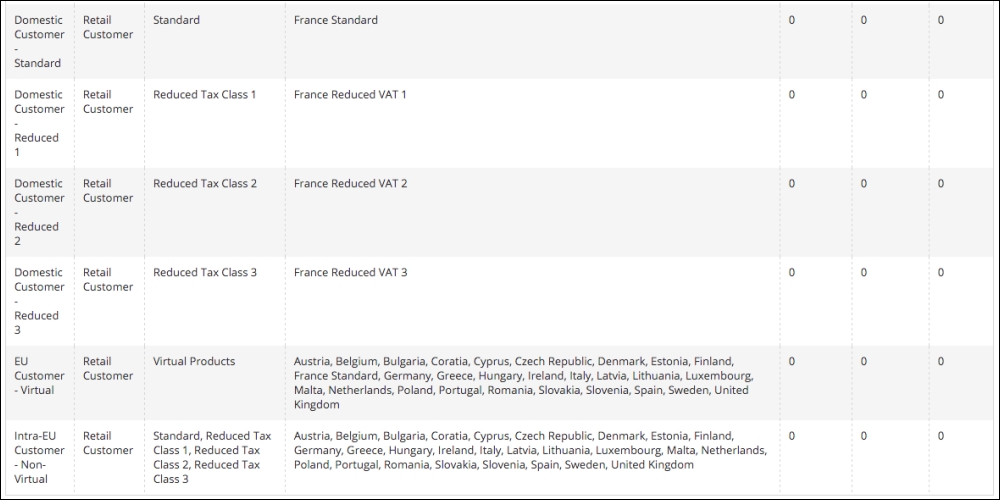
The final piece is to configure your Customer Configuration so that customers are automatically assigned to the proper customer group based on their VAT ID validation. To do that, go to Stores | Configuration | Customers | Customer Configuration and expand the Create New Account Options panel. Some of these settings are done at the global, website, and store view levels, so pay close attention to your store view scope setting in the upper right-hand part of the screen. For our example, we only want to automatically assign customers who visit our French store. Therefore, we will only enable this feature at the Sportswear French View.
Once you have changed to the appropriate store view level, the key fields to configure are:
As with any store configuration, especially one as complex as VAT taxes, we highly recommend that you test your configurations thoroughly.
As customers make purchases in your store, Magento sends — based on your configurations — a number of e-mails to notify customers about their purchases. There are also e-mails for recovering passwords, creating accounts and more.
Magento installs some basic templates for all these transactional e-mails. You can create new e-mail templates to use for your stores that reflect your branding and messaging. In Magento 2, this is quite easy to do.
When you first go to Marketing | Email Templates, you'll see an empty list. That's normal. The base templates installed with Magento will not appear in this list — but they are there, nonetheless. E-mail templates can also be included in Magento themes added to your installation. These will also not show in the list, but will be available for customization.
The process of customizing e-mail templates is:
Once you create your new e-mail template, you can assign it for use as sales e-mails, customer account e-mails, and so on.
You can create new e-mail templates for the following purposes:
As you can see, Magento has quite a number of e-mails. The items in this list with an asterisk (*) are e-mails that are not sent to your customers, but, rather, sent to you or someone you designate. These e-mails are for alerting your team when something doesn't quite go right.
There are also two additional templates that are used to create the headers and footers for your e-mails. In other words, you can manage the top and bottom of your e-mails without having to modify every single e-mail if, for example, you want to change your logo or phone number.
To illustrate how to do this, let's create a new e-mail template for our sportswear store. We will begin by modifying the header and footer for our sportswear store, then create a new New Order e-mail template.
On the Email Templates panel, click on Add New Template. At the top of the New Template panel, you'll see an area titled Load default template. Here, you can select the base template — or a template provided by a theme — and load it into the New Template panel for modification.
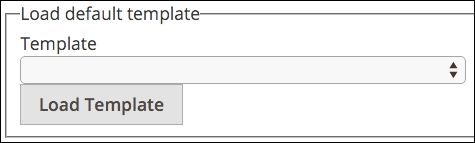
For our new header, select Header and click on Load Template. This will load the base header template into our New Template form.
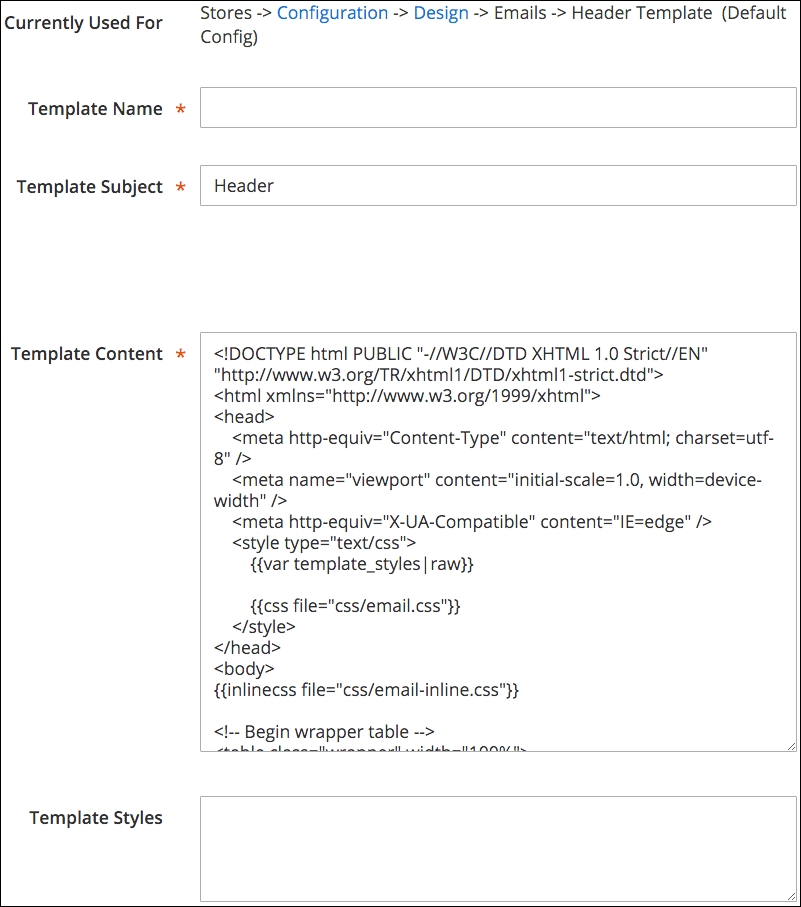
Let's first review the fields shown on this screen:
Once we have modified the header to our liking, we can save it by clicking Save Template. If we look at our list of e-mail templates, we now have the one template listed.

If we click on the template and view its detail, we can see that it has no Currently Used For field, as it has not been assigned to a particular website or store. Once we have created our sportswear footer (it is not necessarily required to create both to be able to create and assign only a header or footer), we can now assign these to our sportswear website so that they appear for each store view.
We have now assigned our new e-mail header and footer to all outgoing e-mails related to the sportswear stores. If you view the detail for your header and footer e-mail templates, they will now display a Currently Used For value.

Now that we have created our special header and footer, we can create our new order email for our sportswear customers.
Thanks for Your {{var store.getFrontendName()}} Order!As you can see, the subject contains a Magento variable that will dynamically include the name of the store. Since we name our sportswear stores Sportswear English View, Sportswear French View, and Sportswear German View, we may not want to use the dynamic store view name, as these don't sound particularly consumer-friendly.
For our example, we would prefer to use Thanks for Your Acmes Sportswear Order!
As with the header and footer, we will now assign this e-mail to the appropriate sales e-mail:
We have now created a modified new order template for our logged-in purchasers and assigned it for our sportswear stores.
As we've seen in this chapter, before you can begin selling on a Magento store, there are considerable configurations that have to be addressed. We have covered managing orders, payment gateway settings, shipping configurations, sales and VAT taxes, and transactional e-mails.
Take your time with these settings and continually test to make sure you have the configurations correct. Mistakes could end up being costly.
In the next chapter, we will discuss how to manage the non-product content of your site: the static pages and text that helps define your brand and give greater confidence to your customers.
As important as products and product information are to e-commerce, successful online stores need more in order to attract customers and fortify the store's brand. Even printed catalogs often contain information about the seller, including hours of operation, return policies, company history, and more. This non-product content is essential.
To gain an understanding of how to create and manipulate non-product content, we will cover the following topics:
Once you know how to interweave non-product content throughout your online store, you will no doubt discover innovative ways to increase customer engagement.
As with most e-commerce platforms, Magento's management of non-product content lacks some of the more robust features of a dedicated content management system (CMS) – such as WordPress, Business Catalyst, or Joomla. However, to its credit, Magento does provide a versatile system that takes into account the possible need for unique content for each of your stores.
As you would expect, the area of the backend for managing the CMS functions of Magento is under the Content menu. This area includes sections for managing Pages, Blocks, and Widgets, as shown in the following screenshot:
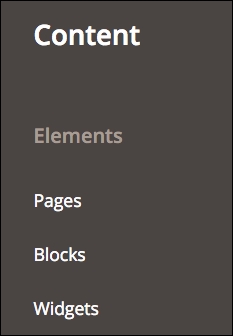
Before we dig into each of these items, it's important to recall our discussion about blocks in Chapter 3, Designs and Themes. Whether configuring a page, or placing a static block or widget, Magento builds the final results by assembling blocks of information.
The pages we will use in the CMS are not actually complete pages, as they lack controls for the overall template items of header, navigation, and footer. These pages actually refer to the central content of a page – that which lies within the overall page template. Within this page, we can add text, images, static blocks, and widgets to give the page its core content. As we will examine in this section, you can add some of the same code as you did in the default.xml file to even manipulate elements outside the core content area, including blocks within the header, navigation, and footer.
To begin, let's look at and alter a default page provided by the sample data installed into a new Magento store.
Go to CMS | Pages in the Magento backend. With the sample data installed, you should see a list of pages, much like those shown in the following screenshot:
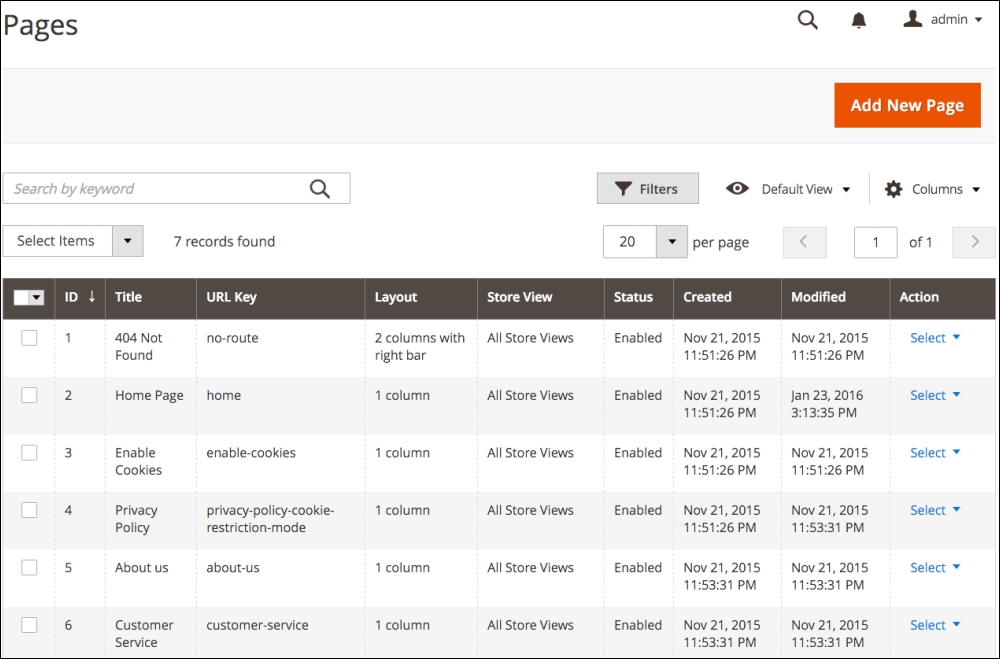
While it's not absolutely necessary that you keep these pages enabled, for e-commerce best practices, it's generally a good idea to retain these core pages.
No doubt, you will find other pages to insert in your Magento store. Creating and managing CMS pages is really quite straightforward.
The first place most designers want to begin modifying a store's design is with the Home Page.
First, we need to understand that pages created in the Magento CMS primarily dictate what appears in the content section of the page. This is the area, highlighted below, apart from the header, top navigation, and footer regions.
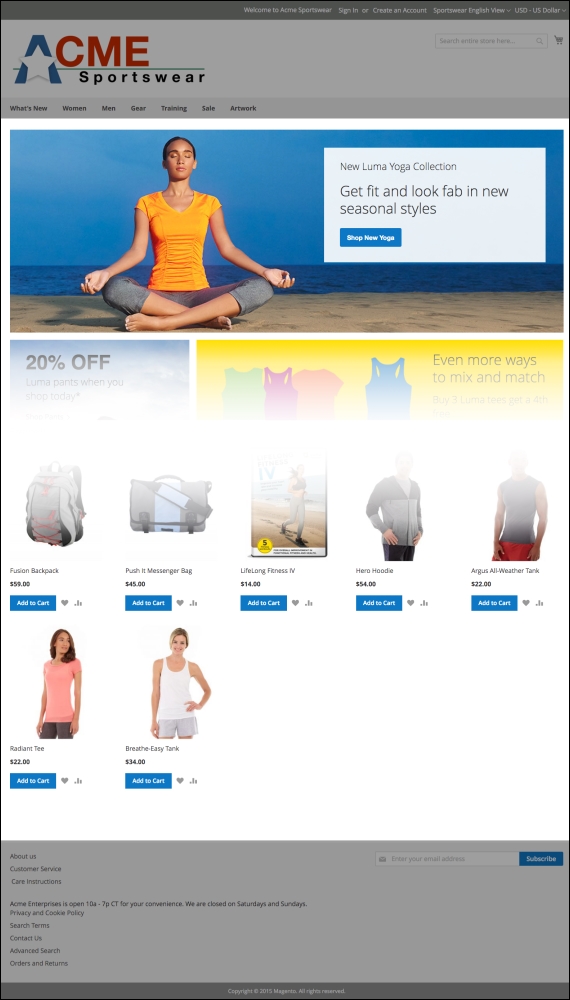
The content section of the Home Page
On the Page Information panel of the Edit Page screen, you should see the following:
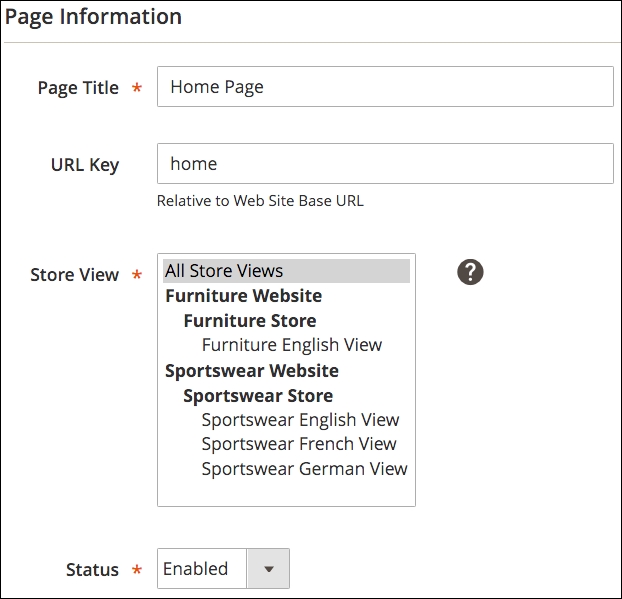
Let us go through the various fields:
In the left tabs, click Content. This is the screen where you can add text, images, or dynamic content that will display in the center content area of your page.
Notice that in the following screenshot, this sample data home page contains a widget.
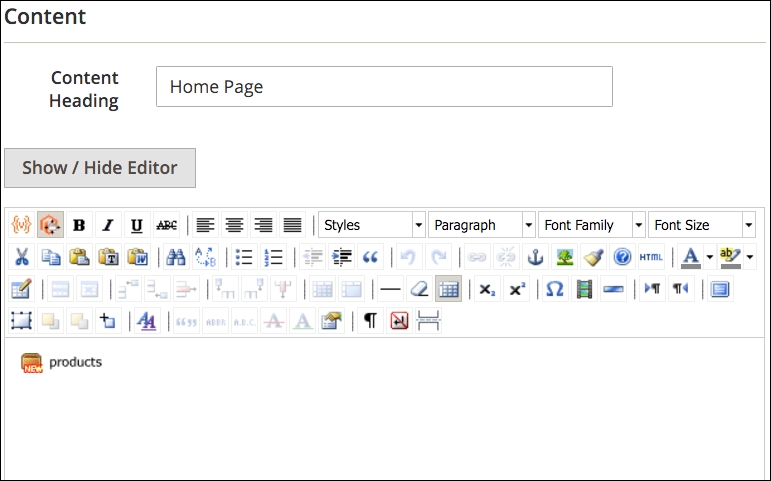
This widget displays products according to the parameters of the widget (we'll discuss widgets later in this chapter). What you don't see — and we're sure you've realized this — are the instructions that control the other graphics and "Hotsellers" shown on the home page.
The other parts of the home page are inserted by using blocks. We will explore the use of blocks a bit later in this chapter. What is important here is that you can create tremendous versatility in your CMS pages by using tools beyond hardcoding layout changes within the theme modules.
For our exercise, let's add some copy to our home page so that it precedes the featured product display.
In the editor field, enter the following before the widget:
Welcome to our store. We hope you enjoy shopping with us. Our goal is to provide you with the best products at the best value.
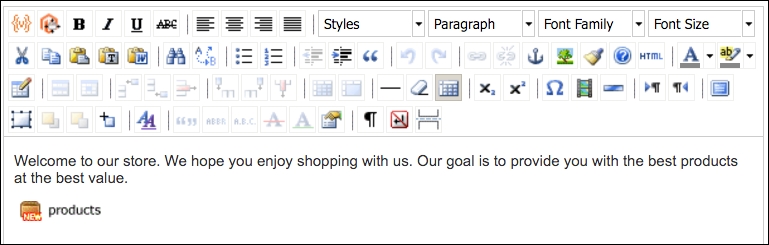
Click on Save and Continue Edit (this will let you remain on this screen) and open your home page in another browser window or tab. It should display your new content:

You've now added content to your default home page. As you go through the remainder of this chapter, you'll discover additional ways to add or affect the content of your home page. We will now create a new CMS page to use on our site. This exercise will also give you additional insights into how to use Magento's CMS feature.
Let's add a new page to our site called Care Instructions. We want to provide information to our apparel site customers on proper techniques for washing the clothing items they purchase from Acme Sportwear:
The first panel is titled Page Information, as shown in the following screenshot:
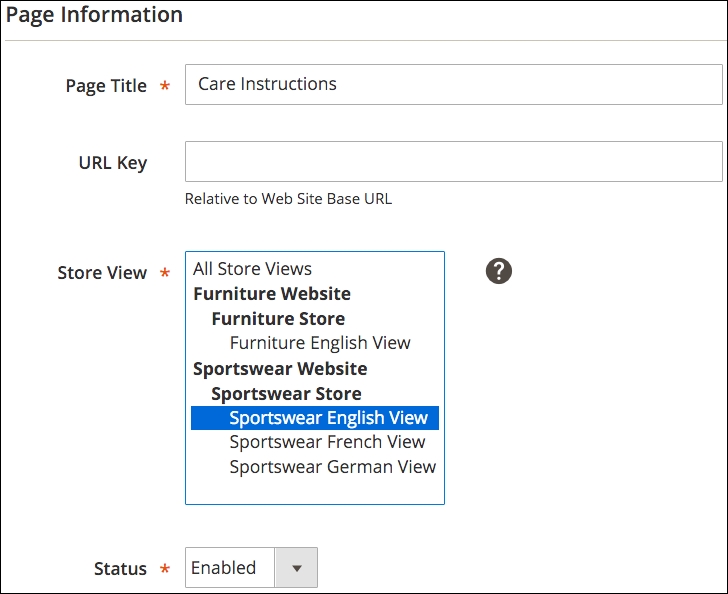
As shown, we have entered the initial information for our new page. Magento will create the URL Key once the new page is saved. However, you can enter a URL Key here. The URL Key will be the actual name used in the URL to access your page: http://www.acmesportswear.com/care-instructions.html. If you want another URL Key value, you can enter it here.
The next panel in the new product screen is Content. It is in this panel that you can create the words, images, and so on that will appear in the main content portion of your new page.
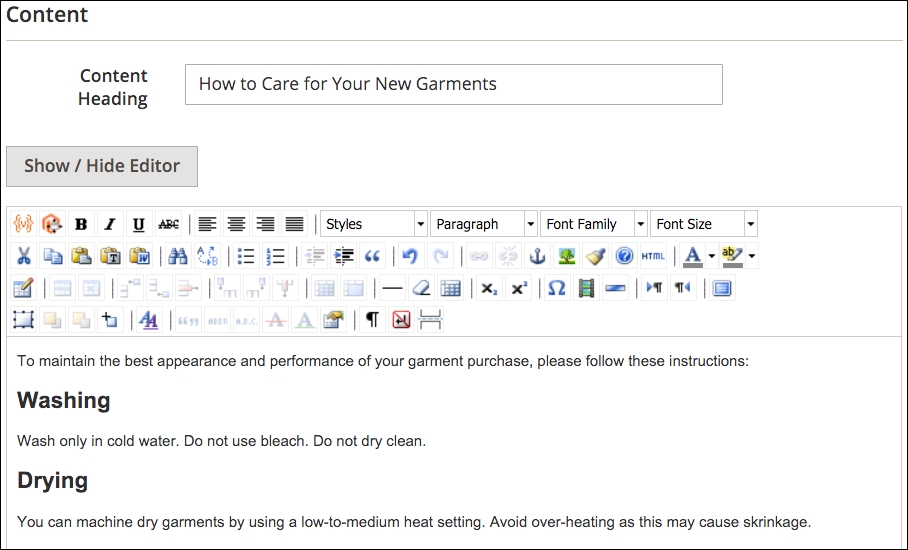
The WYSIWYG editor gives you a lot of great tools to help you build your page content. You can easily insert images, videos, tables, and other styled content.
The Content Heading will appear at the top of your page. It will be displayed within a <h1> tag.
The third panel in the menu on the left side is labeled Design. Based on your theme, you can change the layout of the page to a one-, two-, or three-column display. You can also specify a special theme design. There are additional XML statements that can be inserted that will affect your display. See Chapter 3, Designs and Themes, for guidance on various XML statements that can be used to control layout.
The last panel is Meta Data. Keep this in mind for when we discuss meta information later in this chapter.
Once saved, we can view our new page by going to the URL path we created for this page.
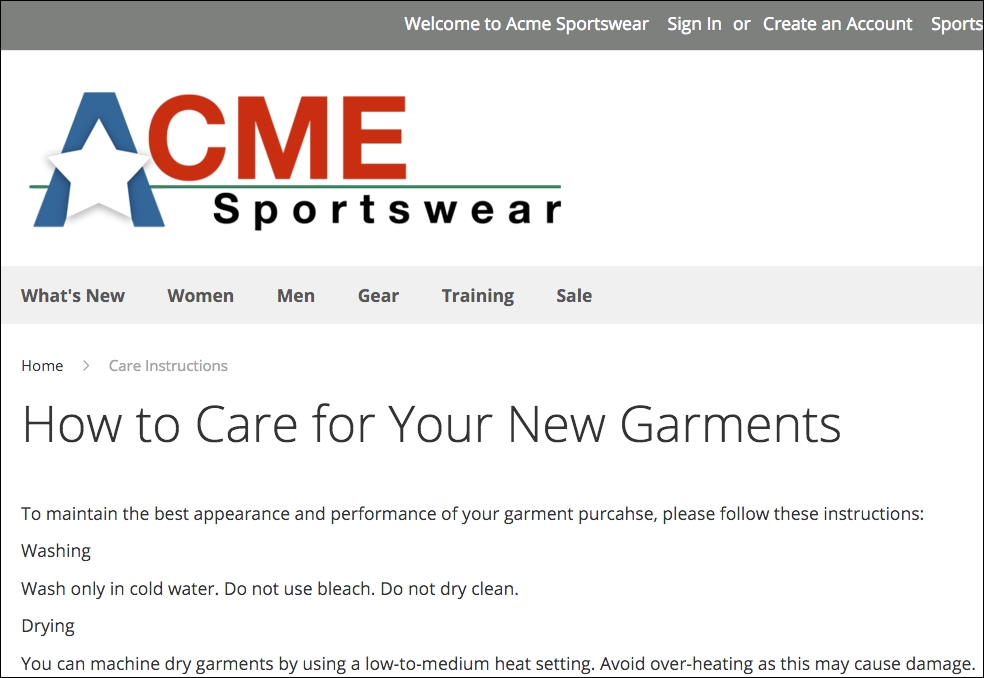
The next step is to add a link to your new page from your site navigation. One easy way is to edit a block that contains links to pages within your site.
Blocks are sections of content that are specified by your theme to appear in various places throughout your site. Blocks can be placed on all pages, some pages, product pages, category pages, or in special, designated spots.
In addition to block locations that are configured within your theme, blocks can be inserted into various areas and pages within your site by using widgets, which we will explore just a bit later in this section.
To view all the blocks in your site, go to Content | Blocks. If you have installed the Magento 2 sample data, you'll see as many as 18 blocks. By their names, you can probably figure out where they appear on your site.
To understand how CMS blocks work — and to add our Care Instructions page link — click on the Select drop-down menu to the far right of the first block, Footer Links Block, and click on Edit.
This block contains the information that appears in the bottom footer of all our sites.
We want to add our Care Instructions link to this block. Now, this is where things get just a bit complex, so read through this process carefully, as it applies anytime you wish to add a link to a page in your site to a block. We are going to explain three different methods of accomplishing the same result.
We can add a link using the WYSIWIG editor, or we could change the view to HTML mode and edit the actual HTML code. Let's do it using the WYSIWYG editor, first.
In the editor space, add the link name as you wish for it to appear on the frontend by adding another bullet row below the Customer Service label. You can, of course, insert your new link anywhere in the list.
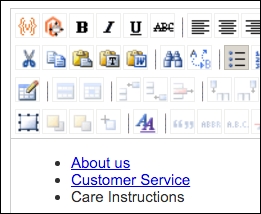
To create the link, select the title you just entered and click the link icon in the menu toolbar. A modal dialogue will appear for entering your link URL.
Magento provides a library of variables which can be used to dynamically insert values and content where appropriate. In this case, the use of a system variable for inserting the store URL is worth learning for our purposes.
The store URL variable is inserted when used in the following format: {{store url=URL_Key}}, where URL_Key is the URL Key for the page, category, or product you wish to access.
Therefore, for our new page, we will insert the following into Link URL: {{store url=care-instructions}}. Add a Title for your link so that it will appear when your customer mouses over the link, and to help describe the link to search engines.
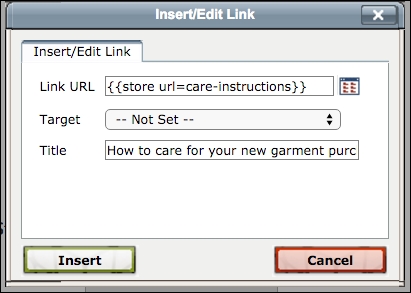
In most Magento help guides, the format for entering a store URL variable is {{store url="URL_Key"}}, with quotes (") around the URL Key. However, we must leave out the quotes when using this variable within the link dialogue box. It's quite possible to use the store URL variable without quotes elsewhere, too. This behavior does not apply when adding links using HTML (see the next section).
Once you click on Import, the text will be linked. If you look on the frontend of your website, you will now see a new link in the footer.
If you select a link in WYSIWYG and click the link icon, the URL that shows in the dialogue field is a very long, encrypted string. This is due to the way Magento stores link references. You can edit the link by replacing it with what you prefer as the link, but you may find building and managing links much easier using HTML rather than the WYSIWYG view.
The method of adding a link using the store URL variable is the same if you work in the HTML view. The key, of course, knows how to properly code an HTML link.
In the block screen, click on Show/Hide Editor to reveal the underlying HTML for this block.
<ul class="footer links">
<li class="nav item"><a href="{{store url="about-us"}}">About us</a></li>
<li class="nav item"><a href="{{store url="customer-service"}}">Customer Service</a></li>
<li class="nav item"><a title="How to care for your new garment purchases." href="{{store%20url=care-instructions}}">Care Instructions</a></li>
</ul>You'll notice that the link you created for the Care Instructions page is slightly different from the other links in the block. This is due to the manner in which the link dialogue saves your entry.
You could also use {{store url="care-instructions"}} for the link code — in HTML view only — and achieve the same results.
If you're hesitant about using the store URL variable or coding HTML, you can use one additional technique for inserting a link: the CMS widget. In fact, as you explore this method, you'll find it can be used to insert the following:
For our example, we want to insert a link to a CMS page. In the WYSIWYG view (you can also use the HTML view), click the widget icon in the top menu bar.
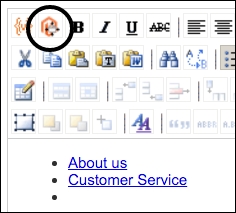
A panel will open from the right side of your screen. For Widget Type, select CMS Page Link. Additional fields will appear:
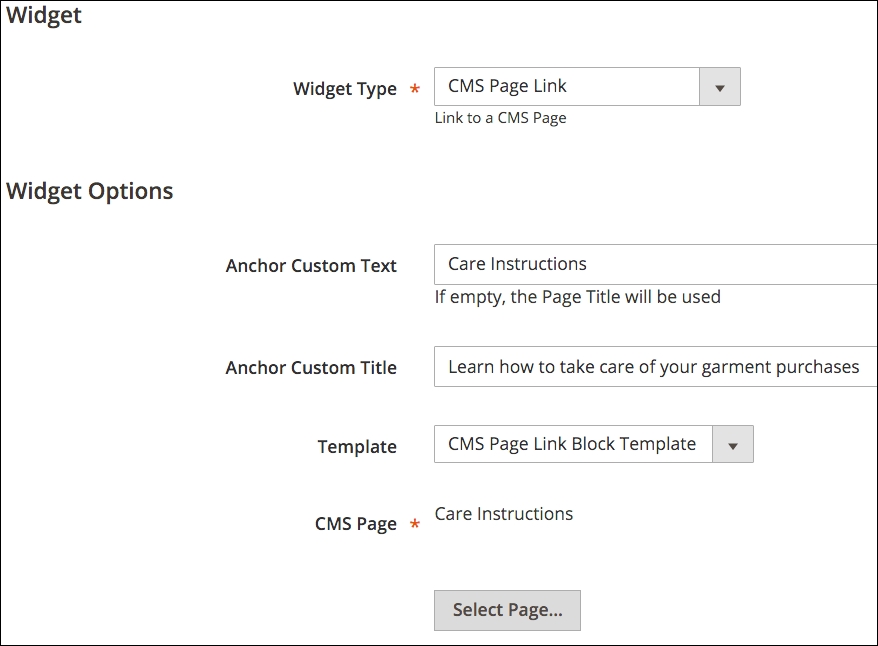
After you insert the widget, it will appear in your WYSIWYG editor as an icon labeled page link. If you want to edit the link, simply double-click on the icon to open the Widget panel.
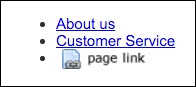
The store URL variable is only one of many available for use in Magento 2. Within the CMS page and block editors, you do have access to a list of standard variables that will dynamically insert information into your content.
Let's say we wanted to include the name and store hours of our business in the same footer block we have been editing:
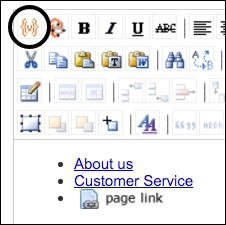
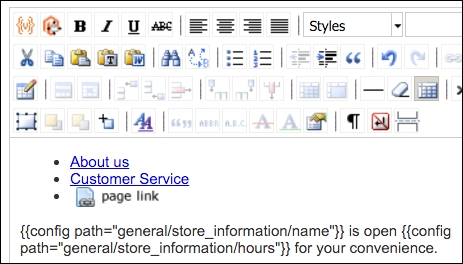
After saving the block, you will see on your site that the actual saved information for store name and store hours) is inserted into its proper places.
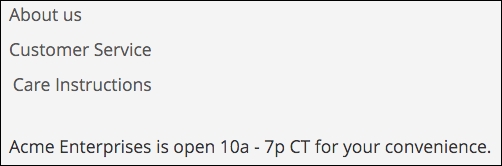
This is one of the least known features of Magento, and yet it can be powerful for reducing the need to edit changes in multiple places in your site. In fact, custom variables can be used not only in pages and blocks, but also in e-mail templates.
As an example, let's say you'd like to add the days on which you are closed to your footer message, but you'd like to use a variable just in case you decide later to change the days on which you are not open:
Let's go through the various fields you will encounter here:
_). This code is used by Magento's programming to reference your variable.The various fields are shown in the following screenshot:
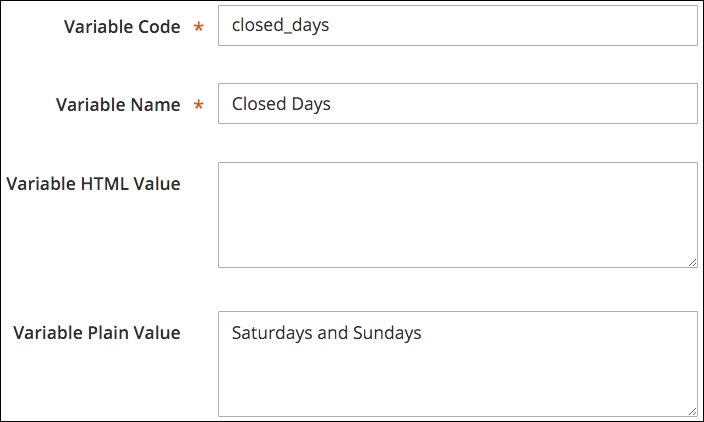
Now, you can return to your footer block and insert your new variable just as you inserted the variables for Store Name and Store Hours.
{{config path="general/store_information/name"}} is open {{config path="general/store_information/hours"}} for your convenience. We are closed on {{customVar code=closed_days}}.With these variables inserted, your site footer now shows the added variable value.

Custom variables could be handy for managing content that you may wish to edit from time to time, yet needs to be displayed in multiple places such as the following:
If any of these need updating on your site, you simply have to change the value of the custom variable.
The widgets we used in editing blocks allowed us to insert dynamic links to blocks and pages. However, widgets can also be used to insert dynamic content into multiple pages and theme locations, such as products, categories, footers, and so on. In fact, the footer links block we have been editing is inserted into the theme's footer content area using a widget.
Let's take a look at this particular widget to see how that is configured. Go to Content | Widgets. Click on the Footer Links widget shown in the list.
The first panel, Storefront Properties, configures where the widget will display its contents. The Type and Design Package/Theme are set when the widget is created and cannot be changed later (although the widget can be deleted and re-created).
You can assign the widget to appear in only certain store views, as well, and control the order in which it may appear if other widgets are also assigned to the same layout section.
The Layout Updates section is where so much of the magic of widgets comes in. You can assign a widget to appear on all pages, certain pages, or certain types of page (or any combination thereof!).
For categories and products, you can also specify specific categories and products. For instance, you could create a widget that would insert a block of content to appear only on the Furniture category page.
In this particular example, this widget inserts a CMS block (our footer links) into a container called CMS Footer Links. Depending on your theme, you can have many different containers to choose from, such as in the Luma theme used in our demo store.
By clicking Add Layout Update, you can also insert the widget content into other containers in your site.
Finally, the Widget Options panel allows you to select the block, link, and so on. Your widget will be inserted. This depends on the type of widget you are creating.
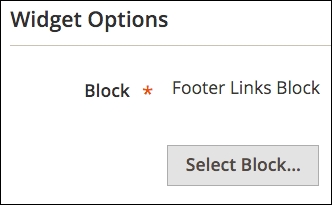
Widgets can be very powerful tools, especially when combined with blocks. We've seen many situations where even experienced developers have programmed block insertions instead of using the simple widget tools in Magento. Get to know blocks and widgets, and we're certain you'll come up with some very creative ways of adding true value to your brand and customer experience.
The Magento CMS provides you with the capability to customize your store without directly altering the XML and HTML files of your theme. You can build productive pages, blocks, and widgets, adding increased functionality and buyer conveniences.
That said, we should never shy away from rolling up our sleeves and diving into the actual theme files. By combining both disciplines, you have greatly elevated the potential of Magento to meet your retailing needs.
In this chapter, we learned about the Magento CMS functionality, viewed how to create and customize pages, explored the creation of blocks, and reviewed the many widgets available for your use.
Now that our store has products and content, it's time to let the world know your store exists as a premiere online shopping destination.
The online marketplace is crowded. Thousands of new stores are coming online each day. With Magento 2, you have one of the most powerful open source platforms for presenting and selling your products and services. But to be noticed — and to create valuable repeat business — you have to do more than just point a domain name to your store.
The key is marketing: presenting a selling proposition to potential customers that will entice them to at least visit your online showroom.
In this chapter, we will explore some of Magento's key marketing tools, including:
As you prepare your store for launch, you need to spend some time becoming familiar with how these tools can help you attract and close more sales.
If you're new to e-commerce, you may not quite have a handle on how to group your potential customers outside of retail and wholesale. Most of you will build retail stores, fewer will build wholesale businesses, and even fewer will do both.
Yet, if you give some careful thought to how you intend to market to your customers, you may find that there are more customers segments you need to identify. Here are examples of some other possible customer groups:
As you contemplate your groups, consider the following:
By default, Magento creates three customer groups: General, Retailer, and Wholesale. When a customer registers in your store, they are automatically put into the General group. You can manually assign a customer to another group, either after they have registered or if you create the customer yourself in the administrative backend to your store.
Creating a new customer group is perhaps the simplest operation in Magento!
And that's all there is to it. Now that you understand how customer groups are created in Magento, let's see how we can use these for marketing.
Every retailer with whom we work finds it beneficial to offer promotions from time to time. From free shipping to coupons, promotions can help consumers choose your products over competitors, particularly if they feel they're getting a great bargain in the process.
As with sales tax, promotions are rule-based, meaning that the application and calculation of a promotion are based on rules you create. In Magento, there are two types of promotion rules:
As described, a catalog price rule is a discount that is applied to selected products automatically. For example, let's assume you wish to provide a 5% discount on all women's apparel priced over $50 sold between November 24, 2016 through November 26, 2016, as a special Black Friday promotion.
Black Friday and Cyber Monday
For years in the United States, the day after Thanksgiving — the last Friday of November, Black Friday — has been one of the busiest shopping days of the Christmas season. Retailers offer huge discounts and shoppers begin lining up well before dawn just to be the first one in the door. To counter the brick and mortar retailers, online retailers created Cyber Monday, the Monday following Black Friday, likewise offering huge discounts and special offers. Personally, we like the sound of Cyber Monday over the morbid moniker of Black Friday. We also like e-commerce!
To create a catalog price rule, you need to perform the following steps:
Now, we need to create the discount calculation:
You now have a new rule that will automatically take effect at 12:01 AM on Friday, November 24th and run until 11:59 PM on Sunday, November 26th. However, there is one final action to take!
Before your new rule can take effect, click on Apply Rules at the top of the Catalog Price Rules page. Magento needs to set itself to apply the rules to the applicable products.
Magento has some very powerful and flexible tools for creating discounts that can be applied once the customer has reached the shopping cart part of their visit. In fact, we have found it difficult to identify a single discount scenario we could not accommodate in Magento.
The key features of cart price rules for which you should be aware are:
Let's use a specific example to learn how to create a cart price rule:
The process of building our rule will follow these steps:
To begin building our cart price rule, go to Marketing | Cart Price Rules in your Magento 2 backend. Click on Add New Rule.
The Rule Information panel for our new rule has several fields to use to set up the rule:

A rule's conditions can be considered as minimum requirements. In other words, what is necessary about a customer's shopping cart for the rule to be valid?
In our example, a coupon code can only be used if the shopping cart contains $100 or more of women's tops or 3 or more women's apparel items. To create this condition, go to the Conditions panel.
Since we have two conditions, both of which are valid, click the ALL in In ALL of these conditions are TRUE. It will allow you to select ANY. These creates an "or" condition.
Our first condition will test whether the customer has $100 or more of women's tops in their shopping cart:
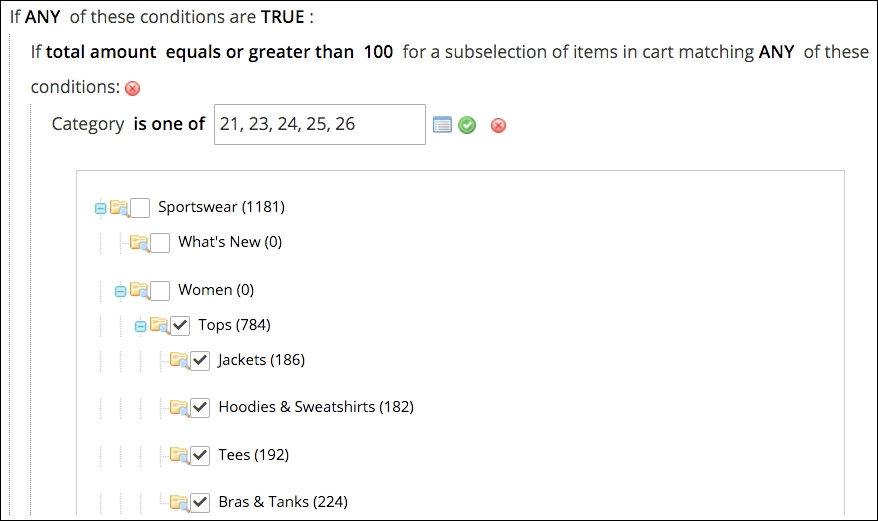
Next, we need to add the or condition that tests whether the customer has three or more women's apparel items into their cart:
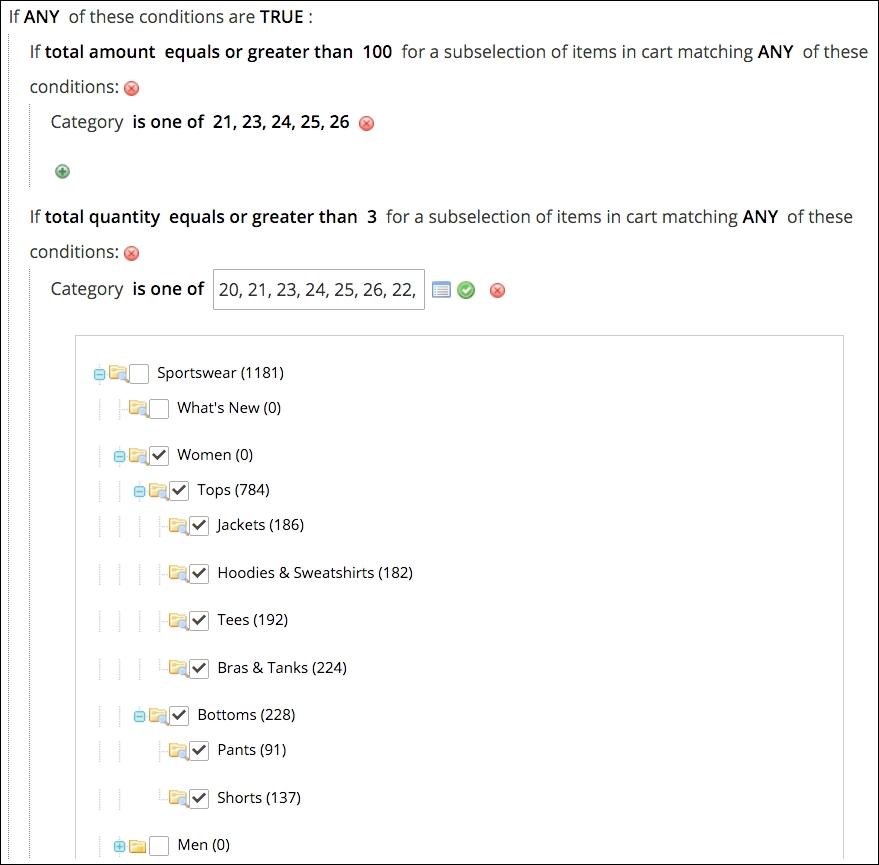
Once your conditions are set, your Conditions panel should look like the following image.
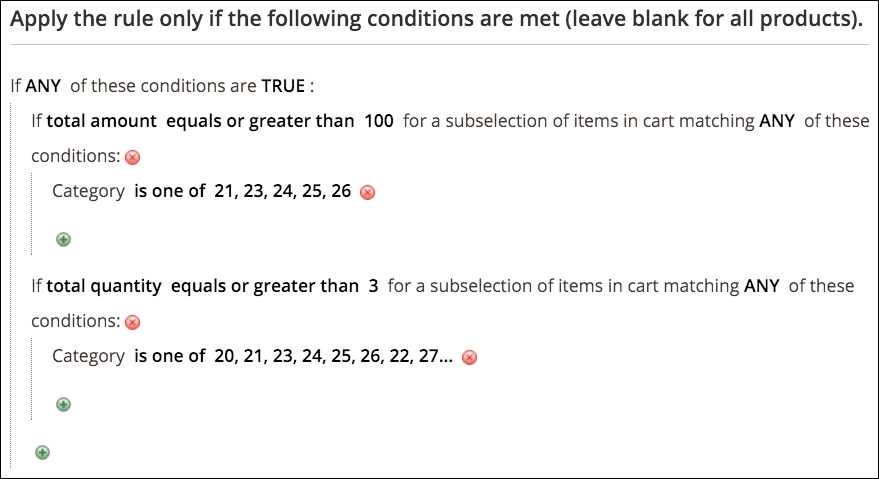
Now we can move on to specifying the actions that will take place for shopping carts that match our conditions.
There are two parts to a rule's actions:
This is important to understand, as many are confused by the fact that action conditions appear very similar to the rule conditions that we created before. The conditions in this panel dictate which products qualify for the discounts.
In other words — as in our case — we're using one set of conditions to qualify the shopping cart and another set, within the Actions panel, to identify to which products the discount will be applied. These conditions are different. If they were the same — for example, you're discounting a shopping cart containing $100 or more in products — then you do not have to add any conditions to the Actions panel.
Let's now configure our Actions panel for our needs:
Let's go over the various choices here, so you have an idea as to which discount will work best with your purposes. Any value that is required will be entered into the Discount Amount field.
For free shipping to work, you have to have at least one free shipping method configured. See Chapter 4, Configuring to Sell, for more information on shipping.
The fields mentioned above can be visualized in the following screenshot:
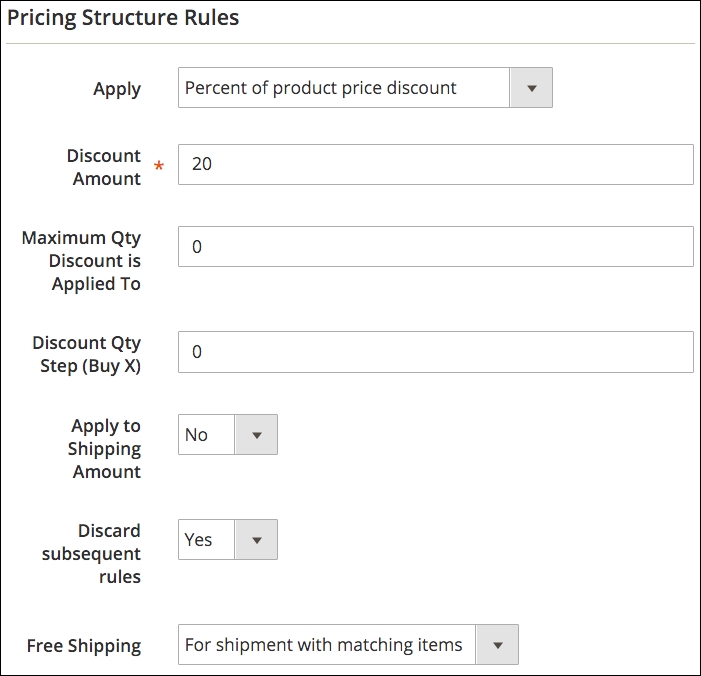
The next part of our actions configuration is to designate to which products the discount will be applied. In our case, any women's apparel (up to the three we set in the top part of the panel).
Using the same methodology we use in the Conditions panel, our Actions panel rules, when completed, will look like the following:

While you could use the name of the rule as what displays to customers, it's probably more prudent to compose a discount label that more succinctly describes the discount. Furthermore, as in our example, we need different labels for each of the foreign language sites on which we sell sportswear.
For our example, we're going to label our discount for our customers as Save 20% & Free Shipping!
And, of course, we click on Save and Continue Edit. Our Labels panel now looks like the following screenshot:
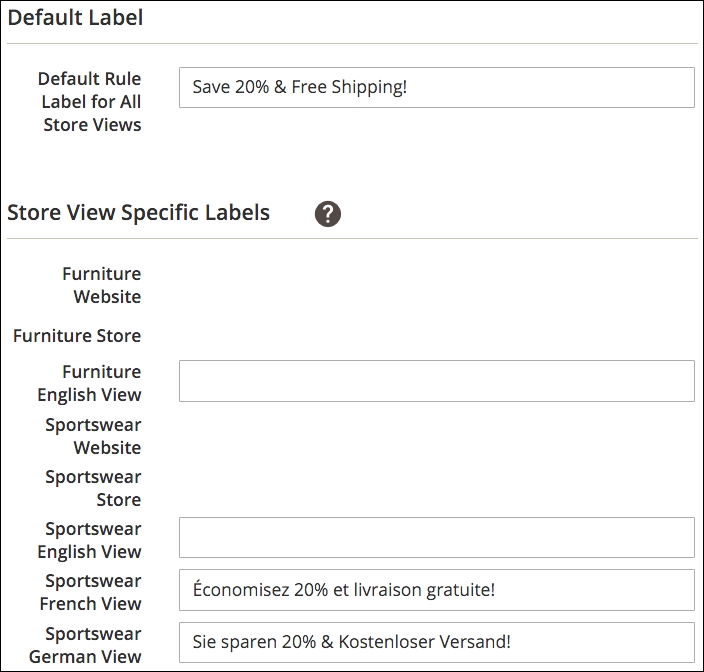
In our example, we want to create 100 unique coupon codes that we can send to our selected customers. Magento does an amazing job of helping you generate codes and also keeps track of how many times specific codes have been used.
To begin, go to the Manage Coupon Codes panel. Let's assume we want to create codes that are alphanumeric (both letters and numbers), 12 characters long, and have a prefix of ASW and a suffix of F20. Our coupon pattern would be ASW-XXX-XXX-F20, where "XXX" is a unique alphanumeric code. To configure this, we set up the parameters for the codes and then click on Generate to allow Magento to create the 100 unique codes we need:
The use of a prefix and/or suffix is purely optional. If you're using unique coupon codes, you may want to use some designators that will help you identify that the code is a valid code for the order. When an order is viewed in your backend, it will show what codes, if any, were applied to the order. If you only use randomly generated codes without other designators, you might not be able to easily determine what actual discount rule was applied. If you want hyphens before or after a prefix/suffix, you need to include it in the appropriate fields.
The fields mentioned above can be visualized in the following screenshot:
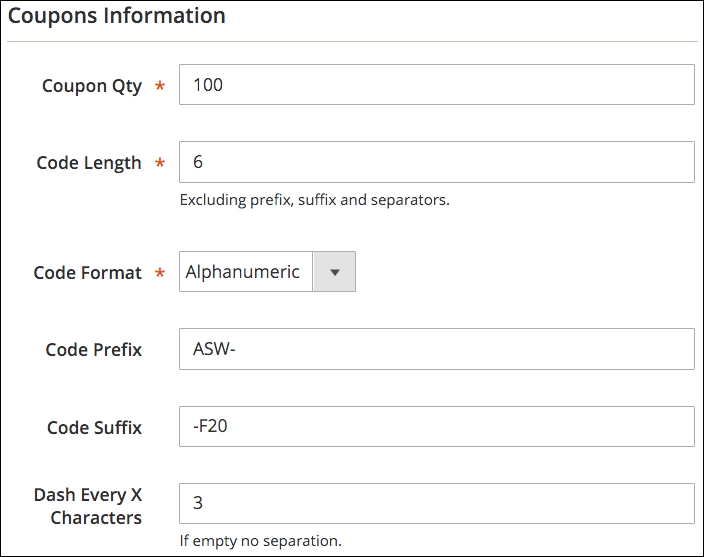
Now, we can click on Generate to create our 100 unique codes. Once generated, you should see 100 records created in the lower portion of the panel. Although your codes will be different (they are randomly generated, after all), your list should look similar to ours.
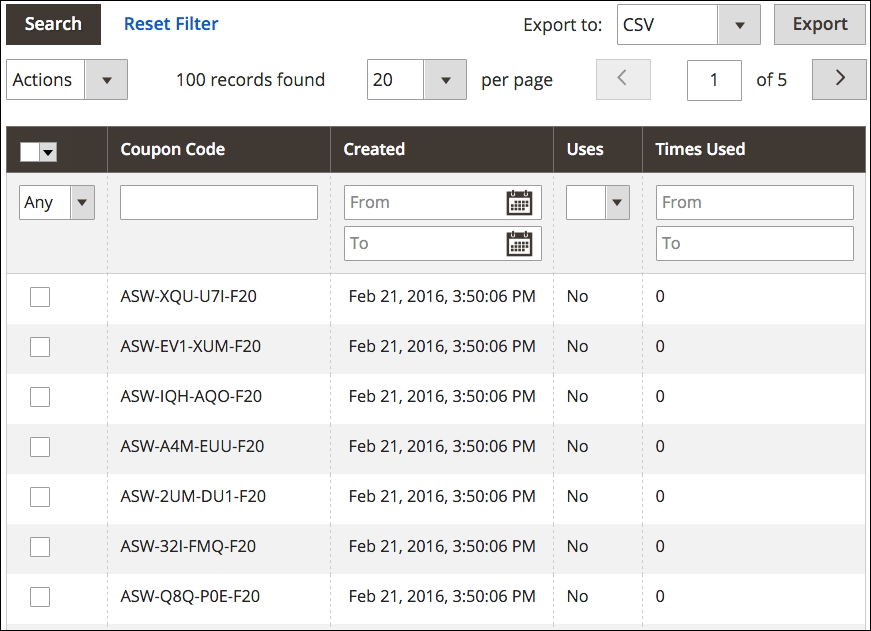
Using the export tool at the top of your list, you can now export your codes and use them with your email program to send these codes to your customers.
When you acquire a new customer, it makes great sense to keep them interested in your offerings so that they will return again to make a purchase from your online store. The Cost of Acquisition for a sale is far less with a repeat transaction.
Magento 2 is able to help you keep your brand in front of your customers with basic email newsletter tools. With these tools you can:
Magento will be the first to admit that their newsletter tools are pretty basic. If you want to be more sophisticated in how you construct your newsletters, segment your customers, and more, you should consider a more robust third-party tool. We use MailChimp (http://www.mailchimp.com), a leading email system that makes it easy to manage campaigns. It's fun to use, as well.
For connecting your Magento 2 store to MailChimp, we recommend the MageMonkey for Magento 2 extension (http://store.ebizmarts.com/magemonkey-magento2.html). Ebizmarts, the creator of this extension, worked closely with MailChimp. The extension also adds emails for abandoned carts, supports multiple MailChimp lists, and creates autoresponders — emails for customer birthdays, related products, and product reviews. And, best of all, at the time of this writing, the extension was offered for free!
The newsletter function is enabled by default in Magento 2. As long as you have a newsletter subscription form on your site, your customers can subscribe and be added to your newsletter list.
Settings for newsletters are configured under Stores | Configuration | Customers in the Magento 2 backend.
By default, a subscription form is placed in the footer of the base theme. If you use a third-party theme, the subscription form may be placed in another location.

Before you can send a newsletter, you have to create a newsletter template. The template contains your marketing message but can also contain dynamic content.
To begin, go to Marketing | Newsletter templates in your Magento backend. Click on Add New Template. On the Template Information panel, you will see the following fields:
<support@acmefurniture.com>. This field is the name part (for example, Acme Support).When creating a new template, you'll see default content for inserting a variable for an unsubscribe link. This is key if you want to avoid violating anti-spam standards. However, there are more guidelines you should follow if you want your newsletters to be considered valid emails to subscribed customers. A good resource for compliance guidance can be found at http://kb.mailchimp.com/accounts#Compliance_Tips.
The fields mentioned above can be visualized in the following screenshot:
Once you've completed your template, you can click on Preview Template to view your newsletter as it will appear to your customers.
When you're ready to schedule your newsletter to be sent, go to Marketing | Newsletter Templates. In the Action column to the right of the newsletter you wish to send, select Queue Newsletter in the dropdown menu. The screen will redirect to the Queue Information panel.
Here, you can select the date on which you wish to send your newsletter, select the store views for whose subscribers you wish to receive your newsletter, and review the contents of your newsletter.
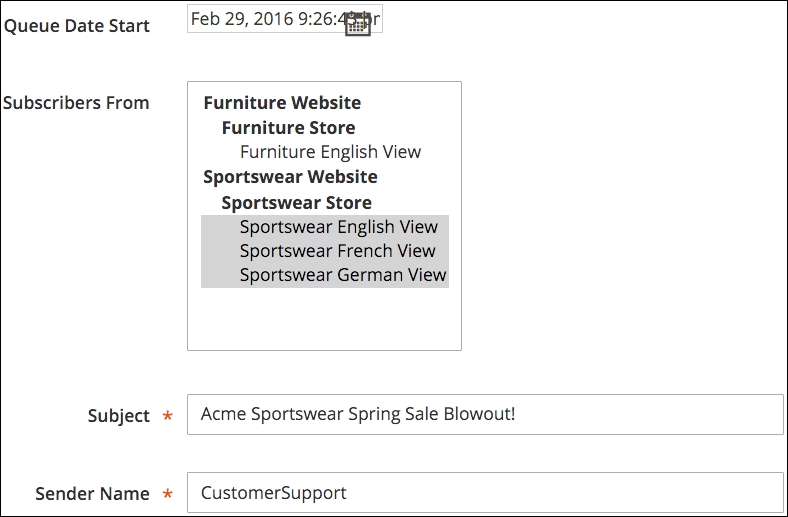
Once you have made your selection, click on Save Newsletter to add it to the internal queue. Magento will send your newsletters to your chosen subscribers on the date you have selected.
To view your newsletter queue and the status of your queued newsletters, go to Marketing | Newsletter Queue.
Once your newsletter is sent, you can see how well it is sent — and check for any problems — by going to Reports | Newsletter Problems Report. If any problems are found, a report identifying each error will appear in this list.
Under Marketing | Newsletter Subscribers, you can view all or a filtered sub-set of your newsletter subscribers. This can be helpful if you wish to see how many have come from various stores in your installation. You can also unsubscribe customers from this screen.
As with most other grid listings in Magento, you can export your subscriber list to use for other purposes.
Many websites have pages that show sitemaps — a hierarchal list of pages within a site. For our purposes, a sitemap is an XML file that resides on your server and is read by Google and other search engines to learn about your site.
If you've ever worked with Google Webmaster Tools (https://www.google.com/webmasters/), you're familiar with the concept of providing a sitemap URL to Google. By doing so, Google can become fully aware of the pages and products within your Magento store without having to figure it out themselves. Sitemaps are an important component of your Search Engine Optimization (SEO) efforts.
Magento 2 has a built-in sitemap functionality that you can configure to generate sitemaps for each store view within your installation.
To create a sitemap for a store view, go to Marketing | Site Map in the Magento 2 backend. Click on Add Sitemap.
For our first sitemap, we'll create one for our furniture store view. We only have the one English language view for that website.
sitemap.xml. However, if you use the same file name for each store, you would not have unique sitemaps for each store view.The fields mentioned above can be visualized in the following screenshot:
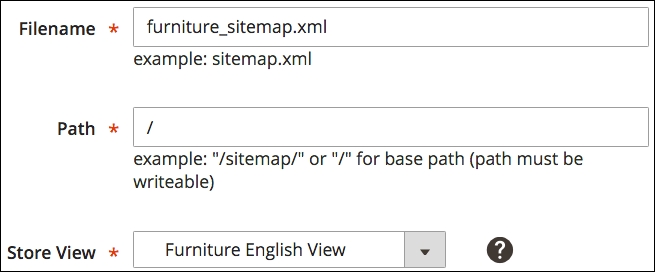
When Magento returns you to your list of sitemaps, you can click on the listed URL to view the actual XML file. The first part of your sitemap file may look like this:
<urlset xmlns="http://www.sitemaps.org/schemas/sitemap/0.9" xmlns:content="http://www.google.com/schemas/sitemap-content/1.0"xmlns:image="http://www.google.com/schemas/sitemap-image/1.1"> <url> <loc>http://acmefurniture.novusweb.com/sofas.html</loc> <lastmod>2015-12-06T17:24:17+00:00</lastmod> <changefreq>daily</changefreq> <priority>0.5</priority> </url> <url> <loc>http://acmefurniture.novusweb.com/sofas/couch.html</loc> <lastmod>2015-12-30T23:09:56+00:00</lastmod> <changefreq>daily</changefreq> <priority>1.0</priority> <image:image> <image:loc> http://acmefurniture.novusweb.com/pub/media/catalog/product/s/a/sample-couch-red_2.jpg </image:loc> <image:title>Couch</image:title> </image:image> <PageMap xmlns="http://www.google.com/schemas/sitemap-pagemap/1.0"> <DataObject type="thumbnail"> <Attribute name="name" value="Couch"/> <Attribute name="src" value="http://acmefurniture.novusweb.com/pub/media/catalog/product/s/a/sample-couch-red_2.jpg"/> </DataObject> </PageMap> </url>
This XML code is parsed by search engines to determine all the products and content of your site. You can control the frequency and importance of various sitemap elements under Stores | Configuration | Catalog | XML Sitemap.
The discussion of these elements is beyond the scope of this book. For a good explanation of indexing sitemaps, go to https://support.google.com/webmasters/answer/156184.
Search Engine Optimization, or SEO, is both important and often misunderstood. There's probably as much misinformation on the Internet about SEO as there is good, solid advice.
While we don't have the opportunity or space to go into great detail about SEO in this book, we can help you establish good practices that can reap great rewards in terms of increasing your search engine visibility and helping online shoppers know what you're offering.
Meta fields are data that are stored in the HTML code of a web page. Customers can't see this code, as it's not displayed by the browser, but search engines can see this data (in fact, they can see everything under the hood). Google, Bing, and others use this meta data in conjunction with many other analyzed items on your page to determine how to present your site to search users, including rank and content.
It begins with a basic understanding of how search engines use meta fields, particularly Google, since Google will provide you with most of your search engine referred traffic.
Take a look at this Google search result:
The title, Magento CSS Manager Extension | Mage Revolution™ is taken from the Title field of the product page, unless a value is used in the Meta Title field of the product in Magento. If so, Google would use the Meta Title value instead.
The URL of the page is, of course, the actual link to the product page. The use of canonical URLs is important, as it gives Google one link to the product, even though, as in this case, the product is also accessible by going to http://www.magerevolution.com/mr/magento-content-management-extensions/custom-css-manager. Without the use of canonical URLs, Google would see this as two different pages, each with the exact same content. Google is known to penalize sites that contain duplicate content by decreasing their rank position.
Finally, the description part of the listing comes first from any existing Meta Description field. If none exists, Google attempts to construct a meaningful description from the content of the page. By using a Meta Description field, you can control how the product is described in search engines.
We talked about the use of Product Fields Auto-Generation: the use of variables to automatically construct meta values for your products. While that is certainly a fast way of populating meta fields in products, it's also important to attend to meta fields for CMS pages and categories. There may also be certain products for which you want to insert special titles and descriptions to enhance their search engine presentation.
Do not under-value the efforts you take to improve your site SEO. So much of your traffic will come from search engines. But also be aware of SEO scams and bogus offers from so-called SEO experts. If anyone says they can guarantee you first page position, they are scammers. No one can guarantee first page search results. That position comes from careful attention to your meta information, product and page content, and really knowing your customers and your products. There are no shortcuts, but there are best practices. If you do need help in managing your SEO, shop around for reputable firms. Visit SEO-related forums and groups and ask others who are successful with SEO for recommendations. Never pay anyone who simply contacts you by unsolicited email. You'll just end up wasting your money with no credible result. And finally, use someone familiar with Magento's SEO features. We've seen several sites compromised by so-called SEO "experts" who tried hard-coding SEO features.
As you prepare your site for launch — and beyond launch — take time to address each important SEO feature in Magento:
Magento 2 also includes a number of SEO features, such as rich snippets. These are hidden data that provides Google et al with specific information about your products in a format that they understand. Price, availability, SKU, and more are easily read by search engines regardless of how this information is or is not presented to your customers.
As you prepare your Magento store for launch — or even if you're up and running — there's always more you can do to increase the sales productivity of your operation. It's important to continue working on your store.
In this chapter, we dove into customer groups, pricing rule promotions, newsletters, sitemaps, and Search Engine Optimization.
By mastering these features, you'll find new customers and new opportunities to sell more.
In the next chapter, we begin exploring the more technical aspects of Magento 2, by learning how to leverage its new architecture and features to customize functionality to meet your e-commerce objectives.
One of Magento's strengths is the fact that the platform can be extended to provide additional features and functions. These extensions—or add-ons—number in the thousands. They include themes, payment gateway integrations, site management enhancements, utilities and many, many more features.
In this chapter, we will discuss the two primary ways of extending Magento:
By learning how Magento can be enhanced, you will find that the power of Magento can be broadened to meet almost any specific e-commerce need you might imagine.
Third-party extensions that are offered to the Magento community are, for the most part, listed in a special section of the Magento website called Magento Connect (http://www.Magentocommerce.com/Magento-connect/):
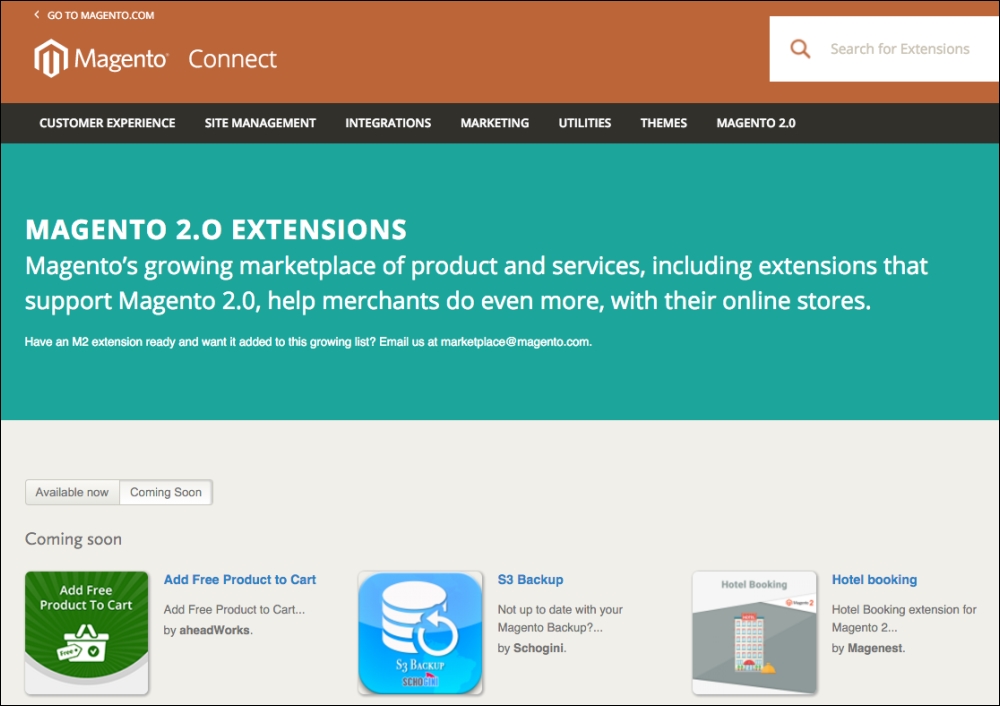
Let's now review some of the features of Magento Connect, as they relate to researching possible add-ons for your Magento installation.
At the center-right of the Magento Connect home page is a search field. As with any intuitive search, simply enter in one or more keywords. You can also select the specific version – which Magento calls a platform—in the drop-down menu to the right of the keyword entry field. As shown in the following screenshot, we are searching for any extensions relating to sales:
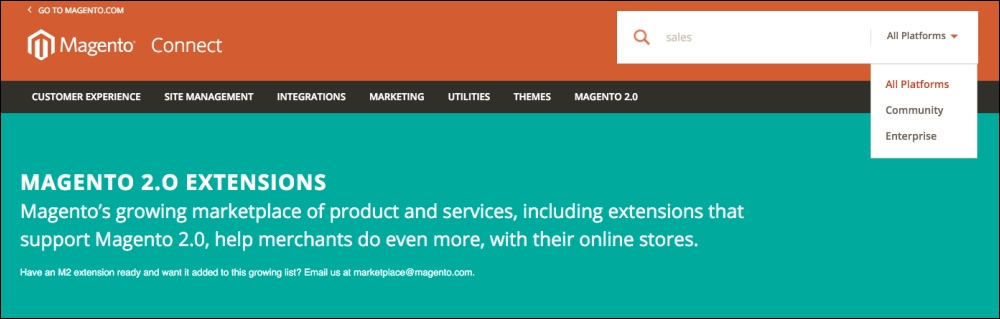
Search field in Magento Connect
Furthermore, we can narrow our search to the specific Magento platform, such as the one on which this book is focused: Community.
The results of our search can be further refined by identifying extensions that are free versus paid, or, if paid, fall within a certain price range.
You can also browse the extensions using the categories in the top navigation bar, or the groupings listed below the search form on the main Magento Connect page.
Magento extensions take time to create, test, package and distribute. Additionally, responsible developers provide support to those who install their extensions. Considering this investment of time and effort, why would any developer offer a free extension?
At the time of writing this, the Magento Connect site for 2.0 was still evolving, and there were no protocols available for uploading extensions to the Connect marketplace. In its current iteration, the Connect site is a module catalog that directs the user to different developer websites. For the latest information on submitting extensions, go to http://www.magentocommerce.com/magento-connect/create_your_extension. The packaging process here is still specific to 1.0 extensions, but will be updated with information when Magento Connect for 2.0 comes online.
Much like Magento 1.0, Magento 2 is divided into modules. These modules are meant to encapsulate functionality related to a certain business feature. The framework provides organization for these modules, which can be found in the app/code directory with the following convention: app/code/(vendor)/(modulename).
Under the (modulename) directory, there are a series of nested directories that contain the blocks, helpers, controllers, and models that make up a module. The hierarchy looks like this:
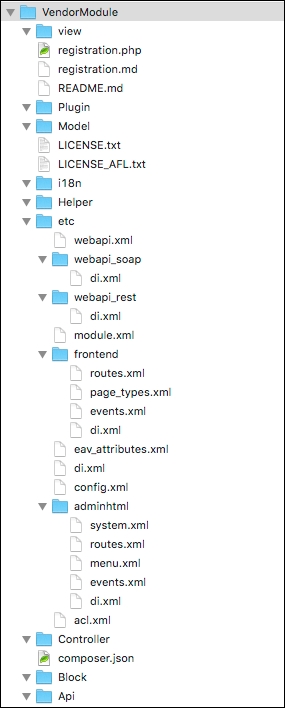
Module architecture with nested directories
The following is a brief description of these directories and the programmatic roles of the files they contain:
Block/: This directory has PHP classes that contain logic to manage the view template. Blocks, therefore, are fundamentally related to display logic and are key to managing this logic.Controller/: This directory contains controllers for the module. A controller is responsible for routing requests in Magento, and handles requests by defining actions in controller class methods. These methods collect relevant data, and prepare and render the view.etc/: The etc/ directory contains files related to Magento configuration. For example, the module.xml file, a required file, contains information about the module version number and name.Model/: This directory has files that provide logic related to the model. The model provides abstraction for managing data from the relational database underlying Magento. Class methods here will allow you to perform CRUD (create read update, and delete) operations without the use of SQL (Structured Query Language), by providing an interstitial layer that generates SQL as a result of method invocation.Setup/: This directory contains classes for the setup of a new database structure and the data it needs to contain. This code is invoked when the module is installed.Api/: The Api/ directory contains module classes that are exposed to the Magento API, making them available to API calls.I18n/: This directory contains module language files used for localization.Plugin/: This directory contains plugins that can be used to extend the functionality of any public method in a Magento class. We'll discuss this directory in greater detail in the section immediately following this one.view/: This directory contains view files, including static templates, design templates, and layout files. We have discussed the contents of this directory and theming in general in greater detail in Chapter 3, Designs and Themes.We'll review a simple example of extending Magento functionality to give you an idea of what's involved and get you on your way. Magento 2.0 has introduced the concept of plugins that rely on dependency injection. While it's tempting to think of a plugin as interchangeable with extension or module, a plugin actually plays a significantly different role. It listens to any public method call on another object. As long as the class or method doesn't use the final keyword, any class and any public method is fair game, including methods in your classes, third-party classes and Magento classes. That's pretty impressive!
Start by declaring the plugin in the di.xml file, in the app/code/(vendor)/(modulename)/Plugins/ path, with the following XML code:
<config>
<type name="ObservedType">
<plugin name="pluginName" type="PluginClassName" sortOrder="1" disabled="false"/>
</type>
</config>In this example, the type name is the class being observed. This is the class with methods we're trying to extend. The plugin name is an arbitrary name you provide to the plugin, and the type is the name of the plugin's class in the \Vendor\Module\Model\class\Plugin format.
This is the class where we'll be defining the custom functionality that extends the method established in the type node.
The sort order attribute in the preceding XML allows for even greater flexibility. Multiple plugins can call the same method, and this field determines the order in which they are run.
The disabled attribute is pretty straightforward. It simply determines whether or not the plugin is active.
Once we've got the di.xml file in place, our next step is to create the class that's going to extend the original method in the \Vendor\Module\Model\class\Plugin.php file. Once it's there, we can choose to extend functionality before, after, and around the original method. So, say you wanted to execute some code, such as logging some data or firing off a call to a third-party API before the result of another public method; the following code would do this before the method was called:
<?php
namespace My\Module\{class};
class classPlugin
{
public function beforeGetName(\Magento\Catalog\Model\Product $subject, $variable)
{
//execute code here
}
}
?>Now, say you wanted to insert some arbitrary code after the original public method. It would simply look like the following code snippet. Note that before has been replaced with after. So the naming convention involves the original method name with before, after, or around as a prefix:
<?php
namespace My\Module\class;
class classPlugin
{
public function afterGetName(\Magento\Catalog\Model\Product $subject,$variable)
{
//execute code here
}
}
?>In the final example, code can be executed before and after the target method, as follows:
namespace My\Module\class;
class classPlugin
{
public function afterGetName(\Magento\Catalog\Model\Product $subject,$proceed)
{
//execute code before original method here.
$result = $proceed();
//execute code after original method here.
return true;
}
}
?>The special sauce here is in the $proceed parameter passed in, which allows delineation between code to be executed before and after a target method.
If you're a strong PHP developer, you may find it beneficial to create your own Magento enhancements. In fact, if you've been working with Magento for any length of time, you've no doubt had cause to tweak the code, even perhaps adding new functionality. For those with experience in MVC object-oriented programming, building new functionality for Magento can be quite rewarding.
If you do plan to create an extension you would like to share with other Magento developers, whether for free or profit, you should know about certain guidelines and resources that can help you create an extension which will be well-received by the Magento community.
If you can't find an extension for Magento to meet your needs, and you think you want to do your own enhancements, take a moment to do some online searching first. One of the first places I look is the Magento documentation (https://magento.com/help/documentation). At the time of writing this, the Magento documentation has been rewritten for Magento 2.0 and is a fantastic source for understanding how extensions work in Magento. Additionally, for a deep dive into Magento functionality, the writings of Alan Storm are without parallel. You can find his articles on Magento 2 here: http://alanstorm.com/category/magento-2. The articles there are quite technical, but remarkably readable and laced with humorous nuggets.
You can also search on Google for possible solutions for your issue. There are numerous blogs where developers freely share some significant solutions. One of my favorites is the Inchoo blog (http://inchoo.net/blog/). These Magento experts have tackled some very interesting challenges with some quite elegant solutions. I also post solutions and tweaks on our website (http://www.novusweb.com).
Therefore, before you dive into your own modifications, check around. Why start from scratch if others have already done most of the work for you?
For your new extension to work, it must be placed correctly within the Magento file hierarchy. We've reviewed the entire hierarchy at the top of the chapter, but for the purposes of this example, we'll only be touching on the subset of those files and directories necessary to stub out a basic module. We've broken this into a series of steps, grouped functionally, to make it a bit more digestible.
The first thing we'll need to do is create a module.xml and register the module. This is actually pretty straightforward in comparison to a lot of what we've been reviewing. You'll place the module.xml file in the app\code\{vendor}\{module_name}\etc\ folder and edit it, adding the following content:
<?xml version="1.0"?>
<config xmlns:xsi="http://www.w3.org/2001/XMLSchema-instance" xsi:noNamespaceSchemaLocation="../../../../../lib/internal/Magento/Framework/Module/etc/module.xsd">
<module name="{module_name}" setup_version="1.0.0">
</module>
</config>Next, in the root directory of the module {vendor}\{module_name}\, create a file named register.php with the following content:
<?php
\Magento\Framework\Component\ComponentRegistrar::register(
\Magento\Framework\Component\ComponentRegistrar::MODULE,
'{vendor}_{module}',
__DIR__
);The inclusion of register.php is a new step in Magento 2.0, and it's required. I was surprised when reviewing a series of themes and modules to find it frequently left out. If you're having problems with a theme or module, this is a good first place to check. If you leave it out, you won't be able to activate the module.
The second thing we'll need to do is create a frontend router. Add the following text to etc/frontend/routes.xml in your module:
<?xml version="1.0"?>
<config xmlns:xsi="http://www.w3.org/2001/XMLSchema-instance" xsi:noNamespaceSchemaLocation="../../../../../../lib/internal/Magento/Framework/App/etc/routes.xsd">
<router id="standard">
<route id="{module}" frontName="{module_name}">
<module name="{vendor}_{module_name}" />
</route>
</router>
</config>It's beyond the scope of this book to pick apart and discuss the constituent parts of this XML, but if you're curious about the details, the resources alluded to earlier in this chapter (especially Alan Storm's series of articles) are an excellent place to go for detail.
The third thing we'll need to do is create a controller action. Start by creating an index.php file in app\code\{vendor}\{module_name}\Controller\Index\ with the following content:
<?php
namespace {vendor}\{module}\Controller\Index;
class Index extends \Magento\Framework\App\Action\Action {
protected $resultPageFactory;
public function __construct(\Magento\Framework\App\Action\Context $context,
\Magento\Framework\View\Result\PageFactory $resultPageFactory) {
$this->resultPageFactory = $resultPageFactory;
parent::__construct($context);
}
public function execute()
{
$resultPage = $this->resultPageFactory->create();
$resultPage->getConfig()->getTitle()->prepend(__('vendor examplemodule'));
return $resultPage;
}
}Every action extends the core Magento action class, and always has an execute() method, which is executed when the action is invoked. It's also important to note how this impacts the URL. The frontname specified in the router is the first part of the URL, the controller folder the second part, and the name of the file containing the controller code, the third part.
Again, there's more fun detail here, but for the purposes of this rudimentary example, we don't want to get bogged down breaking this down into too much detail.
The fourth thing we'll need to do is create a layout file. You'll add this file in the app\code\{vendor}\{module}\View\frontend\layout\ directory using the name default.xml.
The contents should look like this:
<?xml version="1.0"?>
<page xmlns:xsi="http://www.w3.org/2001/XMLSchema-instance" layout="1column" xsi:noNamespaceSchemaLocation="urn:magento:framework:View/Layout/etc/page_configuration.xsd">
<body>
<referenceContainer name="content">
<block class="{vendor}\{module}\Block\{module}.php" name="{vendor}_{module}" template="arbitrary_template_name.phtml">
</block>
</referenceContainer>
</body>
</page>The fifth thing we'll need to do is create a block for our module. Once this is done, we can create a template file and activate the module. The block will be intuitively added to app\code\{vendor}\{module}\Block\{module}.php and contain the following content:
<?php
namespace {vendor}\{module_name}\Block;
class {module_name} extends \Magento\Framework\View\Element\Template
{
public function _prepareLayout()
{
return parent::_prepareLayout();
}
}For the template, we'll just add valid HTML content to the app\code\{vendor}\{module}\View\frontend\layout\ arbitrary_template_name.phtml file, as follows:
<h1> This is text from the arbitrary_template_name.phtml template file. Maybe add some CSS? </h1>
Activate the module. This is most easily done by editing the app\etc\config.php file and adding an entry for your module here:
There's another way to activate the module as well. If you have access to the command line, and are comfortable with its use, you can simply invoke the Magento binary to activate the module, by running the following command from the document root of your website:
bin/magento setup:upgrade
You should see output similar, but not identical, to the following screenshot:
Once the module is active, clear the system cache using the following command:
bin/magento cache:clean
The cleared cache types will be displayed:

After the cache has been cleared, you can view the result of your labor. Remember, the frontname defined in the route.xml defines the first part of the URL, and the second and third are defined by the controller folder and the PHP file. In the example reviewed above, this URL would be http://magentostore/{module_name}/index/index/. Depending on what HTML you've put in your sample template, you should see a result that looks something like the following screenshot:
Almost every week, I search Magento Connect just to see what new features and themes are being added. The creativity of the Magento developer community can be quite impressive.
One of the great joys of working with Magento is knowing that it is fully extendable in many ways, from simple theme enhancements, to full-fledged functionality changes. Depending on your own skills and talents, you may want to take solutions you've created and let others benefit, either as free contributions or money-making add-ons.
In this chapter, we have covered searching, evaluating, and installing Magento Connect extensions, the process of extending existing Magento functionality using plugins, and creating and registering your own extension from scratch.
Of course, we have a couple more interesting areas to cover in Chapters 9, Optimizing Magento, and Chapter 10, Advanced Techniques, which will further help you extend the power of Magento.
As you've no doubt realized by now, Magento 2 is a very powerful e-commerce platform. From its robust product management suite to its virtually unlimited extendability, Magento packs a lot into one open source platform.
From our work within its files, we have learned that Magento combines a great number of separate files and data tables to present any page to online visitors. By its very nature, the MVC architecture of Magento puts a good deal of overhead on any web server. In the beginning, the complexity of Magento discouraged some developers because of the demands the platform placed on hosting servers.
However, over time Magento's developers have worked hard to improve overall performance, and Magento 2 represents a milestone in that regard. Magento 2 is indeed faster than before, even when taking faster servers into account.
That said, for Magento to perform at the highest levels of performance, there are areas with which you should become familiar. Specifically:
After all, a faster website improves the customer's experience and helps improve your rankings with search engines.
Most databases for open source platforms are quite simple in comparison to Magento's. For instance, in the past, when one designed e-commerce systems from scratch, it was likely that a simple relational model would suffice: one table for products that would contain all the key information relating to that product, such as price, available quantity, description, weight, and so on. The challenge with this traditional approach was that if we needed to add a new product attribute, such as height, that field would have to be added to the product table, thereby making previous versions incompatible and complicating any upgrade path.
In order for Magento to be a truly scalable platform, its developers utilize an Entity, Attribute and Value (EAV), or Sparse Matrix, architecture. This database structure adds a great deal of complexity to the Magento data model to be sure, but its advantage is its ability to allow an unlimited number of attributes to be added to any core item, such as products, categories, customers, addresses, and more. Today's Magento installs an initial 296 data tables, many of which are related to EAV.
EAV allows developers (and you) the ability to extend any entity's attributes without changing any of the data tables. Let's break down EAV to understand how this works.
As you go through this chapter, you may want to take an actual look at the tables of your Magento installation. With most hosting providers, you are provided phpAdmin as a tool for exploring and manipulating your database. If not, you can use any number of available tools, including the free MySQL Workbench (http://www.mysql.com/products/workbench/). See your hosting provider for information on how to directly access your database.
Products, categories, customers, customer addresses, ratings, and reviews are all entities in the Magento data scheme. Each entity has its own entity record in one of the following tables:
catalog_product_entitycatalog_category_entitycustomer_entitycustomer_address_entityrating_entityreview_entityeav_entity (stores product attribute entities)Each of these entity tables stores very basic information about the entity. For instance, let's take a look at the columns of the catalog_product_entity table:
entity_identity_type_idattribute_set_idtype_idskuhas_optionsrequired_optionscreated_atupdated_atThese are the only columns required to define any product in the database. Notice that the name, description, and price of the product are not included in this table.
Attributes are the names of various items that belong to an entity. For instance, a product has attributes of price, description, and quantity. Attribute tables don't store the actual value of the item, only its name and its relationship to the entity. That's where value comes in.
If you're following the bouncing ball so far, you now can surmise that value is the actual data of the attribute. So, if we use a simple graphic such as shown in the following figure, we can visualize the entire EAV relationship.
Let's look at how this works in practice for a product. The product entity is stored in the catalog_product_entity table, as described before. To bring together all the information related to a product, we have to pull in all the various attributes (and their values) connected to the product.
To do that, we look into the eav_attribute table. This table connects all attributes to their respective entities. One column in this table is called entity_type_id. This column relates to the entity_type_id column in the catalog_product_entity table, as shown in the following figure:
Once the associated attribute for an entity (in this example, a product) is determined, Magento next works to associate the actual value for the attribute. Here's where it gets a bit complicated, but fun!
For each attribute, Magento stores a type for the associated value. In other words, is the value a decimal value (such as price), a text value (for example, description), and so on. These are stored in the eav_attribute table in a column named backend_type. For each type, Magento has a corresponding table whose name ends in the particular type. The following are the value tables for product entities:
catalog_product_entity_datetimecatalog_product_entity_decimalcatalog_product_entity_intcatalog_product_entity_textcatalog_product_entity_varcharIf a lookup of a product's attribute shows a type of decimal, then the associated value would be found in the catalog_product_entity_decimal table. The following figure illustrates this basic relationship:
If you take a look at the Magento data tables, you'll now begin to understand the relationship between various entities, attributes, and values.
EAV is a key feature of Magento that allows developers to extend the platform without changing its core data structure. Imagine that you want to add new functionality that depends on a new product attribute - you could simply add that attribute into the system without adding a single new column to any table!
Unfortunately, there is a trade-off: performance. As you can see, in order to pull in all the information for a product — such as for a product detail page — Magento has to do a lot of calls to a lot of tables within the database. These lookups take time and server resources.
Fortunately, Magento's developers are still a step ahead of us.
Long ago, developers realized that while EAV was a cool way to build extendability into Magento, it added a major hit in performance. All the lookups, particularly for busy sites, can really slow down response times. MySQL, the database used for Magento, is a single-threaded database, meaning it can only handle one operation at a time.
The solution was to take all the various relationships and pre-compile them into other tables. In essence, Magento could do its lookups using fewer tables (and therefore fewer SQL statements) in order to get the same data.
If you look again at the data tables, you'll see a number of tables with index or flat in the name. These tables combine the EAV relationships into one table.
In order to take advantage of this feature for categories and products (sales orders are automatically flattened):
After saving, you should get a notice at the top of your Admin page, like the following screenshot:
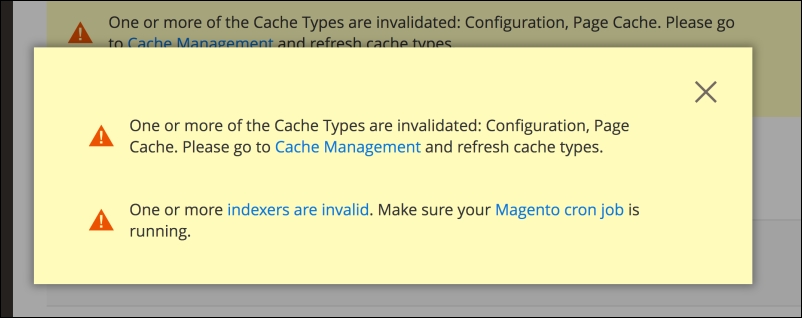
One of the things you will have to do as you add or update products and categories is to reindex your site. We'll discuss indexing in more depth in the next section.
Today's search engines have started measuring rendering times — the time it takes for a web page to download, including graphics and other files — as part of their ranking algorithms. In the past, we used to concentrate on download speed because so many users were connected to the Internet with slow, dial-up connections. With the proliferation of broadband speeds, most developers eased up on this goal, opting to include more flash animations, larger graphics, and complex JavaScripts. Now, we're moving back to the beginning in order to satisfy Google, Yahoo!, and Bing.
With Magento's complex MVC architecture and database structure, you can have the most efficient front-end design possible, yet still experience very slow download speeds as Magento works to build the pages and query the database. Therefore, to create a site with the lowest download speed, we need to take advantage of two important tools: indexing and caching. Each contributes its own benefit to your goal of speeding up the page generation process.
As your Magento installation grows with products, customers, and orders, database lookups can become slower as the MySQL database has to look among a greater number of records to find the ones it needs. Magento uses a number of indexing tables which provide faster lookups by pre-organizing the data records. However, as your site grows, so do these index tables.
In our discussion on EAV, we talked about flattening the categories and products. In essence, when Magento is asked to index categories and products, it pulls in all the various related EAV data for each and creates records in special tables that contain all the related data in one record. In other words, instead of doing lookups among as many as 50 tables to display all the information on a product, Magento looks to only a handful of tables, thereby gathering the necessary information more quickly.
The speed difference when using a flat catalog versus a non-flat catalog is unnoticeable for low-traffic sites, as MySQL can adequately handle requests very, very well. However, as your site grows in traffic, you will notice a wider speed differential. Additionally, if your store hosts thousands of products, you'll certainly appreciate the added speed a flat catalog will give your site.
The trade-off is that reindexing a site with lots of products and/or categories can take a long time if you choose to use a flat catalog. For that reason, we generally keep the flattening feature turned off when we populate a new site with products. However, once we go live, we almost always turn on the flat feature to give our sites the fastest possible rendering possible, even if the initial site traffic is low.
As we saw in the previous figure, if you make changes to your site, Magento will notify you that you need to reindex your site. To do this, you need to perform the following steps:
Once completed, you will see these indexes with a status of READY.
While indexing can help speed up database lookups by pre-organizing the data for faster lookups, caching does virtually the same thing for the HTML page components that make up the front-end experience. Caching stores completed pages or parts of pages so that website visitors will be provided with faster downloads.
In a nutshell, caching works like this (see the following chart, also):
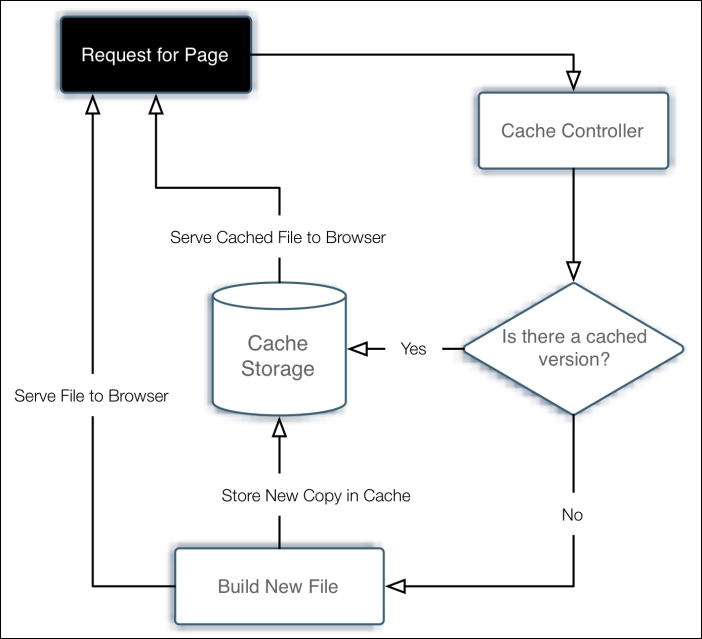
Caching in Magento is accomplished in a couple of ways: with core components, such as modules and layouts, and through whole page caching, which stores entire page outputs.
Every time a page is accessed by a visitor, various modules, layouts, product images, and more are cached or stored for easy retrieval within the /var/cache directory of your Magento installation. If you explore this directory on your server, you'll see thousands of files with strange names. These are the actual pieces of cached data that are delivered to visitors to your site.
Whole page caching is just as the name implies: the caching of an entire web page. Imagine the speed boost if Magento did not have to build a new page by assembling dozens of layout and module components, cached or otherwise!
I've run some tests of sites with and without caching turned on. In almost all of our tests, caching improved download speeds by approximately 25%-40%, depending on the overall load on the server. The heavier the load, the more the benefit since the server is naturally slower in building new pages versus serving cached pages.
This increase in speed, while perhaps not as noticeable to your site visitors, can have a huge impact on how search engines rank your site.
While caching does help speed up page delivery, it does take a bit of management on your part. Caching is controllable in two areas of your backend:
Then, you need to set your core cache settings:
Unfortunately, some extensions are not properly designed to participate in Magento's caching system. If you experience problems in how certain content blocks are rendered, you may want to leave the Blocks HTML output cache disabled. While this prevents content blocks from being cached, it may be your best remedy if you have a third-party extension which you're really fond of.
Magento 2 has included a variety of new areas to the caching engine, as can be seen from the following screenshot:
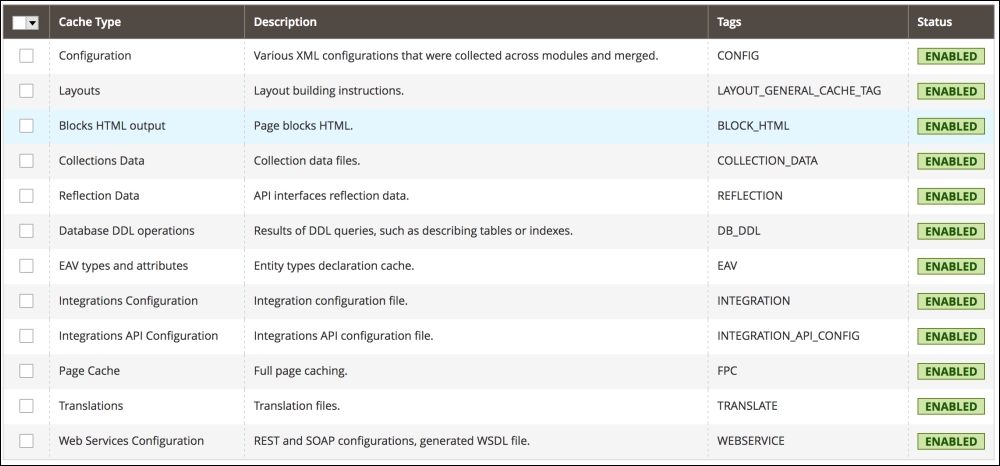
This is great for performance but also good to keep in mind when making changes to the site. Translation changes not showing up? You probably need to clear the cached translation files to fix this. As a rule of thumb, clearing the cache is a good first step when troubleshooting Magento.
Everyone we talk to who works with Magento is concerned about speed. As we've noted earlier, Magento's complex architecture is simultaneously good and bad. The level of functionality and extendability is practically unparalleled in the world of open source platforms, yet even with proper use of indexing and caching, substantial site traffic can make your Magento site feel like a tortoise on sedatives.
The problem lies, in part, in the fact that developers assume that open source is analogous to quick and easy. The fault is not Magento's: it is what is it — a powerful, yet complex, e-commerce platform.
Therefore, if you want to use Magento to its fullest, it's your responsibility to make sure you have the resources and tools to capitalize on its power. In Chapter 1, Planning for Magento, we discussed technical requirements for running a Magento installation. Now, let's discuss some ways of increasing its speed and performance.
Travel with Caution
You'll find an almost endless supply of online blogs, wikis, and postings relating to the optimization of Magento. Some offer quick tweaks; others go into elaborate schemas. The challenge when looking for any type of fix is knowing what is sound practice and what may be out-dated, or simply wrong. The following suggestions are based on what I have found are both within the reach of most developers and that work for the sites we develop and manage. That said, any time you find something you want to try, try it on a test server or your local computer first. Never apply these modifications to a live, production Magento installation.
Apache web servers have a module called mod_deflate. This module, when called by a website, serves to compress files sent by the server. To engage this module, insert the following code into the .htaccess file located in the root directory of your Magento installation, replacing what is currently there for the mod_deflate directive:
<IfModule mod_deflate.c> ############################################ ## enable apache served files compression ## http://developer.yahoo.com/performance/rules.html#gzip # Insert filter SetOutputFilter DEFLATE # Netscape 4.x has some problems... BrowserMatch ^Mozilla/4 gzip-only-text/html # Netscape 4.06-4.08 have some more problems BrowserMatch ^Mozilla/4\.0[678] no-gzip # MSIE masquerades as Netscape, but it is fine BrowserMatch \bMSIE !no-gzip !gzip-only-text/html # Don't compress images SetEnvIfNoCase Request_URI \.(?:gif|jpe?g|png)$ no-gzip dont-vary # Make sure proxies don't deliver the wrong content Header append Vary User-Agent env=!dont-vary </IfModule >
Using BrowserMob (http://www.browsermob.com) as our testing source, a configurable product page on our test site (the one we built to use for writing this book) was reduced in size from 452 KB to 124KB, a 73% reduction in the amount of data delivered!
Another Apache module, mod_expires, controls how browser caches should treat files they store on users' computers. When you visit a website, your browser caches the results. For files that have not changed since a previous visit, the browser will use the file in the cache on the local computer rather than pull it again from the web server.
The expiration of these cached files can be controlled by your web server. If your server provides no expiration instructions, then your site visitor's browser may assume that the cached information is not good (or is still good long after it is) and fail to pull the best information from your site.
Insert the following within the <IfModule mod_expires.c> directive in your root .htaccess file:
ExpiresActive On ExpiresDefault "access plus 1 month"
You can also use a shorter period of time, but generally, you want to allow browsers to use unchanged, cached files for quite a while, thereby lessening the load on your server.
This is one of the more difficult items to change if you're hosting on a shared account, as many hosting providers will not allow you to increase the amount of memory allocated to PHP. The normal default of 64 MB may be sufficient, but if you're expecting a high volume of users, increasing this to 256 MB has produced noticeable improvements for us.
To increase this in your .htaccess file, simply place a hash mark (#) before php_value memory_limit 64M and remove the hash mark before php_value memory_limit 256M.
This is one configuration you may have trouble implementing as it involves changing a couple of core variables for MySQL. When we started looking more closely at ways of speeding up database lookups, we found that with our hosting provider, MySQL was configured to do lookups without a cache: the query cache and query cache limit were both set to zero.
By doing some research, we found that MySQL queries could be made faster by increasing the total size of the query cache and the query cache limit allowed for any one query. Other developers who had experimented with this suggested at least a limit of 1 MB for the individual query and a total limit of 64 MB would handle most initial, growing Magento stores. As your store grows, you may want to increase these limits to allow MySQL to take advantage of its own internal caching mechanism.
If you do have the ability to modify your MySQL database — or if you can request a modification with your hosting provider — you should set the query_cache_limit and the query_cache_size to amounts such as the ones given above.
For specific information on how to set these in MySQL, see http://dev.mysql.com/doc/refman/5.0/en/query-cache-configuration.html.
Nginx is an alternative to Apache when running Magento. Significant performance improvement out of the box is driving quite a bit of this adoption, and a large number of vendors have made the switch from Apache to Nginx. In recognition of this, Magento 2 has been built with full support for Nginx. It's beyond the scope of this chapter to discuss Nginx configuration, but a vast majority of hosting providers will install Nginx for you to use. Magento 2 also has a suggested Nginx configuration file in the root folder, which can be seen via GitHub as well, here: https://github.com/magento/magento2/blob/develop/nginx.conf.sample.
Magento 2 supports Varnish and allows for general parameter and VCL (Varnish Configuration Language) management. It's beyond the scope of this book to dive into configuring a Varnish proxy on your server, but again, this is something that many Magento specific hosting providers will support and configure on your behalf. Once this is in place, you can manage Varnish through Magento 2 in the Store | Configuration | Advanced | System | Full page cache, as shown in the following screenshot:
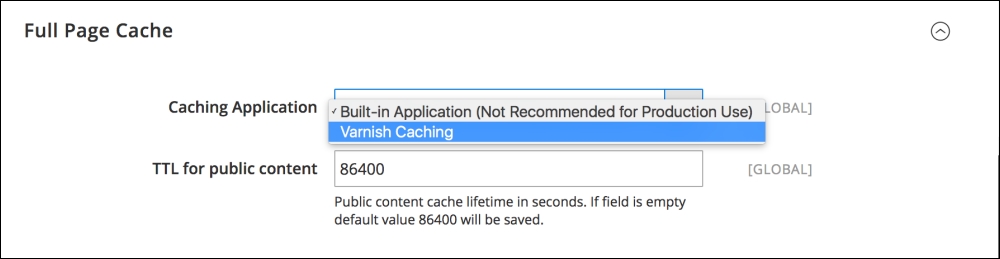
CDNs (Content Delivery Networks), are servers which host your static or non-dynamic content on very fast servers and networks. For instance, if your images and JavaScript files are hosted on CDN servers, such as the ones provided by Amazon or Rackspace, your Magento server doesn't have to spend time processing and delivering those files to your visitors. Since web servers have limits in terms of the number of active connections they can support for delivering files, allowing other servers to carry part of the load means your server can accommodate more visitor requests.
Magento 2 has native CDN support, and if you navigate to Store | Configuration | Web you'll see an area called Base URLs. You can provide the CDN URL's here and Magento will automatically pull the resources from it.
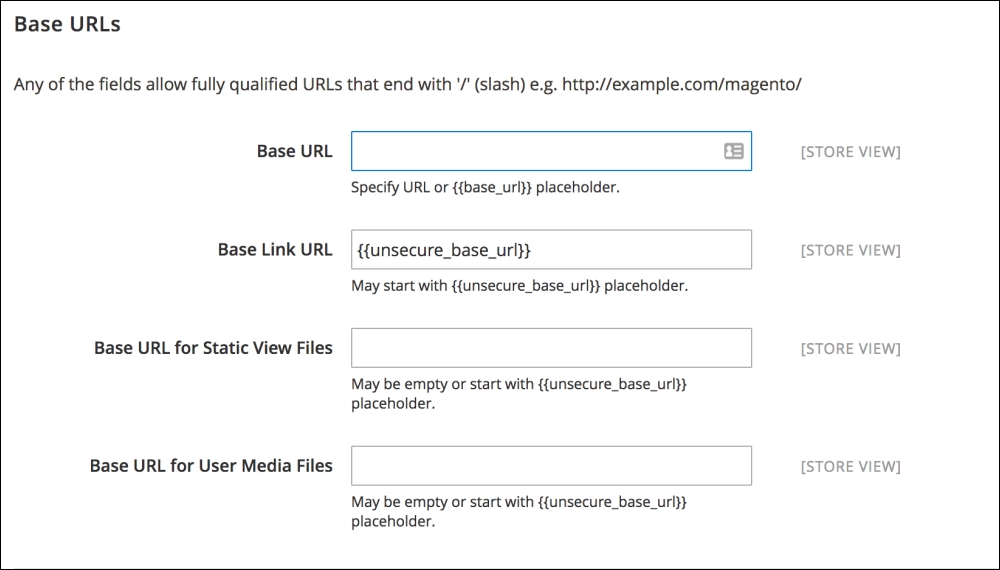
Magento continues to amaze me each day I spend building and managing e-commerce sites. There's little debate over the fact that it is both powerful and complicated; both configurably pleasant and frustratingly massive.
The marketing side of me enjoys the flexibility in design, presentation, and user interaction. The developer side finds satisfaction in learning new ways to squeeze additional performance and functionality from the world's most prolific open source platform.
Hopefully, this chapter has helped you gain a better understanding and appreciation of Magento's EAV data model; learn how to use the inherent indexing and caching capabilities of Magento, and dive into methods of fine-tuning your Magento installation for increased performance and shorter download times for store customers.
As we near the end of our journey toward Magento mastery, we have one final area to explore in the next chapter.
By now, even if you're new to Magento, you should have a newfound appreciation for the power and extensibility of the industry's most active open source e-commerce platform. We've covered just about everything from installation to extending the platform. Your Magento store, if not already online, is most likely ready from a preparation viewpoint.
However, we're not quite finished yet. You may want to undertake a few more options that can make your installation act more like that of a Fortune 500 company — and less like a hobbyist's experiment in e-commerce.
In this chapter, I will take you through four advanced techniques that I feel any bona fide Magento master should have in their own personal knowledge base:
You may not wish to undertake all of these now, or later, but at some point you will find these concepts helpful in turning Magento Community into an enterprise-level contender.
I know it is so very tempting to install Magento onto a production server account, do the initial configurations, and launch your new store. I also know that if you're only working with one Magento installation, there will undoubtedly come a time when — no matter how careful you are — a buggy extension, an errant piece of code, or a mistyped tag will cause your site to "go dark." You may even experience the dreaded Magento error screen (well known for offering little advice or remedy).
Therefore, if you take no other advice in this book to heart, take this one seriously: create a staging environment.
Some developers, particularly those working for large enterprise operations, may want to create an elaborate remote development, staging, and production setup with matching hardware for each environment, to decrease the number of variables present when deploying and testing code. If you're working with a large team and you have the funds available for the time and effort needed to create this type of setup, by all means do so. It's more likely, though, that if you do fall into this category, you're better suited for Magento's Enterprise solution, rather than the do-it-yourself Community edition discussed in this book.
For those of us on smaller budgets — who appreciate what Magento Community offers as a robust yet open source platform — I would suggest that you use a simpler, more rapidly deployable solution. Keep it simple and manageable.
There are actually two staging setups I maintain: one for testing and one for client development. The former is used to test new extensions, programming ideas, and design concepts, with no particular client use in mind. The latter is created for each client site and, except for the data, is an exact duplicate of the client site in terms of code, extensions, and design.
For client sites, this is my suggestion for a basic operation procedure:
At some point, you will feel you're ready to "go live." Guess what? You probably are. If your staging and production installations are in sync, going live is merely repointing the live domain name to your production account and setting payment gateways to "live" mode.
One of the dubious benefits of writing a book like this one is that I get the pleasure of reliving some of my less brilliant moments as a student of Magento as I impart the wisdoms gained to you. This is one of those cases.
If you've followed the simple approach previously outlined, you should have a staging and a production environment that both work successfully. After all, you're not going to do anything to the production installation that you haven't already tried and tested on the staging installation. At least, that's the plan.
But once you launch the production store, there will come a time when you want to take a shortcut. Your client might be pressing to install a new extension they found at the Magento Connect website, or you might need to import some new product types the current store has not been using. Regardless, if you skip applying your changes to your staging installation and go directly to the production installation, you'll find that you will experience the moment when your heart drops out of your chest as your production store ceases to work as intended. It's another of Murphy's laws.
I only had to do that once — and suffer the client's anguished pleas to "get my store back online!" — to learn my lesson: staging first, then production. Never waiver from this dictum and you'll continue to successfully please your client, yourself, or whoever is the owner of the Magento store.
Version control is one of the most helpful and time-saving tools that can be used in support of software development. Even if you're only making small changes to the templates you're using, or adding modules without modifying the code inside of them, version control allows you to track changes that have been made and to evaluate code at any given point in time after the implementation. Even more importantly, it allows you to roll back the code to an earlier state, in cases where you're not quite sure what changes might have caused problems with the site.
At this point, the tool most widely used for version control by the development community is Git. Git is a system that was developed by Linus Torvalds (the originator of LINUX himself!) as a result of his frustration with existing tools. While it's beyond the scope of this book to go into much detail around what exactly it was that frustrated him, suffice to say that the changes he's made have positioned Git as the lingua franca for version control, and understanding its basics is a necessary endeavor if you want to do any development, or even just track changes to your system caused by upgrades.
Magento is a complicated system and even small changes can have a significant impact, causing errors that are obvious (site down) and some that are pernicious and creeping, such as the creation of bad data over time. Using a system to track all the changes that you and others have made to the system is a strongly recommended practice and will invariably, at some point, save you time, money, or both.
Let's start with a very basic prescription: installing the Git binary on your system and checking your current Magento site into a local repository. For the purposes of this example, we'll assume the use of OSX, although Git can be used for pretty much any modern operating system.
If you've installed the developer tools that come with OSX on your system, the Git binary will already be there. If you haven't and don't want to, you can download the Git binary from this link: https://git-scm.com/download/mac.
To make sure that Git has been installed on your system, open a terminal and type git –version. You should see the following output:
The next step you'll take will be to change to the document root of your Magento install. In this example, that's /Users/jbownds/websites/magento2. Once here, you can issue three simple commands to initialize the repository and check in the first version of your files. You'll start with git init ., followed by git add ., and finally git commit . –m "first checkin of files" (you can substitute another message here, if you like).
See the following screenshot for an example of what this will look like:
Once you've checked in the files, you'll see a flurry of messages indicating which files have been added, which looks something like this:
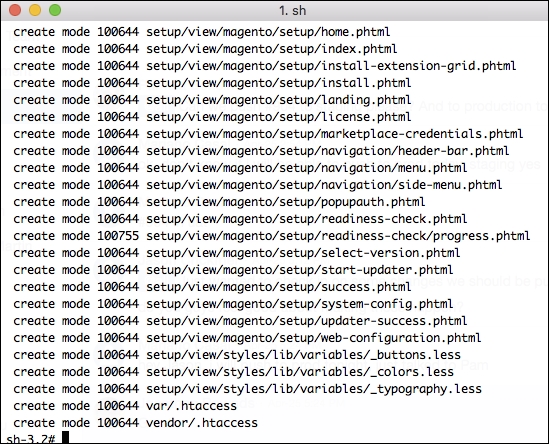
This indicates that the Git repository has been initialized locally and you're ready for the next step. As mentioned before, Git is a distributed version control system. That means it's easy (and a good idea) to store copies of it in different locations. There are many services that allow for this, but the most popular is probably GitHub. For this reason, we'll walk through the steps necessary to take the repository you've created and push it out to GitHub. Start by creating an account here: https://github.com/join:
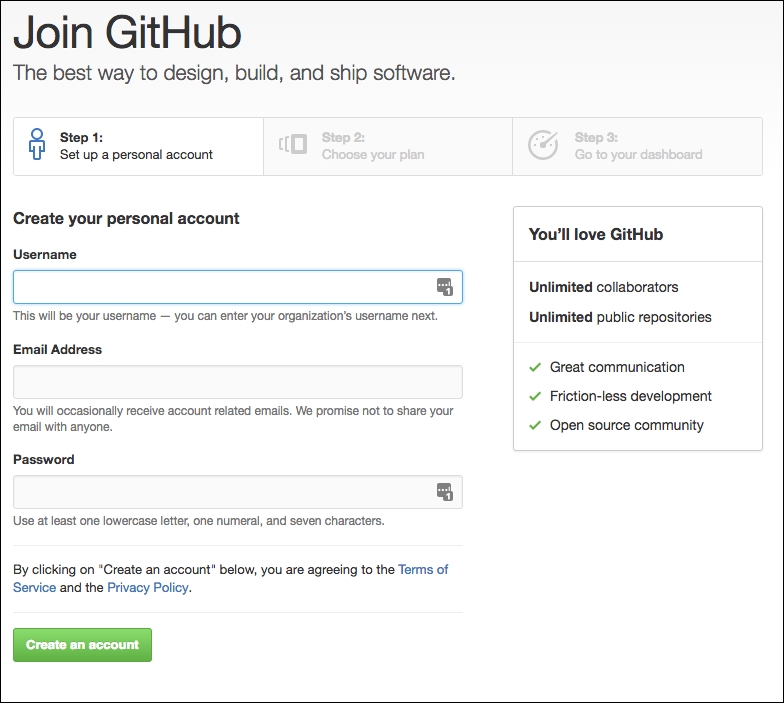
Once you've created an account (there are both free and paid options here), you can create a new repository by clicking the appropriate button on the right gutter:
Click on the repository and there will be step-by-step instructions for pushing an existing repository from the command line:

Go back to the document root for the repository you created and paste these commands into the terminal. The first one should run without a problem, but the second one will probably run into some authentication issues, as in the following example:
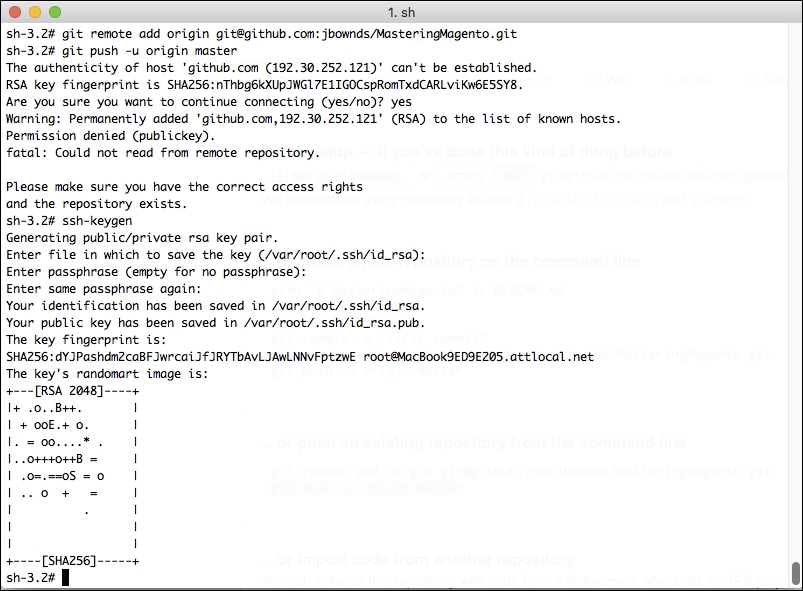
As you can see in this example, the second command had issues. The specific error message is Fatal: could not read remote repository. Please make sure you have the correct access rights.
To address this, you'll need to add a public key for the user to GitHub, so GitHub recognizes the user trying to push this information into the remote repository. Don't worry - this sounds trickier than it is. All you need to do is type in ssh-keygen. You'll be prompted with several questions, all of which you can leave blank. At this point, you should have a generated public key for your user. You can view it by typing vi ~/.ssh/id_rsa.pub, and it'll look something like this (ignore the black arrow, this is just to blot out information in the private key).
Copy this key and head back to GitHub. Once there, you can add this key in the Settings area of your account:
Click New SSH key, provide a title, and paste the value you copied into the text area. Save this value:
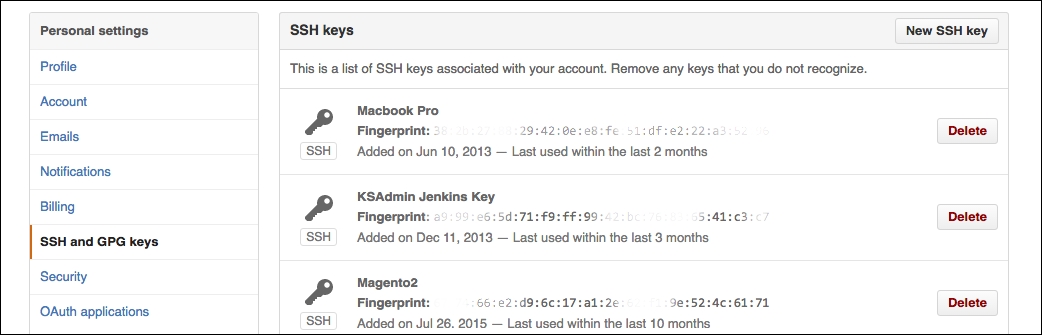
Now, when you go back to the command line and try git push –u origin master command again, you'll see results like this:
Congratulations! You've created your first Git repository and pushed it out to GitHub.
Now, it's worth noting that there are a slew of very well-conceived visual tools that manage this process for you as well. It's beyond the scope of this text to evaluate these tools but it's worth mentioning a couple.
GitHub itself has a free desktop tool you can download and use, and it's quite handy for a visual representation of what's going on. The other tool we've seen used predominately is Tower. Tower can be obtained by visiting their website at https://www.git-tower.com/.While there is cost associated with the use of this tool (after a free trial), if you prefer a visual representation of what's happening with version control, this option may be more attractive to you.

If you're not up on Unix lingo, a cron job is a scheduled action that occurs at preset intervals on your server. For instance, Magento can create a new sitemap for your store according to the time interval you configure in the backend.
What is confounding to many new to Magento is that configuring cron intervals for various Magento functions doesn't actually cause anything to happen. The reason is that your server must still be told to run the configured tasks.
Cron jobs are configured by using what are called crontabs. These are expressions that dictate how often the server is to run the particular task.
There are a few inherent functions included with Magento that can be run periodically, including:
Some third-party modules also include scheduled tasks, such as Google Product feeds. The frequency of most of these can be configured in your Magento backend. For those that aren't, you can find the crontab-style setting for each in the config.xml file of each module.
For example, the following is the cron schedule for the function that sends out scheduled newsletters, from app/code/Mage/Newsletter/etc/config.xml:
<crontab>
<jobs>
<newsletter_send_all>
<schedule><cron_expr>*/5 * * * *</cron_expr></schedule>
<run><model>newsletter/observer::scheduledSend</model></run>
</newsletter_send_all>
</jobs>
</crontab>According to this crontab, Magento looks every 5 minutes to see if any newsletters need to be sent out.
|
Module |
Cron job |
Default frequency |
Active? |
|---|---|---|---|
|
Catalog |
Reindex pricing |
Every day at 2am |
Yes |
|
CatalogIndex |
Reindex the entire catalog |
Every day at 2am |
No |
|
CatalogIndex |
Run queued indexing |
Every minute |
No |
|
CatalogRule |
Daily catalog update |
Every day at 1am |
Yes |
|
Directory |
Update currency rates |
Controlled by Currency Setup | Scheduled Import Settings |
Yes |
|
Log |
Clean logs |
Every 10 minutes |
No |
|
Newsletter |
Send scheduled newsletters |
Every 5 minutes |
Yes |
|
PayPal |
Fetch settlement reports |
Controlled by PayPal | Settlement Report Settings |
Yes |
|
ProductAlert |
Controlled by Catalog | Product Alerts Run Settings |
Yes | |
|
Sales |
Clean expired quotes |
Every day at midnight |
Yes |
|
Sales |
Generate aggregate reports (there are actually five configured) |
Every day at midnight |
Yes |
|
SalesRule |
Generate aggregate coupon data report |
Every day at midnight |
Yes |
|
Sitemap |
Generate sitemaps |
Controlled by Google Sitemap | Generation Settings |
Yes |
|
Tax |
Generate aggregate tax report |
Every day at midnight |
Yes |
Many of Magentos core modules contain crontab scripts, although some are commented out. The following is a list of Magento Community 1.5 crontabs I have found within Magento, indicating for each whether the script is active or not. To make a script active, simply remove the comment tags surrounding the <crontab> code in the appropriate config.xml file.
For your staging environment, you may want to keep cron jobs from running automatically. Rather, you may wish to have Magento run through its list of scheduled tasks at your command so you can watch for any problems or errors.
A wrinkle in Magento 2.0 is that there's no longer a cron.php, so Magento's cron can no longer be triggered from the command line (manually).
To manually run any scheduled jobs, access the magento file found in your site's root folder from the terminal and use the following command:
php <path to magento root>/bin/magento cron:run
For your production server, you'll want cron jobs to run as scheduled around the clock. To do this, you have to create a cronjob for your server, telling it how often to trigger Magento's cron tasks. For most servers — Unix and Linux — the cron program operates as a continuous daemon, waiting to take some action according to any programmed crontabs. In this case, we want to have the magento binary (also in our Magento root folder) run by the server every few minutes or so.
The most straightforward way to schedule a cron job is to do so from the command line. Start by opening up a command prompt as the root user and typing in the following command:
crontab –e
This command will take you to a screen where you can add entries to schedule the cron. To automate the Magento cron, you'll want to add entries that look like this:
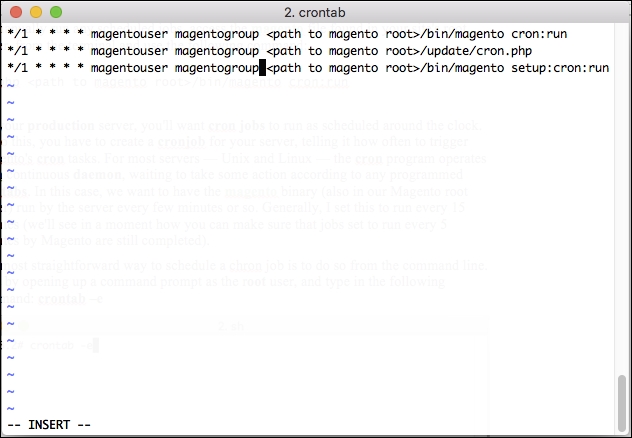
You can schedule crons to run every X number of minutes, hours, days, or months. You can schedule them to run only during certain times of the day, days of the week, or months of the year. Cron is an amazingly flexible system. The following screenshot shows the logic for scheduling crons:
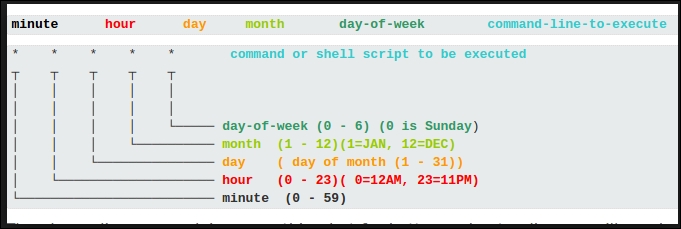
This can be a bit obtuse to understand, though; if you want a quick way to sort out timing for a cron job, you can visit one of the many crontab generating websites. One example is http://crontab-generator.org/. As you can see, this site provides assistance and makes it a bit easier to generate the desired schedule:
The Magento binary does a number of things when your server cron job runs:
The parameters that control this behavior are configured in your Magento backend:
Each field in this panel controls the timing actions of the cron script, as follows:
cron_schedule database table. This will help keep the table from growing too large.cron_schedule table.There remains considerable debate among bloggers on what values are ideal for this configuration. However, from my observations, there are some principles I follow when configuring Magento cron jobs.
Decide the frequency of your server cron job. If you configure your server cron to run every 15 minutes, then you do not need any Magento crontab or cron configuration to be set at anything less than 15 minutes. For example, the Send Newsletter crontab, as shown in the earlier table, is configured by default to run every 5 minutes.
If your system cron task runs every 15 minutes, then when cron.php is executed, the send newsletter task is actually run three times, since Magento schedules ahead and looks back to run any scheduled tasks. In order words, if your system cron runs at 10:00 am, it will run any tasks that were scheduled to run between 9:45 am (the last time it ran) and 10:00 am. Since the send newsletter task was scheduled to run every 5 minutes, at 9:45 am, Magento scheduled it to run at 9:50, 9:55, and 10:00. The task did not run at those times, but instead were all run at once at 10:00 when your system cron ran.
Therefore, you may want to go back through the various module config.xml files (such as the ones in the earlier table) and set the frequency of the jobs to match or be less frequent than your system cron.
Once you have modified any crontabs to match your system cron job frequency, you should now configure the Store | Configuration | Advanced | Cron (Scheduled Tasks) panel:
cron_schedule database table and see if there are any failure messages that can help me diagnose the problem. In fact, even if your store is running smoothly, keeping this number large should not grow your database, as there will be no failure messages to record.So, for example, if I set my system cron job to run every 15 minutes, my Cron (Scheduled Tasks) panel might look like this:

While we're on the topic of cron jobs, one system cron job you should consider is backing up your Magento database. As usual, this advice is based on hard-earned experience. In the course of working with Magento, and especially if you have clients who have permissions to add extensions and change configuration, you may need to restore the Magento database to a previous working state.
While most server hosting providers provide backup services, restoring just the Magento database can take a long time as server backups restore all the files on the server, not just your database. Some providers do provide specific database back-ups, but to be safe, it doesn't hurt to schedule your server to do your own back-ups. Additionally, learning how to quickly and easily back-up and restore your database will come in handy, since you should always do a back-up of your database before installing new extensions or significantly changing configurations.
Magento does have a back-up function in the backend, under Store | Tools | Backups. While this is one way of backing up your Magento database, there is no built-in restore function. Furthermore, I have had problems in the past using the back-up file to restore, due to foreign-key conflicts. For extra, extra safety, it wouldn't hurt to use this function to create a back-up — especially if you do not have SSH access to your server account — but it is not as easy or quick as the following method.
If you have SSH access to your server, using MySQL's built-in backup and restore functions are both quick and easy. You do need a username and password for your database (which you should have if you installed Magento):
mysqldump –u [username] –p[password] –h [hostname] [databasename] > [filename].sql.To provide an example for the previous command, let's assume the following:
mageuser1magepassword1localhostmagento_dbmagento_dbUsing these example values, your command would look like this:
> mysqldump –u mageuser1 –pmagepassword1 –h localhost magento_db > magento_db.sql
To restore your database, a slightly different format is used: mysql –u [username] –p[password] –h [hostname] [databasename] < [filename].sql, or the following to use our above examples:
> mysql –u mageuser1 –pmagepassword1 –h localhost magento_db < magento_db.sql
Now that you know how MySQL can dump a back-up of your database, you can use your server cron to do a dump every night, every week, and/or every month, depending on how fervent you want to be about preserving backups.
Every developer will have their own back-up strategies; so, naturally, do I. While our hosting provider does a complete server back-up every night and preserves back-ups for 7 days, I like to augment that with my own database rolling back-up strategy:
One note here: if you can, you may want to consider dumping these to a computer other than your Magento server. Since our hosting provider does off-site backups, I feel quite comfortable backing up our Magento databases onto a local machine at our office. The chances of all three locations, our hosting provider's facility, the off-site back-up facility, and our office, all burning down at the same time (I'm sure)' is pretty darn remote, especially since all three facilities are spread across a continent.
To schedule your dumps as crontabs, invoke the crontab, as you did earlier in this chapter, and create as many jobs as you feel you need (if you're dumping to another server, you need to, of course, schedule these jobs on the machine to which the backup is to be dumped).
Create a new schedule according to your desired frequency (every day, week, month, and so on) and enter your MySQL dump command, as used previously. For the file name, though, use a name unique to the purpose of the dump. For example, for a dump on Monday, you might use magento_db_Mon.sql; for week 1, magento_db_week_1.sql. In this manner, the next dump for a given script will overwrite the previous dump without filling up your hard drive with dump files.
From time to time, as Magento improves its platform features, or to address bugs and security issues, you will receive a notice that your system needs to be upgraded. With Magento 2, this upgrade process is made infinitely easier and better than in Magento 1.x.
In order to keep your Magento installation upgraded, you must take certain steps:
In order for your store to communicate to Magento for upgrade verifications, you or a developer has to obtain developer keys. While this suggests that keys are only for developers, anyone can create an account at Magento and obtain keys.
If you don't already have an account at Magento, go to https://www.magentocommerce.com/magento-connect/customer/account/create/ and create your free account. Once you are registered, log in to your account at https://www.magentocommerce.com/magento-connect/customer/account/login/.
After you log in:
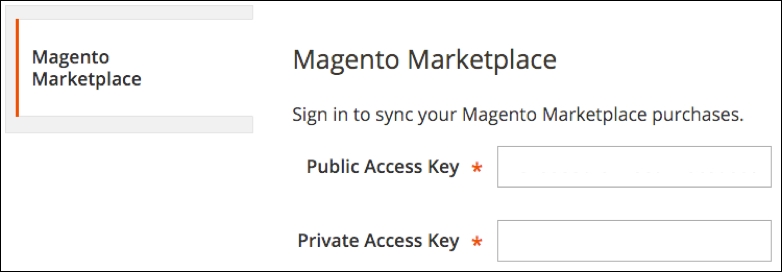
Now that you're able to communicate with Magento Connect, you can begin the process of upgrading your installation.
After entering your keys, you should still be within the Wizard. Find the System Upgrade button or sidebar menu and click it to begin the upgrade process.
The System Upgrade screen shows the steps the process will undertake to complete:
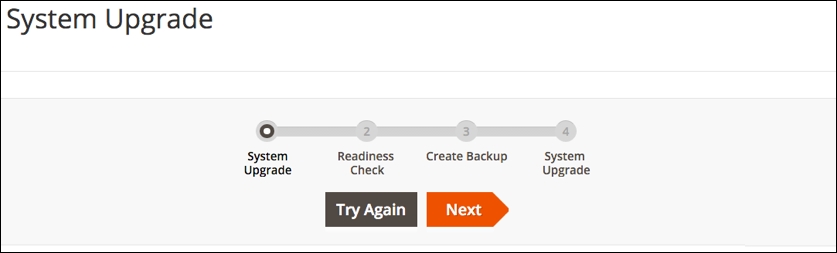
When this screen first loads, it goes through a series of checks to find out what needs to be upgraded. You can choose the version of Magento Core Components you wish to upgrade, as well as any other components that may have been added to your installation.
Once you make your choices, click on Next:
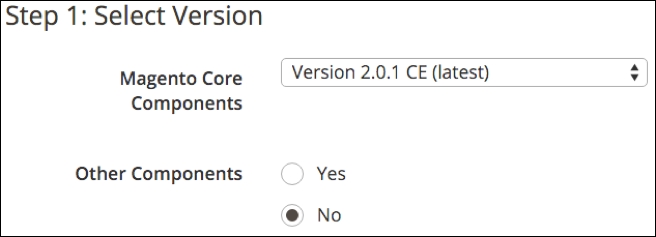
There are many reasons why an upgrade might fail. We have certainly had our share of issues, although far less with Magento 2 than with earlier versions. If you are a developer, you can find that most upgrade errors can be fixed by going to http://devdocs.magento.com/guides/v2.0/comp-mgr/trouble/cman/were-sorry.html and reviewing the advice shown there.
On the next screen, you can determine whether your installation is truly ready for a system upgrade. Click on Start Readiness Check and wait for it to complete its analysis:
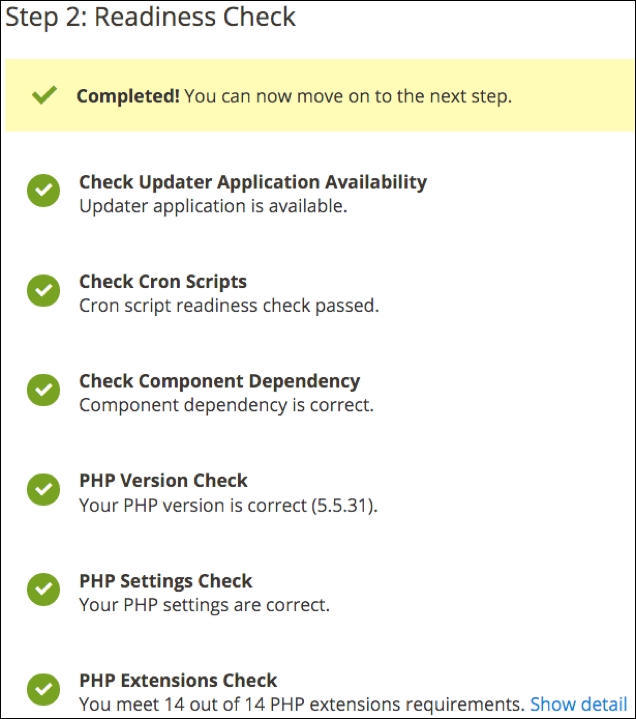
Click Next to create a backup of your installation.
If you're not using a hosting company that provides backups or you do not have a backup protocol, well, you're flirting with trouble. No matter how well a server is configured or you maintain your Magento installation, you should never fail to make regular backups. As in this process, you should also make a backup whenever you make any changes to your Magento code.
In most cases, you will want to include all items in your backup. However, if your server is regularly backed up and you have lots of product images (for example, thousands of product SKUs), you might consider not backing up site "media." Media can take a long time to back-up and consume considerable space. However, if you update your media often, don't hesitate to include it in your backup.
Click on Create Backup to trigger the backup process.
When the backup is complete, click on Next. If all has gone well, the system will tell you it's ready for you to click on Upgrade.
After working your way through this book, you've now reached a level of familiarity and understanding that enables you to call yourself a Magento master. Of course, given the complexity and features of Magento, there's always more that you can learn. You should now have enough comfort with Magento that you can freely experiment. After all, one of the great features of open source software is that you have the access and freedom to augment the original system to meet your needs.
In this chapter on advanced techniques, we have learned a nifty way of integrating WordPress into a Magento installation, discussed a simple method of building and using a staging installation, provided a complete tutorial on scheduling Magento cron tasks, and covered strategies and techniques for backing up your Magento database.
With this book in hand, you most likely are close to completing a new Magento store. Launch date is just around the corner. If you've never launched a Magento store before, you're in for a treat now!
Just one task remaining now: go through the pre-launch checklist one final time before we are all set to go live. This is what we shall go through in the next chapter.
As you've no doubt realized — and one great reason for this book — Magento 2 delivers its power as an e-commerce platform by giving you a lot of versatility. This versatility comes at a price, though, most notably in terms of the vast number of configuration tasks and choices available.
Over the years, we have created our own Magento Pre-Launch Checklist to make sure we touch all the important configuration and design points within Magento 2 that are necessary for a live store to operate. If you've read through this entire book, you may have already addressed a number of these items, but having an itemized list to follow will save you a lot of time and give your store owner a great deal of immediate satisfaction.
We've broken down this checklist into the following areas:
In this chapter, we will go over the configurations to review in order to have a successful Magento store launch.
In Chapter 1, Planning for Magento, we discussed the Global-Website-Store methodology. When planning your Magento installation, you set up whether your installation would have one or more websites, each with one or more store views. As you go through this checklist, you need to pay close attention to the scope in which you are updating configurations and designs. For instance, as we discuss base URLs, take care that your store view is set at the proper level for the configuration. In other words, if you're updating the base URL for the entire installation, your store view is Default Config. On the other hand, if the base URL applies only to your English language furniture store view, then set to that store view.
The area of the Magento back-end that has the most configuration choices is within the Stores | Configuration menus and panels. So, let's begin there first.
Unless your store is using PayPal Express, PayPal Standard, PayPal Advanced, or another off-site payment processing method (for example, Authorize.Net Direct), your store may be taking credit card information on your server. Even though you're not storing the credit card information, you will need to get a Secure Socket Layer (SSL) Encryption Certificate installed on your server. Depending on the type of certificate you purchase, this process can take from 2 days to 2 weeks. It pays to plan ahead on this one: don't wait until the day before launch to try to get an SSL Certificate. Unless you're a master at web server configuration, consult with your hosting provider who can provide you with the necessary encryption keys and installation assistance. For most hosting providers, the installation of an SSL Certificate is outside the permissions of the client (you).
Using the procedures , configure your base URLs for each store view level. You should also review the following panels:
Since anyone who has used Magento 2 knows that, by default, the administrative backend of your store is accessible by going to http://www.storedomain.com/backend, changing this URL may help keep out the bad guys. To set up a new admin domain:
Now you should be able to access your Magento backend using the new domain name. If you have set a Secure Base URL and set Use Secure URLs in Admin to Yes, then the new domain should automatically change to the secure URL. However, this does provide a convenient and more secure means of isolating access to your Magento backend.
Today's search engines are monitoring the speed with which web pages download. The faster the download speed, the better your site is liked by Google et al. More importantly, it makes for a better user experience. Magento helps you by giving the backend administrator the means to combine CSS and JavaScript files, creating fewer files to download to render a page.
We went into quite a bit of detail about caching in Chapter 8, Marketing Tools. We mention it here because during development you may have turned off caching to help speed up design and code changes. Take the time now to set your optimum caching settings.
If you haven't already, configure and turn on cron jobs on your installation. Refer to Chapter 10, Advanced Techniques, for information on how to configure cron jobs.
Before you launch, you may want to set up specific users for whoever will have access to your Magento backend. Certain users may only need access to orders and customers. Others may be responsible for product information and pricing.
Before setting up users, you need to set up various roles or groups of permissions to which you can assign users:
Once you have your roles set up, you can set up your users:
Once you save the user, an email will be sent to them with the login credentials.
Undoubtedly, you've invested a considerable amount of time creating a frontend design to meet your e-commerce needs. Before you launch, however, there are a few design-related tasks that need to be performed.
Using the techniques described in Chapter 4, Configuring to Sell, build and assign the emails that will be sent to customers who purchase, register, and subscribe to newsletters.
The primary thing you need to do for invoice and packing slips is to upload an appropriate logo as a substitute for the default Magento logo. Upload the logo you wish to use for PDF print-outs and on-screen views in the Sales | Sales | Invoice and Packing Slip Design panel.
Don't overlook this little item! You'd be surprised how many Magento-powered websites we visit that still show the Magento logo. To upload your own favicon, go to the General | Design | HTML Head panel under Stores | Configuration.
For products that have no image, Magento inserts default placeholder images. You can create your own — perhaps with your own company's logo — to use instead of the default images with the Magento logo.
To upload your own versions, go to the Stores | Configuration | Catalog | Catalog | Product Image Placeholders panel. Use images similar in size to those that your theme design uses for regular product images.
When you first install Magento, a CMS page is automatically created for use when a visitor tries to access a non-existent page. This default page, as shown in the following screenshot, is not bad, but you may want to update the banner images and, perhaps, provide even better information to visitors as to what they can do to find the correct page.
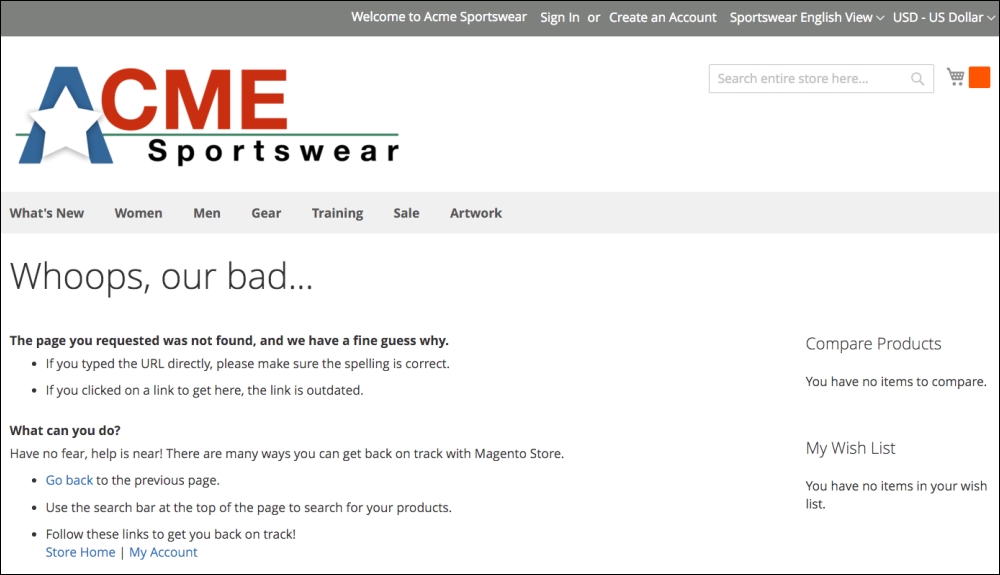
You may want to modify the layout to include a sidebar of categories. It might also be helpful to show your telephone number in large numbers if you want customers to call you for help.
Without exception, for an online store to prosper it has to have customers. Attracting customers comes from a variety of efforts, including search engine rankings. There are a number of SEO-related activities for increasing traffic, from blog postings and backlinks, to product descriptions and reviews. For pre-launch purposes, you want to make sure to do the initial tasks that will add to the SEO arsenal.
If you intend to use meta tags as part of your Search Engine Optimization, see Chapter 6, Marketing Tools, for specific procedural information.
In your Magento backend, under Stores | Configuration | Sales | Google API, is a panel titled Google Analytics. To have Magento automatically include a Google tracking code on each page of your site, set Enable to Yes and enter your Google Analytics ID in the Account Number field.
If you did not already do it after reading Chapter 6, Marketing Tools, configure and activate your Magento store sitemap.
Before you can begin taking orders on your new Magento website, you need to confirm that you have all the necessary configurations in place.
In your Magento backend, go to Stores | Configuration | General | General. Review your settings for the following panels:
Even small online vendors may use different email addresses for different purposes. We often set up multiple email addresses for our client's stores, even if the same person may be receiving emails for sales and support. Having separate email addresses helps to segregate emails by purpose. Additionally, if the business grows and assigns different people to different purposes, you will have already established different email addresses with the store's customers.
A little known feature for those of you who use Google Apps — more specifically, Google Mail — you can create multiple email addresses for the same email account without having to add forwarding or alias configurations to Google Mail. For example, if you have an email address of info@domain.com, you could create the following emails and each one will go to the same email account: info+sales@domain.com, info+support@domain.com, and info+contact@domain.com. Google Mail will ignore the portion of the email address after and including the "+" in the address. We use this often to provide different email addresses without creating multiple email accounts.
The panels on the General | Contacts screen allow you to enable the standard Contact Us form and set to whom these emails should be sent. You can also assign a customized transactional email.
Under Stores | Configuration | Sales | Sales are various panels that control a rather eclectic group of sales-related functions.
If you plan on having more than one customer group (for example, wholesale, preferred, and so on), set up multiple customer groups according to the process described in Chapter 6, Marketing Tools.
In addition, there are a few settings you should review under Stores | Configuration | Customers | Customer Configuration:
The Stores | Configuration | Sales | Sales Emails screen provides panels to allow you to choose customized transactional emails and sender email addresses for orders, invoices, shipment notices, and credit memos.
In Chapter 4, Configuring to Sell, we discussed at length how to configure sales tax rates and rules. Afterwards, you should go to Stores | Configuration | Sales | Tax in your Magento backend for additional sales tax configurations:
Using Chapter 4, Configuring to Sell, for guidance, confirm that the shipping methods you want for your new store are configured and ready.
Likewise, you should confirm your desired payment methods. Most can be set in test mode during configuration.
Configure and test your newsletter configurations. Refer to Chapter 6, Marketing Tools, for detailed information on creating and sending customer newsletters.
Later in this checklist, you will set whether or not you want customers to confirm that they have read your site's terms and conditions before completing their purchase. To compose your terms, go to Stores | Terms and conditions in your Magento backend. Here, you can add the actual text that will be displayed during checkout.
Now, let's turn our attention to the checkout process. Go to Stores | Configuration | Sales | Checkout, where you will find the following panels:
Aside from the process of adding new products to your store, there are a number of configurations you should review that affect how products are managed and presented. The goal of any Magento store is to sell, and the ease with which customers can shop, as well as the presentation of the categories and products, greatly affects the success of any e-commerce venture.
Therefore, this section of the checklist may be a lengthy, yet necessary, process. There are no set recommendations, either, for most of these settings, as we find different intentions for each site we build. As with all Magento configurations, don't assume each setting's purpose is clear.
Some product categories lend themselves to long listings of products, each on its own line. Other products may be better suited to a grid layout of no more than six products to a page. Magento's immense flexibility means you not only have a variety of presentation options; it also means you have to be willing to experiment and test. And that, my friend, is one of the exciting aspects of configuring a Magento store.
The Stores | Configuration | Catalog | Catalog configuration section has, perhaps, the most panels of any section in Magento. I'm going to break each panel down into its own subsection in order to address the many configuration choices.
This is one panel with which we encourage you to experiment, as it dictates how products are to be displayed when a customer views a category in your store.
By default, Magento allows viewers to submit reviews for products. This panel determines whether non-registered customers — or guests — are allowed to submit reviews for products.
The alerts configured in this panel pertain to emails that can be sent to customers when product prices or stock availability changes. If you set Allow Alert When Product Price Changes to Yes, then customers will see a link labeled Sign up for price alert on each product page.
If you have activated your cron jobs, Magento will process any customer-subscribed pricing and stock availability alerts according to the schedule you specify in this panel. You can also receive email alerts if an error in the processing occurs.
See the section Placeholder Images earlier in this checklist for information on uploading placeholder images.
In this panel, you can set how customer-selected recently viewed and compared product lists are handled, especially if you are operating a multi-store installation.
How you choose product price sharing — globally or by website — affects how currency conversions are applied to prices.
In most cases, automatic calculation of price steps in the layered navigation sidebar will work fine. However, in some cases, you may want to set your own steps for each store.
If you want to limit the depth of your top menu category navigation, enter the maximum level you wish. Zero (0) means all levels will be displayed.
This panel contains several settings that can affect how well your site is indexed by search engines, such as Google, Yahoo! and Bing.
.html. You can specify any suffix you wish, but you may also want to have no suffix, as is the common practice for many websites.http://www.storedomain.com/furniture/living-room/ottoman, set this to Yes.http://www.storedomain.com/ottoman and http://www.storedomain.com/furniture/living-room/ottoman take the user to the very same page (Magento knows how to interpret both URLs). To Google, these are two different pages, both with the same content. Therefore, Google might penalize your site for having duplicate content, when, in fact, it's not. Canonical link meta tags are, as the name implies, meta tags in your page header that contain, for lack of a better term, the definitive link to the page. That is, if Google analyzes multiple URLs, but each one has the same value for the canonical link meta tag, then Google understands that these pages are really one in the same and treats them not as duplicate pages, but simply alternative link paths. An example of a canonical link meta tag, for our example ottoman, would be <link rel="canonical" href="http://www.storedomain.com/ottoman" />, and it would be the same regardless of the URL used to arrive at the ottoman page.Your site will most likely have a site-wide search feature, with a search field somewhere on the page. Allowing your visitors to be able to search your site to find products is one more way you can increase the usability of your Magento site.
After setting up a new site, we know it's tempting to consider maintenance issues at a later time. However, before you know it, later becomes yesterday and you may find that not attending to basic maintenance tasks become tomorrow's "oh, shucks!"
Use the information in Chapter 10, Advanced Techniques, to re-confirm that you have set your backup systems in place. This is perhaps the most important pre-launch activity!
At this point, you should be ready to launch. Of course, the store owner or administrator may still need to add more products and content, but from a developer's point of view, if you have completed the steps in this checklist, your initial work is done.
Congratulations!
We would like to add one more item to the list, though: test. Test, test, test, and test again. Before you go live, have the store administrator, any backend users, and your colleagues go through all possible scenarios. Store owners are always eager to launch — usually yesterday — but you cannot overdo thorough testing. It's always better to catch problems before launch than after.
As you've no doubt realized — and one great reason you bought this book — Magento is powerful and complex. Many assume that since the community edition is free to use and PHP-based, that anyone with the knowledge of PHP can easily master Magento. We all know that's not really the case. Knowledge of how to apply Magento and the depth of Magento's features and interactions is what will truly turn a Magento novice into a Magento master.
Copyright © 2016 Packt Publishing
All rights reserved. No part of this course may be reproduced, stored in a retrieval system, or transmitted in any form or by any means, without the prior written permission of the publisher, except in the case of brief quotations embedded in critical articles or reviews.
Every effort has been made in the preparation of this course to ensure the accuracy of the information presented. However, the information contained in this course is sold without warranty, either express or implied. Neither the authors, nor Packt Publishing, and its dealers and distributors will be held liable for any damages caused or alleged to be caused directly or indirectly by this course.
Packt Publishing has endeavored to provide trademark information about all of the companies and products mentioned in this course by the appropriate use of capitals. However, Packt Publishing cannot guarantee the accuracy of this information.
Published on: March 2017
Production reference: 1210317
Published by Packt Publishing Ltd.
Livery Place
35 Livery Street
Birmingham B3 2PB, UK.
ISBN 978-1-84719-752-8
Magento is the leading e-commerce software trusted by world`s leading organizations. Used by thousands of merchants for their transactions worth billions, it provides the flexibility to customize the content and functionality of your website. Our Magento Couse will help you gain knowledge and skills that are required to design & develop world class online stores.
Module 1, Magento 2 Development Essentials - This fast-paced tutorial will provide you with skills you need to successfully create themes, extensions, and solutions to Magento 2 projects. This book begins by setting up Magento 2 before gradually moving onto setting the basic options of the Sell System. You will take advantage of Search Engine Optimization aspects, create design and customize theme layout, develop new extensions, and adjust the Magento System to achieve great performance. By sequentially working through the steps in each chapter, you will quickly explore all the features of Magento 2 to create a great solution.
Module 2, Magento 2 Cookbook – This guide will provide you with the necessary insights to get a better understanding on what is needed to build powerful commerce platform. The book is divided into several recipes, which show you which steps to take to complete a specific action. In each recipe, we have a section that explains how everything works. It will cover configuring your categories and products, performance tuning, creating a theme, developing a module, and much more. At the end of this book, you will gain the knowledge to start building a success website.
Module 3, Magento 2 Cookbook – This guide will provide you with the necessary insights to get a better understanding on what is needed to build powerful commerce platform. The book is divided into several recipes, which show you which steps to take to complete a specific action. In each recipe, we have a section that explains how everything works. It will cover configuring your categories and products, performance tuning, creating a theme, developing a module, and much more. At the end of this book, you will gain the knowledge to start building a success website.
This course is for anyone who wants to mould their skills in building amazing e-commerce websites using Magento. We begin right from getting you started with Magento to becoming an expert at building your own online stores with it.
Feedback from our readers is always welcome. Let us know what you think about this course—what you liked or disliked. Reader feedback is important for us as it helps us develop titles that you will really get the most out of.
To send us general feedback, simply e-mail feedback@packtpub.com, and mention the course's title in the subject of your message.
If there is a topic that you have expertise in and you are interested in either writing or contributing to a book, see our author guide at www.packtpub.com/authors.
Now that you are the proud owner of a Packt course, we have a number of things to help you to get the most from your purchase.
You can download the example code files for this course from your account at http://www.packtpub.com. If you purchased this course elsewhere, you can visit http://www.packtpub.com/support and register to have the files e-mailed directly to you.
You can download the code files by following these steps:
You can also download the code files by clicking on the Code Files button on the course's webpage at the Packt Publishing website. This page can be accessed by entering the course's name in the Search box. Please note that you need to be logged in to your Packt account.
Once the file is downloaded, please make sure that you unzip or extract the folder using the latest version of:
The code bundle for the course is also hosted on GitHub at https://github.com/PacktPublishing/Magento-2-Build-World-Class-online-stores/. We also have other code bundles from our rich catalog of books, videos, and courses available at https://github.com/PacktPublishing/. Check them out!
Although we have taken every care to ensure the accuracy of our content, mistakes do happen. If you find a mistake in one of our courses—maybe a mistake in the text or the code—we would be grateful if you could report this to us. By doing so, you can save other readers from frustration and help us improve subsequent versions of this course. If you find any errata, please report them by visiting http://www.packtpub.com/submit-errata, selecting your course, clicking on the Errata Submission Form link, and entering the details of your errata. Once your errata are verified, your submission will be accepted and the errata will be uploaded to our website or added to any list of existing errata under the Errata section of that title.
To view the previously submitted errata, go to https://www.packtpub.com/books/content/support and enter the name of the course in the search field. The required information will appear under the Errata section.
Piracy of copyrighted material on the Internet is an ongoing problem across all media. At Packt, we take the protection of our copyright and licenses very seriously. If you come across any illegal copies of our works in any form on the Internet, please provide us with the location address or website name immediately so that we can pursue a remedy.
Please contact us at copyright@packtpub.com with a link to the suspected pirated material.
We appreciate your help in protecting our authors and our ability to bring you valuable content.
Magento is a highly customizable e-commerce platform and content management system. Magento is one of the most used e-commerce systems to create online stores around the world by providing management of inventory, orders, customers, payments, and much more. It has a powerful scalable architecture.
Are you ready to start on the world of Magento development?
First of all, we will need to set up our environment. In this book, we will cover how to set up a local environment. It is very important to have this local ecosystem development to work smoothly and in an agile way.
In every chapter of this book, we will work with a mini project. It's kind of a sprint to learn the path. In this chapter, our mission is to create a work environment and understand the basic concepts of Magento (http://magento.com/).
After setting up the environment, you'll study the Magento folder structure and work on a basic Model View Controller (MVC) software architecture pattern and Magento basic setup.
Basically, we will work on this chapter with the following topics:
Are you ready for fun some? Let's go!
The XAMPP is a complete web development environment. On its install package, we can find Apache, MySQL, PHP, and Perl. This is everything that you will want to develop your solutions!
At this time, you can imagine the meaning of XAMPP, but the X before the AMPP has the meaning of cross or cross-platform. So, we have XAMMP: (X) Cross-platform, Apache, Maria DB, PHP, and Perl.
The goal of XAMPP is to build an easy-to-install distribution for developers to get into the world of Apache. XAMPP is a project of Apache Friends (Apache Friends is a non-profit project to promote the Apache web server).
Why we are working with this software? Let's find out:
So far so good, but how about doing some action?
First of all, let's access the XAMPP website on https://www.apachefriends.org/.
XAMPP has three distinct versions for different operating systems (OS): Windows, Linux, and OS X. Choose your preferred version to download, and start the installation process.
XAMPP for Windows has three different kinds of installation files:
The (.exe) installer is the most popular process to install. Download it and execute to start the installation process, shown as follows:
xampp-control.exe and start the Apache web server.http://localhosturl in your favorite web browser. You will see the XAMPP start page:XAMPP for Linux has two main versions of installation files:
Choose the file according to your architecture and follow these steps:
chmod 755 xampp-linux-*-installer.run
sudo ./xampp-linux-*-installer.run
XAMPP is now installed below the /opt/lampp directory.
sudo /opt/lampp/lampp start
http://localhost URL in your favorite web browser. You will see the XAMPP start page:To install XAMPP for OS X, you simply need to follow these steps:
http://localhost URL in your favorite web browser. You will see the XAMPP start page:The XAMPP htdocs folder is the docroot folder of your server. Everything that you save on htdocs can be accessed via any browser. For example, if you save index.php inside the htdocs root, you can access this script by entering http://localhost/index.php. If you save your file in the packt folder, you can access it by http://localhost/packt/index.php. Piece of cake!
Magento is an open source content management system for e-commerce websites. It's one of the most important e-commerce systems, which has grown fast since its launch in 2008.
Basically, Magento works with two different types of Magento: Community Edition (CE) and Enterprise Edition (EE). In this book, we will cover CE.
On a study provided by aheadWorks (https://aheadworks.com/) in October 2014, Magento CE has taken the leading position among examined e-commerce platforms.
Now, we have solid concepts about "where we are going". It's very important to have solids concepts about every aspect that you are working on in this moment. Globally, e-commerce shows a remarkable potential market and Magento professionals are welcome.
First of all, we need to create a user account on the Magento website (http://www.magento.com) to download Magento CE. Click on the top-menu link My Account and after clicking the button labeled Register, fill out the form and confirm your registration.
Once registered, you gain access to download Magento CE. You can access the Products | Open Source/CE and VIEW AVAILABLE DOWNLOADS menus.
On this page, we have three important options:
Choose the
Full Release with Sample Data (ZIP with sample data) option for downloading Magento. Extract the compressed files in the XAMPP htdocsfolder and rename the folder to packt.
Before starting the Magento installation, we'll need to create a new MySQL database instance to store the Magento data. phpMyAdmin is a MySQL web app to manage your database and can be accessed at http://localhost/phpmyadmin/.
Click on the Databases menu and the Create database option to create the packt database.
Now, let's start our Magento installation. On your browser, access http://localhost/packt/setup.
By now, you will see this installation page on your browser:
Let's start the Magento installation by following these steps:
packt-admin.After all these steps, we are done! Congratulations! We have our first Magento installation!
You can access your new site by accessing the URL at http://localhost/packt:
And you can access the admin area by accessing the URL at http://localhost/packt/admin-packt:
For more information about Magento installation, access http://devdocs.magento.com/guides/v2.0/install-gde/bk-install-guide.html.
MVC is an architectural software pattern that works with three different but interconnected parts. Its principal mission is to abstract the development work into interdependent layers providing the best practices to documentation and organization of software projects.
The Magento e-commerce solution is written with the PHP Zend framework, which is one of the most powerful PHP frameworks. For more information, access http://framework.zend.com/.
Magento is a configuration-based MVC System. For example, when you develop a module (we will check this in the next chapters), besides creating new files and classes to your module, you need to also create a config.xml file. This file contains all the configuration data for Magento module. These practices abstract some important information that you can easily edit to set the module as you need.
In this book, we will cover only the very basic Magento software architecture concepts, but it's highly recommended that you to study more software design patterns, especially in our case MVC software architecture needs to be understood well to best experience the field of software development.
You've now seen what Magento can do; you have installed Magento too. You started to understand the basic concepts of Magento, and certainly, you'll get more experience in developing your own Magento solutions by working in the projects of this book.
In the next chapter, we'll work with some Magento Sell System features.
Magento has many features to provide a great experience to the users and developers. Understanding what Magento can provide is the key to success in the development of Magento. All Magento developers seek for improvements in this area.
On the Magento Connect site (https://www.magentocommerce.com/magento-connect/), you can search for uncountable extensions to improve your Magento solution: Checkout, Cart, Order Management, Gifting, Pricing, and Promotion, and a lot more. At this point, it is crucial to understand that Magento has a native solution and how its features can help you think of some great solutions for development.
In the previous chapter, you learned the fundamentals to create a basic local Magento environment to work with book projects. In this chapter, you will learn how Magento manages and improves system sell processes.
The following topics will be covered in this chapter:
Have fun!
Magento Commerce has promoted important changes between its 1.x and 2.0 versions. Some usual problems of the Magento 1.x version were fixed in this new version. The following processes/modules have received improvements in Magento 2.0:
All good software or systems pass through incremental improvements for evolving according to its production environment; it couldn't be different with a commerce platform that powers over 250,000 online stores worldwide.
Magento 2.0 CE has a flexible architecture and a modular code base; it has a modern theming and an extensive Application Programming Interface (API). To get a better performance, Magento 2.0 compresses JavaScript files and images and gives support to Apache Varnish integration on the server side to enable faster performance.
Security is another subject treated in the Magento 2.0 system. According to its official documentation (http://goo.gl/E7sPm3), Magento 2.0 has had substantial enhancements in its security layer:
Extensibility and modularity allow Magento to be highly customizable. As an objected-oriented solution, Magento follows good architectural principles and coding standards that provide high cohesion and loose coupling.
The following diagram illustrates Magento's architecture and how the components are integrated:
Magento works with PHP Standards Recommendations (PSR). The PSR establishes the following good programming practices:
debug, info, notice, warning, error, critical, alert, and emergency).To know more about this, access http://www.php-fig.org/psr/.
On Magento Framework, we have some libraries and dependencies of this architecture. Zend Framework (ZF) is a very important layer of this architecture; once Magento was written in ZF; as we saw earlier.
Finally, we have Web Users (frontend/backend), Service Consumers (API and endpoints), Service Layers (interfaces/contracts), and Models (resources and database).
On the Web Users layer, we can define Magento's main processes as:
We will discuss these topics in the coming chapters, but now, I'd like to introduce to you one of the most important processes of any kind of e-commerce: the Sales layer or Magento Order Management. This is one of the most important things to understand the Magento development core.
On the e-commerce systems, the sell process is one of the most important features of every online business, providing a good e-commerce life cycle.
Some processes will be triggered when a customer confirms his order. Magento collects all the customer data and processes the request turning it into an order. This book will only cover the basic concepts of this process, but it's very important to understand them to develop consistent Magento extension solutions (we will see about this in Chapter 6, Write Magento 2.0 Extensions – a Great Place to Go).
Let's take a look at the Magento sales operations basics.
Let's play with the Magento admin area. In your favorite browser, enter the URL http://localhost/packt/admin-packt. Now, enter with your login credentials to access the admin area:
In Magento 2.0, you can manage sales operations by accessing the Sales menu in the admin area. Magento gives you the possibility to configure the following Sales options:
These options give you the power to manage your sales system as you want. Though it's, it's important to explore some Magento tools, extensions, and techniques to take full advantage and make improvements on your sales system to gather techniques to develop your own solution:
We have many options to make improvements on sales operations. You can configure up-sells and cross-sells features, for example, to give your customer more ways to order on your store. To do so, take advantage of a search engine optimization, work with a multilingual store, a geo-targeting, responsive design, and a simplified checkout process.
In this section, we'll see how to implement a simplified checkout process on our store.
As a system administrator, you can access the admin area (http://localhost/mymagento/admin) to get all the customer order information, generate the product tracking code, invoices, and send a message to your customer. Magento stores all the order data on the admin area | Sales | Orders.
As an admin, Magento gives you the option to order products directly for your customer. On Magento, we have a persistent cart, print invoices, credit memo, and transactions.
You have a few options of payment methods in Magento. Magento has a native support to Google Checkout and PayPal. They both are payment gateways that provide the entire sell transaction environment to your store.
Basically, you choose your payment method and choose how you will pay for your product: credit card or deposit.
With the products prices defined, you can set up promotions in advance. Promotion systems are very useful to establish a solid relationship with the customer.
In Magento, it is possible to define catalog price rules and shopping cart rules. Basically, you can define price behavior according to your promotions and customer defined rules, such as postal code, and certain value of discount.
You can provide coupon codes for your customers to raise Magento sells.
Magento 2.0 has a command-line utility to help developers manage installation and configuration tasks. The new command-line interface can do the following:
To work with this tool, you will need to open a terminal (Linux, OS X) or command prompt (Windows) and access the <your Magento install dir>/bin directory. Then, enter with the php magento command to see all the available commands of the command-line utility:
Remember to configure the PHP path to the system environment variable to execute the command. For further information, access http://php.net/manual/en/faq.installation.php.
Let's play a little bit with the utility by disabling your Magento system cache:
php magento cache:status command. The cache will probably be enabled.php magento cache:disable command to disable any cache system.To know more about cache management in command-utility tools, access http://goo.gl/c5ivCY.
Now let's try to manage Magento indexing. Magento indexing transforms the data to improve the performance of your system by executing the following commands. Indexing technique optimizes the price calculations process, for example, and it has an important role to play in the Magento performance:
php magento indexer:info command to view the lists of indexersphp magento indexer:status command to view the real-time statusphp magento indexer:reindex command to rebuild the indexationMagento indexing was successfully rebuilt, thanks to the command-line utility actions!
You can build cron jobs in a remote server to automate some Magento actions. For example, create an automation routine to re-index Magento periodically.
I strongly advise you to play more with the command-line utility. You can consult the online documentation available at http://goo.gl/iVnQSn.
We started this chapter to get the real bases of Magento power. It's important to get solid concepts, before you eagerly jump and begin developing Magento solutions. Take a moment to understand the scope of your project. This will make Magento development a much more rewarding experience.
Magento has a solid structure to develop your own solutions. You can automate some tasks using the Magento command-line utility and optimize Magento resources to get better results.
In the next chapter, we will work with Magento search engine optimization.
Search Engine Optimization (SEO) is a technique to build your site following good practices established by W3C Consortium and search engines, such as Google, to increase your site's visitation and ranking. On Magento, we need to configure the system properly to take advantage of this feature. Nowadays, SEO is a prerequisite on every website on the Internet.
Magento has a great variety of tools to configure the store of SEO and allows SEO adjustment for products, categories and CMS page titles, metainformation, and headings.
SEO application is a constant job; it never ends. Basically, you need to know how Magento SEO works and what options you have to optimize its working. Magento is a search engine-friendly e-commerce platform, and you will discover its main concepts in this chapter.
In this book, you will learn some good techniques and apply them by configuring the default installation.
The following topics will be covered in this chapter:
SEO is the technique of developing a site according to the high standards defined by the World Wide Web Consortium and search engine companies, such as Google, in order to provide good content visualization to the users and rank the site in organic searches.
Magento provides the user with some significant tools for SEO. Let's take a look at some of these techniques and tools.
By default, Magento's basic installation has the title Magento Commerce on the header settings. It is very important to choose a strong main title to get the right amount of traffic on your site. For example, if you are working on the SEO of a sports store, you can set the main title as My Sports Store to increase the traffic through the title. When people search for something, they always notice the earlier words first.
To adjust your store settings, you need to navigate to Stores | Configuration | Design | HTML Head in the Magento admin area (http://localhost/packt/admin-packt).
Choose a good descriptive title for your Magento commerce. It is possible and recommended to name all your page titles, including categories and products, by entering the site title in the Title Suffix field. To give density to the content for SEO engines by configuring the SEO on CMS pages and products, keep Default Description and Default Keywords empty.
For a local and nonproduction environment, prevent the indexing of the site by setting Default Robots to NOINDEX, NOFOLLOW. Otherwise, it is recommended to set it to INDEX, FOLLOW.
By working on this configuration, you will find that the main SEO parameters of the <head> tag are automatically fulfilled to be run on Magento commerce.
Magento has a specific SEO configuration panel for multiple sections. To access the main Magento SEO configuration, enter in the Magento admin area (http://localhost/packt/admin-packt), and you will find the panel by clicking on the menu at Marketing | SEO & Search:
Magento 2.0 changed some functionality in comparison with its previous version. For example, in the URL Rewrites menu, you can manage and define all the URL addresses of Magento in order to increase the SEO's friendly URLs.
Here, you can simply choose Request Path to edit and enter a description for each of them, as shown in the following screenshot:
In Search Terms, you can define and redirect the URL according to the search made by the user by adding a new search term:
Finally, in the New Site Map section, you can generate Sitemap of your Magento installation as shown in the following screenshot:
Magento has a special panel to take care of the catalog categories of SEO. To access this panel, navigate to Stores | Configuration | Catalog | Search Engine Optimization, as follows:
This panel has the following options:
With these options, you can choose the best strategy for SEO on catalog's default options. Magenta gives the administrator the opportunity to tune these options on catalog pages. We will work this out later in this chapter.
Magento automatically generates an XML sitemap for your store and also keeps it up to date. In order to enable this, navigate to Stores | Configuration | Catalog | XML Sitemap. Magento has the following options for this section:
Basically, with these options, it is possible to choose the frequency and priority of updates. You may set additional options, such as Start Time and Error Notifications, only in the GENERAL settings tab. It's important to configure the cron job functionality in your web server to enable this feature.
Google Analytics helps track all the statistics for your site. To add Google Analytics on Magento, generate a tracking code on your Google Analytics account (http://analytics.google.com) first of all. After this, navigate to System | Configuration | Google API.
This option works only on hosted Magento sites (that is, the remote server). Take note of this for when you work on a remote production Magento site. For the purposes of this book, it isn't necessary, but you need to keep this option in mind when you start to work on remote projects.
Once you make Magento SEO system configurations, it's time to set specific options directly on Magento pages. This Magento SEO flow gives the user the flexibility to focus on content and page ranking.
The Magento Content Management System (CMS) manager is a very simple but powerful tool that provides us with control over each aspect of the Magento page. To access Magento CMS pages configuration in the admin area, go to Content | Pages, as shown in the following screenshot:
Magento's default installation provides some demo content to test CMS pages. Check the Home Page content by selecting the Edit option.
For the purpose of SEO, Magento's CMS page administration has two main SEO side menus: Page Information and Meta Data.
In Page Information, you can set the following options:
In Meta Data, you can set the following options:
The content of your page must be aligned with the metadata for a good SEO implementation.
This is the most important layer in a Magento store. Besides providing a lot of options to configure the product to be sold, this also makes it possible to tune the SEO configuration to increase sales through the search engine page ranking system. In order to access Product options, navigate to Products | Catalog, as shown in the following screenshot:
Click on the first product of the list to take a look at the SEO options. For the purpose of SEO, Product Details has the following options:
Search Engine Optimization has the following options:
Every single product gives the administrator these options to tune SEO on a Magento website.
Magento category pages have great SEO options. As you can note, all the content pages on Magento give us administration options to manage SEO. Every aspect on Magento configuration is integrated to provide the user with the best experience.
To access the Categories configuration, navigate to Products | Categories on the admin dashboard, as shown in the following screenshot:
This will provide an option to create a new category, and in the side menu, it is possible to check all the categories registered on Magento. For the purpose of SEO, Magento has the following options in this section:
Make sure to follow a pattern in your content referring to SEO.
Magento SEO is a powerful tool to increase sales. As a developer, it is very important to keep these options and techniques in mind to create mechanisms that would get better results for Magento users through new extensions and customizations.
In this chapter, we discussed the following:
In the next chapter, we will cover Magento theme development and customization. We have a lot of work coming up!
Magento 2.0 has a complex control of its themes. It works with multiple directories to generate the final result for the user on its frontend.
In this chapter we will consolidate the basic concepts that you need to create your very first example of Magento theme and activate it.
At the end of this chapter, you will be able to create the basic structure of your own theme. The following topics are covered in this chapter:
According to the official documentation available at http://goo.gl/D4oxO1, a Magento theme is a component that provides the visual design for an entire application area using a combination of custom templates, layouts, styles, or images. Themes are implemented by different vendors (frontend developers) and intended to be distributed as additional packages for Magento systems similar to other components.
Magento has its own particularities because it is based on Zend Framework and consequently adopts the MVC architecture as a software design pattern. When the Magento theme process flow becomes a subject, you have some concerns to worry about when you plan to create your own theme. Let's focus on these concepts to create our own theme by the end of this chapter.
Magento 2.0 has a new approach toward managing its themes. Generally, the Magento 2.0 themes are located in the app/design/frontend/<Vendor>/ directory. This location differs according to the built-in themes, such as the
Luma theme, which is located in vendor/magento/theme-frontend-luma.
The different themes are stored in separate directories, as in the following screenshot:
Each vendor can have one or more themes attached to it. So, you can develop different themes inside the same vendor.
The theme structure of Magento 2.0 is illustrated as follows:
How the Magento theme structure works is quite simple to understand: each <Vendor>_<Module> directory corresponds to a specific module or functionality of your theme. For example, Magento_Customer has specific .css and .html files to handle the Customer module of the Magento vendor. Magento handles a significant number of modules. So, I strongly suggest that you navigate to the vendor/magento/theme-frontend-luma folder to take a look at the available modules for the default theme.
In the Magento 2.0 structure, we have three main files that manage the theme behavior, which are as follows:
composer.json: This file describes the dependencies and meta informationregistration.php: This file registers your theme in the systemtheme.xml: This file declares the theme in system and is used by the Magento system to recognize the themeAll the theme files inside the structure explained previously can be divided into static view files and dynamic view files. The static view files have no processing by the server (images, fonts, and .js files), and the dynamic view files are processed by the server before delivering the content to the user (template and layout files).
Static files are generally published in the following folders:
/pub/static/frontend/<Vendor>/<theme>/<language><theme_dir>/media/<theme_dir>/webFor further information, please access the official Magento theme structure documentation at http://goo.gl/ov3IUJ.
The Magento CE 2.0 version comes with a new theme named Luma that implements Responsive Web Design (RWD) practices.
The Luma theme style is based on the Magento user interface (UI) library and uses CSS3 media queries to work with screen width, adapting the layout according to device access.
The Magento UI is a great toolbox for theme development in Magento 2.0 and provides the following components to customize and reuse user interface elements:
The Luma theme uses some of the
blank theme features to be functional. The Magento 2.0 blank theme, available in the vendor/magento/theme-frontend-blank folder, is the basic Magento theme and is declared as the parent theme of Luma. How is this possible? Logically, Magento has distinct folders for every theme, but Magento is too smart to reuse code; it takes advantage of theme inheritance. Let's take a look at how this works.
The frontend of Magento allows designers to create new themes based on the basic blank theme, reusing the main code without changing its structure. The fallback system is a theme's inheritance mechanism and allows developers to create only the files that are necessary for customization.
The Luma theme, for example, uses the fallback system by inheriting the blank theme basic structure. The Luma theme parent is declared in its theme.xml file as follows:
<theme xmlns:xsi="http://www.w3.org/2001/XMLSchema-instance" xsi:noNamespaceSchemaLocation="urn:magento:framework:Config/etc/theme.xsd">
<title>Magento Luma</title>
<parent>Magento/blank</parent>
<media>
<preview_image>media/preview.jpg</preview_image>
</media>
</theme>Inheritance works similar to an override system. You can create new themes using the existent ones (parents) and by replacing (that is, overriding) an existing file with the same name but in your specific theme folder (child).
For example, if you create a new theme in the app/design/frontend/<Vendor>/<theme>/ folder and declare Magento/blank as a parent theme, the theme.xml file and registration.php, you have the entire blank theme structure ready to work in your new theme, including RWD layouts and styles.
Let's say that you have a specific .css file available in the <theme_dir>/web/css folder. If you delete this file, the fallback system will search the file in the <parent_theme_dir>/web/css folder, as shown in the following figure:
Magento has a flexible theme system. Beyond Magento code customization, the admin can create blocks and content on the Magento admin panel, such as Home Page, About us, or any static page that you want to create. CMS pages and blocks on Magento give you the power to embed HTML code in your page.
You can create or edit pages and blocks by accessing the Admin area (http://localhost/packt/admin_packt) by navigating to Content | Pages.
Custom variables are pieces of HTML code that contain specific values as programming variables. By creating a custom variable, you can apply it to multiple areas on your site. An example of the custom variable structure is shown here:
{{config path="web/unsecure/base_url"}}This variable shows the URL of the store.
Now, let's create a custom variable to see how it works. Perform the following steps:
http://localhost/packt/admin_packt.dev_name.Now, we have a custom variable that stores the developer's name. Let's use this variable inside the CMS About Us page via the following steps:
{{CustomVar code="dev_name"}}Let's take a look at the result in the following screenshot:
After understanding the basic Magento 2.0 theme structure, you have the right credentials to go to the next level: creating your own theme. In this chapter, we will develop a simple theme and activate it on the Magento Admin panel. The basic idea is to give you the right directions to Magento theme development and provide you with the tools to let your imagination fly around the creation of various Magento themes!
Before starting the creation, let's disable Magento cache management. It is important when you work with Magento development to get updates in real time. You learned about cache management in Chapter 2, Magento 2.0 Features:
<your Magento install dir>/bin directory.php magento cache:disable command to disable all the cache systems.To create a basic theme structure, follow these steps:
The next step is to declare the theme information for Magento to recognize it as a new theme. Perform the following:
theme.xml under your theme directory (app/design/frontend/Packt/basic/theme.xml).theme.xml file and save the file:<theme xmlns:xsi="http://www.w3.org/2001/XMLSchema-instance" xsi:noNamespaceSchemaLocation="urn:magento:framework:Config/etc/theme.xsd">
<title>Basic theme</title>
<parent>Magento/blank</parent>
<!-- <media>
<preview_image>media/preview.jpg</preview_image>
</media>-->
</theme>This is a basic declaration for the Magento system to recognize our theme as an official theme. This code configures the theme name, parent, and preview image. The preview image is a preview for basic visualization purposes. We don't have a preview image right now, which is the why the code is commented; avoid unnecessary errors.
Once we have the basic configurations, we need to register the theme in the Magento system:
registration.php under your theme directory (app/design/frontend/Packt/basic/registration.php).<?php
/**
* Copyright © 2016 Magento. All rights reserved.
* See COPYING.txt for license details.
*/
\Magento\Framework\Component\ComponentRegistrar::register(
\Magento\Framework\Component\ComponentRegistrar::THEME,
'frontend/Packt/basic',
__DIR__
);This code simply registers our theme in the Magento system by passing a parameter of your new theme's structure directory.
In your theme, you can configure the image properties of the products in the Magento Catalog module by creating the view.xml file. You can control this specific configuration using the id attribute of every product's HTML5 element:
etc under your theme directory (app/design/frontend/Packt/basic/etc).view.xml under your etc directory (app/design/frontend/Packt/basic/etc/view.xml).view.xml and save the file:<image id="category_page_grid" type="small_image">
<width>250</width>
<height>250</height>
</image>In the view.xml file, we declared the values of the width and height of the product image. The id and type attributes specified the kind of image that this rule will be applied to.
For further information, visit http://goo.gl/73IQSz.
The static files (images, .js files, .css files, and fonts) will be stored in the web directory. Inside the web directory, we will organize our static files according to its scope. Create a new directory named web under your directory app/design/frontend/Packt/basic/web theme and create the following directory structure:
With this simple structure, you can manage all the static files of your custom theme.
By default in Magento 2.0, the theme logo is always recognized by the system by the name logo.svg. Magento 2.0 also recognizes the logo's default directory as <theme_dir>/web/images/logo.svg. So, if you have a logo.svg file, you can simply put the file in the right directory.
However, if you want to work with a different logo's name with a different format, you have to declare it in the Magento system. We will make a declaration with this new logo in the Magento_Theme directory because the new logo is a customization of the Magento_Theme module. We will override this module by taking advantage of the fallback system. As you may note, Magento has a specific pattern of declaring elements. This is the way in which Magento organizes its life cycle.
Let's declare a new theme logo by performing the following steps:
logo.png in the app/design/frontend/Packt/basic/Magento_Theme/web/images directory.default.xml under your layout directory (app/design/frontend/Packt/basic/Magento_Theme/layout).default.xml and save the file:<page xmlns:xsi="http://www.w3.org/2001/XMLSchema-instance" xsi:noNamespaceSchemaLocation="urn:magento:framework:View/Layout/etc/page_configuration.xsd">
<body>
<referenceBlock name="logo">
<arguments>
<argument name="logo_file" xsi:type="string">
Magento_Theme/images/logo.png
</argument>
<argument name="logo_img_width" xsi:type="number">
your_logo_width
</argument>
<argument name="logo_img_height" xsi:type="number">
your_logo_height
</argument>
</arguments>
</referenceBlock>
</body>
</page>This declaration has three different arguments to manage three attributes of your new logo: filename, width, and height. Don't forget to replace the your_logo_width and your_logo_height attributes with the correct size of the logo that you choose.
The logo_file argument seems to be wrong because we created our image in the Magento_Theme/web/images directory; however, thank God this is not true. I'll explain: when we activate the new theme, Magento processes the static files and copies them to the pub/static directory. This occurs because static files can be cached by Magento, and the correct directory for this is pub. So, we need to create the web directory for Magento to recognize the files as static files.
The final theme directory structure is illustrated as follows:
Once we have the theme ready to launch, we need to activate it in the Magento admin dashboard:
http://localhost/packt/admin_packt) in your favorite browser.Navigate to the home page of your site by accessing the http://localhost/packt URL to see the final result:
Now, you have all the basic concepts to create a custom theme for Magento and all the information to think in terms of the Magento structure when an idea for your new design comes to mind.
In this chapter, you learned the basic concepts of Magento 2.0 themes, how theme inheritance (that is, the fallback system) works, and which directories Magento uses to create its themes according to the admin area configurations. Finally, you created your own basic theme with these examples.
However, what about creating a quality theme? Is it possible with the knowledge acquired in this chapter? Of course! We will go to the next level in the next chapter and create a responsive theme by example.
In the previous chapter, you learned the fundamentals of creating a custom Magento 2.0 theme, and we created the basic structure by example. In this chapter, we will create our own theme project called the CompStore theme.
The following topics will be covered in this chapter:
The CompStore theme project is the new Magento 2.0 theme that you will develop for a hypothetical computer store client or for a theme marketplace such as http://themeforest.net/. I strongly suggest you to take a look at the Become an author page at http://themeforest.net/become_an_author in order to explore the options to monetize your Magento theme development expertise. Logically, you have to work harder before publishing and selling your own theme solution, but it will be worth it!
Magento 2.0 themes and modules work with the
Composer (https://getcomposer.org/) dependency manager for PHP to generate a reliable deployment of Magento components. This is a great evolution in the Magento universe because this management can provide a powerful environment for the deployment of modules and themes. So, we will create a composer file for our new theme solution.
Before we start the theme development, let's take a look at Composer.
Inspired by
npm (https://www.npmjs.com/) and
bundler (http://bundler.io/), Composer (https://getcomposer.org/) manages the dependencies of your project and installs packages in predetermined directories (for example, vendor) using the composer.json file in the Magento module or theme. This kind of management is very useful once each library has your specific dependency. Composer doesn't let you waste your time by connecting the dependencies to every deployment that you want to do.
In the next chapters, we will use Composer to install components on Magento. However, first, we will start the development of our theme; it is necessary to declare our composer.json file. For now, let's install Composer on the operating system.
To install Composer on Unix-like systems (such as Unix, Linux, and OS X), you simply need to run these two commands in the terminal:
$ curl -s https://getcomposer.org/installer | php $ sudo mv composer.phar /usr/local/bin/composer
The first command downloads the composer.phar installation file. The second command moves the file to the bin directory to install Composer globally on your computer.
Run the following command to check whether Composer was successfully installed:
$ composer
The $ composer command lists all the available Composer commands and their descriptions:
To install Composer on Windows, you simply have to download and execute Composer-Setup.exe, which is available on https://getcomposer.org/Composer-Setup.exe.
This executable file will install the latest Composer version and set up your path to use the composer command in the command prompt window. Open the command prompt window and run command composer to get the list of available commands of Composer.
As you noted in the previous chapter, Magento can store different themes inside the same vendor scope. The proposal project called CompStore will be a template of the Packt vendor. This is the same vendor created in the previous chapter.
First of all, it is important to build the theme directory in the Packt vendor directory (<Magento root directory>/app/design/frontend/Packt/compstore). Create this folder as the following image suggests:
The etc directory usually handles the XML configuration of some components. The Magento_Theme directory will override the native Magento_Theme module by adding new functionalities. The media directory will store the preview image of the CompStore theme. Meanwhile, the web directory would have store CSS and image files by now.
The Compstore theme will have Luma as the parent theme. This example shows you the power of the abstraction used in Magento theme projects. Create the theme.xml file in the Packt/compstore directory with the following code:
<theme xmlns:xsi="http://www.w3.org/2001/XMLSchema-instance" xsi:noNamespaceSchemaLocation="urn:magento:framework:Config/etc/theme.xsd">
<title>CompStore Electronics</title>
<parent>Magento/luma</parent>
<media>
<preview_image>media/preview.jpg</preview_image>
</media>
</theme>The theme.xml file declares the title and parent of the CompStore theme. Create a simple preview.jpg image with a size of 800 x 800 and save it in the Packt/compstore/media directory. For example, the Magento logo is centered at the image size of 800 x 800.
This image shows the preview of the new theme, but as you don't have a preview yet, you can create a placeholder for now.
The next step is creating the registration.php file in the Packt/compstore directory with the following code:
<?php
\Magento\Framework\Component\ComponentRegistrar::register(
\Magento\Framework\Component\ComponentRegistrar::THEME,
'frontend/Packt/compstore',
__DIR__
);In the registration.php file, the CompStore theme of the Packt vendor registers the new theme of the Magento system.
The theme.xml and registration.php files were created earlier. By now, I think you are very comfortable with the structure of these files because you worked with them in the basic theme and now in the CompStore theme. This point forward, you will be introduced to some new concepts of theme development in Magento 2.0, starting with the creation of the composer.json file. Create the composer.json file in the Packt/compstore directory with the following code:
{
"name": "packt/compstore",
"description": "CompStore electronics theme",
"require": {
"php": "~5.5.0|~5.6.0|~7.0.0",
"magento/theme-frontend-luma": "~100.0",
"magento/framework": "~100.0"
},
"type": "magento2-theme",
"version": "1.0.0",
"license": [
"OSL-3.0",
"AFL-3.0"
],
"autoload": {
"files": [ "registration.php" ]
}
}This file has the .json (http://www.json.org/) format and handles important information of the project and its dependencies. As we discussed earlier, this kind of control is crucial because it generates more organization for your project. Let's navigate to the principal parameters of the composer.json file:
Before applying CSS in the CompStore Magento theme, it is important to study CSS behavior in the Magento system. The stylesheets in Magento 2.0 are preprocessed and compiled to CSS using the LESS technology. LESS (http://lesscss.org/) is a CSS preprocessor that extends the CSS traditional features by including variables and functions to generate a powerful CSS code and saves the time in maintaining the code.
All the .less files that you will save in your theme are compiled by the LESS engine but you will always declare .css in the Magento theme frontend. Here are a couple of examples:
css src="css/styles.css" /><Magento _theme_dir>/web/css/styles.lessFor further information, access the Magento 2.0 official documentation at http://goo.gl/XLkOcQ.
A CompStore theme inherits the Luma theme, which in turn inherits a blank theme, as shown here:
Once you have to make changes in CompStore in order to customize the new theme, you can think about the functionalities already available in the other themes to apply your changes.
The vendor directory under the Magento 2.0 root directory handles all the native Magento modules and themes. The Magento blank and Luma themes, which you have been working on until now, are available in vendor/magento/theme-frontend-blank and vendor/magento/theme-frontend-luma, respectively. So, the CompStore theme "receives" all the features of the themes under these folders. It's important to fix these basic concepts to understand the context that you inserted when you developed a Magento theme solution.
Once you have a solid concept about the behavior, let's create a custom .css file for the CompStore theme:
packt/vendor/magento/theme-frontend-blank/web/css/_styles.less file to the packt/app/design/frontend/Packt/compstore/web/css locationimport command as the following example:@import 'source/lib/_lib.less'; @import 'source/_sources.less'; @import 'source/_components.less'; @import 'source/compstore.less';
compstore.less file under the packt/app/design/frontend/compstore/web/css/source directory and type this code:@color-compstore: #F6F6F6;
body{
background: @color-compstore;
}_theme.less file under the packt/app/design/frontend/compstore/web/css/source directory. Execute the following://Change color of elements in Product Page @color-catalog: #4A96AD; @page__background-color: @color-catalog; @sidebar__background-color: @color-gray40; @primary__color: @color-gray80; @border-color__base: @color-gray76; @link__color: @color-gray56; @link__hover__color: @color-gray60; @button__color: @color-gray20; @button__background: @color-gray80; @button__border: 1px solid @border-color__base; @button-primary__background: @color-orange-red1; @button-primary__border: 1px solid @color-orange-red2; @button-primary__color: @color-white; @button-primary__hover__background: darken(@color-orange-red1, 5%); @button-primary__hover__border: 1px solid @color-orange-red2; @button-primary__hover__color: @color-white; @navigation-level0-item__color: @color-gray80; @submenu-item__color: @color-gray80; @navigation__background: @color-gray40; @navigation-desktop-level0-item__color: @color-gray80; @navigation-desktop-level0-item__hover__color: @color-gray34; @navigation-desktop-level0-item__active__color: @navigation-desktop-level0-item__color; @tab-control__background-color: @page__background-color; @form-element-input__background: @color-gray89; @form-element-input-placeholder__color: @color-gray60; @header-icons-color: @color-gray89; @header-icons-color-hover: @color-gray60;
With the compstore.less and _theme.less files, the background and product page colors will change according to the new proposal of the CompStore theme.
You can create a new logo for learning purposes using the Logomakr free online service (http://logomakr.com/). It's a pretty easy tool.
I created this logo for the CompStore theme using Logomakr:
My CompStore proposal of the logo was made in Logomakr, which is a solution developed by Webalys (http://www.streamlineicons.com) and FlatIcon (http://www.flaticon.com) and licensed under Creative Commons by 3.0 (http://creativecommons.org/licenses/by/3.0). If you use this solution for other projects, don't forget to give the due credit to Logomakr.
After finishing the logo, save it under the app/design/frontend/Packt/compstore/Magento_Theme/web/images/logo.png path.
You can feel free to use your own solution for logo instead of using Logomakr.
As you learned in the previous chapter, it's time to activate the new theme. Activate the CompStore Electronics theme in the Admin area (http://localhost/packt/admin_packt) to see the following result:
Sometimes, when you update in the Magento structure or activate a new theme, you need to deploy the theme and module changes. If you want to deploy your changes, follow these steps:
packt/pub/static/frontend/<Vendor>/<theme>/<locale> directory.var/cache directory.var/view_preprocessed directory.packt/bin directory.magento setup:static-content:deploy command.write permissions again to the directories.Once the new theme is activated, it's time to handle the content by creating some options and configuring the products and categories.
To create new categories, you will need access the Admin area (http://localhost/packt/admin_packt) and follow this recipe:
In the Add Category option, you have option to fill the Description, Page Title, and Meta Information areas for SEO purposes, as shown in the following screenshot:
To create new products, you will need access to the Admin area (http://localhost/packt/admin_packt) and follow this recipe:
http://localhost/packt/admin_packt) and navigate to Products | Catalog.Magento has a widget management system that allows the flexibility of the content. The widget helps create a specific list of new products in the home page. To create a new widget, follow these steps:
The default block configuration contains the images and products of the Luma theme. Let's change it via the following steps:
<div class="blocks-promo">
<a class="block-promo home-main" href="{{store url=""}}notebook.html">
<img src="{{media url="wysiwyg/home-main.jpg"}}" alt="" />
<span class="content bg-white"><span class="info">New Desktop available!</span>
<strong class="title">New Brands</strong>
<span class="action more button">Shop New Desktop</span> </span> </a>
</div>
<div class="content-heading">
<h2 class="title">New Products</h2>
<p class="info">Here is what`s trending on CompStore now</p>Go to the Home page to see the final result:
Magento works with .phtml template files to generate the view layer for the users. The modules and themes in Magento have its specific group of .phtml files to show data to the users. Let's create a custom template example in the CompStore theme to see how it works:
Magento_Catalog directory under the compstore theme directory.vendor/magento/module_catalog/view/frontend/templates to app/design/frontend/Packt/compstore/Magento_Catalog/templates.app/design/frontend/Packt/compstore/Magento_Catalog/templates/product/view/addto.phtml file in your favorite code editor.<div><h2>Buy in CompStore!!!</h2></div>
var/view_preprocessed/ and pub/static/frontend/Packt/compstore/ directories.php magento setup:static-content:deploy command.write permission to the pub directory.Navigate to the product page to see the result, as in the following screenshot:
With the content learned in this chapter, you can now develop your own themes and customize solutions. The modern developer creates tools that can maximize the quality and minimize the effort to develop.
As a suggestion, try to read Chapter 4, Magento 2.0 Theme Development – the Developers' Holy Grail, again to create specific Magento pages and layout rules for the CompStore theme. You have uncountable possibilities to develop quality themes for Magento e-commerce and a great solid path to specialize more and more.
Now that you have all the tools to develop a theme for Magento, we will start discovering how to write Magento extensions by programming specific solutions in the next chapter.
In the previous chapter, we created a custom Magento 2.0 theme called CompStore. However, what do you think about extending our Magento expertise by creating our own extension? In this chapter, we will create a new extension called TweetsAbout, add a brand new functionality in our theme, learn the main concepts of Magento extension development, and take a look at how the extension packaging process works.
The following topics will be covered in this chapter:
Magento is an MVC-based application divided into modules. Each module has a specific job inside Magento, following a mature software pattern. For example, Magento has a specific module to control product shipping. This kind of approach is very important to create new functionalities and have the flexibility and modularity to extend its power.
According to Zend Framework Case Study available at https://www.zend.com/topics/Magento-CS.pdf, the Magento project chose to go with industry-standard PHP and the Zend framework because of the extremely simple, object-oriented, and flexible solution that encapsulates best practices and agile testing methodologies and that would result in a very rapid development of enterprise-grade web applications.
Using the Zend framework as the main pillar in the Magento project definitely includes the following advantages:
With the Zend framework, Magento has great flexibility in creating and customizing modules, developing new features for the system, and maintaining the core code.
A basic understanding of Zend components could be interesting for developers to take advantage of this great MVC framework.
You can learn more about Zend framework at http://framework.zend.com/.
Magento 2.0 is a modular system as you can see. That is why it is important to maintain all the code organized, and it couldn't be different with Magento extensions. In previous chapters you saw all the directory structure of Magento, but now let's give special attention to the basic Magento module file structure:
In order to create a new extension according to the preceding image, we must create the same directory structure. However, how will they interact with the Magento system?
Some of these directories have an important role to play in the Magento system. They are directories that are responsible for providing basic functionalities and coupling between modules and the Magento system:
Block: Blocks are View classes that are responsible for providing visualization layers between the logical and frontend layer.Controller: These control all the actions of the Magento. Web servers process the requests and Controller redirects them to specific modules according to the URL.etc: This stores all the module XML configuration files.Helper: This stores auxiliary classes that provide forms, validators, and formatters, which are commonly used in business logic.Model: This stores all business logic and the access layer to the data.Setup: Setup classes are classes that control installation and upgrading functionalities.The other directories support additional configurations and implementations of the module; these are as follows:
The files presented in the root directory are files on which you worked before. The LICENSES and README files are those available for extension distribution purposes.
Now, you have a general concept of creating a new extension for Magento. As a scenario to our development, we will create a simple extension called TweetsAbout to communicate with Twitter via the API and get the latest tweets with the #magento, #packtpub, and #php hashtags.
We will have two simple pages; the first will show a link to the results, and the second will show the tweets.
Let's get to work!
Representational State Transfer (REST) is an architecture created to provide a simple communication channel between different applications over the Internet using mainly the HTTP protocol. It is the hottest data technology nowadays. Facebook, Google, Twitter, and a lot of huge companies have adopted REST applications. With REST APIs, you can read, post, and delete data.
Twitter has a specific format to spread its data on the Web in order to create great integration with different kinds of applications that consume its service. According to Twitter Developers Documentation available at https://dev.twitter.com/rest/public, Twitter REST APIs provide programmatic access to read and write Twitter data. You can author a new Tweet, read an author profile or follower data, and more. The REST API identifies Twitter applications and users using Oauth, and the responses are available in JSON.
Before beginning to code the Magento extension, let's create an account on Twitter Developer to authenticate our new application on the Twitter platform.
Create a new account in Twitter (https://twitter.com/) if you don't have one and access the Twitter Developer page (https://dev.twitter.com/), as in the following screenshot:
We have a lot of options on the developer's website, such as gathering real-time data, crashlytics, and mopub. I strongly suggest that you take a good look at these tools later.
So, let's create a new application to consume Twitter services. Access the URL https://apps.twitter.com/ to create a new Twitter application. In order to use Twitter's public API services, you need to identify your application by generating a token and a secret key.
You can create a new application by clicking on the Create New App button and filling in the form with the following required fields:
Accept the Developer Agreement to finish your app registration and click on the Create your Twitter Application button.
You can access your application's configurations by clicking on the name of your application. Later on in this chapter, we will discuss how to get the right credentials to integrate our application with Twitter.
Now, we can finally start our Magento 2.0 extension solution.
The TwitterOAuth (https://twitteroauth.com/) library provides communication with Twitter via an API. In the TweetsAbout project, this kind of communication is essential for the final proposal of our extension solution. TwitterOAuth is the most popular PHP library to use with the TwitterOAuth REST API.
This project is also available on GitHub (https://github.com/abraham/twitteroauth), as shown in the following screenshot:
To install TwitterOAuth on the TweetsAbout extension, follow this recipe:
packt/app/code/Packt/TweetsAbout/Api directory, run the composer require abraham/twitteroauth command.We'll need these credentials to use on our extension later.
To start the module development, we will declare the basic module configurations. Open your favorite code editor, create a new file called module.xml, and save the file in app/code/Packt/TweetsAbout/etc. Enter this code in the file:
<?xml version="1.0"?>
  <config xmlns:xsi="http://www.w3.org/2001/XMLSchema-instance" xsi:noNamespaceSchemaLocation="urn:magento:framework:Module/etc/module.xsd">
      <module name="Packt_TweetsAbout" setup_version="2.0.0"/>
  </config>
Magento 2.0 works with Uniform Resource Names (URN) schema validation to reference XML declarations, as you can observe in the <config> tag. The module.xsd file works by validating whether your module declaration follows the module declaration schema.
The <module> tag contains the vendor and module name. Always follow this example of module name declaration: Vendor_Module.
Under app/code/Packt/TweetsAbout/etc/frontend, create two new files, as follows:
routes.xmlevents.xmlThe routes.xml file contains the following code:
<?xml version="1.0"?>
<config xmlns:xsi="http://www.w3.org/2001/XMLSchema-instance" xsi:noNamespaceSchemaLocation="urn:magento:framework:App/etc/routes.xsd">
    <router id="standard">
        <route id="tweetsabout" frontName="tweetsabout">
            <module name="Packt_TweetsAbout" />
        </route>
    </router>
</config>
The routes.xml file tells Magento where to look for the controllers (TweetsAbout/Controller) when the URL http://localhost/packt/tweetsabout is accessed (MVC).
The events.xml file contains the following code:
<?xml version="1.0"?>
<config xmlns:xsi="http://www.w3.org/2001/XMLSchema-instance" xsi:noNamespaceSchemaLocation="urn:magento:framework:Event/etc/events.xsd">
    <event name="page_block_html_topmenu_gethtml_before">
        <observer name="Packt_TweetsAbout_observer" instance="Packt\TweetsAbout\Observer\Topmenu" />
    </event>
</config>
The events.xml file declares an Observer event handler in the module, and this file has the mission of configuring a new TweetsAbout top menu link to access the module in the frontend. Observer listens to events triggered by the user or system. The <event> tag gets basic information of the top menu Block to be handled later in the PHP code, and the <observer> tag declares the Topmenu observer class. In this chapter, we will take a look at how the Topmenu class works. For now, it's important to declare this option.
For further information about Observer, access the Magento official documentation at http://goo.gl/0CTzmn.
Now, it is time to create the registration.php file under the root directory of TweetsAbout. Run the following code:
<?php
\Magento\Framework\Component\ComponentRegistrar::register(
    \Magento\Framework\Component\ComponentRegistrar::MODULE,
    'Packt_TweetsAbout',
    __DIR__
);
The registration.php file has the same role as that of theme registration in Magento System.
Create the composer.json file under the root directory of TweetsAbout via the following code:
{
  "name": "packt/tweets-about",
  "description": "Example of Magento Module - Packt Publishing",
  "type": "magento2-module",
  "version": "1.0.0",
  "license": [
    "OSL-3.0",
    "AFL-3.0"
  ],
  "require": {
    "php": "~5.5.0|~5.6.0|~7.0.0",
    "magento/framework": "~100.0",
    "abraham/twitteroauth": "^0.6.2"
  },
  "autoload": {
    "files": [ "registration.php" ],
    "psr-4": {
      "Packt\\TweetsAbout\\": ""
    }
  },
  "extra": {
        "installer-paths": {
            "app/code/Packt/TweetsAbout/Api": ["abraham/twitteroauth"]
        }
    }
}
You can observe in the composer.json file the declaration of the TwitterOAuth project as a required package to our extension. Also, the file defines the installation directory.
For further information about Composer packages, refer to the link https://packagist.org/.
You can copy the LICENSE.txt and LICENSE_AFL.txt files from the Magento root directory to your Packt/TweetsAbout directory. The README.md file is responsible for storing information about the module's scope and some considerations for the purposes of publishing on GitHub (http://github.com/). You can feel free to create the README.md file as you wish.
For now, we have the module declaration and registration files. It's time to create the controllers to start giving some life to the TweetsAbout module.
First, let's create a new file named Index.php. This file will control the access to the initial page of the module. Save it under app/code/Packt/TweetsAbout/Controller/Index/ with the following code:
<?php

  namespace Packt\TweetsAbout\Controller\Index;

  class Index extends \Magento\Framework\App\Action\Action{

      protected $resultPageFactory;

      public function __construct(
          \Magento\Framework\App\Action\Context $context,
          \Magento\Framework\View\Result\PageFactory $resultPageFactory
      ) {
          $this->resultPageFactory = $resultPageFactory;
          parent::__construct($context);
      }

      public function execute(){
          return $this->resultPageFactory->create();
      }
  }
Create another file named Index.php under app/code/Packt/TweetsAbout/Controller/Magento/. This file will control the access to the Magento Tweets page of the module. Save it with the following code:
<?php

  namespace Packt\TweetsAbout\Controller\Magento;

  class Index extends \Magento\Framework\App\Action\Action{

      protected $resultPageFactory;

      public function __construct(
          \Magento\Framework\App\Action\Context $context,
          \Magento\Framework\View\Result\PageFactory $resultPageFactory
      ) {
          $this->resultPageFactory = $resultPageFactory;
          parent::__construct($context);
      }

      public function execute(){
          return $this->resultPageFactory->create();
      }
  }
Create another file named Index.php under app/code/Packt/TweetsAbout/Controller/Packt/. This file will control the access to the Packt tweets page of the module. Save it with the following code:
<?php

  namespace Packt\TweetsAbout\Controller\Packt;

  class Index extends \Magento\Framework\App\Action\Action{

      protected $resultPageFactory;

      public function __construct(
          \Magento\Framework\App\Action\Context $context,
          \Magento\Framework\View\Result\PageFactory $resultPageFactory
      ) {
          $this->resultPageFactory = $resultPageFactory;
          parent::__construct($context);
      }

      public function execute(){
          return $this->resultPageFactory->create();
      }
  }
Create another file named Index.php under app/code/Packt/TweetsAbout/Controller/Php/. This file will control the access to the PHP tweets page of the module. Save it with the following code:
<?php

  namespace Packt\TweetsAbout\Controller\Php;

  class Index extends \Magento\Framework\App\Action\Action{
      protected $resultPageFactory;

      public function __construct(
          \Magento\Framework\App\Action\Context $context,
          \Magento\Framework\View\Result\PageFactory $resultPageFactory
      ) {
          $this->resultPageFactory = $resultPageFactory;
          parent::__construct($context);
      }

      public function execute()
      {
          return $this->resultPageFactory->create();
      }
  }
Magento 2.0 uses namespaces as a PHP standard recommendation (http://www.php-fig.org/psr/) to avoid name collisions between classes and to improve the readability of the code. So, in the namespace instruction, we will declare the class path to follow the PSR-4 pattern (http://www.php-fig.org/psr/psr-4/).
The extends functionality (inheritance) of \Magento\Framework\App\Action\Action provides a functionality to handle actions triggered by the URL access. For example, when the user enters the URL http://<magento_url>/tweetsabout, the routes.xml file redirects to the Index/Index.php controller to treat the user request made by accessing the URL.
The dependency injection of the __construct() method—\Magento\Framework\App\Action\Context $context and \Magento\Framework\View\Result\PageFactory $resultPageFactory—declares the initial construct of the Action class and the view layer to work with the template file.
For further information about the dependency injection, access the Magento official documentation at http://goo.gl/jHFPTr.
Finally, the execute() method renders the layout. We will declare the layout files later on.
At this point, it's important to be familiar with PHP object-oriented programming (http://php.net/manual/en/language.oop5.php). I strongly suggest that you study the main concepts to increase the understanding of the book.
Blocks in Magento 2.0 provide presentation logic for your view templates. In the TweetsAbout project, we will use two blocks to process the view template files.
Under the app/code/Packt/TweetsAbout/Block directory, create a file named Index.php with the following code:
<?php

  namespace Packt\TweetsAbout\Block;

  class Index extends \Magento\Framework\View\Element\Template{

      public function getMagentoUrl(){
          return $this->getData('urlMagento');
      }

      public function getPHPUrl(){
          return $this->getData('urlPHP');
      }

      public function getPacktUrl(){
          return $this->getData('urlPackt');
      }
  }
The three methods, getMagentoUrl(), getPHPUrl(), and getPacktUrl(), get data from layout declaration files to define a URL for each kind of controller and give it to the initial layout of the module.
Now, under the app/code/Packt/TweetsAbout/Block directory, create a file named Tweets.php with the following code:
<?php
  namespace Packt\TweetsAbout\Block;

  require $_SERVER['DOCUMENT_ROOT'] . "/packt/app/code/Packt/TweetsAbout/Api/vendor/autoload.php";
  use Abraham\TwitterOAuth\TwitterOAuth;

  class Tweets extends \Magento\Framework\View\Element\Template{

      private $consumerKey;
      private $consumerSecret;
      private $accessToken;
      private $accessTokenSecret;

    public function searchTweets(){
      $connection = $this->twitterDevAuth();
      $result = $connection->get("search/tweets", array("q" =>$this->getData('hashtag'), "result_type"=>"recent", "count" => 10));

      return $result->statuses;
    }

    private function twitterDevAuth(){
      $this->consumerKey = YOUR_CONSUMER_KEY;
      $this->consumerSecret = YOUR_CONSUMER_SECRET;
      $this->accessToken = YOUR_ACCESS_TOKEN;
      $this->accessTokenSecret  = YOUR_ACCESS_TOKEN_SECRET;

      return new TwitterOAuth($this->consumerKey, $this->consumerSecret, $this->accessToken, $this->accessTokenSecret);
    }
  }
Here are some things to consider about the Tweets.php code:
TwitterOAuth library to work on our extensiontwitterDevAuth() method, you must enter the Twitter API credentialssearchTweets() method, the $connection->get("search/tweets", array("q" =>$this->getData('hashtag'), "result_type"=>"recent", "count" => 10)) instruction works with the Twitter search API, getting the last 10 results of Twitter postsUnder the app/code/Packt/TweetsAbout/Observer directory, create the Topmenu.php file with the following code:
<?php
namespace Packt\TweetsAbout\Observer;
use Magento\Framework\Event\Observer as EventObserver;
use Magento\Framework\Data\Tree\Node;
use Magento\Framework\Event\ObserverInterface;

class Topmenu implements ObserverInterface{

    /**
     * @param EventObserver $observer
     * @return $this
     */
    public function execute(EventObserver $observer)
    {

      $urlInterface = \Magento\Framework\App\ObjectManager::getInstance()->get('Magento\Framework\UrlInterface');

      $active = strpos($urlInterface->getCurrentUrl(), "tweetsabout");


        /** @var \Magento\Framework\Data\Tree\Node $menu */
        $menu = $observer->getMenu();
        $tree = $menu->getTree();
        $data = [
            'name'      => __("TweetsAbout"),
            'id'        => 'tweetsmenu',
            'url'       => $urlInterface->getBaseUrl() . 'tweetsabout',
            'is_active' => $active
        ];
        $node = new Node($data, 'id', $tree, $menu);
        $menu->addChild($node);
        return $this;
    }
}
The Topmenu.php file dynamically creates a new top menu item for the TweetsAbout module by adding a node in the top menu link schema. The \Magento\Framework\App\ObjectManager::getInstance()->get('Magento\Framework\UrlInterface') instruction gets the base URL and the current URL to create a specific link to the TweetsAbout module. The Topmenu observer works with the Document Object Model (DOM) concept of nodes and trees dynamically.
It's time to handle the presentation layer of the project. First, we will create the layout files (.xml) to handle template behavior and to pass arguments to the template via blocks. Every layout file is assigned by following this pattern: <module_name>_<controller>_<controller_file>.xml. This pattern allows the Magento system to assign the correct files according to its controller automatically.
Under the app/code/Packt/TweetsAbout/view/frontend/layout path, create the tweetsabout_index_index.xml file with the following code:
<?xml version="1.0"?>
<page xmlns:xsi="http://www.w3.org/2001/XMLSchema-instance" layout="1column" xsi:noNamespaceSchemaLocation="urn:magento:framework:View/Layout/etc/page_configuration.xsd">
    <head>
        <title>
            TweetsAbout Module
        </title>
    </head>
    <body>
        <referenceContainer name="content">
            <block class="Packt\TweetsAbout\Block\Index" template="Packt_TweetsAbout::index.phtml">
                <arguments>
                    <argument name="urlMagento" xsi:type="url" path="tweetsabout/magento" />
                    <argument name="urlPHP" xsi:type="url" path="tweetsabout/php" />
                    <argument name="urlPackt" xsi:type="url" path="tweetsabout/packt" />
                </arguments>
            </block>
        </referenceContainer>
    </body>
</page>
The <block> tag binds the Index.php Block to the index.phtml template, and the <arguments> tag transports three URL parameters to the Block. These parameters will be used in the index.phtml file.
Under the app/code/Packt/TweetsAbout/view/frontend/layout path, create the tweetsabout_magento_index.xml file with the following code:
<?xml version="1.0"?>
<page xmlns:xsi="http://www.w3.org/2001/XMLSchema-instance" layout="1column" xsi:noNamespaceSchemaLocation="urn:magento:framework:View/Layout/etc/page_configuration.xsd">
    <head>
        <title>
            TweetsAbout #Magento
        </title>
        <css src="Packt_TweetsAbout::css/source/module.css"/>
    </head>
    <body>
        <referenceContainer name="content">
            <block class="Packt\TweetsAbout\Block\Tweets" template="Packt_TweetsAbout::tweets.phtml">
                <arguments>
                    <argument name="hashtag" xsi:type="string">#magento</argument>
                </arguments>
            </block>
        </referenceContainer>
    </body>
</page>
Under the app/code/Packt/TweetsAbout/view/frontend/layout path, create the tweetsabout_packt_index.xml file with the following code:
<?xml version="1.0"?>
<page xmlns:xsi="http://www.w3.org/2001/XMLSchema-instance" layout="1column" xsi:noNamespaceSchemaLocation="urn:magento:framework:View/Layout/etc/page_configuration.xsd">
    <head>
        <title>
            TweetsAbout #Packtpub
        </title>
        <css src="Packt_TweetsAbout::css/source/module.css"/>
    </head>
    <body>
        <referenceContainer name="content">
            <block class="Packt\TweetsAbout\Block\Tweets" template="Packt_TweetsAbout::tweets.phtml">
                <arguments>
                    <argument name="hashtag" xsi:type="string">#packtpub</argument>
                </arguments>
            </block>
        </referenceContainer>
    </body>
</page>
Under the app/code/Packt/TweetsAbout/view/frontend/layout path, create the tweetsabout_php_index.xml file with the following code:
<?xml version="1.0"?>
<page xmlns:xsi="http://www.w3.org/2001/XMLSchema-instance" layout="1column" xsi:noNamespaceSchemaLocation="urn:magento:framework:View/Layout/etc/page_configuration.xsd">
    <head>
        <title>
            TweetsAbout #PHP
        </title>
        <css src="Packt_TweetsAbout::css/source/module.css"/>
    </head>
    <body>
        <referenceContainer name="content">
            <block class="Packt\TweetsAbout\Block\Tweets" template="Packt_TweetsAbout::tweets.phtml">
                <arguments>
                    <argument name="hashtag" xsi:type="string">#php</argument>
                </arguments>
            </block>
        </referenceContainer>
    </body>
</page>
The <css> tag loads the CSS rules of the template. The <block> tag binds the Tweets.php Block to the tweets.phtml file. The <argument name="hashtag"> tag transports the hashtag parameter to the Tweets.php Block to search the latest mentions of the specific hashtag in the Twitter database.
Now, let's create the template files.
Under the app/code/Packt/TweetsAbout/view/frontend/templates path, create the index.phtml file with the following code:
<h2>Recent TweetsAbout: </h2>
<ul>
  <li>
    <a href="<?php echo $block->escapeHtml($block->getMagentoUrl()) ?>">
      <span><?php echo __('Magento')?></span>
    </a>
  </li>
  <li>
    <a href="<?php echo $block->escapeHtml($block->getPacktUrl()) ?>">
      <span><?php echo __('Packtpub')?></span>
    </a>
  </li>
  <li>
    <a href="<?php echo $block->escapeHtml($block->getPHPUrl()) ?>">
      <span><?php echo __('PHP')?></span>
    </a>
  </li>
</ul>
The $block object has access to the methods of Block/Index.php, and the URL of the pages build dynamically.
Under the app/code/Packt/TweetsAbout/view/frontend/templates path, create the tweets.phtml file with the following code:
<?php
  $tweets = $block->searchTweets();
?>

<?php foreach ($tweets as $tweet){ ?>
  <p class="tweet">
    <a href="<?php echo $tweet->user->url; ?>">
      <img src="<?php echo $tweet->user->profile_image_url; ?>" alt="profile">
    </a>
    <b>Created: </b><?php echo $tweet->created_at; ?>
    <br />
    <br />

    <a href="<?php echo isset($tweet->entities->urls[0]->url) ? $tweet->entities->urls[0]->url : "#"; ?>" target="_blank"><?php echo $tweet->text;?></a>

  </p>
  <hr />
<?php } ?>
The searchTweets() method loads tweets according to the URL accessed, and PHP processes the data to show the results to the user.
Under the app/code/Packt/TweetsAbout/view/frontend/web/css/source path, create the module.less file with the following code:
 .tweet {background-color: #878787; padding:15px; border:1px dotted}
.tweet a {color: #ffffff}
.tweet a:hover {text-decoration: underline;}To deploy the module, follow this recipe:
packt/bin directory.php magento module:enable --clear-static-content Packt_TweetsAbout command.php magento setup:upgrade command.php magento setup:static-content:deploy command.write permissions again to the directories.If everything goes alright, when you access the URL http://localhost/packt, you will see one link for the TweetsAbout extension in the topmost menu. Just click on it to see how the extension works. Take a look at the following screenshot:
You can navigate to the links to see how the pages work, as in the following screenshot:
The extension gets the ten last tweets in real time with the date, picture, and post. It's really awesome to watch our work running!
For sure, this extension can get a lot better, but it is only a starting point for big achievements.
Once you have your extension ready to work, you can publish it in the Magento Connect service (http://www.magentocommerce.com/magento-connect). Magento Connect is a service in which Magento members can share their open source or commercial extensions with Magento Community. The main contributions are generally based on the following:
Once you have the composer.json file configured, you can package your module by compacting it as a .zip file in the vendor-name_package-name-1.0.0.zip format.
Upload the module in your personal account in GitHub, and Magento can retrieve it to publish.
For further information, it's strongly recommended that you to access the official documentation available on the Magento Developers official site at http://devdocs.magento.com/guides/v2.0/extension-dev-guide/package_module.html.
You worked on a lot in this chapter! Congratulations. Now, you have solid grasp of the concept in Magento 2.0 extension development. You can note that Magento development has strict rules, but once you learn the basics, you can master Magento with hard work and study. Keep the good work going!
As a suggestion, try to read the official documentation and do projects that demand more user interaction, such as the admin panel and development of dynamic formularies. You can even increase the power of TweetsAbout. The sky is the limit!
In the next chapter, we will start to work with Magento mobile by testing and configuring some great options. See you!
Nowadays e-commerce stores must be responsive and mobile friendly to increase sales according to the huge number of people using mobile devices to buy products and services. It's very important to know the right tools to provide a mobile-friendly Magento theme for your project. Let's go mobile with Magento!
The following topics will be covered in this chapter:
According to a research called State of Mobile Commerce Growing like a weed Q1 2015 conducted by Criteo (http://www.criteo.com/), a digital marketing company, mobile accounts for 29% of e-commerce transactions in the US and 34% globally. By the end of 2015, mobile share is forecast to reach 33% in the US and 40% globally. This research is available at http://www.criteo.com/media/1894/criteo-state-of-mobile-commerce-q1-2015-ppt.pdf.
This is one of the main reasons for which all Magento developers must create responsive designs. We started this process indirectly by creating a new theme with Webcomm Magento Boilerplate. Despite its basic mobile support, we have to make some adjustments to create a completely responsive Magento theme. Let's return to work!
In order to test your website in different devices and, consequently, different screen sizes, it is recommended to use a specific software or service to simulate the screen sizes of devices. If you perform a search on the web, you may find a great number of online test tools, but these tools work only with published websites. Our Magento site works, for now, on our local development environment.
To take advantage of our local development environment, let's work with the Google Chrome DevTools Device Mode and the Responsive Web Designer Tester extensions. In this book, we'll have two options to work with mobile theme development. You choose both of them!
If you don't have Google Chrome installed, download it from the URL https://www.google.com/intl/en/chrome/browser/desktop/ to install it on your operating system.
Google Chrome DevTools is a native tool of Google Chrome that provides a bunch of tools for web developers. By working with DevTools, you can optimize your frontend code, including HTML, CSS, and JavaScript.
Before accessing the DevTools extensions, access your Magento CompStore website at the http://localhost/packt URL.
To access DevTools, in the Google Chrome browser, follow these steps:
Now, you can see the DevTools window, as in the preceding screenshot.
To activate Device Mode, click on the smartphone icon next to the Elements menu item. Now, you can see the page rendering with different options, as in the following screenshot:
According to the Google DevTools official page available at https://developers.google.com/web/tools/chrome-devtools/iterate/device-mode/, you can use the DevTools device mode to do the following:
The DevTools extension has the following options to enhance developer experience:
To change the device preset, click on the Device options:
You can choose from among iPhone, Google Nexus, Samsung Galaxy, and Blackberry, and you can create custom devices to test the screen size.
The media queries are responsible for defining the CSS rule for each screen size. You can access all of these using DevTools. To access media queries, click on the icon in the upper-left corner:
Now, open the Google Chrome browser and navigate to the address https://chrome.google.com/webstore/category/apps to access Chrome Web Store. Conduct a search to find the Responsive Web Designer Tester extension and then add the extension to Google Chrome, as follows:
Great work! Now, let's take a look at how this extension works. On your browser, go to your Magento local site, also known as CompStore, by accessing http://localhost/packt. Remember that you have to turn on Apache Service in XAMMP to test the local website.
Click on the button of the Responsive Web Designer Tester extension shown on the right-hand side of your screen (generally near the end of the browser address bar) and select the iPhone 5—Portrait option for the first test:
After you select the device, you will see a pop-up window having the size of iPhone 5 screen. Navigating on the page, you will see also that the layout is not fully responsive. We have some issues in the home page presentation:
Now we have a tool to test site behavior between the different devices. It is time to make our CompStore theme 100% compatible with multiple devices!
Both the Magento 2.0 native themes, Blank and Luma, use Responsive Web Design (RWD) to provide good visualization in different devices, such as desktops, tablets, and mobiles.
In spite of the fact that the CompStore theme inherited the Luma theme, you can customize the template and CSS codes, as we discussed in Chapter 6, Write Magento 2.0 Extensions – a Great Place to Go. So, what do you think about improving the CompStore theme to make it more user friendly?
The actual mobile version of CompStore has some differences in the desktop version, including colors, elements positioning, and image size. Before creating some mobile standards for the CompStore theme, it's important to fix some CSS responsive design concepts of Magento. Let's get to work!
To handle accessibility for different devices, the Magento 2.0 native themes (Blank and Luma) work with an RWD engine, as we discussed in the Chapter 4, Magento 2.0 Theme Development – the Developers' Holy Grail, and Chapter 5, Creating a Responsive Magento 2.0 Theme. The stylesheets engine provided by the LESS preprocessor is the main utility responsible for this design approach.
The Magento 2.0 native themes were built based on the Magento UI library. The Magento UI library works with CSS 3 media queries to render a page with predefined rules according to the device, which requests the page. An example of media queries would be one that applies a specific rule for screens with a maximum width of 640 px; take a look at the following code:
@media only screen and (max-width: 640px) {
…
}
With media queries, the themes apply breakpoints to handle different screen-width rules for different screen sizes of devices in a progression scale of pixels, as follows:
For further information about media queries, refer to the W3C official documentation available at https://www.w3.org/TR/css3-mediaqueries/.
The Magento 2.0 system works with the LESS CSS preprocessor to extend the features of CSS and enable the opportunity to create theme inheritance with minimal and organized effort. With this premise, to help theme developers, we have the Magento UI library in Magento 2.0.
The Magento UI library is based on LESS and provides a set of components to develop themes and frontend solutions:
Another important resource of the Magento UI and of LESS is the mixin capability. The mixin allows developers to group style rules to work with different devices.
For example, consider that you declared the following CSS code in one determined file:
.media-width(@extremum, @break) when (@extremum = 'max') and (@break = @screen__m) {
    .example-responsive-block {
        background: #ffc;
    }
    .example-responsive-block:before {
        content: 'Mobile styles ';
        font-weight: bold;
    }
}
Then, you executed this CSS code in a different file:
.media-width(@extremum, @break) when (@extremum = 'min') and (@break = @screen__m) {
    .example-responsive-block {
        background: #ccf;
    }
    .example-responsive-block:before {
        content: 'Desktop styles ';
        font-weight: bold;
    }
}
In spite of the two files declaring a mixin named .media-width to the .example-responsive-block class in different files, the mixin allows LESS to make a single query, grouping the rules instead of making multiple calls according to the device rule applied.
You can access the local Magento UI documentation by accessing the URL http://<magento_local_url>/pub/static/frontend/Magento/blank/en_US/css/docs/responsive.html.
For further information about the Magento UI, take a look at the Magento official readme.md file available at https://github.com/magento/magento2/blob/2.0.0/lib/web/css/docs/source/README.md.
First of all, let's take a look at the current mobile version of the CompStore theme. Using Chrome DevTools or Responsive Web Designer Tester, select an Apple iPhone 5 (portrait) device to test the site. You will probably be redirected to home page:
In spite of the previous adjustment in the CompStore theme, when a mobile device accesses a theme, CSS rules don't apply some important features, such as colors and the positioning of elements. As a suggestion, let's create a standard declaration of color approach and configure CSS to show only one product when the mobile device accesses the site. How can we implement these new features? Using media queries, of course!
In your favorite code editor, open the compstore.less file available under the app/design/frontend/Packt/compstore/web/css/source directory and use the following CSS 3 code:
@color-compstore: #F6F6F6;

body{
  background: @color-compstore;
}

.media-width(@extremum, @break) when (@extremum = 'max') and (@break = @screen__s) {
  body{
    background: @color-compstore;
  }
  .widget .block-promo img{
    height: 600px;
  }

  .products-grid .product-item {
    width: 100%;
    display: inline-block;
  }
}

.media-width(@extremum, @break) when (@extremum = 'min') and (@break = @screen__s) {
  body{
    background: @color-compstore;
  }
  .widget .block-promo img{
    height: 600px;
  }
  .products-grid .product-item {
    width: 100%;
    display: inline-block;
  }
}
The Magento UI break points predefined variables to identify the scope of media queries, which are as follows:
@screen__xxs: 320 px@screen__xs: 480 px@screen__s: 640 px@screen__m: 768 px@screen__l: 1024 px@screen__xl: 1440 pxSo, in the CSS 3 new proposal, the media queries use the @screen_s variable to define the application of new rules. We will propose via mixin to change the background color, promo image size, and product size inside mobile rules for portrait and landscape purposes.
To apply the changes, follow this recipe:
packt/pub/static/frontend/<Vendor>/<theme>/<locale> directory.var/cache directory.var/view_preprocessed directory.packt/bin directory.php magento setup:static-content:deploy command.write permissions again to the directories.Test the site again to get the new home page, as in the following screenshot:
The extension that we created in Chapter 6, Write Magento 2.0 Extensions – a Great Place to Go, tweets about extension and has the following appearance:
Let's improve the CSS extension rules to turn it into a mobile-friendly one.
Using Chrome DevTools or Responsive Web Designer Tester, select an Apple iPhone 5—portrait device to test our code optimization.
Open the module.less file available under the packt/app/code/Packt/TweetsAbout/view/frontend/web/css/source directory and add the following code:
/*Tweets About Style*/

@media (min-width: 960px){
#wrapper {
width: 90%;
max-width: 1100px;
min-width: 800px;
margin: 50px auto;
  }

  #columns {
    -webkit-column-count: 3;
    -webkit-column-gap: 10px;
    -webkit-column-fill: auto;
    -moz-column-count: 3;
    -moz-column-gap: 10px;
    -moz-column-fill: auto;
    column-count: 3;
    column-gap: 15px;
    column-fill: auto;
  }
}

.tweet {
    display: inline-block;
    background: #FEFEFE;
    border: 2px solid #FAFAFA;
    box-shadow: 0 1px 2px rgba(34, 25, 25, 0.4);
    margin: 0 2px 15px;
    -webkit-column-break-inside: avoid;
    -moz-column-break-inside: avoid;
    column-break-inside: avoid;
    padding: 15px;
    padding-bottom: 5px;
    background: -webkit-linear-gradient(45deg, #FFF, #F9F9F9);
    opacity: 1;

    -webkit-transition: all .2s ease;
    -moz-transition: all .2s ease;
    -o-transition: all .2s ease;
    transition: all .2s ease;
}

.tweetimg {
    width: 15%;
    display:block;
    float:left;
    margin: 0px 5px 0px 0px;
}

.tweet p {
    font: 12px/18px Arial, sans-serif;
    color: #333;
    margin: 0;
}

#columns:hover .img:not(:hover) {
    opacity: 0.4;
}
After saving the module.less file, change the tweets.phtml code available under packt/app/code/Packt/TweetsAbout/view/frontend/templates, change the file with this new code, and save it, as follows:
<?php
  $tweets = $block->searchTweets();
?>

<div id="wrapper">
  <div id="columns">
    <?php foreach ($tweets as $tweet){ ?>
      <div class="tweet">
        <p>
          <a href="https://twitter.com/intent/user?user_id=<?php echo $tweet->user->id; ?>" target="_blank">
            <img src="<?php echo $tweets->user->profile_image_url; ?>" alt="profile">
            <?php echo $tweet->user->name; ?>
          </a>
          <br />
          Created: <?php echo $tweets->created_at; ?>
          <br /><br />
          <a href="<?php echo isset($tweet->entities->urls[0]->url) ? $tweet->entities->urls[0]->url : "#"; ?>" target="_blank"><?php echo $tweet->text;?></a>
            <?php echo $tweets->text;?>
          </a>
        </p>
      </div>
    <?php } ?>
  </div>
</div>
To deploy the module update, follow this recipe:
packt/bin directory.php magento module:enable --clear-static-content Packt_TweetsAbout command.php magento setup:upgrade command.php magento setup:static-content:deploy command.write permissions again to the directories (var and pub).Now, test the tweets about extension by accessing http://localhost/packt/tweetsabout to see the new responsive look, as shown in the following screenshot:
If you activate DevTools and choose an iPhone 5 device, you will see a result similar to the following screenshot:
In this chapter, you learned about tools that provide you with a great environment to develop Magento frontend themes.
You also increased the power of CompStore CSS to handle access from specific mobile devices. Of course, you can modify the code constantly to have a better experience by fine-tuning in your code. However, this is only the beginning.
In the next chapter, we will start configuring our Magento software, on which we have been working until now, to improve its speed. We will installing solutions and configure the already native Magento options.
Despite the existence of a great solution such as Zend Framework for its system, Magento 2.0 needs some fine tuning to get the best performance in order to provide the users with a better shopping experience. As you noted in the previous chapters, it is very important to focus on every aspect for successful e-commerce.
The following topics will be covered in this chapter:
expires headerWith a complex system architecture, Magento developers realized that a traditional development approach could be counterproductive for a scalable idea to implement an e-commerce solution.
Developers, therefore, decided to adopt the Entity-Attribute-Value (EAV) architecture approach.
This database structure embraces the Magento 2.0 complexity processes and variables and allows an unlimited numbers of attributes to any item, such as categories, products, costumers, addresses, and more.
The three main points of EAV can be described as follows:
This book is a hands–on guide to Magento, but I strongly suggest you to read more about EAV in the Magento official documentation at http://devdocs.magento.com/guides/v2.0/extension-dev-guide/attributes.html.
With the increase in content, images, and script demands for a better experience in e-commerce, we have to handle network consumption in order to provide fast access to our system. Search engines measure some technical points with their algorithms, and fast access is, of course, one of the requisites validated.
Magento has a complex architecture and works with MySQL database constant queries to show specific products information, render pages, and process checkouts. This high process volume demand can slow the download speed when your Magento 2.0 solution is in a production environment.
To improve the Magento 2.0 performance, we can use two important tools: indexing and caching.
In the Magento 2.0 life cycle, at a determined point, we will have considerable megabytes of data on the MySQL database, including information regarding products, orders, customers, and payments. To improve its performance, Magento uses indexed tables to provide faster lookups.
However, as your Magento 2.0 e-commerce grows, the indexation feature starts to lose performance too.
In order to correct this issue, you can precompile database relationships using the flat table option in Magento. This technique combines EAV relationships for categories and products in one table to increase the speed of queries. To enable this feature, you can follow these instructions:
http://localhost/packt/admin_packt).If you make changes to your catalog, product, or some page that has a relationship with indexers, the Magento system needs to re-index the information to keep the flat table schema working. You can manage the indexers with the Magento command-line tool, as follows:
The reindex command rebuilds all the product, catalog, customer, and stock information. The index feature enables a fast return of data once the system has no need to process any basic data, such as product price, every single time that the user accesses the store.
Did you notice in the preceding system message one issue about Magento cron job? Cron job allows you to automate this task and others to improve your efficiency. Let's take a look at how cron job works.
For further information about Magento indexing, take a look at the official Magento documentation at http://devdocs.magento.com/guides/v2.0/extension-dev-guide/indexing.html.
Magento has important system processes that are very important to maintain the system's working at its full potential. These processes need automated executions to handle the updates made by the user and administrator. That is the why this feature is critical to Magento.
Cron job works with UNIX systems and can schedule specific tasks to be executed in a predetermined time on the server. The following activities can be scheduled to execute on the Magento 2.0 system:
To configure the cron job, follow this recipe.
Find the php.ini file path.
If you use XAMPP, as was suggested for a web server solution at the beginning of the book, you simply can use the XAMPP/xamppfiles/etc/php.ini path. If you use a Unix-based terminal, you can use the command to find the PHP configuration file. Perform the following steps:
sudo crontab -u magento_user –e command; here, magento_user refers to your system's owner.*/1 * * * * php -c <php-ini-file-path> <your Magento install dir>/bin/magento cron:run */1 * * * * php -c <php-ini-file-path> <your Magento install dir>/update/cron.php */1 * * * * php -c <php-file-path> <your Magento install dir>/bin/magento setup:cron:run
Here's an example:
*/1 * * * * php -c /Applications/XAMPP/xamppfiles/etc/php.ini /Applications/XAMPP/xamppfiles/etc/php.ini /Applications/XAMPP/htdocs/packt/bin/magento cron:run
*/1 * * * * php -c /Applications/XAMPP/xamppfiles/etc/php.ini /Applications/XAMPP/xamppfiles/etc/php.ini /Applications/XAMPP/htdocs/packt/update/cron.php
*/1 * * * * php -c /Applications/XAMPP/xamppfiles/etc/php.ini /Applications/XAMPP/htdocs/packt/bin/magento setup:cron:run
sudo crontab -u fjmiguel –l command to take a look at your new cron job configuration.In some cases, it is necessary to give write permissions again to the directories.
The */1 * * * * configuration specifies that the cron job will be executed every minute. The cron job will now run in the background every minute. To manually execute the cron job, you can run the php magento cron:run command on the Magento command-line tool, as shown in the following figure:
For further information about the cron job, follow the link at https://help.ubuntu.com/community/CronHowto.
For Magento cron, take a look at the official Magento documentation http://devdocs.magento.com/guides/v2.0/config-guide/cli/config-cli-subcommands-cron.html.
While the indexing technique works on database layer, the caching feature does the same for the HTML page components to increase fast access to the frontend. Caching stores this kind of data in order to provide the visitors with access to faster download.
To enable caching, you need to perform the following steps:
For further information about cache configuration, follow the link at http://devdocs.magento.com/guides/v2.0/config-guide/cli/config-cli-subcommands-cache.html.
You can work with third-party cache solutions to provide a better performance. Some of this solution has support and works very well with the Magento 2.0 solution. This book doesn't cover server configurations, but I strongly suggest you to take a look at the following:
Magento 2.0 has a complex structure, but it follows the good practices of software development, which gives the administrators and the developers of this fantastic e-commerce solution the real possibility to implement a scalable system to conquer a great site traffic and constantly increase the sales.
Despite this advantage, all the scalable systems need a great server infrastructure to provide fast content access through the Internet.
As a developer, you need to always think about all the stages that a successful software needs to go through in an order to aggregate the real value to its administrator and to its users. Try to always see the big picture of your project.
Let's take a look at some techniques and tips to increase your Magento server's capability.
First of all, we need to conduct a deep research on the existent solutions. We will try to gather information about clients of these solutions and test Magento's performance by accessing the Magento website as a visitor.
The Magento official project website provides you with an online tool to search for Magento. You can use this tool by accessing the URL at http://partners.magento.com/partner_locator/search.aspx.
Magento hosting services generally use Apache as a web server solution. Magento is written in PHP, and Apache has a mature environment to handle PHP processes.
In order to give fast response to visitors' requests, we will use Apache's mod_deflate to speed up server response.
According to Apache's official documentation (http://httpd.apache.org/docs/2.2/mod/mod_deflate.html), this module provides the deflate output filter that allows output from your server to be compressed before being sent to the client over the network.
To enable this feature on your server, you need to create the .htaccess file and enter the following code:
<IfModule mod_deflate.c>

############################################
## enable apache served files compression
## http://developer.yahoo.com/performance/rules.html#gzip

    # Insert filter on all content
    SetOutputFilter DEFLATE
    # Insert filter on selected content types only
    AddOutputFilterByType DEFLATE text/html text/plain text/xml text/css text/javascript

    # Netscape 4.x has some problems...
    BrowserMatch ^Mozilla/4 gzip-only-text/html

    # Netscape 4.06-4.08 have some more problems
    BrowserMatch ^Mozilla/4\.0[678] no-gzip

    # MSIE masquerades as Netscape, but it is fine
    BrowserMatch \bMSIE !no-gzip !gzip-only-text/html

    # Don't compress images
    SetEnvIfNoCase Request_URI \.(?:gif|jpe?g|png)$ no-gzip dont-vary

    # Make sure proxies don't deliver the wrong content
    Header append Vary User-Agent env=!dont-vary

</IfModule>
This adjustment reduces about 70% of the amount of data delivered.
For further information about the .htaccess and mod_deflate configurations, take a look at the links at http://httpd.apache.org/docs/current/howto/htaccess.html and http://httpd.apache.org/docs/2.2/mod/mod_deflate.html.
Continuing to take advantage of the Apache web server, we will activate the mod_expires module. This module sends a message to the client machine about the document's validity, and the client can store a cache of the site until the client receives a new message from the server expiration of data. This technique increases the speed of download.
To activate this feature, you can open the .htaccess file available in the Magento root directory and enter this block of code:
<IfModule mod_expires.c>

############################################
## Add default Expires header
## http://developer.yahoo.com/performance/rules.html#expires

    ExpiresActive On
    ExpiresDefault "access plus 1 year"

</IfModule>
For further information about the .htaccess configuration, follow the link at http://httpd.apache.org/docs/2.2/mod/mod_expires.html.
Increasing PHP memory by host configuration has a direct relationship with your contracted hosting service. Some shared hosting services do not give this option to the developers. This is one of the main reasons to choose a specialized Magento hosting service.
Generally, this configuration can be done by adding the following code to the .htaccess file available in the Magento root directory:
<IfModule mod_php5.c>

############################################
## adjust memory limit

php_value memory_limit 256M
php_value max_execution_time 18000

</IfModule>
MySQL has the query cache feature to provide fast queries on a database. Once again, you need to conduct deep research on your possible hosting services before contracting any to make sure you have all the services you need for a great production environment.
Before starting the optimization, refer to the PHP and MySQL documentations of your hosting service to check the availability of these changes.
Open the php.ini hosting service file and place these configurations:
;;;;;;;;;;;;;;;;;;;
; Resource Limits ;
;;;;;;;;;;;;;;;;;;;

max_execution_time = 30     ; Maximum execution time of each script, in seconds
max_input_time = 60	; Maximum amount of time each script may spend parsing request data
memory_limit = 512M      ; Maximum amount of memory a script may consume (8MB)
query_cache_size = 64M

[MySQLi]
; Please refer to http://php.net/manual/en/mysqli.configuration.php for further information

; Maximum number of persistent links.  -1 means no limit.
mysqli.max_persistent = -1

; Allow accessing, from PHP's perspective, local files with LOAD DATA statements
;mysqli.allow_local_infile = On

; Allow or prevent persistent links.
mysqli.allow_persistent = On

; Maximum number of links.  -1 means no limit.
mysqli.max_links = -1

; If mysqlnd is used: Number of cache slots for the internal result set cache
mysqli.cache_size = 2000

; Default port number for mysqli_connect().  If unset, mysqli_connect() will use
; the $MYSQL_TCP_PORT or the mysql-tcp entry in /etc/services or the
; compile-time value defined MYSQL_PORT (in that order).  Win32 will only look
; at MYSQL_PORT.
mysqli.default_port = 3306

; Default socket name for local MySQL connects.  If empty, uses the built-in
; MySQL defaults.
mysqli.default_socket =

; Default host for mysql_connect() (doesn't apply in safe mode).
mysqli.default_host =

; Default user for mysql_connect() (doesn't apply in safe mode).
mysqli.default_user =

; Default password for mysqli_connect() (doesn't apply in safe mode).
; Note that this is generally a *bad* idea to store passwords in this file.
; *Any* user with PHP access can run 'echo get_cfg_var("mysqli.default_pw")
; and reveal this password!  And of course, any users with read access to this
; file will be able to reveal the password as well.
mysqli.default_pw =

; Allow or prevent reconnect
mysqli.reconnect = Off
Now, let's configure the query_cache_size variable directly on the MySQL database.
Open the phpMyAdmin web SQL console, and execute the SHOW VARIABLES LIKE 'query_cache_size'; query without selecting a database. The query will probably return the 0 value for the query_cache_size variable.
Execute the SET GLOBAL query_cache_size = 1048576; query and execute SHOW VARIABLES LIKE 'query_cache_size'; again.
The query will probably return the following information:
The query_cache_size variable was activated with success!
For further information about the MySQL cache size configuration, follow the link at https://dev.mysql.com/doc/refman/5.0/en/query-cache-configuration.html.
Even by testing these configurations in your localhost environment, you can feel the huge positive difference between the first access in your Magento installation and the last access after the configuration. This is really awesome!
Code minification is a technique to remove unnecessary characters from the source code. Minify your JavaScript (.js) and stylesheets (.css) files and improve the load time of your site by compressing the files.
In order to activate this process in Magento, navigate to the admin area (http://localhost/packt/admin_packt) and follow these instructions:
Content Delivery Networks, also known as CDN, are servers of fast access for your static or non-dynamic content. JavaScript files and images are examples of files hosted on CDN servers.
The main idea behind the use of CDN is saving the process time of your Magento server using a CDN solution.
I suggest you to conduct research on hosting services that provide this integration. For example, Nexcess as a Magento partner company provides specific documentation about CDN integration on the URL https://docs.nexcess.net/article/how-to-configure-cdn-access-for-magento.html.
For JavaScript CDN, we have a free-of-charge service available on the Internet! This is thanks to Google for providing us with this amazing feature at https://developers.google.com/speed/libraries/.
In this chapter, you learned important lessons about how to improve Magento performance and pay attention to all the aspects that can make a positive difference in Magento development, including how to create a full-speed environment for Magento System.
I invite you to think in this very for now. We are progressing and walking through all the aspects of Magento: design, development, marketing, and performance. I feel comfortable to say to you, dear reader, that you have the tools to elevate your Magento professional career. Just keep continuing to study hard.
In this chapter, you learned how to:
In the final chapter, we will explore some tools and ways to improve your Magento skills. See you!
We are at the end of the book, but this only the beginning of your walk through the Magento training. It's important to know some Magento extension options, but it is more important to build your own path in the Magento world by studying for a certification and achieving a new professional level.
The following topics will be covered in this chapter:
The Magento 2.0 architecture allows a natural improvement of native resources and the addition of new ones. Magento 2.0 is built based on the best software development practices. Its architecture is modular, which allows the development of extensions, as we discussed in an earlier chapter.
Magento Commerce maintains a marketplace to provide Magento extensions known as Magento Connect (https://www.magentocommerce.com/magento-connect). Magento Connect includes extensions that provide new functionalities, such as modules, add-ons, language packs, design interfaces, and themes to extend the power of your store.
I strongly suggest that you visit Magento Connect to get some ideas for personal projects and follow the extension development tendency in the marketplace.
Besides the Magento Connect marketplace, to search for Magento extension solutions, you can access the extension options through your admin area. To access Magento extension options in your admin area, perform the following steps:
http://localhost/admin_packt.To install the extensions via Composer, you need to configure composer.json to work with the Magento 2 Composer repository (http://packages.magento.com/) as a repository solution for Magento Core extensions. The composer already has the Packagist (https://packagist.org/) configuration. To proceed with this configuration, perform the following:
composer config repositories.magento composer http://packages.magento.com command.To install a Magento extension via composer, do the following:
composer require <vendor>/<module> command.composer require Packt/TweetsAbout.composer update command.php bin/magento setup:upgrade command.To install a Magento extension manually, perform the following steps:
.zip file of the module.<magento_root_directory>/app/code directory.php bin/magento setup:upgrade command.var directory)As you noted in the previous chapters, for every change that you apply in a Magento extension or theme styles, you need to clean the static files directory and deploy it to see the effect. This process takes time and unnecessary effort. So, what if you have a tool to automate this process?
Grunt.js (http://gruntjs.com/) is a task runner to automate tasks; for example, it provides productivity in Magento development by automating CSS changes. To install Grunt, follow these steps:
npm install -g grunt-cli command to install the Grunt command-line interface.packt/ Magento root directory and run the npm install grunt --save-dev command.packt directory, run the npm install command.npm update command.packt/dev/tools/grunt/configs/theme.js file, add the following code, and save it:'use strict';
module.exports = {
blank: {
area: 'frontend',
name: 'Magento/blank',
locale: 'en_US',
files: [
'css/styles-m',
'css/styles-l',
'css/email',
'css/email-inline'
],
dsl: 'less'
},
luma: {
area: 'frontend',
name: 'Magento/luma',
locale: 'en_US',
files: [
'css/styles-m',
'css/styles-l'
],
dsl: 'less'
},
backend: {
area: 'adminhtml',
name: 'Magento/backend',
locale: 'en_US',
files: [
'css/styles-old',
'css/styles'
],
dsl: 'less'
},
compstore: {
area: 'frontend',
name: 'Packt/compstore',
locale: 'en_US',
files: [
'css/styles-m',
'css/styles-l',
'css/source/compstore'
],
dsl: 'less'
}
};Once the Grunt environment is configured, it's time to test Grunt. Perform the following steps:
grunt exec:compstore command.grunt less:compstore command.grunt watch command.These commands will create a direct channel with the possibility to edit your .CSS files on the fly. The grunt watch command shows you the update in real time. With "grunt watch" still active in your terminal/prompt window, try to edit and save the body's background color in the app/design/frontend/Packt/compstore/web/css/source/compstore.less file to see the result in the browser by accessing your base URL:
The Magento team provides great resources of documentation in order to increase the Magento developer's knowledge.
In the Magento documentation (http://magento.com/help/documentation), the user can access the USER GUIDES section for ENTERPRISE EDITION, COMMUNITY EDITION, DESIGNER'S GUIDE, and DEVELOPER DOCUMENTATION.
I strongly suggest that you, dear reader, study Magento's COMMUNITY EDITION, DESIGNER'S GUIDE, and DEVELOPER DOCUMENTATION in the first instance. These three documentations have solid concepts, and you can certainly take advantage by building your Magento concepts.
Welcome to the world of information technology! The professionals of this area need to study harder every single day. It's totally crazy how technology is always in mutation. New technologies and solutions come in a short period of time, and professionals must be prepared all the time to keep an open mind, absorbing this situation assertively.
Magento provides an official training program available at http://magento.com/training/overview. You can access information about courses, and I strongly suggest that you think about Magento certification. Certifications can boost your career.
To learn more about Magento certification, refer to http://magento.com/training/catalog/certification. You can download a free Magento study guide by visiting http://magento.com/training/free-study-guide.
You have a lot of options, such as books, articles, and blogs, to train and improve your Magento skills. Be persistent on your objectives!
Congratulations! You won one more challenge; first, you acquired this great book, and then you completed the reading with merits. It was not easy, but I'm certain it was worth it.
In this chapter, you learned how to:
Thank you so much. I know you can climb the highest mountains; never lose faith in yourself. Good luck!
In this chapter, we will cover the basic tasks related to managing the system tools of Magento 2. You will learn the following recipes:
This chapter explains how to install and manage Magento 2 on a production-like environment. We will be installing a new Magento 2 instance via the shell command with and without sample data. Besides the setup, managing Magento 2 is different from the current Magento version. We will be using a lot of tools from the command line so basic shell knowledge is advised. The command-line tool in the /bin directory is similar to the current Swiss
army knife tool in the current Magento version known as n98-magerun.
Using bin/magento and
Composer is one of the new key features in Magento 2 that will rock your world.
The recipes in this chapter will focus primarily on a more advanced setup of how to install Magento 2 and manage it. However, in some situations, we will dive in deeper related to the subject.
Here is an overview of all the command-line tools in Magento 2:
root@mage2cookbook:/var/www/html# bin/magento
Magento CLI version 2.0.0

Usage:
 command [options] [arguments]

Options:
 --help (-h)       Display this help message
 --quiet (-q)      Do not output any message
 --verbose (-v|vv|vvv) Increase the verbosity of messages: 1 for normal output, 2 for more verbose output and 3 for debug
 --version (-V)    Display this application version
 --ansi        Force ANSI output
 --no-ansi       Disable ANSI output
 --no-interaction (-n) Do not ask any interactive question
The following commands are available in the command-line tools in Magento 2:
|
Commands |
Description |
|---|---|
|
|
This displays help for a command |
|
|
This lists the commands |
|
admin | |
|
|
This creates an administrator |
|
|
This unlocks the administrator account |
|
cache | |
|
|
This cleans the cache type(s) |
|
|
This disables the cache type(s) |
|
|
This enables the cache type(s) |
|
|
This flushes the cache storage used by the cache type(s) |
|
|
This checks the cache status |
|
catalog | |
|
|
This creates resized product images |
|
cron | |
|
|
This runs jobs by schedule |
|
customer | |
|
|
This upgrades the customer's hash according to the latest algorithm |
|
deploy | |
|
|
This sets the application mode |
|
|
This displays the current application mode |
|
dev | |
|
|
This collects and publishes source files for a theme |
|
|
This runs tests |
|
|
This generates the catalog of URNs to |
|
|
This converts XML files using XSL style sheets |
|
i18n | |
|
|
This discovers phrases in the code base |
|
|
This saves language packages |
|
|
This uninstalls language packages |
|
indexer | |
|
|
This shows allowed indexers |
|
|
This reindexes data |
|
|
This sets the index mode type |
|
|
This shows the index mode |
|
|
This shows the status of an indexer |
|
maintenance | |
|
|
This sets the maintenance mode exempt IPs |
|
|
This disables the maintenance mode |
|
|
This enables the maintenance mode |
|
|
This displays the maintenance mode status |
|
module | |
|
|
This disables specified modules |
|
|
This enables specified modules |
|
|
This displays the status of modules |
|
|
This uninstalls modules installed by Composer |
|
sampledata | |
|
|
This deploys sample data modules |
|
|
This removes all sample data from |
|
|
This resets sample data modules for reinstallation |
|
theme | |
|
|
This uninstalls the theme |
|
info | |
|
|
This displays the Magento Admin URI |
|
|
This prints a list of available backup files |
|
|
This displays the list of available currencies |
|
|
This shows the number of dependencies on the Magento framework |
|
|
This shows the number of dependencies between modules |
|
|
This shows the number of circular dependencies between modules |
|
|
This displays a list of available language locales |
|
|
This displays a list of available time zones |
|
setup | |
|
|
This takes a backup of the Magento Application code base, media, and database |
|
|
This creates or modifies the deployment configuration |
|
|
This runs a cron job scheduled for the setup application |
|
|
This installs and upgrades data in the DB |
|
|
This installs and upgrades the DB schema |
|
|
This checks whether the DB schema or data require an upgrade |
|
|
This generates the DI configuration and all non-existing interceptors and factories |
|
|
This generates all non-existing proxies and factories and precompiles class definitions, inheritance information, and plugin definitions |
|
|
This installs the Magento application |
|
|
This generates fixtures |
|
|
This rolls back the Magento application code base, media, and database |
|
|
This deploys static view files |
|
|
This installs the store configuration |
|
|
This uninstalls the Magento application |
|
|
This upgrades the Magento application, DB data, and schema |
We will be using an NGINX-based setup. The Apache setup is pretty straightforward; when needed, we will address specified configuration settings when they occur.
Installing Magento 2 via the graphical user interface (GUI) is not new. Now, we will be installing a new clean version including the sample data.
The sample data can be installed during and at the end of the procedure. We will be using a composer.json file for our setup prerequisites. First, we will be installing a clean version with sample data, and later, I will show you how to install it at the end in case you already have a preinstalled version.
For this recipe, we will use a Droplet and NGINX, at DigitalOcean, https://www.digitalocean.com/. We will be using NGINX, PHP-FPM, and a Composer-based setup. No other prerequisites are required.
For the first step, you can either create a new Droplet or rebuild a clean Droplet based on a Ubuntu or RedHat DigitalOcean image.
The option to rebuild is located in the DigitalOcean control panel in the Destroy menu and then rebuild Droplet:
The steps to install Magento 2 sample data via GUI are as follows:
/var/www/html in this recipe.If you are using a ZIP package, make sure that you install the unzip package first, running the following command on the shell:
apt-get install unzip
chown -R www-data:www-data /var/www/html

find . -type d -exec chmod 770 {} \; && find . -type f -exec chmod 660 {} \; && chmod u+x bin/magento
cd /var/www/html/ && composer install
During the installation process, you will get a notice to create a GitHub OAuth token. The download rate limit is pretty small. Copy the URL from your shell window in your browser, log in at GitHub or create an account, and create the token.
http://yourdomain.com/setup
Continue your flow until Step 4: Customize Your Store. As we have chosen a Magento 2 package including sample data, all software modules are preinstalled and listed in the advanced modules configurations list.
Here is an overview of all the modules selected by Magento that can be managed during installation:
The progress bar and console log will share all details regarding the current status:
Congratulations, you just finished the installation of Magento 2 including sample data. Now go to your browser using yourdomain.com; you will see the default Magento 2 layout theme called
Luma, as follows:
Let's recap and find out what we did throughout this recipe. In steps 1 through 6, we created a Magento 2 version including sample data. The process is almost the same as we did in the previous chapter. The most important change is that we downloaded a full version including sample data. In this build, Magento submitted all of the media files and data sample packages that we need to complete the process. During the graphical setup, we were able to choose which sample data packages are needed. This process could take some time to complete.
In the /var directory, you can find the following hidden file with the current state of the installed sample data:
less /var/www/html/var/.sample-data-state.flag
Want to start all over again? Magento 2 has a magic uninstall option that cleans everything on the fly, cache, and database. You can use the php bin/magento setup:uninstall command on the shell, as shown here:
root@mage2cookbook:/var/www/html# php bin/magento setup:uninstall
Are you sure you want to uninstall Magento?[y/N]y
Starting Magento uninstallation:
Cache cleared successfully
Cleaning up database `magento2`
File system cleanup:
/var/www/html/pub/static/_requirejs
/var/www/html/pub/static/adminhtml
/var/www/html/pub/static/frontend
/var/www/html/var/cache
/var/www/html/var/composer_home
/var/www/html/var/di
/var/www/html/var/generation
/var/www/html/var/log
/var/www/html/var/page_cache
/var/www/html/var/tmp
/var/www/html/var/view_preprocessed
/var/www/html/app/etc/config.php
/var/www/html/app/etc/env.php
Installing Magento 2 via the shell is not new. In the current Magento version, it was already possible using the install.php file. The configuration looked like this:
/usr/local/bin/php -f install.php -- \
--license_agreement_accepted "yes" \
--locale "en_US" \
--timezone "America/Los_Angeles" \
--default_currency "USD" \
--db_host "mysql.example.com" \
--db_name "your_db_name" \
--db_user "your_db_username" \
--db_pass "your_db_password" \
--db_prefix "" \
--admin_frontname "admin" \
--url "http://www.examplesite.com/store" \
--use_rewrites "yes" \
--use_secure "no" \
--secure_base_url "" \
--use_secure_admin "no" \
--admin_firstname "your_first_name" \
--admin_lastname "your_last_name" \
--admin_email "your_email@example.com" \
--admin_username "your_admin_username" \
--admin_password "your_admin_password"
It was very easy to script and use multiple times on any given environment.
In Magento 2, the logic stayed the same but now, it's much easier to use. We will be using a composer.json file for our setup prerequisites.
For this recipe, we will use a Droplet created in Chapter 1, Magento 2 System Tools, at DigitalOcean, https://www.digitalocean.com/. We will be using NGINX, PHP-FPM, and a Composer-based setup. No other prerequisites are required.
For the purpose of this recipe, let's assume that we need to create a Magento 2 hosting environment including sample data. The following steps will guide you through this:
/root/.composer/auth.json file if you have a Magento of GitHub repository token, username, and password. If not, create them. Here is an example (the username and password are dummies):{
"http-basic": {
"repo.magento.com": {
"username": "256e8f49b66689ecf18b07bc3cc2ca2d",
"password": "cb1c7ef2e14b666d8a4e99fe40c8393a"
}
},
"github-oauth": {
"github.com": "e960f7000803e2832ce5f7a637d58a666"
}
}You can create a Magento authentication key in the user section of the Magento connect portal. Go to http://www.magentocommerce.com/magento-connect/, navigate to the Developers | Secure Keys menu item, and create one. Public Key is your username and Private Key is your password.
The GitHub token can be created under the tokens section of your GitHub account. Go to https://github.com/settings/tokens and press Generate new token. Copy the token in your auth.json file of your home or root directory.
/var/www/html directory and use the following command:
composer create-project "magento/project-community-edition" /var/www/html --prefer-dist --repository-url https://repo.magento.com/
composer.json file.
php bin/magento sampledata:deploy
You may get the following error notice; ignore this once you set up the auth.json file:
[Composer\Downloader\TransportException]
The 'https://repo.magento.com/packages.json' URL required authentication.
You must be using the interactive console to authenticate
composer update
chown -R www-data:www-data /var/www/html
The easy way to continue is to visit our setup page from the browser as we did in the Installing Magento 2 sample data via GUI recipe of this chapter using the http://yourdomain.com/setup URL.
bin/magento setup:install \
    --db-host=localhost \
    --db-name=<your-db-name> \
    --db-user="<db-user>" \
    --db-password="<db-password>" \
    --backend-frontname=<admin-path> \
    --base-url=http://yourdomain.com/ \
    --admin-lastname=<your-lastname> \
    --admin-firstname=<your-firstname> \
    --admin-email=<your-email> \
    --admin-user=<your-admin-user> \
--admin-password=<your-password> \Congratulations, you just finished the installation of Magento 2 including sample data. Now go to your browser using yourdomain.com, and you will see the default Magento 2 layout theme called Luma.
Let's recap and find out what we did throughout this recipe. In steps 1 through 6, we installed Magento 2 via the command shell. Before we could continue, we needed to create an auth.json file that stores our Magento and GitHub tokens. Without them, we may not be able to install the software easily due to download restrictions or dependencies.
In step 2, we used one line of code to trigger the whole download process of Magento 2. Depending on whether this is your first call, the process can take some time. Once you install Magento for the second time, the process installs much faster because of the locally stored cache files.
In step 3, we used bin/magento to update the composer.json file including the sample data packages. Then we needed to update Composer before we could install Magento 2 from the shell; otherwise, the sample data would not be included.
In step 6, we used the bin/magento setup:install parameter to commit all of the database, URL admin path, domain name, and user credentials to the setup of Magento 2.
In the current version of Magento, using indexes is one of the most important key features. Without the correct indexes, we will not be able to use Magento properly.
What do the indexes do, and why are they so important? One of the key elements is to make things run faster. Without indexing, Magento 2 would have to calculate data on the fly. In Magento 2, we will be using the following nine indexes:
adminhtml backend pages.catalog_product_index_price_*) and makes the selects (sorting and filtering) much easier.The database table looks as follows:
The control panel of the backend looks like this:
For this recipe, we will use a Droplet created in Chapter 1, Magento 2 System Tools, at DigitalOcean, https://www.digitalocean.com/. We will be using NGINX, PHP-FPM, and a Composer-based setup. A working Magento 2 setup is required.
The following are the steps to implement the recipe:
Update on Save: Index tables are updated immediately after the dictionary data is changed
Update by Schedule: Index tables are updated by cron job according to the configured schedule
php bin/magento indexer:info
We now get an overview of all the indexers.
php bin/magento indexer:status; this will give us an up-to-date status of the current indexes.php bin/magento indexer:show-mode; this information is related to the Update on Save or Update by Schedule modes.
php bin/magento indexer:info realtime customer_grid
Using the mode option realtime (Update on Save) or schedule (Update by Schedule) may set the indexer.
php bin/magento indexer:reindex
This will reindex all the indexers. However, you can also reindex them individually using the following command:
php bin/magento indexer:reindex customer_grid
We can also use the following command:
php bin/magento indexer:reindex customer_grid catalog_category_product etc…
indexer:status to check whether all the indexers are up to date.Let's recap and find out what we did throughout this recipe. In steps 1 through 7, you learned how to use the bin/magento indexer.
In step 5, you learned how to check what the current status is of all the indexes. In step 4, we saw how to switch from the realtime Update on Save to the schedule Update on Schedule modes.
In step 6, you learned how to reindex them individually.
Cache management is one of the new optimized key features in Magento 2. We will be using the following cache types:
By default, we will be using Full Page Cache now in the community version, which is a great improvement next to the web services (API) caches.
Depending on the current development, default, and production state, caches will be different.
In the next recipes of this chapter, we will dive deeper into the use of different states.
When cleaning or flushing your cache, Magento will flush its content from either the var/cache or var/full_page directory. In this recipe, we will refer to the bin/magento cache:enable, bin/magento cache:disable, bin/magento cache:clean, or bin/magento cache:flush options.
For the purpose of this recipe, let's assume that we need to manage the Magento 2 cache setup. The following steps will guide you through this:
php bin/magento cache:status
The output looks like this:
php bin/magento cache:disable config
This will disable the cache for only config. You may pick any cache type code name. To enable the config cache back, use the following command:
php bin/magento cache:enable config
When skipping the cache type code name behind the command, we will be able to enable or disable the caches all at once. It will look like this when we disable the cache:
php bin/magento cache:enable. As you can see now, after enabling the caches, they are cleaned as well:php bin/magento cache:clean config. By removing the cache type code name, we will be able to clean all of them at once.php bin/magentocache:flush config. By removing the cache type code name, we will be able to clean all of them at once.Cleaning a cache type deletes all items from enabled Magento cache types only. In other words, this option does not affect other processes or applications because it cleans only the cache that Magento uses.
Disabled cache types are not cleaned.
Flushing a cache type purges the cache storage (such as Redis, Memcache, and so on), which might affect other process' applications that are using the same storage.
Let's recap and find out what we did throughout this recipe. In steps 1 through 5, you learned how to manage the cache in Magento 2.
In step 1, you learned how to use the status option to check what the current cache status is. In step 2, we were able to enable or disable the caches individually.
In steps 4 and 5, you learned how to flush and clean the caches individually.
Every production environment needs a proper backup plan. By default, Magento 2 has a complete set of options to create and roll back backups.
When creating a backup, we can use one of the following options:
|
Option |
Meaning |
Backup file name |
|---|---|---|
|
|
This creates a backup from the filesystem (excluding |
|
|
|
This creates a backup from the |
|
|
|
This creates a backup from the current database |
|
When creating a backup, Magento will store it in the var/backups directory. In this recipe, we will refer to the bin/magento setup:backup and bin/magento setup:rollback options.
For the purpose of this recipe, let's assume that we need to manage the Magento 2 backup setup. The following steps will guide you through this:
php bin/magento setup:backup --code
Once Magento sets the maintenance code flag, the web shop is offline for everybody. Creating a code backup takes some time. The backup will be stored in var/backups. A clean Magento 2 code backup is around 123 MB.
php bin/magento setup:backup --db
A clean Magento 2 database backup is around 14 MB.
php bin/magento setup:backup --media
A clean Magento 2 media backup with sample data is around 153 MB.
php bin/magento info:backup:list
This will give us an overview of what's available:
Showing backup files in /var/www/html/var/backups.
+---------------------------------+-------------+
| Backup Filename         | Backup Type |
+---------------------------------+-------------+
| 1448480907_filesystem_code.tgz  | code    |
| 1448481232_db.gz        | db      |
| 1448481295_filesystem_media.tgz | media     |
+---------------------------------+-------------+
php bin/magento setup:rollback [-c|--code-file="<name>"] [-m|--media-file="<name>"] [-d|--db-file="<name>"]
For example, to restore a database backup, we can use the following command:
php bin/magento setup:rollback -d 1448481232_db.gz
You will get the following notification to confirm your action:
You are about to remove current code and/or database tables. Are you sure?[y/N]
crontab -e
*/1 * * * * php /var/www/html/bin/magento cron:run
This command will create a cron schedule in the Magento 2 database.
Let's recap and find out what we did throughout this recipe. In steps 1 through 8, you learned how to create rollbacks and manage backups via the command line.
In step 1, we created a backup for our code base only. In step 2, we created a backup for the database and in step 3, for all the media files.
In step 4, we listed all the created backups that are located in var/backups.
The process in step 5 is related to the rollback scenario. Depending on the backup size, rolling back could take some time.
In steps 7 and 8, we configured a cron job to schedule our daily backup process automatically.
Magento 2 comes with a new feature set called MAGE_MODE. This option gives you the configuration to run Magento in either developer, default, or production mode.
This feature is very important during development and product phases. It gives a developer the tool to debug or created optimized caches for high performance needs.
By default, the default mode is set.
The following table describes the modes in which we can run Magento:
|
Mode name |
Description |
|---|---|
|
|
When no given mode is given, this is explicitly set and has the following benefits:
|
|
|
It has the following benefits:
|
|
|
It has the following benefits:
|
Always check what web server you are using; the settings for Apache and NGINX are not the same. In this recipe, we will be showing you how to set this on both of them.
For the purpose of this recipe, let's assume that we need to manage the Magento 2 production or development setup. The following steps will guide you through this:
.htaccess file or configure this in the vhost file. We will first look into the Apache setup. While all recipes of this chapter are based on NGINX, it's best to skip this part and continue to the next listed topic or retrieve an DigitalOcean Droplet.Go to the .htaccess file in your web root directory and remove the # (hash or pound sign) at the fifth line from the top:
SetEnv MAGE_MODE developer
Change it to the following:
SetEnv MAGE_MODE production
If you are using a server-based configuration instead of the .htaccess file, use the following then:
SetEnv MAGE_MODE "developer"
The following code is for the current 000-default.conf:
<VirtualHost *:80>
ServerAdmin webmaster@localhost
DocumentRoot /var/www/html
SetEnv MAGE_MODE "developer"
<Directory /var/www/html>
Options Indexes FollowSymLinks
AllowOverride All
Order allow,deny
allow from all
</Directory>

ErrorLog ${APACHE_LOG_DIR}/error.log
CustomLog ${APACHE_LOG_DIR}/access.log combined

ProxyPassMatch ^/(.*\.php(/.*)?)$ fcgi://127.0.0.1:9000/var/www/html/$1
</VirtualHost>
Now continue to step 3.
vhost file. you will find it in /etc/nginx/conf.d/default.conf.Open the default.conf file and go to the following rule:
set $MAGE_MODE developer;Change this to the following:
set $MAGE_MODE production;Restart your NGINX server now using the following command:
service nginx restart
php bin/magento deploy:mode:show
By default, it shows the default status. We now switch the status using the following:
php bin/magento deploy:mode:set production
We can also use the following command:
php bin/magento deploy:mode:set developer
This will trigger the maintenance mode and start creating all necessary optimized static files needed.
pub/static directory. Run the following command on the shell:
php bin/magento setup:static-content:deploy
--skip-compilation option, as shown in the following command:
php bin/magento deploy:mode:set developer --skip-compilation
Let's recap and find out what we did throughout this recipe. In steps 1 through 6, you learned configuring the development and production modes in Magento 2.
In step 1, we configured the SetEnv parameter in the .htaccess file of Apache to set the correct mode. There is also an option to configure this in the Apache configuration file instead.
In step 2, we configured the set $MAGE_MODE parameter in NGINX to use the correct mode.
In step 3, we used the bin/magento deploy option to tell Magento to start using the selected mode in NGINX or Apache, and create additional static files when running in production mode or show the correct debug headers in the developer mode.
In step 4, you learned how to deploy static content in the pub/static directory when running in production mode. This option will trigger the whole process of merging and compiling the correct code in the public folder.
Use curl to check your HTTP response header to see what current state you are running, as shown in the following:
curl -I http://mage2cookbook.com/

HTTP/1.1 200 OK
Server: nginx/1.9.6
X-Magento-Cache-Debug: HIT
Always check the current status in your HTTP header and Magento shell. Only setting the web server configuration will not automatically trigger the Magento configuration and can mislead you.
Moving your Magento 1 to Magento 2 may be one of the most challenging things out there. Luckily, Magento supported us with a database migration option.
The Magento 2 Data Migration Tool is here to help you convert your products, customers, order/sales data, store configuration, promotions/sales rules, and more to move to a clean Magento 2 setup.
Custom code, Extensions, and Themes are out of the current scope of the Data Migration Tool.
The currently supported migrations are the Community Edition (CE) versions 1.6.x, 1.7.x, 1.8.x, and 1.9.x and Enterprise Edition (EE) versions 1.11.x, 1.12.x, 1.14.x, and 1.14.x.
Before we can start migrating our system, we need to check the following:
A migration of Magento 1 to Magento 2 has the following five phases that are important to follow in the correct order:
The command is php bin/magento migrate:settings.
The command is php bin/magento migrate:data.
The command is php bin/magento migrate:delta.
/media to /pub/media.For the purpose of this recipe, let's assume that we need to manage a Magento 1 to Magento 2 migration setup. The following steps will guide you through this:
data-migration-tool to your current Composer setup:composer config repositories.data-migration-tool git https://github.com/magento/data-migration-tool-ce composer require magento/data-migration-tool:dev-master
Wait while all dependencies are updated.
bin/magento shell tool:|
Commands |
Description |
|---|---|
|
migrate | |
|
|
Main migration of data |
|
|
Migration of the data that is added to Magento after the main migration |
|
|
Migration of the system configuration |
php bin/magento setup:uninstall
Go to /var/www/html/vendor/magento/data-migration-tool/etc/ce-to-ce and pick the correct database version mentioned in the directory. If correct, you will see two files called config.xml.dist and map.xml.dist.
config.xml.dist to config.xml using the cp command:
cp config.xml.dist config.xml
config.xml and look for the <source> tag (line 94). Change it accurately with the database username and password:<source> <database host="localhost" name="magento1" user="root" password="mypassword"/> </source> <destination> <database host="localhost" name="magento2" user="root" password="mypassword"/> </destination> <options> <source_prefix>myprefix-from-magento1</source_prefix> <crypt_key>mycrypt-key-from-magento1</crypt_key> </options>
If you are using a custom prefix in your database or you wish to use your encryption key on your Magento 2 setup, you can add this to the <options> section, as shown in the previous code.
php bin/magento migrate:settings /var/www/magento2/vendor/magento/data-migration-tool/etc/ce-to-ce/1.9.2.2/config.xml
As you can see, here we are using the 1.9.2.2 version. Depending on your version, you may change this before running the command.
The output result looks like this:
[2015-12-02 20:28:56][INFO][mode: settings][stage: integrity check][step: Settings Step]: started
100% [============================] Remaining Time: 1 sec
[2015-12-02 20:28:56][INFO][mode: settings][stage: integrity check][step: Stores Step]: started
100% [============================] Remaining Time: 1 sec
[2015-12-02 20:28:56][INFO][mode: settings][stage: data migration][step: Settings Step]: started
100% [============================] Remaining Time: 1 sec
[2015-12-02 20:28:59][INFO][mode: settings][stage: data migration][step: Stores Step]: started
100% [============================] Remaining Time: 1 sec
[2015-12-02 20:28:59][INFO][mode: settings][stage: volume check][step: Stores Step]: started
100% [============================] Remaining Time: 1 sec
[2015-12-02 20:28:59][INFO][mode: settings][stage: volume check][step: Stores Step]: Migration completed
php bin/magento migrate:data /var/www/magento2/vendor/magento/data-migration-tool/etc/ce-to-ce/1.9.2.2/config.xml
The output result looks like this:
php bin/magento indexer:reindex
php bin/magento cache:clean
php bin/magento cache:flush
migration.log file located in /var.delta option, we push the data to Magento 2 using the following command:
php bin/magento migrate:delta /var/www/magento2/vendor/magento/data-migration-tool/etc/ce-to-ce/1.9.2.2/config.xml
The output result looks like this:
Let's recap and find out what we did throughout this recipe. In steps 1 through 14, you learned how to use the Magento 2 migration tool.
In step 1, we used Composer to add an additional repository for data migration. After installing all of the packages, they are available in the bin/magento tool. In this setup example, we used a clean Magento 1.9.x database.
In step 4, we made sure to run on a clean Magento 2 setup. Depending on your setup, go to vendor/magento/data-migration-tool/etc and select the correct version. Magento 2 supports the migration option for CE and EE. Once we configured the config.xml file with the Magento 1 database information in step 6, we were ready to go.
In step 7, we used the bin/magento migration setting to start the whole process. We started with the setting parameter and continued with the data and delta parameters in steps 7 through 13. We must not forget the reindexing and updating of our caches before using them. The delta parameter option can be run multiple times as it only updates the latest information, which is helpful before going live and switching to production.
As every Magento setup is unique, migrating from Magento 1 to Magento 2 can be hard sometimes. In some situations, you may need to change your tables in the mapping configuration located in vendor/magento/data-migration-tool/etc/ce-to-ce/<version>map.xml.dist.
Resetting your setting, data, and delta migration is easy using the [-r|--reset] parameter in your command. This allows you to rerun all migration scripts from the beginning.
Always check for the currently supported versions on the Magento GitHub Data Migration Tool page at the following link:
https://github.com/magento/data-migration-tool-ce
There is also an alternative Data Migration Tool available by UberTheme at https://github.com/ubertheme/magento2_data_migration.
In this chapter, we will cover the basic tasks related to optimizing your performance in Magento 2. You will learn the following recipes:
This chapter explains one of the most important elements of Magento. From the early Magento days, performance has been a hard topic to cover. Many setups out there in the e-commerce world are performance-great, but most of the time, the majority are having issues. Magento 1 may not be the best performance platform out there.
However, now we have Magento 2, a brand new platform designed for performance. From the very first day, the main Magento developers focused on a better framework and the outcome is great. According to the latest information, Magento focused on a Google PageSpeed ranking of 90% or more.
In this chapter, we will dive in deeper on how to configure Redis caching and Memcached sessions. By default, Magento 2 supports Varnish, and we will manage all of the steps on how to set it up.
Serving the correct catalog or product images is very important, and will save lots of bandwidth on a desktop but most of all on a mobile device, which will have a better user experience.
The new HTTP/2 protocol is a very new important element in the web server configuration. We will set up a full-force HTTP/2 configuration, including SSL.
For a high-demanding Magento 2 website serving customers all over the globe, we introduce CloudFlare, which is a CDN provider optimized for Magento.
Without performance testing, Magento 2 will not perform well. You will learn how to create a company-like profile, including websites, stores, catalogs, products, orders, and much more.
Redis may be one of the best improvements since we used Memcache(d) or Alternative PHP Cache (APC). For the last couple of years, Redis is available in Magento 1 and has a big performance benefit.
What is Redis and why is it important for Magento? Well, Redis is not new; its initial release dates to the beginning of 2009—almost as young as Magento 1. Redis is a key-value storage database that stores the data in-memory of your web server. Besides this, the in-memory caches are fast and also have a persistence feature that is really important when a server reboots. All caches are not flushed during a reboot and are available in-memory when the web server is up again.
In the beginning of the Magento 1 area, we used Memcache(d) or APC, which worked very well but not as well as Redis. In Magento 1, Redis was used for a backend cache and session storage most of the time. Some websites also used it as a Full Page Cache (FPC) storage.
One other great advantage of Redis is that it has multiple database containers, one for the default cache and the other for the FPC. Although the Redis performance is better in a lot of cases, it is not the Holy Grail. There are drawbacks to its architecture.
For this recipe, we will use a Droplet created in Chapter 1, Magento 2 System Tools, at DigitalOcean, https://www.digitalocean.com/. We will be using NGINX, PHP-FPM, and a Composer-based setup, including sample data connected to a Redis server. No other prerequisites are required.
For the purpose of this recipe, let's assume that we need to create a Magento 2 Redis setup. The following steps will guide you through this:
cd /opt
wget http://download.redis.io/releases/redis-3.0.5.tar.gz
tar xzf redis-3.0.5.tar.gz
cd redis-3.0.5
make && make install
Change the version number of the current one if needed.
/opt/redis-3.0.5/utils directory and run the following script:
./install-server.sh
Welcome to the redis service installer
This script will help you easily set up a running redis server

Please select the redis port for this instance: [6379]
Selecting default: 6379
Please select the redis config file name [/etc/redis/6379.conf]
Selected default - /etc/redis/6379.conf
Please select the redis log file name [/var/log/redis_6379.log]
Selected default - /var/log/redis_6379.log
Please select the data directory for this instance [/var/lib/redis/6379]
Selected default - /var/lib/redis/6379
Please select the redis executable path [/usr/local/bin/redis-server]
Selected config:
Port           : 6379
Config file    : /etc/redis/6379.conf
Log file       : /var/log/redis_6379.log
Data dir       : /var/lib/redis/6379
Executable     : /usr/local/bin/redis-server
Cli Executable : /usr/local/bin/redis-cli
Is this ok? Then press ENTER to go on or Ctrl-C to abort.
Copied /tmp/6379.conf => /etc/init.d/redis_6379
Installing service...
Success!
Starting Redis server...
Installation successful!
redis-cli –version
service redis_6379 status
netstat –anp | grep redis
As you can see, the Redis server is running under port 6379.
Use the following command to install PHP Redis:
cd /opt
git clone https://github.com/phpredis/phpredis.git
cd phpredis
phpize
./configure
make && make install
echo "extension=redis.so" | sudo tee /etc/php5/mods-available/redis.ini
Depending on whether you are using PHP 5 or PHP 7, you may want to change the PHP path.
cd /
ln -s /etc/php5/mods-available/redis.ini /etc/php5/fpm/conf.d/20-redis.ini
ln -s /etc/php5/mods-available/redis.ini /etc/php5/cli/conf.d/20-redis.ini
service php5-fpm restart
php -r "if (new Redis() == true){ echo \"\r\n OK \r\n\"; }"
By default, creating a phpinfo.php page in the root directory in Magento 2 will not work. First, you need to create the phpinfo.php file in the /pub directory. Then, you need to change the NGINX configuration (nginx.conf.sample) from location ~ (index|get|static|report|404|503)\.php$ { to location ~ (index|get|static|report|404|503|phpinfo)\.php$ {, which is located at the bottom of the file. In Apache, we don't have an issue like this; it works by default.
env.php file in Magento 2 located at /app/etc and add the following code at the top:/var/page_cache and /var/cache. Let's open up your browser and refresh your website.If everything is configured correctly in the env.php file, you should not get any errors and the ar/page_cache and var/cache directories should be empty.
redis-cli
On the prompt, continue with INFO; this will give you a list of the following details:
To close the Redis terminal, use exit.
Let's recap and find out what we did throughout this recipe. In steps 1 through 13, we installed a Redis server and configured Magento 2 to store the backend cache.
In step 1, we installed Redis from source and compiled the code. This version is more stable than the default one available in Ubuntu. After compiling the code, we are able to use an install script to create a working setup running on port 6379.
After installing and testing the code in steps 3 and 4, we start installing the PHP Redis module. This code is pulled from GitHub and compiled from source.
In step 6, we created a redis.ini file, which is linked in step 7 with the correct PHP module directory. Before we can test it, we need to restart the PHP-FPM server and use a simple PHP command to test if everything is working fine.
In step 11, we added an additional piece of code to the env.php file, which will tell Magento 2 to store all of the cache in Redis as of now.
If you are interested in monitoring your Redis server, the next step is interesting. Clone PHPRedMin (https://github.com/sasanrose/phpredmin) in your Magento 2 root directory, /var/www/html. Make sure to change the ownership to www-data for the owner and group.
Go to your /var/www/html/pub directory and create a symbolic link using the following command:
ln –s ../phpredmin/public phpredmin
Chown the ownership of the symbolic link with the following command:
chown -h www-data:www-data phpredmin
Go to to your NGINX configuration directory, /etc/nginx/conf.d, open the default.conf file, and including the following content below error_log:
location ~ ^/phpredmin/.+\.php {
  fastcgi_split_path_info ^(.+\.php)(/.+)$;

  set $fsn /index.php;
  if (-f $document_root$fastcgi_script_name) {
    set $fsn $fastcgi_script_name;
  }

  # php5-fpm
  fastcgi_pass fastcgi_backend;
  fastcgi_index  index.php;

  fastcgi_param  SCRIPT_FILENAME  $document_root$fsn;
  fastcgi_param  PATH_INFO  $fastcgi_path_info;
  fastcgi_param  PATH_TRANSLATED  $document_root$fsn;

  include fastcgi_params;
}
Now save and restart your NGINX server with service nginx restart.
Before we can continue, we need to add a cronjob rule to gather our Redis data and show it in PHPRedMin. Add the following rule to your crontab.
Open crontab using crontab –e:
* * * * * cd /var/www/html/pub/phpredmin && php index.php cron/index
Open your browser and surf to http://yourdomain.com/phpredmin, and press Stats in the top menu. Now you should see the following information:
As Magento 2 does not support Redis session caching from the beginning, we need to use Memcached instead. Memcached has been around for a long time and was used in Magento 1, since the beginning, as backend and session caching.
Memcached is a distributed memory caching system. It is a flexible in-memory storage container to cache data. As the session handler in the PHP Redis does not support session locking, we use Memcached instead. Keep in mind that Memcached is not persisted, so after restarting the server or daemon, all the data is gone. This could have an impact on a production environment—lost sessions or baskets.
For this recipe, we will use a Droplet created in Chapter 1, Magento 2 System Tools, at DigitalOcean, https://www.digitalocean.com/. We will be using NGINX, PHP-FPM, and a Composer-based setup including sample data connected to a Memcached server. No other prerequisites are required.
For the purpose of this recipe, let's assume that we need to create a Magento 2 Memcached setup. The following steps will guide you through this:
apt-get install -y libevent-dev
apt-get install –y memcached
memcached –V
service memcached status
netstat –anp | grep memcached
As you can see, the Memcached server is running under port 11211.
Use the following command to install PHP Memcached:
apt-get install php5-memcached
We can also use the following command to install it:
apt-get install php-memcached (php7)
cat /etc/php5/mods-available/memcached.ini
Now you should see the Memcached extension called extension=memcached.so.
Depending on whether you are using PHP 5 or PHP 7, you may want to change the PHP path.
service php5-fpm restart
php -r "if (new Memcached() == true){ echo \"\r\n OK \r\n\"; }"
It can also be checked using the following command:
echo "stats settings" | nc localhost 11211
By default, creating a phpinfo.php page in the root directory in Magento 2 will not work. First, you need to create the phpinfo.php file in the /pub directory. Then, you need to change the NGINX configuration from location ~ (index|get|static|report|404|503)\.php$ { to location ~ (index|get|static|report|404|503|phpinfo)\.php$ {, which is located at the bottom of the file. In Apache, we don't have an issue like this; it works by default.
env.php file in Magento 2 located at /app/etc and change the following code in the session section:'session' =>
array (
'save' => 'files',
),Change the preceding code to the following:
'session' =>
   array (
    'save' => 'memcached',
    'save_path' => 'localhost:11211'
),
This is shown in the following screenshot:
var/page_cache, var/cache and var/session. Restart your website using the following command:
service nginx restart && service php-fpm restart
Let's open up your browser and refresh your website.
If everything is configured correctly in the env.php file, you should not get any errors and the /var/session directory should be empty.
echo "stats items" | nc localhost 11211
Let's recap and find out what we did throughout this recipe. In steps 1 through 11, we installed a Memcached server and configured Magento 2 to store the sessions.
In steps 1 through 3, we installed the default Ubuntu Memcached server and PHP Memcached client modules. Depending on whether we are using PHP 5 or 7, we pick a different one. Before this, we make sure to restart the PHP-FPM server and test if everything is working correctly.
In step 8, we added an additional piece of code to the env.php file, which will tell Magento 2 to store all of the sessions in Memcached as of now.
If you are interested in monitoring your Memcached server, the next step is interesting. Clone the
memcached.php file from the GitHub Gist (https://gist.github.com/raybogman/b8b7b4d21bf34ed9dd76) in your Magento 2 root directory, /var/www/html/pub. Make sure to change the ownership to www-data for the owner and group.
By default, creating a memcached.php page in the root directory in Magento 2 will not work. First, you need to store the memcached.php file in the /pub directory. Then, you need to change the NGINX configuration from location ~ (index|get|static|report|404|503)\.php$ { to location ~ (index|get|static|report|404|503|memcached)\.php$ {, which is located at the bottom of the file. In Apache, we don't have an issue like this; it works by default.
Once installed correctly, the page will look as follows:
Note that this Memcached viewer is an outdated version created in 2008 by Harun Yayli and is not maintained anymore. Use it wisely.
As an alternative, you can also use https://github.com/clickalicious/phpMemAdmin.
Varnish may be one of the most interesting elements described in this book, besides Magento 2, of course. What is Varnish and why is it that important? Well, Varnish is like a Ferrari, very fast on the track but hard to maintain or tune. In technical terms, Varnish is an HTTP accelerator designed for heavy websites. Magento users love fast websites.
By default, Varnish support is now included in Magento 2. In Magento 1, we commonly used Turpentine by Nexcess (https://github.com/nexcess/magento-turpentine). The configuration of Varnish is not for the faint-hearted. Varnish includes a Varnish Configuration Language (VCL) file, which holds all the elements to be cached or not.
Setting up a Varnish server may be simple; configuring the VCL is not. Magento 2 provides a default VCL file that works out of the box, but be aware of any custom extensions or layout updates. Any customization has to be added manually in the VCL file before Varnish can cache them.
For this recipe, we will use a Droplet created in Chapter 1, Magento 2 System Tools, at DigitalOcean, https://www.digitalocean.com/. We will be using NGINX, PHP-FPM, and a Composer-based setup including sample data connected to a Varnish server. No other prerequisites are required.
For the purpose of this recipe, let's assume that we need to create a Magento 2 Varnish setup. The following steps will guide you through this:
apt-get install –y apt-transport-https
By default, all current Ubuntu versions support apt-transport-https.
echo "deb https://repo.varnish-cache.org/ubuntu/ trusty varnish-4.1" | sudo tee -a /etc/apt/sources.list.d/varnish-cache.list
curl https://repo.varnish-cache.org/GPG-key.txt | apt-key add -
apt-get update && apt-get install -y varnish
service varnish start
varnishd –V
service varnish status
netstat –anp | grep varnish
As you can see, the Varnish server is running under ports 6081 and 6082.
sed -i 's/80/8080/' /etc/nginx/conf.d/default.conf
We are using port 8080 as an internal port.
Your configuration file could look as follows:
server {
  listen 8080;

server_name yourdomain.com;6081 to 80. Use the following command to change the /etc/default/varnish file:
sed -i 's/6081/80/' /etc/default/varnish
systemd setup. The systemd servers will not update their configuration script after a restart or reboot. Let's update this manually using the following command:
sed -i 's/6081/80/' /lib/systemd/system/varnish.service
Update the systemd process with the following code:
systemctl daemon-reload
service varnish restart && service nginx restart
netstat -upnlt | egrep 'varnish|nginx'
Always make sure that Magento is running in the developer mode when setting up Varnish. When ready to launch, we can switch to the production mode:
/etc/varnish/default.vcl file. Now open the file and change backend default to the following:backend default {
.host = "127.0.0.1";
.port = "8080";
}service varnish restart php bin/magento cache:clean php bin/magento cache:flush
curl -I http://yourdomain.com
The output of this command should be as follows:
root@mage2cookbook:~# curl -I http://mage2cookbook.com
HTTP/1.1 200 OK
Date: Mon, 14 Dec 2015 19:15:40 GMT
Content-Type: text/html; charset=UTF-8
X-Frame-Options: SAMEORIGIN
X-Content-Type-Options: nosniff
X-XSS-Protection: 1; mode=block
X-Magento-Cache-Control: max-age=86400, public, s-maxage=86400
Pragma: no-cache
Expires: -1
Cache-Control: no-store, no-cache, must-revalidate, max-age=0
Vary: Accept-Encoding
Age: 1127
X-Magento-Cache-Debug: HIT
Accept-Ranges: bytes
Connection: keep-alive
Let's recap and find out what we did throughout this recipe. In steps 1 through 16, we installed and configured Varnish to speed up the full page caching.
In steps 1 through 4, we added the official repository to our system and installed Varnish.
In steps 6 and 7, we changed the NGINX port to 8080 instead of 80, and the Varnish port to 80. Now, Varnish will be our gatekeeper after restarting the NGINX and Varnish servers.
In step 12, we told Magento to start communicating with the Varnish server so that all frontend cacheable data is stored here.
The current lifetime of the cache is 86,400 seconds, which is one day. So, installing a cache warmer will speed up your pages after an automatic cache flush by Magento. Always keep in mind that by default, all the pages are cold (without a cache hit) and the first GET (page view) can take longer. Varnish needs to build up the cache before customers can benefit from it.
Check out the following Varnish tools to monitor all the incoming data live:
varnishstat
The output of this command will be as follows:
Now, let's execute the following command:
Varnishlog
The output of this command will be as follows:
Are you managing an international-based brand-serving customer all over the globe? Then, using a Content Delivery Network (CDN) is the best idea. CDNs are a well-known technique to manage high-traffic websites. It is commonly used to distribute static assets such as images, CSS, and JavaScript as quickly as possible to the nearest location of the customers, which decreases the download times of the website.
The modern CDNs have much more to offer than just serving the assets to the customer. Currently, they improve the user experience with optimized HTML output, merging and deferring JavaScript, TCP optimization, and much more. Basic or advanced security is also top-of-mind, such as (D)DoS protection, SSL, Web Application Firewall (WAF), and much more.
For this recipe, we will use a Droplet created in Chapter 1, Magento 2 System Tools, at DigitalOcean, https://www.digitalocean.com/. We will be using NGINX, PHP-FPM, and a Composer-based setup including sample data connected to the CloudFlare CDN. No other prerequisites are required.
For the purpose of this recipe, let's assume that we need to create a Magento 2 Varnish setup. The following steps will guide you through this:
Changing your records in this screen will not change anything in production yet. We still need to adjust the primary and secondary Nameservers before everything works. We will do this as shown in the following screenshot:
Depending on your current DNS provider, this could be a simple or hard step. Changing the Nameservers is not always allowed by your provider.
You can check your e-mail or refresh the CloudFlare dashboard to check whether your domain is Active:
Once the cloud is orange, including an arrow passing through, then you are connected. Click on the cloud icon to change it:
dig yourdomain.com NS +short
The output looks as follows:
root@mage2cookbook:~# dig mage2cookbook.com NS +short
rocky.ns.cloudflare.com.
kate.ns.cloudflare.com.
You can also use the following command to check the IPs:
dig yourdomain.com +short
root@mage2cookbook:~# dig mage2cookbook.com +short
104.18.56.216
104.18.57.216
Let's recap and find out what we did throughout this recipe. In steps 1 through 9, we installed CloudFlare as a CDN to optimize our worldwide performance.
In steps 1 through 8, we created an account and moved our domain to the CloudFlare DNS. In step 7, we activated the orange cloud in DNS to start using the CDN optimization.
If you are interested in how to test the performance of the CloudFlare setup, stay put. Here are some basic commands that you can use:
time curl --I http://yourdomain.com
The output looks as follows:
time curl -I http://mage2cookbook.com
HTTP/1.1 200 OK
X-Magento-Cache-Debug: HIT
Server: cloudflare-nginx
CF-RAY: 257330a8444d2bd6-AMS

real    0m0.198s
user    0m0.006s
sys     0m0.005s
Without CloudFlare, it looks as follows:
time curl -I http://mage2cookbook.com
HTTP/1.1 200 OK
X-Magento-Cache-Debug: HIT

real    0m0.253s
user    0m0.011s
sys     0m0.010s
Keep in mind that this current website is using Varnish. Our Magento 2 server is located in New York while our test server is located in Amsterdam. As you can see, in this test, we save 0.055s. This test is done from server to server. Doing a test from server to real browser clients on a desktop, or mobile device, will result in larger numbers. Larger numbers result in slower connections, which will result in lesser user experience.
Another great load testing tool is Siege. Using Siege helps you to understand how many concurrent clients can visit your website during high loads. We will just cover the basics of Siege here. Install Siege on another Droplet somewhere else in the world. Use the following command to install Siege:
apt-get install siege
Now let's run the following command. We will simulate 50 concurrent users for a period of three minutes. The –d option is the internal delay, in seconds, for which the users sleeps:
siege -c50 -d10 -t3M http://yourdomain.com
Without CloudFlare, the output looks as follows:
siege -c50 -d10 -t3M http://mage2cookbook.com

Transactions:                   1732 hits
Availability:                 100.00 %
Elapsed time:                 179.79 secs
Data transferred:              15.47 MB
Response time:                  0.18 secs
Transaction rate:               9.63 trans/sec
Throughput:                     0.09 MB/sec
Concurrency:                    1.71
Successful transactions:        1732
Failed transactions:               0
Longest transaction:            0.34
Shortest transaction:           0.15
With CloudFlare, the output looks as follows:
siege -c50 -d10 -t3M http://mage2cookbook.com

Transactions:                   1716 hits
Availability:                 100.00 %
Elapsed time:                 179.74 secs
Data transferred:              14.05 MB
Response time:                  0.10 secs
Transaction rate:               9.55 trans/sec
Throughput:                     0.08 MB/sec
Concurrency:                    0.96
Successful transactions:        1716
Failed transactions:               0
Longest transaction:            0.62
Shortest transaction:           0.08
In the last test, we can see that the Response time is 0.10 seconds compared to 0.18 seconds.
The test Droplet that we used was located in Amsterdam using two CPUs and 4 GB memory. For a real browser test, it is best to use tools such as Chrome developer tools. Those timings are more accurate and give you a better idea of the real user experience. Testing on a mobile device is a totally different ball game and is out of the scope of this book.
Running a Magento store can be difficult—configuring the server, creating store views, and adding categories and products. Everyone knows that every product needs at least one product image. In some setups, we even have more than one. From this single master image, multiple thumbs are created, such as base image, small image, swatch image, and thumbnail.
By default, images are not optimized for the web when saving them in Photoshop. Images shown on a website are not exactly the same as images for print. The Exchangeable Image File (EXIF) data, for example, is not needed, and by removing this metadata, you can save lots of bytes. The smaller the image, the faster it's shown in the browser of the customer.
Here is an example of EXIF data (not optimized). The current file size is 620,888 bytes:
EXIF Data

File:
  ExifByteOrder: Big-endian (Motorola, MM)
  CurrentIPTCDigest: 50bb6030364fbdfb1842e98de0e81efe
  ImageWidth: 1024
  ImageHeight: 768
  EncodingProcess: Baseline DCT, Huffman coding
  BitsPerSample: 8
  ColorComponents: 3
  YCbCrSubSampling: YCbCr4:4:4 (1 1)
Storing all these images on your Magento server will result in slower pages and slower rendering of them. Almost 70% of all the content from a single page is filled with images:
So, optimizing images is not only important for desktop users, but also for mobile users. The less data they need to download, the better the user experience. Besides this, it's great for your search ranking optimization, battery consumption, and bandwidth/data plan.
By default, Magento 1 did not optimize the created catalog and CMS images. This could be optimized using software binaries such as jpegtran, jpegoptim, and OptiPNG.
If you don't have the option to install these, you could use Rapido image optimizer (https://www.rapido.nu/), which is a SaaS-based image optimizer for Magento. It is also the only optimizer that checks for the best available optimization per image and tunes all the images in the image cache directory on a daily basis.
For this recipe, we will use a Droplet created in Chapter 1, Magento 2 System Tools, at DigitalOcean, https://www.digitalocean.com/. We will be using NGINX, PHP-FPM, and a Composer-based setup including sample data for image optimization. No other prerequisites are required.
For the purpose of this recipe, let's assume that we need to optimize all Magento 2 images. The following steps will guide you through this:
apt-get install php5-gd
Instead, we can also use the following command:
apt-get install php7.0-gd
To make sure that GD is installed correctly, run the following command:
php -i | grep gd
Run the following command to test which version of GD you are running:
echo '<?php var_dump(gd_info()); ?>' > gd.php
php gd.php
The output looks as follows:
root@mage2cookbook:/var/www/magento2/pub# php gd.php
array(13) {
  ["GD Version"]=>
  string(9) "2.1.1-dev"
Here, you will find the following options:
We first make sure that our Image Adapter is set to PHP GD2. We don't use the ImageMagick setting here. In the There's more… section of this recipe, you can find more information on this.
Next, enable JavaScript Bundling, Merge JavaScript, and Minify JavaScript to YES.
Next, enable Merge CSS and Minify CSS to YES.
Last but not least, enable Static Files to YES. Save all the settings.
php bin/magento deploy:mode:set production
Before running the code, make sure to change your Apache or NGINX configuration to set $MAGE_MODE production;(Nginx) or SetEnv MAGE_MODE production (Apache). In Managing Magento 2, set mode (MAGE_MODE) recipe of Chapter 1, Magento 2 System Tools, we covered everything in detail.
After running this code, make sure to change your user and group permissions. Run the following command:
chown –R www-data:www-data *
Let's recap and find out what we did throughout this recipe. In steps 1 through 5, we configured the image optimizing technique, which is now by default available in Magento 2.
In step 1, we installed the PHP GD library and tested it. In step 2, we configured the Magento backend to start using the optimization by selecting the GD option and additional merging for JS and CSS.
In step 4, we ran the bin/magento production mode to start optimizing all of the code.
Besides the PHP GD2 library, Magento 2 offers the option to switch to the ImageMagick library (http://www.imagemagick.org/). In basis, this library works great for image optimization, but during some tests, we found out that the GD2 had a smaller output. Besides the difference in size, ImageMagick generated files in the baseline (renders top-down) format instead of the progressive (renders from blurry to sharp) format that GD2 does.
Using progressive is the best commonly used format for web pages. It starts as a blurry image and turns sharp when done. It improves the user experience by loading the images incrementally.
If you still want to use ImageMagick, here are some basic commands. Run the following code on your shell. Then, switch to ImageMagick in your Magento configuration backend:
apt-get install -y imagemagick --fix-missing
apt-get install -y php5-imagick
service php-fpm restart
php -i | grep imagick
December 17, 2015, is the day Google mentioned that HTTPS pages have top priority by default. Many Magento websites still use the default SSL pages or, even worse, don't use SSL at all.
Well, this will change now if your website depends on Google's search ranking. Using HTTP/2 in your setup is a must for high-performing and secure websites. The new protocol will be the new standard for fast and secure browsing.
HTTP/2 has many new benefits such as multiple TCP connections, cache pushing (server push), data compression, and much more. By default, HTTP/2 does not need SSL, but many browsers out there will support it only when configured using SSL. NGINX, for example, supports HTTP/2 only when configured including SSL; Apache, on the other hand, supports both, with or without SSL.
So, it is mandatory that we start using HTTP/2 including SSL for a safer and faster web.
For this recipe, we will use a Droplet created in Chapter 1, Magento 2 System Tools, at DigitalOcean, https://www.digitalocean.com/. We will be using NGINX, PHP-FPM, and a Composer-based setup including sample data for HTTP/2. No other prerequisites are required.
For the purpose of this recipe, let's assume that we need to create a Magento 2 using HTTP/2 including SSL. The following steps will guide you through this:
openssl.conf located in /etc/ssl with your favorite editor:
vi /etc/ssl/openssl.conf
Go to line 127 [ req_distinguished_name ] and change or add the settings regarding your company and domain. Change the following lines; here is an example:
countryName_default             = Some-CountryName
stateOrProvinceName_default     = Some-State
localityName_default            = Some-CityName
0.organizationName_default      = Some-CompanyName
organizationalUnitName_default  = Some-DepartmentName
commonName_default              = Some-DomainName
emailAddress_default            = Some-Email
The following screenshot depicts an example of the same:
openssl.conf file, we can create the *.csr and *.key files. We need the *.csr file and send it to our SSL provider. You may pick any SSL provider. Run the following command to generate them:
openssl req -new -newkey rsa:2048 -nodes -keyout yourname.key -out yourname.csr
Change yourname with any given name. When running the command, questions will be asked; hit enter to prompt when the default is okay. Here is a screenshot of the process:
Check your certificate before you submit it. Run the following code to confirm your settings:
openssl req -in yourname.csr -text -noout
In this example, we used a wildcard SSL certificate. The wildcard starts with *.yourdomain.com. We use a wildcard to create unlimited subdomain names, which we will use later to create localized domain names such as de.yourdomain.com or fr.yourdomain.com.
If you don't need a wildcard domain and would rather use www.yourdomain.com or a naked domain such as yourdomain.com, commit this in your openssl.conf file.
*.csr file to your SSL provider and continue all the steps necessary. Depending on your provider, it can take minutes or hours. For the purpose of demonstration, we used https://www.buy-certificate.com/. On this website, there is an option to create a 30-day free SSL certificate. The whole process takes two to three minutes.yourdomain-com.zip file by running the following command:
unzip mage2cookbook-com.zip
Archive:   mage2cookbook-com.zip
inflating: mage2cookbook-com.cer
inflating: readme.txt
inflating: RapidSSLSHA256CA-G3.cer
inflating: GeoTrustGlobalCA.cer
inflating: siteseal_nw4all.html
cat mage2cookbook-com.cer RapidSSLSHA256CA-G3.cer > mage2cookbook-com-2015.cert
mage2cookbook-com-2015.cert file to /etc/ssl/cert using the following command:
cp mage2cookbook-com-2015.cert /etc/ssl/cert
mage2cookbook.key to /etc/ssl/private using the following command: (Let's assume that you are running the openssl reg command in the /etc/ssl directory.)
mv /etc/ssl/mage2cookbook.key /etc/ssl/private
ln -s /etc/ssl/private/mage2cookbook-com.key /etc/ssl/mage2cookbook-com.key
ln -s /etc/ssl/certs/mage2cookbook-com-2015.cer /etc/ssl/mage2cookbook-com.cert
Try to list all the files in the /etc/ssl directory using the following command. You should see the names of the files that we linked:
ll /etc/ssl
default.conf in /etc/nginx/conf.d. Open the default.conf file and change it with the following settings:upstream fastcgi_backend {
server 127.0.0.1:9000;
}
server {
listen 80;
listen 443 ssl http2;
server_name yourdomain.com;
set $MAGE_ROOT /var/www/html;
set $MAGE_MODE developer;
ssl_certificate /etc/ssl/yourdomain-com.cert;
ssl_certificate_key /etc/ssl/yourdomain-com.key;
include /var/www/html/nginx.conf.sample;
access_log /var/log/nginx/access.log;
error_log /var/log/nginx/error.log;
location ~ /\.ht {
deny all;
}
}As you can see, we created a new listen 443 ssl http2 section. Besides the listen section, we also created ssl_certificate and ssl_certificate_key.
The
http2 flag in the listen section covers the entire HTTP/2 configuration.
service nginx restart
php bin/magento setup:store-config:set --base-url-secure=" https://yourdomain.com/" php bin/magento setup:store-config:set --use-secure-admin="1" php bin/magento setup:store-config:set --use-secure="1" php bin/magento setup:static-content:deploy php bin/magento cache:clean php bin/magento cache:flush
Next, we go to https://www.sslshopper.com/ssl-checker.html and check our setup. Commit your domain name in the box and submit. If everything is configured correctly, the output should look as follows:
yourdomain.com.Let's recap and find out what we did throughout this recipe. In steps 1 through 13, we created an SSL certificate, which we need to configure HTTP/2 in NGINX.
In step 1, we configured the openssl.conf file with our domain and business data. In step 2, we created a certificate request that we will be sending to the SSL provider.
In step 4, we downloaded the provided certificate file and unzipped the content. In step 6, we merged the domain certificate and certificate authority file into a single one. This file was then copied to the SSL directory.
In step 6, we copied the private key to the SSL private directory before we started creating a symlink of the private key and merge certificate in the /etc/ssl directory. The main reason why we stored the files in the private and cert directory is maintenance. When replacing or updating keys or certificates in the future, we only need to create a new symlink while our NGINX or Apache configuration can stay the same.
In step 10, we updated the NGINX configuration and added the ssl_certificate parameter including the correct SSL directory. In the listen parameter, we added the http2 flag behind the 443 ssl flag and restarted the NGINX server.
In step 12, we configured the HTTPS domains using the bin/magento setup:store-config:set option.
Setting up Magento 2 including SSL and HTTP/2 is pretty straightforward. However, by default, the only URLs that serve HTTPS are customer/account/login/, customer/account/create/, checkout/, checkout/cart/, contact/, and sales/guest/form/. Currently, it's mandatory to have a full HTTPS website (Google: HTTPS as a ranking signal).
It is easy to update the Magento configuration to serve every URL on HTTPS using the following command:
php bin/magento setup:store-config:set --base-url="https://yourdomain.com/" php bin/magento setup:static-content:deploy php bin/magento cache:clean php bin/magento cache:flush
Performance, performance, performance! This may be one of the most used words in the Magento 1 period. Every Magento website benefits from a great performing platform, and every customer loves it.
However, before we can create a great performing website, all sorts of elements have to be conquered. One of the missing elements in Magento 1 was creating sample data based on a company profile. As every Magento website is unique, so is performance testing based on their profile. Some companies have only one website, store catalog, and store view. Others have 800 websites and are converting one million orders per day.
Magento 2 now provides us with the option to run a profile that creates sample data based on your company profile. By default, there are four sample data profiles. Depending on the profile, creating the sample data may take a long time, so keep this in mind.
After creating the sample data based on your profile, you can start doing performance-based testing. Based on this profile, you may need to scale up or tune one of the components before going into production.
For this recipe, we will use a Droplet created in Chapter 1, Magento 2 System Tools, at DigitalOcean, https://www.digitalocean.com/. We will be using NGINX, PHP-FPM, and a Composer-based setup including Magento 2 (without sample data). No other prerequisites are required.
For the purpose of this recipe, let's assume that we need to run a Magento 2 performance test. The following steps will guide you through this:
rm -rf * /var/www/html composer create-project --repository-url=https://repo.magento.com/ magento/project-community-edition /var/www/html --prefer-dist chown -R www-data:www-data /var/www/html
bin/magento setup:install \
--db-host=localhost \
--db-name=<your-db-name> \
--db-user="<db-user>" \
--db-password="<db-password>" \
--backend-frontname=<admin-path> \
--base-url=http://yourdomain.com/ \
--admin-lastname=<your-lastname> \
--admin-firstname=<your-firstname> \
--admin-email=<your-email> \
--admin-user=<your-admin-user> \
--admin-password=<your-password> \--use-rewrites=1 \
--cleanup-database \php bin/magento setup:di:compile-multi-tenant chown -R www-data:www-data /var/www/html
php bin/magento setup:perf:generate-fixtures /var/www/html/setup/performance-toolkit/profiles/ce/small.xml
setup/performance-toolkit/profiles/ directory. Depending on whether you are running CE or EE, you need to choose one of the subdirectories.yourdomain.com, and check whether everything is correct. You can also log in to the backend of your Magento website and check all the created settings.Let's recap and find out what we did throughout this recipe. In steps 1 through 8, we created sample data to test the performance of the Magento 2 website.
In steps 1 and 2, we started with a clean Magento 2 setup using Composer and bin/magento setup:install.
In step 3, we needed to compile our Magento code base before we could input the sample data.
In step 4, we ran a generated fixture profile using the bin/magento setup:perf option. Depending on the profile, Magento will start creating all of the required data. Running a large profile set can take up to several hours. Adjusting the profile is self-explanatory.
If the default profile does not fit your needs, you can create a custom profile. For example, copy the small.xml file to mycustom.xml in the same directory and open the file in your favorite editor. Run the following command on the shell:
cd /var/www/html/setup/performance-toolkit/profiles/ce/small.xml cp small.xml mycustom.xml vi mycustom.xml
Now you can change data such as websites, store_groups, store_views, simple_products, configurable_products, categories, categories_nesting_level, catalog_price_rules, catalog_target_rules, cart_price_rules, cart_price_rules_floor, customers, tax_rates_file, and orders:
Save your file, and use the following command:
Esc + :wq
Before we start, you need to check whether your setup is clean. Otherwise, start with step 1 of the recipe.
Now we can run the
mycustom.xml file with the following command:
php bin/magento setup:perf:generate-fixtures /var/www/html/setup/performance-toolkit/profiles/ce/mycustom.xml
In this chapter, we will cover the basic tasks related to creating a catalog and products in Magento 2. You will learn how to:
This chapter explains how to set up a vanilla Magento 2 store. If Magento 2 is totally new to you, then lots of new basic whereabouts are pointed out. Are you currently working with Magento 1? If so, not much has changed since then.
The new backend of Magento 2 is the biggest improvement of them all. The design is built responsively and has a great user experience. Compared to Magento 1, this is a great improvement. The menu is located vertically on the left of the screen and works great on desktop and mobile environments:
Within this chapter, we will learn how to set up a website with multiple domains using different catalogs and products. Depending on the website, store, and store view setup, we can create different subcategories, URLs, and products for any domain name.
There are a number of different ways customers can browse your store, but one of the most effective is layered navigation. Layered navigation is located in your catalog and holds product features to sort or filter. We will learn how to create product attributes for use in layered navigation.
Every website benefits from great search engine optimization (SEO). We will learn how to define catalog URLs for catalogs.
Without products, the most important element of the website is missing. We will be creating different types of product in our multi-website setup.
The first thing we need to do when setting up a vanilla Magento 2 website is define our website, store, and store view structure.
So what is the difference between website, store, and store view, and why is it important?
noindex and nofollow), and so on. The option where we use the Base Link URL, for example, (yourdomain.com/myhiddenpage) is easy to set up.The website, store, and store view structure is shown in the following image:
To step through this recipe, you will use a Droplet created in Chapter 1, Magento 2 System Tools, at DigitalOcean (https://www.digitalocean.com/). We will be using an NGINX, PHP-FPM, Composer-based setup with Magento 2 preinstalled. No other prerequisites are required.
For the purpose of this recipe, let's assume that we need to create a multi-website setup including three domains (yourdomain.com, yourdomain.de, and yourdomain.fr) and separated Root Catalogs. The following steps will guide you through this:
Go to /etc/nginx/conf.d, open the default.conf file, and include the following content at the top of your file:
map $http_host $magecode {
hostnames;
default base;
yourdomain.de de;
yourdomain.fr fr;
}map $http_host $magecode {
hostnames;
default base;
yourdomain.de de;
yourdomain.fr fr;
}
upstream fastcgi_backend {
  server  127.0.0.1:9000;
}
server {
  listen       80;
  listen       443 ssl http2;

  server_name  yourdomain.com;

  set $MAGE_ROOT /var/www/html;
  set $MAGE_MODE developer;

  ssl_certificate /etc/ssl/yourdomain-com.cert;
  ssl_certificate_key /etc/ssl/yourdomain-com.key;

  include /var/www/html/nginx.conf.sample;

  access_log /var/log/nginx/access.log;
  error_log /var/log/nginx/error.log;

  location ~ /\.ht {
    deny  all;
  }
}/var/www/html/ and open the nginx.conf.sample file. Go to the bottom and look for:location ~ (index|get|static|report|404|503)\.php$
Now we add the following lines to the file under fastcgi_pass fastcgi_backend;:
fastcgi_param MAGE_RUN_TYPE website;
fastcgi_param MAGE_RUN_CODE $magecode;
location ~ (index|get|static|report|404|503)\.php$ {
  try_files $uri =404;
  fastcgi_pass   fastcgi_backend;

  fastcgi_param MAGE_RUN_TYPE website;
  fastcgi_param MAGE_RUN_CODE $magecode;

  fastcgi_param  PHP_FLAG  "session.auto_start=off \n suhosin.session.cryptua=off";
  fastcgi_param  PHP_VALUE "memory_limit=256M \n max_execution_time=600";
  fastcgi_read_timeout 600s;
  fastcgi_connect_timeout 600s;
  fastcgi_param  MAGE_MODE $MAGE_MODE;

  fastcgi_index  index.php;
  fastcgi_param  SCRIPT_FILENAME  $document_root$fastcgi_script_name;
  include    fastcgi_params;
}
The current setup uses the MAGE_RUN_TYPE website variable. You may change website to store, depending on your setup preferences. When changing the variable, you need your default.conf mapping codes as well.
service nginx restart && service php-fpm restart
var/www/html/pub
echo "<?php header("Content-type: text/plain"); print_r($_SERVER); ?>" > magecode.php
Don't forget to update your nginx.conf.sample file with the new magecode code. It's located on the bottom of your file and should look like this:
location ~ (index|get|static|report|404|503|magecode)\.php$ {Restart NGINX and open the file in your browser. The output should look as follows. As you can see, the created MAGE_RUN variables are available:
|
Name |
|
|
Code |
|
Next, click on Create Store and commit the following details:
|
Website |
|
|
Name |
|
|
Root Category |
|
Next, click on Create Store View and commit the following details:
|
Store |
|
|
Name |
|
|
Code |
|
|
Status |
|
Repeat the same steps for the French domain. Make sure that the Code in Website and Store View is fr.
|
Name |
|
|
Is Active |
|
|
Page Title |
|
Perform the same steps for the French domain. You may add additional information here but it is not needed. Changing the current Root Category called Default Category to Root English is also optional but advised.
Save your configuration and go to Stores | All Stores and change all of the stores to the appropriate Root Catalog we just created. Every Root Category should now have a dedicated Root Catalog.
yourdomain.com, yourdomain.de, and yourdomain.fr.Let's recap and find out what we did throughout this recipe. In steps 1 through 11, we created a multi-store setup for .com, .de, and .fr domains using a separate Root Catalog.
In steps 1 through 4, we configured the domain mapping in the NGINX default.conf file. Then we added the fastcgi_param MAGE_RUN code to the nginx.conf.sample file; this will manage which website or store view to request within Magento.
In step 6, we used an easy test method to check if all domains run the correct MAGE_RUN code.
In steps 7 through 9, we configure the website, store, and store view names and codes for the given domain names.
In step 10, we created additional Root Catalogs for the remaining German and French stores. They are then connected to the previously created store configuration. All stores have their own Root Catalog now.
Are you able to buy additional domain names, but would like to try setting up a multi-store? Here are some tips to create one. Depending on whether you are using Windows, Mac OS, or Linux, the following options apply:
C:\Windows\System32\drivers\etc and open up the hosts file as an administrator. Add the following (change the IP and domain name accordingly):123.456.789.0 yourdomain.de 123.456.789.0 yourdomain.fr 123.456.789.0 www.yourdomain.de 123.456.789.0 www.yourdomain.fr
Save the file and click on the Start button. Search then for cmd.exe and commit the following:
ipconfig /flushdns
/etc/ directory, open up the hosts file as a superuser, and add the following (change the IP and domain name accordingly):123.456.789.0 yourdomain.de 123.456.789.0 yourdomain.fr 123.456.789.0 www.yourdomain.de 123.456.789.0 www.yourdomain.fr
Save the file and run the following command on the shell:
dscacheutil -flushcache
Depending on your Mac version, check out the different commands here: http://www.hongkiat.com/blog/how-to-clear-flush-dns-cache-in-os-x-yosemite/
/etc/ directory, open up the hosts file as a root user, and add the following (change the IP and domain name accordingly):123.456.789.0 yourdomain.de 123.456.789.0 yourdomain.fr 123.456.789.0 www.yourdomain.de 123.456.789.0 www.yourdomain.fr
Save the file and run the following command on the shell:
service nscd restart
Depending on your Linux version, check out the different commands here: http://www.cyberciti.biz/faq/rhel-debian-ubuntu-flush-clear-dns-cache/
Open up your browser and surf to the custom domains.
After creating the foundation of the website, we need to set up a catalog structure. Setting up a catalog structure is not difficult but needs to be well thought out.
Some websites have an easy setup using two levels, while others sometimes use five or more subcategories. Always keep in mind user experience: your customer needs to crawl the pages easily. Keep it simple! The following image shows a simple catalog structure:
To step through this recipe, you will use a Droplet created in Chapter 1, Magento 2 System Tools, at DigitalOcean (https://www.digitalocean.com/). We will be using an NGINX, PHP-FPM, Composer-based setup with Magento 2 preinstalled. No other prerequisites are required.
For the purpose of this recipe, let's assume that we need to set up a catalog including subcategories. The following steps will guide you through this:
Since we have already created Root Catalogs, we start with using the Root English catalog first.
|
Name |
|
|
Is Active |
|
|
Page Title |
|
|
Name |
|
|
Is Active |
|
|
Page Title |
|
|
Name |
|
|
Is Active |
|
|
Page Title |
|
|
Name |
|
|
Is Active |
|
|
Page Title |
|
yourdomain.com, yourdomain.de, and yourdomain.fr. Your categories should now look as follows:Let's recap and find out what we did throughout this recipe. In steps 1 through 4, we created subcategories for the English, German, and French stores. In this recipe, we created a dedicated Root Catalog for every website. This way, every store can be configured using their own tax and shipping rules.
In our example, we only submitted Name, Is Active, and Page Title. You may continue to commit the Description, Image, Meta Keywords, and Meta Description fields. By default, the URL key is similar to the Name field; you can change this depending on your SEO needs.
Every category or subcategory has a default page layout defined by the theme. You may need to override this. Go to the Custom Design tab and click the Page Layout drop-down menu. We can choose from the following options: 1 column, 2 columns with left bar, 2 columns with right bar, 3 columns, and Empty layout.
Every product has a unique DNA; some, such as shoes, could have different colors, brands, and sizes, while a snowboard could have weight, length, torsion, manufacturer, and style.
Setting up a website with all the attributes does not make sense. Depending on the products you sell, you should create attributes specific to each website.
When creating products for your website, attributes are the key element and need to be thought through. What and how many attributes do you need? And how many values do you need? These are all types of question that could have a great impact on your website; and don't forget performance. Creating an attribute such as color and having 100,000 of different key values stored will not improve your overall speed and user experience. Always think things through.
After creating the attributes, we combine them in attribute sets, which can be picked when starting to create a product. Some attributes can be used more than once, while others are unique to one product or attribute set.
To step through this recipe, you will use a Droplet created in Chapter 1, Magento 2 System Tools, at DigitalOcean (https://www.digitalocean.com/). We will be using an NGINX, PHP-FPM, Composer-based setup with Magento 2 preinstalled. No other prerequisites are required.
For the purpose of this recipe, let's assume that we need to create product attributes and sets. The following steps will guide you through them:
Since we are using a vanilla setup, only system attributes and one attribute set are installed. Now click on Add New Attribute and commit the following data in the Properties tab:
|
Attribute Properties | |||
|---|---|---|---|
|
Default label |
| ||
|
Catalog Input Type for Store Owners |
Drop-down | ||
|
Values Required |
No | ||
|
Manage Options (values of your attribute) | |||
|
English |
Admin |
French |
German |
|
4 |
4 |
35 |
35 |
|
4.5 |
4.5 |
35 |
35 |
|
5 |
5 |
35-36 |
35-36 |
|
5.5 |
5.5 |
36 |
36 |
|
6 |
6 |
36-37 |
36-37 |
|
6.5 |
6.5 |
37 |
37 |
|
7 |
7 |
37-38 |
37-38 |
|
7.5 |
7.5 |
38 |
38 |
|
8 |
8 |
38-39 |
38-39 |
|
8.5 |
8.5 |
39 |
39 |
|
Advanced Attribute Properties | |||
|
Scope |
Global | ||
|
Unique Value |
No | ||
|
Add to Column Options |
Yes | ||
|
Use in Filer Options |
Yes | ||
Continue the rest of the chart accordingly (http://www.shoesizingcharts.com).
|
Manage Titles (Size, Color, and so on) | ||
|---|---|---|
|
English |
French |
German |
|
Size |
Taille |
Größe |
|
Storefront Properties | |
|---|---|
|
Use in Search |
No |
|
Comparable in Storefront |
No |
|
Use in Layered Navigation |
Filterable (with result) |
|
Use in Search Result Layered Navigation |
No |
|
Position |
0 |
|
Use for Promo Rule Conditions |
No |
|
Allow HTML Tags on Storefront |
Yes |
|
Visible on Catalog Pages on Storefront |
Yes |
|
Used in Product Listing |
No |
|
Used for Sorting in Product Listing |
No |
cronjob, it will automatically update the newly created attribute.shoe_type, width, color, gender, and occasion attributes can be downloaded at https://github.com/mage2cookbook/chapter4.Shoes. Go to Stores | Attribute Set, click Add Attribute Set, and commit the following data:|
Edit Attribute Set Name | |
|---|---|
|
Name |
|
|
Based On |
|
shoe_size, shoe_type, width, color, gender, and occasion attributes in the group and save the configuration. The cronjob notice is automatically updated, depending on your settings.Let's recap and find out what we did throughout this recipe. In steps 1 through 10, we created attributes that will be used in an attribute set. The attributes and sets are the fundamentals for every website.
In steps 1 through 5, we created multiple attributes to define all details about the shoes and clothes we would like to sell. Some attributes are later used as configurable values on the frontend while others only indicate the gender or occasion.
In steps 6 through 9, we connect the attributes to the related attribute set. Thus, when creating a product, all the correct elements are available.
After creating the Shoe attribute set, continue by creating an attribute set for Clothes.
Use the following attributes to create the set: color, occasion, apparel_type, sleeve_length, fit, size, length, and gender.
Follow the same steps we performed before to create a new attribute set. You may reuse the color, occasion, and
gender attributes. Details of all the attributes can be found here: https://github.com/mage2cookbook/chapter4#clothes-set.
The following screenshot shows the Clothes attribute set:
Eventually, after creating attributes and sets, it comes down to adding products. Magento 2 uses the same types of product as Magento 1. This also includes Magento 2 Enterprise.
The product types we can choose from are: Simple Product, Configurable Product, Grouped Product, Virtual Product, Bundle Product, Downloadable Product, and, for the Enterprise Edition (EE), Gift Card.
Depending on the products you would like to sell, you may use one or two of the types. The most used types are Simple and Configurable Products because they rely on one another when you sell shoes, for example.
Product type definitions are as follows:
Besides the regular ones, it is possible you may need extra options, depending on your product base. In Magento 1, additional third-party modules, such as Configurable Bundles, Events, Training, Rental, and Recurring, could be bought and installed to manage this.
Using product types is now easier than ever. Magento 2 created a user-friendly flow for configuring Configurable Products on the fly.
To step through this recipe, you will use a Droplet created in Chapter 1, Magento 2 System Tools, at DigitalOcean (https://www.digitalocean.com/). We will be using an NGINX, PHP-FPM, Composer-based setup with a single Magento 2 website, Root Catalog, store view, categories, and attributes preinstalled. No other prerequisites are required.
For the purpose of this recipe, let's assume that we need to create Configurable Product for Magento 2. The following steps will guide you through them:
|
Product Details | |
|---|---|
|
Name |
Ellis Flat |
|
SKU |
shw005 |
|
Price |
250.00 |
|
Tax Class |
Taxable Goods |
|
Images and Videos |
Download the images here: https://github.com/mage2cookbook/chapter4 |
|
Quantity |
100 |
|
Weight |
Yes |
|
Categories |
Shoes |
|
Description |
Suede upper. Rubber 0.5" heel. Domestic. |
Now let's go back to our backend and open up the newly created product. Next we are going to set our attribute set we created earlier in this chapter. This option is located above the Product Details title. Here we choose the Shoes attribute set, as shown in the following screenshot:
250 for the Price and 100 for the Quantity. Continue to the next step, as shown in the following screenshot:Let's recap and find out what we did throughout this recipe. In steps 1 through 13, we created a Configurable Product using the new Magento workflow.
In steps 1 through 4, we created a Simple Product and connected it to the attribute set. This product will be the starting point for creating a Configurable Product.
In steps 8 through 11, we used the configurations workflow to select the attributes related to this product and set its values. Depending on the setup, we can apply a single price, image, or quantity to all of the Simple Products created during this process.
By default, when creating a product, Magento 2 starts with a Virtual Product. When changing settings such as Weight (Does this have a weight?) to Yes, the product switches to a Simple Product. The same goes for Downloadable and Configurable Product.
This new technique is stunning and a great benefit for store owners. Everybody can now create and change products on the fly.
Bundle and Grouped Products, on the other hand, are more like Magento 1. You first need to choose the product type using the drop-down arrow in the Add Product button and then continue the same flow, as shown in the following screenshot:
Managing products on a daily basis may not be one of the most entertaining tasks. The product grid in Magento 1 is, out of the box, not the best tool. Lots of merchants install a third-party extension for better use and configuration. Depending on the extension, it is possible to tune the grid accordingly.
Now the new Magento 2 catalog grid is better than ever. Every backend user can create their own view and select the appropriate attributes for the best view ever.
Besides all the fancy features, the product grid loads asynchronously, which means that the page refreshes its data in the background. This is great for performance and user experience.
To step through this recipe, you will use a Droplet created in Chapter 1, Magento 2 System Tools, at DigitalOcean (https://www.digitalocean.com/). We will be using an NGINX, PHP-FPM, Composer-based setup including a single Magento 2 website, Root Catalog, store view, categories, and attributes and four configurable products preinstalled. No other prerequisites are required.
For the purpose of this recipe, let's assume that we need to a create a custom product grid in Magento 2. The following steps will guide you through this:
Let's recap and find out what we did throughout this recipe. In steps 1 through 8, we created a custom grid for the catalog view. You can create as many grids as you like and select your preferred attributes in it. Saving the new grid views is straightforward.
In this chapter, we will cover the basic tasks related to creating a catalog and products in Magento 2. You will learn the following:
Although we've created categories and products, we are not yet ready to go online. Depending on the country or state we live in and ship to, we have to levy additional charges such as VAT and shipping fees.
These shipping fees and tax rates need to be configured correctly according to the website or store view. Shipping options can be straightforward from free shipping to advanced calculations. But keep in mind that, depending on the situation, it is not as easy as it looks and could take some time to set up.
Besides shipping and tax, we should not forget the inventory. Without the correct inventory setup, we could create issues when it comes to stock management. Magento 2 uses the same inventory setup as Magento 1, and is straightforward to configure out of the box.
Are you selling products overseas and need to use different currency rates? Magento 2 is your best friend. This functionality in a multi-store setup is easy to configure.
Some products may depend on special prices related to customer groups. Creating B2C or B2B groups is straightforward and can be connected to advanced pricing within the product types. These prices will be shown after login or store view.
The topic of shipping is so huge that you could write a book about it. The options related, for example, to width, length and height, breakable, edible, and so on, are endless.
After configuring these attributes for a product, we can start relating them to our shipping setup and shipping vendor. Magento has a huge selection of shipping vendors to choose from. It's important to choose the right vendor and the correct Magento extension. This could be challenging. Do not immediately pick the cheapest shipping vendor. Check the quality of their service, their specialty when it comes to shipping your products, and their Magento extension.
Creating the correct tax rules is not for the fainthearted. Are you in the USA, Europe, Asia, or somewhere else? Every country has its own tax rules. Always check with the local authorities to find out which rules to apply.
To step through this recipe, you will use a Droplet created in Chapter 1, Magento 2 System Tools at DigitalOcean https://www.digitalocean.com/. We will be using an NGINX, PHP-FPM, Composer-based setup including sample data. No other prerequisites are required.
For the purpose of this recipe, let's assume that we need to create shipping and tax rules for the European Union. The shipping rules apply to a Table Rates setup using a local shipping vendor. The following steps will guide you through them.
Now complete the entire field set related to your company. This is the starting point. When using the Shipping Policy, just mark it Yes and commit your policy. Here is an example of how a policy could look:
Since the scope of this recipe is Table Rates, using Free Shipping and Flat Rate is pretty straightforward.
Now click on the Table Rates drop-down arrow, and commit the following information:
In the Condition drop-down menu we use the Weight vs. Destination option. Beside this option we also can choose from Price vs. Destination or # (number) of items vs. Destination. Depending on your needs, pick one of them. Since we are using the Weight option, we need to make sure that our entire product set has the correct weight configured.
tablesrates.csv that we need to complete. Download the file and open up a spreadsheet editor, such as MS Excel, OpenOffice Calc, or Google Docs Spreadsheet.Since we are using the Weight vs. Destination option, the CSV schema looks as follows:
|
Country |
Region/State |
Zip/Postal Code |
Weight (and above) |
Shipping Price |
|---|---|---|---|---|
|
NLD |
* |
* |
0 |
6.95 |
|
NLD |
* |
* |
50 |
9.95 |
|
NLD |
* |
* |
100 |
14.50 |
|
DEU |
* |
* |
0 |
10.50 |
|
DEU |
* |
* |
50 |
17.50 |
|
DEU |
* |
* |
100 |
22.50 |
|
FRA |
* |
* |
0 |
10.50 |
|
FRA |
* |
* |
50 |
17.50 |
|
FRA |
* |
* |
100 |
22.50 |
In this example, we use a wildcard for the Region/State and Zip/Postal Code. You can replace this wildcard with the appropriate value. Upload your saved tablesrates.csv file in the Import section and click Save Config, and clean the cache:
50 and click Save & Close. Do the same for Strive Shoulder Pack (49) and Crown Summit Backpack (51). Your product grid should now look as follows:We only used German, French, and Dutch codes in this example. If you want to have your country shipping fees in the Table Rate CSV file, update them accordingly:
EU Customers. Now let's select all the EU countries with the (standard) tax Rate and click Save Rule:In this example we set the default rule to the high tax rate. Create a new rule when you are selling services or products that have a lower tax rate. But don't forget to create a new Product Tax Class in the Additional Settings. This class can then be used in every product type where it applies.
Let's recap and find out what we did throughout the preceding recipe. In Steps 1 through 10, we configured a shipping method called Table Rates to handle all the shipping. We used the Weight vs. Destination option. Using this option we needed to update all our products with the correct weight attribute value.
In Steps 12 through 18, we configured tax rules for the European Union using a tax_rates.csv file from GitHub. By using this file, it was easy to configure the appropriate tax rule. In Step 15, we gave an example of how a system configuration for a store view could look.
Depending on where you live or are sending products to, using the correct measuring units in Magento 2 is important. This new feature helps us to configure whether we calculate the weight in lbs (pounds) or kgs (kilograms). We can find this new option in Stores | Configuration | General | Locale Options. Here is an example showing the Weight Unit field:
Everybody knows that every website is different. Some sites only sell products to Business to Consumer (B2C) while others sell to Business to Business (B2B) or both.
In the B2C market it is pretty common to only have one customer group called Retailer. While the B2B market is related to the Wholesaler. Beside these two, we could also have groups such as Platinum, Gold, Silver, Special members, or groups based on their location. So the options are unlimited. Setting up the correct infrastructure for your customers helps you to segment these groups and offer them different prices.
Magento offers by default the following groups: General, NOT LOGGED IN, Retailer, and Wholesale.
To step through this recipe, you will use a Droplet created in Chapter 1, Magento 2 System Tools at DigitalOcean https://www.digitalocean.com/. We will be using an NGINX, PHP-FPM, Composer-based setup including sample data. No other prerequisites are required.
For the purpose of this recipe, let's assume that we need to add additional customer groups. We want to create the following groups: Platinum, Gold, and Silver. The following steps will guide you through this.
crontab configured correctly, you do not have to worry about this. Magento 2 will update this for you every minute.Let's recap and find out what we did throughout the preceding recipe. In Steps 1 through 6, we configured different Customer Groups and connected them to the appropriate customer.
Creating customers groups basically does nothing. It is the relation to marketing or segmentation that makes the difference. In Magento 2, we got Catalog and Cart Price Rules. When combining them with the Customers Group we are able to create member discounts.
Go to Marketing | Promotions | Catalog Price Rules, or Cart Price Rules and click Add New Rule. In the General Information section we see the Customer Groups list.
Now go ahead and create a new rule and use one of the groups. Here is an example. Create a new rule called Platinum 25%, and select the Customer Groups Platinum. Now go to the Actions tab menu and choose the Apply rule: Percent of product price discount. In the Discount Amount commit 25. This is the amount of percent the Platinum member gets discounted from the total of his shopping cart.
Make sure when testing that the customer login is in this group.
When selling physical products, it makes sense that every product in the warehouse is related to inventory or stock management. Configuring and managing stock is a day-to-day job. A basic inventory setup in Magento 2 is straightforward and comparable to Magento 1. With growth, a product inventory management (PIM) system will be needed.
To step through this recipe, you will use a Droplet created in Chapter 1, Magento 2 System Tools at DigitalOcean https://www.digitalocean.com/. We will be using an NGINX, PHP-FPM, Composer-based setup including sample data. No other prerequisites are required.
For the purpose of this recipe, let's assume that we need to configure an inventory for a Magento 2 setup. The following steps will guide you through this.
In Stock Options you can configure the following:
All options are self-explanatory. One of the more interesting options is Display Out of Stock Products. This can be used to show the product even when it is currently not available. Some websites have a limited stock amount; by using this, the product is not always removed from the web, which is bad for search engine optimization (SEO).
The Out-of-Stock Threshold is set as Global, which means that it is related to all the products. Minimum Qty Allowed in Shopping Cart is related to the Customer Groups we created in the Managing customer groups recipe. Configuring the correct Minimum Qty amount helps to set the default before the discount rule applies. Automatically Return Credit Memo Item to Stock is helpful in managing credit orders. After creating a credit order, all items are updated in the current stock:
In Advanced Inventory you can configure the following. All options are self-explanatory. Interesting options are Qty Uses Decimals and Allow Multiple Boxes for Shipping.
The Qty Uses Decimals setting determines whether decimals will be used in the quantity field for the product (for example, 3.5 yards) or not.
The Allow Multiple Boxes for Shipping setting determines whether multiple boxes will be used for the product during shipping (for example, custom build computer incl. monitor) or not:
Every website selling products uses some kind of currency. Without a valid currency things would start to get messy.
Configuring these currencies is pretty straightforward. The most interesting part is the currency rate exchange. Every day this rate needs to be checked and updated. Decreases in value are important on the product you sell. So choosing the correct default currency needs to be considered appropriately.
To step through this recipe, you will use a Droplet created in Chapter 1, Magento 2 System Tools at DigitalOcean https://www.digitalocean.com/. We will be using an NGINX, PHP-FPM, Composer-based setup including sample data. No other prerequisites are required.
For the purpose of this recipe, let's assume that we need to configure three currencies—US Dollar, Euro, and Pound Sterling—with Magento 2. The following steps will guide you through this.
Let's recap and find out what we did throughout the preceding recipe. In Steps 1 through 5, we configured additional currency for our website. Depending on the currencies you are selling, this can be updated in the backend. On the frontend, customers can easily switch and buy in their preferred currency.
Selling products can be hard. Lots of websites are selling the same product. But how can we attract new customers and persuade them to buy our goods?
Many websites have the same default retail price shown on their site. When using advanced pricing we can show special prices within a particular date range, or display tier prices for our beloved platinum members.
Another option could be using a minimum advertised price (MAP). This feature is useful if your product manufacturer has established a Manufacturer's Suggested Retail Price (MSRP), and you want to sell the product at a price lower than the MSRP. What this feature basically does is hide the product price display in your catalog and only shows this during product purchase.
To step through this recipe, you will use a Droplet created in Chapter 1, Magento 2 System Tools at DigitalOcean https://www.digitalocean.com/. We will be using an NGINX, PHP-FPM, Composer-based setup including sample data. No other prerequisites are required.
For the purpose of this recipe, let's assume that we need to create advanced pricing for some of our products in Magento 2. The following steps will guide you through this.
You can choose from Use Config, On Gesture, In Cart, and Before Order Confirmation.
http://yourdomain.com/joust-duffle-bag.html. Depending on your configuration, it should look as follows:In this chapter, we will cover the basics on how to create your own Magento 2 extensions with the following recipes:
Now that we have installed and configured Magento 2, we will see the basics on how to create a new Magento 2 extension. If you are familiar with creating an extension for Magento 1.x, you will notice that there are some concepts that look a lot like how it is done in Magento 1. However, as the code is a completely new framework, there are also lots of changes in the module structure and necessary files.
Some of the major changes that change the way a extension is created are as follows:
Mage::getModel() (or similar functions), but injected into your class through a dependency injection.The way in which a new extension is built in Magento 2 is a bit different than it was in Magento 1. The major change is that all files are now included in the extension directory. This makes it easier to manage and remove.
The location of an extension is also different; there are no longer separate codepools as used in Magento 1 (core, community, and local). Depending on the way the extension is installed, the extension will be running from the vender directory when installed through Composer. For project-specific extensions, it is also possible to place them in app/code.
When developing an extension, it is advised to run Magento 2 in developer mode as this will give better error messages explaining what went wrong and make debugging a lot easier.
To display all PHP errors and activate developer mode, activate the display_errors setting in app/bootstrap.php and run the following command:
bin/magento deploy:mode:set developer
The code used in this chapter is based on naming the module Genmato_Sample and all files will be placed in the following:
app/code/Genmato/Sample/
Follow these steps to initialize a new extension:
etc/module.xml:
<?xml version="1.0"?>
<config xmlns:xsi="http://www.w3.org/2001/XMLSchema-instance" xsi:noNamespaceSchemaLocation="urn:magento:framework:Module/etc/module.xsd">
  <module name="Genmato_Sample" setup_version="0.1.3">
    <sequence>
      <module name="Magento_Store"/>
    </sequence>
  </module>
</config>registration.php
<?php

\Magento\Framework\Component\ComponentRegistrar::register(
  \Magento\Framework\Component\ComponentRegistrar::MODULE,
  'Genmato_Sample',
  __DIR__
);
composer.json file:composer.json
{
  "name": "genmato/sample",
  "description": "Genmato Magento2 Sample extension",
  "keywords": ["magento2", "genmato", "m2sample"],
  "type": "magento2-module",
  "license": "OSL-3.0",
  "require": {
    "php": "~5.5.0|~5.6.0|~7.0.0"
  },
  "autoload": {
    "files": [ "registration.php" ],
    "psr-4": {
      "Genmato\\Sample\\": ""
    }
  }
}
bin/magento module:enable Genmato_Sample
bin/magento setup:upgrade
The module declaration in step 1 registers the module in Magento; here, the version number and dependencies are also specified to manipulate the load order. The following XML nodes are available:
Genmato_Sample0.1.3 is used for the setup/upgrade scripts creating database schemasWith the use of Composer, modules can be placed in two locations currently. In order for the autoloader to know what file to load when a class is instantiated, the path needs to be registered. Through registration.php from step 2, the (__DIR__) location is stored for a specified package. The registration can be done for the following types of packages:
MODULE: This is for extensions/modulesLIBRARY: This is for extensions that are used as a libraryTHEME: This is for themesLANGUAGE: This is for language packsIn order to use Composer to install the module, it is required to add a composer.json file to the module. The most important elements in this file are as follows:
Name: The extension package name is in the format of <vendor name>/<extension name>; it is important to only use lowercase letters. This name is also used to install the extension through Composer.Type: This defines the package type; the possible options are as follows:magento2-module: Extensions/modulesmagento2-theme: Themesmagento2-language: Language packagesrequire: This defines the packages needed to be installed on the system for this package to work. During installation of the package, Composer will check the requirements and try to install the missing packages. When it's not possible to install them, the installation will fail.Autoload: This element is to specify information that needs to be loaded through the Composer autoloader.In order to install packages in your project, they have to be available for Composer to install. There are a few options available to install packages from:
composer.json file located in your Magento 2 installation root:{
"repositories": [
{
"type": "vcs",
"url": "https://github.com/[github account]/[package]"
}
]
}On Packagist, you can submit your package by specifying your extension repository URL:
Every package is now installable by running the following command in your Magento 2 installation root:
composer require <vendor-name>/<module-name>
Storing data in a database table is handled through a Model class; this model holds the data. While saving the data, a ResourceModel is used, and this class is the link between the Model and database table, and all CRUD operations go through the ResourceModel. When loading a set of records, a Collection is used; it is possible to apply filters to this collection.
Using database models requires that the module configuration is done correctly; otherwise, the autoloader won't be able to find the files to load.
The following steps in this recipe will add the database models to your module:
Model class:Model/Demo.php
<?php
namespace Genmato\Sample\Model;
use Magento\Framework\Model\AbstractModel;
class Demo extends AbstractModel
{
  /**
  * Initialize resource model
  * @return void
  */
  protected function _construct()
  {
    $this->_init('Genmato\Sample\Model\ResourceModel\Demo');
  }
}
ResourceModel class:Model/ResourceModel/Demo.php
<?php
namespace Genmato\Sample\Model\ResourceModel;
use Magento\Framework\Model\ResourceModel\Db\AbstractDb;
class Demo extends AbstractDb
{
  /**
  * Initialize resource model
  * @return void
  */
  protected function _construct()
  {
    $this->_init('genmato_demo', 'demo_id');
  }
}
Collection class:Model/ResourceModel/Demo/Collection.php
<?php
namespace Genmato\Sample\Model\ResourceModel\Demo;
use Magento\Framework\Model\ResourceModel\Db\Collection\AbstractCollection;
class Collection extends AbstractCollection
{
  /**
  * @var string
  */
  protected $_idFieldName = 'demo_id';

  /**
  * Define resource model
  * @return void
  */
  protected function _construct()
  {
    $this->_init('Genmato\Sample\Model\Demo', 'Genmato\Sample\Model\ResourceModel\Demo');
  }
}
The Model class specifies the used ResourceModel in the constructor through the _init() function. When the save() function is called on a Model, it will call the save() function on the ResourceModel; see the save() function in AbstractModel that is extended:
/**
* Save object data
*
* @return $this
* @throws \Exception
*/
public function save()
{
  $this->_getResource()->save($this);
  return $this;
}
Here, _getResource() returns an instance of the class specified in the _init() function.
In the ResourceModel class constructor, the _init() function is called to specify the genmato_demo database table and primary key in the demo_id table. This will be used when creating the queries necessary to load or save the data. Depending on the action performed (save new, save existing, or delete), a corresponding query is generated using an INSERT, UPDATE, or DELETE query. This is handled by the framework and is built (currently) on the Zend_Db_Adapter_Pdo_Mysql class.
In the Collection class, both Model and ResourceModel are specified in the _init() function. ResourceModel is necessary to connect to the database and load the records from the right database table, allowing you to use filters to select the records necessary. The collection is then represented as an array of Models to allow all functionality available to models (magic getters/setters, adding data, and delete/save).
When using database models, as explained in the previous recipe, the corresponding tables needs to be created during setup. These operations are placed in setup scripts and executed during the installation of an extension.
While running the installation of a module, there are four files executed to create schemas and insert data. To create schemas, the files used are as follows:
Setup/InstallSchema.php
Setup/UpgradeSchema.php
The installation file is executed only when there is no record in the setup_module table for the module. The upgrade file is executed only when the current version number in the setup_module table is lower than the version configured in your etc/module.xml file.
When it's necessary to insert default values into a table or new EAV attributes need to be created, these actions need to be configured in the following files:
Setup/InstallData.php
Setup/UpgradeData.php
Magento keeps track of which version is installed for an extension in the setup_module table; here, the current installed version for the schema and data is stored:
Follow these steps to create your database tables:
Setup/InstallSchema.php
<?php
namespace Genmato\Sample\Setup;

use Magento\Framework\Setup\InstallSchemaInterface;
use Magento\Framework\Setup\ModuleContextInterface;
use Magento\Framework\Setup\SchemaSetupInterface;
use Magento\Framework\DB\Adapter\AdapterInterface;

class InstallSchema implements InstallSchemaInterface
{
  public function install(SchemaSetupInterface $setup, ModuleContextInterface $context)
  {
    $installer = $setup;

    $installer->startSetup();

    /**
    * Create table 'genmato_demo'
    */
    $table = $installer->getConnection()->newTable(
      $installer->getTable('genmato_demo')
    )->addColumn(
      'demo_id',
      \Magento\Framework\DB\Ddl\Table::TYPE_SMALLINT,
      null,
      ['identity' => true, 'nullable' => false, 'primary' => true],
      'Demo ID'
    )->addColumn(
      'title',
      \Magento\Framework\DB\Ddl\Table::TYPE_TEXT,
      255,
      ['nullable' => false],
      'Demo Title'
    )->addColumn(
      'creation_time',
      \Magento\Framework\DB\Ddl\Table::TYPE_TIMESTAMP,
      null,
      [],
      'Creation Time'
    )->addColumn(
      'update_time',
      \Magento\Framework\DB\Ddl\Table::TYPE_TIMESTAMP,
      null,
      [],
      'Modification Time'
    )->addColumn(
      'is_active',
      \Magento\Framework\DB\Ddl\Table::TYPE_SMALLINT,
      null,
      ['nullable' => false, 'default' => '1'],
      'Is Active'
    )->addIndex(
      $setup->getIdxName(
        $installer->getTable('genmato_demo'),
        ['title'],
        AdapterInterface::INDEX_TYPE_FULLTEXT
      ),
      ['title'],
      ['type' => AdapterInterface::INDEX_TYPE_FULLTEXT]
    )->setComment(
      'Demo Table'
    );
    $installer->getConnection()->createTable($table);

    $installer->endSetup();
  }
}
bin/magento setup:upgrade
In Magento 2, the running of the setup scripts is no longer triggered by the first request after flushing the cache; to initiate the running of these scripts, run the command specified in step 2. When running the upgrade command, all modules are evaluated on their current version and module version in the configuration file. First, all schema installations/updates are executed, and next, the data installations/updates are processed.
The InstallData and InstallSchema files are executed only when there is no prior registration of the extension in the setup_module table. To run the installation files during testing, it is possible to remove the module row from the table and run the bin/magento setup:upgrade command.
The available methods to create a new table are defined in the Magento\Framework\DB\Adapter\AdapterInterface\Table class and are as follows:
addColumn: This adds a new column to the table; this method has the following parameters:name: This is the name of the tabletype: This is the table type; the available column types are defined as constants in the Magento\Framework\DB\Adapter\AdapterInterface\Table class as TYPE_*:TYPE_BOOLEAN
TYPE_SMALLINT
TYPE_INTEGER
TYPE_BIGINT
TYPE_FLOAT
TYPE_NUMERIC
TYPE_DECIMAL
TYPE_DATE
TYPE_TIMESTAMP
TYPE_DATETIME
TYPE_TEXT
TYPE_BLOB
TYPE_VARBINARY
size: This specifies the size of the columnoptions: This is used to specify extra column options; the available options are as follows:unsigned: This is only for number types; allows True/False (default: False)
precision: This is only for decimal and numeric types (default: calculated from size parameter or 0 if not set)
scale: This is only for decimal and numeric types (default: calculated from size parameter or 10 if not set)
default: The default value is used when creating a new record
nullable: In case a column is NULL (default: True)
primary: This makes a column a primary key
primary_position: This is only for primary keys and sets the sort order for the primary keys
identity/auto_increment: This auto-increments a column on inserting a new record (used to identify a unique record ID)
comment: This is the description of the columnaddForeignKey: This adds a foreign key relation to another table; the parameters allowed are as follows:fkName: This is the name of the foreign keycolumn: This is the column used as the foreign keyrefTable: This is the table where the key references torefColumn: This is the column name in the referenced tableonDelete: This sets the action to be performed when deleting a record; the available options are (constants as defined in Magento\Framework\DB\Adapter\AdapterInterface\Table):ACTION_CASCADE
ACTION_RESTRICT
ACTION_SET_DEFAULT
ACTION_SET_NULL
ACTION_NO_ACTION
addIndex: This adds a column to the search index; the available parameters are as follows:indexName: This is the name used for the indexfields: These are the column(s) used for the index (can be a single column or an array of columns)options: This is an array with extra options; currently, only the option type is used to specify the index typeWhen changing an existing table, it is possible to use the following methods; these are the methods that can be used directly on the $installer->getConnection() class:
dropTable: This removes a table from the database; the available parameters are as follows:tableName: This is the name of the table to deleteschemaName: This is the optional schema name usedrenameTable: This renames a table from the database; the available parameters are as follows:oldTableName: This is the current name of the tablenewTableName: This is the new name for the tableschemaName: This is the optional schema nameaddColumn: This adds an extra column to a table; the available parameters are as follows:tableName: This is the name of the table to altercolumnName: This is the name of the new columndefinition: This is an array with the following parameters:Type: Column type
Length: Column size
Default: Default value
Nullable: If a column can be NULL
Identify/Auto_Increment: Used as an identity column
Comment: Column description
After: Specify where to add the column
schemaName: This is the optional schema namechangeColumn: This changes the column name and definition; the available parameters are as follows:tableName: This is the name of the table to changeoldColumnName: This is the current column namenewColumnName: This is the new name for the columndefinition: This is the table definition; see addColumn for available valuesflushData: This flushes the table cacheschemaName: This is the optional schema namemodifyColumn: This changes the column definition; the available parameters are as follows:dropColumn: This removes a column from the table; the available parameters are as follows:tableName: This is the name of the columncolumnName: This is the name of the column to removeschemaName: This is the optional schema nameaddIndex: This adds a new index; the available parameters are as follows:tableName: This is the name of the table to changeindexName: This is the name of the index to addfields: These are the columns to be used as the indexindexType: This is the type of index; the available options (constants defined in (Magento\Framework\DB\Ddl\Table\AdapterInterface) are as follows:INDEX_TYPE_PRIMARY
INDEX_TYPE_UNIQUE
INDEX_TYPE_INDEX
INDEX_TYPE_FULLTEXT
schemaName: This is the optional schema namedropIndex: This removes an index from a table; the available parameters are as follows:tableName: This is the name of the columnindexName: This is the name of the indexschemaName: This is the optional schema nameaddForeignKey: This adds a new foreign key; the available parameters are as follows:fkName: This is the name of the foreign keytableName: This is the name of the tablecolumnName: This is the name of the column used in the foreign keyrefTableName: This is the name of the referenced tablerefColumnName: This is the name of the referenced columnonDelete: This is the action to perform on delete (see the preceding addForeignKey description for available options)purge: This removes invalid data (default: false)schemaName: This is the optional schema namerefSchemaName: This is the option-referenced schema nameWhen, in a later version of the extension, there are extra fields necessary (or the current fields need to be changed), this is handled through the UpgradeSchema function, upgrade:
Setup/UpgradeSchema.php
<?php
namespace Genmato\Sample\Setup;

use Magento\Framework\DB\Ddl\Table;
use Magento\Framework\Setup\UpgradeSchemaInterface;
use Magento\Framework\Setup\ModuleContextInterface;
use Magento\Framework\Setup\SchemaSetupInterface;

class UpgradeSchema implements UpgradeSchemaInterface
{
  public function upgrade(SchemaSetupInterface $setup, ModuleContextInterface $context)
  {
    $setup->startSetup();

    if (version_compare($context->getVersion(), '0.1.1', '<')) {
      $connection = $setup->getConnection();

      $column = [
        'type' => Table::TYPE_SMALLINT,
        'length' => 6,
        'nullable' => false,
        'comment' => 'Is Visible',
        'default' => '1'
      ];
      $connection->addColumn($setup->getTable('genmato_demo'), 'is_visible', $column);
    }

    $setup->endSetup();
  }
}
As this file is run every time the module version is different than the currently installed version, it is necessary to check the current version that is installed to execute only the updates necessary:
if (version_compare($context->getVersion(), '0.1.1', '<')) {The preceding statement will make sure that the schema changes are executed only if the current version is less than 0.1.1.
In order to provide default content during installation (this can be records in a table or adding extra attributes to some entity), the data installation function is used:
Setup/InstallData.php
<?php
namespace Genmato\Sample\Setup;

use Genmato\Sample\Model\Demo;
use Genmato\Sample\Model\DemoFactory;
use Magento\Framework\Setup\InstallDataInterface;
use Magento\Framework\Setup\ModuleContextInterface;
use Magento\Framework\Setup\ModuleDataSetupInterface;

class InstallData implements InstallDataInterface
{
  /**
  * Demo factory
  *
  * @var DemoFactory
  */
  private $demoFactory;

  /**
  * Init
  *
  * @param DemoFactory $demoFactory
  */
  public function __construct(DemoFactory $demoFactory)
  {
    $this->demoFactory = $demoFactory;
  }

  /**
  * {@inheritdoc}
  * @SuppressWarnings(PHPMD.ExcessiveMethodLength)
  */
  public function install(ModuleDataSetupInterface $setup, ModuleContextInterface $context)
  {
    $demoData = [
      'title' => 'Demo Title',
      'is_active' => 1,
    ];

    /**
    * Insert demo data
    */
    $this->createDemo()->setData($demoData)->save();

  }

  /**
  * Create demo
  *
  * @return Demo
  */
  public function createDemo()
  {
    return $this->demoFactory->create();
  }
}
In this example, there is one record created in the table created during setup. For this, the DemoFactory class is injected through dependency injection into the constructor function of this class. DemoFactory is an automatically created class that allows you to instantiate a class (in this case, Genmato\Sample\Model\Demo) without injecting this directly into the constructor. Here, this is done in the createDemo function:
$this->demoFactory->create();
Similar to SchemaUpgrade, there is also a DataUpgrade option to insert data while upgrading to a newer version.
In order to display data from your extension on the frontend (the public part of the website), the following is necessary:
Follow these steps to extend your module with a frontend web route and output data from a template file:
etc/frontend/routes.xml
<?xml version="1.0"?>
<config xmlns:xsi="http://www.w3.org/2001/XMLSchema-instance" xsi:noNamespaceSchemaLocation="urn:magento:framework:App/etc/routes.xsd">
  <router id="standard">
    <route id="sample" frontName="sample">
      <module name="Genmato_Sample" />
    </route>
  </router>
</config>Controller/Index/Index.php
<?php
namespace Genmato\Sample\Controller\Index;
use Magento\Framework\App\Action\Action;

class Index extends Action
{
  /**
  * @var \Magento\Framework\View\Result\PageFactory
  */
  protected $resultPageFactory;

  /**
  * @param \Magento\Framework\App\Action\Context $context
  * @param \Magento\Framework\View\Result\PageFactory resultPageFactory
  */
  public function __construct(
    \Magento\Framework\App\Action\Context $context,
    \Magento\Framework\View\Result\PageFactory $resultPageFactory
  )
  {
    $this->resultPageFactory = $resultPageFactory;
    parent::__construct($context);
  }

  /**
  * Renders Sample Index
  */
  public function execute()
  {
    return $this->resultPageFactory->create();
  }
}view/frontend/layout/sample_index_index.xml
<?xml version="1.0"?>
<page xmlns:xsi="http://www.w3.org/2001/XMLSchema-instance" layout="1column" xsi:noNamespaceSchemaLocation="urn:magento:framework:View/Layout/etc/page_configuration.xsd">
  <head>
    <title>Sample DemoList</title>
  </head>
  <body>
    <referenceContainer name="content">
      <block class="Genmato\Sample\Block\DemoList" name="demoList" template="Genmato_Sample::list.phtml" />
    </referenceContainer>
  </body>
</page>Block class is called to render the template specified:Block/DemoList.php
<?php
namespace Genmato\Sample\Block;

use Magento\Framework\View\Element\Template;
use Genmato\Sample\Model\ResourceModel\Demo\Collection as DemoCollection;
use Magento\Store\Model\ScopeInterface;

class DemoList extends Template
{
  /**
  * Demo collection
  *
  * @var DemoCollection
  */
  protected $_demoCollection;

  /**
  * Demo resource model
  *
  * @var \Genmato\Sample\Model\ResourceModel\Demo\CollectionFactory
  */
  protected $_demoColFactory;

  /**
  * @param Template\Context $context
  * @param \Genmato\Sample\Model\ResourceModel\Demo\CollectionFactory $collectionFactory
  * @param array $data
  * @SuppressWarnings(PHPMD.ExcessiveParameterList)
  */
  public function __construct(
    Template\Context $context,
    \Genmato\Sample\Model\ResourceModel\Demo\CollectionFactory $collectionFactory,
    array $data = []
  ) {
    $this->_demoColFactory = $collectionFactory;
    parent::__construct(
      $context,
      $data
    );
  }

  /**
  * Get Demo Items Collection
  * @return DemoCollection
  */
  public function getDemoItems()
  {
    if (null === $this->_demoCollection) {
      $this->_demoCollection = $this->_demoColFactory->create();
    }
    return $this->_demoCollection;
  }
}Block class can be used to build the page:view/frontend/templates/list.phtml
<table>
  <tr>
    <td>ID</td>
    <td>Title</td>
  </tr>
  <?php foreach($block->getDemoItems() as $item): ?>
  <tr>
    <td><?php echo $item->getId(); ?></td>
    <td><?php echo $item->getTitle();?></td>
  </tr>
  <?php endforeach; ?>
</table>bin/magento cache:clean
In your browser, open http://[your hostname]/sample/index/index/. This will result in the following page when you access the URL:
When a request is received in the application, the path is evaluated and executed in the following order:
index.php.index.php file creates a bootstrap:$bootstrap = \Magento\Framework\App\Bootstrap::create(BP, $_SERVER);
bootstrap creates a new HTTP application:$app = $bootstrap->createApplication('Magento\Framework\App\Http');bootstrap application is started:$bootstrap->run($app);
run function of the bootstrap class, the created application is launched:$response = $application->launch();
frontcontroller and dispatch the request:$frontController = $this->_objectManager->get('Magento\Framework\App\FrontControllerInterface');
$result = $frontController->dispatch($this->_request);frontcontroller loops through all the available configured controllers and checks whether there is a match. When a match is found, the controller is instantiated and the execute method is called:$result = $actionInstance->execute();
To activate a route on the frontend, it needs to be configured by specifying the first part of the URL. This first part maps the request to the extension that will handle the request.
Here, frontName (sample) is mapped to the extension, Genmato_Sample, allowing it to handle all requests on the frontend.
In order to handle the request to a URL, there needs to be a controller. In Magento 2, the controller now handles only one action (whereas Magento 1 has a controller that has the option to handle multiple actions). Every request consists of three parts:
[route]/[controller]/[action]
[route]: This is the configured frontName
[controller]: This is the path to identify the controller
[action]: This is the action that is executed (the PHP class)
In this case, a request is made to the following:
http://example.com/sample/
This will result with a request to the following:
http://example.com/sample/index/index
This will load the following file:
Genmato\Sample\Controller\Index\Index.php
The executed controller relies on the layout file to render the page by including the specified blocks in the page. Just like the controllers, the layout files are now separate files per page handle. The name of the file is built in the same way as the controllers:
[route]_[controller]_[action].xml
This makes it easier to change a specific page handle in a theme.
The loaded
Block class is the location to handle the collection of the data necessary to be shown in the template (just like in Magento 1). Here, we load the collection from the database so that it can be used in the template.
In Magento, it is possible to store configuration values for global/website or store in the backend. These values can be used to store simple module settings such as API -keys, module enable/disable options, or any setting that you might require for your module. The data is stored in the core_config_data table.
As the configuration fields are only accessible through the backend web pages, the configuration file is stored in the etc/adminhtml directory.
Create your own configuration options with the following step:
etc/adminhtml/system.xml
<?xml version="1.0"?>
<config xmlns:xsi="http://www.w3.org/2001/XMLSchema-instance" xsi:noNamespaceSchemaLocation="urn:magento:module:Magento_Config:etc/system_file.xsd">
  <system>
    <section id="sample" translate="label" type="text" sortOrder="2000" showInDefault="1" showInWebsite="1" showInStore="1">
      <label>Sample Configuration</label>
      <tab>general</tab>
      <resource>Genmato_Sample::config_sample</resource>
      <group id="demo" translate="label" type="text" sortOrder="100" showInDefault="1" showInWebsite="1" showInStore="1">
        <label>Sample</label>
        <field id="header" translate="label" type="text" sortOrder="1" showInDefault="1" showInWebsite="1" showInStore="1">
          <label>Header Title</label>
        </field>
        <field id="selectsample" translate="label" type="select" sortOrder="2" showInDefault="1" showInWebsite="1" showInStore="1">
          <label>Sample Select</label>
          <source_model>Genmato\Sample\Model\Config\Source\DemoList</source_model>
        </field>
      </group>
    </section>
  </system>
</config>The Magento store configuration is divided in separate sections and contains multiple groups of configuration fields. Every section is assigned to a main tab that is displayed above the sections.
When the configuration options that you want to add can't fit in one of the existing tabs, it is possible to add your own through the system.xml file. For this, add the following to your system configuration file:
<tab id="<unique tab name>" translate="label" sortOrder="<sort order>" class="<class>">
  <label>[label]</label>
</tab>
In the configuration, you can use the following attributes:
id: This is a unique identifier for the tab, which is also used to reference to the tab in your sectionstranslate: This specifies the elements that need to be available for translation (in this case, only the label field is available)sortOrder: This is the numeric value to use to sort the tabsclass: This is the optional class name for your tabThe label element is used as the visible name of the tab in the configuration; it is important to make it as descriptive as possible for customers to understand.
Every section is shown below the tab referenced in the configuration. In every section, multiple groups can be configured that can hold multiple fields. Adding a new section can be done by adding the following to your system.xml file:
<section id="<unique_section_name>" translate="label" type="<text>" sortOrder="<sort order>" showInDefault="<0/1>" showInWebsite="<0/1>" showInStore="<0/1>">
  <class>[class]</class>
  <header_css>[header_css]</header_css>
  <label>[label]</label>
  <tab>[tab]</tab>
  <resource>[resource]</resource>
</section>
The attributes used are as follows:
id: This is the unique section identifiertranslate: This specifies the elements that need to be available for translation (in this case, only the label field is available)type: This is the type of field used (normally text)sortOrder: This is the numeric value to use to sort the sectionsshowInDefault: This shows sections in the default store configurationshowInWebsite: This displays sections in the website configurationshowInStore: This displays sections in the store configurationThe available elements in this configuration are as follows:
class: This is the class used for the sectionheader_css: This is the CSS class to use in the text header for the sectionlabel: This is the text to display in the sectiontab: This is the reference to the tab where the section should be addedresource: This is the access control list (ACL) resource referenced, which is used to check whether the user logged in has access to the sectionIn a section, it is possible to create multiple groups; they are displayed as separate fieldsets that can be expanded/collapsed and can hold one or multiple fields. To create a new group, add the following (in the section to hold the group) to the system.xml file:
<group id="<group_id>" translate="label" type="text" sortOrder="<sort order>" showInDefault="<0/1>" showInWebsite="<0/1>" showInStore="<0/1>">
  <label>[label]</label>
</group>
The attributes to configure a group are as follows:
id: This is the unique ID for the group (in the section)translate: These are the fields that needs to be translated, in this case, only the label optiontype: This is the field type (text in this case)sortOrder: This is the numeric value used to sort the groupsshowInDefault: This shows a group in the default store configurationshowInWebsite: This shows a group in the website configurationshowInStore: This shows a group in the store configurationEvery group can have one or multiple fields. In the database, the configuration is stored as a path build, <section>/<group>/<field>. A new config field can be one of the following types: text input, textarea, select, multiselect, or a custom data renderer. To add a field, add the following to a group:
<field id="<field_id>" translate="label" type="<type>" sortOrder="<sort order>" showInDefault="<0/1>" showInWebsite="<0/1>" showInStore="<0/1>">
  <label>[comment]</label>
  <comment>[comment]</comment>
</field>
The attributes used for the field configuration are as follows:
id: This is the unique ID of the field in the grouptranslate: These are the fields that need to be translated (can be the label, comment, tooltip, or hint elements)type: This is the input type, which can be the following:text: Default text input fieldtextarea: Text area inputobscure: Password inputselect: Drop-down selectThis needs a source_model element to specify the available options to select.
multiselect: This is the multiple item select box. This needs a source_model element to specify the available options to select.
image: This is the image upload with a preview if the file is uploaded. This needs different backend_model (to store the uploaded file), upload_dir (to specify where to save the file), and base_url (path used to build the URL to access from the frontend) elements.
sortOrder: This is the numeric value used to sort the fields in the groupshowInDefault: This shows fields in the default store configurationshowInWebsite: This shows fields in the website configurationshowInStore: This shows fields in the store configurationThere are also some extra elements available to configure the field:
label: This is the label, which shows in front of the input fieldcomment: This is the comment shown below the input fieldtooltip: This is the text shown when hovering the question markfrontend_class: This is the class used for the fieldfrontend_model: This is the custom frontend model (block) that will be used to render the input areabackend_model: This is the backend model used when saving the data to process inserted valuessource_model: This is the data source used for select and multiselect fieldsdepends: This is the option to hide/show a field based on a value used by another field, for example:<depends> <field id="[field_name_to_check]">[value_to show]</field> </depends>
When [field_name_to_check] has the [value_to_show] value, the field will be visible, if it contains a different value, then the field is hidden for the user.
To get the data stored in the sample/demo/header field, add the following to the template Block class in our template block:
Block/DemoList.php
/**
* Get Header from configuration value
* @return string
*/
public function getHeader()
{
  return $this->_scopeConfig->getValue('sample/demo/header', ScopeInterface::SCOPE_STORE);
}
The _scopeConfig class is injected through dependency injection (DI) into the Block class in the constructor and allows us to read data stored in the configuration.
Next, we want to display the data in our template by adding the following line at the top of the file:
view/frontend/templates/list.phtml
<p><?php echo $this->getHeader();?></p>
Adding a page to the backend requires, just like the frontend, a configured route, controller, and layout file. In order to display a grid page to show data from a table, there are currently three ways available:
Page module:Magento\Cms\Block\Adminhtml\Page
Magento\Cms\Block\Adminhtml\Page\Grid
Block class created. The grid fields and options are defined in the layout XML file. This makes it possible to extend the grid easily by adding extra fields to the XML. An example of this can be found in the Customer Group code in the following:Magento\Customer\view\adminhtml\layout\customer_group_index.xml
In this example, we will use the last option to build a grid. As this option uses quite a large set of files and long XML listings, the complete code can be found on GitHub (https://github.com/Genmato/M2_Sample).
The following steps will describe how to add a backend data grid:
adminhtml area:etc/adminhtml/routes.xml
<?xml version="1.0"?>
<config xmlns:xsi="http://www.w3.org/2001/XMLSchema-instance" xsi:noNamespaceSchemaLocation="urn:magento:framework:App/etc/routes.xsd">
  <router id="admin">
    <route id="sample" frontName="sample">
      <module name="Genmato_Sample" before="Magento_Backend" />
    </route>
  </router>
</config>
Controller/Adminhtml/Demolist/Index.php
<?php
namespace Genmato\Sample\Controller\Adminhtml\Demolist;

use Magento\Backend\App\Action\Context;
use Magento\Framework\View\Result\PageFactory;
use Magento\Backend\App\Action as BackendAction;

class Index extends BackendAction
{
  /**
  * @var PageFactory
  */
  protected $resultPageFactory;

  /**
  * @param Context $context
  * @param PageFactory $resultPageFactory
  */
  public function __construct(
    Context $context,
    PageFactory $resultPageFactory
  ) {
    parent::__construct($context);
    $this->resultPageFactory = $resultPageFactory;
  }
  /**
  * Check the permission to run it
  *
  * @return bool
  */
  protected function _isAllowed()
  {
    return $this->_authorization->isAllowed('Genmato_Sample::demolist');
  }

  /**
  * Index action
  *
  * @return \Magento\Backend\Model\View\Result\Page
  */
  public function execute()
  {
    /** @var \Magento\Backend\Model\View\Result\Page $resultPage */
    $resultPage = $this->resultPageFactory->create();
    $resultPage->setActiveMenu('Genmato_Sample::demolist');
    $resultPage->addBreadcrumb(__('CMS'), __('CMS'));
    $resultPage->addBreadcrumb(__('Demo List'), __('Demo List'));
    $resultPage->getConfig()->getTitle()->prepend(__('Demo List'));

    return $resultPage;
  }
}etc/acl.xml
<?xml version="1.0"?>
<config xmlns:xsi="http://www.w3.org/2001/XMLSchema-instance" xsi:noNamespaceSchemaLocation="urn:magento:framework:Acl/etc/acl.xsd">
  <acl>
    <resources>
      <resource id="Magento_Backend::admin">
        <resource id="Magento_Backend::content">
          <resource id="Magento_Backend::content_elements">
            <resource id="Genmato_Sample::demolist" title="Demo List" sortOrder="10" />
          </resource>
        </resource>
      </resource>
    </resources>
  </acl>
</config>layout file to specify the grid uiComponent used:view/adminhtml/layout/sample_demolist_index.xml
<?xml version="1.0"?>
<page xmlns:xsi="http://www.w3.org/2001/XMLSchema-instance" xsi:noNamespaceSchemaLocation="urn:magento:framework:View/Layout/etc/page_configuration.xsd">
  <update handle="styles"/>
  <body>
    <referenceContainer name="content">
      <uiComponent name="sample_demolist_listing"/>
    </referenceContainer>
  </body>
</page>uiComponent configuration:The referenced
uiComponent configuration is quite large. In the sample code (on GitHub), this file can be found at the following:
uiComponent to the dependency injection configuration:etc/di.xml
<?xml version="1.0"?>
<config xmlns:xsi="http://www.w3.org/2001/XMLSchema-instance" xsi:noNamespaceSchemaLocation="urn:magento:framework:ObjectManager/etc/config.xsd">
  <preference for="Genmato\Sample\Model\DemoInterface" type="Genmato\Sample\Model\Demo" />

  <type name="Magento\Framework\View\Element\UiComponent\DataProvider\CollectionFactory">
    <arguments>
      <argument name="collections" xsi:type="array">
        <item name="sample_demolist_listing_data_source" xsi:type="string">Genmato\Sample\Model\ResourceModel\Demo\Grid\Collection</item>
      </argument>
    </arguments>
  </type>
  <type name="Genmato\Sample\Model\ResourceModel\Demo\Grid\Collection">
    <arguments>
      <argument name="mainTable" xsi:type="string">genmato_demo</argument>
      <argument name="eventPrefix" xsi:type="string">sample_demolist_grid_collection</argument>
      <argument name="eventObject" xsi:type="string">sample_demolist_collection</argument>
      <argument name="resourceModel" xsi:type="string">Genmato\Sample\Model\ResourceModel\Demo</argument>
    </arguments>
  </type>
  <virtualType name="DemoGridFilterPool" type="Magento\Framework\View\Element\UiComponent\DataProvider\FilterPool">
    <arguments>
      <argument name="appliers" xsi:type="array">
        <item name="regular" xsi:type="object">Magento\Framework\View\Element\UiComponent\DataProvider\RegularFilter</item>
        <item name="fulltext" xsi:type="object">Magento\Framework\View\Element\UiComponent\DataProvider\FulltextFilter</item>
      </argument>
    </arguments>
  </virtualType>
  <virtualType name="DemoGridDataProvider" type="Magento\Framework\View\Element\UiComponent\DataProvider\DataProvider">
    <arguments>
      <argument name="collection" xsi:type="object" shared="false">Genmato\Sample\Model\ResourceModel\Demo\Collection</argument>
      <argument name="filterPool" xsi:type="object" shared="false">DemoGridFilterPool</argument>
    </arguments>
  </virtualType>
</config>Controller/Adminhtml/Demolist/MassDelete.php
<?php
namespace Genmato\Sample\Controller\Adminhtml\Demolist;

use Magento\Framework\Controller\ResultFactory;
use Magento\Backend\App\Action\Context;
use Magento\Ui\Component\MassAction\Filter;
use Genmato\Sample\Model\ResourceModel\Demo\CollectionFactory;
use Magento\Backend\App\Action;

class MassDelete extends Action
{

  /**
  * @var CollectionFactory
  */
  protected $collectionFactory;

  /**
  * @param Context $context
  * @param Filter $filter
  * @param CollectionFactory $collectionFactory
  */
  public function __construct(Context $context, Filter $filter, CollectionFactory $collectionFactory)
  {
    $this->filter = $filter;
    $this->collectionFactory = $collectionFactory;
    parent::__construct($context);
  }

  /**
  * Execute action
  *
  * @return \Magento\Backend\Model\View\Result\Redirect
  */
  public function execute()
  {
    $collection = $this->filter->getCollection($this->collectionFactory->create());
    $collectionSize = $collection->getSize();

    foreach ($collection as $item) {
      $item->delete();
    }

    $this->messageManager->addSuccess(__('A total of %1 record(s) have been deleted.', $collectionSize));

    /** @var \Magento\Backend\Model\View\Result\Redirect $resultRedirect */
    $resultRedirect = $this->resultFactory->create(ResultFactory::TYPE_REDIRECT);
    return $resultRedirect->setPath('*/*/');
  }
}etc/adminhtml/menu.xml
<?xml version="1.0"?>
<config xmlns:xsi="http://www.w3.org/2001/XMLSchema-instance" xsi:noNamespaceSchemaLocation="urn:magento:module:Magento_Backend:etc/menu.xsd">
  <menu>
    <add id="Genmato_Sample::demolist" title="Demo List" module="Genmato_Sample" sortOrder="10" parent="Magento_Backend::content_elements" action="sample/demolist" resource="Genmato_Sample::demolist"/>
  </menu>
</config>The controller and layout file are the same for the frontend, only the backend is protected through an ACL. This allows administrators to create specific user rules and allow access only to the selected pages.
The resource access is checked in the controller in the following function:
protected function _isAllowed()
As the complete configuration through uiComponent results in a large XML file, we will explain some parts on how they are configured and hook in to the system.
The data source is specified through the XML node:
<listing>
<dataSource name="sample_demolist_listing_data_source">
<argument name="dataProvider" xsi:type="configurableObject">
<argument name="class" xsi:type="string">DemoGridDataProvider</argument>
The specified data class, DemoGridDataProvider, is configured through dependency injection and specified in the etc/di.xml file. Here, DemoGridDataProvider corresponds to the Genmato\Sample\Model\ResourceModel\Demo\Collection collection. Additionally, DemoGridFilterPool and the collection are configured through this file to load the data.
It is also easy to specify multiple mass actions to be used in the grid; you can specify the title, action to execute, and optional message alert box:
<massaction name="listing_massaction">
  <argument name="data" xsi:type="array">
    <item name="config" xsi:type="array">
      <item name="selectProvider" xsi:type="string">sample_demolist_listing.sample_demolist_listing.sample_demolist_columns.ids</item>
      <item name="indexField" xsi:type="string">demo_id</item>
    </item>
  </argument>
  <action name="delete">
    <argument name="data" xsi:type="array">
      <item name="config" xsi:type="array">
        <item name="type" xsi:type="string">delete</item>
        <item name="label" xsi:type="string" translate="true">Delete</item>
        <item name="url" xsi:type="url" path="sample/demolist/massDelete"/>
        <item name="confirm" xsi:type="array">
          <item name="title" xsi:type="string" translate="true">Delete items</item>
          <item name="message" xsi:type="string" translate="true">Are you sure you want to delete selected items?</item>
        </item>
      </item>
    </argument>
  </action>
</massaction>
In this example, we add an option to delete records from the database. In order to delete the records from the database, you need to create a controller that handles the removal of the records. You need to create a Controller class for every action you specify, this controller contains your custom code to be executed.
By adding the menu option in the Content menu below the Pages menu item, the page can be accessed through the backend. This link action will go to the specified sample/demolist URL that will result in the full URL:
http://example.com/admin/sample/demolist/
The resource argument defines the ACL that is used to show/hide the menu option depending on the user rights:
When clicking on the menu option, the resulting page will look as follows:
For more information about uiComponents that are available, you can refer to the following:
http://devdocs.magento.com/guides/v2.0/ui-components/ui-component.html
If you want to add a new record or edit an existing record, it is possible to create a form to have a user friendly way to process the data. In this example, we will see how to create a form to edit an existing record. The path used to add a record will be as follows:
http://example.com/admin/sample/demolist/new/
This will require the controller name to be new, but as this is a reserved word in PHP, the class name used will be newAction. The execute function is not only used to add a new record, but it can also be used to edit an existing record. In the following code, only the execute action is shown; see the sample code for the complete source.
In this recipe, we will add the option to add or edit records; for this, the route used in the previous chapter is used, only new controllers and blocks are shown.
Follow these steps to add a form to your module:
Controller/Adminhtml/Demolist/NewAction.php
<?php
namespace Genmato\Sample\Controller\Adminhtml\Demolist;
use Magento\Backend\App\Action;
class NewAction extends Action
{
  public function execute()
  {
    $demoId = $this->getRequest()->getParam('demo_id');
    $this->_coreRegistry->register('current_demo_id', $demoId);

    /** @var \Magento\Backend\Model\View\Result\Page $resultPage */
    $resultPage = $this->resultPageFactory->create();
    if ($demoId === null) {
      $resultPage->addBreadcrumb(__('New DemoList'), __('New DemoList'));
      $resultPage->getConfig()->getTitle()->prepend(__('New DemoList'));
    } else {
      $resultPage->addBreadcrumb(__('Edit DemoList'), __('Edit DemoList'));
      $resultPage->getConfig()->getTitle()->prepend(__('Edit DemoList'));
    }
    // Build the edit form
    $resultPage->getLayout()->addBlock('Genmato\Sample\Block\Adminhtml\Demo\Edit', 'demolist', 'content')
    ->setEditMode((bool)$demoId);

    return $resultPage;
  }
}Form container:Block/Adminhtml/Demo/Edit.php
<?php
namespace Genmato\Sample\Block\Adminhtml\Demo;
use Magento\Backend\Block\Widget\Form\Container;
class Edit extends Container
{
  /**
  * Remove Delete button if record can't be deleted.
  *
  * @return void
  */
  protected function _construct()
  {
    $this->_objectId = 'demo_id';
    $this->_controller = 'adminhtml_demo';
    $this->_blockGroup = 'Genmato_Sample';
    parent::_construct();
    $demoId = $this->getDemoId();
    if (!$demoId) {
      $this->buttonList->remove('delete');
    }
  }

  /**
  * Retrieve the header text, either editing an existing record or creating a new one.
  *
  * @return \Magento\Framework\Phrase
  */
  public function getHeaderText()
  {
    $demoId = $this->getDemoId();
    if (!$demoId) {
      return __('New DemoList Item');
    } else {
      return __('Edit DemoList Item');
    }
  }

  public function getDemoId()
  {
    if (!$this->demoId) {
      $this->demoId=$this->coreRegistry->registry('current_demo_id');
    }
    return $this->demoId;
  }
}Block/Adminhtml/Demo/Edit/Form.php
<?php
namespace Genmato\Sample\Block\Adminhtml\Demo\Edit;
use Magento\Customer\Controller\RegistryConstants;
use Magento\Backend\Block\Widget\Form\Generic;
class Form extends Generic
{
  /**
  * Prepare form for render
  *
  * @return void
  */
  protected function _prepareLayout()
  {
    parent::_prepareLayout();

    /** @var \Magento\Framework\Data\Form $form */
    $form = $this->_formFactory->create();

    $demoId = $this->_coreRegistry->registry('current_demo_id');
    /** @var \Genmato\Sample\Model\DemoFactory $demoData */
    if ($demoId === null) {
      $demoData = $this->demoDataFactory->create();
    } else {
      $demoData = $this->demoDataFactory->create()->load($demoId);
    }

    $yesNo = [];
    $yesNo[0] = 'No';
    $yesNo[1] = 'Yes';

    $fieldset = $form->addFieldset('base_fieldset', ['legend' => __('Basic Information')]);

    $fieldset->addField(
      'title',
      'text',
      [
        'name' => 'title',
        'label' => __('Title'),
        'title' => __('Title'),
        'required' => true
      ]
    );

    $fieldset->addField(
      'is_active',
      'select',
      [
        'name' => 'is_active',
        'label' => __('Active'),
        'title' => __('Active'),
        'class' => 'required-entry',
        'required' => true,
        'values' => $yesNo,
      ]
    );

    $fieldset->addField(
      'is_visible',
      'select',
      [
        'name' => 'is_visible',
        'label' => __('Visible'),
        'title' => __('Visible'),
        'class' => 'required-entry',
        'required' => true,
        'values' => $yesNo,
      ]
    );

    if ($demoData->getId() !== null) {
      // If edit add id
      $form->addField('demo_id', 'hidden', ['name' => 'demo_id', 'value' => $demoData->getId()]);
    }

    if ($this->_backendSession->getDemoData()) {
      $form->addValues($this->_backendSession->getDemoData());
      $this->_backendSession->setDemoData(null);
    } else {
      $form->addValues(
        [
          'id' => $demoData->getId(),
          'title' => $demoData->getTitle(),
          'is_active' => $demoData->getIsActive(),
          'is_visible' => $demoData->getIsVisible(),
        ]
      );
    }

    $form->setUseContainer(true);
    $form->setId('edit_form');
    $form->setAction($this->getUrl('*/*/save'));
    $form->setMethod('post');
    $this->setForm($form);
  }
}Save action controller, which is called when pressing the Submit button:Controller/Adminhtml/Demolist/Save.php
<?php
namespace Genmato\Sample\Controller\Adminhtml\Demolist;
use Magento\Backend\App\Action;
class Save extends Action
{
  /**
  * Save DemoList item.
  *
  * @return \Magento\Backend\Model\View\Result\Page|\Magento\Backend\Model\View\Result\Redirect
  */
  public function execute()
  {
    $id = $this->getRequest()->getParam('demo_id');
    $resultRedirect = $this->resultRedirectFactory->create();
    try {
      if ($id !== null) {
        $demoData = $this->demoFactory->create()->load((int)$id);
      } else {
        $demoData = $this->demoFactory->create();
      }
      $data = $this->getRequest()->getParams();
      $demoData->setData($data)->save();

      $this->messageManager->addSuccess(__('Saved DemoList item.'));
      $resultRedirect->setPath('sample/demolist');
    } catch (\Exception $e) {
      $this->messageManager->addError($e->getMessage());
      $this->_getSession()->setDemoData($data);

      $resultRedirect->setPath('sample/demolist/edit', ['demo_id' => $id]);
    }
    return $resultRedirect;
  }
}In the controller, the demo_id parameter is stored in the Magento registry; this makes the data available to retrieve in the same request in other blocks/models to do further processing with it. Additionally, the Genmato\Sample\Block\Adminhtml\Demo\Edit class is loaded. This class will generate the container for the form and load the Genmato\Sample\Block\Adminhtml\Demo\Edit\Form class that will generate the form to be shown.
Every form is built from the following:
$form = $this->_formFactory->create();
As it is not possible to add fields to a form directly, you need to create a fieldset first. It is possible to add multiple fieldsets to a single form and assign multiple form fields to a fieldset. To create a fieldset, use the following command:
$fieldset = $form->addFieldset('[name]', ['legend' => __([heading])]);Adding a form field to the fieldset is done as follows:
$fieldset->addField([elementId], [type], [config], [after]);
This method has the following parameters:
elementId: This is the unique name of the form field element.type: This defines the type of element that is used as the input field. This can be your own class that implements the Magento\Framework\Data\Form\Element\AbstractElement class or one of the following:These input types are rendered from the classes found under the Magento\Framework\Data\Form\Element\ directory.
config: This is an array of extra configuration data; some of the options are as follows:name: This is the name of the element from the data model that holds the datalabel: This is the text that is used as a labeltitle: This is the text that is used as the field title parameterclass: This is the optional class for the input field, which can be used for form validationrequired: This is optional. This is set if a field is required to have data.value: This is the value used for select/multiselectafter: This is the optional parameter to specify where the form field needs to be placed; use elementId of the form field that you want to place this field after.In order to display the data currently stored for the record that we want to edit, the stored demo_id is retrieved from the registry:
$demoId = $this->_coreRegistry->registry('current_demo_id');Next, we check whether there is a valid value stored as demoId and load the data from the database (or just set an empty object):
/** @var \Genmato\Sample\Model\DemoFactory $demoData */
if ($demoId === null) {
  $demoData = $this->demoDataFactory->create();
} else {
  $demoData = $this->demoDataFactory->create()->load($demoId);
}
Now that the data is loaded, it is possible to set this data to the form fields:
$form->addValues(
  [
    'id' => $demoData->getId(),
    'title' => $demoData->getTitle(),
    'is_active' => $demoData->getIsActive(),
    'is_visible' => $demoData->getIsVisible(),
  ]
);When submitting the form to save the data, the action and method should be set to the URL that handles the save action:
$form->setAction($this->getUrl('*/*/save'));
$form->setMethod('post');
The URL */*/save maps to the Controller/Adminhtml/Demolist/Save controller and will handle the save action.
In the controller, we first load the current record to load all the current values:
if ($id !== null) {
  $demoData = $this->demoFactory->create()->load((int)$id);
} else {
  $demoData = $this->demoFactory->create();
}
Next, we retrieve the submitted data, store it in the loaded object, and save the object:
$data = $this->getRequest()->getParams();
$demoData->setData($data)->save();
In this chapter, we will cover some of the more advanced features when building Magento 2 extensions in the following recipes:
In the previous chapter, we explained the basics on how to create a Magento 2 extension/module, including how to store data in a database and create a frontend page and backend grid with a form to add/edit data. In this chapter, we will explain some more advanced functions that can be used while developing custom extensions. The first two recipes are informational and describe the basic usage of dependency injection and plugins. The other recipes are examples on how to add your custom XML configuration file and commands to the Magento CLI tool.
In Magento 2, they introduced the usage of dependency injection, which is a well-known design pattern that changes the way you use resources in the code. Using dependency injection, all the required resources are created when the class is instantiated instead of creating an object (through the Magento 1.x Mage class) when necessary. The benefit of this is that it is easier to use unit testing as it is possible to mock the required objects.
In this example, we will see how to create a new record in the demolist model created in the previous chapter. The record is created using an observer on the sales_order_place_after event that is dispatched after a new order is saved.
Follow these steps on how to use dependency injection:
Observer to listen to the event that we want:etc/events.xml:
<config xmlns:xsi="http://www.w3.org/2001/XMLSchema-instance" xsi:noNamespaceSchemaLocation="urn:magento:framework:Event/etc/events.xsd">
  <event name="sales_order_place_after">
    <observer name="sample" instance="Genmato\Sample\Observer\PlaceOrder"/>
  </event>
</config>
Observer class as defined in step 1:Observer/PlaceOrder.php:
<?php
namespace Genmato\Sample\Observer;

use Magento\Framework\Event\ObserverInterface;
use Magento\Framework\Event\Observer as EventObserver;
use Genmato\Sample\Model\DemoFactory;

class PlaceOrder implements ObserverInterface
{
  /**
  * @var DemoFactory
  */
  protected $demoFactory;

  /**
  * @param DemoFactory $demoFactory
  */
  public function __construct(DemoFactory $demoFactory)
  {
    $this->demoFactory = $demoFactory;
  }

  /**
  * Add record to demoList when new order is placed
  *
  * @param EventObserver $observer
  * @return void
  */
  public function execute(EventObserver $observer)
  {
    /** @var \Magento\Sales\Model\Order $order */
    $order = $observer->getEvent()->getOrder();

    $demoList = $this->demoFactory->create();

    $demoList->setTitle(__('New order (%1) placed!', $order->getIncrementId()));

    try {
      $demoList->save();
    } catch (\Exception $ex) {
      // Process error here....
    }

  }
}
bin/magento cache:clean
In the Observer class defined in step 2, the object that we need to create a new record in is injected into the constructor function:
public function __construct(DemoFactory $demoFactory)
During the instantiation of the class, the necessary classes are injected by the Magento 2 dependency injection (DI) framework. In this case, it adds the Genmato\Sample\Model\DemoFactory class to the constructor. This class is not a real existing class; this is because the class that we want to use is a non-injectable class. A non-injectable class is a class that you create yourself through the new [classname] command or the Mage::getModel() call in Magento 1.x. With the use of dependency injection, creating a new object should be handled by the object manager, but in order to be able to use unit testing, it is not advisable to create the object directly in the code. To solve this, the Magento framework uses autogenerated classes. In this example, the generated class is stored in var/generation/Genmato/Sample/Model/DemoFactory.php:
<?php
namespace Genmato\Sample\Model;

/**
 * Factory class for @see \Genmato\Sample\Model\Demo
 */
class DemoFactory
{
  /**
  * Object Manager instance
  *
  * @var \Magento\Framework\ObjectManagerInterface
  */
  protected $_objectManager = null;

  /**
  * Instance name to create
  *
  * @var string
  */
  protected $_instanceName = null;

  /**
  * Factory constructor
  *
  * @param \Magento\Framework\ObjectManagerInterface $objectManager
  * @param string $instanceName
  */
  public function __construct(\Magento\Framework\ObjectManagerInterface $objectManager, $instanceName = '\\Genmato\\Sample\\Model\\Demo')
  {
    $this->_objectManager = $objectManager;
    $this->_instanceName = $instanceName;
  }

  /**
  * Create class instance with specified parameters
  *
  * @param array $data
  * @return \Genmato\Sample\Model\Demo
  */
  public function create(array $data = array())
  {
    return $this->_objectManager->create($this->_instanceName, $data);
  }
}
In this case, the autogenerated class is a Factory class that has only the create() function available. In the create function, the object manager is used to instantiate the Genmato\Sample\Model\Demo class; this object can then be used to load an existing record or create a new record and save the data stored in the object.
One of the biggest problems in Magento 1.x was that changing the behavior of a function in a class that didn't have an event trigger had to be rewritten. This works fine if only a single rewrite for a class was used, but when using a large number of extensions, there is a risk that multiple extensions rewrite the same class, which can result in unpredictable results.
In Magento 2, this problem is partly solved by introducing Interception in the form of plugins. With the use of plugins, it is possible to modify a function in three places:
The use of plugins is controlled through di.xml. It is possible to use the global from etc/ or the area specific from etc/[area]; in this case, we will use the global, which means that it is used in all areas.
Create the following files in this recipe to try the use of plugins:
di.xml:etc/di.xml
<type name="Magento\Cms\Model\Page">
  <plugin name="sample_before" type="Genmato\Sample\Plugin\BeforePage" sortOrder="1"/>
</type>

<type name="Magento\Catalog\Model\Product">
  <plugin name="sample_around" type="Genmato\Sample\Plugin\AroundProduct" sortOrder="1"/>
</type>

<type name="Magento\Cms\Model\Page">
  <plugin name="sample_after" type="Genmato\Sample\Plugin\AfterPage" sortOrder="1"/>
</type>
Plugin/BeforePage.php
<?php
namespace Genmato\Sample\Plugin;

use Magento\Cms\Model\Page;

class BeforePage
{
  public function beforeSetContent(Page $subject, $content)
  {
    return $subject->setContent('<!--'.$content.'-->');
  }
}Plugin/AroundProduct.php
<?php

namespace Genmato\Sample\Plugin;

use Magento\Catalog\Model\Product;

class AroundProduct
{
  public function aroundSave(Product $subject, \Closure $proceed)
  {
    $subject->setMyCustomAttribute('sample');

    $return = $proceed();

    $subject->setMyCustomAttribute('');

    return $return;
  }
}Plugin/AfterPage.php
<?php
namespace Genmato\Sample\Plugin;

use Magento\Cms\Model\Page;

class AfterPage
{

  public function afterGetTitle(Page $subject, $result)
  {
    return 'SAMPLE: '.$result;
  }

}
bin/magento cache:clean
All configured interceptors/plugins are evaluated during initialization. When a call is made to a function that is extended through a plugin, all plugin functions are executed based on the configured sortOrder as configured in di.xml. If there are multiple plugins that extend the same original function, they are executed in the following sequence:
sortOrdersortOrdersortOrder)sortOrder)sortOrdersortOrder)There are some limitations on where you can use plugins; it is not possible to use plugins for the following:
__constructIf you need to modify one of these types listed, the only option to do this is to rewrite (preference) your class through di.xml.
In Magento 1.x, it was possible to use the .xml file to include custom configuration options that might be necessary for an extension. This is no longer possible with Magento 2 because the XML files are all validated against a schema and anything other than predefined options are not allowed. To solve this, it is possible to generate your own custom XML file to set up the parameters that you need. This also allows other extensions to define settings as the output is generated from all modules that have this file configured.
In order to use your own XML configuration file, it is important that you generate a valid schema (XSD) file that will be used to validate the XML files when they are merged.
The following steps show you how to define a custom XML configuration file for your module:
Reader for the XML file and define the name of the file that should be read from all modules:Model/Sample/Reader.php
<?php
namespace Genmato\Sample\Model\Sample;

use Magento\Framework\Config\Reader\Filesystem;
use Magento\Framework\Config\FileResolverInterface;
use Magento\Framework\Config\ConverterInterface;
use Genmato\Sample\Model\Sample\SchemaLocator;
use Magento\Framework\Config\ValidationStateInterface;

class Reader extends Filesystem
{
  protected $_idAttributes = [
    '/table/row' => 'id',
    '/table/row/column' => 'id',
  ];

  /**
  * @param FileResolverInterface $fileResolver
  * @param ConverterInterface $converter
  * @param SchemaLocator $schemaLocator
  * @param ValidationStateInterface $validationState
  * @param string $fileName
  * @param array $idAttributes
  * @param string $domDocumentClass
  * @param string $defaultScope
  */
  public function __construct(
    FileResolverInterface $fileResolver,
    ConverterInterface $converter,
    SchemaLocator $schemaLocator,
    ValidationStateInterface $validationState,
    $fileName = 'sample.xml',
    $idAttributes = [],
    $domDocumentClass = 'Magento\Framework\Config\Dom',
    $defaultScope = 'global'
  ) {
    parent::__construct(
      $fileResolver,
      $converter,
      $schemaLocator,
      $validationState,
      $fileName,
      $idAttributes,
      $domDocumentClass,
      $defaultScope
    );
  }
}Reader must know where to find the schema file:Model/Sample/SchemaLocator.php
<?php
namespace Genmato\Sample\Model\Sample;

use Magento\Framework\Config\SchemaLocatorInterface;
use Magento\Framework\Config\Dom\UrnResolver;

class SchemaLocator implements SchemaLocatorInterface
{
  /** @var UrnResolver */
  protected $urnResolver;

  public function __construct(UrnResolver $urnResolver)
  {
    $this->urnResolver = $urnResolver;
  }

  /**
  * Get path to merged config schema
  *
  * @return string
  */
  public function getSchema()
  {
    return $this->urnResolver->getRealPath('urn:genmato:module:Genmato_Sample:/etc/sample.xsd');
  }

  /**
  * Get path to pre file validation schema
  *
  * @return string
  */
  public function getPerFileSchema()
  {
    return $this->urnResolver->getRealPath('urn:genmato:module:Genmato_Sample:/etc/sample.xsd');
  }
}Model/Sample/Data.php
<?php
namespace Genmato\Sample\Model\Sample;

use Magento\Framework\Config\Data\Scoped;
use Genmato\Sample\Model\Sample\Reader;
use Magento\Framework\Config\ScopeInterface;
use Magento\Framework\Config\CacheInterface;

class Data extends Scoped
{
  /**
  * Scope priority loading scheme
  *
  * @var array
  */
  protected $_scopePriorityScheme = ['global'];

  /**
  * @param Reader $reader
  * @param ScopeInterface $configScope
  * @param CacheInterface $cache
  * @param string $cacheId
  */
  public function __construct(
    Reader $reader,
    ScopeInterface $configScope,
    CacheInterface $cache,
    $cacheId = 'sample_config_cache'
  ) {
    parent::__construct($reader, $configScope, $cache, $cacheId);
  }
}etc/sample.xsd
<?xml version="1.0" encoding="UTF-8"?>
<xs:schema xmlns:xs="http://www.w3.org/2001/XMLSchema">
  <xs:element name="table">
    <xs:complexType>
      <xs:sequence>
        <xs:element name="row" maxOccurs="unbounded" minOccurs="0">
          <xs:complexType>
            <xs:sequence>
              <xs:element name="column" maxOccurs="unbounded" minOccurs="0">
                <xs:complexType>
                  <xs:sequence>
                    <xs:element type="xs:string" name="label">
                      <xs:annotation>
                        <xs:documentation>from first xml from second xmlthey apear in both xmls with the same path and id and second one overrides the value for `attr1` from first xml  from first xml</xs:documentation>
                      </xs:annotation>
                    </xs:element>
                  </xs:sequence>
                  <xs:attribute type="xs:string" name="id" use="optional"/>
                  <xs:attribute type="xs:byte" name="sort" use="optional"/>
                  <xs:attribute type="xs:string" name="attr1" use="optional"/>
                  <xs:attribute type="xs:string" name="disabled" use="optional"/>
                </xs:complexType>
              </xs:element>
            </xs:sequence>
            <xs:attribute type="xs:string" name="id" use="optional"/>
          </xs:complexType>
        </xs:element>
      </xs:sequence>
    </xs:complexType>
  </xs:element>
</xs:schema>etc/sample.xml
<?xml version="1.0"?>
<table xmlns:xsi="http://www.w3.org/2001/XMLSchema-instance" xsi:noNamespaceSchemaLocation="urn:genmato:module:Genmato_Sample:/etc/sample.xsd">
  <row id="row1">
    <column id="col1" sort="10" attr1="val1">
      <label>Col 1</label>
    </column>
  </row>
  <row id="row2">
    <column id="col1" sort="10" attr1="val1">
      <label>Col 1</label>
    </column>
    <column id="col2" sort="20" disabled="true" attr1="val2" >
      <label>Col 2</label>
    </column>
    <column id="col3" sort="15" attr1="val1">
      <label>Col 3</label>
    </column>
  </row>
</table>Controller/Index/Sample.php
<?php
namespace Genmato\Sample\Controller\Index;

use Magento\Framework\App\Action\Action;
use Magento\Framework\App\Action\Context;
use Magento\Framework\View\Result\PageFactory;
use Genmato\Sample\Model\Sample\DataFactory;

class Sample extends Action
{
  /**
  * @var PageFactory
  */
  private $resultPageFactory;

  /** @var  DataFactory $dataReader */
  private $dataReader;

  /**
  * @param Context $context
  * @param PageFactory $resultPageFactory
  * @param DataFactory $dataReader
  */
  public function __construct(
    Context $context,
    PageFactory $resultPageFactory,
    DataFactory $dataReader
  )
  {
    $this->dataReader = $dataReader;
    parent::__construct($context);
  }

  /**
  * Renders Sample
  */
  public function execute()
  {
    $myConfig = $this->dataReader->create();
    print_r($myConfig->get());
  }
}
bin/magento cache:clean
http://example.com/sample/index/sample/
The configuration reader defines the file that is used in the ($fileName = 'sample.xml') constructor. Make sure that the filename used is unique; otherwise, configuration data from another module will be merged and validation will fail as it won't match the schema that you defined. A solution could be to use <vendor>_<module>.xml as the filename.
In the constructor, SchemaLocator is also defined; this will define the schema (XSD file) that is used to validate the XML. To be able to get the schema file independent from where the module is installed (vendor/ or app/code), the schema location is built from the defined URN: urn:genmato:module:Genmato_Sample:/etc/sample.xsd. This URN is parsed and translated to the directory where the module is installed, which is done through ComponentRegistrar, and the module location is registered in registration.php as described in Chapter 6, Creating Magento 2 Extensions – the Basics.
It is possible to get all data using the read() method on the Reader class, this will result in re-reading and merging all XML files, which will impact every request. This can delay the website; therefore, the Data class is added. Here, Reader is injected through the constructor. To get the data, you can call the get() method of the Data class. This will read and merge all XML files if they are not cached and return the cached version when available. If you don't supply an argument to the get() method, it will return all data, but it's also possible to specify a node that you would like.
The Data class can be added everywhere that you need to get your configuration data; for this, you add Genmato\Sample\Model\Sample\DataFactory to the constructor. This autogenerated class allows you to instantiate your configuration data class:
$myConfig = $this->dataReader->create();
This gets a value from the configuration:
$myConfig->get('<node>');
In Magento 2, it is easy to add your own product type, which can be useful when you want to add some special features that are not available through the default product types. In this recipe, we will see a minimal new product type that calculates the price based on the cost of the product; you can easily extend it further to fit your own needs.
Every product type has its own unique code specified, and it's important to use a short code to identify your product type.
The following steps in this recipe show you how to create a (minimal) new product type:
etc/product_types.xml
<?xml version="1.0"?>
<config xmlns:xsi="http://www.w3.org/2001/XMLSchema-instance" xsi:noNamespaceSchemaLocation="urn:magento:module:Magento_Catalog:etc/product_types.xsd">
  <type name="demo" label="Demo Product" modelInstance="Genmato\Sample\Model\Product\Type\Demo" indexPriority="80" sortOrder="80">
    <priceModel instance="Genmato\Sample\Model\Product\Type\Demo\Price" />
    <customAttributes>
      <attribute name="refundable" value="true"/>
      <attribute name="taxable" value="true"/>
    </customAttributes>
  </type>
</config>modelInstance as configured in the product type definition; this is the minimal product type code definition. You can add your own functions that would be necessary to your product here:Model/Product/Type/Demo.php
<?php
namespace Genmato\Sample\Model\Product\Type;

use Magento\Catalog\Model\Product\Type\AbstractType;

class Demo extends AbstractType
{
  /**
  * Product-type code
  */
  const TYPE_CODE = 'demo';

  /**
  * Delete data specific for Simple product-type
  *
  * @param \Magento\Catalog\Model\Product $product
  * @return void
  */
  public function deleteTypeSpecificData(\Magento\Catalog\Model\Product $product)
  {
  }
}priceModel is specified. This class holds the code to get the price of a product. Here, we use a fixed value of 1.25*cost attribute. It is also possible to get this value from another attribute or system configuration field:Model/Product/Type/Demo/Price.php
<?php
namespace Genmato\Sample\Model\Product\Type\Demo;

use Magento\Catalog\Model\Product\Type\Price as ProductPrice;

class Price extends ProductPrice
{

  /**
  * Default action to get price of product
  *
  * @param Product $product
  * @return float
  */
  public function getPrice($product)
  {
    return $product->getData('cost')*1.25;
  }
}apply_to field of the cost attribute. This will be done through an UpgradeData script:Setup/UpgradeData.php
<?php
namespace Genmato\Sample\Setup;

use Magento\Eav\Setup\EavSetup;
use Magento\Eav\Setup\EavSetupFactory;
use Magento\Framework\Setup\UpgradeDataInterface;
use Magento\Framework\Setup\ModuleContextInterface;
use Magento\Framework\Setup\ModuleDataSetupInterface;
use Magento\Catalog\Model\Product;

/**
 * @codeCoverageIgnore
 */
class UpgradeData implements UpgradeDataInterface
{
  /**
  * EAV setup factory
  *
  * @var EavSetupFactory
  */
  private $eavSetupFactory;

  /**
  * Init
  *
  * @param EavSetupFactory $eavSetupFactory
  */
  public function __construct(EavSetupFactory $eavSetupFactory)
  {
    $this->eavSetupFactory = $eavSetupFactory;
  }

  /**
  * {@inheritdoc}
  * @SuppressWarnings(PHPMD.ExcessiveMethodLength)
  */
  public function upgrade(ModuleDataSetupInterface $setup, ModuleContextInterface $context)
  {
    if (version_compare($context->getVersion(), '0.8.4', '<')) {
      /** @var EavSetup $eavSetup */
      $eavSetup = $this->eavSetupFactory->create(['setup' => $setup]);

      $fieldList = [
        'price',
        'special_price',
        'special_from_date',
        'special_to_date',
        'minimal_price',
        'cost',
        'tier_price',
        'weight',
      ];

      // make these attributes applicable to demo product
      foreach ($fieldList as $field) {
        $applyTo = explode(
          ',',
          $eavSetup->getAttribute(Product::ENTITY, $field, 'apply_to')
        );
        if (!in_array('demo', $applyTo)) {
          $applyTo[] = 'demo';
          $eavSetup->updateAttribute(
            Product::ENTITY,
            $field,
            'apply_to',
            implode(',', $applyTo)
          );
        }
      }
    }
  }
}etc/sales.xml
<?xml version="1.0"?>
<config xmlns:xsi="http://www.w3.org/2001/XMLSchema-instance" xsi:noNamespaceSchemaLocation="urn:magento:module:Magento_Sales:etc/sales.xsd">
  <order>
    <available_product_type name="demo"/>
  </order>
</config>Invoice and Creditmemo PDF documents:etc/pdf.xml
<?xml version="1.0"?>
<config xmlns:xsi="http://www.w3.org/2001/XMLSchema-instance" xsi:noNamespaceSchemaLocation="urn:magento:module:Magento_Sales:etc/pdf_file.xsd">
  <renderers>
    <page type="invoice">
      <renderer product_type="demo">Magento\Sales\Model\Order\Pdf\Items\Invoice\DefaultInvoice</renderer>
    </page>
    <page type="creditmemo">
      <renderer product_type="demo">Magento\Sales\Model\Order\Pdf\Items\Creditmemo\DefaultCreditmemo</renderer>
    </page>
  </renderers>
</config>setup_version in the module configuration. In this case, the version has been updated from 0.8.3 to 0.8.4. This is used in the upgrade script to execute only if the installed version is lower than the new version.etc/module.xml
<?xml version="1.0"?>
<config xmlns:xsi="http://www.w3.org/2001/XMLSchema-instance" xsi:noNamespaceSchemaLocation="urn:magento:framework:Module/etc/module.xsd">
  <module name="Genmato_Sample" setup_version="0.8.4">
    <sequence>
      <module name="Magento_Store"/>
    </sequence>
  </module>
</config>upgrade command to update the attributes specified in the upgrade command. The cache is flushed at the same time to read the updated configuration.The new defined product type is now available in the backend to create a new product. The attributes used are similar to a simple product, and you can add your own fields if necessary. The priceModel instance specified will calculate the product price on rendering on the frontend; in this case, the cost attribute is used and multiplied by 1.25.
While creating the product, it is possible to set the Cost attribute in the Advanced Pricing tab. In this example, we used a product cost of €25.00:
When the product is saved and requested on the frontend, the price will be calculated based on the preceding values and result in a final price of €31.25:
In the configuration of the new product type (in product_types.xml), it is also possible to specify the following items:
A service layer/contract is a fixed interface to get and store data without knowing the underlying layer. It is possible to swap the way the data is stored without changing the service layer.
A service layer consists of three interface types:
getList: This returns a list of records based on the (optionally) provided search parametersget: This loads the data from the database and returns a data interface for the specified IDsave: This saves the record specified in the data interfacedelete: This deletes the record specified in the data interfacedeleteById: This deletes the record specified by the IDUsing a service layer also makes it easy to extend your module to access the web API; you only need to add a declaration in the appropriate XML to configure the link from the API command to the right interface.
In this recipe, we will add the option to read, create, or delete a record through a service layer contract:
Api/DemoRepositoryInterface.php
<?php
namespace Genmato\Sample\Api;

interface DemoRepositoryInterface
{
  /**
  * Save demo list item.
  *
  * @api
  * @param \Genmato\Sample\Api\Data\DemoInterface $demo
  * @return \Magento\Customer\Api\Data\GroupInterface
  * @throws \Magento\Framework\Exception\InputException If there is a problem with the input
  * @throws \Magento\Framework\Exception\NoSuchEntityException If a group ID is sent but the group does not exist
  * @throws \Magento\Framework\Exception\State\InvalidTransitionException
  *If saving customer group with customer group code that is used by an existing customer group
  * @throws \Magento\Framework\Exception\LocalizedException
  */
  public function save(\Genmato\Sample\Api\Data\DemoInterface $demo);

  /**
  * Get demo list item by ID.
  *
  * @api
  * @param int $id
  * @return \Genmato\Sample\Api\Data\DemoInterface
  * @throws \Magento\Framework\Exception\NoSuchEntityException If $groupId is not found
  * @throws \Magento\Framework\Exception\LocalizedException
  */
  public function getById($id);

  /**
  * Retrieve demo list items.
  *
  * The list of demo items can be filtered
  *
  * @api
  * @param \Magento\Framework\Api\SearchCriteriaInterface $searchCriteria
  * @return \Genmato\Sample\Api\Data\DemoSearchResultsInterface
  * @throws \Magento\Framework\Exception\LocalizedException
  */
  public function getList(\Magento\Framework\Api\SearchCriteriaInterface $searchCriteria);

  /**
  * Delete demo list item.
  *
  * @api
  * @param \Genmato\Sample\Api\Data\DemoInterface $demo
  * @return bool true on success
  * @throws \Magento\Framework\Exception\StateException If customer group cannot be deleted
  * @throws \Magento\Framework\Exception\LocalizedException
  */
  public function delete(\Genmato\Sample\Api\Data\DemoInterface $demo);

  /**
  * Delete demolist by ID.
  *
  * @api
  * @param int $id
  * @return bool true on success
  * @throws \Magento\Framework\Exception\NoSuchEntityException
  * @throws \Magento\Framework\Exception\StateException If customer group cannot be deleted
  * @throws \Magento\Framework\Exception\LocalizedException
  */
  public function deleteById($id);
}Model/ResourceModel/DemoRepository.php
<?php
namespace Genmato\Sample\Model\ResourceModel;

use Genmato\Sample\Model\DemoRegistry;
use Genmato\Sample\Model\DemoFactory;
use Genmato\Sample\Api\Data\DemoInterface;
use Genmato\Sample\Api\Data\DemoInterfaceFactory;
use Genmato\Sample\Api\Data\DemoExtensionInterface;
use Genmato\Sample\Api\Data\DemoSearchResultsInterfaceFactory;
use Genmato\Sample\Model\Demo;
use Genmato\Sample\Model\ResourceModel\Demo as DemoResource;
use Genmato\Sample\Model\ResourceModel\Demo\Collection;
use Genmato\Sample\Api\DemoRepositoryInterface;

use Magento\Framework\Exception\CouldNotDeleteException;
use Magento\Framework\Exception\CouldNotSaveException;
use Magento\Framework\Exception\NoSuchEntityException;
use Magento\Framework\Api\SearchCriteriaInterface;
use Magento\Framework\Reflection\DataObjectProcessor;
use Magento\Framework\Api\ExtensionAttribute\JoinProcessorInterface;

class DemoRepository implements DemoRepositoryInterface
{

  /** @var DemoRegistry  */
  private $demoRegistry;

  /** @var DemoFactory  */
  private $demoFactory;

  /** @var DemoInterfaceFactory  */
  private $demoDataFactory;

  /** @var  Demo */
  private $demoResourceModel;

  /**
  * @var DataObjectProcessor
  */
  private $dataObjectProcessor;

  /**
  * @var DemoSearchResultsInterfaceFactory
  */
  protected $searchResultsFactory;

  /**
  * @var JoinProcessorInterface
  */
  protected $extensionAttributesJoinProcessor;

  /**
  * @param DemoRegistry $demoRegistry
  * @param DemoFactory $demoFactory
  * @param DemoInterfaceFactory $demoDataFactory
  * @param DemoResource $demoResourceModel
  * @param DataObjectProcessor $dataObjectProcessor
  * @param DemoSearchResultsInterfaceFactory $searchResultsFactory
  * @param JoinProcessorInterface $extensionAttributesJoinProcessor
  */
  public function __construct(
    DemoRegistry $demoRegistry,
    DemoFactory $demoFactory,
    DemoInterfaceFactory $demoDataFactory,
    DemoResource $demoResourceModel,
    DataObjectProcessor $dataObjectProcessor,
    DemoSearchResultsInterfaceFactory $searchResultsFactory,
    JoinProcessorInterface $extensionAttributesJoinProcessor
  ) {
    $this->demoRegistry = $demoRegistry;
    $this->demoFactory = $demoFactory;
    $this->demoDataFactory = $demoDataFactory;
    $this->demoResourceModel = $demoResourceModel;
    $this->dataObjectProcessor = $dataObjectProcessor;
    $this->searchResultsFactory = $searchResultsFactory;
    $this->extensionAttributesJoinProcessor = $extensionAttributesJoinProcessor;
  }
  /**
  * {@inheritdoc}
  */
  public function save(DemoInterface $demo)
  {
    /** @var Demo $demoModel */
    $demoModel = $this->demoFactory->create();

    if ($demo->getId()) {
      $demoModel->load($demo->getId());
    }
    $demoModel
    ->setTitle($demo->getTitle())
    ->setIsVisible($demo->getIsVisible())
    ->setIsActive($demo->getIsActive());

    try {
      $demoModel->save();
    } catch (\Exception $exception) {
      throw new CouldNotSaveException(__($exception->getMessage()));
    }
    return $demoModel->getData();
  }

  /**
  * {@inheritdoc}
  */
  public function getById($id)
  {
    $demoModel = $this->demoRegistry->retrieve($id);
    $demoDataObject = $this->demoDataFactory->create()
      ->setId($demoModel->getId())
      ->setTitle($demoModel->getTitle())
      ->setCreationTime($demoModel->getCreationTime())
      ->setUpdateTime($demoModel->getUpdateTime())
      ->setIsVisible($demoModel->getIsVisible())
      ->setIsActive($demoModel->getIsActive());
    return $demoDataObject;
  }

  /**
  * {@inheritdoc}
  */
  public function getList(SearchCriteriaInterface $searchCriteria)
  {
    $searchResults = $this->searchResultsFactory->create();
    $searchResults->setSearchCriteria($searchCriteria);

    /** @var Collection $collection */
    $collection = $this->demoFactory->create()->getCollection();
    foreach ($searchCriteria->getFilterGroups() as $filterGroup) {
      foreach ($filterGroup->getFilters() as $filter) {
        $condition = $filter->getConditionType() ?: 'eq';
        $collection->addFieldToFilter($filter->getField(), [$condition => $filter->getValue()]);
      }
    }
    $searchResults->setTotalCount($collection->getSize());
    $sortOrders = $searchCriteria->getSortOrders();
    if ($sortOrders) {
      /** @var SortOrder $sortOrder */
      foreach ($sortOrders as $sortOrder) {
        $collection->addOrder(
          $sortOrder->getField(),
          ($sortOrder->getDirection() == SortOrder::SORT_ASC) ? 'ASC' : 'DESC'
        );
      }
    }
    $collection->setCurPage($searchCriteria->getCurrentPage());
    $collection->setPageSize($searchCriteria->getPageSize());
    /** @var DemoInterface[] $demos */
    $demos = [];
    /** @var Demo $demo */
    foreach ($collection as $demo) {
      /** @var DemoInterface $demoDataObject */
      $demoDataObject = $this->demoDataFactory->create()
        ->setId($demo->getId())
        ->setTitle($demo->getTitle())
        ->setCreationTime($demo->getCreationTime())
        ->setUpdateTime($demo->getUpdateTime())
        ->setIsVisible($demo->getIsVisible())
        ->setIsActive($demo->getIsActive());

      $demos[] = $demoDataObject;
    }
    $searchResults->setTotalCount($collection->getSize());
    return $searchResults->setItems($demos);
  }

  /**
  * Delete demo list item.
  *
  * @param DemoInterface $demo
  * @return bool true on success
  * @throws \Magento\Framework\Exception\StateException If customer group cannot be deleted
  * @throws \Magento\Framework\Exception\LocalizedException
  */
  public function delete(DemoInterface $demo)
  {
    return $this->deleteById($demo->getId());
  }

  /**
  * Delete demo list item by ID.
  *
  * @param int $id
  * @return bool true on success
  * @throws \Magento\Framework\Exception\NoSuchEntityException
  * @throws \Magento\Framework\Exception\StateException If customer group cannot be deleted
  * @throws \Magento\Framework\Exception\LocalizedException
  */
  public function deleteById($id)
  {
    $demoModel = $this->demoRegistry->retrieve($id);

    if ($id <= 0) {
      throw new \Magento\Framework\Exception\StateException(__('Cannot delete demo item.'));
    }

    $demoModel->delete();
    $this->demoRegistry->remove($id);
    return true;
  }


}Model/DemoRegistry.php
<?php
/**
* Sample
*
* @package Genmato_Sample
* @author  Vladimir Kerkhoff <support@genmato.com>
* @created 2015-12-23
* @copyright Copyright (c) 2015 Genmato BV, https://genmato.com.
*/
namespace Genmato\Sample\Model;

use Genmato\Sample\Api\Data\DemoInterface;
use Magento\Framework\Exception\NoSuchEntityException;

class DemoRegistry
{
  /**
  * @var array
  */
  protected $registry = [];

  /**
  * @var DemoFactory
  */
  protected $demoFactory;

  /**
  * @param DemoFactory $demoFactory
  */
  public function __construct(DemoFactory $demoFactory)
  {
    $this->demoFactory = $demoFactory;
  }

  /**
  * Get instance of the Demo Model identified by an id
  *
  * @param int $demoId
  * @return Demo
  * @throws NoSuchEntityException
  */
  public function retrieve($demoId)
  {
    if (isset($this->registry[$demoId])) {
      return $this->registry[$demoId];
    }
    $demo = $this->demoFactory->create();
    $demo->load($demoId);
    if ($demo->getId() === null || $demo->getId() != $demoId)
    {
      throw NoSuchEntityException::singleField(DemoInterface::ID, $demoId);
    }
    $this->registry[$demoId] = $demo;
    return $demo;
  }

  /**
  * Remove an instance of the Demo Model from the registry
  *
  * @param int $demoId
  * @return void
  */
  public function remove($demoId)
  {
    unset($this->registry[$demoId]);
  }
}Api/Data/DemoInterface.php
<?php
namespace Genmato\Sample\Api\Data;

use Genmato\Sample\Api\Data\DemoExtensionInterface;
use Magento\Framework\Api\ExtensibleDataInterface;

interface DemoInterface extends ExtensibleDataInterface
{

  const ID = 'id';
  const TITLE = 'title';
  const CREATION_TIME = 'creation_time';
  const UPDATE_TIME = 'update_time';
  const IS_ACTIVE = 'is_active';
  const IS_VISIBLE = 'is_visible';

  /**
  * Get id
  *
  * @api
  * @return int|null
  */
  public function getId();

  /**
  * Set id
  *
  * @api
  * @param int $id
  * @return $this
  */
  public function setId($id);

  /**
  * Get Title
  *
  * @api
  * @return string
  */
  public function getTitle();

  /**
  * Set Title
  *
  * @api
  * @param string $title
  * @return $this
  */
  public function setTitle($title);

  /**
  * Get Is Active
  *
  * @api
  * @return bool
  */
  public function getIsActive();

  /**
  * Set Is Active
  *
  * @api
  * @param bool $isActive
  * @return $this
  */
  public function setIsActive($isActive);

  /**
  * Get Is Visible
  *
  * @api
  * @return bool
  */
  public function getIsVisible();

  /**
  * Set Is Active
  *
  * @api
  * @param bool $isVisible
  * @return $this
  */
  public function setIsVisible($isVisible);

  /**
  * Get creation time
  *
  * @api
  * @return string
  */
  public function getCreationTime();

  /**
  * Set creation time
  *
  * @api
  * @param string $creationTime
  * @return $this
  */
  public function setCreationTime($creationTime);

  /**
  * Get update time
  *
  * @api
  * @return string
  */
  public function getUpdateTime();

  /**
  * Set update time
  *
  * @api
  * @param string $updateTime
  * @return $this
  */
  public function setUpdateTime($updateTime);

  /**
  * Retrieve existing extension attributes object or create a new one.
  *
  * @api
  * @return DemoExtensionInterface|null
  */
  public function getExtensionAttributes();

  /**
  * Set an extension attributes object.
  *
  * @api
  * @param DemoExtensionInterface $extensionAttributes
  * @return $this
  */
  public function setExtensionAttributes(DemoExtensionInterface $extensionAttributes);
}Model/Data/Demo.php
<?php
namespace Genmato\Sample\Model\Data;

use Magento\Framework\Api\AbstractExtensibleObject;
use Genmato\Sample\Api\Data\DemoInterface;
use Genmato\Sample\Api\Data\DemoExtensionInterface;

class Demo extends AbstractExtensibleObject implements DemoInterface
{

  /**
  * Get id
  *
  * @return int|null
  */
  public function getId()
  {
    return $this->_get(self::ID);
  }

  /**
  * Set id
  *
  * @param int $id
  * @return $this
  */
  public function setId($id)
  {
    return $this->setData(self::ID, $id);
  }

  /**
  * Get code
  *
  * @return string
  */
  public function getTitle()
  {
    return $this->_get(self::TITLE);
  }

  /**
  * Set code
  *
  * @param string $title
  * @return $this
  */
  public function setTitle($title)
  {
    return $this->setData(self::TITLE, $title);
  }

  /**
  * Get Is Active
  *
  * @return bool
  */
  public function getIsActive()
  {
    return $this->_get(self::IS_ACTIVE);
  }

  /**
  * Set Is Active
  *
  * @param bool $isActive
  * @return $this
  */
  public function setIsActive($isActive)
  {
    return $this->setData(self::IS_ACTIVE, $isActive);
  }

  /**
  * Get Is Visible
  *
  * @return bool
  */
  public function getIsVisible()
  {
    return $this->_get(self::IS_VISIBLE);
  }

  /**
  * Set Is Active
  *
  * @param bool $isVisible
  * @return $this
  */
  public function setIsVisible($isVisible)
  {
    return $this->setData(self::IS_VISIBLE, $isVisible);
  }

  /**
  * Get creation time
  *
  * @return string
  */
  public function getCreationTime()
  {
    return $this->_get(self::CREATION_TIME);
  }

  /**
  * Set creation time
  *
  * @param string $creationTime
  * @return $this
  */
  public function setCreationTime($creationTime)
  {
    return $this->setData(self::CREATION_TIME, $creationTime);
  }

  /**
  * Get update time
  *
  * @return string
  */
  public function getUpdateTime()
  {
    return $this->_get(self::UPDATE_TIME);
  }

  /**
  * Set update time
  *
  * @param string $updateTime
  * @return $this
  */
  public function setUpdateTime($updateTime)
  {
    return $this->setData(self::UPDATE_TIME, $updateTime);
  }

  /**
  * {@inheritdoc}
  *
  * @return DemoExtensionInterface|null
  */
  public function getExtensionAttributes()
  {
    return $this->_getExtensionAttributes();
  }

  /**
  * {@inheritdoc}
  *
  * @param DemoExtensionInterface $extensionAttributes
  * @return $this
  */
  public function setExtensionAttributes(DemoExtensionInterface $extensionAttributes)
  {
    return $this->_setExtensionAttributes($extensionAttributes);
  }
}getList command:Api/Data/DemoSearchResultsInterface.php
<?php
namespace Genmato\Sample\Api\Data;

use Genmato\Sample\Api\Data\DemoInterface;
use Magento\Framework\Api\SearchResultsInterface;

interface DemoSearchResultsInterface extends SearchResultsInterface
{
  /**
  * Get demo item list.
  *
  * @api
  * @return DemoInterface[]
  */
  public function getItems();

  /**
  * Set demo item list.
  *
  * @api
  * @param DemoInterface[] $items
  * @return $this
  */
  public function setItems(array $items);

}di.xml by adding the following lines:etc/di.xml
  <preference for="Genmato\Sample\Api\DemoRepositoryInterface"
    type="Genmato\Sample\Model\ResourceModel\DemoRepository" />

  <preference for="Genmato\Sample\Api\Data\DemoInterface" type="Genmato\Sample\Model\Data\Demo" />
  <preference for="Genmato\Sample\Api\Data\DemoSearchResultsInterface"
type="Magento\Framework\Api\SearchResults" />Test controller; here, we test the working of the service layer: (This is optional.)Controller/Index/Test.php
<?php
namespace Genmato\Sample\Controller\Index;

use Magento\Framework\App\Action\Action;
use Magento\Framework\App\Action\Context;
use Magento\Framework\View\Result\PageFactory;
use Magento\Framework\Api\SearchCriteriaBuilder;
use Genmato\Sample\Api\DemoRepositoryInterface;
use Genmato\Sample\Model\Data\DemoFactory;
use Genmato\Sample\Api\Data\DemoInterface;

class Test extends Action
{
  /**
  * @var PageFactory
  */
  private $resultPageFactory;

  /** @var  DemoRepositoryInterface */
  private $demoRepository;

  /** @var DemoFactory  */
  private $demo;

  /**
  * @var SearchCriteriaBuilder
  */
  private $searchCriteriaBuilder;
  /**
  * @param Context $context
  * @param PageFactory $resultPageFactory
  * @param DemoRepositoryInterface $demoRepository
  * @param SearchCriteriaBuilder $searchCriteriaBuilder
  * @param DemoFactory $demoFactory
  */
  public function __construct(
    Context $context,
    PageFactory $resultPageFactory,
    DemoRepositoryInterface $demoRepository,
    SearchCriteriaBuilder $searchCriteriaBuilder,
    DemoFactory $demoFactory
  )
  {
    $this->demoRepository = $demoRepository;
    $this->searchCriteriaBuilder = $searchCriteriaBuilder;
    $this->demo = $demoFactory;
    parent::__construct($context);
  }

  /**
  * Renders Sample
  */
  public function execute()
  {
    echo '<pre>';

    // Create new record through service layer/contract

    /** @var DemoInterface $demoRecord */
    $demoRecord = $this->demo->create();
    $demoRecord->setIsActive(1)
      ->setIsVisible(1)
      ->setTitle('Test through Service Layer');

    $demo = $this->demoRepository->save($demoRecord);
    print_r($demo);

    // Get list of available records
    $searchCriteria = $this->searchCriteriaBuilder->create();
    $searchResult = $this->demoRepository->getList($searchCriteria);
    foreach ($searchResult->getItems() as $item) {
      echo $item->getId().' => '.$item->getTitle().'<br>';
    }
  }

}
bin/magento setup:upgrade
http://example.com/sample/index/test/
The service layer/contract defines the methods and data format through these interfaces.
This interface describes the available methods, input, and output that is expected. The actual logic for the methods is done by the Model\ResourceModel\ DemoRepository class. In di.xml, there is a preference created that will use DemoRepository instead of the Interface class:
<preference for="Genmato\Sample\Api\DemoRepositoryInterface"
  type="Genmato\Sample\Model\ResourceModel\DemoRepository" />
With Magento 2, there is a command-line interface (CLI) available to run several tasks. The bin/magento command replaces the separate shell scripts that were used in Magento 1. This command is based on the Symfony Console component and looks just like n98-magerun that is available for Magento 1. Just like the rest of Magento 2, it's possible to extend the CLI tool with your own commands.
Adding commands to the CLI script requires some knowledge of the Symfony Console component. This recipe also uses the service layer created in the previous recipe.
In this recipe, we will add four options to the bin/magento CLI command with the following steps:
AddCommand class; this is used to create a new record through the CLI:Console/Command/AddCommand.php
<?php
namespace Genmato\Sample\Console\Command;

use Genmato\Sample\Api\DemoRepositoryInterface;
use Genmato\Sample\Model\Data\DemoFactory;
use Genmato\Sample\Api\Data\DemoInterface;

use Symfony\Component\Console\Input\InputOption;
use Symfony\Component\Console\Input\InputArgument;
use Symfony\Component\Console\Command\Command;
use Symfony\Component\Console\Input\InputInterface;
use Symfony\Component\Console\Output\OutputInterface;
use Symfony\Component\Console\Question\ConfirmationQuestion;


class AddCommand extends Command
{

  /** @var  DemoRepositoryInterface */
  private $demoRepository;

  /** @var DemoFactory  */
  private $demoFactory;

  /**
  * AddCommand constructor.
  * @param DemoRepositoryInterface $demoRepository
  * @param DemoFactory $demoFactory
  * @param null $name
  */
  public function __construct(
    DemoRepositoryInterface $demoRepository,
    DemoFactory $demoFactory,
  $name = null)
  {
    parent::__construct($name);

    $this->demoRepository = $demoRepository;
    $this->demoFactory = $demoFactory;
  }

  /**
  * {@inheritdoc}
  */
  protected function configure()
  {
    $this->setName('demo:add')
      ->setDescription('Add demo record')
      ->addArgument('title',InputArgument::OPTIONAL, 'Title')
      ->addOption('active', null, InputOption::VALUE_NONE, 'Active')
      ->addOption('visible', null, InputOption::VALUE_NONE, 'Visible')
    ;
  }

  /**
  * {@inheritdoc}
  */
  protected function execute(InputInterface $input, OutputInterface $output)
  {
    $title = $input->getArgument('title');
    $active = $input->getOption('active')? 1:0;
    $visible = $input->getOption('visible')? 1:0;
    if (!$title) {
      $dialog = $this->getHelper('dialog');

      $title = $dialog->ask($output, '<question>Enter the Title:</question> ',false);
      $active = $dialog->ask($output, '<question>Should record be active: [Y/n]</question> ','y');
      $active = (strtolower($active) == 'y') ? 1:0;
      $visible = $dialog->ask($output, '<question>Should record be visible: [Y/n]</question> ','y');
      $visible = (strtolower($visible) == 'y') ? 1:0;
    }

    /** @var DemoInterface $demoRecord */
    $demoRecord = $this->demoFactory->create();
    $demoRecord->setIsActive($active)
      ->setIsVisible($visible)
      ->setTitle($title);

    try {
      $demo = $this->demoRepository->save($demoRecord);
      $output->writeln('New record created (id='.$demo->getId().')');
    }catch (\Exception $ex) {
      $output->writeln('<error>'.$ex->getMessage().'</error>');
    }
  }
}Console/Command/DeleteCommand.php
<?php
namespace Genmato\Sample\Console\Command;

use Genmato\Sample\Api\DemoRepositoryInterface;

use Symfony\Component\Console\Input\InputOption;
use Symfony\Component\Console\Command\Command;
use Symfony\Component\Console\Input\InputInterface;
use Symfony\Component\Console\Output\OutputInterface;
use Symfony\Component\Console\Question\ConfirmationQuestion;

class DeleteCommand extends Command
{

  /** @var  DemoRepositoryInterface */
  private $demoRepository;

  public function __construct(
    DemoRepositoryInterface $demoRepository,
  $name = null)
  {
    parent::__construct($name);

    $this->demoRepository = $demoRepository;
  }

  /**
  * {@inheritdoc}
  */
  protected function configure()
  {
    $this->setName('demo:delete')
      ->setDescription('Delete demo record')
      ->addOption(
        'id',
        null,
        InputOption::VALUE_REQUIRED,
        'Demo record ID to delete'
      )
      ->addOption(
        'force',
        null,
        InputOption::VALUE_NONE,
        'Force delete without confirmation'
      );
  }

  /**
  * {@inheritdoc}
  */
  protected function execute(InputInterface $input, OutputInterface $output)
  {
    $helper = $this->getHelper('question');

    $id = $input->getOption('id');

    try {
      if (!$input->getOption('force')) {
        $data = $this->demoRepository->getById($id);
        $output->writeln('Id        :' . $data->getId());
        $output->writeln('Title     :' . $data->getTitle());
        $question = new ConfirmationQuestion('Are you sure you want to delete this record? ', false);

        if (!$helper->ask($input, $output, $question)) {
          return;
        }
      }

      $data = $this->demoRepository->deleteById($id);
      if ($data) {
        $output->writeln('<info>Record deleted!</info>');
      } else {
        $output->writeln('<error>Unable to delete record!</error>');
      }
    } catch (\Exception $ex) {
      $output->writeln('<error>'.$ex->
        getMessage().'</error>');
    }
  }
}Console/Command/GetCommand.php
<?php

namespace Genmato\Sample\Console\Command;

use Genmato\Sample\Api\DemoRepositoryInterface;

use Symfony\Component\Console\Command\Command;
use Symfony\Component\Console\Input\InputArgument;
use Symfony\Component\Console\Input\InputOption;
use Symfony\Component\Console\Input\InputInterface;
use Symfony\Component\Console\Output\OutputInterface;

class GetCommand extends Command
{

  /** @var  DemoRepositoryInterface */
  private $demoRepository;

  public function __construct(
    DemoRepositoryInterface $demoRepository,
  $name = null)
  {
    parent::__construct($name);

    $this->demoRepository = $demoRepository;
  }

  /**
  * {@inheritdoc}
  */
  protected function configure()
  {
    $this->setName('demo:get')
      ->setDescription('Get demo records')
      ->addOption(
        'id',
        null,
        InputOption::VALUE_REQUIRED,
        'Demo record ID to display'
       );
  }

  /**
  * {@inheritdoc}
  */
  protected function execute(InputInterface $input, OutputInterface $output)
  {
    $id = $input->getOption('id');

    try {
      $data = $this->demoRepository->getById($id);

      $table = $this->getHelper('table');
      $table
        ->setHeaders(array(__('ID'), __('Title'), __('Created'), __('Updated'), __('Visible'), __('Active')))
        ->setRows([[
          $data->getId(),
          $data->getTitle(),
          $data->getCreationTime(),
          $data->getUpdateTime(),
          $data->getIsVisible() ? __('Yes') : __('No'),
          $data->getIsActive() ? __('Yes') : __('No')
          ]]);
      $table->render($output);
    } catch (\Exception $ex) {
      $output->writeln('<error>'.$ex->getMessage().'</error>');
    }
  }
}Console/Command/ListCommand.php
<?php
namespace Genmato\Sample\Console\Command;

use Magento\Framework\Api\SearchCriteriaBuilder;
use Genmato\Sample\Api\DemoRepositoryInterface;

use Symfony\Component\Console\Command\Command;
use Symfony\Component\Console\Input\InputInterface;
use Symfony\Component\Console\Output\OutputInterface;

class ListCommand extends Command
{

  /** @var  DemoRepositoryInterface */
  private $demoRepository;

  /**
  * @var SearchCriteriaBuilder
  */
  private $searchCriteriaBuilder;

  public function __construct(
    DemoRepositoryInterface $demoRepository,
    SearchCriteriaBuilder $searchCriteriaBuilder,
    $name = null)
  {
    parent::__construct($name);

    $this->demoRepository = $demoRepository;
    $this->searchCriteriaBuilder = $searchCriteriaBuilder;
  }

  /**
  * {@inheritdoc}
  */
  protected function configure()
  {
    $this->setName('demo:list')->setDescription('List demo records');
  }

  /**
  * {@inheritdoc}
  */
  protected function execute(InputInterface $input, OutputInterface $output)
  {
    // Get list of available records
    $searchCriteria = $this->searchCriteriaBuilder->create();
    $searchResult = $this->demoRepository->getList($searchCriteria);
    $rows = [];
    foreach ($searchResult->getItems() as $item) {
      $rows[] = [$item->getId(), $item->getTitle()];
    }

    $table = $this->getHelper('table');
    $table
      ->setHeaders(array(__('ID'), __('Title')))
      ->setRows($rows)
    ;
    $table->render($output);
  }
}di.xml configuration file:etc/di.xml
<type name="Magento\Framework\Console\CommandList">
  <arguments>
    <argument name="commands" xsi:type="array">
      <item name="demoadd" xsi:type="object">Genmato\Sample\Console\Command\AddCommand</item>
      <item name="demolist" xsi:type="object">Genmato\Sample\Console\Command\ListCommand</item>
      <item name="demoget" xsi:type="object">Genmato\Sample\Console\Command\GetCommand</item>
      <item name="demodelete" xsi:type="object">Genmato\Sample\Console\Command\DeleteCommand</item>
    </argument>
  </arguments>
</type>
bin/magento setup:upgrade
bin/magento
Registering new commands works by registering new items through di.xml with the Magento\Framework\Console\CommandList class. In the XML file, every item that we want to add is listed with a unique name and the class that is used for this command.
In the class listed, there are two methods that are used:
configure: In the configure method, the command is added with the following parameters:setName: This is the option used for the commandsetDesciption: This is a short description of the command, which is shown in the command listingsetArgument (optional): This sets arguments necessary for the commandsetOption (optional): This sets options necessary for the commandexecute: This is the actual method that is executed; here, the logic that you want to perform is locatedIt's not difficult to download Magento 2. With some hosting companies, it only takes a simple request or "one-click" to do an initial installation of this powerful e-commerce platform. The question now becomes, "where do you go from here?"
Before you even download and install Magento, it's important that you take some time to plan. The temptation to dive right in and get your feet wet is strong – especially for those of us who enjoy exploring new technologies. However, this is perhaps the primary reason why many people abandon Magento even before they get off the ground. Not only are there lots of wonderful features and configurations to tackle, there are significant installation issues to consider even before you download the installer.
In this chapter, the following topics will be covered:
There are three important areas to consider when defining your e-commerce project:
It is never wise to skimp on defining and analyzing any of these, as they all play crucial roles in the successful implementation of any e-commerce project (or any web project). Let's look at each of them in detail.
Magento is a powerful, full-featured e-commerce platform. With that power comes a certain degree of complexity (one very good reason to keep this book handy!). It's important to take your analysis of how to leverage this power one step at a time. As you discover the many facets of Magento, it's easy to become overwhelmed. Don't worry. With proper planning, you'll soon find that Magento is quite manageable for whatever e-commerce project you have in mind.
It is very likely that your e-commerce project is ideal for Magento, particularly if you intend to grow the online business well beyond its initial design and configuration – and who doesn't? Magento's expandability and continued development insures that, as an open source platform, Magento is the ideal technology for both start-up and mature stores.
When considering Magento as a platform, here's what Magneto offers that makes it shine:
Where you might find Magento to be more than required is if you have only a small handful of products to offer or expect very few sales.
If you think that Magento might be too complicated to use as an e-commerce platform, think again. Power always involves some level of complexity. With Mastering Magento 2, we feel the challenge of using Magento will quickly become an appreciation for all the ways you can sell more products online.
How are you going to be using your Magento installation? This list will help you focus on particular areas of interest in this book. Answer these questions, as they pertain to your single Magento installation:
Whatever you can conceive for an e-commerce store, it can almost always be accommodated with Magento!
The second stage to defining your scope is to think about "users" – those who will be actually interacting with Magento: customers and store staff. These are people who have no technical expertise, and for whom using the site should be straightforward and intuitive.
Designers and developers may use Magento's administration screens to configure an installation, but it's the ones actually interacting with Magento on a daily basis for which designers and developers must plan. As you use this book to craft a successful Magento store, always keep the end-user in mind.
Who are your users? Basically, your users are divided into two segments: staff and customers.
Staff refers to those who will be using the Magento administration screens on a daily basis. Magento's administration screens are elegant and fairly easy to use, although you'll want to pay close attention to how you create user permissions. Some users won't need access to all the backend features. By turning off certain features, you can make the administration area much more user-friendly and less overwhelming. Of course, regarding staff managers, additional permissions can give them access to reports, marketing tools, and content management sections. In short, as you work with staff, you can fine tune their back-end experience and maximize their effectiveness.
One key staff user should be designated as the "Administrator". If you're the one who will be responsible for managing the Magento configurations on an ongoing basis, congratulations! You now have at your fingertips the power to adjust your online business in ways both significant and subtle. You also have in front of you the guidebook to give you a full appreciation of your capabilities.
For store administrators, Packt Publishing offers a companion book, Learning Magento 2 Administration. This book, authored by Bret and Cyndi Williams, is the perfect training and reference book for your staff.
There are several types of customers, and they are based on their relationship to the vendor: retail and wholesale. Among these customers, you can also have customers that are members of the site – and therefore privy to certain pricing and promotions – both on the retail and wholesale level. You can also subdivide wholesalers into many other levels of manufacturers, jobbers, distributors, and dealers, all operating through the supply chain.
Magento has the ability to handle a variety of different users and user types, including all the ones mentioned above.
The one caveat to consider when scoping users is that if you are going to use a single Magento installation to operate more than one business – which can certainly be done – you cannot create unique permissions for staff users which restrict them to managing the content, customers, and orders of any one business.
As reviewed in the Preface, there are basically three different types of people who will be involved in any Magento installation: the Administrator, the Designer, and the Developer. Which one, or ones, are you?
As a complete, installable platform, make sure you have sufficient technical resources to handle all aspects of web server configuration and administration. It is not uncommon to find one or maybe two people tackling the installation, configuration, and management of a Magento installation. The web industry is well populated with "Jacks-of-all-Trades." As you analyze your own technical abilities, you may find it necessary to hire outside help. These are the disciplines that can help you maximize your Magento success:
When hiring a developer for your Magento store, make sure you find someone with specific experience with Magento 2. The new architecture and coding standards require particular knowledge. Magento provides a list of certified Magento developers at http://www.magentocommerce.com/certification/directory. Be sure to inquire about Magento 2 qualifications.
Fortunately, many Magento-friendly hosting providers offer assistance and expertise when it comes to optimizing your Magento installation. In Chapter 8, Optimizing Magento, we explain ways you can perform many of the optimization functions yourself, but don't hesitate to have frank discussions with potential hosting providers to find out just how much and how well they can help you with your installation.
If you choose to host the installation on your own in-house servers, note that Magento does require certain "tweaks" for performance and reliability, which we cover in Chapter 8, Optimizing Magento.
You have assessed the technical knowledge and experience of yourself and others with whom you may be working, now it is important that you understand the technical requirements of installing and managing a Magento installation.
If you're new to Magento, I certainly recommend that you find a capable hosting provider with specific Magento experience. There are many hosting companies that provide hosting suitable for Magento, but far fewer who invest resources toward supporting their clients with specific Magento-related needs. Keep these points in mind as you research possible hosting candidates:
You may already be hosting PHP based websites, have a robust server setup, or manage racked servers at a hosting facility. In these instances, you might well be capable of managing all aspects of hosting a Magento installation. In this book, you will find considerable information to help you configure and manage the server aspects of your Magento installation. We do repeat the advice that if you're new to Magento, an experienced hosting provider could be your best friend.
Due to Magento's complex architecture, your servers should be powerful. The architecture, indexing, and caching schemas of Magento require considerable resources. While we will attack these issues in Chapter 8, Optimizing Magento, the more horsepower you have, the better your store will perform.
To host your own Magento installation, your server must have the following minimum requirements:
mod_rewrite module must be enabled.Magento 2 can also use Redis 3.0 or Varnish 3.5/4.x for page caching and memcached for session storage.
Most Magento Community users we know (and there are lots!) opt for a hosted solution. Even with our own experience managing web servers, we too use a third-party hosting provider. It's easier, safer, and in most cases, far less expensive than duplicating the same degree of service in-house.
However, we do enjoy installing and testing open source platforms in-house, rather than setting up another hosting account. This is especially true when working with new platforms. Setting up an in-house installation can also allow you to test modifications, extensions, and updates before installing them on your live production server.
You can set up a complete Magento environment with PHP and MySQL on your own desktop computer or a local server in your office. In Chapter 9, Advanced Techniques, we'll provide detailed instructions for several different methods that can be used to install Magento on a local machine.
Now you're probably itching to install your first Magento store. In fact, you probably have done that already and have been fumbling through the vast labyrinth of configuration menus and screens. If you're like so many first-time Magento installers, you might feel ready to uninstall and reinstall; to start all over.
Most of the time, this "restart" happens when users try to take advantage of one of Magento's most powerful features: managing multiple stores. It seems easy when you look at the store management screen until you begin setting up stores, configuring URLs, and assigning specific configurations to each frontend website.
Before you begin laying out your master plan for the various websites and stores you intend to create (and even if you're only beginning with one website), you need to master the Magento methodology for multiple stores. Magento describes this as "GWS," which stands for "Global, Website, Store." Each Magento installation automatically includes one of each part of this hierarchy, plus one more for "Store View."
The following diagram shows how each part of GWS is related to one another:
Global refers to settings (for example, stock management rules) and values (for example, product price) for the entire installation. Throughout your Magento installation, you'll find Global displayed next to various form fields.
In terms of installation planning, your Global considerations should include:
In general, we recommend that you consider a single Magento installation only for multiple websites and stores that are similar in concept. For example, if your online business is selling drop-shipped furniture through several differently branded websites, then a single Magento installation is ideal. However, if you have two or more different businesses, each with a different product focus, company name, banking, and so on, it is best to use a separate Magento installation for each discrete business.
The website is the "root" of a Magento store. From the website, multiple stores are created that can each represent different products and focus. However, it is at the website level that certain configurations are applied that control common functions among its children stores and Store Views.
As described above, one of the most important considerations at the website level is whether or not customer data can be shared among websites. The decision to share this information is a Global configuration; however, remember that you cannot elect to share customer data among some websites and not others: it's an all or nothing configuration.
What can sometimes be confusing is that "Store" for Magento is used to describe both a store structure as well as a Store View. When configuring your hierarchal structure, "Store" is used to associate different product catalogs to different stores under a single "Website," whereas "Store Views" can be created to display a "Store" in multiple languages or styles, each with their own URL or path. Each Store View can be assigned different themes, content, logos, and so on.
Yet, throughout Magento's many administration screens, you will see that "Store" is used to define the scope of a particular value or setting. In these instances, entered values will affect all Views under a Store hierarchy. We know this can be confusing; it was to us, too. However, by following the processes in this book, you'll quickly come to not only understand how a Store and Store View is referred within Magento, but also appreciate the tremendous flexibility this gives you.
How you utilize GWS in your particular case depends on the purpose of your Magento installation. With GWS, you have an enormous number of configuration possibilities to explore. That said, your configuration planning would generally fall within three major categories: multiple domains, multiple businesses, and multiple languages. Of course, in the real world, a Magento installation may include aspects of all three.
It's becoming more popular in e-commerce to create multiple storefronts selling the same or similar products, each having a different domain name, branding design, and content. In this way, merchants can extend their marketing by appealing to different market segments, not just having one website trying to satisfy all consumers.
For example, let's assume you want to sell shoes online. You have a great distribution source where you can source all kinds of shoes, from dress to casual, running to flip-flops. While you can certainly have a comprehensive, "all types available" online shoe store, you might elect to secure different domain names focused on different segments of the shoe market. www.runningshoes4you.com would cater to joggers, while www.highheelsemporium.com features designer-quality dress shoes for women.
In Magento, you would create one website but create at least two stores, one for each of your domains. You might also create a third as an overall retail store for all your shoes. Each store could either share the same product catalog or each have its own separate catalog. By having all stores assigned to the same website, you have the ability to control certain configurations that apply to all stores. For example, if all the stores belong to the same retailer, as in this example, all would offer the same payment methods, such as PayPal.com or Authorize.Net. Most likely, the shipping methods you offer would be the same as well as your policies for returns and shipping.
In short, if all the domains belong to the same retail business, it may make sense to have one website with multiple stores, rather than to create entire website-store hierarchies for each product-focused domain. As you can see in the following diagram, this makes for a slimmer, more manageable structure:
In contrast, if your installation will be used to manage multiple businesses, you will need to create multiple websites. The reason for this is that actual, separate business entities will have separate payment system accounts (for example, PayPal, credit card merchant accounts, shipping), and therefore need to be able to segregate these between different websites.
To extend our example, let's assume your shoe retailer also owns a sideline business selling women's sportswear. This other business exists under a separate legal entity (for example, corporation, partnership), and therefore has different bank accounts, distributors, and customers. With Magento, you should create separate websites for each, even if they are to share certain products.
For instance, the sportswear site might also feature women's casual shoes, which are also offered by the shoe website. The same product can be assigned to multiple product catalogs (and therefore different stores) even if the catalogs belong to separate businesses. And somehow, through a complex database architecture, Magento succeeds in keeping all this straight for you. Amazing.
Even among some of Magento's top competitors in the open source e-commerce arena, very few provide the ability to create multiple language views of a website. Multiple language views are not simple matters for several reasons:
Magento has several tools to help you create multiple languages and currencies for retailers wanting to sell globally (or just provide multiple languages to users within a single country). It all begins with creating multiple views for a given store.
In our example, our running shoe website needs to be available in both English and French, so you would create two views within the running shoe store, one for each language. In your Magento-powered website, you can easily include a small drop-down selector which allows a visitor to choose their preferred language based on the views you have created.
In fact, in most Magento theme designs, this dropdown is automatic whenever there are multiple views created for any given store.
Another interesting use of multiple views could be to segment your customer market within a store. For example, if you wanted your shoe store to have a different overall look for men versus women versus children, you could create multiple views for each customer segment, and then allow the visitor to choose their desired view.
The power of Magento can also be a curse, particularly if you're like many of us: eager to jump in and begin building an online store. However – and this comes from the experience of investing lots of hours – taking a moment to understand the scope of your undertaking will make navigating the intricacies of Magento a much more rewarding experience.
In this chapter, we outlined the key areas to consider when planning our Magento installation. We also learned about the powerful Global-Website-Store methodology for managing multiple web stores in a single installation. In addition, we looked at the possibilities of introducing multiple languages, businesses, and domains for effective market segmentation.
As we go forward in this book, we'll learn how each decision we make in installing, configuring, and managing Magento traces back to what we covered in this chapter. In the next chapter, we will be taking your plans from this chapter and applying them to a new Magento installation.
After successfully installing Magento, you can now take on the task of creating and configuring your store. You could begin by crafting the design that reflects your store's brand, or you could start configuring the many settings that will direct how your customers will interact with your online store.
However, selling online really boils down to the products you are selling. Additionally, many of Magento's configurations are dependent on the products you're offering and how they are arranged into categories.
Therefore, when we create a new Magento-powered store, we begin at the root, so to speak: the products.
In this chapter, we will tackle:
The use of the terms catalogs and categories in Magento used to be a bit confusing, as Magento tended to use these terms with some inconsistency. In Magento 2, the distinction is better defined.
In Magento, the catalog is the full collection of products within your Magento installation. Looking under Products | Catalog in the backend, you can view all your products regardless of to which Website or categories they may be assigned.
Categories in Magento 2 are just that: categories of products. Let us delve a bit deeper into this.
Categories needed for our new stores. Now, we need to learn how to create sub-categories that will allow us to assign products and display them in logical groups on our store.
For our furniture store, we want to create a new subcategory for sofas:
Sofas.Yes.This is how the additional subcategory would then appear:
You can, of course, add additional subcategories, as well as subcategories of subcategories. But, before you go to too much trouble building a huge category hierarchy, be sure to read through the section on Attributes and Attribute Sets later in this chapter.
Let's now explore the other panels and fields in the category detail screen.
Don't be afraid to experiment! While this book provides a considerable amount of detail and helpful advice, the power of Magento can only truly be appreciated the more you work with it. Test various setting combinations. You may well come up with a particular configuration that helps you better connect with your shoppers.
As you will noticed, there are only two required fields when creating a category (Name and Is Active). But others, as shown below, on this tab are important as well.
As you build out your category schema, you may decide that you don't want products displayed on all category pages. For example, a top-level "Furniture" category might display graphics for each subcategory (for example, "Sofas", "Chairs", "Tables"). However, within those subcategories, you probably do want to display the list of products available. Let us have a look at the various attributes within this tab:
Unless your theme is configured otherwise, the description and image you add in the General Information tab will still show even if you choose Products only for Display Mode.
Why use a static block if you can simply add a category description? Good question, and one we're often asked. Static blocks are very useful for displaying the same content in many places. For instance, you may want to use a static block to regularly display a new product announcement or discount. By using a static block, you can update this information in one place and have it instantly appear throughout your site wherever it is referenced.
In this tab, you can control specific display configurations for your category.
For more on themes, see Chapter 3, Designs and Themes.
When you create products in your Magento store, you can assign the product to a category. Alternatively, you can assign multiple products to a category within this tab. Use the search features to find your products.
Once you have identified the products you wish to add, select the ones you wish to add. Be sure to click Save Category in order to complete your assignments.
We mentioned it earlier, but it deserves repeating: you can re-arrange the order of your categories — and how they will appear in navigation menus — by dragging and dropping your categories in the sidebar display. The order in which they appear can be set differently for each website or store view.
Re-arranging categories is a very intensive computing operation owing to the work that Magento has to perform in order to update its data tables and re-index. If you intend to make several changes, you may want to disable caching until you complete your work, although each change may still take some time. Be patient. After each re-arrangement, make sure Magento has completed its work before making the next change. Otherwise, your data tables may become "confused."
Magento provides some inherent tools for grouping products for special display purposes. For example, by designating New From and New To dates in the Advanced Settings | Autosetting panel of a product detail screen, as shown in the following screenshot, Magento will display a product within a New Products block if today's date falls within the range of these dates.
However, in some cases, you may want to display groups of products for other reasons. It's not uncommon to show Featured products on an e-commerce website. You might even want to show products grouped by family or purpose.
Let's take the case of creating a Featured products section for our homepage. Let's also assume that you don't want Featured as a category in your navigation bar just as a "special" category.
You've now created a new category called Featured and added some products. Now we need to add a block to the homepage that will display your Featured Products.
{{widget type="Magento\CatalogWidget\Block\Product\ProductsList" title="Featured" products_count="10" template="product/widget/content/grid.phtml"}}When you view the homepage, you should see a section displaying the featured items you assigned to this special category:
Furthermore, you can access this category and its products by appending the name of your special category to your store URL. For example, to see the entire Featured product category, you can go to http://www.yourstoredomain.com/featured.html.
In Chapter 5, Managing Non-Product Content, we'll go into more detail about blocks and how to use them in creative ways, giving your online store more features and functionality.
The heart of any online store is the selection of products offered to visiting customers. Yet, as simple as that may sound, creating online stores to present the vast array of products and product types has proven to be one of the most challenging quests for platform programmers.
If all stores sold each product as an individual item without different colors, sizes, or add-ons, e-commerce would be much simpler. But that's not how the real world works. If you sell t-shirts (the classic example for this discussion), you might sell each color as a separate item, especially if you only offer a few shirts. However, it would make shopping very cumbersome to your customers if you also had each size of each color listed as a separate product.
People shop by product style, then decide upon variations such as size and color. To reflect this shopping "workflow," we need to create products in our store that are presented in the most convenient and logical manner possible.
If you shop online for a golf putter, you could well find a list of putters sold online where each style is a separate product. The individual putter products would be considered simple products.
In Magento, we think of a simple product as one for which there is a single stock keeping unit (SKU), or if the putter has a SKU of PUT1234, then we would build it in Magento as a simple product.
Simple products can have custom options, though. For instance, we could offer this putter in different shaft lengths, but with a simple product, we cannot manage inventory for each option. Therefore, if we are stocking each putter in different shafts, then we would need to create simple products for each variant.
The preceding figure illustrates a simple product. It has no other sizes or colors and is not a bundle or group of products.
Simple products in Magento become the basis for all other tangible complex product types, which we'll discuss in the next section. The important concept to learn here is that all tangible products begin with the simple product.
When two or more simple products are combined in a single product representation, we are creating a complex product type. In Magento, we also consider virtual and downloadable products as "complex" because of the additional considerations needed to manage non-tangible products.
Perhaps the most popular complex product type is the configurable product type. This type is used when you sell an item that comes in different sizes, colors, and so on. The most common example is clothing.
As shown in the preceding screenshot, this sweatshirt comes in three different colors and five different sizes. In Magento, there are actually two ways you can build out this product:
The key to which method to use boils down to how you answer the following questions:
If you answer Yes to either question, then you should use a configurable product. You cannot track inventory on Custom Options (which we'll go into in more detail later in this chapter), and for whatever Custom Options you create, customers will be able to choose all possible combinations.
Configurable products also give you tremendous content versatility as well. For example, in the sweatshirt product (included in the Magento 2 Sample Data), as the customer selects a different color, the main image changes to that of the associated simple product image.
Additionally, the stock available for each combination selected is shown to the customer. Any associated simple product that is not available will be indicated, as shown in the following screenshot: when Red is selected, the XL size is not available.
As we'll see when we create a configurable product type later, Magento 2 introduces new tools for rapidly creating the needed variants.
Sometimes it's helpful to display several different products as a related group to make it easier for customers to choose one or more products. The grouped product type associates simple or virtual product types into one complex product.
As shown in the sample Yoga Straps, the customer can choose any quantity of any of the products, which exist as simple products in your catalog. Each product chosen will appear separately in the customer's shopping cart.
A complex product similar to the grouped product is the bundle product type. It is similar in that it associates simple or virtual products that do not have Custom Options, but different in that you can create a base collection of products for the bundle and set a price for the combined items. You can also create additional options for the user to choose and allow the pricing to be determined dynamically.
If it's the latter, the product listing will show a range of pricing based on the least expensive and most expensive possible configurations. There's a lot of versatility to the bundle product type.
Although not completely supported, the bundle product can be used to create what is often called a kit. As we use this term, it refers to the assembling of various individual products into a single presented product, usually priced at a discount from the sum of the individual product prices. Let's explore a possible scenario to better understand the concept of a kit.
We have a client who sells dictation-related products. He wants to combine a digital recorder that retails for $500 with a transcription kit that retails for $400 and offer this combined "kit" for a special discounted price of $800, saving the customer $100 if purchased separately. In addition, he needs to maintain inventory counts for both items, so that if one goes out of stock, the bundle is, therefore, not in stock.
Using a bundle product, our client can build this kit — or bundle — assigning its special price, yet maintain each one separately for inventory and shipping purposes.
The big "issue" with using the bundle product type for kits is that, by default, the customer must still click to Customize the bundle before adding it to their cart. Even though you may not have any options available for the customer, this extra step is still required. Look for innovative developers to create modifications that will modify this behavior.
Just as the name implies, a virtual product type is an intangible product. Typical virtual products include subscriptions, memberships, and warranties.
Unlike tangible products, virtual products have no shipping weight and no shipping options will appear during the checkout process, unless a tangible product is also included in the customer's order.
We live in a world of digital distribution. Books, music, and software are more commonly downloaded today than sent on CDs or — anyone remember these? — floppy disks.
In Magento, you can sell and distribute digital products using the downloadable product type. When customers purchase the product, they are emailed links to files on your server or on another server. Customers can also access their downloadable products when they log into their account in your store.
With a downloadable product, you can set the maximum number of downloads you will allow a customer and whether the link is "shareable" with others.
Before diving into the creation of products, we need to explore a very important — and powerful — feature of Magento: product attributes. We have yet to find another common platform that provides the level of sophistication for product attributes as well as Magento.
Every field related to a product is called, in Magento, an attribute. The description, price, weight, and SKU are attributes. In fact, all the fields that appear by default on a product detail screen are attributes.
But the real power comes in those attributes when you can add to your product screens to capture more granular aspects of your products, such as color, size, kHz, and screen size. Obviously, not all attributes are relevant to all products. For instance, t-shirt size would not be applicable to your furniture products. Fabric would not be a useful attribute for computer monitors, and that's where Magento really shines!
If you view the More Information tab under the Sample Data product Montana Wind Jacket, for example, you will see four attributes listed.
Each of these relevant attributes helps your customers get a better understanding of your products. You can certainly include this information in your product description field, but by creating attributes your customers can use them for comparison purposes, and it makes it easier for you to make sure you have included all product specifications when creating new products in your store.
Furthermore, attributes can be used to create the layered navigation that appears in the sidebar on your category pages (if Is Anchor is set to Yes; see Chapter 3, Designs and Themes).
In your Magento 2 backend, go to Stores | Product (under the Attributes group heading).
Here, you will see a listing of all the product attributes, both default and user-added, that are available for your products.
To use attributes for creating products, you create attribute sets (also referred to as product templates in Magento 2) to group attributes into meaningful sets relevant to the various products you are offering. We'll explore attribute sets in a moment, once we learn how to create individual attributes.
Before we begin building or editing product attributes, let's learn about the different attribute types accommodated in Magento 2. Each has its own considerations and features.
Attributes are considered name-value pairs, meaning that for each attribute there is a name, such as "Size," and one or more values, such as "Small, Medium, Large." The values you need for each attribute — and how you wish to use the attribute — is what helps you determine the type of attribute to create.
Before you begin creating attributes, it's important to understand the implication of using one attribute type over another. Each type has its own particular abilities.
The one ability that is usually the most important is whether or not the attribute can be used in layered navigation (as described earlier). For an attribute to be used as a layered attribute, it has to have fixed values. Magento indexes attributes and it makes sense that it cannot provide layered navigation on free-form fields. Therefore, if you wish to use an attribute in layered navigation, it must be a multiple select, dropdown, price, visual swatch, or text swatch attribute type. Eligible attribute types can also be designated for use in the layered navigation of search results.
Another ability commonly considered for attributes is whether the attribute will be used when customers compare products. In the comparison display, only those attributes chosen for comparison will be shown side-by-side. All attribute types, except for media image and fixed product tax, are eligible for use in comparisons.
We're going to create a new attribute to use for our furniture products called "fabric," which will help us learn how to add new attributes. We want to use this value in layered navigation and for comparison purposes.
To begin, click Add New Attribute at the top of the attribute list.
On the first panel, you'll find the following fields:
This section will only appear if you select Multiple Select or Dropdown as your attribute type (Catalog Input Type for Store Owner). For these attribute types, you have to provide the possible value choices. Let's take t-shirt size as an example. If you use a Dropdown type, you can enter all possible size choices — make sure they're presented and spelled as you would like them to appear.
To create an option, click on Add Option. Enter the value you want for the option in the Admin column. If you want different displayed values for your multiple stores, enter those into the other fields. Any store views without a value will use the admin column value.
Once you have more than one value, you can choose which will be the default value when creating a new product by clicking the Is Default radio button. You can also re-arrange the order of the values by clicking and dragging the handle on the left end of an option row.
If you choose a Visual or Text Swatch attribute type, this section will be available. Adding swatch options works very similarly to the Options described before, except that you are working with swatches instead of option values.
Visual swatches are configured by selecting either a color value or uploading an image of the swatch. Using the down-arrow menu, select Choose a Color to reveal a color selector pop-up. You can move your mouse across the color spectrums, enter RGB or HSB numerical values, or enter a hexadecimal value to choose your color. Once you make your selection, click the small, round rainbow-colored button in the lower right-hand color of the selector.
If you choose Upload a File for your swatch, you can select a swatch image on your computer to upload.
Text swatches will display the values you enter as a "button." The swatches will show all available values and if any are out of stock or not available, it will appear as crossed out.
Expand this panel to reveal the following field choices:
By default, your attribute will be named by the value you enter in the Default label field. However, if you want to display the name of your attribute on your store frontend, you may want to supply alternatives for each of your store views. For instance, if you create an attribute called "screen size," you will probably want to translate it for stores you build in other languages.
This is the section that allows you to affect how your attribute can be used by your customers.
In order to have attributes available for use when creating a product, it should belong in an attribute set. Attribute sets also allow you to make available similar attributes across similar products.
To view existing attribute sets, go to Stores | Attribute Sets.
Each existing attribute set (the default will appear if you have not created any sets) contains attributes assigned to that set. Let's create a new attribute set for our furniture products.
For this exercise, we have already created one new attribute: fabric.
We often create a group within an attribute set to contain special, related attributes. For instance, we could create a group called "Furniture Specifications" and drag "fabric" and any other new, related attributes into this new group, as seen in the following screenshot. This can help focus attention on these special attributes when creating or editing products. The order and groups of attributes have no effect on the front end presentation nor will they change any programmatic aspects of Magento 2.
Now that we have created a new "Furniture" attribute set, we can add additional attributes as needed to help describe our furniture offerings. We can also use this attribute set when adding new furniture products so we have just the attributes related to our needs.
A new and powerful feature of Magento 2 is the ability to add existing attributes within the Product Edit screen. This means that as you create products, you can add attributes you need without having to leave your current work. These attributes will also be added to the attribute set you have applied to your current product, which means the attribute will also be added to all products using the same attribute set.
Now that we've discussed the various Magento product types, let's go over the process of creating a new product in the Magento 2 backend. While there are some differences based on product type, the overall process and options are very similar.
After you go to Products | Catalog in the backend, you will see a list of the products in your catalog. In the upper right-hand corner is an orange button, titled Add Product. If you click on Add Product, you can create a simple, configurable, virtual, or downloadable product. For all types — including the bundled and grouped product types — you can also click the button menu (the down arrow on the right side of the button) and choose a specific product type.
The configurable, virtual, and downloadable product types can be created simply by changing settings within the simple product detail panel. For example, you can start with a simple product, add configurations, and the product type will automatically change to a configurable product type.
As we go through the product creation process, you'll learn that Magento has really upped their game in Magento 2, making it much easier for you to manage your products. For instance, you can start out adding all the various t-shirt styles you sell as simple products, and then go back and create the various size and color variants within those products. In Magento 1.x, you could not change the type of an existing product without first deleting the product, then re-adding it.
So, let's begin by building a simple product and then exploring how to create the other complex product types. For our example, we'll start with a red couch.
To begin, click on Add Product button on the Products | Catalog screen.
We're going to fill in the fields in the Product Details section as follows:
Save your product now before proceeding.
Next, we want to click the small down arrow to the right of Default at the top of the screen and type Furniture to select the Furniture Attribute Set we created earlier.
After the screen refreshes, you'll see an additional attribute group you created in the left sidebar, and any attributes you added to the attribute set will be available to you.
In the Furniture Specifications panel, we will enter the following values:
Under the Websites panel, we need to select Furniture Website so that the new product will appear in the stores within the furniture website.
We're going to leave all the other settings as they are for now and click on Save.
When we view the product on the website and click on the More Information tab, we can see the values of the attributes we have selected.
Let's say we have our couch available in three colors: red, blue, and green. How would we present all three choices as a single product yet allow the customer to select their desired color?
The simplest way would be to add colors as an option in our simple product. However, if we manage inventory separately for each color (let's say we have 100 red, 50 blue, and 30 green sofas in the warehouse), we have to, in essence, create three simple products and associate them to a single configurable product.
To do that, we have two options: auto-create the associated products from the configurable product or create the three individual simple products then associate them to a new, configurable product.
First, let's try method one using the couch simple product we just created:
First, you are allowed to choose whether to use the same images for all variants, or assign unique images to each. As with any of these choices, you can also opt to skip this for later.
Alternatively, within the Price box, you can assign the same or unique prices to all variations.
Finally, if you wish, you can assign inventory quantities for the associated products.
Having completed creating the configurable product, the product on the frontend now displays the color swatches for each variant (and removes the Color field from the More Information tab contents). As you click on each swatch, the main image will also change to reflect the image you uploaded for the particular variant.
In the backend, under Products | Catalog, you'll find four products now: the Configurable Product and the three new associated Simple Products.
Alternatively, if you already have the Simple Products added to your store, you can create the configurable product and add the associated products manually instead of creating them automatically, as we just did.
If you have a collection of related products, such as yoga straps (included in the Magento 2 Sample Data set), you can present them as a group. Customers can then select which individual items they want by entering a quantity for each associated product.
To create a grouped product, choose Grouped Product in the Add Product dropdown menu, as shown in the following screenshot:
At the bottom of the Product Details screen, under Grouped Products, you add products to the group and any default quantity you wish to set (customers can always override any default).
Grouped products are not really products at all but simply a virtual grouping of products you wish to present together.
Bundled products are similar to grouped products but with some differences. The biggest difference is that you are creating a bundle of products presented to the customer as one "set" or "bundle." Furthermore, you can configure the product so that the customer can select options of each product, if they wish.
Let's look at the Sprite Yoga Companion Kit product provided in the Magento 2 Sample Data. This is a bundle of yoga equipment that has been configured to include four required products: a Stasis Ball, a Foam Yoga Brick, a Yoga Strap, and a Foam Roller. Customers can select larger balls and longer straps. The price of the bundle is automatically calculated based on their selections.
When the customer clicks on Customize and Add to Cart, the choices available for the bundle are revealed.
First are the choices for the Stasis Ball:
As customers select alternative sizes, the total cost of the bundle will adjust accordingly.
Bundled products are created in two steps: creating the options for each bundle component, then attaching simple products to those options.
Let's build the Sprite Stasis Ball bundle option, as shown, in the Product Detail screen to illustrate this two-step process.
Once you have created your options and attached the associated products, you can save your product.
In today's digital world, many online retailers offer files that can be purchased and downloaded, such as books, music, and software. Creating a downloadable product is achieved by attaching the files to the product. Once purchased, the customer will receive a link they can click to download their purchase to their computer.
Note that many downloadable products cannot be redeemed on mobile devices. Music, for example, may not always be able to be downloaded and played on a mobile device by clicking the redemption link. Please experiment and test your offerings so you know how to communicate any restrictions to your customers.
A downloadable product is created by making two initial selections:
In the Downloadable Information panel, there are two sections: Links and Samples. The Links section allows you to attach files that will be provided to customers once they purchase your products. The Samples section will provide linked files for shoppers to download as examples of what they will get when they buy the product. You can also use this section to attach files to promote the product.
When creating a downloadable product, you have controls over how easily it is for the customer to share their download link and how many times they can download their purchase. While these are not foolproof, they can help restrict the distribution of your digital products.
A virtual product is just as it sounds: a product that doesn't actually exist, but can be purchased by the customer. Basically, a virtual product is one that has no weight and therefore cannot be shipped.
What kinds of product fall into this type? We've used the virtual product type for extended warranties, training courses, and hosting packages.
If you sell actual products, you no doubt have inventory stock. Except in cases where you are having products drop-shipped from a distributor and have no means of monitoring inventory availability, you need to make sure you have enough inventory on hand to fulfill your orders. Furthermore, you may want to restrict customers' ability to order products that are out-of-stock — or, alternatively, allow customers to place backorders.
Magento has a host of configurations to help you establish your inventory rules and policies. Most can be overridden at the product level, too, giving you even more granular control over your product inventory needs.
Here, let's discuss some additional tools in Magento that can help you manage your inventory.
One of the inventory configurations, is that of Notify for Quantity Below. This value sets the threshold whereby Magento will send you an email notification if a product's inventory falls below this quantity. This notification will only come once each day for a given product. Using this feature can help you avoid running out of stock.
Under the Reports menu in your Magento backend are several reports under the Products section. Use these reports regularly to help you monitor your inventory movements and plan your stock purchases. Let's have a look at these reports in brief:
Many times we're faced with needing to manage special pricing for different customer groups or based on quantities purchased. Flexibility in pricing can help you meet the needs of your market and Magento gives you the tools necessary to accommodate those considerations.
In Chapter 3, Designs and Themes, we learned how to create customer groups. You may, for instance, wish to offer discounted pricing for your wholesale customers — those who buy from you for resell to their customers. At the same time, you want to sell products at regular retail prices for your regular customers.
By creating a customer group — say "Wholesale" — and assigning select customers to that group, you can set up specific pricing for a product that will appear to customers who are logged into your store and are assigned to the particular customer group.
Let's use our green couch we created earlier as an example of how to configure pricing for a customer group. If we go to the Product Detail screen for this product and click on Advanced Pricing under the Advanced Settings menu in the left sidebar menu, we see a section called Tier Price (we will also refer to this section later when we discuss quantity-based pricing).
To add pricing for a customer group, click on Add Price. If we wish to set the price for this couch — normally selling for $599.99 — at $350.00 for our wholesale customer, we might configure this new entry as shown in the following screenshot:
With this configuration, any logged in customer who belongs to the wholesale customer group will see this couch priced at $350.00 on your store.
It's probably quite obvious now how you can create quantity-based — or tiered—pricing for your products using the same configuration tool. By adding additional pricing tiers and setting a new quantity value, you can create pricing that changes based on the number of items a customer purchases.
As an example, let's configure the pricing to show a price of $550.00 if a customer buys two-five couches and a price of $500.00 if they buy six or more. We will apply this to all customer groups.
If we commit this pricing scheme, then when viewing the green couch in the store, we would see this pricing notice:
This notice may help stimulate higher purchased quantities by showing customers how much they can save buying more!
Before we leave our discussion of product creation and management, we need to discuss a special panel in the Product Detail screen: Autosettings. This panel is found in the Advanced Settings submenu.
Let's go over the particular settings found on this panel. You'll find these can be valuable to your product presentation efforts.
For each product you create in Magento, you have the opportunity to attract additional purchases from customers by linking products together. These crosslinks allow you to encourage shoppers to consider buying more products than the one they're reviewing. In the bricks-and-mortar world we're constantly bombarded with similar promotions. For instance, if you go into the grocery store, you'll often find small, red coupon machines hanging off the shelves, encouraging you by their flashing red light to pull a coupon out while you're reaching for the canned peaches you came for. Throughout the store, placards and banners promote "2-for-1" specials or "buy 1, get 1 free." The area around the checkout lane is crowded with magazines, razor blades, batteries and gum, put there to catch your eye just as you're about to leave the store.
In a similar fashion, Magento allows you, the store administrator, to encourage shoppers to spend more during their online visit using related products, up-sells, and cross-sells. All three types are managed within the Product Detail screen.
Each of the following product selling features are configured in the Product Detail screen under the Advanced Settings section. Each one has particular features and purposes.
Related products are those which you wish to present to customers as additional purchases to include when adding a viewed product to their shopping cart. In other words, if a customer is interested in product A, they may also want to purchase product B and product C at the same time.
As you can see, a customer may select one or more related items to include with the product they are currently viewing.
By contrast, upsell products are those to be considered as alternatives to the product the customer is viewing. That is, if the customer is interested in product A, they might instead consider product B. Not as an additional purchase, but instead of purchasing product A.
Cross-sell products are presented to your customer on the shopping cart page. For instance, if you want to encourage the purchase of an extended warranty, you could add it as a cross-sell product and it would be presented on the shopping cart. Your customer can add it to their order directly from the shopping cart.
Creating products one-by-one is fine if you're only selling a few products, but many people choose Magento as a platform to sell hundreds and thousands of different products. Entering each product individually can take a long time, especially if you're writing unique product descriptions, uploading photos, and adding crosslinked products.
With Version 2.0.1, Magento has greatly improved the performance of product imports. In previous versions, importing thousands of products could take hours – literally. We once tried to import 19,000 products and the job took 20 hours to complete! The improvements to Magento importing have greatly decreased that time.
After spending hundreds of hours wrestling with the importing schemas of Magento over several versions of the platform, I'm happy to say that, starting with Version 2.0.1, there is one shortcut to helping you import products successfully.
Magento imports CSV files according to a specific layout scheme. Trying to configure an import file to accurately import a variety of different products, product types, attribute sets, and so on, will lead to many, many failed attempts as you try different ways of configuring the CSV to meet your needs. Therefore, my best advice is:
Now you can easily see how each type of product is configured in the export file. Using this format, you can easily add additional products, simply by following a similar pattern.
In the Magento 2.0.1 import interface, there is an option to download a sample file. This is a great step in the right direction and can be very helpful as a reference. Because this file only covers default products, though, we would suggest entering the type of product(s) you intend to sell into your store as described above to generate a more specific reference template.
Notice that for products with various options, particularly configurable products, only the differences between each iteration are included on the rows below the main product row. Never repeat any other fields that are the same between variations. A unique SKU is required of each product, though. For configurable products, you'll need to include a pipe delimited list of the configurable SKUS and the attribute they vary by (in the example below, this is the Color attribute).
You don't need to worry about this for simple products, but if you do have a batch of configurable products it will really help to have a sample configurable product export file as a starting point.
To import images, you must upload the images to your server in the /var/import folder. If the /var/import folder doesn't exist, you can create it (or another of your directory) and specify it as part of the import process.
Put the name of the image file in the image columns of your import CSV file (don't include any path). Magento will pick the image out of the /var/import folder, resize it as needed, and store it within the images/catalog folder hierarchy. Never use capitals, spaces, or other strange characters in your image names; only the letters a through z, the numbers 0 through 9, and the underscore.
The most important thing to remember is to remove any unused columns before importing. For example, if you are not going to include categories in your import, leave that column out. This is especially important if you are re-importing or importing product updates. If you leave a column blank, then Magento will enter a blank value for that column in your product record. Oops!
Selling online begins with your products. Your products have to be presented well and in logical categories. Furthermore, Magento gives you additional, powerful tools for promoting your products to potential customers.
In this chapter, we learned how catalogs and categories relate to each other, and to your stores, and the different types of products that can be sold in a Magento store. We also went in-depth into how to create and manage attributes and attribute sets and discussed inventory management configurations. Finally, we learned a shortcut for configuring product imports.
Getting a handle on how the complexity of categories and products in Magento work is actually one of its greatest strengths and puts you in a better position to leverage the remaining topics in this book towards encouraging more sales from your visiting customers. Next, we turn our attention to grabbing attention: how to theme your Magento store.
Selling online, as with brick-and-mortar retailing, is more than simply having products to offer to customers. Buyers make purchases based on many things apart from the item itself. Customers want to understand the purpose of the retailer and have confidence that the seller is legitimate, safe, and honest. Corporations have spent billions over the years creating this understanding among their active and potential customers, through logos, design, copy, and service. Creating this understanding is called branding.
For an online store, branding is very important. However, unlike the offline shopper who drives to a store, parks, and enters the store to spend several minutes shopping; an online shopper may click to your online store, spend a few seconds to determine if they wish to remain, and leave to visit another website. Therefore, your store's brand—it's graphics, copy and function—must address the following in a matter of seconds:
Magento gives you, or your client, the functional tools and systems to provide a powerfully rich shopping experience for your customers. It cannot, however, provide the branding aspects relating to design. You have to craft the outward appearance that will communicate to the potential buyer feelings of convenience, product selection, and security.
In this chapter, we will teach you:
In Chapter 2, Managing Products, we discussed the Global-Website-Store, or GWS, methodology. As we have learned, Magento allows you to customize many store aspects at some, or all, of the GWS levels.
The same holds true for themes. You can specify the look and feel of your stores at the Global, Website, or Store View levels (themes can be applied for individual Store Views relating to a store) by assigning a specific theme.
In Magento, a group of related themes is referred to as a design package. Design packages contain files that control various functional elements common among the themes within the package. By default, Magento Community installs one design package with two themes.
Themes within a design package contain the various elements that determine the look and feel of the site: layout files, templates, CSS, images, and JavaScript. Each design package must have at least one theme, but can contain other theme variants. You can include any number of theme variants within a design package and use them, for example, for seasonal purposes (such as holidays or back-to-school).
The following graphic shows the relationship between design packages and themes:
A design package and theme can be specified at the Global, Website, or Store levels.
Most Magento users will use the same design package for a website and all descendant stores. Usually, related stores within a website business share very similar functional elements, as well as similar style features. This is not mandatory; you're free to specify a completely different design package and theme for each store view within your website hierarchy.
A design package and theme can also be specified based on a per browser basis at the global and website level, by providing a User-Agent Exception. In the following example, the string for the Firefox browser is provided:
To be certain about the string used in the User-Agent Header, you can check http://whatsmyua.com/ from the browser in question. This site will provide a very specific string you can use for the Search String field.
Magento 2 is a departure from Magento 1.x in that the skin directory used in Magento 1.x is absent, and the structure has been simplified. All files have been consolidated into one location, stored under the /app directory. Additionally, the layout and template directories from Magento 1.x have moved. Now, every module has its own layout and template directories in which you can access all template, layout, JS, and CSS/Less files.
Let's take a closer look at the new structure of a theme for Magento 2.0. The theme directory will typically include the files and directories visible in the following image:
The theme directory
You may notice that in some default Magento 2.x builds, some themes are found in the vendor/ directory. This indicates that a theme has been added via a composer dependency. We'll cover packaging your theme via composer later in the chapter. While Magento does check the vendor/ directory for themes, you should never add a theme directly to this directory. When creating a new theme, always start in the app/design/frontend/ directory.
In the new theme structure for Magento 2, all of the files related to design are in the preceding layout, under the VendorTheme directory. To clarify this new layout, we've provided a brief description of the role of each of the files and directories here:
/composer.json: This file is not a required file, but you'll use it to describe the dependencies your theme has and metadata for your theme. This file is essentially for use if you intend your theme to be a composer package./etc/view.xml: This file is required for a theme, but only if it doesn't already exist in a parent theme. We'll review parent themes later in this chapter as well. It includes information about product images and thumbnails./i18n: This directory includes CSV translation files./media: The /media directory contains a theme thumbnail, typically a screenshot of the theme that serves as a preview of the theme when it's being installed in the admin. This directory is required./registration.php: This file is required; it registers your theme within the system./theme.xml: Also mandatory, the theme.xml file declares the theme as a system component. It contains information about the theme like the theme name, the parent theme name, and so on./Vendor_Module: This directory is the parent for module specific styles, and the naming convention is important. Magento will use it to determine which module it needs to apply the styles, layouts and templates to. If the module being overridden was the Catalog module, the directory would be Magento_Catalog. It is only required for modules that are being overridden./Vendor_Module/layout: This directory contains files that extend or establish module layouts. Layout files are XML that determines the position of blocks and containers on any given Magento page. We'll go into additional detail around layout files and the elements in them in the customizing themes section of this chapter./Vendor_Module/layout/override/base: Files in this directory specifically override the default layouts for the module in question./Vendor_Module/layout/override/parent_theme: Layout files in this directory specifically override the parent theme layouts for the module specified./Vendor_Module/templates: This directory contains template files that override either default or parent templates in place for this module. If there are custom templates for this module, they're stored in this directory as well. We'll review template files in greater detail in the customizing themes section./web: This directory contains static files that can be loaded directly from the frontend. For example, if you wanted to reference a specific image, you could include it here, and you would be able to refer to it in a template file./web/css/source: This is the location where Less CSS configuration files for the theme are stored. Less is a CSS pre-processor that allows for variables and functions, making CSS for the theme more maintainable and extensible./web/css/source/lib: This directory contains files that extend or establish module layouts. Layout files are XML that determine the position of blocks and containers on any given Magento page. We'll go into additional detail around layout files and the elements in them in the using themes to create your own look and feel section of this chapter./web/fonts: This contains fonts specific to this theme. Everything in the web directory is static, so this folder is simply here for organizational purposes./web/images: This directory stores images specific to this theme./web/js: This location contains JavaScript specific to this theme. We'll talk more about how to insert JavaScript into a template in the using themes to create your own look and feel section.A very important aspect of Magento theming is the fallback model. Theme inheritance in Magento 2.x has been completely redesigned. The primary upshot of this is that unlimited fallbacks are supported and the default directory is no longer a part of the fallback mechanism.
The fallback order is slightly different for static assets (JavaScript, Less CSS, CSS) and templates, so we'll review both of these cases in detail. Before we explain the fallback order though, we'll need to begin with how parent themes are established in theme.xml.
This is new and central to the new theme fallback model. In any given theme, you have the option of identifying the parent theme. This is done in the theme.xml file, in the root directory of the theme. The following is an example of what text from a sample theme.xml file might look like:
<theme xmlns:xsi="http://www.w3.org/2001/XMLSchema-instance" xsi:noNamespaceSchemaLocation="urn:magento:framework:Config/etc/theme.xsd">
     <title>Vendor Theme</title>
     <parent>Magento/luma</parent>
     <media>
         <preview_image>media/vendorpreview.jpg</preview_image>
     </media>
</theme>
As you can see, the parent theme is specified explicitly, and in this case it's the Magento Luma theme. That means that any files not found in the "Vendor Theme" theme will be pulled from the Luma theme. Any files not found there will, by default, be pulled from the Magento "Blank" theme, and if they're not found there, they'll be pulled from the module theme files.
Static assets are content such as JavaScript files, CSS, images, fonts, and Less CSS files. Even though Less CSS files are not, technically speaking, static files, they produce the final CSS, so are categorized as such:
web directory, <theme_directory>/web/imagename.jpg.lib/web/.<module_dir>/view/frontend/web/.<module_dir>/view/base/web/.The fallback mechanism for theme files is simpler, because the module context is always known for them.
<theme_dir>/<Namespace>_<Module>/templates.<parent_theme_dir>/<Namespace>_<Module>/templates.<module_dir>/view/frontend/templates.Here's a pictorial representation of the new fallback model in Magento 2.0. It's a little bit tricky, so we'll walk through each scenario represented here:
theme.xml, and there are no module_override files and there are no static override files. In this case, requests to the theme will fall back to the module theme files.magento_blank, and subsequently the module theme files.theme.xml, and have CSS overrides. In these cases, requests to the CSS will fall back to Vendor_Theme_2, and then Magento_Blank:The fallback model is a tremendous shortcut for developers. When a new theme is created, it only has to contain those elements that are different from what is provided by the Parent or Module package files. For example, if all parts of a desired site design are similar to the Parent theme, except for the graphic appearance of the site, a new theme can be created simply by adding new CSS and image files to a new theme. Any new CSS files will need to be included in the local.xml file for your theme (we discuss the local.xml file later in this chapter). If the design requires different layout structures, only the changed layout and template files need to be created; everything that remains the same need not be duplicated.
If you're careful not to alter the magento_blank theme and default module theme files, then future upgrades to the core functionality of Magento will not break your installation. You will have access to the new improvements based on your custom design package or theme, making your installation virtually upgrade proof.
In a new, clean Magento Community installation, you are provided with the following design packages and themes:
Depending on your needs, you could add additional custom design packages, or custom themes within the Magento design package:
We like to make sure that whatever we customize can be "undone" if necessary. It's difficult for us to make changes to the core, installed files; we prefer to work on duplicate copies, preserving the originals in case we need to revert back. After re-installing Magento for the umpteenth time because we had altered too many core files, we learned this the hard way!
Your new theme hierarchy might now look like this:
If you decide to use one of the installed default themes as the basis for designing a new, custom theme, duplicate and rename the theme to preserve the original as your fallback.
The Blank Theme
A default installed theme is called Blank. If the customization to your Magento stores is primarily one of colors and graphics, this is not a bad theme to use as a starting point. As the name implies, it's a pretty stark layout, as shown in the following screenshot. However, it does give you all the basic structures and components.
Stark layout
In most cases, beginner level Magento users will explore the many available Magento themes created by third-party designers. While there are many free themes available, most are sold by dedicated designers.
Shopping for themes
One of the great good/bad aspects of Magento is third-party themes. The architecture of the Magento theme model gives knowledgeable theme designers tremendous abilities to construct themes that are virtually upgrade proof, while possessing powerful enhancements. Unfortunately, not all designers have either upgraded older themes properly or create new themes fully honoring the new 2.0 fallback model. If the older fallback model is still used for current Magento versions, upgrades to the base package could adversely affect your theme.
Therefore, as you review third-party themes, take time to investigate how the designer constructs their themes. Most provide some type of site demo. As you learn more about using themes, you'll find it easier to analyze third-party themes.
Most themes require that you install the necessary files manually, by FTP or SFTP, to your server. Every third-party theme I've ever used has included some instructions on how to install the files to your server. However, allow us to offer the following helpful guidelines:
We learned how to create Store Views in different languages. There's another very powerful tool available to store owners as well, whereby it's possible to provide translations manually. To enable the mode for editing/translating text, log into the administrative interface and visit Store | Configuration | Advanced | Developer. You'll see the option to translate inline, for the storefront and for the backend:
Enable this, and you'll be prompted to clear the cache, with a link to System | Cache Management to do so. Once the cache has been cleared, visit the front page of the site. You'll see red boxes around certain portions of the page. When you hover over these boxes, a dictionary will appear. When you click on this dictionary icon, you can provide inline translation that will be stored in Magento's translation database:
Let's assume we have created a new design package called sportswear_package. Within this design package, create a new theme and call it sportswear_theme. Our new design package file hierarchy, in /app/design/, might resemble the following hierarchy:
app/
  design/
    frontend/
      Magento/
        blank/
        luma/
      sportswear_package/
        sportswear_theme/
Because we want to use the blank theme as a starting point, the theme.xml in the root directory of our theme will look something like this:
<theme xmlns:xsi="http://www.w3.org/2001/XMLSchema-instance" xsi:noNamespaceSchemaLocation="../../../../../lib/internal/Magento/Framework/Config/etc/theme.xsd">
    <title>Sportswear Theme</title>
    <parent>Magento/blank</parent>
    <media>
        <preview_image>media/preview.jpg</preview_image>
    </media>
</theme>
However, let's also take one more customization step here. We can create variations of a theme that are simply controlled by CSS and images by creating more than one skin. For "Sportswear", we might want to have our English language store in a blue color scheme, but our French language store in a green color scheme. We could take the sportswear_theme/ directory and duplicate it, renaming both for the new colors:
app/
  design/
    frontend/
      Magento/
        blank/
        luma/
      sportswear_package/
        sportswear_theme/
        sportswear_blue_theme/
        sportswear_green_theme/
Before we continue, let's go over something that is especially relevant to what we have just created.
For our sportswear theme, we created two skin variants: blue and green. However, what if the difference between the two is only one or two files? If we make changes to other files that would affect both color schemes, but which are otherwise the same for both, this would create more work to keep both color variations in sync, right?
Remember, with the Magento fallback method, if your site calls on a file, it first looks into the assigned theme, then the parent theme, the blank theme, and finally, the module-specific theme files. Therefore, in this example, you could use the sportswear_theme as a common parent to contain all files common to both blue and green. You would only need to include files or CSS impacting the color of these themes.
As mentioned earlier, you can assign design packages and themes at any level of the GWS hierarchy. As with any configuration, the choice depends on the level you wish to assign control. Global configurations affect the entire Magento installation. Website level choices set the default for all subordinate Store Views, which can also have their own theme specifics, if desired.
Let's walk through the process of assigning a custom design package and themes. For the sake of this exercise, let's continue with our sportswear theme, as described earlier. We created a sportswear website and store, with two Store Views for English and French:
We're going to now assign our sportswear theme to the sportswear Website and Store View. Our first task is to assign the design package and theme to the Website as the default for all subordinate Store View:
The reason you enter default in the fields as shown above is to provide the fallback protection we described earlier. Magento needs to know where to look for any files that may be missing from your theme files.
Besides the obvious use of different themes within a package for different looks among Store Views, theme variants can be used to provide alternative frontend layouts based on date, such as holiday shopping season, or device, such as smartphone or tablet.
It would be painful if changes that affect your public site content had to be manually turned on at the exact date and time you wished. For products, you can schedule price changes to automatically take effect between any two dates and times (you could have a one-hour sale price!) simply by adding the date/time configuration in the product detail screen.
Likewise, you can schedule changes in your stores' themes to take effect while you sleep! To schedule a theme variant based on a date:
I've never met a person yet that installed a theme and was ready to launch their Magento store without wanting or even needing changes made to the store design. It's natural, as a store needs to have its own personality and its own brand. In this section, we hope to uncover many of the mysteries of how Magento controls a store's look and feel through layered components that, once you understand how they work together, will give you a tremendous ability to make your Magento store a unique, productive online retail destination.
Finding CSS
While you can view the source code of a webpage in any browser, there are better ways of identifying not only the HTML elements of a page, but the exact CSS style(s) that are controlling how that component appears.
For Firefox browsers, you can install the Firebug plugin (http://getfirebug.com). For Safari and Chrome users, this functionality is included with the browser. Another great tool for Firefox users is the Web developer add-on (https://addons.mozilla.org/pt-br/firefox/addon/web-developer/). These tools allow you to select an element on the page and view in another window, what the styling rules are that apply to the element. Once you know that, you can easily find the CSS style statement in the theme's CSS stylesheets and make any changes you wish.
Page layouts in Magento are managed by XML files that control how the various components on a page are to be assembled. Think of layout files as the blueprints of your site, in that they contain the instructions that direct how various content blocks and template files are combined to produce the structural blocks that define the final output.
Blocks are elements in Magento that are responsible for rendering a discreet piece of content to the page. For example, a product display, category list, user login area, all would likely have their own blocks. These blocks in turn reference template files to generate the HTML for any given area.
Let's take a visual look at how structural blocks and content blocks are combined on a typical page, by analyzing a category page captured from our sample data default installation:
Now, let's look at this page with the structural blocks and content blocks shown inline:
To enable a view like this, that shows which blocks are being rendered on a page, you can visit Stores | Configuration | Advanced | Developer and enable template hints in the debug section:
Enabling template path hints in Debug section
Another less cluttered way to view which blocks and templates are included in any given page is to install the commerce bug extension for Magento 2.0. The extension was written by the exceptional Alan Storm, and can be found here: http://store.pulsestorm.net/products/commerce-bug-3/. As you can see in the following screenshot, the tabular section at the bottom of the page provides a much cleaner account of the blocks and templates being used on a page. If you plan to do any significant work with Magento 2 theming, this extension is well worth its cost.
Magento newcomers, particularly designers, feel a bit lost among the many layout and template files that comprise a Magento theme. However, with a bit of study (this book!) and adherence to a few best practices, anyone can become a Magento design aficionado.
First, keep in mind the concept of the Magento fallback method we previously covered. Layouts are dictated by the most forward layer. This means that if the chosen theme lacks a needed layout or template file, Magento will look into the default directory for the design package, then into the blank theme where, unless you've been naughty and changed anything, Magento will at last find any missing components.
As a designer, this means that you can change layout structures and blocks by creating or editing files within your theme directory, and focus on overriding any base theme behaviors. In short, a theme only has to have only those components that are different from the base design package.
I want to emphasize the enormity of this concept. When I wear my designer's hat, I don't have to replicate all the many layout and template files when creating a theme; I only have to include those most likely few files that will define the delta or difference between the base package and my new theme.
This more robust fallback method (when compared to previous Magento versions) has not been completely absorbed by third-party theme producers. You may find some themes that have many files that really define no difference from the base package. This practice does not conform to Magento's best practices, as it can cause core Magento updates to not be properly reflected in the theme files. In general, we look for themes structures—whether third-party or home-grown—to add only those files necessary to provide the differences between the default layouts and the customized design.
When looking for a file to edit for your intended change, first look into your theme directory. If the file is not there, look to the parent or blank theme directories. If you find the file there, copy it into the same relative position within your theme directory.
Layout files control the various Magento modules, such as Sales, Customers, and Catalog, by using a layout XML file defining their structural blocks, content blocks, and functional components. Page layouts can be located in one of two spots:
<module_dir>/view/frontend/page_layout directory:<theme_dir>/<Namespace>_<Module>/page_layout directory:Now, here's where it may get just a bit complex: each layout file contains Layout Handles, groups of block definitions that generally correspond with a type of page produced by Magento. Handles fall into three categories:
catalog_product_view.catalog_product_view_type_simple_id_128.To get a better understanding of handles, let's review an example handle. This is a handle from /layout/catalog_category_view_type_default.xml.
<page xmlns:xsi="http://www.w3.org/2001/XMLSchema-instance" xsi:noNamespaceSchemaLocation="urn:magento:framework:View/Layout/etc/page_configuration.xsd">
    <body>
        <referenceContainer name="sidebar.main">
            <block class="Magento\Catalog\Block\Navigation" name="catalog.leftnav" before="-" template="navigation/left.phtml"/>
        </referenceContainer>
    </body>
</page>
From this code snippet, we can find out quite a bit about what it does to affect your layout:
<referenceContainer> tells us in what container the enclosed content is to be defined. For example, <referenceContainer name="footer_links"> suggests that the output generated by the enclosed code will be placed within a block defined elsewhere as footer_links. We can use these references to modify where various elements may appear on a page, as we will explore a little later in this chapter.
As you look within each <referenceContainer> or <referenceBlock> tag, you'll typically find a <block> tag and corresponding <argument> tags. Here's the block reference from the preceding handle:
<block class="Magento\Catalog\Block\Navigation" name="catalog.leftnav" before="-" template="navigation/left.phtml"/>
While it may appear to be a bit "inside-out", it is the <block> tag we are most interested in. The <block> defines the content. The <referenceBlock> tag merely designates where the content block is to be placed. We can change the <referenceBlock> tag without affecting the output of the content block.
The <block> tag also specifies a template file, in this case left.phtml that contains the HTML and PHP code defining the visual output for this block (not all blocks have related .phtml files, though).
The attributes for the <block> tag include:
type: Defines the functional purpose of the block. Do not modify this.name: Used by other blocks as a reference to which the block is to be assigned.before and after: this attribute can be used to position the block before or after other referenced blocks that will be placed within the same referenced block. before="-" and after="-" position the block at the very top or very bottom of the referenced block.template: calls the template file that supplies the output functionality of the block.action: a subordinate tag that controls functionality, such as setting values, loading or unloading JavaScript, and more.as: the name which is used by templates to call the block. For example, getChildHtml('left.permanent.callout') would include the block within the template file.In our previous example, the graphic callout defined by the catalog.leftnav block was designed to be placed within the left structural block, not by the name of the block, but rather by the <referenceBlock name="left"> tag. The block could be named just about anything; it's the reference tag that dictates into which structural block on the page the block will be rendered.
If we wanted this block to be positioned within the right structural block, we simply change the reference tag to <referenceBlock name="right">. By using reference tags, we can position our content blocks into the general areas of the page. To refine the placement, we can use the block attributes of before and after, or call the block from within a template file using the as attribute.
Up to this point, we've discussed how, by copying and modifying a few files for your theme, you can change the appearance of various blocks within your layout file. This often-overlooked feature is perhaps one of the most powerful layout tools in your arsenal.
By creating a file called default.xml and placing it within the corresponding module directory of your theme, you can alter your layout by turning off any blocks defined by the base package default.xml file. In other words, if you don't need or want a specific block, you can simply tell Magento to ignore it or, in Magento-ese, remove it. You can also use the default layout file to reposition blocks (as we described previously) or re-define specific handles. In short, it's a great way to make changes to your layouts without having to get deep into the various layout files we discussed earlier.
The first step is to create a default.xml file, if one doesn't already exist, and place it within the /app/design/frontend/[design package]/[design theme]/[module name]/view/frontend/layout/ directory. Add the following code to this text file:
<?xml version="1.0" ?>
<page>
  <!-- Put block overrides here -->
</page>
Within this small collection of code, you can add blocks and handles, as well as specialized statements. For example, to remove the callout block with which we have been working, add the following code between the <page> and </page> tags of your default.xml file:
<remove name="[block_name]" />
Just like that, the block is no longer appearing on your site.
The scope of possibilities for using the default layout file is quite extensive. As you begin exploring the use of this file, I would offer the following advice:
<remove> tag to completely disable blocks rather than removing them from layout files. If you don't have any other use for the layout file that contains the block, then you won't even have the need to copy it from the base package into your theme.<action method="unsetChild"> to simply disable the block from the current layout, but allow it to be used in another position.default.xml file. Then make the changes you want to make. Again, this negates the need for replicating layout files, and it gives you a much quicker ability to make modifications and test them to see if they are behaving as you expected.Creating the look and feel of a new Magento store is, for those designers among us, one of the most exciting aspects of creating a new website. However, as we have seen, to give store owners the level of power and functionality that Magento affords, designers can no longer build static HTML pages, slap in a bit of PHP, and upload to the server. With high levels of functionality come higher levels of architectural complexity.
Fortunately, the complexity of Magento is not nearly as daunting once you understand the methodologies of how pages are built, rendered, and styled. I struggled initially to fully understand this system. However, today I feel very comfortable navigating the design-related components of Magento, after taking the time to understand how it all pieces together. Today, you have the added advantage of a much improved architecture, as well as this book in your hands.
Hopefully, I've also shown you that in most cases, if you want an extensively customized theme, you really don't have to start from scratch. By using the existing default themes, or using a third-party theme, you can do some quite extensive customizations simply by modifying a few key files.
Experiment and have fun!
In this chapter, we explored the Magento theme architecture, learning how the Magento Fallback Method works to ensure our pages always have something to show. We also covered the installation and configuration of themes in the Magento 2 store structure and learned how to modify our themes by understanding the use of layouts, handles, and blocks. Finally, we were introduced to a very powerful tool—the default layout file.
You'll no doubt want to spend some time exploring the concepts of this chapter. I don't blame you. Just writing this chapter makes me want to dig into a new design!
When you're ready to move on, we will begin the process of configuring your store for what it is intended: to sell.
If you've been following along, chapter by chapter, you've created a working, accessible online store front by now. Are you ready to take orders now?
Not just yet. There's still more to do before you can swing open the virtual doors to your new Magento store. Specifically, we need to:
If you're the developer or designer of a Magento powered site, this is usually the time when you consult with your client – the store owner – to learn how they want to take payments, charge for shipping, and offer promotional discounts. Once you understand the concepts in this chapter, you'll be well prepared to ask the right questions.
For store owners and administrators, this chapter will give you insights into what can be managed with Magento. Fortunately, there are few limitations to Magento; however, we are consistently amazed at the various ways retailers price and vend their products. Hopefully, whatever unique selling programs you currently employ can be replicated online with your Magento store. We're betting they can.
If you've shopped online before, you no doubt have some understanding of the usual online sales process:
Magento duplicates this sales process in pretty much the same way. For our purposes, though, we need to understand what happens after the customer commits to the order, for that is when the store administrator's participation is required.
The following chart illustrates both the frontend and backend steps of the Magento sales process:
The black boxes with white type are steps that generally create an e-mail to the customer.
As we'll see in this chapter, there are occasional variations to this process, but in general, the Magento sales process is pretty straightforward. What you'll find impressive is the scope of Magento's ability to give you a wider latitude on adjusting the sales process to meet your particular needs. For instance, if you're selling downloadable products, such as e-books, music or software, you don't need the shipping process steps. Yet, if you sell proprietary digital media, you will need to manage the distribution of the products to your customers. For instance, to prevent unlimited downloads.
Before mapping out the business rules that you will use to configure Magento, it's helpful to see and understand how orders are processed in the Magento backend. Many times, developers and administrators new to Magento rush to configure the myriad of settings (which we will be covering in this chapter) without fully realizing how those choices might impact on the overall sales process. It's understandable because most will want to test the ordering system with all the settings in place. It's a bit of a catch-22: you have no orders to use to understand the configurations, yet without the configurations, you can't test the ordering process.
Fortunately, a basic Magento 2 install with the sample data (again with the sample data? Yes!) gives you the basic configurations to allow you to place some sample orders and review the order process.
Give it a whirl!
If you've installed the sample data, or you have a store already configured to accept some type of test payments, you should spend time placing and processing orders. Try any number of different combinations. Ask your colleagues to place dummy orders, imagining that they are actual shoppers. You'll soon get a real handle on the process, and if you're a developer, your client will certainly appreciate the added insight you have to the Magento ordering process. This is incredibly important to your client, so it should be important to you!
Logging into the Magento backend, we can see our latest orders listed in the left sidebar of the dashboard:
From here we can click on the order we wish to process, or we can go to Sales | Orders in the top navigation bar and then select the order from the list of all orders. Either way, we end up with a detailed view of the order.
Let's take each section of this screen separately and explain what each contributes to the ordering process.
The first section, shown in the preceding image on the left, summarizes key order information, including the timestamp of the order (date and time), the current status (which by default is pending), and from which Magento store the purchase was made.
New orders, by default, are marked as pending. This means the order is awaiting your attention. The customer has already been charged and has received an e-mail confirmation of their order, but it's now up to you to complete the order, eventually taking it to a stage of complete.
The box on the right tells us the name of the customer, their e-mail address, and the fact that they checked out without registering (more on customer groups later in this chapter).
The next row of boxes shows the billing and shipping addresses for the purchaser. Notice that these are editable. Sometimes a customer, upon receiving their e-mail receipt, will see that they made an error in either or both of these. If the customer contacts you with corrected information, you can easily make the changes here.
The third row of boxes give you information about the payment method and the buyer's choice of shipping for the order.
On row four, you'll find the list of products ordered by the customer, the amount charged and the amount of sales tax applicable for each line item.
The final row of boxes are quite interesting and important. First, on the left in the preceding image, is how you can keep notes on an order and update the customer. Let's say, as in this case, that you have discovered that you only have one remaining chair and that more chairs won't arrive for another two weeks. By filling in this information here, and checking the Notify Customer by Email box, you can update the customer ("Would you like us to hold your order, or cancel it?") and have the update sent automatically to the buyer. Furthermore, by checking the Visible on Storefront box, the customer – if they are registered – can view the update in the Account Information section of your store.
All comments entered will be appended to the list at the bottom of the box.
The box to the right is the transaction summary of the order.
The next step for you, as the person who is processing orders, is to invoice this order. In Magento, this means that you are confirming the order, and proceeding with processing.
To convert an order into an invoice, click the button at the top of the page labeled Invoice. The resulting page is similar to the order page, except that it allows you to perform certain additional functions:
Once you have made any of the preceding changes, you can click on Submit Invoice, which will convert the order to an invoice, and record the order as an actual sale. This is key, as your analysis of sales for your store rely on the analysis of invoices, not orders. If you have not shipped the items yet, the status of the order is now shown as Processing.
Now that we have converted an order into an invoice, the box on the Dashboard screen, titled Lifetime Sales, is now updated showing the total sales for the chosen period, less shipping and sales taxes, as shown in the following screenshot.
Now that we have created our invoice, and once we have shipped the purchased products, we can create one or more shipments. To do this, open the order as before and click the Ship button near the top of the screen.
On this screen, you can add tracking numbers for your shipments, as well as indicate the quantity of each product shipped. In the following image, I have added a sample UPS tracking number. You can add as many as required (you may need to ship an order in more than one box, for instance).
Lower on the page, you will find each line item of the order, with a field allowing you to change the number of products shipped, as shown in the following screenshot:
Once you have made any changes, including adding any comments, you can click Submit Shipment. If you ship all ordered items, the status of the order will change to Complete; otherwise, the order will remain Processing.
Once you become familiar with the sales process, you'll have a much better understanding of how various system configurations affect how orders are moved through Magento.
In today's online retailing world, most purchasers use credit cards (or debit cards) as payment currency. Nothing new there. However, the process of taking someone's credit card online, verifying the card for available purchasing limit, and drawing the amount of the purchase from the buyer's account and into your bank account is one that remains a mystery to many. Of all the components that comprise online commerce, the process of moving money – in this case from the credit card account of the buyer to your bank account – remains one of the most complex of them all.
Without the ease of credit cards, online e-commerce might well be growing at a much slower pace. However, the use of credit cards – and the potential for misuse – concerns your shoppers, particularly when the press relates stories of hackers breaking into retailer databases. What is important is that online purchases have never been "hacked." That is, no one has been prosecuted for stealing credit card information used to buy online as long as the store is using SSL encryption. To ease consumers' fears, several payment systems have evolved over the past decade, each designed to help you process the financial transactions for your store, while providing the increased security and processes necessary to give both you and your buyer a safer, easier transaction process.
As a Magento administrator, you have within Magento, several default payment systems available based on your own needs. Each one requires that the store owner enrolls and qualifies, but, having done so, allows the store to provide buyers with a convenient, secure means of paying for their purchase.
In this section, we will cover the most common, popular payment systems and how they work with Magento. This is intended to familiarize you with how each system interacts with Magento, the buyer, and the store owner. Once you understand how they work, you will be able to decide on which system(s) you want to employ, which also makes configuring Magento easier.
The protection of your customer's payment information is extremely important. Not only would a breach of security cause damage to your customer's credit and financial accounts, but the publicity of such a breach could be devastating to your business.
Merchant account providers will require that your store meet stringent guidelines for PCI compliance, a set of security requirements called Payment Card Industry Data Security Standard (PCI DSS). Your ability to be PCI compliant is based on the integrity of your hosting environment and by which methods you allow customers to enter credit card information on your site.
Magento 2 no longer offers a "stored credit card" payment method. It is highly unlikely that you could — or would want to — provide a server configuration secure enough to meet PCI DSS requirements for storing credit card information. You probably don't want the liability exposure, either.
You can, however, provide SSL encryption that could satisfy PCI compliance as long as the credit card information is encrypted before being sent to your server, and then from your server to the credit card processor. As long as you're not storing the customer's credit card information on your server, you can meet PCI compliance as long as your hosting provider can assure compliance for server and database security.
Therefore, you should decide whether to provide onsite or offsite credit card payments. In other words, do you want to take payment information within your Magento checkout page or redirect the user to a payment service, such as PayPal, to complete their transaction?
There are pros and cons of each method. Onsite transactions may be perceived as less secure and you do have to prove PCI compliance to your merchant account provider on an ongoing basis. However, onsite transactions mean that the customer can complete their transaction without leaving your website. This helps to preserve your brand experience for your customers.
Fortunately, Magento is versatile enough to allow you to provide both options to your customers. Personally, we feel that offering multiple payment methods means you're more likely to complete a sale, while also showing your customers that you want to provide the most convenience in purchasing.
Let's now review the various payment methods offered by default in Magento 2.
Magento 2 comes with a host of the most popular and common payment methods. However, you should review other possibilities, such as Amazon Payments, Stripe, and Moneybookers, depending on your target market. We anticipate that developers will be offering add-ons for these and other payment methods.
The determination of which payment system to utilize in your Magento store is driven by a comparison of pros and cons (isn't everything in life?). In terms of credit card sales, there are two basic classifications of payment systems: off-site and on-site.
Off-site systems allow buyers to make purchase choices, but pay for their order on another website which offers the buyer a sense of greater security and fraud protection. The buyer is actually paying the off-site payment provider, who in turn pays the store owner once there is sufficient verification that the order has been processed and shipped. Each system has different degrees of verification based on the type of products sold, the history of the merchant (for example, has there been previous problems with the merchant's reliability?), and the amount of the purchase.
The pros of this type of payment method are as follows:
Many buyers prefer these systems because of the added layer of protection against merchants who fail to deliver the expected results.
Additionally, the off-site system qualifies the merchant as opposed to a merchant account provider or bank. For first-time e-commerce merchants, this qualification is usually easier to obtain, as no credit report is required.
The cons of this type of payment method are as follows:
The dominant off-site systems are PayPal Express, PayPal Standard, and Authorize.net Direct Post.
Almost any well-developed e-commerce store will allow buyers to pay directly on the site without having to go off-site to another payment system. While most will also provide off-site payment alternatives, by providing an on-site payment process, the merchant eliminates any reluctance the buyer may have to enroll in a third-party payment system.
The pros of this type of payment method are as follows:
In order to succeed with on-site payment systems, merchants need to consider design elements and payment system brands that will help buyers have confidence in the security of the payment process. Most buyers have no history with new merchants; therefore, merchants, if they wish to offer on-site payments, should pay special attention to methods of communicating the security of the buyer's information.
The cons of this type of payment method are as follows:
Off-site payments are processed through gateways. Gateways accept the customer payment information, as well as the order total, by means of a secure connection between your store server and the gateway's servers. The gateway validates the buyer's information and returns a result of success or error, which your store platform processes accordingly.
Today, PayPal remains one of the most popular payment systems in the world because it does allow for global purchases. You can sell to buyers in other countries, as long as they have a PayPal account, knowing that you will receive payment. Most regular merchant accounts, such as those used by bricks and mortar retailers, restrict sales to only buyers with cards issued by US banks.
In the past, the downside to using PayPal was that buyers would have to sign up for PayPal if you, the merchant, offered it as a payment system. That changed some years ago: today your buyers don't have to sign up for PayPal. They can purchase using a credit card without enrolling.
While PayPal is commonly known for their quick and easy PayPal Express, PayPal can provide you with credit and debit card solutions that allow customers to use their cards without needing a PayPal account. To the customer, the Magento checkout appears no different than if they were using a normal credit card checkout process.
The big difference is that you have to set up a business account with PayPal before you can begin accepting non-PayPal account payments. Proceeds will go almost immediately into your PayPal account (you have to have a PayPal account), but your customers can pay by using a credit/debit card or their own PayPal account.
With the all-in-one solution, PayPal approves your application for a merchant account and allows you to accept all popular cards, including American Express, at a flat 2.9% rate, plus $0.30/transaction. PayPal payments incur normal per transaction PayPal charges.
PayPal provide two ways to incorporate credit card payment capture on your website:
The difference to your customer is that for Advanced, there is a slight delay while the credit card form is inserted into the checkout page. You may also have some limitations in terms of styling.
PayPal Standard, also a part of the all-in-one solution, takes your customer to a PayPal site for payment. Unlike PayPal Express, however, you can style this page to better reflect your brand image. Plus, customers do not have to have a PayPal account in order to use this checkout method.
If you already have a merchant account for collecting online payments, you can still utilize the integration of PayPal and Magento by setting up a PayPal business account that is linked to your merchant account. Instead of paying PayPal a percentage of each transaction — you would pay this to your merchant account provider — you simply pay a small per transaction fee.
Offering PayPal Express is as easy as having a PayPal account. It does require some configurations of API credentials, but it does provide the simplest means of offering payment services without setting up a merchant account.
PayPal Express will add Buy Now buttons to your product pages and the cart page of your store, giving shoppers quick and immediate ability to checkout using their PayPal account.
PayPal recently acquired Braintree, a payment services company that adds additional services to merchants. While many of their offerings appear to overlap PayPal's, Braintree brings additional features to the marketplace such as Bitcoin, Venmo, Android Pay, and Apple Pay payment methods, recurring billing, and fraud protection. Like PayPal Payments, Braintree charges 2.9% + $0.30/transaction.
If you have customers for whom you will accept payment by check and/or money order, you can enable this payment method. Be sure to enter all the information fields, especially Make Check Payable to and Send Check to. You will most likely want to keep the New Order Status as Pending, which means the order is not ready for fulfillment until you receive payment and update the order as Paid.
As with any payment method, be sure to edit the Title of the method to reflect how you wish to communicate it to your customers. If you only wish to accept money orders, for instance, you might change Title to Money Orders (sorry, no checks).
As with check/money order, you can allow customers to wire money to your account by providing information to your customers who choose this method.
Likewise, you can offer COD payments. We still see this method being made available on wholesale shipments, but very rarely on B2C (business-to-consumer) sales. COD shipments usually cost more, so you will need to accommodate this added fee in your pricing or shipping methods. At present, there is no ability to add a COD fee using this payment method panel.
If your customer, by use of discounts or credits, or selecting free items, owes nothing at the checkout, enabling this method will cause Magento to hide payment methods during checkout. The content in the Title field will be displayed in these cases.
In B2B (business-to-business) sales, it's quite common to accept purchase orders (PO's) for customers with approved credit. If you enable this payment method, an additional field is presented to customers for entering their PO number when ordering.
Authorize.net — perhaps the largest payment gateway provider in the USA — provides an integrated payment capture mechanism that gives your customers the convenience of entering credit/debit card information on your site, but the actual form submission bypasses your server and goes directly to Authorize.net. This mechanism, as with PayPal Payments Advanced, lessens your responsibility for PCI compliance as the data is communicated directly between your customer and Authorize.net instead of passing through the Magento programming.
Once you get paid for a sale, you need to fulfill the order and that means you have to ship the items purchased. How you ship products is largely a function of what shipping methods you make available to your customers.
Shipping is one of the most complex aspects of e-commerce, and one where you can lose money if you're not careful. As you work through your shipping configurations, it's important to keep in mind the following:
Dimensional shipping refers to a recent change by UPS, FedEx, and others to charge you the greater of two rates: the cost based on weight or the cost based on a formula to determine the equivalent weight of a package based on its size: (Length x Width x Height) ÷ 166 (for US domestic shipments; other factors apply for other countries and exports). Therefore, if you have a large package that doesn't weigh much, the live rate quoted in Magento might not be reflective of your actual cost once the dimensional weight is calculated. If your packages may be large and lightweight, consult your carrier representative or shipping fulfillment partner for guidance.
WebShopApps (http://webshopapps.com) is perhaps the pre-eminent Magento shipping add-on provider. More recently, they have created a hosted shipping configuration system called ShipperHQ (https://shipperhq.com), which we have used to configure some rather complex shipping rules. If your shipping rules are more than Magento can natively accommodate, you may want to check these out.
Keeping these insights in mind, let's explore the various shipping methods available by default in Magento 2.
Before we go over the shipping methods, let's go over some basic concepts that will apply to most, if not all, shipping methods.
Where you ship your products from will determine shipping rates, especially for carrier rates (for example, UPS, FedEx). To set your origin, go to Stores | Configuration | Sales | Shipping Settings and expand the Origin panel. At the very least, enter the Country, Region/State and ZIP/Postal Code field. The others are optional for rate calculation purposes.
At the bottom of this panel is the choice to Apply Custom Shipping Policy. If enabled, a field will appear where you can enter text about your overall shipping policy. For instance, you may want to enter Orders placed by 12:00 PM CT will be processed for shipping on the same day. Applies only to orders placed Monday-Friday, excluding shipping holidays.
You can add an invisible handling fee to all shipping rate calculations. Invisible in that it does not appear as a separate line item charge to your customers. To add a handling fee to a shipping method:
As you configure your shipping methods, don't forget to designate to which countries you will ship. If you only ship to the US and Canada, for instance, be sure to have only those countries selected. Otherwise, you'll have customers from other countries placing orders you will have to cancel and refund.
In some cases, the method you configured may not be applicable to a customer based on destination, type of product, weight, or any number of factors. For these instances, you can choose to:
There are several ways to offer free shipping to your customers. If you want to display a Free Shipping option to all customers whose carts meet a minimum order amount (not including taxes or shipping), enable this panel.
However, you may want to be more judicious in how and when you offer free shipping. Other alternatives include:
If you choose to use this panel, note that it will apply to all orders. Therefore, if you want to be more selective, consider one of the above methods.
As with free shipping, above, the Flat Rate panel allows you to charge one, singular flat rate for all orders regardless of weight or destination. You can apply the rate on a per item or per order basis, as well.
While using live carrier rates can provide more accurate shipping quotes for your customers, you may find it more convenient to offer a series of rates for your customers at certain break points.
For example, you might only need something as simple as follows, for any domestic destination:
Let's assume you're a US-based shipper. While these rates will work for you when shipping to any of the contiguous 48 states, you need to charge more for shipments to Alaska and Hawaii. For our example, let's assume tiered pricing of $7.99, $11.99, and $14.99 at the same weight breaks.
All of these conditions can be handled using the table rates shipping method. Based on our example, we would first start by creating a spreadsheet (in Excel or Numbers) similar to the following:
|
Country |
Region/State |
Zip/Postal code |
Weight (and above) |
Shipping price |
|---|---|---|---|---|
|
USA |
* |
* |
0 |
5.99 |
|
USA |
* |
* |
6 |
8.99 |
|
USA |
* |
* |
11 |
10.99 |
|
USA |
AK |
* |
0 |
7.99 |
|
USA |
AK |
* |
6 |
11.99 |
|
USA |
AK |
* |
11 |
14.99 |
|
USA |
HI |
* |
0 |
7.99 |
|
USA |
HI |
* |
6 |
11.99 |
|
USA |
HI |
* |
11 |
14.99 |
Let's review the columns in this chart:
Now, let's discuss the asterisk (*) and how to limit the scope of your rates. As you can see in the chart, we have only indicated rates for US destinations. That's because there are no rows for any other countries. We could easily add rates for all other countries, simply by adding rows with an asterisk in the first column. By adding those rows, we're telling Magento to use the US rates if the customer's ship-to address is in the US, and to use other rates for all other country destinations.
Likewise for the Region/State column, Magento will first look for matches for any state codes listed. If it can't find any, then it will look for any rates with an asterisk. If no asterisk is present for a qualifying weight, then no applicable rate will be provided to the customer.
The asterisk in the Zip/Postal code column means that the rates apply to all postal codes for all states.
In the above example, we used the weight of the items in the cart to determine shipping rates. You can also configure table rates to use calculations based on the number of items in the cart or the total price of all items (less taxes and shipping).
To set up your chart, simply rename the fourth column Quantity (and above) or Subtotal (and above).
To upload your table rates, you'll need to save/export your spreadsheet as a CSV file. You can name it whatever you like. Save it to your computer where you can find it for the next steps.
Before you upload your new rates, you should first set your table rates configurations. To do so, you can set your default settings at the default configuration scope. However, to upload your CSV file, you will need to switch your store view to the appropriate website scope.
When changing to a website scope, you will see the Export CSV button and the ability to upload your rate table file. You'll note that all other settings may have Use Default checked. You can, of course, uncheck this box beside any field and adjust the settings according to your preferences.
Let's review the unique fields in this panel:
You should probably change the default Table Rate to something more descriptive, as this term is likely irrelevant to customers. We have used terms Standard Ground, Economy, or Saver as names. The Title should probably be the same, as well, so that the customer, during checkout, has a visual confirmation of their shipping choice.
The remaining shipping methods involve configuring UPS, USPS, FedEx, and/or DHL to provide "live" rate calculations. UPS is the only one that is set to query for live rates without the need for you to have an account with the carrier. This is both good and bad. It's good, as you only have to enable the shipping method to have it begin querying rates for your customers. On the flip side, the rates that are returned are not negotiated rates. Negotiated rates are those you may have been offered as discounted rates based on your shipping volume.
FedEx, USPS, and DHL require account-specific information in order to activate. This connection with your account should provide rates based on any discounts you have established with your carrier. If you wish to use negotiated rates for UPS, you may have to find a Magento add-on that will provide a modified rate query.
The great unavoidable factor: taxes. If you're a retailer — and even as a wholesaler in some jurisdictions — you will need to master the management of tax rates and rules in your Magento store. We've had to deal with this issue on many other platforms, and while some do provide some cool features, none, in our opinion, offer as much flexibility for taxes as Magento; especially when it comes to VAT taxes.
You'll appreciate as you go through this section, that taxes can be quite complicated. Before configuring taxes in your online store, you should consult your tax professional. Making errors in taxes can not only present legal issues for your business, but also erode consumer confidence if the customers feel they're being inappropriately taxed on purchases.
Taxes are applied to products based on assigned tax classes. Tax classes are combined with tax zones and rates to create tax rules. Tax rules are what are applied to each product or shopping cart to determine the amount of tax charged in a transaction.
Here's a flow chart on how Magento calculates sales taxes based on a tax rule:
There are two types of tax classes in Magento:
Tax rules are created based on jurisdiction and rate: creating a zone for a country, state, and/or zip code, and a percentage used to calculate the tax.
To illustrate, let's review a tax rule included in the default installation for Magento 2:
Let's now take a look at the layout of a tax rule:
A nexus is generally considered if you have an active business in a particular state or locality. For instance, if your office is in Texas and you ship your products from a warehouse in Illinois, then, for taxing purposes, you're considered to have a nexus in Texas and Illinois. Therefore, as it stands at this moment, you are required to collect sales tax on any sales to buyers in Texas and Illinois. However, there are efforts in the United States Congress to radically change taxing laws on online sales transactions. Some state legislatures are also grappling with this issue. We know you're used to hearing this, but you do need to consult a tax professional to make sure you're correctly charging sales tax.
A leader in e-commerce sale tax is TaxJar (https://www.taxjar.com), a company that can provide integration with your store to precisely calculate required sales taxes and help with reporting to the various taxing jurisdictions. Using a tool such as TaxJar could greatly reduce your tax configuration time, while providing greater sales tax accuracy.
You can add or edit tax rates here or under Stores | Tax Zones and Rates. Let's edit the California tax rate here to understand the process:
To the right of the US-CA-*-Rate 1 item name, when you hover your mouse over the item, you will see a pencil icon. Click this to reveal the tax rate modal dialogue.
Let's have a look at the various fields here:
You can use the same field specifics for creating a new tax rate by clicking Add New Tax Rate at the bottom of the Tax Rate list field.
To view the remaining fields, expand the Additional Settings section.
While you can't import tax rules, you can import tax rates, which may be a time saver, particularly where you have multiple taxing jurisdictions to whom you have to report tax collections.
As with many importing capabilities in Magento 2, the easiest way to begin is by exporting the current tax rules and expanding on the CSV file, then importing your changes. To import tax rates, view any tax rule. At the bottom of the screen are buttons to import and export tax rates. Export the current tax rate file, add or edit your rates, then re-import.
In some countries, goods and services are taxed in a means similar to sales tax, but calculated and managed differently. These Value-Added Taxes (VAT) are made even more complex due to varying rates among countries, different rules for registration, and rules for taxation based on the type of product or service sold.
As usual, we can't begin to counsel you on taxes. VAT rules can be complicated, especially for non-EU countries selling into EU countries. We highly suggest you consult with your tax professionals. If you doubt the complexity of EU VAT taxes, see http://goo.gl/y07Pb.
The VAT process in Magento involves three basic components — the needs of them are based on your location:
In Magento, VAT is charged if both the seller and customer are located in the same EU country. If both are EU-registered businesses, no VAT tax is collected if the seller and customer are in different countries.
When selling to consumers in EU countries, the amount of VAT collected is based on what country the seller is located (if the seller is an EU country). These are called intra-EU sales.
One exception (there's always one, yes?) is that when selling digital goods (for example, music, software), the VAT rate to be charged is that of the destination country, not the source country.
The key to effectively managing this complexity is the creation of multiple customer groups that can be automatically assigned during the checkout or registration process based on the VAT ID validation of the buyer.
It would be so easy for us to stop here, call it a day, and leave VAT tax configuration to your imagination. After all, we can play the "too complex for a book" card, correct?
The truth is that VAT taxes can be quite complex. If you're an EU business or exporting to the EU countries, you already understand the complexities. However, we do want you to get the most from Magento 2 and demonstrate its incredible ability to fulfill your tax calculation needs.
To that end — and perhaps the best way to demonstrate the process — we're going to set up VAT taxes as if we were a business based in France (we love Paris!).
Since we're considered, in this example, as an EU member country, we will need to provide for VAT ID validation of our customers and classify them accordingly.
Earlier in this chapter, we added four additional customer groups, specifically for VAT tax use. If we look under Stores | Customer Groups, based on our example Magento install, we should see the following:
Next, we want to create the product classes that we will need for applying the appropriate French VAT tax rates. France groups products into four rate categories, each of which should have a different product class added for taxing purposes:
We now have to consider that for customers living in other EU countries, we will charge our VAT tax rate on purchases of physical products, but charge the buyer's VAT tax rate for digital or virtual purchases.
That means that if we are selling digital products (for example, music, software, and so on) to other EU customers, we have to charge VAT tax at the rate in their country, not France. In order to do that, we have to add tax rates in Magento for every other EU country. As you can imagine, setting up all those tax rates and rules can be quite time consuming.
We have created a CSV file of all EU countries with their standard VAT tax rates (as of the time of writing). You can use this to upload the tax rates to your Magento 2 install.
For France, we need to create the four tax rates described above. After adding these under Stores | Tax Zones and Rates in our Magento 2 backend, the list of tax rates looks like this:
Our next chore is to create the product tax classes that are needed to separate our products according to the taxes we have to apply. For our France-based example, we will need five product tax classes:
While you may not currently sell products that fall into all of these classes, you may want to go ahead and set them up so they're available to you.
Remember, to create additional product tax classes; just click to edit any tax rule, expand Additional Settings, and add your new classes. After adding the above classes, this section will look like the following screenshot:
With the preceding preparation completed, we can now create the tax rules that will be used to calculate VAT taxes on purchases. We need to create the following tax rules to meet our needs as a French online business:
Once entered into our Magento 2 example, our Tax Rules screen would include the following:
The final piece is to configure your Customer Configuration so that customers are automatically assigned to the proper customer group based on their VAT ID validation. To do that, go to Stores | Configuration | Customers | Customer Configuration and expand the Create New Account Options panel. Some of these settings are done at the global, website, and store view levels, so pay close attention to your store view scope setting in the upper right-hand part of the screen. For our example, we only want to automatically assign customers who visit our French store. Therefore, we will only enable this feature at the Sportswear French View.
Once you have changed to the appropriate store view level, the key fields to configure are:
As with any store configuration, especially one as complex as VAT taxes, we highly recommend that you test your configurations thoroughly.
As customers make purchases in your store, Magento sends — based on your configurations — a number of e-mails to notify customers about their purchases. There are also e-mails for recovering passwords, creating accounts and more.
Magento installs some basic templates for all these transactional e-mails. You can create new e-mail templates to use for your stores that reflect your branding and messaging. In Magento 2, this is quite easy to do.
When you first go to Marketing | Email Templates, you'll see an empty list. That's normal. The base templates installed with Magento will not appear in this list — but they are there, nonetheless. E-mail templates can also be included in Magento themes added to your installation. These will also not show in the list, but will be available for customization.
The process of customizing e-mail templates is:
Once you create your new e-mail template, you can assign it for use as sales e-mails, customer account e-mails, and so on.
You can create new e-mail templates for the following purposes:
As you can see, Magento has quite a number of e-mails. The items in this list with an asterisk (*) are e-mails that are not sent to your customers, but, rather, sent to you or someone you designate. These e-mails are for alerting your team when something doesn't quite go right.
There are also two additional templates that are used to create the headers and footers for your e-mails. In other words, you can manage the top and bottom of your e-mails without having to modify every single e-mail if, for example, you want to change your logo or phone number.
To illustrate how to do this, let's create a new e-mail template for our sportswear store. We will begin by modifying the header and footer for our sportswear store, then create a new New Order e-mail template.
On the Email Templates panel, click on Add New Template. At the top of the New Template panel, you'll see an area titled Load default template. Here, you can select the base template — or a template provided by a theme — and load it into the New Template panel for modification.
For our new header, select Header and click on Load Template. This will load the base header template into our New Template form.
Let's first review the fields shown on this screen:
Once we have modified the header to our liking, we can save it by clicking Save Template. If we look at our list of e-mail templates, we now have the one template listed.
If we click on the template and view its detail, we can see that it has no Currently Used For field, as it has not been assigned to a particular website or store. Once we have created our sportswear footer (it is not necessarily required to create both to be able to create and assign only a header or footer), we can now assign these to our sportswear website so that they appear for each store view.
We have now assigned our new e-mail header and footer to all outgoing e-mails related to the sportswear stores. If you view the detail for your header and footer e-mail templates, they will now display a Currently Used For value.
Now that we have created our special header and footer, we can create our new order email for our sportswear customers.
Thanks for Your {{var store.getFrontendName()}} Order!As you can see, the subject contains a Magento variable that will dynamically include the name of the store. Since we name our sportswear stores Sportswear English View, Sportswear French View, and Sportswear German View, we may not want to use the dynamic store view name, as these don't sound particularly consumer-friendly.
For our example, we would prefer to use Thanks for Your Acmes Sportswear Order!
As with the header and footer, we will now assign this e-mail to the appropriate sales e-mail:
We have now created a modified new order template for our logged-in purchasers and assigned it for our sportswear stores.
As we've seen in this chapter, before you can begin selling on a Magento store, there are considerable configurations that have to be addressed. We have covered managing orders, payment gateway settings, shipping configurations, sales and VAT taxes, and transactional e-mails.
Take your time with these settings and continually test to make sure you have the configurations correct. Mistakes could end up being costly.
In the next chapter, we will discuss how to manage the non-product content of your site: the static pages and text that helps define your brand and give greater confidence to your customers.
As important as products and product information are to e-commerce, successful online stores need more in order to attract customers and fortify the store's brand. Even printed catalogs often contain information about the seller, including hours of operation, return policies, company history, and more. This non-product content is essential.
To gain an understanding of how to create and manipulate non-product content, we will cover the following topics:
Once you know how to interweave non-product content throughout your online store, you will no doubt discover innovative ways to increase customer engagement.
As with most e-commerce platforms, Magento's management of non-product content lacks some of the more robust features of a dedicated content management system (CMS) – such as WordPress, Business Catalyst, or Joomla. However, to its credit, Magento does provide a versatile system that takes into account the possible need for unique content for each of your stores.
As you would expect, the area of the backend for managing the CMS functions of Magento is under the Content menu. This area includes sections for managing Pages, Blocks, and Widgets, as shown in the following screenshot:
Before we dig into each of these items, it's important to recall our discussion about blocks in Chapter 3, Designs and Themes. Whether configuring a page, or placing a static block or widget, Magento builds the final results by assembling blocks of information.
The pages we will use in the CMS are not actually complete pages, as they lack controls for the overall template items of header, navigation, and footer. These pages actually refer to the central content of a page – that which lies within the overall page template. Within this page, we can add text, images, static blocks, and widgets to give the page its core content. As we will examine in this section, you can add some of the same code as you did in the default.xml file to even manipulate elements outside the core content area, including blocks within the header, navigation, and footer.
To begin, let's look at and alter a default page provided by the sample data installed into a new Magento store.
Go to CMS | Pages in the Magento backend. With the sample data installed, you should see a list of pages, much like those shown in the following screenshot:
While it's not absolutely necessary that you keep these pages enabled, for e-commerce best practices, it's generally a good idea to retain these core pages.
No doubt, you will find other pages to insert in your Magento store. Creating and managing CMS pages is really quite straightforward.
The first place most designers want to begin modifying a store's design is with the Home Page.
First, we need to understand that pages created in the Magento CMS primarily dictate what appears in the content section of the page. This is the area, highlighted below, apart from the header, top navigation, and footer regions.
The content section of the Home Page
On the Page Information panel of the Edit Page screen, you should see the following:
Let us go through the various fields:
In the left tabs, click Content. This is the screen where you can add text, images, or dynamic content that will display in the center content area of your page.
Notice that in the following screenshot, this sample data home page contains a widget.
This widget displays products according to the parameters of the widget (we'll discuss widgets later in this chapter). What you don't see — and we're sure you've realized this — are the instructions that control the other graphics and "Hotsellers" shown on the home page.
The other parts of the home page are inserted by using blocks. We will explore the use of blocks a bit later in this chapter. What is important here is that you can create tremendous versatility in your CMS pages by using tools beyond hardcoding layout changes within the theme modules.
For our exercise, let's add some copy to our home page so that it precedes the featured product display.
In the editor field, enter the following before the widget:
Welcome to our store. We hope you enjoy shopping with us. Our goal is to provide you with the best products at the best value.
Click on Save and Continue Edit (this will let you remain on this screen) and open your home page in another browser window or tab. It should display your new content:
You've now added content to your default home page. As you go through the remainder of this chapter, you'll discover additional ways to add or affect the content of your home page. We will now create a new CMS page to use on our site. This exercise will also give you additional insights into how to use Magento's CMS feature.
Let's add a new page to our site called Care Instructions. We want to provide information to our apparel site customers on proper techniques for washing the clothing items they purchase from Acme Sportwear:
The first panel is titled Page Information, as shown in the following screenshot:
As shown, we have entered the initial information for our new page. Magento will create the URL Key once the new page is saved. However, you can enter a URL Key here. The URL Key will be the actual name used in the URL to access your page: http://www.acmesportswear.com/care-instructions.html. If you want another URL Key value, you can enter it here.
The next panel in the new product screen is Content. It is in this panel that you can create the words, images, and so on that will appear in the main content portion of your new page.
The WYSIWYG editor gives you a lot of great tools to help you build your page content. You can easily insert images, videos, tables, and other styled content.
The Content Heading will appear at the top of your page. It will be displayed within a <h1> tag.
The third panel in the menu on the left side is labeled Design. Based on your theme, you can change the layout of the page to a one-, two-, or three-column display. You can also specify a special theme design. There are additional XML statements that can be inserted that will affect your display. See Chapter 3, Designs and Themes, for guidance on various XML statements that can be used to control layout.
The last panel is Meta Data. Keep this in mind for when we discuss meta information later in this chapter.
Once saved, we can view our new page by going to the URL path we created for this page.
The next step is to add a link to your new page from your site navigation. One easy way is to edit a block that contains links to pages within your site.
Blocks are sections of content that are specified by your theme to appear in various places throughout your site. Blocks can be placed on all pages, some pages, product pages, category pages, or in special, designated spots.
In addition to block locations that are configured within your theme, blocks can be inserted into various areas and pages within your site by using widgets, which we will explore just a bit later in this section.
To view all the blocks in your site, go to Content | Blocks. If you have installed the Magento 2 sample data, you'll see as many as 18 blocks. By their names, you can probably figure out where they appear on your site.
To understand how CMS blocks work — and to add our Care Instructions page link — click on the Select drop-down menu to the far right of the first block, Footer Links Block, and click on Edit.
This block contains the information that appears in the bottom footer of all our sites.
We want to add our Care Instructions link to this block. Now, this is where things get just a bit complex, so read through this process carefully, as it applies anytime you wish to add a link to a page in your site to a block. We are going to explain three different methods of accomplishing the same result.
We can add a link using the WYSIWIG editor, or we could change the view to HTML mode and edit the actual HTML code. Let's do it using the WYSIWYG editor, first.
In the editor space, add the link name as you wish for it to appear on the frontend by adding another bullet row below the Customer Service label. You can, of course, insert your new link anywhere in the list.
To create the link, select the title you just entered and click the link icon in the menu toolbar. A modal dialogue will appear for entering your link URL.
Magento provides a library of variables which can be used to dynamically insert values and content where appropriate. In this case, the use of a system variable for inserting the store URL is worth learning for our purposes.
The store URL variable is inserted when used in the following format: {{store url=URL_Key}}, where URL_Key is the URL Key for the page, category, or product you wish to access.
Therefore, for our new page, we will insert the following into Link URL: {{store url=care-instructions}}. Add a Title for your link so that it will appear when your customer mouses over the link, and to help describe the link to search engines.
In most Magento help guides, the format for entering a store URL variable is {{store url="URL_Key"}}, with quotes (") around the URL Key. However, we must leave out the quotes when using this variable within the link dialogue box. It's quite possible to use the store URL variable without quotes elsewhere, too. This behavior does not apply when adding links using HTML (see the next section).
Once you click on Import, the text will be linked. If you look on the frontend of your website, you will now see a new link in the footer.
If you select a link in WYSIWYG and click the link icon, the URL that shows in the dialogue field is a very long, encrypted string. This is due to the way Magento stores link references. You can edit the link by replacing it with what you prefer as the link, but you may find building and managing links much easier using HTML rather than the WYSIWYG view.
The method of adding a link using the store URL variable is the same if you work in the HTML view. The key, of course, knows how to properly code an HTML link.
In the block screen, click on Show/Hide Editor to reveal the underlying HTML for this block.
<ul class="footer links">
<li class="nav item"><a href="{{store url="about-us"}}">About us</a></li>
<li class="nav item"><a href="{{store url="customer-service"}}">Customer Service</a></li>
<li class="nav item"><a title="How to care for your new garment purchases." href="{{store%20url=care-instructions}}">Care Instructions</a></li>
</ul>
You'll notice that the link you created for the Care Instructions page is slightly different from the other links in the block. This is due to the manner in which the link dialogue saves your entry.
You could also use {{store url="care-instructions"}} for the link code — in HTML view only — and achieve the same results.
If you're hesitant about using the store URL variable or coding HTML, you can use one additional technique for inserting a link: the CMS widget. In fact, as you explore this method, you'll find it can be used to insert the following:
For our example, we want to insert a link to a CMS page. In the WYSIWYG view (you can also use the HTML view), click the widget icon in the top menu bar.
A panel will open from the right side of your screen. For Widget Type, select CMS Page Link. Additional fields will appear:
After you insert the widget, it will appear in your WYSIWYG editor as an icon labeled page link. If you want to edit the link, simply double-click on the icon to open the Widget panel.
The store URL variable is only one of many available for use in Magento 2. Within the CMS page and block editors, you do have access to a list of standard variables that will dynamically insert information into your content.
Let's say we wanted to include the name and store hours of our business in the same footer block we have been editing:
After saving the block, you will see on your site that the actual saved information for store name and store hours) is inserted into its proper places.
This is one of the least known features of Magento, and yet it can be powerful for reducing the need to edit changes in multiple places in your site. In fact, custom variables can be used not only in pages and blocks, but also in e-mail templates.
As an example, let's say you'd like to add the days on which you are closed to your footer message, but you'd like to use a variable just in case you decide later to change the days on which you are not open:
Let's go through the various fields you will encounter here:
_). This code is used by Magento's programming to reference your variable.The various fields are shown in the following screenshot:
Now, you can return to your footer block and insert your new variable just as you inserted the variables for Store Name and Store Hours.
{{config path="general/store_information/name"}} is open {{config path="general/store_information/hours"}} for your convenience. We are closed on {{customVar code=closed_days}}.With these variables inserted, your site footer now shows the added variable value.
Custom variables could be handy for managing content that you may wish to edit from time to time, yet needs to be displayed in multiple places such as the following:
If any of these need updating on your site, you simply have to change the value of the custom variable.
The widgets we used in editing blocks allowed us to insert dynamic links to blocks and pages. However, widgets can also be used to insert dynamic content into multiple pages and theme locations, such as products, categories, footers, and so on. In fact, the footer links block we have been editing is inserted into the theme's footer content area using a widget.
Let's take a look at this particular widget to see how that is configured. Go to Content | Widgets. Click on the Footer Links widget shown in the list.
The first panel, Storefront Properties, configures where the widget will display its contents. The Type and Design Package/Theme are set when the widget is created and cannot be changed later (although the widget can be deleted and re-created).
You can assign the widget to appear in only certain store views, as well, and control the order in which it may appear if other widgets are also assigned to the same layout section.
The Layout Updates section is where so much of the magic of widgets comes in. You can assign a widget to appear on all pages, certain pages, or certain types of page (or any combination thereof!).
For categories and products, you can also specify specific categories and products. For instance, you could create a widget that would insert a block of content to appear only on the Furniture category page.
In this particular example, this widget inserts a CMS block (our footer links) into a container called CMS Footer Links. Depending on your theme, you can have many different containers to choose from, such as in the Luma theme used in our demo store.
By clicking Add Layout Update, you can also insert the widget content into other containers in your site.
Finally, the Widget Options panel allows you to select the block, link, and so on. Your widget will be inserted. This depends on the type of widget you are creating.
Widgets can be very powerful tools, especially when combined with blocks. We've seen many situations where even experienced developers have programmed block insertions instead of using the simple widget tools in Magento. Get to know blocks and widgets, and we're certain you'll come up with some very creative ways of adding true value to your brand and customer experience.
The Magento CMS provides you with the capability to customize your store without directly altering the XML and HTML files of your theme. You can build productive pages, blocks, and widgets, adding increased functionality and buyer conveniences.
That said, we should never shy away from rolling up our sleeves and diving into the actual theme files. By combining both disciplines, you have greatly elevated the potential of Magento to meet your retailing needs.
In this chapter, we learned about the Magento CMS functionality, viewed how to create and customize pages, explored the creation of blocks, and reviewed the many widgets available for your use.
Now that our store has products and content, it's time to let the world know your store exists as a premiere online shopping destination.
The online marketplace is crowded. Thousands of new stores are coming online each day. With Magento 2, you have one of the most powerful open source platforms for presenting and selling your products and services. But to be noticed — and to create valuable repeat business — you have to do more than just point a domain name to your store.
The key is marketing: presenting a selling proposition to potential customers that will entice them to at least visit your online showroom.
In this chapter, we will explore some of Magento's key marketing tools, including:
As you prepare your store for launch, you need to spend some time becoming familiar with how these tools can help you attract and close more sales.
If you're new to e-commerce, you may not quite have a handle on how to group your potential customers outside of retail and wholesale. Most of you will build retail stores, fewer will build wholesale businesses, and even fewer will do both.
Yet, if you give some careful thought to how you intend to market to your customers, you may find that there are more customers segments you need to identify. Here are examples of some other possible customer groups:
As you contemplate your groups, consider the following:
By default, Magento creates three customer groups: General, Retailer, and Wholesale. When a customer registers in your store, they are automatically put into the General group. You can manually assign a customer to another group, either after they have registered or if you create the customer yourself in the administrative backend to your store.
Creating a new customer group is perhaps the simplest operation in Magento!
And that's all there is to it. Now that you understand how customer groups are created in Magento, let's see how we can use these for marketing.
Every retailer with whom we work finds it beneficial to offer promotions from time to time. From free shipping to coupons, promotions can help consumers choose your products over competitors, particularly if they feel they're getting a great bargain in the process.
As with sales tax, promotions are rule-based, meaning that the application and calculation of a promotion are based on rules you create. In Magento, there are two types of promotion rules:
As described, a catalog price rule is a discount that is applied to selected products automatically. For example, let's assume you wish to provide a 5% discount on all women's apparel priced over $50 sold between November 24, 2016 through November 26, 2016, as a special Black Friday promotion.
Black Friday and Cyber Monday
For years in the United States, the day after Thanksgiving — the last Friday of November, Black Friday — has been one of the busiest shopping days of the Christmas season. Retailers offer huge discounts and shoppers begin lining up well before dawn just to be the first one in the door. To counter the brick and mortar retailers, online retailers created Cyber Monday, the Monday following Black Friday, likewise offering huge discounts and special offers. Personally, we like the sound of Cyber Monday over the morbid moniker of Black Friday. We also like e-commerce!
To create a catalog price rule, you need to perform the following steps:
Now, we need to create the discount calculation:
You now have a new rule that will automatically take effect at 12:01 AM on Friday, November 24th and run until 11:59 PM on Sunday, November 26th. However, there is one final action to take!
Before your new rule can take effect, click on Apply Rules at the top of the Catalog Price Rules page. Magento needs to set itself to apply the rules to the applicable products.
Magento has some very powerful and flexible tools for creating discounts that can be applied once the customer has reached the shopping cart part of their visit. In fact, we have found it difficult to identify a single discount scenario we could not accommodate in Magento.
The key features of cart price rules for which you should be aware are:
Let's use a specific example to learn how to create a cart price rule:
The process of building our rule will follow these steps:
To begin building our cart price rule, go to Marketing | Cart Price Rules in your Magento 2 backend. Click on Add New Rule.
The Rule Information panel for our new rule has several fields to use to set up the rule:
A rule's conditions can be considered as minimum requirements. In other words, what is necessary about a customer's shopping cart for the rule to be valid?
In our example, a coupon code can only be used if the shopping cart contains $100 or more of women's tops or 3 or more women's apparel items. To create this condition, go to the Conditions panel.
Since we have two conditions, both of which are valid, click the ALL in In ALL of these conditions are TRUE. It will allow you to select ANY. These creates an "or" condition.
Our first condition will test whether the customer has $100 or more of women's tops in their shopping cart:
Next, we need to add the or condition that tests whether the customer has three or more women's apparel items into their cart:
Once your conditions are set, your Conditions panel should look like the following image.
Now we can move on to specifying the actions that will take place for shopping carts that match our conditions.
There are two parts to a rule's actions:
This is important to understand, as many are confused by the fact that action conditions appear very similar to the rule conditions that we created before. The conditions in this panel dictate which products qualify for the discounts.
In other words — as in our case — we're using one set of conditions to qualify the shopping cart and another set, within the Actions panel, to identify to which products the discount will be applied. These conditions are different. If they were the same — for example, you're discounting a shopping cart containing $100 or more in products — then you do not have to add any conditions to the Actions panel.
Let's now configure our Actions panel for our needs:
Let's go over the various choices here, so you have an idea as to which discount will work best with your purposes. Any value that is required will be entered into the Discount Amount field.
For free shipping to work, you have to have at least one free shipping method configured. See Chapter 4, Configuring to Sell, for more information on shipping.
The fields mentioned above can be visualized in the following screenshot:
The next part of our actions configuration is to designate to which products the discount will be applied. In our case, any women's apparel (up to the three we set in the top part of the panel).
Using the same methodology we use in the Conditions panel, our Actions panel rules, when completed, will look like the following:
While you could use the name of the rule as what displays to customers, it's probably more prudent to compose a discount label that more succinctly describes the discount. Furthermore, as in our example, we need different labels for each of the foreign language sites on which we sell sportswear.
For our example, we're going to label our discount for our customers as Save 20% & Free Shipping!
And, of course, we click on Save and Continue Edit. Our Labels panel now looks like the following screenshot:
In our example, we want to create 100 unique coupon codes that we can send to our selected customers. Magento does an amazing job of helping you generate codes and also keeps track of how many times specific codes have been used.
To begin, go to the Manage Coupon Codes panel. Let's assume we want to create codes that are alphanumeric (both letters and numbers), 12 characters long, and have a prefix of ASW and a suffix of F20. Our coupon pattern would be ASW-XXX-XXX-F20, where "XXX" is a unique alphanumeric code. To configure this, we set up the parameters for the codes and then click on Generate to allow Magento to create the 100 unique codes we need:
The use of a prefix and/or suffix is purely optional. If you're using unique coupon codes, you may want to use some designators that will help you identify that the code is a valid code for the order. When an order is viewed in your backend, it will show what codes, if any, were applied to the order. If you only use randomly generated codes without other designators, you might not be able to easily determine what actual discount rule was applied. If you want hyphens before or after a prefix/suffix, you need to include it in the appropriate fields.
The fields mentioned above can be visualized in the following screenshot:
Now, we can click on Generate to create our 100 unique codes. Once generated, you should see 100 records created in the lower portion of the panel. Although your codes will be different (they are randomly generated, after all), your list should look similar to ours.
Using the export tool at the top of your list, you can now export your codes and use them with your email program to send these codes to your customers.
When you acquire a new customer, it makes great sense to keep them interested in your offerings so that they will return again to make a purchase from your online store. The Cost of Acquisition for a sale is far less with a repeat transaction.
Magento 2 is able to help you keep your brand in front of your customers with basic email newsletter tools. With these tools you can:
Magento will be the first to admit that their newsletter tools are pretty basic. If you want to be more sophisticated in how you construct your newsletters, segment your customers, and more, you should consider a more robust third-party tool. We use MailChimp (http://www.mailchimp.com), a leading email system that makes it easy to manage campaigns. It's fun to use, as well.
For connecting your Magento 2 store to MailChimp, we recommend the MageMonkey for Magento 2 extension (http://store.ebizmarts.com/magemonkey-magento2.html). Ebizmarts, the creator of this extension, worked closely with MailChimp. The extension also adds emails for abandoned carts, supports multiple MailChimp lists, and creates autoresponders — emails for customer birthdays, related products, and product reviews. And, best of all, at the time of this writing, the extension was offered for free!
The newsletter function is enabled by default in Magento 2. As long as you have a newsletter subscription form on your site, your customers can subscribe and be added to your newsletter list.
Settings for newsletters are configured under Stores | Configuration | Customers in the Magento 2 backend.
By default, a subscription form is placed in the footer of the base theme. If you use a third-party theme, the subscription form may be placed in another location.
Before you can send a newsletter, you have to create a newsletter template. The template contains your marketing message but can also contain dynamic content.
To begin, go to Marketing | Newsletter templates in your Magento backend. Click on Add New Template. On the Template Information panel, you will see the following fields:
<support@acmefurniture.com>. This field is the name part (for example, Acme Support).When creating a new template, you'll see default content for inserting a variable for an unsubscribe link. This is key if you want to avoid violating anti-spam standards. However, there are more guidelines you should follow if you want your newsletters to be considered valid emails to subscribed customers. A good resource for compliance guidance can be found at http://kb.mailchimp.com/accounts#Compliance_Tips.
The fields mentioned above can be visualized in the following screenshot:
Once you've completed your template, you can click on Preview Template to view your newsletter as it will appear to your customers.
When you're ready to schedule your newsletter to be sent, go to Marketing | Newsletter Templates. In the Action column to the right of the newsletter you wish to send, select Queue Newsletter in the dropdown menu. The screen will redirect to the Queue Information panel.
Here, you can select the date on which you wish to send your newsletter, select the store views for whose subscribers you wish to receive your newsletter, and review the contents of your newsletter.
Once you have made your selection, click on Save Newsletter to add it to the internal queue. Magento will send your newsletters to your chosen subscribers on the date you have selected.
To view your newsletter queue and the status of your queued newsletters, go to Marketing | Newsletter Queue.
Once your newsletter is sent, you can see how well it is sent — and check for any problems — by going to Reports | Newsletter Problems Report. If any problems are found, a report identifying each error will appear in this list.
Under Marketing | Newsletter Subscribers, you can view all or a filtered sub-set of your newsletter subscribers. This can be helpful if you wish to see how many have come from various stores in your installation. You can also unsubscribe customers from this screen.
As with most other grid listings in Magento, you can export your subscriber list to use for other purposes.
Many websites have pages that show sitemaps — a hierarchal list of pages within a site. For our purposes, a sitemap is an XML file that resides on your server and is read by Google and other search engines to learn about your site.
If you've ever worked with Google Webmaster Tools (https://www.google.com/webmasters/), you're familiar with the concept of providing a sitemap URL to Google. By doing so, Google can become fully aware of the pages and products within your Magento store without having to figure it out themselves. Sitemaps are an important component of your Search Engine Optimization (SEO) efforts.
Magento 2 has a built-in sitemap functionality that you can configure to generate sitemaps for each store view within your installation.
To create a sitemap for a store view, go to Marketing | Site Map in the Magento 2 backend. Click on Add Sitemap.
For our first sitemap, we'll create one for our furniture store view. We only have the one English language view for that website.
sitemap.xml. However, if you use the same file name for each store, you would not have unique sitemaps for each store view.The fields mentioned above can be visualized in the following screenshot:
When Magento returns you to your list of sitemaps, you can click on the listed URL to view the actual XML file. The first part of your sitemap file may look like this:
<urlset xmlns="http://www.sitemaps.org/schemas/sitemap/0.9" xmlns:content="http://www.google.com/schemas/sitemap-content/1.0"xmlns:image="http://www.google.com/schemas/sitemap-image/1.1">
<url>
<loc>http://acmefurniture.novusweb.com/sofas.html</loc>
<lastmod>2015-12-06T17:24:17+00:00</lastmod>
<changefreq>daily</changefreq>
<priority>0.5</priority>
</url>
<url>
<loc>http://acmefurniture.novusweb.com/sofas/couch.html</loc>
<lastmod>2015-12-30T23:09:56+00:00</lastmod>
<changefreq>daily</changefreq>
<priority>1.0</priority>
<image:image>
<image:loc>
http://acmefurniture.novusweb.com/pub/media/catalog/product/s/a/sample-couch-red_2.jpg
</image:loc>
<image:title>Couch</image:title>
</image:image>
<PageMap xmlns="http://www.google.com/schemas/sitemap-pagemap/1.0">
<DataObject type="thumbnail">
<Attribute name="name" value="Couch"/>
<Attribute name="src" value="http://acmefurniture.novusweb.com/pub/media/catalog/product/s/a/sample-couch-red_2.jpg"/>
</DataObject>
</PageMap>
</url>
This XML code is parsed by search engines to determine all the products and content of your site. You can control the frequency and importance of various sitemap elements under Stores | Configuration | Catalog | XML Sitemap.
The discussion of these elements is beyond the scope of this book. For a good explanation of indexing sitemaps, go to https://support.google.com/webmasters/answer/156184.
Search Engine Optimization, or SEO, is both important and often misunderstood. There's probably as much misinformation on the Internet about SEO as there is good, solid advice.
While we don't have the opportunity or space to go into great detail about SEO in this book, we can help you establish good practices that can reap great rewards in terms of increasing your search engine visibility and helping online shoppers know what you're offering.
Meta fields are data that are stored in the HTML code of a web page. Customers can't see this code, as it's not displayed by the browser, but search engines can see this data (in fact, they can see everything under the hood). Google, Bing, and others use this meta data in conjunction with many other analyzed items on your page to determine how to present your site to search users, including rank and content.
It begins with a basic understanding of how search engines use meta fields, particularly Google, since Google will provide you with most of your search engine referred traffic.
Take a look at this Google search result:
The title, Magento CSS Manager Extension | Mage Revolution™ is taken from the Title field of the product page, unless a value is used in the Meta Title field of the product in Magento. If so, Google would use the Meta Title value instead.
The URL of the page is, of course, the actual link to the product page. The use of canonical URLs is important, as it gives Google one link to the product, even though, as in this case, the product is also accessible by going to http://www.magerevolution.com/mr/magento-content-management-extensions/custom-css-manager. Without the use of canonical URLs, Google would see this as two different pages, each with the exact same content. Google is known to penalize sites that contain duplicate content by decreasing their rank position.
Finally, the description part of the listing comes first from any existing Meta Description field. If none exists, Google attempts to construct a meaningful description from the content of the page. By using a Meta Description field, you can control how the product is described in search engines.
We talked about the use of Product Fields Auto-Generation: the use of variables to automatically construct meta values for your products. While that is certainly a fast way of populating meta fields in products, it's also important to attend to meta fields for CMS pages and categories. There may also be certain products for which you want to insert special titles and descriptions to enhance their search engine presentation.
Do not under-value the efforts you take to improve your site SEO. So much of your traffic will come from search engines. But also be aware of SEO scams and bogus offers from so-called SEO experts. If anyone says they can guarantee you first page position, they are scammers. No one can guarantee first page search results. That position comes from careful attention to your meta information, product and page content, and really knowing your customers and your products. There are no shortcuts, but there are best practices. If you do need help in managing your SEO, shop around for reputable firms. Visit SEO-related forums and groups and ask others who are successful with SEO for recommendations. Never pay anyone who simply contacts you by unsolicited email. You'll just end up wasting your money with no credible result. And finally, use someone familiar with Magento's SEO features. We've seen several sites compromised by so-called SEO "experts" who tried hard-coding SEO features.
As you prepare your site for launch — and beyond launch — take time to address each important SEO feature in Magento:
Magento 2 also includes a number of SEO features, such as rich snippets. These are hidden data that provides Google et al with specific information about your products in a format that they understand. Price, availability, SKU, and more are easily read by search engines regardless of how this information is or is not presented to your customers.
As you prepare your Magento store for launch — or even if you're up and running — there's always more you can do to increase the sales productivity of your operation. It's important to continue working on your store.
In this chapter, we dove into customer groups, pricing rule promotions, newsletters, sitemaps, and Search Engine Optimization.
By mastering these features, you'll find new customers and new opportunities to sell more.
In the next chapter, we begin exploring the more technical aspects of Magento 2, by learning how to leverage its new architecture and features to customize functionality to meet your e-commerce objectives.
One of Magento's strengths is the fact that the platform can be extended to provide additional features and functions. These extensions—or add-ons—number in the thousands. They include themes, payment gateway integrations, site management enhancements, utilities and many, many more features.
In this chapter, we will discuss the two primary ways of extending Magento:
By learning how Magento can be enhanced, you will find that the power of Magento can be broadened to meet almost any specific e-commerce need you might imagine.
Third-party extensions that are offered to the Magento community are, for the most part, listed in a special section of the Magento website called Magento Connect (http://www.Magentocommerce.com/Magento-connect/):
Let's now review some of the features of Magento Connect, as they relate to researching possible add-ons for your Magento installation.
At the center-right of the Magento Connect home page is a search field. As with any intuitive search, simply enter in one or more keywords. You can also select the specific version – which Magento calls a platform—in the drop-down menu to the right of the keyword entry field. As shown in the following screenshot, we are searching for any extensions relating to sales:
Search field in Magento Connect
Furthermore, we can narrow our search to the specific Magento platform, such as the one on which this book is focused: Community.
The results of our search can be further refined by identifying extensions that are free versus paid, or, if paid, fall within a certain price range.
You can also browse the extensions using the categories in the top navigation bar, or the groupings listed below the search form on the main Magento Connect page.
Magento extensions take time to create, test, package and distribute. Additionally, responsible developers provide support to those who install their extensions. Considering this investment of time and effort, why would any developer offer a free extension?
At the time of writing this, the Magento Connect site for 2.0 was still evolving, and there were no protocols available for uploading extensions to the Connect marketplace. In its current iteration, the Connect site is a module catalog that directs the user to different developer websites. For the latest information on submitting extensions, go to http://www.magentocommerce.com/magento-connect/create_your_extension. The packaging process here is still specific to 1.0 extensions, but will be updated with information when Magento Connect for 2.0 comes online.
Much like Magento 1.0, Magento 2 is divided into modules. These modules are meant to encapsulate functionality related to a certain business feature. The framework provides organization for these modules, which can be found in the app/code directory with the following convention: app/code/(vendor)/(modulename).
Under the (modulename) directory, there are a series of nested directories that contain the blocks, helpers, controllers, and models that make up a module. The hierarchy looks like this:
Module architecture with nested directories
The following is a brief description of these directories and the programmatic roles of the files they contain:
Block/: This directory has PHP classes that contain logic to manage the view template. Blocks, therefore, are fundamentally related to display logic and are key to managing this logic.Controller/: This directory contains controllers for the module. A controller is responsible for routing requests in Magento, and handles requests by defining actions in controller class methods. These methods collect relevant data, and prepare and render the view.etc/: The etc/ directory contains files related to Magento configuration. For example, the module.xml file, a required file, contains information about the module version number and name.Model/: This directory has files that provide logic related to the model. The model provides abstraction for managing data from the relational database underlying Magento. Class methods here will allow you to perform CRUD (create read update, and delete) operations without the use of SQL (Structured Query Language), by providing an interstitial layer that generates SQL as a result of method invocation.Setup/: This directory contains classes for the setup of a new database structure and the data it needs to contain. This code is invoked when the module is installed.Api/: The Api/ directory contains module classes that are exposed to the Magento API, making them available to API calls.I18n/: This directory contains module language files used for localization.Plugin/: This directory contains plugins that can be used to extend the functionality of any public method in a Magento class. We'll discuss this directory in greater detail in the section immediately following this one.view/: This directory contains view files, including static templates, design templates, and layout files. We have discussed the contents of this directory and theming in general in greater detail in Chapter 3, Designs and Themes.We'll review a simple example of extending Magento functionality to give you an idea of what's involved and get you on your way. Magento 2.0 has introduced the concept of plugins that rely on dependency injection. While it's tempting to think of a plugin as interchangeable with extension or module, a plugin actually plays a significantly different role. It listens to any public method call on another object. As long as the class or method doesn't use the final keyword, any class and any public method is fair game, including methods in your classes, third-party classes and Magento classes. That's pretty impressive!
Start by declaring the plugin in the di.xml file, in the app/code/(vendor)/(modulename)/Plugins/ path, with the following XML code:
<config>
    <type name="ObservedType">
        <plugin name="pluginName" type="PluginClassName" sortOrder="1" disabled="false"/>
    </type>
</config>
In this example, the type name is the class being observed. This is the class with methods we're trying to extend. The plugin name is an arbitrary name you provide to the plugin, and the type is the name of the plugin's class in the \Vendor\Module\Model\class\Plugin format.
This is the class where we'll be defining the custom functionality that extends the method established in the type node.
The sort order attribute in the preceding XML allows for even greater flexibility. Multiple plugins can call the same method, and this field determines the order in which they are run.
The disabled attribute is pretty straightforward. It simply determines whether or not the plugin is active.
Once we've got the di.xml file in place, our next step is to create the class that's going to extend the original method in the \Vendor\Module\Model\class\Plugin.php file. Once it's there, we can choose to extend functionality before, after, and around the original method. So, say you wanted to execute some code, such as logging some data or firing off a call to a third-party API before the result of another public method; the following code would do this before the method was called:
<?php

namespace My\Module\{class};

class classPlugin
{
    public function beforeGetName(\Magento\Catalog\Model\Product $subject, $variable)
    {
        //execute code here
    }
}
?>
Now, say you wanted to insert some arbitrary code after the original public method. It would simply look like the following code snippet. Note that before has been replaced with after. So the naming convention involves the original method name with before, after, or around as a prefix:
<?php

namespace My\Module\class;

class classPlugin
{
    public function afterGetName(\Magento\Catalog\Model\Product $subject,$variable)
    {
        //execute code here
    }
}
?>
In the final example, code can be executed before and after the target method, as follows:
namespace My\Module\class;

class classPlugin
{
    public function afterGetName(\Magento\Catalog\Model\Product $subject,$proceed)
    {
       //execute code before original method here.
     $result = $proceed();
     //execute code after original method here.
    return true;
    }
}
?>
The special sauce here is in the $proceed parameter passed in, which allows delineation between code to be executed before and after a target method.
If you're a strong PHP developer, you may find it beneficial to create your own Magento enhancements. In fact, if you've been working with Magento for any length of time, you've no doubt had cause to tweak the code, even perhaps adding new functionality. For those with experience in MVC object-oriented programming, building new functionality for Magento can be quite rewarding.
If you do plan to create an extension you would like to share with other Magento developers, whether for free or profit, you should know about certain guidelines and resources that can help you create an extension which will be well-received by the Magento community.
If you can't find an extension for Magento to meet your needs, and you think you want to do your own enhancements, take a moment to do some online searching first. One of the first places I look is the Magento documentation (https://magento.com/help/documentation). At the time of writing this, the Magento documentation has been rewritten for Magento 2.0 and is a fantastic source for understanding how extensions work in Magento. Additionally, for a deep dive into Magento functionality, the writings of Alan Storm are without parallel. You can find his articles on Magento 2 here: http://alanstorm.com/category/magento-2. The articles there are quite technical, but remarkably readable and laced with humorous nuggets.
You can also search on Google for possible solutions for your issue. There are numerous blogs where developers freely share some significant solutions. One of my favorites is the Inchoo blog (http://inchoo.net/blog/). These Magento experts have tackled some very interesting challenges with some quite elegant solutions. I also post solutions and tweaks on our website (http://www.novusweb.com).
Therefore, before you dive into your own modifications, check around. Why start from scratch if others have already done most of the work for you?
For your new extension to work, it must be placed correctly within the Magento file hierarchy. We've reviewed the entire hierarchy at the top of the chapter, but for the purposes of this example, we'll only be touching on the subset of those files and directories necessary to stub out a basic module. We've broken this into a series of steps, grouped functionally, to make it a bit more digestible.
The first thing we'll need to do is create a module.xml and register the module. This is actually pretty straightforward in comparison to a lot of what we've been reviewing. You'll place the module.xml file in the app\code\{vendor}\{module_name}\etc\ folder and edit it, adding the following content:
<?xml version="1.0"?>
<config xmlns:xsi="http://www.w3.org/2001/XMLSchema-instance" xsi:noNamespaceSchemaLocation="../../../../../lib/internal/Magento/Framework/Module/etc/module.xsd">
    <module name="{module_name}" setup_version="1.0.0">
    </module>
</config>
Next, in the root directory of the module {vendor}\{module_name}\, create a file named register.php with the following content:
<?php
\Magento\Framework\Component\ComponentRegistrar::register(
    \Magento\Framework\Component\ComponentRegistrar::MODULE,
    '{vendor}_{module}',
    __DIR__
);The inclusion of register.php is a new step in Magento 2.0, and it's required. I was surprised when reviewing a series of themes and modules to find it frequently left out. If you're having problems with a theme or module, this is a good first place to check. If you leave it out, you won't be able to activate the module.
The second thing we'll need to do is create a frontend router. Add the following text to etc/frontend/routes.xml in your module:
<?xml version="1.0"?>
<config xmlns:xsi="http://www.w3.org/2001/XMLSchema-instance" xsi:noNamespaceSchemaLocation="../../../../../../lib/internal/Magento/Framework/App/etc/routes.xsd">
    <router id="standard">
        <route id="{module}" frontName="{module_name}">
            <module name="{vendor}_{module_name}" />
        </route>
    </router>
</config>
It's beyond the scope of this book to pick apart and discuss the constituent parts of this XML, but if you're curious about the details, the resources alluded to earlier in this chapter (especially Alan Storm's series of articles) are an excellent place to go for detail.
The third thing we'll need to do is create a controller action. Start by creating an index.php file in app\code\{vendor}\{module_name}\Controller\Index\ with the following content:
<?php
namespace {vendor}\{module}\Controller\Index;

class Index extends \Magento\Framework\App\Action\Action {
protected $resultPageFactory;
public function __construct(\Magento\Framework\App\Action\Context $context,
        \Magento\Framework\View\Result\PageFactory $resultPageFactory)     {
        $this->resultPageFactory = $resultPageFactory;
        parent::__construct($context);
    }

public function execute()
    {
      $resultPage = $this->resultPageFactory->create();
      $resultPage->getConfig()->getTitle()->prepend(__('vendor examplemodule'));
      return $resultPage;
    }
}
Every action extends the core Magento action class, and always has an execute() method, which is executed when the action is invoked. It's also important to note how this impacts the URL. The frontname specified in the router is the first part of the URL, the controller folder the second part, and the name of the file containing the controller code, the third part.
Again, there's more fun detail here, but for the purposes of this rudimentary example, we don't want to get bogged down breaking this down into too much detail.
The fourth thing we'll need to do is create a layout file. You'll add this file in the app\code\{vendor}\{module}\View\frontend\layout\ directory using the name default.xml.
The contents should look like this:
<?xml version="1.0"?>
<page xmlns:xsi="http://www.w3.org/2001/XMLSchema-instance" layout="1column" xsi:noNamespaceSchemaLocation="urn:magento:framework:View/Layout/etc/page_configuration.xsd">
  <body>
    <referenceContainer name="content">
      <block class="{vendor}\{module}\Block\{module}.php" name="{vendor}_{module}" template="arbitrary_template_name.phtml">
      </block>
    </referenceContainer>
  </body>
</page>The fifth thing we'll need to do is create a block for our module. Once this is done, we can create a template file and activate the module. The block will be intuitively added to app\code\{vendor}\{module}\Block\{module}.php and contain the following content:
<?php
namespace {vendor}\{module_name}\Block;
class {module_name} extends \Magento\Framework\View\Element\Template
{
  public function _prepareLayout()
  {
    return parent::_prepareLayout();
  }
}
For the template, we'll just add valid HTML content to the app\code\{vendor}\{module}\View\frontend\layout\ arbitrary_template_name.phtml file, as follows:
<h1> This is text from the arbitrary_template_name.phtml template file. Maybe add some CSS? </h1>
Activate the module. This is most easily done by editing the app\etc\config.php file and adding an entry for your module here:
There's another way to activate the module as well. If you have access to the command line, and are comfortable with its use, you can simply invoke the Magento binary to activate the module, by running the following command from the document root of your website:
bin/magento setup:upgrade
You should see output similar, but not identical, to the following screenshot:
Once the module is active, clear the system cache using the following command:
bin/magento cache:clean
The cleared cache types will be displayed:
After the cache has been cleared, you can view the result of your labor. Remember, the frontname defined in the route.xml defines the first part of the URL, and the second and third are defined by the controller folder and the PHP file. In the example reviewed above, this URL would be http://magentostore/{module_name}/index/index/. Depending on what HTML you've put in your sample template, you should see a result that looks something like the following screenshot:
Almost every week, I search Magento Connect just to see what new features and themes are being added. The creativity of the Magento developer community can be quite impressive.
One of the great joys of working with Magento is knowing that it is fully extendable in many ways, from simple theme enhancements, to full-fledged functionality changes. Depending on your own skills and talents, you may want to take solutions you've created and let others benefit, either as free contributions or money-making add-ons.
In this chapter, we have covered searching, evaluating, and installing Magento Connect extensions, the process of extending existing Magento functionality using plugins, and creating and registering your own extension from scratch.
Of course, we have a couple more interesting areas to cover in Chapters 9, Optimizing Magento, and Chapter 10, Advanced Techniques, which will further help you extend the power of Magento.
As you've no doubt realized by now, Magento 2 is a very powerful e-commerce platform. From its robust product management suite to its virtually unlimited extendability, Magento packs a lot into one open source platform.
From our work within its files, we have learned that Magento combines a great number of separate files and data tables to present any page to online visitors. By its very nature, the MVC architecture of Magento puts a good deal of overhead on any web server. In the beginning, the complexity of Magento discouraged some developers because of the demands the platform placed on hosting servers.
However, over time Magento's developers have worked hard to improve overall performance, and Magento 2 represents a milestone in that regard. Magento 2 is indeed faster than before, even when taking faster servers into account.
That said, for Magento to perform at the highest levels of performance, there are areas with which you should become familiar. Specifically:
After all, a faster website improves the customer's experience and helps improve your rankings with search engines.
Most databases for open source platforms are quite simple in comparison to Magento's. For instance, in the past, when one designed e-commerce systems from scratch, it was likely that a simple relational model would suffice: one table for products that would contain all the key information relating to that product, such as price, available quantity, description, weight, and so on. The challenge with this traditional approach was that if we needed to add a new product attribute, such as height, that field would have to be added to the product table, thereby making previous versions incompatible and complicating any upgrade path.
In order for Magento to be a truly scalable platform, its developers utilize an Entity, Attribute and Value (EAV), or Sparse Matrix, architecture. This database structure adds a great deal of complexity to the Magento data model to be sure, but its advantage is its ability to allow an unlimited number of attributes to be added to any core item, such as products, categories, customers, addresses, and more. Today's Magento installs an initial 296 data tables, many of which are related to EAV.
EAV allows developers (and you) the ability to extend any entity's attributes without changing any of the data tables. Let's break down EAV to understand how this works.
As you go through this chapter, you may want to take an actual look at the tables of your Magento installation. With most hosting providers, you are provided phpAdmin as a tool for exploring and manipulating your database. If not, you can use any number of available tools, including the free MySQL Workbench (http://www.mysql.com/products/workbench/). See your hosting provider for information on how to directly access your database.
Products, categories, customers, customer addresses, ratings, and reviews are all entities in the Magento data scheme. Each entity has its own entity record in one of the following tables:
catalog_product_entitycatalog_category_entitycustomer_entitycustomer_address_entityrating_entityreview_entityeav_entity (stores product attribute entities)Each of these entity tables stores very basic information about the entity. For instance, let's take a look at the columns of the catalog_product_entity table:
entity_identity_type_idattribute_set_idtype_idskuhas_optionsrequired_optionscreated_atupdated_atThese are the only columns required to define any product in the database. Notice that the name, description, and price of the product are not included in this table.
Attributes are the names of various items that belong to an entity. For instance, a product has attributes of price, description, and quantity. Attribute tables don't store the actual value of the item, only its name and its relationship to the entity. That's where value comes in.
If you're following the bouncing ball so far, you now can surmise that value is the actual data of the attribute. So, if we use a simple graphic such as shown in the following figure, we can visualize the entire EAV relationship.
Let's look at how this works in practice for a product. The product entity is stored in the catalog_product_entity table, as described before. To bring together all the information related to a product, we have to pull in all the various attributes (and their values) connected to the product.
To do that, we look into the eav_attribute table. This table connects all attributes to their respective entities. One column in this table is called entity_type_id. This column relates to the entity_type_id column in the catalog_product_entity table, as shown in the following figure:
Once the associated attribute for an entity (in this example, a product) is determined, Magento next works to associate the actual value for the attribute. Here's where it gets a bit complicated, but fun!
For each attribute, Magento stores a type for the associated value. In other words, is the value a decimal value (such as price), a text value (for example, description), and so on. These are stored in the eav_attribute table in a column named backend_type. For each type, Magento has a corresponding table whose name ends in the particular type. The following are the value tables for product entities:
catalog_product_entity_datetimecatalog_product_entity_decimalcatalog_product_entity_intcatalog_product_entity_textcatalog_product_entity_varcharIf a lookup of a product's attribute shows a type of decimal, then the associated value would be found in the catalog_product_entity_decimal table. The following figure illustrates this basic relationship:
If you take a look at the Magento data tables, you'll now begin to understand the relationship between various entities, attributes, and values.
EAV is a key feature of Magento that allows developers to extend the platform without changing its core data structure. Imagine that you want to add new functionality that depends on a new product attribute - you could simply add that attribute into the system without adding a single new column to any table!
Unfortunately, there is a trade-off: performance. As you can see, in order to pull in all the information for a product — such as for a product detail page — Magento has to do a lot of calls to a lot of tables within the database. These lookups take time and server resources.
Fortunately, Magento's developers are still a step ahead of us.
Long ago, developers realized that while EAV was a cool way to build extendability into Magento, it added a major hit in performance. All the lookups, particularly for busy sites, can really slow down response times. MySQL, the database used for Magento, is a single-threaded database, meaning it can only handle one operation at a time.
The solution was to take all the various relationships and pre-compile them into other tables. In essence, Magento could do its lookups using fewer tables (and therefore fewer SQL statements) in order to get the same data.
If you look again at the data tables, you'll see a number of tables with index or flat in the name. These tables combine the EAV relationships into one table.
In order to take advantage of this feature for categories and products (sales orders are automatically flattened):
After saving, you should get a notice at the top of your Admin page, like the following screenshot:
One of the things you will have to do as you add or update products and categories is to reindex your site. We'll discuss indexing in more depth in the next section.
Today's search engines have started measuring rendering times — the time it takes for a web page to download, including graphics and other files — as part of their ranking algorithms. In the past, we used to concentrate on download speed because so many users were connected to the Internet with slow, dial-up connections. With the proliferation of broadband speeds, most developers eased up on this goal, opting to include more flash animations, larger graphics, and complex JavaScripts. Now, we're moving back to the beginning in order to satisfy Google, Yahoo!, and Bing.
With Magento's complex MVC architecture and database structure, you can have the most efficient front-end design possible, yet still experience very slow download speeds as Magento works to build the pages and query the database. Therefore, to create a site with the lowest download speed, we need to take advantage of two important tools: indexing and caching. Each contributes its own benefit to your goal of speeding up the page generation process.
As your Magento installation grows with products, customers, and orders, database lookups can become slower as the MySQL database has to look among a greater number of records to find the ones it needs. Magento uses a number of indexing tables which provide faster lookups by pre-organizing the data records. However, as your site grows, so do these index tables.
In our discussion on EAV, we talked about flattening the categories and products. In essence, when Magento is asked to index categories and products, it pulls in all the various related EAV data for each and creates records in special tables that contain all the related data in one record. In other words, instead of doing lookups among as many as 50 tables to display all the information on a product, Magento looks to only a handful of tables, thereby gathering the necessary information more quickly.
The speed difference when using a flat catalog versus a non-flat catalog is unnoticeable for low-traffic sites, as MySQL can adequately handle requests very, very well. However, as your site grows in traffic, you will notice a wider speed differential. Additionally, if your store hosts thousands of products, you'll certainly appreciate the added speed a flat catalog will give your site.
The trade-off is that reindexing a site with lots of products and/or categories can take a long time if you choose to use a flat catalog. For that reason, we generally keep the flattening feature turned off when we populate a new site with products. However, once we go live, we almost always turn on the flat feature to give our sites the fastest possible rendering possible, even if the initial site traffic is low.
As we saw in the previous figure, if you make changes to your site, Magento will notify you that you need to reindex your site. To do this, you need to perform the following steps:
Once completed, you will see these indexes with a status of READY.
While indexing can help speed up database lookups by pre-organizing the data for faster lookups, caching does virtually the same thing for the HTML page components that make up the front-end experience. Caching stores completed pages or parts of pages so that website visitors will be provided with faster downloads.
In a nutshell, caching works like this (see the following chart, also):
Caching in Magento is accomplished in a couple of ways: with core components, such as modules and layouts, and through whole page caching, which stores entire page outputs.
Every time a page is accessed by a visitor, various modules, layouts, product images, and more are cached or stored for easy retrieval within the /var/cache directory of your Magento installation. If you explore this directory on your server, you'll see thousands of files with strange names. These are the actual pieces of cached data that are delivered to visitors to your site.
Whole page caching is just as the name implies: the caching of an entire web page. Imagine the speed boost if Magento did not have to build a new page by assembling dozens of layout and module components, cached or otherwise!
I've run some tests of sites with and without caching turned on. In almost all of our tests, caching improved download speeds by approximately 25%-40%, depending on the overall load on the server. The heavier the load, the more the benefit since the server is naturally slower in building new pages versus serving cached pages.
This increase in speed, while perhaps not as noticeable to your site visitors, can have a huge impact on how search engines rank your site.
While caching does help speed up page delivery, it does take a bit of management on your part. Caching is controllable in two areas of your backend:
Then, you need to set your core cache settings:
Unfortunately, some extensions are not properly designed to participate in Magento's caching system. If you experience problems in how certain content blocks are rendered, you may want to leave the Blocks HTML output cache disabled. While this prevents content blocks from being cached, it may be your best remedy if you have a third-party extension which you're really fond of.
Magento 2 has included a variety of new areas to the caching engine, as can be seen from the following screenshot:
This is great for performance but also good to keep in mind when making changes to the site. Translation changes not showing up? You probably need to clear the cached translation files to fix this. As a rule of thumb, clearing the cache is a good first step when troubleshooting Magento.
Everyone we talk to who works with Magento is concerned about speed. As we've noted earlier, Magento's complex architecture is simultaneously good and bad. The level of functionality and extendability is practically unparalleled in the world of open source platforms, yet even with proper use of indexing and caching, substantial site traffic can make your Magento site feel like a tortoise on sedatives.
The problem lies, in part, in the fact that developers assume that open source is analogous to quick and easy. The fault is not Magento's: it is what is it — a powerful, yet complex, e-commerce platform.
Therefore, if you want to use Magento to its fullest, it's your responsibility to make sure you have the resources and tools to capitalize on its power. In Chapter 1, Planning for Magento, we discussed technical requirements for running a Magento installation. Now, let's discuss some ways of increasing its speed and performance.
Travel with Caution
You'll find an almost endless supply of online blogs, wikis, and postings relating to the optimization of Magento. Some offer quick tweaks; others go into elaborate schemas. The challenge when looking for any type of fix is knowing what is sound practice and what may be out-dated, or simply wrong. The following suggestions are based on what I have found are both within the reach of most developers and that work for the sites we develop and manage. That said, any time you find something you want to try, try it on a test server or your local computer first. Never apply these modifications to a live, production Magento installation.
Apache web servers have a module called mod_deflate. This module, when called by a website, serves to compress files sent by the server. To engage this module, insert the following code into the .htaccess file located in the root directory of your Magento installation, replacing what is currently there for the mod_deflate directive:
<IfModule mod_deflate.c>
############################################
## enable apache served files compression
## http://developer.yahoo.com/performance/rules.html#gzip

# Insert filter
SetOutputFilter DEFLATE
# Netscape 4.x has some problems...
BrowserMatch ^Mozilla/4 gzip-only-text/html
# Netscape 4.06-4.08 have some more problems
BrowserMatch ^Mozilla/4\.0[678] no-gzip
# MSIE masquerades as Netscape, but it is fine
BrowserMatch \bMSIE !no-gzip !gzip-only-text/html
# Don't compress images
SetEnvIfNoCase Request_URI \.(?:gif|jpe?g|png)$ no-gzip dont-vary
# Make sure proxies don't deliver the wrong content
Header append Vary User-Agent env=!dont-vary

</IfModule >
Using BrowserMob (http://www.browsermob.com) as our testing source, a configurable product page on our test site (the one we built to use for writing this book) was reduced in size from 452 KB to 124KB, a 73% reduction in the amount of data delivered!
Another Apache module, mod_expires, controls how browser caches should treat files they store on users' computers. When you visit a website, your browser caches the results. For files that have not changed since a previous visit, the browser will use the file in the cache on the local computer rather than pull it again from the web server.
The expiration of these cached files can be controlled by your web server. If your server provides no expiration instructions, then your site visitor's browser may assume that the cached information is not good (or is still good long after it is) and fail to pull the best information from your site.
Insert the following within the <IfModule mod_expires.c> directive in your root .htaccess file:
ExpiresActive On ExpiresDefault "access plus 1 month"
You can also use a shorter period of time, but generally, you want to allow browsers to use unchanged, cached files for quite a while, thereby lessening the load on your server.
This is one of the more difficult items to change if you're hosting on a shared account, as many hosting providers will not allow you to increase the amount of memory allocated to PHP. The normal default of 64 MB may be sufficient, but if you're expecting a high volume of users, increasing this to 256 MB has produced noticeable improvements for us.
To increase this in your .htaccess file, simply place a hash mark (#) before php_value memory_limit 64M and remove the hash mark before php_value memory_limit 256M.
This is one configuration you may have trouble implementing as it involves changing a couple of core variables for MySQL. When we started looking more closely at ways of speeding up database lookups, we found that with our hosting provider, MySQL was configured to do lookups without a cache: the query cache and query cache limit were both set to zero.
By doing some research, we found that MySQL queries could be made faster by increasing the total size of the query cache and the query cache limit allowed for any one query. Other developers who had experimented with this suggested at least a limit of 1 MB for the individual query and a total limit of 64 MB would handle most initial, growing Magento stores. As your store grows, you may want to increase these limits to allow MySQL to take advantage of its own internal caching mechanism.
If you do have the ability to modify your MySQL database — or if you can request a modification with your hosting provider — you should set the query_cache_limit and the query_cache_size to amounts such as the ones given above.
For specific information on how to set these in MySQL, see http://dev.mysql.com/doc/refman/5.0/en/query-cache-configuration.html.
Nginx is an alternative to Apache when running Magento. Significant performance improvement out of the box is driving quite a bit of this adoption, and a large number of vendors have made the switch from Apache to Nginx. In recognition of this, Magento 2 has been built with full support for Nginx. It's beyond the scope of this chapter to discuss Nginx configuration, but a vast majority of hosting providers will install Nginx for you to use. Magento 2 also has a suggested Nginx configuration file in the root folder, which can be seen via GitHub as well, here: https://github.com/magento/magento2/blob/develop/nginx.conf.sample.
Magento 2 supports Varnish and allows for general parameter and VCL (Varnish Configuration Language) management. It's beyond the scope of this book to dive into configuring a Varnish proxy on your server, but again, this is something that many Magento specific hosting providers will support and configure on your behalf. Once this is in place, you can manage Varnish through Magento 2 in the Store | Configuration | Advanced | System | Full page cache, as shown in the following screenshot:
CDNs (Content Delivery Networks), are servers which host your static or non-dynamic content on very fast servers and networks. For instance, if your images and JavaScript files are hosted on CDN servers, such as the ones provided by Amazon or Rackspace, your Magento server doesn't have to spend time processing and delivering those files to your visitors. Since web servers have limits in terms of the number of active connections they can support for delivering files, allowing other servers to carry part of the load means your server can accommodate more visitor requests.
Magento 2 has native CDN support, and if you navigate to Store | Configuration | Web you'll see an area called Base URLs. You can provide the CDN URL's here and Magento will automatically pull the resources from it.
Magento continues to amaze me each day I spend building and managing e-commerce sites. There's little debate over the fact that it is both powerful and complicated; both configurably pleasant and frustratingly massive.
The marketing side of me enjoys the flexibility in design, presentation, and user interaction. The developer side finds satisfaction in learning new ways to squeeze additional performance and functionality from the world's most prolific open source platform.
Hopefully, this chapter has helped you gain a better understanding and appreciation of Magento's EAV data model; learn how to use the inherent indexing and caching capabilities of Magento, and dive into methods of fine-tuning your Magento installation for increased performance and shorter download times for store customers.
As we near the end of our journey toward Magento mastery, we have one final area to explore in the next chapter.
By now, even if you're new to Magento, you should have a newfound appreciation for the power and extensibility of the industry's most active open source e-commerce platform. We've covered just about everything from installation to extending the platform. Your Magento store, if not already online, is most likely ready from a preparation viewpoint.
However, we're not quite finished yet. You may want to undertake a few more options that can make your installation act more like that of a Fortune 500 company — and less like a hobbyist's experiment in e-commerce.
In this chapter, I will take you through four advanced techniques that I feel any bona fide Magento master should have in their own personal knowledge base:
You may not wish to undertake all of these now, or later, but at some point you will find these concepts helpful in turning Magento Community into an enterprise-level contender.
I know it is so very tempting to install Magento onto a production server account, do the initial configurations, and launch your new store. I also know that if you're only working with one Magento installation, there will undoubtedly come a time when — no matter how careful you are — a buggy extension, an errant piece of code, or a mistyped tag will cause your site to "go dark." You may even experience the dreaded Magento error screen (well known for offering little advice or remedy).
Therefore, if you take no other advice in this book to heart, take this one seriously: create a staging environment.
Some developers, particularly those working for large enterprise operations, may want to create an elaborate remote development, staging, and production setup with matching hardware for each environment, to decrease the number of variables present when deploying and testing code. If you're working with a large team and you have the funds available for the time and effort needed to create this type of setup, by all means do so. It's more likely, though, that if you do fall into this category, you're better suited for Magento's Enterprise solution, rather than the do-it-yourself Community edition discussed in this book.
For those of us on smaller budgets — who appreciate what Magento Community offers as a robust yet open source platform — I would suggest that you use a simpler, more rapidly deployable solution. Keep it simple and manageable.
There are actually two staging setups I maintain: one for testing and one for client development. The former is used to test new extensions, programming ideas, and design concepts, with no particular client use in mind. The latter is created for each client site and, except for the data, is an exact duplicate of the client site in terms of code, extensions, and design.
For client sites, this is my suggestion for a basic operation procedure:
At some point, you will feel you're ready to "go live." Guess what? You probably are. If your staging and production installations are in sync, going live is merely repointing the live domain name to your production account and setting payment gateways to "live" mode.
One of the dubious benefits of writing a book like this one is that I get the pleasure of reliving some of my less brilliant moments as a student of Magento as I impart the wisdoms gained to you. This is one of those cases.
If you've followed the simple approach previously outlined, you should have a staging and a production environment that both work successfully. After all, you're not going to do anything to the production installation that you haven't already tried and tested on the staging installation. At least, that's the plan.
But once you launch the production store, there will come a time when you want to take a shortcut. Your client might be pressing to install a new extension they found at the Magento Connect website, or you might need to import some new product types the current store has not been using. Regardless, if you skip applying your changes to your staging installation and go directly to the production installation, you'll find that you will experience the moment when your heart drops out of your chest as your production store ceases to work as intended. It's another of Murphy's laws.
I only had to do that once — and suffer the client's anguished pleas to "get my store back online!" — to learn my lesson: staging first, then production. Never waiver from this dictum and you'll continue to successfully please your client, yourself, or whoever is the owner of the Magento store.
Version control is one of the most helpful and time-saving tools that can be used in support of software development. Even if you're only making small changes to the templates you're using, or adding modules without modifying the code inside of them, version control allows you to track changes that have been made and to evaluate code at any given point in time after the implementation. Even more importantly, it allows you to roll back the code to an earlier state, in cases where you're not quite sure what changes might have caused problems with the site.
At this point, the tool most widely used for version control by the development community is Git. Git is a system that was developed by Linus Torvalds (the originator of LINUX himself!) as a result of his frustration with existing tools. While it's beyond the scope of this book to go into much detail around what exactly it was that frustrated him, suffice to say that the changes he's made have positioned Git as the lingua franca for version control, and understanding its basics is a necessary endeavor if you want to do any development, or even just track changes to your system caused by upgrades.
Magento is a complicated system and even small changes can have a significant impact, causing errors that are obvious (site down) and some that are pernicious and creeping, such as the creation of bad data over time. Using a system to track all the changes that you and others have made to the system is a strongly recommended practice and will invariably, at some point, save you time, money, or both.
Let's start with a very basic prescription: installing the Git binary on your system and checking your current Magento site into a local repository. For the purposes of this example, we'll assume the use of OSX, although Git can be used for pretty much any modern operating system.
If you've installed the developer tools that come with OSX on your system, the Git binary will already be there. If you haven't and don't want to, you can download the Git binary from this link: https://git-scm.com/download/mac.
To make sure that Git has been installed on your system, open a terminal and type git –version. You should see the following output:
The next step you'll take will be to change to the document root of your Magento install. In this example, that's /Users/jbownds/websites/magento2. Once here, you can issue three simple commands to initialize the repository and check in the first version of your files. You'll start with git init ., followed by git add ., and finally git commit . –m "first checkin of files" (you can substitute another message here, if you like).
See the following screenshot for an example of what this will look like:
Once you've checked in the files, you'll see a flurry of messages indicating which files have been added, which looks something like this:
This indicates that the Git repository has been initialized locally and you're ready for the next step. As mentioned before, Git is a distributed version control system. That means it's easy (and a good idea) to store copies of it in different locations. There are many services that allow for this, but the most popular is probably GitHub. For this reason, we'll walk through the steps necessary to take the repository you've created and push it out to GitHub. Start by creating an account here: https://github.com/join:
Once you've created an account (there are both free and paid options here), you can create a new repository by clicking the appropriate button on the right gutter:
Click on the repository and there will be step-by-step instructions for pushing an existing repository from the command line:
Go back to the document root for the repository you created and paste these commands into the terminal. The first one should run without a problem, but the second one will probably run into some authentication issues, as in the following example:
As you can see in this example, the second command had issues. The specific error message is Fatal: could not read remote repository. Please make sure you have the correct access rights.
To address this, you'll need to add a public key for the user to GitHub, so GitHub recognizes the user trying to push this information into the remote repository. Don't worry - this sounds trickier than it is. All you need to do is type in ssh-keygen. You'll be prompted with several questions, all of which you can leave blank. At this point, you should have a generated public key for your user. You can view it by typing vi ~/.ssh/id_rsa.pub, and it'll look something like this (ignore the black arrow, this is just to blot out information in the private key).
Copy this key and head back to GitHub. Once there, you can add this key in the Settings area of your account:
Click New SSH key, provide a title, and paste the value you copied into the text area. Save this value:
Now, when you go back to the command line and try git push –u origin master command again, you'll see results like this:
Congratulations! You've created your first Git repository and pushed it out to GitHub.
Now, it's worth noting that there are a slew of very well-conceived visual tools that manage this process for you as well. It's beyond the scope of this text to evaluate these tools but it's worth mentioning a couple.
GitHub itself has a free desktop tool you can download and use, and it's quite handy for a visual representation of what's going on. The other tool we've seen used predominately is Tower. Tower can be obtained by visiting their website at https://www.git-tower.com/.While there is cost associated with the use of this tool (after a free trial), if you prefer a visual representation of what's happening with version control, this option may be more attractive to you.
If you're not up on Unix lingo, a cron job is a scheduled action that occurs at preset intervals on your server. For instance, Magento can create a new sitemap for your store according to the time interval you configure in the backend.
What is confounding to many new to Magento is that configuring cron intervals for various Magento functions doesn't actually cause anything to happen. The reason is that your server must still be told to run the configured tasks.
Cron jobs are configured by using what are called crontabs. These are expressions that dictate how often the server is to run the particular task.
There are a few inherent functions included with Magento that can be run periodically, including:
Some third-party modules also include scheduled tasks, such as Google Product feeds. The frequency of most of these can be configured in your Magento backend. For those that aren't, you can find the crontab-style setting for each in the config.xml file of each module.
For example, the following is the cron schedule for the function that sends out scheduled newsletters, from app/code/Mage/Newsletter/etc/config.xml:
<crontab>
<jobs>
<newsletter_send_all>
<schedule><cron_expr>*/5 * * * *</cron_expr></schedule>
<run><model>newsletter/observer::scheduledSend</model></run>
</newsletter_send_all>
</jobs>
</crontab>According to this crontab, Magento looks every 5 minutes to see if any newsletters need to be sent out.
|
Module |
Cron job |
Default frequency |
Active? |
|---|---|---|---|
|
Catalog |
Reindex pricing |
Every day at 2am |
Yes |
|
CatalogIndex |
Reindex the entire catalog |
Every day at 2am |
No |
|
CatalogIndex |
Run queued indexing |
Every minute |
No |
|
CatalogRule |
Daily catalog update |
Every day at 1am |
Yes |
|
Directory |
Update currency rates |
Controlled by Currency Setup | Scheduled Import Settings |
Yes |
|
Log |
Clean logs |
Every 10 minutes |
No |
|
Newsletter |
Send scheduled newsletters |
Every 5 minutes |
Yes |
|
PayPal |
Fetch settlement reports |
Controlled by PayPal | Settlement Report Settings |
Yes |
|
ProductAlert |
Controlled by Catalog | Product Alerts Run Settings |
Yes | |
|
Sales |
Clean expired quotes |
Every day at midnight |
Yes |
|
Sales |
Generate aggregate reports (there are actually five configured) |
Every day at midnight |
Yes |
|
SalesRule |
Generate aggregate coupon data report |
Every day at midnight |
Yes |
|
Sitemap |
Generate sitemaps |
Controlled by Google Sitemap | Generation Settings |
Yes |
|
Tax |
Generate aggregate tax report |
Every day at midnight |
Yes |
Many of Magentos core modules contain crontab scripts, although some are commented out. The following is a list of Magento Community 1.5 crontabs I have found within Magento, indicating for each whether the script is active or not. To make a script active, simply remove the comment tags surrounding the <crontab> code in the appropriate config.xml file.
For your staging environment, you may want to keep cron jobs from running automatically. Rather, you may wish to have Magento run through its list of scheduled tasks at your command so you can watch for any problems or errors.
A wrinkle in Magento 2.0 is that there's no longer a cron.php, so Magento's cron can no longer be triggered from the command line (manually).
To manually run any scheduled jobs, access the magento file found in your site's root folder from the terminal and use the following command:
php <path to magento root>/bin/magento cron:run
For your production server, you'll want cron jobs to run as scheduled around the clock. To do this, you have to create a cronjob for your server, telling it how often to trigger Magento's cron tasks. For most servers — Unix and Linux — the cron program operates as a continuous daemon, waiting to take some action according to any programmed crontabs. In this case, we want to have the magento binary (also in our Magento root folder) run by the server every few minutes or so.
The most straightforward way to schedule a cron job is to do so from the command line. Start by opening up a command prompt as the root user and typing in the following command:
crontab –e
This command will take you to a screen where you can add entries to schedule the cron. To automate the Magento cron, you'll want to add entries that look like this:
You can schedule crons to run every X number of minutes, hours, days, or months. You can schedule them to run only during certain times of the day, days of the week, or months of the year. Cron is an amazingly flexible system. The following screenshot shows the logic for scheduling crons:
This can be a bit obtuse to understand, though; if you want a quick way to sort out timing for a cron job, you can visit one of the many crontab generating websites. One example is http://crontab-generator.org/. As you can see, this site provides assistance and makes it a bit easier to generate the desired schedule:
The Magento binary does a number of things when your server cron job runs:
The parameters that control this behavior are configured in your Magento backend:
Each field in this panel controls the timing actions of the cron script, as follows:
cron_schedule database table. This will help keep the table from growing too large.cron_schedule table.There remains considerable debate among bloggers on what values are ideal for this configuration. However, from my observations, there are some principles I follow when configuring Magento cron jobs.
Decide the frequency of your server cron job. If you configure your server cron to run every 15 minutes, then you do not need any Magento crontab or cron configuration to be set at anything less than 15 minutes. For example, the Send Newsletter crontab, as shown in the earlier table, is configured by default to run every 5 minutes.
If your system cron task runs every 15 minutes, then when cron.php is executed, the send newsletter task is actually run three times, since Magento schedules ahead and looks back to run any scheduled tasks. In order words, if your system cron runs at 10:00 am, it will run any tasks that were scheduled to run between 9:45 am (the last time it ran) and 10:00 am. Since the send newsletter task was scheduled to run every 5 minutes, at 9:45 am, Magento scheduled it to run at 9:50, 9:55, and 10:00. The task did not run at those times, but instead were all run at once at 10:00 when your system cron ran.
Therefore, you may want to go back through the various module config.xml files (such as the ones in the earlier table) and set the frequency of the jobs to match or be less frequent than your system cron.
Once you have modified any crontabs to match your system cron job frequency, you should now configure the Store | Configuration | Advanced | Cron (Scheduled Tasks) panel:
cron_schedule database table and see if there are any failure messages that can help me diagnose the problem. In fact, even if your store is running smoothly, keeping this number large should not grow your database, as there will be no failure messages to record.So, for example, if I set my system cron job to run every 15 minutes, my Cron (Scheduled Tasks) panel might look like this:
While we're on the topic of cron jobs, one system cron job you should consider is backing up your Magento database. As usual, this advice is based on hard-earned experience. In the course of working with Magento, and especially if you have clients who have permissions to add extensions and change configuration, you may need to restore the Magento database to a previous working state.
While most server hosting providers provide backup services, restoring just the Magento database can take a long time as server backups restore all the files on the server, not just your database. Some providers do provide specific database back-ups, but to be safe, it doesn't hurt to schedule your server to do your own back-ups. Additionally, learning how to quickly and easily back-up and restore your database will come in handy, since you should always do a back-up of your database before installing new extensions or significantly changing configurations.
Magento does have a back-up function in the backend, under Store | Tools | Backups. While this is one way of backing up your Magento database, there is no built-in restore function. Furthermore, I have had problems in the past using the back-up file to restore, due to foreign-key conflicts. For extra, extra safety, it wouldn't hurt to use this function to create a back-up — especially if you do not have SSH access to your server account — but it is not as easy or quick as the following method.
If you have SSH access to your server, using MySQL's built-in backup and restore functions are both quick and easy. You do need a username and password for your database (which you should have if you installed Magento):
mysqldump –u [username] –p[password] –h [hostname] [databasename] > [filename].sql.To provide an example for the previous command, let's assume the following:
mageuser1magepassword1localhostmagento_dbmagento_dbUsing these example values, your command would look like this:
> mysqldump –u mageuser1 –pmagepassword1 –h localhost magento_db > magento_db.sql
To restore your database, a slightly different format is used: mysql –u [username] –p[password] –h [hostname] [databasename] < [filename].sql, or the following to use our above examples:
> mysql –u mageuser1 –pmagepassword1 –h localhost magento_db < magento_db.sql
Now that you know how MySQL can dump a back-up of your database, you can use your server cron to do a dump every night, every week, and/or every month, depending on how fervent you want to be about preserving backups.
Every developer will have their own back-up strategies; so, naturally, do I. While our hosting provider does a complete server back-up every night and preserves back-ups for 7 days, I like to augment that with my own database rolling back-up strategy:
One note here: if you can, you may want to consider dumping these to a computer other than your Magento server. Since our hosting provider does off-site backups, I feel quite comfortable backing up our Magento databases onto a local machine at our office. The chances of all three locations, our hosting provider's facility, the off-site back-up facility, and our office, all burning down at the same time (I'm sure)' is pretty darn remote, especially since all three facilities are spread across a continent.
To schedule your dumps as crontabs, invoke the crontab, as you did earlier in this chapter, and create as many jobs as you feel you need (if you're dumping to another server, you need to, of course, schedule these jobs on the machine to which the backup is to be dumped).
Create a new schedule according to your desired frequency (every day, week, month, and so on) and enter your MySQL dump command, as used previously. For the file name, though, use a name unique to the purpose of the dump. For example, for a dump on Monday, you might use magento_db_Mon.sql; for week 1, magento_db_week_1.sql. In this manner, the next dump for a given script will overwrite the previous dump without filling up your hard drive with dump files.
From time to time, as Magento improves its platform features, or to address bugs and security issues, you will receive a notice that your system needs to be upgraded. With Magento 2, this upgrade process is made infinitely easier and better than in Magento 1.x.
In order to keep your Magento installation upgraded, you must take certain steps:
In order for your store to communicate to Magento for upgrade verifications, you or a developer has to obtain developer keys. While this suggests that keys are only for developers, anyone can create an account at Magento and obtain keys.
If you don't already have an account at Magento, go to https://www.magentocommerce.com/magento-connect/customer/account/create/ and create your free account. Once you are registered, log in to your account at https://www.magentocommerce.com/magento-connect/customer/account/login/.
After you log in:
Now that you're able to communicate with Magento Connect, you can begin the process of upgrading your installation.
After entering your keys, you should still be within the Wizard. Find the System Upgrade button or sidebar menu and click it to begin the upgrade process.
The System Upgrade screen shows the steps the process will undertake to complete:
When this screen first loads, it goes through a series of checks to find out what needs to be upgraded. You can choose the version of Magento Core Components you wish to upgrade, as well as any other components that may have been added to your installation.
Once you make your choices, click on Next:
There are many reasons why an upgrade might fail. We have certainly had our share of issues, although far less with Magento 2 than with earlier versions. If you are a developer, you can find that most upgrade errors can be fixed by going to http://devdocs.magento.com/guides/v2.0/comp-mgr/trouble/cman/were-sorry.html and reviewing the advice shown there.
On the next screen, you can determine whether your installation is truly ready for a system upgrade. Click on Start Readiness Check and wait for it to complete its analysis:
Click Next to create a backup of your installation.
If you're not using a hosting company that provides backups or you do not have a backup protocol, well, you're flirting with trouble. No matter how well a server is configured or you maintain your Magento installation, you should never fail to make regular backups. As in this process, you should also make a backup whenever you make any changes to your Magento code.
In most cases, you will want to include all items in your backup. However, if your server is regularly backed up and you have lots of product images (for example, thousands of product SKUs), you might consider not backing up site "media." Media can take a long time to back-up and consume considerable space. However, if you update your media often, don't hesitate to include it in your backup.
Click on Create Backup to trigger the backup process.
When the backup is complete, click on Next. If all has gone well, the system will tell you it's ready for you to click on Upgrade.
After working your way through this book, you've now reached a level of familiarity and understanding that enables you to call yourself a Magento master. Of course, given the complexity and features of Magento, there's always more that you can learn. You should now have enough comfort with Magento that you can freely experiment. After all, one of the great features of open source software is that you have the access and freedom to augment the original system to meet your needs.
In this chapter on advanced techniques, we have learned a nifty way of integrating WordPress into a Magento installation, discussed a simple method of building and using a staging installation, provided a complete tutorial on scheduling Magento cron tasks, and covered strategies and techniques for backing up your Magento database.
With this book in hand, you most likely are close to completing a new Magento store. Launch date is just around the corner. If you've never launched a Magento store before, you're in for a treat now!
Just one task remaining now: go through the pre-launch checklist one final time before we are all set to go live. This is what we shall go through in the next chapter.
As you've no doubt realized — and one great reason for this book — Magento 2 delivers its power as an e-commerce platform by giving you a lot of versatility. This versatility comes at a price, though, most notably in terms of the vast number of configuration tasks and choices available.
Over the years, we have created our own Magento Pre-Launch Checklist to make sure we touch all the important configuration and design points within Magento 2 that are necessary for a live store to operate. If you've read through this entire book, you may have already addressed a number of these items, but having an itemized list to follow will save you a lot of time and give your store owner a great deal of immediate satisfaction.
We've broken down this checklist into the following areas:
In this chapter, we will go over the configurations to review in order to have a successful Magento store launch.
In Chapter 1, Planning for Magento, we discussed the Global-Website-Store methodology. When planning your Magento installation, you set up whether your installation would have one or more websites, each with one or more store views. As you go through this checklist, you need to pay close attention to the scope in which you are updating configurations and designs. For instance, as we discuss base URLs, take care that your store view is set at the proper level for the configuration. In other words, if you're updating the base URL for the entire installation, your store view is Default Config. On the other hand, if the base URL applies only to your English language furniture store view, then set to that store view.
The area of the Magento back-end that has the most configuration choices is within the Stores | Configuration menus and panels. So, let's begin there first.
Unless your store is using PayPal Express, PayPal Standard, PayPal Advanced, or another off-site payment processing method (for example, Authorize.Net Direct), your store may be taking credit card information on your server. Even though you're not storing the credit card information, you will need to get a Secure Socket Layer (SSL) Encryption Certificate installed on your server. Depending on the type of certificate you purchase, this process can take from 2 days to 2 weeks. It pays to plan ahead on this one: don't wait until the day before launch to try to get an SSL Certificate. Unless you're a master at web server configuration, consult with your hosting provider who can provide you with the necessary encryption keys and installation assistance. For most hosting providers, the installation of an SSL Certificate is outside the permissions of the client (you).
Using the procedures , configure your base URLs for each store view level. You should also review the following panels:
Since anyone who has used Magento 2 knows that, by default, the administrative backend of your store is accessible by going to http://www.storedomain.com/backend, changing this URL may help keep out the bad guys. To set up a new admin domain:
Now you should be able to access your Magento backend using the new domain name. If you have set a Secure Base URL and set Use Secure URLs in Admin to Yes, then the new domain should automatically change to the secure URL. However, this does provide a convenient and more secure means of isolating access to your Magento backend.
Today's search engines are monitoring the speed with which web pages download. The faster the download speed, the better your site is liked by Google et al. More importantly, it makes for a better user experience. Magento helps you by giving the backend administrator the means to combine CSS and JavaScript files, creating fewer files to download to render a page.
We went into quite a bit of detail about caching in Chapter 8, Marketing Tools. We mention it here because during development you may have turned off caching to help speed up design and code changes. Take the time now to set your optimum caching settings.
If you haven't already, configure and turn on cron jobs on your installation. Refer to Chapter 10, Advanced Techniques, for information on how to configure cron jobs.
Before you launch, you may want to set up specific users for whoever will have access to your Magento backend. Certain users may only need access to orders and customers. Others may be responsible for product information and pricing.
Before setting up users, you need to set up various roles or groups of permissions to which you can assign users:
Once you have your roles set up, you can set up your users:
Once you save the user, an email will be sent to them with the login credentials.
Undoubtedly, you've invested a considerable amount of time creating a frontend design to meet your e-commerce needs. Before you launch, however, there are a few design-related tasks that need to be performed.
Using the techniques described in Chapter 4, Configuring to Sell, build and assign the emails that will be sent to customers who purchase, register, and subscribe to newsletters.
The primary thing you need to do for invoice and packing slips is to upload an appropriate logo as a substitute for the default Magento logo. Upload the logo you wish to use for PDF print-outs and on-screen views in the Sales | Sales | Invoice and Packing Slip Design panel.
Don't overlook this little item! You'd be surprised how many Magento-powered websites we visit that still show the Magento logo. To upload your own favicon, go to the General | Design | HTML Head panel under Stores | Configuration.
For products that have no image, Magento inserts default placeholder images. You can create your own — perhaps with your own company's logo — to use instead of the default images with the Magento logo.
To upload your own versions, go to the Stores | Configuration | Catalog | Catalog | Product Image Placeholders panel. Use images similar in size to those that your theme design uses for regular product images.
When you first install Magento, a CMS page is automatically created for use when a visitor tries to access a non-existent page. This default page, as shown in the following screenshot, is not bad, but you may want to update the banner images and, perhaps, provide even better information to visitors as to what they can do to find the correct page.
You may want to modify the layout to include a sidebar of categories. It might also be helpful to show your telephone number in large numbers if you want customers to call you for help.
Without exception, for an online store to prosper it has to have customers. Attracting customers comes from a variety of efforts, including search engine rankings. There are a number of SEO-related activities for increasing traffic, from blog postings and backlinks, to product descriptions and reviews. For pre-launch purposes, you want to make sure to do the initial tasks that will add to the SEO arsenal.
If you intend to use meta tags as part of your Search Engine Optimization, see Chapter 6, Marketing Tools, for specific procedural information.
In your Magento backend, under Stores | Configuration | Sales | Google API, is a panel titled Google Analytics. To have Magento automatically include a Google tracking code on each page of your site, set Enable to Yes and enter your Google Analytics ID in the Account Number field.
If you did not already do it after reading Chapter 6, Marketing Tools, configure and activate your Magento store sitemap.
Before you can begin taking orders on your new Magento website, you need to confirm that you have all the necessary configurations in place.
In your Magento backend, go to Stores | Configuration | General | General. Review your settings for the following panels:
Even small online vendors may use different email addresses for different purposes. We often set up multiple email addresses for our client's stores, even if the same person may be receiving emails for sales and support. Having separate email addresses helps to segregate emails by purpose. Additionally, if the business grows and assigns different people to different purposes, you will have already established different email addresses with the store's customers.
A little known feature for those of you who use Google Apps — more specifically, Google Mail — you can create multiple email addresses for the same email account without having to add forwarding or alias configurations to Google Mail. For example, if you have an email address of info@domain.com, you could create the following emails and each one will go to the same email account: info+sales@domain.com, info+support@domain.com, and info+contact@domain.com. Google Mail will ignore the portion of the email address after and including the "+" in the address. We use this often to provide different email addresses without creating multiple email accounts.
The panels on the General | Contacts screen allow you to enable the standard Contact Us form and set to whom these emails should be sent. You can also assign a customized transactional email.
Under Stores | Configuration | Sales | Sales are various panels that control a rather eclectic group of sales-related functions.
If you plan on having more than one customer group (for example, wholesale, preferred, and so on), set up multiple customer groups according to the process described in Chapter 6, Marketing Tools.
In addition, there are a few settings you should review under Stores | Configuration | Customers | Customer Configuration:
The Stores | Configuration | Sales | Sales Emails screen provides panels to allow you to choose customized transactional emails and sender email addresses for orders, invoices, shipment notices, and credit memos.
In Chapter 4, Configuring to Sell, we discussed at length how to configure sales tax rates and rules. Afterwards, you should go to Stores | Configuration | Sales | Tax in your Magento backend for additional sales tax configurations:
Using Chapter 4, Configuring to Sell, for guidance, confirm that the shipping methods you want for your new store are configured and ready.
Likewise, you should confirm your desired payment methods. Most can be set in test mode during configuration.
Configure and test your newsletter configurations. Refer to Chapter 6, Marketing Tools, for detailed information on creating and sending customer newsletters.
Later in this checklist, you will set whether or not you want customers to confirm that they have read your site's terms and conditions before completing their purchase. To compose your terms, go to Stores | Terms and conditions in your Magento backend. Here, you can add the actual text that will be displayed during checkout.
Now, let's turn our attention to the checkout process. Go to Stores | Configuration | Sales | Checkout, where you will find the following panels:
Aside from the process of adding new products to your store, there are a number of configurations you should review that affect how products are managed and presented. The goal of any Magento store is to sell, and the ease with which customers can shop, as well as the presentation of the categories and products, greatly affects the success of any e-commerce venture.
Therefore, this section of the checklist may be a lengthy, yet necessary, process. There are no set recommendations, either, for most of these settings, as we find different intentions for each site we build. As with all Magento configurations, don't assume each setting's purpose is clear.
Some product categories lend themselves to long listings of products, each on its own line. Other products may be better suited to a grid layout of no more than six products to a page. Magento's immense flexibility means you not only have a variety of presentation options; it also means you have to be willing to experiment and test. And that, my friend, is one of the exciting aspects of configuring a Magento store.
The Stores | Configuration | Catalog | Catalog configuration section has, perhaps, the most panels of any section in Magento. I'm going to break each panel down into its own subsection in order to address the many configuration choices.
This is one panel with which we encourage you to experiment, as it dictates how products are to be displayed when a customer views a category in your store.
By default, Magento allows viewers to submit reviews for products. This panel determines whether non-registered customers — or guests — are allowed to submit reviews for products.
The alerts configured in this panel pertain to emails that can be sent to customers when product prices or stock availability changes. If you set Allow Alert When Product Price Changes to Yes, then customers will see a link labeled Sign up for price alert on each product page.
If you have activated your cron jobs, Magento will process any customer-subscribed pricing and stock availability alerts according to the schedule you specify in this panel. You can also receive email alerts if an error in the processing occurs.
See the section Placeholder Images earlier in this checklist for information on uploading placeholder images.
In this panel, you can set how customer-selected recently viewed and compared product lists are handled, especially if you are operating a multi-store installation.
How you choose product price sharing — globally or by website — affects how currency conversions are applied to prices.
In most cases, automatic calculation of price steps in the layered navigation sidebar will work fine. However, in some cases, you may want to set your own steps for each store.
If you want to limit the depth of your top menu category navigation, enter the maximum level you wish. Zero (0) means all levels will be displayed.
This panel contains several settings that can affect how well your site is indexed by search engines, such as Google, Yahoo! and Bing.
.html. You can specify any suffix you wish, but you may also want to have no suffix, as is the common practice for many websites.http://www.storedomain.com/furniture/living-room/ottoman, set this to Yes.http://www.storedomain.com/ottoman and http://www.storedomain.com/furniture/living-room/ottoman take the user to the very same page (Magento knows how to interpret both URLs). To Google, these are two different pages, both with the same content. Therefore, Google might penalize your site for having duplicate content, when, in fact, it's not. Canonical link meta tags are, as the name implies, meta tags in your page header that contain, for lack of a better term, the definitive link to the page. That is, if Google analyzes multiple URLs, but each one has the same value for the canonical link meta tag, then Google understands that these pages are really one in the same and treats them not as duplicate pages, but simply alternative link paths. An example of a canonical link meta tag, for our example ottoman, would be <link rel="canonical" href="http://www.storedomain.com/ottoman" />, and it would be the same regardless of the URL used to arrive at the ottoman page.Your site will most likely have a site-wide search feature, with a search field somewhere on the page. Allowing your visitors to be able to search your site to find products is one more way you can increase the usability of your Magento site.
After setting up a new site, we know it's tempting to consider maintenance issues at a later time. However, before you know it, later becomes yesterday and you may find that not attending to basic maintenance tasks become tomorrow's "oh, shucks!"
Use the information in Chapter 10, Advanced Techniques, to re-confirm that you have set your backup systems in place. This is perhaps the most important pre-launch activity!
At this point, you should be ready to launch. Of course, the store owner or administrator may still need to add more products and content, but from a developer's point of view, if you have completed the steps in this checklist, your initial work is done.
Congratulations!
We would like to add one more item to the list, though: test. Test, test, test, and test again. Before you go live, have the store administrator, any backend users, and your colleagues go through all possible scenarios. Store owners are always eager to launch — usually yesterday — but you cannot overdo thorough testing. It's always better to catch problems before launch than after.
As you've no doubt realized — and one great reason you bought this book — Magento is powerful and complex. Many assume that since the community edition is free to use and PHP-based, that anyone with the knowledge of PHP can easily master Magento. We all know that's not really the case. Knowledge of how to apply Magento and the depth of Magento's features and interactions is what will truly turn a Magento novice into a Magento master.