Table of Contents for
Magento 2 - Build World-Class online stores
 Magento 2 - Build World-Class online stores
Published by
Packt Publishing, 2017
Magento 2 - Build World-Class online stores
Published by
Packt Publishing, 2017
- Cover
- Table of Contents
- Magento 2 - Build World-Class online stores
- Magento 2 - Build World-Class online stores
- Credits
- Preface
- 1. Module 1
- 1. Magento Fundamentals
- XAMPP installation
- Magento
- Summary
- 2. Magento 2.0 Features
- An introduction to the Magento order management system
- Magento 2.0 command-line configuration
- The command-line utility
- Summary
- 3. Working with Search Engine Optimization
- Store configuration
- SEO and searching
- SEO catalog configuration
- Google Analytics tracking code
- Optimizing Magento pages
- Summary
- 4. Magento 2.0 Theme Development – the Developers' Holy Grail
- Magento 2.0 theme structure
- The Magento Luma theme
- Magento theme inheritance
- CMS blocks and pages
- Custom variables
- Creating a basic Magento 2.0 theme
- Summary
- 5. Creating a Responsive Magento 2.0 Theme
- Composer – the PHP dependency manager
- Building the CompStore theme
- CSS preprocessing with LESS
- Applying new CSS to the CompStore theme
- Creating the CompStore logo
- Applying the theme
- Creating CompStore content
- Customizing Magento 2.0 templates
- Summary
- 6. Write Magento 2.0 Extensions – a Great Place to Go
- Using the Zend framework
- Magento 2.0 extension structure
- Developing your first Magento extension
- The Twitter REST API
- The TweetsAbout module structure
- Using TwitterOAuth to authenticate our extension
- Developing the module
- Summary
- 7. Go Mobile with Magento 2.0!
- Adjusting the CompStore theme for mobile devices
- The Magento 2.0 responsive design
- The Magento UI
- Implementing a new CSS mixin media query
- Adjusting tweets about extensions for mobile devices
- Summary
- 8. Speeding up Your Magento 2.0
- Indexing and caching Magento
- Indexing and re-indexing data
- The Magento cron job
- Caching
- Fine-tuning the Magento hosting server
- Selecting the right Magento hosting service
- Apache web server deflation
- Enabling the expires header
- Minifying scripts
- Summary
- 9. Improving Your Magento Skills
- Magento knowledge center
- Improving your Magento skills
- Summary
- 2. Module 2
- 1. Magento 2 System Tools
- Installing Magento 2 sample data via GUI
- Installing Magento 2 sample data via the command line
- Managing Magento 2 indexes via the command line
- Managing Magento 2 cache via the command line
- Managing Magento 2 backup via the command line
- Managing Magento 2 set mode (MAGE_MODE)
- Transferring your Magento 1 database to Magento 2
- 2. Enabling Performance in Magento 2
- Configuring Redis for backend cache
- Configuring Memcached for session caching
- Configuring Varnish as the Full Page Cache
- Configuring Magento 2 with CloudFlare
- Configuring optimized images in Magento 2
- Configuring Magento 2 with HTTP/2
- Configuring Magento 2 performance testing
- 3. Creating Catalogs and Categories
- Create a Root Catalog
- Create subcategories
- Manage attribute sets
- Create products
- Manage products in a catalog grid
- 4. Managing Your Store
- Creating shipping and tax rules
- Managing customer groups
- Configuring inventories
- Configuring currency rates
- Managing advanced pricing
- 5. Creating Magento 2 Extensions – the Basics
- Initializing extension basics
- Working with database models
- Creating tables using setup scripts
- Creating a web route and controller to display data
- Creating system configuration fields
- Creating a backend data grid
- Creating a backend form to add/edit data
- 6. Creating Magento 2 Extensions – Advanced
- Using dependency injection to pass classes to your own class
- Modifying functions with the use of plugins – Interception
- Creating your own XML module configuration file
- Creating your own product type
- Working with service layers/contracts
- Creating a Magento CLI command option
- 3. Module 3
- 1. Planning for Magento
- Technical considerations
- Global-Website-Store methodology
- Planning for multiple stores
- Summary
- 2. Managing Products
- Managing products the customer focused way
- Creating products
- Managing inventory
- Pricing tools
- Autosettings
- Related products, up-sells, and cross-sells
- Importing products
- Summary
- 3. Designs and Themes
- The concept of theme inheritance
- Default installation of design packages and themes
- Installing third-party themes
- Inline translations
- Working with theme variants
- Customizing themes
- Customizing layouts
- Summary
- 4. Configuring to Sell
- Payment methods
- Shipping methods
- Managing taxes
- Transactional e-mails
- Summary
- 5. Managing Non-Product Content
- Summary
- 6. Marketing Tools
- Promotions
- Newsletters
- Using sitemaps
- Optimizing for search engines
- Summary
- 7. Extending Magento
- The new Magento module architecture
- Extending Magento functionality with Magento plugins
- Building your own extensions
- Summary
- 8. Optimizing Magento
- Indexing and caching
- Caching in Magento 2 – not just FPC
- Tuning your server for speed
- Summary
- 9. Advanced Techniques
- Version control
- Magento cron
- Backing up your database
- Upgrading Magento
- Summary
- 10. Pre-Launch Checklist
- System configurations
- Design configurations
- Search engine optimization
- Sales configurations
- Product configurations
- Maintenance configurations
- Summary
- Index
When using database models, as explained in the previous recipe, the corresponding tables needs to be created during setup. These operations are placed in setup scripts and executed during the installation of an extension.
While running the installation of a module, there are four files executed to create schemas and insert data. To create schemas, the files used are as follows:
Setup/InstallSchema.php
Setup/UpgradeSchema.php
The installation file is executed only when there is no record in the setup_module table for the module. The upgrade file is executed only when the current version number in the setup_module table is lower than the version configured in your etc/module.xml file.
When it's necessary to insert default values into a table or new EAV attributes need to be created, these actions need to be configured in the following files:
Setup/InstallData.php
Setup/UpgradeData.php
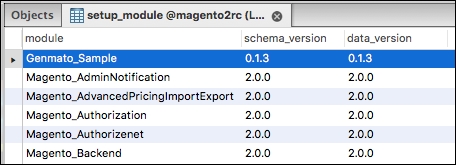
Magento keeps track of which version is installed for an extension in the setup_module table; here, the current installed version for the schema and data is stored:
Follow these steps to create your database tables:
- The following is the table schema installation:
Setup/InstallSchema.php<?php namespace Genmato\Sample\Setup; use Magento\Framework\Setup\InstallSchemaInterface; use Magento\Framework\Setup\ModuleContextInterface; use Magento\Framework\Setup\SchemaSetupInterface; use Magento\Framework\DB\Adapter\AdapterInterface; class InstallSchema implements InstallSchemaInterface { public function install(SchemaSetupInterface $setup, ModuleContextInterface $context) { $installer = $setup; $installer->startSetup(); /** * Create table 'genmato_demo' */ $table = $installer->getConnection()->newTable( $installer->getTable('genmato_demo') )->addColumn( 'demo_id', \Magento\Framework\DB\Ddl\Table::TYPE_SMALLINT, null, ['identity' => true, 'nullable' => false, 'primary' => true], 'Demo ID' )->addColumn( 'title', \Magento\Framework\DB\Ddl\Table::TYPE_TEXT, 255, ['nullable' => false], 'Demo Title' )->addColumn( 'creation_time', \Magento\Framework\DB\Ddl\Table::TYPE_TIMESTAMP, null, [], 'Creation Time' )->addColumn( 'update_time', \Magento\Framework\DB\Ddl\Table::TYPE_TIMESTAMP, null, [], 'Modification Time' )->addColumn( 'is_active', \Magento\Framework\DB\Ddl\Table::TYPE_SMALLINT, null, ['nullable' => false, 'default' => '1'], 'Is Active' )->addIndex( $setup->getIdxName( $installer->getTable('genmato_demo'), ['title'], AdapterInterface::INDEX_TYPE_FULLTEXT ), ['title'], ['type' => AdapterInterface::INDEX_TYPE_FULLTEXT] )->setComment( 'Demo Table' ); $installer->getConnection()->createTable($table); $installer->endSetup(); } } - Trigger the execution of the setup scripts:
bin/magento setup:upgrade
In Magento 2, the running of the setup scripts is no longer triggered by the first request after flushing the cache; to initiate the running of these scripts, run the command specified in step 2. When running the upgrade command, all modules are evaluated on their current version and module version in the configuration file. First, all schema installations/updates are executed, and next, the data installations/updates are processed.
The InstallData and InstallSchema files are executed only when there is no prior registration of the extension in the setup_module table. To run the installation files during testing, it is possible to remove the module row from the table and run the bin/magento setup:upgrade command.
The available methods to create a new table are defined in the Magento\Framework\DB\Adapter\AdapterInterface\Table class and are as follows:
addColumn: This adds a new column to the table; this method has the following parameters:name: This is the name of the tabletype: This is the table type; the available column types are defined as constants in theMagento\Framework\DB\Adapter\AdapterInterface\Tableclass asTYPE_*:TYPE_BOOLEANTYPE_SMALLINTTYPE_INTEGERTYPE_BIGINTTYPE_FLOATTYPE_NUMERICTYPE_DECIMALTYPE_DATETYPE_TIMESTAMPTYPE_DATETIMETYPE_TEXTTYPE_BLOBTYPE_VARBINARYsize: This specifies the size of the columnoptions: This is used to specify extra column options; the available options are as follows:unsigned: This is only for number types; allows True/False (default: False)precision: This is only for decimal and numeric types (default: calculated from size parameter or 0 if not set)scale: This is only for decimal and numeric types (default: calculated from size parameter or 10 if not set)default: The default value is used when creating a new recordnullable: In case a column is NULL (default: True)primary: This makes a column a primary keyprimary_position: This is only for primary keys and sets the sort order for the primary keysidentity/auto_increment: This auto-increments a column on inserting a new record (used to identify a unique record ID)comment: This is the description of the column
addForeignKey: This adds a foreign key relation to another table; the parameters allowed are as follows:fkName: This is the name of the foreign keycolumn: This is the column used as the foreign keyrefTable: This is the table where the key references torefColumn: This is the column name in the referenced tableonDelete: This sets the action to be performed when deleting a record; the available options are (constants as defined inMagento\Framework\DB\Adapter\AdapterInterface\Table):ACTION_CASCADEACTION_RESTRICTACTION_SET_DEFAULTACTION_SET_NULLACTION_NO_ACTION
addIndex: This adds a column to the search index; the available parameters are as follows:indexName: This is the name used for the indexfields: These are the column(s) used for the index (can be a single column or an array of columns)options: This is an array with extra options; currently, only the option type is used to specify the index type
When changing an existing table, it is possible to use the following methods; these are the methods that can be used directly on the $installer->getConnection() class:
dropTable: This removes a table from the database; the available parameters are as follows:tableName: This is the name of the table to deleteschemaName: This is the optional schema name used
renameTable: This renames a table from the database; the available parameters are as follows:oldTableName: This is the current name of the tablenewTableName: This is the new name for the tableschemaName: This is the optional schema name
addColumn: This adds an extra column to a table; the available parameters are as follows:tableName: This is the name of the table to altercolumnName: This is the name of the new columndefinition: This is an array with the following parameters:Type: Column typeLength: Column sizeDefault: Default valueNullable: If a column can be NULLIdentify/Auto_Increment: Used as an identity columnComment: Column descriptionAfter: Specify where to add the columnschemaName: This is the optional schema name
changeColumn: This changes the column name and definition; the available parameters are as follows:tableName: This is the name of the table to changeoldColumnName: This is the current column namenewColumnName: This is the new name for the columndefinition: This is the table definition; seeaddColumnfor available valuesflushData: This flushes the table cacheschemaName: This is the optional schema name
modifyColumn: This changes the column definition; the available parameters are as follows:dropColumn: This removes a column from the table; the available parameters are as follows:tableName: This is the name of the columncolumnName: This is the name of the column to removeschemaName: This is the optional schema name
addIndex: This adds a new index; the available parameters are as follows:tableName: This is the name of the table to changeindexName: This is the name of the index to addfields: These are the columns to be used as the indexindexType: This is the type of index; the available options (constants defined in (Magento\Framework\DB\Ddl\Table\AdapterInterface) are as follows:INDEX_TYPE_PRIMARYINDEX_TYPE_UNIQUEINDEX_TYPE_INDEXINDEX_TYPE_FULLTEXTschemaName: This is the optional schema name
dropIndex: This removes an index from a table; the available parameters are as follows:tableName: This is the name of the columnindexName: This is the name of the indexschemaName: This is the optional schema name
addForeignKey: This adds a new foreign key; the available parameters are as follows:fkName: This is the name of the foreign keytableName: This is the name of the tablecolumnName: This is the name of the column used in the foreign keyrefTableName: This is the name of the referenced tablerefColumnName: This is the name of the referenced columnonDelete: This is the action to perform on delete (see the precedingaddForeignKeydescription for available options)purge: This removes invalid data (default: false)schemaName: This is the optional schema namerefSchemaName: This is the option-referenced schema name
When, in a later version of the extension, there are extra fields necessary (or the current fields need to be changed), this is handled through the UpgradeSchema function, upgrade:
Setup/UpgradeSchema.php
<?php
namespace Genmato\Sample\Setup;

use Magento\Framework\DB\Ddl\Table;
use Magento\Framework\Setup\UpgradeSchemaInterface;
use Magento\Framework\Setup\ModuleContextInterface;
use Magento\Framework\Setup\SchemaSetupInterface;

class UpgradeSchema implements UpgradeSchemaInterface
{
  public function upgrade(SchemaSetupInterface $setup, ModuleContextInterface $context)
  {
    $setup->startSetup();

    if (version_compare($context->getVersion(), '0.1.1', '<')) {
      $connection = $setup->getConnection();

      $column = [
        'type' => Table::TYPE_SMALLINT,
        'length' => 6,
        'nullable' => false,
        'comment' => 'Is Visible',
        'default' => '1'
      ];
      $connection->addColumn($setup->getTable('genmato_demo'), 'is_visible', $column);
    }

    $setup->endSetup();
  }
}
As this file is run every time the module version is different than the currently installed version, it is necessary to check the current version that is installed to execute only the updates necessary:
if (version_compare($context->getVersion(), '0.1.1', '<')) {The preceding statement will make sure that the schema changes are executed only if the current version is less than 0.1.1.
In order to provide default content during installation (this can be records in a table or adding extra attributes to some entity), the data installation function is used:
Setup/InstallData.php
<?php
namespace Genmato\Sample\Setup;

use Genmato\Sample\Model\Demo;
use Genmato\Sample\Model\DemoFactory;
use Magento\Framework\Setup\InstallDataInterface;
use Magento\Framework\Setup\ModuleContextInterface;
use Magento\Framework\Setup\ModuleDataSetupInterface;

class InstallData implements InstallDataInterface
{
  /**
  * Demo factory
  *
  * @var DemoFactory
  */
  private $demoFactory;

  /**
  * Init
  *
  * @param DemoFactory $demoFactory
  */
  public function __construct(DemoFactory $demoFactory)
  {
    $this->demoFactory = $demoFactory;
  }

  /**
  * {@inheritdoc}
  * @SuppressWarnings(PHPMD.ExcessiveMethodLength)
  */
  public function install(ModuleDataSetupInterface $setup, ModuleContextInterface $context)
  {
    $demoData = [
      'title' => 'Demo Title',
      'is_active' => 1,
    ];

    /**
    * Insert demo data
    */
    $this->createDemo()->setData($demoData)->save();

  }

  /**
  * Create demo
  *
  * @return Demo
  */
  public function createDemo()
  {
    return $this->demoFactory->create();
  }
}
In this example, there is one record created in the table created during setup. For this, the DemoFactory class is injected through dependency injection into the constructor function of this class. DemoFactory is an automatically created class that allows you to instantiate a class (in this case, Genmato\Sample\Model\Demo) without injecting this directly into the constructor. Here, this is done in the createDemo function:
$this->demoFactory->create();
Similar to SchemaUpgrade, there is also a DataUpgrade option to insert data while upgrading to a newer version.