Table of Contents for
Magento 2 - Build World-Class online stores
 Magento 2 - Build World-Class online stores
Published by
Packt Publishing, 2017
Magento 2 - Build World-Class online stores
Published by
Packt Publishing, 2017
- Cover
- Table of Contents
- Magento 2 - Build World-Class online stores
- Magento 2 - Build World-Class online stores
- Credits
- Preface
- 1. Module 1
- 1. Magento Fundamentals
- XAMPP installation
- Magento
- Summary
- 2. Magento 2.0 Features
- An introduction to the Magento order management system
- Magento 2.0 command-line configuration
- The command-line utility
- Summary
- 3. Working with Search Engine Optimization
- Store configuration
- SEO and searching
- SEO catalog configuration
- Google Analytics tracking code
- Optimizing Magento pages
- Summary
- 4. Magento 2.0 Theme Development – the Developers' Holy Grail
- Magento 2.0 theme structure
- The Magento Luma theme
- Magento theme inheritance
- CMS blocks and pages
- Custom variables
- Creating a basic Magento 2.0 theme
- Summary
- 5. Creating a Responsive Magento 2.0 Theme
- Composer – the PHP dependency manager
- Building the CompStore theme
- CSS preprocessing with LESS
- Applying new CSS to the CompStore theme
- Creating the CompStore logo
- Applying the theme
- Creating CompStore content
- Customizing Magento 2.0 templates
- Summary
- 6. Write Magento 2.0 Extensions – a Great Place to Go
- Using the Zend framework
- Magento 2.0 extension structure
- Developing your first Magento extension
- The Twitter REST API
- The TweetsAbout module structure
- Using TwitterOAuth to authenticate our extension
- Developing the module
- Summary
- 7. Go Mobile with Magento 2.0!
- Adjusting the CompStore theme for mobile devices
- The Magento 2.0 responsive design
- The Magento UI
- Implementing a new CSS mixin media query
- Adjusting tweets about extensions for mobile devices
- Summary
- 8. Speeding up Your Magento 2.0
- Indexing and caching Magento
- Indexing and re-indexing data
- The Magento cron job
- Caching
- Fine-tuning the Magento hosting server
- Selecting the right Magento hosting service
- Apache web server deflation
- Enabling the expires header
- Minifying scripts
- Summary
- 9. Improving Your Magento Skills
- Magento knowledge center
- Improving your Magento skills
- Summary
- 2. Module 2
- 1. Magento 2 System Tools
- Installing Magento 2 sample data via GUI
- Installing Magento 2 sample data via the command line
- Managing Magento 2 indexes via the command line
- Managing Magento 2 cache via the command line
- Managing Magento 2 backup via the command line
- Managing Magento 2 set mode (MAGE_MODE)
- Transferring your Magento 1 database to Magento 2
- 2. Enabling Performance in Magento 2
- Configuring Redis for backend cache
- Configuring Memcached for session caching
- Configuring Varnish as the Full Page Cache
- Configuring Magento 2 with CloudFlare
- Configuring optimized images in Magento 2
- Configuring Magento 2 with HTTP/2
- Configuring Magento 2 performance testing
- 3. Creating Catalogs and Categories
- Create a Root Catalog
- Create subcategories
- Manage attribute sets
- Create products
- Manage products in a catalog grid
- 4. Managing Your Store
- Creating shipping and tax rules
- Managing customer groups
- Configuring inventories
- Configuring currency rates
- Managing advanced pricing
- 5. Creating Magento 2 Extensions – the Basics
- Initializing extension basics
- Working with database models
- Creating tables using setup scripts
- Creating a web route and controller to display data
- Creating system configuration fields
- Creating a backend data grid
- Creating a backend form to add/edit data
- 6. Creating Magento 2 Extensions – Advanced
- Using dependency injection to pass classes to your own class
- Modifying functions with the use of plugins – Interception
- Creating your own XML module configuration file
- Creating your own product type
- Working with service layers/contracts
- Creating a Magento CLI command option
- 3. Module 3
- 1. Planning for Magento
- Technical considerations
- Global-Website-Store methodology
- Planning for multiple stores
- Summary
- 2. Managing Products
- Managing products the customer focused way
- Creating products
- Managing inventory
- Pricing tools
- Autosettings
- Related products, up-sells, and cross-sells
- Importing products
- Summary
- 3. Designs and Themes
- The concept of theme inheritance
- Default installation of design packages and themes
- Installing third-party themes
- Inline translations
- Working with theme variants
- Customizing themes
- Customizing layouts
- Summary
- 4. Configuring to Sell
- Payment methods
- Shipping methods
- Managing taxes
- Transactional e-mails
- Summary
- 5. Managing Non-Product Content
- Summary
- 6. Marketing Tools
- Promotions
- Newsletters
- Using sitemaps
- Optimizing for search engines
- Summary
- 7. Extending Magento
- The new Magento module architecture
- Extending Magento functionality with Magento plugins
- Building your own extensions
- Summary
- 8. Optimizing Magento
- Indexing and caching
- Caching in Magento 2 – not just FPC
- Tuning your server for speed
- Summary
- 9. Advanced Techniques
- Version control
- Magento cron
- Backing up your database
- Upgrading Magento
- Summary
- 10. Pre-Launch Checklist
- System configurations
- Design configurations
- Search engine optimization
- Sales configurations
- Product configurations
- Maintenance configurations
- Summary
- Index
When you acquire a new customer, it makes great sense to keep them interested in your offerings so that they will return again to make a purchase from your online store. The Cost of Acquisition for a sale is far less with a repeat transaction.
Magento 2 is able to help you keep your brand in front of your customers with basic email newsletter tools. With these tools you can:
- Allow customers to subscribe
- Create newsletter templates
- Schedule the sending of your newsletter
- Manage your subscribers
Tip
Magento will be the first to admit that their newsletter tools are pretty basic. If you want to be more sophisticated in how you construct your newsletters, segment your customers, and more, you should consider a more robust third-party tool. We use MailChimp (http://www.mailchimp.com), a leading email system that makes it easy to manage campaigns. It's fun to use, as well.
For connecting your Magento 2 store to MailChimp, we recommend the MageMonkey for Magento 2 extension (http://store.ebizmarts.com/magemonkey-magento2.html). Ebizmarts, the creator of this extension, worked closely with MailChimp. The extension also adds emails for abandoned carts, supports multiple MailChimp lists, and creates autoresponders — emails for customer birthdays, related products, and product reviews. And, best of all, at the time of this writing, the extension was offered for free!
The newsletter function is enabled by default in Magento 2. As long as you have a newsletter subscription form on your site, your customers can subscribe and be added to your newsletter list.
Settings for newsletters are configured under Stores | Configuration | Customers in the Magento 2 backend.
By default, a subscription form is placed in the footer of the base theme. If you use a third-party theme, the subscription form may be placed in another location.

Before you can send a newsletter, you have to create a newsletter template. The template contains your marketing message but can also contain dynamic content.
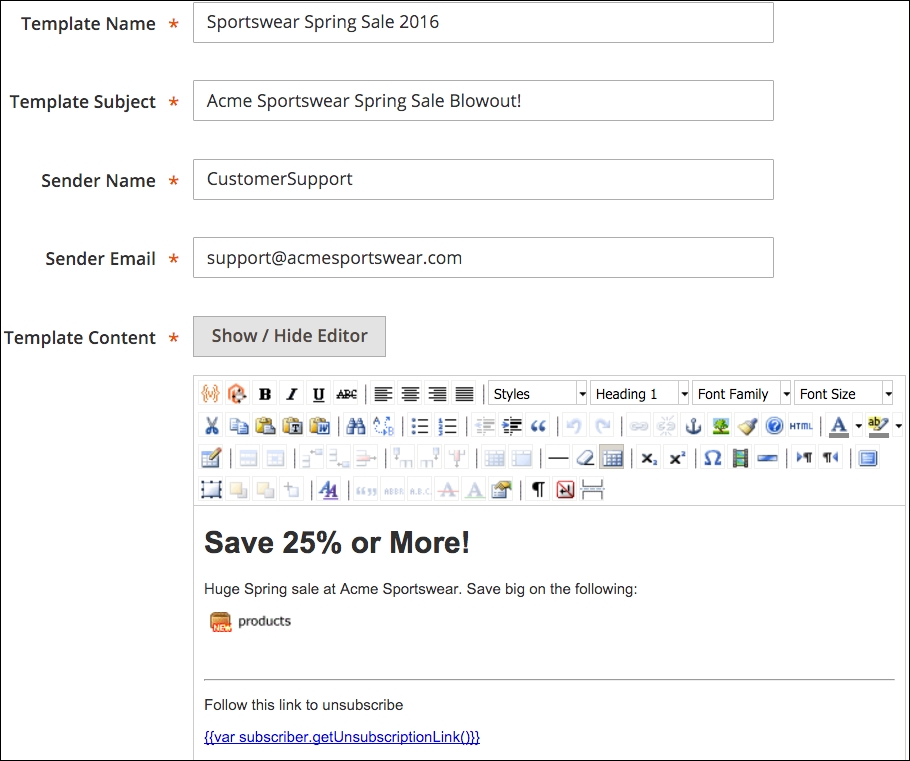
To begin, go to Marketing | Newsletter templates in your Magento backend. Click on Add New Template. On the Template Information panel, you will see the following fields:
- Template Name: Enter a name for the newsletter that is meaningful to you, as shown in your list of templates. You might use something like Marketing Newsletter, Feb 2016 or Spring Sale Announcement, 2016.
- Template Subject: This is the subject that will appear in the email subject received by your customers. Use something that is both enticing without sounding spammy.
- Sender Name: The From email shown in the email header will contain a name and an email address, something like: Acme Support
<support@acmefurniture.com>. This field is the name part (for example, Acme Support). - Sender Email: This is the email address part of the From address. It is also the email address to which replies to your newsletter will be sent.
- Template Content: As with other complex text fields in Magento, this one has a WYSIWYG editor to give you several tools for building an attractive and meaningful email newsletter. As with the blocks and CMS pages we discussed in Chapter 5, Managing Non-Product Content, you can insert variables and widgets, as well. This gives you the ability to insert products, category links, and more!
Tip
When creating a new template, you'll see default content for inserting a variable for an unsubscribe link. This is key if you want to avoid violating anti-spam standards. However, there are more guidelines you should follow if you want your newsletters to be considered valid emails to subscribed customers. A good resource for compliance guidance can be found at http://kb.mailchimp.com/accounts#Compliance_Tips.
- Template Styles: If you wish to add CSS styles to your newsletter content, you can add the CSS styling in this field.
The fields mentioned above can be visualized in the following screenshot:
Once you've completed your template, you can click on Preview Template to view your newsletter as it will appear to your customers.
When you're ready to schedule your newsletter to be sent, go to Marketing | Newsletter Templates. In the Action column to the right of the newsletter you wish to send, select Queue Newsletter in the dropdown menu. The screen will redirect to the Queue Information panel.
Here, you can select the date on which you wish to send your newsletter, select the store views for whose subscribers you wish to receive your newsletter, and review the contents of your newsletter.
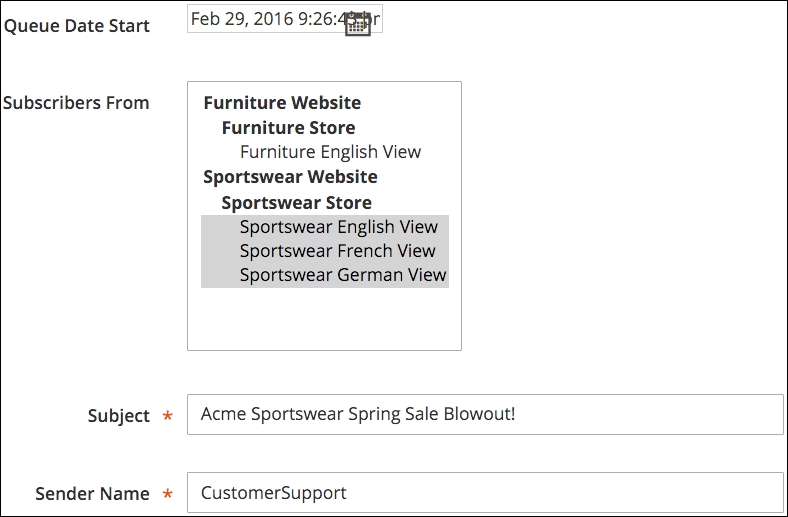
Once you have made your selection, click on Save Newsletter to add it to the internal queue. Magento will send your newsletters to your chosen subscribers on the date you have selected.
To view your newsletter queue and the status of your queued newsletters, go to Marketing | Newsletter Queue.
Once your newsletter is sent, you can see how well it is sent — and check for any problems — by going to Reports | Newsletter Problems Report. If any problems are found, a report identifying each error will appear in this list.
Under Marketing | Newsletter Subscribers, you can view all or a filtered sub-set of your newsletter subscribers. This can be helpful if you wish to see how many have come from various stores in your installation. You can also unsubscribe customers from this screen.
As with most other grid listings in Magento, you can export your subscriber list to use for other purposes.