Table of Contents for
Magento 2 - Build World-Class online stores
 Magento 2 - Build World-Class online stores
Published by
Packt Publishing, 2017
Magento 2 - Build World-Class online stores
Published by
Packt Publishing, 2017
- Cover
- Table of Contents
- Magento 2 - Build World-Class online stores
- Magento 2 - Build World-Class online stores
- Credits
- Preface
- 1. Module 1
- 1. Magento Fundamentals
- XAMPP installation
- Magento
- Summary
- 2. Magento 2.0 Features
- An introduction to the Magento order management system
- Magento 2.0 command-line configuration
- The command-line utility
- Summary
- 3. Working with Search Engine Optimization
- Store configuration
- SEO and searching
- SEO catalog configuration
- Google Analytics tracking code
- Optimizing Magento pages
- Summary
- 4. Magento 2.0 Theme Development – the Developers' Holy Grail
- Magento 2.0 theme structure
- The Magento Luma theme
- Magento theme inheritance
- CMS blocks and pages
- Custom variables
- Creating a basic Magento 2.0 theme
- Summary
- 5. Creating a Responsive Magento 2.0 Theme
- Composer – the PHP dependency manager
- Building the CompStore theme
- CSS preprocessing with LESS
- Applying new CSS to the CompStore theme
- Creating the CompStore logo
- Applying the theme
- Creating CompStore content
- Customizing Magento 2.0 templates
- Summary
- 6. Write Magento 2.0 Extensions – a Great Place to Go
- Using the Zend framework
- Magento 2.0 extension structure
- Developing your first Magento extension
- The Twitter REST API
- The TweetsAbout module structure
- Using TwitterOAuth to authenticate our extension
- Developing the module
- Summary
- 7. Go Mobile with Magento 2.0!
- Adjusting the CompStore theme for mobile devices
- The Magento 2.0 responsive design
- The Magento UI
- Implementing a new CSS mixin media query
- Adjusting tweets about extensions for mobile devices
- Summary
- 8. Speeding up Your Magento 2.0
- Indexing and caching Magento
- Indexing and re-indexing data
- The Magento cron job
- Caching
- Fine-tuning the Magento hosting server
- Selecting the right Magento hosting service
- Apache web server deflation
- Enabling the expires header
- Minifying scripts
- Summary
- 9. Improving Your Magento Skills
- Magento knowledge center
- Improving your Magento skills
- Summary
- 2. Module 2
- 1. Magento 2 System Tools
- Installing Magento 2 sample data via GUI
- Installing Magento 2 sample data via the command line
- Managing Magento 2 indexes via the command line
- Managing Magento 2 cache via the command line
- Managing Magento 2 backup via the command line
- Managing Magento 2 set mode (MAGE_MODE)
- Transferring your Magento 1 database to Magento 2
- 2. Enabling Performance in Magento 2
- Configuring Redis for backend cache
- Configuring Memcached for session caching
- Configuring Varnish as the Full Page Cache
- Configuring Magento 2 with CloudFlare
- Configuring optimized images in Magento 2
- Configuring Magento 2 with HTTP/2
- Configuring Magento 2 performance testing
- 3. Creating Catalogs and Categories
- Create a Root Catalog
- Create subcategories
- Manage attribute sets
- Create products
- Manage products in a catalog grid
- 4. Managing Your Store
- Creating shipping and tax rules
- Managing customer groups
- Configuring inventories
- Configuring currency rates
- Managing advanced pricing
- 5. Creating Magento 2 Extensions – the Basics
- Initializing extension basics
- Working with database models
- Creating tables using setup scripts
- Creating a web route and controller to display data
- Creating system configuration fields
- Creating a backend data grid
- Creating a backend form to add/edit data
- 6. Creating Magento 2 Extensions – Advanced
- Using dependency injection to pass classes to your own class
- Modifying functions with the use of plugins – Interception
- Creating your own XML module configuration file
- Creating your own product type
- Working with service layers/contracts
- Creating a Magento CLI command option
- 3. Module 3
- 1. Planning for Magento
- Technical considerations
- Global-Website-Store methodology
- Planning for multiple stores
- Summary
- 2. Managing Products
- Managing products the customer focused way
- Creating products
- Managing inventory
- Pricing tools
- Autosettings
- Related products, up-sells, and cross-sells
- Importing products
- Summary
- 3. Designs and Themes
- The concept of theme inheritance
- Default installation of design packages and themes
- Installing third-party themes
- Inline translations
- Working with theme variants
- Customizing themes
- Customizing layouts
- Summary
- 4. Configuring to Sell
- Payment methods
- Shipping methods
- Managing taxes
- Transactional e-mails
- Summary
- 5. Managing Non-Product Content
- Summary
- 6. Marketing Tools
- Promotions
- Newsletters
- Using sitemaps
- Optimizing for search engines
- Summary
- 7. Extending Magento
- The new Magento module architecture
- Extending Magento functionality with Magento plugins
- Building your own extensions
- Summary
- 8. Optimizing Magento
- Indexing and caching
- Caching in Magento 2 – not just FPC
- Tuning your server for speed
- Summary
- 9. Advanced Techniques
- Version control
- Magento cron
- Backing up your database
- Upgrading Magento
- Summary
- 10. Pre-Launch Checklist
- System configurations
- Design configurations
- Search engine optimization
- Sales configurations
- Product configurations
- Maintenance configurations
- Summary
- Index
If you're a strong PHP developer, you may find it beneficial to create your own Magento enhancements. In fact, if you've been working with Magento for any length of time, you've no doubt had cause to tweak the code, even perhaps adding new functionality. For those with experience in MVC object-oriented programming, building new functionality for Magento can be quite rewarding.
If you do plan to create an extension you would like to share with other Magento developers, whether for free or profit, you should know about certain guidelines and resources that can help you create an extension which will be well-received by the Magento community.
If you can't find an extension for Magento to meet your needs, and you think you want to do your own enhancements, take a moment to do some online searching first. One of the first places I look is the Magento documentation (https://magento.com/help/documentation). At the time of writing this, the Magento documentation has been rewritten for Magento 2.0 and is a fantastic source for understanding how extensions work in Magento. Additionally, for a deep dive into Magento functionality, the writings of Alan Storm are without parallel. You can find his articles on Magento 2 here: http://alanstorm.com/category/magento-2. The articles there are quite technical, but remarkably readable and laced with humorous nuggets.
You can also search on Google for possible solutions for your issue. There are numerous blogs where developers freely share some significant solutions. One of my favorites is the Inchoo blog (http://inchoo.net/blog/). These Magento experts have tackled some very interesting challenges with some quite elegant solutions. I also post solutions and tweaks on our website (http://www.novusweb.com).
Therefore, before you dive into your own modifications, check around. Why start from scratch if others have already done most of the work for you?
For your new extension to work, it must be placed correctly within the Magento file hierarchy. We've reviewed the entire hierarchy at the top of the chapter, but for the purposes of this example, we'll only be touching on the subset of those files and directories necessary to stub out a basic module. We've broken this into a series of steps, grouped functionally, to make it a bit more digestible.
The first thing we'll need to do is create a module.xml and register the module. This is actually pretty straightforward in comparison to a lot of what we've been reviewing. You'll place the module.xml file in the app\code\{vendor}\{module_name}\etc\ folder and edit it, adding the following content:
<?xml version="1.0"?>
<config xmlns:xsi="http://www.w3.org/2001/XMLSchema-instance" xsi:noNamespaceSchemaLocation="../../../../../lib/internal/Magento/Framework/Module/etc/module.xsd">
    <module name="{module_name}" setup_version="1.0.0">
    </module>
</config>
Next, in the root directory of the module {vendor}\{module_name}\, create a file named register.php with the following content:
<?php
\Magento\Framework\Component\ComponentRegistrar::register(
    \Magento\Framework\Component\ComponentRegistrar::MODULE,
    '{vendor}_{module}',
    __DIR__
);
Tip
The inclusion of register.php is a new step in Magento 2.0, and it's required. I was surprised when reviewing a series of themes and modules to find it frequently left out. If you're having problems with a theme or module, this is a good first place to check. If you leave it out, you won't be able to activate the module.
The second thing we'll need to do is create a frontend router. Add the following text to etc/frontend/routes.xml in your module:
<?xml version="1.0"?>
<config xmlns:xsi="http://www.w3.org/2001/XMLSchema-instance" xsi:noNamespaceSchemaLocation="../../../../../../lib/internal/Magento/Framework/App/etc/routes.xsd">
    <router id="standard">
        <route id="{module}" frontName="{module_name}">
            <module name="{vendor}_{module_name}" />
        </route>
    </router>
</config>
It's beyond the scope of this book to pick apart and discuss the constituent parts of this XML, but if you're curious about the details, the resources alluded to earlier in this chapter (especially Alan Storm's series of articles) are an excellent place to go for detail.
The third thing we'll need to do is create a controller action. Start by creating an index.php file in app\code\{vendor}\{module_name}\Controller\Index\ with the following content:
<?php
namespace {vendor}\{module}\Controller\Index;

class Index extends \Magento\Framework\App\Action\Action {
protected $resultPageFactory;
public function __construct(\Magento\Framework\App\Action\Context $context,
        \Magento\Framework\View\Result\PageFactory $resultPageFactory)     {
        $this->resultPageFactory = $resultPageFactory;
        parent::__construct($context);
    }

public function execute()
    {
      $resultPage = $this->resultPageFactory->create();
      $resultPage->getConfig()->getTitle()->prepend(__('vendor examplemodule'));
      return $resultPage;
    }
}
Every action extends the core Magento action class, and always has an execute() method, which is executed when the action is invoked. It's also important to note how this impacts the URL. The frontname specified in the router is the first part of the URL, the controller folder the second part, and the name of the file containing the controller code, the third part.
Again, there's more fun detail here, but for the purposes of this rudimentary example, we don't want to get bogged down breaking this down into too much detail.
The fourth thing we'll need to do is create a layout file. You'll add this file in the app\code\{vendor}\{module}\View\frontend\layout\ directory using the name default.xml.
The contents should look like this:
<?xml version="1.0"?>
<page xmlns:xsi="http://www.w3.org/2001/XMLSchema-instance" layout="1column" xsi:noNamespaceSchemaLocation="urn:magento:framework:View/Layout/etc/page_configuration.xsd">
  <body>
    <referenceContainer name="content">
      <block class="{vendor}\{module}\Block\{module}.php" name="{vendor}_{module}" template="arbitrary_template_name.phtml">
      </block>
    </referenceContainer>
  </body>
</page>The fifth thing we'll need to do is create a block for our module. Once this is done, we can create a template file and activate the module. The block will be intuitively added to app\code\{vendor}\{module}\Block\{module}.php and contain the following content:
<?php
namespace {vendor}\{module_name}\Block;
class {module_name} extends \Magento\Framework\View\Element\Template
{
  public function _prepareLayout()
  {
    return parent::_prepareLayout();
  }
}
For the template, we'll just add valid HTML content to the app\code\{vendor}\{module}\View\frontend\layout\ arbitrary_template_name.phtml file, as follows:
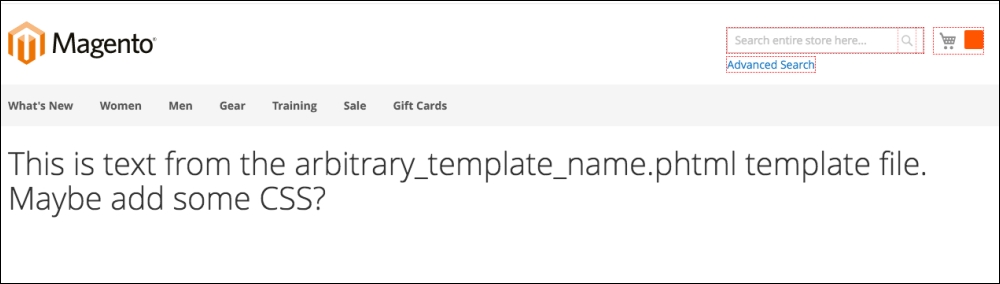
<h1> This is text from the arbitrary_template_name.phtml template file. Maybe add some CSS? </h1>
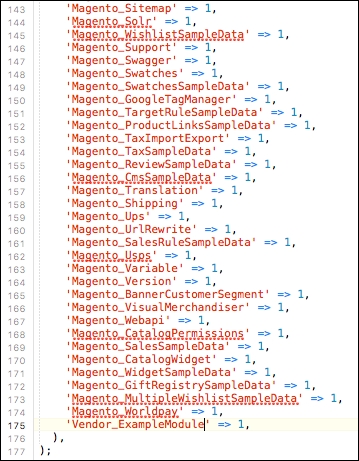
Activate the module. This is most easily done by editing the app\etc\config.php file and adding an entry for your module here:
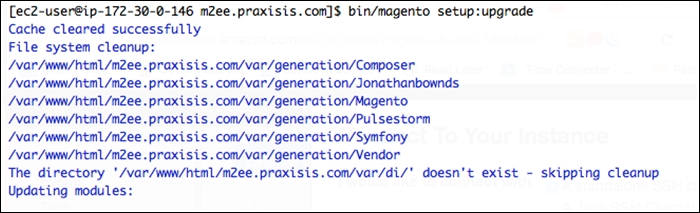
There's another way to activate the module as well. If you have access to the command line, and are comfortable with its use, you can simply invoke the Magento binary to activate the module, by running the following command from the document root of your website:
bin/magento setup:upgrade
You should see output similar, but not identical, to the following screenshot:
Once the module is active, clear the system cache using the following command:
bin/magento cache:clean
The cleared cache types will be displayed:

After the cache has been cleared, you can view the result of your labor. Remember, the frontname defined in the route.xml defines the first part of the URL, and the second and third are defined by the controller folder and the PHP file. In the example reviewed above, this URL would be http://magentostore/{module_name}/index/index/. Depending on what HTML you've put in your sample template, you should see a result that looks something like the following screenshot: