Table of Contents for
Magento 2 - Build World-Class online stores
 Magento 2 - Build World-Class online stores
Published by
Packt Publishing, 2017
Magento 2 - Build World-Class online stores
Published by
Packt Publishing, 2017
- Cover
- Table of Contents
- Magento 2 - Build World-Class online stores
- Magento 2 - Build World-Class online stores
- Credits
- Preface
- 1. Module 1
- 1. Magento Fundamentals
- XAMPP installation
- Magento
- Summary
- 2. Magento 2.0 Features
- An introduction to the Magento order management system
- Magento 2.0 command-line configuration
- The command-line utility
- Summary
- 3. Working with Search Engine Optimization
- Store configuration
- SEO and searching
- SEO catalog configuration
- Google Analytics tracking code
- Optimizing Magento pages
- Summary
- 4. Magento 2.0 Theme Development – the Developers' Holy Grail
- Magento 2.0 theme structure
- The Magento Luma theme
- Magento theme inheritance
- CMS blocks and pages
- Custom variables
- Creating a basic Magento 2.0 theme
- Summary
- 5. Creating a Responsive Magento 2.0 Theme
- Composer – the PHP dependency manager
- Building the CompStore theme
- CSS preprocessing with LESS
- Applying new CSS to the CompStore theme
- Creating the CompStore logo
- Applying the theme
- Creating CompStore content
- Customizing Magento 2.0 templates
- Summary
- 6. Write Magento 2.0 Extensions – a Great Place to Go
- Using the Zend framework
- Magento 2.0 extension structure
- Developing your first Magento extension
- The Twitter REST API
- The TweetsAbout module structure
- Using TwitterOAuth to authenticate our extension
- Developing the module
- Summary
- 7. Go Mobile with Magento 2.0!
- Adjusting the CompStore theme for mobile devices
- The Magento 2.0 responsive design
- The Magento UI
- Implementing a new CSS mixin media query
- Adjusting tweets about extensions for mobile devices
- Summary
- 8. Speeding up Your Magento 2.0
- Indexing and caching Magento
- Indexing and re-indexing data
- The Magento cron job
- Caching
- Fine-tuning the Magento hosting server
- Selecting the right Magento hosting service
- Apache web server deflation
- Enabling the expires header
- Minifying scripts
- Summary
- 9. Improving Your Magento Skills
- Magento knowledge center
- Improving your Magento skills
- Summary
- 2. Module 2
- 1. Magento 2 System Tools
- Installing Magento 2 sample data via GUI
- Installing Magento 2 sample data via the command line
- Managing Magento 2 indexes via the command line
- Managing Magento 2 cache via the command line
- Managing Magento 2 backup via the command line
- Managing Magento 2 set mode (MAGE_MODE)
- Transferring your Magento 1 database to Magento 2
- 2. Enabling Performance in Magento 2
- Configuring Redis for backend cache
- Configuring Memcached for session caching
- Configuring Varnish as the Full Page Cache
- Configuring Magento 2 with CloudFlare
- Configuring optimized images in Magento 2
- Configuring Magento 2 with HTTP/2
- Configuring Magento 2 performance testing
- 3. Creating Catalogs and Categories
- Create a Root Catalog
- Create subcategories
- Manage attribute sets
- Create products
- Manage products in a catalog grid
- 4. Managing Your Store
- Creating shipping and tax rules
- Managing customer groups
- Configuring inventories
- Configuring currency rates
- Managing advanced pricing
- 5. Creating Magento 2 Extensions – the Basics
- Initializing extension basics
- Working with database models
- Creating tables using setup scripts
- Creating a web route and controller to display data
- Creating system configuration fields
- Creating a backend data grid
- Creating a backend form to add/edit data
- 6. Creating Magento 2 Extensions – Advanced
- Using dependency injection to pass classes to your own class
- Modifying functions with the use of plugins – Interception
- Creating your own XML module configuration file
- Creating your own product type
- Working with service layers/contracts
- Creating a Magento CLI command option
- 3. Module 3
- 1. Planning for Magento
- Technical considerations
- Global-Website-Store methodology
- Planning for multiple stores
- Summary
- 2. Managing Products
- Managing products the customer focused way
- Creating products
- Managing inventory
- Pricing tools
- Autosettings
- Related products, up-sells, and cross-sells
- Importing products
- Summary
- 3. Designs and Themes
- The concept of theme inheritance
- Default installation of design packages and themes
- Installing third-party themes
- Inline translations
- Working with theme variants
- Customizing themes
- Customizing layouts
- Summary
- 4. Configuring to Sell
- Payment methods
- Shipping methods
- Managing taxes
- Transactional e-mails
- Summary
- 5. Managing Non-Product Content
- Summary
- 6. Marketing Tools
- Promotions
- Newsletters
- Using sitemaps
- Optimizing for search engines
- Summary
- 7. Extending Magento
- The new Magento module architecture
- Extending Magento functionality with Magento plugins
- Building your own extensions
- Summary
- 8. Optimizing Magento
- Indexing and caching
- Caching in Magento 2 – not just FPC
- Tuning your server for speed
- Summary
- 9. Advanced Techniques
- Version control
- Magento cron
- Backing up your database
- Upgrading Magento
- Summary
- 10. Pre-Launch Checklist
- System configurations
- Design configurations
- Search engine optimization
- Sales configurations
- Product configurations
- Maintenance configurations
- Summary
- Index
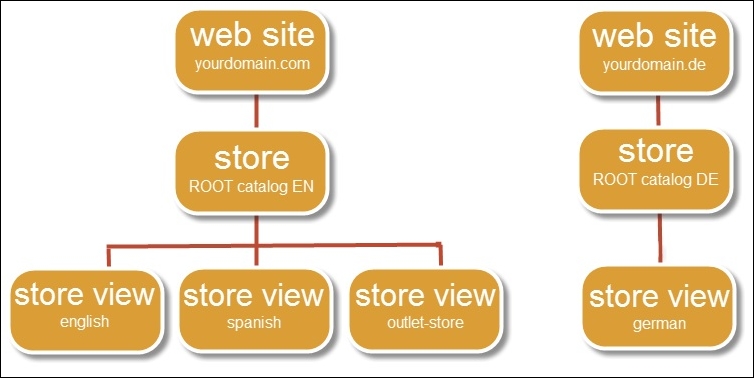
The first thing we need to do when setting up a vanilla Magento 2 website is define our website, store, and store view structure.
So what is the difference between website, store, and store view, and why is it important?
- Website is the top-level container and the most important of the three. It is the parent level of the entire store and used, for example, to define domain names, different shipping methods, payment options, customers, orders, and so on.
- Stores can be used to define, for example, different store views with the same information. A store is always connected to a Root Catalog that holds all the categories and subcategories. One website can manage multiple stores, but every store has a different Root Catalog. When using multiple stores, it is not possible to share one basket. The main reason for this has to do with the configuration setup, where shipping, catalog, customer, inventory, taxes, and payment settings are not shareable between different sites.
- Store view is the lowest level and mostly used to handle different localizations. Every store view can have a different language. Besides using store views just for localizations, they can also be used for Business to Business (B2B), hidden private sales pages (with
noindexandnofollow), and so on. The option where we use the Base Link URL, for example, (yourdomain.com/myhiddenpage) is easy to set up.
The website, store, and store view structure is shown in the following image:
To step through this recipe, you will use a Droplet created in Chapter 1, Magento 2 System Tools, at DigitalOcean (https://www.digitalocean.com/). We will be using an NGINX, PHP-FPM, Composer-based setup with Magento 2 preinstalled. No other prerequisites are required.
For the purpose of this recipe, let's assume that we need to create a multi-website setup including three domains (yourdomain.com, yourdomain.de, and yourdomain.fr) and separated Root Catalogs. The following steps will guide you through this:
- First we need to update our NGINX. We need to configure the additional domains before we can connect them to Magento. Make sure that all domain names are connected to your server and DNS is configured correctly.
Go to
/etc/nginx/conf.d, open thedefault.conffile, and include the following content at the top of your file:map $http_host $magecode { hostnames; default base; yourdomain.de de; yourdomain.fr fr; } - Your configuration should look like this now:
map $http_host $magecode { hostnames; default base; yourdomain.de de; yourdomain.fr fr; } upstream fastcgi_backend { server 127.0.0.1:9000; } server { listen 80; listen 443 ssl http2; server_name yourdomain.com; set $MAGE_ROOT /var/www/html; set $MAGE_MODE developer; ssl_certificate /etc/ssl/yourdomain-com.cert; ssl_certificate_key /etc/ssl/yourdomain-com.key; include /var/www/html/nginx.conf.sample; access_log /var/log/nginx/access.log; error_log /var/log/nginx/error.log; location ~ /\.ht { deny all; } } - Now let's go to the Magento 2 configuration file in
/var/www/html/and open thenginx.conf.samplefile. Go to the bottom and look for:location ~ (index|get|static|report|404|503)\.php$
Now we add the following lines to the file under
fastcgi_pass fastcgi_backend;:fastcgi_param MAGE_RUN_TYPE website; fastcgi_param MAGE_RUN_CODE $magecode;
- Your configuration should look like this now (this is only a small section of the bottom):
location ~ (index|get|static|report|404|503)\.php$ {
  try_files $uri =404;
  fastcgi_pass   fastcgi_backend;

  fastcgi_param MAGE_RUN_TYPE website;
  fastcgi_param MAGE_RUN_CODE $magecode;

  fastcgi_param  PHP_FLAG  "session.auto_start=off \n suhosin.session.cryptua=off";
  fastcgi_param  PHP_VALUE "memory_limit=256M \n max_execution_time=600";
  fastcgi_read_timeout 600s;
  fastcgi_connect_timeout 600s;
  fastcgi_param  MAGE_MODE $MAGE_MODE;

  fastcgi_index  index.php;
  fastcgi_param  SCRIPT_FILENAME  $document_root$fastcgi_script_name;
  include    fastcgi_params;
}
The current setup uses the
MAGE_RUN_TYPE websitevariable. You may changewebsitetostore, depending on your setup preferences. When changing the variable, you need yourdefault.confmapping codes as well. - Now all you have to do is restart NGINX and PHP-FPM to use your new settings. Run the following command:
service nginx restart && service php-fpm restart - Before we continue, we need to check if our web server is serving the correct codes. Run the following command in the Magento 2 web directory:
var/www/html/pub
echo "<?php header("Content-type: text/plain"); print_r($_SERVER); ?>" > magecode.php
Don't forget to update your
nginx.conf.samplefile with the newmagecodecode. It's located on the bottom of your file and should look like this:location ~ (index|get|static|report|404|503|magecode)\.php$ {Restart NGINX and open the file in your browser. The output should look as follows. As you can see, the created
MAGE_RUNvariables are available:
- Congratulations, you just finished configuring NGINX including additional domains. Now let's continue connecting them in Magento 2.
- Log in to the backend and go to Stores | All Stores. By default, Magento 2 has one Website, Store, and Store View setup. Now click on Create Website and commit the following details:
Name
My German WebsiteCode
deNext, click on Create Store and commit the following details:
Website
My German WebsiteName
My German WebsiteRoot Category
Default Category(we will change this later)Next, click on Create Store View and commit the following details:
Store
My German WebsiteName
GermanCode
deStatus
EnabledRepeat the same steps for the French domain. Make sure that the Code in Website and Store View is
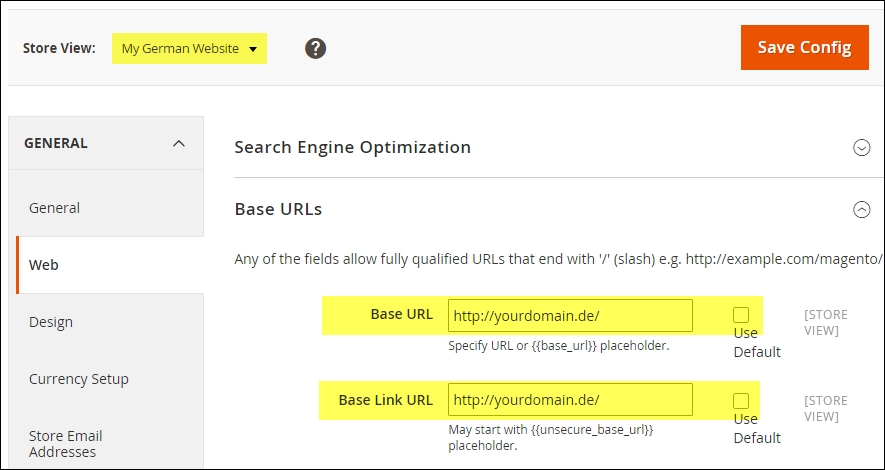
fr. - The next important step is to connect the websites with the domain name. Go to Stores | Configuration | Web | Base URLs. Change the Store View scope at the top to My German Website. You will be prompted when switching; press OK to continue. Now uncheck the checkbox called Use Default from the Base URL and Base Link URL fields and commit your domain name. Now click Save Config and continue the same procedure for the other website. The output should look like this:
- Save your entire configuration and clear your cache. Now go to Products | Categories and click on Add Root Category with the following data:
Name
Root GermanIs Active
YesPage Title
My German WebsitePerform the same steps for the French domain. You may add additional information here but it is not needed. Changing the current Root Category called Default Category to
Root Englishis also optional but advised.Save your configuration and go to Stores | All Stores and change all of the stores to the appropriate Root Catalog we just created. Every Root Category should now have a dedicated Root Catalog.
- Congratulations, you just finished configuring Magento 2 including additional domains and dedicated Root Categories. Now let's open up a browser and surf to the domain names you created:
yourdomain.com,yourdomain.de, andyourdomain.fr.
Let's recap and find out what we did throughout this recipe. In steps 1 through 11, we created a multi-store setup for .com, .de, and .fr domains using a separate Root Catalog.
In steps 1 through 4, we configured the domain mapping in the NGINX default.conf file. Then we added the fastcgi_param MAGE_RUN code to the nginx.conf.sample file; this will manage which website or store view to request within Magento.
In step 6, we used an easy test method to check if all domains run the correct MAGE_RUN code.
In steps 7 through 9, we configure the website, store, and store view names and codes for the given domain names.
In step 10, we created additional Root Catalogs for the remaining German and French stores. They are then connected to the previously created store configuration. All stores have their own Root Catalog now.
Are you able to buy additional domain names, but would like to try setting up a multi-store? Here are some tips to create one. Depending on whether you are using Windows, Mac OS, or Linux, the following options apply:
- Windows: Go to
C:\Windows\System32\drivers\etcand open up thehostsfile as an administrator. Add the following (change the IP and domain name accordingly):123.456.789.0 yourdomain.de 123.456.789.0 yourdomain.fr 123.456.789.0 www.yourdomain.de 123.456.789.0 www.yourdomain.fr
Save the file and click on the Start button. Search then for
cmd.exeand commit the following:ipconfig /flushdns - Mac OS: Go to the
/etc/directory, open up thehostsfile as a superuser, and add the following (change the IP and domain name accordingly):123.456.789.0 yourdomain.de 123.456.789.0 yourdomain.fr 123.456.789.0 www.yourdomain.de 123.456.789.0 www.yourdomain.fr
Save the file and run the following command on the shell:
dscacheutil -flushcacheDepending on your Mac version, check out the different commands here: http://www.hongkiat.com/blog/how-to-clear-flush-dns-cache-in-os-x-yosemite/
- Linux: Go to the
/etc/directory, open up thehostsfile as a root user, and add the following (change the IP and domain name accordingly):123.456.789.0 yourdomain.de 123.456.789.0 yourdomain.fr 123.456.789.0 www.yourdomain.de 123.456.789.0 www.yourdomain.fr
Save the file and run the following command on the shell:
service nscd restartDepending on your Linux version, check out the different commands here: http://www.cyberciti.biz/faq/rhel-debian-ubuntu-flush-clear-dns-cache/
Open up your browser and surf to the custom domains.