Table of Contents for
Magento 2 - Build World-Class online stores
 Magento 2 - Build World-Class online stores
Published by
Packt Publishing, 2017
Magento 2 - Build World-Class online stores
Published by
Packt Publishing, 2017
- Cover
- Table of Contents
- Magento 2 - Build World-Class online stores
- Magento 2 - Build World-Class online stores
- Credits
- Preface
- 1. Module 1
- 1. Magento Fundamentals
- XAMPP installation
- Magento
- Summary
- 2. Magento 2.0 Features
- An introduction to the Magento order management system
- Magento 2.0 command-line configuration
- The command-line utility
- Summary
- 3. Working with Search Engine Optimization
- Store configuration
- SEO and searching
- SEO catalog configuration
- Google Analytics tracking code
- Optimizing Magento pages
- Summary
- 4. Magento 2.0 Theme Development – the Developers' Holy Grail
- Magento 2.0 theme structure
- The Magento Luma theme
- Magento theme inheritance
- CMS blocks and pages
- Custom variables
- Creating a basic Magento 2.0 theme
- Summary
- 5. Creating a Responsive Magento 2.0 Theme
- Composer – the PHP dependency manager
- Building the CompStore theme
- CSS preprocessing with LESS
- Applying new CSS to the CompStore theme
- Creating the CompStore logo
- Applying the theme
- Creating CompStore content
- Customizing Magento 2.0 templates
- Summary
- 6. Write Magento 2.0 Extensions – a Great Place to Go
- Using the Zend framework
- Magento 2.0 extension structure
- Developing your first Magento extension
- The Twitter REST API
- The TweetsAbout module structure
- Using TwitterOAuth to authenticate our extension
- Developing the module
- Summary
- 7. Go Mobile with Magento 2.0!
- Adjusting the CompStore theme for mobile devices
- The Magento 2.0 responsive design
- The Magento UI
- Implementing a new CSS mixin media query
- Adjusting tweets about extensions for mobile devices
- Summary
- 8. Speeding up Your Magento 2.0
- Indexing and caching Magento
- Indexing and re-indexing data
- The Magento cron job
- Caching
- Fine-tuning the Magento hosting server
- Selecting the right Magento hosting service
- Apache web server deflation
- Enabling the expires header
- Minifying scripts
- Summary
- 9. Improving Your Magento Skills
- Magento knowledge center
- Improving your Magento skills
- Summary
- 2. Module 2
- 1. Magento 2 System Tools
- Installing Magento 2 sample data via GUI
- Installing Magento 2 sample data via the command line
- Managing Magento 2 indexes via the command line
- Managing Magento 2 cache via the command line
- Managing Magento 2 backup via the command line
- Managing Magento 2 set mode (MAGE_MODE)
- Transferring your Magento 1 database to Magento 2
- 2. Enabling Performance in Magento 2
- Configuring Redis for backend cache
- Configuring Memcached for session caching
- Configuring Varnish as the Full Page Cache
- Configuring Magento 2 with CloudFlare
- Configuring optimized images in Magento 2
- Configuring Magento 2 with HTTP/2
- Configuring Magento 2 performance testing
- 3. Creating Catalogs and Categories
- Create a Root Catalog
- Create subcategories
- Manage attribute sets
- Create products
- Manage products in a catalog grid
- 4. Managing Your Store
- Creating shipping and tax rules
- Managing customer groups
- Configuring inventories
- Configuring currency rates
- Managing advanced pricing
- 5. Creating Magento 2 Extensions – the Basics
- Initializing extension basics
- Working with database models
- Creating tables using setup scripts
- Creating a web route and controller to display data
- Creating system configuration fields
- Creating a backend data grid
- Creating a backend form to add/edit data
- 6. Creating Magento 2 Extensions – Advanced
- Using dependency injection to pass classes to your own class
- Modifying functions with the use of plugins – Interception
- Creating your own XML module configuration file
- Creating your own product type
- Working with service layers/contracts
- Creating a Magento CLI command option
- 3. Module 3
- 1. Planning for Magento
- Technical considerations
- Global-Website-Store methodology
- Planning for multiple stores
- Summary
- 2. Managing Products
- Managing products the customer focused way
- Creating products
- Managing inventory
- Pricing tools
- Autosettings
- Related products, up-sells, and cross-sells
- Importing products
- Summary
- 3. Designs and Themes
- The concept of theme inheritance
- Default installation of design packages and themes
- Installing third-party themes
- Inline translations
- Working with theme variants
- Customizing themes
- Customizing layouts
- Summary
- 4. Configuring to Sell
- Payment methods
- Shipping methods
- Managing taxes
- Transactional e-mails
- Summary
- 5. Managing Non-Product Content
- Summary
- 6. Marketing Tools
- Promotions
- Newsletters
- Using sitemaps
- Optimizing for search engines
- Summary
- 7. Extending Magento
- The new Magento module architecture
- Extending Magento functionality with Magento plugins
- Building your own extensions
- Summary
- 8. Optimizing Magento
- Indexing and caching
- Caching in Magento 2 – not just FPC
- Tuning your server for speed
- Summary
- 9. Advanced Techniques
- Version control
- Magento cron
- Backing up your database
- Upgrading Magento
- Summary
- 10. Pre-Launch Checklist
- System configurations
- Design configurations
- Search engine optimization
- Sales configurations
- Product configurations
- Maintenance configurations
- Summary
- Index
Once you get paid for a sale, you need to fulfill the order and that means you have to ship the items purchased. How you ship products is largely a function of what shipping methods you make available to your customers.
Shipping is one of the most complex aspects of e-commerce, and one where you can lose money if you're not careful. As you work through your shipping configurations, it's important to keep in mind the following:
- What you charge your customers for shipping does not have to be exactly what you're charged by your carriers. Just as you can offer free shipping, you can also charge flat rates based on weight or quantity, or add a surcharge to "live" rates.
- By default, Magento does not provide you with highly sophisticated shipping rate calculations, especially when it comes to "dimensional" shipping. Consider shipping rate calculations as estimates only. Consult with whomever is actually doing your shipping to determine if any rate adjustments should be made to accommodate dimensional shipping.
Note
Dimensional shipping refers to a recent change by UPS, FedEx, and others to charge you the greater of two rates: the cost based on weight or the cost based on a formula to determine the equivalent weight of a package based on its size: (Length x Width x Height) ÷ 166 (for US domestic shipments; other factors apply for other countries and exports). Therefore, if you have a large package that doesn't weigh much, the live rate quoted in Magento might not be reflective of your actual cost once the dimensional weight is calculated. If your packages may be large and lightweight, consult your carrier representative or shipping fulfillment partner for guidance.
- If your shipping calculations need more sophistication than provided natively in Magento 2, consider an add-on. However, remember that what you charge to your customers does not have to be what you pay. For that reason — and to keep it simple for your customers — consider offering table rates (as described later).
Tip
WebShopApps (http://webshopapps.com) is perhaps the pre-eminent Magento shipping add-on provider. More recently, they have created a hosted shipping configuration system called ShipperHQ (https://shipperhq.com), which we have used to configure some rather complex shipping rules. If your shipping rules are more than Magento can natively accommodate, you may want to check these out.
- Each method you choose will be displayed to your customers if their cart and shipping destination matches the conditions of the method. Take care not to confuse your customers with too many choices: simpler is better.
Keeping these insights in mind, let's explore the various shipping methods available by default in Magento 2.
Before we go over the shipping methods, let's go over some basic concepts that will apply to most, if not all, shipping methods.
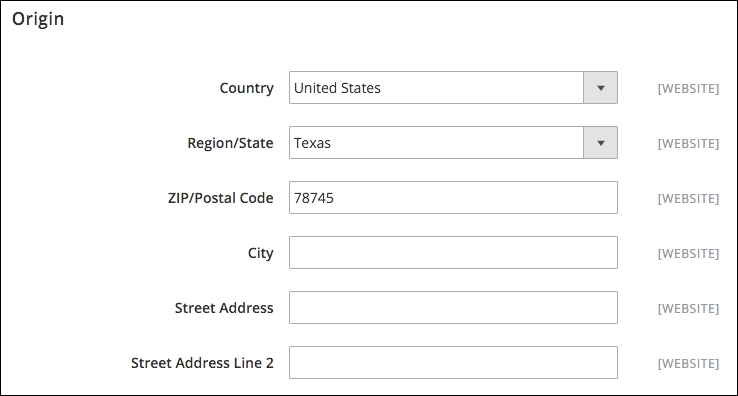
Where you ship your products from will determine shipping rates, especially for carrier rates (for example, UPS, FedEx). To set your origin, go to Stores | Configuration | Sales | Shipping Settings and expand the Origin panel. At the very least, enter the Country, Region/State and ZIP/Postal Code field. The others are optional for rate calculation purposes.
At the bottom of this panel is the choice to Apply Custom Shipping Policy. If enabled, a field will appear where you can enter text about your overall shipping policy. For instance, you may want to enter Orders placed by 12:00 PM CT will be processed for shipping on the same day. Applies only to orders placed Monday-Friday, excluding shipping holidays.
You can add an invisible handling fee to all shipping rate calculations. Invisible in that it does not appear as a separate line item charge to your customers. To add a handling fee to a shipping method:
- Choose whether you wish to add a fixed amount or a percentage of the shipping cost
- If you choose to add a percentage, enter the amount as a decimal number instead of a percentage (for example, 0.06 instead of 6%)
As you configure your shipping methods, don't forget to designate to which countries you will ship. If you only ship to the US and Canada, for instance, be sure to have only those countries selected. Otherwise, you'll have customers from other countries placing orders you will have to cancel and refund.
In some cases, the method you configured may not be applicable to a customer based on destination, type of product, weight, or any number of factors. For these instances, you can choose to:
- Show the method (for example, UPS, USPS, DHL, and so on), but with an error message that the method is not applicable
- Don't show the method at all
There are several ways to offer free shipping to your customers. If you want to display a Free Shipping option to all customers whose carts meet a minimum order amount (not including taxes or shipping), enable this panel.
However, you may want to be more judicious in how and when you offer free shipping. Other alternatives include:
- Creating shopping cart promotions (see Chapter 6, Marketing Tools)
- Include a free shipping method in your table rates (see later in this section)
- Designate a specific free shipping method and minimum qualifying amount within a carrier configuration (such as UPS and FedEx).
If you choose to use this panel, note that it will apply to all orders. Therefore, if you want to be more selective, consider one of the above methods.
As with free shipping, above, the Flat Rate panel allows you to charge one, singular flat rate for all orders regardless of weight or destination. You can apply the rate on a per item or per order basis, as well.
While using live carrier rates can provide more accurate shipping quotes for your customers, you may find it more convenient to offer a series of rates for your customers at certain break points.
For example, you might only need something as simple as follows, for any domestic destination:
- 0-5 lbs, $5.99
- 6-10 lbs, $8.99
- 11+ lbs, $10.99
Let's assume you're a US-based shipper. While these rates will work for you when shipping to any of the contiguous 48 states, you need to charge more for shipments to Alaska and Hawaii. For our example, let's assume tiered pricing of $7.99, $11.99, and $14.99 at the same weight breaks.
All of these conditions can be handled using the table rates shipping method. Based on our example, we would first start by creating a spreadsheet (in Excel or Numbers) similar to the following:
|
Country |
Region/State |
Zip/Postal code |
Weight (and above) |
Shipping price |
|---|---|---|---|---|
|
USA |
* |
* |
0 |
5.99 |
|
USA |
* |
* |
6 |
8.99 |
|
USA |
* |
* |
11 |
10.99 |
|
USA |
AK |
* |
0 |
7.99 |
|
USA |
AK |
* |
6 |
11.99 |
|
USA |
AK |
* |
11 |
14.99 |
|
USA |
HI |
* |
0 |
7.99 |
|
USA |
HI |
* |
6 |
11.99 |
|
USA |
HI |
* |
11 |
14.99 |
Let's review the columns in this chart:
- Country: Here, you would enter the three-character country code (for a list of valid codes, see http://goo.gl/6A1woj).
- Region/State: Enter the two-character code for any state or province.
- Zip/Postal code: Enter any specific postal codes for which you wish the rate to apply.
- Weight (and above): Enter the minimum applicable weight for the range. The assigned rate will apply until the weight of the cart products combined equals a higher weight tier.
- Shipping price: Enter the shipping charge you wish to provide to the customer. Do not include the currency prefix (for example, "$" or "€").
Now, let's discuss the asterisk (*) and how to limit the scope of your rates. As you can see in the chart, we have only indicated rates for US destinations. That's because there are no rows for any other countries. We could easily add rates for all other countries, simply by adding rows with an asterisk in the first column. By adding those rows, we're telling Magento to use the US rates if the customer's ship-to address is in the US, and to use other rates for all other country destinations.
Likewise for the Region/State column, Magento will first look for matches for any state codes listed. If it can't find any, then it will look for any rates with an asterisk. If no asterisk is present for a qualifying weight, then no applicable rate will be provided to the customer.
The asterisk in the Zip/Postal code column means that the rates apply to all postal codes for all states.
In the above example, we used the weight of the items in the cart to determine shipping rates. You can also configure table rates to use calculations based on the number of items in the cart or the total price of all items (less taxes and shipping).
To set up your chart, simply rename the fourth column Quantity (and above) or Subtotal (and above).
To upload your table rates, you'll need to save/export your spreadsheet as a CSV file. You can name it whatever you like. Save it to your computer where you can find it for the next steps.
Before you upload your new rates, you should first set your table rates configurations. To do so, you can set your default settings at the default configuration scope. However, to upload your CSV file, you will need to switch your store view to the appropriate website scope.
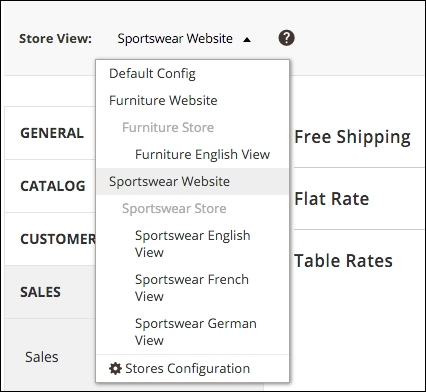
When changing to a website scope, you will see the Export CSV button and the ability to upload your rate table file. You'll note that all other settings may have Use Default checked. You can, of course, uncheck this box beside any field and adjust the settings according to your preferences.
Let's review the unique fields in this panel:
- Enabled: Set to Yes to enable table rates
- Title: Enter the name you wish displayed to customers when they're presented with a table rate-based shipping charge in the checkout process
- Method Name: This name is presented to the customer in the shopping cart
Tip
You should probably change the default Table Rate to something more descriptive, as this term is likely irrelevant to customers. We have used terms Standard Ground, Economy, or Saver as names. The Title should probably be the same, as well, so that the customer, during checkout, has a visual confirmation of their shipping choice.
- Condition: This allows you to choose the calculation method you want to use. Your choices, as we described earlier, are Weight vs. Destination, Price vs. Destination, and # of items vs. Destination.
- Include Virtual Products in Price Calculation: Since virtual products (see Chapter 2, Managing Products) have no weight, this will have no effect on rate calculations for weight-based rates. However, it will affect rate calculations for price or quantity-based rates.
The remaining shipping methods involve configuring UPS, USPS, FedEx, and/or DHL to provide "live" rate calculations. UPS is the only one that is set to query for live rates without the need for you to have an account with the carrier. This is both good and bad. It's good, as you only have to enable the shipping method to have it begin querying rates for your customers. On the flip side, the rates that are returned are not negotiated rates. Negotiated rates are those you may have been offered as discounted rates based on your shipping volume.
FedEx, USPS, and DHL require account-specific information in order to activate. This connection with your account should provide rates based on any discounts you have established with your carrier. If you wish to use negotiated rates for UPS, you may have to find a Magento add-on that will provide a modified rate query.