Table of Contents for
Magento 2 - Build World-Class online stores
 Magento 2 - Build World-Class online stores
Published by
Packt Publishing, 2017
Magento 2 - Build World-Class online stores
Published by
Packt Publishing, 2017
- Cover
- Table of Contents
- Magento 2 - Build World-Class online stores
- Magento 2 - Build World-Class online stores
- Credits
- Preface
- 1. Module 1
- 1. Magento Fundamentals
- XAMPP installation
- Magento
- Summary
- 2. Magento 2.0 Features
- An introduction to the Magento order management system
- Magento 2.0 command-line configuration
- The command-line utility
- Summary
- 3. Working with Search Engine Optimization
- Store configuration
- SEO and searching
- SEO catalog configuration
- Google Analytics tracking code
- Optimizing Magento pages
- Summary
- 4. Magento 2.0 Theme Development – the Developers' Holy Grail
- Magento 2.0 theme structure
- The Magento Luma theme
- Magento theme inheritance
- CMS blocks and pages
- Custom variables
- Creating a basic Magento 2.0 theme
- Summary
- 5. Creating a Responsive Magento 2.0 Theme
- Composer – the PHP dependency manager
- Building the CompStore theme
- CSS preprocessing with LESS
- Applying new CSS to the CompStore theme
- Creating the CompStore logo
- Applying the theme
- Creating CompStore content
- Customizing Magento 2.0 templates
- Summary
- 6. Write Magento 2.0 Extensions – a Great Place to Go
- Using the Zend framework
- Magento 2.0 extension structure
- Developing your first Magento extension
- The Twitter REST API
- The TweetsAbout module structure
- Using TwitterOAuth to authenticate our extension
- Developing the module
- Summary
- 7. Go Mobile with Magento 2.0!
- Adjusting the CompStore theme for mobile devices
- The Magento 2.0 responsive design
- The Magento UI
- Implementing a new CSS mixin media query
- Adjusting tweets about extensions for mobile devices
- Summary
- 8. Speeding up Your Magento 2.0
- Indexing and caching Magento
- Indexing and re-indexing data
- The Magento cron job
- Caching
- Fine-tuning the Magento hosting server
- Selecting the right Magento hosting service
- Apache web server deflation
- Enabling the expires header
- Minifying scripts
- Summary
- 9. Improving Your Magento Skills
- Magento knowledge center
- Improving your Magento skills
- Summary
- 2. Module 2
- 1. Magento 2 System Tools
- Installing Magento 2 sample data via GUI
- Installing Magento 2 sample data via the command line
- Managing Magento 2 indexes via the command line
- Managing Magento 2 cache via the command line
- Managing Magento 2 backup via the command line
- Managing Magento 2 set mode (MAGE_MODE)
- Transferring your Magento 1 database to Magento 2
- 2. Enabling Performance in Magento 2
- Configuring Redis for backend cache
- Configuring Memcached for session caching
- Configuring Varnish as the Full Page Cache
- Configuring Magento 2 with CloudFlare
- Configuring optimized images in Magento 2
- Configuring Magento 2 with HTTP/2
- Configuring Magento 2 performance testing
- 3. Creating Catalogs and Categories
- Create a Root Catalog
- Create subcategories
- Manage attribute sets
- Create products
- Manage products in a catalog grid
- 4. Managing Your Store
- Creating shipping and tax rules
- Managing customer groups
- Configuring inventories
- Configuring currency rates
- Managing advanced pricing
- 5. Creating Magento 2 Extensions – the Basics
- Initializing extension basics
- Working with database models
- Creating tables using setup scripts
- Creating a web route and controller to display data
- Creating system configuration fields
- Creating a backend data grid
- Creating a backend form to add/edit data
- 6. Creating Magento 2 Extensions – Advanced
- Using dependency injection to pass classes to your own class
- Modifying functions with the use of plugins – Interception
- Creating your own XML module configuration file
- Creating your own product type
- Working with service layers/contracts
- Creating a Magento CLI command option
- 3. Module 3
- 1. Planning for Magento
- Technical considerations
- Global-Website-Store methodology
- Planning for multiple stores
- Summary
- 2. Managing Products
- Managing products the customer focused way
- Creating products
- Managing inventory
- Pricing tools
- Autosettings
- Related products, up-sells, and cross-sells
- Importing products
- Summary
- 3. Designs and Themes
- The concept of theme inheritance
- Default installation of design packages and themes
- Installing third-party themes
- Inline translations
- Working with theme variants
- Customizing themes
- Customizing layouts
- Summary
- 4. Configuring to Sell
- Payment methods
- Shipping methods
- Managing taxes
- Transactional e-mails
- Summary
- 5. Managing Non-Product Content
- Summary
- 6. Marketing Tools
- Promotions
- Newsletters
- Using sitemaps
- Optimizing for search engines
- Summary
- 7. Extending Magento
- The new Magento module architecture
- Extending Magento functionality with Magento plugins
- Building your own extensions
- Summary
- 8. Optimizing Magento
- Indexing and caching
- Caching in Magento 2 – not just FPC
- Tuning your server for speed
- Summary
- 9. Advanced Techniques
- Version control
- Magento cron
- Backing up your database
- Upgrading Magento
- Summary
- 10. Pre-Launch Checklist
- System configurations
- Design configurations
- Search engine optimization
- Sales configurations
- Product configurations
- Maintenance configurations
- Summary
- Index
Moving your Magento 1 to Magento 2 may be one of the most challenging things out there. Luckily, Magento supported us with a database migration option.
The Magento 2 Data Migration Tool is here to help you convert your products, customers, order/sales data, store configuration, promotions/sales rules, and more to move to a clean Magento 2 setup.
Custom code, Extensions, and Themes are out of the current scope of the Data Migration Tool.
The currently supported migrations are the Community Edition (CE) versions 1.6.x, 1.7.x, 1.8.x, and 1.9.x and Enterprise Edition (EE) versions 1.11.x, 1.12.x, 1.14.x, and 1.14.x.
Before we can start migrating our system, we need to check the following:
- Have a clean Magento 2 system running.
- Disable your cron jobs.
- Always back up your databases and old and new Magento versions.
- Check whether there is a network connection from the current Magento 1 to Magento 2 server. Check the firewall for database access if needed (port 3306).
- Only use the exact version number, so that the data-migration-tool 2.0.0 corresponds with Magento 2.0.0.
A migration of Magento 1 to Magento 2 has the following five phases that are important to follow in the correct order:
- Settings: Migration of the settings is step 1. This will transfer all information from the stores, website, and system configuration.
The command is
php bin/magento migrate:settings. - Data: Migration of the data is step 2. This will transfer all categories, products, customers, orders, wishlists, ratings, and so on
The command is
php bin/magento migrate:data. - Delta: Migration of the delta is step 3. This is an important step and is used to transfer Magento 1 data to Magento 2 where new updates occur. It will update the most recent data of customers, orders, or other customer-related data. It is common to use this command before going live.
The command is
php bin/magento migrate:delta. - Media: Migration of the media files is easy; just copy all files from
/mediato/pub/media. - Custom modules/themes: Migration of your modules or themes is out of the scope of the migration tool. Contact your solutions provider to check whether they have a new version available. This also applies to any custom-made themes of theme packages bought online.
For the purpose of this recipe, let's assume that we need to manage a Magento 1 to Magento 2 migration setup. The following steps will guide you through this:
- First, we need to run the following command to add
data-migration-toolto your current Composer setup:composer config repositories.data-migration-tool git https://github.com/magento/data-migration-tool-ce composer require magento/data-migration-tool:dev-master
Wait while all dependencies are updated.
- Now check whether the migration tools are available in the
bin/magentoshell tool:Commands
Description
migrate
migrate:dataMain migration of data
migrate:deltaMigration of the data that is added to Magento after the main migration
migrate:settingsMigration of the system configuration
- For this recipe, we will be using a Magento 1 database installation on our DigitalOcean Droplet. You may pick any of your production or Magento 1 sample data SQL dumps. We will be using a Magento 1.9.2.2 sample data SQL dump. Our database is called magento1.
- Now, we need to map the database configuration files from the Magento 1 database to the Magento 2 database. Always make sure that you are using a clean database; otherwise, you can run the following command:
php bin/magento setup:uninstallGo to
/var/www/html/vendor/magento/data-migration-tool/etc/ce-to-ceand pick the correct database version mentioned in the directory. If correct, you will see two files calledconfig.xml.distandmap.xml.dist. - Copy
config.xml.disttoconfig.xmlusing thecpcommand:cp config.xml.dist config.xml - Open your
config.xmland look for the<source>tag (line 94). Change it accurately with the database username and password:<source> <database host="localhost" name="magento1" user="root" password="mypassword"/> </source> <destination> <database host="localhost" name="magento2" user="root" password="mypassword"/> </destination> <options> <source_prefix>myprefix-from-magento1</source_prefix> <crypt_key>mycrypt-key-from-magento1</crypt_key> </options>
If you are using a custom prefix in your database or you wish to use your encryption key on your Magento 2 setup, you can add this to the
<options>section, as shown in the previous code. - Now we can start step 1 of the settings migration using the following command:
php bin/magento migrate:settings /var/www/magento2/vendor/magento/data-migration-tool/etc/ce-to-ce/1.9.2.2/config.xmlAs you can see, here we are using the 1.9.2.2 version. Depending on your version, you may change this before running the command.
The output result looks like this:
[2015-12-02 20:28:56][INFO][mode: settings][stage: integrity check][step: Settings Step]: started
100% [============================] Remaining Time: 1 sec
[2015-12-02 20:28:56][INFO][mode: settings][stage: integrity check][step: Stores Step]: started
100% [============================] Remaining Time: 1 sec
[2015-12-02 20:28:56][INFO][mode: settings][stage: data migration][step: Settings Step]: started
100% [============================] Remaining Time: 1 sec
[2015-12-02 20:28:59][INFO][mode: settings][stage: data migration][step: Stores Step]: started
100% [============================] Remaining Time: 1 sec
[2015-12-02 20:28:59][INFO][mode: settings][stage: volume check][step: Stores Step]: started
100% [============================] Remaining Time: 1 sec
[2015-12-02 20:28:59][INFO][mode: settings][stage: volume check][step: Stores Step]: Migration completed
- You can check your Magento 2 system configuration backend if all updated settings are available. If so, you can continue.
- If step 1 is correct, we continue to migrate our data to Magento 2 using the following command:
php bin/magento migrate:data /var/www/magento2/vendor/magento/data-migration-tool/etc/ce-to-ce/1.9.2.2/config.xmlThe output result looks like this:
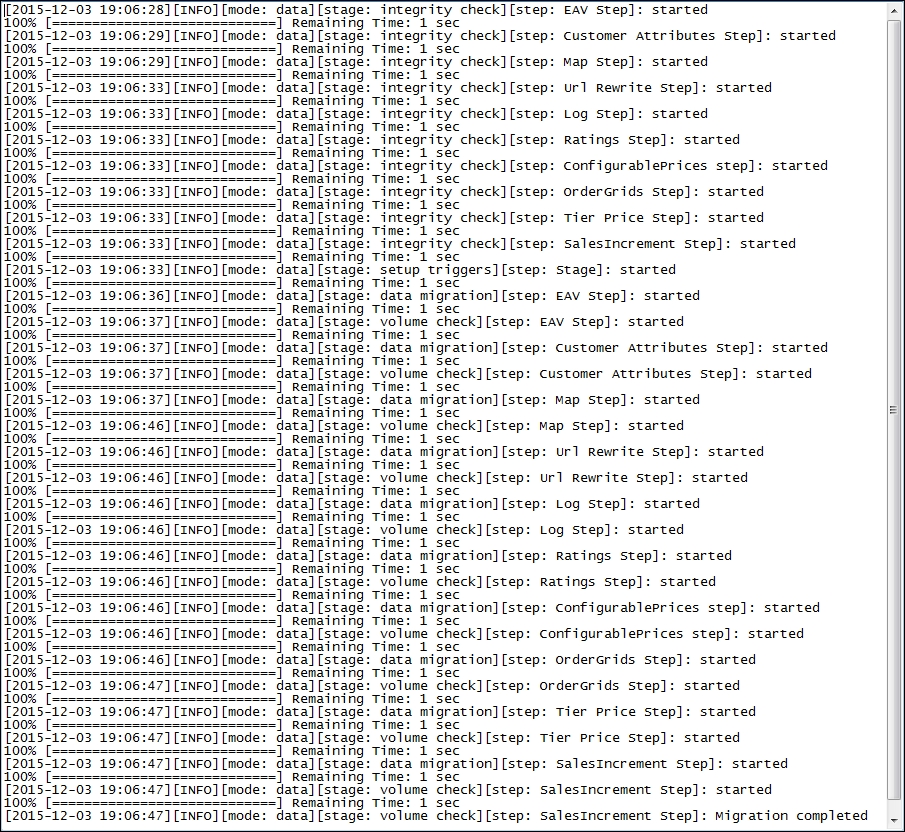
- You can check your Magento 2 catalogs, products, orders, and customers if they are all updated. If so, you can continue.
- Before you continue, make sure to reindex and flush your caches at once:
php bin/magento indexer:reindex
php bin/magento cache:clean
php bin/magento cache:flush
- Now check the frontend and backend whether your data is available in Magento 2. If not, check the
migration.logfile located in/var. - In this recipe, we used a default Magento 1.9.2.2 setup. After the settings and data migration, we created a sales order in Magento 1. Now, using the
deltaoption, we push the data to Magento 2 using the following command:php bin/magento migrate:delta /var/www/magento2/vendor/magento/data-migration-tool/etc/ce-to-ce/1.9.2.2/config.xmlThe output result looks like this:
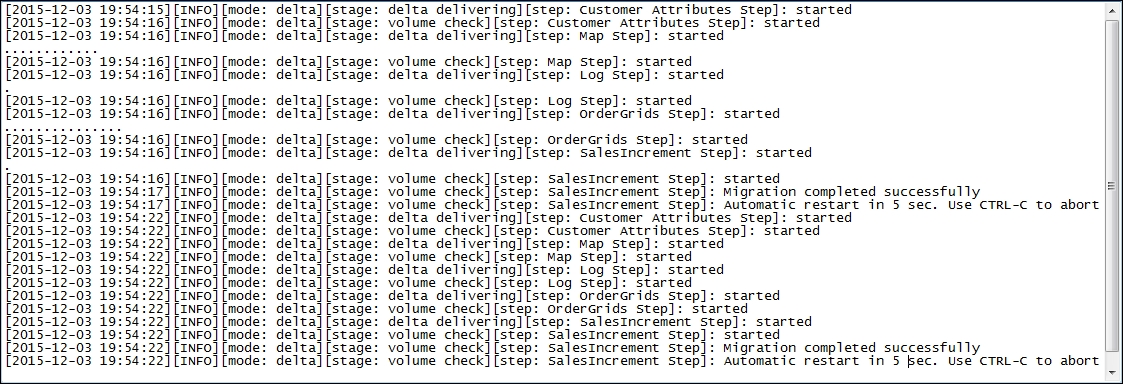
- Now check your sales and customer data. Congratulations, you successfully migrated your database from Magento 1 to Magento 2.
Let's recap and find out what we did throughout this recipe. In steps 1 through 14, you learned how to use the Magento 2 migration tool.
In step 1, we used Composer to add an additional repository for data migration. After installing all of the packages, they are available in the bin/magento tool. In this setup example, we used a clean Magento 1.9.x database.
In step 4, we made sure to run on a clean Magento 2 setup. Depending on your setup, go to vendor/magento/data-migration-tool/etc and select the correct version. Magento 2 supports the migration option for CE and EE. Once we configured the config.xml file with the Magento 1 database information in step 6, we were ready to go.
In step 7, we used the bin/magento migration setting to start the whole process. We started with the setting parameter and continued with the data and delta parameters in steps 7 through 13. We must not forget the reindexing and updating of our caches before using them. The delta parameter option can be run multiple times as it only updates the latest information, which is helpful before going live and switching to production.
As every Magento setup is unique, migrating from Magento 1 to Magento 2 can be hard sometimes. In some situations, you may need to change your tables in the mapping configuration located in vendor/magento/data-migration-tool/etc/ce-to-ce/<version>map.xml.dist.
Resetting your setting, data, and delta migration is easy using the [-r|--reset] parameter in your command. This allows you to rerun all migration scripts from the beginning.
Always check for the currently supported versions on the Magento GitHub Data Migration Tool page at the following link:
https://github.com/magento/data-migration-tool-ce
Tip
There is also an alternative Data Migration Tool available by UberTheme at https://github.com/ubertheme/magento2_data_migration.