Table of Contents for
Magento 2 - Build World-Class online stores
 Magento 2 - Build World-Class online stores
Published by
Packt Publishing, 2017
Magento 2 - Build World-Class online stores
Published by
Packt Publishing, 2017
- Cover
- Table of Contents
- Magento 2 - Build World-Class online stores
- Magento 2 - Build World-Class online stores
- Credits
- Preface
- 1. Module 1
- 1. Magento Fundamentals
- XAMPP installation
- Magento
- Summary
- 2. Magento 2.0 Features
- An introduction to the Magento order management system
- Magento 2.0 command-line configuration
- The command-line utility
- Summary
- 3. Working with Search Engine Optimization
- Store configuration
- SEO and searching
- SEO catalog configuration
- Google Analytics tracking code
- Optimizing Magento pages
- Summary
- 4. Magento 2.0 Theme Development – the Developers' Holy Grail
- Magento 2.0 theme structure
- The Magento Luma theme
- Magento theme inheritance
- CMS blocks and pages
- Custom variables
- Creating a basic Magento 2.0 theme
- Summary
- 5. Creating a Responsive Magento 2.0 Theme
- Composer – the PHP dependency manager
- Building the CompStore theme
- CSS preprocessing with LESS
- Applying new CSS to the CompStore theme
- Creating the CompStore logo
- Applying the theme
- Creating CompStore content
- Customizing Magento 2.0 templates
- Summary
- 6. Write Magento 2.0 Extensions – a Great Place to Go
- Using the Zend framework
- Magento 2.0 extension structure
- Developing your first Magento extension
- The Twitter REST API
- The TweetsAbout module structure
- Using TwitterOAuth to authenticate our extension
- Developing the module
- Summary
- 7. Go Mobile with Magento 2.0!
- Adjusting the CompStore theme for mobile devices
- The Magento 2.0 responsive design
- The Magento UI
- Implementing a new CSS mixin media query
- Adjusting tweets about extensions for mobile devices
- Summary
- 8. Speeding up Your Magento 2.0
- Indexing and caching Magento
- Indexing and re-indexing data
- The Magento cron job
- Caching
- Fine-tuning the Magento hosting server
- Selecting the right Magento hosting service
- Apache web server deflation
- Enabling the expires header
- Minifying scripts
- Summary
- 9. Improving Your Magento Skills
- Magento knowledge center
- Improving your Magento skills
- Summary
- 2. Module 2
- 1. Magento 2 System Tools
- Installing Magento 2 sample data via GUI
- Installing Magento 2 sample data via the command line
- Managing Magento 2 indexes via the command line
- Managing Magento 2 cache via the command line
- Managing Magento 2 backup via the command line
- Managing Magento 2 set mode (MAGE_MODE)
- Transferring your Magento 1 database to Magento 2
- 2. Enabling Performance in Magento 2
- Configuring Redis for backend cache
- Configuring Memcached for session caching
- Configuring Varnish as the Full Page Cache
- Configuring Magento 2 with CloudFlare
- Configuring optimized images in Magento 2
- Configuring Magento 2 with HTTP/2
- Configuring Magento 2 performance testing
- 3. Creating Catalogs and Categories
- Create a Root Catalog
- Create subcategories
- Manage attribute sets
- Create products
- Manage products in a catalog grid
- 4. Managing Your Store
- Creating shipping and tax rules
- Managing customer groups
- Configuring inventories
- Configuring currency rates
- Managing advanced pricing
- 5. Creating Magento 2 Extensions – the Basics
- Initializing extension basics
- Working with database models
- Creating tables using setup scripts
- Creating a web route and controller to display data
- Creating system configuration fields
- Creating a backend data grid
- Creating a backend form to add/edit data
- 6. Creating Magento 2 Extensions – Advanced
- Using dependency injection to pass classes to your own class
- Modifying functions with the use of plugins – Interception
- Creating your own XML module configuration file
- Creating your own product type
- Working with service layers/contracts
- Creating a Magento CLI command option
- 3. Module 3
- 1. Planning for Magento
- Technical considerations
- Global-Website-Store methodology
- Planning for multiple stores
- Summary
- 2. Managing Products
- Managing products the customer focused way
- Creating products
- Managing inventory
- Pricing tools
- Autosettings
- Related products, up-sells, and cross-sells
- Importing products
- Summary
- 3. Designs and Themes
- The concept of theme inheritance
- Default installation of design packages and themes
- Installing third-party themes
- Inline translations
- Working with theme variants
- Customizing themes
- Customizing layouts
- Summary
- 4. Configuring to Sell
- Payment methods
- Shipping methods
- Managing taxes
- Transactional e-mails
- Summary
- 5. Managing Non-Product Content
- Summary
- 6. Marketing Tools
- Promotions
- Newsletters
- Using sitemaps
- Optimizing for search engines
- Summary
- 7. Extending Magento
- The new Magento module architecture
- Extending Magento functionality with Magento plugins
- Building your own extensions
- Summary
- 8. Optimizing Magento
- Indexing and caching
- Caching in Magento 2 – not just FPC
- Tuning your server for speed
- Summary
- 9. Advanced Techniques
- Version control
- Magento cron
- Backing up your database
- Upgrading Magento
- Summary
- 10. Pre-Launch Checklist
- System configurations
- Design configurations
- Search engine optimization
- Sales configurations
- Product configurations
- Maintenance configurations
- Summary
- Index
Everyone we talk to who works with Magento is concerned about speed. As we've noted earlier, Magento's complex architecture is simultaneously good and bad. The level of functionality and extendability is practically unparalleled in the world of open source platforms, yet even with proper use of indexing and caching, substantial site traffic can make your Magento site feel like a tortoise on sedatives.
The problem lies, in part, in the fact that developers assume that open source is analogous to quick and easy. The fault is not Magento's: it is what is it — a powerful, yet complex, e-commerce platform.
Therefore, if you want to use Magento to its fullest, it's your responsibility to make sure you have the resources and tools to capitalize on its power. In Chapter 1, Planning for Magento, we discussed technical requirements for running a Magento installation. Now, let's discuss some ways of increasing its speed and performance.
Tip
Travel with Caution
You'll find an almost endless supply of online blogs, wikis, and postings relating to the optimization of Magento. Some offer quick tweaks; others go into elaborate schemas. The challenge when looking for any type of fix is knowing what is sound practice and what may be out-dated, or simply wrong. The following suggestions are based on what I have found are both within the reach of most developers and that work for the sites we develop and manage. That said, any time you find something you want to try, try it on a test server or your local computer first. Never apply these modifications to a live, production Magento installation.
Apache web servers have a module called mod_deflate. This module, when called by a website, serves to compress files sent by the server. To engage this module, insert the following code into the .htaccess file located in the root directory of your Magento installation, replacing what is currently there for the mod_deflate directive:
<IfModule mod_deflate.c>
############################################
## enable apache served files compression
## http://developer.yahoo.com/performance/rules.html#gzip

# Insert filter
SetOutputFilter DEFLATE
# Netscape 4.x has some problems...
BrowserMatch ^Mozilla/4 gzip-only-text/html
# Netscape 4.06-4.08 have some more problems
BrowserMatch ^Mozilla/4\.0[678] no-gzip
# MSIE masquerades as Netscape, but it is fine
BrowserMatch \bMSIE !no-gzip !gzip-only-text/html
# Don't compress images
SetEnvIfNoCase Request_URI \.(?:gif|jpe?g|png)$ no-gzip dont-vary
# Make sure proxies don't deliver the wrong content
Header append Vary User-Agent env=!dont-vary

</IfModule >
Using BrowserMob (http://www.browsermob.com) as our testing source, a configurable product page on our test site (the one we built to use for writing this book) was reduced in size from 452 KB to 124KB, a 73% reduction in the amount of data delivered!
Another Apache module, mod_expires, controls how browser caches should treat files they store on users' computers. When you visit a website, your browser caches the results. For files that have not changed since a previous visit, the browser will use the file in the cache on the local computer rather than pull it again from the web server.
The expiration of these cached files can be controlled by your web server. If your server provides no expiration instructions, then your site visitor's browser may assume that the cached information is not good (or is still good long after it is) and fail to pull the best information from your site.
Insert the following within the <IfModule mod_expires.c> directive in your root .htaccess file:
ExpiresActive On
ExpiresDefault "access plus 1 month"
You can also use a shorter period of time, but generally, you want to allow browsers to use unchanged, cached files for quite a while, thereby lessening the load on your server.
This is one of the more difficult items to change if you're hosting on a shared account, as many hosting providers will not allow you to increase the amount of memory allocated to PHP. The normal default of 64 MB may be sufficient, but if you're expecting a high volume of users, increasing this to 256 MB has produced noticeable improvements for us.
To increase this in your .htaccess file, simply place a hash mark (#) before php_value memory_limit 64M and remove the hash mark before php_value memory_limit 256M.
This is one configuration you may have trouble implementing as it involves changing a couple of core variables for MySQL. When we started looking more closely at ways of speeding up database lookups, we found that with our hosting provider, MySQL was configured to do lookups without a cache: the query cache and query cache limit were both set to zero.
By doing some research, we found that MySQL queries could be made faster by increasing the total size of the query cache and the query cache limit allowed for any one query. Other developers who had experimented with this suggested at least a limit of 1 MB for the individual query and a total limit of 64 MB would handle most initial, growing Magento stores. As your store grows, you may want to increase these limits to allow MySQL to take advantage of its own internal caching mechanism.
If you do have the ability to modify your MySQL database — or if you can request a modification with your hosting provider — you should set the query_cache_limit and the query_cache_size to amounts such as the ones given above.
Note
For specific information on how to set these in MySQL, see http://dev.mysql.com/doc/refman/5.0/en/query-cache-configuration.html.
Nginx is an alternative to Apache when running Magento. Significant performance improvement out of the box is driving quite a bit of this adoption, and a large number of vendors have made the switch from Apache to Nginx. In recognition of this, Magento 2 has been built with full support for Nginx. It's beyond the scope of this chapter to discuss Nginx configuration, but a vast majority of hosting providers will install Nginx for you to use. Magento 2 also has a suggested Nginx configuration file in the root folder, which can be seen via GitHub as well, here: https://github.com/magento/magento2/blob/develop/nginx.conf.sample.
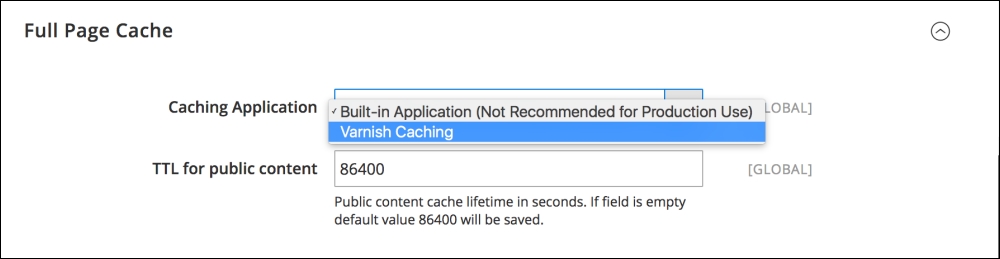
Magento 2 supports Varnish and allows for general parameter and VCL (Varnish Configuration Language) management. It's beyond the scope of this book to dive into configuring a Varnish proxy on your server, but again, this is something that many Magento specific hosting providers will support and configure on your behalf. Once this is in place, you can manage Varnish through Magento 2 in the Store | Configuration | Advanced | System | Full page cache, as shown in the following screenshot:
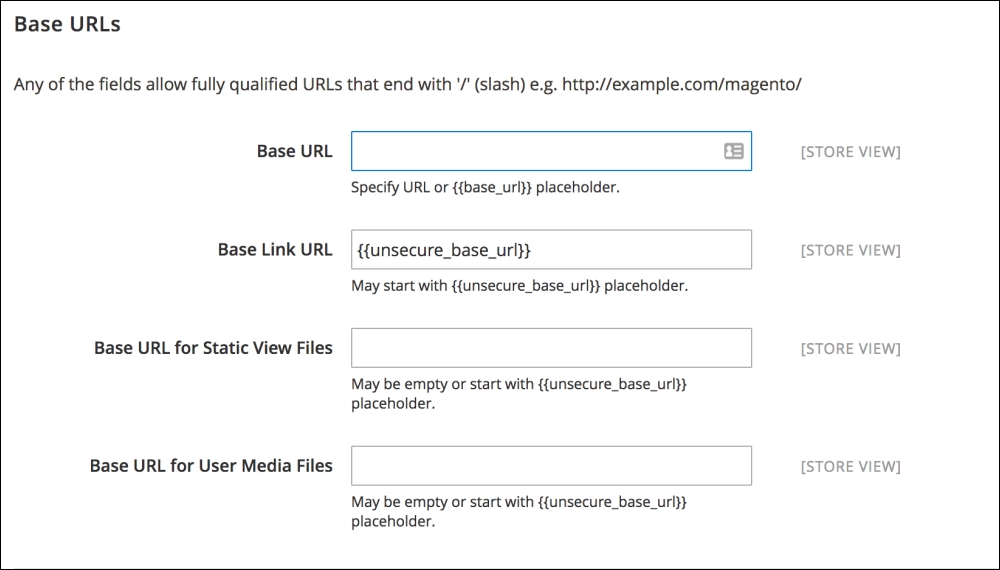
CDNs (Content Delivery Networks), are servers which host your static or non-dynamic content on very fast servers and networks. For instance, if your images and JavaScript files are hosted on CDN servers, such as the ones provided by Amazon or Rackspace, your Magento server doesn't have to spend time processing and delivering those files to your visitors. Since web servers have limits in terms of the number of active connections they can support for delivering files, allowing other servers to carry part of the load means your server can accommodate more visitor requests.
Magento 2 has native CDN support, and if you navigate to Store | Configuration | Web you'll see an area called Base URLs. You can provide the CDN URL's here and Magento will automatically pull the resources from it.