Table of Contents for
Magento 2 - Build World-Class online stores
 Magento 2 - Build World-Class online stores
Published by
Packt Publishing, 2017
Magento 2 - Build World-Class online stores
Published by
Packt Publishing, 2017
- Cover
- Table of Contents
- Magento 2 - Build World-Class online stores
- Magento 2 - Build World-Class online stores
- Credits
- Preface
- 1. Module 1
- 1. Magento Fundamentals
- XAMPP installation
- Magento
- Summary
- 2. Magento 2.0 Features
- An introduction to the Magento order management system
- Magento 2.0 command-line configuration
- The command-line utility
- Summary
- 3. Working with Search Engine Optimization
- Store configuration
- SEO and searching
- SEO catalog configuration
- Google Analytics tracking code
- Optimizing Magento pages
- Summary
- 4. Magento 2.0 Theme Development – the Developers' Holy Grail
- Magento 2.0 theme structure
- The Magento Luma theme
- Magento theme inheritance
- CMS blocks and pages
- Custom variables
- Creating a basic Magento 2.0 theme
- Summary
- 5. Creating a Responsive Magento 2.0 Theme
- Composer – the PHP dependency manager
- Building the CompStore theme
- CSS preprocessing with LESS
- Applying new CSS to the CompStore theme
- Creating the CompStore logo
- Applying the theme
- Creating CompStore content
- Customizing Magento 2.0 templates
- Summary
- 6. Write Magento 2.0 Extensions – a Great Place to Go
- Using the Zend framework
- Magento 2.0 extension structure
- Developing your first Magento extension
- The Twitter REST API
- The TweetsAbout module structure
- Using TwitterOAuth to authenticate our extension
- Developing the module
- Summary
- 7. Go Mobile with Magento 2.0!
- Adjusting the CompStore theme for mobile devices
- The Magento 2.0 responsive design
- The Magento UI
- Implementing a new CSS mixin media query
- Adjusting tweets about extensions for mobile devices
- Summary
- 8. Speeding up Your Magento 2.0
- Indexing and caching Magento
- Indexing and re-indexing data
- The Magento cron job
- Caching
- Fine-tuning the Magento hosting server
- Selecting the right Magento hosting service
- Apache web server deflation
- Enabling the expires header
- Minifying scripts
- Summary
- 9. Improving Your Magento Skills
- Magento knowledge center
- Improving your Magento skills
- Summary
- 2. Module 2
- 1. Magento 2 System Tools
- Installing Magento 2 sample data via GUI
- Installing Magento 2 sample data via the command line
- Managing Magento 2 indexes via the command line
- Managing Magento 2 cache via the command line
- Managing Magento 2 backup via the command line
- Managing Magento 2 set mode (MAGE_MODE)
- Transferring your Magento 1 database to Magento 2
- 2. Enabling Performance in Magento 2
- Configuring Redis for backend cache
- Configuring Memcached for session caching
- Configuring Varnish as the Full Page Cache
- Configuring Magento 2 with CloudFlare
- Configuring optimized images in Magento 2
- Configuring Magento 2 with HTTP/2
- Configuring Magento 2 performance testing
- 3. Creating Catalogs and Categories
- Create a Root Catalog
- Create subcategories
- Manage attribute sets
- Create products
- Manage products in a catalog grid
- 4. Managing Your Store
- Creating shipping and tax rules
- Managing customer groups
- Configuring inventories
- Configuring currency rates
- Managing advanced pricing
- 5. Creating Magento 2 Extensions – the Basics
- Initializing extension basics
- Working with database models
- Creating tables using setup scripts
- Creating a web route and controller to display data
- Creating system configuration fields
- Creating a backend data grid
- Creating a backend form to add/edit data
- 6. Creating Magento 2 Extensions – Advanced
- Using dependency injection to pass classes to your own class
- Modifying functions with the use of plugins – Interception
- Creating your own XML module configuration file
- Creating your own product type
- Working with service layers/contracts
- Creating a Magento CLI command option
- 3. Module 3
- 1. Planning for Magento
- Technical considerations
- Global-Website-Store methodology
- Planning for multiple stores
- Summary
- 2. Managing Products
- Managing products the customer focused way
- Creating products
- Managing inventory
- Pricing tools
- Autosettings
- Related products, up-sells, and cross-sells
- Importing products
- Summary
- 3. Designs and Themes
- The concept of theme inheritance
- Default installation of design packages and themes
- Installing third-party themes
- Inline translations
- Working with theme variants
- Customizing themes
- Customizing layouts
- Summary
- 4. Configuring to Sell
- Payment methods
- Shipping methods
- Managing taxes
- Transactional e-mails
- Summary
- 5. Managing Non-Product Content
- Summary
- 6. Marketing Tools
- Promotions
- Newsletters
- Using sitemaps
- Optimizing for search engines
- Summary
- 7. Extending Magento
- The new Magento module architecture
- Extending Magento functionality with Magento plugins
- Building your own extensions
- Summary
- 8. Optimizing Magento
- Indexing and caching
- Caching in Magento 2 – not just FPC
- Tuning your server for speed
- Summary
- 9. Advanced Techniques
- Version control
- Magento cron
- Backing up your database
- Upgrading Magento
- Summary
- 10. Pre-Launch Checklist
- System configurations
- Design configurations
- Search engine optimization
- Sales configurations
- Product configurations
- Maintenance configurations
- Summary
- Index
The great unavoidable factor: taxes. If you're a retailer — and even as a wholesaler in some jurisdictions — you will need to master the management of tax rates and rules in your Magento store. We've had to deal with this issue on many other platforms, and while some do provide some cool features, none, in our opinion, offer as much flexibility for taxes as Magento; especially when it comes to VAT taxes.
Note
You'll appreciate as you go through this section, that taxes can be quite complicated. Before configuring taxes in your online store, you should consult your tax professional. Making errors in taxes can not only present legal issues for your business, but also erode consumer confidence if the customers feel they're being inappropriately taxed on purchases.
Taxes are applied to products based on assigned tax classes. Tax classes are combined with tax zones and rates to create tax rules. Tax rules are what are applied to each product or shopping cart to determine the amount of tax charged in a transaction.
Here's a flow chart on how Magento calculates sales taxes based on a tax rule:
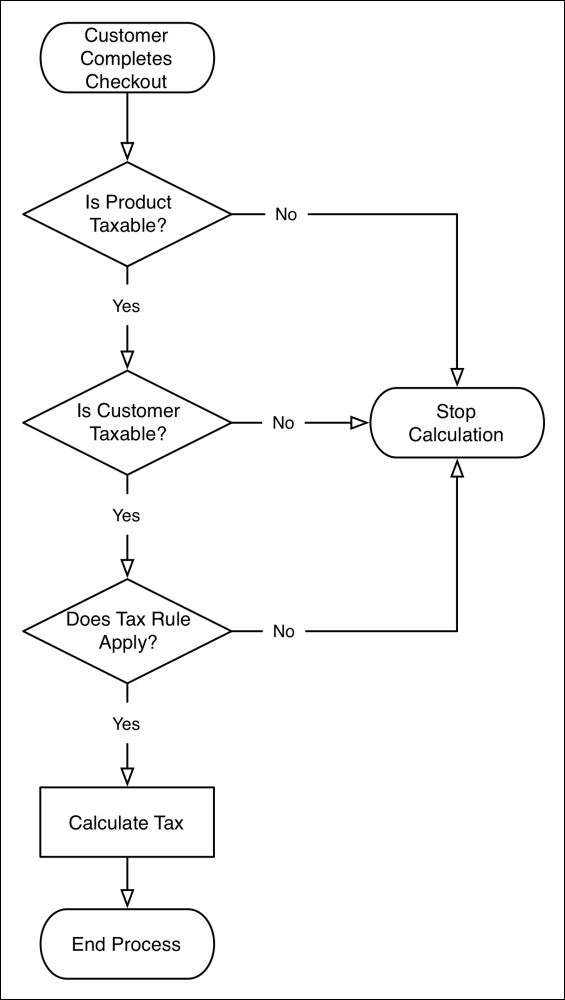
There are two types of tax classes in Magento:
- Product tax class: A product is usually considered taxable or non-taxable. If a product is not to be taxed, a value of None is selected for its tax class. You may find it necessary to have different product tax classes if you have different taxing rules for different products.
- Customer tax class: As we saw in creating customer groups, customers are assigned to a tax class, usually based on whether they are retail or wholesale customers.
Tax rules are created based on jurisdiction and rate: creating a zone for a country, state, and/or zip code, and a percentage used to calculate the tax.
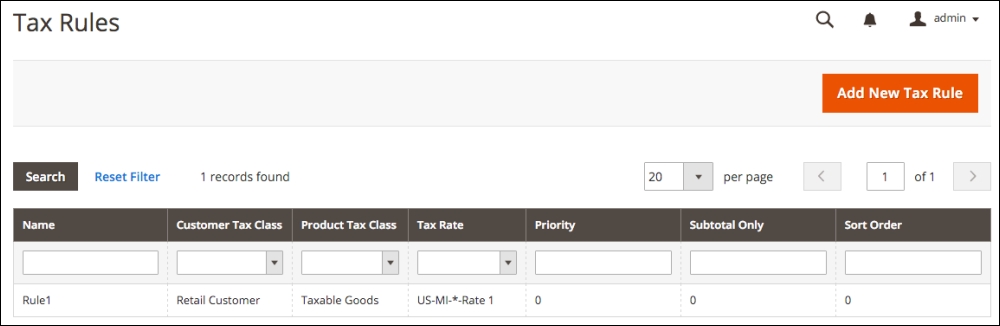
To illustrate, let's review a tax rule included in the default installation for Magento 2:
- Go to Stores | Tax Rules in your Magento backend.
- Click on Rule 1 listed in the tax rules table.
Let's now take a look at the layout of a tax rule:
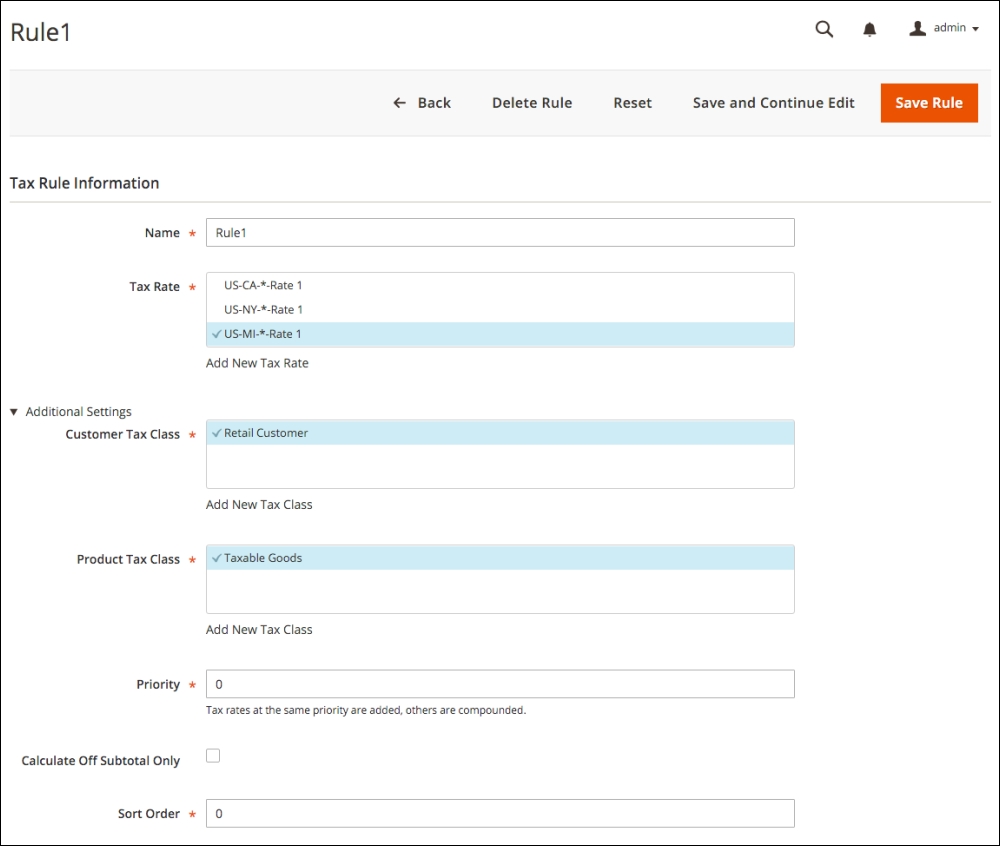
- Name: While Rule 1 is fine, it's not really descriptive, particularly in a list of rules. You can name the rule whatever you feel works best for you.
- Tax Rate: This field allows you to select one or more rates you want to apply to the rule. You might have to apply several tax rates if you have multiple distribution locations or nexuses. The rate is determined by the location of the buyer, usually their Ship To address.
Note
A nexus is generally considered if you have an active business in a particular state or locality. For instance, if your office is in Texas and you ship your products from a warehouse in Illinois, then, for taxing purposes, you're considered to have a nexus in Texas and Illinois. Therefore, as it stands at this moment, you are required to collect sales tax on any sales to buyers in Texas and Illinois. However, there are efforts in the United States Congress to radically change taxing laws on online sales transactions. Some state legislatures are also grappling with this issue. We know you're used to hearing this, but you do need to consult a tax professional to make sure you're correctly charging sales tax.
A leader in e-commerce sale tax is TaxJar (https://www.taxjar.com), a company that can provide integration with your store to precisely calculate required sales taxes and help with reporting to the various taxing jurisdictions. Using a tool such as TaxJar could greatly reduce your tax configuration time, while providing greater sales tax accuracy.
You can add or edit tax rates here or under Stores | Tax Zones and Rates. Let's edit the California tax rate here to understand the process:

To the right of the US-CA-*-Rate 1 item name, when you hover your mouse over the item, you will see a pencil icon. Click this to reveal the tax rate modal dialogue.
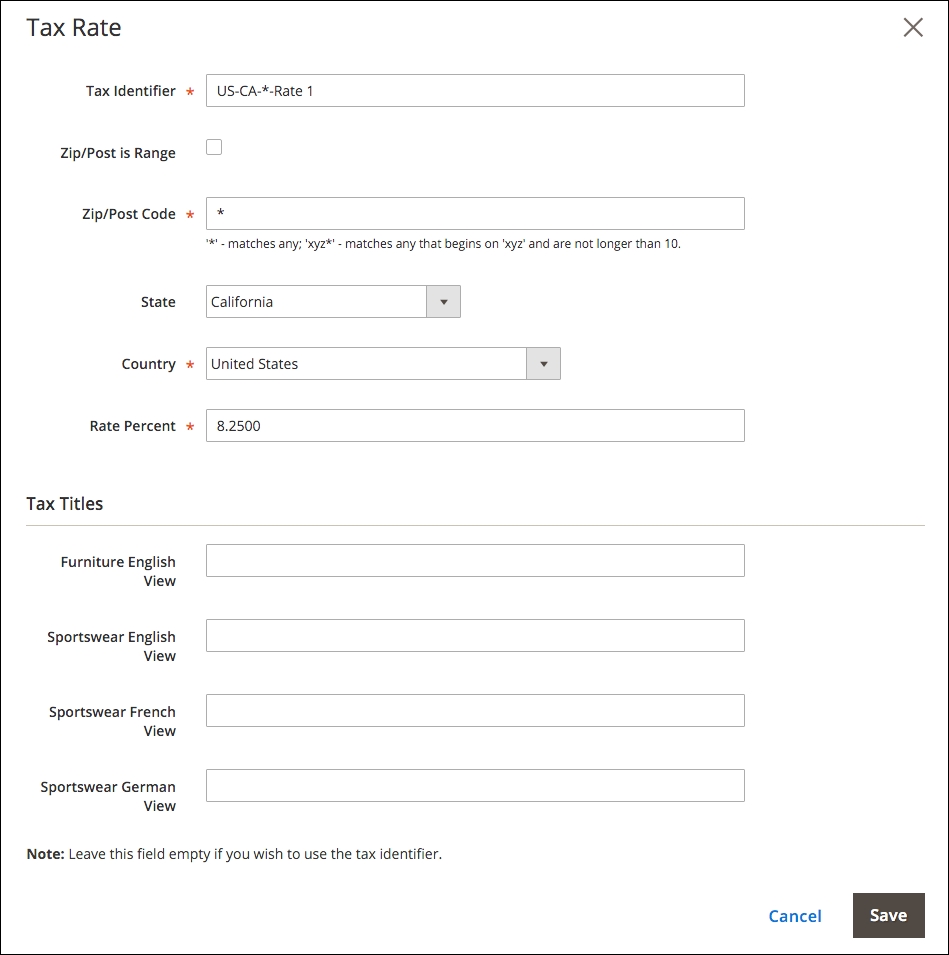
Let's have a look at the various fields here:
- Tax Identifier: You can enter whatever you wish in this space. The naming scheme shown was created by Magento in setting up this default rate.
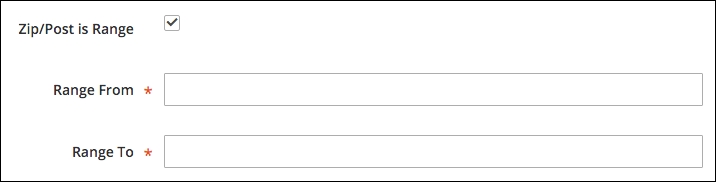
- Zip/Post is Range: By checking this box, the Zip/Post Code field is replaced by range fields, into which you can enter a starting and ending code range. This is particularly useful if you need to apply a different rate to a range of zip codes within a larger region.
- Zip/Post Code: As indicated, an asterisk is considered a wild card. That is, any value will match. If you want to, for example, apply the rate to all zip codes beginning in 78 (for example, 78001, 78002, and so on), you could enter 78*.
- State: Select the state for which the rate applies. The selections will change based on your country selection. An asterisk in this selection will apply the rate to all states and regions within the country.
- Country: Select the country for which the rate applies.
- Rate Percent: Enter the rate to be applied as a percentage amount. In other words, if the rate is 8.25%, enter 8.25, not 0.0825.
- Tax Titles: As in so many places in Magento, you can specifically name this item as you would like it to appear in your various store views. You might, for instance, wish to call the rule CA Sales Tax for your English views, but CA La Taxe De Vente for your French store view. If you leave any of these blank, your customer will be shown the Tax Identifier value.
You can use the same field specifics for creating a new tax rate by clicking Add New Tax Rate at the bottom of the Tax Rate list field.
To view the remaining fields, expand the Additional Settings section.
- Customer Tax Class: As discussed earlier, Customer Tax Classes allow you to assign customer groups to different tax groups. For instance, you will probably have sales taxes only apply to retail customers.
- Product Tax Class: If you need additional Product Tax Classes, you can also add them here and they will be available for selection in product edit panels.
- Priority: If you have more than one tax rate that might apply to a customer's shopping cart, those with the same priority will be added. That is, each tax rule will be calculated separately, and then added together. If the priorities are different, then the rates will be compounded in order of priority. Let's take an example: you have two taxes that will apply to a product — a federal excise tax of 5% and a state sales tax of 8%. If the priorities for both are the same, the shopper's purchase of $100 will be taxed a total of $13: $5 for 5% and $8 for 8%. If you put a priority of 1 for the excise tax and a priority of 2, for instance, for the state sales tax, then the customer is taxed $13.40: $5 for the excise tax and $8.40 for the 8% of $105 ($100 plus the $5 excise tax). The latter is an example of compounded sales tax. Taxes with different priorities will also be listed as separate tax line items to your customers.
- Calculated Off Subtotal Only: Now, take what we just said about priority and consider this: if you want each applicable tax — such as GST and PST taxes in Canada — to display separately to the customer, each tax must have a different priority. However, you don't want these taxes compounding, as explained above. Therefore, to prevent compounding, yet have the tax shown as a separate line item, check this box and the tax will only be applied to the order subtotal, not as a compounded tax calculation.
- Sort Order: If you have more than one applied tax, you can control the order in which they are listed to your customers. This will not change any compounding based on priority.
While you can't import tax rules, you can import tax rates, which may be a time saver, particularly where you have multiple taxing jurisdictions to whom you have to report tax collections.
As with many importing capabilities in Magento 2, the easiest way to begin is by exporting the current tax rules and expanding on the CSV file, then importing your changes. To import tax rates, view any tax rule. At the bottom of the screen are buttons to import and export tax rates. Export the current tax rate file, add or edit your rates, then re-import.
In some countries, goods and services are taxed in a means similar to sales tax, but calculated and managed differently. These Value-Added Taxes (VAT) are made even more complex due to varying rates among countries, different rules for registration, and rules for taxation based on the type of product or service sold.
Note
As usual, we can't begin to counsel you on taxes. VAT rules can be complicated, especially for non-EU countries selling into EU countries. We highly suggest you consult with your tax professionals. If you doubt the complexity of EU VAT taxes, see http://goo.gl/y07Pb.
The VAT process in Magento involves three basic components — the needs of them are based on your location:
- VAT validation: For customers who provide a VAT ID, Magento 2 is able to query the European Commission to verify their VAT ID
- VAT tax rules: As with sales taxes, the creation of tax rules based on certain conditions or considerations
- System configuration: Activate the rules that will manage VAT-eligible purchases
In Magento, VAT is charged if both the seller and customer are located in the same EU country. If both are EU-registered businesses, no VAT tax is collected if the seller and customer are in different countries.
When selling to consumers in EU countries, the amount of VAT collected is based on what country the seller is located (if the seller is an EU country). These are called intra-EU sales.
One exception (there's always one, yes?) is that when selling digital goods (for example, music, software), the VAT rate to be charged is that of the destination country, not the source country.
The key to effectively managing this complexity is the creation of multiple customer groups that can be automatically assigned during the checkout or registration process based on the VAT ID validation of the buyer.
It would be so easy for us to stop here, call it a day, and leave VAT tax configuration to your imagination. After all, we can play the "too complex for a book" card, correct?
The truth is that VAT taxes can be quite complex. If you're an EU business or exporting to the EU countries, you already understand the complexities. However, we do want you to get the most from Magento 2 and demonstrate its incredible ability to fulfill your tax calculation needs.
To that end — and perhaps the best way to demonstrate the process — we're going to set up VAT taxes as if we were a business based in France (we love Paris!).
Since we're considered, in this example, as an EU member country, we will need to provide for VAT ID validation of our customers and classify them accordingly.
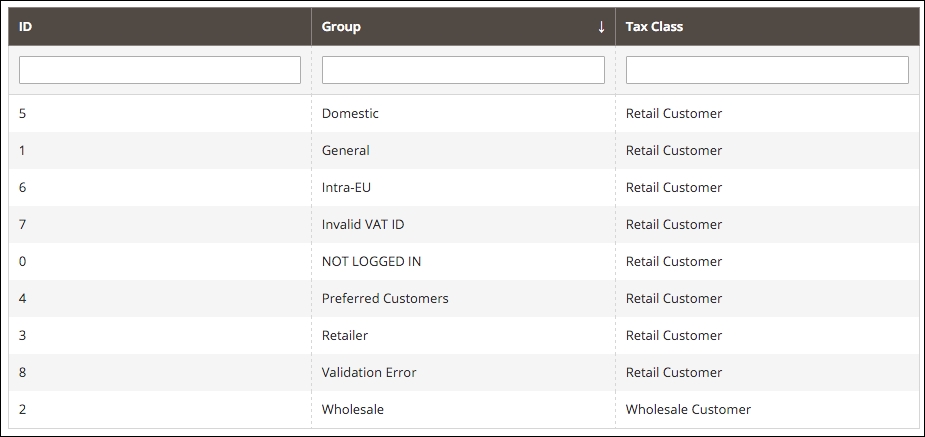
Earlier in this chapter, we added four additional customer groups, specifically for VAT tax use. If we look under Stores | Customer Groups, based on our example Magento install, we should see the following:
Next, we want to create the product classes that we will need for applying the appropriate French VAT tax rates. France groups products into four rate categories, each of which should have a different product class added for taxing purposes:
- Standard VAT: These will be taxed at 20%.
- Reduced VAT 1: Applies to books, transportation, entertainment events and hotels. Taxed at 10%.
- Reduced VAT 2: Applies to medical, food and book products. Taxed at 5.5%.
- Reduced VAT 3: Applies to newspaper and pharmaceuticals. Taxed at 2.1%.
We now have to consider that for customers living in other EU countries, we will charge our VAT tax rate on purchases of physical products, but charge the buyer's VAT tax rate for digital or virtual purchases.
That means that if we are selling digital products (for example, music, software, and so on) to other EU customers, we have to charge VAT tax at the rate in their country, not France. In order to do that, we have to add tax rates in Magento for every other EU country. As you can imagine, setting up all those tax rates and rules can be quite time consuming.
We have created a CSV file of all EU countries with their standard VAT tax rates (as of the time of writing). You can use this to upload the tax rates to your Magento 2 install.
For France, we need to create the four tax rates described above. After adding these under Stores | Tax Zones and Rates in our Magento 2 backend, the list of tax rates looks like this:

Our next chore is to create the product tax classes that are needed to separate our products according to the taxes we have to apply. For our France-based example, we will need five product tax classes:
- Standard: These are physical products and services that don't fall into the other product classes
- Reduced Tax Class 1: In France, these include passenger transportation, events (sports and entertainment), hotels, and restaurants
- Reduced Tax Class 2: Medical, food, and books
- Reduced Tax Class 3: Newspapers and pharmaceuticals
- Virtual Products: Music, software, and other non-physical products
While you may not currently sell products that fall into all of these classes, you may want to go ahead and set them up so they're available to you.
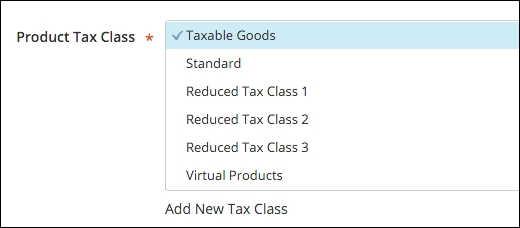
Remember, to create additional product tax classes; just click to edit any tax rule, expand Additional Settings, and add your new classes. After adding the above classes, this section will look like the following screenshot:
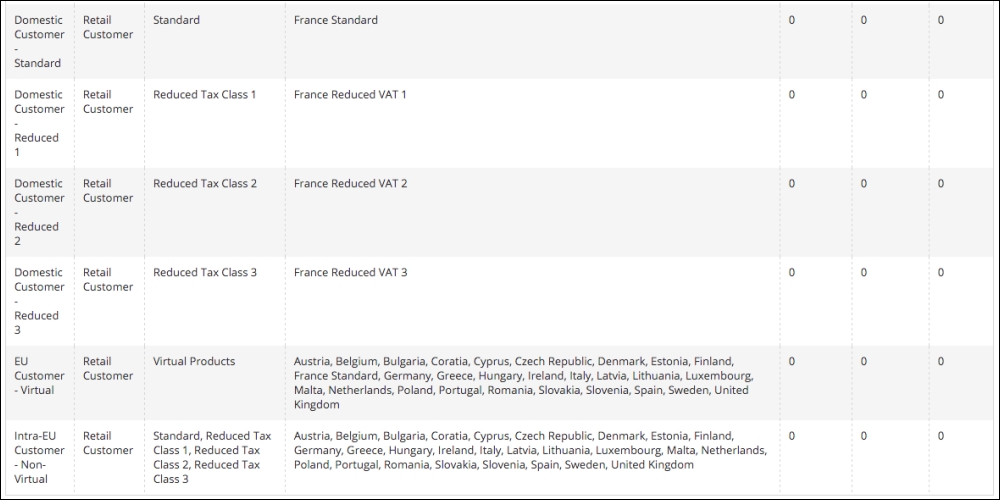
With the preceding preparation completed, we can now create the tax rules that will be used to calculate VAT taxes on purchases. We need to create the following tax rules to meet our needs as a French online business:
- Domestic customers purchasing standard products
- Domestic customers purchasing Reduced Tax Class 1 products
- Domestic customers purchasing Reduced Tax Class 2 products
- Domestic customers purchasing Reduced Tax Class 3 products
- All customers purchasing virtual products
- Intra-EU customers purchasing non-virtual products
Once entered into our Magento 2 example, our Tax Rules screen would include the following:
The final piece is to configure your Customer Configuration so that customers are automatically assigned to the proper customer group based on their VAT ID validation. To do that, go to Stores | Configuration | Customers | Customer Configuration and expand the Create New Account Options panel. Some of these settings are done at the global, website, and store view levels, so pay close attention to your store view scope setting in the upper right-hand part of the screen. For our example, we only want to automatically assign customers who visit our French store. Therefore, we will only enable this feature at the Sportswear French View.
Once you have changed to the appropriate store view level, the key fields to configure are:
- Enable Automatic Assignment to Customer Group: Set to Yes and Magento will reveal additional configuration fields.
- Tax Calculation Based On: Usually, you will set this to Shipping Address so that taxes are based on the customer's taxing jurisdiction, although there are exceptions.
- Default Group: At the store view level, you may want to set this to Domestic.
- Group for Valid VAT ID – Domestic: Set to your domestic group, Domestic.
- Group for Valid VAT ID – Intra-Union: Set to Intra-EU.
- Group of Invalid VAT ID: Set to Invalid VAT ID.
- Validation Error Group. Set to Validation Error as the customer group.
- Validate on Each Transaction: If you're going to calculate VAT taxes, then you would most like set this to Yes.
- Default Value for Disable Automatic Group Changes Based on VAT ID: This feature allows Magento to re-assign customers if their VAT ID or address changes. If you do not want this feature, set this to Yes.
As with any store configuration, especially one as complex as VAT taxes, we highly recommend that you test your configurations thoroughly.