Table of Contents for
Magento 2 - Build World-Class online stores
 Magento 2 - Build World-Class online stores
Published by
Packt Publishing, 2017
Magento 2 - Build World-Class online stores
Published by
Packt Publishing, 2017
- Cover
- Table of Contents
- Magento 2 - Build World-Class online stores
- Magento 2 - Build World-Class online stores
- Credits
- Preface
- 1. Module 1
- 1. Magento Fundamentals
- XAMPP installation
- Magento
- Summary
- 2. Magento 2.0 Features
- An introduction to the Magento order management system
- Magento 2.0 command-line configuration
- The command-line utility
- Summary
- 3. Working with Search Engine Optimization
- Store configuration
- SEO and searching
- SEO catalog configuration
- Google Analytics tracking code
- Optimizing Magento pages
- Summary
- 4. Magento 2.0 Theme Development – the Developers' Holy Grail
- Magento 2.0 theme structure
- The Magento Luma theme
- Magento theme inheritance
- CMS blocks and pages
- Custom variables
- Creating a basic Magento 2.0 theme
- Summary
- 5. Creating a Responsive Magento 2.0 Theme
- Composer – the PHP dependency manager
- Building the CompStore theme
- CSS preprocessing with LESS
- Applying new CSS to the CompStore theme
- Creating the CompStore logo
- Applying the theme
- Creating CompStore content
- Customizing Magento 2.0 templates
- Summary
- 6. Write Magento 2.0 Extensions – a Great Place to Go
- Using the Zend framework
- Magento 2.0 extension structure
- Developing your first Magento extension
- The Twitter REST API
- The TweetsAbout module structure
- Using TwitterOAuth to authenticate our extension
- Developing the module
- Summary
- 7. Go Mobile with Magento 2.0!
- Adjusting the CompStore theme for mobile devices
- The Magento 2.0 responsive design
- The Magento UI
- Implementing a new CSS mixin media query
- Adjusting tweets about extensions for mobile devices
- Summary
- 8. Speeding up Your Magento 2.0
- Indexing and caching Magento
- Indexing and re-indexing data
- The Magento cron job
- Caching
- Fine-tuning the Magento hosting server
- Selecting the right Magento hosting service
- Apache web server deflation
- Enabling the expires header
- Minifying scripts
- Summary
- 9. Improving Your Magento Skills
- Magento knowledge center
- Improving your Magento skills
- Summary
- 2. Module 2
- 1. Magento 2 System Tools
- Installing Magento 2 sample data via GUI
- Installing Magento 2 sample data via the command line
- Managing Magento 2 indexes via the command line
- Managing Magento 2 cache via the command line
- Managing Magento 2 backup via the command line
- Managing Magento 2 set mode (MAGE_MODE)
- Transferring your Magento 1 database to Magento 2
- 2. Enabling Performance in Magento 2
- Configuring Redis for backend cache
- Configuring Memcached for session caching
- Configuring Varnish as the Full Page Cache
- Configuring Magento 2 with CloudFlare
- Configuring optimized images in Magento 2
- Configuring Magento 2 with HTTP/2
- Configuring Magento 2 performance testing
- 3. Creating Catalogs and Categories
- Create a Root Catalog
- Create subcategories
- Manage attribute sets
- Create products
- Manage products in a catalog grid
- 4. Managing Your Store
- Creating shipping and tax rules
- Managing customer groups
- Configuring inventories
- Configuring currency rates
- Managing advanced pricing
- 5. Creating Magento 2 Extensions – the Basics
- Initializing extension basics
- Working with database models
- Creating tables using setup scripts
- Creating a web route and controller to display data
- Creating system configuration fields
- Creating a backend data grid
- Creating a backend form to add/edit data
- 6. Creating Magento 2 Extensions – Advanced
- Using dependency injection to pass classes to your own class
- Modifying functions with the use of plugins – Interception
- Creating your own XML module configuration file
- Creating your own product type
- Working with service layers/contracts
- Creating a Magento CLI command option
- 3. Module 3
- 1. Planning for Magento
- Technical considerations
- Global-Website-Store methodology
- Planning for multiple stores
- Summary
- 2. Managing Products
- Managing products the customer focused way
- Creating products
- Managing inventory
- Pricing tools
- Autosettings
- Related products, up-sells, and cross-sells
- Importing products
- Summary
- 3. Designs and Themes
- The concept of theme inheritance
- Default installation of design packages and themes
- Installing third-party themes
- Inline translations
- Working with theme variants
- Customizing themes
- Customizing layouts
- Summary
- 4. Configuring to Sell
- Payment methods
- Shipping methods
- Managing taxes
- Transactional e-mails
- Summary
- 5. Managing Non-Product Content
- Summary
- 6. Marketing Tools
- Promotions
- Newsletters
- Using sitemaps
- Optimizing for search engines
- Summary
- 7. Extending Magento
- The new Magento module architecture
- Extending Magento functionality with Magento plugins
- Building your own extensions
- Summary
- 8. Optimizing Magento
- Indexing and caching
- Caching in Magento 2 – not just FPC
- Tuning your server for speed
- Summary
- 9. Advanced Techniques
- Version control
- Magento cron
- Backing up your database
- Upgrading Magento
- Summary
- 10. Pre-Launch Checklist
- System configurations
- Design configurations
- Search engine optimization
- Sales configurations
- Product configurations
- Maintenance configurations
- Summary
- Index
Version control is one of the most helpful and time-saving tools that can be used in support of software development. Even if you're only making small changes to the templates you're using, or adding modules without modifying the code inside of them, version control allows you to track changes that have been made and to evaluate code at any given point in time after the implementation. Even more importantly, it allows you to roll back the code to an earlier state, in cases where you're not quite sure what changes might have caused problems with the site.
At this point, the tool most widely used for version control by the development community is Git. Git is a system that was developed by Linus Torvalds (the originator of LINUX himself!) as a result of his frustration with existing tools. While it's beyond the scope of this book to go into much detail around what exactly it was that frustrated him, suffice to say that the changes he's made have positioned Git as the lingua franca for version control, and understanding its basics is a necessary endeavor if you want to do any development, or even just track changes to your system caused by upgrades.
Magento is a complicated system and even small changes can have a significant impact, causing errors that are obvious (site down) and some that are pernicious and creeping, such as the creation of bad data over time. Using a system to track all the changes that you and others have made to the system is a strongly recommended practice and will invariably, at some point, save you time, money, or both.
Let's start with a very basic prescription: installing the Git binary on your system and checking your current Magento site into a local repository. For the purposes of this example, we'll assume the use of OSX, although Git can be used for pretty much any modern operating system.
If you've installed the developer tools that come with OSX on your system, the Git binary will already be there. If you haven't and don't want to, you can download the Git binary from this link: https://git-scm.com/download/mac.
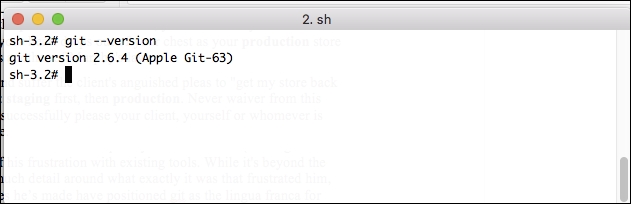
To make sure that Git has been installed on your system, open a terminal and type git –version. You should see the following output:
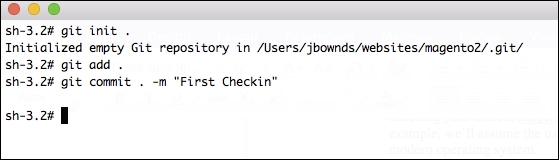
The next step you'll take will be to change to the document root of your Magento install. In this example, that's /Users/jbownds/websites/magento2. Once here, you can issue three simple commands to initialize the repository and check in the first version of your files. You'll start with git init ., followed by git add ., and finally git commit . –m "first checkin of files" (you can substitute another message here, if you like).
See the following screenshot for an example of what this will look like:
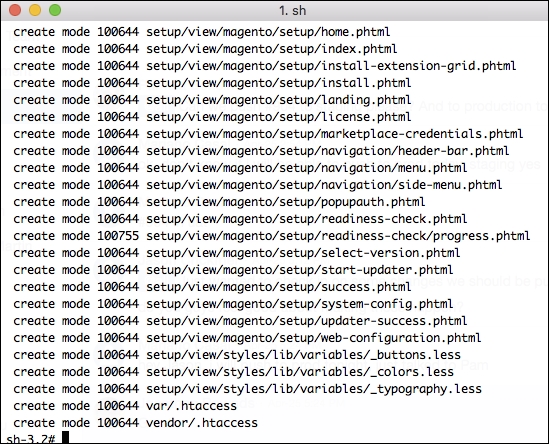
Once you've checked in the files, you'll see a flurry of messages indicating which files have been added, which looks something like this:
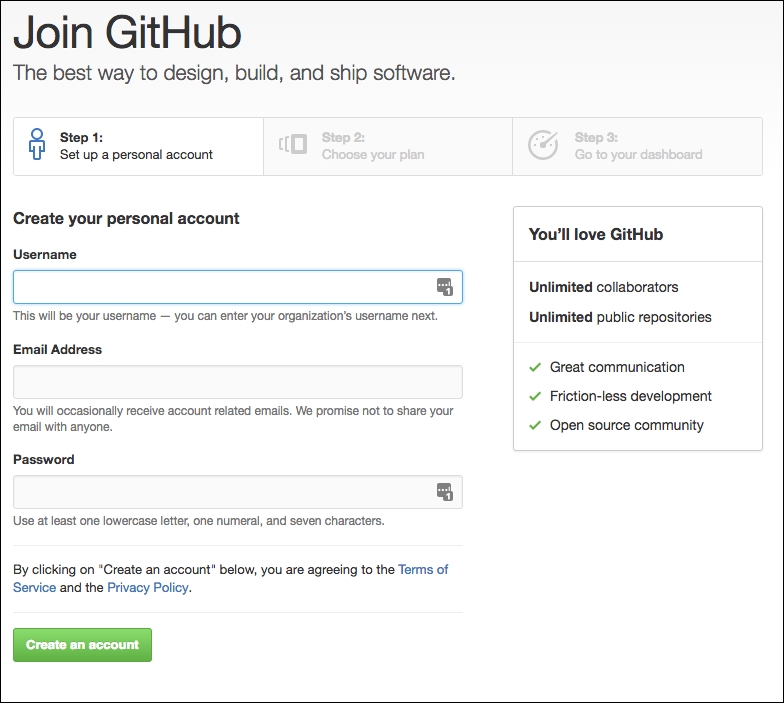
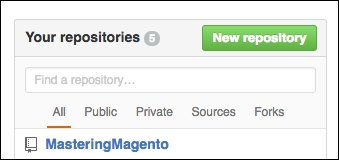
This indicates that the Git repository has been initialized locally and you're ready for the next step. As mentioned before, Git is a distributed version control system. That means it's easy (and a good idea) to store copies of it in different locations. There are many services that allow for this, but the most popular is probably GitHub. For this reason, we'll walk through the steps necessary to take the repository you've created and push it out to GitHub. Start by creating an account here: https://github.com/join:
Once you've created an account (there are both free and paid options here), you can create a new repository by clicking the appropriate button on the right gutter:
Click on the repository and there will be step-by-step instructions for pushing an existing repository from the command line:

Go back to the document root for the repository you created and paste these commands into the terminal. The first one should run without a problem, but the second one will probably run into some authentication issues, as in the following example:
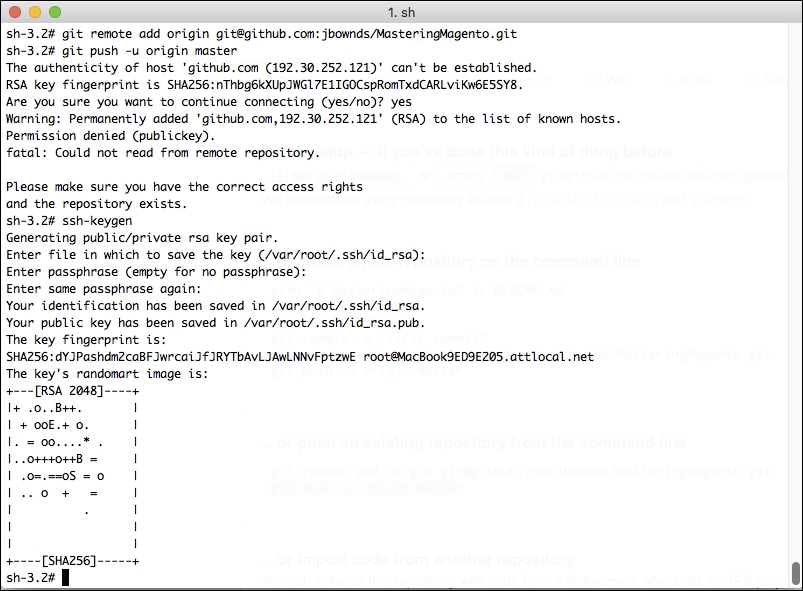
As you can see in this example, the second command had issues. The specific error message is Fatal: could not read remote repository. Please make sure you have the correct access rights.
To address this, you'll need to add a public key for the user to GitHub, so GitHub recognizes the user trying to push this information into the remote repository. Don't worry - this sounds trickier than it is. All you need to do is type in ssh-keygen. You'll be prompted with several questions, all of which you can leave blank. At this point, you should have a generated public key for your user. You can view it by typing vi ~/.ssh/id_rsa.pub, and it'll look something like this (ignore the black arrow, this is just to blot out information in the private key).
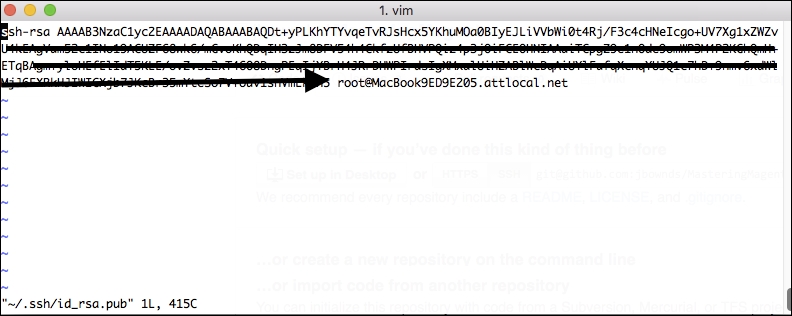
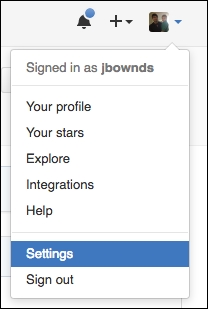
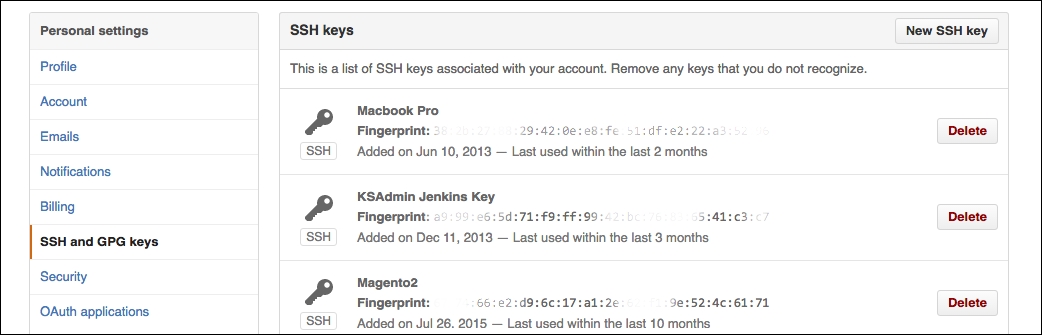
Copy this key and head back to GitHub. Once there, you can add this key in the Settings area of your account:
Click New SSH key, provide a title, and paste the value you copied into the text area. Save this value:
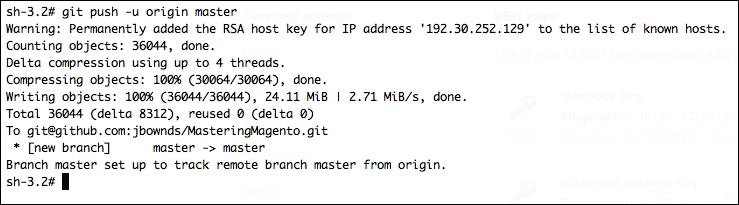
Now, when you go back to the command line and try git push –u origin master command again, you'll see results like this:
Congratulations! You've created your first Git repository and pushed it out to GitHub.
Now, it's worth noting that there are a slew of very well-conceived visual tools that manage this process for you as well. It's beyond the scope of this text to evaluate these tools but it's worth mentioning a couple.
GitHub itself has a free desktop tool you can download and use, and it's quite handy for a visual representation of what's going on. The other tool we've seen used predominately is Tower. Tower can be obtained by visiting their website at https://www.git-tower.com/.While there is cost associated with the use of this tool (after a free trial), if you prefer a visual representation of what's happening with version control, this option may be more attractive to you.