Table of Contents for
Magento 2 - Build World-Class online stores
 Magento 2 - Build World-Class online stores
Published by
Packt Publishing, 2017
Magento 2 - Build World-Class online stores
Published by
Packt Publishing, 2017
- Cover
- Table of Contents
- Magento 2 - Build World-Class online stores
- Magento 2 - Build World-Class online stores
- Credits
- Preface
- 1. Module 1
- 1. Magento Fundamentals
- XAMPP installation
- Magento
- Summary
- 2. Magento 2.0 Features
- An introduction to the Magento order management system
- Magento 2.0 command-line configuration
- The command-line utility
- Summary
- 3. Working with Search Engine Optimization
- Store configuration
- SEO and searching
- SEO catalog configuration
- Google Analytics tracking code
- Optimizing Magento pages
- Summary
- 4. Magento 2.0 Theme Development – the Developers' Holy Grail
- Magento 2.0 theme structure
- The Magento Luma theme
- Magento theme inheritance
- CMS blocks and pages
- Custom variables
- Creating a basic Magento 2.0 theme
- Summary
- 5. Creating a Responsive Magento 2.0 Theme
- Composer – the PHP dependency manager
- Building the CompStore theme
- CSS preprocessing with LESS
- Applying new CSS to the CompStore theme
- Creating the CompStore logo
- Applying the theme
- Creating CompStore content
- Customizing Magento 2.0 templates
- Summary
- 6. Write Magento 2.0 Extensions – a Great Place to Go
- Using the Zend framework
- Magento 2.0 extension structure
- Developing your first Magento extension
- The Twitter REST API
- The TweetsAbout module structure
- Using TwitterOAuth to authenticate our extension
- Developing the module
- Summary
- 7. Go Mobile with Magento 2.0!
- Adjusting the CompStore theme for mobile devices
- The Magento 2.0 responsive design
- The Magento UI
- Implementing a new CSS mixin media query
- Adjusting tweets about extensions for mobile devices
- Summary
- 8. Speeding up Your Magento 2.0
- Indexing and caching Magento
- Indexing and re-indexing data
- The Magento cron job
- Caching
- Fine-tuning the Magento hosting server
- Selecting the right Magento hosting service
- Apache web server deflation
- Enabling the expires header
- Minifying scripts
- Summary
- 9. Improving Your Magento Skills
- Magento knowledge center
- Improving your Magento skills
- Summary
- 2. Module 2
- 1. Magento 2 System Tools
- Installing Magento 2 sample data via GUI
- Installing Magento 2 sample data via the command line
- Managing Magento 2 indexes via the command line
- Managing Magento 2 cache via the command line
- Managing Magento 2 backup via the command line
- Managing Magento 2 set mode (MAGE_MODE)
- Transferring your Magento 1 database to Magento 2
- 2. Enabling Performance in Magento 2
- Configuring Redis for backend cache
- Configuring Memcached for session caching
- Configuring Varnish as the Full Page Cache
- Configuring Magento 2 with CloudFlare
- Configuring optimized images in Magento 2
- Configuring Magento 2 with HTTP/2
- Configuring Magento 2 performance testing
- 3. Creating Catalogs and Categories
- Create a Root Catalog
- Create subcategories
- Manage attribute sets
- Create products
- Manage products in a catalog grid
- 4. Managing Your Store
- Creating shipping and tax rules
- Managing customer groups
- Configuring inventories
- Configuring currency rates
- Managing advanced pricing
- 5. Creating Magento 2 Extensions – the Basics
- Initializing extension basics
- Working with database models
- Creating tables using setup scripts
- Creating a web route and controller to display data
- Creating system configuration fields
- Creating a backend data grid
- Creating a backend form to add/edit data
- 6. Creating Magento 2 Extensions – Advanced
- Using dependency injection to pass classes to your own class
- Modifying functions with the use of plugins – Interception
- Creating your own XML module configuration file
- Creating your own product type
- Working with service layers/contracts
- Creating a Magento CLI command option
- 3. Module 3
- 1. Planning for Magento
- Technical considerations
- Global-Website-Store methodology
- Planning for multiple stores
- Summary
- 2. Managing Products
- Managing products the customer focused way
- Creating products
- Managing inventory
- Pricing tools
- Autosettings
- Related products, up-sells, and cross-sells
- Importing products
- Summary
- 3. Designs and Themes
- The concept of theme inheritance
- Default installation of design packages and themes
- Installing third-party themes
- Inline translations
- Working with theme variants
- Customizing themes
- Customizing layouts
- Summary
- 4. Configuring to Sell
- Payment methods
- Shipping methods
- Managing taxes
- Transactional e-mails
- Summary
- 5. Managing Non-Product Content
- Summary
- 6. Marketing Tools
- Promotions
- Newsletters
- Using sitemaps
- Optimizing for search engines
- Summary
- 7. Extending Magento
- The new Magento module architecture
- Extending Magento functionality with Magento plugins
- Building your own extensions
- Summary
- 8. Optimizing Magento
- Indexing and caching
- Caching in Magento 2 – not just FPC
- Tuning your server for speed
- Summary
- 9. Advanced Techniques
- Version control
- Magento cron
- Backing up your database
- Upgrading Magento
- Summary
- 10. Pre-Launch Checklist
- System configurations
- Design configurations
- Search engine optimization
- Sales configurations
- Product configurations
- Maintenance configurations
- Summary
- Index
After successfully installing Magento, you can now take on the task of creating and configuring your store. You could begin by crafting the design that reflects your store's brand, or you could start configuring the many settings that will direct how your customers will interact with your online store.
However, selling online really boils down to the products you are selling. Additionally, many of Magento's configurations are dependent on the products you're offering and how they are arranged into categories.
Therefore, when we create a new Magento-powered store, we begin at the root, so to speak: the products.
In this chapter, we will tackle:
- Creating categories
- Managing products and attributes to help your customers shop more easily
- Setting up reviews, tags, and feeds to help promote your products
- Importing products en masse
The use of the terms catalogs and categories in Magento used to be a bit confusing, as Magento tended to use these terms with some inconsistency. In Magento 2, the distinction is better defined.
In Magento, the catalog is the full collection of products within your Magento installation. Looking under Products | Catalog in the backend, you can view all your products regardless of to which Website or categories they may be assigned.
Categories in Magento 2 are just that: categories of products. Let us delve a bit deeper into this.
Categories needed for our new stores. Now, we need to learn how to create sub-categories that will allow us to assign products and display them in logical groups on our store.
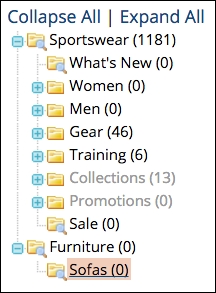
For our furniture store, we want to create a new subcategory for sofas:
- Go to Products | Categories in your Magento backend.
- Click on Furniture in the list of categories on the left.
- Click on Add Subcategory.
- For Name, enter
Sofas. - Set Is Active to
Yes. - Click on Save Category.
This is how the additional subcategory would then appear:
You can, of course, add additional subcategories, as well as subcategories of subcategories. But, before you go to too much trouble building a huge category hierarchy, be sure to read through the section on Attributes and Attribute Sets later in this chapter.
Let's now explore the other panels and fields in the category detail screen.
Tip
Don't be afraid to experiment! While this book provides a considerable amount of detail and helpful advice, the power of Magento can only truly be appreciated the more you work with it. Test various setting combinations. You may well come up with a particular configuration that helps you better connect with your shoppers.
As you will noticed, there are only two required fields when creating a category (Name and Is Active). But others, as shown below, on this tab are important as well.
- URL Key: Once you create a category, Magento will automatically create a unique URL Key. This becomes the path for your category, such as www.acmefurniture.com/sofas.html. The sofas part is the URL Key. If you create more than one category with the same name, Magento will create unique keys by adding an incremental number, such as "sofas-1," "sofas-2." You can rename this to any value you wish, and in some cases, it may have more SEO value for you to enter a key such as "cheap-sofas" or "living-room-sofas." If you change the key of an existing category, you can select Create Permanent Redirect for old URL and Magento will create the necessary URL rewrites so that anyone still trying to view your category with the old URL Key will be automatically re-routed to the new path.
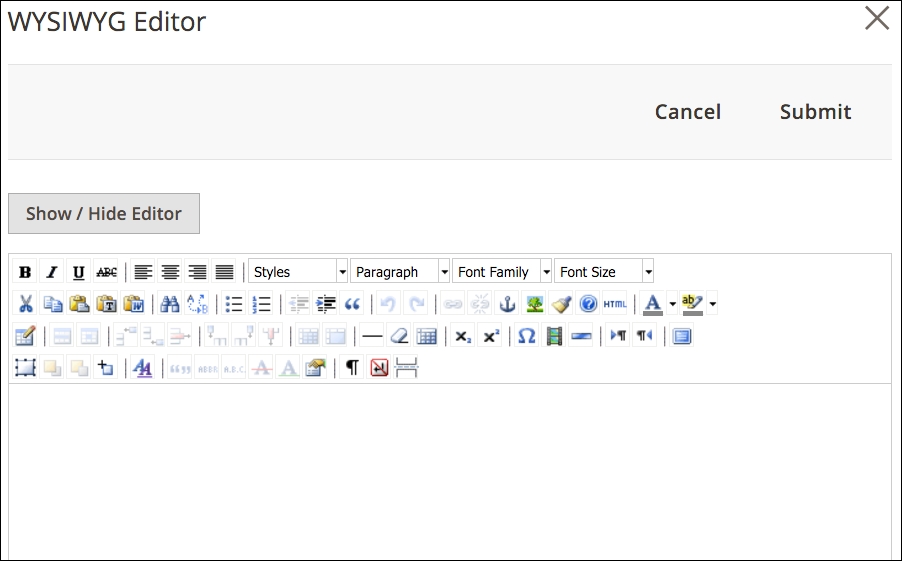
- Description: In the front end of your store, the Description tab will appear at the top of the category page, giving you the ability to describe the category to shoppers, as well as adding more SEO rich content. The field has a very basic WYSIWYG editor. However, you can access a WYSIWYG editor with considerably more features by clicking on WYSIWYG Editor. A panel will slide from the right with the enhanced field.
- Image: You can upload an image to appear at the top of the category. Your theme design may dictate how and where this image is displayed.
- Page Title: The page title shown at the top of a web browser window — this is also displayed as the title of your category in Google search results — is automatically created according to how you configure your store settings. However, you can override your default settings by entering a value here.
- Meta Keywords: Modern search engines don't use meta keywords for determining page rankings or content. However, if you want to enter keywords here, you may enter them inserting a comma between each keyword or phrase.
- Meta Description: In Magento, the meta description that is added to the header of your page for search engines to use is automatically taken from the Description field. However, Google only displays approximately the first 160 characters of a description. You may want to compose a different description here for that purpose.
- Include in Navigation Menu: You will most likely want a category displayed in your main navigation menu. However, there are instances where you may not want the category listed. For example, as discussed later under the section, Special Categories, you may want to create a Featured category that displays products in a special location on your site, but is not listed in the main menu.
As you build out your category schema, you may decide that you don't want products displayed on all category pages. For example, a top-level "Furniture" category might display graphics for each subcategory (for example, "Sofas", "Chairs", "Tables"). However, within those subcategories, you probably do want to display the list of products available. Let us have a look at the various attributes within this tab:
- Display Mode: In Chapter 5, Managing Non-Product Content, we'll explain about static blocks — content that can be used as desired within your site. You can elect to show products, a static block, or both products and a static block.
Note
Unless your theme is configured otherwise, the description and image you add in the General Information tab will still show even if you choose Products only for Display Mode.
Why use a static block if you can simply add a category description? Good question, and one we're often asked. Static blocks are very useful for displaying the same content in many places. For instance, you may want to use a static block to regularly display a new product announcement or discount. By using a static block, you can update this information in one place and have it instantly appear throughout your site wherever it is referenced.
- CMS Block: If you do choose to display a static block, you can choose the block to show within this drop-down menu.
- Is Anchor: Later in this chapter, we will explore attributes and how you can use them in filtered navigation. If you want your category page to show layered navigation for the products within the category (if products are shown), set this to Yes, as shown in the following screenshot:
- Available Product Listing Sort By: By default, Magento allows products to be sorted by position, name, and price. Position is managed within the Category Products tab (this will be explained a bit later). You can choose which of these sorts to include.
- Default Product Listing Sort By: You can also choose which sort you wish to use by default when a customer first views a category page.
- Layered Navigation Price Step: Based on your configurations, Magento will automatically calculate the price steps shown in the layered navigation sidebar. You can override this by entering the steps you wish to show by entering the amounts separated by commas (for example, "0,50,100,500").
In this tab, you can control specific display configurations for your category.
- Use Parent Category Settings: You can choose to have any subcategory use the same display settings as its parent category.
- Apply To Products: Setting it to Yes will apply any applicable design settings to products shown within the category.
- Custom Theme: If you have another theme you wish to apply to a category — perhaps a holiday-focused theme — you can choose that theme in this field.
- Active From/Active To: These date fields, if filled in, allow you to control the dates on which any custom theme will be applied.
- Page Layout: Depending on the capabilities of your theme, you can choose an alternative layout scheme for the category. Your choices include one column, two columns with either left or right sidebar, three columns, or empty (this requires the definition of your own page layout using XML).
- Custom Layout Update: You can enter custom XML code to alter the display of your category page.
Note
For more on themes, see Chapter 3, Designs and Themes.
When you create products in your Magento store, you can assign the product to a category. Alternatively, you can assign multiple products to a category within this tab. Use the search features to find your products.
- Selection Column: The first field at the top of the column allows you to search for products that are (Yes), are not (No), or either (Any) assigned already to your category. For example, if you want to identify products not already assigned to your category, select No.
- Search Fields: The empty fields at the top of the other columns allow you to enter a search criteria for further filtering your search results.
Once you have identified the products you wish to add, select the ones you wish to add. Be sure to click Save Category in order to complete your assignments.
We mentioned it earlier, but it deserves repeating: you can re-arrange the order of your categories — and how they will appear in navigation menus — by dragging and dropping your categories in the sidebar display. The order in which they appear can be set differently for each website or store view.
Note
Re-arranging categories is a very intensive computing operation owing to the work that Magento has to perform in order to update its data tables and re-index. If you intend to make several changes, you may want to disable caching until you complete your work, although each change may still take some time. Be patient. After each re-arrangement, make sure Magento has completed its work before making the next change. Otherwise, your data tables may become "confused."
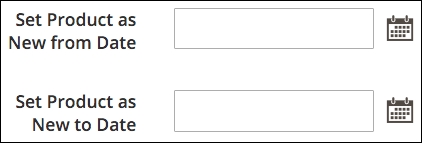
Magento provides some inherent tools for grouping products for special display purposes. For example, by designating New From and New To dates in the Advanced Settings | Autosetting panel of a product detail screen, as shown in the following screenshot, Magento will display a product within a New Products block if today's date falls within the range of these dates.
However, in some cases, you may want to display groups of products for other reasons. It's not uncommon to show Featured products on an e-commerce website. You might even want to show products grouped by family or purpose.
Let's take the case of creating a Featured products section for our homepage. Let's also assume that you don't want Featured as a category in your navigation bar just as a "special" category.
- Go to Products | Categories in your Magento backend.
- Click on the root category under which you wish to create your special category.
- Click on Add Subcategory.
- In the center part of the screen, enter the following values:
- Name: Featured
- Is Active: Yes
- Include in Navigation Menu: No
- Click on the tab at the top labeled Category Products.
- Find the product you wish to add to this category and check the box in the left-most column.
- Click on Save Category.
- After the screen refreshes, note the ID number of the category at the top of the screen, as shown in the following screenshot (in this example, the category ID is 43):
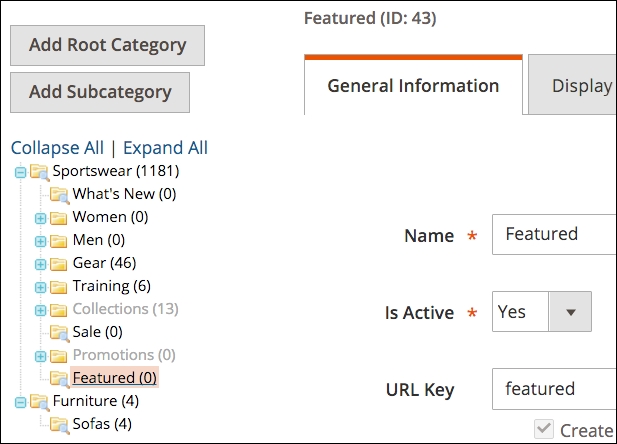
You've now created a new category called Featured and added some products. Now we need to add a block to the homepage that will display your Featured Products.
- Go to Content | Pages.
- Select to edit the home page for the store you wish to update.
- Click the side tab labeled Content.
- If the WYSIWYG editor is showing, click on Show/Hide Editor to reveal the HTML code.
- Find in the code where you want to put your Featured Products section and position the cursor there.
- Click the Insert Widget button.
- For Widget Type, select Catalog Product List.
- Add a custom title.
- Once this is done you should see something similar to the following block notation in the content pane:
{{widget type="Magento\CatalogWidget\Block\Product\ProductsList" title="Featured" products_count="10" template="product/widget/content/grid.phtml"}} - Click Save Page (or Save and Continue Edit).
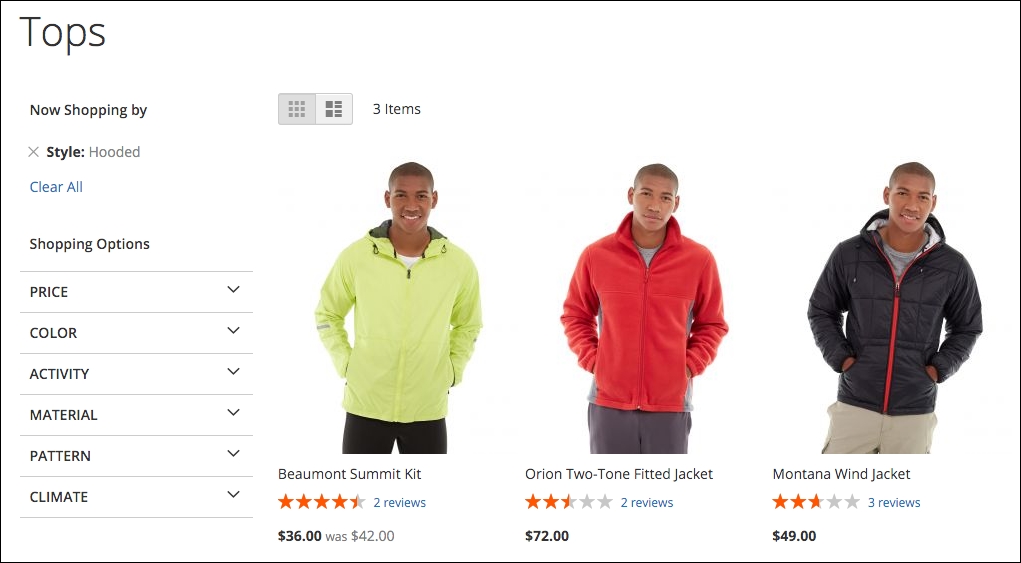
When you view the homepage, you should see a section displaying the featured items you assigned to this special category:
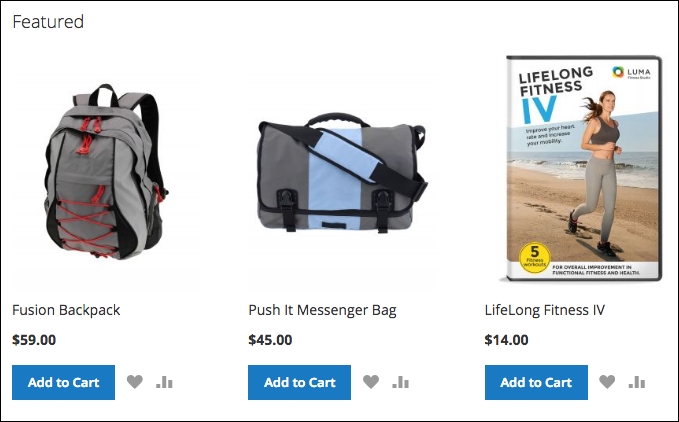
Furthermore, you can access this category and its products by appending the name of your special category to your store URL. For example, to see the entire Featured product category, you can go to http://www.yourstoredomain.com/featured.html.
In Chapter 5, Managing Non-Product Content, we'll go into more detail about blocks and how to use them in creative ways, giving your online store more features and functionality.