Table of Contents for
Magento 2 - Build World-Class online stores
 Magento 2 - Build World-Class online stores
Published by
Packt Publishing, 2017
Magento 2 - Build World-Class online stores
Published by
Packt Publishing, 2017
- Cover
- Table of Contents
- Magento 2 - Build World-Class online stores
- Magento 2 - Build World-Class online stores
- Credits
- Preface
- 1. Module 1
- 1. Magento Fundamentals
- XAMPP installation
- Magento
- Summary
- 2. Magento 2.0 Features
- An introduction to the Magento order management system
- Magento 2.0 command-line configuration
- The command-line utility
- Summary
- 3. Working with Search Engine Optimization
- Store configuration
- SEO and searching
- SEO catalog configuration
- Google Analytics tracking code
- Optimizing Magento pages
- Summary
- 4. Magento 2.0 Theme Development – the Developers' Holy Grail
- Magento 2.0 theme structure
- The Magento Luma theme
- Magento theme inheritance
- CMS blocks and pages
- Custom variables
- Creating a basic Magento 2.0 theme
- Summary
- 5. Creating a Responsive Magento 2.0 Theme
- Composer – the PHP dependency manager
- Building the CompStore theme
- CSS preprocessing with LESS
- Applying new CSS to the CompStore theme
- Creating the CompStore logo
- Applying the theme
- Creating CompStore content
- Customizing Magento 2.0 templates
- Summary
- 6. Write Magento 2.0 Extensions – a Great Place to Go
- Using the Zend framework
- Magento 2.0 extension structure
- Developing your first Magento extension
- The Twitter REST API
- The TweetsAbout module structure
- Using TwitterOAuth to authenticate our extension
- Developing the module
- Summary
- 7. Go Mobile with Magento 2.0!
- Adjusting the CompStore theme for mobile devices
- The Magento 2.0 responsive design
- The Magento UI
- Implementing a new CSS mixin media query
- Adjusting tweets about extensions for mobile devices
- Summary
- 8. Speeding up Your Magento 2.0
- Indexing and caching Magento
- Indexing and re-indexing data
- The Magento cron job
- Caching
- Fine-tuning the Magento hosting server
- Selecting the right Magento hosting service
- Apache web server deflation
- Enabling the expires header
- Minifying scripts
- Summary
- 9. Improving Your Magento Skills
- Magento knowledge center
- Improving your Magento skills
- Summary
- 2. Module 2
- 1. Magento 2 System Tools
- Installing Magento 2 sample data via GUI
- Installing Magento 2 sample data via the command line
- Managing Magento 2 indexes via the command line
- Managing Magento 2 cache via the command line
- Managing Magento 2 backup via the command line
- Managing Magento 2 set mode (MAGE_MODE)
- Transferring your Magento 1 database to Magento 2
- 2. Enabling Performance in Magento 2
- Configuring Redis for backend cache
- Configuring Memcached for session caching
- Configuring Varnish as the Full Page Cache
- Configuring Magento 2 with CloudFlare
- Configuring optimized images in Magento 2
- Configuring Magento 2 with HTTP/2
- Configuring Magento 2 performance testing
- 3. Creating Catalogs and Categories
- Create a Root Catalog
- Create subcategories
- Manage attribute sets
- Create products
- Manage products in a catalog grid
- 4. Managing Your Store
- Creating shipping and tax rules
- Managing customer groups
- Configuring inventories
- Configuring currency rates
- Managing advanced pricing
- 5. Creating Magento 2 Extensions – the Basics
- Initializing extension basics
- Working with database models
- Creating tables using setup scripts
- Creating a web route and controller to display data
- Creating system configuration fields
- Creating a backend data grid
- Creating a backend form to add/edit data
- 6. Creating Magento 2 Extensions – Advanced
- Using dependency injection to pass classes to your own class
- Modifying functions with the use of plugins – Interception
- Creating your own XML module configuration file
- Creating your own product type
- Working with service layers/contracts
- Creating a Magento CLI command option
- 3. Module 3
- 1. Planning for Magento
- Technical considerations
- Global-Website-Store methodology
- Planning for multiple stores
- Summary
- 2. Managing Products
- Managing products the customer focused way
- Creating products
- Managing inventory
- Pricing tools
- Autosettings
- Related products, up-sells, and cross-sells
- Importing products
- Summary
- 3. Designs and Themes
- The concept of theme inheritance
- Default installation of design packages and themes
- Installing third-party themes
- Inline translations
- Working with theme variants
- Customizing themes
- Customizing layouts
- Summary
- 4. Configuring to Sell
- Payment methods
- Shipping methods
- Managing taxes
- Transactional e-mails
- Summary
- 5. Managing Non-Product Content
- Summary
- 6. Marketing Tools
- Promotions
- Newsletters
- Using sitemaps
- Optimizing for search engines
- Summary
- 7. Extending Magento
- The new Magento module architecture
- Extending Magento functionality with Magento plugins
- Building your own extensions
- Summary
- 8. Optimizing Magento
- Indexing and caching
- Caching in Magento 2 – not just FPC
- Tuning your server for speed
- Summary
- 9. Advanced Techniques
- Version control
- Magento cron
- Backing up your database
- Upgrading Magento
- Summary
- 10. Pre-Launch Checklist
- System configurations
- Design configurations
- Search engine optimization
- Sales configurations
- Product configurations
- Maintenance configurations
- Summary
- Index
Page layouts in Magento are managed by XML files that control how the various components on a page are to be assembled. Think of layout files as the blueprints of your site, in that they contain the instructions that direct how various content blocks and template files are combined to produce the structural blocks that define the final output.
Blocks are elements in Magento that are responsible for rendering a discreet piece of content to the page. For example, a product display, category list, user login area, all would likely have their own blocks. These blocks in turn reference template files to generate the HTML for any given area.
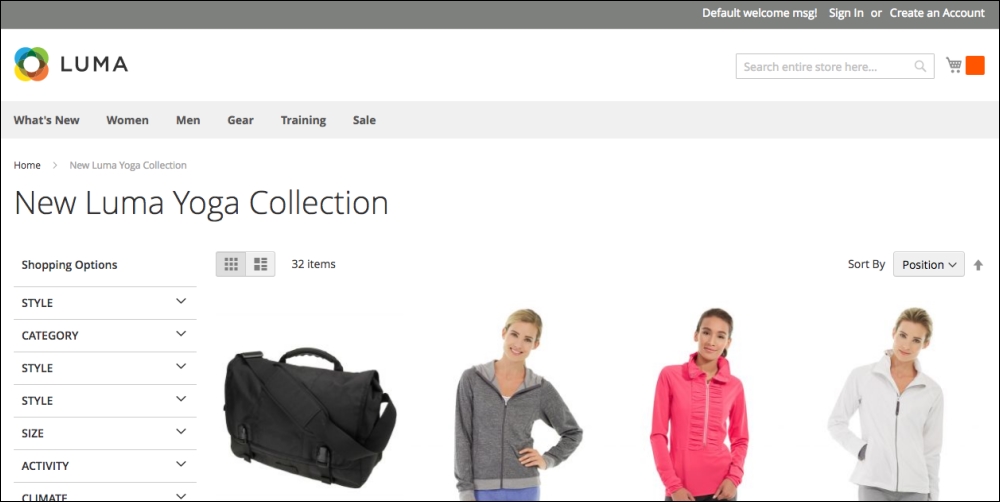
Let's take a visual look at how structural blocks and content blocks are combined on a typical page, by analyzing a category page captured from our sample data default installation:
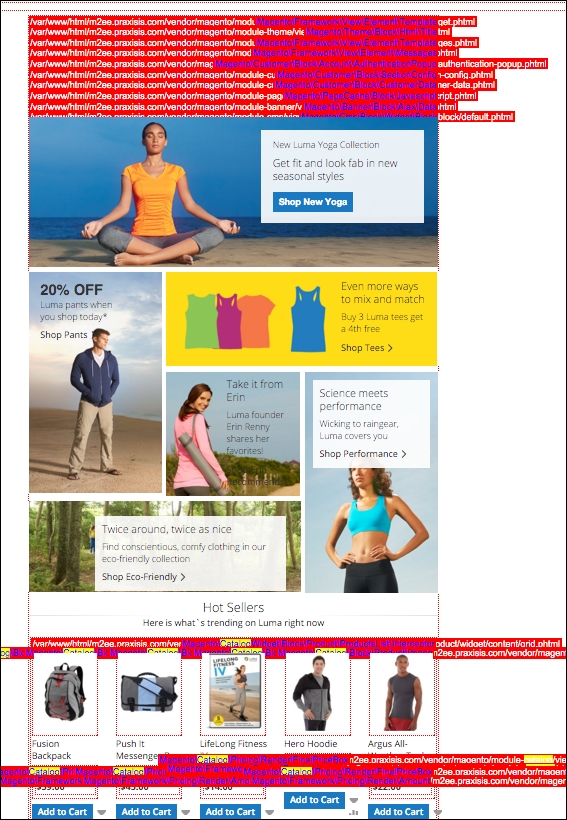
Now, let's look at this page with the structural blocks and content blocks shown inline:
To enable a view like this, that shows which blocks are being rendered on a page, you can visit Stores | Configuration | Advanced | Developer and enable template hints in the debug section:
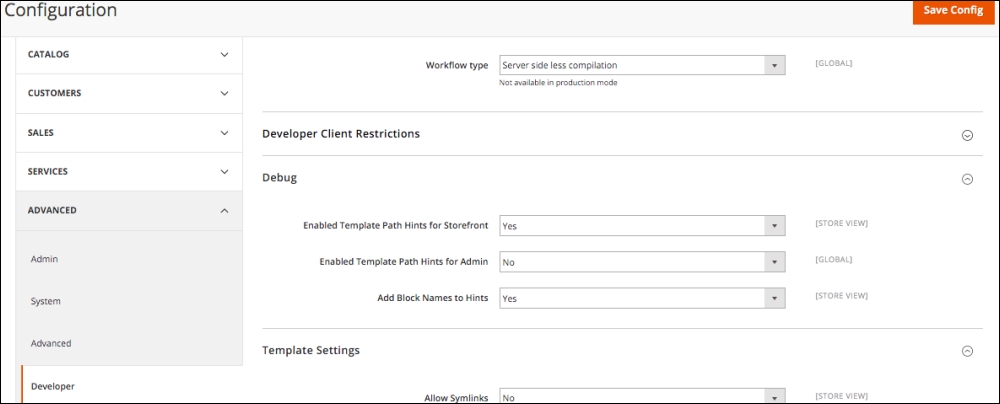
Enabling template path hints in Debug section
Note
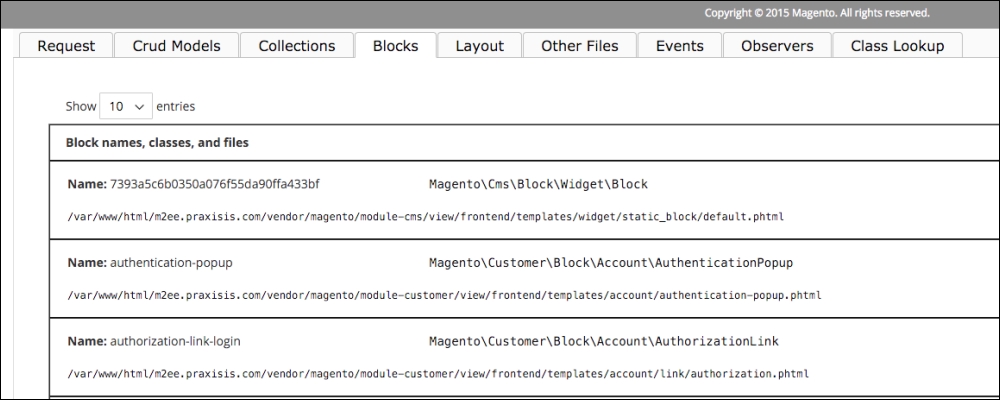
Another less cluttered way to view which blocks and templates are included in any given page is to install the commerce bug extension for Magento 2.0. The extension was written by the exceptional Alan Storm, and can be found here: http://store.pulsestorm.net/products/commerce-bug-3/. As you can see in the following screenshot, the tabular section at the bottom of the page provides a much cleaner account of the blocks and templates being used on a page. If you plan to do any significant work with Magento 2 theming, this extension is well worth its cost.
Magento newcomers, particularly designers, feel a bit lost among the many layout and template files that comprise a Magento theme. However, with a bit of study (this book!) and adherence to a few best practices, anyone can become a Magento design aficionado.
First, keep in mind the concept of the Magento fallback method we previously covered. Layouts are dictated by the most forward layer. This means that if the chosen theme lacks a needed layout or template file, Magento will look into the default directory for the design package, then into the blank theme where, unless you've been naughty and changed anything, Magento will at last find any missing components.
As a designer, this means that you can change layout structures and blocks by creating or editing files within your theme directory, and focus on overriding any base theme behaviors. In short, a theme only has to have only those components that are different from the base design package.
I want to emphasize the enormity of this concept. When I wear my designer's hat, I don't have to replicate all the many layout and template files when creating a theme; I only have to include those most likely few files that will define the delta or difference between the base package and my new theme.
Note
This more robust fallback method (when compared to previous Magento versions) has not been completely absorbed by third-party theme producers. You may find some themes that have many files that really define no difference from the base package. This practice does not conform to Magento's best practices, as it can cause core Magento updates to not be properly reflected in the theme files. In general, we look for themes structures—whether third-party or home-grown—to add only those files necessary to provide the differences between the default layouts and the customized design.
When looking for a file to edit for your intended change, first look into your theme directory. If the file is not there, look to the parent or blank theme directories. If you find the file there, copy it into the same relative position within your theme directory.
Layout files control the various Magento modules, such as Sales, Customers, and Catalog, by using a layout XML file defining their structural blocks, content blocks, and functional components. Page layouts can be located in one of two spots:
- For module page layouts, you'll find them in the
<module_dir>/view/frontend/page_layoutdirectory: - In the case of layouts specific to a theme, you'll find them in the
<theme_dir>/<Namespace>_<Module>/page_layoutdirectory:
Now, here's where it may get just a bit complex: each layout file contains Layout Handles, groups of block definitions that generally correspond with a type of page produced by Magento. Handles fall into three categories:
- The first is the page type layout handle, which corresponds to the controller actions. An example of this might be
catalog_product_view. - The second type of layout handle is the page layout handle. The page layout handle refers to identifiers of specific pages and corresponds to controller actions with arguments that specify particular pages, like
catalog_product_view_type_simple_id_128. - The third and most common type of handle is an arbitrary handle, which doesn't correspond to any page type but can be included by other blocks or containers.
To get a better understanding of handles, let's review an example handle. This is a handle from /layout/catalog_category_view_type_default.xml.
<page xmlns:xsi="http://www.w3.org/2001/XMLSchema-instance" xsi:noNamespaceSchemaLocation="urn:magento:framework:View/Layout/etc/page_configuration.xsd">
    <body>
        <referenceContainer name="sidebar.main">
            <block class="Magento\Catalog\Block\Navigation" name="catalog.leftnav" before="-" template="navigation/left.phtml"/>
        </referenceContainer>
    </body>
</page>
From this code snippet, we can find out quite a bit about what it does to affect your layout:
<referenceContainer> tells us in what container the enclosed content is to be defined. For example, <referenceContainer name="footer_links"> suggests that the output generated by the enclosed code will be placed within a block defined elsewhere as footer_links. We can use these references to modify where various elements may appear on a page, as we will explore a little later in this chapter.
As you look within each <referenceContainer> or <referenceBlock> tag, you'll typically find a <block> tag and corresponding <argument> tags. Here's the block reference from the preceding handle:
<block class="Magento\Catalog\Block\Navigation" name="catalog.leftnav" before="-" template="navigation/left.phtml"/>
Note
While it may appear to be a bit "inside-out", it is the <block> tag we are most interested in. The <block> defines the content. The <referenceBlock> tag merely designates where the content block is to be placed. We can change the <referenceBlock> tag without affecting the output of the content block.
The <block> tag also specifies a template file, in this case left.phtml that contains the HTML and PHP code defining the visual output for this block (not all blocks have related .phtml files, though).
The attributes for the <block> tag include:
type: Defines the functional purpose of the block. Do not modify this.name: Used by other blocks as a reference to which the block is to be assigned.beforeandafter: this attribute can be used to position the block before or after other referenced blocks that will be placed within the same referenced block.before="-"andafter="-"position the block at the very top or very bottom of the referenced block.template: calls the template file that supplies the output functionality of the block.action: a subordinate tag that controls functionality, such as setting values, loading or unloading JavaScript, and more.as: the name which is used by templates to call the block. For example,getChildHtml('left.permanent.callout')would include the block within the template file.
In our previous example, the graphic callout defined by the catalog.leftnav block was designed to be placed within the left structural block, not by the name of the block, but rather by the <referenceBlock name="left"> tag. The block could be named just about anything; it's the reference tag that dictates into which structural block on the page the block will be rendered.
If we wanted this block to be positioned within the right structural block, we simply change the reference tag to <referenceBlock name="right">. By using reference tags, we can position our content blocks into the general areas of the page. To refine the placement, we can use the block attributes of before and after, or call the block from within a template file using the as attribute.
Up to this point, we've discussed how, by copying and modifying a few files for your theme, you can change the appearance of various blocks within your layout file. This often-overlooked feature is perhaps one of the most powerful layout tools in your arsenal.
By creating a file called default.xml and placing it within the corresponding module directory of your theme, you can alter your layout by turning off any blocks defined by the base package default.xml file. In other words, if you don't need or want a specific block, you can simply tell Magento to ignore it or, in Magento-ese, remove it. You can also use the default layout file to reposition blocks (as we described previously) or re-define specific handles. In short, it's a great way to make changes to your layouts without having to get deep into the various layout files we discussed earlier.
The first step is to create a default.xml file, if one doesn't already exist, and place it within the /app/design/frontend/[design package]/[design theme]/[module name]/view/frontend/layout/ directory. Add the following code to this text file:
<?xml version="1.0" ?>
<page>
  <!-- Put block overrides here -->
</page>
Within this small collection of code, you can add blocks and handles, as well as specialized statements. For example, to remove the callout block with which we have been working, add the following code between the <page> and </page> tags of your default.xml file:
<remove name="[block_name]" />
Just like that, the block is no longer appearing on your site.
The scope of possibilities for using the default layout file is quite extensive. As you begin exploring the use of this file, I would offer the following advice:
- Use the
<remove>tag to completely disable blocks rather than removing them from layout files. If you don't have any other use for the layout file that contains the block, then you won't even have the need to copy it from the base package into your theme. - Use
<action method="unsetChild">to simply disable the block from the current layout, but allow it to be used in another position. - If you want to modify a block or handle, copy it from the base package layout file and paste it into your
default.xmlfile. Then make the changes you want to make. Again, this negates the need for replicating layout files, and it gives you a much quicker ability to make modifications and test them to see if they are behaving as you expected.