Table of Contents for
Node.js Complete Reference Guide

Version ebook / Retour

Cover image for bash Cookbook, 2nd Edition Node.js Complete Reference Guide by Diogo Resende Published by Packt Publishing, 2018
  1. Node.js Complete Reference Guide
  2. Title Page
  3. Copyright and Credits
  4. Node.js Complete Reference Guide
  5. About Packt
  6. Why subscribe?
  7. Packt.com
  8. Contributors
  9. About the authors
  10. Packt is searching for authors like you
  11. Table of Contents
  12. Preface
  13. Who this book is for
  14. What this book covers
  15. To get the most out of this book
  16. Download the example code files
  17. Conventions used
  18. Get in touch
  19. Reviews
  20. About Node.js
  21. The capabilities of Node.js
  22. Server-side JavaScript
  23. Why should you use Node.js?
  24. Popularity
  25. JavaScript at all levels of the stack
  26. Leveraging Google's investment in V8
  27. Leaner, asynchronous, event-driven model
  28. Microservice architecture
  29. Node.js is stronger for having survived a major schism and hostile fork
  30. Threaded versus event-driven architecture
  31. Performance and utilization
  32. Is Node.js a cancerous scalability disaster?
  33. Server utilization, the business bottom line, and green web hosting
  34. Embracing advances in the JavaScript language
  35. Deploying ES2015/2016/2017/2018 JavaScript code
  36. Node.js, the microservice architecture, and easily testable systems
  37. Node.js and the Twelve-Factor app model
  38. Summary
  39. Setting up Node.js
  40. System requirements
  41. Installing Node.js using package managers
  42. Installing on macOS with MacPorts
  43. Installing on macOS with Homebrew
  44. Installing on Linux, *BSD, or Windows from package management systems
  45. Installing Node.js in the Windows Subsystem for Linux (WSL)
  46. Opening an administrator-privileged PowerShell on Windows
  47. Installing the Node.js distribution from nodejs.org
  48. Installing from source on POSIX-like systems
  49. Installing prerequisites
  50. Installing developer tools on macOS
  51. Installing from source for all POSIX-like systems
  52. Installing from source on Windows
  53. Installing multiple Node.js instances with nvm
  54. Installing nvm on Windows
  55. Native code modules and node-gyp
  56. Node.js versions policy and what to use
  57. Editors and debuggers
  58. Running and testing commands
  59. Node.js's command-line tools
  60. Running a simple script with Node.js
  61. Conversion to async functions and the Promise paradigm
  62. Launching a server with Node.js
  63. NPM – the Node.js package manager
  64. Node.js, ECMAScript 2015/2016/2017, and beyond 
  65. Using Babel to use experimental JavaScript features
  66. Summary
  67. Node.js Modules
  68. Defining a module
  69. CommonJS and ES2015 module formats
  70. CommonJS/Node.js module format
  71. ES6 module format
  72. JSON modules
  73. Supporting ES6 modules on older Node.js versions
  74. Demonstrating module-level encapsulation
  75. Finding and loading CommonJS and JSON modules using require
  76. File modules
  77. Modules baked into Node.js binary
  78. Directories as modules
  79. Module identifiers and pathnames
  80. An example of application directory structure
  81. Finding and loading ES6 modules using import
  82. Hybrid CommonJS/Node.js/ES6 module scenarios
  83. Dynamic imports with import()
  84. The import.meta feature
  85. npm - the Node.js package management system
  86. The npm package format
  87. Finding npm packages
  88. Other npm commands
  89. Installing an npm package
  90. Installing a package by version number
  91. Global package installs
  92. Avoiding global module installation
  93. Maintaining package dependencies with npm
  94. Automatically updating package.json dependencies
  95. Fixing bugs by updating package dependencies
  96. Packages that install commands
  97. Configuring the PATH variable to handle commands installed by modules
  98. Configuring the PATH variable on Windows
  99. Avoiding modifications to the PATH variable
  100. Updating outdated packages you've installed
  101. Installing packages from outside the npm repository
  102. Initializing a new npm package
  103. Declaring Node.js version compatibility
  104. Publishing an npm package
  105. Explicitly specifying package dependency version numbers
  106. The Yarn package management system
  107. Summary
  108. HTTP Servers and Clients
  109. Sending and receiving events with EventEmitters
  110. JavaScript classes and class inheritance
  111. The EventEmitter Class
  112. The EventEmitter theory
  113. HTTP server applications
  114. ES2015 multiline and template strings
  115. HTTP Sniffer – listening to the HTTP conversation
  116. Web application frameworks
  117. Getting started with Express
  118. Setting environment variables in Windows cmd.exe command line
  119. Walking through the default Express application
  120. The Express middleware
  121. Middleware and request paths
  122. Error handling
  123. Calculating the Fibonacci sequence with an Express application
  124. Computationally intensive code and the Node.js event loop
  125. Algorithmic refactoring
  126. Making HTTP Client requests
  127. Calling a REST backend service from an Express application
  128. Implementing a simple REST server with Express
  129. Refactoring the Fibonacci application for REST
  130. Some RESTful modules and frameworks
  131. Summary
  132. Your First Express Application
  133. Promises, async functions, and Express router functions
  134. Promises and error handling
  135. Flattening our asynchronous code
  136. Promises and generators birthed async functions
  137. Express and the MVC paradigm
  138. Creating the Notes application
  139. Your first Notes model
  140. Understanding ES-2015 class definitions
  141. Filling out the in-memory Notes model
  142. The Notes home page
  143. Adding a new note – create
  144. Viewing notes – read
  145. Editing an existing note – update
  146. Deleting notes – destroy
  147. Theming your Express application
  148. Scaling up – running multiple Notes instances
  149. Summary
  150. Implementing the Mobile-First Paradigm
  151. Problem – the Notes app isn't mobile friendly
  152. Mobile-first paradigm
  153. Using Twitter Bootstrap on the Notes application
  154. Setting it up
  155. Adding Bootstrap to application templates
  156. Alternative layout frameworks
  157. Flexbox and CSS Grids
  158. Mobile-first design for the Notes application
  159. Laying the Bootstrap grid foundation
  160. Responsive page structure for the Notes application
  161. Using icon libraries and improving visual appeal
  162. Responsive page header navigation bar
  163. Improving the Notes list on the front page
  164. Cleaning up the Note viewing experience
  165. Cleaning up the add/edit note form
  166. Cleaning up the delete-note window
  167. Building a customized Bootstrap
  168. Pre-built custom Bootstrap themes
  169. Summary
  170. Data Storage and Retrieval
  171. Data storage and asynchronous code
  172. Logging
  173. Request logging with Morgan
  174. Debugging messages
  175. Capturing stdout and stderr
  176. Uncaught exceptions
  177. Unhandled Promise rejections
  178. Using the ES6 module format
  179. Rewriting app.js as an ES6 module
  180. Rewriting bin/www as an ES6 module
  181. Rewriting models code as ES6 modules
  182. Rewriting router modules as ES6 modules
  183. Storing notes in the filesystem
  184. Dynamic import of ES6 modules
  185. Running the Notes application with filesystem storage
  186. Storing notes with the LevelUP data store
  187. Storing notes in SQL with SQLite3
  188. SQLite3 database schema
  189. SQLite3 model code
  190. Running Notes with SQLite3
  191. Storing notes the ORM way with Sequelize
  192. Sequelize model for the Notes application
  193. Configuring a Sequelize database connection
  194. Running the Notes application with Sequelize
  195. Storing notes in MongoDB
  196. MongoDB model for the Notes application
  197. Running the Notes application with MongoDB
  198. Summary
  199. Multiuser Authentication the Microservice Way
  200. Creating a user information microservice
  201. User information model
  202. A REST server for user information
  203. Scripts to test and administer the user authentication server
  204. Login support for the Notes application
  205. Accessing the user authentication REST API
  206. Login and logout routing functions
  207. Login/logout changes to app.js
  208. Login/logout changes in routes/index.mjs
  209. Login/logout changes required in routes/notes.mjs
  210. View template changes supporting login/logout
  211. Running the Notes application with user authentication
  212. Twitter login support for the Notes application
  213. Registering an application with Twitter
  214. Implementing TwitterStrategy
  215. Securely keeping secrets and passwords
  216. The Notes application stack
  217. Summary
  218. Dynamic Client/Server Interaction with Socket.IO
  219. Introducing Socket.IO
  220. Initializing Socket.IO with Express
  221. Real-time updates on the Notes homepage
  222. The Notes model as an EventEmitter class
  223. Real-time changes in the Notes home page
  224. Changing the homepage and layout templates
  225. Running Notes with real-time homepage updates
  226. Real-time action while viewing notes
  227. Changing the note view template for real-time action
  228. Running Notes with real-time updates while viewing a note
  229. Inter-user chat and commenting for Notes
  230. Data model for storing messages
  231. Adding messages to the Notes router
  232. Changing the note view template for messages
  233. Using a Modal window to compose messages
  234. Sending, displaying, and deleting messages
  235. Running Notes and passing messages
  236. Other applications of Modal windows
  237. Summary
  238. Deploying Node.js Applications
  239. Notes application architecture and deployment considerations
  240. Traditional Linux Node.js service deployment
  241. Prerequisite – provisioning the databases
  242. Installing Node.js on Ubuntu
  243. Setting up Notes and user authentication on the server
  244. Adjusting Twitter authentication to work on the server
  245. Setting up PM2 to manage Node.js processes
  246. Node.js microservice deployment with Docker
  247. Installing Docker on your laptop
  248. Starting Docker with Docker for Windows/macOS
  249. Kicking the tires of Docker
  250. Creating the AuthNet for the user authentication service
  251. MySQL container for Docker
  252. Initializing AuthNet
  253. Script execution on Windows
  254. Linking Docker containers
  255. The db-userauth container
  256. Dockerfile for the authentication service
  257. Configuring the authentication service for Docker
  258. Building and running the authentication service Docker container
  259. Exploring Authnet
  260. Creating FrontNet for the Notes application
  261. MySQL container for the Notes application
  262. Dockerizing the Notes application
  263. Controlling the location of MySQL data volumes
  264. Docker deployment of background services
  265. Deploying to the cloud with Docker compose
  266. Docker compose files
  267. Running the Notes application with Docker compose
  268. Deploying to cloud hosting with Docker compose
  269. Summary
  270. Unit Testing and Functional Testing
  271. Assert – the basis of testing methodologies
  272. Testing a Notes model
  273. Mocha and Chai­ – the chosen test tools
  274. Notes model test suite
  275. Configuring and running tests
  276. More tests for the Notes model
  277. Testing database models
  278. Using Docker to manage test infrastructure
  279. Docker Compose to orchestrate test infrastructure
  280. Executing tests under Docker Compose
  281. MongoDB setup under Docker and testing Notes against MongoDB
  282. Testing REST backend services
  283. Automating test results reporting
  284. Frontend headless browser testing with Puppeteer
  285. Setting up Puppeteer
  286. Improving testability in the Notes UI
  287. Puppeteer test script for Notes
  288. Running the login scenario
  289. The Add Note scenario
  290. Mitigating/preventing spurious test errors in Puppeteer scripts
  291. Configuring timeouts
  292. Tracing events on the Page and the Puppeteer instance
  293. Inserting pauses
  294. Avoiding WebSockets conflicts
  295. Taking screenshots
  296. Summary
  297. REST – What You Did Not Know
  298. REST fundamentals
  299. Principle 1 – Everything is a resource
  300. Principle 2 – Each resource is identifiable by a unique identifier
  301. Principle 3 – Manipulate resources via standard HTTP methods
  302. Principle 4 – Resources can have multiple representations
  303. Principle 5 – Communicate with resources in a stateless manner
  304. The REST goals
  305. Separation of the representation and the resource
  306. Visibility
  307. Reliability
  308. Scalability and performance
  309. Working with WADL
  310. Documenting RESTful APIs with Swagger
  311. Taking advantage of the existing infrastructure
  312. Summary
  313. Building a Typical Web API
  314. Specifying the API
  315. Implementing routes
  316. Querying the API using test data
  317. Content negotiation
  318. API versioning
  319. Self-test questions
  320. Summary
  321. Using NoSQL Databases
  322. MongoDB – a document store database
  323. Database modeling with Mongoose
  324. Testing a Mongoose model with Mocha
  325. Creating a user-defined model around a Mongoose model
  326. Wiring up a NoSQL database module to Express
  327. Self-test questions
  328. Summary
  329. Restful API Design Guidelines
  330. Endpoint URLs and HTTP status codes best practices
  331. Extensibility and versioning
  332. Linked data
  333. Summary
  334. Implementing a Full Fledged RESTful Service
  335. Working with arbitrary data
  336. Linking
  337. Implementing paging and filtering
  338. Caching
  339. Supplying the Cache-Control header in Express applications
  340. Discovering and exploring RESTful services
  341. Summary
  342. Consuming a RESTful API
  343. Consuming RESTful services with jQuery
  344. Troubleshooting and identifying problems on the wire
  345. Cross Origin Resource Sharing
  346. Content Delivery Networks
  347. Handling HTTP status codes on the client side
  348. Summary
  349. Securing the Application
  350. Authentication
  351. Basic authentication
  352. Passport
  353. Passport's basic authentication strategy
  354. Passport's OAuth Strategy
  355. Passport's third-party authentication strategies
  356. Authorization
  357. Transport layer security
  358. Self-test questions
  359. Summary
  360. The Age of Microservices
  361. From monolith to microservices
  362. Patterns of microservices
  363. Decomposable
  364. Autonomous
  365. Scalable
  366. Communicable
  367. Summary
  368. Modules and Toolkits
  369. Seneca
  370. Hydra
  371. Summary
  372. Building a Microservice
  373. Using Hydra
  374. Using Seneca
  375. Plugins
  376. Summary
  377. State
  378. State
  379. Storing state
  380. MySQL
  381. RethinkDB
  382. Redis
  383. Conclusion
  384. Security
  385. Summary
  386. Testing
  387. Integrating tests
  388. Using chai
  389. Adding code coverage
  390. Covering all code
  391. Mocking our services
  392. Summary
  393. Design Patterns
  394. Choosing patterns
  395. Architectural patterns
  396. Front Controller
  397. Layered
  398. Service Locator
  399. Observer
  400. Publish-Subscribe
  401. Using patterns
  402. Planning your microservice
  403. Obstacles when developing
  404. Summary
  405. Other Books You May Enjoy
  406. Leave a review - let other readers know what you think

Implementing TwitterStrategy

As with many web applications, we have decided to allow our users to log in using Twitter credentials. The OAuth2 protocol is widely used for this purpose and is the basis for authenticating on one website using credentials maintained by another website.

The application registration process you just followed at apps.twitter.com generated for you a pair of API keys, a consumer key, and, consumer secret. These keys are part of the OAuth protocol, and will be supplied by any OAuth service you register with, and the keys should be treated with the utmost care. Think of them as the username and password your service uses to access the OAuth-based service (Twitter et al). The more people who can see these keys, the more likely a miscreant can see them and then cause trouble. Anybody with those secrets can write access the service API as if they are you.

Dozens of Strategy packages for various third-party services are available within the Passport ecosystem. Let's install the package required to use TwitterStrategy:

$ npm install passport-twitter@1.x --save

In routes/users.mjs, let's start making some changes:

import passportTwitter from 'passport-twitter';
const TwitterStrategy = passportTwitter.Strategy;

To bring in the package we just installed, add the following:

const twittercallback = process.env.TWITTER_CALLBACK_HOST
? process.env.TWITTER_CALLBACK_HOST
: "http://localhost:3000";

passport.use(new TwitterStrategy({
consumerKey: process.env.TWITTER_CONSUMER_KEY,
consumerSecret: process.env.TWITTER_CONSUMER_SECRET,
callbackURL: `${twittercallback}/users/auth/twitter/callback`
},
async function(token, tokenSecret, profile, done) {
try {
done(null, await usersModel.findOrCreate({
id: profile.username, username: profile.username, password: "",
provider: profile.provider, familyName: profile.displayName,
givenName: "", middleName: "",
photos: profile.photos, emails: profile.emails
}));
} catch(err) { done(err); }
}));

This registers TwitterStrategy with passport, arranging to call the user authentication service as users register with the Notes application. This callback function is called when users successfully authenticate using Twitter.

We defined the usersModel.findOrCreate function specifically to handle user registration from third-party services such as Twitter. Its task is to look for the user described in the profile object and, if that user does not exist, to autocreate that user account in Notes.

The consumerKey and consumerSecret values are supplied by Twitter, after you've registered your application. These secrets are used in the OAuth protocol as proof of identity to Twitter.

The callbackURL setting in the TwitterStrategy configuration is a holdover from Twitter's OAuth1-based API implementation. In OAuth1, the callback URL was passed as part of the OAuth request. Since TwitterStrategy uses Twitter's OAuth1 service, we have to supply the URL here. We'll see in a moment where that URL is implemented in Notes.

The callbackURL, consumerKey, and consumerSecret are all injected using environment variables. It is tempting, because of the convenience, to just put those keys in the source code. But, how widely distributed is your source code?  In the Slack API documentation (https://api.slack.com/docs/oauth-safety), we're warned Do not distribute client secrets in email, distributed native applications, client-side JavaScript, or public code repositories.

In Chapter 10, Deploying Node.js Applications, we'll put these keys into a Dockerfile. That's not entirely secure because the Dockerfile will also be committed to a source repository somewhere.

It was found while debugging that the profile object supplied by the TwitterStrategy did not match the documentation on the passport website. Therefore, we have mapped the object actually supplied by passport into something that Notes can use:

router.get('/auth/twitter', passport.authenticate('twitter')); 

To start the user logging in with Twitter, we'll send them to this URL. Remember that this URL is really /users/auth/twitter, and, in the templates, we'll have to use that URL. When this is called, the passport middleware starts the user authentication and registration process using TwitterStrategy.

Once the user's browser visits this URL, the OAuth dance begins. It's called a dance because the OAuth protocol involves carefully designed redirects between several websites. Passport sends the browser over to the correct URL at Twitter, where Twitter asks the user whether they agree to authenticate using Twitter, and then Twitter redirects the user back to your callback URL. Along the way, specific tokens are passed back and forth in a very carefully designed dance between websites.

Once the OAuth dance concludes, the browser lands here:

router.get('/auth/twitter/callback', 
  passport.authenticate('twitter', { successRedirect: '/', 
                       failureRedirect: '/users/login' })); 

This route handles the callback URL, and it corresponds to the callbackURL setting configured earlier. Depending on whether it indicates a successful registration or not, passport will redirect the browser to either the home page or back to the /users/login page. 

Because router is mounted on /user, this URL is actually /user/auth/twitter/callback. Therefore, the full URL to use in configuring the TwitterStrategy, and to supply to Twitter, is http://localhost:3000/user/auth/twitter/callback

In the process of handling the callback URL, Passport will invoke the callback function shown earlier. Because our callback uses the usersModel.findOrCreate function, the user will be automatically registered if necessary.

We're almost ready, but we need to make a couple of small changes elsewhere in Notes.

In partials/header.hbs, make the following changes to the code:

...
{{else}}
<div class="collapse navbar-collapse" id="navbarLogIn">
<span class="navbar-text text-dark col"></span>
<a class="nav-item nav-link btn btn-dark col-auto" href="/users/login">
Log in</a>
<a class="nav-item nav-link btn btn-dark col-auto" href="/users/auth/twitter">
<img width="15px"
src="/assets/vendor/twitter/Twitter_Social_Icon_Rounded_Square_Color.png"/>
Log in with Twitter</a>
</div>
{{/if}}

This adds a new button that, when clicked, takes the user to /users/auth/twitter, which, of course, kicks off the Twitter authentication process. 

The image being used is from the official Twitter brand assets page at https://about.twitter.com/company/brand-assets. Twitter recommends using these branding assets for a consistent look across all services using Twitter. Download the whole set and then pick one you like. For the URL shown here, place the chosen image in a directory named public/assets/vendor/twitter. Notice that we force the size to be small enough for the navigation bar.

With these changes, we're ready to try logging in with Twitter.

Start the Notes application server as done previously:

$ npm start

> notes@0.0.0 start /Users/David/chap08/notes
> DEBUG=notes:* SEQUELIZE_CONNECT=models/sequelize-sqlite.yaml NOTES_MODEL=sequelize USER_SERVICE_URL=http://localhost:3333 node --experimental-modules ./bin/www.mjs

(node:42095) ExperimentalWarning: The ESM module loader is experimental.
notes:server-debug Listening on port 3000 +0ms

Then use a browser to visit http://localhost:3000:

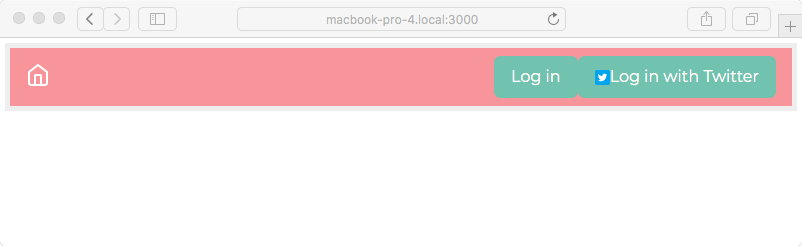
Notice the new button. It looks about right, thanks to having used the official Twitter branding image. The button is a little large, so maybe you want to consult a designer. Obviously, a different design is required if you're going to support dozens of authentication services.

Clicking on this button takes the browser to /users/auth/twitter, which starts Passport running the OAuth2 protocol transactions necessary to authenticate. And then, once you're logged in with Twitter, you'll see something like the following screenshot:

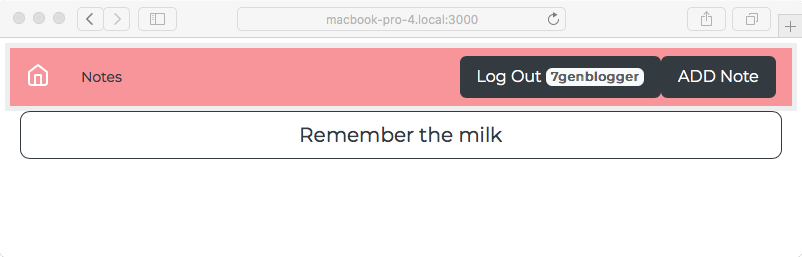
We're now logged in, and notice that our Notes username is the same as our Twitter username. You can browse around the application and create, edit, or delete notes. In fact, you can do this to any note you like, even ones created by others. That's because we did not create any sort of access control or permissions system, and therefore every user has complete access to every note. That's a feature to put on the backlog.

By using multiple browsers or computers, you can simultaneously log in as different users, one user per browser.

You can run multiple instances of the Notes application by doing what we did earlier:

  "scripts": { 
    "start": "SEQUELIZE_CONNECT=models/sequelize-sqlite.yaml NOTES_MODEL=models/notes-sequelize USERS_MODEL=models/users-rest USER_SERVICE_URL=http://localhost:3333 node ./bin/www", 
    "start-server1": "SEQUELIZE_CONNECT=models/sequelize-sqlite.yaml NOTES_MODEL=models/notes-sequelize USERS_MODEL=models/users-rest USER_SERVICE_URL=http://localhost:3333 PORT=3000 node ./bin/www", 
    "start-server2": "SEQUELIZE_CONNECT=models/sequelize-sqlite.yaml NOTES_MODEL=models/notes-sequelize USERS_MODEL=models/users-rest USER_SERVICE_URL=http://localhost:3333 PORT=3002 node ./bin/www", 
"dl-minty": "mkdir -p minty && npm run dl-minty-css && npm run dl-minty-min-css",
"dl-minty-css": "wget https://bootswatch.com/4/minty/bootstrap.css -O minty/bootstrap.css",
"dl-minty-min-css": "wget https://bootswatch.com/4/minty/bootstrap.min.css -O minty/bootstrap.min.css" },

Then, in one command window, run the following command:

$ npm run start-server1

> notes@0.0.0 start-server1 /Users/David/chap08/notes
> DEBUG=notes:* SEQUELIZE_CONNECT=models/sequelize-sqlite.yaml NOTES_MODEL=sequelize USER_SERVICE_URL=http://localhost:3333 PORT=3000 node --experimental-modules ./bin/www.mjs

(node:43591) ExperimentalWarning: The ESM module loader is experimental.
notes:server-debug Listening on port 3000 +0ms

In another command window, run the following command:

$ npm run start-server2

> notes@0.0.0 start-server2 /Users/David/chap08/notes
> DEBUG=notes:* SEQUELIZE_CONNECT=models/sequelize-sqlite.yaml NOTES_MODEL=sequelize USER_SERVICE_URL=http://localhost:3333 PORT=3002 node --experimental-modules ./bin/www.mjs

(node:43755) ExperimentalWarning: The ESM module loader is experimental.
notes:server-debug Listening on port 3002 +0ms

As previously, this starts two instances of the Notes server, each with a different value in the PORT environment variable. In this case, each instance will use the same user authentication service. As shown here, you'll be able to visit the two instances at http://localhost:3000 and http://localhost:3002. And, as previously, you'll be able to start and stop the servers as you wish, see the same notes in each, and see that the notes are retained after restarting the server.

Another thing to try is to fiddle with the session store. Our session data is being stored in the sessions directory. These are just files in the filesystem, and we can take a look:

$ ls -l sessions/
total 32
-rw-r--r-- 1 david wheel 139 Jan 25 19:28 -QOS7eX8ZBAfmK9CCV8Xj8v-3DVEtaLK.json
-rw-r--r-- 1 david wheel 139 Jan 25 21:30 T7VT4xt3_e9BiU49OMC6RjbJi6xB7VqG.json
-rw-r--r-- 1 david wheel 223 Jan 25 19:27 ermh-7ijiqY7XXMnA6zPzJvsvsWUghWm.json
-rw-r--r-- 1 david wheel 139 Jan 25 21:23 uKzkXKuJ8uMN_ROEfaRSmvPU7NmBc3md.json $ cat sessions/T7VT4xt3_e9BiU49OMC6RjbJi6xB7VqG.json
{"cookie":{"originalMaxAge":null,"expires":null,"httpOnly":true,"path":"/"},"__lastAccess":1516944652270,"passport":{"user":"7genblogger"}}

This is after logging in using a Twitter account; you can see that the Twitter account name is stored here in the session data.

What if you want to clear a session? It's just a file in the filesystem. Deleting the session file erases the session, and the user's browser will be forcefully logged out.

The session will time out if the user leaves their browser idle for long enough. One of the session-file-store options, ttl, controls the timeout period, which defaults to 3,600 seconds (an hour). With a timed-out session, the application reverts to a logged-out state.