Node.js Complete
Reference Guide
Reference Guide
Discover a more sustainable way of writing software with high levels of reusability and collaboration using Node.js

BIRMINGHAM - MUMBAI

Copyright © 2018 Packt Publishing
All rights reserved. No part of this book may be reproduced, stored in a retrieval system, or transmitted in any form or by any means, without the prior written permission of the publisher, except in the case of brief quotations embedded in critical articles or reviews.
Every effort has been made in the preparation of this book to ensure the accuracy of the information presented. However, the information contained in this book is sold without warranty, either express or implied. Neither the authors, nor Packt Publishing or its dealers and distributors, will be held liable for any damages caused or alleged to have been caused directly or indirectly by this book.
Packt Publishing has endeavored to provide trademark information about all of the companies and products mentioned in this book by the appropriate use of capitals. However, Packt Publishing cannot guarantee the accuracy of this information.
First published: December 2018
Production reference: 1181218
Published by Packt Publishing Ltd.
Livery Place
35 Livery Street
Birmingham
B3 2PB, UK.
ISBN 978-1-78995-211-7

Mapt is an online digital library that gives you full access to over 5,000 books and videos, as well as industry leading tools to help you plan your personal development and advance your career. For more information, please visit our website.
Spend less time learning and more time coding with practical eBooks and Videos from over 4,000 industry professionals
Improve your learning with Skill Plans built especially for you
Get a free eBook or video every month
Mapt is fully searchable
Copy and paste, print, and bookmark content
Did you know that Packt offers eBook versions of every book published, with PDF and ePub files available? You can upgrade to the eBook version at www.packt.com and as a print book customer, you are entitled to a discount on the eBook copy. Get in touch with us at customercare@packtpub.com for more details.
At www.packt.com, you can also read a collection of free technical articles, sign up for a range of free newsletters, and receive exclusive discounts and offers on Packt books and eBooks.
Valentin Bojinov studied computer science at the Technological School of Electronic Systems in Sofia, Bulgaria, a college within the Technical University of Sofia. He holds a B.Sc. in telecommunication and information engineering. Valentin is an expert in Java, SOAP, RESTful web services, and B2B integration. He specializes B2B Integration and Service Oriented Architecture and currently works as an Senior Integration Consultant in an UK consultancy company Estafet Limited.
David Herron is a software engineer in Silicon Valley, working on projects from an X.400 e-mail server to assist launching the OpenJDK project, to Yahoo's Node.js application-hosting platform, and applications to monitor solar power array performance. David writes about electric vehicles, environmental issues, and green technology on LongTailPipe, and about other topics, including Node.js, Drupal, and Doctor Who on TechSparx. Using Node.js he developed AkashaCMS.
Diogo Resende is a developer with more than 15 years of experience, working with Node.js almost from the beginning. His computer education and experience in many industry and telecommunication projects have given him a wider background knowledge of other architecture components that influence the overall performance.
If you're interested in becoming an author for Packt, please visit authors.packtpub.com and apply today. We have worked with thousands of developers and tech professionals, just like you, to help them share their insight with the global tech community. You can make a general application, apply for a specific hot topic that we are recruiting an author for, or submit your own idea.
Machine learning is becoming more and more transformational to businesses every passing day. Machine Learning with Node.js Complete Reference Guide takes you through rudimentary knowledge of JavaScript and server-side development to create, maintain, deploy, and test your own Node.js applications.
You will begin by learning how to use the HTTP Server and Client objects, store data with both SQL and MongoDB databases, and unit test applications with Mocha 5.x, and functionally test them with Puppeteer 1.1.x. Then, you will learn to create scalable and rich RESTful applications on the Node.js platform and write a simple HTTP request handler with self-descriptive URLs. You will learn to set accurate HTTP status codes, study how to keep your applications backward-compatible and explore some authentication techniques to secure your application. Then, you will study how Node.js has emerged as a strong candidate for developing microservices.
With this Learning Path, you will be able to use the best practices and create efficient microservices.
This Learning Path includes content from the following Packt products:
Node.js Complete Reference Guide is designed for web developers who have a rudimentary understanding of JavaScript and web application development, are keen to enrich their development skills to create RESTful applications, and want utilize their skills to build microservices.
Chapter 1, About Node.js, introduces you to the Node.js platform. It covers its uses, the technological architecture choices in Node.js, its history, the history of server-side JavaScript, why JavaScript should be liberated from the browser, and important recent advances in the JavaScript scene.
Chapter 2, Setting up Node.js, goes over setting up a Node.js developer environment. This includes installing Node.js on Windows, macOS, and Linux. Important tools are covered, including the npm and yarn package management systems and Babel, which is used for transpiling modern JavaScript into a form that's runnable on older JavaScript implementations.
Chapter 3, Node.js Modules, explores the module as the unit of modularity in Node.js applications. We dive deep into understanding and developing Node.js modules and using npm to maintain dependencies. We learn about the new module format, ES6 Modules, that should supplant the CommonJS module format currently used in Node.js, and are natively supported in Node.js 10.x.
Chapter 4, HTTP Servers and Clients, starts exploring web development with Node.js. We develop several small webserver and client applications in Node.js. We use the Fibonacci algorithm to explore the effects of heavy-weight, long-running computations on a Node.js application. We also learn several mitigation strategies, and have our first experience with developing REST services.
Chapter 5, Your First Express Application, begins the section on developing a note-taking application. The first step is getting a basic application running.
Chapter 6, Implementing the Mobile-First Paradigm, uses Bootstrap V4 to implement responsive web design. We take a look at integrating a popular icon set so that we can have pictorial buttons, and go over compiling a custom Bootstrap theme.
Chapter 7, Data Storage and Retrieval, ensures that we don't lose our notes when we restart the application. We explore several database engines and a method to enable easily switching between them at will.
Chapter 8, Multiuser Authentication the Microservice Way, adds user authentication to the note-taking application. Both logged-in and anonymous users can access the application, with varying capabilities based on role. Authentication is supported both for locally stored credentials and for using OAuth against Twitter.
Chapter 9, Dynamic Client/Server Interaction with Socket.IO, lets our users talk with each other in real time. JavaScript code will run in both the browser and the server, with Socket.IO providing the plumbing needed for real-time event exchange. Users will see
notes change as they're edited by other users and can leave messages/comments for others.
Chapter 10, Deploying Node.js Applications, helps us understand Node.js application deployment. We look at both traditional Linux service deployment using an /etc/init script and using Docker for both local development and deployment on cloud hosting
services.
Chapter 11, Unit Testing and Functional Testing, takes a look at three test development models: unit testing, REST testing, and functional testing. We'll use the popular Mocha and Chai frameworks for the first two, and Puppeteer for the third. Puppeteer uses a headless version of Chrome to support running tests. Docker is used to facilitate setting up and tearing down test environments.
Chapter 12, REST – What You Did Not Know, gives you a brief introduction to the history of REST and how it couples with the HTTP protocol.
Chapter 13, Building a Typical Web API, takes you through structuring your application using human-readable URL and URI parameters. You will get to develop a read-only RESTful service application, using the filesystem for storage.
Chapter 14, Using NoSQL Databases, showcases how to use the MongoDB NoSQL database, and explains the foundation of document data stores.
Chapter 15, Restful API Design Guidelines, explains that there are a number of prerequisites that a RESTful API should meet.
Chapter 16, Implementing a Full Fledged RESTful Service, focuses on implementing a production-ready RESTful service that uses NoSQL to store its data. You will get to learn how to handle binary data and how to version an API while it evolves.
Chapter 17, Consuming a RESTful API, showcases a sample frontend client that serves as a consumption reference implementation.
Chapter 18, Securing the Application, covers restricting access to your data by choosing an appropriate authentication approach. You'll then be able to protect data leakage with transport layer security.
Chapter 19, The Age of Microservices, covers the evolution of computing and how development has changed and shifted from paradigm to paradigm depending on processing capacity and user demand, ultimately resulting in the age of microservices.
Chapter 20, Modules and Toolkits, introduces you to some modules that help you create a microservice, detailing different full toolkits approaches, such as Hydra and Seneca.
Chapter 21, Building a Microservice, covers the development of a simple microservice using Seneca and Hydra.
Chapter 22, State, covers the development of our microservice: from using the server filesystem to moving to a more structured database service, such as MySQL.
Chapter 23, Testing, covers the mocking of services.
Chapter 24, Design Patterns, enumerates some of the most common architectural design patterns and reviews the continuous integration and deployment loop used throughout the book.
The execution of the code examples provided in this Learning Path requires Node.js running on POSIX-like operating systems, various UNIX derivatives (Solaris, for example) or workalikes (Linux, macOS, and so on), as well as on Microsoft Windows. It can
run on machines both large and small, including the tiny ARM devices such as the Raspberry Pi microscale embeddable computer for DIY software/hardware projects.
Because many Node.js packages are written in C or C++, you must have a C compiler (such as GCC), Python 2.7 (or later), and the node-gyp package. If you plan to use encryption in your networking code, you will also need the OpenSSL cryptographic library. The modern UNIX derivatives almost certainly come with these, and Node.js's configure script, used when installing from source, will detect their presence. If you need to install them, Python is available at http://python.org and OpenSSL is available at http://openssl.org.
You can download the example code files for this book from your account at www.packt.com. If you purchased this book elsewhere, you can visit www.packt.com/support and register to have the files emailed directly to you.
You can download the code files by following these steps:
Once the file is downloaded, please make sure that you unzip or extract the folder using the latest version of:
The code bundle for the book is also hosted on GitHub at https://github.com/PacktPublishing/Node.js-Complete-Reference-Guide. In case there's an update to the code, it will be updated on the existing GitHub repository.
We also have other code bundles from our rich catalog of books and videos available at https://github.com/PacktPublishing/. Check them out!
There are a number of text conventions used throughout this book.
CodeInText: Indicates code words in text, database table names, folder names, filenames, file extensions, pathnames, dummy URLs, user input, and Twitter handles. Here is an example: "The EventEmitter object is defined in the events module of Node.js."
A block of code is set as follows:
if (anotherNote instanceof Note) {
 ... it's a Note, so act on it as a Note
}
Any command-line input or output is written as follows:
$ npm update express
$ npm update
Bold: Indicates a new term, an important word, or words that you see onscreen. For example, words in menus or dialog boxes appear in the text like this. Here is an example: "If you need something different, click on the DOWNLOADS link in the header for all possible downloads: "
Feedback from our readers is always welcome.
General feedback: If you have questions about any aspect of this book, mention the book title in the subject of your message and email us at customercare@packtpub.com.
Errata: Although we have taken every care to ensure the accuracy of our content, mistakes do happen. If you have found a mistake in this book, we would be grateful if you would report this to us. Please visit www.packt.com/submit-errata, selecting your book, clicking on the Errata Submission Form link, and entering the details.
Piracy: If you come across any illegal copies of our works in any form on the Internet, we would be grateful if you would provide us with the location address or website name. Please contact us at copyright@packt.com with a link to the material.
If you are interested in becoming an author: If there is a topic that you have expertise in and you are interested in either writing or contributing to a book, please visit authors.packtpub.com.
Please leave a review. Once you have read and used this book, why not leave a review on the site that you purchased it from? Potential readers can then see and use your unbiased opinion to make purchase decisions, we at Packt can understand what you think about our products, and our authors can see your feedback on their book. Thank you!
For more information about Packt, please visit packt.com.
Node.js is an exciting new platform for developing web applications, application servers, any sort of network server or client, and general purpose programming. It is designed for extreme scalability in networked applications through an ingenious combination of server-side JavaScript, asynchronous I/O, and asynchronous programming. It is built around JavaScript anonymous functions, and a single execution thread event-driven architecture.
While only a few years old, Node.js has quickly grown in prominence and it's now playing a significant role. Companies, both small and large, are using it for large-scale and small-scale projects. PayPal, for example, has converted many services from Java to Node.js.
The Node.js architecture departs from a typical choice made by other application platforms. Where threads are widely used to scale an application to fill the CPU, Node.js eschews threads because of their inherent complexity. It's claimed that with single-thread event-driven architectures, memory footprint is low, throughput is high, the latency profile under load is better, and the programming model is simpler. The Node.js platform is in a phase of rapid growth, and many are seeing it as a compelling alternative to the traditional web application architectures using Java, PHP, Python, or Ruby on Rails.
At its heart, it is a standalone JavaScript engine with extensions making it suitable for general purpose programming and with a clear focus on application server development. Even though we're comparing Node.js to application server platforms, it is not an application server. Instead, Node.js is a programming run-time akin to Python, Go, or Java SE. While there are web application frameworks and application servers written in Node.js, it is simply a system to execute JavaScript programs.
It is implemented around a non-blocking I/O event loop and a layer of file and network I/O libraries, all built on top of the V8 JavaScript engine (from the Chrome web browser). The rapid performance and feature improvements implemented in Chrome quickly flow through to the Node.js platform. Additionally, a team of folks are working on a Node.js implementation that runs on top of Microsoft's ChakraCore JavaScript engine (from the Edge web browser). That would give the Node.js community greater flexibility by not being reliant on one JavaScript engine provider. Visit https://github.com/nodejs/node-chakracore to take a look at the project.
The Node.js I/O library is general enough to implement any sort of server executing any TCP or UDP protocol, whether it's domain name system (DNS ), HTTP, internet relay chat (IRC), or FTP. While it supports developing internet servers or clients, its biggest use case is in regular websites, in place of technology such as an Apache/PHP or Rails stack, or to complement existing websites. For example, adding real-time chat or monitoring existing websites can be easily done with the Socket. IO library for Node.js. Its lightweight, high-performance nature often sees Node.js used as a glue service.
A particularly intriguing combination is deploying small services using Docker into cloud hosting infrastructure. A large application can be divided into what's now called microservices that are easily deployed at scale using Docker. The result fits agile project management methods since each microservice can be easily managed by a small team that collaborates at the boundary of their individual API.
This book will give you an introduction to Node.js. We presume the following:
We will cover the following topics in this chapter:
We will dive right into developing working applications and recognize that often the best way to learn is by rummaging around in working code.
Node.js is a platform for writing JavaScript applications outside web browsers. This is not the JavaScript we are familiar with in web browsers! For example, there is no DOM built into Node.js, nor any other browser capability.
Beyond its native ability to execute JavaScript, the bundled modules provide capabilities of this sort:
The network layer of Node.js is low level while being simple to use. For example, the HTTP modules allow you to write an HTTP server (or client) using a few lines of code. This is powerful, but it puts you, the programmer, very close to the protocol requests and makes you implement precisely those HTTP headers that you should return in request responses.
Typical web application developers don't need to work at a low level of the HTTP or other protocols. Instead, we tend to be more productive, working with higher-level interfaces. For example, PHP coders assume that Apache (or other HTTP servers) is already there providing the HTTP protocol, and that they don't have to implement the HTTP server portion of the stack. By contrast, a Node.js programmer does implement an HTTP server to which their application code is attached.
To simplify the situation, the Node.js community has several web application frameworks, such as Express, providing the higher-level interfaces required by typical programmers. You can quickly configure an HTTP server with baked-in capabilities such as sessions, cookies, serving static files, and logging, letting developers focus on their business logic. Other frameworks provide OAuth 2 support, or focus on REST APIs, and so on.
Node.js is not limited to web service application development. The community around Node.js has taken it in many other directions,
Build tools: Node.js has become a popular choice for developing command-line tools used in software development, or communicating with service infrastructure. Grunt and Gulp are widely used by frontend developers to build assets for websites. Babel is widely used for transpiling modern ES-2016 code to run on older browsers. Popular CSS optimizers and processors, such as PostCSS, are written in Node.js. Static website generation systems such as Metalsmith, Punch, and AkashaCMS, run at the command line and generate website content that you upload to a web server.
Web UI testing: Puppeteer gives you control over a headless-Chrome web browser instance. With it, you can develop Node.js scripts controlling a modern full-featured web browser. Typical use cases involve web scraping and testing web applications.
Desktop applications: Both Electron and node-webkit (NW.js) are frameworks for developing desktop applications for Windows, macOS, and Linux. These frameworks utilize a large chunk of Chrome, wrapped by Node.js libraries, to develop desktop applications using web UI technologies. Applications are written with modern HTML5, CSS3, and JavaScript, and can utilize leading-edge web frameworks, such as Bootstrap, React, or AngularJS. Many popular applications have been built using Electron, including the Slack desktop client application, the Atom and Microsoft Visual Code programming editors, the Postman REST client, the GitKraken GIT client, and Etcher, which makes it incredibly easy to burn OS images to flash drives to run on single-board computers.
Mobile applications: The Node.js for Mobile Systems project lets you develop smartphone or tablet computer applications using Node.js, for both iOS and Android. Apple's App Store rules preclude incorporating a JavaScript engine with JIT capabilities, meaning that normal Node.js cannot be used in an iOS application. For iOS application development, the project uses Node.js-on-ChakraCore to skirt around the App Store rules. For Android application development the project uses regular Node.js on Android. At the time of writing, the project is in an early stage of development, but it looks promising.
Internet of Things (IoT): Reportedly, it is a very popular language for Internet-of-Things projects, and Node.js does run on most ARM-based single-board computers. The clearest example is the NodeRED project. It offers a graphical programming environment, letting you draw programs by connecting blocks together. It features hardware-oriented input and output mechanisms, for example, to interact with General Purpose I/O (GPIO) pins on Raspberry Pi or Beaglebone single-board computers.
Quit scratching your head already! Of course you're doing it, scratching your head and mumbling to yourself, "What's a browser language doing on the server?" In truth, JavaScript has a long and largely unknown history outside the browser. JavaScript is a programming language, just like any other language, and the better question to ask is "Why should JavaScript remain trapped inside browsers?".
Back in the dawn of the web age, the tools for writing web applications were at a fledgling stage. Some were experimenting with Perl or TCL to write CGI scripts, and the PHP and Java languages had just been developed. Even then, JavaScript saw use on the server side. One early web application server was Netscape's LiveWire server, which used JavaScript. Some versions of Microsoft's ASP used JScript, their version of JavaScript. A more recent server-side JavaScript project is the RingoJS application framework in the Java universe. Java 6 and Java 7 were both shipped with the Rhino JavaScript engine. In Java 8, Rhino was dropped in favor of the newer Nashorn JavaScript engine.
In other words, JavaScript outside the browser is not a new thing, even if it is uncommon.
Among the many available web application development platforms, why should you choose Node.js? There are many stacks to choose from; what is it about Node.js that makes it rise above the others? We will see in the following sections.
Node.js is quickly becoming a popular development platform with adoption by plenty of big and small players. One of those is PayPal, who are replacing their incumbent Java-based system with one written in Node.js. For PayPal's blog post about this, visit https://www.paypal-engineering.com/2013/11/22/node-js-at-paypal/. Other large Node.js adopters include Walmart's online e-commerce platform, LinkedIn, and eBay.
According to NodeSource, Node.js usage is growing rapidly (visit https://nodesource.com/node-by-numbers). The measures include increasing bandwidth for downloading Node.js releases, increasing activity in Node.js-related GitHub projects, and more.
It's best to not just follow the crowd because the crowd claims their software platform does cool things. Node.js does some cool things, but more important is its technical merit.
Having the same programming language on the server and client has been a long-time dream on the web. This dream dates back to the early days of Java, where Java applets were to be the frontend to server applications written in Java, and JavaScript was originally envisioned as a lightweight scripting language for those applets. Java never fulfilled its hype as a client-side programming language, for various reasons. We ended up with JavaScript as the principle in-browser, client-side language, rather than Java. Typically, the frontend JavaScript developers were in a different language universe than the server-side team, who was likely to be coding in PHP, Java, Ruby, or Python.
Over time, in-browser JavaScript engines became incredibly powerful, letting us write ever-more complex browser-side applications. With Node.js, we may finally be able to implement applications with the same programming language on the client and server by having JavaScript at both ends of the web, in the browser and server.
A common language for frontend and backend offers several potential benefits:
The JavaScript language is very popular due to its ubiquity in web browsers. It compares favorably against other languages while having many modern, advanced language concepts. Thanks to its popularity, there is a deep talent pool of experienced JavaScript programmers out there.
To make Chrome a popular and excellent web browser, Google invested in making V8 a super-fast JavaScript engine. Google, therefore, has a huge motivation to keep on improving V8. V8 is the JavaScript engine for Chrome, and it can also be executed standalone. Node.js is built on top of the V8 JavaScript engine.
As Node.js becomes more important to the V8 team, there's a potential synergy of faster V8 performance wins as more people focus on V8 improvements.
We'll get into this later. The Node.js architecture, a single execution thread, an ingenious event-oriented asynchronous-programming model, and a fast JavaScript engine, has less overhead than thread-based architectures.
A new sensation in software development is the microservice idea. Microservices are focused on splitting a large web application into small, tightly-focused services that can be easily developed by small teams. While they aren't exactly a new idea, they're more of a reframing of old client-server computing models, the microservice pattern fits well with agile project management techniques, and gives us more granular application deployment.
Node.js is an excellent platform for implementing microservices. We'll get into this later.
During 2014 and 2015, the Node.js community faced a major split over policy, direction, and control. The io.js project was a hostile fork driven by a group who wanted to incorporate several features and change who's in the decision-making process. The end result was a merge of the Node.js and io.js repositories, an independent Node.js foundation to run the show, and the community is working together to move forward in a common direction.
A concrete result of healing that rift is the rapid adoption of new ECMAScript language features. The V8 engine is adopting those new features quickly to advance the state of web development. The Node.js team, in turn, is adopting those features as quickly as they show up in V8, meaning that Promises and async functions are quickly becoming a reality for Node.js programmers.
The bottom line is that the Node.js community not only survived the io.js fork, but the community and the platform it nurtures grew stronger as a result.
Node.js's blistering performance is said to be because of its asynchronous event-driven architecture, and its use of the V8 JavaScript engine. That's a nice thing to say, but what's the rationale for the statement?
The V8 JavaScript engine is among the fastest JavaScript implementations. As a result, Chrome is widely used not just to view website content, but to run complex applications. Examples include Gmail, the Google GSuite applications (Docs, Slides, and so on), image editors such as Pixlr, and drawing applications such as draw.io and Canva. Both Atom and Microsoft's Visual Studio Code are excellent IDE's that just happen to be implemented in Node.js and Chrome using Electron. That these applications exist and are happily used by a large number of people is testament to V8's performance. Node.js benefits from V8 performance improvements.
The normal application server model uses blocking I/O to retrieve data, and it uses threads for concurrency. Blocking I/O causes threads to wait on results. That causes a churn between threads as the application server starts and stops the threads to handle requests. Each suspended thread (typically waiting on an I/O operation to finish) consumes a full stack trace of memory, increasing memory consumption overhead. Threads add complexity to the application server as well as server overhead.
Node.js has a single execution thread with no waiting on I/O or context switching. Instead, there is an event loop looking for events and dispatching them to handler functions. The paradigm is that any operation that would block or otherwise take time to complete must use the asynchronous model. These functions are to be given an anonymous function to act as a handler callback, or else (with the advent of ES2015 promises), the function would return a Promise. The handler function, or Promise, is invoked when the operation is complete. In the meantime, control returns to the event loop, which continues dispatching events.
At the Node.js interactive conference in 2017, IBM's Chris Bailey made a case for Node.js being an excellent choice for highly scalable microservices. Key performance characteristics are I/O performance, measured in transactions per second, startup time, because that limits how quickly your service can scale up to meet demand, and memory footprint, because that determines how many application instances can be deployed per server. Node.js excels on all those measures; with every subsequent release each, is either improving or remaining fairly steady. Bailey presented figures comparing Node.js to a similar benchmark written in Spring Boot showing Node.js to perform much better. To view his talk, see https://www.youtube.com/watch?v=Fbhhc4jtGW4.
To help us wrap our heads around why this would be, let's return to Ryan Dahl, the creator of Node.js, and the key inspiration leading him to create Node.js. In his Cinco de NodeJS presentation in May 2010, https://www.youtube.com/watch?v=M-sc73Y-zQA, Dahl asked us what happens while executing a line of code such as this:
result = query('SELECT * from db');
// operate on the result
Of course, the program pauses at that point while the database layer sends the query to the database, which determines the result and returns the data. Depending on the query, that pause can be quite long; well, a few milliseconds, which is an eon in computer time. This pause is bad because that execution thread can do nothing while waiting for the result to arrive. If your software is running on a single-threaded platform, the entire server would be blocked and unresponsive. If instead, your application is running on a thread-based server platform, a thread context switch is required to satisfy any other requests that arrive. The greater the number of outstanding connections to the server, the greater the number of thread context switches. Context switching is not free because more threads require more memory per thread state and more time for the CPU to spend on thread management overhead.
Simply using an asynchronous, event-driven I/O, Node.js removes most of this overhead while introducing very little of its own.
Using threads to implement concurrency often comes with admonitions such as these: expensive and error-prone, the error-prone synchronization primitives of Java, or designing concurrent software can be complex and error prone. The complexity comes from the access to shared variables and various strategies to avoid deadlock and competition between threads. The synchronization primitives of Java are an example of such a strategy, and obviously many programmers find them difficult to use. There's the tendency to create frameworks such as java.util.concurrent to tame the complexity of threaded concurrency, but some might argue that papering over complexity does not make things simpler.
Node.js asks us to think differently about concurrency. Callbacks fired asynchronously from an event loop are a much simpler concurrency model—simpler to understand, simpler to implement, simpler to reason about, and simpler to debug and maintain.
Ryan Dahl points to the relative access time of objects to understand the need for asynchronous I/O. Objects in memory are more quickly accessed (in the order of nanoseconds) than objects on disk or objects retrieved over the network (milliseconds or seconds). The longer access time for external objects is measured in zillions of clock cycles, which can be an eternity when your customer is sitting at their web browser ready to move on if it takes longer than two seconds to load the page.
In Node.js, the query discussed previously will read as follows:
query('SELECT * from db', function (err, result) {
    if (err) throw err; // handle errors
    // operate on result
});
The programmer supplies a function that is called (hence the name callback function) when the result (or error) is available. Instead of a thread context switch, this code returns almost immediately to the event loop. That event loop is free to handle other requests. The Node.js runtime keeps track of the stack context leading to this callback function, and eventually an event will fire causing this callback function to be called.
Advances in the JavaScript language are giving us new options to implement this idea. The equivalent code looks like so when used with ES2015 Promise's:
query('SELECT * from db')
.then(result => {
    // operate on result
})
.catch(err => {
    // handle errors
});
The following with an ES-2017 async function:
try {
    var result = await query('SELECT * from db');
    // operate on result
} catch (err) {
    // handle errors
}
All three of these code snippets perform the same query written earlier. The difference is that the query does not block the execution thread, because control passes back to the event loop. By returning almost immediately to the event loop, it is free to service other requests. Eventually, one of those events will be the response to the query shown previously, which will invoke the callback function.
With the callback or Promise approach, the result is not returned as the result of the function call, but is provided to a callback function that will be called later. The order of execution is not one line after another, as it is in synchronous programming languages. Instead, the order of execution is determined by the order of the callback function execution.
When using an async function, the coding style LOOKS like the original synchronous code example. The result is returned as the result of the function call, and errors are handled in a natural manner using try/catch. The await keyword integrates asynchronous results handling without blocking the execution thread. A lot is buried under the covers of the async/await feature, and we'll be covering this model extensively throughout the book.
Commonly, web pages bring together data from dozens of sources. Each one has a query and response as discussed earlier. Using asynchronous queries, each query can happen in parallel, where the page construction function can fire off dozens of queries—no waiting, each with their own callback—and then go back to the event loop, invoking the callbacks as each is done. Because it's in parallel, the data can be collected much more quickly than if these queries were done synchronously one at a time. Now, the reader on the web browser is happier because the page loads more quickly.
Some of the excitement over Node.js is due to its throughput (the requests per second it can serve). Comparative benchmarks of similar applications, for example, Apache, show that Node.js has tremendous performance gains.
One benchmark going around is this simple HTTP server (borrowed from https://nodejs.org/en/), which simply returns a Hello World message directly from memory:
var http = require('http');
http.createServer(function (req, res) {
  res.writeHead(200, {'Content-Type': 'text/plain'});
  res.end('Hello World\n');
}).listen(8124, "127.0.0.1");
console.log('Server running at http://127.0.0.1:8124/');
This is one of the simpler web servers that you can build with Node.js. The http object encapsulates the HTTP protocol, and its http.createServer method creates a whole web server, listening on the port specified in the listen method. Every request (whether a GET or POST on any URL) on that web server calls the provided function. It is very simple and lightweight. In this case, regardless of the URL, it returns a simple text/plain that is the Hello World response.
Ryan Dahl showed a simple benchmark (https://www.youtube.com/watch?v=M-sc73Y-zQA) that returned a 1-megabyte binary buffer; Node.js gave 822 req/sec, while Nginx gave 708 req/sec, for a 15% improvement over Nginx. He also noted that Nginx peaked at four megabytes memory, while Node.js peaked at 64 megabytes.
The key observation was that Node.js, running an interpreted JIT-compiled high-level language, was about as fast as Nginx, built of highly optimized C code, while running similar tasks. That presentation was in May 2010, and Node.js has improved hugely since then, as shown in Chris Bailey's talk that we referenced earlier.
Yahoo! search engineer Fabian Frank published a performance case study of a real-world search query suggestion widget implemented with Apache/PHP and two variants of Node.js stacks (http://www.slideshare.net/FabianFrankDe/nodejs-performance-case-study). The application is a pop-up panel showing search suggestions as the user types in phrases, using a JSON-based HTTP query. The Node.js version could handle eight times the number of requests per second with the same request latency. Fabian Frank said both Node.js stacks scaled linearly until CPU usage hit 100%. In another presentation (http://www.slideshare.net/FabianFrankDe/yahoo-scale-nodejs), he discussed how Yahoo! Axis is running on Manhattan + Mojito and the value of being able to use the same language (JavaScript) and framework (YUI/YQL) on both frontend and backend.
LinkedIn did a massive overhaul of their mobile app using Node.js for the server-side to replace an old Ruby on Rails app. The switch let them move from 30 servers down to three, and allowed them to merge the frontend and backend team because everything was written in JavaScript. Before choosing Node.js, they'd evaluated Rails with Event Machine, Python with Twisted, and Node.js, choosing Node.js for the reasons that we just discussed. For a look at what LinkedIn did, see http://arstechnica.com/information-technology/2012/10/a-behind-the-scenes-look-at-linkedins-mobile-engineering/.
Most existing advice on Node.js performance tips tends to have been written for older V8 versions that used the CrankShaft optimizer. The V8 team has completely dumped CrankShaft, and it has a new optimizer called TurboFan. For example, under CrankShaft, it was slower to use try/catch, let/const, generator functions, and so on. Therefore, common wisdom said to not use those features, which is depressing because we want to use the new JavaScript features because of how much it has improved the JavaScript language. Peter Marshall, an Engineer on the V8 team at Google, gave a talk at Node.js Interactive 2017 claiming that, under TurboFan, you should just write natural JavaScript. With TurboFan, the goal is for across-the-board performance improvements in V8. To view the presentation, see https://www.youtube.com/watch?v=YqOhBezMx1o.
A truism about JavaScript is that it's no good for heavy computation work, because of the nature of JavaScript. We'll go over some ideas related to this in the next section. A talk by Mikola Lysenko at Node.js Interactive 2016 went over some issues with numerical computing in JavaScript, and some possible solutions. Common numerical computing involves large numerical arrays processed by numerical algorithms that you might have learned in Calculus or Linear Algebra classes. What JavaScript lacks is multi-dimensional arrays, and access to certain CPU instructions. The solution he presented is a library to implement multi-dimensional arrays in JavaScript, along with another library full of numerical computing algorithms. To view the presentation, see https://www.youtube.com/watch?v=1ORaKEzlnys.
The bottom line is that Node.js excels at event-driven I/O throughput. Whether a Node.js program can excel at computational programs depends on your ingenuity in working around some limitations in the JavaScript language. A big problem with computational programming is that it prevents the event loop from executing and, as we will see in the next section, that can make Node.js look like a poor candidate for anything.
In October 2011, software developer and blogger Ted Dziuba wrote a blog post (since pulled from his blog) titled Node.js is a cancer, calling it a scalability disaster. The example he showed for proof is a CPU-bound implementation of the Fibonacci sequence algorithm. While his argument was flawed, he raised a valid point that Node.js application developers have to consider the following: where do you put the heavy computational tasks?
A key to maintaining high throughput of Node.js applications is ensuring that events are handled quickly. Because it uses a single execution thread, if that thread is bogged down with a big calculation, Node.js cannot handle events, and event throughput will suffer.
The Fibonacci sequence, serving as a stand-in for heavy computational tasks, quickly becomes computationally expensive to calculate, especially for a naïve implementation such as this:
const fibonacci = exports.fibonacci = function(n) {
    if (n === 1 || n === 2) return 1;
    else return fibonacci(n-1) + fibonacci(n-2);
}
Yes, there are many ways to calculate fibonacci numbers more quickly. We are showing this as a general example of what happens to Node.js when event handlers are slow, and not to debate the best ways to calculate mathematics functions. Consider this server:
const http = require('http');
const url  = require('url');

const fibonacci = // as above

http.createServer(function (req, res) {
  const urlP = url.parse(req.url, true);
  let fibo;
  res.writeHead(200, {'Content-Type': 'text/plain'});
  if (urlP.query['n']) {
    fibo = fibonacci(urlP.query['n']);
    res.end('Fibonacci '+ urlP.query['n'] +'='+ fibo);
  } else {
    res.end('USAGE: http://127.0.0.1:8124?n=## where ## is the Fibonacci number desired');
  }
}).listen(8124, '127.0.0.1');
console.log('Server running at http://127.0.0.1:8124');
For sufficiently large values of n (for example, 40), the server becomes completely unresponsive because the event loop is not running, and instead this function is blocking event processing because it is grinding through the calculation.
Does this mean that Node.js is a flawed platform? No, it just means that the programmer must take care to identify code with long-running computations and develop solutions. These include rewriting the algorithm to work with the event loop, or rewriting the algorithm for efficiency, or integrating a native code library, or foisting computationally expensive calculations on to a backend server.
A simple rewrite dispatches the computations through the event loop, letting the server continue to handle requests on the event loop. Using callbacks and closures (anonymous functions), we're able to maintain asynchronous I/O and concurrency promises:
const fibonacciAsync = function(n, done) {
    if (n === 0) return 0;
    else if (n === 1 || n === 2) done(1);
    else if (n === 3) return 2;
    else {
        process.nextTick(function() {
            fibonacciAsync(n-1, function(val1) {
                process.nextTick(function() {
                    fibonacciAsync(n-2, function(val2) {
                    done(val1+val2); });
                });
            });
        });
    }
}
Because this is an asynchronous function, it necessitates a small refactoring of the server:
const http = require('http');
const url  = require('url');

const fibonacciAsync = // as above

http.createServer(function (req, res) {
  let urlP = url.parse(req.url, true);
  res.writeHead(200, {'Content-Type': 'text/plain'});
  if (urlP.query['n']) {
    fibonacciAsync(urlP.query['n'], fibo => {
        res.end('Fibonacci '+ urlP.query['n'] +'='+ fibo);
    });
  } else {
    res.end('USAGE: http://127.0.0.1:8124?n=## where ## is the Fibonacci number desired');
  }
}).listen(8124, '127.0.0.1'); console.log('Server running at http://127.0.0.1:8124');
Dziuba's valid point wasn't expressed well in his blog post, and it was somewhat lost in the flames following that post. Namely, that while Node.js is a great platform for I/O-bound applications, it isn't a good platform for computationally intensive ones.
Later in this book, we'll explore this example a little more deeply.
The striving for optimal efficiency (handling more requests per second) is not just about the geeky satisfaction that comes from optimization. There are real business and environmental benefits. Handling more requests per second, as Node.js servers can do, means the difference between buying lots of servers and buying only a few servers. Node.js potentially lets your organization do more with less.
Roughly speaking, the more servers you buy, the greater the cost, and the greater the environmental impact of having those servers. There's a whole field of expertise around reducing costs and the environmental impact of running web server facilities, to which that rough guideline doesn't do justice. The goal is fairly obvious—fewer servers, lower costs, and a reduced environmental impact through utilizing more efficient software.
Intel's paper, Increasing Data Center Efficiency with Server Power Measurements (https://www.intel.com/content/dam/doc/white-paper/intel-it-data-center-efficiency-server-power-paper.pdf), gives an objective framework for understanding efficiency and data center costs. There are many factors, such as buildings, cooling systems, and computer system designs. Efficient building design, efficient cooling systems, and efficient computer systems (data center efficiency, data center density, and storage density) can lower costs and environmental impact. But you can destroy those gains by deploying an inefficient software stack compelling you to buy more servers than you would if you had an efficient software stack. Alternatively, you can amplify gains from data center efficiency with an efficient software stack that lets you decrease the number of servers required.
This talk about efficient software stacks isn't just for altruistic environmental purposes. This is one of those cases where being green can help your business bottom line.
The last couple of years have been an exciting time for JavaScript programmers. The TC-39 committee that oversees the ECMAScript standard has added many new features, some of which are syntactic sugar, but several of which have propelled us into a whole new era of JavaScript programming. By itself, the async/await feature promises us a way out of what's called Callback Hell, or the situation we find ourselves in when nesting callbacks within callbacks. It's such an important feature that it should necessitate a broad rethinking of the prevailing callback-oriented paradigm in Node.js and the rest of the JavaScript ecosystem.
Refer back a few pages to this:
query('SELECT * from db', function (err, result) {
    if (err) throw err; // handle errors
    // operate on result
});
This was an important insight on Ryan Dahl's part, and is what propelled Node.js's popularity. Certain actions take a long time to run, such as database queries, and should not be treated the same as operations that quickly retrieve data from memory. Because of the nature of the JavaScript language, Node.js had to express this asynchronous coding construct in an unnatural way. The results do not appear at the next line of code, but instead appear within this callback function. Further, errors have to be handled in an unnatural way, inside that callback function.
The convention in Node.js is that the first parameter to a callback function is an error indicator, and the subsequent parameters are the results. This is a useful convention that you'll find all across the Node.js landscape. However, it complicates working with results and errors because both land in an inconvenient location — that callback function. The natural place for errors and results to land is on the subsequent line(s) of code.
We descend further into callback hell with each layer of callback function nesting. The seventh layer of callback nesting is more complex than the sixth layer of callback nesting. Why? If nothing else, it's that the special considerations for error handling become ever more complex as callbacks are nested more deeply.
var results = await query('SELECT * from db');
Instead, ES2017 async functions return us to this very natural expression of programming intent. Results and errors land in the correct location, while preserving the excellent event-driven asynchronous programming model that made Node.js great. We'll see later in the book how this works.
The TC-39 committee added many more new features to JavaScript, such as:
You may see the new JavaScript described as ES6 or ES2017. What's the preferred name to describe the version of JavaScript that is being used?
ES1 through ES5 marked various phases of JavaScript's development. ES5 was released in 2009, and is widely implemented in modern browsers. Starting with ES6, the TC-39 committee decided to change the naming convention because of their intention to add new language features every year. Therefore, the language version name now includes the year, hence ES2015 was released in 2015, ES2016 was released in 2016, and ES2017 was released in 2017.
The pink elephant in the room is that, because of how JavaScript is delivered to the world, we cannot just start using the latest ES2017 features. In frontend JavaScript, we are limited by the fact that old browsers are still in use. Internet Explorer version 6 has fortunately been almost completely retired, but there are still plenty of old browsers installed on older computers that are still serving a valid role for their owners. Old browsers mean old JavaScript implementations, and if we want our code to work, we need it to be compatible with old browsers.
Using code rewriting tools such as Babel, some of the new features can be retrofitted to function on some of the older browsers. Frontend JavaScript programmers can adopt (some of) the new features at the cost of a more complex build toolchain, and the risk of bugs introduced by the code rewriting process. Some may wish to do that, while others will prefer to wait a while.
The Node.js world doesn't have this problem. Node.js has rapidly adopted ES2015/2016/2017 features as quickly as they were implemented in the V8 engine. With Node.js 8, we can now use async functions as a native feature, and most of the ES2015/2016 features became available with Node.js version 6. The new module format is now supported in Node.js version 10.
In other words, while frontend JavaScript programmers can argue that they must wait a couple of years before adopting ES2015/2016/2017 features, Node.js programmers have no need to wait. We can simply use the new features without needing any code rewriting tools.
New capabilities, such as cloud deployment systems and Docker, make it possible to implement a new kind of service architecture. Docker makes it possible to define server process configuration in a repeatable container that's easy to deploy by the millions into a cloud hosting system. It lends itself best to small single-purpose service instances that can be connected together to make a complete system. Docker isn't the only tool to help simplify cloud deployments; however, its features are well attuned to modern application deployment needs.
Some have popularized the microservice concept as a way to describe this kind of system. According to the microservices.io website, a microservice consists of a set of narrowly focused, independently deployable services. They contrast this with the monolithic application deployment pattern where every aspect of the system is integrated into one bundle (such as a single WAR file for a Java EE app server). The microservice model gives developers much needed flexibility.
Some advantages of microservices are as follows:
Where does Node.js fit in with this? Its design fits the microservice model like a glove:
Throughout this book, we'll call out aspects of the Twelve-Factor App model, and ways to implement those ideas in Node.js. This model is published on http://12factor.net, and is a set of guidelines for application deployment in the modern cloud computing era. It's not that the Twelve-Factor App model is the be-all and end-all of application architecture paradigms. It's a set of useful ideas, clearly birthed after many late nights spent debugging complex applications, which offer useful ideas that could save us all a lot of effort by having easier-to-maintain and more reliable systems.
The guidelines are straightforward, and once you read them, they will seem like pure common sense. As a best practice, the Twelve-Factor App model is a compelling strategy for delivering the kind of fluid self-contained cloud-deployed applications called for by our current computing environment.
You learned a lot in this chapter. Specifically, you saw that JavaScript has a life outside web browsers and you learned about the difference between asynchronous and blocking I/O. We then covered the attributes of Node.js and where it fits in the overall web application platform market and threaded versus asynchronous software. Lastly, we saw the advantages of fast event-driven asynchronous I/O, coupled with a language with great support for anonymous closures.
Our focus in this book is real-world considerations of developing and deploying Node.js applications. We'll cover as many aspects as we can of developing, refining, testing, and deploying Node.js applications.
Now that we've had this introduction to Node.js, we're ready to dive in and start using it. In Chapter 2, Setting up Node.js, we'll go over setting up a Node.js environment, so let's get started.
Before getting started with using Node.js, you must set up your development environment. In the following chapters, we'll use this for development and for non-production deployment.
In this chapter, we will cover the following topics:
So let's get on with it.
Node.js runs on POSIX-like operating systems, various UNIX derivatives (Solaris, for example) or workalikes (Linux, macOS, and so on), as well as on Microsoft Windows. It can run on machines both large and small, including the tiny ARM devices such as the Raspberry Pi microscale embeddable computer for DIY software/hardware projects.
Node.js is now available via package management systems, limiting the need to compile and install from source.
Because many Node.js packages are written in C or C++, you must have a C compiler (such as GCC), Python 2.7 (or later), and the node-gyp package. If you plan to use encryption in your networking code, you will also need the OpenSSL cryptographic library. The modern UNIX derivatives almost certainly come with these, and Node.js's configure script, used when installing from source, will detect their presence. If you need to install them, Python is available at http://python.org and OpenSSL is available at http://openssl.org.
The preferred method for installing Node.js, now, is to use the versions available in package managers, such as apt-get, or MacPorts. Package managers simplify your life by helping to maintain the current version of the software on your computer, ensuring to update dependent packages as necessary, all by typing a simple command such as apt-get update. Let's go over this first.
The MacPorts project (http://www.macports.org/) has for years been packaging a long list of open source software packages for macOS, and they have packaged Node.js. After you have installed MacPorts using the installer on their website, installing Node.js is pretty much this simple:
$ port search nodejs npm
...
nodejs6 @6.12.0 (devel, net)
    Evented I/O for V8 JavaScript

nodejs7 @7.10.1 (devel, net)
    Evented I/O for V8 JavaScript

nodejs8 @8.9.1 (devel, net)
    Evented I/O for V8 JavaScript

nodejs9 @9.2.0 (devel, net)
    Evented I/O for V8 JavaScript

Found 6 ports.
--
npm4 @4.6.1 (devel)
    node package manager

npm5 @5.5.1 (devel)
    node package manager

Found 4 ports.

$ sudo port install nodejs8 npm5
.. long log of downloading and installing prerequisites and Node
$ which node
/opt/local/bin/node
$ node --version
v8.9.1
Homebrew is another open source software package manager for macOS, which some say is the perfect replacement for MacPorts. It is available through their home page at http://brew.sh/. After installing Homebrew using the instructions on their website and ensuring that Homebrew is correctly set up, use the following:
$ brew update
... long wait and lots of output
$ brew search node
==> Searching local taps...
nodelibbitcoin-node node-build node@6 nodeenv
leafnode llnode node@4 nodebrew nodenv
==> Searching taps on GitHub...
caskroom/cask/node-profiler
==> Searching blacklisted, migrated and deleted formulae...
Then, install it this way:
$ brew install node
...
==> Installing node
==> Downloading https://homebrew.bintray.com/bottles/node-8.9.1.el_capitan.bottle.tar.gz
######################################################################## 100.0%
==> Pouring node-8.9.1.el_capitan.bottle.tar.gz
==> Caveats
Bash completion has been installed to:
/usr/local/etc/bash_completion.d
==> Summary/usr/local/Cellar/node/8.9.1: 5,012 files, 49.6MB
Once installed this way, the Node.js command can be run as follows:
$ node --version
v8.9.1
Node.js is now available through most of the package management systems. Instructions on the Node.js website currently list packaged versions of Node.js for a long list of Linux, as well as FreeBSD, OpenBSD, NetBSD, macOS, and even Windows. Visit https://nodejs.org/en/download/package-manager/ for more information.
For example, on Debian and other Debian-based Linux distro's (such as Ubuntu), use the following commands:
# curl -sL https://deb.nodesource.com/setup_10.x | sudo -E bash -
# sudo apt-get install -y nodejs
# sudo apt-get install -y build-essential
To download other Node.js versions (this example shows version 10.x), modify the URL to suit.
The Windows Subsystem for Linux (WSL) lets you install Ubuntu, openSUSE, or SUSE Linux Enterprise on Windows. All three are available via the Store built into Windows 10. You may need to update your Windows for the installation to work.
Once installed, the Linux-specific instructions will install Node.js within the Linux subsystem.
To install the WSL, see https://msdn.microsoft.com/en-us/commandline/wsl/install-win10.
Some of the commands you'll run while installing tools on Windows are to be executed in a PowerShell window with elevated privileges. We mention this because the process of enabling the WSL includes a command to be run in such a PowerShell window.
The process is simple:
The resultant command window will have administrator privileges, and the title bar will say Administrator: Windows PowerShell.
The https://nodejs.org/en/ website offers built-in binaries for Windows, macOS, Linux, and Solaris. We can simply go to the website, click on the Install button, and run the installer. For systems with package managers, such as the ones we've just discussed, it's preferable to use the package management system. That's because you'll find it easier to stay up-to-date with the latest version. But, that doesn't serve all people because:
Simply go to the Node.js website and you'll see something like the following screenshot. The page does its best to determine your OS and supply the appropriate download. If you need something different, click on the DOWNLOADS link in the header for all possible downloads:
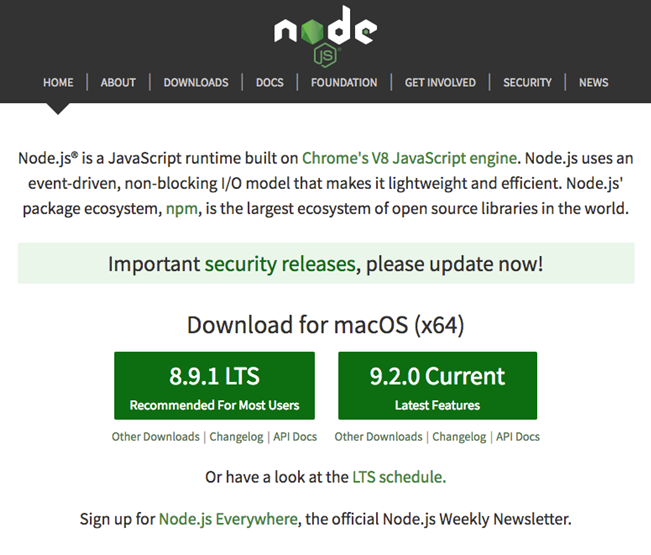
For macOS, the installer is a PKG file giving the typical installation process. For Windows, the installer simply takes you through the typical Install Wizard process.
Once finished with the installer, you have command-line tools, such as node and npm, with which you can run Node.js programs. On Windows, you're supplied with a version of the Windows command shell preconfigured to work nicely with Node.js.
Installing the prepackaged Node.js distributions is the preferred installation method. However, installing Node.js from source is desirable in a few situations:
Now that you have the high-level view, let's get our hands dirty mucking around in some build scripts. The general process follows the usual configure, make, and make install routine that you may already have performed with other open source software packages. If not, don't worry, we'll guide you through the process.
There are three prerequisites: a C compiler, Python, and the OpenSSL libraries. The Node.js compilation process checks for their presence and will fail if the C compiler or Python is not present. The specific method of installing these is dependent on your operating system.
These sorts of commands will check for their presence:
$ cc --version
Apple LLVM version 7.0.2 (clang-700.1.81)
Target: x86_64-apple-darwin15.3.0
Thread model: posix
$ python
Python 2.7.11 (default, Jan  8 2016, 22:23:13)
[GCC 4.2.1 Compatible Apple LLVM 7.0.2 (clang-700.1.81)] on darwin
Type "help", "copyright", "credits" or "license" for more information.
>>>
See this for details: https://github.com/nodejs/node/blob/master/BUILDING.md.
The Node.js build tools do not support Python 3.x.
Developer tools (such as GCC) are an optional installation on macOS. Fortunately, they're easy to acquire.
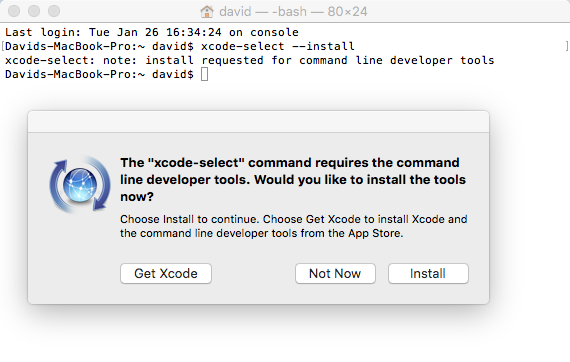
You start with Xcode, which is available for free through the Mac App Store. Simply search for Xcode and click on the Get button. Once you have Xcode installed, open a Terminal window and type the following:
$ xcode-select --install
This installs the Xcode command-line tools:
For additional information, visit http://osxdaily.com/2014/02/12/install-command-line-tools-mac-os-x/.
Compiling Node.js from source follows this process:
The source bundle can be downloaded with your browser, or as follows, substituting your preferred version:
$ mkdir src
$ cd src
$ wget https://nodejs.org/dist/v10.0.0/node-v10.0.0.tar.gz
$ tar xvfz node-v10.0.0.tar.gz
$ cd node-v10.0.0
Now we configure the source so that it can be built. This is just like many other open source packages, and there are a long list of options to customize the build:
$ ./configure --help
To cause the installation to land in your home directory, run it this way:
$ ./configure --prefix=$HOME/node/10.0.0
..output from configure
If you're going to install multiple Node.js versions side by side, it's useful to put the version number in the path like this. That way, each version will sit in a separate directory. It's a simple matter of switching between Node.js versions by changing the PATH variable appropriately:
# On bash shell:
$ export PATH=${HOME}/node/VERSION-NUMBER/bin:${PATH}
# On csh
$ setenv PATH ${HOME}/node/VERSION-NUMBER/bin:${PATH}
A simpler way to install multiple Node.js versions is the nvm script described later.
If you want to install Node.js in a system-wide directory, simply leave off the --prefix option and it will default to installing in /usr/local.
After a moment, it'll stop and will likely have successfully configured the source tree for installation in your chosen directory. If this doesn't succeed, the error messages that are printed will describe what needs to be fixed. Once the configure script is satisfied, you can go on to the next step.
With the configure script satisfied, you compile the software:
$ make
.. a long log of compiler output is printed
$ make install
If you are installing into a system-wide directory, do the last step this way instead:
$ make
$ sudo make install
Once installed, you should make sure that you add the installation directory to your PATH variable as follows:
$ echo 'export PATH=$HOME/node/10.0.0/bin:${PATH}' >>~/.bashrc
$ . ~/.bashrc
Alternatively, for csh users, use this syntax to make an exported environment variable:
$ echo 'setenv PATH $HOME/node/10.0.0/bin:${PATH}' >>~/.cshrc
$ source ~/.cshrc
This should result in some directories, as follows:
$ ls ~/node/10.0.0/
bin   include   lib   share
$ ls ~/node/10.0.0/bin
The BUILDING.md document referenced previously has instructions. One uses the build tools from Visual Studio, or else the full Visual Studio 2017 product:
Three additional tools are required:
Then, run the included .\vcbuild script to perform the build.
Normally, you won't install multiple versions of Node.js and doing so adds complexity to your system. But if you are hacking on Node.js itself, or are testing your software against different Node.js releases, you may want to have multiple Node.js installations. The method to do so is a simple variation on what we've already discussed.
Earlier, while discussing building Node.js from source, we noted that one can install multiple Node.js instances in separate directories. It's only necessary to build from source if you need a customized Node.js build, and most folks will be satisfied with pre-built Node.js binaries. They, too, can be installed into separate directories.
To switch between Node.js versions is simply a matter of changing the PATH variable (on POSIX systems), as follows, using the directory where you installed Node.js:
$ export PATH=/usr/local/node/VERSION-NUMBER/bin:${PATH}
It starts to be a little tedious to maintain this after a while. For each release, you have to set up Node.js, NPM, and any third-party modules you desire in your Node.js installation. Also, the command shown to change your PATH is not quite optimal. Inventive programmers have created several version managers to simplify managing multiple Node.js/NPM releases and providing commands to change your PATH the smart way:
Both maintain multiple simultaneous versions of Node and let you easily switch between versions. Installation instructions are available on their respective websites.
For example, with nvm, you can run commands like these:
$ nvm ls
...
         v6.0.0
         v6.1.0
         v6.2.2
         v6.3.1
         v6.4.0
            ...
        v6.11.2
         v7.0.0
         v7.1.0
        v7.10.0
         v8.0.0
         v8.1.3
         v8.2.1
         v8.5.0
         v8.9.1
         v8.9.3
         v9.2.0
         v9.4.0
         v9.5.0
        v9.10.1
        v9.11.1
     -> v10.0.0
     -> system
node -> stable (-> v8.9.1) (default)
stable -> 8.9 (-> v8.9.1) (default)
iojs -> N/A (default)
$ nvm use 10
Now using node v10.0.0 (npm v5.6.0)
$ node --version
v10.0.0
$ nvm use v4.2
Now using node v4.2.0 (npm v2.14.7)
$ node --version
v4.2.0
$ nvm install 9
Downloading https://nodejs.org/dist/v9.2.0/node-v9.2.0-darwin-x64.tar.xz...
######################################################################## 100.0%
WARNING: checksums are currently disabled for node.js v4.0 and later
Now using node v9.2.0 (npm v5.5.1)
$ node --version
v9.2.0
$ which node
/Users/david/.nvm/versions/node/v9.2.0/bin/node
$ /usr/local/bin/node --version
v8.9.1
$ /opt/local/bin/node --version
v8.9.1
This demonstrates that you can have a system-wide Node.js installed, keep multiple private Node.js versions managed by nvm, and switch between them as needed. When new Node.js versions are released, they are simple to install with nvm even if the official packaged version for your OS doesn't immediately update.
Unfortunately, nvm does not support Windows. Fortunately, a couple of Windows-specific clones of the nvm concept exist:
Another route is to use the WSL. Because in WSL you're interacting with a Linux command line, you can use nvm itself.
Many of the examples in this book were tested using the nvm-windows application. There are slight behavior differences, but it acts largely the same as nvm for Linux and macOS. The biggest change is the version number specifier in the nvm use and nvm install commands.
With nvm for Linux and macOS one can type a simple version number, like nvm use 8, and it will automatically substitute the latest release of the named Node.js version. With nvm-windows the same command acts as if you typed "nvm use 8.0.0". In other words, with nvm-windows you must use the exact version number. Fortunately, the list of supported versions is easily available using the "nvm list available" command.
While we won't discuss native code module development in this book, we do need to make sure that they can be built. Some modules in the NPM repository are native code, and they must be compiled with a C or C++ compiler to build the corresponding .node files (the .node extension is used for binary native-code modules).
The module will often describe itself as a wrapper for some other library. For example, the libxslt and libxmljs modules are wrappers around the C/C++ libraries of the same name. The module includes the C/C++ source code, and when installed, a script is automatically run to do the compilation with node-gyp.
The node-gyp tool is a cross-platform command-line tool written in Node.js for compiling native add-on modules for Node.js. We've mentioned native code modules several times, and it is this tool that compiles them for use with Node.js.
You can easily see this in action by running these commands:
$ mkdir temp
$ cd temp
$ npm install libxmljs libxslt
This is done in a temporary directory, so you can delete it afterward. If your system does not have the tools installed to compile native code modules, you'll see error messages. Otherwise, you'll see in the output a node-gyp execution, followed by many lines of text obviously related to compiling C/C++ files.
The node-gyp tool has prerequisites similar to those for compiling Node.js from source. Namely, a C/C++ compiler, a Python environment, and other build tools such as Git. For Unix/macOS/Linux systems those are easy to come by. For Windows, you should install:
Normally, you won't need to worry about installing node-gyp. That's because it is installed behind the scenes as part of NPM. That's done so that NPM can automatically build native code modules.
Its GitHub repository contains documentation at https://github.com/nodejs/node-gyp.
Reading the node-gyp documentation, in its repository, will give you a clearer understanding of the compilation prerequisites discussed previously, as well as of developing native code modules.
We just threw around so many different Node.js version numbers in the previous section that you may have become confused over which version to use. This book is targeting Node.js version 10.x, and it's expected that everything we'll cover is compatible with Node.js 10.x and any subsequent release.
Starting with Node.js 4.x, the Node.js team is following a dual-track approach. The even-numbered releases (4.x, 6.x, 8.x, and so on) are what they're calling Long Term Support (LTS), while the odd-numbered releases (5.x, 7.x, 9.x, and so on) are where current new feature development occurs. While the development branch is kept stable, the LTS releases are positioned as being for production use and will receive updates for several years.
At the time of writing, Node.js 8.x is the current LTS release; Node.js 9.x was just released and will eventually become Node.js 10.x, which in turn will eventually become the LTS release. For complete details about the release schedule, refer to https://github.com/nodejs/LTS/.
A major impact of each new Node.js release, beyond the usual performance improvements and bug fixes, is bringing in the latest V8 JavaScript engine release. In turn, this means bringing in more of the ES-2015/2016/2017 features as the V8 team implements those features. In Node.js 8.x, async/await functions arrived, and in Node.js 10.x support for the standard ES6 module format has arrived.
A practical consideration is whether a new Node.js release will break your code. New language features are always being added as V8 catches up with ECMA Script, and the Node.js team sometimes makes breaking changes in the Node.js API. If you've tested on one Node.js version, will it work on an earlier version? Will a Node.js change break some assumptions we made?
The NPM Package Manager helps us ensure that our packages execute on the correct Node.js version. This means that we can specify in the package.json file, which we'll explore in Chapter 3, Node.js Modules, the compatible Node.js versions for a package.
We can add an entry to package.json as follows:
engines: {
  "node": ">=6.x"
}
This means exactly what it implies—that the given package is compatible with Node.js version 6.x or later.
Of course, your development machine(s) could have several Node.js versions installed. You'll need the version your software is declared to support, plus any later versions you wish to evaluate.
Since Node.js code is JavaScript, any JavaScript-aware editor will be useful. Unlike some other languages that are so complex that an IDE with code completion is a necessity, a simple programming editor is perfectly sufficient for Node.js development.
Two editors are worth calling out because they are written in Node.js: Atom and Microsoft Visual Studio Code.
Atom (https://atom.io/) bills itself as a hackable editor for the 21st century. It is extendable by writing Node.js modules using the Atom API, and the configuration files are easily editable. In other words, it's hackable in the same way plenty of other editors have been, going back to Emacs, meaning one writes a software module to add capabilities to the editor. The Electron framework was invented in order to build Atom, and Electron is a super easy way to build desktop applications using Node.js.
Microsoft Visual Studio Code (https://code.visualstudio.com/) is also a hackable editor—well, the home page says extensible and customizable, which means the same thing—that is also open source, and is also implemented in Electron. But it's not a hollow me-too editor, aping Atom while adding nothing of its own. Instead, Visual Studio Code is a solid programmers editor in its own right, bringing interesting functionality to the table.
As for debuggers, there are several interesting choices. Starting with Node.js 6.3, the inspector protocol made it possible to use the Google Chrome debugger. Visual Studio Code has a built-in debugger that also uses the inspector protocol.
For a full list of debugging options and tools, see https://nodejs.org/en/docs/guides/debugging-getting-started/.
Now that you've installed Node.js, we want to do two things—verify that the installation was successful, and familiarize you with the command-line tools.
The basic installation of Node.js includes two commands, node and npm. We've already seen the node command in action. It's used either for running command-line scripts or server processes. The other, npm, is a package manager for Node.js.
The easiest way to verify that your Node.js installation works is also the best way to get help with Node.js. Type the following command:
$ node --help
Usage: node [options] [ -e script | script.js | - ] [arguments]
       node inspect script.js [arguments]

Options:
  -v, --version print Node.js version
  -e, --eval script evaluate script
  -p, --print evaluate script and print result
  -c, --check syntax check script without executing
  -i, --interactive always enter the REPL even if stdin
                             does not appear to be a terminal
  -r, --require module to preload (option can be repeated)
  - script read from stdin (default; interactive mode if a tty)
  --inspect[=[host:]port] activate inspector on host:port
                             (default: 127.0.0.1:9229)
  --inspect-brk[=[host:]port]
                             activate inspector on host:port
                             and break at start of user script
  --inspect-port=[host:]port
                             set host:port for inspector

... many more options
Environment variables:
NODE_DEBUG ','-separated list of core modules
                             that should print debug information
NODE_DISABLE_COLORS set to 1 to disable colors in the REPL
NODE_EXTRA_CA_CERTS path to additional CA certificates
                             file
NODE_ICU_DATA data path for ICU (Intl object) data
                             (will extend linked-in data)
NODE_NO_WARNINGS set to 1 to silence process warnings
NODE_NO_HTTP2 set to 1 to suppress the http2 module
NODE_OPTIONS set CLI options in the environment
                             via a space-separated list
NODE_PATH ':'-separated list of directories
                             prefixed to the module search path
NODE_PENDING_DEPRECATION set to 1 to emit pending deprecation
                             warnings
NODE_REPL_HISTORY path to the persistent REPL history
                             file
NODE_REDIRECT_WARNINGS write warnings to path instead of
                             stderr
OPENSSL_CONF load OpenSSL configuration from file

Documentation can be found at https://nodejs.org/
Note that there are options for both Node.js and V8 (not shown in the previous command line). Remember that Node.js is built on top of V8; it has its own universe of options that largely focus on details of bytecode compilation or garbage collection and heap algorithms. Enter node --v8-options to see the full list of them.
On the command line, you can specify options, a single script file, and a list of arguments to that script. We'll discuss script arguments further in the next section, Running a simple script with Node.js.
Running Node.js with no arguments plops you into an interactive JavaScript shell:
$ node
> console.log('Hello, world!');
Hello, world!
undefined
Any code you can write in a Node.js script can be written here. The command interpreter gives a good Terminal-oriented user experience and is useful for interactively playing with your code. You do play with your code, don't you? Good!
Now, let's see how to run scripts with Node.js. It's quite simple; let's start by referring to the help message shown previously. The command-line pattern is just a script filename and some script arguments, which should be familiar to anyone who has written scripts in other languages.
For this and other examples in this book, it doesn't truly matter where you put the files. However, for the sake of neatness, you can start by making a directory named node-web-dev in the home directory of your computer, and inside that creating one directory per chapter (for example, chap02 and chap03).
First, create a text file named ls.js with the following content:
const fs = require('fs');
const util = require('util');
const fs_readdir = util.promisify(fs.readdir);

(async () => {
  const files = await fs_readdir('.');
  for (let fn of files) {
    console.log(fn);
  }
})().catch(err => { console.error(err); });
Next, run it by typing the following command:
$ node ls.js
ls.js
This is a pale cheap imitation of the Unix ls command (as if you couldn't figure that out from the name). The readdir function is a close analog to the Unix readdir system call (type man 3 readdir in a Terminal window to learn more) and is used to list the files in a directory.
We have written this using an inline async function, the await keyword, and an ES2015 for..of loop. Using util.promisify, we can convert any callback-oriented function so it returns a Promise, so that the Promise plays well with the await keyword.
By default fs module functions use the callback paradigm, as does most Node.js modules. But within async functions it is more convenient if functions instead return promises. Using util.promisify we can make it so.
This script is hardcoded to list files in the current directory. The real ls command takes a directory name, so let's modify the script a little.
Command-line arguments land in a global array named process.argv. Therefore we can modify ls.js, copying it as ls2.js, as follows to see how this array works:
const fs = require('fs');
const util = require('util');
const fs_readdir = util.promisify(fs.readdir);

(async () => {
  var dir = '.';
  if (process.argv[2]) dir = process.argv[2];
  const files = await fs_readdir(dir);
  for (let fn of files) {
    console.log(fn);
  }
})().catch(err => { console.error(err); });
You can run it as follows:
$ pwd
/Users/David/chap02
$ node ls2 ..
chap01
chap02
$ node ls2
app.js
ls.js
ls2.js
We simply checked if a command-line argument was present, if (process.argv[2]). If it was, we overrode the value of the dir variable, dir = process.argv[2], and we then used that as the readdir argument.
If you give it a non-existent directory pathname, an error will be thrown and printed using the catch clause. That looks like so:
$ node ls2.js /nonexistent
{ Error: ENOENT: no such file or directory, scandir '/nonexistent'
 errno: -2,
 code: 'ENOENT',
 syscall: 'scandir',
 path: '/nonexistent' }
In the previous section we discussed the util.promisify and its ability to convert a callback-oriented function into one that returns a Promise. The latter play well within async functions and therefore it is preferable for functions to return a Promise.
To be more precise, util.promisify is to be given a function that uses the error-first-callback paradigm. The last argument of such functions is a callback function whose first argument is interpreted as an error indicator, hence the phrase error-first-callback. What util.promisify returns is another function that returns a Promise.
The Promise serves the same purpose as the error-first-callback. If an error is indicated, the Promise resolves to the rejected status, while if success is indicated the Promise resolves to a success status. As we see in these examples, within an async function the Promise is handled very nicely.
The Node.js ecosystem has a large body of functions using the error-first-callback. The community has begun a conversion process where functions will return a Promise, and possibly also take an error-first-callback for API compatibility.
One of the new features in Node.js 10 is an example of such a conversion. Within the fs module is a submodule, named fs.promises, with the same API but producing Promise objects. We could rewrite the previous example as so:
const fs = require('fs').promises;
(async () => {
 var dir = '.';
 if (process.argv[2]) dir = process.argv[2];
 const files = await fs.readdir(dir);
 for (let fn of files) {
     console.log(fn);
 }
})().catch(err => { console.error(err); });
As you can see, the functions in the fs.promises module returns a Promise without requiring a callback function. The new program, which you can save as ls2-promises.js, is run as so:
$ node ls2-promises.js
(node:40329) ExperimentalWarning: The fs.promises API is experimental
app.js
ls.js
ls2-promises.js
ls2.js
The API is currently in an experimental state and therefore we're shown this warning.
Another choice is a 3rd party module, fs-extra. This module has an extended API beyond the standard fs module. On the one hand its functions return a Promise if no callback function is provided, or else invokes the callback. In addition it includes several useful functions.
In the rest of this book we will be using fs-extra because of those additional functions. For documentation of the module, see: https://www.npmjs.com/package/fs-extra.
Many scripts that you'll run are server processes. We'll be running lots of these scripts later on. Since we're still in the dual mode of verifying the installation and familiarizing you with using Node.js, we want to run a simple HTTP server. Let's borrow the simple server script on the Node.js home page (http://nodejs.org).
Create a file named app.js containing the following:
const http = require('http');
http.createServer(function (req, res) {
  res.writeHead(200, {'Content-Type': 'text/plain'});
  res.end('Hello, World!\n');
}).listen(8124, '127.0.0.1');
console.log('Server running at http://127.0.0.1:8124');
Run it as follows:
$ node app.js
Server running at http://127.0.0.1:8124
This is the simplest of web servers you can build with Node.js. If you're interested in how it works, flip forward to Chapter 4, HTTP Servers and Clients; Chapter 5, Your First Express Application; and Chapter 6, Implementing the Mobile-First Paradigm. For the moment, just visit http://127.0.0.1:8124 in your browser to see the Hello, World! message:
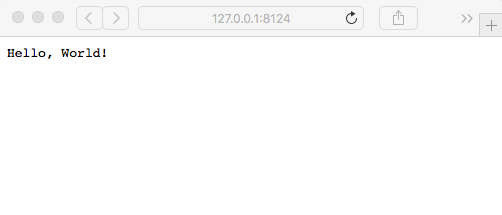
A question to ponder is why this script did not exit when ls.js did exit. In both cases, execution of the script reaches the end of the script; the Node.js process does not exit in app.js, while in ls.js it does.
The reason is the presence of active event listeners. Node.js always starts up an event loop, and in app.js, the listen function creates an event listener that implements the HTTP protocol. This event listener keeps app.js running until you do something such as typing Ctrl + C in the Terminal window. In ls.js, there is nothing that creates a long-running event listener, so when ls.js reaches the end of its script, the node process will exit.
Node.js by itself is a pretty basic system, being a JavaScript interpreter with a few interesting asynchronous I/O libraries. One of the things that makes Node.js interesting is the rapidly growing ecosystem of third-party modules for Node.js.
At the center of that ecosystem is NPM. While Node.js modules can be downloaded as source and assembled manually for use with Node.js programs, that's tedious and it's difficult to implement a repeatable build process. NPM gives us a simpler way; NPM is the de facto standard package manager for Node.js and it greatly simplifies downloading and using these modules. We will talk about NPM at length in the next chapter.
The sharp-eyed will have noticed that npm is already installed via all the installation methods discussed previously. In the past, npm was installed separately, but today it is bundled with Node.js.
Now that we have npm installed, let's take it for a quick spin. The hexy program is a utility for printing hex dumps of files. That's a very 1970 thing to do, but is still extremely useful. It serves our purpose right now in giving us something to quickly install and try out:
$ npm install -g hexy
/opt/local/bin/hexy -> /opt/local/lib/node_modules/hexy/bin/hexy_cmd.js
+ hexy@0.2.10
added 1 package in 1.107s
Adding the -g flag makes the module available globally, irrespective of the present-working-directory of your command shell. A global install is most useful when the module provides a command-line interface. When a package provides a command-line script, npm sets that up. For a global install, the command is installed correctly for use by all users of the computer.
Depending on how Node.js is installed for you, that may need to be run with sudo:
$ sudo npm install -g hexy
Once it is installed, you'll be able to run the newly–installed program this way:
$ hexy --width 12 ls.js
00000000: 636f 6e73 7420 6673 203d 2072 const.fs.=.r
0000000c: 6571 7569 7265 2827 6673 2729 equire('fs')
00000018: 3b0a 636f 6e73 7420 7574 696c ;.const.util
00000024: 203d 2072 6571 7569 7265 2827 .=.require('
00000030: 7574 696c 2729 3b0a 636f 6e73 util');.cons
0000003c: 7420 6673 5f72 6561 6464 6972 t.fs_readdir
00000048: 203d 2075 7469 6c2e 7072 6f6d .=.util.prom
00000054: 6973 6966 7928 6673 2e72 6561 isify(fs.rea
00000060: 6464 6972 293b 0a0a 2861 7379 ddir);..(asy
0000006c: 6e63 2028 2920 3d3e 207b 0a20 nc.().=>.{..
00000078: 2063 6f6e 7374 2066 696c 6573 .const.files
00000084: 203d 2061 7761 6974 2066 735f .=.await.fs_
00000090: 7265 6164 6469 7228 272e 2729 readdir('.')
0000009c: 3b0a 2020 666f 7220 2866 6e20 ;...for.(fn.
000000a8: 6f66 2066 696c 6573 2920 7b0a of.files).{.
000000b4: 2020 2020 636f 6e73 6f6c 652e ....console.
000000c0: 6c6f 6728 666e 293b 0a20 207d log(fn);...}
000000cc: 0a7d 2928 292e 6361 7463 6828 .})().catch(
000000d8: 6572 7220 3d3e 207b 2063 6f6e err.=>.{.con
000000e4: 736f 6c65 2e65 7272 6f72 2865 sole.error(e
000000f0: 7272 293b 207d 293b           rr);.});
Again, we'll be doing a deep dive into NPM in the next chapter. The hexy utility is both a Node.js library and a script for printing out these old-style hex dumps.
In 2015, the ECMAScript committee released a long-awaited major update of the JavaScript language. The update brought in many new features to JavaScript, such as Promises, arrow functions, and Class objects. The language update set the stage for improvements. since that should dramatically improve our ability to write clean, understandable JavaScript code.
The browser makers are adding those much-needed features, meaning the V8 engine is adding those features as well. These features are making their way into Node.js starting with version 4.x.
By default, only the ES-2015/2016/2017 features that V8 considers stable are enabled by Node.js. Further features can be enabled with command-line options. The almost-complete features are enabled with the --es_staging option. The website documentation gives more information.
The Node green website (http://node.green/) has a table listing the status of a long list of features in Node.js versions.
The ES2017 language spec is published at:
https://www.ecma-international.org/publications/standards/Ecma-262.htm.
The TC-39 committee does its work on GitHub https://github.com/tc39.
The ES-2015 features make a big improvement in the JavaScript language. One feature, the Promise class, should mean a fundamental rethinking of common idioms in Node.js programming. In ES-2017, a pair of new keywords, async and await, will simplify writing asynchronous code in Node.js, and it should encourage the Node.js community to further rethink the common idioms of the platform.
There's a long list of new JavaScript features, but let's quickly go over two of them that we'll use extensively.
The first is a lighter-weight function syntax called the arrow function:
fs.readFile('file.txt', 'utf8', (err, data) => {
  if (err) ...; // do something with the error
  else ...;  // do something with the data
});
This is more than the syntactic sugar of replacing the function keyword with the fat arrow. Arrow functions are lighter-weight as well as being easier to read. The lighter weight comes at the cost of changing the value of this inside the arrow function. In regular functions, this has a unique value inside the function. In an arrow function, this has the same value as the scope containing the arrow function. This means that, when using an arrow function, we don't have to jump through hoops to bring this into the callback function because this is the same at both levels of the code.
The next feature is the Promise class, which is used for deferred and asynchronous computations. Deferred code execution to implement asynchronous behavior is a key paradigm for Node.js, and it requires two idiomatic conventions:
While convenient, these conventions resulted in multilayer code pyramids that can be difficult to understand and maintain:
doThis(arg1, arg2, (err, result1, result2) => {
    if (err) ...;
    else {
         // do some work
         doThat(arg2, arg3, (err2, results) => {
              if (err2) ...;
              else {
                     doSomethingElse(arg5, err => {
                             if (err) .. ;
                             else ..;
                     });
              }
         });
    }
});
Depending on how many steps are required for a specific task, a code pyramid can get quite deep. Promises will let us unravel the code pyramid and improve reliability, because error handling is more straightforward and easily captures all errors.
A Promise class is created as follows:
function doThis(arg1, arg2) {
    return new Promise((resolve, reject) => {
        // execute some asynchronous code
        if (errorIsDetected) return reject(errorObject);
        // When the process is finished call this:
        resolve(result1, result2);
    });
}
Rather than passing in a callback function, the caller receives a Promise object. When properly utilized, the preceding pyramid can be coded as follows:
doThis(arg1, arg2)
.then(result => {
  // This can receive only one value, hence to
  // receive multiple values requires an object or array
  return doThat(arg2, arg3);
})
.then((results) => {
  return doSomethingElse(arg5);
})
.then(() => {
   // do a final something
})
.catch(err => {
   // errors land here
});
This works because the Promise class supports chaining if a then function returns a Promise object.
The async/await feature implements the promise of the Promise class to simplify asynchronous coding. This feature becomes active within an async function:
async function mumble() {
   // async magic happens here
}
An async arrow function is as follows:
const mumble = async () => {
    // async magic happens here
};
It's used as so:
async function doSomething(arg1, arg2, arg3, arg4, arg5) {
    var { result1, result2 } = await doThis(arg1, arg2);
    var results = await doThat(arg2, arg3);
    await doSomethingElse(arg5);
    // do a final something
    return finalResult;
}
Isn't this a breath of fresh air compared to the nested structure we started with?
The await keyword is used with a Promise. It automatically waits for the Promise to resolve. If the Promise resolves successfully then the value is returned, and if it resolves with an error then that error is thrown. Both handling results and throwing errors are handled in the natural manner.
This example also shows another ES2015 feature: destructuring. The fields of an object can be extracted using the following:
var { value1, value2 } = {
    value1: "Value 1", value2: "Value 2", value3: "Value3"
};
We have an object with three fields, but extract only two of the fields.
The Babel transpiler (http://babeljs.io/) is a great way to use cutting-edge JavaScript features on older implementations. The word transpile means Babel rewrites JavaScript code into other JavaScript code, specifically to rewrite ES-2015 or ES-2016 features to older JavaScript code. Babel converts JavaScript source to an abstract syntax tree, then manipulates that tree to rewrite the code using older JavaScript features, and then writes that tree to a JavaScript source code file.
Put another way, Babel rewrites JavaScript code into JavaScript code, applying desired transformations such as converting ES2015/2016 features into ES5 code that can run in a web browser.
Many use Babel to experiment with new JavaScript feature proposals working their way through the TC-39 committee. Others use Babel to use new JavaScript features in projects on JavaScript engines that do not support those features.
The Node Green website makes it clear that Node.js supports pretty much all of the ES2015/2016/2017 features. Therefore, as a practical matter, we no longer need to use Babel for Node.js projects.
For web browsers, there is a much longer time lag between a set of ECMAScript features and when we can reliably use those features in browser-side code. It's not that the web browser makers are slow in adopting new features, because the Google, Mozilla, and Microsoft teams are proactive about adopting the latest features. Apple's Safari team seems slow to adopt new features, unfortunately. What's slower, however, is the penetration of new browsers into the fleet of computers in the field.
Therefore, modern JavaScript programmers need to familiarize themselves with Babel.
To get a brief introduction to Babel, we'll use it to transpile the scripts we saw earlier to run on Node.js 6.x. In those scripts we used async functions, which are not supported in Node.js 6.x.
In the directory containing ls.js and ls2.js, type these commands:
$ npm install babel-cli \
       babel-plugin-transform-es2015-modules-commonjs \
       babel-plugin-transform-async-to-generator
This installs the Babel software, along with a couple of transformation plugins. Babel has a plugin system so that you enable the transformations required by your project. Our primary goal in this example is converting the async functions shown earlier into Generator functions. Generators are a new sort of function introduced with ES2015, which form the foundation for implementation of async functions.
Because Node.js 6.x does not have util.promisify, we need to make one substitution:
// const fs_readdir = util.promisify(fs.readdir);
const fs_readdir = dir => {
   return new Promise((resolve, reject) => {
       fs.readdir(dir, (err, fileList) => {
           if (err) reject(err);
           else resolve(fileList);
       });
    });
};
This structure is more or less what the util.promisify function does.
Next, create a file named .babelrc containing the following:
{
 "plugins": [
   "transform-es2015-modules-commonjs",
   "transform-async-to-generator"
 ]
}
This file instructs Babel to use the named transformation plugins that we installed earlier.
Because we installed babel-cli, a babel command is installed such that we can type the following:
$ ./node_modules/.bin/babel -help
To transpile your code, run the following command:
$ ./node_modules/.bin/babel ls2.js -o ls2-babel.js
This command transpiles the named file, producing a new file. The new file is as follows:
'use strict';

function _asyncToGenerator(fn) { return function () { var gen = fn.apply(this, arguments); return new Promise(function (resolve, reject) { function step(key, arg) { try { var info = gen[key](arg); var value = info.value; } catch (error) { reject(error); return; } if (info.done) { resolve(value); } else { return Promise.resolve(value).then(function (value) { step("next", value); }, function (err) { step("throw", err); }); } } return step("next"); }); }; }

const fs = require('fs');
const util = require('util');
// const fs_readdir = util.promisify(fs.readdir);

const fs_readdir = dir => {
 return new Promise((resolve, reject) => {
   fs.readdir(dir, (err, fileList) => {
     if (err) reject(err);
     else resolve(fileList);
   });
 });
};

_asyncToGenerator(function* () {
 var dir = '.';
 if (process.argv[2]) dir = process.argv[2];
 const files = yield fs_readdir(dir);
 for (let fn of files) {
     console.log(fn);
 }
})().catch(err => {
 console.error(err);
});
This code isn't meant to be easy to read by humans. Instead, it's meant that you edit the original source file, and then convert it for your target JavaScript engine. The main thing to notice is that the transpiled code uses a Generator function in place of the async function, and the yield keyword in place of the await keyword. The _asyncToGenerator function implements functionality similar to async functions.
The transpiled script is run as follows:
$ node ls2-babel
.babelrc
app.js
babel
ls.js
ls2-babel.js
ls2.js
node_modules
In other words, it runs the same as the async version, but on an older Node.js release.
You learned a lot in this chapter about installing Node.js, using its command-line tools, and running a Node.js server. We also breezed past a lot of details that will be covered later in the book, so be patient.
Specifically, we covered downloading and compiling the Node.js source code, installing Node.js either for development use in your home directory or for deployment in system directories and installing NPM—the de facto standard package manager used with Node.js. We also saw how to run Node.js scripts or Node.js servers. We then took a look at the new features in ES-2015/2016/2017. Finally, we saw how to use Babel to implement those features in your code.
Now that we've seen how to set up the basic system, we're ready to start working on implementing applications with Node.js. First, you must learn the basic building blocks of Node.js applications and modules, which we will cover in the next chapter.
Before writing Node.js applications, you must learn about Node.js modules and packages. Modules and packages are the building blocks for breaking down your application into smaller pieces.
In this chapter, we will cover the following topics:
So, let's get on with it.
Modules are the basic building blocks for constructing Node.js applications. A Node.js module encapsulates functions, hiding details inside a well-protected container, and exposing an explicitly-declared list of functions.
There are two module formats that we must consider:
Because ES6 modules are now the standard module format, the Node.js Technical Steering Committee (TSC) is committed to first-class support for ES6 modules.
We have already seen modules in action in the previous chapter. Every JavaScript file we use in Node.js is itself a module. It's time to see what they are and how they work. We'll start with CommonJS modules and then quickly bring in ES6 modules.
In the ls.js example in Chapter 2, Setting up Node.js, we wrote the following code to pull in the fs module, giving us access to its functions:
const fs = require('fs');
The require function searches for the named module, loading the module definition into the Node.js runtime, and making its functions available. In this case, the fs object contains the code (and data) exported by the fs module. The fs module is part of the Node.js core and provides filesystem functions.
By declaring fs as const, we have a little bit of assurance against making coding mistakes that would modify the object holding the module reference.
In every Node.js module, the exports object within the module is the interface exported to other code. Anything assigned to a field of the exports object is available to other pieces of code, and everything else is hidden. By the way, this object is actually module.exports. The exports object is an alias for module.exports.
The require function and module.exports objects both come from the CommonJS specification. ES6 modules have similar concepts, but a different implementation.
Let's look at a brief example of this before diving into the details. Ponder over the simple.js module:
var count = 0;
exports.next = function() { return ++count; };
exports.hello = function() {
  return "Hello, world!";
};
We have one variable, count, which is not attached to the exports object, and a function, next, which is attached. Now, let's use it:
$ node
> const s = require('./simple');
undefined
> s.hello();
'Hello, world!'
> s.next();
1
> s.next();
2
> s.next();
3
> console.log(s.count);
undefined
undefined
>
The exports object in the module is the object that is returned by require('./simple'). Therefore, each call to s.next calls the next function in simple.js. Each returns (and increments) the value of the local variable, count. An attempt to access the private field, count, shows it's unavailable from outside the module.
To reiterate the rule:
This is how Node.js solves the global object problem of browser-based JavaScript. The variables that look like they're global variables are only global to the module containing that variable. These variables are not visible to any other code.
Now that we've got a taste for modules, let's take a deeper look.
Node.js's module implementation is strongly inspired by, but not identical to, the CommonJS module specification. The differences between them might only be important if you need to share code between Node and other CommonJS systems.
Among the changes in ES2015 is a standard module format meant for use everywhere. It has some interesting features, and by existing everywhere it should advance the state of JavaScript. Since it is incompatible with the CommonJS/Node.js module system, adopting ES2015 modules in Node.js means reworking our practices and accepted norms.
As a practical matter, Node.js programmers will be dealing with both module formats for some time during a transition period. Our long-term goal should be to adopt ES2015 modules across the board. The Node.js platform is slated to bring in support for ES2015 modules in Node.js 10. As of Node.js 8.5, the feature is available by setting a command-line flag.
We've already seen a couple of examples of this module format, with the simple.js example, and the programs we examined in Chapter 2, Setting up Node.js. So let's take a closer look.
CommonJS modules are stored in files with the extension .js.
Loading a CommonJS module is a synchronous operation. That means that when the require('modulename') function call returns, the module has been located and completely read into memory and is ready to go. The module is cached in memory so that subsequent require('modulename') calls return immediately, and all return the exact same object.
Node.js modules provide a simple encapsulation mechanism to hide implementation details while exposing an API. Modules are treated as if they were written as follows:
(function() { ... contents of module file ... })();
Thus, everything within the module is contained within an anonymous private namespace context. This is how the global object problem is resolved; everything in a module that looks global is actually contained within this private context.
Objects and functions can be exposed from a CommonJS module by means of two free variables Node.js inserts into this private context: module and exports:
exports.funcName = function(arg, arg1) { ... };
module.exports.funcName = function(arg, arg2) { .. };
Your code can break the alias between the two if you do this:
exports = function(arg, arg1) { ... };
Do not do that, because exports will no longer be equivalent to module.exports. If your intent is to assign a single object or function to be what's returned by require, do this instead:
module.exports = function(arg, arg1) { ... };
Some modules do export a single function because that's how the module author envisioned delivering the desired functionality.
ES6 modules are a new module format designed for all JavaScript environments. While Node.js has had a good module system for its whole existence, browser-side JavaScript has not. That left the browser-side community with either relying on the <script> tag, or using non-standardized solutions. For that matter, traditional Node.js modules were never standardized, outside of the CommonJS effort. Therefore, ES6 modules stand to be a big improvement for the entire JavaScript world, by getting everyone on the same page with a common module format and mechanisms.
The side effect is that the Node.js community needs to start looking at, learning about, and adopting the ES2015 module format.
ES6 modules are referred to by Node.js with the extension .mjs. When it came to implementing the new module format, the Node.js team determined that they could not support both CommonJS and ES6 modules with the .js extension. The .mjs extension was decided as the solution, and you may see tongue-in-cheek references to Michael Jackson Script for this file extension.
One interesting detail is that ES6 modules load asynchronously. This may not have an impact on Node.js programmers, except that this is part of the rationale behind requiring the new .mjs extension.
Create a file named simple2.mjs in the same directory as the simple.js example that we looked at earlier:
var count = 0;
export function next() { return ++count; }
function squared() { return Math.pow(count, 2); }
export function hello() {
    return "Hello, world!";
}
export default function() { return count; }
export const meaning = 42;
export let nocount = -1;
export { squared };
ES6 items exported from a module are declared with the export keyword. This keyword can be put in front of any top-level declaration, such as variable, function, or class declarations:
export function next() { .. }
The effect of this is similar to the following:
module.exports.next = function() { .. }
The intent of both is essentially the same: to make a function, or other object, available to code outside the module. A statement such as export function next() is a named export, meaning the exported thing has a name, and that code outside the module uses that name to access the object. As we see here, named exports can be functions or objects, and they may also be class definitions.
Using export default can be done once per module, and is the default export from the module. The default export is what code outside the module accesses when using the module object itself, rather than when using one of the exports from the module.
You can also declare something, such as the squared function, and then export it later.
Now let's see how to use this ES2015 module. Create a simpledemo.mjs file with the following:
import * as simple2 from './simple2.mjs';

console.log(simple2.hello());
console.log(`${simple2.next()} ${simple2.squared()}`);
console.log(`${simple2.next()} ${simple2.squared()}`);
console.log(`${simple2.default()} ${simple2.squared()}`);
console.log(`${simple2.next()} ${simple2.squared()}`);
console.log(`${simple2.next()} ${simple2.squared()}`);
console.log(`${simple2.next()} ${simple2.squared()}`);
console.log(simple2.meaning);
The import statement does what it means: it imports objects exported from a module. This version of the import statement is most similar to a traditional Node.js require statement, meaning that it creates an object through which you access the objects exported from the module.
This is how the code executes:
$ node --experimental-modules simpledemo.mjs
(node:63937) ExperimentalWarning: The ESM module loader is experimental.
Hello, world!
1 1
2 4
2 4
3 9
4 16
5 25
42
As of Node.js 8.5, the new module format is available behind an option flag as shown here. You're also presented with this nice warning that it's an experimental feature. Accessing the default export is accomplished by accessing the field named default. Accessing an exported value, such as the meaning field, is done without parentheses because it is a value and not a function.
Now to see a different way to import objects from a module, create another file, named simpledemo2.mjs, containing the following:
import {
    default as simple, hello, next
} from './simple2.mjs';
console.log(hello());
console.log(next());
console.log(next());
console.log(simple());
console.log(next());
console.log(next());
console.log(next());
In this case, each imported object is its own thing rather than being attached to another object. Instead of writing simple2.next(), you simply write next(). The as clause is a way to declare an alias, if nothing else so you can use the default export. We already used an as clause earlier, and it can be used in other instances where you wish to provide an alias for the value being exported or imported.
Node.js modules can be used from ES2015 .mjs code. Create a file named ls.mjs, containing the following:
import _fs from 'fs';
const fs = _fs.promises;
import util from 'util';

(async () => {
  const files = await fs.readdir('.');
  for (let fn of files) {
    console.log(fn);
  }
})().catch(err => { console.error(err); });
You cannot, however, require an ES2015 module into regular Node.js code. The lookup algorithm for ES2015 modules is different, and as we mentioned earlier, ES2015 modules are loaded asynchronously.
Another wrinkle is handling the fs.promises submodule. We are using that submodule in the example, but how? This import statement does not work:
import { promises as fs } from 'fs';
This fails as so:
$ node --experimental-modules ls.mjs
(node:45186) ExperimentalWarning: The ESM module loader is experimental.
file:///Volumes/Extra/book-4th/chap03/ls.mjs:1
import { promises as fs } from 'fs';
         ^^^^^^^^
SyntaxError: The requested module 'fs' does not provide an export named 'promises'
 at ModuleJob._instantiate (internal/modules/esm/module_job.js:89:21)
That leaves us with this construct:
import _fs from 'fs';
const fs = _fs.promises;
Executing the script gives the following:
$ node --experimental-modules ls.mjs
(node:65359) ExperimentalWarning: The ESM module loader is experimental.
(node:37671) ExperimentalWarning: The fs.promises API is experimental
ls.mjs
module1.js
module2.js
simple.js
simple2.mjs
simpledemo.mjs
simpledemo2.mjs
The last thing to note about ES2015 module code is that import and export statements must be top-level code. Even putting an export inside a simple block like this:
{
   export const meaning = 42;
}
Results in an error:
$ node --experimental-modules badexport.mjs
(node:67984) ExperimentalWarning: The ESM module loader is experimental.
SyntaxError: Unexpected token export
 at ModuleJob.loaders.set [as moduleProvider] (internal/loader/ModuleRequest.js:32:13)
 at <anonymous>
While there are a few more details about ES2015 modules, these are their most important attributes.
Node.js supports using require('/path/to/file-name.json') to import a JSON file. It is equivalent to this code:
const fs = require('fs');
module.exports = JSON.parse(
        fs.readFileSync('/path/to/file-name.json', 'utf8'));
That is, the JSON file is read synchronously, and the text is parsed as JSON. The resultant object is available as the object exported from the module. Create a file named data.json, containing the following:
{
    "hello": "Hello, world!",
    "meaning": 42
}
Now create a file named showdata.js, containing the following:
const util = require('util');
const data = require('./data');
console.log(util.inspect(data));
It will execute as follows:
$ node showdata.js
{ hello: 'Hello, world!', meaning: 42 }
The util.inspect function is a useful way to present an object in an easy-to-read fashion.
While support for ES6 modules arrived as an experimental feature in Node.js 8.5, there are two ways to use these modules on earlier Node.js implementations.
One method is to use the Babel transpiler to rewrite ES6 code so it can execute on older Node.js versions. For an example, see https://blog.revillweb.com/using-es2015-es6-modules-with-babel-6-3ffc0870095b.
The better method is the esm package in the Node.js registry. Simply do the following:
$ nvm install 6
Downloading and installing node v6.14.1...
Downloading https://nodejs.org/dist/v6.14.1/node-v6.14.1-darwin-x64.tar.xz...
######################################################################## 100.0%
Computing checksum with shasum -a 256
Checksums matched!
Now using node v6.14.1 (npm v3.10.10)
$ nvm use 6
Now using node v6.14.1 (npm v3.10.10)
$ npm install esm
... npm output
$ node --require esm simpledemo.mjs
Hello, world!
1 1
2 4
2 4
3 9
4 16
5 25
42
To use this module, one simply invokes require('esm') once, and ES6 modules are retrofitted into Node.js. The --require flag automatically loads the named module. Without rewriting the code, we can selectively use the esm module with this the command-line option.
This example demonstrates retrofitting ES6 modules into older Node.js releases. To successfully execute the ls.mjs example we must have support for async/await functions, and arrow functions. Since Node.js 6.x does not support either, the ls.mjs example will fail, and will necessitate rewriting such code:
$ node --version
v6.14.1
$ node -r esm ls.mjs
/Users/David/chap03/ls.mjs:5
(async () => {
       ^

SyntaxError: Unexpected token (
 at exports.runInThisContext (vm.js:53:16)
 at Module._compile (module.js:373:25)
For more information, see:
https://medium.com/web-on-the-edge/es-modules-in-node-today-32cff914e4b. That article describes an older release of the esm module, at the time named @std/esm.
A key attribute of modules is encapsulation. The objects that are not exported from the module are private to the module, and cannot be accessed from code outside the module. To reiterate, modules are treated as if they were written as follows:
(function() { ... contents of module file ... })();
This JavaScript idiom defines an anonymous private scope. Anything declared within that scope cannot be accessed by code outside the scope. That is, unless some code makes object references available to other code outside this private scope. That's what the module.exports object does: it is a mechanism for the module author to expose object references from the module. Other code can then access resources inside the module in a controlled fashion.
The top-level variables inside a module look like they exist in the global scope. Instead of being truly Global, they're safely private to the module and are completely inaccessible to other code.
Let's take a look at a practical demonstration of that encapsulation. Create a file named module1.js, containing the following:
const A = "value A";
const B = "value B";
exports.values = function() {
   return { A: A, B: B };
}
Then, create a file named module2.js, containing the following:
const util = require('util');
const A = "a different value A";
const B = "a different value B";
const m1 = require('./module1');
console.log(`A=${A} B=${B} values=${util.inspect(m1.values())}`);
console.log(`${m1.A} ${m1.B}`);
const vals = m1.values();
vals.B = "something completely different";
console.log(util.inspect(vals));
console.log(util.inspect(m1.values()));
Then, run it as follows (you must have Node.js already installed):
$ node module2.js
A=a different value A B=a different value B values={ A: 'value A', B: 'value B' }
undefined undefined
{ A: 'value A', B: 'something completely different' }
{ A: 'value A', B: 'value B' }
This artificial example demonstrates encapsulation of the values in module1.js from those in module2.js. The A and B values in module1.js don't overwrite A and B in module2.js because they're encapsulated within module1.js. The values function in module1.js does allow code in module2.js access to the values; however, module2.js cannot directly access those values. We can modify the object module2.js received from module1.js. But doing so does not change the values within module1.js.
We have talked about several types of modules: CommonJS, JSON, ES2015, and native code modules. All but the ES2015 modules are loaded using the require function. That function has a very powerful and flexible algorithm for locating modules within a directory hierarchy. This algorithm, coupled with the npm package management system, gives the Node.js platform a lot of power and flexibility.
The CommonJS and ES2015 modules we've just looked at are what the Node.js documentation describes as a file module. Such modules are contained within a single file, whose filename ends with .js, .mjs, .json, or .node. The latter are compiled from C or C++ source code, or even other languages such as Rust, while the former are of course written in JavaScript or JSON.
We've already looked at several examples of using these modules, as well as the difference between the CommonJS format traditionally used in Node.js, and the new ES2015 modules that are now supported.
Some modules are pre-compiled into the Node.js binary. These are the core Node.js modules documented on the Node.js website at https://nodejs.org/api/index.html.
They start out as source code within the Node.js build tree. The build process compiles them into the binary so that the modules are always available.
A module can contain a whole directory structure full of stuff. Stuff here is a technical term referring to internal file modules, data files, template files, documentation, tests, assets, and more. Once stored within a properly constructed directory structure, Node.js will treat these as a module that satisfies a require('moduleName') call.
In most cases, a directory-as-module contains a package.json file. This file contains data about the module (known as package) that Node.js uses while loading the module. The Node.js runtime recognizes these two fields:
{ name: "myAwesomeLibrary",
  main: "./lib/awesome.js" }
If this package.json file is in a directory named awesomelib, then require('./awesomelib') will load the file module in ./awesomelib/lib/awesome.js.
If there is no package.json, then Node.js will look for either index.js or index.node. In such a case, require('./awesomelib') will load the file module in ./awesomelib/index.js.
In either case, the directory module can easily contain other file modules. The module that's initially loaded would simply use require('./anotherModule') one or more times to load other, private modules.
The npm package management system can recognize a lot more data in the package.json file. That includes the package name, its author, the home page URL, the issue-queue URL, package dependencies, and more. We'll go over this later.
Generally speaking, the module name is a pathname, but with the file extension removed. Earlier, when we wrote require('./simple'), Node.js knew to add .js to the filename and load in simple.js. Similarly, Node.js would recognize simple.json or simple.node as the filename legitimately satisfying require('./simple').
There are three types of module identifiers: relative, absolute, and top-level:
The search begins in the directory containing the file calling require(). If that directory contains a node_modules directory, which then contains either a matching directory module or a matching file module, then the search is satisfied. If the local node_modules directory does not contain a suitable module, it tries again in the parent directory, and it will continue upward in the filesystem until it either finds a suitable module or it reaches the root directory.
That is, with a require call in /home/david/projects/notes/foo.js, the following directories will be consulted:
If the module is not found through this search, there are global folders in which modules can be located. The first is specified in the NODE_PATH environment variable. This is interpreted as a colon-delimited list of absolute paths similar to the PATH environment variable. On Windows, the elements of NODE_PATH are of course separated by semicolons. Node.js will search those directories for a matching module.
This variable was implemented before the module resolution algorithm just described was finalized. Because of that algorithm, NODE_PATH is largely unnecessary.
There are three additional locations that can hold modules:
In this case, $HOME is what you expect, the user's home directory, and $PREFIX is the directory where Node.js is installed.
Some are beginning to recommend against using global modules. The rationale is the desire for repeatability and deployability. If you've tested an app, and all its code is conveniently located within a directory tree, you can copy that tree for deployment to other machines. But, what if the app depended on some other file that was magically installed elsewhere on the system? Will you remember to deploy such files?
Let's take a look at the filesystem structure of a typical Node.js Express application:
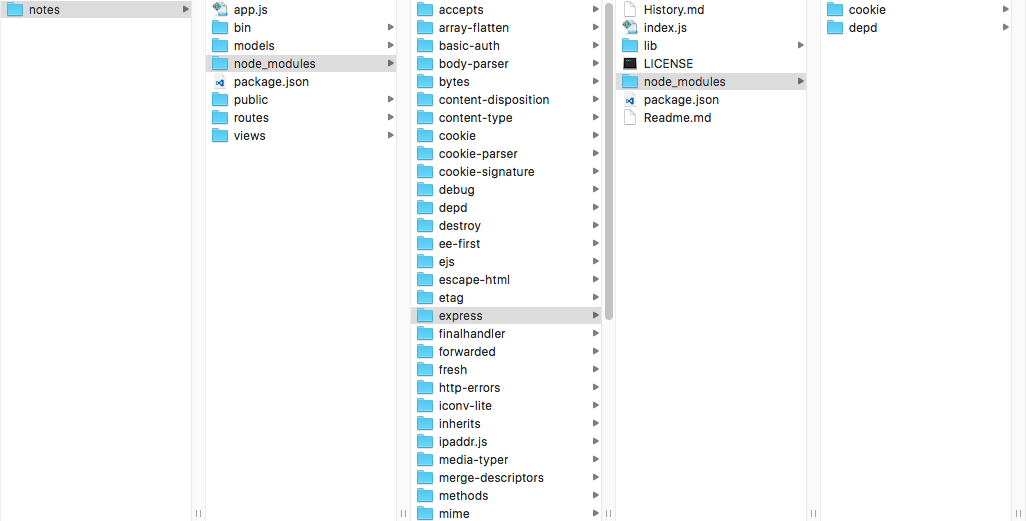
This is an Express application (we'll start using Express in Chapter 5, Your First Express Application) containing a few modules installed in the node_modules directory. One of those, Express, has its own node_modules directory containing a couple of modules.
For app.js to load models-sequelize/notes.js, it uses the following require call:
const notesModel = require('./models-sequelize/notes');
This is a relative module identifier, where the pathname is resolved relative to the directory containing the file making the reference.
Use the following code to do the reverse in models-sequelize/notes.js:
const app = require('../app');
Again, this is a relative module identifier, this time resolved relative to the subdirectory containing models-sequelize/notes.js.
Any reference to a top-level module identifier will first look in the node_modules directory shown here. This directory is populated from the dependencies listed in the package.json, as we'll see in a few pages:
const express = require('express');
const favicon = require('serve-favicon');
const logger = require('morgan');
const cookieParser = require('cookie-parser');
const bodyParser = require('body-parser');
All of these are typical modules included in an Express application. Most of them are readily visible in the screenshot shown earlier. What's loaded is the main file in the corresponding subdirectory of node_modules, for example, node_modules/express/index.js.
But the application cannot directly reference the dependencies of the Express module that are in its internal node_modules directory. The module search algorithm only moves upward in the filesystem; it does not descend into subsidiary directory trees.
One side effect of the upward search direction is the handling of conflicting dependencies.
Suppose two modules (modules A and B) listed a dependency on the same module (C)? In the normal case, the two dependencies on module C could be handled by the same instance of that module. As we'll see in a few pages, npm's dependency list in package.json can use loose or precise version number references. Depending on the current version number for module C, modules A and B may, or may not, be in agreement as to which version to use. If they do not agree, npm can arrange the module installation such that both module A and B get the version of module C they depend on, without either stepping on the other. If both are agreeable with the same module C instance, only one copy will be installed, but if they disagree then npm will install two copies. The two copies will be located such that the module search algorithm will cause each module to find the correct version of module C.
Let's try a concrete example to clarify what was just said. In the screenshot earlier, you see two instances of the cookie module. We can use npm to query for all references to this module:
$ npm ls cookie
notes@0.0.0 /Users/David/chap05/notes
├─┬ cookie-parser@1.3.5
│ └── cookie@0.1.3
└─┬ express@4.13.4
  └── cookie@0.1.5
This says the cookie-parser module depends on version 0.1.3 of cookie, while Express depends on version 0.1.5. How does npm avoid problems with these two conflicting versions? By putting one inside the node_modules directory inside the express module. This way, when Express refers to this module, it will use the 0.1.5 instance in its own node_modules directory, while the cookie-parser module will use the 0.1.3 instance in the top-level node_modules directory.
The import statement is used to load ES6 modules, and it only works inside an ES6 module. Because ES6 modules are loaded asynchronously, the require() statement cannot load ES6 modules. As we said earlier, ES6 modules are recognized by Node.js by the .mjs extension. The ECMAScript TC-39 committee has (or plans to) officially register that file extension with the recognized authorities so that regular tools will recognize both file extensions as JavaScript.
The module specifier one hands to the import statement is interpreted as a URL. For the time being, Node.js will only accept file: URL because of the security implications of loading modules over the Internet. Because it's a URL, some characters such as :, ?, #, or % must receive special treatment. For example:
import './foo?search';
import './foo#hash';
These are valid module specifiers where ?search and #hash have the sort of meaning you'd expect in a URL. So long as Node.js only supports file: URL for import statements, we cannot make use of that feature, but we have to keep it in mind and avoid using these strings in module URL.
One can install custom module loader hooks that could conceivably use those URL parts for some purpose.
The module search algorithm is similar to what we described for require. If the specifier begins with ./, ../, or /, the specifier is interpreted as a pathname. Otherwise, it is interpreted as a top-level module similar to the require statement, with one big difference. The import statement will not search for a global module. This is frowned on, but if one must use a global module, that can be accomplished with a symbolic link.
For documentation, see https://nodejs.org/api/esm.html.
We've gone over the format for CommonJS/Node.js modules, the format for ES6 modules, and the algorithm for locating and importing both. The last thing to cover is those hybrid situations where our code will use both module formats at the same time.
As a practical matter, ES6 modules are very new to the Node.js platform, and therefore we have a large body of existing code written as CommonJS/Node.js modules. Many tools in the Node.js market have implementation dependencies on the CommonJS format. This means we'll be facing situations where ES6 modules will need to use CommonJS modules, and vice versa:
Therefore, out of the box, three of the scenarios are directly supported. The fourth is supported with a workaround module.
When an ES6 module loads a CommonJS module, its module.exports object is exposed as the default export of the module. This means your code uses this pattern:
import cjsModule from 'common-js-module';
...
cjsModule.functionName();
This is extremely similar to using a CommonJS module in another CommonJS module. You are simply transliterating the require() call into an import statement.
ES6 modules do not cover all the requirements to fully replace Node.js/CommonJS modules. One of the missing capabilities is being addressed with the Dynamic Import feature currently on its way through the TC-39 committee.
Support for dynamic imports landed in Node.js 9.7. See the documentation at:
https://github.com/tc39/proposal-dynamic-import.
We'll use dynamic imports to solve an issue in Chapter 7, Data Storage and Retrieval, about dynamically choosing the module to load. In normal usage of the require() statement, can use a simple string literal to specify the module name. But it is also possible to use a string literal to compute the module name, like so:
// Node.js dynamically determined module loading
const moduleName = require(`../models/${process.env.MODEL_NAME}`);
We used this technique in earlier editions of this book to dynamically choose between several implementations of the same model API. The ES6 import statement does not support anything but a simple string literal, and therefore cannot compute the module specifier like this example.
With dynamic imports, we have an import() function where the module specifier is a regular string, letting us make a similar dynamic choice of module. Unlike the require() function, which is synchronous, import() is asynchronous, and returns a Promise. Hence, it's not a direct replacement for require() in that it's not terribly useful as a top-level function. You'll see how to use it in Chapter 7, Data Storage and Retrieval.
Perhaps the most important feature it brings is that CommonJS modules can use import() to load an ES6 module.
Another new feature, import.meta, is making its way through the TC-39 committee, and is being implemented for Node.js 10.x. It is an object existing within the scope of an ES6 module providing some metadata about the module. See https://github.com/tc39/proposal-import-meta.
A partial implementation, supporting just import.meta.url, has landed in the Node.js source. Its use requires the --harmony-import-meta command-line flag. The content of import.meta.url is a fully qualified file: URL for the current module, such as file:///Users/david/chap10/notes/app.mjs.
Where this becomes important is that ES6 modules do not support the __dirname, __filename, and other global variables used historically in Node.js modules. The __dirname variable is routinely used to read in resource data from files sitting in the package directory. It is intended that for such cases, one parses the directory name out of import.meta.url.
As described in Chapter2, Setting up Node.js, npm is a package management and distribution system for Node.js. It has become the de facto standard for distributing modules (packages) for use with Node.js. Conceptually, it's similar to tools such as apt-get (Debian), rpm/yum (Red Hat/Fedora), MacPorts (macOS), CPAN (Perl), or PEAR (PHP). Its purpose is publishing and distributing Node.js packages over the Internet using a simple command-line interface. With npm, you can quickly find packages to serve specific purposes, download them, install them, and manage packages you've already installed.
The npm application extends on the package format for Node.js, which in turn is largely based on the CommonJS package specification. It uses the same package.json file that's supported natively by Node.js, but with additional fields to build in additional functionality.
An npm package is a directory structure with a package.json file describing the package. This is exactly what was referred to earlier as a directory module, except that npm recognizes many more package.json tags than Node.js does. The starting point for npm's package.json are the CommonJS Packages/1.0 specification. The documentation for npm's package.json implementation is accessed using the following command:
$ npm help json
A basic package.json file is as follows:
{ "name": "packageName",
   "version": "1.0",
   "main": "mainModuleName",
   "modules": {
    "mod1": "lib/mod1",
    "mod2": "lib/mod2"
  }
}
The file is in JSON format, which, as a JavaScript programmer, you should be familiar with.
The most important tags are name and version. The name will appear in URLs and command names, so choose one that's safe for both. If you desire to publish a package in the public npm repository, it's helpful to check whether a particular name is already being used at http://npmjs.com or with the following command:
$ npm search packageName
The main tag is treated the same as we discussed in the previous section on directory modules. It defines which file module will be returned when invoking require('packageName'). Packages can contain many modules within themselves and they can be listed in the modules list.
Packages can be bundled as tar-gzip archives (tarballs), especially to send them over the internet.
A package can declare dependencies on other packages. That way, npm can automatically install other modules required by the module being installed. Dependencies are declared as follows:
"dependencies": {
    "foo" : "1.0.0 - 2.x.x",
    "bar" : ">=1.0.2 <2.1.2"
 }
The description and keyword fields help people find the package when searching in an npm repository (https://www.npmjs.com/). Ownership of a package can be documented in the homepage, author, or contributors fields:
"description": "My wonderful package that walks dogs",
"homepage": "http://npm.dogs.org/dogwalker/",
"author": "dogwhisperer@dogs.org"
Some npm packages provide executable programs meant to be in the user's PATH. These are declared using the bin tag. It's a map of command names to the script that implements that command. The command scripts are installed into the directory containing the node executable using the name given:
bin: {
  'nodeload.js': './nodeload.js',
  'nl.js': './nl.js'
},
The directories tag describes the package directory structure. The lib directory is automatically scanned for modules to load. There are other directory tags for binaries, manuals, and documentation:
directories: { lib: './lib', bin: './bin' },
The script tags are script commands run at various events in the life cycle of the package. These events include install, activate, uninstall, update, and more. For more information about script commands, use the following command:
$ npm help scripts
We've already used the scripts feature when showing how to set up Babel. We'll use these later for automating the build, test, and execution processes.
This was only a taste of the npm package format; see the documentation (npm help json) for more.
By default, npm modules are retrieved over the internet from the public package registry maintained on http://npmjs.com. If you know the module name, it can be installed simply by typing the following:
$ npm install moduleName
But what if you don't know the module name? How do you discover the interesting modules? The website http://npmjs.com publishes a searchable index of the modules in that registry.
The npm package also has a command-line search function to consult the same index:

Of course, upon finding a module, it's installed as follows:
$ npm install acoustid
After installing a module, you may want to see the documentation, which would be on the module's website. The homepage tag in package.json lists that URL. The easiest way to look at the package.json file is with the npm view command, as follows:
$ npm view akasharender
...
{ name: 'akasharender',
  description: 'Rendering support for generating static HTML websites
  or EPUB eBooks',
  'dist-tags': { latest: '0.6.15' },
  versions:
   [ '0.0.1',
  ...
  author: 'David Herron <david@davidherron.com>
  (http://davidherron.com)',
  repository: { type: 'git', url:
  'git://github.com/akashacms/akasharender.git' },
  homepage: 'http://akashacms.com/akasharender/toc.html',
...
}
You can use npm view to extract any tag from package.json, like the following, which lets you view just the homepage tag:
$ npm view akasharender homepage
http://akashacms.org/akasharender/toc.html
Other fields in the package.json can be viewed by simply giving the desired tag name.
The main npm command has a long list of subcommands for specific package management operations. These cover every aspect of the life cycle of publishing packages (as a package author), and downloading, using, or removing packages (as an npm consumer).
You can view the list of these commands just by typing npm (with no arguments). If you see one you want to learn more about, view the help information:
$ npm help <command>
The help text will be shown on your screen.
Or, see the website: http://docs.npmjs.com
The npm install command makes it easy to install packages upon finding the one of your dreams, as follows:
$ npm install express
/home/david/projects/notes/
- express@4.13.4
...
The named module is installed in node_modules in the current directory. The specific version installed depends on any version number listed on the command line, as we see in the next section.
Version number matching in npm is powerful and flexible. The same sort of version specifiers used in package.json dependencies can also be used with the npm install command:
$ npm install package-name@tag
$ npm install package-name@version
$ npm install package-name@version-range
The last two are what they sound like. You can specify express@4.16.2 to target a precise version, or express@">4.1.0 < 5.0" to target a range of Express V4 versions.
The version match specifiers include these choices:
The @tag attribute is a symbolic name such as @latest, @stable, or @canary. The package owner assigns these symbolic names to specific version numbers, and can reassign them as desired. The exception is @latest, which is updated whenever a new release of the package is published.
For more documentation, run these commands: npm help json and npm help npm-dist-tag.
In some instances you want to install a module globally, so that it can be used from any directory. For example, the Grunt or Gulp build tools are widely useful, and conceivably you will find it useful if these tools are installed globally. Simply add the -g option:
$ npm install -g grunt-cli
If you get an error, and you're on a Unix-like system (Linux/Mac), you may need to run this with sudo:
$ sudo npm install -g grunt-cli
A global install is most important for those packages which install executable commands. We'll get into this shortly.
If a local package install lands in node_modules, where does a global package install land? On a Unix-like system it lands in PREFIX/lib/node_modules, and on Windows it lands in PREFIX/node_modules. In this case PREFIX means the directory where Node.js is installed. You can inspect the location of this directory like so:
$ npm config get prefix
/Users/david/.nvm/versions/node/v8.9.1
The algorithm used by Node.js for the require function automatically searches this directory for packages if the package is not found elsewhere.
Remember that ES6 modules do not support global packages.
Some in the Node.js community now frown on installing a package globally. One rationale exists in the Twelve Factor model. Namely, a software project is more reliable if all its dependencies are explicitly declared. If a build tool such as Grunt is required, but is not explicitly declared in package.json, the users of the application would have to receive instructions to install Grunt, and they would have to follow those instructions.
Users being users, they might skip over the instructions, fail to install the dependency, and then complain the application doesn't work. Surely most of us have done that once or twice.
It's recommended to avoid this potential problem by installing everything locally via one mechanism—the npm install command.
As we mentioned earlier, the npm install command by itself installs the packages listed in the dependencies section of package.json. This is easy and convenient. Simply by listing all the dependencies, it's quick and easy to install the dependencies required for using the package. What happens is npm looks in package.json for the dependencies or devDependencies field, and it will automatically install the mentioned packages.
You can manage the dependencies manually by editing package.json. Or you can use npm to assist you with editing the dependencies. You can add a new dependency like so:
$ npm install akasharender --save
In response, npm will add a dependencies tag to package.json:
"dependencies": {
    "akasharender": "^0.6.15"
}
Now, when your application is installed, npm will automatically also install that package along with any dependencies listed by that package.
The devDependencies are modules used during development. That field is initialized the same as above, but with the --save-dev flag.
By default, when an npm install is run, modules listed in both dependencies and devDependencies are installed. Of course, the purpose for having two lists is to not install the devDependencies in some cases:
$ npm install --production
This installs only the modules listed in dependencies and none of the devDependencies modules.
In the Twelve-Factor application model, it's suggested that we explicitly identify the dependencies required by the application. This way we can reliably build our application, knowing that we've tested against a specific set of dependencies that we've carefully identified. By installing exactly the dependencies against which the application has been tested, we have more confidence in the application. On the Node.js platform, npm gives us this dependencies section, including a flexible mechanism to declare compatible package versions by their version number.
With npm@5 (also known as npm version 5), one change was that it's no longer required to add --save to the npm install command. Instead, npm by default acts as if you ran the command with --save, and will automatically add the dependency to your package.json. This is meant to simplify using npm, and it is arguably more convenient that npm now does this. At the same time it can be very surprising and inconvenient for npm to go ahead and modify package.json for you. The behavior can be disabled by using the --no-save flag. This behavior can be permanently disabled using the following:
$ npm config set save false
The npm config command supports a long list of settable options for tuning behavior of npm. See npm help config for the documentation, and npm help 7 config for the list of options.
Bugs exist in every piece of software. An update to the Node.js platform may break an existing package, as might an upgrade to packages used by the application. Your application may trigger a bug in a package it uses. In these and other cases, fixing the problem might be as simple as updating a package dependency to a later (or earlier) version.
First identify whether the problem exists in the package or in your code. After determining it's a problem in another package, investigate whether the package maintainers have already fixed the bug. Is the package hosted on GitHub or another service with a public issue queue? Look for an open issue on this problem. That investigation will tell you whether to update the package dependency to a later version. Sometimes, it will tell you to revert to an earlier version; for example, if the package maintainer introduced a bug that doesn't exist in an earlier version.
Sometimes, you will find that the package maintainers are unprepared to issue a new release. In such a case, you can fork their repository and create a patched version of their package.
One approach to fixing this problem is pinning the package version number to one that's known to work. You might know that version 6.1.2 was the last release against which your application functioned, and that starting with version 6.2.0 your application breaks. Hence, in package.json:
"dependencies": {
    "module1": "6.1.2"
}
This freezes your dependency to the specific version number. You're free, then, to take your time updating your code to work against later releases of that module. Once your code is updated, or the upstream project is updated, change the dependency appropriately.
Another approach is to host a version of the package somewhere outside of the npm repository. This is covered in a later section.
Some packages install command-line programs. A side effect of installing such packages is a new command that you can type at the shell prompt or use in shell scripts. An example is the hexy program that we briefly used in Chapter 2, Setting up Node.js. Another example is the widely used Grunt or Gulp build tools.
The package.json file in such packages specifies the command-line tools that are installed. The command can be installed to one of two places:
To run the command, simply type the command name at a shell prompt. Except there's a little bit of configuration required to make that simple.
Typing the full pathname is not a user-friendly requirement to execute the command. We want to use the commands installed by modules, and we want a simple process for doing so. Meaning, we must add an appropriate value in the PATH variable, but what is it?
For global package installations, the executable lands in a directory that is probably already in your PATH variable, like /usr/bin or /usr/local/bin. Local package installations are what require special handling. The full path for the node_modules/.bin directory varies for each project, and obviously it won't work to add the full path for every node_modules/.bin directory to your PATH.
Adding ./node_modules/.bin to the PATH variable (or, on Windows, .\node_modules\.bin) works great. Any time your shell is in the root of a Node.js project, it will automatically find locally-installed commands from Node.js packages.
How we do this depends on the command shell you use, and your operating system.
On a Unix-like system the command shells are bash and csh. Your PATH variable would be set up in one of these ways:
$ export PATH=./node_modules/.bin:${PATH}     # bash
$ setenv PATH ./node_modules/.bin:${PATH}     # csh
The next step is adding the command to your login scripts so the variable is always set. On bash, add the corresponding line to your ~/.bashrc, and on csh add it to your ~/.cshrc.
On Windows, this task is handled through a system-wide settings panel:
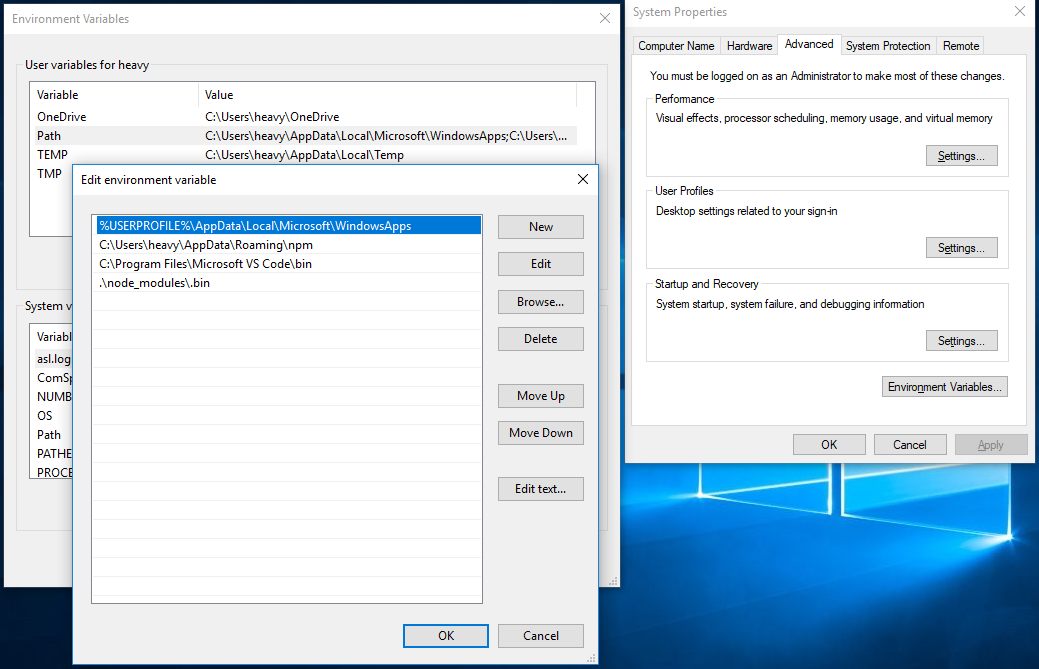
This pane of the System Properties panel is found by searching for PATH in the Windows Settings screen. Click on the Environment Variables button, then select the Path variable, and finally click on the Edit button. In the screen here click the New button to add an entry to this variable, and enter .\node_modules\.bin as shown. You'll have to restart any open command shell windows. Once you do, the effect will be as shown previously.
What if you don't want to add these variables to your PATH at all times? The npm-path module may be of interest. This is a small program that computes the correct PATH variable for your shell and operating system. See the package at https://www.npmjs.com/package/npm-path.
The coder codes, updating their package, leaving you in their dust unless you keep up.
To find out if your installed packages are out of date, use the following command:
$ npm outdated
The report shows the current npm packages, the currently-installed version, as well as the current version in the npm repository. Updating the outdated packages is very simple:
$ npm update express
$ npm update
As awesome as the npm repository is, we don't want to push everything we do through their service. This is especially true for internal development teams who cannot publish their code for all the world to see. While you can rent or install a private npm repository, there's another way. Packages can be installed from other locations. Details about this are in npm help package.json in the dependencies section. Some examples are:
$ npm install git+ssh://user@hostname:project.git#tag --save
If you want to create a new package, you can create the package.json file by hand or you can get npm's help. The npm init command leads you through a little dialog to get starting values for the package.json file.
Once you get through the questions, the package.json file is written to disk.
Expect to have to edit that file considerably before publishing to the npm repository. A few fields help give a good impression to folks looking at the package listing on npmjs.com:
It's important that your Node.js software runs on the correct version of Node.js. The primary reason being when new features are added to the platform. You'll want to use those new features, whether it is the async functions added in 8.x or the ES Modules supported added in 10.x. We need a way to declare the Node.js version required to run our software.
This dependency is declared in package.json using the engines tag:
"engines": {
    "node": ">= 8.x"
}
This, of course, uses the same version number matching scheme discussed earlier.
All those packages in the npm repository came from people like you with an idea of a better way of doing something. It is very easy to get started with publishing packages. Online docs can be found at https://docs.npmjs.com/getting-started/publishing-npm-packages.
You first use the npm adduser command to register yourself with the npm repository. You can also sign up with the website. Next, you log in using the npm login command.
Finally, while sitting in the package root directory, use the npm publish command. Then, stand back so that you don't get stampeded by the crush of thronging fans. Or, maybe not. There are almost 600,000 packages in the repository, with almost 400 packages added every day. To get yours to stand out, you will require some marketing skill, which is another topic beyond the scope of this book.
One feature of the Twelve-Factor methodology is step two, explicitly declaring your dependencies. We've already touched on this, but it's worth reiterating and to seeing npm makes this easy to accomplish.
Step one of the Twelve-Factor methodology is ensuring that your application code is checked into a source code repository. You probably already know this, and even have the best of intentions to ensure that everything is checked in. With Node.js, each module should have its own repository rather than putting every single last piece of code in one repository.
Each module can then progress on its own timeline. A breakage in one module is easy to back out by changing the version dependency in package.json.
This gets us to Twelve-Factor step two. There are two aspects of this step, one of which is the package versioning that we discussed previously. The next is explicitly declaring version numbers, which can be declared in dependencies and devDependencies sections of package.json. This ensures that everyone on the team is on the same page, developing against the same versions of the same modules. When it's time to deploy to testing, staging, or production servers, and the deployment script runs npm install or npm update, the code will use a known version of the module that everyone tested against.
The lazy way of declaring dependencies is putting * in the version field. That uses the latest version in the npm repository. Maybe this will work, until one day the maintainers of that package introduce a bug. You'll type npm update, and all of a sudden your code doesn't work. You'll head over to the GitHub site for the package, look in the issue queue, and possibly see that others have already reported the problem you're seeing. Some of them will say that they've pinned on the previous release until this bug is fixed. What that means is their package.json file does not depend on * for the latest version, but on a specific version number before the bug was created.
Don't do the lazy thing, do the smart thing.
The other aspect of explicitly declaring dependencies is to not implicitly depend on global packages. Earlier, we said that some in the Node.js community caution against installing modules in the global directories. This might seem like an easy shortcut to sharing code between applications. Just install it globally, and you don't have to install the code in each application.
But, doesn't that make deployment harder? Will the new team member be instructed on all the special files to install here and there to make the application run? Will you remember to install that global module on all destination machines?
For Node.js, that means listing all the module dependencies in package.json, and then the installation instructions are simply npm install, followed perhaps by editing a configuration file.
As powerful as npm is, it is not the only package management system for Node.js. Because the Node.js core team does not dictate a package management system, the Node.js community is free to roll up their sleeves and develop any system they feel best. That the vast majority of us use npm is a testament to its value and usefulness. But there is a competitor.
Yarn (see https://yarnpkg.com/en/) is a collaboration between engineers at Facebook, Google, and several other companies. They proclaim that Yarn is ultra fast, ultra-secure (by using checksums of everything), and ultra reliable (by using a yarn-lock.json file to record precise dependencies).
Instead of running their own package repository, Yarn runs on top of npm's package repository at npmjs.com. This means that the Node.js community is not forked by Yarn, but enhanced by having an improved package management tool.
The npm team responded to Yarn in npm@5 (also known as npm version 5) by improving performance, and by introducing a package-lock.json file to improve reliability. The npm team have announced additional improvements in npm@6.
Yarn has become very popular and is widely recommended over npm. They perform extremely similar functions, and the performance is not that different to npm@5. The command-line options are worded differently. An important benefit Yarn brings to the Node.js community is that competition between Yarn and npm seems to be breeding faster advances in Node.js package management.
To get you started, these are the most important commands:
Running yarn by itself does the yarn install behavior. There are several other commands in Yarn, and yarn help will list them all.
You learned a lot in this chapter about modules and packages for Node.js.
Specifically, we covered implementing modules and packages for Node.js, managing installed modules and packages, and saw how Node.js locates modules.
Now that you've learned about modules and packages, we're ready to use them to build applications, which is the topic of the next chapter.
Now that you've learned about Node.js modules, it's time to put this knowledge to work by building a simple Node.js web application. In this chapter, we'll keep to a simple application, enabling us to explore three different application frameworks for Node.js. In later chapters, we'll build some more complex applications, but before we can walk, we must learn to crawl.
We will cover the following topics in this chapter:
EventEmitters are one of the core idioms of Node.js. If Node.js's core idea is an event-driven architecture, emitting events from an object is one of the primary mechanisms of that architecture. An EventEmitter is an object that gives notifications—events—at different points in its life cycle. For example, an HTTP Server object emits events concerning each stage of the startup/shutdown of the Server object, and as HTTP requests are made from HTTP clients.
Many core Node.js modules are EventEmitters, and EventEmitters are an excellent skeleton to implement asynchronous programming. EventEmitters have nothing to do with web application development, but they are so much part of the Node.js woodwork that you may skip over their existence.
In this chapter, we'll work with the HTTPServer and HTTPClient objects. Both are subclasses of the EventEmitter class, and rely on it to send events for each step of the HTTP protocol.
Before getting started on the EventEmitter class, we need to take a look at another of the ES2015 features: classes. The JavaScript language has always had objects, and a concept of a class hierarchy, but nothing so formal as in other languages. The ES2015 class object builds on the existing prototype-based inheritance model, but with a syntax looking very much like class definitions in other languages.
For example, consider this class we'll be using later in the book:
class Note {
    constructor(key, title, body) {
        this._key = key;
        this._title = title;
        this._body = body;
    }
    get key() { return this._key; }
    get title() { return this._title; }
    set title(newTitle) { return this._title = newTitle; }
    get body() { return this._body; }
    set body(newBody) { return this._body = newBody; }
}
Once you've defined the class, you can export the class definition to other modules:
module.exports.Note = class Note { .. }   # in CommonJS modules
export class Note { .. }                  # in ES6 modules
The functions marked with get or set keywords are getters and setters, used like so:
var aNote = new Note("key", "The Rain in Spain", "Falls mainly on the plain");
var key = aNote.key;
var title = aNote.title;
aNote.title = "The Rain in Spain, which made me want to cry with joy";
New instances of a class are created with new. You access a getter or setter function as if it is a simple field on the object. Behind the scenes, the getter/setter function is invoked.
The preceding implementation is not the best because the _title and _body fields are publicly visible, and there is no data hiding or encapsulation. We'll go over a better implementation later.
One tests whether a given object is of a certain class by using the instanceof operator:
if (anotherNote instanceof Note) {
    ... it's a Note, so act on it as a Note
}
Finally, you declare a subclass using the extends operator, similar to what's done in other languages:
class LoveNote extends Note {
    constructor(key, title, body, heart) {
        super(key, title, body);
        this._heart = heart;
    }
    get heart() { return this._heart; }
    set heart(newHeart) { return this._heart = newHeart; }
}
In other words, the LoveNote class has all the fields of Note, plus this new field named heart.
The EventEmitter object is defined in the events module of Node.js. Directly using the EventEmitter class means performing require('events'). In most cases, you'll be using an existing object that uses EventEmitter internally and you won't require this module. But there are cases where needs dictate implementing an EventEmitter subclass.
Create a file named pulser.js containing the following code:
const EventEmitter = require('events');

class Pulser extends EventEmitter {
    start() {
        setInterval(() => {
            console.log(`${new Date().toISOString()} >>>> pulse`);
            this.emit('pulse');
            console.log(`${new Date().toISOString()} <<<< pulse`);
        }, 1000);
    }
}
module.exports = Pulser;
This defines a Pulser class, which inherits from EventEmitter. In older Node.js releases, this would require using util.inherits, but the new class object makes subclassing much simpler.
Another thing to examine is how this.emit in the callback function refers to the Pulser object. Before the ES2015 arrow function, when our callbacks used a regular function, this would not have referred to the Pulser object. Instead, it would have referred to some other object related to the setInterval function. Because it is an arrow function, the this inside the arrow function is the same this as in the outer function.
If you needed to use a function rather than an arrow function, this trick would work:
class Pulser extends EventEmitter {
    start() {
        var self = this;
        setInterval(function() {
            self.emit(...);
        });
    }
}
What's different is the assignment of this to self. The value of this inside the function is different, but the value of self remains the same in every enclosed scope. This widely-used trick is less necessary now that we have arrow functions.
If you want a simple EventEmitter, but with your own class name, the body of the extended class can be empty:
class HeartBeat extends EventEmitter {}
const beatMaker = new HeartBeat();
The purpose of the Pulser class is sending a timed event, once a second, to any listeners. The start method uses setInterval to kick off repeated callback execution, scheduled for every second, calling emit to send the pulse events to any listeners.
Now, let's see how to use the Pulser object. Create a new file, called pulsed.js, containing:
const Pulser = require('./pulser');

// Instantiate a Pulser object
const pulser = new Pulser();
// Handler function
pulser.on('pulse', () => {
    console.log(`${new Date().toISOString()} pulse received`);
});
// Start it pulsing
pulser.start();
Here, we create a Pulser object and consume its pulse events. Calling pulser.on('pulse') sets up connections for the pulse events to invoke the callback function. It then calls the start method to get the process going.
Enter this into a file and name the file pulsed.js. When you run it, you should see the following output:
$ node pulsed.js
2017-12-03T06:24:10.272Z >>>> pulse
2017-12-03T06:24:10.275Z pulse received
2017-12-03T06:24:10.276Z <<<< pulse
2017-12-03T06:24:11.279Z >>>> pulse
2017-12-03T06:24:11.279Z pulse received
2017-12-03T06:24:11.279Z <<<< pulse
2017-12-03T06:24:12.281Z >>>> pulse
2017-12-03T06:24:12.281Z pulse received
2017-12-03T06:24:12.282Z <<<< pulse
That gives you a little practical knowledge of the EventEmitter class. Let's now look at its operational theory.
With the EventEmitter class, your code emits events that other code can receive. It's a way of connecting two separated sections of your program, kind of like how quantum entanglement means two electrons can communicate with each other from any distance. Seems simple enough.
The event name can be anything that makes sense to you, and you can define as many event names as you like. Event names are defined simply by calling .emit with the event name. There's nothing formal to do and no registry of event names. Simply making a call to .emit is enough to define an event name.
An object sends events using the .emit function. Events are sent to any listeners that have registered to receive events from the object. The program registers to receive an event by calling that object's .on method, giving the event name and an event handler function.
There is no central distribution point for all events. Instead, each instance of an EventEmitter object manages its own set of listeners and distributes its events to those listeners.
Often, it is required to send data along with an event. To do so, simply add the data as arguments to the .emit call, as follows:
this.emit('eventName', data1, data2, ..);
When the program receives that event, the data appears as arguments to the callback function. Your program would listen to such an event as follows:
emitter.on('eventName', (data1, data2, ...theArgs) => {
  // act on event
});
There is no handshaking between event receivers and the event sender. That is, the event sender simply goes on with its business, and it gets no notifications about any events received, any action taken, or any error that occurred.
In this example, we used another of the ES2015 features, the rest operator, shown here as ...theArgs. The rest operator catches any number of remaining function parameters into an array. Since EventEmitter can pass along any number of parameters, and the rest operator can automatically receive any number of parameters, it's a match made in heaven, or else in the TC-39 committee.
The HTTP server object is the foundation of all Node.js web applications. The object itself is very close to the HTTP protocol, and its use requires knowledge of that protocol. In most cases, you'll be able to use an application framework such as Express that hides the HTTP protocol details, allowing the programmer to focus on business logic.
We already saw a simple HTTP server application in Chapter 2, Setting up Node.js, which is as follows:
const http = require('http');
http.createServer((req, res) => {
  res.writeHead(200, {'Content-Type': 'text/plain'});
  res.end('Hello, World!\n');
}).listen(8124, '127.0.0.1');
console.log('Server running at http://127.0.0.1:8124');
The http.createServer function creates an http.Server object. Because it is an EventEmitter, this can be written in another way to make that fact explicit:
const http = require('http');
const server = http.createServer();
server.on('request',  (req, res) => {
  res.writeHead(200, {'Content-Type': 'text/plain'});
  res.end('Hello, World!\n');
});
server.listen(8124, '127.0.0.1');
console.log('Server running at http://127.0.0.1:8124');
The request event takes a function, which receives request and response objects. The request object has data from the web browser, while the response object is used to gather the data to be sent in the response. The listen function causes the server to start listening and arranging to dispatch an event for every request arriving from a web browser.
Now, let's look at something more interesting with different actions based on the URL.
Create a new file, named server.js, containing the following code:
const http = require('http');
const util = require('util');
const url  = require('url');
const os   = require('os');

const server = http.createServer();
server.on('request', (req, res) => {
    var requrl = url.parse(req.url, true);
    if (requrl.pathname === '/') {
        res.writeHead(200, {'Content-Type': 'text/html'});
        res.end(
`<html><head><title>Hello, world!</title></head>
<body><h1>Hello, world!</h1>
<p><a href='/osinfo'>OS Info</a></p>
</body></html>`);
    } else if (requrl.pathname === "/osinfo") {
        res.writeHead(200, {'Content-Type': 'text/html'});
        res.end(
`<html><head><title>Operating System Info</title></head>
<body><h1>Operating System Info</h1>
<table>
<tr><th>TMP Dir</th><td>${os.tmpdir()}</td></tr>
<tr><th>Host Name</th><td>${os.hostname()}</td></tr>
<tr><th>OS Type</th><td>${os.type()} ${os.platform()} ${os.arch()} ${os.release()}</td></tr>
<tr><th>Uptime</th><td>${os.uptime()} ${util.inspect(os.loadavg())}</td></tr>
<tr><th>Memory</th><td>total: ${os.totalmem()} free: ${os.freemem()}</td></tr>
<tr><th>CPU's</th><td><pre>${util.inspect(os.cpus())}</pre></td></tr>
<tr><th>Network</th><td><pre>${util.inspect(os.networkInterfaces())}</pre></td></tr>
</table>
</body></html>`);
    } else {
        res.writeHead(404, {'Content-Type': 'text/plain'});
        res.end("bad URL "+ req.url);
    }
});

server.listen(8124);
console.log('listening to http://localhost:8124');
To run it, type the following command:
$ node server.js
listening to http://localhost:8124
This application is meant to be similar to PHP's sysinfo function. Node's os module is consulted to provide information about the server. This example can easily be extended to gather other pieces of data about the server:
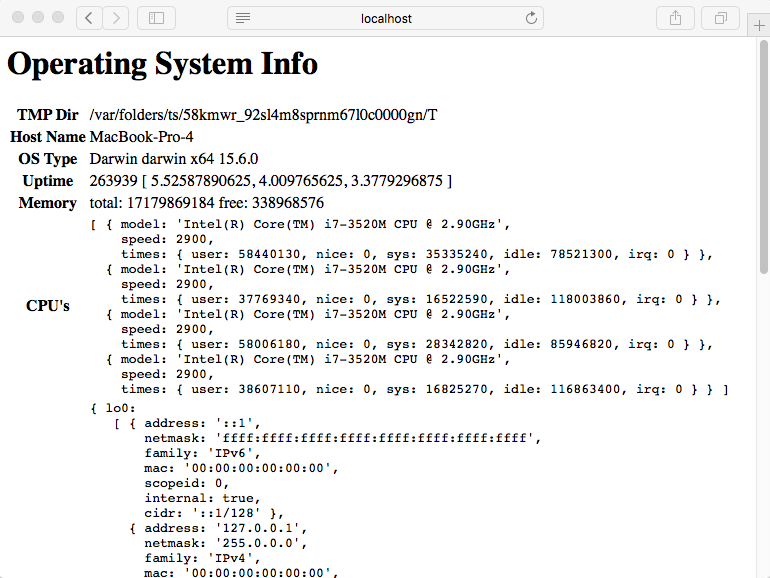
A central part of any web application is the method of routing requests to request handlers. The request object has several pieces of data attached to it, two of which are useful for routing requests: the request.url and request.method fields.
In server.js, we consult the request.url data to determine which page to show, after parsing (using url.parse) to ease the digestion process. In this case, we can do a simple comparison of the pathname to determine which handler method to use.
Some web applications care about the HTTP verb (GET, DELETE, POST, and so on) used and must consult the request.method field of the request object. For example, POST is frequently used for FORM submissions.
The pathname portion of the request URL is used to dispatch the request to the correct handler. While this routing method, based on simple string comparison, will work for a small application, it'll quickly become unwieldy. Larger applications will use pattern matching to use part of the request URL to select the request handler function and other parts to extract request data out of the URL. We'll see this in action while looking at Express later in the Getting started with Express section.
A search for a URL match in the npm repository turns up several promising packages that could be used to implement request matching and routing. A framework like Express has this capability already baked in and tested.
If the request URL is not recognized, the server sends back an error page using a 404 result code. The result code informs the browser about the status of the request, where a 200 code means everything is fine, and a 404 code means the requested page doesn't exist. There are, of course, many other HTTP response codes, each with their own meaning.
The previous example showed two of the new features introduced with ES2015, multiline and template strings. The feature is meant to simplify our life while creating text strings.
The existing string representations use single quotes and double quotes. Template strings are delimited with the backtick character that's also known as the grave accent:
`template string text`
Before ES2015, one way to implement a multiline string was this construct:
["<html><head><title>Hello, world!</title></head>",
 "<body><h1>Hello, world!</h1>",
 "<p><a href='/osinfo'>OS Info</a></p>",
 "</body></html>"]
.join('\n')
Yes, that was the code used in the same example in previous versions of this book. This is what we can do with ES2015:
`<html><head><title>Hello, world!</title></head>
<body><h1>Hello, world!</h1>
<p><a href='/osinfo'>OS Info</a></p>
</body></html>`
This is more succinct and straightforward. The opening quote is on the first line, the closing quote on the last line, and everything in between is part of our string.
The real purpose of the template strings feature is supporting strings where we can easily substitute values directly into the string. Most other programming languages support this ability, and now JavaScript does too.
Pre-ES2015, a programmer could have written code like this:
[ ...
  "<tr><th>OS Type</th><td>{ostype} {osplat} {osarch} {osrelease}</td></tr>"
  ... ].join('\n')
.replace("{ostype}", os.type())
.replace("{osplat}", os.platform())
.replace("{osarch}", os.arch())
.replace("{osrelease}", os.release())
Again, this is extracted from the same example in previous versions of this book. With template strings, this can be written as follows:
`...<tr><th>OS Type</th><td>${os.type()} ${os.platform()} ${os.arch()} ${os.release()}</td></tr>...`
Within a template string, the part within the ${ .. } brackets is interpreted as an expression. It can be a simple mathematical expression, a variable reference, or, as in this case, a function call.
The last thing to mention is a matter of indentation. In normal coding, one indents a long argument list to the same level as the containing function call. But, for these multiline string examples, the text content is flush with column zero. What's up?
This may impede the readability of your code, so it's worth weighing code readability against another issue: excess characters in the HTML output. The blanks we would use to indent the code for readability will become part of the string and will be output in the HTML. By making the code flush with column zero, we don't add excess blanks to the output at the cost of some code readability.
This approach also carries a security risk. Have you verified the data is safe? That it will not form the basis of a security attack? In this case, we're dealing with simple strings and numbers coming from a safe data source. Therefore this code is as safe as the Node.js runtime. What about user-supplied content, and the risk that a nefarious user might supply insecure content implanting some kind of malware into target computers?
For this and many other reasons, it is often safer to use an external template engine. Applications like Express make it easy to do so.
The events emitted by the HTTPServer object can be used for additional purposes beyond the immediate task of delivering a web application. The following code demonstrates a useful module that listens to all the HTTP Server events. It could be a useful debugging tool, which also demonstrates how HTTP server objects operate.
Node.js's HTTP Server object is an EventEmitter and the HTTP Sniffer simply listens to every server event, printing out information pertinent to each event.
What we're about to do is:
Create a file named httpsniffer.js containing the following code:
const util = require('util');
const url  = require('url');

const timestamp = () => { return new Date().toISOString(); }

exports.sniffOn = function(server) {
  server.on('request', (req, res) => {
    console.log(`${timestamp()} e_request`);
    console.log(`${timestamp()} ${reqToString(req)}`);
  });
  server.on('close', errno => { console.log(`${timestamp()} e_close
  ${errno}`); });
  server.on('checkContinue', (req, res) => {
    console.log(`${timestamp()} e_checkContinue`);
    console.log(`${timestamp()} ${reqToString(req)}`);
    res.writeContinue();
  });
  server.on('upgrade', (req, socket, head) => {
    console.log(`${timestamp()} e_upgrade`);
    console.log(`${timestamp()} ${reqToString(req)}`);
  });
  server.on('clientError', () => { console.log(`${timestamp()}
  e_clientError`); });
};

const reqToString = exports.reqToString = (req) => {
  var ret=`req ${req.method} ${req.httpVersion} ${req.url}` +'\n';
  ret += JSON.stringify(url.parse(req.url, true)) +'\n';
  var keys = Object.keys(req.headers);
  for (var i = 0, l = keys.length; i < l; i++) {
    var key = keys[i];
    ret += `${i} ${key}: ${req.headers[key]}` +'\n';
  }
  if (req.trailers) ret += util.inspect(req.trailers) +'\n';
  return ret;
};
That was a lot of code! But the key to it is the sniffOn function. When given an HTTP Server object, it uses the .on function to attach listener functions that print data about each emitted event. It gives a fairly detailed trace of HTTP traffic on an application.
In order to use it, simply insert this code just before the listen function in server.js:
require('./httpsniffer').sniffOn(server);
server.listen(8124);
console.log('listening to http://localhost:8124');
With this in place, run the server as we did earlier. You can visit http://localhost:8124/ in your browser and see the following console output:
$ node server.js
listening to http://localhost:8124
2017-12-03T19:21:33.162Z request
2017-12-03T19:21:33.162Z request GET 1.1 /
{"protocol":null,"slashes":null,"auth":null,"host":null,"port":null,"hostname":null,"hash":null,"search":"","query":{},"pathname":"/","path":"/","href":"/"}
0 host: localhost:8124
1 upgrade-insecure-requests: 1
2 accept: text/html,application/xhtml+xml,application/xml;q=0.9,*/*;q=0.8
3 user-agent: Mozilla/5.0 (Macintosh; Intel Mac OS X 10_11_6) AppleWebKit/604.3.5 (KHTML, like Gecko) Version/11.0.1 Safari/604.3.5
4 accept-language: en-us
5 accept-encoding: gzip, deflate
6 connection: keep-alive
{}

2017-12-03T19:21:42.154Z request
2017-12-03T19:21:42.154Z request GET 1.1 /osinfo
{"protocol":null,"slashes":null,"auth":null,"host":null,"port":null,"hostname":null,"hash":null,"search":"","query":{},"pathname":"/osinfo","path":"/osinfo","href":"/osinfo"}
0 host: localhost:8124
1 connection: keep-alive
2 upgrade-insecure-requests: 1
3 accept: text/html,application/xhtml+xml,application/xml;q=0.9,*/*;q=0.8
4 user-agent: Mozilla/5.0 (Macintosh; Intel Mac OS X 10_11_6) AppleWebKit/604.3.5 (KHTML, like Gecko) Version/11.0.1 Safari/604.3.5
5 referer: http://localhost:8124/
6 accept-language: en-us
7 accept-encoding: gzip, deflate
{}
You now have a tool for snooping on HTTPServer events. This simple technique prints a detailed log of event data. The pattern can be used for any EventEmitter object. You can use this technique as a way to inspect the actual behavior of EventEmitter objects in your program.
The HTTPServer object is very close to the HTTP protocol. While this is powerful in the same way that driving a stick shift car gives you low-level control over the driving experience, typical web application programming is better done at a higher level. Does anybody use assembly language to write web applications? It's better to abstract away the HTTP details and concentrate on your application.
The Node.js developer community has developed quite a few application frameworks to help with different aspects of abstracting away HTTP protocol details. Of them, Express is the most popular, and Koa (http://koajs.com/) should be considered because it was developed by the same team and has fully integrated support for async functions.
The ExpressJS Wiki has a list of frameworks built on top of ExpressJS, or tools that work with it. This includes template engines, middleware modules, and more. The ExpressJS Wiki is located at https://github.com/expressjs/express/wiki.
One reason to use a web framework is that they often provide the best practices used in web application development for over 20 years. The usual best practices include the following:
Web frameworks help you invest your time in the task without getting lost in the details of implementing HTTP protocol. Abstracting away details is a time-honored way for programmers to be more efficient. This is especially true when using a library or framework providing prepackaged functions that take care of the details.
Express is perhaps the most popular Node.js web app framework. It's so popular that it's part of the MEAN Stack acronym. MEAN refers to MongoDB, ExpressJS, AngularJS, and Node.js. Express is described as being Sinatra-like, referring to a popular Ruby application framework, and that it isn't an opinionated framework, meaning the framework authors don't impose their opinions about structuring an application. This means Express is not at all strict about how your code is structured; you just write it the way you think is best.
You can visit the home page for Express at http://expressjs.com/.
Shortly, we'll implement a simple application to calculate Fibonacci numbers using Express, and in later chapters, we'll do quite a bit more with Express. We'll also explore how to mitigate the performance problems from computationally intensive code we discussed earlier.
As of writing this book, Express 4.16 is the current version, and Express 5 is in Alpha testing. According to the ExpressJS website, there are very few differences between Express 4 and Express 5.
Let's start by installing the express-generator. While we can just start writing some code, the express-generator provides a blank starting application. We'll take that and modify it.
Install it using the following commands:
$ mkdir fibonacci
$ cd fibonacci
$ npm install express-generator@4.x
This is different from the suggested installation method on the Express website, which was to use the -g tag for a global install. We're also using an explicit version number to ensure compatibility. As of writing this book, express-generator@5.x does not exist. When it does exist, one should be able to use the 5.x version with the following instructions.
Earlier, we discussed how many now recommend against installing modules globally. In the Twelve-Factor model, it's strongly recommended to not install global dependencies, and that's what we're doing.
The result is that an express command is installed in the ./node_modules/.bin directory:
$ ls node_modules/.bin/
express
Run the express command like so:
$ ./node_modules/.bin/express --help

  Usage: express [options] [dir]

  Options:

    -h, --help          output usage information
    -V, --version       output the version number
    -e, --ejs           add ejs engine support (defaults to jade)
        --hbs           add handlebars engine support
    -H, --hogan         add hogan.js engine support
    -c, --css <engine>  add stylesheet <engine> support
    (less|stylus|compass|sass) (defaults to plain css)
        --git           add .gitignore
    -f, --force         force on non-empty directory
We probably don't want to type ./node_modules/.bin/express every time we run the express-generator application or, for that matter, any of the other applications that provide command-line utilities. Refer back to the discussion in Chapter 3, Node.js Modules about adding that directory to the PATH variable.
Now that you've installed express-generator in the fibonacci directory, use it to set up the blank framework application:
$ ./node_modules/.bin/express --view=hbs --git .
destination is not empty, continue? [y/N] y

   create : .
   create : ./package.json
   create : ./app.js
   create : ./.gitignore
   create : ./public
   create : ./routes
   create : ./routes/index.js
   create : ./routes/users.js
   create : ./views
   create : ./views/index.hbs
   create : ./views/layout.hbs
   create : ./views/error.hbs
   create : ./bin
   create : ./bin/www
   create : ./public/javascripts
   create : ./public/images
   create : ./public/stylesheets
   create : ./public/stylesheets/style.css

   install dependencies:
     $ cd . && npm install

   run the app:
     $ DEBUG=fibonacci:* npm start

    $ npm uninstall express-generator
    added 83 packages and removed 5 packages in 4.104s
This created a bunch of files for us, which we'll walk through in a minute. The node_modules directory still has the express-generator module, which is now not useful. We can just leave it there and ignore it, or we can add it to the devDependencies of the package.json it generated. Alternatively, we can uninstall it as shown here.
The next thing to do is run the blank application in the way we're told. The command shown, npm start, relies on a section of the supplied package.json file:
"scripts": {
    "start": "node ./bin/www"
},
The npm tool supports scripts that are ways to automate various tasks. We'll use this capability throughout the book to do various things. When the Twelve-Factor Application model suggests automating all your administrative tasks, the npm scripts feature is an excellent mechanism to do so. Most npm scripts are run with the npm run scriptName command, but the start command is explicitly recognized by npm and can be run as shown previously.
The steps are:
To install the dependencies, and run the application, type these commands:
$ npm install
$ DEBUG=fibonacci:* npm start

> fibonacci@0.0.0 start /Users/David/chap04/fibonacci
> node ./bin/www

 fibonacci:server Listening on port 3000 +0ms
Setting the DEBUG variable this way turns on some debugging output, which includes this message about listening on port 3000. Otherwise, we aren't told this information. This syntax is what's used in the Bash shell to run a command with an environment variable. If you get an error try running just "npm start" then read the next section.
We can modify the supplied npm start script to always run the app with debugging enabled. Change the scripts section to the following:
"scripts": {
    "start": "DEBUG=fibonacci:* node ./bin/www"
},
Since the output says it is listening on port 3000, we direct our browser to
http://localhost:3000/ and see the following output:
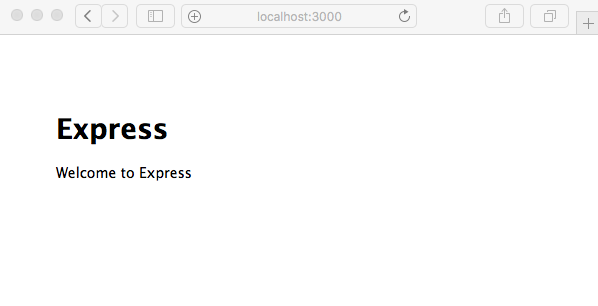
If you're on Windows the previous example may have failed with an error that DEBUG is not a known command. The problem is that the Windows shell, the cmd.exe program, does not support the Bash command-line structure.
Adding VARIABLE=value at the beginning of a command-line is specific to some shells, like Bash, on Linux and macOS. It sets that environment variable only for the command-line being executed, and is a very convenient way to temporarily override environment variables for a specific command.
Clearly a solution is required if your package.json is to be usable across different operating systems.
The best solution appears to be the cross-env package in the npm repository, see: https://www.npmjs.com/package/cross-env With this package installed, commands in the scripts section in package.json can set environment variables just as in Bash on Linux/macOS. The usage looks like so:
"scripts": {
    "start": "cross-env DEBUG=fibonacci:* node ./bin/www"
},
"dependencies": {
    ...
    "cross-env": "5.1.x"
}
Then the command is executed as so:
C:\Users\david\Documents\chap04\fibonacci>npm install
... output from installing packages
C:\Users\david\Documents\chap04\fibonacci>npm run start

> fibonacci@0.0.0 start C:\Users\david\Documents\chap04\fibonacci
> cross-env DEBUG=fibonacci:* node ./bin/www

fibonacci:server Listening on port 3000 +0ms
GET / 304 90.597 ms - -
GET /stylesheets/style.css 304 14.480 ms - -
GET /fibonacci 200 84.726 ms - 503
GET /stylesheets/style.css 304 4.465 ms - -
GET /fibonacci?fibonum=22 500 1069.049 ms - 327
GET /stylesheets/style.css 304 2.601 ms - -
We have a working, blank Express application; let's look at what was generated for us. We're doing this to familiarize ourselves with Express before diving in to start coding our Fibonacci application.
Because we used the --view=hbs option, this application is set up to use the Handlebars.js template engine. Handlebars was built on top of Mustache, and was originally designed for use in the browser; for more information see its homepage at http://handlebarsjs.com/. The version shown here has been packaged for use with Express, and is documented at https://github.com/pillarjs/hbs.
Generally speaking, a template engine makes it possible to insert data into generated web pages. The ExpressJS Wiki has a list of template engines for Express https://github.com/expressjs/express/wiki#template-engines.
The views directory contains two files, error.hbs and index.hbs. The hbs extension is used for Handlebars files. Another file, layout.hbs, is the default page layout. Handlebars has several ways to configure layout templates and even partials (snippets of code which can be included anywhere).
The routes directory contains the initial routing setup, that is, the code to handle specific URLs. We'll modify these later.
The public directory will contain assets that the application doesn't generate, but are simply sent to the browser. What's initially installed is a CSS file, public/stylesheets/style.css.
The package.json file contains our dependencies and other metadata.
The bin directory contains the www script that we saw earlier. That's a Node.js script, which initializes the HTTPServer objects, starts it listening on a TCP port, and calls the last file we'll discuss, app.js. These scripts initialize Express, hook up the routing modules, and do other things.
There's a lot going on in the www and app.js scripts, so let's start with the application initialization. Let's first take a look at a couple of lines in app.js:
var express = require('express');
...
var app = express();
...
module.exports = app;
This means that app.js is a module that exports the object returned by the express module. It doesn't start the HTTP server object, however.
Now, let's turn to the www script. The first thing to see is that it starts with this line:
#!/usr/bin/env node
This is a Unix/Linux technique to make a command script. It says to run the following as a script using the node command. In other words, we have Node.js code and we're instructing the operating system to execute that code using the Node.js runtime:
$ ls -l bin/www
-rwx------  1 david  staff  1595 Feb  5  1970 bin/www
We can also see that the script was made executable by express-generator.
It calls the app.js module as follows:
var app = require('../app');
...
var port = normalizePort(process.env.PORT || '3000');
app.set('port', port);
...
var server = http.createServer(app);
...
server.listen(port);
server.on('error', onError);
server.on('listening', onListening);
We see where port 3000 comes from; it's a parameter to the normalizePort function. We also see that setting the PORT environment variable will override the default port 3000. And finally, we see that the HTTP Server object is created here, and is told to use the application instance created in app.js. Try running the following command:
$ PORT=4242 DEBUG=fibonacci:* npm start
The application now tells you that it's listening on port 4242, where you can ponder the meaning of life.
The app object is next passed to http.createServer(). A look in the Node.js documentation tells us this function takes a requestListener, which is simply a function that takes the request and response objects we've seen previously. Therefore, the app object is such a function.
Finally, the www script starts the server listening on the port we specified.
Let's now walk through app.js in more detail:
app.set('views', path.join(__dirname, 'views'));
app.set('view engine', 'hbs');
This tells Express to look for templates in the views directory and to use the EJS templating engine.
The app.set function is used for setting application properties. It'll be useful to browse the API documentation as we go through (http://expressjs.com/en/4x/api.html).
Next is a series of app.use calls:
app.use(logger('dev'));
app.use(bodyParser.json());
app.use(bodyParser.urlencoded({ extended: false }));
app.use(cookieParser());
app.use(express.static(path.join(__dirname, 'public')));

app.use('/', routes);
app.use('/users', users);
The app.use function mounts middleware functions. This is an important piece of Express jargon we will discuss shortly. At the moment, let's say that middleware functions are executed during the processing of routes. This means all the features named here are enabled in app.js:
Let's round out the walkthrough of app.js by discussing what middleware functions do for our application. We have an example at the end of the script:
app.use(function(req, res, next) {
  var err = new Error('Not found');
  err.status = 404;
  next(err);
});
The comment says catch 404 and forward to error handler. As you probably know, an HTTP 404 status means the requested resource was not found. We need to tell the user their request wasn't satisfied, and maybe show them a picture of a flock of birds pulling a whale out of the ocean. This is the first step in doing so. Before getting to the last step of reporting this error, you must learn how middleware works.
We do have a middleware function right in front of us. Refer to its documentation at http://expressjs.com/en/guide/writing-middleware.html.
Middleware functions take three arguments. The first two, request and response, are equivalent to the request and response of the Node.js HTTP request object. However, Express expands the objects with additional data and capabilities. The last, next, is a callback function controlling when the request-response cycle ends, and it can be used to send errors down the middleware pipeline.
The incoming request gets handled by the first middleware function, then the next, then the next, and so on. Each time the request is to be passed down the chain of middleware functions, the next function is called. If next is called with an error object, as shown here, an error is being signaled. Otherwise, the control simply passes to the next middleware function in the chain.
What happens if next is not called? The HTTP request will hang because no response has been given. A middleware function gives a response when it calls functions on the response object, such as res.send or res.render.
For example, consider the inclusion of app.js:
app.get('/', function(req, res) { res.send('Hello World!'); });
This does not call next, but instead calls res.send. This is the correct method of ending the request-response cycle, by sending a response (res.send) to the request. If neither next nor res.send is called, the request never gets a response.
Hence, a middleware function does one of the following four things:
The ordering of middleware execution depends on the order they're added to the app object. The first added is executed first, and so on.
We've seen two kinds of middleware functions so far. In one, the first argument is the handler function. In the other, the first argument is a string containing a URL snippet, and the second argument is the handler function.
What's actually going on is app.use has an optional first argument: the path the middleware is mounted on. The path is a pattern match against the request URL, and the given function is triggered if the URL matches the pattern. There's even a method to supply named parameters in the URL:
app.use('/user/profile/:id', function(req, res, next) {
    userProfiles.lookup(req.params.id, (err, profile) => {
          if (err) return next(err);
          // do something with the profile
          // Such as display it to the user
          res.send(profile.display());
    });
});
This path specification has a pattern, :id, and the value will land in req.params.id. In this example, we're suggesting a user profiles service, and that for this URL we want to display information about the named user.
Another way to use a middleware function is on a specific HTTP request method. With app.use, any request will be matched, but in truth, GET requests are supposed to behave differently to POST requests. You call app.METHOD where METHOD matches one of the HTTP request verbs. That is, app.get matches the GET method, app.post matches POST, and so on.
Finally, we get to the router object. This is a kind of middleware used explicitly for routing requests based on their URL. Take a look at routes/users.js:
var express = require('express');
var router = express.Router();
router.get('/', function(req, res, next) {
  res.send('respond with a resource');
});
module.exports = router;
We have a module whose exports object is a router. This router has only one route, but it can have any number of routes you think is appropriate.
Back in app.js, this is added as follows:
app.use('/users', users);
All the functions we discussed for the app object apply to the router object. If the request matches, the router is given the request for its own chain of processing functions. An important detail is that the request URL prefix is stripped when the request is passed to the router instance.
You'll notice that the router.get in users.js matches '/' and that this router is mounted on '/users'. In effect, that router.get matches /users as well, but because the prefix was stripped, it specifies '/' instead. This means a router can be mounted on different path prefixes without having to change the router implementation.
Now, we can finally get back to the generated app.js, the 404 Error page not found, and any other errors the application might want to show to the user.
A middleware function indicates an error by passing a value to the next function call. Once Express sees an error, it will skip any remaining non-error routing, and it will only pass it to error handlers instead. An error handler function has a different signature than what we saw earlier.
In app.js, which we're examining, this is our error handler:
app.use(function(err, req, res, next) {
  res.status(err.status || 500);
  res.render('error', {
    message: err.message,
    error: {}
  });
});
Error handler functions take four parameters, with err added to the familiar req, res, and next. For this handler, we use res.status to set the HTTP response status code, and we use res.render to format an HTML response using the views/error.hbs template. The res.render function takes data, rendering it with a template to produce HTML.
This means any error in our application will land here, bypassing any remaining middleware functions.
The Fibonacci numbers are the integer sequence: 0, 1, 1, 2, 3, 5, 8, 13, 21, 34, ...
Each entry in the list is the sum of the previous two entries in the list. The sequence was invented in 1202 by Leonardo of Pisa, who was also known as Fibonacci. One method to calculate entries in the Fibonacci sequence is the recursive algorithm we showed earlier. We will create an Express application that uses the Fibonacci implementation and then explore several methods to mitigate performance problems in computationally intensive algorithms.
Let's start with the blank application we created in the previous step. We had you name that application Fibonacci for a reason. We were thinking ahead.
In app.js, make the following changes to the top portion of the file:
const express = require('express');
const hbs = require('hbs');
const path = require('path');
const favicon = require('serve-favicon');
const logger = require('morgan');
const cookieParser = require('cookie-parser');
const bodyParser = require('body-parser');

const index = require('./routes/index');
const fibonacci = require('./routes/fibonacci');

const app = express();

// view engine setup
app.set('views', path.join(__dirname, 'views'));
app.set('view engine', 'hbs');
hbs.registerPartials(path.join(__dirname, 'partials'));

// uncomment after placing your favicon in /public
//app.use(favicon(path.join(__dirname, 'public', 'favicon.ico')));
app.use(logger('dev'));
app.use(bodyParser.json());
app.use(bodyParser.urlencoded({ extended: false }));
app.use(cookieParser());
app.use(express.static(path.join(__dirname, 'public')));

app.use('/', index);
app.use('/fibonacci', fibonacci);
Most of this is what express-generator gave us. The var statements have been changed to const, for that little teensy bit of extra comfort. We explicitly imported the hbs module so we could do some configuration. And we imported a router module for Fibonacci, which we'll see in a minute.
For the Fibonacci application, we don't need to support users, and therefore deleted that routing module. The fibonacci module, which we'll show next, serves to query a number for which we'll calculate the Fibonacci number.
In the top-level directory, create a file, math.js, containing this extremely simplistic Fibonacci implementation:
exports.fibonacci = function(n) {
    if (n === 0) return 0;
    else if (n === 1 || n === 2) return 1;
    else return exports.fibonacci(n-1) + exports.fibonacci(n-2);
};
In the views directory, look at the file named layout.hbs which express-generator created:
<!DOCTYPE html>
<html>
  <head>
    <title>{{title}}</title>
    <link rel='stylesheet' href='/stylesheets/style.css' />
  </head>
  <body>
    {{{body}}}
  </body>
</html>
This file contains the structure we'll use for HTML pages. Going by the Handlebars syntax, we see that {{title}} appears within the HTML title tag. It means when we call res.render, we should supply a title attribute. The {{{body}}} tag is where the view template content lands.
Change views/index.hbs to just contain the following:
<h1>{{title}}</h1>
{{> navbar}}
This serves as the front page of our application. It will be inserted in place of {{{body}}} in layout.hbs. The marker, {{> navbar}}, refers to a partial named navbar. Earlier, we configured a directory named partials to hold partials. Now let's create a file, partials/navbar.html, containing:
<div class='navbar'>
<p><a href='/'>home</a> | <a href='/fibonacci'>Fibonacci's</a></p>
</div>
This will serve as a navigation bar that's included on every page.
Create a file, views/fibonacci.hbs, containing the following code:
<h1>{{title}}</h1>
{{> navbar}}
{{#if fiboval}}
  <p>Fibonacci for {{fibonum}} is {{fiboval}}</p>
  <hr/>
{{/if}}
<p>Enter a number to see its' Fibonacci number</p>
<form name='fibonacci' action='/fibonacci' method='get'>
<input type='text' name='fibonum' />
<input type='submit' value='Submit' />
</form>
In the routes directory, delete the user.js module. It is generated by the Express framework, but we will not use it in this application.
In routes/index.js, change the router function to the following:
/* GET home page. */
router.get('/', function(req, res, next) {
  res.render('index', { title: "Welcome to the Fibonacci Calculator" });
});
The anonymous object passed to res.render contains the data values we provide to the layout and view templates.
Then, finally, in the routes directory, create a file named fibonacci.js containing the following code:
const express = require('express');
const router = express.Router();

const math = require('../math');
router.get('/', function(req, res, next) {
  if (req.query.fibonum) {
    // Calculate directly in this server
    res.render('fibonacci', {
      title: "Calculate Fibonacci numbers",
      fibonum: req.query.fibonum,
      fiboval: math.fibonacci(req.query.fibonum)
    });
  } else {
    res.render('fibonacci', {
      title: "Calculate Fibonacci numbers",
      fiboval: undefined
    });
  }
});

module.exports = router;
The package.json is already set up so we can use npm start to run the script and always have debugging messages enabled. And now we're ready to do so:
$ npm start

> fibonacci@0.0.0 start /Users/david/chap04/fibonacci
> DEBUG=fibonacci:* node ./bin/www

fibonacci:server Listening on port 3000 +0ms
As it suggests, you can visit http://localhost:3000/ and see what we have:
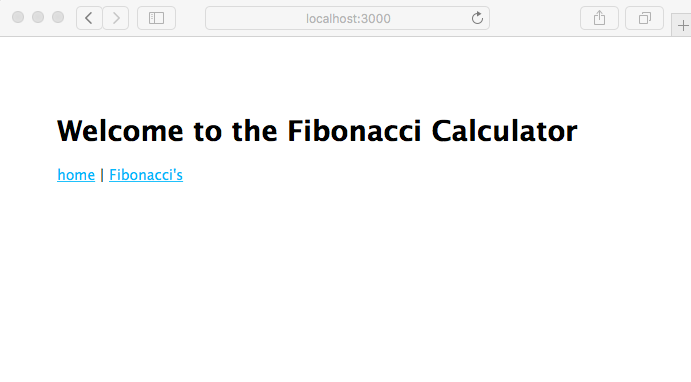
This page is rendered from the views/index.hbs template. Simply click on the Fibonacci's link to go to the next page, which is of course rendered from the views/fibonacci.hbs template. On that page, you'll be able to enter a number, click on the Submit button, and get an answer (hint: pick a number below 40 if you want your answer in a reasonable amount of time):
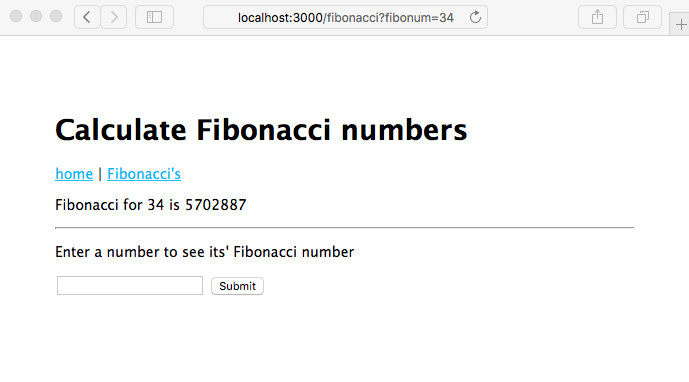
Let's walk through the application to discuss how it works.
There are two routes in app.js: the route for /, which is handled by routes/index.js, and the route for /fibonacci, which is handled by routes/fibonacci.js.
The res.render function renders the named template using the provided data values and emits the result as an HTTP response. For the home page of this application, the rendering code (routes/index.js) and template (views/index.hbs) aren't much, and it is on the Fibonacci page where all the action is happening.
The views/fibonacci.hbs template contains a form in which the user enters a number. Because it is a GET form, when the user clicks on the Submit button, the browser will issue an HTTP GET on the /fibonacci URL. What distinguishes one GET on /fibonacci from another is whether the URL contains a query parameter named fibonum. When the user first enters the page, there is no fibonum and hence nothing to calculate. After the user has entered a number and clicked on Submit, there is a fibonum and something to calculate.
Express automatically parses the query parameters, making them available as req.query. That means routes/fibonacci.js can quickly check whether there is a fibonum. If there is, it calls the fibonacci function to calculate the value.
Earlier, we asked you to enter a number less than 40. Go ahead and enter a larger number, such as 50, but go take a coffee break because this is going to take a while to calculate. Or proceed on to reading the next section where we start to discuss use of computationally intensive code.
This Fibonacci example is purposely inefficient to demonstrate an important consideration for your applications. What happens to the Node.js event loop when running long computations? To see the effect, open two browser windows, each opened to the Fibonacci page. In one, enter the number 55 or greater, and in the other, enter 10. Note that the second window freezes, and if you leave it running long enough, the answer will eventually pop up in both windows. What's happening is the Node.js event loop is blocked from processing events because the Fibonacci algorithm is running and does not ever yield to the event loop.
Since Node.js has a single execution thread, processing requests depend on request handlers quickly returning to the event loop. Normally, the asynchronous coding style ensures that the event loop executes regularly.
This is true even for requests that load data from a server halfway around the globe, because the asynchronous I/O is non-blocking and control is quickly returned to the event loop. The naïve Fibonacci function we chose doesn't fit into this model because it's a long-running blocking operation. This type of event handler prevents the system from processing requests and stops Node.js from doing what it's meant to do, namely to be a blisteringly fast web server.
In this case, the long-response-time problem is obvious. Response time quickly escalates to the point where you can take a vacation to Tibet and perhaps get reincarnated as a llama in Peru during the time it takes to respond with the Fibonacci number!
To see this more clearly, create a file named fibotimes.js containing the following code:
const math = require('./math');
const util = require('util');

for (var num = 1; num < 80; num++) {
    let now = new Date().toISOString();
    console.log(`${now} Fibonacci for ${num} = ${math.fibonacci(num)}`);
}
Now run it. You will get the following output:
$ node fibotimes.js
2017-12-10T23:04:42.342Z Fibonacci for 1 = 1
2017-12-10T23:04:42.345Z Fibonacci for 2 = 1
2017-12-10T23:04:42.345Z Fibonacci for 3 = 2
2017-12-10T23:04:42.345Z Fibonacci for 4 = 3
2017-12-10T23:04:42.345Z Fibonacci for 5 = 5
...
2017-12-10T23:04:42.345Z Fibonacci for 10 = 55
2017-12-10T23:04:42.345Z Fibonacci for 11 = 89
2017-12-10T23:04:42.345Z Fibonacci for 12 = 144
2017-12-10T23:04:42.345Z Fibonacci for 13 = 233
2017-12-10T23:04:42.345Z Fibonacci for 14 = 377
...
2017-12-10T23:04:44.072Z Fibonacci for 40 = 102334155
2017-12-10T23:04:45.118Z Fibonacci for 41 = 165580141
2017-12-10T23:04:46.855Z Fibonacci for 42 = 267914296
2017-12-10T23:04:49.723Z Fibonacci for 43 = 433494437
2017-12-10T23:04:54.218Z Fibonacci for 44 = 701408733
...
2017-12-10T23:06:07.531Z Fibonacci for 48 = 4807526976
2017-12-10T23:07:08.056Z Fibonacci for 49 = 7778742049
^C
This quickly calculates the first 40 or so members of the Fibonacci sequence, but after the 40th member, it starts taking a couple of seconds per result and quickly degrades from there. It is untenable to execute code of this sort on a single-threaded system that relies on a quick return to the event loop. A web service containing such code would give poor performance to the users.
There are two general ways to solve this problem in Node.js:
To prove that we have an artificial problem on our hands, here is a much more efficient Fibonacci function:
exports.fibonacciLoop = function(n) {
    var fibos = [];
    fibos[0] = 0;
    fibos[1] = 1;
    fibos[2] = 1;
    for (var i = 3; i <= n; i++) {
        fibos[i] = fibos[i-2] + fibos[i-1];
    }
    return fibos[n];
}
If we substitute a call to math.fibonacciLoop in place of math.fibonacci, the fibotimes program runs much faster. Even this isn't the most efficient implementation; for example, a simple prewired lookup table is much faster at the cost of some memory.
Edit fibotimes.js as follows and rerun the script. The numbers will fly by so fast your head will spin:
for (var num = 1; num < 8000; num++) {
    let now = new Date().toISOString();
    console.log(`${now} Fibonacci for ${num} = ${math.fibonacciLoop(num)}`);
}
Some algorithms aren't so simple to optimize and still take a long time to calculate the result. In this section, we're exploring how to handle inefficient algorithms, and therefore will stick with the inefficient Fibonacci implementation.
It is possible to divide the calculation into chunks and then dispatch the computation of those chunks through the event loop. Add the following code to math.js:
exports.fibonacciAsync = function(n, done) {
    if (n === 0) done(undefined, 0);
    else if (n === 1 || n === 2) done(undefined, 1);
    else {
        setImmediate(() => {
            exports.fibonacciAsync(n-1, (err, val1) => {
                if (err) done(err);
                else setImmediate(() => {
                    exports.fibonacciAsync(n-2, (err, val2) => {
                        if (err) done(err);
                        else done(undefined, val1+val2);
                    });
                });
            });
        });
    }
};
This converts the fibonacci function from asynchronous function to a traditional callback-oriented asynchronous function. We're using setImmediate at each stage of the calculation to ensure the event loop executes regularly and that the server can easily handle other requests while churning away on a calculation. It does nothing to reduce the computation required; this is still the silly, inefficient Fibonacci algorithm. All we've done is spread the computation through the event loop.
In fibotimes.js, we can use this:
const math = require('./math');
const util = require('util');

(async () => {
   for (var num = 1; num < 8000; num++) {
       await new Promise((resolve, reject) => {
           math.fibonacciAsync(num, (err, fibo) => {
               if (err) reject(err);
               else {
                   let now = new Date().toISOString();
                   console.log(`${now} Fibonacci for ${num} =
                   ${fibo}`);
                   resolve();
               }
           })
       })
    }
})().catch(err => { console.error(err); });
This version of fibotimes.js executes the same, we simply type node fibotimes. However, using fibonacciAsync will require changes in the server.
Because it's an asynchronous function, we will need to change our router code. Create a new file, named routes/fibonacci-async1.js, containing the following:
const express = require('express');
const router = express.Router();

const math = require('../math');

router.get('/', function(req, res, next) {
  if (req.query.fibonum) {
    // Calculate using async-aware function, in this server
    math.fibonacciAsync(req.query.fibonum, (err, fiboval) => {
      res.render('fibonacci', {
        title: "Calculate Fibonacci numbers",
        fibonum: req.query.fibonum,
        fiboval: fiboval
      });
    });
  } else {
    res.render('fibonacci', {
      title: "Calculate Fibonacci numbers",
      fiboval: undefined
    });
  }
});

module.exports = router;
This is the same as earlier, just rewritten for an asynchronous Fibonacci calculation.
In app.js, make this change to the application wiring:
// const fibonacci = require('./routes/fibonacci');
const fibonacci = require('./routes/fibonacci-async1');
With this change, the server no longer freezes when calculating a large Fibonacci number. The calculation of course still takes a long time, but at least other users of the application aren't blocked.
You can verify this by again opening two browser windows in the application. Enter 60 in one window, and in the other start requesting smaller Fibonacci numbers. Unlike with the original fibonacci function, using fibonacciAsync allows both windows to give answers, though if you really did enter 60 in the first window you might as well take that three-month vacation to Tibet:
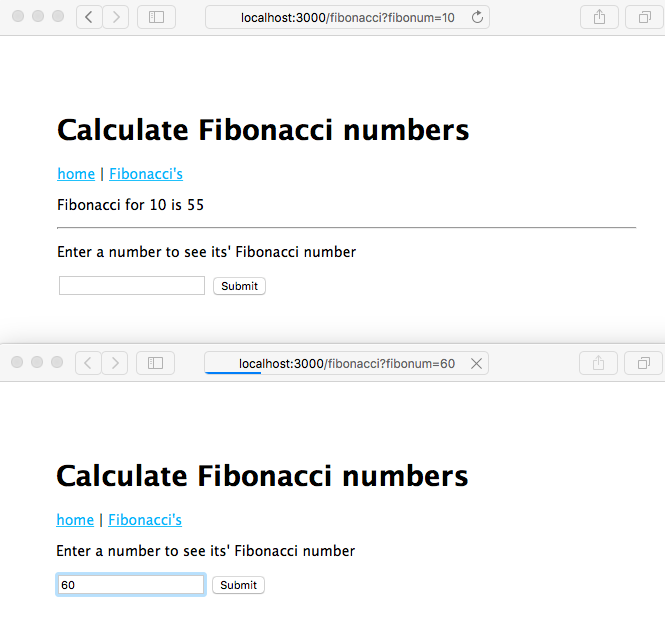
It's up to you, and your specific algorithms, to choose how to best optimize your code and to handle any long-running computations you may have.
The next way to mitigate computationally intensive code is to push the calculation to a backend process. To explore that strategy, we'll request computations from a backend Fibonacci server, using the HTTP Client object to do so. However, before we look at that, let's first talk in general about using the HTTP Client object.
Node.js includes an HTTP Client object, useful for making HTTP requests. It has the capability to issue any kind of HTTP request. In this section, we'll use the HTTP Client object to make HTTP requests similar to calling a Representational State Transfer (REST) web service.
Let's start with some code inspired by the wget or curl commands to make HTTP requests and show the results. Create a file named wget.js containing this code:
const http = require('http');
const url = require('url');
const util = require('util');

const argUrl = process.argv[2];
const parsedUrl = url.parse(argUrl, true);

// The options object is passed to http.request
// telling it the URL to retrieve
const options = {
  host: parsedUrl.hostname,
  port: parsedUrl.port,
  path: parsedUrl.pathname,
  method: 'GET'
};

if (parsedUrl.search) options.path += "?"+parsedUrl.search;

const req = http.request(options);
// Invoked when the request is finished
req.on('response', res => {
  console.log('STATUS: ' + res.statusCode);
  console.log('HEADERS: ' + util.inspect(res.headers));
  res.setEncoding('utf8');
  res.on('data', chunk => { console.log('BODY: ' + chunk); });
  res.on('error', err => { console.log('RESPONSE ERROR: ' + err); });
});
// Invoked on errors
req.on('error', err => { console.log('REQUEST ERROR: ' + err); });
req.end();
You can run the script as follows:
$ node wget.js http://example.com
STATUS: 200
HEADERS: { 'accept-ranges': 'bytes',
  'cache-control': 'max-age=604800',
  'content-type': 'text/html',
  date: 'Sun, 10 Dec 2017 23:40:44 GMT',
  etag: '"359670651"',
  expires: 'Sun, 17 Dec 2017 23:40:44 GMT',
  'last-modified': 'Fri, 09 Aug 2013 23:54:35 GMT',
  server: 'ECS (rhv/81A7)',
  vary: 'Accept-Encoding',
  'x-cache': 'HIT',
  'content-length': '1270',
  connection: 'close' }
BODY: <!doctype html>
<html>
...
There's more in the printout, namely the HTML of the page at http://example.com/. The purpose of wget.js is to make an HTTP request and show you voluminous details of the response. An HTTP request is initiated with the http.request method, as follows:
var http = require('http');
var options = {
  host: 'example.com',
  port: 80,
  path: null,
  method: 'GET'
};
var request = http.request(options);
request.on('response', response => {
  ...
});
The options object describes the request to make, and the callback function is called when the response arrives. The options object is fairly straightforward, with the host, port, and path fields specifying the URL being requested. The method field must be one of the HTTP verbs (GET, PUT, POST, and so on). You can also provide a headers array for the headers in the HTTP request. For example, you might need to provide a cookie:
var options = {
  headers: { 'Cookie': '.. cookie value' }
};
The response object is itself an EventEmitter, which emits the data and error events. The data event is called as data arrives, and the error event is, of course, called on errors.
The request object is a WritableStream, which is useful for HTTP requests containing data, such as PUT or POST. This means the request object has a write function that writes data to the requester. The data format in an HTTP request is specified by the standard Multipurpose Internet Mail Extensions (MIME) originally created to give us better email. Around 1992, the WWW community worked with the MIME standard committee which was developing a format for multi-part, multi-media-rich electronic mail. Receiving fancy-looking email is so commonplace today that one might not be aware that email used to be plain text. MIME-types were developed to describe the format of each piece of data, and the WWW community adopted this for use on the web. HTML forms will post with a Content-Type of multipart/form-data, for example.
Now that we've seen how to make HTTP client requests, we can look at how to make a REST query inside an Express web application. What that effectively means is to make an HTTP GET request to a backend server, which responds with the Fibonacci number represented by the URL. To do so, we'll refactor the Fibonacci application to make a Fibonacci server that is called from the application. While this is overkill for calculating Fibonacci numbers, it lets us look at the basics of implementing a multitier application stack in Express.
Inherently, calling a REST service is an asynchronous operation. That means calling the REST service will involve a function call to initiate the request and a callback function to receive the response. REST services are accessed over HTTP, so we'll use the HTTP client object to do so.
While Express has a powerful templating system, making it suitable for delivering HTML web pages to browsers, it can also be used to implement a simple REST service. The parameterized URLs we showed earlier (/user/profile/:id) can act like parameters to a REST call. And Express makes it easy to return data encoded in JSON.
Now, create a file named fiboserver.js containing this code:
const math  = require('./math');
const express = require('express');
const logger = require('morgan');
const app = express();
app.use(logger('dev'));
app.get('/fibonacci/:n', (req, res, next) => {
    math.fibonacciAsync(Math.floor(req.params.n), (err, val) => {
        if (err) next('FIBO SERVER ERROR ' + err);
        else res.send({ n: req.params.n, result: val });
    });
});
app.listen(process.env.SERVERPORT);
This is a stripped-down Express application that gets right to the point of providing a Fibonacci calculation service. The one route it supports handles the Fibonacci computation using the same functions we've already worked with.
This is the first time we've seen res.send used. It's a flexible way to send responses which can take an array of header values (for the HTTP response header), and an HTTP status code. As used here, it automatically detects the object, formats it as JSON text, and sends it with the correct Content-Type.
In package.json, add this to the scripts section:
"server": "SERVERPORT=3002 node ./fiboserver"
This automates launching our Fibonacci service.
Now, let's run it:
$ npm run server
> fibonacci@0.0.0 server /Users/David/chap04/fibonacci
> SERVERPORT=3002 node ./fiboserver
Then, in a separate command window, we can use the curl program to make some requests against this service:
$ curl -f http://localhost:3002/fibonacci/10
{"n":"10","result":55}
$ curl -f http://localhost:3002/fibonacci/11
{"n":"11","result":89}
$ curl -f http://localhost:3002/fibonacci/12
{"n":"12","result":144}
Over in the window where the service is running, we'll see a log of GET requests and how long each took to process:
$ npm run server

> fibonacci@0.0.0 server /Users/David/chap04/fibonacci
> SERVERPORT=3002 node ./fiboserver

GET /fibonacci/10 200 0.393 ms - 22
GET /fibonacci/11 200 0.647 ms - 22
GET /fibonacci/12 200 0.772 ms - 23
Now, let's create a simple client program, fiboclient.js, to programmatically call the Fibonacci service:
const http = require('http');
[
  "/fibonacci/30", "/fibonacci/20", "/fibonacci/10",
  "/fibonacci/9", "/fibonacci/8", "/fibonacci/7",
  "/fibonacci/6", "/fibonacci/5", "/fibonacci/4",
  "/fibonacci/3", "/fibonacci/2", "/fibonacci/1"
].forEach(path => {
    console.log(`${new Date().toISOString()} requesting ${path}`);
    var req = http.request({
      host: "localhost",
      port: process.env.SERVERPORT,
      path: path,
      method: 'GET'
    }, res => {
      res.on('data', chunk => {
          console.log(`${new Date().toISOString()} BODY: ${chunk}`);
      });
    });
    req.end();
});
Then, in package.json, add this to the scripts section:
"scripts": {
  "start": "node ./bin/www",
  "server": "SERVERPORT=3002 node ./fiboserver" ,
  "client": "SERVERPORT=3002 node ./fiboclient"
}
Then run the client app:
$ npm run client

> fibonacci@0.0.0 client /Users/David/chap04/fibonacci
> SERVERPORT=3002 node ./fiboclient

2017-12-11T00:41:14.857Z requesting /fibonacci/30
2017-12-11T00:41:14.864Z requesting /fibonacci/20
2017-12-11T00:41:14.865Z requesting /fibonacci/10
2017-12-11T00:41:14.865Z requesting /fibonacci/9
2017-12-11T00:41:14.866Z requesting /fibonacci/8
2017-12-11T00:41:14.866Z requesting /fibonacci/7
2017-12-11T00:41:14.866Z requesting /fibonacci/6
2017-12-11T00:41:14.866Z requesting /fibonacci/5
2017-12-11T00:41:14.866Z requesting /fibonacci/4
2017-12-11T00:41:14.866Z requesting /fibonacci/3
2017-12-11T00:41:14.867Z requesting /fibonacci/2
2017-12-11T00:41:14.867Z requesting /fibonacci/1
2017-12-11T00:41:14.884Z BODY: {"n":"9","result":34}
2017-12-11T00:41:14.886Z BODY: {"n":"10","result":55}
2017-12-11T00:41:14.891Z BODY: {"n":"6","result":8}
2017-12-11T00:41:14.892Z BODY: {"n":"7","result":13}
2017-12-11T00:41:14.893Z BODY: {"n":"8","result":21}
2017-12-11T00:41:14.903Z BODY: {"n":"3","result":2}
2017-12-11T00:41:14.904Z BODY: {"n":"4","result":3}
2017-12-11T00:41:14.905Z BODY: {"n":"5","result":5}
2017-12-11T00:41:14.910Z BODY: {"n":"2","result":1}
2017-12-11T00:41:14.911Z BODY: {"n":"1","result":1}
2017-12-11T00:41:14.940Z BODY: {"n":"20","result":6765}
2017-12-11T00:41:18.200Z BODY: {"n":"30","result":832040}
We're building our way toward adding the REST service to the web application. At this point, we've proved several things, one of which is the ability to call a REST service in our program.
We also inadvertently demonstrated an issue with long-running calculations. You'll notice the requests were made from the largest to the smallest, but the results appeared in a very different order. Why? It's because of the processing time for each request, and the inefficient algorithm we're using. The computation time increases enough to ensure that the larger request values require enough processing time to reverse the order.
What happens is that fiboclient.js sends all its requests right away, and then each one waits for the response to arrive. Because the server is using fibonacciAsync, it will work on calculating all responses simultaneously. The values that are quickest to calculate are the ones that will be ready first. As the responses arrive in the client, the matching response handler fires, and in this case, the result prints to the console. The results will arrive when they're ready and not a millisecond sooner.
Now that we've implemented a REST-based server, we can return to the Fibonacci application, applying what we've learned to improve it. We will lift some of the code from fiboclient.js and transplant it into the application to do this. Create a new file, routes/fibonacci-rest.js, with the following code:
const express = require('express');
const router = express.Router();
const http = require('http');
const math = require('../math');

router.get('/', function(req, res, next) {
  if (req.query.fibonum) {
    var httpreq = http.request({
      host: "localhost",
      port: process.env.SERVERPORT,
      path: "/fibonacci/"+Math.floor(req.query.fibonum),
      method: 'GET'
    });
    httpreq.on('response', response => {
      response.on('data', chunk => {
        var data = JSON.parse(chunk);
        res.render('fibonacci', {
          title: "Calculate Fibonacci numbers",
          fibonum: req.query.fibonum,
          fiboval: data.result
        });
      });
      response.on('error', err => { next(err); });
    });
    httpreq.on('error', err => { next(err); });
    httpreq.end();
  } else {
    res.render('fibonacci', {
      title: "Calculate Fibonacci numbers",
      fiboval: undefined
    });
  }
});

module.exports = router;
In app.js, make this change:
const index = require('./routes/index');
// const fibonacci = require('./routes/fibonacci');
// const fibonacci = require('./routes/fibonacci-async1');
// const fibonacci = require('./routes/fibonacci-await');
const fibonacci = require('./routes/fibonacci-rest');
Then, in package.json, change the scripts entry to the following:
"scripts": {
  "start": "DEBUG=fibonacci:* node ./bin/www",
  "startrest": "DEBUG=fibonacci:* SERVERPORT=3002 node ./bin/www",
  "server": "DEBUG=fibonacci:* SERVERPORT=3002 node ./fiboserver" ,
  "client": "DEBUG=fibonacci:* SERVERPORT=3002 node ./fiboclient"
},
How can we have the same value for SERVERPORT for all three scripts entries? The answer is that the variable is used differently in different places. In startrest, that variable is used in routes/fibonacci-rest.js to know at which port the REST service is running. Likewise, in client, fiboclient.js uses that variable for the same purpose. Finally, in server, the fiboserver.js script uses the SERVERPORT variable to know which port to listen on.
In start and startrest, no value is given for PORT. In both cases, bin/www defaults to PORT=3000 if it is not specified.
In one command window, start the backend server, and in the other, start the application. Open a browser window as before, and make a few requests. You should see output similar to this:
$ npm run server

> fibonacci@0.0.0 server /Users/David/chap04/fibonacci
> DEBUG=fibonacci:* SERVERPORT=3002 node ./fiboserver

GET /fibonacci/34 200 21124.036 ms - 27
GET /fibonacci/12 200 1.578 ms - 23
GET /fibonacci/16 200 6.600 ms - 23
GET /fibonacci/20 200 33.980 ms - 24
GET /fibonacci/28 200 1257.514 ms - 26
The output like this for the application:
$ npm run startrest

> fibonacci@0.0.0 startrest /Users/David/chap04/fibonacci
> DEBUG=fibonacci:* SERVERPORT=3002 node ./bin/www

  fibonacci:server Listening on port 3000 +0ms
GET /fibonacci?fibonum=34 200 21317.792 ms - 548
GET /stylesheets/style.css 304 20.952 ms - -
GET /fibonacci?fibonum=12 304 109.516 ms - -
GET /stylesheets/style.css 304 0.465 ms - -
GET /fibonacci?fibonum=16 200 83.067 ms - 544
GET /stylesheets/style.css 304 0.900 ms - -
GET /fibonacci?fibonum=20 200 221.842 ms - 545
GET /stylesheets/style.css 304 0.778 ms - -
GET /fibonacci?fibonum=28 200 1428.292 ms - 547
GET /stylesheets/style.css 304 19.083 ms - -
Because we haven't changed the templates, the screen will look exactly as it did earlier.
We may run into another problem with this solution. The asynchronous implementation of our inefficient Fibonacci algorithm may cause the Fibonacci service process to run out of memory. In the Node.js FAQ, https://github.com/nodejs/node/wiki/FAQ, it's suggested to use the --max_old_space_size flag. You'd add this in package.json as follows:
"server": "SERVERPORT=3002 node ./fiboserver --max_old_space_size 5000",
However, the FAQ also says that if you're running into maximum memory space problems, your application should probably be refactored. This gets back to our point several pages ago that there are several approaches to addressing performance problems, one of which is the algorithmic refactoring of your application.
Why go to the trouble of developing this REST server when we could just directly use fibonacciAsync?
We can now push the CPU load for this heavyweight calculation to a separate server. Doing so would preserve CPU capacity on the frontend server so it can attend to web browsers. GPU co-processors are now widely used for numerical computing and can be accessed via a simple network API. The heavy computation can be kept separate, and you can even deploy a cluster of backend servers sitting behind a load balancer, evenly distributing requests.
What we've demonstrated is that it's possible to implement simple multitier REST services in a few lines of Node.js and Express.
Here are a few available packages and frameworks to assist your REST-based projects:
You learned a lot in this chapter about Node's HTTP support, implementing web applications, and REST service implementation.
Now we can move on to implementing a more complete application: one for taking notes. We will use the Notes application for several upcoming chapters as a vehicle to explore the Express application framework, database access, deployment to cloud services or on your own server, and user authentication.
In the next chapter, we will build the basic infrastructure.
Now that we've got our feet wet building an Express application for Node.js, let's work on an application that performs a useful function. The application we'll build will keep a list of notes, and it will let us explore some aspects of a real application.
In this chapter, we'll only build the basic infrastructure of the application, and in the later chapters, we'll extend the application considerably.
The topics covered in this chapter includes
Before we get into developing our application, we must take a deeper look at a pair of new ES-2015/2016/2017 features that collectively revolutionize JavaScript programming: The Promise class and async functions. Both are used for deferred and asynchronous computation and can make intensely nested callback a thing of the past:
The magic of async functions is that we can write asynchronous code as if it's synchronous code. It's still asynchronous code, meaning long-running request handlers won't block the event loop. The code looks like the synchronous code we'd write in other languages. One statement follows another, the errors are thrown as exceptions, and the results land on the next line of code. Promise and async functions are so much of an improvement that it's extremely compelling for the Node.js community to switch paradigms, meaning rewriting legacy callback-oriented APIs.
Over the years, several other approaches have been used to manage asynchronous code, and you may come across code using these other techniques. Before the Promise object was standardized, at least two implementations were available: Bluebird (http://bluebirdjs.com/) and Q (https://www.npmjs.com/package/q). Use of a non-standard Promise library should be carefully considered, since there is value in maintaining compatibility with the standard Promise object.
The Pyramid of Doom is named after the shape the code takes after a few layers of nesting. Any multistage process can quickly escalate to code nested 15 levels deep. Consider the following example:
router.get('/path/to/something', (req, res, next) => {
  doSomething(arg1, arg2, (err, data1) => {
    if (err) return next(err);
    doAnotherThing(arg3, arg2, data1, (err2, data2) => {
      if (err2) return next(err2);
      somethingCompletelyDifferent(arg1, arg42, (err3, data3) => {
        if (err3) return next(err3);
        doSomethingElse((err4, data4) => {
          if (err4) return next(err4);
          res.render('page', { data });
        });
      });
    });
  });
});
Rewriting this as an async function will make this much clearer. To get there, we need to examine the following ideas:
We generate a Promise this way:
exports.asyncFunction = function(arg1, arg2) {
  return new Promise((resolve, reject) => {
    // perform some task or computation that's asynchronous
    // for any error detected:
    if (errorDetected) return reject(dataAboutError);
    // When the task is finished
    resolve(theResult);
  });
};
Your code must indicate the status of the asynchronous operation via the resolve and reject functions. As implied by the function names, reject indicates an error occurred and resolve indicates a success result. Your caller then uses the function as follows:
asyncFunction(arg1, arg2)
.then((result) => {
   // the operation succeeded
   // do something with the result
   return newResult;
})
.catch(err => {
   // an error occurred
});
The system is fluid enough that the function passed in a .then can return something, such as another Promise, and you can chain the .then calls together. The value returned in a .then handler (if any) becomes a new Promise object, and in this way you can construct a chain of .then and .catch calls to manage a sequence of asynchronous operations.
A sequence of asynchronous operations would be implemented as a chain of .then functions, as we will see in the next section.
Promise objects can be in one of three states:
Consider this code segment similar to the one we'll use later in this chapter:
notes.read(req.query.key)
.then(note => { return filterNote(note); })
.then(note => { return swedishChefSpeak(note); })
.then(note => {
    res.render('noteview', {
        title: note ? note.title : "",
        notekey: req.query.key,
        note: note
    });
})
.catch(err => { next(err); });
There are several places where errors can occur in this little bit of code. The notes.read function has several possible failure modes: the filterNote function might want to raise an alarm if it detects a cross-site scripting attack. The Swedish chef could be on strike. There could be a failure in res.render or the template being used. But we have only one way to catch and report errors. Are we missing something?
The Promise class automatically captures errors, sending them down the chain of operations attached to the Promise. If the Promise class has an error on its hands, it skips over the .then functions and will instead invoke the first .catch function it finds. In other words, using instances of Promise provides a higher assurance of capturing and reporting errors. With the older convention, error reporting was trickier, and it was easy to forget to add correct error handling.
The problem being addressed is that asynchronous coding in JavaScript results in the Pyramid of Doom. To explain, let's reiterate the example Ryan Dahl gave as the primary Node.js idiom:
db.query('SELECT ..etc..', function(err, resultSet) {
   if (err) {
      // Instead, errors arrive here
   } else {
      // Instead, results arrive here
    }
});
// We WANT the errors or results to arrive here
The goal was to avoid blocking the event loop with a long operation. Deferring the processing of results or errors using callback functions was an excellent solution and is the founding idiom of Node.js. The implementation of callback functions led to this pyramid-shaped problem. Namely, that results and errors land in the callback. Rather than delivering them to the next line of code, the errors and results are buried.
Promises help flatten the code so that it no longer takes a pyramidal shape. They also capture errors, ensuring delivery to a useful location. But those errors and results are still buried inside an anonymous function and do not get delivered to the next line of code.
Further, using Promises results in a little bit of boilerplate code that obscures the programmers intent. It's less boilerplate than with regular callback functions, but the boilerplate is still there.
Fortunately, the ECMAScript committee kept working on the problem.
Generators and the associated Iteration Protocol are a large topic, which we will briefly cover.
The Iteration Protocol is what's behind the new for..of loop, and some other new looping constructs. These constructs can be used with anything producing an iterator. For more about both, see https://developer.mozilla.org/en-US/docs/Web/JavaScript/Reference/Iteration_protocols.
A generator is a kind of function which can be stopped and started using the yield keyword. Generators produce an iterator whose values are whatever is given to the yield statement. For more on this, see https://developer.mozilla.org/en-US/docs/Web/JavaScript/Reference/Global_Objects/Generator.
Consider this:
$ cat gen.js
function* gen() {
    yield 1;
    yield 2;
    yield 3;
    yield 4;
}
for (let g of gen()) {
   console.log(g);
}
$ node gen.js
1
2
3
4
The yield statement causes a generator function to pause and to provide the value given to the next call on its next function. The next function isn't explicitly seen here, but is what controls the loop, and is part of the iteration protocol. Instead of the loop, try calling gen().next() several times:
var geniter = gen();
console.log(geniter.next());
console.log(geniter.next());
console.log(geniter.next());
You'll see this:
$ node gen.js
{ value: 1, done: false }
{ value: 2, done: false }
{ value: 3, done: false }
The Iteration protocol says the iterator is finished when done is true. In this case, we didn't call it enough to trigger the end state of the iterator.
Where generators became interesting is when used with functions that return a Promise. The Promise is what's made available through the iterator. The code consuming the iterator can wait on the Promise to get its value. A series of asynchronous operations could be inside the generator and invoked in an iterable fashion.
With the help of an extra function, a generator function along with Promise-returning asynchronous functions can be a very nice way to write asynchronous code. We saw an example of this in Chapter 2, Setting up Node.js, while exploring Babel. Babel has a plugin to rewrite async functions into a generator along with a helper function, and we took a look at the transpiled code and the helper function. The co library (https://www.npmjs.com/package/co) is a popular helper function for implementing asynchronous coding in generators. Create a file named 2files.js:
const fs = require('fs-extra');
const co = require('co');
const util = require('util');
co(function* () {
  var texts = [
    yield fs.readFile('hello.txt', 'utf8'),
    yield fs.readFile('goodbye.txt', 'utf8')
  ];
  console.log(util.inspect(texts));
});
Then run it like so:
$ node 2files.js
[ 'Hello, world!\n', 'Goodbye, world!\n' ]
Normally, fs.readFile sends its result to a callback function, and we'd build a little pyramid-shaped piece of code to perform this task. The fs-extra module contains implementations of all functions from the built-in fs module but changed to return a Promise instead of a callback function. Therefore, each fs.readFile shown here is returning a Promise that's resolved when the file content is fully read into memory. What co does is it manages the dance of waiting for the Promise to be resolved (or rejected), and returns the value of the Promise. Therefore, with two suitable text files we have the result shown from executing 2files.js.
The important thing is that the code is very clean and readable. We aren't caught up in boilerplate code required to manage asynchronous operations. The intent of the programmer is pretty clear.
async functions take that same combination of generators and Promises and define a standardized syntax in the JavaScript language. Create a file named 2files-async.js:
const fs    = require('fs-extra');
const util  = require('util');
async function twofiles() {
    var texts = [
        await fs.readFile('hello.txt', 'utf8'),
        await fs.readFile('goodbye.txt', 'utf8')
    ];
    console.log(util.inspect(texts));
}
twofiles().catch(err => { console.error(err); });
Then run it like so:
$ node 2files-async.js
[ 'Hello, world!\n', 'Goodbye, world!\n' ]
Clean. Readable. The intent of the programmer is clear. No dependency on an add-on library, with syntax built-in to the JavaScript language. Most importantly, everything is handled in a natural way. Errors are indicated naturally by throwing exceptions. The results of an asynchronous operation naturally appear as the result of the operation, with the await keyword facilitating the delivery of that result.
To see the real advantage, let's return to the Pyramid of Doom example from earlier:
router.get('/path/to/something', async (req, res, next) => {
   try {
       let data1 = await doSomething(req.query.arg1, req.query.arg2);
       let data2 = await doAnotherThing(req.query.arg3, req.query.arg2,
       data1);
       let data3 = await somethingCompletelyDifferent(req.query.arg1,
                                                      req.query.arg42);
       let data4 = await doSomethingElse();
       res.render('page', { data1, data2, data3, data4 });
   } catch(err) {
       next(err);
   }
});
Other than the try/catch, this example became very clean compared to its form as a callback pyramid. All the asynchronous callback boilerplate is erased, and the intent of the programmer shines clearly.
Why was the try/catch needed? Normally, an async function catches thrown errors, automatically reporting them correctly. But since this example is within an Express router function, we're limited by its capabilities. Express doesn't know how to recognize an async function, and therefore it does not know to look for the thrown errors. Instead, we're required to catch them and call next(err).
This improvement is only for code executing inside an async function. Code outside an async function still requires callbacks or Promises for asynchronous coding. Further, the return value of an async function is a Promise.
Refer to the official specification of async functions at https://tc39.github.io/ecmascript-asyncawait/ for details.
Express doesn't enforce an opinion on how you should structure the Model, View, and Controller modules of your application, or whether you should follow any kind of MVC paradigm at all. As we learned in the previous chapter, the blank application created by the Express Generator provides two aspects of the MVC model:
This leaves you wondering where to put code corresponding to the model. Models hold the application data, changing it as instructed by the controller and supplying data requested by View code. At a minimum, the Model code should be in separate modules from the Controller code. This is to ensure a clean separation of concerns, for example, to ease the unit testing of each.
The approach we'll use is to create a models directory as a sibling of the views and routes directories. The models directory will hold modules for storing the notes and related data. The API of the modules in the models directory will provide functions to create, read, update, or delete data items Create, Read, Update, and Delete or Destroy (CRUD model) and other functions necessary for the View code to do its thing.
The CRUD model (create, read, update, destroy) is the four basic operations of persistent data storage. The Notes application is structured as a CRUD application to demonstrate implementing each of these operations.
We'll use functions named create, read, update, and destroy to implement each of the basic operations.
Let's start creating the Notes application as before, by using the Express generator to give us a starting point:
$ mkdir notes
$ cd notes
$ npm install express-generator@4.x
$ ./node_modules/.bin/express --view=hbs --git .
destination is not empty, continue? [y/N] y

   create : .
   create : ./package.json
   create : ./app.js
   create : ./.gitignore
   create : ./public
   create : ./routes
   create : ./routes/index.js
   create : ./routes/users.js
   create : ./views
   create : ./views/index.hbs
   create : ./views/layout.hbs
   create : ./views/error.hbs
   create : ./bin
   create : ./bin/www
   create : ./public/stylesheets
   create : ./public/stylesheets/style.css

   install dependencies:
     $ cd . && npm install

   run the app:
     $ DEBUG=notes:* npm start

   create : ./public/javascripts
   create : ./public/images
$ npm install
added 82 packages and removed 5 packages in 97.188s
$ npm uninstall express-generator
up to date in 8.325s
If you wish, you can run npm start and view the blank application in your browser. Instead, let's move on to setting up the code.
Create a directory named models, as a sibling of the views and routes directories.
Then, create a file named Note.js in that directory, and put this code in it:
const _note_key = Symbol('key');
const _note_title = Symbol('title');
const _note_body = Symbol('body');

module.exports = class Note {
    constructor(key, title, body) {
        this[_note_key] = key;
        this[_note_title] = title;
        this[_note_body] = body;
    }

    get key() { return this[_note_key]; }
    get title() { return this[_note_title]; }
    set title(newTitle) { this[_note_title] = newTitle; }
    get body() { return this[_note_body]; }
    set body(newBody) { this[_note_body] = newBody; }
};
This defines a new class, Note, for use within our Notes application. The intent is to hold data related to notes being exchanged between users of our application.
This sort of object class definition is new to JavaScript with ES-2015. It simplifies defining classes over previous methods and brings JavaScript class definitions closer to the syntax in other languages. Under the hood, JavaScript classes still use prototype-based inheritance, but with a simpler syntax, and the coder doesn't even have to think about the object prototype.
We can reliably determine whether an object is a note with the instanceof operator:
$ node
> const Note = require('./Note');
> typeof Note
'function'
> const aNote = new Note('foo', 'The Rain In Spain', 'Falls mainly on the plain');
> var notNote = {}
> notNote instanceof Note
false
> aNote instanceof Note
true
> typeof aNote
'object'
This shows us the clearest method to identify an object is with the instanceof operator. The typeof operator informs us Note is a function (because of the prototype-based inheritance behind the scenes), and that an instance of the Note class is an object. With instance of, we can easily determine whether an object is an instance of a given class.
With the Note class, we have used Symbol instances to provide a small measure of data hiding. JavaScript classes don't provide a data-hiding mechanism—you can't label a field private as you can in Java, for example. It's useful to know how to hide implementation details. This is an important attribute of object-oriented programming, because it's useful to have the freedom to change the implementation at will. And there's the issue of controlling which code can manipulate the object's fields.
First, we declared getter and setter functions to provide access to the values. We went over normal getter/setter usage in Chapter 4, HTTP Servers and Clients.
Access to a getter-based field is by using the name of the property, and not by calling a function - aNote.title and not aNote.title(). It looks like you're accessing an object property by assigning a value or accessing the value. In actuality, the function defined in the class is executed on every access. You can define a read-only property by only implementing a getter, and no setter, as we did with the key field.
There are significant differences between the preceding and simply defining anonymous objects:
{
   key: 'foo', title: 'The Rain in Spain',
   body: 'Falls mainly on the plain'
}
We write code like that in JavaScript all the time. It's easy, it's quick, and it's a very fluid way to share data between functions. But there's no measure of hiding implementation details, and no clear identification of object type.
In the Note class, we could have used this constructor method:
class Note {
  constructor(key, title, body) {
     this.key = key;
     this.title = title;
     this.body = body;
 }
}
That's effectively the same as the anonymous object, in that no details have been hidden and no control is implemented in terms of which code can do what to object instances. The only advantage over an anonymous object is using the instanceof operator to identify object instances.
The method we chose uses the Symbol class, which is also new with ES-2015. A Symbol is an opaque object with two main use cases:
You define a Symbol through a factory method that generates Symbol instances:
> let symfoo = Symbol('foo')
Each time you invoke the Symbol factory method, a new and unique instance is created. For example, Symbol('foo') === Symbol('foo') is false, as is symfoo === Symbol('foo'), because a new instance is created on each side of the equality operator. However, symfoo === symfoo is true, because they are the same instance.
What this means in practice is that if we try a direct approach to access a field, it fails:
> aNote[Symbol('title')]
undefined
Remember that each time we use the Symbol factory method we get a new instance. The new instance of Symbol('title') is not the same instance used within the Note.js module.
The bottom line is that using Symbol objects for the fields provides a small measure of implementation hiding.
Create a file named notes-memory.js in the models directory, with this code:
const Note = require('./Note');

var notes = [];

exports.update = exports.create = async function(key, title, body) {
    notes[key] = new Note(key, title, body);
    return notes[key];
};

exports.read = async function(key) {
    if (notes[key]) return notes[key];
    else throw new Error(`Note ${key} does not exist`);
};

exports.destroy = async function(key) {
    if (notes[key]) {
        delete notes[key];
    } else throw new Error(`Note ${key} does not exist`);
};

exports.keylist = async function() { return Object.keys(notes); };
exports.count = async function() { return notes.length; };
exports.close = async function() { }
This is a simple in-memory data store that's fairly self-explanatory. The key for each Note instance is used as the index to an array, which in turn holds the Note instance. Simple, fast, and easy to implement. It does not support any long-term data persistence. Any data stored in this model will disappear when the server is killed.
We have used async functions because in the future we'll be storing data in the file system or in databases. Therefore, we need an asynchronous API.
The create and update functions are being handled by the same function. At this stage of the Notes application, the code for both these functions can be exactly the same because they perform the exact same operation. Later, when we add database support to Notes, the create and update functions will need to be different. For example, in a SQL data model, create would be implemented with an INSERT INTO command, while update would be implemented with an UPDATE command.
We're going to modify the starter application to support creating, editing, updating, viewing, and deleting notes. Let's start by fixing up the home page. It should show a list of notes, and the top navigation bar should link to an ADD Note page so that we can always add a new note.
While we will be modifying the generated app.js, it needs no modification to support the home page. These lines of code are related to the home page:
const index = require('./routes/index');
..
app.use('/', index);
Additionally, to support Handlebars templates app.js requires these changes:
const hbs = require('hbs');
...
app.set('view engine', 'hbs');
hbs.registerPartials(path.join(__dirname, 'partials'));
We'll put Handlebars partials in a directory, partials, which is a sibling to the views directory. Change routes/index.js to this:
const express = require('express');
const router = express.Router();
const notes = require('../models/notes-memory');

/* GET home page. */
router.get('/', async (req, res, next) => {
  let keylist = await notes.keylist();
  let keyPromises = keylist.map(key => {
    return notes.read(key)
  });
  let notelist = await Promise.all(keyPromises);
  res.render('index', { title: 'Notes', notelist: notelist });
});

module.exports = router;
This gathers data about the notes that we'll be displaying on the home page. By default, we'll show a simple table of note titles. We do need to talk about the technique.
The Promise.all function executes an array of Promises. The Promises are evaluated in parallel, allowing our code to potentially make parallel requests to a service. This should execute more quickly than making the requests one at a time sequentially.
We could have written a simple for loop like so:
let keylist = await notes.keylist();
let notelist = [];
for (key of keylist) {
    let note = await notes.read(keylist);
    notelist.push({ key: note.key, title: note.title });
}
While simpler to read, the notes are retrieved one at a time with no opportunity to overlap read operations.
The Promise array is constructed using the map function. With map, one iterates over an array to produce a new array. In this case, the new array contains the Promises generated by the notes.read function calls.
Because we wrote await Promise.all, the notelist array will be completely filled with the correct data once all the Promises succeed. If any Promise fails—is rejected, in other words—an exception will be thrown instead. What we've done is enqueue a list of asynchronous operations and neatly waited for them all to finish.
The notelist array is then passed into the view templates we're about to write.
Start with views/layout.hbs, containing:
<!DOCTYPE html>
<html>
 <head>
 <title>{{title}}</title>
 <link rel='stylesheet' href='/stylesheets/style.css' />
 </head>
  <body>
  {{> header }}
  {{{body}}}
  </body>
</html>
This is the generated file, with the addition of a partial for the page header. We already declared partials to live in the partials directory. Create partials/header.hbs, containing:
<header>
 <h1>{{ title }}</h1>
  <div class='navbar'>
  <p><a href='/'>Home</a> | <a href='/notes/add'>ADD Note</a></p>
  </div>
</header>
Change views/index.hbs to this:
{{#each notelist}}
<ul>
  <li>{{ key }}:
  <a href="/notes/view?key={{ key }}">{{ title }}</a>
  </li>
</ul>
{{/each}}
This simply steps through the array of note data and formats a simple listing. Each item links to the /notes/view URL with a key parameter. We have yet to look at that code, but this URL will obviously display the note. Another thing of note is that no HTML for the list is generated if the notelist is empty.
There's of course a whole lot more that could be put into this. For example, it's easy to add jQuery support to every page just by adding the appropriate script tags here.
We now have enough written to run the application; let's view the home page:
$ DEBUG=notes:* npm start

> notes@0.0.0 start /Users/David/chap05/notes
> node ./bin/www

  notes:server Listening on port 3000 +0ms
GET / 200 87.300 ms - 308
GET /stylesheets/style.css 200 27.744 ms - 111
If we visit http://localhost:3000, we will see the following page:

Because there aren't any notes (yet), there's nothing to show. Clicking on the Home link just refreshes the page. Clicking on the ADD Note link throws an error because we haven't (yet) implemented that code. This shows that the provided error handler in app.js is performing as expected.
Now, let's look at creating notes. Because the application doesn't have a route configured for the /notes/add URL, we must add one. To do that, we need a controller for the notes.
In app.js, make the following changes.
Comment out these lines:
// var users = require('./routes/users');
..
// app.use('/users', users);
At this stage, the Notes application does not support users, and these routes are not required. That will change in a future chapter.
What we really need to do is add code for the notes controller:
// const users = require('./routes/users');
const notes = require('./routes/notes');
..
// app.use('/users', users);
app.use('/notes', notes);
Now, we'll add a Controller module containing the notes router. Create a file named routes/notes.js, with this content:
const util = require('util');
const express = require('express');
const router = express.Router();
const notes = require('../models/notes-memory');
// Add Note.
router.get('/add', (req, res, next) => {
res.render('noteedit', {
title: "Add a Note",
docreate: true,
notekey: "", note: undefined
});
});
module.exports = router;
The resulting /notes/add URL corresponds to the link in partials/header.hbs.
In the views directory, add a template named noteedit.hbs, containing the following:
<form method='POST' action='/notes/save'>
<input type='hidden' name='docreate' value='<%=
docreate ? "create" : "update"%>'>
<p>Key:
{{#if docreate }}
<input type='text' name='notekey' value=''/>
{{else}}
{{#if note }}{{notekey}}{{/if}}
<input type='hidden' name='notekey'
value='{{#if note }}{{notekey}}{{/if}}'/>
{{/if}}
</p>
<p>Title: <input type='text' name='title'
value='{{#if note }}{{note.title}}{{/if}}' /></p>
<br/><textarea rows=5 cols=40 name='body' >
{{#if note }}{{note.body}}{{/if}}
</textarea>
<br/><input type='submit' value='Submit' />
</form>
We'll be reusing this template to support both editing notes and creating new ones.
Notice that the note and notekey objects passed to the template are empty in this case. The template detects this condition and ensures the input areas are empty. Additionally, a flag, docreate, is passed in so that the form records whether it is being used to create or update a note. At this point, we're adding a new note, so no note object exists. The template code is being written defensively to not throw errors.
This template is a form that will POST its data to the /notes/save URL. If you were to run the application at this time, it would give you an error message because no route is configured for that URL.
To support the /notes/save URL, add this to routes/notes.js:
// Save Note (update)
router.post('/save', async (req, res, next) => {
var note;
if (req.body.docreate === "create") {
note = await notes.create(req.body.notekey,
req.body.title, req.body.body);
} else {
note = await notes.update(req.body.notekey,
req.body.title, req.body.body);
}
res.redirect('/notes/view?key='+ req.body.notekey);
});
Because this URL will also be used for both creating and updating notes, it needs to detect the docreate flag and call the appropriate model operation.
The model returns a Promise for both notes.create and notes.update. Of course, we must call the corresponding Model function based on the docreate flag.
This is a POST operation handler. Because of the bodyParser middleware, the form data is added to the req.body object. The fields attached to req.body correspond directly to elements in the HTML form.
Now, we can run the application again and use the Add a Note form:
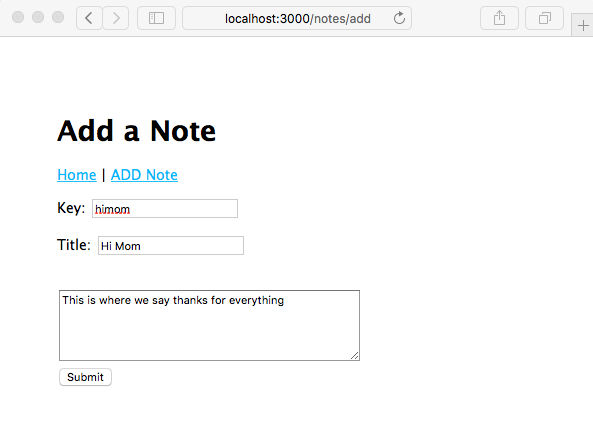
But upon clicking on the Submit button, we get an error message. There isn't anything, yet, implementing the /notes/view URL.
You can modify the URL in the location box to revisit http://localhost:3000, and you'll see something like the following screenshot on the home page:
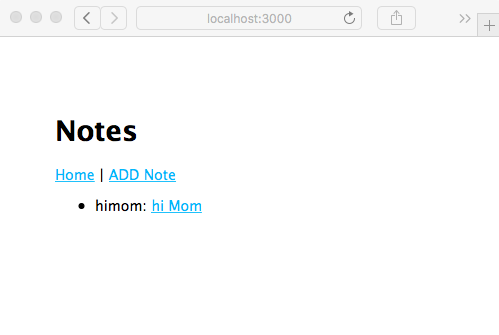
The note is actually there; we just need to implement /notes/view. Let's get on with that.
Now that we've looked at how to create notes, we need to move on to reading them. This means implementing controller logic and view templates for the /notes/view URL.
To routes/notes.js, add this router function:
// Read Note (read)
router.get('/view', async (req, res, next) => {
var note = await notes.read(req.query.key);
res.render('noteview', {
title: note ? note.title : "",
notekey: req.query.key, note: note
});
});
Because this route is mounted on a router handling /notes, this route handles /notes/view.
If notes.read successfully reads the note, it is rendered with the noteview template. If something goes wrong, we'll instead display an error to the user through Express.
To the views directory, add the noteview.hbs template, referenced by this code:
{{#if note}}<h3>{{ note.title }}</h3>{{/if}}
{{#if note}}<p>{{ note.body }}</p>{{/if}}
<p>Key: {{ notekey }}</p>
{{#if notekey }}
<hr/>
<p><a href="/notes/destroy?key={{notekey}}">Delete</a>
| <a href="/notes/edit?key={{notekey}}">Edit</a></p>
{{/if}}
This is straightforward: taking data out of the note object and displaying using HTML. At the bottom are two links, one to /notes/destroy to delete the note and the other to /notes/edit to edit it.
The code for neither of these exists at the moment. But that won't stop us from going ahead and executing the application:
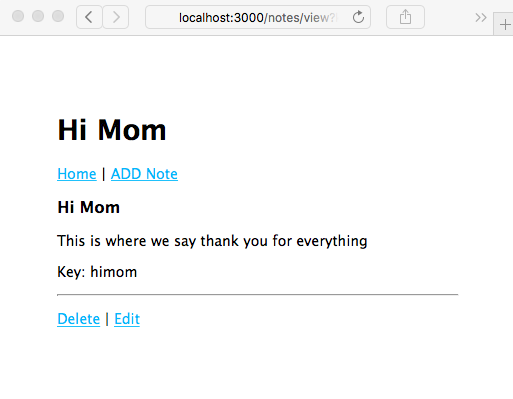
As expected, with this code, the application correctly redirects to /notes/view, and we can see our handiwork. Also, as expected, clicking on either the Delete or Edit links will give you an error, because the code hasn't been implemented.
Now that we've looked at the create and read operations, let's look at how to update or edit a note.
To routes/notes.js, add this router function:
// Edit note (update)
router.get('/edit', async (req, res, next) => {
var note = await notes.read(req.query.key);
res.render('noteedit', {
title: note ? ("Edit " + note.title) : "Add a Note",
docreate: false,
notekey: req.query.key, note: note
});
});
We're reusing the noteedit.ejs template, because it can be used for both create and update/edit operations. Notice that we pass false for docreate, informing the template that it is to be used for editing.
In this case, we first retrieve the note object and then pass it through to the template. This way, the template is set up for editing rather than note creation. When the user clicks on the Submit button, we'll end up in the same /notes/save route handler shown in the preceding screenshot. It already does the right thing: calling the notes.update method in the model rather than notes.create.
Because that's all we need do, we can go ahead and rerun the application:
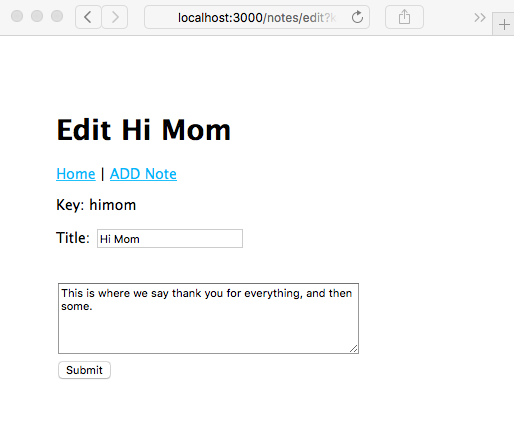
Click on the Submit button here, and you will be redirected to the /notes/view screen and will then be able to read the newly edited note. Back to the /notes/view screen: we've just taken care of the Edit link, but the Delete link still produces an error.
Now, let's look at how to implement the /notes/destroy URL to delete notes.
To routes/notes.js, add the following router function:
// Ask to Delete note (destroy)
router.get('/destroy', async (req, res, next) => {
var note = await notes.read(req.query.key);
res.render('notedestroy', {
title: note ? note.title : "",
notekey: req.query.key, note: note
});
});
Destroying a note is a significant step if only because there's no trash can to retrieve it from if we make a mistake. Therefore, we want to ask the user whether they're sure they want to delete that note. In this case, we retrieve the note and then render the following page, displaying a question to ensure they do want to delete the note.
To the views directory, add a notedestroy.hbs template:
<form method='POST' action='/notes/destroy/confirm'>
<input type='hidden' name='notekey' value='{{#if note}}{{notekey}}{{/if}}'>
<p>Delete {{note.title}}?</p>
<br/><input type='submit' value='DELETE' />
<a href="/notes/view?key={{#if note}}{{notekey}}{{/if}}">Cancel</a>
</form>
This is a simple form, asking the user to confirm by clicking on the button. The Cancel link just sends them back to the /notes/view page. Clicking on the Submit button generates a POST request on the /notes/destroy/confirm URL.
That URL needs a request handler. Add this code to routes/notes.js:
// Really destroy note (destroy)
router.post('/destroy/confirm', async (req, res, next) => {
await notes.destroy(req.body.notekey);
res.redirect('/');
});
This calls the notes.destroy function in the model. If it succeeds, the browser is redirected to the home page. If not, an error message is shown to the user. Rerunning the application, we can now view it in action:
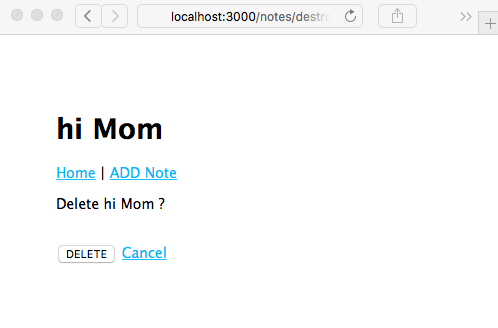
Now that everything is working in the application, you can click on any button or link and keep all the notes you want.
The Express team has done a decent job of making sure Express applications look okay out of the gate. Our Notes application won't win any design awards, but at least it isn't ugly. There's a lot of ways to improve it, now that the basic application is running. Let's take a quick look at theming an Express application. In Chapter 6, Implementing the Mobile-First Paradigm, we'll take a deeper dive, focusing on that all-important goal of addressing the mobile market.
If you're running the Notes application using the recommended method, npm start, a nice log of activity is being printed in your console window. One of those is the following:
GET /stylesheets/style.css 304 0.702 ms - -
This is due to this line of code that we put in layout.hbs:
<link rel='stylesheet' href='/stylesheets/style.css' />
This file was autogenerated for us by the Express Generator at the outset and dropped inside the public directory. The public directory is managed by the Express static file server, using this line in app.js:
app.use(express.static(path.join(__dirname, 'public')));
Let's open public/stylesheets/style.css and take a look:
body {
padding: 50px;
font: 14px "Lucida Grande", Helvetica, Arial, sans-serif;
}
a {
color: #00B7FF;
}
Something that leaps out is that the application content has a lot of white space at the top and left-hand sides of the screen. The reason is that body tags have the padding: 50px style. Changing it is quick business.
Since there is no caching in the Express static file server, we can simply edit the CSS file and reload the page, and the CSS will be reloaded as well. It's possible to turn on cache-control headers and ETags generation, as you would do for a production website. Look in the online Express documentation for details.
It involves a little bit of work:
body {
padding: 5px;
..
}
..
header {
background: #eeeeee;
padding: 5px;
}
As a result, we'll have this:
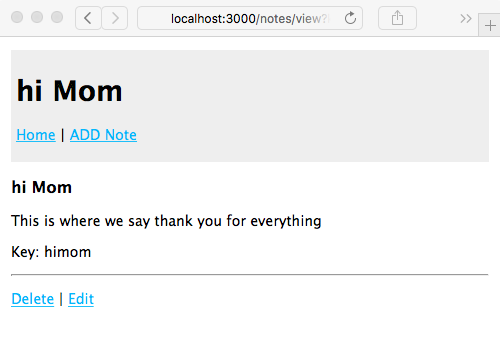
We're not going to win any design awards with this either, but there's the beginning of some branding and theming possibilities.
Generally speaking, the way we've structured the page templates, applying a site-wide theme is just a matter of adding appropriate code to layout.hbs along with appropriate stylesheets and other assets. Many of the modern theming frameworks, such as Twitter's Bootstrap, serve up CSS and JavaScript files out of a CDN server, making it incredibly easy to incorporate into a site design.
For jQuery, refer to http://jquery.com/download/.
Google's Hosted Libraries service provides a long list of libraries, hosted on Google's CDN infrastructure. Refer to https://developers.google.com/speed/libraries/.
While it's straightforward to use third-party CDNs to host these assets, it's safer to host them yourself. Not only do you take responsibility for bandwidth consumption of your application, but you're certain of not being affected by any outages of third-party services. As reliable as Google might be, their service can go down, and if that means jQuery and Bootstrap doesn't load, your customer will think your site is broken. But if those files are loaded from the same server as your application, the reliability of delivering those files will exactly equal the reliability of your application.
In Chapter 6, Implementing the Mobile-First Paradigm, we will look at a simple method to add those front-end libraries to your application.
Now that we've got ourselves a running application, you'll have played around a bit and created, read, updated, and deleted many notes.
Suppose for a moment this isn't a toy application, but one that is interesting enough to draw a million users a day. Serving a high load typically means adding servers, load balancers, and many other things. A core part is to have multiple instances of the application running at the same time to spread the load.
Let's see what happens when you run multiple instances of the Notes application at the same time.
The first thing is to make sure the instances are on different ports. In bin/www, you'll see that setting the PORT environment variable controls the port being used. If the PORT variable is not set, it defaults to http://localhost:3000, or what we've been using all along.
Let's open up package.json and add these lines to the scripts section:
"scripts": {
"start": "DEBUG=notes:* node ./bin/www",
"server1": "DEBUG=notes:* PORT=3001 node ./bin/www",
"server2": "DEBUG=notes:* PORT=3002 node ./bin/www" },
The server1 script runs on PORT 3001, while the server2 script runs on PORT 3002. Isn't it nice to have all this documented in one place?
Then, in one command window, run this:
$ npm run server1
> notes@0.0.0 server1 /Users/David/chap05/notes
> DEBUG=notes:* PORT=3001 node ./bin/www
notes:server Listening on port 3001 +0ms
In another command window, run this:
$ npm run server2
> notes@0.0.0 server2 /Users/David/chap05/notes
> DEBUG=notes:* PORT=3002 node ./bin/www
notes:server Listening on port 3002 +0ms
This gives us two instances of the Notes application. Use two browser windows to visit http://localhost:3001 and http://localhost:3002. Enter a couple of notes, and you might see something like this:
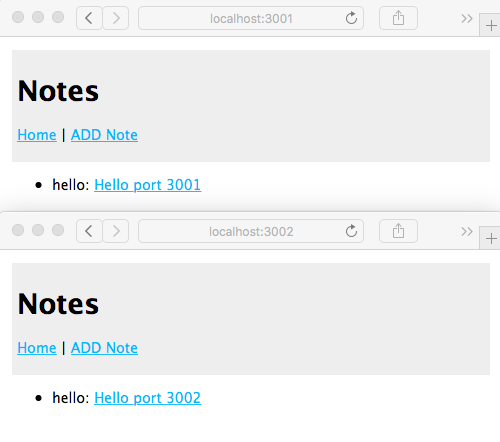
After editing and adding some notes, your two browser windows could look like the preceding screenshot. The two instances do not share the same data pool. Each is instead running in its own process and memory space. You add a note in one, and it does not show in the other screen.
Additionally, because the model code does not persist data anywhere, the notes are not saved. You might have written the greatest Node.js programming book of all time, but as soon as the application server restarts, it's gone.
Typically, you run multiple instances of an application to scale performance. That's the old throw more servers at it trick. For this to work, the data of course must be shared, and each instance must access the same data source. Typically, this involves a database. And when it comes to user identity information, it might even entail armed guards.
Hold on—we'll get to database implementation shortly. Before that, we'll cover mobile-first development.
We've come a long way in this chapter.
We started with the Pyramid of Doom and how the Promise object and async functions can help us a tame asynchronous code. We'll be using these techniques all through this book.
We quickly moved on to writing the foundation of a real application with Express. At the moment, it keeps its data in memory, but it has the basic functionality of what will become a note-taking application supporting real-time collaborative commenting on the notes.
In the next chapter, we'll dip our toes in the water of responsive, mobile-friendly web design. Due to the growing popularity of mobile computing devices, it's become necessary to address mobile devices first before desktop computer users. In order to reach those millions of users a day, the Notes application users need a good user experience when using their smartphone.
In following chapters, we'll keep growing the capabilities of the Notes application, starting with database storage models.
Now that our first Express application is usable, we act on the mantra of this age of software development: mobile-first. Mobile devices, whether they be smartphones, tablet computers, automobile dashboards, refrigerator doors, or bathroom mirrors, are taking over the world.
Another issue is mobile-first indexing, meaning that search engines are starting to preference indexing the mobile version of a website. Search engines so far concentrated on indexing the desktop version of websites, but the growing popularity of mobile devices means search engine results are skewed away from what folks are using. Google says it is not fair to mobile users if the search result, which was derived from the desktop version, does not match the mobile version of a website. For Google's take, including technical tips on the markup to use, see http://webmasters.googleblog.com/2017/12/getting-your-site-ready-for-mobile.html.
The primary considerations in designing for mobiles are the small screen sizes, the touch-oriented interaction, that there's no mouse, and the somewhat different user interface expectations. With the Notes application, our user interface needs are modest, and the lack of a mouse doesn't make any difference to us.
In this chapter, we won't do much Node.js development. Instead, we'll:
By doing so, we'll dip our toes in the water of what it means to be a full stack web engineer.
Let's start by quantifying the problem. We need to explore how well (or not) the application behaves on a mobile device. This is simple to do:
Another way to approach this is to use your desktop browser, resizing it to be very narrow. The Chrome DevTools also includes a mobile device emulator. Either way, you can mimic the small screen size of a smartphone on your desktop.
To see a real user interface problem on a mobile screen, edit views/noteedit.ejs and change this line:
<br/><textarea rows=5 cols=80 name='body' >
{{#if note }}{{note.body}}{{/if}}
</textarea>
What's changed is the cols=80 parameter. We want this textarea element to be overly large so that you can experience how a non-responsive web app appears on a mobile device. View the application on a mobile device and you'll see something like one of the screens in this screenshot:
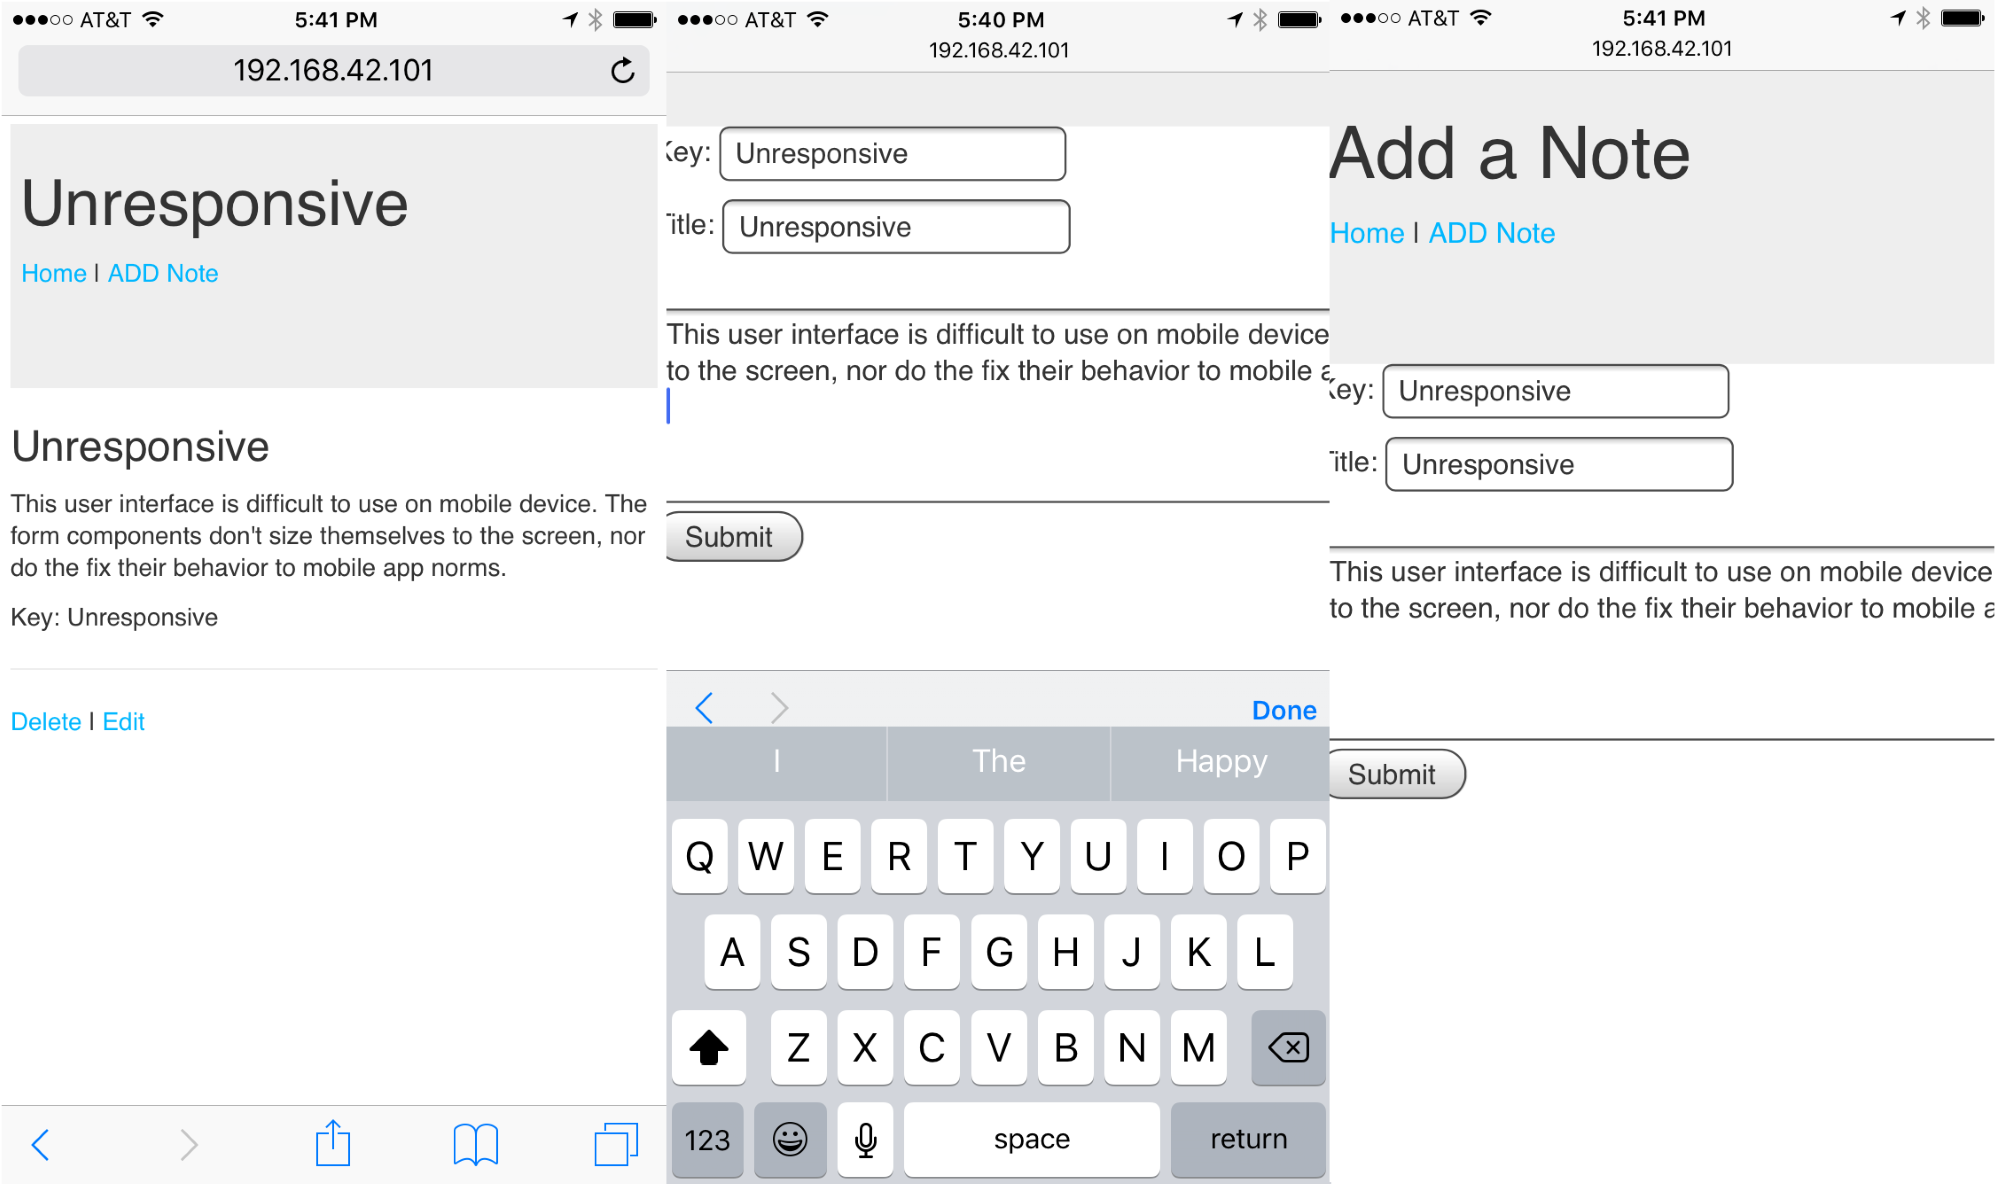
Viewing a note works well on an iPhone 6, but the screen for editing/adding a note is not good. The text entry area is so wide that it runs off the side of the screen. Even though interaction with FORM elements work well, it's clumsy. In general, browsing the Notes application gives an acceptable mobile user experience that doesn't suck and won't make our users give rave reviews.
Mobile devices have a smaller screen, are generally touch oriented, and have different user experience expectations than a desktop computer.
To accommodate smaller screens, we use responsive web design techniques. This means designing the application to accommodate the screen size and ensuring websites provide optimal viewing and interaction across a wide range of devices. Techniques include changing font sizes, rearranging elements on the screen, using collapsible elements that open when touched, and resizing images or videos to fit available space. This is called responsive because the application responds to device characteristics by making these changes.
The primary technique is using media queries in stylesheets to detect device characteristics. Each media query section targets a range of devices, using CSS declaration to appropriately restyle content.
Let's consult a concrete example. The Twenty Twelve theme for Wordpress has a straightforward responsive design implementation. It's not built with any framework, so you can see clearly how the mechanism works, and the stylesheet is small enough to be easily digestible. Refer to its source code in the Wordpress repository at https://themes.svn.wordpress.org/twentytwelve/1.9/style.css.
The stylesheet starts with a number of resets, where the stylesheet overrides some typical browser style settings with clear defaults. Then, the bulk of the stylesheet defines styling for mobile devices. Toward the bottom of the stylesheet is a section labeled Media queries where, for certain sized screens, the styles defined for mobile devices are overridden to work on devices with larger screens.
It does this with the following two media queries:
@media screen and (min-width: 600px) { /* Screens above 600px width */ }
@media screen and (min-width: 960px) { /* Screens above 960px width */ }
The first segment of the stylesheet configures the page layout for all devices. Next, for any browser viewport at least 600px wide, reconfigure the page to display on the larger screen. Then, for any browser viewport at least 960px wide, reconfigure it again. The stylesheet has a final media query to cover print devices.
These widths are what's called a breakpoint. Those threshold viewport widths are where the design changes itself around. You can see breakpoints in action by going to any responsive website, then resizing the browser window. Watch how the design jumps at certain sizes. Those are the breakpoints chosen by the author of that website.
There's a wide range of differing opinions about the best strategy to choose your breakpoints. Do you target specific devices or do you target general characteristics? The Twenty Twelve theme did fairly well on mobile devices using only two viewport-size media queries. The CSS-Tricks blog has posted an extensive list of specific media queries for every known device, which is available at https://css-tricks.com/snippets/css/media-queries-for-standard-devices/.
We should at least target these devices:
Enough with the theory; let's get back to our code.
Bootstrap is a mobile-first framework consisting of HTML5, CSS3, and JavaScript code providing a comprehensive set of world class, responsive web design components. It was developed by engineers at Twitter and then released to the world in August 2011.
The framework includes code to retrofit modern features onto older browsers, a responsive 12-column grid system, and a long list of components (some using JavaScript) for building web applications and websites. It's meant to provide a strong foundation on which to build your application.
Refer to http://getbootstrap.com for more details.
The first step is to duplicate the code you created in the previous chapter. If, for example, you created a directory named chap05/notes, then create one named chap06/notes from the content of chap05/notes.
Now, we need to go about adding Bootstrap's code in the Notes application. The Bootstrap website suggests loading the required CSS and JavaScript files out of the Bootstrap (and jQuery) public CDN. While that's easy to do, we won't do this for two reasons:
Instead, we'll install a local copy of Bootstrap. There are several ways to install Bootstrap. For example, the Bootstrap website offers a downloadable TAR/GZIP archive (tarball). The better approach is an automated dependency management tool.
The most straightforward choice is using Bootstrap (https://www.npmjs.com/package/bootstrap), popper.js (https://www.npmjs.com/package/popper.js), and jQuery (https://www.npmjs.com/package/jquery) packages in the npm repository. These packages provide no Node.js modules, and instead are frontend code distributed through npm.
We install the packages using the following command:
$ npm install bootstrap@4.1.x --save
npm notice created a lockfile as package-lock.json. You should commit this file.
npm WARN bootstrap@4.1.0 requires a peer of jquery@1.9.1 - 3 but none is installed. You must install peer dependencies yourself.
npm WARN bootstrap@4.1.0 requires a peer of popper.js@^1.14.0 but none is installed. You must install peer dependencies yourself.
+ bootstrap@4.1.0
added 1 package in 1.026s
$ npm install jquery@1.9.x --save
+ jquery@1.9.1
$ npm install popper.js@1.14.x --save
+ popper.js@1.14.0
As we see here, when we install Bootstrap, it helpfully tells us the corresponding versions of jQuery and popper.js to use. Therefore, we dutifully install those versions. What's most important is to see what got downloaded:
$ ls node_modules/bootstrap/dist/*
... directory contents
$ ls node_modules/jquery/
... directory contents
$ ls node_modules/popper.js/dist
... directory contents
Within each of these directories are the CSS and JavaScript files that are meant to be used in the browser. More importantly, these files are located in a given directory whose pathname is known—specifically, the directories we just inspected. Let's see how to configure our Express app to use those three packages on the browser side.
On the Bootstrap website, they give a recommended HTML structure. We'll be interpolating from their recommendation to use Bootstrap code provided through the CDN to instead use the local copies of Bootstrap, jQuery, and Popper that we just installed. Refer to the Getting started page at http://getbootstrap.com/docs/4.0/getting-started/introduction/.
What we'll do is modify views/layout.hbs to match their recommended template:
<!doctype html>
<html lang="en">
<head>
<title>{{title}}</title>
<meta charset="utf-8">
<meta name="viewport"
content="width=device-width, initial-scale=1, shrink-to-
fit=no">
<link rel="stylesheet"
href="/assets/vendor/bootstrap/css/bootstrap.min.css">
<link rel='stylesheet' href='/assets/stylesheets/style.css' />
</head>
<body>
{{> header }}
{{{body}}}
<!-- jQuery first, then Popper.js, then Bootstrap JS -->
<script src="/assets/vendor/jquery/jquery.min.js"></script>
<script src="/assets/vendor/popper.js/popper.min.js"></script>
<script src="/assets/vendor/bootstrap/js/bootstrap.min.js"></script>
</body>
</html>
This is largely the template shown on the Bootstrap site, incorporating the previous content of views/layout.hbs. Our own stylesheet is loaded following the Bootstrap stylesheet, giving us the opportunity to override anything in Bootstrap we want to change. What's different is that instead of loading Bootstrap, popper.js, and jQuery packages from their respective CDNs, we use the path /assets/vendor/product-name instead.
This /assets/vendor URL is not currently recognized by the Notes application. To add this support, edit app.js to add these lines:
app.use(express.static(path.join(__dirname, 'public')));
app.use('/assets/vendor/bootstrap', express.static(
path.join(__dirname, 'node_modules', 'bootstrap', 'dist')));
app.use('/assets/vendor/jquery', express.static(
path.join(__dirname, 'node_modules', 'jquery')));
app.use('/assets/vendor/popper.js', express.static(
path.join(__dirname, 'node_modules', 'popper.js', 'dist')));
Within the public directory, we have a little house-keeping to do. When express-generator set up the initial project, it generated public/images, public/javascripts, and public/stylesheets directories. We want each to be within the /assets directory, so do this:
$ mkdir public/assets
$ mv public/images/ public/javascripts/ public/stylesheets/ public/assets/
We now have our asset files, including Bootstrap, popper.js, and jQuery, all available to the Notes application under the /assets directory. The page layout refers to these assets and should give us the default Bootstrap theme:
$ npm start
> notes@0.0.0 start /Users/David/chap06/notes
> DEBUG=notes:* node ./bin/www
notes:server Listening on port 3000 +0ms
GET / 200 306.660 ms - 883
GET /stylesheets/style.css 404 321.057 ms - 2439
GET /assets/stylesheets/style.css 200 160.371 ms - 165
GET /assets/vendor/bootstrap/js/bootstrap.min.js 200 157.459 ms - 50564
GET /assets/vendor/popper.js/popper.min.js 200 769.508 ms - 18070
GET /assets/vendor/jquery/jquery.min.js 200 777.988 ms - 92629
GET /assets/vendor/bootstrap/css/bootstrap.min.css 200 788.028 ms - 127343
The on-screen differences are minor, but this is the proof necessary that the CSS and JavaScript files for Bootstrap are being loaded. We have accomplished the first major goal—using a modern, mobile-friendly framework to implement a mobile-first design.
Bootstrap isn't the only JavaScript/CSS framework providing a responsive layout and useful components. We're using Bootstrap in this project because of its popularity. These frameworks are worthy of a look:
HTML5 Boilerplate (https://html5boilerplate.com/) is an extremely useful basis from which to code the HTML and other assets. It contains the current best practices for the HTML code in web pages, as well as tools to normalize CSS support and configuration files for several web servers.
Other new technologies impacting web application development are two new CSS layout methodologies. The CSS3 committee has been working on several fronts, including page layout.
In the distant past, we used nested HTML tables for page layout. That is a bad memory that we don't have to revisit. More recently, we've been using a box model using DIVs, and even at times using absolute or relative placement techniques. All these techniques have been suboptimal in several ways, some more than others.
One popular layout technique is to divide the horizontal space into columns and assign a certain number of columns to each thing on the page. With some frameworks, we can even have nested DIVs, each with their own set of columns. Bootstrap 3, and other modern frameworks, used that layout technique.
The two new CSS layout methodologies, Flexbox (https://en.wikipedia.org/wiki/CSS_flex-box_layout) and CSS Grids (https://developer.mozilla.org/en-US/docs/Web/CSS/CSS_Grid_Layout), are a significant improvement over all previous methodologies. We are mentioning these technologies because they're both worthy of attention. Both are somewhat early in their adoption curve—they've been standardized by committees and adopted in the latest browsers, but of course there are a lot of old browsers in the field.
With Bootstrap 4, the Bootstrap team chose to go with Flexbox. Therefore, under the hood are Flexbox CSS constructs.
We've learned about the basics of responsive design and Bootstrap, and we hooked the Bootstrap framework into our application. Now we're ready to launch a redesign of the application so that it works well on mobile devices.
Bootstrap uses a 12-column grid system to control layout, giving applications a responsive mobile-first foundation on which to build. It automatically scales components as the viewport changes size or shape. The method relies on <div> elements with classes to describe the role each <div> plays in the layout.
The basic layout pattern is as follows:
<div class="container-fluid">
<div class="row">
<div class="col-sm-3">Column 1 content</div> <!-- 25% -->
<div class="col-sm-9">Column 2 content</div> <!-- 75% -->
</div>
<div class="row">
<div class="col-sm-3">Column 1 content</div> <!-- 25% -->
<div class="col-sm-6">Column 2 content</div> <!-- 50% -->
<div class="col-sm-3">Column 3 content</div> <!-- 25% -->
</div>
</div>
The outermost layer is the .container or .container-fluid element. Containers provide a means to center or horizontally pad the content. Containers marked as .container-fluid act as if they have width: 100%, meaning they expand to fill the horizontal space.
A .row is what it sounds like, a "row". Technically, a row is a wrapper for columns. Containers are wrappers for rows, and rows are wrappers for columns, and columns contain the stuff displayed to our users. Got that?
Columns are marked with variations of the .col class. With the basic column class, .col, the columns divide equally into the available space. You can specify a numerical column count to assign different widths to each column. Bootstrap supports up to 12 numbered columns, hence each row in the example adds up to 12 columns.
You can also specify a breakpoint to which the column applies:
Specifying a breakpoint, for example col-sm, means that it applies to devices matching that breakpoint, or larger. Hence, in the example shown earlier, the column definitions applied to col-sm, col-md, col-lg, and col-xl devices, but not to col-xs devices.
The column count is appended to the class name. That means using col-# when not targeting a breakpoint, for example, col-4, or col-{breakpoint}-# when targeting a breakpoint, for example, col-md-4. If the columns add up to more than 12, the columns beyond the twelfth column wrap around to become a new row. The word auto can be used instead of a numerical column count to size the column to the natural width of its content.
It's possible to mix and match to target multiple breakpoints:
<div class="container-fluid">
<div class="row">
<div class="col-xs-9 col-md-3 col-lg-6">Column 1 content</div>
<div class="col-xs-3 col-md-9 col-lg-6">Column 2 content</div>
</div>
...
</div>
This declares three different layouts, one for extra-small devices, another for medium devices, and the last for large devices. This gives us enough to start modifying the Notes application. The grid system can do a lot more. For details, see the documentation: http://getbootstrap.com/docs/4.0/layout/grid/.
We structured each of the page layouts as follows:
<!DOCTYPE html> <html> <head> .. headerStuff </head> <body> .. pageHeader .. main content
.. bottomOfPageStuff </body> </html>
The page content therefore has two visible rows: the header and the main content. At the bottom of the page are invisible things like the JavaScript files for Bootstrap and jQuery.
No change is required in views/layout.hbs. One might think the container-fluid wrapper would be in that file, with the rows and columns specified in the other templates. Instead, we'll do it in the templates to give us the most layout freedom.
The world around us isn't constructed of words, but instead things. Hence, a pictorial style, as icons, should help computer software to be more comprehensible. Giving a good user experience should make our users reward us with more likes in the app store.
There are several icon libraries that can be used in a website. The Bootstrap team has a curated list at http://getbootstrap.com/docs/4.1/extend/icons/. For this project, we'll use Feather Icons (https://feathericons.com/) and its conveniently available npm package, https://www.npmjs.com/package/feather-icons.
In package.json, add this to the dependencies:
"feather-icons": ">=4.5.x"
Then run npm install to download the new package. You can then inspect the downloaded package and see that ./node_modules/feather-icons/dist/feather.js contains browser-side code, making it easy to use the icons.
We make that directory available by mounting it in app.js, just as we did for Bootstrap and jQuery libraries. Add this code to app.js:
app.use('/assets/vendor/feather-icons', express.static(
path.join(__dirname, 'node_modules', 'feather-icons', 'dist')));
Going by the documentation, we must put this at the bottom of views/layout.hbs to enable feather-icons support:
<script src="/assets/vendor/feather-icons/feather.js"></script>
<script>
feather.replace();
</script>
To use one of the icons, use a data-feather attribute specifying one of the icon names, like so:
<i data-feather="circle"></i>
What's important is the data-feather attribute, which the Feather Icons library uses to identify the SVG file to use. The Feather Icons library completely replaces the element where it found the data-feather attribute. Therefore, if you want the icon to be a clickable link, it's necessary to wrap the icon definition with an <a> tag, rather than adding data-feather to the <a> tag. The next section shows an example.
The header section we designed before contains a page title and a little navigation bar. Bootstrap has several ways to spiff this up, and even give us a responsive navigation bar which neatly collapses to a menu on small devices.
In views/pageHeader.ejs, make this change:
<header class="page-header">
<h1>{{ title }}</h1>
<nav class="navbar navbar-expand-md navbar-dark bg-dark">
<a class="navbar-brand" href='/'><i data-feather="home"></i></a>
<button class="navbar-toggler" type="button"
data-toggle="collapse" data-target="#navbarSupportedContent"
aria-controls="navbarSupportedContent"
aria-expanded="false" aria-label="Toggle navigation">
<span class="navbar-toggler-icon"></span>
</button>
<div class="collapse navbar-collapse" id="navbarSupportedContent">
<div class="navbar-nav col">
{{#if breadcrumb}}
<a class="nav-item nav-link" href='{{breadcrumb.url}}'>
{{breadcrumb.title}}</a>
{{/if}}
</div>
<a class="nav-item nav-link btn btn-light col-auto"
href='/notes/add'>ADD Note</a>
</div>
</nav>
</header>
Adding class="page-header" informs Bootstrap this is, well, the page header. Within that we have the <h1> header as before, giving the page title, and then a responsive Bootstrap navbar.
By default the navbar is expanded—meaning the components inside the navbar are visible—because of the navbar-expand-md class. This navbar is using a navbar-toggler button which governs the responsiveness of the navbar. By default, this button is hidden and the body of the navbar is visible. If the screen is small enough, the navbar-toggler is switched so it's visible, the body of the navbar is invisible, and when clicking on the now-visible navbar-toggler, a menu drops down containing the body of the navbar:
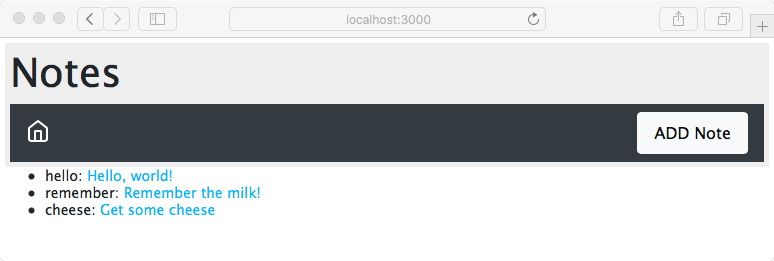
We chose the feather icons home icon because it says go home. It's intended that the middle portion of the navbar will contain a breadcrumb as we navigate around the Notes application.
The ADD Note button is glued to the right-hand-side with a little Flexbox magic. The container is a Flexbox, meaning we can use the Bootstrap classes to control the space consumed by each item. The breadcrumb area is empty in this case, but the <div> that would contain it is there and declared with class="col", meaning that it takes up a column unit. The ADD Note button is, on the other hand, declared with class="col-auto", meaning it takes up only the room required for itself. It is the empty breadcrumb area that will expand to fill the space, while the ADD Note button fills only its own space, and is therefore pushed over to the side.
Because it's the same application, the functionality all works; we're simply working on the presentation. We've added a few notes but the presentation of the list on the front page leaves a lot to be desired. The small size of the title is not very touch-friendly, since it doesn't present a large target area for a fingertip. And can you explain why the notekey value has to be displayed on the home page?
The current home page has a simple text list that's not terribly touch-friendly and showing the key at the front of the line might be inexplicable to the user. Let's fix this.
Edit views/index.hbs and make this change:
<div class="container-fluid">
<div class="row">
<div class="col-12 btn-group-vertical" role="group">
{{#each notelist}}
<a class="btn btn-lg btn-block btn-outline-dark"
href="/notes/view?key={{ key }}">{{ title }}</a>
{{/each}}
</div>
</div>
</div>
The first change is to switch away from using a list and to use a vertical button group. By making the text links look and behave like buttons, we're improving the user interface, especially its touch friendliness. We chose the btn-outline-dark button style because it looks good in the user interface. We use large buttons (btn-lg) that fill the width of the container (btn-block).
We eliminated showing the notekey to the user. This information doesn't add anything to the user experience:
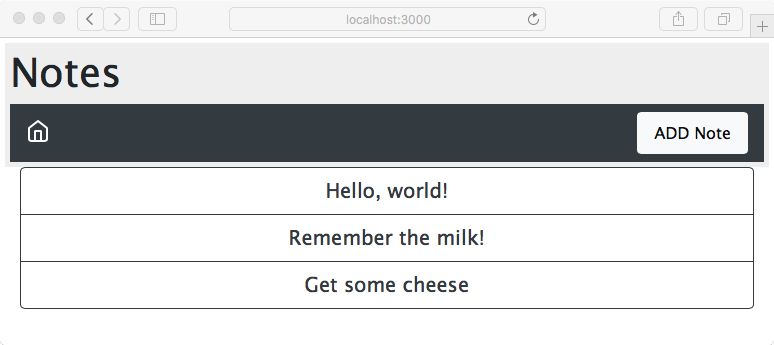
This is beginning to take shape, with a decent-looking home page that handles resizing very nicely and is touch friendly.
There's still something more to do with this, since the header area is taking up a fair amount of space. We should always feel free to rethink a plan as we look at intermediate results. Earlier, we created one design for the header area, but on reflection that design looks to be too large. The intention had been to insert a breadcrumb just to the right of the home icon, and to leave the <h1> title at the top of the header area. But this is taking up vertical space and we can tighten up the header and possibly improve the appearance.
Edit partials/header.hbs and replace it with the following:
<header class="page-header">
<nav class="navbar navbar-expand-md navbar-dark bg-dark">
<a class="navbar-brand" href='/'><i data-feather="home"></i></a>
<button class="navbar-toggler" type="button"
data-toggle="collapse" data-target="#navbarSupportedContent"
aria-controls="navbarSupportedContent"
aria-expanded="false"
aria-label="Toggle navigation">
<span class="navbar-toggler-icon"></span>
</button>
<div class="collapse navbar-collapse" id="navbarSupportedContent">
<span class="navbar-text col">{{ title }}</span>
<a class="nav-item nav-link btn btn-light col-auto" href='/notes/add'>ADD Note</a>
</div>
</nav>
</header>
This removes the <h1> tag at the top of the header area, immediately tightening the presentation.
Within the navbar-collapse area, we've replaced what had been intended as the breadcrumb, with a simple navbar-text component. To keep the ADD Note button glued to the right, we're maintaining the class="col" and class="col-auto" settings:
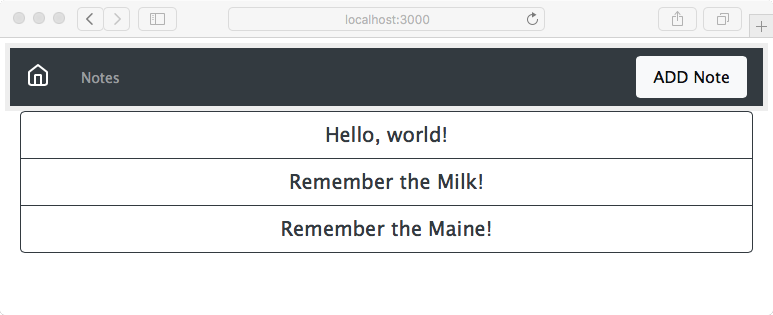
Which header area design is better? That's a good question. Since beauty is in the eye of the beholder, both designs are probably equally good. What we have demonstrated is the ease with which we can update the design by editing the template files.
Viewing a Note isn't bad, but the user experience can be improved. The user does not need to see the notekey, for example. Additionally, Bootstrap has nicer-looking buttons we can use.
In views/noteview.hbs, make these changes:
<div class="container-fluid">
<div class="row"><div class="col-xs-12">
{{#if note}}<h3>{{ note.title }}</h3>{{/if}}
{{#if note}}<p>{{ note.body }}</p>{{/if}}
<p>Key: {{ notekey }}</p>
</div></div>
{{#if notekey }}
<div class="row"><div class="col-xs-12">
<div class="btn-group">
<a class="btn btn-outline-dark"
href="/notes/destroy?key={{notekey}}"
role="button">Delete</a>
<a class="btn btn-outline-dark"
href="/notes/edit?key={{notekey}}"
role="button">Edit</a>
</div>
</div></div>
{{/if}}
</div>
We have declared two rows, one for the Note, and another for buttons to act on the Note. Both are declared to consume all 12 columns, and therefore take up the full available width. The buttons are again contained within a button group:
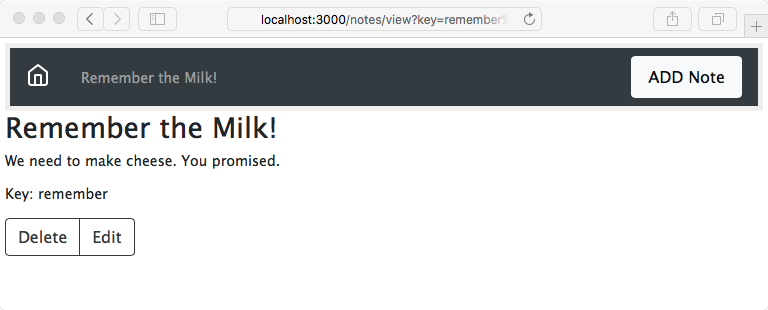
Do we really need to show the notekey to the user? We'll leave it there, but that's an open question for the user experience team. Otherwise, we've improved the note-reading experience.
The next major glaring problem is the form for adding and editing notes. As we said earlier, it's easy to get the text input area to overflow a small screen. On the other hand, Bootstrap has extensive support for making nice-looking forms that work well on mobile devices.
Change the form in views/noteedit.hbs to this:
<form method='POST' action='/notes/save'>
<div class="container-fluid">
{{#if docreate}}
<input type='hidden' name='docreate' value="create">
{{else}}
<input type='hidden' name='docreate' value="update">
{{/if}}
<div class="form-group row align-items-center">
<label for="notekey" class="col-1 col-form-label">Key</label>
{{#if docreate }}
<div class="col">
<input type='text' class="form-control"
placeholder="note key" name='notekey' value=''/>
</div>
{{else}}
{{#if note }}
<span class="input-group-text">{{notekey}}</span>
{{/if}}
<input type='hidden' name='notekey'
value='{{#if note }}{{notekey}}{{/if}} '/>
{{/if}}
</div>
<div class="form-group row">
<label for="title" class="col-1 col-form-label">Title</label>
<div class="col">
<input type="text" class="form-control"
id='title' name='title' placeholder="note title"
value='{{#if note }}{{note.title}}{{/if}}'>
</div>
</div>
<div class="form-group row">
<textarea class="form-control" name='body'
rows="5">{{#if note }}{{note.body}}{{/if}}</textarea>
</div>
<button type="submit" class="btn btn-default">Submit</button>
</div>
</form>
There's a lot going on here. What we've done is reorganize the form so Bootstrap can do the right things with it. The first thing to note is that we have several instances of this:
<div class="form-group row"> .. </div>
These are contained within a container-fluid, meaning that we've set up three rows in the form.
Bootstrap uses form-group elements to add structure to forms, and to encourage proper use of <label> elements, along with other form elements. It's good practice to use a <label> with every <input> to improve assistive behavior in the browser, rather than if you simply left some dangling text.
Every form element has class="form-control". Bootstrap uses this to identify the controls so it can add styling and behavior.
By default, Bootstrap formats form-group elements so the label appears on another line from the input control. Note that we've added class="col-1" to the labels and class="col" to the <div> wrapping the input. This declares two columns, the first consuming one column unit and the other consuming the remainder.
The placeholder='key' attribute puts sample text in an otherwise empty text input element. It disappears as soon as the user types something and is an excellent way to prompt the user with what's expected.
Finally, we changed the Submit button to be a Bootstrap button. These look nice, and Bootstrap makes sure that they work great:
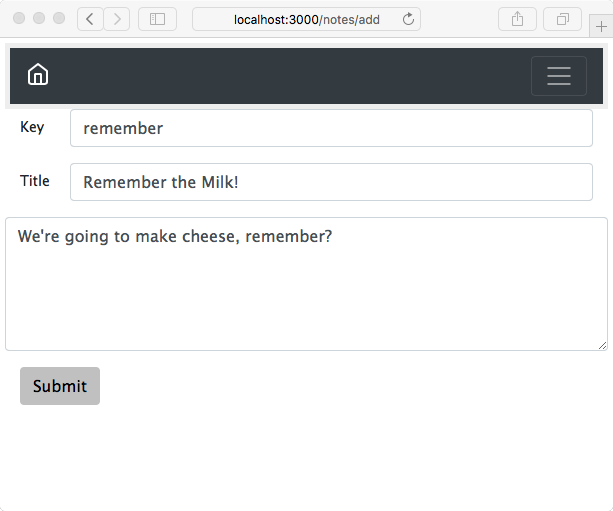
The result looks good and works well on the iPhone. It automatically sizes itself to whatever screen it's on. Everything behaves nicely. In this screenshot, we've resized the window small enough to cause the navbar to collapse. Clicking on the so-called hamburger icon on the right (the three horizontal lines) causes the navbar contents to pop up as a menu.
The window used to verify the desire to delete a Note doesn't look bad, but it can be improved.
Edit views/notedestroy.hbs to contain the following:
<form method='POST' action='/notes/destroy/confirm'>
<div class="container-fluid">
<input type='hidden' name='notekey' value='{{#if note}}{{notekey}}{{/if}}'>
<p class="form-text">Delete {{note.title}}?</p>
<div class="btn-group">
<button type="submit" value='DELETE'
class="btn btn-outline-dark">DELETE</button>
<a class="btn btn-outline-dark"
href="/notes/view?key={{#if note}}{{notekey}}{{/if}}"
role="button">
Cancel</a>
</div>
</div>
</form>
We've reworked everything to use Bootstrap form goodness. The question about deleting the Note is wrapped with class="form-text" so that Bootstrap can display this properly.
The buttons are wrapped with class="btn-group" as before. The buttons have exactly the same styling as on other screens, giving a consistent look across the application:
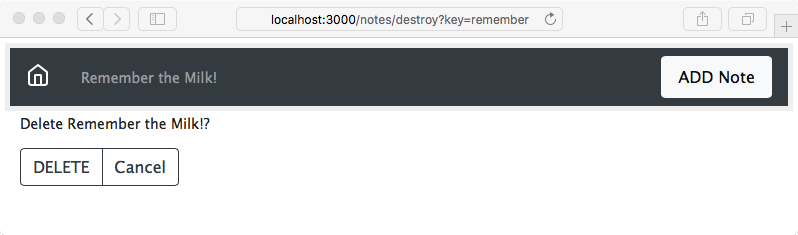
There is an issue that the title text in the navbar does not use the word Delete. In routes/notes.js, we can make this change:
// Ask to Delete note (destroy)
router.get('/destroy', async (req, res, next) => {
var note = await notes.read(req.query.key);
res.render('notedestroy', {
title: note ? `Delete ${note.title}` : "",
notekey: req.query.key, note: note
});
});
What we've done is changed the title parameter passed to the template. We'd done this in the /notes/edit route handler and seemingly missed doing so in this handler.
One reason to use Bootstrap is that you can easily build a customized version. Stylesheets are built using SASS, which is one of the CSS preprocessors to simplify CSS development. In Bootstrap's code, one file (scss/_variables.scss) contains variables used throughout the rest of Bootstrap's .scss files. Change one variable and it can automatically affect the rest of Bootstrap.
Earlier, we overrode a couple of Bootstrap behaviors with our custom CSS file, public/stylesheets/style.css. This is an easy way to change a couple of specific things, but it doesn't work for large-scale changes to Bootstrap. Serious Bootstrap customization requires generating a customized Bootstrap build.
The official documentation on the Bootstrap website (http://getbootstrap.com/docs/4.1/getting-started/build-tools/) is useful for reference on the build process.
If you've followed the directions given earlier, you have a directory, chap06/notes, containing the Notes application source code. Create a directory named chap06/notes/theme, within which we'll set up a custom Bootstrap build process.
As students of the Twelve Factor Application model, we'll be using a package.json in that directory to automate the build process. There isn't any Node.js code involved; npm is also a convenient tool to automate the software build processes.
To start, download the Bootstrap source tree from https://github.com/twbs/bootstrap. While the Bootstrap npm package includes SASS source files, it isn't sufficient to build Bootstrap, and therefore one must download the source tree. What we do is navigate to the GitHub repository, click on the Releases tab, and select the URL for the most recent release.
With theme/package.json containing this scripts section:
{
"scripts": {
"download": "wget -O - https://github.com/twbs/bootstrap/archive/v4.1.0.tar.gz | tar xvfz -",
"postdownload": "cd bootstrap-4.1.0 && npm install"
}
}
Type this command:
$ npm run download
This downloads the tar-gzip (tarball) archive from the Bootstrap repository and immediately unpacks it. If you are on Windows, it will be easiest to run that script in Windows Subsystem for Linux to execute these commands. After downloading and unpacking the archive, the postdownload step runs npm install in the directory. The Bootstrap team uses their package.json, not only to track all the dependencies required to build Bootstrap, but to drive the build process.
The npm install for Bootstrap will take a long time, so be patient.
This much only installs the tools necessary to build Bootstrap. Building the Bootstrap documentation requires installing additional Ruby-based tools (Jekyll and some plugins).
To build Bootstrap, let's add the following lines to the scripts section in our theme/package.json:
"scripts": {
...
"build": "cd bootstrap-4.1.0 && npm run dist",
"watch": "cd bootstrap-4.1.0 && npm run watch"
...
}
Obviously you'll need to adjust the directory name as the Bootstrap project issues new releases. In the Bootstrap source tree, running npm run dist builds Bootstrap, while npm run watch sets up an automated process to scan for changed files and rebuilds Bootstrap upon changing any file. By adding these lines to our theme/package.json, we can start this in the terminal and it automatically reruns the build as needed.
Now run a build with this command:
$ npm run build
The built files land in the theme/bootstrap-4.1.0/dist directory. The content of that directory will match the contents of the corresponding npm package.
In case it hasn't been obvious all along—there are Bootstrap version numbers embedded in these URLs and file or directory names. As new Bootstrap releases are issued, you must adjust the pathnames to match the current version number.
Before proceeding, let's take a look around the Bootstrap source tree. The scss directory contains the SASS source that will be compiled into the Bootstrap CSS files. To generate a customized Bootstrap build will require a few modifications in that directory.
The bootstrap-4.1.0/scss/bootstrap.scss file contains @import directives to pull in all Bootstrap components. The file bootstrap-4.1.0/scss/_variables.scss contains definitions used in the remainder of the Bootstrap SASS source. Editing, or overriding, these values will change the look of websites using the resulting Bootstrap build.
For example, these definitions determine the main color values:
$white: #fff !default;
$gray-100: #f8f9fa !default;
...
$gray-800: #343a40 !default;
...
$blue: #007bff !default;
...
$red: #dc3545 !default;
$orange: #fd7e14 !default;
$yellow: #ffc107 !default;
$green: #28a745 !default;
...
$primary: $blue !default;
$secondary: $gray-600 !default;
$success: $green !default;
$info: $cyan !default;
$warning: $yellow !default;
$danger: $red !default;
$light: $gray-100 !default;
$dark: $gray-800 !default;
These are similar to CSS statements. The !default attribute designates these values as the default. Any !default values can be overridden without editing _values.scss.
Create a file, theme/_custom.scss, containing the following:
$white: #fff !default;
$gray-900: #212529 !default;
$body-bg: $gray-900 !default;
$body-color: $white !default;
This reverses the values for the $body-bg and $body-color settings in _variables.scss. The Notes app will now use white text on a dark background, rather than the default white background with dark text. Because these declarations do not use !default, they'll override the values in _variables.scss.
Then make a copy of scss/bootstrap.scss in the theme directory and modify it, like so:
@import "custom";
@import "functions";
@import "variables";
...
We're importing the _custom.scss file we just created. Finally, add this line to the scripts section of theme/package.json:
"prebuild": "cp _custom.scss bootstrap.scss bootstrap-4.1.0/scss",
With that in place, before building Bootstrap these two files will be copied in place. Next, rebuild Bootstrap:
$ npm run build
> @ prebuild /Users/David/chap06/notes/theme
> cp _custom.scss bootstrap.scss bootstrap-4.1.0/scss
> @ build /Users/David/chap06/notes/theme
> cd bootstrap-4.1.0 && npm run dist
...
While that's building, let's modify notes/app.js to mount the build directory:
// app.use('/assets/vendor/bootstrap', express.static(
// path.join(__dirname, 'node_modules', 'bootstrap', 'dist'))); app.use('/assets/vendor/bootstrap', express.static(
path.join(__dirname, 'theme', 'bootstrap-4.1.0', 'dist')));
What we've done is switch from the Bootstrap in node_modules to what we just built in the theme directory. The Bootstrap version number shows up here, so this must also be updated as new Bootstrap releases are adopted.
Then reload the application, and you'll see the following:
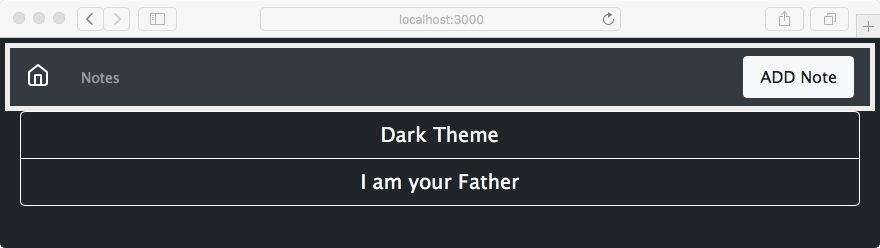
To get exactly this, you may need to make a change in the templates. The Button elements we used earlier have the btn-outline-dark class, which works well on a light background. The background is now dark and these buttons need to use light coloring.
To change the buttons, in views/index.hbs make this change:
<a class="btn btn-lg btn-block btn-outline-light"
href="/notes/view?key={{ key }}"> {{ title }} </a>
Make a similar change in views/noteview.hbs:
<a class="btn btn-outline-light" href="/notes/destroy?key={{notekey}}"
role="button"> Delete </a>
<a class="btn btn-outline-light" href="/notes/edit?key={{notekey}}"
role="button"> Edit </a>
That's cool, we can now rework the Bootstrap color scheme any way we want. Don't show this to your user experience team, because they'll throw a fit. We did this to prove the point that we can edit _custom.scss and change the Bootstrap theme.
If all this is too complicated for you, several websites provide pre-built Bootstrap themes, or else simplified tools to generate a Bootstrap build. To get our feet wet, let's download a theme from Bootswatch (https://bootswatch.com/). This is both a collection of free and open source themes and a build system for generating custom Bootstrap themes (https://github.com/thomaspark/bootswatch/).
Let's use the Minty theme from Bootswatch to explore the needed changes. You can download the theme from the website or add the following to the scripts section of package.json:
"dl-minty": "mkdir -p minty && npm run dl-minty-css && npm run dl-minty-min-css",
"dl-minty-css": "wget https://bootswatch.com/4/minty/bootstrap.css -O minty/bootstrap.css",
"dl-minty-min-css": "wget https://bootswatch.com/4/minty/bootstrap.min.css -O minty/bootstrap.min.css"
This will download the prebuilt CSS files for our chosen theme. In passing, notice that the Bootswatch website offers _variables.scss and _bootswatch.scss files which should be usable with a workflow similar to what we implemented in the previous section. The GitHub repository matching the Bootswatch website has a complete build procedure for building custom themes.
Perform the download:
$ npm run dl-minty
> notes@0.0.0 dl-minty /Users/David/chap06/notes
> mkdir -p minty && npm run dl-minty-css && npm run dl-minty-min-css
> notes@0.0.0 dl-minty-css /Users/David/chap06/notes
> wget https://bootswatch.com/4/minty/bootstrap.css -O minty/bootstrap.css
> notes@0.0.0 dl-minty-min-css /Users/David/chap06/notes
> wget https://bootswatch.com/4/minty/bootstrap.min.css -O minty/bootstrap.min.css
In app.js we will need to change the Bootstrap mounts to separately mount the JavaScript and CSS files. Use the following:
// app.use('/assets/vendor/bootstrap', express.static(
// path.join(__dirname, 'node_modules', 'bootstrap', 'dist')));
// app.use('/assets/vendor/bootstrap', express.static(
// path.join(__dirname, 'theme', 'bootstrap-4.0.0', 'dist')));
app.use('/assets/vendor/bootstrap/js', express.static(
path.join(__dirname, 'node_modules', 'bootstrap', 'dist', 'js')));
app.use('/assets/vendor/bootstrap/css', express.static(
path.join(__dirname, 'minty')));
Instead of one mount for /vendor/bootstrap, we now have two mounts for each of the subdirectories. Simply make the /vendor/bootstrap/css mount point to a directory containing the CSS files you downloaded from the theme provider.
Because Minty is a light-colored theme, the buttons need to use the dark style. We had earlier changed the buttons to use a light style because of the dark background. We must now switch from btn-outline-light back to btn-outline-dark. In partials/header.hbs, the color scheme requires a change to the navbar content:
<div class="collapse navbar-collapse" id="navbarSupportedContent">
<span class="navbar-text text-dark col">{{ title }}</span>
<a class="nav-item nav-link btn btn-dark col-auto" href='/notes/add'>ADD Note</a>
</div>
We selected text-dark and btn-dark classes to provide some contrast against the background.
Re-run the application and you'll see something like this:
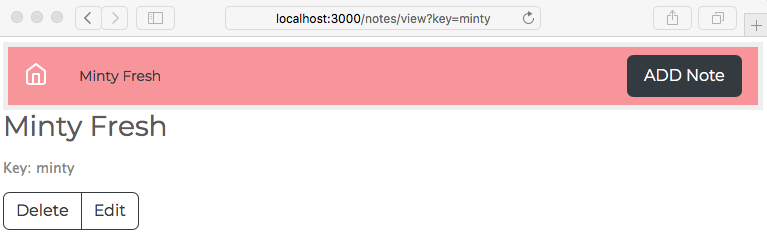
The possibilities for using Bootstrap are endless. While we covered a lot of material, we only touched the surface, and we could have done much more to the Notes application.
You learned what the Twitter Bootstrap framework can do. Bootstrap's goal is to make mobile-responsive development easy. We used Bootstrap to make great improvements to the way the Notes app looks and feels. We customized Bootstrap, dipping our toes into generating a custom theme.
Now, we want to get back to writing Node.js code. We left off Chapter 5, Your First Express Application, with the problem of persistence so that the Notes application can be stopped and restarted without losing our notes. In Chapter 7, Data Storage and Retrieval, we'll dive into using databases to store our data.
To give ourselves some experience with the ES6 Module format, we'll rewrite the Notes application accordingly.
In the previous two chapters, we built a small and somewhat useful application for storing notes, and then made it work on mobile devices. While the application works reasonably well, it doesn't store those notes anywhere on a long-term basis, meaning the notes are lost when you stop the server and, if you run multiple instances of Notes, each instance has its own set of notes. The typical next step is to introduce a database tier.
In this chapter, we will look at database support in Node.js, so the user sees the same set of notes for any Notes instance accessed, and to reliably store notes for long-term retrieval.
We'll start with the Notes application code used in the previous chapter. We started with a simple, in-memory data model using an array to store the notes, and then made it mobile friendly. In this chapter, we will:
Let's get started!
The first step is to duplicate the code from the previous chapter. For instance, if you were working in chap06/notes, duplicate that to be chap07/notes.
By definition, external data storage systems require asynchronous code in the Node.js architecture. The access time to retrieve data from disk, from another process, or from a database, always takes sufficient time to require deferred execution.
The existing Notes data model is an in-memory data store. In theory, in-memory data access does not require asynchronous code and therefore, the existing model module could have used regular functions rather than async functions.
We knew that Notes must move to using databases, and would require an asynchronous API to access Notes data. For that reason, the existing Notes model API uses async functions so that in this chapter, we can persist Note data to databases.
Before we get into databases, we have to address one of the attributes of a high-quality software system: managing logged information, including normal system activity, system errors, and debugging information. Logs give us an insight into the behavior of the system. How much traffic is it getting? If it's a website, which pages are people hitting the most? How many errors occur and of what kind? Do attacks occur? Are malformed requests being sent?
Log management is also an issue. Log rotation means regularly moving the log file out of the way, to start with a fresh log file. You should process logged data to produce reports. A high priority on screening for security vulnerabilities is a must.
The Twelve Factor application model suggests simply sending logging information to the console, and then some other software system captures that output and directs it to a logging service. Following their advice can reduce system complexity by having fewer things that can break. In a later chapter, we'll use PM2 for that purpose.
Let's first complete a tour of information logging as it stands right now in Notes.
When we used the Express Generator to initially create the Notes application, it configured an activity logging system using morgan:
const logger = require('morgan');
..
app.use(logger('dev'));
This is what prints the requests on the Terminal window. Visit https://github.com/expressjs/morgan for more information.
Internally, Express uses the Debug package for debugging traces. You can turn these on using the DEBUG environment variable. We should try to use this package in our application code. For more information, visit https://www.npmjs.com/package/debug.
Finally, the application might generate uncaught exceptions. The uncaughtException error needs to be captured, logged, and dealt with appropriately.
The Morgan package has two general areas for configuration:
As it stands, Notes uses the dev format, which is described as a concise status output meant for developers. This can be used to log web requests as a way to measure website activity and popularity. The Apache log format already has a large ecosystem of reporting tools and, sure enough, Morgan can produce log files in this format.
To change the format, simply change this line in app.js:
app.use(logger(process.env.REQUEST_LOG_FORMAT || 'dev'));
Then run Notes as follows:
$ REQUEST_LOG_FORMAT=common npm start
> notes@0.0.0 start /Users/david/chap07/notes
> node ./bin/www
::1 - - [12/Feb/2016:05:51:21 +0000] "GET / HTTP/1.1" 304 -
::1 - - [12/Feb/2016:05:51:21 +0000] "GET /vendor/bootstrap/css/bootstrap.min.css HTTP/1.1" 304 -
::1 - - [12/Feb/2016:05:51:21 +0000] "GET /stylesheets/style.css HTTP/1.1" 304 -
::1 - - [12/Feb/2016:05:51:21 +0000] "GET /vendor/bootstrap/js/bootstrap.min.js HTTP/1.1" 304 -
To revert to the previous logging output, simply do not set this environment variable. If you've looked at Apache access logs, this logging format will look familiar. The ::1 notation at the beginning of the line is IPV6 notation for the localhost, which you may be more familiar with as 127.0.0.1.
We can declare victory on request logging and move on to debugging messages. However, let's look at logging this to a file directly. While it's possible to capture stdout through a separate process, Morgan is already installed in Notes and it does provide the capability to direct its output to a file.
The Morgan documentation suggests this:
// create a write stream (in append mode)
var accessLogStream = fs.createWriteStream(__dirname + '/access.log', {flags: 'a'})
// setup the logger
app.use(morgan('combined', {stream: accessLogStream}));
But this has a problem; it's impossible to perform log rotation without killing and restarting the server. Instead, we'll use their rotating-file-stream package.
First, install the package:
$ npm install rotating-file-stream --save
Then we add this code to app.js:
const fs = require('fs-extra');
...
const rfs = require('rotating-file-stream');
var logStream;
// Log to a file if requested
if (process.env.REQUEST_LOG_FILE) {
(async () => {
let logDirectory = path.dirname(process.env.REQUEST_LOG_FILE);
await fs.ensureDir(logDirectory);
logStream = rfs(process.env.REQUEST_LOG_FILE, {
size: '10M', // rotate every 10 MegaBytes written
interval: '1d', // rotate daily
compress: 'gzip' // compress rotated files
});
})().catch(err => { console.error(err); });
}
..
app.use(logger(process.env.REQUEST_LOG_FORMAT || 'dev', {
stream: logStream ? logStream : process.stdout
}));
Here, we're using an environment variable, REQUEST_LOG_FILE, to control whether to send the log to stdout or to a file. The log can go into a directory, and the code will automatically create that directory if it doesn't exist. By using rotating-file-stream (https://www.npmjs.com/package/rotating-file-stream), we're guaranteed to have log file rotation with no extra systems required.
The fs-extra module is being used because it adds Promise-based functions to the fs module (https://www.npmjs.com/package/fs-extra). In this case, fs.ensureDir checks if the named directory structure exists and, if not, the directory path is created.
You can generate quite a detailed trace of what Express does by running Notes this way:
$ DEBUG=express:* npm start
This is pretty useful if you want to debug Express. But, we can use this in our own code as well. It is similar to inserting console.log statements, but without having to remember to comment out the debugging code.
It is very simple to enable debugging in a module:
const debug = require('debug')('module-name');
..
debug('some message');
..
debug(`got file ${fileName}`);
Important messages can be printed to process.stdout or process.stderr, which can be lost if you don't capture that output. The Twelve Factor model suggests using a system facility to capture these output streams. With Notes, we'll use PM2 for that purpose, which we'll cover in Chapter 10, Deploying Node.js Applications.
The logbook module (https://github.com/jpillora/node-logbook) offers some useful capabilities in term of not only capturing process.stdout and process.stderr, but sending that output to useful places.
Uncaught exceptions is another area where important information can be lost. This is easy to fix in the Notes application:
const error = require('debug')('notes:error');
process.on('uncaughtException', function(err) {
error("I've crashed!!! - "+ (err.stack || err));
});
..
if (app.get('env') === 'development') {
app.use(function(err, req, res, next) {
// util.log(err.message);
res.status(err.status || 500);
error((err.status || 500) +' '+ error.message);
res.render('error', {
message: err.message,
error: err
});
});
}
..
app.use(function(err, req, res, next) {
// util.log(err.message);
res.status(err.status || 500);
error((err.status || 500) +' '+ error.message);
res.render('error', {
message: err.message,
error: {}
});
});
The debug package has a convention we're following. For an application with several modules, all debugger objects should use the naming pattern app-name:module-name. In this case, we used notes:error that will be used for all error messages. We could also use notes:memory-model or notes:mysql-model for debugging different models.
While we were setting up the handler for uncaught exceptions, it is also a good idea to add error logging into the error handlers.
Using Promise and async functions automatically channels errors in a useful direction. Errors will cause a Promise to flip into a rejected state, which must eventually be handled in a .catch method. Since we're all human, we're bound to forget to ensure that all code paths handle their rejected Promise's.
Currently, Node.js prints the following warning if it detects an unhandled Promise rejection:
(node:4796) UnhandledPromiseRejectionWarning: Unhandled promise rejection
The warning goes on to say that the default handler for unhandled Promise rejection has been deprecated and that such Promise rejections will crash the Node process rather than print this message. The built-in process module does emit an event in this case, so it's easy enough to add a handler:
import util from 'util';
...
process.on('unhandledRejection', (reason, p) => {
error(`Unhandled Rejection at: ${util.inspect(p)} reason: ${reason}`);
});
At the minimum, we can print an error message such as the following:
notes:error Unhandled Rejection at: Promise {
notes:error <rejected> TypeError: model(...).keylist is not a function
... full stack trace
} reason: TypeError: model(...).keylist is not a function +3s
We wrote the Notes application using CommonJS modules, the traditional Node.js module format. While the application could continue using that format, the JavaScript community has chosen to switch to ES6 modules in both browser and Node.js code, and therefore it's important to switch ES6 modules so we can all get on board with a common module format. Let's rewrite the application using ES6 modules, and then write ES6 modules for anything new we add.
The changes required are large to replace require statements with import statements, and renaming files from foo.js to foo.mjs. Let's get started.
Let's start with app.js, changing its name to app.mjs:
$ mv app.js app.mjs
Change the block of require statements at the top to the following:
import fs from 'fs-extra';
import url from 'url';
import express from 'express';
import hbs from 'hbs';
import path from 'path';
import util from 'util';
import favicon from 'serve-favicon';
import logger from 'morgan';
import cookieParser from 'cookie-parser';
import bodyParser from 'body-parser';
import DBG from 'debug';
const debug = DBG('notes:debug');
const error = DBG('notes:error');
import { router as index } from './routes/index';
// const users = require('./routes/users');
import { router as notes } from './routes/notes';
// Workaround for lack of __dirname in ES6 modules
const __dirname = path.dirname(new URL(import.meta.url).pathname);
const app = express();
import rfs from 'rotating-file-stream';
Then, at the bottom of the script, make this change:
export default app;
Let's talk a little about the workaround mentioned here. There were several global variables automatically injected by Node.js into CommonJS modules. Those variables are not supported by ES6 modules. The critical variable for Notes is __dirname, which is used in app.mjs in several places. The code change shown here includes a workaround based on a brand new JavaScript feature that is available starting in Node.js 10.x, the import.meta.url variable.
The import.meta object is meant to inject useful information into an ES6 module. As the name implies, the import.meta.url variable contains the URL describing where the module was loaded from. For Node.js, at this time, ES6 modules can only be loaded from a file:// URL on the local filesystem. That means, if we extract the pathname of that URL, we can easily calculate the directory containing the module, as shown here.
Why this solution? Why not use a pathname beginning with ./? The answer is that a ./ filename is evaluated relative to the process's current working directory. That directory is usually different from the directory containing the Node.js module being executed. Therefore it is more than convenient that the Node.js team has added the import.meta.url feature.
The pattern followed in most cases is this change:
const moduleName = require('moduleName'); // in CommonJS modules
import moduleName from 'moduleName'; // in ES6 modules
Remember that Node.js uses the same module lookup algorithm in both ES6 and CommonJS modules. A Node.js require statement is synchronous, meaning that by the time require finishes, it has executed the module and is returning its module.exports. By contrast, an ES6 module is asynchronous, meaning the module may not have finished loading, and you can import just the required bits of the module.
Most of the module imports shown here are for regular Node.js modules installed in the node_modules directory, most of which are CommonJS modules. The rule for using import with a CommonJS module is that the module.exports object is treated as if it were the default export. The import statement shown earlier name the default export (or the module.exports object) as shown in the import statement. For a CommonJS module imported this way, you then use it as you would in a CommonJS context, moduleName.functionName().
The usage of the debug module is effectively the same, but is coded differently. In the CommonJS context, we're told to use that module as follows:
const debug = require('debug')('notes:debug');
const error = require('debug')('notes:error');
In other words, the module.exports of this module is a function, which we immediately invoke. There isn't a syntax for ES6 modules to use the debug module in that fashion. Therefore, we had to break it apart as shown, and explicitly call that function.
The final point of discussion is the import of the two router modules. It was first attempted to have those modules export the router as the default value, but Express threw an error in that case. Instead, we'll rewrite these modules to export router as a named export and then use that named export as shown here.
Remember that bin/www is a script used to launch the application. It is written as a CommonJS script, but because app.mjs is now an ES6 module, bin/www also must be rewritten as an ES6 module. A CommonJS module cannot, at the time of writing, import an ES6 module.
Change the filename:
$ mv bin/www bin/www.mjs
Then, at the top, change the require statements to import statements:
import app from '../app.mjs';
import DBG from 'debug';
const debug = DBG('notes:server-debug');
const error = DBG('notes:server-error');
import http from 'http';
We've already discussed everything here except that app.mjs exports its app object as the default export. Therefore, we use it as shown here.
The models directory contains two modules: Note.js defines the Note class, and notes-memory.js contains an in-memory data model. Both are easy to convert to ES6 modules.
Change the filenames:
$ cd models
$ mv Note.js Note.mjs
$ mv notes-memory.js notes-memory.mjs
In Note.mjs, simply make the following change:
export default class Note {
...
}
This makes the Note class the default export.
Then, in notes-memory.mjs, make the following change:
import Note from './Note';
var notes = [];
async function crupdate(key, title, body) {
notes[key] = new Note(key, title, body);
return notes[key];
}
export function create(key, title, body) { return crupdate(key, title, body); }
export function update(key, title, body) { return crupdate(key, title, body); }
export async function read(key) {
if (notes[key]) return notes[key];
else throw new Error(`Note ${key} does not exist`);
}
export async function destroy(key) {
if (notes[key]) {
delete notes[key];
} else throw new Error(`Note ${key} does not exist`);
}
export async function keylist() { return Object.keys(notes); }
export async function count() { return notes.length; }
export async function close() { }
This is a straightforward transliteration of assigning functions to module.exports to using named exports.
By defining the Note class as the default export of the Note.mjs module, it imports nicely into any module using that class.
The routes directory contains two router modules. As it stands, each router module creates a router object, adds route functions to that object, and then assigns it to the module.exports field. That suggests we should export the router as the default export, but as we said earlier, that didn't work out right. Instead, we'll export router as a named export.
Change the filenames:
$ cd routes
$ mv index.js index.mjs
$ mv notes.js notes.mjs
Then, at the top of each, change the require statement block to the following:
import util from 'util';
import express from 'express';
import * as notes from '../models/notes-memory';
export const router = express.Router();
It will be the same in both files. Then, at the bottom of each file, delete the line assigning router to module.exports.
Let's turn to app.mjs and change how the router modules are imported.
Because router is a named export, by default you'd import the router object, in app.mjs, as follows:
import { router } from './routes/index';
But then we'd have a conflict since both modules define a router object. Instead, we changed the name of this object using an as clause:
import { router as index } from './routes/index';
import { router as notes } from './routes/notes';
The router object from each module is hence given a suitable name.
The filesystem is an often overlooked database engine. While filesystems don't have the sort of query features supported by database engines, they are a reliable place to store files. The notes schema is simple enough that the filesystem can easily serve as its data storage layer.
Let's start by adding a function to Note.mjs:
export default class Note {
...
get JSON() {
return JSON.stringify({ key: this.key, title: this.title, body: this.body }); }
static fromJSON(json) { var data = JSON.parse(json); var note = new Note(data.key, data.title, data.body); return note; }
}
JSON is a getter, which means it gets the value of the object. In this case, the note.JSON attribute/getter, no parentheses, will simply give us the JSON representation of the Note. We'll use this later for writing to JSON files.
fromJSON is a static function, or factory method, to aid in constructing Note objects if we have a JSON string. The difference is that JSON is associated with an instance of the Note class, while fromJSON is associated with the class itself. The two can be used as follows:
const note = new Note("key", "title", "body");
const json = note.JSON; // produces JSON text
const newnote = Note.fromJSON(json); // produces new Note instance
Now, let's create a new module, models/notes-fs.mjs, to hold the filesystem model:
import fs from 'fs-extra';
import path from 'path';
import util from 'util';
import Note from './Note';
import DBG from 'debug';
const debug = DBG('notes:notes-fs');
const error = DBG('notes:error-fs');
async function notesDir() {
const dir = process.env.NOTES_FS_DIR || "notes-fs-data";
await fs.ensureDir(dir);
return dir;
}
function filePath(notesdir, key) { return path.join(notesdir, `${key}.json`); }
async function readJSON(notesdir, key) {
const readFrom = filePath(notesdir, key);
var data = await fs.readFile(readFrom, 'utf8');
return Note.fromJSON(data);
}
The notesDir function will be used throughout notes-fs to ensure that the directory exists. To make this simple, we're using the fs-extra module because it adds Promise-based functions to the fs module (https://www.npmjs.com/package/fs-extra). In this case, fs.ensureDir verifies whether the named directory structure exists, and, if not, the directory path is created.
The environment variable, NOTES_FS_DIR, configures a directory within which to store notes. We'll have one file per note and store the note as JSON. If no environment variable is specified, we'll fall back on using notes-fs-data as the directory name.
Because we're adding another dependency:
$ npm install fs-extra --save
The filename for each data file is the key with .json appended. That gives one limitation that filenames cannot contain the / character, so we test for that using the following code:
async function crupdate(key, title, body) {
var notesdir = await notesDir();
if (key.indexOf('/') >= 0)
throw new Error(`key ${key} cannot contain '/'`);
var note = new Note(key, title, body);
const writeTo = filePath(notesdir, key);
const writeJSON = note.JSON;
await fs.writeFile(writeTo, writeJSON, 'utf8');
return note;
}
export function create(key, title, body) { return crupdate(key, title, body); }
export function update(key, title, body) { return crupdate(key, title, body); }
As is the case with the notes-memory module, the create and update functions use the exact same code. The notesDir function is used to ensure that the directory exists, then we create a Note object, and then write the data to a file.
Notice how the code is very straightforward because of the async function. We aren't checking for errors because they'll be automatically caught by the async function and bubble out to our caller:
export async function read(key) {
var notesdir = await notesDir();
var thenote = await readJSON(notesdir, key);
return thenote;
}
Using readJSON, read the file from the disk. It already generates the Note object, so all we have to do is return that object:
export async function destroy(key) {
var notesdir = await notesDir();
await fs.unlink(filePath(notesdir, key));
}
The fs.unlink function deletes our file. Because this module uses the filesystem, deleting the file is all that's necessary to delete the note object:
export async function keylist() {
var notesdir = await notesDir();
var filez = await fs.readdir(notesdir);
if (!filez || typeof filez === 'undefined') filez = [];
var thenotes = filez.map(async fname => {
var key = path.basename(fname, '.json');
var thenote = await readJSON(notesdir, key);
return thenote.key;
});
return Promise.all(thenotes);
}
The contract for keylist is to return a Promise that will resolve to an array of keys for existing note objects. Since they're stored as individual files in the notesdir, we have to read every file in that directory to retrieve its key.
Array.map constructs a new array from an existing array, namely the array of filenames returned by fs.readdir. Each entry in the constructed array is the async function, which reads the Note, returning the key:
export async function count() {
var notesdir = await notesDir();
var filez = await fs.readdir(notesdir);
return filez.length;
}
export async function close() { }
Counting the number of notes is simply a matter of counting the number of files in notesdir.
Before we start modifying the router functions, we have to consider how to account for multiple models. We currently have two modules for our data model, notes-memory and notes-fs, and we'll be implementing several more by the end of this chapter. We will need a simple method to select between the model being used.
There are several possible ways to do this. For example, in a CommonJS module, it's possible to do the following:
const path = require('path');
const notes = require(process.env.NOTES_MODEL
? path.join('..', process.env.NOTES_MODEL)
: '../models/notes-memory');
This lets us set an environment variable, NOTES_MODEL, to select the module to use for the data model.
This approach does not work with the regular import statement, because the module name in an import statement cannot be such an expression. The Dynamic Import feature now in Node.js does offer a mechanism similar to the snippet just shown.
Dynamic import is an import() function that returns a Promise that will resolve to the imported module. As a function-returning-a-Promise, import() won't be useful as top-level code in the module. But, consider this:
var NotesModule;
async function model() {
if (NotesModule) return NotesModule;
NotesModule = await import(`../models/notes-${process.env.NOTES_MODEL}`);
return NotesModule;
}
export async function create(key, title, body) {
return (await model()).create(key, title, body);
}
export async function update(key, title, body) {
return (await model()).update(key, title, body);
}
export async function read(key) { return (await model()).read(key); }
export async function destroy(key) { return (await model()).destroy(key); }
export async function keylist() { return (await model()).keylist(); }
export async function count() { return (await model()).count(); }
export async function close() { return (await model()).close(); }
Save that module in a file, models/notes.mjs. This module implements the same API as we'll use for all Notes model modules. The model() function is the key to dynamically selecting a notes model implementation based on an environment variable.
This is an async function and therefore its return value is a Promise. The value of that Promise is the selected module, as loaded by import(). Because import() returns a Promise, we use await to know whether it loaded correctly.
Every API method follows this pattern:
export async function methodName(args) {
return (await model()).methodName(args);
}
Because model() returns a Promise, it's most succinct to use an async function and use await to resolve the Promise. Once the Promise is resolved, we simply call the methodName function and go about our business. Otherwise, those API method functions would be as follows:
export function methodName(args) {
return model().then(notes => { return notes.methodName(args); });
}
The two implementations are equivalent, and it's clear which is the more succinct.
With all this awaiting on Promise's returned from async functions, it's worth discussing the overhead. The worst case is on the first call to model(), because the selected notes model has not been loaded. The first time around, the call flow goes as follows:
The first time around, the time is dominated by waiting on import() to finish loading the module. On subsequent calls, the module has already been loaded and the first step is to simply form a resolved Promise containing the module. The API method can then quickly get on with delegating to the actual API method.
To use this, in routes/index.mjs, and in routes/notes.mjs, we make this change:
import util from 'util';
import express from 'express';
import * as notes from '../models/notes';
export const router = express.Router();
In package.json, add this to the scripts section:
"start-fs": "DEBUG=notes:* NOTES_MODEL=fs node --experimental-modules ./bin/www.mjs",
With this code in place, we can now run the Notes application as follows:
$ DEBUG=notes:* npm run start-fs
> notes@0.0.0 start-fs /Users/david/chap07/notes
> NOTES_MODEL=models/notes-fs node --experimental-modules./bin/www.mjs
notes:server Listening on port 3000 +0ms
notes:fs-model keylist dir=notes-fs-data files=[ ] +4s
Then we can use the application at http://localhost:3000 as before. Because we did not change any template or CSS files, the application will look exactly as you left it at the end of Chapter 6, Implementing the Mobile-First Paradigm.
Because debugging is turned on for notes:*, we'll see a log of whatever the Notes application is doing. It's easy to turn this off simply by not setting the DEBUG variable.
You can now kill and restart the Notes application and see the exact same notes. You can also edit the notes at the command line using regular text editors such as vi. You can now start multiple servers on different ports and see exactly the same notes:
"server1": "NOTES_MODEL=fs PORT=3001 node --experimental-modules./bin/www.mjs", "server2": "NOTES_MODEL=fs PORT=3002 node --experimental-modules./bin/www.mjs",
Then you start server1 and server2 in separate command windows as we did in Chapter 5, Your First Express Application. Then, visit the two servers in separate browser windows, and you will see that both browser windows show the same notes.
The final check is to create a note where the key has a / character. Remember that the key is used to generate the filename where we store the note, and therefore the key cannot contain a / character. With the browser open, click on ADD Note and enter a note, ensuring that you use a / character in the key field. On clicking the Submit button, you'll see an error saying that this isn't allowed.
To get started with actual databases, let's look at an extremely lightweight, small-footprint database engine: LevelUP. This is a Node.js-friendly wrapper around the LevelDB engine developed by Google, which is normally used in web browsers for local data persistence. It is a non-indexed, NoSQL data store designed originally for use in browsers. The Node.js module, Level, uses the LevelDB API, and supports multiple backends, including LevelDOWN, which integrates the C++ LevelDB database into Node.js.
Visit https://www.npmjs.com/package/level for information on the module. The level package automatically sets up the levelup and leveldown packages.
To install the database engine, run this command:
$ npm install level@2.1.x --save
Then, start creating the models/notes-level.mjs module:
import fs from 'fs-extra';
import path from 'path';
import util from 'util';
import Note from './Note';
import level from 'level';
import DBG from 'debug';
const debug = DBG('notes:notes-level');
const error = DBG('notes:error-level');
var db;
async function connectDB() {
if (typeof db !== 'undefined' || db) return db;
db = await level(
process.env.LEVELDB_LOCATION || 'notes.level', {
createIfMissing: true,
valueEncoding: "json"
});
return db;
}
The level module gives us a db object through which to interact with the database. We're storing that object as a global within the module for ease of use. If the db object is set, we can just return it immediately. Otherwise, we open the database using createIfMissing to go ahead and create the database if needed.
The location of the database defaults to notes.level in the current directory. The environment variable LEVELDB_LOCATION can be set, as the name implies, to specify the database location:
async function crupdate(key, title, body) {
const db = await connectDB();
var note = new Note(key, title, body);
await db.put(key, note.JSON);
return note;
}
export function create(key, title, body) {
return crupdate(key, title, body);
}
export function update(key, title, body) {
return crupdate(key, title, body);
}
Calling db.put either creates a new database entry, or replaces an existing one. Therefore, both update and create are set to be the same function. We convert the Note to JSON so it can be easily stored in the database:
export async function read(key) {
const db = await connectDB();
var note = Note.fromJSON(await db.get(key));
return new Note(note.key, note.title, note.body);
}
Reading a Note is easy: just call db.get and it retrieves the data, which must be decoded from the JSON representation.
Notice that db.get and db.put did not take a callback function, and that we use await to get the results value. The functions exported by level can take a callback function, in which the callback will be invoked. Alternatively, if no callback function is provided, the level function will instead return a Promise for compatibility with async functions:
export async function destroy(key) {
const db = await connectDB();
await db.del(key);
}
The db.destroy function deletes a record from the database:
export async function keylist() {
const db = await connectDB();
var keyz = [];
await new Promise((resolve, reject) => {
db.createKeyStream()
.on('data', data => keyz.push(data))
.on('error', err => reject(err))
.on('end', () => resolve(keyz));
});
return keyz;
}
export async function count() {
const db = await connectDB();
var total = 0;
await new Promise((resolve, reject) => {
db.createKeyStream()
.on('data', data => total++)
.on('error', err => reject(err))
.on('end', () => resolve(total));
});
return total;
}
export async function close() {
var _db = db;
db = undefined;
return _db ? _db.close() : undefined;
}
The createKeyStream function uses an event-oriented interface similar to the Streams API. It will stream through every database entry, emitting events as it goes. A data event is emitted for every key in the database, while the end event is emitted at the end of the database, and the error event is emitted on errors. The effect is that there's no simple way to present this as a simple Promise. Instead, we invoke createKeyStream, let it run its course, collecting data as it goes. We have to wrap it inside a Promise object, and call resolve on the end event.
Then we add this to package.json in the scripts section:
"start-level": "DEBUG=notes:* NOTES_MODEL=level node --experimental-modules ./bin/www.mjs",
Finally, you can run the Notes application:
$ DEBUG=notes:* npm run start-level > notes@0.0.0 start /Users/david/chap07/notes > node ./bin/www notes:server Listening on port 3000 +0ms
The printout in the console will be the same, and the application will also look the same. You can put it through its paces and see that everything works correctly.
Since level does not support simultaneous access to a database from multiple instances, you won't be able to use the multiple Notes application scenario. You will, however, be able to stop and restart the application at will without losing any notes.
To get started with more normal databases, let's see how to use SQL from Node.js. First, we'll use SQLite3, a lightweight, simple-to-set-up database engine eminently suitable for many applications.
To learn about the Node.js module, visit https://github.com/mapbox/node-sqlite3/wiki/API or https://www.npmjs.com/package/sqlite3.
The primary advantage of SQLite3 is that it doesn't require a server; it is a self-contained, no-set-up-required SQL database.
The first step is to install the module:
$ npm install sqlite3@3.x --save
Next, we need to make sure that our database is configured. We're using this SQL table definition for the schema (save this as models/schema-sqlite3.sql):
CREATE TABLE IF NOT EXISTS notes (
notekey VARCHAR(255),
title VARCHAR(255),
body TEXT
);
How do we initialize this schema before writing some code? One way is to ensure that the sqlite3 package is installed through your operating system package management system, such as using apt-get on Ubuntu/Debian, and MacPorts on macOS. Once it's installed, you can run the following command:
$ sqlite3 chap07.sqlite3
SQLite version 3.21.0 2017-10-24 18:55:49
Enter ".help" for usage hints.
sqlite> CREATE TABLE IF NOT EXISTS notes (
...> notekey VARCHAR(255),
...> title VARCHAR(255),
...> body TEXT
...> );
sqlite> .schema notes
CREATE TABLE notes (
notekey VARCHAR(255),
title VARCHAR(255),
body TEXT
);
sqlite> ^D
$ ls -l chap07.sqlite3
-rwx------ 1 david staff 8192 Jan 14 20:40 chap07.sqlite3
While we can do that, the Twelve Factor application model says we must automate any administrative processes in this way. To that end, we should instead write a little script to run an SQL operation on SQLite3 and use that to initialize the database.
Fortunately, the sqlite3 command offers us a way to do this. Add the following to the scripts section of package.json:
"sqlite3-setup": "sqlite3 chap07.sqlite3 --init models/schema-sqlite3.sql",
Run the setup script:
$ npm run sqlite3-setup
> notes@0.0.0 sqlite3-setup /Users/david/chap07/notes
> sqlite3 chap07.sqlite3 --init models/schema-sqlite3.sql
-- Loading resources from models/schema-sqlite3.sql
SQLite version 3.10.2 2016-01-20 15:27:19
Enter ".help" for usage hints.
sqlite> .schema notes
CREATE TABLE notes (
notekey VARCHAR(255),
title VARCHAR(255),
body TEXT
);
sqlite> ^D
We could have written a small Node.js script to do this, and it's easy to do so. However, by using the tools provided by the package, we have less code to maintain in our own project.
Now, we can write code to use this database in the Notes application.
Create models/notes-sqlite3.mjs file:
import util from 'util';
import Note from './Note';
import sqlite3 from 'sqlite3';
import DBG from 'debug';
const debug = DBG('notes:notes-sqlite3');
const error = DBG('notes:error-sqlite3');
var db; // store the database connection here
async function connectDB() {
if (db) return db;
var dbfile = process.env.SQLITE_FILE || "notes.sqlite3";
await new Promise((resolve, reject) => {
db = new sqlite3.Database(dbfile,
sqlite3.OPEN_READWRITE | sqlite3.OPEN_CREATE,
err => {
if (err) return reject(err);
resolve(db);
});
});
return db;
}
This serves the same purpose as the connectDB function in notes-level.mjs: to manage the database connection. If the database is not open, it'll go ahead and do so, and even make sure that the database file is created (if it doesn't exist). But if it is already open, it is immediately returned:
export async function create(key, title, body) {
var db = await connectDB();
var note = new Note(key, title, body);
await new Promise((resolve, reject) => {
db.run("INSERT INTO notes ( notekey, title, body) "+
"VALUES ( ?, ? , ? );", [ key, title, body ], err => {
if (err) return reject(err);
resolve(note);
});
});
return note;
}
export async function update(key, title, body) {
var db = await connectDB();
var note = new Note(key, title, body);
await new Promise((resolve, reject) => {
db.run("UPDATE notes "+
"SET title = ?, body = ? WHERE notekey = ?",
[ title, body, key ], err => {
if (err) return reject(err);
resolve(note);
});
});
return note;
}
These are our create and update functions. As promised, we are now justified in defining the Notes model to have separate functions for create and update operations, because the SQL statement for each is different.
Calling db.run executes an SQL query, giving us the opportunity to insert parameters into the query string.
The sqlite3 module uses a parameter substitution paradigm that's common in SQL programming interfaces. The programmer puts the SQL query into a string, and then places a question mark in each place where the aim is to insert a value into the query string. Each question mark in the query string has to match a value in the array provided by the programmer. The module takes care of encoding the values correctly so that the query string is properly formatted, while preventing SQL injection attacks.
The db.run function simply runs the SQL query it is given, and does not retrieve any data. Because the sqlite3 module doesn't produce any kind of Promise, we have to wrap function calls in a Promise object:
export async function read(key) {
var db = await connectDB();
var note = await new Promise((resolve, reject) => {
db.get("SELECT * FROM notes WHERE notekey = ?", [key], (err,row) => {
if (err) return reject(err);
const note = new Note(row.notekey, row.title, row.body);
resolve(note);
});
});
return note;
}
To retrieve data using the sqlite3 module, you use the db.get, db.all, or db.each functions. The db.get function used here returns only the first row of the result set. The db.all function returns all rows of the result set at once, which can be a problem for available memory if the result set is large. The db.each function retrieves one row at a time, while still allowing processing of the entire result set.
For the Notes application, using db.get to retrieve a note is sufficient because there is only one note per notekey. Therefore, our SELECT query will return at most one row anyway. But what if your application will see multiple rows in the result set? We'll see what to do about that in a minute.
By the way, this read function has a bug in it. See if you can spot the error. We'll read more about this in Chapter 11, Unit Testing and Functional Testing, when our testing efforts uncover the bug:
export async function destroy(key) {
var db = await connectDB();
return await new Promise((resolve, reject) => {
db.run("DELETE FROM notes WHERE notekey = ?;", [key], err => {
if (err) return reject(err);
resolve();
});
});
}
To destroy a note, we simply execute the DELETE FROM statement:
export async function keylist() {
var db = await connectDB();
var keyz = await new Promise((resolve, reject) => {
var keyz = [];
db.all("SELECT notekey FROM notes", (err, rows) => {
if (err) return reject(err);
resolve(rows.map(row => row.notekey ));
});
});
return keyz;
}
The db.all function retrieves all rows of the result set.
The contract for this function is to return an array of note keys. The rows object is an array of results from the database that contains the data we are to return, but in a different format. Therefore, we use the map function to convert the array into the format required to fulfill the contract:
export async function count() {
var db = await connectDB();
var count = await new Promise((resolve, reject) => {
db.get("select count(notekey) as count from notes",(err, row)
=> {
if (err) return reject(err);
resolve(row.count);
});
});
return count;
}
export async function close() {
var _db = db;
db = undefined;
return _db ? new Promise((resolve, reject) => {
_db.close(err => {
if (err) reject(err);
else resolve();
});
}) : undefined;
}
We can simply use SQL to count the number of notes for us. In this case, db.get returns a row with a single column, count, which is the value we want to return.
Finally, we're ready to run the Notes application with SQLite3. Add the following code to the scripts section of package.json:
"start-sqlite3": "SQLITE_FILE=chap07.sqlite3 NOTES_MODEL=sqlite3 node --experimental-modules ./bin/www.mjs",
Run the Notes application:
$ DEBUG=notes:* npm run start-sqlite3
> notes@0.0.0 start-sqlite3 /Users/david/chap07/notes
> SQLITE_FILE=chap07.sqlite3 NOTES_MODEL=models/notes-sqlite3 node ./bin/www.mjs
notes:server Listening on port 3000 +0ms
notes:sqlite3-model Opened SQLite3 database chap07.sqlite3 +5s
You can now browse the application at http://localhost:3000, and run it through its paces as before.
Because SQLite3 supports simultaneous access from multiple instances, you can run the multiserver example by adding this to the scripts section of package.json:
"server1-sqlite3": "SQLITE_FILE=chap07.sqlite3 NOTES_MODEL=sqlite3 PORT=3001 node ./bin/www.mjs", "server2-sqlite3": "SQLITE_FILE=chap07.sqlite3 NOTES_MODEL=sqlite3 PORT=3002 node ./bin/www.mjs",
Then, run each of these in separate command Windows, as before.
Because we still haven't made any changes to the View templates or CSS files, the application will look the same as before.
Of course, you can use the sqlite command, or other SQLite3 client applications, to inspect the database:
$ sqlite3 chap07.sqlite3 SQLite version 3.10.2 2016-01-20 15:27:19 Enter ".help" for usage hints. sqlite> select * from notes; hithere|Hi There||ho there what there himom|Hi Mom||This is where we say thanks
There are several popular SQL database engines, such as PostgreSQL, MySQL (https://www.npmjs.com/package/mysql), and MariaDB (https://www.npmjs.com/package/mariasql). Corresponding to each are Node.js client modules similar in nature to the sqlite3 module that we just used. The programmer is close to the SQL, which can be good in the same way that driving a stick shift car is fun. But what if we want a higher-level view of the database so that we can think in terms of objects rather than rows of a database table? Object Relation Mapping (ORM) systems provide such a higher-level interface and even offer the ability to use the same data model with several databases.
The Sequelize module (http://www.sequelizejs.com/) is Promise-based, offers strong, well-developed ORM features, and can connect with SQLite3, MySQL, PostgreSQL, MariaDB, and MSSQL. Because Sequelize is Promise-based, it will fit naturally with the Promise-based application code we're writing.
A prerequisite to most SQL database engines is having access to a database server. In the previous section, we skirted around that issue by using SQLite3, which requires no database server setup. While it's possible to install a database server on your laptop, we want to avoid the complexity of doing so, and will use Sequelize to manage an SQLite3 database. We'll also see that it's simply a matter of a configuration file to run the same Sequelize code against a hosted database such as MySQL. In Chapter 10, Deploying Node.js Applications, we'll learn how to use Docker to easily set up any service, including database servers, on our laptop and deploy the exact same configuration to a live server. Most web hosting providers offer MySQL or PostgreSQL as part of the service.
Before we start on the code, let's install two modules:
$ npm install sequelize@4.31.x --save $ npm install js-yaml@3.10.x --save
The first obviously installs the Sequelize package. The second, js-yaml, is installed so that we can implement a YAML-formatted file to store the Sequelize connection configuration. YAML is a human-readable data serialization language, which simply means YAML is an easy-to-use text file format to describe data objects. Perhaps the best place to learn about YAML is its Wikipedia page at https://en.wikipedia.org/wiki/YAML.
Let's create a new file, models/notes-sequelize.mjs:
import fs from 'fs-extra';
import util from 'util';
import jsyaml from 'js-yaml';
import Note from './Note';
import Sequelize from 'sequelize';
import DBG from 'debug';
const debug = DBG('notes:notes-sequelize');
const error = DBG('notes:error-sequelize');
var SQNote;
var sequlz;
async function connectDB() {
if (typeof sequlz === 'undefined') {
const YAML = await fs.readFile(process.env.SEQUELIZE_CONNECT,'utf8');
const params = jsyaml.safeLoad(YAML, 'utf8');
sequlz = new Sequelize(params.dbname, params.username,
params.password, params.params);
}
if (SQNote) return SQNote.sync();
SQNote = sequlz.define('Note', {
notekey: { type: Sequelize.STRING, primaryKey: true, unique:
true },
title: Sequelize.STRING,
body: Sequelize.TEXT
});
return SQNote.sync();
}
The database connection is stored in the sequlz object, and is established by reading a configuration file (we'll go over this file later), and instantiating a Sequelize instance. The data model, SQNote, describes our object structure to Sequelize so that it can define corresponding database table(s). If SQNote is already defined, we simply return it, otherwise we define and return SQNote.
The Sequelize connection parameters are stored in a YAML file we specify in the SEQUELIZE_CONNECT environment variable. The line new Sequelize(..) opens the database connection. The parameters obviously contain any needed database name, username, password, and other options required to connect with the database.
The line sequlz.define is where we define the database schema. Instead of defining the schema as the SQL command to create the database table, we're giving a high-level description of the fields and their characteristics. Sequelize maps the object attributes into columns in tables.
We're telling Sequelize to call this schema Note, but we're using a SQNote variable to refer to that schema. That's because we already defined Note as a class to represent notes. To avoid a clash of names, we'll keep using the Note class, and use SQNote to interact with Sequelize about the notes stored in the database.
Add these functions to models/notes-sequelize.mjs:
export async function create(key, title, body) {
const SQNote = await connectDB();
const note = new Note(key, title, body);
await SQNote.create({ notekey: key, title: title, body: body });
return note;
}
export async function update(key, title, body) {
const SQNote = await connectDB();
const note = await SQNote.find({ where: { notekey: key } })
if (!note) { throw new Error(`No note found for ${key}`); } else {
await note.updateAttributes({ title: title, body: body });
return new Note(key, title, body);
}
}
There are several ways to create a new object instance in Sequelize. The simplest is to call an object's create function (in this case, SQNote.create). That function collapses together two other functions, build (to create the object), and save (to write it to the database).
Updating an object instance is a little different. First, we must retrieve its entry from the database using the find operation. The find operation is given an object specifying the query. Using find, we retrieve one instance, whereas the findAll operation retrieves all matching instances.
For documentation on Sequelize queries, visit http://docs.sequelizejs.com/en/latest/docs/querying/.
Like most or all other Sequelize functions, SQNote.find returns a Promise. Therefore, inside an async function, we await the result of the operation.
The update operation requires two steps, the first being to find the corresponding object to read it in from the database. Once the instance is found, we can update its values simply with the updateAttributes function:
export async function read(key) {
const SQNote = await connectDB();
const note = await SQNote.find({ where: { notekey: key } })
if (!note) { throw new Error(`No note found for ${key}`); } else {
return new Note(note.notekey, note.title, note.body);
}
}
To read a note, we use the find operation again. There is the possibility of an empty result, and we have to throw an error to match.
The contract for this function is to return a Note object. That means taking the fields retrieved using Sequelize and using that to create a Note object:
export async function destroy(key) {
const SQNote = await connectDB();
const note = await SQNote.find({ where: { notekey: key } })
return note.destroy();
}
To destroy a note, we use the find operation to retrieve its instance, and then call its destroy() method:
export async function keylist() {
const SQNote = await connectDB();
const notes = await SQNote.findAll({ attributes: [ 'notekey' ] });
return notes.map(note => note.notekey);
}
Because the keylist function acts on all Note objects, we use the findAll operation. We query for the notekey attribute on all notes. We're given an array of objects with a field named notekey, and we use the .map function to convert this into an array of the note keys:
export async function count() {
const SQNote = await connectDB();
const count = await SQNote.count();
return count;
}
export async function close() {
if (sequlz) sequlz.close();
sequlz = undefined;
SQNote = undefined;
}
For the count function, we can just use the count() method to calculate the needed result.
Sequelize supports the same API on several SQL database engines. The database connection is initialized using parameters on the Sequelize constructor. The Twelve Factor Application model suggests that configuration data such as this should be kept outside the code and injected using environment variables or a similar mechanism. What we'll do is use a YAML-formatted file to store the connection parameters, specifying the filename with an environment variable.
The Sequelize library does not define any such file for storing connection parameters. But it's simple enough to develop such a file. Let's do so.
The API for the Sequelize constructor is: constructor(database: String, username: String, password: String, options: Object).
In the connectDB function, we wrote the constructor as follows:
sequlz = new Sequelize(params.dbname, params.username, params.password, params.params);
This file, named models/sequelize-sqlite.yaml, provides with us a simple mapping that looks like this for an SQLite3 database:
dbname: notes
username:
password:
params:
dialect: sqlite
storage: notes-sequelize.sqlite3
The YAML file is a direct mapping to the Sequelize constructor parameters. The dbname, username, and password fields in this file correspond directly to the connection credentials, and the params object gives additional parameters. There are many, many, possible attributes to use in the params field, and you can read about them in the Sequelize documentation at http://docs.sequelizejs.com/manual/installation/usage.html.
The dialect field tells Sequelize what kind of database to use. For an SQLite database, the database filename is given in the storage field.
Let's first use SQLite3, because no further setup is required. After that, we'll get adventurous and reconfigure our Sequelize module to use MySQL.
If you already have a different database server available, it's simple to create a corresponding configuration file. For a plausible MySQL database on your laptop, create a new file, such as models/sequelize-mysql.yaml, containing something like the following code:
dbname: notes
username: .. user name
password: .. password
params:
host: localhost
port: 3306
dialect: mysql
This is straightforward. The username and password must correspond to the database credentials, while host and port will specify where the database is hosted. Set the database dialect and other connection information, and you're good to go.
To use MySQL, you will need to install the base MySQL driver so that Sequelize can use MySQL:
$ npm install mysql@2.x --save
Running with Sequelize against other databases it supports, such as PostgreSQL, is just as simple. Just create a configuration file, install the Node.js driver, and install/configure the database engine.
Now we can get ready to run the Notes application using Sequelize. We can run this against both SQLite3 and MySQL, but let's start with SQLite. Add this entry to the scripts entry in package.json:
"start-sequelize": "SEQUELIZE_CONNECT=models/sequelize-sqlite.yaml NOTES_MODEL=sequelize node --experimental-modules ./bin/www.mjs"
Then run it as follows:
$ DEBUG=notes:* npm run start-sequelize
> notes@0.0.0 start-sequelize /Users/david/chap07/notes
> SEQUELIZE_CONNECT=models/sequelize-sqlite.yaml NOTES_MODEL=sequelize node --experimental-modules./bin/www.mjs
notes:server Listening on port 3000 +0ms
As before, the application looks exactly the same because we've not changed the View templates or CSS files. Put it through its paces and everything should work.
With Sequelize, multiple Notes application instances is as simple as adding these lines to the scripts section of package.json, and then starting both instances as before:
"server1-sequelize": "SEQUELIZE_CONNECT=models/sequelize-sqlite.yaml NOTES_MODEL=sequelize PORT=3001 node --experimental-modules ./bin/www.mjs",
"server2-sequelize": "SEQUELIZE_CONNECT=models/sequelize-sqlite.yaml NOTES_MODEL=sequelize PORT=3002 node --experimental-modules ./bin/www.mjs",
You will be able to start both instances, use separate browser windows to visit both instances, and see that they show the same set of notes.
To reiterate using the Sequelize-based model on a given database server:
MongoDB is widely used with Node.js applications, a sign of which is the popular MEAN acronym: MongoDB (or MySQL), Express, Angular, and Node.js. MongoDB is one of the leading NoSQL databases. It is described as a scalable, high-performance, open source, document-oriented database. It uses JSON-style documents with no predefined, rigid schema and a large number of advanced features. You can visit their website for more information and documentation at http://www.mongodb.org.
Mongoose is a popular ORM for MongoDB (http://mongoosejs.com/). In this section, we'll use the native MongoDB driver instead, but Mongoose is a worthy alternative.
You will need a running MongoDB instance. The compose.io (https://www.compose.io/) and ScaleGrid.io (https://scalegrid.io/) hosted service providers offer hosted MongoDB services. Nowadays, it is straightforward to host MongoDB as a Docker container as part of a system built of other Docker containers. We'll do this in Chapter 11, Unit Testing and Functional Testing.
It's possible to set up a temporary MongoDB instance for testing on, say, your laptop. It is available in all the operating system package management systems, and the MongoDB website has instructions (https://docs.mongodb.org/manual/installation/).
Once installed, it's not necessary to set up MongoDB as a background service. Instead, you can run a couple of simple commands to get a MongoDB instance running in the foreground of a command window, which you can kill and restart any time you like.
In one command window, run the following:
$ mkdir data $ mongod --dbpath data
In another command window, you can test it as follows:
$ mongo
MongoDB shell version: 3.0.8
connecting to: test
Welcome to the MongoDB shell.
For interactive help, type "help".
For more comprehensive documentation, see
http://docs.mongodb.org/
Questions? Try the support group
http://groups.google.com/group/mongodb-user
> db.foo.save({ a: 1});
WriteResult({ "nInserted" : 1 })
> db.foo.find();
{ "_id" : ObjectId("56c0c98673f65b7988a96a77"), "a" : 1 }
>
bye
This saves a document in the collection named foo. The second command finds all documents in foo, printing them out for you. The _id field is added by MongoDB and serves as a document identifier. This is useful for testing and debugging. For a real deployment, your MongoDB server must be properly installed on a server. See the MongoDB documentation for these instructions.
Now that you've proved you have a working MongoDB server, let's get to work.
Installing the Node.js driver is as simple as running the following command:
$ npm install mongodb@3.x --save
Now create a new file, models/notes-mongodb.mjs:
import util from 'util';
import Note from './Note';
import mongodb from 'mongodb';
const MongoClient = mongodb.MongoClient;
import DBG from 'debug';
const debug = DBG('notes:notes-mongodb');
const error = DBG('notes:error-mongodb');
var client;
async function connectDB() {
if (!client) client = await MongoClient.connect(process.env.MONGO_URL);
return {
db: client.db(process.env.MONGO_DBNAME),
client: client
};
}
The MongoClient class is used to connect with a MongoDB instance. The required URL, which will be specified through an environment variable, uses a straightforward format: mongodb://localhost/. The database name is specified via another environment variable.
This creates the database client, and then opens the database connection. Both objects are returned from connectDB in an anonymous object. The general pattern for MongoDB operations is as follows:
(async () => {
const client = await MongoClient.connect(process.env.MONGO_URL);
const db = client.db(process.env.MONGO_DBNAME);
// perform database operations using db object
client.close();
})();
Therefore, our model methods require both client and db objects, because they will use both. Let's see how that's done:
export async function create(key, title, body) {
const { db, client } = await connectDB();
const note = new Note(key, title, body);
const collection = db.collection('notes');
await collection.insertOne({ notekey: key, title, body });
return note;
}
export async function update(key, title, body) {
const { db, client } = await connectDB();
const note = new Note(key, title, body);
const collection = db.collection('notes');
await collection.updateOne({ notekey: key }, { $set: { title, body } });
return note;
}
We retrieve db and client into individual variables using a destructuring assignment.
MongoDB stores all documents in collections. A collection is a group of related documents, and a collection is analogous to a table in a relational database. This means creating a new document or updating an existing one starts by constructing it as a JavaScript object, and then asking MongoDB to save that object to the database. MongoDB automatically encodes the object into its internal representation.
The db.collection method gives us a Collection object with which we can manipulate the named collection. See its documentation at http://mongodb.github.io/node-mongodb-native/2.2/api/Collection.html.
As the method name implies, insertOne inserts one document into the collection. Likewise, the updateOne method first finds a document (in this case, by looking up the document with the matching notekey field), and then changes fields in the document as specified.
You'll see that these methods return a Promise. The mongodb driver supports both callbacks and Promises. Many methods will invoke the callback function if one is provided, otherwise it returns a Promise that will deliver the results or errors. And, of course, since we're using async functions, the await keyword makes this so clean.
Next, let's look at reading a note from MongoDB:
export async function read(key) {
const { db, client } = await connectDB();
const collection = db.collection('notes');
const doc = await collection.findOne({ notekey: key });
const note = new Note(doc.notekey, doc.title, doc.body);
return note;
}
The mongodb driver supports several variants of find operations. In this case, the Notes application ensures that there is exactly one document matching a given key. Therefore, we can use the findOne method. As the name implies, findOne will return the first matching document.
The argument to findOne is a query descriptor. This simple query looks for documents whose notekey field matches the requested key. An empty query will, of course, match all documents in the collection. You can match against other fields in a similar way, and the query descriptor can do much more. For documentation on queries, visit https://docs.mongodb.org/getting-started/node/query/.
The insertOne method we used earlier also took the same kind of query descriptor.
In order to satisfy the contract for this function, we create a Note object and then return it to the caller. Hence, we create a Note using the data retrieved from the database:
export async function destroy(key) {
const { db, client } = await connectDB();
const collection = db.collection('notes');
await collection.findOneAndDelete({ notekey: key });
}
One of the find variants is findOneAndDelete. As the name implies, it finds one document matching the query descriptor, and then deletes that document:
export async function keylist() {
const { db, client } = await connectDB();
const collection = db.collection('notes');
const keyz = await new Promise((resolve, reject) => {
var keyz = [];
collection.find({}).forEach(
note => { keyz.push(note.notekey); },
err => {
if (err) reject(err);
else resolve(keyz);
}
);
});
return keyz;
}
Here, we're using the base find operation and giving it an empty query so that it matches every document. What we're to return is an array containing the notekey for every document.
All of the find operations return a Cursor object. The documentation can be found at http://mongodb.github.io/node-mongodb-native/2.1/api/Cursor.html.
The Cursor object is, as the name implies, a pointer into a result set from a query. It has a number of useful functions related to operating on a result set. For example, you can skip the first few items in the results, or limit the size of the result set, or perform the filter and map operations.
The Cursor.forEach method takes two callback functions. The first is called on every element in the result set. In this case, we can use that to record just the notekey in an array. The second callback is called after all elements in the result set have been processed. We use this to indicate success or failure, and to return the keyz array.
Because forEach uses this pattern, it does not have an option for supplying a Promise, and we have to create the Promise ourselves, as shown here:
export async function count() {
const { db, client } = await connectDB();
const collection = db.collection('notes');
const count = await collection.count({});
return count;
}
export async function close() {
if (client) client.close();
client = undefined;
}
The count method takes a query descriptor and, as the name implies, counts the number of matching documents.
Now that we have our MongoDB model, we can get ready to run Notes with it.
By now you know the drill; add this to the scripts section of package.json:
"start-mongodb": "MONGO_URL=mongodb://localhost/ MONGO_DBNAME=chap07 NOTES_MODEL=mongodb node --experimental-modules ./bin/www.mjs",
The MONGO_URL environment variable is the URL to connect with your MongoDB database.
You can start the Notes application as follows:
$ DEBUG=notes:* npm run start-mongodb
> notes@0.0.0 start-mongodb /Users/david/chap07/notes
> MONGO_URL=mongodb://localhost/ MONGO_DBNAME=chap07 NOTES_MODEL=mongodb node --experimental-modules ./bin/www
notes:server Listening on port 3000 +0ms
You can browse the application at http://localhost:3000 and put it through its paces. You can kill and restart the application, and your notes will still be there.
Add this to the scripts section of package.json:
"server1-mongodb": "MONGO_URL=mongodb://localhost/ MONGO_DBNAME=chap07 NOTES_MODEL=mongodb PORT=3001 node --experimental-modules ./bin/www.mjs",
"server2-mongodb": "MONGO_URL=mongodb://localhost/ MONGO_DBNAME=chap07 NOTES_MODEL=mongodb PORT=3002 node --experimental-modules ./bin/www.mjs",
You will be able to start two instances of the Notes application, and see that both share the same set of notes.
In this chapter, we went through a real whirlwind of different database technologies. While we looked at the same seven functions over and over, it's useful to be exposed to the various data storage models and ways of getting things done. Even so, we only touched the surface of options for accessing databases and data storage engines from Node.js.
By abstracting the model implementations correctly, we were able to easily switch data storage engines while not changing the rest of the application. We did skip around the issue of setting up database servers. As promised, we'll get to that in Chapter 10, Deploying Node.js Applications, when we explore production deployment of Node.js applications.
By focusing the model code on the purpose of storing data, both the models and the application should be easier to test. The application can be tested with a mock data module that provides known predictable notes that can be checked predictably. We'll look at this in more depth in Chapter 11, Unit Testing and Functional Testing.
In the next chapter, we'll focus on authenticating our users using OAuth2.
Now that our Notes application can save its data in a database, we can think about the next phase of making this a real application, namely authenticating our users.
It's so natural to log in to a website to use its services. We do it every day, and we even trust banking and investment organizations to secure our financial information through login procedures on a website. HTTP is a stateless protocol, and a web application cannot tell much about one HTTP request versus another. Because HTTP is stateless, HTTP requests do not natively know whether the user driving the web browser is logged in, the user's identity, or even whether the HTTP request was initiated by a human being.
The typical method for user authentication is to send a cookie to the browser containing a token to carry user identity. The cookie needs to contain data identifying the browser and whether that browser is logged in. The cookie will then be sent with every request, letting the application track which user account is associated with the browser.
With Express, the best way to do this is with the express-session middleware. It stores data as a cookie and looks for that data on every browser request. It is easy to configure, but is not a complete solution for user authentication. There are several add-on modules that handle user authentication, and some even support authenticating users against third-party websites, such as Facebook or Twitter.
One package appears to be leading the pack in user authentication – Passport (http://passportjs.org/). It supports a long list of services against which to authenticate, making it easy to develop a website that lets users sign up with credentials from another website, for example, Twitter. Another, express-authentication (https://www.npmjs.com/package/express-authentication), bills itself as the opinionated alternative to Passport.
We will use Passport to authenticate users against both a locally stored user credentials database and using OAuth2 to authenticate against a Twitter account. We'll also take this as an opportunity to explore REST-based microservice implementation with Node.js.
In this chapter, we'll discuss the following three aspects of this phase:
Let's get started!
The first thing to do is duplicate the code used for the previous chapter. For example, if you kept that code in chap07/notes, create a new directory, chap08/notes.
We could implement user authentication and accounts by simply adding a user model, and a few routes and views to the existing Notes application. While it would be accomplishable, is this what we would do in a real-world production application?
Consider the high value of user identity information, and the super-strong need for robust and reliable user authentication. Website intrusions happen regularly, and it seems the item most frequently stolen is user identities.
Can you design and build a user authentication system with the required level of security? One that is probably safe against all kinds of intruders?
As with so many other software development problems, it's best to use a pre-existing authentication library, preferably one with a long track record, where significant bugs have been fixed already.
Another issue is architectural choices to promote security. Bugs will occur and the talented miscreants will break in. Walling off the user information database is an excellent idea to limit the risk.
Keeping a user information database enables you to authenticate your users, present user profiles, help users connect with each other, and so forth. Those are useful services to offer to website users, but how can you limit the risk that data will fall into the wrong hands?
In this chapter, we'll develop a user authentication microservice. The plan is to eventually segregate that service into a well-protected barricaded area. This mimics an architectural choice made by some sites, to strictly control API and even physical access to the user information database, implementing as many technological barriers as possible against unapproved access.
Microservices are, of course, not a panacea, meaning we shouldn't try to force-fit every application into the microservice box. By analogy, microservices are like the Unix philosophy of small tools each doing one thing well, which we mix/match/combine into larger tools. Another word for this is composability. While we can build a lot of useful software tools with that philosophy, does it work for applications such as Photoshop or LibreOffice? While composing a system out of single-purpose tools is highly flexible, one loses the advantages gained by tight integration of components.
The first question is whether to use a REST-service oriented framework, code the REST application on bare Node.js, or what? You could implement REST services on the built-in http module. The advantage of using an application framework is the framework authors will have already baked-in a lot of best practices and bug fixing and security measures. Express, for example, is widely used, very popular, and can easily be used for REST services. There are other frameworks more aligned with developing REST services, and we'll use one of them – Restify (http://restify.com/).
The user authentication server will require two modules:
To test the service, we'll write a couple of simple scripts for administering user information in the database. We won't be implementing an administrative user interface in the Notes application, and will rely on the scripts to administer the users. As a side effect, we'll have a tool to run a couple of simple tests against the user service.
After this service is functioning correctly, we'll set about modifying the Notes application to access user information from the service, while using Passport to handle authentication.
The first step is creating a new directory to hold the User Information microservice. This should be a sibling directory to the Notes application. If you created a directory named chap08/notes to hold the Notes application, then create a directory named chap08/users to hold the microservice.
Then run the following commands:
$ cd users
$ npm init
.. answer questions
.. name - user-auth-server
$ npm install debug@^2.6.x fs-extra@^5.x js-yaml@^3.10.x \
restify@^6.3.x restify-clients@^1.5.x sequelize@^4.31.x \
sqlite3@^3.1.x --save
This gets us ready to start coding. We'll use the debug module for logging messages, js-yaml to read the Sequelize configuration file, restify for its REST framework, and sequelize/mysql/sqlite3 for database access.
We'll be storing the user information using a Sequelize-based model in an SQL database. As we go through this, ponder a question: should we integrate the database code directly into the REST API implementation? Doing so would reduce the user information microservice to one module, with database queries mingled with REST handlers. By separating the REST service from the data storage model, we have the freedom to adopt other data storage systems besides Sequelize/SQL. Further, the data storage model could conceivably be used in ways other than the REST service.
Create a new file named users-sequelize.mjs in users, containing the following:
import Sequelize from "sequelize";
import jsyaml from 'js-yaml';
import fs from 'fs-extra';
import util from 'util';
import DBG from 'debug';
const log = DBG('users:model-users');
const error = DBG('users:error');
var SQUser;
var sequlz;
async function connectDB() {
if (SQUser) return SQUser.sync();
const yamltext = await fs.readFile(process.env.SEQUELIZE_CONNECT,
'utf8');
const params = await jsyaml.safeLoad(yamltext, 'utf8');
if (!sequlz) sequlz = new Sequelize(params.dbname, params.username,
params.password,
params.params);
// These fields largely come from the Passport / Portable Contacts
schema.
// See http://www.passportjs.org/docs/profile
//
// The emails and photos fields are arrays in Portable Contacts.
// We'd need to set up additional tables for those.
//
// The Portable Contacts "id" field maps to the "username" field
here
if (!SQUser) SQUser = sequlz.define('User', {
username: { type: Sequelize.STRING, unique: true },
password: Sequelize.STRING,
provider: Sequelize.STRING,
familyName: Sequelize.STRING,
givenName: Sequelize.STRING,
middleName: Sequelize.STRING,
emails: Sequelize.STRING(2048),
photos: Sequelize.STRING(2048)
});
return SQUser.sync();
}
As with our Sequelize-based model for Notes, we use a YAML file to store connection configuration. We're even using the same environment variable, SEQUELIZE_CONNECT.
What is the best storage service for user authentication data? By using Sequelize, we have our pick of SQL databases to choose from. While NoSQL databases are all the rage, is there any advantage to using one to store user authentication data? Nope. An SQL server will do the job just fine, and Sequelize allows us the freedom of choice.
It's tempting to simplify the overall system by using the same database instance to store notes and user information, and to use Sequelize for both. But we've chosen to simulate a secured server for user data. That calls for the data to be in separate database instances, preferably on separate servers. A highly secure application deployment might put the user information service on completely separate servers, perhaps in a physically isolated data center, with carefully configured firewalls, and there might even be armed guards at the door.
The user profile schema shown here is derived from the normalized profile provided by Passport; refer to http://www.passportjs.org/docs/profile for more information. Passport will harmonize information given by third-party services into a single object definition. To simplify our code, we're simply using the schema defined by Passport:
export async function create(username, password, provider, familyName, givenName, middleName, emails, photos) {
const SQUser = await connectDB();
return SQUser.create({
username, password, provider,
familyName, givenName, middleName,
emails: JSON.stringify(emails), photos: JSON.stringify(photos)
});
}
export async function update(username, password, provider, familyName, givenName, middleName, emails, photos) {
const user = await find(username);
return user ? user.updateAttributes({
password, provider,
familyName, givenName, middleName,
emails: JSON.stringify(emails),
photos: JSON.stringify(photos)
}) : undefined;
}
Our create and update functions take user information and either add a new record or update an existing record:
export async function find(username) {
const SQUser = await connectDB();
const user = await SQUser.find({ where: { username: username } });
const ret = user ? sanitizedUser(user) : undefined;
return ret;
}
This lets us look up a user information record, and we return a sanitized version of that data.
Because we're segregating the user data from the rest of the Notes application, we want to return a sanitized object rather than the actual SQUser object. What if there was some information leakage because we simply sent the SQUser object back to the caller? The sanitizedUser function, shown later, creates an anonymous object with exactly the fields we want exposed to the other modules:
export async function destroy(username) {
const SQUser = await connectDB();
const user = await SQUser.find({ where: { username: username } });
if (!user) throw new Error('Did not find requested '+ username +' to delete');
user.destroy();
}
This lets us support deleting user information. We do this as we did for the Notes Sequelize model, by first finding the user object and then calling its destroy method:
export async function userPasswordCheck(username, password) {
const SQUser = await connectDB();
const user = await SQUser.find({ where: { username: username } });
if (!user) {
return { check: false, username: username, message: "Could not
find user" };
} else if (user.username === username && user.password ===
password) {
return { check: true, username: user.username };
} else {
return { check: false, username: username, message: "Incorrect
password" };
}
}
This lets us support the checking of user passwords. The three conditions to handle are as follows:
The object we return lets the caller distinguish between those cases. The check field indicates whether to allow this user to be logged in. If check is false, there's some reason to deny their request to log in, and the message is what should be displayed to the user:
export async function findOrCreate(profile) {
const user = await find(profile.id);
if (user) return user;
return await create(profile.id, profile.password, profile.provider,
profile.familyName, profile.givenName, profile.middleName,
profile.emails, profile.photos);
}
This combines two actions in one function: first, to verify whether the named user exists and, if not, to create that user. Primarily, this will be used while authenticating against third-party services:
export async function listUsers() {
const SQUser = await connectDB();
const userlist = await SQUser.findAll({});
return userlist.map(user => sanitizedUser(user));
}
List the existing users. The first step is using findAll to give us the list of the users as an array of SQUser objects. Then we sanitize that list so we don't expose any data that we don't want exposed:
export function sanitizedUser(user) {
var ret = {
id: user.username, username: user.username,
provider: user.provider,
familyName: user.familyName, givenName: user.givenName,
middleName: user.middleName,
emails: JSON.parse(user.emails),
photos: JSON.parse(user.photos)
};
try {
ret.emails = JSON.parse(user.emails);
} catch(e) { ret.emails = []; }
try {
ret.photos = JSON.parse(user.photos);
} catch(e) { ret.photos = []; }
return ret;
}
This is our utility function to ensure we expose a carefully controlled set of information to the caller. With this service, we're emulating a secured user information service that's walled off from other applications. As we said earlier, this function returns an anonymous sanitized object where we know exactly what's in the object.
It's very important to decode the JSON string we put into the database. Remember that we stored the emails and photos data using JSON.stringify in the database. Using JSON.parse, we decode those values, just like adding hot water to instant coffee produces a drinkable beverage.
We are building our way towards integrating user information and authentication into the Notes application. The next step is to wrap the user data model we just created into a REST server. After that, we'll create a couple of scripts so that we can add some users, perform other administrative tasks, and generally verify that the service works. Finally, we'll extend the Notes application with login and logout support.
In the package.json file, change the main tag to the following line of code:
"main": "user-server.mjs",
Then create a file named user-server.mjs, containing the following code:
import restify from 'restify';
import util from 'util';
import DBG from 'debug';
const log = DBG('users:service');
const error = DBG('users:error');
import * as usersModel from './users-sequelize';
var server = restify.createServer({
name: "User-Auth-Service",
version: "0.0.1"
});
server.use(restify.plugins.authorizationParser());
server.use(check);
server.use(restify.plugins.queryParser());
server.use(restify.plugins.bodyParser({
mapParams: true
}));
The createServer method can take a long list of configuration options. These two may be useful for identifying information.
As with Express applications, the server.use calls initialize what Express would call middleware functions, but which Restify calls handler functions. These are callback functions whose API is function (req, res, next). As with Express, these are the request and response objects, and next is a function which, when called, carries execution to the next handler function.
Unlike Express, every handler function must call the next function. In order to tell Restify to stop processing through handlers, the next function must be called as next(false). Calling next with an error object also causes the execution to end, and the error is sent back to the requestor.
The handler functions listed here do two things: authorize requests and handle parsing parameters from both the URL and the post request body. The authorizationParser function looks for HTTP basic auth headers. The check function is shown later and emulates the idea of an API token to control access.
Refer to http://restify.com/docs/plugins-api/ for more information on the built-in handlers available in Restify.
Add this to user-server.mjs:
// Create a user record
server.post('/create-user', async (req, res, next) => {
try {
var result = await usersModel.create(
req.params.username, req.params.password,
req.params.provider,
req.params.familyName, req.params.givenName,
req.params.middleName,
req.params.emails, req.params.photos);
res.send(result);
next(false);
} catch(err) { res.send(500, err); next(false); }
});
As for Express, the server.VERB functions let us define the handlers for specific HTTP actions. This route handles a POST on /create-user, and, as the name implies, this will create a user by calling the usersModel.create function.
As a POST request, the parameters arrive in the body of the request rather than as URL parameters. Because of the mapParams flag on the bodyParams handler, the arguments passed in the HTTP body are added to req.params.
We simply call usersModel.create with the parameters sent to us. When completed, the result object should be a user object, which we send back to the requestor using res.send:
// Update an existing user record
server.post('/update-user/:username', async (req, res, next) => {
try {
var result = await usersModel.update(
req.params.username, req.params.password,
req.params.provider,
req.params.familyName, req.params.givenName,
req.params.middleName,
req.params.emails, req.params.photos);
res.send(usersModel.sanitizedUser(result));
next(false);
} catch(err) { res.send(500, err); next(false); }
});
The /update-user route is handled in a similar way. However, we have put the username parameter on the URL. Like Express, Restify lets you put named parameters in the URL like as follows. Such named parameters are also added to req.params.
We simply call usersModel.update with the parameters sent to us. That, too, returns an object we send back to the caller with res.send:
// Find a user, if not found create one given profile information
server.post('/find-or-create', async (req, res, next) => {
log('find-or-create '+ util.inspect(req.params));
try {
var result = await usersModel.findOrCreate({
id: req.params.username, username: req.params.username,
password: req.params.password, provider:
req.params.provider,
familyName: req.params.familyName, givenName:
req.params.givenName,
middleName: req.params.middleName,
emails: req.params.emails, photos: req.params.photos
});
res.send(result);
next(false);
} catch(err) { res.send(500, err); next(false); }
});
This handles our findOrCreate operation. We simply delegate this to the model code, as done previously.
As the name implies, we'll look to see whether the named user already exists and, if so, simply return that user, otherwise it will be created:
// Find the user data (does not return password)
server.get('/find/:username', async (req, res, next) => {
try {
var user = await usersModel.find(req.params.username);
if (!user) {
res.send(404, new Error("Did not find "+
req.params.username));
} else {
res.send(user);
}
next(false);
} catch(err) { res.send(500, err); next(false); }
});
Here, we support looking up the user object for the provided username.
If the user was not found, then we return a 404 status code because it indicates a resource that does not exist. Otherwise, we send the object that was retrieved:
// Delete/destroy a user record
server.del('/destroy/:username', async (req, res, next) => {
try {
await usersModel.destroy(req.params.username);
res.send({});
next(false);
} catch(err) { res.send(500, err); next(false); }
});
This is how we delete a user from the Notes application. The DEL HTTP verb is meant to be used to delete things on a server, making it the natural choice for this functionality:
// Check password
server.post('/passwordCheck', async (req, res, next) => {
try {
await usersModel.userPasswordCheck(
req.params.username, req.params.password);
res.send(check);
next(false);
} catch(err) { res.send(500, err); next(false); }
});
This is another aspect of keeping the password solely within this server. The password check is performed by this server, rather than in the Notes application. We simply call the usersModel.userPasswordCheck function shown earlier and send back the object it returns:
// List users
server.get('/list', async (req, res, next) => {
try {
var userlist = await usersModel.listUsers();
if (!userlist) userlist = [];
res.send(userlist);
next(false);
} catch(err) { res.send(500, err); next(false); }
});
Then, finally, if required, we send a list of Notes application users back to the requestor. In case no list of users is available, we at least send an empty array:
server.listen(process.env.PORT, "localhost", function() {
log(server.name +' listening at '+ server.url);
});
// Mimic API Key authentication.
var apiKeys = [ {
user: 'them',
key: 'D4ED43C0-8BD6-4FE2-B358-7C0E230D11EF'
} ];
function check(req, res, next) {
if (req.authorization) {
var found = false;
for (let auth of apiKeys) {
if (auth.key === req.authorization.basic.password
&& auth.user === req.authorization.basic.username) {
found = true;
break;
}
}
if (found) next();
else {
res.send(401, new Error("Not authenticated"));
next(false);
}
} else {
res.send(500, new Error('No Authorization Key'));
next(false);
}
}
As with the Notes application, we listen to the port named in the PORT environment variable. By explicitly listening only on localhost, we'll limit the scope of systems that can access the user authentication server. In a real deployment, we might have this server behind a firewall with a tight list of host systems allowed to have access.
This last function, check, implements authentication for the REST API itself. This is the handler function we added earlier.
It requires the caller to provide credentials on the HTTP request using the basic auth headers. The authorizationParser handler looks for this and gives it to us on the req.authorization.basic object. The check function simply verifies that the named user and password combination exists in the local array.
This is meant to mimic assigning an API key to an application. There are several ways of doing so; this is just one.
This approach is not limited to just authenticating using HTTP basic auth. The Restify API lets us look at any header in the HTTP request, meaning we could implement any kind of security mechanism we like. The check function could implement some other security method, with the right code.
Because we added check with the initial set of server.use handlers, it is called on every request. Therefore, every request to this server must provide the HTTP basic auth credentials required by this check.
This strategy is good if you want to control access to every single function in your API. For the user authentication service, that's probably a good idea. Some REST services in the world have certain API functions that are open to the world and others protected by an API token. To implement that, the check function should not be configured among the server.use handlers. Instead, it should be added to the appropriate route handlers as follows:
server.get('/request/url', authHandler, (req, res, next) => {
..
});
Such an authHandler would be coded similarly to our check function. A failure to authenticate is indicated by sending an error code and using next(false) to end the routing function chain.
We now have the complete code for the user authentication server. It defines several request URLs, and for each, the corresponding function in the user model is called.
Now we need a YAML file to hold the database credentials, so create sequelize-sqlite.yaml, containing the following code:
dbname: users
username:
password:
params:
dialect: sqlite
storage: users-sequelize.sqlite3
Since this is Sequelize, it's easy to switch to other database engines simply by supplying a different configuration file. Remember that the filename of this configuration file must appear in the SEQUELIZE_CONNECT environment variable.
Finally, package.json should look as follows:
{
"name": "user-auth-server",
"version": "0.0.1",
"description": "",
"main": "user-server.js",
"scripts": {
"start": "DEBUG=users:* PORT=3333 SEQUELIZE_CONNECT=sequelize-sqlite.yaml node --experimental-modules user-server"
},
"author": "",
"license": "ISC",
"engines": {
"node": ">=8.9"
},
"dependencies": {
"debug": "^2.6.9",
"fs-extra": "^5.x",
"js-yaml": "^3.10.x",
"mysql": "^2.15.x",
"restify": "^6.3.x",
"restify-clients": "^1.5.x",
"sqlite3": "^3.1.x",
"sequelize": "^4.31.x"
}
}
We configure this server to listen on port 3333 using the database credentials we just gave and with debugging output for the server code.
You can now start the user authentication server:
$ npm start
> user-auth-server@0.0.1 start /Users/david/chap08/users
> DEBUG=users:* PORT=3333 SEQUELIZE_CONNECT=sequelize-mysql.yaml node user-server
users:server User-Auth-Service listening at http://127.0.0.1:3333 +0ms
But we don't have any way to interact with this server, yet.
To give ourselves assurance that the user authentication server works, let's write a couple of scripts to exercise the API. Because we're not going to take the time to write an administrative backend to the Notes application, these scripts will let us add and delete users who are allowed access to Notes. These scripts will live within the user authentication server package directory.
The Restify package supports coding REST servers. For the REST clients, we're using a companion library, restify-clients, which has been spun out of Restify.
Create a file named users-add.js, containing the following code:
'use strict';
const util = require('util');
const restify = require('restify-clients');
var client = restify.createJsonClient({
url: 'http://localhost:'+process.env.PORT,
version: '*'
});
client.basicAuth('them', 'D4ED43C0-8BD6-4FE2-B358-7C0E230D11EF');
client.post('/create-user', {
username: "me", password: "w0rd", provider: "local",
familyName: "Einarrsdottir", givenName: "Ashildr", middleName: "",
emails: [], photos: []
},
(err, req, res, obj) => {
if (err) console.error(err.stack);
else console.log('Created '+ util.inspect(obj));
});
This is the basic structure of a Restify client. We create the Client object – we have a choice between the JsonClient, as used here, the StringClient, and the HttpClient. The HTTP basicAuth credentials are easy to set, as shown here.
Then we make the request, in this case a POST request on /create-user. Because it is a POST request, the object we specify here is formatted by Restify into HTTP POST body parameters. As we saw earlier, the server has the bodyParser handler function configured, which converts those body parameters into the req.param object.
In the Restify client, as for the Restify server, we use the various HTTP methods by calling client.METHOD. Because it is a POST request, we use client.post. When the request finishes, the callback function is invoked.
Before running these scripts, start the authentication server in one window using the following command:
$ npm start
Now run the test script using the following command:
$ PORT=3333 node users-add.js
Created { id: 1, username: 'me', password: 'w0rd', provider: 'local',
familyName: 'Einarrsdottir', givenName: 'Ashildr',
middleName: '',
emails: '[]', photos: '[]',
updatedAt: '2016-02-24T02:34:41.661Z',
createdAt: '2016-02-24T02:34:41.661Z' }
We can inspect our handiwork using the following command:
$ sqlite3 users-sequelize.sqlite3 SQLite version 3.10.2 2016-01-20 15:27:19 Enter ".help" for usage hints. sqlite> .schema users CREATE TABLE `Users` (`id` INTEGER PRIMARY KEY AUTOINCREMENT, `username` VARCHAR(255) UNIQUE, `password` VARCHAR(255), `provider` VARCHAR(255), `familyName` VARCHAR(255), `givenName` VARCHAR(255), `middleName` VARCHAR(255), `emails` VARCHAR(2048), `photos` VARCHAR(2048), `createdAt` DATETIME NOT NULL, `updatedAt` DATETIME NOT NULL, UNIQUE (`username`));
sqlite> select * from users; 2|me|w0rd|local|Einarrsdottir|Ashildr||[]|[]|2018-01-21 05:34:56.629 +00:00|2018-01-21 05:34:56.629 +00:00 sqlite> ^D
Now let's write a script, users-find.js, to look up a given user:
'use strict';
const util = require('util');
const restify = require('restify-clients');
var client = restify.createJsonClient({
url: 'http://localhost:'+process.env.PORT,
version: '*'
});
client.basicAuth('them', 'D4ED43C0-8BD6-4FE2-B358-7C0E230D11EF');
client.get('/find/'+ process.argv[2],
(err, req, res, obj) => {
if (err) console.error(err.stack);
else console.log('Found '+ util.inspect(obj));
});
This simply calls the /find URL, specifying the username that the user supplies as a command-line argument. Note that the get operation does not take an object full of parameters. Instead, any parameters would be added to the URL.
It's run as follows:
$ PORT=3333 node users-find.js me
Found { username: 'me', provider: 'local',
familyName: 'Einarrsdottir', givenName: 'Ashildr',
middleName: '',
emails: '[]', photos: '[]' }
Similarly, we can write scripts against the other REST functions. But we need to get on with the real goal of integrating this into the Notes application.
Now that we have proved that the user authentication service is working, we can set up the Notes application to support user logins. We'll be using Passport to support login/logout, and the authentication server to store the required data.
Among the available packages, Passport stands out for simplicity and flexibility. It integrates directly with the Express middleware chain, and the Passport community has developed hundreds of so-called Strategy modules to handle authentication against a long list of third-party services. See http://www.passportjs.org/ for information and documentation.
The first step is to create a user data model for the Notes application. Rather than retrieving data from data files or a database, it will use REST to query the server we just created. We could have created user model code that directly accesses the database but, for reasons already discussed, we've decided to segregate user authentication into a separate service.
Let us now turn to the Notes application, which you may have stored as chap08/notes. We'll be modifying the application, first to access the user authentication REST API, and then to use Passport for authorization and authentication.
For the test/admin scripts that we created earlier, we used the restify-clients module. That package is a companion to the restify library, where restify supports the server side of the REST protocol and restify-clients supports the client side. Their names might give away the purpose.
However nice the restify-clients library is, it doesn't support a Promise-oriented API, as is required to play well with async functions. Another library, superagent, does support a Promise-oriented API, plays well in async functions, and there is a companion to that package, Supertest, that's useful in unit testing. We'll use Supertest in Chapter 11, Unit Testing and Functional Testing, when we talk about unit testing. For documentation, see https://www.npmjs.com/package/superagent:
$ npm install superagent@^3.8.x
Create a new file, models/users-superagent.mjs, containing the following code:
import request from 'superagent';
import util from 'util';
import url from 'url';
const URL = url.URL;
import DBG from 'debug';
const debug = DBG('notes:users-superagent');
const error = DBG('notes:error-superagent');
function reqURL(path) {
const requrl = new URL(process.env.USER_SERVICE_URL);
requrl.pathname = path;
return requrl.toString();
}
The reqURL function replaces the connectXYZZY functions that we wrote in earlier modules. With superagent, we don't leave a connection open to the service, but open a new connection on each request. The common thing to do is to formulate the request URL. The user is expected to provide a base URL, such as http://localhost:3333/, in the USER_SERVICE_URL environment variable. This function modifies that URL, using the new WHATWG URL support in Node.js, to use a given URL path:
export async function create(username, password,
provider, familyName, givenName, middleName,
emails, photos) {
var res = await request
.post(reqURL('/create-user'))
.send({
username, password, provider,
familyName, givenName, middleName, emails, photos
})
.set('Content-Type', 'application/json')
.set('Acccept', 'application/json')
.auth('them', 'D4ED43C0-8BD6-4FE2-B358-7C0E230D11EF');
return res.body;
} export async function update(username, password,
provider, familyName, givenName, middleName,
emails, photos) {
var res = await request
.post(reqURL(`/update-user/${username}`))
.send({
username, password, provider,
familyName, givenName, middleName, emails, photos
})
.set('Content-Type', 'application/json')
.set('Acccept', 'application/json')
.auth('them', 'D4ED43C0-8BD6-4FE2-B358-7C0E230D11EF');
return res.body;
}
These are our create and update functions. In each case, they take the data provided, construct an anonymous object, and POST it to the server.
The superagent library uses an API style where one chains together method calls to construct a request. The chain of method calls can end in a .then or .end clause, either of which take a callback function. But leave off both, and it will return a Promise.
All through this library, we'll use the .auth clause to set up the required authentication key.
In this case, we've purposely chosen variable names for the parameters to match field names of the object with parameter names used by the server. By doing so, we can use this shortened notation for anonymous objects, and our code is a little cleaner by using consistent variable names from beginning to end:
export async function find(username) {
var res = await request
.get(reqURL(`/find/${username}`))
.set('Content-Type', 'application/json')
.set('Acccept', 'application/json')
.auth('them', 'D4ED43C0-8BD6-4FE2-B358-7C0E230D11EF');
return res.body;
}
Our find operation lets us look up user information:
export async function userPasswordCheck(username, password) {
var res = await request
.post(reqURL(`/passwordCheck`))
.send({ username, password })
.set('Content-Type', 'application/json')
.set('Acccept', 'application/json')
.auth('them', 'D4ED43C0-8BD6-4FE2-B358-7C0E230D11EF');
return res.body;
}
We're sending the request to check passwords to the server.
A point about this method is useful to note. It could have taken the parameters in the URL, instead of the request body as is done here. But since request URL are routinely logged to files, putting the username and password parameters in the URL means user identity information would be logged to files and part of activity reports. That would obviously be a very bad choice. Putting those parameters in the request body not only avoids that bad result, but if an HTTPS connection to the service were used, the transaction would be encrypted:
export async function findOrCreate(profile) {
var res = await request
.post(reqURL('/find-or-create'))
.send({
username: profile.id, password: profile.password,
provider: profile.provider,
familyName: profile.familyName,
givenName: profile.givenName,
middleName: profile.middleName,
emails: profile.emails, photos: profile.photos
})
.set('Content-Type', 'application/json')
.set('Acccept', 'application/json')
.auth('them', 'D4ED43C0-8BD6-4FE2-B358-7C0E230D11EF');
return res.body;
}
The findOrCreate function either discovers the user in the database, or creates a new user. The profile object will come from Passport, but take careful note of what we do with profile.id. The Passport documentation says it will provide the username in the profile.id field. But we want to store it as username, instead:
export async function listUsers() {
var res = await request
.get(reqURL('/list'))
.set('Content-Type', 'application/json')
.set('Acccept', 'application/json')
.auth('them', 'D4ED43C0-8BD6-4FE2-B358-7C0E230D11EF');
return res.body;
}
Finally, we can retrieve a list of users.
What we've built so far is a user data model, with a REST API wrapping that model to create our authentication information service. Then, within the Notes application, we have a module that requests user data from this server. As of yet, nothing in the Notes application knows that this user model exists. The next step is to create a routing module for login/logout URLs and to change the rest of Notes to use user data.
The routing module is where we use passport to handle user authentication. The first task is to install the required modules:
$ npm install passport@^0.4.x passport-local@1.x --save
The passport module gives us the authentication algorithms. To support different authentication mechanisms, the passport authors have developed several strategy implementations. The authentication mechanisms, or strategies, correspond to the various third-party services that support authentication, such as using OAuth2 to authenticate against services such as Facebook, Twitter, or GitHub.
The LocalStrategy authenticates solely using data stored local to the application, for example, our user authentication information service.
Let's start by creating the routing module, routes/users.mjs:
import path from 'path';
import util from 'util';
import express from 'express';
import passport from 'passport';
import passportLocal from 'passport-local';
const LocalStrategy = passportLocal.Strategy;
import * as usersModel from '../models/users-superagent';
import { sessionCookieName } from '../app';
export const router = express.Router();
import DBG from 'debug';
const debug = DBG('notes:router-users');
const error = DBG('notes:error-users');
This brings in the modules we need for the /users router. This includes the two passport modules and the REST-based user authentication model.
In app.mjs, we will be adding session support so our users can log in and log out. That relies on storing a cookie in the browser, and the cookie name is found in this variable exported from app.mjs. We'll be using that cookie in a moment:
export function initPassport(app) {
app.use(passport.initialize());
app.use(passport.session());
}
export function ensureAuthenticated(req, res, next) {
try {
// req.user is set by Passport in the deserialize function
if (req.user) next();
else res.redirect('/users/login');
} catch (e) { next(e); }
}
The initPassport function will be called from app.mjs, and it installs the Passport middleware into the Express configuration. We'll discuss the implications of this later when we get to app.mjs changes, but Passport uses sessions to detect whether this HTTP request is authenticated or not. It looks at every request coming into the application, looks for clues about whether this browser is logged in or not, and attaches data to the request object as req.user.
The ensureAuthenticated function will be used by other routing modules and is to be inserted into any route definition that requires an authenticated logged-in user. For example, editing or deleting a note requires the user to be logged in, and therefore the corresponding routes in routes/notes.mjs must use ensureAuthenticated. If the user is not logged in, this function redirects them to /users/login so that they can do so:
outer.get('/login', function(req, res, next) {
try {
res.render('login', { title: "Login to Notes", user: req.user, });
} catch (e) { next(e); }
});
router.post('/login',
passport.authenticate('local', {
successRedirect: '/', // SUCCESS: Go to home page
failureRedirect: 'login', // FAIL: Go to /user/login
})
);
Because this router is mounted on /users, all these routes will have /user prepended. The /users/login route simply shows a form requesting a username and password. When this form is submitted, we land in the second route declaration, with a POST on /users/login. If passport deems this a successful login attempt using LocalStrategy, then the browser is redirected to the home page. Otherwise, it is redirected to the /users/login page:
router.get('/logout', function(req, res, next) {
try {
req.session.destroy();
req.logout();
res.clearCookie(sessionCookieName);
res.redirect('/');
} catch (e) { next(e); }
});
When the user requests to log out of Notes, they are to be sent to /users/logout. We'll be adding a button to the header template for this purpose. The req.logout function instructs Passport to erase their login credentials, and they are then redirected to the home page.
This function deviates from what's in the Passport documentation. There, we are told to simply call req.logout. But calling only that function sometimes results in the user not being logged out. It's necessary to destroy the session object, and to clear the cookie, in order to ensure that the user is logged out. The cookie name is defined in app.mjs, and we imported sessionCookieName for this function:
passport.use(new LocalStrategy(
async (username, password, done) => {
try {
var check = await usersModel.userPasswordCheck(username,
password);
if (check.check) {
done(null, { id: check.username, username: check.username });
} else {
done(null, false, check.message);
}
} catch (e) { done(e); }
}
));
Here is where we define our implementation of LocalStrategy. In the callback function, we call usersModel.userPasswordCheck, which makes a REST call to the user authentication service. Remember that this performs the password check and then returns an object indicating whether they're logged in or not.
A successful login is indicated when check.check is true. For this case, we tell Passport to use an object containing the username in the session object. Otherwise, we have two ways to tell Passport that the login attempt was unsuccessful. In one case, we use done(null, false) to indicate an error logging in, and pass along the error message we were given. In the other case, we'll have captured an exception, and pass along that exception.
You'll notice that Passport uses a callback-style API. Passport provides a done function, and we are to call that function when we know what's what. While we use an async function to make a clean asynchronous call to the backend service, Passport doesn't know how to grok the Promise that would be returned. Therefore, we have to throw a try/catch around the function body to catch any thrown exception:
passport.serializeUser(function(user, done) {
try {
done(null, user.username);
} catch (e) { done(e); }
});
passport.deserializeUser(async (username, done) => {
try {
var user = await usersModel.find(username);
done(null, user);
} catch(e) { done(e); }
});
The preceding functions take care of encoding and decoding authentication data for the session. All we need to attach to the session is the username, as we did in serializeUser. The deserializeUser object is called while processing an incoming HTTP request and is where we look up the user profile data. Passport will attach this to the request object.
We have a few changes required in app.mjs, some of which we've already touched on. We did carefully isolate the Passport module dependencies to routes/users.mjs. The changes required in app.mjs support the code in routes/users.mjs.
It's now time to uncomment a line we told you to comment out way back in Chapter 5, Your First Express Application. The imports for the routing modules will now look as follows:
import { router as index } from './routes/index';
import { router as users, initPassport } from './routes/users';
import { router as notes } from './routes/notes';
The User router supports the /login and /logout URL's as well as using Passport for authentication. We need to call initPassport for a little bit of initialization:
import session from 'express-session';
import sessionFileStore from 'session-file-store';
const FileStore = sessionFileStore(session);
export const sessionCookieName = 'notescookie.sid';
Because Passport uses sessions, we need to enable session support in Express, and these modules do so. The session-file-store module saves our session data to disk so that we can kill and restart the application without losing sessions. It's also possible to save sessions to databases with appropriate modules. A filesystem session store is suitable only when all Notes instances are running on the same server computer. For a distributed deployment situation, you'll need to use a session store that runs on a network-wide service, such as a database.
We're defining sessionCookieName here so it can be used in multiple places. By default, express-session uses a cookie named connect.sid to store the session data. As a small measure of security, it's useful when there's a published default to use a different non-default value. Any time we use the default value, it's possible that an attacker might know a security flaw depending on that default.
Use the following command to install the modules:
$ npm install express-session@1.15.x session-file-store@1.2.x --save
Express Session support, including all the various Session Store implementations, is documented on its GitHub project page at https://github.com/expressjs/session.
Add this in app.mjs:
app.use(session({
store: new FileStore({ path: "sessions" }),
secret: 'keyboard mouse',
resave: true,
saveUninitialized: true,
name: sessionCookieName
}));
initPassport(app);
Here we initialize the session support. The field named secret is used to sign the session ID cookie. The session cookie is an encoded string that is encrypted in part using this secret. In the Express Session documentation, they suggest the string keyboard cat for the secret. But, in theory, what if Express has a vulnerability, such that knowing this secret can make it easier to break the session logic on your site? Hence, we chose a different string for the secret just to be a little different and perhaps a little more secure.
Similarly, the default cookie name used by express-session is connect.sid. Here's where we change the cookie name to a non-default name.
The FileStore will store its session data records in a directory named sessions. This directory will be auto-created as needed:
app.use('/', index);
app.use('/users', users);
app.use('/notes', notes);
The preceding are the three routers used in the Notes application.
This router module handles the home page. It does not require the user to be logged in, but we want to change the display a little if they are logged in:
router.get('/', async (req, res, next) => {
try {
let keylist = await notes.keylist();
let keyPromises = keylist.map(key => { return notes.read(key) });
let notelist = await Promise.all(keyPromises);
res.render('index', {
title: 'Notes', notelist: notelist,
user: req.user ? req.user : undefined
});
} catch (e) { next(e); }
});
Remember that we ensured that req.user has the user profile data, which we did in deserializeUser. We simply check for this and make sure to add that data when rendering the views template.
We'll be making similar changes to most of the other route definitions. After that, we'll go over the changes to the view templates in which we use req.user to show the correct buttons on each page.
The changes required here are more significant, but still straightforward:
import { ensureAuthenticated } from './users';
We need to use the ensureAuthenticated function to protect certain routes from being used by users who are not logged in. Notice how ES6 modules let us import just the function(s) we require. Since that function is in the user router module, we need to import it from there:
router.get('/add', ensureAuthenticated, (req, res, next) => {
try {
res.render('noteedit', {
title: "Add a Note",
docreate: true, notekey: "",
user: req.user, note: undefined
});
} catch (e) { next(e); }
});
The first thing we added is to call usersRouter.ensureAuthenticated in the route definition. If the user is not logged in, they'll redirect to /users/login, thanks to that function.
Because we've ensured that the user is authenticated, we know that req.user will already have their profile information. We can then simply pass it to the view template.
For the other routes, we need to make similar changes:
router.post('/save', ensureAuthenticated, (req, res, next) => {
..
});
The /save route requires only this change to call ensureAuthenticated to make sure that the user is logged in:
router.get('/view', (req, res, next) => {
try {
var note = await notes.read(req.query.key);
res.render('noteview', {
title: note ? note.title : "",
notekey: req.query.key,
user: req.user ? req.user : undefined,
note: note
});
} catch (e) { next(e); }
});
For this route, we don't require the user to be logged in. We do need the user's profile information, if any, sent to the view template:
router.get('/edit', ensureAuthenticated, (req, res, next) => {
try {
var note = await notes.read(req.query.key);
res.render('noteedit', {
title: note ? ("Edit " + note.title) : "Add a Note",
docreate: false,
notekey: req.query.key,
user: req.user ? req.user : undefined,
note: note
});
} catch (e) { next(e); }
});
router.get('/destroy', ensureAuthenticated, (req, res, next) => {
try {
var note = await notes.read(req.query.key);
res.render('notedestroy', {
title: note ? `Delete ${note.title}` : "",
notekey: req.query.key,
user: req.user ? req.user : undefined,
note: note
});
} catch (e) { next(e); }
});
router.post('/destroy/confirm', ensureAuthenticated, (req, res, next) => {
..
});
For these routes, we require the user to be logged in. In most cases, we need to send the req.user value to the view template.
So far, we've created a backend user authentication service, a REST module, to access that service, a router module to handle routes related to logging in and out of the website, and changes in app.mjs to use those modules. We're almost ready, but we've got a number of outstanding changes to make in the templates. We're passing the req.user object to every template because each one must be changed to accommodate whether the user is logged in or not.
In partials/header.hbs, make the following additions:
...
{{#if user}}
<div class="collapse navbar-collapse"
id="navbarSupportedContent">
<span class="navbar-text text-dark col">{{ title }}</span>
<a class="btn btn-dark col-auto" href="/users/logout">
Log Out <span class="badge badge-light">{{ user.username }}
</span></a>
<a class="nav-item nav-link btn btn-dark col-auto"
href='/notes/add'>
ADD Note</a>
</div>
{{else}}
<div class="collapse navbar-collapse" id="navbarLogIn">
<a class="btn btn-primary" href="/users/login">Log in</a>
</div>
{{/if}}
...
What we're doing here is controlling which buttons to display at the top of the screen depending on whether the user is logged in or not. The earlier changes ensure that the user variable will be undefined if the user is logged out, otherwise it will have the user profile object. Therefore, it's sufficient to check the user variable as shown here to render different user interface elements.
A logged-out user doesn't get the ADD Note button, and gets a Log in button. Otherwise, the user gets an ADD Note button and a Log Out button. The Log in button takes the user to /users/login, while the Log Out button takes them to /users/logout. Both of those are handled in routes/users.js, and perform the expected function.
The Log Out button has a Bootstrap badge component displaying the username. This adds a little visual splotch, in which we'll put the username that's logged in. As we'll see later, it will serve as a visual cue to the user as to their identity.
We need to create views/login.hbs:
<div class="container-fluid">
<div class="row">
<div class="col-12 btn-group-vertical" role="group">
<form method='POST' action='/users/login'>
<div class="form-group">
<label for="username">User name:</label>
<input class="form-control" type='text' id='username'
name='username' value='' placeholder='User Name'/>
</div>
<div class="form-group">
<label for="password">Password:</label>
<input class="form-control" type='password' id='password'
name='password' value='' placeholder='Password'/>
</div>
<button type="submit" class="btn btn-default">Submit</button>
</form>
</div>
</div>
</div>
This is a simple form decorated with Bootstrap goodness to ask for the username and password. When submitted, it creates a POST request to /users/login, which invokes the desired handler to verify the login request. The handler for that URL will start the Passport's process to decide whether the user is authenticated or not.
In views/notedestroy.hbs, we want to display a message if the user is not logged in. Normally, the form to cause the note to be deleted is displayed, but if the user is not logged in, we want to explain the situation:
<form method='POST' action='/notes/destroy/confirm'>
<div class="container-fluid">
{{#if user}}
<input type='hidden' name='notekey' value='{{#if note}}{{notekey}}{{/if}}'>
<p class="form-text">Delete {{note.title}}?</p>
<div class="btn-group">
<button type="submit" value='DELETE'
class="btn btn-outline-dark">DELETE</button>
<a class="btn btn-outline-dark"
href="/notes/view?key={{#if note}}{{notekey}}{{/if}}"
role="button">Cancel</a>
</div>
{{else}}
{{> not-logged-in }}
{{/if}}
</div>
</form>
That's straightforward; if the user is logged in, display the form, otherwise display the message in partials/not-logged-in.hbs. We determine our approach based on the user variable.
We could put something like this in partials/not-logged-in.hbs:
<div class="jumbotron">
<h1>Not Logged In</h1>
<p>You are required to be logged in for this action, but you are not.
You should not see this message. It's a bug if this message appears.
</p>
<p><a class="btn btn-primary" href="/users/login">Log in</a></p>
</div>
In views/noteedit.hbs, we need a similar change:
..
<div class="row"><div class="col-xs-12">
{{#if user}}
..
{{else}}
{{> not-logged-in }}
{{/if}}
</div></div>
..
That is, at the bottom we add a segment that, for non-logged-in users, pulls in the not-logged-in partial.
The Bootstrap jumbotron component makes a nice and large text display that stands out nicely, and will catch the viewer's attention. However, the user should never see this because each of those templates is used only when we've preverified that the user is logged in.
A message such as this is useful as a check against bugs in your code. Suppose that we slipped up and failed to properly ensure that these forms were displayed only to logged-in users. Suppose that we had other bugs that didn't check the form submission to ensure it's requested only by a logged-in user. Fixing the template in this way is another layer of prevention against displaying forms to users who are not allowed to use that functionality.
Now we're ready to run the Notes application and try our hand at logging in and out.
We need to change the scripts section of package.json as follows:
"scripts": {
"start": "DEBUG=notes:* SEQUELIZE_CONNECT=models/sequelize-sqlite.yaml NOTES_MODEL=sequelize USER_SERVICE_URL=http://localhost:3333 node --experimental-modules ./bin/www.mjs",
"dl-minty": "mkdir -p minty && npm run dl-minty-css && npm run dl-
minty-min-css",
"dl-minty-css": "wget https://bootswatch.com/4/minty/bootstrap.css
-O minty/bootstrap.css",
"dl-minty-min-css": "wget https://bootswatch.com/4/minty/bootstrap.min.css -O minty/bootstrap.min.css"
},
In the previous chapters, we built up quite a few combinations of models and databases for running the Notes application. This leaves us with one, configured to use the Sequelize model for Notes, using the SQLite3 database, and to use the new user authentication service that we wrote earlier. We can simplify the scripts section by deleting those other configurations. All the other Notes data models are still available just by setting the environment variables appropriately.
The USER_SERVICE_URL needs to match the port number that we designated for that service.
In one window, start the user authentication service as follows:
$ cd users
$ npm start
> user-auth-server@0.0.1 start /Users/david/chap08/users
> DEBUG=users:* PORT=3333 SEQUELIZE_CONNECT=sequelize-sqlite.yaml node user-server
users:server User-Auth-Service listening at http://127.0.0.1:3333
+0ms
Then, in another window, start the Notes application:
$ cd notes
$ DEBUG=notes:* npm start
> notes@0.0.0 start /Users/david/chap08/notes
> SEQUELIZE_CONNECT=models/sequelize-sqlite.yaml NOTES_MODEL=models/notes-sequelize USERS_MODEL=models/users-rest USER_SERVICE_URL=http://localhost:3333 node ./bin/www
notes:server Listening on port 3000 +0ms
You'll be greeted with the following:
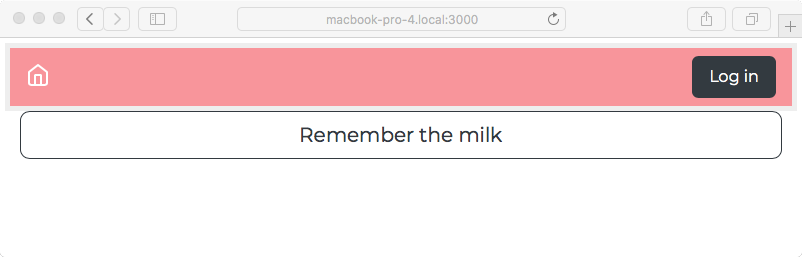
Notice the new button, Log in, and the lack of an ADD Note button. We're not logged in, and therefore partials/header.hbs is rigged to show only the Log in button.
Click on the Log in button, and you will see the login screen:
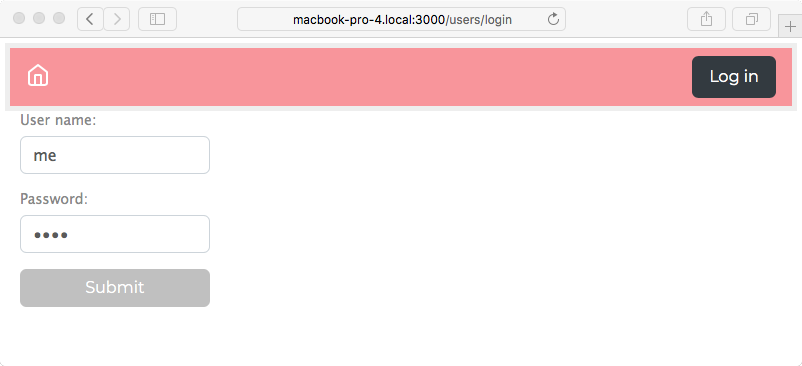
This is our login form from views/login.hbs. You can now log in, create a note or three, and you might end up with the following on the home page:
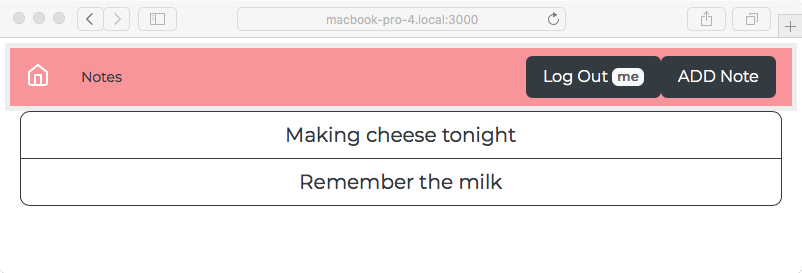
You now have both Log Out and ADD Note buttons.
You'll notice that the Log Out button has the username (me) shown. After some thought and consideration, this seemed the most compact way to show whether the user is logged in or not, and which user is logged in. This might drive the user experience team nuts, and you won't know whether this user interfaces design works until it's tested with users, but it's good enough for our purpose at the moment.
If you want your application to hit the big time, it's a great idea to allow users to register using third-party credentials. Websites all over the internet allow you to log in using Facebook, Twitter, or accounts from other services. Doing so removes hurdles to prospective users signing up for your service. Passport makes it extremely easy to do this.
Supporting Twitter requires installing TwitterStrategy, registering a new application with Twitter, and adding a couple of routes into routes/user.mjs and a small change in partials/header.hbs. Integrating other third-party services requires similar steps.
Twitter, as with every other third-party service, uses OAuth to handle authentication and requires an authentication key to write software using their API. It's their service, so you have to play by their rules, of course.
To register a new application with Twitter, go to https://apps.twitter.com/. Then you click on the Create New App button. Since we haven't deployed the Notes application to a regular server and, more importantly, there isn't a valid domain name for the application, we have to give Twitter the configuration required for testing on our local laptop.
Every service offering OAuth2 authentication has an administrative backend for registering new applications. The common purpose is to describe the application to the service so that the service can correctly recognize the application when requests are made using the authentication tokens. The normal situation is that the application is deployed to a regular server, and is accessed through a domain name such as MyNotes.info. We've done neither as of this moment.
At the time of writing, there are four pieces of information requested by the Twitter sign-up process:
It was found by attempting this procedure with different services that Facebook (and other) services are not lenient about test applications hosted on laptops. At least Twitter is keen for developers to configure a test application on their laptop. Passport's other OAuth-based strategies will work similarly enough to Twitter, so the knowledge we're gaining will transfer to those other authentication strategies.
The last thing to notice is the extremely sensitive nature of the authentication keys. It's bad form to check these into a source code repository or otherwise put them in a place where anybody can access the key.
Twitter does change the signup page from time to time, but it should look something like the following:
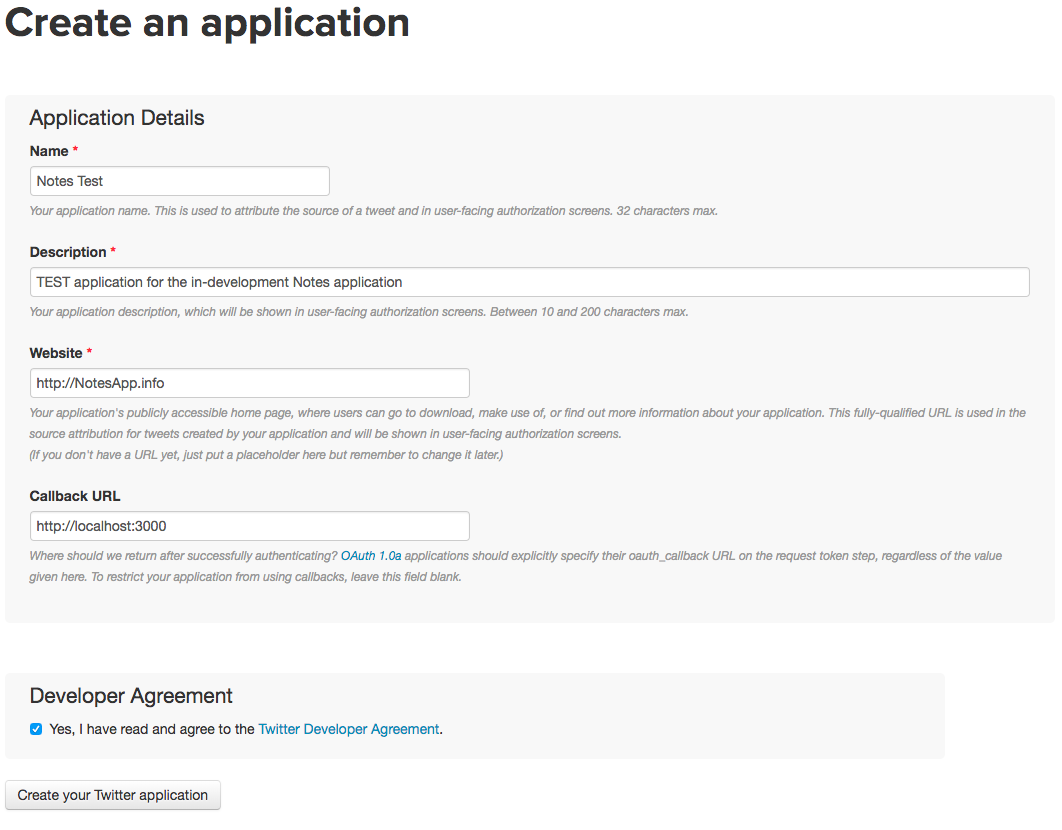
As with many web applications, we have decided to allow our users to log in using Twitter credentials. The OAuth2 protocol is widely used for this purpose and is the basis for authenticating on one website using credentials maintained by another website.
The application registration process you just followed at apps.twitter.com generated for you a pair of API keys, a consumer key, and, consumer secret. These keys are part of the OAuth protocol, and will be supplied by any OAuth service you register with, and the keys should be treated with the utmost care. Think of them as the username and password your service uses to access the OAuth-based service (Twitter et al). The more people who can see these keys, the more likely a miscreant can see them and then cause trouble. Anybody with those secrets can write access the service API as if they are you.
Dozens of Strategy packages for various third-party services are available within the Passport ecosystem. Let's install the package required to use TwitterStrategy:
$ npm install passport-twitter@1.x --save
In routes/users.mjs, let's start making some changes:
import passportTwitter from 'passport-twitter';
const TwitterStrategy = passportTwitter.Strategy;
To bring in the package we just installed, add the following:
const twittercallback = process.env.TWITTER_CALLBACK_HOST
? process.env.TWITTER_CALLBACK_HOST
: "http://localhost:3000";
passport.use(new TwitterStrategy({
consumerKey: process.env.TWITTER_CONSUMER_KEY,
consumerSecret: process.env.TWITTER_CONSUMER_SECRET,
callbackURL: `${twittercallback}/users/auth/twitter/callback`
},
async function(token, tokenSecret, profile, done) {
try {
done(null, await usersModel.findOrCreate({
id: profile.username, username: profile.username, password: "",
provider: profile.provider, familyName: profile.displayName,
givenName: "", middleName: "",
photos: profile.photos, emails: profile.emails
}));
} catch(err) { done(err); }
}));
This registers TwitterStrategy with passport, arranging to call the user authentication service as users register with the Notes application. This callback function is called when users successfully authenticate using Twitter.
We defined the usersModel.findOrCreate function specifically to handle user registration from third-party services such as Twitter. Its task is to look for the user described in the profile object and, if that user does not exist, to autocreate that user account in Notes.
The callbackURL setting in the TwitterStrategy configuration is a holdover from Twitter's OAuth1-based API implementation. In OAuth1, the callback URL was passed as part of the OAuth request. Since TwitterStrategy uses Twitter's OAuth1 service, we have to supply the URL here. We'll see in a moment where that URL is implemented in Notes.
The callbackURL, consumerKey, and consumerSecret are all injected using environment variables. It is tempting, because of the convenience, to just put those keys in the source code. But, how widely distributed is your source code? In the Slack API documentation (https://api.slack.com/docs/oauth-safety), we're warned Do not distribute client secrets in email, distributed native applications, client-side JavaScript, or public code repositories.
In Chapter 10, Deploying Node.js Applications, we'll put these keys into a Dockerfile. That's not entirely secure because the Dockerfile will also be committed to a source repository somewhere.
It was found while debugging that the profile object supplied by the TwitterStrategy did not match the documentation on the passport website. Therefore, we have mapped the object actually supplied by passport into something that Notes can use:
router.get('/auth/twitter', passport.authenticate('twitter'));
To start the user logging in with Twitter, we'll send them to this URL. Remember that this URL is really /users/auth/twitter, and, in the templates, we'll have to use that URL. When this is called, the passport middleware starts the user authentication and registration process using TwitterStrategy.
Once the user's browser visits this URL, the OAuth dance begins. It's called a dance because the OAuth protocol involves carefully designed redirects between several websites. Passport sends the browser over to the correct URL at Twitter, where Twitter asks the user whether they agree to authenticate using Twitter, and then Twitter redirects the user back to your callback URL. Along the way, specific tokens are passed back and forth in a very carefully designed dance between websites.
Once the OAuth dance concludes, the browser lands here:
router.get('/auth/twitter/callback',
passport.authenticate('twitter', { successRedirect: '/',
failureRedirect: '/users/login' }));
This route handles the callback URL, and it corresponds to the callbackURL setting configured earlier. Depending on whether it indicates a successful registration or not, passport will redirect the browser to either the home page or back to the /users/login page.
Because router is mounted on /user, this URL is actually /user/auth/twitter/callback. Therefore, the full URL to use in configuring the TwitterStrategy, and to supply to Twitter, is http://localhost:3000/user/auth/twitter/callback
In the process of handling the callback URL, Passport will invoke the callback function shown earlier. Because our callback uses the usersModel.findOrCreate function, the user will be automatically registered if necessary.
We're almost ready, but we need to make a couple of small changes elsewhere in Notes.
In partials/header.hbs, make the following changes to the code:
...
{{else}}
<div class="collapse navbar-collapse" id="navbarLogIn">
<span class="navbar-text text-dark col"></span>
<a class="nav-item nav-link btn btn-dark col-auto" href="/users/login">
Log in</a>
<a class="nav-item nav-link btn btn-dark col-auto" href="/users/auth/twitter">
<img width="15px"
src="/assets/vendor/twitter/Twitter_Social_Icon_Rounded_Square_Color.png"/>
Log in with Twitter</a>
</div>
{{/if}}
This adds a new button that, when clicked, takes the user to /users/auth/twitter, which, of course, kicks off the Twitter authentication process.
The image being used is from the official Twitter brand assets page at https://about.twitter.com/company/brand-assets. Twitter recommends using these branding assets for a consistent look across all services using Twitter. Download the whole set and then pick one you like. For the URL shown here, place the chosen image in a directory named public/assets/vendor/twitter. Notice that we force the size to be small enough for the navigation bar.
With these changes, we're ready to try logging in with Twitter.
Start the Notes application server as done previously:
$ npm start
> notes@0.0.0 start /Users/David/chap08/notes
> DEBUG=notes:* SEQUELIZE_CONNECT=models/sequelize-sqlite.yaml NOTES_MODEL=sequelize USER_SERVICE_URL=http://localhost:3333 node --experimental-modules ./bin/www.mjs
(node:42095) ExperimentalWarning: The ESM module loader is experimental.
notes:server-debug Listening on port 3000 +0ms
Then use a browser to visit http://localhost:3000:
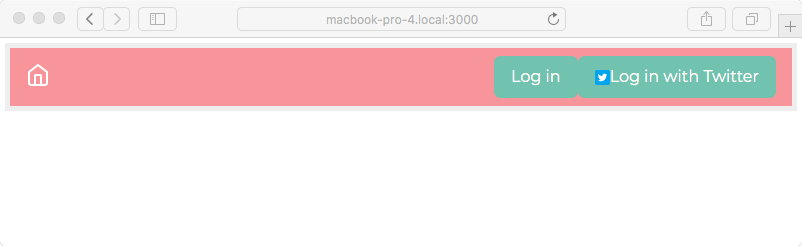
Notice the new button. It looks about right, thanks to having used the official Twitter branding image. The button is a little large, so maybe you want to consult a designer. Obviously, a different design is required if you're going to support dozens of authentication services.
Clicking on this button takes the browser to /users/auth/twitter, which starts Passport running the OAuth2 protocol transactions necessary to authenticate. And then, once you're logged in with Twitter, you'll see something like the following screenshot:
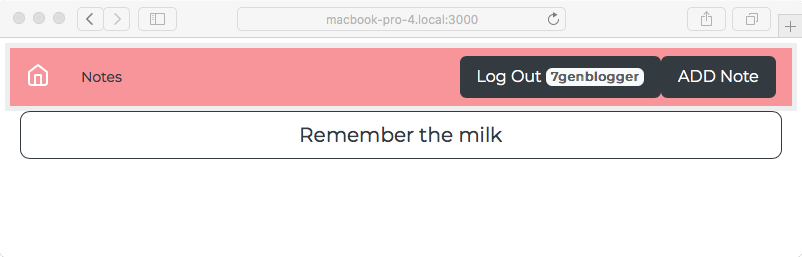
We're now logged in, and notice that our Notes username is the same as our Twitter username. You can browse around the application and create, edit, or delete notes. In fact, you can do this to any note you like, even ones created by others. That's because we did not create any sort of access control or permissions system, and therefore every user has complete access to every note. That's a feature to put on the backlog.
By using multiple browsers or computers, you can simultaneously log in as different users, one user per browser.
You can run multiple instances of the Notes application by doing what we did earlier:
"scripts": {
"start": "SEQUELIZE_CONNECT=models/sequelize-sqlite.yaml NOTES_MODEL=models/notes-sequelize USERS_MODEL=models/users-rest USER_SERVICE_URL=http://localhost:3333 node ./bin/www",
"start-server1": "SEQUELIZE_CONNECT=models/sequelize-sqlite.yaml NOTES_MODEL=models/notes-sequelize USERS_MODEL=models/users-rest USER_SERVICE_URL=http://localhost:3333 PORT=3000 node ./bin/www",
"start-server2": "SEQUELIZE_CONNECT=models/sequelize-sqlite.yaml NOTES_MODEL=models/notes-sequelize USERS_MODEL=models/users-rest USER_SERVICE_URL=http://localhost:3333 PORT=3002 node ./bin/www",
"dl-minty": "mkdir -p minty && npm run dl-minty-css && npm run dl-minty-min-css",
"dl-minty-css": "wget https://bootswatch.com/4/minty/bootstrap.css -O minty/bootstrap.css",
"dl-minty-min-css": "wget https://bootswatch.com/4/minty/bootstrap.min.css -O minty/bootstrap.min.css"
},
Then, in one command window, run the following command:
$ npm run start-server1
> notes@0.0.0 start-server1 /Users/David/chap08/notes
> DEBUG=notes:* SEQUELIZE_CONNECT=models/sequelize-sqlite.yaml NOTES_MODEL=sequelize USER_SERVICE_URL=http://localhost:3333 PORT=3000 node --experimental-modules ./bin/www.mjs
(node:43591) ExperimentalWarning: The ESM module loader is experimental.
notes:server-debug Listening on port 3000 +0ms
In another command window, run the following command:
$ npm run start-server2
> notes@0.0.0 start-server2 /Users/David/chap08/notes
> DEBUG=notes:* SEQUELIZE_CONNECT=models/sequelize-sqlite.yaml NOTES_MODEL=sequelize USER_SERVICE_URL=http://localhost:3333 PORT=3002 node --experimental-modules ./bin/www.mjs
(node:43755) ExperimentalWarning: The ESM module loader is experimental.
notes:server-debug Listening on port 3002 +0ms
As previously, this starts two instances of the Notes server, each with a different value in the PORT environment variable. In this case, each instance will use the same user authentication service. As shown here, you'll be able to visit the two instances at http://localhost:3000 and http://localhost:3002. And, as previously, you'll be able to start and stop the servers as you wish, see the same notes in each, and see that the notes are retained after restarting the server.
Another thing to try is to fiddle with the session store. Our session data is being stored in the sessions directory. These are just files in the filesystem, and we can take a look:
$ ls -l sessions/
total 32
-rw-r--r-- 1 david wheel 139 Jan 25 19:28 -QOS7eX8ZBAfmK9CCV8Xj8v-3DVEtaLK.json
-rw-r--r-- 1 david wheel 139 Jan 25 21:30 T7VT4xt3_e9BiU49OMC6RjbJi6xB7VqG.json
-rw-r--r-- 1 david wheel 223 Jan 25 19:27 ermh-7ijiqY7XXMnA6zPzJvsvsWUghWm.json
-rw-r--r-- 1 david wheel 139 Jan 25 21:23 uKzkXKuJ8uMN_ROEfaRSmvPU7NmBc3md.json $ cat sessions/T7VT4xt3_e9BiU49OMC6RjbJi6xB7VqG.json
{"cookie":{"originalMaxAge":null,"expires":null,"httpOnly":true,"path":"/"},"__lastAccess":1516944652270,"passport":{"user":"7genblogger"}}
This is after logging in using a Twitter account; you can see that the Twitter account name is stored here in the session data.
What if you want to clear a session? It's just a file in the filesystem. Deleting the session file erases the session, and the user's browser will be forcefully logged out.
The session will time out if the user leaves their browser idle for long enough. One of the session-file-store options, ttl, controls the timeout period, which defaults to 3,600 seconds (an hour). With a timed-out session, the application reverts to a logged-out state.
We've cautioned several times about the importance of safely handling user identification information. The intention to safely handle that data is one thing, but it is important to follow through and actually do so. While we're using a few good practices so far, as it stands, the Notes application would not withstand any kind of security audit:
If you don't recognize the phrase clear text, it simply means unencrypted. Anyone could read the text of user passwords or the authentication tokens. It's best to keep both encrypted to avoid information leakage.
Did you notice earlier when we said run the Notes application stack? It's time to explain to the marketing team what's meant by that phrase. They'll perhaps need to put an architecture diagram on marketing brochures and the like. It's also useful for developers like us to take a step back and draw a picture of what we've created, or are planning to create.
Here's the sort of diagram that an engineer might draw to show the marketing team the system design. The marketing team will, of course, hire a graphics artist to clean it up:
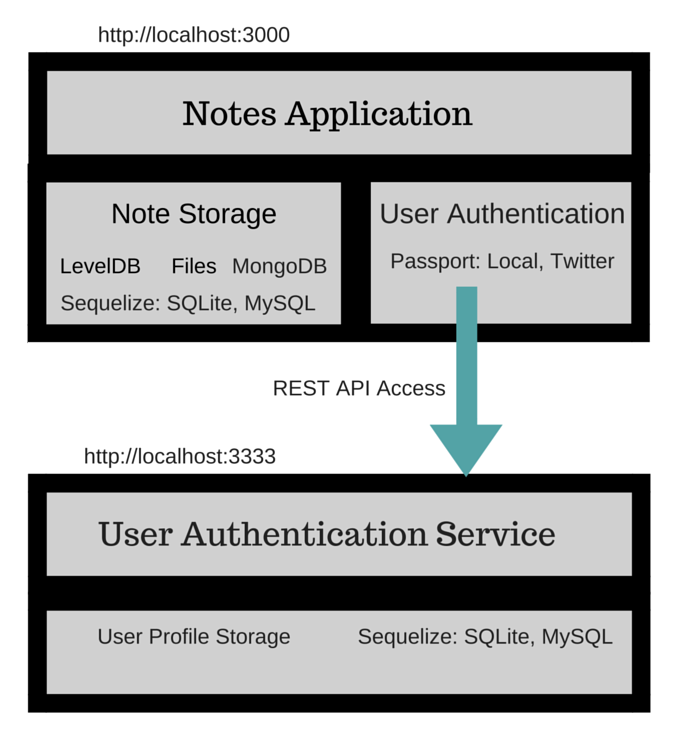
The box labeled Notes Application is the public-facing code implemented by the templates and the router modules. As currently configured, it's visible from our laptop on port 3000. It can use one of several data storage services. It communicates with the backend User Authentication Service over port 3333 (as currently configured).
In Chapter 10, Deploying Node.js Applications, we'll be expanding this picture a bit as we learn how to deploy on a real server.
You've covered a lot of ground in this chapter, looking at not only user authentication in Express applications, but also microservice development.
Specifically, you covered session management in Express, using Passport for user authentication, including Twitter/OAuth, using router middleware to limit access, creating a REST service with Restify, and when to create a microservice.
In the next chapter, we'll take the Notes application to a new level-semi-real-time communication between application users. To do this, we'll write some browser-side JavaScript and explore how the Socket.io package can let us send messages between users.
The original design model of the web is similar to the way that mainframes worked in the 1970s. Both old-school dumb terminals, such as the IBM 3270, and web browsers, follow a request-response paradigm. The user sends a request and the far-off computer sends a response screen. While web browsers can show more complex information than old-school dumb terminals, the interaction pattern in both cases is a back and forth of user requests, each resulting in a screen of data sent by the server screen after screen or, in the case of web browsers, page after page.
In case you're wondering what this history lesson is about, that request-response paradigm is evident in the Node.js HTTP Server API, as shown in the following code:
http.createServer(function (request, response) {
... handle request
}).listen();
The paradigm couldn't be more explicit than this. The request and the response are right there.
The first web browsers were an advancement over text-based user interfaces, with HTML mixing images, and text with varying colors, fonts, and sizes. As CSS came along, HTML improved, iframes allowed embedded media of all kinds, and JavaScript improved, so we have a quite different paradigm. The web browser is still sending requests and receiving a page of data, but that data can be quite complex and, more importantly, JavaScript adds interactivity.
One new technique is keeping an open connection to the server for continual data exchange between server and client. This change in the web application model is called, by some, the real-time web. In some cases, websites keep an open connection to the web browser, with real-time updates to web pages being one goal.
Some observe that traditional web applications can untruthfully display their data; that is, if two people are looking at a page, and one person edits that page, that person's browser will update with the correct copy of the page, while the other browser is not updated. The two browsers show different versions of the page, one of which is untruthful. The second browser can even show a page that no longer exists, if the user at the first browser deletes that page. Some think it would be better if the other person's browser is refreshed to show the new content as soon as the page is edited.
This is one possible role of the real-time web; pages that update themselves as page content changes. All kinds of systems support real-time interactivity between folks on the same website. Whether it's seeing Facebook comments pop up as they're written, or collaboratively edited documents, there's a new interactivity paradigm on the web.
We're about to implement this behavior in the Notes application.
One of the original purposes for inventing Node.js was to support the real-time web. The Comet application architecture (Comet is related to AJAX, and both happen to be names of household cleaning products) involves holding the HTTP connection open for a long time, with data flowing back and forth between browser and server over that channel. The term Comet was introduced by Alex Russell in his blog in 2006 (http://infrequently.org/2006/03/comet-low-latency-data-for-the-browser/) as a general term for the architectural pattern to implement this real-time, two-way data exchange between client and server. That blog post called for the development of a programming platform very similar to Node.js.
To simplify the task, we'll lean on the Socket.IO library (http://socket.io/). This library simplifies two-way communication between the browser and server, and can support a variety of protocols with fallback to old-school web browsers.
We'll be covering the following topics:
The aim of Socket.IO is to make real-time apps possible in every browser and mobile device. It supports several transport protocols, choosing the best one for the specific browser.
If you were to implement your application with WebSockets, it would be limited to the modern browsers supporting that protocol. Because Socket.IO falls back on so many alternate protocols (WebSockets, Flash, XHR, and JSONP), it supports a wide range of web browsers, including some old crufty browsers.
As the application author, you don't have to worry about the specific protocol Socket.IO uses in a given browser. Instead, you can implement the business logic and the library takes care of the details for you.
Socket.IO requires that a client library make its way into the browser. That library is provided, and is easy to instantiate. You'll be writing code on both the browser side and server side using similar Socket.IO APIs at each end.
The model that Socket.IO provides is similar to the EventEmitter object. The programmer uses the .on method to listen for events and the .emit method to send them. The emitted events are sent between the browser and the server with the Socket.IO library taking care of sending them back and forth.
Socket.IO works by wrapping itself around an HTTP Server object. Think back to Chapter 4, HTTP Servers and Clients, where we wrote a module that hooked into HTTP Server methods so that we could spy on HTTP transactions. The HTTP Sniffer attaches a listener to every HTTP event to print out the events. But what if you used that idea to do real work? Socket.IO uses a similar concept, listening to HTTP requests and responding to specific ones by using the Socket.IO protocol to communicate with client code in the browser.
To get started, let's first make a duplicate of the code from the previous chapter. If you created a directory named chap08 for that code, create a new directory named chap09 and copy the source tree there.
We won't make changes to the user authentication microservice, but we will use it for user authentication, of course.
In the Notes source directory, install these new modules:
$ npm install socket.io@2.x passport.socketio@3.7.x --save
We will incorporate user authentication with the passport module, used in Chapter 8, Multiuser Authentication the Microservice Way, into some of the real-time interactions we'll implement.
To initialize Socket.IO, we must do some major surgery on how the Notes application is started. So far, we used the bin/www.mjs script along with app.mjs, with each script hosting different steps of launching Notes. Socket.IO initialization requires that these steps occur in a different order to what we've been doing. Therefore, we must merge these two scripts into one. What we'll do is copy the content of the bin/www.mjs script into appropriate sections of app.mjs, and from there, we'll use app.mjs to launch Notes.
At the beginning of app.mjs, add this to the import statements:
import http from 'http';
import passportSocketIo from 'passport.socketio';
import session from 'express-session';
import sessionFileStore from 'session-file-store';
const FileStore = sessionFileStore(session);
export const sessionCookieName = 'notescookie.sid';
const sessionSecret = 'keyboard mouse';
const sessionStore = new FileStore({ path: "sessions" });
The passport.socketio module integrates Socket.IO with PassportJS-based user authentication. We'll configure this support shortly. The configuration for session management is now shared between Socket.IO, Express, and Passport. These lines centralize that configuration to one place in app.mjs, so we can change it once to affect every place it's needed.
Use this to initialize the HTTP Server object:
const app = express();
export default app;
const server = http.createServer(app);
import socketio from 'socket.io';
const io = socketio(server);
io.use(passportSocketIo.authorize({
cookieParser: cookieParser,
key: sessionCookieName,
secret: sessionSecret,
store: sessionStore
}));
This moves the export default app line from the bottom of the file to this location. Doesn't this location make more sense?
The io object is our entry point into the Socket.IO API. We need to pass this object to any code that needs to use that API. It won't be enough to simply require the socket.io module in other modules because the io object is what wraps the server object. Instead, we'll be passing the io object into whatever modules are to use it.
The io.use function installs in Socket.IO functions similar to Express middleware. In this case, we integrate Passport authentication into Socket.IO:
var port = normalizePort(process.env.PORT || '3000');
app.set('port', port);
server.listen(port);
server.on('error', onError);
server.on('listening', onListening);
This code is copied from bin/www.mjs, and sets up the port to listen to. It relies on three functions that will also be copied into app.mjs from bin/www.mjs:
app.use(session({
store: sessionStore,
secret: sessionSecret,
resave: true,
saveUninitialized: true,
name: sessionCookieName
}));
initPassport(app);
This changes the configuration of Express session support to match the configuration variables we set up earlier. It's the same variables used when setting up the Socket.IO session integration, meaning they're both on the same page.
Use this to initialize Socket.IO code in the router modules:
app.use('/', index);
app.use('/users', users);
app.use('/notes', notes);
indexSocketio(io);
// notesSocketio(io);
This is where we pass the io object into modules that must use it. This is so that the Notes application can send messages to the web browsers about changes in Notes. What that means will be clearer in a second. What's required is analogous to the Express router functions, and therefore the code to send/receive messages from Socket.IO clients will also be located in the router modules.
We haven't written either of these functions yet (have patience). To support this, we need to make a change in an import statement at the top:
import { socketio as indexSocketio, router as index } from './routes/index';
Each router module will export a function named socketio, which we'll have to rename as shown here. This function is what will receive the io object, and handle any Socket.IO-based communications. We haven't written these functions yet.
Then, at the end of app.mjs, we'll copy in the remaining code from bin/www.mjs so the HTTP Server starts listening on our selected port:
function normalizePort(val) {
var port = parseInt(val, 10);
if (isNaN(port)) { // named pipe
return val;
}
if (port >= 0) { // port number
return port;
}
return false;
}
/**
* Event listener for HTTP server "error" event.
*/
function onError(error) {
if (error.syscall !== 'listen') { throw error; }
var bind = typeof port === 'string' ? 'Pipe ' + port : 'Port ' +
port;
// handle specific listen errors with friendly messages
switch (error.code) {
case 'EACCES':
console.error(bind + ' requires elevated privileges');
process.exit(1);
break;
case 'EADDRINUSE':
console.error(bind + ' is already in use');
process.exit(1);
break;
default:
throw error;
}
}
/**
* Event listener for HTTP server "listening" event.
*/
function onListening() {
var addr = server.address();
var bind = typeof addr === 'string' ? 'pipe ' + addr : 'port ' + addr.port;
debug('Listening on ' + bind);
}
Then, in package.json, we must start app.mjs rather than bin/www.mjs:
"scripts": {
"start": "DEBUG=notes:* SEQUELIZE_CONNECT=models/sequelize-sqlite.yaml NOTES_MODEL=sequelize USER_SERVICE_URL=http://localhost:3333 node --experimental-modules ./app",
"start-server1": "DEBUG=notes:* SEQUELIZE_CONNECT=models/sequelize-sqlite.yaml NOTES_MODEL=sequelize USER_SERVICE_URL=http://localhost:3333 PORT=3000 node --experimental-modules ./app",
"start-server2": "DEBUG=notes:* SEQUELIZE_CONNECT=models/sequelize-sqlite.yaml NOTES_MODEL=sequelize USER_SERVICE_URL=http://localhost:3333 PORT=3002 node --experimental-modules ./app",
...
},
At this point, you can delete bin/www.mjs if you like. You can also try starting the server, but it'll fail because the indexSocketio function does not exist yet.
The goal we're working towards is for the Notes home page to automatically update the list of notes, as notes are edited or deleted. What we've done so far is to restructure the application startup so that Socket.IO is initialized in the Notes application. There's no change of behavior yet, except that it will crash due to a missing function.
The approach is for the Notes model classes to send messages whenever a note is created, updated, or deleted. In the router classes, we'll listen to those messages, then send a list of note titles to all browsers attached to the Notes application.
Where the Notes model so far has been a passive repository of documents, it now needs to emit events to any interested parties. This is the listener pattern and, in theory, there will be code that is interested in knowing when notes are created, edited, or destroyed. At the moment, we'll use that knowledge to update the Notes home page, but there are many potential other uses of that knowledge.
The EventEmitter is the class that implements listener support. Let's create a new module, models/notes-events.mjs, containing the following:
import EventEmitter from 'events';
class NotesEmitter extends EventEmitter {
noteCreated(note) { this.emit('notecreated', note); }
noteUpdate (note) { this.emit('noteupdate', note); }
noteDestroy (data) { this.emit('notedestroy', data); }
}
export default new NotesEmitter();
This module maintains the listeners to Notes-related events for us. We've created a subclass of EventEmitter because it already knows how to manage the listeners. An instance of that object is exported as the default export.
Let's now update models/notes.mjs to use notes-events to emit events. Because we have a single module, notes.mjs, to dispatch calls to the individual Notes models, this module provides a key point at which we can intercept the operations and send events. Otherwise, we'd have to integrate the event-sending code into every Notes model.
import _events from './notes-events';
export const events = _events;
We need to import this module for use here, but also export it so that other modules can also emit Notes events. By doing this, another module that imports Notes can call notes.events.function to use the notes-events module.
This technique is called re-exporting. Sometimes, you need to export a function from module A that is actually defined in module B. Module A therefore imports the function from module B, adding it to its exports.
Then we do a little rewriting of these functions:
export async function create(key, title, body) {
const note = await model().create(key, title, body);
_events.noteCreated(note);
return note;
}
export async function update(key, title, body) {
const note = await model().update(key, title, body);
_events.noteUpdate(note);
return note;
}
export async function destroy(key) {
await model().destroy(key);
_events.noteDestroy({ key });
return key;
}
The contract for the Notes model functions is that they return a Promise, and therefore our caller will be using await to resolve the Promise. There are three steps:
The Notes model now sends events as Notes are created, updated, or destroyed. For this to be useful, the events must be displayed to our users. Making the events visible to our users means the controller and view portions of the application must consume those events.
Let's start making changes to routes/index.mjs:
router.get('/', async (req, res, next) => {
try {
let notelist = await getKeyTitlesList();
res.render('index', {
title: 'Notes', notelist: notelist,
user: req.user ? req.user : undefined
});
} catch (e) { next(e); }
});
We need to reuse part of the original routing function, to use it in another function. Therefore, we've pulled code that used to be in this block into a new function, getKeyTitlesList:
async function getKeyTitlesList() {
const keylist = await notes.keylist();
var keyPromises = keylist.map(key => {
return notes.read(key).then(note => {
return { key: note.key, title: note.title };
});
});
return Promise.all(keyPromises);
};
This portion of the original routing function is now its own function. It generates an array of items containing the key and title for all existing Notes, using Promise.all to manage the process of reading everything.
export function socketio(io) {
var emitNoteTitles = async () => {
const notelist = await getKeyTitlesList()
io.of('/home').emit('notetitles', { notelist });
};
notes.events.on('notecreated', emitNoteTitles);
notes.events.on('noteupdate', emitNoteTitles);
notes.events.on('notedestroy', emitNoteTitles);
};
Here is the socketio function we discussed while modifying app.mjs. We receive the io object, then use it to emit a notestitles event to all connected browsers.
The io.of('/namespace') method restricts whatever follows to the given namespace. In this case, we're emitting a notestitle message to the /home namespace.
The code, in this case, is fairly straightforward. It listens to the events we just implemented, notecreated, noteupdate, and notedestroy. For each of these events, it emits an event, notetitles, containing the list of note keys and titles.
That's it!
As Notes are created, updated, and destroyed, we ensure that the homepage will be refreshed to match. The homepage template, views/index.hbs, will require code to receive that event and rewrite the page to match.
Socket.IO runs on both client and server, with the two communicating back and forth over the HTTP connection. This requires loading the client JavaScript library into the client browser. Each page of the Notes application in which we seek to implement Socket.IO services must load the client library and have custom client code for our application.
Each page in Notes will require a different Socket.IO client implementation, since each page has different requirements. This affects how we load JavaScript code in Notes.
Initially, we simply put JavaScript code at the bottom of layout.hbs, because every page required the same set of JavaScript modules. But now we've identified the need for a different set of JavaScript on each page. Furthermore, some of the JavaScript needs to be loaded following the JavaScript currently loaded at the bottom of layout.hbs. Specifically, jQuery is loaded currently in layout.hbs, but we want to use jQuery in the Socket.IO clients to perform DOM manipulations on each page. Therefore, some template refactoring is required.
Create a file, partials/footerjs.hbs, containing:
<!-- jQuery first, then Popper.js, then Bootstrap JS -->
<script src="/assets/vendor/jquery/jquery.min.js"></script>
<script src="/assets/vendor/popper.js/umd/popper.min.js"></script>
<script src="/assets/vendor/bootstrap/js/bootstrap.min.js"></script>
<script src="/assets/vendor/feather-icons/feather.js"></script>
<script>
feather.replace()
</script>
This had been at the bottom of views/layout.hbs. We now need to modify that file as follows:
<body>
{{> header }}
{{{body}}}
</body>
Then, at the bottom of every template (error.hbs, index.hbs, login.hbs, notedestroy.hbs, noteedit.hbs, and noteview.hbs), add this line:
{{> footerjs}}
So far, this hasn't changed what will be loaded in the pages, because footerjs contains exactly what was already at the bottom of layout.hbs. But it gives us the freedom to load Socket.IO client code after the scripts in footerjs are loaded.
In views/index.hbs add this at the bottom, after the footerjs partial:
{{> footerjs}}
<script src="/socket.io/socket.io.js"></script>
<script>
$(document).ready(function () {
var socket = io('/home');
socket.on('notetitles', function(data) {
var notelist = data.notelist;
$('#notetitles').empty();
for (var i = 0; i < notelist.length; i++) {
notedata = notelist[i];
$('#notetitles')
.append('<a class="btn btn-lg btn-block btn-outline-dark"
href="/notes/view?key='+
notedata.key +'">'+ notedata.title +'</a>');
}
});
});
</script>
The first line is where we load the Socket.IO client library. You'll notice that we never set up any Express route to handle the /socket.io URL. Instead, the Socket.IO library did that for us.
Because we've already loaded jQuery (to support Bootstrap), we can easily ensure that this code is executed once the page is fully loaded using $(document).ready.
This code first connects a socket object to the /home namespace. That namespace is being used for events related to the Notes homepage. We then listen for the notetitles events, for which some jQuery DOM manipulation erases the current list of Notes and renders a new list on the screen.
That's it. Our code in routes/index.mjs listened to various events from the Notes model, and, in response, sent a notetitles event to the browser. The browser code takes that list of note information and redraws the screen.
We now have enough implemented to run the application and see some real-time action.
As you did earlier, start the user information microservice in one window:
$ npm start
> user-auth-server@0.0.1 start /Users/david/chap09/users
> DEBUG=users:* PORT=3333 SEQUELIZE_CONNECT=sequelize-sqlite.yaml node --experimental-modules user-server
(node:11866) ExperimentalWarning: The ESM module loader is experimental.
users:service User-Auth-Service listening at http://127.0.0.1:3333 +0ms
Then, in another window, start the Notes application:
$ npm start
> notes@0.0.0 start /Users/david/chap09/notes
> DEBUG=notes:* SEQUELIZE_CONNECT=models/sequelize-sqlite.yaml NOTES_MODEL=sequelize USER_SERVICE_URL=http://localhost:3333 node --experimental-modules ./app
(node:11998) ExperimentalWarning: The ESM module loader is experimental.
notes:debug-INDEX Listening on port 3000 +0ms
Then, in a browser window, go to http://localhost:3000 and log in to the Notes application. To see the real-time effects, open multiple browser windows. If you can use Notes from multiple computers, then do that as well.
In one browser window, start creating and deleting notes, while leaving the other browser windows viewing the home page. Create a note, and it should show up immediately on the home page in the other browser windows. Delete a note and it should disappear immediately as well.
It's cool how we can now see real-time changes in a part of the Notes application. Let's turn to the /notes/view page to see what we can do. What comes to mind is this functionality:
For the first two features, we can rely on the existing events coming from the Notes model. The third feature will require a messaging subsystem, so we'll get to that later in this chapter.
In routes/notes.mjs, add this to the end of the module:
export function socketio(io) {
notes.events.on('noteupdate', newnote => {
io.of('/view').emit('noteupdate', newnote);
});
notes.events.on('notedestroy', data => {
io.of('/view').emit('notedestroy', data);
});
};
At the top of app.mjs, make this change:
import { socketio as indexSocketio, router as index } from './routes/index';
import { router as users, initPassport } from './routes/users';
import { socketio as notesSocketio, router as notes } from './routes/notes'; Uncomment that line of code in app.mjs because we've now implemented the function we said we'd get to later:
indexSocketio(io);
notesSocketio(io);
This sets up the Notes application to send noteupdate and notedestroy messages when notes are updated or destroyed. The destination is the /view namespace. We'll need to make a corresponding modification to the note view template so it does the right thing. This means any browser viewing any note in the application will connect to this namespace. Every such browser will receive events about any note being changed, even those notes that are not being viewed. This means that the client code will have to check the key, and only take action if the event refers to the note being displayed.
As we did earlier, in order to make these events visible to the user, we must not only add client code to the template, views/noteview.hbs; we need a couple of small changes to the template:
<div class="container-fluid">
<div class="row"><div class="col-xs-12">
{{#if note}}<h3 id="notetitle">{{ note.title }}</h3>{{/if}}
{{#if note}}<div id="notebody">{{ note.body }}</div>{{/if}}
<p>Key: {{ notekey }}</p>
</div></div>
{{#if user }}
{{#if notekey }}
<div class="row"><div class="col-xs-12">
<div class="btn-group">
<a class="btn btn-outline-dark"
href="/notes/destroy?key={{notekey}}"
role="button">Delete</a>
<a cl e template, views/noteview.hb
ass="btn btn-outline-dark"
href="/notes/edit?key={{notekey}}"
role="button">Edit</a>
</div>
</div></div>
{{/if}}
{{/if}}
</div>
{{> footerjs}}
{{#if notekey }}
<script src="/socket.io/socket.io.js"></script>
<script>
$(document).ready(function () {
io('/view').on('noteupdate', function(note) {
if (note.key === "{{ notekey }}") {
$('h3#notetitle').empty();
$('h3#notetitle').text(note.title);
$('#notebody').empty();
$('#notebody').text(note.body);
}
});
io('/view').on('notedestroy', function(data) {
if (data.key === "{{ notekey }}") {
window.location.href = "/";
}
});
});
</script>
{{/if}}
We connect to the /view namespace where the messages are sent. As noteupdate or notedestroy messages arrive, we check the key to see whether it matches the key for the note being displayed.
A technique is used here that's important to understand. We have mixed JavaScript executed on the server, with JavaScript executed in the browser. We must compare the notekey received by the client code against the notekey for the note being viewed by this page. The latter notekey value is known on the server, while the former is known in the client.
Remember that code within the {{ .. }} delimiters is interpreted by the Handlebars template engine on the server. Consider the following:
if (note.key === "{{ notekey }}") {
..
}
This comparison is between the notekey value in the browser, which arrived inside the message from the server, and the notekey variable on the server. That variable contains the key of the note being displayed. Therefore, in this case, we are able to ensure these code snippets are executed only for the note being shown on the screen.
For the noteupdate event, we take the new note content and display it on the screen. For this to work, we had to add id= attributes to the HTML so we could use jQuery selectors in manipulating the DOM.
For the notedestroy event, we simply redirect the browser window back to the home page. The note being viewed has been deleted, and there's no point the user continuing to look at a note that no longer exists.
At this point, you can now rerun the Notes application and try this out.
Launch the user authentication server and the Notes application as before. Then, in the browser, open multiple windows on the Notes application. This time, have one viewing the home page, and two viewing a note. In one of those windows, edit the note to make a change, and see the text change on both the home page and the page viewing the note.
Then delete the note, and watch it disappear from the home page, and the browser window that had viewed the note is now on the home page.
This is cool! We now have real-time updates in Notes as we edit delete or create notes. Let's now take it to the next level and implement something akin to inter-user chatting.
It's possible to pivot our Notes application concept and take it in the direction of a social network. In the majority of such networks, users post things (notes, pictures, videos, and so on), and other users comment on those things. Done well, these basic elements can develop a large community of people sharing notes with each other. While the Notes application is kind of a toy, it's not too terribly far from being a basic social network. Commenting the way we will do now is a tiny step in that direction.
On each note page, we'll have an area to display messages from Notes users. Each message will show the username, a timestamp, and their message. We'll also need a method for users to post a message, and we'll also allow users to delete messages.
Each of those operations will be performed without refreshing the screen. Instead, code running inside the web page will send commands to/from the server and take actions dynamically.
Let's get started.
We need to start by implementing a data model for storing messages. The basic fields required are a unique ID, the username of the person sending the message, the namespace the message is sent to, their message, and finally a timestamp for when the message was sent. As messages are received or deleted, events must be emitted from the model so we can do the right thing on the web page.
This model implementation will be written for Sequelize. If you prefer a different storage solution, you can , by all means, re-implement the same API on other data storage systems.
Create a new file, models/messages-sequelize.mjs, containing the following:
import Sequelize from 'sequelize';
import jsyaml from 'js-yaml';
import fs from 'fs-extra';
import util from 'util';
import EventEmitter from 'events';
class MessagesEmitter extends EventEmitter {}
import DBG from 'debug';
const debug = DBG('notes:model-messages');
const error = DBG('notes:error-messages');
var SQMessage;
var sequlz;
export const emitter = new MessagesEmitter();
This sets up the modules being used and also initializes the EventEmitter interface. We're also exporting the EventEmitter as emitter so other modules can use it:
async function connectDB() {
if (typeof sequlz === 'undefined') {
const yamltext = await
fs.readFile(process.env.SEQUELIZE_CONNECT, 'utf8');
const params = jsyaml.safeLoad(yamltext, 'utf8');
sequlz = new Sequelize(params.dbname,
params.username, params.password, params.params);
}
if (SQMessage) return SQMessage.sync();
SQMessage = sequlz.define('Message', {
id: { type: Sequelize.INTEGER, autoIncrement: true, primaryKey:
true },
from: Sequelize.STRING,
namespace: Sequelize.STRING,
message: Sequelize.STRING(1024),
timestamp: Sequelize.DATE
});
return SQMessage.sync();
}
This defines our message schema in the database. We'll use the same database that we used for Notes, but the messages will be stored in their own table.
The id field won't be supplied by the caller; instead, it will be autogenerated. Because it is an autoIncrement field, each message that's added will be assigned a new id number by the database:
export async function postMessage(from, namespace, message) {
const SQMessage = await connectDB();
const newmsg = await SQMessage.create({
from, namespace, message, timestamp: new Date()
});
var toEmit = {
id: newmsg.id, from: newmsg.from,
namespace: newmsg.namespace, message: newmsg.message,
timestamp: newmsg.timestamp
};
emitter.emit('newmessage', toEmit);
}
This is to be called when a user posts a new comment/message. We first store it in the database, and then we emit an event saying the message was created:
export async function destroyMessage(id, namespace) {
const SQMessage = await connectDB();
const msg = await SQMessage.find({ where: { id } });
if (msg) {
msg.destroy();
emitter.emit('destroymessage', { id, namespace });
}
}
This is to be called when a user requests that a message should be deleted. With Sequelize, we must first find the message and then delete it by calling its destroy method. Once that's done, we emit a message saying the message was destroyed:
export async function recentMessages(namespace) {
const SQMessage = await connectDB();
const messages = SQMessage.findAll({
where: { namespace }, order: [ 'timestamp' ], limit: 20
});
return messages.map(message => {
return {
id: message.id, from: message.from,
namespace: message.namespace, message: message.message,
timestamp: message.timestamp
};
});
}
While this is meant to be called when viewing a note, it is generalized to work for any Socket.IO namespace. It finds the most recent 20 messages associated with the given namespace and returns a cleaned-up list to the caller.
Now that we can store messages in the database, let's integrate this into the Notes router module.
In routes/notes.mjs, add this to the import statements:
import * as messages from '../models/messages-sequelize';
If you wish to implement a different data storage model for messages, you'll need to change this import statement. You should consider using an environment variable to specify the module name, as we've done elsewhere:
// Save incoming message to message pool, then broadcast it
router.post('/make-comment', ensureAuthenticated, async (req, res, next) => {
try {
await messages.postMessage(req.body.from,
req.body.namespace, req.body.message);
res.status(200).json({ });
} catch(err) {
res.status(500).end(err.stack);
}
});
// Delete the indicated message
router.post('/del-message', ensureAuthenticated, async (req, res, next) => {
try {
await messages.destroyMessage(req.body.id, req.body.namespace);
res.status(200).json({ });
} catch(err) {
res.status(500).end(err.stack);
}
});
This pair of routes, /notes/make-comment and /notes/del-message, is used to post a new comment or delete an existing one. Each calls the corresponding data model function and then sends an appropriate response back to the caller.
Remember that postMessage stores a message in the database, and then it turns around and emits that message to other browsers. Likewise, destroyMessage deletes the message from the database, then emits a message to other browsers saying that the message has been deleted. Finally, the results from recentMessages will reflect the current set of messages in the database.
Both of these will be called by AJAX code in the browser:
module.exports.socketio = function(io) {
io.of('/view').on('connection', function(socket) {
// 'cb' is a function sent from the browser, to which we
// send the messages for the named note.
socket.on('getnotemessages', (namespace, cb) => {
messages.recentMessages(namespace).then(cb)
.catch(err => console.error(err.stack));
});
});
messages.emitter.on('newmessage', newmsg => {
io.of('/view').emit('newmessage', newmsg);
});
messages.emitter.on('destroymessage', data => {
io.of('/view').emit('destroymessage', data);
});
..
};
This is the Socket.IO glue code, which we will add to the code we looked at earlier.
The getnotemessages message from the browser requests the list of messages for the given Note. This calls the recentMessages function in the model. This uses a feature of Socket.IO where the client can pass a callback function, and server-side Socket.IO code can invoke that callback, giving it some data.
We also listen to the newmessage and destroymessage messages emitted by the messages model, sending corresponding messages to the browser. These are sent using the method described earlier.
We need to dive back into views/noteview.hbs with more changes so that we can view, create, and delete messages. This time, we will add a lot of code, including using a Bootstrap modal popup to get the message, several AJAX calls to communicate with the server, and, of course, more Socket.IO stuff.
The Bootstrap framework has a Modal component that serves a similar purpose to Modal dialogs in desktop applications. You pop up the Modal, it prevents interaction with other parts of the web page, you enter stuff into fields in the Modal, and then click a button to make it close.
This new segment of code replaces the existing segment defining the Edit and Delete buttons, in views/noteview.hbs:
{{#if user}}
{{#if notekey}}
<div class="row"><div class="col-xs-12">
<div class="btn-group">
<a class="btn btn-outline-dark" href="/notes/destroy?key=
{{notekey}}"
role="button">Delete</a>
<a class="btn btn-outline-dark" href="/notes/edit?key=
{{notekey}}"
role="button">Edit</a>
<button type="button" class="btn btn-outline-dark"
data-toggle="modal"
data-target="#notes-comment-modal">Comment</button>
</div>
</div></div>
<div id="noteMessages"></div>
{{/if}}
{{/if}}
This adds support for posting comments on a note. The user will see a Modal pop-up window in which they write their comment. We'll show the code for the Modal later.
We added a new button labeled Comment that the user will click to start the process of posting a message. This button is connected to the Modal by way of the element ID specified in the data-target attribute. The ID will match the outermost div wrapping the Modal. This structure of div elements and class names are from the Bootstrap website at http://getbootstrap.com/docs/4.0/components/modal/.
Let's add the code for the Modal at the bottom of views/noteview.hbs.
{{> footerjs}}
{{#if notekey}}
{{#if user}}
<div class="modal fade" id="notes-comment-modal" tabindex="-1"
role="dialog" aria-labelledby="noteCommentModalLabel" aria-hidden="true">
<div class="modal-dialog modal-dialog-centered" role="document">
<div class="modal-content">
<div class="modal-header">
<button type="button" class="close" data-dismiss="modal" aria-
label="Close">
<span aria-hidden="true">×</span>
</button>
<h4 class="modal-title" id="noteCommentModalLabel">Leave a
Comment</h4>
</div>
<div class="modal-body">
<form method="POST" id="submit-comment" class="well" data-async
data-target="#rating-modal" action="/notes/make-comment">
<input type="hidden" name="from" value="{{ user.id }}">
<input type="hidden" name="namespace" value="/view-
{{notekey}}">
<input type="hidden" name="key" value="{{notekey}}">
<fieldset>
<div class="form-group">
<label for="noteCommentTextArea">
Your Excellent Thoughts, Please</label>
<textarea id="noteCommentTextArea" name="message"
class="form-control" rows="3"></textarea>
</div>
<div class="form-group">
<div class="col-sm-offset-2 col-sm-10">
<button id="submitNewComment" type="submit" class="btn
btn-default">
Make Comment</button>
</div>
</div>
</fieldset>
</form>
</div>
</div>
</div>
</div>
{{/if}}
{{/if}}
The key portion of this is the HTML form contained within the div.modal-body element. It's a straightforward, normal Bootstrap, augmented form with a normal Submit button at the bottom. A few hidden input elements are used to pass extra information inside the request.
With the HTML set up this way, Bootstrap will ensure that this Modal is triggered when the user clicks on the Comment button. The user can close the Modal by clicking on the Close button. Otherwise, it's up to us to implement code to handle the form submission using AJAX so that it doesn't cause the page to reload.
Note that these code snippets are wrapped with {{#if}} statements, so that certain user interface elements are displayed only to sufficiently privileged users. A user that isn't logged in certainly shouldn't be able to post a message.
Now we have a lot of Socket.IO code to add:
{{#if notekey}}
{{#if user}}
<script>
$(document).ready(function () { ... });
{{/if}}
{{/if}}
There's another code section to handle the noteupdate and notedestroy messages. This new section has to do with messages that manage the comments.
We need to handle the form submission for posting a new comment, get the recent messages when first viewing a note, listen for events from the server about new messages or deleted messages, render the messages on the screen, and handle requests to delete a message:
$(document).ready(function () {
io('/view').emit('getnotemessages', '/view-{{notekey}}', function(msgs) {
$('#noteMessages').empty();
if (msgs.length > 0) {
msgs.forEach(function(newmsg) {
$('#noteMessages').append(formatMessage(newmsg));
});
$('#noteMessages').show();
connectMsgDelButton();
} else $('#noteMessages').hide();
});
var connectMsgDelButton = function() {
$('.message-del-button').on('click', function(event) {
$.post('/notes/del-message', {
id: $(this).data("id"),
namespace: $(this).data("namespace")
},
function(response) { });
event.preventDefault();
});
};
var formatMessage = function(newmsg) {
return '<div id="note-message-'+ newmsg.id +'" class="card">'
+'<div class="card-body">'
+'<h5 class="card-title">'+ newmsg.from +'</h5>'
+'<div class="card-text">'+ newmsg.message
+' <small style="display: block">'+ newmsg.timestamp
+'</small></div>'
+' <button type="button" class="btn btn-primary message-
del-button" data-id="'
+ newmsg.id +'" data-namespace="'+ newmsg.namespace +'">'
+'Delete</button>'
+'</div>'
+'</div>';
};
io('/view').on('newmessage', function(newmsg) {
if (newmsg.namespace === '/view-{{notekey}}') {
$('#noteMessages').prepend(formatMessage(newmsg));
connectMsgDelButton();
}
});
io('/view').on('destroymessage', function(data) {
if (data.namespace === '/view-{{notekey}}') {
$('#noteMessages #note-message-'+ data.id).remove();
}
});
$('form#submit-comment').submit(function(event) {
// Abort any pending request
if (request) { request.abort(); }
var $form = $('form#submit-comment');
var $target = $($form.attr('data-target'));
var request = $.ajax({
type: $form.attr('method'),
url: $form.attr('action'),
data: $form.serialize()
});
request.done(function (response, textStatus, jqXHR) { });
request.fail(function (jqXHR, textStatus, errorThrown) {
alert("ERROR "+ jqXHR.responseText);
});
request.always(function () {
// Reenable the inputs
$('#notes-comment-modal').modal('hide');
});
event.preventDefault();
});
});
The code within $('form#submit-comment').submit handles the form submission for the comment form. Because we already have jQuery available, we can use its AJAX support to POST a request to the server without causing a page reload.
Using event.preventDefault, we ensure that the default action does not occur. For the FORM submission, that means the browser page does not reload. What happens is an HTTP POST is sent to /notes/make-comment with a data payload consisting of the values of the form's input elements. Included in those values are three hidden inputs, from, namespace, and key, providing useful identification data.
If you refer to the /notes/make-comment route definition, this calls messagesModel.postMessage to store the message in the database. That function then posts an event, newmessage, which our server-side code forwards to any browser that's connected to the namespace. Shortly after that, a newmessage event will arrive in browsers.
The newmessage event adds a message block, using the formatMessage function. The HTML for the message is prepended to #noteMessages.
When the page is first loaded, we want to retrieve the current messages. This is kicked off with io('/view').emit('getnotemessages', ... This function, as the name implies, sends a getnotemessages message to the server. We showed the implementation of the server-side handler for this message earlier, in routes/notes.mjs.
If you remember, we said that Socket.IO supports the provision of a callback function that is called by the server in response to an event. You simply pass a function as the last parameter to a .emit call. That function is made available at the other end of the communication, to be called when appropriate. To make this clear, we have a callback function on the browser being invoked by server-side code.
In this case, the server-side calls our callback function with a list of messages. The message list arrives in the client-side callback function, which displays them in the #noteMessages area. It uses jQuery DOM manipulation to erase any existing messages, then renders each message into the messages area using the formatMessage function.
The message display template, in formatMessage, is straightforward. It uses a Bootstrap card to give a nice visual effect. And, there is a button for deleting messages.
In formatMessage we created a Delete button for each message. Those buttons need an event handler, and the event handler is set up using the connectMsgDelButton function. In this case, we send an HTTP POST request to /notes/del-message. We again use the jQuery AJAX support to post that HTTP request.
The /notes/del-message route in turn calls messagesModel.destroyMessage to do the deed. That function then emits an event, destroymessage, which gets sent back to the browser. As you see here, the destroymessage event handler causes the corresponding message to be removed using jQuery DOM manipulation. We were careful to add an id= attribute to every message to make removal easy.
Since the flip side of destruction is creation, we need to have the newmessage event handler sitting next to the destroymessage event handler. It also uses jQuery DOM manipulation to insert the new message into the #noteMessages area.
That was a lot of code, but we now have the ability to compose messages, display them on the screen, and delete them, all with no page reloads.
You can run the application as we did earlier, first starting the user authentication server in one command-line window and the Notes application in another:
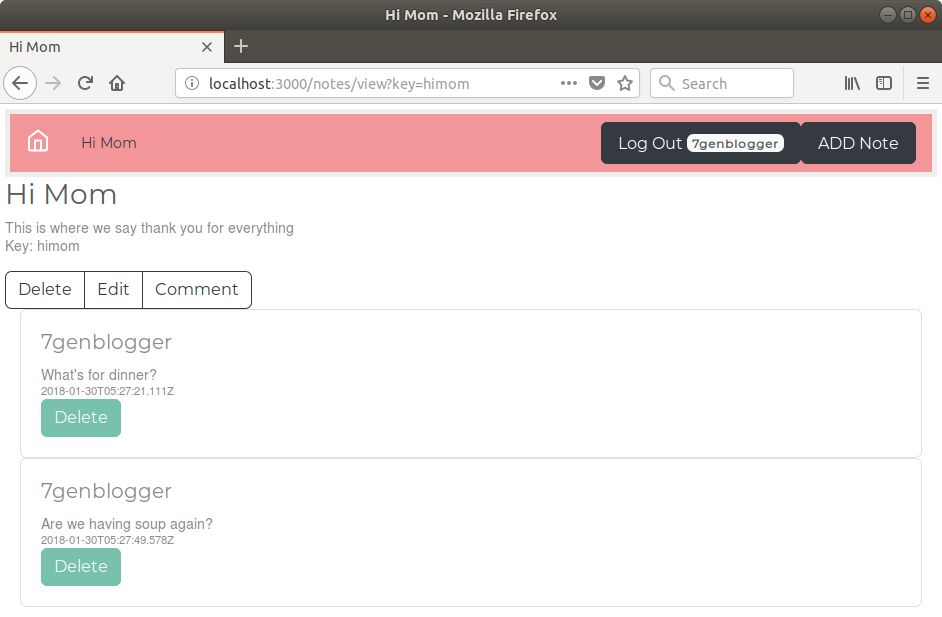
While entering a message, the Modal looks like this:
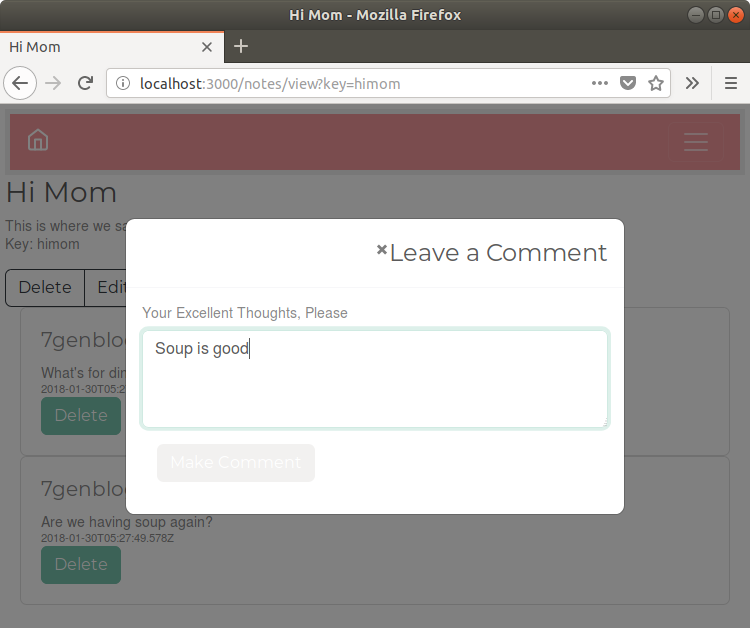
Try this with multiple browser windows viewing the same note or different notes. This way, you can verify that notes show up only on the corresponding note window.
We used a Modal and some AJAX code to avoid one page reload due to a form submission. In the Notes application, as it stands, a similar technique could be used when creating a new note, editing existing notes, and deleting existing notes. In each case, we would use a Modal, some AJAX code to handle the form submission, and some jQuery code to update the page without causing a reload.
But wait, that's not all. Consider the sort of dynamic real-time user interface wizardry on the popular social networks. Imagine what events and/or AJAX calls are required.
When you click on an image in Twitter, it pops up, you guessed it, a Modal window to show a larger version of the image. The Twitter Compose new Tweet window is also a Modal window. Facebook uses many different Modal windows, such as when sharing a post, reporting a spam post, or while doing a lot of other things Facebook's designers deem to require a pop-up window.
Socket.IO, as we've seen, gives us a rich foundation of events passing between server and client that can build multiuser, multichannel communication experiences for your users.
While we came a long way in this chapter, maybe Facebook doesn't have anything to fear from the baby steps we took toward converting the Notes application into a social network. This chapter gave us the opportunity to explore some really cool technology for pseudo real-time communication between browser sessions.
Look up the technical definition for the phrase real time and you'll see the real-time web is not truly real time. The actual meaning of real time involves software with strict time boundaries that must respond to events within a specified time constraint. Real-time software is typically used in embedded systems to respond to button presses, for applications as diverse as junk food dispensers and medical devices in intensive care units. Eat too much junk food and you could end up in intensive care, and be served by real-time software in both cases. Try and remember the distinction between different meanings for this phrase.
In this chapter, you learned about using Socket.IO for pseudo real-time web experiences, using the EventEmitter class to send messages between parts of an application, jQuery, AJAX, and other browser-side JavaScript technologies, while avoiding page reloads while making AJAX calls.
In the next chapter, we will look into Node.js application deployment on real servers. Running code on our laptop is cool, but to hit the big time, the application needs to be properly deployed.
Now that the Notes application is fairly complete, it's time to think about how to deploy it to a real server. We've created a minimal implementation of the collaborative note concept that works fairly well. To grow, Notes must escape our laptop and live on a real server. The goal is to look at deployment methods for Node.js applications.
In this chapter, we will cover the following topics:
The first task is to duplicate the source code from the previous chapter. It's suggested you create a new directory, chap10, as a sibling of the chap09 directory, and copy everything from chap09 to chap10.
Before we get into deploying the Notes application, we need to review its architecture. To deploy the Notes application, we must understand what we're planning to do.
We have segmented the services into two groups, as shown in the following diagram:
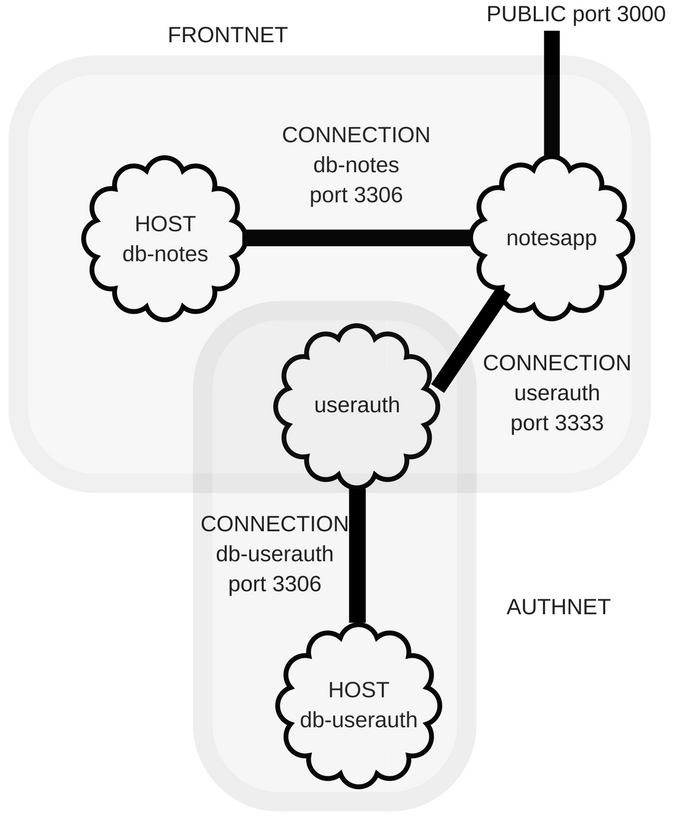
The user authentication server should be the more secure portion of the system. On our laptop, we weren't able to create the envisioned protective wall around that service, but we're about to implement such protection.
One strategy to enhance security is to expose as few ports as possible. That reduces the so-called attack surface, simplifying our work in hardening the application against security bugs. With the Notes application, we have exactly one port to expose, the HTTP service through which users access the application. The other ports, the two for MySQL servers and the user authentication service port, should be hidden.
Internally, the Notes application needs to access both the Notes database and the user authentication service. That service, in turn, needs to access the user authentication database. As currently envisaged, no service outside the Notes application requires access to either database or to the authentication service.
Implementation of this segmentation requires either two or three subnets, depending on the lengths you wish to go to. The first, FrontNet, contains the Notes application and its database. The second, AuthNet, contains the authentication service and its database. A third possible subnet would contain the Notes and authentication services. The subnet configuration must limit the hosts with access to the subnet, and create a security wall between subnets.
Traditional Linux/Unix server application deployment uses an init script to manage background processes. They are to start every time the system boots and cleanly shut down when the system is halted. While it's a simple model, the specifics of this vary widely from one operating system (OS) to another.
A common method is for the init process to manage background processes using shell scripts in the /etc/init.d directory. Other OSes use other process managers, such as upstart or launchd.
The Node.js project itself does not include any scripts to manage server processes on any OS. Node.js is more like a construction kit, with the pieces and parts to build servers, and is not a complete polished server framework itself. Implementing a complete web service based on Node.js means creating the scripting to integrate with process management on your OS. It's up to us to develop those scripts.
Web services have to be:
To demonstrate what's involved, let's use PM2 to implement background server process management for Notes. PM2 detects the system type and can automatically integrate itself with the process management system. It will create an LSB-style init script (http://wiki.debian.org/LSBInitScripts), or other scripts, as required by the process management system on your server.
For this deployment, we'll set up a single Ubuntu 17.10 server. You should provision a Virtual Private Server (VPS) from a hosting provider and do all installation and configuration there. Renting a small machine instance from one of the major providers for the time needed to go through this chapter will only cost a couple of dollars.
You can also do the tasks in this section using VirtualBox on your laptop. Simply install Debian or Ubuntu as a virtual machine in VirtualBox, then follow the instructions in this section. It won't be quite the same as using a remote VPS hosting provider, but does not require renting a server.
Both the Notes and user authentication services will be on that server, along with a single MySQL instance. While our goal is a strong separation between FrontNet and AuthNet, with two MySQL instances, we won't do so at this time.
The Linux package management system doesn't allow us to install two MySQL instances. Instead, we implement separation in the same MySQL instance by using separate databases with different usernames and access privileges for each database.
The first step is to ensure that MySQL is installed on your server. For Ubuntu, DigitalOcean has a fairly good tutorial: https://www.digitalocean.com/community/tutorials/how-to-install-mysql-on-ubuntu-14-04. While the Ubuntu version for that tutorial is old, the instructions are still accurate enough.
The MySQL server must support TCP connections from localhost. Edit the configuration file, /etc/mysql/my.cnf, to have the following line:
bind-address = 127.0.0.1
This limits MySQL server connections to the processes on the server. A miscreant would have to break into the server to access your database. Now that our database server is available, let's set up two databases.
In the chap10/notes/models directory, create a file named mysql-create-db.sql containing the following:
CREATE DATABASE notes; CREATE USER 'notes'@'localhost' IDENTIFIED BY 'notes'; GRANT ALL PRIVILEGES ON notes.* TO 'notes'@'localhost' WITH GRANT OPTION;
In the chap10/users directory, create a file named mysql-create-db.sql containing the following:
CREATE DATABASE userauth; CREATE USER 'userauth'@'localhost' IDENTIFIED BY 'userauth'; GRANT ALL PRIVILEGES ON userauth.* TO 'userauth'@'localhost' WITH GRANT OPTION;
We can't run those scripts on the server, because the Notes application has not yet been copied to the server. When that's accomplished, we'll run the scripts as:
$ mysql -u root -p <chap10/users/mysql-create-db.sql $ mysql -u root -p <chap10/notes/models/mysql-create-db.sql
This will create the two databases, notes and userauth, with associated usernames and passwords. Each user can access only their associated database. Later, we'll set up Notes and the user authentication service with YAML configuration files to access these databases.
According to the Node.js documentation (https://nodejs.org/en/download/package-manager/), the recommended installation method for Debian or Ubuntu Linux distributions is the following:
$ curl -sL https://deb.nodesource.com/setup_10.x | sudo -E bash -
$ sudo apt-get update $ sudo apt-get install -y nodejs build-essential
We've seen this before, so substitute the Node.js desired version number in the URL. Installing this way means that as new Node.js releases are issued, upgrades are easily accomplished with the normal package management procedures.
Before copying the Notes and user authentication code to this server, let's do a little coding to prepare for the move. We know that the Notes and authentication services must access the MySQL instance on localhost using the usernames and passwords given earlier.
Using the approach we've followed so far, this means a pair of YAML files for Sequelize parameters, and changing environment variables in the package.json files to match.
Create a chap10/notes/models/sequelize-server-mysql.yaml file containing:
dbname: notes
username: notes
password: notes12345
params:
host: localhost
port: 3306
dialect: mysql
It was discovered during testing that a simple password such as notes was not acceptable to the MySQL server, and that a longer password was required. In chap10/notes/package.json, add the following line to the scripts section:
"on-server": "SEQUELIZE_CONNECT=models/sequelize-server-mysql.yaml NOTES_MODEL=sequelize USER_SERVICE_URL=http://localhost:3333 PORT=3000 node --experimental-modules ./app",
Then create a chap10/users/sequelize-server-mysql.yaml file containing the following code the following code:
dbname: userauth
username: userauth
password: userauth
params:
host: localhost
port: 3306
dialect: mysql
The passwords shown in these configuration files obviously will not pass any security audits.
In chap10/users/package.json, add the following line to the scripts section:
"on-server": "PORT=3333 SEQUELIZE_CONNECT=sequelize-server-mysql.yaml node --experimental-modules ./user-server",
This configures the authentication service to access the databases just created.
Now we need to select a place on the server to install the application code:
# ls /opt
This empty directory looks to be as good a place as any. Simply upload chap10/notes and chap10/users to your preferred location. Before uploading, remove the node_modules directory in both directories.
That's both to save time on the upload, and because of the simple fact that any native-code modules installed on your laptop will be incompatible with the server.
On your laptop, you might run a command like this:
$ rsync --archive --verbose ./ root@159.89.145.190:/opt/
Use the actual IP address or domain name assigned to the server being used.
You should end up with something like the following:
# ls /opt notes users
Then, in each directory, run these commands:
# rm -rf node_modules # npm install
The simplest way of doing this is to just delete the whole node_modules directory and then let npm install do its job. Remember that we set up the PATH environment variable the following way:
# export PATH=./node_modules/.bin:${PATH}
You can place this in the login script (.bashrc, .cshrc, and so on) on your server so it's automatically enabled.
Finally, you can now run the SQL scripts written earlier to set up the database instances:
# mysql -u root -p <users/mysql-create-db.sql # mysql -u root -p <notes/models/mysql-create-db.sql
Then you should be able to start up the services by hand to check that everything is working correctly. The MySQL instance has already been tested, so we just need to start the user authentication and Notes services:
# cd /opt/users # DEBUG=users:* npm run on-server
> user-auth-server@0.0.1 on-server /opt/users
> PORT=3333 SEQUELIZE_CONNECT=sequelize-server-mysql.yaml node --experimental-modules ./user-server
(node:9844) ExperimentalWarning: The ESM module loader is experimental.
Then log in to the server on another Terminal session and run the following:
# cd /opt/users/ # PORT=3333 node users-add.js
Created { id: 1, username: 'me', password: 'w0rd', provider: 'local',
familyName: 'Einarrsdottir', givenName: 'Ashildr', middleName: '',
emails: '[]', photos: '[]',
updatedAt: '2018-02-02T00:43:16.923Z', createdAt: '2018-02-02T00:43:16.923Z' } # PORT=3333 node users-list.js
List [ { id: 'me', username: 'me', provider: 'local',
familyName: 'Einarrsdottir', givenName: 'Ashildr', middleName: '',
emails: '[]', photos: '[]' } ]
The preceding command both tests that the backend user authentication service is functioning and gives us a user account we can use to log in. The users-list command demonstrates that it works.
You may get an error:
users:error /create-user Error: Please install mysql2 package manually
This is generated inside of Sequelize. The mysql2 driver is an alternate MySQL driver, implemented in pure JavaScript, and includes support for returning Promises for smooth usage in async functions. If you do get this message, go ahead and install the package and remember to add this dependency to your package.json.
Now we can start the Notes service:
# cd ../notes # npm run on-server
> notes@0.0.0 on-server /opt/notes
> SEQUELIZE_CONNECT=models/sequelize-server-mysql.yaml NOTES_MODEL=sequelize USER_SERVICE_URL=http://localhost:3333 PORT=3000 node --experimental-modules ./app
(node:9932) ExperimentalWarning: The ESM module loader is experimental.
Then we can use our web browser to connect to the application. Since you probably do not have a domain name associated with this server, Notes can be accessed via the IP address of the server, such as http://159.89.145.190:3000/.
By now, you know that the drill for verifying Notes is working. Create a few notes, open a few browser windows, see that real-time notifications work, and so on. Once you're satisfied that Notes is working on the server, kill the processes and move on to the next section, where we'll set this up to run when the server starts.
The Twitter application we set up for Notes previously won't work because the authentication URL is incorrect for the server. For now, we can log in using the user profile created previously. If you want to see OAuth work with Twitter, go to apps.twitter.com and reconfigure the application to use the IP address of your server.
By hosting somewhere other than our laptop, the Twitter callbackURL must point to the correct location. The default value was http://localhost:3000 for use on our laptop. But we now need to use the IP address for the server. In notes/package.json, add the following environment variable to the on-server script:
TWITTER_CALLBACK_HOST=http://159.89.145.190:3000
Use the actual IP address or domain name assigned to the server being used. In a real deployment, we'll have a domain name to use here.
There are many ways to manage server processes, to ensure restarts if the process crashes, and so on. We'll use PM2 (http://pm2.keymetrics.io/) because it's optimized for Node.js processes. It bundles process management and monitoring into one application.
Let's create a directory, init, in which to use PM2. The PM2 website suggests you install the tool globally but, as students of the Twelve Factor Application model, we recognize it's best to use explicitly declared dependencies and avoid global unmanaged dependencies.
Create a package.json file containing:
{
"name": "pm2deploy",
"version": "1.0.0",
"scripts": {
"start": "pm2 start ecosystem.json",
"stop": "pm2 stop ecosystem.json",
"restart": "pm2 restart ecosystem.json",
"status": "pm2 status",
"save": "pm2 save",
"startup": "pm2 startup"
},
"dependencies": {
"pm2": "^2.9.3"
}
}
Install PM2 using npm install as usual.
In normal PM2 usage, we launch scripts with pm2 start script-name.js. We could make an /etc/init script which does that, but PM2 also supports a file named ecosystem.json that can be used to manage a cluster of processes. We have two processes to manage together, the user-facing Notes application, and the user authentication service on the back end.
Create a file named ecosystem.json containing the following:
{
"apps" : [
{
"name": "User Authentication",
"script": "user-server.mjs",
"cwd": "/opt/users",
"node_args": "--experimental-modules",
"env": {
"PORT": "3333",
"SEQUELIZE_CONNECT": "sequelize-server-mysql.yaml"
},
"env_production": { "NODE_ENV": "production" }
},
{
"name": "Notes",
"script": "app.mjs",
"cwd": "/opt/notes",
"node_args": "--experimental-modules",
"env": {
"PORT": "3000",
"SEQUELIZE_CONNECT": "models/sequelize-server-mysql.yaml",
"NOTES_MODEL": "sequelize",
"USER_SERVICE_URL": "http://localhost:3333",
"TWITTER_CONSUMER_KEY": "..",
"TWITTER_CONSUMER_SECRET": "..",
"TWITTER_CALLBACK_HOST": "http://45.55.37.74:3000"
},
"env_production": { "NODE_ENV": "production" }
}
]
}
This file describes the directories containing both services, the script to run each service, the command-line options, and the environment variables to use. It's the same information that is in the package.json scripts, but spelled out more clearly. Adjust TWITTER_CALLBACK_HOST for the IP address of the server. For documentation, see http://pm2.keymetrics.io/docs/usage/application-declaration/.
We then start the services with npm run start, which looks like the following on the screen:
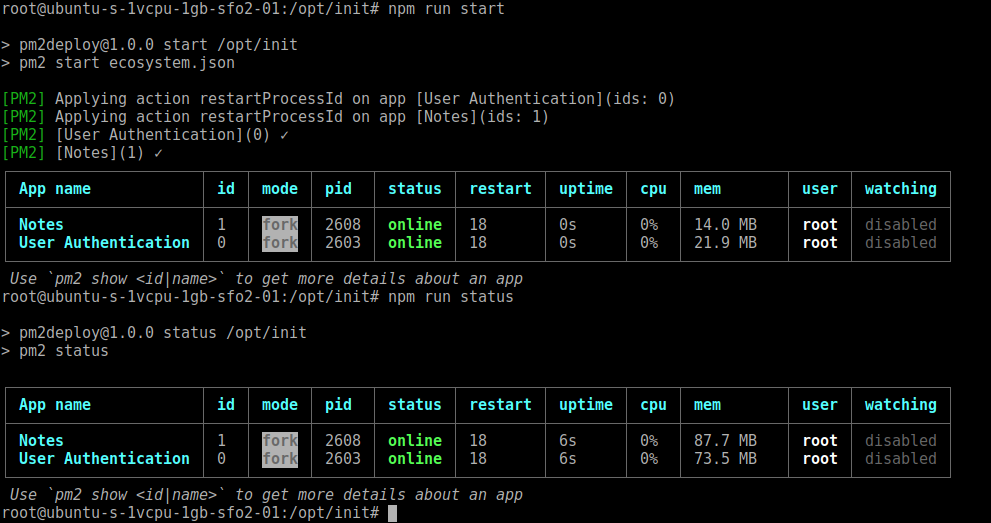
You can again navigate your browser to the URL for your server, such as http://159.89.145.190:3000, and check that Notes is working. Once started, some useful commands are as follows:
# pm2 list # pm2 describe 1 # pm2 logs 1
These commands let you query the status of the services.
The pm2 monit command gives you a pseudo-graphical monitor of system activity. For documentation, see http://pm2.keymetrics.io/docs/usage/monitoring/.
The pm2 logs command addresses the application log management issue we raised elsewhere. Activity logs should be treated as an event stream, and should be captured and managed appropriately. With PM2, the output is automatically captured, can be viewed, and the log files can be rotated and purged. See http://pm2.keymetrics.io/docs/usage/log-management/ for documentation.
If we restart the server, these processes don't start with the server. How do we handle that? It's very simple because PM2 can generate an init script for us:
# pm2 save
[PM2] Saving current process list...
[PM2] Successfully saved in /root/.pm2/dump.pm2
# pm2 startup
[PM2] Init System found: systemd
Platform systemd
Template
[Unit]
Description=PM2 process manager
Documentation=https://pm2.keymetrics.io/
After=network.target
... more output is printed
The pm2 save command saves the current state. Whatever services are running at that time will be saved and managed by the generated start up script.
The next step is to generate the startup script, using the pm startup command. PM2 supports generating start up scripts on several OSes, but when run this way, it autodetects the system type and generates the correct start up script. It also installs the start up script, and starts it running. See the documentation at http://pm2.keymetrics.io/docs/usage/startup/ for more information.
If you look closely at the output, some useful commands will be printed. The details will vary based on your operating system, because each operating system has its own commands for managing background processes. In this case, the installation is geared to use the systemctl command, as verified by this output:
Command list
[ 'systemctl enable pm2-root',
'systemctl start pm2-root',
'systemctl daemon-reload',
'systemctl status pm2-root' ]
[PM2] Writing init configuration in /etc/systemd/system/pm2-root.service
[PM2] Making script booting at startup...
...
[DONE]
>>> Executing systemctl start pm2-root
[DONE]
>>> Executing systemctl daemon-reload
[DONE]
>>> Executing systemctl status pm2-root
You are free to run these commands yourself:
# systemctl status pm2-root
● pm2-root.service - PM2 process manager
Loaded: loaded (/etc/systemd/system/pm2-root.service; enabled; vendor preset: enabled)
Active: active (running) since Fri 2018-02-02 22:27:45 UTC; 29min ago
Docs: https://pm2.keymetrics.io/
Process: 738 ExecStart=/opt/init/node_modules/pm2/bin/pm2 resurrect (code=exited, status=0/SUCCESS)
Main PID: 873 (PM2 v2.9.3: God)
Tasks: 30 (limit: 4915)
Memory: 171.6M
CPU: 11.528s
CGroup: /system.slice/pm2-root.service
├─873 PM2 v2.9.3: God Daemon (/root/.pm2)
├─895 node /opt/users/user-server.mjs
└─904 node /opt/notes/app.mjs
To verify that PM2 starts the services as advertised, reboot your server, then use PM2 to check the status:
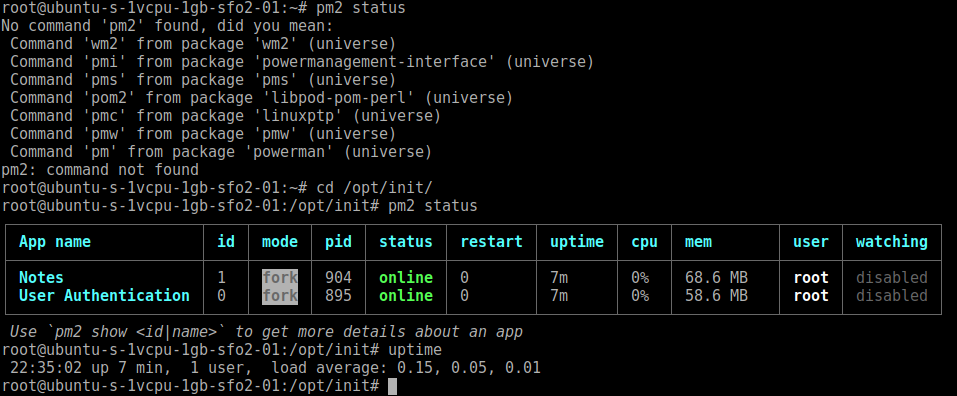
The first thing to notice is that upon initially logging in to the root account, the pm2 status command is not available. We installed PM2 locally to /opt/init, and the command is only available in that directory.
After going to that directory, we can now run the command and see the status. Remember to set the correct IP address or domain name in the TWITTER_CALLBACK_HOST environment variable. Otherwise, logging in with Twitter will fail.
We now have the Notes application under a fairly good management system. We can easily update its code on the server and restart the service. If the service crashes, PM2 will automatically restart it. Log files are automatically kept for our perusal.
PM2 also supports deployment from the source on our laptop, which we can push to staging or production environments. To support this, we must add deployment information to the ecosystem.json file and then run the pm2 deploy command to push the code to the server. See the PM2 website for more information: http://pm2.keymetrics.io/docs/usage/deployment/.
While PM2 does a good job at managing server processes, the system we've developed is insufficient for an internet-scale service. What if the Notes application were to become a viral hit and suddenly we need to deploy a million servers spread around the planet? Deploying and maintaining servers one at a time, like this, is not scalable.
We also skipped over implementing the architectural decisions at the beginning. Putting the user authentication data on the same server is a security risk. We want to deploy that data on a different server, under tighter security.
In the next section, we'll explore a new system, Docker, that solves these problems and more.
Docker (http://docker.com) is the new attraction in the software industry. Interest is taking off like crazy, spawning many projects, often with names containing puns around shipping containers.
It is described as an open platform for distributed applications for developers and sysadmins. It is designed around Linux containerization technology and focuses on describing the configuration of software on any variant of Linux.
Docker automates the application deployment within software containers. The basic concepts of Linux containers date back to chroot jail's first implementation in the 1970s, and other systems such as Solaris Zones. The Docker implementation creates a layer of software isolation and virtualization based on Linux cgroups, kernel namespaces, and union-capable filesystems, which blend together to make Docker what it is. That was some heavy geek-speak, so let's try a simpler explanation.
A Docker container is a running instantiation of a Docker image. An image is a given Linux OS and application configuration designed by developers for whatever purpose they have in mind. Developers describe an image using a Dockerfile. The Dockerfile is a fairly simple-to-write script showing Docker how to build an image. Docker images are designed to be copied to any server, where the image is instantiated as a Docker container.
A running container will make you feel like you're inside a virtual server running on a virtual machine. But Docker containerization is very different from a virtual machine system such as VirtualBox. The processes running inside the container are actually running on the host OS. The containerization technology (cgroups, kernel namespaces, and so on) create the illusion of running on the Linux variant specified in the Dockerfile, even if the host OS is completely different. Your host OS could be Ubuntu and the container OS could be Fedora or OpenSUSE; Docker makes it all work.
By contrast, with Virtual Machine software (VirtualBox, and VMWare, among others), you're using what feels like a real computer. There is a virtual BIOS and virtualized system hardware, and you must install a full-fledged guest OS. You must follow every ritual of computer ownership, including securing licenses if it's a closed source system such as Windows.
While Docker is primarily targeted at x86 flavors of Linux, it is available on several ARM-based OSes, as well as other processors. You can even run Docker on single-board computers, such as Raspberry Pis, for hardware-oriented Internet of Things projects. Operating systems such as Resin.IO are optimized to solely run Docker containers.
The Docker ecosystem contains many tools, and their number is quickly increasing. For our purposes, we'll be focusing on the following three specific tools:
With the Docker ecosystem, you can create a whole universe of subnets and services to implement your dream application. That universe can run on your laptop or be deployed to a globe-spanning network of cloud-hosting facilities around the world. The surface area through which miscreants can attack is strictly defined by the developer. A multicontainer application will even limit access so strongly between services that miscreants who do manage to break into a container will find it difficult to break out of the container.
Using Docker, we'll first design on our laptop the system shown in the previous diagram. Then we'll migrate that system to a Docker instance on a server.
The best place to learn how to install Docker on your laptop is the Docker documentation website. What we're looking for is the Docker Community Edition (CE). There is the Docker Enterprise Edition (EE), with more features and some opportunities to pay support fees:
Because Docker runs on Linux, it does not run natively on macOS or Windows. Installation on either OS requires installing Linux inside a virtual machine and then running Docker tools within that virtual Linux machine. The days when you had to handcraft that setup yourself are long gone. The Docker team has made this easy by developing easy-to-use Docker applications for Mac and Windows. The Docker for Windows and Docker for Mac bundles package the Docker tools and lightweight virtual machine software. The result is very lightweight, and the Docker containers can be left running in the background with little impact.
You may find references to Docker Toolbox as the method to install Docker on macOS. That application is long gone, and has been replaced by Docker for Windows and Docker for Mac.
To start Docker for Windows or Mac is very simple. You simply find and double-click on the application icon. It launches as would any other native application. When started, it manages a virtual machine (not VirtualBox) within which is a Linux instance running the Docker Engine. On macOS, a menu bar icon shows up with which you control Docker.app, and on Windows, an icon is available in the system tray.
There are settings available so that Docker automatically launches every time you start your laptop.
On both, the CPU must support Virtualization. Bundled inside Docker for Windows and Docker for Mac is an ultra-lightweight hypervisor, which, in turn, requires virtualization support from the CPU.
For Windows, this may require BIOS configuration. See https://docs.docker.com/docker-for-windows/troubleshoot/#virtualization-must-be-enabled.
For Mac, this requires hardware from 2010 or newer, with Intel’s hardware support for memory management unit (MMU) virtualization, including Extended Page Tables (EPT) and Unrestricted Mode. You can check for this support by running sysctl kern.hv_support. It also requires macOS 10.11 or later.
With the setup accomplished, we can use the local Docker instance to create Docker containers, run a few commands, and, in general, learn how to use this amazing system.
As in so many software journeys, this one starts with saying Hello World:
$ docker run hello-world
Unable to find image 'hello-world:latest' locally
latest: Pulling from library/hello-world
ca4f61b1923c: Pull complete
Digest: sha256:66ef312bbac49c39a89aa9bcc3cb4f3c9e7de3788c944158df3ee0176d32b751
Status: Downloaded newer image for hello-world:latest
Hello from Docker!
This message shows that your installation appears to be working correctly.
To generate this message, Docker took the following steps:
1. The Docker client contacted the Docker daemon.
2. The Docker daemon pulled the "hello-world" image from the Docker Hub.
(amd64)
3. The Docker daemon created a new container from that image which runs the
executable that produces the output you are currently reading.
4. The Docker daemon streamed that output to the Docker client, which sent it
to your terminal.
To try something more ambitious, you can run an Ubuntu container with:
$ docker run -it ubuntu bash
Share images, automate workflows, and more with a free Docker ID:
https://cloud.docker.com/
For more examples and ideas, visit:
https://docs.docker.com/engine/userguide/
The docker run command downloads a Docker image, named on the command line, initializes a Docker container from that image, and then runs that container. In this case, the image, named hello-world, was not present on the local computer and had to be downloaded and initialized. Once that was done, the hello-world container was executed and it printed out these instructions.
You can query your computer to see that while the hello-world container has executed and finished, it still exists:

The docker ps command lists the running Docker containers. As we see here, the hello-world container is no longer running, but with the -a switch, docker ps also shows those containers that exist but are not currently running. We also see that this computer has a Nextcloud instance installed along with its associated database.
When you're done using a container, you can clean up with the following command:
$ docker rm boring_lumiere boring_lumiere
The name boring_lumiere is the container name automatically generated by Docker. While the image name was hello-world, that's not the container name. Docker generated the container name so you have a more user-friendly identifier for the containers than the hex ID shown in the container ID column. When creating a container, it's easy to specify any container name you like.
With all that theory spinning around our heads, it's time to do something practical. Let's start by setting up the user authentication service. In the diagram shown earlier, this will be the box labeled AuthNet containing a MySQL instance and the authentication server.
To find publicly available Docker images, go to https://hub.docker.com/ and search. You'll find many Docker images ready to go. For example, Nextcloud, and its associated database, was shown earlier installed alongside the hello-world application when we kicked the tires. Both are available from their respective project teams and it's simply (more or less) a matter of typing docker run nextcloud to install and run the containers. The process of installing Nextcloud, and its associated database, as well as many other packaged applications, such as GitLab, is very similar to what we're about to do to build AuthNet, so the skills you're about to learn are very practical.
Just for MySQL, there are over 11,000 containers available. Fortunately, the two containers provided by the MySQL team are very popular and easy to use. The mysql/mysql-server image is a little easier to configure, so let's use that.
A Docker image name can be specified, along with a tag that is usually the software version number. In this case, we'll use mysql/mysql-server:5.7, where mysql/mysql-server is the container name, and 5.7 is the tag. MySQL 5.7 is the current GA release. Download the image as follows:
$ docker pull mysql/mysql-server:5.7
5.7: Pulling from mysql/mysql-server
4040fe120662: Pull complete
d049aa45d358: Pull complete
a6c7ed00840d: Pull complete
853789d8032e: Pull complete
Digest: sha256:1b4c7c24df07fa89cdb7fe1c2eb94fbd2c7bd84ac14bd1779e3dec79f75f37c5
Status: Downloaded newer image for mysql/mysql-server:5.7
This downloaded four images in total, because this image is built on top of three other images. We'll see later how that works when we learn how to build a Dockerfile.
A container can be started using this image as follows:
$ docker run --name=mysql --env MYSQL_ROOT_PASSWORD=f00bar mysql/mysql-server:5.7
[Entrypoint] MySQL Docker Image 5.7.21-1.1.4
[Entrypoint] Initializing database
[Entrypoint] Database initialized
...
[Entrypoint] ignoring /docker-entrypoint-initdb.d/*
[Entrypoint] Server shut down
[Entrypoint] MySQL init process done. Ready for start up.
[Entrypoint] Starting MySQL 5.7.21-1.1.4
We started this service in the foreground. The container name is mysql. We set an environment variable, which, in turn (according to the image documentation), initializes the root password as shown. In another window, we can get into the container and run the MySQL client as follows:
$ docker exec -it mysql mysql -u root -p
Enter password:
Welcome to the MySQL monitor. Commands end with ; or \g.
Your MySQL connection id is 4
Server version: 5.7.21 MySQL Community Server (GPL)
Copyright (c) 2000, 2018, Oracle and/or its affiliates. All rights reserved.
Oracle is a registered trademark of Oracle Corporation and/or its
affiliates. Other names may be trademarks of their respective
owners.
Type 'help;' or '\h' for help. Type '\c' to clear the current input statement.
mysql> show databases;
+--------------------+
| Database |
+--------------------+
| information_schema |
| mysql |
| performance_schema |
| sys |
+--------------------+
4 rows in set (0.00 sec)
mysql>
The docker exec command lets you run programs inside the container. The -it option says the command is run interactively, on an assigned terminal. Substitute bash for mysql, and you have an interactive bash command shell.
This mysql command instance is running inside the container. The container is configured by default to not expose any external port, and it has a default my.cnf file.
The database files are locked inside the container. As soon as that container is deleted, the database will go away. Docker containers are meant to be ephemeral, being created and destroyed as needed, while databases are meant to be permanent, with lifetimes measured in decades sometimes.
In other words, it's cool that we can easily install and launch a MySQL instance. But there are several deficiencies:
Before proceeding, let's clean up. In a Terminal window, type:
$ docker stop mysql
mysql
$ docker rm mysql
mysql
This closes out and cleans up the containers. And, to reiterate the point made earlier, the database in that container went away. If that database contained critical information, you just lost it with no chance to recover the data.
Docker supports creating virtual bridge networks between containers. Remember that a Docker container has many of the features of an installed Linux OS. Each container can have its own IP address(es) and exposed ports. Docker supports creating what amounts to being a virtual Ethernet segment, called a bridge network. These networks live solely within the host computer and, by default, are not reachable by anything outside the host computer.
A Docker bridge network, therefore, has strictly limited access. Any Docker container attached to a bridge network can communicate with other containers attached to that network. The containers find each other by hostname, and Docker includes an embedded DNS server to set up the hostnames required. That DNS server is configured to not require dots in domain names, meaning that the DNS/hostname of each container is simply the container name, rather than something such as container-name.service. This policy of using hostnames to identify containers is Docker's implementation of service discovery.
Create a directory named authnet as a sibling to the users and notes directories. We'll be working on AuthNet in that directory.
Create a file, buildauthnet.sh, containing the following:
docker network create --driver bridge authnet
Type the following:
$ sh -x buildauthnet.sh
+ docker network create --driver bridge authnet
3021e2069278c2acb08d94a2d31507a43f089db1c02eecc97792414b498eb785
This creates a Docker bridge network.
Executing scripts on Windows is different because it uses PowerShell rather than bash, and a large number of other considerations. For this, and the scripts which follow, make these changes.
Powershell script filenames must end with the .ps1 extension. For most of these scripts, that's all that is required because the scripts are so simple. To execute the script, simply type .\scriptname.ps1 in the Powershell window. In other words, on Windows, the script just shown must be named buildauthnet.ps1, and is executed as .\buildauthnet.ps1.
To execute the scripts, you may need to change the Powershell Execution Policy:
PS C:\Users\david\chap10\authnet> Get-ExecutionPolicy
Restricted
PS C:\Users\david\chap10\authnet> Set-ExecutionPolicy Unrestricted
Obviously, there are security considerations with this change, so change the Execution Policy back when you're done.
A simpler method on Windows is to simply paste these commands into a PowerShell window.
In the older days of Docker, we were told to link containers using the --link option. With that option, Docker would create entries in /etc/hosts so that one container can refer to another container by its hostname. That option also arranged access to TCP ports and volumes between linked containers. This allowed the creation of multicontainer services, using private TCP ports for communication that exposed nothing to processes outside the containers.
Today, we are told that the --link option is a legacy feature, and that instead we should use bridge networks. In this chapter, we'll focus solely on using bridge networks.
You can list the networks as follows:
$ docker network ls
NETWORK ID NAME DRIVER SCOPE
3021e2069278 authnet bridge local
Look at details about the network with this command:
$ docker network inspect authnet
... much JSON output
At the moment, this won't show any containers attached to authnet. The output shows the network name, the IP range of this network, the default gateway, and other useful network configuration information. Since nothing is connected to the network, let's get started with building the required containers.
Now that we have a network, we can start connecting containers to that network. And then we'll explore the containers to see how private they are.
Create a script, startdb.sh, containing:
docker run --name db-userauth --env MYSQL_RANDOM_ROOT_PASSWORD=true \
--env MYSQL_USER=userauth --env MYSQL_PASSWORD=userauth \
--env MYSQL_DATABASE=userauth \
--volume `pwd`/my.cnf:/etc/my.cnf \
--volume `pwd`/../userauth-data:/var/lib/mysql \
--network authnet mysql/mysql-server:5.7
On Windows, you will need to name the script startdb.ps1 instead, and put the text all on one line rather than extend the lines with backslashes. And, the volume mounted on /var/lib/mysql must be created separately. Use these commands instead:
docker volume create db-userauth-volume
docker run --name db-userauth --env MYSQL_RANDOM_ROOT_PASSWORD=true --env MYSQL_USER=userauth --env MYSQL_PASSWORD=userauth --env MYSQL_DATABASE=userauth --volume $PSScriptRoot\my.cnf:/etc/my.cnf --volume db-userauth-volume:/var/lib/mysql --network authnet mysql/mysql-server:5.7
When run, the container will be named db-userauth. To give a little bit of security, the root password has been randomized. We've instead defined a database named userauth, accessed by a user named userauth, using the password userauth. That's not exactly secure, so feel free to choose better names and passwords. The container is attached to the authnet network.
There are two --volume options that we must talk about. In Dockerese, a volume is a thing inside a container that can be mounted from outside the container. In this case, we're defining a volume, userauth-data, in the host filesystem to be mounted as /var/lib/mysql inside the container. And, we're defining a local my.cnf file to be used as /etc/my.cnf inside the container.
For the Windows version, we have two changes to the --volume mounts. We specify the mount for /etc/my.cnf as $PSScriptRoot\my.cnf:/etc/my.cnf, because that's how you reference a local file in Powershell.
For /var/lib/mysql, we referenced a separately created volume. The volume is created using the volume create command, and with that command there is no opportunity to control the location of the volume. It's important that the volume lives outside the container, so that the database files survive the destruction/creation cycle for this container.
Taken together, those settings mean the database files and the configuration file live outside the container and will therefore exist beyond the lifetime of one specific container. To get the my.cnf, you will have to run the container once without the --volume `pwd`/my.cnf:/etc/my.cnf option so you can copy the default my.cnf file into the authnet directory.
Run the script once without that option:
$ sh startdb.sh
... much output
[Entrypoint] GENERATED ROOT PASSWORD: UMyh@q]@j4qijyj@wK4s4SkePIkq
... much output
The output is similar to what we saw earlier, but for this newline giving the randomized password:
$ docker network inspect authnet
This will tell you the db-userauth container is attached to authnet:
$ docker exec -it db-userauth mysql -u userauth -p
Enter password:
Welcome to the MySQL monitor. Commands end with ; or \g.
... much output
mysql> show databases;
+--------------------+
| Database |
+--------------------+
| information_schema |
| userauth |
+--------------------+
2 rows in set (0.00 sec)
mysql> use userauth;
Database changed
mysql> show tables;
Empty set (0.00 sec)
We see our database has been created and it's empty. But we did this so we could grab the my.cnf file:
$ docker cp db-userauth:/etc/my.cnf .
$ ls
my.cnf mysql-data startdb.sh
The docker cp command is used for copying files in and out of containers. If you've used scp, the syntax will be familiar.
Once you have the my.cnf file, there's a big pile of setting changes you might want to make. The first specific change to make is commenting out the line reading socket=/var/lib/mysql/mysql.sock, and the second is adding a line reading bind-address = 0.0.0.0. The purpose with these changes is to configure the MySQL service to listen on a TCP port rather than a Unix domain socket. This makes it possible to communicate with the MySQL service from outside the container. The result would be:
# socket=/var/lib/mysql/mysql.sock
bind-address = 0.0.0.0
Now stop the db-userauth service, and remove the container, as we did earlier. Edit the startdb script to enable the line mounting /etc/my.cnf into the container, and then restart the container:
$ docker stop db-userauth
db-userauth
$ docker rm db-userauth
db-userauth
$ sh ./startdb.sh
[Entrypoint] MySQL Docker Image 5.7.21-1.1.4
[Entrypoint] Starting MySQL 5.7.21-1.1.4
Now, if we inspect the authnet network, we see the following:
$ docker network inspect authnet
"Name": "authnet",
...
"Subnet": "172.18.0.0/16",
"Gateway": "172.18.0.1"
...
"Containers": {
"Name": "db-userauth",
"MacAddress": "02:42:ac:12:00:02",
"IPv4Address": "172.18.0.2/16",
...
In other words, the authnet network has the network number 172.18.0.0/16, and the db-userauth container was assigned 172.18.0.2. This level of detail is rarely important, but it is useful on our first time through to carefully examine the setup so we understand what we're dealing with:
# cat /etc/resolv.conf
search attlocal.net
nameserver 127.0.0.11
options ndots:0
As we said earlier, there is a DNS server running within the Docker bridge network setup, and domain name resolution is configured to use nodots. That's so Docker container names are the DNS hostname for the container:
# mysql -h db-userauth -u userauth -p
Enter password:
Welcome to the MySQL monitor. Commands end with ; or \g.
Your MySQL connection id is 33
Server version: 5.7.21 MySQL Community Server (GPL)
Access the MySQL server using the container name as the hostname.
In the users directory, create a file named Dockerfile containing the following:
FROM node:10
ENV DEBUG="users:*"
ENV PORT="3333"
ENV SEQUELIZE_CONNECT="sequelize-docker-mysql.yaml"
ENV REST_LISTEN="0.0.0.0"
RUN mkdir -p /userauth
COPY package.json sequelize-docker-mysql.yaml *.mjs *.js /userauth/
WORKDIR /userauth
RUN apt-get update -y \
&& apt-get -y install curl python build-essential git ca-certificates \
&& npm install --unsafe-perm
EXPOSE 3333
CMD npm run docker
Dockerfiles describe the installation of an application on a server. See https://docs.docker.com/engine/reference/builder/ for documentation. They document assembly of the bits in a Docker container image, and the instructions in a Dockerfile are used to build a Docker image.
The FROM command specifies a pre-existing image from which to derive a given image. We talked about this earlier; you can build a Docker container starting from an existing image. The official Node.js Docker image (https://hub.docker.com/_/node/) we're using is derived from debian:jessie. Therefore, commands available within the container are what Debian offers, and we use apt-get to install more packages. We use Node.js 10 because it supports ES6 modules and the other features we've been using.
The ENV commands define environment variables. In this case, we're using the same environment variables defined within the user authentication service, except we have a new REST_LISTEN variable. We'll take a look at that shortly.
The RUN commands are where we run the shell commands required to build the container. The first thing is to make a /userauth directory that will contain the service source code. The COPY command copies files into that directory. And then we'll need to run an npm install so that we can run the service. But first we use the WORKDIR command to move the current working directory into /userauth so that the npm install is run in the correct place. We also install the requisite Debian packages so that any native code Node.js packages can be installed.
It's recommended that you always combine apt-get update with apt-get install in the same command line, like this, because of the Docker build cache. When rebuilding an image, Docker starts with the first changed line. By putting those two together, you ensure that apt-get update is executed any time you change the list of packages to be installed. For a complete discussion, see the documentation at https://docs.docker.com/develop/develop-images/dockerfile_best-practices/.
At the end of this command is npm install --unsafe-perm. The issue here is that these commands are being run as root. Normally, when npm is run as root, it changes its user ID to a nonprivileged user. This can cause failure, however, and the --unsafe-perm option prevents changing the user ID.
The EXPOSE command informs Docker that the container listens on the named TCP port. This does not expose the port beyond the container.
Finally, the CMD command documents the process to launch when the container is executed. The RUN commands are executed while building the container, while CMD says what's executed when the container starts.
We could have installed PM2 in the container, then used a PM2 command to launch the service. But Docker is able to fulfill the same function, because it supports automatically restarting a container if the service process dies. We'll see how to do this later.
We're using a different file for SEQUELIZE_CONNECT. Create a new file named users/sequelize-docker-mysql.yaml containing the following:
dbname: userauth
username: userauth
password: userauth
params:
host: db-userauth
port: 3306
dialect: mysql
The difference is that instead of localhost as the database host, we use db-userauth. Earlier, we explored the db-userauth container and determined that was the hostname of the container. By using db-userauth in this file, the authentication service will use the database in the container.
Now we need to take care of the environment variable named REST_LISTEN. Previously, the authentication server had listened only to http://localhost:3333. We'd done this for security purposes, that is, to limit which processes could connect to the service. Under Docker, we need to connect to this service from outside its container so that other containers can connect to this service. Therefore, it must listen to connections from outside the localhost.
In users-server.mjs, we need to make the following change:
server.listen(process.env.PORT,
process.env.REST_LISTEN ? process.env.REST_LISTEN : "localhost",
() => { log(server.name +' listening at '+ server.url); });
That is, if the REST_LISTEN variable exists, the REST server is told to listen to whatever it says, otherwise the service is to listen to localhost. With the environment variable in the Dockerfile, the authentication service will listen to the world (0.0.0.0). Are we throwing caution to the wind and abrogating our fiduciary duty in keeping the sacred trust of storing all this user identification information? No. Be patient. We'll describe momentarily how to connect this service and its database to AuthNet and will prevent access to AuthNet by any other process.
In users/package.json add the following line to the scripts section:
"docker": "node --experimental-modules ./user-server",
"docker-build": "docker build -t node-web-development/userauth ."
Previously, we've put the configuration environment variables into package.json. In this case, the configuration environment variables are in the Dockerfile. This means we need a way to run the server with no environment variables other than those in the Dockerfile. With this scriptsentry, we can do npm run docker and then the Dockerfile environment variables will supply all configuration.
We can build the authentication service as follows:
$ npm run docker-build
> user-auth-server@0.0.1 docker-build /Users/david/chap10/users
> docker build -t node-web-development/userauth .
Sending build context to Docker daemon 33.8MB
Step 1/11 : FROM node:9.5
---> a696309517c6
Step 2/11 : ENV DEBUG="users:*"
---> Using cache
---> f8cc103432e8
Step 3/11 : ENV PORT="3333"
---> Using cache
---> 39b24b8b554e
... more output
The docker build command builds a container from a Dockerfile. As we said earlier, the process begins with the image defined in the FROM command. Then the build proceeds step by step, and the output shows literally each step as it is executed.
Then create a script, authnet/startserver.sh, or on Windows call it startserver.ps1, containing the following command:
docker run -it --name userauth --net=authnet node-web-development/userauthThis launches the newly built container, giving it the name userauth, attaching it to authnet:
$ sh -x startserver.sh
+ docker run -it --name userauth --net=authnet node-web-development/userauth
> user-auth-server@0.0.1 docker /userauth
> node --experimental-modules ./user-server
(node:17) ExperimentalWarning: The ESM module loader is experimental.
users:service User-Auth-Service listening at http://0.0.0.0:3333 +0ms
That starts the user authentication service. On Windows, start it as .\startserver.ps1. You should recall that it's a REST service, and therefore running it through its paces is done with users-add.js and the other scripts. But, since we did not expose a public port from the service we must run those scripts from inside the container.
We determine whether a container exposes a public port in one of two ways. The easiest is running docker ps -a and viewing the container listing details. There is a column marked PORTS, and for userauth we see 3333/tcp. This is a side effect of the EXPOSE command in the Dockerfile. If that port were exposed, it would appear in the PORTS column as 0.0.0.0:3333->3333/tcp. Remember the goal for the userauth container, and authnet overall, was that it would not be publicly accessible because of security concerns.
Let's explore what we just created:
$ docker network inspect authnet
This prints out a large JSON object describing the network, and its attached containers, which we've looked at before. If all went well, we'll see there are now two containers attached to authnet where there'd previously been only one.
Let's go into the userauth container and poke around:
$ docker exec -it userauth bash
root@a29d833287bf:/userauth# ls
node_modules user-server.mjs users-list.js
package-lock.json users-add.js users-sequelize.mjs
package.json users-delete.js
sequelize-docker-mysql.yaml users-find.js
The /userauth directory is inside the container and is exactly the files placed in the container using the COPY command, plus the installed files in node_modules:
root@a29d833287bf:/userauth# PORT=3333 node users-list.js
List []
root@a29d833287bf:/userauth# PORT=3333 node users-add.js
Created { id: 1, username: 'me', password: 'w0rd', provider: 'local',
familyName: 'Einarrsdottir', givenName: 'Ashildr',
middleName: '', emails: '[]', photos: '[]',
updatedAt: '2018-02-05T01:54:53.320Z', createdAt: '2018-02-
05T01:54:53.320Z' }
root@a29d833287bf:/userauth# PORT=3333 node users-list.js
List [ { id: 'me', username: 'me', provider: 'local',
familyName: 'Einarrsdottir', givenName: 'Ashildr', middleName: '',
emails: '[]', photos: '[]' } ]
Our test of adding a user to the authentication service works:
root@a29d833287bf:/userauth# ps -eafw
UID PID PPID C STIME TTY TIME CMD
root 1 0 0 01:52 pts/0 00:00:00 /bin/sh -c npm run docker
root 9 1 0 01:52 pts/0 00:00:00 npm
root 19 9 0 01:52 pts/0 00:00:00 sh -c node --experimental-modules ./user-server
root 20 19 0 01:52 pts/0 00:00:01 node --experimental-modules ./user-server
root 30 0 0 01:54 pts/1 00:00:00 bash
root 70 30 0 01:57 pts/1 00:00:00 ps -eafw
root@a29d833287bf:/userauth# ping db-userauth
PING db-userauth (172.18.0.2): 56 data bytes
64 bytes from 172.18.0.2: icmp_seq=0 ttl=64 time=0.105 ms
64 bytes from 172.18.0.2: icmp_seq=1 ttl=64 time=0.077 ms
^C--- db-userauth ping statistics ---
2 packets transmitted, 2 packets received, 0% packet loss
round-trip min/avg/max/stddev = 0.077/0.091/0.105/0.000 ms
root@a29d833287bf:/userauth# ping userauth
PING userauth (172.18.0.3): 56 data bytes
64 bytes from 172.18.0.3: icmp_seq=0 ttl=64 time=0.132 ms
64 bytes from 172.18.0.3: icmp_seq=1 ttl=64 time=0.095 ms
^C--- userauth ping statistics ---
2 packets transmitted, 2 packets received, 0% packet loss
The process listing is interesting to study. Process PID 1 is the npm run docker command in the Dockerfile. Processes proceed from there to the node process running the actual server.
A ping command proves the two containers are available as hostnames matching the container names.
Then, you can log in to the db-userauth container and inspect the database:
$ docker exec -it db-userauth bash
bash-4.2# mysql -u userauth -p
Enter password:
Welcome to the MySQL monitor. Commands end with ; or \g.
...
mysql> use userauth
Database changed
mysql> show tables;
+--------------------+
| Tables_in_userauth |
+--------------------+
| Users |
+--------------------+
1 row in set (0.00 sec)
mysql> select * from Users;
+----+----------+----------+----------+---------------+-----------+--...
| id | username | password | provider | familyName | givenName | ...
+----+----------+----------+----------+---------------+-----------+--...
| 1 | me | w0rd | local | Einarrsdottir | Ashildr | ...
+----+----------+----------+----------+---------------+-----------+--...
1 row in set (0.00 sec)
We have successfully Dockerized the user authentication service in two containers, db-userauth and userauth. We've poked around the insides of a running container and found some interesting things. But, our users need the fantastic Notes application to be running, and we can't afford to rest on our laurels.
We have the back half of our system set up in a Docker container, as well as the private bridge network to connect the backend containers. We now need to set up another private bridge network, frontnet, and attach the other half of our system to that network.
Create a directory, frontnet, which is where we'll develop the tools to build and run that network. In that directory, create a file, buildfrontnet.sh, or on Windows, buildfrontnet.ps1, containing:
docker network create --driver bridge frontnet
Let's go ahead and create the frontnet bridge network:
$ sh -x buildfrontnet.sh
+ docker network create --driver bridge frontnet
f3df227d4bfff57bc7aed1e096a2ad16f6cebce4938315a54d9386a42d1ae3ed
$ docker network ls
NETWORK ID NAME DRIVER SCOPE
3021e2069278 authnet bridge local
f3df227d4bff frontnet bridge local
We'll proceed from here similarly to how authnet was created. However, we can work more quickly because we've already gone over the basics.
From the authnet directory, copy the my.cnf and startdb.sh files into the frontnet directory.
The my.cnf file can probably be used unmodified, but we have a few changes to make to the startdb.sh file:
docker run --name db-notes --env MYSQL_RANDOM_ROOT_PASSWORD=true \
--env MYSQL_USER=notes --env MYSQL_PASSWORD=notes12345 \
--env MYSQL_DATABASE=notes \
--volume `pwd`/my.cnf:/etc/my.cnf \
--volume `pwd`/../notes-data:/var/lib/mysql \
--network frontnet mysql/mysql-server:5.7
On Windows, name the file startdb.ps1 containing this:
docker volume create notes-data-volume
docker run --name db-notes --env MYSQL_RANDOM_ROOT_PASSWORD=true --env MYSQL_USER=notes --env MYSQL_PASSWORD=notes12345 --env MYSQL_DATABASE=notes --volume $PSScriptRoot\my.cnf:/etc/my.cnf --volume notes-data-volume:/var/lib/mysql --network frontnet mysql/mysql-server:5.7
The changes are simple substitutions to transliterate from userauth to notes. And then run it:
$ mkdir ../notes-data
$ sh -x startdb.sh
+ pwd
+ pwd
+ docker run --name db-notes --env MYSQL_RANDOM_ROOT_PASSWORD=true --env MYSQL_USER=notes --env MYSQL_PASSWORD=notes12345 --env MYSQL_DATABASE=notes --volume /home/david/nodewebdev/node-web-development-code-4th-edition/chap10/frontnet/my.cnf:/etc/my.cnf --volume /home/david/nodewebdev/node-web-development-code-4th-edition/chap10/frontnet/../notes-data:/var/lib/mysql --network frontnet mysql/mysql-server:5.7
[Entrypoint] MySQL Docker Image 5.7.21-1.1.4
[Entrypoint] Initializing database
[Entrypoint] Database initialized
[Entrypoint] GENERATED ROOT PASSWORD: 3kZ@q4hBItYGYj3Mes!AdiP83Nol
[Entrypoint] ignoring /docker-entrypoint-initdb.d/*
[Entrypoint] Server shut down
[Entrypoint] MySQL init process done. Ready for start up.
[Entrypoint] Starting MySQL 5.7.21-1.1.4
For Windows, simply run .\startdb.ps1.
This database will be available at the db-notes domain name on frontnet. Because it's attached to frontnet, it won't be reachable by containers connected to authnet.
$ docker exec -it userauth bash
root@0a2009334b79:/userauth# ping db-notes
ping: unknown host
Since db-notes is on a different network segment, we've achieved separation.
In the notes directory, create a file named Dockerfile containing the following:
FROM node:10
ENV DEBUG="notes:*,messages:*"
ENV SEQUELIZE_CONNECT="models/sequelize-docker-mysql.yaml"
ENV NOTES_MODEL="sequelize"
ENV USER_SERVICE_URL="http://userauth:3333"
ENV PORT="3000"
ENV NOTES_SESSIONS_DIR="/sessions"
# ENV TWITTER_CONSUMER_KEY="..."
# ENV TWITTER_CONSUMER_SECRET="..."
# Use this line when the Twitter Callback URL
# has to be other than localhost:3000
# ENV TWITTER_CALLBACK_HOST=http://45.55.37.74:3000
RUN mkdir -p /notesapp /notesapp/minty /notesapp/partials /notesapp/public /notesapp/routes /notesapp/theme /notesapp/views
COPY minty/ /notesapp/minty/
COPY models/*.mjs models/sequelize-docker-mysql.yaml /notesapp/models/
COPY partials/ /notesapp/partials/
COPY public/ /notesapp/public/
COPY routes/ /notesapp/routes/
COPY theme/ /notesapp/theme/
COPY views/ /notesapp/views/
COPY app.mjs package.json /notesapp/
WORKDIR /notesapp
RUN apt-get update -y \
&& apt-get -y install curl python build-essential git ca-certificates \
&& npm install --unsafe-perm
# Uncomment to build the theme directory
# WORKDIR /notesapp/theme
# RUN npm run download && npm run build && npm run clean
WORKDIR /notesapp
VOLUME /sessions
EXPOSE 3000
CMD node --experimental-modules ./app
This is similar to the Dockerfile we used for the authentication service. We're using the environment variables from notes/package.json, plus a new one, and there's a couple of new tricks involved here, so let's take a look.
The most obvious change is the number of COPY commands. The Notes application is a lot more involved given the number of subdirectories full of files that must be installed. We start by creating the top-level directories of the Notes application deployment tree. Then, one by one, we copy each subdirectory into its corresponding subdirectory in the container filesystem.
In a COPY command, the trailing slash on the destination directory is important. Why? Because the documentation says that the trailing slash is important.
The big question is: Why use multiple COPY commands such as this? This would have been trivially simple:
COPY . /notesapp
But, it is important to avoid copying the node_modules directory into the container. The container node_modules must be built inside the container, because the container operating system is almost certainly different to the host operating system. Any native code modules must be built for the correct operating system. That constraint led to the question of concisely copying specific files to the destination.
We've developed a process to build a Bootstrap 4 theme, which we developed in Chapter 6, Implementing the Mobile-First Paradigm. If you have a Bootstrap 4 theme to build, simply uncomment the corresponding lines in the Dockerfile. Those lines move the working directory to /notesapp/theme and then run the scripts to build the theme. A new script is required in theme/package.json to remove the theme/node_modules directory after the theme has been built:
"scripts": {
...
"clean": "rm -rf bootstrap-4.0.0/node_modules"
...
}
We also have a new SEQUELIZE_CONNECT file. Create models/sequelize-docker-mysql.yaml containing the following:
dbname: notes
username: notes
password: notes12345
params:
host: db-notes
port: 3306
dialect: mysql
This will access a database server on the db-notes domain name using the named database, username, and password.
Notice that the USER_SERVICE_URL variable no longer accesses the authentication service at localhost, but at userauth. The userauth domain name is currently only advertised by the DNS server on AuthNet, but the Notes service is on FrontNet. This means we'll have to connect the userauth container to the FrontNet bridge network so that its name is known there as well. We'll get to that in a minute.
In Chapter 8, Multiuser Authentication the Microservice Way we discussed the need to protect the API keys supplied by Twitter.
We didn't want to commit the keys in the source code, but they have to go somewhere. Placeholders are in the Dockerfile for specifying TWITTER_CONSUMER_KEY and TWITTER_CONSUMER_SECRET.
The value for TWITTER_CALLBACK_HOST needs to reflect where Notes is deployed. Right now, it is still on your laptop, but by the end of the chapter, it will be deployed to the server, and, at that time, it will need the IP address or domain name of the server.
A new variable is NOTES_SESSIONS_DIR and the matching VOLUME declaration. If we were to run multiple Notes instances, they could share session data by sharing this volume.
Supporting the NOTES_SESSIONS_DIR variable requires one change in app.mjs:
const sessionStore = new FileStore({
path: process.env.NOTES_SESSIONS_DIR ?
process.env.NOTES_SESSIONS_DIR : "sessions"
});
Instead of a hardcoded directory name, we can use an environment variable to define the location where session data is stored. Alternatively, there are sessionStore implementations for various servers such as REDIS, enabling session data sharing between containers on separate host systems.
In notes/package.json, add these scripts:
"scripts": {
...
"docker": "node --experimental-modules ./app",
"docker-build": "docker build -t node-web-development/notes ."
...
}
As for the authentication server, this lets us build the container and then, within the container, we can run the service.
Now we can build the container image:
$ npm run docker-build
> notes@0.0.0 docker-build /Users/david/chap10/notes
> docker build -t node-web-development/notes .
Sending build context to Docker daemon 76.27MB
Step 1/22 : FROM node:9.5
---> a696309517c6
Step 2/22 : ENV DEBUG="notes:*,messages:*"
---> Using cache
---> 8628ecad9fa4
Next, in the frontnet directory, create a file named startserver.sh, or, on Windows, startserver.ps1:
docker run -it --name notes --net=frontnet -p 3000:3000 node-web-development/notesUnlike the authentication service, the Notes application container must export a port to the public. Otherwise, the public will never be able to enjoy this wonderful creation we're building. The -p option is how we instruct Docker to expose a port.
The first number is a TCP port number published from the container, and the second number is the TCP port inside the container. Generally speaking, this option maps a port inside the container to one reachable by the public.
Then run it as follows:
$ sh -x startserver.sh
+ docker run -it --name notes --net=frontnet -p 3000:3000 node-web-development/notes
(node:6) ExperimentalWarning: The ESM module loader is experimental.
notes:debug-INDEX Listening on port 3000 +0ms
On Windows, run .\startserver.ps1.
At this point, we can connect our browser to http://localhost:3000 and start using the Notes application. But we'll quickly run into a problem:
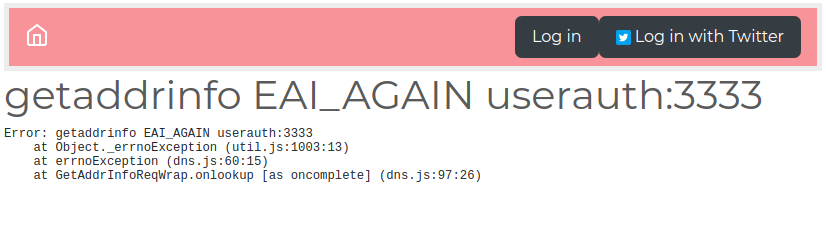
The user experience team is going to scream about this ugly error message, so put it on your backlog to generate a prettier error screen. For example, a flock of birds pulling a whale out of the ocean is popular.
This error means that Notes cannot access anything at the host named userauth. That host does exist, because the container is running, but it's not on frontnet, and is not reachable from the notes container. Namely:
$ docker exec -it notes bash
root@125a196c3fd5:/notesapp# ping userauth
ping: unknown host
root@125a196c3fd5:/notesapp# ping db-notes
PING db-notes (172.19.0.2): 56 data bytes
64 bytes from 172.19.0.2: icmp_seq=0 ttl=64 time=0.136 ms
^C--- db-notes ping statistics ---
1 packets transmitted, 1 packets received, 0% packet loss
round-trip min/avg/max/stddev = 0.136/0.136/0.136/0.000 ms
root@125a196c3fd5:/notesapp#
If you inspect FrontNet and AuthNet, you'll see the containers attached to each do not overlap:
$ docker network inspect frontnet
$ docker network inspect authnet
In the architecture diagram at the beginning of the chapter, we showed a connection between the notes and userauth containers. The connection is required so notes can authenticate its users. But that connection does not exist, yet.
Unfortunately, a simple change to startserver.sh (startserver.ps1) does not work:
docker run -it --name notes --net=authnet --net=frontnet -p 3000:3000 node-web-development/notes
While it is conceptually simple to specify multiple --net options when starting a container, Docker does not support this. It silently accepts the command as shown, but only connects the container to the last network mentioned in the options. Instead, Docker requires that you take a second step to attach the container to a second network:
$ docker network connect authnet notes
With no other change, the Notes application will now allow you to log in and start adding and editing notes.
There is a glaring architecture question staring at us. Do we connect the userauth service to frontnet, or do we connect the notes service to authnet? To verify that either direction solves the problem, run these commands:
$ docker network disconnect authnet notes
$ docker network connect frontnet userauth
The first time around, we connected notes to authnet, then we disconnected it from authnet, and then connected userauth to frontnet. That means we tried both combinations and, as expected, in both cases notes and userauth were able to communicate.
This is a question for security experts since the consideration is the attack vectors available to any intruders. Suppose Notes has a security hole allowing an invader to gain access. How do we limit what is reachable via that hole?
The primary observation is that by connecting notes to authnet, notes not only has access to userauth, but also to db-userauth:
$ docker network disconnect frontnet userauth
$ docker network connect authnet notes
$ docker exec -it notes bash
root@7fce818e9a4d:/notesapp# ping userauth
PING userauth (172.18.0.3): 56 data bytes
64 bytes from 172.18.0.3: icmp_seq=0 ttl=64 time=0.103 ms
^C--- userauth ping statistics ---
1 packets transmitted, 1 packets received, 0% packet loss
round-trip min/avg/max/stddev = 0.103/0.103/0.103/0.000 ms
root@7fce818e9a4d:/notesapp# ping db-userauth
PING db-userauth (172.18.0.2): 56 data bytes
64 bytes from 172.18.0.2: icmp_seq=0 ttl=64 time=0.201 ms
^C--- db-userauth ping statistics ---
1 packets transmitted, 1 packets received, 0% packet loss
round-trip min/avg/max/stddev = 0.201/0.201/0.201/0.000 ms
root@7fce818e9a4d:/notesapp#
This sequence reconnects notes to authnet, and demonstrates the ability to access both the userauth and db-userauth containers. Therefore, a successful invader could access the db-userauth database, a result we wanted to prevent. Our diagram at the beginning showed no such connection between notes and db-userauth.
Given that our goal for using Docker was to limit the attack vectors, we have a clear distinction between the two container/network connection setups. Attaching userauth to frontnet limits the number of containers that can access db-userauth. For an intruder to access the user information database, they must first break into notes, and then break into userauth. Unless, that is, our amateur attempt at a security audit is flawed.
The db-userauth and db-notes Dockerfiles contain VOLUME /var/lib/mysql, and when we started the containers, we gave --volume options, assigning a host directory for that container directory:
docker run --name db-notes \
...
--volume `pwd`/../notes-data:/var/lib/mysql \
...
We can easily see this connects a host directory, so it appears within the container at that location. Simply inspecting the host directory with tools such as ls shows that files are created in that directory corresponding to a MySQL database.
The VOLUME instruction instructs Docker to create a directory outside the container and to map that directory so that it's mounted inside the container on the named path. The VOLUME instruction by itself doesn't control the directory name on the host computer. If no --volume option is given, Docker still arranges for the content of said directory to be kept outside the container. That's useful, and at least the data is available outside the container, but you haven't controlled the location.
If we restart the db-notes container without using the --volume option for /var/lib/mysql, we can inspect the container to discover where Docker put the volume:
$ docker inspect --format '{{json .Mounts}}' db-notes
[{"Type":"bind",
"Source":"/Users/david/chap10/frontnet/my.cnf","Destination":"/etc/my.cnf",
"Mode":"","RW":true,"Propagation":"rprivate"},{"Type":"volume","Name":"39f9a80b49e3ecdebc7789de7b7dd2366c400ee7fbfedd6e4df18f7e60bad409",
"Source":"/var/lib/docker/volumes/39f9a80b49e3ecdebc7789de7b7dd2366c400ee7fbfedd6e4df18f7e60bad409/_data","Destination":"/var/lib/mysql",
"Driver":"local","Mode":"","RW":true,"Propagation":""}]
That's not exactly a user-friendly pathname, but you can snoop into that directory and see that indeed the MySQL database is stored there. The simplest way to use a user-friendly pathname for a volume is with the --volume options we showed earlier.
Another advantage we have is to easily switch databases. For example, we could test Notes with pre-cooked test databases full of notes written in Swahili (notes-data-swahili), Romanian (notes-data-romanian), German (notes-data-german) and English (notes-data-english). Each test database could be stored in the named directory, and testing against the specific language is as simple as running the notes container with different --volume options.
In any case, if you restart the notes container with the --volume option, you can inspect the container and see the directory is mounted on the directory you specified:
$ docker inspect --format '{{json .Mounts}}' db-notes
[{"Type":"bind",
"Source":"/Users/david/chap10/frontnet/my.cnf","Destination":"/etc/my.cnf",
"Mode":"","RW":true,"Propagation":"rprivate"},
{"Type":"bind",
"Source":"/Users/david/chap10/notes-data","Destination":"/var/lib/mysql",
"Mode":"","RW":true,"Propagation":"rprivate"}]
With the --volume options, we have controlled the location of the host directory corresponding to the container directory.
The last thing to note is that controlling the location of such directories makes it easier to make backups and take other administrative actions with that data.
With the scripts we've written so far, the Docker container is run in the foreground. That makes it easier to debug the service since you see the errors. For a production deployment, we need the Docker container detached from the terminal, and an assurance that it will restart itself automatically. Those two attributes are simple to implement.
Simply change this pattern:
$ docker run -it ...
To this pattern:
$ docker run --detach --restart always ...
The -it option is what causes the Docker container to run in the foreground. Using these options causes the Docker container to run detached from your terminal, and if the service process dies, the container will automatically restart.
This is cool that we can create encapsulated instantiations of the software services we've created. But the promise was to use the Dockerized application for deployment on cloud services. In other words, we need to take all this learning and apply it to the task of deploying Notes on a public internet server with a fairly high degree of security.
We've demonstrated that, with Docker, Notes can be decomposed into four containers that have a high degree of isolation from each other, and from the outside world.
There is another glaring problem: our process in the previous section was partly manual, partly automated. We created scripts to launch each portion of the system, which is a good practice according to the Twelve Factor Application model. But we did not automate the entire process to bring up Notes and the authentication services. Nor is this solution scalable beyond one machine.
Let's start with the last issue first—scalability. Within the Docker ecosystem, several Docker orchestrator services are available. An Orchestrator automatically deploys and manages Docker containers over a group of machines. Some examples of Docker Orchestrators are Docker Swarm (which is built into the Docker CLI), Kubernetes, CoreOS Fleet, and Apache Mesos. These are powerful systems able to automatically increase/decrease resources as needed, to move containers from one host to another, and more. We mention these systems for your further study as your needs grow.
Docker compose (https://docs.docker.com/compose/overview/) will solve the other problems we've identified. It lets us easily define and run several Docker containers together as a complete application. It uses a YAML file, docker-compose.yml, to describe the containers, their dependencies, the virtual networks, and the volumes. While we'll be using it to describe the deployment onto a single host machine, Docker compose can be used for multimachine deployments, especially when combined with Docker Swarm. Understanding Docker compose will provide a basis upon which to understand/use the other tools, such as Swarm or Kubernetes.
Docker machine (https://docs.docker.com/machine/overview/) is a tool for installing Docker Engine on virtual hosts, either local or remote, and for managing Docker containers on those hosts. We'll be using this to provision a server on a cloud hosting service, and push containers into that server. It can also be used to provision a virtual host on your laptop within a VirtualBox instance.
Before proceeding, ensure Docker compose and Docker machine are installed. If you've installed Docker for Windows or Docker for Mac, both are installed along with everything else. On Linux, you must install both separately by following the instructions at the links given earlier.
Let's start by creating a directory, compose, as a sibling to the users and notes directories. In that directory, create a file named docker-compose.yml:
version: '3'
services:
db-userauth:
image: "mysql/mysql-server:5.7"
container_name: db-userauth
command: [ "mysqld", "--character-set-server=utf8mb4",
"--collation-server=utf8mb4_unicode_ci",
"--bind-address=0.0.0.0" ]
expose:
- "3306"
networks:
- authnet
volumes:
- db-userauth-data:/var/lib/mysql
- ../authnet/my.cnf:/etc/my.cnf
environment:
MYSQL_RANDOM_ROOT_PASSWORD: "true"
MYSQL_USER: userauth
MYSQL_PASSWORD: userauth
MYSQL_DATABASE: userauth
restart: always
userauth:
build: ../users
container_name: userauth
depends_on:
- db-userauth
networks:
- authnet
- frontnet
restart: always
db-notes:
image: "mysql/mysql-server:5.7"
container_name: db-notes
command: [ "mysqld", "--character-set-server=utf8mb4",
"--collation-server=utf8mb4_unicode_ci",
"--bind-address=0.0.0.0" ]
expose:
- "3306"
networks:
- frontnet
volumes:
- db-notes-data:/var/lib/mysql
- ../frontnet/my.cnf:/etc/my.cnf
environment:
MYSQL_RANDOM_ROOT_PASSWORD: "true"
MYSQL_USER: notes
MYSQL_PASSWORD: notes12345
MYSQL_DATABASE: notes
restart: always
notes:
build: ../notes
container_name: notes
restart: always
depends_on:
- db-notes
networks:
- frontnet
ports:
- "3000:3000"
restart: always
networks:
frontnet:
driver: bridge
authnet:
driver: bridge
volumes:
db-userauth-data:
db-notes-data:
That's the description of the entire Notes deployment. It's at a fairly high level of abstraction, roughly equivalent to the options on the command-line tools we've used so far. Further details are located inside the Dockerfiles, which are referenced from this compose file.
The version line says that this is a version 3 compose file. The version number is inspected by the docker-compose command, so it can correctly interpret its content. The full documentation is worth reading at https://docs.docker.com/compose/compose-file/.
There are three major sections used here: services, volumes, and networks. The services section describes the containers being used, the networks section describes the networks, and the volumes section describes the volumes. The content of each section matches the intent/purpose of the commands we ran earlier. The information we've already dealt with is all here, just rearranged.
There are two database containers, db-userauth and db-notes. Both reference the Dockerhub image using the image tag. For the databases, we did not create a Dockerfile, but instead built directly from the Dockerhub image. The same happens here in the compose file.
For the userauth and notes containers, we created a Dockerfile. The directory containing that file is referenced by the build tag. To build the container, docker-compose looks for a file named Dockerfile in the named directory. There are more options for the build tag, which are discussed in the official documentation.
The container_name attribute is equivalent to the --name attribute and specifies a user-friendly name for the container. We must specify the container name in order to specify the container hostname in order to do Docker-style service discovery.
The command tag overrides the CMD tag in the Dockerfile. We've specified this for the two database containers, so we can instruct MySQL to bind to IP address 0.0.0.0. Even though we didn't create a Dockerfile for the database containers, there is a Dockerfile created by the MySQL maintainers.
The networks attribute lists the networks to which this container must be connected and is exactly equivalent to the --net argument. Even though the docker command doesn't support multiple --net options, we can list multiple networks in the compose file. In this case, the networks are bridge networks. As we did earlier, the networks themselves must be created separately, and in a compose file, that's done in the networks section.
Each of the networks in our system is a bridge network. This fact is described in the compose file.
The expose attribute declares which ports are exposed from the container, and is equivalent to the EXPOSE tag. The exposed ports are not published outside the host machine, however. The ports attribute declares the ports that are to be published. In the ports declaration, we have two port numbers: the first being the published port number and the second being the port number inside the container. This is exactly equivalent to the -p option used earlier.
The notes container has a few environment variables, such as TWITTER_CONSUMER_KEY and TWITTER_CONSUMER_SECRET, that you may prefer to store in this file rather than in the Dockerfile.
The depends_on attribute lets us control the start up order. A container that depends on another will wait to start until the depended-upon container is running.
The volumes attribute describes mappings of a container directory to a host directory. In this case, we've defined two volume names, db-userauth-data and db-notes-data, and then used them for the volume mapping.
To explore the volumes, start with this command:
$ docker volume ls
DRIVER VOLUME NAME
...
local compose_db-notes-data
local compose_db-userauth-data
...
The volume names are the same as in the compose file, but with compose_ tacked on the front.
You can inspect the volume location using the docker command line:
$ docker volume inspect compose_db-notes-data $ docker volume inspect compose_db-userauth-data
If it's preferable, you can specify a pathname in the compose file:
db-auth:
..
volumes:
# - db-userauth-data:/var/lib/mysql
- ../userauth-data:/var/lib/mysql
db-notes:
..
volumes:
# - db-notes-data:/var/lib/mysql
- ../notes-data:/var/lib/mysql
This is the same configuration we made earlier. It uses the userauth-data and notes-data directories for the MySQL data files for their respective database containers.
The environment tag describes the environment variables that will be received by the container. As before, environment variables should be used to inject configuration data.
The restart attribute controls what happens if, or when, the container dies. When a container starts, it runs the program named in the CMD instruction, and when that program exits, the container exits. But what if that program is meant to run forever, shouldn't Docker know it should restart the process? We could use a background process supervisor, such as Supervisord or PM2. But, we can also use the Docker restart option.
The restart attribute can take one of the following four values:
On Windows, we're able to run the commands in this section unchanged.
Before deploying this to a server, let's run it on our laptop using docker-compose:
$ docker stop db-notes userauth db-auth notesapp db-notes userauth db-auth notesapp $ docker rm db-notes userauth db-auth notesapp db-notes userauth db-auth notesapp
We first needed to stop and delete the existing containers. Because the compose file wants to launch containers with the same names as we'd built earlier, we also have to remove the existing containers:
$ docker-compose build Building db-auth .. lots of output $ docker-compose up Creating db-auth Recreating compose_db-notes_1 Recreating compose_userauth_1 Recreating compose_notesapp_1 Attaching to db-auth, db-notes, userauth, notesapp
Once that's done, we can build the containers, docker-compose build, and then start them running, docker-compose up.
The first test is to execute a shell in userauth to run our user database script:
$ docker exec -it userauth bash
root@9972adbbdbb3:/userauth# PORT=3333 node users-add.js
Created { id: 2,
username: 'me', password: 'w0rd', provider: 'local',
familyName: 'Einarrsdottir', givenName: 'Ashildr', middleName: '',
emails: '[]', photos: '[]',
updatedAt: '2018-02-07T02:24:04.257Z', createdAt: '2018-02-07T02:24:04.257Z' }
root@9972adbbdbb3:/userauth#
Now that we've proved that the authentication service will work, and, by the way, created a user account, you should be able to browse to the Notes application and run it through its paces.
You can also try pinging different containers to ensure that the application network topology has been created correctly.
By default, docker-compose attaches to the containers so that logging output is printed on the Terminal. Output from all four containers will be intermingled together. Thankfully, each line is prepended by the container name.
When you're done testing the system, simply type CTRL + C on the Terminal:
^CGracefully stopping... (press Ctrl+C again to force)
Stopping db-userauth ... done
Stopping userauth ... done
Stopping db-notes ... done
Stopping notes ... done
To avoid running with the containers attached to the Terminal, use the -d option. This says to detach from the Terminal and run in the background.
An alternate way to bring down the system described in the compose file is with the docker-compose down command.
The up command builds, recreates, and starts the containers. The build step can be handled separately using the docker-compose build command. Likewise, starting and stopping the containers can be handled separately by using the docker-compose start and docker-compose-stop commands.
In all cases, your command shell should be in the directory containing the docker-compose.yml file. That's the default name for this file. This can be overridden with the -f option to specify a different filename.
We've verified on our laptop that the services described by the compose file work as intended. Launching the containers is now automated, fixing one of the issues we named earlier. It's now time to see how to deploy to a cloud-hosting provider. This is where we turn to Docker machine.
Docker machine can be used to provision Docker instances inside a VirtualBox host on your laptop. What we'll be doing is provisioning a Docker system on DigitalOcean. The docker-machine command comes with drivers supporting a long list of cloud-hosting providers. It's easy to adapt the instructions shown here for other providers, simply by substituting a different driver.
After signing up for a DigitalOcean account, click on the API link in the dashboard. We need an API token to grant docker-machine access to the account. Go through the process of creating a token and save away the token string you're given. The Docker website has a tutorial at https://docs.docker.com/machine/examples/ocean/.
With the token in hand, type the following:
$ docker-machine create --driver digitalocean --digitalocean-size 2gb \
--digitalocean-access-token TOKEN-FROM-PROVIDER \
sandbox
Running pre-create checks...
Creating machine...
(sandbox) Creating SSH key...
(sandbox) Creating Digital Ocean droplet...
(sandbox) Waiting for IP address to be assigned to the Droplet...
Waiting for machine to be running, this may take a few minutes...
Detecting operating system of created instance...
Waiting for SSH to be available...
Detecting the provisioner...
Provisioning with ubuntu(systemd)...
Installing Docker...
Copying certs to the local machine directory...
Copying certs to the remote machine...
Setting Docker configuration on the remote daemon...
Checking connection to Docker...
Docker is up and running!
To see how to connect your Docker Client to the Docker Engine running on this virtual machine, run: docker-machine env sandbox
The digitalocean driver is, as we said earlier, used with Digital Ocean. The Docker website has a list of drivers at https://docs.docker.com/machine/drivers/.
A lot of information is printed here about things being set up. The most important is the message at the end. A series of environment variables are used to tell the docker command where to connect to the Docker Engine instance. As the messages say, run: docker-machine env sandbox:
$ docker-machine env sandbox
export DOCKER_TLS_VERIFY="1"
export DOCKER_HOST="tcp://45.55.37.74:2376"
export DOCKER_CERT_PATH="/home/david/.docker/machine/machines/sandbox"
export DOCKER_MACHINE_NAME="sandbox"
# Run this command to configure your shell:
# eval $(docker-machine env sandbox)
That's the environment variables used to access the Docker host we just created. You should also go to your cloud-hosting provider dashboard and see that the host has been created. This command also gives us some instructions to follow:
$ eval $(docker-machine env sandbox)
$ docker-machine ls
NAME ACTIVE DRIVER STATE URL SWARM DOCKER ERRORS
sandbox * digitalocean Running tcp://45.55.37.74:2376 v18.01.0-ce
This shows that we have a Docker Engine instance running in a host at our chosen cloud-hosting provider.
One interesting test at this point is to run docker ps -a on this Terminal, and then to run it in another Terminal that does not have these environment variables. That should show the cloud host has no containers at all, while your local machine may have some containers (depending on what you currently have running):
$ docker run hello-world
Unable to find image 'hello-world:latest' locally
latest: Pulling from library/hello-world
ca4f61b1923c: Pull complete
Digest: sha256:66ef312bbac49c39a89aa9bcc3cb4f3c9e7de3788c944158df3ee0176d32b751
Status: Downloaded newer image for hello-world:latest
...
$ docker images
REPOSITORY TAG IMAGE ID CREATED SIZE
hello-world latest f2a91732366c 2 months ago 1.85kB
Here, we've verified that we can launch a container on the remote host.
The next step is to build our containers for the new machine. Because we've switched the environment variables to point to the new server, these commands cause action to happen there rather than inside our laptop:
$ docker-compose build
db-userauth uses an image, skipping
db-notes uses an image, skipping
Building notes
Step 1/22 : FROM node:9.5
9.5: Pulling from library/node
f49cf87b52c1: Pull complete
7b491c575b06: Pull complete
b313b08bab3b: Pull complete
51d6678c3f0e: Pull complete
...
Because we changed the environment variables, the build occurs on the sandbox machine rather than on our laptop, as previously.
This will take a while because the Docker image cache on the remote machine is empty. Additionally, building the notesapp and userauth containers copies the entire source tree to the server and runs all build steps on the server.
The build may fail if the default memory size is 500 MB, the default on DigitalOcean at the time of writing. If so, the first thing to try is resizing the memory on the host to at least 2 GB.
Once the build is finished, launch the containers on the remote machine:
$ docker-compose up
Creating notes ... done
Recreating db-userauth ... done
Recreating db-notes ... done
Creating notes ...
Attaching to db-userauth, db-notes, userauth, notes
Once the containers start, you should test the userauth container as we've done previously. Unfortunately, the first time you do this, that command will fail. The problem is these lines in the docker-compose.yml:
- ../authnet/my.cnf:/etc/my.cnf
...
- ../frontnet/my.cnf:/etc/my.cnf
In this case, the build occurs on the remote machine, and the docker-machine command does not copy the named file to the server. Hence, when Docker attempts to start the container, it is unable to do so because that volume mount cannot be satisfied because the file is simply not there. This, then, means some surgery on docker-compose.yml, and to add two new Dockerfiles.
First, make these changes to docker-compose.yml:
...
db-userauth:
build: ../authnet
container_name: db-userauth
networks:
- authnet
volumes:
- db-userauth-data:/var/lib/mysql
restart: always
...
db-notes:
build: ../frontnet
container_name: db-notes
networks:
- frontnet
volumes:
- db-notes-data:/var/lib/mysql
restart: always
Instead of building the database containers from a Docker image, we're now building them from a pair of Dockerfiles. Now we must create those two Dockerfiles.
In authnet, create a file named Dockerfile containing the following:
FROM mysql/mysql-server:5.7
EXPOSE 3306
COPY my.cnf /etc/
ENV MYSQL_RANDOM_ROOT_PASSWORD="true"
ENV MYSQL_USER=userauth
ENV MYSQL_PASSWORD=userauth
ENV MYSQL_DATABASE=userauth
CMD [ "mysqld", "--character-set-server=utf8mb4", \
"--collation-server=utf8mb4_unicode_ci", "--bind-address=0.0.0.0" ]
This copies certain settings from what had been the db-userauth description in docker-compose.yml. The important thing is that we now COPY the my.cnf file rather than use a volume mount.
In frontnet, create a Dockerfile containing the following:
FROM mysql/mysql-server:5.7
EXPOSE 3306
COPY my.cnf /etc/
ENV MYSQL_RANDOM_ROOT_PASSWORD="true"
ENV MYSQL_USER=notes
ENV MYSQL_PASSWORD=notes12345
ENV MYSQL_DATABASE=notes
CMD [ "mysqld", "--character-set-server=utf8mb4", \
"--collation-server=utf8mb4_unicode_ci", "--bind-address=0.0.0.0" ]
This is the same, but with a few critical values changed.
After making these changes, we can now build the containers, and launch them:
$ docker-compose build
... much output
$ docker-compose up --force-recreate
... much output
Now that we have a working build, and can bring up the containers, let's inspect them and verify everything works.
Execute a shell in userauth to test and set up the user database:
$ docker exec -it userauth bash
root@931dd2a267b4:/userauth# PORT=3333 node users-list.js
List [ { id: 'me', username: 'me', provider: 'local',
familyName: 'Einarrsdottir', givenName: 'Ashildr', middleName: '',
emails: '[]', photos: '[]' } ]
As mentioned previously, this verifies that the userauth service works, that the remote containers are set up, and that we can proceed to using the Notes application.
The question is: What's the URL to use? The service is not on localhost, because it's on the remote server. We don't have a domain name assigned, but there is an IP address for the server.
Run the following command:
$ docker-machine ip sandbox
45.55.37.74
Docker tells you the IP address, which you should use as the basis of the URL. Hence, in your browser, visit http://IP-ADDRESS:3000
With Notes deployed to the remote server, you should check out all the things we've looked at previously. The bridge networks should exist, as shown previously, with the same limited access between containers. The only public access should be port 3000 on the notes container.
Remember to set the TWITTER_CALLBACK_HOST environment variable appropriately for your server.
Because our database containers mount a volume to store the data, let's see where that volume landed on the server:
$ docker volume ls
DRIVER VOLUME NAME
local compose_db-notes-data
local compose_db-userauth-data
Those are the expected volumes, one for each container:
$ docker volume inspect compose_db-notes-data
[
{
"CreatedAt": "2018-02-07T06:30:06Z",
"Driver": "local",
"Labels": {
"com.docker.compose.project": "compose",
"com.docker.compose.volume": "db-notes-data"
},
"Mountpoint": "/var/lib/docker/volumes/compose_db-notes-
data/_data",
"Name": "compose_db-notes-data",
"Options": {},
"Scope": "local"
}
]
Those are the directories, but they're not located on our laptop. Instead, they're on the remote server. Accessing these directories means logging into the remote server to take a look:
$ docker-machine ssh sandbox
Welcome to Ubuntu 16.04.3 LTS (GNU/Linux 4.4.0-112-generic x86_64)
* Documentation: https://help.ubuntu.com
* Management: https://landscape.canonical.com
* Support: https://ubuntu.com/advantage
Get cloud support with Ubuntu Advantage Cloud Guest:
http://www.ubuntu.com/business/services/cloud
4 packages can be updated.
0 updates are security updates.
Last login: Wed Feb 7 04:00:29 2018 from 108.213.68.139
root@sandbox:~#
From this point, you can inspect the directories corresponding to these volumes and see that they indeed contain MySQL configuration and data files:
root@sandbox:~# ls /var/lib/docker/volumes/compose_db-notes-data/_data
auto.cnf client-key.pem ib_logfile1 mysql.sock.lock public_key.pem
ca-key.pem ib_buffer_pool ibtmp1 notes server-cert.pem
ca.pem ibdata1 mysql performance_schema server-key.pem
client-cert.pem ib_logfile0 mysql.sock private_key.pem sys
You'll also find that the Docker command-line tools will work. The process list is especially interesting:
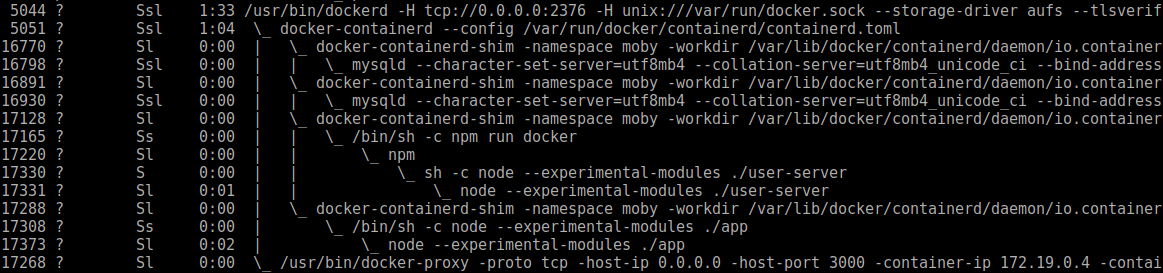
Look closely at this and you see a process corresponding to every container in the system. These processes are running in the host operating system. Docker creates layers of configuration/containment around those processes to create the appearance that the process is running under a different operating system, and with various system/network configuration files, as specified in the container screenshot.
The claimed advantage Docker has over virtualization approaches, such as VirtualBox, is that Docker is very lightweight. We see right here why Docker is lightweight: there is no virtualization layer, there is only a containerization process (docker-containerd-shim).
Once you're satisfied that Notes is working on the remote server, you can shut it down and remove it as follows:
$ docker-compose stop Stopping notesapp ... done Stopping userauth ... done Stopping db-notes ... done Stopping db-auth ... done
This shuts down all the containers at once:
$ docker-machine stop sandbox Stopping "sandbox"... Machine "sandbox" was stopped.
This shuts down the remote machine. The cloud-hosting provider dashboard will show that the Droplet has stopped.
At this point, you can go ahead and delete the Docker machine instance as well, if you like:
$ docker-machine rm sandbox About to remove sandbox Are you sure? (y/n): y Successfully removed sandbox
And, if you're truly certain you want to delete the machine, the preceding command does the deed. As soon as you do this, the machine will be erased from your cloud-hosting provider dashboard.
This chapter has been quite a journey. We went from an application that existed solely on our laptop, to exploring two ways to deploy Node.js applications to a production server.
We started by reviewing the Notes application architecture and how that will affect deployment. That enabled you to understand what you had to do for server deployment.
Then you learned the traditional way to deploy services on Linux using an init script. PM2 is a useful tool for managing background processes in such an environment. You also learned how to provision a remote server using a virtual machine hosting service.
Then you took a long trip into the land of Docker, a new and exciting system for deploying services on machines. You learned how to write a Dockerfile so that Docker knows how to construct a service image. You learned several ways to deploy Docker images on a laptop or on a remote server. And you learned how to describe a multi-container application using Docker compose.
You're almost ready to wrap up this book. You've learned a lot along the way; there are two final things to cover.
In the next chapter, we will learn about both unit testing and functional testing. While a core principle of test-driven development is to write the unit tests before writing the application, we've done it the other way around and put the chapter about unit testing at the end of this book. That's not to say unit testing is unimportant, because it is extremely important.
In the final chapter, we'll explore how to harden our application, and application infrastructure, against attackers.
nit testing has become a primary part of good software development practice. It is a method by which individual units of source code are tested to ensure proper functioning. Each unit is theoretically the smallest testable part of an application. In a Node.js application, you might consider each module as a unit.
In unit testing, each unit is tested separately, isolating the unit under test as much as possible from other parts of the application. If a test fails, you would want it to be due to a bug in your code rather than a bug in the package that your code happens to use. A common technique is to use mock objects or mock data to isolate individual parts of the application from one another.
Functional testing, on the other hand, doesn't try to test individual components, but instead it tests the whole system. Generally speaking, unit testing is performed by the development team, and functional testing is performed by a Quality Assurance (QA) or Quality Engineering (QE) team. Both testing models are needed to fully certify an application. An analogy might be that unit testing is similar to ensuring that each word in a sentence is correctly spelled, while functional testing ensures that the paragraph containing that sentence has a good structure.
In this chapter, we'll cover:
Node.js has a useful built-in testing tool, the assert module. Its functionality is similar to assert libraries in other languages. Namely, it's a collection of functions for testing conditions, and if the conditions indicate an error, the assert function throws an exception.
At its simplest, a test suite is a series of assert calls to validate the behavior of a thing being tested. For example, a test suite could instantiate the user authentication service, then make an API call, using assert methods to validate the result, then make another API call, validating its results, and so on.
Consider a code snippet like this, which you could save in a file named deleteFile.js:
const fs = require('fs');
exports.deleteFile = function(fname, callback) {
fs.stat(fname, (err, stats) => {
if (err) callback(new Error(`the file ${fname} does not exist`));
else {
fs.unlink(fname, err2 => {
if (err) callback(new Error(`could not delete ${fname}`));
else callback();
});
}
});
};
The first thing to notice is this contains several layers of asynchronous callback functions. That presents a couple of challenges:
The following is an example of using assert for testing. Create a file named test-deleteFile.js containing the following:
const fs = require('fs');
const assert = require('assert');
const df = require('./deleteFile');
df.deleteFile("no-such-file", (err) => {
assert.throws(
function() { if (err) throw err; },
function(error) {
if ((error instanceof Error)
&& /does not exist/.test(error)) {
return true;
} else return false;
},
"unexpected error"
);
});
This is what's called a negative test scenario, in that it's testing whether requesting to delete a nonexistent file throws an error.
If you are looking for a quick way to test, the assert module can be useful when used this way. If it runs and no messages are printed, then the test passes. But, did it catch the instance of the deleteFile callback never being called?
$ node test-deleteFile.js
The assert module is used by many of the test frameworks as a core tool for writing test cases. What the test frameworks do is create a familiar test suite and test case structure to encapsulate your test code.
There are many styles of assertion libraries available in Node.js. Later in this chapter, we'll use the Chai assertion library (http://chaijs.com/) which gives you a choice between three different assertion styles (should, expect, and assert).
Let's start our unit testing journey with the data models we wrote for the Notes application. Because this is unit testing, the models should be tested separately from the rest of the Notes application.
In the case of most of the Notes models, isolating their dependencies implies creating a mock database. Are you going to test the data model or the underlying database? Mocking out a database means creating a fake database implementation, which does not look like a productive use of our time. You can argue that testing a data model is really about testing the interaction between your code and the database, that mocking out the database means not testing that interaction, and therefore we should test our code against the database engine used in production.
With that line of reasoning in mind, we'll skip mocking out the database, and instead run the tests against a database containing test data. To simplify launching the test database, we'll use Docker to start and stop a version of the Notes application stack that's set up for testing.
If you haven't already done so, duplicate the source tree to use in this chapter. For example, if you had a directory named chap10, create one named chap11 containing everything from chap10.
In the notes directory, create a new directory named test.
Mocha (http://mochajs.org/) is one of many test frameworks available for Node.js. As you'll see shortly, it helps us write test cases and test suites, and it provides a test results reporting mechanism. It was chosen over the alternatives because it supports Promises. It fits very well with the Chai assertion library mentioned earlier. And, we'll need to use ES6 modules from test suites written in CommonJS, and therefore we must use the esm module.
You may find references to an earlier @std/esm module. That module has been deprecated, with esm put in its place.
While in the notes/test directory, type this to install Mocha, Chai, and esm:
$ npm init
... answer the questions to create package.json
$ npm install mocha@5.x chai@4.1.x esm --save
Because we have several Notes models, the test suite should run against any model. We can write tests using the Notes model API we developed, and an environment variable should be used to declare the model to test.
Because we've written the Notes application using ES6 modules, we have a small challenge to overcome. Mocha only supports running tests in CommonJS modules, and Node.js (as of this writing) does not support loading an ES6 module from a CommonJS module. An ES6 module can use import to load a CommonJS module, but a CommonJS module cannot use require to load an ES6 module. There are various technical reasons behind this, the bottom line is that we're limited in this way.
Because Mocha requires that tests be CommonJS modules, we're in the position of having to load an ES6 module into a CommonJS module. A module, esm, exists which allows that combination to work. If you'll refer back, we installed that module in the previous section. Let's see how to use it.
In the test directory, create a file named test-model.js containing this as the outer shell of the test suite:
'use strict';
require = require("esm")(module,{"esm":"js"});
const assert = require('chai').assert;
const model = require('../models/notes'); describe("Model Test", function() { .. });
The support to load ES6 modules is enabled by the require('esm') statement shown here. It replaces the standard require function with one from the esm module. That parameter list at the end enables the feature to load ES6 modules in a CommonJS module. Once you've done this, your CommonJS module can load an ES6 module as evidenced by require('../models/notes') a couple of lines later.
The Chai library supports three flavors of assertions. We're using the assert style here, but it's easy to use a different style if you prefer. For the other styles supported by Chai, see http://chaijs.com/guide/styles/.
Chai's assertions include a very long list of useful assertion functions, see http://chaijs.com/api/assert/.
The Notes model to test must be selected with the NOTES_MODEL environment variable. For the models that also consult environment variables, we'll need to supply that configuration as well.
With Mocha, a test suite is contained within a describe block. The first argument is descriptive text, which you use to tailor the presentation of test results.
Rather than maintaining a separate test database, we can create one on the fly while executing tests. Mocha has what are called hooks, which are functions executed before or after test case execution. The hook functions let you, the test suite author, set up and tear down required conditions for the test suite to operate as desired. For example, to create a test database with known test content:
describe("Model Test", function() {
beforeEach(async function() {
try {
const keyz = await model.keylist();
for (let key of keyz) {
await model.destroy(key);
}
await model.create("n1", "Note 1", "Note 1");
await model.create("n2", "Note 2", "Note 2");
await model.create("n3", "Note 3", "Note 3");
} catch (e) {
console.error(e);
throw e;
}
});
..
});
This defines a beforeEach hook, which is executed before every test case. The other hooks are before, after, beforeEach, and afterEach. The each hooks are triggered before or after each test case execution.
This is meant to be a cleanup/preparation step before every test. It uses our Notes API to first delete all notes from the database (if any) and then create a set of new notes with known characteristics. This technique simplifies tests by ensuring that we have known conditions to test against.
We also have a side effect of testing the model.keylist and model.create methods.
In Mocha, a series of test cases are encapsulated with a describe block, and written using an it block. The describe block is meant to describe that group of tests, and the it block is for checking assertions on a specific aspect of the thing being tested. You can nest the describe blocks as deeply as you like:
describe("check keylist", function() {
it("should have three entries", async function() {
const keyz = await model.keylist();
assert.exists(keyz);
assert.isArray(keyz);
assert.lengthOf(keyz, 3);
});
it("should have keys n1 n2 n3", async function() {
const keyz = await model.keylist();
assert.exists(keyz);
assert.isArray(keyz);
assert.lengthOf(keyz, 3);
for (let key of keyz) {
assert.match(key, /n[123]/, "correct key");
}
});
it("should have titles Node #", async function() {
const keyz = await model.keylist();
assert.exists(keyz);
assert.isArray(keyz);
assert.lengthOf(keyz, 3);
var keyPromises = keyz.map(key => model.read(key));
const notez = await Promise.all(keyPromises);
for (let note of notez) {
assert.match(note.title, /Note [123]/, "correct title");
}
});
});
The idea is to call Notes API functions, then to test the results to check whether they matched the expected results.
This describe block is within the outer describe block. The descriptions given in the describe and it blocks are used to make the test report more readable. The it block forms a pseudo-sentence along the lines of it (the thing being tested) should do this or that.
Even though Mocha requires regular functions for the describe and it blocks, we can use arrow functions within those functions.
How does Mocha know whether the test code passes? How does it know when the test finishes? This segment of code shows one of the three methods.
Generally, Mocha is looking to see if the function throws an exception, or whether the test case takes too long to execute (a timeout situation). In either case, Mocha will indicate a test failure. That's of course simple to determine for non-asynchronous code. But, Node.js is all about asynchronous code, and Mocha has two models for testing asynchronous code.
In the first (not seen here), Mocha passes in a callback function, and the test code is to call the callback function. In the second, as seen here, it looks for a Promise being returned by the test function, and determines pass/fail on whether the Promise is in the resolve or reject state.
In this case, we're using async functions, because they automatically return a Promise. Within the functions, we're calling asynchronous functions using await, ensuring any thrown exception is indicated as a rejected Promise.
Another item to note is the question asked earlier: what if the callback function we're testing is never called? Or, what if a Promise is never resolved? Mocha starts a timer and if the test case does not finish before the timer expires, Mocha fails the test case.
We have more tests to write, but let's first get set up to run the tests. The simplest model to test is the in-memory model. Let's add this to the scripts section of notes/test/package.json:
"test-notes-memory": "NOTES_MODEL=memory mocha test-model",
To install dependencies, we must run npm install in both the notes/test and notes directories. That way both the dependencies for the test code, and the dependencies for Notes, are installed in their correct place.
Then, we can run it as follows:
$ npm run test-notes-memory
> notes-test@1.0.0 test-notes-memory /Users/david/chap11/notes/test
> NOTES_MODEL=memory mocha test-model
Model Test
check keylist
√ should have three entries
√ should have keys n1 n2 n3
√ should have titles Node #
3 passing (18ms)
The mocha command is used to run the test suite.
The structure of the output follows the structure of the describe and it blocks. You should set up the descriptive text strings so it reads nicely.
That wasn't enough to test much, so let's go ahead and add some more tests:
describe("read note", function() {
it("should have proper note", async function() {
const note = await model.read("n1");
assert.exists(note);
assert.deepEqual({ key: note.key, title: note.title, body:
note.body }, {
key: "n1", title: "Note 1 FAIL", body: "Note 1"
});
});
it("Unknown note should fail", async function() {
try {
const note = await model.read("badkey12");
assert.notExists(note);
throw new Error("should not get here");
} catch(err) {
// this is expected, so do not indicate error
assert.notEqual(err.message, "should not get here");
}
});
});
describe("change note", function() {
it("after a successful model.update", async function() {
const newnote = await model.update("n1", "Note 1 title
changed", "Note 1 body changed");
const note = await model.read("n1");
assert.exists(note);
assert.deepEqual({ key: note.key, title: note.title, body:
note.body }, {
key: "n1", title: "Note 1 title changed", body: "Note 1 body
changed"
});
});
});
describe("destroy note", function() {
it("should remove note", async function() {
await model.destroy("n1");
const keyz = await model.keylist();
assert.exists(keyz);
assert.isArray(keyz);
assert.lengthOf(keyz, 2);
for (let key of keyz) {
assert.match(key, /n[23]/, "correct key");
}
});
it("should fail to remove unknown note", async function() {
try {
await model.destroy("badkey12");
throw new Error("should not get here");
} catch(err) {
// this is expected, so do not indicate error
assert.notEqual(err.message, "should not get here");
}
});
});
after(function() { model.close(); });
});
Notice that for the negative tests – where the test passes if an error is thrown – we run it in a try/catch block. The throw new Error line in each case should not execute because the preceding code should throw an error. Therefore, we can check if the message in that thrown error is the message which arrives, and fail the test if that's the case.
Now, the test report:
$ npm run test-notes-memory
> notes-test@1.0.0 test-notes-memory /Users/david/chap11/notes/test
> NOTES_MODEL=memory mocha test-model
Model Test
check keylist
√ should have three entries
√ should have keys n1 n2 n3
√ should have titles Node #
read note
√ should have proper note
√ Unknown note should fail
change note
√ after a successful model.update
destroy note
√ should remove note
√ should fail to remove unknown note
8 passing (17ms)
In these additional tests, we have a couple of negative tests. In each test that we expect to fail, we supply a notekey that we know is not in the database, and we then ensure that the model gives us an error.
The Chai Assertions API includes some very expressive assertions. In this case, we've used the deepEqual method which does a deep comparison of two objects. In our case, it looks like this:
assert.deepEqual({ key: note.key, title: note.title, body: note.body }, {
key: "n1", title: "Note 1", body: "Note 1"
});This reads nicely in the test code, but more importantly a reported test failure looks very nice. Since these are currently passing, try introducing an error by changing one of the expected value strings. Upon rerunning the test, you'll see:
Model Test
check keylist
√ should have three entries
√ should have keys n1 n2 n3
√ should have titles Node #
read note
1) should have proper note
√ Unknown note should fail
change note
√ after a successful model.update
destroy note
√ should remove note
√ should fail to remove unknown note
7 passing (42ms)
1 failing
1) Model Test
read note
should have proper note:
AssertionError: expected { Object (key, title, ...) } to deeply
equal { Object (key, title, ...) }
+ expected - actual
{
"body": "Note 1"
"key": "n1"
- "title": "Note 1"
+ "title": "Note 1 FAIL"
}
at Context.<anonymous> (test-model.js:53:16)
at <anonymous>
At the top is the status report of each test case. For one test, instead of a check mark is a number, and the number corresponds to the reported details at the bottom. Mocha presents test failures this way when the spec reporter is used. Mocha supports other test report formats, some of which produce data that can be sent into test status reporting systems. For more information, see https://mochajs.org/#reporters.
In this case, the failure was detected by a deepEqual method, which presents the detected object inequality in this way.
That was good, but we obviously won't run Notes in production with the in-memory Notes model. This means that we need to test all the other models.
Testing the LevelUP and filesystem models is easy, just add this to the scripts section of package.json:
"test-notes-levelup": "NOTES_MODEL=levelup mocha", "test-notes-fs": "NOTES_MODEL=fs mocha",
Then run the following command:
$ npm run test-notes-fs $ npm run test-notes-levelup
This will produce a successful test result.
The simplest database to test is SQLite3, since it requires zero setup. We have two SQLite3 models to test, let's start with notes-sqlite3.js. Add the following to the scripts section of package.json:
"test-notes-sqlite3": "rm -f chap11.sqlite3 && sqlite3 chap11.sqlite3 --init ../models/chap07.sql </dev/null && NOTES_MODEL=sqlite3 SQLITE_FILE=chap11.sqlite3 mocha test-model",
This command sequence puts the test database in the chap11.sqlite3 file. It first initializes that database using the sqlite3 command-line tool. Note that we've connected its input to /dev/null because the sqlite3 command will prompt for input otherwise. Then, it runs the test suite passing in environment variables required to run against the SQLite3 model.
Running the test suite does find two errors:
$ npm run test-notes-sqlite3
> notes-test@1.0.0 test-notes-sqlite3 /Users/david/chap11/notes/test
> rm -f chap11.sqlite3 && sqlite3 chap11.sqlite3 --init ../models/chap07.sql </dev/null && NOTES_MODEL=sqlite3 SQLITE_FILE=chap11.sqlite3 mocha test-model
Model Test
check keylist
√ should have three entries
√ should have keys n1 n2 n3
√ should have titles Node #
read note
√ should have proper note
1) Unknown note should fail
change note
√ after a successful model.update (114ms)
destroy note
√ should remove note (103ms)
2) should fail to remove unknown note
6 passing (6s)
2 failing
1) Model Test
read note
Unknown note should fail:
Uncaught TypeError: Cannot read property 'notekey' of undefined
at Statement.db.get (/home/david/nodewebdev/node-web-development-
code-4th-edition/chap11/notes/models/notes-sqlite3.mjs:64:39)
2) Model Test
destroy note
should fail to remove unknown note:
AssertionError: expected 'should not get here' to not equal
'should not get here'
+ expected - actual
The failing test calls model.read("badkey12"), a key which we know does not exist. Writing negative tests paid off. The failing line of code at models/notes-sqlite3.mjs (line 64) reads as follows:
const note = new Note(row.notekey, row.title, row.body);
It's easy enough to insert console.log(util.inspect(row)); just before this and learn that, for the failing call, SQLite3 gave us undefined for row, explaining the error message.
The test suite calls the read function multiple times with a notekey value that does exist. Obviously, when given an invalid notekey value, the query gives an empty results set and SQLite3 invokes the callback with both the undefined error and the undefined row values. This is common behavior for database modules. An empty result set isn't an error, and therefore we received no error and an undefined row.
In fact, we saw this behavior earlier with models/notes-sequelize.mjs. The equivalent code in models/notes-sequelize.mjs does the right thing, and it has a check, which we can adapt. Let's rewrite the read function in models/notes-sqlite.mjs to this:
export async function read(key) {
var db = await connectDB();
var note = await new Promise((resolve, reject) => {
db.get("SELECT * FROM notes WHERE notekey = ?", [ key ], (err, row)
=> {
if (err) return reject(err);
if (!row) { reject(new Error(`No note found for ${key}`)); }
else {
const note = new Note(row.notekey, row.title, row.body);
resolve(note);
}
});
});
return note;
}
This is simple, we just check whether row is undefined and, if so, throw an error. While the database doesn't see an empty results set as an error, Notes does. Furthermore, Notes already knows how to deal with a thrown error in this case. Make this change and that particular test case passes.
There is a second similar error in the destroy logic. The test to destroy a nonexistent note fails to produce an error at this line:
await model.destroy("badkey12");
If we inspect the other models, they're throwing errors for a nonexistent key. In SQL, it obviously is not an error if this SQL (from models/notes-sqlite3.mjs) does not delete anything:
db.run("DELETE FROM notes WHERE notekey = ?;", ... );
Unfortunately, there isn't a SQL option to make this SQL statement fail if it does not delete any records. Therefore, we must add a check to see if a record exists. Namely:
export async function destroy(key) {
const db = await connectDB();
const note = await read(key);
return await new Promise((resolve, reject) => {
db.run("DELETE FROM notes WHERE notekey = ?;", [ key ], err =>
{
if (err) return reject(err);
resolve();
});
});
}
Therefore, we read the note and as a byproduct we verify the note exists. If the note doesn't exist, read will throw an error, and the DELETE operation will not even run.
These are the bugs we referred to in Chapter 7, Data Storage and Retrieval. We simply forgot to check for these conditions in this particular model. Thankfully, our diligent testing caught the problem. At least, that's the story to tell the managers rather than telling them that we forgot to check for something we already knew could happen.
Now that we've fixed models/notes-sqlite3.mjs, let's also test models/notes-sequelize.mjs using the SQLite3 database. To do this, we need a connection object to specify in the SEQUELIZE_CONNECT variable. While we can reuse the existing one, let's create a new one. Create a file named test/sequelize-sqlite.yaml containing this:
dbname: notestest
username:
password:
params:
dialect: sqlite
storage: notestest-sequelize.sqlite3
logging: false
This way, we don't overwrite the production database instance with our test suite. Since the test suite destroys the database it tests, it must be run against a database we are comfortable destroying. The logging parameter turns off the voluminous output Sequelize produces so that we can read the test results report.
Add the following to the scripts section of package.json:
"test-notes-sequelize-sqlite": "NOTES_MODEL=sequelize SEQUELIZE_CONNECT=sequelize-sqlite.yaml mocha test-model"
Then run the test suite:
$ npm run test-notes-sequelize-sqlite .. 8 passing (2s)
We pass with flying colors! We've been able to leverage the same test suite against multiple Notes models. We even found two bugs in one model. But, we have two test configurations remaining to test.
Our test results matrix reads as follows:
The two untested models both require the setup of a database server. We avoided testing these combinations, but our manager won't accept that excuse because the CEO needs to know we've completed the test cycles. Notes must be tested in a similar configuration to the production environment.
In production, we'll be using a regular database server, of course, with MySQL or MongoDB being the primary choices. Therefore, we need a way that incurs a low overhead to run tests against those databases. Testing against the production configuration must be so easy that we should feel no resistance in doing so, to ensure that tests are run often enough to make the desired impact.
Fortunately, we've already had experience of a technology that supports easily creating and destroying the deployment infrastructure. Hello, Docker!
One advantage Docker gives is the ability to install the production environment on our laptop. It's then very easy to push the same Docker setup to the cloud-hosting environment for staging or production deployment.
What we'll do in this section is demonstrate reusing the Docker Compose configuration defined previously for test infrastructure, and to automate executing the Notes test suite inside the containers using a shell script. Generally speaking, it's important to replicate the production environment when running tests. Docker can make this an easy thing to do.
Using Docker, we'll be able to easily test against a database, and have a simple method for starting and stopping a test version of our production environment. Let's get started.
We had a great experience using Docker Compose to orchestrate Notes application deployment. The whole system, with four independent services, is easily described in compose/docker-compose.yml. What we'll do is duplicate the Compose file, then make a couple of small changes required to support test execution.
Let's start by making a new directory, test-compose, as a sibling to the notes, users, and compose directories. Copy compose/docker-compose.yml to the newly created test-compose directory. We'll be making several changes to this file and a couple of small changes to the existing Dockerfiles.
We want to change the container and network names so our test infrastructure doesn't clobber the production infrastructure. We'll constantly delete and recreate the test containers, so as to keep the developers happy, we'll leave development infrastructure alone and perform testing on separate infrastructure. By maintaining separate test containers and networks, our test scripts can do anything they like without disturbing the development or production containers.
Consider this change to the db-auth and db-notes containers:
db-userauth-test:
build: ../authnet
container_name: db-userauth-test
networks:
- authnet-test
environment:
MYSQL_RANDOM_ROOT_PASSWORD: "true"
MYSQL_USER: userauth-test
MYSQL_PASSWORD: userauth-test
MYSQL_DATABASE: userauth-test
volumes:
- db-userauth-test-data:/var/lib/mysql
restart: always .. db-notes-test:
build: ../frontnet
container_name: db-notes-test
networks:
- frontnet-test
environment:
MYSQL_RANDOM_ROOT_PASSWORD: "true"
MYSQL_USER: notes-test
MYSQL_PASSWORD: notes12345
MYSQL_DATABASE: notes-test
volumes:
- db-notes-test-data:/var/lib/mysql
restart: always
This is the same as earlier, but with -test appended to container and network names.
That's the first change we must make, append -test to every container and network name in test-compose/docker-compose.yml. Everything we'll do with tests will run on completely separate containers, hostnames, and networks from those of the development instance.
This change will affect the notes-test and userauth-test services because the database server hostnames are now db-auth-test and db-notest-test. There are several environment variables or configuration files to update.
Another consideration is the environment variables required to configure the services. Previously, we defined all environment variables in the Dockerfiles. It's extremely useful to reuse those Dockerfiles so we know we're testing the same deployment as is used in production. But we need to tweak the configuration settings to match the test infrastructure.
The database configuration shown here is an example. The same Dockerfiles are used, but we also define environment variables in test-compose/docker-compose.yml. As you might expect, this overrides the Dockerfile environment variables with the values set here:
userauth-test:
build: ../users
container_name: userauth-test
depends_on:
- db-userauth-test
networks:
- authnet-test
- frontnet-test
environment:
DEBUG: ""
NODE_ENV: "test"
SEQUELIZE_CONNECT: "sequelize-docker-test-mysql.yaml"
HOST_USERS_TEST: "localhost"
restart: always
volumes:
- ./reports-userauth:/reports .. notes-test:
build: ../notes
container_name: notes-test
depends_on:
- db-notes-test
networks:
- frontnet-test
ports:
- "3000:3000"
restart: always
environment:
NODE_ENV: "test"
SEQUELIZE_CONNECT: "test/sequelize-mysql.yaml"
USER_SERVICE_URL: "http://userauth-test:3333"
volumes:
- ./reports-notes:/reports
...
networks:
frontnet-test:
driver: bridge
authnet-test:
driver: bridge
volumes:
db-userauth-test-data:
db-notes-test-data:
Again, we changed the container and network names to append -test. We moved some of the environment variables from Dockerfile to test-compose/docker-compose.yml. Finally, we added some data volumes to mount host directories inside the container.
Another thing to do is to set up directories to store test code. A common practice in Node.js projects is to put test code in the same directory as the application code. Earlier in this chapter, we did so, implementing a small test suite in the notes/test directory. As it stands, notes/Dockerfile does not copy that directory into the container. The test code must exist in the container to execute the tests. Another issue is it's helpful to not deploy test code in production.
What we can do is to ensure that test-compose/docker-compose.yml mounts notes/test into the container:
notes-test:
...
volumes:
- ./reports-notes:/reports
- ../notes/test:/notesapp/test
This gives us the best of both worlds.
We have a couple of configuration files remaining for the Sequelize database connection to set up.
For the userauth-test container, the SEQUELIZE_CONNECT variable now refers to a configuration file that does not exist, thanks to overriding the variable in user/Dockerfile. Let's create that file as test-compose/userauth/sequelize-docker-mysql.yaml, containing the following:
dbname: userauth-test
username: userauth-test
password: userauth-test
params:
host: db-userauth-test
port: 3306
dialect: mysql
The values match the variables passed to the db-userauth-test container. Then we must ensure this configuration file is mounted into the userauth-test container:
userauth-test:
...
volumes:
- ./reports-userauth:/reports
- ./userauth/sequelize-docker-test-mysql.yaml:/userauth/sequelize-
docker-test-mysql.yaml
For notes-test we have a configuration file, test/sequelize-mysql.yaml, to put in the notes/test directory:
dbname: notes-test
username: notes-test
password: notes12345
params:
host: db-notes-test
port: 3306
dialect: mysql
logging: false
Again, this matches the configuration variables in db-notes-test. In test-compose/docker-compose.yml, we mount that file into the container.
Now we're ready to execute some of the tests inside a container. We've used a Docker Compose file to describe the test environment for the Notes application, using the same architecture as in the production environment. The test scripts and configuration has been injected into the containers. The question is, how do we automate test execution?
The technique we'll use is to run a shell script, and use docker exec -it to execute commands to run the test scripts. This is somewhat automated, and with some more work it can be fully automated.
In test-compose, let's make a shell script called run.sh (on Windows, run.ps1):
docker-compose stop
docker-compose build
docker-compose up --force-recreate -d
docker ps
docker network ls
sleep 20
docker exec -it --workdir /notesapp/test -e DEBUG= notes-test npm install
docker exec -it --workdir /notesapp/test -e DEBUG= notes-test npm run test-notes-memory
docker exec -it --workdir /notesapp/test -e DEBUG= notes-test npm run test-notes-fs
docker exec -it --workdir /notesapp/test -e DEBUG= notes-test npm run test-notes-levelup
docker exec -it --workdir /notesapp/test -e DEBUG= notes-test npm run test-notes-sqlite3
docker exec -it --workdir /notesapp/test -e DEBUG= notes-test npm run test-notes-sequelize-sqlite
docker exec -it --workdir /notesapp/test -e DEBUG= notes-test npm run test-notes-sequelize-mysql
docker-compose stop
That makes the first real step to building the containers, followed by bringing them up. The script sleeps for a few seconds to give the containers time to fully instantiate themselves.
The subsequent commands all follow a particular pattern that is important to understand. The commands are executed in the /notesapp/test directory thanks to the --workdir option. Remember that directory is injected into the container by the Docker Compose file.
Using -e DEBUG= we've disabled the DEBUG options. If those options are set, we'd have excess unwanted output in the test results, so using this option ensures that debugging output doesn't occur.
Now that you understand the options, you can see that the subsequent commands are all executed in the test directory using the package.json in that directory. It starts by running npm install, and then running each of the scenarios in the test matrix.
To run the tests, simply type:
$ sh -x run.sh
That's good, we've got most of our test matrix automated and pretty well squared away. There is a glaring hole in the test matrix and plugging that hole will let us see how to set up MongoDB under Docker.
In Chapter 7, Data Storage and Retrieval, we developed MongoDB support for Notes, and since then we've focused on Sequelize. To make up for that slight, let's make sure we at least test our MongoDB support. Testing on MongoDB would simply require defining a container for the MongoDB database and a little bit of configuration.
Visit https://hub.docker.com/_/mongo/ for the official MongoDB container. You'll be able to retrofit this to allow deploying the Notes application running on MongoDB.
Add this to test-compose/docker-compose.yml:
db-notes-mongo-test:
image: mongo:3.6-jessie
container_name: db-notes-mongo-test
networks:
- frontnet-test
volumes:
- ./db-notes-mongo:/data/db
That's all that's required to add a MongoDB container to a Docker Compose file. We've connected it to frontnet so that the notes (notes-test) container can access the service.
Then in notes/test/package.json we add a line to facilitate running tests on MongoDB:
"test-notes-mongodb": "MONGO_URL=mongodb://db-notes-mongo-test/ MONGO_DBNAME=chap11-test NOTES_MODEL=mongodb mocha --no-timeouts test-model"
Simply by adding the MongoDB container to frontnet-test, the database is available at the URL shown here. Hence, it's simple to now run the test suite using the Notes MongoDB model.
The --no-timeouts option was necessary to avoid a spurious error while testing the suite against MongoDB. This option instructs Mocha to not check whether a test case execution takes too long.
The final requirement is to add this line in run.sh (or run.ps1 for Windows):
docker exec -it --workdir /notesapp/test -e DEBUG= notes-test npm run test-notes-mongodb
That, then, ensures MongoDB is tested during every test run.
We can now report to the manager the final test results matrix:
The manager will tell you "good job" and then remember that the Models are only a portion of the Notes application. We've left two areas completely untested:
Let's get on with those testing areas.
It's now time to turn our attention to the user authentication service. We've mentioned tests of this service, saying that we'll get to them later. We had developed some scripts for ad hoc testing, which have been useful all along. But later is now, and it's time to get cracking on some real tests.
There's a question of which tool to use for testing the authentication service. Mocha does a good job of organizing a series of test cases, and we should reuse it here. But the thing we have to test is a REST service. The customer of this service, the Notes application, uses it through the REST API, giving us a perfect rationalization to test at the REST interface. Our ad hoc scripts used the SuperAgent library to simplify making REST API calls. There happens to be a companion library, SuperTest, that is meant for REST API testing. Read its documentation here: https://www.npmjs.com/package/supertest.
We've already made the test-compose/userauth directory. In that directory, create a file named test.js:
'use strict';
const assert = require('chai').assert;
const request = require('supertest')(process.env.URL_USERS_TEST);
const util = require('util');
const url = require('url');
const URL = url.URL;
const authUser = 'them';
const authKey = 'D4ED43C0-8BD6-4FE2-B358-7C0E230D11EF';
describe("Users Test", function() {
... Test code follows
});
This sets up Mocha and the SuperTest client. The URL_USERS_TEST environment variable specifies the base URL of the server to run the test against. You'll almost certainly be using http://localhost:3333 given the configuration we've used earlier in the book. SuperTest initializes itself a little differently to SuperAgent. The SuperTest module exposes a function that we call with the URL_USERS_TEST environment variable, then we use THAT request object throughout the rest of the script to make REST API requests.
This variable was already set in test-compose/docker-compose.yml with the required value. The other thing of importance is a pair of variables to store the authentication user ID and key:
beforeEach(async function() {
await request.post('/create-user')
.send({
username: "me", password: "w0rd", provider: "local",
familyName: "Einarrsdottir", givenName: "Ashildr",
middleName: "",
emails: [], photos: []
})
.set('Content-Type', 'application/json')
.set('Acccept', 'application/json')
.auth(authUser, authKey);
});
afterEach(async function() {
await request.delete('/destroy/me')
.set('Content-Type', 'application/json')
.set('Acccept', 'application/json')
.auth(authUser, authKey);
});
If you remember, the beforeEach function is run immediately before every test case, and afterEach is run afterward. These functions use the REST API to create our test user before running the test, and then afterward to destroy the test user. That way our tests can assume this user will exist:
describe("List user", function() {
it("list created users", async function() {
const res = await request.get('/list')
.set('Content-Type', 'application/json')
.set('Acccept', 'application/json')
.auth(authUser, authKey);
assert.exists(res.body);
assert.isArray(res.body);
assert.lengthOf(res.body, 1);
assert.deepEqual(res.body[0], {
username: "me", id: "me", provider: "local",
familyName: "Einarrsdottir", givenName: "Ashildr",
middleName: "",
emails: [], photos: []
});
});
});
Now, we can turn to testing some API methods, such as the /list operation.
We have already guaranteed that there is an account, in the beforeEach method, so /list should give us an array with one entry.
This follows the general pattern for using Mocha to test a REST API method. First, we use SuperTest's request object to call the API method, and await its result. Once we have the result, we use assert methods to validate it is what is expected:
describe("find user", function() {
it("find created users", async function() {
const res = await request.get('/find/me')
.set('Content-Type', 'application/json')
.set('Acccept', 'application/json')
.auth(authUser, authKey);
assert.exists(res.body);
assert.isObject(res.body);
assert.deepEqual(res.body, {
username: "me", id: "me", provider: "local",
familyName: "Einarrsdottir", givenName: "Ashildr",
middleName: "",
emails: [], photos: []
});
});
it("fail to find non-existent users", async function() {
var res;
try {
res = await request.get('/find/nonExistentUser')
.set('Content-Type', 'application/json')
.set('Acccept', 'application/json')
.auth(authUser, authKey);
} catch(e) {
return; // Test is okay in this case
}
assert.exists(res.body);
assert.isObject(res.body);
assert.deepEqual(res.body, {});
});
});
We are checking the /find operation in two ways:
Add this test case:
describe("delete user", function() {
it("delete nonexistent users", async function() {
var res;
try {
res = await request.delete('/destroy/nonExistentUser')
.set('Content-Type', 'application/json')
.set('Acccept', 'application/json')
.auth(authUser, authKey);
} catch(e) {
return; // Test is okay in this case
}
assert.exists(res);
assert.exists(res.error);
assert.notEqual(res.status, 200);
});
});
Finally, we should check the /destroy operation. We already check this operation in the afterEach method, where we destroy a known user account. We need to also perform the negative test and verify its behavior against an account we know does not exist.
The desired behavior is that either an error is thrown, or the result shows an HTTP status indicating an error. In fact, the current authentication server code gives a 500 status code along with some other information.
In test-compose/docker-compose.yml, we need to inject this script, test.js, into the userauth-test container. We'll add that here:
userauth-test:
...
volumes:
- ./reports-userauth:/reports
- ./userauth/sequelize-docker-test-mysql.yaml:/userauth/sequelize-docker-test-mysql.yaml
- ./userauth/test.js:/userauth/test.js
We have a test script, and have injected that script into the desired container (userauth-test). The next step is to automate running this test. One way is to add this to run.sh (aka run.ps1 on Windows):
docker exec -it -e DEBUG= userauth-test npm install supertest mocha chai
docker exec -it -e DEBUG= userauth-test ./node_modules/.bin/mocha test.js
Now, if you run the run.sh test script you'll see the required packages get installed, and then this test suite execution.
It's cool we have automated test execution, and Mocha makes the test results look nice with all those check marks. What if the management wants a graph of test failure trends over time? Or there could be any number of reasons to report test results as data rather than a user-friendly printout on the console.
Mocha uses what's called a Reporter to report test results. A Mocha Reporter is a module that prints data in whatever format it supports. Information is on the Mocha website: https://mochajs.org/#reporters.
You will find the current list of available reporters like so:
# mocha --reporters
dot - dot matrix
doc - html documentation
spec - hierarchical spec list
json - single json object
progress - progress bar
list - spec-style listing
tap - test-anything-protocol
...
Then you use a specific reporter like so:
# mocha --reporter tap test
1..4
ok 1 Users Test List user list created users
ok 2 Users Test find user find created users
ok 3 Users Test find user fail to find non-existent users
ok 4 Users Test delete user delete nonexistent users
# tests 4
# pass 4
# fail 0
Test Anything Protocol (TAP) is a widely used test results format, increasing the possibility of finding higher level reporting tools. Obviously, the next step would be to save the results into a file somewhere, after mounting a host directory into the container.
A big cost area in testing is manual user interface testing. Therefore, a wide range of tools have been developed to automate running tests at the HTTP level. Selenium is a popular tool implemented in Java, for example. In the Node.js world, we have a few interesting choices. The chai-http plugin to Chai would let us interact at the HTTP level with the Notes application, while staying within the now-familiar Chai environment.
However, for this section, we'll use Puppeteer (https://github.com/GoogleChrome/puppeteer). This tool is a high-level Node.js module to control a headless Chrome or Chromium browser, using the DevTools protocol. That protocol allows tools to instrument, inspect, debug, and profile Chromium or Chrome.
Puppeteer is meant to be a general purpose test automation tool, and has a strong feature set for that purpose. Because it's easy to make web page screenshots with Puppeteer, it can also be used in a screenshot service.
Because Puppeteer is controlling a real web browser, your user interface tests will be very close to live browser testing without having to hire a human to do the work. Because it uses a headless version of Chrome, no visible browser window will show on your screen, and tests can be run in the background, instead. A downside to this attractive story is that Puppeteer only works against Chrome. Meaning that an automated test against Chrome does not test your application against other browsers, such as Opera or Firefox.
Let's first set up the directory and install the packages:
$ mkdir test-compose/notesui
$ cd test-compose/notesui
$ npm init
... answer the questions
$ npm install puppeteer@1.1.x mocha@5.x chai@4.1.x --save
During installation, you'll see that Puppeteer causes the download of Chromium like so:
Downloading Chromium r497674 - 92.5 Mb [====================] 100% 0.0s
The puppeteer module will launch that Chromium instance as needed, managing it as a background process, and communicating with it using the DevTools protocol.
In the script we're about to write, we need a user account that we can use to log in and perform some actions. Fortunately, we already have a script to set up a test account. In users/package.json, add this line to the scripts section:
"setupuser": "PORT=3333 node users-add",
We're about to write this test script, but let's finish the setup, the final bit of which is adding these lines to run.sh:
docker exec -it userauth-test npm run setupuser docker exec -it notesapp-test npm run test-docker-ui
When executed, these two lines ensure that the test user is set up, and it then runs the user interface tests.
While the Notes application displays well in the browser, how do we write test software to distinguish one page from another? The key requirement is for test scripts to inspect the page, determine which page is being displayed, and read the data on the page. That means each HTML element must be easily addressable using a CSS selector.
While developing the Notes application, we forgot to do that, and the Software Quality Engineering (SQE) manager has requested our assistance. At stake is the testing budget, which will be stretched further the more the SQE team can automate their tests.
All that's necessary is to add a few id or class attributes to HTML elements to improve testability. With a few identifiers, and a commitment to maintain those identifiers, the SQE team can write repeatable test scripts to validate the application.
In notes/partials/header.hbs, change these lines:
...
<a id="btnGoHome" class="navbar-brand" href='/'>
...
{{#if user}}
...
<a class="nav-item nav-link btn btn-dark col-auto" id="btnLogout" href="/users/logout">...</a>
<a class="nav-item nav-link btn btn-dark col-auto" id="btnAddNote" href='/notes/add'>...</a>
{{else}}
...
<a class="nav-item nav-link btn btn-dark col-auto" id="btnloginlocal" href="/users/login">..</a>
<a class="nav-item nav-link btn btn-dark col-auto"
id="btnLoginTwitter" href="/users/auth/twitter">...</a>
...
{{/if}}
...
In notes/views/index.hbs, make these changes:
<div id="notesHomePage" class="container-fluid">
<div class="row">
<div id="notetitles" class="col-12 btn-group-vertical" role="group">
{{#each notelist}}
<a id="{{key}}" class="btn btn-lg btn-block btn-outline-dark"
href="/notes/view?key={{ key }}">...</a>
{{/each}}
</div>
</div>
</div>
In notes/views/login.hbs, make these changes:
<div id="notesLoginPage" class="container-fluid">
...
<form id="notesLoginForm" method='POST' action='/users/login'>
...
<button type="submit" id="formLoginBtn" class="btn btn-default">Submit</button>
</form>
...
</div>
In notes/views/notedestroy.hbs, make these changes:
<form id="formDestroyNote" method='POST' action='/notes/destroy/confirm'>
...
<button id="btnConfirmDeleteNote" type="submit" value='DELETE'
class="btn btn-outline-dark">DELETE</button>
...
</form>
In notes/views/noteedit.hbs, make these changes:
<form id="formAddEditNote" method='POST' action='/notes/save'>
...
<button id='btnSave' type="submit" class="btn btn-default">Submit</button>
...
</form>
In notes/views/noteview.hbs, make these changes:
<div id="noteView" class="container-fluid">
...
<p id="showKey">Key: {{ notekey }}</p>
...
<a id="btnDestroyNote" class="btn btn-outline-dark"
href="/notes/destroy?key={{notekey}}" role="button"> ... </a>
<a id="btnEditNote" class="btn btn-outline-dark"
href="/notes/edit?key={{notekey}}" role="button"> ... </a>
<button id="btnComment" type="button" class="btn btn-outline-dark"
data-toggle="modal" data-target="#notes-comment-modal"> ... </button>
...
</div>
What we've done is add id= attributes to selected elements in the templates. We can now easily write CSS selectors to address any element. The engineering team can also start using these selectors in UI code.
In test-compose/notesui, create a file named uitest.js containing the following:
const puppeteer = require('puppeteer');
const assert = require('chai').assert;
const util = require('util');
const { URL } = require('url');
describe('Notes', function() {
this.timeout(10000);
let browser;
let page;
before(async function() {
browser = await puppeteer.launch({ slomo: 500 });
page = await browser.newPage();
await page.goto(process.env.NOTES_HOME_URL);
});
after(async function() {
await page.close();
await browser.close();
});
});
This is the start of a Mocha test suite. In the before function, we set up Puppeteer by launching a Puppeteer instance, starting a new Page object, and telling that Page to go to the Notes application home page. That URL is passed in using the named environment variable.
It's useful to first think about scenarios we might want to verify with the Notes applications:
Here's code for an implementation of the Login scenario:
describe('Login', function() {
before(async function() { ... });
it('should click on login button', async function() {
const btnLogin = await page.waitForSelector('#btnloginlocal');
await btnLogin.click();
});
it('should fill in login form', async function() {
const loginForm = await page.waitForSelector('#notesLoginPage
#notesLoginForm');
await page.type('#notesLoginForm #username', "me");
await page.type('#notesLoginForm #password', "w0rd");
await page.click('#formLoginBtn');
});
it('should return to home page', async function() {
const home = await page.waitForSelector('#notesHomePage');
const btnLogout = await page.waitForSelector('#btnLogout');
const btnAddNote = await page.$('#btnAddNote');
assert.exists(btnAddNote);
});
after(async function() { ... });
});
This test sequence handles the Login Scenario. It shows you a few of the Puppeteer API methods. Documentation of the full API is at https://github.com/GoogleChrome/puppeteer/blob/master/docs/api.md. The Page object encapsulates the equivalent of a browser tab in Chrome/Chromium.
The waitForSelector function does what it says – it waits until an HTML element matching the CSS selector appears, and it will wait over one or more page refreshes. There are several variants of this function to allow waiting for several kinds of things. This function returns a Promise, making it worth our time to use async functions in our test code. The Promise will resolve to an ElementHandle, which is a wrapper around an HTML element, or else throw an exception, which would conveniently make the test fail.
The named element, #btnloginlocal, is in partials/header.hbs, and will show up only when a user is not logged in. Hence, we will have determined that the browser is currently displaying a Notes page, and that it is not logged in.
The click method does what it suggests, and causes a mouse button click on the referenced HTML element. If you want to emulate a tap, such as for a mobile device, there is a tap method for that purpose.
The next stage of the test sequence picks up from that click. The browser should have gone to the Login page, and therefore this CSS selector should become valid: #notesLoginPage #notesLoginForm. What we do next is type text for our test user ID and password into the corresponding form elements, and then click on the Log In button.
The next test stage picks up from there, and the browser should be on the home page as determined by this CSS selector: #notesHomePage. If we were logged in successfully, the page should have Log Out (#btnLogout) and ADD Note buttons (#btnAddNote).
In this case, we've used a different function, $, to check if the ADD Note button exists. Unlike the wait functions, $ simply queries the current page without waiting. If the named CSS Selector is not in the current page, it simply returns null rather than throwing an exception. Therefore, to determine that the element exists, we use assert.exists rather than relying on the thrown exception.
Now that we have one test scenario entered, let's give it a whirl. In one window, start the Notes test infrastructure:
$ cd test-compose
$ docker-compose up --force-rebuild
Then in another window:
$ docker exec -it userauth bash
userauth# PORT=3333 node ./users-add.js
userauth# exit
$ cd test-compare/notesui
$ NOTES_HOME_URL=http://localhost:3000 mocha --no-timeouts uitest.js
Notes
Login
√ should click on login button
√ should fill in login form (72ms)
√ should return to home page (1493ms)
3 passing (3s)
The NOTES_HOME_URL variable is what the script looks for to direct the Chromium browser to use the Notes application. To run the tests, we should use Docker Compose to launch the test infrastructure, and then ensure the test user is installed in the user database.
Add this to uitest.js:
describe('Add Note', function() {
// before(async function() { ... });
it('should see Add Note button', async function() {
const btnAddNote = await page.waitForSelector('#btnAddNote');
await btnAddNote.click();
});
it('should fill in Add Note form', async function() {
const formAddEditNote = await
page.waitForSelector('#formAddEditNote');
await page.type('#notekey', 'key42');
await page.type('#title', 'Hello, world!');
await page.type('#body', 'Lorem ipsum dolor');
await page.click('#btnSave');
});
it('should view note', async function() {
await page.waitForSelector('#noteView');
const shownKey = await page.$eval('#showKey', el =>
el.innerText);
assert.exists(shownKey);
assert.isString(shownKey);
assert.include(shownKey, 'key42');
const shownTitle = await page.$eval('#notetitle', el =>
el.innerText);
assert.exists(shownTitle);
assert.isString(shownTitle);
assert.include(shownTitle, 'Hello, world!');
const shownBody = await page.$eval('#notebody', el =>
el.innerText);
assert.exists(shownBody);
assert.isString(shownBody);
assert.include(shownBody, 'Lorem ipsum dolor');
});
it('should go to home page', async function() {
await page.waitForSelector('#btnGoHome');
await page.goto(process.env.NOTES_HOME_URL);
// await page.click('#btnGoHome');
await page.waitForSelector('#notesHomePage');
const titles = await page.$('#notetitles');
assert.exists(titles);
const key42 = await page.$('#key42');
assert.exists(key42);
const btnLogout = await page.$('#btnLogout');
assert.exists(btnLogout);
const btnAddNote = await page.$('#btnAddNote');
assert.exists(btnAddNote);
});
// after(async function() { ... });
});
This is a more involved scenario, in which we:
Most of this is using the same Puppeteer functions as before, but with a couple of additions.
The $eval function looks for the element matching the CSS selector, and invokes the callback function on that element. If no element is found an error is thrown instead. As used here, we are retrieving the text from certain elements on the screen, and validating that it matches what the test entered as the note. That's an end-to-end test of adding and retrieving notes.
The next difference is using goto instead of clicking on #btnGoHome.
As you add test scenarios to the test script, you'll find it easy for Puppeteer to have a spurious timeout, or for the login process to mysteriously not work, or other spurious errors.
Rather than go over the remaining scenarios, we'll spend the next section discussing how to mitigate such issues. But first we need to prove the scenario does work even if we have to run the test 10 times to get this result:
$ NOTES_HOME_URL=http://localhost:3000 ./node_modules/.bin/mocha --no-timeouts uitest3.js
Notes
Login
√ should click on login button (50ms)
√ should fill in login form (160ms)
√ should return to home page (281ms)
Add Note
√ should see Add Note button
√ should fill in Add Note form (1843ms)
√ should view note
√ should go to home page (871ms)
7 passing (5s)
The goal is to fully automate the test run, in order to avoid having to hire a human to babysit the test execution and spend time rerunning tests because of spurious errors. To do so, the tests need to be repeatable without any spurious errors. Puppeteer is a complex system – there is a Node.js module communicating with a Chromium instance running Headless in the background – and it seems easy for timing issues to cause a spurious error.
Both Mocha and Puppeteer allow you to set timeout values, and a long timeout value can avoid triggering an error, if some action simply requires a long time to run. At the top of the test suite, we used this Mocha function:
this.timeout(10000);
That gives 10 seconds for every test case. If you want to use a longer timeout, increase that number.
The puppeteer.launch function can take a timeout value in its options object. By default, Puppeteer uses a 30-second timeout on most operations, and they all take an options object with a setting to change that timeout period. In this case, we've added the slowMo option to slow down operations on the browser.
Another useful tactic is to generate a trace of what happened so you can puzzle away. Inserting console.log statements is tedious and makes your code look a little ugly. Puppeteer offers a couple of methods to trace the actions and to dynamically turn off tracing.
In uitest.js, add this code:
function frameEvent(evtname, frame) {
console.log(`${evtname} ${frame.url()} ${frame.title()}`);
}
function ignoreURL(url) {
if (url.match(/\/assets\//) === null
&& url.match(/\/socket.io\//) === null
&& url.match(/fonts.gstatic.com/) === null
&& url.match(/fonts.googleapis.com/) === null) {
return false;
} else {
return true;
}
}
...
before(async function() {
browser = await puppeteer.launch({ slomo: 500 });
page = await browser.newPage();
page.on('console', msg => {
console.log(`${msg.type()} ${msg.text()} ${msg.args().join(' ')}`);
});
page.on('error', err => {
console.error(`page ERROR ${err.stack}`);
});
page.on('pageerror', err => {
console.error(`page PAGEERROR ${err.stack}`);
});
page.on('request', req => {
if (ignoreURL(req.url())) return;
console.log(`page request ${req.method()} ${req.url()}`);
});
page.on('response', async (res) => {
if (ignoreURL(res.url())) return;
console.log(`page response ${res.status()} ${res.url()}`);
});
page.on('frameattached', async (frame) => frameEvent('frameattached', await frame));
page.on('framedetached', async (frame) => frameEvent('framedetached', await frame));
page.on('framenavigated', async (frame) => frameEvent('framenavigated', await frame));
await page.goto(process.env.NOTES_HOME_URL);
});
...
That is, the Page object offers several event listeners in which we can output details about various events, including HTTP requests and responses. We can even print out the HTML text of the response. The ignoreURL function lets us suppress a few select URLs so we're not inundated with unimportant requests and responses.
You can trace Puppeteer itself using its DEBUG environment variable. See the README for more information: https://github.com/GoogleChrome/puppeteer.
It can be useful to insert a long pause at certain points to give the browser time to do something. Try this function:
function waitFor(timeToWait) {
return new Promise(resolve => {
setTimeout(() => { resolve(true); }, timeToWait);
});
};
This is how we implement the equivalent of a sleep function using Promises. Using setTimeOut this way, along with a timeout value, simply causes a delay for the given number of milliseconds.
To use this function, simply insert this into the test scenarios:
await waitFor(3000);
A variant on this is to wait for things to fully render in the browser. For example, you might have seen a pause before the Home icon in the upper-left corner fully renders. That pause can cause spurious errors, and this function can wait until that button fully renders itself:
async function waitForBtnGoHome() {
return page.waitForSelector('#btnGoHome');
}
To use it:
await waitForBtnGoHome();
If you don't want to maintain this extra function, it's easy enough to add the waitForSelector call into your test cases instead.
An error, Cannot find context with specified id undefined, can be thrown by Puppeteer. According to an issue in the Puppeteer issue queue, this can arise from unplanned interactions between Puppeteer and WebSockets: https://github.com/GoogleChrome/puppeteer/issues/1325 This issue in turn affects the Socket.IO support in the Notes application, and therefore it may be useful to disable Socket.IO support during test runs.
It's fairly simple to allow disabling of Socket.IO. In app.mjs, add this exported function:
export function enableSocketio() {
var ret = true;
const env = process.env.NOTES_DISABLE_SOCKETIO;
if (!env || env !== 'true') {
ret = true;
}
return ret;
}
This looks for an environment variable to cause the function to return true or false.
In routes/index.mjs and routes/notes.mjs, add this line:
import { enableSocketio, sessionCookieName } from '../app';
We do this to import the preceding function. It also demonstrates some of the flexibility we get from ES6 Modules, because we can import just the required functions.
In routes/index.mjs and routes/notes.mjs, for every router function that calls res.render to send results, use the enableSocketio function as so:
res.render('view-name', {
...
enableSocketio: enableSocketio()
});
Hence, we've imported the function and for every view we pass enableSocketio as data to the view template.
In views/index.hbs and views/noteview.hbs, we have a section of JavaScript code to implement SocketIO-based semi-real-time features. Surround each such section like so:
{{#if enableSocketio}}
... JavaScript code for SocketIO support
{{/if}}
By eliminating the client-side SocketIO code, we ensure the user interface does not open a connection to the SocketIO service. The point of this exercise was to avoid using WebSockets to avoid issues with Puppeteer.
Similarly, in views/noteview.hbs support disabling the Comment button like so:
{{#if enableSocketio}}
<button id="btnComment" type="button" class="btn btn-outline-dark"
data-toggle="modal" data-target="#notes-comment-modal">Comment</button>
{{/if}}
The final step would be to set the environment variable, NOTES_DISABLE_SOCKETIO, in the Docker Compose file.
One of Puppeteer's core features is to take screenshots, either as PNG or PDF files. In our test scripts, we can take screenshots to track what was on the screen at any given time during the test. For example, if the Login scenario spuriously fails to log in, we can see that in the screenshots:
await page.screenshot({
type: 'png',
path: `./screen/login-01-start.png`
});
Simply add code snippets like this throughout your test script. The filename shown here follows a convention where the first segment names the test scenario, the number is a sequence number within the test scenario, and the last describes the step within the test scenario.
Taking screenshots also provides another stage of validation. You may want to do visual validation of your application as well. The pixelmatch module can compare two PNG files, and therefore a set of so-called Golden Images can be maintained for comparison during test runs.
For an example of using Puppeteer this way, see: https://meowni.ca/posts/2017-puppeteer-tests/.
We've covered a lot of territory in this chapter, looking at three distinct areas of testing: unit testing, REST API testing, and UI functional tests. Ensuring that an application is well tested is an important step on the road to software success. A team that does not follow good testing practices is often bogged down with fixing regression after regression.
We've talked about the potential simplicity of simply using the assert module for testing. While the test frameworks, such as Mocha, provide great features, we can go a long way with a simple script.
There is a place for test frameworks, such as Mocha, if only to regularize our test cases, and to produce test results reports. We used Mocha and Chai for this, and these tools were quite successful. We even found a couple of bugs with a small test suite.
When starting down the unit testing road, one design consideration is mocking out dependencies. But it's not always a good use of our time to replace every dependency with a mock version.
To ease the administrative burden of running tests, we used Docker to automate setting up and tearing down the test infrastructure. Just as Docker was useful in automating deployment of the Notes application, it's also useful in automating test infrastructure deployment.
Finally, we were able to test the Notes web user interface in a real web browser. We can't trust that unit testing will find every bug; some bugs will only show up in the web browser. Even so, we've only touched the beginning of what could be tested in Notes.
In this book, we've covered the gamut of Node.js development, giving you a strong foundation from which to start developing Node.js applications.
In the next chapter, we'll explore RESTful web services.
Over the last few years, we have started taking for granted that data sources feeding for content, mobile device service feeds, or cloud computing are all driven by modern technologies, such as RESTful web services. Everybody has been talking about how their stateless model allows applications to scale easily and how it emphasizes on clear decoupling between data provisioning and data consumption. Nowadays, architects have started introducing the concept of microservices, aiming to reduce the complexity in systems by splitting their core components into small independent pieces that simply do a single task. So, enterprise-grade software is about to become a composite of such microservices. This makes it easy to maintain, and allows better life cycle management when new parts need to be introduced. Unsurprisingly, most of the microservices are serviced by RESTful frameworks. This fact may leave the impression that REST was invented sometime in the last decade, but that is far from the truth. In fact, REST has been around since the last decade of the previous century!
This chapter will walk you through the foundation of Representational State Transfer (REST) and will explain how REST couples with the HTTP protocol. You will look into five key principles that have to be considered while turning any HTTP application into a RESTful service-enabled application. You will also look at the differences between describing RESTful and classic Simple Object Access Protocol (SOAP)-based web services. Finally, you will learn how to utilize already-existing infrastructure for your benefit.
In this chapter, we will cover the following topics:
It actually happened back in 1999, when a request for comments was submitted to the Internet Engineering Task Force (IETF; http://www.ietf.org/) via RFC 2616: Hypertext Transfer Protocol-HTTP/1.1. One of its authors, Roy Fielding, later defined a set of principles built around the HTTP and URI standards. This gave birth to REST as we know it today.
Let's look at the key principles around the HTTP and URI standards, sticking to which will make your HTTP application a RESTful service-enabled application:
To understand this principle, one must conceive of the idea of representing data by a specific format and not by a physical file containing a bunch of bytes. Each piece of data available on the internet has a format that describes it, known as the content type; for example, JPEG images, MPEG videos, HTML, XML, text documents, and binary data are all resources with the following content types: image/jpeg, video/mpeg, text/html, text/xml, and application/octet-stream.
Since the internet contains so many different resources, they all should be accessible via URIs and should be identified uniquely. Furthermore, the URIs can be in a human-readable format, despite the fact that their consumers are more likely to be software programs rather than ordinary humans.
Human-readable URIs keep data self-descriptive and ease further development against it. This helps you to keep the risk of logical errors in your programs to a minimum.
Here are a few sample examples of such URIs representing different resources in a catalog application:
These human-readable URIs expose different types of resources in a straightforward manner. In the preceding example URIs, it is quite clear the data is items in a catalog, which are categorized watches. The first link shows all the items in the category. The second shows only the ones that are part of the 2018 collection. Next is a link pointing to the image of the item, followed by a link to a sample video. The last link points to a resource containing items from the previous collection in a ZIP archive. The media types served per each URI are rather easy to identify, with the assumption that the data format of an item is either JSON or XML, so we can easily map the media type of a self-described URL to one of the following:
The native HTTP protocol (RFC 2616) defines eight actions, also known as HTTP verbs:
The first four of them just feel natural in the context of resources, especially when defining actions for data manipulation. Let's make a parallel with relative SQL databases where the native language for data manipulation is CRUD (short for Create, Read, Update, and Delete), originating from the different types of SQL statements, INSERT, SELECT, UPDATE, and DELETE, respectively. In the same manner, if you apply the REST principles correctly, the HTTP verbs should be used as shown here:
| HTTP verb | Action | HTTP response status code |
| GET | Retrieves an existing resource. | 200 OK if the resource exists, 404 Not Found if it does not exist, and 500 Internal Server Error for other errors. |
| PUT | Updates a resource. If the resource does not exist, the server can either decide to create it with the provided identifer or return the appropriate status code. |
200 OK if successfully updated, 201 Created if a new resource is created, 404 Not found if the resource to be updated does not exist, and 500 Internal Server Error for other unexpected errors. |
| POST | Creates a resource with an identifier generated at server side or updates a resource with an existing identifier provided from the client. If this verb is to be used only for creating but not for updating, return the appropriate status code. | 201 CREATED if a new resource is created, 200 OK if the resource has been updated successfully, 409 Conflict if the resource already exists and update is not allowed, 404 Not Found if the resource to be updated does not exist, and 500 Internal Server Error for other errors. |
| DELETE | Deletes a resource. | 200 OK or 204 No Content if the resource has been deleted successfully, 404 Not Found if the resource to be deleted does not exist, and 500 Internal Server Error for other errors. |
Note that a resource might be created by either the POST or PUT HTTP verbs, based on the policy of an application. However, if a resource has to be created under a specific URI with an identifier provided by the client, then PUT is the appropriate action:
PUT /categories/watches/model-abc HTTP/1.1 Content-Type: text/xml Host: www.mycatalog.com <?xml version="1.0" encoding="utf-8"?> <Item category="watch">
<Brand>...</Brand>
</Price></Price> </Item>
HTTP/1.1 201 Created
Content-Type: text/xml
Location: http://www.mycatalog.com/categories/watches/model-abc
However, in your application, you may want to leave it up to the backend RESTful service to decide where to expose the newly created resource, and thus create it under an appropriate but still unknown or non-existent location.
For instance, in our example, we might want the server to define the identifier of newly created items. In such cases, just use the POST verb to a URL without providing an identifier parameter. Then it is up to the service itself to provide a new unique and valid identifier for the new resource and to expose back this URL via the Location header of the response:
POST /categories/watches HTTP/1.1 Content-Type: text/xml Host: www.mycatalog.com <?xml version="1.0" encoding="utf-8"?> <Item category="watch">
<Brand>...</Brand>
</Price></Price> </Item>
HTTP/1.1 201 Created
Content-Type: text/xml
Location: http://www.mycatalog.com/categories/watches/model-abc
A key feature of a resource is that it may be represented in a different format from the one in which it is stored. Thus, it can be requested or created in different representations. As long as the specified format is supported, the REST-enabled endpoint should use it. In the preceding example, we posted an XML representation of a watch item, but if the server had supported the JSON format, the following request would have been valid as well:
POST /categories/watches HTTP/1.1
Content-Type: application/json
Host: www.mycatalog.com
{
"watch": {
"id": ""watch-abc"",
"brand": "...",
"price": {
"-currency": "EUR",
"#text": "100"
}
}
}
HTTP/1.1 201 Created
Content-Type: application/json
Location: http://mycatalog.com/categories/watches/watch-abc
Resource manipulation operations through HTTP requests should always be considered atomic. All modifications of a resource should be carried out within an HTTP request in an isolated manner. After the request execution, the resource is left in a final state; this implicitly means that partial resource updates are not supported. You should always send the complete state of the resource.
Back to our catalog example, updating the price field of a given item would mean making a PUT request with a complete document (JSON or XML) that contains the entire data, including the updated price field. Posting only the updated price is not stateless, as it implies that the application is aware that the resource has a price field, that is, it knows its state.
Another requirement for your RESTful application to be stateless is that once the service gets deployed on a production environment, it is likely that incoming requests are served by a load balancer, ensuring scalability and high availability. Once exposed via a load balancer, the idea of keeping your application state at server side gets compromised. This doesn't mean that you are not allowed to keep the state of your application. It just means that you should keep it in a RESTful way. For example, keep a part of the state within the URI, or use HTTP headers to provide additional state-related data
The statelessness of your RESTful API isolates the caller against changes at the server side. Thus, the caller is not expected to communicate with the same server in consecutive requests. This allows easy application of changes within the server infrastructure, such as adding or removing nodes.
Now that you know that REST is around 18 years old, a sensible question would be, "Why has it become so popular just quite recently?" Well, we the developers usually reject simple, straightforward approaches and, most of the time, prefer spending more time on turning already-complex solutions into even more complex and sophisticated ones.
Take classical SOAP web services, for example. Their various WS-* specifications are so many, and sometimes so loosely defined, that in order to make different solutions from different vendors interoperable, a separate specification, WS-Basic Profile, has been introduced. It defines extra interoperability rules in order to ensure that all WS-* specifications in SOAP-based web services can work together.
When it comes to transporting binary data with classical web services over HTTP, things get even more complex, as SOAP-based web services provide different ways of transporting binary data. Each way is defined in other sets of specifications, such as SOAP with Attachment References (SwaRef) and Message Transmission Optimization Mechanism (MTOM). All this complexity was caused mainly because the initial idea of the web service was to execute business logic remotely, not to transport large amounts of data.
The real world has shown us that, when it comes to data transfer, things should not be that complex. This is where REST fits into the big picture—by introducing the concept of resources and a standard means for manipulating them.
Now that we've covered the main REST principles, it is time to dive deeper into what can be achieved when they are followed:
A resource is just a set of information, and as defined by principle 4, it can have multiple representations; however, its state is atomic. It is up to the caller to specify the desired media type with the Accept header in the HTTP request, and then it is up to the server application to handle the representation accordingly, returning the appropriate content type of the resource together with a relevant HTTP status code:
Let's assume that, at server side, we have items resources stored in an XML format. We can have an API that allows a consumer to request the item resources in various formats, such as application/xml, application/json, application/zip, application/octet-stream, and so on.
It would be up to the API itself to load the requested resource, transform it into the requested type (for example, JSON or XML), and either use ZIP to compress it or directly flush it to the HTTP response output.
The caller would make use of the Accept HTTP header to specify the media type of the response they expect. So, if we want to request our item data inserted in the previous section in XML format, the following request should be executed:
GET /category/watches/watch-abc HTTP/1.1 Host: my-computer-hostname Accept: text/xml HTTP/1.1 200 OK Content-Type: text/xml <?xml version="1.0" encoding="utf-8"?> <Item category="watch">
<Brand>...</Brand>
</Price></Price> </Item>
To request the same item in JSON format, the Accept header needs to be set to application/json:
GET /categoery/watches/watch-abc HTTP/1.1
Host: my-computer-hostname
Accept: application/json
HTTP/1.1 200 OK
Content-Type: application/json
{
"watch": {
"id": ""watch-abc"",
"brand": "...",
"price": {
"-currency": "EUR",
"#text": "100"
}
}
}
REST is designed to be visible and simple. Visibility of the service means that every aspect of it should self-descriptive and follow the natural HTTP language according to principles 3, 4, and 5.
Visibility in the context of the outer world would mean that monitoring applications would be interested only in the HTTP communication between the REST service and the caller. Since the requests and responses are stateless and atomic, nothing more is needed to flow the behavior of the application and to understand whether anything has gone wrong.
Before talking about reliability, we need to define which HTTP methods are safe and which are idempotent in the REST context. So, let's first define what safe and idempotent methods are:
The following table lists which HTTP methods are safe and which are idempotent:
| HTTP method | Safe | Idempotent |
| GET | Yes | Yes |
| POST | No | No |
| PUT | No | Yes |
| DELETE | No | Yes |
Consumers should consider operation's safety and the idempotence features in order to be served reliably.
So far, we stressed the importance of having stateless behavior for a RESTful web application. The World Wide Web (WWW) is an enormous universe, containing huge amount of data and a lot of users, eager to get that data. The evolution of the WWW has brought the requirement that applications should scale easily as their load increases. Scaling applications that have a state is difficult to achieve, especially when zero or close-to-zero operational downtime is expected.
That's why staying stateless is crucial for any application that needs to scale. In the best-case scenario, scaling your application would require you to put another piece of hardware for a load balancer, or bring another instance in your cloud environment. There would be no need for the different nodes to sync between each other, as they should not care about the state at all. Scalability is all about serving all your clients in an acceptable amount of time. Its main idea is to keep your application running and to prevent Denial of Service (DoS) caused by a huge amount of incoming requests.
Scalability should not be confused with the performance of an application. Performance is measured by the time needed for a single request to be processed, not by the total number of requests that the application can handle. The asynchronous non-blocking architecture and event-driven design of Node.js make it a logical choice for implementing an application that scales and performs well.
If you are familiar with SOAP web services, you may have heard of the Web Service Definition Language (WSDL). It is an XML description of the interface of the service and defines an endpoint URL for invocation. It is mandatory for a SOAP web service to be described by such a WSDL definition.
Similar to SOAP web services, RESTful services can also make use of a description language, called WADL. WADL stands for Web Application Definition Language. Unlike WSDL for SOAP web services, a WADL description of a RESTful service is optional, that is, consuming the service has nothing to do with its description.
Here is a sample part of a WADL file that describes the GET operation of our catalog service:
<?xml version="1.0" encoding="UTF-8"?>
<application xmlns="http://wadl.dev.java.net/2009/02" xmlns:service="http://localhost:8080/catalog/" xmlns:xsd="http://www.w3.org/2001/XMLSchema">
<grammer>
<include href="items.xsd" />
<include href="error.xsd" />
</grammer>
<resources base="http://localhost:8080/catalog/categories">
<resource path="{category}">
<method name="GET">
<request>
<param name="category" type="xsd:string" style="template" />
</request>
<response status="200">
<representation mediaType="application/xml" element="service:item" />
<representation mediaType="application/json" />
</response>
<response status="404">
<representation mediaType="application/xml" element="service:item" />
</response>
</method>
</resource>
</resources>
</application>This extract of a WADL file shows how application, exposing resources is described. Briefly, each resource must be part of an application. The resource provides a, where it is located with the base attribute, and describes each of its supported HTTP methods in a method. Additionally, an optional doc element can be used at resource and application to provide additional documentation about the service and its operations.
Though WADL is optional, it significantly reduces the efforts of discovering RESTful services.
Public APIs exposed on the web should be well documented, otherwise it would be difficult for developers to use them in their applications. While WADL definitions might be considered a source of documentation, they address a different problem—the discovery of the service. They serve metadata for the services to machines, not to humans. The Swagger project (https://swagger.io/) addresses the need for neat documentation of RESTful APIs. It defines a meta description of an API from an almost human-readable JSON format. The following is a sample swagger.json file, partially describing the catalog service:
{
"swagger": "2.0",
"info": {
"title": "Catalog API Documentation",
"version": "v1"
},
"paths": {
"/categories/{id}" : {
"get": {
"operationId": "getCategoryV1",
"summary": "Get a specific category ",
"produces": [
"application/json"
],
"responses": {
"200": {
"description": "200 OK",
"examples":
{"application/json": {
"id": 1,
"name": "Watches",
"itemsCount": 550
}
}
},
"404": {"description" : "404 Not Found"},
"500": {"description": "500 Internal Server Error"}
}
}
}
},
"consumes": ["application/json"]
}
The swagger.json file is really straightforward: it defines a name and version of your API and gives a brief description of each operation it exposes, nicely coupled with a sample payload. But the real benefit from it comes in another subproject of Swagger, called swagger-ui (https://swagger.io/swagger-ui/), which actually renders this data from swagger.json nicely into an interactive web page that only provides documentation, but also allows interaction with the service:
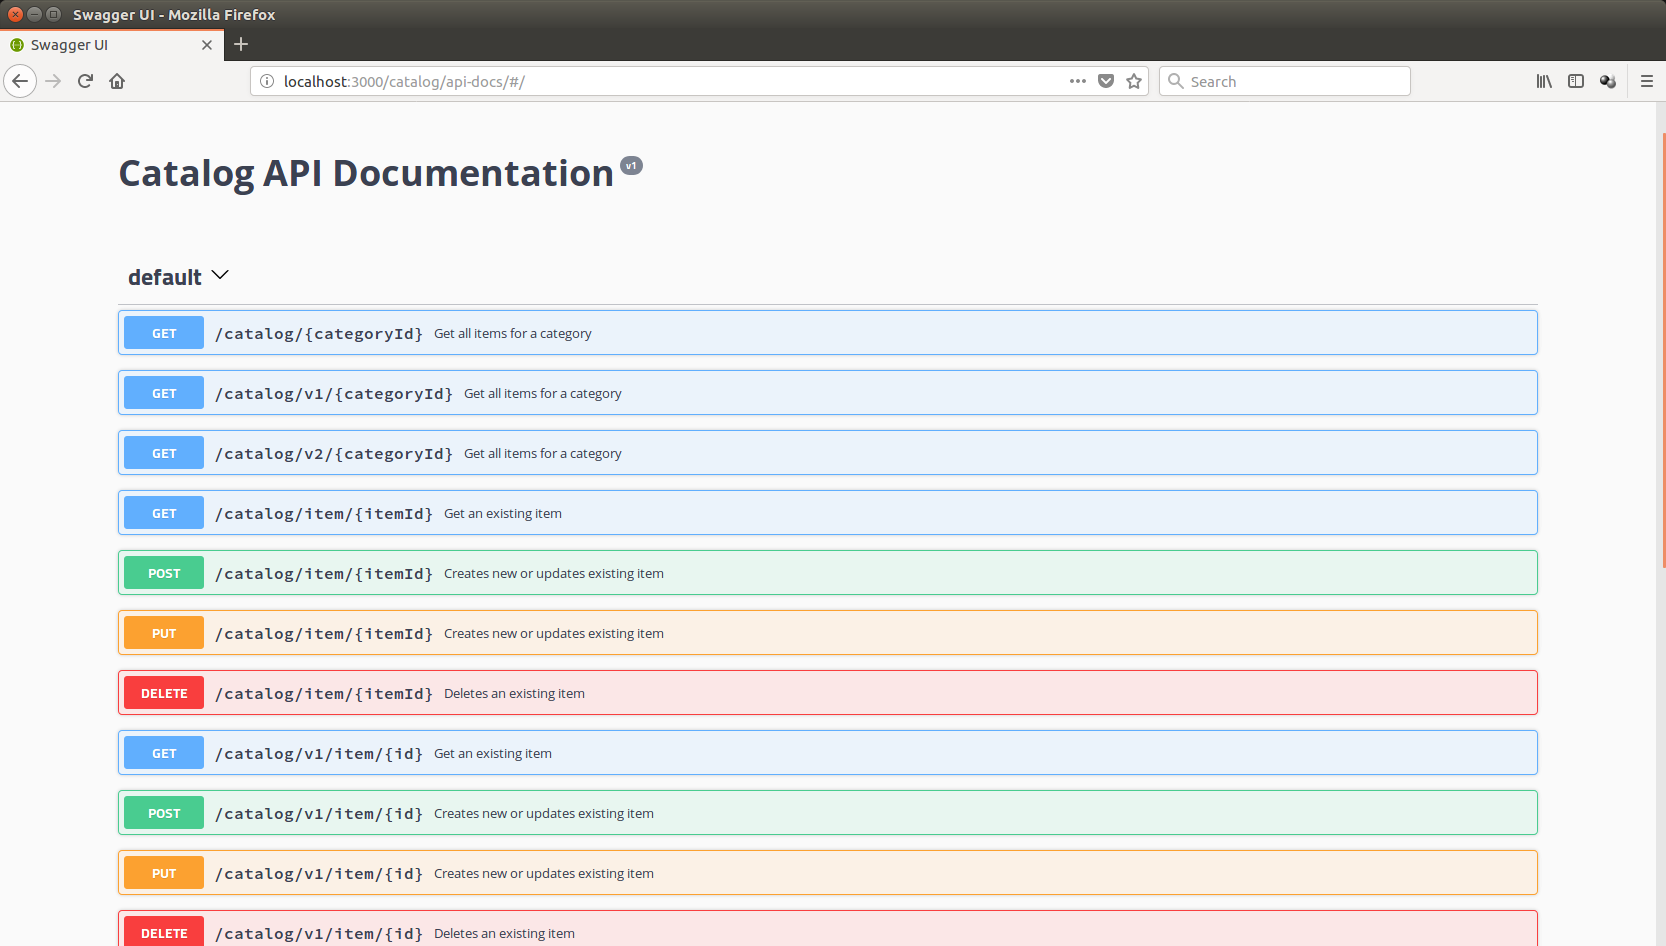
We will have a look at and utilize the swagger-ui Node.js module to provide the API that we will develop later in the book, with up-to-date documentation.
The best part of developing and distributing RESTful applications is that the infrastructure needed is already out there, available to you. As RESTful applications use the existing web space heavily, you need to do nothing more than follow the REST principles when developing. In addition, there are plenty of libraries available out there for any platform, and I do mean any platform. This eases the development of RESTful applications, so you just need to choose your preferred platform and start developing.
In this chapter, you learned about foundation of a REST, looking at five key principles that transform a web application into a REST-enabled application. We made a brief comparison between RESTful services and classical SOAP web services, and finally took a look at how RESTful services are documented and how we can simplify the discovery of the services we develop.
Now that you know the basics, we are ready to dive into the Node.js way of implementing RESTful services. In the next chapter, you will learn about the essentials of Node.js and the accompanying tools that it is necessary to use and understand in order to build a real-life fully-fledged web service.
Our first draft API will be a read-only version and will not support creating or updating items in the catalog as real-world applications do. Instead, we will concentrate on the API definition itself, and will worry about data storage later on. Of course, using file storage for data exposed to millions of users is anything but an option, so a database layer will be provided to our application further in the book, after we have looked into modern NoSQL database solutions.
We will also cover the topic of content negotiation, a mechanism that allows consumers to specify the expected format of requested data. Finally, we will take a look at several ways to expose different versions of a service, in case it evolves in a backward-incompatible way.
To sum up, in this chapter, you will learn the following:
After this chapter, you should be able to completely specify a RESTful API and will be almost ready to start implementing real-life Node.js RESTful services.
The very first thing a project usually starts with is a definition of the operations the API will expose. According to the REST principles, an operation is exposed by an HTTP method and a URI. The action performed by each operation should not contradict the natural meaning of its HTTP method. The following table specifies the operations of our API in detail:
| Method | URI | Description |
| GET | /category | Retrieves all available categories in the catalog. |
| GET | /category/{category-id}/ | Retrieves all the items available under a specific category. |
| GET | /category/{category-id}/{item-id} | Retrieves an item by its ID under a specific category. |
| POST | /category |
Creates a new category; if it exists, it will update it. |
| POST | /category/{category-id}/ |
Creates a new item in a specified category. If the item exists, it will update it. |
| PUT | /category/{category-id} | Updates a category. |
| PUT | /category/{category-id}/{item-id} | Updates an item in a specified category. |
| DELETE | /category/{category-id} | Deletes an existing category. |
| DELETE | /category/{category-id}/{item-id} | Deletes an item in a specified category. |
The second step is to choose an appropriate format for our catalog application's data. JSON objects are natively supported by JavaScript. They are easy to extend during the evolution of an application and are consumable by almost any platform available. Thus, the JSON format seems to be our logical choice for us. Here is the JSON representation of an item, and category objects that will be used throughout this book:
{
"itemId": "item-identifier-1",
"itemName": "Sports Watch",
"category": "Watches",
"categoryId": 1,
"price": 150,
"currency": "EUR"
}
{
"categoryName" : "Watches",
"categoryId" : "1",
"itemsCount" : 100,
"items" : [{
"itemId" : "item-identifier-1",
"itemName":"Sports Watch",
"price": 150,
"currency" : "EUR"
}]
}
So far, our API has defined a set of operations and the data format to be used. The next step is to implement a module that will export functions serving each of the operations in the route.
To begin with, let's create a new Node.js Express project. Select a directory where your projects will be stored and from your shell Terminal, execute express chapter3. If you are using Windows, you will need to install the express-generator module before generating the project. The express-generator will create your an initial express project layout in the selected directory. This layout provides the default project structure for you, ensuring that your Express project follows the standard project structure. It makes your project easier to navigate.
The next step is to import the project into the Atom IDE. Right-click anywhere in the Projects tab and select Add project folder then select the directory Express generated for you.
As you can see, Express has done some background work for us and has created a starting point for our application: app.js. It has also created the package.json file for us. Let's take a look at each of these files, starting with package.json:
{
"name": "chapter3",
"version": "1.0.0",
"description": "",
"main": "app.js",
"scripts": {
"test": "test"
},
"author": "",
"license": "ISC",
"dependencies": {
"dependencies": {
"body-parser": "~1.13.2",
"cookie-parser": "~1.3.5",
"debug": "~2.2.0",
"express": "~4.16.1",
"jade": "~1.11.0",
"morgan": "~1.6.1",
"serve-favicon": "~2.3.0"
}
}
As we created a blank Node.js Express project, we initially have dependencies only to the Express framework, some middleware modules such as morgan, body-parser, and cookie-parser, and the Jade template language. Jade is a straightforward template language used to produce HTML code inside templates. If you are interested in it, you can find out more about it at http://www.jade-lang.com.
The current version of the Express framework at the time of writing is 4.16.1; to update it, execute npm install express@4.16.1 --save from the chapter3 directory. This command will update the dependency of the application to the desired version. The --save option will update and save the new version of the dependency in the project's package.json file.
We will come to what middleware modules are a bit later in the chapter.
For now, we will ignore the content of the public and view directories as it is not relevant to our RESTful service. They contain the auto-generated stylesheets and template files that might be helpful, if we decide to develop a web-based consumer of the services at a later stage.
We've already mentioned that the Express project created a starting point for our web application in app.js. Let's take a deeper look at it:
var express = require('express');
var path = require('path');
var favicon = require('serve-favicon');
var logger = require('morgan');
var cookieParser = require('cookie-parser');
var bodyParser = require('body-parser');
var routes = require('./routes/index');
var users = require('./routes/users');
var app = express();
// view engine setup
app.set('views', path.join(__dirname, 'views'));
app.set('view engine', 'jade');
// uncomment after placing your favicon in /public
//app.use(favicon(path.join(__dirname, 'public', 'favicon.ico')));
app.use(logger('dev'));
app.use(bodyParser.json());
app.use(bodyParser.urlencoded({ extended: false }));
app.use(cookieParser());
app.use(express.static(path.join(__dirname, 'public')));
app.use('/', routes);
app.use('/users', users);
// catch 404 and forward to error handler
app.use(function(req, res, next) {
var err = new Error('Not Found');
err.status = 404;
next(err);
});
// error handlers
// development error handler
// will print stacktrace
if (app.get('env') === 'development') {
app.use(function(err, req, res, next) {
res.status(err.status || 500);
res.render('error', {
message: err.message,
error: err
});
});
}
// production error handler
// no stacktraces leaked to user
app.use(function(err, req, res, next) {
res.status(err.status || 500);
res.render('error', {
message: err.message,
error: {}
});
});
module.exports = app;
Obviously, the Express generator has done a lot for us as it has instantiated the Express framework and has assigned a complete development environment around it. It has done the following:
You will have to install all the modules used in app.js in order to start the generated application successfully. Also, make sure you update the dependencies of your package.json file using the --save option after installing them.
The Express generator also created a starting script for the application. It is under the bin/www directory of your project and looks like the following snippet:
#!/usr/bin/env node
/**
* Module dependencies.
*/
var app = require('../app');
var debug = require('debug')('chapter3:server');
var http = require('http');
/**
* Get port from environment and store in Express.
*/
var port = normalizePort(process.env.PORT || '3000');
app.set('port', port);
/**
* Create HTTP server.
*/
var server = http.createServer(app);
/**
* Listen on provided port, on all network interfaces.
*/
server.listen(port);
server.on('error', onError);
server.on('listening', onListening);
/**
* Normalize a port into a number, string, or false.
*/
function normalizePort(val) {
var port = parseInt(val, 10);
if (isNaN(port)) {
// named pipe
return val;
}
if (port >= 0) {
// port number
return port;
}
return false;
}
/**
* Event listener for HTTP server "error" event.
*/
function onError(error) {
if (error.syscall !== 'listen') {
throw error;
}
var bind = typeof port === 'string'
? 'Pipe ' + port
: 'Port ' + port;
// handle specific listen errors with friendly messages
switch (error.code) {
case 'EACCES':
console.error(bind + ' requires elevated privileges');
process.exit(1);
break;
case 'EADDRINUSE':
console.error(bind + ' is already in use');
process.exit(1);
break;
default:
throw error;
}
}
/**
* Event listener for HTTP server "listening" event.
*/
function onListening() {
var addr = server.address();
var bind = typeof addr === 'string'
? 'pipe ' + addr
: 'port ' + addr.port;
debug('Listening on ' + bind);
}
To start the application, execute node bin/www; this will execute the script above and will start the Node.js application. So requesting http://localhost:3000 in your browser will result in calling the default GET handler, which gives a warm welcome response:
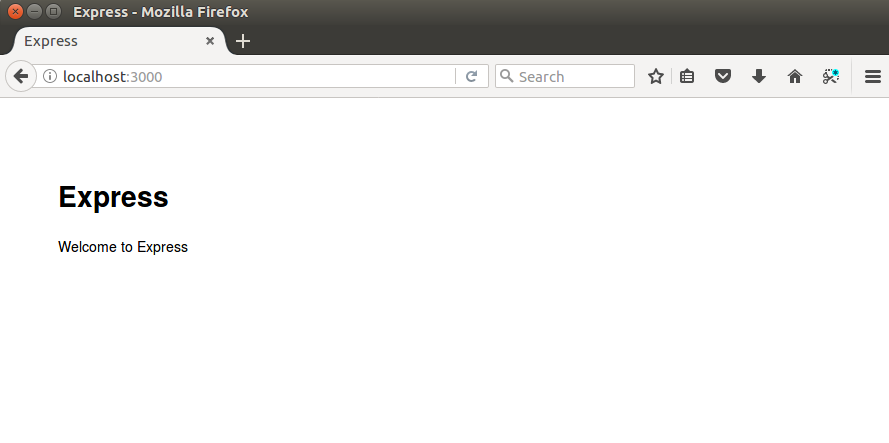
The generator created a dummy routes/users.js; it exposes a route linked to a dummy module available at the /users location. Requesting it will result in calling the list function of the user's route, which outputs a static response: respond with a resource.
Our application will not be using a template language and style sheets, so let's get rid of the lines that set the views and view engine properties in the application configuration. In addition, we will be implementing our own routes. Thus, we don't need the binding of the / and /users URIs for our app, neither do we need the user module; instead, we will utilize a catalog module and from a route:
var express = require('express');
var path = require('path');
var favicon = require('serve-favicon');
var logger = require('morgan');
var cookieParser = require('cookie-parser');
var bodyParser = require('body-parser');
var routes = require('./routes/index');
var catalog = require('./routes/catalog')
var app = express();
//uncomment after placing your favicon in /public
//app.use(favicon(path.join(__dirname, 'public', 'favicon.ico')));
app.use(logger('dev'));
app.use(bodyParser.json());
app.use(bodyParser.urlencoded({ extended: false }));
app.use(cookieParser());
app.use(express.static(path.join(__dirname, 'public')));
app.use('/', routes);
app.use('/catalog', catalog);
// catch 404 and forward to error handler
app.use(function(req, res, next) {
var err = new Error('Not Found');
err.status = 404;
next(err);
});
//development error handler will print stacktrace
if (app.get('env') === 'development') {
app.use(function(err, req, res, next) {
res.status(err.status || 500);
res.render('error', {
message: err.message,
error: err
});
});
}
// production error handler no stacktraces leaked to user
app.use(function(err, req, res, next) {
res.status(err.status || 500);
res.render('error', {
message: err.message,
error: {}
});
});
module.exports = app;
So after this cleanup, our application looks a lot cleaner and we are ready to move forward.
Here are the basic rules that apply to the middleware chain:
Now that we know what a middleware function is, let's clarify what the currently used middleware functions provide our application with. The body-parser middleware is the Express framework built in a parser. It parses the request body and populates the request object after the middleware execution finishes, that is, it provides JSON payload handling.
Now it is time to move on and implement our user module that will be mapped to our URIs. The module will be named modules/catalog.js:
var fs = require('fs');
function readCatalogSync() {
var file = './data/catalog.json';
if (fs.existsSync(file)) {
var content = fs.readFileSync(file);
var catalog = JSON.parse(content);
return catalog;
}
return undefined;
}
exports.findItems = function(categoryId) {
console.log('Returning all items for categoryId: ' + categoryId);
var catalog = readCatalogSync();
if (catalog) {
var items = [];
for (var index in catalog.catalog) {
if (catalog.catalog[index].categoryId === categoryId) {
var category = catalog.catalog[index];
for (var itemIndex in category.items) {
items.push(category.items[itemIndex]);
}
}
}
return items;
}
return undefined;
}
exports.findItem = function(categoryId, itemId) {
console.log('Looking for item with id' + itemId);
var catalog = readCatalogSync();
if (catalog) {
for (var index in catalog.catalog) {
if (catalog.catalog[index].categoryId === categoryId) {
var category = catalog.catalog[index];
for (var itemIndex in category.items) {
if (category.items[itemIndex].itemId === itemId) {
return category.items[itemIndex];
}
}
}
}
}
return undefined;
}
exports.findCategoryies = function() {
console.log('Returning all categories');
var catalog = readCatalogSync();
if (catalog) {
var categories = [];
for (var index in catalog.catalog) {
var category = {};
category["categoryId"] = catalog.catalog[index].categoryId;
category["categoryName"] = catalog.catalog[index].categoryName;
categories.push(category);
}
return categories;
}
return [];
}
The catalog module is built around the catalog.json file, stored in the data directory. The content of the source file is read synchronously using the File System module, fs, within the readCatalogSync function. The File System module provides multiple useful filesystem operations such as functions for creating, renaming, or deleting files or directories; truncating; linking; chmod functions; as well as synchronous and asynchronous file access for reading and writing data. In our sample application, we aim to use the most straightforward approach, so we implement functions that read the catalog.json file by utilizing the readFileSync function of the File System module. It returns the content of a file as a string, within a synchronous call. All other functions of the module are exported and can be used to query the content of the source file, based on different criteria.
The catalog module exports the following functions:
Now that we have three complete functions, let's see how to bind them to our Express application.
In Node.js terms, a route is a binding between a URI and function. The Express framework provides built-in support for routing. An express object instance contains functions named after each HTTP verb: get, post, put, and delete. They have the following syntax: function(uri, handler);.
They are used to bind a handler function to a specific HTTP action executed over a URI. The handler function usually takes two arguments: request and response. Let's see it with a simple Hello route application:
var express = require('express');
var app = express();
app.get('/hello', function(request, response){
response.send('Hello route');
});
app.listen(3000);
Running this sample at localhost and accessing http://localhost:3000/hello will result in calling your handler function and it will respond saying Hello route, but routing can give you much more. It allows you to define a URI with parameters; for example, let's use /hello/:name as a routing string. It tells the framework that the URI used consists of two parts: a static part (hello) and a variable part (the name parameter).
Furthermore, when the routing string and the handler function are defined in line with the get function of an Express instance, a parameter collection is made available directly in the request argument of the handler function. To demonstrate this, let's modify our previous example a bit:
var express = require('express');
var app = express();
app.get('/hello:name', function(request, response){
response.send('Hello ' + request.params.name);
});
app.listen(3000);
As you can see in the preceding code snippet, we used a colon (:) to separate the parameter part of the URI from the static part. You can have multiple parameters in an Express route; for example, /category/:category-id/items/:item-id defines a route for displaying an item that belongs to a category, where the category-id and item-id are parameters.
Now let's try it out. Requesting http://localhost:3000/hello/friend will result in the following output:
hello friend
This is how we can provide parameterized URIs with Express. It is a nice feature, but it is often not enough. In web applications, we are used to providing additional parameters with GET parameters.
Unfortunately, the Express framework is not so good with GET parameters. Thus, we have to utilize the url module. It is built into Node.js to provide an easy way of using URL parsing. Let's use our hello result with other parameters in the application again, but extend it in a way that it outputs hello all when /hello is requested and hello friend when the requested URI is /hello?name=friend:
var express = require('express');
var url = require('url');
var app = express();
app.get('/hello', function(request, response){
var getParams = url.parse(request.url, true).query;
if (Object.keys(getParams).length == 0) {
response.end('Hello all');
} else {
response.end('Hello ' + getParams.name);
}
});
app.listen(3000);
There are a few things worth mentioning here. We used the url module's function parse. It takes a URL as its first argument and a Boolean as an optional second argument, which specifies whether the query string should be parsed or not. The url.parse function returns an associative object. We used Object.keys with it to transform the keys in these associative objects into an array so that we can check its length. This will help us check whether our URI has been called with GET parameters or not. In addition to the routing functions named after each HTTP verb, there is also a function named all. When used, it routes all the HTTP actions to the specified URI.
Now that we know how routing and the GET parameters work within Node.js and the Express environment, we are ready to define a route for the catalog module and bind it in our application. The following is the route as defined in routes/catalog.js.
var express = require('express');
var catalog = require('../modules/catalog.js')
var router = express.Router();
router.get('/', function(request, response, next) {
var categories = catalog.findCategoryies();
response.json(categories);
});
router.get('/:categoryId', function(request, response, next) {
var categories = catalog.findItems(request.params.categoryId);
if (categories === undefined) {
response.writeHead(404, {'Content-Type' : 'text/plain'});
response.end('Not found');
} else {
response.json(categories);
}
});
router.get('/:categoryId/:itemId', function(request, response, next) {
var item = catalog.findItem(request.params.categoryId, request.params.itemId);
if (item === undefined) {
response.writeHead(404, {'Content-Type' : 'text/plain'});
response.end('Not found');
} else {
response.json(item);
}
});
module.exports = router;
First, a Router instance is created from the Express module. Here is a table that nicely describes the routing we just implemented. This will be helpful later when we test our API:
| HTTP method | Route | Catalog's module function |
| GET | /catalog | findCategories() |
| GET | /catalog/:categoryId | findItems(categoryId) |
| GET | /catalog/:categoryId/:itemId | findItem(categoryId, itemId) |
We need some test data in order to test our service, so let's use the catalog.json file in the data directory of our project. This data will allow us to test all our three functions, but to do that, we would need a client that can send REST requests against an endpoint. If you still haven't created a Postman project for testing your application, now is an appropriate time to create it.
Requesting /catalog should return all the categories in the test file:
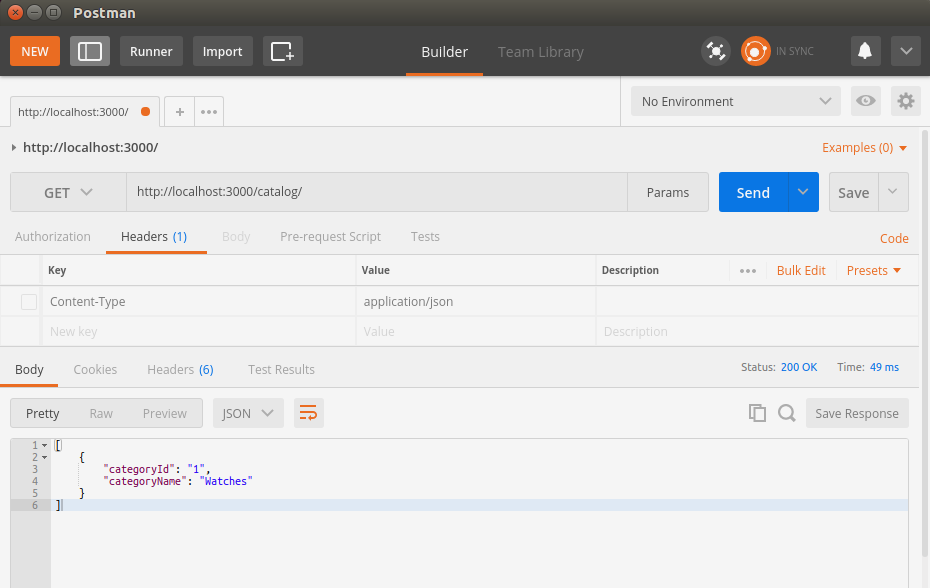
Thus, requesting /catalog/1 should result in returning a list with all the items under the Watches category:
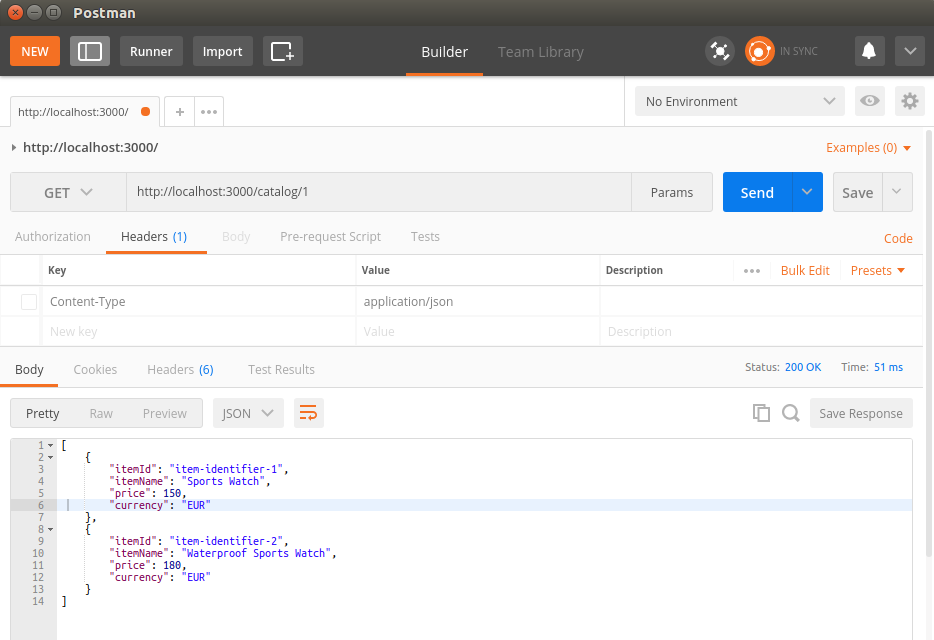
Finally, requesting http://localhost:3000/catalog/1/item-identifier-1 would display only the item identified by item-identifier-1, and requesting a nonexistent item would result in response with status code 404:
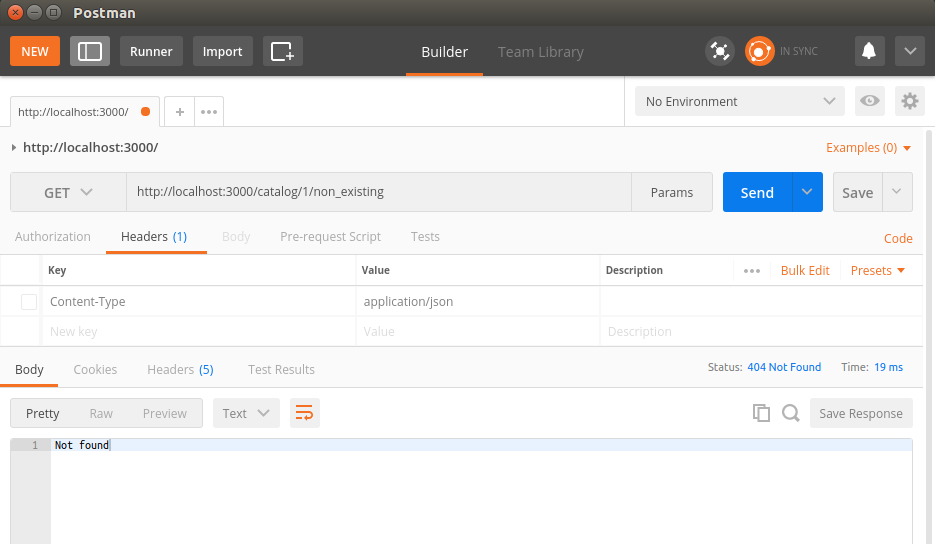
So far, the catalog service supports only the JSON format, and thus works only with the media type application/json. Let's assume our service has to offer data in different formats, for example, both JSON and XML. Then, the consumer needs to explicitly define the data format they need. The best way to carry out content negotiation in REST has been a very debatable subject for a long time.
In his famous discussion on implementing content negotiation correctly, Roy Fielding states the following:
However, that leaves a gap on how to expose the same resource in a different data format, so Roy continues with the following:
While one can still choose to stick with a URI-driven negotiation by providing the desired format with custom GET parameters, the REST community has chosen to stick to Roy's suggestion for agent-driven negotiation. Now that it has been almost a decade since this argument was initiated, it has been proven that they took the right decision. Agent-driven negotiation makes use of the Accept HTTP header.
The Accept HTTP header specifies the media type of the resource that the consumer is willing to process. In addition to the Accept header, the consumer may also make use of the Accept-Language and Accept-Encoding headers to specify what language and encoding the results should be provided in. If the server fails to provide the results in the expected format, it can either return a default value or make use of HTTP 406 Not acceptable in order not to cause data confusion errors on the client side.
The Node.js HTTP response object contains a method, format, that performs content negotiation based on the Accept HTTP header if set in the request object. It uses the built-in request.accepts() to select an appropriate handler for the request. If that is not found, the server invokes the default handler, which responds with HTTP 406 Not acceptable. Let's create a demo on how to use the format method within one of our routes. For that purpose, let's assume we have implemented a function within our catalog module, named list_groups_in_xml, that provides the group data in XML format:
app.get('/catalog', function(request, response) {
response.format( {
'text/xml' : function() {
response.send(catalog.findCategoiesXml());
},
'application/json' : function() {
response.json(catalog.findCategoriesJson());
},
'default' : function() {.
response.status(406).send('Not Acceptable');
}
});
});
This is how you can implement content negotiation in a clear and straightforward way.
It is an inevitable fact that all application APIs evolve. However, the evolution of public APIs with an unknown number of consumers, such as RESTful services, is a sensitive topic. As consumers may not be able to handle the modified data appropriately and there is no way of notifying all of them, we need to keep our APIs as backward-compatible as possible. One way to do so is to use different URIs for different versions of our application. Currently, our catalog API is available at /catalog.
When the time is right for a new version, for example, Version 2, we may need to keep the previous version available at another URI for backward-compatibility. Best practice is to encode the version number in the URI, such as /v1/catalog, and keep /catalog mapped to the latest version. Thus, requesting /catalog will cause a redirect to /v2/catalog and will make use of the HTTP 3xx status codes to indicate the redirection to the latest version.
Another option for versioning would be to keep the URI of your API stable and rely on custom HTTP headers that will specify the version. But that's not very stable approach concerning backward-compatibility as it is much more natural to modify a URL of a request in an application rather than modify the headers that are sent within the request.
To get additional confidence, go through this set of statements and state whether they are true or false:
In this chapter, we dived into some more complex topics. Let's sum up what we covered. We started by specifying the operations of our web API and defined that an operation is a combination of a URI and HTTP action. Next, we implemented routes and bound them to an operation. Then, we requested each operation using the Postman REST client to request the URIs that we routed. In the content negotiation section, we handled the Accept HTTP header to provide the results in the format requested by consumers. Finally, we covered the topic of API versions, which allow us to develop backward-compatible APIs.
We used old-fashioned filesystem storage for our data in this chapter. This is not suitable for a web application. Thus, we will look into modern, scalable, and reliable NoSQL storage in the next chapter.
In the last chapter, we implemented a sample application exposing a read-only service that provided catalog data. For the sake of simplicity, we introduced a performance bottleneck in this implementation by using file storage. This storage is not suitable for web applications. It relies on 33 physical files, preventing our application from servicing heavy loads, as file storage lacks multitenant support due to disc I/O operations. In other words, we definitely need to look for a better storage solution, which scales easily, when needed, following the demands of our REST-enabled application. NoSQL databases are now heavily used in web and in cloud environments, ensuring zero downtime and high availability. They have the following advantages over traditional transactional SQL databases:
Nearly all modern NoSQL solutions out there support clustering and can scale further, along with the load of your application. Additionally, most of them have REST-enabled interfaces over HTTP, which eases their usage over a load balancer in high-availability scenarios. Classical database drivers are usually not available for traditional client-side languages, such as JavaScript, because they require native libraries or drivers. However, the idea of NoSQL originated from using document data stores. Thus, most of them support the JSON format, which is native to JavaScript. Last but not least, most NoSQL solutions are open source and are available for free, with all the benefits that open source projects offer: community, examples, and freedom!
In this chapter, we will take a look at the MongoDB NoSQL database and the Mongoose module that interacts with it. We will see how to design and implement automated tests for the database models. Finally, at the end of the chapter, we will remove the file storage bottleneck and will move our application to an almost ready for production state.
MongoDB is an open source document database with built-in support for the JSON format. It provides a full index support, based on any of the available attributes in a document. It is ideal for high-availability scenarios due to its scalability features. MongoDB, available at https://mms.mongodb.com, is cloud-ready with its management services, MongoDB Management Services (MMS). They utilize and automate most development operations that need to be carried out to keep your cloud database in good shape, taking care of upgrades, further scaling, backups, recovery, performance, and security alerts.
Let's move forward and install MongoDB. Installers for Windows, Linux, macOS, and Solaris are available at http://www.mongodb.org/downloads. Linux users can find MongoDB in all popular distribution repositories, while Windows users can make use of a user-friendly wizard which will guide you through the installation steps, where, for a typical installation, all you need to do is accept the license agreement and provide an installation path.
After a successful installation, execute the following command to start MongoDB. If you want to specify a custom location for your data, you have to use the --dbpath argument. Optionally, you can start the MongoDB HTTP console via the --rest argument:
mongod --dbpath ./data --rest
The default port for communicating with MongoDB is 27017, and its HTTP console is implicitly configured to use a port higher than the data port by a value of 1,000. Therefore, the default port of the console will be 28017. The HTTP console provides useful information about the database, such as logs, health status, available databases, and so on. I strongly advise you to spend some time with it. The console can also be used as a RESTful health check service of the database, because it provides JSON-encoded information about the running database services and the last error that occurred:
GET /replSetGetStatus?text=1 HTTP/1.1
Host: localhost:28017
Connection: Keep-Alive
User-Agent: RestClient-Tool
HTTP/1.0 200 OK
Content-Length: 56
Connection: close
Content-Type: text/plain;charset=utf-8
{
"ok": 0,
"errmsg": "not running with --replSet"
}
This REST interface can be used in a script or an application to automate altering notifications providing the current state of the database engine and so on.
The log section of the console shows that your server is running successfully (if it is). Now we are ready to move further and see how to connect Node.js to MongoDB.
Mongoose is a module that connects Node.js to MongoDB in an object document mapper (ODM) style. It offers the Create, Read, Update, and Delete (also known as CRUD) functionalities for documents stored in the database. Mongoose defines the structure of the used documents using schemas. The schema is the smallest unit of data definition in Mongoose. A model is built out of a schema definition. It is a constructor-like function that can be used to create or query documents. Documents are instances of a model and represent one-to-one mapping to the documents stored in MongoDB. The schema-model-document hierarchy provides a self-descriptive way of defining objects and allows easy data validation.
Let's start by installing Mongoose with npm:
npm install mongoose
Now that we have the Mongoose module installed, our first step will be to define a schema that will represent an item in the catalog:
var mongoose = require('mongoose');
var Schema = mongoose.Schema;
var itemSchema = new Schema ({
"itemId" : {type: String, index: {unique: true}},
"itemName": String,
"price": Number,
"currency" : String,
"categories": [String]
});
The preceding code snippet creates a schema definition of an item. Defining a schema is straightforward and is quite similar to JSON schema definition; you have to describe and attribute with its type and optionally provide additional properties for each key. In the case of the catalog application, we need to use the itemId as a unique index in order to avoid having two different items with the same ID. Thus, apart from defining its type as String, we also use the index attribute to describe that the value of the itemId field must be unique for each individual item.
Mongoose introduces the term model. A model is a constructor-like function compiled out of a schema definition. An instance of a model represents a document that can be saved to or read from the database. Creating a model instance is done by calling the model function of a mongoose instance and passing the schema that the model should use:
var CatalogItem = mongoose.model('Item', itemSchema);
A model also exposes functions for querying and data manipulations. Assuming that we have initialized a schema and created a model, storing a new item to MongoDB is as simple as creating a new model instance and invoking its save function:
var mongoose = require('mongoose');
mongoose.connect('mongodb://localhost/catalog');
var db = mongoose.connection;
db.on('error', console.error.bind(console, 'connection error:'));
db.once('open', function() {
var watch = new CatalogItem({
itemId: 9 ,
itemName: "Sports Watch1",
brand: 'А1',
price: 100,
currency: "EUR",
categories: ["Watches", "Sports Watches"]
});
watch.save((error, item, affectedNo)=> {
if (!error) {
console.log('Item added successfully to the catalog');
} else {
console.log('Cannot add item to the catlog');
}
});
});
db.once('open', function() {
var filter = {
'itemName' : 'Sports Watch1',
'price': 100
}
CatalogItem.find(filter, (error, result) => {
if (error) {
consoloe.log('Error occured');
} else {
console.log('Results found:'+ result.length);
console.log(result);
}
});
});
Here is how to use the model in order to query for documents representing a sports watch belonging to the Watches group named Sports Watches:
db.once('open', function() {
var filter = {
'itemName' : 'Sports Watch1',
'price': 100
}
CatalogItem.findOne(filter, (error, result) => {
if (error) {
consoloe.log('Error occurred');
} else {
console.log(result);
}
});
});
The model also exposes a findOne function, a convenient way of finding an object by its unique index and then performing some data manipulation on it, that is, for delete or update operations. The following example deletes an item:
CatalogItem.findOne({itemId: 1 }, (error, data) => {
if (error) {
console.log(error);
return;
} else {
if (!data) {
console.log('not found');
return;
} else {
data.remove(function(error){
if (!error) { data.remove();}
else { console.log(error);}
});
}
}
});
Mocha is one of the most popular testing frameworks for JavaScript; its main goal is to provide an easy way to test asynchronous JavaScript code. Let's install Mocha globally so that we can make it available to any Node.js application that we may develop in the future:
npm install -g mocha
We will also need an assertion library that can be used together with Mocha. The assertion library provides functions for validating actual values, against expected ones, when they are not equal, the assertion library will cause test failure. Should.js assertion library module is easy to use and it will be our choice, so let's install it globally too:
npm install -g should
Now that we have our testing modules installed, we need to specify our testcase file path in the package.json file. Let's modify it by adding a test element pointing to Mocha and the testcase file in the script node:
{
"name": "chapter4",
"version": "0.0.0",
"private": true,
"scripts": {
"start": "node ./bin/www",
"test": "mocha test/model-test.js"
},
"dependencies": {
"body-parser": "~1.13.2",
"cookie-parser": "~1.3.5",
"debug": "~2.2.0",
"express": "~4.16.0",
"jade": "~1.11.0",
"morgan": "~1.6.1",
"serve-favicon": "~2.3.0"
}
}
This will tell the npm package manager to trigger Mocha when the npm test is executed.
Automation of Mongoose tests must not be affected by the current state of the database. To ensure that the results are predictable at each test run, we need to ensure that the database state is exactly as we would expect it. We will implement a module called prepare.js in the test directory. It will clear the database before each test run:
var mongoose = require('mongoose');
beforeEach(function (done) {
function clearDatabase() {
for (var i in mongoose.connection.collections) {
mongoose.connection.collections[i].remove(function()
{});
}
return done();
}
if (mongoose.connection.readyState === 0) {
mongoose.connect(config.db.test, function (err) {
if (err) {
throw err;
}
return clearDatabase();
});
} else {
return clearDatabase();
}
});
afterEach(function (done) {
mongoose.disconnect();
return done();
});
Next, we will implement a Mocha test, which creates a new item:
var mongoose = require('mongoose');
var should = require('should');
var prepare = require('./prepare');
const model = require('../model/item.js');
const CatalogItem = model.CatalogItem;
mongoose.createConnection('mongodb://localhost/catalog');
describe('CatalogItem: models', function () {
describe('#create()', function () {
it('Should create a new CatalogItem', function (done) {
var item = {
"itemId": "1",
"itemName": "Sports Watch",
"price": 100,
"currency": "EUR",
"categories": [
"Watches",
"Sports Watches"
]
};
CatalogItem.create(item, function (err, createdItem) {
// Check that no error occured
should.not.exist(err);
// Assert that the returned item has is what we expect
createdItem.itemId.should.equal('1');
createdItem.itemName.should.equal('Sports Watch');
createdItem.price.should.equal(100);
createdItem.currency.should.equal('EUR');
createdItem.categories[0].should.equal('Watches');
createdItem.categories[1].should.equal('Sports Watches');
//Notify mocha that the test has completed
done();
});
});
});
});
Executing the npm test now results in a call against the MongoDB database creating an item out of the passed JSON object. After insertion, the assert callback will be executing, ensuring that values passed to by Mongoose are the same as the returned ones from the database. Give it a try and break the test—simply change the expected value in the assert with an invalid one—you will see the test failing.
After seeing how a model works, it is time to create a user-defined module that wraps all CRUD operations for the catalog. Since we intend to use that module in a RESTful web application, it seems logical to leave the schema definition and the model creation outside the module and have them provided as arguments of each module function. The same schema definition is used in the unit tests, ensuring stability of the module. Now let's add an implementation for each CRUD function, starting with a remove() function. It looks up an item based on its id and deletes it from the database, if it exists:
exports.remove = function (request, response) {
console.log('Deleting item with id: ' + request.body.itemId);
CatalogItem.findOne({itemId: request.params.itemId}, function(error, data) {
if (error) {
console.log(error);
if (response != null) {
response.writeHead(500, contentTypePlainText);
response.end('Internal server error');
}
return;
} else {
if (!data) {
console.log('Item not found');
if (response != null) {
response.writeHead(404, contentTypePlainText);
response.end('Not Found');
}
return;
} else {
data.remove(function(error){
if (!error) {
data.remove();
response.json({'Status': 'Successfully deleted'});
}
else {
console.log(error);
response.writeHead(500, contentTypePlainText);
response.end('Internal Server Error');
}
});
}
}
});
}
The saveItem() function takes the request body payload as an argument. A valid update request will contain the new state of an item object, represented in JSON format. First, the itemId is parsed out of the JSON object. Next, lookup is done. If an item exists, it gets updated. Otherwise, a new one gets created:
exports.saveItem = function(request, response)
{
var item = toItem(request.body);
item.save((error) => {
if (!error) {
item.save();
response.writeHead(201, contentTypeJson);
response.end(JSON.stringify(request.body));
} else {
console.log(error);
CatalogItem.findOne({itemId : item.itemId },
(error, result) => {
console.log('Check if such an item exists');
if (error) {
console.log(error);
response.writeHead(500, contentTypePlainText);
response.end('Internal Server Error');
} else {
if (!result) {
console.log('Item does not exist. Creating a new one');
item.save();
response.writeHead(201, contentTypeJson);
response.
response.end(JSON.stringify(request.body));
} else {
console.log('Updating existing item');
result.itemId = item.itemId;
result.itemName = item.itemName;
result.price = item.price;
result.currency = item.currency;
result.categories = item.categories;
result.save();
response.json(JSON.stringify(result));
}
}
});
}
});
};
The toItem() function converts the JSON payload to a CatalogItem model instance, that is, an item document:
function toItem(body) {
return new CatalogItem({
itemId: body.itemId,
itemName: body.itemName,
price: body.price,
currency: body.currency,
categories: body.categories
});
}
We will also need to provide a means of querying data, so let's implement a function that queries for all items in a category:
exports.findItemsByCategory = function (category, response) {
CatalogItem.find({categories: category}, function(error, result) {
if (error) {
console.error(error);
response.writeHead(500, { 'Content-Type': 'text/plain' });
return;
} else {
if (!result) {
if (response != null) {
response.writeHead(404, contentTypePlainText);
response.end('Not Found');
}
return;
}
if (response != null){
response.setHeader('Content-Type', 'application/json');
response.send(result);
}
console.log(result);
}
});
}
Similar to findItemsByCategory, the following is a function that finds an item by its ID:
exports.findItemById = function (itemId, response) {
CatalogItem.findOne({itemId: itemId}, function(error, result) {
if (error) {
console.error(error);
response.writeHead(500, contentTypePlainText);
return;
} else {
if (!result) {
if (response != null) {
response.writeHead(404, contentTypePlainText);
response.end('Not Found');
}
return;
}
if (response != null){
response.setHeader('Content-Type', 'application/json');
response.send(result);
}
console.log(result);
}
});
}
Finally, there's a function that lists all the catalog items stored in the database. It uses the Mongoose model find function that looks for all documents of the model, and uses its first arguments as a filter. We want a function that returns all existing documents; that's why we provide an empty object. This will return all available items. The results are available in the callback function, which is the second argument of the model's find function:
exports.findAllItems = function (response) {
CatalogItem.find({}, (error, result) => {
if (error) {
console.error(error);
return null;
}
if (result != null) {
response.json(result);
} else {
response.json({});
}
});
};
The catalog module will be the foundation of our RESTful service. It is responsible for all data manipulation operations, as well as for different kinds of queries. It encapsulates all operations in a reusable way.
Now we have automated tests for the model and a user-defined module which makes use of them. This ensures the stability of the module and makes it ready for wider adoption.
It is time to build a new Express-based application and add a route, exposing the new module to it:
const express = require('express');
const router = express.Router();
const catalog = require('../modules/catalog');
const model = require('../model/item.js');
router.get('/', function(request, response, next) {
catalog.findAllItems(response);
});
router.get('/item/:itemId', function(request, response, next) {
console.log(request.url + ' : querying for ' + request.params.itemId);
catalog.findItemById(request.params.itemId, response);
});
router.get('/:categoryId', function(request, response, next) {
console.log(request.url + ' : querying for ' + request.params.categoryId);
catalog.findItemsByCategory(request.params.categoryId, response);
});
router.post('/', function(request, response, next) {
console.log('Saving item using POST method);
catalog.saveItem(request, response);
});
router.put('/', function(request, response, next) {
console.log('Saving item using PUT method');
catalog.saveItem(request, response);
});
router.delete('/item/:itemId', function(request, response, next) {
console.log('Deleting item with id: request.params.itemId);
catalog.remove(request, response);
});
module.exports = router;
To sum up, we routed each function of the catalog data service module to an operation of a RESTful service:
As we have our operations exposed, we are ready to perform some more serious REST testing. Let's start Postman and test the newly exposed endpoints:
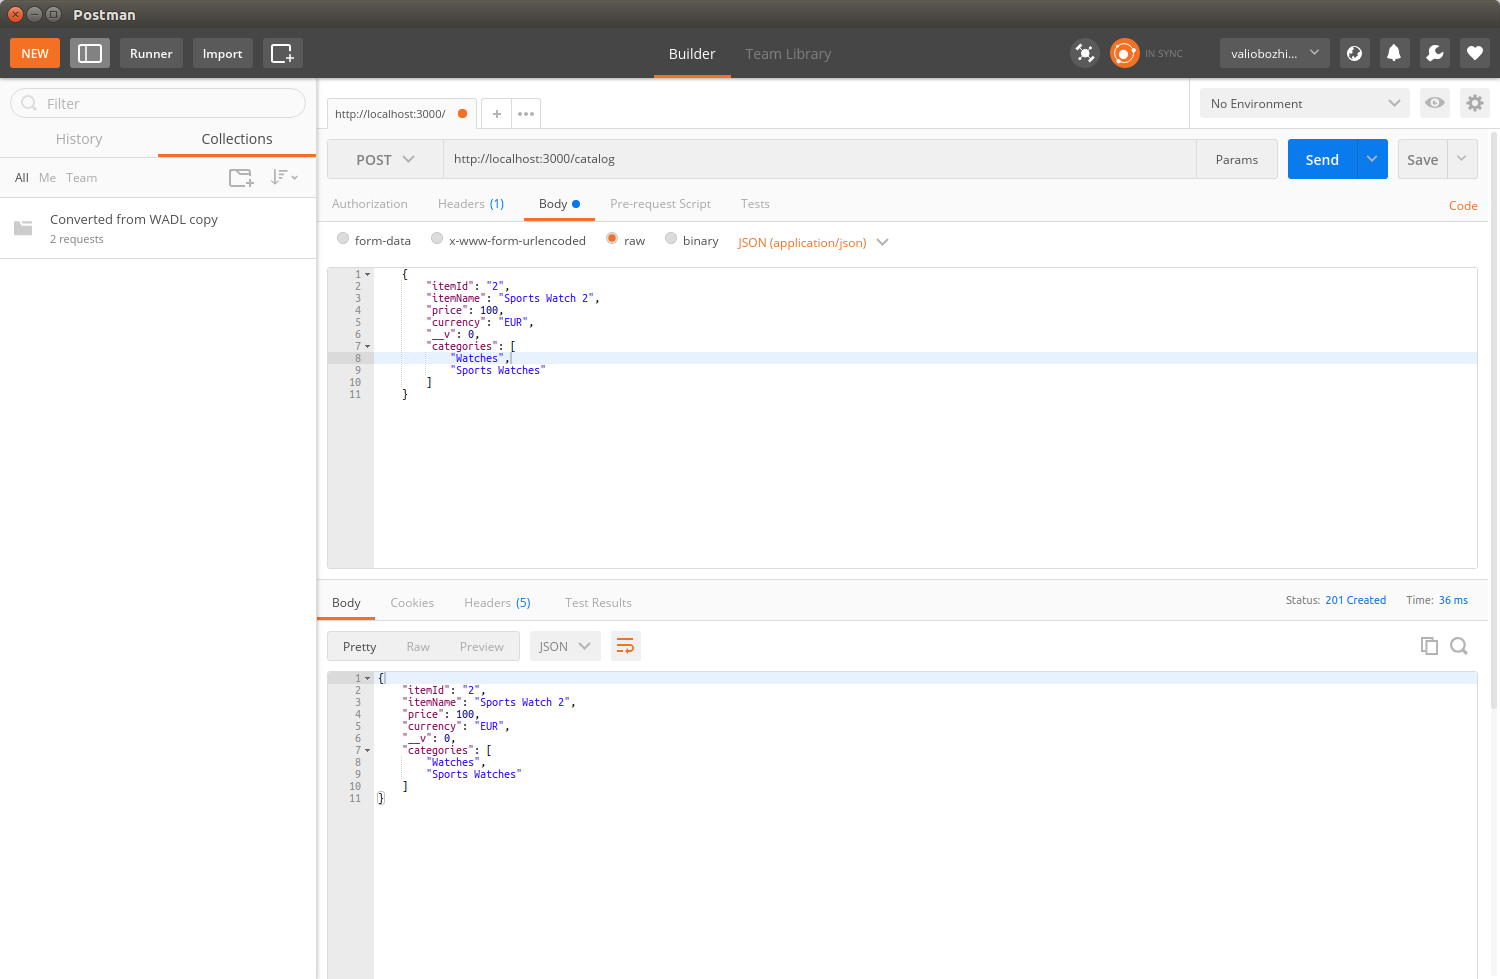
Spend some time testing each operation thoroughly. This will help you gain confidence that the catalog data service module really works, and also will make you more comfortable with how HTTP responses are served and read. As a RESTful API developer, you should be able to read HTTP dumps, which show different request payloads and status codes, fluently.
Go through the following questions:
In this chapter, we looked at MongoDB, a powerful document-oriented database. We utilized it and made use of Mocha to implement an automated test for the database layer. Now it is time to build a fully-fledged RESTful web service. In the next chapter, we will extend the user-defined module by including support for searching via document attributes, and add filtering and pagination capabilities that will finally evolve into full-fledged RESTful service implementation.
In the previous chapter, we implemented a catalog module that exposed functions for data manipulation for the items in the catalog application. These functions made use of the express.js request object to parse the incoming data in the body and then to carry out the appropriate database operation. Each function populated the response object with a relevant status code and response body payload, if needed. Finally, we bound each function to a route, accepting HTTP requests.
Now, it's time to look closer into the URLs of the routes and into the returned HTTP status codes per operation.
In this chapter, we will cover the following topics:
Each RESTful API operation is a combination of an HTTP request against a URL and an appropriate HTTP method.
When executed, each operation will return a status code, indicating whether the invocation has been successful or not. Successful invocation is indicated by a HTTP 2XX status code, while operations that are not executed correctly indicate this with erroneous status code—4XX if the error is at client side, or 5xx when the server fails to process a valid request.
Having a well-specified API is vital for its adoption. Such specification should not only completely enumerate the status codes of each operation, but should also specify the expected data format, that is, its supported media types.
The following table defines how the Express.js Router will expose the API operations, and it should serve as a reference specification for it:
| Method | URI | Media type | Description | Status Code |
| GET | /catalog | application/json |
Returns all the items in the catalog.
|
200 OK 500 Internal Server Error |
| GET | /catalog/{categoryId} | application/json | Returns all items for the selected category. If the category does not exist, it returns 404. |
200 OK, 404 NOT FOUND 500 Internal Server Error |
| GET | /item/{itemId} | application/json | Returns a single item for the selected itemId. If there is no such item, it returns 404. |
200 OK, 404 NOT FOUND 500 Internal Server Error |
| POST | /item/ | application/json | Creates a new item; if an item with the same identifier exists, it will be updated. When an item is created, a Location header is returned. It provides the URL where the newly created item can be accessed. |
201 Created 200 OK 500 Internal Server Error |
| PUT | /item/{itemId} | application/json | Updates an existing item; if an item with the provided identifier does not exist, it creates it. When an item is created, a Location header is returned. It provides the URL where the newly created item can be accessed. |
201 Created 200 OK 500 Internal Server Error |
| DELETE | /item/{itemId} | application/json | Deletes an existing item; if an item with the provided identifier does not exist, it returns 404. |
200 OK, 404 NOT FOUND 500 Internal Server Error |
The catalog application handles two types of entities: items and categories. Each item entity contains a collection of categories where it belongs. As you can see, the category is just a logical entity in our application; it will exist as long as there is at least one item referencing it, and will cease to exist when no items refer it. This is why the application exposes routes for exposing data manipulation functions only for resources of type items, while the operations for categories are more or less read only. Looking more carefully into the URLs exposing the data manipulation operations for the items, we can see a clear pattern aligning the URL to the REST fundamental principles—a resource is exposed by a single URL, and it supports resource manipulation actions that are determined by the HTTP method of the request. To sum up, listed here are the generally accepted rules that a well-defined API should follow. They are semantically related to each resource manipulation operation:
Now that we have defined some general recommendations on how operations should behave, it's time to implement them in a new version of the API.
We've already defined a few basic versioning rules in Chapter 13, Building a Typical Web API. Let's apply them to the MongoDB database-aware module we implemented in the previous chapter. Our starting point would be to enable the current consumers of the API to continue using the same version on a different URL. This will keep them backward-compatible until they adopt and successfully test the new version.
Keeping a REST API stable is not a question of only moving one endpoint from one URI to another. It makes no sense to perform redirection and afterward have an API that behaves differently. Thus, we need to ensure that the behavior of the moved endpoint stays the same. To ensure that we don't change the previously implemented behavior, let's move the current behavior from the catalog.js module to a new module by renaming the file to catalogV1.js. Then, make a copy of it to the catalogV2.js module, where we will introduce all new functionality; but before doing that, we have to reroute Version 1 from /, /{categoryId}, /{itemId} to /v1, /v1/{categoryId}, /v1/{itemId}:
const express = require('express');
const router = express.Router();
const catalogV1 = require('../modules/catalogV1');
const model = require('../model/item.js');
router.get('/v1/', function(request, response, next) {
catalogV1.findAllItems(response);
});
router.get('/v1/item/:itemId', function(request, response, next) {
console.log(request.url + ' : querying for ' + request.params.itemId);
catalogV1.findItemById(request.params.itemId, response);
});
router.get('/v1/:categoryId', function(request, response, next) {
console.log(request.url + ' : querying for ' + request.params.categoryId);
catalogV1.findItemsByCategory(request.params.categoryId, response);
});
router.post('/v1/', function(request, response, next) {
catalogV1.saveItem(request, response);
});
router.put('/v1/', function(request, response, next) {
catalogV1.saveItem(request, response);
});
router.delete('/v1/item/:itemId', function(request, response, next) {
catalogV1.remove(request, response);
});
router.get('/', function(request, response) {
console.log('Redirecting to v1');
response.writeHead(301, {'Location' : '/catalog/v1/'});
response.end('Version 1 is moved to /catalog/v1/: ');
});
module.exports = router;
Since Version 2 of our API is not yet implemented, executing a GET request against / will result in receiving a 301 Moved Permanently HTTP status, which will then redirect to /v1/. This will notify our consumers that the API is evolving and that they will soon need to decide whether to continue using Version 1 by explicitly requesting its new URI or prepare for adopting Version 2.
Go ahead and give it a try! Start the modified node application and, from Postman, make a GET request to http://localhost:3000/catalog:
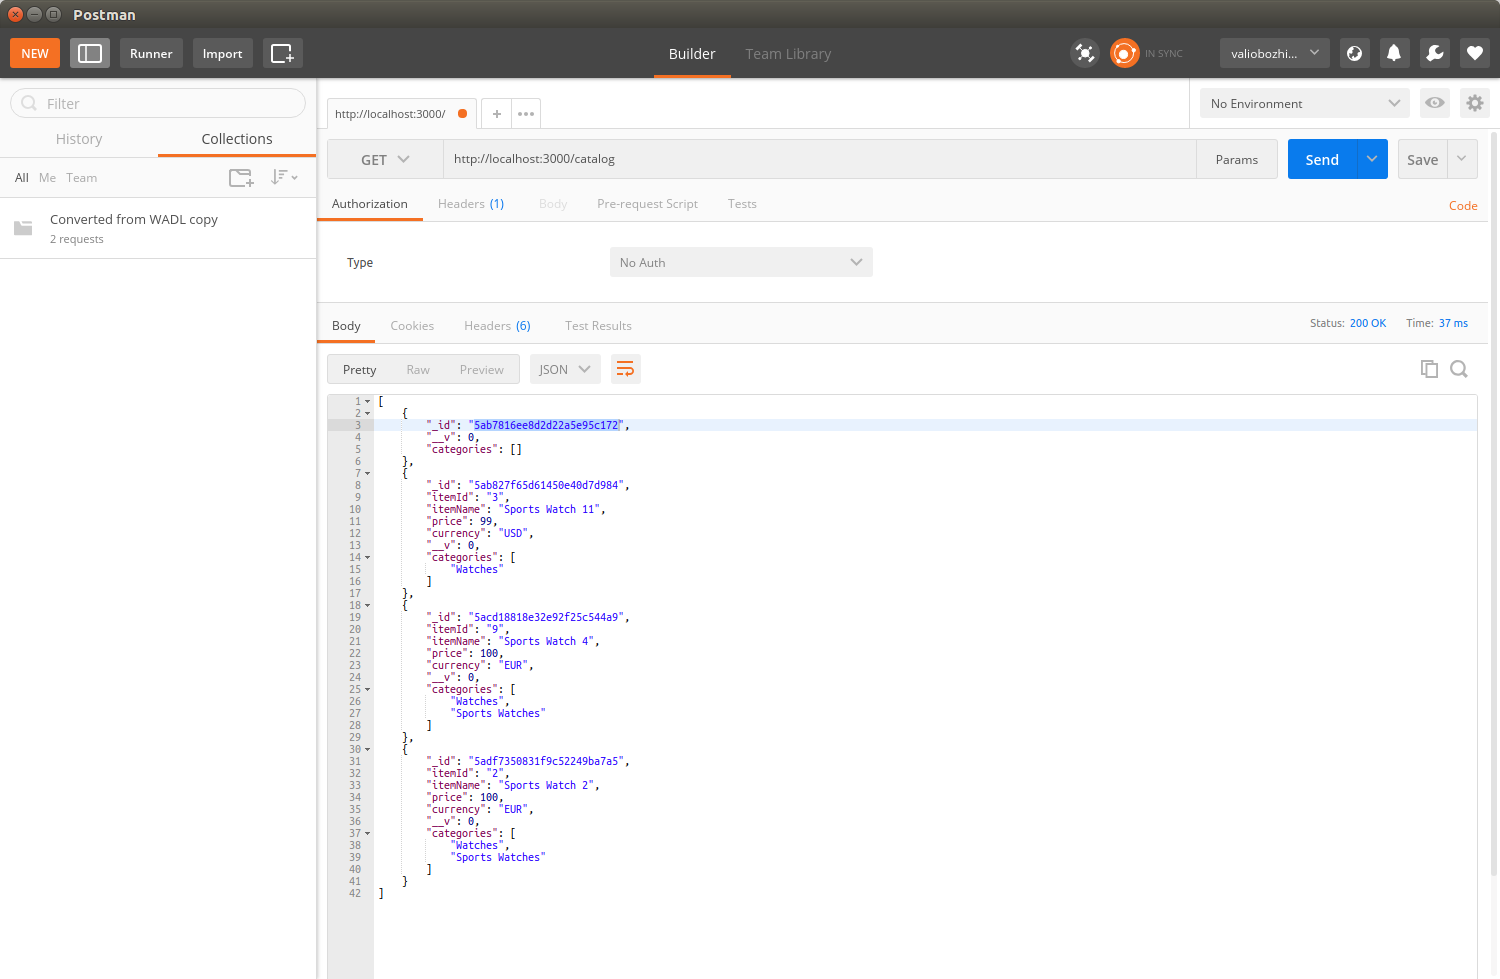
You will see that your request is redirected to the newly routed location at http://localhost:3000/catalog/v1.
Now that we have finalized Version 1 of the catalog, it's time to think of further extensions that we can add in Version 2. Currently, the catalog service supports listing of all items in a category and fetching an item by its ID. It's about time to take full advantage of MongoDB, being a document-oriented database, and implement a function that will enable our API consumer to query for items based on any of their attributes. For instance, list all items for a specific category with an attribute that matches a query parameter, such as price or color, or search by item name. RESTful services usually expose document-oriented data. However, their usage is not limited to documents only. In the next chapter, we will extend the catalog in a way that it also stores binary data—an image that can be linked to each item. For that purpose, we will use a MongoDB binary format called Binary JSON (BSON) in the Working with arbitrary data section in Chapter 16, Implementing a Full Fledged RESTful Service.
Getting back to the searching extension, we've already used the Mongoose.js model's find() and findOne() functions. So far, we used them to provide the name of the document attribute to be searched with, statically, in our JavaScript code. However, this filtering parameter of find() is just a JSON object where the key is the document attribute and the value is the attribute's value to be used in the query. Here is the first new function we will add to Version 2. It queries MongoDB by an arbitrary attribute and its value:
exports.findItemsByAttribute = function (key, value, response) {
var filter = {};
filter[key] = value;
CatalogItem.find(filter, function(error, result) {
if (error) {
console.error(error);
response.writeHead(500, contentTypePlainText);
response.end('Internal server error');
return;
} else {
if (!result) {
if (response != null) {
response.writeHead(200, contentTypeJson);
response.end({});
}
return;
}
if (response != null){
response.setHeader('Content-Type', 'application/json');
response.send(result);
}
}
});
}
This function calls find on the model with the provided attribute and value as parameters. We will bind this function to the router's /v2/item/ GET handler.
At the end, our aim is to have /v2/item/?currency=USD that returns only records for items that are sold in USD currency, as indicated by the value of the passed GET parameter. That way, if we modify the model with additional attributes, such as color and size, we can query for all items having the same color or any other attribute that an item can have.
We will keep the old behavior of returning a list of all available items when no parameters are provided within the query string, but we will also parse the query string for the first provided GET parameter and use it as a filter in the findItemsByAttribute() function:
router.get('/v2/items', function(request, response) {
var getParams = url.parse(request.url, true).query;
if (Object.keys(getParams).length == 0) {
catalogV2.findAllItems(response);
} else {
var key = Object.keys(getParams)[0];
var value = getParams[key];
catalogV2.findItemsByAttribute(key, value, response);
}
});
Perhaps the most interesting part in this function is the URL parsing. As you can see, we keep using the same old strategy to check whether any GET parameters are supplied. We parse the URL in order to get the query string, and then we use the built-in Object.keys function to check whether the parsed key/value list contains elements. If it does, we take the first element and extract its value. Both the key and the value are passed to the findByAttribute function.
Every catalog application supports an image or set of images bound to this item. For that purpose, in the next chapter, we will see how to work with binary objects in MongoDB. However, now is the time to decide how to semantically link the binary data to an item document. Extending the model schema in such a way that it contains binary base64 representation of binary data in the document is anything but a good idea, as mixing literally encoded and binary data in one format is never a good idea. It increases the complexity of the application and makes it error-prone:
{
"_id": "5a4c004b0eed73835833cc9a",
"itemId": "1",
"itemName": "Sports Watch",
"price": 100,
"currency": "EUR",
"categories": [
"Watches",
"Sports Watches"
],
"image":"
iVBORw0KGgoAAAANSUhEUgAAAJEAAACRCAMAAAD0BqoRAAAAGXRFWHRTb2Z0d2FyZQBBZG9iZSBJbWFnZVJlYWR5ccllPAAAAyJpVFh0WE1MOmNvbS5hZG9iZS54bXAAAAAAADw/eHBhY2tldCBiZWdpbj0i77u/IiBpZD0iVzVNME1wQ2VoaUh6cmVTek5UY3prYzlkIj8+IDx4OnhtcG1ldGEgeG1sbnM6eD0iYWRvYmU6bnM6bWV0YS8iIHg6eG1wdGs9IkFkb2JlIFhNUCBDb3JlIDUuMC1jMDYwIDYxLjEzNDc3NywgMjAxMC8wMi8xMi0xNzozMjowMCAgICAgICAgIj4gPHJkZjpSREYgeG1sbnM6cmRmPSJodHRwOi8vd3d3LnczLm9yZy8xOTk5LzAyLzIyLXJkZi1zeW50YXgtbnMjIj4gPHJkZjpEZXNuzjcmlwdGlvbiByZGY6YWJvdXQ9IiIgeG1sbnM6eG1wPSJodHRwOi8vbnMuYWRvYmUuY29tL3hhcC8xLjAvIiB4bWxuczp4bXBNTT0iaHR0cDovL25zLmFkb2JlLmNvbS94YXAvMS4wL21tLyIgeG1sbnM6c3RSZWY9Imh0dHA6Ly9ucy5hZG9iZS5jb20veGFwLzEuMC9zVHlwZS9SZXNvdXJjZVJlZiMiIHhtcDpDcmVhdG9yVG9vbD0iQWRvYmUgUGhvdG9zaG9wIENTNSBNYWNpbnRvc2giIHhtcE1NOkluc3RhbmNlSUQ9InhtcC5paWQ6MjMwNjQ1NDdFNjJCMTFERkI5QzU4OTFCMjJCQzEzM0EiIHhtcE1NOkRvY3VtZW50SUQ9InhtcC5kaWQ6MjMwNjQ1NDhFNjJCMTFERkI5QzU4OTFCMjJCQzEzM0EiPiA8eG1wTU06RGVyaXZlZEZyb20gc3RSZWY6aW5zdGFuY2VJRD0ieG1wLmlpZDoyMzA2NDU0NUU2MkIxMURGQjlDNTg5MUIyMkJDMTMzQSIgc3RSZWY6ZG9jdW1lbnRJRD0ieG1wLmRpZDoyMzA2NDU0NkU2MkIxMURGQjlDNTg5MUIyMkJDMTMzQSIvPiA8L3JkZjpEZXNjcmlwdGlvbj4gPC9yZGY6UkRGPiA8L3g6eG1wbWV0YT4gPD94cGFja2V0IGVuZD0iciI/Px5Xq1XXhWFY1+v151/b3ij5tI/GPEVP0e8U/SPAABPLjHnaJ6XvAAAAAElFTkSuQmCC
"}
Imagine how large a result for a non-filtered query can become just for a few hundred items, if all of them had an image binary representation as a value of a JSON attribute. To avoid that, we will return the image for each item at a URL that is logically linked to the resource's URL—/catalog/v2/item/{itemId}/image.
That way, if there is an image assigned to an item, it will be served at a known location. This approach, however, does not semantically link the binary item to its corresponding resource, as when accessing the item at /catalog/v2/item/{itemId}, there would be no indication of whether it has an image assigned or not. To solve this, let's use a custom HTTP header in response of the item route:
GET http://localhost:3000/catalog/v2/item/1 HTTP/1.1
Host: localhost:3000
Connection: Keep-Alive
User-Agent: Apache-HttpClient/4.1.1 (java 1.5)
HTTP/1.1 200 OK
X-Powered-By: Express
Content-Type: application/json; charset=utf-8
Content-Length: 152
Image-Url: http://localhost:3000/catalog/v2/item/1/image
ETag: W/"98-2nJj2mZdLV2YDME3WYCyEwIXfuA"
Date: Thu, 01 Feb 2018 13:50:43 GMT
Connection: keep-alive
{
"_id": "5a4c004b0eed73835833cc9a",
"itemId": "1",
"itemName": "Sports Watch",
"price": 100,
"currency": "EUR",
"__v": 0,
"categories": [
"Watches",
"Sports Watches"
]
}
When present in the response, the Image-Url header indicates that the item has an additional resource bound to it, and the header value provides the address where it is available. Using this approach, we linked a binary resource semantically to our document.
In the next chapter, we will implement the routes that will handle the manipulation of arbitrary items bound to the items in the catalog.
In this chapter, we discussed in detail how resources should be exposed via a RESTful API; we paid close attention to URL best practices and looked into appropriate usage of the HTTP status codes indicating each state of our operations.
We covered the topics of versioning and extensibility, where we used the 301 Moved Permanently status code to automatically redirect API calls to different URLs.
Finally, we figured out how to semantically link our resource items to arbitrary binary represented data.
So far, we have created a second version of our RESTful service, and we had the two versions exposed by different URLs, ensuring backward compatibility. We implemented unit tests for its database layer and discussed how to use HTTP status codes appropriately. In this chapter, we will extend that implementation—by providing handling of non-document—binary data to the second version of the service and linking it accordingly to the documents it relates to.
We will look at a convenient way of presenting large result sets to consumers. For that purpose, we will introduce pagination as well as further filtering capabilities to our API.
There are cases when caching data responses should be considered as an option. We will look at its benefits and drawbacks and also decide to enable caching when necessary.
Finally, we will dive into the discovery and exploration of REST services.
To sum up, here's what should be further implemented to turn the catalog data service into a full-fledged RESTful service:
MongoDB utilizes BSON (Binary JSON) as the primary data format. It is a binary format that stores key/value pairs in a single entity called document. For example, a sample JSON, {"hello":"world"}, becomes \x16\x00\x00\x00\x02hello\x00\x06\x00\x00\x00world\x00\x00 when encoded in BSON.
BSON stores data rather than literals. For instance, if an image is to be part of the document, it will not have to be converted to a base64-encoded string; instead, it will be directly stored as binary data, unlike plain JSON, which will usually represent such data as base64-encoded bytes, but that is obviously not the most efficient way.
Mongoose schemas enable storing binary content in the BSON format via the schema type—buffer. It stores binary content (image, ZIP archive, and so on) up to 16 MB. The reason behind the relatively small storage capacity is to prevent excessive usage of memory and bandwidth during transmission.
The GridFS specification addresses this limitation of BSON and enables you to work with data larger than 16 MB. GridFS divides data into chunks stored as separate document entries. Each chunk, by default, has a size of up to 255 KB. When data is requested from the data store, the GridFS driver retrieves all the required chunks and returns them in an assembled order, as if they had never been divided. Not only does this mechanism allow storage of data larger than 16 MB, it also enables consumers to retrieve data in portions so that it doesn't have to be loaded completely into the memory. Thus, the specification implicitly enables streaming support.
GridFS actually offers more—it supports storing metadata for the given binary data, for example, its format, a filename, size, and so on. The metadata is stored in a separate file and is available for more complex queries. There is a very usable Node.js module called gridfs-stream. It enables easy streaming of data in and out of MongoDB, as on all other modules it is installed as an npm package. So, let's install it globally and see how it is used; we will also use the -s option to ensure that the dependencies in the project's package.json are updated:
npm install -g -s gridfs-stream
To create a Grid instance, you are required to have a connection opened to the database:
const mongoose = require('mongoose')
const Grid = require('gridfs-stream');
mongoose.connect('mongodb://localhost/catalog');
var connection = mongoose.connection;
var gfs = Grid(connection.db, mongoose.mongo);
Reading and writing into the stream is done through the createReadStream() and createWriteStream() functions. Each piece of data streamed into the database must have an ObjectId attribute set. The ObjectId identifies binary data entry uniquely, just as it would have identified any other document in MongoDB; using this ObjectId, we can find or delete it from the MongoDB collection by this identifier.
Let's extend the catalog service with functions for fetching, adding, and deleting an image assigned to an item. For simplicity, the service will support a single image per item, so there will be a single function responsible for adding an image. It will overwrite an existing image each time it is invoked, so an appropriate name for it is saveImage:
exports.saveImage = function(gfs, request, response) {
var writeStream = gfs.createWriteStream({
filename : request.params.itemId,
mode : 'w'
});
writeStream.on('error', function(error) {
response.send('500', 'Internal Server Error');
console.log(error);
return;
})
writeStream.on('close', function() {
readImage(gfs, request, response);
});
request.pipe(writeStream);
}
As you can see, all we need to do to flush the data in MongoDB is to create a GridFS write stream instance. It requires some options that provide the ObjectId of the MongoDB entry and some additional metadata, such as a title as well as the writing mode. Then, we simply call the pipe function of the request. Piping will result in flushing the data from the request to the write stream, and, in this way, it will be safely stored in MongoDB. Once stored, the close event associated with the writeStream will occur, and this is when our function reads back whatever it has stored in the database and returns that image in the HTTP response.
Retrieving an image is done the other way around—a readStream is created with options, and the value of the _id parameter should be the ObjectId of the arbitrary data, optional file name, and read mode:
function readImage(gfs, request, response) {
var imageStream = gfs.createReadStream({
filename : request.params.itemId,
mode : 'r'
});
imageStream.on('error', function(error) {
console.log(error);
response.send('404', 'Not found');
return;
});
response.setHeader('Content-Type', 'image/jpeg');
imageStream.pipe(response);
}
Before piping the read stream to the response, the appropriate Content-Type header has to be set so that the arbitrary data can be presented to the client with an appropriate image media type, image/jpeg, in our case.
Finally, we export from our module a function for fetching the image back from MongoDB. We will use that function to bind it to the express route that reads the image from the database:
exports.getImage = function(gfs, itemId, response) {
readImage(gfs, itemId, response);
};
Deleting arbitrary data from MongoDB is also straightforward. You have to delete the entry from two internal MongoDB collections, the fs.files, where all the files are kept, and from the fs.files.chunks:
exports.deleteImage = function(gfs, mongodb, itemId, response) {
console.log('Deleting image for itemId:' + itemId);
var options = {
filename : itemId,
};
var chunks = mongodb.collection('fs.files.chunks');
chunks.remove(options, function (error, image) {
if (error) {
console.log(error);
response.send('500', 'Internal Server Error');
return;
} else {
console.log('Successfully deleted image for item: ' + itemId);
}
});
var files = mongodb.collection('fs.files');
files.remove(options, function (error, image) {
if (error) {
console.log(error);
response.send('500', 'Internal Server Error');
return;
}
if (image === null) {
response.send('404', 'Not found');
return;
} else {
console.log('Successfully deleted image for primary item: ' + itemId);
response.json({'deleted': true});
}
});
}
Let's bind the new functionality to the appropriate item route and test it:
router.get('/v2/item/:itemId/image',
function(request, response){
var gfs = Grid(model.connection.db, mongoose.mongo);
catalogV2.getImage(gfs, request, response);
});
router.get('/item/:itemId/image',
function(request, response){
var gfs = Grid(model.connection.db, mongoose.mongo);
catalogV2.getImage(gfs, request, response);
});
router.post('/v2/item/:itemId/image',
function(request, response){
var gfs = Grid(model.connection.db, mongoose.mongo);
catalogV2.saveImage(gfs, request, response);
});
router.post('/item/:itemId/image',
function(request, response){
var gfs = Grid(model.connection.db, mongoose.mongo);
catalogV2.saveImage(gfs, request.params.itemId, response);
});
router.put('/v2/item/:itemId/image',
function(request, response){
var gfs = Grid(model.connection.db, mongoose.mongo);
catalogV2.saveImage (gfs, request.params.itemId, response);
});
router.put('/item/:itemId/image',
function(request, response){
var gfs = Grid(model.connection.db, mongoose.mongo);
catalogV2.saveImage(gfs, request.params.itemId, response);
});
router.delete('/v2/item/:itemId/image',
function(request, response){
var gfs = Grid(model.connection.db, mongoose.mongo);
catalogV2.deleteImage(gfs, model.connection,
request.params.itemId, response);
});
router.delete('/item/:itemId/image',
function(request, response){
var gfs = Grid(model.connection.db, mongoose.mongo);
catalogV2.deleteImage(gfs, model.connection, request.params.itemId, response);
});
Let's start Postman and post an image to an existing item, assuming that we have an item with ID 14 /catalog/v2/item/14/image:
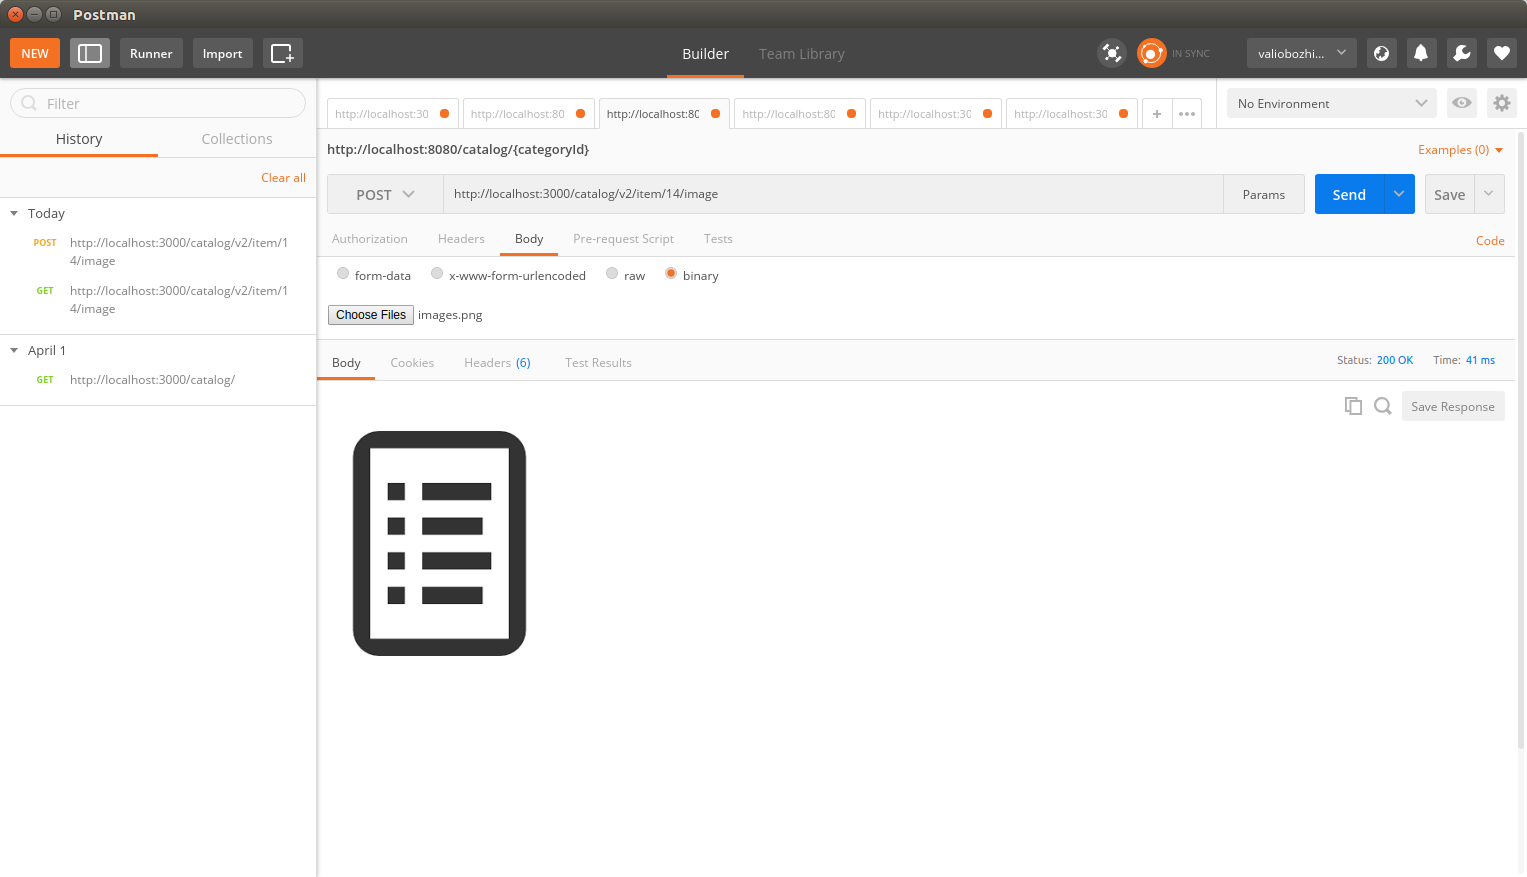
After the request is processed, the binary data is stored in the grid datastore and the image is returned in the response.
In the Linked data section of the previous chapter, we defined that if an item in the catalog has an image assigned to it, this will be indicated with an HTTP header named Image-URL.
Let's modify the findItemById function in the V2 of the catalog. We will use the GridFS's existing function to check whether there is an image bound to the selected item; in case there is an image assigned to the item, its URL will be available to the response with the Image-Url header:
exports.findItemById = function (gfs, request, response) {
CatalogItem.findOne({itemId: request.params.itemId}, function(error, result) {
if (error) {
console.error(error);
response.writeHead(500, contentTypePlainText);
return;
} else {
if (!result) {
if (response != null) {
response.writeHead(404, contentTypePlainText);
response.end('Not Found');
}
return;
}
var options = {
filename : result.itemId,
};
gfs.exist(options, function(error, found) {
if (found) {
response.setHeader('Content-Type', 'application/json');
var imageUrl = request.protocol + '://' + request.get('host') + request.baseUrl + request.path + '/image';
response.setHeader('Image-Url', imageUrl);
response.send(result);
} else {
response.json(result);
}
});
}
});
}
So far, we linked an item to its image; however, that leaves our data partially linked, as there is a link from an item to its image but not the other way around. Let's change that and supply a header Item-Url to the image response by modifying the readImage function:
function readImage(gfs, request, response) {
var imageStream = gfs.createReadStream({
filename : request.params.itemId,
mode : 'r'
});
imageStream.on('error', function(error) {
console.log(error);
response.send('404', 'Not found');
return;
});
var itemImageUrl = request.protocol + '://' + request.get('host') + request.baseUrl+ request.path;
var itemUrl = itemImageUrl.substring(0, itemImageUrl.indexOf('/image'));
response.setHeader('Content-Type', 'image/jpeg');
response.setHeader('Item-Url', itemUrl);
imageStream.pipe(response);
}
Now requesting the item at http://localhost:3000/catalog/v2/item/3/ will return the item encoded in the JSON format:
GET http://localhost:3000/catalog/v2/item/3/image HTTP/1.1
Accept-Encoding: gzip,deflate
Host: localhost:3000
HTTP/1.1 200 OK
X-Powered-By: Express
Content-Type: application/json; charset=utf-8
Image-Url: http://localhost:3000/catalog/v2/item/3/image
Content-Length: 137
Date: Tue, 03 Apr 2018 19:47:41 GMT
Connection: keep-alive
{
"_id": "5ab827f65d61450e40d7d984",
"itemId": "3",
"itemName": "Sports Watch 11",
"price": 99,
"currency": "USD",
"__v": 0,
"categories": ["Watches"]
}
Looking into the response headers, we find the Image-Url header its value, http://localhost:3000/catalog/v2/item/3/image provides the URL of the image linked to the item.
Requesting that image results in the following:
GET http://localhost:3000/catalog/v2/item/3/image HTTP/1.1
Host: localhost:3000
Connection: Keep-Alive
HTTP/1.1 200 OK
X-Powered-By: Express
Content-Type: image/jpeg
Item-Url: http://localhost:3000/catalog/v2/item/3
Connection: keep-alive
Transfer-Encoding: chunked
<BINARY DATA>
This time, the response provides the payload of the image linked to the item and a special header Item-Url. Its value—http://localhost:3000/catalog/v2/item/3—is the address where the item resource is available. Now if the item image appears, for instance, in image search results, the URL of the item linked with the image will also be part of the result. In this way, we linked the two data semantically without modifying or compromising their payload.
Once deployed to the web, each service becomes available to an enormous number of consumers. They will not only use it to get data but also to insert new data. At some point of time, this will inevitably lead to a large amount of data being available in the database. To keep the service user-friendly and maintain a reasonable response time, we need to take care of providing big data in reasonable portions, assuring that it does not need to return a few hundred thousand items when the /catalog URI is requested.
Web data consumers are used to having various pagination and filtering capabilities. Earlier in this chapter, we implemented the findIfindItemsByAttribute() function, which enabled filtering by any of the attributes of an item Now, it's time to introduce pagination capabilities to enable navigation within the resultset with the help of a URI parameter.
The mongoose.js models can make use of different plugin modules to provide additional functionality on top of them. Such a plugin module is mongoose-paginate. The Express framework also provides a piece of pagination middleware named express-paginate. It provides out-of-the-box linking and navigation with Mongoose's result pages:
npm install -g -s express-paginate npm install -g -s mongoose-paginate
expressPaginate = require('express-paginate');
app.use(expressPaginate.middleware(limit, maxLimit);
var mongoose = require('mongoose');
var mongoosePaginate = require('mongoose-paginate');
var Schema = mongoose.Schema;
mongoose.connect('mongodb://localhost/catalog');
var itemSchema = new Schema ({
"itemId" : {type: String, index: {unique: true}},
"itemName": String,
"price": Number,
"currency" : String,
"categories": [String]
});
console.log('paginate');
itemSchema.plugin(mongoosePaginate);
var CatalogItem = mongoose.model('Item', itemSchema);
module.exports = {CatalogItem : CatalogItem, connection : mongoose.connection};
CatalogItem.paginate({}, {page:request.query.page, limit:request.query.limit},
function (error, result){
if(error) {
console.log(error);
response.writeHead('500',
{'Content-Type' : 'text/plain'});
response.end('Internal Server Error');
} else {
response.json(result);
}
});
The first parameter is the filter that Mongoose should use for its query. The second parameter is an object specifying which page is requested and the entries per page. The third parameter is a callback-handler function, providing the result and any available error information via its parameters:
The express-paginate middleware enables seamless integration of the mongoose-paginate module in the web environment by enriching the request and response objects of an Express handler function.
The request objects get two new attributes: query.limit, which tells the middleware the number of entries on the page, and query.page, which specifies the requested page. Note that the middleware will ignore values of query.limit that are larger than the maxLimit value specified at the middleware's initialization. This prevents the consumer from overriding the maximum limit and gives you total control over your application.
Here's the implementation of the paginate function in the second version of the catalog module:
exports.paginate = function(model, request, response) {
var pageSize = request.query.limit;
var page = request.query.page;
if (pageSize === undefined) {
pageSize = 100;
}
if (page === undefined) {
page = 1;
}
model.paginate({}, {page:page, limit:pageSize},
function (error, result){
if(error) {
console.log(error);
response.writeHead('500',
{'Content-Type' : 'text/plain'});
response.end('Internal Server Error');
}
else {
response.json(result);
}
});
}
The following is the response from querying a dataset containing 11 items with a limit of five items per page:
{
"docs": [
{
"_id": "5a4c004b0eed73835833cc9a",
"itemId": "1",
"itemName": "Sports Watch 1",
"price": 100,
"currency": "EUR",
"__v": 0,
"categories": [
"Watches",
"Sports Watches"
]
},
{
"_id": "5a4c0b7aad0ebbce584593ee",
"itemId": "2",
"itemName": "Sports Watch 2",
"price": 100,
"currency": "USD",
"__v": 0,
"categories": [
"Sports Watches"
]
},
{
"_id": "5a64d7ecfa1b585142008017",
"itemId": "3",
"itemName": "Sports Watch 3",
"price": 100,
"currency": "USD",
"__v": 0,
"categories": [
"Watches",
"Sports Watches"
]
},
{
"_id": "5a64d9a59f4dc4e34329b80f",
"itemId": "8",
"itemName": "Sports Watch 4",
"price": 100,
"currency": "EUR",
"__v": 0,
"categories": [
"Watches",
"Sports Watches"
]
},
{
"_id": "5a64da377d25d96e44c9c273",
"itemId": "9",
"itemName": "Sports Watch 5",
"price": 100,
"currency": "USD",
"__v": 0,
"categories": [
"Watches",
"Sports Watches"
]
}
],
"total": 11,
"limit": "5",
"page": "1",
"pages": 3
}
The docs attribute contains all the items that are part of the results. Its size is the same as the selected limit value. The pages attribute provides the total number of pages; in the example here, its value is 3, as 11 items are accommodated in three pages, each containing five items. The Total attribute gives us the total number of items.
The final step to enable pagination is to modify the /v2/ route to start making use of the newly created function:
router.get('/v2/', function(request, response) {
var getParams = url.parse(request.url, true).query;
if (getParams['page'] !=null) {
catalogV2.paginate(model.CatalogItem, request, response);
} else {
var key = Object.keys(getParams)[0];
var value = getParams[key];
catalogV2.findItemsByAttribute(key, value, response);
}
});
We will use the HTTP 302 Found status for the default route, /catalog. In this way, all incoming requests will be redirected to /v2/:
router.get('/', function(request, response) {
console.log('Redirecting to v2');
response.writeHead(302, {'Location' : '/catalog/v2/'});
response.end('Version 2 is is available at /catalog/v2/: ');
});
Using an appropriate status code for redirection here is vital to the life cycle of any RESTful web service. Returning 302 Found, followed by a redirection, ensures that the consumer of the API will always have its latest version available at that location. Furthermore, it is also a good practice from the development point of view to use redirection instead of code duplication here.
When you are between two versions, you should always consider using the HTTP 301 Moved Permanently status to show where the previous version has been moved and the HTTP 302 Found status to show the actual URI of the current version.
Now, getting back to pagination, as the requested page and the limit number are provided as GET parameters and we don't want to mix that up with the filtering capabilities, there is an explicit check for them. Pagination will be used only when either the page or the limit GET parameters, are available in the request. Otherwise, searching will be carried out.
Initially, we set the maximum limit of 100 results and a default limit of 10, so, before trying the new pagination functionality, ensure that you insert more items than the default limit into the database. This will make the test results more obvious.
Now, let's give it a try. Requesting /catalog?limit=3 will result in returning a list containing only two items, as shown:
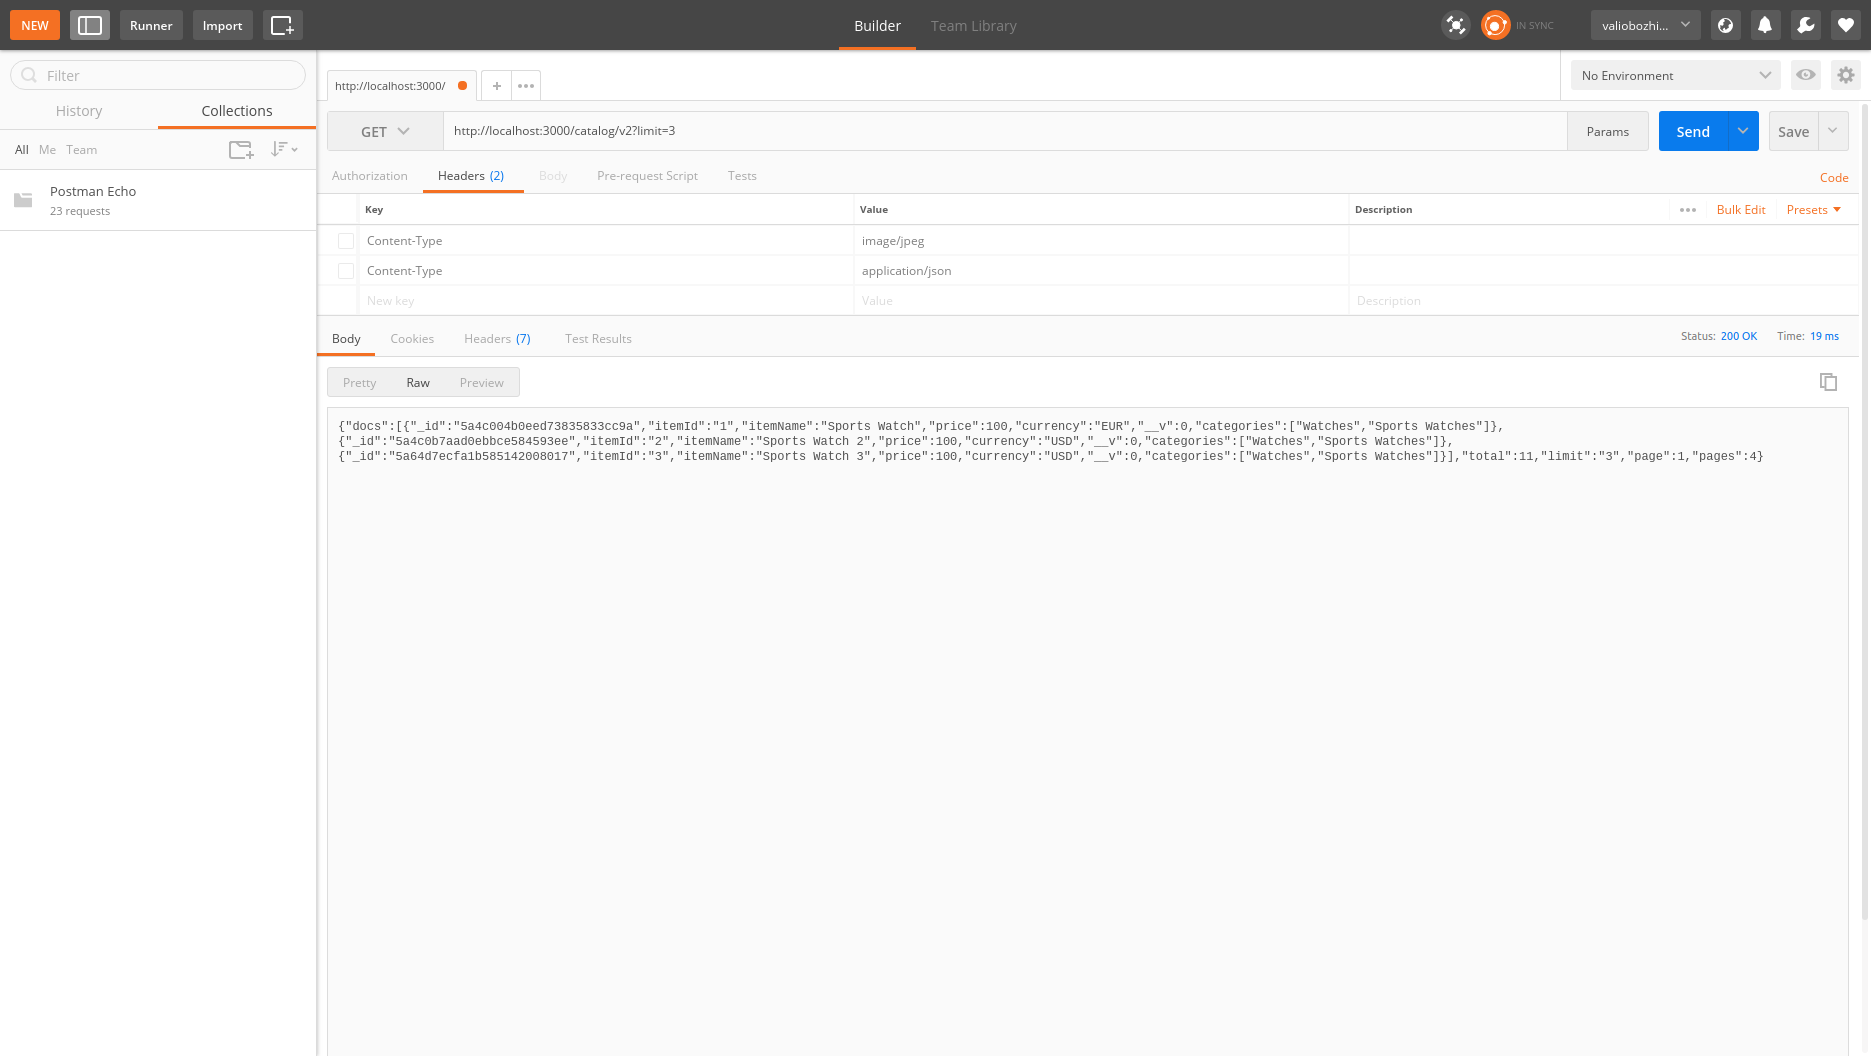
As you can see from the example, the total number of pages is four. The total number of items is stored in the database 11. Since we didn't specify a page parameter in the request, the pagination implicitly returned the first page. To navigate to the next page, simply add &page=2 to the URI.
Also, try changing the limit attribute, requesting /catalog/v2?limit=4. This will return the first four items, and the response will show that the total number of pages is three.
When we discussed the REST principles defined by Roy Fielding, we mentioned that caching was a rather sensitive topic. In the end, our consumers will expect up-to-date results when executing a query. However, from a statistical point of view, data exposed in the web is more likely to be read rather than updated or deleted.
So, it is reasonable that some resources exposed by a public URL become a subject of millions of requests, considering taking off part of the load from the server to a cache. The HTTP protocol allows us to cache some responses for a given period of time. For instance, when multiple requests are received in a short period of time, querying for all items in the catalog of a given group, such as /catalog/v2, our service can utilize special HTTP headers that would force the HTTP server to cache the response for a defined time period. This would prevent redundant requests to the underlying database server.
Caching at the HTTP server level is achieved via special response headers. The HTTP server uses a Cache-Control header to specify how long a given response should be cached for. The period before the cache needs invalidation is set via its max-age attribute, and its value is provided in seconds. Of course, there is a nice Node.js module that provides a middleware function for caching, called express-cache-control.
Let's install it with the NPM package manager; once again, we will install it globally and make use of the -s option, which will update the package.json file with the new express-cache-control dependency automatically:
npm install -g -s express-cache-control
Enabling caching with the express-cache-control middleware requires three straightforward steps:
CacheControl = require("express-cache-control")
var cache = new CacheControl().middleware;
router.get('/v2/', cache('minutes', 1), function(request, response) {
var getParams = url.parse(request.url, true).query;
if (getParams['page'] !=null || getParams['limit'] != null) {
catalogV2.paginate(model.CatalogItem, request, response);
} else {
var key = Object.keys(getParams)[0];
var value = getParams[key];
catalogV2.findItemsByAttribute(key, value, response);
}
});
Let's test our changes by requesting /catalog/v2 in Postman:
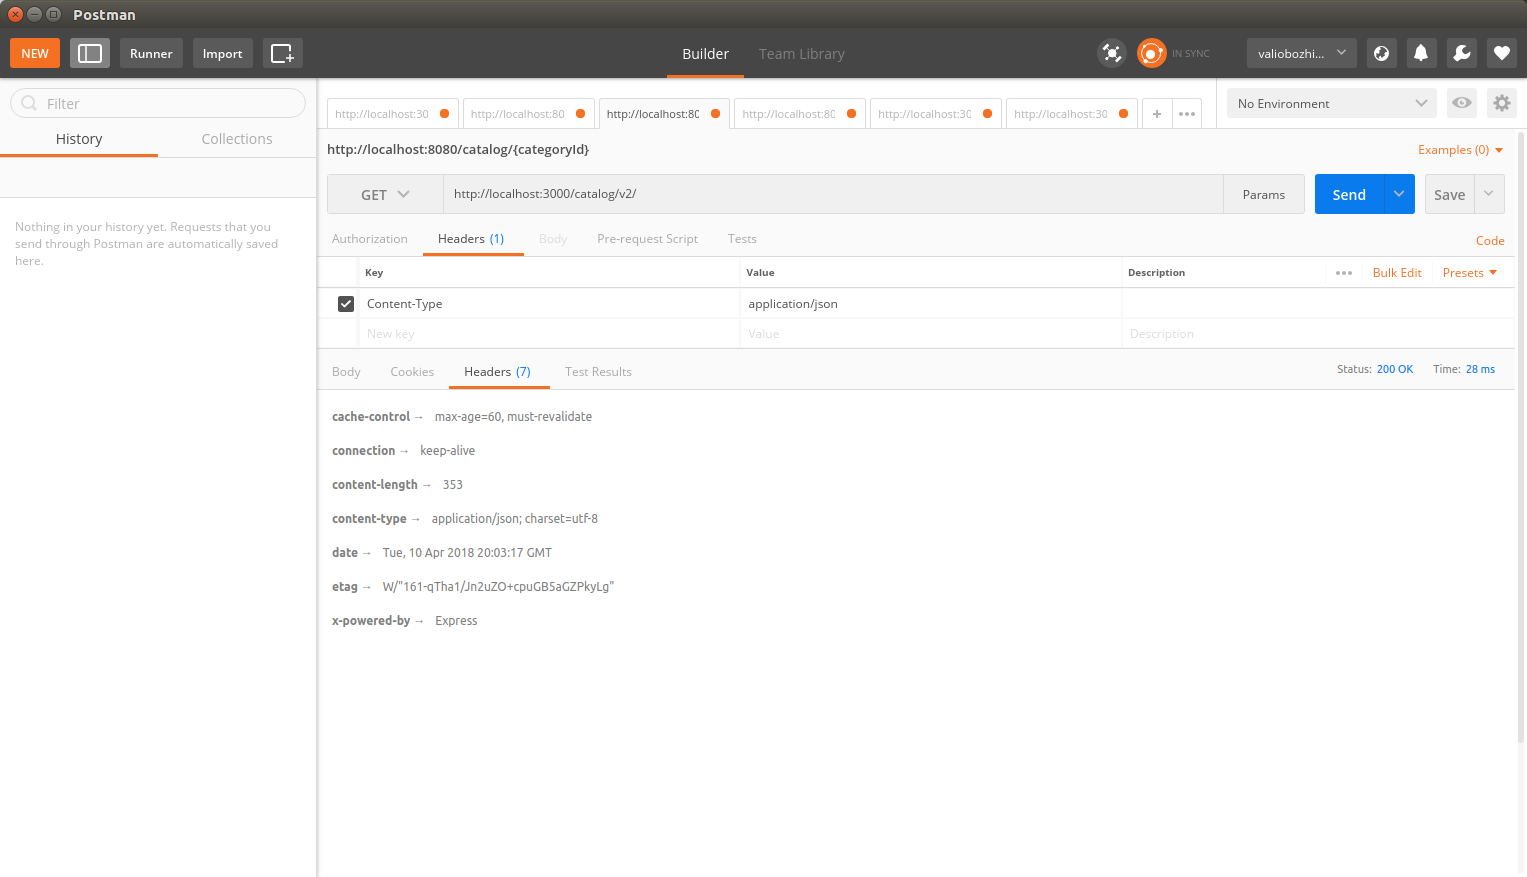
As expected, the express-cache-control middleware has done its job—the Cache-Control header is now included in the response. The must-revalidate option ensures that the cache content is invalidated after the max-age interval expires. Now, if you make another request for a specific item, you will see that the response does not make use of the express-cache-control middleware, which is because it needs to be explicitly provided in each individual route. It will not be used in URIs deriving from one another.
Responses from GET requests against any route /v1/ will not contain the Cache-Control header, as it is supported only in Version 2 of our API, and the Cache-Control middleware is used only in the main catalog routes: /catalog/v2/ or /catalog.
The topic of discovering RESTful services has a long and complicated history. The HTTP specification states that a resource should be self-descriptive and that it should be identified uniquely by a URI. Dependent resources should be linked by the dependency using their own unique URIs. Discovering a RESTful service means navigating from one service to another, following the links it provides.
In the year 2009, a specification called Web Application Discovery Language (WADL) was invented. It aims to document every URI exposed from a web application, along with the HTTP methods it supports and the parameter it expects. The response media type of the URI is also described. This is very useful for documenting purposes, and it's all that a WADL file can provide us in terms of RESTful service provisioning.
Unfortunately, there is currently no Node.js module that can automatically generate a WADL file for a given express route. We will have to manually create a WADL file to demonstrate how it is used by other clients for discovery.
The following listing shows a sample WADL file describing the resources available at /catalog, /catalog/v2/{categoryId}:
<?xml version="1.0" encoding="UTF-8"?>
<application xmlns="http://wadl.dev.java.net/2009/02" xmlns:service="http://localhost:8080/catalog/" xmlns:xsd="http://www.w3.org/2001/XMLSchema">
<grammer>
<include href="items.xsd" />
<include href="error.xsd" />
</grammer>
<resources base="http://localhost:8080/catalog/">
<resource path="{categoryId}">
<method name="GET">
<request>
<param name="category" type="xsd:string" style="template" />
</request>
<response status="200">
<representation mediaType="application/xml" element="service:item" />
<representation mediaType="application/json" />
</response>
<response status="404">
<representation mediaType="text/plain" element="service:item" />
</response>
</method>
</resource>
<resource path="/v2/{categoryId}">
<method name="GET">
<request>
<param name="category" type="xsd:string" style="template" />
</request>
<response status="200">
<representation mediaType="application/xml" element="service:item" />
<representation mediaType="application/json" />
</response>
<response status="404">
<representation mediaType="text/plain" element="service:item" />
</response>
</method>
</resource>
</resources>
</application>
As you can see, the WADL format is very straightforward. It basically describes the URI of each resource, providing information about the media types it uses and the status codes that are expected at that URI. Many third-party RESTful clients understand the WADL language and can generate request messages out of a given WADL file.
Let's import the WADL file in Postman. Click on the Import button and select your WADL file:
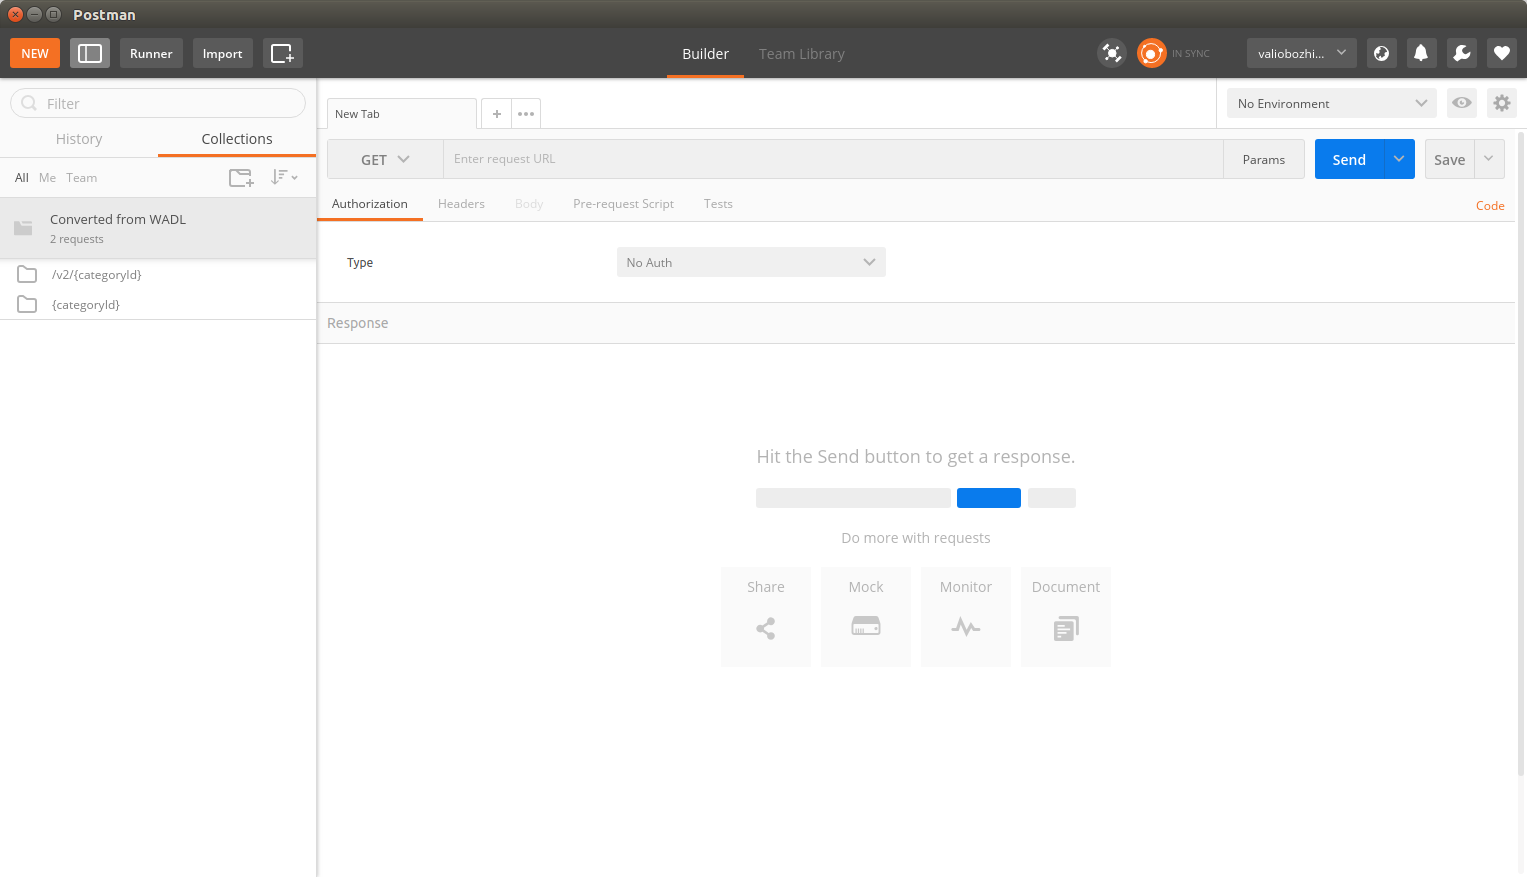
As you can see, the result of importing the WADL file is that we have a project ready to test each aspect of a REST service in the nick of time. All the routes defined in the WADL file are now conveniently available as separate request entities on the right menu. That's not all; apart from the WADL standard, currently the swagger documentation format is heavily adopted and has become an informal standard for describing RESTful services, so we can also use it to ease the adoption and discovery of our service. In the next chapter, we will bind these description files to our service. This is an important step in the phase of production preparation.
Congratulations! In this chapter, you succeeded in transforming a sample REST-enabled endpoint into a full-fledged RESTful web service that supports filtering for usability and paging for easy navigation. The service delivers both arbitrary and JSON data, and it is ready for high-load scenarios, as it enables caching in its critical parts. One thing that should draw your attention is the appropriate usage of the HTTP status codes when it comes to redirection between new and obsolete versions of any public API.
Implementing appropriate HTTP status is really important for the REST application, so we made use of rather exotic statuses, such as 301 Moved Permanently and 302 Found.
To demonstrate some more advanced topics related to the consumption of our API, we will implement a really simple web client. It will help us cover those topics, and it can serve as a reference implementation for the catalog's consumers. For this frontend client, we will use the famous JavaScript library, jQuery. Utilizing it will help us cover the following:
JQuery is a fast, light, and powerful JavaScript library; it eliminates DOM-related complexity by providing direct access to HTML elements once the DOM three has been loaded. To use jQuery within an HTML document, you have to import it:
<script type="text/javascript" src="https://code.jquery.com/jquery-3.3.1.min.js "></script>
Assume that somewhere within an HTML document, there is a button defined as <input type="button" id="btnDelete" value="Delete"/>.
To assign a function to the click event of this button with JQuery means we need to do the following:
$(document).ready(function() {
$('#btn').click(function () {
alert('Clicked');
});
});
The $('#identifier') expression provides direct access to elements in DOM three, $ states that an object is referenced, and the value within the bracket, prefix by # specifies its identifier. jQuery will have access to the element only after the entire document has been loaded; that's why elements should be accessed within ${document).ready() block scope.
Similarly, you can access the value of a text input with an identifier txt:
$(document).ready(function() {
var textValue = $('#txt').val();
});
});
The $(document) object is predefined in jQuery and represents the entire DOM document of the HTML page. In a similar way, jQuery predefines a function for AJAX-enabled communication, that is, for sending HTTP request to an HTTP endpoint. This function is named after Asynchronous JavaScript + XML- AJAX, which was the de facto standard that enabled a JavaScript application to communicate with HTTP-enabled backends. Nowadays, JSON is being widely used; however, naming conversion for AJAX is still used as a term for asynchronous communication, regardless of the data format; that is why the predefined function in jQuery is called $.ajax(options, handlers).
To send an http request with the $.ajax function, invoke it by providing the endpoint URL, http method for the request, and its content type; the result will be returned in a callback function. The following example shows how an item with identifier 3 is requested from our catalog:
$.ajax({
contentType: 'application/json',
url: 'http://localhost:3000/catalog/v2/item/3',
type: 'GET',
success: function (item, status, xhr) {
if (status === 'success') {
//the item is successfully retrieved load & display its details here
}
}
,error: function (xhr, options, error) {
//Item was not retrieved due to an error handle it here
}
});
});
Posting data to an endpoint is rather similar:
$.ajax({
url: "http://localhost:3000/catalog/v2/",
type: "POST",
dataType: "json",
data: JSON.stringify(newItem),
success: function (item, status, xhr) {
if (status === 'success') {
//item was created successfully
}
},
error: function(xhr, options, error) {
//Error occurred while creating the iteam
}
});
Simply use the appropriate options type set to POST, and the dateType set to JSON. Those will specify that a POST request is to be sent to the endpoint in the JSON format. The payload of the object is provided as a value to the data attribute.
Invoking a delete method is quite similar:
$.ajax({
contentType: 'application/json',
url: 'http://localhost:3000/catalog/v2/item/3',
type: 'DELETE',
success: function (item, status, xhr) {
if (status === 'success') {
//handle successful deletion
}
}
,error: function (xhr, options, error) {
//handle errors on delete
}
});
A basic understanding of how jQuery works is just about fine for the scope of this book. Now, let's glue all this together and create two HTML pages; that way, we will handle creating, displaying, and deleting an item in our catalog, starting with the page that displays an item and allows its deletion. This page loads an item from the catalog using GET request, and then displays the item's attributes in the HTML page in a table-like manner:
<html>
<head><title>Item</title></head>
<body>
<script type="text/javascript" src="https://code.jquery.com/jquery-3.3.1.min.js "></script>
<script>
$(document).ready(function() {
$('#btnDelete').click(function () {
$.ajax({
contentType: 'application/json',
url: 'http://localhost:3000/catalog/v2/item/3',
type: 'DELETE',
success: function (item, status, xhr) {
if (status === 'success') {
$('#item').text('Deleted');
$('#price').text('Deleted');
$('#categories').text('Deleted');
}
}
,error: function (xhr, options, error) {
alert('Unable to delete item');
}
});
});
$.ajax({
contentType: 'application/json',
url: 'http://localhost:3000/catalog/v2/item/3',
type: 'GET',
success: function (item, status, xhr) {
if (status === 'success') {
$('#item').text(item.itemName);
$('#price').text(item.price + ' ' + item.currency);
$('#categories').text(item.categories);
}
}
,error: function (xhr, options, error) {
alert('Unable to load details');
}
});
});
</script>
<div>
<div style="position: relative">
<div style="float:left; width: 80px;">Item: </div>
<div><span id="item"/>k</div>
</div>
<div style="position: relative">
<div style="float:left; width: 80px;">Price: </div>
<div><span id="price"/>jjj</div>
</div>
<div style="position: relative">
<div style="float:left; width: 80px;">Categories: </div>
<div><span id="categories"/>jjj</div>
</div>
<div><input type="button" id="btnDelete" value="Delete"/></div>
</div>
</body>
</html>
The page that handles creation is quite similar. However, it provides text inputs instead of span labels for an item's fields, where the view page will display the data for the attributes of the loaded item. JQuery provides a simplified access model to the input controls, rather than DOM—simply access the input element as follows:
<html>
<head><title>Item</title></head>
<body>
<script type="text/javascript" src="https://code.jquery.com/jquery-3.3.1.min.js "></script>
<script>
$(document).ready(function() {
$('#btnCreate').click(function(){
var txtItemName = $('#txtItem').val();
var txtItemPrice = $('#txtItemPrice').val();
var txtItemCurrency = $('#txtItemCurrency').val();
var newItem = {
itemId: 4,
itemName: txtItemName,
price: txtItemPrice,
currency: txtItemCurrency,
categories: [
"Watches"
]
};
$.ajax({
url: "http://localhost:3000/catalog/v2/",
type: "POST",
dataType: "json",
data: JSON.stringify(newItem),
success: function (item, status, xhr) {
alert(status);
}
});
})
});
</script>
<div>
<div style="position: relative">
<div style="float:left; width: 80px;">Id: </div>
<div><input type="text" id="id"/></div>
<div style="float:left; width: 80px;">Item: </div>
<div><input type="text" id="txtItem"/></div>
</div>
<div style="position: relative">
<div style="float:left; width: 80px;">Price: </div>
<div><input type="text" id="price"/></div>
</div>
<div style="position: relative">
<div style="float:left; width: 80px;">Categories: </div>
<div><input type="text" id="categories"/></div>
</div>
<div><input type="button" id="btnCreate" value="Create"/></div>
</div>
</body>
</html>
Let's give that a try and load an existing item in the view page by opening our static page directly from the filesystem in a browser of your choice. It looks as if we have some kind of a problem, as nothing gets displayed. Enabling client-side debugging using the browser's developer suite doesn't give much more information either:
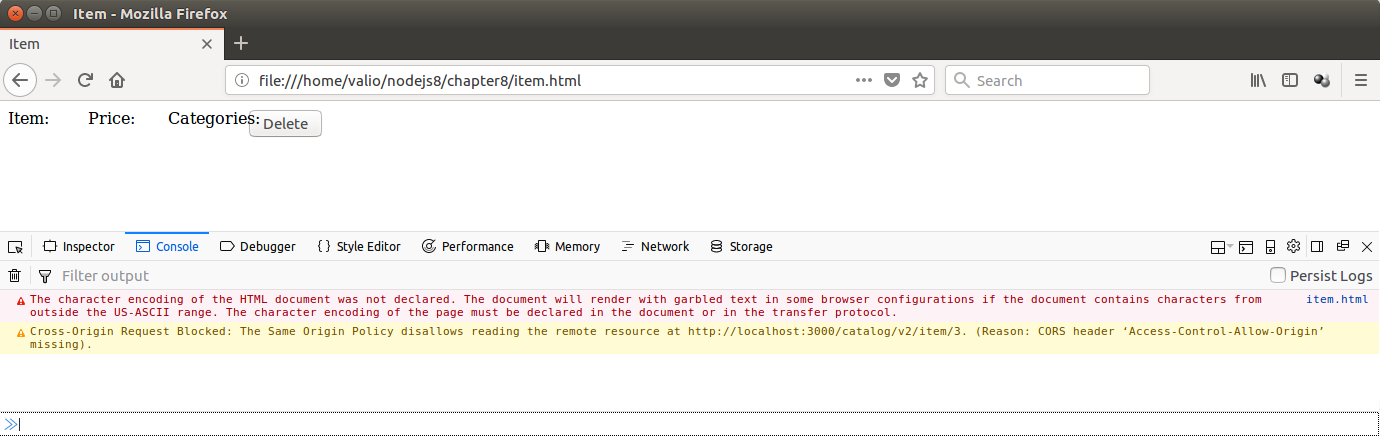
It states that the content is partially blocked; however, it is not quite clear whether this is due to a backend-related error, or something has gone wrong on the client side. We will look at how to troubleshoot such problematic situations in the next section.
Sometimes the interaction between the client and the server fails, and the reason for such failures often requires analysis; otherwise, their root cause stays unknown. We spotted that our client application does not load and thus doesn't display data for an existing item. Let's try to investigate the root cause for that by setting up an http tunnel between the client and the server. This will be a kind of MiM (man-in-the-middle)-based investigation, as we will listen to one port and redirect the incoming request to another, to see whether the server returns correct responses or its pipe gets broken somewhere in the middle. There are various TCP tunnels available out there; I have been using a simple open source one available on GitHub at https://github.com/vakuum/tcptunnel. Its author also maintains a separate website where you can download prebuilt binaries for the most common operating system; they are available at http://www.vakuumverpackt.de/tcptunnel/.
After you have built or downloaded a copy of the tunnel, start it as follows:
./tcptunnel --local-port=3001 --remote-port=3000 --remote-host=localhost --log
This will start the application listening on port 3001 and will forward each incoming request to location port 3000; the --log option specifies that all the data flow passing the tunnel should be logged in the console. Finally, modify HTML pages to use port 3001 instead of 3000, and let's see what the tunnel would show us after firing new GET request for the item with id 3, this time on port 3001: http://localhost:3001/catalog/v2/item/3:
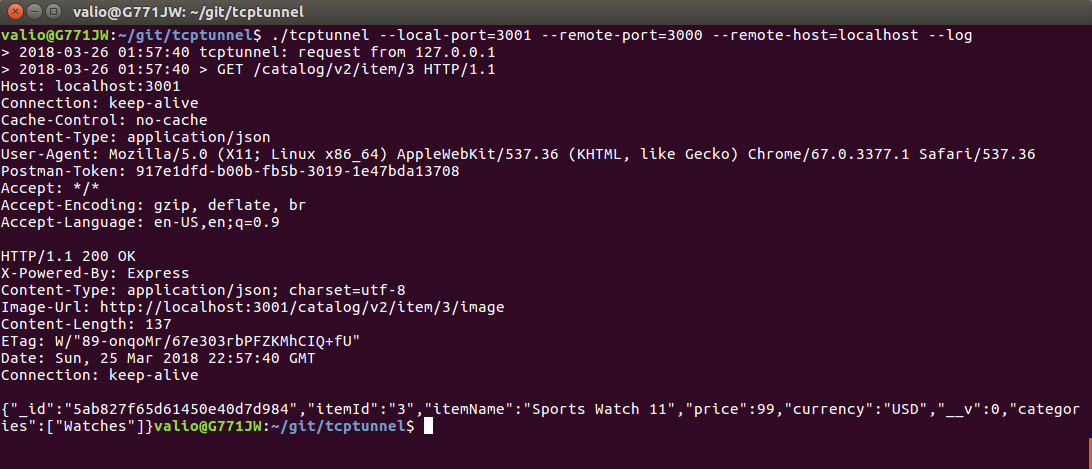
Surprisingly, the tunnel shows that the server responds normally with 200 OK and a relevant payload. So it seems as if the problem is not on the server side.
Well, since the error is obviously not on the server side, let's try to investigate deeper what has happened on the client side. Nowadays, all popular browsers have so-called web developer tools. They provide access to http logs, dynamically-rendered code, the DOM three of the HTML document, and so on. Let's invoke our RESTful GET operation with Mozillas Firefox and see what its web console will log about our request. Open the Mozilla Firefox menu and select Web Developer, and then select Browser Console:
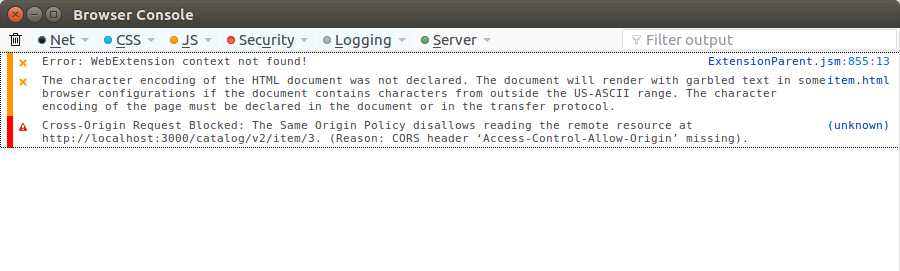
Aha! Seems like we found it: Cross-Origin Request Blocked: The Same Origin Policy disallows reading the remove resource at....
This error is blocking the server-side response at client level. In the next section, we will see what this actually means.
Cross-site HTTP requests are requests that refer to resources to be loaded from a domain different from the one that initially requested them. In our case, we started the client from our filesystem, and it requested resources from a network address. This is considered a potential Cross-site scripting request, which, according to the W3C recommendation at http://w3.org/cors/TR/cors, should be carefully handled. This means that if an external resource is requested, the domain where it is requested from—its Origin—should be explicitly specified in a header, as long as an external resource loading is not allowed in general. This mechanism prevents Cross-Side Scripting (XSS) attacks, and it is based on HTTP headers.
The following HTTP request headers specify how external resources should be handled on the client side:
On the server side, the following headers indicate whether a response is eligible for a CORS-enabled client request:
There are some more Access-Control-* headers that can be used for further granularity when incoming XSS requests are to be served, or not, based on credentials and request's max-age, but basically, the most important ones are for the allowed origin, allowed methods, and allowed headers.
There is a node module that handles CORS configuration at server side; it is installed by npm install -g cors and is easily enabled in our application via a middleware module. Simply use it in all the exposed routes by passing it to the application:
app.use(cors());
Use the tunnel after you enabled the cors middleware to see that the server would now gracefully handle requests from different origins by serving the "Access-Control-Allow-Origin' header set to '*'":
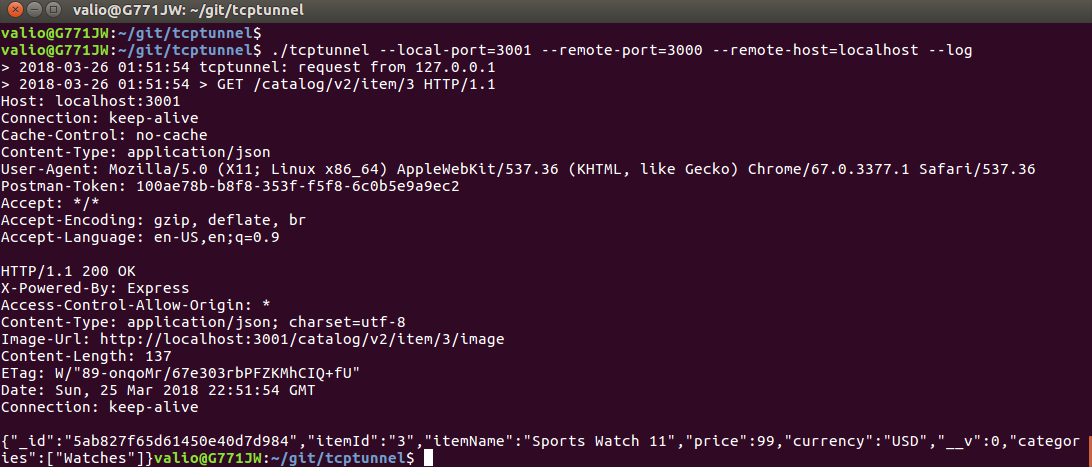
When we imported the jQuery library into our client application, we directly referred to its optimized source from its vendor as <script type="text/javascript" src="https://code.jquery.com/jquery-3.3.1.min.js "/>.
Now, imagine that for some reason this site goes down either temporarily or for good; this will make our application unusable, as the import wouldn't work.
Content Delivery Networks come to help in these cases. They serve as a repository for libraries or other static media content, assuring that the needed resources will be available without downtime, even when something goes wrong with their vendors. One of the most popular JavaScript CDNs is https://cdnjs.com/; it provides the most common JS libraries available out there. We will switch our clients to refer to the jquery library from this CDN rather than from its vendors' website at <script type="text/javascript" src="https://code.jquery.com/jquery-3.3.1.min.js "/>.
While there is hardly anything wrong with directly downloading your JS libraries and placing them in the static directory of your node.js project, it may lead to having local changes and fixes directly in your library dependencies. This can easily result in incompatible changes and can prevent your application from easily switching to newer versions in the future. As long as your dependencies are open source, you should strive to improve them by contributing fixes or reporting bugs rather than having fixes in your own local fork. Still, if you are unfortunate enough to run into a bug that you can easily fix, you can fork the library to resolve your problem faster. However, always consider contributing the fix back to the community. After it is accepted, switch back to the official version; otherwise, you will find yourself in a difficult situation the next time with another issue, and the community would track it much harder if reported from a forked version. That is the beauty of open source, and that is why you should always consider consuming JavaScript APIs' Content Delivery Networks. They will provide you with the stability and support you may need at any point in the life of your application.
We spent quite some time addressing how RESTful services should represent each state, including erroneous ones, gracefully. A well-defined API should demand from its consumers to handle all its errors gracefully and to provide as much information per state as required, rather than just stating "An error has occurred". That is why it should look up the returned status code and clearly distinguish between client requests such as 400 Bad Request or 415 Unsupported media types caused by faulty payload, caused by wrong media types, or authentication-related errors, such as 401 Unauthorized.
The status code of an erroneous response is available in the error callback of the jQuery callback function and should be used to provide detailed information back to the request:
$.ajax({
url: "http://localhost:3000/catalog/v2/",
type: "POST",
dataType: "json",
data: JSON.stringify(newItem),
success: function (item, status, jqXHR) {
alert(status);
},
error: function(jqXHR, statusText, error) {
switch(jqXHR.status) {
case 400: alert('Bad request'); break;
case 401: alert('Unauthroizaed'); break;
case 404: alert('Not found'); break;
//handle any other client errors below
case 500: alert('Internal server error); break;
//handle any other server errors below
}
}
});
Unsuccessful requests are handled by the error callback function. It provides jqXHR - the XmlHttpRequest JavaScript—object as its first argument. It carries across all the request/response related information, such as status code and headers. Use it to determine what the requested server has returned so that your application can handle different errors more granularly.
In this chapter, we implemented a simple web-based client with the jQuery library. We utilized this client to demonstrate how the Cross-Origin Resource Sharing policy works, and we used a man in the middle means to troubleshoot issues on the wire. Finally, we looked at how errors should be handled on the client side. This chapter brings us one step closer to the end of our journey, as we got the first consumer of our service. In the next chapter, we will walk you through the final step before bringing a service to production—choosing its security model.
Once deployed in production, an application is exposed to a large number of requests. Inevitably, some of them will be malicious. This brings the requirement of granting explicit access permissions only to authenticated users, that is, authenticating a selected number of consumers to have access to your service. Most of the consumers will use the service only for data provisioning. However, a few will need to be able to provide new, or modify the existing, catalog data. To ensure that only appropriate consumers will be able to execute the POST, PUT, and DELETE requests, we will have to introduce the concept of authorization into our application, which will grant only explicitly selected users modification permissions.
Data services may provide sensitive private information, such as email addresses; the HTTP protocol, being a text protocol, may not be secure enough. The information transmitted through it is subject to man-in-the-middle attacks, which can lead to data leakage. To prevent such cases, Transport Layer Security (TLS) should be used. The HTTPS protocol encrypts the transmitted data, ensuring that only appropriate consumers who have the right decryption key will be able to consume the data exposed by the service.
In this chapter, we will look at how Node.js enables the following security features:
An application considers a user authenticated when their identity has been successfully validated against a trusted store. Such trusted stores can either be any kind of specially maintained database, storing the credentials of the application (basic authentication), or a third-party service that checks a given identity against its own trusted store (third-party authentication).
HTTP basic authentication is one of the most popular and straightforward authentication mechanisms available out there. It relies on HTTP headers in the request, which provide the user's credentials. Optionally, the server may reply with a header, forcing the clients to authenticate themselves. The following diagram shows a client-server interaction when basic authentication is carried out:
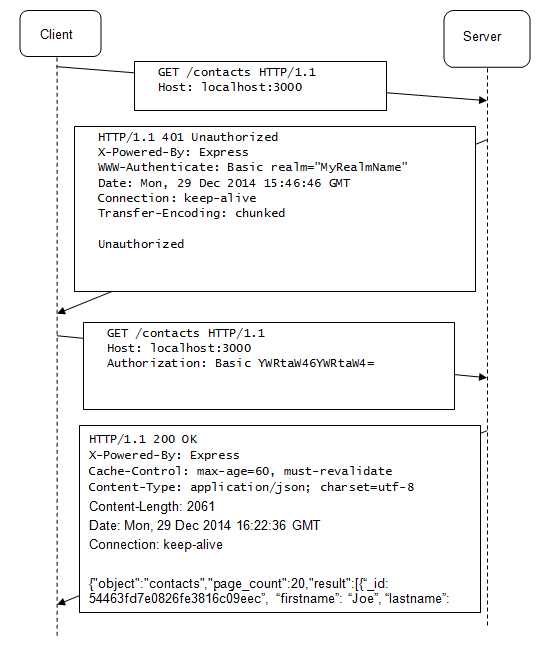
Whenever an HTTP request is sent to an endpoint secured by HTTP basic authentication, the server replies with an HTTP 401 Unauthorized status code, and, optionally, with a WWW-Authenticate header. This header forces the client to send another request, containing the Authorization header, which specifies that the authentication method is basic. This request is followed by a base64-encoded key/value pair, providing the username and the password to authenticate with. Optionally, the server can specify a message to the client with the realm attribute.
This attribute specifies that resources sharing the same realm value should support the same authentication means. In the preceding diagram, the realm message is MyRealmName. The client authenticates by sending the Authentication header with the value of Basic YWRtaW46YWRtaW4, specifying that Basic authentication is used, followed by the base64-encoded value. In the diagram, the literal YWRtaW46YWRtaW4 decoded in base64 represents the admin:admin literal. In case such a username/password combination is successfully authenticated, the HTTP server will respond with the JSON payload of the requested items. If the authentication fails, the server will respond with the 401 Unauthorized status code, but this time without including the WWW-Authenticate header.
There are plenty of authentication methods to choose from nowadays. Perhaps the most popular methods are basic authentication, where each user has their own username and password, and third-party authentication, where users can identify themselves with their already-existing account for an external public service, such as personal social services such as LinkedIn, Facebook, and Twitter.
Choosing the most appropriate type of authentication for a web API depends mainly on its consumers. Apparently, an application consuming an API to fetch data is not likely to authenticate with a personal social account. This approach is more suitable when the API is used via a frontend directly by a human being.
Implementing a solution capable of switching between different authentication methods easily is a complex and time-consuming task. In fact, it can become hardly possible if not considered at the initial design phase of an application.
Passport is a piece of authentication middleware for Node.js, created especially for use-cases where the means of authentication should be easily switched from one to another. It has modular architecture that enables the usage of a specific authentication provider, called strategy. The strategy takes care of implementing a chosen authentication approach.
There are plenty of authentication strategies to choose from, for example, a regular basic authentication strategy or social platform-based strategies for services such as Facebook, LinkedIn, and Twitter. Refer to the official Passport website, http://www.passportjs.org/, for a complete list of the available strategies.
Now it is time to look at how to utilize Passport's strategies; we will start with the basic authentication strategy; it is a logical choice now that we know how basic authentication works.
As usual, we will start by installing the relevant modules with the NPM package manager. We will need the passport module, which provides the base functionality that allows you to plug in different authentication strategies, and a concrete strategy for basic authentication, provided by the passport-http module:
npm install passport npm install passport-http
Next, we have to instantiate both the Passport middleware and the basic authentication strategy. BasicStrategy takes as an argument a callback function, which checks whether the provided username/password combination is valid. Finally, passport's authenticate method is provided as a middleware function to the express route, assuring that unauthenticated requests will be rejected with an appropriate 401 Unauthorized status:
const passport = require('passport');
const BasicStrategy = require('passport-http').BasicStrategy;
passport.use(new BasicStrategy(function(username, password, done) {
if (username == 'user' && password=='default') {
return done(null, username);
}
}));
router.get('/v1/',
passport.authenticate('basic', { session: false }),
function(request, response, next) {
catalogV1.findAllItems(response);
});
router.get('/v2/',
passport.authenticate('basic', { session: false }),
function(request, response, next) {
catalogV1.findAllItems(response);
});
router.get('/',
passport.authenticate('basic', { session: false }),
function(request, response, next) {
catalogV1.findAllItems(response);
});
The BasicStrategy constructor takes a handler function as an argument. It gives us access to the username and password supplied by the client, and to the Passport middleware's done() function, which notifies Passport with whether the user has been successfully authenticated. Invoke the done() function with user as an argument in order to grant authentication, or pass the error argument to it to revoke the authentication:
passport.use(new BasicStrategy(
function(username, password, done) {
AuthUser.findOne({username: username, password: password},
function(error, user) {
if (error) {
return done(error);
} else {
if (!user) {
console.log('unknown user');
return done(error);
} else {
console.log(user.username + '
authenticated successfully');
return done(null, user);
}
}
});
})
);
Finally, use the passort authenticate() function in the router middleware to attach it to a specific HTTP method-handler function.
In our case, we specify that we don't want to store any authentication details in a session. This is because, when using basic authentication, there is no need to store any user information in a session, as each request contains the Authorization header that provides the login details.
OAuth is an open standard for third party authorization, it defines a delegation protocol used fer authorizing against a third party authentication providers. OAuth uses special tokens, once issued, identify the user instead of user credentials. Let's look closer at OAuth workflow, with a sample scenario. The main actors in the scenario are - a user interacting with a web application, which consumes a restful service from a back-end system providing some kind of data. The web application delegates its authorization to a separate third-party authorization server.
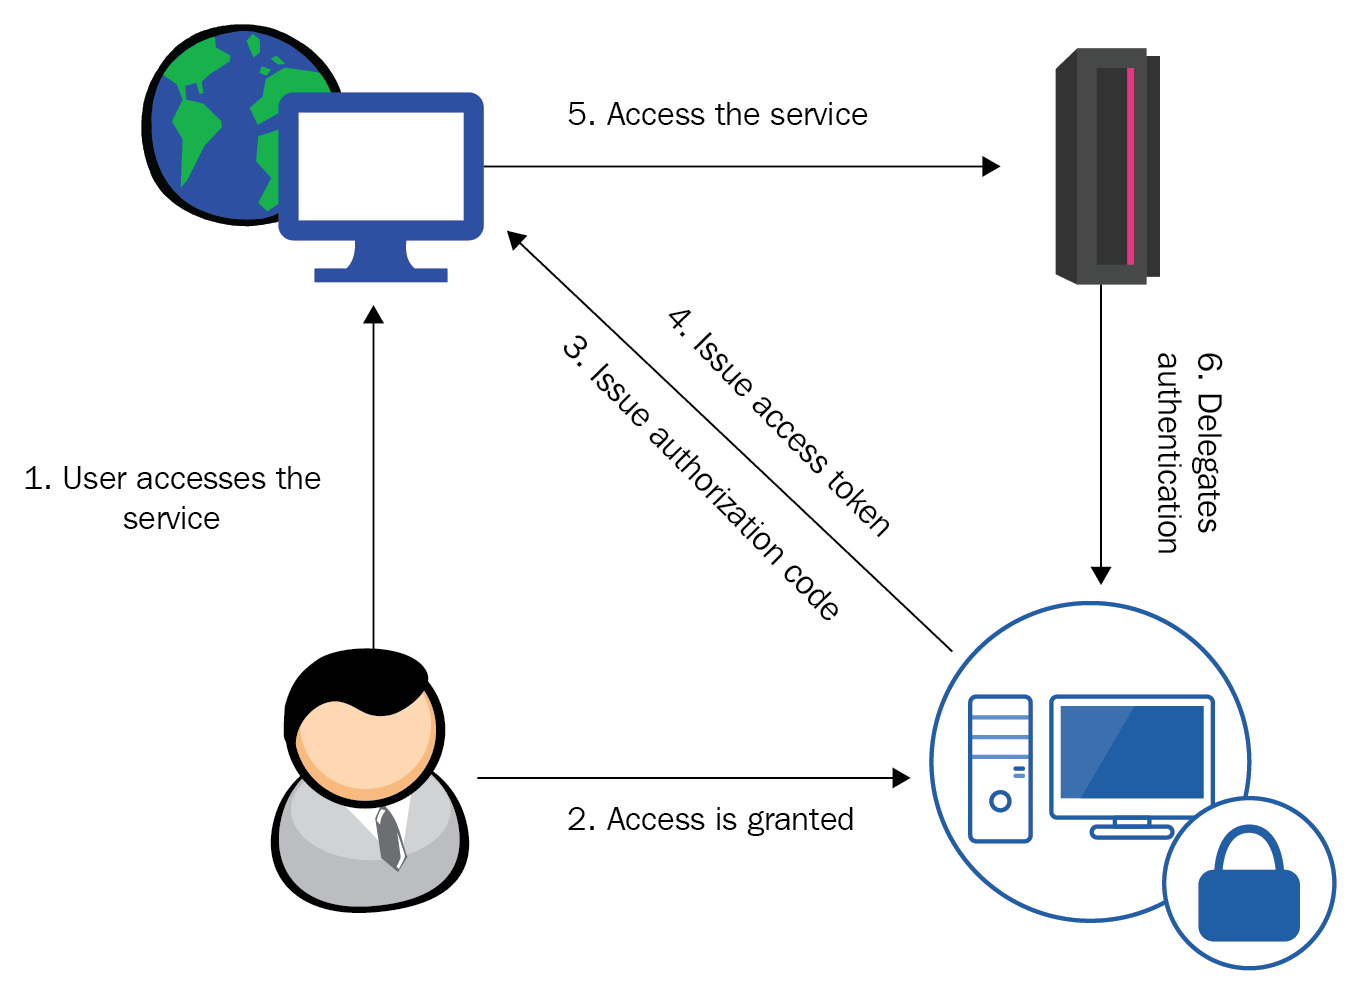
Passport.js hides the complexity behind this process with a separate strategy module automating the OAuth workflow. It is available in the npm repository
npm install passport-oauth
Create an instance of the strategy and supply it with the urls for requesting tokens and for authenticating it together, it is your personal consumer key and a secret phrase of your choice.
var passport = require('passport') , OAuthStrategy = require('passport-oauth').OAuthStrategy; passport.use('provider', new OAuthStrategy({ requestTokenURL: 'https://www.provider.com/oauth/request_token', accessTokenURL: 'https://www.provider.com/oauth/access_token', userAuthorizationURL: 'https://www.provider.com/oauth/authorize', consumerKey: '123-456-789', consumerSecret: 'secret' callbackURL: 'https://www.example.com/auth/provider/callback' }, function(token, tokenSecret, profile, done) {
//lookup the profile and authenticate and call done } ));
Passport.js provides separate strategy wrapping different providers, like linkedin or github. They ensure that your application stays up to date with the token issuing URLs. Once you have made up your mind about the provider you want to support, you should check for specific strategies for them.
Today, almost everyone owns at least one personal public social media account, such as Twitter, Facebook, and LinkedIn. Recently, it has become really popular for websites to allow their visitors to authenticate themselves via one of their social accounts by just clicking on an icon to bind their social service account to a service-internal automatically generated account.
This approach is very convenient for web users who are usually permanently logged into at least one of their accounts. If they are not currently logged in, clicking on an icon will redirect them to their social service login page, and, after a successful login, another redirection takes place, ensuring that the user gets the content they originally requested. When it comes to exposing data via a web API, this approach is not really an option.
Publicly exposed APIs cannot predict whether they are to be consumed by a human or by an application. Also, APIs aren't usually consumed directly by humans. Thus, third-party authentication is the only option when you, as API authors, are convinced that the exposed data will be directly available to the end users who have requested it manually through a frontend from an internet browser. Once they have successfully logged into their social account, a unique user identifier will be stored in a session, so your service will need to be able to handle such sessions appropriately.
To enable session support for storing user login information with Passport and Express, you have to initialize the Express session middleware before initializing Passport and its session middleware:
app.use(express.session()); app.use(passport.initialize()); app.use(passport.session());
Then, specify the user whose details Passport should serialize/deserialize into or out of the session. For that purpose, Passport provides the serializeUser() and deserializeUser() functions, which store complete user information in a session:
passport.serializeUser(function(user, done) { done(null, user); }); passport.deserializeUser(function(obj, done) { done(null, obj); });
After enabling session support, you have to decide which third-party authentication strategy to rely on. Basically, third-party authentication is enabled via a plugin or application created by the third-party provider, for example, a social service site. We will briefly look at creating a LinkedIn application that allows authentication via the OAuth standard.
Usually, this is done via a pair of public key and a secret (token) associated with the social media application. Creating a LinkedIn application is easy—you just have to log into http://www.linkedin.com/secure/developer and fill out a brief application information form. You will be given a secret key and a token to enable the authentication. Perform the following steps to enable LinkedIn authentication:
Install the linkedin-strategy module—npm install linkedin-strategy
Get an instance of the LinkedIn strategy and initialize it to the Passport middleware by the use() function after session support has been enabled:
var passport = require('passport')
, LinkedInStrategy = require('passport-
linkedin').Strategy;
app.use(express.session());
app.use(passport.initialize());
app.use(passport.session());
passport.serializeUser(function(user, done) {
done(null, user);
});
passport.deserializeUser(function(obj, done) {
done(null, obj);
});
passport.use(new LinkedInStragety({
consumerKey: 'api-key',
consumerSecret: 'secret-key',
callbackURL: "http://localhost:3000/catalog/v2"
},
function(token, tokenSecret, profile, done) {
process.nextTick(function () {
return done(null, profile);
});
})
);
Explicitly specify that the LinkedIn strategy should be used as Passport for each individual route, ensuring that session handling is enabled:
router.get('/v2/',
cache('minutes',1),
passport.authenticate('linked', { session: true}),
function(request, response) {
//...
}
});
Provide a means for a user to log out by exposing a logout URI, making use of request.logout:
router.get('/logout', function(req, res){
request.logout();
response.redirect('/catalog');
});
So far, the catalog data service uses basic authentication to protect its routes from unknown users; however, a catalog application should allow only few white-listed users to modify the items inside the catalog. To restrict access to the catalog, we will introduce the concept of authorization, that is, a subset of authenticated users, with appropriate permission allowed.
When Passport's done() function is invoked to authenticate a successful login, it takes as an argument a user instance of the user that has been granted authentication. The done() function adds that user model instance to the request object, and, in this way, provides access to it via the request.user property, after successful authentication. We will make use of that property to implement a function performing the authorization check after successful authentication:
function authorize(user, response) {
if ((user == null) || (user.role != 'Admin')) {
response.writeHead(403, { 'Content-Type' :
'text/plain'});
response.end('Forbidden');
return;
}
}
The authorize() function will close the response stream, returning the 403 Forbidden status code, which indicates that the logged-in user is recognized but has insufficient permissions. This revokes access to the resource. This function has to be used in each route that carries out data manipulation.
Here's an example of how a post route implements authorization:
app.post('/v2',
passport.authenticate('basic', { session: false }),
function(request, response) {
authorize(request.user, response);
if (!response.closed) {
catalogV2.saveItem(request, response);
}
}
);
After authorize() is invoked, we check whether the response object still allows writing to its output by checking the value of the closed property of the response object. It will return true once the end function of the response object has been called, which is exactly what the authorize() function does when the user lacks admin permissions. Thus, we can rely on the closed property in our implementation.
Publicly available information in the web easily becomes the subject of different types of cyber attacks. Often it is not enough just to keep the so-called "bad guys" out. Sometimes, they won't bother gaining authentication at all and may prefer to carry out a man-in-the-middle (MiM) attack, pretending to be the final receiver of a message and sniffing the communication channel that transmits the data—or, even worse, altering the data while it flows.
Being a text-based protocol, HTTP transfers data in a human-readable format, which makes it an easy victim of MiM attacks. Unless transferred in an encrypted format, all the catalog data of our service is vulnerable to MiM attacks. In this section, we will switch our transport from an insecure HTTP protocol to the secure HTTPS protocol.
HTTPS is secured by asymmetric cryptography, also known as public-key encryption. It is based on a pair of keys that are mathematically related. The key used for encryption is called public key, and the key used for decryption is called private key. The idea is to freely provide the encryption key to partners who have to send encrypted messages and to perform decryption with the private key.
A typical public-key encryption communication scenario between two parties, A and B, will be the following:
Party A composes a message, encrypts it with Party B's public key, and sends it
Party B decrypts the message with its own private key and processes it
Party B composes a response message, encrypts it with Party A's public key, and then sends it
Party A decrypts the response message with its own private key
Now that we know how public-key encryption works, let's go through a sample of HTTPS client-server communication, as shown in this diagram:
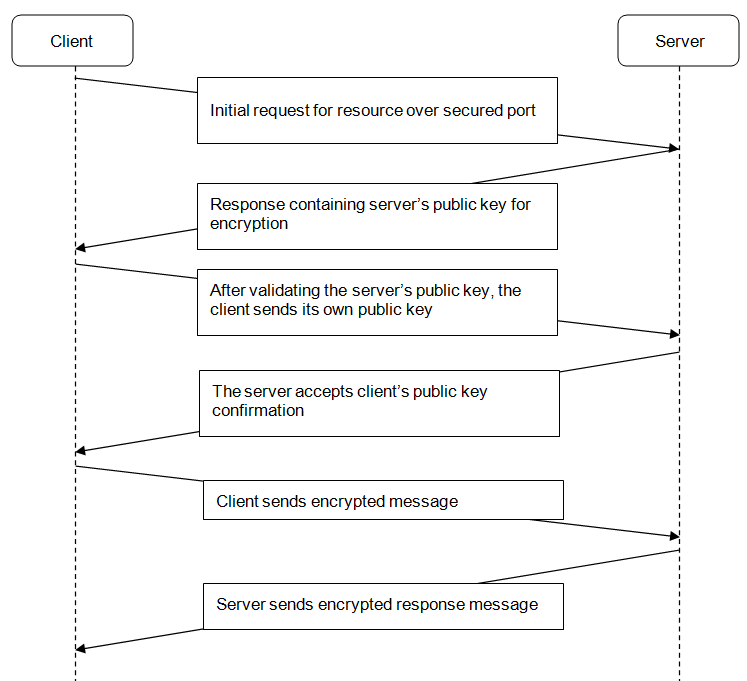
The client sends an initial request against an SSL-secured endpoint. The server responds to that request by sending its public key to be used for encrypting further incoming requests. Then, the client has to check the validity and verify the identity of the received key. After successful verification of the server's public key, the client has to send its own public key back to the server. Finally, after the key exchange procedure is complete, the two parties can start communicating securely.
HTTPS relies on trust; thus, it is vital to have a reliable way of checking whether a specific public key belongs to a specific server. Public keys are exchanged within an X.509 certificate, which has a hierarchical structure. This structure enables clients to check whether a given certificate has been generated from a trusted root certificate. Clients should trust only certificates that have been issued by a known certificate authority (CA).
Before switching our service to use the HTTPS transport, we need a public/private key pair. Since we are not a certificate authority, we will have to use OpenSSL tooling to generate test keys for us.
OpenSSL is available for download at http://www.openssl.org/, where source code distributions are available for all popular operating systems. OpenSSL can be installed as follows:
Binary distribution is available for download for Windows, and Debian and Ubuntu users can make use of the packaged distribution by executing the following:
sudo apt-get install openssl
Now let's generate a test key/value pair with OpenSSL:
opensslreq -x509 -nodes -days 365 -newkey rsa:2048-keyoutcatalog.pem -out catalog.crt
OpenSSL will prompt some details required for generating the certificate, such as country code, city, and fully qualified domain name. Afterward, it will generate a private key in the catalog.pem file and a public key certificate that will be valid for a year in the catalog.crt file. We will be using these newly generated files, so copy them into a new subdirectory, called ssl, in the catalog data service directory.
Now we have everything needed to modify our service to use HTTPS:
First, we need to switch and use the HTTPS module instead of HTTP and specify the port that we want to use to enable HTTPS communication:
var https = require('https');
var app = express();
app.set('port', process.env.PORT || 3443);
Then, we have to read the private key from the catalog.cem file and the certificate from catalog.crt into an array:
var options = {key : fs.readFileSync('./ssl/catalog.pem'),
cert : fs.readFileSync('./ssl/catalog.crt')
};
Finally, we pass the array containing the key pair to the HTTPS instance when creating the server and start listening through the specified port:
https.createServer(options, app).listen(app.get('port'));
That's all you need to do to enable HTTPS for an Express-based application. Save your changes and give it a try by requesting https://localhost:3443/catalog/v2 in a browser. You will be shown a warning message informing you that the server you are connecting to is using a certificate that is not issued by a trusted certificate authority. That's normal, as we generated the certificate on our own, and we are not a CA for sure, so just ignore that warning.
Go through the following questions:
Is HTTP basic authentication secure against man-in-the-middle attacks?
What are the benefits of Transport Layer Security?
In this chapter, you learned how to protect exposed data by enabling a means of authentication and authorization. This is a critical aspect of any publicly available data service. In addition, you learned how to prevent man-in-the-middle attacks using the secured layer transport protocol between a service and its users. As a developer of such services, you should always consider the most appropriate security features that your application should support.
I hope this was a useful experience! You gained enough knowledge and practical experience, which should have made you much more confident in understanding how RESTful APIs work and how they are designed and developed. I strongly encourage you to go through the code evolution chapter by chapter. You should be able to further refactor it, adopting it to your own coding style. Of course, some parts of it can be further optimized, as they repeat quite often. That is an intentional decision rather than good practice, as I wanted to emphasize their importance. You should always strive to improve your code-base, making it easier to maintain.
Finally, I would like to encourage you to always follow the development of the Node.js modules you use in your applications. Node.js has an extraordinary community that is eager to grow rapidly. There is always something exciting going on there, so ensure that you don't miss it. Good luck!
Decades ago, more specifically in 1974, Intel introduced 8080 to the world, which is an 8-bit processor with a 2 MHz clock speed and 64 KB of memory. This processor was used in Altair and began the revolution in personal computers.
It was sold pre-assembled or as a kit for hobbyists. It was the first computer to have enough power to actually be used for calculations. Even though it had some poor design choices and needed an engineering major to be able to use and program it, it started the spread of personal computers to the general public.
The technology evolved rapidly and the processor industry followed Moore's law, almost doubling speed every two years. Processors were still single core, with a low-efficiency ratio (power consumption per clock cycle). Because of this, servers usually did one specific job, called a service, like serving HTTP pages or managing a Lightweight Directory Access Protocol (LDAP) directory. Services were the monolith, with very few components, and were compiled altogether to be able to take the most out of the hardware processor and memory.
In the 90s, the internet was still only available for the few. Hypertext, based on HTML and HTTP, was in its infancy. Documents were simple and browsers developed language and protocol as they pleased. Competition for market share was ferocious between Internet Explorer and Netscape. The latter introduced JavaScript, which Microsoft copied as JScript:
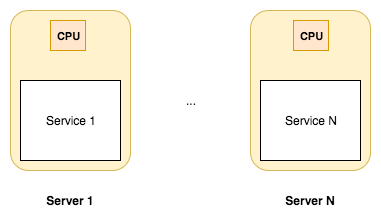
After the turn of the century, processor speed continued to increase, memory grew to generous sizes, and 32-bit became insufficient for allocating memory addresses. The all-new 64-bit architecture appeared and personal computer processors hit the 100 W consumption mark. Servers gained muscle and were able to handle different services. Developers still avoided breaking the service into parts. Interprocess communication was considered slow and services were kept in threads, inside a single process.
The internet was starting to become largely available. Telcos started offering triple play, which included the internet bundled with television and phone services. Cellphones became part of the revolution and the age of the smartphone began.
JSON appeared as a subset of the JavaScript language, although it's considered a language-independent data format. Some web services began to support the format.
The following is an example of servers with a couple of services running, but still having only one processor.
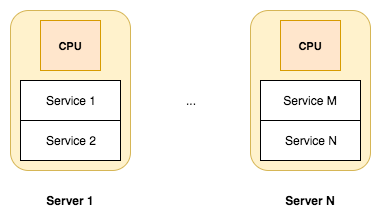
Processor evolution then shifted. Instead of the increased speed that we were used to, processors started to appear with two cores, and then four cores. Eight cores followed, and it seemed the evolution of the computer would follow this path for some time.
This also meant a shift in architecture in the development paradigms. Relying on the system to take advantage of all processors is unwise. Services started to take advantage of this new layout and now it's common to see services having at least one processor per core. Just look at any web server or proxy, such as Apache or Nginx.
The internet is now widely available. Mobile access to the internet and its information corresponds to more or less half of all internet access.
In 2012, the Internet Engineering Task Force (IETF) began its first drafts for the second version of HTTP or HTTP/2, and World Wide Web Consortium (W3C) did the same for HTML/HTML5, as both standards were old and needed a remake. Thankfully, browsers agreed on merging new features and specifications and developers no longer have the burden of developing and testing their ideas on the different browser edge cases.
The following is an example of servers with more services running as we reach a point where each server has more than one processor:
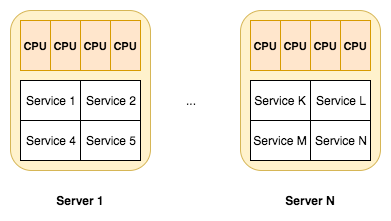
Access to information in real time is a growing demand. The Internet of Things (IoT) multiplies the number of devices connected to the internet. People now have a couple of devices at home, and the number will just keep rising. Applications need to be able to handle this growth.
On the internet, HTTP is the standard protocol for communication. Routers usually do not block it, as it is considered a low traffic protocol (in contrast with video streams). This is actually not true nowadays, but it's now so widely used that changing this behavior would probably cause trouble.
Nowadays, it's actually so common to have the HTTP serving developer API working with JSON that most programming languages that release any version after 2015 probably support this data format natively.
As a consequence of processor evolution, and because of the data-demanding internet we now have, it's important to not only be able to scale a service or application to the several available cores, but also to scale outside a single hardware machine.
Many developers started using and following the Service-Oriented Architecture (SOA) principle. It's a principle where the architecture is focused on services, and each service presents itself to others as an application component and provides information to other application components, passing messages over some standard communication protocol.
As we described previously, a microservices architecture is based on a loosely coupled set of services that work together to achieve a specific target application. At the end of the spectrum, there are monolith applications.
A monolith application is composed of a set of components that are tightly coupled. These components are usually developed using the same language and the application runs as a whole. The first noticeable difference is probably the slow start. Deploying might also be slow since you might need a couple of dependencies before having anything up and running.
Let's imagine an event application, a simple one, an application that lets users define events and be notified when those events are about to start.
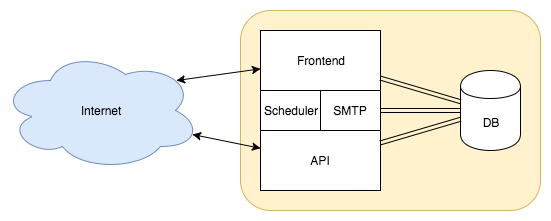
Let's describe what the event application does:
Imagine the preceding application as being a monolith (the greyed out area on the right).
Imagine that all four parts are part of the same process, even though they could be in separate threads. Imagine that the database is accessed directly across the application. Sound good?
Well, it sounds terrible, perhaps not for a small application, but for a medium one, this would be a representation of chaos. Having a group of developers making new features or improvements would be a nightmare, and for new developers entering the group, it would take some time before having the base knowledge to make some changes.
The first principle that you should follow is the Don't Repeat Yourself (DRY) principle. Avoiding multiple components from accessing a data source helps developers in the future. Later on, if there's a need to change the data source or part of its structure, it will be easier if only one component manipulates it. This is not always possible, but if it is possible, you should keep the data source access to a minimum.
In our example, the API should probably have access, and all others should use the API.
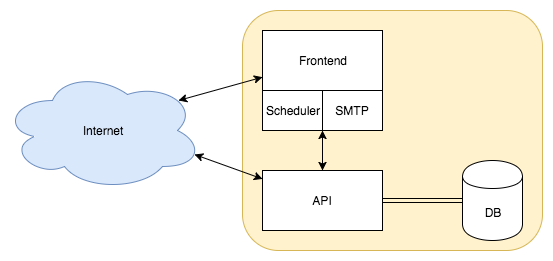
We now have two services:
Although the frontend is used to manage events, it uses the API service to manipulate data sources. Besides having only one service managing data sources, it forces you to think of the API for external developers. It's a win-win.
There is still room for improvement. The Frontend could be in a separate service, allowing you to scale the interface according to user traffic, and have the other parts on separate services. Scheduler and SMTP are both candidates for separate services. SMTP should be thought of as a reusable service for other applications you might develop later on.
Let's take a look at how we could build the same application using the microservices approach:
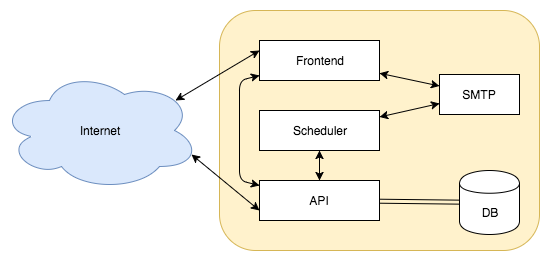
It looks more complex. Well, the architecture is more complex. The difference is that now, we have loosely coupled components, and each one of them is easily understandable and maintainable. Summing up the changes and advantages:
You can think of these components as capabilities of your application. They can be swapped, upgraded, maintained, and scaled, all without affecting other components or your application.
A commonly underestimated advantage of using this approach is that your application is much more resilient to failures. In a monolith application, any part can bring your application offline. In this microservices approach, this application might not send emails but can still be running and accessible. Add caching into the mixture and the API can restart in moments.
Microservices architecture, like other archicectures, has a set of patterns that are easily identifiable and form the basis for this application development approach.
Some of these patterns can make the initial bootstrap a burden and can eventually be postponed. Others are essential from the beginning or you will have difficulty, later on, in migrating to a full microservice approach.
The following patterns are not an extensive list but they represent a solid foundation:
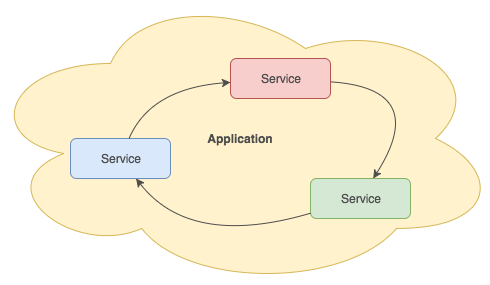
The main pattern behind a microservice architecture is the ability to have loosely coupled services. These services are decomposed, separated into smaller parts. This decomposition should create a set of services that implement a set of strongly related functions.
Each service should be small but complete, meaning it should run a set of functions in a given context. Those functions should represent all the functions you need or need to support for that context. What this means is that if you have a service that handles meeting events, all meeting event functions should be done using that service, whether it's creating an event, changing, removing, or getting information about a specific event. This ensures that an implementation change to events will affect that service only.
Decomposing an application can take one of two main approaches:
In our previous event application, a service that was decomposed by capability is, for example, the SMTP service. A service decomposed by the domain could be the API service, assuming the application only manages events:
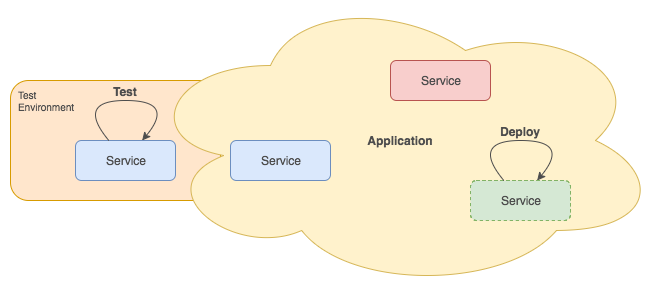
In a microservice architecture, each service should be autonomous. A small team should be able to run it without the other services that make your application. That team should also be able to develop autonomously and make changes to implementation without affecting the application.
The development team should be able to:
Services should be able to evolve regardless of others, keeping backward compatibility, adding new functions, and scaling to several locations, with minimal changes to the architecture:
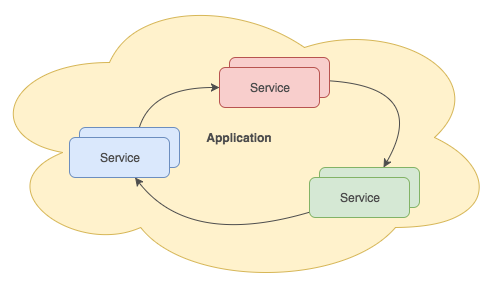
A service should be scalable. At least two instances should be able to run in parallel, enabling failure tolerance and maintenance downtime. A service can also, later on, scale geographically, be near your customers, and improve apparent performance and application response.
For this scaling to be effective, the application platform will need service discovery and routing, a service that could be used by other services to register themselves and expose their capabilities. Other services could, later on, inquire this service directory and know how to reach these capabilities.
To reduce complexity for other services, a service router can redirect requests to service instances. For example, to send emails, you could have three instances and one central router that would redirect requests in a round-robin manner. If any of those instances go offline, the router will stop redirecting to it and the rest of the application doesn't need to care about it.
Another approach could be to use a DNS approach. The name service is capable of handling registrations to a subdomain, and then, when another service makes simple requests, it will receive one or all of the addresses and connect it as if there was only one service operating:
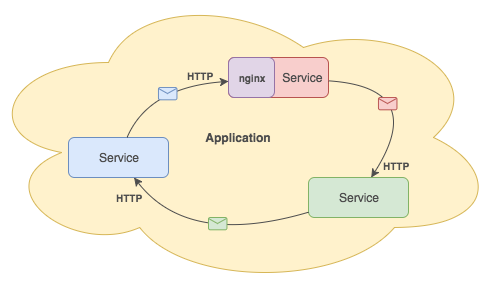
Usually, services communicate over HTTP using a REST-compliant API. This is not a pattern that you must follow, but it's something that comes naturally based on how common HTTP is nowadays, making it an obvious choice.
There are plenty of HTTP servers out there, making it easy to expose a non-HTTP service with minimum effort.
HTTP is also a mature communication transport layer. It's a stateless protocol, giving developers and operations many features, such as:
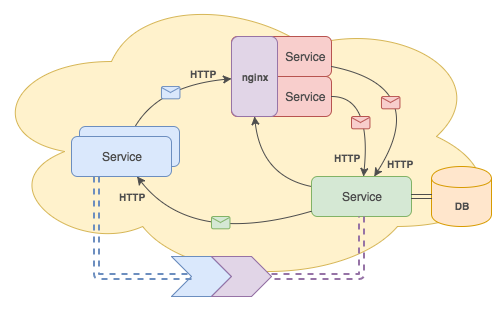
In conclusion, microservices architecture is a good, clear pattern that helps tackle more complex projects. In the long term, it reduces the complexity associated with new projects by appealing to service reuse. It helps to structure an application into loosely coupled services that can be independently developed and tested by small, different teams. It comes at the cost of initial proper planning and a more complex deployment.
Before creating your first microservice, let's look at some Node.js tools that could eventually help you leverage your next big project. This is what we'll be covering in the next chapter.
Now that we have reviewed what Node.js's new features are, and now that we know what a microservice is, it's time to see what tools or modules we can we to create one. We'll review a couple of options and build a more or less simple microservice so that we can point out advantages and disadvantages for each approach.
We'll look at different modules:
Let's look at framework called Seneca which was designed to help you develop message-based microservices. It has two distinct characteristics:
What is really interesting about Seneca is its ability to expose functions based on object patterns. Let's start by installing Seneca:
npm install seneca
For now, let's forget the transport and create a producer and consumer in the same file. Let's look at an example:
const seneca = require("seneca");
const service = seneca();
service.add({ math: "sum" }, (msg, next) => {
next(null, {
sum : msg.values.reduce((total, value) => (total + value), 0)
});
});
service.act({ math: "sum", values: [ 1, 2, 3 ] }, (err, msg) => {
if (err) return console.error(err);
console.log("sum = %s", msg.sum);
});
We first include the seneca module and create a new service. We then expose a producer function that matches an object that has math equal to sum. This means that any request object to the service that has the property math and that is equal to sum will be passed to this function. This function accepts two arguments. The first, which we called msg, is the request object. The second argument, next, is the callback that the function should invoke when finished or in case of an error. In this particular case, we're expecting an object that also has a values list and we're returning the sum of all values by using the reduce method that's available in arrays. Finally, we invoke act, expecting it to consume our producer. We pass an object with the math equal to sum and a list of values. Our producer should be invoked and should return the sum.
Assuming you have this code in app.js, if you run this in the command line, you should see something like this:
$ node app
sum = 6
Let's try and replicate our previous stack example. This time, instead of having the consumer and producer in the code, we'll use curl as the consumer, just like we did previously.
First, we need to create our service. We do that, as we've seen before, by loading Seneca and creating an instance:
const seneca = require("seneca");
const service = seneca({ log: "silent" });
We explicitly tell it that we don't care about logging for now. Now, let's create a variable to hold our stack:
const stack = [];
We then create our producers. We'll create three of them: one for adding an element to the stack, called push; one to remove the last element from the stack, called pop; and one to see the stack, called get. Both push and pop will return the final stack result. The third producer is just a helper function so that we can see the stack without performing any operations.
To add elements to the stack, we define:
service.add("stack:push,value:*", (msg, next) => {
stack.push(msg.value);
next(null, stack);
});
There are a few new things to see here:
We now define a simpler function to remove the last element of the stack:
service.add("stack:pop", (msg, next) => {
stack.pop();
next(null, stack);
});
This one is simpler as we don't need a value, we're just removing the last one. We're not addressing the case where the stack is empty already. An empty array won't throw an exception, but perhaps, in a real scenario, you would want another response.
Our third function is even simpler as we just return the stack:
service.add("stack:get", (msg, next) => {
next(null, stack);
});
Finally, we need to tell our service to listen for messages. The default transport is HTTP and we just indicate port 3000 as we did in our previous examples:
service.listen(3000);
Wrap all this code in a file and try it out. You can use curl or just try it in your browser. Seneca won't differentiate between HTTP verbs in this case. Let's begin by checking our stack. The URL describes an action (/act) we want to perform and the query parameter gets converted to our pattern:
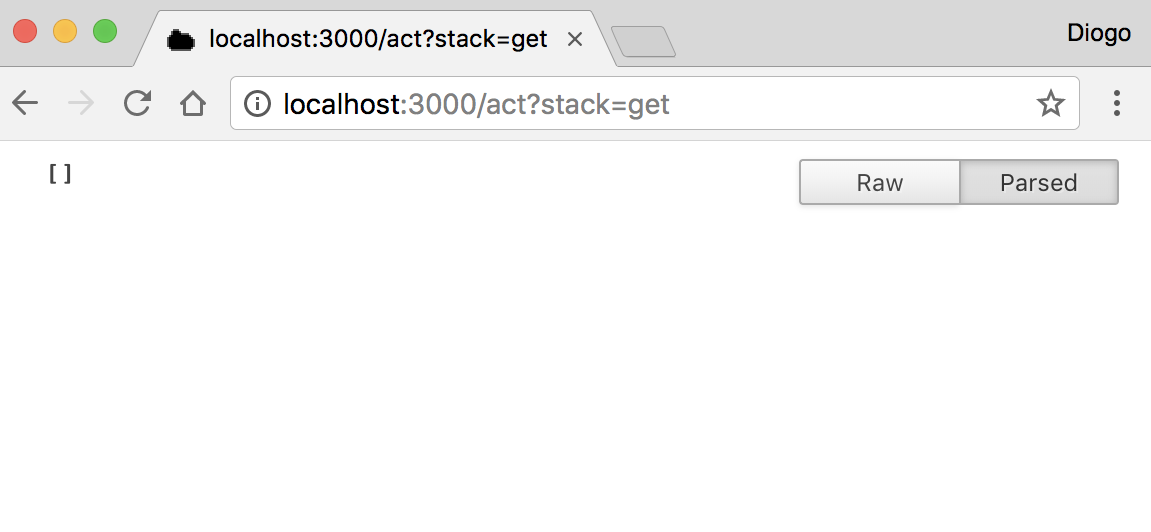
We can then try adding the value one to our stack and see the final stack:
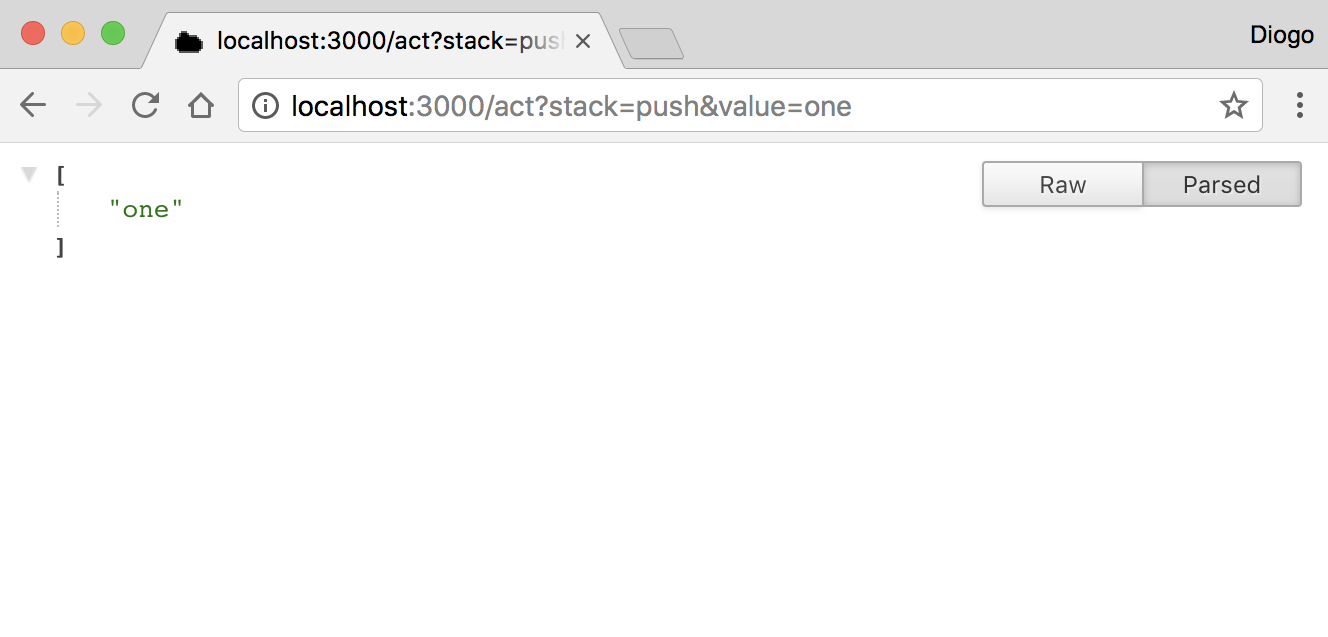
We can continue and add the value two and see how the stack grows:

If we then try to remove the last element, we'll see the stack shrinking:
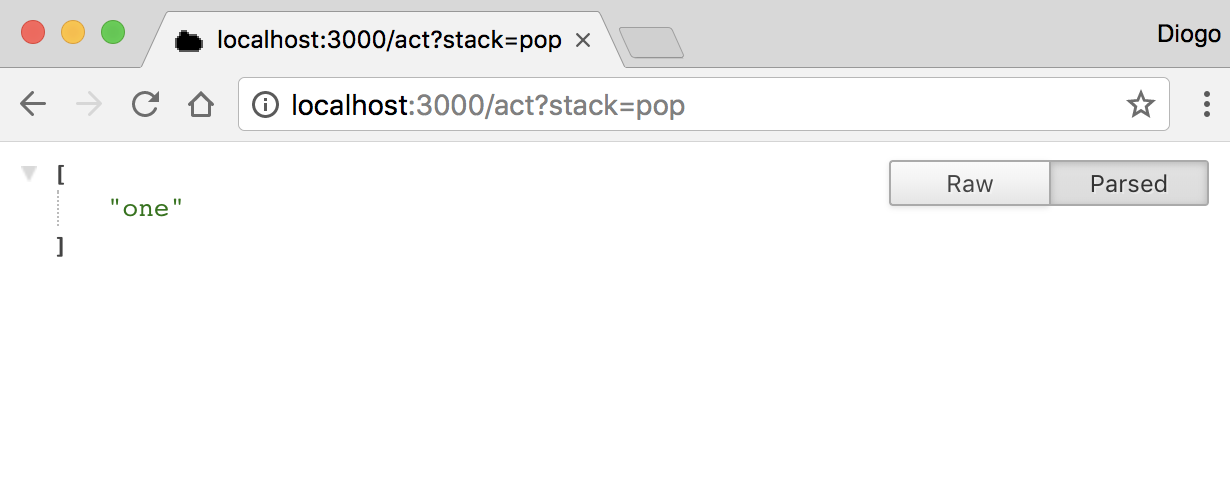
As in Express, Seneca also has middleware that you can install and use. In this case, the middleware is called plugins. By default, Seneca includes a number of core plugins for transport, and both HTTP and TCP transports are supported. There are more transports available, such as Advanced Message Queuing Protocol (AMQP) and Redis.
There are also storage plugins for persistent data and there's support for several database servers, both relational and non-relational. Seneca exposes an object-relational mapping (ORM)-like interface to manage data entities. You can manipulate entities and use a simple storage in development and then move to production storage later on. Let's see a more complex example of this:
const async = require("async");
const seneca = require("seneca");
const service = seneca();
service.use("basic");
service.use("entity");
service.use("jsonfile-store", { folder : "data" });
const stack = service.make$("stack");
stack.load$((err) => {
if (err) throw err;
service.add("stack:push,value:*", (msg, next) => {
stack.make$().save$({ value: msg.value }, (err) => {
return next(err, { value: msg.value });
});
});
service.add("stack:pop,value:*", (msg, next) => {
stack.list$({ value: msg.value }, (err, items) => {
async.each(items, (item, next) => {
item.remove$(next);
}, (err) => {
if (err) return next(err);
return next(err, { remove: items.length });
});
});
});
service.add("stack:get", (msg, next) => {
stack.list$((err, items) => {
if (err) return next(err);
return next(null, items.map((item) => (item.value)));
});
});
service.listen(3000);
});
Just run this new code and we'll see how this code behaves by making some requests to test it. First, let's see how our stack is by requesting it:
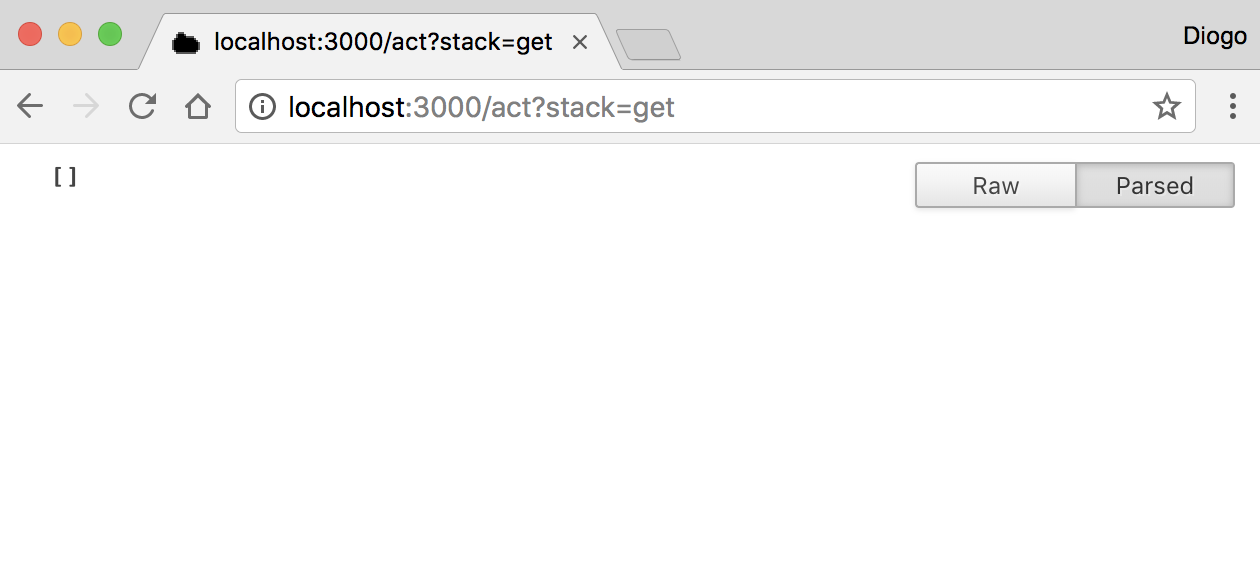
Nothing different. Now, let's add the value one to the stack:

Well, we haven't received the final stack. We could, but instead we changed the service to return the exact item that was added. It's actually a good way to confirm what we just did. Let's add another one:
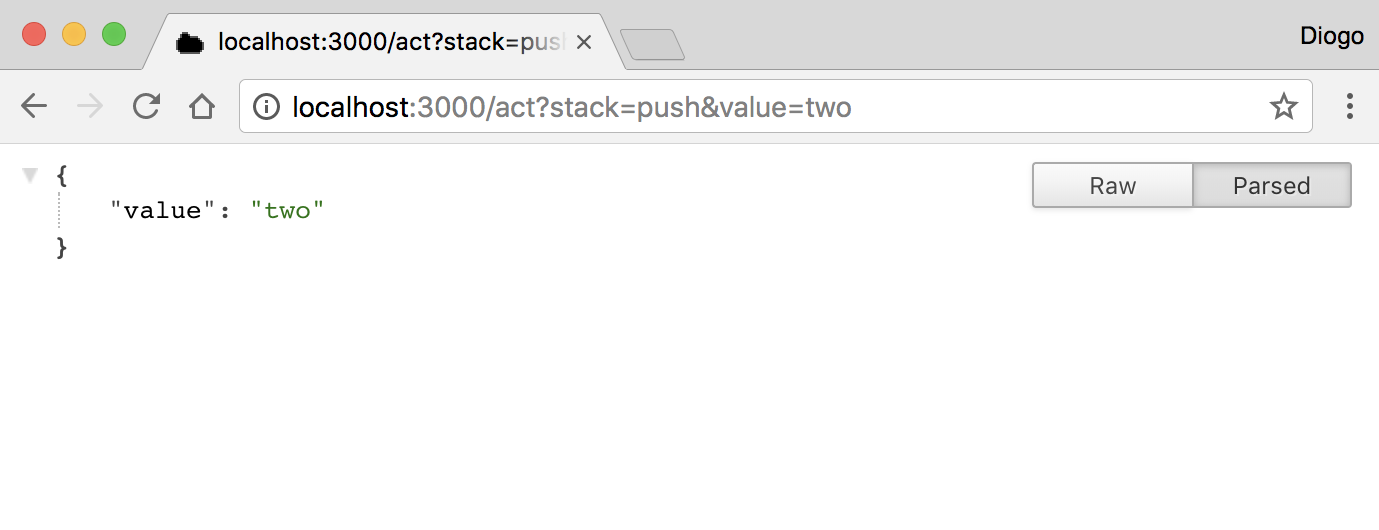
Again, it returns the value we just added. Now, let's see how our stack is:
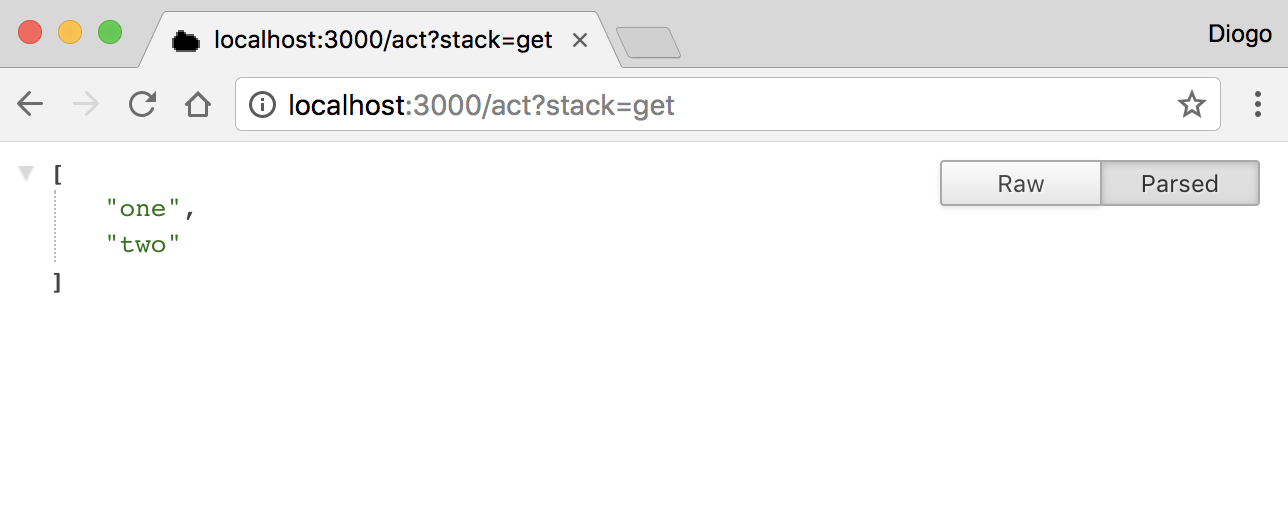
Our stack now has our two values. Now comes one big difference compared with the previous code. We're using entities, an API exposed by Seneca, which helps you store and manipulate data objects using a simple abstraction layer similar to an ORM, or to people who are familiar with Ruby, an ActiveRecord.
Our new code, instead of just popping out the last value, removes a value we indicate. So, let's remove the value one instead of two:
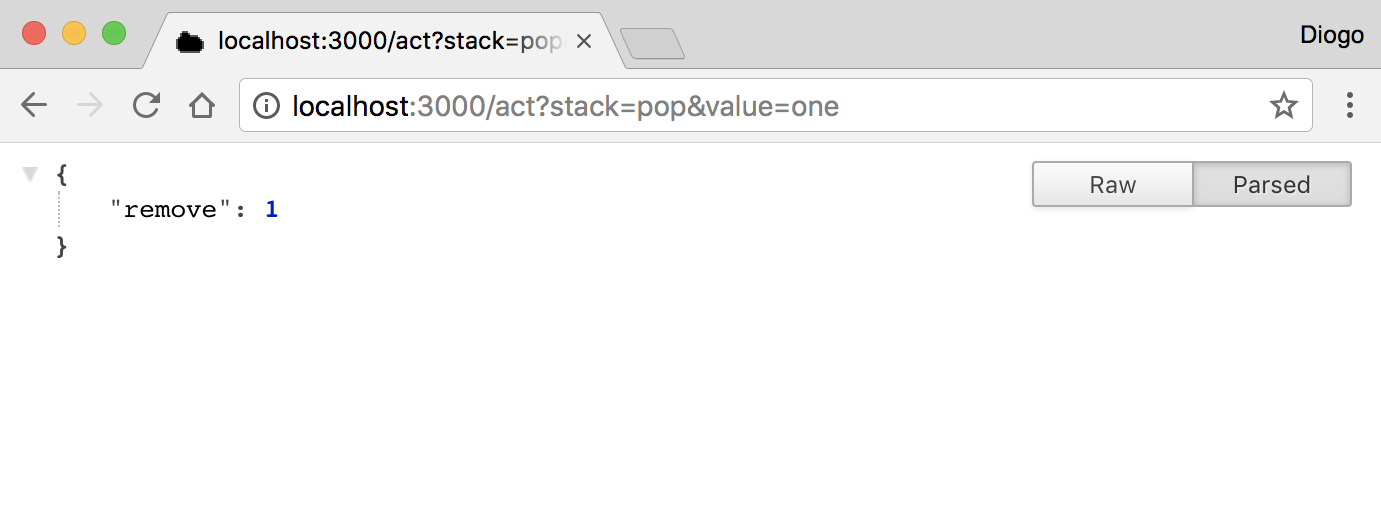
Success! We removed exactly one item. Our code will remove all items from the stack that match the value (it has no duplication check so you can have repeated items). Let's try to remove the same item again:
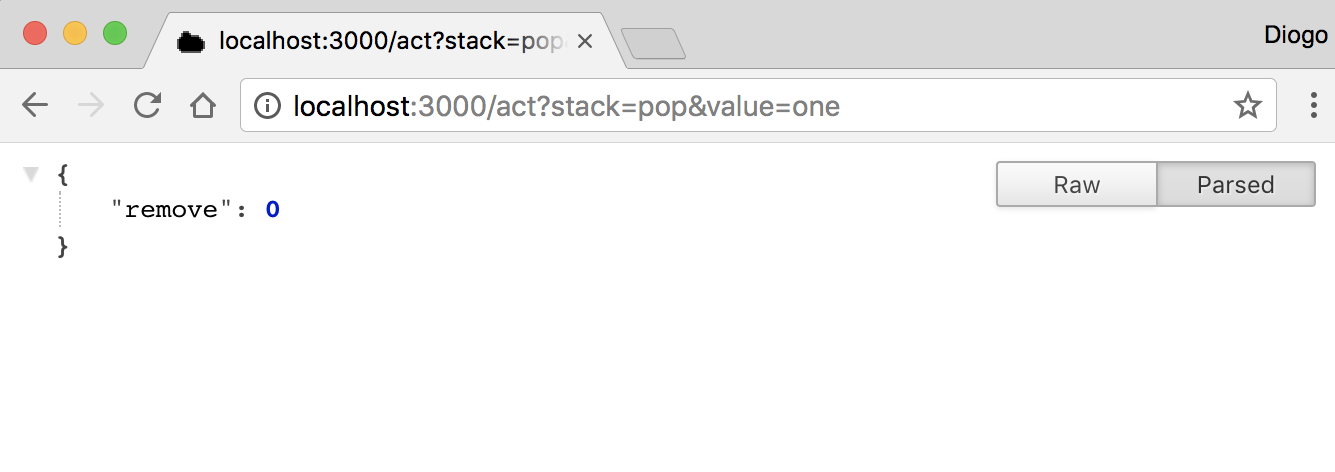
No more items match one, so it didn't remove anything. We can now check our stack and confirm that we still have the value two:
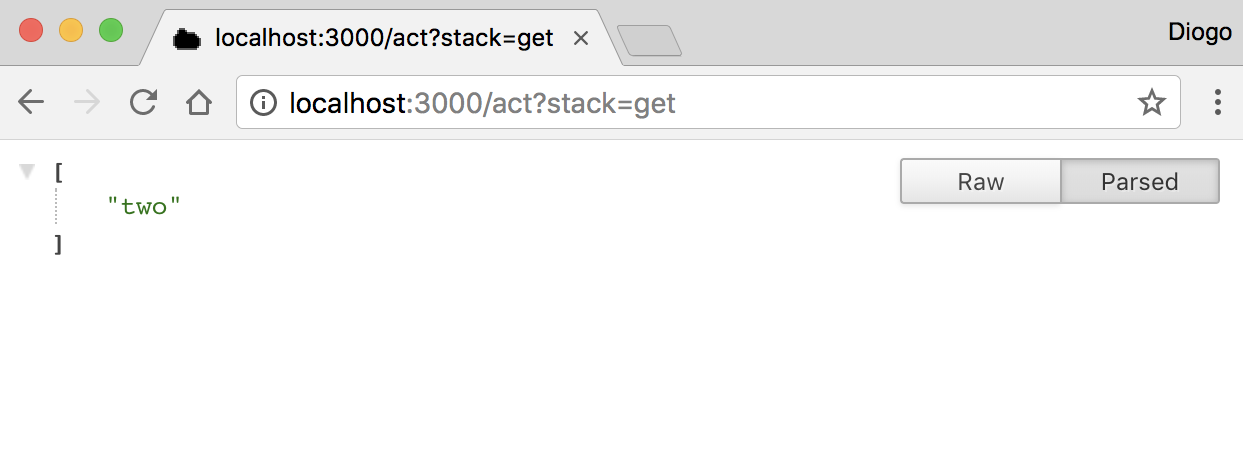
Correct! And, as a bonus, you can stop and restart the code and your stack will still have the value two. That's because we're using the JSON file store plugin.
Let's get back to Express. As you've seen before, it's a rock-solid layer on top of the http module. Although it adds an important base layer in the somewhat raw module, it still lacks many features you need to make a good microservice.
As there are lots of plugins out there to extend Express, it can be hard to pick a useful list for us to use.
After picking the right list, you'll still need to make other decisions:
Enter Hydra, a framework that facilitates building distributed microservices. Hydra leverages the power of Express and helps you create microservices or communicate with microservices.
It will, out of the box, enable you to:
Unlike the other modules we've reviewed so far, Hydra has a dependency that is not installable directly using the NPM. Hydra uses Redis to accomplish its goal. Look for information on the Redis website at https://redis.io/ to install it on your operating system before continuing. If you have macOS and use Homebrew, type the following to install redis:
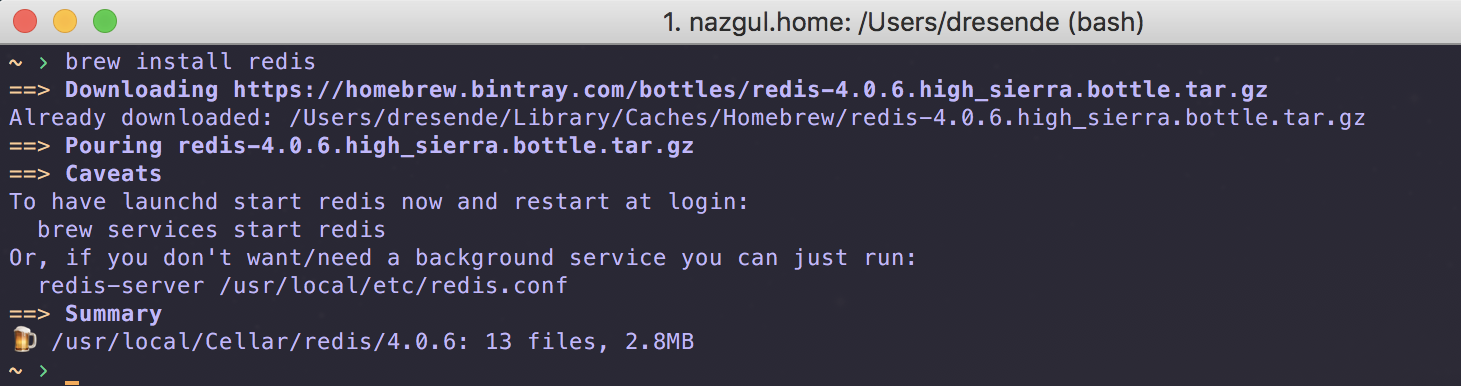
Now, let's make sure redis has successfully started:
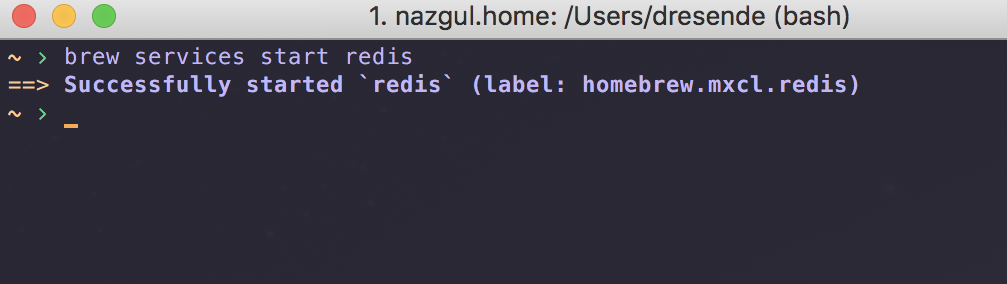
After that, we need to install Hydra command-line tools:
sudo npm install -g yo generator-fwsp-hydra hydra-cli
We now need to configure the connection to Redis. We do this by creating a configuration. Type in the command and follow the instructions. If you installed it locally (or used the preceding instructions), you should answer something similar to the following screenshot:
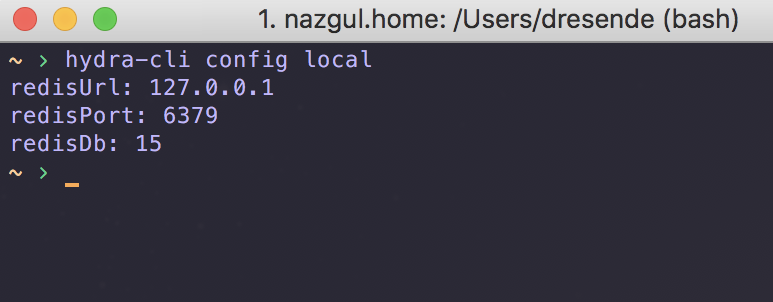
Now, let's create a very simple microservice, just to see what the workflow is like. Hydra has a scaffolding tool using yeoman. To create a service, type the following command and follow the instructions:
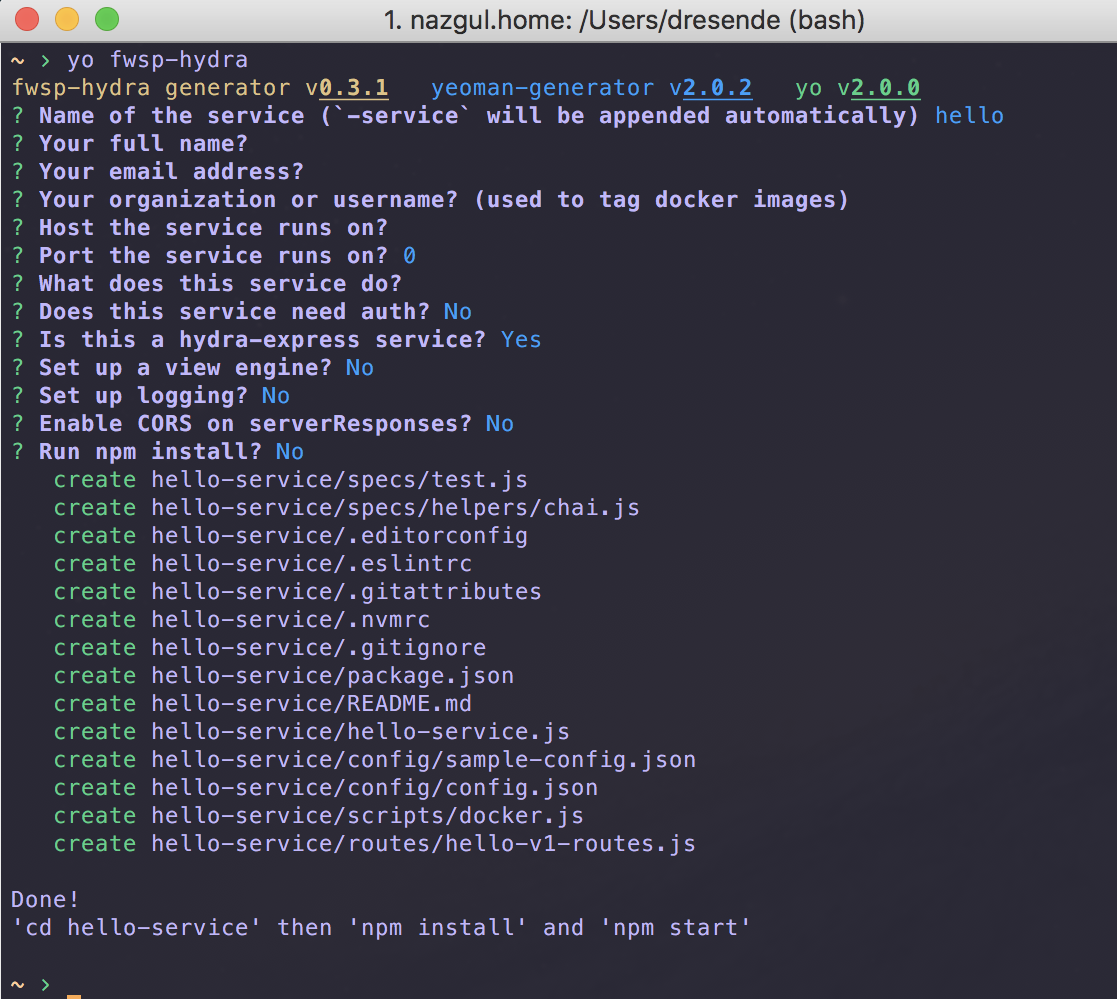
On the name of the service, just type hello. Just hit Enter to the rest of the questions to use the defaults. In the end, enter the folder that was created and install the dependencies:
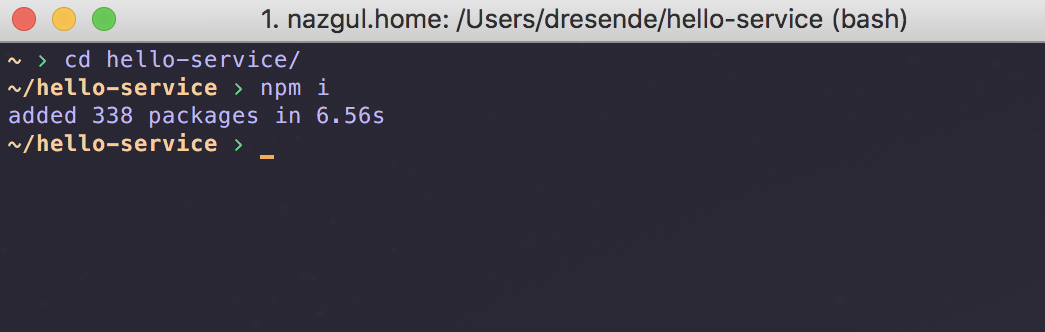
The service is now ready to start. You might have already seen the instructions when scaffolding the service. Let's start the service:
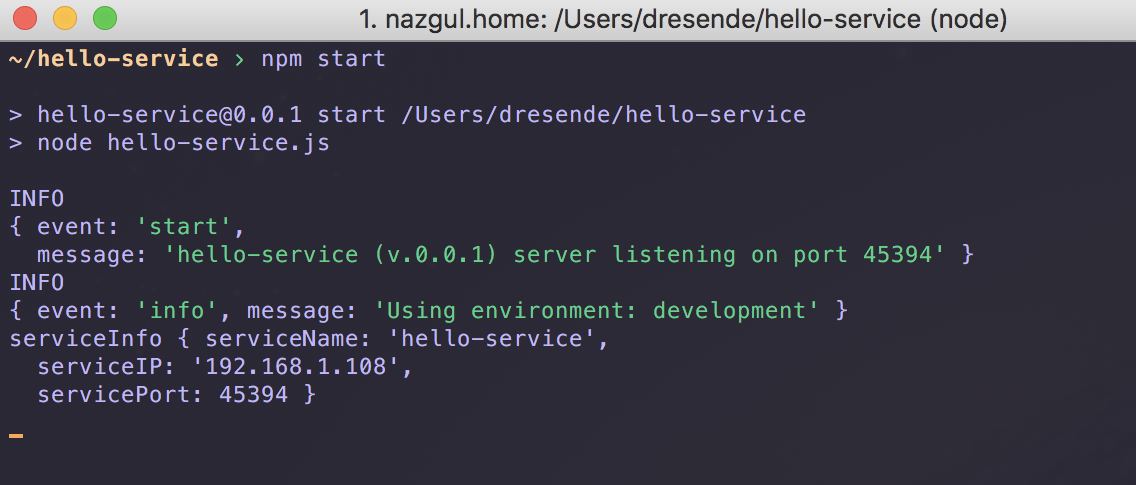
As we can see from the preceding screenshot, the service has started and has been attached to a local IP (192.168.1.108) and port (45394). Open up the folder in your code editor:
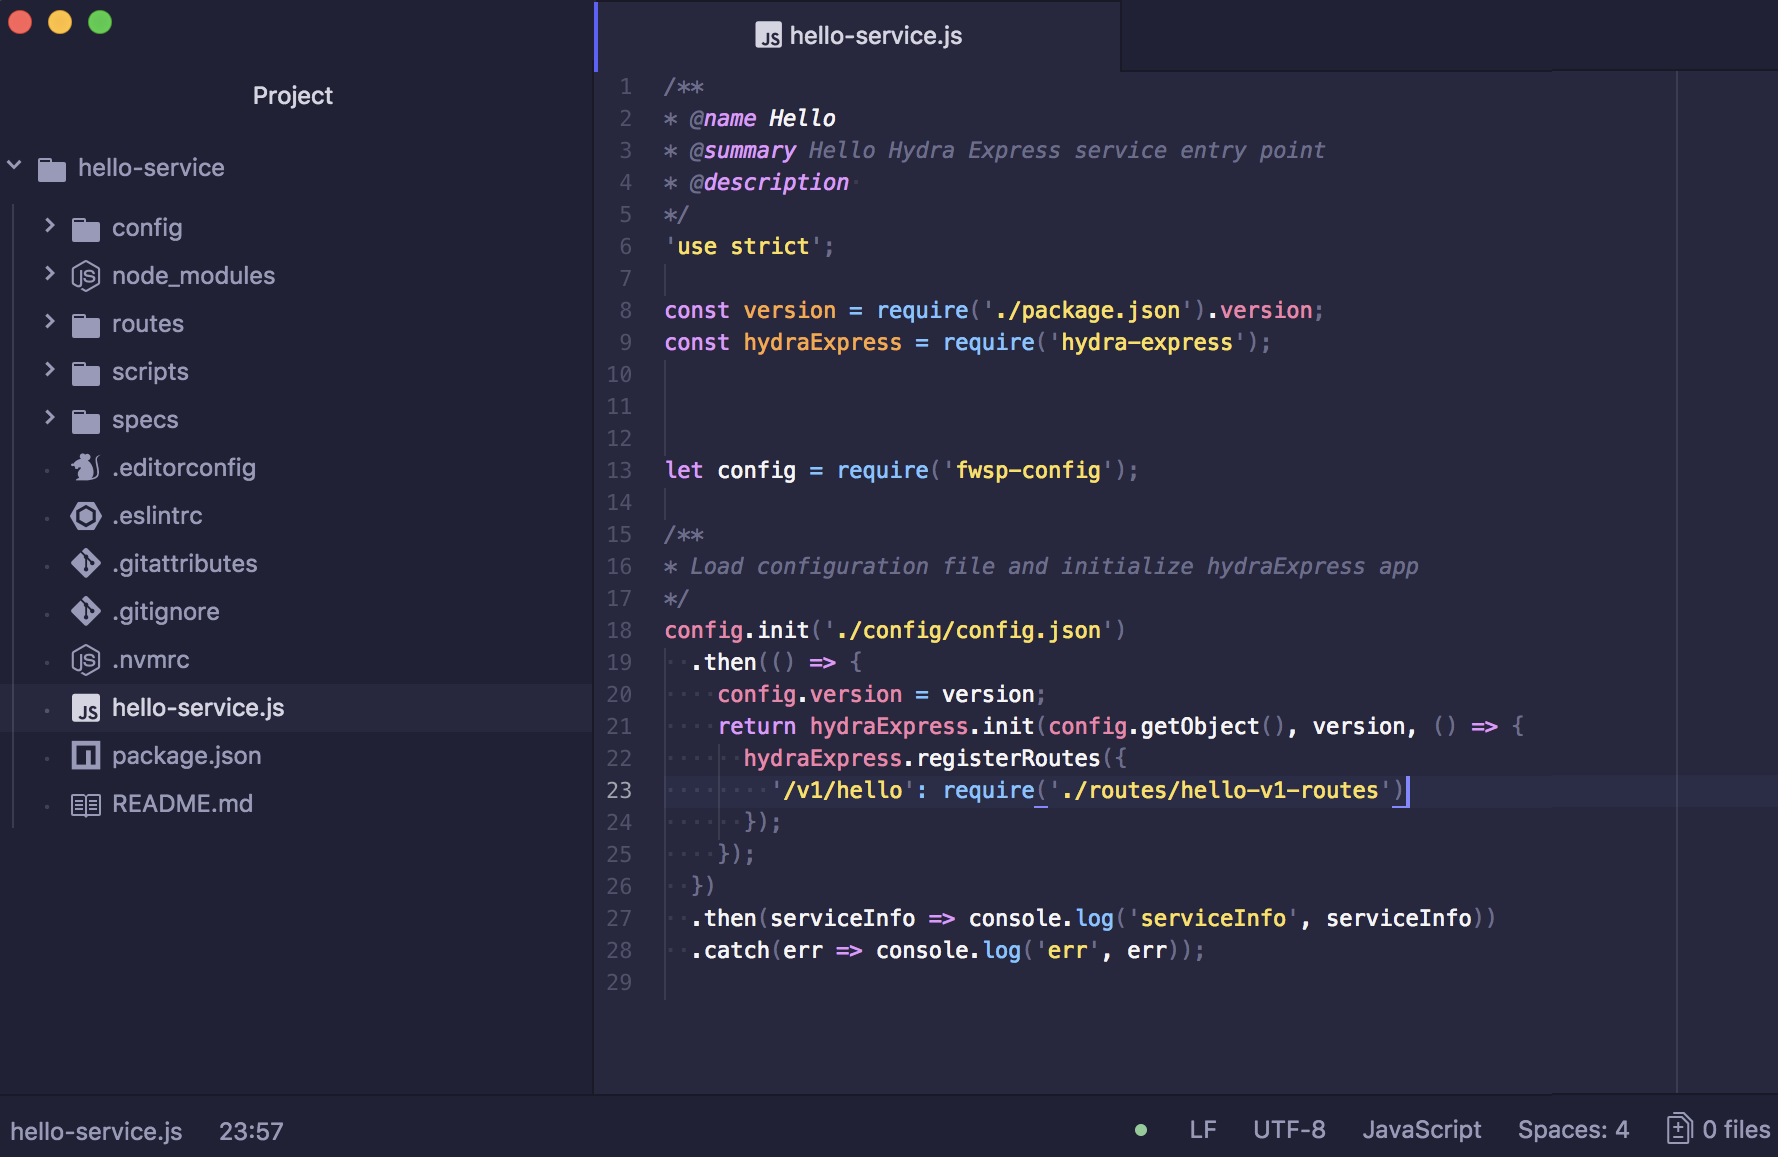
You'll see a file in the base folder called hello-service.js, which has the service routes inside it. You'll find the /v1/hello route, which points to another file in routes/hello-v1-routes.js:
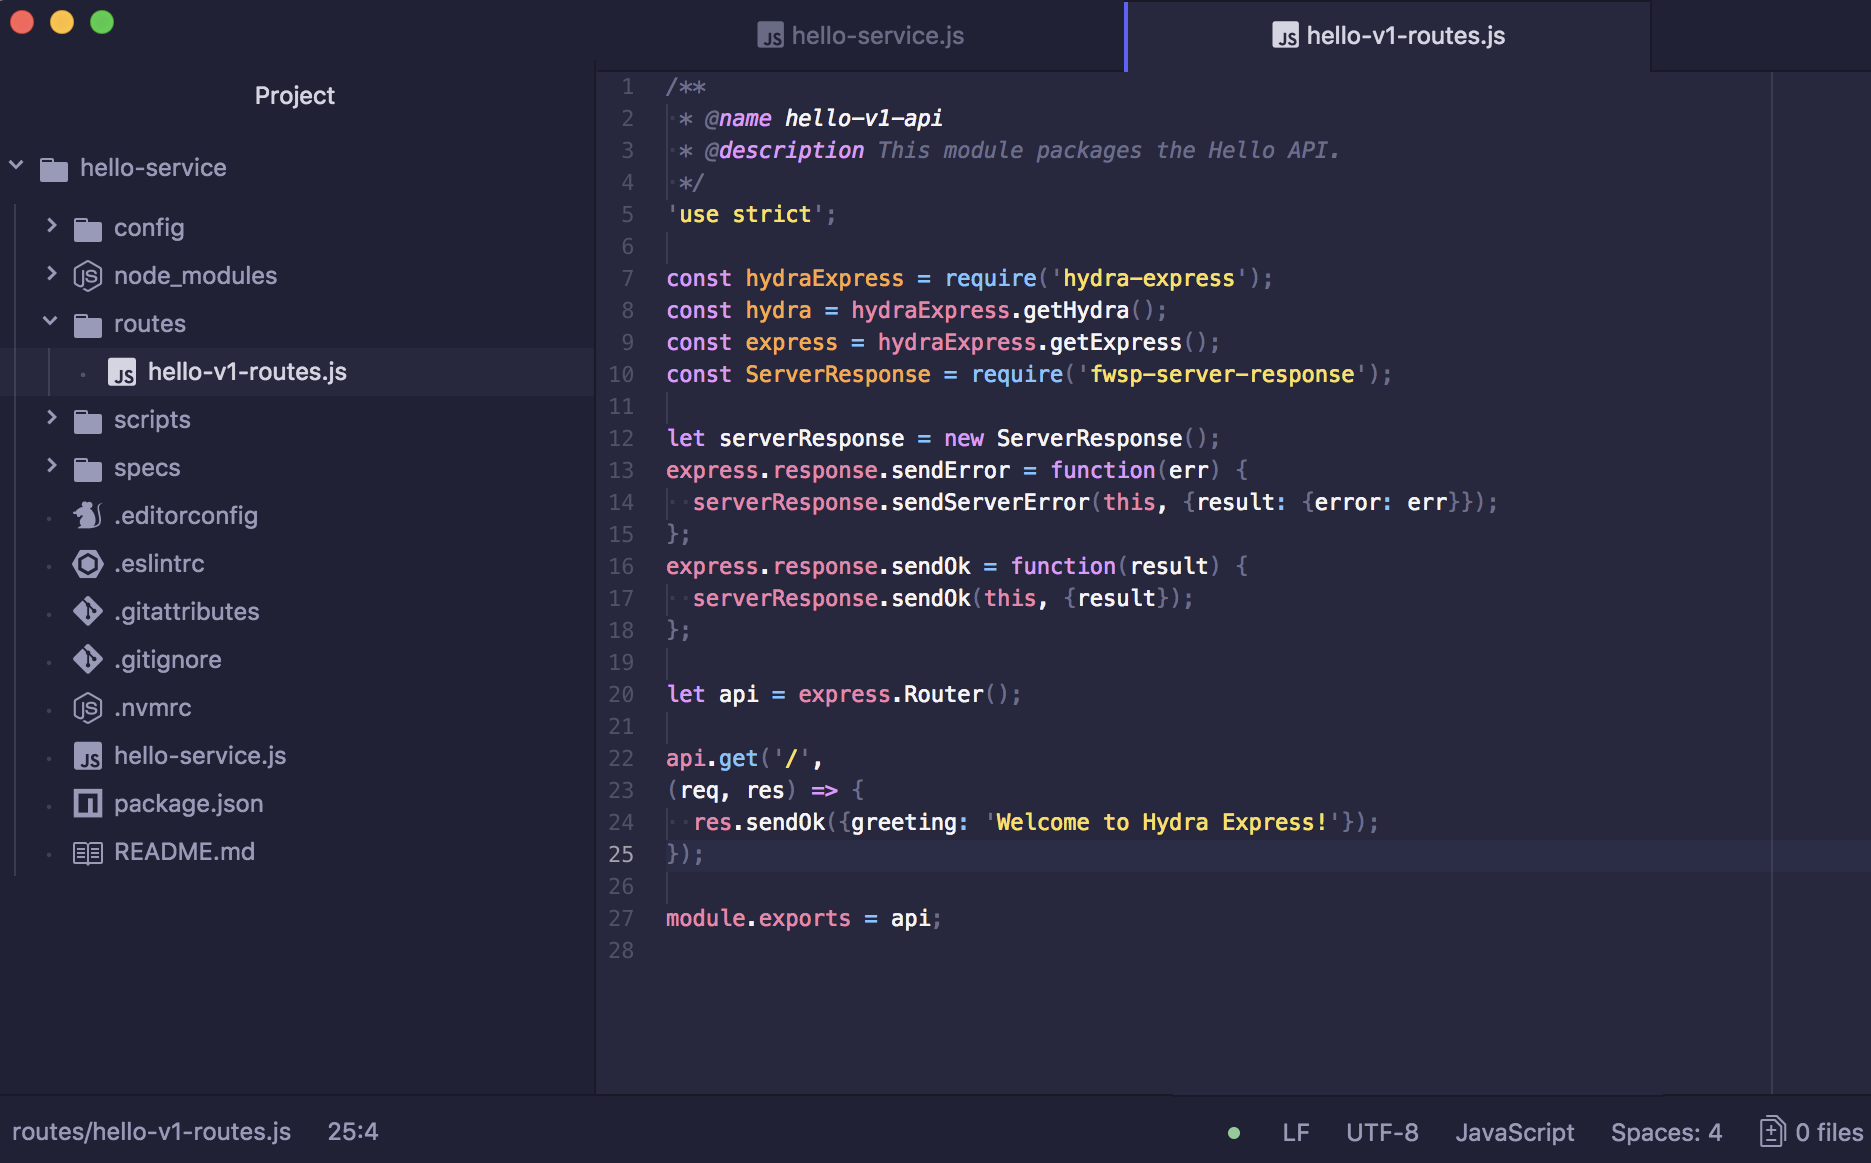
Inside that file, you'll see the response to that route. Now, let's jump to a web browser and see if it's up and running:
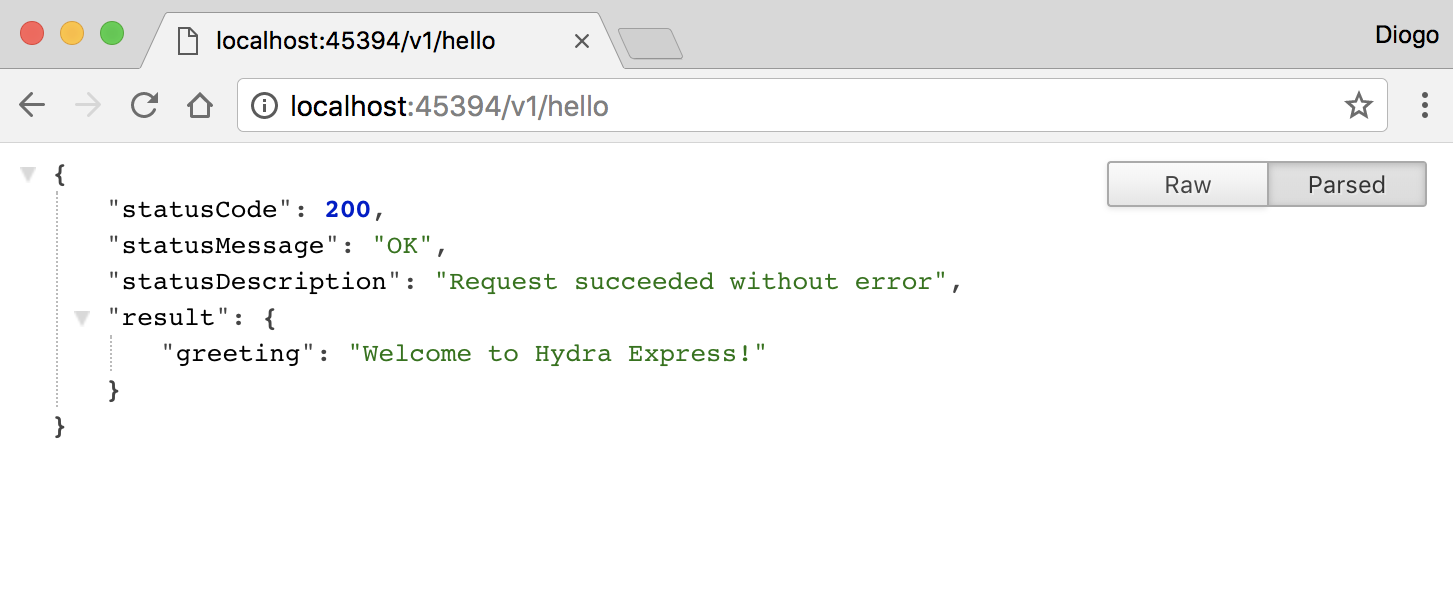
What we saw in the file is inside the result property of the JSON response. We just deployed our first Hydra microservice without writing a single line of code!
We've just covered a range of different modules and toolkits to help develop microservices. From patterns in Seneca, to the Hydra bundle, many approaches are available.
They all target different audiences and fill different needs. I would advise you to experiment with some of them to help you make a better choice instead of just picking one.
Let's dig into some of these tools and start creating a more complete microservice. In the next chapter, we'll be making a useful microservice, covering different use cases, while we develop a fully functional and distributed microservice.
Now that we've seen some examples of building microservices using some tools, let's dig deeper and create a microservice from scratch using these tools. To accomplish our goal, we'll first use Hydra, and then, we'll create our microservice using the Seneca approach.
There are many microservices we could create, but some are more interesting than others. More specifically, a microservice that you can use in several applications is obviously more useful.
Let's create an image processing microservice. We'll start with a simple thumbnail service, and then we'll evolve to make some simple image transformations. We'll be covering how to:
The microservice name is very important, as it gives identity. Let's name it imagini, the Latin name for image.
As you may remember, Hydra has a scaffolding command that helps to bootstrap our service quickly. Let's use it, and prepare our base layout. Run yo fwsp-hydra and answer the questions. You can leave most of them as default. Depending on the versions you'll use, you should get something similar to the lines shown here:
fwsp-hydra generator v0.3.1 yeoman-generator v2.0.2 yo v2.0.1
? Name of the service (`-service` will be appended automatically) imagini
? Your full name? Diogo Resende
? Your email address? dresende@thinkdigital.pt
? Your organization or username? (used to tag docker images) dresende
? Host the service runs on?
? Port the service runs on? 3000
? What does this service do? Image thumbnail and manipulation
? Does this service need auth? No
? Is this a hydra-express service? Yes
? Set up a view engine? No
? Set up logging? No
? Enable CORS on serverResponses? No
? Run npm install? No
create imagini-service/specs/test.js
create imagini-service/specs/helpers/chai.js
create imagini-service/.editorconfig
create imagini-service/.eslintrc
create imagini-service/.gitattributes
create imagini-service/.nvmrc
create imagini-service/.gitignore
create imagini-service/package.json
create imagini-service/README.md
create imagini-service/imagini-service.js
create imagini-service/config/sample-config.json
create imagini-service/config/config.json
create imagini-service/scripts/docker.js
create imagini-service/routes/imagini-v1-routes.js
Done!
'cd imagini-service' then 'npm install' and 'npm start'
Well, let's do just that. Let's enter our service folder and install dependencies. If you then start it using npm start, and open the browser and point it to our service, you should get something like this:
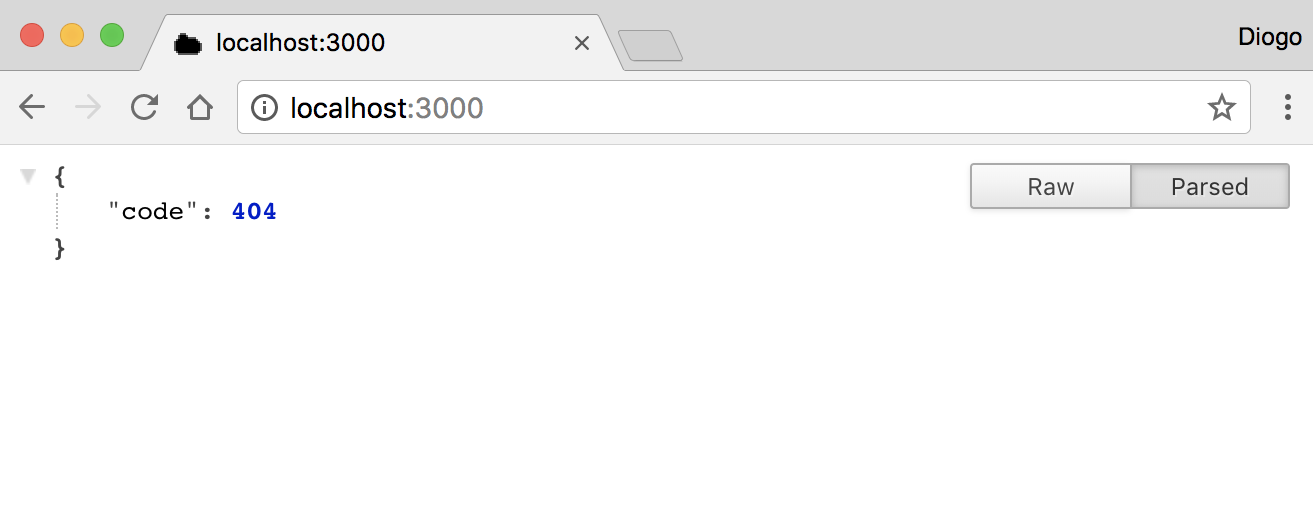
Not surprising, because Hydra created a different base route. To enable versioning and having different services running on the same HTTP backend, Hydra scaffolding created a route under the /v1/imagini prefix. Remember, we scaffolded Hydra with Express integration, so many of the terms we discussed earlier will be the same here:
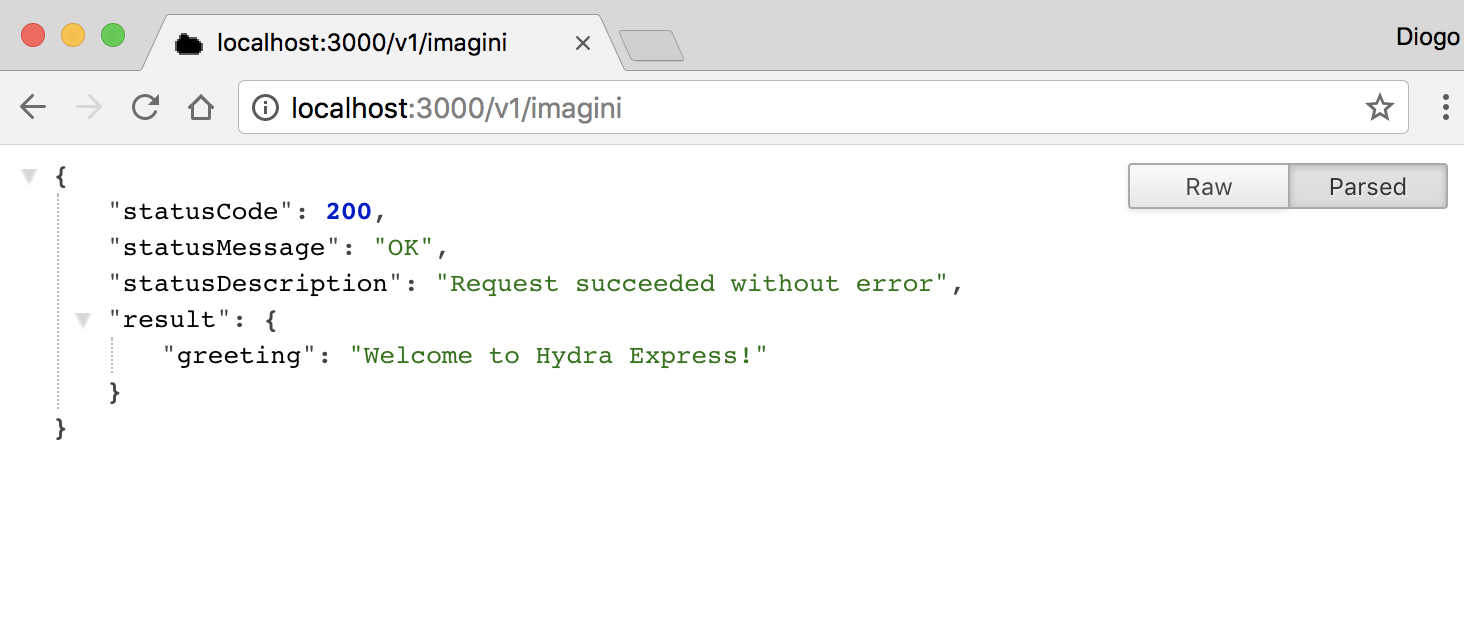
Before we pick our previous code and integrate into Hydra, we need to add our Sharp dependency to package.json. Look up the dependencies property and add sharp. You should end up with something along these lines:
(…)
"dependencies": {
"sharp" : "^0.19.0",
"body-parser" : "^1.18.2",
"fwsp-config" : "1.1.5",
"hydra-express" : "1.5.5",
"fwsp-server-response" : "2.2.6"
},
(…)
Now, run npm install to install Sharp. Then, open the imagini-v1-routes.js file, which is under the routes folder. Basically, what it does is get a handler for Hydra and Express, prepare a generic JSON server response (that's what the fwsp-server-response module is), create an Express router, attach the / route, and then export it.
We'll keep this structure for now. I refactored the file as I'm a bit picky about indentation and quotes. I added our image route parameter and added the image upload route. I changed our previous route code to drop the /uploads route prefix, and use the new sendOk and sendError functions you see in the preceding code:
/**
* @name imagini-v1-api
* @description This module packages the Imagini API.
*/
"use strict";
const fs = require("fs");
const path = require("path");
const sharp = require("sharp");
const bodyparser = require("body-parser");
const hydraExpress = require("hydra-express");
const ServerResponse = require("fwsp-server-response");
const hydra = hydraExpress.getHydra();
const express = hydraExpress.getExpress();
let serverResponse = new ServerResponse();
express.response.sendError = function (err) {
serverResponse.sendServerError(this, { result : { error : err }});
};
express.response.sendOk = function (result) {
serverResponse.sendOk(this, { result });
};
let api = express.Router();
api.param("image", (req, res, next, image) => {
if (!image.match(/\.(png|jpg)$/i)) {
return res.sendError("invalid image type/extension");
}
req.image = image;
req.localpath = path.join(__dirname, "../uploads", req.image);
return next();
});
api.post("/:image", bodyparser.raw({
limit : "10mb",
type : "image/*"
}), (req, res) => {
let fd = fs.createWriteStream(req.localpath, {
flags : "w+",
encoding : "binary"
});
fd.end(req.body);
fd.on("close", () => {
res.sendOk({ size: req.body.length });
});
});
module.exports = api;
Then, we restart our microservice, create the uploads folder under the imagini-service folder, and try to upload an image. Like before, I used curl to test it:
curl -X POST -H 'Content-Type: image/png' \
--data-binary @example.png \
http://localhost:3000/v1/imagini/example.png
As expected, I received a JSON response with our size property:
{
"statusCode" : 200,
"statusMessage" : "OK",
"statusDescription" : "Request succeeded without error",
"result" : {
"size" : 55543
}
}
We can have our uploaded file in our uploads folder. We're getting there; just two more routes:
api.head("/:image", (req, res) => {
fs.access(req.localpath, fs.constants.R_OK , (err) => {
if (err) {
return res.sendError("image not found");
}
return res.sendOk();
});
});
Our check route is very similar. We just changed the return methods to use the methods defined previously:
api.get("/:image", (req, res) => {
fs.access(req.localpath, fs.constants.R_OK , (err) => {
if (err) {
return res.sendError("image not found");
}
let image = sharp(req.localpath);
let width = +req.query.width;
let height = +req.query.height;
let blur = +req.query.blur;
let sharpen = +req.query.sharpen;
let greyscale = [ "y", "yes", "true", "1",
"on"].includes(req.query.greyscale);
let flip = [ "y", "yes", "true", "1",
"on"].includes(req.query.flip);
let flop = [ "y", "yes", "true", "1",
"on"].includes(req.query.flop);
if (width > 0 && height > 0) {
image.ignoreAspectRatio();
}
if (width > 0 || height > 0) {
image.resize(width || null, height || null);
}
if (flip) image.flip();
if (flop) image.flop();
if (blur > 0) image.blur(blur);
if (sharpen > 0) image.sharpen(sharpen);
if (greyscale) image.greyscale();
res.setHeader("Content-Type", "image/" +
path.extname(req.image).substr(1));
image.pipe(res);
});
});
Our image download method is equally similar. For this route, we're not using the JSON responses, and instead just return our image directly. This allows us to try it out on our browser:
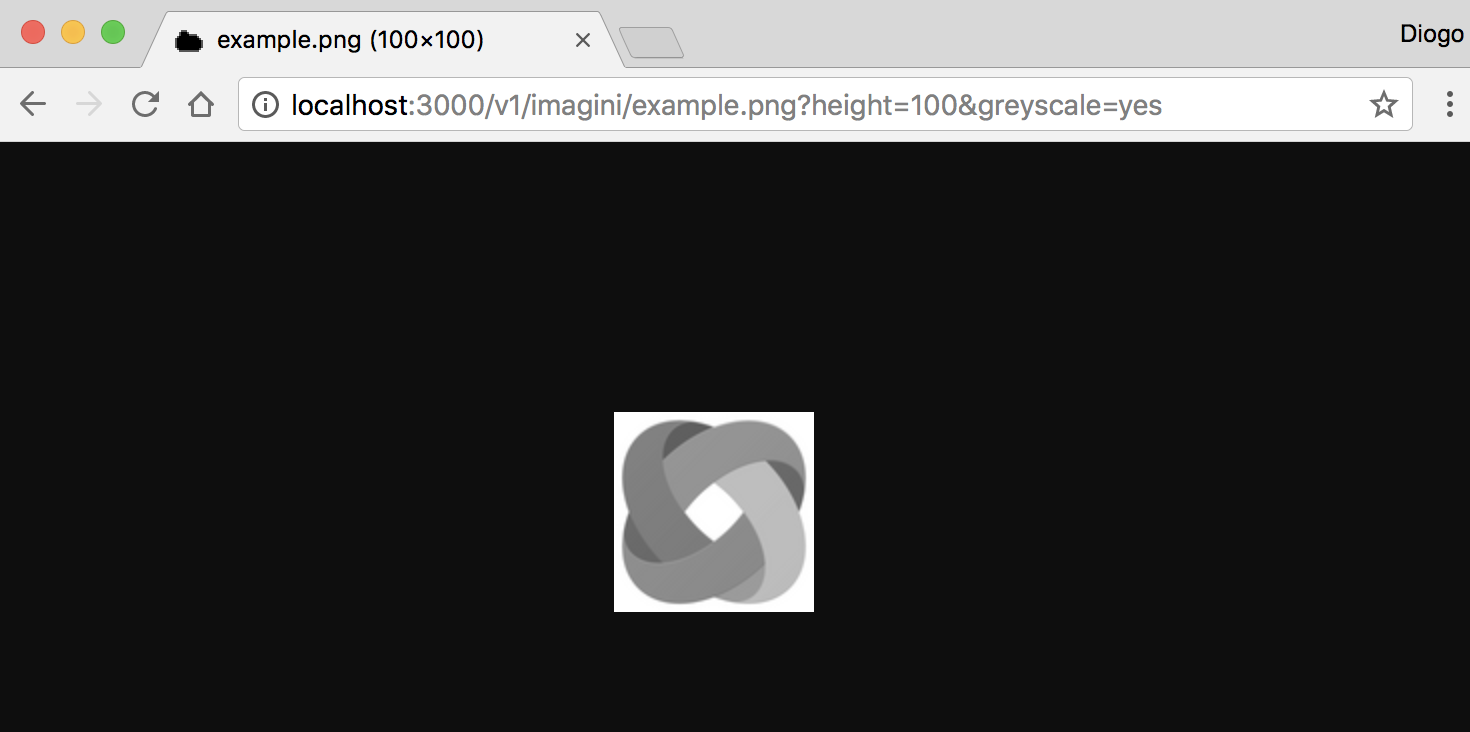
We just migrated our service from Express to Hydra. Not much of a difference, but Hydra gives you a more robust layout, about which we'll find out more later on. Let's take a look at our third framework: Seneca.
Remember that routing on this framework is all about patterns. Let's keep it simple for now and use a role property to indicate what we want to do (upload, check, or download).
By default, every message should be JSON-encoded, so we'll encode the image in base64 to pass it as a string inside the JSON messages to upload and download.
Create a folder for our Seneca service, and then create a child folder called uploads. Then, install seneca and sharp on that folder by running the following command:
npm install seneca sharp --save
Then, create a file called imagini.js with the following content:
const seneca = require("seneca");
const sharp = require("sharp");
const path = require("path");
const fs = require("fs");
const service = seneca();
service.add("role:upload,image:*,data:*", function (msg, next) {
let filename = path.join(__dirname, "uploads", msg.image);
let data = Buffer.from(msg.data, "base64");
fs.writeFile(filename, data, (err) => {
if (err) return next(err);
return next(null, { size : data.length });
});
});
service.listen(3000);
What this does is initiate a simple service with a route for uploading. Since we're receiving all the image content directly on an object property, I used fs.writeFile. It's a simpler method and gives me an error whether something incorrect happens, which we can pass on to the route response.
I also used Buffer.from to convert our image data, which we'll be uploading in base64.
So, let's just start it as we did with the others. I included the same example.png image and used curl to test this out.
curl -H "Content-Type: application/json" \
--data '{"role":"upload","image":"example.png","data":"'"$( base64 example.png)"'"}' \
http://localhost:3000/act
Seneca promptly replied with the following:
{"size":55543}
This is the image size. Notice I'm taking advantage of bash interpolation (variable substitution) to directly convert the image file to base64 and pass it to curl, which then sends that JSON piece of data to our service:
service.add("role:check,image:*", function (msg, next) {
let filename = path.join(__dirname, "uploads", msg.image);
fs.access(filename, fs.constants.R_OK , (err) => {
return next(null, { exists : !err });
});
});
Our check route is very similar. Instead of just replying with an HTTP 404 response code, we reply with a stringified JSON object with a boolean property exists, which will indicate if the image was found.
Here, we are checking for our image using curl:
curl -H "Content-Type: application/json" \
--data '{"role":"check","image":"example.png"}' \
http://localhost:3000/act
We will respond with the following:
{"exists":true}
If you change the image name, it will respond with false:
service.add("role:download,image:*", function (msg, next) {
let filename = path.join(__dirname, "uploads", msg.image);
fs.access(filename, fs.constants.R_OK , (err) => {
if (err) return next(err);
let image = sharp(filename);
let width = +msg.width;
let height = +msg.height;
let blur = +msg.blur;
let sharpen = +msg.sharpen;
let greyscale = !!msg.greyscale;
let flip = !!msg.flip;
let flop = !!msg.flop;
if (width > 0 && height > 0) {
image.ignoreAspectRatio();
}
if (width > 0 || height > 0) {
image.resize(width || null, height || null);
}
if (flip) image.flip();
if (flop) image.flop();
if (blur > 0) image.blur(blur);
if (sharpen > 0) image.sharpen(sharpen);
if (greyscale) image.greyscale();
image.toBuffer().then((data) => {
return next(null, { data: data.toString("base64") });
});
});
});
Our downloaded route has some changes:
We need some tools to test this on the command line. Since I use JSON a lot, I have jq installed. I strongly recommend you install it too and take a look at the tutorials. It will make your life easier. Using the base64 command we previously used to encode, we can decode the content and pipe the data to a local file:
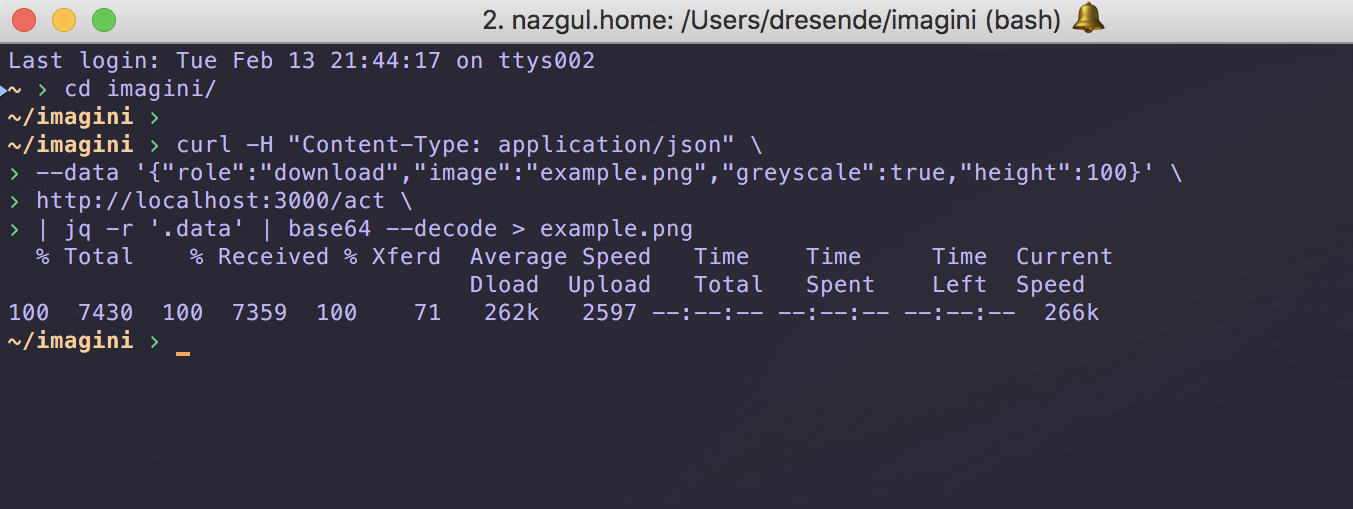
We can then open the folder and see the image is there. Notice I added greyscale and resized the image just by passing two more JSON parameters:
In the spirit of Seneca, we should make a plugin for our imagini service. Let's split our code into two parts:
There's lot of room for improvement on our code, starting with code we repeated constantly. It's important to detect repetitions while our service is still very small.
The most repeated part is the local filename. This is actually something you might want to configure when starting the service, so let's change that to a function. Start by changing our imagini.js file to be a plugin. Clear all content and write this code:
const sharp = require("sharp");
const path = require("path");
const fs = require("fs");
module.exports = function (settings = { path: "uploads" }) {
// plugin code goes here
};
This is the basis of our plugin. We're loading the modules we need, but not Seneca, because our plugin will have access to the service directly. Seneca itself will load the plugin by calling our exported function. Following the idea of being able to configure the local image folder, we define an optional settings parameter, which will default to an object with the property path equal to uploads, which is the folder we've been using so far.
Now, let's add the content of our plugin, inside the preceding function:
const localpath = (image) => {
return path.join(settings.path, image);
}
We start by defining a function that will convert our image parameter to the local path. We can actually reduce the function to be written in one single line:
const localpath = (image) => (path.join(settings.path, image));
Then, let's create another function that will check whether we have access to a local file, and return a Boolean (if it exists or not) and the filename we provided:
const access = (filename, next) => {
fs.access(filename, fs.constants.R_OK , (err) => {
return next(!err, filename);
});
};
We can use this for our image check, and for our image download. This way, we can improve or even cache the results for greater performance, avoiding excessive filesystem hits. Our image check route can now be written in a very concise way:
this.add("role:check,image:*", (msg, next) => {
access(localpath(msg.image), (exists) => {
return next(null, { exists : exists });
});
});
Notice that we're referring to the this object. Our Seneca service will call our plugin function and reference itself to this. Again, we can write it in a more concise way:
this.add("role:check,image:*", (msg, next) => {
access(localpath(msg.image), (exists) => (next(null, { exists })));
});
Our upload route is fairly simple and has no changes:
this.add("role:upload,image:*,data:*", (msg, next) => {
let data = Buffer.from(msg.data, "base64");
fs.writeFile(localpath(msg.image), data, (err) => {
return next(err, { size : data.length });
});
});
The download route uses our previously created helper functions to avoid storing our local filename. We also made some tweaks to how width and height were treated:
this.add("role:download,image:*", (msg, next) => {
access(localpath(msg.image), (exists, filename) => {
if (!exists) return next(new Error("image not found"));
let image = sharp(filename);
let width = +msg.width || null;
let height = +msg.height || null;
let blur = +msg.blur;
let sharpen = +msg.sharpen;
let greyscale = !!msg.greyscale;
let flip = !!msg.flip;
let flop = !!msg.flop;
if (width && height) image.ignoreAspectRatio();
if (width || height) image.resize(width, height);
if (flip) image.flip();
if (flop) image.flop();
if (blur > 0) image.blur(blur);
if (sharpen > 0) image.sharpen(sharpen);
if (greyscale) image.greyscale();
image.toBuffer().then((data) => {
return next(null, { data: data.toString("base64") });
});
});
});
There are actually a lot of variables we're using where we could just check the message parameter instead. We can rewrite our download function and get one-third reduction:
this.add("role:download,image:*", (msg, next) => {
access(localpath(msg.image), (exists, filename) => {
if (!exists) return next(new Error("image not found"));
let image = sharp(filename);
let width = +msg.width || null;
let height = +msg.height || null;
if (width && height) image.ignoreAspectRatio();
if (width || height) image.resize(width, height);
if (msg.flip) image.flip();
if (msg.flop) image.flop();
if (msg.blur > 0) image.blur(blur);
if (msg.sharpen > 0) image.sharpen(sharpen);
if (msg.greyscale) image.greyscale();
image.toBuffer().then((data) => {
return next(null, { data: data.toString("base64") });
});
});
});
In the end, you should have an imagini.js file with the following content:
const sharp = require("sharp");
const path = require("path");
const fs = require("fs");
module.exports = function (settings = { path: "uploads" }) {
const localpath = (image) => (path.join(settings.path, image));
const access = (filename, next) => {
fs.access(filename, fs.constants.R_OK , (err) => {
return next(!err, filename);
});
};
this.add("role:check,image:*", (msg, next) => {
access(localpath(msg.image), (exists) => (next(null, { exists })));
});
this.add("role:upload,image:*,data:*", (msg, next) => {
let data = Buffer.from(msg.data, "base64");
fs.writeFile(localpath(msg.image), data, (err) => {
return next(err, { size : data.length });
});
});
this.add("role:download,image:*", (msg, next) => {
access(localpath(msg.image), (exists, filename) => {
if (!exists) return next(new Error("image not found"));
let image = sharp(filename);
let width = +msg.width || null;
let height = +msg.height || null;
if (width && height) image.ignoreAspectRatio();
if (width || height) image.resize(width, height);
if (msg.flip) image.flip();
if (msg.flop) image.flop();
if (msg.blur > 0) image.blur(blur);
if (msg.sharpen > 0) image.sharpen(sharpen);
if (msg.greyscale) image.greyscale();
image.toBuffer().then((data) => {
return next(null, { data: data.toString("base64") });
});
});
});
};
We just need to create our Seneca service and use our plugin. This is actually very straightforward. Create a file called seneca.js, and add the following:
const seneca = require("seneca");
const service = seneca();
service.use("./imagini.js", { path: __dirname + "/uploads" });
service.listen(3000);
What the code does, line by line, is as follows:
That's it, our service is now a plugin and could be used by any Seneca service! You should now start our service by running the new file and not imagini.js directly:
node seneca
As you can see, writing a service does not change much between frameworks. Our code is very similar, with minor changes. Seneca is stricter about message format and content, so we used base64 to encode our image inside the JSON message. Other than that, everything is the same.
You get the advantage of being able to choose everything about the service, but you need to write a lot of code. To facilitate the task, Hydra might be a good start for an initial set of plugins.
For other tools such as Seneca, some aspects of the microservice (for instance, the communication using JSON messages and service composition) are already packed. This comes at the price of a stricter service definition.
In the next chapter, we will discuss the security of our three service versions, and how we can store state.
Now that we have created our microservice base layout on different frameworks, it's time to read our code more carefully and see if everything looks good. It's easy to just keep writing code and stop thinking about what we're doing, but later on, when we do stop for a while, we'll be wasting time deleting repeated code and reorganizing our service.
It's always better to think before we code. This is something you'll learn with time, to value the time you dedicate to plan your service or think about a new feature. It's never a good idea to just start coding. In theory, your Service should be inside a Security layer, with a good and stable connection to State:
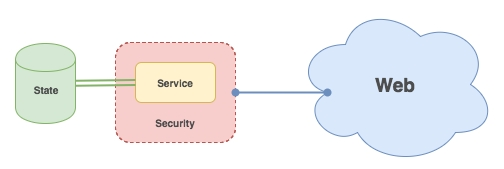
Think of state as a person's memory. Usually, a service has state, which means it has memory of actions and information it's serving. The idea is that our service will run indefinitely, but sometimes we're forced to restart it or even stop it for some time because of maintenance or an upgrade.
Ideally, a service should resume without losing state, giving its users the perception that it never stopped. This is achieved by doing one of two things:
The first option will make your service a bit slower (nothing is faster than state in system memory) but should give you a more consistent state across restarts.
The second option is trickier, because sometimes our service might stop abruptly and be unable to save that state, but for those use cases, you may not care about the state. It's up to you.
There are a lot of options to store state; it will depend on what you want to store. For a microservice, you should avoid the filesystem so as to make your service more compatible with multiple operating systems.
Depending on your service, you can store state using:
The first option is still the most commonly used one. You'll rely on stable and more than proven database systems that run in multiple systems and that you can find on any cloud service where you might want to deploy your microservice. Apart from the maturity of most solutions, a relational database, if properly set up, should give you consistency.
The second option is more recent compared to the first one. Usually, there are no fixed tables as in RDBMS, and you normally work with collections of documents that are just common JSON structures. It's more agile as there are usually no restrictions, and each document might have a different structure. The more agile, the less consistent.
All three options, depending on the specific system you choose, support replication, which should enable fault tolerance and improve speed in geographically spaced instances.
Let's try each of the three options using one of the suggested systems. Let's begin with the relational database, and use MySQL.
Installing MySQL is very simple. Just head to the official website and follow the instructions. You'll usually be asked for a password for the root user, which you can use later on to manage the server settings and user accounts.
There are some options to connect to a MySQL server using Node.js, but the best tools are the mysql and mysql2 modules. They both serve the required purpose, and neither is the next version of the other, they're just a bit different in design and supported features.
First, let's add the dependency to our service. On the terminal, go to our service folder and type:
npm install mysql --save
We can now include our dependency and configure a connection to the database. To avoid having the credentials in our code, we can create a separate file and put settings there that we may change in the future, and that shouldn't belong in the code. We can take advantage of Node.js being able to include JSON files, and just write our settings in JSON.
Create a file called settings.json, and add the following content:
{
"db": "mysql://root:test@localhost/imagini"
}
We defined a setting called db that has a database URI, which is a handy way of defining our database access and credentials using an address similar to any website address. Our database uses mysql; it's at localhost (using the default port), which can be accessed using the username root and the password test, and our database name is called imagini.
We can now include the module and settings, and create the connection:
const settings = require("./settings");
const mysql = require("mysql");
const db = mysql.createConnection(settings.db);
This module only connects to the database when you make a query. This means the service would start and you wouldn't know whether your connection settings are correct until you make the first query. We don't want to figure out we can't connect to the database only when the service is used later on, so let's force a connection and check if the server is running and accepts our connection:
db.connect((err) => {
if (err) throw err;
console.log("db: ready");
// ...
// the rest of our service code
// ...
app.listen(3000, () => {
console.log("app: ready");
});
});
This way, if anything is wrong with the database, the service won't start and will throw an exception, which will notify you to check what's wrong. Here's an example of a possible error:
Error: ER_ACCESS_DENIED_ERROR: Access denied for user 'root'@'localhost' (using password: YES)
This indicates you probably typed the password incorrectly, or the user doesn't match, or even the hostname or database may be wrong. Ensuring you connect to the database before setting up the service means your service won't be exposed to the public without a proper state.
Our microservice has a very simple state, so to speak. Our state is the images previously uploaded. Instead of using the filesystem, we can now use the database and create a table to store them all:
db.query(
`CREATE TABLE IF NOT EXISTS images
(
id INT(11) UNSIGNED NOT NULL AUTO_INCREMENT,
date_created TIMESTAMP NOT NULL DEFAULT CURRENT_TIMESTAMP,
date_used TIMESTAMP NULL DEFAULT NULL,
name VARCHAR(300) NOT NULL,
size INT(11) UNSIGNED NOT NULL,
data LONGBLOB NOT NULL,
PRIMARY KEY (id),
UNIQUE KEY name (name)
)
ENGINE=InnoDB DEFAULT CHARSET=utf8`
);
We can issue this query every time the service starts because it will create the images table only if it doesn't exist already. If we don't change its structure, it's fine to always do this.
You can see we're creating a table with a unique identification number (id), a creation date (date_created), a date to know when our image has been used(date_used), the name of the image, the size of it in bytes, and the image data. The size is a little redundant here as we could just check the data length, but bear with me, this is just an example.
We also defined our name as a unique key, meaning it has an index for quickly finding images by name, and also ensures our name does not repeat and that no one can overwrite an image (without removing it first).
Having the images stored this way on a database table gives you several advantages, such as regarding:
It also enables you to improve your service; for example, you can delete images that are not used for longer than a specific time period. You can also make this dependent on the image sizes. Later, you can add authentication (mandatory or not) and have user-specific rules.
It's also easy to back up and replicate the state to another site. There are plenty of tools for backing up databases, and you can have another MySQL server acting as a slave to this one and have your images replicated in real time to another geographical location.
Let's change our service from the previous chapter to use our table instead of the previously used folder on our filesystem.
We can remove our fs module dependency (don't remove the path dependency for now):
app.param("image", (req, res, next, image) => {
if (!image.match(/\.(png|jpg)$/i)) {
return res.status(403).end();
}
db.query("SELECT * FROM images WHERE name = ?", [ image ], (err,
images) => {
if (err || !images.length) {
return res.status(404).end();
}
req.image = images[0];
return next();
});
});
Our app.param is completely different. We now validate the image against our image table. If it doesn't find it, it returns code 404. If it does find it, it stores the image information in req.image. We can now change our image upload to store the image on our table:
app.post("/uploads/:name", bodyparser.raw({
limit : "10mb",
type : "image/*"
}), (req, res) => {
db.query("INSERT INTO images SET ?", {
name : req.params.name,
size : req.body.length,
data : req.body,
}, (err) => {
if (err) {
return res.send({ status : "error", code: err.code });
}
res.send({ status : "ok", size: req.body.length });
});
});
Uploading images no longer use the filesystem and instead creates a new row on our table. We don't need to specify the id as it's automatic. Our creation date is also automatic as it defaults to the current timestamp. Our use date defaults to NULL, which means we haven't used the image yet:
app.head("/uploads/:image", (req, res) => {
return res.status(200).end();
});
Our image check method now gets extremely simple as it relies on the previous app.param to check whether the image exists, so, if we get to this point, we already know the image exists (it's on req.image), so we just need to return the code 200.
Before updating our image fetch method, let's try our service. If you start it on the console, you can immediately open any MySQL administration tool and check our database. I'm using Sequel Pro for macOS. Although there's a Pro in the name, it's free software and it's damn good:
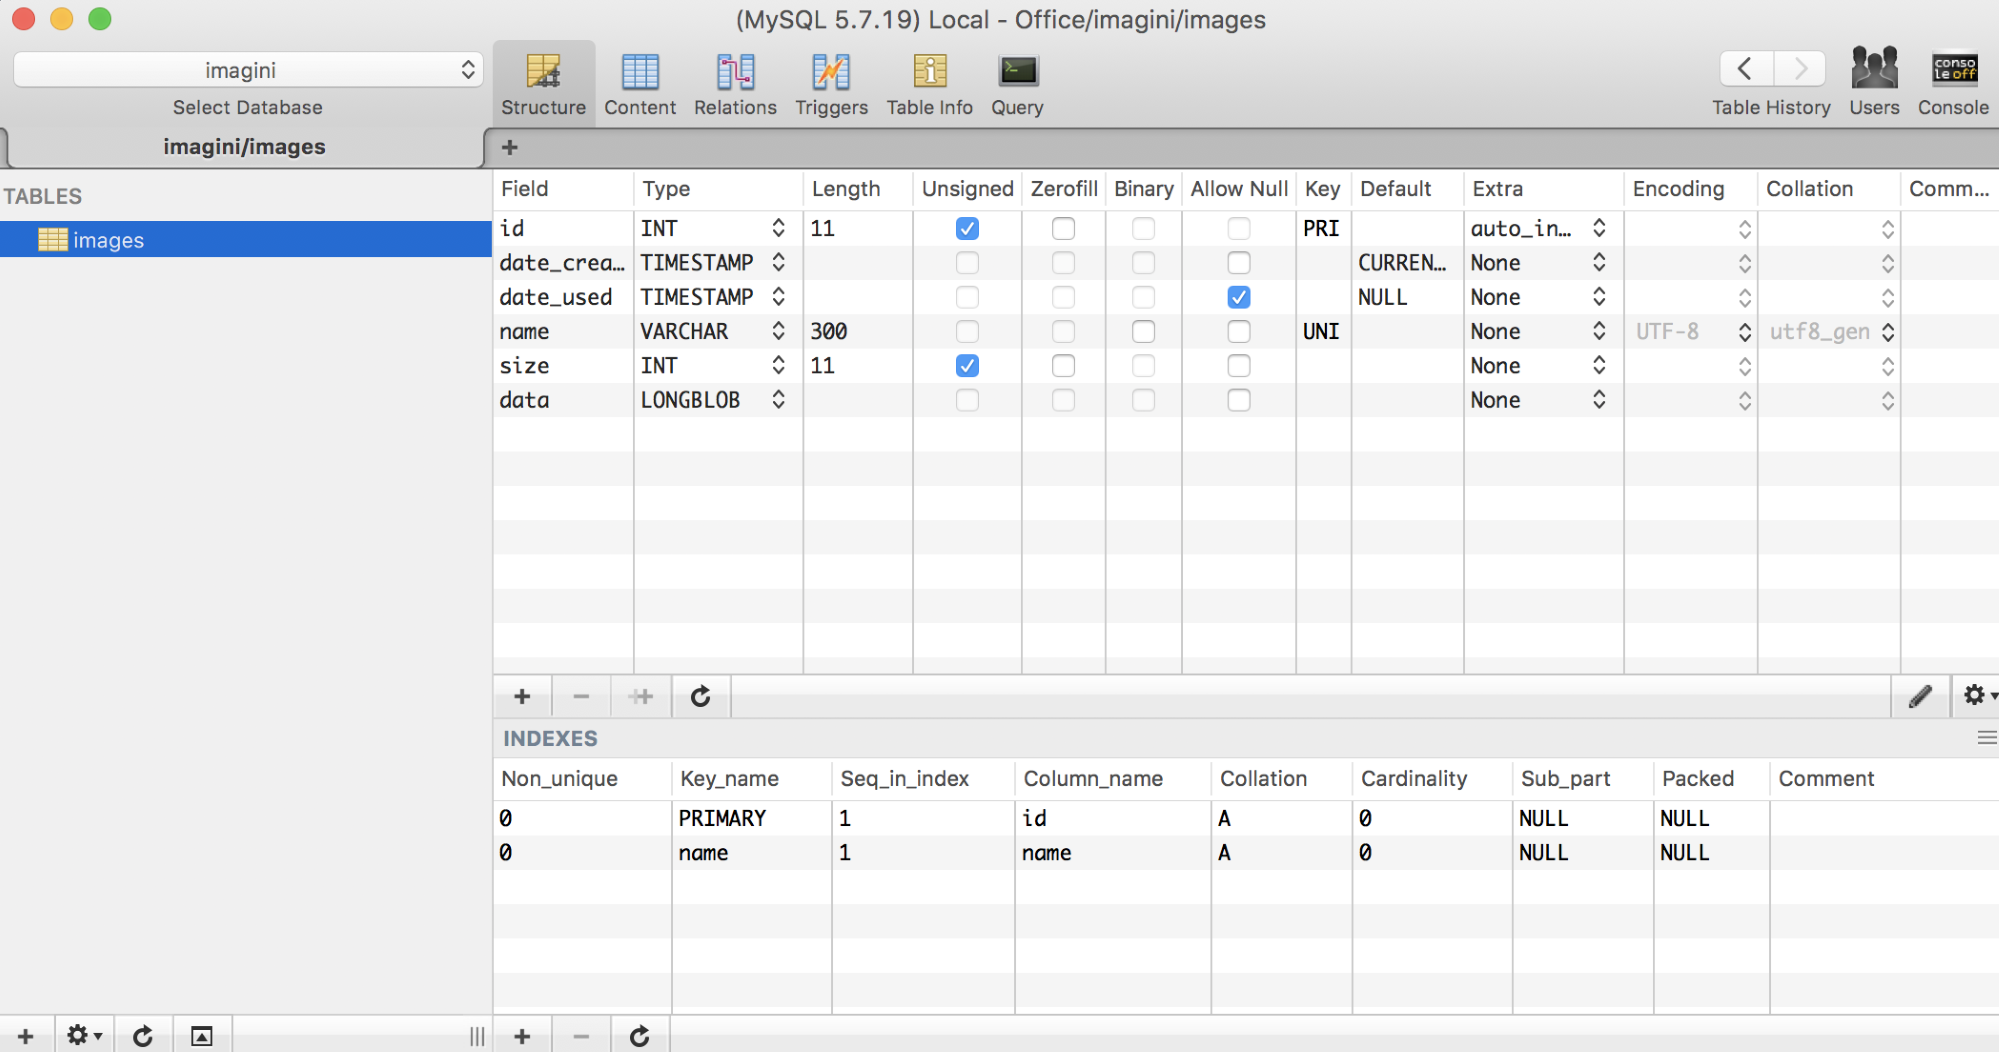
Our table was created, and you can check it has all the properties and indexes we defined. Let's now upload an image once again:
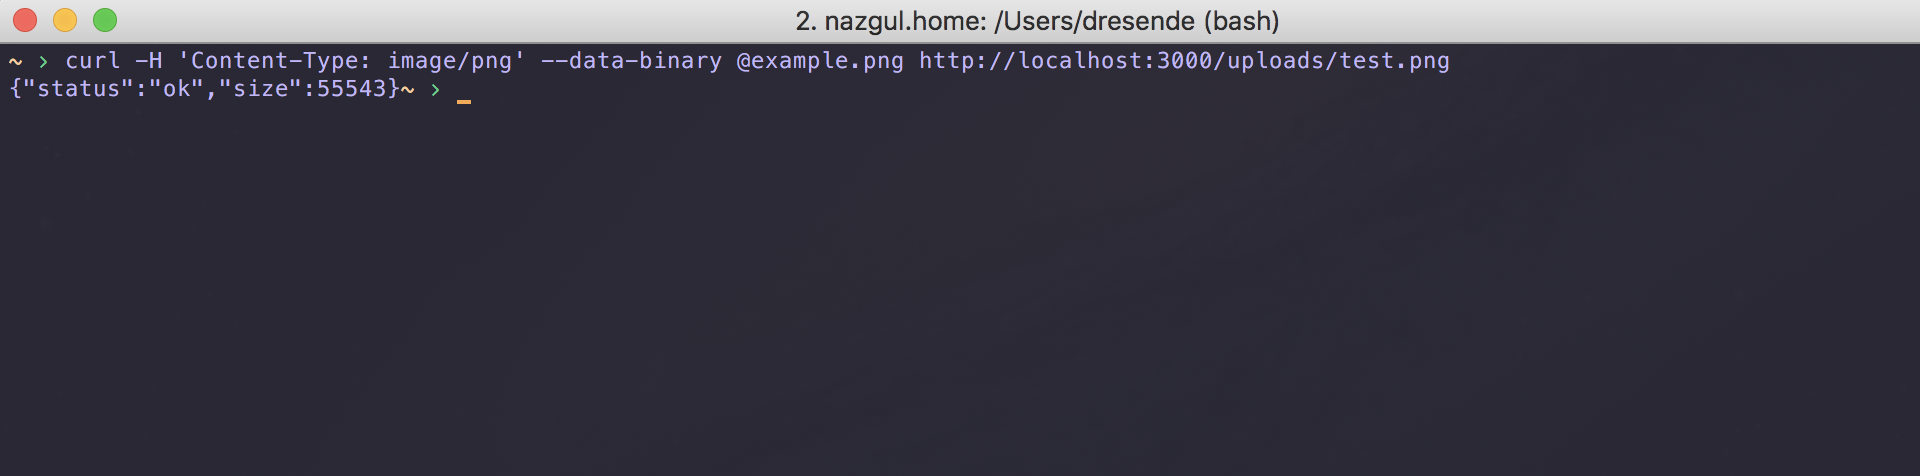
As before, it returns a JSON response with a success status and the size of the image. If you look at Sequel again, on the content separator, you'll see our images data:
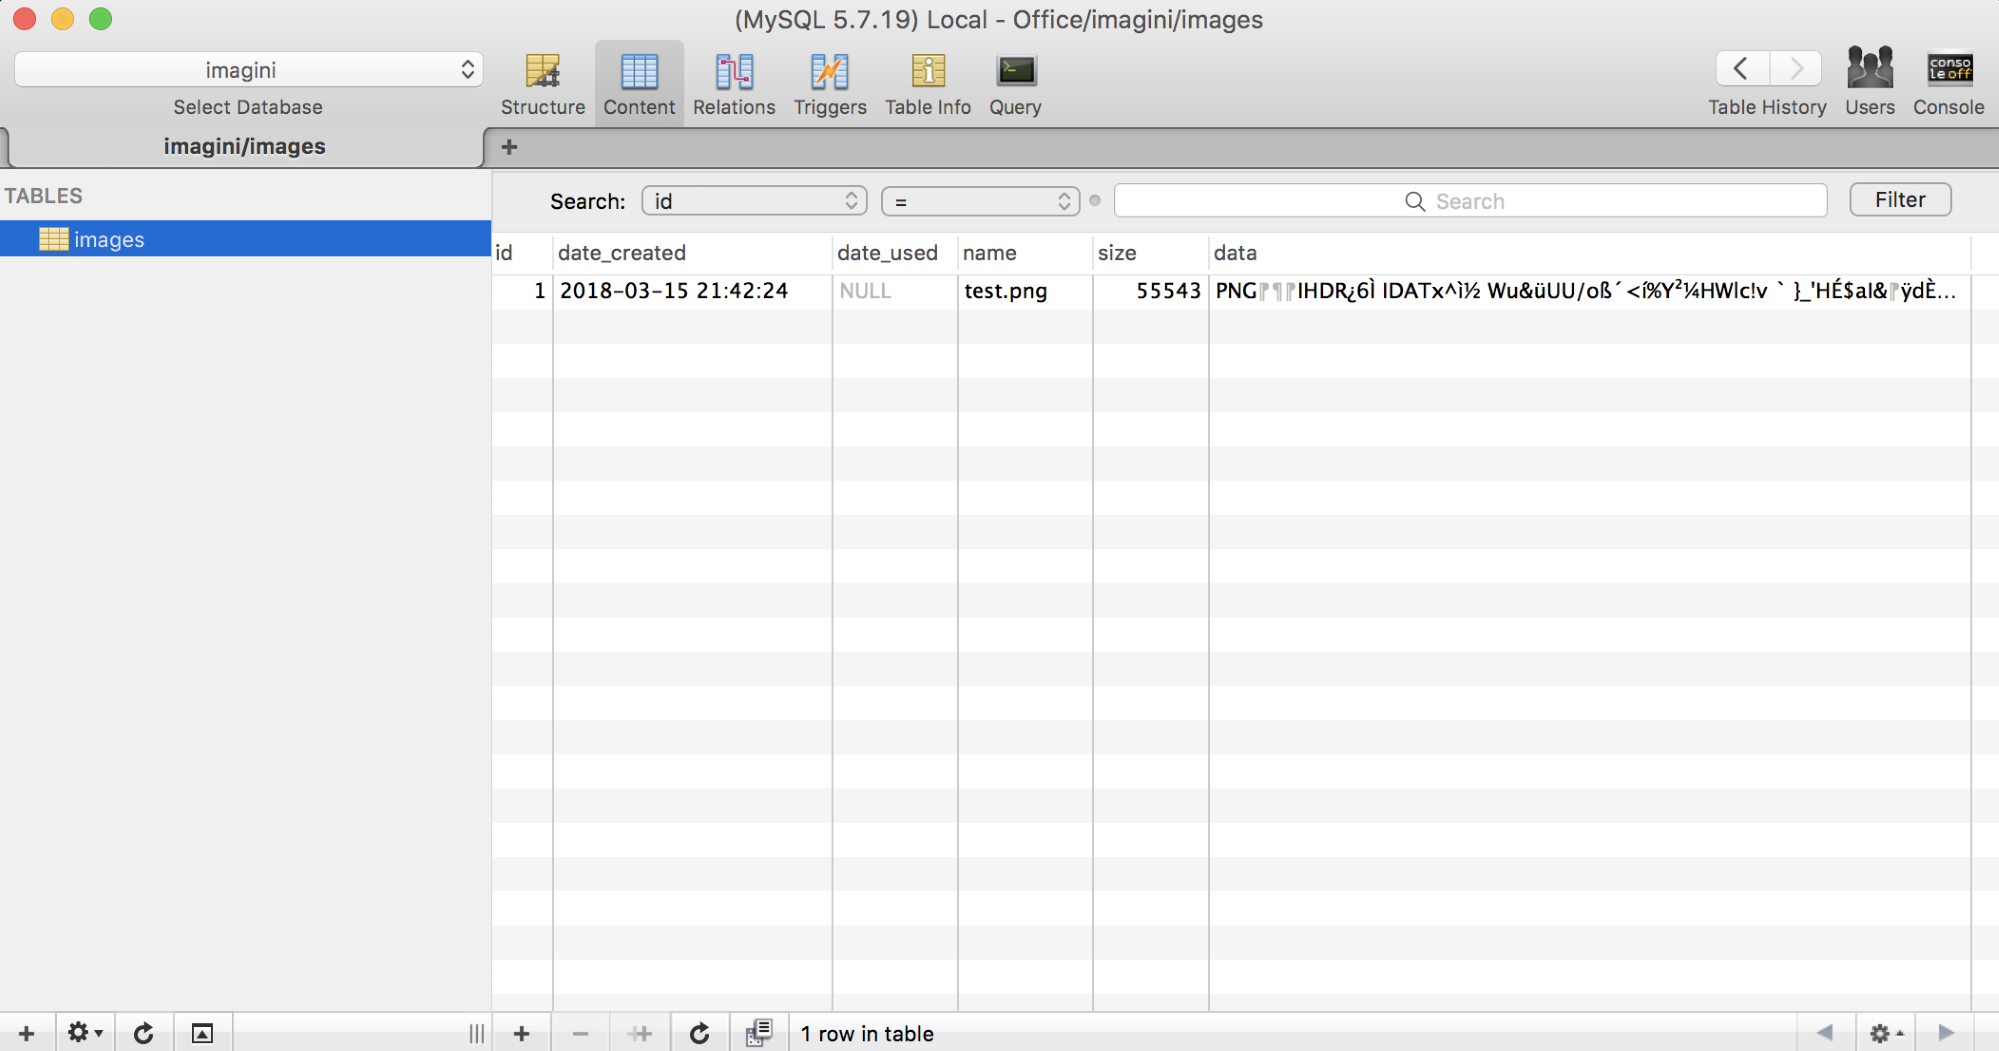
Let's try and upload the image again. Previously, our service would just overwrite it. Now, because of our unique index, it should deny an INSERT with the same name:
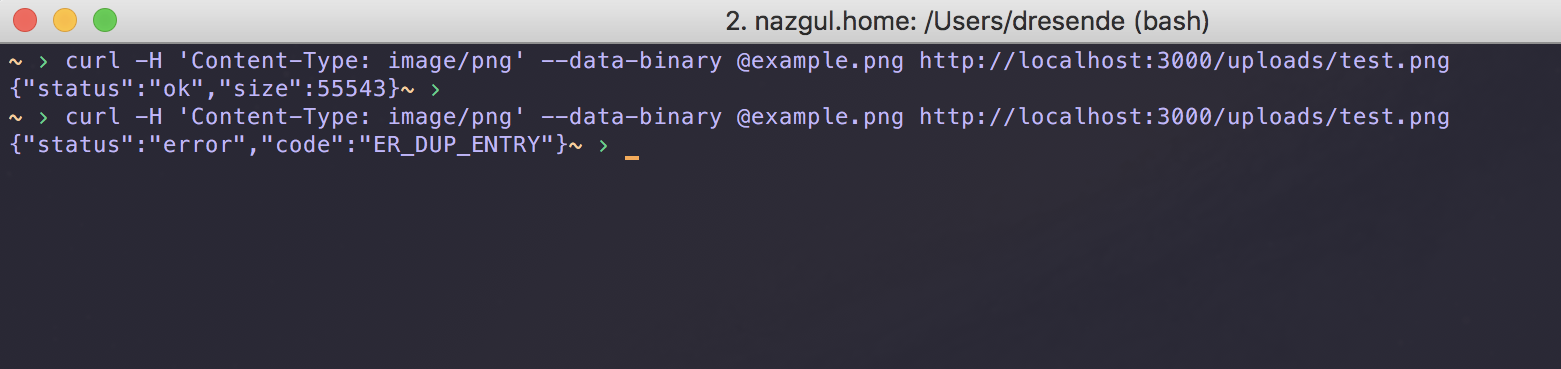
Great! The ER_DUP_ENTRY is the MySQL code for duplicate insertion. We can rely on that and deny overwriting images.
We can also check whether our image exists using the check method:
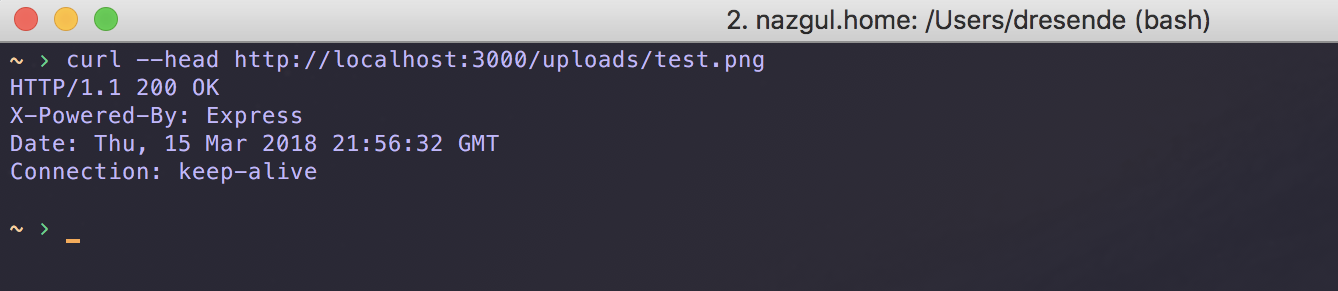
If we use another name, we'll get a code 404:
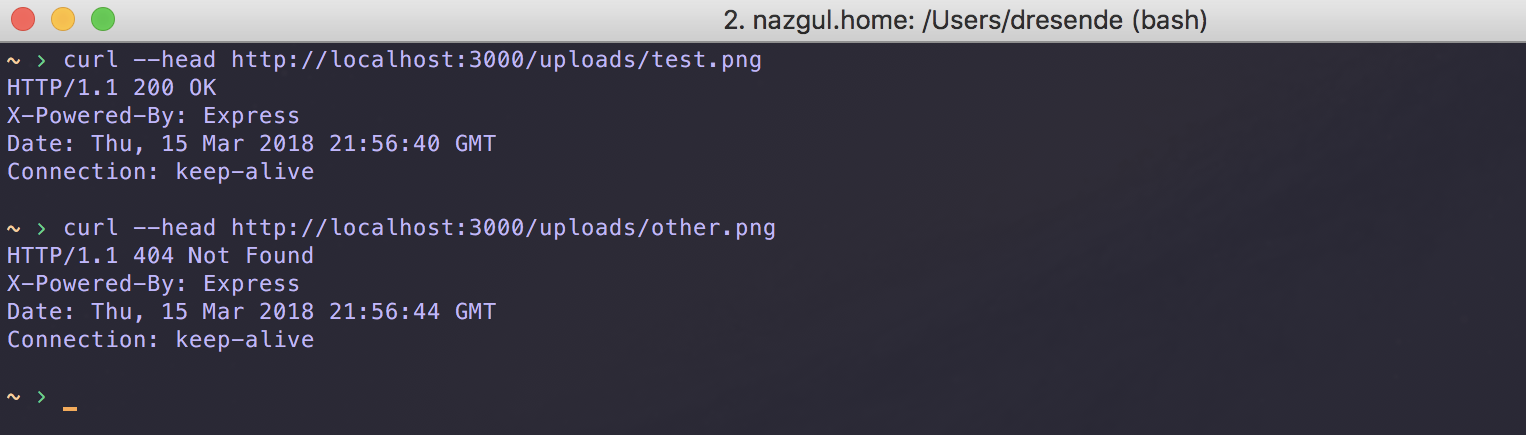
It looks like everything is working great. Let's now change our final method, the image manipulation one. This method is almost the same; we just don't have to read the image file, as it's already available:
app.get("/uploads/:image", (req, res) => {
let image = sharp(req.image.data);
let width = +req.query.width;
let height = +req.query.height;
let blur = +req.query.blur;
let sharpen = +req.query.sharpen;
let greyscale = [ "y", "yes", "true", "1",
"on"].includes(req.query.greyscale);
let flip = [ "y", "yes", "true", "1",
"on"].includes(req.query.flip);
let flop = [ "y", "yes", "true", "1",
"on"].includes(req.query.flop);
if (width > 0 && height > 0) {
image.ignoreAspectRatio();
}
if (width > 0 || height > 0) {
image.resize(width || null, height || null);
}
if (flip) image.flip();
if (flop) image.flop();
if (blur > 0) image.blur(blur);
if (sharpen > 0) image.sharpen(sharpen);
if (greyscale) image.greyscale();
db.query("UPDATE images " +
"SET date_used = UTC_TIMESTAMP " +
"WHERE id = ?", [ req.image.id ]);
res.setHeader("Content-Type", "image/" + path.extname(req.image.name).substr(1));
image.pipe(res);
});
You can see how we used the path dependency to get the extension of the image name. The rest is the same. We just add an update to our image every time we request this method.
We can use a web browser to test our method and see our previously uploaded image:

Everything should just work as before because we haven't changed our image manipulation dependency, so blurring and the other actions should work as expected:
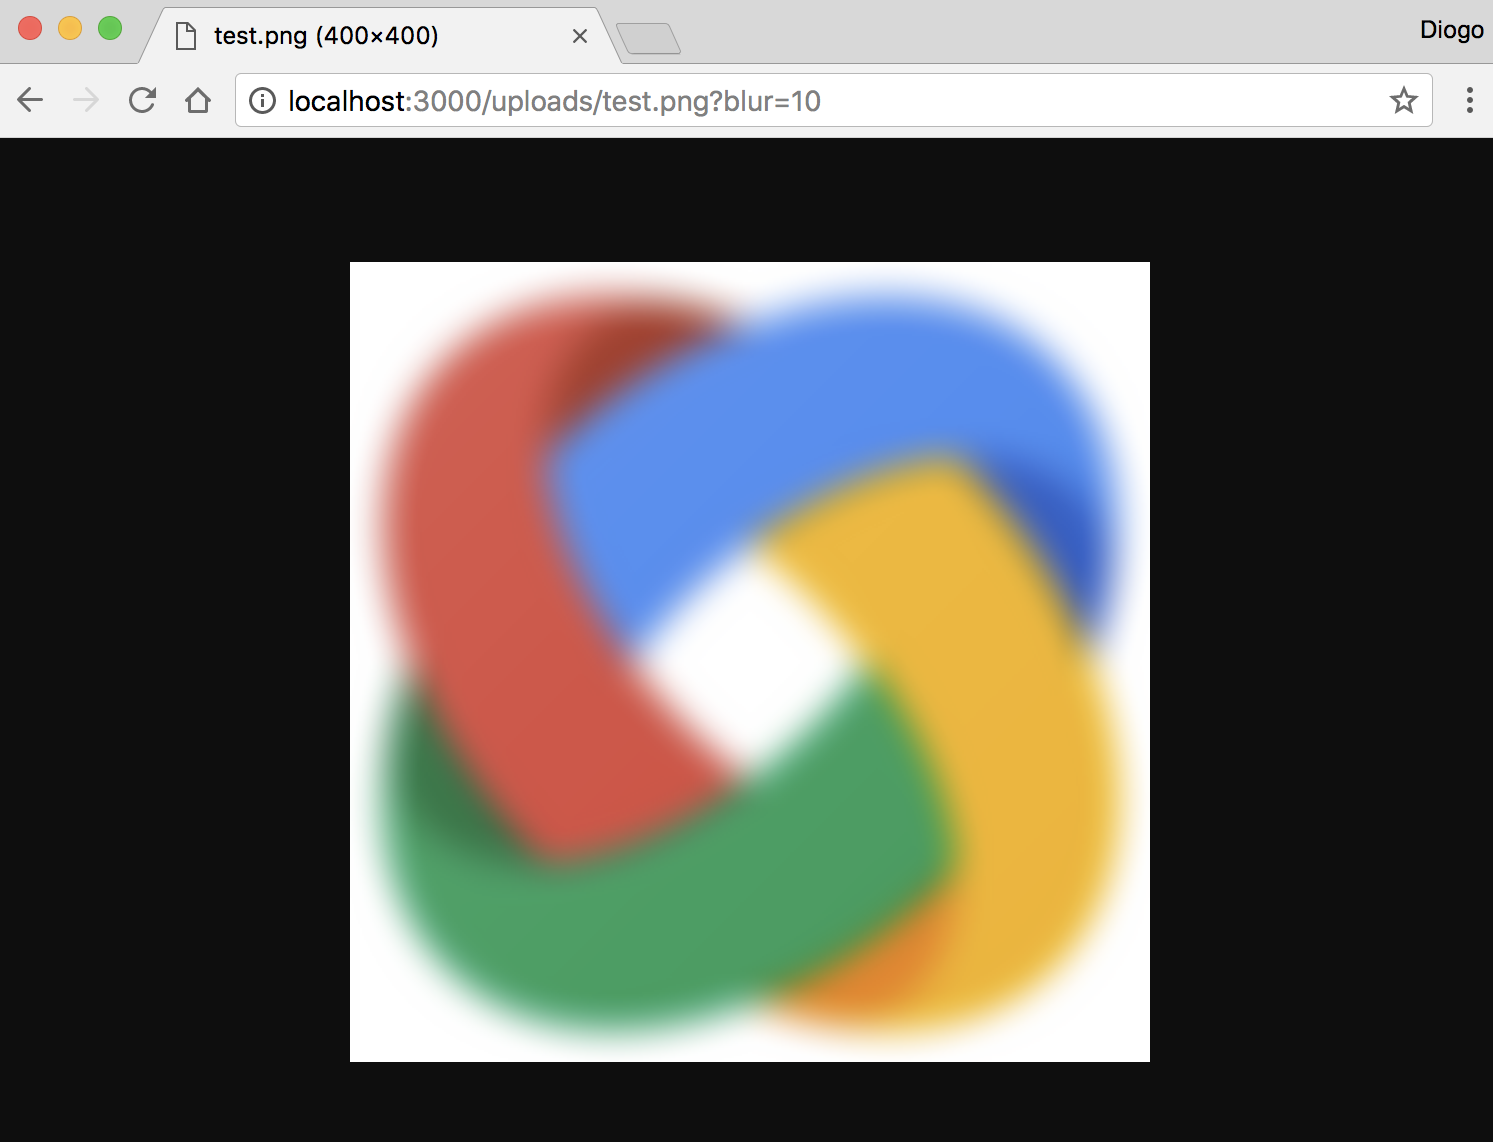
We can now improve our service and add a method we didn't expose before: deleting an image. To do that, we can use the DELETE verb from HTTP and just remove the image from our table:
app.delete("/uploads/:image", (req, res) => {
db.query("DELETE FROM images WHERE id = ?", [ req.image.id ], (err)
=> {
return res.status(err ? 500 : 200).end();
});
});
We just have to check whether the query resulted in an error. If so, we respond with a code 500 (internal server error). If not, we respond with the usual code 200.
Let's restart our microservice and try to delete our image:
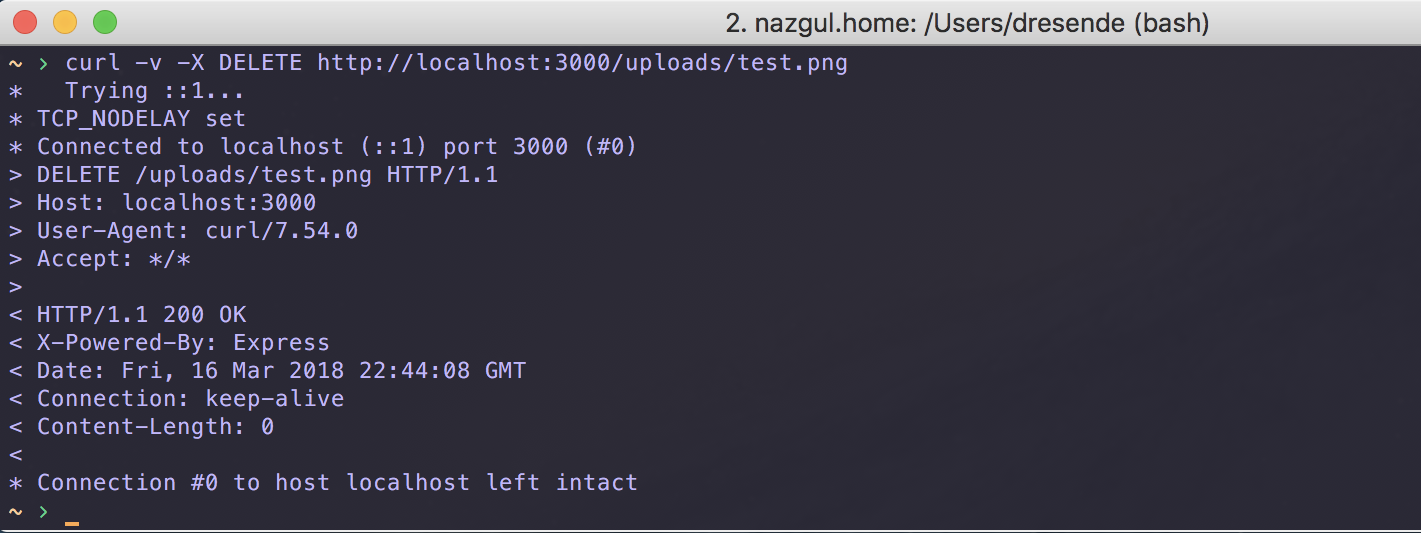
It looks like it worked; it responded with a code 200. If we try to open our image in the web browser, we should see something like this:
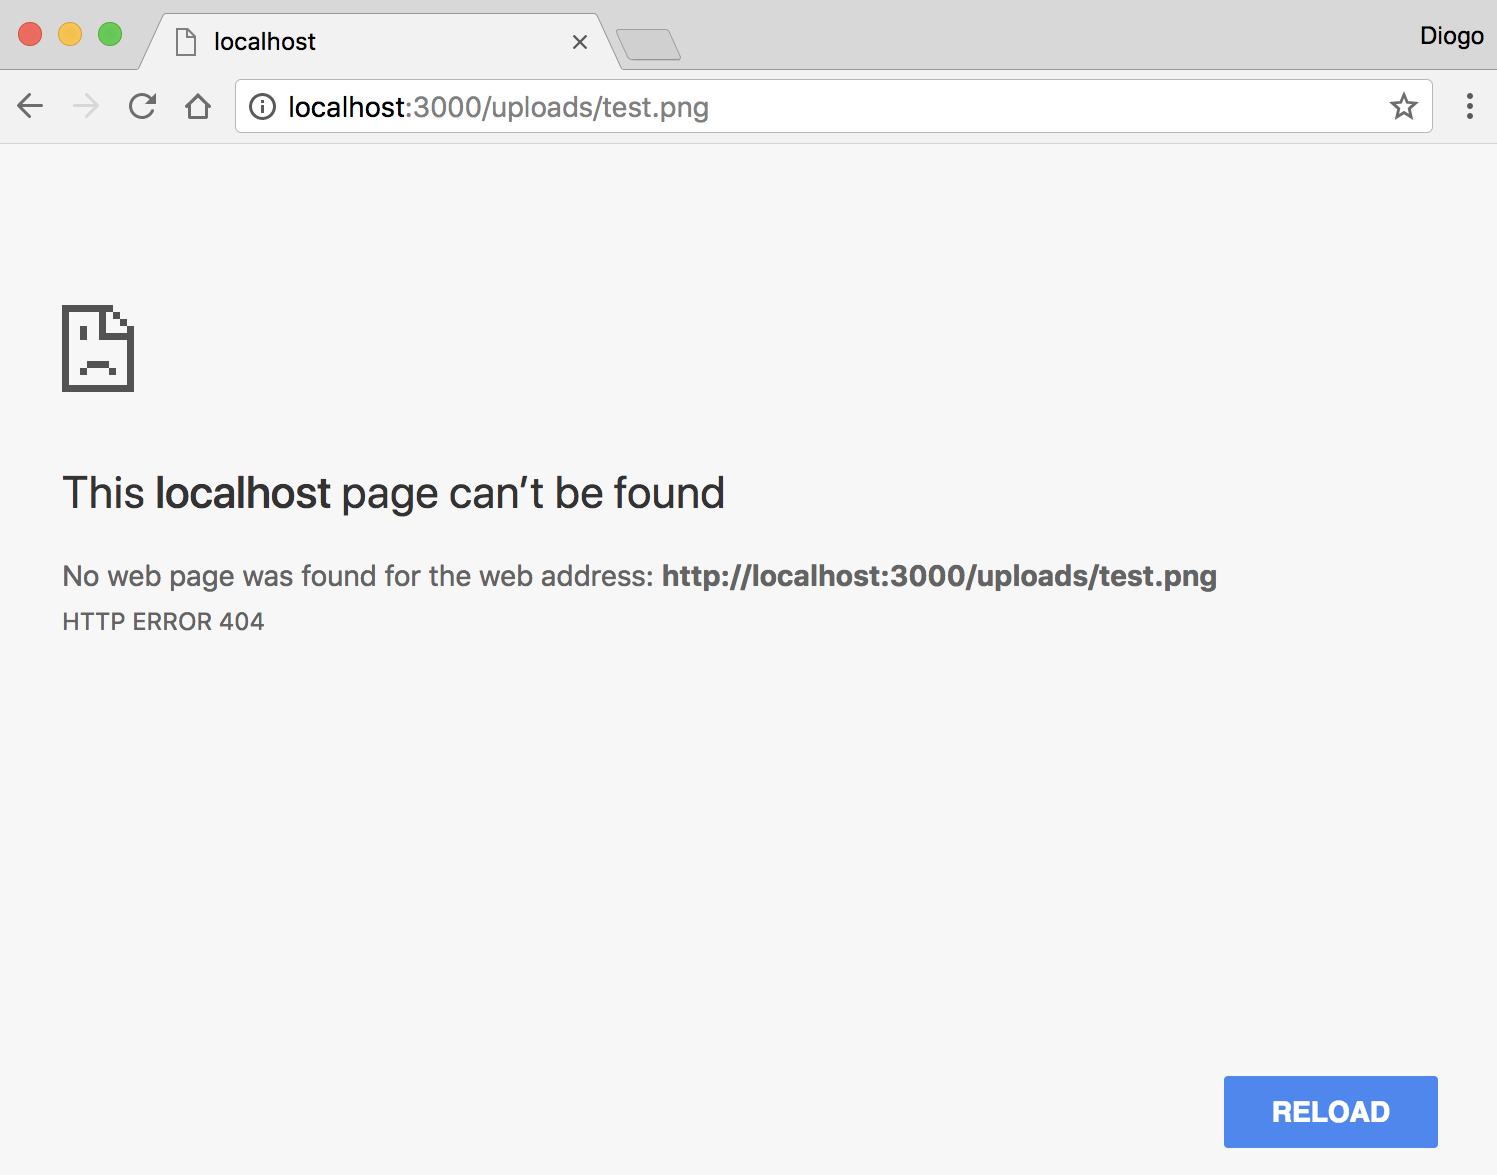
On Sequel, the table should now be empty too:
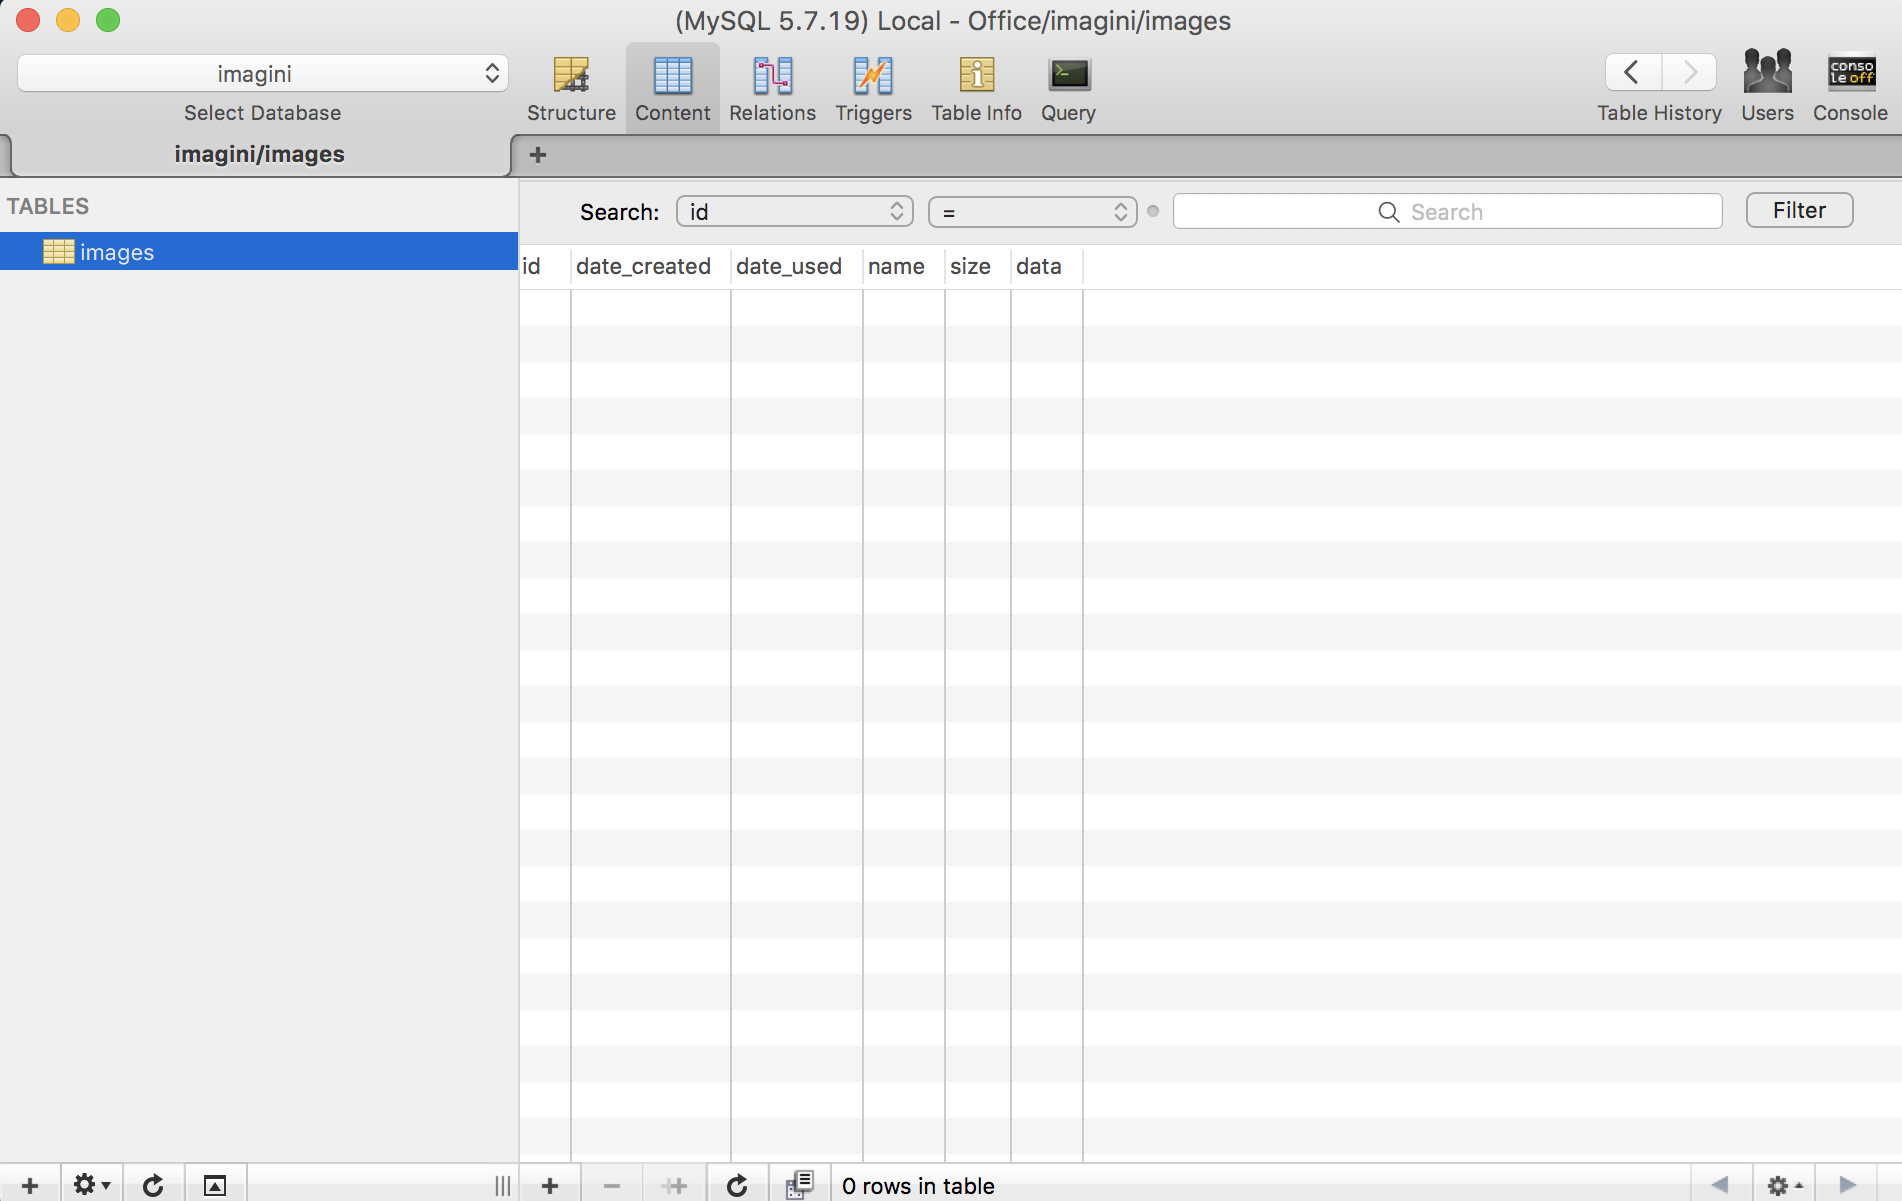
We now have a functional microservice with a state that persists across restarts, as we intended. You can now deploy to any cloud service with no dependency on the filesystem, just a database.
You could easily change MySQL to another database or use an object relational mapping (ORM) module to enable you to change database server without changing your code. An ORM is a library that allows you to use a common interface to access different types of databases. Usually, this kind of abstraction involves not using SQL at all and reducing your interaction with the databases to simpler queries (to allow for interoperability between database servers).
Let's take this opportunity to go a little further and add a few methods that got simplified by this migration to the database. Let's create a method that exposes statistics about our database, and let's remove old images.
Our first statistics method should just return a JSON structure with some useful information. Let's expose the following:
Here's an example of how our statistics method could look:
app.get("/stats", (req, res) => {
db.query("SELECT COUNT(*) total" +
", SUM(size) size " +
", MAX(date_created) last_created " +
"FROM images",
(err, rows) => {
if (err) {
return res.status(500).end();
}
rows[0].uptime = process.uptime();
return res.send(rows[0]);
});
});
Restart the service, and let's try it:

As we can see, we have no images as we just removed our image previously. There's no size because we have no images. There's also no used date, and the service uptime is 5 seconds.
If we upload our previous image, we will get different results, something like the following screenshot:

Now, for our second task, deleting old images, we need to check our database periodically. We'll use an interval timer and just run a DELETE query. The intervals mentioned in the following query are just an example; you can write the conditions you want.
setInterval(() => {
db.query("DELETE FROM images " +
"WHERE (date_created < UTC_TIMETSTAMP - INTERVAL 1 WEEK
AND date_used IS NULL) " +
" OR (date_used < UTC_TIMETSTAMP - INTERVAL 1 MONTH)");
}, 3600 * 1000);
This query deletes images that were not used in the past month (but were used before) or images that were not used in the past week (and never used before). This means that images uploaded need to be used at least once or they will get removed quickly.
You can think of a different strategy, or use no strategy and delete manually if you want. Now that we've seen MySQL, let's move on and look at another kind of database server.
Let's see the differences for a non-relational database using RethinkDB. If you don't have it, just install it by following the official documentation (https://www.rethinkdb.com/docs/). Let's just start the server:
rethinkdb
This will start the server, which comes with a very nice administration console on port 8080. You can open it in the web browser:
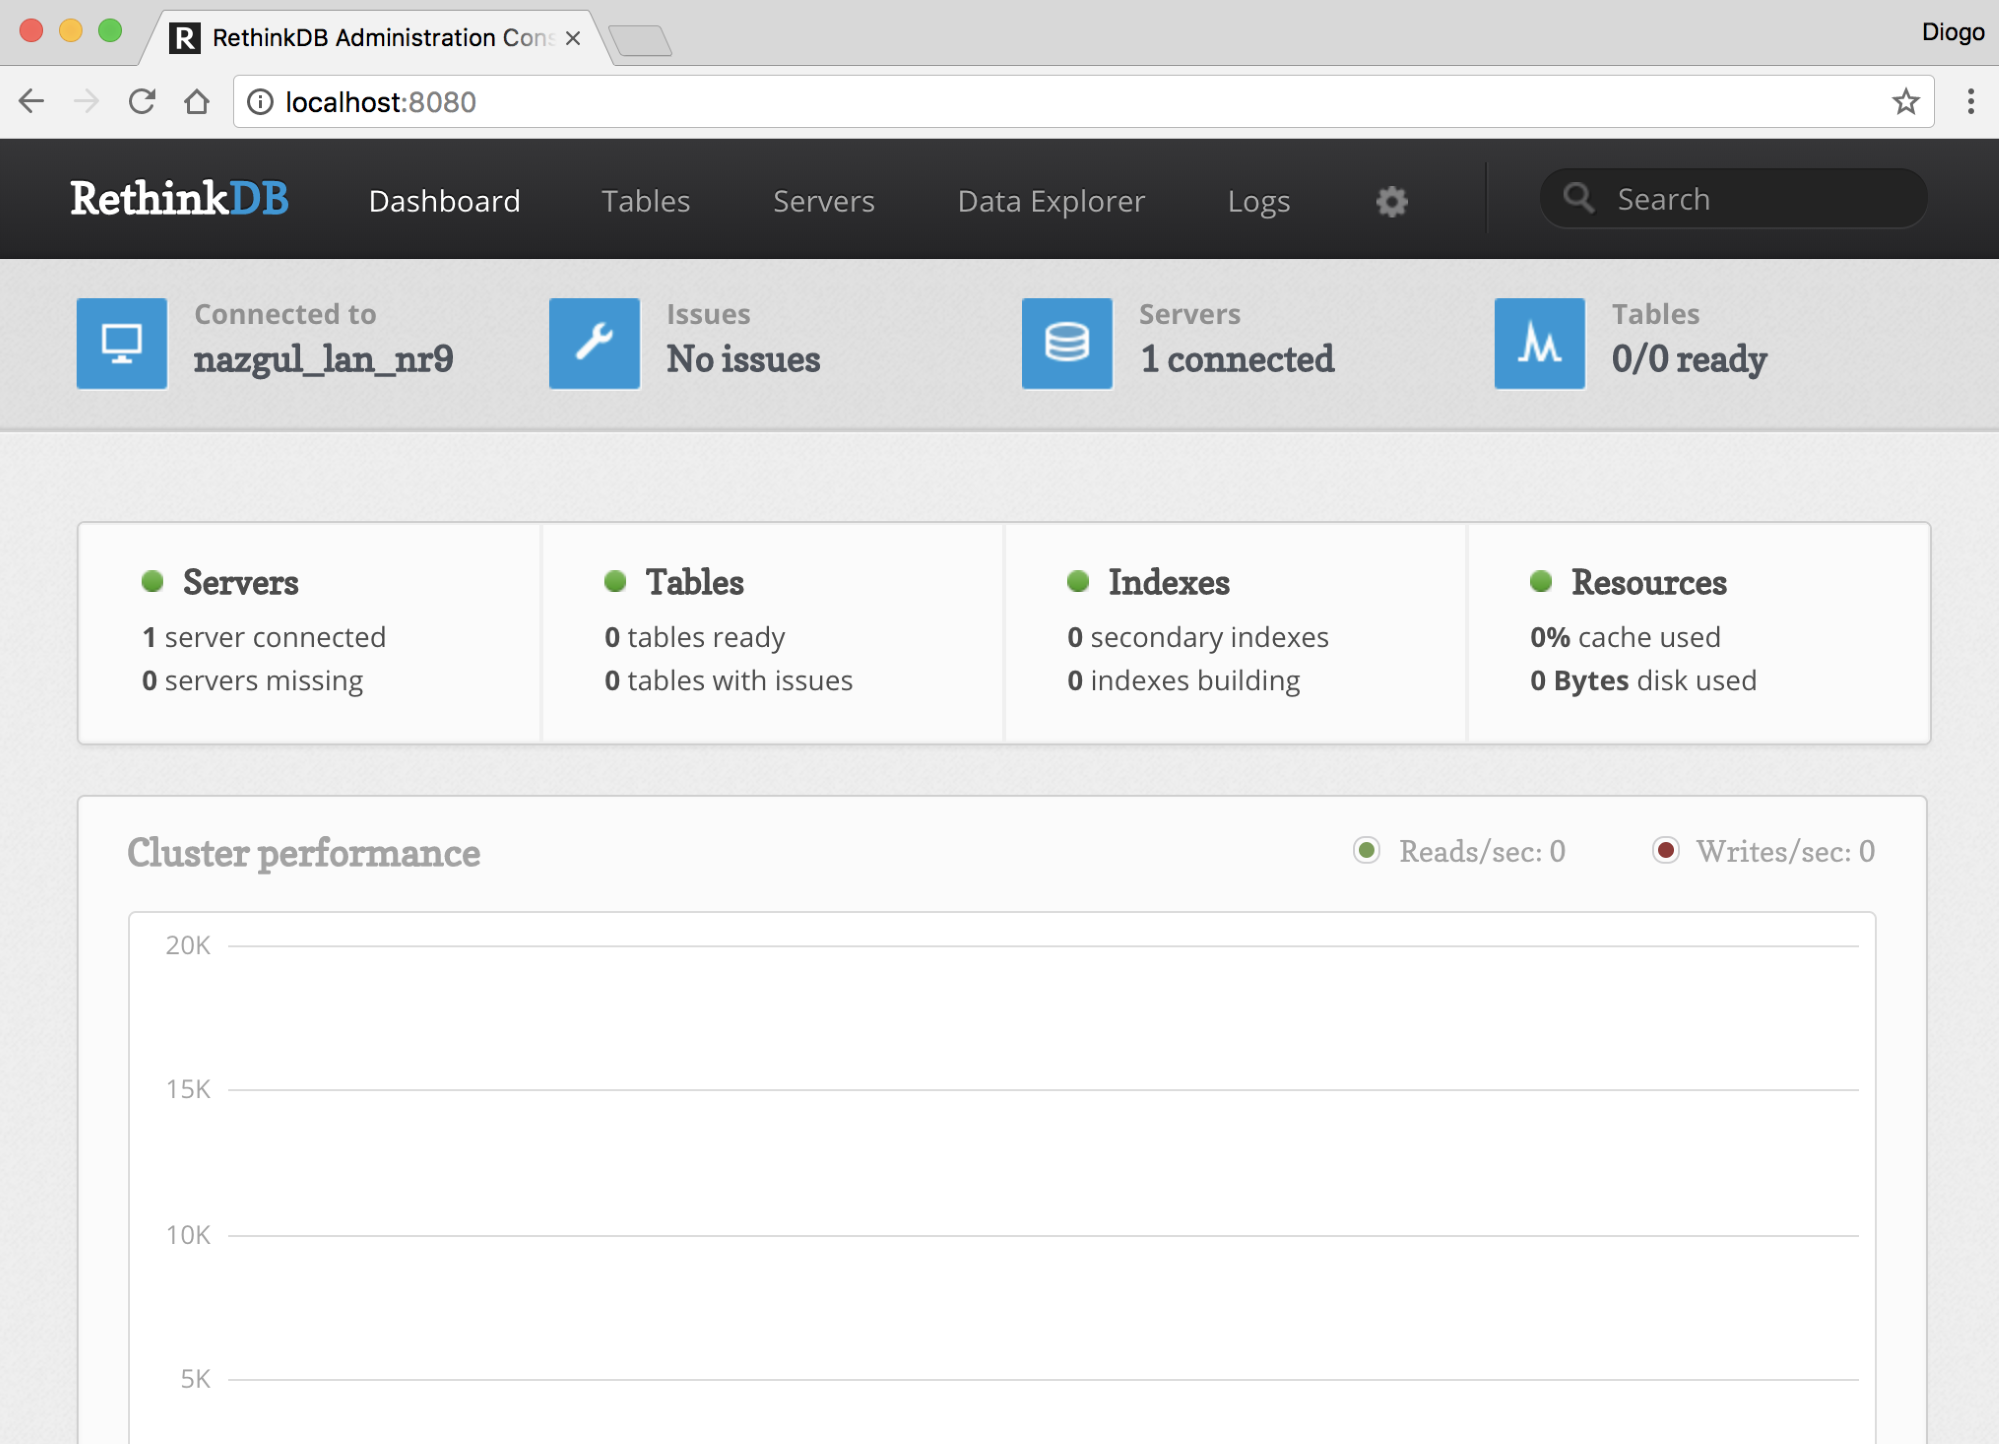
Go to the Tables section on top to see the databases:
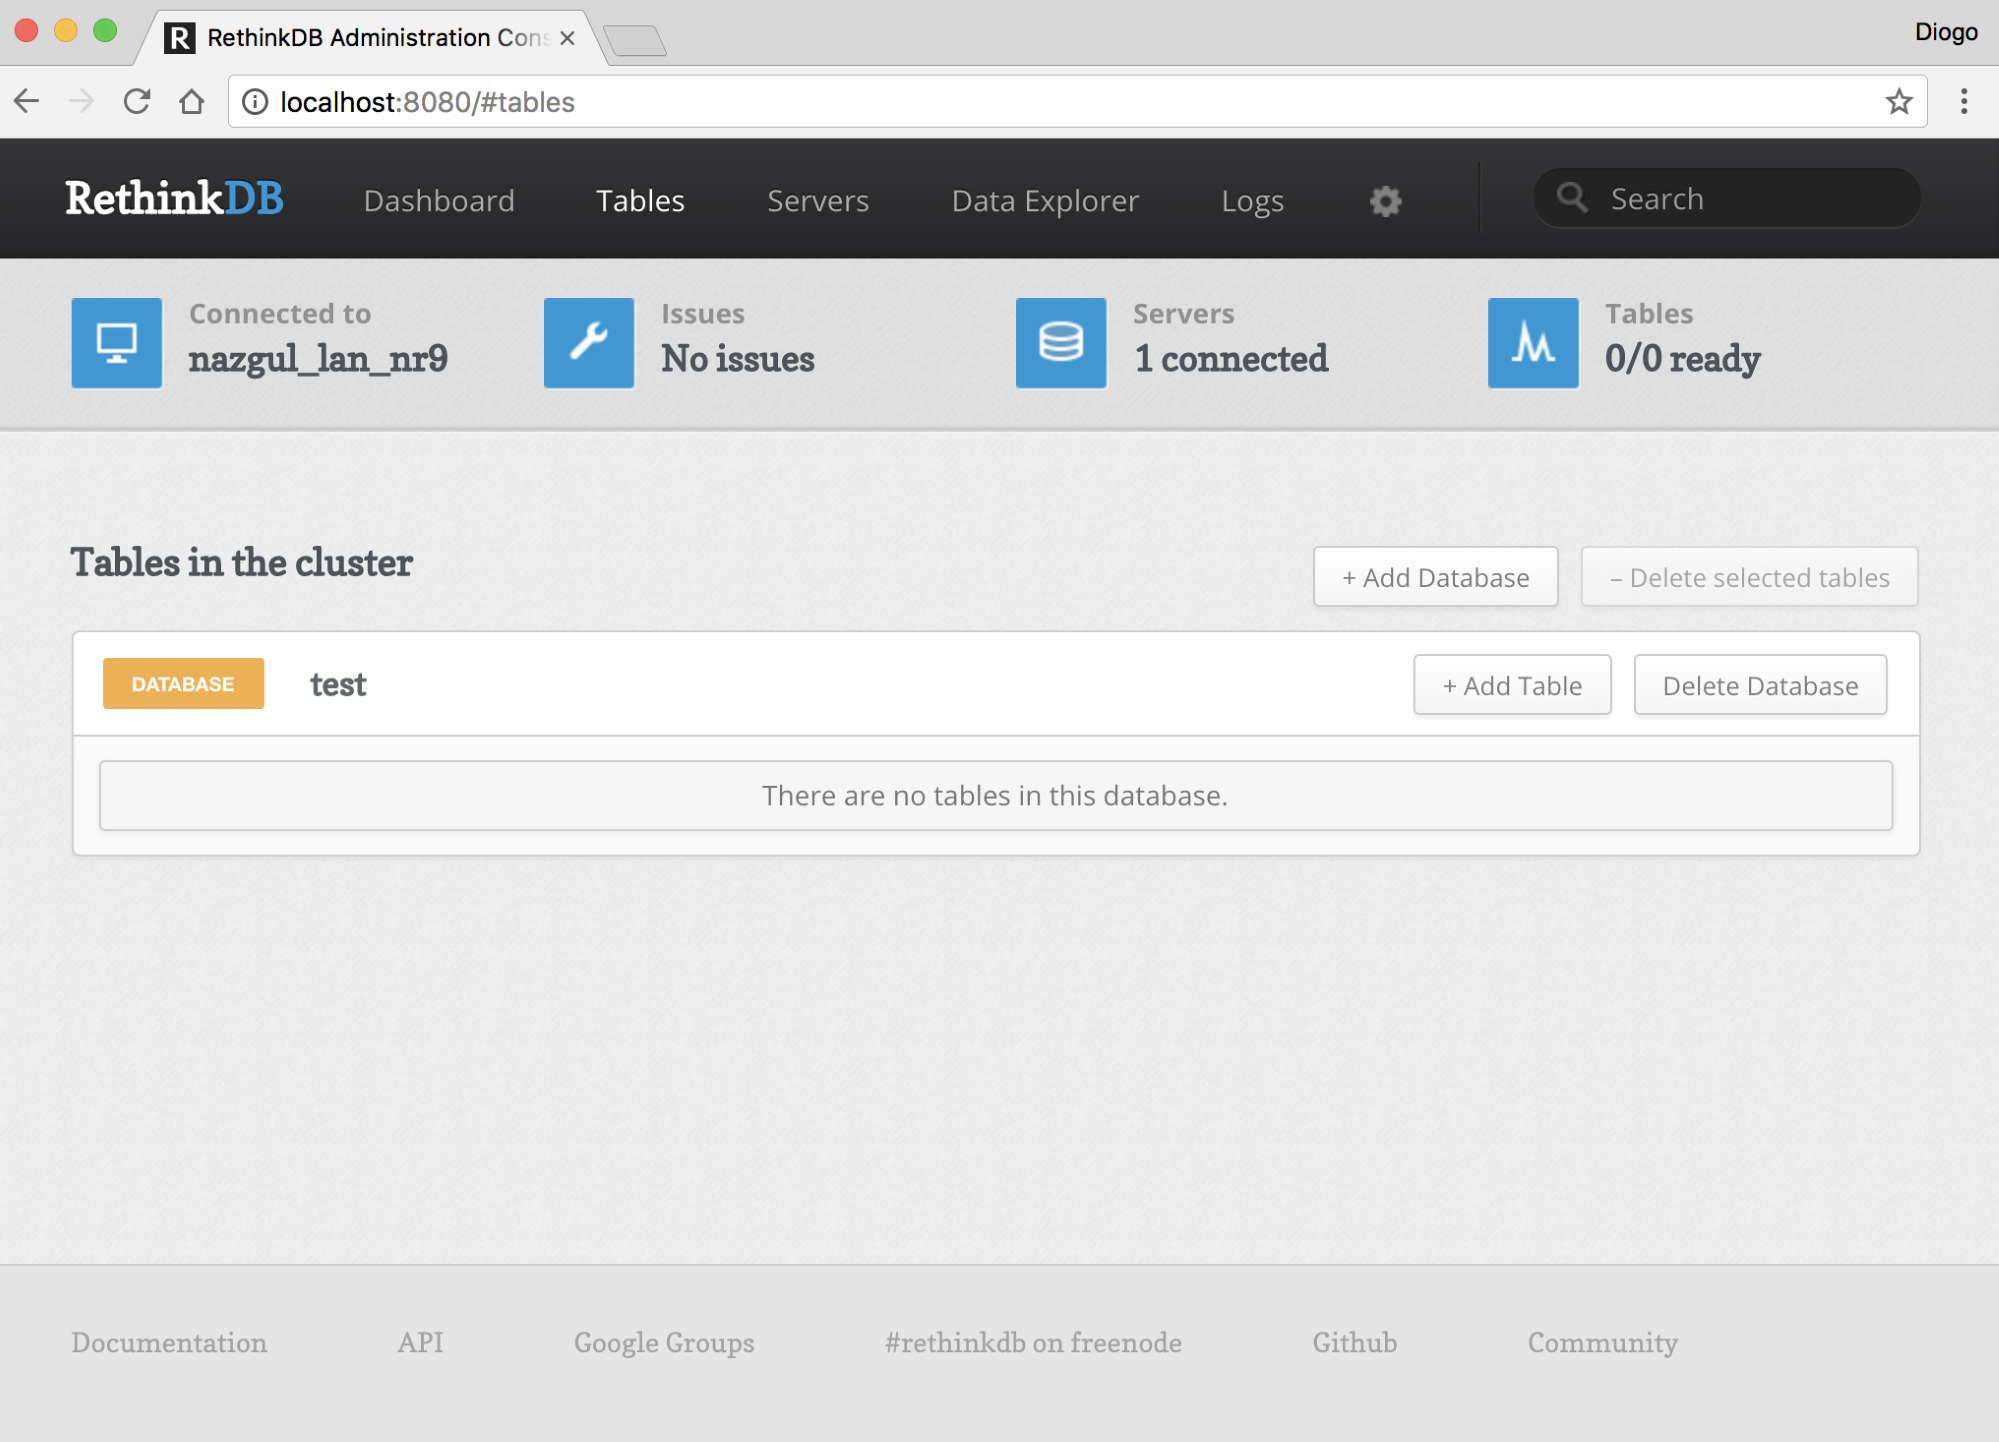
Create a database called imagini using the Add Database button. You should now have our database ready. You need nothing else here:
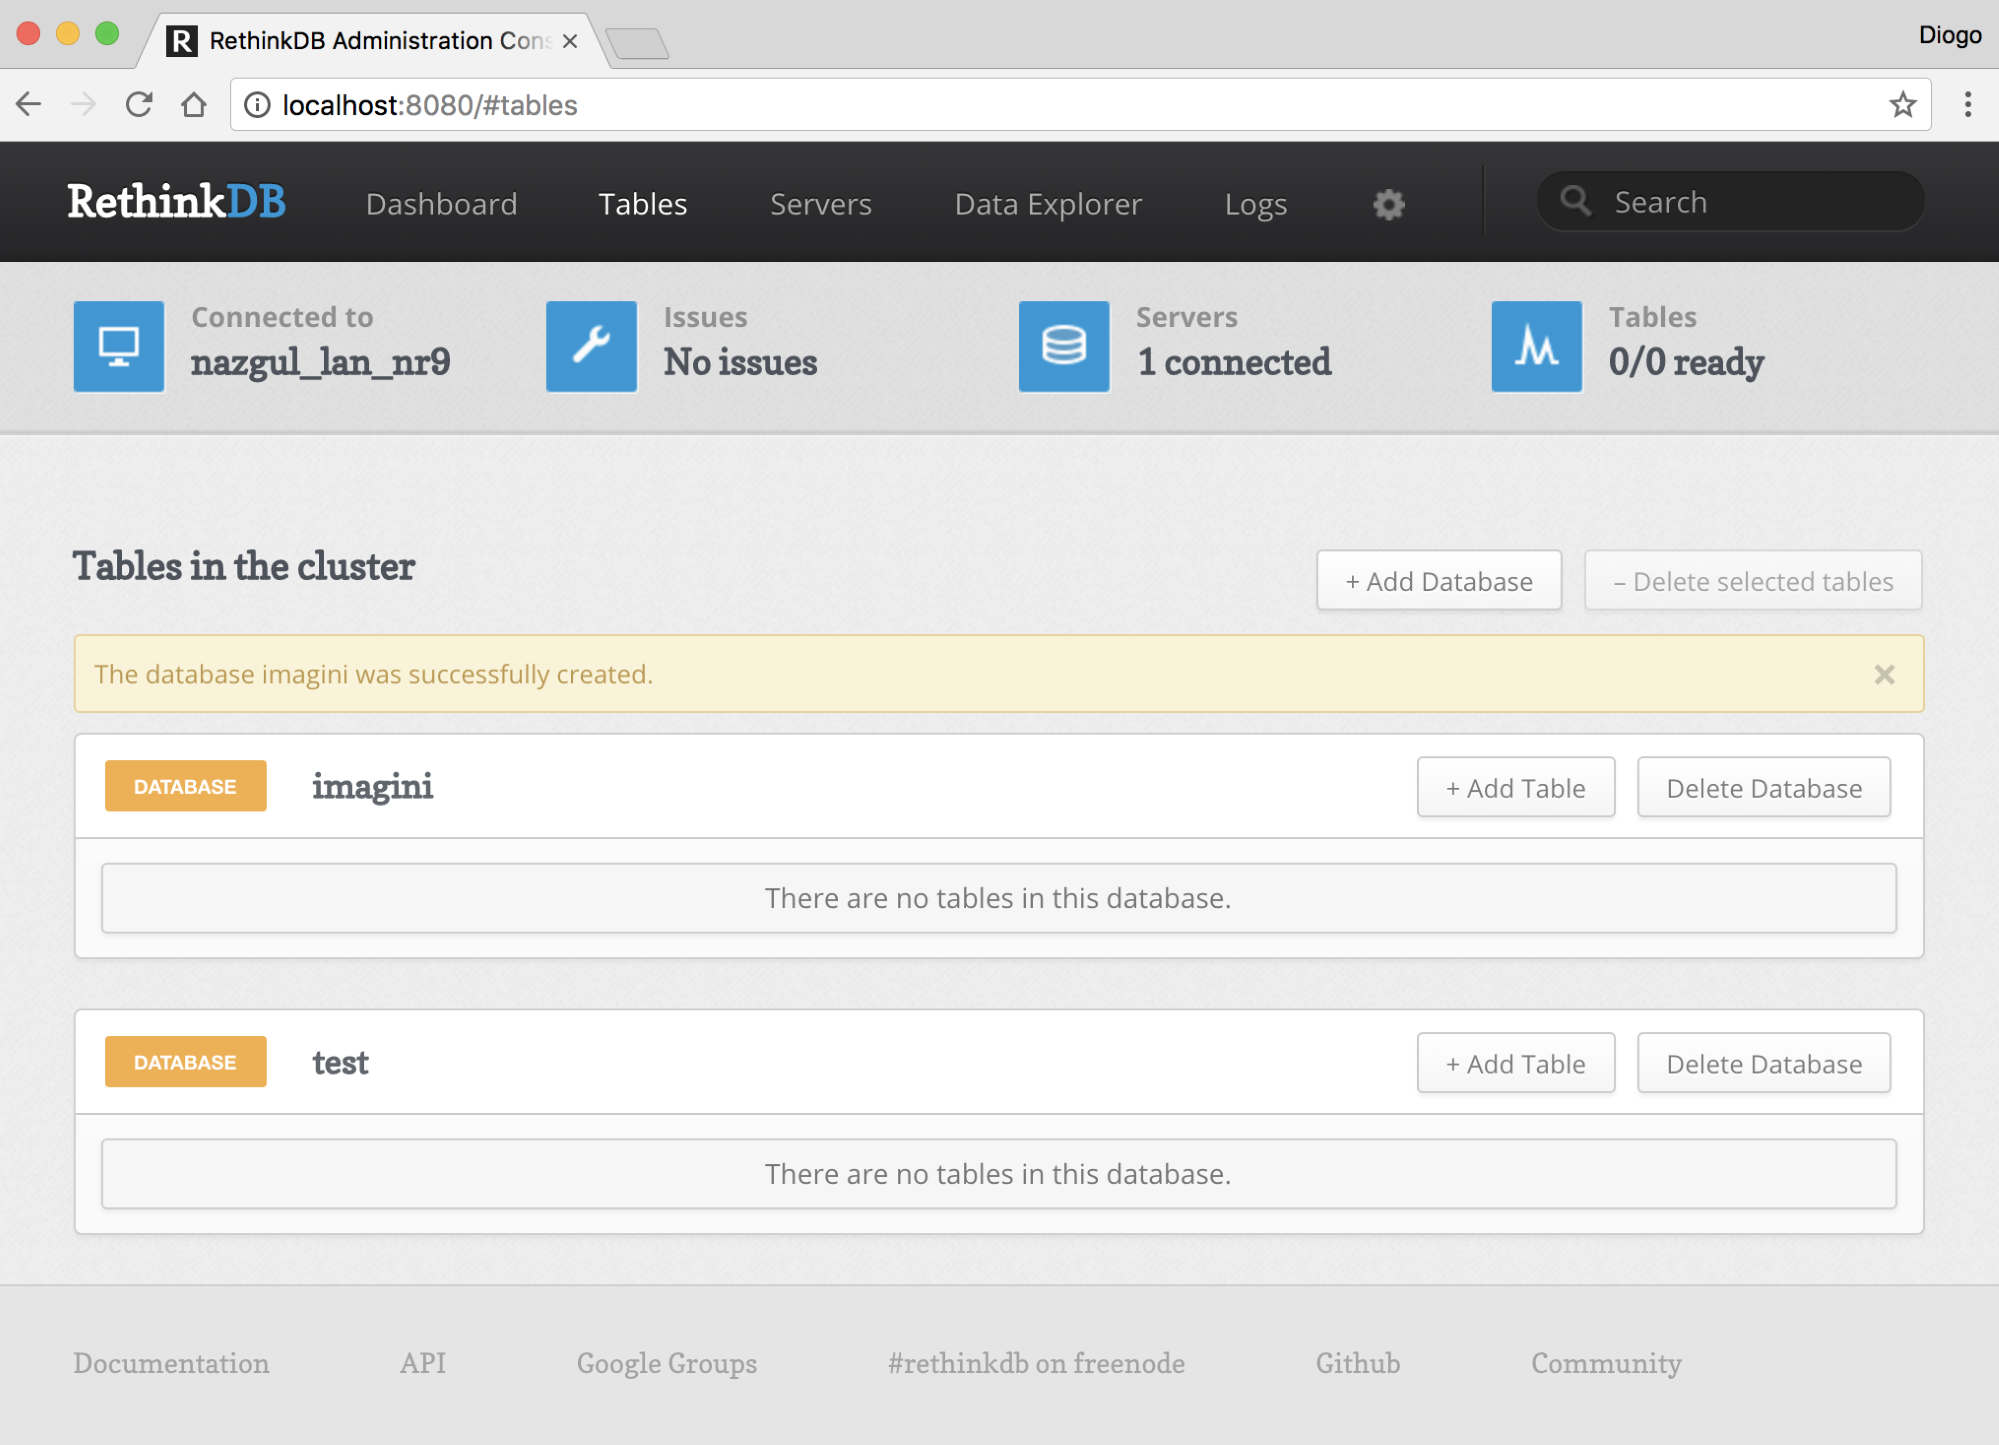
To use our new database, we need to install the rethinkdb dependency. You can remove the MySQL dependency:
npm uninstall mysql --save
npm install rethinkdb -–save
Now, let's change our settings file. This module doesn't accept a connection string, so we'll use a JSON structure:
{
"db": {
"host" : "localhost",
"db" : "imagini"
}
}
To include our dependency, we just need to include the module:
const rethinkdb = require("rethinkdb");
Then, use this to connect to our server:
rethinkdb.connect(settings.db, (err, db) => {
if (err) throw err;
console.log("db: ready");
// ...
// the rest of our service code
// ...
app.listen(3000, () => {
console.log("app: ready");
});
});
After connecting, we can create our table as we did before. This time, we don't need to specify any structure:
rethinkdb.tableCreate("images").run(db);
The rethinkdb object is the one we'll use to manipulate our table, and the db object is a connection object used to reference the connection and to indicate where to run our manipulations.
If you restart our service just like this, you'll see a new table on our previously created database:
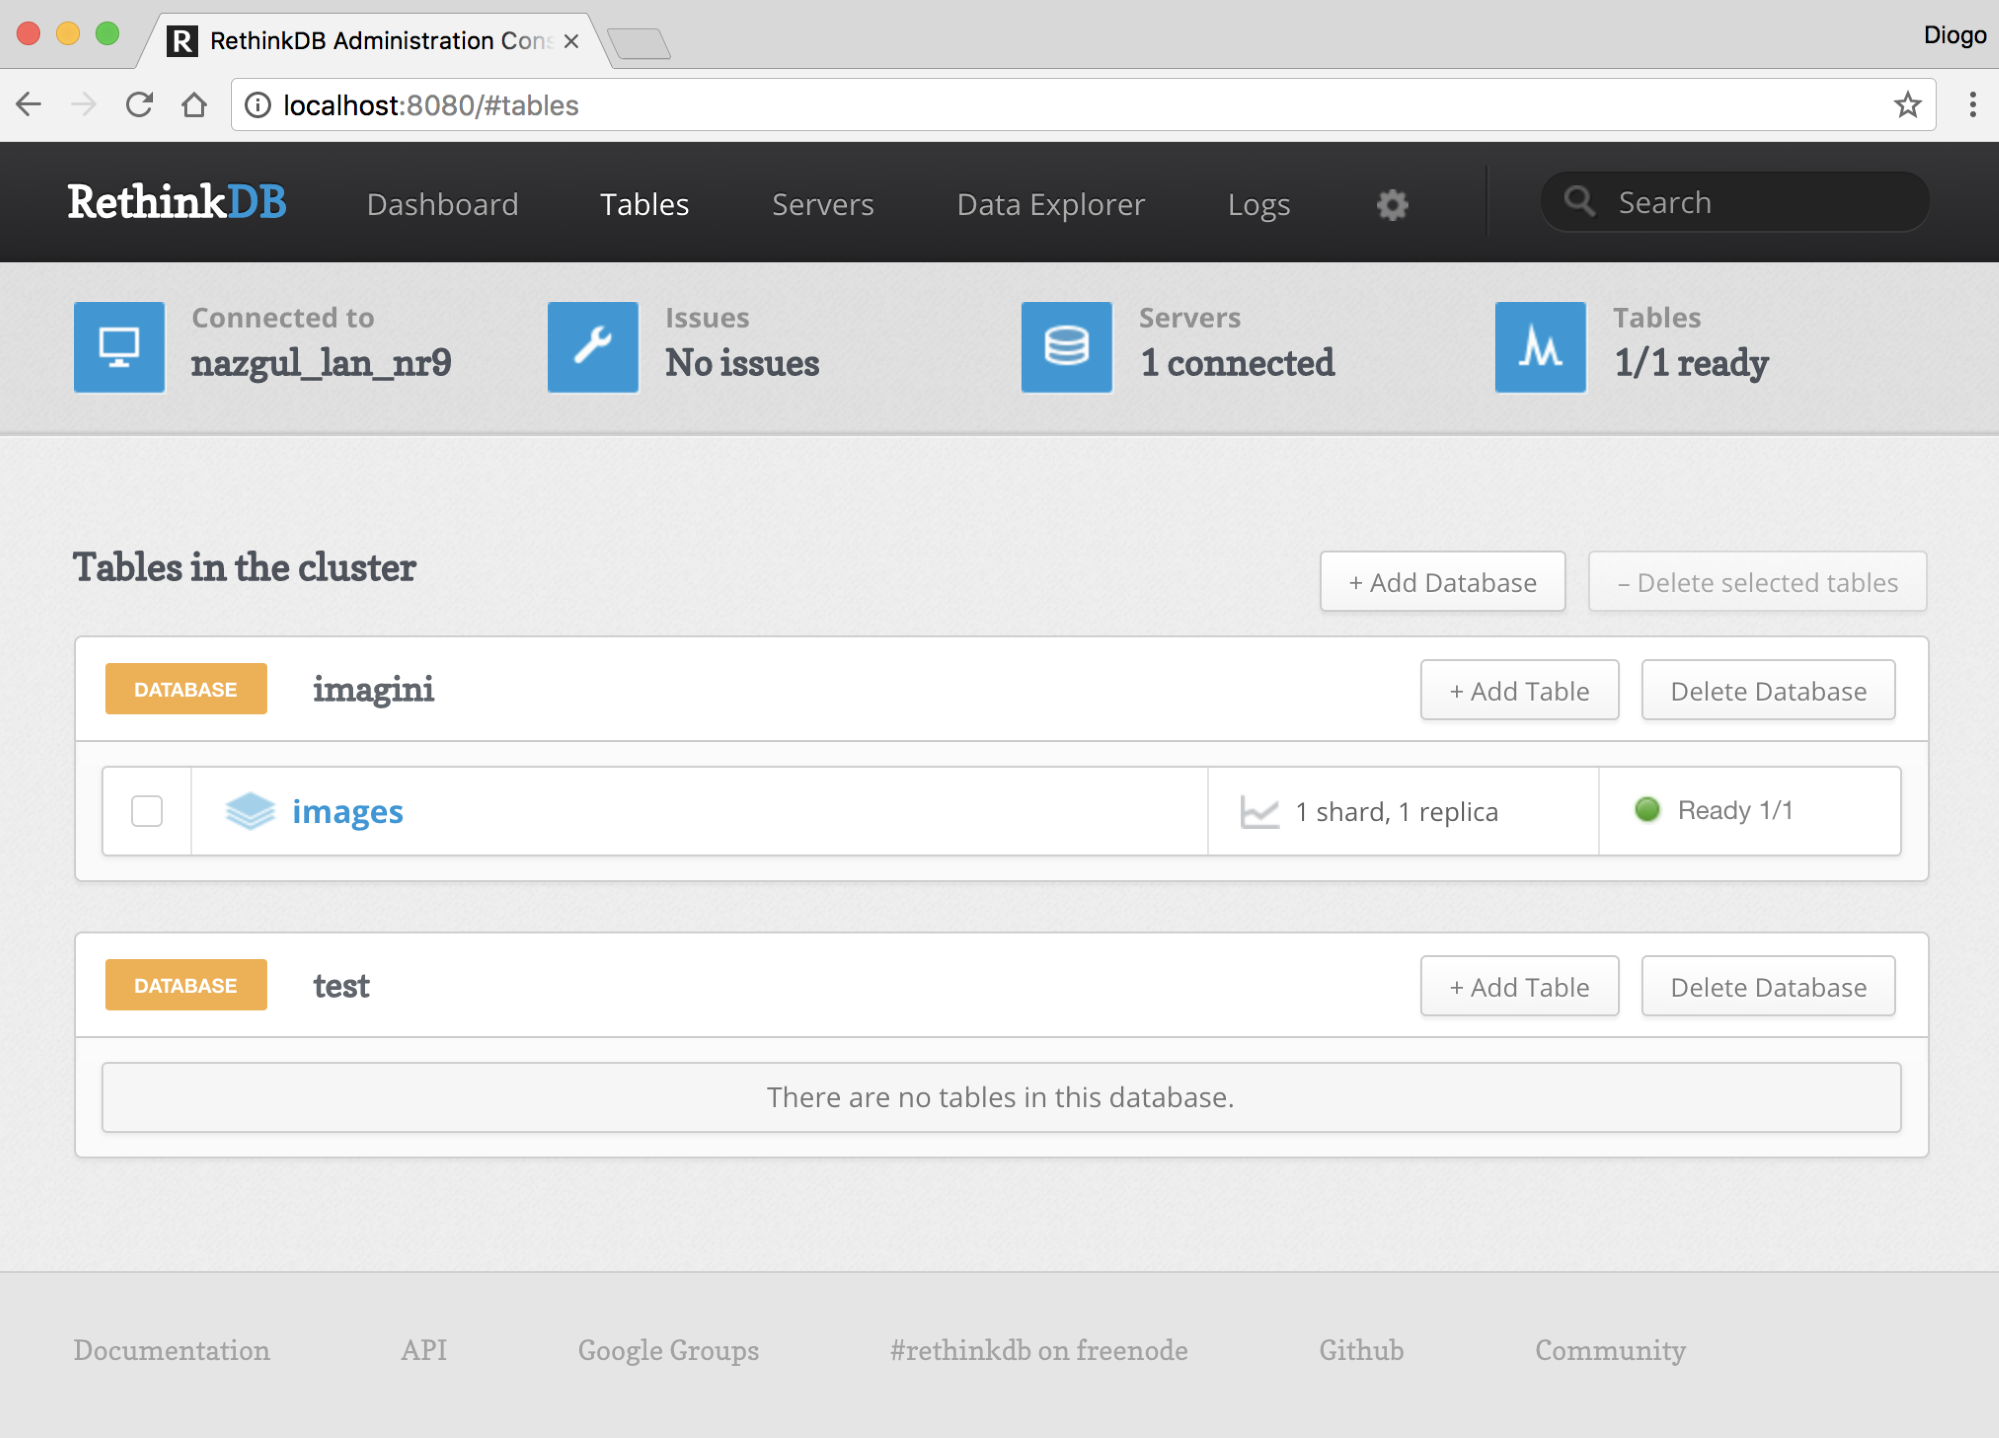
If you restart our service again, you'll get an error trying to create the table that already exists. We need to check whether it already exists, and only issue the command if not:
rethinkdb.tableList().run(db, (err, tables) => {
if (err) throw err;
if (!tables.includes("images")) {
rethinkdb.tableCreate("images").run(db);
}
});
Moving on, our upload method should be changed slightly to something like the following:
app.post("/uploads/:name", bodyparser.raw({
limit : "10mb",
type : "image/*"
}), (req, res) => {
rethinkdb.table("images").insert({
name : req.params.name,
size : req.body.length,
data : req.body,
}).run(db, (err) => {
if (err) {
return res.send({ status : "error", code: err.code });
}
res.send({ status : "ok", size: req.body.length });
});
});
If you restart the server just like this, you should be able to upload an image:
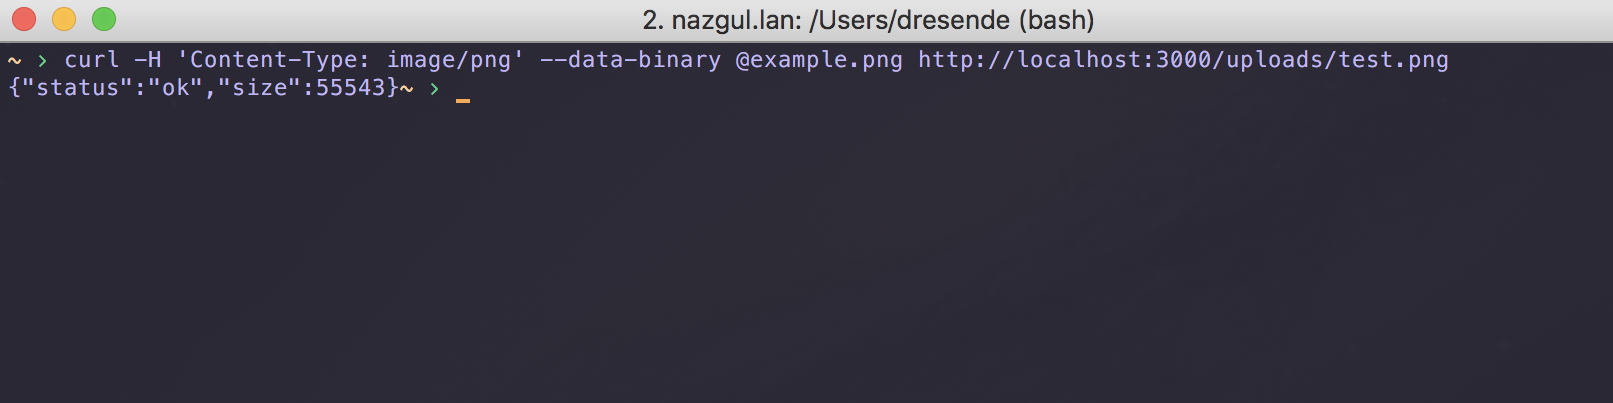
We receive the same response, just like with MySQL. We can go to the Data Explorer section in the administration console and get our record to see whether it's there:
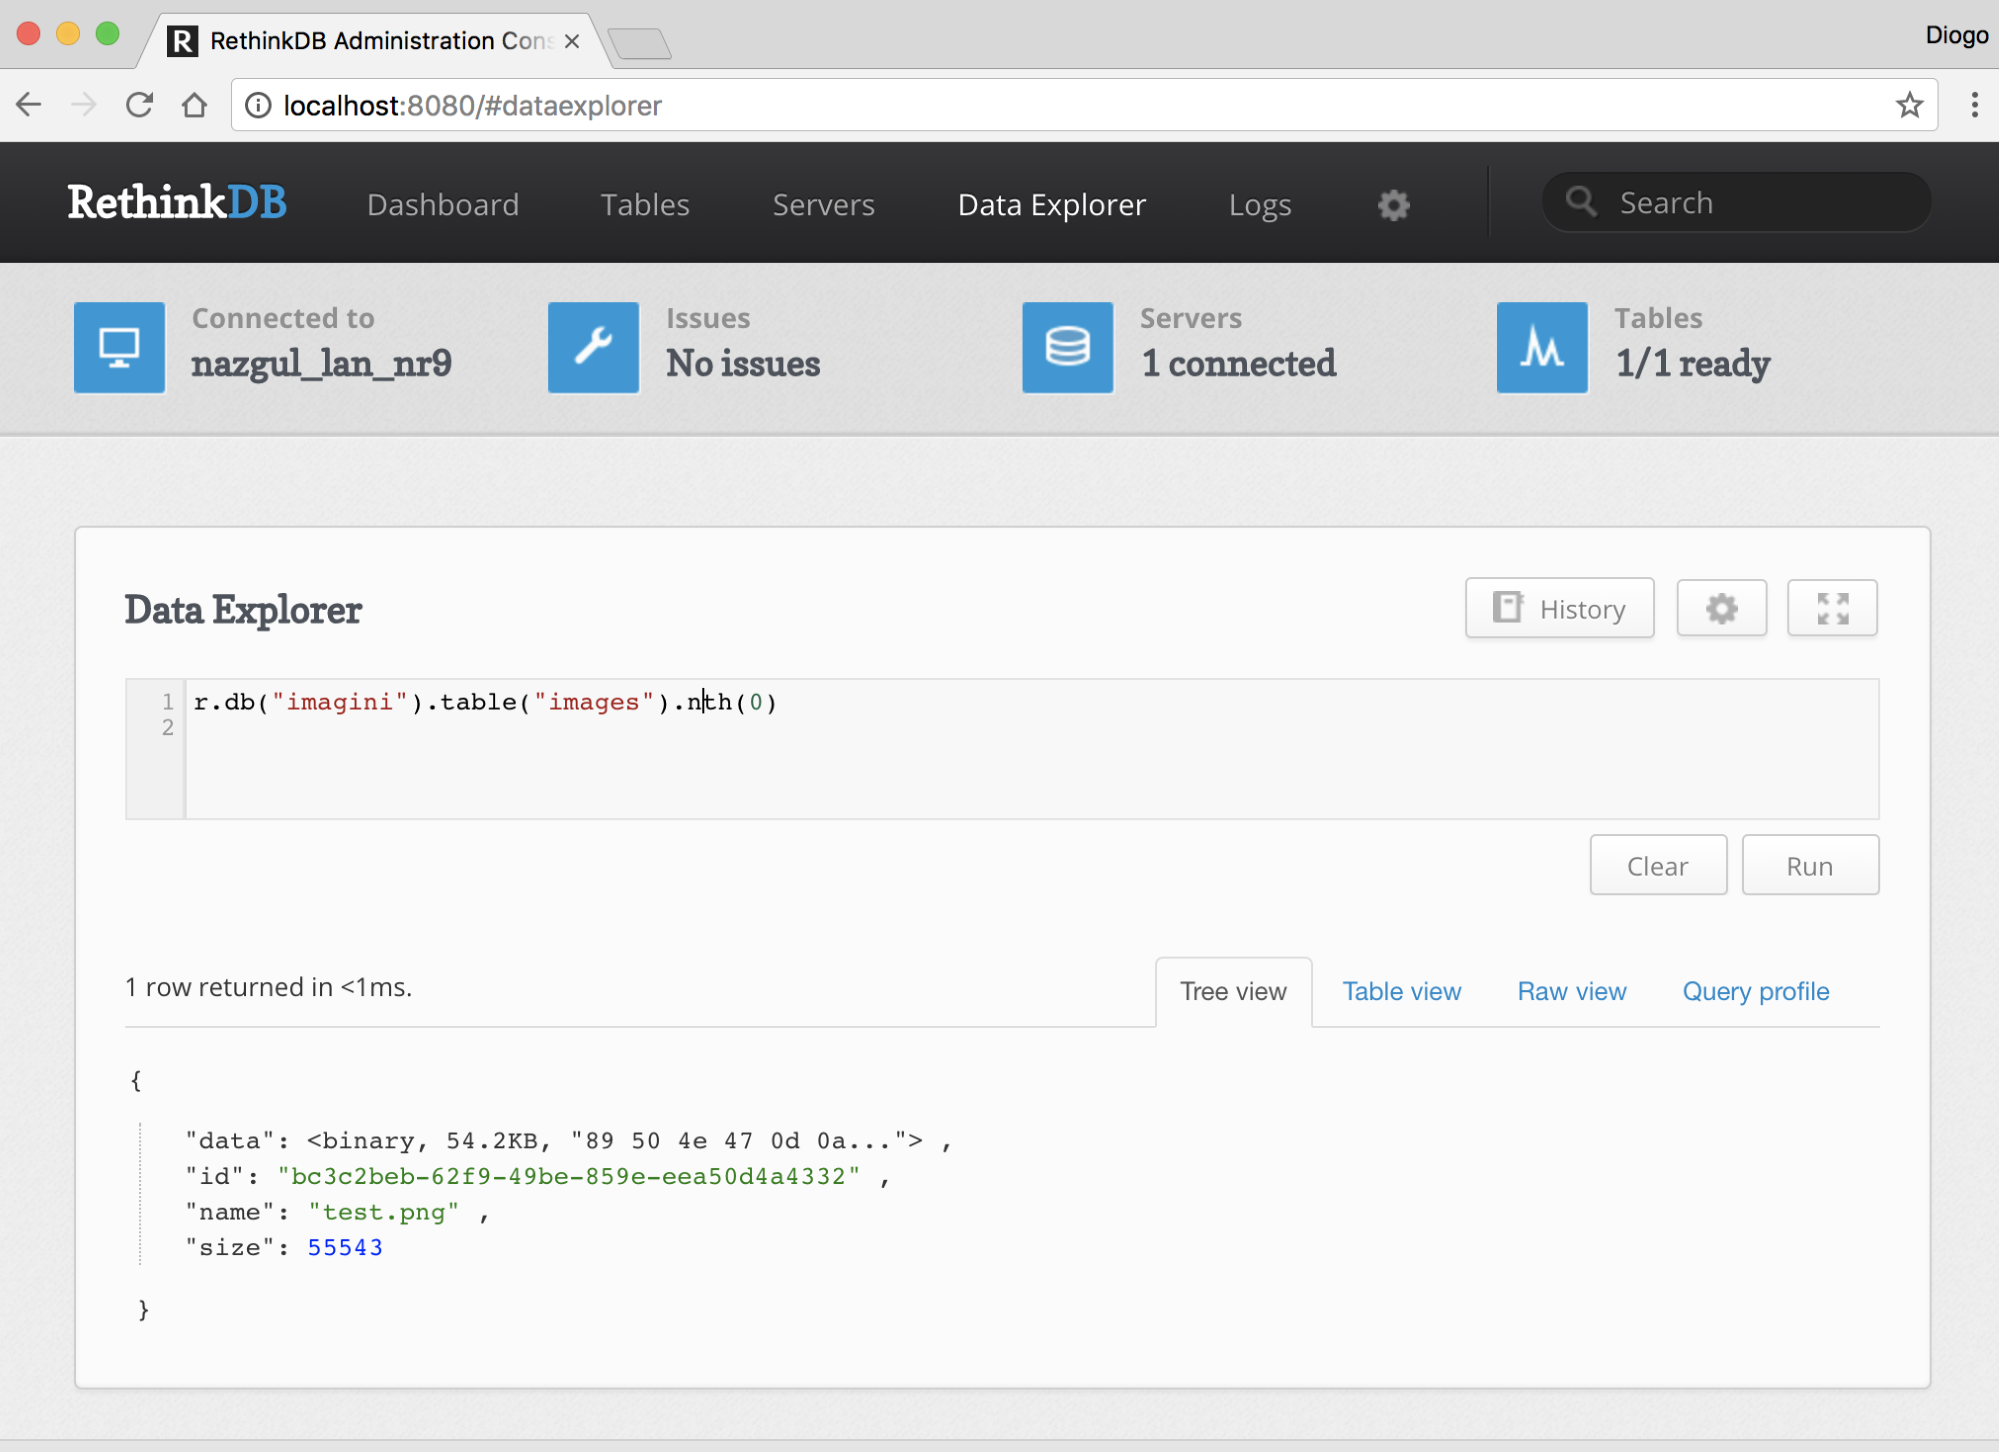
Looks good. Notice our record ID is not a number, it's a Universally Unique Identifier (UUID). This is because RethinkDB has support for sharding (our table is sharded by default if there was more than one server) and it's easier to shard unique identifiers than an incremental number.
Moving on to our Express parameter:
app.param("image", (req, res, next, image) => {
if (!image.match(/\.(png|jpg)$/i)) {
return res.status(403).end();
}
rethinkdb.table("images").filter({
name : image
}).limit(1).run(db, (err, images) => {
if (err) return res.status(404).end();
images.toArray((err, images) => {
if (err) return res.status(500).end();
if (!images.length) return res.status(404).end();
req.image = images[0];
return next();
});
});
});
With this change, we can now restart our service and see whether our image exists:
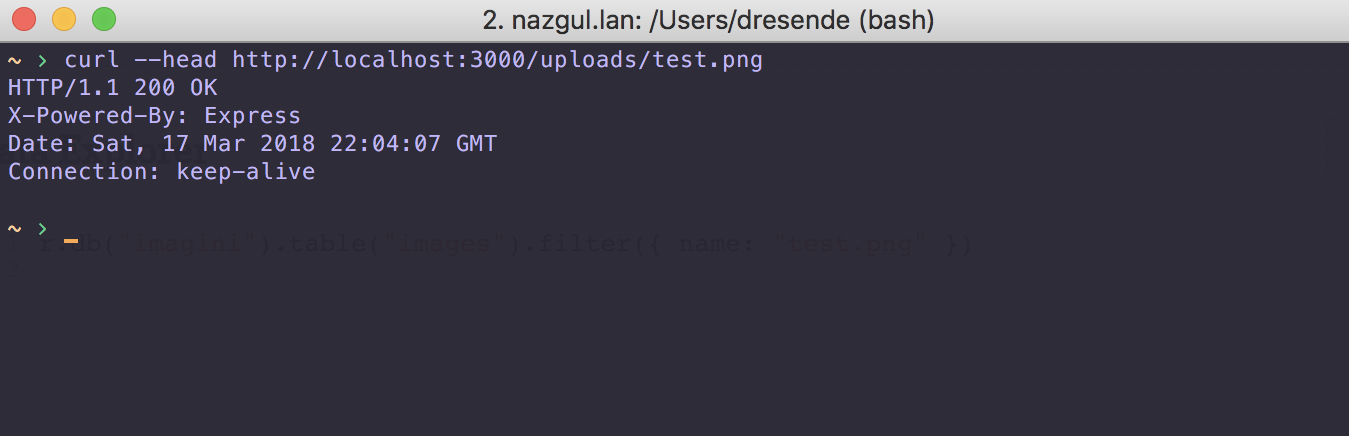
We need to change the download just a little bit. We need to remove the previous query to update our usage date and replace it with a new one:
app.get("/uploads/:image", (req, res) => {
let image = sharp(req.image.data);
let width = +req.query.width;
let height = +req.query.height;
let blur = +req.query.blur;
let sharpen = +req.query.sharpen;
let greyscale = [ "y", "yes", "true", "1",
"on"].includes(req.query.greyscale);
let flip = [ "y", "yes", "true", "1",
"on"].includes(req.query.flip);
let flop = [ "y", "yes", "true", "1",
"on"].includes(req.query.flop);
if (width > 0 && height > 0) {
image.ignoreAspectRatio();
}
if (width > 0 || height > 0) {
image.resize(width || null, height || null);
}
if (flip) image.flip();
if (flop) image.flop();
if (blur > 0) image.blur(blur);
if (sharpen > 0) image.sharpen(sharpen);
if (greyscale) image.greyscale();
rethinkdb.table("images").get(req.image.id).update({ date_used :
Date.now() }).run(db);
res.setHeader("Content-Type", "image/" +
path.extname(req.image.name).substr(1));
image.pipe(res);
});
We can now download our image using the web browser:
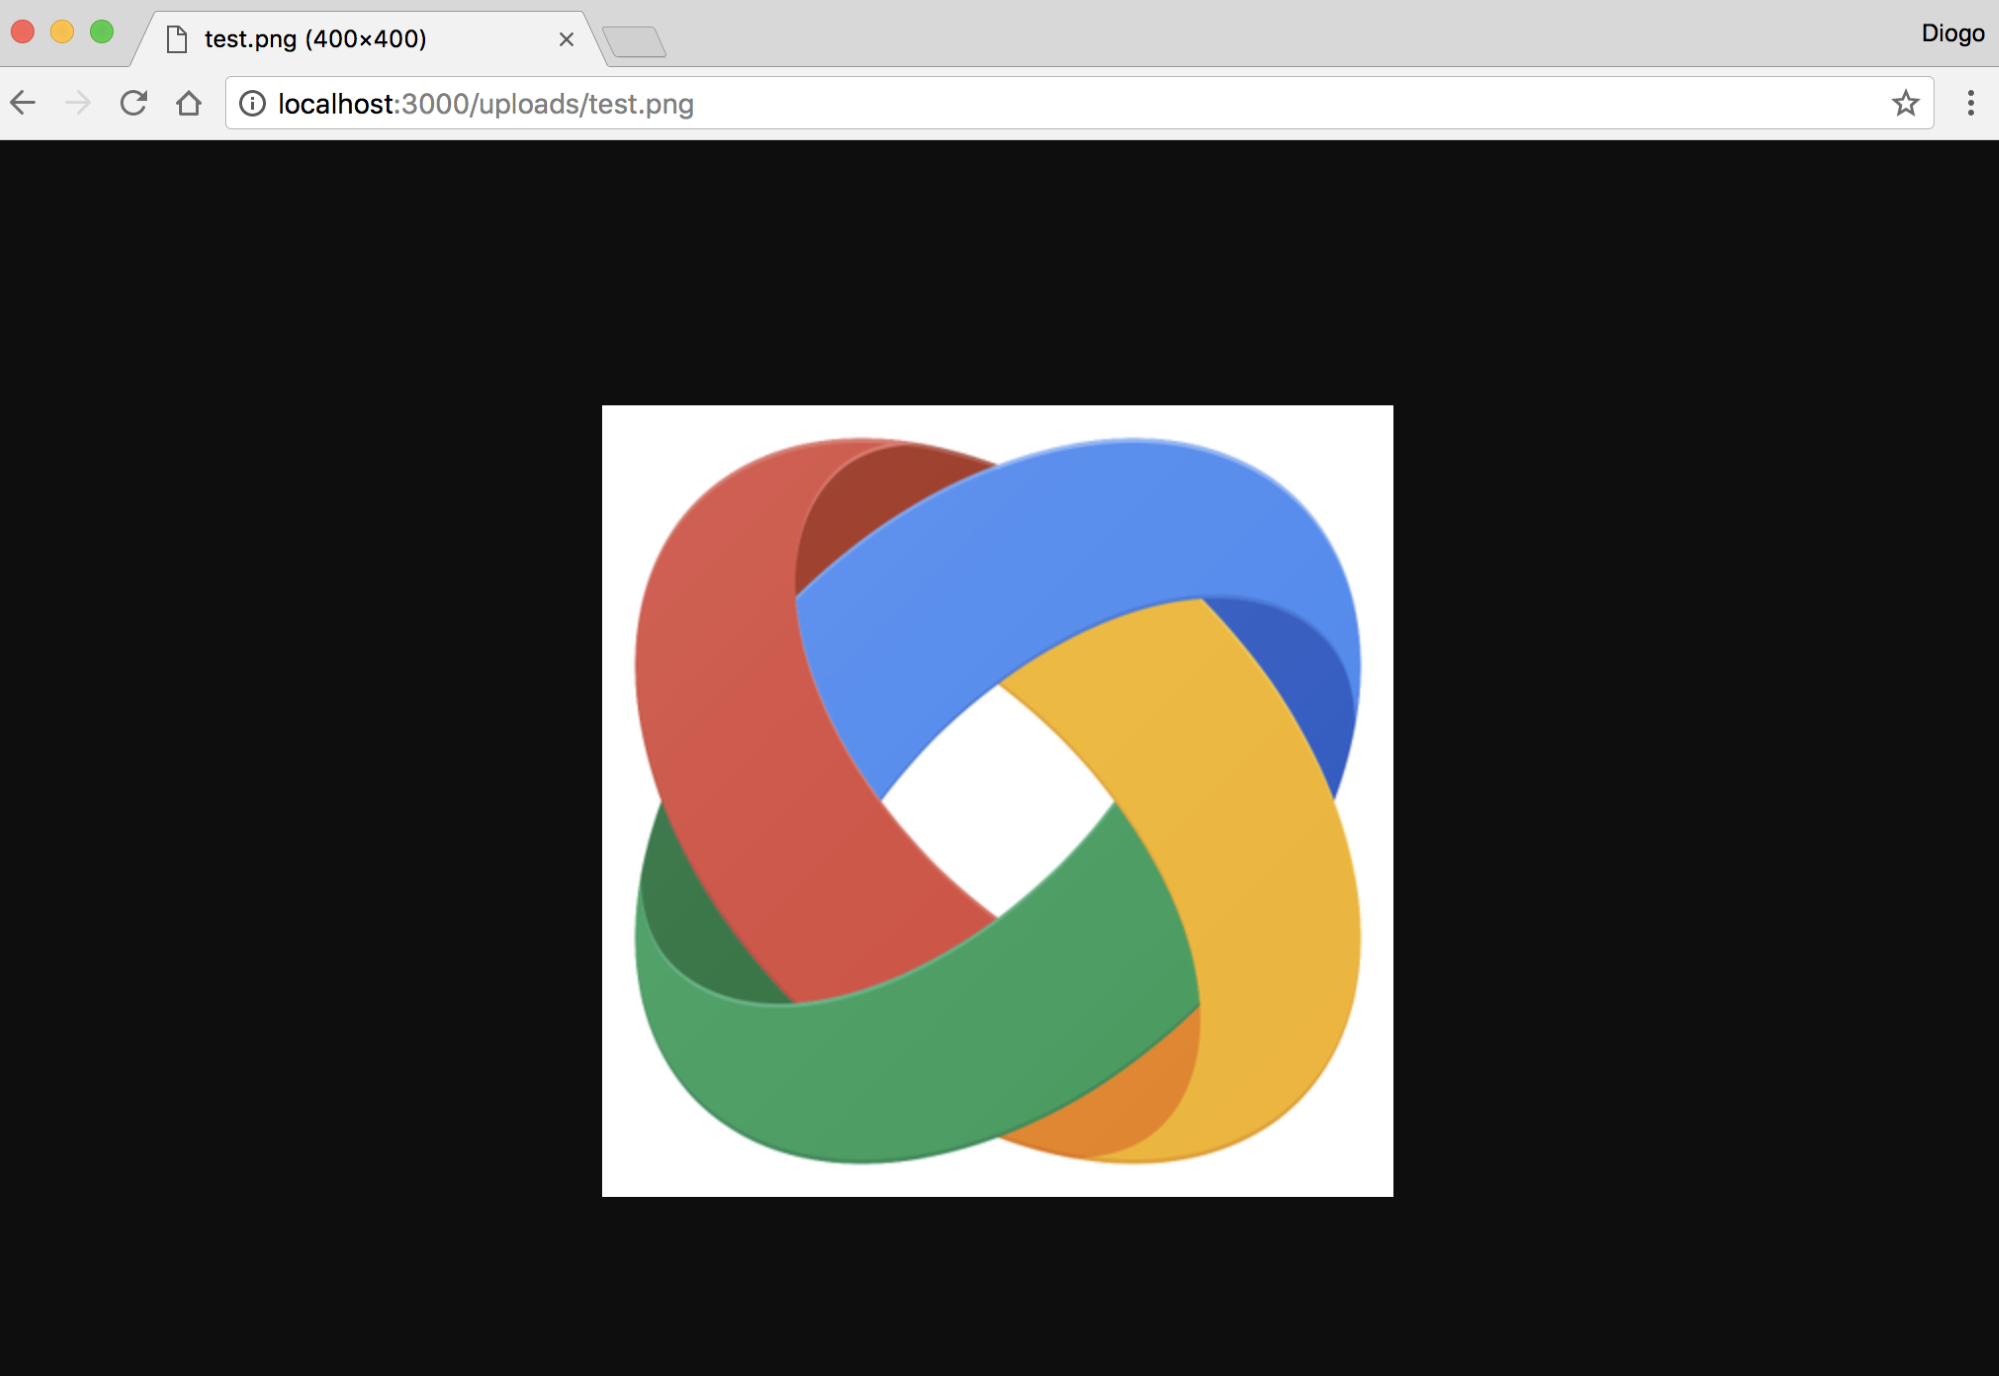
Next, we need to update our image removal method. It's as easy as our upload:
app.delete("/uploads/:image", (req, res) => {
rethinkdb.table("images").get(req.image.id).delete().run(db, (err)
=> {
return res.status(err ? 500 : 200).end();
});
});
This time, we used the image unique ID to remove it. If we try again using the curl command, we'll receive a code 200:
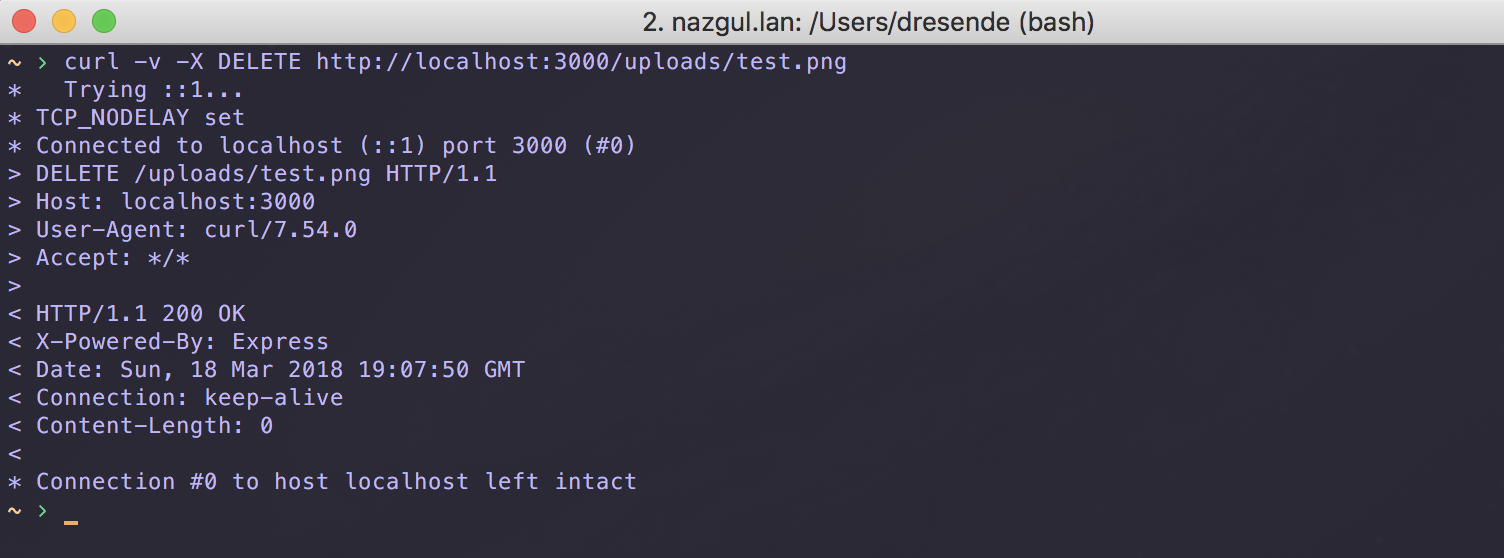
If we try to get the first record of our table, we'll see there's nothing there:
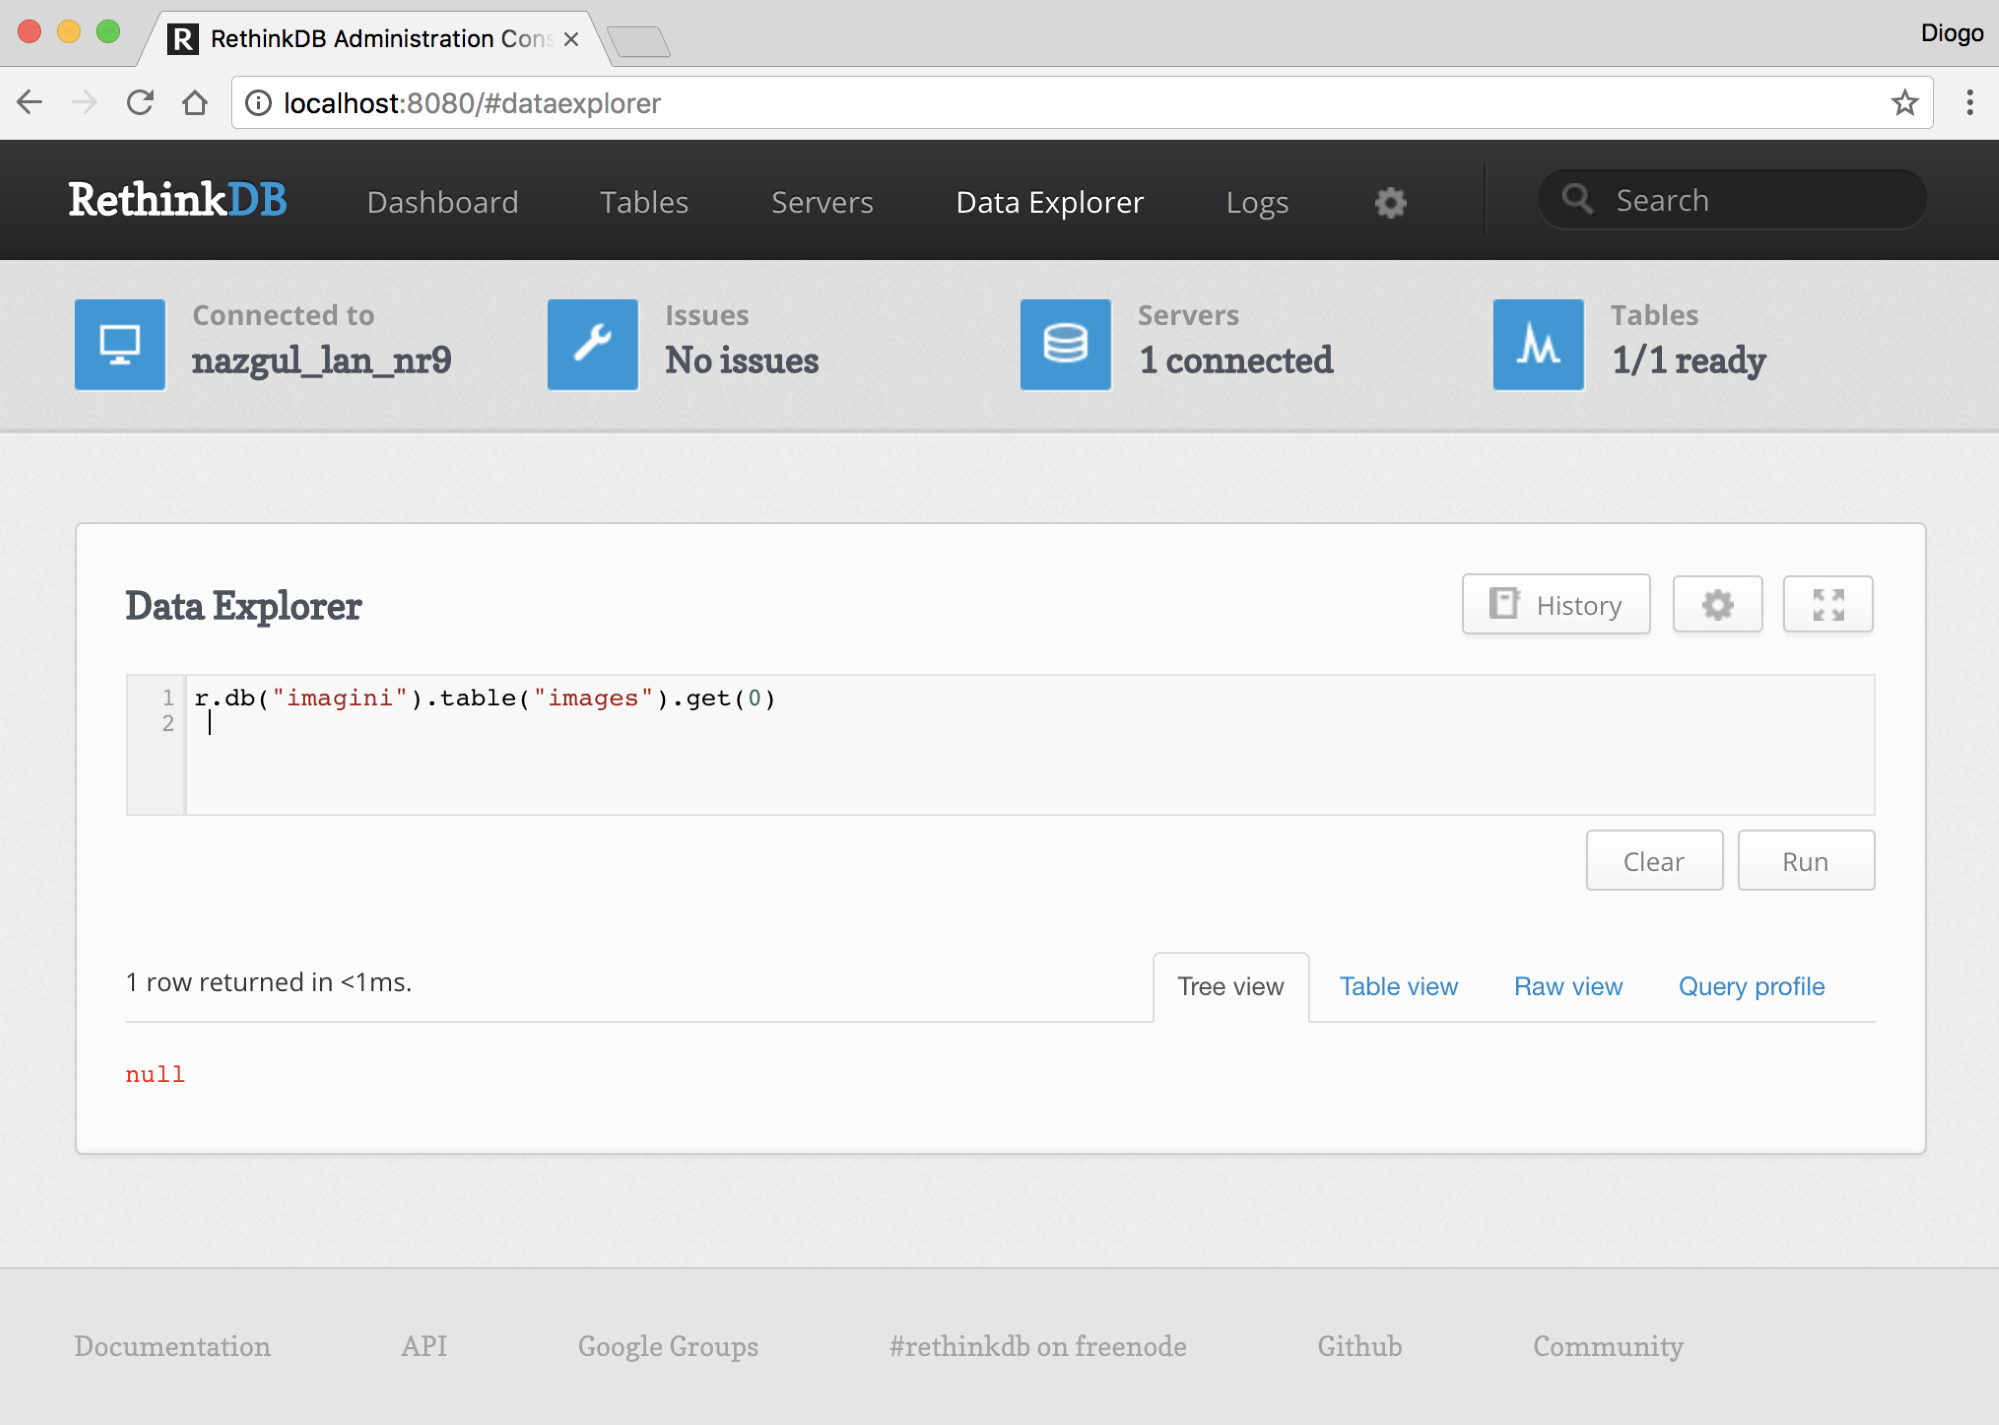
Finally, there are our two extra features that we added after introducing MySQL: the statistics and removing old unused images.
Our statistics method is not so simple as running an SQL query with aggregations. We must calculate each of our statistics:
app.get("/stats", (req, res) => {
let uptime = process.uptime();
rethinkdb.table("images").count().run(db, (err, total) => {
if (err) return res.status(500).end();
rethinkdb.table("images").sum("size").run(db, (err, size) => {
if (err) return res.status(500).end();
rethinkdb.table("images").max("date_created").run(db, (err,
last_created) => {
if (err) return res.status(500).end();
last_created = (last_created ? new
Date(last_created.date_created) : null);
return res.send({ total, size, last_created, uptime });
});
});
});
});
We should have a similar result to before:

Removing old images is more or less easy; we just need to filter the images we want to remove, and then remove them:
setInterval(() => {
let expiration = Date.now() - (30 * 86400 * 1000);
rethinkdb.table("images").filter((image) => {
return image("date_used").lt(expiration);
}).delete().run(db);
}, 3600 * 1000);
I simplified the previous strategy and am just removing images older than 1 month (30 days, times 86,400 seconds a day, times 1,000 milliseconds).
In-memory databases are different from the previous two types, as they're usually not structured, which means you have no tables. What you have is normally lists of some kind that you can look up and manipulate, or simple hash tables.
Taking advantage of the Redis instance we installed previously for Hydra, let's see another drawback, or actually feature, of this kind of database. Let's connect to our Redis instance and make the following sequence of instructions:
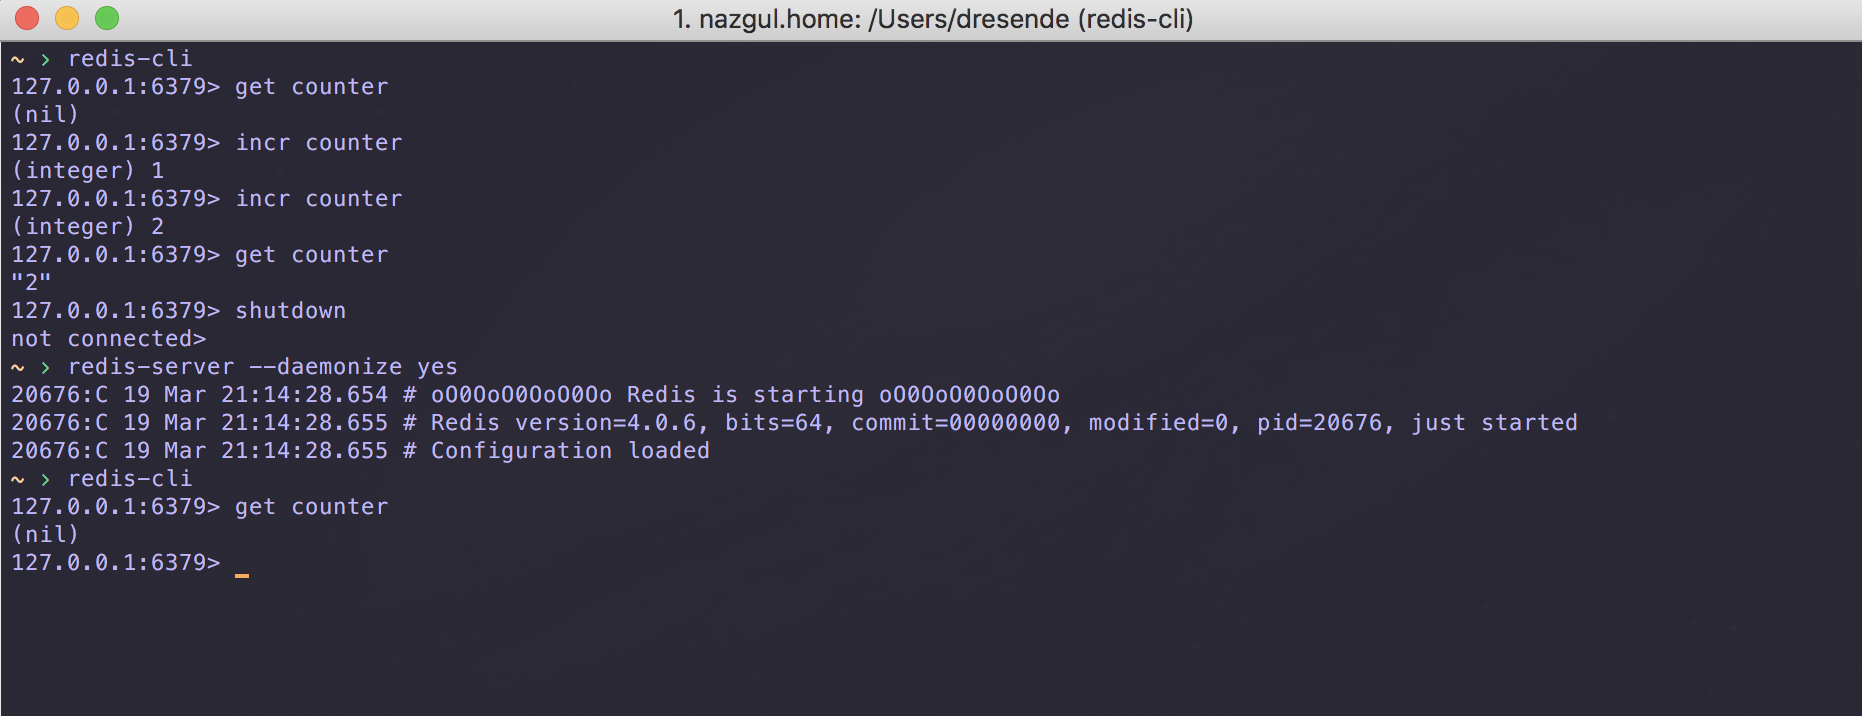
What we did here was to:
Where's our counter? Well, this is an in-memory database, so everything is gone when we shut down the Redis service. This is the design of almost all kinds of in-memory databases.
They're designed to be fast and in-memory. Their purpose is normally to cache data that is expensive to get, such as some complex calculations, or extensive to download, and we want that to be available faster (in-memory).
I wasn't completely fair with Redis as it actually allows your data to be saved between service restarts. So, let's see how far we can go in using it to save our microservice state.
As before, let's uninstall rethinkdb and install the redis module:
npm uninstall rethinkdb --save
npm install redis --save
Let's ignore our settings.json file (you can remove it if you prefer) and assume Redis will be on our local machine.
First, we need to include the redis module and create a Client instance:
const redis = require("redis");
const db = redis.createClient();
We then need to wait until it connects:
db.on("connect", () => {
console.log("db: ready");
// ...
// the rest of our service code
// ...
app.listen(3000, () => {
console.log("app: ready");
});
});
There are a couple of ways we can use Redis to store our data. To make it simple, as we don't have tables, let's use hashes to store our images. Each image will have a different hash, and the name of the hash will be the name of the image.
As there are no tables in this kind of database, our initialization code can just be removed.
Next, let's change our upload method to store data on Redis. As I mentioned, let's store it in a hash with the name of the image:
app.post("/uploads/:name", bodyparser.raw({
limit : "10mb",
type : "image/*"
}), (req, res) => {
db.hmset(req.params.name, {
size : req.body.length,
data : req.body.toString("base64"),
}, (err) => {
if (err) {
return res.send({ status : "error", code: err.code });
}
res.send({ status : "ok", size: req.body.length });
});
});
The hmset command lets us set multiple fields of a hash, in our case, size and data. Notice we're storing our image content in base64 encoding, otherwise we'll lose data. If we restart our service and try to upload our test image, it should work fine:

We can then use redis-cli and see whether our image is there. Well, we're checking to see whether our hash has the field size and matches our image size:

Great! We can now change our Express parameter to look for the image hash:
app.param("image", (req, res, next, name) => {
if (!name.match(/\.(png|jpg)$/i)) {
return res.status(403).end();
}
db.hgetall(name, (err, image) => {
if (err || !image) return res.status(404).end();
req.image = image;
req.image.name = name;
return next();
});
});
Our image check method should work now. And, for our download method to work, we just need to change the image loading to decode our previous base64 encoding:
app.get("/uploads/:image", (req, res) => {
let image = sharp(Buffer.from(req.image.data, "base64"));
let width = +req.query.width;
let height = +req.query.height;
let blur = +req.query.blur;
let sharpen = +req.query.sharpen;
let greyscale = [ "y", "yes", "true", "1", "on"].includes(req.query.greyscale);
let flip = [ "y", "yes", "true", "1", "on"].includes(req.query.flip);
let flop = [ "y", "yes", "true", "1", "on"].includes(req.query.flop);
if (width > 0 && height > 0) {
image.ignoreAspectRatio();
}
if (width > 0 || height > 0) {
image.resize(width || null, height || null);
}
if (flip) image.flip();
if (flop) image.flop();
if (blur > 0) image.blur(blur);
if (sharpen > 0) image.sharpen(sharpen);
if (greyscale) image.greyscale();
db.hset(req.image.name, "date_used", Date.now());
res.setHeader("Content-Type", "image/" + path.extname(req.image.name).substr(1));
image.pipe(res);
});
Our images are now being served from Redis. As a bonus, we're adding/updating a date_used field in our image hash to indicate when it was last used:

Removing our image is as simple as removing our hash:
app.delete("/uploads/:image", (req, res) => {
db.del(req.image.name, (err) => {
return res.status(err ? 500 : 200).end();
});
});
We can then try to remove our test image:
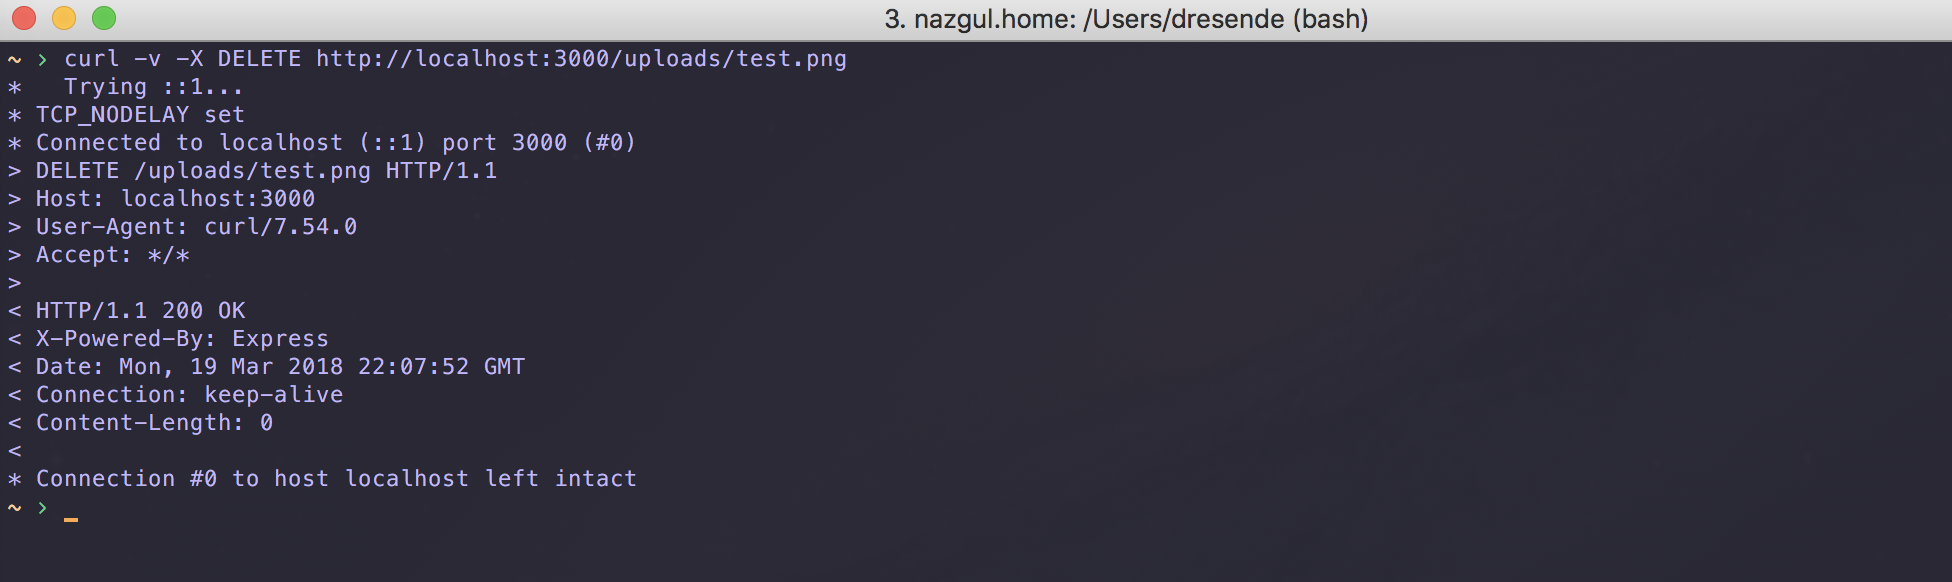
Using redis-cli to check whether the hash exists, we see that it's gone:
The only two features missing are the statistics and removing old images.
For the statistics, that could be hard as we're using generic hash tables and we can't be sure how many hash tables are defined, and if all or any have image data. We would have to scan all hash tables, which is complex for large sets.
To remove old images, the problem is the same as there's no way of looking for hash tables with a specific condition, such as a field value.
There are still other paths available to tackle this problem. For example, we could have another hash table with just our image names and use dates. But, the complexity would increase, and the integrity could be at risk as we're splitting information through different hash tables with no certainty of making Atomicity, Consistency, Isolation, and Durability (ACID) operations.
As we've seen, there are plenty of options to store our microservice state. Depending on the type of information we're manipulating, there are databases better-prepared to handle our data.
It all depends on a few different questions we should ask ourselves:
If our data integrity is important or the data structure is complex, do not use in-memory databases. Depending on the complexity, see if you need a non-relational database, or whether you can go with a relational database that can handle more complex manipulation and data aggregation operations, which will help you to achieve the last point.
One good practice is to write code iteratively, testing every time we make a new small feature or improvement, and always write code thinking of all the features we envision for our service.
Thinking about the service roadmap allows you to prepare the service for future improvements, reducing the amount of code wasted or replaced later on.
For instance, in terms of security:
Luckily, our frameworks allow our code to be composed and allow us to add layers of security later. For example, using Express or Hydra, we can add a precedent routing function that will run before any of our service methods, allowing us to enforce, for example, authentication.
Looking at our service, since it exposes its methods using HTTP, there are a couple of improvements we can add to it, for example:
To introduce these improvements, you may add an authentication module such as the Passport module, and use a certificate to give your users a more secure HTTPS experience.
Other types of insecurity come directly from your code and don't improve by adding a certificate or forcing authentication. I'm referring to:
To minimize these events, you should always keep evolving your test suite, adding use cases as they show up, ensuring a new bug that is solved does not reappear later. Regarding dependency bugs, you can subscribe to the Node Security Project and even integrate it with your code to always know when one of your dependencies is a risk.
If there were source code commandments, the next four would surely be on the list:
The state is part of any service, and state is built upon data. For a more cloud-native experience, a service cannot depend on a traditional filesystem and needs to use other kinds of storage structures to store data. Databases are a natural progress, and there are some types of databases to choose from, depending on how important and complex our data is.
Assuming our state is securely stored in a database service of some kind, it's also important to ensure our data cannot be corrupted using our service. There can be security flaws and bugs in our service that may put our data at risk, so it's important to write simple code, validate input, and think about security in general when planning the service roadmap.
To progress our service, let's introduce something we haven't done yet, and should, which is a proper test suite. In the next chapter, we'll see some good options and create a test suite, establishing whether anything needs to change in order to make our service as secure as possible.
When you're developing an application, it will eventually form a structure and evolve into a stable product that you can use in production and sell to your customers. In the beginning, everything may seem simple and many tend to postpone the construction of a proper test suite.
Later on, the application may become just sufficiently complex for you to hesitate to begin testing. You may eventually give up and never test your application. It may be frustrating, especially if you have never seen or used any test suite before.
Proper testing gives you more than a little bit of quality assurance. Proper testing gives you:
There's a developing methodology that involves first creating a test for a new feature and then making sure the test passes. This way, you can focus on how you think your code should be used (in the new test) and then evolve it (actually develop it) so the test stops failing and gives proper results.
Let's see how code coverage can help in the testing process. Finally, we'll look at how you can mock parts of your code.
We will create our first integration tests. Each of our tests will run separately, meaning they should not depend on any other test and should follow a predictable workflow. First, we need to change our run.js file to run all test files. For that, we'll use mocha and add all files found in the integration folder:
const fs = require("fs");
const path = require("path");
const mocha = require("mocha");
const suite = new mocha();
fs.readdir(path.join(__dirname, "integration"), (err, files) => {
if (err) throw err;
files.filter((filename) =>
(filename.match(/\.js$/))).map((filename) => {
suite.addFile(path.join(__dirname, "integration", filename));
});
suite.run((failures) => {
process.exit(failures);
});
});
Then, let's create the integration folder inside our test folder, and let's create our first test file, called image-upload.js. Add this content to the file:
describe("Uploading image", () => {
it("should accept only images");
});
If we now run the tests again, we should see the default mocha response with no tests passing and no tests failing:
npm test
> imagini@1.0.0 test /Users/dresende/imagini
> node test/run
0 passing (2ms)
To avoid repeating code, let's create a tools.js file inside the test folder, so we can export common tasks that every test file can use. Out of the box, I'm thinking about our microservice location and a sample image:
const fs = require("fs");
const path = require("path");
exports.service = require("../imagini.js");
exports.sample = fs.readFileSync(path.join(__dirname, "sample.png"));
Create a sample.png image in the test folder. When a test needs to upload an image, it will use that sample. In the future, we could have different kinds of samples, such as huge images, to test performance and limitations.
We also need to make a little change to our microservice. We need to export its app so that the HTTP plugin from chai can load it and were able to test it without the need to run in a separate console. Add this to the end of our microservice file:
module.exports = app;
You should have a folder hierarchy similar to the following screenshot:
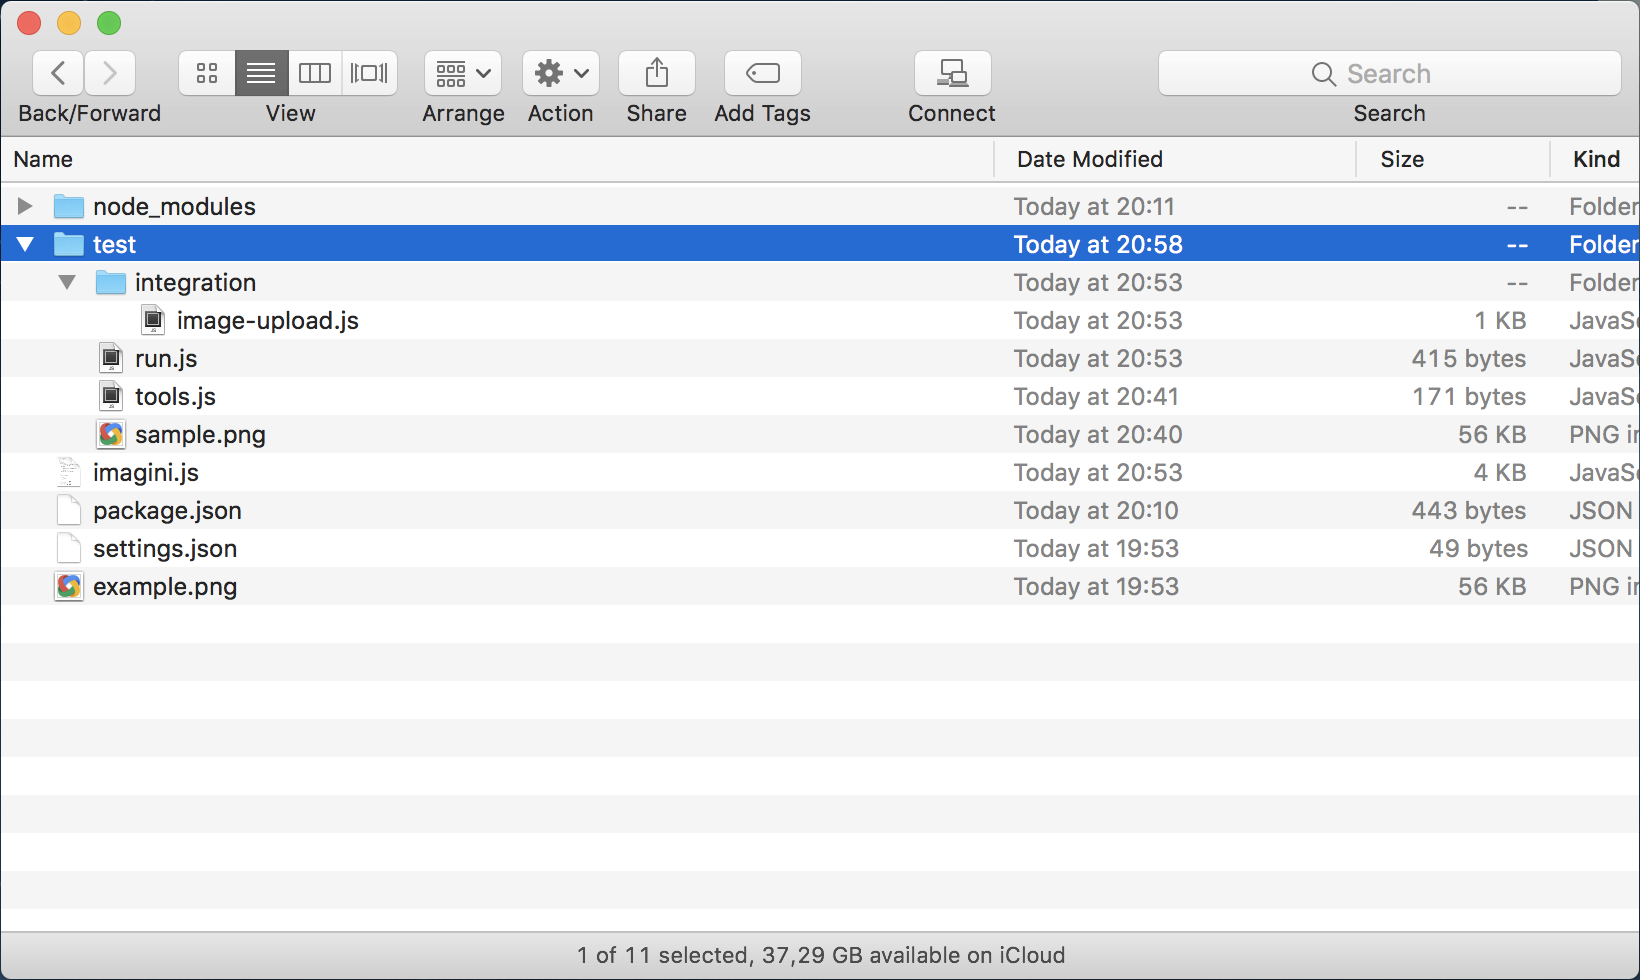
We should now change our image-upload.js test file to create our first real test:
const chai = require("chai");
const http = require("chai-http");
const tools = require("../tools");
chai.use(http);
describe("Uploading image", () => {
beforeEach((done) => {
chai
.request(tools.service)
.delete("/uploads/test_image_upload.png")
.end(() => {
return done();
});
});
it ("should accept a PNG image", function (done) {
chai
.request(tools.service)
.post("/uploads/test_image_upload.png")
.set("Content-Type", "image/png")
.send(tools.sample)
.end((err, res) => {
chai.expect(res).to.have.status(200);
chai.expect(res.body).to.have.status("ok");
return done();
});
});
});
We start by first including the chai modules and our tools file:
const chai = require("chai");
const http = require("chai-http");
const tools = require("../tools");
chai.use(http);
Then, we describe our test file as Uploading image:
describe("Uploading image", () => {
We'll add the different use cases we can think of, related to the uploading of images.
Inside, we use beforeEach, which is a mocha method that will be called before every test in this file. Remember, we want our tests to be consistent, so we add this method to remove our image before running every test. We don't care whether the image exists:
beforeEach((done) => {
chai
.request(tools.service)
.delete("/uploads/test_image_upload.png")
.end(() => {
return done();
});
});
Look how we use the tools.service, which points to our microservice. If, later on, we change the name or somehow make it more complex, we just need to change the tools file, and everything should work.
Then, we add our first integration file's test – a simple image upload:
it("should accept a PNG image", (done) => {
chai
.request(tools.service)
.post("/uploads/test_image_upload.png")
.set("Content-Type", "image/png")
.send(tools.sample)
.end((err, res) => {
chai.expect(res).to.have.status(200);
chai.expect(res.body).to.have.status("ok");
return done();
});
});
It checks whether the HTTP response code is 200 and if the response body, which is a JSON structure, has the status property set to ok. And we're done!
Let's run our test suite again and see how it goes.
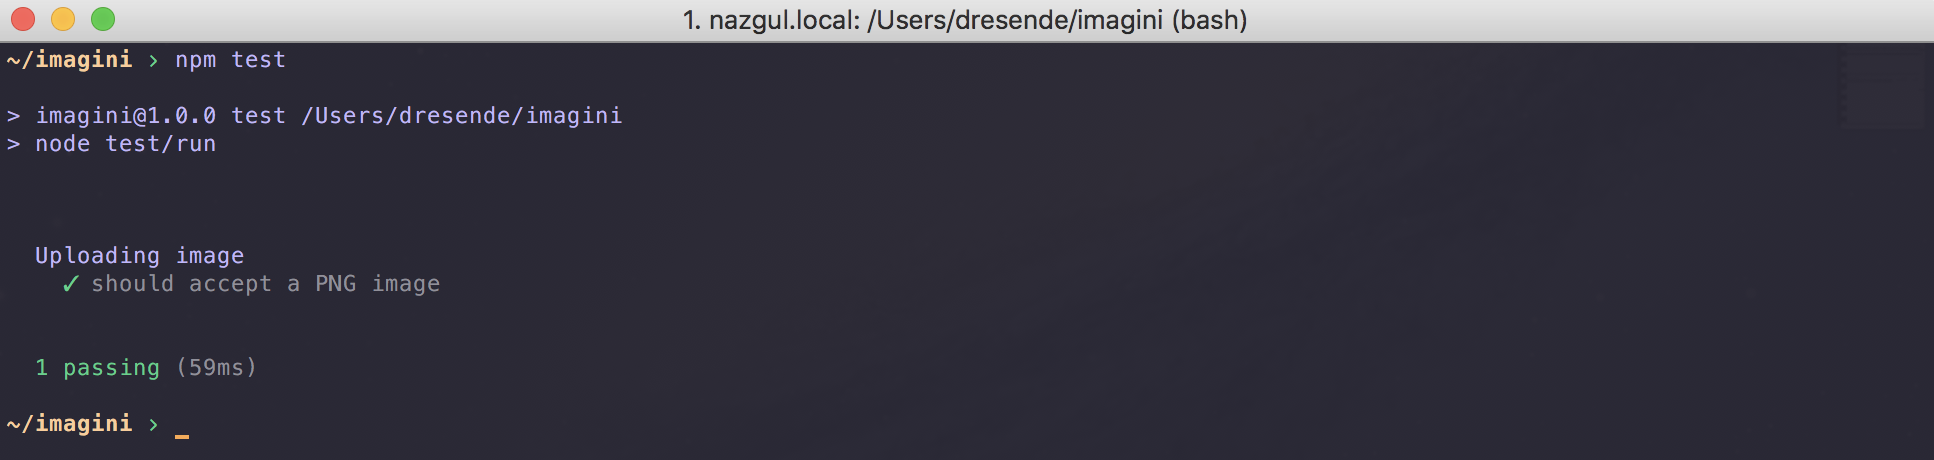
Now that our test suite is working and has one test, let's introduce code coverage. Adding this from the beginning of development is very easy and will help us focus on parts of the code that need to be tested, especially some use cases that involve specific conditions (such as if-then-else statements in our code). Having it all set up from the start of development is easy. On the other hand, if you have a fully working code and want to add tests and coverage, it will be harder and will take quite some time.
To add code coverage, we'll introduce another module. We'll install it globally to be able to run the tests with it directly:
npm install -g nyc
We can now run our tests with the following instrumentation:
nyc npm test
This should run our tests with the instrumentation installed. In the end, you'll get a nice console report.
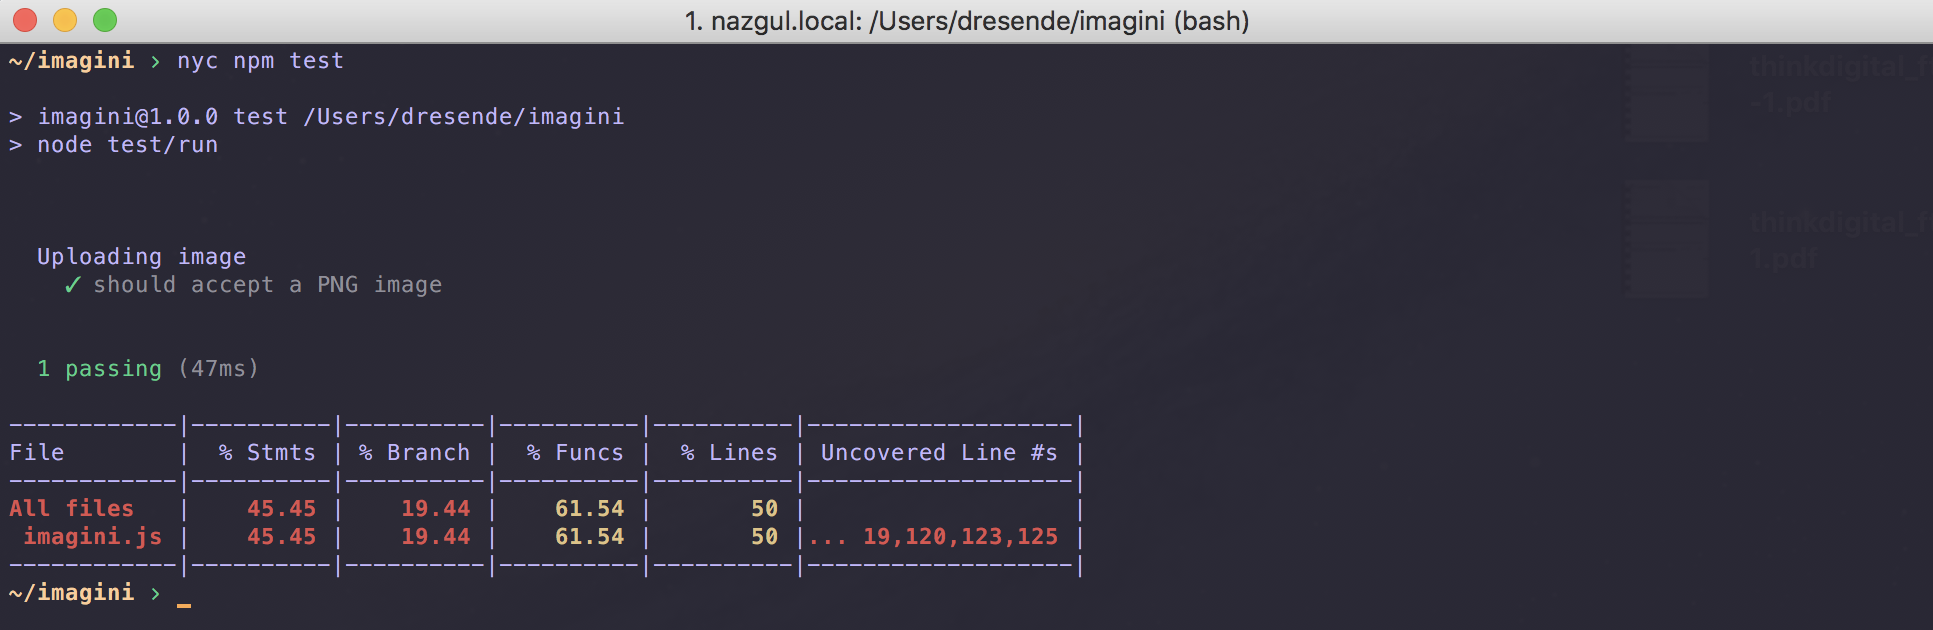
The coverage results are stored inside in a .nyc_output folder. This enables you to look at the last test results without running tests again. This is useful if your test suite is big and takes some time to finish.
To see the results, you just run nyc report:

The result is a console report. There are several other styles of reports. One particularly useful one is the html report. Let's generate it:
nyc report --reporter=html
You should now have a coverage folder with an index.html file. Open that in your browser, and you should see something like the following screenshot:
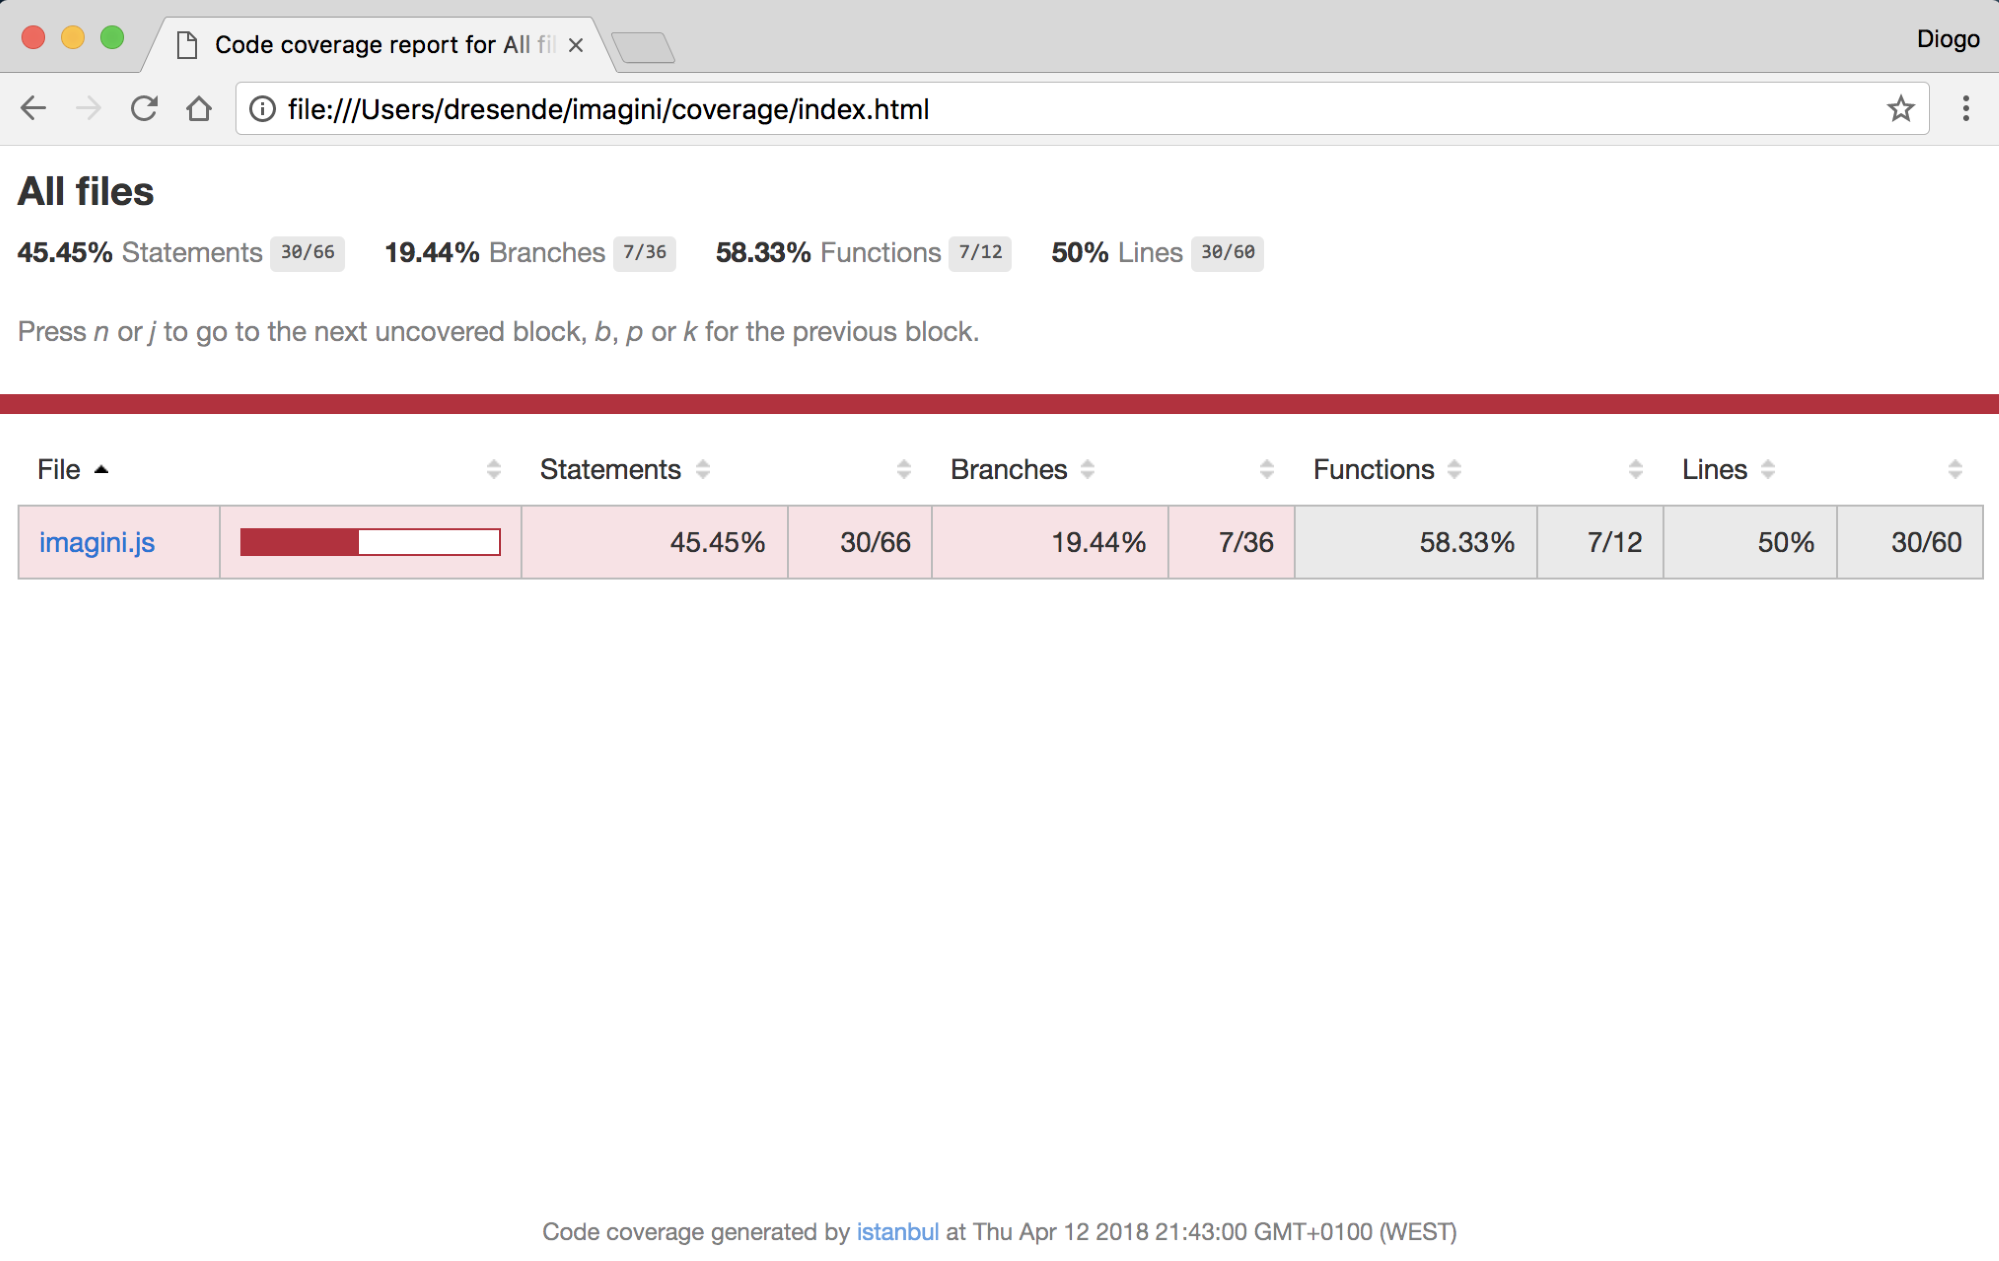
We only have one file that represents our microservice. If we had more, they would be listed hierarchically. There are global average statistics for every file.
There are three important groups of columns:
You can click in our file, look at the specific details of it and, more specifically, see the code and information line by line:
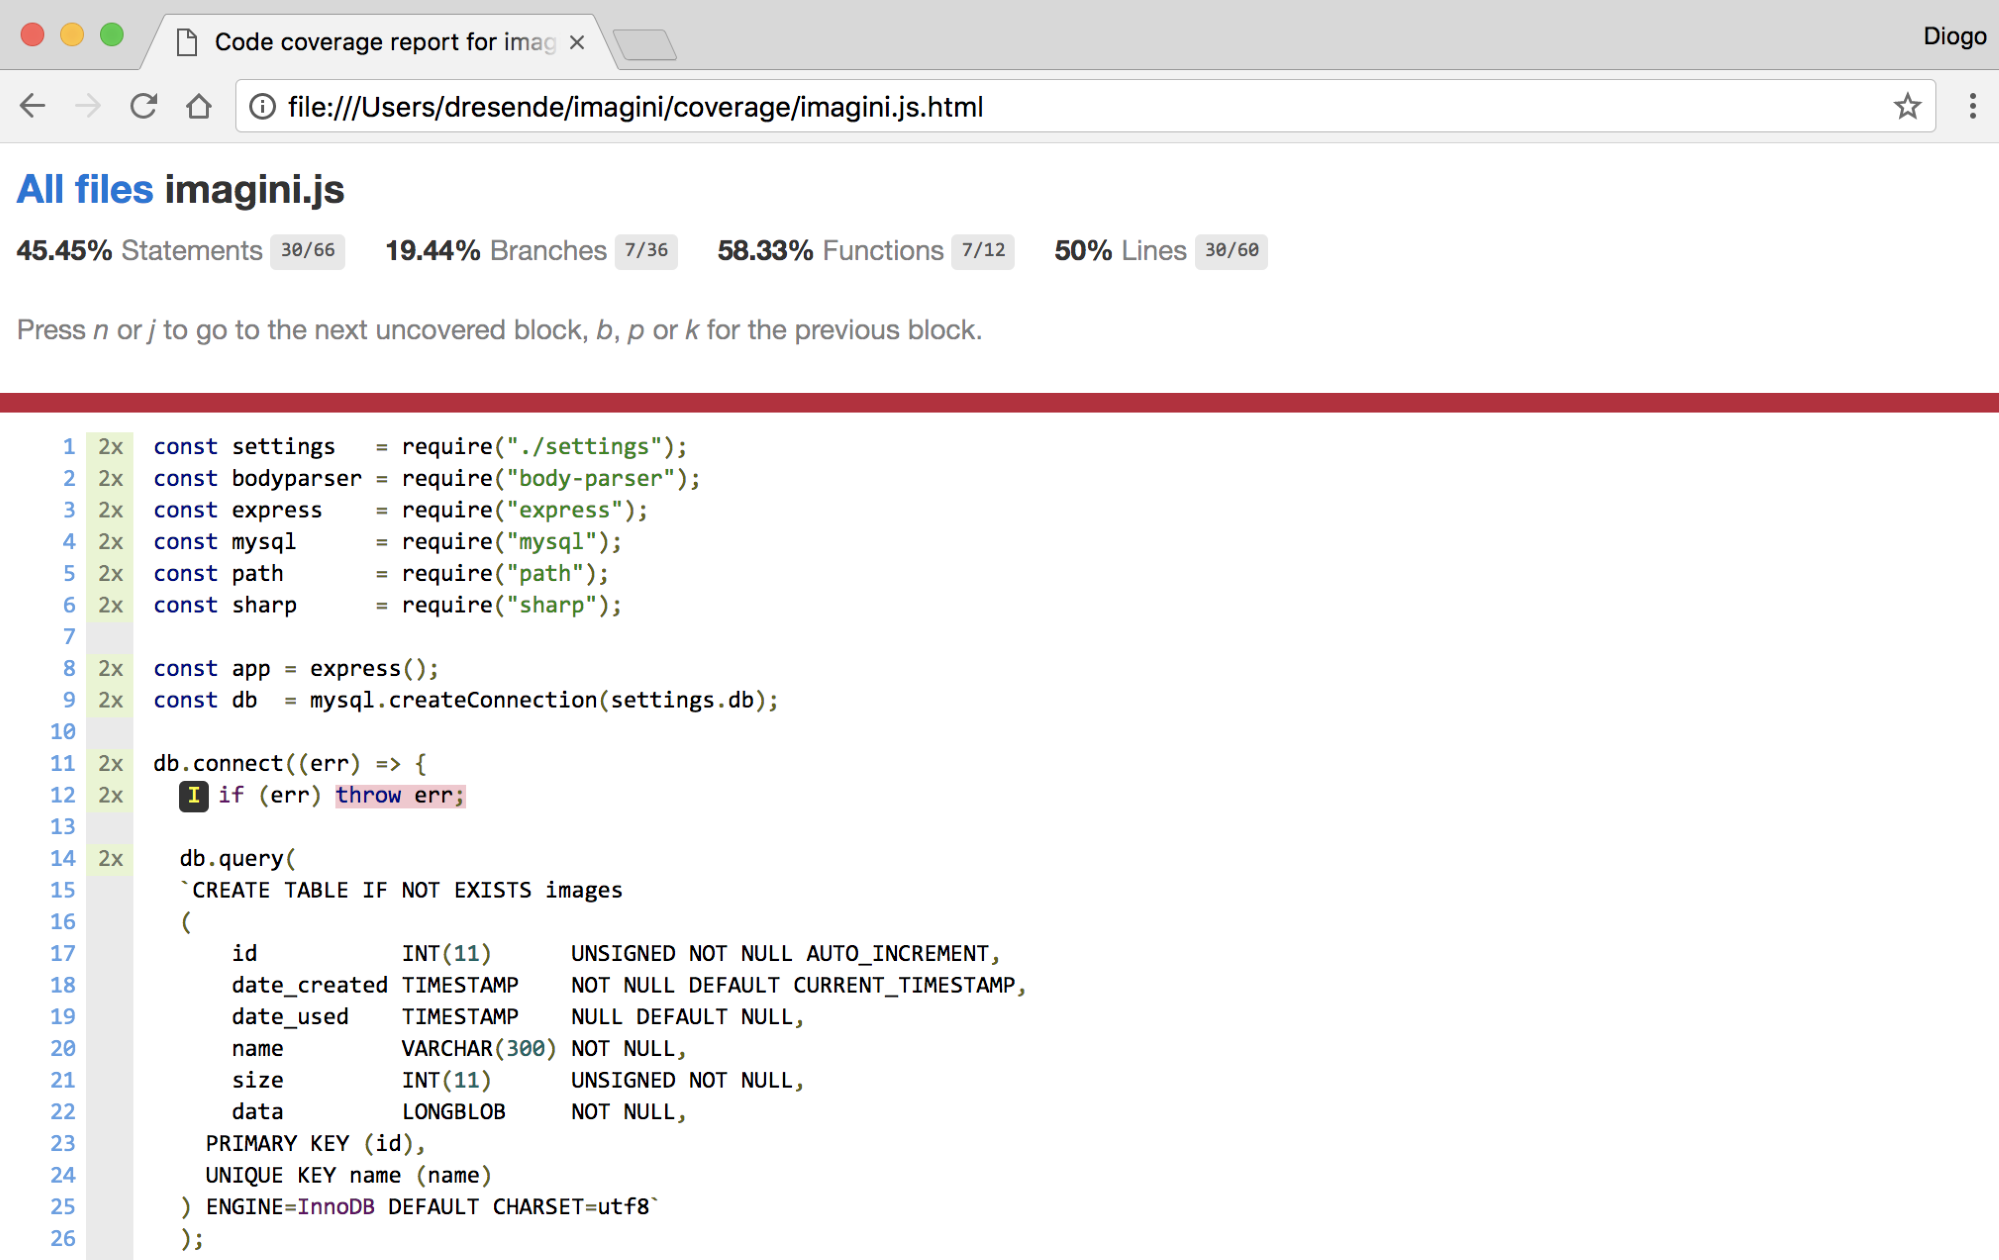
To the right of every line number, you see a gray area and, in this case, you see 2x in some of the lines. This is the execution count for that line. The execution has passed by that line twice. This is actually not that important, unless you're looking for bits of code that get largely executed and you want to do some kind of optimization.
You can also see that line 12 has two changes. First, there's a pinkish background in the back of throw err. That means that statement never got executed, which is normal for now as we always successfully connected to the database. The mark before the if statement means that the condition never got executed:
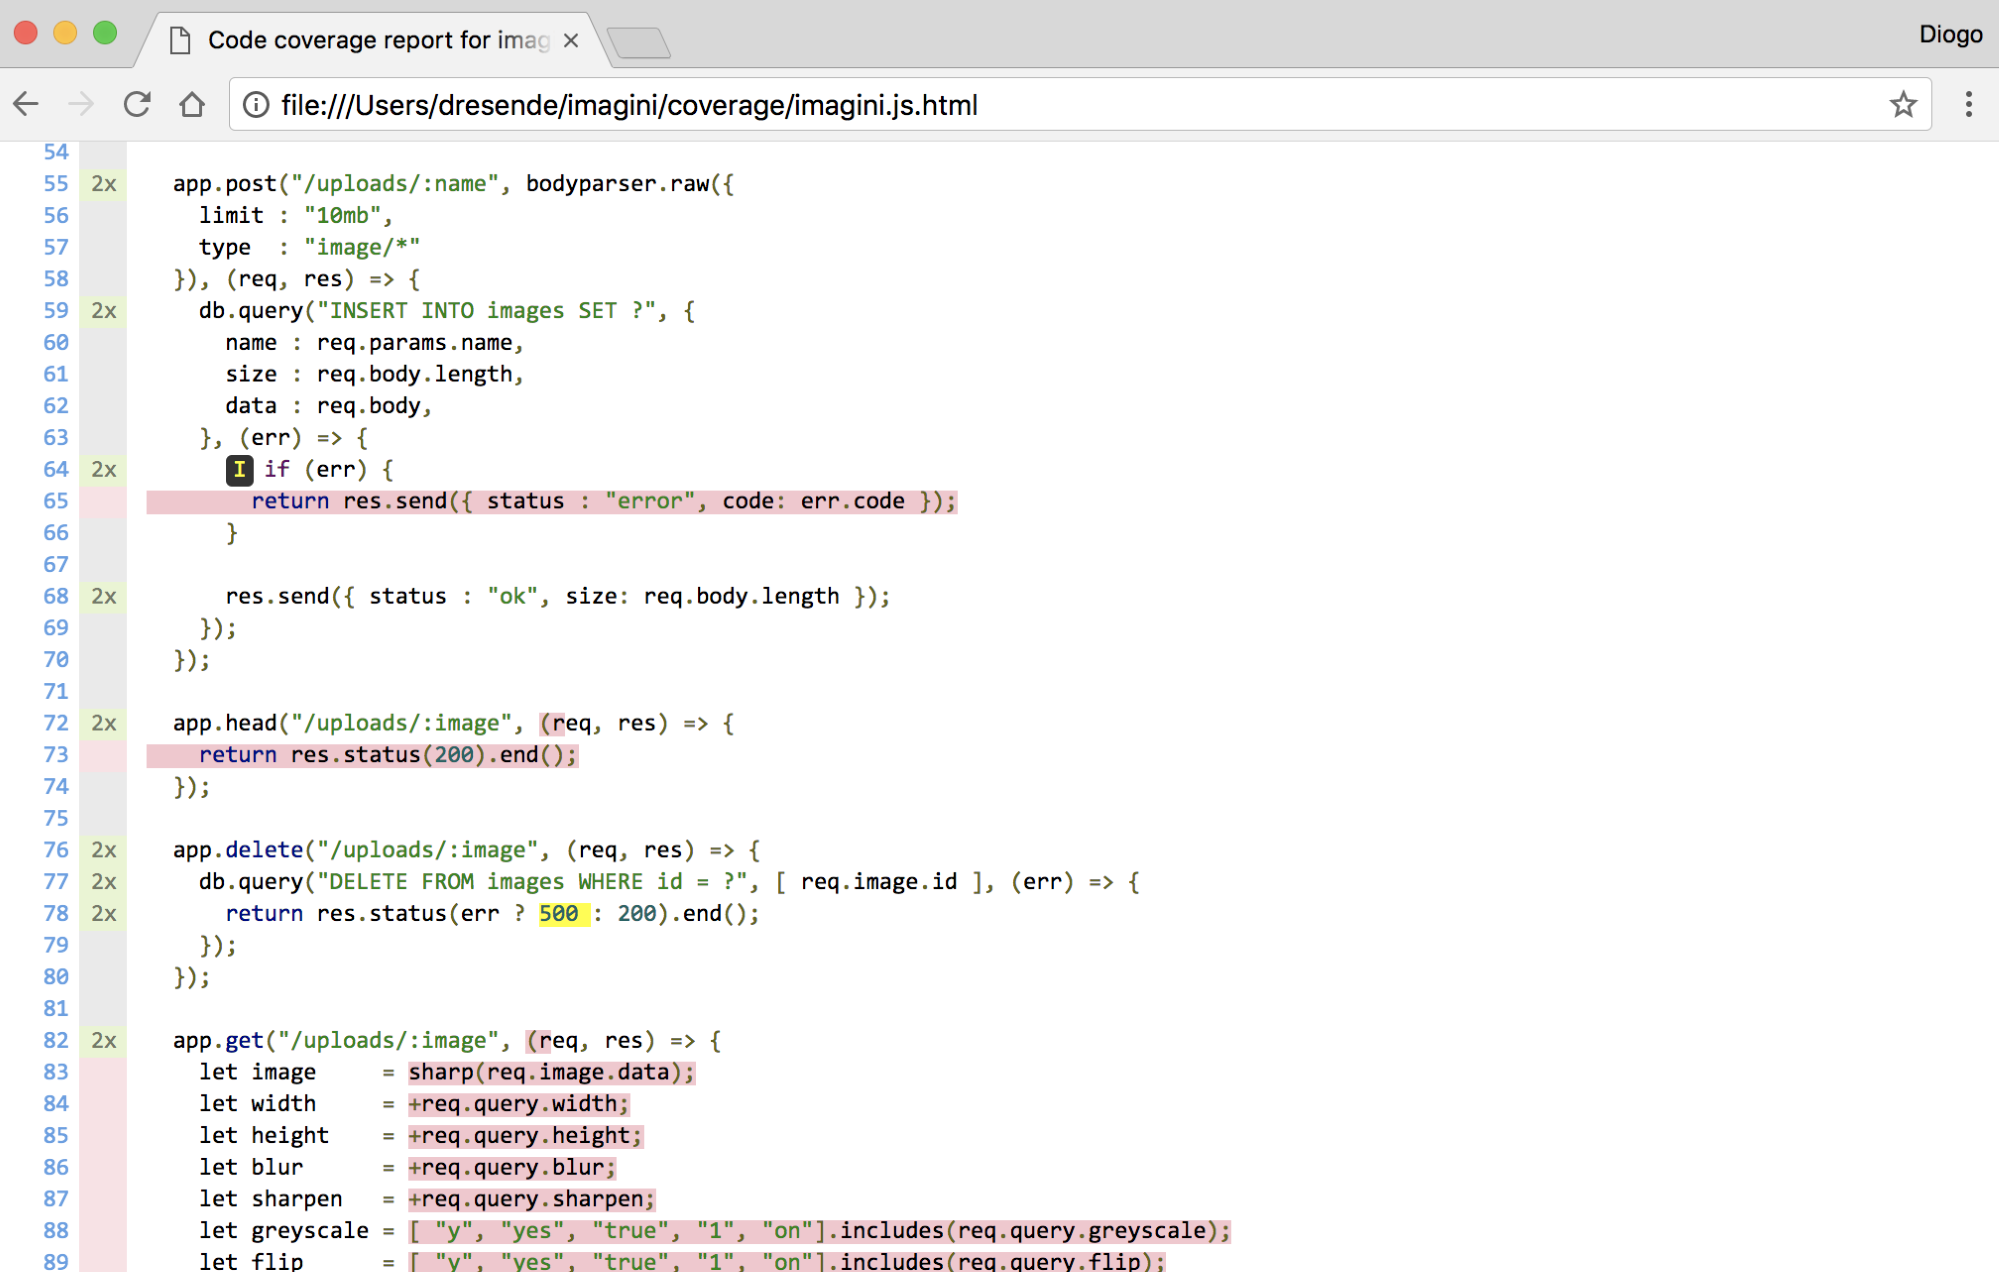
If you scroll a few lines down, we'll see more lines with marks. For example, we can see our image upload method got almost completely covered. The only statement missing is the error handling.
As we delete our test image before running the tests, our image deletion method is also covered. Again, the only missing branch is if the database returns an error to our DELETE query.
Before going any further with the image upload, let's add another integration test file called image-parameter.js, and add some tests to increase our coverage:
const chai = require("chai");
const http = require("chai-http");
const tools = require("../tools");
chai.use(http);
describe("The image parameter", () => {
beforeEach((done) => {
chai
.request(tools.service)
.delete("/uploads/test_image_parameter.png")
.end(() => {
return done();
});
});
it("should reply 403 for non image extension", (done) => {
chai
.request(tools.service)
.get("/uploads/test_image_parameter.txt")
.end((err, res) => {
chai.expect(res).to.have.status(403);
return done();
});
});
it("should reply 404 for non image existence", (done) => {
chai
.request(tools.service)
.get("/uploads/test_image_parameter.png")
.end((err, res) => {
chai.expect(res).to.have.status(404);
return done();
});
});
});
Let's run our test suite and see how it goes:
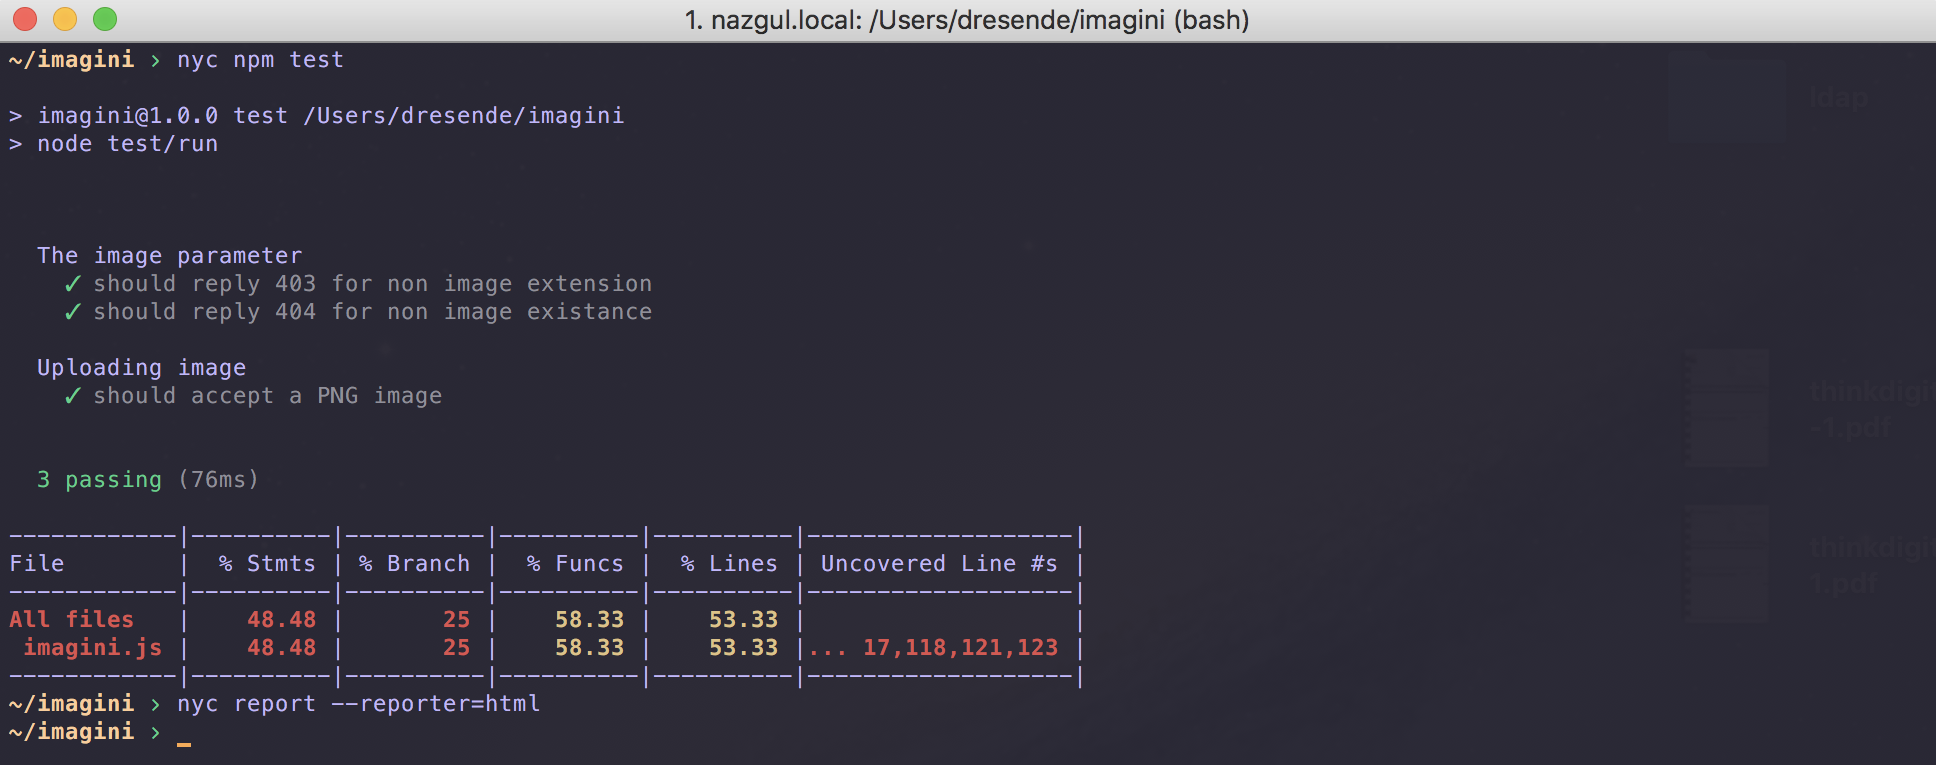
Refresh the HTML report page and look at our parameter method:
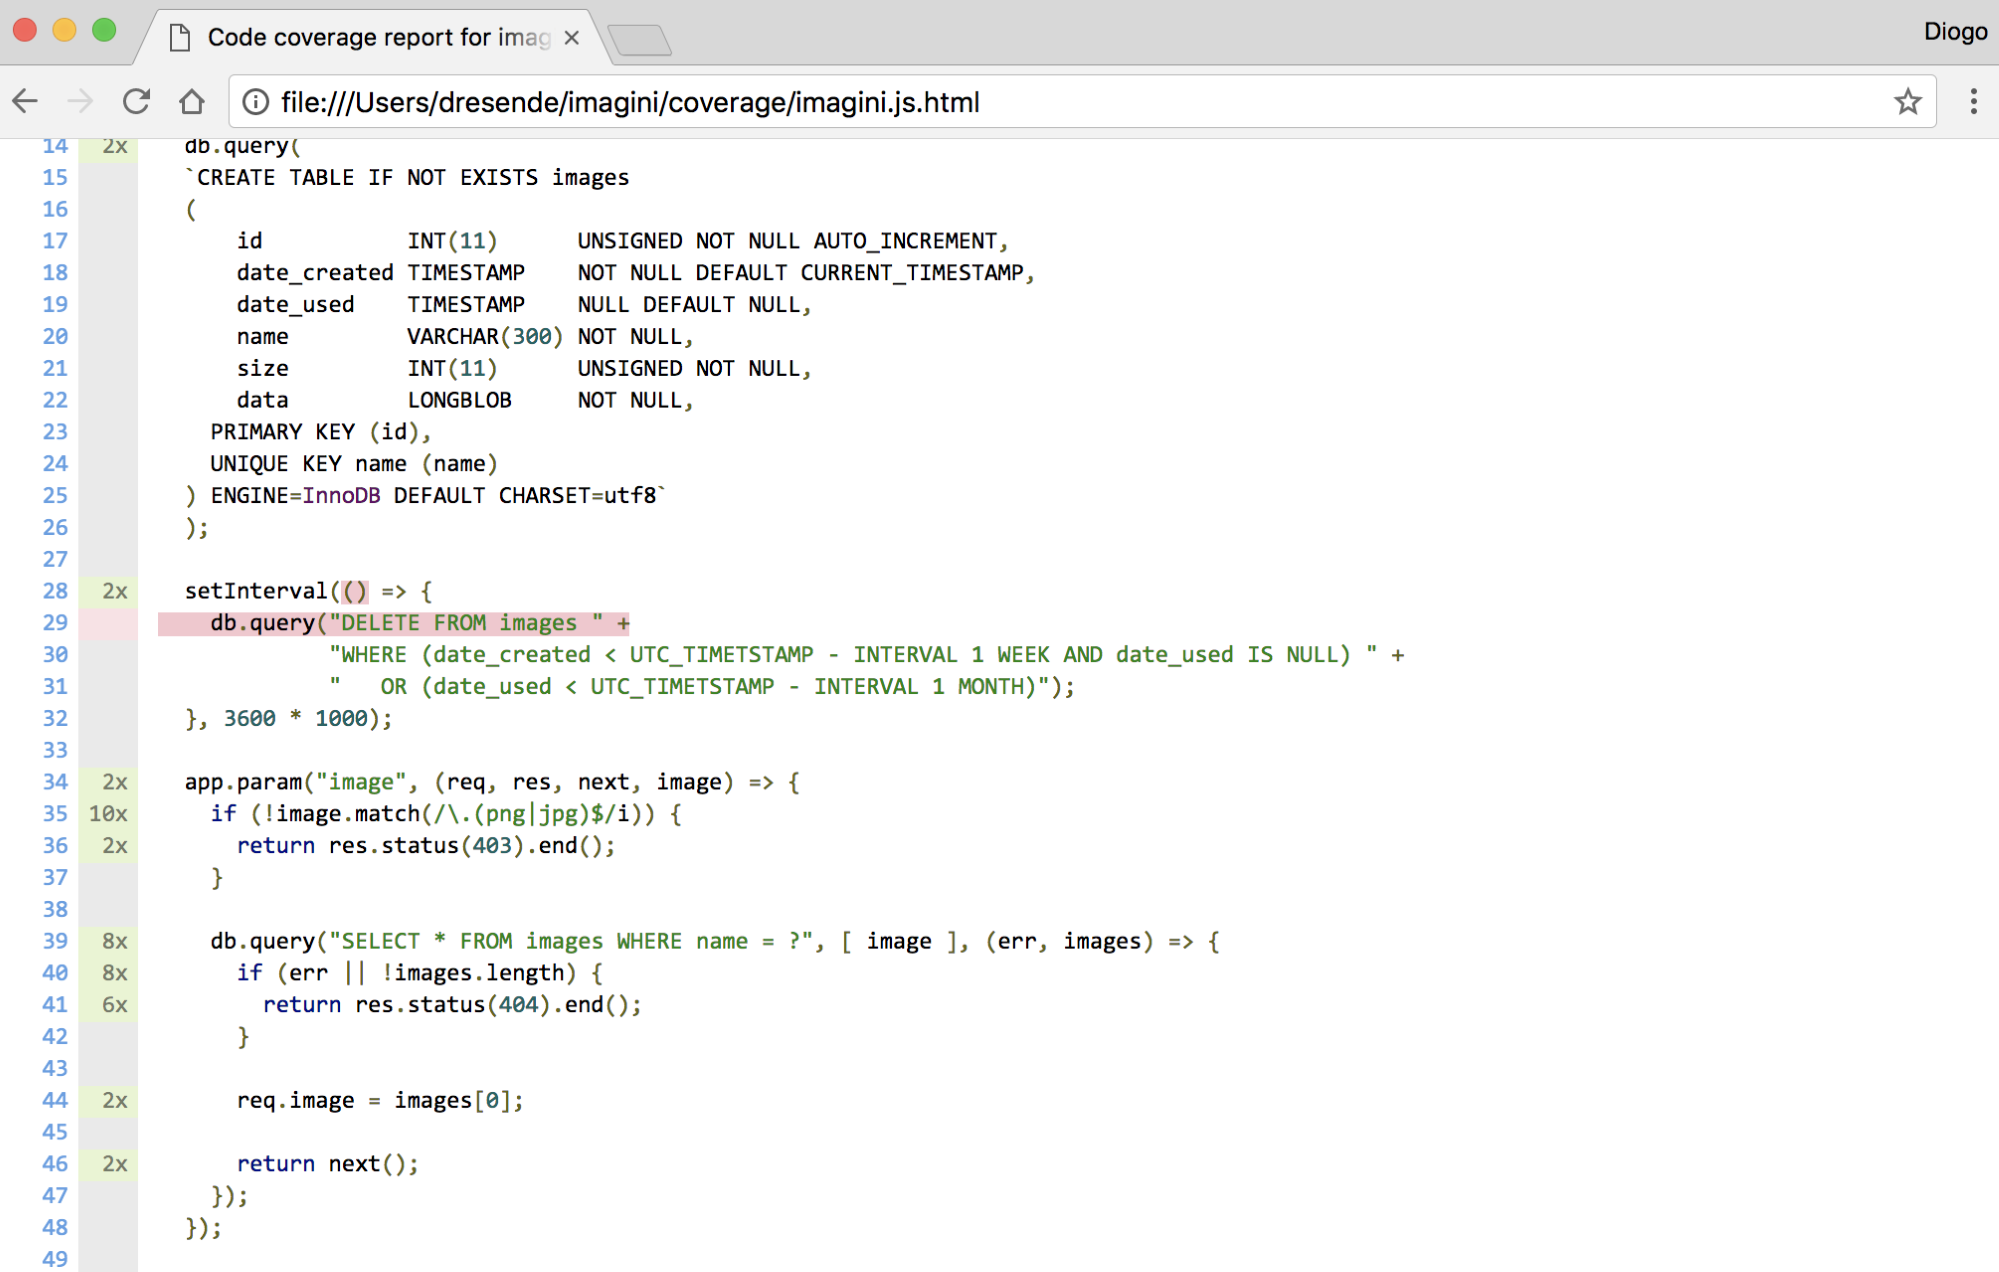
As you can see, we now cover the following condition:
if (!image.match(/\.(png|jpg)$/i)) {
The following condition:
if (err || !images.length) {
We now have full coverage on this method.
There are other coverage lines that are harder to test, such as timers (you can see one on line 28), catch statements, or external errors coming from databases or other storage sources. There are ways of mocking those events, and we'll cover them later on.
For now, let's focus on adding coverage to our code. It's important to have it covered as much as possible when it's still just a small service. If we start adding tests and coverage when it's already big, you'll be frustrated, and it will be hard to find the motivation to cover it all.
This way, you'll find it rewarding to cover it in the beginning and keep the coverage percentage as high as possible along with code evolution.
Let's get back to our image upload test, and add another test:
it("should deny duplicated images", (done) => {
chai
.request(tools.service)
.post("/uploads/test_image_upload.png")
.set("Content-Type", "image/png")
.send(tools.sample)
.end((err, res) => {
chai.expect(res).to.have.status(200);
chai.expect(res.body).to.have.status("ok");
chai
.request(tools.service)
.post("/uploads/test_image_upload.png")
.set("Content-Type", "image/png")
.send(tools.sample)
.end((err, res) => {
chai.expect(res).to.have.status(200);
chai.expect(res.body).to.have.status("error");
chai.expect(res.body).to.have.property("code",
"ER_DUP_ENTRY");
return done();
});
});
});
This will upload the same image twice in a row and we should receive an error from the database saying there's a duplicate. Let's run the tests again:
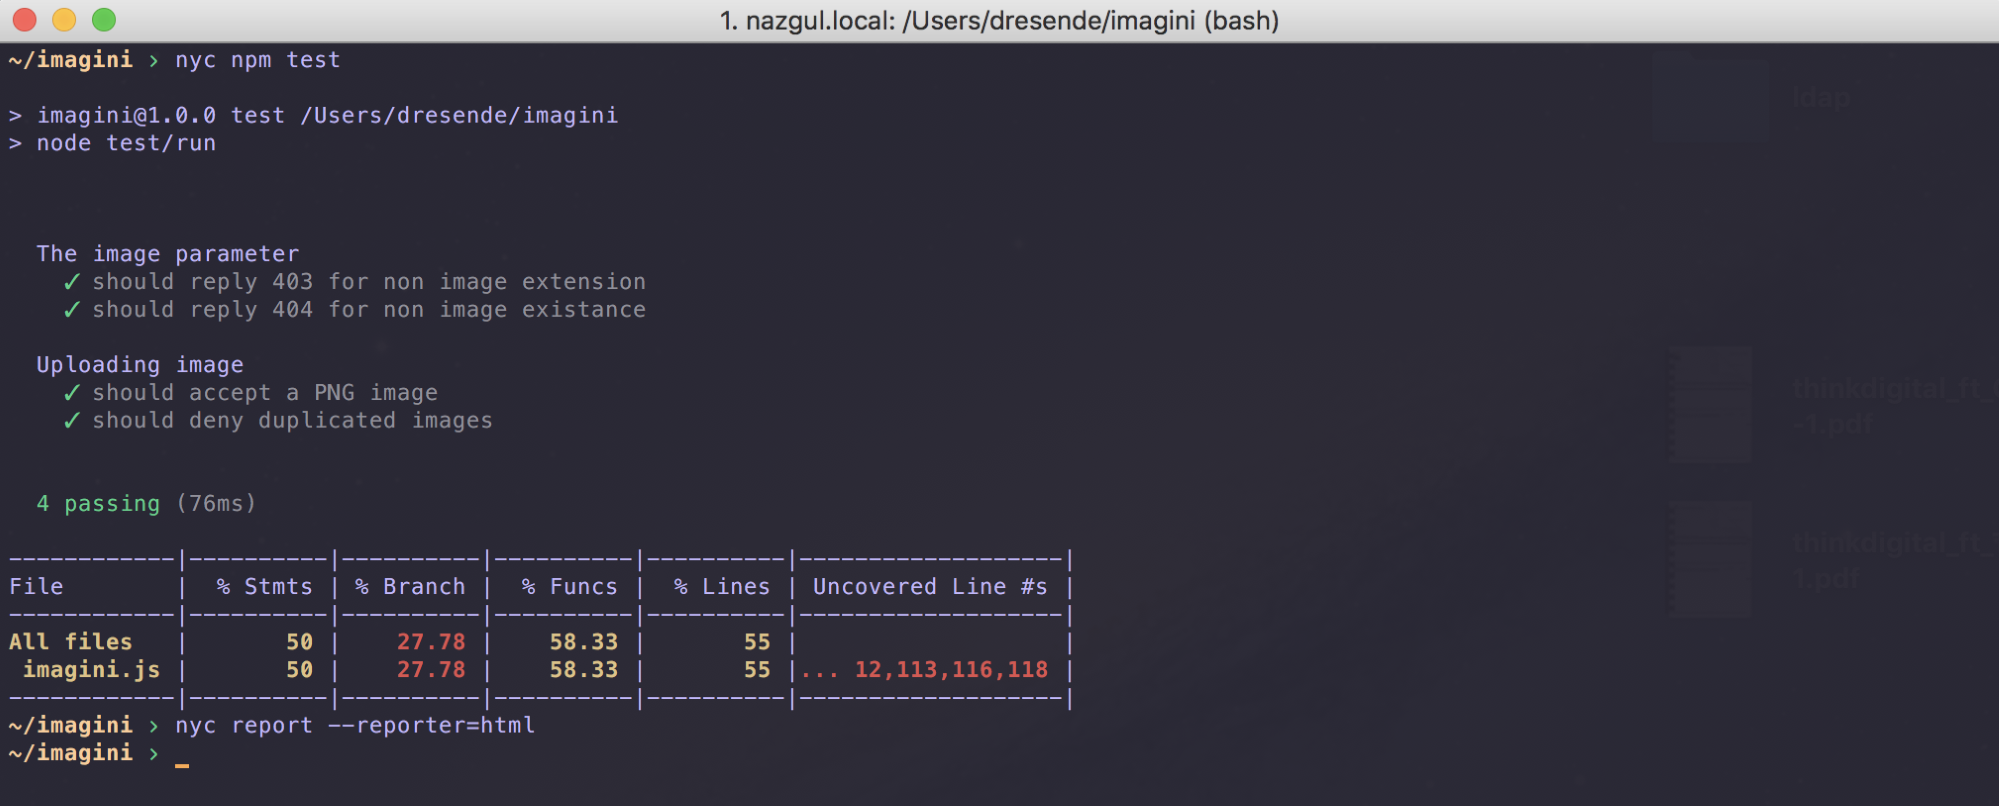
Now, let's open the initial page of the coverage report:
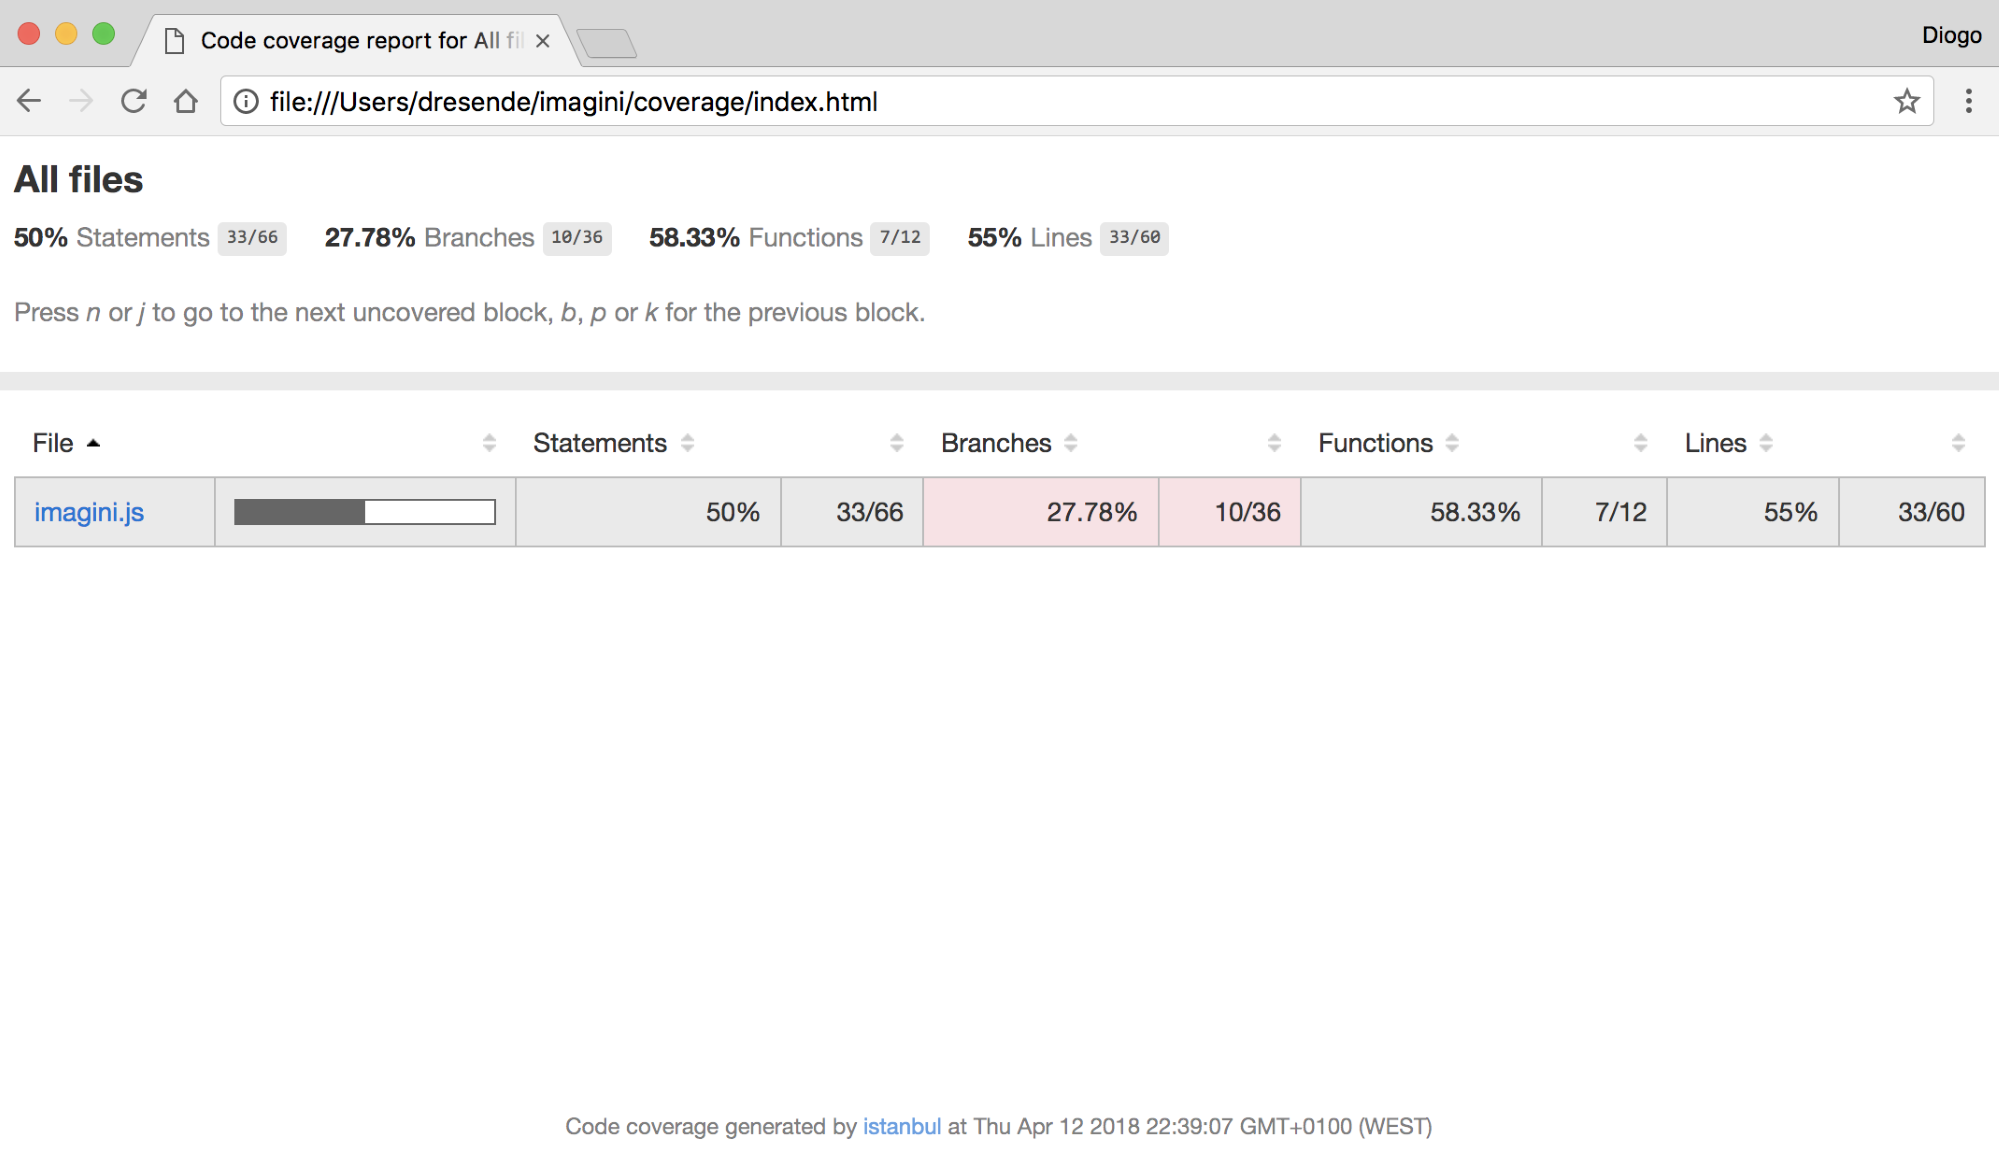
Notice that our file is no longer in a red background. This means the statement coverage has reached 50%. Let's click on our file and see how our image upload method is covered:
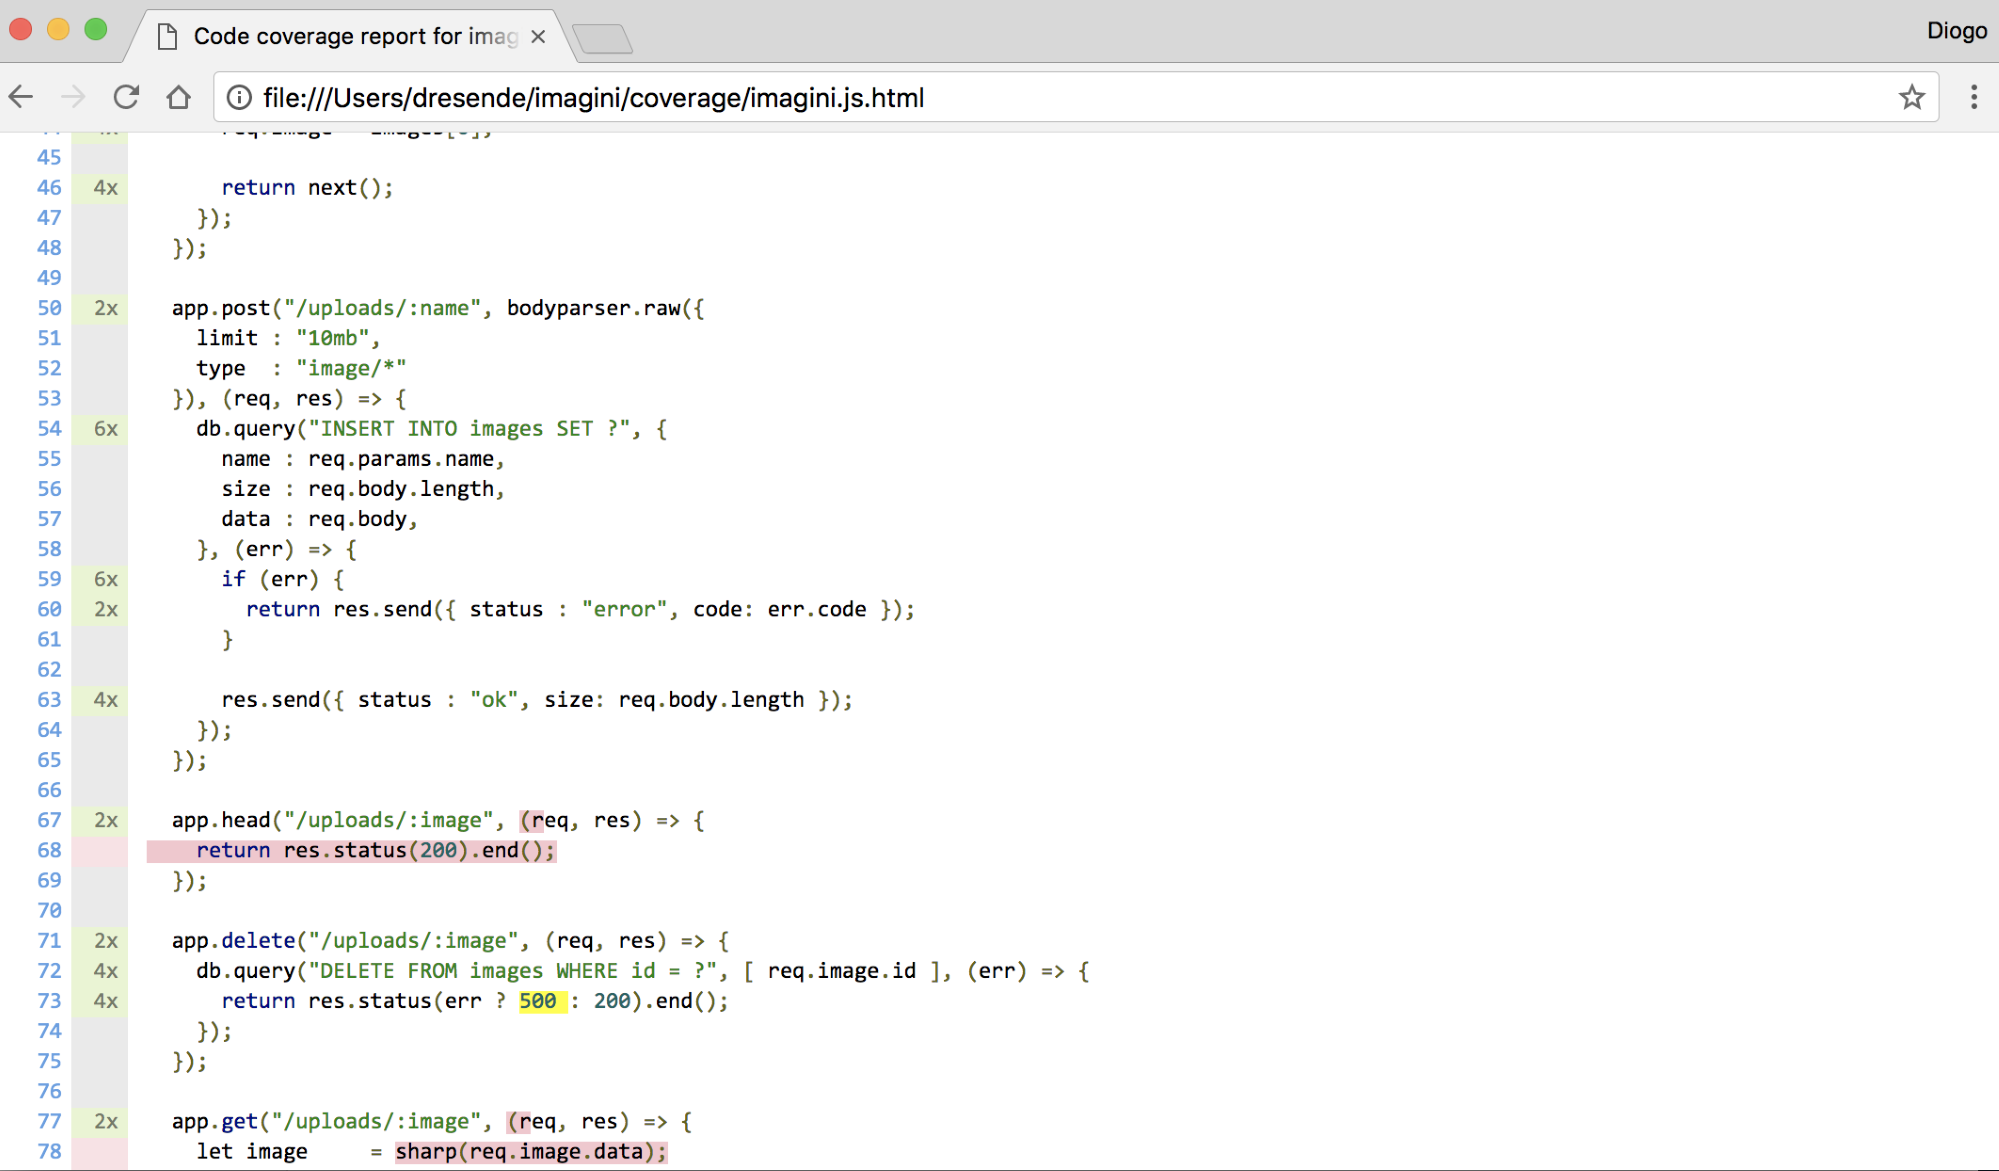
It's complete! We can now move on. Just a reminder before we move to another method: having full coverage does not mean there are no bugs. That's something you need to understand. You might have a use case that you're not expecting, and so, you have no code for it, so there's no obvious coverage.
For example, the bodyparser module will not limit the type of content. If we upload a text file with an image name on it, our code will accept it and store it in the database without noticing. Think of this use case as your homework, and try to create a test to cover that use case and then fix the code.
Let's move to the next method we see after our upload method: the image check on line 67. Let's create a new integration test file called image-check.js, and add a simple test:
const chai = require("chai");
const http = require("chai-http");
const tools = require("../tools");
chai.use(http);
describe("Checking image", () => {
beforeEach((done) => {
chai
.request(tools.service)
.delete("/uploads/test_image_check.png")
.end(() => {
return done();
});
});
it("should return 404 if it doesn't exist", (done) => {
chai
.request(tools.service)
.head("/uploads/test_image_check.png")
.end((err, res) => {
chai.expect(res).to.have.status(404);
return done();
});
});
it("should return 200 if it exists", (done) => {
chai
.request(tools.service)
.post("/uploads/test_image_check.png")
.set("Content-Type", "image/png")
.send(tools.sample)
.end((err, res) => {
chai.expect(res).to.have.status(200);
chai.expect(res.body).to.have.status("ok");
chai
.request(tools.service)
.head("/uploads/test_image_check.png")
.end((err, res) => {
chai.expect(res).to.have.status(200);
return done();
});
});
});
});
Let's run the test suite:

We can see our console report is getting bigger. As we're creating new integration test files and having a description for each one, mocha writes a nice tree view showing how the tests run. On the bottom, we can see the coverage report:
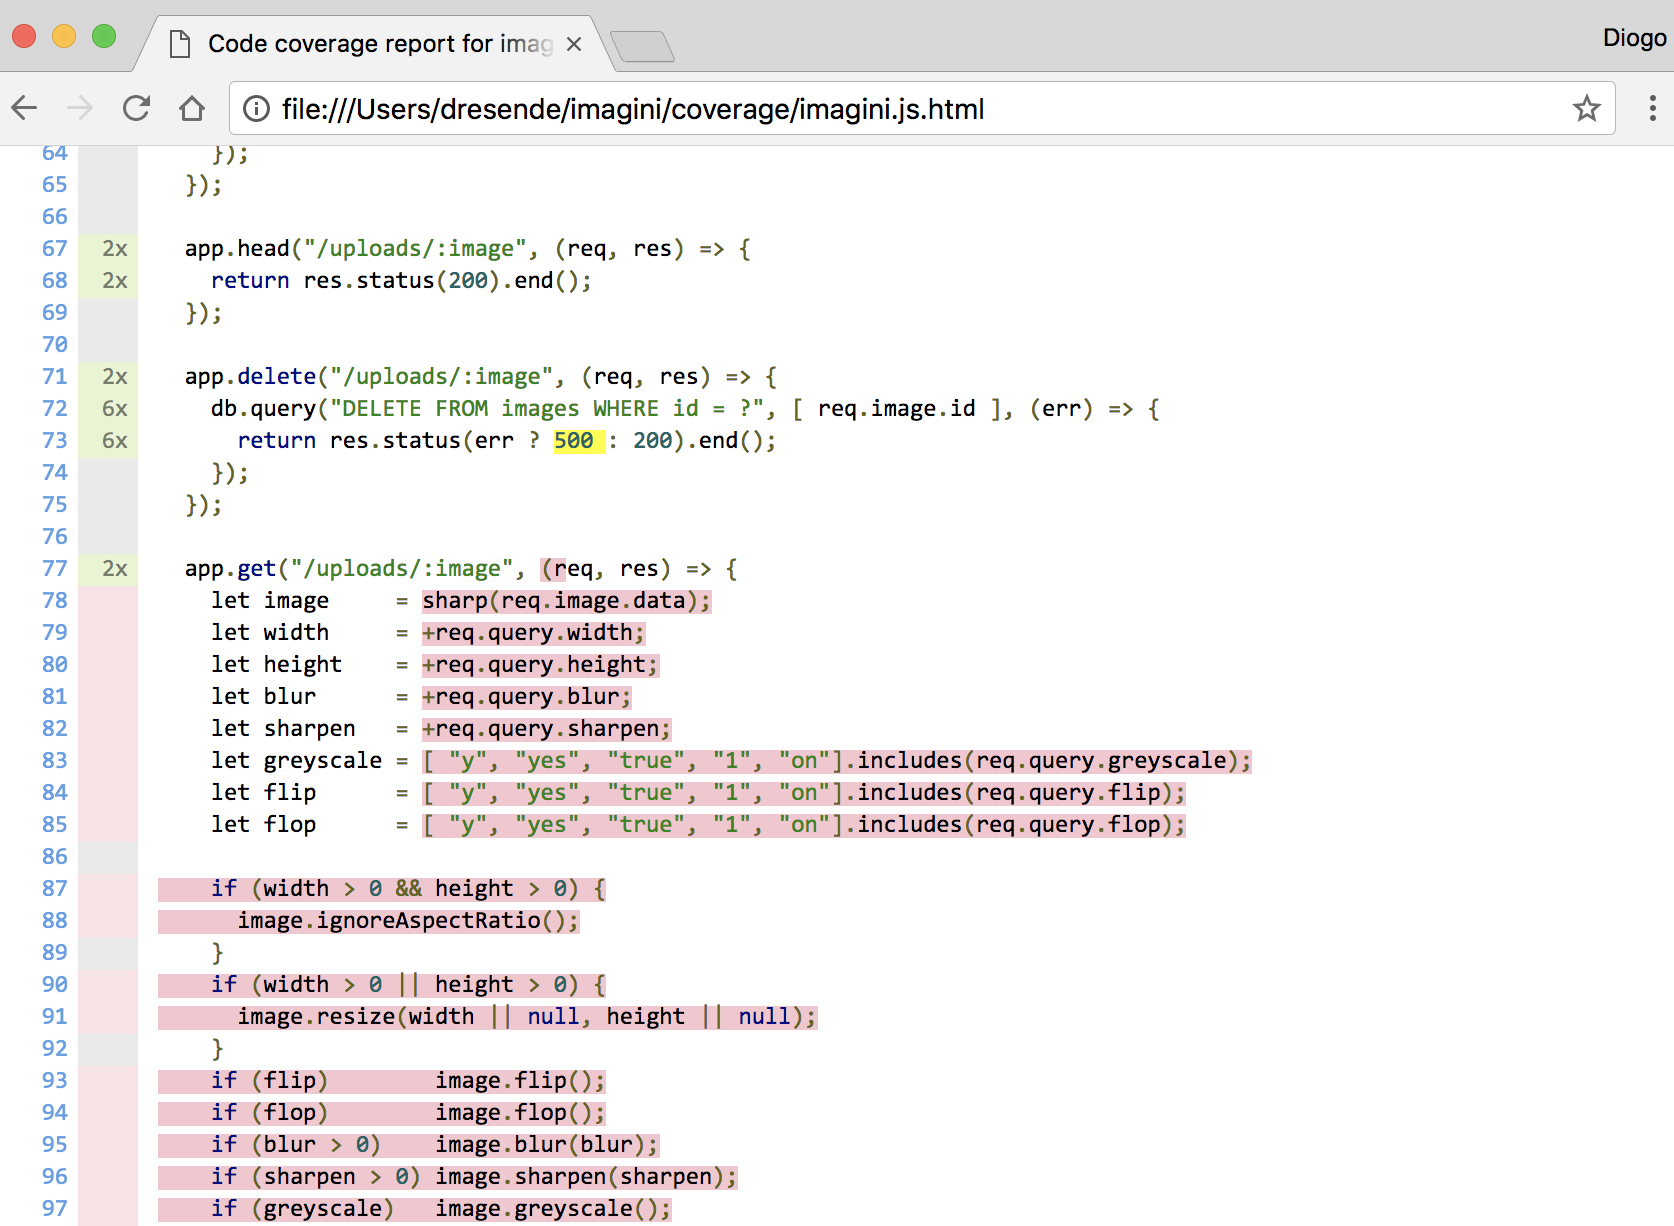
Looking at the check method, we see it's now fully covered. This one was very simple.
We're still in the middle of statement coverage as our top method; the image manipulation one is almost half of our code. This means that when we start covering it, the coverage will significantly rise.
Let's create an integration test for it:
const chai = require("chai");
const http = require("chai-http");
const tools = require("../tools");
chai.use(http);
describe("Downloading image", () => {
beforeEach((done) => {
chai
.request(tools.service)
.delete("/uploads/test_image_download.png")
.end(() => {
chai
.request(tools.service)
.post("/uploads/test_image_download.png")
.set("Content-Type", "image/png")
.send(tools.sample)
.end((err, res) => {
chai.expect(res).to.have.status(200);
chai.expect(res.body).to.have.status("ok");
return done();
});
});
});
it("should return the original image size if no parameters given",
(done) => {
chai
.request(tools.service)
.get("/uploads/test_image_download.png")
.end((err, res) => {
chai.expect(res).to.have.status(200);
chai.expect(res.body).to.have.length(tools.sample.length);
return done();
});
});
});
Before each test, we're deleting the image (if it exists) and then uploading a fresh sample one. Then, for each test, we'll download it and test the output according to what we asked for.
Let's try and run it:
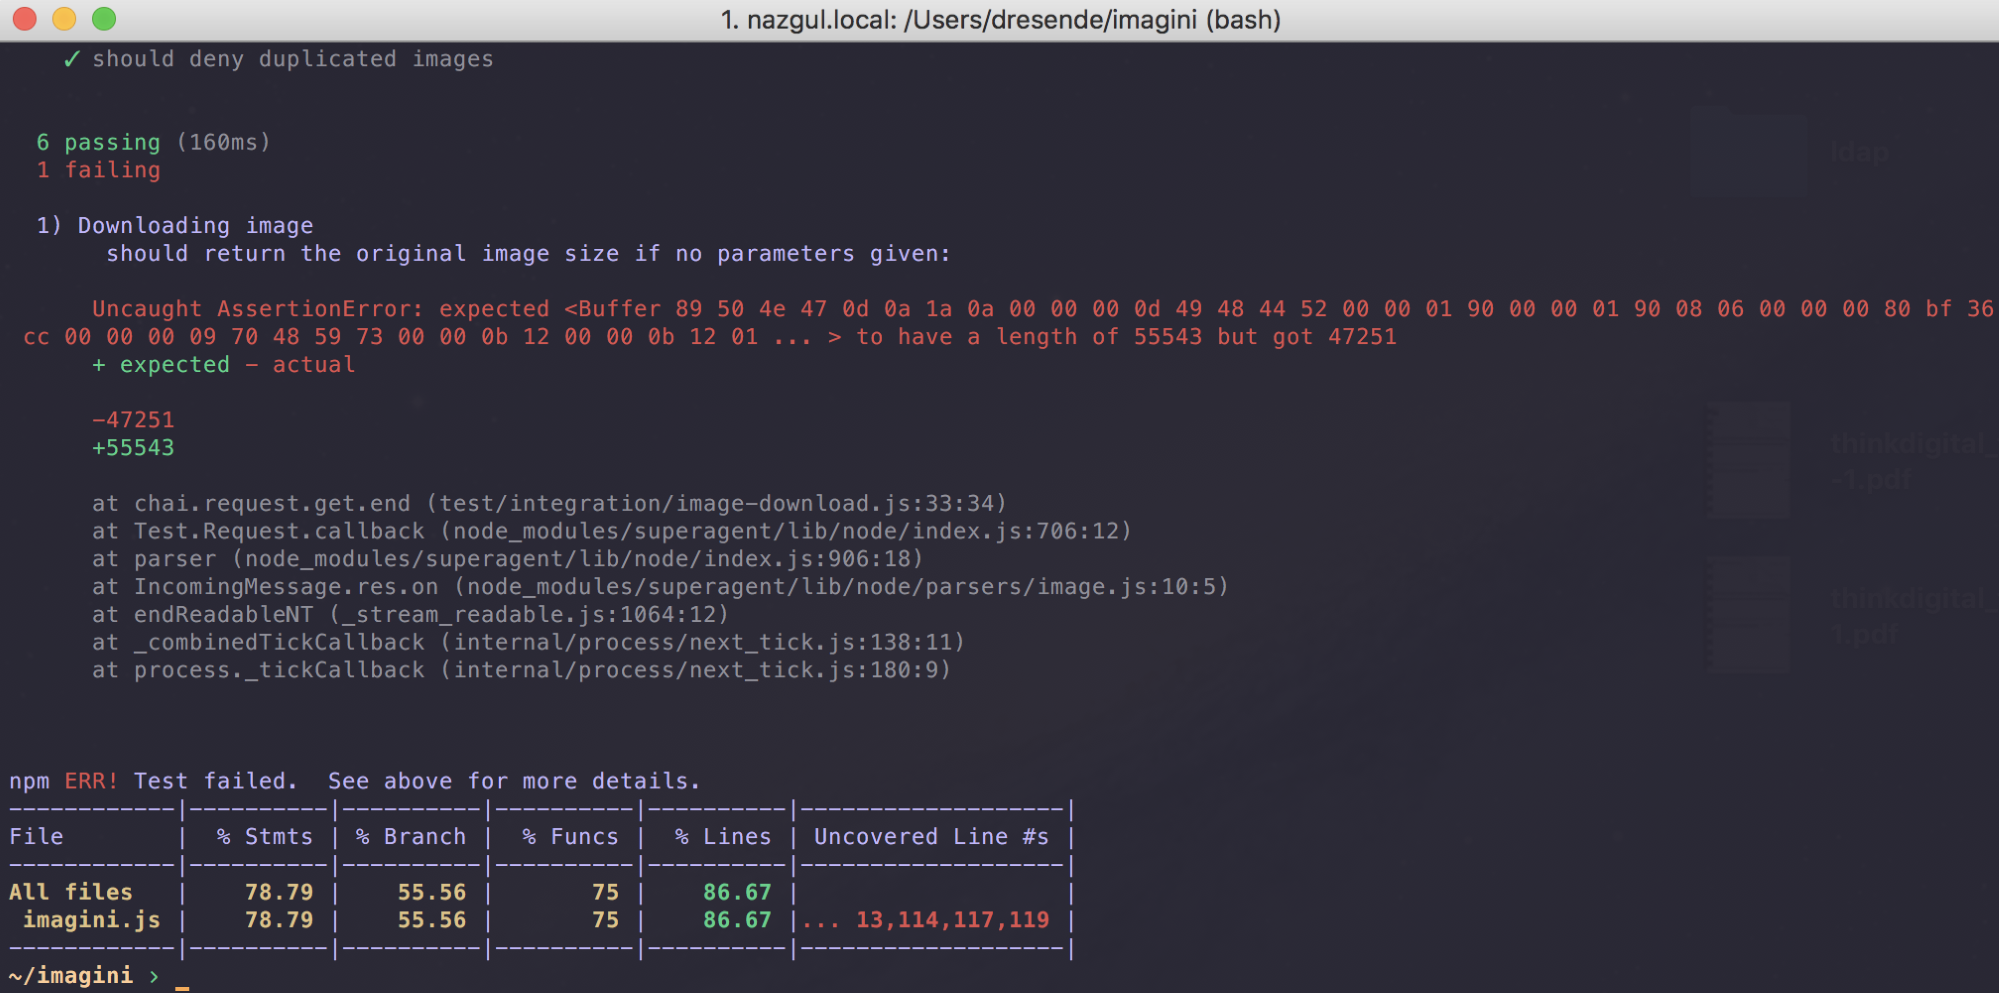
Well, that was unexpected. The test fails because our length check does not match. This is actually a good example of something we just notice when we start to execute testing.
What happens is that, when we request an image, we use the sharp module to make any manipulation on the image, according to query parameters. In this case, we're not asking for any manipulation, but when we output the image (through sharp), it actually returns the same image in size, but perhaps with a little bit less quality, or maybe it just knows how to better encode our image and remove data from the file that is not needed.
We don't know exactly, but let's assume we want the original image, untouched. We need to change our download method. Let's assume that if no query parameters are defined at all, we just return the original image. Let's add a condition to the top of our method:
if (Object.keys(req.query).length === 0) {
db.query("UPDATE images " +
"SET date_used = UTC_TIMESTAMP " +
"WHERE id = ?",
[ req.image.id ]);
res.setHeader("Content-Type", "image/" +
path.extname(req.image.name).substr(1));
return res.end(req.image.data);
}
If we run it now, we should have no failures:
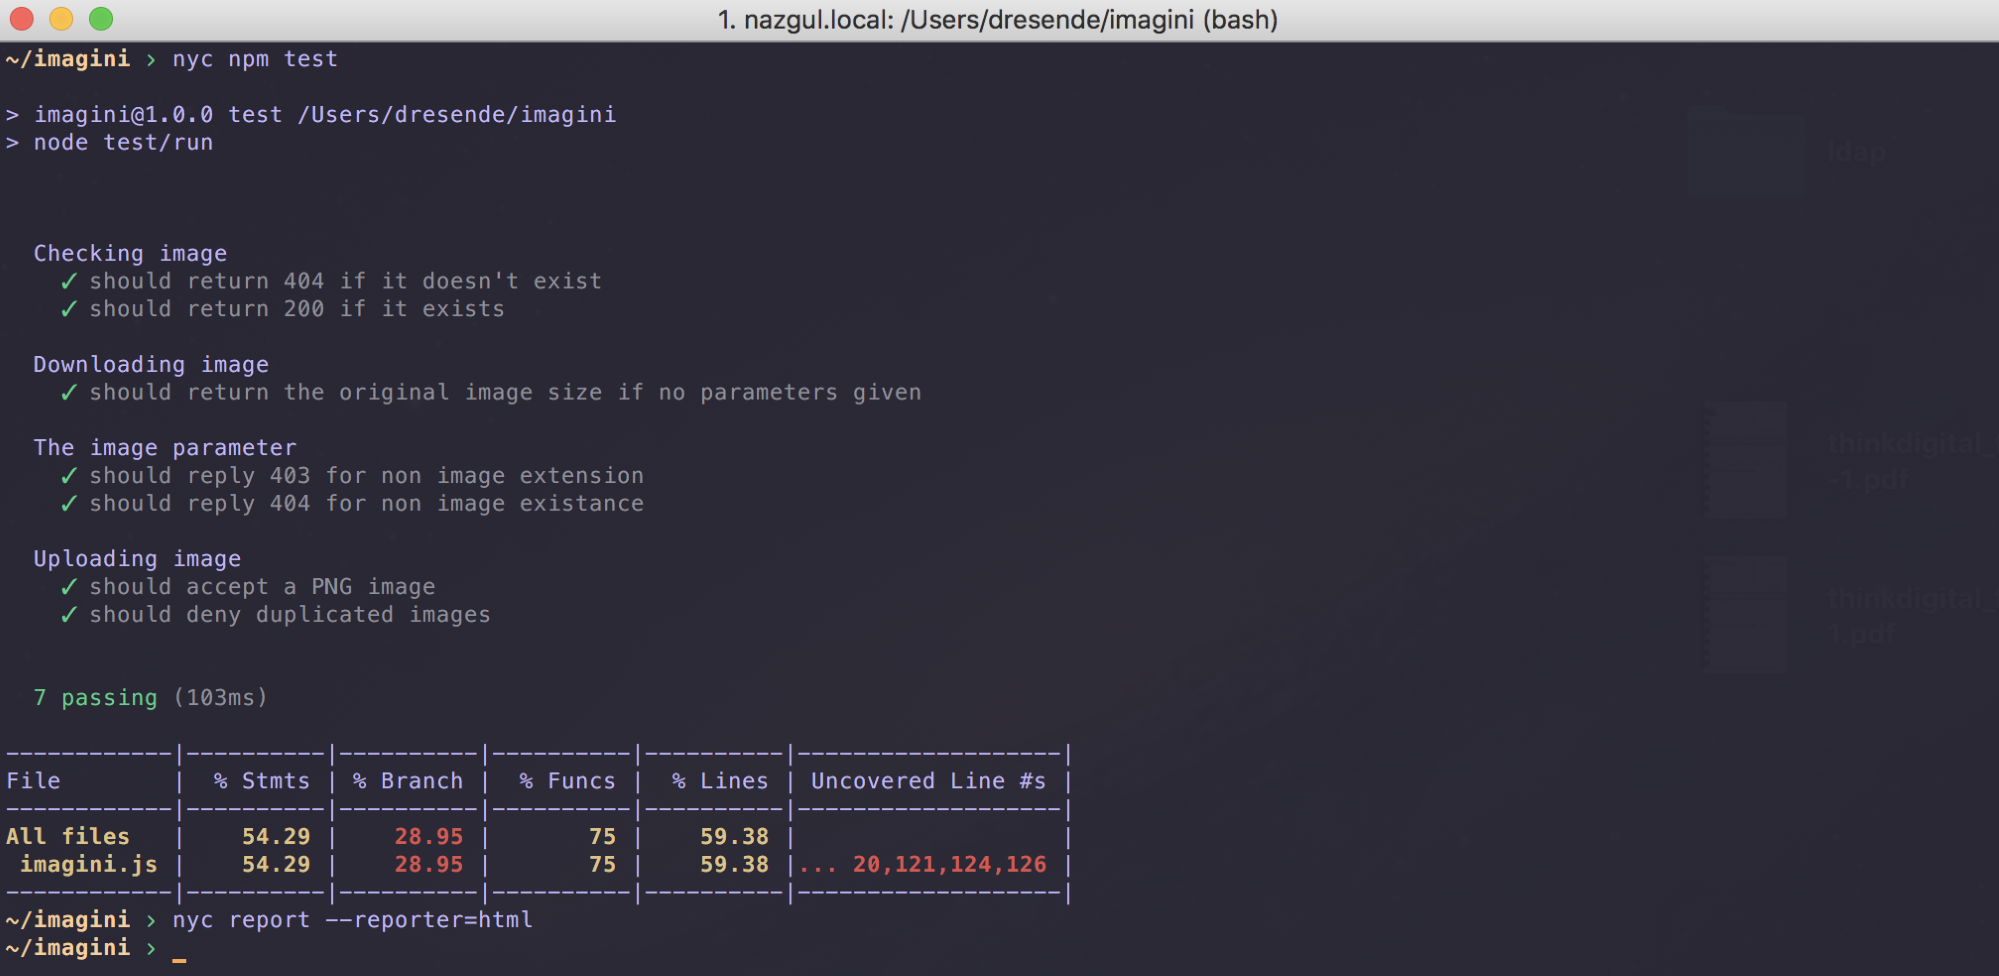
Our statement coverage did not rise much because we actually created a condition on top of the method and returned immediately, so our previous method is still untested:
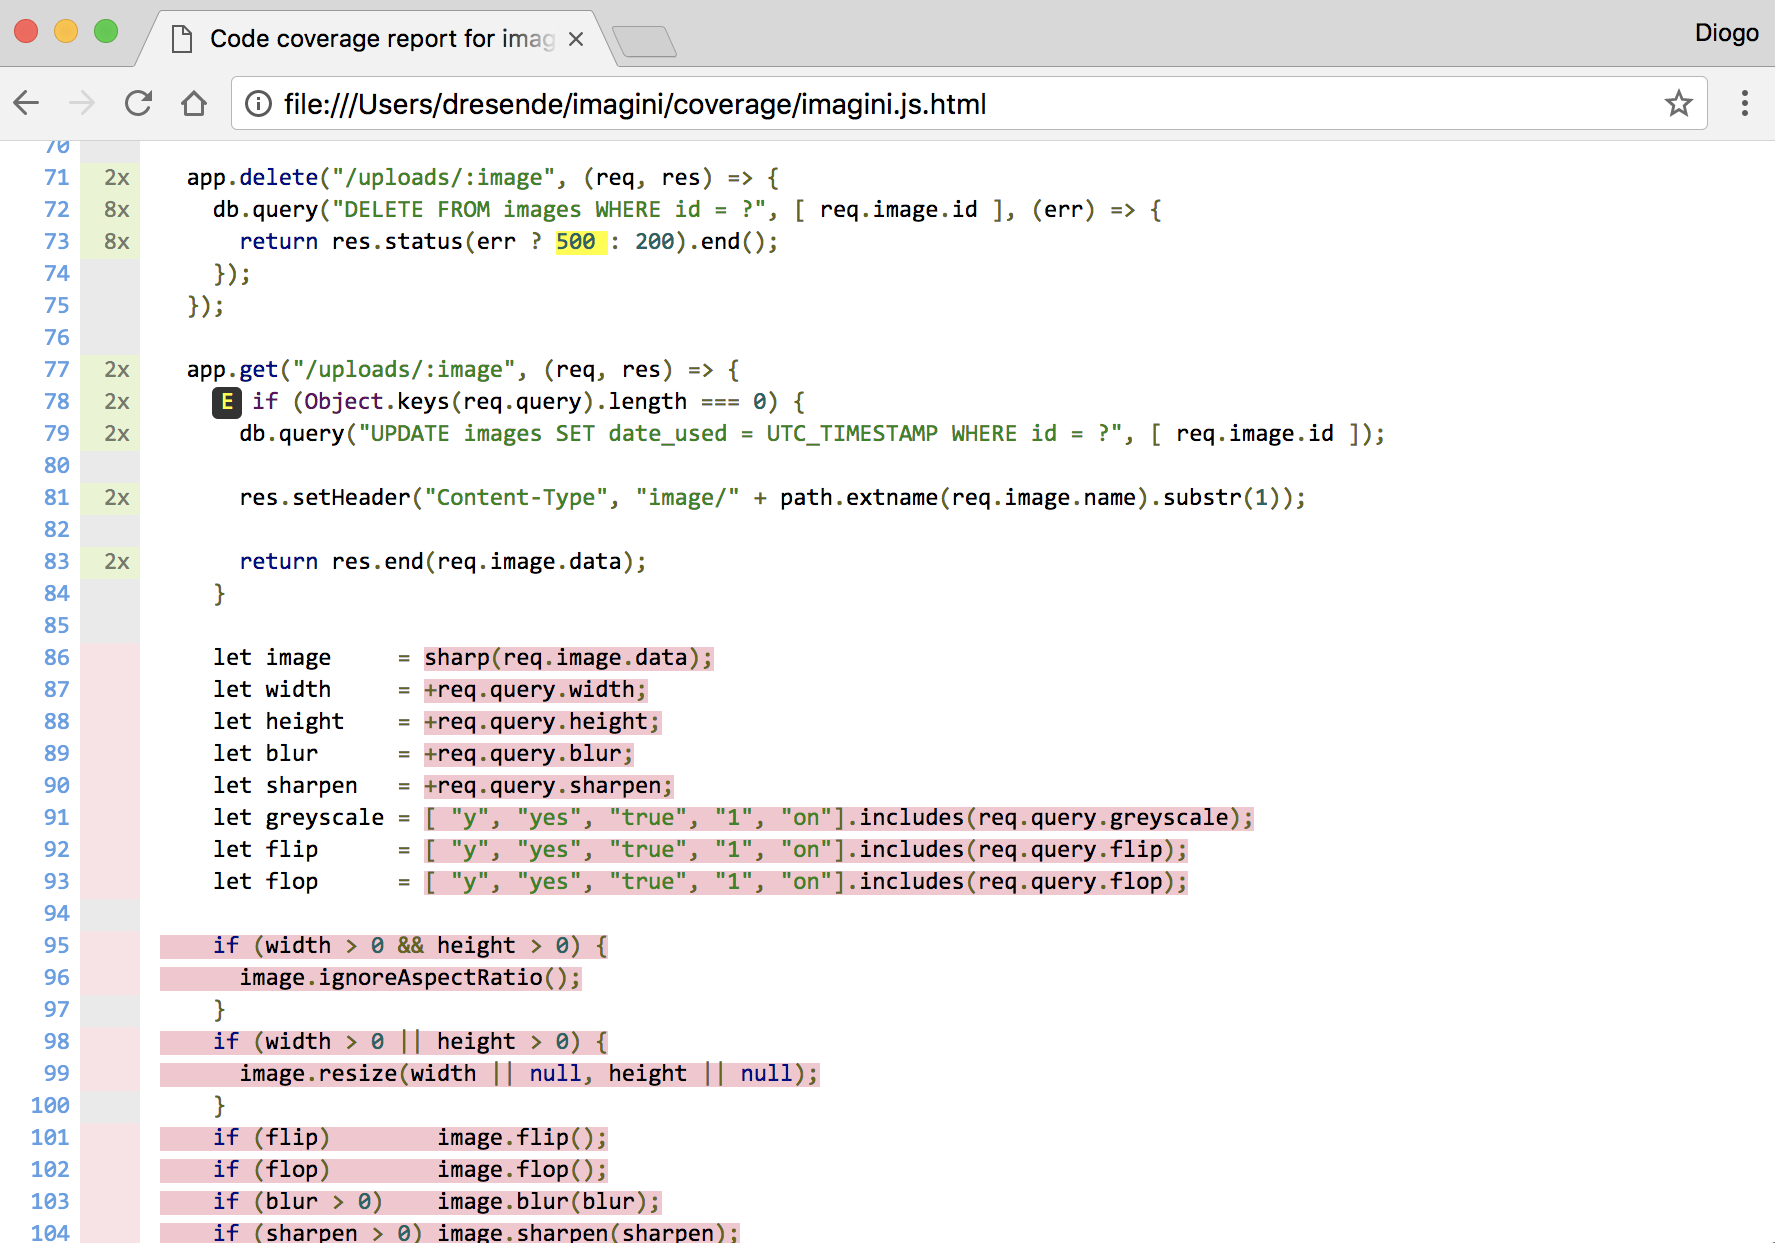
Looking at line 78, you should see a new mark, an E that means that the condition in that line never executed the else statement, which is the rest of our code. Let's add a test to this integration and resize our image.
We will need sharp to help us check whether the results are correct. Let's include it on the top of our file:
const sharp = require("sharp");
Then, add a resize test:
it("should be able to resize the image as we request", (done) => {
chai
.request(tools.service)
.get("/uploads/test_image_download.png?width=200&height=100")
.end((err, res) => {
chai.expect(res).to.have.status(200);
let image = sharp(res.body);
image
.metadata()
.then((metadata) => {
chai.expect(metadata).to.have.property("width", 200);
chai.expect(metadata).to.have.property("height", 100);
return done();
});
});
});
Let's run our test suite:
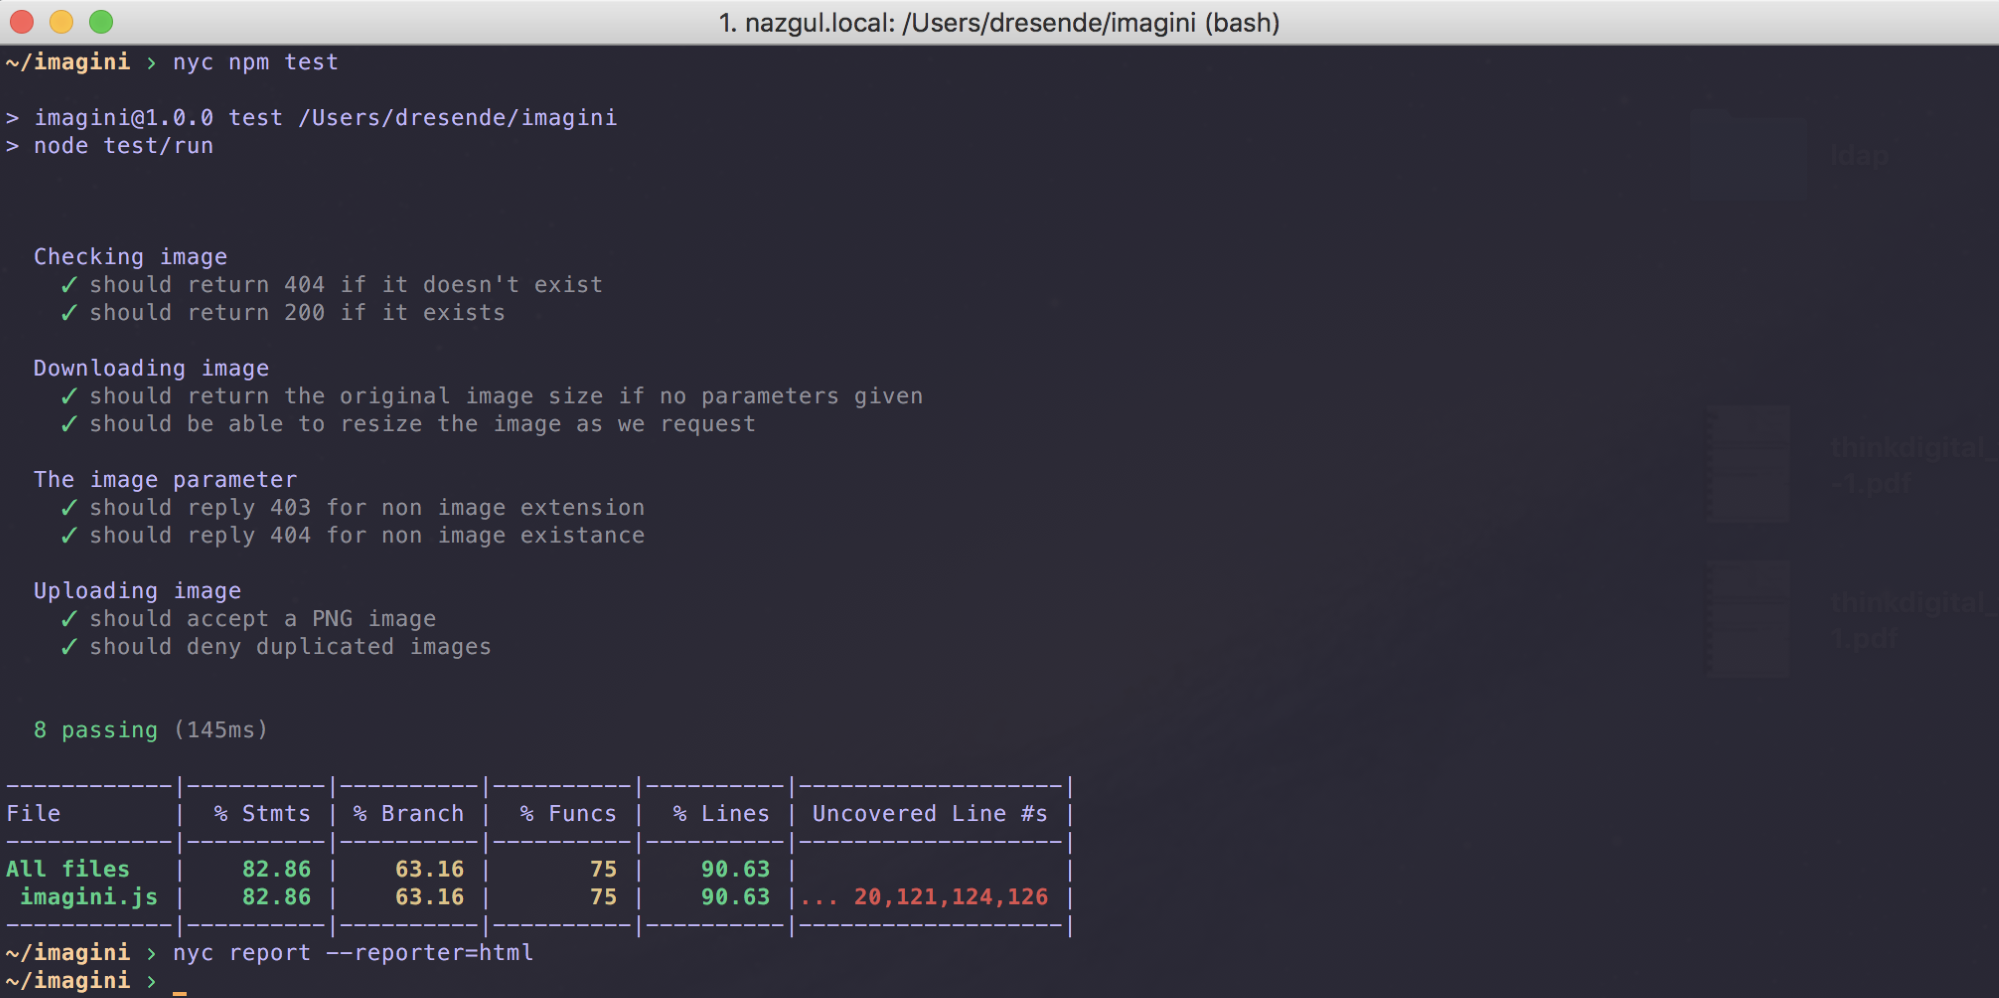
It now looks very good. From the console report, we can see some green. Let's look at the front page of the coverage report:
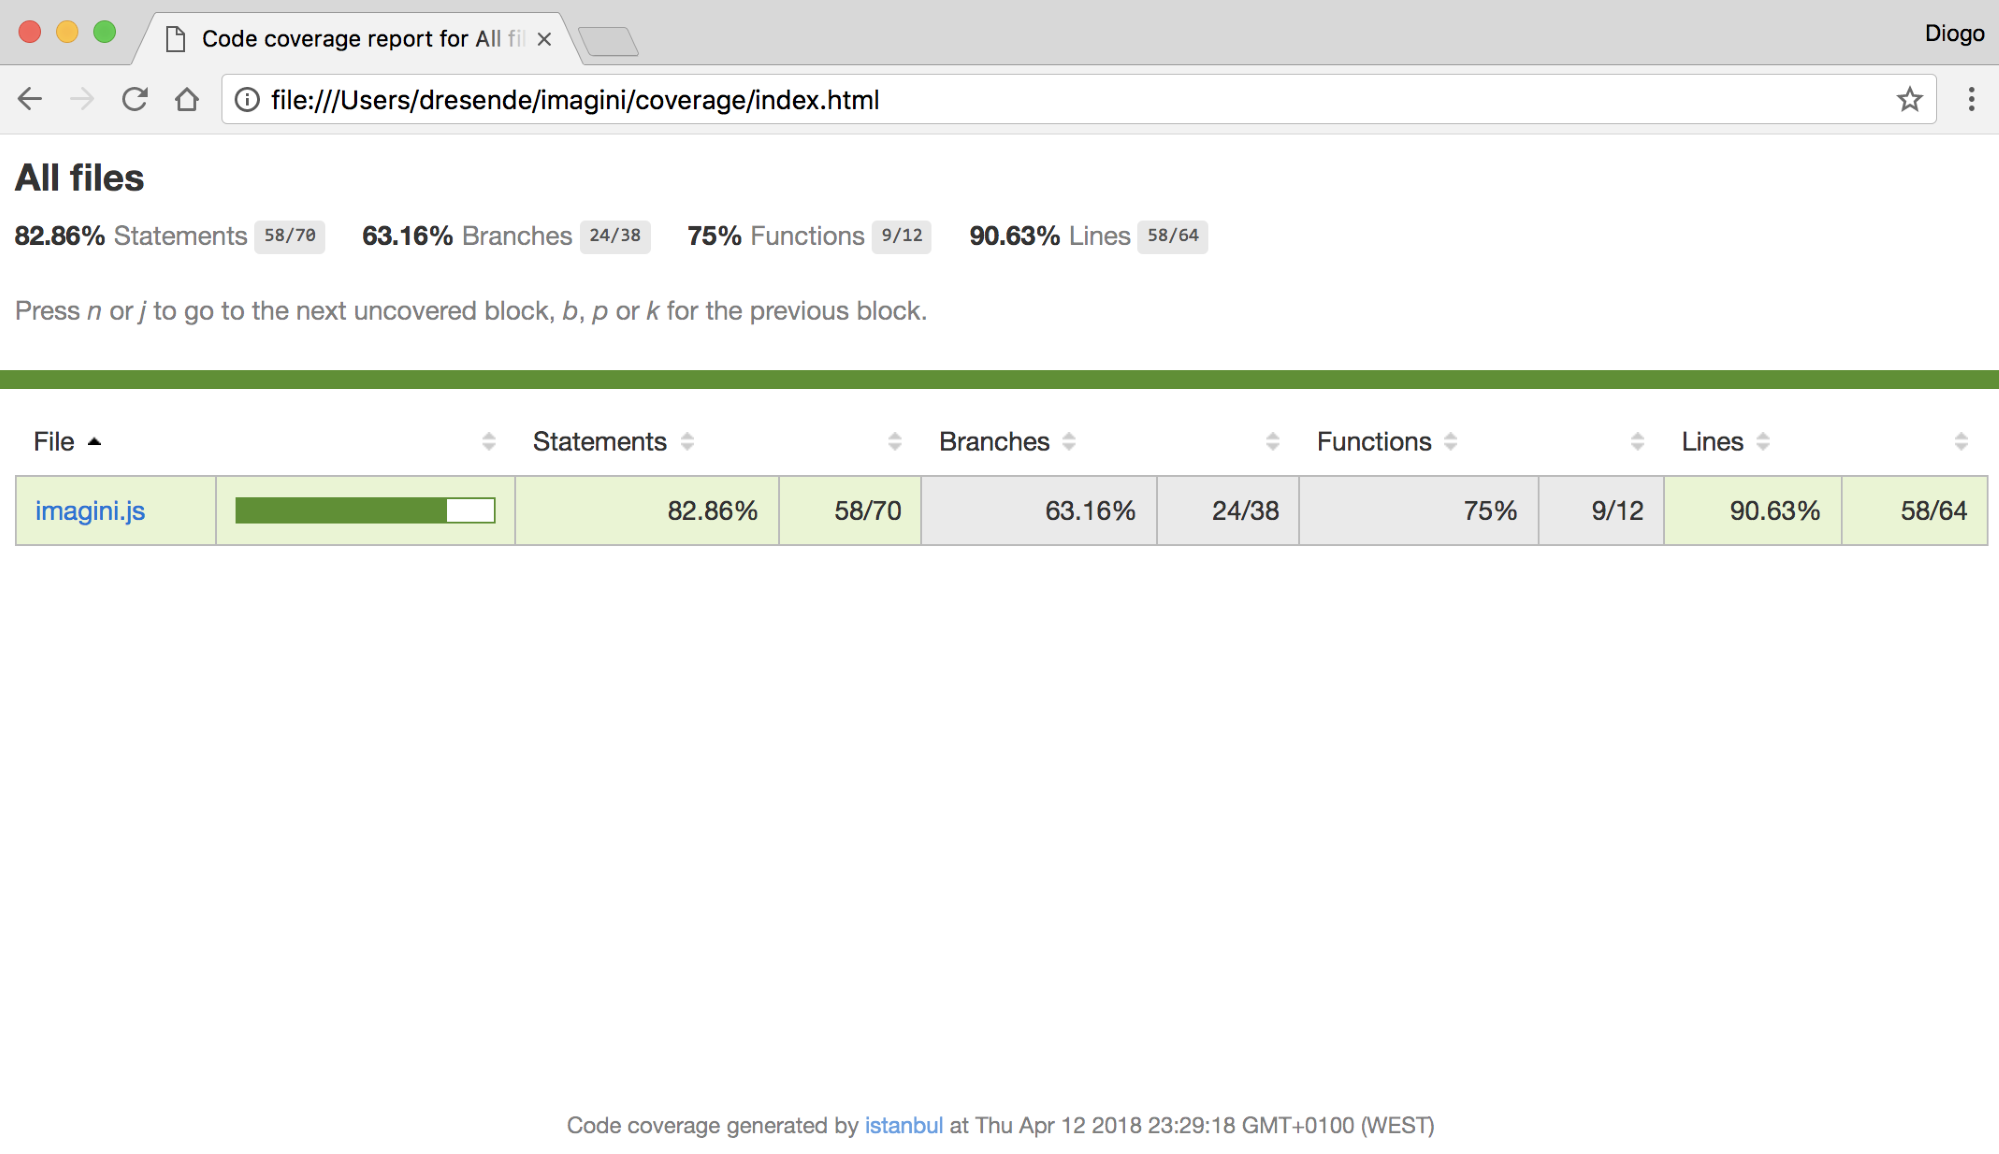
We see green here as well. Having more than 80% coverage is good, but we can still go further. Let's see the file:
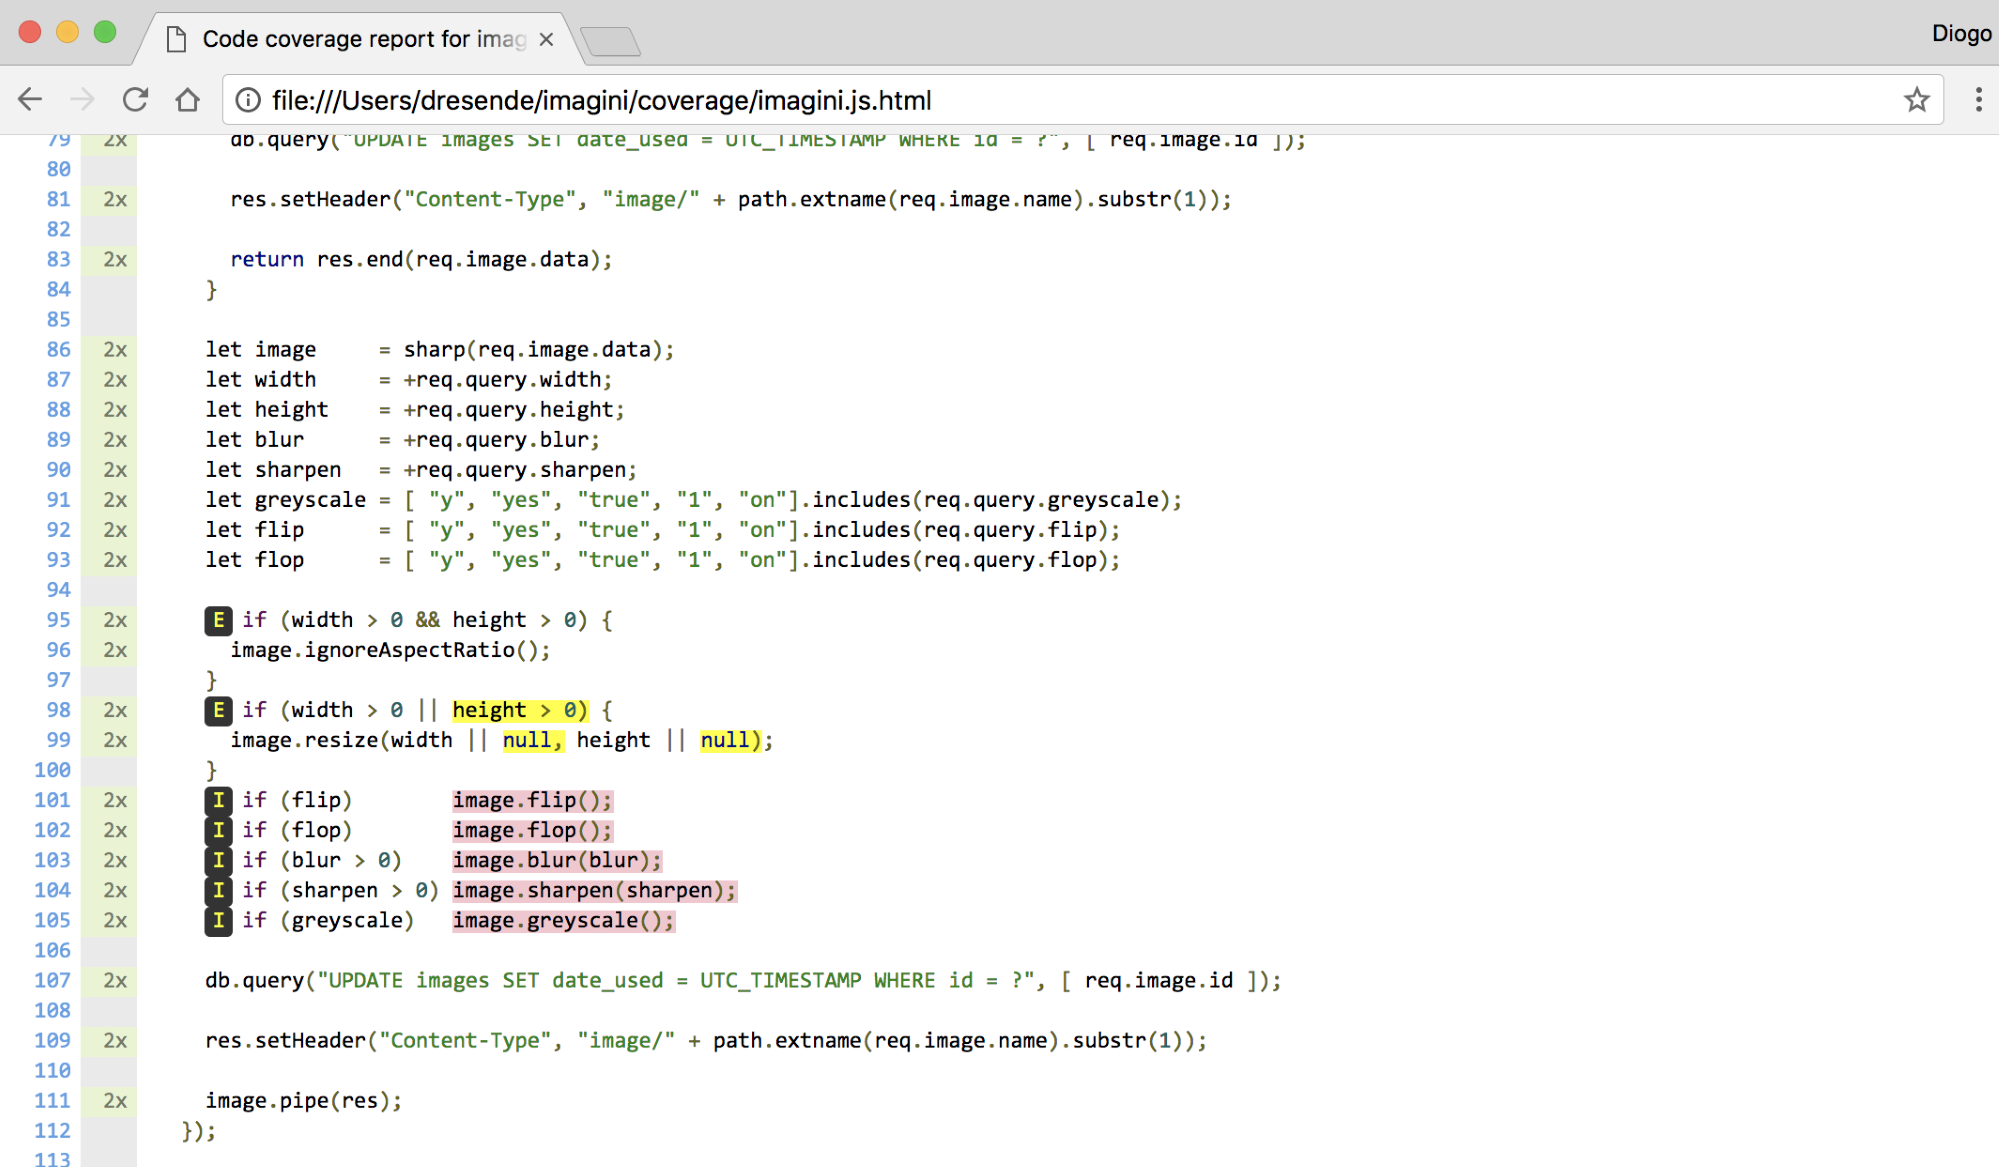
It's more or less covered. We still need to cover all the effects. We can actually run them all at once. The first two conditions also have an E marker, but that should disappear after adding a test without resizing. Let's add it:
it("should be able to add image effects as we request", (done) => {
chai
.request(tools.service)
.get("/uploads/test_image_download.png?
flip=y&flop=y&greyscale=y&blur=10&sharpen=10")
.end((err, res) => {
chai.expect(res).to.have.status(200);
return done();
});
});
Looking at our report now, we see the coverage is almost complete:
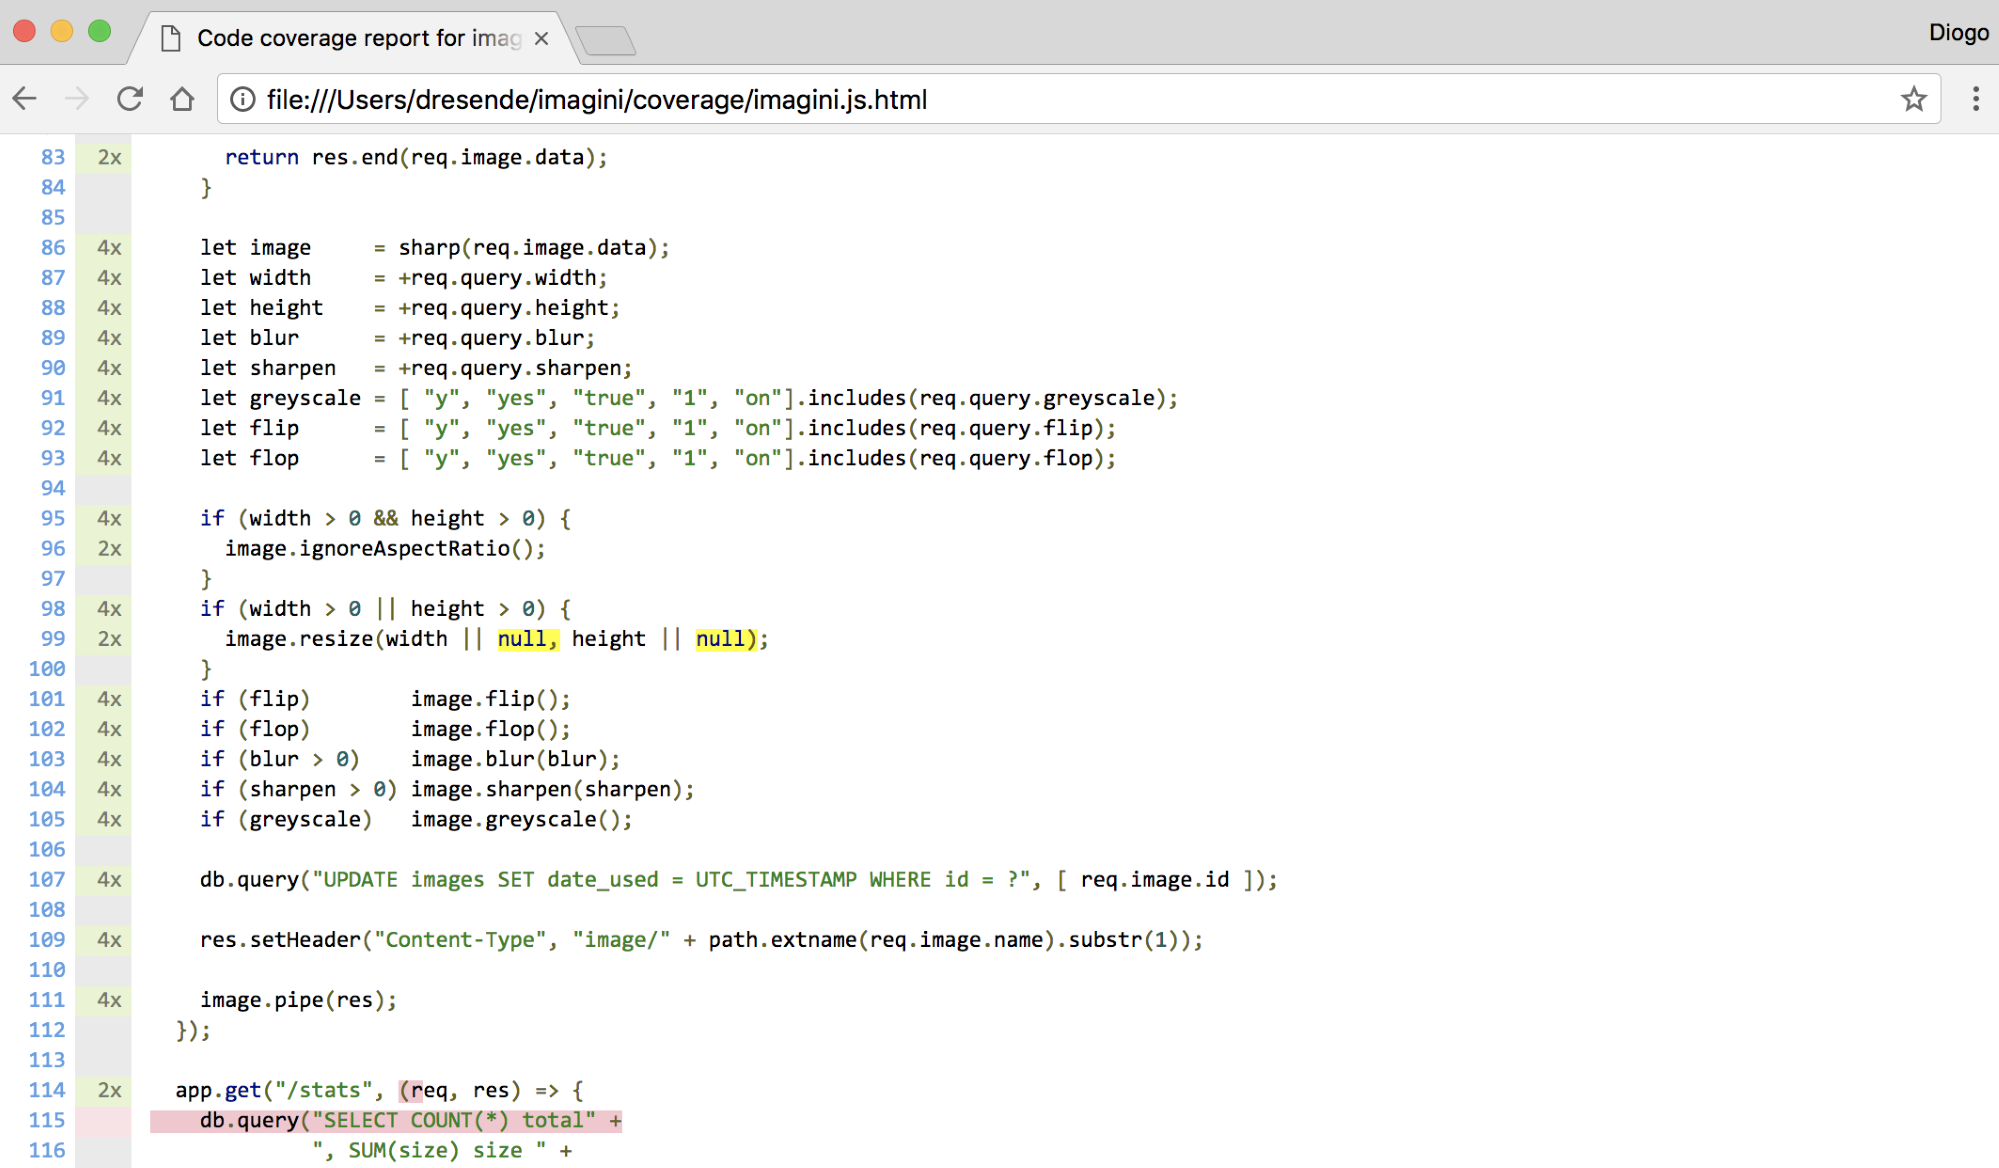
To cover those yellow nulls there, we need to resize the image with only width or height. We can add two tests for those:
it("should be able to resize the image width as we request", (done) => {
chai
.request(tools.service)
.get("/uploads/test_image_download.png?width=200")
.end((err, res) => {
chai.expect(res).to.have.status(200);
let image = sharp(res.body);
image
.metadata()
.then((metadata) => {
chai.expect(metadata).to.have.property("width", 200);
return done();
});
});
});
Add a similar one for the height, and run the test suite. You should not see the statement coverage go up, only the branch coverage:

The only method missing is the statistics method. This one is simple. We could eventually run a more specific test, by asking statistics, making a change such as an upload, and asking for statistics again to compare. I'll leave that to you. Let's just add a simple request test:
const chai = require("chai");
const http = require("chai-http");
const tools = require("../tools");
chai.use(http);
describe("Statistics", () => {
it("should return an object with total, size, last_used and
uptime", (done) => {
chai
.request(tools.service)
.get("/stats")
.end((err, res) => {
chai.expect(res).to.have.status(200);
chai.expect(res.body).to.have.property("total");
chai.expect(res.body).to.have.property("size");
chai.expect(res.body).to.have.property("last_used");
chai.expect(res.body).to.have.property("uptime");
return done();
});
});
});
Now, running our test suite should give all green:
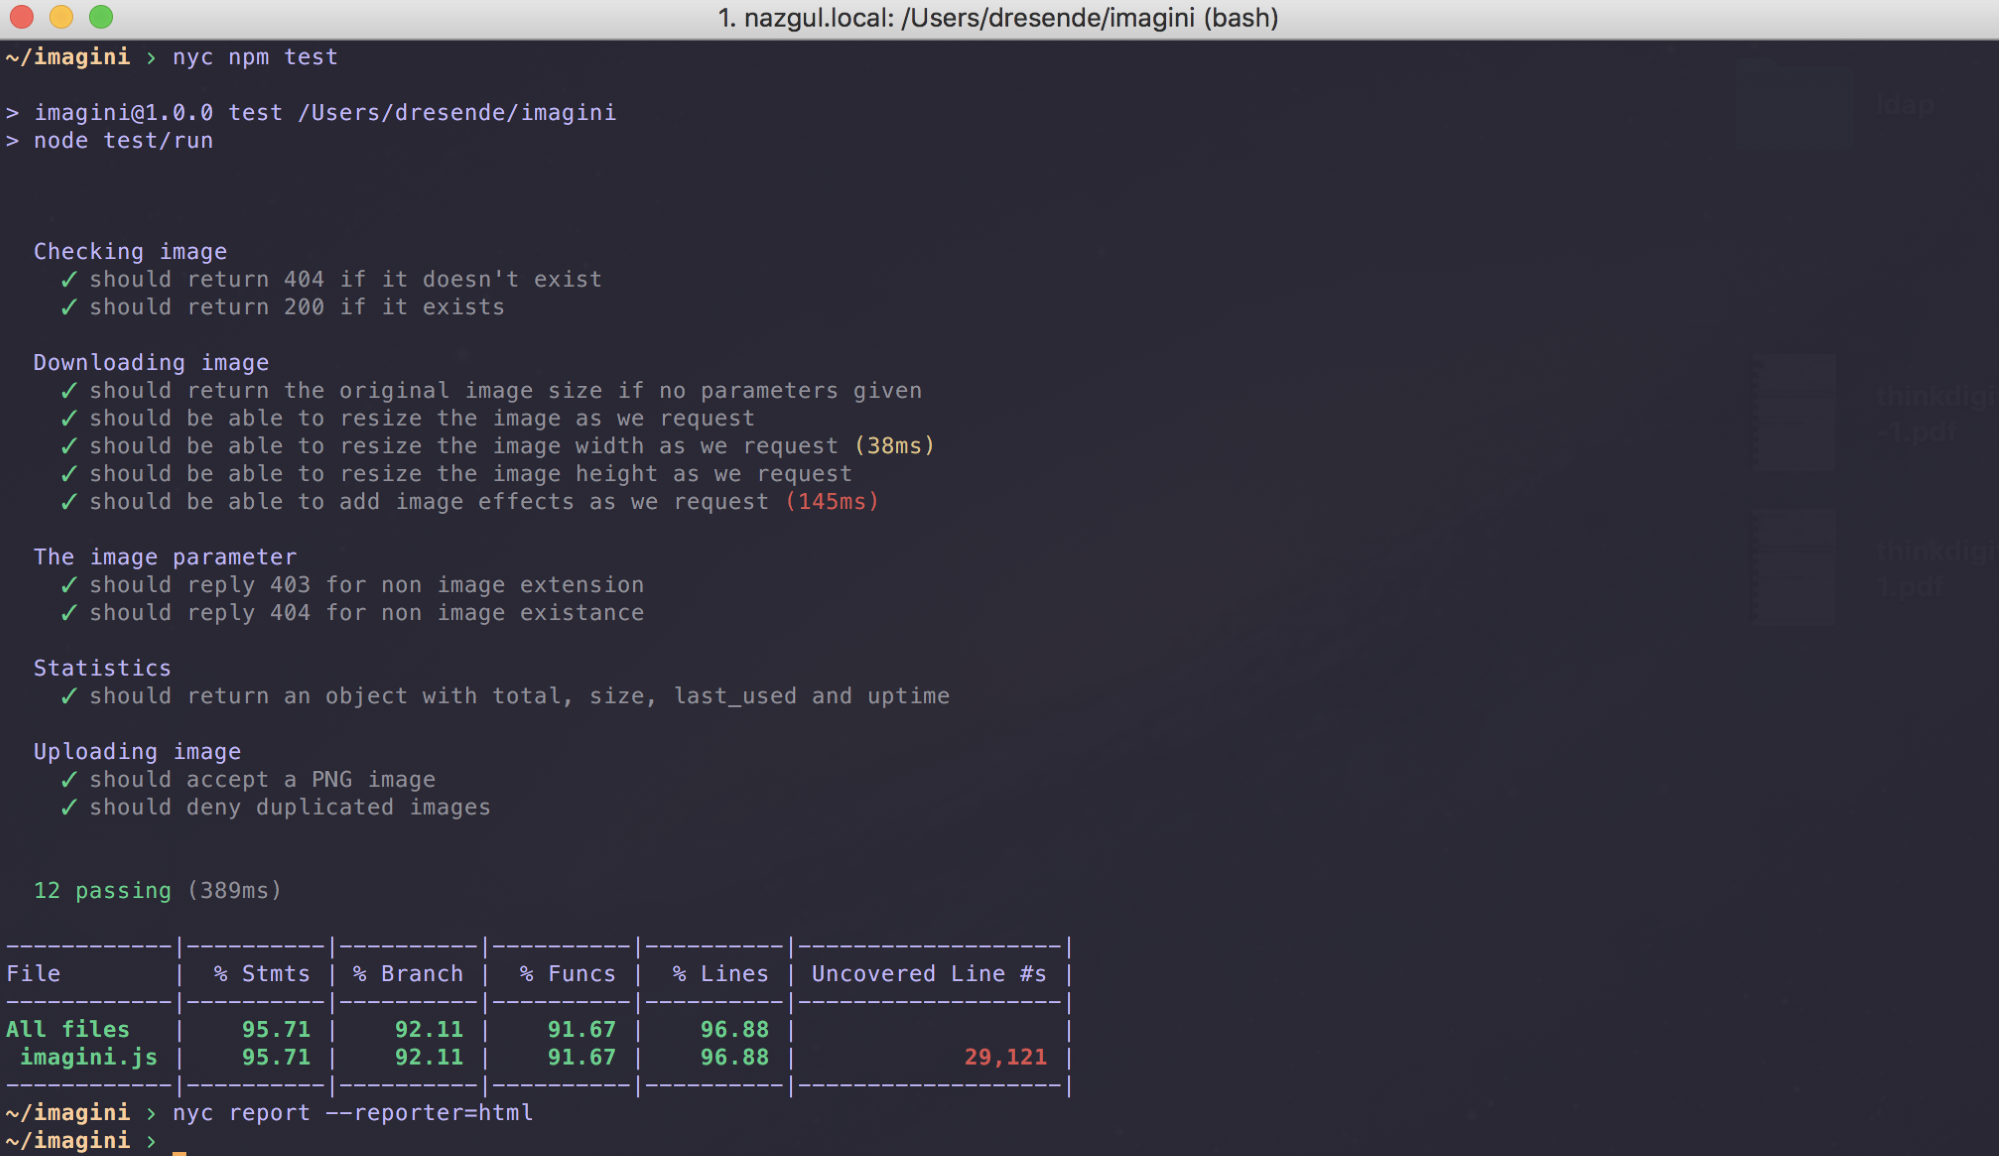
We see there are only two lines uncovered: 29.121. The first one is our timer and the second one is on the statistics method. Let's refresh our HTML report:
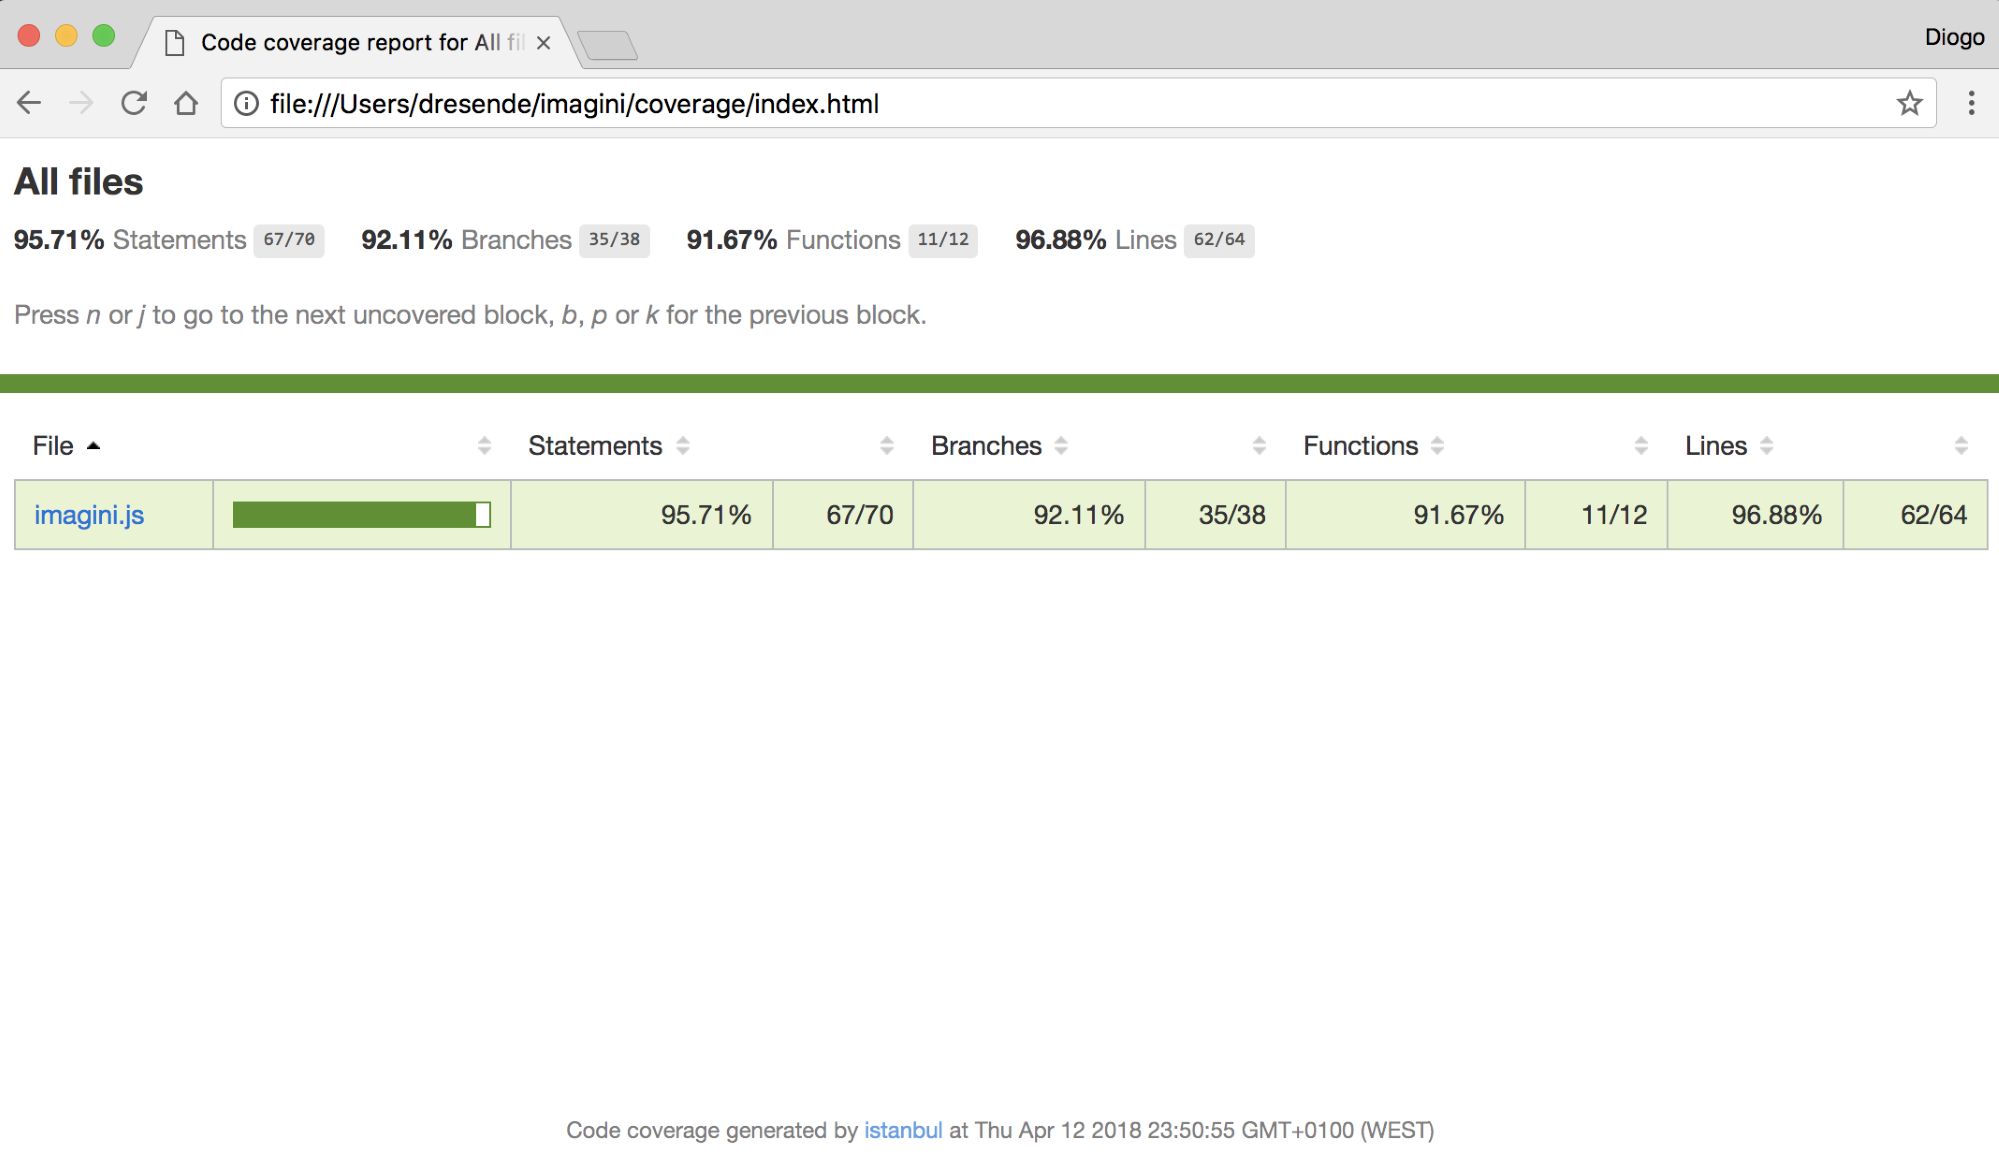
This is rewarding; we have almost 100% coverage. There's only one function not covered, which is our timer. And, there are only tree statements, which also represent the three branches, that aren't covered, but those aren't actually that important.
What is important is to keep this high coverage mark during the course of our development.
It's not at all uncommon to have parts of your service that are harder to test. Some, or most, of those parts are error-related conditions, where it's hard to make an external service such as a database engine return an error that will rarely occur during normal execution.
To be able to test, or at least simulate these kinds of events, we need to mock our services. There are a couple of options around, and Sinon is the most commonly used one in the Node.js ecosystem. This framework provides more than mocking; it also provides the following:
Sinon also allows us to bend time, by virtually changing the service perception of time, and to be able to test timed interval calls (remember our interval timer?). With this in mind, let's see if we can make our microservice reach 100% test coverage.
Let's start by installing the framework, as we did with chai:
npm install --save-dev sinon
Now, let's add a test for the image deletion. This method is tested through the other tests and that's why we didn't need to add it before, but now that we want to fully test it, let's add a basic test file called image-delete.js, with the following content:
const chai = require("chai");
const sinon = require("sinon");
const http = require("chai-http");
const tools = require("../tools");
chai.use(http);
describe.only("Deleting image", () => {
beforeEach((done) => {
chai
.request(tools.service)
.delete("/uploads/test_image_delete.png")
.end(() => {
return done();
});
});
it("should return 200 if it exists", (done) => {
chai
.request(tools.service)
.post("/uploads/test_image_delete.png")
.set("Content-Type", "image/png")
.send(tools.sample)
.end((err, res) => {
chai.expect(res).to.have.status(200);
chai.expect(res.body).to.have.status("ok");
chai
.request(tools.service)
.delete("/uploads/test_image_delete.png")
.end((err, res) => {
chai.expect(res).to.have.status(200);
return done();
});
});
});
});
Notice that I added the Sinon dependency on top, although I'm not using it just yet. You may run the tests again, but you shouldn't notice any difference.
We'll need to change the database behavior, so let's export a reference to it, so as to be able to access it from the tests. Add the following line in our microservice file before connecting to the database:
app.db = db;
Now, add another test to that file:
it("should return 500 if a database error happens", (done) => {
chai
.request(tools.service)
.post("/uploads/test_image_delete.png")
.set("Content-Type", "image/png")
.send(tools.sample)
.end((err, res) => {
chai.expect(res).to.have.status(200);
chai.expect(res.body).to.have.status("ok");
let query = sinon.stub(tools.service.db, "query");
query
.withArgs("DELETE FROM images WHERE id = ?")
.callsArgWithAsync(2, new Error("Fake"));
query
.callThrough();
chai
.request(tools.service)
.delete("/uploads/test_image_delete.png")
.end((err, res) => {
chai.expect(res).to.have.status(500);
query.restore();
return done();
});
});
});
What we're doing is uploading an image, but, before requesting to delete it, we create a stub on the db.query method. We then inform Sinon that when the stub is called with the first argument with DELETE, we want it to asynchronously call the third argument (counting starts at 0) with a fake error. For any other call, we want it to just pass through.
Then, after deleting the image, we check that we received an HTTP 500 error code and restore the stub to the original function, ensuring that the other tests pass.
We're able to test this because mocha runs tests in serial; otherwise, we would need to do some gymnastics to ensure that we wouldn't interfere with the other tests.
Now, open the previously created test file, image-stats.js, include Sinon on the top, and add the following test:
it("should return 500 if a database error happens", (done) => {
let query = sinon.stub(tools.service.db, "query");
query
.withArgs("SELECT COUNT(*) total, SUM(size) size, MAX(date_used)
last_used FROM images")
.callsArgWithAsync(1, new Error("Fake"));
query
.callThrough();
chai
.request(tools.service)
.get("/stats")
.end((err, res) => {
chai.expect(res).to.have.status(500);
query.restore();
return done();
});
});
We're now over 97% coverage. Let's bend time and test our timer. Create a new test file called image-delete-old.js, and add the following content:
const chai = require("chai");
const sinon = require("sinon");
const http = require("chai-http");
const tools = require("../tools");
chai.use(http);
describe("Deleting older images", () => {
let clock = sinon.useFakeTimers({ shouldAdvanceTime : true });
it("should run every hour", (done) => {
chai
.request(tools.service)
.get("/stats")
.end((err, res) => {
chai.expect(res).to.have.status(200);
clock.tick(3600 * 1000);
clock.restore();
return done();
});
});
});
In this test, we're replacing the global timer functions (setTimeoutand setInterval) with fake timers. We then make a simple call to statistics, and then advance time by one hour (the tick call), and then finish.
Now, run the tests and see the results:
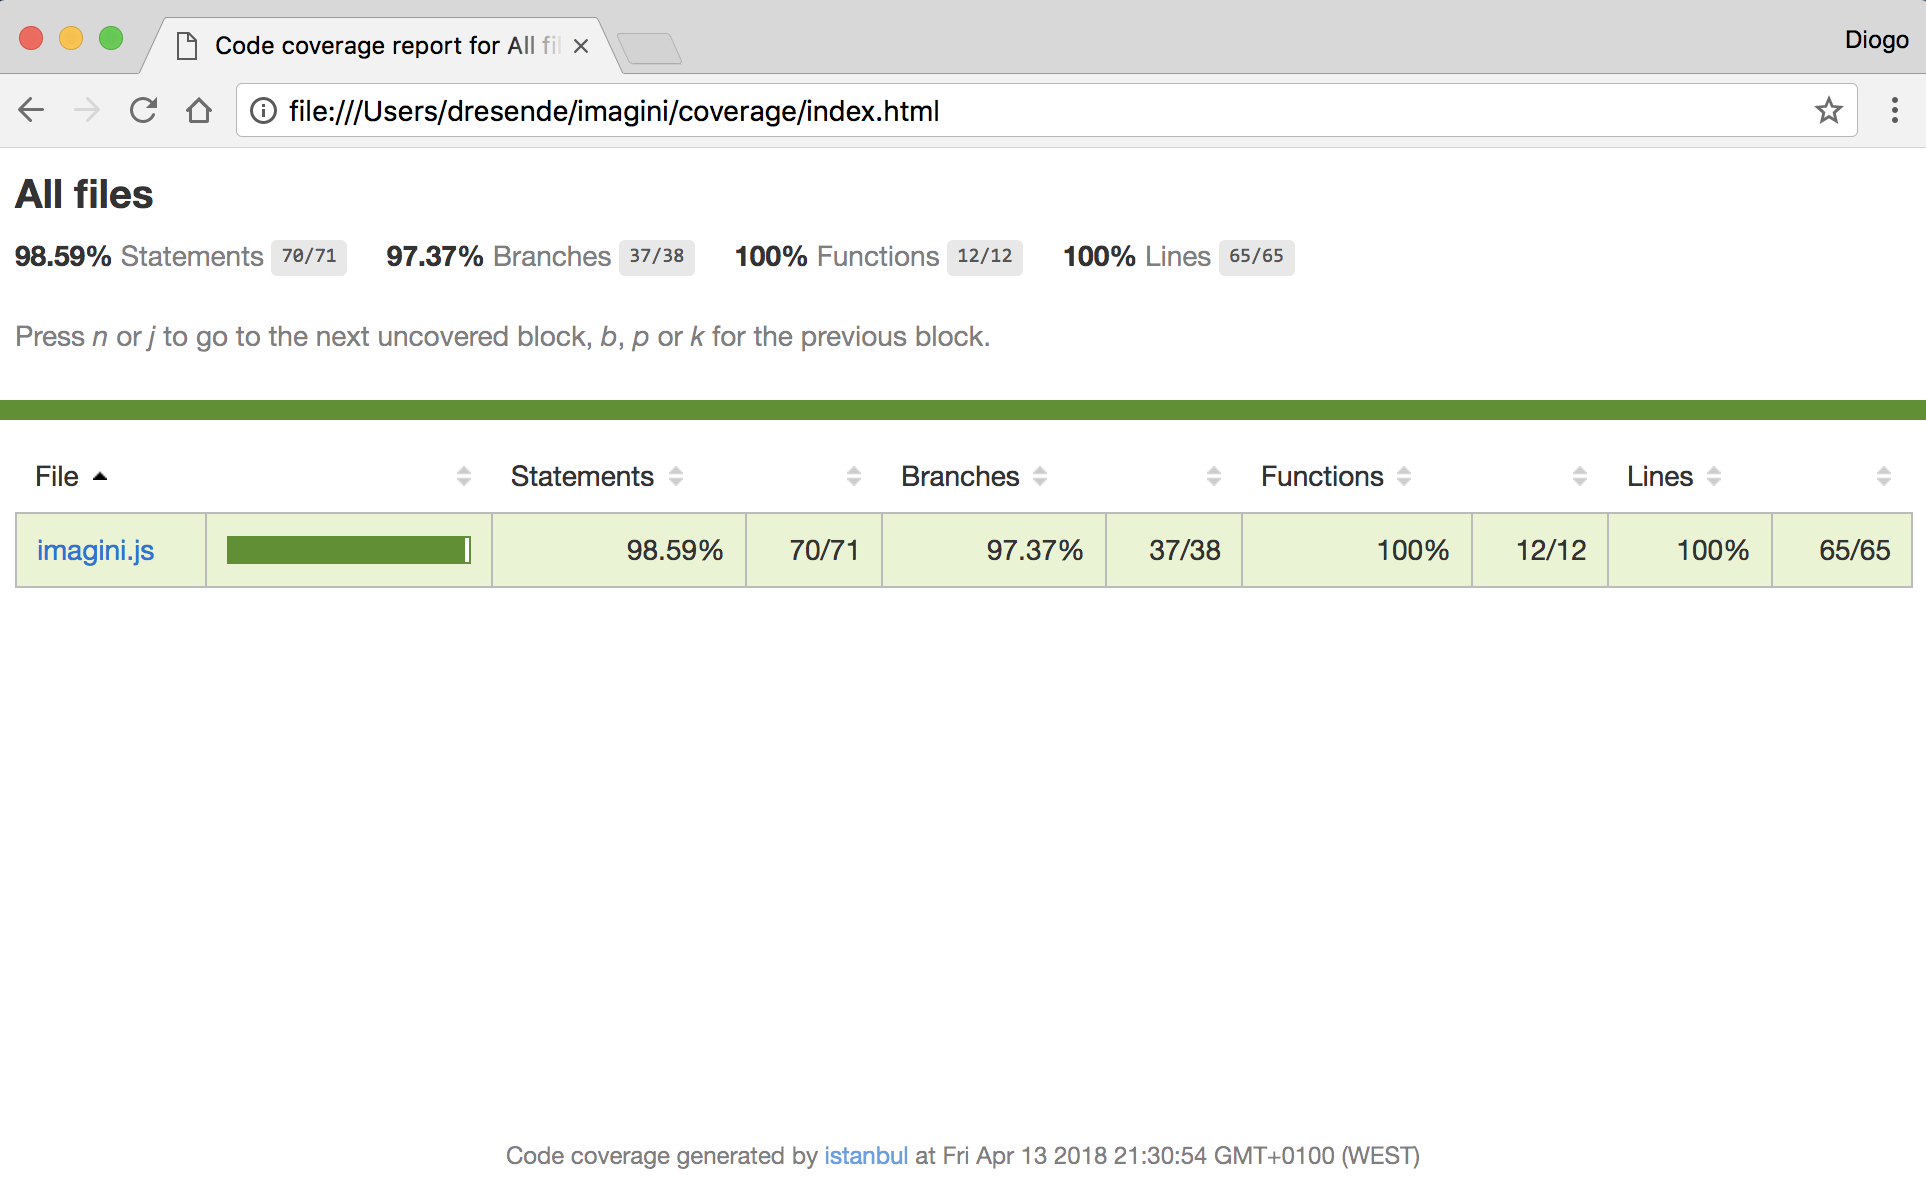
We now reach 100% coverage on functions and lines. There's only one branch, with one statement missing. It's the possibility of a connection error:
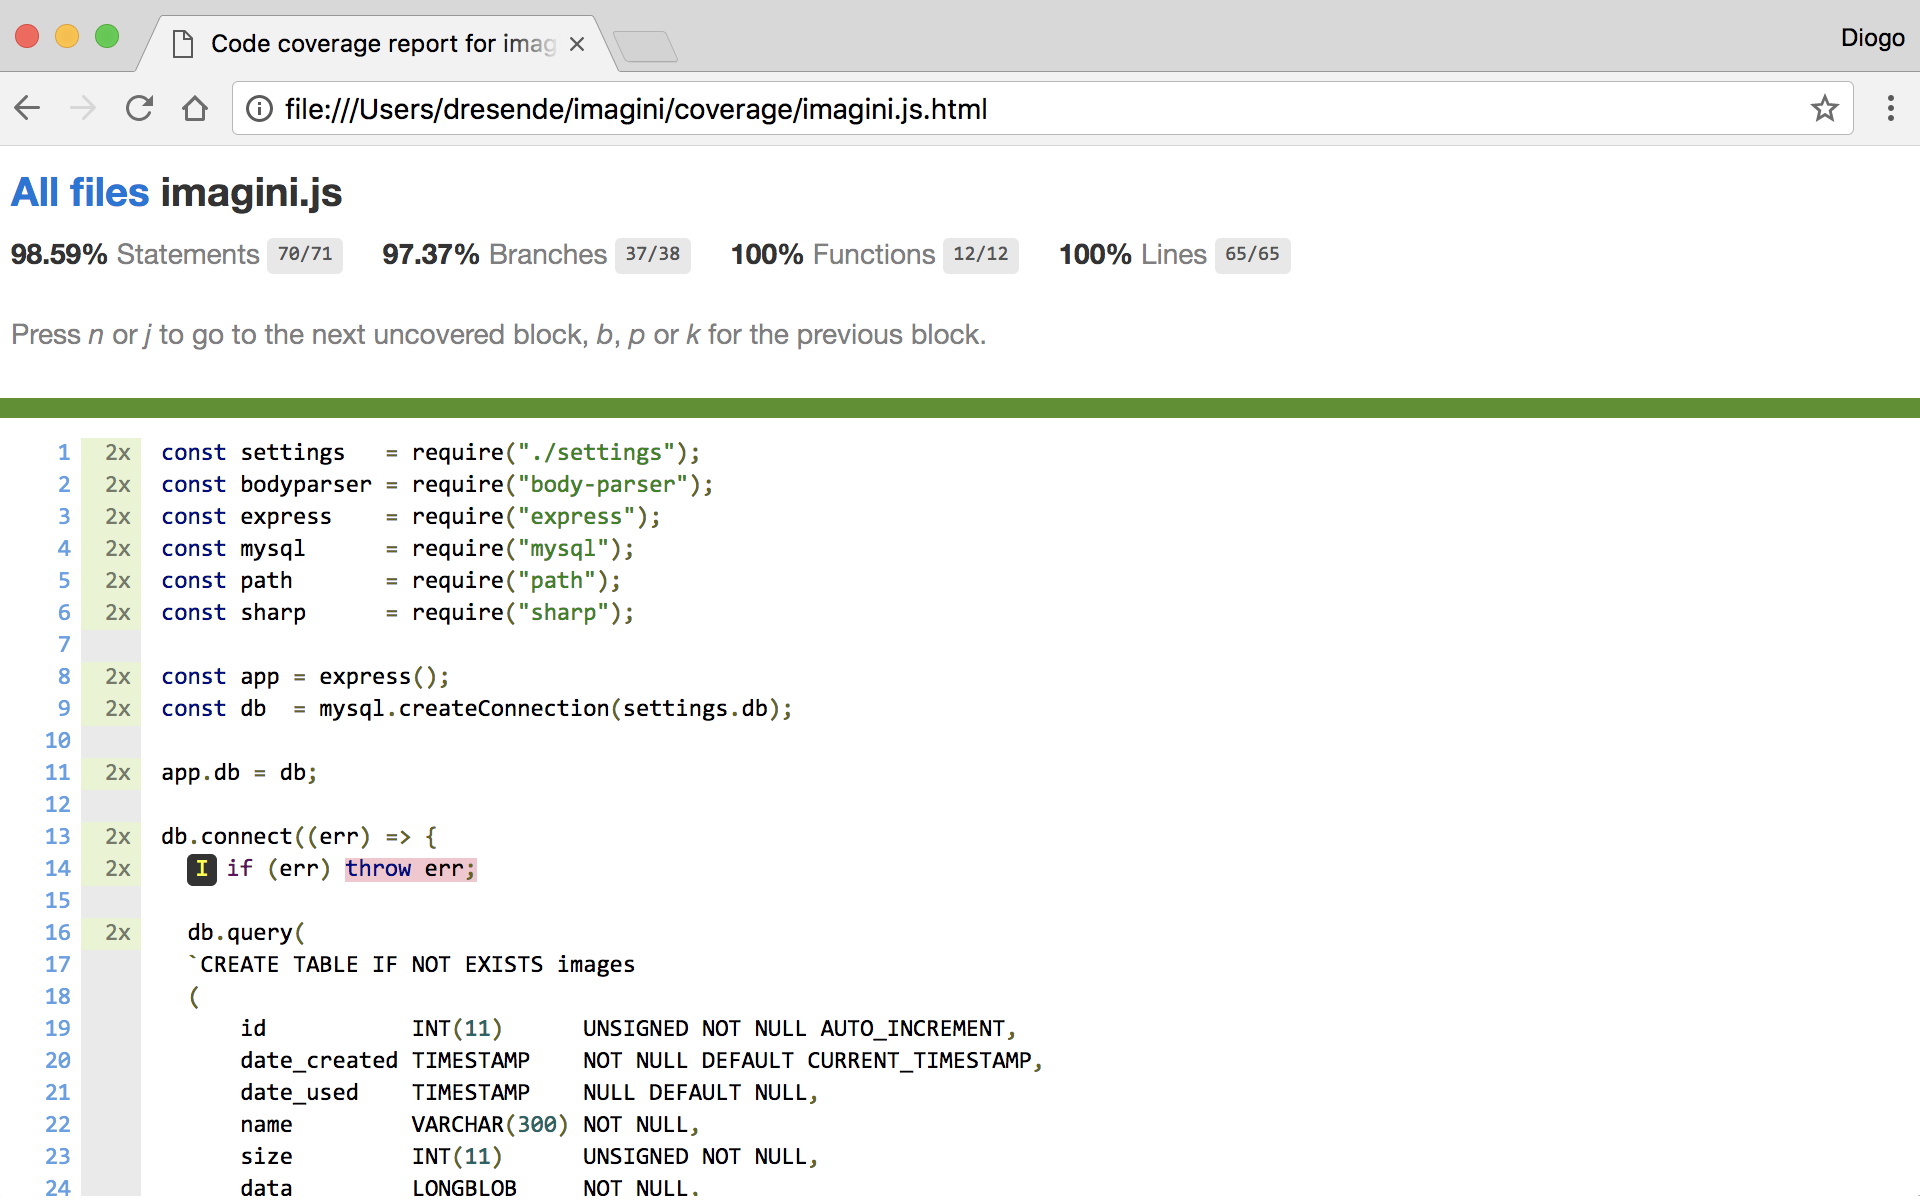
I'll leave it to you to figure it out how to mock that.
Tests allow us to ensure a certain code quality level. It's very important to include tests from the very beginning, while the code is simple, to ensure that we keep tests updated and avoid regressions to the expected behavior.
It's very rewarding when we see that our code has a very high test coverage. This feeling forces you to keep that high mark and indirectly maintains good code quality.
In the previous chapter, we successfully deployed our service to a cloud provider without having to fundamentally change our code. We used a database to store our data, and the only thing we needed to do was to point to the new location.
It's common, during the specification and development process, to have challenging problems with one or more ways of solving them. The ways, or paths, you choose throughout the development are called design patterns, as they're part of your design.
Some design patterns are more common than others. Some are well-known, others, not so much. Some are good design patterns and you should follow them. Others are bad because of the disadvantages they bring in the short or long term.
In this chapter, we're going to take a look at the importance of choosing good patterns; we will look at some common architectural patterns and review the continuous integration we followed through the entire book until we successfully deployed to the cloud.
Patterns are not libraries or classes, they're concepts, reusable solutions to common programming problems, tested and optimized for specific use cases. As they're just concepts to solve specific problems, they have to be implemented in every language.
Every pattern has its advantages and disadvantages, and choosing a wrong pattern for a problem can cause you a big headache.
Patterns can speed up the development process because they provide well-tested and well-proven development paradigms. Reusing patterns helps prevent issues and improves code readability between developers that are familiar with the patterns.
Patterns have major importance in high-performance applications. Sometimes, in order to achieve some flexibility, patterns introduce a new level of indirection in the code, which may reduce performance. You should choose when to introduce a pattern or when that introduction will hurt the performance metric you're targeting.
Knowing good patterns is essential for avoiding the opposite: anti-patterns. An anti-pattern is something that looks good in the beginning but later on turns out to look like the worst decision you ever made. Anti-patterns are not specific patterns but are more like common errors, seen by the majority as strategies you shouldn't use. Some of the most common and frequent anti-patterns seen out there are:
When developing microservices and, more specifically, an ecosystem of microservices, some patterns become very obvious, and you'll use them without knowing. Just looking at the architectural patterns, here are some that you might find interesting. Perhaps you have already used them before.
The Front Controller pattern is when all requests go for a single point in your architecture, called the handler, which then processes and dispatches the requests to other handlers. This is the pattern used by, for example, load balancers and reverses proxies:
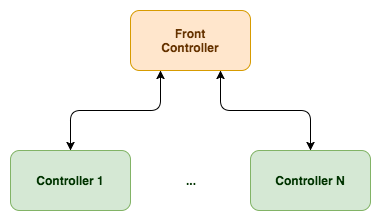
It's useful to scale horizontally, especially when the Front Controller is just routing requests, so it can handle a lot more requests than each separate controller, which need, some time to actually process each request.
This pattern is also very useful in helping other services not having to know where the controllers are and choosing the one with the lowest load that should handle the request faster.
The layered pattern is common in filesystems and operative systems (and virtual machines for that matter). This pattern consists of creating different layers that go from the raw data through to the data seen by a user:
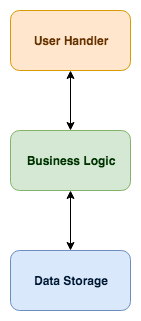
The idea is to separate the complexity of the different layers, each one not having to know how the others do their tasks:
The Service Locator pattern is actually an anti-pattern. It's not considered a good practice because it adds much more complexity to an ecosystem. The pattern consists of a central registry, called a Service Locator, where services register their abilities, and other services can consult the registry and know where the services they need are located:
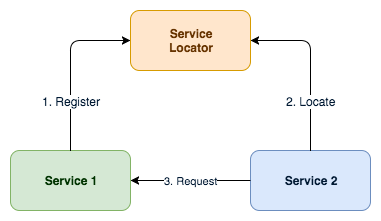
The Service Locator is similar to the Front Controller, but with added complexity, as you need to contact the Service Locator and the service you need, instead of just making a simple request to a Front Controller.
The Observer pattern is used every day in Node.js. It consists of a Subject, which maintains a list of dependents, called Observers, which get notified of any state change happening on the Subject:
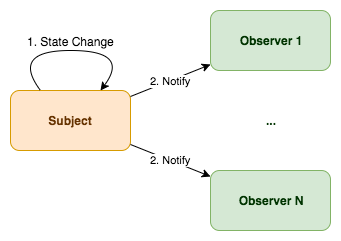
You can see this happening every time in your web browser when some code (Observer) attaches an event listener to an object or interface element (Subject).
Another very similar pattern is the Publish-Subscribe pattern, usually abbreviated as Pub-Sub. This pattern is almost exactly the same as the previous one. You have Subscribers that, as the name implies, subscribe to a specific event, or topic, or whatever you want to call it, and then you have Publishers that emit those events or send information to those topics:
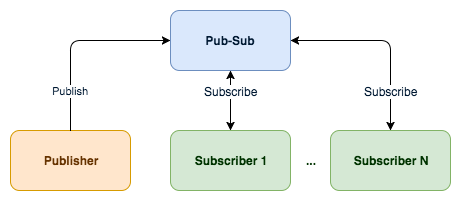
The difference to the previous pattern may look very thin but is actually very important. The Pub-Sub pattern involves a third-party service and, unlike the Observer pattern, the Publishers have no knowledge of the Subscribers. This removes the need to handle and directly notify the Subscribers, thereby simplifying your code.
This pattern is quite useful for microservice communication. It involves a third party that abstracts the state change notification. Also, Publishers and Subscribers have no knowledge of each other.
Choosing good design patterns is essentially choosing best practices. Not all design patterns fit every purpose, but for many scenarios, they'll make your life easier. Perhaps you may not notice any difference in the beginning, but you should in the long-term.
Good design patterns also have indirect advantages. You'll find more documentation and examples online, as well as a broader set of options to choose from, for example, when using the Publish-Subscribe pattern, where you'll find many types of implementations to integrate with your services.
Choosing the pattern that fits your needs also involves planning and knowing what you need and what you'll need in the future. Think of the edge cases and see if the pattern is capable of handling them.
Developing a microservice may look like a simple task. As the name implies, it is a micro service. But that is not necessarily true, as sometimes we tend to complexify something that should be simple.
This does not mean a service should be simple, it can be quite complex. What should be simple is the goal and the properties of the service. There shouldn't be any doubt regarding what it does and what it shouldn't do.
Before writing any line of code, you should start by knowing a couple of what I call characteristics of the service, such as:
This can be summed in one word—purpose. If you don't clearly define its purpose and just start developing tasks it can handle, you'll end up having a mixed service that deviates from the main goal of a microservice.
After having a proper purpose, you can then choose the best pattern and plan the individual tasks. The first task will probably take longer to develop, as you're creating the base layout for the service.
Don't forget to add tests, coverage, and documentation as soon as possible. I know this is something most developers tend to ignore, but it will bite you later. It's easier to add a simple test for a first simple task. Code coverage is easier at this point. Adding documentation should also be easier if you're planning the individual tasks.
After having your first task, with a proper test, you should set your first deploy. This will end your first development cycle and bring you back to planning. If you keep this loop going, with small tasks, you'll develop faster, and deploy faster:
This type of simple loop with small tasks will allow you to do what is called continuous integration and continuous deployment, where you're able to develop and deploy to a testing cluster. The change can be automatically tested and deployed if everything passes the tests.
As we saw previously, a microservice architecture has many advantages, such as splitting code into smaller isolated projects, where it becomes easier to develop or even delegate responsibility.
These advantages come at a cost, which is the build of a more complex system or application. Because of how microservices are supposed to work, an information barrier is intrinsic. A microservice responsible for a type of information should be the only one manipulating it, forcing any other service to communicate with it to have access to information.
This gives you a finer control over the information because you know the service responsible for it, and you can force service or user authentication, with authorization or even rate-access limits. But, this means that a complex application will tend to penalize the network as there will be significant inter-service messaging.
Inter-service messaging means network traffic and latency. If the services are not on the same local network, this will eventually create noticeable latency. Adding some kind of cache service to accelerate access will also add more complexity.
Although testing and development for each microservice should be easier than a monolith application, looking at the microservice test frameworks all together, and having two or more services test together, is more complicated.
Finally, avoid something called a nanoservice. This is considered an anti-pattern, and it's when you exaggerate on fine-graining your architecture and create overly small services, complexifying your development to the extreme.
Find a good balance between the number of microservices and what each will do. Think of them as a person that will handle a specific task. Is the task too simple to have one person allocated to do just that? Shouldn't the person have a broader set of tasks from the same context?
Today's applications have space for microservices. Applications are no longer monolith and left the traditional computer architecture long ago. Users constantly demand integrations and interoperability between applications.
Microservices help developers to reduce the complexity of applications by separating different contexts, such as frontend, backend, mobile, or a simple API. They're a concept, or a pattern, that, when used well, can give you great power, and split complexity and responsibility.
But, microservices are more than that. Microservices help you scale horizontally by just replicating the services you need and not a complete monolith application, saving resources and, ultimately, money.
There's a lot to explore out there; we have just scratched the surface. There are plenty of cloud providers and tools for you to experiment with and choose what fits you best. Remember, practice makes perfect, so head to your work desk, and good luck!
If you enjoyed this book, you may be interested in these other books by Packt:

Advanced Node.js Development
Andrew Mead
ISBN: 9781788393935

Learning Node.js for Mobile Application Development
Stefan Buttigieg, Milorad Jevdjenic
ISBN: 9781785280498

Building Bots with Node.js
Stefan Buttigieg, Milorad Jevdjenic
ISBN: 9781786465450
Please share your thoughts on this book with others by leaving a review on the site that you bought it from. If you purchased the book from Amazon, please leave us an honest review on this book's Amazon page. This is vital so that other potential readers can see and use your unbiased opinion to make purchasing decisions, we can understand what our customers think about our products, and our authors can see your feedback on the title that they have worked with Packt to create. It will only take a few minutes of your time, but is valuable to other potential customers, our authors, and Packt. Thank you!
Copyright © 2018 Packt Publishing
All rights reserved. No part of this book may be reproduced, stored in a retrieval system, or transmitted in any form or by any means, without the prior written permission of the publisher, except in the case of brief quotations embedded in critical articles or reviews.
Every effort has been made in the preparation of this book to ensure the accuracy of the information presented. However, the information contained in this book is sold without warranty, either express or implied. Neither the authors, nor Packt Publishing or its dealers and distributors, will be held liable for any damages caused or alleged to have been caused directly or indirectly by this book.
Packt Publishing has endeavored to provide trademark information about all of the companies and products mentioned in this book by the appropriate use of capitals. However, Packt Publishing cannot guarantee the accuracy of this information.
First published: December 2018
Production reference: 1181218
Published by Packt Publishing Ltd.
Livery Place
35 Livery Street
Birmingham
B3 2PB, UK.
ISBN 978-1-78995-211-7
Mapt is an online digital library that gives you full access to over 5,000 books and videos, as well as industry leading tools to help you plan your personal development and advance your career. For more information, please visit our website.
Spend less time learning and more time coding with practical eBooks and Videos from over 4,000 industry professionals
Improve your learning with Skill Plans built especially for you
Get a free eBook or video every month
Mapt is fully searchable
Copy and paste, print, and bookmark content
Did you know that Packt offers eBook versions of every book published, with PDF and ePub files available? You can upgrade to the eBook version at www.packt.com and as a print book customer, you are entitled to a discount on the eBook copy. Get in touch with us at customercare@packtpub.com for more details.
At www.packt.com, you can also read a collection of free technical articles, sign up for a range of free newsletters, and receive exclusive discounts and offers on Packt books and eBooks.
Valentin Bojinov studied computer science at the Technological School of Electronic Systems in Sofia, Bulgaria, a college within the Technical University of Sofia. He holds a B.Sc. in telecommunication and information engineering. Valentin is an expert in Java, SOAP, RESTful web services, and B2B integration. He specializes B2B Integration and Service Oriented Architecture and currently works as an Senior Integration Consultant in an UK consultancy company Estafet Limited.
David Herron is a software engineer in Silicon Valley, working on projects from an X.400 e-mail server to assist launching the OpenJDK project, to Yahoo's Node.js application-hosting platform, and applications to monitor solar power array performance. David writes about electric vehicles, environmental issues, and green technology on LongTailPipe, and about other topics, including Node.js, Drupal, and Doctor Who on TechSparx. Using Node.js he developed AkashaCMS.
Diogo Resende is a developer with more than 15 years of experience, working with Node.js almost from the beginning. His computer education and experience in many industry and telecommunication projects have given him a wider background knowledge of other architecture components that influence the overall performance.
If you're interested in becoming an author for Packt, please visit authors.packtpub.com and apply today. We have worked with thousands of developers and tech professionals, just like you, to help them share their insight with the global tech community. You can make a general application, apply for a specific hot topic that we are recruiting an author for, or submit your own idea.
Machine learning is becoming more and more transformational to businesses every passing day. Machine Learning with Node.js Complete Reference Guide takes you through rudimentary knowledge of JavaScript and server-side development to create, maintain, deploy, and test your own Node.js applications.
You will begin by learning how to use the HTTP Server and Client objects, store data with both SQL and MongoDB databases, and unit test applications with Mocha 5.x, and functionally test them with Puppeteer 1.1.x. Then, you will learn to create scalable and rich RESTful applications on the Node.js platform and write a simple HTTP request handler with self-descriptive URLs. You will learn to set accurate HTTP status codes, study how to keep your applications backward-compatible and explore some authentication techniques to secure your application. Then, you will study how Node.js has emerged as a strong candidate for developing microservices.
With this Learning Path, you will be able to use the best practices and create efficient microservices.
This Learning Path includes content from the following Packt products:
Node.js Complete Reference Guide is designed for web developers who have a rudimentary understanding of JavaScript and web application development, are keen to enrich their development skills to create RESTful applications, and want utilize their skills to build microservices.
Chapter 1, About Node.js, introduces you to the Node.js platform. It covers its uses, the technological architecture choices in Node.js, its history, the history of server-side JavaScript, why JavaScript should be liberated from the browser, and important recent advances in the JavaScript scene.
Chapter 2, Setting up Node.js, goes over setting up a Node.js developer environment. This includes installing Node.js on Windows, macOS, and Linux. Important tools are covered, including the npm and yarn package management systems and Babel, which is used for transpiling modern JavaScript into a form that's runnable on older JavaScript implementations.
Chapter 3, Node.js Modules, explores the module as the unit of modularity in Node.js applications. We dive deep into understanding and developing Node.js modules and using npm to maintain dependencies. We learn about the new module format, ES6 Modules, that should supplant the CommonJS module format currently used in Node.js, and are natively supported in Node.js 10.x.
Chapter 4, HTTP Servers and Clients, starts exploring web development with Node.js. We develop several small webserver and client applications in Node.js. We use the Fibonacci algorithm to explore the effects of heavy-weight, long-running computations on a Node.js application. We also learn several mitigation strategies, and have our first experience with developing REST services.
Chapter 5, Your First Express Application, begins the section on developing a note-taking application. The first step is getting a basic application running.
Chapter 6, Implementing the Mobile-First Paradigm, uses Bootstrap V4 to implement responsive web design. We take a look at integrating a popular icon set so that we can have pictorial buttons, and go over compiling a custom Bootstrap theme.
Chapter 7, Data Storage and Retrieval, ensures that we don't lose our notes when we restart the application. We explore several database engines and a method to enable easily switching between them at will.
Chapter 8, Multiuser Authentication the Microservice Way, adds user authentication to the note-taking application. Both logged-in and anonymous users can access the application, with varying capabilities based on role. Authentication is supported both for locally stored credentials and for using OAuth against Twitter.
Chapter 9, Dynamic Client/Server Interaction with Socket.IO, lets our users talk with each other in real time. JavaScript code will run in both the browser and the server, with Socket.IO providing the plumbing needed for real-time event exchange. Users will see
notes change as they're edited by other users and can leave messages/comments for others.
Chapter 10, Deploying Node.js Applications, helps us understand Node.js application deployment. We look at both traditional Linux service deployment using an /etc/init script and using Docker for both local development and deployment on cloud hosting
services.
Chapter 11, Unit Testing and Functional Testing, takes a look at three test development models: unit testing, REST testing, and functional testing. We'll use the popular Mocha and Chai frameworks for the first two, and Puppeteer for the third. Puppeteer uses a headless version of Chrome to support running tests. Docker is used to facilitate setting up and tearing down test environments.
Chapter 12, REST – What You Did Not Know, gives you a brief introduction to the history of REST and how it couples with the HTTP protocol.
Chapter 13, Building a Typical Web API, takes you through structuring your application using human-readable URL and URI parameters. You will get to develop a read-only RESTful service application, using the filesystem for storage.
Chapter 14, Using NoSQL Databases, showcases how to use the MongoDB NoSQL database, and explains the foundation of document data stores.
Chapter 15, Restful API Design Guidelines, explains that there are a number of prerequisites that a RESTful API should meet.
Chapter 16, Implementing a Full Fledged RESTful Service, focuses on implementing a production-ready RESTful service that uses NoSQL to store its data. You will get to learn how to handle binary data and how to version an API while it evolves.
Chapter 17, Consuming a RESTful API, showcases a sample frontend client that serves as a consumption reference implementation.
Chapter 18, Securing the Application, covers restricting access to your data by choosing an appropriate authentication approach. You'll then be able to protect data leakage with transport layer security.
Chapter 19, The Age of Microservices, covers the evolution of computing and how development has changed and shifted from paradigm to paradigm depending on processing capacity and user demand, ultimately resulting in the age of microservices.
Chapter 20, Modules and Toolkits, introduces you to some modules that help you create a microservice, detailing different full toolkits approaches, such as Hydra and Seneca.
Chapter 21, Building a Microservice, covers the development of a simple microservice using Seneca and Hydra.
Chapter 22, State, covers the development of our microservice: from using the server filesystem to moving to a more structured database service, such as MySQL.
Chapter 23, Testing, covers the mocking of services.
Chapter 24, Design Patterns, enumerates some of the most common architectural design patterns and reviews the continuous integration and deployment loop used throughout the book.
The execution of the code examples provided in this Learning Path requires Node.js running on POSIX-like operating systems, various UNIX derivatives (Solaris, for example) or workalikes (Linux, macOS, and so on), as well as on Microsoft Windows. It can
run on machines both large and small, including the tiny ARM devices such as the Raspberry Pi microscale embeddable computer for DIY software/hardware projects.
Because many Node.js packages are written in C or C++, you must have a C compiler (such as GCC), Python 2.7 (or later), and the node-gyp package. If you plan to use encryption in your networking code, you will also need the OpenSSL cryptographic library. The modern UNIX derivatives almost certainly come with these, and Node.js's configure script, used when installing from source, will detect their presence. If you need to install them, Python is available at http://python.org and OpenSSL is available at http://openssl.org.
You can download the example code files for this book from your account at www.packt.com. If you purchased this book elsewhere, you can visit www.packt.com/support and register to have the files emailed directly to you.
You can download the code files by following these steps:
Once the file is downloaded, please make sure that you unzip or extract the folder using the latest version of:
The code bundle for the book is also hosted on GitHub at https://github.com/PacktPublishing/Node.js-Complete-Reference-Guide. In case there's an update to the code, it will be updated on the existing GitHub repository.
We also have other code bundles from our rich catalog of books and videos available at https://github.com/PacktPublishing/. Check them out!
There are a number of text conventions used throughout this book.
CodeInText: Indicates code words in text, database table names, folder names, filenames, file extensions, pathnames, dummy URLs, user input, and Twitter handles. Here is an example: "The EventEmitter object is defined in the events module of Node.js."
A block of code is set as follows:
if (anotherNote instanceof Note) {
... it's a Note, so act on it as a Note
}
Any command-line input or output is written as follows:
$ npm update express
$ npm update
Bold: Indicates a new term, an important word, or words that you see onscreen. For example, words in menus or dialog boxes appear in the text like this. Here is an example: "If you need something different, click on the DOWNLOADS link in the header for all possible downloads: "
Feedback from our readers is always welcome.
General feedback: If you have questions about any aspect of this book, mention the book title in the subject of your message and email us at customercare@packtpub.com.
Errata: Although we have taken every care to ensure the accuracy of our content, mistakes do happen. If you have found a mistake in this book, we would be grateful if you would report this to us. Please visit www.packt.com/submit-errata, selecting your book, clicking on the Errata Submission Form link, and entering the details.
Piracy: If you come across any illegal copies of our works in any form on the Internet, we would be grateful if you would provide us with the location address or website name. Please contact us at copyright@packt.com with a link to the material.
If you are interested in becoming an author: If there is a topic that you have expertise in and you are interested in either writing or contributing to a book, please visit authors.packtpub.com.
Please leave a review. Once you have read and used this book, why not leave a review on the site that you purchased it from? Potential readers can then see and use your unbiased opinion to make purchase decisions, we at Packt can understand what you think about our products, and our authors can see your feedback on their book. Thank you!
For more information about Packt, please visit packt.com.
Node.js is an exciting new platform for developing web applications, application servers, any sort of network server or client, and general purpose programming. It is designed for extreme scalability in networked applications through an ingenious combination of server-side JavaScript, asynchronous I/O, and asynchronous programming. It is built around JavaScript anonymous functions, and a single execution thread event-driven architecture.
While only a few years old, Node.js has quickly grown in prominence and it's now playing a significant role. Companies, both small and large, are using it for large-scale and small-scale projects. PayPal, for example, has converted many services from Java to Node.js.
The Node.js architecture departs from a typical choice made by other application platforms. Where threads are widely used to scale an application to fill the CPU, Node.js eschews threads because of their inherent complexity. It's claimed that with single-thread event-driven architectures, memory footprint is low, throughput is high, the latency profile under load is better, and the programming model is simpler. The Node.js platform is in a phase of rapid growth, and many are seeing it as a compelling alternative to the traditional web application architectures using Java, PHP, Python, or Ruby on Rails.
At its heart, it is a standalone JavaScript engine with extensions making it suitable for general purpose programming and with a clear focus on application server development. Even though we're comparing Node.js to application server platforms, it is not an application server. Instead, Node.js is a programming run-time akin to Python, Go, or Java SE. While there are web application frameworks and application servers written in Node.js, it is simply a system to execute JavaScript programs.
It is implemented around a non-blocking I/O event loop and a layer of file and network I/O libraries, all built on top of the V8 JavaScript engine (from the Chrome web browser). The rapid performance and feature improvements implemented in Chrome quickly flow through to the Node.js platform. Additionally, a team of folks are working on a Node.js implementation that runs on top of Microsoft's ChakraCore JavaScript engine (from the Edge web browser). That would give the Node.js community greater flexibility by not being reliant on one JavaScript engine provider. Visit https://github.com/nodejs/node-chakracore to take a look at the project.
The Node.js I/O library is general enough to implement any sort of server executing any TCP or UDP protocol, whether it's domain name system (DNS ), HTTP, internet relay chat (IRC), or FTP. While it supports developing internet servers or clients, its biggest use case is in regular websites, in place of technology such as an Apache/PHP or Rails stack, or to complement existing websites. For example, adding real-time chat or monitoring existing websites can be easily done with the Socket. IO library for Node.js. Its lightweight, high-performance nature often sees Node.js used as a glue service.
A particularly intriguing combination is deploying small services using Docker into cloud hosting infrastructure. A large application can be divided into what's now called microservices that are easily deployed at scale using Docker. The result fits agile project management methods since each microservice can be easily managed by a small team that collaborates at the boundary of their individual API.
This book will give you an introduction to Node.js. We presume the following:
We will cover the following topics in this chapter:
We will dive right into developing working applications and recognize that often the best way to learn is by rummaging around in working code.
Node.js is a platform for writing JavaScript applications outside web browsers. This is not the JavaScript we are familiar with in web browsers! For example, there is no DOM built into Node.js, nor any other browser capability.
Beyond its native ability to execute JavaScript, the bundled modules provide capabilities of this sort:
The network layer of Node.js is low level while being simple to use. For example, the HTTP modules allow you to write an HTTP server (or client) using a few lines of code. This is powerful, but it puts you, the programmer, very close to the protocol requests and makes you implement precisely those HTTP headers that you should return in request responses.
Typical web application developers don't need to work at a low level of the HTTP or other protocols. Instead, we tend to be more productive, working with higher-level interfaces. For example, PHP coders assume that Apache (or other HTTP servers) is already there providing the HTTP protocol, and that they don't have to implement the HTTP server portion of the stack. By contrast, a Node.js programmer does implement an HTTP server to which their application code is attached.
To simplify the situation, the Node.js community has several web application frameworks, such as Express, providing the higher-level interfaces required by typical programmers. You can quickly configure an HTTP server with baked-in capabilities such as sessions, cookies, serving static files, and logging, letting developers focus on their business logic. Other frameworks provide OAuth 2 support, or focus on REST APIs, and so on.
Node.js is not limited to web service application development. The community around Node.js has taken it in many other directions,
Build tools: Node.js has become a popular choice for developing command-line tools used in software development, or communicating with service infrastructure. Grunt and Gulp are widely used by frontend developers to build assets for websites. Babel is widely used for transpiling modern ES-2016 code to run on older browsers. Popular CSS optimizers and processors, such as PostCSS, are written in Node.js. Static website generation systems such as Metalsmith, Punch, and AkashaCMS, run at the command line and generate website content that you upload to a web server.
Web UI testing: Puppeteer gives you control over a headless-Chrome web browser instance. With it, you can develop Node.js scripts controlling a modern full-featured web browser. Typical use cases involve web scraping and testing web applications.
Desktop applications: Both Electron and node-webkit (NW.js) are frameworks for developing desktop applications for Windows, macOS, and Linux. These frameworks utilize a large chunk of Chrome, wrapped by Node.js libraries, to develop desktop applications using web UI technologies. Applications are written with modern HTML5, CSS3, and JavaScript, and can utilize leading-edge web frameworks, such as Bootstrap, React, or AngularJS. Many popular applications have been built using Electron, including the Slack desktop client application, the Atom and Microsoft Visual Code programming editors, the Postman REST client, the GitKraken GIT client, and Etcher, which makes it incredibly easy to burn OS images to flash drives to run on single-board computers.
Mobile applications: The Node.js for Mobile Systems project lets you develop smartphone or tablet computer applications using Node.js, for both iOS and Android. Apple's App Store rules preclude incorporating a JavaScript engine with JIT capabilities, meaning that normal Node.js cannot be used in an iOS application. For iOS application development, the project uses Node.js-on-ChakraCore to skirt around the App Store rules. For Android application development the project uses regular Node.js on Android. At the time of writing, the project is in an early stage of development, but it looks promising.
Internet of Things (IoT): Reportedly, it is a very popular language for Internet-of-Things projects, and Node.js does run on most ARM-based single-board computers. The clearest example is the NodeRED project. It offers a graphical programming environment, letting you draw programs by connecting blocks together. It features hardware-oriented input and output mechanisms, for example, to interact with General Purpose I/O (GPIO) pins on Raspberry Pi or Beaglebone single-board computers.
Quit scratching your head already! Of course you're doing it, scratching your head and mumbling to yourself, "What's a browser language doing on the server?" In truth, JavaScript has a long and largely unknown history outside the browser. JavaScript is a programming language, just like any other language, and the better question to ask is "Why should JavaScript remain trapped inside browsers?".
Back in the dawn of the web age, the tools for writing web applications were at a fledgling stage. Some were experimenting with Perl or TCL to write CGI scripts, and the PHP and Java languages had just been developed. Even then, JavaScript saw use on the server side. One early web application server was Netscape's LiveWire server, which used JavaScript. Some versions of Microsoft's ASP used JScript, their version of JavaScript. A more recent server-side JavaScript project is the RingoJS application framework in the Java universe. Java 6 and Java 7 were both shipped with the Rhino JavaScript engine. In Java 8, Rhino was dropped in favor of the newer Nashorn JavaScript engine.
In other words, JavaScript outside the browser is not a new thing, even if it is uncommon.
Among the many available web application development platforms, why should you choose Node.js? There are many stacks to choose from; what is it about Node.js that makes it rise above the others? We will see in the following sections.
Node.js is quickly becoming a popular development platform with adoption by plenty of big and small players. One of those is PayPal, who are replacing their incumbent Java-based system with one written in Node.js. For PayPal's blog post about this, visit https://www.paypal-engineering.com/2013/11/22/node-js-at-paypal/. Other large Node.js adopters include Walmart's online e-commerce platform, LinkedIn, and eBay.
According to NodeSource, Node.js usage is growing rapidly (visit https://nodesource.com/node-by-numbers). The measures include increasing bandwidth for downloading Node.js releases, increasing activity in Node.js-related GitHub projects, and more.
It's best to not just follow the crowd because the crowd claims their software platform does cool things. Node.js does some cool things, but more important is its technical merit.
Having the same programming language on the server and client has been a long-time dream on the web. This dream dates back to the early days of Java, where Java applets were to be the frontend to server applications written in Java, and JavaScript was originally envisioned as a lightweight scripting language for those applets. Java never fulfilled its hype as a client-side programming language, for various reasons. We ended up with JavaScript as the principle in-browser, client-side language, rather than Java. Typically, the frontend JavaScript developers were in a different language universe than the server-side team, who was likely to be coding in PHP, Java, Ruby, or Python.
Over time, in-browser JavaScript engines became incredibly powerful, letting us write ever-more complex browser-side applications. With Node.js, we may finally be able to implement applications with the same programming language on the client and server by having JavaScript at both ends of the web, in the browser and server.
A common language for frontend and backend offers several potential benefits:
The JavaScript language is very popular due to its ubiquity in web browsers. It compares favorably against other languages while having many modern, advanced language concepts. Thanks to its popularity, there is a deep talent pool of experienced JavaScript programmers out there.
To make Chrome a popular and excellent web browser, Google invested in making V8 a super-fast JavaScript engine. Google, therefore, has a huge motivation to keep on improving V8. V8 is the JavaScript engine for Chrome, and it can also be executed standalone. Node.js is built on top of the V8 JavaScript engine.
As Node.js becomes more important to the V8 team, there's a potential synergy of faster V8 performance wins as more people focus on V8 improvements.
We'll get into this later. The Node.js architecture, a single execution thread, an ingenious event-oriented asynchronous-programming model, and a fast JavaScript engine, has less overhead than thread-based architectures.
A new sensation in software development is the microservice idea. Microservices are focused on splitting a large web application into small, tightly-focused services that can be easily developed by small teams. While they aren't exactly a new idea, they're more of a reframing of old client-server computing models, the microservice pattern fits well with agile project management techniques, and gives us more granular application deployment.
Node.js is an excellent platform for implementing microservices. We'll get into this later.
During 2014 and 2015, the Node.js community faced a major split over policy, direction, and control. The io.js project was a hostile fork driven by a group who wanted to incorporate several features and change who's in the decision-making process. The end result was a merge of the Node.js and io.js repositories, an independent Node.js foundation to run the show, and the community is working together to move forward in a common direction.
A concrete result of healing that rift is the rapid adoption of new ECMAScript language features. The V8 engine is adopting those new features quickly to advance the state of web development. The Node.js team, in turn, is adopting those features as quickly as they show up in V8, meaning that Promises and async functions are quickly becoming a reality for Node.js programmers.
The bottom line is that the Node.js community not only survived the io.js fork, but the community and the platform it nurtures grew stronger as a result.
Node.js's blistering performance is said to be because of its asynchronous event-driven architecture, and its use of the V8 JavaScript engine. That's a nice thing to say, but what's the rationale for the statement?
The V8 JavaScript engine is among the fastest JavaScript implementations. As a result, Chrome is widely used not just to view website content, but to run complex applications. Examples include Gmail, the Google GSuite applications (Docs, Slides, and so on), image editors such as Pixlr, and drawing applications such as draw.io and Canva. Both Atom and Microsoft's Visual Studio Code are excellent IDE's that just happen to be implemented in Node.js and Chrome using Electron. That these applications exist and are happily used by a large number of people is testament to V8's performance. Node.js benefits from V8 performance improvements.
The normal application server model uses blocking I/O to retrieve data, and it uses threads for concurrency. Blocking I/O causes threads to wait on results. That causes a churn between threads as the application server starts and stops the threads to handle requests. Each suspended thread (typically waiting on an I/O operation to finish) consumes a full stack trace of memory, increasing memory consumption overhead. Threads add complexity to the application server as well as server overhead.
Node.js has a single execution thread with no waiting on I/O or context switching. Instead, there is an event loop looking for events and dispatching them to handler functions. The paradigm is that any operation that would block or otherwise take time to complete must use the asynchronous model. These functions are to be given an anonymous function to act as a handler callback, or else (with the advent of ES2015 promises), the function would return a Promise. The handler function, or Promise, is invoked when the operation is complete. In the meantime, control returns to the event loop, which continues dispatching events.
At the Node.js interactive conference in 2017, IBM's Chris Bailey made a case for Node.js being an excellent choice for highly scalable microservices. Key performance characteristics are I/O performance, measured in transactions per second, startup time, because that limits how quickly your service can scale up to meet demand, and memory footprint, because that determines how many application instances can be deployed per server. Node.js excels on all those measures; with every subsequent release each, is either improving or remaining fairly steady. Bailey presented figures comparing Node.js to a similar benchmark written in Spring Boot showing Node.js to perform much better. To view his talk, see https://www.youtube.com/watch?v=Fbhhc4jtGW4.
To help us wrap our heads around why this would be, let's return to Ryan Dahl, the creator of Node.js, and the key inspiration leading him to create Node.js. In his Cinco de NodeJS presentation in May 2010, https://www.youtube.com/watch?v=M-sc73Y-zQA, Dahl asked us what happens while executing a line of code such as this:
result = query('SELECT * from db');
// operate on the result
Of course, the program pauses at that point while the database layer sends the query to the database, which determines the result and returns the data. Depending on the query, that pause can be quite long; well, a few milliseconds, which is an eon in computer time. This pause is bad because that execution thread can do nothing while waiting for the result to arrive. If your software is running on a single-threaded platform, the entire server would be blocked and unresponsive. If instead, your application is running on a thread-based server platform, a thread context switch is required to satisfy any other requests that arrive. The greater the number of outstanding connections to the server, the greater the number of thread context switches. Context switching is not free because more threads require more memory per thread state and more time for the CPU to spend on thread management overhead.
Simply using an asynchronous, event-driven I/O, Node.js removes most of this overhead while introducing very little of its own.
Using threads to implement concurrency often comes with admonitions such as these: expensive and error-prone, the error-prone synchronization primitives of Java, or designing concurrent software can be complex and error prone. The complexity comes from the access to shared variables and various strategies to avoid deadlock and competition between threads. The synchronization primitives of Java are an example of such a strategy, and obviously many programmers find them difficult to use. There's the tendency to create frameworks such as java.util.concurrent to tame the complexity of threaded concurrency, but some might argue that papering over complexity does not make things simpler.
Node.js asks us to think differently about concurrency. Callbacks fired asynchronously from an event loop are a much simpler concurrency model—simpler to understand, simpler to implement, simpler to reason about, and simpler to debug and maintain.
Ryan Dahl points to the relative access time of objects to understand the need for asynchronous I/O. Objects in memory are more quickly accessed (in the order of nanoseconds) than objects on disk or objects retrieved over the network (milliseconds or seconds). The longer access time for external objects is measured in zillions of clock cycles, which can be an eternity when your customer is sitting at their web browser ready to move on if it takes longer than two seconds to load the page.
In Node.js, the query discussed previously will read as follows:
query('SELECT * from db', function (err, result) {
if (err) throw err; // handle errors
// operate on result
});
The programmer supplies a function that is called (hence the name callback function) when the result (or error) is available. Instead of a thread context switch, this code returns almost immediately to the event loop. That event loop is free to handle other requests. The Node.js runtime keeps track of the stack context leading to this callback function, and eventually an event will fire causing this callback function to be called.
Advances in the JavaScript language are giving us new options to implement this idea. The equivalent code looks like so when used with ES2015 Promise's:
query('SELECT * from db')
.then(result => {
// operate on result
})
.catch(err => {
// handle errors
});
The following with an ES-2017 async function:
try {
var result = await query('SELECT * from db');
// operate on result
} catch (err) {
// handle errors
}
All three of these code snippets perform the same query written earlier. The difference is that the query does not block the execution thread, because control passes back to the event loop. By returning almost immediately to the event loop, it is free to service other requests. Eventually, one of those events will be the response to the query shown previously, which will invoke the callback function.
With the callback or Promise approach, the result is not returned as the result of the function call, but is provided to a callback function that will be called later. The order of execution is not one line after another, as it is in synchronous programming languages. Instead, the order of execution is determined by the order of the callback function execution.
When using an async function, the coding style LOOKS like the original synchronous code example. The result is returned as the result of the function call, and errors are handled in a natural manner using try/catch. The await keyword integrates asynchronous results handling without blocking the execution thread. A lot is buried under the covers of the async/await feature, and we'll be covering this model extensively throughout the book.
Commonly, web pages bring together data from dozens of sources. Each one has a query and response as discussed earlier. Using asynchronous queries, each query can happen in parallel, where the page construction function can fire off dozens of queries—no waiting, each with their own callback—and then go back to the event loop, invoking the callbacks as each is done. Because it's in parallel, the data can be collected much more quickly than if these queries were done synchronously one at a time. Now, the reader on the web browser is happier because the page loads more quickly.
Some of the excitement over Node.js is due to its throughput (the requests per second it can serve). Comparative benchmarks of similar applications, for example, Apache, show that Node.js has tremendous performance gains.
One benchmark going around is this simple HTTP server (borrowed from https://nodejs.org/en/), which simply returns a Hello World message directly from memory:
var http = require('http');
http.createServer(function (req, res) {
res.writeHead(200, {'Content-Type': 'text/plain'});
res.end('Hello World\n');
}).listen(8124, "127.0.0.1");
console.log('Server running at http://127.0.0.1:8124/');
This is one of the simpler web servers that you can build with Node.js. The http object encapsulates the HTTP protocol, and its http.createServer method creates a whole web server, listening on the port specified in the listen method. Every request (whether a GET or POST on any URL) on that web server calls the provided function. It is very simple and lightweight. In this case, regardless of the URL, it returns a simple text/plain that is the Hello World response.
Ryan Dahl showed a simple benchmark (https://www.youtube.com/watch?v=M-sc73Y-zQA) that returned a 1-megabyte binary buffer; Node.js gave 822 req/sec, while Nginx gave 708 req/sec, for a 15% improvement over Nginx. He also noted that Nginx peaked at four megabytes memory, while Node.js peaked at 64 megabytes.
The key observation was that Node.js, running an interpreted JIT-compiled high-level language, was about as fast as Nginx, built of highly optimized C code, while running similar tasks. That presentation was in May 2010, and Node.js has improved hugely since then, as shown in Chris Bailey's talk that we referenced earlier.
Yahoo! search engineer Fabian Frank published a performance case study of a real-world search query suggestion widget implemented with Apache/PHP and two variants of Node.js stacks (http://www.slideshare.net/FabianFrankDe/nodejs-performance-case-study). The application is a pop-up panel showing search suggestions as the user types in phrases, using a JSON-based HTTP query. The Node.js version could handle eight times the number of requests per second with the same request latency. Fabian Frank said both Node.js stacks scaled linearly until CPU usage hit 100%. In another presentation (http://www.slideshare.net/FabianFrankDe/yahoo-scale-nodejs), he discussed how Yahoo! Axis is running on Manhattan + Mojito and the value of being able to use the same language (JavaScript) and framework (YUI/YQL) on both frontend and backend.
LinkedIn did a massive overhaul of their mobile app using Node.js for the server-side to replace an old Ruby on Rails app. The switch let them move from 30 servers down to three, and allowed them to merge the frontend and backend team because everything was written in JavaScript. Before choosing Node.js, they'd evaluated Rails with Event Machine, Python with Twisted, and Node.js, choosing Node.js for the reasons that we just discussed. For a look at what LinkedIn did, see http://arstechnica.com/information-technology/2012/10/a-behind-the-scenes-look-at-linkedins-mobile-engineering/.
Most existing advice on Node.js performance tips tends to have been written for older V8 versions that used the CrankShaft optimizer. The V8 team has completely dumped CrankShaft, and it has a new optimizer called TurboFan. For example, under CrankShaft, it was slower to use try/catch, let/const, generator functions, and so on. Therefore, common wisdom said to not use those features, which is depressing because we want to use the new JavaScript features because of how much it has improved the JavaScript language. Peter Marshall, an Engineer on the V8 team at Google, gave a talk at Node.js Interactive 2017 claiming that, under TurboFan, you should just write natural JavaScript. With TurboFan, the goal is for across-the-board performance improvements in V8. To view the presentation, see https://www.youtube.com/watch?v=YqOhBezMx1o.
A truism about JavaScript is that it's no good for heavy computation work, because of the nature of JavaScript. We'll go over some ideas related to this in the next section. A talk by Mikola Lysenko at Node.js Interactive 2016 went over some issues with numerical computing in JavaScript, and some possible solutions. Common numerical computing involves large numerical arrays processed by numerical algorithms that you might have learned in Calculus or Linear Algebra classes. What JavaScript lacks is multi-dimensional arrays, and access to certain CPU instructions. The solution he presented is a library to implement multi-dimensional arrays in JavaScript, along with another library full of numerical computing algorithms. To view the presentation, see https://www.youtube.com/watch?v=1ORaKEzlnys.
The bottom line is that Node.js excels at event-driven I/O throughput. Whether a Node.js program can excel at computational programs depends on your ingenuity in working around some limitations in the JavaScript language. A big problem with computational programming is that it prevents the event loop from executing and, as we will see in the next section, that can make Node.js look like a poor candidate for anything.
In October 2011, software developer and blogger Ted Dziuba wrote a blog post (since pulled from his blog) titled Node.js is a cancer, calling it a scalability disaster. The example he showed for proof is a CPU-bound implementation of the Fibonacci sequence algorithm. While his argument was flawed, he raised a valid point that Node.js application developers have to consider the following: where do you put the heavy computational tasks?
A key to maintaining high throughput of Node.js applications is ensuring that events are handled quickly. Because it uses a single execution thread, if that thread is bogged down with a big calculation, Node.js cannot handle events, and event throughput will suffer.
The Fibonacci sequence, serving as a stand-in for heavy computational tasks, quickly becomes computationally expensive to calculate, especially for a naïve implementation such as this:
const fibonacci = exports.fibonacci = function(n) {
if (n === 1 || n === 2) return 1;
else return fibonacci(n-1) + fibonacci(n-2);
}
Yes, there are many ways to calculate fibonacci numbers more quickly. We are showing this as a general example of what happens to Node.js when event handlers are slow, and not to debate the best ways to calculate mathematics functions. Consider this server:
const http = require('http');
const url = require('url');
const fibonacci = // as above
http.createServer(function (req, res) {
const urlP = url.parse(req.url, true);
let fibo;
res.writeHead(200, {'Content-Type': 'text/plain'});
if (urlP.query['n']) {
fibo = fibonacci(urlP.query['n']);
res.end('Fibonacci '+ urlP.query['n'] +'='+ fibo);
} else {
res.end('USAGE: http://127.0.0.1:8124?n=## where ## is the Fibonacci number desired');
}
}).listen(8124, '127.0.0.1');
console.log('Server running at http://127.0.0.1:8124');
For sufficiently large values of n (for example, 40), the server becomes completely unresponsive because the event loop is not running, and instead this function is blocking event processing because it is grinding through the calculation.
Does this mean that Node.js is a flawed platform? No, it just means that the programmer must take care to identify code with long-running computations and develop solutions. These include rewriting the algorithm to work with the event loop, or rewriting the algorithm for efficiency, or integrating a native code library, or foisting computationally expensive calculations on to a backend server.
A simple rewrite dispatches the computations through the event loop, letting the server continue to handle requests on the event loop. Using callbacks and closures (anonymous functions), we're able to maintain asynchronous I/O and concurrency promises:
const fibonacciAsync = function(n, done) {
if (n === 0) return 0;
else if (n === 1 || n === 2) done(1);
else if (n === 3) return 2;
else {
process.nextTick(function() {
fibonacciAsync(n-1, function(val1) {
process.nextTick(function() {
fibonacciAsync(n-2, function(val2) {
done(val1+val2); });
});
});
});
}
}
Because this is an asynchronous function, it necessitates a small refactoring of the server:
const http = require('http');
const url = require('url');
const fibonacciAsync = // as above
http.createServer(function (req, res) {
let urlP = url.parse(req.url, true);
res.writeHead(200, {'Content-Type': 'text/plain'});
if (urlP.query['n']) {
fibonacciAsync(urlP.query['n'], fibo => {
res.end('Fibonacci '+ urlP.query['n'] +'='+ fibo);
});
} else {
res.end('USAGE: http://127.0.0.1:8124?n=## where ## is the Fibonacci number desired');
}
}).listen(8124, '127.0.0.1'); console.log('Server running at http://127.0.0.1:8124');
Dziuba's valid point wasn't expressed well in his blog post, and it was somewhat lost in the flames following that post. Namely, that while Node.js is a great platform for I/O-bound applications, it isn't a good platform for computationally intensive ones.
Later in this book, we'll explore this example a little more deeply.
The striving for optimal efficiency (handling more requests per second) is not just about the geeky satisfaction that comes from optimization. There are real business and environmental benefits. Handling more requests per second, as Node.js servers can do, means the difference between buying lots of servers and buying only a few servers. Node.js potentially lets your organization do more with less.
Roughly speaking, the more servers you buy, the greater the cost, and the greater the environmental impact of having those servers. There's a whole field of expertise around reducing costs and the environmental impact of running web server facilities, to which that rough guideline doesn't do justice. The goal is fairly obvious—fewer servers, lower costs, and a reduced environmental impact through utilizing more efficient software.
Intel's paper, Increasing Data Center Efficiency with Server Power Measurements (https://www.intel.com/content/dam/doc/white-paper/intel-it-data-center-efficiency-server-power-paper.pdf), gives an objective framework for understanding efficiency and data center costs. There are many factors, such as buildings, cooling systems, and computer system designs. Efficient building design, efficient cooling systems, and efficient computer systems (data center efficiency, data center density, and storage density) can lower costs and environmental impact. But you can destroy those gains by deploying an inefficient software stack compelling you to buy more servers than you would if you had an efficient software stack. Alternatively, you can amplify gains from data center efficiency with an efficient software stack that lets you decrease the number of servers required.
This talk about efficient software stacks isn't just for altruistic environmental purposes. This is one of those cases where being green can help your business bottom line.
The last couple of years have been an exciting time for JavaScript programmers. The TC-39 committee that oversees the ECMAScript standard has added many new features, some of which are syntactic sugar, but several of which have propelled us into a whole new era of JavaScript programming. By itself, the async/await feature promises us a way out of what's called Callback Hell, or the situation we find ourselves in when nesting callbacks within callbacks. It's such an important feature that it should necessitate a broad rethinking of the prevailing callback-oriented paradigm in Node.js and the rest of the JavaScript ecosystem.
Refer back a few pages to this:
query('SELECT * from db', function (err, result) {
if (err) throw err; // handle errors
// operate on result
});
This was an important insight on Ryan Dahl's part, and is what propelled Node.js's popularity. Certain actions take a long time to run, such as database queries, and should not be treated the same as operations that quickly retrieve data from memory. Because of the nature of the JavaScript language, Node.js had to express this asynchronous coding construct in an unnatural way. The results do not appear at the next line of code, but instead appear within this callback function. Further, errors have to be handled in an unnatural way, inside that callback function.
The convention in Node.js is that the first parameter to a callback function is an error indicator, and the subsequent parameters are the results. This is a useful convention that you'll find all across the Node.js landscape. However, it complicates working with results and errors because both land in an inconvenient location — that callback function. The natural place for errors and results to land is on the subsequent line(s) of code.
We descend further into callback hell with each layer of callback function nesting. The seventh layer of callback nesting is more complex than the sixth layer of callback nesting. Why? If nothing else, it's that the special considerations for error handling become ever more complex as callbacks are nested more deeply.
var results = await query('SELECT * from db');
Instead, ES2017 async functions return us to this very natural expression of programming intent. Results and errors land in the correct location, while preserving the excellent event-driven asynchronous programming model that made Node.js great. We'll see later in the book how this works.
The TC-39 committee added many more new features to JavaScript, such as:
You may see the new JavaScript described as ES6 or ES2017. What's the preferred name to describe the version of JavaScript that is being used?
ES1 through ES5 marked various phases of JavaScript's development. ES5 was released in 2009, and is widely implemented in modern browsers. Starting with ES6, the TC-39 committee decided to change the naming convention because of their intention to add new language features every year. Therefore, the language version name now includes the year, hence ES2015 was released in 2015, ES2016 was released in 2016, and ES2017 was released in 2017.
The pink elephant in the room is that, because of how JavaScript is delivered to the world, we cannot just start using the latest ES2017 features. In frontend JavaScript, we are limited by the fact that old browsers are still in use. Internet Explorer version 6 has fortunately been almost completely retired, but there are still plenty of old browsers installed on older computers that are still serving a valid role for their owners. Old browsers mean old JavaScript implementations, and if we want our code to work, we need it to be compatible with old browsers.
Using code rewriting tools such as Babel, some of the new features can be retrofitted to function on some of the older browsers. Frontend JavaScript programmers can adopt (some of) the new features at the cost of a more complex build toolchain, and the risk of bugs introduced by the code rewriting process. Some may wish to do that, while others will prefer to wait a while.
The Node.js world doesn't have this problem. Node.js has rapidly adopted ES2015/2016/2017 features as quickly as they were implemented in the V8 engine. With Node.js 8, we can now use async functions as a native feature, and most of the ES2015/2016 features became available with Node.js version 6. The new module format is now supported in Node.js version 10.
In other words, while frontend JavaScript programmers can argue that they must wait a couple of years before adopting ES2015/2016/2017 features, Node.js programmers have no need to wait. We can simply use the new features without needing any code rewriting tools.
New capabilities, such as cloud deployment systems and Docker, make it possible to implement a new kind of service architecture. Docker makes it possible to define server process configuration in a repeatable container that's easy to deploy by the millions into a cloud hosting system. It lends itself best to small single-purpose service instances that can be connected together to make a complete system. Docker isn't the only tool to help simplify cloud deployments; however, its features are well attuned to modern application deployment needs.
Some have popularized the microservice concept as a way to describe this kind of system. According to the microservices.io website, a microservice consists of a set of narrowly focused, independently deployable services. They contrast this with the monolithic application deployment pattern where every aspect of the system is integrated into one bundle (such as a single WAR file for a Java EE app server). The microservice model gives developers much needed flexibility.
Some advantages of microservices are as follows:
Where does Node.js fit in with this? Its design fits the microservice model like a glove:
Throughout this book, we'll call out aspects of the Twelve-Factor App model, and ways to implement those ideas in Node.js. This model is published on http://12factor.net, and is a set of guidelines for application deployment in the modern cloud computing era. It's not that the Twelve-Factor App model is the be-all and end-all of application architecture paradigms. It's a set of useful ideas, clearly birthed after many late nights spent debugging complex applications, which offer useful ideas that could save us all a lot of effort by having easier-to-maintain and more reliable systems.
The guidelines are straightforward, and once you read them, they will seem like pure common sense. As a best practice, the Twelve-Factor App model is a compelling strategy for delivering the kind of fluid self-contained cloud-deployed applications called for by our current computing environment.
You learned a lot in this chapter. Specifically, you saw that JavaScript has a life outside web browsers and you learned about the difference between asynchronous and blocking I/O. We then covered the attributes of Node.js and where it fits in the overall web application platform market and threaded versus asynchronous software. Lastly, we saw the advantages of fast event-driven asynchronous I/O, coupled with a language with great support for anonymous closures.
Our focus in this book is real-world considerations of developing and deploying Node.js applications. We'll cover as many aspects as we can of developing, refining, testing, and deploying Node.js applications.
Now that we've had this introduction to Node.js, we're ready to dive in and start using it. In Chapter 2, Setting up Node.js, we'll go over setting up a Node.js environment, so let's get started.
Before getting started with using Node.js, you must set up your development environment. In the following chapters, we'll use this for development and for non-production deployment.
In this chapter, we will cover the following topics:
So let's get on with it.
Node.js runs on POSIX-like operating systems, various UNIX derivatives (Solaris, for example) or workalikes (Linux, macOS, and so on), as well as on Microsoft Windows. It can run on machines both large and small, including the tiny ARM devices such as the Raspberry Pi microscale embeddable computer for DIY software/hardware projects.
Node.js is now available via package management systems, limiting the need to compile and install from source.
Because many Node.js packages are written in C or C++, you must have a C compiler (such as GCC), Python 2.7 (or later), and the node-gyp package. If you plan to use encryption in your networking code, you will also need the OpenSSL cryptographic library. The modern UNIX derivatives almost certainly come with these, and Node.js's configure script, used when installing from source, will detect their presence. If you need to install them, Python is available at http://python.org and OpenSSL is available at http://openssl.org.
The preferred method for installing Node.js, now, is to use the versions available in package managers, such as apt-get, or MacPorts. Package managers simplify your life by helping to maintain the current version of the software on your computer, ensuring to update dependent packages as necessary, all by typing a simple command such as apt-get update. Let's go over this first.
The MacPorts project (http://www.macports.org/) has for years been packaging a long list of open source software packages for macOS, and they have packaged Node.js. After you have installed MacPorts using the installer on their website, installing Node.js is pretty much this simple:
$ port search nodejs npm
...
nodejs6 @6.12.0 (devel, net)
Evented I/O for V8 JavaScript
nodejs7 @7.10.1 (devel, net)
Evented I/O for V8 JavaScript
nodejs8 @8.9.1 (devel, net)
Evented I/O for V8 JavaScript
nodejs9 @9.2.0 (devel, net)
Evented I/O for V8 JavaScript
Found 6 ports.
--
npm4 @4.6.1 (devel)
node package manager
npm5 @5.5.1 (devel)
node package manager
Found 4 ports.
$ sudo port install nodejs8 npm5 .. long log of downloading and installing prerequisites and Node $ which node /opt/local/bin/node $ node --version v8.9.1
Homebrew is another open source software package manager for macOS, which some say is the perfect replacement for MacPorts. It is available through their home page at http://brew.sh/. After installing Homebrew using the instructions on their website and ensuring that Homebrew is correctly set up, use the following:
$ brew update
... long wait and lots of output
$ brew search node
==> Searching local taps...
node
leafnode llnode node@4 nodebrew nodenv
==> Searching taps on GitHub...
caskroom/cask/node-profiler
==> Searching blacklisted, migrated and deleted formulae...
Then, install it this way:
$ brew install node
...
==> Installing node
==> Downloading https://homebrew.bintray.com/bottles/node-8.9.1.el_capitan.bottle.tar.gz
######################################################################## 100.0%
==> Pouring node-8.9.1.el_capitan.bottle.tar.gz
==> Caveats
Bash completion has been installed to:
/usr/local/etc/bash_completion.d
==> Summary
Once installed this way, the Node.js command can be run as follows:
$ node --version v8.9.1
Node.js is now available through most of the package management systems. Instructions on the Node.js website currently list packaged versions of Node.js for a long list of Linux, as well as FreeBSD, OpenBSD, NetBSD, macOS, and even Windows. Visit https://nodejs.org/en/download/package-manager/ for more information.
For example, on Debian and other Debian-based Linux distro's (such as Ubuntu), use the following commands:
# curl -sL https://deb.nodesource.com/setup_10.x | sudo -E bash - # sudo apt-get install -y nodejs # sudo apt-get install -y build-essential
To download other Node.js versions (this example shows version 10.x), modify the URL to suit.
The Windows Subsystem for Linux (WSL) lets you install Ubuntu, openSUSE, or SUSE Linux Enterprise on Windows. All three are available via the Store built into Windows 10. You may need to update your Windows for the installation to work.
Once installed, the Linux-specific instructions will install Node.js within the Linux subsystem.
To install the WSL, see https://msdn.microsoft.com/en-us/commandline/wsl/install-win10.
Some of the commands you'll run while installing tools on Windows are to be executed in a PowerShell window with elevated privileges. We mention this because the process of enabling the WSL includes a command to be run in such a PowerShell window.
The process is simple:
The resultant command window will have administrator privileges, and the title bar will say Administrator: Windows PowerShell.
The https://nodejs.org/en/ website offers built-in binaries for Windows, macOS, Linux, and Solaris. We can simply go to the website, click on the Install button, and run the installer. For systems with package managers, such as the ones we've just discussed, it's preferable to use the package management system. That's because you'll find it easier to stay up-to-date with the latest version. But, that doesn't serve all people because:
Simply go to the Node.js website and you'll see something like the following screenshot. The page does its best to determine your OS and supply the appropriate download. If you need something different, click on the DOWNLOADS link in the header for all possible downloads:
For macOS, the installer is a PKG file giving the typical installation process. For Windows, the installer simply takes you through the typical Install Wizard process.
Once finished with the installer, you have command-line tools, such as node and npm, with which you can run Node.js programs. On Windows, you're supplied with a version of the Windows command shell preconfigured to work nicely with Node.js.
Installing the prepackaged Node.js distributions is the preferred installation method. However, installing Node.js from source is desirable in a few situations:
Now that you have the high-level view, let's get our hands dirty mucking around in some build scripts. The general process follows the usual configure, make, and make install routine that you may already have performed with other open source software packages. If not, don't worry, we'll guide you through the process.
There are three prerequisites: a C compiler, Python, and the OpenSSL libraries. The Node.js compilation process checks for their presence and will fail if the C compiler or Python is not present. The specific method of installing these is dependent on your operating system.
These sorts of commands will check for their presence:
$ cc --version Apple LLVM version 7.0.2 (clang-700.1.81) Target: x86_64-apple-darwin15.3.0 Thread model: posix $ python Python 2.7.11 (default, Jan 8 2016, 22:23:13) [GCC 4.2.1 Compatible Apple LLVM 7.0.2 (clang-700.1.81)] on darwin Type "help", "copyright", "credits" or "license" for more information. >>>
See this for details: https://github.com/nodejs/node/blob/master/BUILDING.md.
The Node.js build tools do not support Python 3.x.
Developer tools (such as GCC) are an optional installation on macOS. Fortunately, they're easy to acquire.
You start with Xcode, which is available for free through the Mac App Store. Simply search for Xcode and click on the Get button. Once you have Xcode installed, open a Terminal window and type the following:
$ xcode-select --install
This installs the Xcode command-line tools:
For additional information, visit http://osxdaily.com/2014/02/12/install-command-line-tools-mac-os-x/.
Compiling Node.js from source follows this process:
The source bundle can be downloaded with your browser, or as follows, substituting your preferred version:
$ mkdir src $ cd src $ wget https://nodejs.org/dist/v10.0.0/node-v10.0.0.tar.gz $ tar xvfz node-v10.0.0.tar.gz $ cd node-v10.0.0
Now we configure the source so that it can be built. This is just like many other open source packages, and there are a long list of options to customize the build:
$ ./configure --help
To cause the installation to land in your home directory, run it this way:
$ ./configure --prefix=$HOME/node/10.0.0 ..output from configure
If you're going to install multiple Node.js versions side by side, it's useful to put the version number in the path like this. That way, each version will sit in a separate directory. It's a simple matter of switching between Node.js versions by changing the PATH variable appropriately:
# On bash shell:
$ export PATH=${HOME}/node/VERSION-NUMBER/bin:${PATH}
# On csh
$ setenv PATH ${HOME}/node/VERSION-NUMBER/bin:${PATH}
A simpler way to install multiple Node.js versions is the nvm script described later.
If you want to install Node.js in a system-wide directory, simply leave off the --prefix option and it will default to installing in /usr/local.
After a moment, it'll stop and will likely have successfully configured the source tree for installation in your chosen directory. If this doesn't succeed, the error messages that are printed will describe what needs to be fixed. Once the configure script is satisfied, you can go on to the next step.
With the configure script satisfied, you compile the software:
$ make .. a long log of compiler output is printed $ make install
If you are installing into a system-wide directory, do the last step this way instead:
$ make $ sudo make install
Once installed, you should make sure that you add the installation directory to your PATH variable as follows:
$ echo 'export PATH=$HOME/node/10.0.0/bin:${PATH}' >>~/.bashrc
$ . ~/.bashrc
Alternatively, for csh users, use this syntax to make an exported environment variable:
$ echo 'setenv PATH $HOME/node/10.0.0/bin:${PATH}' >>~/.cshrc
$ source ~/.cshrc
This should result in some directories, as follows:
$ ls ~/node/10.0.0/ bin include lib share $ ls ~/node/10.0.0/bin
The BUILDING.md document referenced previously has instructions. One uses the build tools from Visual Studio, or else the full Visual Studio 2017 product:
Three additional tools are required:
Then, run the included .\vcbuild script to perform the build.
Normally, you won't install multiple versions of Node.js and doing so adds complexity to your system. But if you are hacking on Node.js itself, or are testing your software against different Node.js releases, you may want to have multiple Node.js installations. The method to do so is a simple variation on what we've already discussed.
Earlier, while discussing building Node.js from source, we noted that one can install multiple Node.js instances in separate directories. It's only necessary to build from source if you need a customized Node.js build, and most folks will be satisfied with pre-built Node.js binaries. They, too, can be installed into separate directories.
To switch between Node.js versions is simply a matter of changing the PATH variable (on POSIX systems), as follows, using the directory where you installed Node.js:
$ export PATH=/usr/local/node/VERSION-NUMBER/bin:${PATH}
It starts to be a little tedious to maintain this after a while. For each release, you have to set up Node.js, NPM, and any third-party modules you desire in your Node.js installation. Also, the command shown to change your PATH is not quite optimal. Inventive programmers have created several version managers to simplify managing multiple Node.js/NPM releases and providing commands to change your PATH the smart way:
Both maintain multiple simultaneous versions of Node and let you easily switch between versions. Installation instructions are available on their respective websites.
For example, with nvm, you can run commands like these:
$ nvm ls
...
v6.0.0
v6.1.0
v6.2.2
v6.3.1
v6.4.0
...
v6.11.2
v7.0.0
v7.1.0
v7.10.0
v8.0.0
v8.1.3
v8.2.1
v8.5.0
v8.9.1
v8.9.3
v9.2.0
v9.4.0
v9.5.0
v9.10.1
v9.11.1
-> v10.0.0
-> system
node -> stable (-> v8.9.1) (default)
stable -> 8.9 (-> v8.9.1) (default)
iojs -> N/A (default)
$ nvm use 10
Now using node v10.0.0 (npm v5.6.0)
$ node --version
v10.0.0
$ nvm use v4.2 Now using node v4.2.0 (npm v2.14.7) $ node --version v4.2.0
$ nvm install 9
Downloading https://nodejs.org/dist/v9.2.0/node-v9.2.0-darwin-x64.tar.xz...
######################################################################## 100.0%
WARNING: checksums are currently disabled for node.js v4.0 and later
Now using node v9.2.0 (npm v5.5.1)
$ node --version
v9.2.0
$ which node
/Users/david/.nvm/versions/node/v9.2.0/bin/node
$ /usr/local/bin/node --version
v8.9.1
$ /opt/local/bin/node --version
v8.9.1
This demonstrates that you can have a system-wide Node.js installed, keep multiple private Node.js versions managed by nvm, and switch between them as needed. When new Node.js versions are released, they are simple to install with nvm even if the official packaged version for your OS doesn't immediately update.
Unfortunately, nvm does not support Windows. Fortunately, a couple of Windows-specific clones of the nvm concept exist:
Another route is to use the WSL. Because in WSL you're interacting with a Linux command line, you can use nvm itself.
Many of the examples in this book were tested using the nvm-windows application. There are slight behavior differences, but it acts largely the same as nvm for Linux and macOS. The biggest change is the version number specifier in the nvm use and nvm install commands.
With nvm for Linux and macOS one can type a simple version number, like nvm use 8, and it will automatically substitute the latest release of the named Node.js version. With nvm-windows the same command acts as if you typed "nvm use 8.0.0". In other words, with nvm-windows you must use the exact version number. Fortunately, the list of supported versions is easily available using the "nvm list available" command.
While we won't discuss native code module development in this book, we do need to make sure that they can be built. Some modules in the NPM repository are native code, and they must be compiled with a C or C++ compiler to build the corresponding .node files (the .node extension is used for binary native-code modules).
The module will often describe itself as a wrapper for some other library. For example, the libxslt and libxmljs modules are wrappers around the C/C++ libraries of the same name. The module includes the C/C++ source code, and when installed, a script is automatically run to do the compilation with node-gyp.
The node-gyp tool is a cross-platform command-line tool written in Node.js for compiling native add-on modules for Node.js. We've mentioned native code modules several times, and it is this tool that compiles them for use with Node.js.
You can easily see this in action by running these commands:
$ mkdir temp $ cd temp $ npm install libxmljs libxslt
This is done in a temporary directory, so you can delete it afterward. If your system does not have the tools installed to compile native code modules, you'll see error messages. Otherwise, you'll see in the output a node-gyp execution, followed by many lines of text obviously related to compiling C/C++ files.
The node-gyp tool has prerequisites similar to those for compiling Node.js from source. Namely, a C/C++ compiler, a Python environment, and other build tools such as Git. For Unix/macOS/Linux systems those are easy to come by. For Windows, you should install:
Normally, you won't need to worry about installing node-gyp. That's because it is installed behind the scenes as part of NPM. That's done so that NPM can automatically build native code modules.
Its GitHub repository contains documentation at https://github.com/nodejs/node-gyp.
Reading the node-gyp documentation, in its repository, will give you a clearer understanding of the compilation prerequisites discussed previously, as well as of developing native code modules.
We just threw around so many different Node.js version numbers in the previous section that you may have become confused over which version to use. This book is targeting Node.js version 10.x, and it's expected that everything we'll cover is compatible with Node.js 10.x and any subsequent release.
Starting with Node.js 4.x, the Node.js team is following a dual-track approach. The even-numbered releases (4.x, 6.x, 8.x, and so on) are what they're calling Long Term Support (LTS), while the odd-numbered releases (5.x, 7.x, 9.x, and so on) are where current new feature development occurs. While the development branch is kept stable, the LTS releases are positioned as being for production use and will receive updates for several years.
At the time of writing, Node.js 8.x is the current LTS release; Node.js 9.x was just released and will eventually become Node.js 10.x, which in turn will eventually become the LTS release. For complete details about the release schedule, refer to https://github.com/nodejs/LTS/.
A major impact of each new Node.js release, beyond the usual performance improvements and bug fixes, is bringing in the latest V8 JavaScript engine release. In turn, this means bringing in more of the ES-2015/2016/2017 features as the V8 team implements those features. In Node.js 8.x, async/await functions arrived, and in Node.js 10.x support for the standard ES6 module format has arrived.
A practical consideration is whether a new Node.js release will break your code. New language features are always being added as V8 catches up with ECMA Script, and the Node.js team sometimes makes breaking changes in the Node.js API. If you've tested on one Node.js version, will it work on an earlier version? Will a Node.js change break some assumptions we made?
The NPM Package Manager helps us ensure that our packages execute on the correct Node.js version. This means that we can specify in the package.json file, which we'll explore in Chapter 3, Node.js Modules, the compatible Node.js versions for a package.
We can add an entry to package.json as follows:
engines: {
"node": ">=6.x"
}
This means exactly what it implies—that the given package is compatible with Node.js version 6.x or later.
Of course, your development machine(s) could have several Node.js versions installed. You'll need the version your software is declared to support, plus any later versions you wish to evaluate.
Since Node.js code is JavaScript, any JavaScript-aware editor will be useful. Unlike some other languages that are so complex that an IDE with code completion is a necessity, a simple programming editor is perfectly sufficient for Node.js development.
Two editors are worth calling out because they are written in Node.js: Atom and Microsoft Visual Studio Code.
Atom (https://atom.io/) bills itself as a hackable editor for the 21st century. It is extendable by writing Node.js modules using the Atom API, and the configuration files are easily editable. In other words, it's hackable in the same way plenty of other editors have been, going back to Emacs, meaning one writes a software module to add capabilities to the editor. The Electron framework was invented in order to build Atom, and Electron is a super easy way to build desktop applications using Node.js.
Microsoft Visual Studio Code (https://code.visualstudio.com/) is also a hackable editor—well, the home page says extensible and customizable, which means the same thing—that is also open source, and is also implemented in Electron. But it's not a hollow me-too editor, aping Atom while adding nothing of its own. Instead, Visual Studio Code is a solid programmers editor in its own right, bringing interesting functionality to the table.
As for debuggers, there are several interesting choices. Starting with Node.js 6.3, the inspector protocol made it possible to use the Google Chrome debugger. Visual Studio Code has a built-in debugger that also uses the inspector protocol.
For a full list of debugging options and tools, see https://nodejs.org/en/docs/guides/debugging-getting-started/.
Now that you've installed Node.js, we want to do two things—verify that the installation was successful, and familiarize you with the command-line tools.
The basic installation of Node.js includes two commands, node and npm. We've already seen the node command in action. It's used either for running command-line scripts or server processes. The other, npm, is a package manager for Node.js.
The easiest way to verify that your Node.js installation works is also the best way to get help with Node.js. Type the following command:
$ node --help
Usage: node [options] [ -e script | script.js | - ] [arguments]
node inspect script.js [arguments]
Options:
-v, --version print Node.js version
-e, --eval script evaluate script
-p, --print evaluate script and print result
-c, --check syntax check script without executing
-i, --interactive always enter the REPL even if stdin
does not appear to be a terminal
-r, --require module to preload (option can be repeated)
- script read from stdin (default; interactive mode if a tty)
--inspect[=[host:]port] activate inspector on host:port
(default: 127.0.0.1:9229)
--inspect-brk[=[host:]port]
activate inspector on host:port
and break at start of user script
--inspect-port=[host:]port
set host:port for inspector
... many more options
Environment variables:
NODE_DEBUG ','-separated list of core modules
that should print debug information
NODE_DISABLE_COLORS set to 1 to disable colors in the REPL
NODE_EXTRA_CA_CERTS path to additional CA certificates
file
NODE_ICU_DATA data path for ICU (Intl object) data
(will extend linked-in data)
NODE_NO_WARNINGS set to 1 to silence process warnings
NODE_NO_HTTP2 set to 1 to suppress the http2 module
NODE_OPTIONS set CLI options in the environment
via a space-separated list
NODE_PATH ':'-separated list of directories
prefixed to the module search path
NODE_PENDING_DEPRECATION set to 1 to emit pending deprecation
warnings
NODE_REPL_HISTORY path to the persistent REPL history
file
NODE_REDIRECT_WARNINGS write warnings to path instead of
stderr
OPENSSL_CONF load OpenSSL configuration from file
Documentation can be found at https://nodejs.org/
Note that there are options for both Node.js and V8 (not shown in the previous command line). Remember that Node.js is built on top of V8; it has its own universe of options that largely focus on details of bytecode compilation or garbage collection and heap algorithms. Enter node --v8-options to see the full list of them.
On the command line, you can specify options, a single script file, and a list of arguments to that script. We'll discuss script arguments further in the next section, Running a simple script with Node.js.
Running Node.js with no arguments plops you into an interactive JavaScript shell:
$ node
> console.log('Hello, world!');
Hello, world!
undefined
Any code you can write in a Node.js script can be written here. The command interpreter gives a good Terminal-oriented user experience and is useful for interactively playing with your code. You do play with your code, don't you? Good!
Now, let's see how to run scripts with Node.js. It's quite simple; let's start by referring to the help message shown previously. The command-line pattern is just a script filename and some script arguments, which should be familiar to anyone who has written scripts in other languages.
For this and other examples in this book, it doesn't truly matter where you put the files. However, for the sake of neatness, you can start by making a directory named node-web-dev in the home directory of your computer, and inside that creating one directory per chapter (for example, chap02 and chap03).
First, create a text file named ls.js with the following content:
const fs = require('fs');
const util = require('util');
const fs_readdir = util.promisify(fs.readdir);
(async () => {
const files = await fs_readdir('.');
for (let fn of files) {
console.log(fn);
}
})().catch(err => { console.error(err); });
Next, run it by typing the following command:
$ node ls.js ls.js
This is a pale cheap imitation of the Unix ls command (as if you couldn't figure that out from the name). The readdir function is a close analog to the Unix readdir system call (type man 3 readdir in a Terminal window to learn more) and is used to list the files in a directory.
We have written this using an inline async function, the await keyword, and an ES2015 for..of loop. Using util.promisify, we can convert any callback-oriented function so it returns a Promise, so that the Promise plays well with the await keyword.
By default fs module functions use the callback paradigm, as does most Node.js modules. But within async functions it is more convenient if functions instead return promises. Using util.promisify we can make it so.
This script is hardcoded to list files in the current directory. The real ls command takes a directory name, so let's modify the script a little.
Command-line arguments land in a global array named process.argv. Therefore we can modify ls.js, copying it as ls2.js, as follows to see how this array works:
const fs = require('fs');
const util = require('util');
const fs_readdir = util.promisify(fs.readdir);
(async () => {
var dir = '.';
if (process.argv[2]) dir = process.argv[2];
const files = await fs_readdir(dir);
for (let fn of files) {
console.log(fn);
}
})().catch(err => { console.error(err); });
You can run it as follows:
$ pwd
/Users/David/chap02
$ node ls2 ..
chap01
chap02
$ node ls2
app.js
ls.js
ls2.js
We simply checked if a command-line argument was present, if (process.argv[2]). If it was, we overrode the value of the dir variable, dir = process.argv[2], and we then used that as the readdir argument.
If you give it a non-existent directory pathname, an error will be thrown and printed using the catch clause. That looks like so:
$ node ls2.js /nonexistent
{ Error: ENOENT: no such file or directory, scandir '/nonexistent'
errno: -2,
code: 'ENOENT',
syscall: 'scandir',
path: '/nonexistent' }
In the previous section we discussed the util.promisify and its ability to convert a callback-oriented function into one that returns a Promise. The latter play well within async functions and therefore it is preferable for functions to return a Promise.
To be more precise, util.promisify is to be given a function that uses the error-first-callback paradigm. The last argument of such functions is a callback function whose first argument is interpreted as an error indicator, hence the phrase error-first-callback. What util.promisify returns is another function that returns a Promise.
The Promise serves the same purpose as the error-first-callback. If an error is indicated, the Promise resolves to the rejected status, while if success is indicated the Promise resolves to a success status. As we see in these examples, within an async function the Promise is handled very nicely.
The Node.js ecosystem has a large body of functions using the error-first-callback. The community has begun a conversion process where functions will return a Promise, and possibly also take an error-first-callback for API compatibility.
One of the new features in Node.js 10 is an example of such a conversion. Within the fs module is a submodule, named fs.promises, with the same API but producing Promise objects. We could rewrite the previous example as so:
const fs = require('fs').promises;
(async () => {
var dir = '.';
if (process.argv[2]) dir = process.argv[2];
const files = await fs.readdir(dir);
for (let fn of files) {
console.log(fn);
}
})().catch(err => { console.error(err); });
As you can see, the functions in the fs.promises module returns a Promise without requiring a callback function. The new program, which you can save as ls2-promises.js, is run as so:
$ node ls2-promises.js
(node:40329) ExperimentalWarning: The fs.promises API is experimental
app.js
ls.js
ls2-promises.js
ls2.js
The API is currently in an experimental state and therefore we're shown this warning.
Another choice is a 3rd party module, fs-extra. This module has an extended API beyond the standard fs module. On the one hand its functions return a Promise if no callback function is provided, or else invokes the callback. In addition it includes several useful functions.
In the rest of this book we will be using fs-extra because of those additional functions. For documentation of the module, see: https://www.npmjs.com/package/fs-extra.
Many scripts that you'll run are server processes. We'll be running lots of these scripts later on. Since we're still in the dual mode of verifying the installation and familiarizing you with using Node.js, we want to run a simple HTTP server. Let's borrow the simple server script on the Node.js home page (http://nodejs.org).
Create a file named app.js containing the following:
const http = require('http');
http.createServer(function (req, res) {
res.writeHead(200, {'Content-Type': 'text/plain'});
res.end('Hello, World!\n');
}).listen(8124, '127.0.0.1');
console.log('Server running at http://127.0.0.1:8124');
Run it as follows:
$ node app.js Server running at http://127.0.0.1:8124
This is the simplest of web servers you can build with Node.js. If you're interested in how it works, flip forward to Chapter 4, HTTP Servers and Clients; Chapter 5, Your First Express Application; and Chapter 6, Implementing the Mobile-First Paradigm. For the moment, just visit http://127.0.0.1:8124 in your browser to see the Hello, World! message:
A question to ponder is why this script did not exit when ls.js did exit. In both cases, execution of the script reaches the end of the script; the Node.js process does not exit in app.js, while in ls.js it does.
The reason is the presence of active event listeners. Node.js always starts up an event loop, and in app.js, the listen function creates an event listener that implements the HTTP protocol. This event listener keeps app.js running until you do something such as typing Ctrl + C in the Terminal window. In ls.js, there is nothing that creates a long-running event listener, so when ls.js reaches the end of its script, the node process will exit.
Node.js by itself is a pretty basic system, being a JavaScript interpreter with a few interesting asynchronous I/O libraries. One of the things that makes Node.js interesting is the rapidly growing ecosystem of third-party modules for Node.js.
At the center of that ecosystem is NPM. While Node.js modules can be downloaded as source and assembled manually for use with Node.js programs, that's tedious and it's difficult to implement a repeatable build process. NPM gives us a simpler way; NPM is the de facto standard package manager for Node.js and it greatly simplifies downloading and using these modules. We will talk about NPM at length in the next chapter.
The sharp-eyed will have noticed that npm is already installed via all the installation methods discussed previously. In the past, npm was installed separately, but today it is bundled with Node.js.
Now that we have npm installed, let's take it for a quick spin. The hexy program is a utility for printing hex dumps of files. That's a very 1970 thing to do, but is still extremely useful. It serves our purpose right now in giving us something to quickly install and try out:
$ npm install -g hexy
/opt/local/bin/hexy -> /opt/local/lib/node_modules/hexy/bin/hexy_cmd.js
+ hexy@0.2.10
added 1 package in 1.107s
Adding the -g flag makes the module available globally, irrespective of the present-working-directory of your command shell. A global install is most useful when the module provides a command-line interface. When a package provides a command-line script, npm sets that up. For a global install, the command is installed correctly for use by all users of the computer.
Depending on how Node.js is installed for you, that may need to be run with sudo:
$ sudo npm install -g hexy
Once it is installed, you'll be able to run the newly–installed program this way:
$ hexy --width 12 ls.js
00000000: 636f 6e73 7420 6673 203d 2072 const.fs.=.r
0000000c: 6571 7569 7265 2827 6673 2729 equire('fs')
00000018: 3b0a 636f 6e73 7420 7574 696c ;.const.util
00000024: 203d 2072 6571 7569 7265 2827 .=.require('
00000030: 7574 696c 2729 3b0a 636f 6e73 util');.cons
0000003c: 7420 6673 5f72 6561 6464 6972 t.fs_readdir
00000048: 203d 2075 7469 6c2e 7072 6f6d .=.util.prom
00000054: 6973 6966 7928 6673 2e72 6561 isify(fs.rea
00000060: 6464 6972 293b 0a0a 2861 7379 ddir);..(asy
0000006c: 6e63 2028 2920 3d3e 207b 0a20 nc.().=>.{..
00000078: 2063 6f6e 7374 2066 696c 6573 .const.files
00000084: 203d 2061 7761 6974 2066 735f .=.await.fs_
00000090: 7265 6164 6469 7228 272e 2729 readdir('.')
0000009c: 3b0a 2020 666f 7220 2866 6e20 ;...for.(fn.
000000a8: 6f66 2066 696c 6573 2920 7b0a of.files).{.
000000b4: 2020 2020 636f 6e73 6f6c 652e ....console.
000000c0: 6c6f 6728 666e 293b 0a20 207d log(fn);...}
000000cc: 0a7d 2928 292e 6361 7463 6828 .})().catch(
000000d8: 6572 7220 3d3e 207b 2063 6f6e err.=>.{.con
000000e4: 736f 6c65 2e65 7272 6f72 2865 sole.error(e
000000f0: 7272 293b 207d 293b rr);.});
Again, we'll be doing a deep dive into NPM in the next chapter. The hexy utility is both a Node.js library and a script for printing out these old-style hex dumps.
In 2015, the ECMAScript committee released a long-awaited major update of the JavaScript language. The update brought in many new features to JavaScript, such as Promises, arrow functions, and Class objects. The language update set the stage for improvements. since that should dramatically improve our ability to write clean, understandable JavaScript code.
The browser makers are adding those much-needed features, meaning the V8 engine is adding those features as well. These features are making their way into Node.js starting with version 4.x.
By default, only the ES-2015/2016/2017 features that V8 considers stable are enabled by Node.js. Further features can be enabled with command-line options. The almost-complete features are enabled with the --es_staging option. The website documentation gives more information.
The Node green website (http://node.green/) has a table listing the status of a long list of features in Node.js versions.
The ES2017 language spec is published at:
https://www.ecma-international.org/publications/standards/Ecma-262.htm.
The TC-39 committee does its work on GitHub https://github.com/tc39.
The ES-2015 features make a big improvement in the JavaScript language. One feature, the Promise class, should mean a fundamental rethinking of common idioms in Node.js programming. In ES-2017, a pair of new keywords, async and await, will simplify writing asynchronous code in Node.js, and it should encourage the Node.js community to further rethink the common idioms of the platform.
There's a long list of new JavaScript features, but let's quickly go over two of them that we'll use extensively.
The first is a lighter-weight function syntax called the arrow function:
fs.readFile('file.txt', 'utf8', (err, data) => {
if (err) ...; // do something with the error
else ...; // do something with the data
});
This is more than the syntactic sugar of replacing the function keyword with the fat arrow. Arrow functions are lighter-weight as well as being easier to read. The lighter weight comes at the cost of changing the value of this inside the arrow function. In regular functions, this has a unique value inside the function. In an arrow function, this has the same value as the scope containing the arrow function. This means that, when using an arrow function, we don't have to jump through hoops to bring this into the callback function because this is the same at both levels of the code.
The next feature is the Promise class, which is used for deferred and asynchronous computations. Deferred code execution to implement asynchronous behavior is a key paradigm for Node.js, and it requires two idiomatic conventions:
While convenient, these conventions resulted in multilayer code pyramids that can be difficult to understand and maintain:
doThis(arg1, arg2, (err, result1, result2) => {
if (err) ...;
else {
// do some work
doThat(arg2, arg3, (err2, results) => {
if (err2) ...;
else {
doSomethingElse(arg5, err => {
if (err) .. ;
else ..;
});
}
});
}
});
Depending on how many steps are required for a specific task, a code pyramid can get quite deep. Promises will let us unravel the code pyramid and improve reliability, because error handling is more straightforward and easily captures all errors.
A Promise class is created as follows:
function doThis(arg1, arg2) {
return new Promise((resolve, reject) => {
// execute some asynchronous code
if (errorIsDetected) return reject(errorObject);
// When the process is finished call this:
resolve(result1, result2);
});
}
Rather than passing in a callback function, the caller receives a Promise object. When properly utilized, the preceding pyramid can be coded as follows:
doThis(arg1, arg2)
.then(result => {
// This can receive only one value, hence to
// receive multiple values requires an object or array
return doThat(arg2, arg3);
})
.then((results) => {
return doSomethingElse(arg5);
})
.then(() => {
// do a final something
})
.catch(err => {
// errors land here
});
This works because the Promise class supports chaining if a then function returns a Promise object.
The async/await feature implements the promise of the Promise class to simplify asynchronous coding. This feature becomes active within an async function:
async function mumble() {
// async magic happens here
}
An async arrow function is as follows:
const mumble = async () => {
// async magic happens here
};
It's used as so:
async function doSomething(arg1, arg2, arg3, arg4, arg5) {
var { result1, result2 } = await doThis(arg1, arg2);
var results = await doThat(arg2, arg3);
await doSomethingElse(arg5);
// do a final something
return finalResult;
}
Isn't this a breath of fresh air compared to the nested structure we started with?
The await keyword is used with a Promise. It automatically waits for the Promise to resolve. If the Promise resolves successfully then the value is returned, and if it resolves with an error then that error is thrown. Both handling results and throwing errors are handled in the natural manner.
This example also shows another ES2015 feature: destructuring. The fields of an object can be extracted using the following:
var { value1, value2 } = {
value1: "Value 1", value2: "Value 2", value3: "Value3"
};
We have an object with three fields, but extract only two of the fields.
The Babel transpiler (http://babeljs.io/) is a great way to use cutting-edge JavaScript features on older implementations. The word transpile means Babel rewrites JavaScript code into other JavaScript code, specifically to rewrite ES-2015 or ES-2016 features to older JavaScript code. Babel converts JavaScript source to an abstract syntax tree, then manipulates that tree to rewrite the code using older JavaScript features, and then writes that tree to a JavaScript source code file.
Put another way, Babel rewrites JavaScript code into JavaScript code, applying desired transformations such as converting ES2015/2016 features into ES5 code that can run in a web browser.
Many use Babel to experiment with new JavaScript feature proposals working their way through the TC-39 committee. Others use Babel to use new JavaScript features in projects on JavaScript engines that do not support those features.
The Node Green website makes it clear that Node.js supports pretty much all of the ES2015/2016/2017 features. Therefore, as a practical matter, we no longer need to use Babel for Node.js projects.
For web browsers, there is a much longer time lag between a set of ECMAScript features and when we can reliably use those features in browser-side code. It's not that the web browser makers are slow in adopting new features, because the Google, Mozilla, and Microsoft teams are proactive about adopting the latest features. Apple's Safari team seems slow to adopt new features, unfortunately. What's slower, however, is the penetration of new browsers into the fleet of computers in the field.
Therefore, modern JavaScript programmers need to familiarize themselves with Babel.
To get a brief introduction to Babel, we'll use it to transpile the scripts we saw earlier to run on Node.js 6.x. In those scripts we used async functions, which are not supported in Node.js 6.x.
In the directory containing ls.js and ls2.js, type these commands:
$ npm install babel-cli \
babel-plugin-transform-es2015-modules-commonjs \
babel-plugin-transform-async-to-generator
This installs the Babel software, along with a couple of transformation plugins. Babel has a plugin system so that you enable the transformations required by your project. Our primary goal in this example is converting the async functions shown earlier into Generator functions. Generators are a new sort of function introduced with ES2015, which form the foundation for implementation of async functions.
Because Node.js 6.x does not have util.promisify, we need to make one substitution:
// const fs_readdir = util.promisify(fs.readdir);
const fs_readdir = dir => {
return new Promise((resolve, reject) => {
fs.readdir(dir, (err, fileList) => {
if (err) reject(err);
else resolve(fileList);
});
});
};
This structure is more or less what the util.promisify function does.
Next, create a file named .babelrc containing the following:
{
"plugins": [
"transform-es2015-modules-commonjs",
"transform-async-to-generator"
]
}
This file instructs Babel to use the named transformation plugins that we installed earlier.
Because we installed babel-cli, a babel command is installed such that we can type the following:
$ ./node_modules/.bin/babel -help
To transpile your code, run the following command:
$ ./node_modules/.bin/babel ls2.js -o ls2-babel.js
This command transpiles the named file, producing a new file. The new file is as follows:
'use strict';
function _asyncToGenerator(fn) { return function () { var gen = fn.apply(this, arguments); return new Promise(function (resolve, reject) { function step(key, arg) { try { var info = gen[key](arg); var value = info.value; } catch (error) { reject(error); return; } if (info.done) { resolve(value); } else { return Promise.resolve(value).then(function (value) { step("next", value); }, function (err) { step("throw", err); }); } } return step("next"); }); }; }
const fs = require('fs');
const util = require('util');
// const fs_readdir = util.promisify(fs.readdir);
const fs_readdir = dir => {
return new Promise((resolve, reject) => {
fs.readdir(dir, (err, fileList) => {
if (err) reject(err);
else resolve(fileList);
});
});
};
_asyncToGenerator(function* () {
var dir = '.';
if (process.argv[2]) dir = process.argv[2];
const files = yield fs_readdir(dir);
for (let fn of files) {
console.log(fn);
}
})().catch(err => {
console.error(err);
});
This code isn't meant to be easy to read by humans. Instead, it's meant that you edit the original source file, and then convert it for your target JavaScript engine. The main thing to notice is that the transpiled code uses a Generator function in place of the async function, and the yield keyword in place of the await keyword. The _asyncToGenerator function implements functionality similar to async functions.
The transpiled script is run as follows:
$ node ls2-babel
.babelrc
app.js
babel
ls.js
ls2-babel.js
ls2.js
node_modules
In other words, it runs the same as the async version, but on an older Node.js release.
You learned a lot in this chapter about installing Node.js, using its command-line tools, and running a Node.js server. We also breezed past a lot of details that will be covered later in the book, so be patient.
Specifically, we covered downloading and compiling the Node.js source code, installing Node.js either for development use in your home directory or for deployment in system directories and installing NPM—the de facto standard package manager used with Node.js. We also saw how to run Node.js scripts or Node.js servers. We then took a look at the new features in ES-2015/2016/2017. Finally, we saw how to use Babel to implement those features in your code.
Now that we've seen how to set up the basic system, we're ready to start working on implementing applications with Node.js. First, you must learn the basic building blocks of Node.js applications and modules, which we will cover in the next chapter.
Before writing Node.js applications, you must learn about Node.js modules and packages. Modules and packages are the building blocks for breaking down your application into smaller pieces.
In this chapter, we will cover the following topics:
So, let's get on with it.
Modules are the basic building blocks for constructing Node.js applications. A Node.js module encapsulates functions, hiding details inside a well-protected container, and exposing an explicitly-declared list of functions.
There are two module formats that we must consider:
Because ES6 modules are now the standard module format, the Node.js Technical Steering Committee (TSC) is committed to first-class support for ES6 modules.
We have already seen modules in action in the previous chapter. Every JavaScript file we use in Node.js is itself a module. It's time to see what they are and how they work. We'll start with CommonJS modules and then quickly bring in ES6 modules.
In the ls.js example in Chapter 2, Setting up Node.js, we wrote the following code to pull in the fs module, giving us access to its functions:
const fs = require('fs');
The require function searches for the named module, loading the module definition into the Node.js runtime, and making its functions available. In this case, the fs object contains the code (and data) exported by the fs module. The fs module is part of the Node.js core and provides filesystem functions.
By declaring fs as const, we have a little bit of assurance against making coding mistakes that would modify the object holding the module reference.
In every Node.js module, the exports object within the module is the interface exported to other code. Anything assigned to a field of the exports object is available to other pieces of code, and everything else is hidden. By the way, this object is actually module.exports. The exports object is an alias for module.exports.
The require function and module.exports objects both come from the CommonJS specification. ES6 modules have similar concepts, but a different implementation.
Let's look at a brief example of this before diving into the details. Ponder over the simple.js module:
var count = 0;
exports.next = function() { return ++count; };
exports.hello = function() {
return "Hello, world!";
};
We have one variable, count, which is not attached to the exports object, and a function, next, which is attached. Now, let's use it:
$ node
> const s = require('./simple');
undefined
> s.hello();
'Hello, world!'
> s.next();
1
> s.next();
2
> s.next();
3
> console.log(s.count);
undefined
undefined
>
The exports object in the module is the object that is returned by require('./simple'). Therefore, each call to s.next calls the next function in simple.js. Each returns (and increments) the value of the local variable, count. An attempt to access the private field, count, shows it's unavailable from outside the module.
To reiterate the rule:
This is how Node.js solves the global object problem of browser-based JavaScript. The variables that look like they're global variables are only global to the module containing that variable. These variables are not visible to any other code.
Now that we've got a taste for modules, let's take a deeper look.
Node.js's module implementation is strongly inspired by, but not identical to, the CommonJS module specification. The differences between them might only be important if you need to share code between Node and other CommonJS systems.
Among the changes in ES2015 is a standard module format meant for use everywhere. It has some interesting features, and by existing everywhere it should advance the state of JavaScript. Since it is incompatible with the CommonJS/Node.js module system, adopting ES2015 modules in Node.js means reworking our practices and accepted norms.
As a practical matter, Node.js programmers will be dealing with both module formats for some time during a transition period. Our long-term goal should be to adopt ES2015 modules across the board. The Node.js platform is slated to bring in support for ES2015 modules in Node.js 10. As of Node.js 8.5, the feature is available by setting a command-line flag.
We've already seen a couple of examples of this module format, with the simple.js example, and the programs we examined in Chapter 2, Setting up Node.js. So let's take a closer look.
CommonJS modules are stored in files with the extension .js.
Loading a CommonJS module is a synchronous operation. That means that when the require('modulename') function call returns, the module has been located and completely read into memory and is ready to go. The module is cached in memory so that subsequent require('modulename') calls return immediately, and all return the exact same object.
Node.js modules provide a simple encapsulation mechanism to hide implementation details while exposing an API. Modules are treated as if they were written as follows:
(function() { ... contents of module file ... })();
Thus, everything within the module is contained within an anonymous private namespace context. This is how the global object problem is resolved; everything in a module that looks global is actually contained within this private context.
Objects and functions can be exposed from a CommonJS module by means of two free variables Node.js inserts into this private context: module and exports:
exports.funcName = function(arg, arg1) { ... };
module.exports.funcName = function(arg, arg2) { .. };
Your code can break the alias between the two if you do this:
exports = function(arg, arg1) { ... };
Do not do that, because exports will no longer be equivalent to module.exports. If your intent is to assign a single object or function to be what's returned by require, do this instead:
module.exports = function(arg, arg1) { ... };
Some modules do export a single function because that's how the module author envisioned delivering the desired functionality.
ES6 modules are a new module format designed for all JavaScript environments. While Node.js has had a good module system for its whole existence, browser-side JavaScript has not. That left the browser-side community with either relying on the <script> tag, or using non-standardized solutions. For that matter, traditional Node.js modules were never standardized, outside of the CommonJS effort. Therefore, ES6 modules stand to be a big improvement for the entire JavaScript world, by getting everyone on the same page with a common module format and mechanisms.
The side effect is that the Node.js community needs to start looking at, learning about, and adopting the ES2015 module format.
ES6 modules are referred to by Node.js with the extension .mjs. When it came to implementing the new module format, the Node.js team determined that they could not support both CommonJS and ES6 modules with the .js extension. The .mjs extension was decided as the solution, and you may see tongue-in-cheek references to Michael Jackson Script for this file extension.
One interesting detail is that ES6 modules load asynchronously. This may not have an impact on Node.js programmers, except that this is part of the rationale behind requiring the new .mjs extension.
Create a file named simple2.mjs in the same directory as the simple.js example that we looked at earlier:
var count = 0;
export function next() { return ++count; }
function squared() { return Math.pow(count, 2); }
export function hello() {
return "Hello, world!";
}
export default function() { return count; }
export const meaning = 42;
export let nocount = -1;
export { squared };
ES6 items exported from a module are declared with the export keyword. This keyword can be put in front of any top-level declaration, such as variable, function, or class declarations:
export function next() { .. }
The effect of this is similar to the following:
module.exports.next = function() { .. }
The intent of both is essentially the same: to make a function, or other object, available to code outside the module. A statement such as export function next() is a named export, meaning the exported thing has a name, and that code outside the module uses that name to access the object. As we see here, named exports can be functions or objects, and they may also be class definitions.
Using export default can be done once per module, and is the default export from the module. The default export is what code outside the module accesses when using the module object itself, rather than when using one of the exports from the module.
You can also declare something, such as the squared function, and then export it later.
Now let's see how to use this ES2015 module. Create a simpledemo.mjs file with the following:
import * as simple2 from './simple2.mjs';
console.log(simple2.hello());
console.log(`${simple2.next()} ${simple2.squared()}`);
console.log(`${simple2.next()} ${simple2.squared()}`);
console.log(`${simple2.default()} ${simple2.squared()}`);
console.log(`${simple2.next()} ${simple2.squared()}`);
console.log(`${simple2.next()} ${simple2.squared()}`);
console.log(`${simple2.next()} ${simple2.squared()}`);
console.log(simple2.meaning);
The import statement does what it means: it imports objects exported from a module. This version of the import statement is most similar to a traditional Node.js require statement, meaning that it creates an object through which you access the objects exported from the module.
This is how the code executes:
$ node --experimental-modules simpledemo.mjs
(node:63937) ExperimentalWarning: The ESM module loader is experimental.
Hello, world!
1 1
2 4
2 4
3 9
4 16
5 25
42
As of Node.js 8.5, the new module format is available behind an option flag as shown here. You're also presented with this nice warning that it's an experimental feature. Accessing the default export is accomplished by accessing the field named default. Accessing an exported value, such as the meaning field, is done without parentheses because it is a value and not a function.
Now to see a different way to import objects from a module, create another file, named simpledemo2.mjs, containing the following:
import {
default as simple, hello, next
} from './simple2.mjs';
console.log(hello());
console.log(next());
console.log(next());
console.log(simple());
console.log(next());
console.log(next());
console.log(next());
In this case, each imported object is its own thing rather than being attached to another object. Instead of writing simple2.next(), you simply write next(). The as clause is a way to declare an alias, if nothing else so you can use the default export. We already used an as clause earlier, and it can be used in other instances where you wish to provide an alias for the value being exported or imported.
Node.js modules can be used from ES2015 .mjs code. Create a file named ls.mjs, containing the following:
import _fs from 'fs';
const fs = _fs.promises;
import util from 'util';
(async () => {
const files = await fs.readdir('.');
for (let fn of files) {
console.log(fn);
}
})().catch(err => { console.error(err); });You cannot, however, require an ES2015 module into regular Node.js code. The lookup algorithm for ES2015 modules is different, and as we mentioned earlier, ES2015 modules are loaded asynchronously.
Another wrinkle is handling the fs.promises submodule. We are using that submodule in the example, but how? This import statement does not work:
import { promises as fs } from 'fs';
This fails as so:
$ node --experimental-modules ls.mjs
(node:45186) ExperimentalWarning: The ESM module loader is experimental.
file:///Volumes/Extra/book-4th/chap03/ls.mjs:1
import { promises as fs } from 'fs';
^^^^^^^^
SyntaxError: The requested module 'fs' does not provide an export named 'promises'
at ModuleJob._instantiate (internal/modules/esm/module_job.js:89:21)
That leaves us with this construct:
import _fs from 'fs';
const fs = _fs.promises;
Executing the script gives the following:
$ node --experimental-modules ls.mjs
(node:65359) ExperimentalWarning: The ESM module loader is experimental.
(node:37671) ExperimentalWarning: The fs.promises API is experimental
ls.mjs
module1.js
module2.js
simple.js
simple2.mjs
simpledemo.mjs
simpledemo2.mjs
The last thing to note about ES2015 module code is that import and export statements must be top-level code. Even putting an export inside a simple block like this:
{
export const meaning = 42;
}
Results in an error:
$ node --experimental-modules badexport.mjs
(node:67984) ExperimentalWarning: The ESM module loader is experimental.
SyntaxError: Unexpected token export
at ModuleJob.loaders.set [as moduleProvider] (internal/loader/ModuleRequest.js:32:13)
at <anonymous>
While there are a few more details about ES2015 modules, these are their most important attributes.
Node.js supports using require('/path/to/file-name.json') to import a JSON file. It is equivalent to this code:
const fs = require('fs');
module.exports = JSON.parse(
fs.readFileSync('/path/to/file-name.json', 'utf8'));
That is, the JSON file is read synchronously, and the text is parsed as JSON. The resultant object is available as the object exported from the module. Create a file named data.json, containing the following:
{
"hello": "Hello, world!",
"meaning": 42
}
Now create a file named showdata.js, containing the following:
const util = require('util');
const data = require('./data');
console.log(util.inspect(data));
It will execute as follows:
$ node showdata.js
{ hello: 'Hello, world!', meaning: 42 }
The util.inspect function is a useful way to present an object in an easy-to-read fashion.
While support for ES6 modules arrived as an experimental feature in Node.js 8.5, there are two ways to use these modules on earlier Node.js implementations.
One method is to use the Babel transpiler to rewrite ES6 code so it can execute on older Node.js versions. For an example, see https://blog.revillweb.com/using-es2015-es6-modules-with-babel-6-3ffc0870095b.
The better method is the esm package in the Node.js registry. Simply do the following:
$ nvm install 6
Downloading and installing node v6.14.1...
Downloading https://nodejs.org/dist/v6.14.1/node-v6.14.1-darwin-x64.tar.xz...
######################################################################## 100.0%
Computing checksum with shasum -a 256
Checksums matched!
Now using node v6.14.1 (npm v3.10.10)
$ nvm use 6
Now using node v6.14.1 (npm v3.10.10)
$ npm install esm
... npm output
$ node --require esm simpledemo.mjs
Hello, world!
1 1
2 4
2 4
3 9
4 16
5 25
42
To use this module, one simply invokes require('esm') once, and ES6 modules are retrofitted into Node.js. The --require flag automatically loads the named module. Without rewriting the code, we can selectively use the esm module with this the command-line option.
This example demonstrates retrofitting ES6 modules into older Node.js releases. To successfully execute the ls.mjs example we must have support for async/await functions, and arrow functions. Since Node.js 6.x does not support either, the ls.mjs example will fail, and will necessitate rewriting such code:
$ node --version
v6.14.1
$ node -r esm ls.mjs
/Users/David/chap03/ls.mjs:5
(async () => {
^
SyntaxError: Unexpected token (
at exports.runInThisContext (vm.js:53:16)
at Module._compile (module.js:373:25)
For more information, see:
https://medium.com/web-on-the-edge/es-modules-in-node-today-32cff914e4b. That article describes an older release of the esm module, at the time named @std/esm.
A key attribute of modules is encapsulation. The objects that are not exported from the module are private to the module, and cannot be accessed from code outside the module. To reiterate, modules are treated as if they were written as follows:
(function() { ... contents of module file ... })();
This JavaScript idiom defines an anonymous private scope. Anything declared within that scope cannot be accessed by code outside the scope. That is, unless some code makes object references available to other code outside this private scope. That's what the module.exports object does: it is a mechanism for the module author to expose object references from the module. Other code can then access resources inside the module in a controlled fashion.
The top-level variables inside a module look like they exist in the global scope. Instead of being truly Global, they're safely private to the module and are completely inaccessible to other code.
Let's take a look at a practical demonstration of that encapsulation. Create a file named module1.js, containing the following:
const A = "value A";
const B = "value B";
exports.values = function() {
return { A: A, B: B };
}
Then, create a file named module2.js, containing the following:
const util = require('util');
const A = "a different value A";
const B = "a different value B";
const m1 = require('./module1');
console.log(`A=${A} B=${B} values=${util.inspect(m1.values())}`);
console.log(`${m1.A} ${m1.B}`);
const vals = m1.values();
vals.B = "something completely different";
console.log(util.inspect(vals));
console.log(util.inspect(m1.values()));
Then, run it as follows (you must have Node.js already installed):
$ node module2.js
A=a different value A B=a different value B values={ A: 'value A', B: 'value B' }
undefined undefined
{ A: 'value A', B: 'something completely different' }
{ A: 'value A', B: 'value B' }
This artificial example demonstrates encapsulation of the values in module1.js from those in module2.js. The A and B values in module1.js don't overwrite A and B in module2.js because they're encapsulated within module1.js. The values function in module1.js does allow code in module2.js access to the values; however, module2.js cannot directly access those values. We can modify the object module2.js received from module1.js. But doing so does not change the values within module1.js.
We have talked about several types of modules: CommonJS, JSON, ES2015, and native code modules. All but the ES2015 modules are loaded using the require function. That function has a very powerful and flexible algorithm for locating modules within a directory hierarchy. This algorithm, coupled with the npm package management system, gives the Node.js platform a lot of power and flexibility.
The CommonJS and ES2015 modules we've just looked at are what the Node.js documentation describes as a file module. Such modules are contained within a single file, whose filename ends with .js, .mjs, .json, or .node. The latter are compiled from C or C++ source code, or even other languages such as Rust, while the former are of course written in JavaScript or JSON.
We've already looked at several examples of using these modules, as well as the difference between the CommonJS format traditionally used in Node.js, and the new ES2015 modules that are now supported.
Some modules are pre-compiled into the Node.js binary. These are the core Node.js modules documented on the Node.js website at https://nodejs.org/api/index.html.
They start out as source code within the Node.js build tree. The build process compiles them into the binary so that the modules are always available.
A module can contain a whole directory structure full of stuff. Stuff here is a technical term referring to internal file modules, data files, template files, documentation, tests, assets, and more. Once stored within a properly constructed directory structure, Node.js will treat these as a module that satisfies a require('moduleName') call.
In most cases, a directory-as-module contains a package.json file. This file contains data about the module (known as package) that Node.js uses while loading the module. The Node.js runtime recognizes these two fields:
{ name: "myAwesomeLibrary",
main: "./lib/awesome.js" }
If this package.json file is in a directory named awesomelib, then require('./awesomelib') will load the file module in ./awesomelib/lib/awesome.js.
If there is no package.json, then Node.js will look for either index.js or index.node. In such a case, require('./awesomelib') will load the file module in ./awesomelib/index.js.
In either case, the directory module can easily contain other file modules. The module that's initially loaded would simply use require('./anotherModule') one or more times to load other, private modules.
The npm package management system can recognize a lot more data in the package.json file. That includes the package name, its author, the home page URL, the issue-queue URL, package dependencies, and more. We'll go over this later.
Generally speaking, the module name is a pathname, but with the file extension removed. Earlier, when we wrote require('./simple'), Node.js knew to add .js to the filename and load in simple.js. Similarly, Node.js would recognize simple.json or simple.node as the filename legitimately satisfying require('./simple').
There are three types of module identifiers: relative, absolute, and top-level:
The search begins in the directory containing the file calling require(). If that directory contains a node_modules directory, which then contains either a matching directory module or a matching file module, then the search is satisfied. If the local node_modules directory does not contain a suitable module, it tries again in the parent directory, and it will continue upward in the filesystem until it either finds a suitable module or it reaches the root directory.
That is, with a require call in /home/david/projects/notes/foo.js, the following directories will be consulted:
If the module is not found through this search, there are global folders in which modules can be located. The first is specified in the NODE_PATH environment variable. This is interpreted as a colon-delimited list of absolute paths similar to the PATH environment variable. On Windows, the elements of NODE_PATH are of course separated by semicolons. Node.js will search those directories for a matching module.
This variable was implemented before the module resolution algorithm just described was finalized. Because of that algorithm, NODE_PATH is largely unnecessary.
There are three additional locations that can hold modules:
In this case, $HOME is what you expect, the user's home directory, and $PREFIX is the directory where Node.js is installed.
Some are beginning to recommend against using global modules. The rationale is the desire for repeatability and deployability. If you've tested an app, and all its code is conveniently located within a directory tree, you can copy that tree for deployment to other machines. But, what if the app depended on some other file that was magically installed elsewhere on the system? Will you remember to deploy such files?
Let's take a look at the filesystem structure of a typical Node.js Express application:
This is an Express application (we'll start using Express in Chapter 5, Your First Express Application) containing a few modules installed in the node_modules directory. One of those, Express, has its own node_modules directory containing a couple of modules.
For app.js to load models-sequelize/notes.js, it uses the following require call:
const notesModel = require('./models-sequelize/notes');
This is a relative module identifier, where the pathname is resolved relative to the directory containing the file making the reference.
Use the following code to do the reverse in models-sequelize/notes.js:
const app = require('../app');
Again, this is a relative module identifier, this time resolved relative to the subdirectory containing models-sequelize/notes.js.
Any reference to a top-level module identifier will first look in the node_modules directory shown here. This directory is populated from the dependencies listed in the package.json, as we'll see in a few pages:
const express = require('express');
const favicon = require('serve-favicon');
const logger = require('morgan');
const cookieParser = require('cookie-parser');
const bodyParser = require('body-parser');
All of these are typical modules included in an Express application. Most of them are readily visible in the screenshot shown earlier. What's loaded is the main file in the corresponding subdirectory of node_modules, for example, node_modules/express/index.js.
But the application cannot directly reference the dependencies of the Express module that are in its internal node_modules directory. The module search algorithm only moves upward in the filesystem; it does not descend into subsidiary directory trees.
One side effect of the upward search direction is the handling of conflicting dependencies.
Suppose two modules (modules A and B) listed a dependency on the same module (C)? In the normal case, the two dependencies on module C could be handled by the same instance of that module. As we'll see in a few pages, npm's dependency list in package.json can use loose or precise version number references. Depending on the current version number for module C, modules A and B may, or may not, be in agreement as to which version to use. If they do not agree, npm can arrange the module installation such that both module A and B get the version of module C they depend on, without either stepping on the other. If both are agreeable with the same module C instance, only one copy will be installed, but if they disagree then npm will install two copies. The two copies will be located such that the module search algorithm will cause each module to find the correct version of module C.
Let's try a concrete example to clarify what was just said. In the screenshot earlier, you see two instances of the cookie module. We can use npm to query for all references to this module:
$ npm ls cookie
notes@0.0.0 /Users/David/chap05/notes
├─┬ cookie-parser@1.3.5
│ └── cookie@0.1.3
└─┬ express@4.13.4
└── cookie@0.1.5
This says the cookie-parser module depends on version 0.1.3 of cookie, while Express depends on version 0.1.5. How does npm avoid problems with these two conflicting versions? By putting one inside the node_modules directory inside the express module. This way, when Express refers to this module, it will use the 0.1.5 instance in its own node_modules directory, while the cookie-parser module will use the 0.1.3 instance in the top-level node_modules directory.
The import statement is used to load ES6 modules, and it only works inside an ES6 module. Because ES6 modules are loaded asynchronously, the require() statement cannot load ES6 modules. As we said earlier, ES6 modules are recognized by Node.js by the .mjs extension. The ECMAScript TC-39 committee has (or plans to) officially register that file extension with the recognized authorities so that regular tools will recognize both file extensions as JavaScript.
The module specifier one hands to the import statement is interpreted as a URL. For the time being, Node.js will only accept file: URL because of the security implications of loading modules over the Internet. Because it's a URL, some characters such as :, ?, #, or % must receive special treatment. For example:
import './foo?search'; import './foo#hash';
These are valid module specifiers where ?search and #hash have the sort of meaning you'd expect in a URL. So long as Node.js only supports file: URL for import statements, we cannot make use of that feature, but we have to keep it in mind and avoid using these strings in module URL.
One can install custom module loader hooks that could conceivably use those URL parts for some purpose.
The module search algorithm is similar to what we described for require. If the specifier begins with ./, ../, or /, the specifier is interpreted as a pathname. Otherwise, it is interpreted as a top-level module similar to the require statement, with one big difference. The import statement will not search for a global module. This is frowned on, but if one must use a global module, that can be accomplished with a symbolic link.
For documentation, see https://nodejs.org/api/esm.html.
We've gone over the format for CommonJS/Node.js modules, the format for ES6 modules, and the algorithm for locating and importing both. The last thing to cover is those hybrid situations where our code will use both module formats at the same time.
As a practical matter, ES6 modules are very new to the Node.js platform, and therefore we have a large body of existing code written as CommonJS/Node.js modules. Many tools in the Node.js market have implementation dependencies on the CommonJS format. This means we'll be facing situations where ES6 modules will need to use CommonJS modules, and vice versa:
Therefore, out of the box, three of the scenarios are directly supported. The fourth is supported with a workaround module.
When an ES6 module loads a CommonJS module, its module.exports object is exposed as the default export of the module. This means your code uses this pattern:
import cjsModule from 'common-js-module';
...
cjsModule.functionName();
This is extremely similar to using a CommonJS module in another CommonJS module. You are simply transliterating the require() call into an import statement.
ES6 modules do not cover all the requirements to fully replace Node.js/CommonJS modules. One of the missing capabilities is being addressed with the Dynamic Import feature currently on its way through the TC-39 committee.
Support for dynamic imports landed in Node.js 9.7. See the documentation at:
https://github.com/tc39/proposal-dynamic-import.
We'll use dynamic imports to solve an issue in Chapter 7, Data Storage and Retrieval, about dynamically choosing the module to load. In normal usage of the require() statement, can use a simple string literal to specify the module name. But it is also possible to use a string literal to compute the module name, like so:
// Node.js dynamically determined module loading
const moduleName = require(`../models/${process.env.MODEL_NAME}`);
We used this technique in earlier editions of this book to dynamically choose between several implementations of the same model API. The ES6 import statement does not support anything but a simple string literal, and therefore cannot compute the module specifier like this example.
With dynamic imports, we have an import() function where the module specifier is a regular string, letting us make a similar dynamic choice of module. Unlike the require() function, which is synchronous, import() is asynchronous, and returns a Promise. Hence, it's not a direct replacement for require() in that it's not terribly useful as a top-level function. You'll see how to use it in Chapter 7, Data Storage and Retrieval.
Perhaps the most important feature it brings is that CommonJS modules can use import() to load an ES6 module.
Another new feature, import.meta, is making its way through the TC-39 committee, and is being implemented for Node.js 10.x. It is an object existing within the scope of an ES6 module providing some metadata about the module. See https://github.com/tc39/proposal-import-meta.
A partial implementation, supporting just import.meta.url, has landed in the Node.js source. Its use requires the --harmony-import-meta command-line flag. The content of import.meta.url is a fully qualified file: URL for the current module, such as file:///Users/david/chap10/notes/app.mjs.
Where this becomes important is that ES6 modules do not support the __dirname, __filename, and other global variables used historically in Node.js modules. The __dirname variable is routinely used to read in resource data from files sitting in the package directory. It is intended that for such cases, one parses the directory name out of import.meta.url.
As described in Chapter2, Setting up Node.js, npm is a package management and distribution system for Node.js. It has become the de facto standard for distributing modules (packages) for use with Node.js. Conceptually, it's similar to tools such as apt-get (Debian), rpm/yum (Red Hat/Fedora), MacPorts (macOS), CPAN (Perl), or PEAR (PHP). Its purpose is publishing and distributing Node.js packages over the Internet using a simple command-line interface. With npm, you can quickly find packages to serve specific purposes, download them, install them, and manage packages you've already installed.
The npm application extends on the package format for Node.js, which in turn is largely based on the CommonJS package specification. It uses the same package.json file that's supported natively by Node.js, but with additional fields to build in additional functionality.
An npm package is a directory structure with a package.json file describing the package. This is exactly what was referred to earlier as a directory module, except that npm recognizes many more package.json tags than Node.js does. The starting point for npm's package.json are the CommonJS Packages/1.0 specification. The documentation for npm's package.json implementation is accessed using the following command:
$ npm help json
A basic package.json file is as follows:
{ "name": "packageName",
"version": "1.0",
"main": "mainModuleName",
"modules": {
"mod1": "lib/mod1",
"mod2": "lib/mod2"
}
}
The file is in JSON format, which, as a JavaScript programmer, you should be familiar with.
The most important tags are name and version. The name will appear in URLs and command names, so choose one that's safe for both. If you desire to publish a package in the public npm repository, it's helpful to check whether a particular name is already being used at http://npmjs.com or with the following command:
$ npm search packageName
The main tag is treated the same as we discussed in the previous section on directory modules. It defines which file module will be returned when invoking require('packageName'). Packages can contain many modules within themselves and they can be listed in the modules list.
Packages can be bundled as tar-gzip archives (tarballs), especially to send them over the internet.
A package can declare dependencies on other packages. That way, npm can automatically install other modules required by the module being installed. Dependencies are declared as follows:
"dependencies": {
"foo" : "1.0.0 - 2.x.x",
"bar" : ">=1.0.2 <2.1.2"
}
The description and keyword fields help people find the package when searching in an npm repository (https://www.npmjs.com/). Ownership of a package can be documented in the homepage, author, or contributors fields:
"description": "My wonderful package that walks dogs",
"homepage": "http://npm.dogs.org/dogwalker/",
"author": "dogwhisperer@dogs.org"
Some npm packages provide executable programs meant to be in the user's PATH. These are declared using the bin tag. It's a map of command names to the script that implements that command. The command scripts are installed into the directory containing the node executable using the name given:
bin: {
'nodeload.js': './nodeload.js',
'nl.js': './nl.js'
},
The directories tag describes the package directory structure. The lib directory is automatically scanned for modules to load. There are other directory tags for binaries, manuals, and documentation:
directories: { lib: './lib', bin: './bin' },
The script tags are script commands run at various events in the life cycle of the package. These events include install, activate, uninstall, update, and more. For more information about script commands, use the following command:
$ npm help scripts
We've already used the scripts feature when showing how to set up Babel. We'll use these later for automating the build, test, and execution processes.
This was only a taste of the npm package format; see the documentation (npm help json) for more.
By default, npm modules are retrieved over the internet from the public package registry maintained on http://npmjs.com. If you know the module name, it can be installed simply by typing the following:
$ npm install moduleName
But what if you don't know the module name? How do you discover the interesting modules? The website http://npmjs.com publishes a searchable index of the modules in that registry.
The npm package also has a command-line search function to consult the same index:
Of course, upon finding a module, it's installed as follows:
$ npm install acoustid
After installing a module, you may want to see the documentation, which would be on the module's website. The homepage tag in package.json lists that URL. The easiest way to look at the package.json file is with the npm view command, as follows:
$ npm view akasharender
...
{ name: 'akasharender',
description: 'Rendering support for generating static HTML websites
or EPUB eBooks',
'dist-tags': { latest: '0.6.15' },
versions:
[ '0.0.1',
...
author: 'David Herron <david@davidherron.com>
(http://davidherron.com)',
repository: { type: 'git', url:
'git://github.com/akashacms/akasharender.git' },
homepage: 'http://akashacms.com/akasharender/toc.html',
...
}
You can use npm view to extract any tag from package.json, like the following, which lets you view just the homepage tag:
$ npm view akasharender homepage
http://akashacms.org/akasharender/toc.html
Other fields in the package.json can be viewed by simply giving the desired tag name.
The main npm command has a long list of subcommands for specific package management operations. These cover every aspect of the life cycle of publishing packages (as a package author), and downloading, using, or removing packages (as an npm consumer).
You can view the list of these commands just by typing npm (with no arguments). If you see one you want to learn more about, view the help information:
$ npm help <command> The help text will be shown on your screen. Or, see the website: http://docs.npmjs.com
The npm install command makes it easy to install packages upon finding the one of your dreams, as follows:
$ npm install express /home/david/projects/notes/ - express@4.13.4 ...
The named module is installed in node_modules in the current directory. The specific version installed depends on any version number listed on the command line, as we see in the next section.
Version number matching in npm is powerful and flexible. The same sort of version specifiers used in package.json dependencies can also be used with the npm install command:
$ npm install package-name@tag
$ npm install package-name@version
$ npm install package-name@version-range
The last two are what they sound like. You can specify express@4.16.2 to target a precise version, or express@">4.1.0 < 5.0" to target a range of Express V4 versions.
The version match specifiers include these choices:
The @tag attribute is a symbolic name such as @latest, @stable, or @canary. The package owner assigns these symbolic names to specific version numbers, and can reassign them as desired. The exception is @latest, which is updated whenever a new release of the package is published.
For more documentation, run these commands: npm help json and npm help npm-dist-tag.
In some instances you want to install a module globally, so that it can be used from any directory. For example, the Grunt or Gulp build tools are widely useful, and conceivably you will find it useful if these tools are installed globally. Simply add the -g option:
$ npm install -g grunt-cli
If you get an error, and you're on a Unix-like system (Linux/Mac), you may need to run this with sudo:
$ sudo npm install -g grunt-cli
A global install is most important for those packages which install executable commands. We'll get into this shortly.
If a local package install lands in node_modules, where does a global package install land? On a Unix-like system it lands in PREFIX/lib/node_modules, and on Windows it lands in PREFIX/node_modules. In this case PREFIX means the directory where Node.js is installed. You can inspect the location of this directory like so:
$ npm config get prefix
/Users/david/.nvm/versions/node/v8.9.1
The algorithm used by Node.js for the require function automatically searches this directory for packages if the package is not found elsewhere.
Remember that ES6 modules do not support global packages.
Some in the Node.js community now frown on installing a package globally. One rationale exists in the Twelve Factor model. Namely, a software project is more reliable if all its dependencies are explicitly declared. If a build tool such as Grunt is required, but is not explicitly declared in package.json, the users of the application would have to receive instructions to install Grunt, and they would have to follow those instructions.
Users being users, they might skip over the instructions, fail to install the dependency, and then complain the application doesn't work. Surely most of us have done that once or twice.
It's recommended to avoid this potential problem by installing everything locally via one mechanism—the npm install command.
As we mentioned earlier, the npm install command by itself installs the packages listed in the dependencies section of package.json. This is easy and convenient. Simply by listing all the dependencies, it's quick and easy to install the dependencies required for using the package. What happens is npm looks in package.json for the dependencies or devDependencies field, and it will automatically install the mentioned packages.
You can manage the dependencies manually by editing package.json. Or you can use npm to assist you with editing the dependencies. You can add a new dependency like so:
$ npm install akasharender --save
In response, npm will add a dependencies tag to package.json:
"dependencies": {
"akasharender": "^0.6.15"
}
Now, when your application is installed, npm will automatically also install that package along with any dependencies listed by that package.
The devDependencies are modules used during development. That field is initialized the same as above, but with the --save-dev flag.
By default, when an npm install is run, modules listed in both dependencies and devDependencies are installed. Of course, the purpose for having two lists is to not install the devDependencies in some cases:
$ npm install --production
This installs only the modules listed in dependencies and none of the devDependencies modules.
In the Twelve-Factor application model, it's suggested that we explicitly identify the dependencies required by the application. This way we can reliably build our application, knowing that we've tested against a specific set of dependencies that we've carefully identified. By installing exactly the dependencies against which the application has been tested, we have more confidence in the application. On the Node.js platform, npm gives us this dependencies section, including a flexible mechanism to declare compatible package versions by their version number.
With npm@5 (also known as npm version 5), one change was that it's no longer required to add --save to the npm install command. Instead, npm by default acts as if you ran the command with --save, and will automatically add the dependency to your package.json. This is meant to simplify using npm, and it is arguably more convenient that npm now does this. At the same time it can be very surprising and inconvenient for npm to go ahead and modify package.json for you. The behavior can be disabled by using the --no-save flag. This behavior can be permanently disabled using the following:
$ npm config set save false
The npm config command supports a long list of settable options for tuning behavior of npm. See npm help config for the documentation, and npm help 7 config for the list of options.
Bugs exist in every piece of software. An update to the Node.js platform may break an existing package, as might an upgrade to packages used by the application. Your application may trigger a bug in a package it uses. In these and other cases, fixing the problem might be as simple as updating a package dependency to a later (or earlier) version.
First identify whether the problem exists in the package or in your code. After determining it's a problem in another package, investigate whether the package maintainers have already fixed the bug. Is the package hosted on GitHub or another service with a public issue queue? Look for an open issue on this problem. That investigation will tell you whether to update the package dependency to a later version. Sometimes, it will tell you to revert to an earlier version; for example, if the package maintainer introduced a bug that doesn't exist in an earlier version.
Sometimes, you will find that the package maintainers are unprepared to issue a new release. In such a case, you can fork their repository and create a patched version of their package.
One approach to fixing this problem is pinning the package version number to one that's known to work. You might know that version 6.1.2 was the last release against which your application functioned, and that starting with version 6.2.0 your application breaks. Hence, in package.json:
"dependencies": {
"module1": "6.1.2"
}
This freezes your dependency to the specific version number. You're free, then, to take your time updating your code to work against later releases of that module. Once your code is updated, or the upstream project is updated, change the dependency appropriately.
Another approach is to host a version of the package somewhere outside of the npm repository. This is covered in a later section.
Some packages install command-line programs. A side effect of installing such packages is a new command that you can type at the shell prompt or use in shell scripts. An example is the hexy program that we briefly used in Chapter 2, Setting up Node.js. Another example is the widely used Grunt or Gulp build tools.
The package.json file in such packages specifies the command-line tools that are installed. The command can be installed to one of two places:
To run the command, simply type the command name at a shell prompt. Except there's a little bit of configuration required to make that simple.
Typing the full pathname is not a user-friendly requirement to execute the command. We want to use the commands installed by modules, and we want a simple process for doing so. Meaning, we must add an appropriate value in the PATH variable, but what is it?
For global package installations, the executable lands in a directory that is probably already in your PATH variable, like /usr/bin or /usr/local/bin. Local package installations are what require special handling. The full path for the node_modules/.bin directory varies for each project, and obviously it won't work to add the full path for every node_modules/.bin directory to your PATH.
Adding ./node_modules/.bin to the PATH variable (or, on Windows, .\node_modules\.bin) works great. Any time your shell is in the root of a Node.js project, it will automatically find locally-installed commands from Node.js packages.
How we do this depends on the command shell you use, and your operating system.
On a Unix-like system the command shells are bash and csh. Your PATH variable would be set up in one of these ways:
$ export PATH=./node_modules/.bin:${PATH} # bash
$ setenv PATH ./node_modules/.bin:${PATH} # csh
The next step is adding the command to your login scripts so the variable is always set. On bash, add the corresponding line to your ~/.bashrc, and on csh add it to your ~/.cshrc.
On Windows, this task is handled through a system-wide settings panel:
This pane of the System Properties panel is found by searching for PATH in the Windows Settings screen. Click on the Environment Variables button, then select the Path variable, and finally click on the Edit button. In the screen here click the New button to add an entry to this variable, and enter .\node_modules\.bin as shown. You'll have to restart any open command shell windows. Once you do, the effect will be as shown previously.
What if you don't want to add these variables to your PATH at all times? The npm-path module may be of interest. This is a small program that computes the correct PATH variable for your shell and operating system. See the package at https://www.npmjs.com/package/npm-path.
The coder codes, updating their package, leaving you in their dust unless you keep up.
To find out if your installed packages are out of date, use the following command:
$ npm outdated
The report shows the current npm packages, the currently-installed version, as well as the current version in the npm repository. Updating the outdated packages is very simple:
$ npm update express $ npm update
As awesome as the npm repository is, we don't want to push everything we do through their service. This is especially true for internal development teams who cannot publish their code for all the world to see. While you can rent or install a private npm repository, there's another way. Packages can be installed from other locations. Details about this are in npm help package.json in the dependencies section. Some examples are:
$ npm install git+ssh://user@hostname:project.git#tag --save
If you want to create a new package, you can create the package.json file by hand or you can get npm's help. The npm init command leads you through a little dialog to get starting values for the package.json file.
Once you get through the questions, the package.json file is written to disk.
Expect to have to edit that file considerably before publishing to the npm repository. A few fields help give a good impression to folks looking at the package listing on npmjs.com:
It's important that your Node.js software runs on the correct version of Node.js. The primary reason being when new features are added to the platform. You'll want to use those new features, whether it is the async functions added in 8.x or the ES Modules supported added in 10.x. We need a way to declare the Node.js version required to run our software.
This dependency is declared in package.json using the engines tag:
"engines": {
"node": ">= 8.x"
}
This, of course, uses the same version number matching scheme discussed earlier.
All those packages in the npm repository came from people like you with an idea of a better way of doing something. It is very easy to get started with publishing packages. Online docs can be found at https://docs.npmjs.com/getting-started/publishing-npm-packages.
You first use the npm adduser command to register yourself with the npm repository. You can also sign up with the website. Next, you log in using the npm login command.
Finally, while sitting in the package root directory, use the npm publish command. Then, stand back so that you don't get stampeded by the crush of thronging fans. Or, maybe not. There are almost 600,000 packages in the repository, with almost 400 packages added every day. To get yours to stand out, you will require some marketing skill, which is another topic beyond the scope of this book.
One feature of the Twelve-Factor methodology is step two, explicitly declaring your dependencies. We've already touched on this, but it's worth reiterating and to seeing npm makes this easy to accomplish.
Step one of the Twelve-Factor methodology is ensuring that your application code is checked into a source code repository. You probably already know this, and even have the best of intentions to ensure that everything is checked in. With Node.js, each module should have its own repository rather than putting every single last piece of code in one repository.
Each module can then progress on its own timeline. A breakage in one module is easy to back out by changing the version dependency in package.json.
This gets us to Twelve-Factor step two. There are two aspects of this step, one of which is the package versioning that we discussed previously. The next is explicitly declaring version numbers, which can be declared in dependencies and devDependencies sections of package.json. This ensures that everyone on the team is on the same page, developing against the same versions of the same modules. When it's time to deploy to testing, staging, or production servers, and the deployment script runs npm install or npm update, the code will use a known version of the module that everyone tested against.
The lazy way of declaring dependencies is putting * in the version field. That uses the latest version in the npm repository. Maybe this will work, until one day the maintainers of that package introduce a bug. You'll type npm update, and all of a sudden your code doesn't work. You'll head over to the GitHub site for the package, look in the issue queue, and possibly see that others have already reported the problem you're seeing. Some of them will say that they've pinned on the previous release until this bug is fixed. What that means is their package.json file does not depend on * for the latest version, but on a specific version number before the bug was created.
Don't do the lazy thing, do the smart thing.
The other aspect of explicitly declaring dependencies is to not implicitly depend on global packages. Earlier, we said that some in the Node.js community caution against installing modules in the global directories. This might seem like an easy shortcut to sharing code between applications. Just install it globally, and you don't have to install the code in each application.
But, doesn't that make deployment harder? Will the new team member be instructed on all the special files to install here and there to make the application run? Will you remember to install that global module on all destination machines?
For Node.js, that means listing all the module dependencies in package.json, and then the installation instructions are simply npm install, followed perhaps by editing a configuration file.
As powerful as npm is, it is not the only package management system for Node.js. Because the Node.js core team does not dictate a package management system, the Node.js community is free to roll up their sleeves and develop any system they feel best. That the vast majority of us use npm is a testament to its value and usefulness. But there is a competitor.
Yarn (see https://yarnpkg.com/en/) is a collaboration between engineers at Facebook, Google, and several other companies. They proclaim that Yarn is ultra fast, ultra-secure (by using checksums of everything), and ultra reliable (by using a yarn-lock.json file to record precise dependencies).
Instead of running their own package repository, Yarn runs on top of npm's package repository at npmjs.com. This means that the Node.js community is not forked by Yarn, but enhanced by having an improved package management tool.
The npm team responded to Yarn in npm@5 (also known as npm version 5) by improving performance, and by introducing a package-lock.json file to improve reliability. The npm team have announced additional improvements in npm@6.
Yarn has become very popular and is widely recommended over npm. They perform extremely similar functions, and the performance is not that different to npm@5. The command-line options are worded differently. An important benefit Yarn brings to the Node.js community is that competition between Yarn and npm seems to be breeding faster advances in Node.js package management.
To get you started, these are the most important commands:
Running yarn by itself does the yarn install behavior. There are several other commands in Yarn, and yarn help will list them all.
You learned a lot in this chapter about modules and packages for Node.js.
Specifically, we covered implementing modules and packages for Node.js, managing installed modules and packages, and saw how Node.js locates modules.
Now that you've learned about modules and packages, we're ready to use them to build applications, which is the topic of the next chapter.
Now that you've learned about Node.js modules, it's time to put this knowledge to work by building a simple Node.js web application. In this chapter, we'll keep to a simple application, enabling us to explore three different application frameworks for Node.js. In later chapters, we'll build some more complex applications, but before we can walk, we must learn to crawl.
We will cover the following topics in this chapter:
EventEmitters are one of the core idioms of Node.js. If Node.js's core idea is an event-driven architecture, emitting events from an object is one of the primary mechanisms of that architecture. An EventEmitter is an object that gives notifications—events—at different points in its life cycle. For example, an HTTP Server object emits events concerning each stage of the startup/shutdown of the Server object, and as HTTP requests are made from HTTP clients.
Many core Node.js modules are EventEmitters, and EventEmitters are an excellent skeleton to implement asynchronous programming. EventEmitters have nothing to do with web application development, but they are so much part of the Node.js woodwork that you may skip over their existence.
In this chapter, we'll work with the HTTPServer and HTTPClient objects. Both are subclasses of the EventEmitter class, and rely on it to send events for each step of the HTTP protocol.
Before getting started on the EventEmitter class, we need to take a look at another of the ES2015 features: classes. The JavaScript language has always had objects, and a concept of a class hierarchy, but nothing so formal as in other languages. The ES2015 class object builds on the existing prototype-based inheritance model, but with a syntax looking very much like class definitions in other languages.
For example, consider this class we'll be using later in the book:
class Note {
constructor(key, title, body) {
this._key = key;
this._title = title;
this._body = body;
}
get key() { return this._key; }
get title() { return this._title; }
set title(newTitle) { return this._title = newTitle; }
get body() { return this._body; }
set body(newBody) { return this._body = newBody; }
}
Once you've defined the class, you can export the class definition to other modules:
module.exports.Note = class Note { .. } # in CommonJS modules
export class Note { .. } # in ES6 modules
The functions marked with get or set keywords are getters and setters, used like so:
var aNote = new Note("key", "The Rain in Spain", "Falls mainly on the plain");
var key = aNote.key;
var title = aNote.title;
aNote.title = "The Rain in Spain, which made me want to cry with joy";
New instances of a class are created with new. You access a getter or setter function as if it is a simple field on the object. Behind the scenes, the getter/setter function is invoked.
The preceding implementation is not the best because the _title and _body fields are publicly visible, and there is no data hiding or encapsulation. We'll go over a better implementation later.
One tests whether a given object is of a certain class by using the instanceof operator:
if (anotherNote instanceof Note) {
... it's a Note, so act on it as a Note
}
Finally, you declare a subclass using the extends operator, similar to what's done in other languages:
class LoveNote extends Note {
constructor(key, title, body, heart) {
super(key, title, body);
this._heart = heart;
}
get heart() { return this._heart; }
set heart(newHeart) { return this._heart = newHeart; }
}
In other words, the LoveNote class has all the fields of Note, plus this new field named heart.
The EventEmitter object is defined in the events module of Node.js. Directly using the EventEmitter class means performing require('events'). In most cases, you'll be using an existing object that uses EventEmitter internally and you won't require this module. But there are cases where needs dictate implementing an EventEmitter subclass.
Create a file named pulser.js containing the following code:
const EventEmitter = require('events');
class Pulser extends EventEmitter {
start() {
setInterval(() => {
console.log(`${new Date().toISOString()} >>>> pulse`);
this.emit('pulse');
console.log(`${new Date().toISOString()} <<<< pulse`);
}, 1000);
}
}
module.exports = Pulser;
This defines a Pulser class, which inherits from EventEmitter. In older Node.js releases, this would require using util.inherits, but the new class object makes subclassing much simpler.
Another thing to examine is how this.emit in the callback function refers to the Pulser object. Before the ES2015 arrow function, when our callbacks used a regular function, this would not have referred to the Pulser object. Instead, it would have referred to some other object related to the setInterval function. Because it is an arrow function, the this inside the arrow function is the same this as in the outer function.
If you needed to use a function rather than an arrow function, this trick would work:
class Pulser extends EventEmitter {
start() {
var self = this;
setInterval(function() {
self.emit(...);
});
}
}
What's different is the assignment of this to self. The value of this inside the function is different, but the value of self remains the same in every enclosed scope. This widely-used trick is less necessary now that we have arrow functions.
If you want a simple EventEmitter, but with your own class name, the body of the extended class can be empty:
class HeartBeat extends EventEmitter {}
const beatMaker = new HeartBeat();
The purpose of the Pulser class is sending a timed event, once a second, to any listeners. The start method uses setInterval to kick off repeated callback execution, scheduled for every second, calling emit to send the pulse events to any listeners.
Now, let's see how to use the Pulser object. Create a new file, called pulsed.js, containing:
const Pulser = require('./pulser');
// Instantiate a Pulser object
const pulser = new Pulser();
// Handler function
pulser.on('pulse', () => {
console.log(`${new Date().toISOString()} pulse received`);
});
// Start it pulsing
pulser.start();
Here, we create a Pulser object and consume its pulse events. Calling pulser.on('pulse') sets up connections for the pulse events to invoke the callback function. It then calls the start method to get the process going.
Enter this into a file and name the file pulsed.js. When you run it, you should see the following output:
$ node pulsed.js
2017-12-03T06:24:10.272Z >>>> pulse
2017-12-03T06:24:10.275Z pulse received
2017-12-03T06:24:10.276Z <<<< pulse
2017-12-03T06:24:11.279Z >>>> pulse
2017-12-03T06:24:11.279Z pulse received
2017-12-03T06:24:11.279Z <<<< pulse
2017-12-03T06:24:12.281Z >>>> pulse
2017-12-03T06:24:12.281Z pulse received
2017-12-03T06:24:12.282Z <<<< pulse
That gives you a little practical knowledge of the EventEmitter class. Let's now look at its operational theory.
With the EventEmitter class, your code emits events that other code can receive. It's a way of connecting two separated sections of your program, kind of like how quantum entanglement means two electrons can communicate with each other from any distance. Seems simple enough.
The event name can be anything that makes sense to you, and you can define as many event names as you like. Event names are defined simply by calling .emit with the event name. There's nothing formal to do and no registry of event names. Simply making a call to .emit is enough to define an event name.
An object sends events using the .emit function. Events are sent to any listeners that have registered to receive events from the object. The program registers to receive an event by calling that object's .on method, giving the event name and an event handler function.
There is no central distribution point for all events. Instead, each instance of an EventEmitter object manages its own set of listeners and distributes its events to those listeners.
Often, it is required to send data along with an event. To do so, simply add the data as arguments to the .emit call, as follows:
this.emit('eventName', data1, data2, ..);
When the program receives that event, the data appears as arguments to the callback function. Your program would listen to such an event as follows:
emitter.on('eventName', (data1, data2, ...theArgs) => {
// act on event
});
There is no handshaking between event receivers and the event sender. That is, the event sender simply goes on with its business, and it gets no notifications about any events received, any action taken, or any error that occurred.
In this example, we used another of the ES2015 features, the rest operator, shown here as ...theArgs. The rest operator catches any number of remaining function parameters into an array. Since EventEmitter can pass along any number of parameters, and the rest operator can automatically receive any number of parameters, it's a match made in heaven, or else in the TC-39 committee.
The HTTP server object is the foundation of all Node.js web applications. The object itself is very close to the HTTP protocol, and its use requires knowledge of that protocol. In most cases, you'll be able to use an application framework such as Express that hides the HTTP protocol details, allowing the programmer to focus on business logic.
We already saw a simple HTTP server application in Chapter 2, Setting up Node.js, which is as follows:
const http = require('http');
http.createServer((req, res) => {
res.writeHead(200, {'Content-Type': 'text/plain'});
res.end('Hello, World!\n');
}).listen(8124, '127.0.0.1');
console.log('Server running at http://127.0.0.1:8124');
The http.createServer function creates an http.Server object. Because it is an EventEmitter, this can be written in another way to make that fact explicit:
const http = require('http');
const server = http.createServer();
server.on('request', (req, res) => {
res.writeHead(200, {'Content-Type': 'text/plain'});
res.end('Hello, World!\n');
});
server.listen(8124, '127.0.0.1');
console.log('Server running at http://127.0.0.1:8124');
The request event takes a function, which receives request and response objects. The request object has data from the web browser, while the response object is used to gather the data to be sent in the response. The listen function causes the server to start listening and arranging to dispatch an event for every request arriving from a web browser.
Now, let's look at something more interesting with different actions based on the URL.
Create a new file, named server.js, containing the following code:
const http = require('http');
const util = require('util');
const url = require('url');
const os = require('os');
const server = http.createServer();
server.on('request', (req, res) => {
var requrl = url.parse(req.url, true);
if (requrl.pathname === '/') {
res.writeHead(200, {'Content-Type': 'text/html'});
res.end(
`<html><head><title>Hello, world!</title></head>
<body><h1>Hello, world!</h1>
<p><a href='/osinfo'>OS Info</a></p>
</body></html>`);
} else if (requrl.pathname === "/osinfo") {
res.writeHead(200, {'Content-Type': 'text/html'});
res.end(
`<html><head><title>Operating System Info</title></head>
<body><h1>Operating System Info</h1>
<table>
<tr><th>TMP Dir</th><td>${os.tmpdir()}</td></tr>
<tr><th>Host Name</th><td>${os.hostname()}</td></tr>
<tr><th>OS Type</th><td>${os.type()} ${os.platform()} ${os.arch()} ${os.release()}</td></tr>
<tr><th>Uptime</th><td>${os.uptime()} ${util.inspect(os.loadavg())}</td></tr>
<tr><th>Memory</th><td>total: ${os.totalmem()} free: ${os.freemem()}</td></tr>
<tr><th>CPU's</th><td><pre>${util.inspect(os.cpus())}</pre></td></tr>
<tr><th>Network</th><td><pre>${util.inspect(os.networkInterfaces())}</pre></td></tr>
</table>
</body></html>`);
} else {
res.writeHead(404, {'Content-Type': 'text/plain'});
res.end("bad URL "+ req.url);
}
});
server.listen(8124);
console.log('listening to http://localhost:8124');
To run it, type the following command:
$ node server.js listening to http://localhost:8124
This application is meant to be similar to PHP's sysinfo function. Node's os module is consulted to provide information about the server. This example can easily be extended to gather other pieces of data about the server:
A central part of any web application is the method of routing requests to request handlers. The request object has several pieces of data attached to it, two of which are useful for routing requests: the request.url and request.method fields.
In server.js, we consult the request.url data to determine which page to show, after parsing (using url.parse) to ease the digestion process. In this case, we can do a simple comparison of the pathname to determine which handler method to use.
Some web applications care about the HTTP verb (GET, DELETE, POST, and so on) used and must consult the request.method field of the request object. For example, POST is frequently used for FORM submissions.
The pathname portion of the request URL is used to dispatch the request to the correct handler. While this routing method, based on simple string comparison, will work for a small application, it'll quickly become unwieldy. Larger applications will use pattern matching to use part of the request URL to select the request handler function and other parts to extract request data out of the URL. We'll see this in action while looking at Express later in the Getting started with Express section.
A search for a URL match in the npm repository turns up several promising packages that could be used to implement request matching and routing. A framework like Express has this capability already baked in and tested.
If the request URL is not recognized, the server sends back an error page using a 404 result code. The result code informs the browser about the status of the request, where a 200 code means everything is fine, and a 404 code means the requested page doesn't exist. There are, of course, many other HTTP response codes, each with their own meaning.
The previous example showed two of the new features introduced with ES2015, multiline and template strings. The feature is meant to simplify our life while creating text strings.
The existing string representations use single quotes and double quotes. Template strings are delimited with the backtick character that's also known as the grave accent:
`template string text`
Before ES2015, one way to implement a multiline string was this construct:
["<html><head><title>Hello, world!</title></head>",
"<body><h1>Hello, world!</h1>",
"<p><a href='/osinfo'>OS Info</a></p>",
"</body></html>"]
.join('\n')
Yes, that was the code used in the same example in previous versions of this book. This is what we can do with ES2015:
`<html><head><title>Hello, world!</title></head> <body><h1>Hello, world!</h1> <p><a href='/osinfo'>OS Info</a></p> </body></html>`
This is more succinct and straightforward. The opening quote is on the first line, the closing quote on the last line, and everything in between is part of our string.
The real purpose of the template strings feature is supporting strings where we can easily substitute values directly into the string. Most other programming languages support this ability, and now JavaScript does too.
Pre-ES2015, a programmer could have written code like this:
[ ...
"<tr><th>OS Type</th><td>{ostype} {osplat} {osarch} {osrelease}</td></tr>"
... ].join('\n')
.replace("{ostype}", os.type())
.replace("{osplat}", os.platform())
.replace("{osarch}", os.arch())
.replace("{osrelease}", os.release())
Again, this is extracted from the same example in previous versions of this book. With template strings, this can be written as follows:
`...<tr><th>OS Type</th><td>${os.type()} ${os.platform()} ${os.arch()} ${os.release()}</td></tr>...`
Within a template string, the part within the ${ .. } brackets is interpreted as an expression. It can be a simple mathematical expression, a variable reference, or, as in this case, a function call.
The last thing to mention is a matter of indentation. In normal coding, one indents a long argument list to the same level as the containing function call. But, for these multiline string examples, the text content is flush with column zero. What's up?
This may impede the readability of your code, so it's worth weighing code readability against another issue: excess characters in the HTML output. The blanks we would use to indent the code for readability will become part of the string and will be output in the HTML. By making the code flush with column zero, we don't add excess blanks to the output at the cost of some code readability.
This approach also carries a security risk. Have you verified the data is safe? That it will not form the basis of a security attack? In this case, we're dealing with simple strings and numbers coming from a safe data source. Therefore this code is as safe as the Node.js runtime. What about user-supplied content, and the risk that a nefarious user might supply insecure content implanting some kind of malware into target computers?
For this and many other reasons, it is often safer to use an external template engine. Applications like Express make it easy to do so.
The events emitted by the HTTPServer object can be used for additional purposes beyond the immediate task of delivering a web application. The following code demonstrates a useful module that listens to all the HTTP Server events. It could be a useful debugging tool, which also demonstrates how HTTP server objects operate.
Node.js's HTTP Server object is an EventEmitter and the HTTP Sniffer simply listens to every server event, printing out information pertinent to each event.
What we're about to do is:
Create a file named httpsniffer.js containing the following code:
const util = require('util');
const url = require('url');
const timestamp = () => { return new Date().toISOString(); }
exports.sniffOn = function(server) {
server.on('request', (req, res) => {
console.log(`${timestamp()} e_request`);
console.log(`${timestamp()} ${reqToString(req)}`);
});
server.on('close', errno => { console.log(`${timestamp()} e_close
${errno}`); });
server.on('checkContinue', (req, res) => {
console.log(`${timestamp()} e_checkContinue`);
console.log(`${timestamp()} ${reqToString(req)}`);
res.writeContinue();
});
server.on('upgrade', (req, socket, head) => {
console.log(`${timestamp()} e_upgrade`);
console.log(`${timestamp()} ${reqToString(req)}`);
});
server.on('clientError', () => { console.log(`${timestamp()}
e_clientError`); });
};
const reqToString = exports.reqToString = (req) => {
var ret=`req ${req.method} ${req.httpVersion} ${req.url}` +'\n';
ret += JSON.stringify(url.parse(req.url, true)) +'\n';
var keys = Object.keys(req.headers);
for (var i = 0, l = keys.length; i < l; i++) {
var key = keys[i];
ret += `${i} ${key}: ${req.headers[key]}` +'\n';
}
if (req.trailers) ret += util.inspect(req.trailers) +'\n';
return ret;
};
That was a lot of code! But the key to it is the sniffOn function. When given an HTTP Server object, it uses the .on function to attach listener functions that print data about each emitted event. It gives a fairly detailed trace of HTTP traffic on an application.
In order to use it, simply insert this code just before the listen function in server.js:
require('./httpsniffer').sniffOn(server);
server.listen(8124);
console.log('listening to http://localhost:8124');
With this in place, run the server as we did earlier. You can visit http://localhost:8124/ in your browser and see the following console output:
$ node server.js listening to http://localhost:8124 2017-12-03T19:21:33.162Z request
2017-12-03T19:21:33.162Z request GET 1.1 /
{"protocol":null,"slashes":null,"auth":null,"host":null,"port":null,"hostname":null,"hash":null,"search":"","query":{},"pathname":"/","path":"/","href":"/"}
0 host: localhost:8124
1 upgrade-insecure-requests: 1
2 accept: text/html,application/xhtml+xml,application/xml;q=0.9,*/*;q=0.8
3 user-agent: Mozilla/5.0 (Macintosh; Intel Mac OS X 10_11_6) AppleWebKit/604.3.5 (KHTML, like Gecko) Version/11.0.1 Safari/604.3.5
4 accept-language: en-us
5 accept-encoding: gzip, deflate
6 connection: keep-alive
{}
2017-12-03T19:21:42.154Z request
2017-12-03T19:21:42.154Z request GET 1.1 /osinfo
{"protocol":null,"slashes":null,"auth":null,"host":null,"port":null,"hostname":null,"hash":null,"search":"","query":{},"pathname":"/osinfo","path":"/osinfo","href":"/osinfo"}
0 host: localhost:8124
1 connection: keep-alive
2 upgrade-insecure-requests: 1
3 accept: text/html,application/xhtml+xml,application/xml;q=0.9,*/*;q=0.8
4 user-agent: Mozilla/5.0 (Macintosh; Intel Mac OS X 10_11_6) AppleWebKit/604.3.5 (KHTML, like Gecko) Version/11.0.1 Safari/604.3.5
5 referer: http://localhost:8124/
6 accept-language: en-us
7 accept-encoding: gzip, deflate
{}
You now have a tool for snooping on HTTPServer events. This simple technique prints a detailed log of event data. The pattern can be used for any EventEmitter object. You can use this technique as a way to inspect the actual behavior of EventEmitter objects in your program.
The HTTPServer object is very close to the HTTP protocol. While this is powerful in the same way that driving a stick shift car gives you low-level control over the driving experience, typical web application programming is better done at a higher level. Does anybody use assembly language to write web applications? It's better to abstract away the HTTP details and concentrate on your application.
The Node.js developer community has developed quite a few application frameworks to help with different aspects of abstracting away HTTP protocol details. Of them, Express is the most popular, and Koa (http://koajs.com/) should be considered because it was developed by the same team and has fully integrated support for async functions.
The ExpressJS Wiki has a list of frameworks built on top of ExpressJS, or tools that work with it. This includes template engines, middleware modules, and more. The ExpressJS Wiki is located at https://github.com/expressjs/express/wiki.
One reason to use a web framework is that they often provide the best practices used in web application development for over 20 years. The usual best practices include the following:
Web frameworks help you invest your time in the task without getting lost in the details of implementing HTTP protocol. Abstracting away details is a time-honored way for programmers to be more efficient. This is especially true when using a library or framework providing prepackaged functions that take care of the details.
Express is perhaps the most popular Node.js web app framework. It's so popular that it's part of the MEAN Stack acronym. MEAN refers to MongoDB, ExpressJS, AngularJS, and Node.js. Express is described as being Sinatra-like, referring to a popular Ruby application framework, and that it isn't an opinionated framework, meaning the framework authors don't impose their opinions about structuring an application. This means Express is not at all strict about how your code is structured; you just write it the way you think is best.
You can visit the home page for Express at http://expressjs.com/.
Shortly, we'll implement a simple application to calculate Fibonacci numbers using Express, and in later chapters, we'll do quite a bit more with Express. We'll also explore how to mitigate the performance problems from computationally intensive code we discussed earlier.
As of writing this book, Express 4.16 is the current version, and Express 5 is in Alpha testing. According to the ExpressJS website, there are very few differences between Express 4 and Express 5.
Let's start by installing the express-generator. While we can just start writing some code, the express-generator provides a blank starting application. We'll take that and modify it.
Install it using the following commands:
$ mkdir fibonacci $ cd fibonacci $ npm install express-generator@4.x
This is different from the suggested installation method on the Express website, which was to use the -g tag for a global install. We're also using an explicit version number to ensure compatibility. As of writing this book, express-generator@5.x does not exist. When it does exist, one should be able to use the 5.x version with the following instructions.
Earlier, we discussed how many now recommend against installing modules globally. In the Twelve-Factor model, it's strongly recommended to not install global dependencies, and that's what we're doing.
The result is that an express command is installed in the ./node_modules/.bin directory:
$ ls node_modules/.bin/ express
Run the express command like so:
$ ./node_modules/.bin/express --help
Usage: express [options] [dir]
Options:
-h, --help output usage information
-V, --version output the version number
-e, --ejs add ejs engine support (defaults to jade)
--hbs add handlebars engine support
-H, --hogan add hogan.js engine support
-c, --css <engine> add stylesheet <engine> support
(less|stylus|compass|sass) (defaults to plain css)
--git add .gitignore
-f, --force force on non-empty directory
We probably don't want to type ./node_modules/.bin/express every time we run the express-generator application or, for that matter, any of the other applications that provide command-line utilities. Refer back to the discussion in Chapter 3, Node.js Modules about adding that directory to the PATH variable.
Now that you've installed express-generator in the fibonacci directory, use it to set up the blank framework application:
$ ./node_modules/.bin/express --view=hbs --git .
destination is not empty, continue? [y/N] y
create : .
create : ./package.json
create : ./app.js
create : ./.gitignore
create : ./public
create : ./routes
create : ./routes/index.js
create : ./routes/users.js
create : ./views
create : ./views/index.hbs
create : ./views/layout.hbs
create : ./views/error.hbs
create : ./bin
create : ./bin/www
create : ./public/javascripts
create : ./public/images
create : ./public/stylesheets
create : ./public/stylesheets/style.css
install dependencies:
$ cd . && npm install
run the app:
$ DEBUG=fibonacci:* npm start
$ npm uninstall express-generator
added 83 packages and removed 5 packages in 4.104s
This created a bunch of files for us, which we'll walk through in a minute. The node_modules directory still has the express-generator module, which is now not useful. We can just leave it there and ignore it, or we can add it to the devDependencies of the package.json it generated. Alternatively, we can uninstall it as shown here.
The next thing to do is run the blank application in the way we're told. The command shown, npm start, relies on a section of the supplied package.json file:
"scripts": {
"start": "node ./bin/www"
},
The npm tool supports scripts that are ways to automate various tasks. We'll use this capability throughout the book to do various things. When the Twelve-Factor Application model suggests automating all your administrative tasks, the npm scripts feature is an excellent mechanism to do so. Most npm scripts are run with the npm run scriptName command, but the start command is explicitly recognized by npm and can be run as shown previously.
The steps are:
To install the dependencies, and run the application, type these commands:
$ npm install
$ DEBUG=fibonacci:* npm start
> fibonacci@0.0.0 start /Users/David/chap04/fibonacci
> node ./bin/www
fibonacci:server Listening on port 3000 +0ms
Setting the DEBUG variable this way turns on some debugging output, which includes this message about listening on port 3000. Otherwise, we aren't told this information. This syntax is what's used in the Bash shell to run a command with an environment variable. If you get an error try running just "npm start" then read the next section.
We can modify the supplied npm start script to always run the app with debugging enabled. Change the scripts section to the following:
"scripts": {
"start": "DEBUG=fibonacci:* node ./bin/www"
},
Since the output says it is listening on port 3000, we direct our browser to
http://localhost:3000/ and see the following output:
If you're on Windows the previous example may have failed with an error that DEBUG is not a known command. The problem is that the Windows shell, the cmd.exe program, does not support the Bash command-line structure.
Adding VARIABLE=value at the beginning of a command-line is specific to some shells, like Bash, on Linux and macOS. It sets that environment variable only for the command-line being executed, and is a very convenient way to temporarily override environment variables for a specific command.
Clearly a solution is required if your package.json is to be usable across different operating systems.
The best solution appears to be the cross-env package in the npm repository, see: https://www.npmjs.com/package/cross-env With this package installed, commands in the scripts section in package.json can set environment variables just as in Bash on Linux/macOS. The usage looks like so:
"scripts": {
"start": "cross-env DEBUG=fibonacci:* node ./bin/www"
},
"dependencies": {
...
"cross-env": "5.1.x"
}
Then the command is executed as so:
C:\Users\david\Documents\chap04\fibonacci>npm install
... output from installing packages
C:\Users\david\Documents\chap04\fibonacci>npm run start
> fibonacci@0.0.0 start C:\Users\david\Documents\chap04\fibonacci
> cross-env DEBUG=fibonacci:* node ./bin/www
fibonacci:server Listening on port 3000 +0ms
GET / 304 90.597 ms - -
GET /stylesheets/style.css 304 14.480 ms - -
GET /fibonacci 200 84.726 ms - 503
GET /stylesheets/style.css 304 4.465 ms - -
GET /fibonacci?fibonum=22 500 1069.049 ms - 327
GET /stylesheets/style.css 304 2.601 ms - -
We have a working, blank Express application; let's look at what was generated for us. We're doing this to familiarize ourselves with Express before diving in to start coding our Fibonacci application.
Because we used the --view=hbs option, this application is set up to use the Handlebars.js template engine. Handlebars was built on top of Mustache, and was originally designed for use in the browser; for more information see its homepage at http://handlebarsjs.com/. The version shown here has been packaged for use with Express, and is documented at https://github.com/pillarjs/hbs.
Generally speaking, a template engine makes it possible to insert data into generated web pages. The ExpressJS Wiki has a list of template engines for Express https://github.com/expressjs/express/wiki#template-engines.
The views directory contains two files, error.hbs and index.hbs. The hbs extension is used for Handlebars files. Another file, layout.hbs, is the default page layout. Handlebars has several ways to configure layout templates and even partials (snippets of code which can be included anywhere).
The routes directory contains the initial routing setup, that is, the code to handle specific URLs. We'll modify these later.
The public directory will contain assets that the application doesn't generate, but are simply sent to the browser. What's initially installed is a CSS file, public/stylesheets/style.css.
The package.json file contains our dependencies and other metadata.
The bin directory contains the www script that we saw earlier. That's a Node.js script, which initializes the HTTPServer objects, starts it listening on a TCP port, and calls the last file we'll discuss, app.js. These scripts initialize Express, hook up the routing modules, and do other things.
There's a lot going on in the www and app.js scripts, so let's start with the application initialization. Let's first take a look at a couple of lines in app.js:
var express = require('express');
...
var app = express();
...
module.exports = app;
This means that app.js is a module that exports the object returned by the express module. It doesn't start the HTTP server object, however.
Now, let's turn to the www script. The first thing to see is that it starts with this line:
#!/usr/bin/env node
This is a Unix/Linux technique to make a command script. It says to run the following as a script using the node command. In other words, we have Node.js code and we're instructing the operating system to execute that code using the Node.js runtime:
$ ls -l bin/www
-rwx------ 1 david staff 1595 Feb 5 1970 bin/www
We can also see that the script was made executable by express-generator.
It calls the app.js module as follows:
var app = require('../app');
...
var port = normalizePort(process.env.PORT || '3000');
app.set('port', port);
...
var server = http.createServer(app);
...
server.listen(port);
server.on('error', onError);
server.on('listening', onListening);
We see where port 3000 comes from; it's a parameter to the normalizePort function. We also see that setting the PORT environment variable will override the default port 3000. And finally, we see that the HTTP Server object is created here, and is told to use the application instance created in app.js. Try running the following command:
$ PORT=4242 DEBUG=fibonacci:* npm start
The application now tells you that it's listening on port 4242, where you can ponder the meaning of life.
The app object is next passed to http.createServer(). A look in the Node.js documentation tells us this function takes a requestListener, which is simply a function that takes the request and response objects we've seen previously. Therefore, the app object is such a function.
Finally, the www script starts the server listening on the port we specified.
Let's now walk through app.js in more detail:
app.set('views', path.join(__dirname, 'views'));
app.set('view engine', 'hbs');
This tells Express to look for templates in the views directory and to use the EJS templating engine.
The app.set function is used for setting application properties. It'll be useful to browse the API documentation as we go through (http://expressjs.com/en/4x/api.html).
Next is a series of app.use calls:
app.use(logger('dev'));
app.use(bodyParser.json());
app.use(bodyParser.urlencoded({ extended: false }));
app.use(cookieParser());
app.use(express.static(path.join(__dirname, 'public')));
app.use('/', routes);
app.use('/users', users);
The app.use function mounts middleware functions. This is an important piece of Express jargon we will discuss shortly. At the moment, let's say that middleware functions are executed during the processing of routes. This means all the features named here are enabled in app.js:
Let's round out the walkthrough of app.js by discussing what middleware functions do for our application. We have an example at the end of the script:
app.use(function(req, res, next) {
var err = new Error('Not found');
err.status = 404;
next(err);
});
The comment says catch 404 and forward to error handler. As you probably know, an HTTP 404 status means the requested resource was not found. We need to tell the user their request wasn't satisfied, and maybe show them a picture of a flock of birds pulling a whale out of the ocean. This is the first step in doing so. Before getting to the last step of reporting this error, you must learn how middleware works.
We do have a middleware function right in front of us. Refer to its documentation at http://expressjs.com/en/guide/writing-middleware.html.
Middleware functions take three arguments. The first two, request and response, are equivalent to the request and response of the Node.js HTTP request object. However, Express expands the objects with additional data and capabilities. The last, next, is a callback function controlling when the request-response cycle ends, and it can be used to send errors down the middleware pipeline.
The incoming request gets handled by the first middleware function, then the next, then the next, and so on. Each time the request is to be passed down the chain of middleware functions, the next function is called. If next is called with an error object, as shown here, an error is being signaled. Otherwise, the control simply passes to the next middleware function in the chain.
What happens if next is not called? The HTTP request will hang because no response has been given. A middleware function gives a response when it calls functions on the response object, such as res.send or res.render.
For example, consider the inclusion of app.js:
app.get('/', function(req, res) { res.send('Hello World!'); });
This does not call next, but instead calls res.send. This is the correct method of ending the request-response cycle, by sending a response (res.send) to the request. If neither next nor res.send is called, the request never gets a response.
Hence, a middleware function does one of the following four things:
The ordering of middleware execution depends on the order they're added to the app object. The first added is executed first, and so on.
We've seen two kinds of middleware functions so far. In one, the first argument is the handler function. In the other, the first argument is a string containing a URL snippet, and the second argument is the handler function.
What's actually going on is app.use has an optional first argument: the path the middleware is mounted on. The path is a pattern match against the request URL, and the given function is triggered if the URL matches the pattern. There's even a method to supply named parameters in the URL:
app.use('/user/profile/:id', function(req, res, next) {
userProfiles.lookup(req.params.id, (err, profile) => {
if (err) return next(err);
// do something with the profile
// Such as display it to the user
res.send(profile.display());
});
});
This path specification has a pattern, :id, and the value will land in req.params.id. In this example, we're suggesting a user profiles service, and that for this URL we want to display information about the named user.
Another way to use a middleware function is on a specific HTTP request method. With app.use, any request will be matched, but in truth, GET requests are supposed to behave differently to POST requests. You call app.METHOD where METHOD matches one of the HTTP request verbs. That is, app.get matches the GET method, app.post matches POST, and so on.
Finally, we get to the router object. This is a kind of middleware used explicitly for routing requests based on their URL. Take a look at routes/users.js:
var express = require('express');
var router = express.Router();
router.get('/', function(req, res, next) {
res.send('respond with a resource');
});
module.exports = router;
We have a module whose exports object is a router. This router has only one route, but it can have any number of routes you think is appropriate.
Back in app.js, this is added as follows:
app.use('/users', users);
All the functions we discussed for the app object apply to the router object. If the request matches, the router is given the request for its own chain of processing functions. An important detail is that the request URL prefix is stripped when the request is passed to the router instance.
You'll notice that the router.get in users.js matches '/' and that this router is mounted on '/users'. In effect, that router.get matches /users as well, but because the prefix was stripped, it specifies '/' instead. This means a router can be mounted on different path prefixes without having to change the router implementation.
Now, we can finally get back to the generated app.js, the 404 Error page not found, and any other errors the application might want to show to the user.
A middleware function indicates an error by passing a value to the next function call. Once Express sees an error, it will skip any remaining non-error routing, and it will only pass it to error handlers instead. An error handler function has a different signature than what we saw earlier.
In app.js, which we're examining, this is our error handler:
app.use(function(err, req, res, next) {
res.status(err.status || 500);
res.render('error', {
message: err.message,
error: {}
});
});
Error handler functions take four parameters, with err added to the familiar req, res, and next. For this handler, we use res.status to set the HTTP response status code, and we use res.render to format an HTML response using the views/error.hbs template. The res.render function takes data, rendering it with a template to produce HTML.
This means any error in our application will land here, bypassing any remaining middleware functions.
The Fibonacci numbers are the integer sequence: 0, 1, 1, 2, 3, 5, 8, 13, 21, 34, ...
Each entry in the list is the sum of the previous two entries in the list. The sequence was invented in 1202 by Leonardo of Pisa, who was also known as Fibonacci. One method to calculate entries in the Fibonacci sequence is the recursive algorithm we showed earlier. We will create an Express application that uses the Fibonacci implementation and then explore several methods to mitigate performance problems in computationally intensive algorithms.
Let's start with the blank application we created in the previous step. We had you name that application Fibonacci for a reason. We were thinking ahead.
In app.js, make the following changes to the top portion of the file:
const express = require('express');
const hbs = require('hbs');
const path = require('path');
const favicon = require('serve-favicon');
const logger = require('morgan');
const cookieParser = require('cookie-parser');
const bodyParser = require('body-parser');
const index = require('./routes/index');
const fibonacci = require('./routes/fibonacci');
const app = express();
// view engine setup
app.set('views', path.join(__dirname, 'views'));
app.set('view engine', 'hbs');
hbs.registerPartials(path.join(__dirname, 'partials'));
// uncomment after placing your favicon in /public
//app.use(favicon(path.join(__dirname, 'public', 'favicon.ico')));
app.use(logger('dev'));
app.use(bodyParser.json());
app.use(bodyParser.urlencoded({ extended: false }));
app.use(cookieParser());
app.use(express.static(path.join(__dirname, 'public')));
app.use('/', index);
app.use('/fibonacci', fibonacci);
Most of this is what express-generator gave us. The var statements have been changed to const, for that little teensy bit of extra comfort. We explicitly imported the hbs module so we could do some configuration. And we imported a router module for Fibonacci, which we'll see in a minute.
For the Fibonacci application, we don't need to support users, and therefore deleted that routing module. The fibonacci module, which we'll show next, serves to query a number for which we'll calculate the Fibonacci number.
In the top-level directory, create a file, math.js, containing this extremely simplistic Fibonacci implementation:
exports.fibonacci = function(n) {
if (n === 0) return 0;
else if (n === 1 || n === 2) return 1;
else return exports.fibonacci(n-1) + exports.fibonacci(n-2);
};
In the views directory, look at the file named layout.hbs which express-generator created:
<!DOCTYPE html>
<html>
<head>
<title>{{title}}</title>
<link rel='stylesheet' href='/stylesheets/style.css' />
</head>
<body>
{{{body}}}
</body>
</html>
This file contains the structure we'll use for HTML pages. Going by the Handlebars syntax, we see that {{title}} appears within the HTML title tag. It means when we call res.render, we should supply a title attribute. The {{{body}}} tag is where the view template content lands.
Change views/index.hbs to just contain the following:
<h1>{{title}}</h1>
{{> navbar}}
This serves as the front page of our application. It will be inserted in place of {{{body}}} in layout.hbs. The marker, {{> navbar}}, refers to a partial named navbar. Earlier, we configured a directory named partials to hold partials. Now let's create a file, partials/navbar.html, containing:
<div class='navbar'>
<p><a href='/'>home</a> | <a href='/fibonacci'>Fibonacci's</a></p>
</div>
This will serve as a navigation bar that's included on every page.
Create a file, views/fibonacci.hbs, containing the following code:
<h1>{{title}}</h1>
{{> navbar}}
{{#if fiboval}}
<p>Fibonacci for {{fibonum}} is {{fiboval}}</p>
<hr/>
{{/if}}
<p>Enter a number to see its' Fibonacci number</p>
<form name='fibonacci' action='/fibonacci' method='get'>
<input type='text' name='fibonum' />
<input type='submit' value='Submit' />
</form>
In the routes directory, delete the user.js module. It is generated by the Express framework, but we will not use it in this application.
In routes/index.js, change the router function to the following:
/* GET home page. */
router.get('/', function(req, res, next) {
res.render('index', { title: "Welcome to the Fibonacci Calculator" });
});
The anonymous object passed to res.render contains the data values we provide to the layout and view templates.
Then, finally, in the routes directory, create a file named fibonacci.js containing the following code:
const express = require('express');
const router = express.Router();
const math = require('../math');
router.get('/', function(req, res, next) {
if (req.query.fibonum) {
// Calculate directly in this server
res.render('fibonacci', {
title: "Calculate Fibonacci numbers",
fibonum: req.query.fibonum,
fiboval: math.fibonacci(req.query.fibonum)
});
} else {
res.render('fibonacci', {
title: "Calculate Fibonacci numbers",
fiboval: undefined
});
}
});
module.exports = router;
The package.json is already set up so we can use npm start to run the script and always have debugging messages enabled. And now we're ready to do so:
$ npm start
> fibonacci@0.0.0 start /Users/david/chap04/fibonacci
> DEBUG=fibonacci:* node ./bin/www
fibonacci:server Listening on port 3000 +0ms
As it suggests, you can visit http://localhost:3000/ and see what we have:
This page is rendered from the views/index.hbs template. Simply click on the Fibonacci's link to go to the next page, which is of course rendered from the views/fibonacci.hbs template. On that page, you'll be able to enter a number, click on the Submit button, and get an answer (hint: pick a number below 40 if you want your answer in a reasonable amount of time):
Let's walk through the application to discuss how it works.
There are two routes in app.js: the route for /, which is handled by routes/index.js, and the route for /fibonacci, which is handled by routes/fibonacci.js.
The res.render function renders the named template using the provided data values and emits the result as an HTTP response. For the home page of this application, the rendering code (routes/index.js) and template (views/index.hbs) aren't much, and it is on the Fibonacci page where all the action is happening.
The views/fibonacci.hbs template contains a form in which the user enters a number. Because it is a GET form, when the user clicks on the Submit button, the browser will issue an HTTP GET on the /fibonacci URL. What distinguishes one GET on /fibonacci from another is whether the URL contains a query parameter named fibonum. When the user first enters the page, there is no fibonum and hence nothing to calculate. After the user has entered a number and clicked on Submit, there is a fibonum and something to calculate.
Express automatically parses the query parameters, making them available as req.query. That means routes/fibonacci.js can quickly check whether there is a fibonum. If there is, it calls the fibonacci function to calculate the value.
Earlier, we asked you to enter a number less than 40. Go ahead and enter a larger number, such as 50, but go take a coffee break because this is going to take a while to calculate. Or proceed on to reading the next section where we start to discuss use of computationally intensive code.
This Fibonacci example is purposely inefficient to demonstrate an important consideration for your applications. What happens to the Node.js event loop when running long computations? To see the effect, open two browser windows, each opened to the Fibonacci page. In one, enter the number 55 or greater, and in the other, enter 10. Note that the second window freezes, and if you leave it running long enough, the answer will eventually pop up in both windows. What's happening is the Node.js event loop is blocked from processing events because the Fibonacci algorithm is running and does not ever yield to the event loop.
Since Node.js has a single execution thread, processing requests depend on request handlers quickly returning to the event loop. Normally, the asynchronous coding style ensures that the event loop executes regularly.
This is true even for requests that load data from a server halfway around the globe, because the asynchronous I/O is non-blocking and control is quickly returned to the event loop. The naïve Fibonacci function we chose doesn't fit into this model because it's a long-running blocking operation. This type of event handler prevents the system from processing requests and stops Node.js from doing what it's meant to do, namely to be a blisteringly fast web server.
In this case, the long-response-time problem is obvious. Response time quickly escalates to the point where you can take a vacation to Tibet and perhaps get reincarnated as a llama in Peru during the time it takes to respond with the Fibonacci number!
To see this more clearly, create a file named fibotimes.js containing the following code:
const math = require('./math');
const util = require('util');
for (var num = 1; num < 80; num++) {
let now = new Date().toISOString();
console.log(`${now} Fibonacci for ${num} = ${math.fibonacci(num)}`);
}
Now run it. You will get the following output:
$ node fibotimes.js
2017-12-10T23:04:42.342Z Fibonacci for 1 = 1
2017-12-10T23:04:42.345Z Fibonacci for 2 = 1
2017-12-10T23:04:42.345Z Fibonacci for 3 = 2
2017-12-10T23:04:42.345Z Fibonacci for 4 = 3
2017-12-10T23:04:42.345Z Fibonacci for 5 = 5
...
2017-12-10T23:04:42.345Z Fibonacci for 10 = 55
2017-12-10T23:04:42.345Z Fibonacci for 11 = 89
2017-12-10T23:04:42.345Z Fibonacci for 12 = 144
2017-12-10T23:04:42.345Z Fibonacci for 13 = 233
2017-12-10T23:04:42.345Z Fibonacci for 14 = 377
...
2017-12-10T23:04:44.072Z Fibonacci for 40 = 102334155
2017-12-10T23:04:45.118Z Fibonacci for 41 = 165580141
2017-12-10T23:04:46.855Z Fibonacci for 42 = 267914296
2017-12-10T23:04:49.723Z Fibonacci for 43 = 433494437
2017-12-10T23:04:54.218Z Fibonacci for 44 = 701408733
...
2017-12-10T23:06:07.531Z Fibonacci for 48 = 4807526976
2017-12-10T23:07:08.056Z Fibonacci for 49 = 7778742049
^C
This quickly calculates the first 40 or so members of the Fibonacci sequence, but after the 40th member, it starts taking a couple of seconds per result and quickly degrades from there. It is untenable to execute code of this sort on a single-threaded system that relies on a quick return to the event loop. A web service containing such code would give poor performance to the users.
There are two general ways to solve this problem in Node.js:
To prove that we have an artificial problem on our hands, here is a much more efficient Fibonacci function:
exports.fibonacciLoop = function(n) {
var fibos = [];
fibos[0] = 0;
fibos[1] = 1;
fibos[2] = 1;
for (var i = 3; i <= n; i++) {
fibos[i] = fibos[i-2] + fibos[i-1];
}
return fibos[n];
}
If we substitute a call to math.fibonacciLoop in place of math.fibonacci, the fibotimes program runs much faster. Even this isn't the most efficient implementation; for example, a simple prewired lookup table is much faster at the cost of some memory.
Edit fibotimes.js as follows and rerun the script. The numbers will fly by so fast your head will spin:
for (var num = 1; num < 8000; num++) {
let now = new Date().toISOString();
console.log(`${now} Fibonacci for ${num} = ${math.fibonacciLoop(num)}`);
}
Some algorithms aren't so simple to optimize and still take a long time to calculate the result. In this section, we're exploring how to handle inefficient algorithms, and therefore will stick with the inefficient Fibonacci implementation.
It is possible to divide the calculation into chunks and then dispatch the computation of those chunks through the event loop. Add the following code to math.js:
exports.fibonacciAsync = function(n, done) {
if (n === 0) done(undefined, 0);
else if (n === 1 || n === 2) done(undefined, 1);
else {
setImmediate(() => {
exports.fibonacciAsync(n-1, (err, val1) => {
if (err) done(err);
else setImmediate(() => {
exports.fibonacciAsync(n-2, (err, val2) => {
if (err) done(err);
else done(undefined, val1+val2);
});
});
});
});
}
};
This converts the fibonacci function from asynchronous function to a traditional callback-oriented asynchronous function. We're using setImmediate at each stage of the calculation to ensure the event loop executes regularly and that the server can easily handle other requests while churning away on a calculation. It does nothing to reduce the computation required; this is still the silly, inefficient Fibonacci algorithm. All we've done is spread the computation through the event loop.
In fibotimes.js, we can use this:
const math = require('./math');
const util = require('util');
(async () => {
for (var num = 1; num < 8000; num++) {
await new Promise((resolve, reject) => {
math.fibonacciAsync(num, (err, fibo) => {
if (err) reject(err);
else {
let now = new Date().toISOString();
console.log(`${now} Fibonacci for ${num} =
${fibo}`);
resolve();
}
})
})
}
})().catch(err => { console.error(err); });
This version of fibotimes.js executes the same, we simply type node fibotimes. However, using fibonacciAsync will require changes in the server.
Because it's an asynchronous function, we will need to change our router code. Create a new file, named routes/fibonacci-async1.js, containing the following:
const express = require('express');
const router = express.Router();
const math = require('../math');
router.get('/', function(req, res, next) {
if (req.query.fibonum) {
// Calculate using async-aware function, in this server
math.fibonacciAsync(req.query.fibonum, (err, fiboval) => {
res.render('fibonacci', {
title: "Calculate Fibonacci numbers",
fibonum: req.query.fibonum,
fiboval: fiboval
});
});
} else {
res.render('fibonacci', {
title: "Calculate Fibonacci numbers",
fiboval: undefined
});
}
});
module.exports = router;
This is the same as earlier, just rewritten for an asynchronous Fibonacci calculation.
In app.js, make this change to the application wiring:
// const fibonacci = require('./routes/fibonacci');
const fibonacci = require('./routes/fibonacci-async1');
With this change, the server no longer freezes when calculating a large Fibonacci number. The calculation of course still takes a long time, but at least other users of the application aren't blocked.
You can verify this by again opening two browser windows in the application. Enter 60 in one window, and in the other start requesting smaller Fibonacci numbers. Unlike with the original fibonacci function, using fibonacciAsync allows both windows to give answers, though if you really did enter 60 in the first window you might as well take that three-month vacation to Tibet:
It's up to you, and your specific algorithms, to choose how to best optimize your code and to handle any long-running computations you may have.
The next way to mitigate computationally intensive code is to push the calculation to a backend process. To explore that strategy, we'll request computations from a backend Fibonacci server, using the HTTP Client object to do so. However, before we look at that, let's first talk in general about using the HTTP Client object.
Node.js includes an HTTP Client object, useful for making HTTP requests. It has the capability to issue any kind of HTTP request. In this section, we'll use the HTTP Client object to make HTTP requests similar to calling a Representational State Transfer (REST) web service.
Let's start with some code inspired by the wget or curl commands to make HTTP requests and show the results. Create a file named wget.js containing this code:
const http = require('http');
const url = require('url');
const util = require('util');
const argUrl = process.argv[2];
const parsedUrl = url.parse(argUrl, true);
// The options object is passed to http.request
// telling it the URL to retrieve
const options = {
host: parsedUrl.hostname,
port: parsedUrl.port,
path: parsedUrl.pathname,
method: 'GET'
};
if (parsedUrl.search) options.path += "?"+parsedUrl.search;
const req = http.request(options);
// Invoked when the request is finished
req.on('response', res => {
console.log('STATUS: ' + res.statusCode);
console.log('HEADERS: ' + util.inspect(res.headers));
res.setEncoding('utf8');
res.on('data', chunk => { console.log('BODY: ' + chunk); });
res.on('error', err => { console.log('RESPONSE ERROR: ' + err); });
});
// Invoked on errors
req.on('error', err => { console.log('REQUEST ERROR: ' + err); });
req.end();
You can run the script as follows:
$ node wget.js http://example.com
STATUS: 200
HEADERS: { 'accept-ranges': 'bytes',
'cache-control': 'max-age=604800',
'content-type': 'text/html',
date: 'Sun, 10 Dec 2017 23:40:44 GMT',
etag: '"359670651"',
expires: 'Sun, 17 Dec 2017 23:40:44 GMT',
'last-modified': 'Fri, 09 Aug 2013 23:54:35 GMT',
server: 'ECS (rhv/81A7)',
vary: 'Accept-Encoding',
'x-cache': 'HIT',
'content-length': '1270',
connection: 'close' }
BODY: <!doctype html>
<html>
...
There's more in the printout, namely the HTML of the page at http://example.com/. The purpose of wget.js is to make an HTTP request and show you voluminous details of the response. An HTTP request is initiated with the http.request method, as follows:
var http = require('http');
var options = {
host: 'example.com',
port: 80,
path: null,
method: 'GET'
};
var request = http.request(options);
request.on('response', response => {
...
});
The options object describes the request to make, and the callback function is called when the response arrives. The options object is fairly straightforward, with the host, port, and path fields specifying the URL being requested. The method field must be one of the HTTP verbs (GET, PUT, POST, and so on). You can also provide a headers array for the headers in the HTTP request. For example, you might need to provide a cookie:
var options = {
headers: { 'Cookie': '.. cookie value' }
};
The response object is itself an EventEmitter, which emits the data and error events. The data event is called as data arrives, and the error event is, of course, called on errors.
The request object is a WritableStream, which is useful for HTTP requests containing data, such as PUT or POST. This means the request object has a write function that writes data to the requester. The data format in an HTTP request is specified by the standard Multipurpose Internet Mail Extensions (MIME) originally created to give us better email. Around 1992, the WWW community worked with the MIME standard committee which was developing a format for multi-part, multi-media-rich electronic mail. Receiving fancy-looking email is so commonplace today that one might not be aware that email used to be plain text. MIME-types were developed to describe the format of each piece of data, and the WWW community adopted this for use on the web. HTML forms will post with a Content-Type of multipart/form-data, for example.
Now that we've seen how to make HTTP client requests, we can look at how to make a REST query inside an Express web application. What that effectively means is to make an HTTP GET request to a backend server, which responds with the Fibonacci number represented by the URL. To do so, we'll refactor the Fibonacci application to make a Fibonacci server that is called from the application. While this is overkill for calculating Fibonacci numbers, it lets us look at the basics of implementing a multitier application stack in Express.
Inherently, calling a REST service is an asynchronous operation. That means calling the REST service will involve a function call to initiate the request and a callback function to receive the response. REST services are accessed over HTTP, so we'll use the HTTP client object to do so.
While Express has a powerful templating system, making it suitable for delivering HTML web pages to browsers, it can also be used to implement a simple REST service. The parameterized URLs we showed earlier (/user/profile/:id) can act like parameters to a REST call. And Express makes it easy to return data encoded in JSON.
Now, create a file named fiboserver.js containing this code:
const math = require('./math');
const express = require('express');
const logger = require('morgan');
const app = express();
app.use(logger('dev'));
app.get('/fibonacci/:n', (req, res, next) => {
math.fibonacciAsync(Math.floor(req.params.n), (err, val) => {
if (err) next('FIBO SERVER ERROR ' + err);
else res.send({ n: req.params.n, result: val });
});
});
app.listen(process.env.SERVERPORT);
This is a stripped-down Express application that gets right to the point of providing a Fibonacci calculation service. The one route it supports handles the Fibonacci computation using the same functions we've already worked with.
This is the first time we've seen res.send used. It's a flexible way to send responses which can take an array of header values (for the HTTP response header), and an HTTP status code. As used here, it automatically detects the object, formats it as JSON text, and sends it with the correct Content-Type.
In package.json, add this to the scripts section:
"server": "SERVERPORT=3002 node ./fiboserver"
This automates launching our Fibonacci service.
Now, let's run it:
$ npm run server
> fibonacci@0.0.0 server /Users/David/chap04/fibonacci
> SERVERPORT=3002 node ./fiboserver
Then, in a separate command window, we can use the curl program to make some requests against this service:
$ curl -f http://localhost:3002/fibonacci/10
{"n":"10","result":55}
$ curl -f http://localhost:3002/fibonacci/11
{"n":"11","result":89}
$ curl -f http://localhost:3002/fibonacci/12
{"n":"12","result":144}
Over in the window where the service is running, we'll see a log of GET requests and how long each took to process:
$ npm run server
> fibonacci@0.0.0 server /Users/David/chap04/fibonacci
> SERVERPORT=3002 node ./fiboserver
GET /fibonacci/10 200 0.393 ms - 22
GET /fibonacci/11 200 0.647 ms - 22
GET /fibonacci/12 200 0.772 ms - 23
Now, let's create a simple client program, fiboclient.js, to programmatically call the Fibonacci service:
const http = require('http');
[
"/fibonacci/30", "/fibonacci/20", "/fibonacci/10",
"/fibonacci/9", "/fibonacci/8", "/fibonacci/7",
"/fibonacci/6", "/fibonacci/5", "/fibonacci/4",
"/fibonacci/3", "/fibonacci/2", "/fibonacci/1"
].forEach(path => {
console.log(`${new Date().toISOString()} requesting ${path}`);
var req = http.request({
host: "localhost",
port: process.env.SERVERPORT,
path: path,
method: 'GET'
}, res => {
res.on('data', chunk => {
console.log(`${new Date().toISOString()} BODY: ${chunk}`);
});
});
req.end();
});
Then, in package.json, add this to the scripts section:
"scripts": {
"start": "node ./bin/www",
"server": "SERVERPORT=3002 node ./fiboserver" ,
"client": "SERVERPORT=3002 node ./fiboclient"
}
Then run the client app:
$ npm run client
> fibonacci@0.0.0 client /Users/David/chap04/fibonacci
> SERVERPORT=3002 node ./fiboclient
2017-12-11T00:41:14.857Z requesting /fibonacci/30
2017-12-11T00:41:14.864Z requesting /fibonacci/20
2017-12-11T00:41:14.865Z requesting /fibonacci/10
2017-12-11T00:41:14.865Z requesting /fibonacci/9
2017-12-11T00:41:14.866Z requesting /fibonacci/8
2017-12-11T00:41:14.866Z requesting /fibonacci/7
2017-12-11T00:41:14.866Z requesting /fibonacci/6
2017-12-11T00:41:14.866Z requesting /fibonacci/5
2017-12-11T00:41:14.866Z requesting /fibonacci/4
2017-12-11T00:41:14.866Z requesting /fibonacci/3
2017-12-11T00:41:14.867Z requesting /fibonacci/2
2017-12-11T00:41:14.867Z requesting /fibonacci/1
2017-12-11T00:41:14.884Z BODY: {"n":"9","result":34}
2017-12-11T00:41:14.886Z BODY: {"n":"10","result":55}
2017-12-11T00:41:14.891Z BODY: {"n":"6","result":8}
2017-12-11T00:41:14.892Z BODY: {"n":"7","result":13}
2017-12-11T00:41:14.893Z BODY: {"n":"8","result":21}
2017-12-11T00:41:14.903Z BODY: {"n":"3","result":2}
2017-12-11T00:41:14.904Z BODY: {"n":"4","result":3}
2017-12-11T00:41:14.905Z BODY: {"n":"5","result":5}
2017-12-11T00:41:14.910Z BODY: {"n":"2","result":1}
2017-12-11T00:41:14.911Z BODY: {"n":"1","result":1}
2017-12-11T00:41:14.940Z BODY: {"n":"20","result":6765}
2017-12-11T00:41:18.200Z BODY: {"n":"30","result":832040}
We're building our way toward adding the REST service to the web application. At this point, we've proved several things, one of which is the ability to call a REST service in our program.
We also inadvertently demonstrated an issue with long-running calculations. You'll notice the requests were made from the largest to the smallest, but the results appeared in a very different order. Why? It's because of the processing time for each request, and the inefficient algorithm we're using. The computation time increases enough to ensure that the larger request values require enough processing time to reverse the order.
What happens is that fiboclient.js sends all its requests right away, and then each one waits for the response to arrive. Because the server is using fibonacciAsync, it will work on calculating all responses simultaneously. The values that are quickest to calculate are the ones that will be ready first. As the responses arrive in the client, the matching response handler fires, and in this case, the result prints to the console. The results will arrive when they're ready and not a millisecond sooner.
Now that we've implemented a REST-based server, we can return to the Fibonacci application, applying what we've learned to improve it. We will lift some of the code from fiboclient.js and transplant it into the application to do this. Create a new file, routes/fibonacci-rest.js, with the following code:
const express = require('express');
const router = express.Router();
const http = require('http');
const math = require('../math');
router.get('/', function(req, res, next) {
if (req.query.fibonum) {
var httpreq = http.request({
host: "localhost",
port: process.env.SERVERPORT,
path: "/fibonacci/"+Math.floor(req.query.fibonum),
method: 'GET'
});
httpreq.on('response', response => {
response.on('data', chunk => {
var data = JSON.parse(chunk);
res.render('fibonacci', {
title: "Calculate Fibonacci numbers",
fibonum: req.query.fibonum,
fiboval: data.result
});
});
response.on('error', err => { next(err); });
});
httpreq.on('error', err => { next(err); });
httpreq.end();
} else {
res.render('fibonacci', {
title: "Calculate Fibonacci numbers",
fiboval: undefined
});
}
});
module.exports = router;
In app.js, make this change:
const index = require('./routes/index');
// const fibonacci = require('./routes/fibonacci');
// const fibonacci = require('./routes/fibonacci-async1');
// const fibonacci = require('./routes/fibonacci-await');
const fibonacci = require('./routes/fibonacci-rest');
Then, in package.json, change the scripts entry to the following:
"scripts": {
"start": "DEBUG=fibonacci:* node ./bin/www",
"startrest": "DEBUG=fibonacci:* SERVERPORT=3002 node ./bin/www",
"server": "DEBUG=fibonacci:* SERVERPORT=3002 node ./fiboserver" ,
"client": "DEBUG=fibonacci:* SERVERPORT=3002 node ./fiboclient"
},
How can we have the same value for SERVERPORT for all three scripts entries? The answer is that the variable is used differently in different places. In startrest, that variable is used in routes/fibonacci-rest.js to know at which port the REST service is running. Likewise, in client, fiboclient.js uses that variable for the same purpose. Finally, in server, the fiboserver.js script uses the SERVERPORT variable to know which port to listen on.
In start and startrest, no value is given for PORT. In both cases, bin/www defaults to PORT=3000 if it is not specified.
In one command window, start the backend server, and in the other, start the application. Open a browser window as before, and make a few requests. You should see output similar to this:
$ npm run server
> fibonacci@0.0.0 server /Users/David/chap04/fibonacci
> DEBUG=fibonacci:* SERVERPORT=3002 node ./fiboserver
GET /fibonacci/34 200 21124.036 ms - 27
GET /fibonacci/12 200 1.578 ms - 23
GET /fibonacci/16 200 6.600 ms - 23
GET /fibonacci/20 200 33.980 ms - 24
GET /fibonacci/28 200 1257.514 ms - 26
The output like this for the application:
$ npm run startrest
> fibonacci@0.0.0 startrest /Users/David/chap04/fibonacci
> DEBUG=fibonacci:* SERVERPORT=3002 node ./bin/www
fibonacci:server Listening on port 3000 +0ms
GET /fibonacci?fibonum=34 200 21317.792 ms - 548
GET /stylesheets/style.css 304 20.952 ms - -
GET /fibonacci?fibonum=12 304 109.516 ms - -
GET /stylesheets/style.css 304 0.465 ms - -
GET /fibonacci?fibonum=16 200 83.067 ms - 544
GET /stylesheets/style.css 304 0.900 ms - -
GET /fibonacci?fibonum=20 200 221.842 ms - 545
GET /stylesheets/style.css 304 0.778 ms - -
GET /fibonacci?fibonum=28 200 1428.292 ms - 547
GET /stylesheets/style.css 304 19.083 ms - -
Because we haven't changed the templates, the screen will look exactly as it did earlier.
We may run into another problem with this solution. The asynchronous implementation of our inefficient Fibonacci algorithm may cause the Fibonacci service process to run out of memory. In the Node.js FAQ, https://github.com/nodejs/node/wiki/FAQ, it's suggested to use the --max_old_space_size flag. You'd add this in package.json as follows:
"server": "SERVERPORT=3002 node ./fiboserver --max_old_space_size 5000",
However, the FAQ also says that if you're running into maximum memory space problems, your application should probably be refactored. This gets back to our point several pages ago that there are several approaches to addressing performance problems, one of which is the algorithmic refactoring of your application.
Why go to the trouble of developing this REST server when we could just directly use fibonacciAsync?
We can now push the CPU load for this heavyweight calculation to a separate server. Doing so would preserve CPU capacity on the frontend server so it can attend to web browsers. GPU co-processors are now widely used for numerical computing and can be accessed via a simple network API. The heavy computation can be kept separate, and you can even deploy a cluster of backend servers sitting behind a load balancer, evenly distributing requests.
What we've demonstrated is that it's possible to implement simple multitier REST services in a few lines of Node.js and Express.
Here are a few available packages and frameworks to assist your REST-based projects:
You learned a lot in this chapter about Node's HTTP support, implementing web applications, and REST service implementation.
Now we can move on to implementing a more complete application: one for taking notes. We will use the Notes application for several upcoming chapters as a vehicle to explore the Express application framework, database access, deployment to cloud services or on your own server, and user authentication.
In the next chapter, we will build the basic infrastructure.
Now that we've got our feet wet building an Express application for Node.js, let's work on an application that performs a useful function. The application we'll build will keep a list of notes, and it will let us explore some aspects of a real application.
In this chapter, we'll only build the basic infrastructure of the application, and in the later chapters, we'll extend the application considerably.
The topics covered in this chapter includes
Before we get into developing our application, we must take a deeper look at a pair of new ES-2015/2016/2017 features that collectively revolutionize JavaScript programming: The Promise class and async functions. Both are used for deferred and asynchronous computation and can make intensely nested callback a thing of the past:
The magic of async functions is that we can write asynchronous code as if it's synchronous code. It's still asynchronous code, meaning long-running request handlers won't block the event loop. The code looks like the synchronous code we'd write in other languages. One statement follows another, the errors are thrown as exceptions, and the results land on the next line of code. Promise and async functions are so much of an improvement that it's extremely compelling for the Node.js community to switch paradigms, meaning rewriting legacy callback-oriented APIs.
Over the years, several other approaches have been used to manage asynchronous code, and you may come across code using these other techniques. Before the Promise object was standardized, at least two implementations were available: Bluebird (http://bluebirdjs.com/) and Q (https://www.npmjs.com/package/q). Use of a non-standard Promise library should be carefully considered, since there is value in maintaining compatibility with the standard Promise object.
The Pyramid of Doom is named after the shape the code takes after a few layers of nesting. Any multistage process can quickly escalate to code nested 15 levels deep. Consider the following example:
router.get('/path/to/something', (req, res, next) => {
doSomething(arg1, arg2, (err, data1) => {
if (err) return next(err);
doAnotherThing(arg3, arg2, data1, (err2, data2) => {
if (err2) return next(err2);
somethingCompletelyDifferent(arg1, arg42, (err3, data3) => {
if (err3) return next(err3);
doSomethingElse((err4, data4) => {
if (err4) return next(err4);
res.render('page', { data });
});
});
});
});
});
Rewriting this as an async function will make this much clearer. To get there, we need to examine the following ideas:
We generate a Promise this way:
exports.asyncFunction = function(arg1, arg2) {
return new Promise((resolve, reject) => {
// perform some task or computation that's asynchronous
// for any error detected:
if (errorDetected) return reject(dataAboutError);
// When the task is finished
resolve(theResult);
});
};
Your code must indicate the status of the asynchronous operation via the resolve and reject functions. As implied by the function names, reject indicates an error occurred and resolve indicates a success result. Your caller then uses the function as follows:
asyncFunction(arg1, arg2)
.then((result) => {
// the operation succeeded
// do something with the result
return newResult;
})
.catch(err => {
// an error occurred
});
The system is fluid enough that the function passed in a .then can return something, such as another Promise, and you can chain the .then calls together. The value returned in a .then handler (if any) becomes a new Promise object, and in this way you can construct a chain of .then and .catch calls to manage a sequence of asynchronous operations.
A sequence of asynchronous operations would be implemented as a chain of .then functions, as we will see in the next section.
Promise objects can be in one of three states:
Consider this code segment similar to the one we'll use later in this chapter:
notes.read(req.query.key)
.then(note => { return filterNote(note); })
.then(note => { return swedishChefSpeak(note); })
.then(note => {
res.render('noteview', {
title: note ? note.title : "",
notekey: req.query.key,
note: note
});
})
.catch(err => { next(err); });
There are several places where errors can occur in this little bit of code. The notes.read function has several possible failure modes: the filterNote function might want to raise an alarm if it detects a cross-site scripting attack. The Swedish chef could be on strike. There could be a failure in res.render or the template being used. But we have only one way to catch and report errors. Are we missing something?
The Promise class automatically captures errors, sending them down the chain of operations attached to the Promise. If the Promise class has an error on its hands, it skips over the .then functions and will instead invoke the first .catch function it finds. In other words, using instances of Promise provides a higher assurance of capturing and reporting errors. With the older convention, error reporting was trickier, and it was easy to forget to add correct error handling.
The problem being addressed is that asynchronous coding in JavaScript results in the Pyramid of Doom. To explain, let's reiterate the example Ryan Dahl gave as the primary Node.js idiom:
db.query('SELECT ..etc..', function(err, resultSet) {
if (err) {
// Instead, errors arrive here
} else {
// Instead, results arrive here
}
});
// We WANT the errors or results to arrive here
The goal was to avoid blocking the event loop with a long operation. Deferring the processing of results or errors using callback functions was an excellent solution and is the founding idiom of Node.js. The implementation of callback functions led to this pyramid-shaped problem. Namely, that results and errors land in the callback. Rather than delivering them to the next line of code, the errors and results are buried.
Promises help flatten the code so that it no longer takes a pyramidal shape. They also capture errors, ensuring delivery to a useful location. But those errors and results are still buried inside an anonymous function and do not get delivered to the next line of code.
Further, using Promises results in a little bit of boilerplate code that obscures the programmers intent. It's less boilerplate than with regular callback functions, but the boilerplate is still there.
Fortunately, the ECMAScript committee kept working on the problem.
Generators and the associated Iteration Protocol are a large topic, which we will briefly cover.
The Iteration Protocol is what's behind the new for..of loop, and some other new looping constructs. These constructs can be used with anything producing an iterator. For more about both, see https://developer.mozilla.org/en-US/docs/Web/JavaScript/Reference/Iteration_protocols.
A generator is a kind of function which can be stopped and started using the yield keyword. Generators produce an iterator whose values are whatever is given to the yield statement. For more on this, see https://developer.mozilla.org/en-US/docs/Web/JavaScript/Reference/Global_Objects/Generator.
Consider this:
$ cat gen.js
function* gen() {
yield 1;
yield 2;
yield 3;
yield 4;
}
for (let g of gen()) {
console.log(g);
}
$ node gen.js
1
2
3
4
The yield statement causes a generator function to pause and to provide the value given to the next call on its next function. The next function isn't explicitly seen here, but is what controls the loop, and is part of the iteration protocol. Instead of the loop, try calling gen().next() several times:
var geniter = gen();
console.log(geniter.next());
console.log(geniter.next());
console.log(geniter.next());
You'll see this:
$ node gen.js
{ value: 1, done: false }
{ value: 2, done: false }
{ value: 3, done: false }
The Iteration protocol says the iterator is finished when done is true. In this case, we didn't call it enough to trigger the end state of the iterator.
Where generators became interesting is when used with functions that return a Promise. The Promise is what's made available through the iterator. The code consuming the iterator can wait on the Promise to get its value. A series of asynchronous operations could be inside the generator and invoked in an iterable fashion.
With the help of an extra function, a generator function along with Promise-returning asynchronous functions can be a very nice way to write asynchronous code. We saw an example of this in Chapter 2, Setting up Node.js, while exploring Babel. Babel has a plugin to rewrite async functions into a generator along with a helper function, and we took a look at the transpiled code and the helper function. The co library (https://www.npmjs.com/package/co) is a popular helper function for implementing asynchronous coding in generators. Create a file named 2files.js:
const fs = require('fs-extra');
const co = require('co');
const util = require('util');
co(function* () {
var texts = [
yield fs.readFile('hello.txt', 'utf8'),
yield fs.readFile('goodbye.txt', 'utf8')
];
console.log(util.inspect(texts));
});
Then run it like so:
$ node 2files.js
[ 'Hello, world!\n', 'Goodbye, world!\n' ]
Normally, fs.readFile sends its result to a callback function, and we'd build a little pyramid-shaped piece of code to perform this task. The fs-extra module contains implementations of all functions from the built-in fs module but changed to return a Promise instead of a callback function. Therefore, each fs.readFile shown here is returning a Promise that's resolved when the file content is fully read into memory. What co does is it manages the dance of waiting for the Promise to be resolved (or rejected), and returns the value of the Promise. Therefore, with two suitable text files we have the result shown from executing 2files.js.
The important thing is that the code is very clean and readable. We aren't caught up in boilerplate code required to manage asynchronous operations. The intent of the programmer is pretty clear.
async functions take that same combination of generators and Promises and define a standardized syntax in the JavaScript language. Create a file named 2files-async.js:
const fs = require('fs-extra');
const util = require('util');
async function twofiles() {
var texts = [
await fs.readFile('hello.txt', 'utf8'),
await fs.readFile('goodbye.txt', 'utf8')
];
console.log(util.inspect(texts));
}
twofiles().catch(err => { console.error(err); });
Then run it like so:
$ node 2files-async.js
[ 'Hello, world!\n', 'Goodbye, world!\n' ]
Clean. Readable. The intent of the programmer is clear. No dependency on an add-on library, with syntax built-in to the JavaScript language. Most importantly, everything is handled in a natural way. Errors are indicated naturally by throwing exceptions. The results of an asynchronous operation naturally appear as the result of the operation, with the await keyword facilitating the delivery of that result.
To see the real advantage, let's return to the Pyramid of Doom example from earlier:
router.get('/path/to/something', async (req, res, next) => {
try {
let data1 = await doSomething(req.query.arg1, req.query.arg2);
let data2 = await doAnotherThing(req.query.arg3, req.query.arg2,
data1);
let data3 = await somethingCompletelyDifferent(req.query.arg1,
req.query.arg42);
let data4 = await doSomethingElse();
res.render('page', { data1, data2, data3, data4 });
} catch(err) {
next(err);
}
});
Other than the try/catch, this example became very clean compared to its form as a callback pyramid. All the asynchronous callback boilerplate is erased, and the intent of the programmer shines clearly.
Why was the try/catch needed? Normally, an async function catches thrown errors, automatically reporting them correctly. But since this example is within an Express router function, we're limited by its capabilities. Express doesn't know how to recognize an async function, and therefore it does not know to look for the thrown errors. Instead, we're required to catch them and call next(err).
This improvement is only for code executing inside an async function. Code outside an async function still requires callbacks or Promises for asynchronous coding. Further, the return value of an async function is a Promise.
Refer to the official specification of async functions at https://tc39.github.io/ecmascript-asyncawait/ for details.
Express doesn't enforce an opinion on how you should structure the Model, View, and Controller modules of your application, or whether you should follow any kind of MVC paradigm at all. As we learned in the previous chapter, the blank application created by the Express Generator provides two aspects of the MVC model:
This leaves you wondering where to put code corresponding to the model. Models hold the application data, changing it as instructed by the controller and supplying data requested by View code. At a minimum, the Model code should be in separate modules from the Controller code. This is to ensure a clean separation of concerns, for example, to ease the unit testing of each.
The approach we'll use is to create a models directory as a sibling of the views and routes directories. The models directory will hold modules for storing the notes and related data. The API of the modules in the models directory will provide functions to create, read, update, or delete data items Create, Read, Update, and Delete or Destroy (CRUD model) and other functions necessary for the View code to do its thing.
The CRUD model (create, read, update, destroy) is the four basic operations of persistent data storage. The Notes application is structured as a CRUD application to demonstrate implementing each of these operations.
We'll use functions named create, read, update, and destroy to implement each of the basic operations.
Let's start creating the Notes application as before, by using the Express generator to give us a starting point:
$ mkdir notes
$ cd notes
$ npm install express-generator@4.x
$ ./node_modules/.bin/express --view=hbs --git .
destination is not empty, continue? [y/N] y
create : .
create : ./package.json
create : ./app.js
create : ./.gitignore
create : ./public
create : ./routes
create : ./routes/index.js
create : ./routes/users.js
create : ./views
create : ./views/index.hbs
create : ./views/layout.hbs
create : ./views/error.hbs
create : ./bin
create : ./bin/www
create : ./public/stylesheets
create : ./public/stylesheets/style.css
install dependencies:
$ cd . && npm install
run the app:
$ DEBUG=notes:* npm start
create : ./public/javascripts
create : ./public/images
$ npm install
added 82 packages and removed 5 packages in 97.188s
$ npm uninstall express-generator
up to date in 8.325s
If you wish, you can run npm start and view the blank application in your browser. Instead, let's move on to setting up the code.
Create a directory named models, as a sibling of the views and routes directories.
Then, create a file named Note.js in that directory, and put this code in it:
const _note_key = Symbol('key');
const _note_title = Symbol('title');
const _note_body = Symbol('body');
module.exports = class Note {
constructor(key, title, body) {
this[_note_key] = key;
this[_note_title] = title;
this[_note_body] = body;
}
get key() { return this[_note_key]; }
get title() { return this[_note_title]; }
set title(newTitle) { this[_note_title] = newTitle; }
get body() { return this[_note_body]; }
set body(newBody) { this[_note_body] = newBody; }
};
This defines a new class, Note, for use within our Notes application. The intent is to hold data related to notes being exchanged between users of our application.
This sort of object class definition is new to JavaScript with ES-2015. It simplifies defining classes over previous methods and brings JavaScript class definitions closer to the syntax in other languages. Under the hood, JavaScript classes still use prototype-based inheritance, but with a simpler syntax, and the coder doesn't even have to think about the object prototype.
We can reliably determine whether an object is a note with the instanceof operator:
$ node
> const Note = require('./Note');
> typeof Note
'function'
> const aNote = new Note('foo', 'The Rain In Spain', 'Falls mainly on the plain');
> var notNote = {}
> notNote instanceof Note
false
> aNote instanceof Note
true
> typeof aNote
'object'
This shows us the clearest method to identify an object is with the instanceof operator. The typeof operator informs us Note is a function (because of the prototype-based inheritance behind the scenes), and that an instance of the Note class is an object. With instance of, we can easily determine whether an object is an instance of a given class.
With the Note class, we have used Symbol instances to provide a small measure of data hiding. JavaScript classes don't provide a data-hiding mechanism—you can't label a field private as you can in Java, for example. It's useful to know how to hide implementation details. This is an important attribute of object-oriented programming, because it's useful to have the freedom to change the implementation at will. And there's the issue of controlling which code can manipulate the object's fields.
First, we declared getter and setter functions to provide access to the values. We went over normal getter/setter usage in Chapter 4, HTTP Servers and Clients.
Access to a getter-based field is by using the name of the property, and not by calling a function - aNote.title and not aNote.title(). It looks like you're accessing an object property by assigning a value or accessing the value. In actuality, the function defined in the class is executed on every access. You can define a read-only property by only implementing a getter, and no setter, as we did with the key field.
There are significant differences between the preceding and simply defining anonymous objects:
{
key: 'foo', title: 'The Rain in Spain',
body: 'Falls mainly on the plain'
}
We write code like that in JavaScript all the time. It's easy, it's quick, and it's a very fluid way to share data between functions. But there's no measure of hiding implementation details, and no clear identification of object type.
In the Note class, we could have used this constructor method:
class Note {
constructor(key, title, body) {
this.key = key;
this.title = title;
this.body = body;
}
}
That's effectively the same as the anonymous object, in that no details have been hidden and no control is implemented in terms of which code can do what to object instances. The only advantage over an anonymous object is using the instanceof operator to identify object instances.
The method we chose uses the Symbol class, which is also new with ES-2015. A Symbol is an opaque object with two main use cases:
You define a Symbol through a factory method that generates Symbol instances:
> let symfoo = Symbol('foo')
Each time you invoke the Symbol factory method, a new and unique instance is created. For example, Symbol('foo') === Symbol('foo') is false, as is symfoo === Symbol('foo'), because a new instance is created on each side of the equality operator. However, symfoo === symfoo is true, because they are the same instance.
What this means in practice is that if we try a direct approach to access a field, it fails:
> aNote[Symbol('title')]
undefined
Remember that each time we use the Symbol factory method we get a new instance. The new instance of Symbol('title') is not the same instance used within the Note.js module.
The bottom line is that using Symbol objects for the fields provides a small measure of implementation hiding.
Create a file named notes-memory.js in the models directory, with this code:
const Note = require('./Note');
var notes = [];
exports.update = exports.create = async function(key, title, body) {
notes[key] = new Note(key, title, body);
return notes[key];
};
exports.read = async function(key) {
if (notes[key]) return notes[key];
else throw new Error(`Note ${key} does not exist`);
};
exports.destroy = async function(key) {
if (notes[key]) {
delete notes[key];
} else throw new Error(`Note ${key} does not exist`);
};
exports.keylist = async function() { return Object.keys(notes); };
exports.count = async function() { return notes.length; };
exports.close = async function() { }
This is a simple in-memory data store that's fairly self-explanatory. The key for each Note instance is used as the index to an array, which in turn holds the Note instance. Simple, fast, and easy to implement. It does not support any long-term data persistence. Any data stored in this model will disappear when the server is killed.
We have used async functions because in the future we'll be storing data in the file system or in databases. Therefore, we need an asynchronous API.
The create and update functions are being handled by the same function. At this stage of the Notes application, the code for both these functions can be exactly the same because they perform the exact same operation. Later, when we add database support to Notes, the create and update functions will need to be different. For example, in a SQL data model, create would be implemented with an INSERT INTO command, while update would be implemented with an UPDATE command.
We're going to modify the starter application to support creating, editing, updating, viewing, and deleting notes. Let's start by fixing up the home page. It should show a list of notes, and the top navigation bar should link to an ADD Note page so that we can always add a new note.
While we will be modifying the generated app.js, it needs no modification to support the home page. These lines of code are related to the home page:
const index = require('./routes/index');
..
app.use('/', index);
Additionally, to support Handlebars templates app.js requires these changes:
const hbs = require('hbs');
...
app.set('view engine', 'hbs');
hbs.registerPartials(path.join(__dirname, 'partials'));
We'll put Handlebars partials in a directory, partials, which is a sibling to the views directory. Change routes/index.js to this:
const express = require('express');
const router = express.Router();
const notes = require('../models/notes-memory');
/* GET home page. */
router.get('/', async (req, res, next) => {
let keylist = await notes.keylist();
let keyPromises = keylist.map(key => {
return notes.read(key)
});
let notelist = await Promise.all(keyPromises);
res.render('index', { title: 'Notes', notelist: notelist });
});
module.exports = router;
This gathers data about the notes that we'll be displaying on the home page. By default, we'll show a simple table of note titles. We do need to talk about the technique.
The Promise.all function executes an array of Promises. The Promises are evaluated in parallel, allowing our code to potentially make parallel requests to a service. This should execute more quickly than making the requests one at a time sequentially.
We could have written a simple for loop like so:
let keylist = await notes.keylist();
let notelist = [];
for (key of keylist) {
let note = await notes.read(keylist);
notelist.push({ key: note.key, title: note.title });
}
While simpler to read, the notes are retrieved one at a time with no opportunity to overlap read operations.
The Promise array is constructed using the map function. With map, one iterates over an array to produce a new array. In this case, the new array contains the Promises generated by the notes.read function calls.
Because we wrote await Promise.all, the notelist array will be completely filled with the correct data once all the Promises succeed. If any Promise fails—is rejected, in other words—an exception will be thrown instead. What we've done is enqueue a list of asynchronous operations and neatly waited for them all to finish.
The notelist array is then passed into the view templates we're about to write.
Start with views/layout.hbs, containing:
<!DOCTYPE html>
<html>
<head>
<title>{{title}}</title>
<link rel='stylesheet' href='/stylesheets/style.css' />
</head>
<body>
{{> header }}
{{{body}}}
</body>
</html>
This is the generated file, with the addition of a partial for the page header. We already declared partials to live in the partials directory. Create partials/header.hbs, containing:
<header>
<h1>{{ title }}</h1>
<div class='navbar'>
<p><a href='/'>Home</a> | <a href='/notes/add'>ADD Note</a></p>
</div>
</header>
Change views/index.hbs to this:
{{#each notelist}}
<ul>
<li>{{ key }}:
<a href="/notes/view?key={{ key }}">{{ title }}</a>
</li>
</ul>
{{/each}}
This simply steps through the array of note data and formats a simple listing. Each item links to the /notes/view URL with a key parameter. We have yet to look at that code, but this URL will obviously display the note. Another thing of note is that no HTML for the list is generated if the notelist is empty.
There's of course a whole lot more that could be put into this. For example, it's easy to add jQuery support to every page just by adding the appropriate script tags here.
We now have enough written to run the application; let's view the home page:
$ DEBUG=notes:* npm start
> notes@0.0.0 start /Users/David/chap05/notes
> node ./bin/www
notes:server Listening on port 3000 +0ms
GET / 200 87.300 ms - 308
GET /stylesheets/style.css 200 27.744 ms - 111
If we visit http://localhost:3000, we will see the following page:
Because there aren't any notes (yet), there's nothing to show. Clicking on the Home link just refreshes the page. Clicking on the ADD Note link throws an error because we haven't (yet) implemented that code. This shows that the provided error handler in app.js is performing as expected.
Now, let's look at creating notes. Because the application doesn't have a route configured for the /notes/add URL, we must add one. To do that, we need a controller for the notes.
In app.js, make the following changes.
Comment out these lines:
// var users = require('./routes/users');
..
// app.use('/users', users);
At this stage, the Notes application does not support users, and these routes are not required. That will change in a future chapter.
What we really need to do is add code for the notes controller:
// const users = require('./routes/users');
const notes = require('./routes/notes');
..
// app.use('/users', users);
app.use('/notes', notes);
Now, we'll add a Controller module containing the notes router. Create a file named routes/notes.js, with this content:
const util = require('util');
const express = require('express');
const router = express.Router();
const notes = require('../models/notes-memory');
// Add Note.
router.get('/add', (req, res, next) => {
res.render('noteedit', {
title: "Add a Note",
docreate: true,
notekey: "", note: undefined
});
});
module.exports = router;
The resulting /notes/add URL corresponds to the link in partials/header.hbs.
In the views directory, add a template named noteedit.hbs, containing the following:
<form method='POST' action='/notes/save'>
<input type='hidden' name='docreate' value='<%=
docreate ? "create" : "update"%>'>
<p>Key:
{{#if docreate }}
<input type='text' name='notekey' value=''/>
{{else}}
{{#if note }}{{notekey}}{{/if}}
<input type='hidden' name='notekey'
value='{{#if note }}{{notekey}}{{/if}}'/>
{{/if}}
</p>
<p>Title: <input type='text' name='title'
value='{{#if note }}{{note.title}}{{/if}}' /></p>
<br/><textarea rows=5 cols=40 name='body' >
{{#if note }}{{note.body}}{{/if}}
</textarea>
<br/><input type='submit' value='Submit' />
</form>
We'll be reusing this template to support both editing notes and creating new ones.
Notice that the note and notekey objects passed to the template are empty in this case. The template detects this condition and ensures the input areas are empty. Additionally, a flag, docreate, is passed in so that the form records whether it is being used to create or update a note. At this point, we're adding a new note, so no note object exists. The template code is being written defensively to not throw errors.
This template is a form that will POST its data to the /notes/save URL. If you were to run the application at this time, it would give you an error message because no route is configured for that URL.
To support the /notes/save URL, add this to routes/notes.js:
// Save Note (update)
router.post('/save', async (req, res, next) => {
var note;
if (req.body.docreate === "create") {
note = await notes.create(req.body.notekey,
req.body.title, req.body.body);
} else {
note = await notes.update(req.body.notekey,
req.body.title, req.body.body);
}
res.redirect('/notes/view?key='+ req.body.notekey);
});
Because this URL will also be used for both creating and updating notes, it needs to detect the docreate flag and call the appropriate model operation.
The model returns a Promise for both notes.create and notes.update. Of course, we must call the corresponding Model function based on the docreate flag.
This is a POST operation handler. Because of the bodyParser middleware, the form data is added to the req.body object. The fields attached to req.body correspond directly to elements in the HTML form.
Now, we can run the application again and use the Add a Note form:
But upon clicking on the Submit button, we get an error message. There isn't anything, yet, implementing the /notes/view URL.
You can modify the URL in the location box to revisit http://localhost:3000, and you'll see something like the following screenshot on the home page:
The note is actually there; we just need to implement /notes/view. Let's get on with that.
Now that we've looked at how to create notes, we need to move on to reading them. This means implementing controller logic and view templates for the /notes/view URL.
To routes/notes.js, add this router function:
// Read Note (read)
router.get('/view', async (req, res, next) => {
var note = await notes.read(req.query.key);
res.render('noteview', {
title: note ? note.title : "",
notekey: req.query.key, note: note
});
});
Because this route is mounted on a router handling /notes, this route handles /notes/view.
If notes.read successfully reads the note, it is rendered with the noteview template. If something goes wrong, we'll instead display an error to the user through Express.
To the views directory, add the noteview.hbs template, referenced by this code:
{{#if note}}<h3>{{ note.title }}</h3>{{/if}}
{{#if note}}<p>{{ note.body }}</p>{{/if}}
<p>Key: {{ notekey }}</p>
{{#if notekey }}
<hr/>
<p><a href="/notes/destroy?key={{notekey}}">Delete</a>
| <a href="/notes/edit?key={{notekey}}">Edit</a></p>
{{/if}}
This is straightforward: taking data out of the note object and displaying using HTML. At the bottom are two links, one to /notes/destroy to delete the note and the other to /notes/edit to edit it.
The code for neither of these exists at the moment. But that won't stop us from going ahead and executing the application:
As expected, with this code, the application correctly redirects to /notes/view, and we can see our handiwork. Also, as expected, clicking on either the Delete or Edit links will give you an error, because the code hasn't been implemented.
Now that we've looked at the create and read operations, let's look at how to update or edit a note.
To routes/notes.js, add this router function:
// Edit note (update)
router.get('/edit', async (req, res, next) => {
var note = await notes.read(req.query.key);
res.render('noteedit', {
title: note ? ("Edit " + note.title) : "Add a Note",
docreate: false,
notekey: req.query.key, note: note
});
});
We're reusing the noteedit.ejs template, because it can be used for both create and update/edit operations. Notice that we pass false for docreate, informing the template that it is to be used for editing.
In this case, we first retrieve the note object and then pass it through to the template. This way, the template is set up for editing rather than note creation. When the user clicks on the Submit button, we'll end up in the same /notes/save route handler shown in the preceding screenshot. It already does the right thing: calling the notes.update method in the model rather than notes.create.
Because that's all we need do, we can go ahead and rerun the application:
Click on the Submit button here, and you will be redirected to the /notes/view screen and will then be able to read the newly edited note. Back to the /notes/view screen: we've just taken care of the Edit link, but the Delete link still produces an error.
Now, let's look at how to implement the /notes/destroy URL to delete notes.
To routes/notes.js, add the following router function:
// Ask to Delete note (destroy)
router.get('/destroy', async (req, res, next) => {
var note = await notes.read(req.query.key);
res.render('notedestroy', {
title: note ? note.title : "",
notekey: req.query.key, note: note
});
});
Destroying a note is a significant step if only because there's no trash can to retrieve it from if we make a mistake. Therefore, we want to ask the user whether they're sure they want to delete that note. In this case, we retrieve the note and then render the following page, displaying a question to ensure they do want to delete the note.
To the views directory, add a notedestroy.hbs template:
<form method='POST' action='/notes/destroy/confirm'>
<input type='hidden' name='notekey' value='{{#if note}}{{notekey}}{{/if}}'>
<p>Delete {{note.title}}?</p>
<br/><input type='submit' value='DELETE' />
<a href="/notes/view?key={{#if note}}{{notekey}}{{/if}}">Cancel</a>
</form>
This is a simple form, asking the user to confirm by clicking on the button. The Cancel link just sends them back to the /notes/view page. Clicking on the Submit button generates a POST request on the /notes/destroy/confirm URL.
That URL needs a request handler. Add this code to routes/notes.js:
// Really destroy note (destroy)
router.post('/destroy/confirm', async (req, res, next) => {
await notes.destroy(req.body.notekey);
res.redirect('/');
});
This calls the notes.destroy function in the model. If it succeeds, the browser is redirected to the home page. If not, an error message is shown to the user. Rerunning the application, we can now view it in action:
Now that everything is working in the application, you can click on any button or link and keep all the notes you want.
The Express team has done a decent job of making sure Express applications look okay out of the gate. Our Notes application won't win any design awards, but at least it isn't ugly. There's a lot of ways to improve it, now that the basic application is running. Let's take a quick look at theming an Express application. In Chapter 6, Implementing the Mobile-First Paradigm, we'll take a deeper dive, focusing on that all-important goal of addressing the mobile market.
If you're running the Notes application using the recommended method, npm start, a nice log of activity is being printed in your console window. One of those is the following:
GET /stylesheets/style.css 304 0.702 ms - -
This is due to this line of code that we put in layout.hbs:
<link rel='stylesheet' href='/stylesheets/style.css' />
This file was autogenerated for us by the Express Generator at the outset and dropped inside the public directory. The public directory is managed by the Express static file server, using this line in app.js:
app.use(express.static(path.join(__dirname, 'public')));
Let's open public/stylesheets/style.css and take a look:
body {
padding: 50px;
font: 14px "Lucida Grande", Helvetica, Arial, sans-serif;
}
a {
color: #00B7FF;
}
Something that leaps out is that the application content has a lot of white space at the top and left-hand sides of the screen. The reason is that body tags have the padding: 50px style. Changing it is quick business.
Since there is no caching in the Express static file server, we can simply edit the CSS file and reload the page, and the CSS will be reloaded as well. It's possible to turn on cache-control headers and ETags generation, as you would do for a production website. Look in the online Express documentation for details.
It involves a little bit of work:
body {
padding: 5px;
..
}
..
header {
background: #eeeeee;
padding: 5px;
}
As a result, we'll have this:
We're not going to win any design awards with this either, but there's the beginning of some branding and theming possibilities.
Generally speaking, the way we've structured the page templates, applying a site-wide theme is just a matter of adding appropriate code to layout.hbs along with appropriate stylesheets and other assets. Many of the modern theming frameworks, such as Twitter's Bootstrap, serve up CSS and JavaScript files out of a CDN server, making it incredibly easy to incorporate into a site design.
For jQuery, refer to http://jquery.com/download/.
Google's Hosted Libraries service provides a long list of libraries, hosted on Google's CDN infrastructure. Refer to https://developers.google.com/speed/libraries/.
While it's straightforward to use third-party CDNs to host these assets, it's safer to host them yourself. Not only do you take responsibility for bandwidth consumption of your application, but you're certain of not being affected by any outages of third-party services. As reliable as Google might be, their service can go down, and if that means jQuery and Bootstrap doesn't load, your customer will think your site is broken. But if those files are loaded from the same server as your application, the reliability of delivering those files will exactly equal the reliability of your application.
In Chapter 6, Implementing the Mobile-First Paradigm, we will look at a simple method to add those front-end libraries to your application.
Now that we've got ourselves a running application, you'll have played around a bit and created, read, updated, and deleted many notes.
Suppose for a moment this isn't a toy application, but one that is interesting enough to draw a million users a day. Serving a high load typically means adding servers, load balancers, and many other things. A core part is to have multiple instances of the application running at the same time to spread the load.
Let's see what happens when you run multiple instances of the Notes application at the same time.
The first thing is to make sure the instances are on different ports. In bin/www, you'll see that setting the PORT environment variable controls the port being used. If the PORT variable is not set, it defaults to http://localhost:3000, or what we've been using all along.
Let's open up package.json and add these lines to the scripts section:
"scripts": {
"start": "DEBUG=notes:* node ./bin/www",
"server1": "DEBUG=notes:* PORT=3001 node ./bin/www",
"server2": "DEBUG=notes:* PORT=3002 node ./bin/www" },
The server1 script runs on PORT 3001, while the server2 script runs on PORT 3002. Isn't it nice to have all this documented in one place?
Then, in one command window, run this:
$ npm run server1
> notes@0.0.0 server1 /Users/David/chap05/notes
> DEBUG=notes:* PORT=3001 node ./bin/www
notes:server Listening on port 3001 +0ms
In another command window, run this:
$ npm run server2
> notes@0.0.0 server2 /Users/David/chap05/notes
> DEBUG=notes:* PORT=3002 node ./bin/www
notes:server Listening on port 3002 +0ms
This gives us two instances of the Notes application. Use two browser windows to visit http://localhost:3001 and http://localhost:3002. Enter a couple of notes, and you might see something like this:
After editing and adding some notes, your two browser windows could look like the preceding screenshot. The two instances do not share the same data pool. Each is instead running in its own process and memory space. You add a note in one, and it does not show in the other screen.
Additionally, because the model code does not persist data anywhere, the notes are not saved. You might have written the greatest Node.js programming book of all time, but as soon as the application server restarts, it's gone.
Typically, you run multiple instances of an application to scale performance. That's the old throw more servers at it trick. For this to work, the data of course must be shared, and each instance must access the same data source. Typically, this involves a database. And when it comes to user identity information, it might even entail armed guards.
Hold on—we'll get to database implementation shortly. Before that, we'll cover mobile-first development.
We've come a long way in this chapter.
We started with the Pyramid of Doom and how the Promise object and async functions can help us a tame asynchronous code. We'll be using these techniques all through this book.
We quickly moved on to writing the foundation of a real application with Express. At the moment, it keeps its data in memory, but it has the basic functionality of what will become a note-taking application supporting real-time collaborative commenting on the notes.
In the next chapter, we'll dip our toes in the water of responsive, mobile-friendly web design. Due to the growing popularity of mobile computing devices, it's become necessary to address mobile devices first before desktop computer users. In order to reach those millions of users a day, the Notes application users need a good user experience when using their smartphone.
In following chapters, we'll keep growing the capabilities of the Notes application, starting with database storage models.
Now that our first Express application is usable, we act on the mantra of this age of software development: mobile-first. Mobile devices, whether they be smartphones, tablet computers, automobile dashboards, refrigerator doors, or bathroom mirrors, are taking over the world.
Another issue is mobile-first indexing, meaning that search engines are starting to preference indexing the mobile version of a website. Search engines so far concentrated on indexing the desktop version of websites, but the growing popularity of mobile devices means search engine results are skewed away from what folks are using. Google says it is not fair to mobile users if the search result, which was derived from the desktop version, does not match the mobile version of a website. For Google's take, including technical tips on the markup to use, see http://webmasters.googleblog.com/2017/12/getting-your-site-ready-for-mobile.html.
The primary considerations in designing for mobiles are the small screen sizes, the touch-oriented interaction, that there's no mouse, and the somewhat different user interface expectations. With the Notes application, our user interface needs are modest, and the lack of a mouse doesn't make any difference to us.
In this chapter, we won't do much Node.js development. Instead, we'll:
By doing so, we'll dip our toes in the water of what it means to be a full stack web engineer.
Let's start by quantifying the problem. We need to explore how well (or not) the application behaves on a mobile device. This is simple to do:
Another way to approach this is to use your desktop browser, resizing it to be very narrow. The Chrome DevTools also includes a mobile device emulator. Either way, you can mimic the small screen size of a smartphone on your desktop.
To see a real user interface problem on a mobile screen, edit views/noteedit.ejs and change this line:
<br/><textarea rows=5 cols=80 name='body' >
{{#if note }}{{note.body}}{{/if}}
</textarea>
What's changed is the cols=80 parameter. We want this textarea element to be overly large so that you can experience how a non-responsive web app appears on a mobile device. View the application on a mobile device and you'll see something like one of the screens in this screenshot:
Viewing a note works well on an iPhone 6, but the screen for editing/adding a note is not good. The text entry area is so wide that it runs off the side of the screen. Even though interaction with FORM elements work well, it's clumsy. In general, browsing the Notes application gives an acceptable mobile user experience that doesn't suck and won't make our users give rave reviews.
Mobile devices have a smaller screen, are generally touch oriented, and have different user experience expectations than a desktop computer.
To accommodate smaller screens, we use responsive web design techniques. This means designing the application to accommodate the screen size and ensuring websites provide optimal viewing and interaction across a wide range of devices. Techniques include changing font sizes, rearranging elements on the screen, using collapsible elements that open when touched, and resizing images or videos to fit available space. This is called responsive because the application responds to device characteristics by making these changes.
The primary technique is using media queries in stylesheets to detect device characteristics. Each media query section targets a range of devices, using CSS declaration to appropriately restyle content.
Let's consult a concrete example. The Twenty Twelve theme for Wordpress has a straightforward responsive design implementation. It's not built with any framework, so you can see clearly how the mechanism works, and the stylesheet is small enough to be easily digestible. Refer to its source code in the Wordpress repository at https://themes.svn.wordpress.org/twentytwelve/1.9/style.css.
The stylesheet starts with a number of resets, where the stylesheet overrides some typical browser style settings with clear defaults. Then, the bulk of the stylesheet defines styling for mobile devices. Toward the bottom of the stylesheet is a section labeled Media queries where, for certain sized screens, the styles defined for mobile devices are overridden to work on devices with larger screens.
It does this with the following two media queries:
@media screen and (min-width: 600px) { /* Screens above 600px width */ }
@media screen and (min-width: 960px) { /* Screens above 960px width */ }
The first segment of the stylesheet configures the page layout for all devices. Next, for any browser viewport at least 600px wide, reconfigure the page to display on the larger screen. Then, for any browser viewport at least 960px wide, reconfigure it again. The stylesheet has a final media query to cover print devices.
These widths are what's called a breakpoint. Those threshold viewport widths are where the design changes itself around. You can see breakpoints in action by going to any responsive website, then resizing the browser window. Watch how the design jumps at certain sizes. Those are the breakpoints chosen by the author of that website.
There's a wide range of differing opinions about the best strategy to choose your breakpoints. Do you target specific devices or do you target general characteristics? The Twenty Twelve theme did fairly well on mobile devices using only two viewport-size media queries. The CSS-Tricks blog has posted an extensive list of specific media queries for every known device, which is available at https://css-tricks.com/snippets/css/media-queries-for-standard-devices/.
We should at least target these devices:
Enough with the theory; let's get back to our code.
Bootstrap is a mobile-first framework consisting of HTML5, CSS3, and JavaScript code providing a comprehensive set of world class, responsive web design components. It was developed by engineers at Twitter and then released to the world in August 2011.
The framework includes code to retrofit modern features onto older browsers, a responsive 12-column grid system, and a long list of components (some using JavaScript) for building web applications and websites. It's meant to provide a strong foundation on which to build your application.
Refer to http://getbootstrap.com for more details.
The first step is to duplicate the code you created in the previous chapter. If, for example, you created a directory named chap05/notes, then create one named chap06/notes from the content of chap05/notes.
Now, we need to go about adding Bootstrap's code in the Notes application. The Bootstrap website suggests loading the required CSS and JavaScript files out of the Bootstrap (and jQuery) public CDN. While that's easy to do, we won't do this for two reasons:
Instead, we'll install a local copy of Bootstrap. There are several ways to install Bootstrap. For example, the Bootstrap website offers a downloadable TAR/GZIP archive (tarball). The better approach is an automated dependency management tool.
The most straightforward choice is using Bootstrap (https://www.npmjs.com/package/bootstrap), popper.js (https://www.npmjs.com/package/popper.js), and jQuery (https://www.npmjs.com/package/jquery) packages in the npm repository. These packages provide no Node.js modules, and instead are frontend code distributed through npm.
We install the packages using the following command:
$ npm install bootstrap@4.1.x --save
npm notice created a lockfile as package-lock.json. You should commit this file.
npm WARN bootstrap@4.1.0 requires a peer of jquery@1.9.1 - 3 but none is installed. You must install peer dependencies yourself.
npm WARN bootstrap@4.1.0 requires a peer of popper.js@^1.14.0 but none is installed. You must install peer dependencies yourself.
+ bootstrap@4.1.0
added 1 package in 1.026s
$ npm install jquery@1.9.x --save
+ jquery@1.9.1
$ npm install popper.js@1.14.x --save
+ popper.js@1.14.0
As we see here, when we install Bootstrap, it helpfully tells us the corresponding versions of jQuery and popper.js to use. Therefore, we dutifully install those versions. What's most important is to see what got downloaded:
$ ls node_modules/bootstrap/dist/*
... directory contents
$ ls node_modules/jquery/
... directory contents
$ ls node_modules/popper.js/dist
... directory contents
Within each of these directories are the CSS and JavaScript files that are meant to be used in the browser. More importantly, these files are located in a given directory whose pathname is known—specifically, the directories we just inspected. Let's see how to configure our Express app to use those three packages on the browser side.
On the Bootstrap website, they give a recommended HTML structure. We'll be interpolating from their recommendation to use Bootstrap code provided through the CDN to instead use the local copies of Bootstrap, jQuery, and Popper that we just installed. Refer to the Getting started page at http://getbootstrap.com/docs/4.0/getting-started/introduction/.
What we'll do is modify views/layout.hbs to match their recommended template:
<!doctype html>
<html lang="en">
<head>
<title>{{title}}</title>
<meta charset="utf-8">
<meta name="viewport"
content="width=device-width, initial-scale=1, shrink-to-
fit=no">
<link rel="stylesheet"
href="/assets/vendor/bootstrap/css/bootstrap.min.css">
<link rel='stylesheet' href='/assets/stylesheets/style.css' />
</head>
<body>
{{> header }}
{{{body}}}
<!-- jQuery first, then Popper.js, then Bootstrap JS -->
<script src="/assets/vendor/jquery/jquery.min.js"></script>
<script src="/assets/vendor/popper.js/popper.min.js"></script>
<script src="/assets/vendor/bootstrap/js/bootstrap.min.js"></script>
</body>
</html>
This is largely the template shown on the Bootstrap site, incorporating the previous content of views/layout.hbs. Our own stylesheet is loaded following the Bootstrap stylesheet, giving us the opportunity to override anything in Bootstrap we want to change. What's different is that instead of loading Bootstrap, popper.js, and jQuery packages from their respective CDNs, we use the path /assets/vendor/product-name instead.
This /assets/vendor URL is not currently recognized by the Notes application. To add this support, edit app.js to add these lines:
app.use(express.static(path.join(__dirname, 'public')));
app.use('/assets/vendor/bootstrap', express.static(
path.join(__dirname, 'node_modules', 'bootstrap', 'dist')));
app.use('/assets/vendor/jquery', express.static(
path.join(__dirname, 'node_modules', 'jquery')));
app.use('/assets/vendor/popper.js', express.static(
path.join(__dirname, 'node_modules', 'popper.js', 'dist')));
Within the public directory, we have a little house-keeping to do. When express-generator set up the initial project, it generated public/images, public/javascripts, and public/stylesheets directories. We want each to be within the /assets directory, so do this:
$ mkdir public/assets
$ mv public/images/ public/javascripts/ public/stylesheets/ public/assets/
We now have our asset files, including Bootstrap, popper.js, and jQuery, all available to the Notes application under the /assets directory. The page layout refers to these assets and should give us the default Bootstrap theme:
$ npm start
> notes@0.0.0 start /Users/David/chap06/notes
> DEBUG=notes:* node ./bin/www
notes:server Listening on port 3000 +0ms
GET / 200 306.660 ms - 883
GET /stylesheets/style.css 404 321.057 ms - 2439
GET /assets/stylesheets/style.css 200 160.371 ms - 165
GET /assets/vendor/bootstrap/js/bootstrap.min.js 200 157.459 ms - 50564
GET /assets/vendor/popper.js/popper.min.js 200 769.508 ms - 18070
GET /assets/vendor/jquery/jquery.min.js 200 777.988 ms - 92629
GET /assets/vendor/bootstrap/css/bootstrap.min.css 200 788.028 ms - 127343
The on-screen differences are minor, but this is the proof necessary that the CSS and JavaScript files for Bootstrap are being loaded. We have accomplished the first major goal—using a modern, mobile-friendly framework to implement a mobile-first design.
Bootstrap isn't the only JavaScript/CSS framework providing a responsive layout and useful components. We're using Bootstrap in this project because of its popularity. These frameworks are worthy of a look:
HTML5 Boilerplate (https://html5boilerplate.com/) is an extremely useful basis from which to code the HTML and other assets. It contains the current best practices for the HTML code in web pages, as well as tools to normalize CSS support and configuration files for several web servers.
Other new technologies impacting web application development are two new CSS layout methodologies. The CSS3 committee has been working on several fronts, including page layout.
In the distant past, we used nested HTML tables for page layout. That is a bad memory that we don't have to revisit. More recently, we've been using a box model using DIVs, and even at times using absolute or relative placement techniques. All these techniques have been suboptimal in several ways, some more than others.
One popular layout technique is to divide the horizontal space into columns and assign a certain number of columns to each thing on the page. With some frameworks, we can even have nested DIVs, each with their own set of columns. Bootstrap 3, and other modern frameworks, used that layout technique.
The two new CSS layout methodologies, Flexbox (https://en.wikipedia.org/wiki/CSS_flex-box_layout) and CSS Grids (https://developer.mozilla.org/en-US/docs/Web/CSS/CSS_Grid_Layout), are a significant improvement over all previous methodologies. We are mentioning these technologies because they're both worthy of attention. Both are somewhat early in their adoption curve—they've been standardized by committees and adopted in the latest browsers, but of course there are a lot of old browsers in the field.
With Bootstrap 4, the Bootstrap team chose to go with Flexbox. Therefore, under the hood are Flexbox CSS constructs.
We've learned about the basics of responsive design and Bootstrap, and we hooked the Bootstrap framework into our application. Now we're ready to launch a redesign of the application so that it works well on mobile devices.
Bootstrap uses a 12-column grid system to control layout, giving applications a responsive mobile-first foundation on which to build. It automatically scales components as the viewport changes size or shape. The method relies on <div> elements with classes to describe the role each <div> plays in the layout.
The basic layout pattern is as follows:
<div class="container-fluid">
<div class="row">
<div class="col-sm-3">Column 1 content</div> <!-- 25% -->
<div class="col-sm-9">Column 2 content</div> <!-- 75% -->
</div>
<div class="row">
<div class="col-sm-3">Column 1 content</div> <!-- 25% -->
<div class="col-sm-6">Column 2 content</div> <!-- 50% -->
<div class="col-sm-3">Column 3 content</div> <!-- 25% -->
</div>
</div>
The outermost layer is the .container or .container-fluid element. Containers provide a means to center or horizontally pad the content. Containers marked as .container-fluid act as if they have width: 100%, meaning they expand to fill the horizontal space.
A .row is what it sounds like, a "row". Technically, a row is a wrapper for columns. Containers are wrappers for rows, and rows are wrappers for columns, and columns contain the stuff displayed to our users. Got that?
Columns are marked with variations of the .col class. With the basic column class, .col, the columns divide equally into the available space. You can specify a numerical column count to assign different widths to each column. Bootstrap supports up to 12 numbered columns, hence each row in the example adds up to 12 columns.
You can also specify a breakpoint to which the column applies:
Specifying a breakpoint, for example col-sm, means that it applies to devices matching that breakpoint, or larger. Hence, in the example shown earlier, the column definitions applied to col-sm, col-md, col-lg, and col-xl devices, but not to col-xs devices.
The column count is appended to the class name. That means using col-# when not targeting a breakpoint, for example, col-4, or col-{breakpoint}-# when targeting a breakpoint, for example, col-md-4. If the columns add up to more than 12, the columns beyond the twelfth column wrap around to become a new row. The word auto can be used instead of a numerical column count to size the column to the natural width of its content.
It's possible to mix and match to target multiple breakpoints:
<div class="container-fluid">
<div class="row">
<div class="col-xs-9 col-md-3 col-lg-6">Column 1 content</div>
<div class="col-xs-3 col-md-9 col-lg-6">Column 2 content</div>
</div>
...
</div>
This declares three different layouts, one for extra-small devices, another for medium devices, and the last for large devices. This gives us enough to start modifying the Notes application. The grid system can do a lot more. For details, see the documentation: http://getbootstrap.com/docs/4.0/layout/grid/.
We structured each of the page layouts as follows:
<!DOCTYPE html> <html> <head> .. headerStuff </head> <body> .. pageHeader .. main content
.. bottomOfPageStuff </body> </html>
The page content therefore has two visible rows: the header and the main content. At the bottom of the page are invisible things like the JavaScript files for Bootstrap and jQuery.
No change is required in views/layout.hbs. One might think the container-fluid wrapper would be in that file, with the rows and columns specified in the other templates. Instead, we'll do it in the templates to give us the most layout freedom.
The world around us isn't constructed of words, but instead things. Hence, a pictorial style, as icons, should help computer software to be more comprehensible. Giving a good user experience should make our users reward us with more likes in the app store.
There are several icon libraries that can be used in a website. The Bootstrap team has a curated list at http://getbootstrap.com/docs/4.1/extend/icons/. For this project, we'll use Feather Icons (https://feathericons.com/) and its conveniently available npm package, https://www.npmjs.com/package/feather-icons.
In package.json, add this to the dependencies:
"feather-icons": ">=4.5.x"
Then run npm install to download the new package. You can then inspect the downloaded package and see that ./node_modules/feather-icons/dist/feather.js contains browser-side code, making it easy to use the icons.
We make that directory available by mounting it in app.js, just as we did for Bootstrap and jQuery libraries. Add this code to app.js:
app.use('/assets/vendor/feather-icons', express.static(
path.join(__dirname, 'node_modules', 'feather-icons', 'dist')));
Going by the documentation, we must put this at the bottom of views/layout.hbs to enable feather-icons support:
<script src="/assets/vendor/feather-icons/feather.js"></script>
<script>
feather.replace();
</script>
To use one of the icons, use a data-feather attribute specifying one of the icon names, like so:
<i data-feather="circle"></i>
What's important is the data-feather attribute, which the Feather Icons library uses to identify the SVG file to use. The Feather Icons library completely replaces the element where it found the data-feather attribute. Therefore, if you want the icon to be a clickable link, it's necessary to wrap the icon definition with an <a> tag, rather than adding data-feather to the <a> tag. The next section shows an example.
The header section we designed before contains a page title and a little navigation bar. Bootstrap has several ways to spiff this up, and even give us a responsive navigation bar which neatly collapses to a menu on small devices.
In views/pageHeader.ejs, make this change:
<header class="page-header">
<h1>{{ title }}</h1>
<nav class="navbar navbar-expand-md navbar-dark bg-dark">
<a class="navbar-brand" href='/'><i data-feather="home"></i></a>
<button class="navbar-toggler" type="button"
data-toggle="collapse" data-target="#navbarSupportedContent"
aria-controls="navbarSupportedContent"
aria-expanded="false" aria-label="Toggle navigation">
<span class="navbar-toggler-icon"></span>
</button>
<div class="collapse navbar-collapse" id="navbarSupportedContent">
<div class="navbar-nav col">
{{#if breadcrumb}}
<a class="nav-item nav-link" href='{{breadcrumb.url}}'>
{{breadcrumb.title}}</a>
{{/if}}
</div>
<a class="nav-item nav-link btn btn-light col-auto"
href='/notes/add'>ADD Note</a>
</div>
</nav>
</header>
Adding class="page-header" informs Bootstrap this is, well, the page header. Within that we have the <h1> header as before, giving the page title, and then a responsive Bootstrap navbar.
By default the navbar is expanded—meaning the components inside the navbar are visible—because of the navbar-expand-md class. This navbar is using a navbar-toggler button which governs the responsiveness of the navbar. By default, this button is hidden and the body of the navbar is visible. If the screen is small enough, the navbar-toggler is switched so it's visible, the body of the navbar is invisible, and when clicking on the now-visible navbar-toggler, a menu drops down containing the body of the navbar:
We chose the feather icons home icon because it says go home. It's intended that the middle portion of the navbar will contain a breadcrumb as we navigate around the Notes application.
The ADD Note button is glued to the right-hand-side with a little Flexbox magic. The container is a Flexbox, meaning we can use the Bootstrap classes to control the space consumed by each item. The breadcrumb area is empty in this case, but the <div> that would contain it is there and declared with class="col", meaning that it takes up a column unit. The ADD Note button is, on the other hand, declared with class="col-auto", meaning it takes up only the room required for itself. It is the empty breadcrumb area that will expand to fill the space, while the ADD Note button fills only its own space, and is therefore pushed over to the side.
Because it's the same application, the functionality all works; we're simply working on the presentation. We've added a few notes but the presentation of the list on the front page leaves a lot to be desired. The small size of the title is not very touch-friendly, since it doesn't present a large target area for a fingertip. And can you explain why the notekey value has to be displayed on the home page?
The current home page has a simple text list that's not terribly touch-friendly and showing the key at the front of the line might be inexplicable to the user. Let's fix this.
Edit views/index.hbs and make this change:
<div class="container-fluid">
<div class="row">
<div class="col-12 btn-group-vertical" role="group">
{{#each notelist}}
<a class="btn btn-lg btn-block btn-outline-dark"
href="/notes/view?key={{ key }}">{{ title }}</a>
{{/each}}
</div>
</div>
</div>
The first change is to switch away from using a list and to use a vertical button group. By making the text links look and behave like buttons, we're improving the user interface, especially its touch friendliness. We chose the btn-outline-dark button style because it looks good in the user interface. We use large buttons (btn-lg) that fill the width of the container (btn-block).
We eliminated showing the notekey to the user. This information doesn't add anything to the user experience:
This is beginning to take shape, with a decent-looking home page that handles resizing very nicely and is touch friendly.
There's still something more to do with this, since the header area is taking up a fair amount of space. We should always feel free to rethink a plan as we look at intermediate results. Earlier, we created one design for the header area, but on reflection that design looks to be too large. The intention had been to insert a breadcrumb just to the right of the home icon, and to leave the <h1> title at the top of the header area. But this is taking up vertical space and we can tighten up the header and possibly improve the appearance.
Edit partials/header.hbs and replace it with the following:
<header class="page-header">
<nav class="navbar navbar-expand-md navbar-dark bg-dark">
<a class="navbar-brand" href='/'><i data-feather="home"></i></a>
<button class="navbar-toggler" type="button"
data-toggle="collapse" data-target="#navbarSupportedContent"
aria-controls="navbarSupportedContent"
aria-expanded="false"
aria-label="Toggle navigation">
<span class="navbar-toggler-icon"></span>
</button>
<div class="collapse navbar-collapse" id="navbarSupportedContent">
<span class="navbar-text col">{{ title }}</span>
<a class="nav-item nav-link btn btn-light col-auto" href='/notes/add'>ADD Note</a>
</div>
</nav>
</header>
This removes the <h1> tag at the top of the header area, immediately tightening the presentation.
Within the navbar-collapse area, we've replaced what had been intended as the breadcrumb, with a simple navbar-text component. To keep the ADD Note button glued to the right, we're maintaining the class="col" and class="col-auto" settings:
Which header area design is better? That's a good question. Since beauty is in the eye of the beholder, both designs are probably equally good. What we have demonstrated is the ease with which we can update the design by editing the template files.
Viewing a Note isn't bad, but the user experience can be improved. The user does not need to see the notekey, for example. Additionally, Bootstrap has nicer-looking buttons we can use.
In views/noteview.hbs, make these changes:
<div class="container-fluid">
<div class="row"><div class="col-xs-12">
{{#if note}}<h3>{{ note.title }}</h3>{{/if}}
{{#if note}}<p>{{ note.body }}</p>{{/if}}
<p>Key: {{ notekey }}</p>
</div></div>
{{#if notekey }}
<div class="row"><div class="col-xs-12">
<div class="btn-group">
<a class="btn btn-outline-dark"
href="/notes/destroy?key={{notekey}}"
role="button">Delete</a>
<a class="btn btn-outline-dark"
href="/notes/edit?key={{notekey}}"
role="button">Edit</a>
</div>
</div></div>
{{/if}}
</div>
We have declared two rows, one for the Note, and another for buttons to act on the Note. Both are declared to consume all 12 columns, and therefore take up the full available width. The buttons are again contained within a button group:
Do we really need to show the notekey to the user? We'll leave it there, but that's an open question for the user experience team. Otherwise, we've improved the note-reading experience.
The next major glaring problem is the form for adding and editing notes. As we said earlier, it's easy to get the text input area to overflow a small screen. On the other hand, Bootstrap has extensive support for making nice-looking forms that work well on mobile devices.
Change the form in views/noteedit.hbs to this:
<form method='POST' action='/notes/save'>
<div class="container-fluid">
{{#if docreate}}
<input type='hidden' name='docreate' value="create">
{{else}}
<input type='hidden' name='docreate' value="update">
{{/if}}
<div class="form-group row align-items-center">
<label for="notekey" class="col-1 col-form-label">Key</label>
{{#if docreate }}
<div class="col">
<input type='text' class="form-control"
placeholder="note key" name='notekey' value=''/>
</div>
{{else}}
{{#if note }}
<span class="input-group-text">{{notekey}}</span>
{{/if}}
<input type='hidden' name='notekey'
value='{{#if note }}{{notekey}}{{/if}} '/>
{{/if}}
</div>
<div class="form-group row">
<label for="title" class="col-1 col-form-label">Title</label>
<div class="col">
<input type="text" class="form-control"
id='title' name='title' placeholder="note title"
value='{{#if note }}{{note.title}}{{/if}}'>
</div>
</div>
<div class="form-group row">
<textarea class="form-control" name='body'
rows="5">{{#if note }}{{note.body}}{{/if}}</textarea>
</div>
<button type="submit" class="btn btn-default">Submit</button>
</div>
</form>
There's a lot going on here. What we've done is reorganize the form so Bootstrap can do the right things with it. The first thing to note is that we have several instances of this:
<div class="form-group row"> .. </div>
These are contained within a container-fluid, meaning that we've set up three rows in the form.
Bootstrap uses form-group elements to add structure to forms, and to encourage proper use of <label> elements, along with other form elements. It's good practice to use a <label> with every <input> to improve assistive behavior in the browser, rather than if you simply left some dangling text.
Every form element has class="form-control". Bootstrap uses this to identify the controls so it can add styling and behavior.
By default, Bootstrap formats form-group elements so the label appears on another line from the input control. Note that we've added class="col-1" to the labels and class="col" to the <div> wrapping the input. This declares two columns, the first consuming one column unit and the other consuming the remainder.
The placeholder='key' attribute puts sample text in an otherwise empty text input element. It disappears as soon as the user types something and is an excellent way to prompt the user with what's expected.
Finally, we changed the Submit button to be a Bootstrap button. These look nice, and Bootstrap makes sure that they work great:
The result looks good and works well on the iPhone. It automatically sizes itself to whatever screen it's on. Everything behaves nicely. In this screenshot, we've resized the window small enough to cause the navbar to collapse. Clicking on the so-called hamburger icon on the right (the three horizontal lines) causes the navbar contents to pop up as a menu.
The window used to verify the desire to delete a Note doesn't look bad, but it can be improved.
Edit views/notedestroy.hbs to contain the following:
<form method='POST' action='/notes/destroy/confirm'>
<div class="container-fluid">
<input type='hidden' name='notekey' value='{{#if note}}{{notekey}}{{/if}}'>
<p class="form-text">Delete {{note.title}}?</p>
<div class="btn-group">
<button type="submit" value='DELETE'
class="btn btn-outline-dark">DELETE</button>
<a class="btn btn-outline-dark"
href="/notes/view?key={{#if note}}{{notekey}}{{/if}}"
role="button">
Cancel</a>
</div>
</div>
</form>
We've reworked everything to use Bootstrap form goodness. The question about deleting the Note is wrapped with class="form-text" so that Bootstrap can display this properly.
The buttons are wrapped with class="btn-group" as before. The buttons have exactly the same styling as on other screens, giving a consistent look across the application:
There is an issue that the title text in the navbar does not use the word Delete. In routes/notes.js, we can make this change:
// Ask to Delete note (destroy)
router.get('/destroy', async (req, res, next) => {
var note = await notes.read(req.query.key);
res.render('notedestroy', {
title: note ? `Delete ${note.title}` : "",
notekey: req.query.key, note: note
});
});
What we've done is changed the title parameter passed to the template. We'd done this in the /notes/edit route handler and seemingly missed doing so in this handler.
One reason to use Bootstrap is that you can easily build a customized version. Stylesheets are built using SASS, which is one of the CSS preprocessors to simplify CSS development. In Bootstrap's code, one file (scss/_variables.scss) contains variables used throughout the rest of Bootstrap's .scss files. Change one variable and it can automatically affect the rest of Bootstrap.
Earlier, we overrode a couple of Bootstrap behaviors with our custom CSS file, public/stylesheets/style.css. This is an easy way to change a couple of specific things, but it doesn't work for large-scale changes to Bootstrap. Serious Bootstrap customization requires generating a customized Bootstrap build.
The official documentation on the Bootstrap website (http://getbootstrap.com/docs/4.1/getting-started/build-tools/) is useful for reference on the build process.
If you've followed the directions given earlier, you have a directory, chap06/notes, containing the Notes application source code. Create a directory named chap06/notes/theme, within which we'll set up a custom Bootstrap build process.
As students of the Twelve Factor Application model, we'll be using a package.json in that directory to automate the build process. There isn't any Node.js code involved; npm is also a convenient tool to automate the software build processes.
To start, download the Bootstrap source tree from https://github.com/twbs/bootstrap. While the Bootstrap npm package includes SASS source files, it isn't sufficient to build Bootstrap, and therefore one must download the source tree. What we do is navigate to the GitHub repository, click on the Releases tab, and select the URL for the most recent release.
With theme/package.json containing this scripts section:
{
"scripts": {
"download": "wget -O - https://github.com/twbs/bootstrap/archive/v4.1.0.tar.gz | tar xvfz -",
"postdownload": "cd bootstrap-4.1.0 && npm install"
}
}
Type this command:
$ npm run download
This downloads the tar-gzip (tarball) archive from the Bootstrap repository and immediately unpacks it. If you are on Windows, it will be easiest to run that script in Windows Subsystem for Linux to execute these commands. After downloading and unpacking the archive, the postdownload step runs npm install in the directory. The Bootstrap team uses their package.json, not only to track all the dependencies required to build Bootstrap, but to drive the build process.
The npm install for Bootstrap will take a long time, so be patient.
This much only installs the tools necessary to build Bootstrap. Building the Bootstrap documentation requires installing additional Ruby-based tools (Jekyll and some plugins).
To build Bootstrap, let's add the following lines to the scripts section in our theme/package.json:
"scripts": {
...
"build": "cd bootstrap-4.1.0 && npm run dist",
"watch": "cd bootstrap-4.1.0 && npm run watch"
...
}
Obviously you'll need to adjust the directory name as the Bootstrap project issues new releases. In the Bootstrap source tree, running npm run dist builds Bootstrap, while npm run watch sets up an automated process to scan for changed files and rebuilds Bootstrap upon changing any file. By adding these lines to our theme/package.json, we can start this in the terminal and it automatically reruns the build as needed.
Now run a build with this command:
$ npm run build
The built files land in the theme/bootstrap-4.1.0/dist directory. The content of that directory will match the contents of the corresponding npm package.
In case it hasn't been obvious all along—there are Bootstrap version numbers embedded in these URLs and file or directory names. As new Bootstrap releases are issued, you must adjust the pathnames to match the current version number.
Before proceeding, let's take a look around the Bootstrap source tree. The scss directory contains the SASS source that will be compiled into the Bootstrap CSS files. To generate a customized Bootstrap build will require a few modifications in that directory.
The bootstrap-4.1.0/scss/bootstrap.scss file contains @import directives to pull in all Bootstrap components. The file bootstrap-4.1.0/scss/_variables.scss contains definitions used in the remainder of the Bootstrap SASS source. Editing, or overriding, these values will change the look of websites using the resulting Bootstrap build.
For example, these definitions determine the main color values:
$white: #fff !default;
$gray-100: #f8f9fa !default;
...
$gray-800: #343a40 !default;
...
$blue: #007bff !default;
...
$red: #dc3545 !default;
$orange: #fd7e14 !default;
$yellow: #ffc107 !default;
$green: #28a745 !default;
...
$primary: $blue !default;
$secondary: $gray-600 !default;
$success: $green !default;
$info: $cyan !default;
$warning: $yellow !default;
$danger: $red !default;
$light: $gray-100 !default;
$dark: $gray-800 !default;
These are similar to CSS statements. The !default attribute designates these values as the default. Any !default values can be overridden without editing _values.scss.
Create a file, theme/_custom.scss, containing the following:
$white: #fff !default;
$gray-900: #212529 !default;
$body-bg: $gray-900 !default;
$body-color: $white !default;
This reverses the values for the $body-bg and $body-color settings in _variables.scss. The Notes app will now use white text on a dark background, rather than the default white background with dark text. Because these declarations do not use !default, they'll override the values in _variables.scss.
Then make a copy of scss/bootstrap.scss in the theme directory and modify it, like so:
@import "custom";
@import "functions";
@import "variables";
...
We're importing the _custom.scss file we just created. Finally, add this line to the scripts section of theme/package.json:
"prebuild": "cp _custom.scss bootstrap.scss bootstrap-4.1.0/scss",
With that in place, before building Bootstrap these two files will be copied in place. Next, rebuild Bootstrap:
$ npm run build
> @ prebuild /Users/David/chap06/notes/theme
> cp _custom.scss bootstrap.scss bootstrap-4.1.0/scss
> @ build /Users/David/chap06/notes/theme
> cd bootstrap-4.1.0 && npm run dist
...
While that's building, let's modify notes/app.js to mount the build directory:
// app.use('/assets/vendor/bootstrap', express.static(
// path.join(__dirname, 'node_modules', 'bootstrap', 'dist'))); app.use('/assets/vendor/bootstrap', express.static(
path.join(__dirname, 'theme', 'bootstrap-4.1.0', 'dist')));
What we've done is switch from the Bootstrap in node_modules to what we just built in the theme directory. The Bootstrap version number shows up here, so this must also be updated as new Bootstrap releases are adopted.
Then reload the application, and you'll see the following:
To get exactly this, you may need to make a change in the templates. The Button elements we used earlier have the btn-outline-dark class, which works well on a light background. The background is now dark and these buttons need to use light coloring.
To change the buttons, in views/index.hbs make this change:
<a class="btn btn-lg btn-block btn-outline-light"
href="/notes/view?key={{ key }}"> {{ title }} </a>
Make a similar change in views/noteview.hbs:
<a class="btn btn-outline-light" href="/notes/destroy?key={{notekey}}"
role="button"> Delete </a>
<a class="btn btn-outline-light" href="/notes/edit?key={{notekey}}"
role="button"> Edit </a>
That's cool, we can now rework the Bootstrap color scheme any way we want. Don't show this to your user experience team, because they'll throw a fit. We did this to prove the point that we can edit _custom.scss and change the Bootstrap theme.
If all this is too complicated for you, several websites provide pre-built Bootstrap themes, or else simplified tools to generate a Bootstrap build. To get our feet wet, let's download a theme from Bootswatch (https://bootswatch.com/). This is both a collection of free and open source themes and a build system for generating custom Bootstrap themes (https://github.com/thomaspark/bootswatch/).
Let's use the Minty theme from Bootswatch to explore the needed changes. You can download the theme from the website or add the following to the scripts section of package.json:
"dl-minty": "mkdir -p minty && npm run dl-minty-css && npm run dl-minty-min-css",
"dl-minty-css": "wget https://bootswatch.com/4/minty/bootstrap.css -O minty/bootstrap.css",
"dl-minty-min-css": "wget https://bootswatch.com/4/minty/bootstrap.min.css -O minty/bootstrap.min.css"
This will download the prebuilt CSS files for our chosen theme. In passing, notice that the Bootswatch website offers _variables.scss and _bootswatch.scss files which should be usable with a workflow similar to what we implemented in the previous section. The GitHub repository matching the Bootswatch website has a complete build procedure for building custom themes.
Perform the download:
$ npm run dl-minty
> notes@0.0.0 dl-minty /Users/David/chap06/notes
> mkdir -p minty && npm run dl-minty-css && npm run dl-minty-min-css
> notes@0.0.0 dl-minty-css /Users/David/chap06/notes
> wget https://bootswatch.com/4/minty/bootstrap.css -O minty/bootstrap.css
> notes@0.0.0 dl-minty-min-css /Users/David/chap06/notes
> wget https://bootswatch.com/4/minty/bootstrap.min.css -O minty/bootstrap.min.css
In app.js we will need to change the Bootstrap mounts to separately mount the JavaScript and CSS files. Use the following:
// app.use('/assets/vendor/bootstrap', express.static(
// path.join(__dirname, 'node_modules', 'bootstrap', 'dist')));
// app.use('/assets/vendor/bootstrap', express.static(
// path.join(__dirname, 'theme', 'bootstrap-4.0.0', 'dist')));
app.use('/assets/vendor/bootstrap/js', express.static(
path.join(__dirname, 'node_modules', 'bootstrap', 'dist', 'js')));
app.use('/assets/vendor/bootstrap/css', express.static(
path.join(__dirname, 'minty')));
Instead of one mount for /vendor/bootstrap, we now have two mounts for each of the subdirectories. Simply make the /vendor/bootstrap/css mount point to a directory containing the CSS files you downloaded from the theme provider.
Because Minty is a light-colored theme, the buttons need to use the dark style. We had earlier changed the buttons to use a light style because of the dark background. We must now switch from btn-outline-light back to btn-outline-dark. In partials/header.hbs, the color scheme requires a change to the navbar content:
<div class="collapse navbar-collapse" id="navbarSupportedContent">
<span class="navbar-text text-dark col">{{ title }}</span>
<a class="nav-item nav-link btn btn-dark col-auto" href='/notes/add'>ADD Note</a>
</div>
We selected text-dark and btn-dark classes to provide some contrast against the background.
Re-run the application and you'll see something like this:
The possibilities for using Bootstrap are endless. While we covered a lot of material, we only touched the surface, and we could have done much more to the Notes application.
You learned what the Twitter Bootstrap framework can do. Bootstrap's goal is to make mobile-responsive development easy. We used Bootstrap to make great improvements to the way the Notes app looks and feels. We customized Bootstrap, dipping our toes into generating a custom theme.
Now, we want to get back to writing Node.js code. We left off Chapter 5, Your First Express Application, with the problem of persistence so that the Notes application can be stopped and restarted without losing our notes. In Chapter 7, Data Storage and Retrieval, we'll dive into using databases to store our data.
To give ourselves some experience with the ES6 Module format, we'll rewrite the Notes application accordingly.
In the previous two chapters, we built a small and somewhat useful application for storing notes, and then made it work on mobile devices. While the application works reasonably well, it doesn't store those notes anywhere on a long-term basis, meaning the notes are lost when you stop the server and, if you run multiple instances of Notes, each instance has its own set of notes. The typical next step is to introduce a database tier.
In this chapter, we will look at database support in Node.js, so the user sees the same set of notes for any Notes instance accessed, and to reliably store notes for long-term retrieval.
We'll start with the Notes application code used in the previous chapter. We started with a simple, in-memory data model using an array to store the notes, and then made it mobile friendly. In this chapter, we will:
Let's get started!
The first step is to duplicate the code from the previous chapter. For instance, if you were working in chap06/notes, duplicate that to be chap07/notes.
By definition, external data storage systems require asynchronous code in the Node.js architecture. The access time to retrieve data from disk, from another process, or from a database, always takes sufficient time to require deferred execution.
The existing Notes data model is an in-memory data store. In theory, in-memory data access does not require asynchronous code and therefore, the existing model module could have used regular functions rather than async functions.
We knew that Notes must move to using databases, and would require an asynchronous API to access Notes data. For that reason, the existing Notes model API uses async functions so that in this chapter, we can persist Note data to databases.
Before we get into databases, we have to address one of the attributes of a high-quality software system: managing logged information, including normal system activity, system errors, and debugging information. Logs give us an insight into the behavior of the system. How much traffic is it getting? If it's a website, which pages are people hitting the most? How many errors occur and of what kind? Do attacks occur? Are malformed requests being sent?
Log management is also an issue. Log rotation means regularly moving the log file out of the way, to start with a fresh log file. You should process logged data to produce reports. A high priority on screening for security vulnerabilities is a must.
The Twelve Factor application model suggests simply sending logging information to the console, and then some other software system captures that output and directs it to a logging service. Following their advice can reduce system complexity by having fewer things that can break. In a later chapter, we'll use PM2 for that purpose.
Let's first complete a tour of information logging as it stands right now in Notes.
When we used the Express Generator to initially create the Notes application, it configured an activity logging system using morgan:
const logger = require('morgan');
..
app.use(logger('dev'));
This is what prints the requests on the Terminal window. Visit https://github.com/expressjs/morgan for more information.
Internally, Express uses the Debug package for debugging traces. You can turn these on using the DEBUG environment variable. We should try to use this package in our application code. For more information, visit https://www.npmjs.com/package/debug.
Finally, the application might generate uncaught exceptions. The uncaughtException error needs to be captured, logged, and dealt with appropriately.
The Morgan package has two general areas for configuration:
As it stands, Notes uses the dev format, which is described as a concise status output meant for developers. This can be used to log web requests as a way to measure website activity and popularity. The Apache log format already has a large ecosystem of reporting tools and, sure enough, Morgan can produce log files in this format.
To change the format, simply change this line in app.js:
app.use(logger(process.env.REQUEST_LOG_FORMAT || 'dev'));
Then run Notes as follows:
$ REQUEST_LOG_FORMAT=common npm start
> notes@0.0.0 start /Users/david/chap07/notes
> node ./bin/www
::1 - - [12/Feb/2016:05:51:21 +0000] "GET / HTTP/1.1" 304 -
::1 - - [12/Feb/2016:05:51:21 +0000] "GET /vendor/bootstrap/css/bootstrap.min.css HTTP/1.1" 304 -
::1 - - [12/Feb/2016:05:51:21 +0000] "GET /stylesheets/style.css HTTP/1.1" 304 -
::1 - - [12/Feb/2016:05:51:21 +0000] "GET /vendor/bootstrap/js/bootstrap.min.js HTTP/1.1" 304 -
To revert to the previous logging output, simply do not set this environment variable. If you've looked at Apache access logs, this logging format will look familiar. The ::1 notation at the beginning of the line is IPV6 notation for the localhost, which you may be more familiar with as 127.0.0.1.
We can declare victory on request logging and move on to debugging messages. However, let's look at logging this to a file directly. While it's possible to capture stdout through a separate process, Morgan is already installed in Notes and it does provide the capability to direct its output to a file.
The Morgan documentation suggests this:
// create a write stream (in append mode)
var accessLogStream = fs.createWriteStream(__dirname + '/access.log', {flags: 'a'})
// setup the logger
app.use(morgan('combined', {stream: accessLogStream}));
But this has a problem; it's impossible to perform log rotation without killing and restarting the server. Instead, we'll use their rotating-file-stream package.
First, install the package:
$ npm install rotating-file-stream --save
Then we add this code to app.js:
const fs = require('fs-extra');
...
const rfs = require('rotating-file-stream');
var logStream;
// Log to a file if requested
if (process.env.REQUEST_LOG_FILE) {
(async () => {
let logDirectory = path.dirname(process.env.REQUEST_LOG_FILE);
await fs.ensureDir(logDirectory);
logStream = rfs(process.env.REQUEST_LOG_FILE, {
size: '10M', // rotate every 10 MegaBytes written
interval: '1d', // rotate daily
compress: 'gzip' // compress rotated files
});
})().catch(err => { console.error(err); });
}
..
app.use(logger(process.env.REQUEST_LOG_FORMAT || 'dev', {
stream: logStream ? logStream : process.stdout
}));
Here, we're using an environment variable, REQUEST_LOG_FILE, to control whether to send the log to stdout or to a file. The log can go into a directory, and the code will automatically create that directory if it doesn't exist. By using rotating-file-stream (https://www.npmjs.com/package/rotating-file-stream), we're guaranteed to have log file rotation with no extra systems required.
The fs-extra module is being used because it adds Promise-based functions to the fs module (https://www.npmjs.com/package/fs-extra). In this case, fs.ensureDir checks if the named directory structure exists and, if not, the directory path is created.
You can generate quite a detailed trace of what Express does by running Notes this way:
$ DEBUG=express:* npm start
This is pretty useful if you want to debug Express. But, we can use this in our own code as well. It is similar to inserting console.log statements, but without having to remember to comment out the debugging code.
It is very simple to enable debugging in a module:
const debug = require('debug')('module-name');
..
debug('some message');
..
debug(`got file ${fileName}`);
Important messages can be printed to process.stdout or process.stderr, which can be lost if you don't capture that output. The Twelve Factor model suggests using a system facility to capture these output streams. With Notes, we'll use PM2 for that purpose, which we'll cover in Chapter 10, Deploying Node.js Applications.
The logbook module (https://github.com/jpillora/node-logbook) offers some useful capabilities in term of not only capturing process.stdout and process.stderr, but sending that output to useful places.
Uncaught exceptions is another area where important information can be lost. This is easy to fix in the Notes application:
const error = require('debug')('notes:error');
process.on('uncaughtException', function(err) {
error("I've crashed!!! - "+ (err.stack || err));
});
..
if (app.get('env') === 'development') {
app.use(function(err, req, res, next) {
// util.log(err.message);
res.status(err.status || 500);
error((err.status || 500) +' '+ error.message);
res.render('error', {
message: err.message,
error: err
});
});
}
..
app.use(function(err, req, res, next) {
// util.log(err.message);
res.status(err.status || 500);
error((err.status || 500) +' '+ error.message);
res.render('error', {
message: err.message,
error: {}
});
});
The debug package has a convention we're following. For an application with several modules, all debugger objects should use the naming pattern app-name:module-name. In this case, we used notes:error that will be used for all error messages. We could also use notes:memory-model or notes:mysql-model for debugging different models.
While we were setting up the handler for uncaught exceptions, it is also a good idea to add error logging into the error handlers.
Using Promise and async functions automatically channels errors in a useful direction. Errors will cause a Promise to flip into a rejected state, which must eventually be handled in a .catch method. Since we're all human, we're bound to forget to ensure that all code paths handle their rejected Promise's.
Currently, Node.js prints the following warning if it detects an unhandled Promise rejection:
(node:4796) UnhandledPromiseRejectionWarning: Unhandled promise rejection
The warning goes on to say that the default handler for unhandled Promise rejection has been deprecated and that such Promise rejections will crash the Node process rather than print this message. The built-in process module does emit an event in this case, so it's easy enough to add a handler:
import util from 'util';
...
process.on('unhandledRejection', (reason, p) => {
error(`Unhandled Rejection at: ${util.inspect(p)} reason: ${reason}`);
});
At the minimum, we can print an error message such as the following:
notes:error Unhandled Rejection at: Promise {
notes:error <rejected> TypeError: model(...).keylist is not a function
... full stack trace
} reason: TypeError: model(...).keylist is not a function +3s
We wrote the Notes application using CommonJS modules, the traditional Node.js module format. While the application could continue using that format, the JavaScript community has chosen to switch to ES6 modules in both browser and Node.js code, and therefore it's important to switch ES6 modules so we can all get on board with a common module format. Let's rewrite the application using ES6 modules, and then write ES6 modules for anything new we add.
The changes required are large to replace require statements with import statements, and renaming files from foo.js to foo.mjs. Let's get started.
Let's start with app.js, changing its name to app.mjs:
$ mv app.js app.mjs
Change the block of require statements at the top to the following:
import fs from 'fs-extra';
import url from 'url';
import express from 'express';
import hbs from 'hbs';
import path from 'path';
import util from 'util';
import favicon from 'serve-favicon';
import logger from 'morgan';
import cookieParser from 'cookie-parser';
import bodyParser from 'body-parser';
import DBG from 'debug';
const debug = DBG('notes:debug');
const error = DBG('notes:error');
import { router as index } from './routes/index';
// const users = require('./routes/users');
import { router as notes } from './routes/notes';
// Workaround for lack of __dirname in ES6 modules
const __dirname = path.dirname(new URL(import.meta.url).pathname);
const app = express();
import rfs from 'rotating-file-stream';
Then, at the bottom of the script, make this change:
export default app;
Let's talk a little about the workaround mentioned here. There were several global variables automatically injected by Node.js into CommonJS modules. Those variables are not supported by ES6 modules. The critical variable for Notes is __dirname, which is used in app.mjs in several places. The code change shown here includes a workaround based on a brand new JavaScript feature that is available starting in Node.js 10.x, the import.meta.url variable.
The import.meta object is meant to inject useful information into an ES6 module. As the name implies, the import.meta.url variable contains the URL describing where the module was loaded from. For Node.js, at this time, ES6 modules can only be loaded from a file:// URL on the local filesystem. That means, if we extract the pathname of that URL, we can easily calculate the directory containing the module, as shown here.
Why this solution? Why not use a pathname beginning with ./? The answer is that a ./ filename is evaluated relative to the process's current working directory. That directory is usually different from the directory containing the Node.js module being executed. Therefore it is more than convenient that the Node.js team has added the import.meta.url feature.
The pattern followed in most cases is this change:
const moduleName = require('moduleName'); // in CommonJS modules
import moduleName from 'moduleName'; // in ES6 modules
Remember that Node.js uses the same module lookup algorithm in both ES6 and CommonJS modules. A Node.js require statement is synchronous, meaning that by the time require finishes, it has executed the module and is returning its module.exports. By contrast, an ES6 module is asynchronous, meaning the module may not have finished loading, and you can import just the required bits of the module.
Most of the module imports shown here are for regular Node.js modules installed in the node_modules directory, most of which are CommonJS modules. The rule for using import with a CommonJS module is that the module.exports object is treated as if it were the default export. The import statement shown earlier name the default export (or the module.exports object) as shown in the import statement. For a CommonJS module imported this way, you then use it as you would in a CommonJS context, moduleName.functionName().
The usage of the debug module is effectively the same, but is coded differently. In the CommonJS context, we're told to use that module as follows:
const debug = require('debug')('notes:debug');
const error = require('debug')('notes:error');
In other words, the module.exports of this module is a function, which we immediately invoke. There isn't a syntax for ES6 modules to use the debug module in that fashion. Therefore, we had to break it apart as shown, and explicitly call that function.
The final point of discussion is the import of the two router modules. It was first attempted to have those modules export the router as the default value, but Express threw an error in that case. Instead, we'll rewrite these modules to export router as a named export and then use that named export as shown here.
Remember that bin/www is a script used to launch the application. It is written as a CommonJS script, but because app.mjs is now an ES6 module, bin/www also must be rewritten as an ES6 module. A CommonJS module cannot, at the time of writing, import an ES6 module.
Change the filename:
$ mv bin/www bin/www.mjs
Then, at the top, change the require statements to import statements:
import app from '../app.mjs';
import DBG from 'debug';
const debug = DBG('notes:server-debug');
const error = DBG('notes:server-error');
import http from 'http';
We've already discussed everything here except that app.mjs exports its app object as the default export. Therefore, we use it as shown here.
The models directory contains two modules: Note.js defines the Note class, and notes-memory.js contains an in-memory data model. Both are easy to convert to ES6 modules.
Change the filenames:
$ cd models
$ mv Note.js Note.mjs
$ mv notes-memory.js notes-memory.mjs
In Note.mjs, simply make the following change:
export default class Note {
...
}
This makes the Note class the default export.
Then, in notes-memory.mjs, make the following change:
import Note from './Note';
var notes = [];
async function crupdate(key, title, body) {
notes[key] = new Note(key, title, body);
return notes[key];
}
export function create(key, title, body) { return crupdate(key, title, body); }
export function update(key, title, body) { return crupdate(key, title, body); }
export async function read(key) {
if (notes[key]) return notes[key];
else throw new Error(`Note ${key} does not exist`);
}
export async function destroy(key) {
if (notes[key]) {
delete notes[key];
} else throw new Error(`Note ${key} does not exist`);
}
export async function keylist() { return Object.keys(notes); }
export async function count() { return notes.length; }
export async function close() { }
This is a straightforward transliteration of assigning functions to module.exports to using named exports.
By defining the Note class as the default export of the Note.mjs module, it imports nicely into any module using that class.
The routes directory contains two router modules. As it stands, each router module creates a router object, adds route functions to that object, and then assigns it to the module.exports field. That suggests we should export the router as the default export, but as we said earlier, that didn't work out right. Instead, we'll export router as a named export.
Change the filenames:
$ cd routes
$ mv index.js index.mjs
$ mv notes.js notes.mjs
Then, at the top of each, change the require statement block to the following:
import util from 'util';
import express from 'express';
import * as notes from '../models/notes-memory';
export const router = express.Router();
It will be the same in both files. Then, at the bottom of each file, delete the line assigning router to module.exports.
Let's turn to app.mjs and change how the router modules are imported.
Because router is a named export, by default you'd import the router object, in app.mjs, as follows:
import { router } from './routes/index';
But then we'd have a conflict since both modules define a router object. Instead, we changed the name of this object using an as clause:
import { router as index } from './routes/index';
import { router as notes } from './routes/notes';
The router object from each module is hence given a suitable name.
The filesystem is an often overlooked database engine. While filesystems don't have the sort of query features supported by database engines, they are a reliable place to store files. The notes schema is simple enough that the filesystem can easily serve as its data storage layer.
Let's start by adding a function to Note.mjs:
export default class Note {
...
get JSON() {
return JSON.stringify({ key: this.key, title: this.title, body: this.body }); }
static fromJSON(json) { var data = JSON.parse(json); var note = new Note(data.key, data.title, data.body); return note; }
}
JSON is a getter, which means it gets the value of the object. In this case, the note.JSON attribute/getter, no parentheses, will simply give us the JSON representation of the Note. We'll use this later for writing to JSON files.
fromJSON is a static function, or factory method, to aid in constructing Note objects if we have a JSON string. The difference is that JSON is associated with an instance of the Note class, while fromJSON is associated with the class itself. The two can be used as follows:
const note = new Note("key", "title", "body");
const json = note.JSON; // produces JSON text
const newnote = Note.fromJSON(json); // produces new Note instance
Now, let's create a new module, models/notes-fs.mjs, to hold the filesystem model:
import fs from 'fs-extra';
import path from 'path';
import util from 'util';
import Note from './Note';
import DBG from 'debug';
const debug = DBG('notes:notes-fs');
const error = DBG('notes:error-fs');
async function notesDir() {
const dir = process.env.NOTES_FS_DIR || "notes-fs-data";
await fs.ensureDir(dir);
return dir;
}
function filePath(notesdir, key) { return path.join(notesdir, `${key}.json`); }
async function readJSON(notesdir, key) {
const readFrom = filePath(notesdir, key);
var data = await fs.readFile(readFrom, 'utf8');
return Note.fromJSON(data);
}
The notesDir function will be used throughout notes-fs to ensure that the directory exists. To make this simple, we're using the fs-extra module because it adds Promise-based functions to the fs module (https://www.npmjs.com/package/fs-extra). In this case, fs.ensureDir verifies whether the named directory structure exists, and, if not, the directory path is created.
The environment variable, NOTES_FS_DIR, configures a directory within which to store notes. We'll have one file per note and store the note as JSON. If no environment variable is specified, we'll fall back on using notes-fs-data as the directory name.
Because we're adding another dependency:
$ npm install fs-extra --save
The filename for each data file is the key with .json appended. That gives one limitation that filenames cannot contain the / character, so we test for that using the following code:
async function crupdate(key, title, body) {
var notesdir = await notesDir();
if (key.indexOf('/') >= 0)
throw new Error(`key ${key} cannot contain '/'`);
var note = new Note(key, title, body);
const writeTo = filePath(notesdir, key);
const writeJSON = note.JSON;
await fs.writeFile(writeTo, writeJSON, 'utf8');
return note;
}
export function create(key, title, body) { return crupdate(key, title, body); }
export function update(key, title, body) { return crupdate(key, title, body); }
As is the case with the notes-memory module, the create and update functions use the exact same code. The notesDir function is used to ensure that the directory exists, then we create a Note object, and then write the data to a file.
Notice how the code is very straightforward because of the async function. We aren't checking for errors because they'll be automatically caught by the async function and bubble out to our caller:
export async function read(key) {
var notesdir = await notesDir();
var thenote = await readJSON(notesdir, key);
return thenote;
}
Using readJSON, read the file from the disk. It already generates the Note object, so all we have to do is return that object:
export async function destroy(key) {
var notesdir = await notesDir();
await fs.unlink(filePath(notesdir, key));
}
The fs.unlink function deletes our file. Because this module uses the filesystem, deleting the file is all that's necessary to delete the note object:
export async function keylist() {
var notesdir = await notesDir();
var filez = await fs.readdir(notesdir);
if (!filez || typeof filez === 'undefined') filez = [];
var thenotes = filez.map(async fname => {
var key = path.basename(fname, '.json');
var thenote = await readJSON(notesdir, key);
return thenote.key;
});
return Promise.all(thenotes);
}
The contract for keylist is to return a Promise that will resolve to an array of keys for existing note objects. Since they're stored as individual files in the notesdir, we have to read every file in that directory to retrieve its key.
Array.map constructs a new array from an existing array, namely the array of filenames returned by fs.readdir. Each entry in the constructed array is the async function, which reads the Note, returning the key:
export async function count() {
var notesdir = await notesDir();
var filez = await fs.readdir(notesdir);
return filez.length;
}
export async function close() { }
Counting the number of notes is simply a matter of counting the number of files in notesdir.
Before we start modifying the router functions, we have to consider how to account for multiple models. We currently have two modules for our data model, notes-memory and notes-fs, and we'll be implementing several more by the end of this chapter. We will need a simple method to select between the model being used.
There are several possible ways to do this. For example, in a CommonJS module, it's possible to do the following:
const path = require('path');
const notes = require(process.env.NOTES_MODEL
? path.join('..', process.env.NOTES_MODEL)
: '../models/notes-memory');
This lets us set an environment variable, NOTES_MODEL, to select the module to use for the data model.
This approach does not work with the regular import statement, because the module name in an import statement cannot be such an expression. The Dynamic Import feature now in Node.js does offer a mechanism similar to the snippet just shown.
Dynamic import is an import() function that returns a Promise that will resolve to the imported module. As a function-returning-a-Promise, import() won't be useful as top-level code in the module. But, consider this:
var NotesModule;
async function model() {
if (NotesModule) return NotesModule;
NotesModule = await import(`../models/notes-${process.env.NOTES_MODEL}`);
return NotesModule;
}
export async function create(key, title, body) {
return (await model()).create(key, title, body);
}
export async function update(key, title, body) {
return (await model()).update(key, title, body);
}
export async function read(key) { return (await model()).read(key); }
export async function destroy(key) { return (await model()).destroy(key); }
export async function keylist() { return (await model()).keylist(); }
export async function count() { return (await model()).count(); }
export async function close() { return (await model()).close(); }
Save that module in a file, models/notes.mjs. This module implements the same API as we'll use for all Notes model modules. The model() function is the key to dynamically selecting a notes model implementation based on an environment variable.
This is an async function and therefore its return value is a Promise. The value of that Promise is the selected module, as loaded by import(). Because import() returns a Promise, we use await to know whether it loaded correctly.
Every API method follows this pattern:
export async function methodName(args) {
return (await model()).methodName(args);
}
Because model() returns a Promise, it's most succinct to use an async function and use await to resolve the Promise. Once the Promise is resolved, we simply call the methodName function and go about our business. Otherwise, those API method functions would be as follows:
export function methodName(args) {
return model().then(notes => { return notes.methodName(args); });
}
The two implementations are equivalent, and it's clear which is the more succinct.
With all this awaiting on Promise's returned from async functions, it's worth discussing the overhead. The worst case is on the first call to model(), because the selected notes model has not been loaded. The first time around, the call flow goes as follows:
The first time around, the time is dominated by waiting on import() to finish loading the module. On subsequent calls, the module has already been loaded and the first step is to simply form a resolved Promise containing the module. The API method can then quickly get on with delegating to the actual API method.
To use this, in routes/index.mjs, and in routes/notes.mjs, we make this change:
import util from 'util';
import express from 'express';
import * as notes from '../models/notes';
export const router = express.Router();
In package.json, add this to the scripts section:
"start-fs": "DEBUG=notes:* NOTES_MODEL=fs node --experimental-modules ./bin/www.mjs",
With this code in place, we can now run the Notes application as follows:
$ DEBUG=notes:* npm run start-fs
> notes@0.0.0 start-fs /Users/david/chap07/notes
> NOTES_MODEL=models/notes-fs node --experimental-modules./bin/www.mjs
notes:server Listening on port 3000 +0ms
notes:fs-model keylist dir=notes-fs-data files=[ ] +4s
Then we can use the application at http://localhost:3000 as before. Because we did not change any template or CSS files, the application will look exactly as you left it at the end of Chapter 6, Implementing the Mobile-First Paradigm.
Because debugging is turned on for notes:*, we'll see a log of whatever the Notes application is doing. It's easy to turn this off simply by not setting the DEBUG variable.
You can now kill and restart the Notes application and see the exact same notes. You can also edit the notes at the command line using regular text editors such as vi. You can now start multiple servers on different ports and see exactly the same notes:
"server1": "NOTES_MODEL=fs PORT=3001 node --experimental-modules./bin/www.mjs", "server2": "NOTES_MODEL=fs PORT=3002 node --experimental-modules./bin/www.mjs",
Then you start server1 and server2 in separate command windows as we did in Chapter 5, Your First Express Application. Then, visit the two servers in separate browser windows, and you will see that both browser windows show the same notes.
The final check is to create a note where the key has a / character. Remember that the key is used to generate the filename where we store the note, and therefore the key cannot contain a / character. With the browser open, click on ADD Note and enter a note, ensuring that you use a / character in the key field. On clicking the Submit button, you'll see an error saying that this isn't allowed.
To get started with actual databases, let's look at an extremely lightweight, small-footprint database engine: LevelUP. This is a Node.js-friendly wrapper around the LevelDB engine developed by Google, which is normally used in web browsers for local data persistence. It is a non-indexed, NoSQL data store designed originally for use in browsers. The Node.js module, Level, uses the LevelDB API, and supports multiple backends, including LevelDOWN, which integrates the C++ LevelDB database into Node.js.
Visit https://www.npmjs.com/package/level for information on the module. The level package automatically sets up the levelup and leveldown packages.
To install the database engine, run this command:
$ npm install level@2.1.x --save
Then, start creating the models/notes-level.mjs module:
import fs from 'fs-extra';
import path from 'path';
import util from 'util';
import Note from './Note';
import level from 'level';
import DBG from 'debug';
const debug = DBG('notes:notes-level');
const error = DBG('notes:error-level');
var db;
async function connectDB() {
if (typeof db !== 'undefined' || db) return db;
db = await level(
process.env.LEVELDB_LOCATION || 'notes.level', {
createIfMissing: true,
valueEncoding: "json"
});
return db;
}
The level module gives us a db object through which to interact with the database. We're storing that object as a global within the module for ease of use. If the db object is set, we can just return it immediately. Otherwise, we open the database using createIfMissing to go ahead and create the database if needed.
The location of the database defaults to notes.level in the current directory. The environment variable LEVELDB_LOCATION can be set, as the name implies, to specify the database location:
async function crupdate(key, title, body) {
const db = await connectDB();
var note = new Note(key, title, body);
await db.put(key, note.JSON);
return note;
}
export function create(key, title, body) {
return crupdate(key, title, body);
}
export function update(key, title, body) {
return crupdate(key, title, body);
}
Calling db.put either creates a new database entry, or replaces an existing one. Therefore, both update and create are set to be the same function. We convert the Note to JSON so it can be easily stored in the database:
export async function read(key) {
const db = await connectDB();
var note = Note.fromJSON(await db.get(key));
return new Note(note.key, note.title, note.body);
}
Reading a Note is easy: just call db.get and it retrieves the data, which must be decoded from the JSON representation.
Notice that db.get and db.put did not take a callback function, and that we use await to get the results value. The functions exported by level can take a callback function, in which the callback will be invoked. Alternatively, if no callback function is provided, the level function will instead return a Promise for compatibility with async functions:
export async function destroy(key) {
const db = await connectDB();
await db.del(key);
}
The db.destroy function deletes a record from the database:
export async function keylist() {
const db = await connectDB();
var keyz = [];
await new Promise((resolve, reject) => {
db.createKeyStream()
.on('data', data => keyz.push(data))
.on('error', err => reject(err))
.on('end', () => resolve(keyz));
});
return keyz;
}
export async function count() {
const db = await connectDB();
var total = 0;
await new Promise((resolve, reject) => {
db.createKeyStream()
.on('data', data => total++)
.on('error', err => reject(err))
.on('end', () => resolve(total));
});
return total;
}
export async function close() {
var _db = db;
db = undefined;
return _db ? _db.close() : undefined;
}
The createKeyStream function uses an event-oriented interface similar to the Streams API. It will stream through every database entry, emitting events as it goes. A data event is emitted for every key in the database, while the end event is emitted at the end of the database, and the error event is emitted on errors. The effect is that there's no simple way to present this as a simple Promise. Instead, we invoke createKeyStream, let it run its course, collecting data as it goes. We have to wrap it inside a Promise object, and call resolve on the end event.
Then we add this to package.json in the scripts section:
"start-level": "DEBUG=notes:* NOTES_MODEL=level node --experimental-modules ./bin/www.mjs",
Finally, you can run the Notes application:
$ DEBUG=notes:* npm run start-level > notes@0.0.0 start /Users/david/chap07/notes > node ./bin/www notes:server Listening on port 3000 +0ms
The printout in the console will be the same, and the application will also look the same. You can put it through its paces and see that everything works correctly.
Since level does not support simultaneous access to a database from multiple instances, you won't be able to use the multiple Notes application scenario. You will, however, be able to stop and restart the application at will without losing any notes.
To get started with more normal databases, let's see how to use SQL from Node.js. First, we'll use SQLite3, a lightweight, simple-to-set-up database engine eminently suitable for many applications.
To learn about the Node.js module, visit https://github.com/mapbox/node-sqlite3/wiki/API or https://www.npmjs.com/package/sqlite3.
The primary advantage of SQLite3 is that it doesn't require a server; it is a self-contained, no-set-up-required SQL database.
The first step is to install the module:
$ npm install sqlite3@3.x --save
Next, we need to make sure that our database is configured. We're using this SQL table definition for the schema (save this as models/schema-sqlite3.sql):
CREATE TABLE IF NOT EXISTS notes (
notekey VARCHAR(255),
title VARCHAR(255),
body TEXT
);
How do we initialize this schema before writing some code? One way is to ensure that the sqlite3 package is installed through your operating system package management system, such as using apt-get on Ubuntu/Debian, and MacPorts on macOS. Once it's installed, you can run the following command:
$ sqlite3 chap07.sqlite3
SQLite version 3.21.0 2017-10-24 18:55:49
Enter ".help" for usage hints.
sqlite> CREATE TABLE IF NOT EXISTS notes (
...> notekey VARCHAR(255),
...> title VARCHAR(255),
...> body TEXT
...> );
sqlite> .schema notes
CREATE TABLE notes (
notekey VARCHAR(255),
title VARCHAR(255),
body TEXT
);
sqlite> ^D
$ ls -l chap07.sqlite3
-rwx------ 1 david staff 8192 Jan 14 20:40 chap07.sqlite3
While we can do that, the Twelve Factor application model says we must automate any administrative processes in this way. To that end, we should instead write a little script to run an SQL operation on SQLite3 and use that to initialize the database.
Fortunately, the sqlite3 command offers us a way to do this. Add the following to the scripts section of package.json:
"sqlite3-setup": "sqlite3 chap07.sqlite3 --init models/schema-sqlite3.sql",
Run the setup script:
$ npm run sqlite3-setup
> notes@0.0.0 sqlite3-setup /Users/david/chap07/notes
> sqlite3 chap07.sqlite3 --init models/schema-sqlite3.sql
-- Loading resources from models/schema-sqlite3.sql
SQLite version 3.10.2 2016-01-20 15:27:19
Enter ".help" for usage hints.
sqlite> .schema notes
CREATE TABLE notes (
notekey VARCHAR(255),
title VARCHAR(255),
body TEXT
);
sqlite> ^D
We could have written a small Node.js script to do this, and it's easy to do so. However, by using the tools provided by the package, we have less code to maintain in our own project.
Now, we can write code to use this database in the Notes application.
Create models/notes-sqlite3.mjs file:
import util from 'util';
import Note from './Note';
import sqlite3 from 'sqlite3';
import DBG from 'debug';
const debug = DBG('notes:notes-sqlite3');
const error = DBG('notes:error-sqlite3');
var db; // store the database connection here
async function connectDB() {
if (db) return db;
var dbfile = process.env.SQLITE_FILE || "notes.sqlite3";
await new Promise((resolve, reject) => {
db = new sqlite3.Database(dbfile,
sqlite3.OPEN_READWRITE | sqlite3.OPEN_CREATE,
err => {
if (err) return reject(err);
resolve(db);
});
});
return db;
}
This serves the same purpose as the connectDB function in notes-level.mjs: to manage the database connection. If the database is not open, it'll go ahead and do so, and even make sure that the database file is created (if it doesn't exist). But if it is already open, it is immediately returned:
export async function create(key, title, body) {
var db = await connectDB();
var note = new Note(key, title, body);
await new Promise((resolve, reject) => {
db.run("INSERT INTO notes ( notekey, title, body) "+
"VALUES ( ?, ? , ? );", [ key, title, body ], err => {
if (err) return reject(err);
resolve(note);
});
});
return note;
}
export async function update(key, title, body) {
var db = await connectDB();
var note = new Note(key, title, body);
await new Promise((resolve, reject) => {
db.run("UPDATE notes "+
"SET title = ?, body = ? WHERE notekey = ?",
[ title, body, key ], err => {
if (err) return reject(err);
resolve(note);
});
});
return note;
}
These are our create and update functions. As promised, we are now justified in defining the Notes model to have separate functions for create and update operations, because the SQL statement for each is different.
Calling db.run executes an SQL query, giving us the opportunity to insert parameters into the query string.
The sqlite3 module uses a parameter substitution paradigm that's common in SQL programming interfaces. The programmer puts the SQL query into a string, and then places a question mark in each place where the aim is to insert a value into the query string. Each question mark in the query string has to match a value in the array provided by the programmer. The module takes care of encoding the values correctly so that the query string is properly formatted, while preventing SQL injection attacks.
The db.run function simply runs the SQL query it is given, and does not retrieve any data. Because the sqlite3 module doesn't produce any kind of Promise, we have to wrap function calls in a Promise object:
export async function read(key) {
var db = await connectDB();
var note = await new Promise((resolve, reject) => {
db.get("SELECT * FROM notes WHERE notekey = ?", [key], (err,row) => {
if (err) return reject(err);
const note = new Note(row.notekey, row.title, row.body);
resolve(note);
});
});
return note;
}
To retrieve data using the sqlite3 module, you use the db.get, db.all, or db.each functions. The db.get function used here returns only the first row of the result set. The db.all function returns all rows of the result set at once, which can be a problem for available memory if the result set is large. The db.each function retrieves one row at a time, while still allowing processing of the entire result set.
For the Notes application, using db.get to retrieve a note is sufficient because there is only one note per notekey. Therefore, our SELECT query will return at most one row anyway. But what if your application will see multiple rows in the result set? We'll see what to do about that in a minute.
By the way, this read function has a bug in it. See if you can spot the error. We'll read more about this in Chapter 11, Unit Testing and Functional Testing, when our testing efforts uncover the bug:
export async function destroy(key) {
var db = await connectDB();
return await new Promise((resolve, reject) => {
db.run("DELETE FROM notes WHERE notekey = ?;", [key], err => {
if (err) return reject(err);
resolve();
});
});
}
To destroy a note, we simply execute the DELETE FROM statement:
export async function keylist() {
var db = await connectDB();
var keyz = await new Promise((resolve, reject) => {
var keyz = [];
db.all("SELECT notekey FROM notes", (err, rows) => {
if (err) return reject(err);
resolve(rows.map(row => row.notekey ));
});
});
return keyz;
}
The db.all function retrieves all rows of the result set.
The contract for this function is to return an array of note keys. The rows object is an array of results from the database that contains the data we are to return, but in a different format. Therefore, we use the map function to convert the array into the format required to fulfill the contract:
export async function count() {
var db = await connectDB();
var count = await new Promise((resolve, reject) => {
db.get("select count(notekey) as count from notes",(err, row)
=> {
if (err) return reject(err);
resolve(row.count);
});
});
return count;
}
export async function close() {
var _db = db;
db = undefined;
return _db ? new Promise((resolve, reject) => {
_db.close(err => {
if (err) reject(err);
else resolve();
});
}) : undefined;
}
We can simply use SQL to count the number of notes for us. In this case, db.get returns a row with a single column, count, which is the value we want to return.
Finally, we're ready to run the Notes application with SQLite3. Add the following code to the scripts section of package.json:
"start-sqlite3": "SQLITE_FILE=chap07.sqlite3 NOTES_MODEL=sqlite3 node --experimental-modules ./bin/www.mjs",
Run the Notes application:
$ DEBUG=notes:* npm run start-sqlite3
> notes@0.0.0 start-sqlite3 /Users/david/chap07/notes
> SQLITE_FILE=chap07.sqlite3 NOTES_MODEL=models/notes-sqlite3 node ./bin/www.mjs
notes:server Listening on port 3000 +0ms
notes:sqlite3-model Opened SQLite3 database chap07.sqlite3 +5s
You can now browse the application at http://localhost:3000, and run it through its paces as before.
Because SQLite3 supports simultaneous access from multiple instances, you can run the multiserver example by adding this to the scripts section of package.json:
"server1-sqlite3": "SQLITE_FILE=chap07.sqlite3 NOTES_MODEL=sqlite3 PORT=3001 node ./bin/www.mjs", "server2-sqlite3": "SQLITE_FILE=chap07.sqlite3 NOTES_MODEL=sqlite3 PORT=3002 node ./bin/www.mjs",
Then, run each of these in separate command Windows, as before.
Because we still haven't made any changes to the View templates or CSS files, the application will look the same as before.
Of course, you can use the sqlite command, or other SQLite3 client applications, to inspect the database:
$ sqlite3 chap07.sqlite3 SQLite version 3.10.2 2016-01-20 15:27:19 Enter ".help" for usage hints. sqlite> select * from notes; hithere|Hi There||ho there what there himom|Hi Mom||This is where we say thanks
There are several popular SQL database engines, such as PostgreSQL, MySQL (https://www.npmjs.com/package/mysql), and MariaDB (https://www.npmjs.com/package/mariasql). Corresponding to each are Node.js client modules similar in nature to the sqlite3 module that we just used. The programmer is close to the SQL, which can be good in the same way that driving a stick shift car is fun. But what if we want a higher-level view of the database so that we can think in terms of objects rather than rows of a database table? Object Relation Mapping (ORM) systems provide such a higher-level interface and even offer the ability to use the same data model with several databases.
The Sequelize module (http://www.sequelizejs.com/) is Promise-based, offers strong, well-developed ORM features, and can connect with SQLite3, MySQL, PostgreSQL, MariaDB, and MSSQL. Because Sequelize is Promise-based, it will fit naturally with the Promise-based application code we're writing.
A prerequisite to most SQL database engines is having access to a database server. In the previous section, we skirted around that issue by using SQLite3, which requires no database server setup. While it's possible to install a database server on your laptop, we want to avoid the complexity of doing so, and will use Sequelize to manage an SQLite3 database. We'll also see that it's simply a matter of a configuration file to run the same Sequelize code against a hosted database such as MySQL. In Chapter 10, Deploying Node.js Applications, we'll learn how to use Docker to easily set up any service, including database servers, on our laptop and deploy the exact same configuration to a live server. Most web hosting providers offer MySQL or PostgreSQL as part of the service.
Before we start on the code, let's install two modules:
$ npm install sequelize@4.31.x --save $ npm install js-yaml@3.10.x --save
The first obviously installs the Sequelize package. The second, js-yaml, is installed so that we can implement a YAML-formatted file to store the Sequelize connection configuration. YAML is a human-readable data serialization language, which simply means YAML is an easy-to-use text file format to describe data objects. Perhaps the best place to learn about YAML is its Wikipedia page at https://en.wikipedia.org/wiki/YAML.
Let's create a new file, models/notes-sequelize.mjs:
import fs from 'fs-extra';
import util from 'util';
import jsyaml from 'js-yaml';
import Note from './Note';
import Sequelize from 'sequelize';
import DBG from 'debug';
const debug = DBG('notes:notes-sequelize');
const error = DBG('notes:error-sequelize');
var SQNote;
var sequlz;
async function connectDB() {
if (typeof sequlz === 'undefined') {
const YAML = await fs.readFile(process.env.SEQUELIZE_CONNECT,'utf8');
const params = jsyaml.safeLoad(YAML, 'utf8');
sequlz = new Sequelize(params.dbname, params.username,
params.password, params.params);
}
if (SQNote) return SQNote.sync();
SQNote = sequlz.define('Note', {
notekey: { type: Sequelize.STRING, primaryKey: true, unique:
true },
title: Sequelize.STRING,
body: Sequelize.TEXT
});
return SQNote.sync();
}
The database connection is stored in the sequlz object, and is established by reading a configuration file (we'll go over this file later), and instantiating a Sequelize instance. The data model, SQNote, describes our object structure to Sequelize so that it can define corresponding database table(s). If SQNote is already defined, we simply return it, otherwise we define and return SQNote.
The Sequelize connection parameters are stored in a YAML file we specify in the SEQUELIZE_CONNECT environment variable. The line new Sequelize(..) opens the database connection. The parameters obviously contain any needed database name, username, password, and other options required to connect with the database.
The line sequlz.define is where we define the database schema. Instead of defining the schema as the SQL command to create the database table, we're giving a high-level description of the fields and their characteristics. Sequelize maps the object attributes into columns in tables.
We're telling Sequelize to call this schema Note, but we're using a SQNote variable to refer to that schema. That's because we already defined Note as a class to represent notes. To avoid a clash of names, we'll keep using the Note class, and use SQNote to interact with Sequelize about the notes stored in the database.
Add these functions to models/notes-sequelize.mjs:
export async function create(key, title, body) {
const SQNote = await connectDB();
const note = new Note(key, title, body);
await SQNote.create({ notekey: key, title: title, body: body });
return note;
}
export async function update(key, title, body) {
const SQNote = await connectDB();
const note = await SQNote.find({ where: { notekey: key } })
if (!note) { throw new Error(`No note found for ${key}`); } else {
await note.updateAttributes({ title: title, body: body });
return new Note(key, title, body);
}
}
There are several ways to create a new object instance in Sequelize. The simplest is to call an object's create function (in this case, SQNote.create). That function collapses together two other functions, build (to create the object), and save (to write it to the database).
Updating an object instance is a little different. First, we must retrieve its entry from the database using the find operation. The find operation is given an object specifying the query. Using find, we retrieve one instance, whereas the findAll operation retrieves all matching instances.
For documentation on Sequelize queries, visit http://docs.sequelizejs.com/en/latest/docs/querying/.
Like most or all other Sequelize functions, SQNote.find returns a Promise. Therefore, inside an async function, we await the result of the operation.
The update operation requires two steps, the first being to find the corresponding object to read it in from the database. Once the instance is found, we can update its values simply with the updateAttributes function:
export async function read(key) {
const SQNote = await connectDB();
const note = await SQNote.find({ where: { notekey: key } })
if (!note) { throw new Error(`No note found for ${key}`); } else {
return new Note(note.notekey, note.title, note.body);
}
}
To read a note, we use the find operation again. There is the possibility of an empty result, and we have to throw an error to match.
The contract for this function is to return a Note object. That means taking the fields retrieved using Sequelize and using that to create a Note object:
export async function destroy(key) {
const SQNote = await connectDB();
const note = await SQNote.find({ where: { notekey: key } })
return note.destroy();
}
To destroy a note, we use the find operation to retrieve its instance, and then call its destroy() method:
export async function keylist() {
const SQNote = await connectDB();
const notes = await SQNote.findAll({ attributes: [ 'notekey' ] });
return notes.map(note => note.notekey);
}
Because the keylist function acts on all Note objects, we use the findAll operation. We query for the notekey attribute on all notes. We're given an array of objects with a field named notekey, and we use the .map function to convert this into an array of the note keys:
export async function count() {
const SQNote = await connectDB();
const count = await SQNote.count();
return count;
}
export async function close() {
if (sequlz) sequlz.close();
sequlz = undefined;
SQNote = undefined;
}
For the count function, we can just use the count() method to calculate the needed result.
Sequelize supports the same API on several SQL database engines. The database connection is initialized using parameters on the Sequelize constructor. The Twelve Factor Application model suggests that configuration data such as this should be kept outside the code and injected using environment variables or a similar mechanism. What we'll do is use a YAML-formatted file to store the connection parameters, specifying the filename with an environment variable.
The Sequelize library does not define any such file for storing connection parameters. But it's simple enough to develop such a file. Let's do so.
The API for the Sequelize constructor is: constructor(database: String, username: String, password: String, options: Object).
In the connectDB function, we wrote the constructor as follows:
sequlz = new Sequelize(params.dbname, params.username, params.password, params.params);
This file, named models/sequelize-sqlite.yaml, provides with us a simple mapping that looks like this for an SQLite3 database:
dbname: notes
username:
password:
params:
dialect: sqlite
storage: notes-sequelize.sqlite3
The YAML file is a direct mapping to the Sequelize constructor parameters. The dbname, username, and password fields in this file correspond directly to the connection credentials, and the params object gives additional parameters. There are many, many, possible attributes to use in the params field, and you can read about them in the Sequelize documentation at http://docs.sequelizejs.com/manual/installation/usage.html.
The dialect field tells Sequelize what kind of database to use. For an SQLite database, the database filename is given in the storage field.
Let's first use SQLite3, because no further setup is required. After that, we'll get adventurous and reconfigure our Sequelize module to use MySQL.
If you already have a different database server available, it's simple to create a corresponding configuration file. For a plausible MySQL database on your laptop, create a new file, such as models/sequelize-mysql.yaml, containing something like the following code:
dbname: notes
username: .. user name
password: .. password
params:
host: localhost
port: 3306
dialect: mysql
This is straightforward. The username and password must correspond to the database credentials, while host and port will specify where the database is hosted. Set the database dialect and other connection information, and you're good to go.
To use MySQL, you will need to install the base MySQL driver so that Sequelize can use MySQL:
$ npm install mysql@2.x --save
Running with Sequelize against other databases it supports, such as PostgreSQL, is just as simple. Just create a configuration file, install the Node.js driver, and install/configure the database engine.
Now we can get ready to run the Notes application using Sequelize. We can run this against both SQLite3 and MySQL, but let's start with SQLite. Add this entry to the scripts entry in package.json:
"start-sequelize": "SEQUELIZE_CONNECT=models/sequelize-sqlite.yaml NOTES_MODEL=sequelize node --experimental-modules ./bin/www.mjs"
Then run it as follows:
$ DEBUG=notes:* npm run start-sequelize
> notes@0.0.0 start-sequelize /Users/david/chap07/notes
> SEQUELIZE_CONNECT=models/sequelize-sqlite.yaml NOTES_MODEL=sequelize node --experimental-modules./bin/www.mjs
notes:server Listening on port 3000 +0ms
As before, the application looks exactly the same because we've not changed the View templates or CSS files. Put it through its paces and everything should work.
With Sequelize, multiple Notes application instances is as simple as adding these lines to the scripts section of package.json, and then starting both instances as before:
"server1-sequelize": "SEQUELIZE_CONNECT=models/sequelize-sqlite.yaml NOTES_MODEL=sequelize PORT=3001 node --experimental-modules ./bin/www.mjs",
"server2-sequelize": "SEQUELIZE_CONNECT=models/sequelize-sqlite.yaml NOTES_MODEL=sequelize PORT=3002 node --experimental-modules ./bin/www.mjs",
You will be able to start both instances, use separate browser windows to visit both instances, and see that they show the same set of notes.
To reiterate using the Sequelize-based model on a given database server:
MongoDB is widely used with Node.js applications, a sign of which is the popular MEAN acronym: MongoDB (or MySQL), Express, Angular, and Node.js. MongoDB is one of the leading NoSQL databases. It is described as a scalable, high-performance, open source, document-oriented database. It uses JSON-style documents with no predefined, rigid schema and a large number of advanced features. You can visit their website for more information and documentation at http://www.mongodb.org.
Mongoose is a popular ORM for MongoDB (http://mongoosejs.com/). In this section, we'll use the native MongoDB driver instead, but Mongoose is a worthy alternative.
You will need a running MongoDB instance. The compose.io (https://www.compose.io/) and ScaleGrid.io (https://scalegrid.io/) hosted service providers offer hosted MongoDB services. Nowadays, it is straightforward to host MongoDB as a Docker container as part of a system built of other Docker containers. We'll do this in Chapter 11, Unit Testing and Functional Testing.
It's possible to set up a temporary MongoDB instance for testing on, say, your laptop. It is available in all the operating system package management systems, and the MongoDB website has instructions (https://docs.mongodb.org/manual/installation/).
Once installed, it's not necessary to set up MongoDB as a background service. Instead, you can run a couple of simple commands to get a MongoDB instance running in the foreground of a command window, which you can kill and restart any time you like.
In one command window, run the following:
$ mkdir data $ mongod --dbpath data
In another command window, you can test it as follows:
$ mongo
MongoDB shell version: 3.0.8
connecting to: test
Welcome to the MongoDB shell.
For interactive help, type "help".
For more comprehensive documentation, see
http://docs.mongodb.org/
Questions? Try the support group
http://groups.google.com/group/mongodb-user
> db.foo.save({ a: 1});
WriteResult({ "nInserted" : 1 })
> db.foo.find();
{ "_id" : ObjectId("56c0c98673f65b7988a96a77"), "a" : 1 }
>
bye
This saves a document in the collection named foo. The second command finds all documents in foo, printing them out for you. The _id field is added by MongoDB and serves as a document identifier. This is useful for testing and debugging. For a real deployment, your MongoDB server must be properly installed on a server. See the MongoDB documentation for these instructions.
Now that you've proved you have a working MongoDB server, let's get to work.
Installing the Node.js driver is as simple as running the following command:
$ npm install mongodb@3.x --save
Now create a new file, models/notes-mongodb.mjs:
import util from 'util';
import Note from './Note';
import mongodb from 'mongodb';
const MongoClient = mongodb.MongoClient;
import DBG from 'debug';
const debug = DBG('notes:notes-mongodb');
const error = DBG('notes:error-mongodb');
var client;
async function connectDB() {
if (!client) client = await MongoClient.connect(process.env.MONGO_URL);
return {
db: client.db(process.env.MONGO_DBNAME),
client: client
};
}
The MongoClient class is used to connect with a MongoDB instance. The required URL, which will be specified through an environment variable, uses a straightforward format: mongodb://localhost/. The database name is specified via another environment variable.
This creates the database client, and then opens the database connection. Both objects are returned from connectDB in an anonymous object. The general pattern for MongoDB operations is as follows:
(async () => {
const client = await MongoClient.connect(process.env.MONGO_URL);
const db = client.db(process.env.MONGO_DBNAME);
// perform database operations using db object
client.close();
})();
Therefore, our model methods require both client and db objects, because they will use both. Let's see how that's done:
export async function create(key, title, body) {
const { db, client } = await connectDB();
const note = new Note(key, title, body);
const collection = db.collection('notes');
await collection.insertOne({ notekey: key, title, body });
return note;
}
export async function update(key, title, body) {
const { db, client } = await connectDB();
const note = new Note(key, title, body);
const collection = db.collection('notes');
await collection.updateOne({ notekey: key }, { $set: { title, body } });
return note;
}
We retrieve db and client into individual variables using a destructuring assignment.
MongoDB stores all documents in collections. A collection is a group of related documents, and a collection is analogous to a table in a relational database. This means creating a new document or updating an existing one starts by constructing it as a JavaScript object, and then asking MongoDB to save that object to the database. MongoDB automatically encodes the object into its internal representation.
The db.collection method gives us a Collection object with which we can manipulate the named collection. See its documentation at http://mongodb.github.io/node-mongodb-native/2.2/api/Collection.html.
As the method name implies, insertOne inserts one document into the collection. Likewise, the updateOne method first finds a document (in this case, by looking up the document with the matching notekey field), and then changes fields in the document as specified.
You'll see that these methods return a Promise. The mongodb driver supports both callbacks and Promises. Many methods will invoke the callback function if one is provided, otherwise it returns a Promise that will deliver the results or errors. And, of course, since we're using async functions, the await keyword makes this so clean.
Next, let's look at reading a note from MongoDB:
export async function read(key) {
const { db, client } = await connectDB();
const collection = db.collection('notes');
const doc = await collection.findOne({ notekey: key });
const note = new Note(doc.notekey, doc.title, doc.body);
return note;
}
The mongodb driver supports several variants of find operations. In this case, the Notes application ensures that there is exactly one document matching a given key. Therefore, we can use the findOne method. As the name implies, findOne will return the first matching document.
The argument to findOne is a query descriptor. This simple query looks for documents whose notekey field matches the requested key. An empty query will, of course, match all documents in the collection. You can match against other fields in a similar way, and the query descriptor can do much more. For documentation on queries, visit https://docs.mongodb.org/getting-started/node/query/.
The insertOne method we used earlier also took the same kind of query descriptor.
In order to satisfy the contract for this function, we create a Note object and then return it to the caller. Hence, we create a Note using the data retrieved from the database:
export async function destroy(key) {
const { db, client } = await connectDB();
const collection = db.collection('notes');
await collection.findOneAndDelete({ notekey: key });
}
One of the find variants is findOneAndDelete. As the name implies, it finds one document matching the query descriptor, and then deletes that document:
export async function keylist() {
const { db, client } = await connectDB();
const collection = db.collection('notes');
const keyz = await new Promise((resolve, reject) => {
var keyz = [];
collection.find({}).forEach(
note => { keyz.push(note.notekey); },
err => {
if (err) reject(err);
else resolve(keyz);
}
);
});
return keyz;
}
Here, we're using the base find operation and giving it an empty query so that it matches every document. What we're to return is an array containing the notekey for every document.
All of the find operations return a Cursor object. The documentation can be found at http://mongodb.github.io/node-mongodb-native/2.1/api/Cursor.html.
The Cursor object is, as the name implies, a pointer into a result set from a query. It has a number of useful functions related to operating on a result set. For example, you can skip the first few items in the results, or limit the size of the result set, or perform the filter and map operations.
The Cursor.forEach method takes two callback functions. The first is called on every element in the result set. In this case, we can use that to record just the notekey in an array. The second callback is called after all elements in the result set have been processed. We use this to indicate success or failure, and to return the keyz array.
Because forEach uses this pattern, it does not have an option for supplying a Promise, and we have to create the Promise ourselves, as shown here:
export async function count() {
const { db, client } = await connectDB();
const collection = db.collection('notes');
const count = await collection.count({});
return count;
}
export async function close() {
if (client) client.close();
client = undefined;
}
The count method takes a query descriptor and, as the name implies, counts the number of matching documents.
Now that we have our MongoDB model, we can get ready to run Notes with it.
By now you know the drill; add this to the scripts section of package.json:
"start-mongodb": "MONGO_URL=mongodb://localhost/ MONGO_DBNAME=chap07 NOTES_MODEL=mongodb node --experimental-modules ./bin/www.mjs",
The MONGO_URL environment variable is the URL to connect with your MongoDB database.
You can start the Notes application as follows:
$ DEBUG=notes:* npm run start-mongodb
> notes@0.0.0 start-mongodb /Users/david/chap07/notes
> MONGO_URL=mongodb://localhost/ MONGO_DBNAME=chap07 NOTES_MODEL=mongodb node --experimental-modules ./bin/www
notes:server Listening on port 3000 +0ms
You can browse the application at http://localhost:3000 and put it through its paces. You can kill and restart the application, and your notes will still be there.
Add this to the scripts section of package.json:
"server1-mongodb": "MONGO_URL=mongodb://localhost/ MONGO_DBNAME=chap07 NOTES_MODEL=mongodb PORT=3001 node --experimental-modules ./bin/www.mjs",
"server2-mongodb": "MONGO_URL=mongodb://localhost/ MONGO_DBNAME=chap07 NOTES_MODEL=mongodb PORT=3002 node --experimental-modules ./bin/www.mjs",
You will be able to start two instances of the Notes application, and see that both share the same set of notes.
In this chapter, we went through a real whirlwind of different database technologies. While we looked at the same seven functions over and over, it's useful to be exposed to the various data storage models and ways of getting things done. Even so, we only touched the surface of options for accessing databases and data storage engines from Node.js.
By abstracting the model implementations correctly, we were able to easily switch data storage engines while not changing the rest of the application. We did skip around the issue of setting up database servers. As promised, we'll get to that in Chapter 10, Deploying Node.js Applications, when we explore production deployment of Node.js applications.
By focusing the model code on the purpose of storing data, both the models and the application should be easier to test. The application can be tested with a mock data module that provides known predictable notes that can be checked predictably. We'll look at this in more depth in Chapter 11, Unit Testing and Functional Testing.
In the next chapter, we'll focus on authenticating our users using OAuth2.
Now that our Notes application can save its data in a database, we can think about the next phase of making this a real application, namely authenticating our users.
It's so natural to log in to a website to use its services. We do it every day, and we even trust banking and investment organizations to secure our financial information through login procedures on a website. HTTP is a stateless protocol, and a web application cannot tell much about one HTTP request versus another. Because HTTP is stateless, HTTP requests do not natively know whether the user driving the web browser is logged in, the user's identity, or even whether the HTTP request was initiated by a human being.
The typical method for user authentication is to send a cookie to the browser containing a token to carry user identity. The cookie needs to contain data identifying the browser and whether that browser is logged in. The cookie will then be sent with every request, letting the application track which user account is associated with the browser.
With Express, the best way to do this is with the express-session middleware. It stores data as a cookie and looks for that data on every browser request. It is easy to configure, but is not a complete solution for user authentication. There are several add-on modules that handle user authentication, and some even support authenticating users against third-party websites, such as Facebook or Twitter.
One package appears to be leading the pack in user authentication – Passport (http://passportjs.org/). It supports a long list of services against which to authenticate, making it easy to develop a website that lets users sign up with credentials from another website, for example, Twitter. Another, express-authentication (https://www.npmjs.com/package/express-authentication), bills itself as the opinionated alternative to Passport.
We will use Passport to authenticate users against both a locally stored user credentials database and using OAuth2 to authenticate against a Twitter account. We'll also take this as an opportunity to explore REST-based microservice implementation with Node.js.
In this chapter, we'll discuss the following three aspects of this phase:
Let's get started!
The first thing to do is duplicate the code used for the previous chapter. For example, if you kept that code in chap07/notes, create a new directory, chap08/notes.
We could implement user authentication and accounts by simply adding a user model, and a few routes and views to the existing Notes application. While it would be accomplishable, is this what we would do in a real-world production application?
Consider the high value of user identity information, and the super-strong need for robust and reliable user authentication. Website intrusions happen regularly, and it seems the item most frequently stolen is user identities.
Can you design and build a user authentication system with the required level of security? One that is probably safe against all kinds of intruders?
As with so many other software development problems, it's best to use a pre-existing authentication library, preferably one with a long track record, where significant bugs have been fixed already.
Another issue is architectural choices to promote security. Bugs will occur and the talented miscreants will break in. Walling off the user information database is an excellent idea to limit the risk.
Keeping a user information database enables you to authenticate your users, present user profiles, help users connect with each other, and so forth. Those are useful services to offer to website users, but how can you limit the risk that data will fall into the wrong hands?
In this chapter, we'll develop a user authentication microservice. The plan is to eventually segregate that service into a well-protected barricaded area. This mimics an architectural choice made by some sites, to strictly control API and even physical access to the user information database, implementing as many technological barriers as possible against unapproved access.
Microservices are, of course, not a panacea, meaning we shouldn't try to force-fit every application into the microservice box. By analogy, microservices are like the Unix philosophy of small tools each doing one thing well, which we mix/match/combine into larger tools. Another word for this is composability. While we can build a lot of useful software tools with that philosophy, does it work for applications such as Photoshop or LibreOffice? While composing a system out of single-purpose tools is highly flexible, one loses the advantages gained by tight integration of components.
The first question is whether to use a REST-service oriented framework, code the REST application on bare Node.js, or what? You could implement REST services on the built-in http module. The advantage of using an application framework is the framework authors will have already baked-in a lot of best practices and bug fixing and security measures. Express, for example, is widely used, very popular, and can easily be used for REST services. There are other frameworks more aligned with developing REST services, and we'll use one of them – Restify (http://restify.com/).
The user authentication server will require two modules:
To test the service, we'll write a couple of simple scripts for administering user information in the database. We won't be implementing an administrative user interface in the Notes application, and will rely on the scripts to administer the users. As a side effect, we'll have a tool to run a couple of simple tests against the user service.
After this service is functioning correctly, we'll set about modifying the Notes application to access user information from the service, while using Passport to handle authentication.
The first step is creating a new directory to hold the User Information microservice. This should be a sibling directory to the Notes application. If you created a directory named chap08/notes to hold the Notes application, then create a directory named chap08/users to hold the microservice.
Then run the following commands:
$ cd users
$ npm init
.. answer questions
.. name - user-auth-server
$ npm install debug@^2.6.x fs-extra@^5.x js-yaml@^3.10.x \
restify@^6.3.x restify-clients@^1.5.x sequelize@^4.31.x \
sqlite3@^3.1.x --save
This gets us ready to start coding. We'll use the debug module for logging messages, js-yaml to read the Sequelize configuration file, restify for its REST framework, and sequelize/mysql/sqlite3 for database access.
We'll be storing the user information using a Sequelize-based model in an SQL database. As we go through this, ponder a question: should we integrate the database code directly into the REST API implementation? Doing so would reduce the user information microservice to one module, with database queries mingled with REST handlers. By separating the REST service from the data storage model, we have the freedom to adopt other data storage systems besides Sequelize/SQL. Further, the data storage model could conceivably be used in ways other than the REST service.
Create a new file named users-sequelize.mjs in users, containing the following:
import Sequelize from "sequelize";
import jsyaml from 'js-yaml';
import fs from 'fs-extra';
import util from 'util';
import DBG from 'debug';
const log = DBG('users:model-users');
const error = DBG('users:error');
var SQUser;
var sequlz;
async function connectDB() {
if (SQUser) return SQUser.sync();
const yamltext = await fs.readFile(process.env.SEQUELIZE_CONNECT,
'utf8');
const params = await jsyaml.safeLoad(yamltext, 'utf8');
if (!sequlz) sequlz = new Sequelize(params.dbname, params.username,
params.password,
params.params);
// These fields largely come from the Passport / Portable Contacts
schema.
// See http://www.passportjs.org/docs/profile
//
// The emails and photos fields are arrays in Portable Contacts.
// We'd need to set up additional tables for those.
//
// The Portable Contacts "id" field maps to the "username" field
here
if (!SQUser) SQUser = sequlz.define('User', {
username: { type: Sequelize.STRING, unique: true },
password: Sequelize.STRING,
provider: Sequelize.STRING,
familyName: Sequelize.STRING,
givenName: Sequelize.STRING,
middleName: Sequelize.STRING,
emails: Sequelize.STRING(2048),
photos: Sequelize.STRING(2048)
});
return SQUser.sync();
}
As with our Sequelize-based model for Notes, we use a YAML file to store connection configuration. We're even using the same environment variable, SEQUELIZE_CONNECT.
What is the best storage service for user authentication data? By using Sequelize, we have our pick of SQL databases to choose from. While NoSQL databases are all the rage, is there any advantage to using one to store user authentication data? Nope. An SQL server will do the job just fine, and Sequelize allows us the freedom of choice.
It's tempting to simplify the overall system by using the same database instance to store notes and user information, and to use Sequelize for both. But we've chosen to simulate a secured server for user data. That calls for the data to be in separate database instances, preferably on separate servers. A highly secure application deployment might put the user information service on completely separate servers, perhaps in a physically isolated data center, with carefully configured firewalls, and there might even be armed guards at the door.
The user profile schema shown here is derived from the normalized profile provided by Passport; refer to http://www.passportjs.org/docs/profile for more information. Passport will harmonize information given by third-party services into a single object definition. To simplify our code, we're simply using the schema defined by Passport:
export async function create(username, password, provider, familyName, givenName, middleName, emails, photos) {
const SQUser = await connectDB();
return SQUser.create({
username, password, provider,
familyName, givenName, middleName,
emails: JSON.stringify(emails), photos: JSON.stringify(photos)
});
}
export async function update(username, password, provider, familyName, givenName, middleName, emails, photos) {
const user = await find(username);
return user ? user.updateAttributes({
password, provider,
familyName, givenName, middleName,
emails: JSON.stringify(emails),
photos: JSON.stringify(photos)
}) : undefined;
}
Our create and update functions take user information and either add a new record or update an existing record:
export async function find(username) {
const SQUser = await connectDB();
const user = await SQUser.find({ where: { username: username } });
const ret = user ? sanitizedUser(user) : undefined;
return ret;
}
This lets us look up a user information record, and we return a sanitized version of that data.
Because we're segregating the user data from the rest of the Notes application, we want to return a sanitized object rather than the actual SQUser object. What if there was some information leakage because we simply sent the SQUser object back to the caller? The sanitizedUser function, shown later, creates an anonymous object with exactly the fields we want exposed to the other modules:
export async function destroy(username) {
const SQUser = await connectDB();
const user = await SQUser.find({ where: { username: username } });
if (!user) throw new Error('Did not find requested '+ username +' to delete');
user.destroy();
}
This lets us support deleting user information. We do this as we did for the Notes Sequelize model, by first finding the user object and then calling its destroy method:
export async function userPasswordCheck(username, password) {
const SQUser = await connectDB();
const user = await SQUser.find({ where: { username: username } });
if (!user) {
return { check: false, username: username, message: "Could not
find user" };
} else if (user.username === username && user.password ===
password) {
return { check: true, username: user.username };
} else {
return { check: false, username: username, message: "Incorrect
password" };
}
}
This lets us support the checking of user passwords. The three conditions to handle are as follows:
The object we return lets the caller distinguish between those cases. The check field indicates whether to allow this user to be logged in. If check is false, there's some reason to deny their request to log in, and the message is what should be displayed to the user:
export async function findOrCreate(profile) {
const user = await find(profile.id);
if (user) return user;
return await create(profile.id, profile.password, profile.provider,
profile.familyName, profile.givenName, profile.middleName,
profile.emails, profile.photos);
}
This combines two actions in one function: first, to verify whether the named user exists and, if not, to create that user. Primarily, this will be used while authenticating against third-party services:
export async function listUsers() {
const SQUser = await connectDB();
const userlist = await SQUser.findAll({});
return userlist.map(user => sanitizedUser(user));
}
List the existing users. The first step is using findAll to give us the list of the users as an array of SQUser objects. Then we sanitize that list so we don't expose any data that we don't want exposed:
export function sanitizedUser(user) {
var ret = {
id: user.username, username: user.username,
provider: user.provider,
familyName: user.familyName, givenName: user.givenName,
middleName: user.middleName,
emails: JSON.parse(user.emails),
photos: JSON.parse(user.photos)
};
try {
ret.emails = JSON.parse(user.emails);
} catch(e) { ret.emails = []; }
try {
ret.photos = JSON.parse(user.photos);
} catch(e) { ret.photos = []; }
return ret;
}
This is our utility function to ensure we expose a carefully controlled set of information to the caller. With this service, we're emulating a secured user information service that's walled off from other applications. As we said earlier, this function returns an anonymous sanitized object where we know exactly what's in the object.
It's very important to decode the JSON string we put into the database. Remember that we stored the emails and photos data using JSON.stringify in the database. Using JSON.parse, we decode those values, just like adding hot water to instant coffee produces a drinkable beverage.
We are building our way towards integrating user information and authentication into the Notes application. The next step is to wrap the user data model we just created into a REST server. After that, we'll create a couple of scripts so that we can add some users, perform other administrative tasks, and generally verify that the service works. Finally, we'll extend the Notes application with login and logout support.
In the package.json file, change the main tag to the following line of code:
"main": "user-server.mjs",
Then create a file named user-server.mjs, containing the following code:
import restify from 'restify';
import util from 'util';
import DBG from 'debug';
const log = DBG('users:service');
const error = DBG('users:error');
import * as usersModel from './users-sequelize';
var server = restify.createServer({
name: "User-Auth-Service",
version: "0.0.1"
});
server.use(restify.plugins.authorizationParser());
server.use(check);
server.use(restify.plugins.queryParser());
server.use(restify.plugins.bodyParser({
mapParams: true
}));
The createServer method can take a long list of configuration options. These two may be useful for identifying information.
As with Express applications, the server.use calls initialize what Express would call middleware functions, but which Restify calls handler functions. These are callback functions whose API is function (req, res, next). As with Express, these are the request and response objects, and next is a function which, when called, carries execution to the next handler function.
Unlike Express, every handler function must call the next function. In order to tell Restify to stop processing through handlers, the next function must be called as next(false). Calling next with an error object also causes the execution to end, and the error is sent back to the requestor.
The handler functions listed here do two things: authorize requests and handle parsing parameters from both the URL and the post request body. The authorizationParser function looks for HTTP basic auth headers. The check function is shown later and emulates the idea of an API token to control access.
Refer to http://restify.com/docs/plugins-api/ for more information on the built-in handlers available in Restify.
Add this to user-server.mjs:
// Create a user record
server.post('/create-user', async (req, res, next) => {
try {
var result = await usersModel.create(
req.params.username, req.params.password,
req.params.provider,
req.params.familyName, req.params.givenName,
req.params.middleName,
req.params.emails, req.params.photos);
res.send(result);
next(false);
} catch(err) { res.send(500, err); next(false); }
});
As for Express, the server.VERB functions let us define the handlers for specific HTTP actions. This route handles a POST on /create-user, and, as the name implies, this will create a user by calling the usersModel.create function.
As a POST request, the parameters arrive in the body of the request rather than as URL parameters. Because of the mapParams flag on the bodyParams handler, the arguments passed in the HTTP body are added to req.params.
We simply call usersModel.create with the parameters sent to us. When completed, the result object should be a user object, which we send back to the requestor using res.send:
// Update an existing user record
server.post('/update-user/:username', async (req, res, next) => {
try {
var result = await usersModel.update(
req.params.username, req.params.password,
req.params.provider,
req.params.familyName, req.params.givenName,
req.params.middleName,
req.params.emails, req.params.photos);
res.send(usersModel.sanitizedUser(result));
next(false);
} catch(err) { res.send(500, err); next(false); }
});
The /update-user route is handled in a similar way. However, we have put the username parameter on the URL. Like Express, Restify lets you put named parameters in the URL like as follows. Such named parameters are also added to req.params.
We simply call usersModel.update with the parameters sent to us. That, too, returns an object we send back to the caller with res.send:
// Find a user, if not found create one given profile information
server.post('/find-or-create', async (req, res, next) => {
log('find-or-create '+ util.inspect(req.params));
try {
var result = await usersModel.findOrCreate({
id: req.params.username, username: req.params.username,
password: req.params.password, provider:
req.params.provider,
familyName: req.params.familyName, givenName:
req.params.givenName,
middleName: req.params.middleName,
emails: req.params.emails, photos: req.params.photos
});
res.send(result);
next(false);
} catch(err) { res.send(500, err); next(false); }
});
This handles our findOrCreate operation. We simply delegate this to the model code, as done previously.
As the name implies, we'll look to see whether the named user already exists and, if so, simply return that user, otherwise it will be created:
// Find the user data (does not return password)
server.get('/find/:username', async (req, res, next) => {
try {
var user = await usersModel.find(req.params.username);
if (!user) {
res.send(404, new Error("Did not find "+
req.params.username));
} else {
res.send(user);
}
next(false);
} catch(err) { res.send(500, err); next(false); }
});
Here, we support looking up the user object for the provided username.
If the user was not found, then we return a 404 status code because it indicates a resource that does not exist. Otherwise, we send the object that was retrieved:
// Delete/destroy a user record
server.del('/destroy/:username', async (req, res, next) => {
try {
await usersModel.destroy(req.params.username);
res.send({});
next(false);
} catch(err) { res.send(500, err); next(false); }
});
This is how we delete a user from the Notes application. The DEL HTTP verb is meant to be used to delete things on a server, making it the natural choice for this functionality:
// Check password
server.post('/passwordCheck', async (req, res, next) => {
try {
await usersModel.userPasswordCheck(
req.params.username, req.params.password);
res.send(check);
next(false);
} catch(err) { res.send(500, err); next(false); }
});
This is another aspect of keeping the password solely within this server. The password check is performed by this server, rather than in the Notes application. We simply call the usersModel.userPasswordCheck function shown earlier and send back the object it returns:
// List users
server.get('/list', async (req, res, next) => {
try {
var userlist = await usersModel.listUsers();
if (!userlist) userlist = [];
res.send(userlist);
next(false);
} catch(err) { res.send(500, err); next(false); }
});
Then, finally, if required, we send a list of Notes application users back to the requestor. In case no list of users is available, we at least send an empty array:
server.listen(process.env.PORT, "localhost", function() {
log(server.name +' listening at '+ server.url);
});
// Mimic API Key authentication.
var apiKeys = [ {
user: 'them',
key: 'D4ED43C0-8BD6-4FE2-B358-7C0E230D11EF'
} ];
function check(req, res, next) {
if (req.authorization) {
var found = false;
for (let auth of apiKeys) {
if (auth.key === req.authorization.basic.password
&& auth.user === req.authorization.basic.username) {
found = true;
break;
}
}
if (found) next();
else {
res.send(401, new Error("Not authenticated"));
next(false);
}
} else {
res.send(500, new Error('No Authorization Key'));
next(false);
}
}
As with the Notes application, we listen to the port named in the PORT environment variable. By explicitly listening only on localhost, we'll limit the scope of systems that can access the user authentication server. In a real deployment, we might have this server behind a firewall with a tight list of host systems allowed to have access.
This last function, check, implements authentication for the REST API itself. This is the handler function we added earlier.
It requires the caller to provide credentials on the HTTP request using the basic auth headers. The authorizationParser handler looks for this and gives it to us on the req.authorization.basic object. The check function simply verifies that the named user and password combination exists in the local array.
This is meant to mimic assigning an API key to an application. There are several ways of doing so; this is just one.
This approach is not limited to just authenticating using HTTP basic auth. The Restify API lets us look at any header in the HTTP request, meaning we could implement any kind of security mechanism we like. The check function could implement some other security method, with the right code.
Because we added check with the initial set of server.use handlers, it is called on every request. Therefore, every request to this server must provide the HTTP basic auth credentials required by this check.
This strategy is good if you want to control access to every single function in your API. For the user authentication service, that's probably a good idea. Some REST services in the world have certain API functions that are open to the world and others protected by an API token. To implement that, the check function should not be configured among the server.use handlers. Instead, it should be added to the appropriate route handlers as follows:
server.get('/request/url', authHandler, (req, res, next) => {
..
});
Such an authHandler would be coded similarly to our check function. A failure to authenticate is indicated by sending an error code and using next(false) to end the routing function chain.
We now have the complete code for the user authentication server. It defines several request URLs, and for each, the corresponding function in the user model is called.
Now we need a YAML file to hold the database credentials, so create sequelize-sqlite.yaml, containing the following code:
dbname: users
username:
password:
params:
dialect: sqlite
storage: users-sequelize.sqlite3
Since this is Sequelize, it's easy to switch to other database engines simply by supplying a different configuration file. Remember that the filename of this configuration file must appear in the SEQUELIZE_CONNECT environment variable.
Finally, package.json should look as follows:
{
"name": "user-auth-server",
"version": "0.0.1",
"description": "",
"main": "user-server.js",
"scripts": {
"start": "DEBUG=users:* PORT=3333 SEQUELIZE_CONNECT=sequelize-sqlite.yaml node --experimental-modules user-server"
},
"author": "",
"license": "ISC",
"engines": {
"node": ">=8.9"
},
"dependencies": {
"debug": "^2.6.9",
"fs-extra": "^5.x",
"js-yaml": "^3.10.x",
"mysql": "^2.15.x",
"restify": "^6.3.x",
"restify-clients": "^1.5.x",
"sqlite3": "^3.1.x",
"sequelize": "^4.31.x"
}
}
We configure this server to listen on port 3333 using the database credentials we just gave and with debugging output for the server code.
You can now start the user authentication server:
$ npm start
> user-auth-server@0.0.1 start /Users/david/chap08/users
> DEBUG=users:* PORT=3333 SEQUELIZE_CONNECT=sequelize-mysql.yaml node user-server
users:server User-Auth-Service listening at http://127.0.0.1:3333 +0ms
But we don't have any way to interact with this server, yet.
To give ourselves assurance that the user authentication server works, let's write a couple of scripts to exercise the API. Because we're not going to take the time to write an administrative backend to the Notes application, these scripts will let us add and delete users who are allowed access to Notes. These scripts will live within the user authentication server package directory.
The Restify package supports coding REST servers. For the REST clients, we're using a companion library, restify-clients, which has been spun out of Restify.
Create a file named users-add.js, containing the following code:
'use strict';
const util = require('util');
const restify = require('restify-clients');
var client = restify.createJsonClient({
url: 'http://localhost:'+process.env.PORT,
version: '*'
});
client.basicAuth('them', 'D4ED43C0-8BD6-4FE2-B358-7C0E230D11EF');
client.post('/create-user', {
username: "me", password: "w0rd", provider: "local",
familyName: "Einarrsdottir", givenName: "Ashildr", middleName: "",
emails: [], photos: []
},
(err, req, res, obj) => {
if (err) console.error(err.stack);
else console.log('Created '+ util.inspect(obj));
});
This is the basic structure of a Restify client. We create the Client object – we have a choice between the JsonClient, as used here, the StringClient, and the HttpClient. The HTTP basicAuth credentials are easy to set, as shown here.
Then we make the request, in this case a POST request on /create-user. Because it is a POST request, the object we specify here is formatted by Restify into HTTP POST body parameters. As we saw earlier, the server has the bodyParser handler function configured, which converts those body parameters into the req.param object.
In the Restify client, as for the Restify server, we use the various HTTP methods by calling client.METHOD. Because it is a POST request, we use client.post. When the request finishes, the callback function is invoked.
Before running these scripts, start the authentication server in one window using the following command:
$ npm start
Now run the test script using the following command:
$ PORT=3333 node users-add.js
Created { id: 1, username: 'me', password: 'w0rd', provider: 'local',
familyName: 'Einarrsdottir', givenName: 'Ashildr',
middleName: '',
emails: '[]', photos: '[]',
updatedAt: '2016-02-24T02:34:41.661Z',
createdAt: '2016-02-24T02:34:41.661Z' }
We can inspect our handiwork using the following command:
$ sqlite3 users-sequelize.sqlite3 SQLite version 3.10.2 2016-01-20 15:27:19 Enter ".help" for usage hints. sqlite> .schema users CREATE TABLE `Users` (`id` INTEGER PRIMARY KEY AUTOINCREMENT, `username` VARCHAR(255) UNIQUE, `password` VARCHAR(255), `provider` VARCHAR(255), `familyName` VARCHAR(255), `givenName` VARCHAR(255), `middleName` VARCHAR(255), `emails` VARCHAR(2048), `photos` VARCHAR(2048), `createdAt` DATETIME NOT NULL, `updatedAt` DATETIME NOT NULL, UNIQUE (`username`));
sqlite> select * from users; 2|me|w0rd|local|Einarrsdottir|Ashildr||[]|[]|2018-01-21 05:34:56.629 +00:00|2018-01-21 05:34:56.629 +00:00 sqlite> ^D
Now let's write a script, users-find.js, to look up a given user:
'use strict';
const util = require('util');
const restify = require('restify-clients');
var client = restify.createJsonClient({
url: 'http://localhost:'+process.env.PORT,
version: '*'
});
client.basicAuth('them', 'D4ED43C0-8BD6-4FE2-B358-7C0E230D11EF');
client.get('/find/'+ process.argv[2],
(err, req, res, obj) => {
if (err) console.error(err.stack);
else console.log('Found '+ util.inspect(obj));
});
This simply calls the /find URL, specifying the username that the user supplies as a command-line argument. Note that the get operation does not take an object full of parameters. Instead, any parameters would be added to the URL.
It's run as follows:
$ PORT=3333 node users-find.js me
Found { username: 'me', provider: 'local',
familyName: 'Einarrsdottir', givenName: 'Ashildr',
middleName: '',
emails: '[]', photos: '[]' }
Similarly, we can write scripts against the other REST functions. But we need to get on with the real goal of integrating this into the Notes application.
Now that we have proved that the user authentication service is working, we can set up the Notes application to support user logins. We'll be using Passport to support login/logout, and the authentication server to store the required data.
Among the available packages, Passport stands out for simplicity and flexibility. It integrates directly with the Express middleware chain, and the Passport community has developed hundreds of so-called Strategy modules to handle authentication against a long list of third-party services. See http://www.passportjs.org/ for information and documentation.
The first step is to create a user data model for the Notes application. Rather than retrieving data from data files or a database, it will use REST to query the server we just created. We could have created user model code that directly accesses the database but, for reasons already discussed, we've decided to segregate user authentication into a separate service.
Let us now turn to the Notes application, which you may have stored as chap08/notes. We'll be modifying the application, first to access the user authentication REST API, and then to use Passport for authorization and authentication.
For the test/admin scripts that we created earlier, we used the restify-clients module. That package is a companion to the restify library, where restify supports the server side of the REST protocol and restify-clients supports the client side. Their names might give away the purpose.
However nice the restify-clients library is, it doesn't support a Promise-oriented API, as is required to play well with async functions. Another library, superagent, does support a Promise-oriented API, plays well in async functions, and there is a companion to that package, Supertest, that's useful in unit testing. We'll use Supertest in Chapter 11, Unit Testing and Functional Testing, when we talk about unit testing. For documentation, see https://www.npmjs.com/package/superagent:
$ npm install superagent@^3.8.x
Create a new file, models/users-superagent.mjs, containing the following code:
import request from 'superagent';
import util from 'util';
import url from 'url';
const URL = url.URL;
import DBG from 'debug';
const debug = DBG('notes:users-superagent');
const error = DBG('notes:error-superagent');
function reqURL(path) {
const requrl = new URL(process.env.USER_SERVICE_URL);
requrl.pathname = path;
return requrl.toString();
}
The reqURL function replaces the connectXYZZY functions that we wrote in earlier modules. With superagent, we don't leave a connection open to the service, but open a new connection on each request. The common thing to do is to formulate the request URL. The user is expected to provide a base URL, such as http://localhost:3333/, in the USER_SERVICE_URL environment variable. This function modifies that URL, using the new WHATWG URL support in Node.js, to use a given URL path:
export async function create(username, password,
provider, familyName, givenName, middleName,
emails, photos) {
var res = await request
.post(reqURL('/create-user'))
.send({
username, password, provider,
familyName, givenName, middleName, emails, photos
})
.set('Content-Type', 'application/json')
.set('Acccept', 'application/json')
.auth('them', 'D4ED43C0-8BD6-4FE2-B358-7C0E230D11EF');
return res.body;
} export async function update(username, password,
provider, familyName, givenName, middleName,
emails, photos) {
var res = await request
.post(reqURL(`/update-user/${username}`))
.send({
username, password, provider,
familyName, givenName, middleName, emails, photos
})
.set('Content-Type', 'application/json')
.set('Acccept', 'application/json')
.auth('them', 'D4ED43C0-8BD6-4FE2-B358-7C0E230D11EF');
return res.body;
}
These are our create and update functions. In each case, they take the data provided, construct an anonymous object, and POST it to the server.
The superagent library uses an API style where one chains together method calls to construct a request. The chain of method calls can end in a .then or .end clause, either of which take a callback function. But leave off both, and it will return a Promise.
All through this library, we'll use the .auth clause to set up the required authentication key.
In this case, we've purposely chosen variable names for the parameters to match field names of the object with parameter names used by the server. By doing so, we can use this shortened notation for anonymous objects, and our code is a little cleaner by using consistent variable names from beginning to end:
export async function find(username) {
var res = await request
.get(reqURL(`/find/${username}`))
.set('Content-Type', 'application/json')
.set('Acccept', 'application/json')
.auth('them', 'D4ED43C0-8BD6-4FE2-B358-7C0E230D11EF');
return res.body;
}
Our find operation lets us look up user information:
export async function userPasswordCheck(username, password) {
var res = await request
.post(reqURL(`/passwordCheck`))
.send({ username, password })
.set('Content-Type', 'application/json')
.set('Acccept', 'application/json')
.auth('them', 'D4ED43C0-8BD6-4FE2-B358-7C0E230D11EF');
return res.body;
}
We're sending the request to check passwords to the server.
A point about this method is useful to note. It could have taken the parameters in the URL, instead of the request body as is done here. But since request URL are routinely logged to files, putting the username and password parameters in the URL means user identity information would be logged to files and part of activity reports. That would obviously be a very bad choice. Putting those parameters in the request body not only avoids that bad result, but if an HTTPS connection to the service were used, the transaction would be encrypted:
export async function findOrCreate(profile) {
var res = await request
.post(reqURL('/find-or-create'))
.send({
username: profile.id, password: profile.password,
provider: profile.provider,
familyName: profile.familyName,
givenName: profile.givenName,
middleName: profile.middleName,
emails: profile.emails, photos: profile.photos
})
.set('Content-Type', 'application/json')
.set('Acccept', 'application/json')
.auth('them', 'D4ED43C0-8BD6-4FE2-B358-7C0E230D11EF');
return res.body;
}
The findOrCreate function either discovers the user in the database, or creates a new user. The profile object will come from Passport, but take careful note of what we do with profile.id. The Passport documentation says it will provide the username in the profile.id field. But we want to store it as username, instead:
export async function listUsers() {
var res = await request
.get(reqURL('/list'))
.set('Content-Type', 'application/json')
.set('Acccept', 'application/json')
.auth('them', 'D4ED43C0-8BD6-4FE2-B358-7C0E230D11EF');
return res.body;
}
Finally, we can retrieve a list of users.
What we've built so far is a user data model, with a REST API wrapping that model to create our authentication information service. Then, within the Notes application, we have a module that requests user data from this server. As of yet, nothing in the Notes application knows that this user model exists. The next step is to create a routing module for login/logout URLs and to change the rest of Notes to use user data.
The routing module is where we use passport to handle user authentication. The first task is to install the required modules:
$ npm install passport@^0.4.x passport-local@1.x --save
The passport module gives us the authentication algorithms. To support different authentication mechanisms, the passport authors have developed several strategy implementations. The authentication mechanisms, or strategies, correspond to the various third-party services that support authentication, such as using OAuth2 to authenticate against services such as Facebook, Twitter, or GitHub.
The LocalStrategy authenticates solely using data stored local to the application, for example, our user authentication information service.
Let's start by creating the routing module, routes/users.mjs:
import path from 'path';
import util from 'util';
import express from 'express';
import passport from 'passport';
import passportLocal from 'passport-local';
const LocalStrategy = passportLocal.Strategy;
import * as usersModel from '../models/users-superagent';
import { sessionCookieName } from '../app';
export const router = express.Router();
import DBG from 'debug';
const debug = DBG('notes:router-users');
const error = DBG('notes:error-users');
This brings in the modules we need for the /users router. This includes the two passport modules and the REST-based user authentication model.
In app.mjs, we will be adding session support so our users can log in and log out. That relies on storing a cookie in the browser, and the cookie name is found in this variable exported from app.mjs. We'll be using that cookie in a moment:
export function initPassport(app) {
app.use(passport.initialize());
app.use(passport.session());
}
export function ensureAuthenticated(req, res, next) {
try {
// req.user is set by Passport in the deserialize function
if (req.user) next();
else res.redirect('/users/login');
} catch (e) { next(e); }
}
The initPassport function will be called from app.mjs, and it installs the Passport middleware into the Express configuration. We'll discuss the implications of this later when we get to app.mjs changes, but Passport uses sessions to detect whether this HTTP request is authenticated or not. It looks at every request coming into the application, looks for clues about whether this browser is logged in or not, and attaches data to the request object as req.user.
The ensureAuthenticated function will be used by other routing modules and is to be inserted into any route definition that requires an authenticated logged-in user. For example, editing or deleting a note requires the user to be logged in, and therefore the corresponding routes in routes/notes.mjs must use ensureAuthenticated. If the user is not logged in, this function redirects them to /users/login so that they can do so:
outer.get('/login', function(req, res, next) {
try {
res.render('login', { title: "Login to Notes", user: req.user, });
} catch (e) { next(e); }
});
router.post('/login',
passport.authenticate('local', {
successRedirect: '/', // SUCCESS: Go to home page
failureRedirect: 'login', // FAIL: Go to /user/login
})
);
Because this router is mounted on /users, all these routes will have /user prepended. The /users/login route simply shows a form requesting a username and password. When this form is submitted, we land in the second route declaration, with a POST on /users/login. If passport deems this a successful login attempt using LocalStrategy, then the browser is redirected to the home page. Otherwise, it is redirected to the /users/login page:
router.get('/logout', function(req, res, next) {
try {
req.session.destroy();
req.logout();
res.clearCookie(sessionCookieName);
res.redirect('/');
} catch (e) { next(e); }
});
When the user requests to log out of Notes, they are to be sent to /users/logout. We'll be adding a button to the header template for this purpose. The req.logout function instructs Passport to erase their login credentials, and they are then redirected to the home page.
This function deviates from what's in the Passport documentation. There, we are told to simply call req.logout. But calling only that function sometimes results in the user not being logged out. It's necessary to destroy the session object, and to clear the cookie, in order to ensure that the user is logged out. The cookie name is defined in app.mjs, and we imported sessionCookieName for this function:
passport.use(new LocalStrategy(
async (username, password, done) => {
try {
var check = await usersModel.userPasswordCheck(username,
password);
if (check.check) {
done(null, { id: check.username, username: check.username });
} else {
done(null, false, check.message);
}
} catch (e) { done(e); }
}
));
Here is where we define our implementation of LocalStrategy. In the callback function, we call usersModel.userPasswordCheck, which makes a REST call to the user authentication service. Remember that this performs the password check and then returns an object indicating whether they're logged in or not.
A successful login is indicated when check.check is true. For this case, we tell Passport to use an object containing the username in the session object. Otherwise, we have two ways to tell Passport that the login attempt was unsuccessful. In one case, we use done(null, false) to indicate an error logging in, and pass along the error message we were given. In the other case, we'll have captured an exception, and pass along that exception.
You'll notice that Passport uses a callback-style API. Passport provides a done function, and we are to call that function when we know what's what. While we use an async function to make a clean asynchronous call to the backend service, Passport doesn't know how to grok the Promise that would be returned. Therefore, we have to throw a try/catch around the function body to catch any thrown exception:
passport.serializeUser(function(user, done) {
try {
done(null, user.username);
} catch (e) { done(e); }
});
passport.deserializeUser(async (username, done) => {
try {
var user = await usersModel.find(username);
done(null, user);
} catch(e) { done(e); }
});
The preceding functions take care of encoding and decoding authentication data for the session. All we need to attach to the session is the username, as we did in serializeUser. The deserializeUser object is called while processing an incoming HTTP request and is where we look up the user profile data. Passport will attach this to the request object.
We have a few changes required in app.mjs, some of which we've already touched on. We did carefully isolate the Passport module dependencies to routes/users.mjs. The changes required in app.mjs support the code in routes/users.mjs.
It's now time to uncomment a line we told you to comment out way back in Chapter 5, Your First Express Application. The imports for the routing modules will now look as follows:
import { router as index } from './routes/index';
import { router as users, initPassport } from './routes/users';
import { router as notes } from './routes/notes';
The User router supports the /login and /logout URL's as well as using Passport for authentication. We need to call initPassport for a little bit of initialization:
import session from 'express-session';
import sessionFileStore from 'session-file-store';
const FileStore = sessionFileStore(session);
export const sessionCookieName = 'notescookie.sid';
Because Passport uses sessions, we need to enable session support in Express, and these modules do so. The session-file-store module saves our session data to disk so that we can kill and restart the application without losing sessions. It's also possible to save sessions to databases with appropriate modules. A filesystem session store is suitable only when all Notes instances are running on the same server computer. For a distributed deployment situation, you'll need to use a session store that runs on a network-wide service, such as a database.
We're defining sessionCookieName here so it can be used in multiple places. By default, express-session uses a cookie named connect.sid to store the session data. As a small measure of security, it's useful when there's a published default to use a different non-default value. Any time we use the default value, it's possible that an attacker might know a security flaw depending on that default.
Use the following command to install the modules:
$ npm install express-session@1.15.x session-file-store@1.2.x --save
Express Session support, including all the various Session Store implementations, is documented on its GitHub project page at https://github.com/expressjs/session.
Add this in app.mjs:
app.use(session({
store: new FileStore({ path: "sessions" }),
secret: 'keyboard mouse',
resave: true,
saveUninitialized: true,
name: sessionCookieName
}));
initPassport(app);
Here we initialize the session support. The field named secret is used to sign the session ID cookie. The session cookie is an encoded string that is encrypted in part using this secret. In the Express Session documentation, they suggest the string keyboard cat for the secret. But, in theory, what if Express has a vulnerability, such that knowing this secret can make it easier to break the session logic on your site? Hence, we chose a different string for the secret just to be a little different and perhaps a little more secure.
Similarly, the default cookie name used by express-session is connect.sid. Here's where we change the cookie name to a non-default name.
The FileStore will store its session data records in a directory named sessions. This directory will be auto-created as needed:
app.use('/', index);
app.use('/users', users);
app.use('/notes', notes);
The preceding are the three routers used in the Notes application.
This router module handles the home page. It does not require the user to be logged in, but we want to change the display a little if they are logged in:
router.get('/', async (req, res, next) => {
try {
let keylist = await notes.keylist();
let keyPromises = keylist.map(key => { return notes.read(key) });
let notelist = await Promise.all(keyPromises);
res.render('index', {
title: 'Notes', notelist: notelist,
user: req.user ? req.user : undefined
});
} catch (e) { next(e); }
});
Remember that we ensured that req.user has the user profile data, which we did in deserializeUser. We simply check for this and make sure to add that data when rendering the views template.
We'll be making similar changes to most of the other route definitions. After that, we'll go over the changes to the view templates in which we use req.user to show the correct buttons on each page.
The changes required here are more significant, but still straightforward:
import { ensureAuthenticated } from './users';
We need to use the ensureAuthenticated function to protect certain routes from being used by users who are not logged in. Notice how ES6 modules let us import just the function(s) we require. Since that function is in the user router module, we need to import it from there:
router.get('/add', ensureAuthenticated, (req, res, next) => {
try {
res.render('noteedit', {
title: "Add a Note",
docreate: true, notekey: "",
user: req.user, note: undefined
});
} catch (e) { next(e); }
});
The first thing we added is to call usersRouter.ensureAuthenticated in the route definition. If the user is not logged in, they'll redirect to /users/login, thanks to that function.
Because we've ensured that the user is authenticated, we know that req.user will already have their profile information. We can then simply pass it to the view template.
For the other routes, we need to make similar changes:
router.post('/save', ensureAuthenticated, (req, res, next) => {
..
});
The /save route requires only this change to call ensureAuthenticated to make sure that the user is logged in:
router.get('/view', (req, res, next) => {
try {
var note = await notes.read(req.query.key);
res.render('noteview', {
title: note ? note.title : "",
notekey: req.query.key,
user: req.user ? req.user : undefined,
note: note
});
} catch (e) { next(e); }
});
For this route, we don't require the user to be logged in. We do need the user's profile information, if any, sent to the view template:
router.get('/edit', ensureAuthenticated, (req, res, next) => {
try {
var note = await notes.read(req.query.key);
res.render('noteedit', {
title: note ? ("Edit " + note.title) : "Add a Note",
docreate: false,
notekey: req.query.key,
user: req.user ? req.user : undefined,
note: note
});
} catch (e) { next(e); }
});
router.get('/destroy', ensureAuthenticated, (req, res, next) => {
try {
var note = await notes.read(req.query.key);
res.render('notedestroy', {
title: note ? `Delete ${note.title}` : "",
notekey: req.query.key,
user: req.user ? req.user : undefined,
note: note
});
} catch (e) { next(e); }
});
router.post('/destroy/confirm', ensureAuthenticated, (req, res, next) => {
..
});
For these routes, we require the user to be logged in. In most cases, we need to send the req.user value to the view template.
So far, we've created a backend user authentication service, a REST module, to access that service, a router module to handle routes related to logging in and out of the website, and changes in app.mjs to use those modules. We're almost ready, but we've got a number of outstanding changes to make in the templates. We're passing the req.user object to every template because each one must be changed to accommodate whether the user is logged in or not.
In partials/header.hbs, make the following additions:
...
{{#if user}}
<div class="collapse navbar-collapse"
id="navbarSupportedContent">
<span class="navbar-text text-dark col">{{ title }}</span>
<a class="btn btn-dark col-auto" href="/users/logout">
Log Out <span class="badge badge-light">{{ user.username }}
</span></a>
<a class="nav-item nav-link btn btn-dark col-auto"
href='/notes/add'>
ADD Note</a>
</div>
{{else}}
<div class="collapse navbar-collapse" id="navbarLogIn">
<a class="btn btn-primary" href="/users/login">Log in</a>
</div>
{{/if}}
...
What we're doing here is controlling which buttons to display at the top of the screen depending on whether the user is logged in or not. The earlier changes ensure that the user variable will be undefined if the user is logged out, otherwise it will have the user profile object. Therefore, it's sufficient to check the user variable as shown here to render different user interface elements.
A logged-out user doesn't get the ADD Note button, and gets a Log in button. Otherwise, the user gets an ADD Note button and a Log Out button. The Log in button takes the user to /users/login, while the Log Out button takes them to /users/logout. Both of those are handled in routes/users.js, and perform the expected function.
The Log Out button has a Bootstrap badge component displaying the username. This adds a little visual splotch, in which we'll put the username that's logged in. As we'll see later, it will serve as a visual cue to the user as to their identity.
We need to create views/login.hbs:
<div class="container-fluid">
<div class="row">
<div class="col-12 btn-group-vertical" role="group">
<form method='POST' action='/users/login'>
<div class="form-group">
<label for="username">User name:</label>
<input class="form-control" type='text' id='username'
name='username' value='' placeholder='User Name'/>
</div>
<div class="form-group">
<label for="password">Password:</label>
<input class="form-control" type='password' id='password'
name='password' value='' placeholder='Password'/>
</div>
<button type="submit" class="btn btn-default">Submit</button>
</form>
</div>
</div>
</div>
This is a simple form decorated with Bootstrap goodness to ask for the username and password. When submitted, it creates a POST request to /users/login, which invokes the desired handler to verify the login request. The handler for that URL will start the Passport's process to decide whether the user is authenticated or not.
In views/notedestroy.hbs, we want to display a message if the user is not logged in. Normally, the form to cause the note to be deleted is displayed, but if the user is not logged in, we want to explain the situation:
<form method='POST' action='/notes/destroy/confirm'>
<div class="container-fluid">
{{#if user}}
<input type='hidden' name='notekey' value='{{#if note}}{{notekey}}{{/if}}'>
<p class="form-text">Delete {{note.title}}?</p>
<div class="btn-group">
<button type="submit" value='DELETE'
class="btn btn-outline-dark">DELETE</button>
<a class="btn btn-outline-dark"
href="/notes/view?key={{#if note}}{{notekey}}{{/if}}"
role="button">Cancel</a>
</div>
{{else}}
{{> not-logged-in }}
{{/if}}
</div>
</form>
That's straightforward; if the user is logged in, display the form, otherwise display the message in partials/not-logged-in.hbs. We determine our approach based on the user variable.
We could put something like this in partials/not-logged-in.hbs:
<div class="jumbotron">
<h1>Not Logged In</h1>
<p>You are required to be logged in for this action, but you are not.
You should not see this message. It's a bug if this message appears.
</p>
<p><a class="btn btn-primary" href="/users/login">Log in</a></p>
</div>
In views/noteedit.hbs, we need a similar change:
..
<div class="row"><div class="col-xs-12">
{{#if user}}
..
{{else}}
{{> not-logged-in }}
{{/if}}
</div></div>
..
That is, at the bottom we add a segment that, for non-logged-in users, pulls in the not-logged-in partial.
The Bootstrap jumbotron component makes a nice and large text display that stands out nicely, and will catch the viewer's attention. However, the user should never see this because each of those templates is used only when we've preverified that the user is logged in.
A message such as this is useful as a check against bugs in your code. Suppose that we slipped up and failed to properly ensure that these forms were displayed only to logged-in users. Suppose that we had other bugs that didn't check the form submission to ensure it's requested only by a logged-in user. Fixing the template in this way is another layer of prevention against displaying forms to users who are not allowed to use that functionality.
Now we're ready to run the Notes application and try our hand at logging in and out.
We need to change the scripts section of package.json as follows:
"scripts": {
"start": "DEBUG=notes:* SEQUELIZE_CONNECT=models/sequelize-sqlite.yaml NOTES_MODEL=sequelize USER_SERVICE_URL=http://localhost:3333 node --experimental-modules ./bin/www.mjs",
"dl-minty": "mkdir -p minty && npm run dl-minty-css && npm run dl-
minty-min-css",
"dl-minty-css": "wget https://bootswatch.com/4/minty/bootstrap.css
-O minty/bootstrap.css",
"dl-minty-min-css": "wget https://bootswatch.com/4/minty/bootstrap.min.css -O minty/bootstrap.min.css"
},
In the previous chapters, we built up quite a few combinations of models and databases for running the Notes application. This leaves us with one, configured to use the Sequelize model for Notes, using the SQLite3 database, and to use the new user authentication service that we wrote earlier. We can simplify the scripts section by deleting those other configurations. All the other Notes data models are still available just by setting the environment variables appropriately.
The USER_SERVICE_URL needs to match the port number that we designated for that service.
In one window, start the user authentication service as follows:
$ cd users
$ npm start
> user-auth-server@0.0.1 start /Users/david/chap08/users
> DEBUG=users:* PORT=3333 SEQUELIZE_CONNECT=sequelize-sqlite.yaml node user-server
users:server User-Auth-Service listening at http://127.0.0.1:3333
+0ms
Then, in another window, start the Notes application:
$ cd notes
$ DEBUG=notes:* npm start
> notes@0.0.0 start /Users/david/chap08/notes
> SEQUELIZE_CONNECT=models/sequelize-sqlite.yaml NOTES_MODEL=models/notes-sequelize USERS_MODEL=models/users-rest USER_SERVICE_URL=http://localhost:3333 node ./bin/www
notes:server Listening on port 3000 +0ms
You'll be greeted with the following:
Notice the new button, Log in, and the lack of an ADD Note button. We're not logged in, and therefore partials/header.hbs is rigged to show only the Log in button.
Click on the Log in button, and you will see the login screen:
This is our login form from views/login.hbs. You can now log in, create a note or three, and you might end up with the following on the home page:
You now have both Log Out and ADD Note buttons.
You'll notice that the Log Out button has the username (me) shown. After some thought and consideration, this seemed the most compact way to show whether the user is logged in or not, and which user is logged in. This might drive the user experience team nuts, and you won't know whether this user interfaces design works until it's tested with users, but it's good enough for our purpose at the moment.
If you want your application to hit the big time, it's a great idea to allow users to register using third-party credentials. Websites all over the internet allow you to log in using Facebook, Twitter, or accounts from other services. Doing so removes hurdles to prospective users signing up for your service. Passport makes it extremely easy to do this.
Supporting Twitter requires installing TwitterStrategy, registering a new application with Twitter, and adding a couple of routes into routes/user.mjs and a small change in partials/header.hbs. Integrating other third-party services requires similar steps.
Twitter, as with every other third-party service, uses OAuth to handle authentication and requires an authentication key to write software using their API. It's their service, so you have to play by their rules, of course.
To register a new application with Twitter, go to https://apps.twitter.com/. Then you click on the Create New App button. Since we haven't deployed the Notes application to a regular server and, more importantly, there isn't a valid domain name for the application, we have to give Twitter the configuration required for testing on our local laptop.
Every service offering OAuth2 authentication has an administrative backend for registering new applications. The common purpose is to describe the application to the service so that the service can correctly recognize the application when requests are made using the authentication tokens. The normal situation is that the application is deployed to a regular server, and is accessed through a domain name such as MyNotes.info. We've done neither as of this moment.
At the time of writing, there are four pieces of information requested by the Twitter sign-up process:
It was found by attempting this procedure with different services that Facebook (and other) services are not lenient about test applications hosted on laptops. At least Twitter is keen for developers to configure a test application on their laptop. Passport's other OAuth-based strategies will work similarly enough to Twitter, so the knowledge we're gaining will transfer to those other authentication strategies.
The last thing to notice is the extremely sensitive nature of the authentication keys. It's bad form to check these into a source code repository or otherwise put them in a place where anybody can access the key.
Twitter does change the signup page from time to time, but it should look something like the following:
As with many web applications, we have decided to allow our users to log in using Twitter credentials. The OAuth2 protocol is widely used for this purpose and is the basis for authenticating on one website using credentials maintained by another website.
The application registration process you just followed at apps.twitter.com generated for you a pair of API keys, a consumer key, and, consumer secret. These keys are part of the OAuth protocol, and will be supplied by any OAuth service you register with, and the keys should be treated with the utmost care. Think of them as the username and password your service uses to access the OAuth-based service (Twitter et al). The more people who can see these keys, the more likely a miscreant can see them and then cause trouble. Anybody with those secrets can write access the service API as if they are you.
Dozens of Strategy packages for various third-party services are available within the Passport ecosystem. Let's install the package required to use TwitterStrategy:
$ npm install passport-twitter@1.x --save
In routes/users.mjs, let's start making some changes:
import passportTwitter from 'passport-twitter';
const TwitterStrategy = passportTwitter.Strategy;
To bring in the package we just installed, add the following:
const twittercallback = process.env.TWITTER_CALLBACK_HOST
? process.env.TWITTER_CALLBACK_HOST
: "http://localhost:3000";
passport.use(new TwitterStrategy({
consumerKey: process.env.TWITTER_CONSUMER_KEY,
consumerSecret: process.env.TWITTER_CONSUMER_SECRET,
callbackURL: `${twittercallback}/users/auth/twitter/callback`
},
async function(token, tokenSecret, profile, done) {
try {
done(null, await usersModel.findOrCreate({
id: profile.username, username: profile.username, password: "",
provider: profile.provider, familyName: profile.displayName,
givenName: "", middleName: "",
photos: profile.photos, emails: profile.emails
}));
} catch(err) { done(err); }
}));
This registers TwitterStrategy with passport, arranging to call the user authentication service as users register with the Notes application. This callback function is called when users successfully authenticate using Twitter.
We defined the usersModel.findOrCreate function specifically to handle user registration from third-party services such as Twitter. Its task is to look for the user described in the profile object and, if that user does not exist, to autocreate that user account in Notes.
The callbackURL setting in the TwitterStrategy configuration is a holdover from Twitter's OAuth1-based API implementation. In OAuth1, the callback URL was passed as part of the OAuth request. Since TwitterStrategy uses Twitter's OAuth1 service, we have to supply the URL here. We'll see in a moment where that URL is implemented in Notes.
The callbackURL, consumerKey, and consumerSecret are all injected using environment variables. It is tempting, because of the convenience, to just put those keys in the source code. But, how widely distributed is your source code? In the Slack API documentation (https://api.slack.com/docs/oauth-safety), we're warned Do not distribute client secrets in email, distributed native applications, client-side JavaScript, or public code repositories.
In Chapter 10, Deploying Node.js Applications, we'll put these keys into a Dockerfile. That's not entirely secure because the Dockerfile will also be committed to a source repository somewhere.
It was found while debugging that the profile object supplied by the TwitterStrategy did not match the documentation on the passport website. Therefore, we have mapped the object actually supplied by passport into something that Notes can use:
router.get('/auth/twitter', passport.authenticate('twitter'));
To start the user logging in with Twitter, we'll send them to this URL. Remember that this URL is really /users/auth/twitter, and, in the templates, we'll have to use that URL. When this is called, the passport middleware starts the user authentication and registration process using TwitterStrategy.
Once the user's browser visits this URL, the OAuth dance begins. It's called a dance because the OAuth protocol involves carefully designed redirects between several websites. Passport sends the browser over to the correct URL at Twitter, where Twitter asks the user whether they agree to authenticate using Twitter, and then Twitter redirects the user back to your callback URL. Along the way, specific tokens are passed back and forth in a very carefully designed dance between websites.
Once the OAuth dance concludes, the browser lands here:
router.get('/auth/twitter/callback',
passport.authenticate('twitter', { successRedirect: '/',
failureRedirect: '/users/login' }));
This route handles the callback URL, and it corresponds to the callbackURL setting configured earlier. Depending on whether it indicates a successful registration or not, passport will redirect the browser to either the home page or back to the /users/login page.
Because router is mounted on /user, this URL is actually /user/auth/twitter/callback. Therefore, the full URL to use in configuring the TwitterStrategy, and to supply to Twitter, is http://localhost:3000/user/auth/twitter/callback
In the process of handling the callback URL, Passport will invoke the callback function shown earlier. Because our callback uses the usersModel.findOrCreate function, the user will be automatically registered if necessary.
We're almost ready, but we need to make a couple of small changes elsewhere in Notes.
In partials/header.hbs, make the following changes to the code:
...
{{else}}
<div class="collapse navbar-collapse" id="navbarLogIn">
<span class="navbar-text text-dark col"></span>
<a class="nav-item nav-link btn btn-dark col-auto" href="/users/login">
Log in</a>
<a class="nav-item nav-link btn btn-dark col-auto" href="/users/auth/twitter">
<img width="15px"
src="/assets/vendor/twitter/Twitter_Social_Icon_Rounded_Square_Color.png"/>
Log in with Twitter</a>
</div>
{{/if}}
This adds a new button that, when clicked, takes the user to /users/auth/twitter, which, of course, kicks off the Twitter authentication process.
The image being used is from the official Twitter brand assets page at https://about.twitter.com/company/brand-assets. Twitter recommends using these branding assets for a consistent look across all services using Twitter. Download the whole set and then pick one you like. For the URL shown here, place the chosen image in a directory named public/assets/vendor/twitter. Notice that we force the size to be small enough for the navigation bar.
With these changes, we're ready to try logging in with Twitter.
Start the Notes application server as done previously:
$ npm start
> notes@0.0.0 start /Users/David/chap08/notes
> DEBUG=notes:* SEQUELIZE_CONNECT=models/sequelize-sqlite.yaml NOTES_MODEL=sequelize USER_SERVICE_URL=http://localhost:3333 node --experimental-modules ./bin/www.mjs
(node:42095) ExperimentalWarning: The ESM module loader is experimental.
notes:server-debug Listening on port 3000 +0ms
Then use a browser to visit http://localhost:3000:
Notice the new button. It looks about right, thanks to having used the official Twitter branding image. The button is a little large, so maybe you want to consult a designer. Obviously, a different design is required if you're going to support dozens of authentication services.
Clicking on this button takes the browser to /users/auth/twitter, which starts Passport running the OAuth2 protocol transactions necessary to authenticate. And then, once you're logged in with Twitter, you'll see something like the following screenshot:
We're now logged in, and notice that our Notes username is the same as our Twitter username. You can browse around the application and create, edit, or delete notes. In fact, you can do this to any note you like, even ones created by others. That's because we did not create any sort of access control or permissions system, and therefore every user has complete access to every note. That's a feature to put on the backlog.
By using multiple browsers or computers, you can simultaneously log in as different users, one user per browser.
You can run multiple instances of the Notes application by doing what we did earlier:
"scripts": {
"start": "SEQUELIZE_CONNECT=models/sequelize-sqlite.yaml NOTES_MODEL=models/notes-sequelize USERS_MODEL=models/users-rest USER_SERVICE_URL=http://localhost:3333 node ./bin/www",
"start-server1": "SEQUELIZE_CONNECT=models/sequelize-sqlite.yaml NOTES_MODEL=models/notes-sequelize USERS_MODEL=models/users-rest USER_SERVICE_URL=http://localhost:3333 PORT=3000 node ./bin/www",
"start-server2": "SEQUELIZE_CONNECT=models/sequelize-sqlite.yaml NOTES_MODEL=models/notes-sequelize USERS_MODEL=models/users-rest USER_SERVICE_URL=http://localhost:3333 PORT=3002 node ./bin/www",
"dl-minty": "mkdir -p minty && npm run dl-minty-css && npm run dl-minty-min-css",
"dl-minty-css": "wget https://bootswatch.com/4/minty/bootstrap.css -O minty/bootstrap.css",
"dl-minty-min-css": "wget https://bootswatch.com/4/minty/bootstrap.min.css -O minty/bootstrap.min.css"
},
Then, in one command window, run the following command:
$ npm run start-server1
> notes@0.0.0 start-server1 /Users/David/chap08/notes
> DEBUG=notes:* SEQUELIZE_CONNECT=models/sequelize-sqlite.yaml NOTES_MODEL=sequelize USER_SERVICE_URL=http://localhost:3333 PORT=3000 node --experimental-modules ./bin/www.mjs
(node:43591) ExperimentalWarning: The ESM module loader is experimental.
notes:server-debug Listening on port 3000 +0ms
In another command window, run the following command:
$ npm run start-server2
> notes@0.0.0 start-server2 /Users/David/chap08/notes
> DEBUG=notes:* SEQUELIZE_CONNECT=models/sequelize-sqlite.yaml NOTES_MODEL=sequelize USER_SERVICE_URL=http://localhost:3333 PORT=3002 node --experimental-modules ./bin/www.mjs
(node:43755) ExperimentalWarning: The ESM module loader is experimental.
notes:server-debug Listening on port 3002 +0ms
As previously, this starts two instances of the Notes server, each with a different value in the PORT environment variable. In this case, each instance will use the same user authentication service. As shown here, you'll be able to visit the two instances at http://localhost:3000 and http://localhost:3002. And, as previously, you'll be able to start and stop the servers as you wish, see the same notes in each, and see that the notes are retained after restarting the server.
Another thing to try is to fiddle with the session store. Our session data is being stored in the sessions directory. These are just files in the filesystem, and we can take a look:
$ ls -l sessions/
total 32
-rw-r--r-- 1 david wheel 139 Jan 25 19:28 -QOS7eX8ZBAfmK9CCV8Xj8v-3DVEtaLK.json
-rw-r--r-- 1 david wheel 139 Jan 25 21:30 T7VT4xt3_e9BiU49OMC6RjbJi6xB7VqG.json
-rw-r--r-- 1 david wheel 223 Jan 25 19:27 ermh-7ijiqY7XXMnA6zPzJvsvsWUghWm.json
-rw-r--r-- 1 david wheel 139 Jan 25 21:23 uKzkXKuJ8uMN_ROEfaRSmvPU7NmBc3md.json $ cat sessions/T7VT4xt3_e9BiU49OMC6RjbJi6xB7VqG.json
{"cookie":{"originalMaxAge":null,"expires":null,"httpOnly":true,"path":"/"},"__lastAccess":1516944652270,"passport":{"user":"7genblogger"}}
This is after logging in using a Twitter account; you can see that the Twitter account name is stored here in the session data.
What if you want to clear a session? It's just a file in the filesystem. Deleting the session file erases the session, and the user's browser will be forcefully logged out.
The session will time out if the user leaves their browser idle for long enough. One of the session-file-store options, ttl, controls the timeout period, which defaults to 3,600 seconds (an hour). With a timed-out session, the application reverts to a logged-out state.
We've cautioned several times about the importance of safely handling user identification information. The intention to safely handle that data is one thing, but it is important to follow through and actually do so. While we're using a few good practices so far, as it stands, the Notes application would not withstand any kind of security audit:
If you don't recognize the phrase clear text, it simply means unencrypted. Anyone could read the text of user passwords or the authentication tokens. It's best to keep both encrypted to avoid information leakage.
Did you notice earlier when we said run the Notes application stack? It's time to explain to the marketing team what's meant by that phrase. They'll perhaps need to put an architecture diagram on marketing brochures and the like. It's also useful for developers like us to take a step back and draw a picture of what we've created, or are planning to create.
Here's the sort of diagram that an engineer might draw to show the marketing team the system design. The marketing team will, of course, hire a graphics artist to clean it up:
The box labeled Notes Application is the public-facing code implemented by the templates and the router modules. As currently configured, it's visible from our laptop on port 3000. It can use one of several data storage services. It communicates with the backend User Authentication Service over port 3333 (as currently configured).
In Chapter 10, Deploying Node.js Applications, we'll be expanding this picture a bit as we learn how to deploy on a real server.
You've covered a lot of ground in this chapter, looking at not only user authentication in Express applications, but also microservice development.
Specifically, you covered session management in Express, using Passport for user authentication, including Twitter/OAuth, using router middleware to limit access, creating a REST service with Restify, and when to create a microservice.
In the next chapter, we'll take the Notes application to a new level-semi-real-time communication between application users. To do this, we'll write some browser-side JavaScript and explore how the Socket.io package can let us send messages between users.
The original design model of the web is similar to the way that mainframes worked in the 1970s. Both old-school dumb terminals, such as the IBM 3270, and web browsers, follow a request-response paradigm. The user sends a request and the far-off computer sends a response screen. While web browsers can show more complex information than old-school dumb terminals, the interaction pattern in both cases is a back and forth of user requests, each resulting in a screen of data sent by the server screen after screen or, in the case of web browsers, page after page.
In case you're wondering what this history lesson is about, that request-response paradigm is evident in the Node.js HTTP Server API, as shown in the following code:
http.createServer(function (request, response) {
... handle request
}).listen();
The paradigm couldn't be more explicit than this. The request and the response are right there.
The first web browsers were an advancement over text-based user interfaces, with HTML mixing images, and text with varying colors, fonts, and sizes. As CSS came along, HTML improved, iframes allowed embedded media of all kinds, and JavaScript improved, so we have a quite different paradigm. The web browser is still sending requests and receiving a page of data, but that data can be quite complex and, more importantly, JavaScript adds interactivity.
One new technique is keeping an open connection to the server for continual data exchange between server and client. This change in the web application model is called, by some, the real-time web. In some cases, websites keep an open connection to the web browser, with real-time updates to web pages being one goal.
Some observe that traditional web applications can untruthfully display their data; that is, if two people are looking at a page, and one person edits that page, that person's browser will update with the correct copy of the page, while the other browser is not updated. The two browsers show different versions of the page, one of which is untruthful. The second browser can even show a page that no longer exists, if the user at the first browser deletes that page. Some think it would be better if the other person's browser is refreshed to show the new content as soon as the page is edited.
This is one possible role of the real-time web; pages that update themselves as page content changes. All kinds of systems support real-time interactivity between folks on the same website. Whether it's seeing Facebook comments pop up as they're written, or collaboratively edited documents, there's a new interactivity paradigm on the web.
We're about to implement this behavior in the Notes application.
One of the original purposes for inventing Node.js was to support the real-time web. The Comet application architecture (Comet is related to AJAX, and both happen to be names of household cleaning products) involves holding the HTTP connection open for a long time, with data flowing back and forth between browser and server over that channel. The term Comet was introduced by Alex Russell in his blog in 2006 (http://infrequently.org/2006/03/comet-low-latency-data-for-the-browser/) as a general term for the architectural pattern to implement this real-time, two-way data exchange between client and server. That blog post called for the development of a programming platform very similar to Node.js.
To simplify the task, we'll lean on the Socket.IO library (http://socket.io/). This library simplifies two-way communication between the browser and server, and can support a variety of protocols with fallback to old-school web browsers.
We'll be covering the following topics:
The aim of Socket.IO is to make real-time apps possible in every browser and mobile device. It supports several transport protocols, choosing the best one for the specific browser.
If you were to implement your application with WebSockets, it would be limited to the modern browsers supporting that protocol. Because Socket.IO falls back on so many alternate protocols (WebSockets, Flash, XHR, and JSONP), it supports a wide range of web browsers, including some old crufty browsers.
As the application author, you don't have to worry about the specific protocol Socket.IO uses in a given browser. Instead, you can implement the business logic and the library takes care of the details for you.
Socket.IO requires that a client library make its way into the browser. That library is provided, and is easy to instantiate. You'll be writing code on both the browser side and server side using similar Socket.IO APIs at each end.
The model that Socket.IO provides is similar to the EventEmitter object. The programmer uses the .on method to listen for events and the .emit method to send them. The emitted events are sent between the browser and the server with the Socket.IO library taking care of sending them back and forth.
Socket.IO works by wrapping itself around an HTTP Server object. Think back to Chapter 4, HTTP Servers and Clients, where we wrote a module that hooked into HTTP Server methods so that we could spy on HTTP transactions. The HTTP Sniffer attaches a listener to every HTTP event to print out the events. But what if you used that idea to do real work? Socket.IO uses a similar concept, listening to HTTP requests and responding to specific ones by using the Socket.IO protocol to communicate with client code in the browser.
To get started, let's first make a duplicate of the code from the previous chapter. If you created a directory named chap08 for that code, create a new directory named chap09 and copy the source tree there.
We won't make changes to the user authentication microservice, but we will use it for user authentication, of course.
In the Notes source directory, install these new modules:
$ npm install socket.io@2.x passport.socketio@3.7.x --save
We will incorporate user authentication with the passport module, used in Chapter 8, Multiuser Authentication the Microservice Way, into some of the real-time interactions we'll implement.
To initialize Socket.IO, we must do some major surgery on how the Notes application is started. So far, we used the bin/www.mjs script along with app.mjs, with each script hosting different steps of launching Notes. Socket.IO initialization requires that these steps occur in a different order to what we've been doing. Therefore, we must merge these two scripts into one. What we'll do is copy the content of the bin/www.mjs script into appropriate sections of app.mjs, and from there, we'll use app.mjs to launch Notes.
At the beginning of app.mjs, add this to the import statements:
import http from 'http';
import passportSocketIo from 'passport.socketio';
import session from 'express-session';
import sessionFileStore from 'session-file-store';
const FileStore = sessionFileStore(session);
export const sessionCookieName = 'notescookie.sid';
const sessionSecret = 'keyboard mouse';
const sessionStore = new FileStore({ path: "sessions" });
The passport.socketio module integrates Socket.IO with PassportJS-based user authentication. We'll configure this support shortly. The configuration for session management is now shared between Socket.IO, Express, and Passport. These lines centralize that configuration to one place in app.mjs, so we can change it once to affect every place it's needed.
Use this to initialize the HTTP Server object:
const app = express();
export default app;
const server = http.createServer(app);
import socketio from 'socket.io';
const io = socketio(server);
io.use(passportSocketIo.authorize({
cookieParser: cookieParser,
key: sessionCookieName,
secret: sessionSecret,
store: sessionStore
}));
This moves the export default app line from the bottom of the file to this location. Doesn't this location make more sense?
The io object is our entry point into the Socket.IO API. We need to pass this object to any code that needs to use that API. It won't be enough to simply require the socket.io module in other modules because the io object is what wraps the server object. Instead, we'll be passing the io object into whatever modules are to use it.
The io.use function installs in Socket.IO functions similar to Express middleware. In this case, we integrate Passport authentication into Socket.IO:
var port = normalizePort(process.env.PORT || '3000');
app.set('port', port);
server.listen(port);
server.on('error', onError);
server.on('listening', onListening);
This code is copied from bin/www.mjs, and sets up the port to listen to. It relies on three functions that will also be copied into app.mjs from bin/www.mjs:
app.use(session({
store: sessionStore,
secret: sessionSecret,
resave: true,
saveUninitialized: true,
name: sessionCookieName
}));
initPassport(app);
This changes the configuration of Express session support to match the configuration variables we set up earlier. It's the same variables used when setting up the Socket.IO session integration, meaning they're both on the same page.
Use this to initialize Socket.IO code in the router modules:
app.use('/', index);
app.use('/users', users);
app.use('/notes', notes);
indexSocketio(io);
// notesSocketio(io);
This is where we pass the io object into modules that must use it. This is so that the Notes application can send messages to the web browsers about changes in Notes. What that means will be clearer in a second. What's required is analogous to the Express router functions, and therefore the code to send/receive messages from Socket.IO clients will also be located in the router modules.
We haven't written either of these functions yet (have patience). To support this, we need to make a change in an import statement at the top:
import { socketio as indexSocketio, router as index } from './routes/index';
Each router module will export a function named socketio, which we'll have to rename as shown here. This function is what will receive the io object, and handle any Socket.IO-based communications. We haven't written these functions yet.
Then, at the end of app.mjs, we'll copy in the remaining code from bin/www.mjs so the HTTP Server starts listening on our selected port:
function normalizePort(val) {
var port = parseInt(val, 10);
if (isNaN(port)) { // named pipe
return val;
}
if (port >= 0) { // port number
return port;
}
return false;
}
/**
* Event listener for HTTP server "error" event.
*/
function onError(error) {
if (error.syscall !== 'listen') { throw error; }
var bind = typeof port === 'string' ? 'Pipe ' + port : 'Port ' +
port;
// handle specific listen errors with friendly messages
switch (error.code) {
case 'EACCES':
console.error(bind + ' requires elevated privileges');
process.exit(1);
break;
case 'EADDRINUSE':
console.error(bind + ' is already in use');
process.exit(1);
break;
default:
throw error;
}
}
/**
* Event listener for HTTP server "listening" event.
*/
function onListening() {
var addr = server.address();
var bind = typeof addr === 'string' ? 'pipe ' + addr : 'port ' + addr.port;
debug('Listening on ' + bind);
}
Then, in package.json, we must start app.mjs rather than bin/www.mjs:
"scripts": {
"start": "DEBUG=notes:* SEQUELIZE_CONNECT=models/sequelize-sqlite.yaml NOTES_MODEL=sequelize USER_SERVICE_URL=http://localhost:3333 node --experimental-modules ./app",
"start-server1": "DEBUG=notes:* SEQUELIZE_CONNECT=models/sequelize-sqlite.yaml NOTES_MODEL=sequelize USER_SERVICE_URL=http://localhost:3333 PORT=3000 node --experimental-modules ./app",
"start-server2": "DEBUG=notes:* SEQUELIZE_CONNECT=models/sequelize-sqlite.yaml NOTES_MODEL=sequelize USER_SERVICE_URL=http://localhost:3333 PORT=3002 node --experimental-modules ./app",
...
},
At this point, you can delete bin/www.mjs if you like. You can also try starting the server, but it'll fail because the indexSocketio function does not exist yet.
The goal we're working towards is for the Notes home page to automatically update the list of notes, as notes are edited or deleted. What we've done so far is to restructure the application startup so that Socket.IO is initialized in the Notes application. There's no change of behavior yet, except that it will crash due to a missing function.
The approach is for the Notes model classes to send messages whenever a note is created, updated, or deleted. In the router classes, we'll listen to those messages, then send a list of note titles to all browsers attached to the Notes application.
Where the Notes model so far has been a passive repository of documents, it now needs to emit events to any interested parties. This is the listener pattern and, in theory, there will be code that is interested in knowing when notes are created, edited, or destroyed. At the moment, we'll use that knowledge to update the Notes home page, but there are many potential other uses of that knowledge.
The EventEmitter is the class that implements listener support. Let's create a new module, models/notes-events.mjs, containing the following:
import EventEmitter from 'events';
class NotesEmitter extends EventEmitter {
noteCreated(note) { this.emit('notecreated', note); }
noteUpdate (note) { this.emit('noteupdate', note); }
noteDestroy (data) { this.emit('notedestroy', data); }
}
export default new NotesEmitter();
This module maintains the listeners to Notes-related events for us. We've created a subclass of EventEmitter because it already knows how to manage the listeners. An instance of that object is exported as the default export.
Let's now update models/notes.mjs to use notes-events to emit events. Because we have a single module, notes.mjs, to dispatch calls to the individual Notes models, this module provides a key point at which we can intercept the operations and send events. Otherwise, we'd have to integrate the event-sending code into every Notes model.
import _events from './notes-events';
export const events = _events;
We need to import this module for use here, but also export it so that other modules can also emit Notes events. By doing this, another module that imports Notes can call notes.events.function to use the notes-events module.
This technique is called re-exporting. Sometimes, you need to export a function from module A that is actually defined in module B. Module A therefore imports the function from module B, adding it to its exports.
Then we do a little rewriting of these functions:
export async function create(key, title, body) {
const note = await model().create(key, title, body);
_events.noteCreated(note);
return note;
}
export async function update(key, title, body) {
const note = await model().update(key, title, body);
_events.noteUpdate(note);
return note;
}
export async function destroy(key) {
await model().destroy(key);
_events.noteDestroy({ key });
return key;
}
The contract for the Notes model functions is that they return a Promise, and therefore our caller will be using await to resolve the Promise. There are three steps:
The Notes model now sends events as Notes are created, updated, or destroyed. For this to be useful, the events must be displayed to our users. Making the events visible to our users means the controller and view portions of the application must consume those events.
Let's start making changes to routes/index.mjs:
router.get('/', async (req, res, next) => {
try {
let notelist = await getKeyTitlesList();
res.render('index', {
title: 'Notes', notelist: notelist,
user: req.user ? req.user : undefined
});
} catch (e) { next(e); }
});
We need to reuse part of the original routing function, to use it in another function. Therefore, we've pulled code that used to be in this block into a new function, getKeyTitlesList:
async function getKeyTitlesList() {
const keylist = await notes.keylist();
var keyPromises = keylist.map(key => {
return notes.read(key).then(note => {
return { key: note.key, title: note.title };
});
});
return Promise.all(keyPromises);
};
This portion of the original routing function is now its own function. It generates an array of items containing the key and title for all existing Notes, using Promise.all to manage the process of reading everything.
export function socketio(io) {
var emitNoteTitles = async () => {
const notelist = await getKeyTitlesList()
io.of('/home').emit('notetitles', { notelist });
};
notes.events.on('notecreated', emitNoteTitles);
notes.events.on('noteupdate', emitNoteTitles);
notes.events.on('notedestroy', emitNoteTitles);
};
Here is the socketio function we discussed while modifying app.mjs. We receive the io object, then use it to emit a notestitles event to all connected browsers.
The io.of('/namespace') method restricts whatever follows to the given namespace. In this case, we're emitting a notestitle message to the /home namespace.
The code, in this case, is fairly straightforward. It listens to the events we just implemented, notecreated, noteupdate, and notedestroy. For each of these events, it emits an event, notetitles, containing the list of note keys and titles.
That's it!
As Notes are created, updated, and destroyed, we ensure that the homepage will be refreshed to match. The homepage template, views/index.hbs, will require code to receive that event and rewrite the page to match.
Socket.IO runs on both client and server, with the two communicating back and forth over the HTTP connection. This requires loading the client JavaScript library into the client browser. Each page of the Notes application in which we seek to implement Socket.IO services must load the client library and have custom client code for our application.
Each page in Notes will require a different Socket.IO client implementation, since each page has different requirements. This affects how we load JavaScript code in Notes.
Initially, we simply put JavaScript code at the bottom of layout.hbs, because every page required the same set of JavaScript modules. But now we've identified the need for a different set of JavaScript on each page. Furthermore, some of the JavaScript needs to be loaded following the JavaScript currently loaded at the bottom of layout.hbs. Specifically, jQuery is loaded currently in layout.hbs, but we want to use jQuery in the Socket.IO clients to perform DOM manipulations on each page. Therefore, some template refactoring is required.
Create a file, partials/footerjs.hbs, containing:
<!-- jQuery first, then Popper.js, then Bootstrap JS -->
<script src="/assets/vendor/jquery/jquery.min.js"></script>
<script src="/assets/vendor/popper.js/umd/popper.min.js"></script>
<script src="/assets/vendor/bootstrap/js/bootstrap.min.js"></script>
<script src="/assets/vendor/feather-icons/feather.js"></script>
<script>
feather.replace()
</script>
This had been at the bottom of views/layout.hbs. We now need to modify that file as follows:
<body>
{{> header }}
{{{body}}}
</body>
Then, at the bottom of every template (error.hbs, index.hbs, login.hbs, notedestroy.hbs, noteedit.hbs, and noteview.hbs), add this line:
{{> footerjs}}
So far, this hasn't changed what will be loaded in the pages, because footerjs contains exactly what was already at the bottom of layout.hbs. But it gives us the freedom to load Socket.IO client code after the scripts in footerjs are loaded.
In views/index.hbs add this at the bottom, after the footerjs partial:
{{> footerjs}}
<script src="/socket.io/socket.io.js"></script>
<script>
$(document).ready(function () {
var socket = io('/home');
socket.on('notetitles', function(data) {
var notelist = data.notelist;
$('#notetitles').empty();
for (var i = 0; i < notelist.length; i++) {
notedata = notelist[i];
$('#notetitles')
.append('<a class="btn btn-lg btn-block btn-outline-dark"
href="/notes/view?key='+
notedata.key +'">'+ notedata.title +'</a>');
}
});
});
</script>
The first line is where we load the Socket.IO client library. You'll notice that we never set up any Express route to handle the /socket.io URL. Instead, the Socket.IO library did that for us.
Because we've already loaded jQuery (to support Bootstrap), we can easily ensure that this code is executed once the page is fully loaded using $(document).ready.
This code first connects a socket object to the /home namespace. That namespace is being used for events related to the Notes homepage. We then listen for the notetitles events, for which some jQuery DOM manipulation erases the current list of Notes and renders a new list on the screen.
That's it. Our code in routes/index.mjs listened to various events from the Notes model, and, in response, sent a notetitles event to the browser. The browser code takes that list of note information and redraws the screen.
We now have enough implemented to run the application and see some real-time action.
As you did earlier, start the user information microservice in one window:
$ npm start
> user-auth-server@0.0.1 start /Users/david/chap09/users
> DEBUG=users:* PORT=3333 SEQUELIZE_CONNECT=sequelize-sqlite.yaml node --experimental-modules user-server
(node:11866) ExperimentalWarning: The ESM module loader is experimental.
users:service User-Auth-Service listening at http://127.0.0.1:3333 +0ms
Then, in another window, start the Notes application:
$ npm start
> notes@0.0.0 start /Users/david/chap09/notes
> DEBUG=notes:* SEQUELIZE_CONNECT=models/sequelize-sqlite.yaml NOTES_MODEL=sequelize USER_SERVICE_URL=http://localhost:3333 node --experimental-modules ./app
(node:11998) ExperimentalWarning: The ESM module loader is experimental.
notes:debug-INDEX Listening on port 3000 +0ms
Then, in a browser window, go to http://localhost:3000 and log in to the Notes application. To see the real-time effects, open multiple browser windows. If you can use Notes from multiple computers, then do that as well.
In one browser window, start creating and deleting notes, while leaving the other browser windows viewing the home page. Create a note, and it should show up immediately on the home page in the other browser windows. Delete a note and it should disappear immediately as well.
It's cool how we can now see real-time changes in a part of the Notes application. Let's turn to the /notes/view page to see what we can do. What comes to mind is this functionality:
For the first two features, we can rely on the existing events coming from the Notes model. The third feature will require a messaging subsystem, so we'll get to that later in this chapter.
In routes/notes.mjs, add this to the end of the module:
export function socketio(io) {
notes.events.on('noteupdate', newnote => {
io.of('/view').emit('noteupdate', newnote);
});
notes.events.on('notedestroy', data => {
io.of('/view').emit('notedestroy', data);
});
};
At the top of app.mjs, make this change:
import { socketio as indexSocketio, router as index } from './routes/index';
import { router as users, initPassport } from './routes/users';
import { socketio as notesSocketio, router as notes } from './routes/notes'; Uncomment that line of code in app.mjs because we've now implemented the function we said we'd get to later:
indexSocketio(io);
notesSocketio(io);
This sets up the Notes application to send noteupdate and notedestroy messages when notes are updated or destroyed. The destination is the /view namespace. We'll need to make a corresponding modification to the note view template so it does the right thing. This means any browser viewing any note in the application will connect to this namespace. Every such browser will receive events about any note being changed, even those notes that are not being viewed. This means that the client code will have to check the key, and only take action if the event refers to the note being displayed.
As we did earlier, in order to make these events visible to the user, we must not only add client code to the template, views/noteview.hbs; we need a couple of small changes to the template:
<div class="container-fluid">
<div class="row"><div class="col-xs-12">
{{#if note}}<h3 id="notetitle">{{ note.title }}</h3>{{/if}}
{{#if note}}<div id="notebody">{{ note.body }}</div>{{/if}}
<p>Key: {{ notekey }}</p>
</div></div>
{{#if user }}
{{#if notekey }}
<div class="row"><div class="col-xs-12">
<div class="btn-group">
<a class="btn btn-outline-dark"
href="/notes/destroy?key={{notekey}}"
role="button">Delete</a>
<a cl e template, views/noteview.hb
ass="btn btn-outline-dark"
href="/notes/edit?key={{notekey}}"
role="button">Edit</a>
</div>
</div></div>
{{/if}}
{{/if}}
</div>
{{> footerjs}}
{{#if notekey }}
<script src="/socket.io/socket.io.js"></script>
<script>
$(document).ready(function () {
io('/view').on('noteupdate', function(note) {
if (note.key === "{{ notekey }}") {
$('h3#notetitle').empty();
$('h3#notetitle').text(note.title);
$('#notebody').empty();
$('#notebody').text(note.body);
}
});
io('/view').on('notedestroy', function(data) {
if (data.key === "{{ notekey }}") {
window.location.href = "/";
}
});
});
</script>
{{/if}}
We connect to the /view namespace where the messages are sent. As noteupdate or notedestroy messages arrive, we check the key to see whether it matches the key for the note being displayed.
A technique is used here that's important to understand. We have mixed JavaScript executed on the server, with JavaScript executed in the browser. We must compare the notekey received by the client code against the notekey for the note being viewed by this page. The latter notekey value is known on the server, while the former is known in the client.
Remember that code within the {{ .. }} delimiters is interpreted by the Handlebars template engine on the server. Consider the following:
if (note.key === "{{ notekey }}") {
..
}
This comparison is between the notekey value in the browser, which arrived inside the message from the server, and the notekey variable on the server. That variable contains the key of the note being displayed. Therefore, in this case, we are able to ensure these code snippets are executed only for the note being shown on the screen.
For the noteupdate event, we take the new note content and display it on the screen. For this to work, we had to add id= attributes to the HTML so we could use jQuery selectors in manipulating the DOM.
For the notedestroy event, we simply redirect the browser window back to the home page. The note being viewed has been deleted, and there's no point the user continuing to look at a note that no longer exists.
At this point, you can now rerun the Notes application and try this out.
Launch the user authentication server and the Notes application as before. Then, in the browser, open multiple windows on the Notes application. This time, have one viewing the home page, and two viewing a note. In one of those windows, edit the note to make a change, and see the text change on both the home page and the page viewing the note.
Then delete the note, and watch it disappear from the home page, and the browser window that had viewed the note is now on the home page.
This is cool! We now have real-time updates in Notes as we edit delete or create notes. Let's now take it to the next level and implement something akin to inter-user chatting.
It's possible to pivot our Notes application concept and take it in the direction of a social network. In the majority of such networks, users post things (notes, pictures, videos, and so on), and other users comment on those things. Done well, these basic elements can develop a large community of people sharing notes with each other. While the Notes application is kind of a toy, it's not too terribly far from being a basic social network. Commenting the way we will do now is a tiny step in that direction.
On each note page, we'll have an area to display messages from Notes users. Each message will show the username, a timestamp, and their message. We'll also need a method for users to post a message, and we'll also allow users to delete messages.
Each of those operations will be performed without refreshing the screen. Instead, code running inside the web page will send commands to/from the server and take actions dynamically.
Let's get started.
We need to start by implementing a data model for storing messages. The basic fields required are a unique ID, the username of the person sending the message, the namespace the message is sent to, their message, and finally a timestamp for when the message was sent. As messages are received or deleted, events must be emitted from the model so we can do the right thing on the web page.
This model implementation will be written for Sequelize. If you prefer a different storage solution, you can , by all means, re-implement the same API on other data storage systems.
Create a new file, models/messages-sequelize.mjs, containing the following:
import Sequelize from 'sequelize';
import jsyaml from 'js-yaml';
import fs from 'fs-extra';
import util from 'util';
import EventEmitter from 'events';
class MessagesEmitter extends EventEmitter {}
import DBG from 'debug';
const debug = DBG('notes:model-messages');
const error = DBG('notes:error-messages');
var SQMessage;
var sequlz;
export const emitter = new MessagesEmitter();
This sets up the modules being used and also initializes the EventEmitter interface. We're also exporting the EventEmitter as emitter so other modules can use it:
async function connectDB() {
if (typeof sequlz === 'undefined') {
const yamltext = await
fs.readFile(process.env.SEQUELIZE_CONNECT, 'utf8');
const params = jsyaml.safeLoad(yamltext, 'utf8');
sequlz = new Sequelize(params.dbname,
params.username, params.password, params.params);
}
if (SQMessage) return SQMessage.sync();
SQMessage = sequlz.define('Message', {
id: { type: Sequelize.INTEGER, autoIncrement: true, primaryKey:
true },
from: Sequelize.STRING,
namespace: Sequelize.STRING,
message: Sequelize.STRING(1024),
timestamp: Sequelize.DATE
});
return SQMessage.sync();
}
This defines our message schema in the database. We'll use the same database that we used for Notes, but the messages will be stored in their own table.
The id field won't be supplied by the caller; instead, it will be autogenerated. Because it is an autoIncrement field, each message that's added will be assigned a new id number by the database:
export async function postMessage(from, namespace, message) {
const SQMessage = await connectDB();
const newmsg = await SQMessage.create({
from, namespace, message, timestamp: new Date()
});
var toEmit = {
id: newmsg.id, from: newmsg.from,
namespace: newmsg.namespace, message: newmsg.message,
timestamp: newmsg.timestamp
};
emitter.emit('newmessage', toEmit);
}
This is to be called when a user posts a new comment/message. We first store it in the database, and then we emit an event saying the message was created:
export async function destroyMessage(id, namespace) {
const SQMessage = await connectDB();
const msg = await SQMessage.find({ where: { id } });
if (msg) {
msg.destroy();
emitter.emit('destroymessage', { id, namespace });
}
}
This is to be called when a user requests that a message should be deleted. With Sequelize, we must first find the message and then delete it by calling its destroy method. Once that's done, we emit a message saying the message was destroyed:
export async function recentMessages(namespace) {
const SQMessage = await connectDB();
const messages = SQMessage.findAll({
where: { namespace }, order: [ 'timestamp' ], limit: 20
});
return messages.map(message => {
return {
id: message.id, from: message.from,
namespace: message.namespace, message: message.message,
timestamp: message.timestamp
};
});
}
While this is meant to be called when viewing a note, it is generalized to work for any Socket.IO namespace. It finds the most recent 20 messages associated with the given namespace and returns a cleaned-up list to the caller.
Now that we can store messages in the database, let's integrate this into the Notes router module.
In routes/notes.mjs, add this to the import statements:
import * as messages from '../models/messages-sequelize';
If you wish to implement a different data storage model for messages, you'll need to change this import statement. You should consider using an environment variable to specify the module name, as we've done elsewhere:
// Save incoming message to message pool, then broadcast it
router.post('/make-comment', ensureAuthenticated, async (req, res, next) => {
try {
await messages.postMessage(req.body.from,
req.body.namespace, req.body.message);
res.status(200).json({ });
} catch(err) {
res.status(500).end(err.stack);
}
});
// Delete the indicated message
router.post('/del-message', ensureAuthenticated, async (req, res, next) => {
try {
await messages.destroyMessage(req.body.id, req.body.namespace);
res.status(200).json({ });
} catch(err) {
res.status(500).end(err.stack);
}
});
This pair of routes, /notes/make-comment and /notes/del-message, is used to post a new comment or delete an existing one. Each calls the corresponding data model function and then sends an appropriate response back to the caller.
Remember that postMessage stores a message in the database, and then it turns around and emits that message to other browsers. Likewise, destroyMessage deletes the message from the database, then emits a message to other browsers saying that the message has been deleted. Finally, the results from recentMessages will reflect the current set of messages in the database.
Both of these will be called by AJAX code in the browser:
module.exports.socketio = function(io) {
io.of('/view').on('connection', function(socket) {
// 'cb' is a function sent from the browser, to which we
// send the messages for the named note.
socket.on('getnotemessages', (namespace, cb) => {
messages.recentMessages(namespace).then(cb)
.catch(err => console.error(err.stack));
});
});
messages.emitter.on('newmessage', newmsg => {
io.of('/view').emit('newmessage', newmsg);
});
messages.emitter.on('destroymessage', data => {
io.of('/view').emit('destroymessage', data);
});
..
};
This is the Socket.IO glue code, which we will add to the code we looked at earlier.
The getnotemessages message from the browser requests the list of messages for the given Note. This calls the recentMessages function in the model. This uses a feature of Socket.IO where the client can pass a callback function, and server-side Socket.IO code can invoke that callback, giving it some data.
We also listen to the newmessage and destroymessage messages emitted by the messages model, sending corresponding messages to the browser. These are sent using the method described earlier.
We need to dive back into views/noteview.hbs with more changes so that we can view, create, and delete messages. This time, we will add a lot of code, including using a Bootstrap modal popup to get the message, several AJAX calls to communicate with the server, and, of course, more Socket.IO stuff.
The Bootstrap framework has a Modal component that serves a similar purpose to Modal dialogs in desktop applications. You pop up the Modal, it prevents interaction with other parts of the web page, you enter stuff into fields in the Modal, and then click a button to make it close.
This new segment of code replaces the existing segment defining the Edit and Delete buttons, in views/noteview.hbs:
{{#if user}}
{{#if notekey}}
<div class="row"><div class="col-xs-12">
<div class="btn-group">
<a class="btn btn-outline-dark" href="/notes/destroy?key=
{{notekey}}"
role="button">Delete</a>
<a class="btn btn-outline-dark" href="/notes/edit?key=
{{notekey}}"
role="button">Edit</a>
<button type="button" class="btn btn-outline-dark"
data-toggle="modal"
data-target="#notes-comment-modal">Comment</button>
</div>
</div></div>
<div id="noteMessages"></div>
{{/if}}
{{/if}}
This adds support for posting comments on a note. The user will see a Modal pop-up window in which they write their comment. We'll show the code for the Modal later.
We added a new button labeled Comment that the user will click to start the process of posting a message. This button is connected to the Modal by way of the element ID specified in the data-target attribute. The ID will match the outermost div wrapping the Modal. This structure of div elements and class names are from the Bootstrap website at http://getbootstrap.com/docs/4.0/components/modal/.
Let's add the code for the Modal at the bottom of views/noteview.hbs.
{{> footerjs}}
{{#if notekey}}
{{#if user}}
<div class="modal fade" id="notes-comment-modal" tabindex="-1"
role="dialog" aria-labelledby="noteCommentModalLabel" aria-hidden="true">
<div class="modal-dialog modal-dialog-centered" role="document">
<div class="modal-content">
<div class="modal-header">
<button type="button" class="close" data-dismiss="modal" aria-
label="Close">
<span aria-hidden="true">×</span>
</button>
<h4 class="modal-title" id="noteCommentModalLabel">Leave a
Comment</h4>
</div>
<div class="modal-body">
<form method="POST" id="submit-comment" class="well" data-async
data-target="#rating-modal" action="/notes/make-comment">
<input type="hidden" name="from" value="{{ user.id }}">
<input type="hidden" name="namespace" value="/view-
{{notekey}}">
<input type="hidden" name="key" value="{{notekey}}">
<fieldset>
<div class="form-group">
<label for="noteCommentTextArea">
Your Excellent Thoughts, Please</label>
<textarea id="noteCommentTextArea" name="message"
class="form-control" rows="3"></textarea>
</div>
<div class="form-group">
<div class="col-sm-offset-2 col-sm-10">
<button id="submitNewComment" type="submit" class="btn
btn-default">
Make Comment</button>
</div>
</div>
</fieldset>
</form>
</div>
</div>
</div>
</div>
{{/if}}
{{/if}}
The key portion of this is the HTML form contained within the div.modal-body element. It's a straightforward, normal Bootstrap, augmented form with a normal Submit button at the bottom. A few hidden input elements are used to pass extra information inside the request.
With the HTML set up this way, Bootstrap will ensure that this Modal is triggered when the user clicks on the Comment button. The user can close the Modal by clicking on the Close button. Otherwise, it's up to us to implement code to handle the form submission using AJAX so that it doesn't cause the page to reload.
Note that these code snippets are wrapped with {{#if}} statements, so that certain user interface elements are displayed only to sufficiently privileged users. A user that isn't logged in certainly shouldn't be able to post a message.
Now we have a lot of Socket.IO code to add:
{{#if notekey}}
{{#if user}}
<script>
$(document).ready(function () { ... });
{{/if}}
{{/if}}
There's another code section to handle the noteupdate and notedestroy messages. This new section has to do with messages that manage the comments.
We need to handle the form submission for posting a new comment, get the recent messages when first viewing a note, listen for events from the server about new messages or deleted messages, render the messages on the screen, and handle requests to delete a message:
$(document).ready(function () {
io('/view').emit('getnotemessages', '/view-{{notekey}}', function(msgs) {
$('#noteMessages').empty();
if (msgs.length > 0) {
msgs.forEach(function(newmsg) {
$('#noteMessages').append(formatMessage(newmsg));
});
$('#noteMessages').show();
connectMsgDelButton();
} else $('#noteMessages').hide();
});
var connectMsgDelButton = function() {
$('.message-del-button').on('click', function(event) {
$.post('/notes/del-message', {
id: $(this).data("id"),
namespace: $(this).data("namespace")
},
function(response) { });
event.preventDefault();
});
};
var formatMessage = function(newmsg) {
return '<div id="note-message-'+ newmsg.id +'" class="card">'
+'<div class="card-body">'
+'<h5 class="card-title">'+ newmsg.from +'</h5>'
+'<div class="card-text">'+ newmsg.message
+' <small style="display: block">'+ newmsg.timestamp
+'</small></div>'
+' <button type="button" class="btn btn-primary message-
del-button" data-id="'
+ newmsg.id +'" data-namespace="'+ newmsg.namespace +'">'
+'Delete</button>'
+'</div>'
+'</div>';
};
io('/view').on('newmessage', function(newmsg) {
if (newmsg.namespace === '/view-{{notekey}}') {
$('#noteMessages').prepend(formatMessage(newmsg));
connectMsgDelButton();
}
});
io('/view').on('destroymessage', function(data) {
if (data.namespace === '/view-{{notekey}}') {
$('#noteMessages #note-message-'+ data.id).remove();
}
});
$('form#submit-comment').submit(function(event) {
// Abort any pending request
if (request) { request.abort(); }
var $form = $('form#submit-comment');
var $target = $($form.attr('data-target'));
var request = $.ajax({
type: $form.attr('method'),
url: $form.attr('action'),
data: $form.serialize()
});
request.done(function (response, textStatus, jqXHR) { });
request.fail(function (jqXHR, textStatus, errorThrown) {
alert("ERROR "+ jqXHR.responseText);
});
request.always(function () {
// Reenable the inputs
$('#notes-comment-modal').modal('hide');
});
event.preventDefault();
});
});
The code within $('form#submit-comment').submit handles the form submission for the comment form. Because we already have jQuery available, we can use its AJAX support to POST a request to the server without causing a page reload.
Using event.preventDefault, we ensure that the default action does not occur. For the FORM submission, that means the browser page does not reload. What happens is an HTTP POST is sent to /notes/make-comment with a data payload consisting of the values of the form's input elements. Included in those values are three hidden inputs, from, namespace, and key, providing useful identification data.
If you refer to the /notes/make-comment route definition, this calls messagesModel.postMessage to store the message in the database. That function then posts an event, newmessage, which our server-side code forwards to any browser that's connected to the namespace. Shortly after that, a newmessage event will arrive in browsers.
The newmessage event adds a message block, using the formatMessage function. The HTML for the message is prepended to #noteMessages.
When the page is first loaded, we want to retrieve the current messages. This is kicked off with io('/view').emit('getnotemessages', ... This function, as the name implies, sends a getnotemessages message to the server. We showed the implementation of the server-side handler for this message earlier, in routes/notes.mjs.
If you remember, we said that Socket.IO supports the provision of a callback function that is called by the server in response to an event. You simply pass a function as the last parameter to a .emit call. That function is made available at the other end of the communication, to be called when appropriate. To make this clear, we have a callback function on the browser being invoked by server-side code.
In this case, the server-side calls our callback function with a list of messages. The message list arrives in the client-side callback function, which displays them in the #noteMessages area. It uses jQuery DOM manipulation to erase any existing messages, then renders each message into the messages area using the formatMessage function.
The message display template, in formatMessage, is straightforward. It uses a Bootstrap card to give a nice visual effect. And, there is a button for deleting messages.
In formatMessage we created a Delete button for each message. Those buttons need an event handler, and the event handler is set up using the connectMsgDelButton function. In this case, we send an HTTP POST request to /notes/del-message. We again use the jQuery AJAX support to post that HTTP request.
The /notes/del-message route in turn calls messagesModel.destroyMessage to do the deed. That function then emits an event, destroymessage, which gets sent back to the browser. As you see here, the destroymessage event handler causes the corresponding message to be removed using jQuery DOM manipulation. We were careful to add an id= attribute to every message to make removal easy.
Since the flip side of destruction is creation, we need to have the newmessage event handler sitting next to the destroymessage event handler. It also uses jQuery DOM manipulation to insert the new message into the #noteMessages area.
That was a lot of code, but we now have the ability to compose messages, display them on the screen, and delete them, all with no page reloads.
You can run the application as we did earlier, first starting the user authentication server in one command-line window and the Notes application in another:
While entering a message, the Modal looks like this:
Try this with multiple browser windows viewing the same note or different notes. This way, you can verify that notes show up only on the corresponding note window.
We used a Modal and some AJAX code to avoid one page reload due to a form submission. In the Notes application, as it stands, a similar technique could be used when creating a new note, editing existing notes, and deleting existing notes. In each case, we would use a Modal, some AJAX code to handle the form submission, and some jQuery code to update the page without causing a reload.
But wait, that's not all. Consider the sort of dynamic real-time user interface wizardry on the popular social networks. Imagine what events and/or AJAX calls are required.
When you click on an image in Twitter, it pops up, you guessed it, a Modal window to show a larger version of the image. The Twitter Compose new Tweet window is also a Modal window. Facebook uses many different Modal windows, such as when sharing a post, reporting a spam post, or while doing a lot of other things Facebook's designers deem to require a pop-up window.
Socket.IO, as we've seen, gives us a rich foundation of events passing between server and client that can build multiuser, multichannel communication experiences for your users.
While we came a long way in this chapter, maybe Facebook doesn't have anything to fear from the baby steps we took toward converting the Notes application into a social network. This chapter gave us the opportunity to explore some really cool technology for pseudo real-time communication between browser sessions.
Look up the technical definition for the phrase real time and you'll see the real-time web is not truly real time. The actual meaning of real time involves software with strict time boundaries that must respond to events within a specified time constraint. Real-time software is typically used in embedded systems to respond to button presses, for applications as diverse as junk food dispensers and medical devices in intensive care units. Eat too much junk food and you could end up in intensive care, and be served by real-time software in both cases. Try and remember the distinction between different meanings for this phrase.
In this chapter, you learned about using Socket.IO for pseudo real-time web experiences, using the EventEmitter class to send messages between parts of an application, jQuery, AJAX, and other browser-side JavaScript technologies, while avoiding page reloads while making AJAX calls.
In the next chapter, we will look into Node.js application deployment on real servers. Running code on our laptop is cool, but to hit the big time, the application needs to be properly deployed.
Now that the Notes application is fairly complete, it's time to think about how to deploy it to a real server. We've created a minimal implementation of the collaborative note concept that works fairly well. To grow, Notes must escape our laptop and live on a real server. The goal is to look at deployment methods for Node.js applications.
In this chapter, we will cover the following topics:
The first task is to duplicate the source code from the previous chapter. It's suggested you create a new directory, chap10, as a sibling of the chap09 directory, and copy everything from chap09 to chap10.
Before we get into deploying the Notes application, we need to review its architecture. To deploy the Notes application, we must understand what we're planning to do.
We have segmented the services into two groups, as shown in the following diagram:
The user authentication server should be the more secure portion of the system. On our laptop, we weren't able to create the envisioned protective wall around that service, but we're about to implement such protection.
One strategy to enhance security is to expose as few ports as possible. That reduces the so-called attack surface, simplifying our work in hardening the application against security bugs. With the Notes application, we have exactly one port to expose, the HTTP service through which users access the application. The other ports, the two for MySQL servers and the user authentication service port, should be hidden.
Internally, the Notes application needs to access both the Notes database and the user authentication service. That service, in turn, needs to access the user authentication database. As currently envisaged, no service outside the Notes application requires access to either database or to the authentication service.
Implementation of this segmentation requires either two or three subnets, depending on the lengths you wish to go to. The first, FrontNet, contains the Notes application and its database. The second, AuthNet, contains the authentication service and its database. A third possible subnet would contain the Notes and authentication services. The subnet configuration must limit the hosts with access to the subnet, and create a security wall between subnets.
Traditional Linux/Unix server application deployment uses an init script to manage background processes. They are to start every time the system boots and cleanly shut down when the system is halted. While it's a simple model, the specifics of this vary widely from one operating system (OS) to another.
A common method is for the init process to manage background processes using shell scripts in the /etc/init.d directory. Other OSes use other process managers, such as upstart or launchd.
The Node.js project itself does not include any scripts to manage server processes on any OS. Node.js is more like a construction kit, with the pieces and parts to build servers, and is not a complete polished server framework itself. Implementing a complete web service based on Node.js means creating the scripting to integrate with process management on your OS. It's up to us to develop those scripts.
Web services have to be:
To demonstrate what's involved, let's use PM2 to implement background server process management for Notes. PM2 detects the system type and can automatically integrate itself with the process management system. It will create an LSB-style init script (http://wiki.debian.org/LSBInitScripts), or other scripts, as required by the process management system on your server.
For this deployment, we'll set up a single Ubuntu 17.10 server. You should provision a Virtual Private Server (VPS) from a hosting provider and do all installation and configuration there. Renting a small machine instance from one of the major providers for the time needed to go through this chapter will only cost a couple of dollars.
You can also do the tasks in this section using VirtualBox on your laptop. Simply install Debian or Ubuntu as a virtual machine in VirtualBox, then follow the instructions in this section. It won't be quite the same as using a remote VPS hosting provider, but does not require renting a server.
Both the Notes and user authentication services will be on that server, along with a single MySQL instance. While our goal is a strong separation between FrontNet and AuthNet, with two MySQL instances, we won't do so at this time.
The Linux package management system doesn't allow us to install two MySQL instances. Instead, we implement separation in the same MySQL instance by using separate databases with different usernames and access privileges for each database.
The first step is to ensure that MySQL is installed on your server. For Ubuntu, DigitalOcean has a fairly good tutorial: https://www.digitalocean.com/community/tutorials/how-to-install-mysql-on-ubuntu-14-04. While the Ubuntu version for that tutorial is old, the instructions are still accurate enough.
The MySQL server must support TCP connections from localhost. Edit the configuration file, /etc/mysql/my.cnf, to have the following line:
bind-address = 127.0.0.1
This limits MySQL server connections to the processes on the server. A miscreant would have to break into the server to access your database. Now that our database server is available, let's set up two databases.
In the chap10/notes/models directory, create a file named mysql-create-db.sql containing the following:
CREATE DATABASE notes; CREATE USER 'notes'@'localhost' IDENTIFIED BY 'notes'; GRANT ALL PRIVILEGES ON notes.* TO 'notes'@'localhost' WITH GRANT OPTION;
In the chap10/users directory, create a file named mysql-create-db.sql containing the following:
CREATE DATABASE userauth; CREATE USER 'userauth'@'localhost' IDENTIFIED BY 'userauth'; GRANT ALL PRIVILEGES ON userauth.* TO 'userauth'@'localhost' WITH GRANT OPTION;
We can't run those scripts on the server, because the Notes application has not yet been copied to the server. When that's accomplished, we'll run the scripts as:
$ mysql -u root -p <chap10/users/mysql-create-db.sql $ mysql -u root -p <chap10/notes/models/mysql-create-db.sql
This will create the two databases, notes and userauth, with associated usernames and passwords. Each user can access only their associated database. Later, we'll set up Notes and the user authentication service with YAML configuration files to access these databases.
According to the Node.js documentation (https://nodejs.org/en/download/package-manager/), the recommended installation method for Debian or Ubuntu Linux distributions is the following:
$ curl -sL https://deb.nodesource.com/setup_10.x | sudo -E bash -
$ sudo apt-get update $ sudo apt-get install -y nodejs build-essential
We've seen this before, so substitute the Node.js desired version number in the URL. Installing this way means that as new Node.js releases are issued, upgrades are easily accomplished with the normal package management procedures.
Before copying the Notes and user authentication code to this server, let's do a little coding to prepare for the move. We know that the Notes and authentication services must access the MySQL instance on localhost using the usernames and passwords given earlier.
Using the approach we've followed so far, this means a pair of YAML files for Sequelize parameters, and changing environment variables in the package.json files to match.
Create a chap10/notes/models/sequelize-server-mysql.yaml file containing:
dbname: notes
username: notes
password: notes12345
params:
host: localhost
port: 3306
dialect: mysql
It was discovered during testing that a simple password such as notes was not acceptable to the MySQL server, and that a longer password was required. In chap10/notes/package.json, add the following line to the scripts section:
"on-server": "SEQUELIZE_CONNECT=models/sequelize-server-mysql.yaml NOTES_MODEL=sequelize USER_SERVICE_URL=http://localhost:3333 PORT=3000 node --experimental-modules ./app",
Then create a chap10/users/sequelize-server-mysql.yaml file containing the following code the following code:
dbname: userauth
username: userauth
password: userauth
params:
host: localhost
port: 3306
dialect: mysql
The passwords shown in these configuration files obviously will not pass any security audits.
In chap10/users/package.json, add the following line to the scripts section:
"on-server": "PORT=3333 SEQUELIZE_CONNECT=sequelize-server-mysql.yaml node --experimental-modules ./user-server",
This configures the authentication service to access the databases just created.
Now we need to select a place on the server to install the application code:
# ls /opt
This empty directory looks to be as good a place as any. Simply upload chap10/notes and chap10/users to your preferred location. Before uploading, remove the node_modules directory in both directories.
That's both to save time on the upload, and because of the simple fact that any native-code modules installed on your laptop will be incompatible with the server.
On your laptop, you might run a command like this:
$ rsync --archive --verbose ./ root@159.89.145.190:/opt/
Use the actual IP address or domain name assigned to the server being used.
You should end up with something like the following:
# ls /opt notes users
Then, in each directory, run these commands:
# rm -rf node_modules # npm install
The simplest way of doing this is to just delete the whole node_modules directory and then let npm install do its job. Remember that we set up the PATH environment variable the following way:
# export PATH=./node_modules/.bin:${PATH}
You can place this in the login script (.bashrc, .cshrc, and so on) on your server so it's automatically enabled.
Finally, you can now run the SQL scripts written earlier to set up the database instances:
# mysql -u root -p <users/mysql-create-db.sql # mysql -u root -p <notes/models/mysql-create-db.sql
Then you should be able to start up the services by hand to check that everything is working correctly. The MySQL instance has already been tested, so we just need to start the user authentication and Notes services:
# cd /opt/users # DEBUG=users:* npm run on-server
> user-auth-server@0.0.1 on-server /opt/users
> PORT=3333 SEQUELIZE_CONNECT=sequelize-server-mysql.yaml node --experimental-modules ./user-server
(node:9844) ExperimentalWarning: The ESM module loader is experimental.
Then log in to the server on another Terminal session and run the following:
# cd /opt/users/ # PORT=3333 node users-add.js
Created { id: 1, username: 'me', password: 'w0rd', provider: 'local',
familyName: 'Einarrsdottir', givenName: 'Ashildr', middleName: '',
emails: '[]', photos: '[]',
updatedAt: '2018-02-02T00:43:16.923Z', createdAt: '2018-02-02T00:43:16.923Z' } # PORT=3333 node users-list.js
List [ { id: 'me', username: 'me', provider: 'local',
familyName: 'Einarrsdottir', givenName: 'Ashildr', middleName: '',
emails: '[]', photos: '[]' } ]
The preceding command both tests that the backend user authentication service is functioning and gives us a user account we can use to log in. The users-list command demonstrates that it works.
You may get an error:
users:error /create-user Error: Please install mysql2 package manually
This is generated inside of Sequelize. The mysql2 driver is an alternate MySQL driver, implemented in pure JavaScript, and includes support for returning Promises for smooth usage in async functions. If you do get this message, go ahead and install the package and remember to add this dependency to your package.json.
Now we can start the Notes service:
# cd ../notes # npm run on-server
> notes@0.0.0 on-server /opt/notes
> SEQUELIZE_CONNECT=models/sequelize-server-mysql.yaml NOTES_MODEL=sequelize USER_SERVICE_URL=http://localhost:3333 PORT=3000 node --experimental-modules ./app
(node:9932) ExperimentalWarning: The ESM module loader is experimental.
Then we can use our web browser to connect to the application. Since you probably do not have a domain name associated with this server, Notes can be accessed via the IP address of the server, such as http://159.89.145.190:3000/.
By now, you know that the drill for verifying Notes is working. Create a few notes, open a few browser windows, see that real-time notifications work, and so on. Once you're satisfied that Notes is working on the server, kill the processes and move on to the next section, where we'll set this up to run when the server starts.
The Twitter application we set up for Notes previously won't work because the authentication URL is incorrect for the server. For now, we can log in using the user profile created previously. If you want to see OAuth work with Twitter, go to apps.twitter.com and reconfigure the application to use the IP address of your server.
By hosting somewhere other than our laptop, the Twitter callbackURL must point to the correct location. The default value was http://localhost:3000 for use on our laptop. But we now need to use the IP address for the server. In notes/package.json, add the following environment variable to the on-server script:
TWITTER_CALLBACK_HOST=http://159.89.145.190:3000
Use the actual IP address or domain name assigned to the server being used. In a real deployment, we'll have a domain name to use here.
There are many ways to manage server processes, to ensure restarts if the process crashes, and so on. We'll use PM2 (http://pm2.keymetrics.io/) because it's optimized for Node.js processes. It bundles process management and monitoring into one application.
Let's create a directory, init, in which to use PM2. The PM2 website suggests you install the tool globally but, as students of the Twelve Factor Application model, we recognize it's best to use explicitly declared dependencies and avoid global unmanaged dependencies.
Create a package.json file containing:
{
"name": "pm2deploy",
"version": "1.0.0",
"scripts": {
"start": "pm2 start ecosystem.json",
"stop": "pm2 stop ecosystem.json",
"restart": "pm2 restart ecosystem.json",
"status": "pm2 status",
"save": "pm2 save",
"startup": "pm2 startup"
},
"dependencies": {
"pm2": "^2.9.3"
}
}
Install PM2 using npm install as usual.
In normal PM2 usage, we launch scripts with pm2 start script-name.js. We could make an /etc/init script which does that, but PM2 also supports a file named ecosystem.json that can be used to manage a cluster of processes. We have two processes to manage together, the user-facing Notes application, and the user authentication service on the back end.
Create a file named ecosystem.json containing the following:
{
"apps" : [
{
"name": "User Authentication",
"script": "user-server.mjs",
"cwd": "/opt/users",
"node_args": "--experimental-modules",
"env": {
"PORT": "3333",
"SEQUELIZE_CONNECT": "sequelize-server-mysql.yaml"
},
"env_production": { "NODE_ENV": "production" }
},
{
"name": "Notes",
"script": "app.mjs",
"cwd": "/opt/notes",
"node_args": "--experimental-modules",
"env": {
"PORT": "3000",
"SEQUELIZE_CONNECT": "models/sequelize-server-mysql.yaml",
"NOTES_MODEL": "sequelize",
"USER_SERVICE_URL": "http://localhost:3333",
"TWITTER_CONSUMER_KEY": "..",
"TWITTER_CONSUMER_SECRET": "..",
"TWITTER_CALLBACK_HOST": "http://45.55.37.74:3000"
},
"env_production": { "NODE_ENV": "production" }
}
]
}
This file describes the directories containing both services, the script to run each service, the command-line options, and the environment variables to use. It's the same information that is in the package.json scripts, but spelled out more clearly. Adjust TWITTER_CALLBACK_HOST for the IP address of the server. For documentation, see http://pm2.keymetrics.io/docs/usage/application-declaration/.
We then start the services with npm run start, which looks like the following on the screen:
You can again navigate your browser to the URL for your server, such as http://159.89.145.190:3000, and check that Notes is working. Once started, some useful commands are as follows:
# pm2 list # pm2 describe 1 # pm2 logs 1
These commands let you query the status of the services.
The pm2 monit command gives you a pseudo-graphical monitor of system activity. For documentation, see http://pm2.keymetrics.io/docs/usage/monitoring/.
The pm2 logs command addresses the application log management issue we raised elsewhere. Activity logs should be treated as an event stream, and should be captured and managed appropriately. With PM2, the output is automatically captured, can be viewed, and the log files can be rotated and purged. See http://pm2.keymetrics.io/docs/usage/log-management/ for documentation.
If we restart the server, these processes don't start with the server. How do we handle that? It's very simple because PM2 can generate an init script for us:
# pm2 save
[PM2] Saving current process list...
[PM2] Successfully saved in /root/.pm2/dump.pm2
# pm2 startup
[PM2] Init System found: systemd
Platform systemd
Template
[Unit]
Description=PM2 process manager
Documentation=https://pm2.keymetrics.io/
After=network.target
... more output is printed
The pm2 save command saves the current state. Whatever services are running at that time will be saved and managed by the generated start up script.
The next step is to generate the startup script, using the pm startup command. PM2 supports generating start up scripts on several OSes, but when run this way, it autodetects the system type and generates the correct start up script. It also installs the start up script, and starts it running. See the documentation at http://pm2.keymetrics.io/docs/usage/startup/ for more information.
If you look closely at the output, some useful commands will be printed. The details will vary based on your operating system, because each operating system has its own commands for managing background processes. In this case, the installation is geared to use the systemctl command, as verified by this output:
Command list
[ 'systemctl enable pm2-root',
'systemctl start pm2-root',
'systemctl daemon-reload',
'systemctl status pm2-root' ]
[PM2] Writing init configuration in /etc/systemd/system/pm2-root.service
[PM2] Making script booting at startup...
...
[DONE]
>>> Executing systemctl start pm2-root
[DONE]
>>> Executing systemctl daemon-reload
[DONE]
>>> Executing systemctl status pm2-root
You are free to run these commands yourself:
# systemctl status pm2-root
● pm2-root.service - PM2 process manager
Loaded: loaded (/etc/systemd/system/pm2-root.service; enabled; vendor preset: enabled)
Active: active (running) since Fri 2018-02-02 22:27:45 UTC; 29min ago
Docs: https://pm2.keymetrics.io/
Process: 738 ExecStart=/opt/init/node_modules/pm2/bin/pm2 resurrect (code=exited, status=0/SUCCESS)
Main PID: 873 (PM2 v2.9.3: God)
Tasks: 30 (limit: 4915)
Memory: 171.6M
CPU: 11.528s
CGroup: /system.slice/pm2-root.service
├─873 PM2 v2.9.3: God Daemon (/root/.pm2)
├─895 node /opt/users/user-server.mjs
└─904 node /opt/notes/app.mjs
To verify that PM2 starts the services as advertised, reboot your server, then use PM2 to check the status:
The first thing to notice is that upon initially logging in to the root account, the pm2 status command is not available. We installed PM2 locally to /opt/init, and the command is only available in that directory.
After going to that directory, we can now run the command and see the status. Remember to set the correct IP address or domain name in the TWITTER_CALLBACK_HOST environment variable. Otherwise, logging in with Twitter will fail.
We now have the Notes application under a fairly good management system. We can easily update its code on the server and restart the service. If the service crashes, PM2 will automatically restart it. Log files are automatically kept for our perusal.
PM2 also supports deployment from the source on our laptop, which we can push to staging or production environments. To support this, we must add deployment information to the ecosystem.json file and then run the pm2 deploy command to push the code to the server. See the PM2 website for more information: http://pm2.keymetrics.io/docs/usage/deployment/.
While PM2 does a good job at managing server processes, the system we've developed is insufficient for an internet-scale service. What if the Notes application were to become a viral hit and suddenly we need to deploy a million servers spread around the planet? Deploying and maintaining servers one at a time, like this, is not scalable.
We also skipped over implementing the architectural decisions at the beginning. Putting the user authentication data on the same server is a security risk. We want to deploy that data on a different server, under tighter security.
In the next section, we'll explore a new system, Docker, that solves these problems and more.
Docker (http://docker.com) is the new attraction in the software industry. Interest is taking off like crazy, spawning many projects, often with names containing puns around shipping containers.
It is described as an open platform for distributed applications for developers and sysadmins. It is designed around Linux containerization technology and focuses on describing the configuration of software on any variant of Linux.
Docker automates the application deployment within software containers. The basic concepts of Linux containers date back to chroot jail's first implementation in the 1970s, and other systems such as Solaris Zones. The Docker implementation creates a layer of software isolation and virtualization based on Linux cgroups, kernel namespaces, and union-capable filesystems, which blend together to make Docker what it is. That was some heavy geek-speak, so let's try a simpler explanation.
A Docker container is a running instantiation of a Docker image. An image is a given Linux OS and application configuration designed by developers for whatever purpose they have in mind. Developers describe an image using a Dockerfile. The Dockerfile is a fairly simple-to-write script showing Docker how to build an image. Docker images are designed to be copied to any server, where the image is instantiated as a Docker container.
A running container will make you feel like you're inside a virtual server running on a virtual machine. But Docker containerization is very different from a virtual machine system such as VirtualBox. The processes running inside the container are actually running on the host OS. The containerization technology (cgroups, kernel namespaces, and so on) create the illusion of running on the Linux variant specified in the Dockerfile, even if the host OS is completely different. Your host OS could be Ubuntu and the container OS could be Fedora or OpenSUSE; Docker makes it all work.
By contrast, with Virtual Machine software (VirtualBox, and VMWare, among others), you're using what feels like a real computer. There is a virtual BIOS and virtualized system hardware, and you must install a full-fledged guest OS. You must follow every ritual of computer ownership, including securing licenses if it's a closed source system such as Windows.
While Docker is primarily targeted at x86 flavors of Linux, it is available on several ARM-based OSes, as well as other processors. You can even run Docker on single-board computers, such as Raspberry Pis, for hardware-oriented Internet of Things projects. Operating systems such as Resin.IO are optimized to solely run Docker containers.
The Docker ecosystem contains many tools, and their number is quickly increasing. For our purposes, we'll be focusing on the following three specific tools:
With the Docker ecosystem, you can create a whole universe of subnets and services to implement your dream application. That universe can run on your laptop or be deployed to a globe-spanning network of cloud-hosting facilities around the world. The surface area through which miscreants can attack is strictly defined by the developer. A multicontainer application will even limit access so strongly between services that miscreants who do manage to break into a container will find it difficult to break out of the container.
Using Docker, we'll first design on our laptop the system shown in the previous diagram. Then we'll migrate that system to a Docker instance on a server.
The best place to learn how to install Docker on your laptop is the Docker documentation website. What we're looking for is the Docker Community Edition (CE). There is the Docker Enterprise Edition (EE), with more features and some opportunities to pay support fees:
Because Docker runs on Linux, it does not run natively on macOS or Windows. Installation on either OS requires installing Linux inside a virtual machine and then running Docker tools within that virtual Linux machine. The days when you had to handcraft that setup yourself are long gone. The Docker team has made this easy by developing easy-to-use Docker applications for Mac and Windows. The Docker for Windows and Docker for Mac bundles package the Docker tools and lightweight virtual machine software. The result is very lightweight, and the Docker containers can be left running in the background with little impact.
You may find references to Docker Toolbox as the method to install Docker on macOS. That application is long gone, and has been replaced by Docker for Windows and Docker for Mac.
To start Docker for Windows or Mac is very simple. You simply find and double-click on the application icon. It launches as would any other native application. When started, it manages a virtual machine (not VirtualBox) within which is a Linux instance running the Docker Engine. On macOS, a menu bar icon shows up with which you control Docker.app, and on Windows, an icon is available in the system tray.
There are settings available so that Docker automatically launches every time you start your laptop.
On both, the CPU must support Virtualization. Bundled inside Docker for Windows and Docker for Mac is an ultra-lightweight hypervisor, which, in turn, requires virtualization support from the CPU.
For Windows, this may require BIOS configuration. See https://docs.docker.com/docker-for-windows/troubleshoot/#virtualization-must-be-enabled.
For Mac, this requires hardware from 2010 or newer, with Intel’s hardware support for memory management unit (MMU) virtualization, including Extended Page Tables (EPT) and Unrestricted Mode. You can check for this support by running sysctl kern.hv_support. It also requires macOS 10.11 or later.
With the setup accomplished, we can use the local Docker instance to create Docker containers, run a few commands, and, in general, learn how to use this amazing system.
As in so many software journeys, this one starts with saying Hello World:
$ docker run hello-world
Unable to find image 'hello-world:latest' locally
latest: Pulling from library/hello-world
ca4f61b1923c: Pull complete
Digest: sha256:66ef312bbac49c39a89aa9bcc3cb4f3c9e7de3788c944158df3ee0176d32b751
Status: Downloaded newer image for hello-world:latest
Hello from Docker!
This message shows that your installation appears to be working correctly.
To generate this message, Docker took the following steps:
1. The Docker client contacted the Docker daemon.
2. The Docker daemon pulled the "hello-world" image from the Docker Hub.
(amd64)
3. The Docker daemon created a new container from that image which runs the
executable that produces the output you are currently reading.
4. The Docker daemon streamed that output to the Docker client, which sent it
to your terminal.
To try something more ambitious, you can run an Ubuntu container with:
$ docker run -it ubuntu bash
Share images, automate workflows, and more with a free Docker ID:
https://cloud.docker.com/
For more examples and ideas, visit:
https://docs.docker.com/engine/userguide/
The docker run command downloads a Docker image, named on the command line, initializes a Docker container from that image, and then runs that container. In this case, the image, named hello-world, was not present on the local computer and had to be downloaded and initialized. Once that was done, the hello-world container was executed and it printed out these instructions.
You can query your computer to see that while the hello-world container has executed and finished, it still exists:
The docker ps command lists the running Docker containers. As we see here, the hello-world container is no longer running, but with the -a switch, docker ps also shows those containers that exist but are not currently running. We also see that this computer has a Nextcloud instance installed along with its associated database.
When you're done using a container, you can clean up with the following command:
$ docker rm boring_lumiere boring_lumiere
The name boring_lumiere is the container name automatically generated by Docker. While the image name was hello-world, that's not the container name. Docker generated the container name so you have a more user-friendly identifier for the containers than the hex ID shown in the container ID column. When creating a container, it's easy to specify any container name you like.
With all that theory spinning around our heads, it's time to do something practical. Let's start by setting up the user authentication service. In the diagram shown earlier, this will be the box labeled AuthNet containing a MySQL instance and the authentication server.
To find publicly available Docker images, go to https://hub.docker.com/ and search. You'll find many Docker images ready to go. For example, Nextcloud, and its associated database, was shown earlier installed alongside the hello-world application when we kicked the tires. Both are available from their respective project teams and it's simply (more or less) a matter of typing docker run nextcloud to install and run the containers. The process of installing Nextcloud, and its associated database, as well as many other packaged applications, such as GitLab, is very similar to what we're about to do to build AuthNet, so the skills you're about to learn are very practical.
Just for MySQL, there are over 11,000 containers available. Fortunately, the two containers provided by the MySQL team are very popular and easy to use. The mysql/mysql-server image is a little easier to configure, so let's use that.
A Docker image name can be specified, along with a tag that is usually the software version number. In this case, we'll use mysql/mysql-server:5.7, where mysql/mysql-server is the container name, and 5.7 is the tag. MySQL 5.7 is the current GA release. Download the image as follows:
$ docker pull mysql/mysql-server:5.7
5.7: Pulling from mysql/mysql-server
4040fe120662: Pull complete
d049aa45d358: Pull complete
a6c7ed00840d: Pull complete
853789d8032e: Pull complete
Digest: sha256:1b4c7c24df07fa89cdb7fe1c2eb94fbd2c7bd84ac14bd1779e3dec79f75f37c5
Status: Downloaded newer image for mysql/mysql-server:5.7
This downloaded four images in total, because this image is built on top of three other images. We'll see later how that works when we learn how to build a Dockerfile.
A container can be started using this image as follows:
$ docker run --name=mysql --env MYSQL_ROOT_PASSWORD=f00bar mysql/mysql-server:5.7
[Entrypoint] MySQL Docker Image 5.7.21-1.1.4
[Entrypoint] Initializing database
[Entrypoint] Database initialized
...
[Entrypoint] ignoring /docker-entrypoint-initdb.d/*
[Entrypoint] Server shut down
[Entrypoint] MySQL init process done. Ready for start up.
[Entrypoint] Starting MySQL 5.7.21-1.1.4
We started this service in the foreground. The container name is mysql. We set an environment variable, which, in turn (according to the image documentation), initializes the root password as shown. In another window, we can get into the container and run the MySQL client as follows:
$ docker exec -it mysql mysql -u root -p
Enter password:
Welcome to the MySQL monitor. Commands end with ; or \g.
Your MySQL connection id is 4
Server version: 5.7.21 MySQL Community Server (GPL)
Copyright (c) 2000, 2018, Oracle and/or its affiliates. All rights reserved.
Oracle is a registered trademark of Oracle Corporation and/or its
affiliates. Other names may be trademarks of their respective
owners.
Type 'help;' or '\h' for help. Type '\c' to clear the current input statement.
mysql> show databases;
+--------------------+
| Database |
+--------------------+
| information_schema |
| mysql |
| performance_schema |
| sys |
+--------------------+
4 rows in set (0.00 sec)
mysql>
The docker exec command lets you run programs inside the container. The -it option says the command is run interactively, on an assigned terminal. Substitute bash for mysql, and you have an interactive bash command shell.
This mysql command instance is running inside the container. The container is configured by default to not expose any external port, and it has a default my.cnf file.
The database files are locked inside the container. As soon as that container is deleted, the database will go away. Docker containers are meant to be ephemeral, being created and destroyed as needed, while databases are meant to be permanent, with lifetimes measured in decades sometimes.
In other words, it's cool that we can easily install and launch a MySQL instance. But there are several deficiencies:
Before proceeding, let's clean up. In a Terminal window, type:
$ docker stop mysql
mysql
$ docker rm mysql
mysql
This closes out and cleans up the containers. And, to reiterate the point made earlier, the database in that container went away. If that database contained critical information, you just lost it with no chance to recover the data.
Docker supports creating virtual bridge networks between containers. Remember that a Docker container has many of the features of an installed Linux OS. Each container can have its own IP address(es) and exposed ports. Docker supports creating what amounts to being a virtual Ethernet segment, called a bridge network. These networks live solely within the host computer and, by default, are not reachable by anything outside the host computer.
A Docker bridge network, therefore, has strictly limited access. Any Docker container attached to a bridge network can communicate with other containers attached to that network. The containers find each other by hostname, and Docker includes an embedded DNS server to set up the hostnames required. That DNS server is configured to not require dots in domain names, meaning that the DNS/hostname of each container is simply the container name, rather than something such as container-name.service. This policy of using hostnames to identify containers is Docker's implementation of service discovery.
Create a directory named authnet as a sibling to the users and notes directories. We'll be working on AuthNet in that directory.
Create a file, buildauthnet.sh, containing the following:
docker network create --driver bridge authnet
Type the following:
$ sh -x buildauthnet.sh
+ docker network create --driver bridge authnet
3021e2069278c2acb08d94a2d31507a43f089db1c02eecc97792414b498eb785
This creates a Docker bridge network.
Executing scripts on Windows is different because it uses PowerShell rather than bash, and a large number of other considerations. For this, and the scripts which follow, make these changes.
Powershell script filenames must end with the .ps1 extension. For most of these scripts, that's all that is required because the scripts are so simple. To execute the script, simply type .\scriptname.ps1 in the Powershell window. In other words, on Windows, the script just shown must be named buildauthnet.ps1, and is executed as .\buildauthnet.ps1.
To execute the scripts, you may need to change the Powershell Execution Policy:
PS C:\Users\david\chap10\authnet> Get-ExecutionPolicy
Restricted
PS C:\Users\david\chap10\authnet> Set-ExecutionPolicy Unrestricted
Obviously, there are security considerations with this change, so change the Execution Policy back when you're done.
A simpler method on Windows is to simply paste these commands into a PowerShell window.
In the older days of Docker, we were told to link containers using the --link option. With that option, Docker would create entries in /etc/hosts so that one container can refer to another container by its hostname. That option also arranged access to TCP ports and volumes between linked containers. This allowed the creation of multicontainer services, using private TCP ports for communication that exposed nothing to processes outside the containers.
Today, we are told that the --link option is a legacy feature, and that instead we should use bridge networks. In this chapter, we'll focus solely on using bridge networks.
You can list the networks as follows:
$ docker network ls
NETWORK ID NAME DRIVER SCOPE
3021e2069278 authnet bridge local
Look at details about the network with this command:
$ docker network inspect authnet
... much JSON output
At the moment, this won't show any containers attached to authnet. The output shows the network name, the IP range of this network, the default gateway, and other useful network configuration information. Since nothing is connected to the network, let's get started with building the required containers.
Now that we have a network, we can start connecting containers to that network. And then we'll explore the containers to see how private they are.
Create a script, startdb.sh, containing:
docker run --name db-userauth --env MYSQL_RANDOM_ROOT_PASSWORD=true \
--env MYSQL_USER=userauth --env MYSQL_PASSWORD=userauth \
--env MYSQL_DATABASE=userauth \
--volume `pwd`/my.cnf:/etc/my.cnf \
--volume `pwd`/../userauth-data:/var/lib/mysql \
--network authnet mysql/mysql-server:5.7
On Windows, you will need to name the script startdb.ps1 instead, and put the text all on one line rather than extend the lines with backslashes. And, the volume mounted on /var/lib/mysql must be created separately. Use these commands instead:
docker volume create db-userauth-volume
docker run --name db-userauth --env MYSQL_RANDOM_ROOT_PASSWORD=true --env MYSQL_USER=userauth --env MYSQL_PASSWORD=userauth --env MYSQL_DATABASE=userauth --volume $PSScriptRoot\my.cnf:/etc/my.cnf --volume db-userauth-volume:/var/lib/mysql --network authnet mysql/mysql-server:5.7
When run, the container will be named db-userauth. To give a little bit of security, the root password has been randomized. We've instead defined a database named userauth, accessed by a user named userauth, using the password userauth. That's not exactly secure, so feel free to choose better names and passwords. The container is attached to the authnet network.
There are two --volume options that we must talk about. In Dockerese, a volume is a thing inside a container that can be mounted from outside the container. In this case, we're defining a volume, userauth-data, in the host filesystem to be mounted as /var/lib/mysql inside the container. And, we're defining a local my.cnf file to be used as /etc/my.cnf inside the container.
For the Windows version, we have two changes to the --volume mounts. We specify the mount for /etc/my.cnf as $PSScriptRoot\my.cnf:/etc/my.cnf, because that's how you reference a local file in Powershell.
For /var/lib/mysql, we referenced a separately created volume. The volume is created using the volume create command, and with that command there is no opportunity to control the location of the volume. It's important that the volume lives outside the container, so that the database files survive the destruction/creation cycle for this container.
Taken together, those settings mean the database files and the configuration file live outside the container and will therefore exist beyond the lifetime of one specific container. To get the my.cnf, you will have to run the container once without the --volume `pwd`/my.cnf:/etc/my.cnf option so you can copy the default my.cnf file into the authnet directory.
Run the script once without that option:
$ sh startdb.sh
... much output
[Entrypoint] GENERATED ROOT PASSWORD: UMyh@q]@j4qijyj@wK4s4SkePIkq
... much output
The output is similar to what we saw earlier, but for this newline giving the randomized password:
$ docker network inspect authnet
This will tell you the db-userauth container is attached to authnet:
$ docker exec -it db-userauth mysql -u userauth -p
Enter password:
Welcome to the MySQL monitor. Commands end with ; or \g.
... much output
mysql> show databases;
+--------------------+
| Database |
+--------------------+
| information_schema |
| userauth |
+--------------------+
2 rows in set (0.00 sec)
mysql> use userauth;
Database changed
mysql> show tables;
Empty set (0.00 sec)
We see our database has been created and it's empty. But we did this so we could grab the my.cnf file:
$ docker cp db-userauth:/etc/my.cnf .
$ ls
my.cnf mysql-data startdb.sh
The docker cp command is used for copying files in and out of containers. If you've used scp, the syntax will be familiar.
Once you have the my.cnf file, there's a big pile of setting changes you might want to make. The first specific change to make is commenting out the line reading socket=/var/lib/mysql/mysql.sock, and the second is adding a line reading bind-address = 0.0.0.0. The purpose with these changes is to configure the MySQL service to listen on a TCP port rather than a Unix domain socket. This makes it possible to communicate with the MySQL service from outside the container. The result would be:
# socket=/var/lib/mysql/mysql.sock
bind-address = 0.0.0.0
Now stop the db-userauth service, and remove the container, as we did earlier. Edit the startdb script to enable the line mounting /etc/my.cnf into the container, and then restart the container:
$ docker stop db-userauth
db-userauth
$ docker rm db-userauth
db-userauth
$ sh ./startdb.sh
[Entrypoint] MySQL Docker Image 5.7.21-1.1.4
[Entrypoint] Starting MySQL 5.7.21-1.1.4
Now, if we inspect the authnet network, we see the following:
$ docker network inspect authnet
"Name": "authnet",
...
"Subnet": "172.18.0.0/16",
"Gateway": "172.18.0.1"
...
"Containers": {
"Name": "db-userauth",
"MacAddress": "02:42:ac:12:00:02",
"IPv4Address": "172.18.0.2/16",
...
In other words, the authnet network has the network number 172.18.0.0/16, and the db-userauth container was assigned 172.18.0.2. This level of detail is rarely important, but it is useful on our first time through to carefully examine the setup so we understand what we're dealing with:
# cat /etc/resolv.conf
search attlocal.net
nameserver 127.0.0.11
options ndots:0
As we said earlier, there is a DNS server running within the Docker bridge network setup, and domain name resolution is configured to use nodots. That's so Docker container names are the DNS hostname for the container:
# mysql -h db-userauth -u userauth -p
Enter password:
Welcome to the MySQL monitor. Commands end with ; or \g.
Your MySQL connection id is 33
Server version: 5.7.21 MySQL Community Server (GPL)
Access the MySQL server using the container name as the hostname.
In the users directory, create a file named Dockerfile containing the following:
FROM node:10
ENV DEBUG="users:*"
ENV PORT="3333"
ENV SEQUELIZE_CONNECT="sequelize-docker-mysql.yaml"
ENV REST_LISTEN="0.0.0.0"
RUN mkdir -p /userauth
COPY package.json sequelize-docker-mysql.yaml *.mjs *.js /userauth/
WORKDIR /userauth
RUN apt-get update -y \
&& apt-get -y install curl python build-essential git ca-certificates \
&& npm install --unsafe-perm
EXPOSE 3333
CMD npm run docker
Dockerfiles describe the installation of an application on a server. See https://docs.docker.com/engine/reference/builder/ for documentation. They document assembly of the bits in a Docker container image, and the instructions in a Dockerfile are used to build a Docker image.
The FROM command specifies a pre-existing image from which to derive a given image. We talked about this earlier; you can build a Docker container starting from an existing image. The official Node.js Docker image (https://hub.docker.com/_/node/) we're using is derived from debian:jessie. Therefore, commands available within the container are what Debian offers, and we use apt-get to install more packages. We use Node.js 10 because it supports ES6 modules and the other features we've been using.
The ENV commands define environment variables. In this case, we're using the same environment variables defined within the user authentication service, except we have a new REST_LISTEN variable. We'll take a look at that shortly.
The RUN commands are where we run the shell commands required to build the container. The first thing is to make a /userauth directory that will contain the service source code. The COPY command copies files into that directory. And then we'll need to run an npm install so that we can run the service. But first we use the WORKDIR command to move the current working directory into /userauth so that the npm install is run in the correct place. We also install the requisite Debian packages so that any native code Node.js packages can be installed.
It's recommended that you always combine apt-get update with apt-get install in the same command line, like this, because of the Docker build cache. When rebuilding an image, Docker starts with the first changed line. By putting those two together, you ensure that apt-get update is executed any time you change the list of packages to be installed. For a complete discussion, see the documentation at https://docs.docker.com/develop/develop-images/dockerfile_best-practices/.
At the end of this command is npm install --unsafe-perm. The issue here is that these commands are being run as root. Normally, when npm is run as root, it changes its user ID to a nonprivileged user. This can cause failure, however, and the --unsafe-perm option prevents changing the user ID.
The EXPOSE command informs Docker that the container listens on the named TCP port. This does not expose the port beyond the container.
Finally, the CMD command documents the process to launch when the container is executed. The RUN commands are executed while building the container, while CMD says what's executed when the container starts.
We could have installed PM2 in the container, then used a PM2 command to launch the service. But Docker is able to fulfill the same function, because it supports automatically restarting a container if the service process dies. We'll see how to do this later.
We're using a different file for SEQUELIZE_CONNECT. Create a new file named users/sequelize-docker-mysql.yaml containing the following:
dbname: userauth
username: userauth
password: userauth
params:
host: db-userauth
port: 3306
dialect: mysql
The difference is that instead of localhost as the database host, we use db-userauth. Earlier, we explored the db-userauth container and determined that was the hostname of the container. By using db-userauth in this file, the authentication service will use the database in the container.
Now we need to take care of the environment variable named REST_LISTEN. Previously, the authentication server had listened only to http://localhost:3333. We'd done this for security purposes, that is, to limit which processes could connect to the service. Under Docker, we need to connect to this service from outside its container so that other containers can connect to this service. Therefore, it must listen to connections from outside the localhost.
In users-server.mjs, we need to make the following change:
server.listen(process.env.PORT,
process.env.REST_LISTEN ? process.env.REST_LISTEN : "localhost",
() => { log(server.name +' listening at '+ server.url); });
That is, if the REST_LISTEN variable exists, the REST server is told to listen to whatever it says, otherwise the service is to listen to localhost. With the environment variable in the Dockerfile, the authentication service will listen to the world (0.0.0.0). Are we throwing caution to the wind and abrogating our fiduciary duty in keeping the sacred trust of storing all this user identification information? No. Be patient. We'll describe momentarily how to connect this service and its database to AuthNet and will prevent access to AuthNet by any other process.
In users/package.json add the following line to the scripts section:
"docker": "node --experimental-modules ./user-server",
"docker-build": "docker build -t node-web-development/userauth ."
Previously, we've put the configuration environment variables into package.json. In this case, the configuration environment variables are in the Dockerfile. This means we need a way to run the server with no environment variables other than those in the Dockerfile. With this scriptsentry, we can do npm run docker and then the Dockerfile environment variables will supply all configuration.
We can build the authentication service as follows:
$ npm run docker-build
> user-auth-server@0.0.1 docker-build /Users/david/chap10/users
> docker build -t node-web-development/userauth .
Sending build context to Docker daemon 33.8MB
Step 1/11 : FROM node:9.5
---> a696309517c6
Step 2/11 : ENV DEBUG="users:*"
---> Using cache
---> f8cc103432e8
Step 3/11 : ENV PORT="3333"
---> Using cache
---> 39b24b8b554e
... more output
The docker build command builds a container from a Dockerfile. As we said earlier, the process begins with the image defined in the FROM command. Then the build proceeds step by step, and the output shows literally each step as it is executed.
Then create a script, authnet/startserver.sh, or on Windows call it startserver.ps1, containing the following command:
docker run -it --name userauth --net=authnet node-web-development/userauthThis launches the newly built container, giving it the name userauth, attaching it to authnet:
$ sh -x startserver.sh
+ docker run -it --name userauth --net=authnet node-web-development/userauth
> user-auth-server@0.0.1 docker /userauth
> node --experimental-modules ./user-server
(node:17) ExperimentalWarning: The ESM module loader is experimental.
users:service User-Auth-Service listening at http://0.0.0.0:3333 +0ms
That starts the user authentication service. On Windows, start it as .\startserver.ps1. You should recall that it's a REST service, and therefore running it through its paces is done with users-add.js and the other scripts. But, since we did not expose a public port from the service we must run those scripts from inside the container.
We determine whether a container exposes a public port in one of two ways. The easiest is running docker ps -a and viewing the container listing details. There is a column marked PORTS, and for userauth we see 3333/tcp. This is a side effect of the EXPOSE command in the Dockerfile. If that port were exposed, it would appear in the PORTS column as 0.0.0.0:3333->3333/tcp. Remember the goal for the userauth container, and authnet overall, was that it would not be publicly accessible because of security concerns.
Let's explore what we just created:
$ docker network inspect authnet
This prints out a large JSON object describing the network, and its attached containers, which we've looked at before. If all went well, we'll see there are now two containers attached to authnet where there'd previously been only one.
Let's go into the userauth container and poke around:
$ docker exec -it userauth bash
root@a29d833287bf:/userauth# ls
node_modules user-server.mjs users-list.js
package-lock.json users-add.js users-sequelize.mjs
package.json users-delete.js
sequelize-docker-mysql.yaml users-find.js
The /userauth directory is inside the container and is exactly the files placed in the container using the COPY command, plus the installed files in node_modules:
root@a29d833287bf:/userauth# PORT=3333 node users-list.js
List []
root@a29d833287bf:/userauth# PORT=3333 node users-add.js
Created { id: 1, username: 'me', password: 'w0rd', provider: 'local',
familyName: 'Einarrsdottir', givenName: 'Ashildr',
middleName: '', emails: '[]', photos: '[]',
updatedAt: '2018-02-05T01:54:53.320Z', createdAt: '2018-02-
05T01:54:53.320Z' }
root@a29d833287bf:/userauth# PORT=3333 node users-list.js
List [ { id: 'me', username: 'me', provider: 'local',
familyName: 'Einarrsdottir', givenName: 'Ashildr', middleName: '',
emails: '[]', photos: '[]' } ]
Our test of adding a user to the authentication service works:
root@a29d833287bf:/userauth# ps -eafw
UID PID PPID C STIME TTY TIME CMD
root 1 0 0 01:52 pts/0 00:00:00 /bin/sh -c npm run docker
root 9 1 0 01:52 pts/0 00:00:00 npm
root 19 9 0 01:52 pts/0 00:00:00 sh -c node --experimental-modules ./user-server
root 20 19 0 01:52 pts/0 00:00:01 node --experimental-modules ./user-server
root 30 0 0 01:54 pts/1 00:00:00 bash
root 70 30 0 01:57 pts/1 00:00:00 ps -eafw
root@a29d833287bf:/userauth# ping db-userauth
PING db-userauth (172.18.0.2): 56 data bytes
64 bytes from 172.18.0.2: icmp_seq=0 ttl=64 time=0.105 ms
64 bytes from 172.18.0.2: icmp_seq=1 ttl=64 time=0.077 ms
^C--- db-userauth ping statistics ---
2 packets transmitted, 2 packets received, 0% packet loss
round-trip min/avg/max/stddev = 0.077/0.091/0.105/0.000 ms
root@a29d833287bf:/userauth# ping userauth
PING userauth (172.18.0.3): 56 data bytes
64 bytes from 172.18.0.3: icmp_seq=0 ttl=64 time=0.132 ms
64 bytes from 172.18.0.3: icmp_seq=1 ttl=64 time=0.095 ms
^C--- userauth ping statistics ---
2 packets transmitted, 2 packets received, 0% packet loss
The process listing is interesting to study. Process PID 1 is the npm run docker command in the Dockerfile. Processes proceed from there to the node process running the actual server.
A ping command proves the two containers are available as hostnames matching the container names.
Then, you can log in to the db-userauth container and inspect the database:
$ docker exec -it db-userauth bash
bash-4.2# mysql -u userauth -p
Enter password:
Welcome to the MySQL monitor. Commands end with ; or \g.
...
mysql> use userauth
Database changed
mysql> show tables;
+--------------------+
| Tables_in_userauth |
+--------------------+
| Users |
+--------------------+
1 row in set (0.00 sec)
mysql> select * from Users;
+----+----------+----------+----------+---------------+-----------+--...
| id | username | password | provider | familyName | givenName | ...
+----+----------+----------+----------+---------------+-----------+--...
| 1 | me | w0rd | local | Einarrsdottir | Ashildr | ...
+----+----------+----------+----------+---------------+-----------+--...
1 row in set (0.00 sec)
We have successfully Dockerized the user authentication service in two containers, db-userauth and userauth. We've poked around the insides of a running container and found some interesting things. But, our users need the fantastic Notes application to be running, and we can't afford to rest on our laurels.
We have the back half of our system set up in a Docker container, as well as the private bridge network to connect the backend containers. We now need to set up another private bridge network, frontnet, and attach the other half of our system to that network.
Create a directory, frontnet, which is where we'll develop the tools to build and run that network. In that directory, create a file, buildfrontnet.sh, or on Windows, buildfrontnet.ps1, containing:
docker network create --driver bridge frontnet
Let's go ahead and create the frontnet bridge network:
$ sh -x buildfrontnet.sh
+ docker network create --driver bridge frontnet
f3df227d4bfff57bc7aed1e096a2ad16f6cebce4938315a54d9386a42d1ae3ed
$ docker network ls
NETWORK ID NAME DRIVER SCOPE
3021e2069278 authnet bridge local
f3df227d4bff frontnet bridge local
We'll proceed from here similarly to how authnet was created. However, we can work more quickly because we've already gone over the basics.
From the authnet directory, copy the my.cnf and startdb.sh files into the frontnet directory.
The my.cnf file can probably be used unmodified, but we have a few changes to make to the startdb.sh file:
docker run --name db-notes --env MYSQL_RANDOM_ROOT_PASSWORD=true \
--env MYSQL_USER=notes --env MYSQL_PASSWORD=notes12345 \
--env MYSQL_DATABASE=notes \
--volume `pwd`/my.cnf:/etc/my.cnf \
--volume `pwd`/../notes-data:/var/lib/mysql \
--network frontnet mysql/mysql-server:5.7
On Windows, name the file startdb.ps1 containing this:
docker volume create notes-data-volume
docker run --name db-notes --env MYSQL_RANDOM_ROOT_PASSWORD=true --env MYSQL_USER=notes --env MYSQL_PASSWORD=notes12345 --env MYSQL_DATABASE=notes --volume $PSScriptRoot\my.cnf:/etc/my.cnf --volume notes-data-volume:/var/lib/mysql --network frontnet mysql/mysql-server:5.7
The changes are simple substitutions to transliterate from userauth to notes. And then run it:
$ mkdir ../notes-data
$ sh -x startdb.sh
+ pwd
+ pwd
+ docker run --name db-notes --env MYSQL_RANDOM_ROOT_PASSWORD=true --env MYSQL_USER=notes --env MYSQL_PASSWORD=notes12345 --env MYSQL_DATABASE=notes --volume /home/david/nodewebdev/node-web-development-code-4th-edition/chap10/frontnet/my.cnf:/etc/my.cnf --volume /home/david/nodewebdev/node-web-development-code-4th-edition/chap10/frontnet/../notes-data:/var/lib/mysql --network frontnet mysql/mysql-server:5.7
[Entrypoint] MySQL Docker Image 5.7.21-1.1.4
[Entrypoint] Initializing database
[Entrypoint] Database initialized
[Entrypoint] GENERATED ROOT PASSWORD: 3kZ@q4hBItYGYj3Mes!AdiP83Nol
[Entrypoint] ignoring /docker-entrypoint-initdb.d/*
[Entrypoint] Server shut down
[Entrypoint] MySQL init process done. Ready for start up.
[Entrypoint] Starting MySQL 5.7.21-1.1.4
For Windows, simply run .\startdb.ps1.
This database will be available at the db-notes domain name on frontnet. Because it's attached to frontnet, it won't be reachable by containers connected to authnet.
$ docker exec -it userauth bash
root@0a2009334b79:/userauth# ping db-notes
ping: unknown host
Since db-notes is on a different network segment, we've achieved separation.
In the notes directory, create a file named Dockerfile containing the following:
FROM node:10
ENV DEBUG="notes:*,messages:*"
ENV SEQUELIZE_CONNECT="models/sequelize-docker-mysql.yaml"
ENV NOTES_MODEL="sequelize"
ENV USER_SERVICE_URL="http://userauth:3333"
ENV PORT="3000"
ENV NOTES_SESSIONS_DIR="/sessions"
# ENV TWITTER_CONSUMER_KEY="..."
# ENV TWITTER_CONSUMER_SECRET="..."
# Use this line when the Twitter Callback URL
# has to be other than localhost:3000
# ENV TWITTER_CALLBACK_HOST=http://45.55.37.74:3000
RUN mkdir -p /notesapp /notesapp/minty /notesapp/partials /notesapp/public /notesapp/routes /notesapp/theme /notesapp/views
COPY minty/ /notesapp/minty/
COPY models/*.mjs models/sequelize-docker-mysql.yaml /notesapp/models/
COPY partials/ /notesapp/partials/
COPY public/ /notesapp/public/
COPY routes/ /notesapp/routes/
COPY theme/ /notesapp/theme/
COPY views/ /notesapp/views/
COPY app.mjs package.json /notesapp/
WORKDIR /notesapp
RUN apt-get update -y \
&& apt-get -y install curl python build-essential git ca-certificates \
&& npm install --unsafe-perm
# Uncomment to build the theme directory
# WORKDIR /notesapp/theme
# RUN npm run download && npm run build && npm run clean
WORKDIR /notesapp
VOLUME /sessions
EXPOSE 3000
CMD node --experimental-modules ./app
This is similar to the Dockerfile we used for the authentication service. We're using the environment variables from notes/package.json, plus a new one, and there's a couple of new tricks involved here, so let's take a look.
The most obvious change is the number of COPY commands. The Notes application is a lot more involved given the number of subdirectories full of files that must be installed. We start by creating the top-level directories of the Notes application deployment tree. Then, one by one, we copy each subdirectory into its corresponding subdirectory in the container filesystem.
In a COPY command, the trailing slash on the destination directory is important. Why? Because the documentation says that the trailing slash is important.
The big question is: Why use multiple COPY commands such as this? This would have been trivially simple:
COPY . /notesapp
But, it is important to avoid copying the node_modules directory into the container. The container node_modules must be built inside the container, because the container operating system is almost certainly different to the host operating system. Any native code modules must be built for the correct operating system. That constraint led to the question of concisely copying specific files to the destination.
We've developed a process to build a Bootstrap 4 theme, which we developed in Chapter 6, Implementing the Mobile-First Paradigm. If you have a Bootstrap 4 theme to build, simply uncomment the corresponding lines in the Dockerfile. Those lines move the working directory to /notesapp/theme and then run the scripts to build the theme. A new script is required in theme/package.json to remove the theme/node_modules directory after the theme has been built:
"scripts": {
...
"clean": "rm -rf bootstrap-4.0.0/node_modules"
...
}
We also have a new SEQUELIZE_CONNECT file. Create models/sequelize-docker-mysql.yaml containing the following:
dbname: notes
username: notes
password: notes12345
params:
host: db-notes
port: 3306
dialect: mysql
This will access a database server on the db-notes domain name using the named database, username, and password.
Notice that the USER_SERVICE_URL variable no longer accesses the authentication service at localhost, but at userauth. The userauth domain name is currently only advertised by the DNS server on AuthNet, but the Notes service is on FrontNet. This means we'll have to connect the userauth container to the FrontNet bridge network so that its name is known there as well. We'll get to that in a minute.
In Chapter 8, Multiuser Authentication the Microservice Way we discussed the need to protect the API keys supplied by Twitter.
We didn't want to commit the keys in the source code, but they have to go somewhere. Placeholders are in the Dockerfile for specifying TWITTER_CONSUMER_KEY and TWITTER_CONSUMER_SECRET.
The value for TWITTER_CALLBACK_HOST needs to reflect where Notes is deployed. Right now, it is still on your laptop, but by the end of the chapter, it will be deployed to the server, and, at that time, it will need the IP address or domain name of the server.
A new variable is NOTES_SESSIONS_DIR and the matching VOLUME declaration. If we were to run multiple Notes instances, they could share session data by sharing this volume.
Supporting the NOTES_SESSIONS_DIR variable requires one change in app.mjs:
const sessionStore = new FileStore({
path: process.env.NOTES_SESSIONS_DIR ?
process.env.NOTES_SESSIONS_DIR : "sessions"
});
Instead of a hardcoded directory name, we can use an environment variable to define the location where session data is stored. Alternatively, there are sessionStore implementations for various servers such as REDIS, enabling session data sharing between containers on separate host systems.
In notes/package.json, add these scripts:
"scripts": {
...
"docker": "node --experimental-modules ./app",
"docker-build": "docker build -t node-web-development/notes ."
...
}
As for the authentication server, this lets us build the container and then, within the container, we can run the service.
Now we can build the container image:
$ npm run docker-build
> notes@0.0.0 docker-build /Users/david/chap10/notes
> docker build -t node-web-development/notes .
Sending build context to Docker daemon 76.27MB
Step 1/22 : FROM node:9.5
---> a696309517c6
Step 2/22 : ENV DEBUG="notes:*,messages:*"
---> Using cache
---> 8628ecad9fa4
Next, in the frontnet directory, create a file named startserver.sh, or, on Windows, startserver.ps1:
docker run -it --name notes --net=frontnet -p 3000:3000 node-web-development/notesUnlike the authentication service, the Notes application container must export a port to the public. Otherwise, the public will never be able to enjoy this wonderful creation we're building. The -p option is how we instruct Docker to expose a port.
The first number is a TCP port number published from the container, and the second number is the TCP port inside the container. Generally speaking, this option maps a port inside the container to one reachable by the public.
Then run it as follows:
$ sh -x startserver.sh
+ docker run -it --name notes --net=frontnet -p 3000:3000 node-web-development/notes
(node:6) ExperimentalWarning: The ESM module loader is experimental.
notes:debug-INDEX Listening on port 3000 +0ms
On Windows, run .\startserver.ps1.
At this point, we can connect our browser to http://localhost:3000 and start using the Notes application. But we'll quickly run into a problem:
The user experience team is going to scream about this ugly error message, so put it on your backlog to generate a prettier error screen. For example, a flock of birds pulling a whale out of the ocean is popular.
This error means that Notes cannot access anything at the host named userauth. That host does exist, because the container is running, but it's not on frontnet, and is not reachable from the notes container. Namely:
$ docker exec -it notes bash
root@125a196c3fd5:/notesapp# ping userauth
ping: unknown host
root@125a196c3fd5:/notesapp# ping db-notes
PING db-notes (172.19.0.2): 56 data bytes
64 bytes from 172.19.0.2: icmp_seq=0 ttl=64 time=0.136 ms
^C--- db-notes ping statistics ---
1 packets transmitted, 1 packets received, 0% packet loss
round-trip min/avg/max/stddev = 0.136/0.136/0.136/0.000 ms
root@125a196c3fd5:/notesapp#
If you inspect FrontNet and AuthNet, you'll see the containers attached to each do not overlap:
$ docker network inspect frontnet
$ docker network inspect authnet
In the architecture diagram at the beginning of the chapter, we showed a connection between the notes and userauth containers. The connection is required so notes can authenticate its users. But that connection does not exist, yet.
Unfortunately, a simple change to startserver.sh (startserver.ps1) does not work:
docker run -it --name notes --net=authnet --net=frontnet -p 3000:3000 node-web-development/notes
While it is conceptually simple to specify multiple --net options when starting a container, Docker does not support this. It silently accepts the command as shown, but only connects the container to the last network mentioned in the options. Instead, Docker requires that you take a second step to attach the container to a second network:
$ docker network connect authnet notes
With no other change, the Notes application will now allow you to log in and start adding and editing notes.
There is a glaring architecture question staring at us. Do we connect the userauth service to frontnet, or do we connect the notes service to authnet? To verify that either direction solves the problem, run these commands:
$ docker network disconnect authnet notes
$ docker network connect frontnet userauth
The first time around, we connected notes to authnet, then we disconnected it from authnet, and then connected userauth to frontnet. That means we tried both combinations and, as expected, in both cases notes and userauth were able to communicate.
This is a question for security experts since the consideration is the attack vectors available to any intruders. Suppose Notes has a security hole allowing an invader to gain access. How do we limit what is reachable via that hole?
The primary observation is that by connecting notes to authnet, notes not only has access to userauth, but also to db-userauth:
$ docker network disconnect frontnet userauth
$ docker network connect authnet notes
$ docker exec -it notes bash
root@7fce818e9a4d:/notesapp# ping userauth
PING userauth (172.18.0.3): 56 data bytes
64 bytes from 172.18.0.3: icmp_seq=0 ttl=64 time=0.103 ms
^C--- userauth ping statistics ---
1 packets transmitted, 1 packets received, 0% packet loss
round-trip min/avg/max/stddev = 0.103/0.103/0.103/0.000 ms
root@7fce818e9a4d:/notesapp# ping db-userauth
PING db-userauth (172.18.0.2): 56 data bytes
64 bytes from 172.18.0.2: icmp_seq=0 ttl=64 time=0.201 ms
^C--- db-userauth ping statistics ---
1 packets transmitted, 1 packets received, 0% packet loss
round-trip min/avg/max/stddev = 0.201/0.201/0.201/0.000 ms
root@7fce818e9a4d:/notesapp#
This sequence reconnects notes to authnet, and demonstrates the ability to access both the userauth and db-userauth containers. Therefore, a successful invader could access the db-userauth database, a result we wanted to prevent. Our diagram at the beginning showed no such connection between notes and db-userauth.
Given that our goal for using Docker was to limit the attack vectors, we have a clear distinction between the two container/network connection setups. Attaching userauth to frontnet limits the number of containers that can access db-userauth. For an intruder to access the user information database, they must first break into notes, and then break into userauth. Unless, that is, our amateur attempt at a security audit is flawed.
The db-userauth and db-notes Dockerfiles contain VOLUME /var/lib/mysql, and when we started the containers, we gave --volume options, assigning a host directory for that container directory:
docker run --name db-notes \
...
--volume `pwd`/../notes-data:/var/lib/mysql \
...
We can easily see this connects a host directory, so it appears within the container at that location. Simply inspecting the host directory with tools such as ls shows that files are created in that directory corresponding to a MySQL database.
The VOLUME instruction instructs Docker to create a directory outside the container and to map that directory so that it's mounted inside the container on the named path. The VOLUME instruction by itself doesn't control the directory name on the host computer. If no --volume option is given, Docker still arranges for the content of said directory to be kept outside the container. That's useful, and at least the data is available outside the container, but you haven't controlled the location.
If we restart the db-notes container without using the --volume option for /var/lib/mysql, we can inspect the container to discover where Docker put the volume:
$ docker inspect --format '{{json .Mounts}}' db-notes
[{"Type":"bind",
"Source":"/Users/david/chap10/frontnet/my.cnf","Destination":"/etc/my.cnf",
"Mode":"","RW":true,"Propagation":"rprivate"},{"Type":"volume","Name":"39f9a80b49e3ecdebc7789de7b7dd2366c400ee7fbfedd6e4df18f7e60bad409",
"Source":"/var/lib/docker/volumes/39f9a80b49e3ecdebc7789de7b7dd2366c400ee7fbfedd6e4df18f7e60bad409/_data","Destination":"/var/lib/mysql",
"Driver":"local","Mode":"","RW":true,"Propagation":""}]
That's not exactly a user-friendly pathname, but you can snoop into that directory and see that indeed the MySQL database is stored there. The simplest way to use a user-friendly pathname for a volume is with the --volume options we showed earlier.
Another advantage we have is to easily switch databases. For example, we could test Notes with pre-cooked test databases full of notes written in Swahili (notes-data-swahili), Romanian (notes-data-romanian), German (notes-data-german) and English (notes-data-english). Each test database could be stored in the named directory, and testing against the specific language is as simple as running the notes container with different --volume options.
In any case, if you restart the notes container with the --volume option, you can inspect the container and see the directory is mounted on the directory you specified:
$ docker inspect --format '{{json .Mounts}}' db-notes
[{"Type":"bind",
"Source":"/Users/david/chap10/frontnet/my.cnf","Destination":"/etc/my.cnf",
"Mode":"","RW":true,"Propagation":"rprivate"},
{"Type":"bind",
"Source":"/Users/david/chap10/notes-data","Destination":"/var/lib/mysql",
"Mode":"","RW":true,"Propagation":"rprivate"}]
With the --volume options, we have controlled the location of the host directory corresponding to the container directory.
The last thing to note is that controlling the location of such directories makes it easier to make backups and take other administrative actions with that data.
With the scripts we've written so far, the Docker container is run in the foreground. That makes it easier to debug the service since you see the errors. For a production deployment, we need the Docker container detached from the terminal, and an assurance that it will restart itself automatically. Those two attributes are simple to implement.
Simply change this pattern:
$ docker run -it ...
To this pattern:
$ docker run --detach --restart always ...
The -it option is what causes the Docker container to run in the foreground. Using these options causes the Docker container to run detached from your terminal, and if the service process dies, the container will automatically restart.
This is cool that we can create encapsulated instantiations of the software services we've created. But the promise was to use the Dockerized application for deployment on cloud services. In other words, we need to take all this learning and apply it to the task of deploying Notes on a public internet server with a fairly high degree of security.
We've demonstrated that, with Docker, Notes can be decomposed into four containers that have a high degree of isolation from each other, and from the outside world.
There is another glaring problem: our process in the previous section was partly manual, partly automated. We created scripts to launch each portion of the system, which is a good practice according to the Twelve Factor Application model. But we did not automate the entire process to bring up Notes and the authentication services. Nor is this solution scalable beyond one machine.
Let's start with the last issue first—scalability. Within the Docker ecosystem, several Docker orchestrator services are available. An Orchestrator automatically deploys and manages Docker containers over a group of machines. Some examples of Docker Orchestrators are Docker Swarm (which is built into the Docker CLI), Kubernetes, CoreOS Fleet, and Apache Mesos. These are powerful systems able to automatically increase/decrease resources as needed, to move containers from one host to another, and more. We mention these systems for your further study as your needs grow.
Docker compose (https://docs.docker.com/compose/overview/) will solve the other problems we've identified. It lets us easily define and run several Docker containers together as a complete application. It uses a YAML file, docker-compose.yml, to describe the containers, their dependencies, the virtual networks, and the volumes. While we'll be using it to describe the deployment onto a single host machine, Docker compose can be used for multimachine deployments, especially when combined with Docker Swarm. Understanding Docker compose will provide a basis upon which to understand/use the other tools, such as Swarm or Kubernetes.
Docker machine (https://docs.docker.com/machine/overview/) is a tool for installing Docker Engine on virtual hosts, either local or remote, and for managing Docker containers on those hosts. We'll be using this to provision a server on a cloud hosting service, and push containers into that server. It can also be used to provision a virtual host on your laptop within a VirtualBox instance.
Before proceeding, ensure Docker compose and Docker machine are installed. If you've installed Docker for Windows or Docker for Mac, both are installed along with everything else. On Linux, you must install both separately by following the instructions at the links given earlier.
Let's start by creating a directory, compose, as a sibling to the users and notes directories. In that directory, create a file named docker-compose.yml:
version: '3'
services:
db-userauth:
image: "mysql/mysql-server:5.7"
container_name: db-userauth
command: [ "mysqld", "--character-set-server=utf8mb4",
"--collation-server=utf8mb4_unicode_ci",
"--bind-address=0.0.0.0" ]
expose:
- "3306"
networks:
- authnet
volumes:
- db-userauth-data:/var/lib/mysql
- ../authnet/my.cnf:/etc/my.cnf
environment:
MYSQL_RANDOM_ROOT_PASSWORD: "true"
MYSQL_USER: userauth
MYSQL_PASSWORD: userauth
MYSQL_DATABASE: userauth
restart: always
userauth:
build: ../users
container_name: userauth
depends_on:
- db-userauth
networks:
- authnet
- frontnet
restart: always
db-notes:
image: "mysql/mysql-server:5.7"
container_name: db-notes
command: [ "mysqld", "--character-set-server=utf8mb4",
"--collation-server=utf8mb4_unicode_ci",
"--bind-address=0.0.0.0" ]
expose:
- "3306"
networks:
- frontnet
volumes:
- db-notes-data:/var/lib/mysql
- ../frontnet/my.cnf:/etc/my.cnf
environment:
MYSQL_RANDOM_ROOT_PASSWORD: "true"
MYSQL_USER: notes
MYSQL_PASSWORD: notes12345
MYSQL_DATABASE: notes
restart: always
notes:
build: ../notes
container_name: notes
restart: always
depends_on:
- db-notes
networks:
- frontnet
ports:
- "3000:3000"
restart: always
networks:
frontnet:
driver: bridge
authnet:
driver: bridge
volumes:
db-userauth-data:
db-notes-data:
That's the description of the entire Notes deployment. It's at a fairly high level of abstraction, roughly equivalent to the options on the command-line tools we've used so far. Further details are located inside the Dockerfiles, which are referenced from this compose file.
The version line says that this is a version 3 compose file. The version number is inspected by the docker-compose command, so it can correctly interpret its content. The full documentation is worth reading at https://docs.docker.com/compose/compose-file/.
There are three major sections used here: services, volumes, and networks. The services section describes the containers being used, the networks section describes the networks, and the volumes section describes the volumes. The content of each section matches the intent/purpose of the commands we ran earlier. The information we've already dealt with is all here, just rearranged.
There are two database containers, db-userauth and db-notes. Both reference the Dockerhub image using the image tag. For the databases, we did not create a Dockerfile, but instead built directly from the Dockerhub image. The same happens here in the compose file.
For the userauth and notes containers, we created a Dockerfile. The directory containing that file is referenced by the build tag. To build the container, docker-compose looks for a file named Dockerfile in the named directory. There are more options for the build tag, which are discussed in the official documentation.
The container_name attribute is equivalent to the --name attribute and specifies a user-friendly name for the container. We must specify the container name in order to specify the container hostname in order to do Docker-style service discovery.
The command tag overrides the CMD tag in the Dockerfile. We've specified this for the two database containers, so we can instruct MySQL to bind to IP address 0.0.0.0. Even though we didn't create a Dockerfile for the database containers, there is a Dockerfile created by the MySQL maintainers.
The networks attribute lists the networks to which this container must be connected and is exactly equivalent to the --net argument. Even though the docker command doesn't support multiple --net options, we can list multiple networks in the compose file. In this case, the networks are bridge networks. As we did earlier, the networks themselves must be created separately, and in a compose file, that's done in the networks section.
Each of the networks in our system is a bridge network. This fact is described in the compose file.
The expose attribute declares which ports are exposed from the container, and is equivalent to the EXPOSE tag. The exposed ports are not published outside the host machine, however. The ports attribute declares the ports that are to be published. In the ports declaration, we have two port numbers: the first being the published port number and the second being the port number inside the container. This is exactly equivalent to the -p option used earlier.
The notes container has a few environment variables, such as TWITTER_CONSUMER_KEY and TWITTER_CONSUMER_SECRET, that you may prefer to store in this file rather than in the Dockerfile.
The depends_on attribute lets us control the start up order. A container that depends on another will wait to start until the depended-upon container is running.
The volumes attribute describes mappings of a container directory to a host directory. In this case, we've defined two volume names, db-userauth-data and db-notes-data, and then used them for the volume mapping.
To explore the volumes, start with this command:
$ docker volume ls
DRIVER VOLUME NAME
...
local compose_db-notes-data
local compose_db-userauth-data
...
The volume names are the same as in the compose file, but with compose_ tacked on the front.
You can inspect the volume location using the docker command line:
$ docker volume inspect compose_db-notes-data $ docker volume inspect compose_db-userauth-data
If it's preferable, you can specify a pathname in the compose file:
db-auth:
..
volumes:
# - db-userauth-data:/var/lib/mysql
- ../userauth-data:/var/lib/mysql
db-notes:
..
volumes:
# - db-notes-data:/var/lib/mysql
- ../notes-data:/var/lib/mysql
This is the same configuration we made earlier. It uses the userauth-data and notes-data directories for the MySQL data files for their respective database containers.
The environment tag describes the environment variables that will be received by the container. As before, environment variables should be used to inject configuration data.
The restart attribute controls what happens if, or when, the container dies. When a container starts, it runs the program named in the CMD instruction, and when that program exits, the container exits. But what if that program is meant to run forever, shouldn't Docker know it should restart the process? We could use a background process supervisor, such as Supervisord or PM2. But, we can also use the Docker restart option.
The restart attribute can take one of the following four values:
On Windows, we're able to run the commands in this section unchanged.
Before deploying this to a server, let's run it on our laptop using docker-compose:
$ docker stop db-notes userauth db-auth notesapp db-notes userauth db-auth notesapp $ docker rm db-notes userauth db-auth notesapp db-notes userauth db-auth notesapp
We first needed to stop and delete the existing containers. Because the compose file wants to launch containers with the same names as we'd built earlier, we also have to remove the existing containers:
$ docker-compose build Building db-auth .. lots of output $ docker-compose up Creating db-auth Recreating compose_db-notes_1 Recreating compose_userauth_1 Recreating compose_notesapp_1 Attaching to db-auth, db-notes, userauth, notesapp
Once that's done, we can build the containers, docker-compose build, and then start them running, docker-compose up.
The first test is to execute a shell in userauth to run our user database script:
$ docker exec -it userauth bash
root@9972adbbdbb3:/userauth# PORT=3333 node users-add.js
Created { id: 2,
username: 'me', password: 'w0rd', provider: 'local',
familyName: 'Einarrsdottir', givenName: 'Ashildr', middleName: '',
emails: '[]', photos: '[]',
updatedAt: '2018-02-07T02:24:04.257Z', createdAt: '2018-02-07T02:24:04.257Z' }
root@9972adbbdbb3:/userauth#
Now that we've proved that the authentication service will work, and, by the way, created a user account, you should be able to browse to the Notes application and run it through its paces.
You can also try pinging different containers to ensure that the application network topology has been created correctly.
By default, docker-compose attaches to the containers so that logging output is printed on the Terminal. Output from all four containers will be intermingled together. Thankfully, each line is prepended by the container name.
When you're done testing the system, simply type CTRL + C on the Terminal:
^CGracefully stopping... (press Ctrl+C again to force)
Stopping db-userauth ... done
Stopping userauth ... done
Stopping db-notes ... done
Stopping notes ... done
To avoid running with the containers attached to the Terminal, use the -d option. This says to detach from the Terminal and run in the background.
An alternate way to bring down the system described in the compose file is with the docker-compose down command.
The up command builds, recreates, and starts the containers. The build step can be handled separately using the docker-compose build command. Likewise, starting and stopping the containers can be handled separately by using the docker-compose start and docker-compose-stop commands.
In all cases, your command shell should be in the directory containing the docker-compose.yml file. That's the default name for this file. This can be overridden with the -f option to specify a different filename.
We've verified on our laptop that the services described by the compose file work as intended. Launching the containers is now automated, fixing one of the issues we named earlier. It's now time to see how to deploy to a cloud-hosting provider. This is where we turn to Docker machine.
Docker machine can be used to provision Docker instances inside a VirtualBox host on your laptop. What we'll be doing is provisioning a Docker system on DigitalOcean. The docker-machine command comes with drivers supporting a long list of cloud-hosting providers. It's easy to adapt the instructions shown here for other providers, simply by substituting a different driver.
After signing up for a DigitalOcean account, click on the API link in the dashboard. We need an API token to grant docker-machine access to the account. Go through the process of creating a token and save away the token string you're given. The Docker website has a tutorial at https://docs.docker.com/machine/examples/ocean/.
With the token in hand, type the following:
$ docker-machine create --driver digitalocean --digitalocean-size 2gb \
--digitalocean-access-token TOKEN-FROM-PROVIDER \
sandbox
Running pre-create checks...
Creating machine...
(sandbox) Creating SSH key...
(sandbox) Creating Digital Ocean droplet...
(sandbox) Waiting for IP address to be assigned to the Droplet...
Waiting for machine to be running, this may take a few minutes...
Detecting operating system of created instance...
Waiting for SSH to be available...
Detecting the provisioner...
Provisioning with ubuntu(systemd)...
Installing Docker...
Copying certs to the local machine directory...
Copying certs to the remote machine...
Setting Docker configuration on the remote daemon...
Checking connection to Docker...
Docker is up and running!
To see how to connect your Docker Client to the Docker Engine running on this virtual machine, run: docker-machine env sandbox
The digitalocean driver is, as we said earlier, used with Digital Ocean. The Docker website has a list of drivers at https://docs.docker.com/machine/drivers/.
A lot of information is printed here about things being set up. The most important is the message at the end. A series of environment variables are used to tell the docker command where to connect to the Docker Engine instance. As the messages say, run: docker-machine env sandbox:
$ docker-machine env sandbox
export DOCKER_TLS_VERIFY="1"
export DOCKER_HOST="tcp://45.55.37.74:2376"
export DOCKER_CERT_PATH="/home/david/.docker/machine/machines/sandbox"
export DOCKER_MACHINE_NAME="sandbox"
# Run this command to configure your shell:
# eval $(docker-machine env sandbox)
That's the environment variables used to access the Docker host we just created. You should also go to your cloud-hosting provider dashboard and see that the host has been created. This command also gives us some instructions to follow:
$ eval $(docker-machine env sandbox)
$ docker-machine ls
NAME ACTIVE DRIVER STATE URL SWARM DOCKER ERRORS
sandbox * digitalocean Running tcp://45.55.37.74:2376 v18.01.0-ce
This shows that we have a Docker Engine instance running in a host at our chosen cloud-hosting provider.
One interesting test at this point is to run docker ps -a on this Terminal, and then to run it in another Terminal that does not have these environment variables. That should show the cloud host has no containers at all, while your local machine may have some containers (depending on what you currently have running):
$ docker run hello-world
Unable to find image 'hello-world:latest' locally
latest: Pulling from library/hello-world
ca4f61b1923c: Pull complete
Digest: sha256:66ef312bbac49c39a89aa9bcc3cb4f3c9e7de3788c944158df3ee0176d32b751
Status: Downloaded newer image for hello-world:latest
...
$ docker images
REPOSITORY TAG IMAGE ID CREATED SIZE
hello-world latest f2a91732366c 2 months ago 1.85kB
Here, we've verified that we can launch a container on the remote host.
The next step is to build our containers for the new machine. Because we've switched the environment variables to point to the new server, these commands cause action to happen there rather than inside our laptop:
$ docker-compose build
db-userauth uses an image, skipping
db-notes uses an image, skipping
Building notes
Step 1/22 : FROM node:9.5
9.5: Pulling from library/node
f49cf87b52c1: Pull complete
7b491c575b06: Pull complete
b313b08bab3b: Pull complete
51d6678c3f0e: Pull complete
...
Because we changed the environment variables, the build occurs on the sandbox machine rather than on our laptop, as previously.
This will take a while because the Docker image cache on the remote machine is empty. Additionally, building the notesapp and userauth containers copies the entire source tree to the server and runs all build steps on the server.
The build may fail if the default memory size is 500 MB, the default on DigitalOcean at the time of writing. If so, the first thing to try is resizing the memory on the host to at least 2 GB.
Once the build is finished, launch the containers on the remote machine:
$ docker-compose up
Creating notes ... done
Recreating db-userauth ... done
Recreating db-notes ... done
Creating notes ...
Attaching to db-userauth, db-notes, userauth, notes
Once the containers start, you should test the userauth container as we've done previously. Unfortunately, the first time you do this, that command will fail. The problem is these lines in the docker-compose.yml:
- ../authnet/my.cnf:/etc/my.cnf
...
- ../frontnet/my.cnf:/etc/my.cnf
In this case, the build occurs on the remote machine, and the docker-machine command does not copy the named file to the server. Hence, when Docker attempts to start the container, it is unable to do so because that volume mount cannot be satisfied because the file is simply not there. This, then, means some surgery on docker-compose.yml, and to add two new Dockerfiles.
First, make these changes to docker-compose.yml:
...
db-userauth:
build: ../authnet
container_name: db-userauth
networks:
- authnet
volumes:
- db-userauth-data:/var/lib/mysql
restart: always
...
db-notes:
build: ../frontnet
container_name: db-notes
networks:
- frontnet
volumes:
- db-notes-data:/var/lib/mysql
restart: always
Instead of building the database containers from a Docker image, we're now building them from a pair of Dockerfiles. Now we must create those two Dockerfiles.
In authnet, create a file named Dockerfile containing the following:
FROM mysql/mysql-server:5.7
EXPOSE 3306
COPY my.cnf /etc/
ENV MYSQL_RANDOM_ROOT_PASSWORD="true"
ENV MYSQL_USER=userauth
ENV MYSQL_PASSWORD=userauth
ENV MYSQL_DATABASE=userauth
CMD [ "mysqld", "--character-set-server=utf8mb4", \
"--collation-server=utf8mb4_unicode_ci", "--bind-address=0.0.0.0" ]
This copies certain settings from what had been the db-userauth description in docker-compose.yml. The important thing is that we now COPY the my.cnf file rather than use a volume mount.
In frontnet, create a Dockerfile containing the following:
FROM mysql/mysql-server:5.7
EXPOSE 3306
COPY my.cnf /etc/
ENV MYSQL_RANDOM_ROOT_PASSWORD="true"
ENV MYSQL_USER=notes
ENV MYSQL_PASSWORD=notes12345
ENV MYSQL_DATABASE=notes
CMD [ "mysqld", "--character-set-server=utf8mb4", \
"--collation-server=utf8mb4_unicode_ci", "--bind-address=0.0.0.0" ]
This is the same, but with a few critical values changed.
After making these changes, we can now build the containers, and launch them:
$ docker-compose build
... much output
$ docker-compose up --force-recreate
... much output
Now that we have a working build, and can bring up the containers, let's inspect them and verify everything works.
Execute a shell in userauth to test and set up the user database:
$ docker exec -it userauth bash
root@931dd2a267b4:/userauth# PORT=3333 node users-list.js
List [ { id: 'me', username: 'me', provider: 'local',
familyName: 'Einarrsdottir', givenName: 'Ashildr', middleName: '',
emails: '[]', photos: '[]' } ]
As mentioned previously, this verifies that the userauth service works, that the remote containers are set up, and that we can proceed to using the Notes application.
The question is: What's the URL to use? The service is not on localhost, because it's on the remote server. We don't have a domain name assigned, but there is an IP address for the server.
Run the following command:
$ docker-machine ip sandbox
45.55.37.74
Docker tells you the IP address, which you should use as the basis of the URL. Hence, in your browser, visit http://IP-ADDRESS:3000
With Notes deployed to the remote server, you should check out all the things we've looked at previously. The bridge networks should exist, as shown previously, with the same limited access between containers. The only public access should be port 3000 on the notes container.
Remember to set the TWITTER_CALLBACK_HOST environment variable appropriately for your server.
Because our database containers mount a volume to store the data, let's see where that volume landed on the server:
$ docker volume ls
DRIVER VOLUME NAME
local compose_db-notes-data
local compose_db-userauth-data
Those are the expected volumes, one for each container:
$ docker volume inspect compose_db-notes-data
[
{
"CreatedAt": "2018-02-07T06:30:06Z",
"Driver": "local",
"Labels": {
"com.docker.compose.project": "compose",
"com.docker.compose.volume": "db-notes-data"
},
"Mountpoint": "/var/lib/docker/volumes/compose_db-notes-
data/_data",
"Name": "compose_db-notes-data",
"Options": {},
"Scope": "local"
}
]
Those are the directories, but they're not located on our laptop. Instead, they're on the remote server. Accessing these directories means logging into the remote server to take a look:
$ docker-machine ssh sandbox
Welcome to Ubuntu 16.04.3 LTS (GNU/Linux 4.4.0-112-generic x86_64)
* Documentation: https://help.ubuntu.com
* Management: https://landscape.canonical.com
* Support: https://ubuntu.com/advantage
Get cloud support with Ubuntu Advantage Cloud Guest:
http://www.ubuntu.com/business/services/cloud
4 packages can be updated.
0 updates are security updates.
Last login: Wed Feb 7 04:00:29 2018 from 108.213.68.139
root@sandbox:~#
From this point, you can inspect the directories corresponding to these volumes and see that they indeed contain MySQL configuration and data files:
root@sandbox:~# ls /var/lib/docker/volumes/compose_db-notes-data/_data
auto.cnf client-key.pem ib_logfile1 mysql.sock.lock public_key.pem
ca-key.pem ib_buffer_pool ibtmp1 notes server-cert.pem
ca.pem ibdata1 mysql performance_schema server-key.pem
client-cert.pem ib_logfile0 mysql.sock private_key.pem sys
You'll also find that the Docker command-line tools will work. The process list is especially interesting:
Look closely at this and you see a process corresponding to every container in the system. These processes are running in the host operating system. Docker creates layers of configuration/containment around those processes to create the appearance that the process is running under a different operating system, and with various system/network configuration files, as specified in the container screenshot.
The claimed advantage Docker has over virtualization approaches, such as VirtualBox, is that Docker is very lightweight. We see right here why Docker is lightweight: there is no virtualization layer, there is only a containerization process (docker-containerd-shim).
Once you're satisfied that Notes is working on the remote server, you can shut it down and remove it as follows:
$ docker-compose stop Stopping notesapp ... done Stopping userauth ... done Stopping db-notes ... done Stopping db-auth ... done
This shuts down all the containers at once:
$ docker-machine stop sandbox Stopping "sandbox"... Machine "sandbox" was stopped.
This shuts down the remote machine. The cloud-hosting provider dashboard will show that the Droplet has stopped.
At this point, you can go ahead and delete the Docker machine instance as well, if you like:
$ docker-machine rm sandbox About to remove sandbox Are you sure? (y/n): y Successfully removed sandbox
And, if you're truly certain you want to delete the machine, the preceding command does the deed. As soon as you do this, the machine will be erased from your cloud-hosting provider dashboard.
This chapter has been quite a journey. We went from an application that existed solely on our laptop, to exploring two ways to deploy Node.js applications to a production server.
We started by reviewing the Notes application architecture and how that will affect deployment. That enabled you to understand what you had to do for server deployment.
Then you learned the traditional way to deploy services on Linux using an init script. PM2 is a useful tool for managing background processes in such an environment. You also learned how to provision a remote server using a virtual machine hosting service.
Then you took a long trip into the land of Docker, a new and exciting system for deploying services on machines. You learned how to write a Dockerfile so that Docker knows how to construct a service image. You learned several ways to deploy Docker images on a laptop or on a remote server. And you learned how to describe a multi-container application using Docker compose.
You're almost ready to wrap up this book. You've learned a lot along the way; there are two final things to cover.
In the next chapter, we will learn about both unit testing and functional testing. While a core principle of test-driven development is to write the unit tests before writing the application, we've done it the other way around and put the chapter about unit testing at the end of this book. That's not to say unit testing is unimportant, because it is extremely important.
In the final chapter, we'll explore how to harden our application, and application infrastructure, against attackers.
nit testing has become a primary part of good software development practice. It is a method by which individual units of source code are tested to ensure proper functioning. Each unit is theoretically the smallest testable part of an application. In a Node.js application, you might consider each module as a unit.
In unit testing, each unit is tested separately, isolating the unit under test as much as possible from other parts of the application. If a test fails, you would want it to be due to a bug in your code rather than a bug in the package that your code happens to use. A common technique is to use mock objects or mock data to isolate individual parts of the application from one another.
Functional testing, on the other hand, doesn't try to test individual components, but instead it tests the whole system. Generally speaking, unit testing is performed by the development team, and functional testing is performed by a Quality Assurance (QA) or Quality Engineering (QE) team. Both testing models are needed to fully certify an application. An analogy might be that unit testing is similar to ensuring that each word in a sentence is correctly spelled, while functional testing ensures that the paragraph containing that sentence has a good structure.
In this chapter, we'll cover:
Node.js has a useful built-in testing tool, the assert module. Its functionality is similar to assert libraries in other languages. Namely, it's a collection of functions for testing conditions, and if the conditions indicate an error, the assert function throws an exception.
At its simplest, a test suite is a series of assert calls to validate the behavior of a thing being tested. For example, a test suite could instantiate the user authentication service, then make an API call, using assert methods to validate the result, then make another API call, validating its results, and so on.
Consider a code snippet like this, which you could save in a file named deleteFile.js:
const fs = require('fs');
exports.deleteFile = function(fname, callback) {
fs.stat(fname, (err, stats) => {
if (err) callback(new Error(`the file ${fname} does not exist`));
else {
fs.unlink(fname, err2 => {
if (err) callback(new Error(`could not delete ${fname}`));
else callback();
});
}
});
};
The first thing to notice is this contains several layers of asynchronous callback functions. That presents a couple of challenges:
The following is an example of using assert for testing. Create a file named test-deleteFile.js containing the following:
const fs = require('fs');
const assert = require('assert');
const df = require('./deleteFile');
df.deleteFile("no-such-file", (err) => {
assert.throws(
function() { if (err) throw err; },
function(error) {
if ((error instanceof Error)
&& /does not exist/.test(error)) {
return true;
} else return false;
},
"unexpected error"
);
});
This is what's called a negative test scenario, in that it's testing whether requesting to delete a nonexistent file throws an error.
If you are looking for a quick way to test, the assert module can be useful when used this way. If it runs and no messages are printed, then the test passes. But, did it catch the instance of the deleteFile callback never being called?
$ node test-deleteFile.js
The assert module is used by many of the test frameworks as a core tool for writing test cases. What the test frameworks do is create a familiar test suite and test case structure to encapsulate your test code.
There are many styles of assertion libraries available in Node.js. Later in this chapter, we'll use the Chai assertion library (http://chaijs.com/) which gives you a choice between three different assertion styles (should, expect, and assert).
Let's start our unit testing journey with the data models we wrote for the Notes application. Because this is unit testing, the models should be tested separately from the rest of the Notes application.
In the case of most of the Notes models, isolating their dependencies implies creating a mock database. Are you going to test the data model or the underlying database? Mocking out a database means creating a fake database implementation, which does not look like a productive use of our time. You can argue that testing a data model is really about testing the interaction between your code and the database, that mocking out the database means not testing that interaction, and therefore we should test our code against the database engine used in production.
With that line of reasoning in mind, we'll skip mocking out the database, and instead run the tests against a database containing test data. To simplify launching the test database, we'll use Docker to start and stop a version of the Notes application stack that's set up for testing.
If you haven't already done so, duplicate the source tree to use in this chapter. For example, if you had a directory named chap10, create one named chap11 containing everything from chap10.
In the notes directory, create a new directory named test.
Mocha (http://mochajs.org/) is one of many test frameworks available for Node.js. As you'll see shortly, it helps us write test cases and test suites, and it provides a test results reporting mechanism. It was chosen over the alternatives because it supports Promises. It fits very well with the Chai assertion library mentioned earlier. And, we'll need to use ES6 modules from test suites written in CommonJS, and therefore we must use the esm module.
You may find references to an earlier @std/esm module. That module has been deprecated, with esm put in its place.
While in the notes/test directory, type this to install Mocha, Chai, and esm:
$ npm init
... answer the questions to create package.json
$ npm install mocha@5.x chai@4.1.x esm --save
Because we have several Notes models, the test suite should run against any model. We can write tests using the Notes model API we developed, and an environment variable should be used to declare the model to test.
Because we've written the Notes application using ES6 modules, we have a small challenge to overcome. Mocha only supports running tests in CommonJS modules, and Node.js (as of this writing) does not support loading an ES6 module from a CommonJS module. An ES6 module can use import to load a CommonJS module, but a CommonJS module cannot use require to load an ES6 module. There are various technical reasons behind this, the bottom line is that we're limited in this way.
Because Mocha requires that tests be CommonJS modules, we're in the position of having to load an ES6 module into a CommonJS module. A module, esm, exists which allows that combination to work. If you'll refer back, we installed that module in the previous section. Let's see how to use it.
In the test directory, create a file named test-model.js containing this as the outer shell of the test suite:
'use strict';
require = require("esm")(module,{"esm":"js"});
const assert = require('chai').assert;
const model = require('../models/notes'); describe("Model Test", function() { .. });
The support to load ES6 modules is enabled by the require('esm') statement shown here. It replaces the standard require function with one from the esm module. That parameter list at the end enables the feature to load ES6 modules in a CommonJS module. Once you've done this, your CommonJS module can load an ES6 module as evidenced by require('../models/notes') a couple of lines later.
The Chai library supports three flavors of assertions. We're using the assert style here, but it's easy to use a different style if you prefer. For the other styles supported by Chai, see http://chaijs.com/guide/styles/.
Chai's assertions include a very long list of useful assertion functions, see http://chaijs.com/api/assert/.
The Notes model to test must be selected with the NOTES_MODEL environment variable. For the models that also consult environment variables, we'll need to supply that configuration as well.
With Mocha, a test suite is contained within a describe block. The first argument is descriptive text, which you use to tailor the presentation of test results.
Rather than maintaining a separate test database, we can create one on the fly while executing tests. Mocha has what are called hooks, which are functions executed before or after test case execution. The hook functions let you, the test suite author, set up and tear down required conditions for the test suite to operate as desired. For example, to create a test database with known test content:
describe("Model Test", function() {
beforeEach(async function() {
try {
const keyz = await model.keylist();
for (let key of keyz) {
await model.destroy(key);
}
await model.create("n1", "Note 1", "Note 1");
await model.create("n2", "Note 2", "Note 2");
await model.create("n3", "Note 3", "Note 3");
} catch (e) {
console.error(e);
throw e;
}
});
..
});
This defines a beforeEach hook, which is executed before every test case. The other hooks are before, after, beforeEach, and afterEach. The each hooks are triggered before or after each test case execution.
This is meant to be a cleanup/preparation step before every test. It uses our Notes API to first delete all notes from the database (if any) and then create a set of new notes with known characteristics. This technique simplifies tests by ensuring that we have known conditions to test against.
We also have a side effect of testing the model.keylist and model.create methods.
In Mocha, a series of test cases are encapsulated with a describe block, and written using an it block. The describe block is meant to describe that group of tests, and the it block is for checking assertions on a specific aspect of the thing being tested. You can nest the describe blocks as deeply as you like:
describe("check keylist", function() {
it("should have three entries", async function() {
const keyz = await model.keylist();
assert.exists(keyz);
assert.isArray(keyz);
assert.lengthOf(keyz, 3);
});
it("should have keys n1 n2 n3", async function() {
const keyz = await model.keylist();
assert.exists(keyz);
assert.isArray(keyz);
assert.lengthOf(keyz, 3);
for (let key of keyz) {
assert.match(key, /n[123]/, "correct key");
}
});
it("should have titles Node #", async function() {
const keyz = await model.keylist();
assert.exists(keyz);
assert.isArray(keyz);
assert.lengthOf(keyz, 3);
var keyPromises = keyz.map(key => model.read(key));
const notez = await Promise.all(keyPromises);
for (let note of notez) {
assert.match(note.title, /Note [123]/, "correct title");
}
});
});
The idea is to call Notes API functions, then to test the results to check whether they matched the expected results.
This describe block is within the outer describe block. The descriptions given in the describe and it blocks are used to make the test report more readable. The it block forms a pseudo-sentence along the lines of it (the thing being tested) should do this or that.
Even though Mocha requires regular functions for the describe and it blocks, we can use arrow functions within those functions.
How does Mocha know whether the test code passes? How does it know when the test finishes? This segment of code shows one of the three methods.
Generally, Mocha is looking to see if the function throws an exception, or whether the test case takes too long to execute (a timeout situation). In either case, Mocha will indicate a test failure. That's of course simple to determine for non-asynchronous code. But, Node.js is all about asynchronous code, and Mocha has two models for testing asynchronous code.
In the first (not seen here), Mocha passes in a callback function, and the test code is to call the callback function. In the second, as seen here, it looks for a Promise being returned by the test function, and determines pass/fail on whether the Promise is in the resolve or reject state.
In this case, we're using async functions, because they automatically return a Promise. Within the functions, we're calling asynchronous functions using await, ensuring any thrown exception is indicated as a rejected Promise.
Another item to note is the question asked earlier: what if the callback function we're testing is never called? Or, what if a Promise is never resolved? Mocha starts a timer and if the test case does not finish before the timer expires, Mocha fails the test case.
We have more tests to write, but let's first get set up to run the tests. The simplest model to test is the in-memory model. Let's add this to the scripts section of notes/test/package.json:
"test-notes-memory": "NOTES_MODEL=memory mocha test-model",
To install dependencies, we must run npm install in both the notes/test and notes directories. That way both the dependencies for the test code, and the dependencies for Notes, are installed in their correct place.
Then, we can run it as follows:
$ npm run test-notes-memory
> notes-test@1.0.0 test-notes-memory /Users/david/chap11/notes/test
> NOTES_MODEL=memory mocha test-model
Model Test
check keylist
√ should have three entries
√ should have keys n1 n2 n3
√ should have titles Node #
3 passing (18ms)
The mocha command is used to run the test suite.
The structure of the output follows the structure of the describe and it blocks. You should set up the descriptive text strings so it reads nicely.
That wasn't enough to test much, so let's go ahead and add some more tests:
describe("read note", function() {
it("should have proper note", async function() {
const note = await model.read("n1");
assert.exists(note);
assert.deepEqual({ key: note.key, title: note.title, body:
note.body }, {
key: "n1", title: "Note 1 FAIL", body: "Note 1"
});
});
it("Unknown note should fail", async function() {
try {
const note = await model.read("badkey12");
assert.notExists(note);
throw new Error("should not get here");
} catch(err) {
// this is expected, so do not indicate error
assert.notEqual(err.message, "should not get here");
}
});
});
describe("change note", function() {
it("after a successful model.update", async function() {
const newnote = await model.update("n1", "Note 1 title
changed", "Note 1 body changed");
const note = await model.read("n1");
assert.exists(note);
assert.deepEqual({ key: note.key, title: note.title, body:
note.body }, {
key: "n1", title: "Note 1 title changed", body: "Note 1 body
changed"
});
});
});
describe("destroy note", function() {
it("should remove note", async function() {
await model.destroy("n1");
const keyz = await model.keylist();
assert.exists(keyz);
assert.isArray(keyz);
assert.lengthOf(keyz, 2);
for (let key of keyz) {
assert.match(key, /n[23]/, "correct key");
}
});
it("should fail to remove unknown note", async function() {
try {
await model.destroy("badkey12");
throw new Error("should not get here");
} catch(err) {
// this is expected, so do not indicate error
assert.notEqual(err.message, "should not get here");
}
});
});
after(function() { model.close(); });
});
Notice that for the negative tests – where the test passes if an error is thrown – we run it in a try/catch block. The throw new Error line in each case should not execute because the preceding code should throw an error. Therefore, we can check if the message in that thrown error is the message which arrives, and fail the test if that's the case.
Now, the test report:
$ npm run test-notes-memory
> notes-test@1.0.0 test-notes-memory /Users/david/chap11/notes/test
> NOTES_MODEL=memory mocha test-model
Model Test
check keylist
√ should have three entries
√ should have keys n1 n2 n3
√ should have titles Node #
read note
√ should have proper note
√ Unknown note should fail
change note
√ after a successful model.update
destroy note
√ should remove note
√ should fail to remove unknown note
8 passing (17ms)
In these additional tests, we have a couple of negative tests. In each test that we expect to fail, we supply a notekey that we know is not in the database, and we then ensure that the model gives us an error.
The Chai Assertions API includes some very expressive assertions. In this case, we've used the deepEqual method which does a deep comparison of two objects. In our case, it looks like this:
assert.deepEqual({ key: note.key, title: note.title, body: note.body }, {
key: "n1", title: "Note 1", body: "Note 1"
});This reads nicely in the test code, but more importantly a reported test failure looks very nice. Since these are currently passing, try introducing an error by changing one of the expected value strings. Upon rerunning the test, you'll see:
Model Test
check keylist
√ should have three entries
√ should have keys n1 n2 n3
√ should have titles Node #
read note
1) should have proper note
√ Unknown note should fail
change note
√ after a successful model.update
destroy note
√ should remove note
√ should fail to remove unknown note
7 passing (42ms)
1 failing
1) Model Test
read note
should have proper note:
AssertionError: expected { Object (key, title, ...) } to deeply
equal { Object (key, title, ...) }
+ expected - actual
{
"body": "Note 1"
"key": "n1"
- "title": "Note 1"
+ "title": "Note 1 FAIL"
}
at Context.<anonymous> (test-model.js:53:16)
at <anonymous>
At the top is the status report of each test case. For one test, instead of a check mark is a number, and the number corresponds to the reported details at the bottom. Mocha presents test failures this way when the spec reporter is used. Mocha supports other test report formats, some of which produce data that can be sent into test status reporting systems. For more information, see https://mochajs.org/#reporters.
In this case, the failure was detected by a deepEqual method, which presents the detected object inequality in this way.
That was good, but we obviously won't run Notes in production with the in-memory Notes model. This means that we need to test all the other models.
Testing the LevelUP and filesystem models is easy, just add this to the scripts section of package.json:
"test-notes-levelup": "NOTES_MODEL=levelup mocha", "test-notes-fs": "NOTES_MODEL=fs mocha",
Then run the following command:
$ npm run test-notes-fs $ npm run test-notes-levelup
This will produce a successful test result.
The simplest database to test is SQLite3, since it requires zero setup. We have two SQLite3 models to test, let's start with notes-sqlite3.js. Add the following to the scripts section of package.json:
"test-notes-sqlite3": "rm -f chap11.sqlite3 && sqlite3 chap11.sqlite3 --init ../models/chap07.sql </dev/null && NOTES_MODEL=sqlite3 SQLITE_FILE=chap11.sqlite3 mocha test-model",
This command sequence puts the test database in the chap11.sqlite3 file. It first initializes that database using the sqlite3 command-line tool. Note that we've connected its input to /dev/null because the sqlite3 command will prompt for input otherwise. Then, it runs the test suite passing in environment variables required to run against the SQLite3 model.
Running the test suite does find two errors:
$ npm run test-notes-sqlite3
> notes-test@1.0.0 test-notes-sqlite3 /Users/david/chap11/notes/test
> rm -f chap11.sqlite3 && sqlite3 chap11.sqlite3 --init ../models/chap07.sql </dev/null && NOTES_MODEL=sqlite3 SQLITE_FILE=chap11.sqlite3 mocha test-model
Model Test
check keylist
√ should have three entries
√ should have keys n1 n2 n3
√ should have titles Node #
read note
√ should have proper note
1) Unknown note should fail
change note
√ after a successful model.update (114ms)
destroy note
√ should remove note (103ms)
2) should fail to remove unknown note
6 passing (6s)
2 failing
1) Model Test
read note
Unknown note should fail:
Uncaught TypeError: Cannot read property 'notekey' of undefined
at Statement.db.get (/home/david/nodewebdev/node-web-development-
code-4th-edition/chap11/notes/models/notes-sqlite3.mjs:64:39)
2) Model Test
destroy note
should fail to remove unknown note:
AssertionError: expected 'should not get here' to not equal
'should not get here'
+ expected - actual
The failing test calls model.read("badkey12"), a key which we know does not exist. Writing negative tests paid off. The failing line of code at models/notes-sqlite3.mjs (line 64) reads as follows:
const note = new Note(row.notekey, row.title, row.body);
It's easy enough to insert console.log(util.inspect(row)); just before this and learn that, for the failing call, SQLite3 gave us undefined for row, explaining the error message.
The test suite calls the read function multiple times with a notekey value that does exist. Obviously, when given an invalid notekey value, the query gives an empty results set and SQLite3 invokes the callback with both the undefined error and the undefined row values. This is common behavior for database modules. An empty result set isn't an error, and therefore we received no error and an undefined row.
In fact, we saw this behavior earlier with models/notes-sequelize.mjs. The equivalent code in models/notes-sequelize.mjs does the right thing, and it has a check, which we can adapt. Let's rewrite the read function in models/notes-sqlite.mjs to this:
export async function read(key) {
var db = await connectDB();
var note = await new Promise((resolve, reject) => {
db.get("SELECT * FROM notes WHERE notekey = ?", [ key ], (err, row)
=> {
if (err) return reject(err);
if (!row) { reject(new Error(`No note found for ${key}`)); }
else {
const note = new Note(row.notekey, row.title, row.body);
resolve(note);
}
});
});
return note;
}
This is simple, we just check whether row is undefined and, if so, throw an error. While the database doesn't see an empty results set as an error, Notes does. Furthermore, Notes already knows how to deal with a thrown error in this case. Make this change and that particular test case passes.
There is a second similar error in the destroy logic. The test to destroy a nonexistent note fails to produce an error at this line:
await model.destroy("badkey12");
If we inspect the other models, they're throwing errors for a nonexistent key. In SQL, it obviously is not an error if this SQL (from models/notes-sqlite3.mjs) does not delete anything:
db.run("DELETE FROM notes WHERE notekey = ?;", ... );
Unfortunately, there isn't a SQL option to make this SQL statement fail if it does not delete any records. Therefore, we must add a check to see if a record exists. Namely:
export async function destroy(key) {
const db = await connectDB();
const note = await read(key);
return await new Promise((resolve, reject) => {
db.run("DELETE FROM notes WHERE notekey = ?;", [ key ], err =>
{
if (err) return reject(err);
resolve();
});
});
}
Therefore, we read the note and as a byproduct we verify the note exists. If the note doesn't exist, read will throw an error, and the DELETE operation will not even run.
These are the bugs we referred to in Chapter 7, Data Storage and Retrieval. We simply forgot to check for these conditions in this particular model. Thankfully, our diligent testing caught the problem. At least, that's the story to tell the managers rather than telling them that we forgot to check for something we already knew could happen.
Now that we've fixed models/notes-sqlite3.mjs, let's also test models/notes-sequelize.mjs using the SQLite3 database. To do this, we need a connection object to specify in the SEQUELIZE_CONNECT variable. While we can reuse the existing one, let's create a new one. Create a file named test/sequelize-sqlite.yaml containing this:
dbname: notestest
username:
password:
params:
dialect: sqlite
storage: notestest-sequelize.sqlite3
logging: false
This way, we don't overwrite the production database instance with our test suite. Since the test suite destroys the database it tests, it must be run against a database we are comfortable destroying. The logging parameter turns off the voluminous output Sequelize produces so that we can read the test results report.
Add the following to the scripts section of package.json:
"test-notes-sequelize-sqlite": "NOTES_MODEL=sequelize SEQUELIZE_CONNECT=sequelize-sqlite.yaml mocha test-model"
Then run the test suite:
$ npm run test-notes-sequelize-sqlite .. 8 passing (2s)
We pass with flying colors! We've been able to leverage the same test suite against multiple Notes models. We even found two bugs in one model. But, we have two test configurations remaining to test.
Our test results matrix reads as follows:
The two untested models both require the setup of a database server. We avoided testing these combinations, but our manager won't accept that excuse because the CEO needs to know we've completed the test cycles. Notes must be tested in a similar configuration to the production environment.
In production, we'll be using a regular database server, of course, with MySQL or MongoDB being the primary choices. Therefore, we need a way that incurs a low overhead to run tests against those databases. Testing against the production configuration must be so easy that we should feel no resistance in doing so, to ensure that tests are run often enough to make the desired impact.
Fortunately, we've already had experience of a technology that supports easily creating and destroying the deployment infrastructure. Hello, Docker!
One advantage Docker gives is the ability to install the production environment on our laptop. It's then very easy to push the same Docker setup to the cloud-hosting environment for staging or production deployment.
What we'll do in this section is demonstrate reusing the Docker Compose configuration defined previously for test infrastructure, and to automate executing the Notes test suite inside the containers using a shell script. Generally speaking, it's important to replicate the production environment when running tests. Docker can make this an easy thing to do.
Using Docker, we'll be able to easily test against a database, and have a simple method for starting and stopping a test version of our production environment. Let's get started.
We had a great experience using Docker Compose to orchestrate Notes application deployment. The whole system, with four independent services, is easily described in compose/docker-compose.yml. What we'll do is duplicate the Compose file, then make a couple of small changes required to support test execution.
Let's start by making a new directory, test-compose, as a sibling to the notes, users, and compose directories. Copy compose/docker-compose.yml to the newly created test-compose directory. We'll be making several changes to this file and a couple of small changes to the existing Dockerfiles.
We want to change the container and network names so our test infrastructure doesn't clobber the production infrastructure. We'll constantly delete and recreate the test containers, so as to keep the developers happy, we'll leave development infrastructure alone and perform testing on separate infrastructure. By maintaining separate test containers and networks, our test scripts can do anything they like without disturbing the development or production containers.
Consider this change to the db-auth and db-notes containers:
db-userauth-test:
build: ../authnet
container_name: db-userauth-test
networks:
- authnet-test
environment:
MYSQL_RANDOM_ROOT_PASSWORD: "true"
MYSQL_USER: userauth-test
MYSQL_PASSWORD: userauth-test
MYSQL_DATABASE: userauth-test
volumes:
- db-userauth-test-data:/var/lib/mysql
restart: always .. db-notes-test:
build: ../frontnet
container_name: db-notes-test
networks:
- frontnet-test
environment:
MYSQL_RANDOM_ROOT_PASSWORD: "true"
MYSQL_USER: notes-test
MYSQL_PASSWORD: notes12345
MYSQL_DATABASE: notes-test
volumes:
- db-notes-test-data:/var/lib/mysql
restart: always
This is the same as earlier, but with -test appended to container and network names.
That's the first change we must make, append -test to every container and network name in test-compose/docker-compose.yml. Everything we'll do with tests will run on completely separate containers, hostnames, and networks from those of the development instance.
This change will affect the notes-test and userauth-test services because the database server hostnames are now db-auth-test and db-notest-test. There are several environment variables or configuration files to update.
Another consideration is the environment variables required to configure the services. Previously, we defined all environment variables in the Dockerfiles. It's extremely useful to reuse those Dockerfiles so we know we're testing the same deployment as is used in production. But we need to tweak the configuration settings to match the test infrastructure.
The database configuration shown here is an example. The same Dockerfiles are used, but we also define environment variables in test-compose/docker-compose.yml. As you might expect, this overrides the Dockerfile environment variables with the values set here:
userauth-test:
build: ../users
container_name: userauth-test
depends_on:
- db-userauth-test
networks:
- authnet-test
- frontnet-test
environment:
DEBUG: ""
NODE_ENV: "test"
SEQUELIZE_CONNECT: "sequelize-docker-test-mysql.yaml"
HOST_USERS_TEST: "localhost"
restart: always
volumes:
- ./reports-userauth:/reports .. notes-test:
build: ../notes
container_name: notes-test
depends_on:
- db-notes-test
networks:
- frontnet-test
ports:
- "3000:3000"
restart: always
environment:
NODE_ENV: "test"
SEQUELIZE_CONNECT: "test/sequelize-mysql.yaml"
USER_SERVICE_URL: "http://userauth-test:3333"
volumes:
- ./reports-notes:/reports
...
networks:
frontnet-test:
driver: bridge
authnet-test:
driver: bridge
volumes:
db-userauth-test-data:
db-notes-test-data:
Again, we changed the container and network names to append -test. We moved some of the environment variables from Dockerfile to test-compose/docker-compose.yml. Finally, we added some data volumes to mount host directories inside the container.
Another thing to do is to set up directories to store test code. A common practice in Node.js projects is to put test code in the same directory as the application code. Earlier in this chapter, we did so, implementing a small test suite in the notes/test directory. As it stands, notes/Dockerfile does not copy that directory into the container. The test code must exist in the container to execute the tests. Another issue is it's helpful to not deploy test code in production.
What we can do is to ensure that test-compose/docker-compose.yml mounts notes/test into the container:
notes-test:
...
volumes:
- ./reports-notes:/reports
- ../notes/test:/notesapp/test
This gives us the best of both worlds.
We have a couple of configuration files remaining for the Sequelize database connection to set up.
For the userauth-test container, the SEQUELIZE_CONNECT variable now refers to a configuration file that does not exist, thanks to overriding the variable in user/Dockerfile. Let's create that file as test-compose/userauth/sequelize-docker-mysql.yaml, containing the following:
dbname: userauth-test
username: userauth-test
password: userauth-test
params:
host: db-userauth-test
port: 3306
dialect: mysql
The values match the variables passed to the db-userauth-test container. Then we must ensure this configuration file is mounted into the userauth-test container:
userauth-test:
...
volumes:
- ./reports-userauth:/reports
- ./userauth/sequelize-docker-test-mysql.yaml:/userauth/sequelize-
docker-test-mysql.yaml
For notes-test we have a configuration file, test/sequelize-mysql.yaml, to put in the notes/test directory:
dbname: notes-test
username: notes-test
password: notes12345
params:
host: db-notes-test
port: 3306
dialect: mysql
logging: false
Again, this matches the configuration variables in db-notes-test. In test-compose/docker-compose.yml, we mount that file into the container.
Now we're ready to execute some of the tests inside a container. We've used a Docker Compose file to describe the test environment for the Notes application, using the same architecture as in the production environment. The test scripts and configuration has been injected into the containers. The question is, how do we automate test execution?
The technique we'll use is to run a shell script, and use docker exec -it to execute commands to run the test scripts. This is somewhat automated, and with some more work it can be fully automated.
In test-compose, let's make a shell script called run.sh (on Windows, run.ps1):
docker-compose stop
docker-compose build
docker-compose up --force-recreate -d
docker ps
docker network ls
sleep 20
docker exec -it --workdir /notesapp/test -e DEBUG= notes-test npm install
docker exec -it --workdir /notesapp/test -e DEBUG= notes-test npm run test-notes-memory
docker exec -it --workdir /notesapp/test -e DEBUG= notes-test npm run test-notes-fs
docker exec -it --workdir /notesapp/test -e DEBUG= notes-test npm run test-notes-levelup
docker exec -it --workdir /notesapp/test -e DEBUG= notes-test npm run test-notes-sqlite3
docker exec -it --workdir /notesapp/test -e DEBUG= notes-test npm run test-notes-sequelize-sqlite
docker exec -it --workdir /notesapp/test -e DEBUG= notes-test npm run test-notes-sequelize-mysql
docker-compose stop
That makes the first real step to building the containers, followed by bringing them up. The script sleeps for a few seconds to give the containers time to fully instantiate themselves.
The subsequent commands all follow a particular pattern that is important to understand. The commands are executed in the /notesapp/test directory thanks to the --workdir option. Remember that directory is injected into the container by the Docker Compose file.
Using -e DEBUG= we've disabled the DEBUG options. If those options are set, we'd have excess unwanted output in the test results, so using this option ensures that debugging output doesn't occur.
Now that you understand the options, you can see that the subsequent commands are all executed in the test directory using the package.json in that directory. It starts by running npm install, and then running each of the scenarios in the test matrix.
To run the tests, simply type:
$ sh -x run.sh
That's good, we've got most of our test matrix automated and pretty well squared away. There is a glaring hole in the test matrix and plugging that hole will let us see how to set up MongoDB under Docker.
In Chapter 7, Data Storage and Retrieval, we developed MongoDB support for Notes, and since then we've focused on Sequelize. To make up for that slight, let's make sure we at least test our MongoDB support. Testing on MongoDB would simply require defining a container for the MongoDB database and a little bit of configuration.
Visit https://hub.docker.com/_/mongo/ for the official MongoDB container. You'll be able to retrofit this to allow deploying the Notes application running on MongoDB.
Add this to test-compose/docker-compose.yml:
db-notes-mongo-test:
image: mongo:3.6-jessie
container_name: db-notes-mongo-test
networks:
- frontnet-test
volumes:
- ./db-notes-mongo:/data/db
That's all that's required to add a MongoDB container to a Docker Compose file. We've connected it to frontnet so that the notes (notes-test) container can access the service.
Then in notes/test/package.json we add a line to facilitate running tests on MongoDB:
"test-notes-mongodb": "MONGO_URL=mongodb://db-notes-mongo-test/ MONGO_DBNAME=chap11-test NOTES_MODEL=mongodb mocha --no-timeouts test-model"
Simply by adding the MongoDB container to frontnet-test, the database is available at the URL shown here. Hence, it's simple to now run the test suite using the Notes MongoDB model.
The --no-timeouts option was necessary to avoid a spurious error while testing the suite against MongoDB. This option instructs Mocha to not check whether a test case execution takes too long.
The final requirement is to add this line in run.sh (or run.ps1 for Windows):
docker exec -it --workdir /notesapp/test -e DEBUG= notes-test npm run test-notes-mongodb
That, then, ensures MongoDB is tested during every test run.
We can now report to the manager the final test results matrix:
The manager will tell you "good job" and then remember that the Models are only a portion of the Notes application. We've left two areas completely untested:
Let's get on with those testing areas.
It's now time to turn our attention to the user authentication service. We've mentioned tests of this service, saying that we'll get to them later. We had developed some scripts for ad hoc testing, which have been useful all along. But later is now, and it's time to get cracking on some real tests.
There's a question of which tool to use for testing the authentication service. Mocha does a good job of organizing a series of test cases, and we should reuse it here. But the thing we have to test is a REST service. The customer of this service, the Notes application, uses it through the REST API, giving us a perfect rationalization to test at the REST interface. Our ad hoc scripts used the SuperAgent library to simplify making REST API calls. There happens to be a companion library, SuperTest, that is meant for REST API testing. Read its documentation here: https://www.npmjs.com/package/supertest.
We've already made the test-compose/userauth directory. In that directory, create a file named test.js:
'use strict';
const assert = require('chai').assert;
const request = require('supertest')(process.env.URL_USERS_TEST);
const util = require('util');
const url = require('url');
const URL = url.URL;
const authUser = 'them';
const authKey = 'D4ED43C0-8BD6-4FE2-B358-7C0E230D11EF';
describe("Users Test", function() {
... Test code follows
});
This sets up Mocha and the SuperTest client. The URL_USERS_TEST environment variable specifies the base URL of the server to run the test against. You'll almost certainly be using http://localhost:3333 given the configuration we've used earlier in the book. SuperTest initializes itself a little differently to SuperAgent. The SuperTest module exposes a function that we call with the URL_USERS_TEST environment variable, then we use THAT request object throughout the rest of the script to make REST API requests.
This variable was already set in test-compose/docker-compose.yml with the required value. The other thing of importance is a pair of variables to store the authentication user ID and key:
beforeEach(async function() {
await request.post('/create-user')
.send({
username: "me", password: "w0rd", provider: "local",
familyName: "Einarrsdottir", givenName: "Ashildr",
middleName: "",
emails: [], photos: []
})
.set('Content-Type', 'application/json')
.set('Acccept', 'application/json')
.auth(authUser, authKey);
});
afterEach(async function() {
await request.delete('/destroy/me')
.set('Content-Type', 'application/json')
.set('Acccept', 'application/json')
.auth(authUser, authKey);
});
If you remember, the beforeEach function is run immediately before every test case, and afterEach is run afterward. These functions use the REST API to create our test user before running the test, and then afterward to destroy the test user. That way our tests can assume this user will exist:
describe("List user", function() {
it("list created users", async function() {
const res = await request.get('/list')
.set('Content-Type', 'application/json')
.set('Acccept', 'application/json')
.auth(authUser, authKey);
assert.exists(res.body);
assert.isArray(res.body);
assert.lengthOf(res.body, 1);
assert.deepEqual(res.body[0], {
username: "me", id: "me", provider: "local",
familyName: "Einarrsdottir", givenName: "Ashildr",
middleName: "",
emails: [], photos: []
});
});
});
Now, we can turn to testing some API methods, such as the /list operation.
We have already guaranteed that there is an account, in the beforeEach method, so /list should give us an array with one entry.
This follows the general pattern for using Mocha to test a REST API method. First, we use SuperTest's request object to call the API method, and await its result. Once we have the result, we use assert methods to validate it is what is expected:
describe("find user", function() {
it("find created users", async function() {
const res = await request.get('/find/me')
.set('Content-Type', 'application/json')
.set('Acccept', 'application/json')
.auth(authUser, authKey);
assert.exists(res.body);
assert.isObject(res.body);
assert.deepEqual(res.body, {
username: "me", id: "me", provider: "local",
familyName: "Einarrsdottir", givenName: "Ashildr",
middleName: "",
emails: [], photos: []
});
});
it("fail to find non-existent users", async function() {
var res;
try {
res = await request.get('/find/nonExistentUser')
.set('Content-Type', 'application/json')
.set('Acccept', 'application/json')
.auth(authUser, authKey);
} catch(e) {
return; // Test is okay in this case
}
assert.exists(res.body);
assert.isObject(res.body);
assert.deepEqual(res.body, {});
});
});
We are checking the /find operation in two ways:
Add this test case:
describe("delete user", function() {
it("delete nonexistent users", async function() {
var res;
try {
res = await request.delete('/destroy/nonExistentUser')
.set('Content-Type', 'application/json')
.set('Acccept', 'application/json')
.auth(authUser, authKey);
} catch(e) {
return; // Test is okay in this case
}
assert.exists(res);
assert.exists(res.error);
assert.notEqual(res.status, 200);
});
});
Finally, we should check the /destroy operation. We already check this operation in the afterEach method, where we destroy a known user account. We need to also perform the negative test and verify its behavior against an account we know does not exist.
The desired behavior is that either an error is thrown, or the result shows an HTTP status indicating an error. In fact, the current authentication server code gives a 500 status code along with some other information.
In test-compose/docker-compose.yml, we need to inject this script, test.js, into the userauth-test container. We'll add that here:
userauth-test:
...
volumes:
- ./reports-userauth:/reports
- ./userauth/sequelize-docker-test-mysql.yaml:/userauth/sequelize-docker-test-mysql.yaml
- ./userauth/test.js:/userauth/test.js
We have a test script, and have injected that script into the desired container (userauth-test). The next step is to automate running this test. One way is to add this to run.sh (aka run.ps1 on Windows):
docker exec -it -e DEBUG= userauth-test npm install supertest mocha chai
docker exec -it -e DEBUG= userauth-test ./node_modules/.bin/mocha test.js
Now, if you run the run.sh test script you'll see the required packages get installed, and then this test suite execution.
It's cool we have automated test execution, and Mocha makes the test results look nice with all those check marks. What if the management wants a graph of test failure trends over time? Or there could be any number of reasons to report test results as data rather than a user-friendly printout on the console.
Mocha uses what's called a Reporter to report test results. A Mocha Reporter is a module that prints data in whatever format it supports. Information is on the Mocha website: https://mochajs.org/#reporters.
You will find the current list of available reporters like so:
# mocha --reporters
dot - dot matrix
doc - html documentation
spec - hierarchical spec list
json - single json object
progress - progress bar
list - spec-style listing
tap - test-anything-protocol
...
Then you use a specific reporter like so:
# mocha --reporter tap test
1..4
ok 1 Users Test List user list created users
ok 2 Users Test find user find created users
ok 3 Users Test find user fail to find non-existent users
ok 4 Users Test delete user delete nonexistent users
# tests 4
# pass 4
# fail 0
Test Anything Protocol (TAP) is a widely used test results format, increasing the possibility of finding higher level reporting tools. Obviously, the next step would be to save the results into a file somewhere, after mounting a host directory into the container.
A big cost area in testing is manual user interface testing. Therefore, a wide range of tools have been developed to automate running tests at the HTTP level. Selenium is a popular tool implemented in Java, for example. In the Node.js world, we have a few interesting choices. The chai-http plugin to Chai would let us interact at the HTTP level with the Notes application, while staying within the now-familiar Chai environment.
However, for this section, we'll use Puppeteer (https://github.com/GoogleChrome/puppeteer). This tool is a high-level Node.js module to control a headless Chrome or Chromium browser, using the DevTools protocol. That protocol allows tools to instrument, inspect, debug, and profile Chromium or Chrome.
Puppeteer is meant to be a general purpose test automation tool, and has a strong feature set for that purpose. Because it's easy to make web page screenshots with Puppeteer, it can also be used in a screenshot service.
Because Puppeteer is controlling a real web browser, your user interface tests will be very close to live browser testing without having to hire a human to do the work. Because it uses a headless version of Chrome, no visible browser window will show on your screen, and tests can be run in the background, instead. A downside to this attractive story is that Puppeteer only works against Chrome. Meaning that an automated test against Chrome does not test your application against other browsers, such as Opera or Firefox.
Let's first set up the directory and install the packages:
$ mkdir test-compose/notesui
$ cd test-compose/notesui
$ npm init
... answer the questions
$ npm install puppeteer@1.1.x mocha@5.x chai@4.1.x --save
During installation, you'll see that Puppeteer causes the download of Chromium like so:
Downloading Chromium r497674 - 92.5 Mb [====================] 100% 0.0s
The puppeteer module will launch that Chromium instance as needed, managing it as a background process, and communicating with it using the DevTools protocol.
In the script we're about to write, we need a user account that we can use to log in and perform some actions. Fortunately, we already have a script to set up a test account. In users/package.json, add this line to the scripts section:
"setupuser": "PORT=3333 node users-add",
We're about to write this test script, but let's finish the setup, the final bit of which is adding these lines to run.sh:
docker exec -it userauth-test npm run setupuser docker exec -it notesapp-test npm run test-docker-ui
When executed, these two lines ensure that the test user is set up, and it then runs the user interface tests.
While the Notes application displays well in the browser, how do we write test software to distinguish one page from another? The key requirement is for test scripts to inspect the page, determine which page is being displayed, and read the data on the page. That means each HTML element must be easily addressable using a CSS selector.
While developing the Notes application, we forgot to do that, and the Software Quality Engineering (SQE) manager has requested our assistance. At stake is the testing budget, which will be stretched further the more the SQE team can automate their tests.
All that's necessary is to add a few id or class attributes to HTML elements to improve testability. With a few identifiers, and a commitment to maintain those identifiers, the SQE team can write repeatable test scripts to validate the application.
In notes/partials/header.hbs, change these lines:
...
<a id="btnGoHome" class="navbar-brand" href='/'>
...
{{#if user}}
...
<a class="nav-item nav-link btn btn-dark col-auto" id="btnLogout" href="/users/logout">...</a>
<a class="nav-item nav-link btn btn-dark col-auto" id="btnAddNote" href='/notes/add'>...</a>
{{else}}
...
<a class="nav-item nav-link btn btn-dark col-auto" id="btnloginlocal" href="/users/login">..</a>
<a class="nav-item nav-link btn btn-dark col-auto"
id="btnLoginTwitter" href="/users/auth/twitter">...</a>
...
{{/if}}
...
In notes/views/index.hbs, make these changes:
<div id="notesHomePage" class="container-fluid">
<div class="row">
<div id="notetitles" class="col-12 btn-group-vertical" role="group">
{{#each notelist}}
<a id="{{key}}" class="btn btn-lg btn-block btn-outline-dark"
href="/notes/view?key={{ key }}">...</a>
{{/each}}
</div>
</div>
</div>
In notes/views/login.hbs, make these changes:
<div id="notesLoginPage" class="container-fluid">
...
<form id="notesLoginForm" method='POST' action='/users/login'>
...
<button type="submit" id="formLoginBtn" class="btn btn-default">Submit</button>
</form>
...
</div>
In notes/views/notedestroy.hbs, make these changes:
<form id="formDestroyNote" method='POST' action='/notes/destroy/confirm'>
...
<button id="btnConfirmDeleteNote" type="submit" value='DELETE'
class="btn btn-outline-dark">DELETE</button>
...
</form>
In notes/views/noteedit.hbs, make these changes:
<form id="formAddEditNote" method='POST' action='/notes/save'>
...
<button id='btnSave' type="submit" class="btn btn-default">Submit</button>
...
</form>
In notes/views/noteview.hbs, make these changes:
<div id="noteView" class="container-fluid">
...
<p id="showKey">Key: {{ notekey }}</p>
...
<a id="btnDestroyNote" class="btn btn-outline-dark"
href="/notes/destroy?key={{notekey}}" role="button"> ... </a>
<a id="btnEditNote" class="btn btn-outline-dark"
href="/notes/edit?key={{notekey}}" role="button"> ... </a>
<button id="btnComment" type="button" class="btn btn-outline-dark"
data-toggle="modal" data-target="#notes-comment-modal"> ... </button>
...
</div>
What we've done is add id= attributes to selected elements in the templates. We can now easily write CSS selectors to address any element. The engineering team can also start using these selectors in UI code.
In test-compose/notesui, create a file named uitest.js containing the following:
const puppeteer = require('puppeteer');
const assert = require('chai').assert;
const util = require('util');
const { URL } = require('url');
describe('Notes', function() {
this.timeout(10000);
let browser;
let page;
before(async function() {
browser = await puppeteer.launch({ slomo: 500 });
page = await browser.newPage();
await page.goto(process.env.NOTES_HOME_URL);
});
after(async function() {
await page.close();
await browser.close();
});
});
This is the start of a Mocha test suite. In the before function, we set up Puppeteer by launching a Puppeteer instance, starting a new Page object, and telling that Page to go to the Notes application home page. That URL is passed in using the named environment variable.
It's useful to first think about scenarios we might want to verify with the Notes applications:
Here's code for an implementation of the Login scenario:
describe('Login', function() {
before(async function() { ... });
it('should click on login button', async function() {
const btnLogin = await page.waitForSelector('#btnloginlocal');
await btnLogin.click();
});
it('should fill in login form', async function() {
const loginForm = await page.waitForSelector('#notesLoginPage
#notesLoginForm');
await page.type('#notesLoginForm #username', "me");
await page.type('#notesLoginForm #password', "w0rd");
await page.click('#formLoginBtn');
});
it('should return to home page', async function() {
const home = await page.waitForSelector('#notesHomePage');
const btnLogout = await page.waitForSelector('#btnLogout');
const btnAddNote = await page.$('#btnAddNote');
assert.exists(btnAddNote);
});
after(async function() { ... });
});
This test sequence handles the Login Scenario. It shows you a few of the Puppeteer API methods. Documentation of the full API is at https://github.com/GoogleChrome/puppeteer/blob/master/docs/api.md. The Page object encapsulates the equivalent of a browser tab in Chrome/Chromium.
The waitForSelector function does what it says – it waits until an HTML element matching the CSS selector appears, and it will wait over one or more page refreshes. There are several variants of this function to allow waiting for several kinds of things. This function returns a Promise, making it worth our time to use async functions in our test code. The Promise will resolve to an ElementHandle, which is a wrapper around an HTML element, or else throw an exception, which would conveniently make the test fail.
The named element, #btnloginlocal, is in partials/header.hbs, and will show up only when a user is not logged in. Hence, we will have determined that the browser is currently displaying a Notes page, and that it is not logged in.
The click method does what it suggests, and causes a mouse button click on the referenced HTML element. If you want to emulate a tap, such as for a mobile device, there is a tap method for that purpose.
The next stage of the test sequence picks up from that click. The browser should have gone to the Login page, and therefore this CSS selector should become valid: #notesLoginPage #notesLoginForm. What we do next is type text for our test user ID and password into the corresponding form elements, and then click on the Log In button.
The next test stage picks up from there, and the browser should be on the home page as determined by this CSS selector: #notesHomePage. If we were logged in successfully, the page should have Log Out (#btnLogout) and ADD Note buttons (#btnAddNote).
In this case, we've used a different function, $, to check if the ADD Note button exists. Unlike the wait functions, $ simply queries the current page without waiting. If the named CSS Selector is not in the current page, it simply returns null rather than throwing an exception. Therefore, to determine that the element exists, we use assert.exists rather than relying on the thrown exception.
Now that we have one test scenario entered, let's give it a whirl. In one window, start the Notes test infrastructure:
$ cd test-compose
$ docker-compose up --force-rebuild
Then in another window:
$ docker exec -it userauth bash
userauth# PORT=3333 node ./users-add.js
userauth# exit
$ cd test-compare/notesui
$ NOTES_HOME_URL=http://localhost:3000 mocha --no-timeouts uitest.js
Notes
Login
√ should click on login button
√ should fill in login form (72ms)
√ should return to home page (1493ms)
3 passing (3s)
The NOTES_HOME_URL variable is what the script looks for to direct the Chromium browser to use the Notes application. To run the tests, we should use Docker Compose to launch the test infrastructure, and then ensure the test user is installed in the user database.
Add this to uitest.js:
describe('Add Note', function() {
// before(async function() { ... });
it('should see Add Note button', async function() {
const btnAddNote = await page.waitForSelector('#btnAddNote');
await btnAddNote.click();
});
it('should fill in Add Note form', async function() {
const formAddEditNote = await
page.waitForSelector('#formAddEditNote');
await page.type('#notekey', 'key42');
await page.type('#title', 'Hello, world!');
await page.type('#body', 'Lorem ipsum dolor');
await page.click('#btnSave');
});
it('should view note', async function() {
await page.waitForSelector('#noteView');
const shownKey = await page.$eval('#showKey', el =>
el.innerText);
assert.exists(shownKey);
assert.isString(shownKey);
assert.include(shownKey, 'key42');
const shownTitle = await page.$eval('#notetitle', el =>
el.innerText);
assert.exists(shownTitle);
assert.isString(shownTitle);
assert.include(shownTitle, 'Hello, world!');
const shownBody = await page.$eval('#notebody', el =>
el.innerText);
assert.exists(shownBody);
assert.isString(shownBody);
assert.include(shownBody, 'Lorem ipsum dolor');
});
it('should go to home page', async function() {
await page.waitForSelector('#btnGoHome');
await page.goto(process.env.NOTES_HOME_URL);
// await page.click('#btnGoHome');
await page.waitForSelector('#notesHomePage');
const titles = await page.$('#notetitles');
assert.exists(titles);
const key42 = await page.$('#key42');
assert.exists(key42);
const btnLogout = await page.$('#btnLogout');
assert.exists(btnLogout);
const btnAddNote = await page.$('#btnAddNote');
assert.exists(btnAddNote);
});
// after(async function() { ... });
});
This is a more involved scenario, in which we:
Most of this is using the same Puppeteer functions as before, but with a couple of additions.
The $eval function looks for the element matching the CSS selector, and invokes the callback function on that element. If no element is found an error is thrown instead. As used here, we are retrieving the text from certain elements on the screen, and validating that it matches what the test entered as the note. That's an end-to-end test of adding and retrieving notes.
The next difference is using goto instead of clicking on #btnGoHome.
As you add test scenarios to the test script, you'll find it easy for Puppeteer to have a spurious timeout, or for the login process to mysteriously not work, or other spurious errors.
Rather than go over the remaining scenarios, we'll spend the next section discussing how to mitigate such issues. But first we need to prove the scenario does work even if we have to run the test 10 times to get this result:
$ NOTES_HOME_URL=http://localhost:3000 ./node_modules/.bin/mocha --no-timeouts uitest3.js
Notes
Login
√ should click on login button (50ms)
√ should fill in login form (160ms)
√ should return to home page (281ms)
Add Note
√ should see Add Note button
√ should fill in Add Note form (1843ms)
√ should view note
√ should go to home page (871ms)
7 passing (5s)
The goal is to fully automate the test run, in order to avoid having to hire a human to babysit the test execution and spend time rerunning tests because of spurious errors. To do so, the tests need to be repeatable without any spurious errors. Puppeteer is a complex system – there is a Node.js module communicating with a Chromium instance running Headless in the background – and it seems easy for timing issues to cause a spurious error.
Both Mocha and Puppeteer allow you to set timeout values, and a long timeout value can avoid triggering an error, if some action simply requires a long time to run. At the top of the test suite, we used this Mocha function:
this.timeout(10000);
That gives 10 seconds for every test case. If you want to use a longer timeout, increase that number.
The puppeteer.launch function can take a timeout value in its options object. By default, Puppeteer uses a 30-second timeout on most operations, and they all take an options object with a setting to change that timeout period. In this case, we've added the slowMo option to slow down operations on the browser.
Another useful tactic is to generate a trace of what happened so you can puzzle away. Inserting console.log statements is tedious and makes your code look a little ugly. Puppeteer offers a couple of methods to trace the actions and to dynamically turn off tracing.
In uitest.js, add this code:
function frameEvent(evtname, frame) {
console.log(`${evtname} ${frame.url()} ${frame.title()}`);
}
function ignoreURL(url) {
if (url.match(/\/assets\//) === null
&& url.match(/\/socket.io\//) === null
&& url.match(/fonts.gstatic.com/) === null
&& url.match(/fonts.googleapis.com/) === null) {
return false;
} else {
return true;
}
}
...
before(async function() {
browser = await puppeteer.launch({ slomo: 500 });
page = await browser.newPage();
page.on('console', msg => {
console.log(`${msg.type()} ${msg.text()} ${msg.args().join(' ')}`);
});
page.on('error', err => {
console.error(`page ERROR ${err.stack}`);
});
page.on('pageerror', err => {
console.error(`page PAGEERROR ${err.stack}`);
});
page.on('request', req => {
if (ignoreURL(req.url())) return;
console.log(`page request ${req.method()} ${req.url()}`);
});
page.on('response', async (res) => {
if (ignoreURL(res.url())) return;
console.log(`page response ${res.status()} ${res.url()}`);
});
page.on('frameattached', async (frame) => frameEvent('frameattached', await frame));
page.on('framedetached', async (frame) => frameEvent('framedetached', await frame));
page.on('framenavigated', async (frame) => frameEvent('framenavigated', await frame));
await page.goto(process.env.NOTES_HOME_URL);
});
...
That is, the Page object offers several event listeners in which we can output details about various events, including HTTP requests and responses. We can even print out the HTML text of the response. The ignoreURL function lets us suppress a few select URLs so we're not inundated with unimportant requests and responses.
You can trace Puppeteer itself using its DEBUG environment variable. See the README for more information: https://github.com/GoogleChrome/puppeteer.
It can be useful to insert a long pause at certain points to give the browser time to do something. Try this function:
function waitFor(timeToWait) {
return new Promise(resolve => {
setTimeout(() => { resolve(true); }, timeToWait);
});
};
This is how we implement the equivalent of a sleep function using Promises. Using setTimeOut this way, along with a timeout value, simply causes a delay for the given number of milliseconds.
To use this function, simply insert this into the test scenarios:
await waitFor(3000);
A variant on this is to wait for things to fully render in the browser. For example, you might have seen a pause before the Home icon in the upper-left corner fully renders. That pause can cause spurious errors, and this function can wait until that button fully renders itself:
async function waitForBtnGoHome() {
return page.waitForSelector('#btnGoHome');
}
To use it:
await waitForBtnGoHome();
If you don't want to maintain this extra function, it's easy enough to add the waitForSelector call into your test cases instead.
An error, Cannot find context with specified id undefined, can be thrown by Puppeteer. According to an issue in the Puppeteer issue queue, this can arise from unplanned interactions between Puppeteer and WebSockets: https://github.com/GoogleChrome/puppeteer/issues/1325 This issue in turn affects the Socket.IO support in the Notes application, and therefore it may be useful to disable Socket.IO support during test runs.
It's fairly simple to allow disabling of Socket.IO. In app.mjs, add this exported function:
export function enableSocketio() {
var ret = true;
const env = process.env.NOTES_DISABLE_SOCKETIO;
if (!env || env !== 'true') {
ret = true;
}
return ret;
}
This looks for an environment variable to cause the function to return true or false.
In routes/index.mjs and routes/notes.mjs, add this line:
import { enableSocketio, sessionCookieName } from '../app';
We do this to import the preceding function. It also demonstrates some of the flexibility we get from ES6 Modules, because we can import just the required functions.
In routes/index.mjs and routes/notes.mjs, for every router function that calls res.render to send results, use the enableSocketio function as so:
res.render('view-name', {
...
enableSocketio: enableSocketio()
});
Hence, we've imported the function and for every view we pass enableSocketio as data to the view template.
In views/index.hbs and views/noteview.hbs, we have a section of JavaScript code to implement SocketIO-based semi-real-time features. Surround each such section like so:
{{#if enableSocketio}}
... JavaScript code for SocketIO support
{{/if}}
By eliminating the client-side SocketIO code, we ensure the user interface does not open a connection to the SocketIO service. The point of this exercise was to avoid using WebSockets to avoid issues with Puppeteer.
Similarly, in views/noteview.hbs support disabling the Comment button like so:
{{#if enableSocketio}}
<button id="btnComment" type="button" class="btn btn-outline-dark"
data-toggle="modal" data-target="#notes-comment-modal">Comment</button>
{{/if}}
The final step would be to set the environment variable, NOTES_DISABLE_SOCKETIO, in the Docker Compose file.
One of Puppeteer's core features is to take screenshots, either as PNG or PDF files. In our test scripts, we can take screenshots to track what was on the screen at any given time during the test. For example, if the Login scenario spuriously fails to log in, we can see that in the screenshots:
await page.screenshot({
type: 'png',
path: `./screen/login-01-start.png`
});
Simply add code snippets like this throughout your test script. The filename shown here follows a convention where the first segment names the test scenario, the number is a sequence number within the test scenario, and the last describes the step within the test scenario.
Taking screenshots also provides another stage of validation. You may want to do visual validation of your application as well. The pixelmatch module can compare two PNG files, and therefore a set of so-called Golden Images can be maintained for comparison during test runs.
For an example of using Puppeteer this way, see: https://meowni.ca/posts/2017-puppeteer-tests/.
We've covered a lot of territory in this chapter, looking at three distinct areas of testing: unit testing, REST API testing, and UI functional tests. Ensuring that an application is well tested is an important step on the road to software success. A team that does not follow good testing practices is often bogged down with fixing regression after regression.
We've talked about the potential simplicity of simply using the assert module for testing. While the test frameworks, such as Mocha, provide great features, we can go a long way with a simple script.
There is a place for test frameworks, such as Mocha, if only to regularize our test cases, and to produce test results reports. We used Mocha and Chai for this, and these tools were quite successful. We even found a couple of bugs with a small test suite.
When starting down the unit testing road, one design consideration is mocking out dependencies. But it's not always a good use of our time to replace every dependency with a mock version.
To ease the administrative burden of running tests, we used Docker to automate setting up and tearing down the test infrastructure. Just as Docker was useful in automating deployment of the Notes application, it's also useful in automating test infrastructure deployment.
Finally, we were able to test the Notes web user interface in a real web browser. We can't trust that unit testing will find every bug; some bugs will only show up in the web browser. Even so, we've only touched the beginning of what could be tested in Notes.
In this book, we've covered the gamut of Node.js development, giving you a strong foundation from which to start developing Node.js applications.
In the next chapter, we'll explore RESTful web services.
Over the last few years, we have started taking for granted that data sources feeding for content, mobile device service feeds, or cloud computing are all driven by modern technologies, such as RESTful web services. Everybody has been talking about how their stateless model allows applications to scale easily and how it emphasizes on clear decoupling between data provisioning and data consumption. Nowadays, architects have started introducing the concept of microservices, aiming to reduce the complexity in systems by splitting their core components into small independent pieces that simply do a single task. So, enterprise-grade software is about to become a composite of such microservices. This makes it easy to maintain, and allows better life cycle management when new parts need to be introduced. Unsurprisingly, most of the microservices are serviced by RESTful frameworks. This fact may leave the impression that REST was invented sometime in the last decade, but that is far from the truth. In fact, REST has been around since the last decade of the previous century!
This chapter will walk you through the foundation of Representational State Transfer (REST) and will explain how REST couples with the HTTP protocol. You will look into five key principles that have to be considered while turning any HTTP application into a RESTful service-enabled application. You will also look at the differences between describing RESTful and classic Simple Object Access Protocol (SOAP)-based web services. Finally, you will learn how to utilize already-existing infrastructure for your benefit.
In this chapter, we will cover the following topics:
It actually happened back in 1999, when a request for comments was submitted to the Internet Engineering Task Force (IETF; http://www.ietf.org/) via RFC 2616: Hypertext Transfer Protocol-HTTP/1.1. One of its authors, Roy Fielding, later defined a set of principles built around the HTTP and URI standards. This gave birth to REST as we know it today.
Let's look at the key principles around the HTTP and URI standards, sticking to which will make your HTTP application a RESTful service-enabled application:
To understand this principle, one must conceive of the idea of representing data by a specific format and not by a physical file containing a bunch of bytes. Each piece of data available on the internet has a format that describes it, known as the content type; for example, JPEG images, MPEG videos, HTML, XML, text documents, and binary data are all resources with the following content types: image/jpeg, video/mpeg, text/html, text/xml, and application/octet-stream.
Since the internet contains so many different resources, they all should be accessible via URIs and should be identified uniquely. Furthermore, the URIs can be in a human-readable format, despite the fact that their consumers are more likely to be software programs rather than ordinary humans.
Human-readable URIs keep data self-descriptive and ease further development against it. This helps you to keep the risk of logical errors in your programs to a minimum.
Here are a few sample examples of such URIs representing different resources in a catalog application:
These human-readable URIs expose different types of resources in a straightforward manner. In the preceding example URIs, it is quite clear the data is items in a catalog, which are categorized watches. The first link shows all the items in the category. The second shows only the ones that are part of the 2018 collection. Next is a link pointing to the image of the item, followed by a link to a sample video. The last link points to a resource containing items from the previous collection in a ZIP archive. The media types served per each URI are rather easy to identify, with the assumption that the data format of an item is either JSON or XML, so we can easily map the media type of a self-described URL to one of the following:
The native HTTP protocol (RFC 2616) defines eight actions, also known as HTTP verbs:
The first four of them just feel natural in the context of resources, especially when defining actions for data manipulation. Let's make a parallel with relative SQL databases where the native language for data manipulation is CRUD (short for Create, Read, Update, and Delete), originating from the different types of SQL statements, INSERT, SELECT, UPDATE, and DELETE, respectively. In the same manner, if you apply the REST principles correctly, the HTTP verbs should be used as shown here:
| HTTP verb | Action | HTTP response status code |
| GET | Retrieves an existing resource. | 200 OK if the resource exists, 404 Not Found if it does not exist, and 500 Internal Server Error for other errors. |
| PUT | Updates a resource. If the resource does not exist, the server can either decide to create it with the provided identifer or return the appropriate status code. |
200 OK if successfully updated, 201 Created if a new resource is created, 404 Not found if the resource to be updated does not exist, and 500 Internal Server Error for other unexpected errors. |
| POST | Creates a resource with an identifier generated at server side or updates a resource with an existing identifier provided from the client. If this verb is to be used only for creating but not for updating, return the appropriate status code. | 201 CREATED if a new resource is created, 200 OK if the resource has been updated successfully, 409 Conflict if the resource already exists and update is not allowed, 404 Not Found if the resource to be updated does not exist, and 500 Internal Server Error for other errors. |
| DELETE | Deletes a resource. | 200 OK or 204 No Content if the resource has been deleted successfully, 404 Not Found if the resource to be deleted does not exist, and 500 Internal Server Error for other errors. |
Note that a resource might be created by either the POST or PUT HTTP verbs, based on the policy of an application. However, if a resource has to be created under a specific URI with an identifier provided by the client, then PUT is the appropriate action:
PUT /categories/watches/model-abc HTTP/1.1 Content-Type: text/xml Host: www.mycatalog.com <?xml version="1.0" encoding="utf-8"?> <Item category="watch">
<Brand>...</Brand>
</Price></Price> </Item>
HTTP/1.1 201 Created
Content-Type: text/xml
Location: http://www.mycatalog.com/categories/watches/model-abc
However, in your application, you may want to leave it up to the backend RESTful service to decide where to expose the newly created resource, and thus create it under an appropriate but still unknown or non-existent location.
For instance, in our example, we might want the server to define the identifier of newly created items. In such cases, just use the POST verb to a URL without providing an identifier parameter. Then it is up to the service itself to provide a new unique and valid identifier for the new resource and to expose back this URL via the Location header of the response:
POST /categories/watches HTTP/1.1 Content-Type: text/xml Host: www.mycatalog.com <?xml version="1.0" encoding="utf-8"?> <Item category="watch">
<Brand>...</Brand>
</Price></Price> </Item>
HTTP/1.1 201 Created
Content-Type: text/xml
Location: http://www.mycatalog.com/categories/watches/model-abc
A key feature of a resource is that it may be represented in a different format from the one in which it is stored. Thus, it can be requested or created in different representations. As long as the specified format is supported, the REST-enabled endpoint should use it. In the preceding example, we posted an XML representation of a watch item, but if the server had supported the JSON format, the following request would have been valid as well:
POST /categories/watches HTTP/1.1
Content-Type: application/json
Host: www.mycatalog.com
{
"watch": {
"id": ""watch-abc"",
"brand": "...",
"price": {
"-currency": "EUR",
"#text": "100"
}
}
}
HTTP/1.1 201 Created
Content-Type: application/json
Location: http://mycatalog.com/categories/watches/watch-abc
Resource manipulation operations through HTTP requests should always be considered atomic. All modifications of a resource should be carried out within an HTTP request in an isolated manner. After the request execution, the resource is left in a final state; this implicitly means that partial resource updates are not supported. You should always send the complete state of the resource.
Back to our catalog example, updating the price field of a given item would mean making a PUT request with a complete document (JSON or XML) that contains the entire data, including the updated price field. Posting only the updated price is not stateless, as it implies that the application is aware that the resource has a price field, that is, it knows its state.
Another requirement for your RESTful application to be stateless is that once the service gets deployed on a production environment, it is likely that incoming requests are served by a load balancer, ensuring scalability and high availability. Once exposed via a load balancer, the idea of keeping your application state at server side gets compromised. This doesn't mean that you are not allowed to keep the state of your application. It just means that you should keep it in a RESTful way. For example, keep a part of the state within the URI, or use HTTP headers to provide additional state-related data
The statelessness of your RESTful API isolates the caller against changes at the server side. Thus, the caller is not expected to communicate with the same server in consecutive requests. This allows easy application of changes within the server infrastructure, such as adding or removing nodes.
Now that you know that REST is around 18 years old, a sensible question would be, "Why has it become so popular just quite recently?" Well, we the developers usually reject simple, straightforward approaches and, most of the time, prefer spending more time on turning already-complex solutions into even more complex and sophisticated ones.
Take classical SOAP web services, for example. Their various WS-* specifications are so many, and sometimes so loosely defined, that in order to make different solutions from different vendors interoperable, a separate specification, WS-Basic Profile, has been introduced. It defines extra interoperability rules in order to ensure that all WS-* specifications in SOAP-based web services can work together.
When it comes to transporting binary data with classical web services over HTTP, things get even more complex, as SOAP-based web services provide different ways of transporting binary data. Each way is defined in other sets of specifications, such as SOAP with Attachment References (SwaRef) and Message Transmission Optimization Mechanism (MTOM). All this complexity was caused mainly because the initial idea of the web service was to execute business logic remotely, not to transport large amounts of data.
The real world has shown us that, when it comes to data transfer, things should not be that complex. This is where REST fits into the big picture—by introducing the concept of resources and a standard means for manipulating them.
Now that we've covered the main REST principles, it is time to dive deeper into what can be achieved when they are followed:
A resource is just a set of information, and as defined by principle 4, it can have multiple representations; however, its state is atomic. It is up to the caller to specify the desired media type with the Accept header in the HTTP request, and then it is up to the server application to handle the representation accordingly, returning the appropriate content type of the resource together with a relevant HTTP status code:
Let's assume that, at server side, we have items resources stored in an XML format. We can have an API that allows a consumer to request the item resources in various formats, such as application/xml, application/json, application/zip, application/octet-stream, and so on.
It would be up to the API itself to load the requested resource, transform it into the requested type (for example, JSON or XML), and either use ZIP to compress it or directly flush it to the HTTP response output.
The caller would make use of the Accept HTTP header to specify the media type of the response they expect. So, if we want to request our item data inserted in the previous section in XML format, the following request should be executed:
GET /category/watches/watch-abc HTTP/1.1 Host: my-computer-hostname Accept: text/xml HTTP/1.1 200 OK Content-Type: text/xml <?xml version="1.0" encoding="utf-8"?> <Item category="watch">
<Brand>...</Brand>
</Price></Price> </Item>
To request the same item in JSON format, the Accept header needs to be set to application/json:
GET /categoery/watches/watch-abc HTTP/1.1
Host: my-computer-hostname
Accept: application/json
HTTP/1.1 200 OK
Content-Type: application/json
{
"watch": {
"id": ""watch-abc"",
"brand": "...",
"price": {
"-currency": "EUR",
"#text": "100"
}
}
}
REST is designed to be visible and simple. Visibility of the service means that every aspect of it should self-descriptive and follow the natural HTTP language according to principles 3, 4, and 5.
Visibility in the context of the outer world would mean that monitoring applications would be interested only in the HTTP communication between the REST service and the caller. Since the requests and responses are stateless and atomic, nothing more is needed to flow the behavior of the application and to understand whether anything has gone wrong.
Before talking about reliability, we need to define which HTTP methods are safe and which are idempotent in the REST context. So, let's first define what safe and idempotent methods are:
The following table lists which HTTP methods are safe and which are idempotent:
| HTTP method | Safe | Idempotent |
| GET | Yes | Yes |
| POST | No | No |
| PUT | No | Yes |
| DELETE | No | Yes |
Consumers should consider operation's safety and the idempotence features in order to be served reliably.
So far, we stressed the importance of having stateless behavior for a RESTful web application. The World Wide Web (WWW) is an enormous universe, containing huge amount of data and a lot of users, eager to get that data. The evolution of the WWW has brought the requirement that applications should scale easily as their load increases. Scaling applications that have a state is difficult to achieve, especially when zero or close-to-zero operational downtime is expected.
That's why staying stateless is crucial for any application that needs to scale. In the best-case scenario, scaling your application would require you to put another piece of hardware for a load balancer, or bring another instance in your cloud environment. There would be no need for the different nodes to sync between each other, as they should not care about the state at all. Scalability is all about serving all your clients in an acceptable amount of time. Its main idea is to keep your application running and to prevent Denial of Service (DoS) caused by a huge amount of incoming requests.
Scalability should not be confused with the performance of an application. Performance is measured by the time needed for a single request to be processed, not by the total number of requests that the application can handle. The asynchronous non-blocking architecture and event-driven design of Node.js make it a logical choice for implementing an application that scales and performs well.
If you are familiar with SOAP web services, you may have heard of the Web Service Definition Language (WSDL). It is an XML description of the interface of the service and defines an endpoint URL for invocation. It is mandatory for a SOAP web service to be described by such a WSDL definition.
Similar to SOAP web services, RESTful services can also make use of a description language, called WADL. WADL stands for Web Application Definition Language. Unlike WSDL for SOAP web services, a WADL description of a RESTful service is optional, that is, consuming the service has nothing to do with its description.
Here is a sample part of a WADL file that describes the GET operation of our catalog service:
<?xml version="1.0" encoding="UTF-8"?>
<application xmlns="http://wadl.dev.java.net/2009/02" xmlns:service="http://localhost:8080/catalog/" xmlns:xsd="http://www.w3.org/2001/XMLSchema">
<grammer>
<include href="items.xsd" />
<include href="error.xsd" />
</grammer>
<resources base="http://localhost:8080/catalog/categories">
<resource path="{category}">
<method name="GET">
<request>
<param name="category" type="xsd:string" style="template" />
</request>
<response status="200">
<representation mediaType="application/xml" element="service:item" />
<representation mediaType="application/json" />
</response>
<response status="404">
<representation mediaType="application/xml" element="service:item" />
</response>
</method>
</resource>
</resources>
</application>This extract of a WADL file shows how application, exposing resources is described. Briefly, each resource must be part of an application. The resource provides a, where it is located with the base attribute, and describes each of its supported HTTP methods in a method. Additionally, an optional doc element can be used at resource and application to provide additional documentation about the service and its operations.
Though WADL is optional, it significantly reduces the efforts of discovering RESTful services.
Public APIs exposed on the web should be well documented, otherwise it would be difficult for developers to use them in their applications. While WADL definitions might be considered a source of documentation, they address a different problem—the discovery of the service. They serve metadata for the services to machines, not to humans. The Swagger project (https://swagger.io/) addresses the need for neat documentation of RESTful APIs. It defines a meta description of an API from an almost human-readable JSON format. The following is a sample swagger.json file, partially describing the catalog service:
{
"swagger": "2.0",
"info": {
"title": "Catalog API Documentation",
"version": "v1"
},
"paths": {
"/categories/{id}" : {
"get": {
"operationId": "getCategoryV1",
"summary": "Get a specific category ",
"produces": [
"application/json"
],
"responses": {
"200": {
"description": "200 OK",
"examples":
{"application/json": {
"id": 1,
"name": "Watches",
"itemsCount": 550
}
}
},
"404": {"description" : "404 Not Found"},
"500": {"description": "500 Internal Server Error"}
}
}
}
},
"consumes": ["application/json"]
}
The swagger.json file is really straightforward: it defines a name and version of your API and gives a brief description of each operation it exposes, nicely coupled with a sample payload. But the real benefit from it comes in another subproject of Swagger, called swagger-ui (https://swagger.io/swagger-ui/), which actually renders this data from swagger.json nicely into an interactive web page that only provides documentation, but also allows interaction with the service:
We will have a look at and utilize the swagger-ui Node.js module to provide the API that we will develop later in the book, with up-to-date documentation.
The best part of developing and distributing RESTful applications is that the infrastructure needed is already out there, available to you. As RESTful applications use the existing web space heavily, you need to do nothing more than follow the REST principles when developing. In addition, there are plenty of libraries available out there for any platform, and I do mean any platform. This eases the development of RESTful applications, so you just need to choose your preferred platform and start developing.
In this chapter, you learned about foundation of a REST, looking at five key principles that transform a web application into a REST-enabled application. We made a brief comparison between RESTful services and classical SOAP web services, and finally took a look at how RESTful services are documented and how we can simplify the discovery of the services we develop.
Now that you know the basics, we are ready to dive into the Node.js way of implementing RESTful services. In the next chapter, you will learn about the essentials of Node.js and the accompanying tools that it is necessary to use and understand in order to build a real-life fully-fledged web service.
Our first draft API will be a read-only version and will not support creating or updating items in the catalog as real-world applications do. Instead, we will concentrate on the API definition itself, and will worry about data storage later on. Of course, using file storage for data exposed to millions of users is anything but an option, so a database layer will be provided to our application further in the book, after we have looked into modern NoSQL database solutions.
We will also cover the topic of content negotiation, a mechanism that allows consumers to specify the expected format of requested data. Finally, we will take a look at several ways to expose different versions of a service, in case it evolves in a backward-incompatible way.
To sum up, in this chapter, you will learn the following:
After this chapter, you should be able to completely specify a RESTful API and will be almost ready to start implementing real-life Node.js RESTful services.
The very first thing a project usually starts with is a definition of the operations the API will expose. According to the REST principles, an operation is exposed by an HTTP method and a URI. The action performed by each operation should not contradict the natural meaning of its HTTP method. The following table specifies the operations of our API in detail:
| Method | URI | Description |
| GET | /category | Retrieves all available categories in the catalog. |
| GET | /category/{category-id}/ | Retrieves all the items available under a specific category. |
| GET | /category/{category-id}/{item-id} | Retrieves an item by its ID under a specific category. |
| POST | /category |
Creates a new category; if it exists, it will update it. |
| POST | /category/{category-id}/ |
Creates a new item in a specified category. If the item exists, it will update it. |
| PUT | /category/{category-id} | Updates a category. |
| PUT | /category/{category-id}/{item-id} | Updates an item in a specified category. |
| DELETE | /category/{category-id} | Deletes an existing category. |
| DELETE | /category/{category-id}/{item-id} | Deletes an item in a specified category. |
The second step is to choose an appropriate format for our catalog application's data. JSON objects are natively supported by JavaScript. They are easy to extend during the evolution of an application and are consumable by almost any platform available. Thus, the JSON format seems to be our logical choice for us. Here is the JSON representation of an item, and category objects that will be used throughout this book:
{
"itemId": "item-identifier-1",
"itemName": "Sports Watch",
"category": "Watches",
"categoryId": 1,
"price": 150,
"currency": "EUR"
}
{
"categoryName" : "Watches",
"categoryId" : "1",
"itemsCount" : 100,
"items" : [{
"itemId" : "item-identifier-1",
"itemName":"Sports Watch",
"price": 150,
"currency" : "EUR"
}]
}
So far, our API has defined a set of operations and the data format to be used. The next step is to implement a module that will export functions serving each of the operations in the route.
To begin with, let's create a new Node.js Express project. Select a directory where your projects will be stored and from your shell Terminal, execute express chapter3. If you are using Windows, you will need to install the express-generator module before generating the project. The express-generator will create your an initial express project layout in the selected directory. This layout provides the default project structure for you, ensuring that your Express project follows the standard project structure. It makes your project easier to navigate.
The next step is to import the project into the Atom IDE. Right-click anywhere in the Projects tab and select Add project folder then select the directory Express generated for you.
As you can see, Express has done some background work for us and has created a starting point for our application: app.js. It has also created the package.json file for us. Let's take a look at each of these files, starting with package.json:
{
"name": "chapter3",
"version": "1.0.0",
"description": "",
"main": "app.js",
"scripts": {
"test": "test"
},
"author": "",
"license": "ISC",
"dependencies": {
"dependencies": {
"body-parser": "~1.13.2",
"cookie-parser": "~1.3.5",
"debug": "~2.2.0",
"express": "~4.16.1",
"jade": "~1.11.0",
"morgan": "~1.6.1",
"serve-favicon": "~2.3.0"
}
}
As we created a blank Node.js Express project, we initially have dependencies only to the Express framework, some middleware modules such as morgan, body-parser, and cookie-parser, and the Jade template language. Jade is a straightforward template language used to produce HTML code inside templates. If you are interested in it, you can find out more about it at http://www.jade-lang.com.
The current version of the Express framework at the time of writing is 4.16.1; to update it, execute npm install express@4.16.1 --save from the chapter3 directory. This command will update the dependency of the application to the desired version. The --save option will update and save the new version of the dependency in the project's package.json file.
We will come to what middleware modules are a bit later in the chapter.
For now, we will ignore the content of the public and view directories as it is not relevant to our RESTful service. They contain the auto-generated stylesheets and template files that might be helpful, if we decide to develop a web-based consumer of the services at a later stage.
We've already mentioned that the Express project created a starting point for our web application in app.js. Let's take a deeper look at it:
var express = require('express');
var path = require('path');
var favicon = require('serve-favicon');
var logger = require('morgan');
var cookieParser = require('cookie-parser');
var bodyParser = require('body-parser');
var routes = require('./routes/index');
var users = require('./routes/users');
var app = express();
// view engine setup
app.set('views', path.join(__dirname, 'views'));
app.set('view engine', 'jade');
// uncomment after placing your favicon in /public
//app.use(favicon(path.join(__dirname, 'public', 'favicon.ico')));
app.use(logger('dev'));
app.use(bodyParser.json());
app.use(bodyParser.urlencoded({ extended: false }));
app.use(cookieParser());
app.use(express.static(path.join(__dirname, 'public')));
app.use('/', routes);
app.use('/users', users);
// catch 404 and forward to error handler
app.use(function(req, res, next) {
var err = new Error('Not Found');
err.status = 404;
next(err);
});
// error handlers
// development error handler
// will print stacktrace
if (app.get('env') === 'development') {
app.use(function(err, req, res, next) {
res.status(err.status || 500);
res.render('error', {
message: err.message,
error: err
});
});
}
// production error handler
// no stacktraces leaked to user
app.use(function(err, req, res, next) {
res.status(err.status || 500);
res.render('error', {
message: err.message,
error: {}
});
});
module.exports = app;
Obviously, the Express generator has done a lot for us as it has instantiated the Express framework and has assigned a complete development environment around it. It has done the following:
You will have to install all the modules used in app.js in order to start the generated application successfully. Also, make sure you update the dependencies of your package.json file using the --save option after installing them.
The Express generator also created a starting script for the application. It is under the bin/www directory of your project and looks like the following snippet:
#!/usr/bin/env node
/**
* Module dependencies.
*/
var app = require('../app');
var debug = require('debug')('chapter3:server');
var http = require('http');
/**
* Get port from environment and store in Express.
*/
var port = normalizePort(process.env.PORT || '3000');
app.set('port', port);
/**
* Create HTTP server.
*/
var server = http.createServer(app);
/**
* Listen on provided port, on all network interfaces.
*/
server.listen(port);
server.on('error', onError);
server.on('listening', onListening);
/**
* Normalize a port into a number, string, or false.
*/
function normalizePort(val) {
var port = parseInt(val, 10);
if (isNaN(port)) {
// named pipe
return val;
}
if (port >= 0) {
// port number
return port;
}
return false;
}
/**
* Event listener for HTTP server "error" event.
*/
function onError(error) {
if (error.syscall !== 'listen') {
throw error;
}
var bind = typeof port === 'string'
? 'Pipe ' + port
: 'Port ' + port;
// handle specific listen errors with friendly messages
switch (error.code) {
case 'EACCES':
console.error(bind + ' requires elevated privileges');
process.exit(1);
break;
case 'EADDRINUSE':
console.error(bind + ' is already in use');
process.exit(1);
break;
default:
throw error;
}
}
/**
* Event listener for HTTP server "listening" event.
*/
function onListening() {
var addr = server.address();
var bind = typeof addr === 'string'
? 'pipe ' + addr
: 'port ' + addr.port;
debug('Listening on ' + bind);
}
To start the application, execute node bin/www; this will execute the script above and will start the Node.js application. So requesting http://localhost:3000 in your browser will result in calling the default GET handler, which gives a warm welcome response:
The generator created a dummy routes/users.js; it exposes a route linked to a dummy module available at the /users location. Requesting it will result in calling the list function of the user's route, which outputs a static response: respond with a resource.
Our application will not be using a template language and style sheets, so let's get rid of the lines that set the views and view engine properties in the application configuration. In addition, we will be implementing our own routes. Thus, we don't need the binding of the / and /users URIs for our app, neither do we need the user module; instead, we will utilize a catalog module and from a route:
var express = require('express');
var path = require('path');
var favicon = require('serve-favicon');
var logger = require('morgan');
var cookieParser = require('cookie-parser');
var bodyParser = require('body-parser');
var routes = require('./routes/index');
var catalog = require('./routes/catalog')
var app = express();
//uncomment after placing your favicon in /public
//app.use(favicon(path.join(__dirname, 'public', 'favicon.ico')));
app.use(logger('dev'));
app.use(bodyParser.json());
app.use(bodyParser.urlencoded({ extended: false }));
app.use(cookieParser());
app.use(express.static(path.join(__dirname, 'public')));
app.use('/', routes);
app.use('/catalog', catalog);
// catch 404 and forward to error handler
app.use(function(req, res, next) {
var err = new Error('Not Found');
err.status = 404;
next(err);
});
//development error handler will print stacktrace
if (app.get('env') === 'development') {
app.use(function(err, req, res, next) {
res.status(err.status || 500);
res.render('error', {
message: err.message,
error: err
});
});
}
// production error handler no stacktraces leaked to user
app.use(function(err, req, res, next) {
res.status(err.status || 500);
res.render('error', {
message: err.message,
error: {}
});
});
module.exports = app;
So after this cleanup, our application looks a lot cleaner and we are ready to move forward.
Here are the basic rules that apply to the middleware chain:
Now that we know what a middleware function is, let's clarify what the currently used middleware functions provide our application with. The body-parser middleware is the Express framework built in a parser. It parses the request body and populates the request object after the middleware execution finishes, that is, it provides JSON payload handling.
Now it is time to move on and implement our user module that will be mapped to our URIs. The module will be named modules/catalog.js:
var fs = require('fs');
function readCatalogSync() {
var file = './data/catalog.json';
if (fs.existsSync(file)) {
var content = fs.readFileSync(file);
var catalog = JSON.parse(content);
return catalog;
}
return undefined;
}
exports.findItems = function(categoryId) {
console.log('Returning all items for categoryId: ' + categoryId);
var catalog = readCatalogSync();
if (catalog) {
var items = [];
for (var index in catalog.catalog) {
if (catalog.catalog[index].categoryId === categoryId) {
var category = catalog.catalog[index];
for (var itemIndex in category.items) {
items.push(category.items[itemIndex]);
}
}
}
return items;
}
return undefined;
}
exports.findItem = function(categoryId, itemId) {
console.log('Looking for item with id' + itemId);
var catalog = readCatalogSync();
if (catalog) {
for (var index in catalog.catalog) {
if (catalog.catalog[index].categoryId === categoryId) {
var category = catalog.catalog[index];
for (var itemIndex in category.items) {
if (category.items[itemIndex].itemId === itemId) {
return category.items[itemIndex];
}
}
}
}
}
return undefined;
}
exports.findCategoryies = function() {
console.log('Returning all categories');
var catalog = readCatalogSync();
if (catalog) {
var categories = [];
for (var index in catalog.catalog) {
var category = {};
category["categoryId"] = catalog.catalog[index].categoryId;
category["categoryName"] = catalog.catalog[index].categoryName;
categories.push(category);
}
return categories;
}
return [];
}
The catalog module is built around the catalog.json file, stored in the data directory. The content of the source file is read synchronously using the File System module, fs, within the readCatalogSync function. The File System module provides multiple useful filesystem operations such as functions for creating, renaming, or deleting files or directories; truncating; linking; chmod functions; as well as synchronous and asynchronous file access for reading and writing data. In our sample application, we aim to use the most straightforward approach, so we implement functions that read the catalog.json file by utilizing the readFileSync function of the File System module. It returns the content of a file as a string, within a synchronous call. All other functions of the module are exported and can be used to query the content of the source file, based on different criteria.
The catalog module exports the following functions:
Now that we have three complete functions, let's see how to bind them to our Express application.
In Node.js terms, a route is a binding between a URI and function. The Express framework provides built-in support for routing. An express object instance contains functions named after each HTTP verb: get, post, put, and delete. They have the following syntax: function(uri, handler);.
They are used to bind a handler function to a specific HTTP action executed over a URI. The handler function usually takes two arguments: request and response. Let's see it with a simple Hello route application:
var express = require('express');
var app = express();
app.get('/hello', function(request, response){
response.send('Hello route');
});
app.listen(3000);
Running this sample at localhost and accessing http://localhost:3000/hello will result in calling your handler function and it will respond saying Hello route, but routing can give you much more. It allows you to define a URI with parameters; for example, let's use /hello/:name as a routing string. It tells the framework that the URI used consists of two parts: a static part (hello) and a variable part (the name parameter).
Furthermore, when the routing string and the handler function are defined in line with the get function of an Express instance, a parameter collection is made available directly in the request argument of the handler function. To demonstrate this, let's modify our previous example a bit:
var express = require('express');
var app = express();
app.get('/hello:name', function(request, response){
response.send('Hello ' + request.params.name);
});
app.listen(3000);
As you can see in the preceding code snippet, we used a colon (:) to separate the parameter part of the URI from the static part. You can have multiple parameters in an Express route; for example, /category/:category-id/items/:item-id defines a route for displaying an item that belongs to a category, where the category-id and item-id are parameters.
Now let's try it out. Requesting http://localhost:3000/hello/friend will result in the following output:
hello friend
This is how we can provide parameterized URIs with Express. It is a nice feature, but it is often not enough. In web applications, we are used to providing additional parameters with GET parameters.
Unfortunately, the Express framework is not so good with GET parameters. Thus, we have to utilize the url module. It is built into Node.js to provide an easy way of using URL parsing. Let's use our hello result with other parameters in the application again, but extend it in a way that it outputs hello all when /hello is requested and hello friend when the requested URI is /hello?name=friend:
var express = require('express');
var url = require('url');
var app = express();
app.get('/hello', function(request, response){
var getParams = url.parse(request.url, true).query;
if (Object.keys(getParams).length == 0) {
response.end('Hello all');
} else {
response.end('Hello ' + getParams.name);
}
});
app.listen(3000);
There are a few things worth mentioning here. We used the url module's function parse. It takes a URL as its first argument and a Boolean as an optional second argument, which specifies whether the query string should be parsed or not. The url.parse function returns an associative object. We used Object.keys with it to transform the keys in these associative objects into an array so that we can check its length. This will help us check whether our URI has been called with GET parameters or not. In addition to the routing functions named after each HTTP verb, there is also a function named all. When used, it routes all the HTTP actions to the specified URI.
Now that we know how routing and the GET parameters work within Node.js and the Express environment, we are ready to define a route for the catalog module and bind it in our application. The following is the route as defined in routes/catalog.js.
var express = require('express');
var catalog = require('../modules/catalog.js')
var router = express.Router();
router.get('/', function(request, response, next) {
var categories = catalog.findCategoryies();
response.json(categories);
});
router.get('/:categoryId', function(request, response, next) {
var categories = catalog.findItems(request.params.categoryId);
if (categories === undefined) {
response.writeHead(404, {'Content-Type' : 'text/plain'});
response.end('Not found');
} else {
response.json(categories);
}
});
router.get('/:categoryId/:itemId', function(request, response, next) {
var item = catalog.findItem(request.params.categoryId, request.params.itemId);
if (item === undefined) {
response.writeHead(404, {'Content-Type' : 'text/plain'});
response.end('Not found');
} else {
response.json(item);
}
});
module.exports = router;
First, a Router instance is created from the Express module. Here is a table that nicely describes the routing we just implemented. This will be helpful later when we test our API:
| HTTP method | Route | Catalog's module function |
| GET | /catalog | findCategories() |
| GET | /catalog/:categoryId | findItems(categoryId) |
| GET | /catalog/:categoryId/:itemId | findItem(categoryId, itemId) |
We need some test data in order to test our service, so let's use the catalog.json file in the data directory of our project. This data will allow us to test all our three functions, but to do that, we would need a client that can send REST requests against an endpoint. If you still haven't created a Postman project for testing your application, now is an appropriate time to create it.
Requesting /catalog should return all the categories in the test file:
Thus, requesting /catalog/1 should result in returning a list with all the items under the Watches category:
Finally, requesting http://localhost:3000/catalog/1/item-identifier-1 would display only the item identified by item-identifier-1, and requesting a nonexistent item would result in response with status code 404:
So far, the catalog service supports only the JSON format, and thus works only with the media type application/json. Let's assume our service has to offer data in different formats, for example, both JSON and XML. Then, the consumer needs to explicitly define the data format they need. The best way to carry out content negotiation in REST has been a very debatable subject for a long time.
In his famous discussion on implementing content negotiation correctly, Roy Fielding states the following:
However, that leaves a gap on how to expose the same resource in a different data format, so Roy continues with the following:
While one can still choose to stick with a URI-driven negotiation by providing the desired format with custom GET parameters, the REST community has chosen to stick to Roy's suggestion for agent-driven negotiation. Now that it has been almost a decade since this argument was initiated, it has been proven that they took the right decision. Agent-driven negotiation makes use of the Accept HTTP header.
The Accept HTTP header specifies the media type of the resource that the consumer is willing to process. In addition to the Accept header, the consumer may also make use of the Accept-Language and Accept-Encoding headers to specify what language and encoding the results should be provided in. If the server fails to provide the results in the expected format, it can either return a default value or make use of HTTP 406 Not acceptable in order not to cause data confusion errors on the client side.
The Node.js HTTP response object contains a method, format, that performs content negotiation based on the Accept HTTP header if set in the request object. It uses the built-in request.accepts() to select an appropriate handler for the request. If that is not found, the server invokes the default handler, which responds with HTTP 406 Not acceptable. Let's create a demo on how to use the format method within one of our routes. For that purpose, let's assume we have implemented a function within our catalog module, named list_groups_in_xml, that provides the group data in XML format:
app.get('/catalog', function(request, response) {
response.format( {
'text/xml' : function() {
response.send(catalog.findCategoiesXml());
},
'application/json' : function() {
response.json(catalog.findCategoriesJson());
},
'default' : function() {.
response.status(406).send('Not Acceptable');
}
});
});
This is how you can implement content negotiation in a clear and straightforward way.
It is an inevitable fact that all application APIs evolve. However, the evolution of public APIs with an unknown number of consumers, such as RESTful services, is a sensitive topic. As consumers may not be able to handle the modified data appropriately and there is no way of notifying all of them, we need to keep our APIs as backward-compatible as possible. One way to do so is to use different URIs for different versions of our application. Currently, our catalog API is available at /catalog.
When the time is right for a new version, for example, Version 2, we may need to keep the previous version available at another URI for backward-compatibility. Best practice is to encode the version number in the URI, such as /v1/catalog, and keep /catalog mapped to the latest version. Thus, requesting /catalog will cause a redirect to /v2/catalog and will make use of the HTTP 3xx status codes to indicate the redirection to the latest version.
Another option for versioning would be to keep the URI of your API stable and rely on custom HTTP headers that will specify the version. But that's not very stable approach concerning backward-compatibility as it is much more natural to modify a URL of a request in an application rather than modify the headers that are sent within the request.
To get additional confidence, go through this set of statements and state whether they are true or false:
In this chapter, we dived into some more complex topics. Let's sum up what we covered. We started by specifying the operations of our web API and defined that an operation is a combination of a URI and HTTP action. Next, we implemented routes and bound them to an operation. Then, we requested each operation using the Postman REST client to request the URIs that we routed. In the content negotiation section, we handled the Accept HTTP header to provide the results in the format requested by consumers. Finally, we covered the topic of API versions, which allow us to develop backward-compatible APIs.
We used old-fashioned filesystem storage for our data in this chapter. This is not suitable for a web application. Thus, we will look into modern, scalable, and reliable NoSQL storage in the next chapter.
In the last chapter, we implemented a sample application exposing a read-only service that provided catalog data. For the sake of simplicity, we introduced a performance bottleneck in this implementation by using file storage. This storage is not suitable for web applications. It relies on 33 physical files, preventing our application from servicing heavy loads, as file storage lacks multitenant support due to disc I/O operations. In other words, we definitely need to look for a better storage solution, which scales easily, when needed, following the demands of our REST-enabled application. NoSQL databases are now heavily used in web and in cloud environments, ensuring zero downtime and high availability. They have the following advantages over traditional transactional SQL databases:
Nearly all modern NoSQL solutions out there support clustering and can scale further, along with the load of your application. Additionally, most of them have REST-enabled interfaces over HTTP, which eases their usage over a load balancer in high-availability scenarios. Classical database drivers are usually not available for traditional client-side languages, such as JavaScript, because they require native libraries or drivers. However, the idea of NoSQL originated from using document data stores. Thus, most of them support the JSON format, which is native to JavaScript. Last but not least, most NoSQL solutions are open source and are available for free, with all the benefits that open source projects offer: community, examples, and freedom!
In this chapter, we will take a look at the MongoDB NoSQL database and the Mongoose module that interacts with it. We will see how to design and implement automated tests for the database models. Finally, at the end of the chapter, we will remove the file storage bottleneck and will move our application to an almost ready for production state.
MongoDB is an open source document database with built-in support for the JSON format. It provides a full index support, based on any of the available attributes in a document. It is ideal for high-availability scenarios due to its scalability features. MongoDB, available at https://mms.mongodb.com, is cloud-ready with its management services, MongoDB Management Services (MMS). They utilize and automate most development operations that need to be carried out to keep your cloud database in good shape, taking care of upgrades, further scaling, backups, recovery, performance, and security alerts.
Let's move forward and install MongoDB. Installers for Windows, Linux, macOS, and Solaris are available at http://www.mongodb.org/downloads. Linux users can find MongoDB in all popular distribution repositories, while Windows users can make use of a user-friendly wizard which will guide you through the installation steps, where, for a typical installation, all you need to do is accept the license agreement and provide an installation path.
After a successful installation, execute the following command to start MongoDB. If you want to specify a custom location for your data, you have to use the --dbpath argument. Optionally, you can start the MongoDB HTTP console via the --rest argument:
mongod --dbpath ./data --rest
The default port for communicating with MongoDB is 27017, and its HTTP console is implicitly configured to use a port higher than the data port by a value of 1,000. Therefore, the default port of the console will be 28017. The HTTP console provides useful information about the database, such as logs, health status, available databases, and so on. I strongly advise you to spend some time with it. The console can also be used as a RESTful health check service of the database, because it provides JSON-encoded information about the running database services and the last error that occurred:
GET /replSetGetStatus?text=1 HTTP/1.1
Host: localhost:28017
Connection: Keep-Alive
User-Agent: RestClient-Tool
HTTP/1.0 200 OK
Content-Length: 56
Connection: close
Content-Type: text/plain;charset=utf-8
{
"ok": 0,
"errmsg": "not running with --replSet"
}
This REST interface can be used in a script or an application to automate altering notifications providing the current state of the database engine and so on.
The log section of the console shows that your server is running successfully (if it is). Now we are ready to move further and see how to connect Node.js to MongoDB.
Mongoose is a module that connects Node.js to MongoDB in an object document mapper (ODM) style. It offers the Create, Read, Update, and Delete (also known as CRUD) functionalities for documents stored in the database. Mongoose defines the structure of the used documents using schemas. The schema is the smallest unit of data definition in Mongoose. A model is built out of a schema definition. It is a constructor-like function that can be used to create or query documents. Documents are instances of a model and represent one-to-one mapping to the documents stored in MongoDB. The schema-model-document hierarchy provides a self-descriptive way of defining objects and allows easy data validation.
Let's start by installing Mongoose with npm:
npm install mongoose
Now that we have the Mongoose module installed, our first step will be to define a schema that will represent an item in the catalog:
var mongoose = require('mongoose');
var Schema = mongoose.Schema;
var itemSchema = new Schema ({
"itemId" : {type: String, index: {unique: true}},
"itemName": String,
"price": Number,
"currency" : String,
"categories": [String]
});
The preceding code snippet creates a schema definition of an item. Defining a schema is straightforward and is quite similar to JSON schema definition; you have to describe and attribute with its type and optionally provide additional properties for each key. In the case of the catalog application, we need to use the itemId as a unique index in order to avoid having two different items with the same ID. Thus, apart from defining its type as String, we also use the index attribute to describe that the value of the itemId field must be unique for each individual item.
Mongoose introduces the term model. A model is a constructor-like function compiled out of a schema definition. An instance of a model represents a document that can be saved to or read from the database. Creating a model instance is done by calling the model function of a mongoose instance and passing the schema that the model should use:
var CatalogItem = mongoose.model('Item', itemSchema);
A model also exposes functions for querying and data manipulations. Assuming that we have initialized a schema and created a model, storing a new item to MongoDB is as simple as creating a new model instance and invoking its save function:
var mongoose = require('mongoose');
mongoose.connect('mongodb://localhost/catalog');
var db = mongoose.connection;
db.on('error', console.error.bind(console, 'connection error:'));
db.once('open', function() {
var watch = new CatalogItem({
itemId: 9 ,
itemName: "Sports Watch1",
brand: 'А1',
price: 100,
currency: "EUR",
categories: ["Watches", "Sports Watches"]
});
watch.save((error, item, affectedNo)=> {
if (!error) {
console.log('Item added successfully to the catalog');
} else {
console.log('Cannot add item to the catlog');
}
});
});
db.once('open', function() {
var filter = {
'itemName' : 'Sports Watch1',
'price': 100
}
CatalogItem.find(filter, (error, result) => {
if (error) {
consoloe.log('Error occured');
} else {
console.log('Results found:'+ result.length);
console.log(result);
}
});
});
Here is how to use the model in order to query for documents representing a sports watch belonging to the Watches group named Sports Watches:
db.once('open', function() {
var filter = {
'itemName' : 'Sports Watch1',
'price': 100
}
CatalogItem.findOne(filter, (error, result) => {
if (error) {
consoloe.log('Error occurred');
} else {
console.log(result);
}
});
});
The model also exposes a findOne function, a convenient way of finding an object by its unique index and then performing some data manipulation on it, that is, for delete or update operations. The following example deletes an item:
CatalogItem.findOne({itemId: 1 }, (error, data) => {
if (error) {
console.log(error);
return;
} else {
if (!data) {
console.log('not found');
return;
} else {
data.remove(function(error){
if (!error) { data.remove();}
else { console.log(error);}
});
}
}
});
Mocha is one of the most popular testing frameworks for JavaScript; its main goal is to provide an easy way to test asynchronous JavaScript code. Let's install Mocha globally so that we can make it available to any Node.js application that we may develop in the future:
npm install -g mocha
We will also need an assertion library that can be used together with Mocha. The assertion library provides functions for validating actual values, against expected ones, when they are not equal, the assertion library will cause test failure. Should.js assertion library module is easy to use and it will be our choice, so let's install it globally too:
npm install -g should
Now that we have our testing modules installed, we need to specify our testcase file path in the package.json file. Let's modify it by adding a test element pointing to Mocha and the testcase file in the script node:
{
"name": "chapter4",
"version": "0.0.0",
"private": true,
"scripts": {
"start": "node ./bin/www",
"test": "mocha test/model-test.js"
},
"dependencies": {
"body-parser": "~1.13.2",
"cookie-parser": "~1.3.5",
"debug": "~2.2.0",
"express": "~4.16.0",
"jade": "~1.11.0",
"morgan": "~1.6.1",
"serve-favicon": "~2.3.0"
}
}
This will tell the npm package manager to trigger Mocha when the npm test is executed.
Automation of Mongoose tests must not be affected by the current state of the database. To ensure that the results are predictable at each test run, we need to ensure that the database state is exactly as we would expect it. We will implement a module called prepare.js in the test directory. It will clear the database before each test run:
var mongoose = require('mongoose');
beforeEach(function (done) {
function clearDatabase() {
for (var i in mongoose.connection.collections) {
mongoose.connection.collections[i].remove(function()
{});
}
return done();
}
if (mongoose.connection.readyState === 0) {
mongoose.connect(config.db.test, function (err) {
if (err) {
throw err;
}
return clearDatabase();
});
} else {
return clearDatabase();
}
});
afterEach(function (done) {
mongoose.disconnect();
return done();
});
Next, we will implement a Mocha test, which creates a new item:
var mongoose = require('mongoose');
var should = require('should');
var prepare = require('./prepare');
const model = require('../model/item.js');
const CatalogItem = model.CatalogItem;
mongoose.createConnection('mongodb://localhost/catalog');
describe('CatalogItem: models', function () {
describe('#create()', function () {
it('Should create a new CatalogItem', function (done) {
var item = {
"itemId": "1",
"itemName": "Sports Watch",
"price": 100,
"currency": "EUR",
"categories": [
"Watches",
"Sports Watches"
]
};
CatalogItem.create(item, function (err, createdItem) {
// Check that no error occured
should.not.exist(err);
// Assert that the returned item has is what we expect
createdItem.itemId.should.equal('1');
createdItem.itemName.should.equal('Sports Watch');
createdItem.price.should.equal(100);
createdItem.currency.should.equal('EUR');
createdItem.categories[0].should.equal('Watches');
createdItem.categories[1].should.equal('Sports Watches');
//Notify mocha that the test has completed
done();
});
});
});
});
Executing the npm test now results in a call against the MongoDB database creating an item out of the passed JSON object. After insertion, the assert callback will be executing, ensuring that values passed to by Mongoose are the same as the returned ones from the database. Give it a try and break the test—simply change the expected value in the assert with an invalid one—you will see the test failing.
After seeing how a model works, it is time to create a user-defined module that wraps all CRUD operations for the catalog. Since we intend to use that module in a RESTful web application, it seems logical to leave the schema definition and the model creation outside the module and have them provided as arguments of each module function. The same schema definition is used in the unit tests, ensuring stability of the module. Now let's add an implementation for each CRUD function, starting with a remove() function. It looks up an item based on its id and deletes it from the database, if it exists:
exports.remove = function (request, response) {
console.log('Deleting item with id: ' + request.body.itemId);
CatalogItem.findOne({itemId: request.params.itemId}, function(error, data) {
if (error) {
console.log(error);
if (response != null) {
response.writeHead(500, contentTypePlainText);
response.end('Internal server error');
}
return;
} else {
if (!data) {
console.log('Item not found');
if (response != null) {
response.writeHead(404, contentTypePlainText);
response.end('Not Found');
}
return;
} else {
data.remove(function(error){
if (!error) {
data.remove();
response.json({'Status': 'Successfully deleted'});
}
else {
console.log(error);
response.writeHead(500, contentTypePlainText);
response.end('Internal Server Error');
}
});
}
}
});
}
The saveItem() function takes the request body payload as an argument. A valid update request will contain the new state of an item object, represented in JSON format. First, the itemId is parsed out of the JSON object. Next, lookup is done. If an item exists, it gets updated. Otherwise, a new one gets created:
exports.saveItem = function(request, response)
{
var item = toItem(request.body);
item.save((error) => {
if (!error) {
item.save();
response.writeHead(201, contentTypeJson);
response.end(JSON.stringify(request.body));
} else {
console.log(error);
CatalogItem.findOne({itemId : item.itemId },
(error, result) => {
console.log('Check if such an item exists');
if (error) {
console.log(error);
response.writeHead(500, contentTypePlainText);
response.end('Internal Server Error');
} else {
if (!result) {
console.log('Item does not exist. Creating a new one');
item.save();
response.writeHead(201, contentTypeJson);
response.
response.end(JSON.stringify(request.body));
} else {
console.log('Updating existing item');
result.itemId = item.itemId;
result.itemName = item.itemName;
result.price = item.price;
result.currency = item.currency;
result.categories = item.categories;
result.save();
response.json(JSON.stringify(result));
}
}
});
}
});
};
The toItem() function converts the JSON payload to a CatalogItem model instance, that is, an item document:
function toItem(body) {
return new CatalogItem({
itemId: body.itemId,
itemName: body.itemName,
price: body.price,
currency: body.currency,
categories: body.categories
});
}
We will also need to provide a means of querying data, so let's implement a function that queries for all items in a category:
exports.findItemsByCategory = function (category, response) {
CatalogItem.find({categories: category}, function(error, result) {
if (error) {
console.error(error);
response.writeHead(500, { 'Content-Type': 'text/plain' });
return;
} else {
if (!result) {
if (response != null) {
response.writeHead(404, contentTypePlainText);
response.end('Not Found');
}
return;
}
if (response != null){
response.setHeader('Content-Type', 'application/json');
response.send(result);
}
console.log(result);
}
});
}
Similar to findItemsByCategory, the following is a function that finds an item by its ID:
exports.findItemById = function (itemId, response) {
CatalogItem.findOne({itemId: itemId}, function(error, result) {
if (error) {
console.error(error);
response.writeHead(500, contentTypePlainText);
return;
} else {
if (!result) {
if (response != null) {
response.writeHead(404, contentTypePlainText);
response.end('Not Found');
}
return;
}
if (response != null){
response.setHeader('Content-Type', 'application/json');
response.send(result);
}
console.log(result);
}
});
}
Finally, there's a function that lists all the catalog items stored in the database. It uses the Mongoose model find function that looks for all documents of the model, and uses its first arguments as a filter. We want a function that returns all existing documents; that's why we provide an empty object. This will return all available items. The results are available in the callback function, which is the second argument of the model's find function:
exports.findAllItems = function (response) {
CatalogItem.find({}, (error, result) => {
if (error) {
console.error(error);
return null;
}
if (result != null) {
response.json(result);
} else {
response.json({});
}
});
};
The catalog module will be the foundation of our RESTful service. It is responsible for all data manipulation operations, as well as for different kinds of queries. It encapsulates all operations in a reusable way.
Now we have automated tests for the model and a user-defined module which makes use of them. This ensures the stability of the module and makes it ready for wider adoption.
It is time to build a new Express-based application and add a route, exposing the new module to it:
const express = require('express');
const router = express.Router();
const catalog = require('../modules/catalog');
const model = require('../model/item.js');
router.get('/', function(request, response, next) {
catalog.findAllItems(response);
});
router.get('/item/:itemId', function(request, response, next) {
console.log(request.url + ' : querying for ' + request.params.itemId);
catalog.findItemById(request.params.itemId, response);
});
router.get('/:categoryId', function(request, response, next) {
console.log(request.url + ' : querying for ' + request.params.categoryId);
catalog.findItemsByCategory(request.params.categoryId, response);
});
router.post('/', function(request, response, next) {
console.log('Saving item using POST method);
catalog.saveItem(request, response);
});
router.put('/', function(request, response, next) {
console.log('Saving item using PUT method');
catalog.saveItem(request, response);
});
router.delete('/item/:itemId', function(request, response, next) {
console.log('Deleting item with id: request.params.itemId);
catalog.remove(request, response);
});
module.exports = router;
To sum up, we routed each function of the catalog data service module to an operation of a RESTful service:
As we have our operations exposed, we are ready to perform some more serious REST testing. Let's start Postman and test the newly exposed endpoints:
Spend some time testing each operation thoroughly. This will help you gain confidence that the catalog data service module really works, and also will make you more comfortable with how HTTP responses are served and read. As a RESTful API developer, you should be able to read HTTP dumps, which show different request payloads and status codes, fluently.
Go through the following questions:
In this chapter, we looked at MongoDB, a powerful document-oriented database. We utilized it and made use of Mocha to implement an automated test for the database layer. Now it is time to build a fully-fledged RESTful web service. In the next chapter, we will extend the user-defined module by including support for searching via document attributes, and add filtering and pagination capabilities that will finally evolve into full-fledged RESTful service implementation.
In the previous chapter, we implemented a catalog module that exposed functions for data manipulation for the items in the catalog application. These functions made use of the express.js request object to parse the incoming data in the body and then to carry out the appropriate database operation. Each function populated the response object with a relevant status code and response body payload, if needed. Finally, we bound each function to a route, accepting HTTP requests.
Now, it's time to look closer into the URLs of the routes and into the returned HTTP status codes per operation.
In this chapter, we will cover the following topics:
Each RESTful API operation is a combination of an HTTP request against a URL and an appropriate HTTP method.
When executed, each operation will return a status code, indicating whether the invocation has been successful or not. Successful invocation is indicated by a HTTP 2XX status code, while operations that are not executed correctly indicate this with erroneous status code—4XX if the error is at client side, or 5xx when the server fails to process a valid request.
Having a well-specified API is vital for its adoption. Such specification should not only completely enumerate the status codes of each operation, but should also specify the expected data format, that is, its supported media types.
The following table defines how the Express.js Router will expose the API operations, and it should serve as a reference specification for it:
| Method | URI | Media type | Description | Status Code |
| GET | /catalog | application/json |
Returns all the items in the catalog.
|
200 OK 500 Internal Server Error |
| GET | /catalog/{categoryId} | application/json | Returns all items for the selected category. If the category does not exist, it returns 404. |
200 OK, 404 NOT FOUND 500 Internal Server Error |
| GET | /item/{itemId} | application/json | Returns a single item for the selected itemId. If there is no such item, it returns 404. |
200 OK, 404 NOT FOUND 500 Internal Server Error |
| POST | /item/ | application/json | Creates a new item; if an item with the same identifier exists, it will be updated. When an item is created, a Location header is returned. It provides the URL where the newly created item can be accessed. |
201 Created 200 OK 500 Internal Server Error |
| PUT | /item/{itemId} | application/json | Updates an existing item; if an item with the provided identifier does not exist, it creates it. When an item is created, a Location header is returned. It provides the URL where the newly created item can be accessed. |
201 Created 200 OK 500 Internal Server Error |
| DELETE | /item/{itemId} | application/json | Deletes an existing item; if an item with the provided identifier does not exist, it returns 404. |
200 OK, 404 NOT FOUND 500 Internal Server Error |
The catalog application handles two types of entities: items and categories. Each item entity contains a collection of categories where it belongs. As you can see, the category is just a logical entity in our application; it will exist as long as there is at least one item referencing it, and will cease to exist when no items refer it. This is why the application exposes routes for exposing data manipulation functions only for resources of type items, while the operations for categories are more or less read only. Looking more carefully into the URLs exposing the data manipulation operations for the items, we can see a clear pattern aligning the URL to the REST fundamental principles—a resource is exposed by a single URL, and it supports resource manipulation actions that are determined by the HTTP method of the request. To sum up, listed here are the generally accepted rules that a well-defined API should follow. They are semantically related to each resource manipulation operation:
Now that we have defined some general recommendations on how operations should behave, it's time to implement them in a new version of the API.
We've already defined a few basic versioning rules in Chapter 13, Building a Typical Web API. Let's apply them to the MongoDB database-aware module we implemented in the previous chapter. Our starting point would be to enable the current consumers of the API to continue using the same version on a different URL. This will keep them backward-compatible until they adopt and successfully test the new version.
Keeping a REST API stable is not a question of only moving one endpoint from one URI to another. It makes no sense to perform redirection and afterward have an API that behaves differently. Thus, we need to ensure that the behavior of the moved endpoint stays the same. To ensure that we don't change the previously implemented behavior, let's move the current behavior from the catalog.js module to a new module by renaming the file to catalogV1.js. Then, make a copy of it to the catalogV2.js module, where we will introduce all new functionality; but before doing that, we have to reroute Version 1 from /, /{categoryId}, /{itemId} to /v1, /v1/{categoryId}, /v1/{itemId}:
const express = require('express');
const router = express.Router();
const catalogV1 = require('../modules/catalogV1');
const model = require('../model/item.js');
router.get('/v1/', function(request, response, next) {
catalogV1.findAllItems(response);
});
router.get('/v1/item/:itemId', function(request, response, next) {
console.log(request.url + ' : querying for ' + request.params.itemId);
catalogV1.findItemById(request.params.itemId, response);
});
router.get('/v1/:categoryId', function(request, response, next) {
console.log(request.url + ' : querying for ' + request.params.categoryId);
catalogV1.findItemsByCategory(request.params.categoryId, response);
});
router.post('/v1/', function(request, response, next) {
catalogV1.saveItem(request, response);
});
router.put('/v1/', function(request, response, next) {
catalogV1.saveItem(request, response);
});
router.delete('/v1/item/:itemId', function(request, response, next) {
catalogV1.remove(request, response);
});
router.get('/', function(request, response) {
console.log('Redirecting to v1');
response.writeHead(301, {'Location' : '/catalog/v1/'});
response.end('Version 1 is moved to /catalog/v1/: ');
});
module.exports = router;
Since Version 2 of our API is not yet implemented, executing a GET request against / will result in receiving a 301 Moved Permanently HTTP status, which will then redirect to /v1/. This will notify our consumers that the API is evolving and that they will soon need to decide whether to continue using Version 1 by explicitly requesting its new URI or prepare for adopting Version 2.
Go ahead and give it a try! Start the modified node application and, from Postman, make a GET request to http://localhost:3000/catalog:
You will see that your request is redirected to the newly routed location at http://localhost:3000/catalog/v1.
Now that we have finalized Version 1 of the catalog, it's time to think of further extensions that we can add in Version 2. Currently, the catalog service supports listing of all items in a category and fetching an item by its ID. It's about time to take full advantage of MongoDB, being a document-oriented database, and implement a function that will enable our API consumer to query for items based on any of their attributes. For instance, list all items for a specific category with an attribute that matches a query parameter, such as price or color, or search by item name. RESTful services usually expose document-oriented data. However, their usage is not limited to documents only. In the next chapter, we will extend the catalog in a way that it also stores binary data—an image that can be linked to each item. For that purpose, we will use a MongoDB binary format called Binary JSON (BSON) in the Working with arbitrary data section in Chapter 16, Implementing a Full Fledged RESTful Service.
Getting back to the searching extension, we've already used the Mongoose.js model's find() and findOne() functions. So far, we used them to provide the name of the document attribute to be searched with, statically, in our JavaScript code. However, this filtering parameter of find() is just a JSON object where the key is the document attribute and the value is the attribute's value to be used in the query. Here is the first new function we will add to Version 2. It queries MongoDB by an arbitrary attribute and its value:
exports.findItemsByAttribute = function (key, value, response) {
var filter = {};
filter[key] = value;
CatalogItem.find(filter, function(error, result) {
if (error) {
console.error(error);
response.writeHead(500, contentTypePlainText);
response.end('Internal server error');
return;
} else {
if (!result) {
if (response != null) {
response.writeHead(200, contentTypeJson);
response.end({});
}
return;
}
if (response != null){
response.setHeader('Content-Type', 'application/json');
response.send(result);
}
}
});
}
This function calls find on the model with the provided attribute and value as parameters. We will bind this function to the router's /v2/item/ GET handler.
At the end, our aim is to have /v2/item/?currency=USD that returns only records for items that are sold in USD currency, as indicated by the value of the passed GET parameter. That way, if we modify the model with additional attributes, such as color and size, we can query for all items having the same color or any other attribute that an item can have.
We will keep the old behavior of returning a list of all available items when no parameters are provided within the query string, but we will also parse the query string for the first provided GET parameter and use it as a filter in the findItemsByAttribute() function:
router.get('/v2/items', function(request, response) {
var getParams = url.parse(request.url, true).query;
if (Object.keys(getParams).length == 0) {
catalogV2.findAllItems(response);
} else {
var key = Object.keys(getParams)[0];
var value = getParams[key];
catalogV2.findItemsByAttribute(key, value, response);
}
});
Perhaps the most interesting part in this function is the URL parsing. As you can see, we keep using the same old strategy to check whether any GET parameters are supplied. We parse the URL in order to get the query string, and then we use the built-in Object.keys function to check whether the parsed key/value list contains elements. If it does, we take the first element and extract its value. Both the key and the value are passed to the findByAttribute function.
Every catalog application supports an image or set of images bound to this item. For that purpose, in the next chapter, we will see how to work with binary objects in MongoDB. However, now is the time to decide how to semantically link the binary data to an item document. Extending the model schema in such a way that it contains binary base64 representation of binary data in the document is anything but a good idea, as mixing literally encoded and binary data in one format is never a good idea. It increases the complexity of the application and makes it error-prone:
{
"_id": "5a4c004b0eed73835833cc9a",
"itemId": "1",
"itemName": "Sports Watch",
"price": 100,
"currency": "EUR",
"categories": [
"Watches",
"Sports Watches"
],
"image":"
iVBORw0KGgoAAAANSUhEUgAAAJEAAACRCAMAAAD0BqoRAAAAGXRFWHRTb2Z0d2FyZQBBZG9iZSBJbWFnZVJlYWR5ccllPAAAAyJpVFh0WE1MOmNvbS5hZG9iZS54bXAAAAAAADw/eHBhY2tldCBiZWdpbj0i77u/IiBpZD0iVzVNME1wQ2VoaUh6cmVTek5UY3prYzlkIj8+IDx4OnhtcG1ldGEgeG1sbnM6eD0iYWRvYmU6bnM6bWV0YS8iIHg6eG1wdGs9IkFkb2JlIFhNUCBDb3JlIDUuMC1jMDYwIDYxLjEzNDc3NywgMjAxMC8wMi8xMi0xNzozMjowMCAgICAgICAgIj4gPHJkZjpSREYgeG1sbnM6cmRmPSJodHRwOi8vd3d3LnczLm9yZy8xOTk5LzAyLzIyLXJkZi1zeW50YXgtbnMjIj4gPHJkZjpEZXNuzjcmlwdGlvbiByZGY6YWJvdXQ9IiIgeG1sbnM6eG1wPSJodHRwOi8vbnMuYWRvYmUuY29tL3hhcC8xLjAvIiB4bWxuczp4bXBNTT0iaHR0cDovL25zLmFkb2JlLmNvbS94YXAvMS4wL21tLyIgeG1sbnM6c3RSZWY9Imh0dHA6Ly9ucy5hZG9iZS5jb20veGFwLzEuMC9zVHlwZS9SZXNvdXJjZVJlZiMiIHhtcDpDcmVhdG9yVG9vbD0iQWRvYmUgUGhvdG9zaG9wIENTNSBNYWNpbnRvc2giIHhtcE1NOkluc3RhbmNlSUQ9InhtcC5paWQ6MjMwNjQ1NDdFNjJCMTFERkI5QzU4OTFCMjJCQzEzM0EiIHhtcE1NOkRvY3VtZW50SUQ9InhtcC5kaWQ6MjMwNjQ1NDhFNjJCMTFERkI5QzU4OTFCMjJCQzEzM0EiPiA8eG1wTU06RGVyaXZlZEZyb20gc3RSZWY6aW5zdGFuY2VJRD0ieG1wLmlpZDoyMzA2NDU0NUU2MkIxMURGQjlDNTg5MUIyMkJDMTMzQSIgc3RSZWY6ZG9jdW1lbnRJRD0ieG1wLmRpZDoyMzA2NDU0NkU2MkIxMURGQjlDNTg5MUIyMkJDMTMzQSIvPiA8L3JkZjpEZXNjcmlwdGlvbj4gPC9yZGY6UkRGPiA8L3g6eG1wbWV0YT4gPD94cGFja2V0IGVuZD0iciI/Px5Xq1XXhWFY1+v151/b3ij5tI/GPEVP0e8U/SPAABPLjHnaJ6XvAAAAAElFTkSuQmCC
"}
Imagine how large a result for a non-filtered query can become just for a few hundred items, if all of them had an image binary representation as a value of a JSON attribute. To avoid that, we will return the image for each item at a URL that is logically linked to the resource's URL—/catalog/v2/item/{itemId}/image.
That way, if there is an image assigned to an item, it will be served at a known location. This approach, however, does not semantically link the binary item to its corresponding resource, as when accessing the item at /catalog/v2/item/{itemId}, there would be no indication of whether it has an image assigned or not. To solve this, let's use a custom HTTP header in response of the item route:
GET http://localhost:3000/catalog/v2/item/1 HTTP/1.1
Host: localhost:3000
Connection: Keep-Alive
User-Agent: Apache-HttpClient/4.1.1 (java 1.5)
HTTP/1.1 200 OK
X-Powered-By: Express
Content-Type: application/json; charset=utf-8
Content-Length: 152
Image-Url: http://localhost:3000/catalog/v2/item/1/image
ETag: W/"98-2nJj2mZdLV2YDME3WYCyEwIXfuA"
Date: Thu, 01 Feb 2018 13:50:43 GMT
Connection: keep-alive
{
"_id": "5a4c004b0eed73835833cc9a",
"itemId": "1",
"itemName": "Sports Watch",
"price": 100,
"currency": "EUR",
"__v": 0,
"categories": [
"Watches",
"Sports Watches"
]
}
When present in the response, the Image-Url header indicates that the item has an additional resource bound to it, and the header value provides the address where it is available. Using this approach, we linked a binary resource semantically to our document.
In the next chapter, we will implement the routes that will handle the manipulation of arbitrary items bound to the items in the catalog.
In this chapter, we discussed in detail how resources should be exposed via a RESTful API; we paid close attention to URL best practices and looked into appropriate usage of the HTTP status codes indicating each state of our operations.
We covered the topics of versioning and extensibility, where we used the 301 Moved Permanently status code to automatically redirect API calls to different URLs.
Finally, we figured out how to semantically link our resource items to arbitrary binary represented data.
So far, we have created a second version of our RESTful service, and we had the two versions exposed by different URLs, ensuring backward compatibility. We implemented unit tests for its database layer and discussed how to use HTTP status codes appropriately. In this chapter, we will extend that implementation—by providing handling of non-document—binary data to the second version of the service and linking it accordingly to the documents it relates to.
We will look at a convenient way of presenting large result sets to consumers. For that purpose, we will introduce pagination as well as further filtering capabilities to our API.
There are cases when caching data responses should be considered as an option. We will look at its benefits and drawbacks and also decide to enable caching when necessary.
Finally, we will dive into the discovery and exploration of REST services.
To sum up, here's what should be further implemented to turn the catalog data service into a full-fledged RESTful service:
MongoDB utilizes BSON (Binary JSON) as the primary data format. It is a binary format that stores key/value pairs in a single entity called document. For example, a sample JSON, {"hello":"world"}, becomes \x16\x00\x00\x00\x02hello\x00\x06\x00\x00\x00world\x00\x00 when encoded in BSON.
BSON stores data rather than literals. For instance, if an image is to be part of the document, it will not have to be converted to a base64-encoded string; instead, it will be directly stored as binary data, unlike plain JSON, which will usually represent such data as base64-encoded bytes, but that is obviously not the most efficient way.
Mongoose schemas enable storing binary content in the BSON format via the schema type—buffer. It stores binary content (image, ZIP archive, and so on) up to 16 MB. The reason behind the relatively small storage capacity is to prevent excessive usage of memory and bandwidth during transmission.
The GridFS specification addresses this limitation of BSON and enables you to work with data larger than 16 MB. GridFS divides data into chunks stored as separate document entries. Each chunk, by default, has a size of up to 255 KB. When data is requested from the data store, the GridFS driver retrieves all the required chunks and returns them in an assembled order, as if they had never been divided. Not only does this mechanism allow storage of data larger than 16 MB, it also enables consumers to retrieve data in portions so that it doesn't have to be loaded completely into the memory. Thus, the specification implicitly enables streaming support.
GridFS actually offers more—it supports storing metadata for the given binary data, for example, its format, a filename, size, and so on. The metadata is stored in a separate file and is available for more complex queries. There is a very usable Node.js module called gridfs-stream. It enables easy streaming of data in and out of MongoDB, as on all other modules it is installed as an npm package. So, let's install it globally and see how it is used; we will also use the -s option to ensure that the dependencies in the project's package.json are updated:
npm install -g -s gridfs-stream
To create a Grid instance, you are required to have a connection opened to the database:
const mongoose = require('mongoose')
const Grid = require('gridfs-stream');
mongoose.connect('mongodb://localhost/catalog');
var connection = mongoose.connection;
var gfs = Grid(connection.db, mongoose.mongo);
Reading and writing into the stream is done through the createReadStream() and createWriteStream() functions. Each piece of data streamed into the database must have an ObjectId attribute set. The ObjectId identifies binary data entry uniquely, just as it would have identified any other document in MongoDB; using this ObjectId, we can find or delete it from the MongoDB collection by this identifier.
Let's extend the catalog service with functions for fetching, adding, and deleting an image assigned to an item. For simplicity, the service will support a single image per item, so there will be a single function responsible for adding an image. It will overwrite an existing image each time it is invoked, so an appropriate name for it is saveImage:
exports.saveImage = function(gfs, request, response) {
var writeStream = gfs.createWriteStream({
filename : request.params.itemId,
mode : 'w'
});
writeStream.on('error', function(error) {
response.send('500', 'Internal Server Error');
console.log(error);
return;
})
writeStream.on('close', function() {
readImage(gfs, request, response);
});
request.pipe(writeStream);
}
As you can see, all we need to do to flush the data in MongoDB is to create a GridFS write stream instance. It requires some options that provide the ObjectId of the MongoDB entry and some additional metadata, such as a title as well as the writing mode. Then, we simply call the pipe function of the request. Piping will result in flushing the data from the request to the write stream, and, in this way, it will be safely stored in MongoDB. Once stored, the close event associated with the writeStream will occur, and this is when our function reads back whatever it has stored in the database and returns that image in the HTTP response.
Retrieving an image is done the other way around—a readStream is created with options, and the value of the _id parameter should be the ObjectId of the arbitrary data, optional file name, and read mode:
function readImage(gfs, request, response) {
var imageStream = gfs.createReadStream({
filename : request.params.itemId,
mode : 'r'
});
imageStream.on('error', function(error) {
console.log(error);
response.send('404', 'Not found');
return;
});
response.setHeader('Content-Type', 'image/jpeg');
imageStream.pipe(response);
}
Before piping the read stream to the response, the appropriate Content-Type header has to be set so that the arbitrary data can be presented to the client with an appropriate image media type, image/jpeg, in our case.
Finally, we export from our module a function for fetching the image back from MongoDB. We will use that function to bind it to the express route that reads the image from the database:
exports.getImage = function(gfs, itemId, response) {
readImage(gfs, itemId, response);
};
Deleting arbitrary data from MongoDB is also straightforward. You have to delete the entry from two internal MongoDB collections, the fs.files, where all the files are kept, and from the fs.files.chunks:
exports.deleteImage = function(gfs, mongodb, itemId, response) {
console.log('Deleting image for itemId:' + itemId);
var options = {
filename : itemId,
};
var chunks = mongodb.collection('fs.files.chunks');
chunks.remove(options, function (error, image) {
if (error) {
console.log(error);
response.send('500', 'Internal Server Error');
return;
} else {
console.log('Successfully deleted image for item: ' + itemId);
}
});
var files = mongodb.collection('fs.files');
files.remove(options, function (error, image) {
if (error) {
console.log(error);
response.send('500', 'Internal Server Error');
return;
}
if (image === null) {
response.send('404', 'Not found');
return;
} else {
console.log('Successfully deleted image for primary item: ' + itemId);
response.json({'deleted': true});
}
});
}
Let's bind the new functionality to the appropriate item route and test it:
router.get('/v2/item/:itemId/image',
function(request, response){
var gfs = Grid(model.connection.db, mongoose.mongo);
catalogV2.getImage(gfs, request, response);
});
router.get('/item/:itemId/image',
function(request, response){
var gfs = Grid(model.connection.db, mongoose.mongo);
catalogV2.getImage(gfs, request, response);
});
router.post('/v2/item/:itemId/image',
function(request, response){
var gfs = Grid(model.connection.db, mongoose.mongo);
catalogV2.saveImage(gfs, request, response);
});
router.post('/item/:itemId/image',
function(request, response){
var gfs = Grid(model.connection.db, mongoose.mongo);
catalogV2.saveImage(gfs, request.params.itemId, response);
});
router.put('/v2/item/:itemId/image',
function(request, response){
var gfs = Grid(model.connection.db, mongoose.mongo);
catalogV2.saveImage (gfs, request.params.itemId, response);
});
router.put('/item/:itemId/image',
function(request, response){
var gfs = Grid(model.connection.db, mongoose.mongo);
catalogV2.saveImage(gfs, request.params.itemId, response);
});
router.delete('/v2/item/:itemId/image',
function(request, response){
var gfs = Grid(model.connection.db, mongoose.mongo);
catalogV2.deleteImage(gfs, model.connection,
request.params.itemId, response);
});
router.delete('/item/:itemId/image',
function(request, response){
var gfs = Grid(model.connection.db, mongoose.mongo);
catalogV2.deleteImage(gfs, model.connection, request.params.itemId, response);
});
Let's start Postman and post an image to an existing item, assuming that we have an item with ID 14 /catalog/v2/item/14/image:
After the request is processed, the binary data is stored in the grid datastore and the image is returned in the response.
In the Linked data section of the previous chapter, we defined that if an item in the catalog has an image assigned to it, this will be indicated with an HTTP header named Image-URL.
Let's modify the findItemById function in the V2 of the catalog. We will use the GridFS's existing function to check whether there is an image bound to the selected item; in case there is an image assigned to the item, its URL will be available to the response with the Image-Url header:
exports.findItemById = function (gfs, request, response) {
CatalogItem.findOne({itemId: request.params.itemId}, function(error, result) {
if (error) {
console.error(error);
response.writeHead(500, contentTypePlainText);
return;
} else {
if (!result) {
if (response != null) {
response.writeHead(404, contentTypePlainText);
response.end('Not Found');
}
return;
}
var options = {
filename : result.itemId,
};
gfs.exist(options, function(error, found) {
if (found) {
response.setHeader('Content-Type', 'application/json');
var imageUrl = request.protocol + '://' + request.get('host') + request.baseUrl + request.path + '/image';
response.setHeader('Image-Url', imageUrl);
response.send(result);
} else {
response.json(result);
}
});
}
});
}
So far, we linked an item to its image; however, that leaves our data partially linked, as there is a link from an item to its image but not the other way around. Let's change that and supply a header Item-Url to the image response by modifying the readImage function:
function readImage(gfs, request, response) {
var imageStream = gfs.createReadStream({
filename : request.params.itemId,
mode : 'r'
});
imageStream.on('error', function(error) {
console.log(error);
response.send('404', 'Not found');
return;
});
var itemImageUrl = request.protocol + '://' + request.get('host') + request.baseUrl+ request.path;
var itemUrl = itemImageUrl.substring(0, itemImageUrl.indexOf('/image'));
response.setHeader('Content-Type', 'image/jpeg');
response.setHeader('Item-Url', itemUrl);
imageStream.pipe(response);
}
Now requesting the item at http://localhost:3000/catalog/v2/item/3/ will return the item encoded in the JSON format:
GET http://localhost:3000/catalog/v2/item/3/image HTTP/1.1
Accept-Encoding: gzip,deflate
Host: localhost:3000
HTTP/1.1 200 OK
X-Powered-By: Express
Content-Type: application/json; charset=utf-8
Image-Url: http://localhost:3000/catalog/v2/item/3/image
Content-Length: 137
Date: Tue, 03 Apr 2018 19:47:41 GMT
Connection: keep-alive
{
"_id": "5ab827f65d61450e40d7d984",
"itemId": "3",
"itemName": "Sports Watch 11",
"price": 99,
"currency": "USD",
"__v": 0,
"categories": ["Watches"]
}
Looking into the response headers, we find the Image-Url header its value, http://localhost:3000/catalog/v2/item/3/image provides the URL of the image linked to the item.
Requesting that image results in the following:
GET http://localhost:3000/catalog/v2/item/3/image HTTP/1.1
Host: localhost:3000
Connection: Keep-Alive
HTTP/1.1 200 OK
X-Powered-By: Express
Content-Type: image/jpeg
Item-Url: http://localhost:3000/catalog/v2/item/3
Connection: keep-alive
Transfer-Encoding: chunked
<BINARY DATA>
This time, the response provides the payload of the image linked to the item and a special header Item-Url. Its value—http://localhost:3000/catalog/v2/item/3—is the address where the item resource is available. Now if the item image appears, for instance, in image search results, the URL of the item linked with the image will also be part of the result. In this way, we linked the two data semantically without modifying or compromising their payload.
Once deployed to the web, each service becomes available to an enormous number of consumers. They will not only use it to get data but also to insert new data. At some point of time, this will inevitably lead to a large amount of data being available in the database. To keep the service user-friendly and maintain a reasonable response time, we need to take care of providing big data in reasonable portions, assuring that it does not need to return a few hundred thousand items when the /catalog URI is requested.
Web data consumers are used to having various pagination and filtering capabilities. Earlier in this chapter, we implemented the findIfindItemsByAttribute() function, which enabled filtering by any of the attributes of an item Now, it's time to introduce pagination capabilities to enable navigation within the resultset with the help of a URI parameter.
The mongoose.js models can make use of different plugin modules to provide additional functionality on top of them. Such a plugin module is mongoose-paginate. The Express framework also provides a piece of pagination middleware named express-paginate. It provides out-of-the-box linking and navigation with Mongoose's result pages:
npm install -g -s express-paginate npm install -g -s mongoose-paginate
expressPaginate = require('express-paginate');
app.use(expressPaginate.middleware(limit, maxLimit);
var mongoose = require('mongoose');
var mongoosePaginate = require('mongoose-paginate');
var Schema = mongoose.Schema;
mongoose.connect('mongodb://localhost/catalog');
var itemSchema = new Schema ({
"itemId" : {type: String, index: {unique: true}},
"itemName": String,
"price": Number,
"currency" : String,
"categories": [String]
});
console.log('paginate');
itemSchema.plugin(mongoosePaginate);
var CatalogItem = mongoose.model('Item', itemSchema);
module.exports = {CatalogItem : CatalogItem, connection : mongoose.connection};
CatalogItem.paginate({}, {page:request.query.page, limit:request.query.limit},
function (error, result){
if(error) {
console.log(error);
response.writeHead('500',
{'Content-Type' : 'text/plain'});
response.end('Internal Server Error');
} else {
response.json(result);
}
});
The first parameter is the filter that Mongoose should use for its query. The second parameter is an object specifying which page is requested and the entries per page. The third parameter is a callback-handler function, providing the result and any available error information via its parameters:
The express-paginate middleware enables seamless integration of the mongoose-paginate module in the web environment by enriching the request and response objects of an Express handler function.
The request objects get two new attributes: query.limit, which tells the middleware the number of entries on the page, and query.page, which specifies the requested page. Note that the middleware will ignore values of query.limit that are larger than the maxLimit value specified at the middleware's initialization. This prevents the consumer from overriding the maximum limit and gives you total control over your application.
Here's the implementation of the paginate function in the second version of the catalog module:
exports.paginate = function(model, request, response) {
var pageSize = request.query.limit;
var page = request.query.page;
if (pageSize === undefined) {
pageSize = 100;
}
if (page === undefined) {
page = 1;
}
model.paginate({}, {page:page, limit:pageSize},
function (error, result){
if(error) {
console.log(error);
response.writeHead('500',
{'Content-Type' : 'text/plain'});
response.end('Internal Server Error');
}
else {
response.json(result);
}
});
}
The following is the response from querying a dataset containing 11 items with a limit of five items per page:
{
"docs": [
{
"_id": "5a4c004b0eed73835833cc9a",
"itemId": "1",
"itemName": "Sports Watch 1",
"price": 100,
"currency": "EUR",
"__v": 0,
"categories": [
"Watches",
"Sports Watches"
]
},
{
"_id": "5a4c0b7aad0ebbce584593ee",
"itemId": "2",
"itemName": "Sports Watch 2",
"price": 100,
"currency": "USD",
"__v": 0,
"categories": [
"Sports Watches"
]
},
{
"_id": "5a64d7ecfa1b585142008017",
"itemId": "3",
"itemName": "Sports Watch 3",
"price": 100,
"currency": "USD",
"__v": 0,
"categories": [
"Watches",
"Sports Watches"
]
},
{
"_id": "5a64d9a59f4dc4e34329b80f",
"itemId": "8",
"itemName": "Sports Watch 4",
"price": 100,
"currency": "EUR",
"__v": 0,
"categories": [
"Watches",
"Sports Watches"
]
},
{
"_id": "5a64da377d25d96e44c9c273",
"itemId": "9",
"itemName": "Sports Watch 5",
"price": 100,
"currency": "USD",
"__v": 0,
"categories": [
"Watches",
"Sports Watches"
]
}
],
"total": 11,
"limit": "5",
"page": "1",
"pages": 3
}
The docs attribute contains all the items that are part of the results. Its size is the same as the selected limit value. The pages attribute provides the total number of pages; in the example here, its value is 3, as 11 items are accommodated in three pages, each containing five items. The Total attribute gives us the total number of items.
The final step to enable pagination is to modify the /v2/ route to start making use of the newly created function:
router.get('/v2/', function(request, response) {
var getParams = url.parse(request.url, true).query;
if (getParams['page'] !=null) {
catalogV2.paginate(model.CatalogItem, request, response);
} else {
var key = Object.keys(getParams)[0];
var value = getParams[key];
catalogV2.findItemsByAttribute(key, value, response);
}
});
We will use the HTTP 302 Found status for the default route, /catalog. In this way, all incoming requests will be redirected to /v2/:
router.get('/', function(request, response) {
console.log('Redirecting to v2');
response.writeHead(302, {'Location' : '/catalog/v2/'});
response.end('Version 2 is is available at /catalog/v2/: ');
});
Using an appropriate status code for redirection here is vital to the life cycle of any RESTful web service. Returning 302 Found, followed by a redirection, ensures that the consumer of the API will always have its latest version available at that location. Furthermore, it is also a good practice from the development point of view to use redirection instead of code duplication here.
When you are between two versions, you should always consider using the HTTP 301 Moved Permanently status to show where the previous version has been moved and the HTTP 302 Found status to show the actual URI of the current version.
Now, getting back to pagination, as the requested page and the limit number are provided as GET parameters and we don't want to mix that up with the filtering capabilities, there is an explicit check for them. Pagination will be used only when either the page or the limit GET parameters, are available in the request. Otherwise, searching will be carried out.
Initially, we set the maximum limit of 100 results and a default limit of 10, so, before trying the new pagination functionality, ensure that you insert more items than the default limit into the database. This will make the test results more obvious.
Now, let's give it a try. Requesting /catalog?limit=3 will result in returning a list containing only two items, as shown:
As you can see from the example, the total number of pages is four. The total number of items is stored in the database 11. Since we didn't specify a page parameter in the request, the pagination implicitly returned the first page. To navigate to the next page, simply add &page=2 to the URI.
Also, try changing the limit attribute, requesting /catalog/v2?limit=4. This will return the first four items, and the response will show that the total number of pages is three.
When we discussed the REST principles defined by Roy Fielding, we mentioned that caching was a rather sensitive topic. In the end, our consumers will expect up-to-date results when executing a query. However, from a statistical point of view, data exposed in the web is more likely to be read rather than updated or deleted.
So, it is reasonable that some resources exposed by a public URL become a subject of millions of requests, considering taking off part of the load from the server to a cache. The HTTP protocol allows us to cache some responses for a given period of time. For instance, when multiple requests are received in a short period of time, querying for all items in the catalog of a given group, such as /catalog/v2, our service can utilize special HTTP headers that would force the HTTP server to cache the response for a defined time period. This would prevent redundant requests to the underlying database server.
Caching at the HTTP server level is achieved via special response headers. The HTTP server uses a Cache-Control header to specify how long a given response should be cached for. The period before the cache needs invalidation is set via its max-age attribute, and its value is provided in seconds. Of course, there is a nice Node.js module that provides a middleware function for caching, called express-cache-control.
Let's install it with the NPM package manager; once again, we will install it globally and make use of the -s option, which will update the package.json file with the new express-cache-control dependency automatically:
npm install -g -s express-cache-control
Enabling caching with the express-cache-control middleware requires three straightforward steps:
CacheControl = require("express-cache-control")
var cache = new CacheControl().middleware;
router.get('/v2/', cache('minutes', 1), function(request, response) {
var getParams = url.parse(request.url, true).query;
if (getParams['page'] !=null || getParams['limit'] != null) {
catalogV2.paginate(model.CatalogItem, request, response);
} else {
var key = Object.keys(getParams)[0];
var value = getParams[key];
catalogV2.findItemsByAttribute(key, value, response);
}
});
Let's test our changes by requesting /catalog/v2 in Postman:
As expected, the express-cache-control middleware has done its job—the Cache-Control header is now included in the response. The must-revalidate option ensures that the cache content is invalidated after the max-age interval expires. Now, if you make another request for a specific item, you will see that the response does not make use of the express-cache-control middleware, which is because it needs to be explicitly provided in each individual route. It will not be used in URIs deriving from one another.
Responses from GET requests against any route /v1/ will not contain the Cache-Control header, as it is supported only in Version 2 of our API, and the Cache-Control middleware is used only in the main catalog routes: /catalog/v2/ or /catalog.
The topic of discovering RESTful services has a long and complicated history. The HTTP specification states that a resource should be self-descriptive and that it should be identified uniquely by a URI. Dependent resources should be linked by the dependency using their own unique URIs. Discovering a RESTful service means navigating from one service to another, following the links it provides.
In the year 2009, a specification called Web Application Discovery Language (WADL) was invented. It aims to document every URI exposed from a web application, along with the HTTP methods it supports and the parameter it expects. The response media type of the URI is also described. This is very useful for documenting purposes, and it's all that a WADL file can provide us in terms of RESTful service provisioning.
Unfortunately, there is currently no Node.js module that can automatically generate a WADL file for a given express route. We will have to manually create a WADL file to demonstrate how it is used by other clients for discovery.
The following listing shows a sample WADL file describing the resources available at /catalog, /catalog/v2/{categoryId}:
<?xml version="1.0" encoding="UTF-8"?>
<application xmlns="http://wadl.dev.java.net/2009/02" xmlns:service="http://localhost:8080/catalog/" xmlns:xsd="http://www.w3.org/2001/XMLSchema">
<grammer>
<include href="items.xsd" />
<include href="error.xsd" />
</grammer>
<resources base="http://localhost:8080/catalog/">
<resource path="{categoryId}">
<method name="GET">
<request>
<param name="category" type="xsd:string" style="template" />
</request>
<response status="200">
<representation mediaType="application/xml" element="service:item" />
<representation mediaType="application/json" />
</response>
<response status="404">
<representation mediaType="text/plain" element="service:item" />
</response>
</method>
</resource>
<resource path="/v2/{categoryId}">
<method name="GET">
<request>
<param name="category" type="xsd:string" style="template" />
</request>
<response status="200">
<representation mediaType="application/xml" element="service:item" />
<representation mediaType="application/json" />
</response>
<response status="404">
<representation mediaType="text/plain" element="service:item" />
</response>
</method>
</resource>
</resources>
</application>
As you can see, the WADL format is very straightforward. It basically describes the URI of each resource, providing information about the media types it uses and the status codes that are expected at that URI. Many third-party RESTful clients understand the WADL language and can generate request messages out of a given WADL file.
Let's import the WADL file in Postman. Click on the Import button and select your WADL file:
As you can see, the result of importing the WADL file is that we have a project ready to test each aspect of a REST service in the nick of time. All the routes defined in the WADL file are now conveniently available as separate request entities on the right menu. That's not all; apart from the WADL standard, currently the swagger documentation format is heavily adopted and has become an informal standard for describing RESTful services, so we can also use it to ease the adoption and discovery of our service. In the next chapter, we will bind these description files to our service. This is an important step in the phase of production preparation.
Congratulations! In this chapter, you succeeded in transforming a sample REST-enabled endpoint into a full-fledged RESTful web service that supports filtering for usability and paging for easy navigation. The service delivers both arbitrary and JSON data, and it is ready for high-load scenarios, as it enables caching in its critical parts. One thing that should draw your attention is the appropriate usage of the HTTP status codes when it comes to redirection between new and obsolete versions of any public API.
Implementing appropriate HTTP status is really important for the REST application, so we made use of rather exotic statuses, such as 301 Moved Permanently and 302 Found.
To demonstrate some more advanced topics related to the consumption of our API, we will implement a really simple web client. It will help us cover those topics, and it can serve as a reference implementation for the catalog's consumers. For this frontend client, we will use the famous JavaScript library, jQuery. Utilizing it will help us cover the following:
JQuery is a fast, light, and powerful JavaScript library; it eliminates DOM-related complexity by providing direct access to HTML elements once the DOM three has been loaded. To use jQuery within an HTML document, you have to import it:
<script type="text/javascript" src="https://code.jquery.com/jquery-3.3.1.min.js "></script>
Assume that somewhere within an HTML document, there is a button defined as <input type="button" id="btnDelete" value="Delete"/>.
To assign a function to the click event of this button with JQuery means we need to do the following:
$(document).ready(function() {
$('#btn').click(function () {
alert('Clicked');
});
});
The $('#identifier') expression provides direct access to elements in DOM three, $ states that an object is referenced, and the value within the bracket, prefix by # specifies its identifier. jQuery will have access to the element only after the entire document has been loaded; that's why elements should be accessed within ${document).ready() block scope.
Similarly, you can access the value of a text input with an identifier txt:
$(document).ready(function() {
var textValue = $('#txt').val();
});
});
The $(document) object is predefined in jQuery and represents the entire DOM document of the HTML page. In a similar way, jQuery predefines a function for AJAX-enabled communication, that is, for sending HTTP request to an HTTP endpoint. This function is named after Asynchronous JavaScript + XML- AJAX, which was the de facto standard that enabled a JavaScript application to communicate with HTTP-enabled backends. Nowadays, JSON is being widely used; however, naming conversion for AJAX is still used as a term for asynchronous communication, regardless of the data format; that is why the predefined function in jQuery is called $.ajax(options, handlers).
To send an http request with the $.ajax function, invoke it by providing the endpoint URL, http method for the request, and its content type; the result will be returned in a callback function. The following example shows how an item with identifier 3 is requested from our catalog:
$.ajax({
contentType: 'application/json',
url: 'http://localhost:3000/catalog/v2/item/3',
type: 'GET',
success: function (item, status, xhr) {
if (status === 'success') {
//the item is successfully retrieved load & display its details here
}
}
,error: function (xhr, options, error) {
//Item was not retrieved due to an error handle it here
}
});
});
Posting data to an endpoint is rather similar:
$.ajax({
url: "http://localhost:3000/catalog/v2/",
type: "POST",
dataType: "json",
data: JSON.stringify(newItem),
success: function (item, status, xhr) {
if (status === 'success') {
//item was created successfully
}
},
error: function(xhr, options, error) {
//Error occurred while creating the iteam
}
});
Simply use the appropriate options type set to POST, and the dateType set to JSON. Those will specify that a POST request is to be sent to the endpoint in the JSON format. The payload of the object is provided as a value to the data attribute.
Invoking a delete method is quite similar:
$.ajax({
contentType: 'application/json',
url: 'http://localhost:3000/catalog/v2/item/3',
type: 'DELETE',
success: function (item, status, xhr) {
if (status === 'success') {
//handle successful deletion
}
}
,error: function (xhr, options, error) {
//handle errors on delete
}
});
A basic understanding of how jQuery works is just about fine for the scope of this book. Now, let's glue all this together and create two HTML pages; that way, we will handle creating, displaying, and deleting an item in our catalog, starting with the page that displays an item and allows its deletion. This page loads an item from the catalog using GET request, and then displays the item's attributes in the HTML page in a table-like manner:
<html>
<head><title>Item</title></head>
<body>
<script type="text/javascript" src="https://code.jquery.com/jquery-3.3.1.min.js "></script>
<script>
$(document).ready(function() {
$('#btnDelete').click(function () {
$.ajax({
contentType: 'application/json',
url: 'http://localhost:3000/catalog/v2/item/3',
type: 'DELETE',
success: function (item, status, xhr) {
if (status === 'success') {
$('#item').text('Deleted');
$('#price').text('Deleted');
$('#categories').text('Deleted');
}
}
,error: function (xhr, options, error) {
alert('Unable to delete item');
}
});
});
$.ajax({
contentType: 'application/json',
url: 'http://localhost:3000/catalog/v2/item/3',
type: 'GET',
success: function (item, status, xhr) {
if (status === 'success') {
$('#item').text(item.itemName);
$('#price').text(item.price + ' ' + item.currency);
$('#categories').text(item.categories);
}
}
,error: function (xhr, options, error) {
alert('Unable to load details');
}
});
});
</script>
<div>
<div style="position: relative">
<div style="float:left; width: 80px;">Item: </div>
<div><span id="item"/>k</div>
</div>
<div style="position: relative">
<div style="float:left; width: 80px;">Price: </div>
<div><span id="price"/>jjj</div>
</div>
<div style="position: relative">
<div style="float:left; width: 80px;">Categories: </div>
<div><span id="categories"/>jjj</div>
</div>
<div><input type="button" id="btnDelete" value="Delete"/></div>
</div>
</body>
</html>
The page that handles creation is quite similar. However, it provides text inputs instead of span labels for an item's fields, where the view page will display the data for the attributes of the loaded item. JQuery provides a simplified access model to the input controls, rather than DOM—simply access the input element as follows:
<html>
<head><title>Item</title></head>
<body>
<script type="text/javascript" src="https://code.jquery.com/jquery-3.3.1.min.js "></script>
<script>
$(document).ready(function() {
$('#btnCreate').click(function(){
var txtItemName = $('#txtItem').val();
var txtItemPrice = $('#txtItemPrice').val();
var txtItemCurrency = $('#txtItemCurrency').val();
var newItem = {
itemId: 4,
itemName: txtItemName,
price: txtItemPrice,
currency: txtItemCurrency,
categories: [
"Watches"
]
};
$.ajax({
url: "http://localhost:3000/catalog/v2/",
type: "POST",
dataType: "json",
data: JSON.stringify(newItem),
success: function (item, status, xhr) {
alert(status);
}
});
})
});
</script>
<div>
<div style="position: relative">
<div style="float:left; width: 80px;">Id: </div>
<div><input type="text" id="id"/></div>
<div style="float:left; width: 80px;">Item: </div>
<div><input type="text" id="txtItem"/></div>
</div>
<div style="position: relative">
<div style="float:left; width: 80px;">Price: </div>
<div><input type="text" id="price"/></div>
</div>
<div style="position: relative">
<div style="float:left; width: 80px;">Categories: </div>
<div><input type="text" id="categories"/></div>
</div>
<div><input type="button" id="btnCreate" value="Create"/></div>
</div>
</body>
</html>
Let's give that a try and load an existing item in the view page by opening our static page directly from the filesystem in a browser of your choice. It looks as if we have some kind of a problem, as nothing gets displayed. Enabling client-side debugging using the browser's developer suite doesn't give much more information either:
It states that the content is partially blocked; however, it is not quite clear whether this is due to a backend-related error, or something has gone wrong on the client side. We will look at how to troubleshoot such problematic situations in the next section.
Sometimes the interaction between the client and the server fails, and the reason for such failures often requires analysis; otherwise, their root cause stays unknown. We spotted that our client application does not load and thus doesn't display data for an existing item. Let's try to investigate the root cause for that by setting up an http tunnel between the client and the server. This will be a kind of MiM (man-in-the-middle)-based investigation, as we will listen to one port and redirect the incoming request to another, to see whether the server returns correct responses or its pipe gets broken somewhere in the middle. There are various TCP tunnels available out there; I have been using a simple open source one available on GitHub at https://github.com/vakuum/tcptunnel. Its author also maintains a separate website where you can download prebuilt binaries for the most common operating system; they are available at http://www.vakuumverpackt.de/tcptunnel/.
After you have built or downloaded a copy of the tunnel, start it as follows:
./tcptunnel --local-port=3001 --remote-port=3000 --remote-host=localhost --log
This will start the application listening on port 3001 and will forward each incoming request to location port 3000; the --log option specifies that all the data flow passing the tunnel should be logged in the console. Finally, modify HTML pages to use port 3001 instead of 3000, and let's see what the tunnel would show us after firing new GET request for the item with id 3, this time on port 3001: http://localhost:3001/catalog/v2/item/3:
Surprisingly, the tunnel shows that the server responds normally with 200 OK and a relevant payload. So it seems as if the problem is not on the server side.
Well, since the error is obviously not on the server side, let's try to investigate deeper what has happened on the client side. Nowadays, all popular browsers have so-called web developer tools. They provide access to http logs, dynamically-rendered code, the DOM three of the HTML document, and so on. Let's invoke our RESTful GET operation with Mozillas Firefox and see what its web console will log about our request. Open the Mozilla Firefox menu and select Web Developer, and then select Browser Console:
Aha! Seems like we found it: Cross-Origin Request Blocked: The Same Origin Policy disallows reading the remove resource at....
This error is blocking the server-side response at client level. In the next section, we will see what this actually means.
Cross-site HTTP requests are requests that refer to resources to be loaded from a domain different from the one that initially requested them. In our case, we started the client from our filesystem, and it requested resources from a network address. This is considered a potential Cross-site scripting request, which, according to the W3C recommendation at http://w3.org/cors/TR/cors, should be carefully handled. This means that if an external resource is requested, the domain where it is requested from—its Origin—should be explicitly specified in a header, as long as an external resource loading is not allowed in general. This mechanism prevents Cross-Side Scripting (XSS) attacks, and it is based on HTTP headers.
The following HTTP request headers specify how external resources should be handled on the client side:
On the server side, the following headers indicate whether a response is eligible for a CORS-enabled client request:
There are some more Access-Control-* headers that can be used for further granularity when incoming XSS requests are to be served, or not, based on credentials and request's max-age, but basically, the most important ones are for the allowed origin, allowed methods, and allowed headers.
There is a node module that handles CORS configuration at server side; it is installed by npm install -g cors and is easily enabled in our application via a middleware module. Simply use it in all the exposed routes by passing it to the application:
app.use(cors());
Use the tunnel after you enabled the cors middleware to see that the server would now gracefully handle requests from different origins by serving the "Access-Control-Allow-Origin' header set to '*'":
When we imported the jQuery library into our client application, we directly referred to its optimized source from its vendor as <script type="text/javascript" src="https://code.jquery.com/jquery-3.3.1.min.js "/>.
Now, imagine that for some reason this site goes down either temporarily or for good; this will make our application unusable, as the import wouldn't work.
Content Delivery Networks come to help in these cases. They serve as a repository for libraries or other static media content, assuring that the needed resources will be available without downtime, even when something goes wrong with their vendors. One of the most popular JavaScript CDNs is https://cdnjs.com/; it provides the most common JS libraries available out there. We will switch our clients to refer to the jquery library from this CDN rather than from its vendors' website at <script type="text/javascript" src="https://code.jquery.com/jquery-3.3.1.min.js "/>.
While there is hardly anything wrong with directly downloading your JS libraries and placing them in the static directory of your node.js project, it may lead to having local changes and fixes directly in your library dependencies. This can easily result in incompatible changes and can prevent your application from easily switching to newer versions in the future. As long as your dependencies are open source, you should strive to improve them by contributing fixes or reporting bugs rather than having fixes in your own local fork. Still, if you are unfortunate enough to run into a bug that you can easily fix, you can fork the library to resolve your problem faster. However, always consider contributing the fix back to the community. After it is accepted, switch back to the official version; otherwise, you will find yourself in a difficult situation the next time with another issue, and the community would track it much harder if reported from a forked version. That is the beauty of open source, and that is why you should always consider consuming JavaScript APIs' Content Delivery Networks. They will provide you with the stability and support you may need at any point in the life of your application.
We spent quite some time addressing how RESTful services should represent each state, including erroneous ones, gracefully. A well-defined API should demand from its consumers to handle all its errors gracefully and to provide as much information per state as required, rather than just stating "An error has occurred". That is why it should look up the returned status code and clearly distinguish between client requests such as 400 Bad Request or 415 Unsupported media types caused by faulty payload, caused by wrong media types, or authentication-related errors, such as 401 Unauthorized.
The status code of an erroneous response is available in the error callback of the jQuery callback function and should be used to provide detailed information back to the request:
$.ajax({
url: "http://localhost:3000/catalog/v2/",
type: "POST",
dataType: "json",
data: JSON.stringify(newItem),
success: function (item, status, jqXHR) {
alert(status);
},
error: function(jqXHR, statusText, error) {
switch(jqXHR.status) {
case 400: alert('Bad request'); break;
case 401: alert('Unauthroizaed'); break;
case 404: alert('Not found'); break;
//handle any other client errors below
case 500: alert('Internal server error); break;
//handle any other server errors below
}
}
});
Unsuccessful requests are handled by the error callback function. It provides jqXHR - the XmlHttpRequest JavaScript—object as its first argument. It carries across all the request/response related information, such as status code and headers. Use it to determine what the requested server has returned so that your application can handle different errors more granularly.
In this chapter, we implemented a simple web-based client with the jQuery library. We utilized this client to demonstrate how the Cross-Origin Resource Sharing policy works, and we used a man in the middle means to troubleshoot issues on the wire. Finally, we looked at how errors should be handled on the client side. This chapter brings us one step closer to the end of our journey, as we got the first consumer of our service. In the next chapter, we will walk you through the final step before bringing a service to production—choosing its security model.
Once deployed in production, an application is exposed to a large number of requests. Inevitably, some of them will be malicious. This brings the requirement of granting explicit access permissions only to authenticated users, that is, authenticating a selected number of consumers to have access to your service. Most of the consumers will use the service only for data provisioning. However, a few will need to be able to provide new, or modify the existing, catalog data. To ensure that only appropriate consumers will be able to execute the POST, PUT, and DELETE requests, we will have to introduce the concept of authorization into our application, which will grant only explicitly selected users modification permissions.
Data services may provide sensitive private information, such as email addresses; the HTTP protocol, being a text protocol, may not be secure enough. The information transmitted through it is subject to man-in-the-middle attacks, which can lead to data leakage. To prevent such cases, Transport Layer Security (TLS) should be used. The HTTPS protocol encrypts the transmitted data, ensuring that only appropriate consumers who have the right decryption key will be able to consume the data exposed by the service.
In this chapter, we will look at how Node.js enables the following security features:
An application considers a user authenticated when their identity has been successfully validated against a trusted store. Such trusted stores can either be any kind of specially maintained database, storing the credentials of the application (basic authentication), or a third-party service that checks a given identity against its own trusted store (third-party authentication).
HTTP basic authentication is one of the most popular and straightforward authentication mechanisms available out there. It relies on HTTP headers in the request, which provide the user's credentials. Optionally, the server may reply with a header, forcing the clients to authenticate themselves. The following diagram shows a client-server interaction when basic authentication is carried out:
Whenever an HTTP request is sent to an endpoint secured by HTTP basic authentication, the server replies with an HTTP 401 Unauthorized status code, and, optionally, with a WWW-Authenticate header. This header forces the client to send another request, containing the Authorization header, which specifies that the authentication method is basic. This request is followed by a base64-encoded key/value pair, providing the username and the password to authenticate with. Optionally, the server can specify a message to the client with the realm attribute.
This attribute specifies that resources sharing the same realm value should support the same authentication means. In the preceding diagram, the realm message is MyRealmName. The client authenticates by sending the Authentication header with the value of Basic YWRtaW46YWRtaW4, specifying that Basic authentication is used, followed by the base64-encoded value. In the diagram, the literal YWRtaW46YWRtaW4 decoded in base64 represents the admin:admin literal. In case such a username/password combination is successfully authenticated, the HTTP server will respond with the JSON payload of the requested items. If the authentication fails, the server will respond with the 401 Unauthorized status code, but this time without including the WWW-Authenticate header.
There are plenty of authentication methods to choose from nowadays. Perhaps the most popular methods are basic authentication, where each user has their own username and password, and third-party authentication, where users can identify themselves with their already-existing account for an external public service, such as personal social services such as LinkedIn, Facebook, and Twitter.
Choosing the most appropriate type of authentication for a web API depends mainly on its consumers. Apparently, an application consuming an API to fetch data is not likely to authenticate with a personal social account. This approach is more suitable when the API is used via a frontend directly by a human being.
Implementing a solution capable of switching between different authentication methods easily is a complex and time-consuming task. In fact, it can become hardly possible if not considered at the initial design phase of an application.
Passport is a piece of authentication middleware for Node.js, created especially for use-cases where the means of authentication should be easily switched from one to another. It has modular architecture that enables the usage of a specific authentication provider, called strategy. The strategy takes care of implementing a chosen authentication approach.
There are plenty of authentication strategies to choose from, for example, a regular basic authentication strategy or social platform-based strategies for services such as Facebook, LinkedIn, and Twitter. Refer to the official Passport website, http://www.passportjs.org/, for a complete list of the available strategies.
Now it is time to look at how to utilize Passport's strategies; we will start with the basic authentication strategy; it is a logical choice now that we know how basic authentication works.
As usual, we will start by installing the relevant modules with the NPM package manager. We will need the passport module, which provides the base functionality that allows you to plug in different authentication strategies, and a concrete strategy for basic authentication, provided by the passport-http module:
npm install passport npm install passport-http
Next, we have to instantiate both the Passport middleware and the basic authentication strategy. BasicStrategy takes as an argument a callback function, which checks whether the provided username/password combination is valid. Finally, passport's authenticate method is provided as a middleware function to the express route, assuring that unauthenticated requests will be rejected with an appropriate 401 Unauthorized status:
const passport = require('passport');
const BasicStrategy = require('passport-http').BasicStrategy;
passport.use(new BasicStrategy(function(username, password, done) {
if (username == 'user' && password=='default') {
return done(null, username);
}
}));
router.get('/v1/',
passport.authenticate('basic', { session: false }),
function(request, response, next) {
catalogV1.findAllItems(response);
});
router.get('/v2/',
passport.authenticate('basic', { session: false }),
function(request, response, next) {
catalogV1.findAllItems(response);
});
router.get('/',
passport.authenticate('basic', { session: false }),
function(request, response, next) {
catalogV1.findAllItems(response);
});
The BasicStrategy constructor takes a handler function as an argument. It gives us access to the username and password supplied by the client, and to the Passport middleware's done() function, which notifies Passport with whether the user has been successfully authenticated. Invoke the done() function with user as an argument in order to grant authentication, or pass the error argument to it to revoke the authentication:
passport.use(new BasicStrategy(
function(username, password, done) {
AuthUser.findOne({username: username, password: password},
function(error, user) {
if (error) {
return done(error);
} else {
if (!user) {
console.log('unknown user');
return done(error);
} else {
console.log(user.username + '
authenticated successfully');
return done(null, user);
}
}
});
})
);
Finally, use the passort authenticate() function in the router middleware to attach it to a specific HTTP method-handler function.
In our case, we specify that we don't want to store any authentication details in a session. This is because, when using basic authentication, there is no need to store any user information in a session, as each request contains the Authorization header that provides the login details.
OAuth is an open standard for third party authorization, it defines a delegation protocol used fer authorizing against a third party authentication providers. OAuth uses special tokens, once issued, identify the user instead of user credentials. Let's look closer at OAuth workflow, with a sample scenario. The main actors in the scenario are - a user interacting with a web application, which consumes a restful service from a back-end system providing some kind of data. The web application delegates its authorization to a separate third-party authorization server.
Passport.js hides the complexity behind this process with a separate strategy module automating the OAuth workflow. It is available in the npm repository
npm install passport-oauth
Create an instance of the strategy and supply it with the urls for requesting tokens and for authenticating it together, it is your personal consumer key and a secret phrase of your choice.
var passport = require('passport') , OAuthStrategy = require('passport-oauth').OAuthStrategy; passport.use('provider', new OAuthStrategy({ requestTokenURL: 'https://www.provider.com/oauth/request_token', accessTokenURL: 'https://www.provider.com/oauth/access_token', userAuthorizationURL: 'https://www.provider.com/oauth/authorize', consumerKey: '123-456-789', consumerSecret: 'secret' callbackURL: 'https://www.example.com/auth/provider/callback' }, function(token, tokenSecret, profile, done) {
//lookup the profile and authenticate and call done } ));
Passport.js provides separate strategy wrapping different providers, like linkedin or github. They ensure that your application stays up to date with the token issuing URLs. Once you have made up your mind about the provider you want to support, you should check for specific strategies for them.
Today, almost everyone owns at least one personal public social media account, such as Twitter, Facebook, and LinkedIn. Recently, it has become really popular for websites to allow their visitors to authenticate themselves via one of their social accounts by just clicking on an icon to bind their social service account to a service-internal automatically generated account.
This approach is very convenient for web users who are usually permanently logged into at least one of their accounts. If they are not currently logged in, clicking on an icon will redirect them to their social service login page, and, after a successful login, another redirection takes place, ensuring that the user gets the content they originally requested. When it comes to exposing data via a web API, this approach is not really an option.
Publicly exposed APIs cannot predict whether they are to be consumed by a human or by an application. Also, APIs aren't usually consumed directly by humans. Thus, third-party authentication is the only option when you, as API authors, are convinced that the exposed data will be directly available to the end users who have requested it manually through a frontend from an internet browser. Once they have successfully logged into their social account, a unique user identifier will be stored in a session, so your service will need to be able to handle such sessions appropriately.
To enable session support for storing user login information with Passport and Express, you have to initialize the Express session middleware before initializing Passport and its session middleware:
app.use(express.session()); app.use(passport.initialize()); app.use(passport.session());
Then, specify the user whose details Passport should serialize/deserialize into or out of the session. For that purpose, Passport provides the serializeUser() and deserializeUser() functions, which store complete user information in a session:
passport.serializeUser(function(user, done) { done(null, user); }); passport.deserializeUser(function(obj, done) { done(null, obj); });
After enabling session support, you have to decide which third-party authentication strategy to rely on. Basically, third-party authentication is enabled via a plugin or application created by the third-party provider, for example, a social service site. We will briefly look at creating a LinkedIn application that allows authentication via the OAuth standard.
Usually, this is done via a pair of public key and a secret (token) associated with the social media application. Creating a LinkedIn application is easy—you just have to log into http://www.linkedin.com/secure/developer and fill out a brief application information form. You will be given a secret key and a token to enable the authentication. Perform the following steps to enable LinkedIn authentication:
Install the linkedin-strategy module—npm install linkedin-strategy
Get an instance of the LinkedIn strategy and initialize it to the Passport middleware by the use() function after session support has been enabled:
var passport = require('passport')
, LinkedInStrategy = require('passport-
linkedin').Strategy;
app.use(express.session());
app.use(passport.initialize());
app.use(passport.session());
passport.serializeUser(function(user, done) {
done(null, user);
});
passport.deserializeUser(function(obj, done) {
done(null, obj);
});
passport.use(new LinkedInStragety({
consumerKey: 'api-key',
consumerSecret: 'secret-key',
callbackURL: "http://localhost:3000/catalog/v2"
},
function(token, tokenSecret, profile, done) {
process.nextTick(function () {
return done(null, profile);
});
})
);
Explicitly specify that the LinkedIn strategy should be used as Passport for each individual route, ensuring that session handling is enabled:
router.get('/v2/',
cache('minutes',1),
passport.authenticate('linked', { session: true}),
function(request, response) {
//...
}
});
Provide a means for a user to log out by exposing a logout URI, making use of request.logout:
router.get('/logout', function(req, res){
request.logout();
response.redirect('/catalog');
});
So far, the catalog data service uses basic authentication to protect its routes from unknown users; however, a catalog application should allow only few white-listed users to modify the items inside the catalog. To restrict access to the catalog, we will introduce the concept of authorization, that is, a subset of authenticated users, with appropriate permission allowed.
When Passport's done() function is invoked to authenticate a successful login, it takes as an argument a user instance of the user that has been granted authentication. The done() function adds that user model instance to the request object, and, in this way, provides access to it via the request.user property, after successful authentication. We will make use of that property to implement a function performing the authorization check after successful authentication:
function authorize(user, response) {
if ((user == null) || (user.role != 'Admin')) {
response.writeHead(403, { 'Content-Type' :
'text/plain'});
response.end('Forbidden');
return;
}
}
The authorize() function will close the response stream, returning the 403 Forbidden status code, which indicates that the logged-in user is recognized but has insufficient permissions. This revokes access to the resource. This function has to be used in each route that carries out data manipulation.
Here's an example of how a post route implements authorization:
app.post('/v2',
passport.authenticate('basic', { session: false }),
function(request, response) {
authorize(request.user, response);
if (!response.closed) {
catalogV2.saveItem(request, response);
}
}
);
After authorize() is invoked, we check whether the response object still allows writing to its output by checking the value of the closed property of the response object. It will return true once the end function of the response object has been called, which is exactly what the authorize() function does when the user lacks admin permissions. Thus, we can rely on the closed property in our implementation.
Publicly available information in the web easily becomes the subject of different types of cyber attacks. Often it is not enough just to keep the so-called "bad guys" out. Sometimes, they won't bother gaining authentication at all and may prefer to carry out a man-in-the-middle (MiM) attack, pretending to be the final receiver of a message and sniffing the communication channel that transmits the data—or, even worse, altering the data while it flows.
Being a text-based protocol, HTTP transfers data in a human-readable format, which makes it an easy victim of MiM attacks. Unless transferred in an encrypted format, all the catalog data of our service is vulnerable to MiM attacks. In this section, we will switch our transport from an insecure HTTP protocol to the secure HTTPS protocol.
HTTPS is secured by asymmetric cryptography, also known as public-key encryption. It is based on a pair of keys that are mathematically related. The key used for encryption is called public key, and the key used for decryption is called private key. The idea is to freely provide the encryption key to partners who have to send encrypted messages and to perform decryption with the private key.
A typical public-key encryption communication scenario between two parties, A and B, will be the following:
Party A composes a message, encrypts it with Party B's public key, and sends it
Party B decrypts the message with its own private key and processes it
Party B composes a response message, encrypts it with Party A's public key, and then sends it
Party A decrypts the response message with its own private key
Now that we know how public-key encryption works, let's go through a sample of HTTPS client-server communication, as shown in this diagram:
The client sends an initial request against an SSL-secured endpoint. The server responds to that request by sending its public key to be used for encrypting further incoming requests. Then, the client has to check the validity and verify the identity of the received key. After successful verification of the server's public key, the client has to send its own public key back to the server. Finally, after the key exchange procedure is complete, the two parties can start communicating securely.
HTTPS relies on trust; thus, it is vital to have a reliable way of checking whether a specific public key belongs to a specific server. Public keys are exchanged within an X.509 certificate, which has a hierarchical structure. This structure enables clients to check whether a given certificate has been generated from a trusted root certificate. Clients should trust only certificates that have been issued by a known certificate authority (CA).
Before switching our service to use the HTTPS transport, we need a public/private key pair. Since we are not a certificate authority, we will have to use OpenSSL tooling to generate test keys for us.
OpenSSL is available for download at http://www.openssl.org/, where source code distributions are available for all popular operating systems. OpenSSL can be installed as follows:
Binary distribution is available for download for Windows, and Debian and Ubuntu users can make use of the packaged distribution by executing the following:
sudo apt-get install openssl
Now let's generate a test key/value pair with OpenSSL:
opensslreq -x509 -nodes -days 365 -newkey rsa:2048-keyoutcatalog.pem -out catalog.crt
OpenSSL will prompt some details required for generating the certificate, such as country code, city, and fully qualified domain name. Afterward, it will generate a private key in the catalog.pem file and a public key certificate that will be valid for a year in the catalog.crt file. We will be using these newly generated files, so copy them into a new subdirectory, called ssl, in the catalog data service directory.
Now we have everything needed to modify our service to use HTTPS:
First, we need to switch and use the HTTPS module instead of HTTP and specify the port that we want to use to enable HTTPS communication:
var https = require('https');
var app = express();
app.set('port', process.env.PORT || 3443);
Then, we have to read the private key from the catalog.cem file and the certificate from catalog.crt into an array:
var options = {key : fs.readFileSync('./ssl/catalog.pem'),
cert : fs.readFileSync('./ssl/catalog.crt')
};
Finally, we pass the array containing the key pair to the HTTPS instance when creating the server and start listening through the specified port:
https.createServer(options, app).listen(app.get('port'));
That's all you need to do to enable HTTPS for an Express-based application. Save your changes and give it a try by requesting https://localhost:3443/catalog/v2 in a browser. You will be shown a warning message informing you that the server you are connecting to is using a certificate that is not issued by a trusted certificate authority. That's normal, as we generated the certificate on our own, and we are not a CA for sure, so just ignore that warning.
Go through the following questions:
Is HTTP basic authentication secure against man-in-the-middle attacks?
What are the benefits of Transport Layer Security?
In this chapter, you learned how to protect exposed data by enabling a means of authentication and authorization. This is a critical aspect of any publicly available data service. In addition, you learned how to prevent man-in-the-middle attacks using the secured layer transport protocol between a service and its users. As a developer of such services, you should always consider the most appropriate security features that your application should support.
I hope this was a useful experience! You gained enough knowledge and practical experience, which should have made you much more confident in understanding how RESTful APIs work and how they are designed and developed. I strongly encourage you to go through the code evolution chapter by chapter. You should be able to further refactor it, adopting it to your own coding style. Of course, some parts of it can be further optimized, as they repeat quite often. That is an intentional decision rather than good practice, as I wanted to emphasize their importance. You should always strive to improve your code-base, making it easier to maintain.
Finally, I would like to encourage you to always follow the development of the Node.js modules you use in your applications. Node.js has an extraordinary community that is eager to grow rapidly. There is always something exciting going on there, so ensure that you don't miss it. Good luck!
Decades ago, more specifically in 1974, Intel introduced 8080 to the world, which is an 8-bit processor with a 2 MHz clock speed and 64 KB of memory. This processor was used in Altair and began the revolution in personal computers.
It was sold pre-assembled or as a kit for hobbyists. It was the first computer to have enough power to actually be used for calculations. Even though it had some poor design choices and needed an engineering major to be able to use and program it, it started the spread of personal computers to the general public.
The technology evolved rapidly and the processor industry followed Moore's law, almost doubling speed every two years. Processors were still single core, with a low-efficiency ratio (power consumption per clock cycle). Because of this, servers usually did one specific job, called a service, like serving HTTP pages or managing a Lightweight Directory Access Protocol (LDAP) directory. Services were the monolith, with very few components, and were compiled altogether to be able to take the most out of the hardware processor and memory.
In the 90s, the internet was still only available for the few. Hypertext, based on HTML and HTTP, was in its infancy. Documents were simple and browsers developed language and protocol as they pleased. Competition for market share was ferocious between Internet Explorer and Netscape. The latter introduced JavaScript, which Microsoft copied as JScript:
After the turn of the century, processor speed continued to increase, memory grew to generous sizes, and 32-bit became insufficient for allocating memory addresses. The all-new 64-bit architecture appeared and personal computer processors hit the 100 W consumption mark. Servers gained muscle and were able to handle different services. Developers still avoided breaking the service into parts. Interprocess communication was considered slow and services were kept in threads, inside a single process.
The internet was starting to become largely available. Telcos started offering triple play, which included the internet bundled with television and phone services. Cellphones became part of the revolution and the age of the smartphone began.
JSON appeared as a subset of the JavaScript language, although it's considered a language-independent data format. Some web services began to support the format.
The following is an example of servers with a couple of services running, but still having only one processor.
Processor evolution then shifted. Instead of the increased speed that we were used to, processors started to appear with two cores, and then four cores. Eight cores followed, and it seemed the evolution of the computer would follow this path for some time.
This also meant a shift in architecture in the development paradigms. Relying on the system to take advantage of all processors is unwise. Services started to take advantage of this new layout and now it's common to see services having at least one processor per core. Just look at any web server or proxy, such as Apache or Nginx.
The internet is now widely available. Mobile access to the internet and its information corresponds to more or less half of all internet access.
In 2012, the Internet Engineering Task Force (IETF) began its first drafts for the second version of HTTP or HTTP/2, and World Wide Web Consortium (W3C) did the same for HTML/HTML5, as both standards were old and needed a remake. Thankfully, browsers agreed on merging new features and specifications and developers no longer have the burden of developing and testing their ideas on the different browser edge cases.
The following is an example of servers with more services running as we reach a point where each server has more than one processor:
Access to information in real time is a growing demand. The Internet of Things (IoT) multiplies the number of devices connected to the internet. People now have a couple of devices at home, and the number will just keep rising. Applications need to be able to handle this growth.
On the internet, HTTP is the standard protocol for communication. Routers usually do not block it, as it is considered a low traffic protocol (in contrast with video streams). This is actually not true nowadays, but it's now so widely used that changing this behavior would probably cause trouble.
Nowadays, it's actually so common to have the HTTP serving developer API working with JSON that most programming languages that release any version after 2015 probably support this data format natively.
As a consequence of processor evolution, and because of the data-demanding internet we now have, it's important to not only be able to scale a service or application to the several available cores, but also to scale outside a single hardware machine.
Many developers started using and following the Service-Oriented Architecture (SOA) principle. It's a principle where the architecture is focused on services, and each service presents itself to others as an application component and provides information to other application components, passing messages over some standard communication protocol.
As we described previously, a microservices architecture is based on a loosely coupled set of services that work together to achieve a specific target application. At the end of the spectrum, there are monolith applications.
A monolith application is composed of a set of components that are tightly coupled. These components are usually developed using the same language and the application runs as a whole. The first noticeable difference is probably the slow start. Deploying might also be slow since you might need a couple of dependencies before having anything up and running.
Let's imagine an event application, a simple one, an application that lets users define events and be notified when those events are about to start.
Let's describe what the event application does:
Imagine the preceding application as being a monolith (the greyed out area on the right).
Imagine that all four parts are part of the same process, even though they could be in separate threads. Imagine that the database is accessed directly across the application. Sound good?
Well, it sounds terrible, perhaps not for a small application, but for a medium one, this would be a representation of chaos. Having a group of developers making new features or improvements would be a nightmare, and for new developers entering the group, it would take some time before having the base knowledge to make some changes.
The first principle that you should follow is the Don't Repeat Yourself (DRY) principle. Avoiding multiple components from accessing a data source helps developers in the future. Later on, if there's a need to change the data source or part of its structure, it will be easier if only one component manipulates it. This is not always possible, but if it is possible, you should keep the data source access to a minimum.
In our example, the API should probably have access, and all others should use the API.
We now have two services:
Although the frontend is used to manage events, it uses the API service to manipulate data sources. Besides having only one service managing data sources, it forces you to think of the API for external developers. It's a win-win.
There is still room for improvement. The Frontend could be in a separate service, allowing you to scale the interface according to user traffic, and have the other parts on separate services. Scheduler and SMTP are both candidates for separate services. SMTP should be thought of as a reusable service for other applications you might develop later on.
Let's take a look at how we could build the same application using the microservices approach:
It looks more complex. Well, the architecture is more complex. The difference is that now, we have loosely coupled components, and each one of them is easily understandable and maintainable. Summing up the changes and advantages:
You can think of these components as capabilities of your application. They can be swapped, upgraded, maintained, and scaled, all without affecting other components or your application.
A commonly underestimated advantage of using this approach is that your application is much more resilient to failures. In a monolith application, any part can bring your application offline. In this microservices approach, this application might not send emails but can still be running and accessible. Add caching into the mixture and the API can restart in moments.
Microservices architecture, like other archicectures, has a set of patterns that are easily identifiable and form the basis for this application development approach.
Some of these patterns can make the initial bootstrap a burden and can eventually be postponed. Others are essential from the beginning or you will have difficulty, later on, in migrating to a full microservice approach.
The following patterns are not an extensive list but they represent a solid foundation:
The main pattern behind a microservice architecture is the ability to have loosely coupled services. These services are decomposed, separated into smaller parts. This decomposition should create a set of services that implement a set of strongly related functions.
Each service should be small but complete, meaning it should run a set of functions in a given context. Those functions should represent all the functions you need or need to support for that context. What this means is that if you have a service that handles meeting events, all meeting event functions should be done using that service, whether it's creating an event, changing, removing, or getting information about a specific event. This ensures that an implementation change to events will affect that service only.
Decomposing an application can take one of two main approaches:
In our previous event application, a service that was decomposed by capability is, for example, the SMTP service. A service decomposed by the domain could be the API service, assuming the application only manages events:
In a microservice architecture, each service should be autonomous. A small team should be able to run it without the other services that make your application. That team should also be able to develop autonomously and make changes to implementation without affecting the application.
The development team should be able to:
Services should be able to evolve regardless of others, keeping backward compatibility, adding new functions, and scaling to several locations, with minimal changes to the architecture:
A service should be scalable. At least two instances should be able to run in parallel, enabling failure tolerance and maintenance downtime. A service can also, later on, scale geographically, be near your customers, and improve apparent performance and application response.
For this scaling to be effective, the application platform will need service discovery and routing, a service that could be used by other services to register themselves and expose their capabilities. Other services could, later on, inquire this service directory and know how to reach these capabilities.
To reduce complexity for other services, a service router can redirect requests to service instances. For example, to send emails, you could have three instances and one central router that would redirect requests in a round-robin manner. If any of those instances go offline, the router will stop redirecting to it and the rest of the application doesn't need to care about it.
Another approach could be to use a DNS approach. The name service is capable of handling registrations to a subdomain, and then, when another service makes simple requests, it will receive one or all of the addresses and connect it as if there was only one service operating:
Usually, services communicate over HTTP using a REST-compliant API. This is not a pattern that you must follow, but it's something that comes naturally based on how common HTTP is nowadays, making it an obvious choice.
There are plenty of HTTP servers out there, making it easy to expose a non-HTTP service with minimum effort.
HTTP is also a mature communication transport layer. It's a stateless protocol, giving developers and operations many features, such as:
In conclusion, microservices architecture is a good, clear pattern that helps tackle more complex projects. In the long term, it reduces the complexity associated with new projects by appealing to service reuse. It helps to structure an application into loosely coupled services that can be independently developed and tested by small, different teams. It comes at the cost of initial proper planning and a more complex deployment.
Before creating your first microservice, let's look at some Node.js tools that could eventually help you leverage your next big project. This is what we'll be covering in the next chapter.
Now that we have reviewed what Node.js's new features are, and now that we know what a microservice is, it's time to see what tools or modules we can we to create one. We'll review a couple of options and build a more or less simple microservice so that we can point out advantages and disadvantages for each approach.
We'll look at different modules:
Let's look at framework called Seneca which was designed to help you develop message-based microservices. It has two distinct characteristics:
What is really interesting about Seneca is its ability to expose functions based on object patterns. Let's start by installing Seneca:
npm install seneca
For now, let's forget the transport and create a producer and consumer in the same file. Let's look at an example:
const seneca = require("seneca");
const service = seneca();
service.add({ math: "sum" }, (msg, next) => {
next(null, {
sum : msg.values.reduce((total, value) => (total + value), 0)
});
});
service.act({ math: "sum", values: [ 1, 2, 3 ] }, (err, msg) => {
if (err) return console.error(err);
console.log("sum = %s", msg.sum);
});
We first include the seneca module and create a new service. We then expose a producer function that matches an object that has math equal to sum. This means that any request object to the service that has the property math and that is equal to sum will be passed to this function. This function accepts two arguments. The first, which we called msg, is the request object. The second argument, next, is the callback that the function should invoke when finished or in case of an error. In this particular case, we're expecting an object that also has a values list and we're returning the sum of all values by using the reduce method that's available in arrays. Finally, we invoke act, expecting it to consume our producer. We pass an object with the math equal to sum and a list of values. Our producer should be invoked and should return the sum.
Assuming you have this code in app.js, if you run this in the command line, you should see something like this:
$ node app
sum = 6
Let's try and replicate our previous stack example. This time, instead of having the consumer and producer in the code, we'll use curl as the consumer, just like we did previously.
First, we need to create our service. We do that, as we've seen before, by loading Seneca and creating an instance:
const seneca = require("seneca");
const service = seneca({ log: "silent" });
We explicitly tell it that we don't care about logging for now. Now, let's create a variable to hold our stack:
const stack = [];
We then create our producers. We'll create three of them: one for adding an element to the stack, called push; one to remove the last element from the stack, called pop; and one to see the stack, called get. Both push and pop will return the final stack result. The third producer is just a helper function so that we can see the stack without performing any operations.
To add elements to the stack, we define:
service.add("stack:push,value:*", (msg, next) => {
stack.push(msg.value);
next(null, stack);
});
There are a few new things to see here:
We now define a simpler function to remove the last element of the stack:
service.add("stack:pop", (msg, next) => {
stack.pop();
next(null, stack);
});
This one is simpler as we don't need a value, we're just removing the last one. We're not addressing the case where the stack is empty already. An empty array won't throw an exception, but perhaps, in a real scenario, you would want another response.
Our third function is even simpler as we just return the stack:
service.add("stack:get", (msg, next) => {
next(null, stack);
});
Finally, we need to tell our service to listen for messages. The default transport is HTTP and we just indicate port 3000 as we did in our previous examples:
service.listen(3000);
Wrap all this code in a file and try it out. You can use curl or just try it in your browser. Seneca won't differentiate between HTTP verbs in this case. Let's begin by checking our stack. The URL describes an action (/act) we want to perform and the query parameter gets converted to our pattern:
We can then try adding the value one to our stack and see the final stack:
We can continue and add the value two and see how the stack grows:
If we then try to remove the last element, we'll see the stack shrinking:
As in Express, Seneca also has middleware that you can install and use. In this case, the middleware is called plugins. By default, Seneca includes a number of core plugins for transport, and both HTTP and TCP transports are supported. There are more transports available, such as Advanced Message Queuing Protocol (AMQP) and Redis.
There are also storage plugins for persistent data and there's support for several database servers, both relational and non-relational. Seneca exposes an object-relational mapping (ORM)-like interface to manage data entities. You can manipulate entities and use a simple storage in development and then move to production storage later on. Let's see a more complex example of this:
const async = require("async");
const seneca = require("seneca");
const service = seneca();
service.use("basic");
service.use("entity");
service.use("jsonfile-store", { folder : "data" });
const stack = service.make$("stack");
stack.load$((err) => {
if (err) throw err;
service.add("stack:push,value:*", (msg, next) => {
stack.make$().save$({ value: msg.value }, (err) => {
return next(err, { value: msg.value });
});
});
service.add("stack:pop,value:*", (msg, next) => {
stack.list$({ value: msg.value }, (err, items) => {
async.each(items, (item, next) => {
item.remove$(next);
}, (err) => {
if (err) return next(err);
return next(err, { remove: items.length });
});
});
});
service.add("stack:get", (msg, next) => {
stack.list$((err, items) => {
if (err) return next(err);
return next(null, items.map((item) => (item.value)));
});
});
service.listen(3000);
});
Just run this new code and we'll see how this code behaves by making some requests to test it. First, let's see how our stack is by requesting it:
Nothing different. Now, let's add the value one to the stack:
Well, we haven't received the final stack. We could, but instead we changed the service to return the exact item that was added. It's actually a good way to confirm what we just did. Let's add another one:
Again, it returns the value we just added. Now, let's see how our stack is:
Our stack now has our two values. Now comes one big difference compared with the previous code. We're using entities, an API exposed by Seneca, which helps you store and manipulate data objects using a simple abstraction layer similar to an ORM, or to people who are familiar with Ruby, an ActiveRecord.
Our new code, instead of just popping out the last value, removes a value we indicate. So, let's remove the value one instead of two:
Success! We removed exactly one item. Our code will remove all items from the stack that match the value (it has no duplication check so you can have repeated items). Let's try to remove the same item again:
No more items match one, so it didn't remove anything. We can now check our stack and confirm that we still have the value two:
Correct! And, as a bonus, you can stop and restart the code and your stack will still have the value two. That's because we're using the JSON file store plugin.
Let's get back to Express. As you've seen before, it's a rock-solid layer on top of the http module. Although it adds an important base layer in the somewhat raw module, it still lacks many features you need to make a good microservice.
As there are lots of plugins out there to extend Express, it can be hard to pick a useful list for us to use.
After picking the right list, you'll still need to make other decisions:
Enter Hydra, a framework that facilitates building distributed microservices. Hydra leverages the power of Express and helps you create microservices or communicate with microservices.
It will, out of the box, enable you to:
Unlike the other modules we've reviewed so far, Hydra has a dependency that is not installable directly using the NPM. Hydra uses Redis to accomplish its goal. Look for information on the Redis website at https://redis.io/ to install it on your operating system before continuing. If you have macOS and use Homebrew, type the following to install redis:
Now, let's make sure redis has successfully started:
After that, we need to install Hydra command-line tools:
sudo npm install -g yo generator-fwsp-hydra hydra-cli
We now need to configure the connection to Redis. We do this by creating a configuration. Type in the command and follow the instructions. If you installed it locally (or used the preceding instructions), you should answer something similar to the following screenshot:
Now, let's create a very simple microservice, just to see what the workflow is like. Hydra has a scaffolding tool using yeoman. To create a service, type the following command and follow the instructions:
On the name of the service, just type hello. Just hit Enter to the rest of the questions to use the defaults. In the end, enter the folder that was created and install the dependencies:
The service is now ready to start. You might have already seen the instructions when scaffolding the service. Let's start the service:
As we can see from the preceding screenshot, the service has started and has been attached to a local IP (192.168.1.108) and port (45394). Open up the folder in your code editor:
You'll see a file in the base folder called hello-service.js, which has the service routes inside it. You'll find the /v1/hello route, which points to another file in routes/hello-v1-routes.js:
Inside that file, you'll see the response to that route. Now, let's jump to a web browser and see if it's up and running:
What we saw in the file is inside the result property of the JSON response. We just deployed our first Hydra microservice without writing a single line of code!
We've just covered a range of different modules and toolkits to help develop microservices. From patterns in Seneca, to the Hydra bundle, many approaches are available.
They all target different audiences and fill different needs. I would advise you to experiment with some of them to help you make a better choice instead of just picking one.
Let's dig into some of these tools and start creating a more complete microservice. In the next chapter, we'll be making a useful microservice, covering different use cases, while we develop a fully functional and distributed microservice.
Now that we've seen some examples of building microservices using some tools, let's dig deeper and create a microservice from scratch using these tools. To accomplish our goal, we'll first use Hydra, and then, we'll create our microservice using the Seneca approach.
There are many microservices we could create, but some are more interesting than others. More specifically, a microservice that you can use in several applications is obviously more useful.
Let's create an image processing microservice. We'll start with a simple thumbnail service, and then we'll evolve to make some simple image transformations. We'll be covering how to:
The microservice name is very important, as it gives identity. Let's name it imagini, the Latin name for image.
As you may remember, Hydra has a scaffolding command that helps to bootstrap our service quickly. Let's use it, and prepare our base layout. Run yo fwsp-hydra and answer the questions. You can leave most of them as default. Depending on the versions you'll use, you should get something similar to the lines shown here:
fwsp-hydra generator v0.3.1 yeoman-generator v2.0.2 yo v2.0.1
? Name of the service (`-service` will be appended automatically) imagini
? Your full name? Diogo Resende
? Your email address? dresende@thinkdigital.pt
? Your organization or username? (used to tag docker images) dresende
? Host the service runs on?
? Port the service runs on? 3000
? What does this service do? Image thumbnail and manipulation
? Does this service need auth? No
? Is this a hydra-express service? Yes
? Set up a view engine? No
? Set up logging? No
? Enable CORS on serverResponses? No
? Run npm install? No
create imagini-service/specs/test.js
create imagini-service/specs/helpers/chai.js
create imagini-service/.editorconfig
create imagini-service/.eslintrc
create imagini-service/.gitattributes
create imagini-service/.nvmrc
create imagini-service/.gitignore
create imagini-service/package.json
create imagini-service/README.md
create imagini-service/imagini-service.js
create imagini-service/config/sample-config.json
create imagini-service/config/config.json
create imagini-service/scripts/docker.js
create imagini-service/routes/imagini-v1-routes.js
Done!
'cd imagini-service' then 'npm install' and 'npm start'
Well, let's do just that. Let's enter our service folder and install dependencies. If you then start it using npm start, and open the browser and point it to our service, you should get something like this:
Not surprising, because Hydra created a different base route. To enable versioning and having different services running on the same HTTP backend, Hydra scaffolding created a route under the /v1/imagini prefix. Remember, we scaffolded Hydra with Express integration, so many of the terms we discussed earlier will be the same here:
Before we pick our previous code and integrate into Hydra, we need to add our Sharp dependency to package.json. Look up the dependencies property and add sharp. You should end up with something along these lines:
(…)
"dependencies": {
"sharp" : "^0.19.0",
"body-parser" : "^1.18.2",
"fwsp-config" : "1.1.5",
"hydra-express" : "1.5.5",
"fwsp-server-response" : "2.2.6"
},
(…)
Now, run npm install to install Sharp. Then, open the imagini-v1-routes.js file, which is under the routes folder. Basically, what it does is get a handler for Hydra and Express, prepare a generic JSON server response (that's what the fwsp-server-response module is), create an Express router, attach the / route, and then export it.
We'll keep this structure for now. I refactored the file as I'm a bit picky about indentation and quotes. I added our image route parameter and added the image upload route. I changed our previous route code to drop the /uploads route prefix, and use the new sendOk and sendError functions you see in the preceding code:
/**
* @name imagini-v1-api
* @description This module packages the Imagini API.
*/
"use strict";
const fs = require("fs");
const path = require("path");
const sharp = require("sharp");
const bodyparser = require("body-parser");
const hydraExpress = require("hydra-express");
const ServerResponse = require("fwsp-server-response");
const hydra = hydraExpress.getHydra();
const express = hydraExpress.getExpress();
let serverResponse = new ServerResponse();
express.response.sendError = function (err) {
serverResponse.sendServerError(this, { result : { error : err }});
};
express.response.sendOk = function (result) {
serverResponse.sendOk(this, { result });
};
let api = express.Router();
api.param("image", (req, res, next, image) => {
if (!image.match(/\.(png|jpg)$/i)) {
return res.sendError("invalid image type/extension");
}
req.image = image;
req.localpath = path.join(__dirname, "../uploads", req.image);
return next();
});
api.post("/:image", bodyparser.raw({
limit : "10mb",
type : "image/*"
}), (req, res) => {
let fd = fs.createWriteStream(req.localpath, {
flags : "w+",
encoding : "binary"
});
fd.end(req.body);
fd.on("close", () => {
res.sendOk({ size: req.body.length });
});
});
module.exports = api;
Then, we restart our microservice, create the uploads folder under the imagini-service folder, and try to upload an image. Like before, I used curl to test it:
curl -X POST -H 'Content-Type: image/png' \
--data-binary @example.png \
http://localhost:3000/v1/imagini/example.png
As expected, I received a JSON response with our size property:
{
"statusCode" : 200,
"statusMessage" : "OK",
"statusDescription" : "Request succeeded without error",
"result" : {
"size" : 55543
}
}
We can have our uploaded file in our uploads folder. We're getting there; just two more routes:
api.head("/:image", (req, res) => {
fs.access(req.localpath, fs.constants.R_OK , (err) => {
if (err) {
return res.sendError("image not found");
}
return res.sendOk();
});
});
Our check route is very similar. We just changed the return methods to use the methods defined previously:
api.get("/:image", (req, res) => {
fs.access(req.localpath, fs.constants.R_OK , (err) => {
if (err) {
return res.sendError("image not found");
}
let image = sharp(req.localpath);
let width = +req.query.width;
let height = +req.query.height;
let blur = +req.query.blur;
let sharpen = +req.query.sharpen;
let greyscale = [ "y", "yes", "true", "1",
"on"].includes(req.query.greyscale);
let flip = [ "y", "yes", "true", "1",
"on"].includes(req.query.flip);
let flop = [ "y", "yes", "true", "1",
"on"].includes(req.query.flop);
if (width > 0 && height > 0) {
image.ignoreAspectRatio();
}
if (width > 0 || height > 0) {
image.resize(width || null, height || null);
}
if (flip) image.flip();
if (flop) image.flop();
if (blur > 0) image.blur(blur);
if (sharpen > 0) image.sharpen(sharpen);
if (greyscale) image.greyscale();
res.setHeader("Content-Type", "image/" +
path.extname(req.image).substr(1));
image.pipe(res);
});
});
Our image download method is equally similar. For this route, we're not using the JSON responses, and instead just return our image directly. This allows us to try it out on our browser:
We just migrated our service from Express to Hydra. Not much of a difference, but Hydra gives you a more robust layout, about which we'll find out more later on. Let's take a look at our third framework: Seneca.
Remember that routing on this framework is all about patterns. Let's keep it simple for now and use a role property to indicate what we want to do (upload, check, or download).
By default, every message should be JSON-encoded, so we'll encode the image in base64 to pass it as a string inside the JSON messages to upload and download.
Create a folder for our Seneca service, and then create a child folder called uploads. Then, install seneca and sharp on that folder by running the following command:
npm install seneca sharp --save
Then, create a file called imagini.js with the following content:
const seneca = require("seneca");
const sharp = require("sharp");
const path = require("path");
const fs = require("fs");
const service = seneca();
service.add("role:upload,image:*,data:*", function (msg, next) {
let filename = path.join(__dirname, "uploads", msg.image);
let data = Buffer.from(msg.data, "base64");
fs.writeFile(filename, data, (err) => {
if (err) return next(err);
return next(null, { size : data.length });
});
});
service.listen(3000);
What this does is initiate a simple service with a route for uploading. Since we're receiving all the image content directly on an object property, I used fs.writeFile. It's a simpler method and gives me an error whether something incorrect happens, which we can pass on to the route response.
I also used Buffer.from to convert our image data, which we'll be uploading in base64.
So, let's just start it as we did with the others. I included the same example.png image and used curl to test this out.
curl -H "Content-Type: application/json" \
--data '{"role":"upload","image":"example.png","data":"'"$( base64 example.png)"'"}' \
http://localhost:3000/act
Seneca promptly replied with the following:
{"size":55543}
This is the image size. Notice I'm taking advantage of bash interpolation (variable substitution) to directly convert the image file to base64 and pass it to curl, which then sends that JSON piece of data to our service:
service.add("role:check,image:*", function (msg, next) {
let filename = path.join(__dirname, "uploads", msg.image);
fs.access(filename, fs.constants.R_OK , (err) => {
return next(null, { exists : !err });
});
});
Our check route is very similar. Instead of just replying with an HTTP 404 response code, we reply with a stringified JSON object with a boolean property exists, which will indicate if the image was found.
Here, we are checking for our image using curl:
curl -H "Content-Type: application/json" \
--data '{"role":"check","image":"example.png"}' \
http://localhost:3000/act
We will respond with the following:
{"exists":true}
If you change the image name, it will respond with false:
service.add("role:download,image:*", function (msg, next) {
let filename = path.join(__dirname, "uploads", msg.image);
fs.access(filename, fs.constants.R_OK , (err) => {
if (err) return next(err);
let image = sharp(filename);
let width = +msg.width;
let height = +msg.height;
let blur = +msg.blur;
let sharpen = +msg.sharpen;
let greyscale = !!msg.greyscale;
let flip = !!msg.flip;
let flop = !!msg.flop;
if (width > 0 && height > 0) {
image.ignoreAspectRatio();
}
if (width > 0 || height > 0) {
image.resize(width || null, height || null);
}
if (flip) image.flip();
if (flop) image.flop();
if (blur > 0) image.blur(blur);
if (sharpen > 0) image.sharpen(sharpen);
if (greyscale) image.greyscale();
image.toBuffer().then((data) => {
return next(null, { data: data.toString("base64") });
});
});
});
Our downloaded route has some changes:
We need some tools to test this on the command line. Since I use JSON a lot, I have jq installed. I strongly recommend you install it too and take a look at the tutorials. It will make your life easier. Using the base64 command we previously used to encode, we can decode the content and pipe the data to a local file:
We can then open the folder and see the image is there. Notice I added greyscale and resized the image just by passing two more JSON parameters:
In the spirit of Seneca, we should make a plugin for our imagini service. Let's split our code into two parts:
There's lot of room for improvement on our code, starting with code we repeated constantly. It's important to detect repetitions while our service is still very small.
The most repeated part is the local filename. This is actually something you might want to configure when starting the service, so let's change that to a function. Start by changing our imagini.js file to be a plugin. Clear all content and write this code:
const sharp = require("sharp");
const path = require("path");
const fs = require("fs");
module.exports = function (settings = { path: "uploads" }) {
// plugin code goes here
};
This is the basis of our plugin. We're loading the modules we need, but not Seneca, because our plugin will have access to the service directly. Seneca itself will load the plugin by calling our exported function. Following the idea of being able to configure the local image folder, we define an optional settings parameter, which will default to an object with the property path equal to uploads, which is the folder we've been using so far.
Now, let's add the content of our plugin, inside the preceding function:
const localpath = (image) => {
return path.join(settings.path, image);
}
We start by defining a function that will convert our image parameter to the local path. We can actually reduce the function to be written in one single line:
const localpath = (image) => (path.join(settings.path, image));
Then, let's create another function that will check whether we have access to a local file, and return a Boolean (if it exists or not) and the filename we provided:
const access = (filename, next) => {
fs.access(filename, fs.constants.R_OK , (err) => {
return next(!err, filename);
});
};
We can use this for our image check, and for our image download. This way, we can improve or even cache the results for greater performance, avoiding excessive filesystem hits. Our image check route can now be written in a very concise way:
this.add("role:check,image:*", (msg, next) => {
access(localpath(msg.image), (exists) => {
return next(null, { exists : exists });
});
});
Notice that we're referring to the this object. Our Seneca service will call our plugin function and reference itself to this. Again, we can write it in a more concise way:
this.add("role:check,image:*", (msg, next) => {
access(localpath(msg.image), (exists) => (next(null, { exists })));
});
Our upload route is fairly simple and has no changes:
this.add("role:upload,image:*,data:*", (msg, next) => {
let data = Buffer.from(msg.data, "base64");
fs.writeFile(localpath(msg.image), data, (err) => {
return next(err, { size : data.length });
});
});
The download route uses our previously created helper functions to avoid storing our local filename. We also made some tweaks to how width and height were treated:
this.add("role:download,image:*", (msg, next) => {
access(localpath(msg.image), (exists, filename) => {
if (!exists) return next(new Error("image not found"));
let image = sharp(filename);
let width = +msg.width || null;
let height = +msg.height || null;
let blur = +msg.blur;
let sharpen = +msg.sharpen;
let greyscale = !!msg.greyscale;
let flip = !!msg.flip;
let flop = !!msg.flop;
if (width && height) image.ignoreAspectRatio();
if (width || height) image.resize(width, height);
if (flip) image.flip();
if (flop) image.flop();
if (blur > 0) image.blur(blur);
if (sharpen > 0) image.sharpen(sharpen);
if (greyscale) image.greyscale();
image.toBuffer().then((data) => {
return next(null, { data: data.toString("base64") });
});
});
});
There are actually a lot of variables we're using where we could just check the message parameter instead. We can rewrite our download function and get one-third reduction:
this.add("role:download,image:*", (msg, next) => {
access(localpath(msg.image), (exists, filename) => {
if (!exists) return next(new Error("image not found"));
let image = sharp(filename);
let width = +msg.width || null;
let height = +msg.height || null;
if (width && height) image.ignoreAspectRatio();
if (width || height) image.resize(width, height);
if (msg.flip) image.flip();
if (msg.flop) image.flop();
if (msg.blur > 0) image.blur(blur);
if (msg.sharpen > 0) image.sharpen(sharpen);
if (msg.greyscale) image.greyscale();
image.toBuffer().then((data) => {
return next(null, { data: data.toString("base64") });
});
});
});
In the end, you should have an imagini.js file with the following content:
const sharp = require("sharp");
const path = require("path");
const fs = require("fs");
module.exports = function (settings = { path: "uploads" }) {
const localpath = (image) => (path.join(settings.path, image));
const access = (filename, next) => {
fs.access(filename, fs.constants.R_OK , (err) => {
return next(!err, filename);
});
};
this.add("role:check,image:*", (msg, next) => {
access(localpath(msg.image), (exists) => (next(null, { exists })));
});
this.add("role:upload,image:*,data:*", (msg, next) => {
let data = Buffer.from(msg.data, "base64");
fs.writeFile(localpath(msg.image), data, (err) => {
return next(err, { size : data.length });
});
});
this.add("role:download,image:*", (msg, next) => {
access(localpath(msg.image), (exists, filename) => {
if (!exists) return next(new Error("image not found"));
let image = sharp(filename);
let width = +msg.width || null;
let height = +msg.height || null;
if (width && height) image.ignoreAspectRatio();
if (width || height) image.resize(width, height);
if (msg.flip) image.flip();
if (msg.flop) image.flop();
if (msg.blur > 0) image.blur(blur);
if (msg.sharpen > 0) image.sharpen(sharpen);
if (msg.greyscale) image.greyscale();
image.toBuffer().then((data) => {
return next(null, { data: data.toString("base64") });
});
});
});
};
We just need to create our Seneca service and use our plugin. This is actually very straightforward. Create a file called seneca.js, and add the following:
const seneca = require("seneca");
const service = seneca();
service.use("./imagini.js", { path: __dirname + "/uploads" });
service.listen(3000);
What the code does, line by line, is as follows:
That's it, our service is now a plugin and could be used by any Seneca service! You should now start our service by running the new file and not imagini.js directly:
node seneca
As you can see, writing a service does not change much between frameworks. Our code is very similar, with minor changes. Seneca is stricter about message format and content, so we used base64 to encode our image inside the JSON message. Other than that, everything is the same.
You get the advantage of being able to choose everything about the service, but you need to write a lot of code. To facilitate the task, Hydra might be a good start for an initial set of plugins.
For other tools such as Seneca, some aspects of the microservice (for instance, the communication using JSON messages and service composition) are already packed. This comes at the price of a stricter service definition.
In the next chapter, we will discuss the security of our three service versions, and how we can store state.
Now that we have created our microservice base layout on different frameworks, it's time to read our code more carefully and see if everything looks good. It's easy to just keep writing code and stop thinking about what we're doing, but later on, when we do stop for a while, we'll be wasting time deleting repeated code and reorganizing our service.
It's always better to think before we code. This is something you'll learn with time, to value the time you dedicate to plan your service or think about a new feature. It's never a good idea to just start coding. In theory, your Service should be inside a Security layer, with a good and stable connection to State:
Think of state as a person's memory. Usually, a service has state, which means it has memory of actions and information it's serving. The idea is that our service will run indefinitely, but sometimes we're forced to restart it or even stop it for some time because of maintenance or an upgrade.
Ideally, a service should resume without losing state, giving its users the perception that it never stopped. This is achieved by doing one of two things:
The first option will make your service a bit slower (nothing is faster than state in system memory) but should give you a more consistent state across restarts.
The second option is trickier, because sometimes our service might stop abruptly and be unable to save that state, but for those use cases, you may not care about the state. It's up to you.
There are a lot of options to store state; it will depend on what you want to store. For a microservice, you should avoid the filesystem so as to make your service more compatible with multiple operating systems.
Depending on your service, you can store state using:
The first option is still the most commonly used one. You'll rely on stable and more than proven database systems that run in multiple systems and that you can find on any cloud service where you might want to deploy your microservice. Apart from the maturity of most solutions, a relational database, if properly set up, should give you consistency.
The second option is more recent compared to the first one. Usually, there are no fixed tables as in RDBMS, and you normally work with collections of documents that are just common JSON structures. It's more agile as there are usually no restrictions, and each document might have a different structure. The more agile, the less consistent.
All three options, depending on the specific system you choose, support replication, which should enable fault tolerance and improve speed in geographically spaced instances.
Let's try each of the three options using one of the suggested systems. Let's begin with the relational database, and use MySQL.
Installing MySQL is very simple. Just head to the official website and follow the instructions. You'll usually be asked for a password for the root user, which you can use later on to manage the server settings and user accounts.
There are some options to connect to a MySQL server using Node.js, but the best tools are the mysql and mysql2 modules. They both serve the required purpose, and neither is the next version of the other, they're just a bit different in design and supported features.
First, let's add the dependency to our service. On the terminal, go to our service folder and type:
npm install mysql --save
We can now include our dependency and configure a connection to the database. To avoid having the credentials in our code, we can create a separate file and put settings there that we may change in the future, and that shouldn't belong in the code. We can take advantage of Node.js being able to include JSON files, and just write our settings in JSON.
Create a file called settings.json, and add the following content:
{
"db": "mysql://root:test@localhost/imagini"
}
We defined a setting called db that has a database URI, which is a handy way of defining our database access and credentials using an address similar to any website address. Our database uses mysql; it's at localhost (using the default port), which can be accessed using the username root and the password test, and our database name is called imagini.
We can now include the module and settings, and create the connection:
const settings = require("./settings");
const mysql = require("mysql");
const db = mysql.createConnection(settings.db);
This module only connects to the database when you make a query. This means the service would start and you wouldn't know whether your connection settings are correct until you make the first query. We don't want to figure out we can't connect to the database only when the service is used later on, so let's force a connection and check if the server is running and accepts our connection:
db.connect((err) => {
if (err) throw err;
console.log("db: ready");
// ...
// the rest of our service code
// ...
app.listen(3000, () => {
console.log("app: ready");
});
});
This way, if anything is wrong with the database, the service won't start and will throw an exception, which will notify you to check what's wrong. Here's an example of a possible error:
Error: ER_ACCESS_DENIED_ERROR: Access denied for user 'root'@'localhost' (using password: YES)
This indicates you probably typed the password incorrectly, or the user doesn't match, or even the hostname or database may be wrong. Ensuring you connect to the database before setting up the service means your service won't be exposed to the public without a proper state.
Our microservice has a very simple state, so to speak. Our state is the images previously uploaded. Instead of using the filesystem, we can now use the database and create a table to store them all:
db.query(
`CREATE TABLE IF NOT EXISTS images
(
id INT(11) UNSIGNED NOT NULL AUTO_INCREMENT,
date_created TIMESTAMP NOT NULL DEFAULT CURRENT_TIMESTAMP,
date_used TIMESTAMP NULL DEFAULT NULL,
name VARCHAR(300) NOT NULL,
size INT(11) UNSIGNED NOT NULL,
data LONGBLOB NOT NULL,
PRIMARY KEY (id),
UNIQUE KEY name (name)
)
ENGINE=InnoDB DEFAULT CHARSET=utf8`
);
We can issue this query every time the service starts because it will create the images table only if it doesn't exist already. If we don't change its structure, it's fine to always do this.
You can see we're creating a table with a unique identification number (id), a creation date (date_created), a date to know when our image has been used(date_used), the name of the image, the size of it in bytes, and the image data. The size is a little redundant here as we could just check the data length, but bear with me, this is just an example.
We also defined our name as a unique key, meaning it has an index for quickly finding images by name, and also ensures our name does not repeat and that no one can overwrite an image (without removing it first).
Having the images stored this way on a database table gives you several advantages, such as regarding:
It also enables you to improve your service; for example, you can delete images that are not used for longer than a specific time period. You can also make this dependent on the image sizes. Later, you can add authentication (mandatory or not) and have user-specific rules.
It's also easy to back up and replicate the state to another site. There are plenty of tools for backing up databases, and you can have another MySQL server acting as a slave to this one and have your images replicated in real time to another geographical location.
Let's change our service from the previous chapter to use our table instead of the previously used folder on our filesystem.
We can remove our fs module dependency (don't remove the path dependency for now):
app.param("image", (req, res, next, image) => {
if (!image.match(/\.(png|jpg)$/i)) {
return res.status(403).end();
}
db.query("SELECT * FROM images WHERE name = ?", [ image ], (err,
images) => {
if (err || !images.length) {
return res.status(404).end();
}
req.image = images[0];
return next();
});
});
Our app.param is completely different. We now validate the image against our image table. If it doesn't find it, it returns code 404. If it does find it, it stores the image information in req.image. We can now change our image upload to store the image on our table:
app.post("/uploads/:name", bodyparser.raw({
limit : "10mb",
type : "image/*"
}), (req, res) => {
db.query("INSERT INTO images SET ?", {
name : req.params.name,
size : req.body.length,
data : req.body,
}, (err) => {
if (err) {
return res.send({ status : "error", code: err.code });
}
res.send({ status : "ok", size: req.body.length });
});
});
Uploading images no longer use the filesystem and instead creates a new row on our table. We don't need to specify the id as it's automatic. Our creation date is also automatic as it defaults to the current timestamp. Our use date defaults to NULL, which means we haven't used the image yet:
app.head("/uploads/:image", (req, res) => {
return res.status(200).end();
});
Our image check method now gets extremely simple as it relies on the previous app.param to check whether the image exists, so, if we get to this point, we already know the image exists (it's on req.image), so we just need to return the code 200.
Before updating our image fetch method, let's try our service. If you start it on the console, you can immediately open any MySQL administration tool and check our database. I'm using Sequel Pro for macOS. Although there's a Pro in the name, it's free software and it's damn good:
Our table was created, and you can check it has all the properties and indexes we defined. Let's now upload an image once again:
As before, it returns a JSON response with a success status and the size of the image. If you look at Sequel again, on the content separator, you'll see our images data:
Let's try and upload the image again. Previously, our service would just overwrite it. Now, because of our unique index, it should deny an INSERT with the same name:
Great! The ER_DUP_ENTRY is the MySQL code for duplicate insertion. We can rely on that and deny overwriting images.
We can also check whether our image exists using the check method:
If we use another name, we'll get a code 404:
It looks like everything is working great. Let's now change our final method, the image manipulation one. This method is almost the same; we just don't have to read the image file, as it's already available:
app.get("/uploads/:image", (req, res) => {
let image = sharp(req.image.data);
let width = +req.query.width;
let height = +req.query.height;
let blur = +req.query.blur;
let sharpen = +req.query.sharpen;
let greyscale = [ "y", "yes", "true", "1",
"on"].includes(req.query.greyscale);
let flip = [ "y", "yes", "true", "1",
"on"].includes(req.query.flip);
let flop = [ "y", "yes", "true", "1",
"on"].includes(req.query.flop);
if (width > 0 && height > 0) {
image.ignoreAspectRatio();
}
if (width > 0 || height > 0) {
image.resize(width || null, height || null);
}
if (flip) image.flip();
if (flop) image.flop();
if (blur > 0) image.blur(blur);
if (sharpen > 0) image.sharpen(sharpen);
if (greyscale) image.greyscale();
db.query("UPDATE images " +
"SET date_used = UTC_TIMESTAMP " +
"WHERE id = ?", [ req.image.id ]);
res.setHeader("Content-Type", "image/" + path.extname(req.image.name).substr(1));
image.pipe(res);
});
You can see how we used the path dependency to get the extension of the image name. The rest is the same. We just add an update to our image every time we request this method.
We can use a web browser to test our method and see our previously uploaded image:
Everything should just work as before because we haven't changed our image manipulation dependency, so blurring and the other actions should work as expected:
We can now improve our service and add a method we didn't expose before: deleting an image. To do that, we can use the DELETE verb from HTTP and just remove the image from our table:
app.delete("/uploads/:image", (req, res) => {
db.query("DELETE FROM images WHERE id = ?", [ req.image.id ], (err)
=> {
return res.status(err ? 500 : 200).end();
});
});
We just have to check whether the query resulted in an error. If so, we respond with a code 500 (internal server error). If not, we respond with the usual code 200.
Let's restart our microservice and try to delete our image:
It looks like it worked; it responded with a code 200. If we try to open our image in the web browser, we should see something like this:
On Sequel, the table should now be empty too:
We now have a functional microservice with a state that persists across restarts, as we intended. You can now deploy to any cloud service with no dependency on the filesystem, just a database.
You could easily change MySQL to another database or use an object relational mapping (ORM) module to enable you to change database server without changing your code. An ORM is a library that allows you to use a common interface to access different types of databases. Usually, this kind of abstraction involves not using SQL at all and reducing your interaction with the databases to simpler queries (to allow for interoperability between database servers).
Let's take this opportunity to go a little further and add a few methods that got simplified by this migration to the database. Let's create a method that exposes statistics about our database, and let's remove old images.
Our first statistics method should just return a JSON structure with some useful information. Let's expose the following:
Here's an example of how our statistics method could look:
app.get("/stats", (req, res) => {
db.query("SELECT COUNT(*) total" +
", SUM(size) size " +
", MAX(date_created) last_created " +
"FROM images",
(err, rows) => {
if (err) {
return res.status(500).end();
}
rows[0].uptime = process.uptime();
return res.send(rows[0]);
});
});
Restart the service, and let's try it:
As we can see, we have no images as we just removed our image previously. There's no size because we have no images. There's also no used date, and the service uptime is 5 seconds.
If we upload our previous image, we will get different results, something like the following screenshot:
Now, for our second task, deleting old images, we need to check our database periodically. We'll use an interval timer and just run a DELETE query. The intervals mentioned in the following query are just an example; you can write the conditions you want.
setInterval(() => {
db.query("DELETE FROM images " +
"WHERE (date_created < UTC_TIMETSTAMP - INTERVAL 1 WEEK
AND date_used IS NULL) " +
" OR (date_used < UTC_TIMETSTAMP - INTERVAL 1 MONTH)");
}, 3600 * 1000);
This query deletes images that were not used in the past month (but were used before) or images that were not used in the past week (and never used before). This means that images uploaded need to be used at least once or they will get removed quickly.
You can think of a different strategy, or use no strategy and delete manually if you want. Now that we've seen MySQL, let's move on and look at another kind of database server.
Let's see the differences for a non-relational database using RethinkDB. If you don't have it, just install it by following the official documentation (https://www.rethinkdb.com/docs/). Let's just start the server:
rethinkdb
This will start the server, which comes with a very nice administration console on port 8080. You can open it in the web browser:
Go to the Tables section on top to see the databases:
Create a database called imagini using the Add Database button. You should now have our database ready. You need nothing else here:
To use our new database, we need to install the rethinkdb dependency. You can remove the MySQL dependency:
npm uninstall mysql --save
npm install rethinkdb -–save
Now, let's change our settings file. This module doesn't accept a connection string, so we'll use a JSON structure:
{
"db": {
"host" : "localhost",
"db" : "imagini"
}
}
To include our dependency, we just need to include the module:
const rethinkdb = require("rethinkdb");
Then, use this to connect to our server:
rethinkdb.connect(settings.db, (err, db) => {
if (err) throw err;
console.log("db: ready");
// ...
// the rest of our service code
// ...
app.listen(3000, () => {
console.log("app: ready");
});
});
After connecting, we can create our table as we did before. This time, we don't need to specify any structure:
rethinkdb.tableCreate("images").run(db);
The rethinkdb object is the one we'll use to manipulate our table, and the db object is a connection object used to reference the connection and to indicate where to run our manipulations.
If you restart our service just like this, you'll see a new table on our previously created database:
If you restart our service again, you'll get an error trying to create the table that already exists. We need to check whether it already exists, and only issue the command if not:
rethinkdb.tableList().run(db, (err, tables) => {
if (err) throw err;
if (!tables.includes("images")) {
rethinkdb.tableCreate("images").run(db);
}
});
Moving on, our upload method should be changed slightly to something like the following:
app.post("/uploads/:name", bodyparser.raw({
limit : "10mb",
type : "image/*"
}), (req, res) => {
rethinkdb.table("images").insert({
name : req.params.name,
size : req.body.length,
data : req.body,
}).run(db, (err) => {
if (err) {
return res.send({ status : "error", code: err.code });
}
res.send({ status : "ok", size: req.body.length });
});
});
If you restart the server just like this, you should be able to upload an image:
We receive the same response, just like with MySQL. We can go to the Data Explorer section in the administration console and get our record to see whether it's there:
Looks good. Notice our record ID is not a number, it's a Universally Unique Identifier (UUID). This is because RethinkDB has support for sharding (our table is sharded by default if there was more than one server) and it's easier to shard unique identifiers than an incremental number.
Moving on to our Express parameter:
app.param("image", (req, res, next, image) => {
if (!image.match(/\.(png|jpg)$/i)) {
return res.status(403).end();
}
rethinkdb.table("images").filter({
name : image
}).limit(1).run(db, (err, images) => {
if (err) return res.status(404).end();
images.toArray((err, images) => {
if (err) return res.status(500).end();
if (!images.length) return res.status(404).end();
req.image = images[0];
return next();
});
});
});
With this change, we can now restart our service and see whether our image exists:
We need to change the download just a little bit. We need to remove the previous query to update our usage date and replace it with a new one:
app.get("/uploads/:image", (req, res) => {
let image = sharp(req.image.data);
let width = +req.query.width;
let height = +req.query.height;
let blur = +req.query.blur;
let sharpen = +req.query.sharpen;
let greyscale = [ "y", "yes", "true", "1",
"on"].includes(req.query.greyscale);
let flip = [ "y", "yes", "true", "1",
"on"].includes(req.query.flip);
let flop = [ "y", "yes", "true", "1",
"on"].includes(req.query.flop);
if (width > 0 && height > 0) {
image.ignoreAspectRatio();
}
if (width > 0 || height > 0) {
image.resize(width || null, height || null);
}
if (flip) image.flip();
if (flop) image.flop();
if (blur > 0) image.blur(blur);
if (sharpen > 0) image.sharpen(sharpen);
if (greyscale) image.greyscale();
rethinkdb.table("images").get(req.image.id).update({ date_used :
Date.now() }).run(db);
res.setHeader("Content-Type", "image/" +
path.extname(req.image.name).substr(1));
image.pipe(res);
});
We can now download our image using the web browser:
Next, we need to update our image removal method. It's as easy as our upload:
app.delete("/uploads/:image", (req, res) => {
rethinkdb.table("images").get(req.image.id).delete().run(db, (err)
=> {
return res.status(err ? 500 : 200).end();
});
});
This time, we used the image unique ID to remove it. If we try again using the curl command, we'll receive a code 200:
If we try to get the first record of our table, we'll see there's nothing there:
Finally, there are our two extra features that we added after introducing MySQL: the statistics and removing old unused images.
Our statistics method is not so simple as running an SQL query with aggregations. We must calculate each of our statistics:
app.get("/stats", (req, res) => {
let uptime = process.uptime();
rethinkdb.table("images").count().run(db, (err, total) => {
if (err) return res.status(500).end();
rethinkdb.table("images").sum("size").run(db, (err, size) => {
if (err) return res.status(500).end();
rethinkdb.table("images").max("date_created").run(db, (err,
last_created) => {
if (err) return res.status(500).end();
last_created = (last_created ? new
Date(last_created.date_created) : null);
return res.send({ total, size, last_created, uptime });
});
});
});
});
We should have a similar result to before:
Removing old images is more or less easy; we just need to filter the images we want to remove, and then remove them:
setInterval(() => {
let expiration = Date.now() - (30 * 86400 * 1000);
rethinkdb.table("images").filter((image) => {
return image("date_used").lt(expiration);
}).delete().run(db);
}, 3600 * 1000);
I simplified the previous strategy and am just removing images older than 1 month (30 days, times 86,400 seconds a day, times 1,000 milliseconds).
In-memory databases are different from the previous two types, as they're usually not structured, which means you have no tables. What you have is normally lists of some kind that you can look up and manipulate, or simple hash tables.
Taking advantage of the Redis instance we installed previously for Hydra, let's see another drawback, or actually feature, of this kind of database. Let's connect to our Redis instance and make the following sequence of instructions:
What we did here was to:
Where's our counter? Well, this is an in-memory database, so everything is gone when we shut down the Redis service. This is the design of almost all kinds of in-memory databases.
They're designed to be fast and in-memory. Their purpose is normally to cache data that is expensive to get, such as some complex calculations, or extensive to download, and we want that to be available faster (in-memory).
I wasn't completely fair with Redis as it actually allows your data to be saved between service restarts. So, let's see how far we can go in using it to save our microservice state.
As before, let's uninstall rethinkdb and install the redis module:
npm uninstall rethinkdb --save
npm install redis --save
Let's ignore our settings.json file (you can remove it if you prefer) and assume Redis will be on our local machine.
First, we need to include the redis module and create a Client instance:
const redis = require("redis");
const db = redis.createClient();
We then need to wait until it connects:
db.on("connect", () => {
console.log("db: ready");
// ...
// the rest of our service code
// ...
app.listen(3000, () => {
console.log("app: ready");
});
});
There are a couple of ways we can use Redis to store our data. To make it simple, as we don't have tables, let's use hashes to store our images. Each image will have a different hash, and the name of the hash will be the name of the image.
As there are no tables in this kind of database, our initialization code can just be removed.
Next, let's change our upload method to store data on Redis. As I mentioned, let's store it in a hash with the name of the image:
app.post("/uploads/:name", bodyparser.raw({
limit : "10mb",
type : "image/*"
}), (req, res) => {
db.hmset(req.params.name, {
size : req.body.length,
data : req.body.toString("base64"),
}, (err) => {
if (err) {
return res.send({ status : "error", code: err.code });
}
res.send({ status : "ok", size: req.body.length });
});
});
The hmset command lets us set multiple fields of a hash, in our case, size and data. Notice we're storing our image content in base64 encoding, otherwise we'll lose data. If we restart our service and try to upload our test image, it should work fine:
We can then use redis-cli and see whether our image is there. Well, we're checking to see whether our hash has the field size and matches our image size:
Great! We can now change our Express parameter to look for the image hash:
app.param("image", (req, res, next, name) => {
if (!name.match(/\.(png|jpg)$/i)) {
return res.status(403).end();
}
db.hgetall(name, (err, image) => {
if (err || !image) return res.status(404).end();
req.image = image;
req.image.name = name;
return next();
});
});
Our image check method should work now. And, for our download method to work, we just need to change the image loading to decode our previous base64 encoding:
app.get("/uploads/:image", (req, res) => {
let image = sharp(Buffer.from(req.image.data, "base64"));
let width = +req.query.width;
let height = +req.query.height;
let blur = +req.query.blur;
let sharpen = +req.query.sharpen;
let greyscale = [ "y", "yes", "true", "1", "on"].includes(req.query.greyscale);
let flip = [ "y", "yes", "true", "1", "on"].includes(req.query.flip);
let flop = [ "y", "yes", "true", "1", "on"].includes(req.query.flop);
if (width > 0 && height > 0) {
image.ignoreAspectRatio();
}
if (width > 0 || height > 0) {
image.resize(width || null, height || null);
}
if (flip) image.flip();
if (flop) image.flop();
if (blur > 0) image.blur(blur);
if (sharpen > 0) image.sharpen(sharpen);
if (greyscale) image.greyscale();
db.hset(req.image.name, "date_used", Date.now());
res.setHeader("Content-Type", "image/" + path.extname(req.image.name).substr(1));
image.pipe(res);
});
Our images are now being served from Redis. As a bonus, we're adding/updating a date_used field in our image hash to indicate when it was last used:
Removing our image is as simple as removing our hash:
app.delete("/uploads/:image", (req, res) => {
db.del(req.image.name, (err) => {
return res.status(err ? 500 : 200).end();
});
});
We can then try to remove our test image:
Using redis-cli to check whether the hash exists, we see that it's gone:
The only two features missing are the statistics and removing old images.
For the statistics, that could be hard as we're using generic hash tables and we can't be sure how many hash tables are defined, and if all or any have image data. We would have to scan all hash tables, which is complex for large sets.
To remove old images, the problem is the same as there's no way of looking for hash tables with a specific condition, such as a field value.
There are still other paths available to tackle this problem. For example, we could have another hash table with just our image names and use dates. But, the complexity would increase, and the integrity could be at risk as we're splitting information through different hash tables with no certainty of making Atomicity, Consistency, Isolation, and Durability (ACID) operations.
As we've seen, there are plenty of options to store our microservice state. Depending on the type of information we're manipulating, there are databases better-prepared to handle our data.
It all depends on a few different questions we should ask ourselves:
If our data integrity is important or the data structure is complex, do not use in-memory databases. Depending on the complexity, see if you need a non-relational database, or whether you can go with a relational database that can handle more complex manipulation and data aggregation operations, which will help you to achieve the last point.
One good practice is to write code iteratively, testing every time we make a new small feature or improvement, and always write code thinking of all the features we envision for our service.
Thinking about the service roadmap allows you to prepare the service for future improvements, reducing the amount of code wasted or replaced later on.
For instance, in terms of security:
Luckily, our frameworks allow our code to be composed and allow us to add layers of security later. For example, using Express or Hydra, we can add a precedent routing function that will run before any of our service methods, allowing us to enforce, for example, authentication.
Looking at our service, since it exposes its methods using HTTP, there are a couple of improvements we can add to it, for example:
To introduce these improvements, you may add an authentication module such as the Passport module, and use a certificate to give your users a more secure HTTPS experience.
Other types of insecurity come directly from your code and don't improve by adding a certificate or forcing authentication. I'm referring to:
To minimize these events, you should always keep evolving your test suite, adding use cases as they show up, ensuring a new bug that is solved does not reappear later. Regarding dependency bugs, you can subscribe to the Node Security Project and even integrate it with your code to always know when one of your dependencies is a risk.
If there were source code commandments, the next four would surely be on the list:
The state is part of any service, and state is built upon data. For a more cloud-native experience, a service cannot depend on a traditional filesystem and needs to use other kinds of storage structures to store data. Databases are a natural progress, and there are some types of databases to choose from, depending on how important and complex our data is.
Assuming our state is securely stored in a database service of some kind, it's also important to ensure our data cannot be corrupted using our service. There can be security flaws and bugs in our service that may put our data at risk, so it's important to write simple code, validate input, and think about security in general when planning the service roadmap.
To progress our service, let's introduce something we haven't done yet, and should, which is a proper test suite. In the next chapter, we'll see some good options and create a test suite, establishing whether anything needs to change in order to make our service as secure as possible.
When you're developing an application, it will eventually form a structure and evolve into a stable product that you can use in production and sell to your customers. In the beginning, everything may seem simple and many tend to postpone the construction of a proper test suite.
Later on, the application may become just sufficiently complex for you to hesitate to begin testing. You may eventually give up and never test your application. It may be frustrating, especially if you have never seen or used any test suite before.
Proper testing gives you more than a little bit of quality assurance. Proper testing gives you:
There's a developing methodology that involves first creating a test for a new feature and then making sure the test passes. This way, you can focus on how you think your code should be used (in the new test) and then evolve it (actually develop it) so the test stops failing and gives proper results.
Let's see how code coverage can help in the testing process. Finally, we'll look at how you can mock parts of your code.
We will create our first integration tests. Each of our tests will run separately, meaning they should not depend on any other test and should follow a predictable workflow. First, we need to change our run.js file to run all test files. For that, we'll use mocha and add all files found in the integration folder:
const fs = require("fs");
const path = require("path");
const mocha = require("mocha");
const suite = new mocha();
fs.readdir(path.join(__dirname, "integration"), (err, files) => {
if (err) throw err;
files.filter((filename) =>
(filename.match(/\.js$/))).map((filename) => {
suite.addFile(path.join(__dirname, "integration", filename));
});
suite.run((failures) => {
process.exit(failures);
});
});
Then, let's create the integration folder inside our test folder, and let's create our first test file, called image-upload.js. Add this content to the file:
describe("Uploading image", () => {
it("should accept only images");
});
If we now run the tests again, we should see the default mocha response with no tests passing and no tests failing:
npm test
> imagini@1.0.0 test /Users/dresende/imagini
> node test/run
0 passing (2ms)
To avoid repeating code, let's create a tools.js file inside the test folder, so we can export common tasks that every test file can use. Out of the box, I'm thinking about our microservice location and a sample image:
const fs = require("fs");
const path = require("path");
exports.service = require("../imagini.js");
exports.sample = fs.readFileSync(path.join(__dirname, "sample.png"));
Create a sample.png image in the test folder. When a test needs to upload an image, it will use that sample. In the future, we could have different kinds of samples, such as huge images, to test performance and limitations.
We also need to make a little change to our microservice. We need to export its app so that the HTTP plugin from chai can load it and were able to test it without the need to run in a separate console. Add this to the end of our microservice file:
module.exports = app;
You should have a folder hierarchy similar to the following screenshot:
We should now change our image-upload.js test file to create our first real test:
const chai = require("chai");
const http = require("chai-http");
const tools = require("../tools");
chai.use(http);
describe("Uploading image", () => {
beforeEach((done) => {
chai
.request(tools.service)
.delete("/uploads/test_image_upload.png")
.end(() => {
return done();
});
});
it ("should accept a PNG image", function (done) {
chai
.request(tools.service)
.post("/uploads/test_image_upload.png")
.set("Content-Type", "image/png")
.send(tools.sample)
.end((err, res) => {
chai.expect(res).to.have.status(200);
chai.expect(res.body).to.have.status("ok");
return done();
});
});
});
We start by first including the chai modules and our tools file:
const chai = require("chai");
const http = require("chai-http");
const tools = require("../tools");
chai.use(http);
Then, we describe our test file as Uploading image:
describe("Uploading image", () => {
We'll add the different use cases we can think of, related to the uploading of images.
Inside, we use beforeEach, which is a mocha method that will be called before every test in this file. Remember, we want our tests to be consistent, so we add this method to remove our image before running every test. We don't care whether the image exists:
beforeEach((done) => {
chai
.request(tools.service)
.delete("/uploads/test_image_upload.png")
.end(() => {
return done();
});
});
Look how we use the tools.service, which points to our microservice. If, later on, we change the name or somehow make it more complex, we just need to change the tools file, and everything should work.
Then, we add our first integration file's test – a simple image upload:
it("should accept a PNG image", (done) => {
chai
.request(tools.service)
.post("/uploads/test_image_upload.png")
.set("Content-Type", "image/png")
.send(tools.sample)
.end((err, res) => {
chai.expect(res).to.have.status(200);
chai.expect(res.body).to.have.status("ok");
return done();
});
});
It checks whether the HTTP response code is 200 and if the response body, which is a JSON structure, has the status property set to ok. And we're done!
Let's run our test suite again and see how it goes.
Now that our test suite is working and has one test, let's introduce code coverage. Adding this from the beginning of development is very easy and will help us focus on parts of the code that need to be tested, especially some use cases that involve specific conditions (such as if-then-else statements in our code). Having it all set up from the start of development is easy. On the other hand, if you have a fully working code and want to add tests and coverage, it will be harder and will take quite some time.
To add code coverage, we'll introduce another module. We'll install it globally to be able to run the tests with it directly:
npm install -g nyc
We can now run our tests with the following instrumentation:
nyc npm test
This should run our tests with the instrumentation installed. In the end, you'll get a nice console report.
The coverage results are stored inside in a .nyc_output folder. This enables you to look at the last test results without running tests again. This is useful if your test suite is big and takes some time to finish.
To see the results, you just run nyc report:
The result is a console report. There are several other styles of reports. One particularly useful one is the html report. Let's generate it:
nyc report --reporter=html
You should now have a coverage folder with an index.html file. Open that in your browser, and you should see something like the following screenshot:
We only have one file that represents our microservice. If we had more, they would be listed hierarchically. There are global average statistics for every file.
There are three important groups of columns:
You can click in our file, look at the specific details of it and, more specifically, see the code and information line by line:
To the right of every line number, you see a gray area and, in this case, you see 2x in some of the lines. This is the execution count for that line. The execution has passed by that line twice. This is actually not that important, unless you're looking for bits of code that get largely executed and you want to do some kind of optimization.
You can also see that line 12 has two changes. First, there's a pinkish background in the back of throw err. That means that statement never got executed, which is normal for now as we always successfully connected to the database. The mark before the if statement means that the condition never got executed:
If you scroll a few lines down, we'll see more lines with marks. For example, we can see our image upload method got almost completely covered. The only statement missing is the error handling.
As we delete our test image before running the tests, our image deletion method is also covered. Again, the only missing branch is if the database returns an error to our DELETE query.
Before going any further with the image upload, let's add another integration test file called image-parameter.js, and add some tests to increase our coverage:
const chai = require("chai");
const http = require("chai-http");
const tools = require("../tools");
chai.use(http);
describe("The image parameter", () => {
beforeEach((done) => {
chai
.request(tools.service)
.delete("/uploads/test_image_parameter.png")
.end(() => {
return done();
});
});
it("should reply 403 for non image extension", (done) => {
chai
.request(tools.service)
.get("/uploads/test_image_parameter.txt")
.end((err, res) => {
chai.expect(res).to.have.status(403);
return done();
});
});
it("should reply 404 for non image existence", (done) => {
chai
.request(tools.service)
.get("/uploads/test_image_parameter.png")
.end((err, res) => {
chai.expect(res).to.have.status(404);
return done();
});
});
});
Let's run our test suite and see how it goes:
Refresh the HTML report page and look at our parameter method:
As you can see, we now cover the following condition:
if (!image.match(/\.(png|jpg)$/i)) {
The following condition:
if (err || !images.length) {
We now have full coverage on this method.
There are other coverage lines that are harder to test, such as timers (you can see one on line 28), catch statements, or external errors coming from databases or other storage sources. There are ways of mocking those events, and we'll cover them later on.
For now, let's focus on adding coverage to our code. It's important to have it covered as much as possible when it's still just a small service. If we start adding tests and coverage when it's already big, you'll be frustrated, and it will be hard to find the motivation to cover it all.
This way, you'll find it rewarding to cover it in the beginning and keep the coverage percentage as high as possible along with code evolution.
Let's get back to our image upload test, and add another test:
it("should deny duplicated images", (done) => {
chai
.request(tools.service)
.post("/uploads/test_image_upload.png")
.set("Content-Type", "image/png")
.send(tools.sample)
.end((err, res) => {
chai.expect(res).to.have.status(200);
chai.expect(res.body).to.have.status("ok");
chai
.request(tools.service)
.post("/uploads/test_image_upload.png")
.set("Content-Type", "image/png")
.send(tools.sample)
.end((err, res) => {
chai.expect(res).to.have.status(200);
chai.expect(res.body).to.have.status("error");
chai.expect(res.body).to.have.property("code",
"ER_DUP_ENTRY");
return done();
});
});
});
This will upload the same image twice in a row and we should receive an error from the database saying there's a duplicate. Let's run the tests again:
Now, let's open the initial page of the coverage report:
Notice that our file is no longer in a red background. This means the statement coverage has reached 50%. Let's click on our file and see how our image upload method is covered:
It's complete! We can now move on. Just a reminder before we move to another method: having full coverage does not mean there are no bugs. That's something you need to understand. You might have a use case that you're not expecting, and so, you have no code for it, so there's no obvious coverage.
For example, the bodyparser module will not limit the type of content. If we upload a text file with an image name on it, our code will accept it and store it in the database without noticing. Think of this use case as your homework, and try to create a test to cover that use case and then fix the code.
Let's move to the next method we see after our upload method: the image check on line 67. Let's create a new integration test file called image-check.js, and add a simple test:
const chai = require("chai");
const http = require("chai-http");
const tools = require("../tools");
chai.use(http);
describe("Checking image", () => {
beforeEach((done) => {
chai
.request(tools.service)
.delete("/uploads/test_image_check.png")
.end(() => {
return done();
});
});
it("should return 404 if it doesn't exist", (done) => {
chai
.request(tools.service)
.head("/uploads/test_image_check.png")
.end((err, res) => {
chai.expect(res).to.have.status(404);
return done();
});
});
it("should return 200 if it exists", (done) => {
chai
.request(tools.service)
.post("/uploads/test_image_check.png")
.set("Content-Type", "image/png")
.send(tools.sample)
.end((err, res) => {
chai.expect(res).to.have.status(200);
chai.expect(res.body).to.have.status("ok");
chai
.request(tools.service)
.head("/uploads/test_image_check.png")
.end((err, res) => {
chai.expect(res).to.have.status(200);
return done();
});
});
});
});
Let's run the test suite:
We can see our console report is getting bigger. As we're creating new integration test files and having a description for each one, mocha writes a nice tree view showing how the tests run. On the bottom, we can see the coverage report:
Looking at the check method, we see it's now fully covered. This one was very simple.
We're still in the middle of statement coverage as our top method; the image manipulation one is almost half of our code. This means that when we start covering it, the coverage will significantly rise.
Let's create an integration test for it:
const chai = require("chai");
const http = require("chai-http");
const tools = require("../tools");
chai.use(http);
describe("Downloading image", () => {
beforeEach((done) => {
chai
.request(tools.service)
.delete("/uploads/test_image_download.png")
.end(() => {
chai
.request(tools.service)
.post("/uploads/test_image_download.png")
.set("Content-Type", "image/png")
.send(tools.sample)
.end((err, res) => {
chai.expect(res).to.have.status(200);
chai.expect(res.body).to.have.status("ok");
return done();
});
});
});
it("should return the original image size if no parameters given",
(done) => {
chai
.request(tools.service)
.get("/uploads/test_image_download.png")
.end((err, res) => {
chai.expect(res).to.have.status(200);
chai.expect(res.body).to.have.length(tools.sample.length);
return done();
});
});
});
Before each test, we're deleting the image (if it exists) and then uploading a fresh sample one. Then, for each test, we'll download it and test the output according to what we asked for.
Let's try and run it:
Well, that was unexpected. The test fails because our length check does not match. This is actually a good example of something we just notice when we start to execute testing.
What happens is that, when we request an image, we use the sharp module to make any manipulation on the image, according to query parameters. In this case, we're not asking for any manipulation, but when we output the image (through sharp), it actually returns the same image in size, but perhaps with a little bit less quality, or maybe it just knows how to better encode our image and remove data from the file that is not needed.
We don't know exactly, but let's assume we want the original image, untouched. We need to change our download method. Let's assume that if no query parameters are defined at all, we just return the original image. Let's add a condition to the top of our method:
if (Object.keys(req.query).length === 0) {
db.query("UPDATE images " +
"SET date_used = UTC_TIMESTAMP " +
"WHERE id = ?",
[ req.image.id ]);
res.setHeader("Content-Type", "image/" +
path.extname(req.image.name).substr(1));
return res.end(req.image.data);
}
If we run it now, we should have no failures:
Our statement coverage did not rise much because we actually created a condition on top of the method and returned immediately, so our previous method is still untested:
Looking at line 78, you should see a new mark, an E that means that the condition in that line never executed the else statement, which is the rest of our code. Let's add a test to this integration and resize our image.
We will need sharp to help us check whether the results are correct. Let's include it on the top of our file:
const sharp = require("sharp");
Then, add a resize test:
it("should be able to resize the image as we request", (done) => {
chai
.request(tools.service)
.get("/uploads/test_image_download.png?width=200&height=100")
.end((err, res) => {
chai.expect(res).to.have.status(200);
let image = sharp(res.body);
image
.metadata()
.then((metadata) => {
chai.expect(metadata).to.have.property("width", 200);
chai.expect(metadata).to.have.property("height", 100);
return done();
});
});
});
Let's run our test suite:
It now looks very good. From the console report, we can see some green. Let's look at the front page of the coverage report:
We see green here as well. Having more than 80% coverage is good, but we can still go further. Let's see the file:
It's more or less covered. We still need to cover all the effects. We can actually run them all at once. The first two conditions also have an E marker, but that should disappear after adding a test without resizing. Let's add it:
it("should be able to add image effects as we request", (done) => {
chai
.request(tools.service)
.get("/uploads/test_image_download.png?
flip=y&flop=y&greyscale=y&blur=10&sharpen=10")
.end((err, res) => {
chai.expect(res).to.have.status(200);
return done();
});
});
Looking at our report now, we see the coverage is almost complete:
To cover those yellow nulls there, we need to resize the image with only width or height. We can add two tests for those:
it("should be able to resize the image width as we request", (done) => {
chai
.request(tools.service)
.get("/uploads/test_image_download.png?width=200")
.end((err, res) => {
chai.expect(res).to.have.status(200);
let image = sharp(res.body);
image
.metadata()
.then((metadata) => {
chai.expect(metadata).to.have.property("width", 200);
return done();
});
});
});
Add a similar one for the height, and run the test suite. You should not see the statement coverage go up, only the branch coverage:
The only method missing is the statistics method. This one is simple. We could eventually run a more specific test, by asking statistics, making a change such as an upload, and asking for statistics again to compare. I'll leave that to you. Let's just add a simple request test:
const chai = require("chai");
const http = require("chai-http");
const tools = require("../tools");
chai.use(http);
describe("Statistics", () => {
it("should return an object with total, size, last_used and
uptime", (done) => {
chai
.request(tools.service)
.get("/stats")
.end((err, res) => {
chai.expect(res).to.have.status(200);
chai.expect(res.body).to.have.property("total");
chai.expect(res.body).to.have.property("size");
chai.expect(res.body).to.have.property("last_used");
chai.expect(res.body).to.have.property("uptime");
return done();
});
});
});
Now, running our test suite should give all green:
We see there are only two lines uncovered: 29.121. The first one is our timer and the second one is on the statistics method. Let's refresh our HTML report:
This is rewarding; we have almost 100% coverage. There's only one function not covered, which is our timer. And, there are only tree statements, which also represent the three branches, that aren't covered, but those aren't actually that important.
What is important is to keep this high coverage mark during the course of our development.
It's not at all uncommon to have parts of your service that are harder to test. Some, or most, of those parts are error-related conditions, where it's hard to make an external service such as a database engine return an error that will rarely occur during normal execution.
To be able to test, or at least simulate these kinds of events, we need to mock our services. There are a couple of options around, and Sinon is the most commonly used one in the Node.js ecosystem. This framework provides more than mocking; it also provides the following:
Sinon also allows us to bend time, by virtually changing the service perception of time, and to be able to test timed interval calls (remember our interval timer?). With this in mind, let's see if we can make our microservice reach 100% test coverage.
Let's start by installing the framework, as we did with chai:
npm install --save-dev sinon
Now, let's add a test for the image deletion. This method is tested through the other tests and that's why we didn't need to add it before, but now that we want to fully test it, let's add a basic test file called image-delete.js, with the following content:
const chai = require("chai");
const sinon = require("sinon");
const http = require("chai-http");
const tools = require("../tools");
chai.use(http);
describe.only("Deleting image", () => {
beforeEach((done) => {
chai
.request(tools.service)
.delete("/uploads/test_image_delete.png")
.end(() => {
return done();
});
});
it("should return 200 if it exists", (done) => {
chai
.request(tools.service)
.post("/uploads/test_image_delete.png")
.set("Content-Type", "image/png")
.send(tools.sample)
.end((err, res) => {
chai.expect(res).to.have.status(200);
chai.expect(res.body).to.have.status("ok");
chai
.request(tools.service)
.delete("/uploads/test_image_delete.png")
.end((err, res) => {
chai.expect(res).to.have.status(200);
return done();
});
});
});
});
Notice that I added the Sinon dependency on top, although I'm not using it just yet. You may run the tests again, but you shouldn't notice any difference.
We'll need to change the database behavior, so let's export a reference to it, so as to be able to access it from the tests. Add the following line in our microservice file before connecting to the database:
app.db = db;
Now, add another test to that file:
it("should return 500 if a database error happens", (done) => {
chai
.request(tools.service)
.post("/uploads/test_image_delete.png")
.set("Content-Type", "image/png")
.send(tools.sample)
.end((err, res) => {
chai.expect(res).to.have.status(200);
chai.expect(res.body).to.have.status("ok");
let query = sinon.stub(tools.service.db, "query");
query
.withArgs("DELETE FROM images WHERE id = ?")
.callsArgWithAsync(2, new Error("Fake"));
query
.callThrough();
chai
.request(tools.service)
.delete("/uploads/test_image_delete.png")
.end((err, res) => {
chai.expect(res).to.have.status(500);
query.restore();
return done();
});
});
});
What we're doing is uploading an image, but, before requesting to delete it, we create a stub on the db.query method. We then inform Sinon that when the stub is called with the first argument with DELETE, we want it to asynchronously call the third argument (counting starts at 0) with a fake error. For any other call, we want it to just pass through.
Then, after deleting the image, we check that we received an HTTP 500 error code and restore the stub to the original function, ensuring that the other tests pass.
We're able to test this because mocha runs tests in serial; otherwise, we would need to do some gymnastics to ensure that we wouldn't interfere with the other tests.
Now, open the previously created test file, image-stats.js, include Sinon on the top, and add the following test:
it("should return 500 if a database error happens", (done) => {
let query = sinon.stub(tools.service.db, "query");
query
.withArgs("SELECT COUNT(*) total, SUM(size) size, MAX(date_used)
last_used FROM images")
.callsArgWithAsync(1, new Error("Fake"));
query
.callThrough();
chai
.request(tools.service)
.get("/stats")
.end((err, res) => {
chai.expect(res).to.have.status(500);
query.restore();
return done();
});
});
We're now over 97% coverage. Let's bend time and test our timer. Create a new test file called image-delete-old.js, and add the following content:
const chai = require("chai");
const sinon = require("sinon");
const http = require("chai-http");
const tools = require("../tools");
chai.use(http);
describe("Deleting older images", () => {
let clock = sinon.useFakeTimers({ shouldAdvanceTime : true });
it("should run every hour", (done) => {
chai
.request(tools.service)
.get("/stats")
.end((err, res) => {
chai.expect(res).to.have.status(200);
clock.tick(3600 * 1000);
clock.restore();
return done();
});
});
});
In this test, we're replacing the global timer functions (setTimeoutand setInterval) with fake timers. We then make a simple call to statistics, and then advance time by one hour (the tick call), and then finish.
Now, run the tests and see the results:
We now reach 100% coverage on functions and lines. There's only one branch, with one statement missing. It's the possibility of a connection error:
I'll leave it to you to figure it out how to mock that.
Tests allow us to ensure a certain code quality level. It's very important to include tests from the very beginning, while the code is simple, to ensure that we keep tests updated and avoid regressions to the expected behavior.
It's very rewarding when we see that our code has a very high test coverage. This feeling forces you to keep that high mark and indirectly maintains good code quality.
In the previous chapter, we successfully deployed our service to a cloud provider without having to fundamentally change our code. We used a database to store our data, and the only thing we needed to do was to point to the new location.
It's common, during the specification and development process, to have challenging problems with one or more ways of solving them. The ways, or paths, you choose throughout the development are called design patterns, as they're part of your design.
Some design patterns are more common than others. Some are well-known, others, not so much. Some are good design patterns and you should follow them. Others are bad because of the disadvantages they bring in the short or long term.
In this chapter, we're going to take a look at the importance of choosing good patterns; we will look at some common architectural patterns and review the continuous integration we followed through the entire book until we successfully deployed to the cloud.
Patterns are not libraries or classes, they're concepts, reusable solutions to common programming problems, tested and optimized for specific use cases. As they're just concepts to solve specific problems, they have to be implemented in every language.
Every pattern has its advantages and disadvantages, and choosing a wrong pattern for a problem can cause you a big headache.
Patterns can speed up the development process because they provide well-tested and well-proven development paradigms. Reusing patterns helps prevent issues and improves code readability between developers that are familiar with the patterns.
Patterns have major importance in high-performance applications. Sometimes, in order to achieve some flexibility, patterns introduce a new level of indirection in the code, which may reduce performance. You should choose when to introduce a pattern or when that introduction will hurt the performance metric you're targeting.
Knowing good patterns is essential for avoiding the opposite: anti-patterns. An anti-pattern is something that looks good in the beginning but later on turns out to look like the worst decision you ever made. Anti-patterns are not specific patterns but are more like common errors, seen by the majority as strategies you shouldn't use. Some of the most common and frequent anti-patterns seen out there are:
When developing microservices and, more specifically, an ecosystem of microservices, some patterns become very obvious, and you'll use them without knowing. Just looking at the architectural patterns, here are some that you might find interesting. Perhaps you have already used them before.
The Front Controller pattern is when all requests go for a single point in your architecture, called the handler, which then processes and dispatches the requests to other handlers. This is the pattern used by, for example, load balancers and reverses proxies:
It's useful to scale horizontally, especially when the Front Controller is just routing requests, so it can handle a lot more requests than each separate controller, which need, some time to actually process each request.
This pattern is also very useful in helping other services not having to know where the controllers are and choosing the one with the lowest load that should handle the request faster.
The layered pattern is common in filesystems and operative systems (and virtual machines for that matter). This pattern consists of creating different layers that go from the raw data through to the data seen by a user:
The idea is to separate the complexity of the different layers, each one not having to know how the others do their tasks:
The Service Locator pattern is actually an anti-pattern. It's not considered a good practice because it adds much more complexity to an ecosystem. The pattern consists of a central registry, called a Service Locator, where services register their abilities, and other services can consult the registry and know where the services they need are located:
The Service Locator is similar to the Front Controller, but with added complexity, as you need to contact the Service Locator and the service you need, instead of just making a simple request to a Front Controller.
The Observer pattern is used every day in Node.js. It consists of a Subject, which maintains a list of dependents, called Observers, which get notified of any state change happening on the Subject:
You can see this happening every time in your web browser when some code (Observer) attaches an event listener to an object or interface element (Subject).
Another very similar pattern is the Publish-Subscribe pattern, usually abbreviated as Pub-Sub. This pattern is almost exactly the same as the previous one. You have Subscribers that, as the name implies, subscribe to a specific event, or topic, or whatever you want to call it, and then you have Publishers that emit those events or send information to those topics:
The difference to the previous pattern may look very thin but is actually very important. The Pub-Sub pattern involves a third-party service and, unlike the Observer pattern, the Publishers have no knowledge of the Subscribers. This removes the need to handle and directly notify the Subscribers, thereby simplifying your code.
This pattern is quite useful for microservice communication. It involves a third party that abstracts the state change notification. Also, Publishers and Subscribers have no knowledge of each other.
Choosing good design patterns is essentially choosing best practices. Not all design patterns fit every purpose, but for many scenarios, they'll make your life easier. Perhaps you may not notice any difference in the beginning, but you should in the long-term.
Good design patterns also have indirect advantages. You'll find more documentation and examples online, as well as a broader set of options to choose from, for example, when using the Publish-Subscribe pattern, where you'll find many types of implementations to integrate with your services.
Choosing the pattern that fits your needs also involves planning and knowing what you need and what you'll need in the future. Think of the edge cases and see if the pattern is capable of handling them.
Developing a microservice may look like a simple task. As the name implies, it is a micro service. But that is not necessarily true, as sometimes we tend to complexify something that should be simple.
This does not mean a service should be simple, it can be quite complex. What should be simple is the goal and the properties of the service. There shouldn't be any doubt regarding what it does and what it shouldn't do.
Before writing any line of code, you should start by knowing a couple of what I call characteristics of the service, such as:
This can be summed in one word—purpose. If you don't clearly define its purpose and just start developing tasks it can handle, you'll end up having a mixed service that deviates from the main goal of a microservice.
After having a proper purpose, you can then choose the best pattern and plan the individual tasks. The first task will probably take longer to develop, as you're creating the base layout for the service.
Don't forget to add tests, coverage, and documentation as soon as possible. I know this is something most developers tend to ignore, but it will bite you later. It's easier to add a simple test for a first simple task. Code coverage is easier at this point. Adding documentation should also be easier if you're planning the individual tasks.
After having your first task, with a proper test, you should set your first deploy. This will end your first development cycle and bring you back to planning. If you keep this loop going, with small tasks, you'll develop faster, and deploy faster:
This type of simple loop with small tasks will allow you to do what is called continuous integration and continuous deployment, where you're able to develop and deploy to a testing cluster. The change can be automatically tested and deployed if everything passes the tests.
As we saw previously, a microservice architecture has many advantages, such as splitting code into smaller isolated projects, where it becomes easier to develop or even delegate responsibility.
These advantages come at a cost, which is the build of a more complex system or application. Because of how microservices are supposed to work, an information barrier is intrinsic. A microservice responsible for a type of information should be the only one manipulating it, forcing any other service to communicate with it to have access to information.
This gives you a finer control over the information because you know the service responsible for it, and you can force service or user authentication, with authorization or even rate-access limits. But, this means that a complex application will tend to penalize the network as there will be significant inter-service messaging.
Inter-service messaging means network traffic and latency. If the services are not on the same local network, this will eventually create noticeable latency. Adding some kind of cache service to accelerate access will also add more complexity.
Although testing and development for each microservice should be easier than a monolith application, looking at the microservice test frameworks all together, and having two or more services test together, is more complicated.
Finally, avoid something called a nanoservice. This is considered an anti-pattern, and it's when you exaggerate on fine-graining your architecture and create overly small services, complexifying your development to the extreme.
Find a good balance between the number of microservices and what each will do. Think of them as a person that will handle a specific task. Is the task too simple to have one person allocated to do just that? Shouldn't the person have a broader set of tasks from the same context?
Today's applications have space for microservices. Applications are no longer monolith and left the traditional computer architecture long ago. Users constantly demand integrations and interoperability between applications.
Microservices help developers to reduce the complexity of applications by separating different contexts, such as frontend, backend, mobile, or a simple API. They're a concept, or a pattern, that, when used well, can give you great power, and split complexity and responsibility.
But, microservices are more than that. Microservices help you scale horizontally by just replicating the services you need and not a complete monolith application, saving resources and, ultimately, money.
There's a lot to explore out there; we have just scratched the surface. There are plenty of cloud providers and tools for you to experiment with and choose what fits you best. Remember, practice makes perfect, so head to your work desk, and good luck!
If you enjoyed this book, you may be interested in these other books by Packt:
Advanced Node.js Development
Andrew Mead
ISBN: 9781788393935
Learning Node.js for Mobile Application Development
Stefan Buttigieg, Milorad Jevdjenic
ISBN: 9781785280498
Building Bots with Node.js
Stefan Buttigieg, Milorad Jevdjenic
ISBN: 9781786465450
Please share your thoughts on this book with others by leaving a review on the site that you bought it from. If you purchased the book from Amazon, please leave us an honest review on this book's Amazon page. This is vital so that other potential readers can see and use your unbiased opinion to make purchasing decisions, we can understand what our customers think about our products, and our authors can see your feedback on the title that they have worked with Packt to create. It will only take a few minutes of your time, but is valuable to other potential customers, our authors, and Packt. Thank you!