Table of Contents for
Node.js Complete Reference Guide

Version ebook / Retour

Cover image for bash Cookbook, 2nd Edition Node.js Complete Reference Guide by Diogo Resende Published by Packt Publishing, 2018
  1. Node.js Complete Reference Guide
  2. Title Page
  3. Copyright and Credits
  4. Node.js Complete Reference Guide
  5. About Packt
  6. Why subscribe?
  7. Packt.com
  8. Contributors
  9. About the authors
  10. Packt is searching for authors like you
  11. Table of Contents
  12. Preface
  13. Who this book is for
  14. What this book covers
  15. To get the most out of this book
  16. Download the example code files
  17. Conventions used
  18. Get in touch
  19. Reviews
  20. About Node.js
  21. The capabilities of Node.js
  22. Server-side JavaScript
  23. Why should you use Node.js?
  24. Popularity
  25. JavaScript at all levels of the stack
  26. Leveraging Google's investment in V8
  27. Leaner, asynchronous, event-driven model
  28. Microservice architecture
  29. Node.js is stronger for having survived a major schism and hostile fork
  30. Threaded versus event-driven architecture
  31. Performance and utilization
  32. Is Node.js a cancerous scalability disaster?
  33. Server utilization, the business bottom line, and green web hosting
  34. Embracing advances in the JavaScript language
  35. Deploying ES2015/2016/2017/2018 JavaScript code
  36. Node.js, the microservice architecture, and easily testable systems
  37. Node.js and the Twelve-Factor app model
  38. Summary
  39. Setting up Node.js
  40. System requirements
  41. Installing Node.js using package managers
  42. Installing on macOS with MacPorts
  43. Installing on macOS with Homebrew
  44. Installing on Linux, *BSD, or Windows from package management systems
  45. Installing Node.js in the Windows Subsystem for Linux (WSL)
  46. Opening an administrator-privileged PowerShell on Windows
  47. Installing the Node.js distribution from nodejs.org
  48. Installing from source on POSIX-like systems
  49. Installing prerequisites
  50. Installing developer tools on macOS
  51. Installing from source for all POSIX-like systems
  52. Installing from source on Windows
  53. Installing multiple Node.js instances with nvm
  54. Installing nvm on Windows
  55. Native code modules and node-gyp
  56. Node.js versions policy and what to use
  57. Editors and debuggers
  58. Running and testing commands
  59. Node.js's command-line tools
  60. Running a simple script with Node.js
  61. Conversion to async functions and the Promise paradigm
  62. Launching a server with Node.js
  63. NPM – the Node.js package manager
  64. Node.js, ECMAScript 2015/2016/2017, and beyond 
  65. Using Babel to use experimental JavaScript features
  66. Summary
  67. Node.js Modules
  68. Defining a module
  69. CommonJS and ES2015 module formats
  70. CommonJS/Node.js module format
  71. ES6 module format
  72. JSON modules
  73. Supporting ES6 modules on older Node.js versions
  74. Demonstrating module-level encapsulation
  75. Finding and loading CommonJS and JSON modules using require
  76. File modules
  77. Modules baked into Node.js binary
  78. Directories as modules
  79. Module identifiers and pathnames
  80. An example of application directory structure
  81. Finding and loading ES6 modules using import
  82. Hybrid CommonJS/Node.js/ES6 module scenarios
  83. Dynamic imports with import()
  84. The import.meta feature
  85. npm - the Node.js package management system
  86. The npm package format
  87. Finding npm packages
  88. Other npm commands
  89. Installing an npm package
  90. Installing a package by version number
  91. Global package installs
  92. Avoiding global module installation
  93. Maintaining package dependencies with npm
  94. Automatically updating package.json dependencies
  95. Fixing bugs by updating package dependencies
  96. Packages that install commands
  97. Configuring the PATH variable to handle commands installed by modules
  98. Configuring the PATH variable on Windows
  99. Avoiding modifications to the PATH variable
  100. Updating outdated packages you've installed
  101. Installing packages from outside the npm repository
  102. Initializing a new npm package
  103. Declaring Node.js version compatibility
  104. Publishing an npm package
  105. Explicitly specifying package dependency version numbers
  106. The Yarn package management system
  107. Summary
  108. HTTP Servers and Clients
  109. Sending and receiving events with EventEmitters
  110. JavaScript classes and class inheritance
  111. The EventEmitter Class
  112. The EventEmitter theory
  113. HTTP server applications
  114. ES2015 multiline and template strings
  115. HTTP Sniffer – listening to the HTTP conversation
  116. Web application frameworks
  117. Getting started with Express
  118. Setting environment variables in Windows cmd.exe command line
  119. Walking through the default Express application
  120. The Express middleware
  121. Middleware and request paths
  122. Error handling
  123. Calculating the Fibonacci sequence with an Express application
  124. Computationally intensive code and the Node.js event loop
  125. Algorithmic refactoring
  126. Making HTTP Client requests
  127. Calling a REST backend service from an Express application
  128. Implementing a simple REST server with Express
  129. Refactoring the Fibonacci application for REST
  130. Some RESTful modules and frameworks
  131. Summary
  132. Your First Express Application
  133. Promises, async functions, and Express router functions
  134. Promises and error handling
  135. Flattening our asynchronous code
  136. Promises and generators birthed async functions
  137. Express and the MVC paradigm
  138. Creating the Notes application
  139. Your first Notes model
  140. Understanding ES-2015 class definitions
  141. Filling out the in-memory Notes model
  142. The Notes home page
  143. Adding a new note – create
  144. Viewing notes – read
  145. Editing an existing note – update
  146. Deleting notes – destroy
  147. Theming your Express application
  148. Scaling up – running multiple Notes instances
  149. Summary
  150. Implementing the Mobile-First Paradigm
  151. Problem – the Notes app isn't mobile friendly
  152. Mobile-first paradigm
  153. Using Twitter Bootstrap on the Notes application
  154. Setting it up
  155. Adding Bootstrap to application templates
  156. Alternative layout frameworks
  157. Flexbox and CSS Grids
  158. Mobile-first design for the Notes application
  159. Laying the Bootstrap grid foundation
  160. Responsive page structure for the Notes application
  161. Using icon libraries and improving visual appeal
  162. Responsive page header navigation bar
  163. Improving the Notes list on the front page
  164. Cleaning up the Note viewing experience
  165. Cleaning up the add/edit note form
  166. Cleaning up the delete-note window
  167. Building a customized Bootstrap
  168. Pre-built custom Bootstrap themes
  169. Summary
  170. Data Storage and Retrieval
  171. Data storage and asynchronous code
  172. Logging
  173. Request logging with Morgan
  174. Debugging messages
  175. Capturing stdout and stderr
  176. Uncaught exceptions
  177. Unhandled Promise rejections
  178. Using the ES6 module format
  179. Rewriting app.js as an ES6 module
  180. Rewriting bin/www as an ES6 module
  181. Rewriting models code as ES6 modules
  182. Rewriting router modules as ES6 modules
  183. Storing notes in the filesystem
  184. Dynamic import of ES6 modules
  185. Running the Notes application with filesystem storage
  186. Storing notes with the LevelUP data store
  187. Storing notes in SQL with SQLite3
  188. SQLite3 database schema
  189. SQLite3 model code
  190. Running Notes with SQLite3
  191. Storing notes the ORM way with Sequelize
  192. Sequelize model for the Notes application
  193. Configuring a Sequelize database connection
  194. Running the Notes application with Sequelize
  195. Storing notes in MongoDB
  196. MongoDB model for the Notes application
  197. Running the Notes application with MongoDB
  198. Summary
  199. Multiuser Authentication the Microservice Way
  200. Creating a user information microservice
  201. User information model
  202. A REST server for user information
  203. Scripts to test and administer the user authentication server
  204. Login support for the Notes application
  205. Accessing the user authentication REST API
  206. Login and logout routing functions
  207. Login/logout changes to app.js
  208. Login/logout changes in routes/index.mjs
  209. Login/logout changes required in routes/notes.mjs
  210. View template changes supporting login/logout
  211. Running the Notes application with user authentication
  212. Twitter login support for the Notes application
  213. Registering an application with Twitter
  214. Implementing TwitterStrategy
  215. Securely keeping secrets and passwords
  216. The Notes application stack
  217. Summary
  218. Dynamic Client/Server Interaction with Socket.IO
  219. Introducing Socket.IO
  220. Initializing Socket.IO with Express
  221. Real-time updates on the Notes homepage
  222. The Notes model as an EventEmitter class
  223. Real-time changes in the Notes home page
  224. Changing the homepage and layout templates
  225. Running Notes with real-time homepage updates
  226. Real-time action while viewing notes
  227. Changing the note view template for real-time action
  228. Running Notes with real-time updates while viewing a note
  229. Inter-user chat and commenting for Notes
  230. Data model for storing messages
  231. Adding messages to the Notes router
  232. Changing the note view template for messages
  233. Using a Modal window to compose messages
  234. Sending, displaying, and deleting messages
  235. Running Notes and passing messages
  236. Other applications of Modal windows
  237. Summary
  238. Deploying Node.js Applications
  239. Notes application architecture and deployment considerations
  240. Traditional Linux Node.js service deployment
  241. Prerequisite – provisioning the databases
  242. Installing Node.js on Ubuntu
  243. Setting up Notes and user authentication on the server
  244. Adjusting Twitter authentication to work on the server
  245. Setting up PM2 to manage Node.js processes
  246. Node.js microservice deployment with Docker
  247. Installing Docker on your laptop
  248. Starting Docker with Docker for Windows/macOS
  249. Kicking the tires of Docker
  250. Creating the AuthNet for the user authentication service
  251. MySQL container for Docker
  252. Initializing AuthNet
  253. Script execution on Windows
  254. Linking Docker containers
  255. The db-userauth container
  256. Dockerfile for the authentication service
  257. Configuring the authentication service for Docker
  258. Building and running the authentication service Docker container
  259. Exploring Authnet
  260. Creating FrontNet for the Notes application
  261. MySQL container for the Notes application
  262. Dockerizing the Notes application
  263. Controlling the location of MySQL data volumes
  264. Docker deployment of background services
  265. Deploying to the cloud with Docker compose
  266. Docker compose files
  267. Running the Notes application with Docker compose
  268. Deploying to cloud hosting with Docker compose
  269. Summary
  270. Unit Testing and Functional Testing
  271. Assert – the basis of testing methodologies
  272. Testing a Notes model
  273. Mocha and Chai­ – the chosen test tools
  274. Notes model test suite
  275. Configuring and running tests
  276. More tests for the Notes model
  277. Testing database models
  278. Using Docker to manage test infrastructure
  279. Docker Compose to orchestrate test infrastructure
  280. Executing tests under Docker Compose
  281. MongoDB setup under Docker and testing Notes against MongoDB
  282. Testing REST backend services
  283. Automating test results reporting
  284. Frontend headless browser testing with Puppeteer
  285. Setting up Puppeteer
  286. Improving testability in the Notes UI
  287. Puppeteer test script for Notes
  288. Running the login scenario
  289. The Add Note scenario
  290. Mitigating/preventing spurious test errors in Puppeteer scripts
  291. Configuring timeouts
  292. Tracing events on the Page and the Puppeteer instance
  293. Inserting pauses
  294. Avoiding WebSockets conflicts
  295. Taking screenshots
  296. Summary
  297. REST – What You Did Not Know
  298. REST fundamentals
  299. Principle 1 – Everything is a resource
  300. Principle 2 – Each resource is identifiable by a unique identifier
  301. Principle 3 – Manipulate resources via standard HTTP methods
  302. Principle 4 – Resources can have multiple representations
  303. Principle 5 – Communicate with resources in a stateless manner
  304. The REST goals
  305. Separation of the representation and the resource
  306. Visibility
  307. Reliability
  308. Scalability and performance
  309. Working with WADL
  310. Documenting RESTful APIs with Swagger
  311. Taking advantage of the existing infrastructure
  312. Summary
  313. Building a Typical Web API
  314. Specifying the API
  315. Implementing routes
  316. Querying the API using test data
  317. Content negotiation
  318. API versioning
  319. Self-test questions
  320. Summary
  321. Using NoSQL Databases
  322. MongoDB – a document store database
  323. Database modeling with Mongoose
  324. Testing a Mongoose model with Mocha
  325. Creating a user-defined model around a Mongoose model
  326. Wiring up a NoSQL database module to Express
  327. Self-test questions
  328. Summary
  329. Restful API Design Guidelines
  330. Endpoint URLs and HTTP status codes best practices
  331. Extensibility and versioning
  332. Linked data
  333. Summary
  334. Implementing a Full Fledged RESTful Service
  335. Working with arbitrary data
  336. Linking
  337. Implementing paging and filtering
  338. Caching
  339. Supplying the Cache-Control header in Express applications
  340. Discovering and exploring RESTful services
  341. Summary
  342. Consuming a RESTful API
  343. Consuming RESTful services with jQuery
  344. Troubleshooting and identifying problems on the wire
  345. Cross Origin Resource Sharing
  346. Content Delivery Networks
  347. Handling HTTP status codes on the client side
  348. Summary
  349. Securing the Application
  350. Authentication
  351. Basic authentication
  352. Passport
  353. Passport's basic authentication strategy
  354. Passport's OAuth Strategy
  355. Passport's third-party authentication strategies
  356. Authorization
  357. Transport layer security
  358. Self-test questions
  359. Summary
  360. The Age of Microservices
  361. From monolith to microservices
  362. Patterns of microservices
  363. Decomposable
  364. Autonomous
  365. Scalable
  366. Communicable
  367. Summary
  368. Modules and Toolkits
  369. Seneca
  370. Hydra
  371. Summary
  372. Building a Microservice
  373. Using Hydra
  374. Using Seneca
  375. Plugins
  376. Summary
  377. State
  378. State
  379. Storing state
  380. MySQL
  381. RethinkDB
  382. Redis
  383. Conclusion
  384. Security
  385. Summary
  386. Testing
  387. Integrating tests
  388. Using chai
  389. Adding code coverage
  390. Covering all code
  391. Mocking our services
  392. Summary
  393. Design Patterns
  394. Choosing patterns
  395. Architectural patterns
  396. Front Controller
  397. Layered
  398. Service Locator
  399. Observer
  400. Publish-Subscribe
  401. Using patterns
  402. Planning your microservice
  403. Obstacles when developing
  404. Summary
  405. Other Books You May Enjoy
  406. Leave a review - let other readers know what you think

Dockerizing the Notes application

In the notes directory, create a file named Dockerfile containing the following:

FROM node:10 

ENV DEBUG="notes:*,messages:*"
ENV SEQUELIZE_CONNECT="models/sequelize-docker-mysql.yaml"
ENV NOTES_MODEL="sequelize"
ENV USER_SERVICE_URL="http://userauth:3333"
ENV PORT="3000"
ENV NOTES_SESSIONS_DIR="/sessions"
# ENV TWITTER_CONSUMER_KEY="..."
# ENV TWITTER_CONSUMER_SECRET="..."
# Use this line when the Twitter Callback URL
# has to be other than localhost:3000
# ENV TWITTER_CALLBACK_HOST=http://45.55.37.74:3000

RUN mkdir -p /notesapp /notesapp/minty /notesapp/partials /notesapp/public /notesapp/routes /notesapp/theme /notesapp/views
COPY minty/ /notesapp/minty/
COPY models/*.mjs models/sequelize-docker-mysql.yaml /notesapp/models/
COPY partials/ /notesapp/partials/
COPY public/ /notesapp/public/
COPY routes/ /notesapp/routes/
COPY theme/ /notesapp/theme/
COPY views/ /notesapp/views/
COPY app.mjs package.json /notesapp/

WORKDIR /notesapp
RUN apt-get update -y \
&& apt-get -y install curl python build-essential git ca-certificates \
&& npm install --unsafe-perm

# Uncomment to build the theme directory
# WORKDIR /notesapp/theme
# RUN npm run download && npm run build && npm run clean

WORKDIR /notesapp

VOLUME /sessions
EXPOSE 3000
CMD node --experimental-modules ./app

This is similar to the Dockerfile we used for the authentication service. We're using the environment variables from notes/package.json, plus a new one, and there's a couple of new tricks involved here, so let's take a look.

The most obvious change is the number of COPY commands. The Notes application is a lot more involved given the number of subdirectories full of files that must be installed.  We start by creating the top-level directories of the Notes application deployment tree. Then, one by one, we copy each subdirectory into its corresponding subdirectory in the container filesystem.

In a COPY command, the trailing slash on the destination directory is important. Why?  Because the documentation says that the trailing slash is important.

The big question is: Why use multiple COPY commands such as this?  This would have been trivially simple:

COPY . /notesapp

But, it is important to avoid copying the node_modules directory into the container. The container node_modules must be built inside the container, because the container operating system is almost certainly different to the host operating system. Any native code modules must be built for the correct operating system. That constraint led to the question of concisely copying specific files to the destination.

We've developed a process to build a Bootstrap 4 theme, which we developed in Chapter 6, Implementing the Mobile-First Paradigm.  If you have a Bootstrap 4 theme to build, simply uncomment the corresponding lines in the Dockerfile. Those lines move the working directory to /notesapp/theme and then run the scripts to build the theme. A new script is required in theme/package.json to remove the theme/node_modules directory after the theme has been built:

 "scripts": {
...
"clean": "rm -rf bootstrap-4.0.0/node_modules"
...
}

We also have a new SEQUELIZE_CONNECT file. Create models/sequelize-docker-mysql.yaml containing the following:

dbname: notes 
username: notes 
password: notes12345
params: 
    host: db-notes 
    port: 3306 
    dialect: mysql 

This will access a database server on the db-notes domain name using the named database, username, and password. 

Notice that the USER_SERVICE_URL variable no longer accesses the authentication service at localhost, but at userauth. The userauth domain name is currently only advertised by the DNS server on AuthNet, but the Notes service is on FrontNet. This means we'll have to connect the userauth container to the FrontNet bridge network so that its name is known there as well. We'll get to that in a minute.

In Chapter 8, Multiuser Authentication the Microservice Way we discussed the need to protect the API keys supplied by Twitter.

We didn't want to commit the keys in the source code, but they have to go somewhere.  Placeholders are in the Dockerfile for specifying TWITTER_CONSUMER_KEY and TWITTER_CONSUMER_SECRET.

The value for TWITTER_CALLBACK_HOST needs to reflect where Notes is deployed. Right now, it is still on your laptop, but by the end of the chapter, it will be deployed to the server, and, at that time, it will need the IP address or domain name of the server.

A new variable is NOTES_SESSIONS_DIR and the matching VOLUME declaration. If we were to run multiple Notes instances, they could share session data by sharing this volume.

Supporting the NOTES_SESSIONS_DIR variable requires one change in app.mjs:

const sessionStore  = new FileStore({ 
    path: process.env.NOTES_SESSIONS_DIR ?             
          process.env.NOTES_SESSIONS_DIR : "sessions" 
}); 

Instead of a hardcoded directory name, we can use an environment variable to define the location where session data is stored. Alternatively, there are sessionStore implementations for various servers such as REDIS, enabling session data sharing between containers on separate host systems.

In notes/package.json, add these scripts:

"scripts": {
...
"docker": "node --experimental-modules ./app",
"docker-build": "docker build -t node-web-development/notes ."
...
}

As for the authentication server, this lets us build the container and then, within the container, we can run the service. 

Now we can build the container image:

$ npm run docker-build

> notes@0.0.0 docker-build /Users/david/chap10/notes
> docker build -t node-web-development/notes .

Sending build context to Docker daemon 76.27MB
Step 1/22 : FROM node:9.5
---> a696309517c6
Step 2/22 : ENV DEBUG="notes:*,messages:*"
---> Using cache
---> 8628ecad9fa4

Next, in the frontnet directory, create a file named startserver.sh, or, on Windows, startserver.ps1:

docker run -it --name notes --net=frontnet -p 3000:3000 node-web-development/notes

Unlike the authentication service, the Notes application container must export a port to the public. Otherwise, the public will never be able to enjoy this wonderful creation we're building. The -p option is how we instruct Docker to expose a port. 

The first number is a TCP port number published from the container, and the second number is the TCP port inside the container. Generally speaking, this option maps a port inside the container to one reachable by the public.

Then run it as follows:

$ sh -x startserver.sh 
+ docker run -it --name notes --net=frontnet -p 3000:3000 node-web-development/notes
(node:6) ExperimentalWarning: The ESM module loader is experimental.
notes:debug-INDEX Listening on port 3000 +0ms

On Windows, run .\startserver.ps1.

At this point, we can connect our browser to http://localhost:3000 and start using the Notes application. But we'll quickly run into a problem:

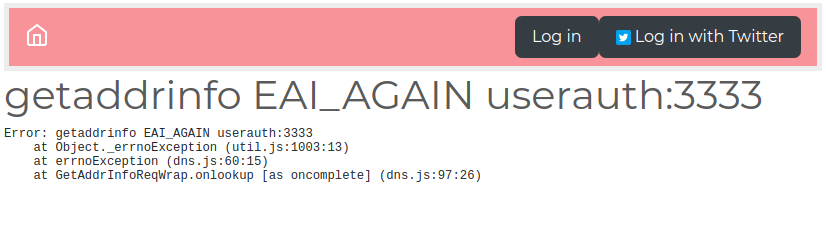
The user experience team is going to scream about this ugly error message, so put it on your backlog to generate a prettier error screen. For example, a flock of birds pulling a whale out of the ocean is popular.

This error means that Notes cannot access anything at the host named userauth. That host does exist, because the container is running, but it's not on frontnet, and is not reachable from the notes container. Namely:

$ docker exec -it notes bash 
root@125a196c3fd5:/notesapp# ping userauth
ping: unknown host
root@125a196c3fd5:/notesapp# ping db-notes
PING db-notes (172.19.0.2): 56 data bytes
64 bytes from 172.19.0.2: icmp_seq=0 ttl=64 time=0.136 ms
^C--- db-notes ping statistics ---
1 packets transmitted, 1 packets received, 0% packet loss
round-trip min/avg/max/stddev = 0.136/0.136/0.136/0.000 ms
root@125a196c3fd5:/notesapp#

If you inspect FrontNet and AuthNet, you'll see the containers attached to each do not overlap:

$ docker network inspect frontnet
$ docker network inspect authnet

In the architecture diagram at the beginning of the chapter, we showed a connection between the notes and userauth containers. The connection is required so notes can authenticate its users. But that connection does not exist, yet.

Unfortunately, a simple change to startserver.sh (startserver.ps1) does not work:

docker run -it --name notes --net=authnet --net=frontnet -p 3000:3000 node-web-development/notes

While it is conceptually simple to specify multiple --net options when starting a container, Docker does not support this. It silently accepts the command as shown, but only connects the container to the last network mentioned in the options. Instead, Docker requires that you take a second step to attach the container to a second network:

$ docker network connect authnet notes

With no other change, the Notes application will now allow you to log in and start adding and editing notes. 

There is a glaring architecture question staring at us. Do we connect the userauth service to frontnet, or do we connect the notes service to authnet?    To verify that either direction solves the problem, run these commands:

$ docker network disconnect authnet notes 
$ docker network connect frontnet userauth
 

The first time around, we connected notes to authnet, then we disconnected it from authnet, and then connected userauth to frontnet. That means we tried both combinations and, as expected, in both cases notes and userauth were able to communicate.

This is a question for security experts since the consideration is the attack vectors available to any intruders. Suppose Notes has a security hole allowing an invader to gain access. How do we limit what is reachable via that hole?  

The primary observation is that by connecting notes to authnet, notes not only has access to userauth, but also to db-userauth:

$ docker network disconnect frontnet userauth
$ docker network connect authnet notes
$ docker exec -it notes bash
root@7fce818e9a4d:/notesapp# ping userauth
PING userauth (172.18.0.3): 56 data bytes
64 bytes from 172.18.0.3: icmp_seq=0 ttl=64 time=0.103 ms
^C--- userauth ping statistics ---
1 packets transmitted, 1 packets received, 0% packet loss
round-trip min/avg/max/stddev = 0.103/0.103/0.103/0.000 ms
root@7fce818e9a4d:/notesapp# ping db-userauth
PING db-userauth (172.18.0.2): 56 data bytes
64 bytes from 172.18.0.2: icmp_seq=0 ttl=64 time=0.201 ms
^C--- db-userauth ping statistics ---
1 packets transmitted, 1 packets received, 0% packet loss
round-trip min/avg/max/stddev = 0.201/0.201/0.201/0.000 ms
root@7fce818e9a4d:/notesapp#

This sequence reconnects notes to authnet, and demonstrates the ability to access both the userauth and db-userauth containers. Therefore, a successful invader could access the db-userauth database, a result we wanted to prevent. Our diagram at the beginning showed no such connection between notes and db-userauth.

Given that our goal for using Docker was to limit the attack vectors, we have a clear distinction between the two container/network connection setups. Attaching userauth to frontnet limits the number of containers that can access db-userauth. For an intruder to access the user information database, they must first break into notes, and then break into userauth. Unless, that is, our amateur attempt at a security audit is flawed.