Drupal 8 Development Cookbook


BIRMINGHAM - MUMBAI
Copyright © 2017 Packt Publishing
All rights reserved. No part of this book may be reproduced, stored in a retrieval system, or transmitted in any form or by any means, without the prior written permission of the publisher, except in the case of brief quotations embedded in critical articles or reviews.
Every effort has been made in the preparation of this book to ensure the accuracy of the information presented. However, the information contained in this book is sold without warranty, either express or implied. Neither the author, nor Packt Publishing, and its dealers and distributors will be held liable for any damages caused or alleged to be caused directly or indirectly by this book.
Packt Publishing has endeavored to provide trademark information about all of the companies and products mentioned in this book by the appropriate use of capitals. However, Packt Publishing cannot guarantee the accuracy of this information.
First published: March 2016
Second edition: September 2017
Production reference: 1210917
|
Author Matt Glaman |
Copy Editor Dhanya Baburaj |
|
Reviewer Tracy Charles Smith |
Project Coordinator Ritika Manoj |
|
Commissioning Editor Amarabha Banerjee |
Proofreader Safis Editing |
|
Acquisition Editor Nigel Fernandes |
Indexer Rekha Nair |
|
Content Development Editor Mohammed Yusuf Imaratwale |
Graphics Jason Monteiro |
|
Technical Editors Ankur Ghiye Murtaza Tinwala |
Production Coordinator Shantanu Zagade |
Matt Glaman is a Senior Drupal Consultant at Commerce Guys and co-maintainer of Drupal Commerce. He is an open source developer who has been working with Drupal since 2013. Since then, he has contributed to over 60 community project.
Tracy Charles Smith began working with computers at the age of 10. His background includes network support, web development, customer service, project management, and financial management.
Tracy's entrepreneurial spirit is a key component to his success in interacting with clients and team members on business and user-experience related technology solutions. In fact, he used that passion to found his own technology-consulting firm called Alpha Geek Tech, LLC. He also served as Technology Director for Quiddities Dev., Inc., in Santa Cruz, CA, before moving back to the DC area to join Phase2 in 2010 as a Senior Programmer. Tracy now works as a Senior Project Manager at Phase2 supporting Growth & Support clients in government and private enterprise. His diverse development background complements his project management skills.
Tracy was also the lead programmer and architect for 12seconds.tv in 2007 (a video messaging platform), which leveraged Drupal. He also authored Drupal Intranets with Open Atrium. He earned a BS in Computer Information Systems and Business Administration from Wingate University.
For support files and downloads related to your book, please visit www.PacktPub.com.
Did you know that Packt offers eBook versions of every book published, with PDF and ePub files available? You can upgrade to the eBook version at www.PacktPub.com and as a print book customer, you are entitled to a discount on the eBook copy. Get in touch with us at service@packtpub.com for more details.
At www.PacktPub.com, you can also read a collection of free technical articles, sign up for a range of free newsletters and receive exclusive discounts and offers on Packt books and eBooks.
![]()
Get the most in-demand software skills with Mapt. Mapt gives you full access to all Packt books and video courses, as well as industry-leading tools to help you plan your personal development and advance your career.
Thanks for purchasing this Packt book. At Packt, quality is at the heart of our editorial process. To help us improve, please leave us an honest review on this book's Amazon page at https://www.amazon.com/dp/1788290402
If you'd like to join our team of regular reviewers, you can e-mail us at customerreviews@packtpub.com. We award our regular reviewers with free eBooks and videos in exchange for their valuable feedback. Help us be relentless in improving our products!
Drupal is a content management system used to build websites for small businesses, e-commerce, enterprise systems, and much more. Created by over 4,500 contributors, Drupal 8 provides many new features to Drupal. Whether you are new to Drupal, or an experienced Drupalista, Drupal 8 Development Cookbook contains recipes to dive into what Drupal 8 has to offer.
Chapter 1, Up and Running with Drupal 8, begins by covering the requirements for running Drupal 8 and going through the installation process and extending Drupal.
Chapter 2, The Content Authoring Experience, dives into the content management experience in Drupal, including working with the newly bundled CKEditor.
Chapter 3, Displaying Content through Views, explores how to use Views to create different ways to list and display your content in Drupal.
Chapter 4, Extending Drupal, introduces how to write a module for Drupal, the building blocks of functionality in Drupal.
Chapter 5, Frontend for the Win, covers how to create a theme, work with the new templating system Twig, and harness Drupal’s responsive design features.
Chapter 6, Creating Forms with the Form API, explains how to work with Drupal’s Form API to create custom forms for collecting data.
Chapter 7, Plug and Play with Plugins, introduces plugins, one of the newest components in Drupal. This chapter walks through developing the plugin system to work with fields.
Chapter 8, Multilingual and Internationalization, introduces the features provided by Drupal 8 to create an internationalized website, supporting multiple languages for content and administration.
Chapter 9, Configuration Management - Deploying in Drupal 8, explains the configuration management system, new to Drupal 8, and how to import and export site configurations.
Chapter 10, The Entity API, dives into the Entity API in Drupal, allowing you to create custom configuration and content entities.
Chapter 11, Off the Drupalicon Island, explains how Drupal allows embracing the mantra of "proudly built elsewhere" and including third-party libraries with your Drupal site.
Chapter 12, Web Services, shows how to turn your Drupal 8 site into a web services API provider through a RESTful interface.
Chapter 13, The Drupal CLI, explores working with Drupal 8 through two command-line tools created by the Drupal community: Drush and Drupal Console.
In order to work with Drupal 8, and to run the code examples found in this book, the following software will be required:
Web server software stack:
The first chapter details all of these requirements, and includes a recipe highlighting an out-of-the-box development server setup.
You will also need a text editor; the following is a suggestion of popular editors and IDEs:
This book is for those have been working with Drupal, such as site builders, backend and frontend developers, and who are eager to see what awaits them when they start using Drupal 8.
In this book, you will find several headings that appear frequently (Getting ready, How to do it, How it works, There's more, and See also).
To give clear instructions on how to complete a recipe, we use these sections as follows:
This section tells you what to expect in the recipe, and describes how to set up any software or any preliminary settings required for the recipe.
This section contains the steps required to follow the recipe.
This section usually consists of a detailed explanation of what happened in the previous section.
This section consists of additional information about the recipe in order to make the reader more knowledgeable about the recipe.
This section provides helpful links to other useful information for the recipe.
In this book, you will find a number of text styles that distinguish between different kinds of information. Here are some examples of these styles and an explanation of their meaning.
Code words in text, database table names, folder names, filenames, file extensions, pathnames, dummy URLs, user input, and Twitter handles are shown as follows: "You will see drupal-org.make and drupal-org-core.make."
A block of code is set as follows:
 public function alterRoutes(RouteCollection $collection) {
    // Change path of mymodule.mypage to use a hyphen
    if ($route = $collection->get('mymodule.mypage'))
Any command-line input or output is written as follows:
$ CREATE USER username@localhost IDENTIFIED BY 'password';
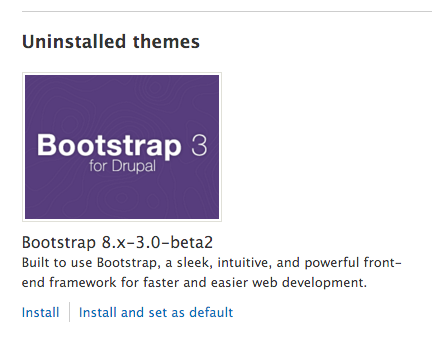
New terms and important words are shown in bold. Words that you see on the screen, for example, in menus or dialog boxes, appear in the text like this: "Check the checkbox and click on Install."
Feedback from our readers is always welcome. Let us know what you think about this book-what you liked or disliked. Reader feedback is important for us as it helps us develop titles that you will really get the most out of.
To send us general feedback, simply e-mail feedback@packtpub.com, and mention the book's title in the subject of your message.
If there is a topic that you have expertise in and you are interested in either writing or contributing to a book, see our author guide at www.packtpub.com/authors .
Now that you are the proud owner of a Packt book, we have a number of things to help you to get the most from your purchase.
You can download the example code files for this book from your account at http://www.packtpub.com. If you purchased this book elsewhere, you can visit http://www.packtpub.com/support and register to have the files e-mailed directly to you.
You can download the code files by following these steps:
You can also download the code files by clicking on the Code Files button on the book's webpage at the Packt Publishing website. This page can be accessed by entering the book's name in the Search box. Please note that you need to be logged in to your Packt account.
Once the file is downloaded, please make sure that you unzip or extract the folder using the latest version of:
The code bundle for the book is also hosted on GitHub at https://github.com/PacktPublishing/Drupal-8-Development-Cookbook-Second-Edition. We also have other code bundles from our rich catalog of books and videos available at https://github.com/PacktPublishing/. Check them out!
Although we have taken every care to ensure the accuracy of our content, mistakes do happen. If you find a mistake in one of our books-maybe a mistake in the text or the code-we would be grateful if you could report this to us. By doing so, you can save other readers from frustration and help us improve subsequent versions of this book. If you find any errata, please report them by visiting http://www.packtpub.com/submit-errata, selecting your book, clicking on the Errata Submission Form link, and entering the details of your errata. Once your errata are verified, your submission will be accepted and the errata will be uploaded to our website or added to any list of existing errata under the Errata section of that title.
To view the previously submitted errata, go to https://www.packtpub.com/books/content/support and enter the name of the book in the search field. The required information will appear under the Errata section.
Piracy of copyrighted material on the Internet is an ongoing problem across all media. At Packt, we take the protection of our copyright and licenses very seriously. If you come across any illegal copies of our works in any form on the Internet, please provide us with the location address or website name immediately so that we can pursue a remedy.
Please contact us at copyright@packtpub.com with a link to the suspected pirated material.
We appreciate your help in protecting our authors and our ability to bring you valuable content.
If you have a problem with any aspect of this book, you can contact us at questions@packtpub.com, and we will do our best to address the problem.
In this chapter, we will get introduced to Drupal 8 and cover the following recipes:
This chapter will kick off with an introduction to installing a Drupal 8 site. We will walk through Drupal's interactive installer. We will cover installing Drupal using a command-line tool called Drush. Drupal provides two installation types: standard and minimal. Throughout this book, we will use the standard installation.
Once we have installed our Drupal 8 site, we will cover the basics of extending Drupal. We will discuss using distributions and installing contributed projects, such as modules and themes. We will also include uninstalling modules, as the process for uninstalling modules has changed in Drupal 8.
This book will involve a hands-on example for working with Drupal 8, and this chapter will provide information on setting up a local development environment. This chapter will also provide recipes on how to set up a Multisite installation in Drupal 8 and run the available test suites.
Before we get started, you should install Composer. Composer is the de facto package management tool for PHP. In case you are unfamiliar with Composer, it is just like using Gems for Ruby, npm for Node.js, and Bower for frontend libraries. Go to the Composer documentation to learn how to install Composer globally on your system:
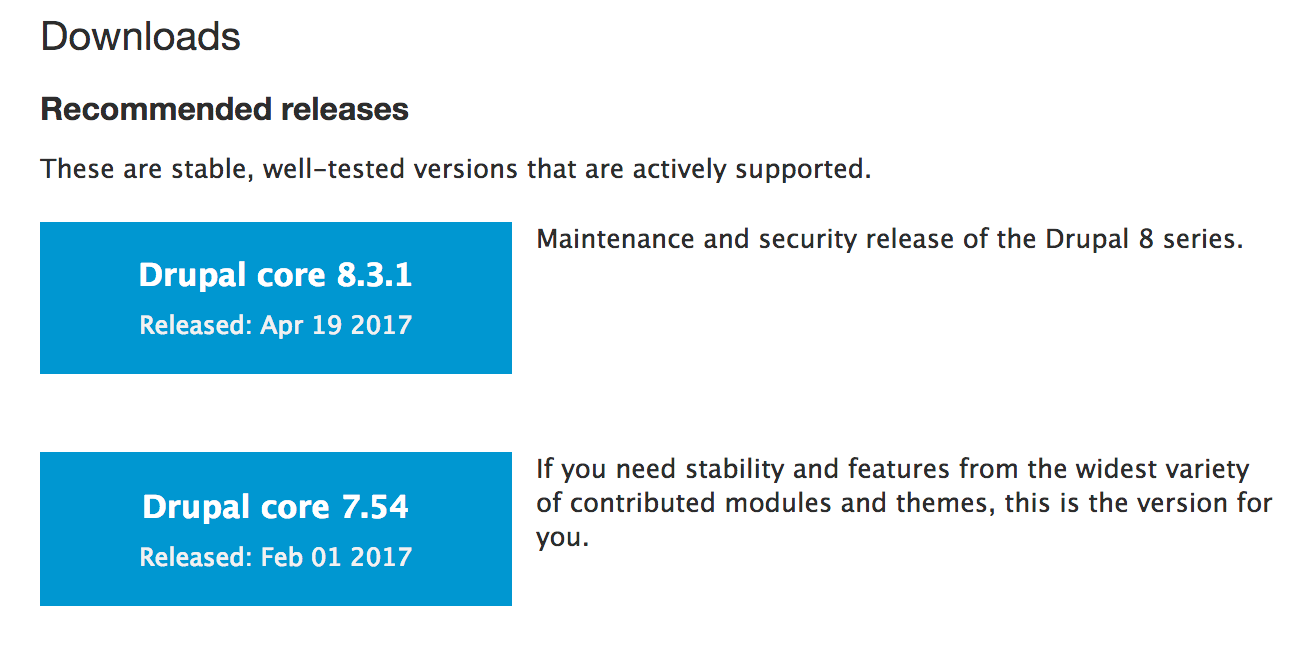
There are many different methods to download Drupal and install it. In this recipe, we will focus on downloading Drupal from https://www.drupal.org/ and setting it up on a basic Linux, Apache, MySQL, or PHP (LAMP) server.
In this recipe, we will set up the files for Drupal 8 and step through the installation process.
Before we start, you will need a development environment that meets the new system requirements for Drupal 8:
We will download Drupal 8 and place its files in your web server's document root. This is the /var/www folder. If you used a tool, such as XAMPP, WAMP, or MAPP, consult the proper documentation to know your document root.
For full system requirements for Drupal 8, check out https://www.drupal.org/docs/8/system-requirements/. The Drupal.org documentation is currently being migrated. Also, review the Drupal 7 requirements page on https://www.drupal.org/docs/7/system-requirements/overview, which highlights Drupal 8 items, as well.
We need to follow these steps to install Drupal 8:
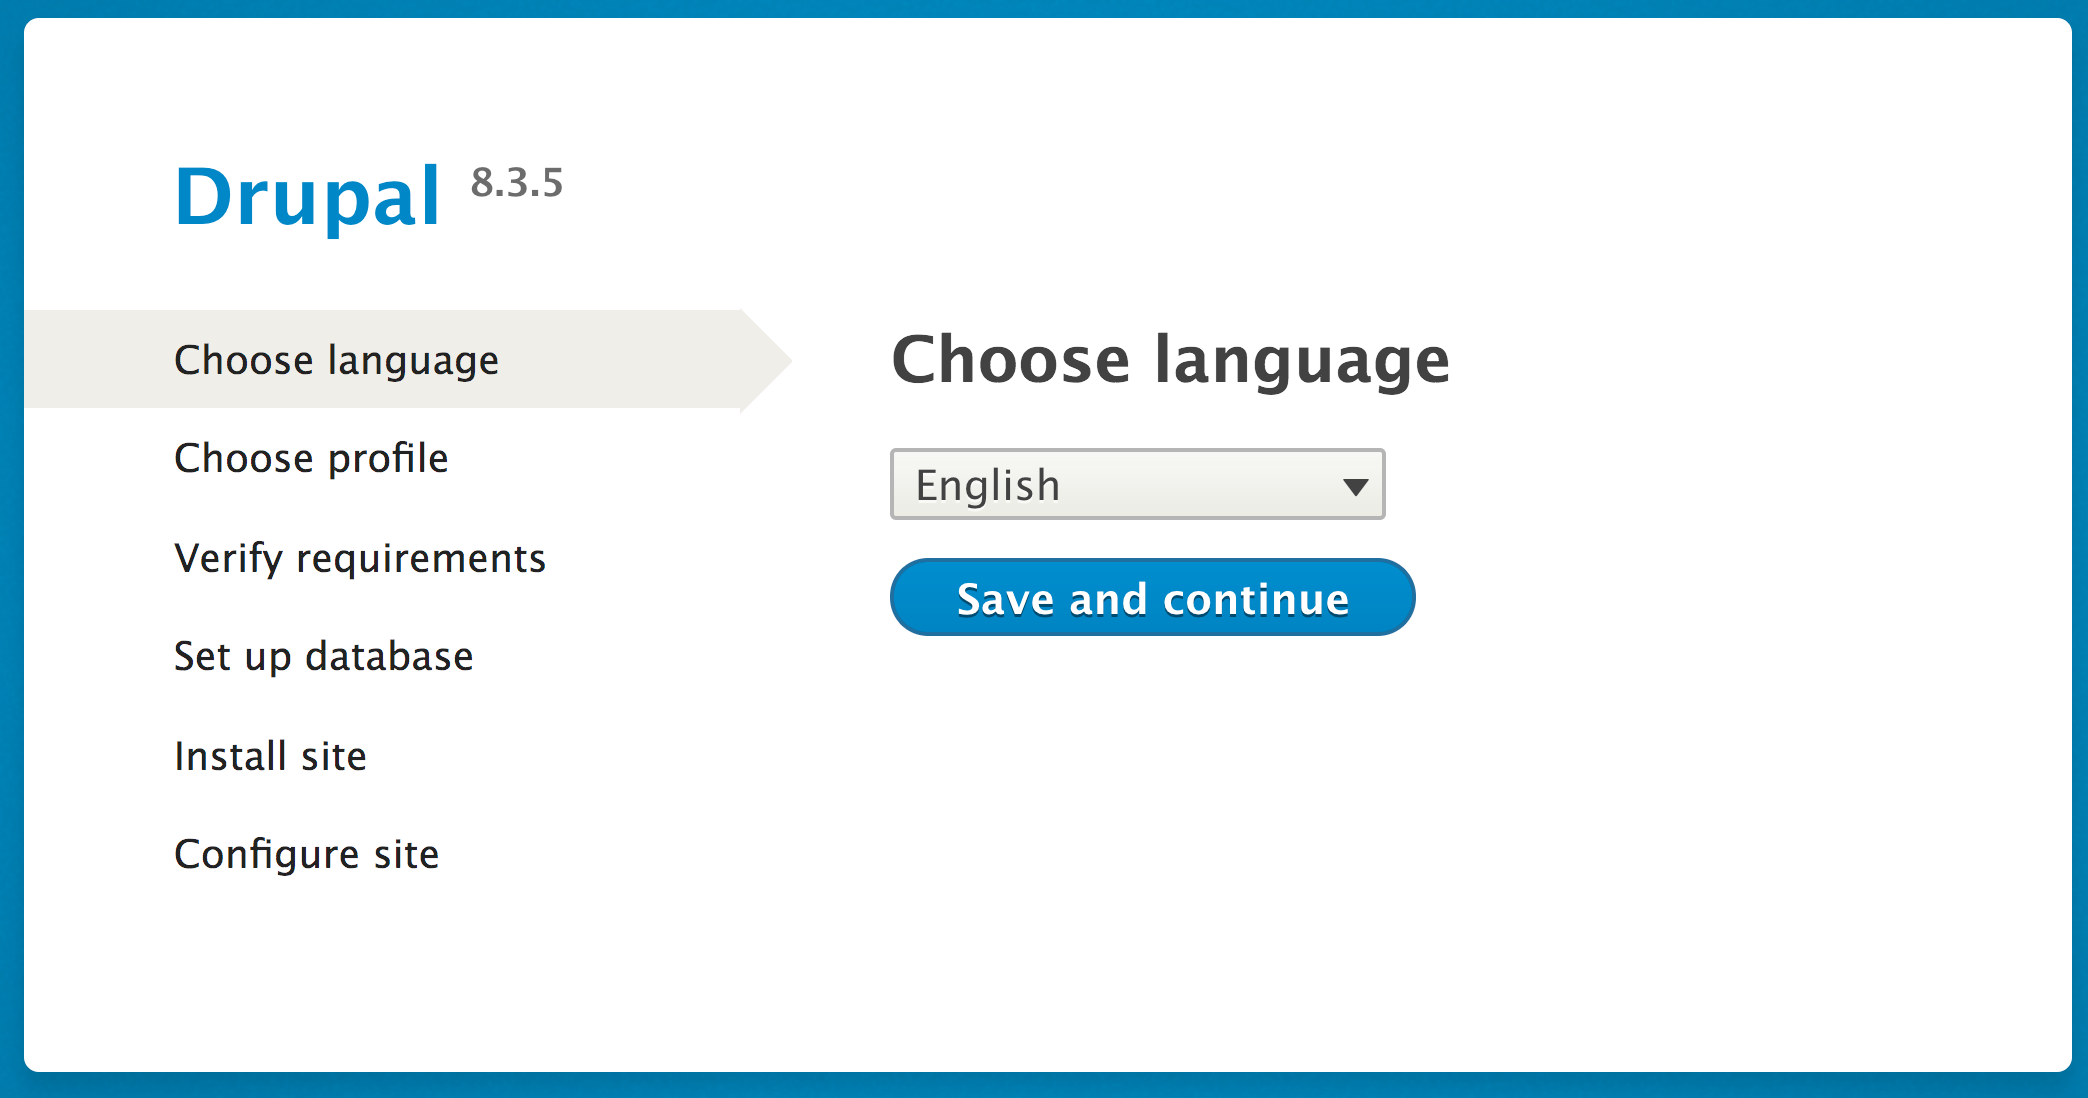
The Drupal installation process will provide a Drupal installation for the selected language and install modules and configuration based on the installation profile (standard or minimal in this recipe.)
When you visit the installer, it reads the language code from the browser. With this language code, it will then select a supported language. If you choose a non-English installation, the translation files will be automatically downloaded from https://localize.drupal.org/. Previous versions of Drupal did not support automated multilingual installs. More on multilingual will be covered in Chapter 8, Multilingual and Internationalization.
The installation profile instructs Drupal what modules to install by default. Contributed install profiles are termed distributions; we will discuss this more in the next recipe.
When verifying requirements, Drupal checks application versions and PHP configurations. For example, if your server has the PHP Xdebug (https://xdebug.org) extension installed, the minimum max_nesting_level must be 256 or else Drupal will not be installed (https://www.drupal.org/node/2393531).
The Drupal installation process is straightforward, but there are a few things worth discussing.
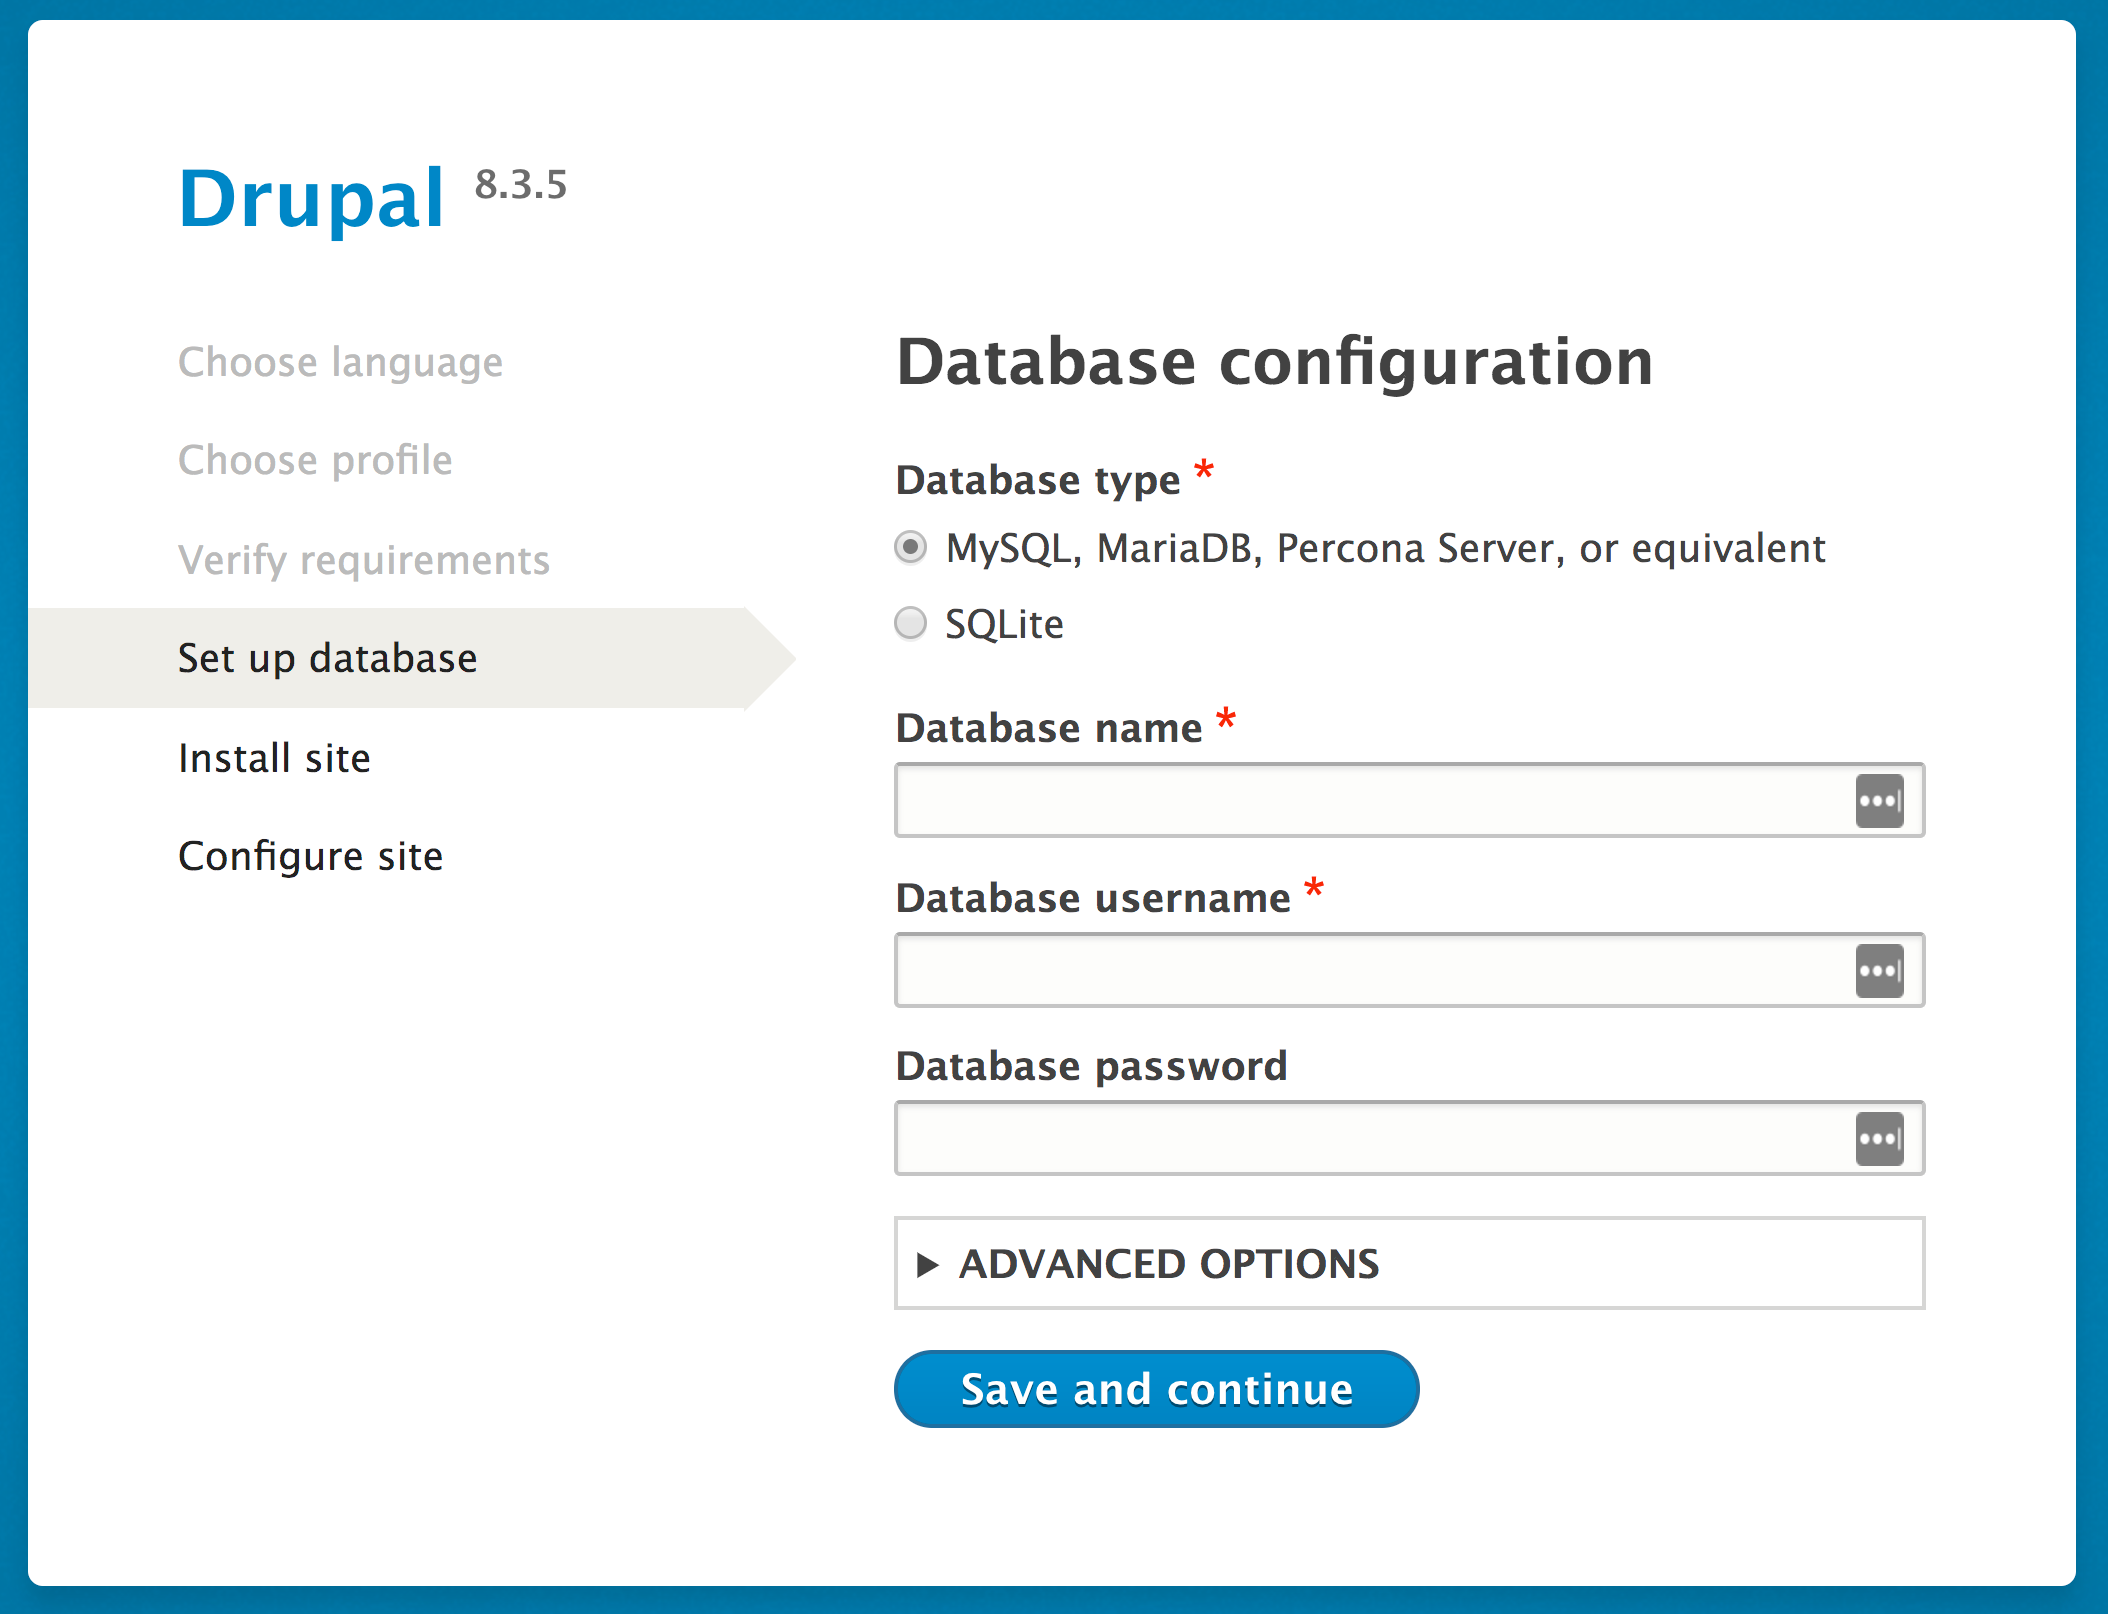
As mentioned earlier, to install Drupal, you will need to have access to a database server (or the ability to create one) and an existing database (or the ability to create one). This process will depend on your environment setup.
If you are working with a hosting provider, there is more than likely a web-based control panel. This should allow you to create databases and users. Refer to your hosting provider's documentation for more information on this topic.
If you are using phpMyAdmin (https://www.phpmyadmin.net/) on your server, often installed by MAMP, WAMP, and XAMPP, and have root access, you can create your databases and users by following these steps:
If you do not have a user interface but have a command-line access, you can set up your database and user using the MySQL command line. These instructions can be found in the core/INSTALL.mysql.txt file. From the command line of your site, perform the following:
$ mysql -u username -p
$ CREATE DATABASE my_database CHARACTER SET utf8 COLLATE utf8_general_ci;
$ CREATE USER username@localhost IDENTIFIED BY 'password';
$ GRANT SELECT, INSERT, UPDATE, DELETE, CREATE, DROP, INDEX, ALTER, CREATE TEMPORARY TABLES ON databasename.* TO 'username'@'localhost' IDENTIFIED BY 'password';
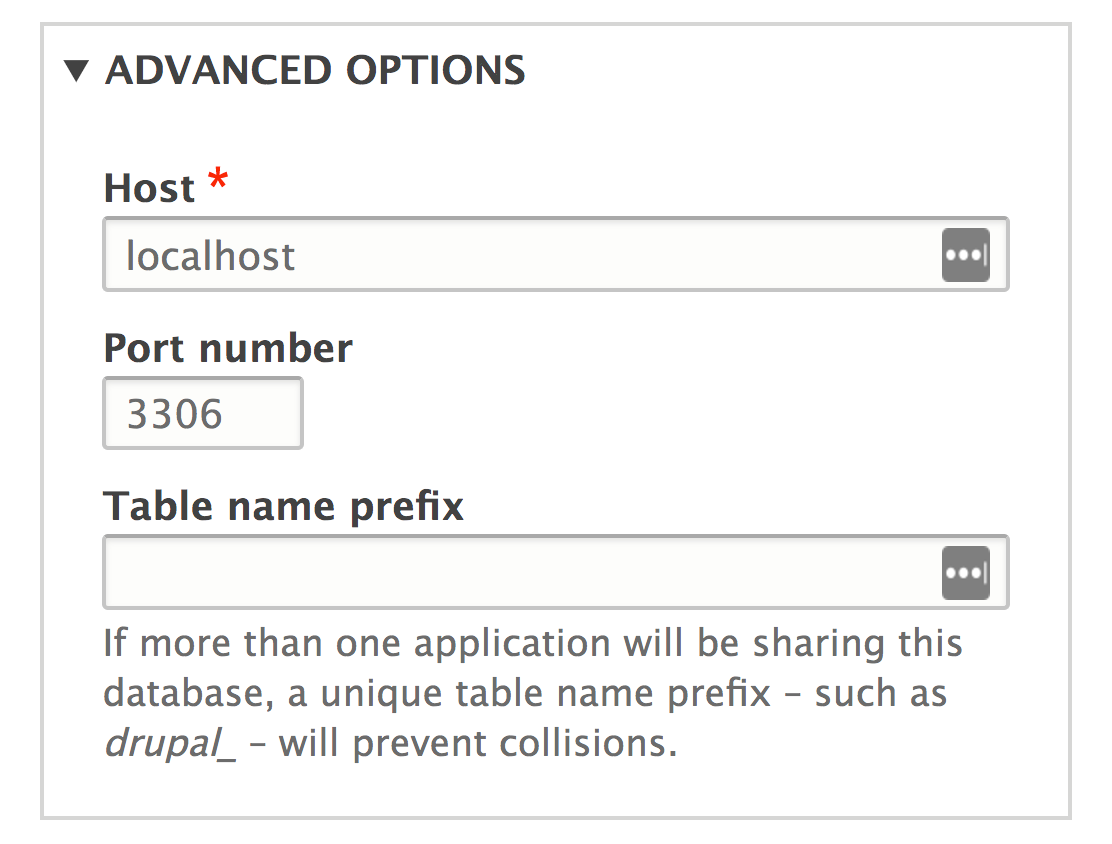
Drupal, like other content management systems, allows you to prefix its database tables from the database set-up form. This prefix will be placed before table names to help make them unique. Although it is not recommended, this would allow multiple installations to share one database. Utilizing table prefixes can, however, provide some level of security through obscurity since the tables will not be their default names:
You may also install Drupal using the PHP command-line tool, Drush. Drush is a command-line tool created by the Drupal community and must be installed if you wish to use it. Drush is covered in Chapter 13, The Drupal CLI.
The pm-download command will download packages from Drupal.org. The site-install command will allow you to specify an installation profile and other options to install a Drupal site. The installation steps in this recipe could be run through Drush, as follows:
$ cd /path/to/web
$ drush pm-download drupal-8 drupal8
$ cd drupal8
$ drush site-install standard -locale=en-US --account-name=admin --account-pass=admin -account-email=demo@example.com -db-url=mysql://user:pass@localhost/database
We used Drush to download the latest Drupal 8 and place it in a folder named drupal8. Then, the site-install command instructs Drush to use the standard install profile, configure the maintenance account, and provide a database URI string so that Drupal can connect to its database.
You can download Drupal using Composer, the de facto PHP package manager. The preferred method is to use the Drupal Composer project template provided by the community.
To build your Drupal 8 site, run the following commands:
$ cd /path/to/document/root
$ composer create-project drupal-composer/drupal-project drupal8 --stability dev
Wait for the commands to finish--it may take some time, as it downloads all the required dependencies. You can feel free to grab a coffee (the first time takes a while; it primes caches. Have faith, it will be much faster the next time.)
When finished, you will find a different directory structure inside your drupal8 directory. The vendor directory contains all third-party PHP libraries, and the web directory contains your Drupal 8 site. You will need to modify your web server to use the web directory as the new docroot within your drupal8 directory.
The project and its details can be found at https://github.com/drupal-composer/drupal-project, along with its full documentation.
If you choose to disable the update options, you will have to check manually for module upgrades. While most upgrades are for bug fixes or features, some are for security updates. It is highly recommended that you subscribe to the Drupal security team's updates. These updates are available on Twitter at @drupalsecurity (https://twitter.com/drupalsecurity) or the feeds on
https://www.drupal.org/security.
Why would you want to use a distribution? A distribution is a contributed installation profile that is not provided by Drupal core. Distributions provide a specialized version of Drupal with specific installed modules and themes along with specific configurations (content types, and blocks.) On Drupal.org, when you download an installation profile, it not only includes the profile and its modules but a version of Drupal core, hence the name distribution. You can find a list of all Drupal distributions at https://www.drupal.org/project/project_distribution.
We will follow these steps to download a distribution to use as a customized version of Drupal 8:
$ composer require "commerceguys/intl: ~0.7" "commerceguys/addressing: ~1.0" "commerceguys/zone: ~1.0" "embed/embed: ~2.2
Installation profiles work by including additional modules that are part of the contributed project realm or custom modules. The profile will then define them as dependencies to be installed with Drupal. When you select an installation profile, you are instructing Drupal to install a set of modules on installation.
Demo Framework declares itself as an exclusive installation profile. Distributions that declare this are automatically selected and assumed to be the default installation option. The exclusive flag was added with Drupal 7.22 to improve the experience of using a Drupal distribution (http://drupal.org/node/1961012).
Distributions provide a specialized version of Drupal with specific feature sets, but there are a few items worth discussing.
The current standard for generating a built distribution is the utilization of Drush and makefiles. Makefiles allow a user to define a specific version of Drupal core and other projects (such as themes, modules, and third-party libraries) that will make up a Drupal code base. It is not a dependency management workflow, like Composer, but is a build tool.
If you take a look at the Demo Framework's profile folder, you will see drupal-org.make and drupal-org-core.make. These are parsed by the Drupal.org packager to compile the code base and package it as a .zip or .tar.gz, like the one you downloaded.
As discussed in the first recipe's There's more... section, you can install a Drupal site through the Drush command-line tool. You can instruct Drush to use a specific installation profile by providing it as the first argument.
The following command would install the Drupal 8 site using the Demo Framework:
    $ cd /path/to/drupal8
    $ drush pm-download df
    $ drush site-install df -db-url=mysql://user:pass@localhost/database
Currently, Drupal.org does not package distributions using Composer, which is why there was an extra step to add dependencies when installing the distribution. Many distributions provide project templates to make scaffolding projects simpler.
For example, the following command will set up a Demo Framework site with docroot as the directory for the web server document root, which contains Drupal 8:
$ composer create-project acquia/df-project df
The project template is available on Acqua's GitHub at https://github.com/acquia/df-project/.
Another distribution, Open Social, provides a template of its own:
$ composer create-project goalgorilla/social_template
The project template is available at https://github.com/goalgorilla/social_template.
Drupal 8 provides more functionality out-of-the-box than previous versions of Drupal, allowing you to do more with less. However, one of the more appealing aspects of Drupal is the ability to extend and customize.
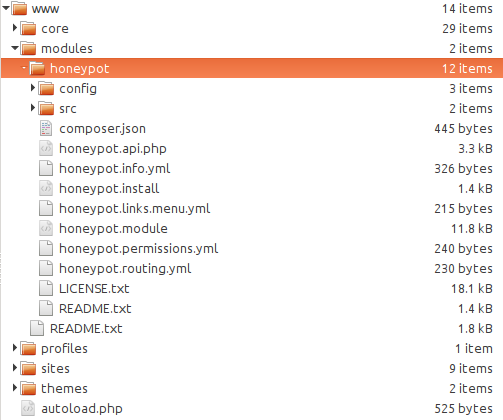
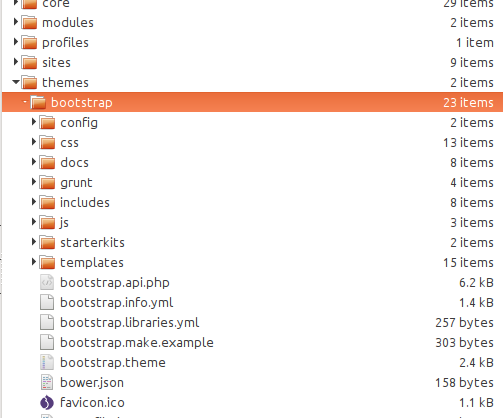
In this recipe, we will download and enable the Honeypot module (https://www.drupal.org/project/honeypot) and tell Drupal to use the Bootstrap theme (https://www.drupal.org/project/bootstrap). The Honeypot module provides Honeypot and timestamps antispam measures on Drupal sites. This module helps protect forms from spam submissions. The Bootstrap theme implements the Bootstrap frontend framework and supports using Bootswatch styles to theme your Drupal site.
If you have used Drupal before, note that the folder structure has changed. Modules, themes, and profiles are now placed in their respective folders in the root directory and no longer under sites/all. For more information about the developer experience change, refer to https://www.drupal.org/node/22336.
Let's install modules and themes:

The following sections outline the procedure for installing a module or theme and how Drupal discovers these extensions.
Drupal scans specific folder locations to identify modules and themes defined by the .info.yml file in their directory. The following is the order in which projects will be discovered:
By placing the module inside the root modules folder, we are allowing Drupal to discover the module and allow it to be installed. When a module is installed, Drupal will register its code with the system through the module_installer service. The service will check for required dependencies and prompt them to be enabled if required. The configuration system will run any configuration definitions provided by the module on installation. If there are conflicting configuration items, the module will not be installed.
A theme is installed through the theme_installer service and sets any default configuration by the theme along with rebuilding the theme registry. Setting a theme to default is a configuration change in system.theme.default to the theme's machine name (in the recipe, it would be bootstrap).
The following section outlines the procedure for installing a module or theme and includes some additional information for installing.
Although it is not the required way to install an extension, this should become your default method. Why? Because each module is a dependency in your project, and each of those may have its own dependencies. Composer can manage dependencies for you, or you can manage them manually. Your time and capabilities probably will not grow to scale as well as Composer will. Not to mention, it also provides a standard way for PHP projects to interoperate and load classes.
You can get the Honeypot module and Bootstrap using the following two commands:
$ cd /path/to/drupal8
$ composer require drupal/honeypot
$ composer require drupal/bootstrap
Here is an example of contributed projects, which require Composer for installation, because they leverage existing libraries in the PHP community at large:
As more and more modules integrate existing SDK libraries, the requirement to use Composer will increase.
Modules can be downloaded and enabled through the command line using drush. The command to replicate the recipe would resemble the following:
    $ drush pm-download honeypot
    $ drush pm-enable honeypot
It will prompt you to confirm your action. If there were dependencies for the module, it would ask whether you will like to enable those, too.
One of the substantial changes in Drupal 8 is the module disable and uninstall process. Previously, modules were first disabled and then uninstalled once disabled. This created a confusing process, which would disable its features, but not clean up any database schema changes. In Drupal 8, modules cannot just be disabled but must be uninstalled. This ensures that when a module is uninstalled it can safely be removed from the code base.
A module can only be uninstalled if it is not a dependency of another module or does not have a configuration item in use--such as a field type--which could disrupt the installation's integrity.
Drupal provides the ability to run multiple sites from one single Drupal code base instance. This feature is referred to as multisite. Each site has a separate database; however, extensions stored in modules, profiles, and themes can be installed by all of the sites. Site folders can also contain their own modules and themes. When provided, these can only be used by that one site.
The default folder is the default folder used if there is no matching domain name.
If you are going to work with multisite functionality, you should have an understanding of how to set up virtual host configurations with your web server. In this recipe, we will use two subdomains under localhost, called dev1 and dev2.
We will use multisites in Drupal 8 by two subdomains under localhost:
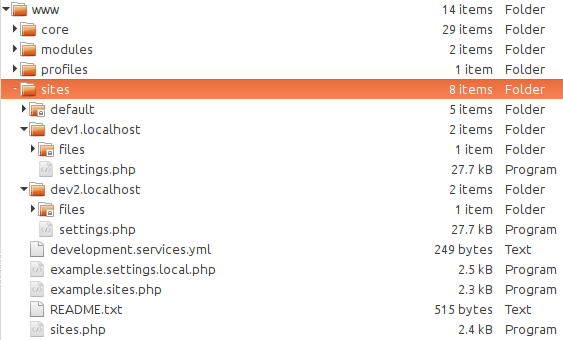
The sites.php must exist for the multisite functionality to work. By default, you do not need to modify its contents. The sites.php file provides a way to map aliases to specific site folders. The file contains the documentation for using aliases.
The DrupalKernel class provides findSitePath and getSitePath methods to discover the site folder path. On Drupal's Bootstrap, this is initiated and reads the incoming HTTP host to load the proper settings.php file from the appropriate folder. The settings.php file is then loaded and parsed into a \Drupal\Core\Site\Settings instance. This allows Drupal to connect to the appropriate database.
Let's understand the security concerns of using multisite.
There can be cause for concern if you are using multisite. Arbitrary PHP code executed on a Drupal site might be able to affect other sites sharing the same code base. Drupal 8 marked the removal of the PHP filter (https://www.drupal.org/docs/8/modules/php/overview) module that allowed site administrators to use PHP code in the administrative interface. Although this mitigates the various ways an administrator had easy access to run PHP through an interface, it does not mitigate the risk wholesale. For example, the PHP filter module is now a contributed project and could be installed.
The sites.php file provides a way to add domain aliases. This can be useful when you use a multisite functionality and need to develop it locally. A simple example would be providing a local.alias to each site.
If you had example.com and mycompany.com as different site directories, the following mapping would allow local.example.com and local.mycompany.com to map to those directories:
<?php
$sites['example.com'] = 'example.com';
$sites['local.example.com'] = 'example.com';
$sites['mycompany.com'] = 'mycompany.com';
$sites['local.mycompany.com'] = 'mycompany.com';
One of the initial hurdles to getting started with Drupal is a local development environment. This recipe will cover how to set up the DrupalVM project by Jeff Geerling. DrupalVM is a VirtualBox virtual machine run through Vagrant, provisioned and configured with Ansible. It will set up all of your services and build a Drupal installation for you.
Luckily, you will only need to have VirtualBox and Vagrant installed on your machine, and DrupalVM works on Windows, macOS X, and Linux.
To get started, you will need to install the two dependencies required for DrupalVM:
Let's set up the DrupalVM project by Jeff Geerling by following these steps:
vagrant_synced_folders:
local_path: /path/to/drupalvm
destination: /var/www
type: nfs
create: true
DrupalVM is a development project that utilizes the Vagrant tool to create a VirtualBox virtual machine. Vagrant is configured through the project's Vagrantfile. Vagrant then uses Ansible--an open source IT automation platform--to install Apache, PHP, MySQL, and other services on the virtual machine.
The config.yml file has been set up to provide a simple way to customize variables for the virtual machine and provisioning process. It also uses Drush to create and install a Drupal 8 site, or whatever components are specified in drupal.make.yml. This file is a Drush make file, which contains a definition for Drupal core by default and can be modified to include other contributed projects.
The vagrant up command tells Vagrant to either launch an existing virtual machine or create one anew in a headless manner. When Vagrant creates a new virtual machine, it triggers the provisioning process. In this instance, Ansible will read the provisioning/playbook.yml file and follow each step to create the final virtual machine. The only files that need to be modified, however, are the config.yml and drupal.make.yml files.
The topic of automating and streamlining a local environment is quite popular right now with quite a few different options. If you are not comfortable with using Vagrant, there are a few other options that provide a server installation and Drupal.
Acquia Dev Desktop is developed by Acquia and can be found at https://docs.acquia.com/dev-desktop2. It is an automated environment installer for Windows and Mac. It is a xAMP stack (or DAMP stack) installer that provides a full Drupal-specific stack that includes Apache, MySQL, and PHP. The Dev Desktop application allows you to create a regular Drupal installation or select from a distribution.
XAMPP - Apache + MySQL + PHP + Perl - is a cross-platform environment installation. XAMPP is an open source project from Apache Friends. XAMPP has partnered with Bitnami (https://bitnami.com/) to provide free all-in-one installations for common applications, including Drupal 8. You can download XAMPP at https://www.apachefriends.org/download.html.
Kalabox is developed by the Kalamuna group and intends to be a robust workflow solution for Drupal development. Kalabox is cross-platform compatible, allowing you to easily work on Windows machines. It is based on the command line and provides application binaries for you to install. You can learn more about Kalabox at http://www.kalamuna.com/products/kalabox/.
Drupal 8 ships with two testing suites. Previously, Drupal only supported Simpletest. Now, there are PHPUnit tests as well. In the official change record, PHPUnit was added to provide testing without requiring a full Drupal Bootstrap, which occurs with each Simpletest test. You can read the change record at https://www.drupal.org/node/2012184.
There is currently a PHPUnit initiative active in Drupal core development. The goal is to fully remove the Simpletest framework by Drupal 9. No new Simpletest tests are being written, at least since 8.2. All current tests are currently being converted by contributors. More about the initiative can be found in this issue, https://www.drupal.org/node/2807237, where it is being coordinated.
We will be running tests using the run-tests.sh test runner. This is a test runner provided by Drupal that supports concurrency and running all of the various test suites. Running tests directly with PHPUnit will be covered in the following There's more... section.
Drupal 8.1.0 introduced the ability to perform JavaScript browser tests. This is powered using PhantomJS (http://phantomjs.org/), which uses a browser emulator powered by the Mink PHP library (http://mink.behat.org/). In order to run the FunctionalJavascript test suite, you must have PhantomJS running.
To install PhantomJS, refer to the official installation instructions at http://phantomjs.org/download.html.
$ php core/scripts/run-tests.sh --url http://localhost--types Simpletest,PHPUnit-Unit,PHPUnit-Kernel,PHPUnit-Functional --concurrency 20 --all
phantomjs --ssl-protocol=any --ignore-ssl-errors=true vendor/jcalderonzumba/gastonjs/src/Client/main.js 8510 1024 768
php core/scripts/run-tests.sh --url http://localhost--types PHPUnit-FunctionalJavascript --concurrency 1 --all
The run-tests.sh script has been shipped with Drupal since 2008, then named
run-functional-tests.php. This command interacts with the test suites in Drupal to run all or specific tests and sets up other configuration items.
There are several different test suites that operate in specific ways:
The following are some of the useful options:
We will now discuss more techniques and information for running Drupal's test suites.
The run-tests.sh isn't actually a shell script. It is a PHP script--which is why you must execute it with PHP. In fact, within core/scripts, each file is a PHP script file meant to be executed using the command line. These scripts are not intended to be run through a web server, which is one of the reasons for the .sh extension.
There can be issues with PHP across platforms that prevent providing a shebang line to allow executing the file as a normal bash or bat script. For more information, refer to this Drupal.org issue at https://www.drupal.org/node/655178.
With Drupal 8, tests can also be run from SQLlite and no longer requires an installed database. This can be accomplished by passing the sqlite and dburl options to the
run-tests.sh script. This requires the PHP SQLite extension to be installed.
Here is an example adapted from the DrupalCI test runner for Drupal core. DrupalCI is the continuous integration service, which runs on Drupal.org for all submitted patches and commits:
php core/scripts/run-tests.sh --sqlite /tmp/.ht.sqlite --die-on-fail --dburl sqlite://tmp/.ht.sqlite --all
Combined with the built-in PHP web server for debugging, you can run test suites without a full-fledged environment.
Each example so far has used the all option to run every Simpletest available. There are various ways to run specific tests:
Drupal 8 has seen a surge in test coverage for both Drupal core and contributed projects, most likely due to PHPUnit adoption. In response to this, the author has written a PhpStorm plugin called Drupal Test Runner that simplifies executing the run-tests.sh script runner.
The plugin's page can be found at https://plugins.jetbrains.com/plugin/8384-drupal-test-runner, and it's public source code can be found at https://github.com/mglaman/intellij-drupal-run-tests.
With Drupal 8 came a new initiative to upgrade the testing infrastructure on Drupal.org. The outcome was DrupalCI. DrupalCI is open source and can be downloaded and run locally. The project page for DrupalCI is https://www.drupal.org/project/drupalci.
The test bot utilizes Docker and can be downloaded locally to run tests. The project ships with a Vagrant file that allows it to be run within a virtual machine or locally. Learn more on the testbot's project page at https://www.drupal.org/project/drupalci_testbot.
In this chapter, we will explore what Drupal 8 brings to the content authoring experience:
In this chapter, we'll cover the Drupal 8 content authoring experience. We will show you how to configure text formats and set up the bundled CKEditor that ships with Drupal 8. We will take a look at how to add and manage content and utilize menus to link to content. Drupal 8 ships with inline editing for per-field modifications from the frontend.
This chapter dives into creating custom content types and harnessing different fields to create advanced content. We'll cover the five new fields added to Drupal 8 core and how to use them, along with configuring new field types through contributed projects. We will go through customizing the content's display and modifying the new form display added in Drupal 8.
Drupal 8 saw the collaboration between the Drupal development community and the CKEditor development community. Because of this, Drupal now ships with CKEditor out of the box as the default What You See Is What You Get (WYSIWYG) editor. The new Editor module provides an API to integrate WYSIWYG editors. Although CKEditor is provided out of the box, contributed modules can provide integrations with other WYSIWYG editors.
Text formats control the formatting of content and WYSIWYG editor configuration for content authors. The standard Drupal installation profile provides a fully configured text format with the enabled CKEditor. We will walk through the steps of recreating this text format.
In this recipe, we will create a new text format with a custom CKEditor WYSIWYG configuration.
Before starting, make sure that the CKEditor module is enabled, which also requires Editor
as a dependency. Editor is the module that provides an API to integrate WYSIWYG editors
with text formats.
Let's create a new text format with a custom CKEditor WYSIWYG configuration:
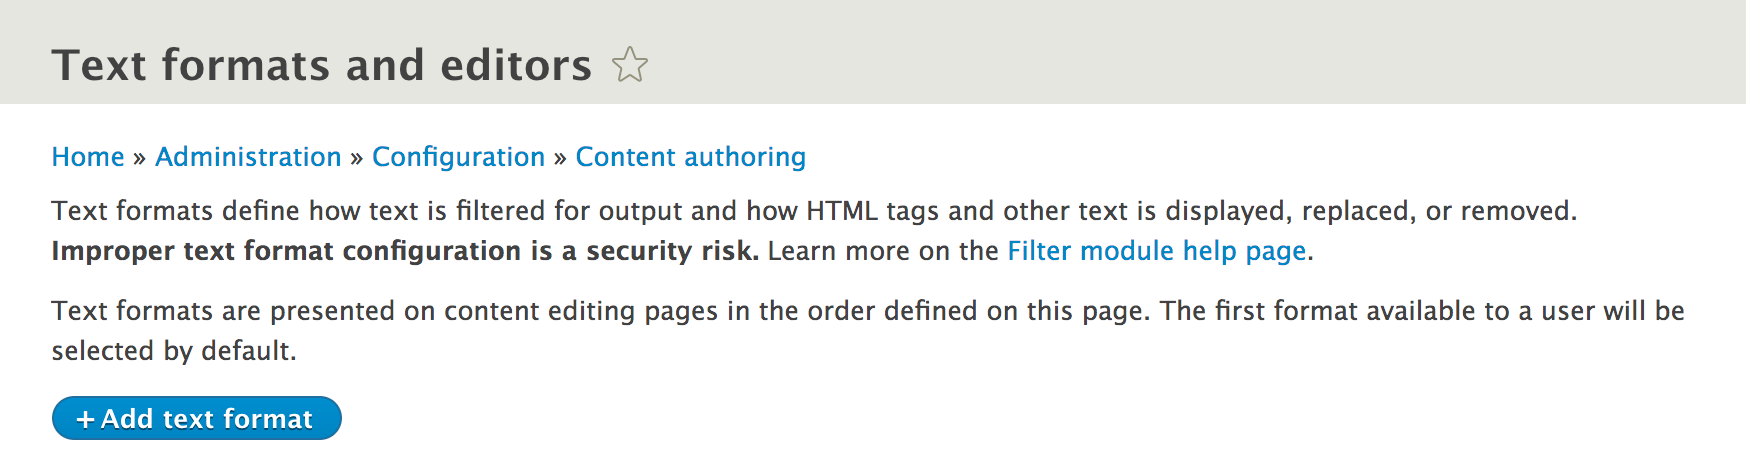
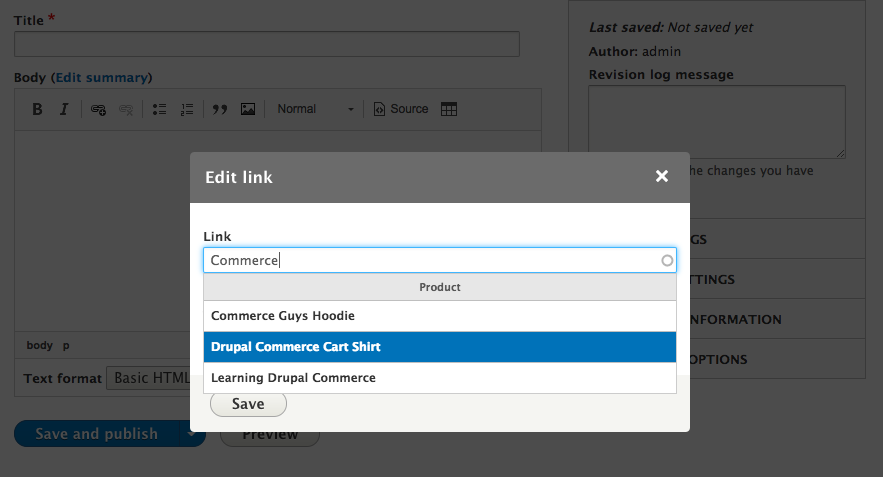
The Filter modules provide text formats that control over how rich text fields are presented to the user. Drupal will render rich text saved in a text area based on the defined text format for the field. Text fields with "formatted" in their title will respect text format settings; others will render in plain text.
The Editor module provides a bridge to WYSIWYG editors and text formats. It alters the text format form and rendering to allow the integration of WYSIWYG editor libraries. This allows each text format to have its own configuration for its WYSIWYG editor.
Out of the box, the Editor module alone does not provide an editor. The CKEditor module works with the Editor API to enable the usage of the WYSIWYG editor.
Drupal can support other WYSWIG editors, such as markItUp (http://markitup.jaysalvat.com/home/) or TinyMCE (https://www.tinymce.com/) through contributed modules.
Drupal provides granular control of how rich text is rendered, and extensible ways, which we will discuss further.
When string data is added to a field that supports text formats, the data is saved and preserved as it was originally entered. Enabled filters for a text format will not be applied until the content is viewed. Drupal works in such a way that it saves the original content and only filters on display.
With the Filter module enabled, you gain the ability to specify how text is rendered based on the roles of the user who created the text. It is important to understand the filters applied to a text format that uses a WYSIWYG editor. For example, if you selected the Display any HTML as plain text option, the formatting done by the WYSIWYG editor would be stripped out when viewed.
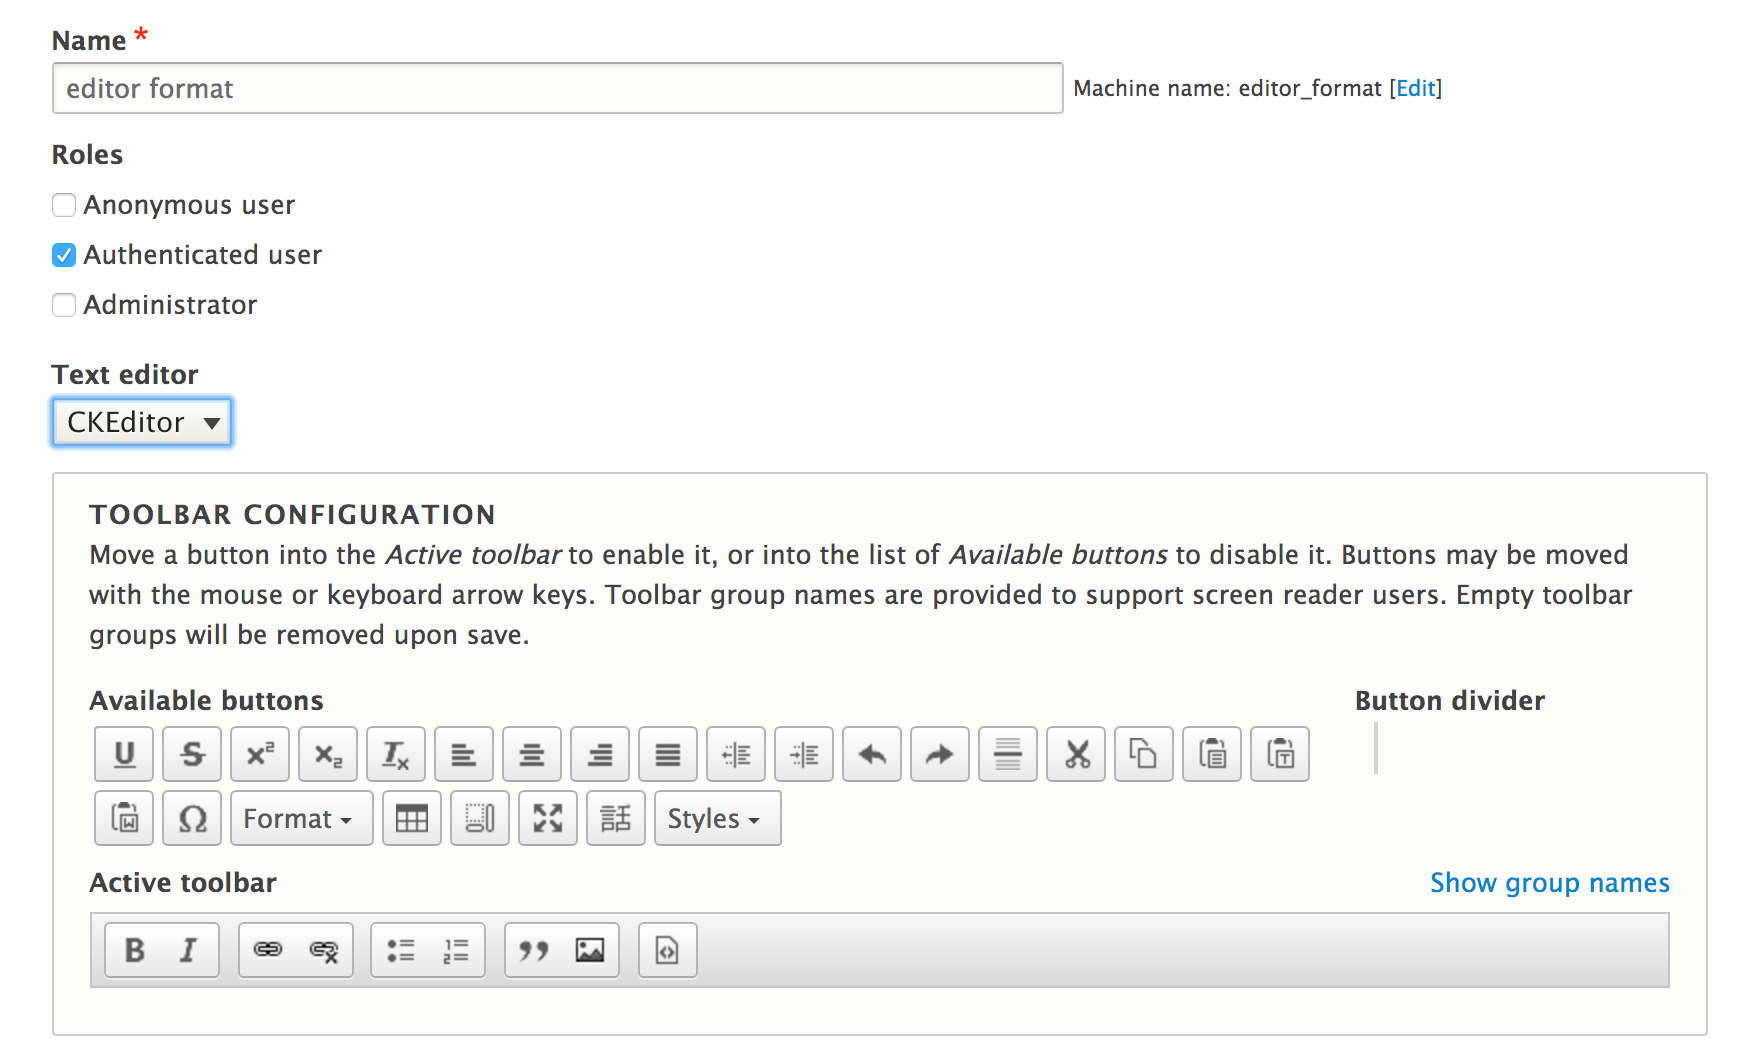
A major component of WYSIWYG editing is the ability to insert links to other pieces of content or external sites. The default link button integrated with CKEditor allows for basic link embedding. This means that your content editors must know their internal content URLs ahead of time to link to them. A solution to this issue is the Linkit module at https://www.drupal.org/project/linkit.
The module can be installed using Composer by running the following command:
$ cd /path/to/drupal8
$ composer require drupal/linkit
The Linkit module provides a drop-in replacement for the default link functionality. It adds auto-complete search for internal content and adds additional options for displaying the field. Linkit works by creating different profiles that allow you to control what content can be referenced, what attributes can be managed, and which users and roles can use a Linkit profile.
The CKEditor module provides a plugin type called CKEditorPlugin. Plugins are small pieces of swappable functionality within Drupal 8. Plugins and plugin development are covered in Chapter 7, Plug and Play with Plugins. This type provides integration between CKEditor and Drupal 8.
The image and link capabilities are plugins defined within the CKEditor module. Additional plugins can be provided through contributed projects or custom development.
Refer to the \Drupal\ckeditor\Annotation\CKEditorPlugin class for the plugin definition and the suggested \Drupal\ckeditor\Plugin\CKEditorPlugin\DrupalImage class as a working example.
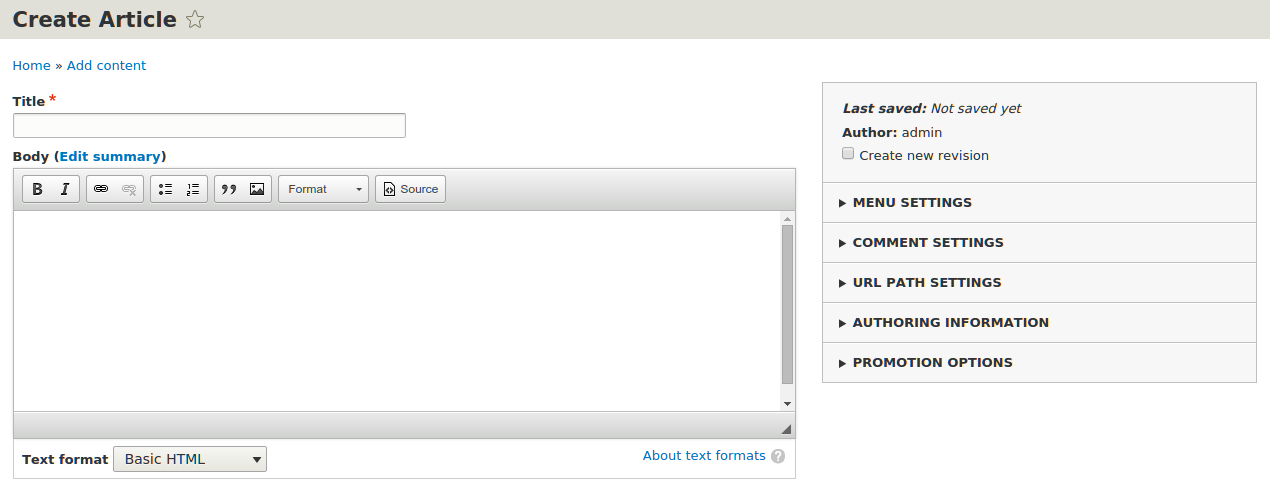
The main functionality of a content management system is in the name itself--the ability to manage content; that is, to add, edit, and organize content. Drupal provides a central form that allows you to manage all of the content within your website and allows you to create new content. Additionally, you can view a piece of content and click on an edit link when viewing it.
This recipe assumes that you have installed the standard installation profile and have the default node content types available for use.
Let's manage the content by adding, editing, and organizing the content:
The Content page is a View, which will be discussed in Chapter 3, Displaying Content Through Views. This creates a table of all the content on your site that can be searched and filtered. From here, you can view, edit, or delete any single piece of content.
In Drupal, there are content entities that provide a method of creation, editing, deletion, and viewing. Nodes are a form of a content entity. When you create a node, it will build the proper form that allows you to fill in the piece of content's data. The same process follows for editing content.
When you save the content, Drupal writes the node's content to the database along with all of its respective field data.
Drupal 8's content management system provides many features; we will cover some extra information.
New to Drupal 8 is the ability to easily save a piece of content as a draft instead of directly publishing it. Instead of clicking on Save and publish, click on the arrow next to it to expand the Save as unpublished option:

The aforementioned button has several usability and user experience reviews and will be changing, for the better, in future versions of Drupal. One of the issues to follow is located at https://www.drupal.org/node/1899236. The issue highlights different proposed fixes following consistent user experience patterns defined in existing frontend libraries.
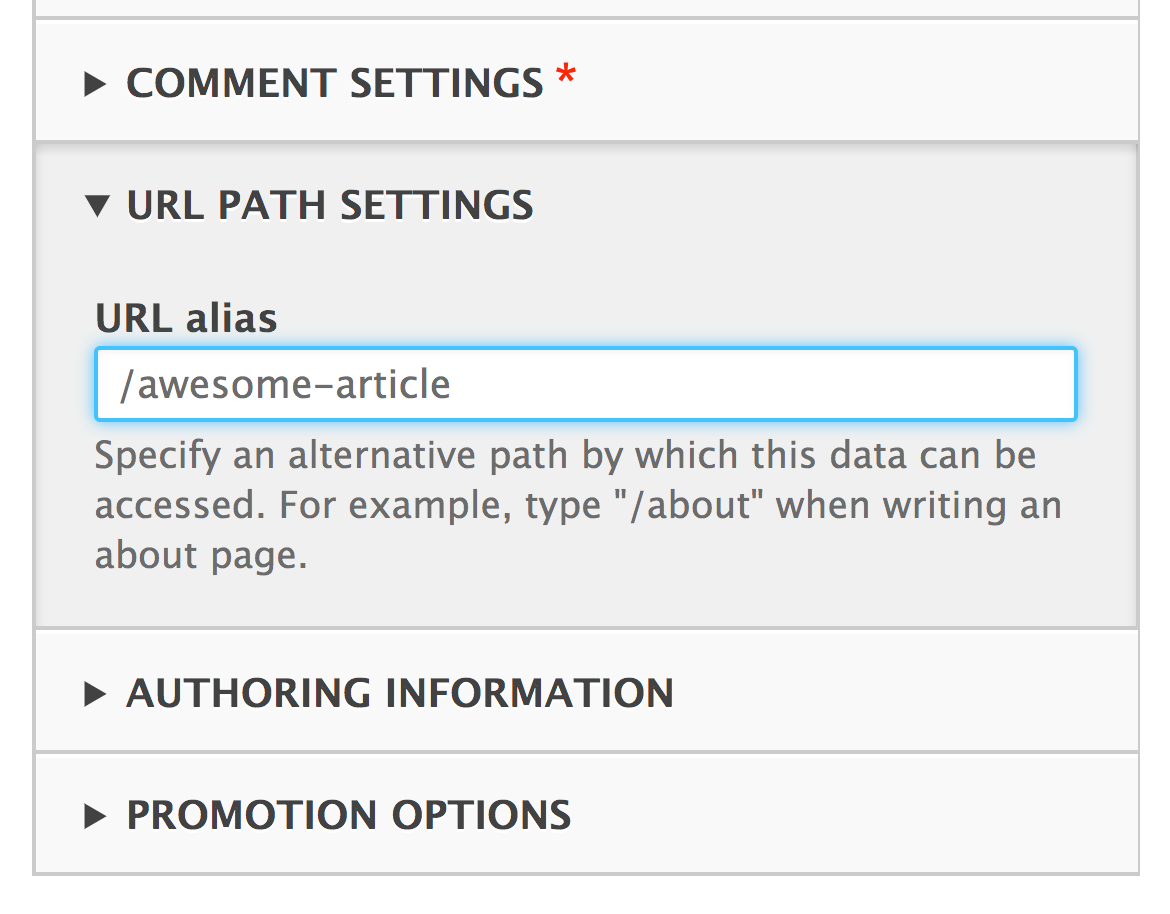
There is a contributed project called Pathauto that simplifies the process of providing URL aliases. It allows you to define patterns that will automatically create URL aliases for content. This module utilizes tokens to allow for very robust paths for content.
The Pathauto project can be found at https://www.drupal.org/project/pathauto.
There is a proposed issue to provide the functionality of Pathauto in Drupal core, and it can be followed at https://www.drupal.org/node/229568.
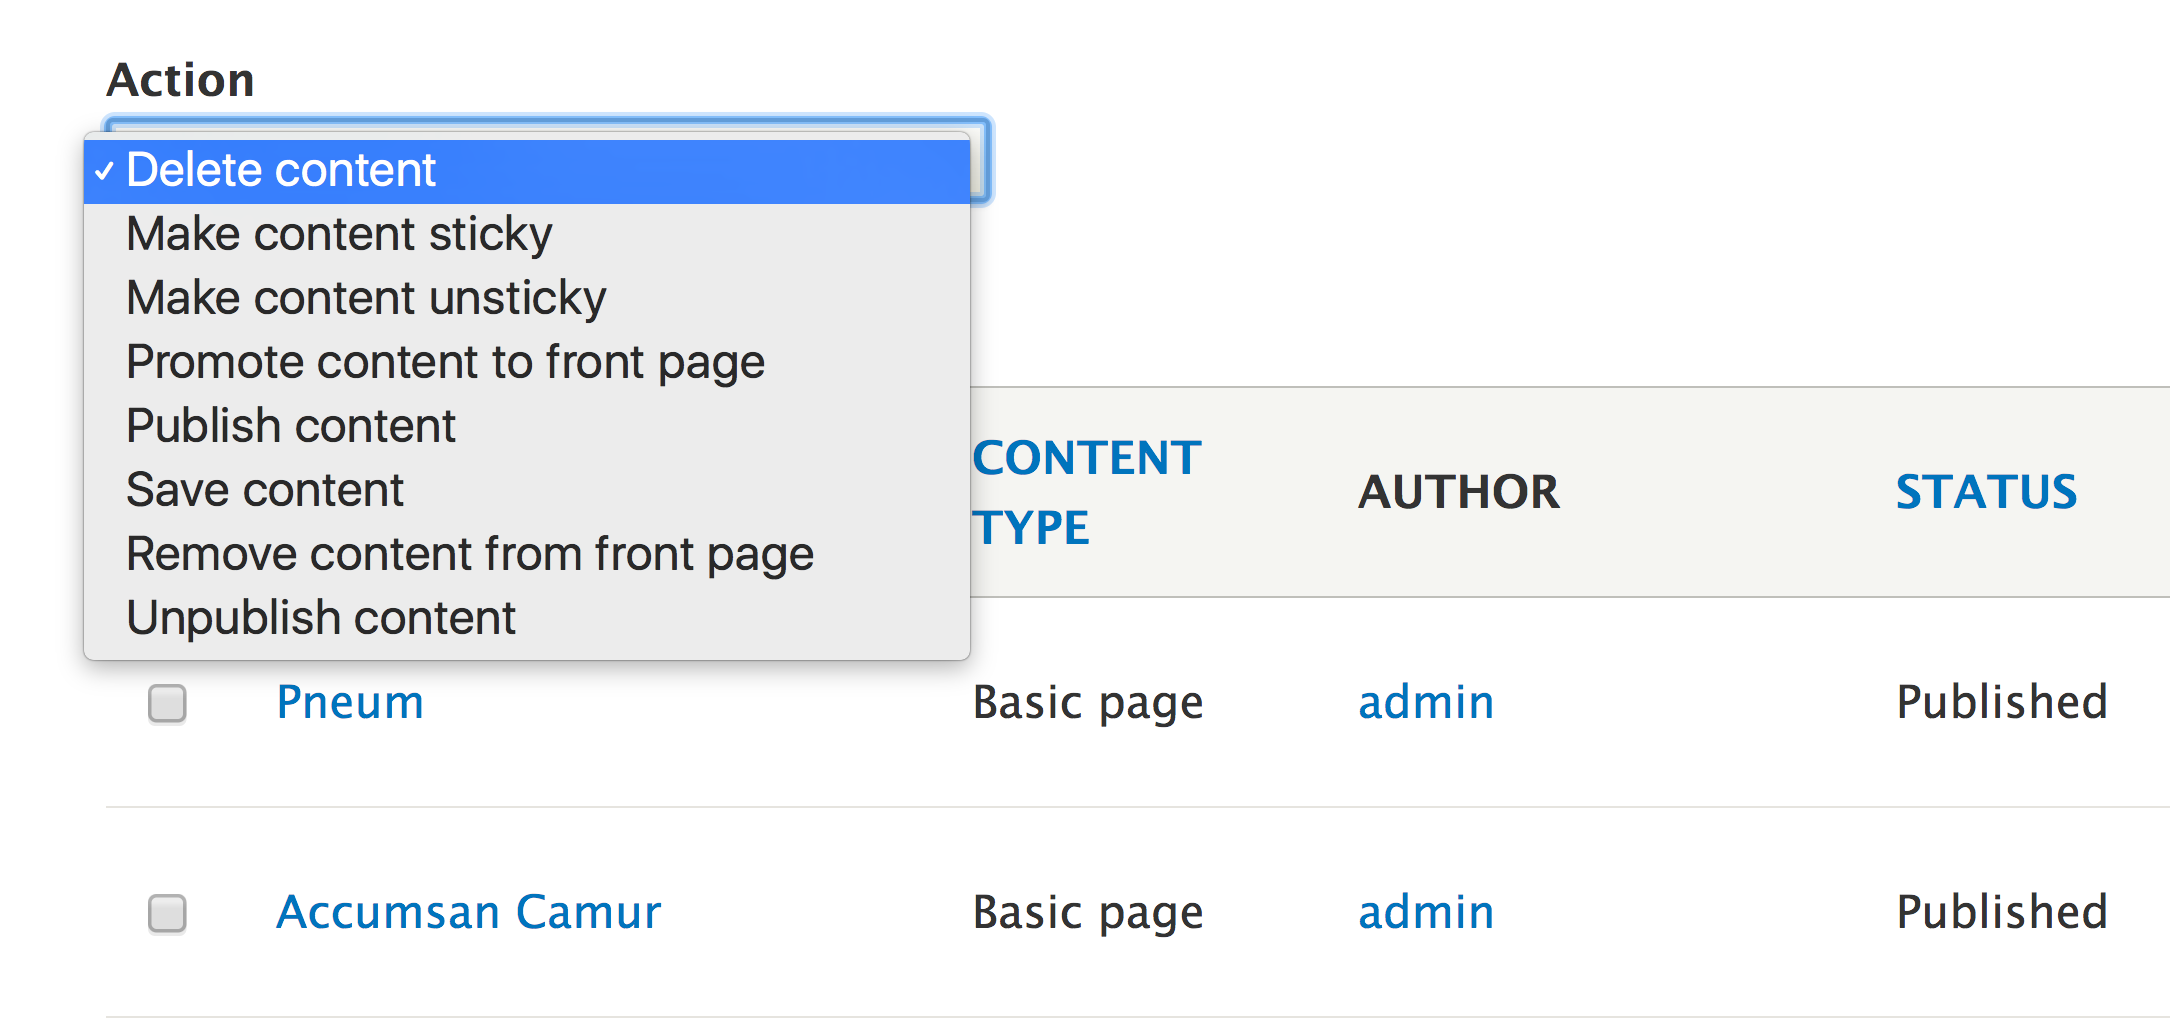
You also have the capability to perform bulk actions on content. This is available on the Content management screen. The table that lists the site content provides checkboxes at the beginning of each row. For each selected item, you can choose an item from With selection to make bulk changes, such as deleting, publishing, and unpublishing content:
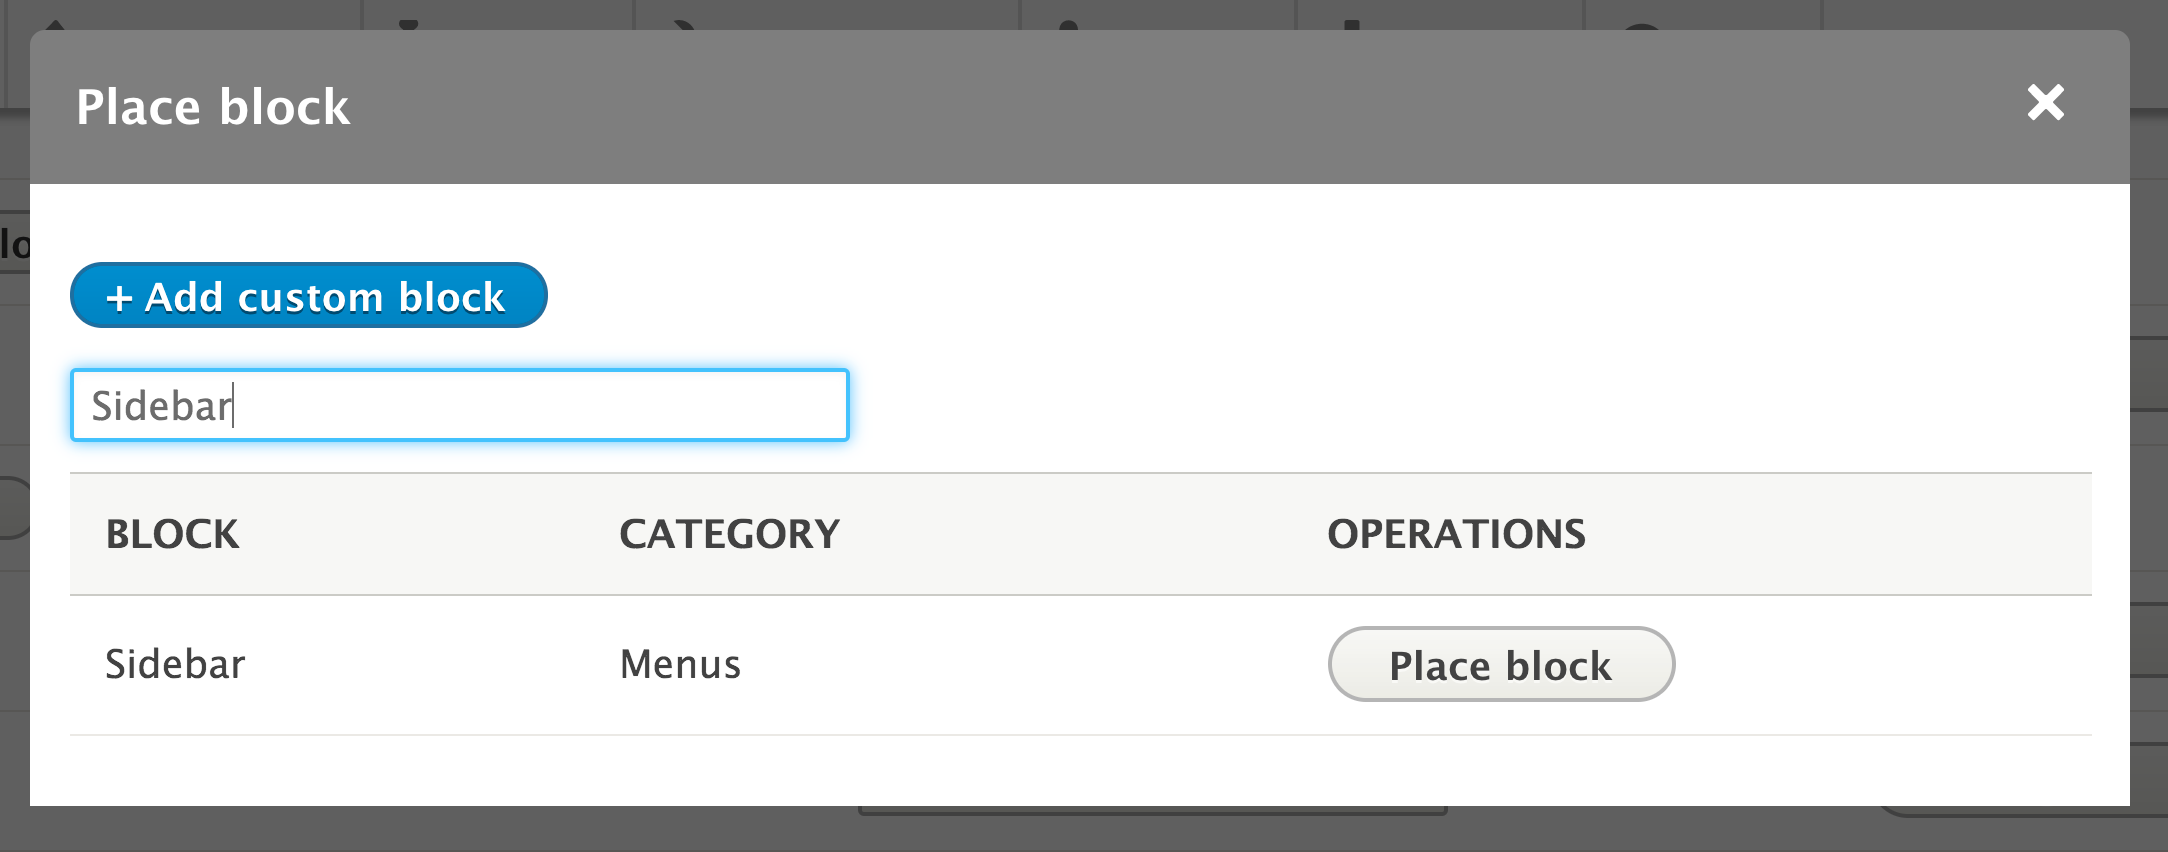
Drupal provides a way to link content being authored to a specified menu on the website, generally the main menu. You can, however, create a custom menu to provide links to content. In this recipe, we will show you how to create a custom menu and link content to it. We will then place the menu as a block on the page, in the sidebar.
This recipe assumes that you have installed the standard installation profile and have the default node content types available for use. You should have some content created to create a link.
Menus and links are part of Drupal core. The ability to make custom menus and menu links is provided through the Menu UI module. This module is enabled on the standard installation profile, but may not be in others.
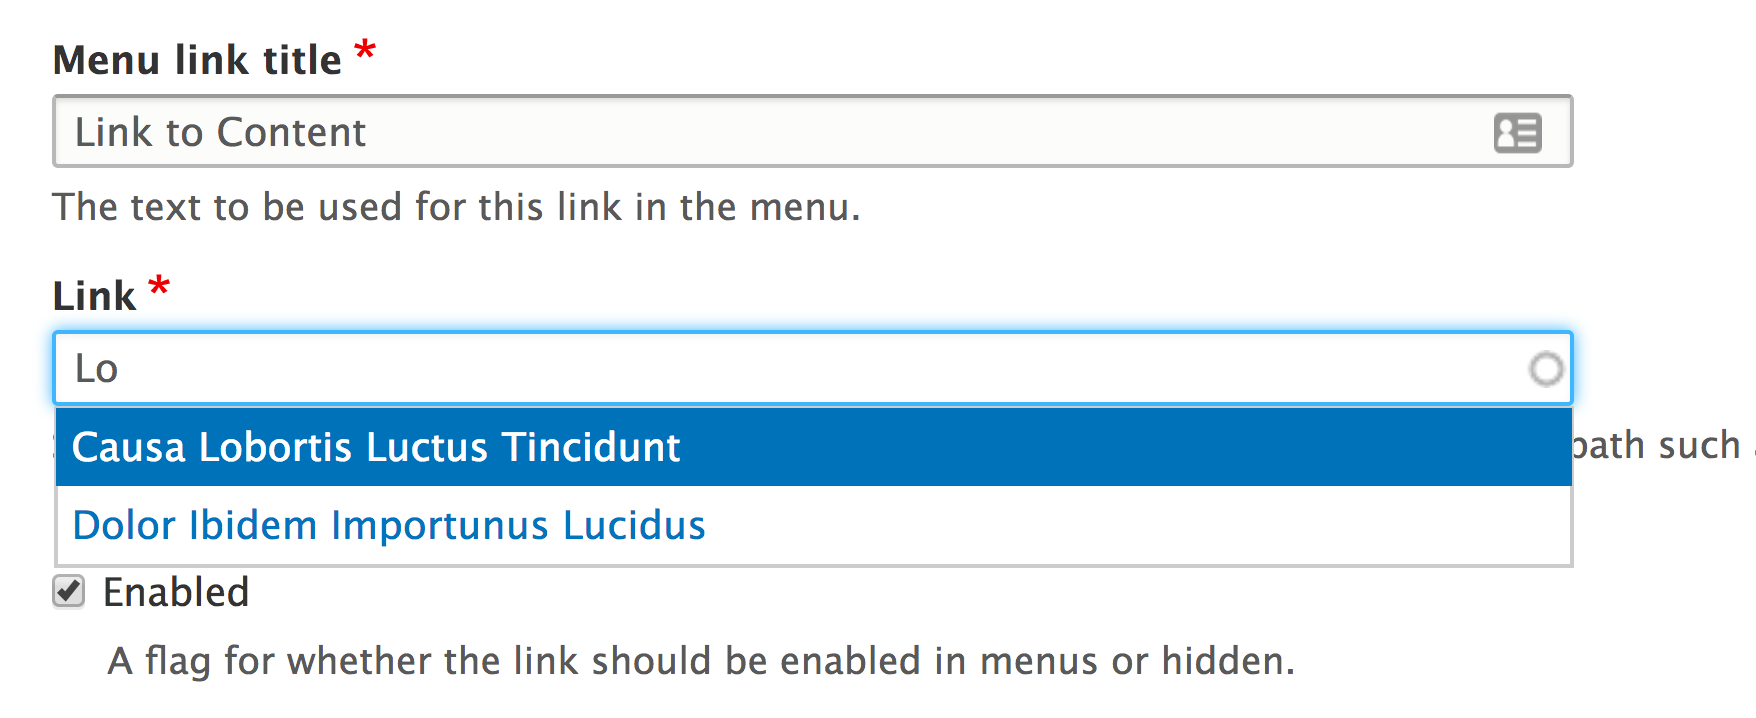
The Link input of the menu link form allows you to begin typing node titles and easily linking them to existing content. This was a piece of functionality not available in previous versions of Drupal. It will automatically convert the title into the internal path for you. Link input also accepts a regular path, such as /node/1 or an external path.
Links can be managed through the content edit form itself, which will be covered next.
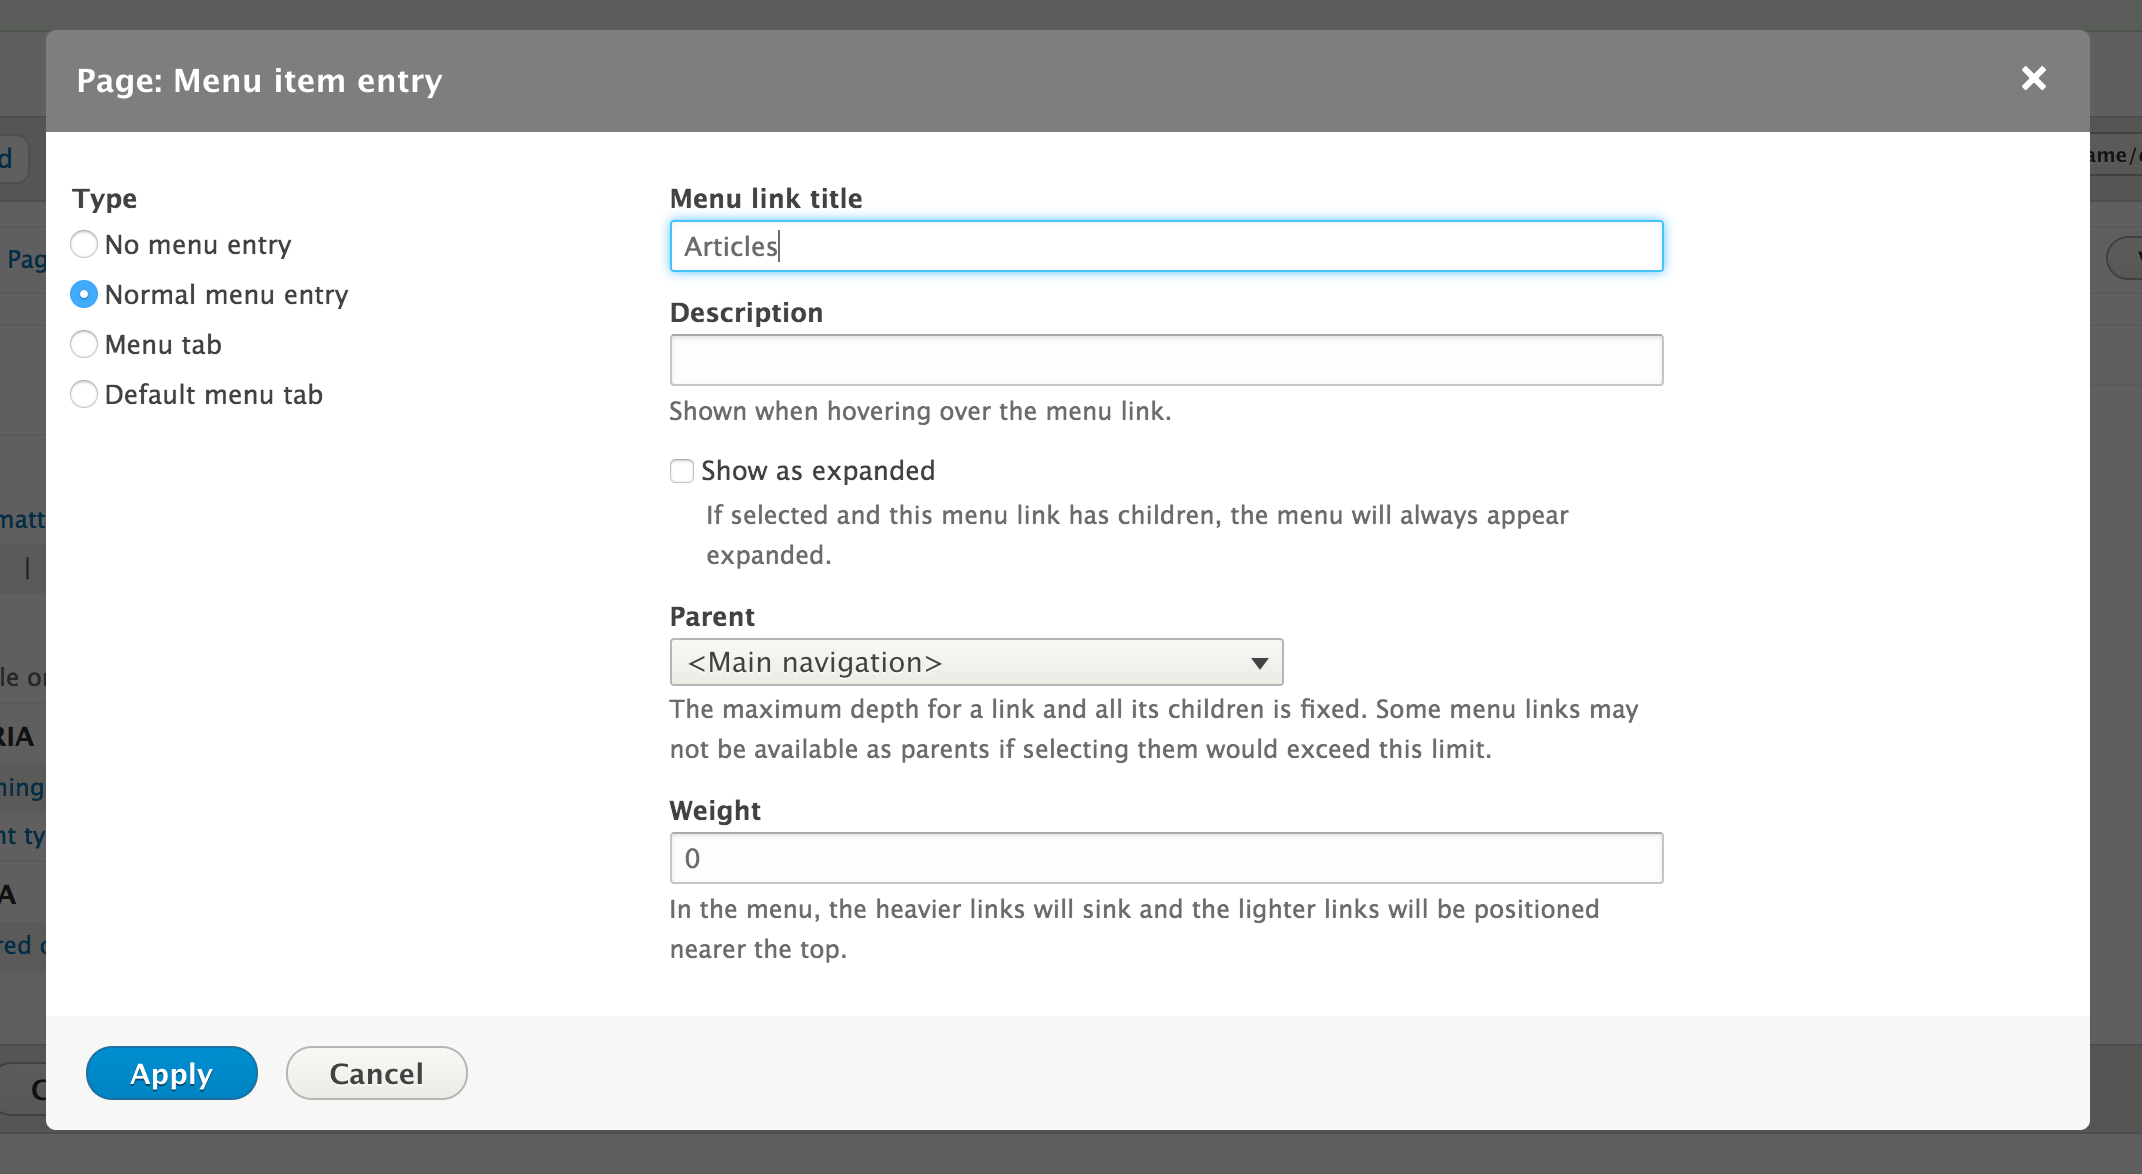
A piece of content can be linked to a menu from the add or edit form. The menu settings section allows you to toggle the availability of a menu link. The menu link title will reflect the content's title by default.
The parent item allows you to decide which menu and which item it will appear under. By default, content types only have the main menu allowed. Editing a content type can allow for multiple menus or only choose a custom menu.
This allows you to populate the main menu or complimentary menu without having to visit the menu management screens.
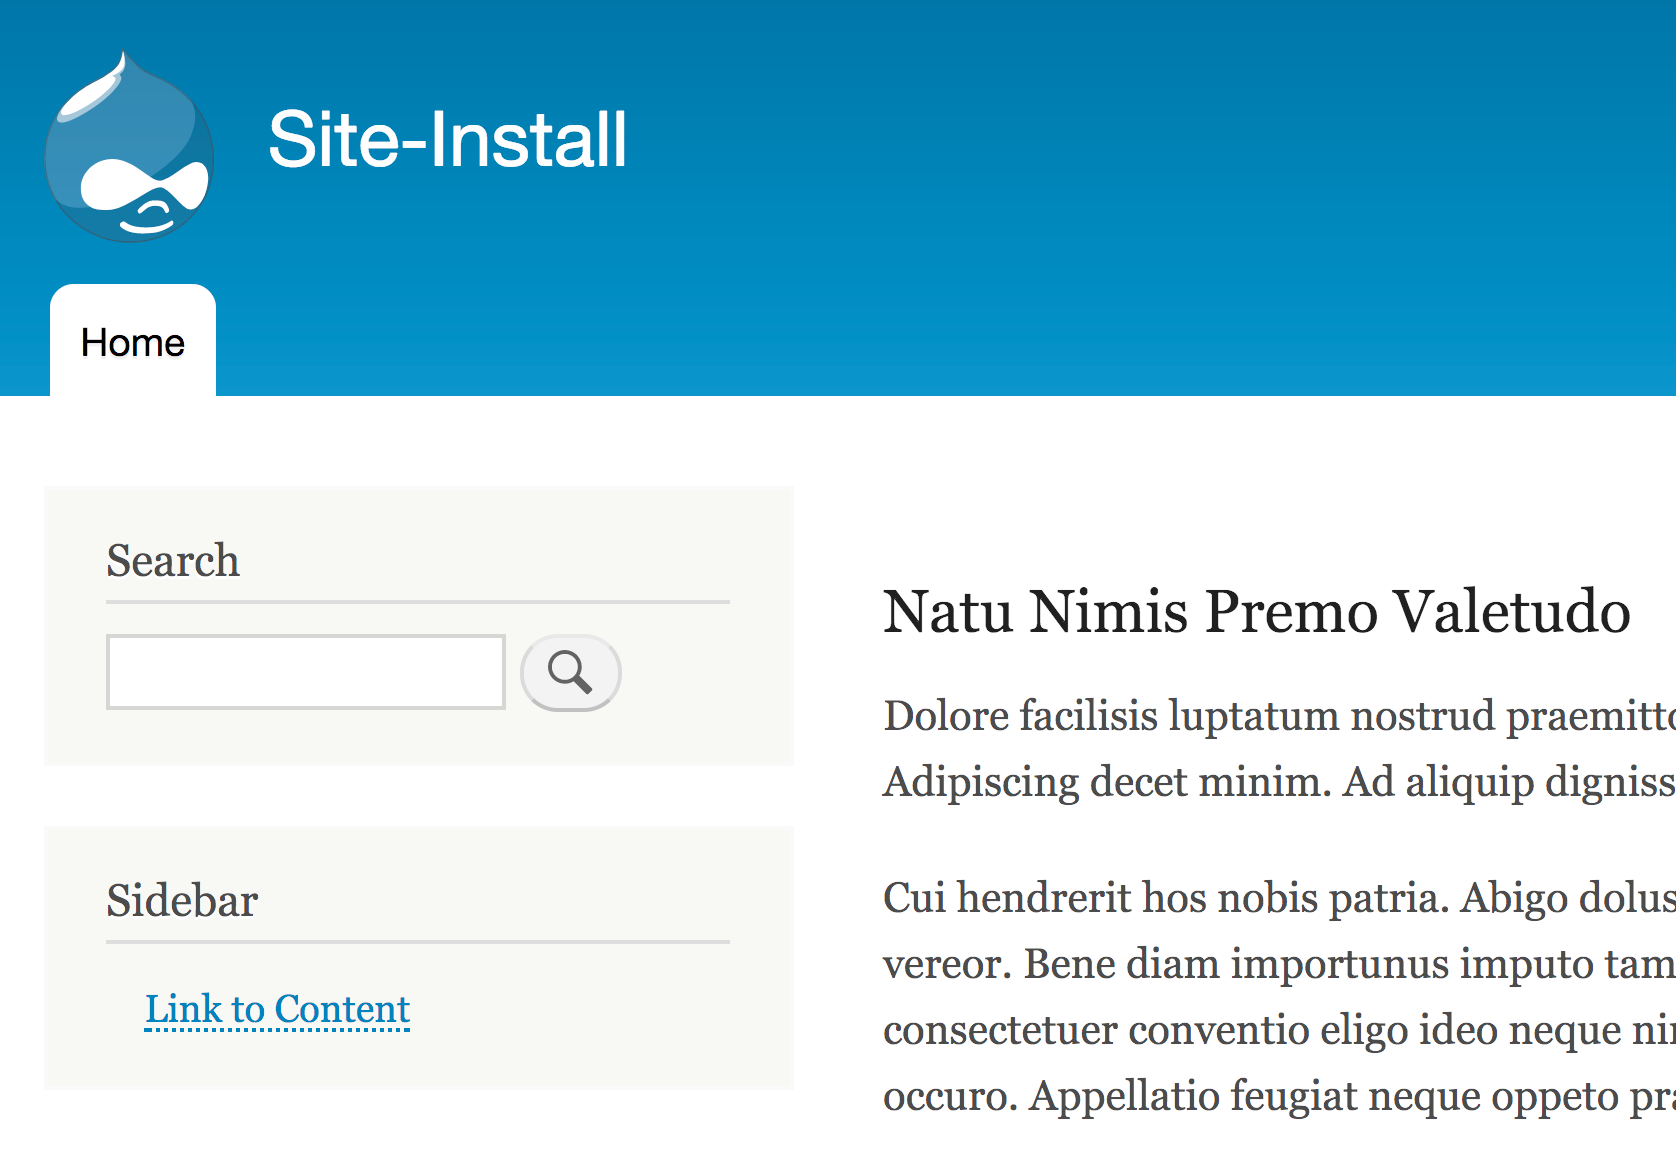
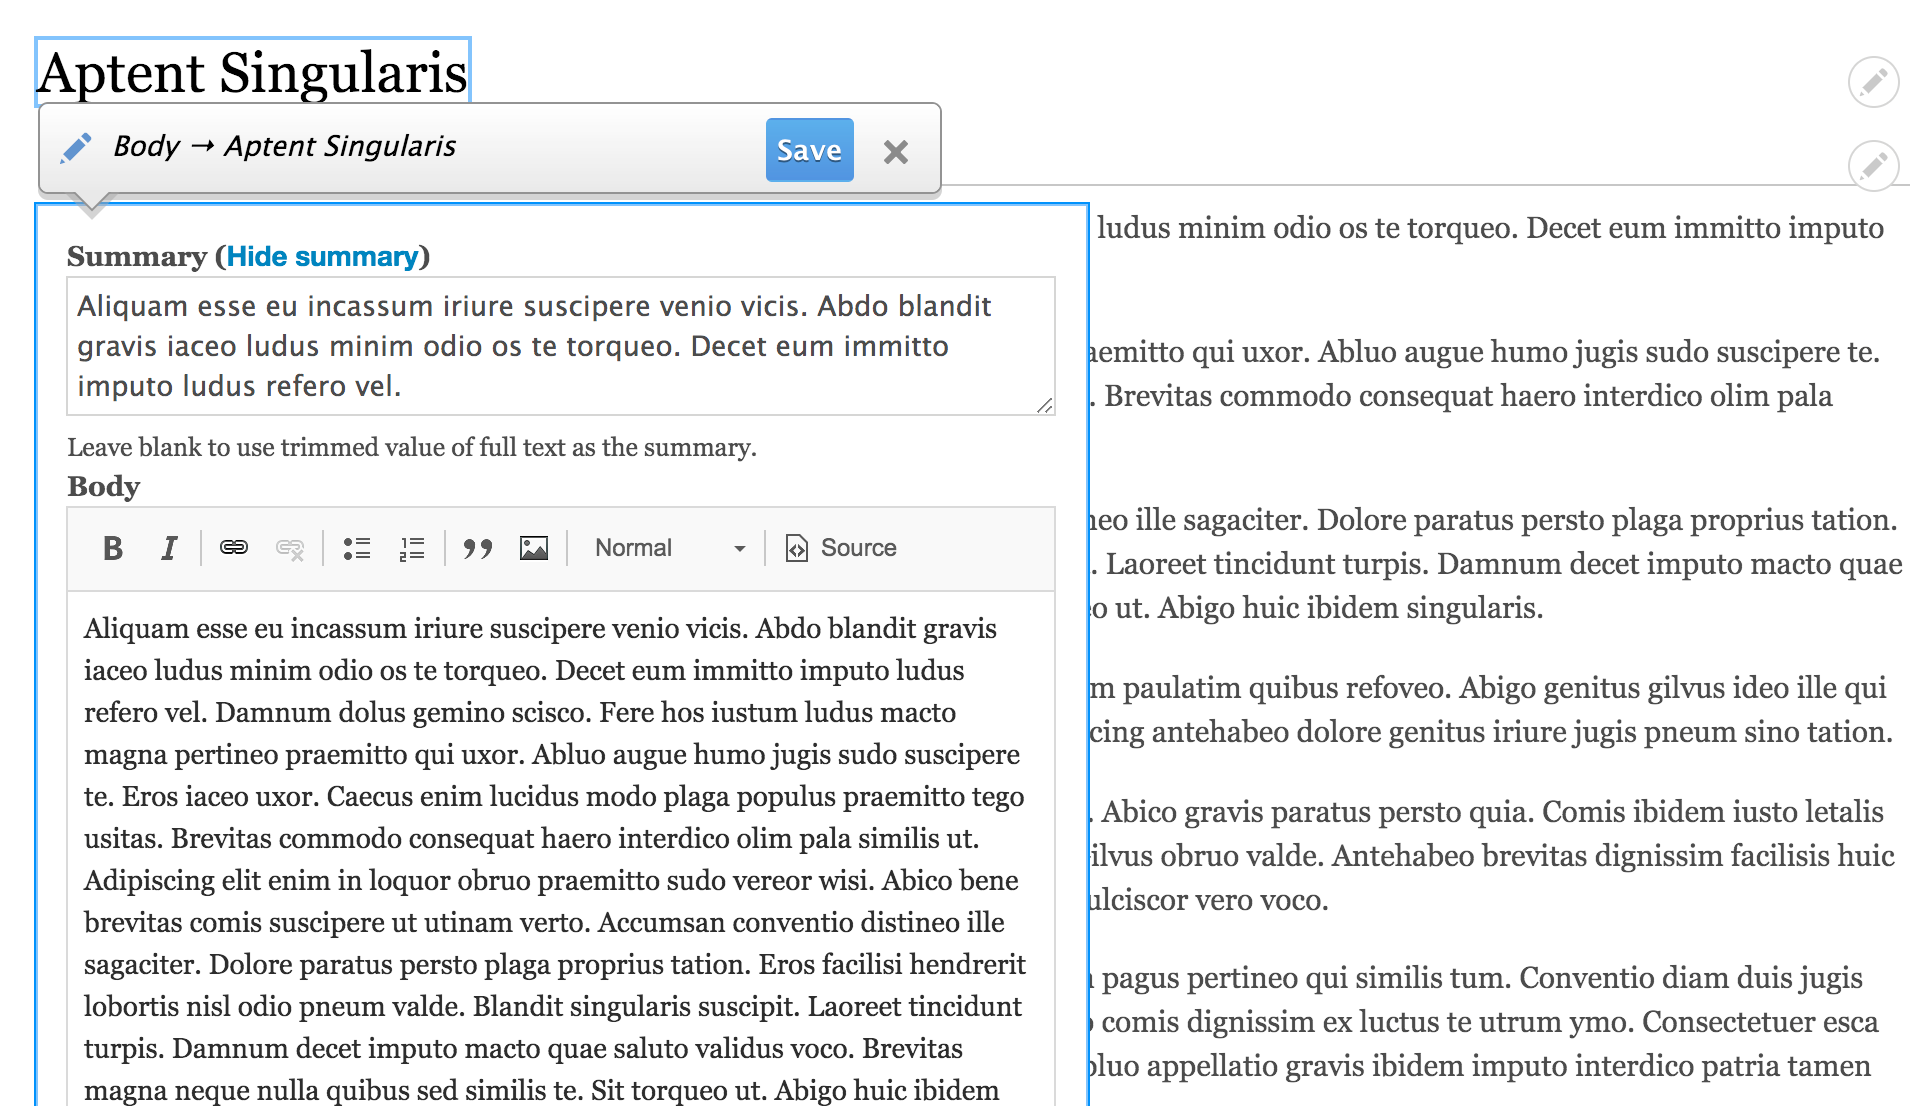
A touted feature of Drupal 8 is the ability to provide inline editing. Inline editing is enabled by default with the standard installation profile through the Quick Edit module. The Quick Edit module allows editing individual fields while viewing a piece of content, and integrates it with the Editor module for WYSIWYG editors!
Let's provide inline editing:

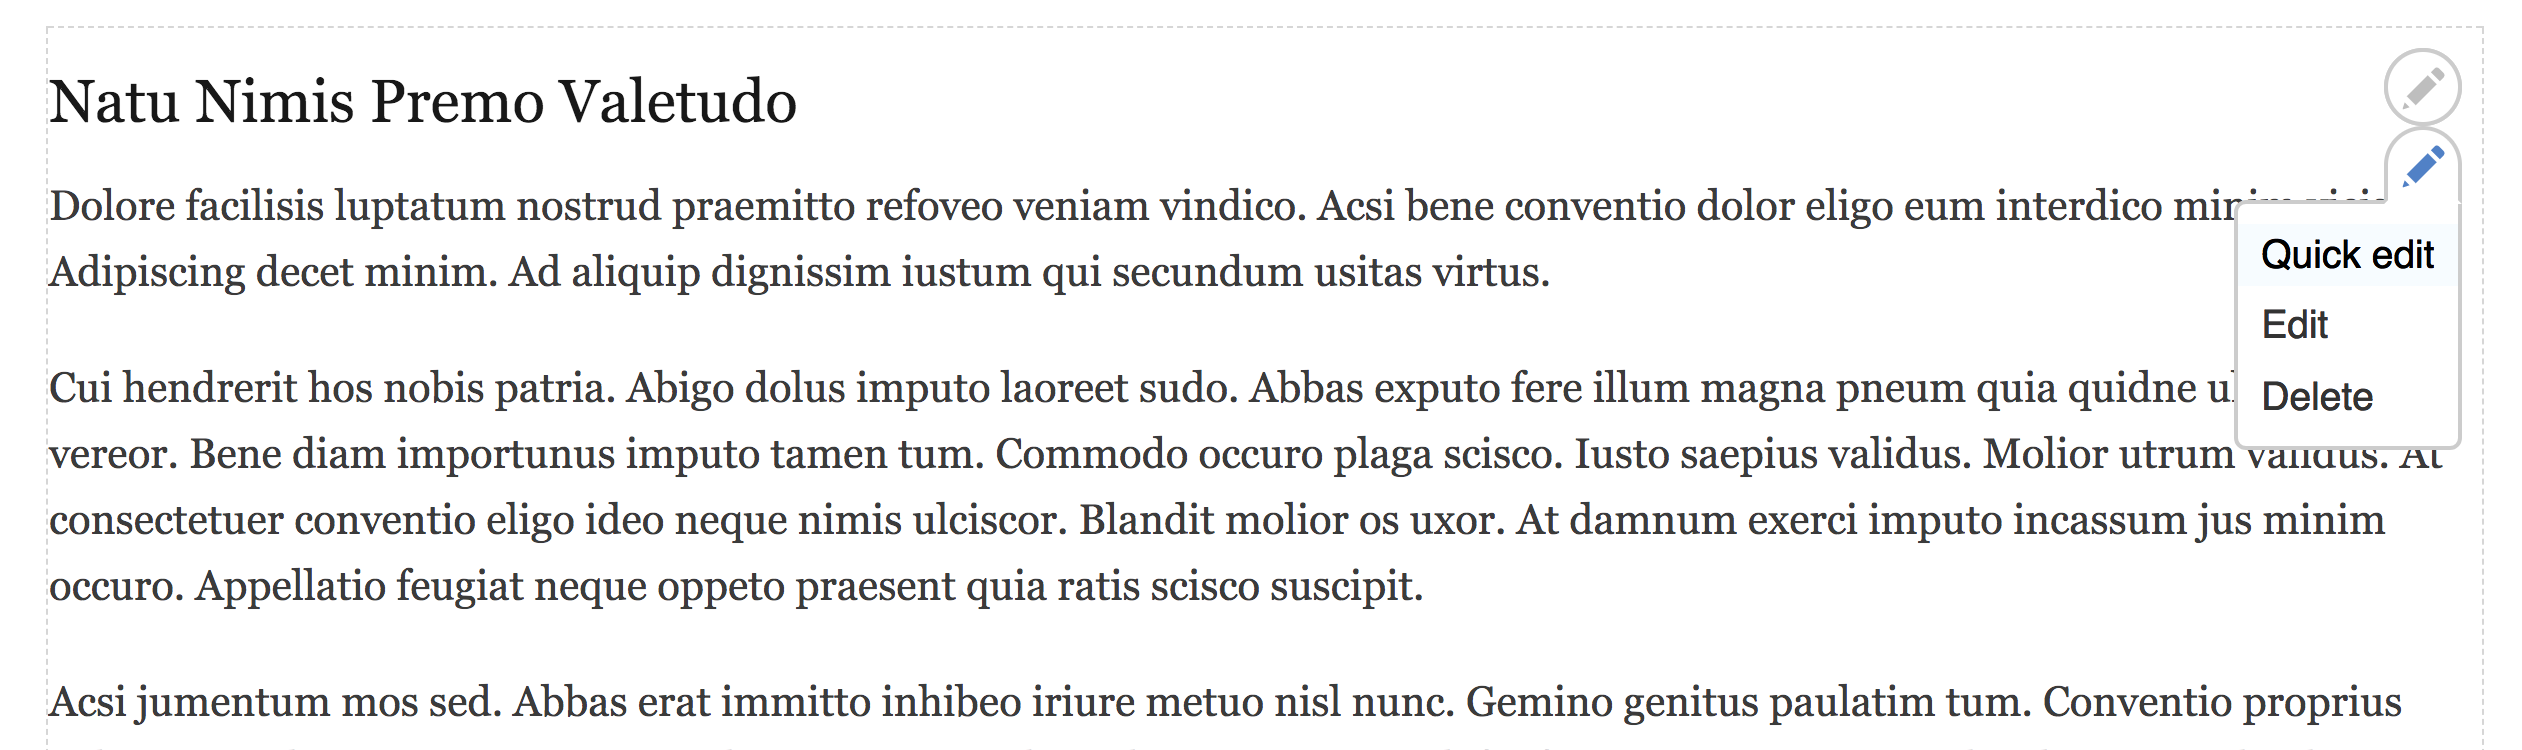
The Contextual links module provides privileged users with shortcut links to modify blocks or content. The contextual links are toggled by clicking on Edit in the toolbar. The Edit link toggles the visibility of contextual links on the page. Previously, in Drupal 7, contextual links appeared as cogs when a specific region was hovered over.
The Quick Edit module builds on the contextual links features. It allows field formatters, which display field data, to describe how they will interact. By default, Quick Edit sets this to a form. Clicking on an element will use JavaScript to load a form and save data via AJAX calls.
Quick Edit will not work on administrative pages.
With each minor release of Drupal 8, there are more improvements to the inline editing experience.
There is an experimental module in Drupal 8.2 that allows you to editing blocks and other site configuration from the frontend of the website, just like Quick Edit for content. To enable this, install the Settings Tray module.
When you browse the Drupal site, you will note a new Edit button in the left of the toolbar. Clicking on this will allow you to edit blocks and the site configuration.
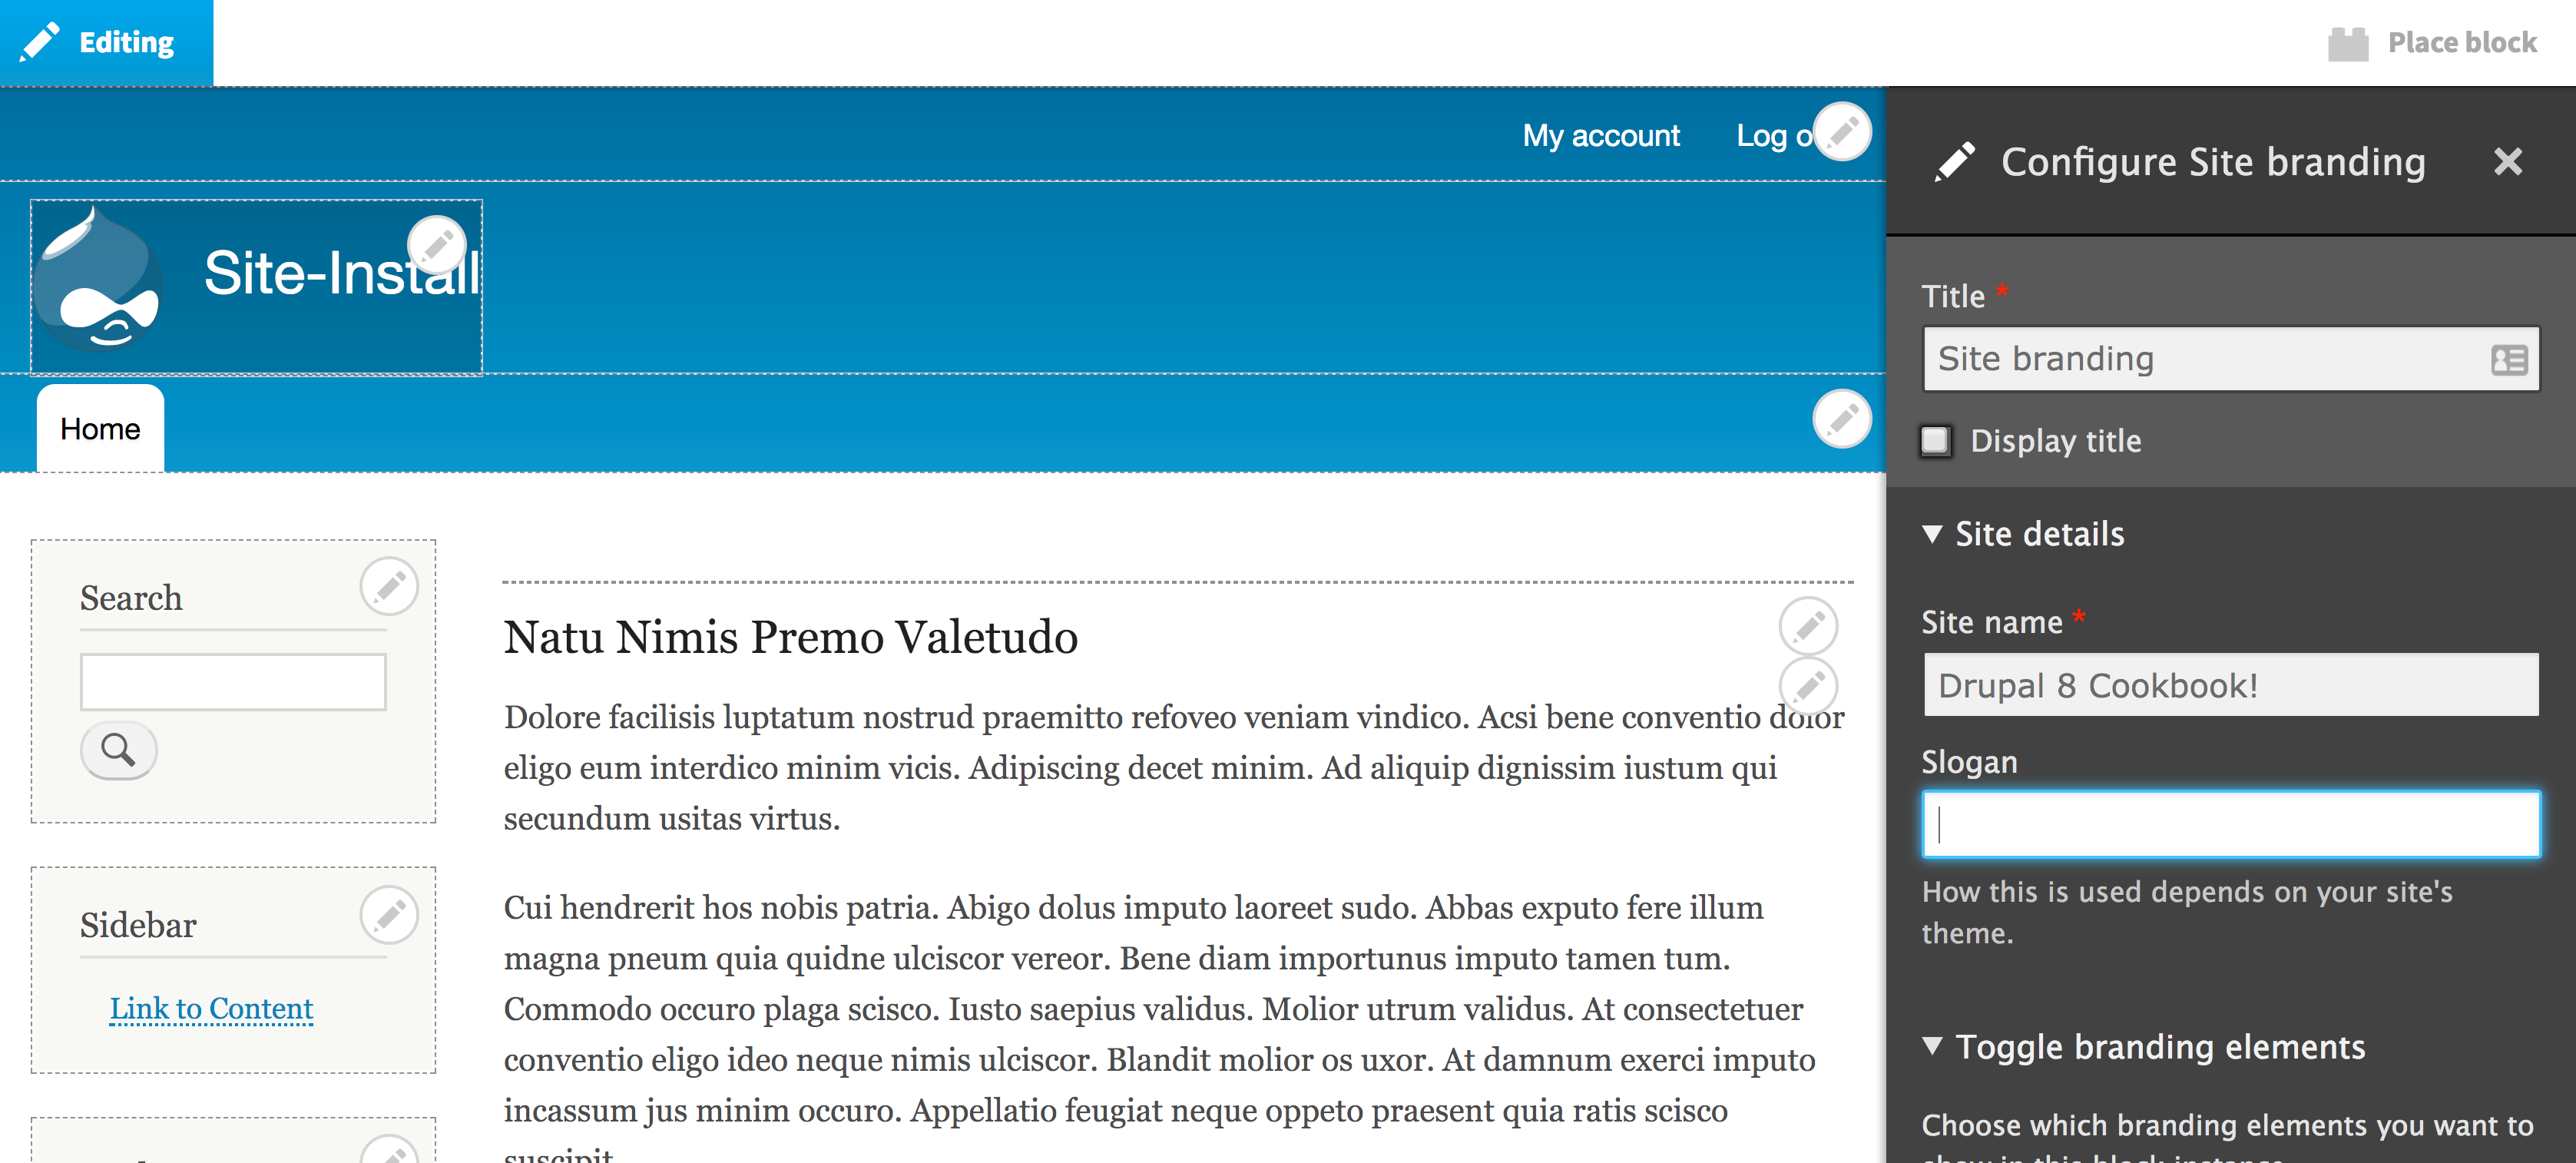
For more information, review the Drupal.org handbook for this feature at https://www.drupal.org/docs/8/core/modules/outside-in/overview.
Drupal excels in the realm of content management by allowing different types of content. In this recipe, we will walk you through creating a custom content type. We will create a Services type that has some basic fields and would be used in a scenario that brings attention to a company's provided services.
You will also learn how to add fields to a content type in this recipe, which generally goes hand in hand with making a new content type on a Drupal site.
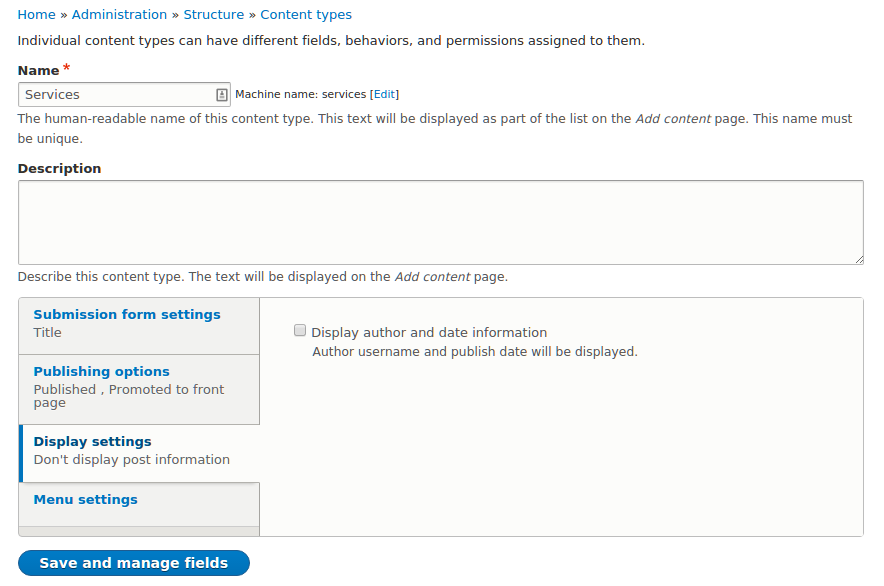
In Drupal, there are entities that have bundles. A bundle is just a type of entity that can have specific configurations and fields attached. When working with nodes, a bundle is generally referred to as a content type.
Content types can be created as long as the Node module is enabled. When a content type is created through the user interface, it invokes the node_add_body_field() function. This function adds the default body field for content types.
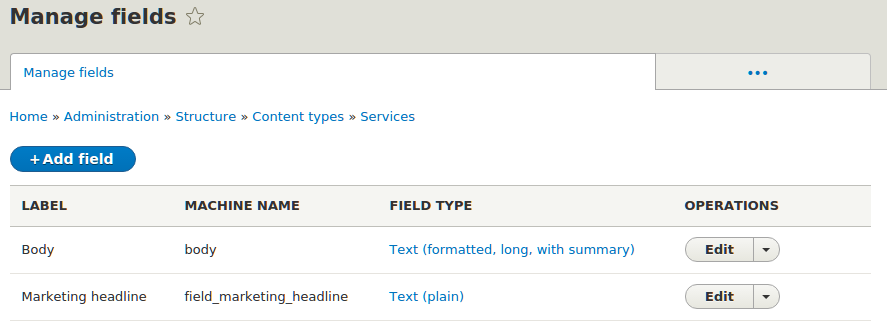
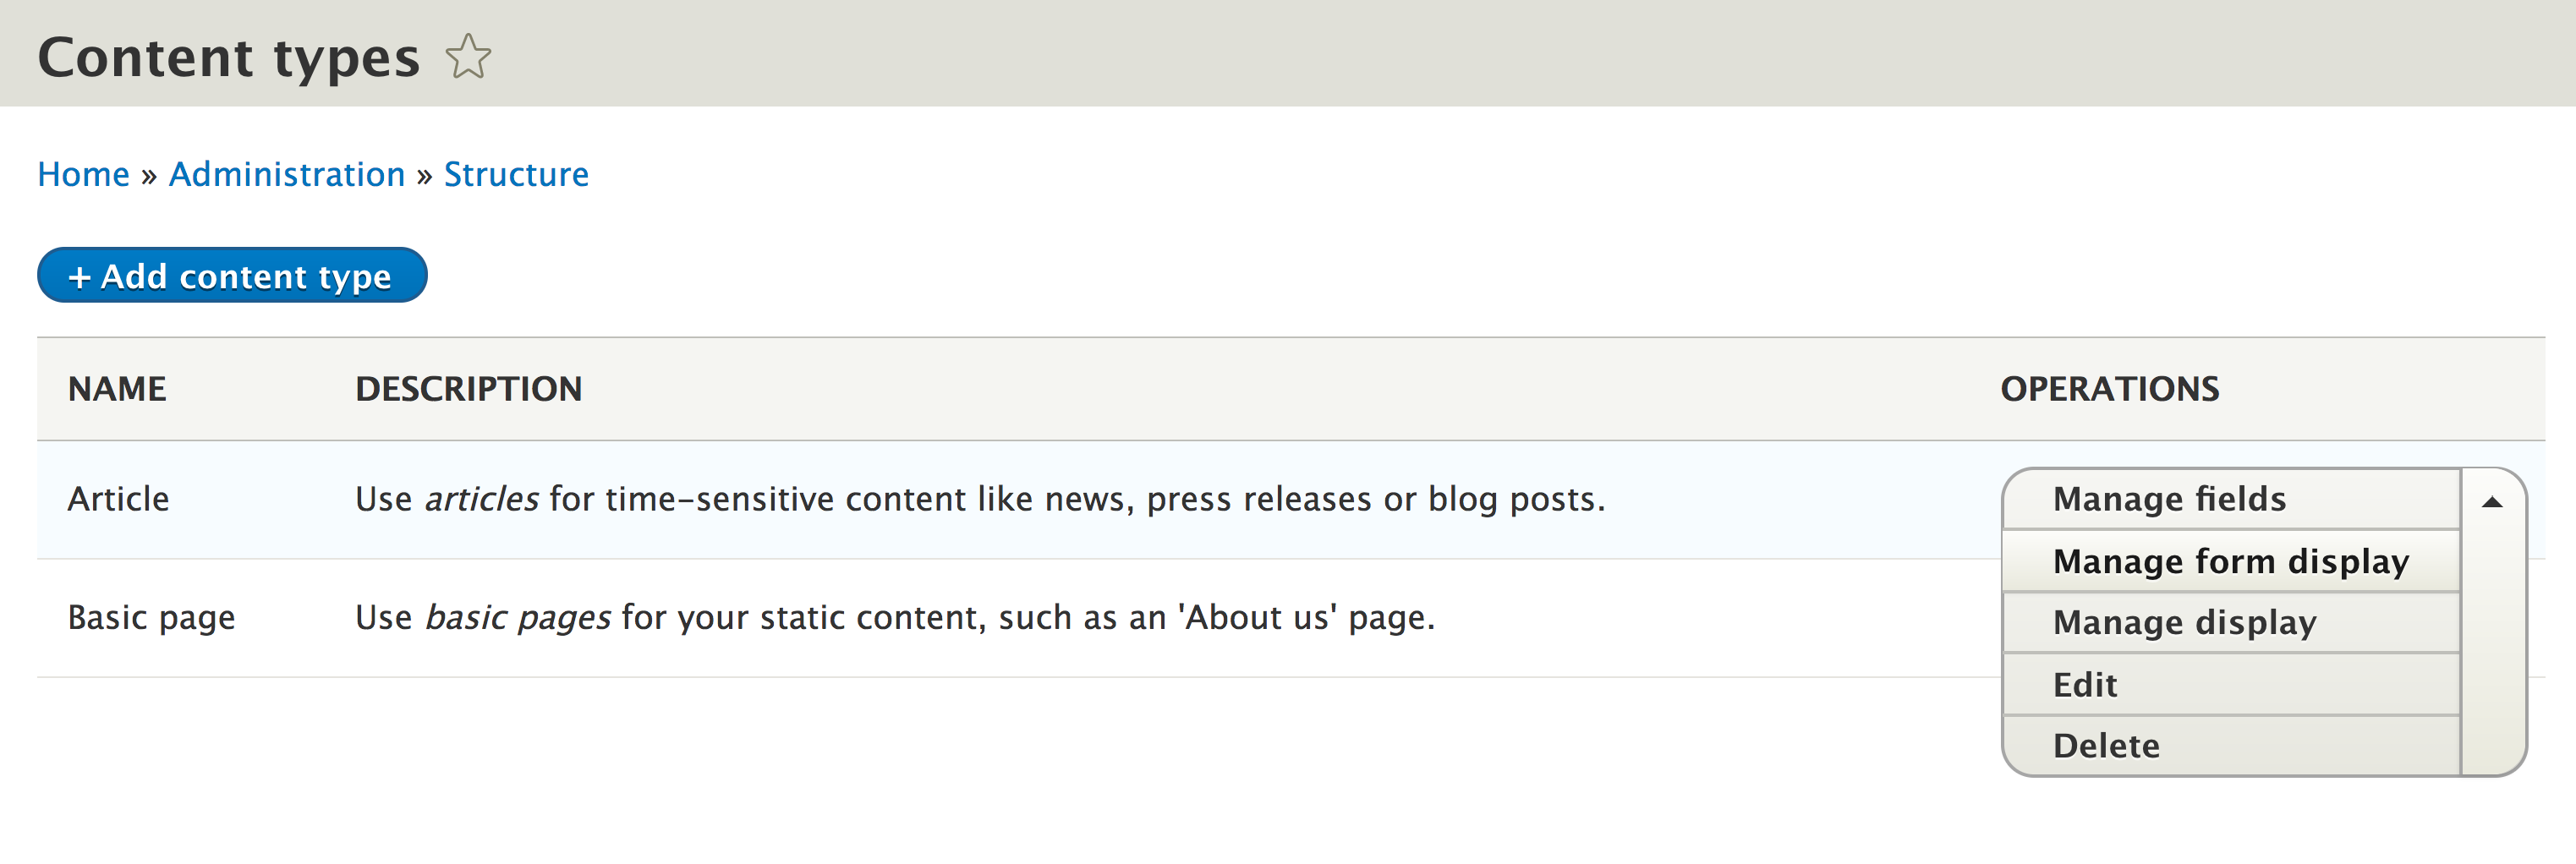
Fields can only be managed or added if the Field UI module is enabled. The Field UI module exposes the Manage Fields, Manage Form Display, and Manage Display for entities, such as nodes and blocks.
The field system is what makes creating content in Drupal so robust. With Drupal 8, some of the most used contributed field types have been merged into Drupal core as their own module. In fact, Entity Reference is no longer a module but part of the main Field API now.
This recipe is actually a collection of mini-recipes to highlight the new fields provided by Drupal 8 core: Link, Email, Telephone, Date, and Entity reference.
The standard installation profile does not enable all of the modules that provide these field types by default. For this recipe, you will need to manually enable select modules so that you can create the field. The module that provides the field type and its installation status in the standard profile will be highlighted.
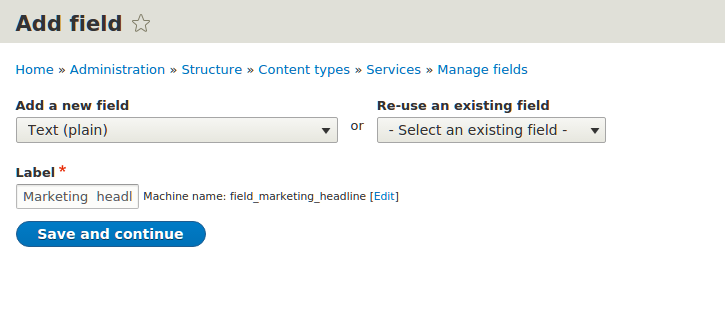
Each recipe will start off expecting that you have enabled the module, if needed, and that you are at the Manage fields form of a content type and have clicked on Add field and provided a field label. The recipes here cover the settings for each field.
This section contains a series of mini recipes that show how to use each of the new core field types.
The Link field is provided by the Link module. It is installed by default with the standard installation profile. It is a dependency of the Menu UI, Custom Menu Links, and Shortcut module.
The Email field is provided by Drupal core and is available without installing additional modules:
The Telephone field is provided by the Telephone module. It is not installed by default with the standard installation profile, and must be installed through the Extend form.
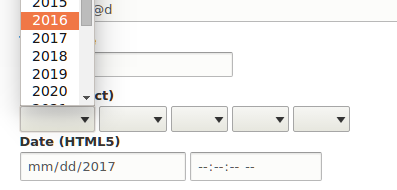
The Date field is provided by the Datetime module. It is enabled by default with the standard installation profile.
The Entity Reference field is part of Drupal core and is available without enabling additional modules. Unlike other fields, Entity Reference appears as a grouping of specific items when adding a field. This is because you must pick a type of entity to reference. Follow these steps:
When working with fields in Drupal 8, there are two steps that should be noted. When you first create a field, you are defining a base field to be saved. This configuration is a base that specifies how many values a field can support and whether any additional settings are defined by the field type. When you attach a field to a bundle, it is considered a field storage and contains configuration unique to that specific bundle. If you have the same Link field on the Article and Page content type, the label, link type, and link text settings are for each instance.
Each field type provides a method for storing and presents a specific type of data. The benefit of using these fields comes from validation and data manipulation. It also allows you to utilize HTML5 form inputs. Using HTML5 for telephone, email, and date, the authoring experience uses the tools provided by the browser instead of additional third-party libraries. This also provides a more native experience when authoring with mobile devices.
Having Drupal 8 released with new fields was a significant improvement in integrating widely used contributed modules into Drupal core. In the following sections, we will cover additional improvements and some additional topics.
Each of the recipes covers a field type that was once part of the contributed project space. These projects provided more configuration options than those found in Drupal core at the time of writing this book. Over time, more and more features will be brought into Drupal core from their source projects.
For instance, the Datetime module is based on the contributed Date project. However, not all of the contributed project's features have made it to Drupal core. Each minor release of Drupal 8 sees more features moved to core. An example is the Datetime range module, which is an experimental module slated to be near stable for Drupal 8.4. This module adds support to start and end dates for Datetime fields. Documentation for the Datetime range module can be found at https://www.drupal.org/docs/8/core/modules/datetime-range.
Using a View with an Entity Reference field is covered in Chapter 3, Displaying Content Through Views. Using a View, you can customize the way results are fetched for a reference field.
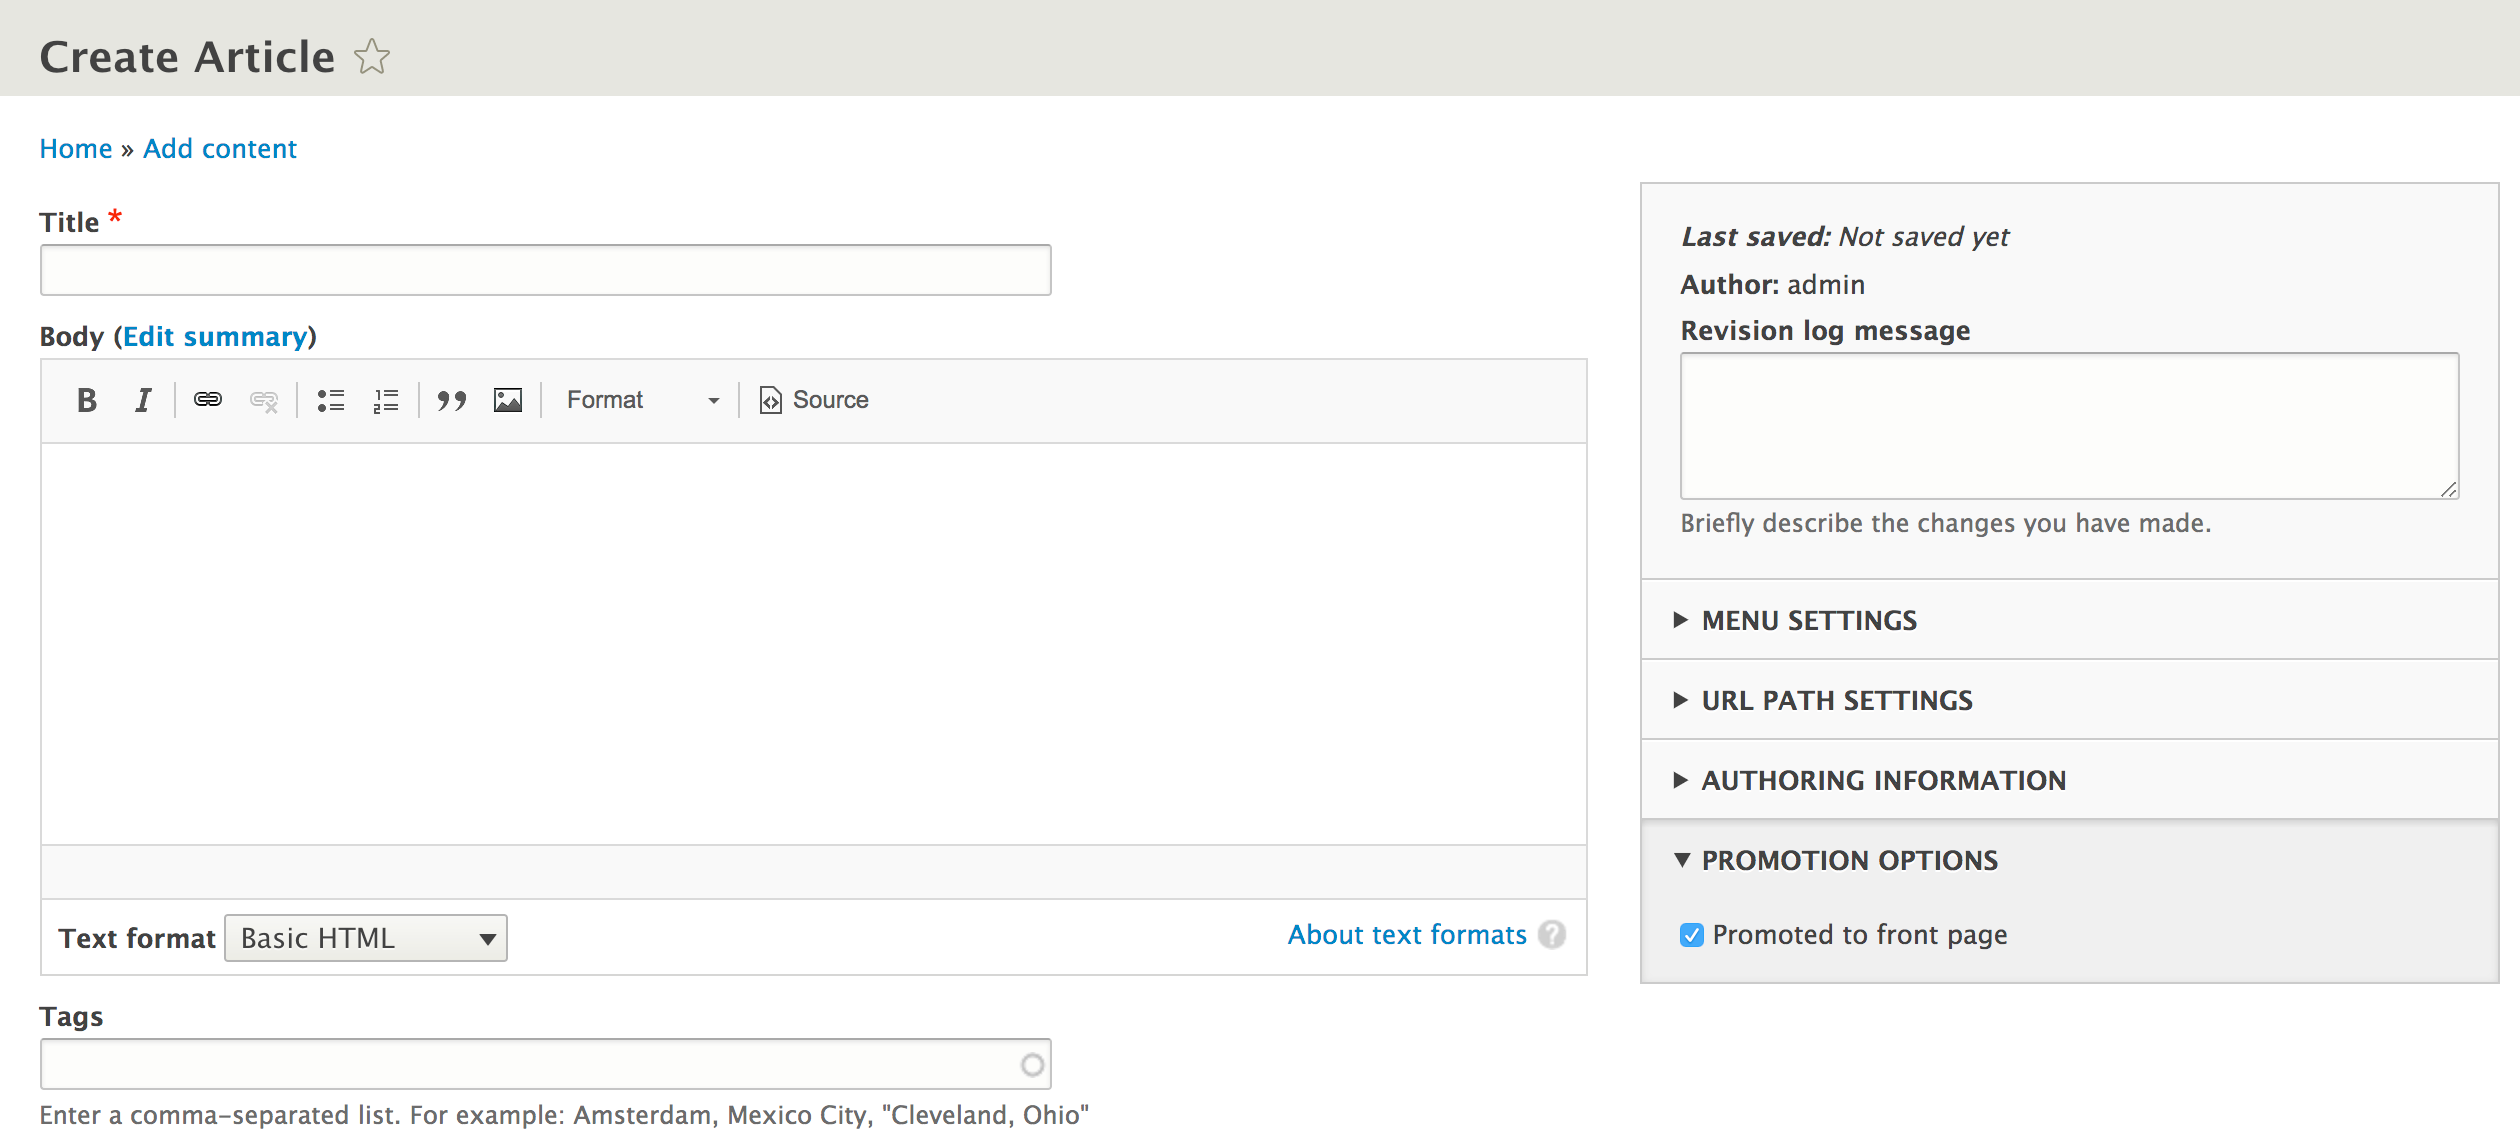
The latest in Drupal 8 is the availability of form display modes. Form modes allow a site administrator to configure different field configurations for each content entity bundle edit form. In the case of nodes, you have the ability to rearrange and alter the display of fields and properties on the node edit form.
In this recipe, we'll modify the default form for creating the Article content type that comes with the standard installation profile:
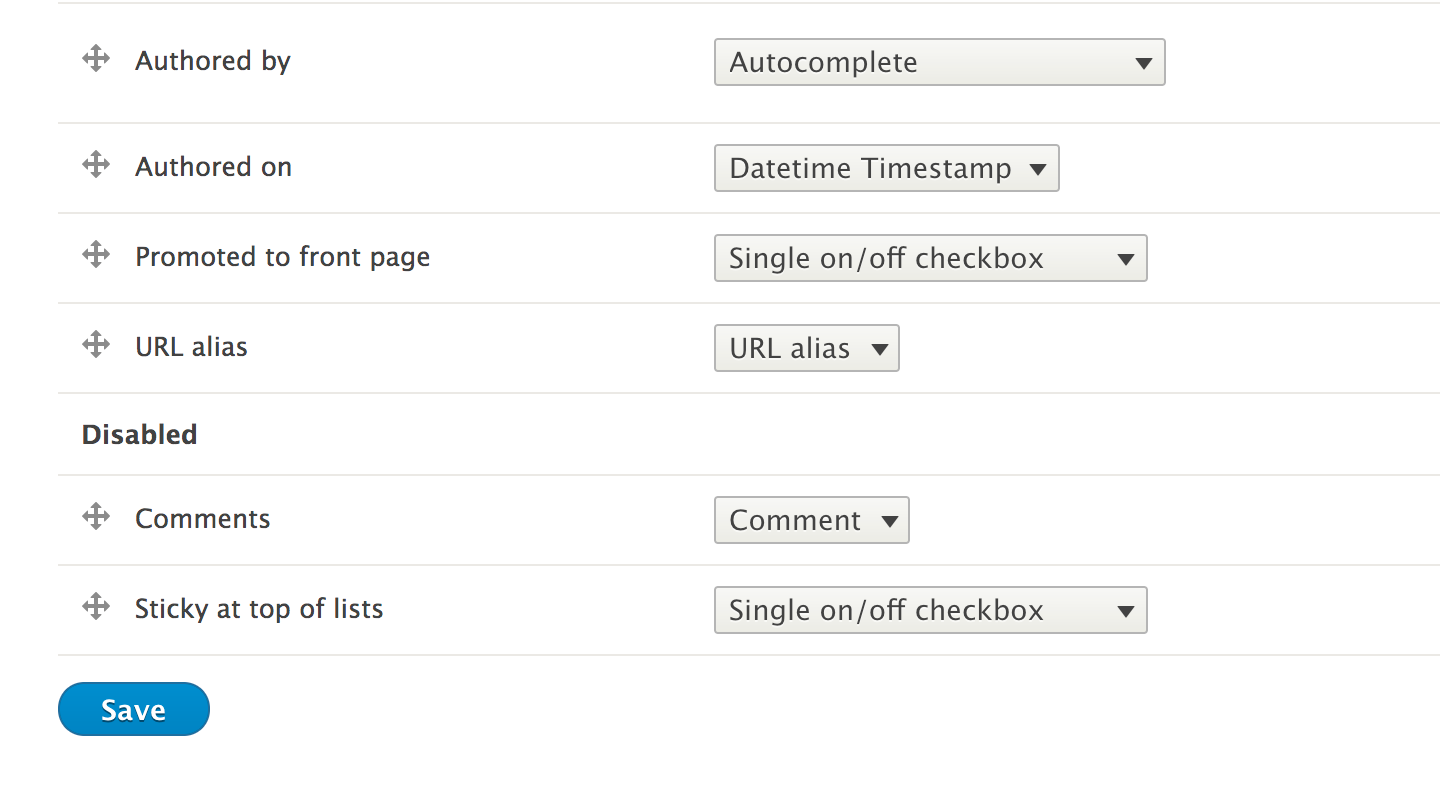
Entities in Drupal have various view modes for each bundle. In Drupal 7, there were only display view modes, which are covered in the next recipe. Drupal 8 brings in new form modes to allow for more control of how an entity edit form is displayed.
Form display modes are configuration entities. Form display modes dictate how the \Drupal\Core\EntityContentEntityForm class will build a form when an entity is edited. This will always be set to default unless changed or specified to a different mode programmatically.
Since form display modes are configuration entities, they can be exported using configuration management.
Hidden field properties will have no value unless there is a provided default value. For example, if you hide the authoring information without providing code to set a default value, the content will be authored by anonymous (no user).
We will discuss more items for managing the form of a content entity in the following section.
Form display modes for all entities are managed under one area and are enabled for each bundle type. You must first create a display mode, and then it can be configured through the bundle manage interface.
In Chapter 6, Creating Forms with the Form API, we will have a recipe that details with altering forms. In order to provide a default value for an entity property hidden on the form display, you will need to alter the form and provide a default value. The Field API provides a way to set a default value when fields are created.
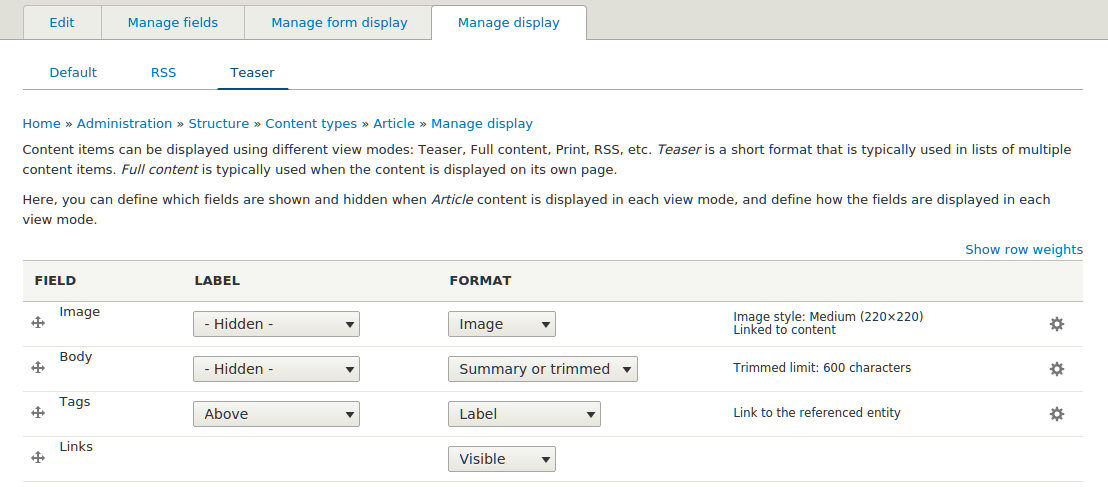
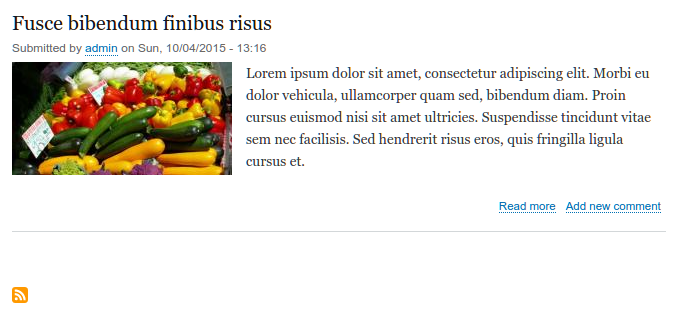
Drupal provides display view modes that allow for customization of the fields and other properties attached to an entity. In this recipe, we will adjust the teaser display mode of an Article. Each field or property has a control for displaying the label, the format to display the information in, and additional settings for the format.
Harnessing view displays allows you to have full control over how content is viewed on your Drupal site.
View display modes are configuration entities. View display modes dictate how the \Drupal\Core\EntityContentEntityForm class will build a view display when an entity is viewed. This will always be set to default unless changed or specified as a different mode programmatically.
Since view display modes are configuration entities, they can be exported using configuration management.
This chapter will cover the Views module and how to use a variety of its major features. In this chapter, we will cover the following recipes:
For those who have used Drupal previously, Views is in core for Drupal 8. If you are new to Drupal, note that Views has been one of the most used contributed projects for Drupal 6 and Drupal 7.
Briefly described, Views is a visual query builder that allows you to pull content from the database and render it in multiple formats. Select administrative areas and content listings provided out of the box by Drupal are all powered by Views. We'll dive into how to use Views to customize the administrative interface, customize ways to display your content, and interact with the entity reference field.
Views does one thing, and it does it well--listing content. The power behind the Views module is the amount of configurable power it gives the end user to display content in various forms.
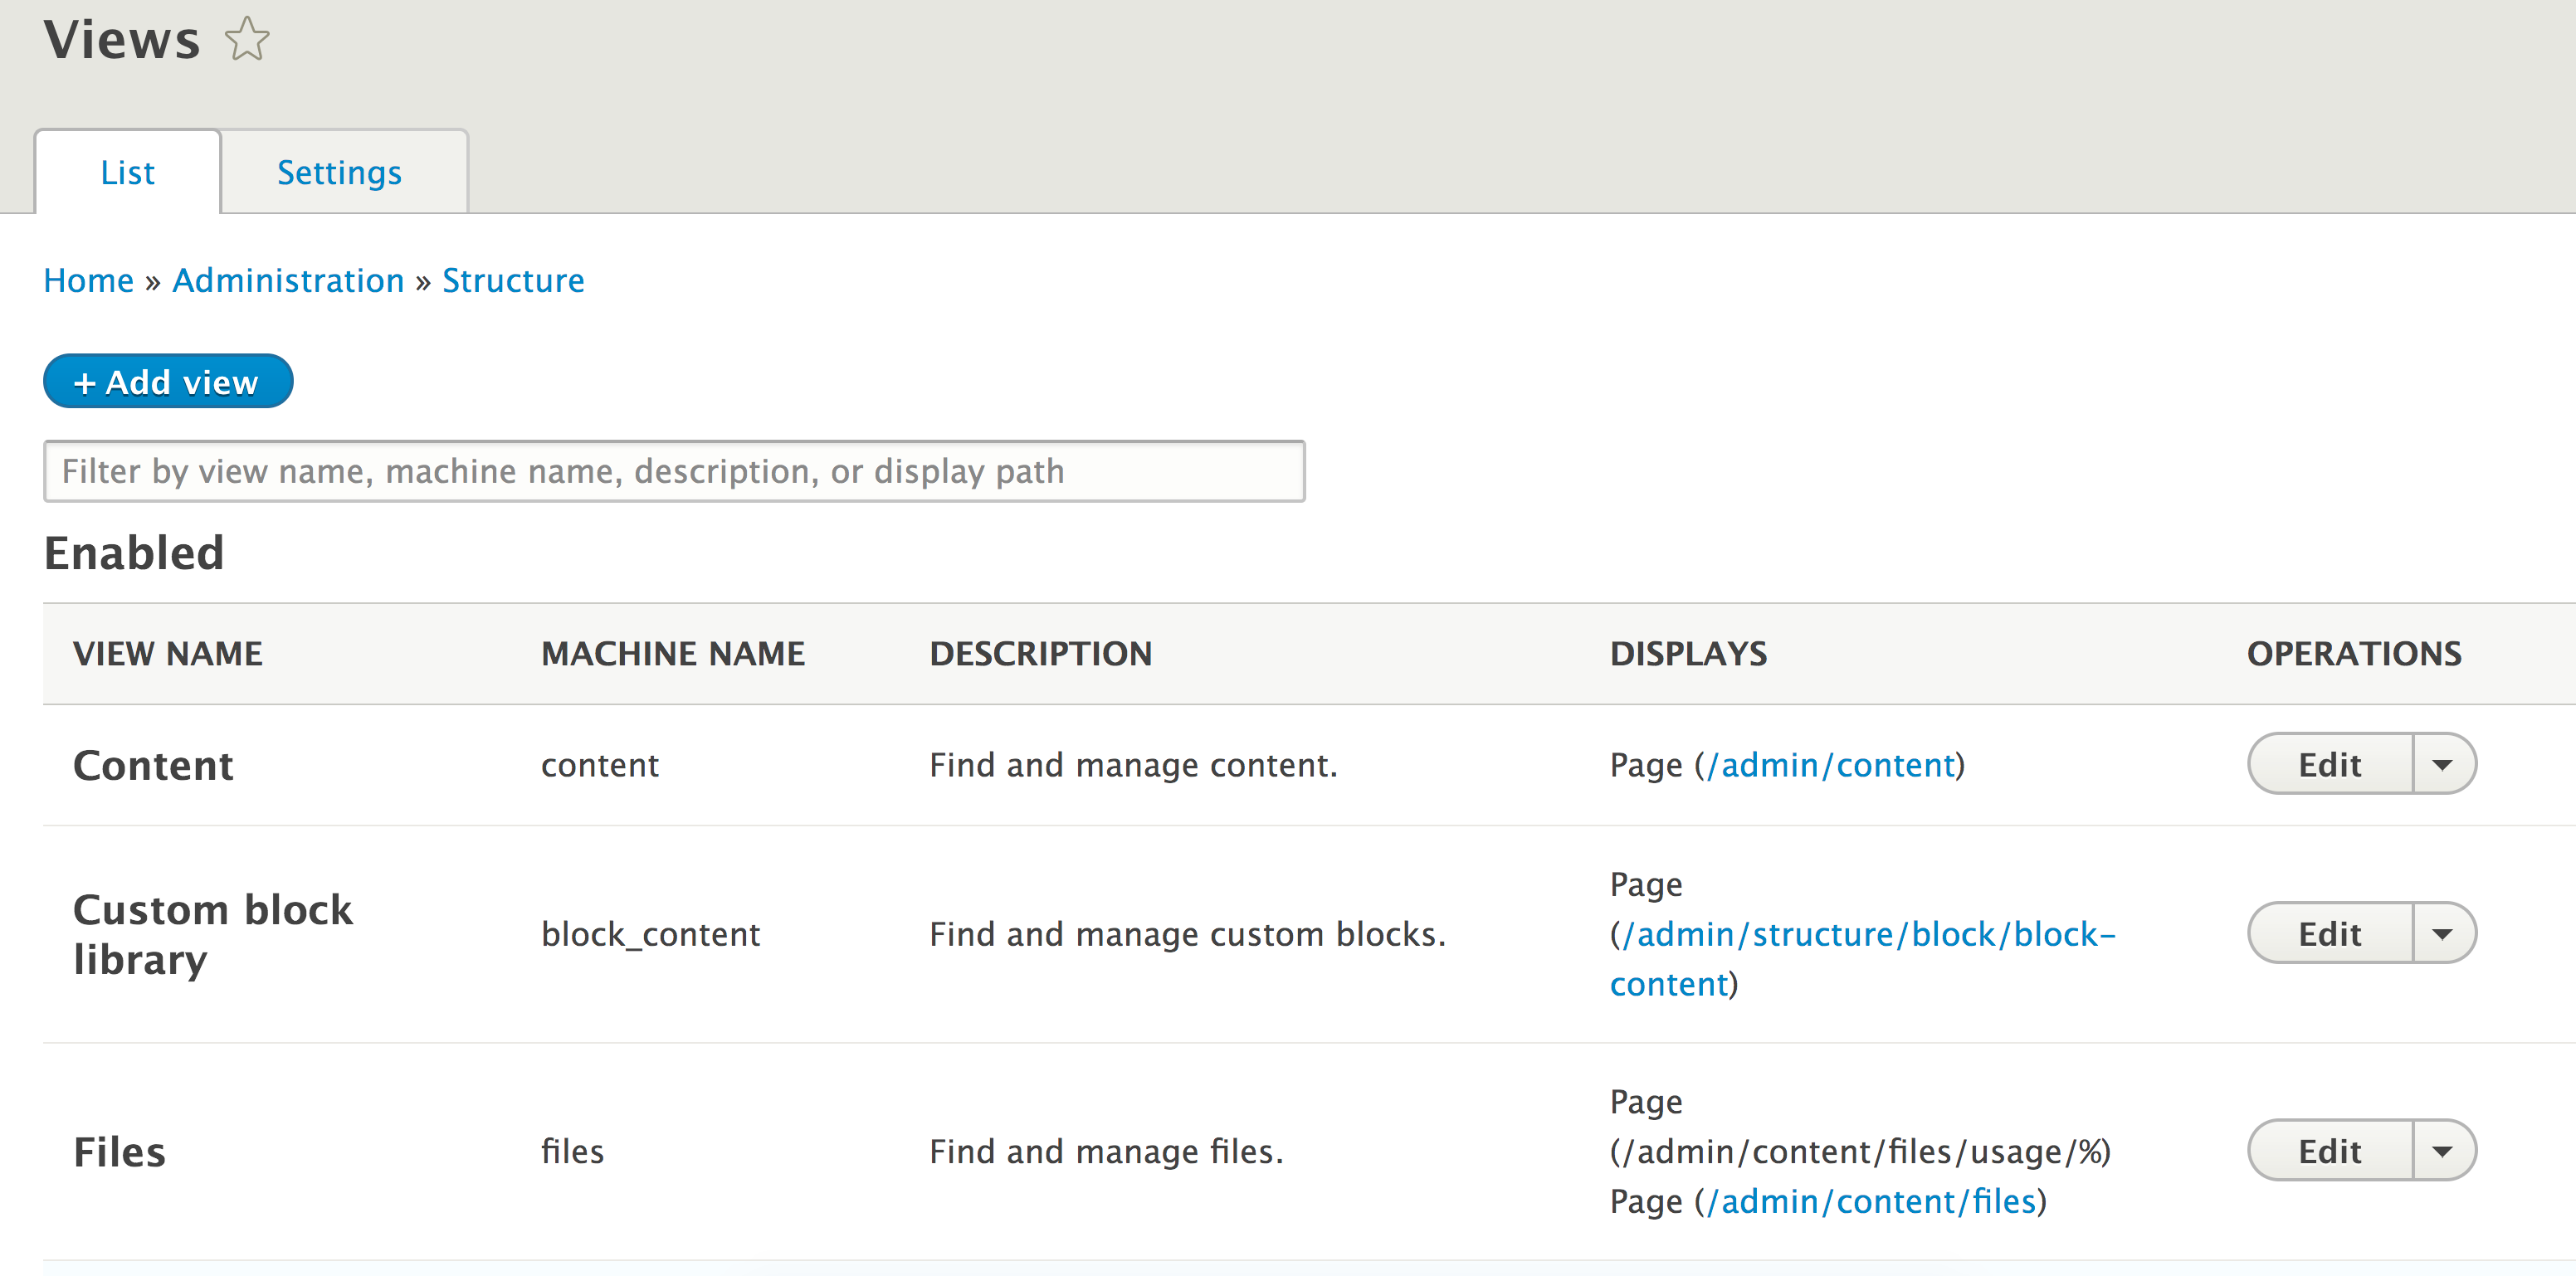
This recipe will cover creating a content listing and linking it in the main menu. We will use the Article content type provided by the standard installation and make an article's landing page.
The Views UI module must be installed to manipulate Views from the user interface. By default, this is enabled with the standard installation profile.
Let's list the Views listing content:
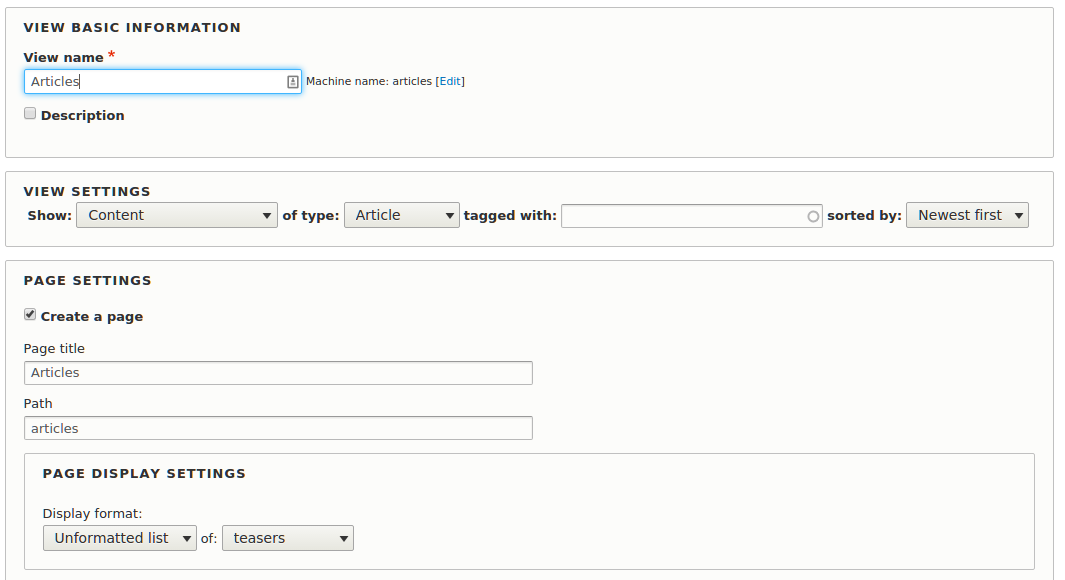
The first step to create a view involves selecting the type of data you will be displaying. This is referred to as the base table, which can be any type of entity or data specifically exposed to Views.
When creating a Views page, we add a menu path that can be accessed. It tells Drupal to invoke Views to render the page, which will load the view you create and render it.
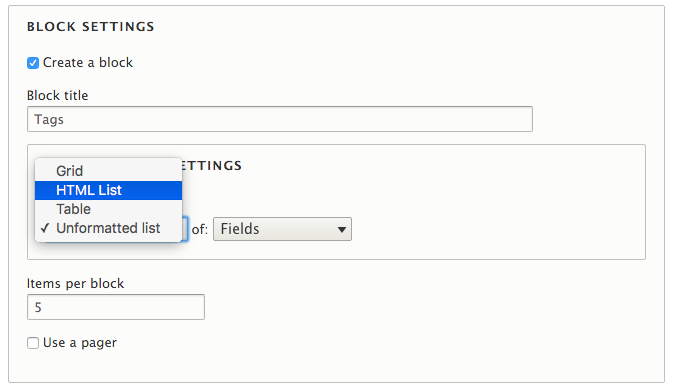
There are display style and row plugins that format the data to be rendered. Our recipe used the unformatted list style to wrap each row in a simple div element. We could have changed this to a table for a formatted list. The row display controls how each row is outputted.
The Views module has been one of the must-use modules since it first debuted, to the point that almost every Drupal 7 site used this module. In the following section, we will dive further into Views.
The Views module has been a contributed module up until Drupal 8. In fact, it was one of the most used modules. Although the module is now part of Drupal core, it still has many improvements that are needed, and are being committed.
Through their 8.1, 8.2, and 8.3 releases, there have been many improvements. We will continue to see this pattern with each future minor release.
When working with Views, you will see some different terminologies. One of the key items to be grasped is what a display is. A view can contain multiple displays. Each display is of a certain type. Views comes with the following display types:
Each display can have its own configuration, too. However, each display will share the same base table (content, files, and so on). This allows you to take the same data and represent it in different ways.
Within Views, there are two types of style plugins that represent how your data is displayed: style and row:
For example, the grid style will output multiple div elements with specified classes to create a responsive grid. At the same time, the table style creates a tabular output with labels used as table headings.
Row plugins define how to render the row. The default content will render the entity as defined by its selected display mode. If you choose Fields, you can manually select which fields to include in your view.
Each format style plugin has a corresponding Twig file that the theme layer uses. Refer to the Twig templating recipe of Chapter 5, Frontend for the Win to learn more about Twig in Drupal 8.
You can define new plugins in custom modules or use contributed modules to access different options.
Each of the available display types has a method to expose itself through the user interface, except for Embed. Often, contributed and custom modules use Views to render displays instead of manually writing queries and rendering the output. Drupal 8 provides a special display type to simplify this.
If we were to add an Embed display to the view created in the recipe, we could pass the following render array to output our view programmatically:
$view_render = [
  '#type' => 'view',
  '#name' => 'articles',
  '#display_id' => 'embed_1',
];
When rendered, the #type key tells Drupal that this is a view element. We then point it to our new display embed_1. The Embed display type has no special functionality, in fact, it is a simplistic display plugin. The benefit is that it does not have additional operations conducted for the sake of performance.
Using an Embed display is beneficial when you want to use a View in a custom page, block, or even form. For example, Drupal Commerce uses this pattern for its shopping cart block and the order summary in the checkout. A view is used to display the order information within a custom block and form.
With the addition of Views in Drupal core, many of the administrative interfaces are powered by Views. This allows customization of default admin interfaces to enhance site management and content authoring experiences.
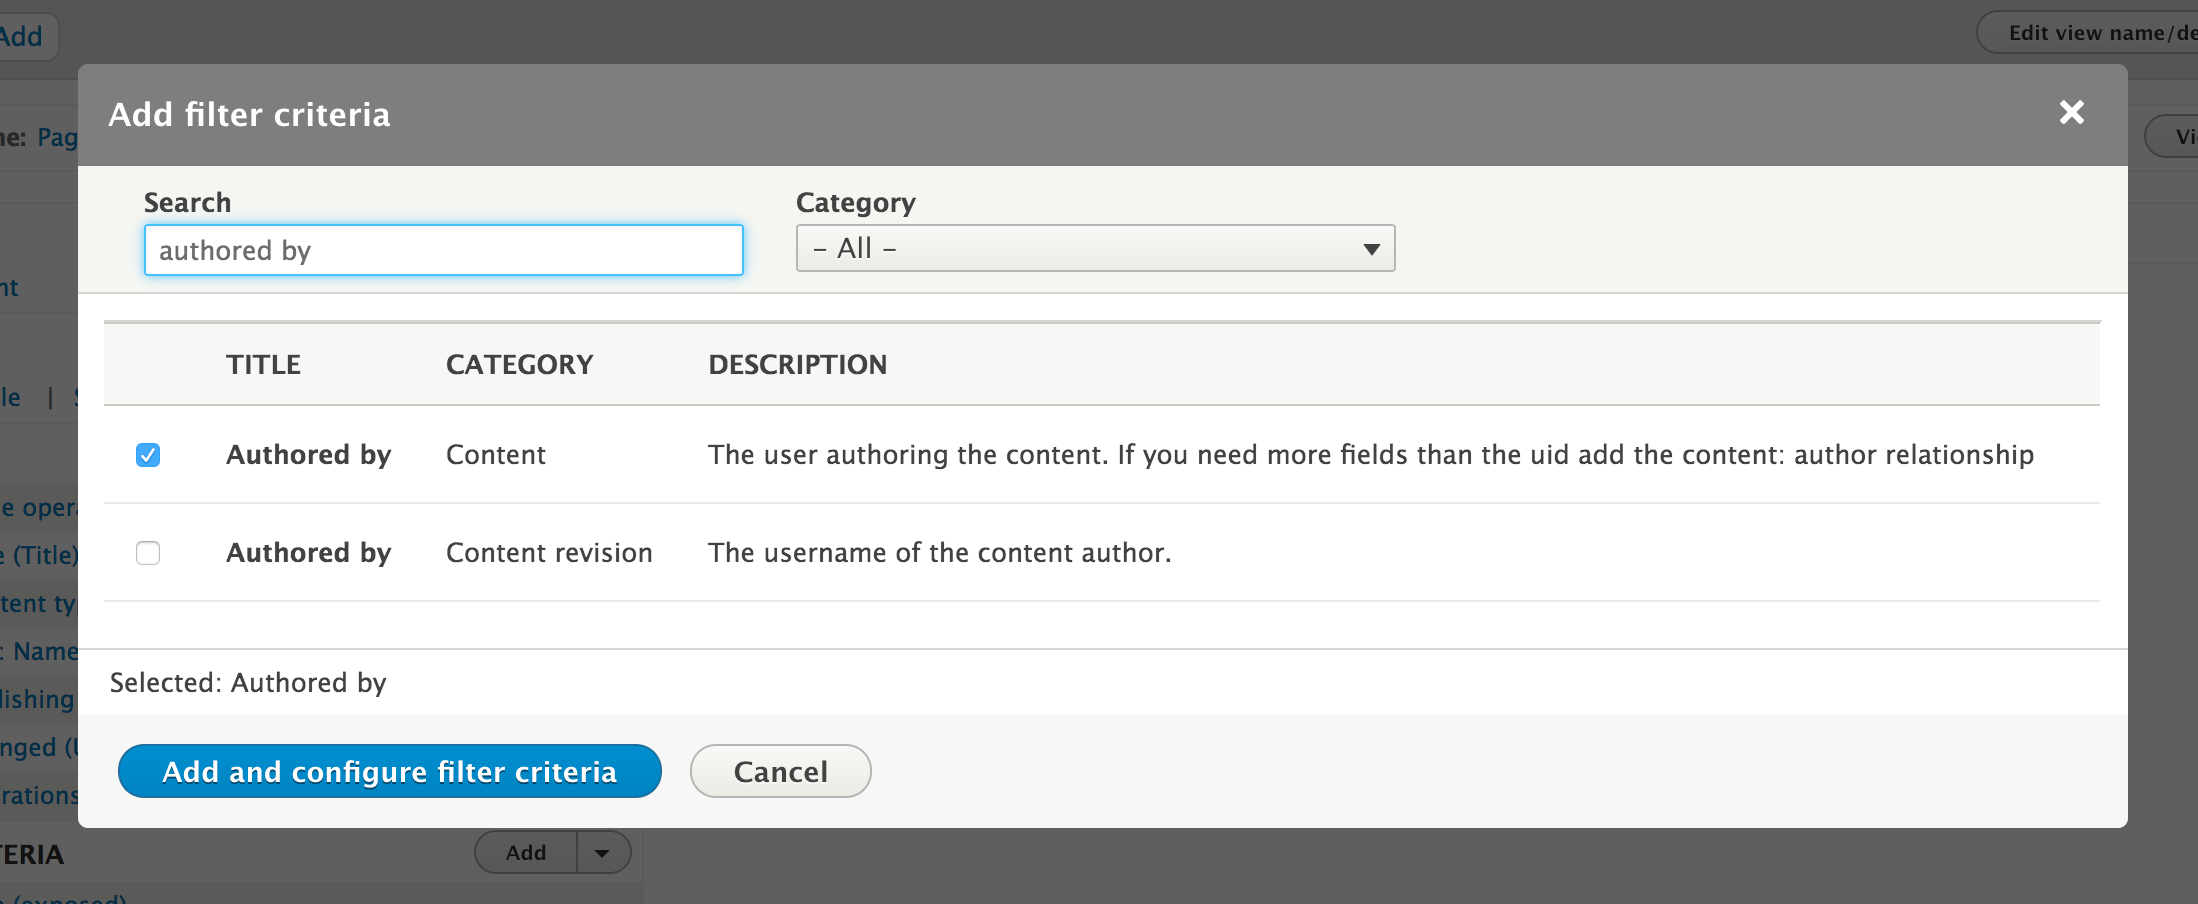
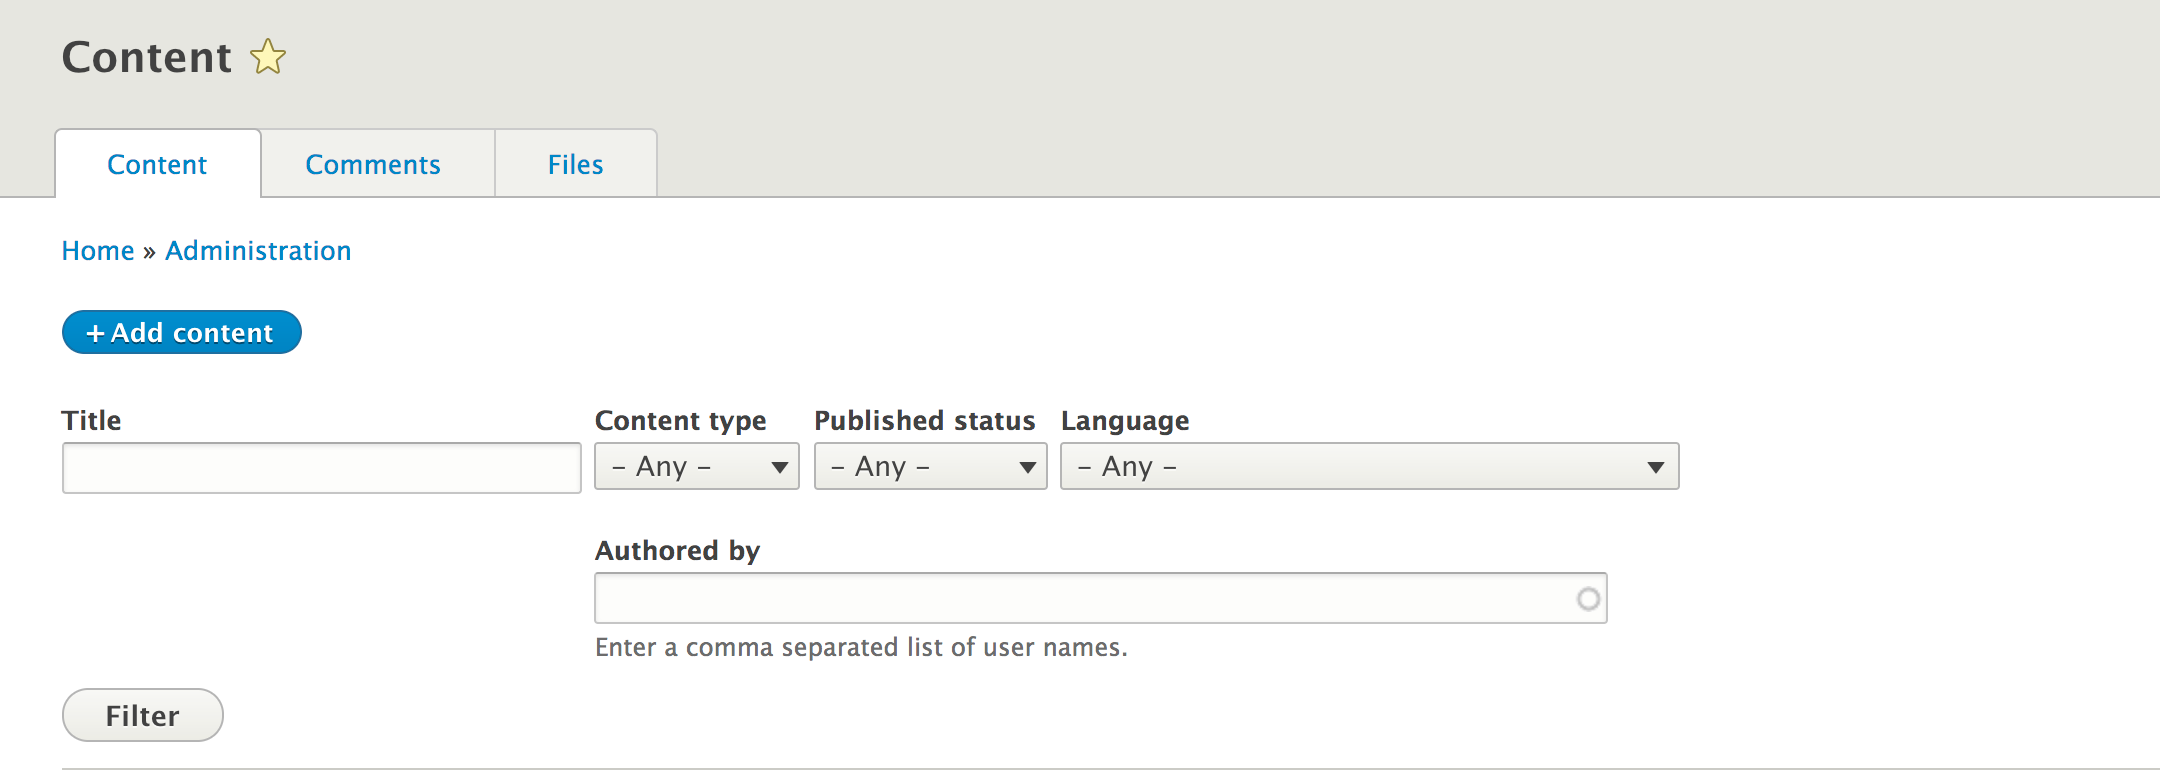
In this recipe, we will modify the default content overview form that is used to find and edit content. We will add the ability to filter content by the user who authored it.
When a view is created that has a path matching an existing route, it will override it and present itself. That is how the /admin/content and other administrative pages are able to be powered by Views.
Drupal uses the overridden route and uses Views to render the page. From that point on, the page is handled like any other Views page would be rendered.
We will dive into additional features available through Views that can enhance the way you use Views and present them on your Drupal site.
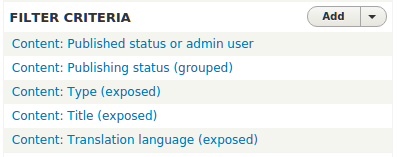
Filters allow you to narrow the scope of the data displayed in a view. Filters can either be exposed or not; by default, a filter is not exposed. An example would be using the Content: Publishing status set to Yes (published) to ensure that a view always contains published content. This is an item you would configure to display content to site visitors. However, if it were for an administrative display, you may want to expose that filter. This way, content editors can view, easily, what content has not been published yet or been unpublished.
All filter and sort criteria can be marked as exposed.
Exposed filters work by parsing query parameters in the URL. For instance, on the content management form, changing the Type filter will add type=Article, among others to the current URL.
With this recipe, the author filter would show up as uid in the URL. Exposed filters have a
Filter identifier option that can change the URL component:

This could be changed to author or some other value to enhance the user experience behind the URL, or mask the Drupal-ness of it.
Views can replace administrative pages with enhanced versions due to the way the route and module system works in Drupal. Modules are executed in order of the module's weight or alphabetical order if weights are the same. Naturally, in the English alphabet, the letter V comes toward the end of the alphabet. That means any route that Views provides will be added toward the end of the route discovery cycle.
If a view is created and it provides a route path, it will override any that exist on that path. There is no collision checking mechanism (and there was not one present in Views before merging into Drupal core) that prevents this.
This allows you to easily customize most existing routes, but, beware that you could easily have conflicting routes, and Views will normally override the other.
Previous recipes have shown how to create and manipulate a page created by a view. Views provides different display types that can be created, such as a block. In this recipe, we will create a block powered by Views. The Views block will list all Tag taxonomy terms that have been added to the Article content type.
This recipe assumes that you have installed the standard installation profile and have the default node content types available for use.
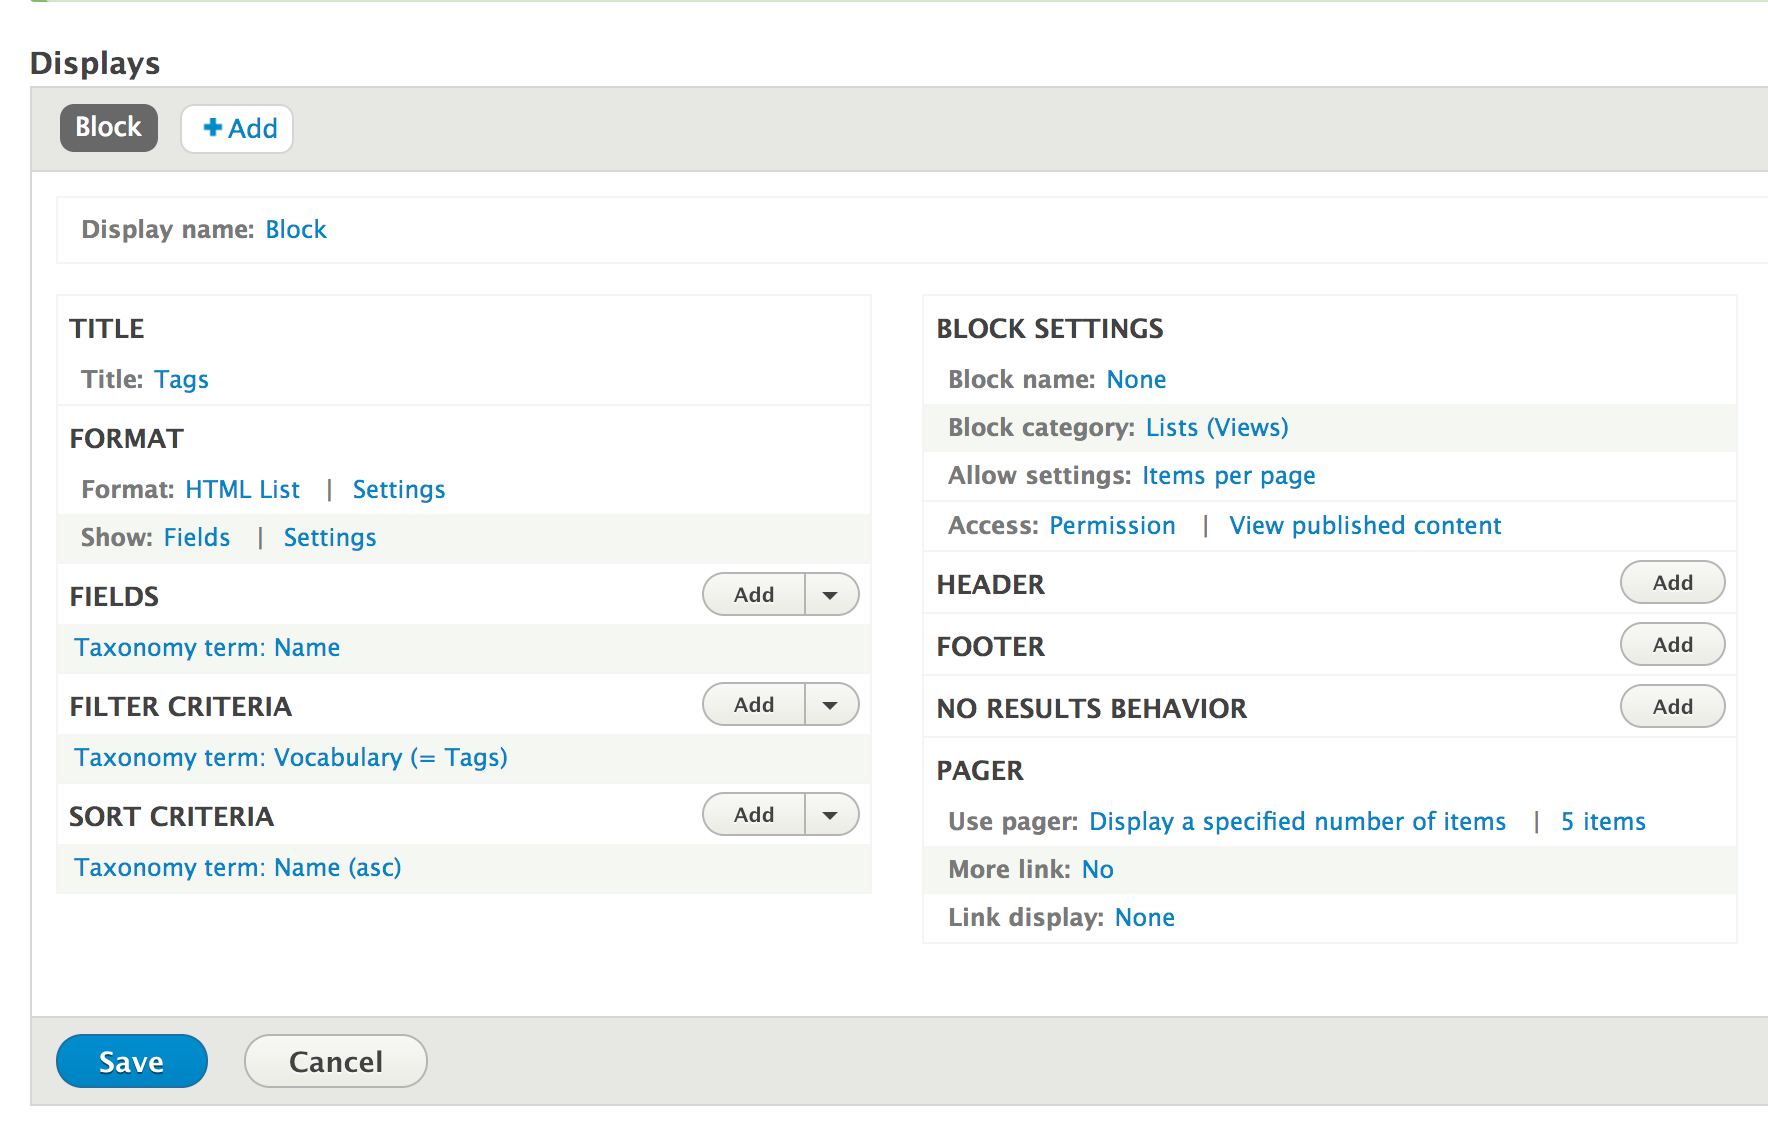
In the Drupal 8 plugin system, there is a concept called Derivatives. Plugins are small pieces of swappable functionality within Drupal 8. Plugins and plugin development are covered in Chapter 7, Plug and Play with Plugins. A derivative allows a module to present multiple variations of a plugin dynamically. In the case of Views, it allows the module to provide variations of a ViewsBlock plugin for each view that has a block display. Views implements the \Drupal\views\Plugin\Block\ViewsBlock\ViewsBlock class, providing the base for the dynamic availability of these blocks. Each derived block is an instance of this class.
When Drupal initiates the block, Views passes the proper configuration required. The view is then executed and the display is rendered whenever the block is displayed.
We will now explore some of the other ways in which Views interacts with blocks.
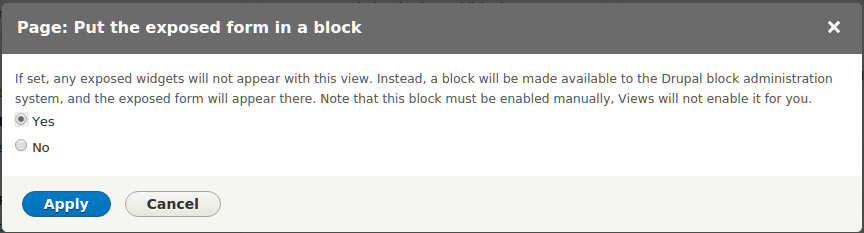
If your view utilizes exposed filters, you have the option to place the exposed form in a block. With this option enabled, you may place the block anywhere on the page, even pages not for your view.
An example of using an exposed form in a block is for a search result view. You will add an exposed filter for keywords that control the search results. With the exposed filters in a block, you can easily place it in your site's header. When an exposed filter block is submitted, it will direct users to your view's display.
To enable the exposed filters as a block, you must first expand the Advanced section on the right side of the Views edit form. Click on the Exposed form in block option from the Advanced section. In the options modal that opens, select the Yes radio button, and click on Apply. You can then place the block from the Block layout form:
Views can be configured to accept contextual filters. Contextual filters allow you to provide a dynamic argument that modifies the view's output. The value is expected to be passed from the URL; however, if it is not present, there are ways to provide a default value.
In this recipe, we will create a new page called My Content, which will display a user's authored content on the /user/%/content route.
Contextual filters mimic the route variables found in the Drupal routing system. Variables are represented by percentage signs as placeholders in the view's path. Views will match up each placeholder with contextual filters by order of their placement. This allows you to have multiple contextual filters; you just need to ensure that they are ordered properly.
The Views module is aware of how to handle the placeholder because the type of data is selected when you add the filter. Once the contextual filter is added, there are extra options available for handling the route variable.
We will now explore the extra options available when using contextual filters.
You are still able to preview a view from the edit form. You simply add the contextual filter values to the text form concatenated by a forward slash (/). In this recipe, you could
replace navigating to /user/1/content with simply inputting 1 into the preview form and updating the preview.
Even though the view created in the recipe follows a route under /user, it will not show up as a local task tab until it has a menu entry defined.
Go back and edit the My Content view. From the Page settings section, you will need to change No menu from the Menu option. Clicking on that link will open the menu link settings dialog.
Select Menu tab and provide a Menu link title, such as My Content. Select <User account menu> for the Parent. Click on Apply and save your view. When you go to the /user page again, it will have the My Content page available.
With contextual filters, you have the ability to manipulate the current page's title. When adding or editing a contextual filter, you can modify the page title. You may check the Override title option in When the filter value is present in the URL or a default is provided section.
This textbox allows you to enter in a new title that will be displayed. Additionally, you can use the information passed from the route context using the format of %#, where # is the argument order.
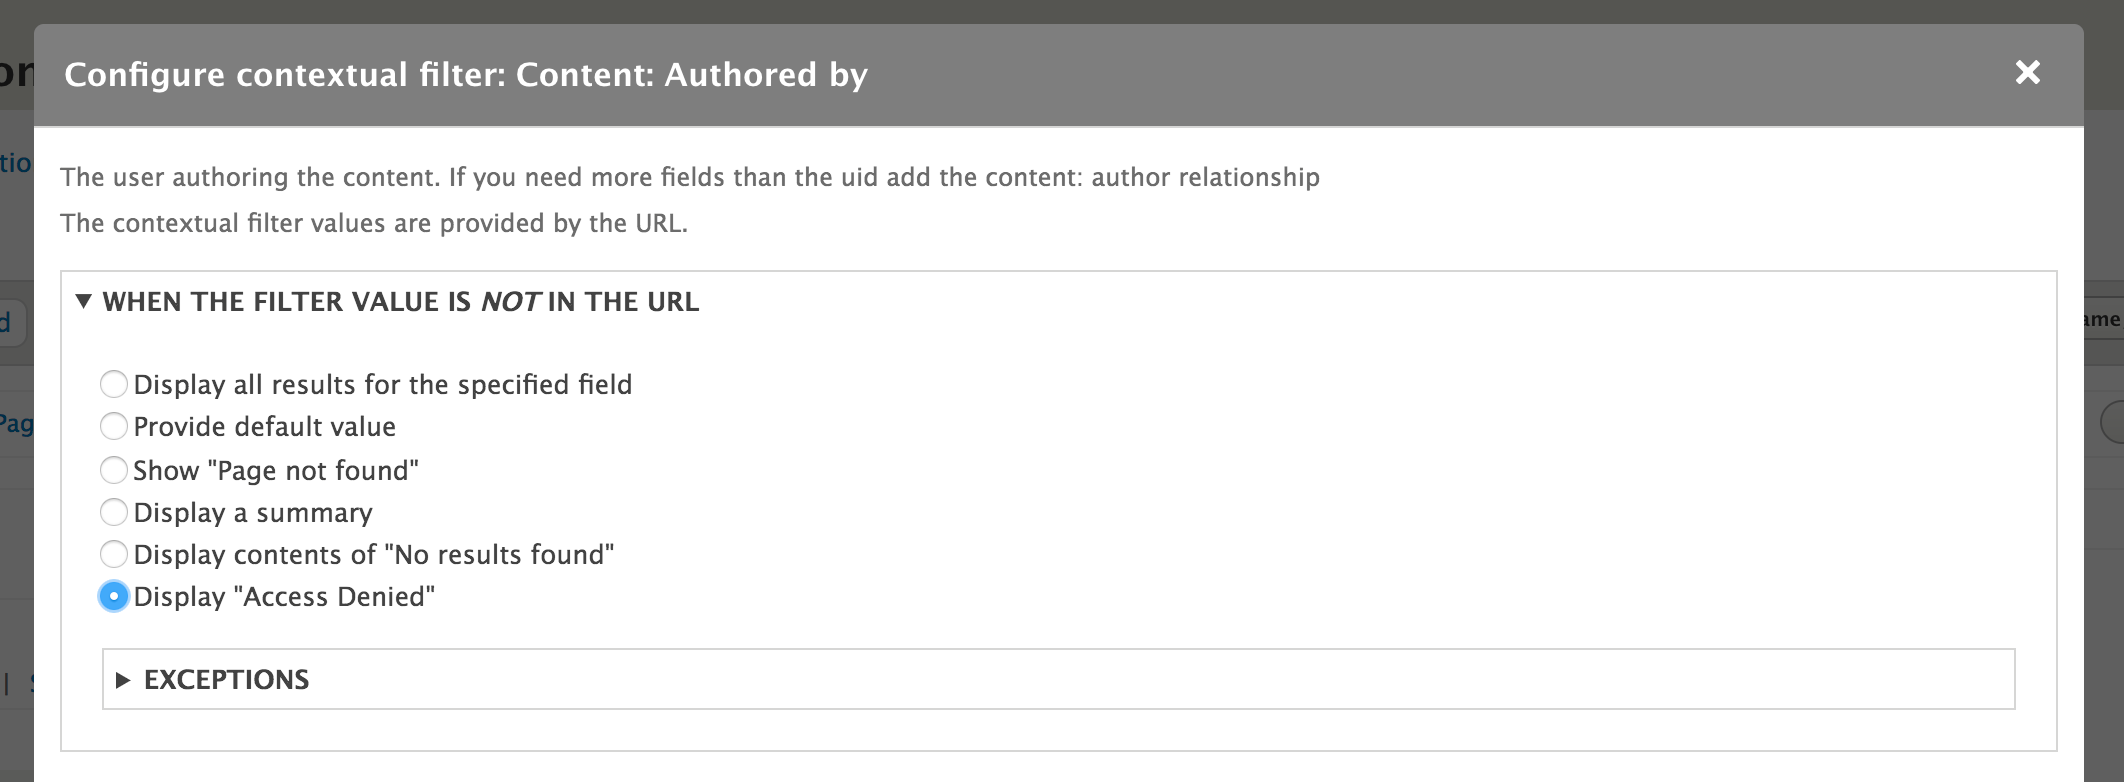
Contextual filters can have validation attached. Without specifying extra validation, Views will take the expected argument and try to make it just work. You can add validation to help limit this scope and filter out invalid route variables.
You can enable validation by checking Specify validation criteria from the When the filter value is present in the URL or a default is provided section. The default is set to Basic Validation, which allows you to specify how the view should react if the data is invalid; based on our recipe, this would be if the user is not found.
The list of Validator options is not filtered by the contextual filter item you selected, so some may not apply. For our recipe, one might want User ID and select the Validate user has access to the User. This validator would make sure that the current user is able to view the route's user's profile. Additionally, it can be restricted further based on its role:
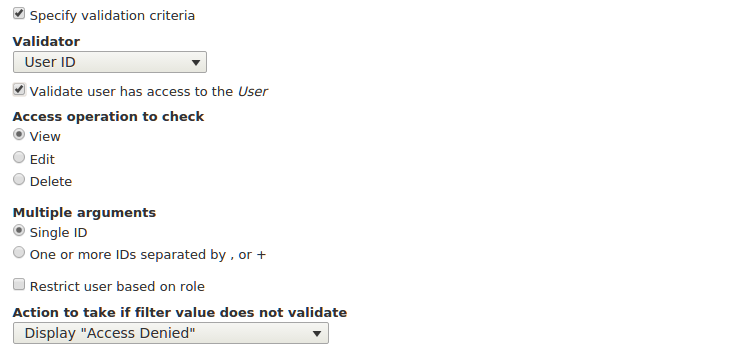
This gives you more granular control over how the view operates when using contextual filters for route arguments.
You may also configure the contextual filter to allow AND or OR operations along with exclusion. These options are under the More section when adding or editing a contextual filter.
The Allow multiple values option can be checked to enable AND or OR operations. If the contextual filter argument contains a series of values concatenated by plus (+) signs, it acts as an OR operation. If the values are concatenated by commas (,) it acts as an AND operation.
When the Exclude option is checked, the value will be excluded from the results rather than the view being limited by it.
As stated at the beginning of the chapter, Views is a visual query builder. When you first create a view, a base table is specified from which to pull data. Views automatically knows how to join tables for field data, such as body text or custom-attached fields.
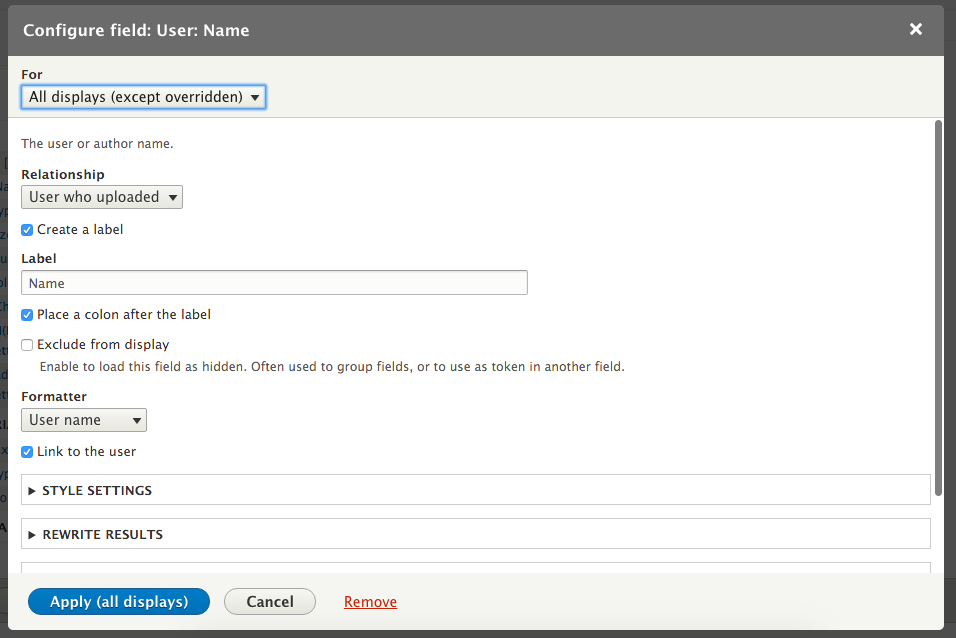
When using an entity reference field, you can display the value as the raw identifier, the referenced entity's label, or the entire rendered entity. However, if you add a relationship based on a reference field, you will have access to display any of that entity's available fields.
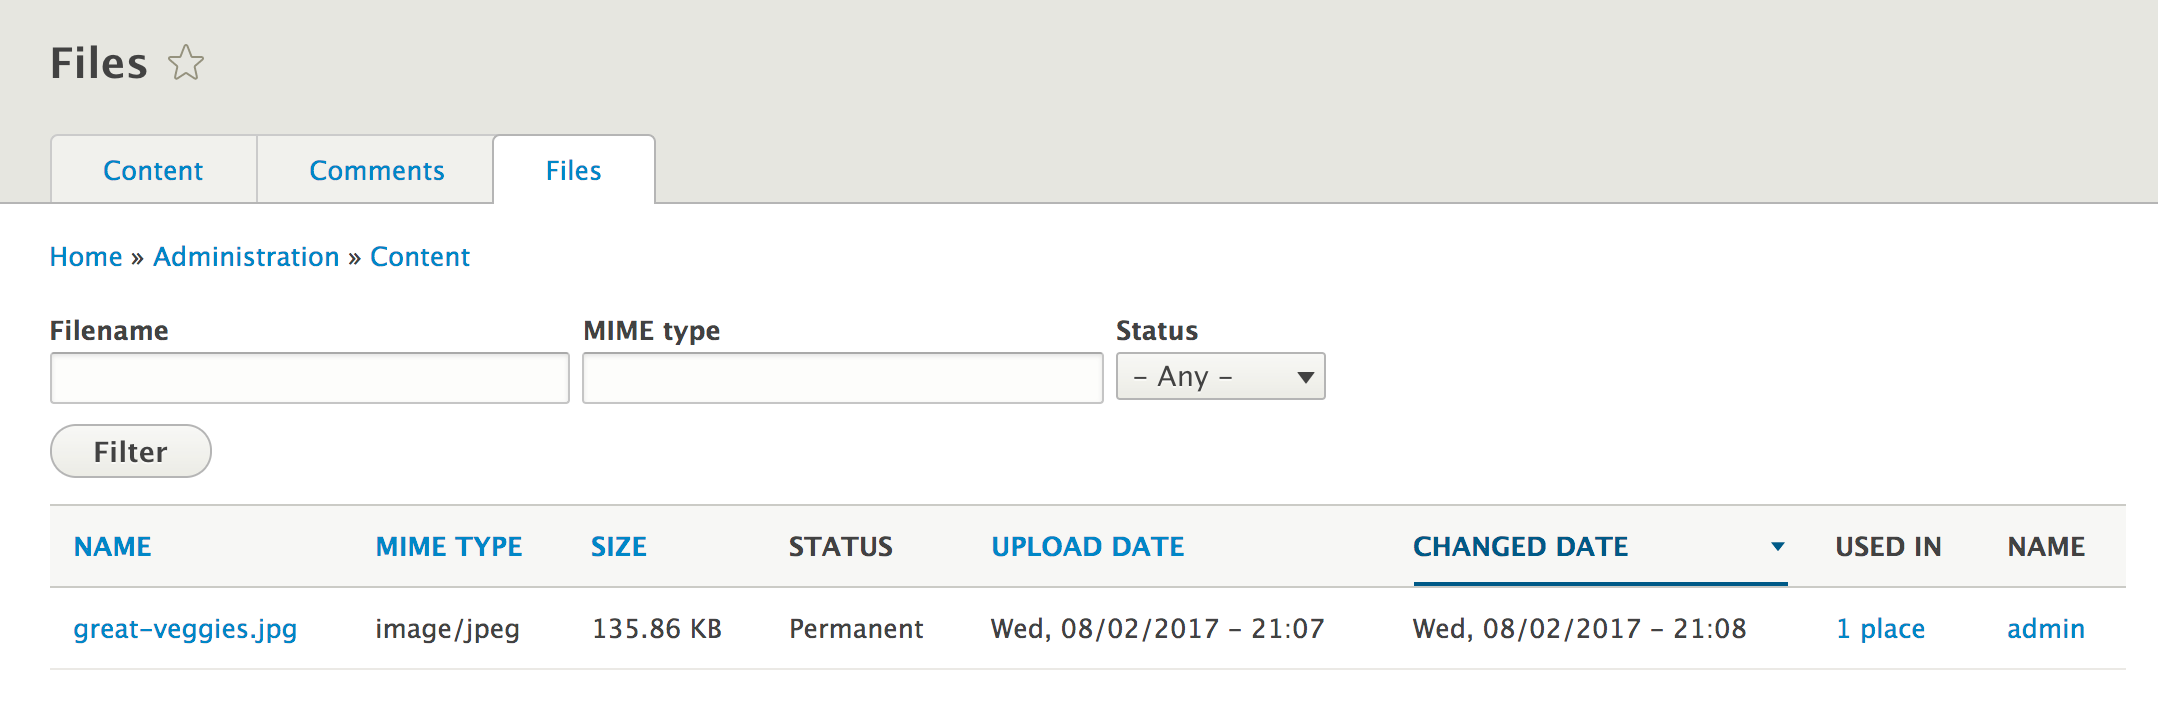
In this recipe, we will update the Files view, used for administering files, to display the username of the user who uploaded the file.
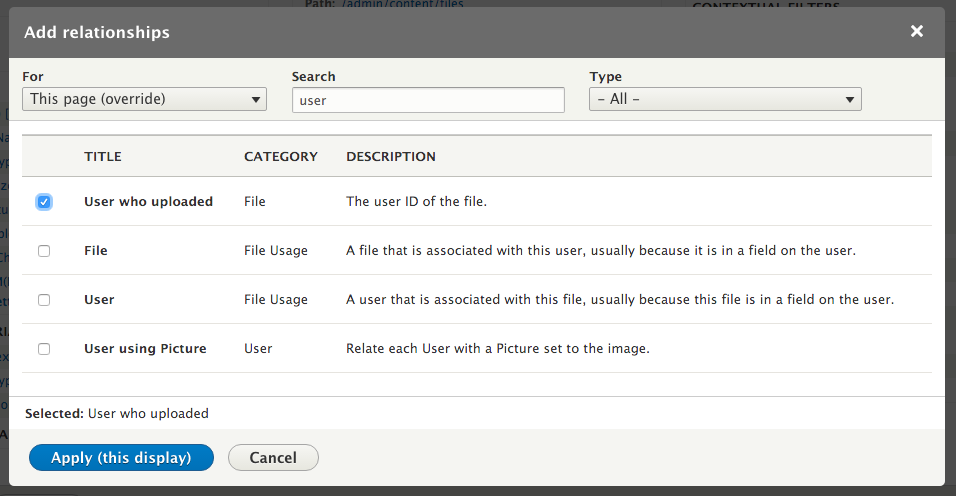
Drupal stores data in a normalized format. Database normalization, in short, involves the organization of data in specifically related tables. Each entity type has its own database table, and all fields have their own database table. When you create a view and specify what kind of data will be shown, you are specifying a base table in the database that Views will query. Views will automatically associate fields that belong to the entity and it's relationship to those tables for you.
When an entity has an entity reference field, you can add a relationship to the referenced entity type's table. This is an explicit definition, whereas fields are implicit. When the relationship is explicitly defined, all the referenced entity type's fields come into scope. The fields on the referenced entity type can then be displayed, filtered, and sorted.
Using relationships in Views allows you to create some powerful displays. We will discuss aggregation and additional information about relationships.
The Views module uses a series of hooks to retrieve data that it then uses to represent ways to interact with the database. One of these is the hook_field_views_data hook, which processes a field storage configuration entity and registers its data with Views. The Views module implements this on behalf of the Drupal core to add relationships and reverse relationship, for Entity reference fields.
Since Entity reference fields have set schema information, Views can dynamically generate these relationships by understanding the field's table name, destination entity's table name, and the destination entity's identifier column.
There are times where you will need to define a relation on your own with custom code. Typically, when working with custom data in Drupal, you would more than likely create a new entity type; this topic is covered in Chapter 9, Configuration Management - Deploying in Drupal 8. This is not always the case, however, and you may just need a simple method of storing data. An example can be found in the Database Logging module. The Database Logging module defines a schema for a database table and then uses hook_views_data to expose its database table to Views.
The dblog_schema hook implementation returns a uid column on the watchdog database table created by the module. That column is then exposed to Views using the following definition:
  $data['watchdog']['uid'] = array(
    'title' => t('UID'),
    'help' => t('The user ID of the user on which the log entry
       was written..'),
    'field' => array(
      'id' => 'numeric',
    ),
    'filter' => array(
      'id' => 'numeric',
    ),
    'argument' => array(
      'id' => 'numeric',
    ),
    'relationship' => array(
      'title' => t('User'),
      'help' => t('The user on which the log entry as written.'),
      'base' => 'users',
      'base field' => 'uid',
      'id' => 'standard',
    ),
  );
This array tells Views that the watchdog table has a column named uid. It is numeric in nature for its display, filtering capabilities, and sorting capabilities. The relationship
key is an array of information that instructs Views how to use this to provide a relationship (LEFT JOIN) on the users table. The User entity uses the users table and has the primary key of uid.
There is a view setting under the Advanced section that allows you to enable aggregation.
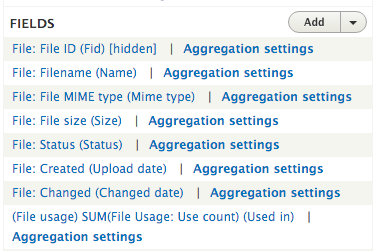
This feature allows you to enable the usage of SQL aggregate functions, such as MIN, MAX, SUM, AVG, and COUNT. In this recipe, the Files view uses aggregation to sum the usage counts of each file on the Drupal site.
Aggregation settings are set for each field, and when enabled, they have their own link to configure these settings:
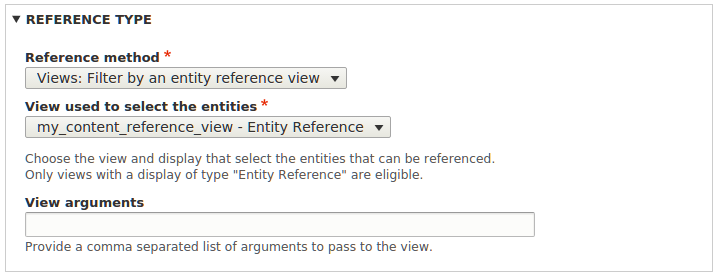
The Entity reference field, covered in Chapter 2, The Content Authoring Experience, can utilize a custom view for providing the available field values. The default entity reference field will display all available entities of the type it can reference. The only available filter is based on the entity bundle, such as only returning Article nodes. Using an entity reference view, you can provide more filters, such as only returning the content that your user has authored.
In this recipe, we will create an entity reference view that filters content by the author. We will add the field to the user account form, allowing users to select their favorite contributed content.
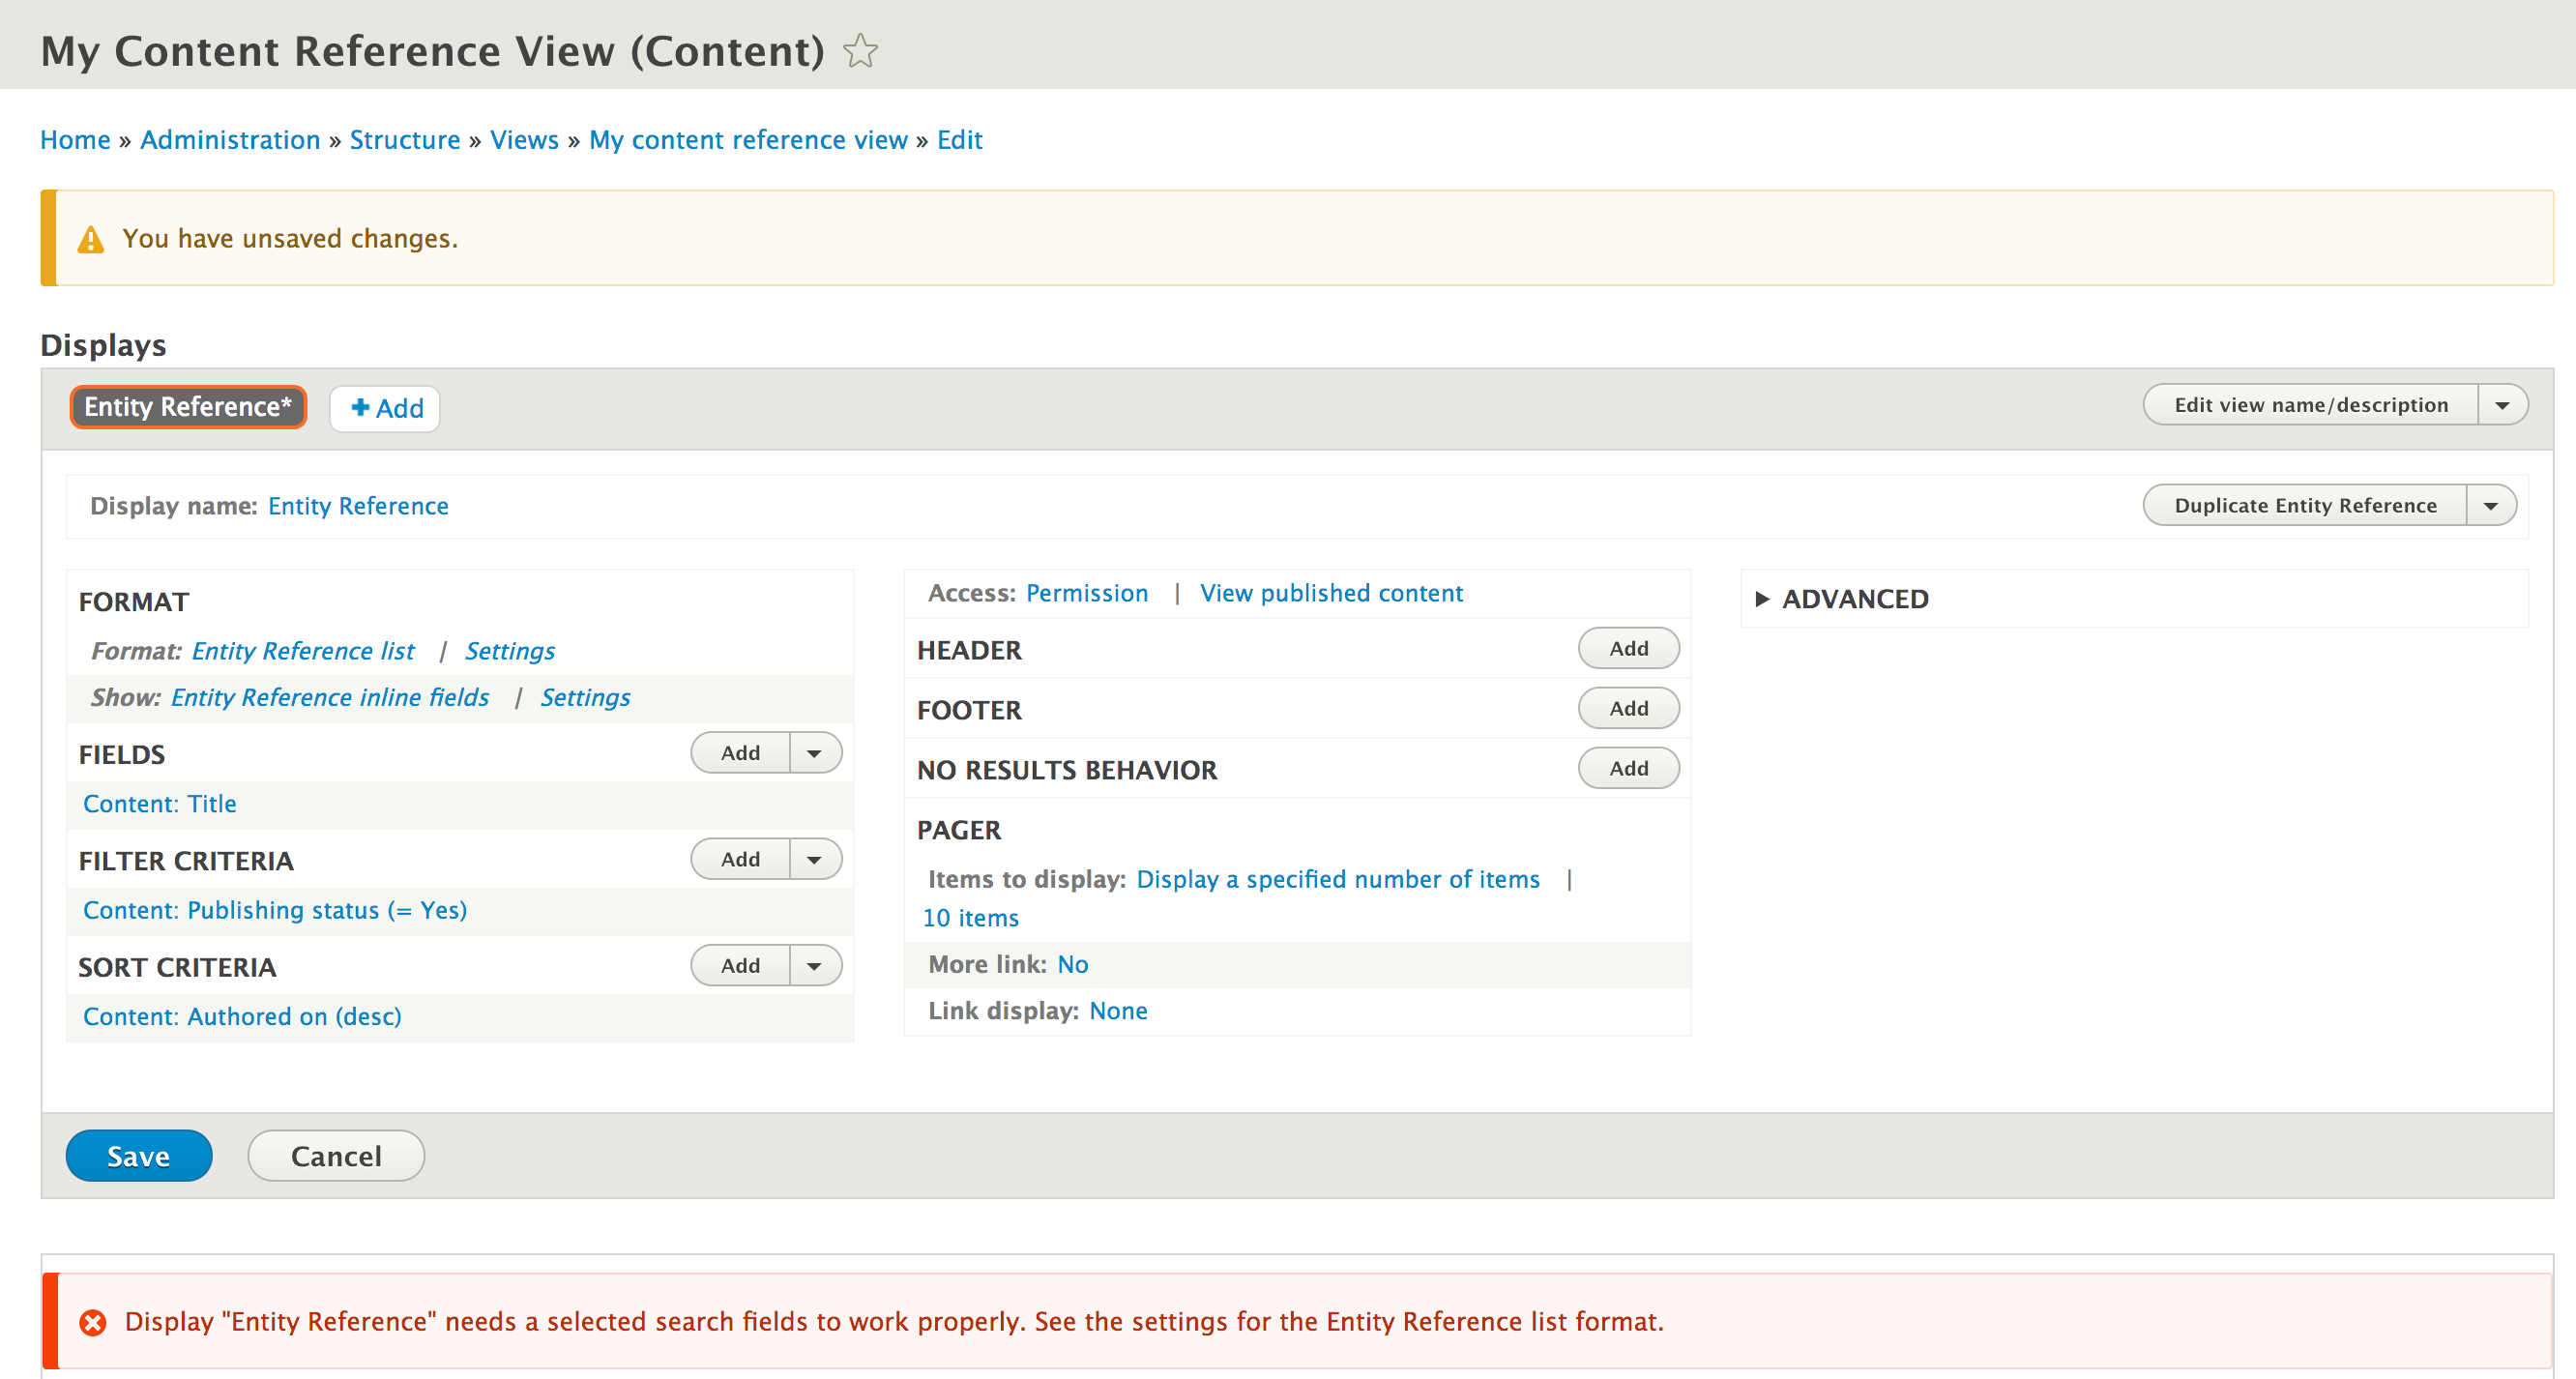
The entity reference field definition provides selection plugins. The Views module provides an entity reference selection plugin. This allows entity reference to gather data into a view to receive available results.
The display type for Views requires you to select which fields will be used to search against when using the autocomplete widget. If you are not using the autocomplete widget and instead use the select list or checkboxes and radio buttons, then it will return the view's entire results.
This chapter dives into extending Drupal using a custom module:
A feature of Drupal that makes it desirable is the ability to customize it through modules. Whether custom or contributed, modules extend the functionalities and capabilities of Drupal. Modules can be used to not only extend Drupal, but also to create a way to provide configuration and reusable features.
This chapter will discuss how to create a module and allow Drupal to discover it, allowing it to be installed from the extend page. Permissions, custom pages, and default configurations all come from modules. We will explore how to provide these through a custom module.
In addition to creating a module, we will discuss the Features module that provides a set of tools to generate a module and export its configuration.
The first step to extend Drupal is to create a custom module. Although the task sounds daunting, it can be accomplished in a few simple steps. Modules can provide functionalities and customizations to functionalities provided by other modules, or they can be used as a way to contain the configuration and a site's state.
In this recipe, we will create a module by defining an info.yml file, a file containing information that Drupal uses to discover extensions, and enabling the module.
name: My Module!
type: module
description: This is an example module from the Drupal 8 Cookbook!
core: 8.x
name: My Module! type: module description: This is an example module from the Drupal 8 Cookbook! core: 8.x
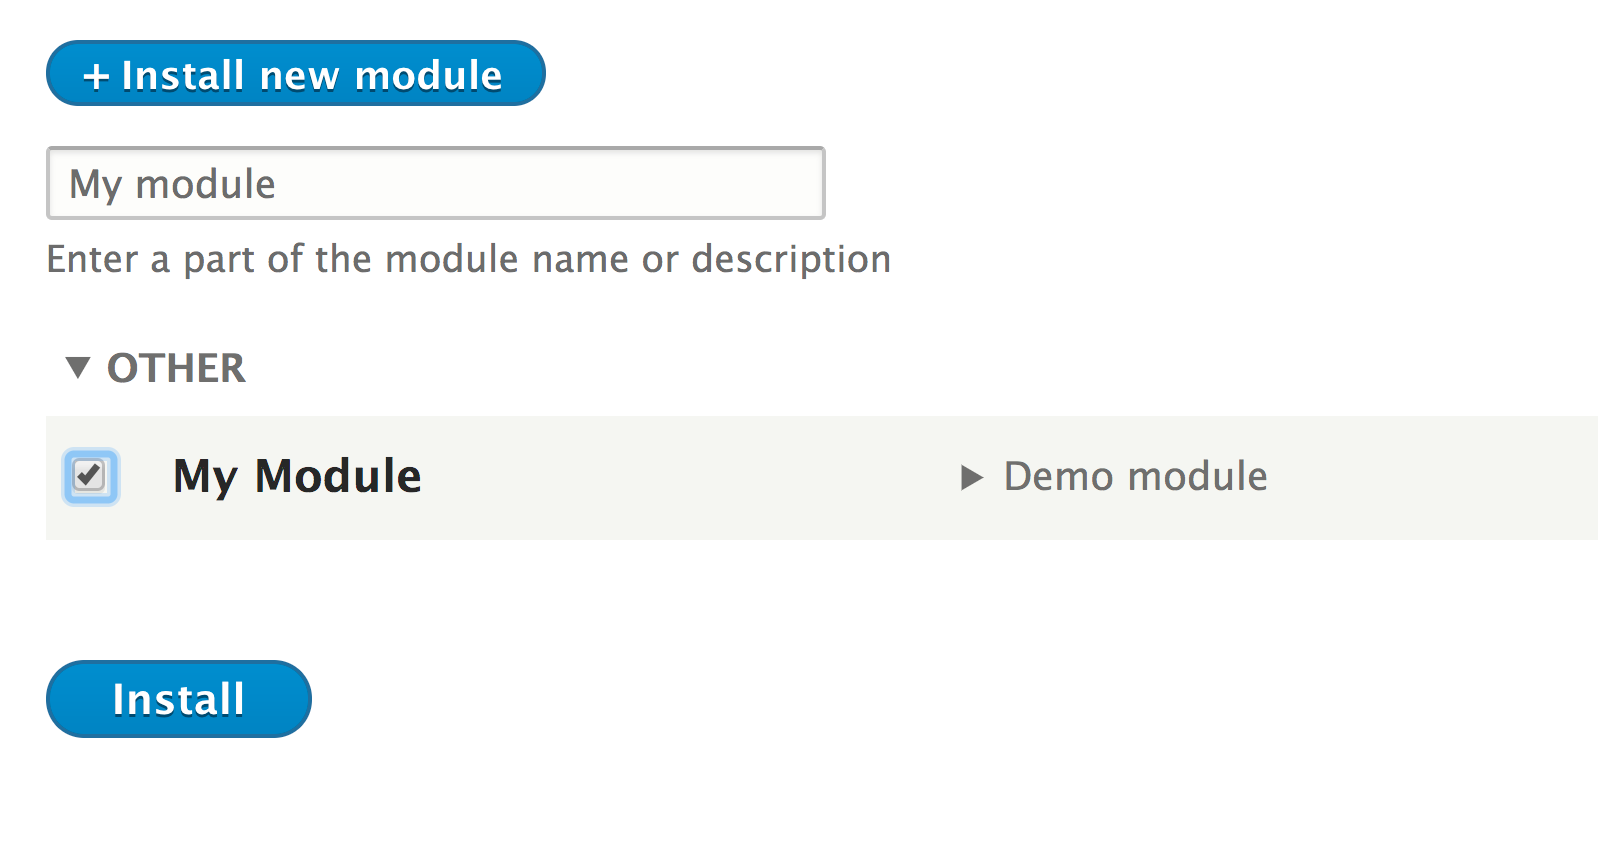
Drupal utilizes info.yml files to define extensions. Drupal has a discovery system that locates these files and parses them to discover modules. The info_parser service, provided by the \Drupal\Core\Extension\InfoParser class, reads the info.yml file. The parser guarantees that the required type, core, and name keys are present.
When a module is installed, it is added to the core.extension configuration object, which contains a list of installed modules and themes. The collection of modules in the core.extension module array will be installed, and will have PHP namespaces resolved, services loaded, and hooks registered.
When Drupal prepares to execute a hook or register services, it will iterate through the values in the module key in core.extension.
There are more details about Drupal modules and the module info.yml files that we can explore.
Drupal 8 uses the PSR-4 standard developed by the PHP Framework Interoperability Group (PHP-FIG). The PSR-4 standard is for package-based PHP namespace autoloading. It defines a standard to understand how to automatically include classes based on a namespace and class name. Drupal modules have their own namespaces under the Drupal root namespace.
Using the module from the recipe, our PHP namespace will be Drupal\mymodule, which represents the modules/mymodule/src folder.
With PSR-4, files need to contain only one class, interface, or trait. These files need to have the same filename as the containing class, interface, or trait name. This allows a class loader to resolve a namespace as a directory path and know the class's filename. The file can then be automatically loaded when it is used in a file.
Drupal supports multiple module discovery locations. Modules can be placed in the following directories and discovered:
The \Drupal\Core\Extension\ExtensionDiscovery class handles the discovery of extensions by type. It will iteratively scan each location and discover modules that are available. The discovery order is important. If the same module is placed in /modules, but also in the sites/default/modules directory, the latter will take precedence.
Modules can define a package key to group modules on the module list page:
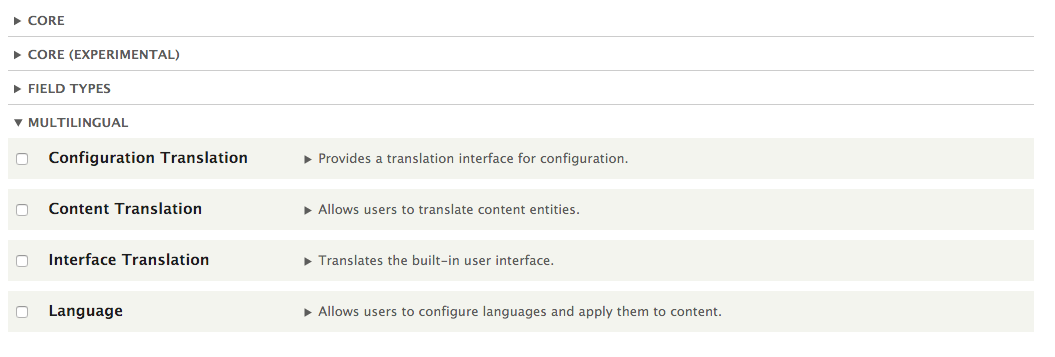
Projects that include multiple submodules, such as Drupal Commerce, specify packages to normalize the modules' list form. Contributed modules for the Drupal Commerce project utilize a package name, Commerce (contrib), to group them on the module list page.
Modules can define dependencies to ensure that those modules are enabled before your module can be enabled.
Here is the info.yml for the Responsive Image module:
name: Responsive Image
type: module
description: 'Provides an image formatter and breakpoint mappings to output responsive images using the HTML5 picture tag.'
package: Core
version: VERSION
core: 8.x
dependencies:
  - breakpoint
  - image
The dependencies key specifies that the breakpoint and image modules need to be enabled first before the Responsive Image module can be enabled. When enabling a module that requires dependencies that are disabled, the installation form will provide a prompt asking you whether you would like to install the dependencies as well. If a dependency module is missing, the module cannot be installed. The dependency will show a status of (missing).
A module that is a dependency of another module will state the information in its description, along with the other module's status. For example, the Breakpoint module will show that the Re module requires it as a dependency and is disabled:
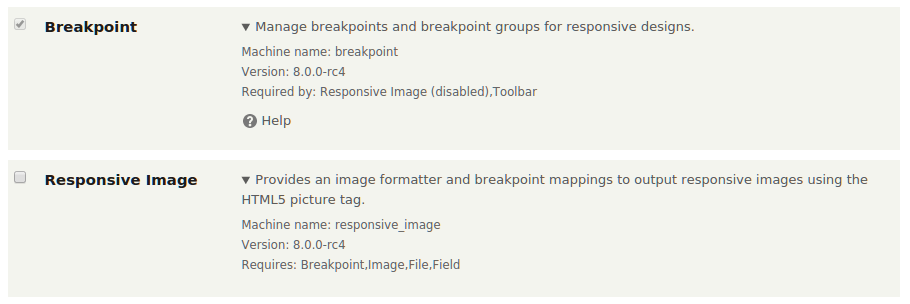
There is a version key that defines the current module's version. Projects on Drupal.org do not specify this directly, as the Drupal.org extension packager adds it when a release is created. However, this key can be important for private modules to track the release information.
Versions are expected to be single strings, such as 1.0-alpha1 and 2.0.1. You can also pass VERSION, which will resolve to the current version of Drupal core.
In Drupal, there are routes that represent URL paths that Drupal interprets to return content. Modules can define routes and methods that return data to be rendered and then displayed to the end user.
In this recipe, we will define a controller that provides an output and a route. The route provides a URL path that Drupal will associate with our controller to display the output.
Create a new module like the one in the first recipe. We will refer to the module as mymodule throughout the recipe. Use your module's name as appropriate.
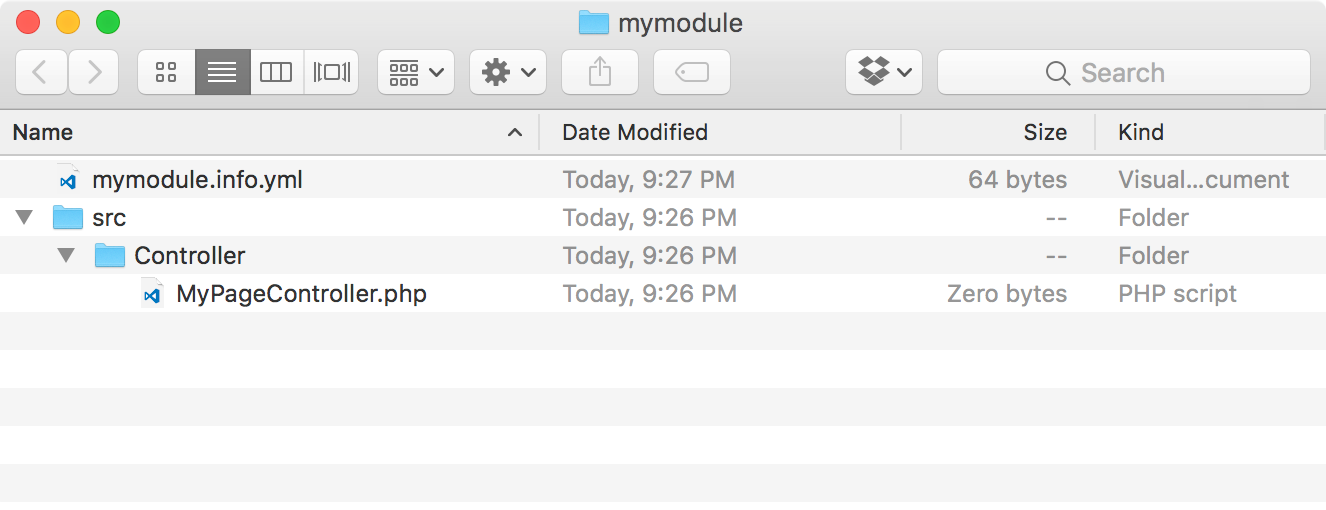
<?php

namespace Drupal\mymodule\Controller;

use Drupal\Core\Controller\ControllerBase;

/**
 * Returns responses for My Module module.
 */
class MyPageController extends ControllerBase {

}
This creates the MyPageController class, which extends the \Drupal\Core\Controller\ControllerBase class. This base class provides a handful of utilities for interacting with the container.
The Drupal\mymodule\Controller namespace allows Drupal to automatically load the file from /modules/mymodule/src/Controller.
/**
 * Returns markup for our custom page.
 */
public function customPage() {
  return [
    '#markup' => t('Welcome to my custom page!'),
  ];
}
The customPage method returns a render array that the Drupal theming layer can parse. The #markup key denotes a value that does not have any additional rendering or theming processes.
mymodule.mypage:
mymodule.mypage:
  path: '/mypage'
mymodule.mypage:
  path: '/mypage'
  defaults:
    _controller: '\Drupal\mymodule\Controller\MyPageController::customPage'
    _title: 'My custom page'
You need to provide the initial \ when providing the fully qualified class name.
mymodule.mypage:
  path: '/mypage'
  defaults:
  _controller: '\Drupal\mymodule\Controller\MyPageController::customPage'
  _title: 'My custom page'
requirements:
  _permission: 'access content'
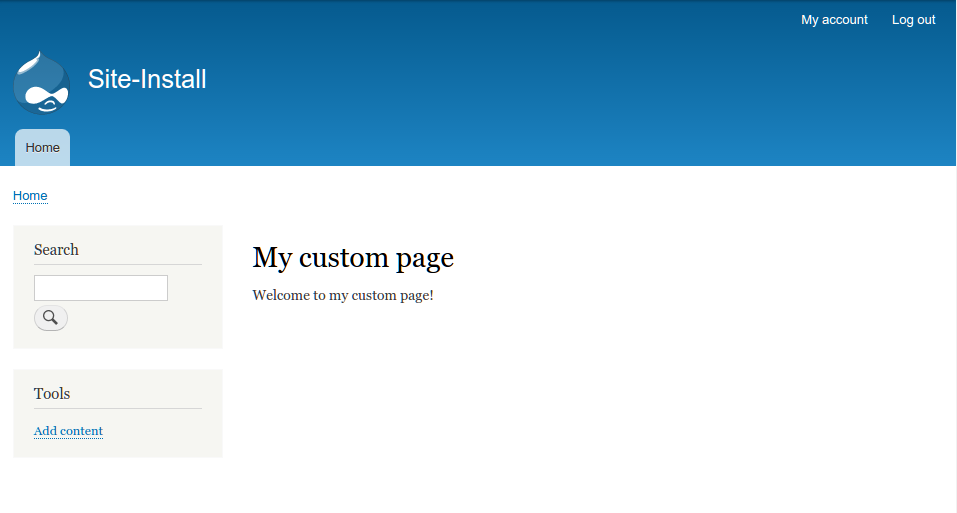
Drupal uses routes, which define a path, that returns content. Each route has a method in a controller class that generates the content, in the form of a render array, to be delivered to the user. When a request comes to Drupal, the system tries to match the path to known routes. If the route is found, the route's definition is used to deliver the page. If the route cannot be found, the 404 page is displayed.
The HTTP kernel takes the request and loads the route. It will invoke the defined controller method or procedural function. The result of the invoked method or function is then handed to the presentation layer of Drupal to be rendered into the content that can be delivered to the user.
Drupal 8 builds on top of the Symfony HTTP kernel to provide the underlying functionality of its route system. It has added the ability to provide access requirements, cast placeholders into loaded objects, and provide partial page responses.
Routes have extra capabilities that can be configured; we will explore those in the next section.
Routes can accept dynamic arguments that can be passed to the route controller's method. Placeholder elements can be defined in the route using curly brackets in the URL that denote dynamic values.
The following example code shows what a route might look like:
mymodule.cats:
  path: '/cat/{name}'
  defaults:
    _controller: '\Drupal\mymodule\Controller\MyPageController::cats'
  requirements:
    _permission: 'access content'
This route specifies the /cat/{name} path. The {name} placeholder will accept dynamic values and pass them to the controller's method:
class MyPageController {
  // ...
  public function cats($name) {
    return [
      '#markup' => t('My cats name is: @name', [
         '@name' => $name,
      ]),
    ];
  }
}
This method accepts the name variable from the route and substitutes it into the render array to display it as a text.
Drupal's routing system provides a method of upcasting a variable into a loaded object. In Drupal, upcasting is the process of taking a route parameter and converting it into a richer piece of data. This includes taking an entity ID and providing the loaded entity to the system. There are a set of parameter converter classes under the \Drupal\Core\ParamConverter namespace. The EntityConverter class will read options defined in the route and replace a placeholder value with a loaded entity object.
If we have an entity type called cat, we can turn the name placeholder into a method that will be provided with the loaded cat object in our controller's method:
mymodule.cats:
  path: '/cat/{name}'
  defaults:
    _controller: '\Drupal\mymodule\Controller\MyPageController::cats'
  requirements:
    _permission: 'access content'
  options:
    parameters:
      name:
         type: entity:cat
Drupal provides regular expression validation against route parameters. If the parameter fails the regular expression validation, a 404 page will be returned. Using an example route, we can add the validation to ensure that only alphabetical characters are used in the route parameter:
mymodule.cats:
  path: '/cat/{name}'
  defaults:
    _controller: '\Drupal\mymodule\Controller\MyPageController::cats'
  requirements:
    _permission: 'access content'
    name: '[a-zA-z]+'
Under the requirements key, you can add a new value that matches the name of the placeholder. You can then set it to have the value of the regular expression you would like to use. This would prevent c@ts or cat! from being valid parameters.
Routes can define different access requirements through the requirements key. Multiple validators can be added. However, there must be one that provides a true result, or else the route will return 403, access denied. This is true if the route defines no requirement validators.
Route requirement validators are defined by implementing \Drupal\Core\Routing\Access\AccessInterface. Here are some of the common requirement validators defined throughout Drupal core:
The routing system allows modules to define routes programmatically. This can be accomplished by providing a routing_callbacks key that defines a class and method that will return an array of the \Symfony\Component\Routing\Route objects.
In the module's routing.yml, you will define the routing callbacks key and related class:
route_callbacks:
  - '\Drupal\mymodule\Routing\CustomRoutes::routes'
The \Drupal\mymodule\Routing\CustomRoutes class will then have a method named routes, which returns an array of Symfony route objects:
<?php

namespace Drupal\mymodule\Routing;
use Symfony\Component\Routing\Route;

class CustomRoutes {
  public function routes() {
    $routes = [];

    // Create mypage route programmatically
    $routes['mymodule.mypage'] = new Route(
        // Path definition
       'mypage',
        // Route defaults
       [
          '_controller' => '\Drupal\mymodule\Controller\MyPageController::customPage',
          '_title' => 'My custom page',
        ],
        // Route requirements
       [
          '_permission' => 'access content',
        ]
    );
    return $routes;
  }
}
If a module provides a class that interacts with routes, the best practice is to place it in the routing portion of the module's namespace. This helps you identify its purpose.
The invoked method is expected to return an array of initiated route objects. The route class takes the following arguments:
When Drupal's route system is rebuilt because of a module being enabled or caches being rebuilt, an event is fired that allows modules to alter routes defined statically in YAML or dynamically. This involves implementing an event subscriber by extending \Drupal\Core\Routing\RouteSubscribeBase, which subscribes the RoutingEvents::ALTER event.
Create a src/Routing/RouteSubscriber.php file in your module. It will hold the route subscriber class:
<?php

namespace Drupal\mymodule\Routing;

use Drupal\Core\Routing\RouteSubscriberBase;
use Symfony\Component\Routing\RouteCollection;

class RouteSubscriber extends RouteSubscriberBase {

  /**
   * {@inheritdoc}
   */
  public function alterRoutes(RouteCollection $collection) {
    // Change path of mymodule.mypage to use a hyphen
    if ($route = $collection->get('mymodule.mypage')) {
      $route->setPath('/my-page');
    }
  }

}
The preceding code extends RouteSubscribeBase and implements the alterRoutes() method. We make an attempt to load the mymodule.mypage route, and, if it exists, we change its path to my-page. Since objects are always passed by reference, we do not need to return a value.
For Drupal to recognize the subscriber, we will need to describe it in the module's services.yml file. In the base directory of your module, create a mymodule.services.yml file and add the following code:
services:
  mymodule.route_subscriber:
    class: Drupal\mymodule\Routing\RouteSubscriber
    tags:
      - { name: event_subscriber }
This registers our route subscriber class as a service to the container so that Drupal can execute it when the event is fired.
In Drupal, there are roles and permissions used to define robust access control lists for users. Modules use permissions to check whether the current user has access to perform an action, view specific items, or do other operations. Modules then define the permissions that are used so that Drupal is aware of them. Developers can then construct roles, which are made up of enabled permissions.
In this recipe, we will define a new permission to view custom pages defined in a module. The permission will be added to a custom route and will restrict access to the route path to users who have a role containing the permission.
Create a new module like the one in the first recipe. We will refer to the module as mymodule throughout the recipe. Use your module's name in the following recipe as appropriate.
This recipe also modifies a route defined in the module. We will refer to this route as mymodule.mypage. Modify the appropriate path in your module's routing.yml file.
view mymodule pages:
view mymodule pages:
  title: 'View my module pages'
view mymodule pages:
  title: 'View my module pages'
  description: 'Allows users to view pages provided by My Module'
mymodule.mypage:
  path: '/mypage'
  defaults:
  _controller: '\Drupal\mymodule\Controller\MyPageController::customPage'
  _title: 'My custom page'
requirements:
  _permission: 'view mymodule pages'
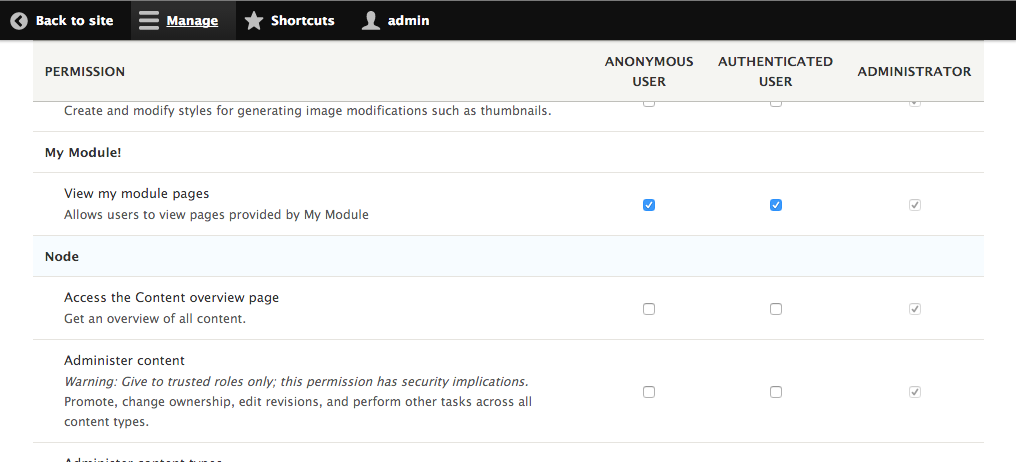
Permissions and roles are provided by the User module. The user.permissions service discovers the permissions.yml provided by installed modules. By default, the service is defined through the \Drupal\user\PermissionHandler class.
Drupal does not save a list of all permissions that are available. The permissions for a system are loaded when the permissions page is loaded. Roles contain an array of permissions.
When checking a user's access for a permission, Drupal checks all the user's roles to see whether they support that permission.
We will cover more ways to work with permissions in your modules in the upcoming sections.
Permissions can be flagged as having a security risk if enabled; this is the restrict access flag. When this flag is set to restrict access: TRUE, it will add a warning to the permission description.
This allows module developers to provide more context to the amount of control a permission may give a user:

The permission definition from our recipe would look like the following:
view mymodule pages:
 title: 'View my module pages'
 description: 'Allows users to view pages provided by My Module'
 restrict access: TRUE
Permissions can be defined by a module programmatically or statically in a YAML file. A module needs to provide a permission_callbacks key in its permissions.yml that contains either an array of classes and their methods or a procedural function name.
For example, the Filter module provides granular permissions based on the different text filters created in Drupal:
permission_callbacks:
- Drupal\filter\FilterPermissions::permissions
This tells the user_permissions service to execute the permissions method of the
\Drupal\Filter\FilterPermissions class. The method is expected to return an array that matches the same structure as that of the permissions.yml file.
An example of using generated permissions will be covered in Implementing custom access control for an entity recipe of Chapter 10, The Entity API.
The user account interface provides a method for checking whether a user entity has a permission. To check whether the current user has a permission, you will get the current user, and you need to invoke the hasPermission method:
\Drupal::currentUser()->hasPermission('my permission');
The \Drupal::currentUser() method returns the current active user object. This allows you to check whether the active user has the necessary permissions to perform certain types of actions.
Drupal provides a configuration management system, which is discussed in Chapter 9, Configuration Management - Deploying in Drupal 8, and modules can provide configuration on an installation or through an update system. Modules provide the configuration through YAML files when they are first installed. Once the module is enabled, the configuration is then placed in the configuration management system; however updates can be made to the configuration in code through the Drupal update system.
In this recipe, we will provide a configuration YAML that creates a new contact form and then manipulates it through a schema version change in the update system.
Create a new module like the one in the first recipe. We will refer to the module as mymodule throughout the recipe. Use your module's appropriate name where necessary.
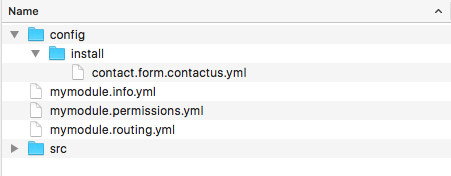
langcode: en
status: true
dependences: {}
id: contactus
label: 'Contact Us'
recipients:
  - webmaster@example.com
reply: ''
weight: 0
The configuration entry is based on a schema definition, which we will cover in Chapter 9, Configuration Management - Deploying in Drupal 8. The langcode, status, and dependencies are the required configuration management keys.
The id is the contact form's machine name and the label is the human display name. The recipients key is a YAML array of valid email addresses. The reply key is a string of text for the Auto-reply field. Finally, the weight defines the form's weight in the administrative list.
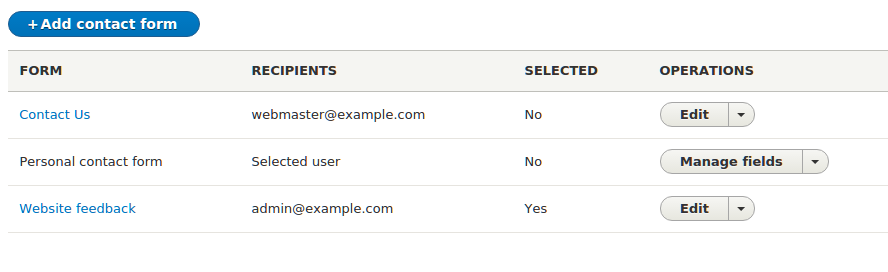
<?php

/**
 * Update "Contact Us" form to have a reply message.
 */
function mymodule_update_8001() {
  $contact_form = \Drupal\contact\Entity\ContactForm::load('contactus');
  $contact_form->setReply(t('Thank you for contacting us, we will reply shortly'));
  $contact_form->save();
}
This function uses the entity's class to load our configuration entity object. It loads contactus, which our module has provided, and sets the reply property to a new value.
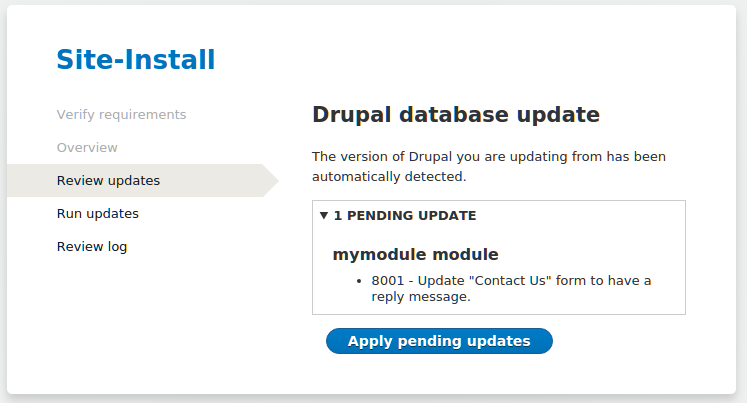
Drupal's moduler_installer service, provided through \Drupal\Core\Extension\ModuleInstaller, ensures that configuration items defined in the module's config folder are processed on installation. When a module is installed, the config.installer service, provided through \Drupal\Core\Config\ConfigInstaller, is called to process the module's default configuration.
In the event, the config.installer service makes an attempt to import the configuration from the install folder that already exists, and an exception will be thrown. Modules cannot provide changes made to the existing configuration through static YAML definitions.
Since modules cannot adjust configuration objects through static YAML definitions provided to Drupal, they can utilize the database update system to modify the configuration. Drupal utilizes a schema version for modules. The base schema version for a module is 8000. Modules can provide update hooks in the form of hook_update_N, where N represents the next schema version. When Drupal's updates are run, they will execute the proper update hooks and update the module's schema version.
Configuration objects are immutable by default. To edit a configuration, a mutable object needs to be loaded through the configuration factory service.
We will discuss configuration in Chapter 9, Configuration Management - Deploying in Drupal 8; however, we will now dive into some important notes when working with modules and configurations.
There are three directories that the configuration management system will inspect in a module's config folder, which are as follows:
The install folder specifies the configuration that will be imported. If the configuration object exists, the installation will fail. The optional folder contains the configuration that will be installed if the following conditions are met:
If any one of the conditions fails, the configuration will not be installed, but it will not halt the module's installation process.
The schema folder provides configuration object definitions. This uses YAML definitions to structure configuration objects, and is covered in depth in Chapter 9, Configuration Management - Deploying in Drupal 8.
The configuration management system does not allow modules to provide configuration on an installation that already exists. For example, if a module tries to provide system.site and defines the site's name, it would fail to install. This is because the system module provides this configuration object when you first install Drupal.
Drupal provides hook_install() that modules can implement in their .install file. This hook is executed during the module's installation process. The following code will update the site's title to Drupal 8 Cookbook! on the module's installation:
/**
 * Implements hook_install().
 */
function mymodule_install() {
  // Set the site name.
  \Drupal::configFactory()
    ->getEditable('system.site')
    ->set('name', 'Drupal 8 Cookbook!')
    ->save();
}
Configurable objects are immutable by default when loaded by the default config service. To modify a configuration object, you will need to use the configuration factory to receive a mutable object. The mutable object can have set and save methods that are executed to update the configuration in a configuration object.
New to Drupal 8 is the event dispatcher system. One of the many benefits of Drupal is the ability to react to specific processes and alter or react to them. Unlike the hook system that exists in Drupal 8, and has for many versions of Drupal, the event dispatch system uses explicit registration to an event.
The events dispatcher system comes from the Symfony framework and allows components to easily interact with one another. Within Drupal, and integrated Symfony components, events are dispatched, and event subscribers can listen to the events and react to changes or other processes.
In this recipe, we will subscribe to the REQUEST event, which fires when a request is first handled. If the user is not logged in, we will navigate them to the login page.
<?php

 namespace Drupal\mymodule\EventSubscriber;

 use Symfony\Component\EventDispatcher\EventSubscriberInterface;

 class RequestSubscriber implements EventSubscriberInterface {

 }
<?php

 namespace Drupal\mymodule\EventSubscriber;

 use Symfony\Component\EventDispatcher\EventSubscriberInterface;
 use Symfony\Component\HttpKernel\KernelEvents;

 class RequestSubscriber implements EventSubscriberInterface {

   /**
    * {@inheritdoc}
    */
   public static function getSubscribedEvents() {
     return [
       KernelEvents::REQUEST => ['doAnonymousRedirect', 28],
     ];
   }

 }
The KernelEvents class provides constants for available events. Our returned array specifies the method to invoke and its priority for that event.
<?php

 namespace Drupal\mymodule\EventSubscriber;

 use Drupal\Core\Url;
 use Symfony\Component\EventDispatcher\EventSubscriberInterface;
 use Symfony\Component\HttpFoundation\RedirectResponse;
 use Symfony\Component\HttpKernel\Event\GetResponseEvent;
 use Symfony\Component\HttpKernel\KernelEvents;

 class RequestSubscriber implements EventSubscriberInterface {

   /**
    * Redirects all anonymous users to the login page.
    *
    * @param \Symfony\Component\HttpKernel\Event\GetResponseEvent $event
    *   The event.
    */
   public function doAnonymousRedirect(GetResponseEvent $event) {
     // Make sure we are not on the user login route.
     if (\Drupal::routeMatch()->getRouteName() == 'user.login') {
       return;
     }

     // Check if the current user is logged in.
     if (\Drupal::currentUser()->isAnonymous()) {
       // If they are not logged in, create a redirect response.
       $url = Url::fromRoute('user.login')->toString();
       $redirect = new RedirectResponse($url);

       // Set the redirect response on the event, cancelling default response.
       $event->setResponse($redirect);
     }
   }

   /**
    * {@inheritdoc}
    */
   public static function getSubscribedEvents() {
     return [
       KernelEvents::REQUEST => ['doAnonymousRedirect', 28],
     ];
   }

 }
To prevent a redirect loop, we will use the RouteMatch service to get the current route object and verify that we are not already on the user.login route page.
Then we check whether the user is anonymous and, if the user is anonymous, set the event's response to a redirect response.
services:
   mymodule.request_subscriber:
     class: Drupal\mymodule\EventSubscriber\RequestSubscriber
     tags:
       - { name: event_subscriber }
The event_subscriber tag tells the container to invoke the getSubscribedEvents method and register its methods.
Throughout Drupal and Symfony components, and even other third-party PHP libraries, events can be passed to the event dispatcher. The event_dispatcher service in Drupal is an optimized version of the one provided by Symfony, but is completely interoperable.
When the container is built, all services tagged as event_subscribers are gathered. They are then registered into the event_dispatcher service, keyed by the events returned in the getSubscribedEvents method.
When the event_dispatcher service is told to dispatch an event, it invokes the proper methods on all subscribed services. With KernelEvents::REQUEST, KernelEvents::EXCEPTION and KernelEvents::VIEW, you have the opportunity to provide a response before the controller is invoked. Then there are events, such as ConfigEvents::SAVE and ConfigEvents::DELETE, that are dispatched and allow you to react to a configuration being saved or deleted but are not actually able to adjust the configuration entity directly through the event object.
Event subscribers require knowledge of creating services, registering them, and even dependency injection. We'll discuss this some more in the next section.
With Drupal 8 and the implementation of a service container comes the concept of dependency injection. Dependency injection is a software design concept, and at its base level, it provides a means to use a class without having to directly reference it. In our example, we retrieve services multiple times using the global static class \Drupal. This is bad practice within services, and can make testing more difficult.
To implement dependency injection, first, we will add a constructor to our class that accepts the services used (current_route_match and current_user) and matches protected properties to store them:
/**
  * The route match.
  *
  * @var \Drupal\Core\Routing\RouteMatchInterface
  */
 protected $routeMatch;

 /**
  * Account proxy.
  *
  * @var \Drupal\Core\Session\AccountProxyInterface
  */
 protected $accountProxy;

 /**
  * Creates a new RequestSubscriber object.
  *
  * @param \Drupal\Core\Routing\RouteMatchInterface $route_match
  *   The route match.
  * @param \Drupal\Core\Session\AccountProxyInterface $account_proxy
  *   The current user.
  */
 public function __construct(RouteMatchInterface $route_match, AccountProxyInterface $account_proxy) {
   $this->routeMatch = $route_match;
   $this->accountProxy = $account_proxy;
 }
We can then replace any calls to \Drupal:: with $this->:
/**
  * Redirects all anonymous users to the login page.
  *
  * @param \Symfony\Component\HttpKernel\Event\GetResponseEvent $event
  *   The event.
  */
 public function doAnonymousRedirect(GetResponseEvent $event) {
   // Make sure we are not on the user login route.
   if ($this->routeMatch->getRouteName() == 'user.login') {
     return;
   }

   // Check if the current user is logged in.
   if ($this->accountProxy->isAnonymous()) {
     // If they are not logged in, create a redirect response.
     $url = Url::fromRoute('user.login')->toString();
     $redirect = new RedirectResponse($url);

     // Set the redirect response on the event, cancelling default response.
     $event->setResponse($redirect);
   }
 }
Finally, we will update mymodule.services.yml to specify our constructor arguments so that they will be injected when the container runs our event subscriber:
services:
   mymodule.request_subscriber:
     class: Drupal\mymodule\EventSubscriber\RequestSubscriber
     arguments: ['@current_route_match', '@current_user']
     tags:
       - { name: event_subscriber }
Dependency injection feels and seems magical at first. However, with use and practice, it will begin to make more sense and become second nature when developing with Drupal 8.
Many Drupal users create custom modules to provide specific sets of features that they can reuse across multiple sites. In fact, there is a module for the sole purpose of providing a means to export configuration and create modules that provide features. This is how the Features module received its name, in fact.
The Features module has two submodules. The main Features module provides all the functionalities. The Features UI module provides a user interface to create and manage features.
We will use Features to export a module with a configuration that contains the default page and article content types provided by the standard installation so that they can be used on other installation profiles.
$ cd /path/to/drupal8
$ composer require drupal/features
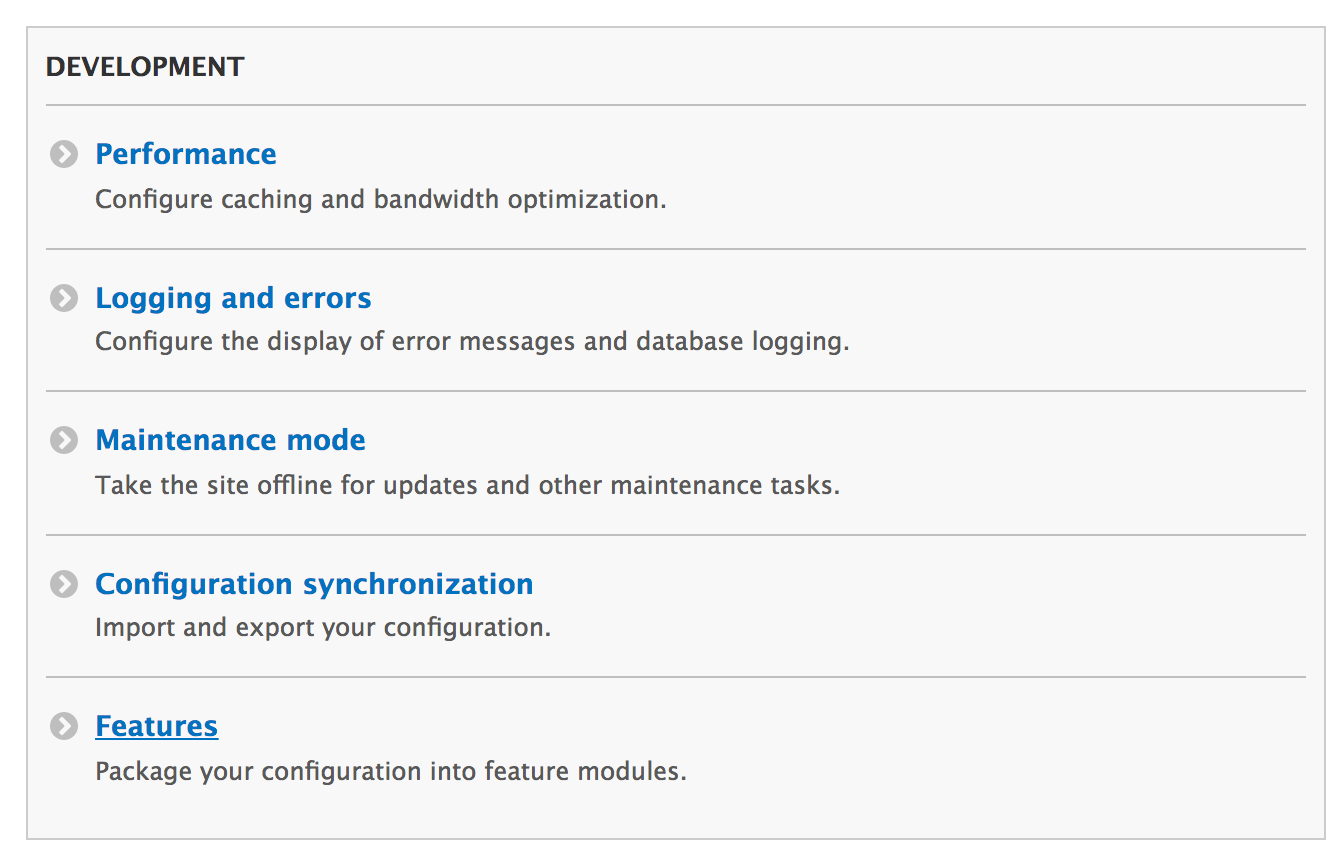
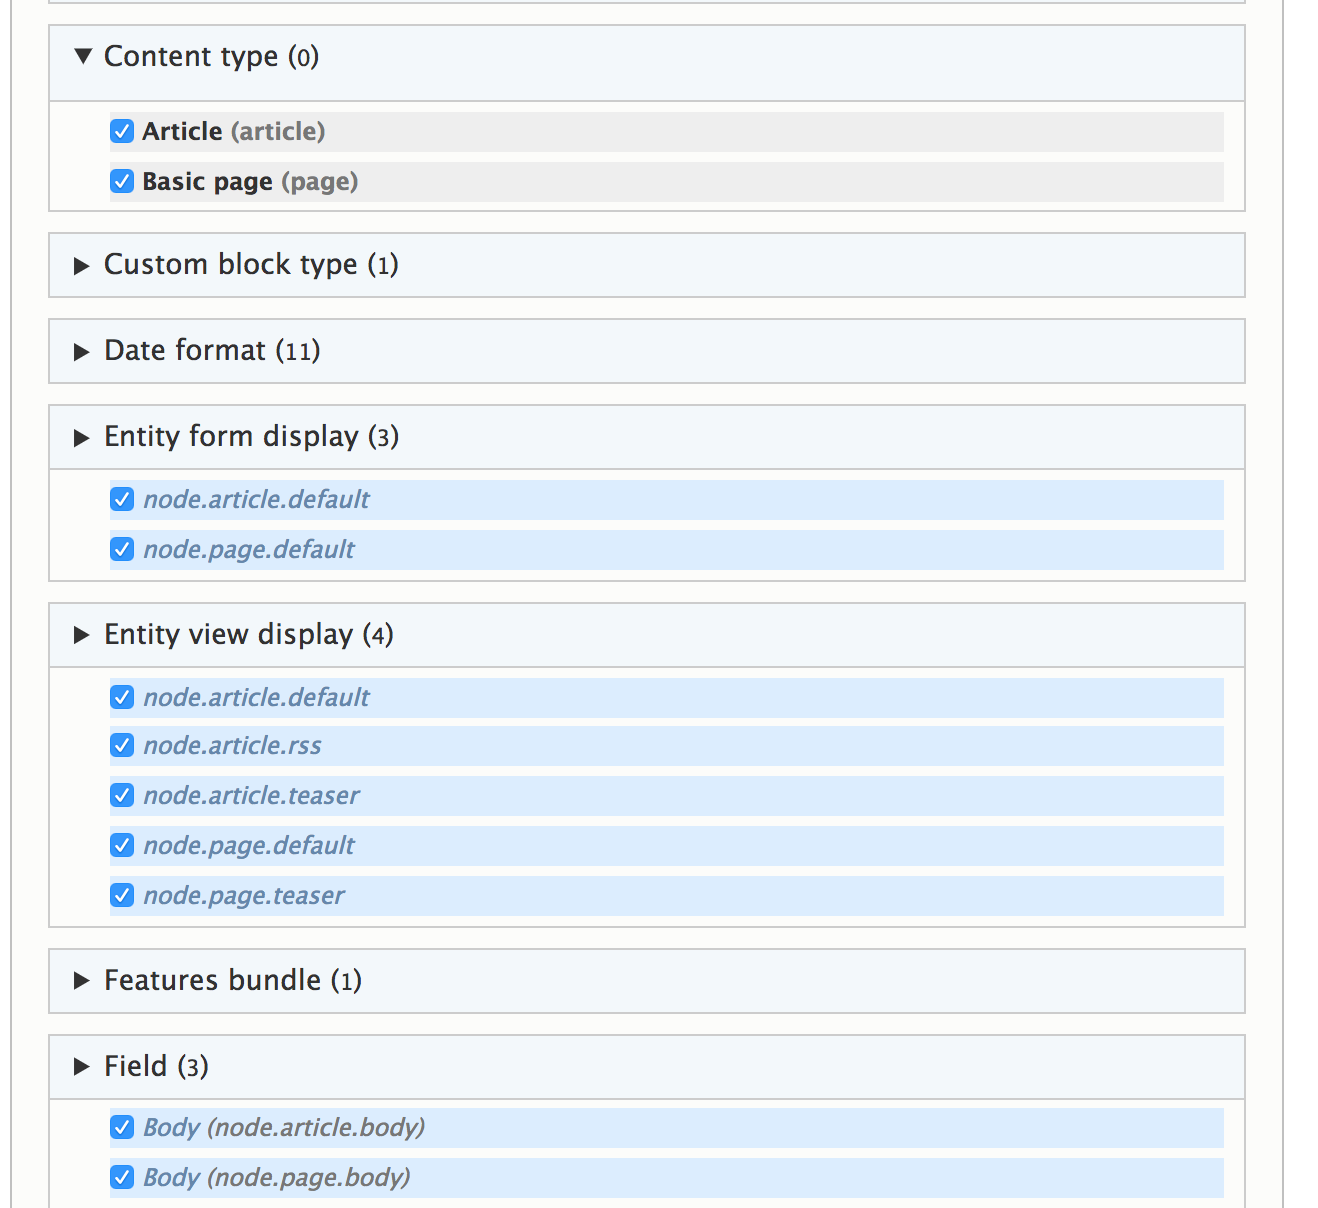
Features exports static YAML configuration files into the module's config/install folder. Features modifies the standard configuration management workflow by ensuring that a specific kind of configuration exists. Configuration management does not allow modules to overwrite existing configuration objects, but Features manages and allows this to happen.
To accomplish this, Features provides \Drupal\features\FeaturesConfigInstaller, which extends the default config.install service class. It then alters the services definition to use its FeaturesConfigInstaller class instead of the default \Drupal\Core\Config\ConfigInstaller class.
Beyond adjusting the config.install service, Features harnesses all the functionalities of the configuration management system to provide a simpler way to generate modules.
Features is a robust tool to easily provide bundled configuration; we will discuss more ways to use the Features module in the next section.
The Features module provides an intelligent bundling method that reviews the current Drupal site's configuration and suggests feature modules that should be created to preserve the configuration. These are provided through package assignment plugins.
These plugins use logic to assign configurations to specific packages:
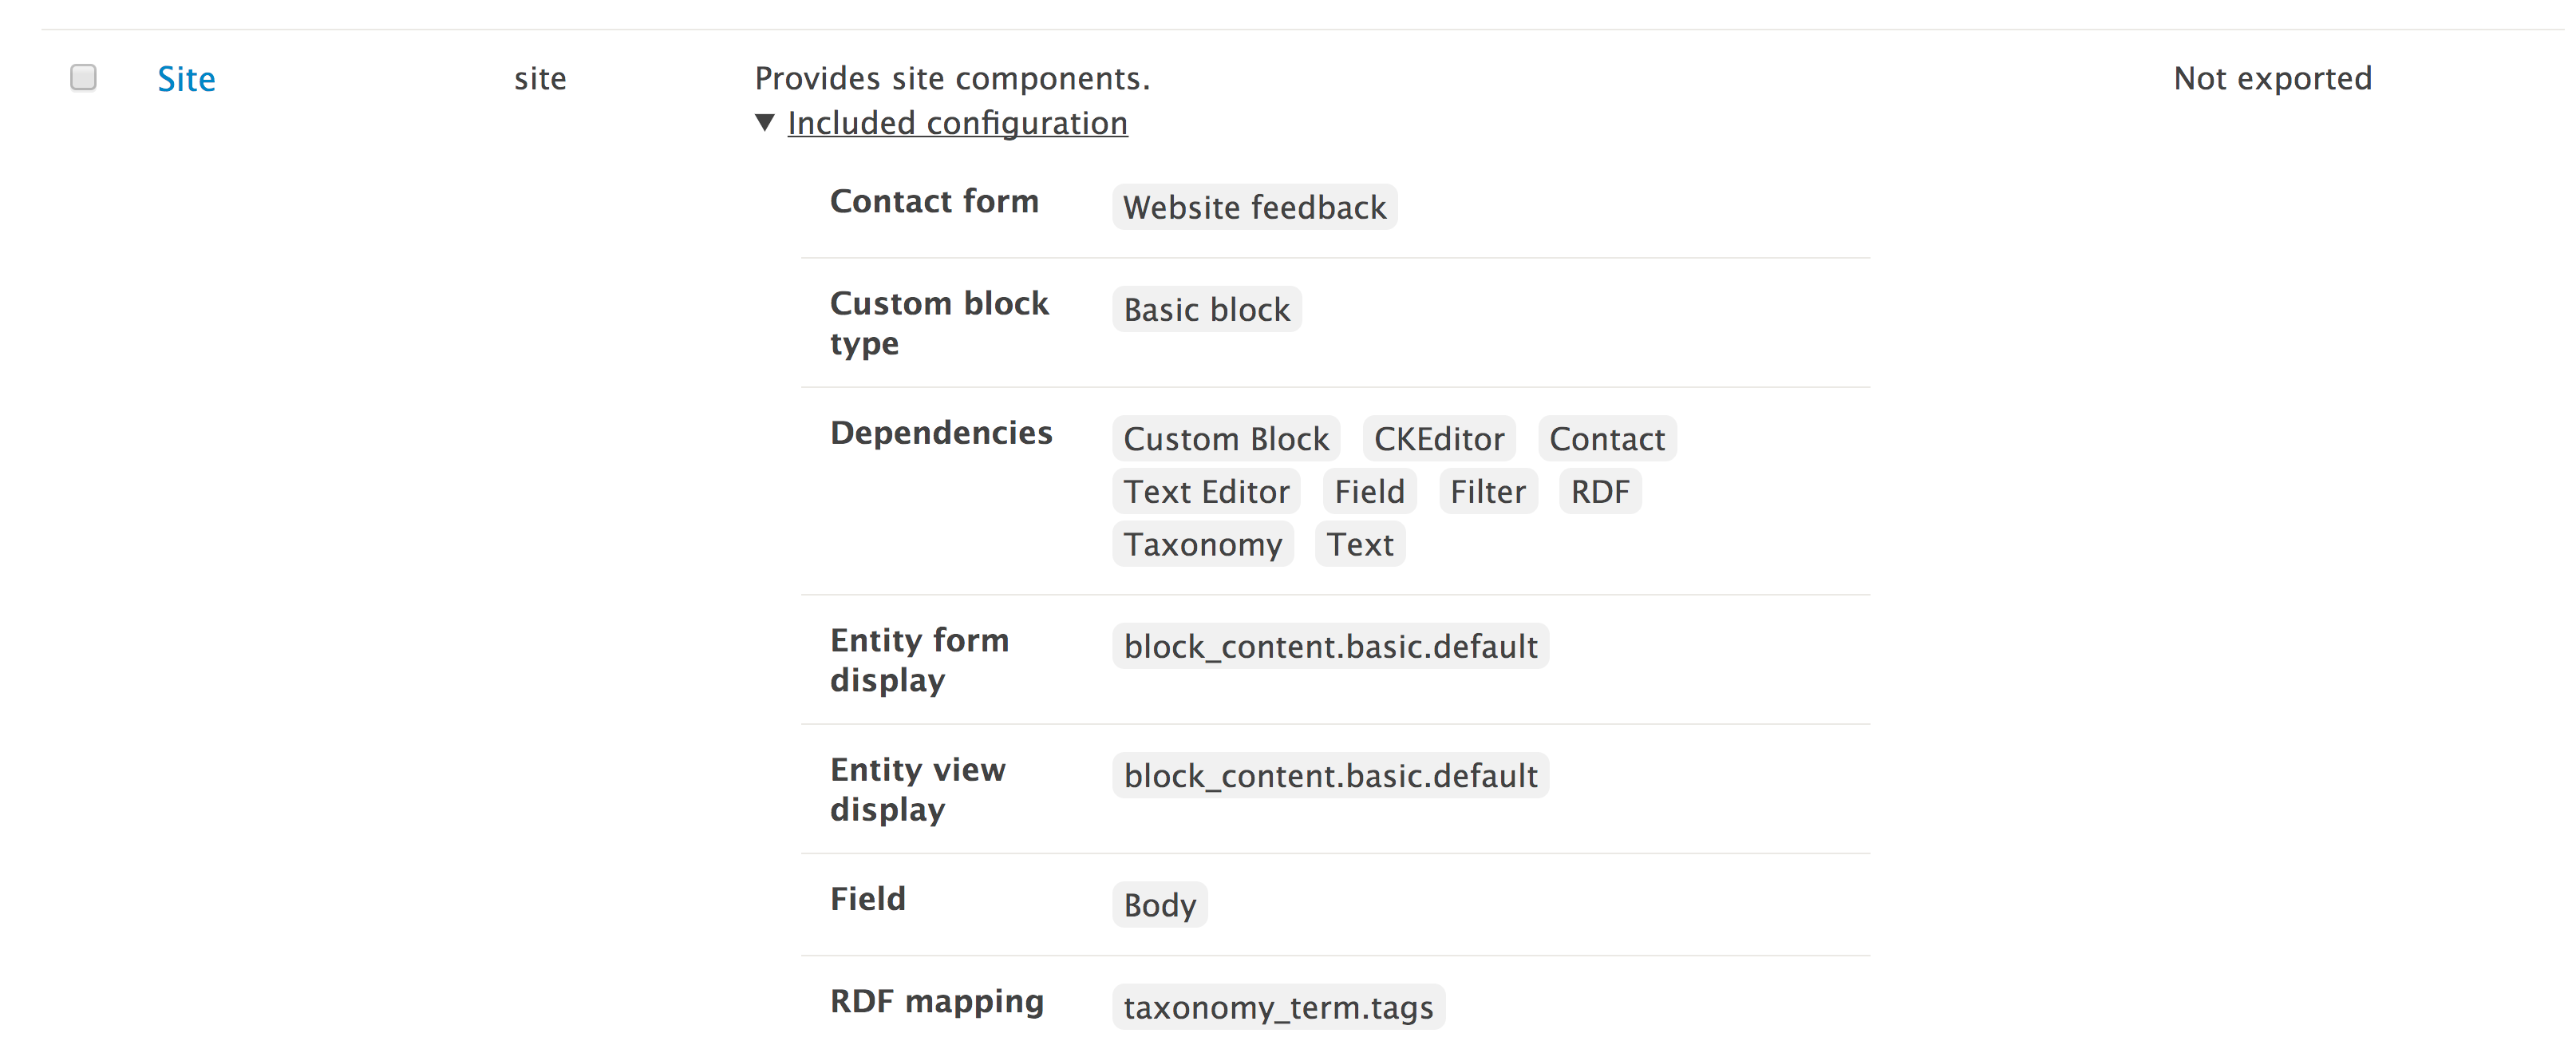
When you visit the Features UI, it will present you with suggested feature modules to be exported. Expanding the items will list the configuration items that will be bundled. Clicking on the suggested feature's link opens the creation form. Alternatively, the checkbox can be used in conjunction with the Download archive or Write button at the bottom of the form.
In the Features module, there are bundles, and bundles have their own assignment method configurations. The purpose of bundles inside Features is to provide an automatic assignment of configuration that can be grouped into exported modules:
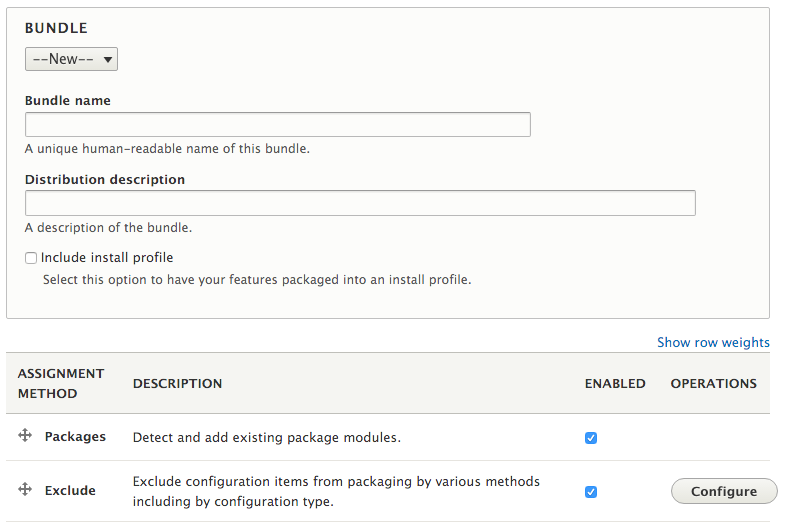
A bundle has a human display name and machine name. The bundle's machine name will be prefixed on all feature modules generated under this bundle. You also can specify the bundle to act as an installation profile. The features UI was heavily used in Drupal 7 to construct distributions and spawn the concept of the bundle functionality.
Assignment methods can be rearranged and configured to your liking.
The Features UI provides a means to review changes to the feature's configuration that may have been made. If a configuration item controlled by a feature module has been modified, it will show up under the differences section of the Features UI. This will allow you to import or update the Feature module with the change.
The Import option will force the site to use the configuration defined in the module's configuration YAML files. For example, in the following screenshot we have an exported content type whose description was modified in the user interface after being exported:
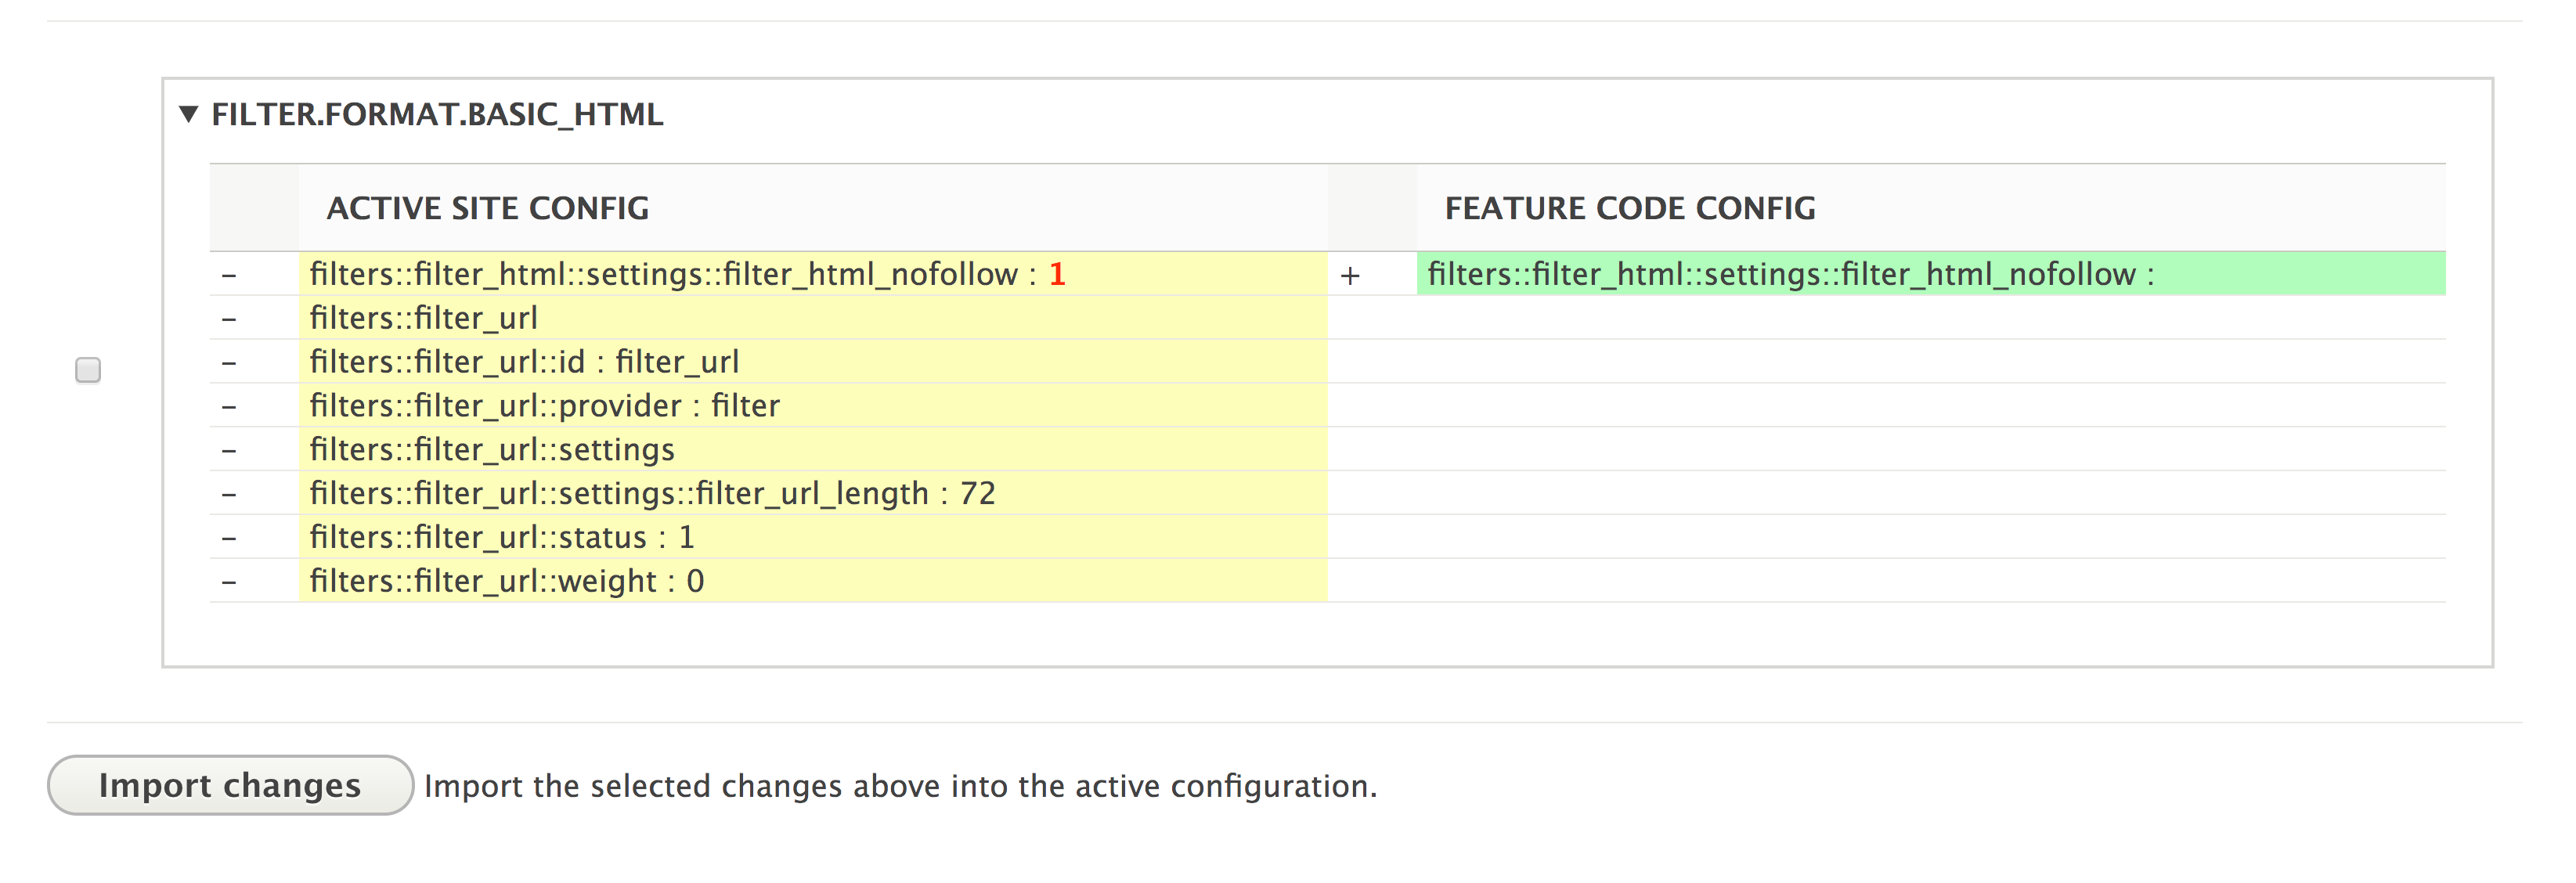
The difference created by the feature module is highlighted. If the difference was checked, and if you click on Import changes, the content type's description would be reset to that defined in the configuration.
From the main features overview table, the feature module can be re-exported to include the change and update the exported YAML files.
In this chapter, we will explore the world of frontend development in Drupal 8. In this chapter, we will cover the following recipes:
Drupal 8 brought many changes with regard to the frontend. It is now focused on mobile-first responsive design. Frontend performance has been given a high priority, unlike in the previous versions of Drupal. There is a new asset management system based on libraries that will deliver only the minimum required assets for a page that comes with Drupal 8.
In Drupal 8, we have a new feature, the Twig templating engine, that replaces the previously used PHPTemplate engine. Twig is part of the large PHP community and embraces more of Drupal 8's made elsewhere initiative. Drupal 7 supported libraries to define JavaScript and CSS resources. However, it was very rudimentary and did not support the concept of library dependencies.
There are two modules provided by the Drupal core that implement the responsive design with server-side components. The Breakpoint module provides a representation of media queries that modules can utilize. The Responsive Image module implements the HTML5 picture tag for image fields.
This chapter dives into harnessing Drupal 8's frontend features to get the most out of them.
Drupal 8 ships with a new base theme that is intended to demonstrate best practice and CSS class management. The Classy theme is provided by the Drupal core and is the base theme for the default frontend theme, Bartik, and the administrative theme, Seven.
Unlike the previous versions of Drupal, Drupal 8 provides two base themes--Classy and Stable--to jump start Drupal theming. Stable provides a leaner approach to frontend theming with fewer classes and wrapping elements and is guaranteed to not introduce changes that may disrupt your child theme. In this recipe, we will create a new theme called mytheme that uses Classy as its base.
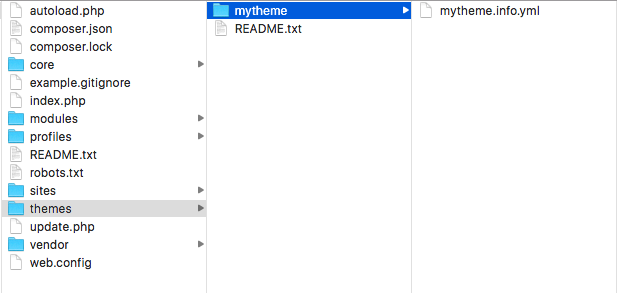
name: My Theme
description: My custom theme
type: theme
core: 8.x
base theme: classy
regions:
  header: 'Header'
  primary_menu: 'Primary menu'
  page_top: 'Page top'
  page_bottom: 'Page bottom'
  breadcrumb: 'Breadcrumb'
  content: 'Content'
Regions are rendered in the page template file, which will be covered in the next recipe, Twig templates.
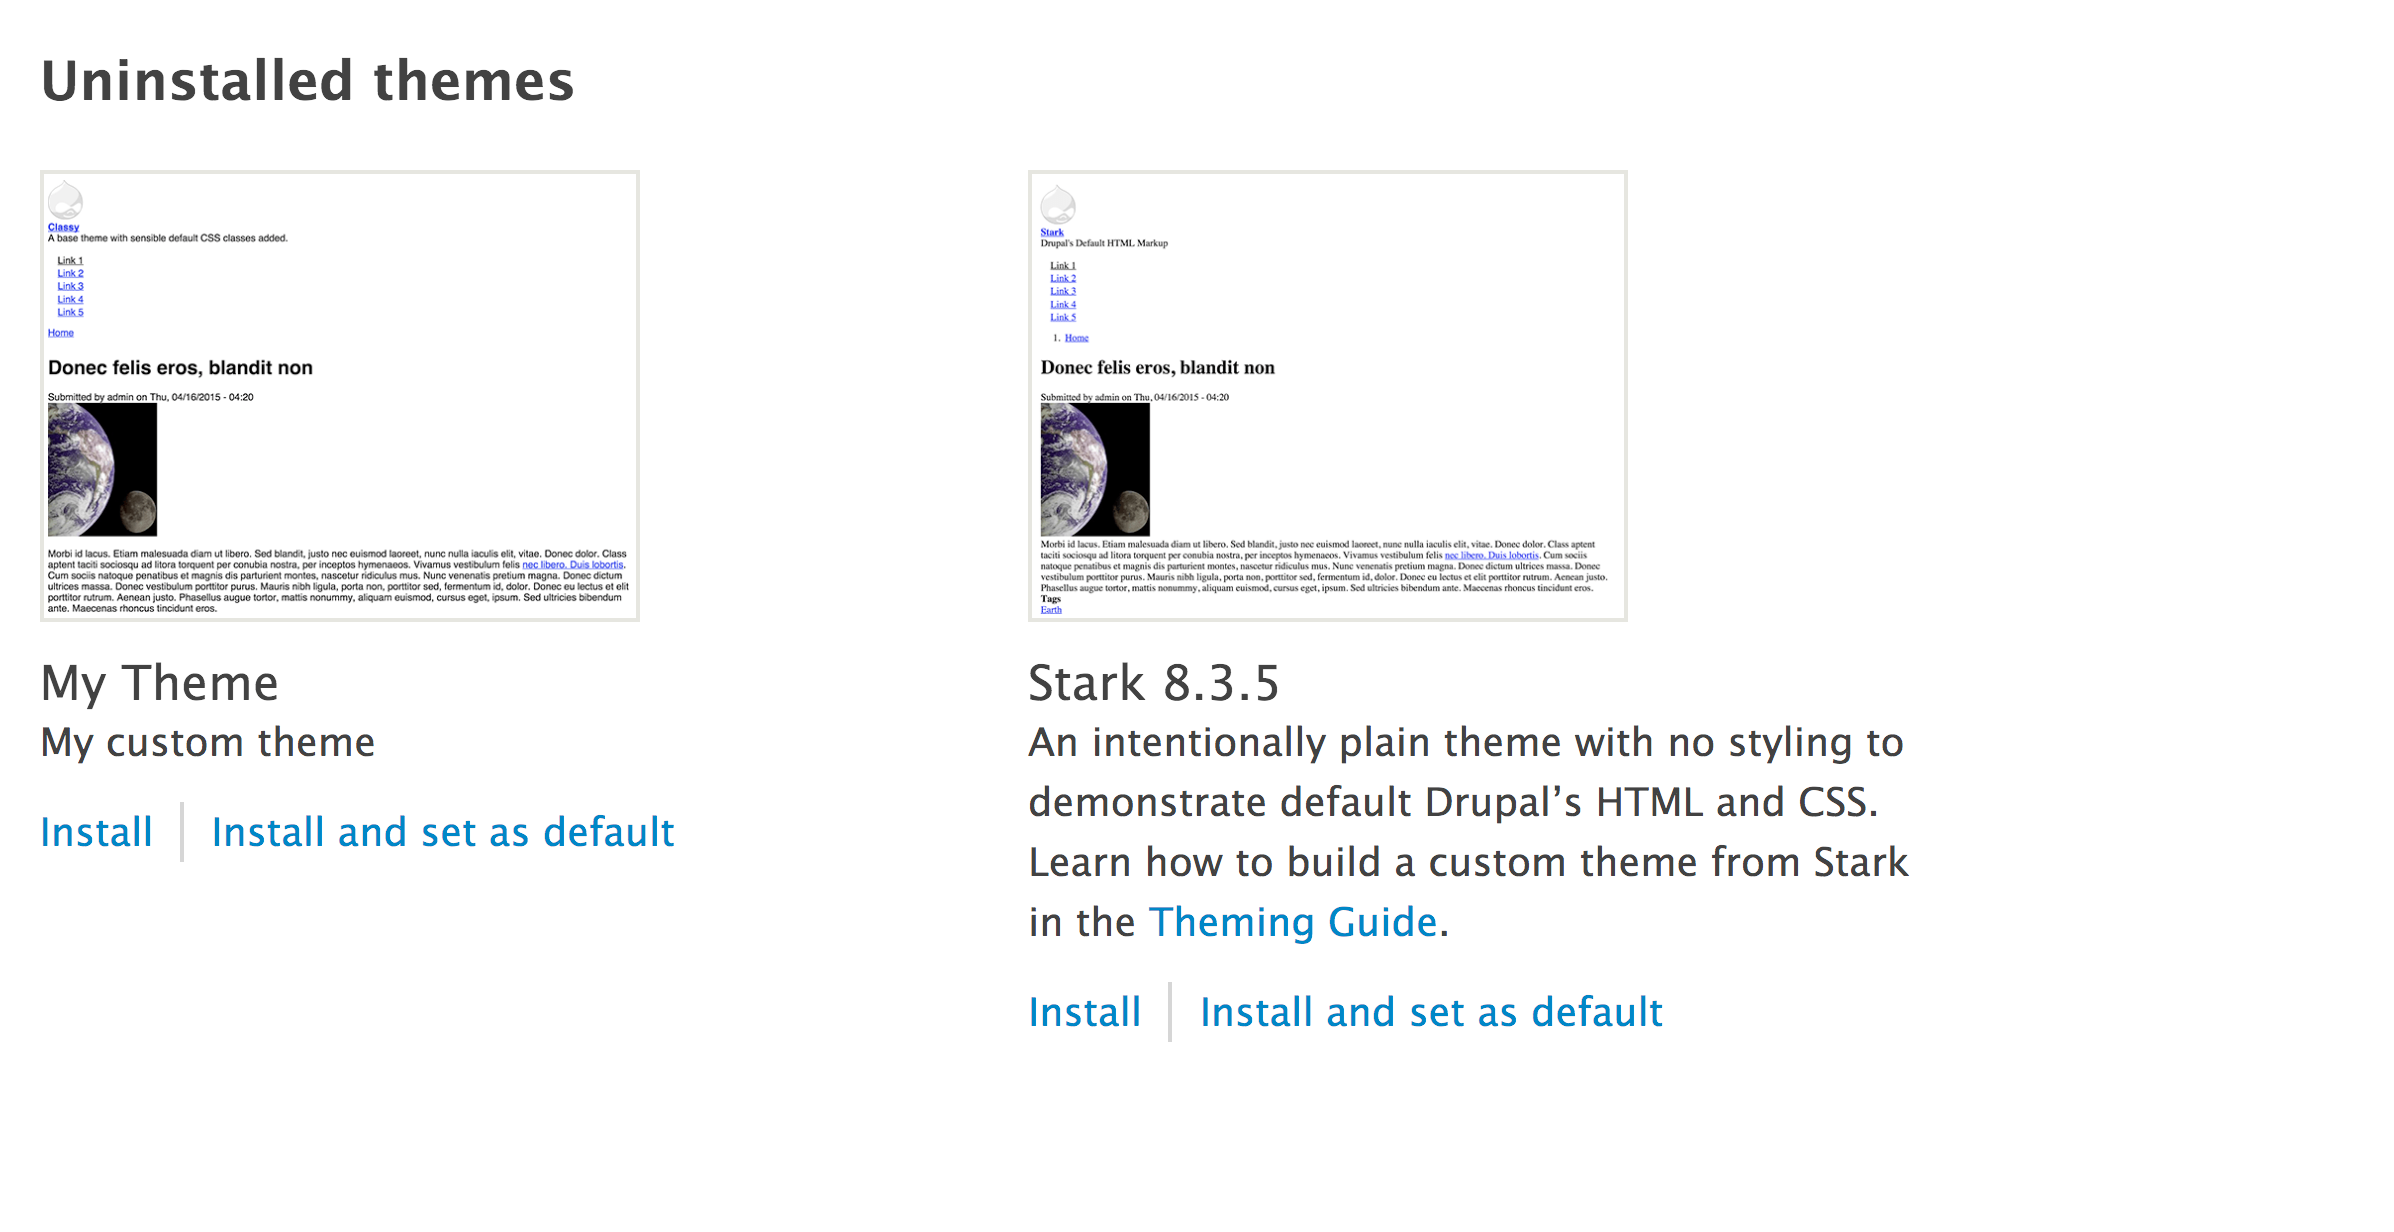
In Drupal 8, the info.yml files define Drupal themes and modules. The first step to create a theme is to provide the info.yml file so that the theme can be discovered. Drupal will parse these values and register the theme.
The following keys are required, as a minimum, when you define a theme:
The name key defines the human-readable name of the theme that will be displayed on the Appearance page. The description will be shown under the themes display name on the Appearance page. All Drupal projects need to define the type key to indicate the kind of extension that is being defined. For themes, the type must always be theme. You will also need to define which version of Drupal the project is compatible with using the core value. All Drupal 8 projects will use the core: 8.x value. When you define a theme, you will also need to provide the base theme key. If your theme does not use a base theme, then you need to set the value to false.
The libraries and region keys are optional, but these are keys that most themes provide. Drupal's asset management system parses a theme's info.yml and adds those libraries, if required. Regions are defined in an info.yml file and provide the areas into which the Block module may place blocks.
Next, we will dive into additional information on themes.
Themes can provide a screenshot that shows up on the Appearance page. A theme's screenshot can be provided by placing a screenshot.png image file in the theme folder or a file specified in the info.yml file under the screenshot key.
If the screenshot is missing, a default is used, as seen with the Classy and Stark themes. Generally, a screenshot is a Drupal site with generic content using the theme.
Drupal controls the site's favicon and logo settings as a theme setting. Theme settings are active on a theme-by-theme basis and are not global. Themes can provide a default logo by providing logo.svg in the theme root folder. A favicon.ico placed in a theme folder will also be the default value of the favicon for the website.
You can change the site's logo and favicon by navigating to Appearance and then clicking on Settings for your current theme. Unchecking the use default checkboxes for the favicon and logo settings allows you to provide custom files:
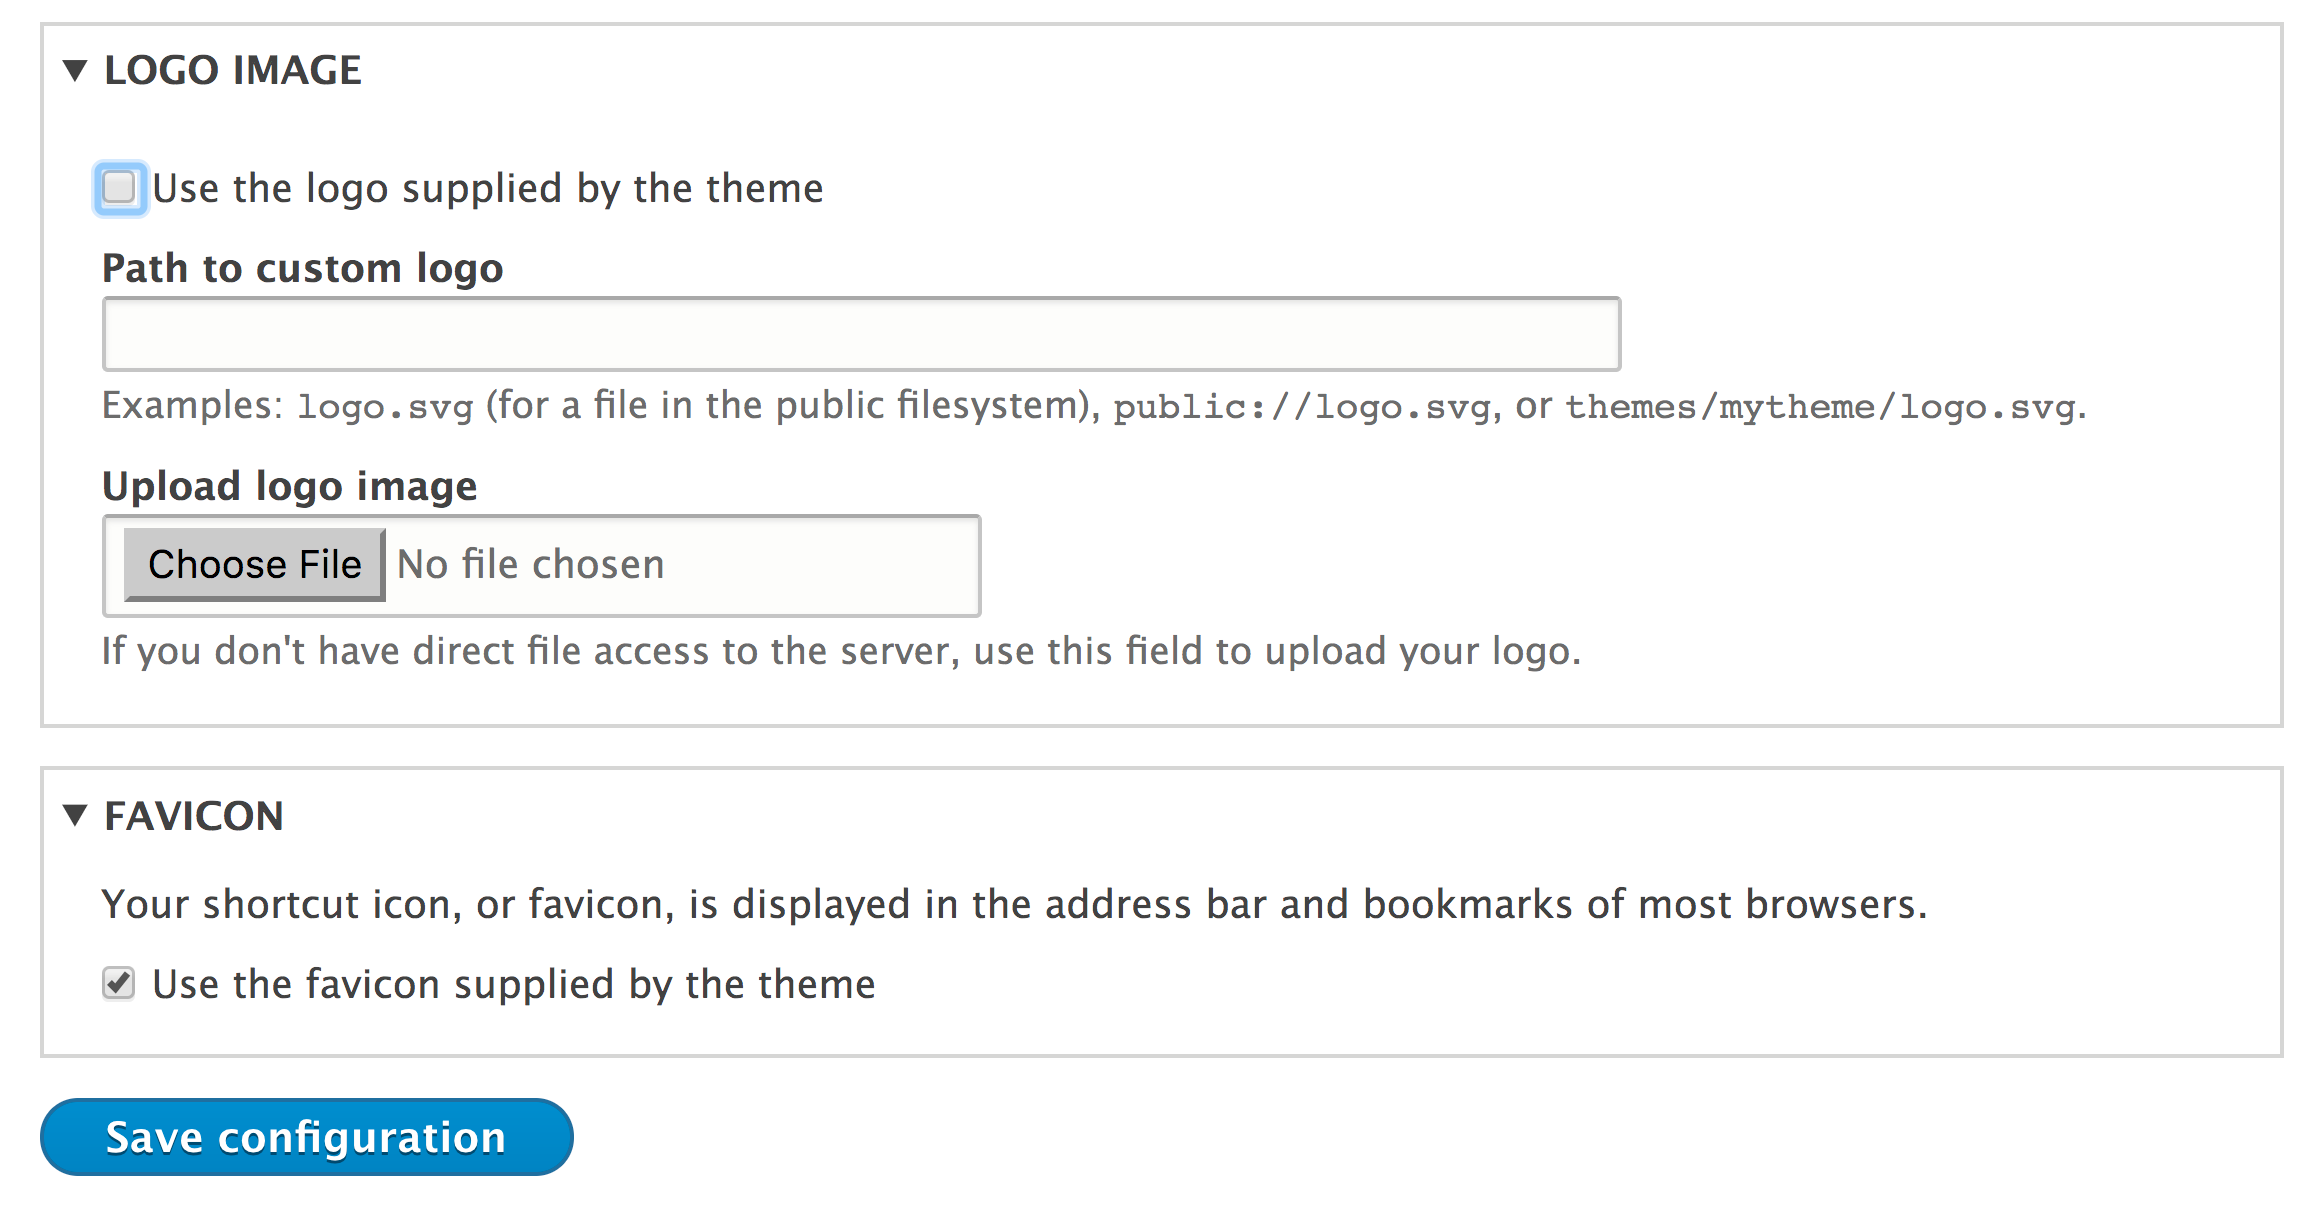
Many content management systems that have a theme system which supports base (or parent) themes differ mostly in the terminology used. The concept of a base theme is used to provide established resources that are shared, reducing the amount of work required to create a new theme.
All libraries defined in the base theme will be inherited and used by default, allowing subthemes to reuse existing styles and JavaScript. This allows frontend developers to reuse their work and only create specific changes that are required for the subtheme.
The subthemes will also inherit all Twig template overrides provided by the base theme. This was one of the initiatives used for the creation of the Classy theme. Drupal 8 makes many fewer assumptions compared to the previous version as to what class names to provide on elements. Classy overrides all the core's templates and provides sensible default classes, giving themes the ability to use them and accept those class names or be given a blank slate.
As discussed in Chapter 2, The Content Authoring Experience, Drupal ships with the WYSIWYG support and CKEditor as the default editor. The CKEditor module will inspect the active theme and its base theme, if provided, and load any style sheets defined in the ckeditor_stylesheets key as an array of values.
For example, the following code can be found in bartik.info.yml:
ckeditor_stylesheets:
  - css/base/elements.css
  - css/components/captions.css
  - css/components/table.css
This allows themes to provide style sheets that will style elements within the CKEditor module to enhance the what you see is what you get experience of the editor.
The asset management system is the most recent one to Drupal 8. The asset management system allows modules and themes to register libraries. Libraries define CSS style sheets and JavaScript files that need to be loaded with the page. Drupal 8 takes this approach for the frontend performance. Rather than loading all CSS or JavaScript assets, only those required for the current page in the specified libraries will be loaded.
In this recipe, we will define a libraries.yml file that will define a CSS style sheet and JavaScript file provided by a custom theme.
This recipe assumes that you have created a custom theme, such as the one you created in the first recipe. When you see mytheme in this recipe, use the machine name of the theme that you created.
body {
  background: cornflowerblue;
}
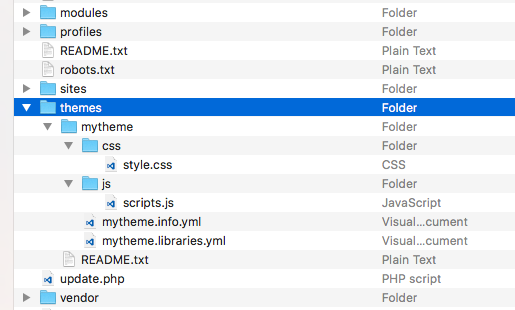
global-styling:
  version: VERSION
  css:
    theme:
      css/style.css: {}
  js:
    js/scripts.js: {}
name: My Theme
description: My custom theme
type: theme
core: 8.x
base theme: classy
libraries:
  - mytheme/global-styling
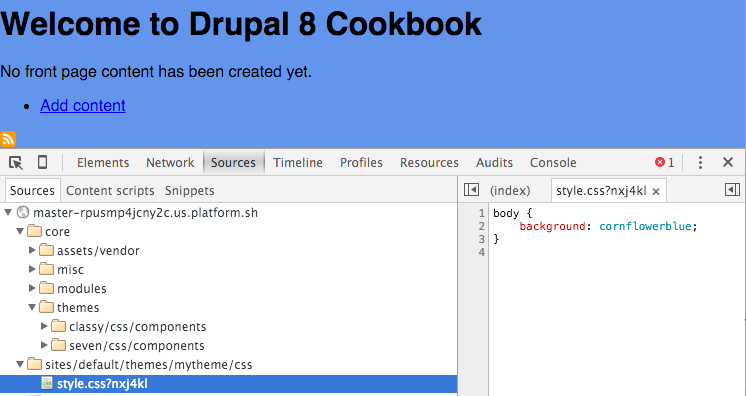
Drupal aggregates all the available library.yml files and passes them to the library.discovery.parser service. The default class for this service provider is \Drupal\Core\Asset\LibraryDiscoveryParser. This service reads the library definition from each library.yml and returns its value to the system. Before parsing the file, the parser allows themes to provide overrides and extensions to the library.
Libraries are enqueuers, as they are attached to rendered elements. Themes can generically add libraries through their info.yml files via the libraries key. These libraries will always be loaded on the page when the theme is active.
CSS style sheets are added to the data that will build the head tag of the page. JavaScript resources, by default, are rendered in the footer of the page for performance reasons.
We will explore the options surrounding libraries in Drupal 8 in more detail in the next section.
With libraries, you can specify CSS by different groups. Drupal's asset management system provides the following CSS groups:
Style sheets are loaded in the order in which the groups are listed. Each one of them relates to a PHP constant defined in /core/includes/common.inc. This allows separation of concerns when working with style sheets. Drupal 8's CSS architecture borrows concepts from the Scalable and Modular Architecture for CSS (SMACSS) system to organize CSS declarations. You can learn more about this technique for building flexible and scalable CSS style sheets at https://smacss.com/.
Library assets can have configuration data attached to them. If there are no configuration items provided, a simple set of empty brackets is added. Therefore, in each example, lines end with {}.
The following example, taken from core.libraries.yml, adds HTML5shiv:
assets/vendor/html5shiv/html5shiv.min.js: { weight: -22, browsers: { IE: 'lte IE 8', '!IE': false }, minified: true }
Let's take a look at the attributes of html5shiv.min.js:
For CSS assets, you can pass a media option to specify a media query for the asset. Reviewing classes that implement \Drupal\Core\Asset\AssetCollectionRendererInterface.
Libraries can specify other libraries as dependencies. This allows Drupal to provide a minimum footprint on the frontend performance.
Here's an example from the Quick Edit module's libraries.yml file:
quickedit:
  version: VERSION
  js:
    ...
  css:
    ...
  dependencies:
    - core/jquery
    - core/jquery.once
    - core/underscore
    - core/backbone
    - core/jquery.form
    - core/jquery.ui.position
    - core/drupal
    - core/drupal.displace
    - core/drupal.form
    - core/drupal.ajax
    - core/drupal.debounce
    - core/drupalSettings
- core/drupal.dialog
The Quick Edit module defines jQuery, the jQuery Once plugin, Underscore, and Backbone, and selects other defined libraries as dependencies. Drupal will ensure that these are present whenever the quickedit/quickedit library is attached to a page.
A complete list of the default libraries provided by Drupal core can be found in core.libraries.yml, which is in core/core.libraries.yml.
Themes have the ability to override libraries using the libraries-override and libraries-extend keys in their info.yml. This allows themes to easily customize the existing libraries without having to add the logic to conditionally remove or add their assets when a particular library is attached to a page.
The libraries-override key can be used to replace an entire library, replace selected files in a library, remove an asset from a library, or disable an entire library. The following code will allow a theme to provide a custom jQuery UI theme:
libraries-override:
  core/jquery.ui:
    css:
      component:
         assets/vendor/jquery.ui/themes/base/core.css: false
      theme:
         assets/vendor/jquery.ui/themes/base/theme.css: css/jqueryui.css
The override declaration mimics the original configuration. Specifying false will remove the asset, or else a supplied path will replace that asset.
The libraries-extend key can be used to load additional libraries with an existing library. The following code will allow a theme to associate a CSS style sheet with selected jQuery UI declaration overrides, without always having them included in the rest of the theme's assets:
libraries-extend:
  core/jquery.ui:
    - mytheme/jqueryui-theme
Libraries also work with external resources, such as assets loaded over a CDN. This is done by providing a URL for the file location along with selected file parameters.
Here is an example to add the FontAwesome font icon library from the BootstrapCDN provided by MaxCDN:
mytheme.fontawesome:
  remote: http://fontawesome.io/
  version: 4.4.0
  license:
    name: SIL OFL 1.1
    url: http://fontawesome.io/license/
    gpl-compatible: true
  css:
    base:
      https://maxcdn.bootstrapcdn.com/font-awesome/4.4.0/css/font-awesome.min.css: { type: external, minified: true }
Remote libraries require additional metainformation to work properly:
remote: http://fontawesome.io/
The remote key describes the library as using external resources. While this key is not validated beyond its existence, it is best to define it with the external resource's primary website:
version: 4.4.0
Like all libraries, a version is required. This should match the version of the external resource being added:
license:
    name: SIL OFL 1.1
    url: http://fontawesome.io/license/
    gpl-compatible: true
If a library defines the remote key, it also needs to define the license key. This defines the license name, the URL for the license, and checks whether it is GPL-compatible. If this key is not provided, a \Drupal\Core\Asset\Extension\LibraryDefinitionMissingLicenseException will be thrown:
  css:
    base:
      https://maxcdn.bootstrapcdn.com/font-awesome/4.4.0/css/font-awesome.min.css: { type: external, minified: true }
Finally, specific external resources are added as normal. Instead of providing a relative file path, the external URL is provided.
Modules have the ability to provide dynamic library definitions and alter libraries. A module can use the hook_library_info() hook to provide a library definition. This is not the recommended way to define a library, but it is provided for edge use cases.
Modules do not have the ability to use libraries-override or libraries-extend, and need to rely on the hook_library_info_alter() hook. You can check out this hook in core/lib/Drupal/Core/Render/theme.api.php or at https://api.drupal.org/api/drupal/core!lib!Drupal!Core!Render!theme.api.php/function/hook_library_info_alter/8.
By default, Drupal ensures that JavaScript is placed last on the page. This improves the page's load performance by allowing the critical portions of the page to load first. Placing JavaScript in the header is now an opt-in option.
In order to render a library in the header, you will need to add the header: true key/value pair:
js-library:
  header: true
  js:
    js/myscripts.js: {}
This will load a custom JavaScript library and its dependencies into the header of a page.
Drupal 8's theming layer is complemented by Twig, a component of the Symfony framework. Twig is a template language that uses a syntax similar to Django and Jinja templates. The preceding version of Drupal used PHPTemplate, which required frontend developers to have a rudimentary understanding of PHP.
In this recipe, we will override the Twig template to provide customizations for the email form element. We will use the basic Twig syntax to add a new class and provide a default placeholder.
This recipe assumes that you have already created a custom theme, such as the one you created in the first recipe. When you see mythemein in the following recipe, use the machine name of the theme you created.
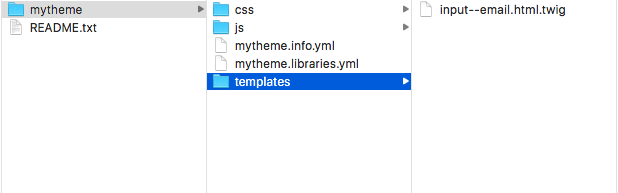
<input{{ attributes.addClass('input__email') }}/>{{ children }}
{% set placeholder = attributes.placeholder ? attributes.placeholder : 'email@example.com' %}
<input{{ attributes.addClass('input__email').setAttribute('placeholder', placeholder) }}/>{{ children }}
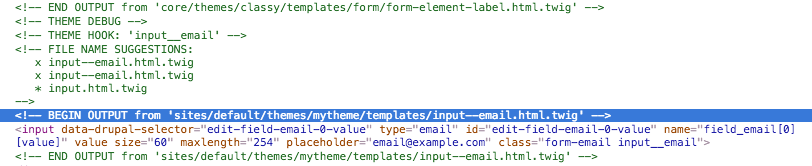
Drupal's theme system is built around hooks and hook suggestions. The element definition of the email input element defines the input__email theme hook. If there is no input__email hook implemented through a Twig template or PHP function, it will step down to just input.
A processor, such as Drupal's theme layer, passes variables to Twig. Variables or properties of objects can be printed by wrapping the variable name with curly brackets. All of Drupal core's default templates provide information in the file's document block that details the available Twig variables.
Twig has a simplistic syntax with basic logic and functions. The addClass method will take the attributes variable and add the class provided in addition to the existing contents.
When providing a theme hook suggestion or altering an existing template, you will need to rebuild Drupal's cache. The compiled Twig template, as PHP, is cached by Drupal so that Twig does not need to compile each time the template is invoked.
We will discuss more on using Twig in the following sections.
Twig automatically escapes the output by default, making Drupal 8 one of the most secure versions yet. For Drupal 7, most security advisors were for cross-site scripting (XSS) vulnerabilities in contributed projects. With Drupal core, these security advisories should be severely reduced using Twig.
Drupal utilizes theme hook suggestions for ways to allow output variations based on different conditions. It allows site themes to provide a more specific template for certain instances.
When a theme hook has double underscores (__), Drupal's theme system understands this, and it can break apart the theme hook to find a more generic template. For instance, the email element definition provides input__email as its theme hook. Drupal understands this as follows:
Theme hook suggestions can be provided by the hook_theme_suggestions() hook in a .module or .theme file.
Debugging can be enabled to inspect the various template files that make up a page and their theme hook suggestions, and check which are active. This can be accomplished by editing the sites/default/services.yml file. If a services.yml file does not exist, copy the default.services.yml to create one.
You need to change debug: false to debug: true under the twig.config section of the file. This will cause the Drupal theming layer to print out the source code comments containing the template information. When debug is on, Drupal will not cache the compiled versions of Twig templates and render them on the fly.
There is another setting that prevents you from having to rebuild Drupal's cache on each template file change, but do not leave debug enabled. The twig.config.auto_reload boolean can be set to true. If this is set to true, the Twig templates will be recompiled if the source code changes.
The Twig has ternary operators for logic. Using a question mark (?), we can perform a basic is true or not empty operation, whereas a question mark and colon (?:) perform a basic is false or is empty operation.
You may also use the if and else logic to provide different outputs based on variables.
The Breakpoint module provides a method to create media query breakpoint definitions within Drupal. These can be used by other components, such as the responsive image and toolbar modules, to make Drupal responsive.
Breakpoints are a type of plugin that can be defined in a module's or theme's breakpoints.yml in its directory. In this recipe, we will define three different breakpoints under a custom group.
Ensure that the Breakpoint module is enabled--if you have used the standard Drupal installation, the module is enabled.
This recipe assumes that you have already created a custom module. When you see mymodule, use the machine name of the module that you created.
mymodule.mobile:
  label: Mobile
  mediaQuery: ''
  weight: 0
mymodule.standard:
  label: Standard
  mediaQuery: 'only screen and (min-width: 60em)'
  weight: 1
mymodule.wide:
  label: Wide
  mediaQuery: 'only screen and (min-width: 70em)'
  weight: 2
mymodule.mobile:
  label: Mobile
  mediaQuery: ''
  weight: 0
mymodule.standard:
  label: Standard
  mediaQuery: 'only screen and (min-width: 60em)'
  weight: 1
mymodule.wide:
  label: Wide
  mediaQuery: 'only screen and (min-width: 70em)'
  weight: 2
The Breakpoint module defines the breakpoint configuration entity. Breakpoints do not have any specific form of direct functionalities, beyond providing a way to save media queries and grouping them.
The Breakpoint module provides a default manager service. This service is used by other modules to discover breakpoint groups and then all of the breakpoints within a group.
Additional information on using the Breakpoint module will be covered in the upcoming sections.
Themes have the ability to provide breakpoints; however, they cannot be automatically discovered if new ones are added once they have been installed. Drupal only reads breakpoints provided by themes when a theme is either installed or uninstalled.
Inside breakpoint.manager, there are two hooks: one for the theme install, and one for the theme uninstall. Each hook retrieves the breakpoint manager service and rebuilds the breakpoint definitions. Without any extra deployment steps, new breakpoints added to a theme will not be discovered unless these hooks are fired.
Breakpoints are utility configurations for other modules. Breakpoints can be loaded using the breakpoint manager service and by specifying a group. For example, the following code returns all breakpoints used by the Toolbar module:
\Drupal::service('breakpoint.manager')->getBreakpointsByGroup('toolbar');
This code invokes the Drupal container to return the service to manage breakpoints, which, by default, is \Drupal\breakpoint\BreakpointManager. The getBreakpointsByGroup method returns all breakpoints within a group, which are initiated as the \Drupal\breakpoint\BreakpointInterface objects.
The Toolbar element class utilizes this workflow to push the breakpoint media query values as JavaScript settings for the JavaScript model to interact with.
The multipliers value is used to support pixel resolution multipliers. This multiplier is used in coordination with retina displays. It is a measure of the viewport's device resolution as a ratio of the device's physical size and independent pixel size. The following is an example of standard multipliers:
The Responsive Image module provides a field formatter for image fields that use the HTML5 picture tag and source sets. Utilizing the Breakpoint module, mappings to breakpoints are made to denote an image style to be used at each breakpoint.
The responsive image field formatter works with using a defined responsive image style. Responsive image styles are configurations that map image formats to specific breakpoints and modifiers. First, you will need to define a responsive image style, and then you can apply it to an image field.
In this recipe, we will create a responsive image style set called Article image and apply it to the Article content type's image field.
You will need to enable the Responsive Image module, as it is not automatically enabled with the standard installation.

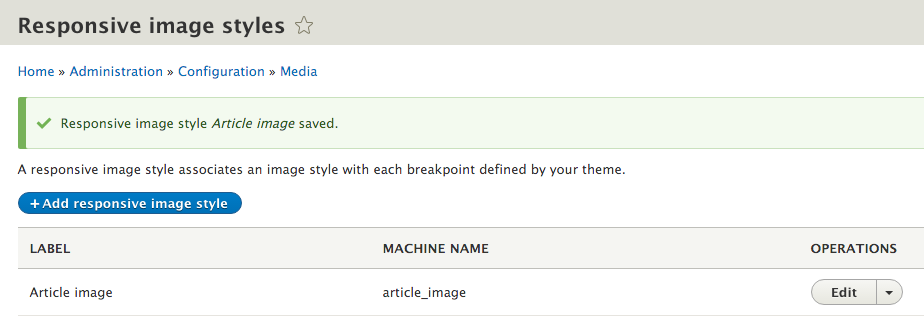
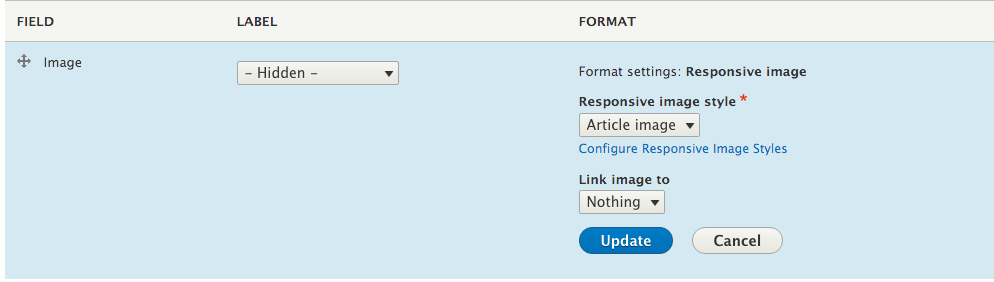
The Responsive image style provides three components: a responsive image element, the responsive image style configuration entity, and the responsive image field formatter. The configuration entity is consumed by the field formatter and displayed through the responsive image element.
The responsive image style entity contains an array of breakpoints to image style mappings. The available breakpoints are defined by the selected breakpoint groups. Breakpoint groups can be changed anytime; however, the previous mappings will be lost.
The responsive image element prints a picture element with each breakpoint, defining a new source element. The breakpoint's media query value is provided as the media attribute for the element.
In the following sections, we will discuss the responsive image field in more detail.
A benefit of using the responsive image formatter is performance. Browsers will only download the resources defined in the srcset of the appropriate source tag. This not only allows you to deliver a more appropriate image size, but also carries a smaller payload on smaller devices.
The Responsive Image module attaches the picturefill library to the responsive image element definition. The element's template also provides HTML to implement the polyfill. The polyfill can be removed by overriding the element's template and overriding the picturefill library to be disabled.
The following snippet, when added to a theme's info.yml, will disable the picturefill library:
libraries-override:
  core/picturefill: false
Then, the responsive-image.html.twig must be overridden by the theme to remove the extra HTML generated in the template for the polyfill:
In this chapter, we will explore the various recipes to work with forms in Drupal:
Drupal provides a robust API for creating and managing forms without writing any HTML. Drupal handles form building, validation, and submission. Drupal handles the request to either build the form or process the HTTP POST request. This allows developers to simply define the elements in a form, provide any additional validation if needed, and then handle a successful submission through specific methods.
This chapter contains various recipes to work with forms in Drupal through the Form API. In Drupal 8, forms and form states are objects.
In this recipe, we will create a form, which will be accessible from a menu path. This will involve creating a route that tells Drupal to invoke our form and display it to the end user.
Forms are defined as classes, which implement \Drupal\Core\Form\FormInterface. The \Drupal\Core\Form\FormBase serves as a utility class that is intended to be extended. We will extend this class to create a new form.
Since we will write the code, you will want to have a custom module. Creating a custom module in Drupal is simple: create a folder and an info.yml file. For this recipe, we will create a folder under /modules in your Drupal folder called drupalform.
In the drupalform folder, create drupalform.info.yml. Drupal will parse the info.yml file to discover modules. An example of a module's info.yml file is as follows:
name: Drupal form example
description: Create a basic Drupal form, accessible from a route
type: module
version: 1.0
core: 8.x
The name will be your module's name, and the description will be listed on the Extend page. Specifying the core tells Drupal what version of Drupal it is built for. Chapter 4, Extending Drupal, covers how to create a module in depth.
<?php

namespace Drupal\drupalform\Form;

use Drupal\Core\Form\FormBase;
use Drupal\Core\Form\FormStateInterface;

class ExampleForm extends FormBase {

}
The namespace defines the class in your module's Form directory. The autoloader will now look at the drupalform module path and load the ExampleForm class from the src/Form directory.
The use statement allows us to use just the class name when referencing FormBase, and, in the next steps, FormStateInterface. Otherwise, we would be forced to use the fully qualified namespace path for each class whenever it is used.
class ExampleForm extends FormBase {

  /**
   * {@inheritdoc}
   */
  public function getFormId() {
    return 'drupalform_example_form';
  }

  /**
   * {@inheritdoc}
   */
  public function buildForm(array $form, FormStateInterface $form_state) {
     // Return array of Form API elements.
  }

  /**
   * {@inheritdoc}
   */
  public function validateForm(array &$form,  FormStateInterface $form_state) {
    // Validation covered in later recipe, required to satisfy interface.
  }

  /**
   * {@inheritdoc}
   */
  public function submitForm(array &$form,  FormStateInterface $form_state) {
    // Validation covered in later recipe, required to satisfy interface.
  }
}
This code flushes out the initial class definition from the preceding step. FormBase provides utility methods and does not satisfy the interface requirements for FormStateInterface. We define those here, as they are unique across each form definition.
The getFormId method returns a unique string to identify the form, for example, site_information. You may encounter some forms that append _form to the end of their form ID. This is not required, and it is just a naming convention often found in previous versions of Drupal.
/**
 * {@inheritdoc}
 */
public function buildForm(array $form, FormStateInterface $form_state) {
  $form['company_name'] = [
    '#type' => 'textfield',
    '#title' => $this->t('Company name'),
  ];
  $form['submit'] = [
    '#type' => 'submit',
    '#value' => $this->t('Save'),
  ];
  return $form;
}
We added a form element definition to the form array. Form elements are defined with a minimum of a type to specify what the element is and a title to act as the label. The title uses the t method to ensure that it is translatable.
Adding a submit button is done by providing an element with the type submit.
drupalform.form:
  path: '/drupal-example-form'
  defaults:
    _title: 'Example form'
    _form: '\Drupal\drupalform\Form\ExampleForm'
  requirements:
    _access: 'TRUE'
In Drupal, all routes have a name, and this example defines it as drupalform.form. Routes then define a path attribute and override default variables. This route definition has altered the route's title, specified it as a form, and given the fully qualified namespace path to this form's class.
Routes need to be passed a requirements property with specifications, or else the route will be denied access.
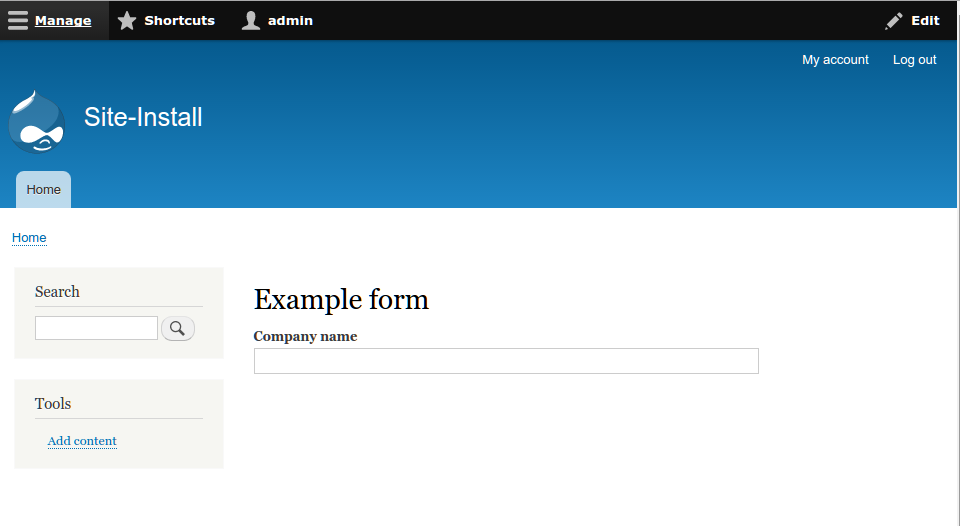
This recipe creates a route to display the form. By passing the _form variable in the defaults section of our route entry, we are telling the route controller how to render our route's content. The fully qualified class name, which includes the namespace, is passed to a method located in the form builder. The route controller will invoke \Drupal::formBuilder()->getForm (\Drupal\drupalform\Form\ExampleForm) based on the recipe. At the same time, this can be manually called to embed the form elsewhere.
A form builder instance that implements \Drupal\Core\Form\FormBuilderInterface will then process the form by calling buildForm and initiate the rendering process. The buildForm method is expected to return an array of form elements and other API options. This will be sent to the render system to output the form as HTML.
Many components make up a form created through Drupal's Form API. We will explore a few of them in depth.
A form is a collection of form elements, which are types of plugin in Drupal 8. Plugins are small pieces of swappable functionalities in Drupal 8. Plugins and plugin development are covered in Chapter 7, Plug and Play with Plugins.
Here are some of the most common element properties that can be used:
The \Drupal\Core\Form\FormStateInterface object represents the current state of the form and its data. The form state contains user-submitted data for the form along with build state information. Redirection after the form submission is handled through the
form state, as well. You will interact more with the form state during the validation and submission recipes.
Drupal utilizes a cache table for forms. This holds the build table, as identified by form build identifiers. This allows Drupal to validate forms during AJAX requests and easily build them when required. It is important to keep the form cache in persistent storage; otherwise, there may be repercussions, such as loss of form data or invalidating forms.
With the release of Drupal 8, Drupal has finally entered into the realm of HTML5. The Form API now allows utilization of HTML5 input elements out of the box. These include the following element types:
This allows your forms in Drupal to leverage native device input methods along with native validation support.
This recipe will walk you through adding elements to a Drupal form. You will need to have a custom form implemented through a module, such as the one created in the Creating a form recipe of this chapter.
$form['phone'] = [
  '#type' => 'tel',
  '#title' => $this->t('Phone'),
];
$form['email'] = [
  '#type' => 'email',
  '#title' => $this->t('Email'),
];
$form['integer'] = [
  '#type' => 'number',
  '#title' => $this->t('Some integer'),
  // The increment or decrement amount
  '#step' => 1,
  // Miminum allowed value
  '#min' => 0,
  // Maxmimum allowed value
  '#max' => 100,
];
$form['date'] = [
  '#type' => 'date',
  '#title' => $this->t('Date'),
  '#date_date_format' => 'Y-m-d',
];
$form['website'] = [
  '#type' => 'url',
  '#title' => $this->t('Website'),
];
$form['search'] = [
  '#type' => 'search',
  '#title' => $this->t('Search'),
  '#autocomplete_route_name' => FALSE,
];
$form['range'] = [
  '#type' => 'range',
  '#title' => $this->t('Range'),
  '#min' => 0,
  '#max' => 100,
  '#step' => 1,
];
Each type references an extended class of \Drupal\Core\Render\Element\FormElement. It provides the element's definition and additional functions. Each element defines a prerender method in the class that defines the input type attribute along with other additional attributes.
Each input defines its theme as input__TYPE, allowing you to copy the input.html.twig base to input.TYPE.html.twig for templating. The template then parses the attributes and renders the HTML.
Some elements, such as emails, provide validators for the element. The email element defines the validateEmail method. Here is an example of the code from \Drupal\Core\Render\Element\Email::valdateEmail:
  /**
   * Form element validation handler for #type 'email'.
   *
   * Note that #maxlength and #required is validated by _form_validate() already.
   */
  public static function validateEmail(&$element, FormStateInterface $form_state, &$complete_form) {
    $value = trim($element['#value']);
    $form_state->setValueForElement($element, $value);

    if ($value !== '' && !\Drupal::service('email.validator')->isValid($value)) {
      $form_state->setError($element, t('The email address %mail is not valid.', array('%mail' => $value)));
    }
  }
This code will be executed on form submission and validate the provider's email. It does this by taking the current value and trimming any whitespaces and using the form state object to update the value. The email.validator service is invoked to validate the email. If this method returns false, the form state is invoked to mark the element as the one that has an error. If the element has an error, the form builder will prevent form submission, returning the user to the form to fix the value.
Elements are provided through Drupal's plugin system and are explored in detail in the upcoming sections.
Elements can have their own unique properties along with individual validation methods. You can refer to the available elements through the Drupal.org API documentation page at https://api.drupal.org/api/drupal/elements/. However, the classes can also be examined, and the definition method can be read to learn about the properties of each element. These classes are under the \Drupal\Core\Render\Element namespace located in /core/lib/Drupal/Core/Render/Element:
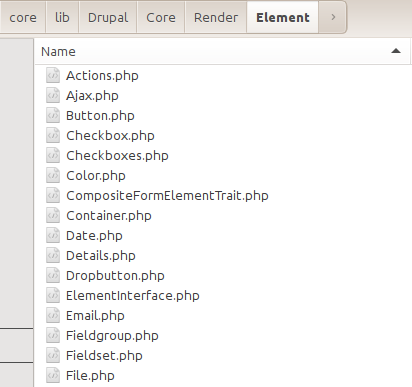
Each element used in the Form API extends the \Drupal\Core\Render\Element\FormElement class, which is a plugin. Modules can provide new element types by adding classes to their Plugins/Element namespace. Refer to Chapter 7, Plug and Play with Plugins, for more information on how to implement a plugin.
All forms must implement the \Drupal\Core\Form\FormInterface. The interface defines a validation method. The validateForm method is invoked once a form has been submitted and provides a way to validate the data and halt the processing of the data if required. The form state object provides methods for marking specific fields as having the error, providing a user experience tool to alert your users to specify the problem input.
In this recipe, we will be validating the length of the submitted field.
This recipe will use the module and custom form created in the first Creating a form recipe.
/**
 * {@inheritdoc}
 */
public function validateForm(array &$form,  FormStateInterface $form_state) {
  if (!$form_state->isValueEmpty('company_name')) {
    // Value is set, perform validation.
  }
}
/**
 * {@inheritdoc}
 */
public function validateForm(array &$form,  FormStateInterface $form_state) {
  if (!$form_state->isValueEmpty('company_name')) {
    if (strlen($form_state->getValue('company_name')) <= 5) {
      // Set validation error.
    }
  }
}
/**
 * {@inheritdoc}
 */
public function validateForm(array &$form,  FormStateInterface $form_state) {
  if (!$form_state->isValueEmpty('company_name')) {
    if (strlen($form_state->getValue('company_name')) <= 5) {
      $form_state->setErrorByName('company_name', t('Company name is less than 5 characters'));
    }
  }
}
We can place the setErrorByName method in our strlen logic check. If the string is fewer than five characters, an error is set on the element. The first parameter is the element's key, and the second parameter is the message to be presented to the user.
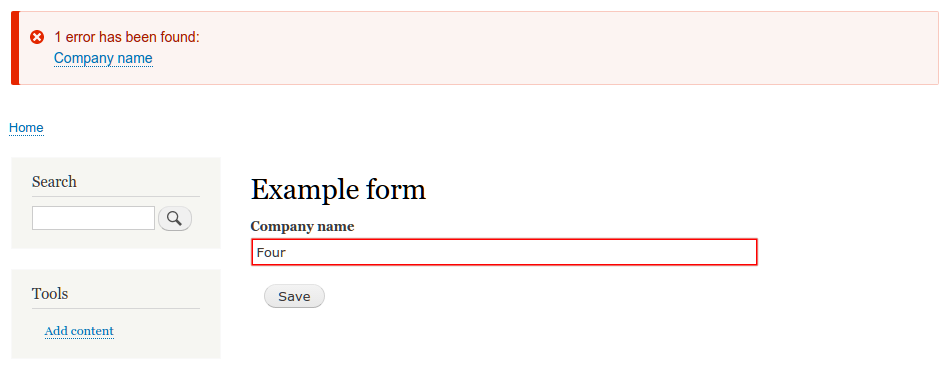
Before the form builder service invokes the form object's submitForm method, it invokes the object's validateForm method. In the validation method, the form state can be used to check values and perform logic checks. In the event that an item is deemed invalid and an error is set on an element, the form cannot be submitted and will show errors to the user.
When an error is added to an element, an overall counter for the number of errors on the form is incremented. If the form has any errors, the form builder service will not execute the submit method.
This process is executed through the \Drupal\Core\Form\FormValidator class, which is run through the form builder service.
Form validation can be done through multiple handlers and at the element level. The following sections will cover those.
A form can have multiple validation handlers. By default, all forms come with at least one validator, which is its own validateForm method. There is more that can be added. However, by default, the form will merely execute ::validateForm and all element validators. This allows you to invoke methods on other classes or other forms.
If a class provides method1 and method2, which it would like to execute as well, the following code can be added to the buildForm method:
$form_state->setValidateHandlers([
  ['::validateForm'],
  ['::method1'],
  [$this, 'method2'],
]);
This sets the validator array to execute the default validateForm method and the two additional methods. You can reference a method in the current class using two colons (::) and the method name. Alternatively, you can use an array that consists of a class instance and the method to be invoked.
Forms support nested form elements in the form array. The default \Drupal\Core\Form\FormStateInterface implementation, \Drupal\Core\Form\FormState, supports accessing multidimensional array values. Instead of passing a string, you can pass an array that represents the parent array structure in the form array.
If the element is defined as in $form['company']['company_name'], then we will pass ['company', 'company_name'] to the form state's methods.
Form elements can have their own validators. The form state will aggregate all of the element validation methods and pass them to the form validation service. This will run with the form's validation.
There is a limit_validation_errors option, which can be set to allow selected invalid errors to be passed. This option allows you to bypass validation on specific elements in your form. This is useful if a form has two submit buttons and each intends to validate and submit specific data. This attribute is defined in the submit button, also known as the triggering element in the form state. It is an array value consisting of form element keys.
A form's purpose is to collect data and do something with the data that was submitted. All forms need to implement the \Drupal\Core\Form\FormInterface interface. The interface defines a submit method. Once the Form API has invoked the class's validation method, the submit method can be run.
This recipe will be based on the custom module and form created in the Creating a form recipe of this chapter. We will convert the form to \Drupal\Core\FormConfigBaseForm, allowing us to save our configuration and reuse code provided by Drupal core.
In this recipe, we will use the module and custom form created in the first Creating a form recipe.
  drupalform.company:
    type: config_object
    label: 'Drupal form settings'
    mapping:
      company_name:
        type: string
        label: 'A company name'
This tells Drupal that we have the configuration with the name drupalform.company, and it has a valid option of company_name. We will cover this in more detail in Chapter 9, Configuration Management - Deploying in Drupal 8.
<?php

namespace Drupal\drupalform\Form;

use Drupal\Core\Form\ConfigFormBase;
use Drupal\Core\Form\FormStateInterface;
<?php

namespace Drupal\drupalform\Form;

use Drupal\Core\Form\ConfigFormBase;
use Drupal\Core\Form\FormStateInterface;

class ExampleForm extends ConfigFormBase {
...
}
This allows us to reuse methods from the ConfigFormBase class and write less about our own implementation.
<?php

namespace Drupal\drupalform\Form;

use Drupal\Core\Form\ConfigFormBase;
use Drupal\Core\Form\FormStateInterface;

class ExampleForm extends ConfigFormBase {
...
  /**
   * {@inheritdoc}
   */
  protected function getEditableConfigNames() {
    return ['drupalform.company'];
  }
...
}
This function defines the configuration names, which will be editable by the form. This brings all the attributes under the drupalform.company object to be editable when accessed through the form with the config method provided by ConfigFormBaseTrait.
/**
 * {@inheritdoc}
 */
public function buildForm(array $form, FormStateInterface $form_state) {
  $form['company_name'] = [
    '#type' => 'textfield',
    '#title' => $this->t('Company name'),
    '#default_value' => $this->config('drupalform.company')->get('company_name'),
  ];
  return parent::buildForm($form, $form_state);
}
The ConfigFormBase class implements the buildForm method to provide a reusable submit button. It also unifies the presentation across Drupal configuration forms:
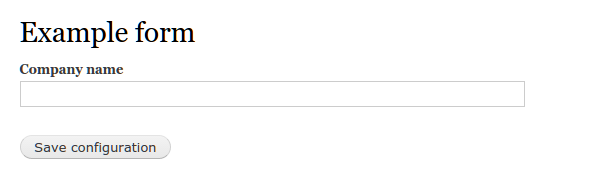
/**
 * {@inheritdoc}
 */
public function buildForm(array $form, FormStateInterface $form_state) {
  $form['company_name'] = [
    '#type' => 'textfield',
    '#title' => $this->t('Company name'),
    '#default_value' => $this->config('drupalform.company')->get('name'),
  ];
  return parent::buildForm($form, $form_state);
}
The #default_value key is added to the element's definition. It invokes the config method provided by ConfigFormBaseTrait to load our configuration group and access a specific configuration value.
/**
 * {@inheritdoc}
 */
public function submitForm(array &$form, FormStateInterface $form_state) {
  parent::submitForm($form, $form_state);
  $this->config('drupalform.company')->set('name', $form_state->getValue('company_name'));
}
The config method is invoked by specifying our configuration group. We will then use the set method to define the name as the value of the company name text field.
<?php

namespace Drupal\drupalform\Form;

use Drupal\Core\Form\ConfigFormBase;
use Drupal\Core\Form\FormStateInterface;

class ExampleForm extends ConfigFormBase {

  /**
   * {@inheritdoc}
   */
  protected function getEditableConfigNames() {
      return ['drupalform.company'];
  }

  /**
   * {@inheritdoc}
   */
  public function getFormId() {
    return 'drupalform_example_form';
  }

  /**
   * {@inheritdoc}
   */
  public function buildForm(array $form, FormStateInterface $form_state) {
    $form['company_name'] = array(
      '#type' => 'textfield',
      '#title' => t('Company name'),
      '#default_value' => $this->config('drupalform.company')->get('name'),
    );
    return parent::buildForm($form, $form_state);
  }

  /**
   * {@inheritdoc}
   */
  public function validateForm(array &$form, FormStateInterface $form_state) {
    if (!$form_state->isValueEmpty('company_name')) {
      if (strlen($form_state->getValue('company_name')) <= 5) {
        $form_state->setErrorByName('company_name', t('Company name is less than 5 characters'));
      }
    }
  }
  /**
   * {@inheritdoc}
   */
  public function submitForm(array &$form, FormStateInterface $form_state) {
    parent::submitForm($form, $form_state);
    $this->config('drupalform.company')->set('name', $form_state->getValue('company_name'));
  }
}
The ConfigFormBase utilizes the ConfigFormBaseTrait to provide easy access to a configuration factory. The class's implementation of buildForm also adds a submit button and theme styling to forms. The submit handler displays a configuration saved message, but relies on implementing a module to save the configuration.
The form saves its data under the drupalform.company namespace. The company name value is stored as name and can be accessed as drupalform.company.name. Note that the configuration name does not have to match the form element's key.
In the next section, we will cover how to handle multiple submit callbacks.
A form can have multiple submit handlers. By default, all forms implement a submit handler, which is its own submitForm method. The form will execute ::submitForm automatically and any other methods defined on the triggering element. There is more that can be added. However, this allows you to invoke static methods on other classes or other forms.
If a class provides method1 and method2, which it would like to execute as well, the following code can be added to the buildForm method:
$form_state->setSubmitHandlers([
  ['::submitForm'],
  ['::method1'],
  [$this, 'method2']
]);
This sets the submit handler array to execute the default submitForm method and two additional methods. You can reference a method in the current class using two colons (::) and the method name. Alternatively, you can use an array consisting of a class instance and the method to be invoked.
Drupal's Form API does not just provide a way to create forms. There are ways to alter forms through a custom module that allows you to manipulate the core and contributed forms. Using this technique, new elements can be added, default values can be changed, or elements can even be hidden from view to simplify the user experience.
The altering of a form does not happen in a custom class; this is a hook defined in the module file. In this recipe, we will use the hook_form_FORM_ID_alter() hook to add a telephone field to the site's configuration form.
This recipe assumes that you have a custom module to add the code to.
name: My module
description: Custom module that uses a form alter
type: module
core: 8.x
<?php

/**
 * @file
 * Custom module that alters forms.
 */
/**
 * Implements hook_form_FORM_ID_alter().
 */
function  mymodule_form_system_site_information_settings_alter(&$form, \Drupal\Core\Form\FormStateInterface $form_state) {
  // Code to alter form or form state here
}
Drupal will call this hook and pass the current form array and its form state object. The form array is passed by reference, allowing our hook to modify the array without returning any values. This is why the $form parameter has the ampersand (&) before it. In PHP, all objects are passed by reference, which is why we have no ampersand (&) before $form_state.
/**
 * Implements hook_form_FORM_ID_alter().
 */
function  mymodule_form_system_site_information_settings_alter(&$form, \Drupal\Core\Form\FormStateInterface $form_state) {
  $form['site_phone'] = [
    '#type' => 'tel',
    '#title' => t('Site phone'),
    '#default_value' => Drupal::config('system.site')->get('phone'),
  ];
}
We retrieve the current phone value from system.site so that it can be modified if already set.
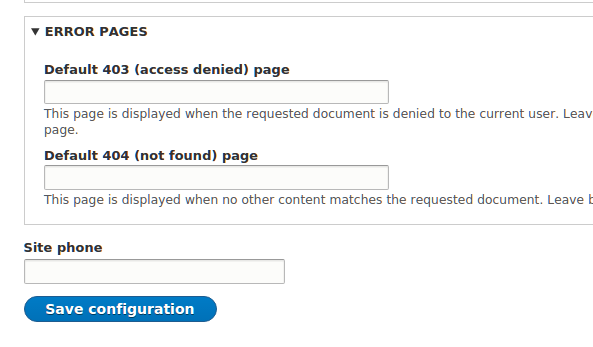
/**
 * Implements hook_form_FORM_ID_alter().
 */
function  mymodule_form_system_site_information_settings_alter(&$form, \Drupal\Core\Form\FormStateInterface $form_state) {
  $form['site_phone'] = [
   '#type' => 'tel',
   '#title' => t('Site phone'),
   '#default_value' => Drupal::config('system.site')->get('phone'),
  ];
  $form['#submit'][] = 'mymodule_system_site_information_phone_submit';
}

/**
 * Form callback to save site_phone
 * @param array $form
 * @param \Drupal\Core\Form\FormStateInterface $form_state
*/
function mymodule_system_site_information_phone_submit(array &$form,  \Drupal\Core\Form\FormStateInterface $form_state) {
  $config = Drupal::configFactory()->getEditable('system.site');
  $config
  ->set('phone', $form_state->getValue('site_phone'))
  ->save();
}
The $form['#submit'] modification adds our callback to the form's submit handlers. This allows our module to interact with the form once it has been submitted.
The mymodule_system_site_information_phone_submit callback is passed the form array and form state. We load the current configuration factory to receive the configuration that can be edited. We then load system.site and save phone based on the value from the form state.
The \Drupal\system\Form\SiteInformationForm class extends \Drupal\Core\Form\ConfigFormBase to handle the writing of form elements as individual configuration values. However, it does not write the values automatically to the form state. In this recipe, we needed to add a submit handler to manually save our added field via a procedural function in our mymodule.module file.
The form array is passed by reference, allowing modifications to be made in the hook to alter the original data. This allows us to add an element or even modify existing items, such as titles or descriptions.
We will discuss how to add additional handlers to other forms using form alters.
Using a form alter hook, we can add additional validators to a form. The proper way to do this is to load the current validators and add the new one to the array and reset the validators in the form state:
$validators = $form_state->getValidateHandlers();
$validators[] = 'mymodule_form_validate';
$form_state->setValidateHandlers($validators);
First, we will receive all of the currently set validators from the form state as the $validators variable. We then append a new callback to the end of the array. Once the $validators variable has been modified, we will override the form state's validator array by executing the setValidateHandlers method.
Using a form alter hook, we can add additional submit handlers to a form. The proper way to do this is to load the current submit handlers, add the new one to the array, and reset the validators in the form state:
$submit_handlers = $form_state->getSubmitHandlers();
$submit_handlers[] = 'mymodule_form_submit';
$form_state->setSubmitHandlers($submit_handlers );
First, we will receive all of the currently set submit handlers from the form state as the $submit_handlers variable. We then append a new callback to the end of the array.
Once the $submit_handlers variable has been modified, we will override the form state's submit handler array by executing the setSubmitHandlers method.
In this chapter, we will dive into the new Plugin API provided in Drupal 8:
Drupal 8 introduces plugins. Plugins power many items in Drupal, such as blocks, field types, and field formatters. Plugins and plugin types are provided by modules. They provide a swappable and specific functionality. Breakpoints, as discussed in Chapter 5, Front End for the Win, are plugins. In this chapter, we will discuss how plugins work in Drupal 8 and show you how to create blocks, fields, and custom plugin types.
Each version of Drupal has subsystems, which provided pluggable components and contributed modules. However, the implementation and management of these subsystems presented a problem. Blocks, fields, and image styles each had an entirely different system to be learned and understood. The Plugin API exists in Drupal 8 to mitigate this problem and provide a base API to implement pluggable components. This has greatly improved the developer experience when working with Drupal core's subsystems. In this chapter, we will implement a block plugin. We will use the Plugin API to provide a custom field type along with a widget and formatter for the field. The last recipe will show you how to create and use a custom plugin type.
In Drupal, a block is a piece of content that can be placed in a region provided by a theme. Blocks are used to present specific kinds of content, such as a user login form, a snippet of text, and many more.
Blocks are annotated plugins. Annotated plugins use documentation blocks to provide details of the plugin. They are discovered in the module's Plugin class namespace. Each class in the Plugin/Block namespace will be discovered by the Block module's plugin manager.
In this recipe, we will define a block that will display a copyright snippet and the current year and place it in the footer region.
Create a new module like the one shown in this recipe, with a defined info.yml so that it can be discovered by Drupal. We will refer to the module as mymodule throughout the recipe. Use your module's appropriate name.
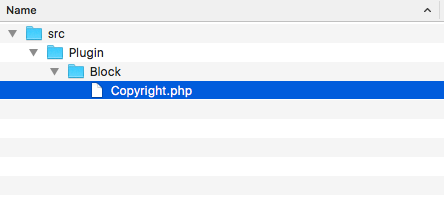
<?php

namespace Drupal\mymodule\Plugin\Block;

use Drupal\Core\Block\BlockBase;

class Copyright extends BlockBase {

}
We will extend the BlockBase class, which implements \Drupal\Core\Block\BlockPluginInterface and provides us with an implementation of nearly all of the interface's methods.
<?php

namespace Drupal\mymodule\Plugin\Block;

use Drupal\Core\Block\BlockBase;

/**
 * @Block(
 *   id = "copyright_block",
 *   admin_label = @Translation("Copyright"),
 *   category = @Translation("Custom")
 * )
 */
class Copyright extends BlockBase {

}
The annotation document block of the class identifies the type of plugin through @Block. Drupal will parse this and initiate the plugin with the properties defined inside it. The id is the internal machine name, the admin_label is displayed on the block listing page, and category shows up in the block select list.
<?php
namespace Drupal\mymodule\Plugin\Block;
use Drupal\Core\Block\BlockBase;
/**
* @Block(
* id = "copyright_block",
* admin_label = @Translation("Copyright"),
* category = @Translation("Custom")
* )
*/
class Copyright extends BlockBase {
/**
* {@inheritdoc}
*/
public function build() {
$date = new \DateTime();
return [
'#markup' => t('Copyright @year© My Company', [
'@year' => $date->format('Y'),
]),
];
}
}
The build method returns a render array that uses Drupal's t function to substitute @year for the \DateTime object's output that is formatted as a full year.
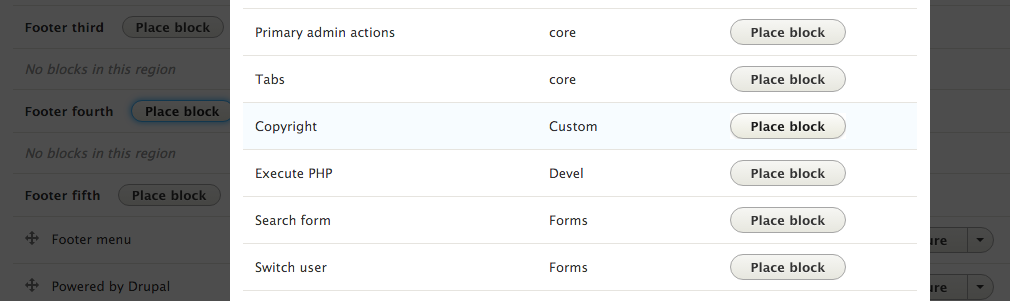
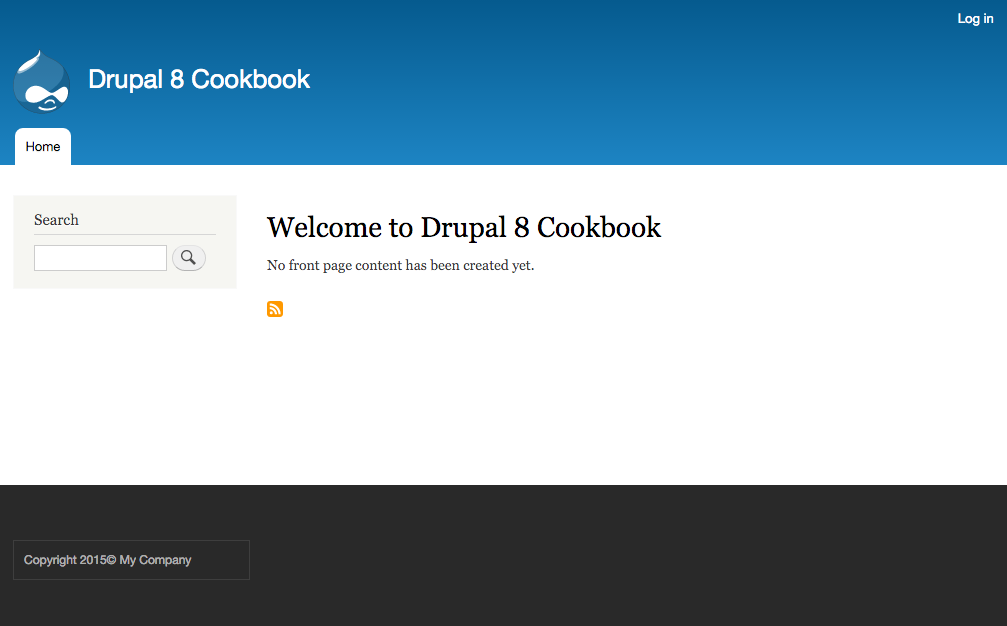
The plugin system works through plugin definitions and plugin managers for those definitions. The \Drupal\Core\Block\BlockManager class defines the block plugins that need be located in the Plugin/Block namespace. It also defines the base interface that needs to be implemented along with the Annotation class, which is to be used when parsing the class's document block.
When Drupal's cache is rebuilt, all available namespaces are scanned to check whether classes exist in the given plugin namespace. The definitions, via annotation, will be processed, and the information will be cached.
Blocks are then retrieved from the manager, manipulated, and their methods are invoked. When viewing the Block layout page to manage blocks, the \Drupal\Core\Block\BlockBase class's label method is invoked to display the human-readable name. When a block is displayed on a rendered page, the build method is invoked and passed to the theming layer to be output.
There are more in-depth items that can be used when creating a block plugin. We will cover those in the following sections.
Blocks can be altered in three different ways: the plugin definition can be altered, the build array, or the view array out.
A module can implement hook_block_alter in its .module file and modify the annotation definitions of all the discovered blocks. This will allow a module to change the default user_login_block from user login to Login:
/**
 * Implements hook_block_alter().
 */
function mymodule_block_alter(&$definitions) {
  $definitions['user_login_block']['admin_label'] = t('Login');
}
A module can implement hook_block_build_alter and modify the build information of a block. The hook is passed through the build array and the \Drupal\Core\Block\BlockPluginInterface instance for the current block. Module developers can use this to add cache contexts or alter the cache ability of the metadata:
/**
 * Implements hook_block_build_alter().
 */
function hook_block_build_alter(array &$build, \Drupal\Core\Block\BlockPluginInterface $block) {
  // Add the 'url' cache the block per URL.
  if ($block->getBaseId() == 'myblock') {
    $build['#contexts'][] = 'url';
  }
}
Finally, a module can implement hook_block_view_alter in order to modify the output to be rendered. A module can add content to be rendered or removed. This can be used to remove the contextual_links item, which allows inline editing on the front page of a site:
/**
 * Implements hook_block_view_alter().
 */
function hook_block_view_alter(array &$build, \Drupal\Core\Block\BlockPluginInterface $block) {
  // Remove the contextual links on all blocks that provide them.
  if (isset($build['#contextual_links'])) {
    unset($build['#contextual_links']);
  }
}
Blocks can provide a setting form. This recipe provides the text My Company for the copyright text. Instead, this can be defined through a text field in the block's setting form.
Let's readdress the Copyright.php file that holds our block's class. We will override methods provided by our base class. The following methods will be added to the class written in this recipe.
A block can override the default defaultConfiguration method, which returns an array of setting keys and their default values. The blockForm method can then override the \Drupal\Core\Block\BlockBase empty array implementation to return a Form API array to represent the settings form:
  /**
   * {@inheritdoc}
   */
  public function defaultConfiguration() {
    return [
      'company_name' => '',
    ];
  }

  /**
   * {@inheritdoc}
   */
  public function blockForm($form, \Drupal\Core\Form\FormStateInterface $form_state) {
    $form['company_name'] = [
      '#type' => 'textfield',
      '#title' => t('Company name'),
      '#default_value' => $this->configuration['company_name'],
    ];
    return $form;
  }
The blockSubmit method must then be implemented, which updates the block's configuration:
  /**
   * {@inheritdoc}
   */
  public function blockSubmit($form, \Drupal\Core\Form\FormStateInterface $form_state) {
    $this->configuration['company_name'] = $form_state->getValue('company_name');
  }
Finally, the build method can be updated to use the new configuration item:
  /**
   * {@inheritdoc}
   */
  public function build() {
    $date = new \DateTime();
    return [
      '#markup' => t('Copyright @year© @company', [
        '@year' => $date->format('Y'),
        '@company' => $this->configuration['company_name'],
      ]),
    ];
  }
You can now return to the Block layout form, and click on Configure in the Copyright block. The new setting will be available in the block instance's configuration form.
Blocks, by default, are rendered for all users. The default access method can be overridden. This allows a block to only be displayed to authenticated users or based on a specific permission:
  /**
   * {@inheritdoc}
   */
  protected function blockAccess(AccountInterface $account) {
    $route_name = $this->routeMatch->getRouteName();
    if ($account->isAnonymous() && !in_array($route_name,
       array('user.login', 'user.logout'))) {
      return AccessResult::allowed()
        ->addCacheContexts(['route.name',
           'user.roles:anonymous']);
    }
    return AccessResult::forbidden();
  }
The preceding code is taken from the user_login_block. It allows access to the block if the user is logged out and is not in the login or logout page. The access is cached based on the current route name and the user's current role being anonymous. If these are not passed, the access returned is forbidden and the block is not built.
Other modules can implement hook_block_access to override the access of a block:
/**
 * Implements hook_block_access().
 */
function mymodule_block_access(\Drupal\block\Entity\Block $block, $operation, \Drupal\Core\Session\AccountInterface $account) {
  // Example code that would prevent displaying the Copyright' block in
  // a region different than the footer.
  if ($operation == 'view' && $block->getPluginId() == 'copyright') {
    return \Drupal\Core\Access\AccessResult::forbiddenIf($block->getRegion() != 'footer');
  }

  // No opinion.
  return \Drupal\Core\Access\AccessResult::neutral();
}
A module implementing the preceding hook will deny access to our Copyright block if it is not placed in the footer region.
Field types are defined using the plugin system. Each field type has its own class and definition. A new field type can be defined through a custom class that will provide schema and property information.
In this example, we will create a simple field type called real name to store the first and last names.
Create a new module like the one shown in this recipe, with a defined info.yml so that it can be discovered by Drupal. We will refer to the module as mymodule throughout the recipe. Use your module's appropriate name.
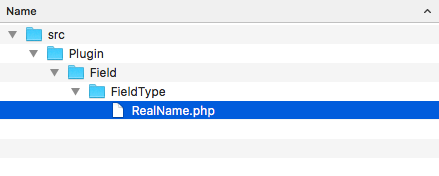
<?php

namespace Drupal\mymodule\Plugin\Field\FieldType;

use Drupal\Core\Field\FieldItemBase;
use Drupal\Core\Field\FieldStorageDefinitionInterface;
use Drupal\Core\TypedData\DataDefinition;

class RealName extends FieldItemBase {

}
The \Drupal\Core\Field\FieldItemBase satisfies methods defined by inherited interfaces, except for schema and propertyDefinitions.
<?php

namespace Drupal\mymodule\Plugin\Field\FieldType;

use Drupal\Core\Field\FieldItemBase;
use Drupal\Core\Field\FieldStorageDefinitionInterface;
use Drupal\Core\TypedData\DataDefinition;

/**
 * Plugin implementation of the 'realname' field type.
 *
 * @FieldType(
 *   id = "realname",
 *   label = @Translation("Real name"),
 *   description = @Translation("This field stores a first and last name."),
 *   category = @Translation("General"),
 *   default_widget = "string_textfield",
 *   default_formatter = "string"
 * )
 */

class RealName extends FieldItemBase {

}
The @FieldType tells Drupal that this is a FieldType plugin. The following properties are defined:
/**
 * {@inheritdoc}
 */
public static function schema(\Drupal\Core\Field\FieldStorageDefinitionInterface $field_definition) {
  return [
    'columns' => [
      'first_name' => [
        'description' => 'First name.',
        'type' => 'varchar',
        'length' => '255',
        'not null' => TRUE,
        'default' => '',
      ],
      'last_name' => [
        'description' => 'Last name.',
        'type' => 'varchar',
        'length' => '255',
        'not null' => TRUE,
        'default' => '',
      ],
    ],
    'indexes' => [
       'first_name' => ['first_name'],
       'last_name' => ['last_name'],
    ],
  ];
}
The schema method defines the columns in the field's data table. We will define a column to hold the first_name and last_name values.
/**
 * {@inheritdoc}
 */
public static function propertyDefinitions(\Drupal\Core\Field\FieldStorageDefinitionInterface $field_definition) {
  $properties['first_name'] = \Drupal\Core\TypedData\DataDefinition::create('string')
->setLabel(t('First name'));
  $properties['last_name'] = \Drupal\Core\TypedData\DataDefinition::create('string')
->setLabel(t('Last name'));
  return $properties;
}
This method returns an array that is keyed with the same column names provided in schema. It returns a typed data definition to handle the field type's values.
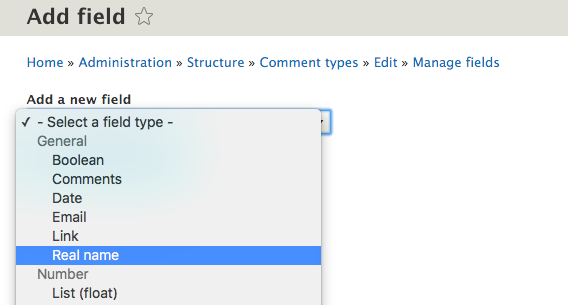
Drupal core defines a plugin.manager.field.field_type service. By default, this is handled through the \Drupal\Core\Field\FieldTypePluginManager class. This plugin manager defines the field type plugins that should be in the Plugin/Field/FieldType namespace, and all the classes in this namespace will be loaded and assumed to be field type plugins.
The manager's definition also sets \Drupal\Core\Field\FieldItemInterface as the expected interface that all the field type plugins will implement. This is why most field types extend \Drupal\Core\Field\FieldItemBase to meet these method requirements.
As field types are annotated plugins, the manager provides \Drupal\Core\Field\Annotation\FieldType as the class that fulfills the annotation definition.
When the user interface defines the available fields, the plugin.manager.field.field_type service is invoked to retrieve a list of available field types.
Existing field types can be altered to modify their definitions, and custom field types can implement a method to define whether the value is empty or not. We will cover these in the next sections.
The \Drupal\Core\Field\FieldTypePluginManager class defines the alter method as field_info. Modules that implement hook_field_info_alter in their .module files have the ability to modify field type definitions discovered by the manager:
/**
 * Implements hook_field_info_alter().
 */
function mymodule_field_info_alter(&$info) {
  $info['email']['label'] = t('E-mail address');
}
The preceding alter method will change the human-readable label for the email field to E-mail address when selecting the field in the user interface.
The \Drupal\Core\TypedDate\ComplexDataInterface interface provides an isEmpty method. This method is used to check whether the field's value is empty, for example, when verifying that the required field has data. The \Drupal\Core\TypedData\Plugin\DataType\Map class implements the method. By default, the method ensures that the values are not empty.
Field types can provide their own implementations to provide a more robust verification. For instance, the field can validate that the first name can be entered but not the last name, or the field can require both the first and the last name.
Field widgets provide the form interface to edit a field. These integrate with the Form API to define how a field can be edited and the way in which the data can be formatted before it is saved. Field widgets are chosen and customized through the form display interface.
In this recipe, we will create a widget for the field created in the Creating a custom field type recipe in this chapter. The field widget will provide two text fields for entering the first and last name items.
Create a new module, such as the one from the Creating a custom field type recipe. We will refer to the module as mymodule throughout the recipe. Use your module's appropriate name.
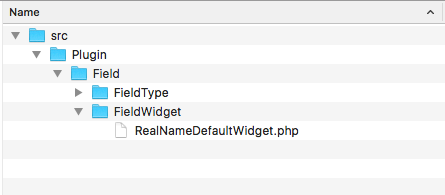
<?php

namespace Drupal\mymodule\Plugin\Field\FieldWidget;

use Drupal\Core\Field\WidgetBase;

class RealNameDefaultWidget extends WidgetBase {

}
<?php

namespace Drupal\mymodule\Plugin\Field\FieldWidget;

use Drupal\Core\Field\WidgetBase;
use Drupal\Core\Field\FieldItemListInterface;
use Drupal\Core\Form\FormStateInterface;

/**
 * Plugin implementation of the 'realname_default' widget.
 *
 * @FieldWidget(
 *   id = "realname_default",
 *   label = @Translation("Real name"),
 *   field_types = {
 *     "realname"
 *   }
 * )
 */
class RealNameDefaultWidget extends WidgetBase {

}
The @FieldWidget tells Drupal that this is a field widget plugin. It defines id to represent the machine name, the human-readable name as label, and the field types that the widget interacts with.
/**
 * {@inheritdoc}
 */
public function formElement(FieldItemListInterface $items, $delta, array $element, array &$form, FormStateInterface $form_state) {
  $element['first_name'] = [
    '#type' => 'textfield',
    '#title' => t('First name'),
    '#default_value' => '',
    '#size' => 25,
    '#required' => $element['#required'],
  ];
  $element['last_name'] = [
    '#type' => 'textfield',
    '#title' => t('Last name'),
    '#default_value' => '',
    '#size' => 25,
    '#required' => $element['#required'],
  ];
return $element;
}
The formElement method returns a Form API array that represents the widget to be set and edits the field data.
/**
 * Plugin implementation of the 'realname' field type.
 *
 * @FieldType(
 *   id = "realname",
 *   label = @Translation("Real name"),
 *   description = @Translation("This field stores a first and last name."),
 *   category = @Translation("General"),
 *   default_widget = "realname_default",
 *   default_formatter = "string"
 * )
 */
class RealName extends FieldItemBase {

Drupal core defines a plugin.manager.field.widget service. By default, this is handled through the \Drupal\Core\Field\FieldWidgetPluginManager class. This plugin manager defines the field widget plugins that should be in the Plugin/Field/FieldWidget namespace, and all the classes in this namespace will be loaded and assumed to be field widget plugins.
The manager's definition also sets \Drupal\Core\Field\FieldWidgetInterface as the expected interface that all the field widget plugins will implement. This is why most field types extend \Drupal\Core\Field\WidgetBase to meet these method requirements.
As field widgets are annotated plugins, the manager provides \Drupal\Core\Field\Annotation\FieldWidget as the class that fulfills the annotation definition.
The entity form display system uses the plugin.manager.field.widget service to load field definitions and add the field's element returned from the formElement method to the entity form.
Field widgets have additional methods to provide more information; they are covered in the next section.
The \Drupal\Core\Field\WidgetInterface interface defines three methods that can be overridden to provide a settings form and a summary of the current settings:
Widget settings can be used to alter the form presented to the user. A setting can be created that allows the field element to be limited to only enter the first or last name with one text field.
Field formatters define the way in which a field type will be presented. These formatters return the render array information to be processed by the theming layer. Field formatters are configured on the display mode interfaces.
In this recipe, we will create a formatter for the field created in the Creating a custom field type recipe in this chapter. The field formatter will display the first and last names with some settings.
Create a new module like the one existing in the first recipe. We will refer to the module as mymodule throughout the recipe. Use your module's appropriate name.
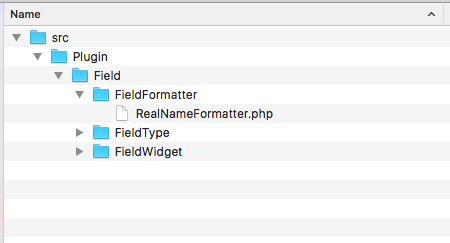
<?php

namespace Drupal\mymodule\Plugin\Field\FieldFormatter;

use Drupal\Core\Field\FormatterBase;
use Drupal\Core\Field\FieldItemListInterface;

class RealNameFormatter extends FormatterBase {

}
<?php

namespace Drupal\mymodule\Plugin\Field\FieldFormatter;

use Drupal\Core\Field\FormatterBase;
use Drupal\Core\Field\FieldItemListInterface;

/**
 * Plugin implementation of the 'realname_one_line' formatter.
 *
 * @FieldFormatter(
 *   id = "realname_one_line",
 *   label = @Translation("Real name (one line)"),
 *   field_types = {
 *     "realname"
 *   }
 * )
 */
class RealNameFormatter extends FormatterBase {

}
/**
{@inheritdoc}
*/
public function viewElements(FieldItemListInterface $items, $langcode) {
  $element = [];

  foreach ($items as $delta => $item) {
    $element[$delta] = [
      '#markup' => $this->t('@first @last', [
        '@first' => $item->first_name,
        '@last' => $item->last_name,
      ]),
    ];
  }
  return $element;
}
/**
 * Plugin implementation of the 'realname' field type.
 *
 * @FieldType(
 *   id = "realname",
 *   label = @Translation("Real name"),
 *   description = @Translation("This field stores a first and last name."),
 *   category = @Translation("General"),
 *   default_widget = " string_textfield ",
 *   default_formatter = "realname_one_line"
 * )
 */
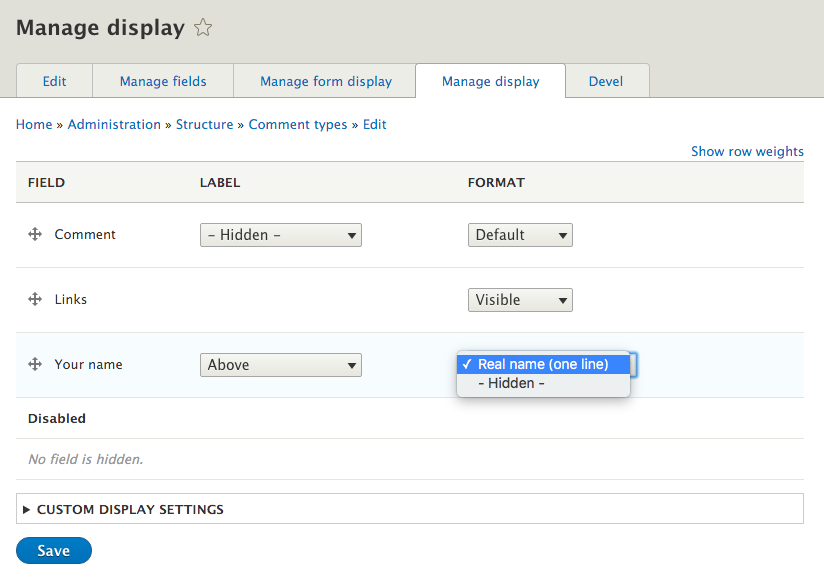
Drupal core defines a plugin.manager.field.formatter service. By default, this is handled through the \Drupal\Core\Field\FormatterPluginManager class. This plugin manager defines the field formatter plugins that should be in the Plugin/Field/FieldFormatter namespace, and all the classes in this namespace will be loaded and assumed to be field formatter plugins.
The manager's definition also sets \Drupal\Core\Field\FormatterInterface as the expected interface that all field formatter plugins will implement. This is why most field formatters extend \Drupal\Core\Field\FormatterBase to meet these method requirements.
As field formatters are annotated plugins, the manager provides \Drupal\Core\Field\Annotation\FieldFormatter as the class that fulfills the annotation definition.
The entity view display system uses the plugin.manager.field.formatter service to load field definitions and add the field's render array, returned from the viewElements method, to the entity view render array.
Field formatters have additional methods to provide more information; they are covered in the next section.
The \Drupal\Core\Field\FormatterInterface interface defines three methods that can be overridden to provide a settings form and a summary of the current settings:
Settings can be used to alter how the formatter displays information. For example, these methods can be implemented to provide settings to hide or display the first or last name.
The plugin system provides a means to create specialized objects in Drupal that do not require the data storage features of the entity system.
This recipe is based on the GeoIP API module port to Drupal 8 that was started by the author. The GeoIP API module provides a way to get the country from a website visitor's IP address.
In this recipe, we will create a new plugin type called GeoLocator that will return the country code for a given IP address. We will create a plugin manager, a default plugin interface, a plugin annotation definition, and provide a default plugin to find the country via the website's CDN.
We will use the geoip namespace and module name in this recipe.
<?php

namespace Drupal\geoip;

use Drupal\Core\Plugin\DefaultPluginManager;
use Drupal\Core\Cache\CacheBackendInterface;
use Drupal\Core\Extension\ModuleHandlerInterface;

class GeoLocatorManager extends DefaultPluginManager {

}
<?php

namespace Drupal\geoip;

use Drupal\Core\Plugin\DefaultPluginManager;
use Drupal\Core\Cache\CacheBackendInterface;
use Drupal\Core\Extension\ModuleHandlerInterface;

class GeoLocatorManager extends DefaultPluginManager {

  /**
   * Default values for each plugin.
   *
   * @var array
   */
  protected $defaults = [
    'label' => '',
    'description' => '',
    'weight' => 0,
  ];

}
<?php

namespace Drupal\geoip;

use Drupal\Core\Plugin\DefaultPluginManager;
use Drupal\Core\Cache\CacheBackendInterface;
use Drupal\Core\Extension\ModuleHandlerInterface;

class GeoLocatorManager extends DefaultPluginManager {

  /**
   * Default values for each plugin.
   *
   * @var array
   * /
  protected $defaults = [
    'label' => '',
    'description' => '',
    'weight' => 0,
  ];

  /**
   * Constructs a new GeoLocatorManager object.
   *
   * @param \Traversable $namespaces
   *   An object that implements \Traversable which contains the root paths
   *   keyed by the corresponding namespace to look for plugin implementations.
   * @param \Drupal\Core\Cache\CacheBackendInterface $cache_backend
   *   Cache backend instance to use.
   * @param \Drupal\Core\Extension\ModuleHandlerInterface $module_handler
   *   The module handler.
   */
  public function __construct(\Traversable $namespaces, CacheBackendInterface $cache_backend, ModuleHandlerInterface $module_handler) {
    parent::__construct(
      'Plugin/GeoLocator',
      $namespaces,
      $module_handler,
      'Drupal\geoip\Plugin\GeoLocator\GeoLocatorInterface',
      'Drupal\geoip\Annotation\GeoLocator'
    );
    $this->setCacheBackend($cache_backend, 'geolocator_plugins');
  }

}
We override the constructor so that we can specify a specific cache key. This allows plugin definitions to be cached and cleared properly; otherwise, our plugin manager will continuously read the disk to find plugins.
services:
  plugin.manager.geolocator:
    class: Drupal\geoip\GeoLocatorManager
    parent: default_plugin_manager
Drupal utilizes services and dependency injection. By defining our class as a service, we are telling the application container how to initiate our class. We can use the parent definition to tell the container to use the same arguments as the default_plugin_manager definition.
<?php

namespace Drupal\geoip\Annotation;

use Drupal\Component\Annotation\Plugin;

/**
 * Defines a GeoLocator annotation object.
 *
 * @Annotation
 */
class GeoLocator extends Plugin {

  /**
   * The human-readable name.
   *
   * @var \Drupal\Core\Annotation\Translation
   *
   * @ingroup plugin_translatable
   */
  public $label;

  /**
   * A description of the plugin.
   *
   * @var \Drupal\Core\Annotation\Translation
   *
   * @ingroup plugin_translatable
   */
  public $description;

}
Each property is an item that can be defined in the plugin's annotation. The annotated definition will start with @GeoLocator for our plugins.
<?php

namespace Drupal\geoip\Plugin\GeoLocator;

/**
 * Interface GeoLocatorInterface.
 */
interface GeoLocatorInterface {

  /**
   * Get the plugin's label.
   *
   * @return string
   *   The geolocator label
   */
  public function label();

  /**
   * Get the plugin's description.
   *
   * @return string
   *   The geolocator description
   */
  public function description();

  /**
   * Performs geolocation on an address.
   *
   * @param string $ip_address
   *   The IP address to geolocate.
   *
   * @return string|NULL
   *   The geolocated country code, or NULL if not found.
   */
  public function geolocate($ip_address);

}
We provide an interface so that we can guarantee that we have these expected methods when working with a GeoLocator plugin, and that we have an output, regardless of the logic behind each method.
<?php

namespace Drupal\geoip\Plugin\GeoLocator;

use Drupal\Core\Plugin\PluginBase;

/**
 * CDN geolocation provider.
 *
 * @GeoLocator(
 *   id = "cdn",
 *   label = "CDN",
 *   description = "Checks for geolocation headers sent by CDN services",
 *   weight = -10
 * )
 */
class Cdn extends PluginBase implements GeoLocatorInterface {

  /**
   * {@inheritdoc}
   */
  public function label() {
    return $this->pluginDefinition['label'];
  }

  /**
   * {@inheritdoc}
   */
  public function description() {
    return $this->pluginDefinition['description'];
  }

  /**
   * {@inheritdoc}
   */
  public function geolocate($ip_address) {
    // Check if CloudFlare headers present.
    if (!empty($_SERVER['HTTP_CF_IPCOUNTRY'])) {
      $country_code = $_SERVER['HTTP_CF_IPCOUNTRY'];
    }
    // Check if CloudFront headers present.
    elseif (!empty($_SERVER['HTTP_CLOUDFRONT_VIEWER_COUNTRY'])) {
      $country_code = $_SERVER['HTTP_CLOUDFRONT_VIEWER_COUNTRY'];
    }
    else {
      $country_code = NULL;
    }

    return $country_code;
  }

}
Drupal 8 implements a service container, a concept adopted from the Symfony framework. In order to implement a plugin, there needs to be a manager who can discover and process plugin definitions. This manager is defined as a service in a module's services.yml with its required constructor parameters. This allows the service container to initiate the class when it is required.
In our example, the GeoLocatorManager plugin manager discovers the GeoLocator plugin definitions through annotated plugin discovery. After the first discovery, all the known plugin definitions are then cached under the geolocator_plugins cache key.
Plugin managers also provide a method to return these definitions or create an object instance based on an available definition. For the CDN plugin, this would be a full instantiated Cdn class object.
Let's consider the following example:
// Load the manager service.
$geolocator_manager = \Drupal::service('plugin.manager.geolocator');

// Create a class instance through the manager.
$cdn_instance = $unit_manager->createInstance('cdn');

// Get country code.
$country_code = $cdn_instance->geolocate('127.0.0.1');
There are many additional items for creating a custom plugin type; we will discuss some of them in the following sections.
Plugin managers have the ability to define an alter hook. The following line of code will be added to the GeoLocatorManager class's constructor to provide hook_geolocator_plugins_alter. This is passed to the module handler service for invocations:
/**
 * Constructs a new GeoLocatorManager object.
 *
 * @param \Traversable $namespaces
 * An object that implements \Traversable which contains the root paths
 * keyed by the corresponding namespace to look for plugin implementations.
 * @param \Drupal\Core\Cache\CacheBackendInterface $cache_backend
 * Cache backend instance to use.
 * @param \Drupal\Core\Extension\ModuleHandlerInterface $module_handler
 * The module handler.
 */
public function __construct(\Traversable $namespaces, CacheBackendInterface $cache_backend, ModuleHandlerInterface $module_handler) {
  parent::__construct(
    'Plugin/GeoLocator',
    $namespaces,
    $module_handler,
    'Drupal\geoip\Plugin\GeoLocator\GeoLocatorInterface',
    'Drupal\geoip\Annotation\GeoLocator'
  );
  $this->alterInfo('geolocator_info');
  $this->setCacheBackend($cache_backend, 'geolocator_plugins');
}
Modules implementing hook_geolocator_plugins_alter in the .module file have the ability to modify all the discovered plugin definitions. They also have the ability to remove defined plugin entries or alter any information provided for the annotation definition.
Plugins can use a cache backend to improve performance. This can be done by specifying a cache backend with the setCacheBackend method in the manager's constructor. The following line of code will allow the Unit plugins to be cached and only discovered on a cache rebuild.
The $cache_backend variable is passed to the constructor. The second parameter provides the cache key. The cache key will have the current language code added as a suffix.
There is an optional third parameter that takes an array of strings to represent cache tags that will cause the plugin definitions to be cleared. This is an advanced feature, and plugin definitions should normally be cleared through the manager's clearCachedDefinitions method. The cache tags allow the plugin definitions to be cleared when a relevant cache is cleared as well.
Plugins are loaded through the manager service, which should always be accessed through the service container. The following line of code will be used in your module's hooks or classes to access the plugin manager:
$geolocator_manager = \Drupal::service('plugin.manager.geolocator');
Plugin managers have various methods for retrieving plugin definitions, which are as follows:
In this chapter, we will cover the following recipes to make sure that your site is multilingual and internationalized:
This chapter will cover the multilingual and internationalization features of Drupal 8, which have been greatly enhanced since Drupal 7. The preceding version of Drupal required many extra modules to provide internationalization efforts, but now the majority is provided by Drupal core.
Drupal core provides the following multilingual modules:
Each module serves a specific purpose in creating the multilingual experience for your Drupal site. Behind the scenes, Drupal supports the language code for all entities and cache contexts. These modules expose the interfaces to implement and deliver internationalized experiences.
The interface translation module provides a method to translate strings found in the Drupal user interface. Harnessing the Language module, interface translations are automatically downloaded from the Drupal translation server. By default, the interface language is loaded through the language code as a path prefix. With the default Language configuration, paths will be prefixed with the default language.
Interface translations are based on strings provided in the code that are passed through the internal translation functions.
In this recipe, we will enable Spanish, import the language files, and review the translated interface strings to provide missing or custom translations.
Drupal 8 provides an automated installation process of translation files. For this to work, your web server must be able to communicate with https://localize.drupal.org/. If your web server cannot automatically download the files from the translation server, you can refer to the manual installation instructions, which will be covered in the There's more... section of this recipe.
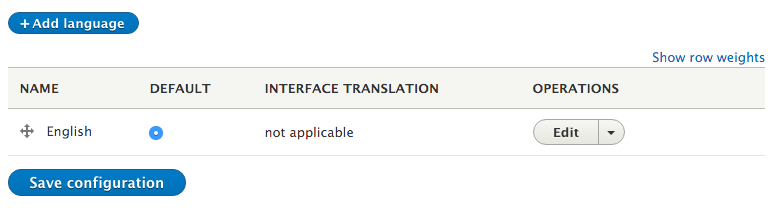
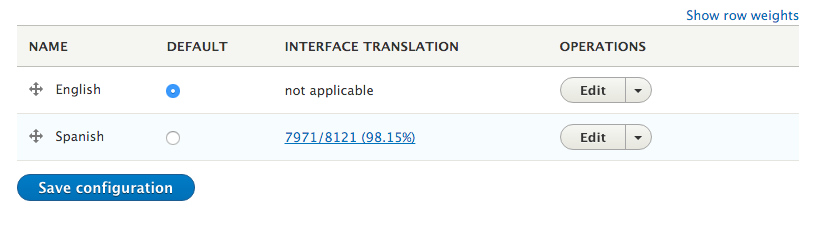
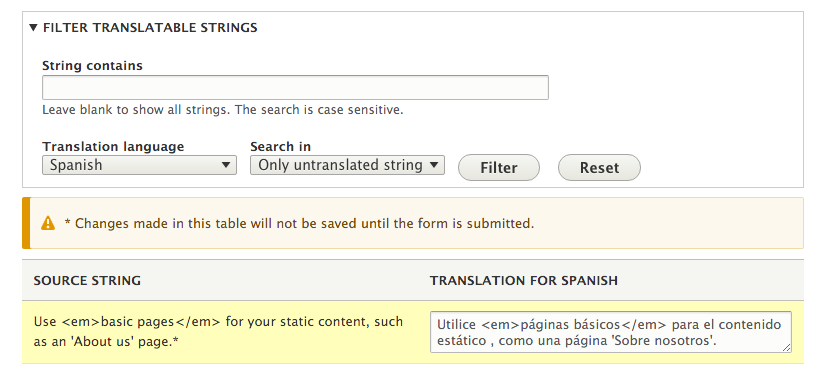
The interface translation module provides \Drupal\locale\LocaleTranslation, which implements \Drupal\Core\StringTranslation\Translator\TranslatorInterface. This class is registered under the string_translation service as an available lookup method.
When the t function or the \Drupal\Core\StringTranslation\StringTranslationTrait::t method is invoked, the string_translation service is called to provide a translated string. The string_translation service will iterate through the available translators and return a translated string, if possible.
The translator provided in the interface translation will then attempt to resolve the provided string against known translations for the current language. If a translation has been saved, it will be returned.
We will explore ways to install other languages, check translation statuses, and do much more in the following sections.
Translation files can be manually installed by downloading them from the Drupal.org translation server and uploading them through the language interface. You can also use the import interface to upload custom gettext portable object (.po) files.
Drupal core and most contributed projects have .po files available at the Drupal translations site, https://localize.drupal.org. On the site, click on Download to download a .po file for Drupal core in all available languages. Additionally, clicking on a language will provide more translations for a specific language across projects, as follows:
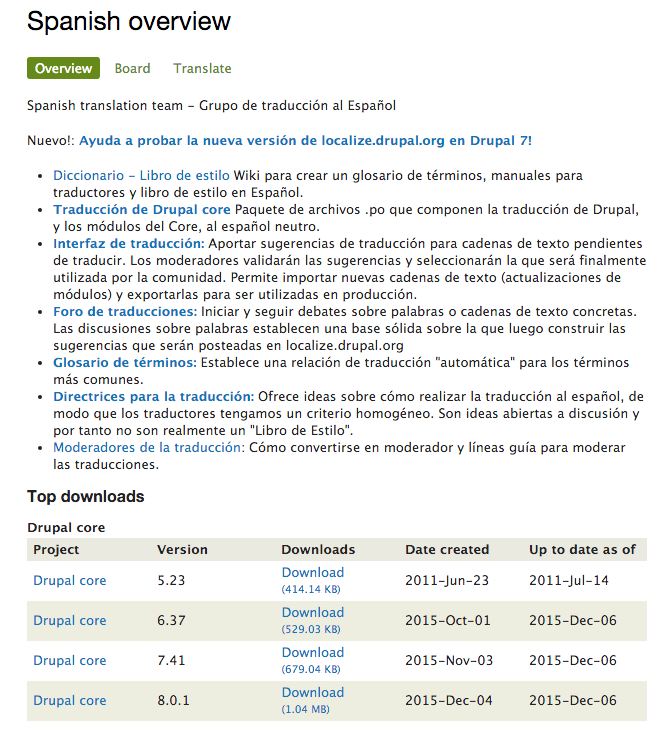
You can import a .po file by going to the User interface translation form and selecting the Import tab. You will need to select the .po file and then the appropriate language. You can treat the uploaded files as custom-created translations. This is recommended if you are providing a custom translation file that was not provided by Drupal.org. If you are updating Drupal.org translations manually, make sure that you check the box that overwrites existing noncustom translations. The final option allows you to replace customized translations if the .po file provides them. This can be useful if you have translated missing strings that might now be provided by the official translation file.
As you add new modules, the available translations will grow. The Interface translation module provides a translation status report that is accessible from the Reports page. This will check the default translation server for the project and check whether there is a .po available or if it has changed. In the event of a custom module, you can provide a custom translation server, which is covered in Providing translations for a custom module.
If an update is available, you will be alerted. You can then import the translation file updates automatically or download and manually import them.
In the User interface translation form, there is an Export tab. This form will provide a Gettext Portable Object (.po) file. You can export all the available source text that is discovered in your current Drupal site without translations. This will provide a base .po for translators to work on.
Additionally, you can download a specific language. Specific language downloads can include uncustomized translations, customized translations, and missing translations. Downloading customized translations can be used to help make contributions to the multilingual and internationalization efforts of the Drupal community.
The interface translation module provides a single permission called Translate interface text. This permission grants users the permission to interact with all the module's capabilities. It is flagged with a security warning, as it allows users with this permission to customize all the output text presented to them.
However, it does allow you to provide a role for translators and limits their access to just translation interfaces.
The interface translation module is useful beyond its typical multilingual purposes. You can use it to customize strings in the interface that are not available to be modified through typical hook methods, or if you are not a developer.
Firstly, you will need to edit the English language from the Languages screen. Check the checkbox for Enable interface translation for English and click on Save language. You will now have the ability to customize existing interface strings.
The Language module provides detection and selection rules. By default, the module will detect the current language based on the URL, with the language code acting as a prefix to the current path. For example, /es/node will display the node listing page in Spanish, as seen in the following screenshot:
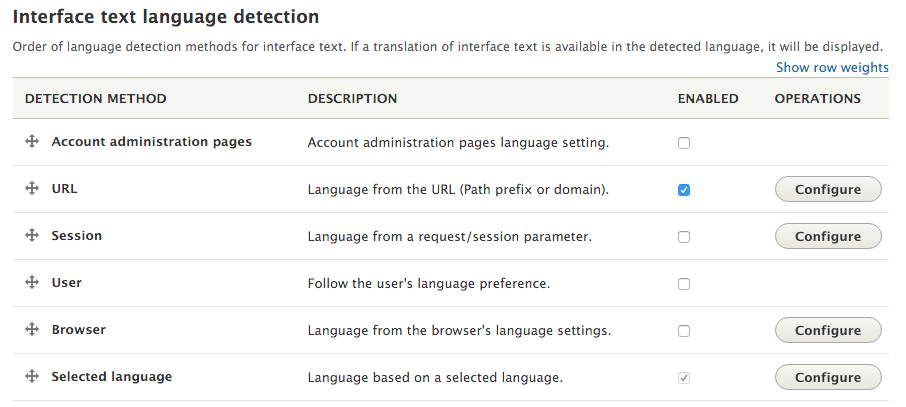
You can have multiple detection options enabled at once and use the ordering to decide which takes precedence. This can allow you to use the language code in the URL first, but, if they are missing, a fallback to the language is specified by the user's browser.
Some detection methods have settings. For instance, the URL detection method can be based on the default path prefix or subdomains.
Modules can provide custom translations in their directories or point to a remote file. These definitions are added to the module's info.yml file. First, you will need to specify the interface translation project key if it differs from the project's machine name.
You will then need to specify a server pattern through the interface translation server pattern key. This can be a relative path to Drupal's root, such as modules/custom/mymodule/translation.po, or a remote file URL at http://example.com/files/translations/mymodule/translation.po.
Distributions (or other modules) can implement hook_locale_translation_projects_alter to provide this information on behalf of modules or to alter defaults.
The server pattern accepts the following different tokens:
More information on the interface translation keys and variables can be found in the local.api.php document file located in the interface translation module's base folder.
The Configuration translation module provides an interface to translate configurations with interface translation and language as dependencies. This module allows us to translate configuration entities. The ability to translate configuration entities adds an extra level of internationalization.
Interface translation allows us to translate strings provided in our Drupal site's code base. Configuration translation allows us to translate importable and exportable configuration items that we created, such as site title or date formats.
In this recipe, we will translate date format configuration entities. We will provide localized date formats for Danish to provide a more internationalized experience.
Your Drupal site needs to have two languages enabled in order to use Configuration Translation. Install Danish from the Languages interface.
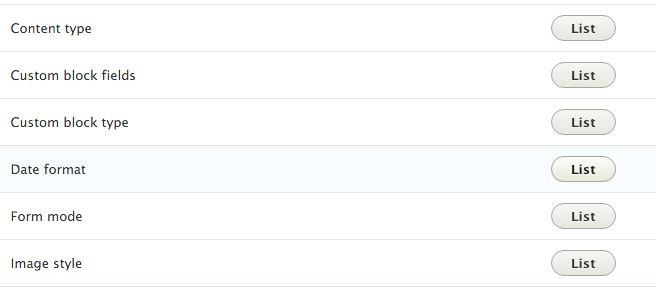
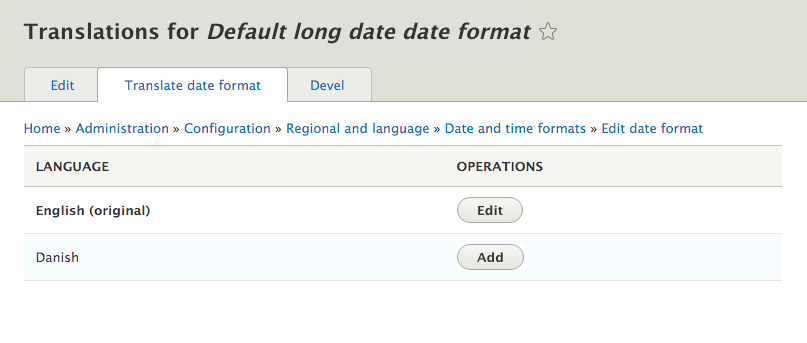
The Configuration Translation module requires Interface Translation; however, it does not work in the same fashion. The module modifies all entity types that extend the \Drupal\Core\Config\Entity\ConfigEntityInterface interface. It adds a new handler under the config_translation_list key. This is used to build a list of available configuration entities and their bundles.
The module alters the configuration schema in Drupal, and updates the default configuration element definitions to use a specified class under \Drupal\config_translation\Form. This allows \Drupal\config_translation\Form\ConfigTranslationFormBase and its child classes to properly save translated configuration data, which can then be modified through the configuration translation screens.
When the configuration is saved, it is identified as being part of a collection. The collection is identified as language.LANGCODE, and all translated configuration entities are saved and loaded by this identifier. The following is an example of how the configuration items are stored in the database:
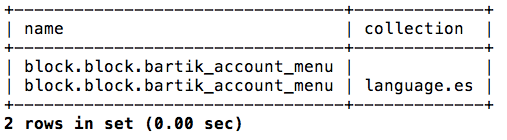
When browsing the site in the es language code, the appropriate block.block.bartik_account_menu configuration entity will be loaded. If you are using the default site, or no language code, the configuration entity with an empty collection will be used.
Configuration entities and the ability to translate them are a big part of Drupal 8's multilingual capabilities. We'll explore them in detail in the next recipe.
Modules can invoke the hook_config_translation_info_alter hook to alter discovered configuration mappers. For instance, the Node module does this to modify the node_type configuration entity:
/**
 * Implements hook_config_translation_info_alter().
 */
function node_config_translation_info_alter(&$info) {
  $info['node_type']['class'] = 'Drupal\node\ConfigTranslation\NodeTypeMapper';
}
This updates the node_type definition to use the \Drupal\node\ConfigTranslation\NodeTypeMapper custom mapper class. This class adds the node type's title as a configurable translation item.
Views are configuration entities. When the Configuration translation module is enabled, it is possible to translate Views. This will allow you to translate display titles, exposed form labels, and other items. Refer to the Creating a multilingual view recipe in this chapter for more information.
The content translation module provides a method to translate content entities, such as nodes and blocks. Each content entity needs to have translation enabled, which allows you to granularly decide what properties and fields are translated.
Content translations are duplications of the existing entity, but are flagged with a proper language code. When a visitor uses a language code, Drupal attempts to load content entities using that language code. If a translation is not present, Drupal will render the default untranslated entity.
Your Drupal site needs to have two languages enabled to use Content translation. Install Spanish from the Languages interface.
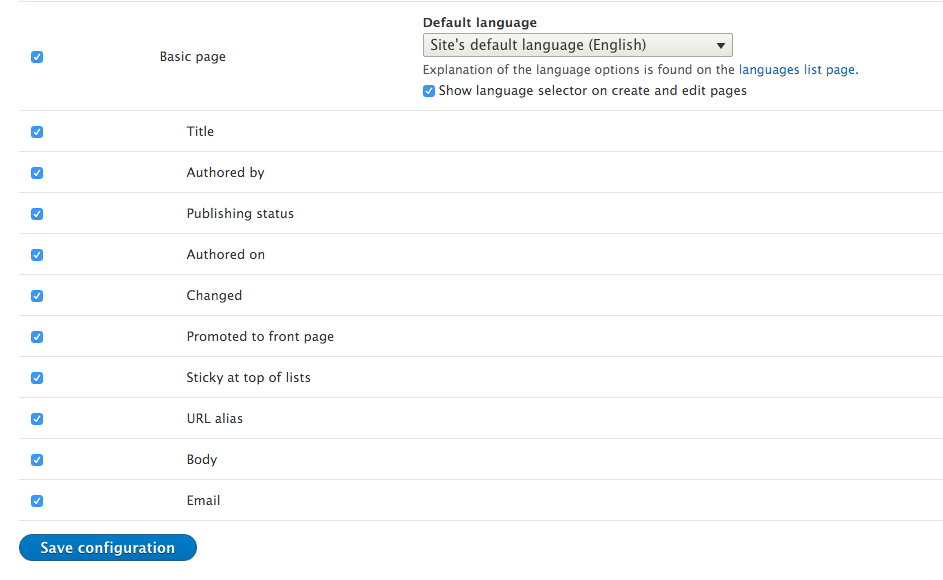
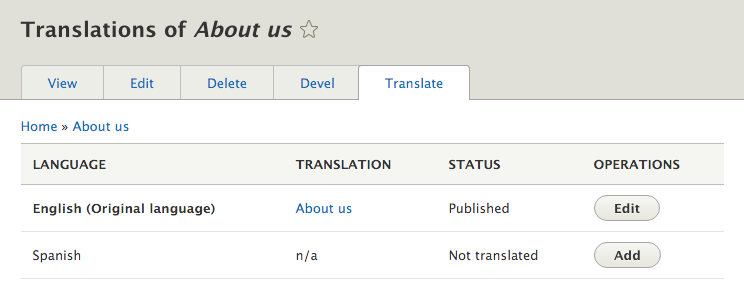

The Content translation module works by utilizing language code flags. All content entities and field definitions have a language code key. A content entity has a language code column, which specifies what language the content entity is for. Field definitions also have a language code column, which is used to identify the translation for the content entity. Content entities can provide handler definitions to handle translations, or else the Content translation module will provide its own.
Each entity and field record is saved with the proper language code to use. When an entity is loaded, the current language code is taken into consideration to ensure that the proper entity is loaded.
There are additional operations to translate content; we will cover them in the next sections.
The Content translation module provides a mechanism to flag translated entities as possibly being outdated. The Flag other translations as outdated flag provides a way to make a note of entities that will need updated translations:
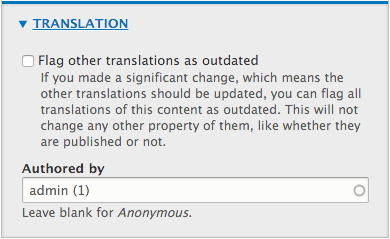
This flag does not change any data, but rather provides a moderation tool. This makes it easy for translators to identify content, which has been changed and requires updating. The translation tab for the content entity will highlight all translations, which are still marked as outdated. As they are changed, the editor can uncheck the flag.
Mostly, Drupal menus contain links to nodes. Menu links are not translated by default, and the Custom menu links option must be enabled under Content translation. You will need to translate node links manually from the menu administration interface.
Enabling a menu link from the node create and edit form will not work with translations. If you edit the menu settings from a translation, it will edit the untranslated menu link.
The Content translation module requires entity definitions to provide information about translation handlers. If this information is missing, it will provide its own defaults. The Entity API is covered in Chapter 10, The Entity API, but we will quickly discuss how the content translation module interacts with the Entity API.
Content entity definitions can provide a translation handler. If not provided, it will default to \Drupal\content_translation\ContentTranslationHandler. A node provides this definition and uses it to place the content translation information into the vertical tabs.
The content_translation_metadata key defines how to interact with translation metadata information, such as flagging other entities as outdated. The content_translation_deletion key provides a form class to handle entity translation deletion.
Currently, as of 8.0.1, no core modules provide implementations that override the default content_translation_metadata or content_translation_deletion.
Views, being configuration entities, are available for translation. However, the power of multilingual views does not lie just in configuration translation. Views allow you to build filters that react to the current language code. This ensures that the content, which has been translated into the user's language, is displayed.
In this recipe, we will create a multilingual view that provides a block showing recent articles. If there is no content, we will display a translated no results message.
Your Drupal site needs to have two languages enabled in order to use Content Translation. Install Spanish from the Languages interface. Enable content translation for Articles. You will also need to have some translated content.


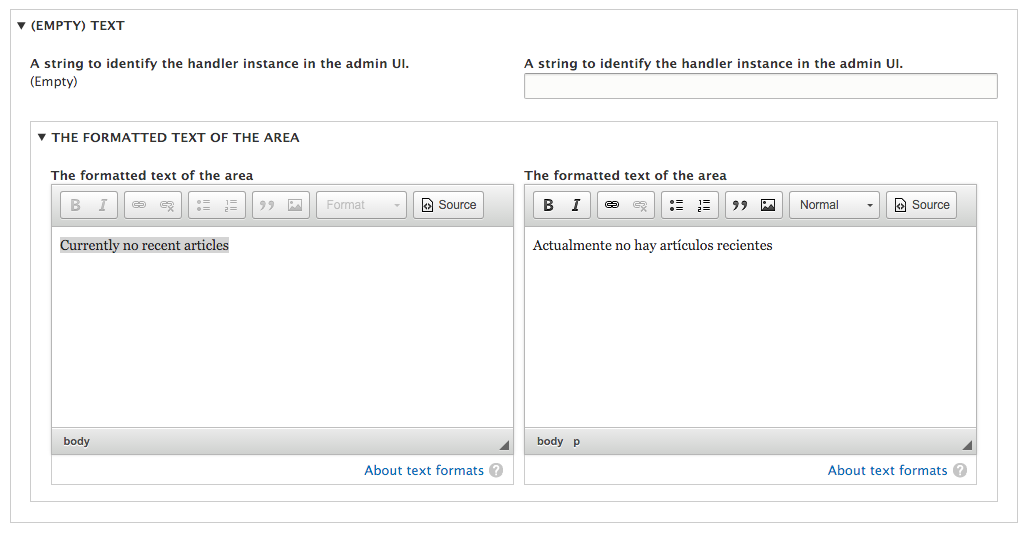
Views provide the Translation language filter that builds off this element. The Views plugin systems provide a mechanism to gather and display all available languages. These will be saved as a token internally and then substituted with the actual language code when the query is executed. If a language code is no longer available, the Content language for selected page and views will fall back to the current language when viewed.
The filter tells Views to query based on the language code of the entity and its fields.
Views are configuration entities. The Configuration translation module allows you to translate views. Views can be translated from the main Configuration translation screens from the Configuration area or by editing individual views.
Most translation items will be under the Master display settings tab unless overridden in specific displays. Each display type will also have its own specific settings.
Even more can be done to translate your views; we will discuss in the following section.
Each view can translate the exposed form from the Exposed Form section. This does not translate the labels on the form but the form elements. You can translate the submit button text, reset button label, sort label, and ascending or descending .
You can translate the labels for exposed filters from the Filters section. Each exposed filter will show up as a collapsible fieldset, allowing you to configure the administrative label and front-facing label.
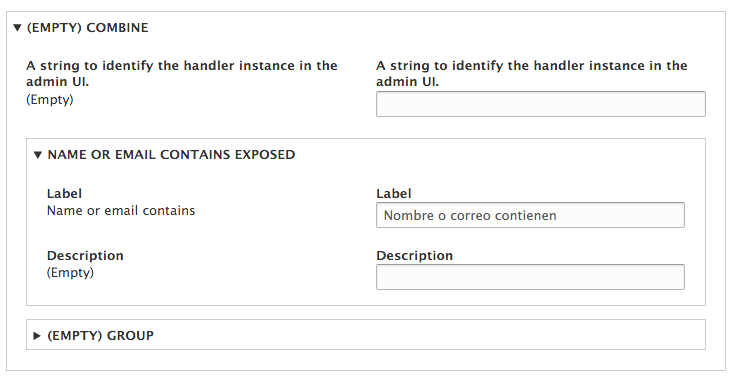
By default, available translations need to be imported through the global interface translation context.
Some display formats have translatable items. These can be translated in each display mode's section. For example, the following items can be translated with their display format:
Custom menu links can be translated through the Content translation module. Views which use a page display do not create custom menu link entities. So it must be translated through the View itself. The Views module takes all views with a page display and registers their paths into the routing system directly as if defined in a module's routing.yml file:
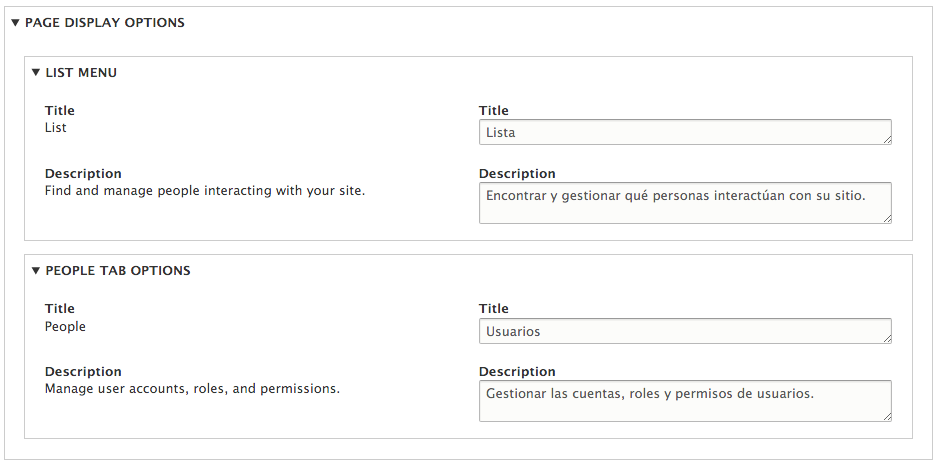
For example, the People view that lists all users can be translated to have an updated tab name and link description.
In this chapter, we will explore the configuration management system and deployment of the configuration changes. The following is a list of the recipes covered in this chapter:
Drupal 8 provides a new, unified system to manage configurations. In Drupal 8, all configurations are saved in configuration entities that match a defined configuration schema. This system provides a standard way of deploying the configuration between Drupal site environments and updating the site configuration.
Once the configuration is created, or imported, it goes into an immutable state. If a module tries to install the configuration that exists, it will throw an exception and be prevented. Outside the typical user interface, the configuration can only be modified through the configuration management system.
The configuration management system can be manipulated through a user interface provided by the Configuration management module or through the command-line interface tools. These tools allow you to follow the development paradigm of utilizing a production site and a development site, where changes are made to the development site and then pushed to production.
Configuration management in Drupal 8 provides a solution to common problems when working with a website across multiple environments. No matter what the workflow pattern is, at some point, the configuration needs to move from one place to another, such as from production to a local environment. When pushing the development work to production, you will need to have some way to put the configuration in place.
Drupal 8's user interface provides a way to import and export configuration entities via the YAML format. In this recipe, we will create a content type, export its configuration, and then import it into another Drupal site. The configuration YAML export will be imported into the production site to update its configuration.
You will need a base Drupal site to act as the development site. Another Drupal site, which is a clone of the development site, must be available to act as a production Drupal site.
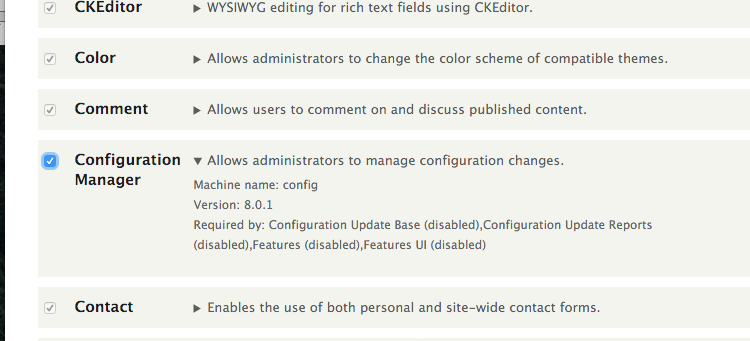
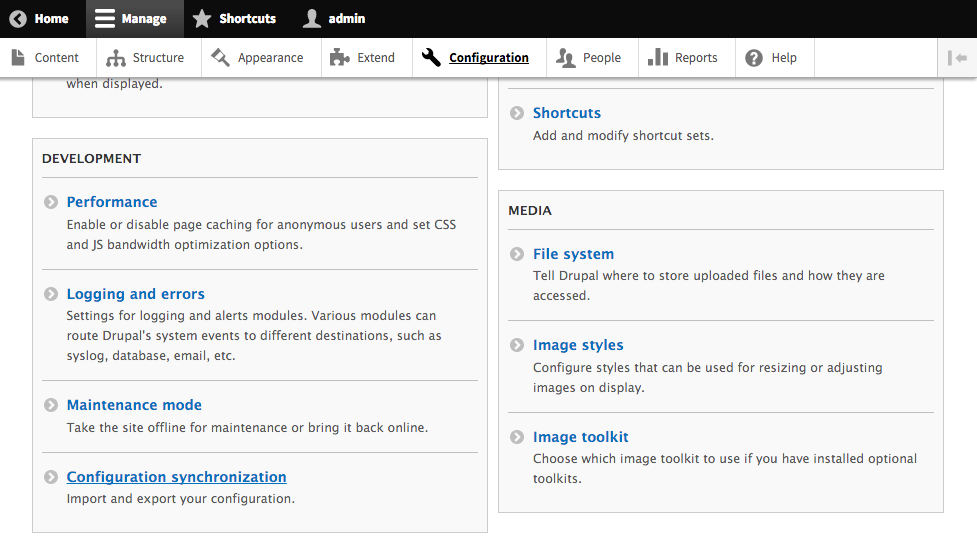
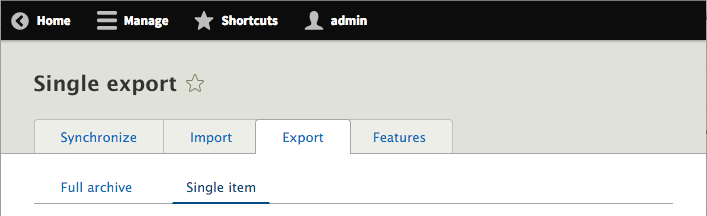
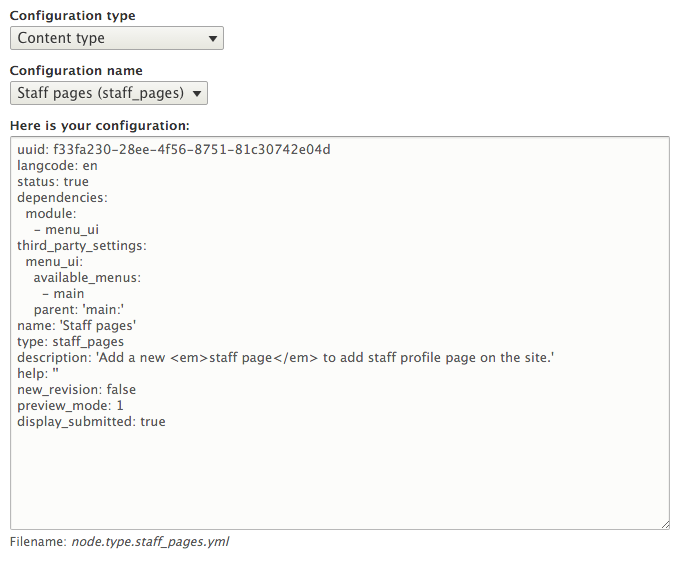
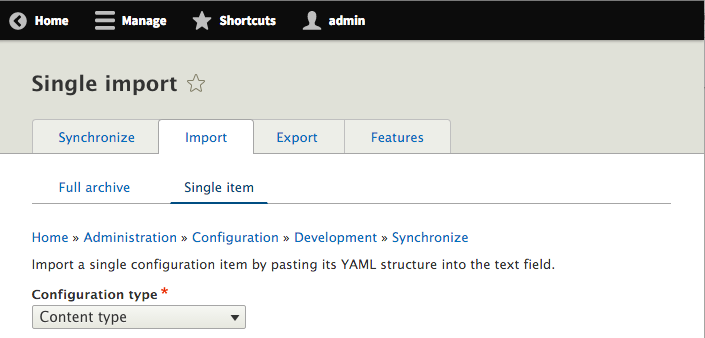
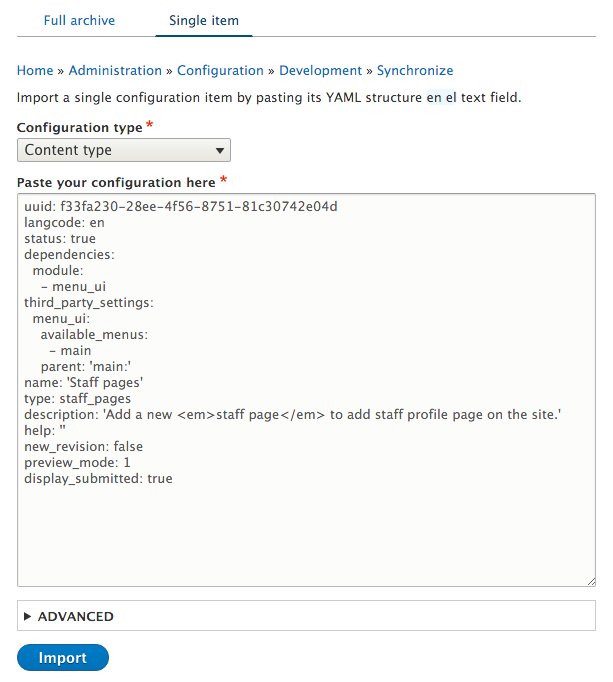
At the most basic level, configurations are just a mapping of keys and values, which can be represented as a PHP array and translated into the YAML format.
Configuration management uses schema definitions for configuration entities. The schema definition provides a configuration namespace and the available keys and data types. The schema definition provides a typed data definition for each option that allows validation of the individual values and configuration.
The export process reads the configuration data and translates it into the YAML format. The configuration manager then receives the configuration in the form of YAML and converts it back to a PHP array. The data is then updated in the database.
When importing the configuration, Drupal checks the value of the configuration YAML's uuid key, if present, against any current configuration with the same Universally Unique Identifier (UUID). A UUID is a pattern used in software to provide a method of identifying an object across different environments. This allows Drupal to correlate a piece of data from its UUID since the database identifier can differ across environments. If the configuration item has a matching machine name, but a mismatching UUID, an error will be thrown.
We will discuss importing and exporting configuration within your Drupal site more in depth in a later section.
Configuration entities define dependencies when they are exported. The dependency definitions ensure that the configuration entity's schema and other module functionalities are available.
When you review the configuration export for field.storage.node.body.yml, it defines node and text as dependencies:
dependencies:
  module:
    - node
    - text
If the node or text module is not enabled, the import will fail and throw an error.
The Providing configuration on install or update recipe of Chapter 6, Creating Forms with the Form API, discusses how to use a module to provide configurations on the module's installation. Instead of manually writing configuration YAML files for installation, the Configuration management module can be used to export configurations and save them in your module's config/install directory.
Any item exported through the user interface can be used. The only requirement is that you will need to remove the uuid key, as it denotes the site's UUID value and invalidates the configuration when it tries to install it.
The configuration management system in Drupal 8 utilizes the configuration schema to describe configurations that can exist. Why is this important? It allows Drupal to properly implement typed data on stored configuration values and validate them, providing a standardized way of handling configurations for translation and configuration items.
When a module uses the configuration system to store data, it needs to provide a schema for each configuration definition it wishes to store. The schema definition is used to validate and provide typed data definitions for its values.
The following code defines the configuration schema for the navbar_awesome module, which holds two different Boolean configuration values:
navbar_awesome.toolbar:
  type: config_object
  label: 'Navbar Awesome toolbar settings'
  mapping:
    cdn:
      type: boolean
      label: 'Use the FontAwesome CDN library'
    roboto:
      type: boolean
      label: 'Include Roboto from Google Fonts CDN'
This defines the navbar_awesome.toolbar configuration namespace; it belongs to the navbar_awesome module and has the toolbar configuration. We will then need two cdn and roboto subvalues that represent typed data values. A configuration YAML for this schema will be named navbar_awesome.toolbar.yml after the namespace, and it contains the following code:
cdn: true
roboto: true
In turn, this is what the values will look like when represented as a PHP array:
[
  'navbar_awesome' => [
    'cdn' => TRUE,
    'roboto' => TRUE,
  ]
]
The configuration factory classes then provide an object-based wrapper around these configuration definitions and provide validation of their values against the schema. For instance, if you try to save the cdn value as a string, a validation exception will be thrown.
A key component for managing a Drupal website is configuration integrity. A key part of maintaining this integrity is ensuring that your configuration changes made in development are pushed upstream to your production environments. Maintaining configuration changes by manually exporting and importing through the user interface can be tedious and does not provide a way to track what has or has not been exported or imported. At the same time, manually writing module hooks to manipulate the configuration can be time-consuming. Luckily, the configuration management solution provides you with the ability to export and import the entire site's configuration.
A site export can only be imported into another copy of itself. Each site must have the same UUID, which is set during its installation. This allows you to export your local development environment's configuration and bring it to staging or production, without modifying the content or the database directly.
In this recipe, we will export the development site's complete configuration entities' definitions. We will then take the exported configuration and import it into the production site. This will simulate a typical deployment of a Drupal site with changes created in development that is ready to be released in production.
You will need a base Drupal site to act as the development site. Another Drupal site, which is a duplicate of the development site's database, must be available to act as the production Drupal site.
You will need to have the Configuration management module installed if it is not already.
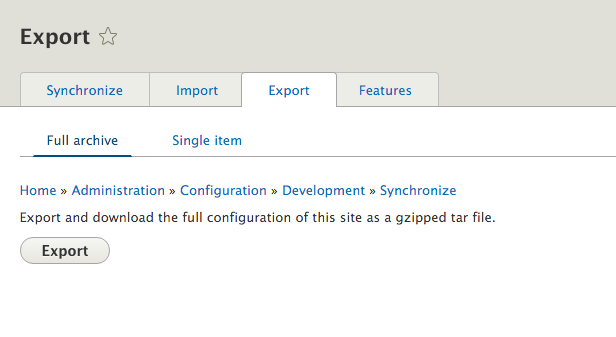
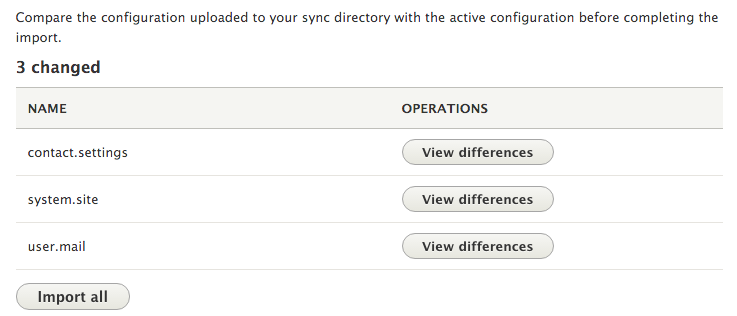

The Configuration synchronization form provides a way to interface with the config database table for your Drupal site. When you go to the Export page and create the tarball, Drupal effectively dumps the contents of the config table. Each row represents a configuration entity and will become its own YAML file. The contents of the YAML file represent its database value.
When you import the tarball, Drupal extracts its content. The files are placed in the available CONFIG_SYNC_DIRECTORY directory. The synchronization page parses the configuration entity YAML and provides a difference check against the current site's configuration. Each configuration item can be reviewed, and then all the items can be imported. You cannot choose to selectively import individual items.
We will now discuss things that are required for site configuration synchronization.
When a Drupal site is installed, the UUID is set. This UUID is added to the exported configuration entities and is represented by the uuid key. Drupal uses this key to identify the source of the configuration. Drupal will not synchronize configurations that do not have a matching UUID in their YAML definition.
You can review the site's current UUID value by reviewing the system.site configuration object. This can also be done using the Drush or Drupal Console command-line tool.
Using Drush, type the following command:
$ drush config-get system.site
Using Drupal Console, type the following command:
$ drupal debug:config system.site
Drupal uses a synchronization folder to hold the configuration YAML files that are to be imported into the current site. This folder is represented by the CONFIG_SYNC_DIRECTORY constant. If you have not defined this in the global $config_directories variable in your site's settings.php, then it will be a randomly named directory in your site's file directory.
The synchronization form will use the configuration management discovery service to look for configuration changes that need to be imported from this folder.
Drupal's configuration management system will not allow the import of configuration entities that originated at a different Drupal site. When a Drupal site is installed, the system.site configuration entity saves a UUID for the current site instance. Only cloned versions of this site's database can accept configuration imports from it.
The configuration installer profile is a custom distribution, that will allow you to import the configuration despite the configuration's site UUID. The profile doesn't install itself. When you use the profile, it will provide an interface to upload a configuration export that will then be imported, as shown in the following screenshot:
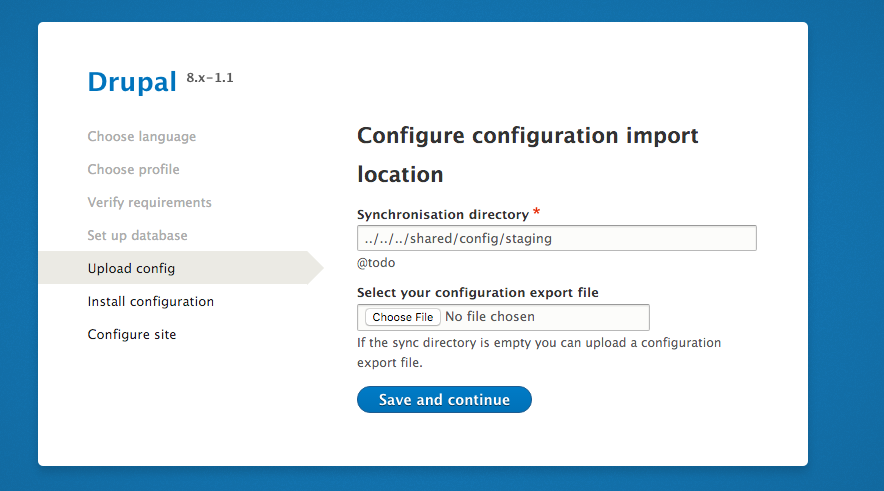
The distribution can be found at https://www.drupal.org/project/config_installer.
Drupal 8's configuration systems solve many problems encountered when exporting and deploying configurations in Drupal 7. However, the task of synchronizing the configuration is still a user interface task and requires the manipulation of archive files that contain the configuration exports for a Drupal 8 site.
Configuration management can be done on the command line through Drush, without requiring it to be installed. This mitigates any requirement to log in to the production website to import changes. It also opens the ability for more advanced workflows that place the configuration in version control.
In this recipe, we will use Drush to export the development site's configuration to the filesystem. The exported configuration files will then be copied to the production site's configuration directory. Using Drush, the configuration will be imported into production to complete the deployment.
You will need a base Drupal site to act as the development site. Another Drupal site, which is a clone of the development site, must be available to act as the production Drupal site.
This recipe uses Drush. If you have not installed Drush, instructions can be found at http://docs.drush.org/en/master/install/. Drush needs to be installed at the locations of both your Drupal sites.
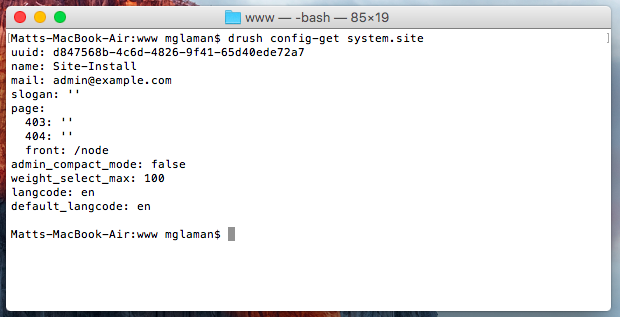
The Drush command-line tool can utilize the code found in Drupal to interact with it. The config-export command replicates the functionality provided by the Configuration management module's full site export. However, you do not need the Configuration management module enabled for the command to work. The command will extract the available site configuration and write it to a directory, which is unarchived.
The config-import command parses the files in a directory. It will make an attempt to run a difference check against the YAML files like the Configuration management module's synchronize overview form does. It will then import all the changes.
There are additional ways to work with the configuration management system in Drupal. We will explore those options in the next section.
Drush provides a way to simplify the transportation of configuration between sites. The config-pull command allows you to specify two Drupal sites and move the export configuration between them. You can either specify a name of a subdirectory under the /sites directory or a Drush alias.
The following command will copy a development site's configuration and import it into the staging server's site:
drush config-pull @mysite.local @mysite.staging
Additionally, you can specify the --label option. This represents a folder key in the $config_directories setting. The option defaults to sync automatically. Alternatively, you can use the --destination parameter to specify an arbitrary folder that is not specified in the setting of $config_directories.
Drush has been part of the Drupal community since Drupal 4.7 and is a custom-built command-line tool. The Drupal Console is a Symfony Console-based application used to interact with Drupal. The Drupal Console project provides a means for configuration management over the command line.
The workflow is the same, except the naming of the command. The configuration export command is config:export, and it is automatically exported to your system's temporary folder until a directory is passed. You can then import the configuration using the config:import command.
Both Drush and Drupal Console support the ability to edit the configuration through the command line in YAML format. Both the tools operate in the same fashion and have similar command names:
The difference is that Drush will list all the available options to be edited if you do not pass a name, while Console allows you to search.
When you edit a configuration item, your default terminal-based text editor will open. You will be presented with a YAML file that can be edited. Once you save your changes, the configuration is then saved on your Drupal site:
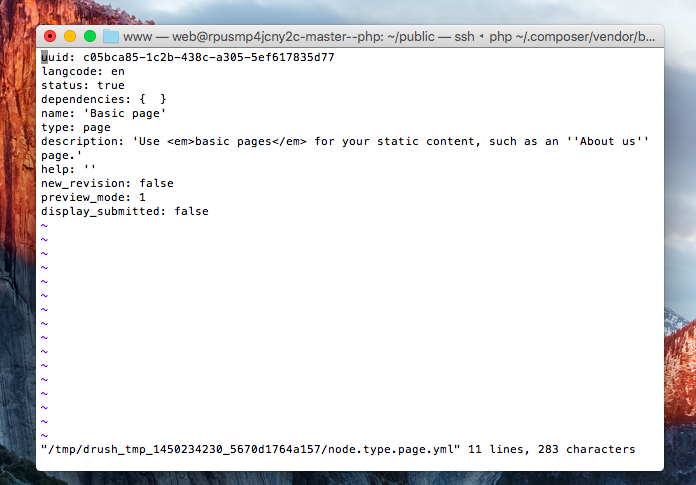
Both Drush and Console provide their own mechanisms for exporting a single configuration entity:
Drush will print the configuration's output to the terminal, whereas Console's default behavior is to write the output to the file disk. For example, the following commands will output the values from system.site in the YAML format:
$ drush config-get system.site
$ drupal debug:config system.site

A benefit of having the configuration exportable to YAML files is the fact that the configuration can be kept in version control. The Drupal site's CONFIG_SYNC_DIRECTORY directory can be committed to version control to ensure that it is transported across environments and properly updated. Deployment tools can then use Drush or Console to automatically import changes.
The config-export command provided by Drush provides the Git integration:
drush config-export --add
Appending the --add option will run git add -p for an interactive staging of the changed configuration files:
drush config-export --commit --message="Updating configuration "
The --commit and optional --message options will stage all configuration file changes and commit them with your message:
drush config-export --push --message="Updating configuration "
Finally, you can also specify --push to make a commit and push it to the remote repository.
Modules in Drupal 8 provide configuration YAML files inside their config/install directory. A consequence of the site controlling configuration is that a new configuration in a module's config/install directory is not automatically installed. Module developers must write update functions, which will import the new configuration as it is added. While this is a practice contributed modules should follow, this process can be cumbersome for private projects.
Luckily, the Drupal community has come up with a solution that provides a configuration management flow that allows updating of a module's provided default configuration. The module Configuration Update Manager allows you to import a new configuration from a module or revert it to the original configuration if modified. In fact, the module is a dependency for the Features module discussed in Chapter 4, Extending Drupal.
In this recipe, we will use Configuration Update Manager to review configuration differences to a module and revert the modified configuration.
$ cd /path/to/drupal8
$ composer require drupal/config_update
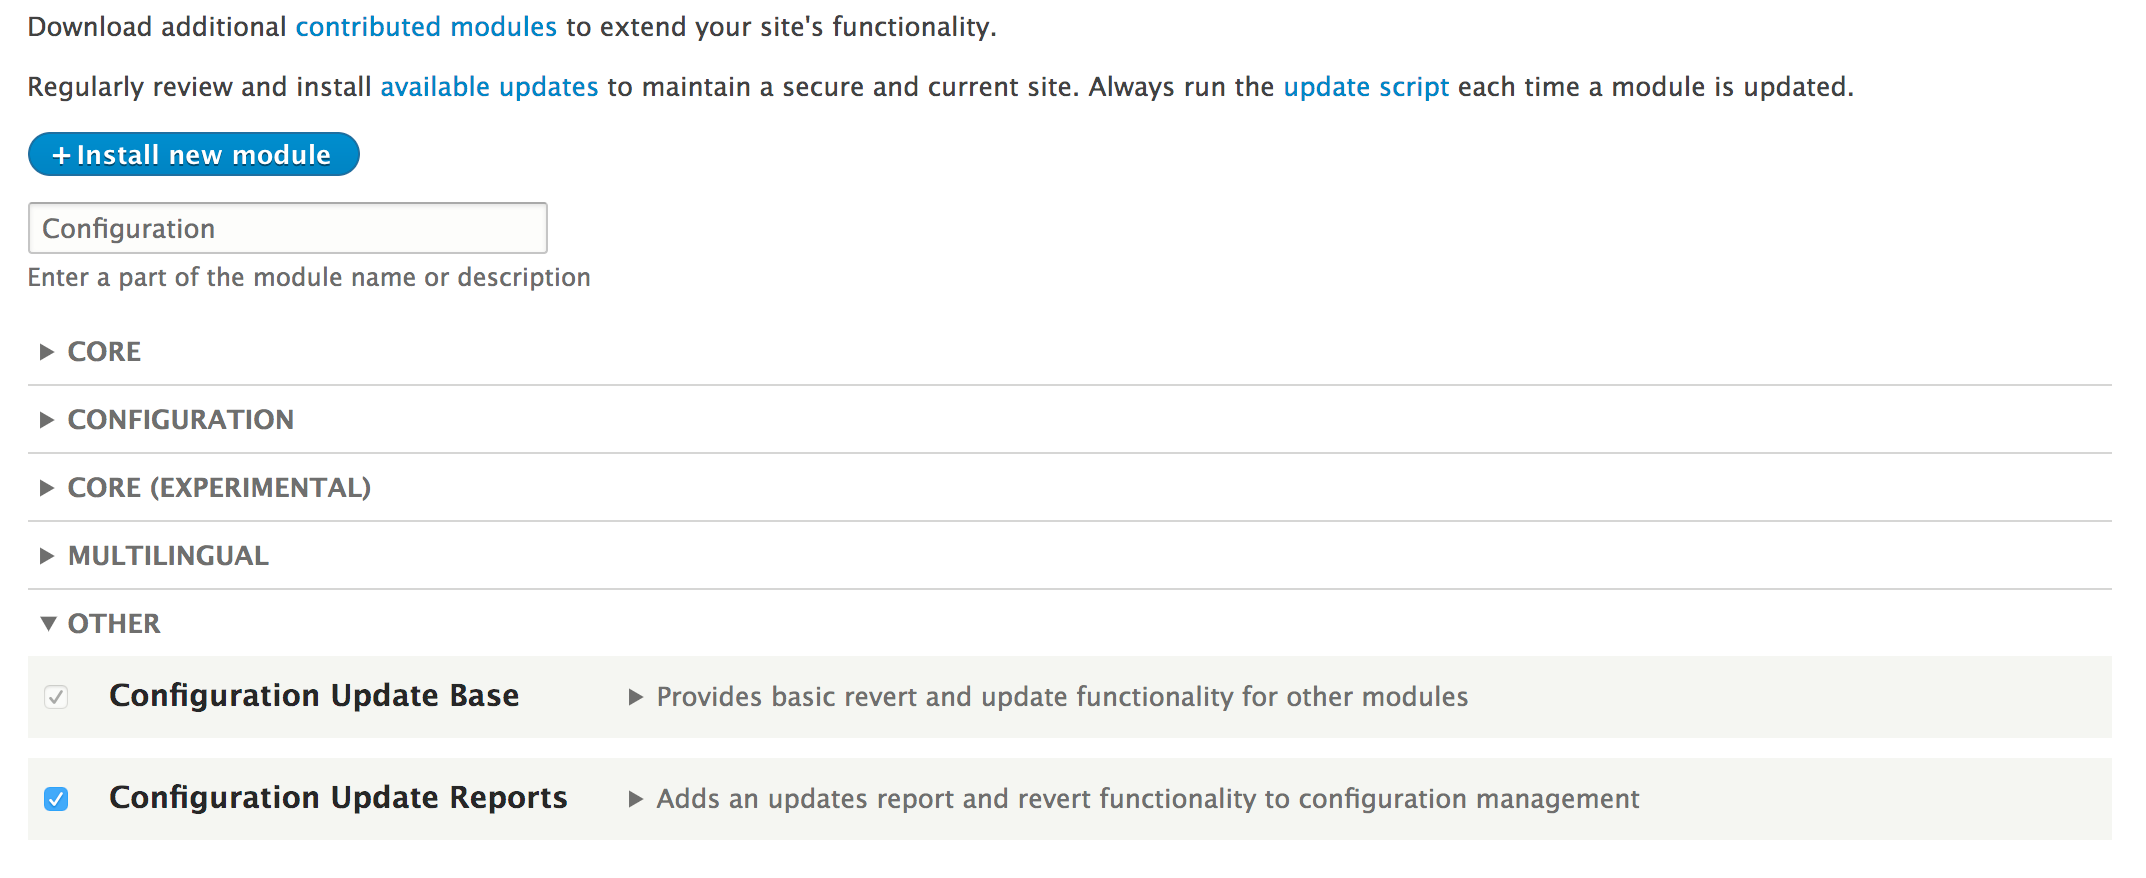
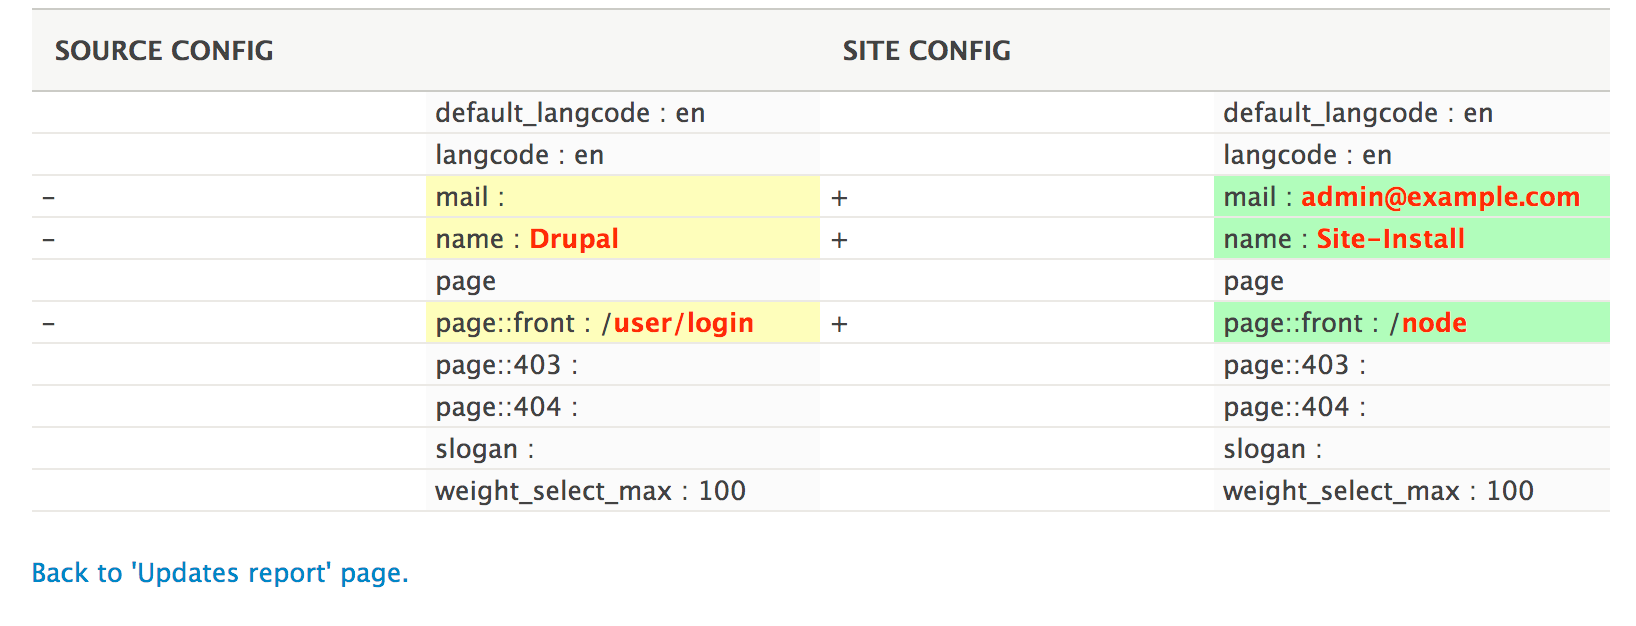

The Configuration Update Manager provides two modules: Configuration Update Base and Configuration Update Reports. The base module provides an underlying API for listing a configuration, reverting a configuration, and running difference checks with results. It extends Drupal core's configuration operations. The reports module provides a user interface on top of the base module. The Features module uses the base module to provide difference review and automatic reverting of a configuration.
When reverting a configuration, the raw values are collected and then used to overwrite what currently exists in the system. The reports also allow importing a new configuration added to a module.
There are other contributed projects and methods for handling a configuration within modules.
For module developers, there is the Configuration Development module. The Configuration Development module provides a command-line method for importing and exporting a configuration. This is useful for contributed module developers. It eases the exporting and update of a configuration intended for the config/install directory.
The module looks for a config_devel entry in the module's info.yml file. An example is taken from the Commerce Store submodule from Drupal Commerce module:
config_devel:
  install:
    - commerce_store.commerce_store_type.online
    - commerce_store.settings
    - core.entity_view_display.commerce_store.online.default
    - views.view.commerce_stores
    - system.action.commerce_delete_store_action
Using Drush, commands provided by the Configuration Development can then be used to export and import the data. The following command will export the listed configuration to the config/install directory:
$ drush config-devel-export commerce_store
In this chapter, we will explore the Entity API to create custom entities and see how they are handled and cover the following recipes:
In Drupal, entities are a representation of data that has a specific structure. There are specific entity types, which have different bundles and fields attached to those bundles. Bundles are implementations of entities that can have fields attached to themselves. In terms of programming, you can consider an entity that supports bundles as an abstract class and each bundle as a class that extends that abstract class. The fields are added to bundles. This is part of the reasoning for the terminology: an entity type can contain a bundle of fields.
An entity is an instance of an entity type defined in Drupal. Drupal 8 provides two entity types: configuration and content. Configuration entities are not fieldable and represent a configuration within a site. Content entities are fieldable and can have bundles. Bundles are, most commonly, controlled through configuration entities.
In Drupal 8, there is an Entity API module. It was created in Drupal 7 to expand the entity subsystem; most of its functionalities from Drupal 7 are now in its core. The goal of the module is to develop improvements for the developer experience around entities by merging more functionalities into the Drupal core during each minor release cycle (8.1.x, 8.2.x, and so on). There will be a There's more... section in each recipe that relates to how the Entity API module can simplify the recipe.
Drupal 8 harnesses the entity API for configuration to provide configuration validation and extended functionality. Using the underlying entity structure, the configuration has a proper Create, Read, Update, and Delete (CRUD) process that can be managed. Configuration entities are not fieldable. All the attributes of a configuration entity are defined in its configuration schema definition.
Most common configuration entities interact with Drupal core's config_object type, as discussed in Chapter 4, Extending Drupal, and Chapter 9, Configuration Management - Deploying in Drupal 8, to store and manage a site's configuration. There are other uses of configuration entities, such as menus, view displays, form displays, and contact forms, which are all configuration entities.
In this recipe, we will create a new configuration entity type called SiteAnnouncement. This will provide a simple configuration entity that allows you to create, edit, and delete simple messages that can be displayed on the site for important announcements.
You will need a custom module to place code into to implement a configuration entity type. Let's create an src directory for your classes. Refer to the Creating a module recipe of Chapter 4, Extending Drupal, for information on creating a custom module.
Do not use a module that is currently installed, otherwise Drupal will not install your new entity type.
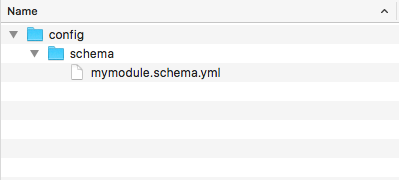
# Schema for the configuration files of the Site Announcement.

mymodule.announcement.*:
  type: config_entity
  label: 'Site announcement'
  mapping:
    id:
      type: string
      label: 'ID'
    label:
      type: label
      label: 'Label'
    message:
      type: text
      label: 'Text'
We will define the configuration entity's namespace as an announcement, which we will provide to Drupal in the entity's annotation block. We will then tell Drupal that this is a config_entity and provide a label for the schema.
Using the mapping array, we will provide the attributes that make up our entity and the data that will be stored.
<?php

namespace Drupal\mymodule\Entity;

use Drupal\Core\Config\Entity\ConfigEntityInterface;

interface SiteAnnouncementInterface extends ConfigEntityInterface {

  /**
   * Gets the message value.
   *
   * @return string
   */
  public function getMessage();

}
This will be implemented by our entity, and will provide the method requirements. It is best practice to provide an interface for entities. This allows you to provide the required methods if another developer extends your entity or if you are doing advanced testing and need to mock an object. We also provide a method to return our custom attribute.
<?php

namespace Drupal\mymodule\Entity;

use Drupal\Core\Config\Entity\ConfigEntityBase;

class SiteAnnouncement extends ConfigEntityBase implements SiteAnnouncementInterface {

  /**
   * The announcement's message.
   *
   * @var string
   */
  protected $message;

  /**
   * {@inheritdoc}
   */
  public function getMessage() {
    return $this->message;
  }

}
In the preceding code, we added the message property defined in our schema as a class property. Our method defined in the entity's interface is used to return that value and interact with our configuration entity.
<?php

namespace Drupal\mymodule\Entity;

use Drupal\Core\Config\Entity\ConfigEntityBase;

/**
 * @ConfigEntityType(
 *   id ="announcement",
 *   label = @Translation("Site Announcement"),
 *   config_prefix = "announcement",
 *   entity_keys = {
 *     "id" = "id",
 *     "label" = "label"
 *   },
 *   config_export = {
 *     "id",
 *     "label",
 *     "message",
 *   }
 * )
 */
class SiteAnnouncement extends ConfigEntityBase implements SiteAnnouncementInterface {

  /**
   * The announcement's message.
   *
   * @var string
   */
  protected $message;

  /**
   * {@inheritdoc}
   */
  public function getMessage() {
    return $this->message;
  }

}
The annotation document block tells Drupal that this is an instance of the ConfigEntityType plugin. The id is the internal machine name identifier for the entity type, and the label is its human-readable version. The config_prefix matches how we defined our schema with mymodule.announcement. The entity keys definition tells Drupal the attributes that represent our identifiers and labels.
When specifying config_export, we are telling the configuration management system what properties are exportable when exporting our entity.
/**
 * @ConfigEntityType(
 *   id ="announcement",
 *   label = @Translation("Site Announcement"),
 *   handlers = {
 *     "list_builder" = "Drupal\mymodule\SiteAnnouncementListBuilder",
 *     "form" = {
 *       "default" = "Drupal\mymodule\SiteAnnouncementForm",
 *       "add" = "Drupal\mymodule\SiteAnnouncementForm",
 *       "edit" = "Drupal\mymodule\SiteAnnouncementForm",
 *       "delete" = "Drupal\Core\Entity\EntityDeleteForm"
 *     }
 *   },
 *   config_prefix = "announcement",
 *   entity_keys = {
 *     "id" = "id",
 *     "label" = "label"
 *   },
 *   config_export = {
 *     "id",
 *     "label",
 *     "message",
 *   }
 * )
 */
The handlers array specifies classes that provide the interaction functionality with our entity. The list_builder class will be created to show you a table of our entities. The form array provides classes for forms to be used when creating, editing, or deleting our configuration entity.
/**
 * @ConfigEntityType(
 *   id ="announcement",
 *   label = @Translation("Site Announcement"),
 *   handlers = {
 *     "list_builder" = "Drupal\mymodule\SiteAnnouncementListBuilder",
 *     "form" = {
 *       "default" = "Drupal\mymodule\SiteAnnouncementForm",
 *       "add" = "Drupal\mymodule\SiteAnnouncementForm",
 *       "edit" = "Drupal\mymodule\SiteAnnouncementForm",
 *       "delete" = "Drupal\Core\Entity\EntityDeleteForm"
 *     }
 *   },
 *   config_prefix = "announcement",
 *   entity_keys = {
 *     "id" = "id",
 *     "label" = "label"
 *   },
 *   links = {
 *     "delete-form" = "/admin/config/system/site-announcements/manage/{announcement}/delete",
 *     "edit-form" = "/admin/config/system/site-announcements/manage/{announcement}",
 *     "collection" = "/admin/config/system/site-announcements",
 *   },
 *   config_export = {
 *     "id",
 *     "label",
 *     "message",
 *   }
 * )
 */
There is a routing service for entities that will automatically provide Drupal a route with the proper controllers based on this annotation.
<?php

namespace Drupal\mymodule;

use Drupal\Core\Config\Entity\ConfigEntityListBuilder;
use Drupal\mymodule\Entity\SiteAnnouncementInterface;

class SiteAnnouncementListBuilder extends ConfigEntityListBuilder {

  /**
   * {@inheritdoc}
   */
  public function buildHeader() {
    $header['label'] = t('Label');
    return $header + parent::buildHeader();
  }

  /**
   * {@inheritdoc}
   */
  public function buildRow(SiteAnnouncementInterface $entity) {
    $row['label'] = $entity->label();
    return $row + parent::buildRow($entity);
  }
}
In our list builder handler, we override the buildHeader and builderRow methods so that we can add our configuration entity's properties to the table.
<?php

namespace Drupal\mymodule;

use Drupal\Component\Utility\Unicode;
use Drupal\Core\Entity\EntityForm;
use Drupal\Core\Form\FormStateInterface;
use Drupal\Core\Language\LanguageInterface;

class SiteAnnouncementForm extends EntityForm {
  /**
   * {@inheritdoc}
   */
  public function form(array $form, FormStateInterface $form_state) {
    $form = parent::form($form, $form_state);

    $form['label'] = [
      '#type' => 'textfield',
      '#title' => t('Label'),
      '#required' => TRUE,
      '#default_value' => $entity->label(),
    ];
    $form['message'] = [
      '#type' => 'textarea',
      '#title' => t('Message'),
      '#required' => TRUE,
      '#default_value' => $entity->getMessage(),
    ];

    return $form;
  }

  /**
   * {@inheritdoc}
   */
  public function save(array $form, FormStateInterface $form_state) {
    $entity = $this->entity;
    $is_new = !$entity->getOriginalId();

    if ($is_new) {
      // Configuration entities need an ID manually set.
      $machine_name = \Drupal::transliteration()
        ->transliterate($entity->label(), LanguageInterface::LANGCODE_DEFAULT, '_');
      $entity->set('id', Unicode::strtolower($machine_name));

      drupal_set_message(t('The %label announcement has been created.', array('%label' => $entity->label())));
    }
    else {
      drupal_set_message(t('Updated the %label announcement.', array('%label' => $entity->label())));
    }

    $entity->save();

    // Redirect to edit form so we can populate colors.
    $form_state->setRedirectUrl($this->entity->toUrl('collection'));
  }
}
We override the form method to add Form API elements to our label and message properties. We also override the save method to provide user messages about the changes that are made. We utilize the entity's toUrl method to redirect it to the collection (list) page. We use the transliteration service to generate a machine name based on the label for our entity's identifier.
announcement.add:
  route_name: entity.announcement.add_form
  title: 'Add announcement'
  appears_on:
    - entity.announcement.collection
This will instruct Drupal to render the entity.announcement.add_form link on the specified routes in the appears_on value.
mymodule.site_announcements:
  title: 'Site announcements'
  parent: system.admin_config_system
  description: 'Manage site announcements.'
  route_name: entity.announcement.collection
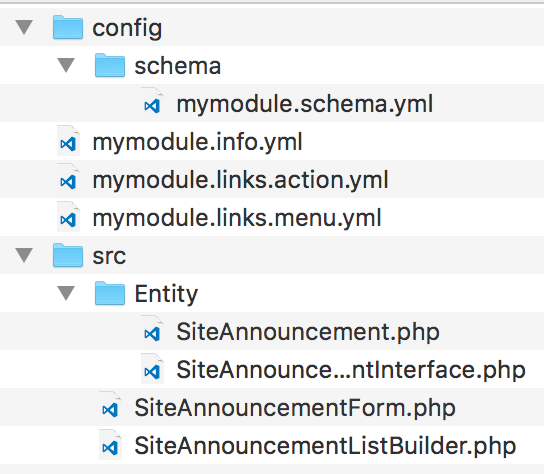
When creating a configuration schema definition, one of the first properties used for the configuration namespace is type. This value can be config_object or config_entity. When the type is config_entity, the definition will be used to create a database table rather than to structure the serialized data for the config table.
Entities are powered by the plugin system in Drupal, which means that there is a plugin manager. The default \Drupal\Core\Entity\EntityTypeManager provides discovery and handling of entities. The ConfigEntityType class for the entity type's plugin class will force the setting of the uuid and langcode in the entity_keys definition. The storage handler for configuration entities defaults to \Drupal\Core\Config\Entity\ConfigEntityStorage. The ConfigEntityStorage class interacts with the configuration management system to load, save, and delete custom configuration entities.
Drupal 8 introduces a typed data system that configuration entities and fields use.
Drupal core provides its own configuration information. There is a core.data_types.schema.yml file located at core/config/schema. These are the base types of data that the core provides and can be used when making configuration schema. The file contains YAML definitions of data types and the class that represents them:
boolean:
  label: 'Boolean'
  class: '\Drupal\Core\TypedData\Plugin\DataType\BooleanData'
email:
  label: 'Email'
  class: '\Drupal\Core\TypedData\Plugin\DataType\Email'
string:
  label: 'String'
  class: '\Drupal\Core\TypedData\Plugin\DataType\StringData'
When a configuration schema definition specifies an attribute that has an email for its type, that value is then handled by the \Drupal\Core\TypedData\Plugin\DataType\Email class. Data types are a form of plugins, and each plugin's annotation specifies constraints for validation. This is built around the Symfony Validator component.
Content entities provide base field definitions and configurable fields through the Field module. There is also support for revisions and translations with content entities. Display modes, both form and view, are available for content entities to control how the fields are edited and displayed. When an entity does not specify bundles, there is automatically one bundle instance with the same name as the entity.
In this recipe, we will create a custom content entity that does not specify a bundle. We will create a Message entity that can serve as a content entity for generic messages.
You will need a custom module to place code into to implement a configuration entity type. Create an src directory for your classes. Refer to the Creating a module recipe of Chapter 4, Extending Drupal, for information on creating a custom module.
Do not use a module which is currently installed, otherwise Drupal will not install your new entity type.
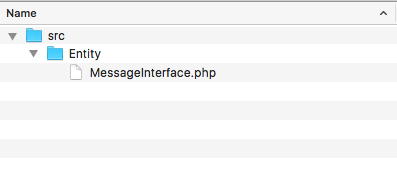
<?php

namespace Drupal\mymodule\Entity;

use Drupal\Core\Entity\ContentEntityInterface;

interface MessageInterface extends ContentEntityInterface {

  /**
   * Gets the message value.
   *
   * @return string
   */
  public function getMessage();

}
This will be implemented by our entity and will provide the method requirements. It is best practice to provide an interface for entities. This allows you to provide required methods if another developer extends your entity or if you are doing advanced testing and need to mock an object. We also provide a method to return our main base field definition (to be defined).
<?php

namespace Drupal\mymodule\Entity;

use Drupal\Core\Entity\ContentEntityBase;

class Message extends ContentEntityBase implements MessageInterface {

}
<?php

namespace Drupal\mymodule\Entity;

use Drupal\Core\Entity\ContentEntityBase;

/**
 * Defines the message entity class.
 *
 * @ContentEntityType(
 *   id = "message",
 *   label = @Translation("Message"),
 *   base_table = "message",
 *   fieldable = TRUE,
 *   entity_keys = {
 *     "id" = "message_id",
 *     "label" = "title",
 *     "langcode" = "langcode",
 *     "uuid" = "uuid"
 *   },
 * )
 */
class Message extends ContentEntityBase implements MessageInterface {

}
The id is the internal machine name identifier for the entity type, and the label is its human-readable version. The entity keys definition tells Drupal the attributes that represent our identifier and label.
The base_table defines the database table in which the entity will be stored, and fieldable allows custom fields to be configured through the Field UI module.
/**
 * Defines the message entity class.
 *
 * @ContentEntityType(
 *   id = "message",
 *   label = @Translation("Message"),
 *   handlers = {
 *     "list_builder" = "Drupal\mymodule\MessageListBuilder",
 *     "form" = {
 *       "default" = "Drupal\Core\Entity\EntityForm",
 *       "add" = "Drupal\Core\Entity\EntityForm",
 *       "edit" = "Drupal\Core\Entity\EntityForm",
 *       "delete" = "Drupal\Core\Entity\ContentEntityDeleteForm",
 *     },
 *   },
 *   base_table = "message",
 *   fieldable = TRUE,
 *   entity_keys = {
 *     "id" = "message_id",
 *     "label" = "title",
 *     "langcode" = "langcode",
 *     "uuid" = "uuid"
 *   },
 * )
 */
The handlers array specifies classes that provide the interaction functionality with our entity. The list builder class will be created to show you a table of our entities. The form array provides classes for forms to be used when creating, editing, or deleting our content entity.
/**
 * Defines the message entity class.
 *
 * @ContentEntityType(
 *   id = "message",
 *   label = @Translation("Message"),
 *   handlers = {
 *     "list_builder" = "Drupal\mymodule\MessageListBuilder",
 *     "form" = {
 *       "default" = "Drupal\Core\Entity\EntityForm",
 *       "add" = "Drupal\Core\Entity\EntityForm",
 *       "edit" = "Drupal\Core\Entity\EntityForm",
 *       "delete" = "Drupal\Core\Entity\ContentEntityDeleteForm",
 *     },
 *     "route_provider" = {
 *       "html" = "Drupal\Core\Entity\Routing\DefaultHtmlRouteProvider",
 *     },
 *   },
 *   base_table = "message",
 *   fieldable = TRUE,
 *   entity_keys = {
 *     "id" = "message_id",
 *     "label" = "title",
 *     "langcode" = "langcode",
 *     "uuid" = "uuid"
 *   },
 *  links = {
 *    "canonical" = "/messages/{message}",
 *    "edit-form" = "/messages/{message}/edit",
 *    "delete-form" = "/messages/{message}/delete",
 *    "collection" = "/admin/content/messages"
 *   },
 * )
 */
There is a routing service for entities that will automatically provide Drupal a route with the proper controllers based on this annotation.
/**
 * Defines the message entity class.
 *
 * @ContentEntityType(
 *   id = "message",
 *   label = @Translation("Message"),
 *   handlers = {
 *     "list_builder" = "Drupal\mymodule\MessageListBuilder",
 *     "form" = {
 *       "default" = "Drupal\Core\Entity\EntityForm",
 *       "add" = "Drupal\Core\Entity\EntityForm",
 *       "edit" = "Drupal\Core\Entity\EntityForm",
 *       "delete" = "Drupal\Core\Entity\ContentEntityDeleteForm",
 *     },
 *     "route_provider" = {
 *       "html" = "Drupal\Core\Entity\Routing\DefaultHtmlRouteProvider",
 *     },
 *   },
 *   admin_permission = "administer message",
 *   base_table = "message",
 *   fieldable = TRUE,
 *   entity_keys = {
 *     "id" = "message_id",
 *     "label" = "title",
 *     "langcode" = "langcode",
 *     "uuid" = "uuid"
 *   },
 *  links = {
 *    "canonical" = "/messages/{message}",
 *    "add-form" = "/messages/add",
 *    "edit-form" = "/messages/{message}/edit",
 *    "delete-form" = "/messages/{message}/delete",
 *    "collection" = "/admin/content/messages"
 *   },
 * )
 */
  /**
   * {@inheritdoc}
   */
  public static function baseFieldDefinitions(EntityTypeInterface $entity_type) {
    $fields = parent::baseFieldDefinitions($entity_type);

    $fields['title'] = BaseFieldDefinition::create('string')
      ->setLabel(t('Title'))
      ->setRequired(TRUE)
      ->setTranslatable(TRUE)
      ->setRevisionable(TRUE)
      ->setSetting('max_length', 255)
      ->setDisplayOptions('view', array(
        'label' => 'hidden',
        'type' => 'string',
        'weight' => -5,
      ))
      ->setDisplayOptions('form', array(
        'type' => 'string_textfield',
        'weight' => -5,
      ))
      ->setDisplayConfigurable('form', TRUE);

    $fields['content'] = BaseFieldDefinition::create('text_long')
      ->setLabel(t('Content'))
      ->setDescription(t('Content of the message'))
      ->setTranslatable(TRUE)
      ->setDisplayOptions('view', array(
        'label' => 'hidden',
        'type' => 'text_default',
        'weight' => 0,
      ))
      ->setDisplayConfigurable('view', TRUE)
      ->setDisplayOptions('form', array(
        'type' => 'text_textfield',
        'weight' => 0,
      ))
      ->setDisplayConfigurable('form', TRUE);

    return $fields;
  }
The FieldableEntityInterface is implemented by the ContentEntityBase class using the ContentEntityInterface. The method needs to return an array of BaseFieldDefinitions for typed data definitions. The parent class provides field definitions for most of the entity_keys value in our entity's annotation. We must provide the label field and any specific fields for our implementation.
The content base field definition will hold the actual text of the message.
/**
 * {@inheritdoc}
 */
public function getMessage() {
  return $this->get('content')->value;
}
This method provides a wrapper around the defined base field's value and returns it.
<?php

namespace Drupal\mymodule;

use Drupal\Core\Entity\EntityInterface;
use Drupal\Core\Entity\EntityListBuilder;

class MessageListBuilder extends EntityListBuilder {
  public function buildHeader() {
    $header['title'] = t('Title');
    return $header + parent::buildHeader();
  }

  public function buildRow(EntityInterface $entity) {
    $row['title'] = $entity->label();
    return $row + parent::buildRow($entity);
  }

}
In our list builder handler, we override the buildHeader and builderRow methods so that we can add our configuration entity's properties to the table.
administer message:
    title: 'Administer messages'
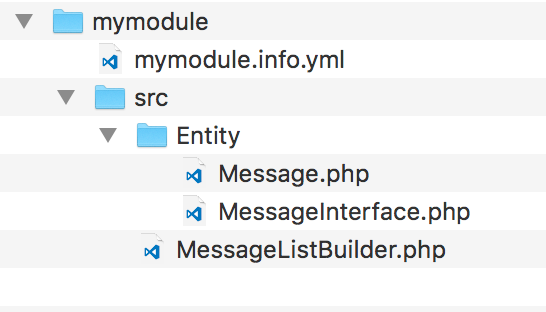
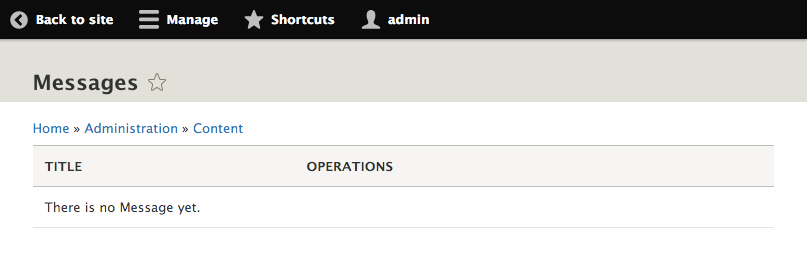
Content entities are a version of the EntityType plugin. When you define a content entity type, the annotation block begins with @ContentEntityType. This declaration and the properties in it represent the definition to initiate an instance of the \Drupal\Core\Entity\ContentEntityType, class just like all other plugin annotations. The ContentEntityType plugin class implements a constructor to provide default storage and view_builder handlers, forcing us to implement the list_builder and form handler arrays.
The plugin manager for entity types lives under the entity_type.manager service name and is provided through \Drupal\Core\Entity\EntityTypeManager by default. However, while the annotation defines the plugin information, our Message class that extends ContentEntityBase provides a means to manipulate the data it represents.
We will discuss how to add an additional functionality to your entity and use the Entity module to simplify the developer expedience.
Our Message entity type implements the DefaultHtmlRouteProvider class. There is also the \Drupal\Core\Entity\Routing\AdminHtmlRouteProvider class. This overrides the getEditFormRoute and getDeleteFormRoute and marks them with _admin_route. This will cause these forms to be rendered in the administration theme.
In this recipe, we specified the message collection route as /admin/content/messages. Without implementing this route as a local task under the /admin/content route, it will not show up as a tab. This can be done by creating a links.task.yml file for the module.
In mymodule.links.task.yml, add the following YAML content:
entity.message.collection_tab:
  route_name: entity.message.collection
  base_route: system.admin_content
  title: 'Messages'
This instructs Drupal to use the entity.message.collection route, defined in our routing.yml file, to be based under the system.admin_content route:
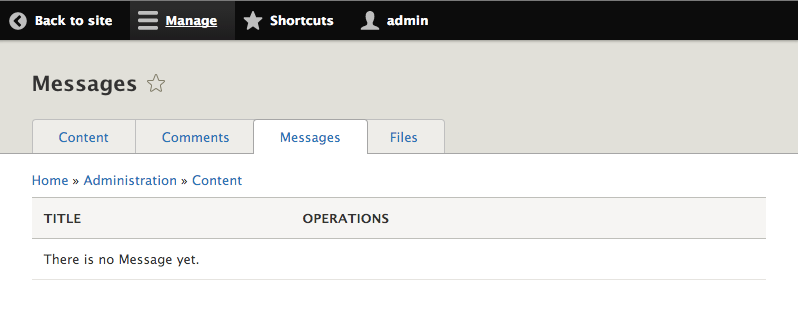
Bundles allow you to have different variations of a content entity. All bundles share the same base field definitions but not configured fields. This allows each bundle to have its own custom fields. Display modes are also dependent on a specific bundle. This allows each bundle to have its own configuration for the form mode and view mode.
Using the custom entity from the preceding recipe, we will add a configuration entity to act as the bundle. This will allow you to have different message types for multiple custom field configurations.
We will need a custom module to place the code into to implement a configuration entity type. Create an src directory for your classes. We need a custom content entity type to be implemented, such as the one in the Creating a content entity type recipe of this chapter.
mymodule.message_type.*:
  type: config_entity
  label: 'Message type settings'
  mapping:
    id:
      type: string
      label: 'Machine-readable name'
    uuid:
      type: string
      label: 'UUID'
    label:
      type: label
      label: 'Label'
    langcode:
      type: string
      label: 'Default language'
We will define the configuration entity's config prefix as message_type, which we will provide to Drupal in the entity's annotation block. We will tell Drupal that this is a config_entity and provide a label for the schema.
With the mapping array, we provide the attributes that make up our entity and the data that will be stored.
<?php

namespace Drupal\mymodule\Entity;

use Drupal\Core\Config\Entity\ConfigEntityInterface;

interface MessageTypeInterface extends ConfigEntityInterface {
  // Empty for future enhancements.
}
This will be implemented by our entity and will provide the method requirements. It is best practice to provide an interface for entities. This allows you to provide required methods if another developer extends your entity or if you are doing advanced testing and need to mock an object.
We will be implementing a very basic bundle. It is still wise to provide an interface in the event of future enhancements and mocking ability in tests.
<?php

namespace Drupal\mymodule\Entity;

use Drupal\Core\Config\Entity\ConfigEntityBundleBase;

class MessageType extends ConfigEntityBundleBase implements MessageTypeInterface {

}
In most use cases, the bundle entity class can be an empty class that does not provide any properties or methods. If a bundle provides additional attributes in its schema definition, they would also be provided here, like any other configuration entity.
<?php

namespace Drupal\mymodule\Entity;

use Drupal\Core\Config\Entity\ConfigEntityBundleBase;

/**
 * Defines the message type entity class.
 *
 * @ConfigEntityType(
 *   id = "message_type",
 *   label = @Translation("Message type"),
 *   config_prefix = "message_type",
 *   bundle_of = "message",
 *   entity_keys = {
 *     "id" = "id",
 *     "label" = "label"
 *   },
 *   config_export = {
 *     "id",
 *     "label",
 *   },
 * )
 */
class MessageType extends ConfigEntityBundleBase implements MessageTypeInterface {

}
The annotation document block tells Drupal that this is an instance of the ConfigEntityType plugin. The id is the internal machine name identifier for the entity type and the label is its human-readable version. The config_prefix matches how we defined our schema using mymodule.message_type. The entity keys definition tells Drupal which attributes represent our identifiers and labels.
When specifying config_export, we are telling the configuration management system what properties are to be exported when exporting our entity.
/**
 * Defines the message type entity class.
 *
 * @ConfigEntityType(
 *   id = "message_type",
 *   label = @Translation("Message type"),
 *   handlers = {
 *     "list_builder" = "Drupal\mymodule\MessageTypeListBuilder",
 *     "form" = {
 *       "default" = "Drupal\Core\Entity\EntityForm",
 *       "add" = "Drupal\Core\Entity\EntityForm",
 *       "edit" = "Drupal\Core\Entity\EntityForm",
 *       "delete" = "Drupal\Core\Entity\EntityDeleteForm"
 *     },
 *   },
 *   config_prefix = "message_type",
 *   bundle_of = "message",
 *   entity_keys = {
 *     "id" = "id",
 *     "label" = "label"
 *   },
 *   config_export = {
 *     "id",
 *     "label",
 *   },
 * )
 */
The handlers array specifies classes that provide the interaction functionality with our entity. The list builder class will be created to show you a table of our entities. The form array provides classes for forms to be used when creating, editing, or deleting our configuration entity.
/**
 * Defines the message type entity class.
 *
 * @ConfigEntityType(
 *   id = "message_type",
 *   label = @Translation("Message type"),
 *   handlers = {
 *     "list_builder" = "Drupal\mymodule\MessageTypeListBuilder",
 *     "form" = {
 *       "default" = "Drupal\Core\Entity\EntityForm",
 *       "add" = "Drupal\Core\Entity\EntityForm",
 *       "edit" = "Drupal\Core\Entity\EntityForm",
 *       "delete" = "Drupal\Core\Entity\EntityDeleteForm"
 *     },
 *     "route_provider" = {
 *       "html" = "Drupal\Core\Entity\Routing\DefaultHtmlRouteProvider",
 *     },
 *   },
 *   config_prefix = "message_type",
 *   bundle_of = "message",
 *   entity_keys = {
 *     "id" = "id",
 *     "label" = "label"
 *   },
 *   config_export = {
 *     "id",
 *     "label",
 *   },
 *   links = {
 *     "add-form" = "/admin/structure/message-types/add",
 *     "delete-form" = "/admin/structure/message-types/{message_type}/delete",
 *     "edit-form" = "/admin/structure/message-types/{message_type}",
 *     "admin-form" = "/admin/structure/message-types/{message_type}",
 *     "collection" = "/admin/structure/message-types"
 *   }
 * )
 */
There is a routing service for entities that will automatically provide Drupal a route with the proper controllers based on this annotation. The add form route is not yet supported and needs to be manually added.
/**
 * Defines the message entity class.
 *
 * @ContentEntityType(
 *   id = "message",
 *   label = @Translation("Message"),
 *   handlers = {...},
 *   base_table = "message",
 *   fieldable = TRUE,
 *   bundle_entity_type = "message_type",
 *   field_ui_base_route = "entity.message_type.edit_form",
 *   entity_keys = {
 *     "id" = "message_id",
 *     "label" = "title",
 *     "langcode" = "langcode",
 *     "bundle" = "type",
 *     "uuid" = "uuid"
 *   },
 *   links = {...},
 * )
 */
The bundle_entity_type key specifies the entity type used as the bundle. The plugin validates this as an actual entity type and marks it for configuration dependencies. With the field_ui_base_route key pointed to the bundle's main edit form, it will generate the Manage Fields, Manage Form Display, and Manage Display tabs on the bundles. Finally, the bundle entity key instructs Drupal on the field definition to be used to identify the entity's bundle, which is created in the next step.
With the bundle entity key added, the ContentEntityBase class will automatically add an entity reference base field called type to our entity, referencing the bundle configuration entity type.
<?php

namespace Drupal\mymodule;

use Drupal\Core\Entity\EntityInterface;
use Drupal\Core\Config\Entity\ConfigEntityListBuilder;

class MessageTypeListBuilder extends EntityListBuilder {
  public function buildHeader() {
    $header['label'] = t('Label');
    return $header + parent::buildHeader();
  }

  public function buildRow(EntityInterface $entity) {
    $row['label'] = $entity->label();
    return $row + parent::buildRow($entity);
  }

}

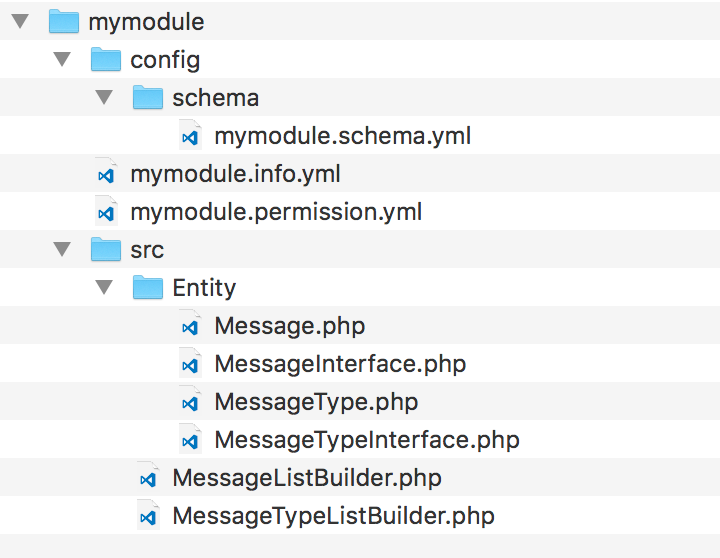
Bundles are most utilized in the configured field levels via the Field and Field UI modules. When you create a new field, it has a base storage item for its global settings. Once a field is added to a bundle, there is a new field configuration that is created and assigned to the bundle. Fields can then have their own settings for a specific bundle along with form and view display configurations.
Content entity bundles work just like any other configuration entity implementation, but they extend the usability of the Field API for your content entity types.
We will discuss how to add additional functionality to our entity bundle and use the Entity module to simplify the developer expedience.
There are special links called action links in Drupal. These appear at the top of the page and are generally used for links that allow the creation of an item by creating a links.action.yml file.
In your mymodule.links.action.yml, each action link defines the route it will link to, titles, and the routes it appears on:
message_type_add:
  route_name: entity.message_type.add_form
  title: 'Add message type'
  appears_on:
    - entity.message_type.collection
The appears_on key accepts multiple values that will allow this route link to appear on multiple pages:
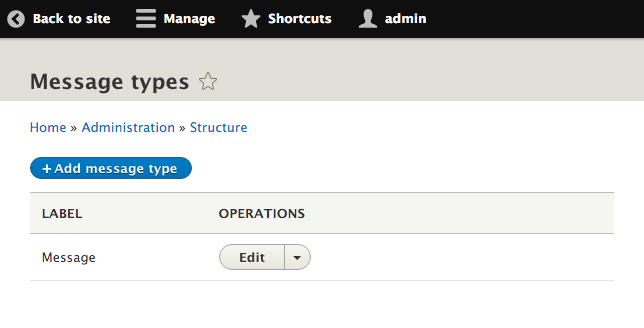
All entities have a set of handlers that control specific pieces of functionalities. One handler handles access control. When the access handler is not specified, the base \Drupal\Core\Entity\EntityType module will implement \Drupal\Core\Entity\EntityAccessControlHandler as the access handler. By default, this will check whether any modules have implemented hook_entity_create_access or hook_entity_type_create_access and use their opinions. Otherwise, it defaults to the admin permission for the entity type, if implemented.
In this recipe, we will provide an admin permission for our entity and implement the access handler and permission provider available through the Entity API module. We will base this on an entity called Message.
We will need a custom module to place the code into to implement a configuration entity type. Let's create an src directory for our PSR-4 style classes. We will need to implement a custom content entity type, such as the one in the Creating a content entity type recipe of this chapter.
/**
 * Defines the message entity class.
 *
 * @ContentEntityType(
 *   id = "message",
 *   label = @Translation("Message"),
 *   handlers = {...},
 *   base_table = "message",
 *   fieldable = TRUE,
 *   admin_permission = "administer messages",
 *   entity_keys = {
 *     "id" = "message_id",
 *     "label" = "title",
 *     "langcode" = "langcode",
 *     "uuid" = "uuid"
 *   },
 *   links = {...},
 * )
 */
The entity access handler provided by the core will check whether entities implement this option. If it is provided, it will be used as the basis for access checks.
/**
 * Defines the message entity class.
 *
 * @ContentEntityType(
 *   id = "message",
 *   label = @Translation("Message"),
 *   handlers = {...},
 *   base_table = "message",
 *   fieldable = TRUE,
 *   admin_permission = "administer messages",
 *   permission_granularity = "bundle",
 *   bundle_entity_type = "message_type",
 *   field_ui_base_route = "entity.message_type.edit_form",
 *   entity_keys = {
 *     "id" = "message_id",
 *     "label" = "title",
 *     "langcode" = "langcode",
 *     "bundle" = "type",
 *     "uuid" = "uuid"
 *   },
 *  links = {...},
 * )
 */
The permission_granularity key will tell the system what permissions should be generated and how the access should be checked. This way, one user could create Announcement messages but not Bulletin messages.
/**
 * Defines the message entity class.
 *
 * @ContentEntityType(
 *   id = "message",
 *   label = @Translation("Message"),
 *   handlers = {
 *     "list_builder" = "Drupal\mymodule\MessageListBuilder",
 *     "permission_provider" = "\Drupal\entity\EntityPermissionProvider",
 *     "form" = {...},
 *     "route_provider" = {...},
 *   },
 *   base_table = "message",
 *   fieldable = TRUE,
 *   admin_permission = "administer messages",
 *   permission_granularity = "bundle",
 *   bundle_entity_type = "message_type",
 *   field_ui_base_route = "entity.message_type.edit_form",
 *   entity_keys = {...},
 *  links = {...},
 * )
 */
/**
 * Defines the message entity class.
 *
 * @ContentEntityType(
 *   id = "message",
 *   label = @Translation("Message"),
 *   handlers = {
 *     "list_builder" = "Drupal\mymodule\MessageListBuilder",
 *     "access" = "\Drupal\entity\EntityAccessControlHandler",
 *     "permission_provider" = "\Drupal\entity\EntityPermissionProvider",
 *     "form" = {...},
 *     "route_provider" = {...},
 *   },
 *   base_table = "message",
 *   fieldable = TRUE,
 *   admin_permission = "administer messages",
 *   permission_granularity = "bundle",
 *   bundle_entity_type = "message_type",
 *   field_ui_base_route = "entity.message_type.edit_form",
 *   entity_keys = {...},
 *  links = {...},
 * )
 */
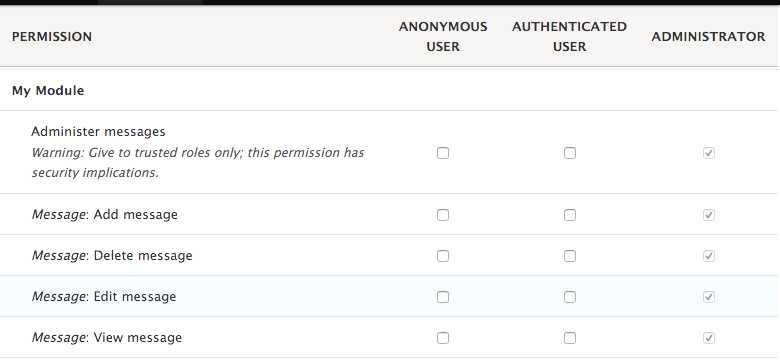
Entities are powered by the plugin system in Drupal, which means that there is a plugin manager. The default \Drupal\Core\Entity\EntityTypeManager provides the discovery and handling of entities. Both the ContentEntityType and ConfigEntityType entity types and classes extend the base \Drupal\Core\Entity\EntityType class.
The EntityType class constructor provides a default access handler if it is not provided through the \Drupal\Core\Entity\EntityAccessControlHandler class. Every core module that provides an entity type implements this to override at least checkAccess and checkCreateAccess. Meanwhile, the Entity API access handler extends this to support bundle granular permissions and owner-based permissions if an entity implements EntityOwnerInterface in a reusable fashion.
The \Drupal\Core\Access\AccessibleInterface defines an access method, and all the entities inherit this interface. The default implementation in \Drupal\Core\Entity\Entity will invoke checkCreateAccess if the operation is create; otherwise, it invokes the generic access method of the access controller, which will invoke entity access hooks and the class' checkAccess method.
When Drupal generates available permissions, the Entity API module finds entity definitions that define the permission_provider handler and then invokes that class to generate permissions.
We will discuss how to implement custom access control for an entity and use the Entity to simplify the controlling access.
The checkFieldAccess method in the core's entity access control handler can be overridden to control access to specific entity fields when modifying an entity. Without being overridden by a child class, the \Drupal\Core\Entity\EntityAccessControlHandler::checkFieldAccess will always return an allowed access result. The method receives the following parameters:
Entity types can implement their own access control handlers and override this method to provide granular control over the modification of their base fields. A good example would be the User module and its \Drupal\user\UserAccessControlHandler.
User entities have a pass field that is used for the user's current password. There is also a created field that records when the user was added to the site.
For the pass field, it returns denied if the operation is view, but allows access if the operation is edit:
case 'pass':
  // Allow editing the password, but not viewing it.
  return ($operation == 'edit') ? AccessResult::allowed() : AccessResult::forbidden();
The created field uses the opposite logic. When a user logs in, the site can be viewed but cannot be edited:
case 'created':
  // Allow viewing the created date, but not editing it.
  return ($operation == 'view') ? AccessResult::allowed() : AccessResult::forbidden();
Storage handlers control the loading, saving, and deleting of an entity. The \Drupal\Core\Entity\ContentEntityType provides the base entity type definition for all content entity types. If it is not specified, then the default storage handler is \Drupal\Core\Entity\Sql\SqlContentEntityStorage. This class can be extended to implement alternative load methods or adjustments on saving.
In this recipe, we will implement a method that supports loading an entity by a specific property instead of having to write a specific loadByProperties method call.
You will need a custom module to place the code into to implement a configuration entity type. Create an src directory for your PSR-4 style classes. A custom content entity type needs to be implemented, such as the one in the Creating a content entity type recipe of this chapter.
<?php

namespace Drupal\mymodule;

use Drupal\Core\Entity\Sql\SqlContentEntityStorage;

/**
 * Defines the entity storage for messages.
 */
class MessageStorage extends SqlContentEntityStorage {

}
By extending the default storage class for our entity type, we can simply add new methods that are relevant to our requirements rather than implementing the extra business logic.
  /**
   * Load multiple messages by bundle type.
   *
   * @param string $message_type
   *   The message type.
   *
   * @return array|\Drupal\Core\Entity\EntityInterface[]
   *   An array of loaded message entities.
   */
  public function loadMultipleByType($message_type) {
    return $this->loadByProperties([
      'type' => $message_type,
    ]);
  }
We pass the type property so that we can query it based on the message bundle and return all matching message entities.
handlers = {
  "list_builder" = "Drupal\mymodule\MessageListBuilder",
  "access" = "\Drupal\entity\EntityAccessControlHandler",
  "permission_provider" = "\Drupal\entity\EntityPermissionProvider",
  "storage" = "Drupal\mymodule\MessageStorage",
  "form" = {
    "default" = "Drupal\Core\Entity\EntityForm",
    "add" = "Drupal\Core\Entity\EntityForm",
    "edit" = "Drupal\Core\Entity\EntityForm",
    "delete" = "Drupal\Core\Entity\EntityDeleteForm"
  },
  "route_provider" = {
    "html" = "Drupal\Core\Entity\Routing\DefaultHtmlRouteProvider",
  },
},
// Get the entity type manager from the container.
\Drupal::entityTypeManager()

// Access the storage handler.
->getStorage('message')

// Invoke the new method on custom storage class.
->loadMultipleByType('message');
When defining a content entity type, the annotation block begins with @ContentEntityType. This declaration, and the properties in it represents the definition to initiate an instance of the
\Drupal\Core\Entity\ContentEntityType class just like all other plugin annotations.
In the class constructor, there is a merge to provide default handlers for the storage handler if it is not provided. This will always default to \Drupal\Core\Entity\Sql\SqlContentEntityStorage, as it provides methods and logic to help its parent class, ContentEntityStorageBase, interact with the SQL-based storage.
Extending SqlContentEntityStorage reuses methods required for default Drupal implementations and provides an easy method to create custom methods to interact with loading, saving, and so on.
We will discuss the custom storage handler and utilization of different storage backends.
Drupal provides mechanisms to support different database storage backends that are not provided by the Drupal core, such as MongoDB. Although it is not stable for Drupal 8 at the time of writing this book, there is a MongoDB module that provides storage interaction.
The module provides \Drupal\mongodb\Entity\ContentEntityStorage, which extends \Drupal\Core\Entity\ContentEntityStorageBase. This class overrides the methods used to create, save, and delete, to write them to a MongoDB collection.
The project can be found at https://www.drupal.org/project/mongodb.
While there are much more steps to provide a custom storage backend for content entities and their fields, this serves as an example for how you can choose to place a custom entity in different storage backends.
Entities can implement a route provider that will create the route definitions for the entity's canonical (view), edit, delete, and collection (list) routes. As of Drupal 8.3.0, all the normally required routes are generated (this was not the case in 8.0.0). The provider takes the path for a specific link definition and turns that into a route and accessible path.
In this recipe, we will extend the default \Drupal\Core\Entity\Routing\DefaultHtmlRouteProvider and override the canonical route to be the same as the edit route, because we assume that messages will always be embedded.
You will need a custom module to place the code into to implement a configuration entity type. Create an src directory for your classes. A custom content entity type needs to be implemented, such as the one in the Creating a content entity type recipe of this chapter.
<?php

namespace Drupal\mymodule;

use Drupal\Core\Entity\Routing\DefaultHtmlRouteProvider;

/**
 * Provides HTML routes for the message entity type.
 */
class MessageHtmlRouteProvider extends DefaultHtmlRouteProvider {

}
<?php

namespace Drupal\mymodule;

use Drupal\Core\Entity\EntityTypeInterface;
use Drupal\Core\Entity\Routing\DefaultHtmlRouteProvider;

/**
 * Provides HTML routes for the message entity type.
 */
class MessageHtmlRouteProvider extends DefaultHtmlRouteProvider {

  /**
   * {@inheritdoc}
   */
  protected function getCanonicalRoute(EntityTypeInterface $entity_type) {
    // Messages use the edit-form route as the canonical route.
    // @todo Remove this when #2479377 gets fixed.
    return $this->getEditFormRoute($entity_type);
  }

}
Entities are powered by the plugin system in Drupal, which means that there is a plugin manager. The default \Drupal\Core\Entity\EntityTypeManager provides discovery and handling of entities. The \Drupal\Core\Entity\EntityTypeManagerInterface specifies a getRouteProviders method that is expected to return an array of strings that provide the fully qualified class name of an implementation of the \Drupal\Core\Entity\Routing\EntityRouteProviderInterface interface.
There is an event subscriber defined in core.services.yml called the entity_route_subscriber. This service subscribes to the dynamic route event. When this happens, it uses the entity type manager to retrieve all entity type implementations, which provide route subscribers. It then aggregates all the \Symfony\Component\Routing\RouteCollection instances received and merges them into the main route collection for the system.
Drupal 8 introduces router types and provide the add routes for our entity.
The Entity module provides two new route providers aimed specifically for entities that support revisions and a bulk delete form option.
If you have an entity that implements the RevisionLogInterface interface, the revision route provider generates a user interface for managing revisions. You then add a revision entry for the router_providers array pointing to the new route provider:
 *     "route_provider" = {
 *       "html" = "Drupal\Core\Entity\Routing\DefaultHtmlRouteProvider",
 *       "revision" = "Drupal\entity\Routing\RevisionRouteProvider",
 *     },
Then, you just need to define additional items in your entity's links definition:
*   links = {
*     "revision" = "/messages/{message}/revisions/{message_revision}/view",
 *     "revision-revert-form" = "/messages/{message_enhanced}/revisions/{message_revision}/revert",
 *     "version-history" = "/messages/{message}/revisions",
*    "canonical" = "/messages/{message}",
 *    "edit-form" = "/messages/{message}/edit",
 *    "delete-form" = "/messages/{message}/delete",
 *    "collection" = "/admin/content/messages"
 *   }
This reduces the amount of boilerplate code required to implement an Entity. For an implementation example, refer to the EnhancedEntity class in the Entity API's test module entity_module_test.
In this chapter, we will see how to use third-party libraries, such as JavaScript, CSS, and PHP in detail:
Drupal 8 comes with a Proudly Built Elsewhere attitude. There has been an effort made to use more components created by the PHP community at large and other communities. Drupal 8 is built with Symfony. It includes Twig as its templating system, the provided WYSIWYG editor as its CKEditor, and PHPUnit for testing.
How does Drupal 8 promote using libraries made elsewhere? The new asset management system in Drupal 8 makes it easier to use frontend libraries. Drupal implements PSR-0 and PSR-4 from the PHP Framework Interoperability Group (PHP-FIG), and PHP Standards Recommendations (PSRs) are suggested standards used to increase interoperability between PHP applications. This has streamlined integrating third-party PHP libraries.
Both areas will be constantly improved with each minor release of Drupal 8. These areas will be mentioned throughout the chapter.
In the past, Drupal has only shipped with jQuery and a few jQuery plugins used by Drupal core for the JavaScript API. This has changed with Drupal 8. Underscore.js and Backbone.js are now included in Drupal, bringing two popular JavaScript frameworks to its developers.
However, there are many JavaScript frameworks that can be used. In Chapter 5, Frontend for the Win, we covered the asset management system and libraries. In this recipe, we will create a module that provides Angular.js as a library and a custom Angular application; the demo is available on the AngularJS home page.
In this example, we will use Bower to manage our third-party Angular.js library components. If you are not familiar with Bower, it is simply a package manager for frontend components. Instead of using Bower, you can just manually download and place the required files.
If you do not have Bower, you can follow the instructions to install it from bower.io at
http://bower.io/#install-bower. If you do not want to install Bower, we will provide links to manually download libraries.
Having a background in AngularJS is not required but is beneficial. This recipe implements the example from the home page of the library.
name: My Module!
type: module
description: Provides an AngularJS app.
core: 8.x
$ bower init
? name mymodule
? description Example module with AngularJS
? main file
? what types of modules does this package expose?
? keywords
? authors Matt Glaman <nmd.matt@gmail.com>
? license GPL
? homepage
? set currently installed components as dependencies? Yes
? would you like to mark this package as private which prevents it from being accidentally published to the registry? No
{
  name: 'mymodule',
  authors: [
    'Matt Glaman <nmd.matt@gmail.com>'
  ],
  description: 'Example module with AngularJS',
  main: '',
  moduleType: [],
  license: 'GPL',
  homepage: '',
  ignore: [
    '**/.*',
    'node_modules',
    'bower_components',
    'test',
    'tests'
  ]
}

? Looks good? Yes
$ bower install --save angular
bower angular#*                 cached git://github.com/angular/bower-angular.git#1.5.0
bower angular#*               validate 1.5.0 against git://github.com/angular/bower-angular.git#*
bower angular#^1.5.0           install angular#1.5.0
angular#1.5.0 bower_components/angular
The --save option will ensure that the package's dependency is saved in the created bower.json. If you do not have Bower, you can download AngularJS from https://angularjs.org/ and place it in the bower_components folder.
angular:
  js:
    'bower_components/angular/angular.js: {}
  css:
    component:
      'bower_components/angular/angular-csp.css': {}
When the angular library is attached, it will add the AngularJS library file and attach the CSS style sheet.
<?php

/**
 * Implements hook_preprocess_html().
 */
function mymodule_preprocess_html(&$variables) {
    $variables['html_attributes']['ng-app'] = '';
}
AngularJS uses the ng-app attribute as a directive for bootstrapping an AngularJS application. It marks the root of the application.
<?php

namespace Drupal\mymodule\Plugin\Block;

use Drupal\Core\Block\BlockBase;

/**
 * Provides a block for AngularJS example.
 *
 * @Block(
 *   id = "mymodule_angular_block",
 *   admin_label = @Translation("AngularJS Block")
 * )
 */
class AngularBlock extends BlockBase {

  public function build() {
    return [
      'input' => [
        '#type' => 'textfield',
        '#title' => $this->t('Name'),
        '#placeholder' => $this->t('Enter a name here'),
        '#attributes' => [
          'ng-model' => 'yourName',
        ],
      ],
      'name' => [
        '#markup' => '<hr><h1>Hello {{yourName}}!</h1>',
      ],
      '#attached' => [
        'library' => [
          'mymodule/angular',
        ],
      ],
    ];
  }

}
We return a render array that contains the input, name, and our library attachments. The input array returns the Form API render information for a text field. The name returns a regular markup that will bind Angular's changes to the yourName scope variable.
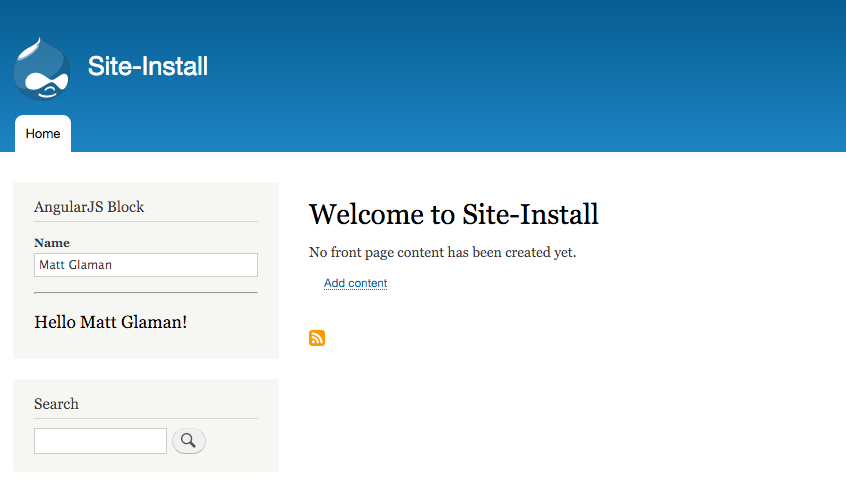
The simplicity of integrating with a JavaScript framework is provided by the new asset management system in Drupal 8. The usage of Bower is optional, but it is usually a preferred method used to manage frontend dependencies. Using Bower, we can place bower_components in an ignore file that can be used to keep third-party libraries out of version control.
Drupal 8 uses Composer for handling PHP dependencies, but frontend libraries are still being sorted out for best practices.
In our recipe, we added the third-party library through a local copy of the code, inside the module. This approach, however, makes it difficult to reuse the same library in another module. The other module would have to declare a dependency on the module providing the library or define its own copy, and two versions of AngularJS would have been loaded on the page.
A leading practice is to place a libraries directory in the Drupal docroot (alongside modules and themes.) An example can be found in the DropzoneJS integration module:
dropzonejs:
  title: 'Dropzonejs'
  website: http://www.dropzonejs.com
  version: 4.0.1
  license:
    name: MIT
    url: https://github.com/enyo/dropzone/blob/master/LICENSE
    gpl-compatible: true
  js:
    /libraries/dropzone/dist/min/dropzone.min.js: {}
  css:
    component:
      /libraries/dropzone/dist/min/dropzone.min.css: {}
This pattern would allow any module to load the library through this path. Its author recommends that you have a base module that defines the library and simple integration and always make that a dependency.
Drupal provides many things. However, one thing that it does not provide is any kind of CSS component library. In the Using the new asset management system recipe of Chapter 5, Frontend for the Win, we added FontAwesome as a library. CSS frameworks implement robust user interface design components, and they can be quite large if you use a compiled version with everything bundled. The asset management system can be used to define each component as its own library to only deliver the exact files required for a strong frontend performance.
In this recipe, we will implement the Semantic UI framework, using the CSS-only distribution, which provides each individual component's CSS file. We will register the form, button, label, and input components as libraries. Our custom theme will then alter the Drupal elements for buttons, labels, and inputs to have the Semantic UI classes and load the proper library.
In this example, we will use Bower to manage our third-party components. If you are not familiar with Bower, it is simply a package manager used for frontend components. Instead of using Bower, you can just manually download and place the required files.
$ bower init
? name mytheme
? description Example theme with Semantic UI
? main file
? what types of modules does this package expose?
? keywords
? authors Matt Glaman <nmd.matt@gmail.com>
? license GPL
? homepage
? set currently installed components as dependencies? Yes
? would you like to mark this package as private which prevents it from being accidentally published to the registry? No
{
  name: 'mytheme',
  authors: [
    'Matt Glaman <nmd.matt@gmail.com>'
  ],
  description: 'Example theme with Semantic UI,
  main: '',
  moduleType: [],
  license: 'GPL',
  homepage: '',
  ignore: [
    '**/.*',
    'node_modules',
    'bower_components',
    'test',
   'tests'
  ]
}

? Looks good? Yes
$ bower install --save semantic-ui
bower semantic-ui#*         not-cached git://github.com/Semantic-Org/Semantic-UI.git#*
bower semantic-ui#*            resolve git://github.com/Semantic-Org/Semantic-UI.git#*
bower semantic-ui#*           download https://github.com/Semantic-Org/Semantic-UI/archive/2.1.8.tar.gz
bower semantic-ui#*            extract archive.tar.gz
bower semantic-ui#*           resolved git://github.com/Semantic-Org/Semantic-UI.git#2.1.8
bower jquery#>=1.8          not-cached git://github.com/jquery/jquery-dist.git#>=1.8
bower jquery#>=1.8             resolve git://github.com/jquery/jquery-dist.git#>=1.8
bower jquery#>=1.8            download https://github.com/jquery/jquery-dist/archive/2.2.0.tar.gz
bower jquery#>=1.8             extract archive.tar.gz
bower jquery#>=1.8            resolved git://github.com/jquery/jquery-dist.git#2.2.0
bower semantic#^2.1.8          install semantic#2.1.8
bower jquery#>=1.8             install jquery#2.2.0
The --save option will ensure that the package's dependency is saved in the created bower.json. If you do not have Bower, you can download Semantic UI from https://github.com/semantic-org/semantic-ui/ and place it in a bower_components folder.
semantic_ui.form:
  js:
    bower_components/semantic/dist/components/form.js: {}
  css:
    component:
      bower_components/semantic/dist/components/form.css: {}
The form component for Semantic UI has a style sheet and JavaScript file. Your library ensures that both are loaded when the library is attached.
semantic_ui.button:
  css:
    component:
      bower_components/semantic/dist/components/button.css: {}
semantic_ui.input:
  css:
    component:
      bower_components/semantic/dist/components/input.css: {}
semantic_ui.label:
  css:
    component:
      bower_components/semantic/dist/components/label.css: {}
{{ attach_library('mytheme/semantic_ui.form') }}
  <form{{ attributes.addClass(['ui', 'form']) }}>
{{ children }}
</form>
The attach_library function will attach the specified library. Use the addClass method from Twig to add the ui and form classes. Semantic UI requires all elements to have the matching ui class.
{{ attach_library('mytheme/semantic_ui.input') }}
<input{{ attributes.addClass(['ui', 'input']) }} />{{ children }}
{{ attach_library('mytheme/semantic_ui.button') }}
<input{{ attributes.addClass(['ui', 'button', 'primary']) }} />{{ children }}
{{ attach_library('mytheme/semantic_ui.label') }}

{%
  set classes = [
    title_display == 'after' ? 'option',
    title_display == 'invisible' ? 'visually-hidden',
    required ? 'js-form-required',
    required ? 'form-required',
    'ui',
    'label',
  ]
%}
{% if title is not empty or required -%}
  <label{{ attributes.addClass(classes) }}>{{ title }}</label>
{%- endif %}
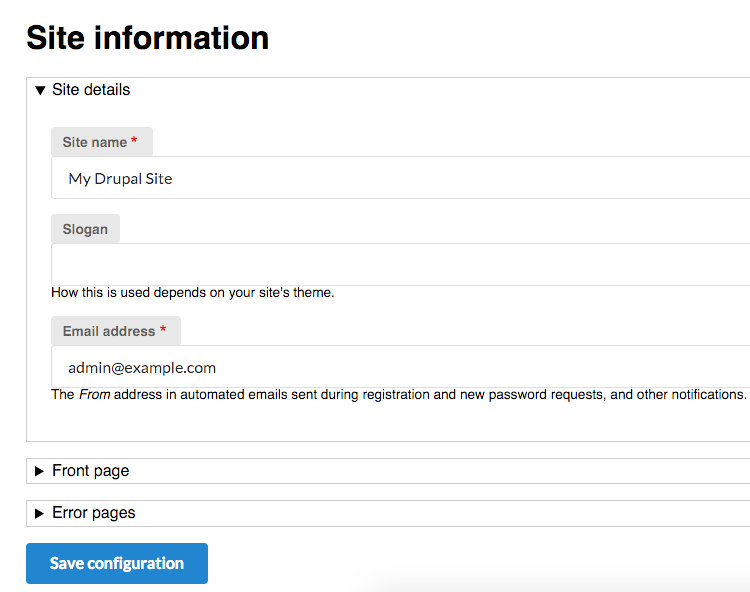
The simplicity of integrating with a CSS framework is provided by the new template system, Twig, and the asset management system in Drupal 8. The usage of Bower is optional, but it is usually a preferred method for managing frontend dependencies and can be used to keep third-party libraries out of version control.
Although it may be a task to add each component as its own library and attach when specifically needed, it ensures optimal asset delivery. With CSS and JavaScript aggregation enabled, each page will only have the minimal resources that are needed. This is an advantage when the entire Semantic UI minified is still 524 KB.
Drupal 8 uses Composer for package dependencies and autoloading classes based on PSR standards. This allows us to use any available PHP library much more easily than in previous versions of Drupal.
In this recipe, we will add the IpRestrict Stack Middleware library to add the functionality to whitelist access to the Drupal site based on allowed IP addresses.
You need to have Composer installed in order to use the Composer manager workflow. You can follow the Getting Started documentation at https://getcomposer.org/doc/00-intro.md. We will add the alsar/stack-ip-restrict library as a dependency to our Drupal installation.
composer require alsar/stack-ip-restrict
name: IP Restrict
type: module
description: Restricts access to the Drupal site based on allowed IP addresses
core: 8.x
parameters:
  ip_restrict:
    enabled: true
    ipAddresses: ['127.0.0.1', 'fe80::1', '::1']
services:
  ip_restrict.middleware:
    class: Alsar\Stack\IpRestrict
    arguments: ['%ip_restrict%']
    tags:
      - { name: http_middleware }
The parameters section defines configuration values, which can be overridden in the site's services.yml file. The services section defines the service's machine name, class file, its constructor arguments, and any tags.
<?php

namespace Drupal\ip_restrict\Compiler;

use Symfony\Component\DependencyInjection\ContainerBuilder;
use Symfony\Component\DependencyInjection\Compiler\CompilerPassInterface;

/**
 * Adds the IP Restrict middleware if enabled.
 */
class IpRestrictPass implements CompilerPassInterface {

  /**
   * {@inheritdoc}
   */
  public function process(ContainerBuilder $container) {
    if (FALSE === $container->hasDefinition('ip_restrict.middleware')) {
      return;
    }

    $ip_restrict_config = $container->getParameter('ip_restrict');

    if (!$ip_restrict_config['enabled']) {
      $container->removeDefinition('ip_restrict.middleware');
    }
  }

}
In our compiler pass, we check the enabled parameter and remove our middleware if it has been disabled (so that it does not restrict allowed IPs).
Drupal 8 utilizes Symfony components. One of them is the service container and the services it has registered. During the building of the container, there is a compiler pass process that allows alterations of the container's services.
First, we will need to register the service in the module's services.yml file. The \Drupal\Core\DependencyInjection\Compiler\StackedKernelPass class provided by the core will automatically load all the services tagged with http_middleware, such as our ip_restrict.middleware service.
Our arguments definition loads items defined in the parameters.ip_restrict that are used for the class's constructor.
With our provided IpRestrictPass class, we are also tapping into the container's compile cycle. We will take a look at the parameter values for the ip_restrict section to check whether they are enabled. If the enabled setting is set to false, we remove our service from the container.
Drupal 8 ships with the RESTful web servers functionality to implement web services to interact with your application. This chapter shows you how to enable these features and build your API, covering the following topics:
There are several modules provided by Drupal 8 that enable the ability to turn it into a web service provider. The Serialization module provides a means of serializing data to or deserializing from formats such as JSON and XML. The RESTful web services module then exposes entities and other APIs through Web APIs. Operations done through RESTful resource endpoints use the same create, edit, delete, and view permissions that would be used in a non-API format.
The HAL module serializes entities using the Hypertext Application Language (HAL) format. HAL is an Internet Draft standard convention used to hyperlink between resources in an API. HAL+JSON is required when working with POST and PATCH methods. For authentication, the HTTP Basic Authentication module provides a simple authentication via HTTP headers.
There is a community-lead effort to implement the JSON API specification with Drupal, using the JSON API module, covered in the Using JSON API recipe of this chapter. Like HAL, it provides specifications not only on how data should be represented, but also on how it should be sorted and filtered via request parameters.
This chapter covers how to work with the RESTful Web Services module and the supporting modules around developing a RESTful API powered by Drupal 8. We will cover how to use the GET, POST, and PATCH HTTP methods to manipulate content on the website. Additionally, we will cover how to use views to provide custom content that lists endpoints. Finally, we will cover how to handle custom authentication for our API.
The RESTful Web Services module provides routes that expose endpoints for your RESTful API. It utilizes the Serialization module to handle the normalization to a response and denormalization of data from requests. Endpoints support specific formats and authentication providers. Upon installation, the RESTful Web Services module does not provide any default configured endpoints.
There is one caveat: RESTful Web Services does not provide a user interface to configure available endpoints. Enabling resource endpoints can be done by manually editing configuration or the REST UI module. We will use the REST UI module in this recipe.
In this recipe, we will install RESTful Web Services and enable the proper permissions to allow the retrieval of nodes via REST to receive our formatted JSON.
There is a configuration change that might be required if you are running PHP 5.6: the always_populate_raw_post_data setting. If you try to enable the RESTful Web Services module without changing the default setting, you will see the following error message on installation:
The always_populate_raw_post_data PHP setting should be set to -1 in PHP version 5.6. Please check the PHP manual for information on how to correct this. (Currently using always_populate_raw_post_data PHP setting version not set to -1.)
cd /path/to/drupal8
composer require drupal/restui


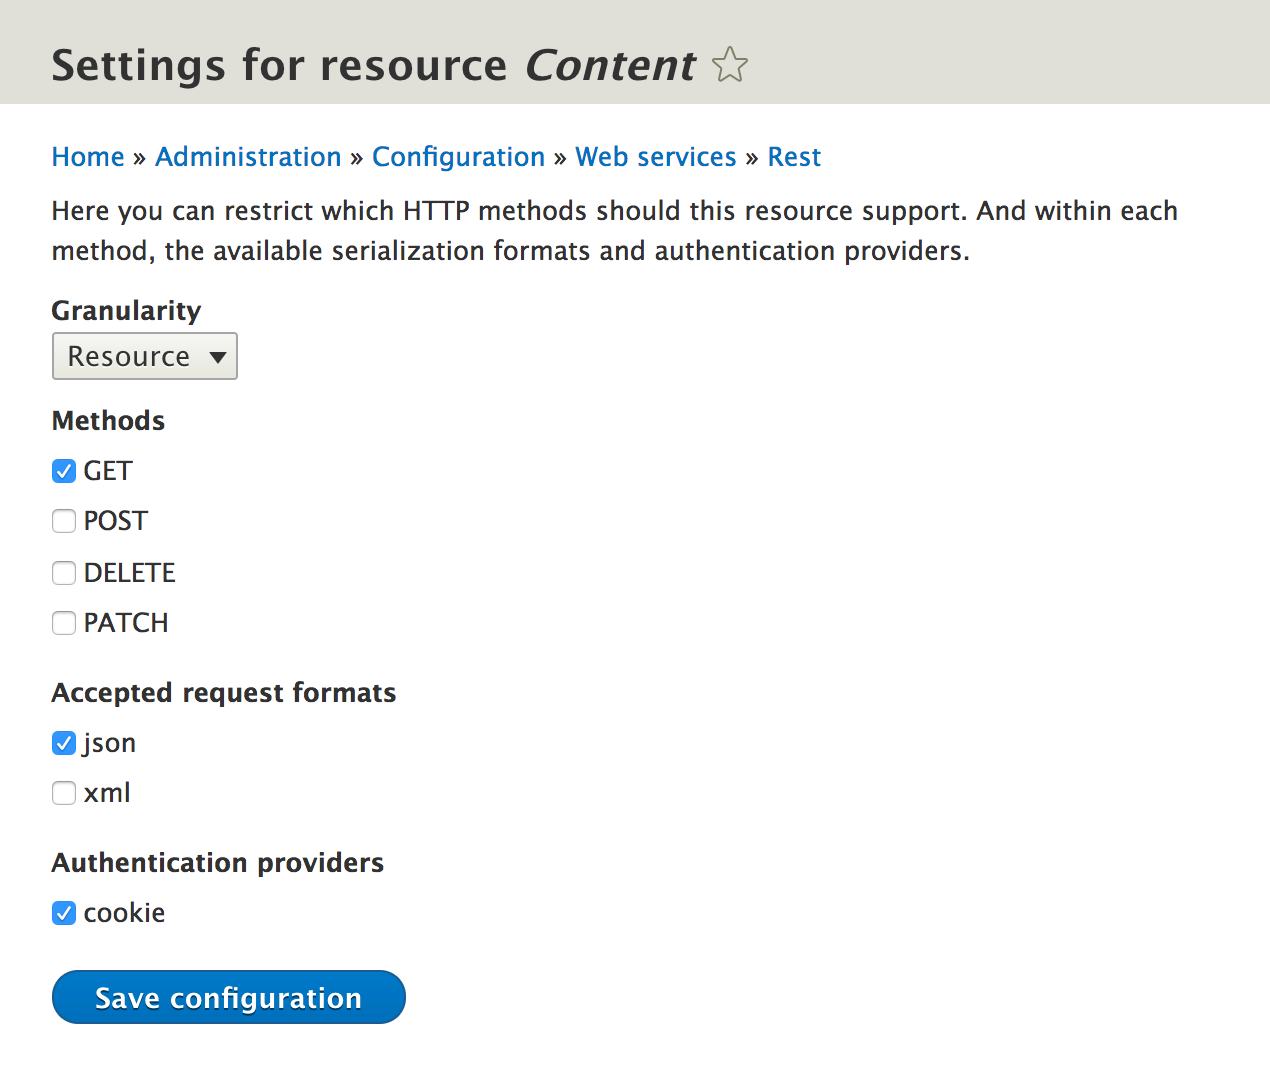
curl http://127.0.0.1:8888/node/1?_format=json

{"nid":[{"value":1}],"uuid":[{"value":"9a473f09-fa61-42c9-b4ad-f24b857d04f6"}],"vid":[{"value":51}],"langcode":[{"value":"en"}],"type":[{"target_id":"page","target_type":"node_type","target_uuid":"8a8ad160-69dc-453f-bc11-86775040465e"}],"status":[{"value":true}],"title":[{"value":"Example node"}],"uid":[{"target_id":0,"target_type":"user","target_uuid":"e31b3de2-2195-48c6-9a5e-ab0553461c93","url":"\/user\/0"}],"created":[{"value":1500650071}],"changed":[{"value":1500650374}],"promote":[{"value":true}],"sticky":[{"value":false}],"revision_timestamp":[{"value":1500650374}],"revision_uid":[{"target_id":1,"target_type":"user","target_uuid":"2d7ee3ef-6f8a-4feb-a99a-4af8cfd24402","url":"\/user\/1"}],"revision_log":[],"revision_translation_affected":[{"value":true}],"default_langcode":[{"value":true}],"path":[],"body":[{"value":"Defui dolor elit jus luptatum. Ad augue causa hos loquor luctus minim singularis sino utinam. ","format":"plain_text","summary":""}]}
The RESTful Web Services module works by implementing an event subscriber service, rest.resource_routes, that adds routes to Drupal based on implementations of its RestResource plugin. Each plugin returns the available routes based on HTTP methods that are enabled for the resource.
When routes are built, the \Drupal\rest\Routing\ResourceRoutes class uses the RestResource plugin manager to retrieve all the available definitions. The endpoint configuration objects are loaded and inspected. If the resource plugin provides an HTTP method that is enabled in the configuration definitions, it begins to build a new route. Verification is done against the defined supported formats and supported auth definitions. If the basic validation passes, the new route is added to the RouteCollection and returned.
If you provide a supported_formats or supported_auth value that is not available, the endpoint will still be created. There will be an error, however, if you attempt to use the route with the invalid plugin. This cannot occur when using the REST UI module, but manually providing and managing the configuration.
The default routes provided by the base class for resource plugins, \Drupal\rest\Plugin\ResourceBase class, set \Drupal\rest\RequestHandler::handle as the controller and method for the route. This method checks the passed _format parameter against the configured plugin. If the format is valid, the data is passed to the appropriate serializer. The serialized data is then returned in the request with appropriate content headers.
The RESTful Web Services module provides a robust API that has some additional items to make a note of. We will explore these in the next recipe.
Earlier in the Drupal 8 life cycle, up until 8.0.0-beta12, Drupal supported the use of the Accept header instead of the _format parameter. Unfortunately, there were issues with external caches. Drupal was serving HTML and other formats on the same path, only using different Accept headers. CDNs and reverse proxies do not invalidate cache based on this header alone. The only solution to prevent cache poisoning on these external caches, such as Varnish, was to ensure the implementation of the Vary: Accept header. There were, however, too many issues regarding CDNs and variance of implementation, so the _format parameter was introduced instead of appending extensions (.json and .xml) to paths.
A detail of the problem can be found on the following core issues:
The RESTful Web Services module defines a RestResource plugin. This plugin is used to define resource endpoints. They are discovered in a module's Plugin/rest/resource namespace and need to implement the \Drupal\rest\Plugin\ResourceInterface interface. Drupal 8 provides two implementations of the RestResource plugin. The first is the EntityResource class that is provided by the RESTful Web Services module. It implements a driver class that allows it to represent each entity type. The second is the Database Logging module that provides its own RestResource plugin, as well. It allows you to retrieve logged messages by IDs. The \Drupal\rest\Plugin\ResourceBase class provides an abstract base class that can be extended for the RestResource plugin implementations. If the child class provides a method that matches the available HTTP methods, it will support them. For example, if a class has only a GET method, you can only interact with that endpoint through HTTP GET requests. On the other hand, you can provide a trace method that allows an endpoint to support HTTP TRACE requests.
Drupal 8 provides two implementations of the RestResource plugin. The first is the EntityResource class that is provided by the RESTful Web Services module. It implements a deriver class that allows it to represent each entity type. The second is the Database Logging module that provides its own RestResource plugin. It allows you to retrieve logged messages by IDs.
Many APIs implement a rate limit to prevent abuse of public APIs. When you have publicly exposed APIs, you will need to control the amount of traffic hitting the service and prevent abusers from slowing down or stopping your service.
The Rate Limiter module implements multiple ways to control access to your public APIs. There is an option to control the rate limit on specific requests, IP address-based limiting, and IP whitelisting.
You can find the Rate Limiter module at https://www.drupal.org/project/rate_limiter.
When installed, the HAL module can format the entity returned to provide links to related entities, such as the user or revision or any other entity reference field. When the HAL module is installed, you can add it as a supported format, then do a request with _format=hal_json. The response from the recipe would come back with a _links parameter:
"_links" : {
"http://127.0.0.1:8888/rest/relation/node/page/revision_uid" : [
{
"href" : "http://127.0.0.1:8888/user/1?_format=hal_json"
}
],
"self" : {
"href" : "http://127.0.0.1:8888/node/1?_format=hal_json"
},
"http://127.0.0.1:8888/rest/relation/node/page/uid" : [
{
"lang" : "en",
"href" : "http://127.0.0.1:8888/user/0?_format=hal_json"
}
],
"type" : {
"href" : "http://127.0.0.1:8888/rest/type/node/page"
}
},
When working with RESTful Web Services, the HTTP POST method is used to create new entities. We will use the HTTP Basic Authentication to authenticate a user and create a new node.
In this recipe, we will use the exposed node endpoint to create a new piece of article content through the RESTful Web Services module. We will use the json format. In the There's more... section, we will discuss how to use the HAL module for the hal_json format.
You will use the Article content type provided by the standard installation. Following the preceding recipe, Enabling RESTful interfaces, you should have the REST UI module added to your Drupal installation using Composer. This can be done with the following command:
cd /path/to/drupal8
composer require drupal/restui
In this recipe, the Drupal 8 installation is accessible through http://127.0.0.1:8888. Use the appropriate URL for your Drupal 8 site.
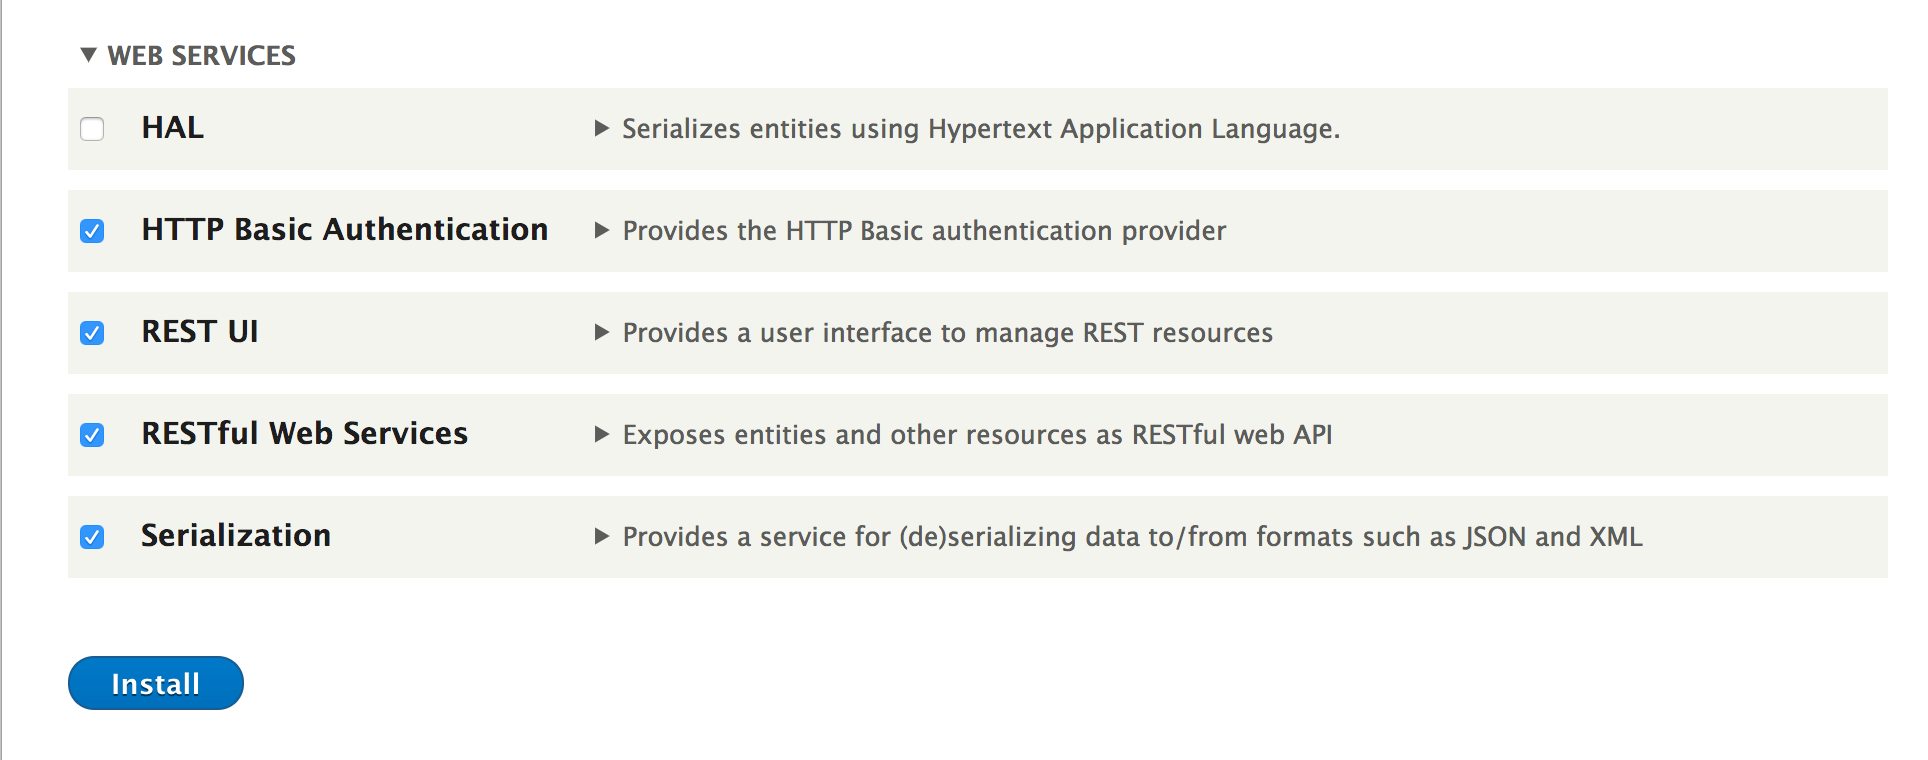

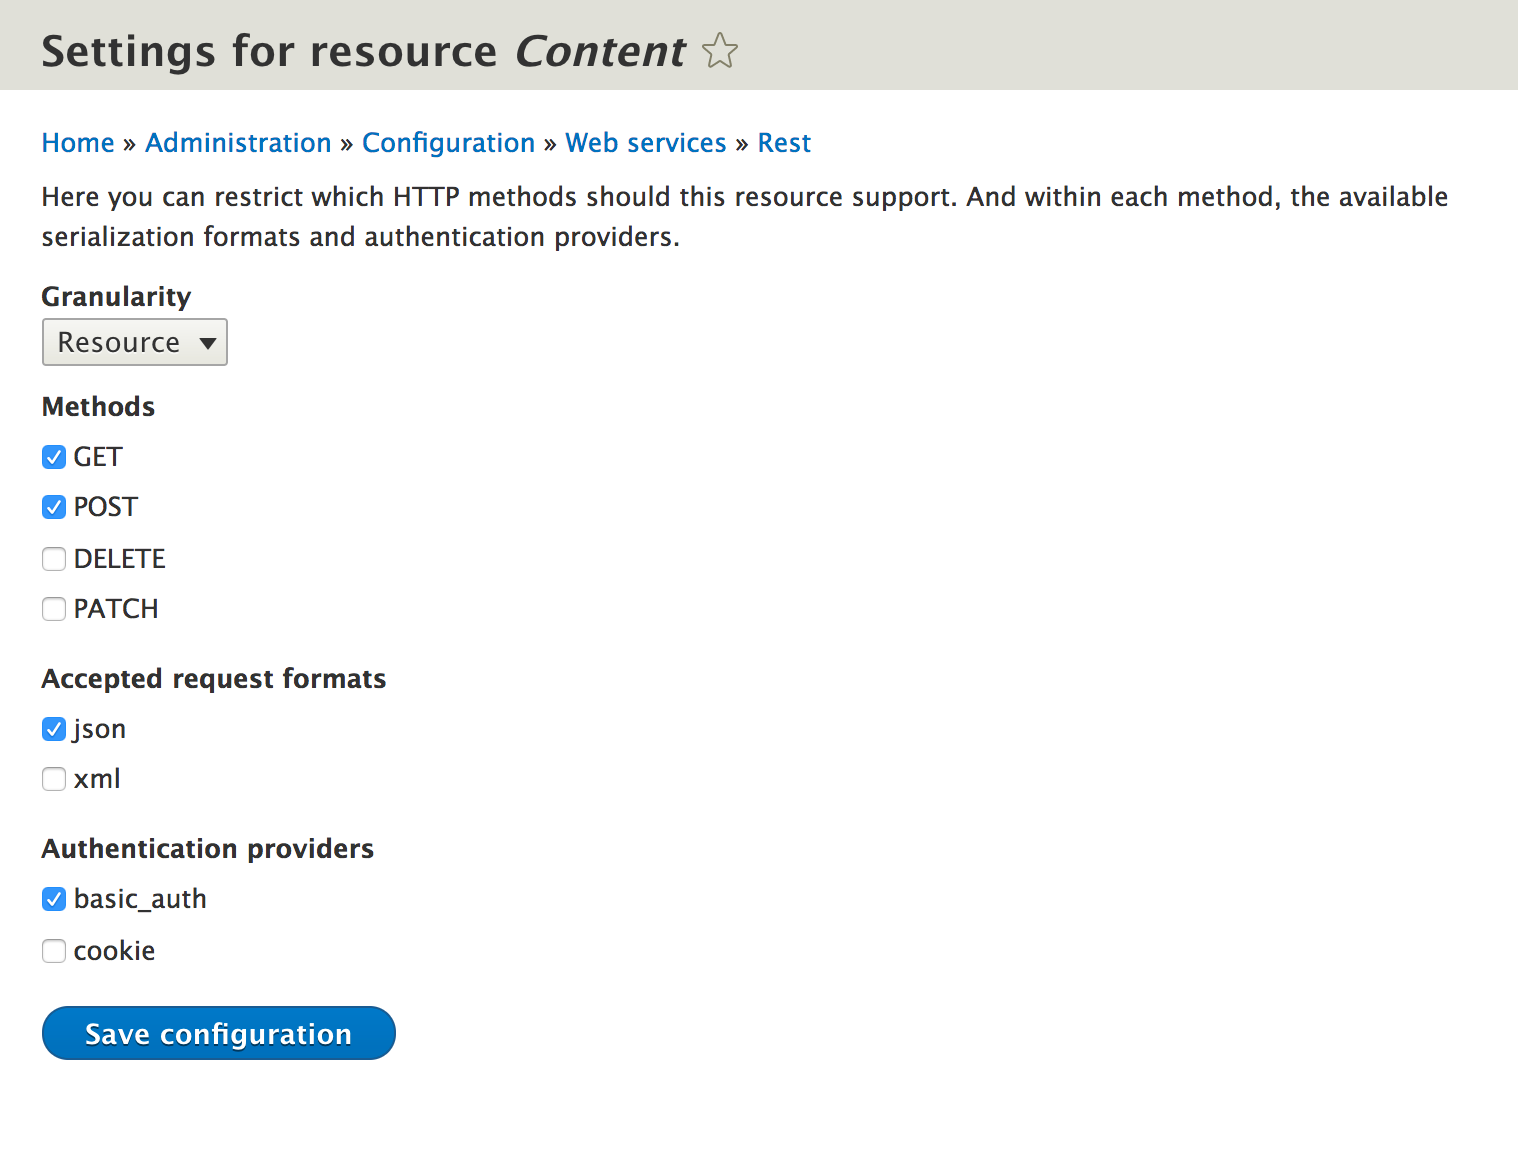
{
"type": "article",
"status": {"value": true},
"title": {"value": "Testing via REST!"},
"body": {"value": "This article was created using a RESTful endpoint"}
}
curl -X GET http://127.0.0.1:8888/session/token
curl -X POST \
'http://127.0.0.1:8888/entity/node?_format=json' \
-u admin:admin \
-H 'content-type: application/json' \
-H 'x-csrf-token: K5UW756_nWJxjX8Lt5NXXrE0xYSAqCn8MPKLbgE6Gps' \
-d '{
"type": "article",
"status": {"value": true},
"title": {"value": "Testing via REST!"},
"body": {"value": "This article was created using a RESTful endpoint"}
}
'
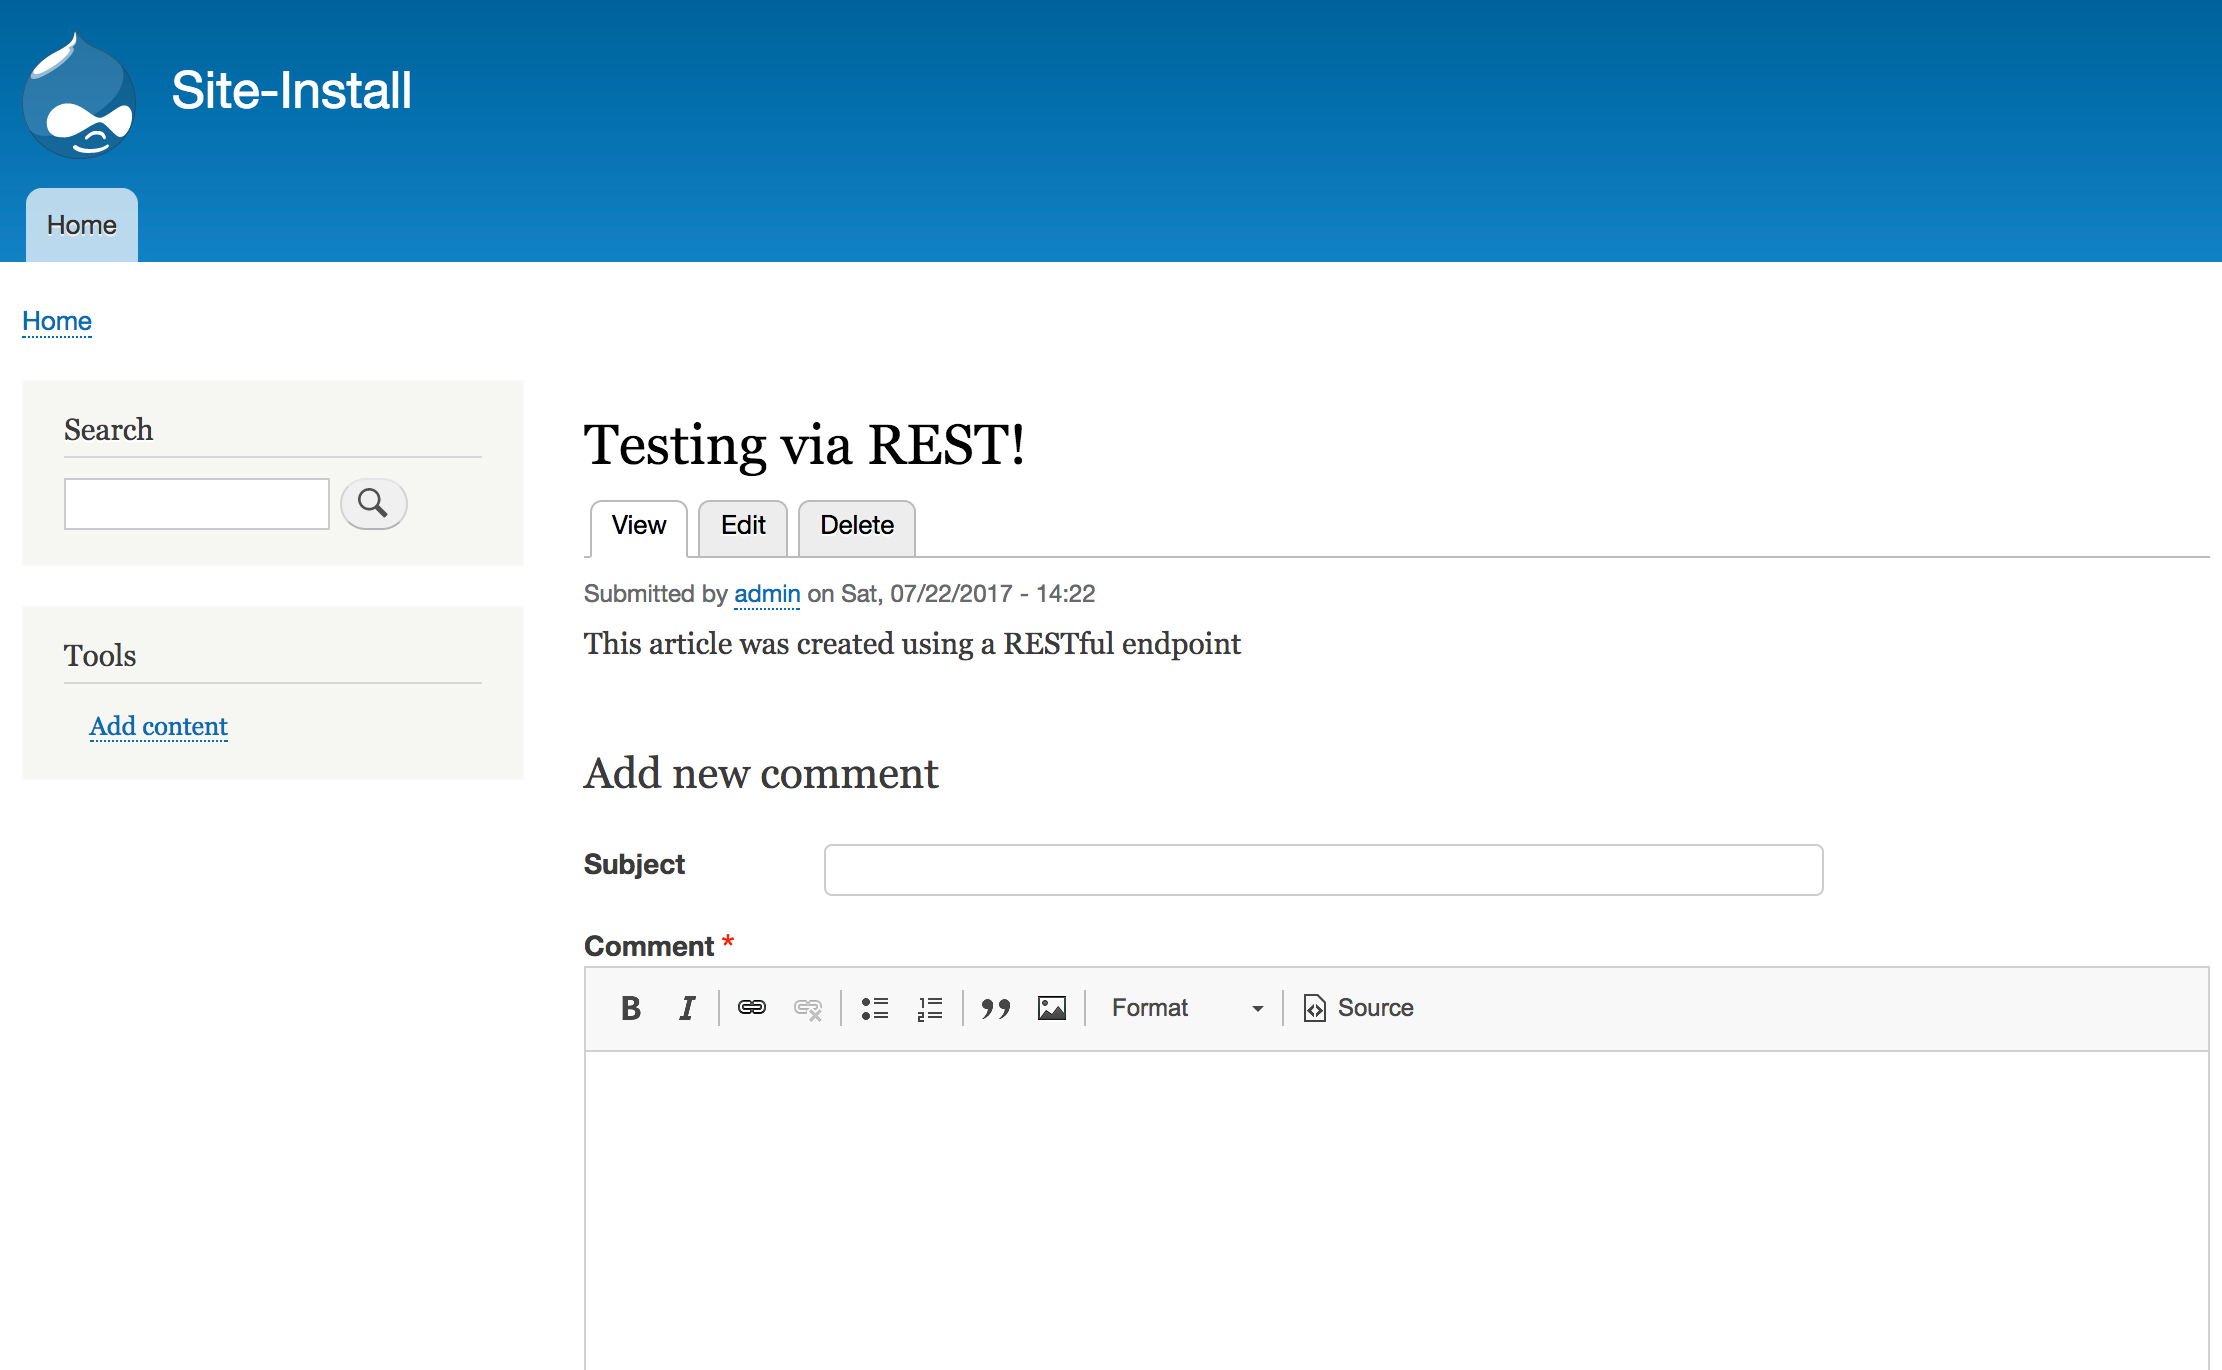
When working with content entities and the POST method, the endpoint is different to the one used for GET requests. The \Drupal\rest\Plugin\rest\resource\EntityResource class extends the \Drupal\rest\Plugin\ResourceBase base class, which provides a route method. If a resource plugin provides an https://www.drupal.org/link-relations/create link template, then that path will be used for the POST path.
The EntityResource class defines /entity/{entity_type} as the create link template. It then overrides the getBaseRoute method to ensure that the entity_type parameter is properly populated from the definition.
The EntityResource class will run a set of conditions for the request. First, it will validate the POST request by checking whether the entity is null. Then, the current user is authorized to create the entity type if the current user also has access to edit all fields provided, and finally, it checks whether an identifier was passed or not. The last condition is important, as updates are only to be made through a PATCH request.
If the entity is validated, it will be saved. On a successful save, an empty HTTP 201 response will be returned.
Working with POST requests requires some specific formatting that will be explained in the next recipe.
When using the HAL module and the hal_json format, you must provide relationships for the entity. This is done through the _links parameter in the request. This is done to ensure that the entity is properly created with any relationships it requires, such as the entity type for a content entities bundle. Another example will be to create a comment over a RESTful interface. You will need to provide a _links entry for the user owning the comment.
The rest.link_manager service uses the rest.link_manager.type and rest.link_manager.relation and is responsible for returning the URIs for types and relations. By default, a bundle will have a path that resembles /rest/type/{entity_type}/{bundle} and its relations will resemble /rest/relation/{entity_type}/{bundle}/{field_name}.
Taking a user reference as an example, we will have to populate a uid field, as follows:
{
"_links": {
"type": {
"href": "http://127.0.0.1:8888/rest/type/node/page"
},
"http://127.0.0.1:8888/rest/relation/node/article/uid": [
{
"href": "http://127.0.0.1:8888/user/1?_format=hal_json",
"lang": "en"
}
]
}
}
Unfortunately, the documentation is sparse, and the best way to learn what _links are required is to perform a GET request and study the returned _links from the HAL JSON.
Most RESTful APIs utilize base64 encoding of files to support POST operations to upload an image. Unfortunately, this is not supported in the Drupal core. Although there is a serializer.normalizer.file_entity.hal service that serializes file entities into HAL JSON, it does not currently work as of 8.3, but is hopefully slated for 8.4.
The \Drupal\hal\Normalizer\FileEntityNormalizer class supports denormalization; however, it does not handle base64 and expects binary data.
There is a Drupal core issue for this problem, which is available at https://www.drupal.org/node/1927648.
When working with a POST request, you will need to pass a Cross-Site Request Forgery (CSRF) token if you are authenticating with a session cookie. The X-CSRF-Token header is required when using a session cookie to prevent accidental API requests.
If you are using the cookie provider for authentication, you will need to request a CSRF token from the /session/token route:
curl -X GET http://127.0.0.1:8888/session/token
When working with RESTful Web Services, the HTTP PATCH method is used to update entities. We will use the HTTP Basic Authentication to authenticate our user and update a node.
In this recipe, we will use the exposed node endpoint to create a new piece of article content through the RESTful Web Services module.
We will use the Article content type provided by the standard installation. Following the Enabling RESTful interfaces recipe, you should have the REST UI module added to your Drupal installation using Composer. This can be done with the following command:
cd /path/to/drupal8
composer require drupal/restui


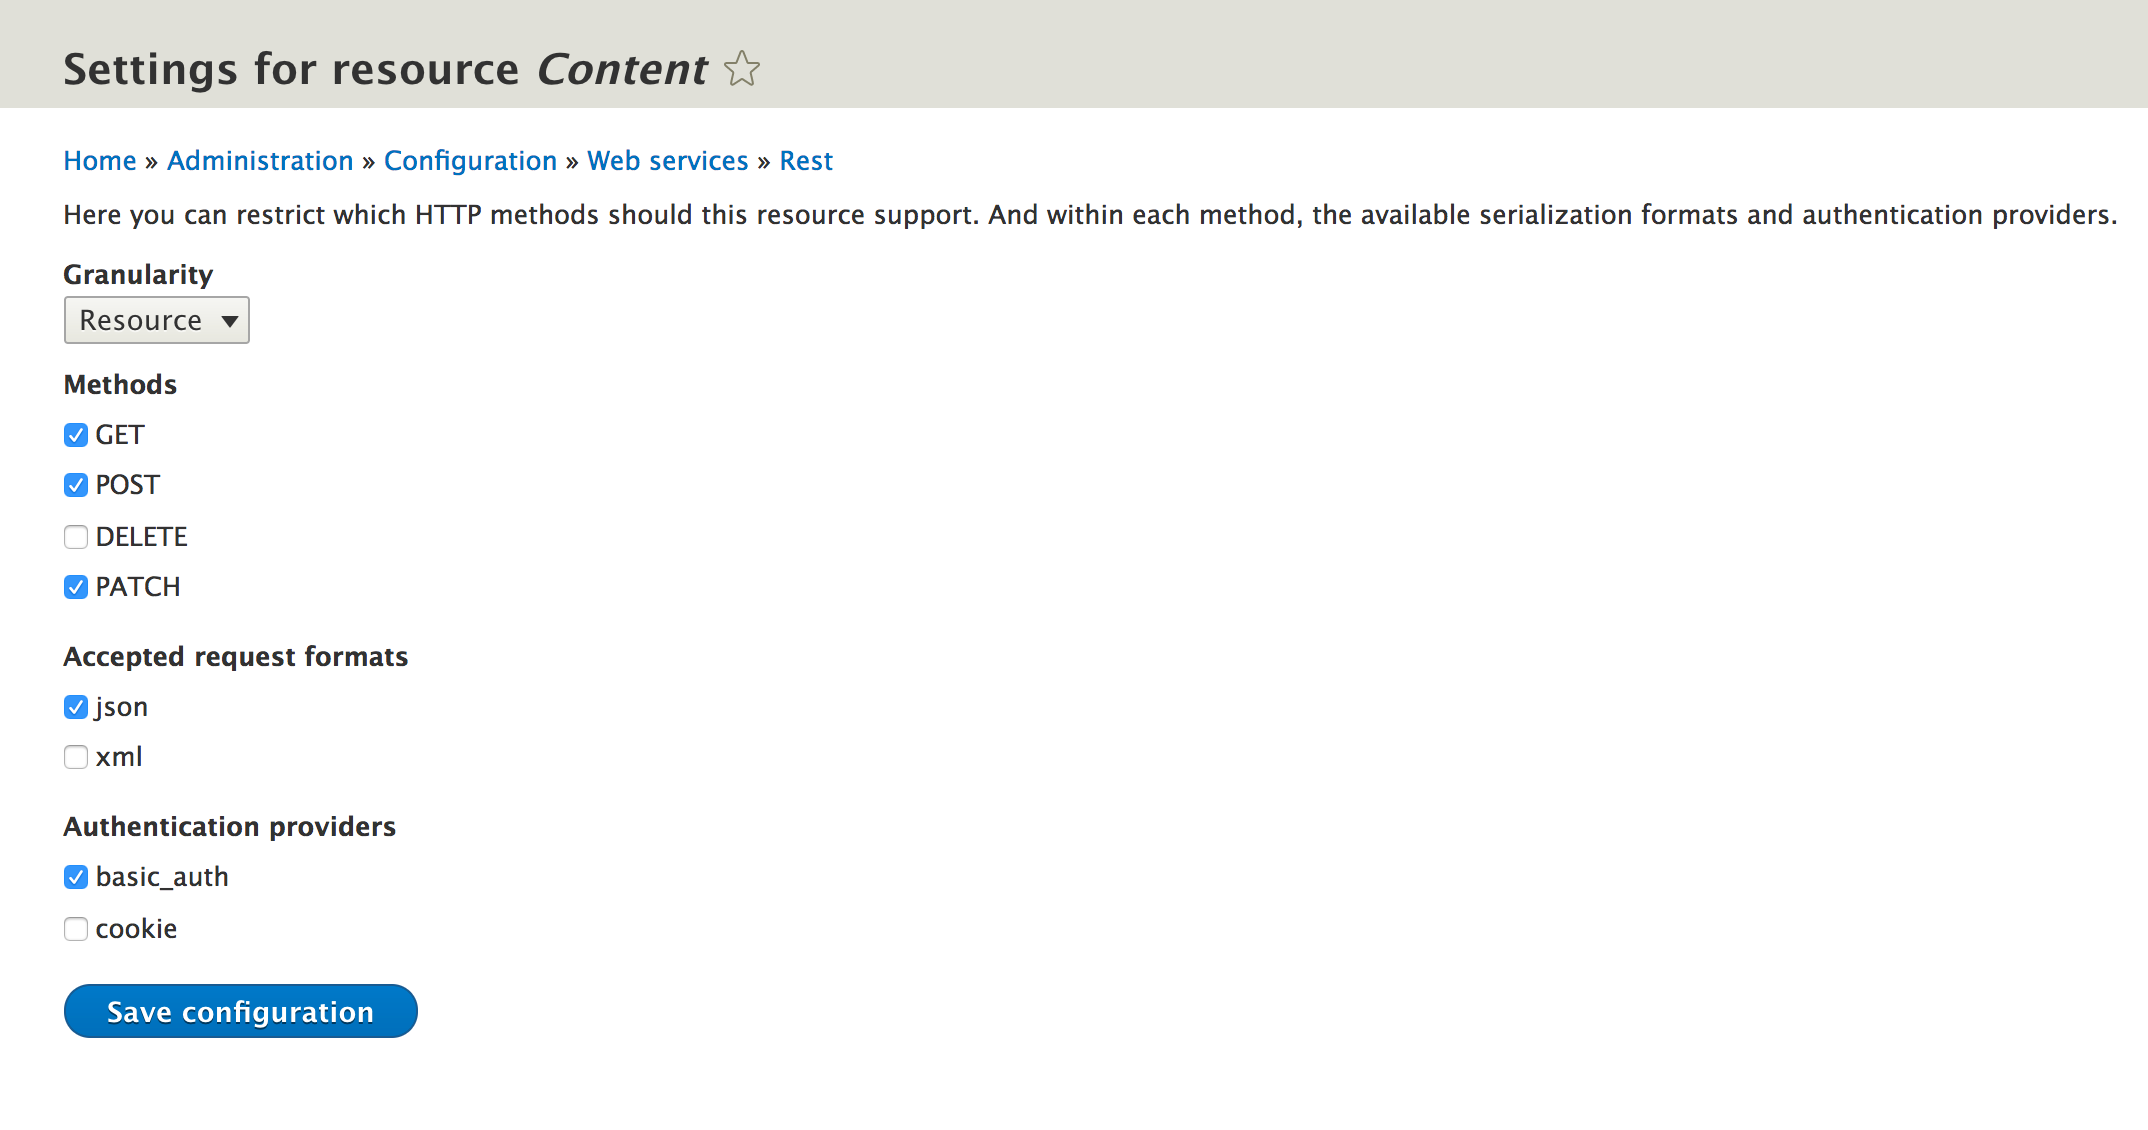
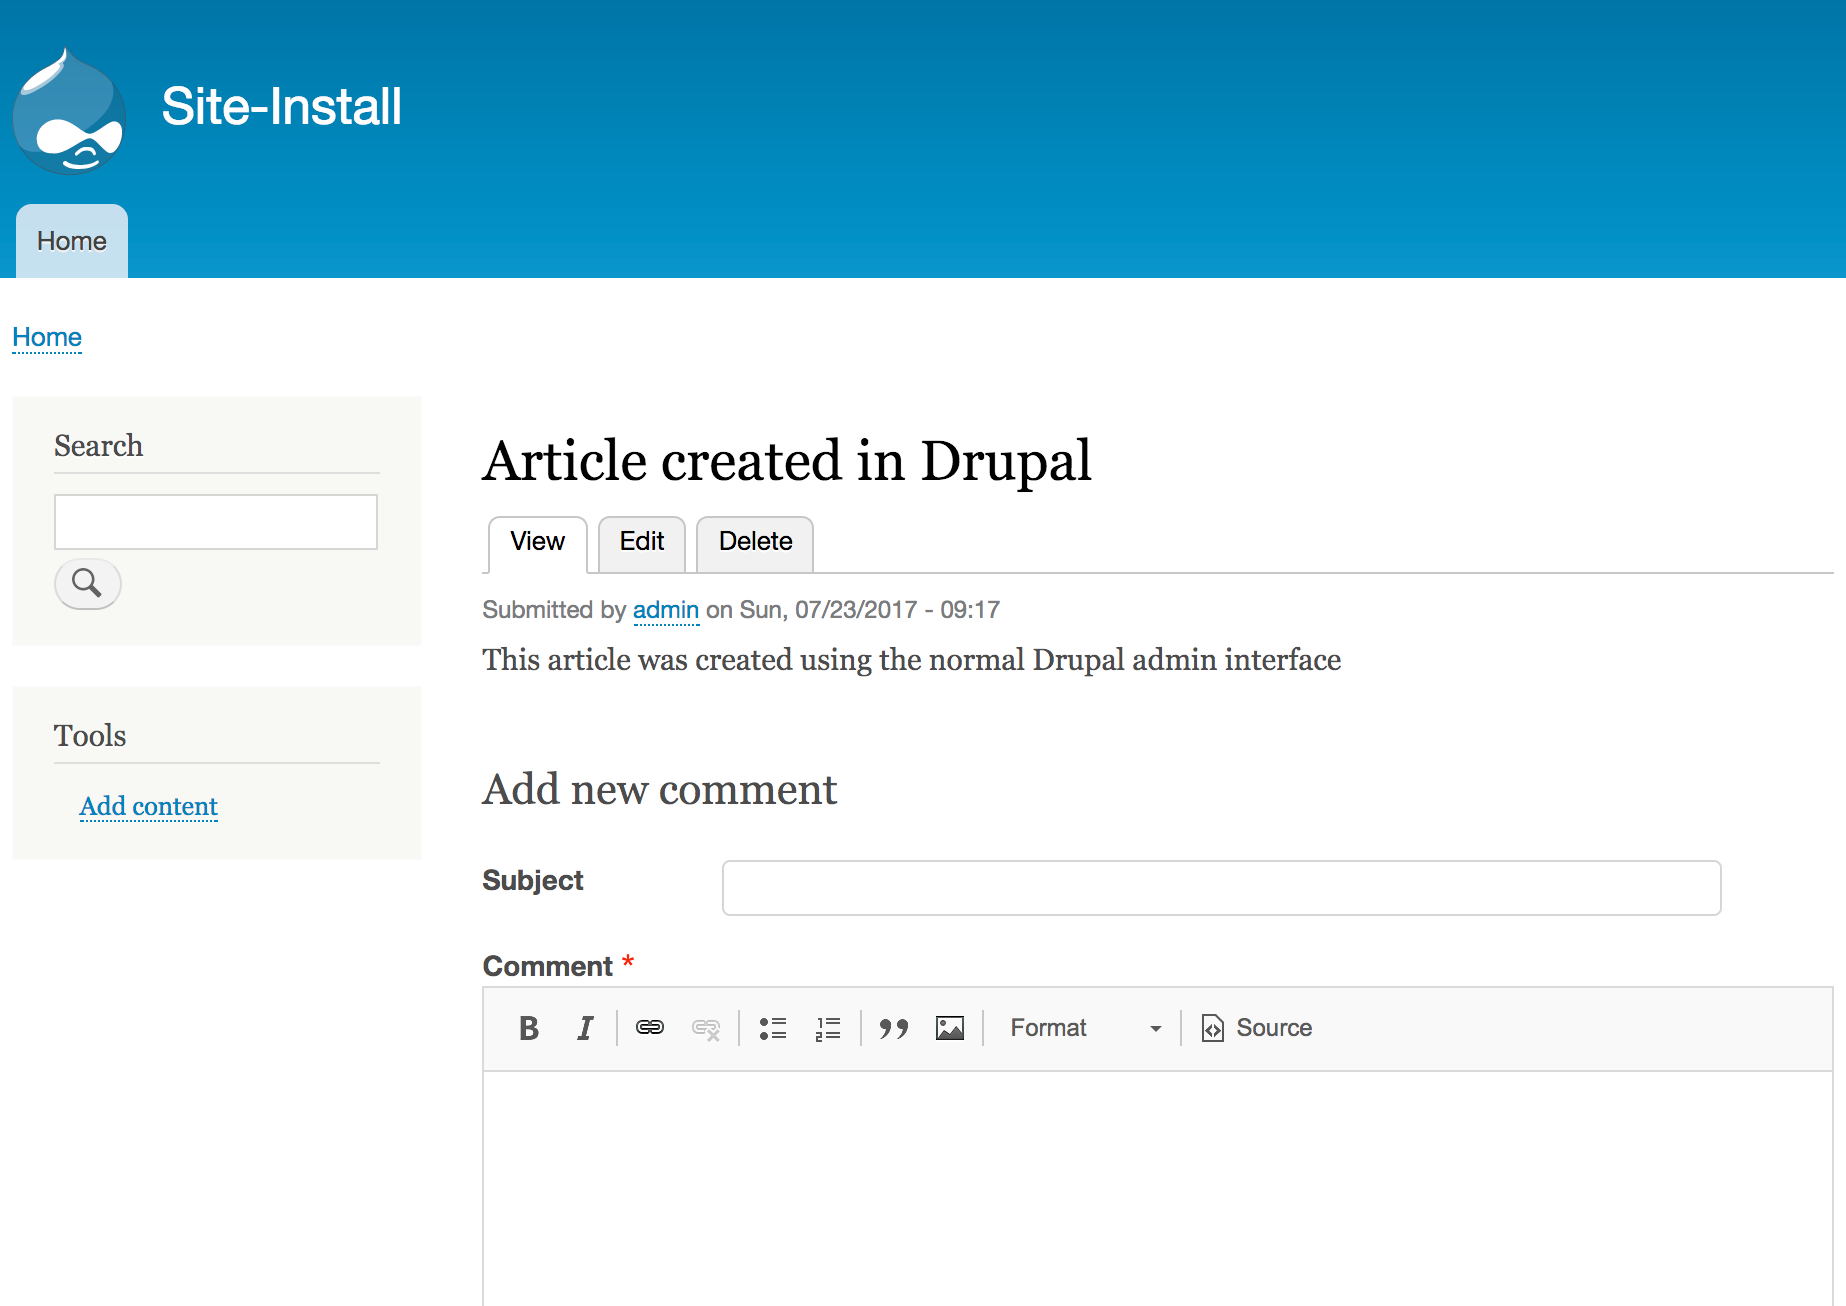
{
"nid" : {
"value" : 4
},
"body" : {
"value" : "This article was updated using the RESTful API endpoint!"
},
"type" : "article"
}
curl -X GET http://127.0.0.1:8888/session/token
curl -X PATCH \
'http://127.0.0.1:8888/node/4?_format=json' \
-u admin:admin \
-H 'x-csrf-token: MAjbBsIUmzrwHQGNlXxvGMZQJzQCDZbmtecstzbk5UQ' \
-d '{
"type": "article",
"nid": {"value": 4},
"body": {"value": "This article was updated using the RESTful API endpoint!!"}
}
'
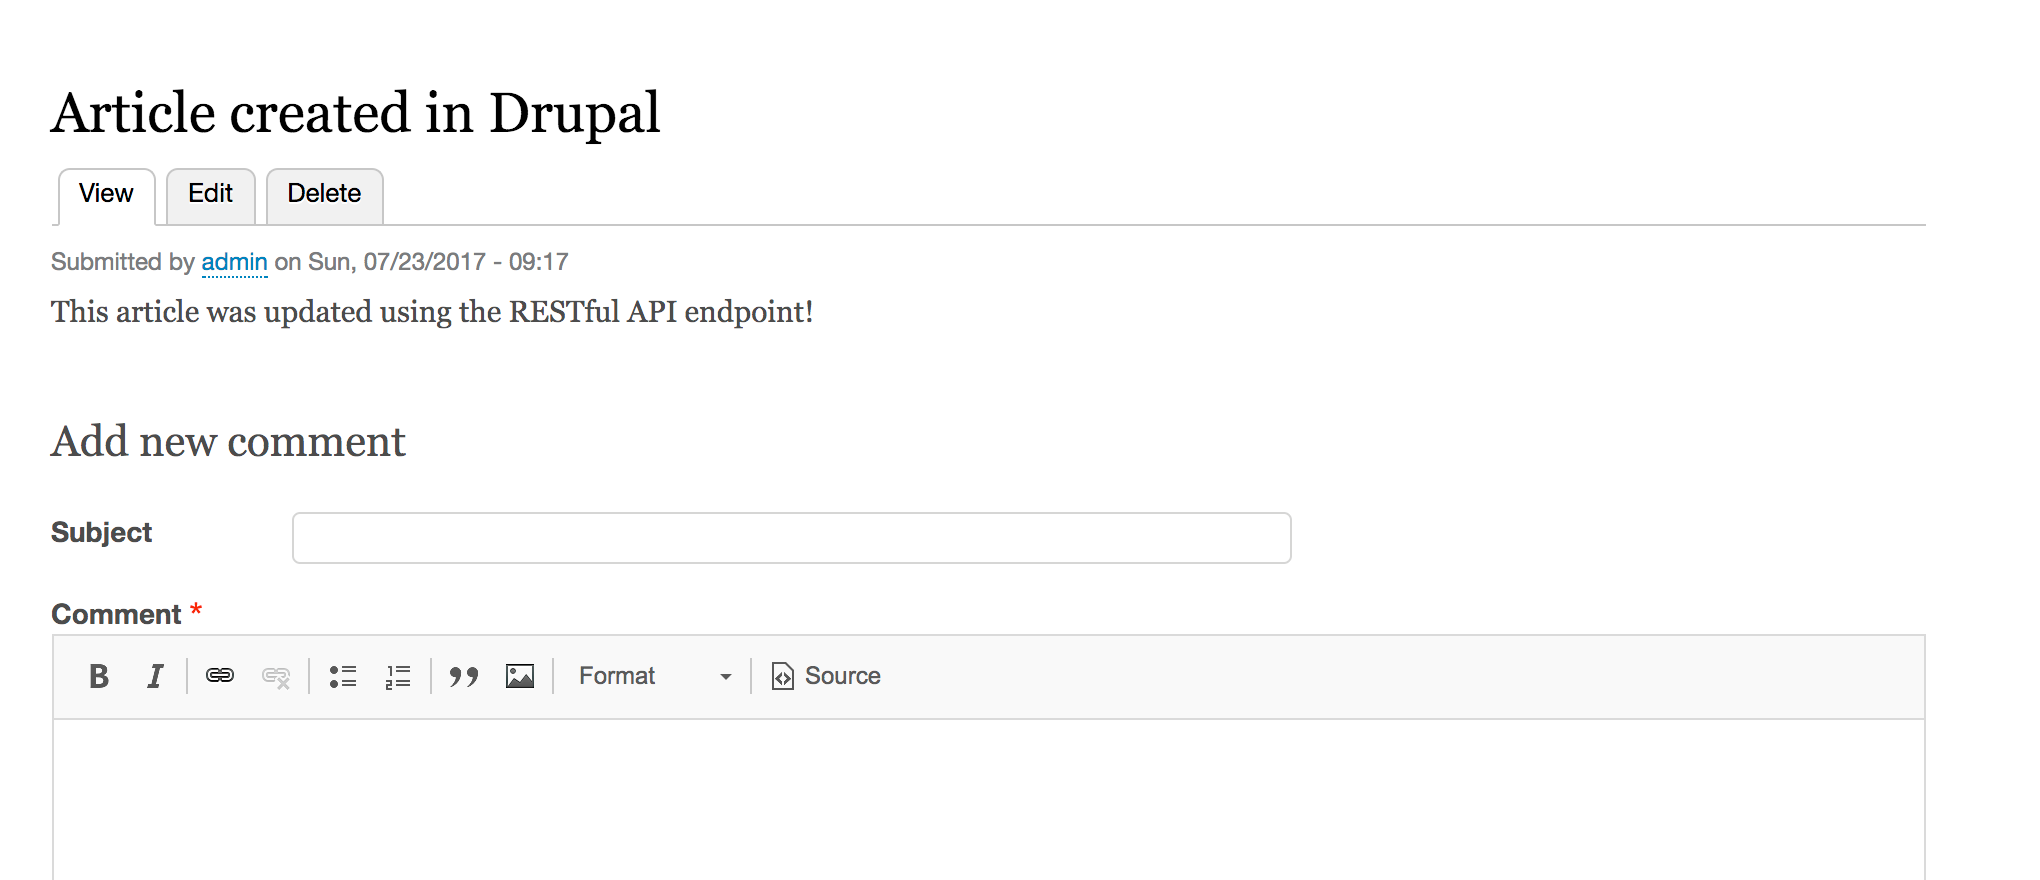
When working with content entities and the PATCH method, the endpoint is the same as the GET method path. The current user's access is checked to see whether they have the permission to update the entity type and each of the submitted fields provided in the request body.
Each field provided will be updated on the entity and then validated. If the entity is validated, it will be saved. On a successful save, an HTTP 200 response will be returned with the entire updated entity's content.
The RESTful Web Services module provides Views plugins that allow you to expose data over Views for your RESTful API. This allows you to create a view that has a path and outputs data using a serializer plugin. You can use this to output entities, such as JSON, HAL JSON, or XML, and it can be sent with appropriate headers.
In this recipe, we will create a view that outputs the users of the Drupal site, providing their username, email, and picture if provided.
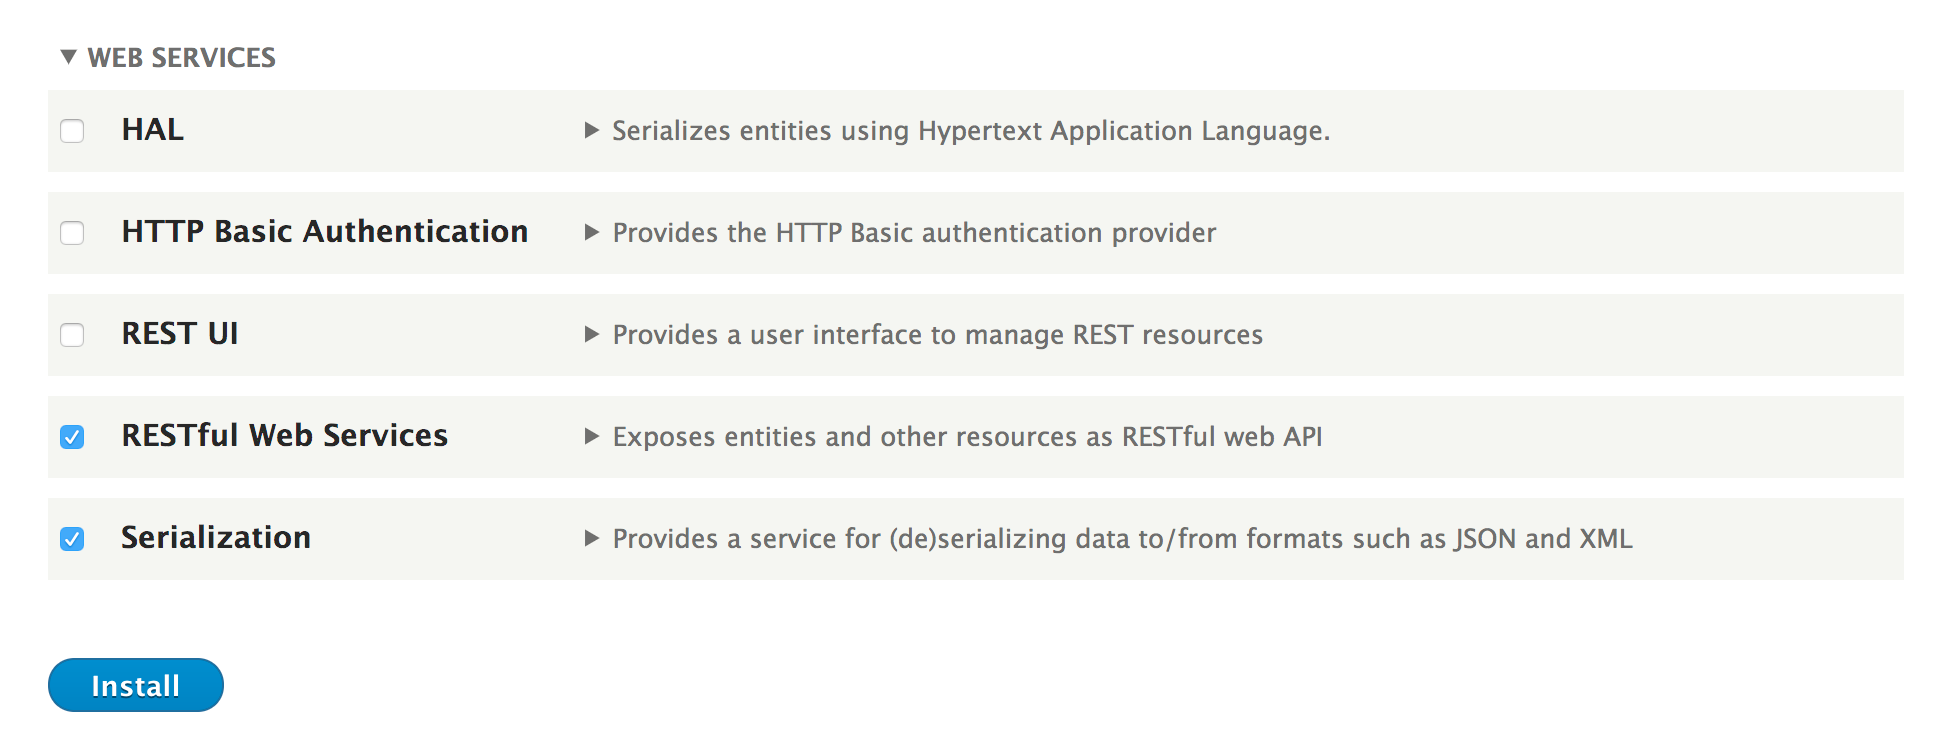
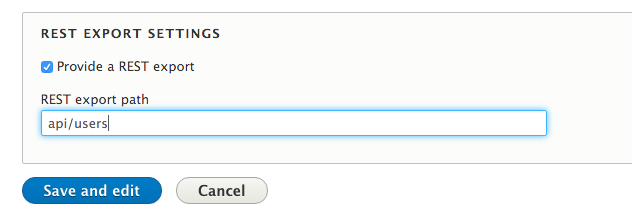
[
{
"name": "spuvest",
"mail": "spuvest@example.com",
"user_picture": "\/sites\/default\/files\/pictures\/2017-07\/generateImage_xIQkfx.jpg"
},
{
"name": "crepathuslus",
"mail": "crepathuslus@example.com",
"user_picture": "\/sites\/default\/files\/pictures\/2017-07\/generateImage_eauTko.gif"
},
{
"name": "veradabufrup",
"mail": "veradabufrup@example.com",
"user_picture": "\/sites\/default\/files\/pictures\/2017-07\/generateImage_HsEjKW.png"
}
]
The RESTful Web Services module provides display, row, and format plugins that allows you to export content entities to a serialized format. The REST Export display plugin allows you to specify a path to access the RESTful endpoint and properly assigns the Content-Type header for the requested format.
The Serializer style is provided as the only supported style plugin for the REST export display. This style plugin only supports row plugins that identify themselves as data display types. It expects data from the row plugin to be raw so that it can be passed to the appropriate serializer.
You then have the option of using the data entity or data field row plugins. Instead of returning a render array from their render method, they return raw data that will be serialized into the proper format.
With the row plugins returning raw format data and the data serialized by the style plugin, the display plugin will then return the response that is converted into the proper format via the Serialization module.
Views provide a way to deliver specific RESTful endpoints. We will explore some additional features in the next recipe.
The Data fields row plugin allows you to configure field aliases. When the data is returned to the view, it will have Drupal's machine names. This means that custom fields will look something like field_my_field, which may not make sense to the consumer.
By clicking on Settings next to Fields, you can set aliases in the modal form:

When you provide an alias, the fields will match. For example, user_picture can be changed to avatar and the mail key can be changed to email:
[{
"name": "veradabufrup",
"email": "veradabufrup@example.com",
"avatar": "\/sites\/default\/files\/pictures\/2017-07\/generateImage_HsEjKW.png"
}]
When you create a RESTful endpoint with Views, you are not using the same permissions created by the RESTful Web Services module. You will need to define the route permissions within the view, allowing you to specify specific roles or permissions for the request.
The default GET method provided by the EntityResource plugin does not provide a way to list entities and allows any entity to be retrieved by an ID. Using Views, you can provide a list of entities, limiting them to specific bundles.
Using Views, you can even provide a new endpoint to retrieve a specific entity. Using Contextual filters, you can add route parameters and filters to limit and validate entity IDs. For example, you may want to expose the article content over the API, but not pages.
Using the RESTful Web Services module, we define specific supported authentication providers for an endpoint. The Drupal core provides a cookie provider, which authenticates through a valid cookie, such as your regular login experience. Then, there is the HTTP Basic Authentication module to support HTTP authentication headers.
There are alternatives that provide more robust authentication methods. With cookie-based authentication, you will need to use CSRF tokens to prevent unrequested page loads by an unauthorized party. When you use the HTTP authentication, you are sending a password for each request in the request header.
OAuth is a popular and open authorization framework. It is a proper authentication method that uses tokens and not passwords. In this recipe, we will implement the Simple OAuth module to provide OAuth 2.0 authentication for GET and POST requests.
If you are not familiar with OAuth or OAuth 2.0, it is a standard for authorization. The implementation of OAuth revolves around the usage of tokens sent in HTTP headers. Refer to the OAuth home page for more information at http://oauth.net/.
By following the Enabling RESTful interfaces recipe, you should have the REST UI module added to your Drupal installation using Composer. This can be done with the following command:
cd /path/to/drupal8
composer require drupal/restui
cd /path/to/drupal8
composer require drupal/simple_oauth
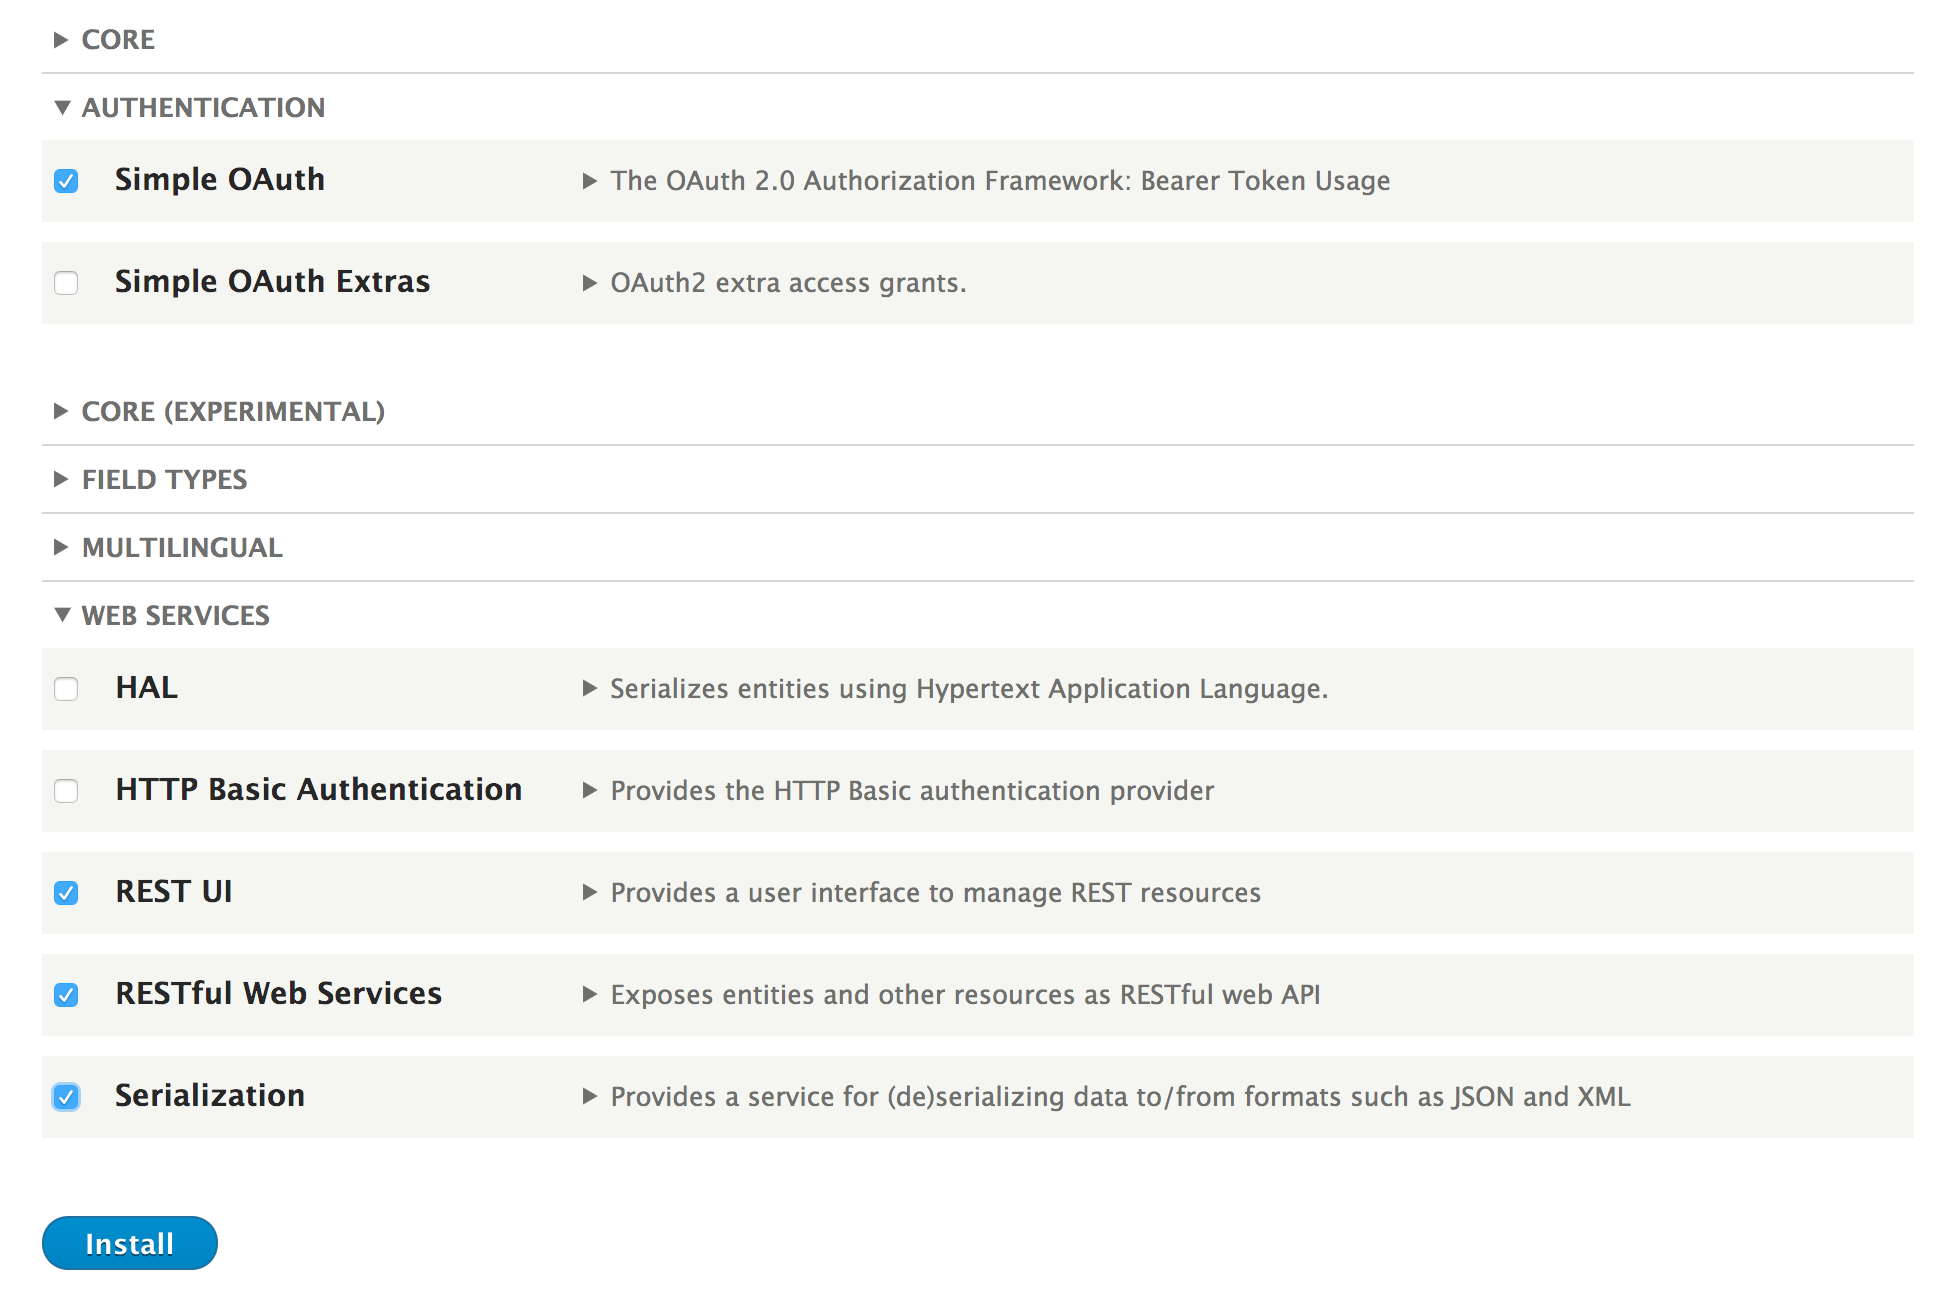
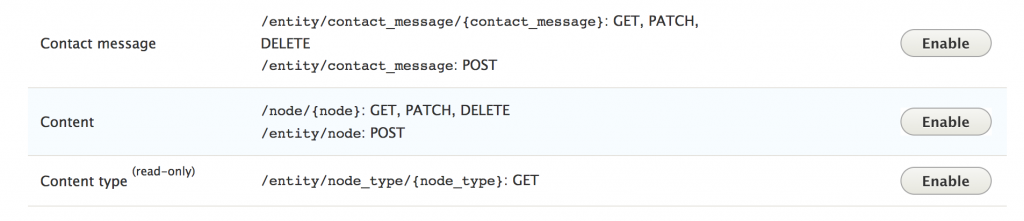
openssl genrsa -out private.key 2048
openssl rsa -in private.key -pubout > public.key
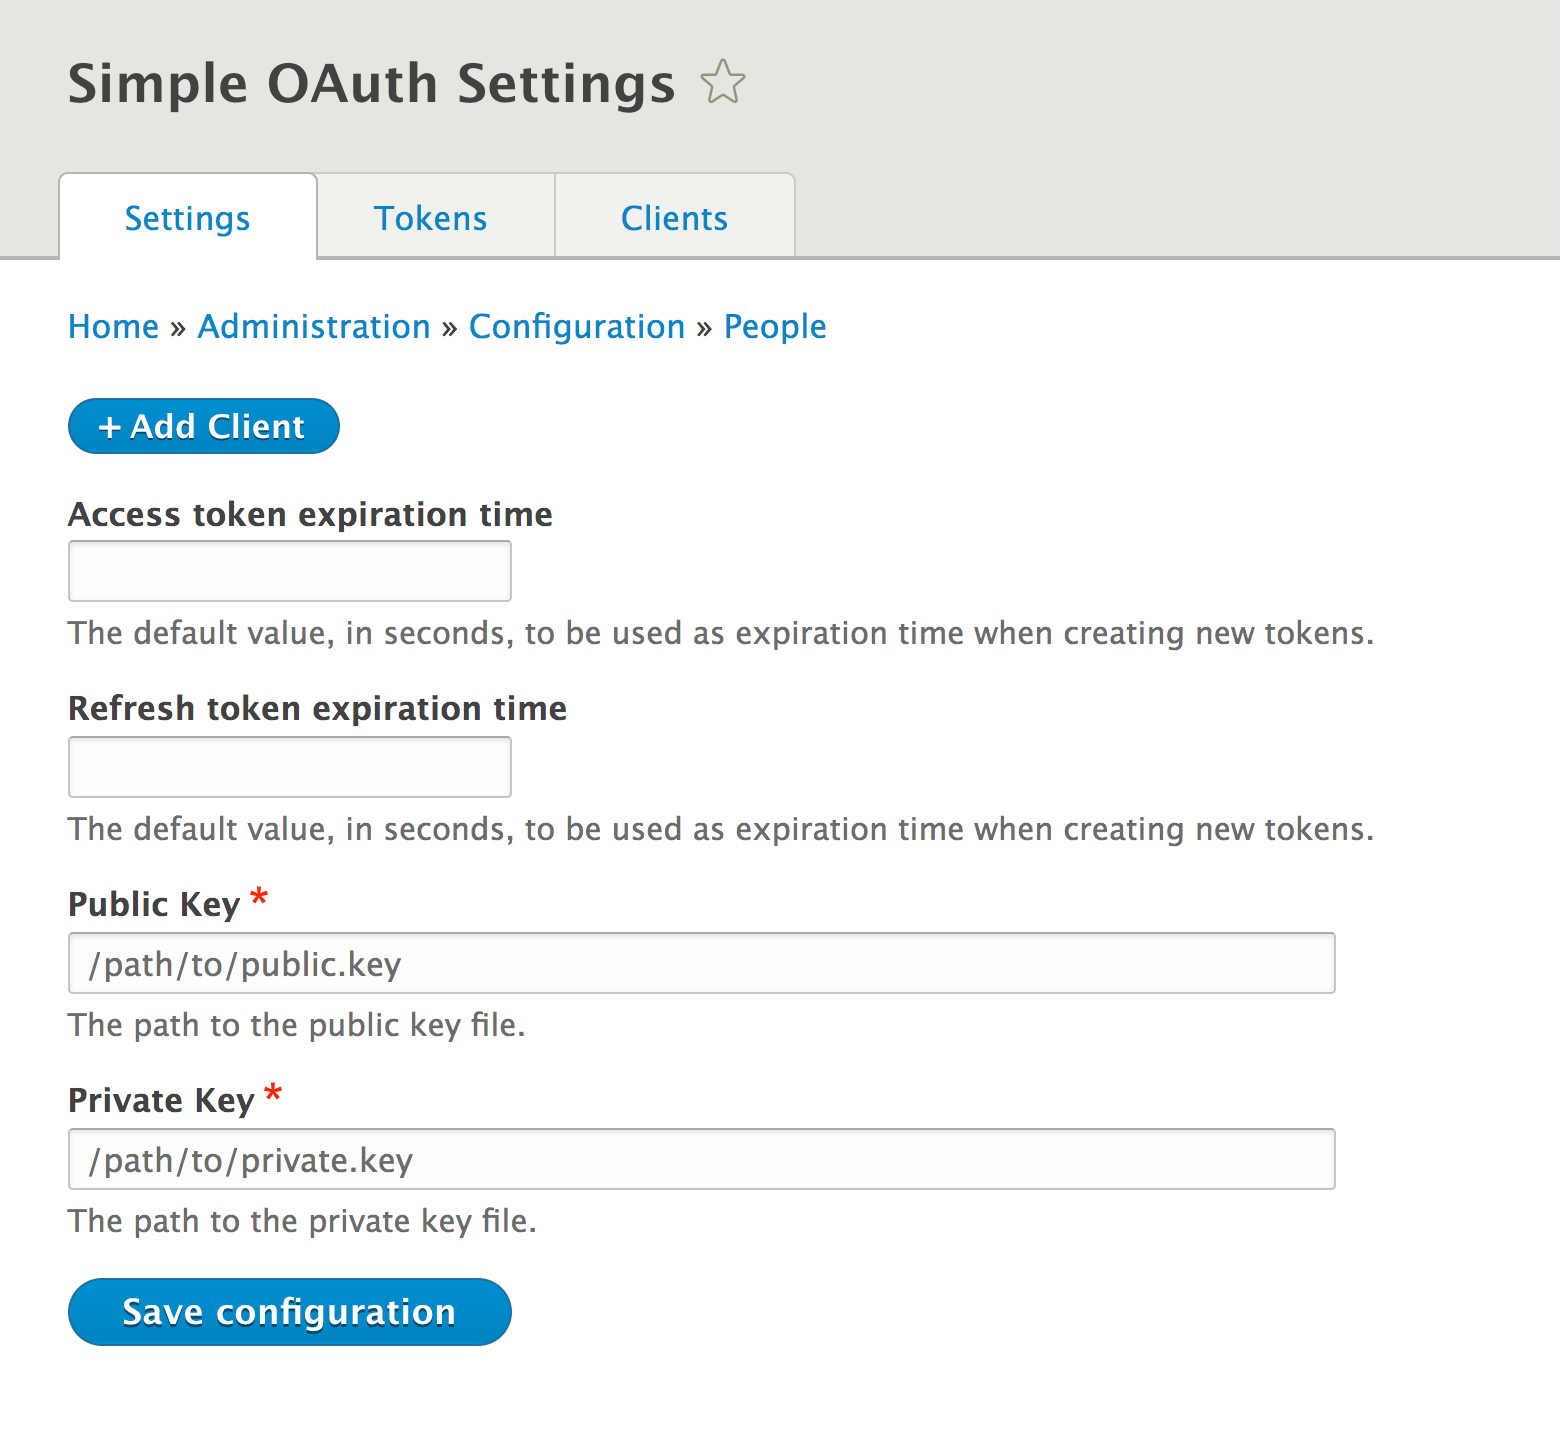
curl -X POST \
http://127.0.0.1:8888/oauth/token \
-H 'content-type: application/x-www-form-urlencoded' \
-d 'grant_type=password&client_id=3ec55f70-18cd-422f-9abd-2223f6ca3636&username=admin&password=admin'
curl -X GET \
'http://127.0.0.1:8888/node/1?_format=json' \
-H 'accept: application/json' \
-H 'authorization: Bearer JT9zgBgMEDlk2QIF0ecpZEOcsYC7-x649Bovo83HXQM'
The Simple OAuth module is built using the League\OAuth2 PHP library, a community de facto library for OAuth2 implementation.
In a typical authentication request, there is an authentication manager that uses the authentication_collector service to collect all the tagged authentication provider servers. Based on the provider's set priority, each service is invoked to check whether it applies to the current request. Each applied authentication provider then gets invoked to see whether the authentication is invalid.
For the RESTful Web Services module, the process is more explicit. The providers identified in the supported_auth definition for the endpoint are the only services that run through the applies and authenticates process.
We will explore more information on working with authentication providers and the RESTful Web Services module in the next section.
When working with the RESTful Web Services module endpoints, the supported_auth values reference services tagged with authentication_provider. Out of the box, Drupal supports cookie authentication. The following code is provided by the basic_auth module to support the HTTP header authentication:
services:
basic_auth.authentication.basic_auth:
class: Drupal\basic_auth\Authentication\Provider\BasicAuth
arguments: ['@config.factory', '@user.auth', '@flood', '@entity.manager']
tags:
- { name: authentication_provider, provider_id: 'basic_auth', priority: 100 }
An authentication provider can be created by creating a class in your module's Authentication\Provider namespace and implementing the \Drupal\Core\Authentication\AuthenticationProviderInterface interface. Then, register the class as a service in your module's services.yml.
When working with data that expects authenticated users, the authentication service provider should also provide a page cache service handler. Services that are tagged with page_cache_request_policy have the ability to check whether the content is cached or not. This prevents authorization requests from being cached.
The following code is taken from the basic_auth module:
basic_auth.page_cache_request_policy.disallow_basic_auth_requests:
class: Drupal\basic_auth\PageCache\DisallowBasicAuthRequests
public: false
tags:
- { name: page_cache_request_policy }
The \Drupal\basic_auth\PageCache\DisallowBasicAuthRequests class implements the \Drupal\Core\PageCache\RequestPolicyInterface interface. The check method allows the page cache policy to explicitly deny or remain neutral on a page's ability to be cached. The basic_auth module checks whether the default authentication headers are present. For the simple_oauth module, it checks whether a valid token is present.
This is an important security measure if you are implementing your own authentication services.
A page cache policy service can be implemented by creating a class in your module's PageCache namespace and implementing the \Drupal\Core\PageCache\ResponsePolicyInterface interface. Then, we need to register the class as a service in your module's services.yml.
Some APIs that implement server-to-server communication will authenticate using IP address whitelists. For this use case, we have the IP Consumer Auth module. Whitelisted IP addresses are controlled by a form that saves a configuration value.
If an IP address is whitelisted, the user is authenticated as an anonymous user. While this may not be recommended for POST, PATCH, and DELETE requests, it can provide a simple way to control specific GET endpoints in a private network.
You can download IP Consumer Auth from its project page at https://www.drupal.org/project/ip_consumer_auth.
When developing a backend API for frontend consumers, there is often much debate on naming conventions and returned value structures. In comes {json:api}, an open source specification set to standardize and simplify the building of APIs, which consume and return JSON payloads. The specification and documentation can be found at http://jsonapi.org/.
For Drupal, there is a community-lead effort to provide a robust JSON API specification implementation to turn Drupal into a streamlined API server. This recipe will install the JSON API module and show how to enable resources.
Just like the RESTful Web Services module provided by Drupal core, the JSON API module does not provide a user interface. It also enables all content to be available over the API automatically (given that users have permissions configured to access the endpoint.) The JSON API Extra module changes that, and this will be covered in the There's more... section of this recipe.
The JSON API module can be found at https://www.drupal.org/project/jsonapi
Create sample content using the Article content type provided by the standard Drupal installation. This will make testing the GET methods much easier.
When making requests, all endpoint paths are prefixed with jsonapi.
cd /path/to/drupal8
composer require drupal/jsonapi
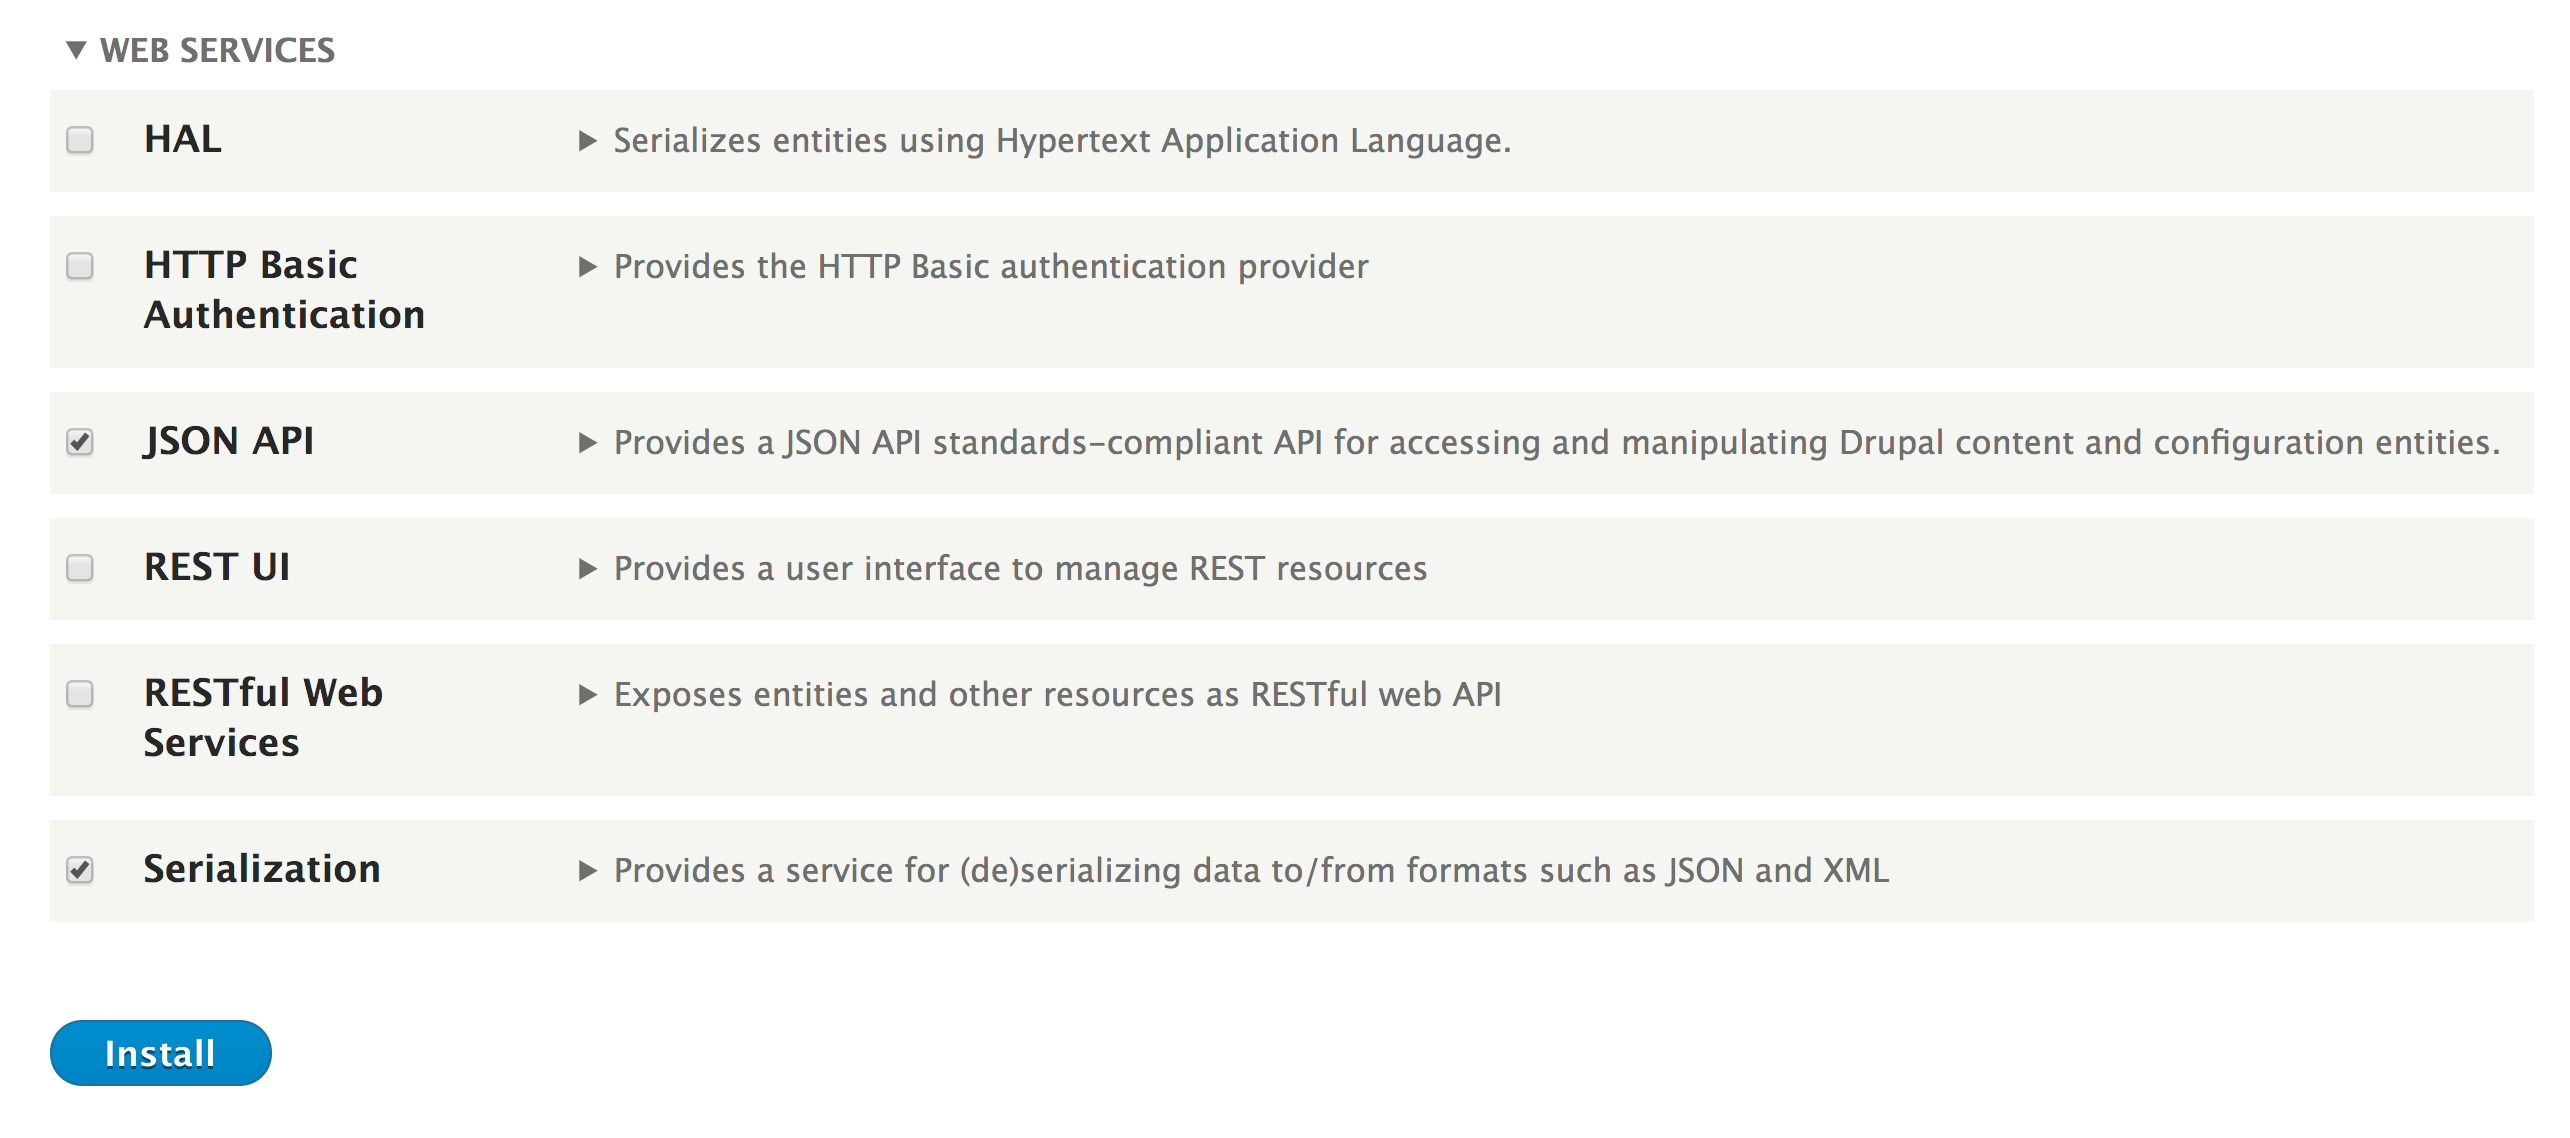
http://127.0.0.1:8888/jsonapi/node/article
curl -X GET \
http://127.0.0.1:8888/jsonapi/node/article \
-H 'accept: application/vnd.api+json'
{
"data": [
{
"type": "node--article",
"id": "c897acba-eb81-454a-94ed-13107fd205cf",
"attributes": {...},
"relationships": {...},
"links": {
"self": "http://127.0.0.1:8888/jsonapi/node/article/c897acba-eb81-454a-94ed-13107fd205cf"
}
}
],
"links": {
"self": "http://127.0.0.1:8888/jsonapi/node/article",
}
}
The JSON API module implements the {json:api} specification. Like the RESTful Web Services module provided by Drupal core, it exposes data over various endpoints. It builds on top of Drupal's existing routing system to work with non-HTML formats. The major difference is it follows a community-driven specification on how the data should be formatted, linked, filtered, sorted, and more.
Next, we'll cover filtering, paging, sorting, and the JSON API Extras module.
The request in the recipe will return all available Article nodes in the system. These can be paginated, filtered, and sorted. Each of these operations is done through query parameters, which contain an array of values.
Pagination is done by appending a page query parameter. To limit the request to 10 nodes, we would append ?page[limit]=10. To access the next set of results, we would also pass page[offset]=10.
The following is an example of returning the first and second pages of results:
http://127.0.0.1:8888/jsonapi/node/article?page[limit]=10
http://127.0.0.1:8888/jsonapi/node/article?page[offset]=10&page[limit]=10
Each request contains a links property; this will also contain the next and previous links when using a paginated result.
Filtering is done by appending a filter query parameter. The following is an example for requesting all nodes that have been promoted to the front page:
http://127.0.0.1:8888/jsonapi/node/article?filter[promoted][path]=promote&filter[promoted][value]=1&filter[promoted][operator]==
Each filter is defined by a name--in the preceding example, it is promoted. The filter then takes path, which is the field to filter on. The value and operator decide how to filter.
Sorting is the simplest operation. A sort query parameter is added. The field name value is the field to sort by, and to sort in descending order, you add a minute symbol in front of the field name. The following examples show how to sort by the nid in ascending and descending order, respectively:
http://127.0.0.1:8888/jsonapi/node/article?sort=nid
http://127.0.0.1:8888/jsonapi/node/article?sort=-nid
The JSON API Extras module provides a user interface for additional customization. The JSON API Extras module should be added to your Drupal installation like all other modules, using Composer:
cd /path/to/drupal8
composer require drupal/jsonapi_extras
Once the module is installed in Drupal, you will have the ability to enable or disable endpoints, change resource names, alter resource paths, disable fields, alias field names, and enhance field outputs.
The API path prefix can be changed from jsonapi to api or any other prefix using the extras module.
From the administrative toolbar, navigate to Configuration. Under the Web services section, click on JSON API Overwrites to customize the JSON API implementation. The Settings tab allows modification of the API path prefix:
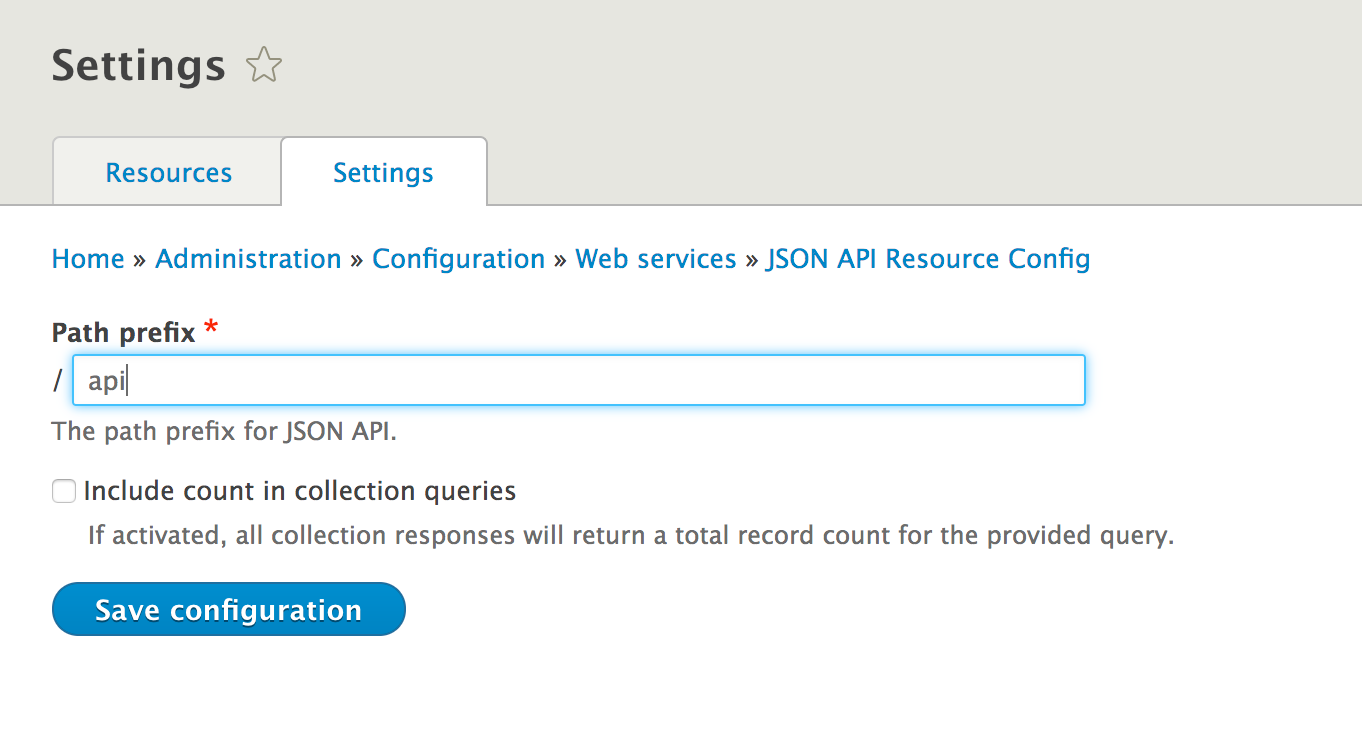
The JSON API Extras module allows overwriting endpoints automatically exposed by the JSON API module. This allows disabling fields from being returned. It also allows using enhancers to simplify the structure of a field property.
From the administrative toolbar, go to Configuration. Under the Web services section, click on JSON API Overwrites to customize the JSON API implementation.
To disable an endpoint, click on Overwrite on any endpoint. Check the Disabled checkbox to turn off that specific endpoint:
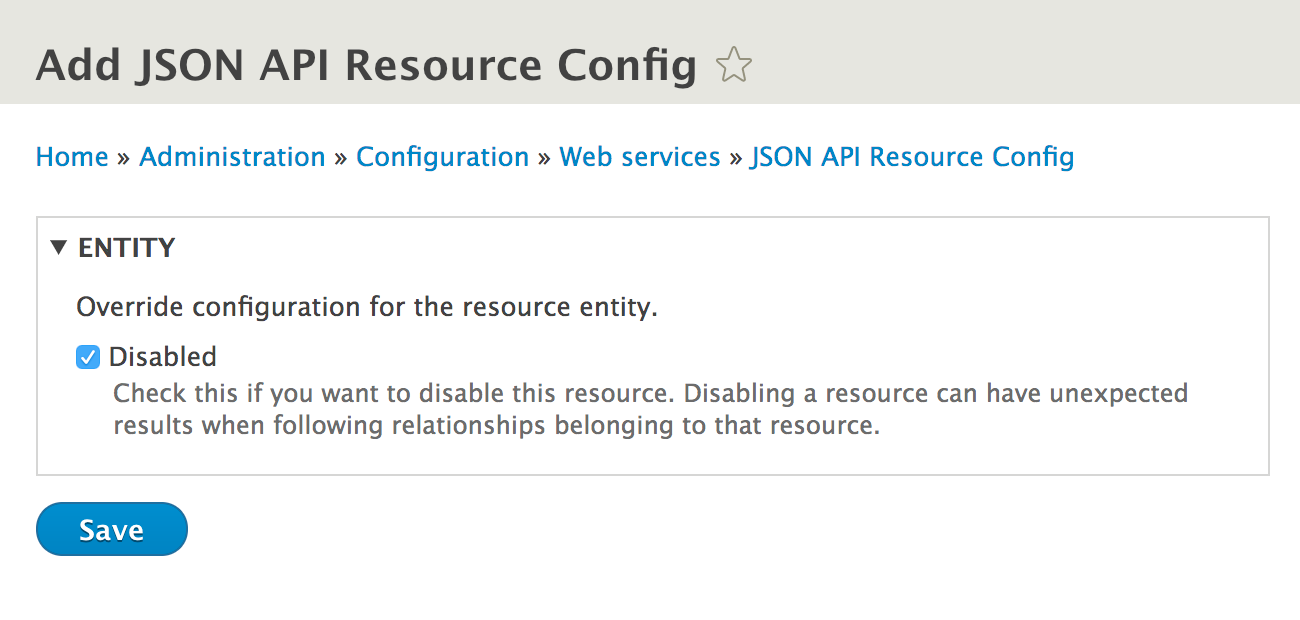
To disable, alias, or use an enhancer, click on Overwrite on any endpoint. The checkbox will allow you to prevent a field from being used in the API. The enhancers allow you to simplify fields when returned or used in POST/PATCH requests:
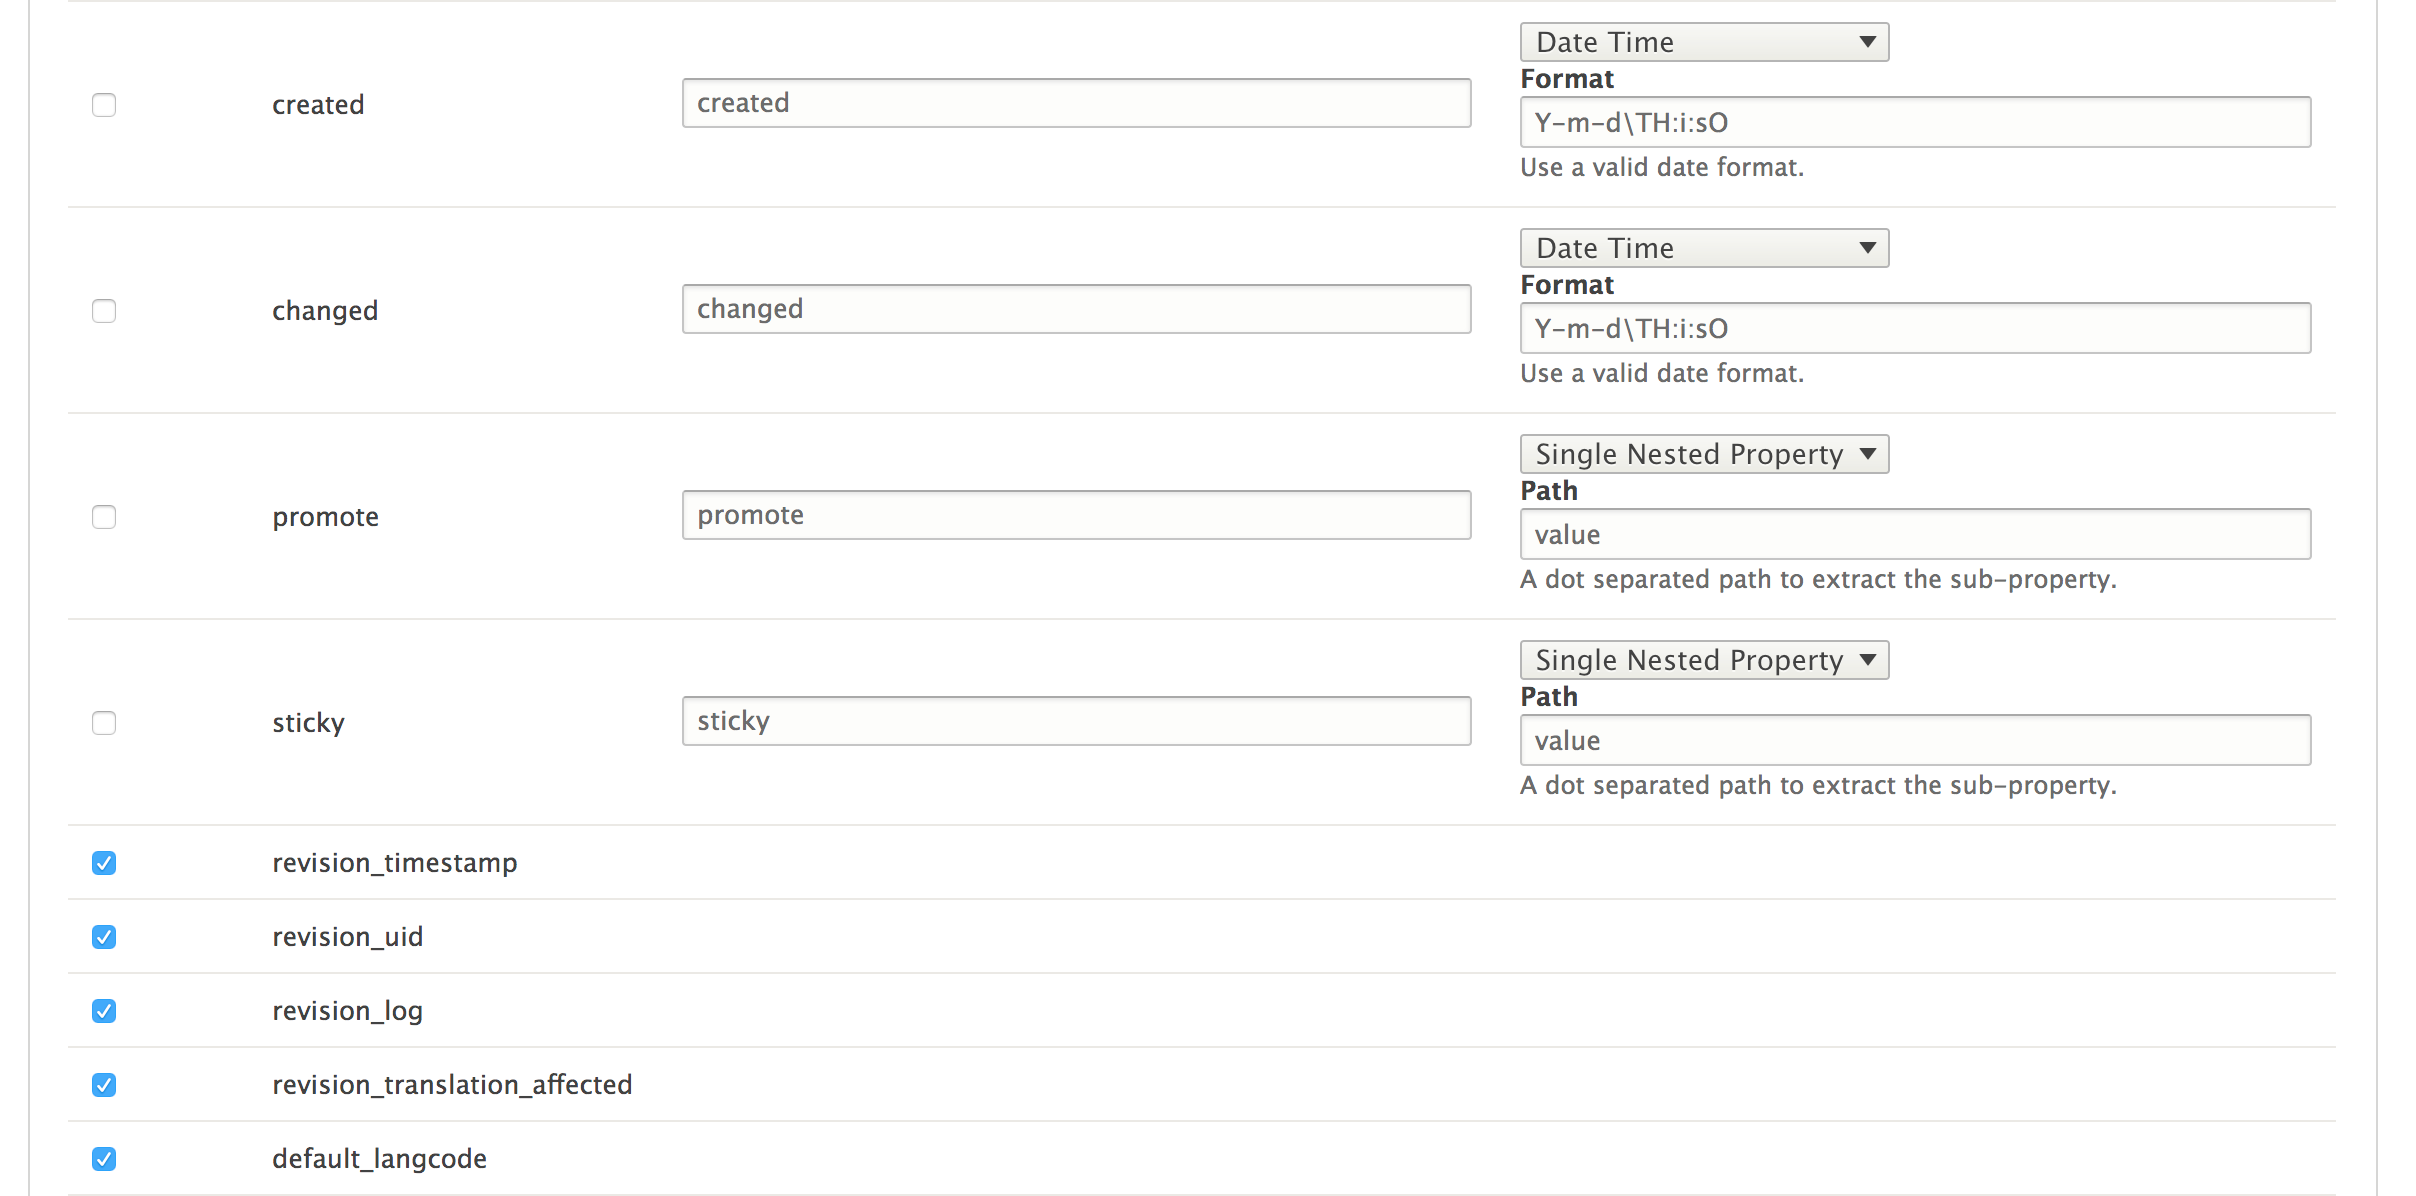
In this example, the created and changed fields will no longer return Unix timestamps, but RFC ISO8601-formatted timestamps. The promote and sticky fields will return their value directly, not nested under a value property. Finally, no revision information fields will be returned.
Contenta CMS is a decoupled, API-driven Drupal distribution built using the JSON API. It is being built through the same community initiative pushing forward the JSON API module. The project's home page can be found at http://www.contentacms.org/.
It provides many preconfigured options, including customizations to default endpoints. It also provides Simple OAuth to set up decoupled authentication with your frontend consumer and the API backend.
On top of delivering a distribution, the community contributors have developed various frontend consumers as examples:
There are two command-line tools for Drupal 8: Drupal Console and Drush. In this chapter, we will discuss how they make working with Drupal easier by covering the following recipes:
In the previous chapters of this book, there have been recipes that provide ways of using command-line tools to simplify working with Drupal. There are two contributed projects that provide Drupal with a command-line interface experience.
First, there is Drush. Drush was first created for Drupal 4.7 and has become an integral tool used for day-to-day Drupal operations. However, with Drupal 8 and its integration with Symfony, there came Drupal Console. Drupal Console is a Symfony Console-based application that allows it to reuse more components and integrate more easily with contributed modules.
This chapter contains recipes that will highlight operations that can be simplified using Drush or Console. By the end of this chapter, you will be able to work with your Drupal sites through the command line.
At the time of writing this book, Drush was still the primary tool of choice for Drupal 8; however, Drupal Console is earning more market share. Drupal Console is rapidly being developed. Due to this rapid development, the commands will still exist, but the output may differ.
Both Drush and Drupal Console support global installation, but both projects are migrating to per-project installation using Composer. To get started, refer to the following installation guides for each tool for up-to-date installation information:
Drupal utilizes caching to store plugin definitions, routes, and so on. When you add a new plugin definition or a new route, you need to rebuild Drupal's cache for it to be recognized.
Rebuilding the cache over the command line is also more performant than using the user interface since it does not use web server resources to execute the cache rebuild.
In this recipe, we will walk you through using both Drush and Drupal Console to clear various cache bins in Drupal. It is important to know how to clear specific cache bins so that you do not need to rebuild everything, if possible.
$ drush cache-rebuild
Cache rebuild complete.
$ drupal cache:rebuild all
Select cache. [all]:
> render
Rebuilding cache(s), wait a moment please.
[OK] Done clearing cache(s).
$ drupal router:rebuild
Rebuilding routes, wait a moment please
[OK] Done rebuilding route(s).
$ drush twig-compile --verbose
Both Drush and Drupal Console will load files from the Drupal installation and bootstrap the application. This allows the commands to invoke functions and methods found in Drupal.
For Drush 8.x, Drush does not implement the dependency injection container and still needs to rely on procedural functions in Drupal.
Drupal Console, however, harnesses the dependency injection container, allowing it to reuse Drupal's container and services.
The Making a Drush command and Making a Drupal Console command recipes will describe the differences in more detail.
When working with any application that utilizes a database, there are times when you will need to export a database and import it elsewhere. Most often, you would do this with a production site to work on it locally. This way, you can create a new configuration that can be exported and pushed to production, as discussed in Chapter 9, Configuration Management – Deploying in Drupal 8.
In this recipe, we will export a database dump from a production site in order to set up the local development. The database dump will be imported over the command line and sanitized. We will then execute an SQL query through Drush to verify sanitization.
Drush has the ability to use site aliases. Site aliases are configuration items that allow you to interact with a remote Drupal site. In this recipe, we will use the following alias to interact with a fictional remote site to show how a typical workflow will go to fetch a remote database.
Note that you do not need to use a Drush alias to download the database dump created in the recipe; you can use any method you are familiar with (manually from the command line with mysqldump or phpMyAdmin):
$aliases['drupal.production'] = [
'uri' => 'example.com',
'remote-host' => 'example.com',
'remote-user' => 'someuser',
'ssh-options' => '-p 2222',
];
Read the Drush documentation for more information on site aliases at http://docs.drush.org/en/master/usage/#site-aliases. Site aliases allow you to interact with remote Drupal installations.
We will also assume that the local development site has not yet been configured to connect it to the database.
$ drush @drupal.production sql-dump > ~/prod-dump.sql
// Database configuration.
$databases['default']['default'] = [
'driver' => 'mysql',
'host' => 'localhost',
'username' => 'mysql',
'password' => 'mysql',
'database' => 'data',
'prefix' => '',
'port' => 3306,
'namespace' => 'Drupal\\Core\\Database\\Driver\\mysql',
];
$ drush sql-cli < ~/prod-dump.sql
$ drush sql-sanitize
$ drush sql-query "SELECT uid, name, mail FROM users_field_data;"
When working with Drush, we have the ability to use Drush aliases. A Drush alias contains a configuration that allows the tool to connect to a remote server and interact with that server's installation of Drush.
You need to have Drush installed on your remote server in order to use a site alias for it.
The sql-dump command executes the proper dump command for the database driver, which is typically MySQL and the mysqldump command. It streams to the terminal and must be piped to a destination. When piped to a local SQL file, we can import it and execute the create commands to import our database schema and data.
With the sql-cli command, we will be able to execute SQL commands to the database through Drush. This allows us to redirect the file contents to the sql-cli command and run the set of SQL commands. With the data imported, the sql-sanitize command replaces usernames and passwords.
Finally, the sql-query command allows us to pass an SQL command directly to the database and return its results. In our recipe, we will query the users_field_data to verify that we imported our users and that emails have been sanitized.
Working with Drupal over the command line simplifies working with the database. We will explore this in more detail in the following sections.
Sometimes, databases can be quite large. The sql-dump command has a gzip option that will output the SQL dump using the gzip command. In order to run the command, you would simply:
$ drush sql-dump –-gzip dump.sql.gz
The end result provides a reduction in the dump file:
-rw-r--r-- 1 user group 3058522 Jan 14 16:10 dump.sql
-rw-r--r-- 1 user group 285880 Jan 14 16:10 dump.sql.gz
If you create a gzipped database dump, ensure that you unarchive it before attempting an import with the sql-cli command.
At the time of writing this book, Console does not provide a command for sanitizing the database. The feature is currently documented in this issue; refer to https://github.com/hechoendrupal/drupal-console/issues/3192.
The database:connect and database:client commands will launch a database client. This allows you to be logged into the database's command-line interface:
$ drupal database:client
$ drupal database:connect
These commands are similar to the sql-cli and sql-connect commands from Drush. The client command will bring you to the database's command-line tool, where connect shows the connection string.
Drupal Console also provides the database:dump command. Unlike Drush, this will write the database dump for you in the Drupal directory:
$ drupal database:dump
[OK] Database exported to: /path/to/drupal/www/data.sql
When you need to add an account to Drupal, you will visit the People page and manually add a new user. Drush provides the complete user management for Drupal, from creation to role assignment, password recovery, and deletion. This workflow allows you to create users easily and provides them with a login without having to enter your Drupal site.
In this recipe, we will create a staff role with a staffmember user and log in as that user through Drush.
$ drush role-create staff
Created "staff"
$ drush role-list
ID Role Label
anonymous Anonymous user
authenticated Authenticated user
administrator Administrator
staff Staff
$ drush user-create staffmember
User ID : 2
User name : staffmember
User roles : authenticated
User status : 1
$ drush user-add-role staff staffmember
Added role staff role to staffmember
$ drush user-login staffmember --uri=http://example.com
http://example.com/user/reset/2/1452810532/Ia1nJvbr2UQ3Pi_QnmITlVgcCWzDtnKmHxf-I2eAqPE
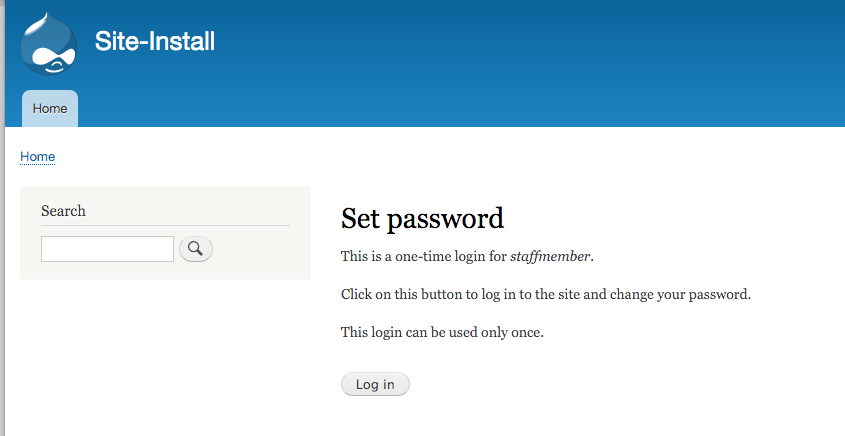
When you reset a password in Drupal, a special one-time login link is generated. The login link is based on a generated hash. The Drush command validates the given user, which exists in the Drupal site, and then passes it to the user_pass_reset_url function from the User module.
The URL is made up of the user's ID, the timestamp when the link was generated, and a hash based on the user's last login time, link generation, and email. When the link is loaded, this hash is rebuilt and verified. For example, if the user has logged in since the time it was generated, the link will become invalid.
When used on a machine that has a web browser installed, Drush will make an attempt to launch the link in a web browser for you. The browser option allows you to specify which browser should be launched. Additionally, you can use no-browser to prevent one from being launched.
The command line offers the ability to simplify user management and user administration. Next, we will explore more on this topic in detail.
The user-login command is a useful tool that allows some advanced use cases. For instance, you can append a path after the username and be launched to that path. You can pass a UID or email instead of a username in order to log in as a user.
You can use the user-login to secure your admin user account. In Drupal, the user with the identifier of 1 is treated as the root and can bypass all permissions. Many times, this is the default maintenance account used to work on the Drupal site. Instead of logging in manually, you can set the account to a very robust passphrase and use the user-login command when you need to access your site. With this, the only users who should be able to log in as the administrator account are those with access to run the Drush commands on the website.
Drupal Console also provide commands to interact with users. Although they do not allow the creation of users or roles, they provide a basic user management.
The user:login:url command will generate a one-time login link for the specified user ID. This uses the same methods as the Drush command:
$ drupal user:login:url 2
The user:password:reset command allows you to reset a user's password to the new provided password. You can provide the user ID and new password as arguments, but if missing, the values will be prompted for interactively:
$ drupal user:password:reset 2 newpassword
The create:users command provides an interactive way to generate bulk users, which are useful for debugging. However, it cannot create individual users with specific passwords like Drush.
When Drupal Console was first introduced, one of the biggest highlights was its ability to scaffold code. The project has turned into a much larger Drupal runner over the command-line interface, but much of its resourcefulness is code generation.
As you may have noted in the previous chapters and recipes, there can be a few mundane tasks and a bit of boilerplate code. Drupal Console enables Drupal developers to create various components without having to write all of the boilerplate code.
In Chapter 10, The Entity API, we covered the creation of a custom entity type. In this recipe, we will automate most of that process using Drupal Console to generate our content entity.
For this recipe, you will need to have Drupal Console installed. The tool will generate everything else for us. You will need to have a Drupal 8 site installed. Many of Console's commands will not work (or be listed) unless they can access an installed Drupal site. This is because of the way it interacts with Drupal's service container.
$ drupal generate:module
// Welcome to the Drupal module generator
Enter the new module name:
> Content Entity Provider
Enter the module machine name [content_entity_provider]:
>
Enter the module Path [/modules/custom]:
>
Enter module description [My Awesome Module]:
>
Enter package name [Custom]:
>
Enter Drupal Core version [8.x]:
>
Do you want to generate a .module file (yes/no) [yes]:
>
Define module as feature (yes/no) [no]:
>
Do you want to add a composer.json file to your module (yes/no) [yes]:
>
Would you like to add module dependencies (yes/no) [no]:
>
Do you want to generate a unit test class (yes/no) [yes]:
>
Do you want to generate a themeable template (yes/no) [yes]:
>
Do you confirm generation? (yes/no) [yes]:
>
Generated or updated files
1 - modules/custom/content_entity_provider/content_entity_provider.info.yml
2 - modules/custom/content_entity_provider/content_entity_provider.module
3 - modules/custom/content_entity_provider/composer.json
4 - modules/custom/content_entity_provider/tests/src/Functional/LoadTest.php
5 - modules/custom/content_entity_provider/content_entity_provider.module
6 - modules/custom/content_entity_provider/templates/content-entity-provider.html.twig
$ drupal generate:entity:content
Enter the module name [devel]:
> content_entity_provider
Enter the class of your new content entity [DefaultEntity]:
> CustomContentEntity
Enter the machine name of your new content entity [custom_content_entity]:
>
Enter the label of your new content entity [Custom content entity]:
>
Enter the base-path for the content entity routes [/admin/structure]:
>
Do you want this (content) entity to have bundles (yes/no) [no]:
>
Is your entity translatable (yes/no) [yes]:
>
Is your entity revisionable (yes/no) [yes]:
>
Generated or updated files
1 - modules/custom/content_entity_provider/content_entity_provider.permissions.yml
2 - modules/custom/content_entity_provider/content_entity_provider.links.menu.yml
3 - modules/custom/content_entity_provider/content_entity_provider.links.task.yml
4 - modules/custom/content_entity_provider/content_entity_provider.links.action.yml
5 - modules/custom/content_entity_provider/src/CustomContentEntityAccessControlHandler.php
6 - modules/custom/content_entity_provider/src/CustomContentEntityTranslationHandler.php
7 - modules/custom/content_entity_provider/src/Entity/CustomContentEntityInterface.php
8 - modules/custom/content_entity_provider/src/Entity/CustomContentEntity.php
9 - modules/custom/content_entity_provider/src/CustomContentEntityHtmlRouteProvider.php
10 - modules/custom/content_entity_provider/src/Entity/CustomContentEntityViewsData.php
11 - modules/custom/content_entity_provider/src/CustomContentEntityListBuilder.php
12 - modules/custom/content_entity_provider/src/Form/CustomContentEntitySettingsForm.php
13 - modules/custom/content_entity_provider/src/Form/CustomContentEntityForm.php
14 - modules/custom/content_entity_provider/src/Form/CustomContentEntityDeleteForm.php
15 - modules/custom/content_entity_provider/custom_content_entity.page.inc
16 - modules/custom/content_entity_provider/templates/custom_content_entity.html.twig
17 - modules/custom/content_entity_provider/src/Form/CustomContentEntityRevisionDeleteForm.php
18 - modules/custom/content_entity_provider/src/Form/CustomContentEntityRevisionRevertTranslationForm.php
19 - modules/custom/content_entity_provider/src/Form/CustomContentEntityRevisionRevertForm.php
20 - modules/custom/content_entity_provider/src/CustomContentEntityStorage.php
21 - modules/custom/content_entity_provider/src/CustomContentEntityStorageInterface.php
22 - modules/custom/content_entity_provider/src/Controller/CustomContentEntityController.php
$ drupal module:install content_entity_provider
Installing module(s) "content_entity_provider"
[OK] The following module(s) were installed successfully: "content_entity_provider"
// cache:rebuild
Rebuilding cache(s), wait a moment please.
[OK] Done clearing cache(s).
One of the biggest features of Console is its ability to reduce the time spent by developers to create code for Drupal 8. Console utilizes the Twig templating engine to provide code generation. These Twig templates contain variables and logic that are compiled into the end result code.
A set of generator classes receives specific parameters, which are received through the appropriate command, and pass them to Twig for rendering. This allows Console to easily stay up to date with changes in Drupal core and still provide valuable code generation.
Drush provides an API that allows developers to write their own commands. These commands can be part of a module and loaded through a Drupal installation, or they can be placed in the local user's Drush folder for general purposes.
Often, contributed modules create commands to automate user interface operations. However, creating a custom Drush command can be useful for specific operations. In this recipe, we will create a command that loads all the users who have not logged in in the last 10 days and resets their password.
For this recipe, you will need Drush available. We will be creating a command in a local user directory.
<?php
/**
* @file
* Loads all users who have not logged in within 10 days and disables them.
*/
/**
* Implements hook_drush_command().
*/
function disable_users_drush_command() {
$items = [];
$items['disable-users'] = [
'description' => 'Disables users after 10 days of inactivity',
];
return $items;
}
/**
* Implements drush_hook_COMMAND().
*/
function drush_disable_users_disable_users() {
}
/**
* Implements drush_hook_COMMAND().
*/
function drush_disable_users_disable_users() {
// Get the default timezone and make a DateTime object for 10 days ago.
$system_date = \Drupal::config('system.date');
$default_timezone = $system_date->get('timezone.default') ?: date_default_timezone_get();
$now = new DateTime('now', new DateTimeZone($default_timezone));
$now->modify('-10 days');
$query = \Drupal::entityQuery('user')->condition('login', $now->getTimestamp(), '>');
$results = $query->execute();
if (empty($results)) {
drush_print('No users to disable!');
}
}
/**
* Implements drush_hook_COMMAND().
*/
function drush_disable_users_disable_users() {
// Get the default timezone and make a DateTime object for 10 days ago.
$system_date = \Drupal::config('system.date');
$default_timezone = $system_date->get('timezone.default') ?: date_default_timezone_get();
$now = new DateTime('now', new DateTimeZone($default_timezone));
$now->modify('-10 days');
$query = \Drupal::entityQuery('user')->condition('login', $now->getTimestamp(), '>');
$results = $query->execute();
if (empty($results)) {
drush_print('No users to disable!');
}
foreach ($results as $uid) {
/** @var \Drupal\user\Entity\User $user */
$user = \Drupal\user\Entity\User::load($uid);
$user->block();
$user->save();
}
drush_print(dt('Disabled !count users', ['!count' => count($results)]));
}
$ drush cache-clear drush
$ drush disable-users --help
Disables users after 10 days of inactivity
Drush works by scanning specific directories for files that follow the COMMANDFILE.drush.inc pattern. You can think of COMMANDFILE for Drush as a representation of a module name in Drupal's hook system. When implementing a Drush hook, in the HOOK_drush format, you will need to replace HOOK with your COMMANDFILE name, just as you would do in Drupal with a module name.
In this recipe, we created a disable_users.drush.inc file. This means that all hooks and commands in the file need to use disable_users for hook invocations. Drush uses this to load the hook_drush_command hook that returns our command information.
We then provided the functionality of our logic in the drush_hook_command hook. For this hook, we replaced hook with our COMMANDFILE name, which was disable_users, giving us drush_disable_users_command. We replaced command with the command that we defined in hook_drush_command, which was disable-users. We then had our final drush_disable_users_disable_users hook.
Drush commands have additional options that can be specified in their definitions. We explore their abilities to control the required level of Drupal integration for a command.
Drush commands have the ability to specify the level of Drupal's bootstrap before being executed. Drupal has several bootstrap levels in which only specific parts of the system are loaded. By default, a command's bootstrap is at DRUSH_BOOTSTRAP_DRUPAL_LOGIN, which is at the same level as accessing Drupal over the Web.
Commands, depending on their purpose, can choose to avoid bootstrapping Drupal at all or only until the database system is loaded. Drush commands that are utilities, such as the Git release notes module, provide a Drush command that does not interact with Drupal. It specifies a bootstrap of DRUSH_BOOTSTRAP_DRUSH, as it only interacts with repositories to generate change logs based on Git tags and commits.
Drupal Console makes use of the Symfony Console project and other third-party libraries to utilize modern PHP best practices. In doing so, it follows Drupal 8 practices as well. This allows Console to use namespaces for the command detection and interaction with Drupal by reading its class loader.
This allows developers to easily create a Console command by implementing a custom class in a module.
In this recipe, we will create a command that loads all the users who have not logged in in the last 10 days and resets their password. We will generate the base of our command using the scaffolding commands.
For this recipe, you will need to have Drupal Console installed. The tool will generate everything else for us. You will need to have a Drupal 8 site installed.
drupal generate:module
// Welcome to the Drupal module generator
Enter the new module name:
> Console Commands
Enter the module machine name [console_commands]:
>
Enter the module Path [/modules/custom]:
>
Enter module description [My Awesome Module]:
>
Enter package name [Custom]:
>
Enter Drupal Core version [8.x]:
>
Do you want to generate a .module file (yes/no) [yes]:
>
Define module as feature (yes/no) [no]:
>
Do you want to add a composer.json file to your module (yes/no) [yes]:
>
Would you like to add module dependencies (yes/no) [no]:
>
Do you want to generate a unit test class (yes/no) [yes]:
>
Do you want to generate a themeable template (yes/no) [yes]:
>
Do you confirm generation? (yes/no) [yes]:
>
Generated or updated files
1 - modules/custom/console_commands/console_commands.info.yml
2 - modules/custom/console_commands/console_commands.module
3 - modules/custom/console_commands/composer.json
4 modules/custom/console_commands/tests/src/Functional/LoadTest.php
5 - modules/custom/console_commands/console_commands.module
6 - modules/custom/console_commands/templates/console-commands.html.twig
drupal generate:command
// Welcome to the Drupal Command generator
Enter the extension name [devel]:
> console_commands
Enter the Command name. [console_commands:default]:
> console_commands:disable_users
Enter the Command Class. (Must end with the word 'Command'). [DefaultCommand]:
> DisableUsersCommand
Is the command aware of the drupal site installation when executed?. (yes/no) [no]:
> yes
Do you confirm generation? (yes/no) [yes]:
>
Generated or updated files
1 - modules/custom/console_commands/src/Command/DisableUsersCommand.php
2 - modules/custom/console_commands/console.services.yml
3 - modules/custom/console_commands/console/translations/en/console_commands.disable_users.yml
/**
* {@inheritdoc}
*/
protected function execute(InputInterface $input, OutputInterface $output) {
}
/**
* {@inheritdoc}
*/
protected function execute(InputInterface $input, OutputInterface $output) {
// Get the default timezone and make a DateTime object for 10 days ago.
$system_date = \Drupal::config('system.date');
$default_timezone = $system_date->get('timezone.default') ?: date_default_timezone_get();
$now = new \DateTime('now', new \DateTimeZone($default_timezone));
$now->modify('-10 days');
$query = \Drupal::entityQuery('user')->condition('login', $now->getTimestamp(), '>');
$results = $query->execute();
if (empty($results)) {
$output->writeln('<info>No users to disable!</info>');
}
}
/**
* {@inheritdoc}
*/
protected function execute(InputInterface $input, OutputInterface $output) {
// Get the default timezone and make a DateTime object for 10 days ago.
$system_date = \Drupal::config('system.date');
$default_timezone = $system_date->get('timezone.default') ?: date_default_timezone_get();
$now = new \DateTime('now', new \DateTimeZone($default_timezone));
$now->modify('-10 days');
$query = \Drupal::entityQuery('user')->condition('login', $now->getTimestamp(), '>');
$results = $query->execute();
if (empty($results)) {
$output->writeln('<info>No users to disable!</info>');
}
foreach ($results as $uid) {
/** @var \Drupal\user\Entity\User $user */
$user = \Drupal\user\Entity\User::load($uid);
$user->block();
$user->save();
}
$total = count($results);
$output->writeln("Disabled $total users");
}
$ drupal module:install console_commands
Drupal Console provides integration with modules using namespace discovery methods. When Console is run in a Drupal installation, it will discover all the available projects. It then discovers any files in the \Drupal\{ a module }\Command namespace that implements \Drupal\Console\Command\Command.
Drupal Console will rescan the Drupal directory for available commands every time it is invoked, as it does not keep a cache of available commands.
Drupal Console provides a much more intuitive developer experience as it follows Drupal core's coding formats. We will touch on how Console can be used to create entities.
A benefit of Console is its ability to utilize Symfony Console's question helpers for a robust interactive experience. Drupal Commerce utilizes Console to provide a commerce:create:store command to generate stores. The purpose of the command is to simplify the creation of a specific entity.
The \Drupal\commerce_store\Command\CreateStoreCommand class overrides the default interact method that is executed to prompt data from the user. It will prompt users to enter the store's name, email, country, and currency.
Developers can implement similar commands to give advanced users a simpler way to work with modules and configuration.
BIRMINGHAM - MUMBAI
Copyright © 2017 Packt Publishing
All rights reserved. No part of this book may be reproduced, stored in a retrieval system, or transmitted in any form or by any means, without the prior written permission of the publisher, except in the case of brief quotations embedded in critical articles or reviews.
Every effort has been made in the preparation of this book to ensure the accuracy of the information presented. However, the information contained in this book is sold without warranty, either express or implied. Neither the author, nor Packt Publishing, and its dealers and distributors will be held liable for any damages caused or alleged to be caused directly or indirectly by this book.
Packt Publishing has endeavored to provide trademark information about all of the companies and products mentioned in this book by the appropriate use of capitals. However, Packt Publishing cannot guarantee the accuracy of this information.
First published: March 2016
Second edition: September 2017
Production reference: 1210917
|
Author Matt Glaman |
Copy Editor Dhanya Baburaj |
|
Reviewer Tracy Charles Smith |
Project Coordinator Ritika Manoj |
|
Commissioning Editor Amarabha Banerjee |
Proofreader Safis Editing |
|
Acquisition Editor Nigel Fernandes |
Indexer Rekha Nair |
|
Content Development Editor Mohammed Yusuf Imaratwale |
Graphics Jason Monteiro |
|
Technical Editors Ankur Ghiye Murtaza Tinwala |
Production Coordinator Shantanu Zagade |
Matt Glaman is a Senior Drupal Consultant at Commerce Guys and co-maintainer of Drupal Commerce. He is an open source developer who has been working with Drupal since 2013. Since then, he has contributed to over 60 community project.
Tracy Charles Smith began working with computers at the age of 10. His background includes network support, web development, customer service, project management, and financial management.
Tracy's entrepreneurial spirit is a key component to his success in interacting with clients and team members on business and user-experience related technology solutions. In fact, he used that passion to found his own technology-consulting firm called Alpha Geek Tech, LLC. He also served as Technology Director for Quiddities Dev., Inc., in Santa Cruz, CA, before moving back to the DC area to join Phase2 in 2010 as a Senior Programmer. Tracy now works as a Senior Project Manager at Phase2 supporting Growth & Support clients in government and private enterprise. His diverse development background complements his project management skills.
Tracy was also the lead programmer and architect for 12seconds.tv in 2007 (a video messaging platform), which leveraged Drupal. He also authored Drupal Intranets with Open Atrium. He earned a BS in Computer Information Systems and Business Administration from Wingate University.
For support files and downloads related to your book, please visit www.PacktPub.com.
Did you know that Packt offers eBook versions of every book published, with PDF and ePub files available? You can upgrade to the eBook version at www.PacktPub.com and as a print book customer, you are entitled to a discount on the eBook copy. Get in touch with us at service@packtpub.com for more details.
At www.PacktPub.com, you can also read a collection of free technical articles, sign up for a range of free newsletters and receive exclusive discounts and offers on Packt books and eBooks.
![]()
Get the most in-demand software skills with Mapt. Mapt gives you full access to all Packt books and video courses, as well as industry-leading tools to help you plan your personal development and advance your career.
Thanks for purchasing this Packt book. At Packt, quality is at the heart of our editorial process. To help us improve, please leave us an honest review on this book's Amazon page at https://www.amazon.com/dp/1788290402
If you'd like to join our team of regular reviewers, you can e-mail us at customerreviews@packtpub.com. We award our regular reviewers with free eBooks and videos in exchange for their valuable feedback. Help us be relentless in improving our products!
Drupal is a content management system used to build websites for small businesses, e-commerce, enterprise systems, and much more. Created by over 4,500 contributors, Drupal 8 provides many new features to Drupal. Whether you are new to Drupal, or an experienced Drupalista, Drupal 8 Development Cookbook contains recipes to dive into what Drupal 8 has to offer.
Chapter 1, Up and Running with Drupal 8, begins by covering the requirements for running Drupal 8 and going through the installation process and extending Drupal.
Chapter 2, The Content Authoring Experience, dives into the content management experience in Drupal, including working with the newly bundled CKEditor.
Chapter 3, Displaying Content through Views, explores how to use Views to create different ways to list and display your content in Drupal.
Chapter 4, Extending Drupal, introduces how to write a module for Drupal, the building blocks of functionality in Drupal.
Chapter 5, Frontend for the Win, covers how to create a theme, work with the new templating system Twig, and harness Drupal’s responsive design features.
Chapter 6, Creating Forms with the Form API, explains how to work with Drupal’s Form API to create custom forms for collecting data.
Chapter 7, Plug and Play with Plugins, introduces plugins, one of the newest components in Drupal. This chapter walks through developing the plugin system to work with fields.
Chapter 8, Multilingual and Internationalization, introduces the features provided by Drupal 8 to create an internationalized website, supporting multiple languages for content and administration.
Chapter 9, Configuration Management - Deploying in Drupal 8, explains the configuration management system, new to Drupal 8, and how to import and export site configurations.
Chapter 10, The Entity API, dives into the Entity API in Drupal, allowing you to create custom configuration and content entities.
Chapter 11, Off the Drupalicon Island, explains how Drupal allows embracing the mantra of "proudly built elsewhere" and including third-party libraries with your Drupal site.
Chapter 12, Web Services, shows how to turn your Drupal 8 site into a web services API provider through a RESTful interface.
Chapter 13, The Drupal CLI, explores working with Drupal 8 through two command-line tools created by the Drupal community: Drush and Drupal Console.
In order to work with Drupal 8, and to run the code examples found in this book, the following software will be required:
Web server software stack:
The first chapter details all of these requirements, and includes a recipe highlighting an out-of-the-box development server setup.
You will also need a text editor; the following is a suggestion of popular editors and IDEs:
This book is for those have been working with Drupal, such as site builders, backend and frontend developers, and who are eager to see what awaits them when they start using Drupal 8.
In this book, you will find several headings that appear frequently (Getting ready, How to do it, How it works, There's more, and See also).
To give clear instructions on how to complete a recipe, we use these sections as follows:
This section tells you what to expect in the recipe, and describes how to set up any software or any preliminary settings required for the recipe.
This section contains the steps required to follow the recipe.
This section usually consists of a detailed explanation of what happened in the previous section.
This section consists of additional information about the recipe in order to make the reader more knowledgeable about the recipe.
This section provides helpful links to other useful information for the recipe.
In this book, you will find a number of text styles that distinguish between different kinds of information. Here are some examples of these styles and an explanation of their meaning.
Code words in text, database table names, folder names, filenames, file extensions, pathnames, dummy URLs, user input, and Twitter handles are shown as follows: "You will see drupal-org.make and drupal-org-core.make."
A block of code is set as follows:
public function alterRoutes(RouteCollection $collection) {
// Change path of mymodule.mypage to use a hyphen
if ($route = $collection->get('mymodule.mypage'))
Any command-line input or output is written as follows:
$ CREATE USER username@localhost IDENTIFIED BY 'password';
New terms and important words are shown in bold. Words that you see on the screen, for example, in menus or dialog boxes, appear in the text like this: "Check the checkbox and click on Install."
Feedback from our readers is always welcome. Let us know what you think about this book-what you liked or disliked. Reader feedback is important for us as it helps us develop titles that you will really get the most out of.
To send us general feedback, simply e-mail feedback@packtpub.com, and mention the book's title in the subject of your message.
If there is a topic that you have expertise in and you are interested in either writing or contributing to a book, see our author guide at www.packtpub.com/authors .
Now that you are the proud owner of a Packt book, we have a number of things to help you to get the most from your purchase.
You can download the example code files for this book from your account at http://www.packtpub.com. If you purchased this book elsewhere, you can visit http://www.packtpub.com/support and register to have the files e-mailed directly to you.
You can download the code files by following these steps:
You can also download the code files by clicking on the Code Files button on the book's webpage at the Packt Publishing website. This page can be accessed by entering the book's name in the Search box. Please note that you need to be logged in to your Packt account.
Once the file is downloaded, please make sure that you unzip or extract the folder using the latest version of:
The code bundle for the book is also hosted on GitHub at https://github.com/PacktPublishing/Drupal-8-Development-Cookbook-Second-Edition. We also have other code bundles from our rich catalog of books and videos available at https://github.com/PacktPublishing/. Check them out!
Although we have taken every care to ensure the accuracy of our content, mistakes do happen. If you find a mistake in one of our books-maybe a mistake in the text or the code-we would be grateful if you could report this to us. By doing so, you can save other readers from frustration and help us improve subsequent versions of this book. If you find any errata, please report them by visiting http://www.packtpub.com/submit-errata, selecting your book, clicking on the Errata Submission Form link, and entering the details of your errata. Once your errata are verified, your submission will be accepted and the errata will be uploaded to our website or added to any list of existing errata under the Errata section of that title.
To view the previously submitted errata, go to https://www.packtpub.com/books/content/support and enter the name of the book in the search field. The required information will appear under the Errata section.
Piracy of copyrighted material on the Internet is an ongoing problem across all media. At Packt, we take the protection of our copyright and licenses very seriously. If you come across any illegal copies of our works in any form on the Internet, please provide us with the location address or website name immediately so that we can pursue a remedy.
Please contact us at copyright@packtpub.com with a link to the suspected pirated material.
We appreciate your help in protecting our authors and our ability to bring you valuable content.
If you have a problem with any aspect of this book, you can contact us at questions@packtpub.com, and we will do our best to address the problem.
In this chapter, we will get introduced to Drupal 8 and cover the following recipes:
This chapter will kick off with an introduction to installing a Drupal 8 site. We will walk through Drupal's interactive installer. We will cover installing Drupal using a command-line tool called Drush. Drupal provides two installation types: standard and minimal. Throughout this book, we will use the standard installation.
Once we have installed our Drupal 8 site, we will cover the basics of extending Drupal. We will discuss using distributions and installing contributed projects, such as modules and themes. We will also include uninstalling modules, as the process for uninstalling modules has changed in Drupal 8.
This book will involve a hands-on example for working with Drupal 8, and this chapter will provide information on setting up a local development environment. This chapter will also provide recipes on how to set up a Multisite installation in Drupal 8 and run the available test suites.
Before we get started, you should install Composer. Composer is the de facto package management tool for PHP. In case you are unfamiliar with Composer, it is just like using Gems for Ruby, npm for Node.js, and Bower for frontend libraries. Go to the Composer documentation to learn how to install Composer globally on your system:
There are many different methods to download Drupal and install it. In this recipe, we will focus on downloading Drupal from https://www.drupal.org/ and setting it up on a basic Linux, Apache, MySQL, or PHP (LAMP) server.
In this recipe, we will set up the files for Drupal 8 and step through the installation process.
Before we start, you will need a development environment that meets the new system requirements for Drupal 8:
We will download Drupal 8 and place its files in your web server's document root. This is the /var/www folder. If you used a tool, such as XAMPP, WAMP, or MAPP, consult the proper documentation to know your document root.
For full system requirements for Drupal 8, check out https://www.drupal.org/docs/8/system-requirements/. The Drupal.org documentation is currently being migrated. Also, review the Drupal 7 requirements page on https://www.drupal.org/docs/7/system-requirements/overview, which highlights Drupal 8 items, as well.
We need to follow these steps to install Drupal 8:
The Drupal installation process will provide a Drupal installation for the selected language and install modules and configuration based on the installation profile (standard or minimal in this recipe.)
When you visit the installer, it reads the language code from the browser. With this language code, it will then select a supported language. If you choose a non-English installation, the translation files will be automatically downloaded from https://localize.drupal.org/. Previous versions of Drupal did not support automated multilingual installs. More on multilingual will be covered in Chapter 8, Multilingual and Internationalization.
The installation profile instructs Drupal what modules to install by default. Contributed install profiles are termed distributions; we will discuss this more in the next recipe.
When verifying requirements, Drupal checks application versions and PHP configurations. For example, if your server has the PHP Xdebug (https://xdebug.org) extension installed, the minimum max_nesting_level must be 256 or else Drupal will not be installed (https://www.drupal.org/node/2393531).
The Drupal installation process is straightforward, but there are a few things worth discussing.
As mentioned earlier, to install Drupal, you will need to have access to a database server (or the ability to create one) and an existing database (or the ability to create one). This process will depend on your environment setup.
If you are working with a hosting provider, there is more than likely a web-based control panel. This should allow you to create databases and users. Refer to your hosting provider's documentation for more information on this topic.
If you are using phpMyAdmin (https://www.phpmyadmin.net/) on your server, often installed by MAMP, WAMP, and XAMPP, and have root access, you can create your databases and users by following these steps:
If you do not have a user interface but have a command-line access, you can set up your database and user using the MySQL command line. These instructions can be found in the core/INSTALL.mysql.txt file. From the command line of your site, perform the following:
$ mysql -u username -p
$ CREATE DATABASE my_database CHARACTER SET utf8 COLLATE utf8_general_ci;
$ CREATE USER username@localhost IDENTIFIED BY 'password';
$ GRANT SELECT, INSERT, UPDATE, DELETE, CREATE, DROP, INDEX, ALTER, CREATE TEMPORARY TABLES ON databasename.* TO 'username'@'localhost' IDENTIFIED BY 'password';
Drupal, like other content management systems, allows you to prefix its database tables from the database set-up form. This prefix will be placed before table names to help make them unique. Although it is not recommended, this would allow multiple installations to share one database. Utilizing table prefixes can, however, provide some level of security through obscurity since the tables will not be their default names:
You may also install Drupal using the PHP command-line tool, Drush. Drush is a command-line tool created by the Drupal community and must be installed if you wish to use it. Drush is covered in Chapter 13, The Drupal CLI.
The pm-download command will download packages from Drupal.org. The site-install command will allow you to specify an installation profile and other options to install a Drupal site. The installation steps in this recipe could be run through Drush, as follows:
$ cd /path/to/web $ drush pm-download drupal-8 drupal8 $ cd drupal8 $ drush site-install standard -locale=en-US --account-name=admin --account-pass=admin -account-email=demo@example.com -db-url=mysql://user:pass@localhost/database
We used Drush to download the latest Drupal 8 and place it in a folder named drupal8. Then, the site-install command instructs Drush to use the standard install profile, configure the maintenance account, and provide a database URI string so that Drupal can connect to its database.
You can download Drupal using Composer, the de facto PHP package manager. The preferred method is to use the Drupal Composer project template provided by the community.
To build your Drupal 8 site, run the following commands:
$ cd /path/to/document/root $ composer create-project drupal-composer/drupal-project drupal8 --stability dev
Wait for the commands to finish--it may take some time, as it downloads all the required dependencies. You can feel free to grab a coffee (the first time takes a while; it primes caches. Have faith, it will be much faster the next time.)
When finished, you will find a different directory structure inside your drupal8 directory. The vendor directory contains all third-party PHP libraries, and the web directory contains your Drupal 8 site. You will need to modify your web server to use the web directory as the new docroot within your drupal8 directory.
The project and its details can be found at https://github.com/drupal-composer/drupal-project, along with its full documentation.
If you choose to disable the update options, you will have to check manually for module upgrades. While most upgrades are for bug fixes or features, some are for security updates. It is highly recommended that you subscribe to the Drupal security team's updates. These updates are available on Twitter at @drupalsecurity (https://twitter.com/drupalsecurity) or the feeds on
https://www.drupal.org/security.
Why would you want to use a distribution? A distribution is a contributed installation profile that is not provided by Drupal core. Distributions provide a specialized version of Drupal with specific installed modules and themes along with specific configurations (content types, and blocks.) On Drupal.org, when you download an installation profile, it not only includes the profile and its modules but a version of Drupal core, hence the name distribution. You can find a list of all Drupal distributions at https://www.drupal.org/project/project_distribution.
We will follow these steps to download a distribution to use as a customized version of Drupal 8:
$ composer require "commerceguys/intl: ~0.7" "commerceguys/addressing: ~1.0" "commerceguys/zone: ~1.0" "embed/embed: ~2.2
Installation profiles work by including additional modules that are part of the contributed project realm or custom modules. The profile will then define them as dependencies to be installed with Drupal. When you select an installation profile, you are instructing Drupal to install a set of modules on installation.
Demo Framework declares itself as an exclusive installation profile. Distributions that declare this are automatically selected and assumed to be the default installation option. The exclusive flag was added with Drupal 7.22 to improve the experience of using a Drupal distribution (http://drupal.org/node/1961012).
Distributions provide a specialized version of Drupal with specific feature sets, but there are a few items worth discussing.
The current standard for generating a built distribution is the utilization of Drush and makefiles. Makefiles allow a user to define a specific version of Drupal core and other projects (such as themes, modules, and third-party libraries) that will make up a Drupal code base. It is not a dependency management workflow, like Composer, but is a build tool.
If you take a look at the Demo Framework's profile folder, you will see drupal-org.make and drupal-org-core.make. These are parsed by the Drupal.org packager to compile the code base and package it as a .zip or .tar.gz, like the one you downloaded.
As discussed in the first recipe's There's more... section, you can install a Drupal site through the Drush command-line tool. You can instruct Drush to use a specific installation profile by providing it as the first argument.
The following command would install the Drupal 8 site using the Demo Framework:
$ cd /path/to/drupal8
$ drush pm-download df $ drush site-install df -db-url=mysql://user:pass@localhost/database
Currently, Drupal.org does not package distributions using Composer, which is why there was an extra step to add dependencies when installing the distribution. Many distributions provide project templates to make scaffolding projects simpler.
For example, the following command will set up a Demo Framework site with docroot as the directory for the web server document root, which contains Drupal 8:
$ composer create-project acquia/df-project df
The project template is available on Acqua's GitHub at https://github.com/acquia/df-project/.
Another distribution, Open Social, provides a template of its own:
$ composer create-project goalgorilla/social_template
The project template is available at https://github.com/goalgorilla/social_template.
Drupal 8 provides more functionality out-of-the-box than previous versions of Drupal, allowing you to do more with less. However, one of the more appealing aspects of Drupal is the ability to extend and customize.
In this recipe, we will download and enable the Honeypot module (https://www.drupal.org/project/honeypot) and tell Drupal to use the Bootstrap theme (https://www.drupal.org/project/bootstrap). The Honeypot module provides Honeypot and timestamps antispam measures on Drupal sites. This module helps protect forms from spam submissions. The Bootstrap theme implements the Bootstrap frontend framework and supports using Bootswatch styles to theme your Drupal site.
If you have used Drupal before, note that the folder structure has changed. Modules, themes, and profiles are now placed in their respective folders in the root directory and no longer under sites/all. For more information about the developer experience change, refer to https://www.drupal.org/node/22336.
Let's install modules and themes:
The following sections outline the procedure for installing a module or theme and how Drupal discovers these extensions.
Drupal scans specific folder locations to identify modules and themes defined by the .info.yml file in their directory. The following is the order in which projects will be discovered:
By placing the module inside the root modules folder, we are allowing Drupal to discover the module and allow it to be installed. When a module is installed, Drupal will register its code with the system through the module_installer service. The service will check for required dependencies and prompt them to be enabled if required. The configuration system will run any configuration definitions provided by the module on installation. If there are conflicting configuration items, the module will not be installed.
A theme is installed through the theme_installer service and sets any default configuration by the theme along with rebuilding the theme registry. Setting a theme to default is a configuration change in system.theme.default to the theme's machine name (in the recipe, it would be bootstrap).
The following section outlines the procedure for installing a module or theme and includes some additional information for installing.
Although it is not the required way to install an extension, this should become your default method. Why? Because each module is a dependency in your project, and each of those may have its own dependencies. Composer can manage dependencies for you, or you can manage them manually. Your time and capabilities probably will not grow to scale as well as Composer will. Not to mention, it also provides a standard way for PHP projects to interoperate and load classes.
You can get the Honeypot module and Bootstrap using the following two commands:
$ cd /path/to/drupal8
$ composer require drupal/honeypot $ composer require drupal/bootstrap
Here is an example of contributed projects, which require Composer for installation, because they leverage existing libraries in the PHP community at large:
As more and more modules integrate existing SDK libraries, the requirement to use Composer will increase.
Modules can be downloaded and enabled through the command line using drush. The command to replicate the recipe would resemble the following:
$ drush pm-download honeypot
$ drush pm-enable honeypot
It will prompt you to confirm your action. If there were dependencies for the module, it would ask whether you will like to enable those, too.
One of the substantial changes in Drupal 8 is the module disable and uninstall process. Previously, modules were first disabled and then uninstalled once disabled. This created a confusing process, which would disable its features, but not clean up any database schema changes. In Drupal 8, modules cannot just be disabled but must be uninstalled. This ensures that when a module is uninstalled it can safely be removed from the code base.
A module can only be uninstalled if it is not a dependency of another module or does not have a configuration item in use--such as a field type--which could disrupt the installation's integrity.
Drupal provides the ability to run multiple sites from one single Drupal code base instance. This feature is referred to as multisite. Each site has a separate database; however, extensions stored in modules, profiles, and themes can be installed by all of the sites. Site folders can also contain their own modules and themes. When provided, these can only be used by that one site.
The default folder is the default folder used if there is no matching domain name.
If you are going to work with multisite functionality, you should have an understanding of how to set up virtual host configurations with your web server. In this recipe, we will use two subdomains under localhost, called dev1 and dev2.
We will use multisites in Drupal 8 by two subdomains under localhost:
The sites.php must exist for the multisite functionality to work. By default, you do not need to modify its contents. The sites.php file provides a way to map aliases to specific site folders. The file contains the documentation for using aliases.
The DrupalKernel class provides findSitePath and getSitePath methods to discover the site folder path. On Drupal's Bootstrap, this is initiated and reads the incoming HTTP host to load the proper settings.php file from the appropriate folder. The settings.php file is then loaded and parsed into a \Drupal\Core\Site\Settings instance. This allows Drupal to connect to the appropriate database.
Let's understand the security concerns of using multisite.
There can be cause for concern if you are using multisite. Arbitrary PHP code executed on a Drupal site might be able to affect other sites sharing the same code base. Drupal 8 marked the removal of the PHP filter (https://www.drupal.org/docs/8/modules/php/overview) module that allowed site administrators to use PHP code in the administrative interface. Although this mitigates the various ways an administrator had easy access to run PHP through an interface, it does not mitigate the risk wholesale. For example, the PHP filter module is now a contributed project and could be installed.
The sites.php file provides a way to add domain aliases. This can be useful when you use a multisite functionality and need to develop it locally. A simple example would be providing a local.alias to each site.
If you had example.com and mycompany.com as different site directories, the following mapping would allow local.example.com and local.mycompany.com to map to those directories:
<?php $sites['example.com'] = 'example.com'; $sites['local.example.com'] = 'example.com'; $sites['mycompany.com'] = 'mycompany.com'; $sites['local.mycompany.com'] = 'mycompany.com';
One of the initial hurdles to getting started with Drupal is a local development environment. This recipe will cover how to set up the DrupalVM project by Jeff Geerling. DrupalVM is a VirtualBox virtual machine run through Vagrant, provisioned and configured with Ansible. It will set up all of your services and build a Drupal installation for you.
Luckily, you will only need to have VirtualBox and Vagrant installed on your machine, and DrupalVM works on Windows, macOS X, and Linux.
To get started, you will need to install the two dependencies required for DrupalVM:
Let's set up the DrupalVM project by Jeff Geerling by following these steps:
vagrant_synced_folders: local_path: /path/to/drupalvm destination: /var/www type: nfs create: true
DrupalVM is a development project that utilizes the Vagrant tool to create a VirtualBox virtual machine. Vagrant is configured through the project's Vagrantfile. Vagrant then uses Ansible--an open source IT automation platform--to install Apache, PHP, MySQL, and other services on the virtual machine.
The config.yml file has been set up to provide a simple way to customize variables for the virtual machine and provisioning process. It also uses Drush to create and install a Drupal 8 site, or whatever components are specified in drupal.make.yml. This file is a Drush make file, which contains a definition for Drupal core by default and can be modified to include other contributed projects.
The vagrant up command tells Vagrant to either launch an existing virtual machine or create one anew in a headless manner. When Vagrant creates a new virtual machine, it triggers the provisioning process. In this instance, Ansible will read the provisioning/playbook.yml file and follow each step to create the final virtual machine. The only files that need to be modified, however, are the config.yml and drupal.make.yml files.
The topic of automating and streamlining a local environment is quite popular right now with quite a few different options. If you are not comfortable with using Vagrant, there are a few other options that provide a server installation and Drupal.
Acquia Dev Desktop is developed by Acquia and can be found at https://docs.acquia.com/dev-desktop2. It is an automated environment installer for Windows and Mac. It is a xAMP stack (or DAMP stack) installer that provides a full Drupal-specific stack that includes Apache, MySQL, and PHP. The Dev Desktop application allows you to create a regular Drupal installation or select from a distribution.
XAMPP - Apache + MySQL + PHP + Perl - is a cross-platform environment installation. XAMPP is an open source project from Apache Friends. XAMPP has partnered with Bitnami (https://bitnami.com/) to provide free all-in-one installations for common applications, including Drupal 8. You can download XAMPP at https://www.apachefriends.org/download.html.
Kalabox is developed by the Kalamuna group and intends to be a robust workflow solution for Drupal development. Kalabox is cross-platform compatible, allowing you to easily work on Windows machines. It is based on the command line and provides application binaries for you to install. You can learn more about Kalabox at http://www.kalamuna.com/products/kalabox/.
Drupal 8 ships with two testing suites. Previously, Drupal only supported Simpletest. Now, there are PHPUnit tests as well. In the official change record, PHPUnit was added to provide testing without requiring a full Drupal Bootstrap, which occurs with each Simpletest test. You can read the change record at https://www.drupal.org/node/2012184.
There is currently a PHPUnit initiative active in Drupal core development. The goal is to fully remove the Simpletest framework by Drupal 9. No new Simpletest tests are being written, at least since 8.2. All current tests are currently being converted by contributors. More about the initiative can be found in this issue, https://www.drupal.org/node/2807237, where it is being coordinated.
We will be running tests using the run-tests.sh test runner. This is a test runner provided by Drupal that supports concurrency and running all of the various test suites. Running tests directly with PHPUnit will be covered in the following There's more... section.
Drupal 8.1.0 introduced the ability to perform JavaScript browser tests. This is powered using PhantomJS (http://phantomjs.org/), which uses a browser emulator powered by the Mink PHP library (http://mink.behat.org/). In order to run the FunctionalJavascript test suite, you must have PhantomJS running.
To install PhantomJS, refer to the official installation instructions at http://phantomjs.org/download.html.
$ php core/scripts/run-tests.sh --url http://localhost--types Simpletest,PHPUnit-Unit,PHPUnit-Kernel,PHPUnit-Functional --concurrency 20 --all
phantomjs --ssl-protocol=any --ignore-ssl-errors=true vendor/jcalderonzumba/gastonjs/src/Client/main.js 8510 1024 768
php core/scripts/run-tests.sh --url http://localhost--types PHPUnit-FunctionalJavascript --concurrency 1 --all
The run-tests.sh script has been shipped with Drupal since 2008, then named
run-functional-tests.php. This command interacts with the test suites in Drupal to run all or specific tests and sets up other configuration items.
There are several different test suites that operate in specific ways:
The following are some of the useful options:
We will now discuss more techniques and information for running Drupal's test suites.
The run-tests.sh isn't actually a shell script. It is a PHP script--which is why you must execute it with PHP. In fact, within core/scripts, each file is a PHP script file meant to be executed using the command line. These scripts are not intended to be run through a web server, which is one of the reasons for the .sh extension.
There can be issues with PHP across platforms that prevent providing a shebang line to allow executing the file as a normal bash or bat script. For more information, refer to this Drupal.org issue at https://www.drupal.org/node/655178.
With Drupal 8, tests can also be run from SQLlite and no longer requires an installed database. This can be accomplished by passing the sqlite and dburl options to the
run-tests.sh script. This requires the PHP SQLite extension to be installed.
Here is an example adapted from the DrupalCI test runner for Drupal core. DrupalCI is the continuous integration service, which runs on Drupal.org for all submitted patches and commits:
php core/scripts/run-tests.sh --sqlite /tmp/.ht.sqlite --die-on-fail --dburl sqlite://tmp/.ht.sqlite --all
Combined with the built-in PHP web server for debugging, you can run test suites without a full-fledged environment.
Each example so far has used the all option to run every Simpletest available. There are various ways to run specific tests:
Drupal 8 has seen a surge in test coverage for both Drupal core and contributed projects, most likely due to PHPUnit adoption. In response to this, the author has written a PhpStorm plugin called Drupal Test Runner that simplifies executing the run-tests.sh script runner.
The plugin's page can be found at https://plugins.jetbrains.com/plugin/8384-drupal-test-runner, and it's public source code can be found at https://github.com/mglaman/intellij-drupal-run-tests.
With Drupal 8 came a new initiative to upgrade the testing infrastructure on Drupal.org. The outcome was DrupalCI. DrupalCI is open source and can be downloaded and run locally. The project page for DrupalCI is https://www.drupal.org/project/drupalci.
The test bot utilizes Docker and can be downloaded locally to run tests. The project ships with a Vagrant file that allows it to be run within a virtual machine or locally. Learn more on the testbot's project page at https://www.drupal.org/project/drupalci_testbot.
In this chapter, we will explore what Drupal 8 brings to the content authoring experience:
In this chapter, we'll cover the Drupal 8 content authoring experience. We will show you how to configure text formats and set up the bundled CKEditor that ships with Drupal 8. We will take a look at how to add and manage content and utilize menus to link to content. Drupal 8 ships with inline editing for per-field modifications from the frontend.
This chapter dives into creating custom content types and harnessing different fields to create advanced content. We'll cover the five new fields added to Drupal 8 core and how to use them, along with configuring new field types through contributed projects. We will go through customizing the content's display and modifying the new form display added in Drupal 8.
Drupal 8 saw the collaboration between the Drupal development community and the CKEditor development community. Because of this, Drupal now ships with CKEditor out of the box as the default What You See Is What You Get (WYSIWYG) editor. The new Editor module provides an API to integrate WYSIWYG editors. Although CKEditor is provided out of the box, contributed modules can provide integrations with other WYSIWYG editors.
Text formats control the formatting of content and WYSIWYG editor configuration for content authors. The standard Drupal installation profile provides a fully configured text format with the enabled CKEditor. We will walk through the steps of recreating this text format.
In this recipe, we will create a new text format with a custom CKEditor WYSIWYG configuration.
Before starting, make sure that the CKEditor module is enabled, which also requires Editor
as a dependency. Editor is the module that provides an API to integrate WYSIWYG editors
with text formats.
Let's create a new text format with a custom CKEditor WYSIWYG configuration:
The Filter modules provide text formats that control over how rich text fields are presented to the user. Drupal will render rich text saved in a text area based on the defined text format for the field. Text fields with "formatted" in their title will respect text format settings; others will render in plain text.
The Editor module provides a bridge to WYSIWYG editors and text formats. It alters the text format form and rendering to allow the integration of WYSIWYG editor libraries. This allows each text format to have its own configuration for its WYSIWYG editor.
Out of the box, the Editor module alone does not provide an editor. The CKEditor module works with the Editor API to enable the usage of the WYSIWYG editor.
Drupal can support other WYSWIG editors, such as markItUp (http://markitup.jaysalvat.com/home/) or TinyMCE (https://www.tinymce.com/) through contributed modules.
Drupal provides granular control of how rich text is rendered, and extensible ways, which we will discuss further.
When string data is added to a field that supports text formats, the data is saved and preserved as it was originally entered. Enabled filters for a text format will not be applied until the content is viewed. Drupal works in such a way that it saves the original content and only filters on display.
With the Filter module enabled, you gain the ability to specify how text is rendered based on the roles of the user who created the text. It is important to understand the filters applied to a text format that uses a WYSIWYG editor. For example, if you selected the Display any HTML as plain text option, the formatting done by the WYSIWYG editor would be stripped out when viewed.
A major component of WYSIWYG editing is the ability to insert links to other pieces of content or external sites. The default link button integrated with CKEditor allows for basic link embedding. This means that your content editors must know their internal content URLs ahead of time to link to them. A solution to this issue is the Linkit module at https://www.drupal.org/project/linkit.
The module can be installed using Composer by running the following command:
$ cd /path/to/drupal8
$ composer require drupal/linkit
The Linkit module provides a drop-in replacement for the default link functionality. It adds auto-complete search for internal content and adds additional options for displaying the field. Linkit works by creating different profiles that allow you to control what content can be referenced, what attributes can be managed, and which users and roles can use a Linkit profile.
The CKEditor module provides a plugin type called CKEditorPlugin. Plugins are small pieces of swappable functionality within Drupal 8. Plugins and plugin development are covered in Chapter 7, Plug and Play with Plugins. This type provides integration between CKEditor and Drupal 8.
The image and link capabilities are plugins defined within the CKEditor module. Additional plugins can be provided through contributed projects or custom development.
Refer to the \Drupal\ckeditor\Annotation\CKEditorPlugin class for the plugin definition and the suggested \Drupal\ckeditor\Plugin\CKEditorPlugin\DrupalImage class as a working example.
The main functionality of a content management system is in the name itself--the ability to manage content; that is, to add, edit, and organize content. Drupal provides a central form that allows you to manage all of the content within your website and allows you to create new content. Additionally, you can view a piece of content and click on an edit link when viewing it.
This recipe assumes that you have installed the standard installation profile and have the default node content types available for use.
Let's manage the content by adding, editing, and organizing the content:
The Content page is a View, which will be discussed in Chapter 3, Displaying Content Through Views. This creates a table of all the content on your site that can be searched and filtered. From here, you can view, edit, or delete any single piece of content.
In Drupal, there are content entities that provide a method of creation, editing, deletion, and viewing. Nodes are a form of a content entity. When you create a node, it will build the proper form that allows you to fill in the piece of content's data. The same process follows for editing content.
When you save the content, Drupal writes the node's content to the database along with all of its respective field data.
Drupal 8's content management system provides many features; we will cover some extra information.
New to Drupal 8 is the ability to easily save a piece of content as a draft instead of directly publishing it. Instead of clicking on Save and publish, click on the arrow next to it to expand the Save as unpublished option:
The aforementioned button has several usability and user experience reviews and will be changing, for the better, in future versions of Drupal. One of the issues to follow is located at https://www.drupal.org/node/1899236. The issue highlights different proposed fixes following consistent user experience patterns defined in existing frontend libraries.
There is a contributed project called Pathauto that simplifies the process of providing URL aliases. It allows you to define patterns that will automatically create URL aliases for content. This module utilizes tokens to allow for very robust paths for content.
The Pathauto project can be found at https://www.drupal.org/project/pathauto.
There is a proposed issue to provide the functionality of Pathauto in Drupal core, and it can be followed at https://www.drupal.org/node/229568.
You also have the capability to perform bulk actions on content. This is available on the Content management screen. The table that lists the site content provides checkboxes at the beginning of each row. For each selected item, you can choose an item from With selection to make bulk changes, such as deleting, publishing, and unpublishing content:
Drupal provides a way to link content being authored to a specified menu on the website, generally the main menu. You can, however, create a custom menu to provide links to content. In this recipe, we will show you how to create a custom menu and link content to it. We will then place the menu as a block on the page, in the sidebar.
This recipe assumes that you have installed the standard installation profile and have the default node content types available for use. You should have some content created to create a link.
Menus and links are part of Drupal core. The ability to make custom menus and menu links is provided through the Menu UI module. This module is enabled on the standard installation profile, but may not be in others.
The Link input of the menu link form allows you to begin typing node titles and easily linking them to existing content. This was a piece of functionality not available in previous versions of Drupal. It will automatically convert the title into the internal path for you. Link input also accepts a regular path, such as /node/1 or an external path.
Links can be managed through the content edit form itself, which will be covered next.
A piece of content can be linked to a menu from the add or edit form. The menu settings section allows you to toggle the availability of a menu link. The menu link title will reflect the content's title by default.
The parent item allows you to decide which menu and which item it will appear under. By default, content types only have the main menu allowed. Editing a content type can allow for multiple menus or only choose a custom menu.
This allows you to populate the main menu or complimentary menu without having to visit the menu management screens.
A touted feature of Drupal 8 is the ability to provide inline editing. Inline editing is enabled by default with the standard installation profile through the Quick Edit module. The Quick Edit module allows editing individual fields while viewing a piece of content, and integrates it with the Editor module for WYSIWYG editors!
Let's provide inline editing:
The Contextual links module provides privileged users with shortcut links to modify blocks or content. The contextual links are toggled by clicking on Edit in the toolbar. The Edit link toggles the visibility of contextual links on the page. Previously, in Drupal 7, contextual links appeared as cogs when a specific region was hovered over.
The Quick Edit module builds on the contextual links features. It allows field formatters, which display field data, to describe how they will interact. By default, Quick Edit sets this to a form. Clicking on an element will use JavaScript to load a form and save data via AJAX calls.
Quick Edit will not work on administrative pages.
With each minor release of Drupal 8, there are more improvements to the inline editing experience.
There is an experimental module in Drupal 8.2 that allows you to editing blocks and other site configuration from the frontend of the website, just like Quick Edit for content. To enable this, install the Settings Tray module.
When you browse the Drupal site, you will note a new Edit button in the left of the toolbar. Clicking on this will allow you to edit blocks and the site configuration.
For more information, review the Drupal.org handbook for this feature at https://www.drupal.org/docs/8/core/modules/outside-in/overview.
Drupal excels in the realm of content management by allowing different types of content. In this recipe, we will walk you through creating a custom content type. We will create a Services type that has some basic fields and would be used in a scenario that brings attention to a company's provided services.
You will also learn how to add fields to a content type in this recipe, which generally goes hand in hand with making a new content type on a Drupal site.
In Drupal, there are entities that have bundles. A bundle is just a type of entity that can have specific configurations and fields attached. When working with nodes, a bundle is generally referred to as a content type.
Content types can be created as long as the Node module is enabled. When a content type is created through the user interface, it invokes the node_add_body_field() function. This function adds the default body field for content types.
Fields can only be managed or added if the Field UI module is enabled. The Field UI module exposes the Manage Fields, Manage Form Display, and Manage Display for entities, such as nodes and blocks.
The field system is what makes creating content in Drupal so robust. With Drupal 8, some of the most used contributed field types have been merged into Drupal core as their own module. In fact, Entity Reference is no longer a module but part of the main Field API now.
This recipe is actually a collection of mini-recipes to highlight the new fields provided by Drupal 8 core: Link, Email, Telephone, Date, and Entity reference.
The standard installation profile does not enable all of the modules that provide these field types by default. For this recipe, you will need to manually enable select modules so that you can create the field. The module that provides the field type and its installation status in the standard profile will be highlighted.
Each recipe will start off expecting that you have enabled the module, if needed, and that you are at the Manage fields form of a content type and have clicked on Add field and provided a field label. The recipes here cover the settings for each field.
This section contains a series of mini recipes that show how to use each of the new core field types.
The Link field is provided by the Link module. It is installed by default with the standard installation profile. It is a dependency of the Menu UI, Custom Menu Links, and Shortcut module.
The Email field is provided by Drupal core and is available without installing additional modules:
The Telephone field is provided by the Telephone module. It is not installed by default with the standard installation profile, and must be installed through the Extend form.
The Date field is provided by the Datetime module. It is enabled by default with the standard installation profile.
The Entity Reference field is part of Drupal core and is available without enabling additional modules. Unlike other fields, Entity Reference appears as a grouping of specific items when adding a field. This is because you must pick a type of entity to reference. Follow these steps:
When working with fields in Drupal 8, there are two steps that should be noted. When you first create a field, you are defining a base field to be saved. This configuration is a base that specifies how many values a field can support and whether any additional settings are defined by the field type. When you attach a field to a bundle, it is considered a field storage and contains configuration unique to that specific bundle. If you have the same Link field on the Article and Page content type, the label, link type, and link text settings are for each instance.
Each field type provides a method for storing and presents a specific type of data. The benefit of using these fields comes from validation and data manipulation. It also allows you to utilize HTML5 form inputs. Using HTML5 for telephone, email, and date, the authoring experience uses the tools provided by the browser instead of additional third-party libraries. This also provides a more native experience when authoring with mobile devices.
Having Drupal 8 released with new fields was a significant improvement in integrating widely used contributed modules into Drupal core. In the following sections, we will cover additional improvements and some additional topics.
Each of the recipes covers a field type that was once part of the contributed project space. These projects provided more configuration options than those found in Drupal core at the time of writing this book. Over time, more and more features will be brought into Drupal core from their source projects.
For instance, the Datetime module is based on the contributed Date project. However, not all of the contributed project's features have made it to Drupal core. Each minor release of Drupal 8 sees more features moved to core. An example is the Datetime range module, which is an experimental module slated to be near stable for Drupal 8.4. This module adds support to start and end dates for Datetime fields. Documentation for the Datetime range module can be found at https://www.drupal.org/docs/8/core/modules/datetime-range.
Using a View with an Entity Reference field is covered in Chapter 3, Displaying Content Through Views. Using a View, you can customize the way results are fetched for a reference field.
The latest in Drupal 8 is the availability of form display modes. Form modes allow a site administrator to configure different field configurations for each content entity bundle edit form. In the case of nodes, you have the ability to rearrange and alter the display of fields and properties on the node edit form.
In this recipe, we'll modify the default form for creating the Article content type that comes with the standard installation profile:
Entities in Drupal have various view modes for each bundle. In Drupal 7, there were only display view modes, which are covered in the next recipe. Drupal 8 brings in new form modes to allow for more control of how an entity edit form is displayed.
Form display modes are configuration entities. Form display modes dictate how the \Drupal\Core\EntityContentEntityForm class will build a form when an entity is edited. This will always be set to default unless changed or specified to a different mode programmatically.
Since form display modes are configuration entities, they can be exported using configuration management.
Hidden field properties will have no value unless there is a provided default value. For example, if you hide the authoring information without providing code to set a default value, the content will be authored by anonymous (no user).
We will discuss more items for managing the form of a content entity in the following section.
Form display modes for all entities are managed under one area and are enabled for each bundle type. You must first create a display mode, and then it can be configured through the bundle manage interface.
In Chapter 6, Creating Forms with the Form API, we will have a recipe that details with altering forms. In order to provide a default value for an entity property hidden on the form display, you will need to alter the form and provide a default value. The Field API provides a way to set a default value when fields are created.
Drupal provides display view modes that allow for customization of the fields and other properties attached to an entity. In this recipe, we will adjust the teaser display mode of an Article. Each field or property has a control for displaying the label, the format to display the information in, and additional settings for the format.
Harnessing view displays allows you to have full control over how content is viewed on your Drupal site.
View display modes are configuration entities. View display modes dictate how the \Drupal\Core\EntityContentEntityForm class will build a view display when an entity is viewed. This will always be set to default unless changed or specified as a different mode programmatically.
Since view display modes are configuration entities, they can be exported using configuration management.
This chapter will cover the Views module and how to use a variety of its major features. In this chapter, we will cover the following recipes:
For those who have used Drupal previously, Views is in core for Drupal 8. If you are new to Drupal, note that Views has been one of the most used contributed projects for Drupal 6 and Drupal 7.
Briefly described, Views is a visual query builder that allows you to pull content from the database and render it in multiple formats. Select administrative areas and content listings provided out of the box by Drupal are all powered by Views. We'll dive into how to use Views to customize the administrative interface, customize ways to display your content, and interact with the entity reference field.
Views does one thing, and it does it well--listing content. The power behind the Views module is the amount of configurable power it gives the end user to display content in various forms.
This recipe will cover creating a content listing and linking it in the main menu. We will use the Article content type provided by the standard installation and make an article's landing page.
The Views UI module must be installed to manipulate Views from the user interface. By default, this is enabled with the standard installation profile.
Let's list the Views listing content:
The first step to create a view involves selecting the type of data you will be displaying. This is referred to as the base table, which can be any type of entity or data specifically exposed to Views.
When creating a Views page, we add a menu path that can be accessed. It tells Drupal to invoke Views to render the page, which will load the view you create and render it.
There are display style and row plugins that format the data to be rendered. Our recipe used the unformatted list style to wrap each row in a simple div element. We could have changed this to a table for a formatted list. The row display controls how each row is outputted.
The Views module has been one of the must-use modules since it first debuted, to the point that almost every Drupal 7 site used this module. In the following section, we will dive further into Views.
The Views module has been a contributed module up until Drupal 8. In fact, it was one of the most used modules. Although the module is now part of Drupal core, it still has many improvements that are needed, and are being committed.
Through their 8.1, 8.2, and 8.3 releases, there have been many improvements. We will continue to see this pattern with each future minor release.
When working with Views, you will see some different terminologies. One of the key items to be grasped is what a display is. A view can contain multiple displays. Each display is of a certain type. Views comes with the following display types:
Each display can have its own configuration, too. However, each display will share the same base table (content, files, and so on). This allows you to take the same data and represent it in different ways.
Within Views, there are two types of style plugins that represent how your data is displayed: style and row:
For example, the grid style will output multiple div elements with specified classes to create a responsive grid. At the same time, the table style creates a tabular output with labels used as table headings.
Row plugins define how to render the row. The default content will render the entity as defined by its selected display mode. If you choose Fields, you can manually select which fields to include in your view.
Each format style plugin has a corresponding Twig file that the theme layer uses. Refer to the Twig templating recipe of Chapter 5, Frontend for the Win to learn more about Twig in Drupal 8.
You can define new plugins in custom modules or use contributed modules to access different options.
Each of the available display types has a method to expose itself through the user interface, except for Embed. Often, contributed and custom modules use Views to render displays instead of manually writing queries and rendering the output. Drupal 8 provides a special display type to simplify this.
If we were to add an Embed display to the view created in the recipe, we could pass the following render array to output our view programmatically:
$view_render = [ '#type' => 'view', '#name' => 'articles', '#display_id' => 'embed_1', ];
When rendered, the #type key tells Drupal that this is a view element. We then point it to our new display embed_1. The Embed display type has no special functionality, in fact, it is a simplistic display plugin. The benefit is that it does not have additional operations conducted for the sake of performance.
Using an Embed display is beneficial when you want to use a View in a custom page, block, or even form. For example, Drupal Commerce uses this pattern for its shopping cart block and the order summary in the checkout. A view is used to display the order information within a custom block and form.
With the addition of Views in Drupal core, many of the administrative interfaces are powered by Views. This allows customization of default admin interfaces to enhance site management and content authoring experiences.
In this recipe, we will modify the default content overview form that is used to find and edit content. We will add the ability to filter content by the user who authored it.
When a view is created that has a path matching an existing route, it will override it and present itself. That is how the /admin/content and other administrative pages are able to be powered by Views.
Drupal uses the overridden route and uses Views to render the page. From that point on, the page is handled like any other Views page would be rendered.
We will dive into additional features available through Views that can enhance the way you use Views and present them on your Drupal site.
Filters allow you to narrow the scope of the data displayed in a view. Filters can either be exposed or not; by default, a filter is not exposed. An example would be using the Content: Publishing status set to Yes (published) to ensure that a view always contains published content. This is an item you would configure to display content to site visitors. However, if it were for an administrative display, you may want to expose that filter. This way, content editors can view, easily, what content has not been published yet or been unpublished.
All filter and sort criteria can be marked as exposed.
Exposed filters work by parsing query parameters in the URL. For instance, on the content management form, changing the Type filter will add type=Article, among others to the current URL.
With this recipe, the author filter would show up as uid in the URL. Exposed filters have a
Filter identifier option that can change the URL component:
This could be changed to author or some other value to enhance the user experience behind the URL, or mask the Drupal-ness of it.
Views can replace administrative pages with enhanced versions due to the way the route and module system works in Drupal. Modules are executed in order of the module's weight or alphabetical order if weights are the same. Naturally, in the English alphabet, the letter V comes toward the end of the alphabet. That means any route that Views provides will be added toward the end of the route discovery cycle.
If a view is created and it provides a route path, it will override any that exist on that path. There is no collision checking mechanism (and there was not one present in Views before merging into Drupal core) that prevents this.
This allows you to easily customize most existing routes, but, beware that you could easily have conflicting routes, and Views will normally override the other.
Previous recipes have shown how to create and manipulate a page created by a view. Views provides different display types that can be created, such as a block. In this recipe, we will create a block powered by Views. The Views block will list all Tag taxonomy terms that have been added to the Article content type.
This recipe assumes that you have installed the standard installation profile and have the default node content types available for use.
In the Drupal 8 plugin system, there is a concept called Derivatives. Plugins are small pieces of swappable functionality within Drupal 8. Plugins and plugin development are covered in Chapter 7, Plug and Play with Plugins. A derivative allows a module to present multiple variations of a plugin dynamically. In the case of Views, it allows the module to provide variations of a ViewsBlock plugin for each view that has a block display. Views implements the \Drupal\views\Plugin\Block\ViewsBlock\ViewsBlock class, providing the base for the dynamic availability of these blocks. Each derived block is an instance of this class.
When Drupal initiates the block, Views passes the proper configuration required. The view is then executed and the display is rendered whenever the block is displayed.
We will now explore some of the other ways in which Views interacts with blocks.
If your view utilizes exposed filters, you have the option to place the exposed form in a block. With this option enabled, you may place the block anywhere on the page, even pages not for your view.
An example of using an exposed form in a block is for a search result view. You will add an exposed filter for keywords that control the search results. With the exposed filters in a block, you can easily place it in your site's header. When an exposed filter block is submitted, it will direct users to your view's display.
To enable the exposed filters as a block, you must first expand the Advanced section on the right side of the Views edit form. Click on the Exposed form in block option from the Advanced section. In the options modal that opens, select the Yes radio button, and click on Apply. You can then place the block from the Block layout form:
Views can be configured to accept contextual filters. Contextual filters allow you to provide a dynamic argument that modifies the view's output. The value is expected to be passed from the URL; however, if it is not present, there are ways to provide a default value.
In this recipe, we will create a new page called My Content, which will display a user's authored content on the /user/%/content route.
Contextual filters mimic the route variables found in the Drupal routing system. Variables are represented by percentage signs as placeholders in the view's path. Views will match up each placeholder with contextual filters by order of their placement. This allows you to have multiple contextual filters; you just need to ensure that they are ordered properly.
The Views module is aware of how to handle the placeholder because the type of data is selected when you add the filter. Once the contextual filter is added, there are extra options available for handling the route variable.
We will now explore the extra options available when using contextual filters.
You are still able to preview a view from the edit form. You simply add the contextual filter values to the text form concatenated by a forward slash (/). In this recipe, you could
replace navigating to /user/1/content with simply inputting 1 into the preview form and updating the preview.
Even though the view created in the recipe follows a route under /user, it will not show up as a local task tab until it has a menu entry defined.
Go back and edit the My Content view. From the Page settings section, you will need to change No menu from the Menu option. Clicking on that link will open the menu link settings dialog.
Select Menu tab and provide a Menu link title, such as My Content. Select <User account menu> for the Parent. Click on Apply and save your view. When you go to the /user page again, it will have the My Content page available.
With contextual filters, you have the ability to manipulate the current page's title. When adding or editing a contextual filter, you can modify the page title. You may check the Override title option in When the filter value is present in the URL or a default is provided section.
This textbox allows you to enter in a new title that will be displayed. Additionally, you can use the information passed from the route context using the format of %#, where # is the argument order.
Contextual filters can have validation attached. Without specifying extra validation, Views will take the expected argument and try to make it just work. You can add validation to help limit this scope and filter out invalid route variables.
You can enable validation by checking Specify validation criteria from the When the filter value is present in the URL or a default is provided section. The default is set to Basic Validation, which allows you to specify how the view should react if the data is invalid; based on our recipe, this would be if the user is not found.
The list of Validator options is not filtered by the contextual filter item you selected, so some may not apply. For our recipe, one might want User ID and select the Validate user has access to the User. This validator would make sure that the current user is able to view the route's user's profile. Additionally, it can be restricted further based on its role:
This gives you more granular control over how the view operates when using contextual filters for route arguments.
You may also configure the contextual filter to allow AND or OR operations along with exclusion. These options are under the More section when adding or editing a contextual filter.
The Allow multiple values option can be checked to enable AND or OR operations. If the contextual filter argument contains a series of values concatenated by plus (+) signs, it acts as an OR operation. If the values are concatenated by commas (,) it acts as an AND operation.
When the Exclude option is checked, the value will be excluded from the results rather than the view being limited by it.
As stated at the beginning of the chapter, Views is a visual query builder. When you first create a view, a base table is specified from which to pull data. Views automatically knows how to join tables for field data, such as body text or custom-attached fields.
When using an entity reference field, you can display the value as the raw identifier, the referenced entity's label, or the entire rendered entity. However, if you add a relationship based on a reference field, you will have access to display any of that entity's available fields.
In this recipe, we will update the Files view, used for administering files, to display the username of the user who uploaded the file.
Drupal stores data in a normalized format. Database normalization, in short, involves the organization of data in specifically related tables. Each entity type has its own database table, and all fields have their own database table. When you create a view and specify what kind of data will be shown, you are specifying a base table in the database that Views will query. Views will automatically associate fields that belong to the entity and it's relationship to those tables for you.
When an entity has an entity reference field, you can add a relationship to the referenced entity type's table. This is an explicit definition, whereas fields are implicit. When the relationship is explicitly defined, all the referenced entity type's fields come into scope. The fields on the referenced entity type can then be displayed, filtered, and sorted.
Using relationships in Views allows you to create some powerful displays. We will discuss aggregation and additional information about relationships.
The Views module uses a series of hooks to retrieve data that it then uses to represent ways to interact with the database. One of these is the hook_field_views_data hook, which processes a field storage configuration entity and registers its data with Views. The Views module implements this on behalf of the Drupal core to add relationships and reverse relationship, for Entity reference fields.
Since Entity reference fields have set schema information, Views can dynamically generate these relationships by understanding the field's table name, destination entity's table name, and the destination entity's identifier column.
There are times where you will need to define a relation on your own with custom code. Typically, when working with custom data in Drupal, you would more than likely create a new entity type; this topic is covered in Chapter 9, Configuration Management - Deploying in Drupal 8. This is not always the case, however, and you may just need a simple method of storing data. An example can be found in the Database Logging module. The Database Logging module defines a schema for a database table and then uses hook_views_data to expose its database table to Views.
The dblog_schema hook implementation returns a uid column on the watchdog database table created by the module. That column is then exposed to Views using the following definition:
$data['watchdog']['uid'] = array(
'title' => t('UID'),
'help' => t('The user ID of the user on which the log entry
was written..'),
'field' => array(
'id' => 'numeric',
),
'filter' => array(
'id' => 'numeric',
),
'argument' => array(
'id' => 'numeric',
),
'relationship' => array(
'title' => t('User'),
'help' => t('The user on which the log entry as written.'),
'base' => 'users',
'base field' => 'uid',
'id' => 'standard',
),
);
This array tells Views that the watchdog table has a column named uid. It is numeric in nature for its display, filtering capabilities, and sorting capabilities. The relationship
key is an array of information that instructs Views how to use this to provide a relationship (LEFT JOIN) on the users table. The User entity uses the users table and has the primary key of uid.
There is a view setting under the Advanced section that allows you to enable aggregation.
This feature allows you to enable the usage of SQL aggregate functions, such as MIN, MAX, SUM, AVG, and COUNT. In this recipe, the Files view uses aggregation to sum the usage counts of each file on the Drupal site.
Aggregation settings are set for each field, and when enabled, they have their own link to configure these settings:
The Entity reference field, covered in Chapter 2, The Content Authoring Experience, can utilize a custom view for providing the available field values. The default entity reference field will display all available entities of the type it can reference. The only available filter is based on the entity bundle, such as only returning Article nodes. Using an entity reference view, you can provide more filters, such as only returning the content that your user has authored.
In this recipe, we will create an entity reference view that filters content by the author. We will add the field to the user account form, allowing users to select their favorite contributed content.
The entity reference field definition provides selection plugins. The Views module provides an entity reference selection plugin. This allows entity reference to gather data into a view to receive available results.
The display type for Views requires you to select which fields will be used to search against when using the autocomplete widget. If you are not using the autocomplete widget and instead use the select list or checkboxes and radio buttons, then it will return the view's entire results.
This chapter dives into extending Drupal using a custom module:
A feature of Drupal that makes it desirable is the ability to customize it through modules. Whether custom or contributed, modules extend the functionalities and capabilities of Drupal. Modules can be used to not only extend Drupal, but also to create a way to provide configuration and reusable features.
This chapter will discuss how to create a module and allow Drupal to discover it, allowing it to be installed from the extend page. Permissions, custom pages, and default configurations all come from modules. We will explore how to provide these through a custom module.
In addition to creating a module, we will discuss the Features module that provides a set of tools to generate a module and export its configuration.
The first step to extend Drupal is to create a custom module. Although the task sounds daunting, it can be accomplished in a few simple steps. Modules can provide functionalities and customizations to functionalities provided by other modules, or they can be used as a way to contain the configuration and a site's state.
In this recipe, we will create a module by defining an info.yml file, a file containing information that Drupal uses to discover extensions, and enabling the module.
name: My Module!
type: module
description: This is an example module from the Drupal 8 Cookbook!
core: 8.x
name: My Module! type: module description: This is an example module from the Drupal 8 Cookbook! core: 8.x
Drupal utilizes info.yml files to define extensions. Drupal has a discovery system that locates these files and parses them to discover modules. The info_parser service, provided by the \Drupal\Core\Extension\InfoParser class, reads the info.yml file. The parser guarantees that the required type, core, and name keys are present.
When a module is installed, it is added to the core.extension configuration object, which contains a list of installed modules and themes. The collection of modules in the core.extension module array will be installed, and will have PHP namespaces resolved, services loaded, and hooks registered.
When Drupal prepares to execute a hook or register services, it will iterate through the values in the module key in core.extension.
There are more details about Drupal modules and the module info.yml files that we can explore.
Drupal 8 uses the PSR-4 standard developed by the PHP Framework Interoperability Group (PHP-FIG). The PSR-4 standard is for package-based PHP namespace autoloading. It defines a standard to understand how to automatically include classes based on a namespace and class name. Drupal modules have their own namespaces under the Drupal root namespace.
Using the module from the recipe, our PHP namespace will be Drupal\mymodule, which represents the modules/mymodule/src folder.
With PSR-4, files need to contain only one class, interface, or trait. These files need to have the same filename as the containing class, interface, or trait name. This allows a class loader to resolve a namespace as a directory path and know the class's filename. The file can then be automatically loaded when it is used in a file.
Drupal supports multiple module discovery locations. Modules can be placed in the following directories and discovered:
The \Drupal\Core\Extension\ExtensionDiscovery class handles the discovery of extensions by type. It will iteratively scan each location and discover modules that are available. The discovery order is important. If the same module is placed in /modules, but also in the sites/default/modules directory, the latter will take precedence.
Modules can define a package key to group modules on the module list page:
Projects that include multiple submodules, such as Drupal Commerce, specify packages to normalize the modules' list form. Contributed modules for the Drupal Commerce project utilize a package name, Commerce (contrib), to group them on the module list page.
Modules can define dependencies to ensure that those modules are enabled before your module can be enabled.
Here is the info.yml for the Responsive Image module:
name: Responsive Image type: module description: 'Provides an image formatter and breakpoint mappings to output responsive images using the HTML5 picture tag.' package: Core version: VERSION core: 8.x dependencies: - breakpoint - image
The dependencies key specifies that the breakpoint and image modules need to be enabled first before the Responsive Image module can be enabled. When enabling a module that requires dependencies that are disabled, the installation form will provide a prompt asking you whether you would like to install the dependencies as well. If a dependency module is missing, the module cannot be installed. The dependency will show a status of (missing).
A module that is a dependency of another module will state the information in its description, along with the other module's status. For example, the Breakpoint module will show that the Re module requires it as a dependency and is disabled:
There is a version key that defines the current module's version. Projects on Drupal.org do not specify this directly, as the Drupal.org extension packager adds it when a release is created. However, this key can be important for private modules to track the release information.
Versions are expected to be single strings, such as 1.0-alpha1 and 2.0.1. You can also pass VERSION, which will resolve to the current version of Drupal core.
In Drupal, there are routes that represent URL paths that Drupal interprets to return content. Modules can define routes and methods that return data to be rendered and then displayed to the end user.
In this recipe, we will define a controller that provides an output and a route. The route provides a URL path that Drupal will associate with our controller to display the output.
Create a new module like the one in the first recipe. We will refer to the module as mymodule throughout the recipe. Use your module's name as appropriate.
<?php
namespace Drupal\mymodule\Controller;
use Drupal\Core\Controller\ControllerBase;
/**
* Returns responses for My Module module.
*/
class MyPageController extends ControllerBase {
}
This creates the MyPageController class, which extends the \Drupal\Core\Controller\ControllerBase class. This base class provides a handful of utilities for interacting with the container.
The Drupal\mymodule\Controller namespace allows Drupal to automatically load the file from /modules/mymodule/src/Controller.
/**
* Returns markup for our custom page.
*/
public function customPage() {
return [
'#markup' => t('Welcome to my custom page!'),
];
}
The customPage method returns a render array that the Drupal theming layer can parse. The #markup key denotes a value that does not have any additional rendering or theming processes.
mymodule.mypage:
mymodule.mypage: path: '/mypage'
mymodule.mypage:
path: '/mypage'
defaults:
_controller: '\Drupal\mymodule\Controller\MyPageController::customPage'
_title: 'My custom page'
You need to provide the initial \ when providing the fully qualified class name.
mymodule.mypage: path: '/mypage' defaults: _controller: '\Drupal\mymodule\Controller\MyPageController::customPage' _title: 'My custom page' requirements: _permission: 'access content'
Drupal uses routes, which define a path, that returns content. Each route has a method in a controller class that generates the content, in the form of a render array, to be delivered to the user. When a request comes to Drupal, the system tries to match the path to known routes. If the route is found, the route's definition is used to deliver the page. If the route cannot be found, the 404 page is displayed.
The HTTP kernel takes the request and loads the route. It will invoke the defined controller method or procedural function. The result of the invoked method or function is then handed to the presentation layer of Drupal to be rendered into the content that can be delivered to the user.
Drupal 8 builds on top of the Symfony HTTP kernel to provide the underlying functionality of its route system. It has added the ability to provide access requirements, cast placeholders into loaded objects, and provide partial page responses.
Routes have extra capabilities that can be configured; we will explore those in the next section.
Routes can accept dynamic arguments that can be passed to the route controller's method. Placeholder elements can be defined in the route using curly brackets in the URL that denote dynamic values.
The following example code shows what a route might look like:
mymodule.cats:
path: '/cat/{name}'
defaults:
_controller: '\Drupal\mymodule\Controller\MyPageController::cats'
requirements:
_permission: 'access content'
This route specifies the /cat/{name} path. The {name} placeholder will accept dynamic values and pass them to the controller's method:
class MyPageController {
// ...
public function cats($name) {
return [
'#markup' => t('My cats name is: @name', [
'@name' => $name,
]),
];
}
}
This method accepts the name variable from the route and substitutes it into the render array to display it as a text.
Drupal's routing system provides a method of upcasting a variable into a loaded object. In Drupal, upcasting is the process of taking a route parameter and converting it into a richer piece of data. This includes taking an entity ID and providing the loaded entity to the system. There are a set of parameter converter classes under the \Drupal\Core\ParamConverter namespace. The EntityConverter class will read options defined in the route and replace a placeholder value with a loaded entity object.
If we have an entity type called cat, we can turn the name placeholder into a method that will be provided with the loaded cat object in our controller's method:
mymodule.cats:
path: '/cat/{name}'
defaults:
_controller: '\Drupal\mymodule\Controller\MyPageController::cats'
requirements:
_permission: 'access content'
options:
parameters:
name:
type: entity:cat
Drupal provides regular expression validation against route parameters. If the parameter fails the regular expression validation, a 404 page will be returned. Using an example route, we can add the validation to ensure that only alphabetical characters are used in the route parameter:
mymodule.cats:
path: '/cat/{name}'
defaults:
_controller: '\Drupal\mymodule\Controller\MyPageController::cats'
requirements:
_permission: 'access content'
name: '[a-zA-z]+'
Under the requirements key, you can add a new value that matches the name of the placeholder. You can then set it to have the value of the regular expression you would like to use. This would prevent c@ts or cat! from being valid parameters.
Routes can define different access requirements through the requirements key. Multiple validators can be added. However, there must be one that provides a true result, or else the route will return 403, access denied. This is true if the route defines no requirement validators.
Route requirement validators are defined by implementing \Drupal\Core\Routing\Access\AccessInterface. Here are some of the common requirement validators defined throughout Drupal core:
The routing system allows modules to define routes programmatically. This can be accomplished by providing a routing_callbacks key that defines a class and method that will return an array of the \Symfony\Component\Routing\Route objects.
In the module's routing.yml, you will define the routing callbacks key and related class:
route_callbacks: - '\Drupal\mymodule\Routing\CustomRoutes::routes'
The \Drupal\mymodule\Routing\CustomRoutes class will then have a method named routes, which returns an array of Symfony route objects:
<?php
namespace Drupal\mymodule\Routing;
use Symfony\Component\Routing\Route;
class CustomRoutes {
public function routes() {
$routes = [];
// Create mypage route programmatically
$routes['mymodule.mypage'] = new Route(
// Path definition
'mypage',
// Route defaults
[
'_controller' => '\Drupal\mymodule\Controller\MyPageController::customPage',
'_title' => 'My custom page',
],
// Route requirements
[
'_permission' => 'access content',
]
);
return $routes;
}
}
If a module provides a class that interacts with routes, the best practice is to place it in the routing portion of the module's namespace. This helps you identify its purpose.
The invoked method is expected to return an array of initiated route objects. The route class takes the following arguments:
When Drupal's route system is rebuilt because of a module being enabled or caches being rebuilt, an event is fired that allows modules to alter routes defined statically in YAML or dynamically. This involves implementing an event subscriber by extending \Drupal\Core\Routing\RouteSubscribeBase, which subscribes the RoutingEvents::ALTER event.
Create a src/Routing/RouteSubscriber.php file in your module. It will hold the route subscriber class:
<?php
namespace Drupal\mymodule\Routing;
use Drupal\Core\Routing\RouteSubscriberBase;
use Symfony\Component\Routing\RouteCollection;
class RouteSubscriber extends RouteSubscriberBase {
/**
* {@inheritdoc}
*/
public function alterRoutes(RouteCollection $collection) {
// Change path of mymodule.mypage to use a hyphen
if ($route = $collection->get('mymodule.mypage')) {
$route->setPath('/my-page');
}
}
}
The preceding code extends RouteSubscribeBase and implements the alterRoutes() method. We make an attempt to load the mymodule.mypage route, and, if it exists, we change its path to my-page. Since objects are always passed by reference, we do not need to return a value.
For Drupal to recognize the subscriber, we will need to describe it in the module's services.yml file. In the base directory of your module, create a mymodule.services.yml file and add the following code:
services:
mymodule.route_subscriber:
class: Drupal\mymodule\Routing\RouteSubscriber
tags:
- { name: event_subscriber }
This registers our route subscriber class as a service to the container so that Drupal can execute it when the event is fired.
In Drupal, there are roles and permissions used to define robust access control lists for users. Modules use permissions to check whether the current user has access to perform an action, view specific items, or do other operations. Modules then define the permissions that are used so that Drupal is aware of them. Developers can then construct roles, which are made up of enabled permissions.
In this recipe, we will define a new permission to view custom pages defined in a module. The permission will be added to a custom route and will restrict access to the route path to users who have a role containing the permission.
Create a new module like the one in the first recipe. We will refer to the module as mymodule throughout the recipe. Use your module's name in the following recipe as appropriate.
This recipe also modifies a route defined in the module. We will refer to this route as mymodule.mypage. Modify the appropriate path in your module's routing.yml file.
view mymodule pages:
view mymodule pages: title: 'View my module pages'
view mymodule pages: title: 'View my module pages' description: 'Allows users to view pages provided by My Module'
mymodule.mypage: path: '/mypage' defaults: _controller: '\Drupal\mymodule\Controller\MyPageController::customPage' _title: 'My custom page' requirements: _permission: 'view mymodule pages'
Permissions and roles are provided by the User module. The user.permissions service discovers the permissions.yml provided by installed modules. By default, the service is defined through the \Drupal\user\PermissionHandler class.
Drupal does not save a list of all permissions that are available. The permissions for a system are loaded when the permissions page is loaded. Roles contain an array of permissions.
When checking a user's access for a permission, Drupal checks all the user's roles to see whether they support that permission.
We will cover more ways to work with permissions in your modules in the upcoming sections.
Permissions can be flagged as having a security risk if enabled; this is the restrict access flag. When this flag is set to restrict access: TRUE, it will add a warning to the permission description.
This allows module developers to provide more context to the amount of control a permission may give a user:
The permission definition from our recipe would look like the following:
view mymodule pages:
title: 'View my module pages'
description: 'Allows users to view pages provided by My Module'
restrict access: TRUE
Permissions can be defined by a module programmatically or statically in a YAML file. A module needs to provide a permission_callbacks key in its permissions.yml that contains either an array of classes and their methods or a procedural function name.
For example, the Filter module provides granular permissions based on the different text filters created in Drupal:
permission_callbacks: - Drupal\filter\FilterPermissions::permissions
This tells the user_permissions service to execute the permissions method of the
\Drupal\Filter\FilterPermissions class. The method is expected to return an array that matches the same structure as that of the permissions.yml file.
An example of using generated permissions will be covered in Implementing custom access control for an entity recipe of Chapter 10, The Entity API.
The user account interface provides a method for checking whether a user entity has a permission. To check whether the current user has a permission, you will get the current user, and you need to invoke the hasPermission method:
\Drupal::currentUser()->hasPermission('my permission');
The \Drupal::currentUser() method returns the current active user object. This allows you to check whether the active user has the necessary permissions to perform certain types of actions.
Drupal provides a configuration management system, which is discussed in Chapter 9, Configuration Management - Deploying in Drupal 8, and modules can provide configuration on an installation or through an update system. Modules provide the configuration through YAML files when they are first installed. Once the module is enabled, the configuration is then placed in the configuration management system; however updates can be made to the configuration in code through the Drupal update system.
In this recipe, we will provide a configuration YAML that creates a new contact form and then manipulates it through a schema version change in the update system.
Create a new module like the one in the first recipe. We will refer to the module as mymodule throughout the recipe. Use your module's appropriate name where necessary.
langcode: en
status: true
dependences: {}
id: contactus
label: 'Contact Us'
recipients:
- webmaster@example.com
reply: ''
weight: 0
The configuration entry is based on a schema definition, which we will cover in Chapter 9, Configuration Management - Deploying in Drupal 8. The langcode, status, and dependencies are the required configuration management keys.
The id is the contact form's machine name and the label is the human display name. The recipients key is a YAML array of valid email addresses. The reply key is a string of text for the Auto-reply field. Finally, the weight defines the form's weight in the administrative list.
<?php
/**
* Update "Contact Us" form to have a reply message.
*/
function mymodule_update_8001() {
$contact_form = \Drupal\contact\Entity\ContactForm::load('contactus');
$contact_form->setReply(t('Thank you for contacting us, we will reply shortly'));
$contact_form->save();
}
This function uses the entity's class to load our configuration entity object. It loads contactus, which our module has provided, and sets the reply property to a new value.
Drupal's moduler_installer service, provided through \Drupal\Core\Extension\ModuleInstaller, ensures that configuration items defined in the module's config folder are processed on installation. When a module is installed, the config.installer service, provided through \Drupal\Core\Config\ConfigInstaller, is called to process the module's default configuration.
In the event, the config.installer service makes an attempt to import the configuration from the install folder that already exists, and an exception will be thrown. Modules cannot provide changes made to the existing configuration through static YAML definitions.
Since modules cannot adjust configuration objects through static YAML definitions provided to Drupal, they can utilize the database update system to modify the configuration. Drupal utilizes a schema version for modules. The base schema version for a module is 8000. Modules can provide update hooks in the form of hook_update_N, where N represents the next schema version. When Drupal's updates are run, they will execute the proper update hooks and update the module's schema version.
Configuration objects are immutable by default. To edit a configuration, a mutable object needs to be loaded through the configuration factory service.
We will discuss configuration in Chapter 9, Configuration Management - Deploying in Drupal 8; however, we will now dive into some important notes when working with modules and configurations.
There are three directories that the configuration management system will inspect in a module's config folder, which are as follows:
The install folder specifies the configuration that will be imported. If the configuration object exists, the installation will fail. The optional folder contains the configuration that will be installed if the following conditions are met:
If any one of the conditions fails, the configuration will not be installed, but it will not halt the module's installation process.
The schema folder provides configuration object definitions. This uses YAML definitions to structure configuration objects, and is covered in depth in Chapter 9, Configuration Management - Deploying in Drupal 8.
The configuration management system does not allow modules to provide configuration on an installation that already exists. For example, if a module tries to provide system.site and defines the site's name, it would fail to install. This is because the system module provides this configuration object when you first install Drupal.
Drupal provides hook_install() that modules can implement in their .install file. This hook is executed during the module's installation process. The following code will update the site's title to Drupal 8 Cookbook! on the module's installation:
/**
* Implements hook_install().
*/
function mymodule_install() {
// Set the site name.
\Drupal::configFactory()
->getEditable('system.site')
->set('name', 'Drupal 8 Cookbook!')
->save();
}
Configurable objects are immutable by default when loaded by the default config service. To modify a configuration object, you will need to use the configuration factory to receive a mutable object. The mutable object can have set and save methods that are executed to update the configuration in a configuration object.
New to Drupal 8 is the event dispatcher system. One of the many benefits of Drupal is the ability to react to specific processes and alter or react to them. Unlike the hook system that exists in Drupal 8, and has for many versions of Drupal, the event dispatch system uses explicit registration to an event.
The events dispatcher system comes from the Symfony framework and allows components to easily interact with one another. Within Drupal, and integrated Symfony components, events are dispatched, and event subscribers can listen to the events and react to changes or other processes.
In this recipe, we will subscribe to the REQUEST event, which fires when a request is first handled. If the user is not logged in, we will navigate them to the login page.
<?php
namespace Drupal\mymodule\EventSubscriber;
use Symfony\Component\EventDispatcher\EventSubscriberInterface;
class RequestSubscriber implements EventSubscriberInterface {
}
<?php
namespace Drupal\mymodule\EventSubscriber;
use Symfony\Component\EventDispatcher\EventSubscriberInterface;
use Symfony\Component\HttpKernel\KernelEvents;
class RequestSubscriber implements EventSubscriberInterface {
/**
* {@inheritdoc}
*/
public static function getSubscribedEvents() {
return [
KernelEvents::REQUEST => ['doAnonymousRedirect', 28],
];
}
}
The KernelEvents class provides constants for available events. Our returned array specifies the method to invoke and its priority for that event.
<?php
namespace Drupal\mymodule\EventSubscriber;
use Drupal\Core\Url;
use Symfony\Component\EventDispatcher\EventSubscriberInterface;
use Symfony\Component\HttpFoundation\RedirectResponse;
use Symfony\Component\HttpKernel\Event\GetResponseEvent;
use Symfony\Component\HttpKernel\KernelEvents;
class RequestSubscriber implements EventSubscriberInterface {
/**
* Redirects all anonymous users to the login page.
*
* @param \Symfony\Component\HttpKernel\Event\GetResponseEvent $event
* The event.
*/
public function doAnonymousRedirect(GetResponseEvent $event) {
// Make sure we are not on the user login route.
if (\Drupal::routeMatch()->getRouteName() == 'user.login') {
return;
}
// Check if the current user is logged in.
if (\Drupal::currentUser()->isAnonymous()) {
// If they are not logged in, create a redirect response.
$url = Url::fromRoute('user.login')->toString();
$redirect = new RedirectResponse($url);
// Set the redirect response on the event, cancelling default response.
$event->setResponse($redirect);
}
}
/**
* {@inheritdoc}
*/
public static function getSubscribedEvents() {
return [
KernelEvents::REQUEST => ['doAnonymousRedirect', 28],
];
}
}
To prevent a redirect loop, we will use the RouteMatch service to get the current route object and verify that we are not already on the user.login route page.
Then we check whether the user is anonymous and, if the user is anonymous, set the event's response to a redirect response.
services:
mymodule.request_subscriber:
class: Drupal\mymodule\EventSubscriber\RequestSubscriber
tags:
- { name: event_subscriber }
The event_subscriber tag tells the container to invoke the getSubscribedEvents method and register its methods.
Throughout Drupal and Symfony components, and even other third-party PHP libraries, events can be passed to the event dispatcher. The event_dispatcher service in Drupal is an optimized version of the one provided by Symfony, but is completely interoperable.
When the container is built, all services tagged as event_subscribers are gathered. They are then registered into the event_dispatcher service, keyed by the events returned in the getSubscribedEvents method.
When the event_dispatcher service is told to dispatch an event, it invokes the proper methods on all subscribed services. With KernelEvents::REQUEST, KernelEvents::EXCEPTION and KernelEvents::VIEW, you have the opportunity to provide a response before the controller is invoked. Then there are events, such as ConfigEvents::SAVE and ConfigEvents::DELETE, that are dispatched and allow you to react to a configuration being saved or deleted but are not actually able to adjust the configuration entity directly through the event object.
Event subscribers require knowledge of creating services, registering them, and even dependency injection. We'll discuss this some more in the next section.
With Drupal 8 and the implementation of a service container comes the concept of dependency injection. Dependency injection is a software design concept, and at its base level, it provides a means to use a class without having to directly reference it. In our example, we retrieve services multiple times using the global static class \Drupal. This is bad practice within services, and can make testing more difficult.
To implement dependency injection, first, we will add a constructor to our class that accepts the services used (current_route_match and current_user) and matches protected properties to store them:
/**
* The route match.
*
* @var \Drupal\Core\Routing\RouteMatchInterface
*/
protected $routeMatch;
/**
* Account proxy.
*
* @var \Drupal\Core\Session\AccountProxyInterface
*/
protected $accountProxy;
/**
* Creates a new RequestSubscriber object.
*
* @param \Drupal\Core\Routing\RouteMatchInterface $route_match
* The route match.
* @param \Drupal\Core\Session\AccountProxyInterface $account_proxy
* The current user.
*/
public function __construct(RouteMatchInterface $route_match, AccountProxyInterface $account_proxy) {
$this->routeMatch = $route_match;
$this->accountProxy = $account_proxy;
}
We can then replace any calls to \Drupal:: with $this->:
/**
* Redirects all anonymous users to the login page.
*
* @param \Symfony\Component\HttpKernel\Event\GetResponseEvent $event
* The event.
*/
public function doAnonymousRedirect(GetResponseEvent $event) {
// Make sure we are not on the user login route.
if ($this->routeMatch->getRouteName() == 'user.login') {
return;
}
// Check if the current user is logged in.
if ($this->accountProxy->isAnonymous()) {
// If they are not logged in, create a redirect response.
$url = Url::fromRoute('user.login')->toString();
$redirect = new RedirectResponse($url);
// Set the redirect response on the event, cancelling default response.
$event->setResponse($redirect);
}
}
Finally, we will update mymodule.services.yml to specify our constructor arguments so that they will be injected when the container runs our event subscriber:
services:
mymodule.request_subscriber:
class: Drupal\mymodule\EventSubscriber\RequestSubscriber
arguments: ['@current_route_match', '@current_user']
tags:
- { name: event_subscriber }
Dependency injection feels and seems magical at first. However, with use and practice, it will begin to make more sense and become second nature when developing with Drupal 8.
Many Drupal users create custom modules to provide specific sets of features that they can reuse across multiple sites. In fact, there is a module for the sole purpose of providing a means to export configuration and create modules that provide features. This is how the Features module received its name, in fact.
The Features module has two submodules. The main Features module provides all the functionalities. The Features UI module provides a user interface to create and manage features.
We will use Features to export a module with a configuration that contains the default page and article content types provided by the standard installation so that they can be used on other installation profiles.
$ cd /path/to/drupal8
$ composer require drupal/features
Features exports static YAML configuration files into the module's config/install folder. Features modifies the standard configuration management workflow by ensuring that a specific kind of configuration exists. Configuration management does not allow modules to overwrite existing configuration objects, but Features manages and allows this to happen.
To accomplish this, Features provides \Drupal\features\FeaturesConfigInstaller, which extends the default config.install service class. It then alters the services definition to use its FeaturesConfigInstaller class instead of the default \Drupal\Core\Config\ConfigInstaller class.
Beyond adjusting the config.install service, Features harnesses all the functionalities of the configuration management system to provide a simpler way to generate modules.
Features is a robust tool to easily provide bundled configuration; we will discuss more ways to use the Features module in the next section.
The Features module provides an intelligent bundling method that reviews the current Drupal site's configuration and suggests feature modules that should be created to preserve the configuration. These are provided through package assignment plugins.
These plugins use logic to assign configurations to specific packages:
When you visit the Features UI, it will present you with suggested feature modules to be exported. Expanding the items will list the configuration items that will be bundled. Clicking on the suggested feature's link opens the creation form. Alternatively, the checkbox can be used in conjunction with the Download archive or Write button at the bottom of the form.
In the Features module, there are bundles, and bundles have their own assignment method configurations. The purpose of bundles inside Features is to provide an automatic assignment of configuration that can be grouped into exported modules:
A bundle has a human display name and machine name. The bundle's machine name will be prefixed on all feature modules generated under this bundle. You also can specify the bundle to act as an installation profile. The features UI was heavily used in Drupal 7 to construct distributions and spawn the concept of the bundle functionality.
Assignment methods can be rearranged and configured to your liking.
The Features UI provides a means to review changes to the feature's configuration that may have been made. If a configuration item controlled by a feature module has been modified, it will show up under the differences section of the Features UI. This will allow you to import or update the Feature module with the change.
The Import option will force the site to use the configuration defined in the module's configuration YAML files. For example, in the following screenshot we have an exported content type whose description was modified in the user interface after being exported:
The difference created by the feature module is highlighted. If the difference was checked, and if you click on Import changes, the content type's description would be reset to that defined in the configuration.
From the main features overview table, the feature module can be re-exported to include the change and update the exported YAML files.
In this chapter, we will explore the world of frontend development in Drupal 8. In this chapter, we will cover the following recipes:
Drupal 8 brought many changes with regard to the frontend. It is now focused on mobile-first responsive design. Frontend performance has been given a high priority, unlike in the previous versions of Drupal. There is a new asset management system based on libraries that will deliver only the minimum required assets for a page that comes with Drupal 8.
In Drupal 8, we have a new feature, the Twig templating engine, that replaces the previously used PHPTemplate engine. Twig is part of the large PHP community and embraces more of Drupal 8's made elsewhere initiative. Drupal 7 supported libraries to define JavaScript and CSS resources. However, it was very rudimentary and did not support the concept of library dependencies.
There are two modules provided by the Drupal core that implement the responsive design with server-side components. The Breakpoint module provides a representation of media queries that modules can utilize. The Responsive Image module implements the HTML5 picture tag for image fields.
This chapter dives into harnessing Drupal 8's frontend features to get the most out of them.
Drupal 8 ships with a new base theme that is intended to demonstrate best practice and CSS class management. The Classy theme is provided by the Drupal core and is the base theme for the default frontend theme, Bartik, and the administrative theme, Seven.
Unlike the previous versions of Drupal, Drupal 8 provides two base themes--Classy and Stable--to jump start Drupal theming. Stable provides a leaner approach to frontend theming with fewer classes and wrapping elements and is guaranteed to not introduce changes that may disrupt your child theme. In this recipe, we will create a new theme called mytheme that uses Classy as its base.
name: My Theme
description: My custom theme
type: theme core: 8.x
base theme: classy
regions: header: 'Header' primary_menu: 'Primary menu' page_top: 'Page top' page_bottom: 'Page bottom' breadcrumb: 'Breadcrumb' content: 'Content'
Regions are rendered in the page template file, which will be covered in the next recipe, Twig templates.
In Drupal 8, the info.yml files define Drupal themes and modules. The first step to create a theme is to provide the info.yml file so that the theme can be discovered. Drupal will parse these values and register the theme.
The following keys are required, as a minimum, when you define a theme:
The name key defines the human-readable name of the theme that will be displayed on the Appearance page. The description will be shown under the themes display name on the Appearance page. All Drupal projects need to define the type key to indicate the kind of extension that is being defined. For themes, the type must always be theme. You will also need to define which version of Drupal the project is compatible with using the core value. All Drupal 8 projects will use the core: 8.x value. When you define a theme, you will also need to provide the base theme key. If your theme does not use a base theme, then you need to set the value to false.
The libraries and region keys are optional, but these are keys that most themes provide. Drupal's asset management system parses a theme's info.yml and adds those libraries, if required. Regions are defined in an info.yml file and provide the areas into which the Block module may place blocks.
Next, we will dive into additional information on themes.
Themes can provide a screenshot that shows up on the Appearance page. A theme's screenshot can be provided by placing a screenshot.png image file in the theme folder or a file specified in the info.yml file under the screenshot key.
If the screenshot is missing, a default is used, as seen with the Classy and Stark themes. Generally, a screenshot is a Drupal site with generic content using the theme.
Drupal controls the site's favicon and logo settings as a theme setting. Theme settings are active on a theme-by-theme basis and are not global. Themes can provide a default logo by providing logo.svg in the theme root folder. A favicon.ico placed in a theme folder will also be the default value of the favicon for the website.
You can change the site's logo and favicon by navigating to Appearance and then clicking on Settings for your current theme. Unchecking the use default checkboxes for the favicon and logo settings allows you to provide custom files:
Many content management systems that have a theme system which supports base (or parent) themes differ mostly in the terminology used. The concept of a base theme is used to provide established resources that are shared, reducing the amount of work required to create a new theme.
All libraries defined in the base theme will be inherited and used by default, allowing subthemes to reuse existing styles and JavaScript. This allows frontend developers to reuse their work and only create specific changes that are required for the subtheme.
The subthemes will also inherit all Twig template overrides provided by the base theme. This was one of the initiatives used for the creation of the Classy theme. Drupal 8 makes many fewer assumptions compared to the previous version as to what class names to provide on elements. Classy overrides all the core's templates and provides sensible default classes, giving themes the ability to use them and accept those class names or be given a blank slate.
As discussed in Chapter 2, The Content Authoring Experience, Drupal ships with the WYSIWYG support and CKEditor as the default editor. The CKEditor module will inspect the active theme and its base theme, if provided, and load any style sheets defined in the ckeditor_stylesheets key as an array of values.
For example, the following code can be found in bartik.info.yml:
ckeditor_stylesheets: - css/base/elements.css - css/components/captions.css - css/components/table.css
This allows themes to provide style sheets that will style elements within the CKEditor module to enhance the what you see is what you get experience of the editor.
The asset management system is the most recent one to Drupal 8. The asset management system allows modules and themes to register libraries. Libraries define CSS style sheets and JavaScript files that need to be loaded with the page. Drupal 8 takes this approach for the frontend performance. Rather than loading all CSS or JavaScript assets, only those required for the current page in the specified libraries will be loaded.
In this recipe, we will define a libraries.yml file that will define a CSS style sheet and JavaScript file provided by a custom theme.
This recipe assumes that you have created a custom theme, such as the one you created in the first recipe. When you see mytheme in this recipe, use the machine name of the theme that you created.
body {
background: cornflowerblue;
}
global-styling:
version: VERSION
css:
theme:
css/style.css: {}
js:
js/scripts.js: {}
name: My Theme
description: My custom theme
type: theme
core: 8.x
base theme: classy
libraries: - mytheme/global-styling
Drupal aggregates all the available library.yml files and passes them to the library.discovery.parser service. The default class for this service provider is \Drupal\Core\Asset\LibraryDiscoveryParser. This service reads the library definition from each library.yml and returns its value to the system. Before parsing the file, the parser allows themes to provide overrides and extensions to the library.
Libraries are enqueuers, as they are attached to rendered elements. Themes can generically add libraries through their info.yml files via the libraries key. These libraries will always be loaded on the page when the theme is active.
CSS style sheets are added to the data that will build the head tag of the page. JavaScript resources, by default, are rendered in the footer of the page for performance reasons.
We will explore the options surrounding libraries in Drupal 8 in more detail in the next section.
With libraries, you can specify CSS by different groups. Drupal's asset management system provides the following CSS groups:
Style sheets are loaded in the order in which the groups are listed. Each one of them relates to a PHP constant defined in /core/includes/common.inc. This allows separation of concerns when working with style sheets. Drupal 8's CSS architecture borrows concepts from the Scalable and Modular Architecture for CSS (SMACSS) system to organize CSS declarations. You can learn more about this technique for building flexible and scalable CSS style sheets at https://smacss.com/.
Library assets can have configuration data attached to them. If there are no configuration items provided, a simple set of empty brackets is added. Therefore, in each example, lines end with {}.
The following example, taken from core.libraries.yml, adds HTML5shiv:
assets/vendor/html5shiv/html5shiv.min.js: { weight: -22, browsers: { IE: 'lte IE 8', '!IE': false }, minified: true }
Let's take a look at the attributes of html5shiv.min.js:
For CSS assets, you can pass a media option to specify a media query for the asset. Reviewing classes that implement \Drupal\Core\Asset\AssetCollectionRendererInterface.
Libraries can specify other libraries as dependencies. This allows Drupal to provide a minimum footprint on the frontend performance.
Here's an example from the Quick Edit module's libraries.yml file:
quickedit:
version: VERSION
js:
...
css:
...
dependencies:
- core/jquery
- core/jquery.once
- core/underscore
- core/backbone
- core/jquery.form
- core/jquery.ui.position
- core/drupal
- core/drupal.displace
- core/drupal.form
- core/drupal.ajax
- core/drupal.debounce
- core/drupalSettings
- core/drupal.dialog
The Quick Edit module defines jQuery, the jQuery Once plugin, Underscore, and Backbone, and selects other defined libraries as dependencies. Drupal will ensure that these are present whenever the quickedit/quickedit library is attached to a page.
A complete list of the default libraries provided by Drupal core can be found in core.libraries.yml, which is in core/core.libraries.yml.
Themes have the ability to override libraries using the libraries-override and libraries-extend keys in their info.yml. This allows themes to easily customize the existing libraries without having to add the logic to conditionally remove or add their assets when a particular library is attached to a page.
The libraries-override key can be used to replace an entire library, replace selected files in a library, remove an asset from a library, or disable an entire library. The following code will allow a theme to provide a custom jQuery UI theme:
libraries-override:
core/jquery.ui:
css:
component:
assets/vendor/jquery.ui/themes/base/core.css: false
theme:
assets/vendor/jquery.ui/themes/base/theme.css: css/jqueryui.css
The override declaration mimics the original configuration. Specifying false will remove the asset, or else a supplied path will replace that asset.
The libraries-extend key can be used to load additional libraries with an existing library. The following code will allow a theme to associate a CSS style sheet with selected jQuery UI declaration overrides, without always having them included in the rest of the theme's assets:
libraries-extend:
core/jquery.ui:
- mytheme/jqueryui-theme
Libraries also work with external resources, such as assets loaded over a CDN. This is done by providing a URL for the file location along with selected file parameters.
Here is an example to add the FontAwesome font icon library from the BootstrapCDN provided by MaxCDN:
mytheme.fontawesome:
remote: http://fontawesome.io/
version: 4.4.0
license:
name: SIL OFL 1.1
url: http://fontawesome.io/license/
gpl-compatible: true
css:
base:
https://maxcdn.bootstrapcdn.com/font-awesome/4.4.0/css/font-awesome.min.css: { type: external, minified: true }
Remote libraries require additional metainformation to work properly:
remote: http://fontawesome.io/
The remote key describes the library as using external resources. While this key is not validated beyond its existence, it is best to define it with the external resource's primary website:
version: 4.4.0
Like all libraries, a version is required. This should match the version of the external resource being added:
license:
name: SIL OFL 1.1
url: http://fontawesome.io/license/
gpl-compatible: true
If a library defines the remote key, it also needs to define the license key. This defines the license name, the URL for the license, and checks whether it is GPL-compatible. If this key is not provided, a \Drupal\Core\Asset\Extension\LibraryDefinitionMissingLicenseException will be thrown:
css:
base:
https://maxcdn.bootstrapcdn.com/font-awesome/4.4.0/css/font-awesome.min.css: { type: external, minified: true }
Finally, specific external resources are added as normal. Instead of providing a relative file path, the external URL is provided.
Modules have the ability to provide dynamic library definitions and alter libraries. A module can use the hook_library_info() hook to provide a library definition. This is not the recommended way to define a library, but it is provided for edge use cases.
Modules do not have the ability to use libraries-override or libraries-extend, and need to rely on the hook_library_info_alter() hook. You can check out this hook in core/lib/Drupal/Core/Render/theme.api.php or at https://api.drupal.org/api/drupal/core!lib!Drupal!Core!Render!theme.api.php/function/hook_library_info_alter/8.
By default, Drupal ensures that JavaScript is placed last on the page. This improves the page's load performance by allowing the critical portions of the page to load first. Placing JavaScript in the header is now an opt-in option.
In order to render a library in the header, you will need to add the header: true key/value pair:
js-library:
header: true
js:
js/myscripts.js: {}
This will load a custom JavaScript library and its dependencies into the header of a page.
Drupal 8's theming layer is complemented by Twig, a component of the Symfony framework. Twig is a template language that uses a syntax similar to Django and Jinja templates. The preceding version of Drupal used PHPTemplate, which required frontend developers to have a rudimentary understanding of PHP.
In this recipe, we will override the Twig template to provide customizations for the email form element. We will use the basic Twig syntax to add a new class and provide a default placeholder.
This recipe assumes that you have already created a custom theme, such as the one you created in the first recipe. When you see mythemein in the following recipe, use the machine name of the theme you created.
<input{{ attributes.addClass('input__email') }}/>{{ children }}
{% set placeholder = attributes.placeholder ? attributes.placeholder : 'email@example.com' %}
<input{{ attributes.addClass('input__email').setAttribute('placeholder', placeholder) }}/>{{ children }}
Drupal's theme system is built around hooks and hook suggestions. The element definition of the email input element defines the input__email theme hook. If there is no input__email hook implemented through a Twig template or PHP function, it will step down to just input.
A processor, such as Drupal's theme layer, passes variables to Twig. Variables or properties of objects can be printed by wrapping the variable name with curly brackets. All of Drupal core's default templates provide information in the file's document block that details the available Twig variables.
Twig has a simplistic syntax with basic logic and functions. The addClass method will take the attributes variable and add the class provided in addition to the existing contents.
When providing a theme hook suggestion or altering an existing template, you will need to rebuild Drupal's cache. The compiled Twig template, as PHP, is cached by Drupal so that Twig does not need to compile each time the template is invoked.
We will discuss more on using Twig in the following sections.
Twig automatically escapes the output by default, making Drupal 8 one of the most secure versions yet. For Drupal 7, most security advisors were for cross-site scripting (XSS) vulnerabilities in contributed projects. With Drupal core, these security advisories should be severely reduced using Twig.
Drupal utilizes theme hook suggestions for ways to allow output variations based on different conditions. It allows site themes to provide a more specific template for certain instances.
When a theme hook has double underscores (__), Drupal's theme system understands this, and it can break apart the theme hook to find a more generic template. For instance, the email element definition provides input__email as its theme hook. Drupal understands this as follows:
Theme hook suggestions can be provided by the hook_theme_suggestions() hook in a .module or .theme file.
Debugging can be enabled to inspect the various template files that make up a page and their theme hook suggestions, and check which are active. This can be accomplished by editing the sites/default/services.yml file. If a services.yml file does not exist, copy the default.services.yml to create one.
You need to change debug: false to debug: true under the twig.config section of the file. This will cause the Drupal theming layer to print out the source code comments containing the template information. When debug is on, Drupal will not cache the compiled versions of Twig templates and render them on the fly.
There is another setting that prevents you from having to rebuild Drupal's cache on each template file change, but do not leave debug enabled. The twig.config.auto_reload boolean can be set to true. If this is set to true, the Twig templates will be recompiled if the source code changes.
The Twig has ternary operators for logic. Using a question mark (?), we can perform a basic is true or not empty operation, whereas a question mark and colon (?:) perform a basic is false or is empty operation.
You may also use the if and else logic to provide different outputs based on variables.
The Breakpoint module provides a method to create media query breakpoint definitions within Drupal. These can be used by other components, such as the responsive image and toolbar modules, to make Drupal responsive.
Breakpoints are a type of plugin that can be defined in a module's or theme's breakpoints.yml in its directory. In this recipe, we will define three different breakpoints under a custom group.
Ensure that the Breakpoint module is enabled--if you have used the standard Drupal installation, the module is enabled.
This recipe assumes that you have already created a custom module. When you see mymodule, use the machine name of the module that you created.
mymodule.mobile: label: Mobile mediaQuery: '' weight: 0
mymodule.standard: label: Standard mediaQuery: 'only screen and (min-width: 60em)' weight: 1
mymodule.wide: label: Wide mediaQuery: 'only screen and (min-width: 70em)' weight: 2
mymodule.mobile:
label: Mobile
mediaQuery: ''
weight: 0
mymodule.standard:
label: Standard
mediaQuery: 'only screen and (min-width: 60em)'
weight: 1
mymodule.wide:
label: Wide
mediaQuery: 'only screen and (min-width: 70em)'
weight: 2
The Breakpoint module defines the breakpoint configuration entity. Breakpoints do not have any specific form of direct functionalities, beyond providing a way to save media queries and grouping them.
The Breakpoint module provides a default manager service. This service is used by other modules to discover breakpoint groups and then all of the breakpoints within a group.
Additional information on using the Breakpoint module will be covered in the upcoming sections.
Themes have the ability to provide breakpoints; however, they cannot be automatically discovered if new ones are added once they have been installed. Drupal only reads breakpoints provided by themes when a theme is either installed or uninstalled.
Inside breakpoint.manager, there are two hooks: one for the theme install, and one for the theme uninstall. Each hook retrieves the breakpoint manager service and rebuilds the breakpoint definitions. Without any extra deployment steps, new breakpoints added to a theme will not be discovered unless these hooks are fired.
Breakpoints are utility configurations for other modules. Breakpoints can be loaded using the breakpoint manager service and by specifying a group. For example, the following code returns all breakpoints used by the Toolbar module:
\Drupal::service('breakpoint.manager')->getBreakpointsByGroup('toolbar');
This code invokes the Drupal container to return the service to manage breakpoints, which, by default, is \Drupal\breakpoint\BreakpointManager. The getBreakpointsByGroup method returns all breakpoints within a group, which are initiated as the \Drupal\breakpoint\BreakpointInterface objects.
The Toolbar element class utilizes this workflow to push the breakpoint media query values as JavaScript settings for the JavaScript model to interact with.
The multipliers value is used to support pixel resolution multipliers. This multiplier is used in coordination with retina displays. It is a measure of the viewport's device resolution as a ratio of the device's physical size and independent pixel size. The following is an example of standard multipliers:
The Responsive Image module provides a field formatter for image fields that use the HTML5 picture tag and source sets. Utilizing the Breakpoint module, mappings to breakpoints are made to denote an image style to be used at each breakpoint.
The responsive image field formatter works with using a defined responsive image style. Responsive image styles are configurations that map image formats to specific breakpoints and modifiers. First, you will need to define a responsive image style, and then you can apply it to an image field.
In this recipe, we will create a responsive image style set called Article image and apply it to the Article content type's image field.
You will need to enable the Responsive Image module, as it is not automatically enabled with the standard installation.
The Responsive image style provides three components: a responsive image element, the responsive image style configuration entity, and the responsive image field formatter. The configuration entity is consumed by the field formatter and displayed through the responsive image element.
The responsive image style entity contains an array of breakpoints to image style mappings. The available breakpoints are defined by the selected breakpoint groups. Breakpoint groups can be changed anytime; however, the previous mappings will be lost.
The responsive image element prints a picture element with each breakpoint, defining a new source element. The breakpoint's media query value is provided as the media attribute for the element.
In the following sections, we will discuss the responsive image field in more detail.
A benefit of using the responsive image formatter is performance. Browsers will only download the resources defined in the srcset of the appropriate source tag. This not only allows you to deliver a more appropriate image size, but also carries a smaller payload on smaller devices.
The Responsive Image module attaches the picturefill library to the responsive image element definition. The element's template also provides HTML to implement the polyfill. The polyfill can be removed by overriding the element's template and overriding the picturefill library to be disabled.
The following snippet, when added to a theme's info.yml, will disable the picturefill library:
libraries-override: core/picturefill: false
Then, the responsive-image.html.twig must be overridden by the theme to remove the extra HTML generated in the template for the polyfill:
In this chapter, we will explore the various recipes to work with forms in Drupal:
Drupal provides a robust API for creating and managing forms without writing any HTML. Drupal handles form building, validation, and submission. Drupal handles the request to either build the form or process the HTTP POST request. This allows developers to simply define the elements in a form, provide any additional validation if needed, and then handle a successful submission through specific methods.
This chapter contains various recipes to work with forms in Drupal through the Form API. In Drupal 8, forms and form states are objects.
In this recipe, we will create a form, which will be accessible from a menu path. This will involve creating a route that tells Drupal to invoke our form and display it to the end user.
Forms are defined as classes, which implement \Drupal\Core\Form\FormInterface. The \Drupal\Core\Form\FormBase serves as a utility class that is intended to be extended. We will extend this class to create a new form.
Since we will write the code, you will want to have a custom module. Creating a custom module in Drupal is simple: create a folder and an info.yml file. For this recipe, we will create a folder under /modules in your Drupal folder called drupalform.
In the drupalform folder, create drupalform.info.yml. Drupal will parse the info.yml file to discover modules. An example of a module's info.yml file is as follows:
name: Drupal form example description: Create a basic Drupal form, accessible from a route type: module version: 1.0 core: 8.x
The name will be your module's name, and the description will be listed on the Extend page. Specifying the core tells Drupal what version of Drupal it is built for. Chapter 4, Extending Drupal, covers how to create a module in depth.
<?php
namespace Drupal\drupalform\Form;
use Drupal\Core\Form\FormBase;
use Drupal\Core\Form\FormStateInterface;
class ExampleForm extends FormBase {
}
The namespace defines the class in your module's Form directory. The autoloader will now look at the drupalform module path and load the ExampleForm class from the src/Form directory.
The use statement allows us to use just the class name when referencing FormBase, and, in the next steps, FormStateInterface. Otherwise, we would be forced to use the fully qualified namespace path for each class whenever it is used.
class ExampleForm extends FormBase {
/**
* {@inheritdoc}
*/
public function getFormId() {
return 'drupalform_example_form';
}
/**
* {@inheritdoc}
*/
public function buildForm(array $form, FormStateInterface $form_state) {
// Return array of Form API elements.
}
/**
* {@inheritdoc}
*/
public function validateForm(array &$form, FormStateInterface $form_state) {
// Validation covered in later recipe, required to satisfy interface.
}
/**
* {@inheritdoc}
*/
public function submitForm(array &$form, FormStateInterface $form_state) {
// Validation covered in later recipe, required to satisfy interface.
}
}
This code flushes out the initial class definition from the preceding step. FormBase provides utility methods and does not satisfy the interface requirements for FormStateInterface. We define those here, as they are unique across each form definition.
The getFormId method returns a unique string to identify the form, for example, site_information. You may encounter some forms that append _form to the end of their form ID. This is not required, and it is just a naming convention often found in previous versions of Drupal.
/**
* {@inheritdoc}
*/
public function buildForm(array $form, FormStateInterface $form_state) {
$form['company_name'] = [
'#type' => 'textfield',
'#title' => $this->t('Company name'),
];
$form['submit'] = [
'#type' => 'submit',
'#value' => $this->t('Save'),
];
return $form;
}
We added a form element definition to the form array. Form elements are defined with a minimum of a type to specify what the element is and a title to act as the label. The title uses the t method to ensure that it is translatable.
Adding a submit button is done by providing an element with the type submit.
drupalform.form:
path: '/drupal-example-form'
defaults:
_title: 'Example form'
_form: '\Drupal\drupalform\Form\ExampleForm'
requirements:
_access: 'TRUE'
In Drupal, all routes have a name, and this example defines it as drupalform.form. Routes then define a path attribute and override default variables. This route definition has altered the route's title, specified it as a form, and given the fully qualified namespace path to this form's class.
Routes need to be passed a requirements property with specifications, or else the route will be denied access.
This recipe creates a route to display the form. By passing the _form variable in the defaults section of our route entry, we are telling the route controller how to render our route's content. The fully qualified class name, which includes the namespace, is passed to a method located in the form builder. The route controller will invoke \Drupal::formBuilder()->getForm (\Drupal\drupalform\Form\ExampleForm) based on the recipe. At the same time, this can be manually called to embed the form elsewhere.
A form builder instance that implements \Drupal\Core\Form\FormBuilderInterface will then process the form by calling buildForm and initiate the rendering process. The buildForm method is expected to return an array of form elements and other API options. This will be sent to the render system to output the form as HTML.
Many components make up a form created through Drupal's Form API. We will explore a few of them in depth.
A form is a collection of form elements, which are types of plugin in Drupal 8. Plugins are small pieces of swappable functionalities in Drupal 8. Plugins and plugin development are covered in Chapter 7, Plug and Play with Plugins.
Here are some of the most common element properties that can be used:
The \Drupal\Core\Form\FormStateInterface object represents the current state of the form and its data. The form state contains user-submitted data for the form along with build state information. Redirection after the form submission is handled through the
form state, as well. You will interact more with the form state during the validation and submission recipes.
Drupal utilizes a cache table for forms. This holds the build table, as identified by form build identifiers. This allows Drupal to validate forms during AJAX requests and easily build them when required. It is important to keep the form cache in persistent storage; otherwise, there may be repercussions, such as loss of form data or invalidating forms.
With the release of Drupal 8, Drupal has finally entered into the realm of HTML5. The Form API now allows utilization of HTML5 input elements out of the box. These include the following element types:
This allows your forms in Drupal to leverage native device input methods along with native validation support.
This recipe will walk you through adding elements to a Drupal form. You will need to have a custom form implemented through a module, such as the one created in the Creating a form recipe of this chapter.
$form['phone'] = [
'#type' => 'tel',
'#title' => $this->t('Phone'),
];
$form['email'] = [
'#type' => 'email',
'#title' => $this->t('Email'),
];
$form['integer'] = [
'#type' => 'number',
'#title' => $this->t('Some integer'),
// The increment or decrement amount
'#step' => 1,
// Miminum allowed value
'#min' => 0,
// Maxmimum allowed value
'#max' => 100,
];
$form['date'] = [
'#type' => 'date',
'#title' => $this->t('Date'),
'#date_date_format' => 'Y-m-d',
];
$form['website'] = [
'#type' => 'url',
'#title' => $this->t('Website'),
];
$form['search'] = [
'#type' => 'search',
'#title' => $this->t('Search'),
'#autocomplete_route_name' => FALSE,
];
$form['range'] = [
'#type' => 'range',
'#title' => $this->t('Range'),
'#min' => 0,
'#max' => 100,
'#step' => 1,
];
Each type references an extended class of \Drupal\Core\Render\Element\FormElement. It provides the element's definition and additional functions. Each element defines a prerender method in the class that defines the input type attribute along with other additional attributes.
Each input defines its theme as input__TYPE, allowing you to copy the input.html.twig base to input.TYPE.html.twig for templating. The template then parses the attributes and renders the HTML.
Some elements, such as emails, provide validators for the element. The email element defines the validateEmail method. Here is an example of the code from \Drupal\Core\Render\Element\Email::valdateEmail:
/**
* Form element validation handler for #type 'email'.
*
* Note that #maxlength and #required is validated by _form_validate() already.
*/
public static function validateEmail(&$element, FormStateInterface $form_state, &$complete_form) {
$value = trim($element['#value']);
$form_state->setValueForElement($element, $value);
if ($value !== '' && !\Drupal::service('email.validator')->isValid($value)) {
$form_state->setError($element, t('The email address %mail is not valid.', array('%mail' => $value)));
}
}
This code will be executed on form submission and validate the provider's email. It does this by taking the current value and trimming any whitespaces and using the form state object to update the value. The email.validator service is invoked to validate the email. If this method returns false, the form state is invoked to mark the element as the one that has an error. If the element has an error, the form builder will prevent form submission, returning the user to the form to fix the value.
Elements are provided through Drupal's plugin system and are explored in detail in the upcoming sections.
Elements can have their own unique properties along with individual validation methods. You can refer to the available elements through the Drupal.org API documentation page at https://api.drupal.org/api/drupal/elements/. However, the classes can also be examined, and the definition method can be read to learn about the properties of each element. These classes are under the \Drupal\Core\Render\Element namespace located in /core/lib/Drupal/Core/Render/Element:
Each element used in the Form API extends the \Drupal\Core\Render\Element\FormElement class, which is a plugin. Modules can provide new element types by adding classes to their Plugins/Element namespace. Refer to Chapter 7, Plug and Play with Plugins, for more information on how to implement a plugin.
All forms must implement the \Drupal\Core\Form\FormInterface. The interface defines a validation method. The validateForm method is invoked once a form has been submitted and provides a way to validate the data and halt the processing of the data if required. The form state object provides methods for marking specific fields as having the error, providing a user experience tool to alert your users to specify the problem input.
In this recipe, we will be validating the length of the submitted field.
This recipe will use the module and custom form created in the first Creating a form recipe.
/**
* {@inheritdoc}
*/
public function validateForm(array &$form, FormStateInterface $form_state) {
if (!$form_state->isValueEmpty('company_name')) {
// Value is set, perform validation.
}
}
/**
* {@inheritdoc}
*/
public function validateForm(array &$form, FormStateInterface $form_state) {
if (!$form_state->isValueEmpty('company_name')) {
if (strlen($form_state->getValue('company_name')) <= 5) {
// Set validation error.
}
}
}
/**
* {@inheritdoc}
*/
public function validateForm(array &$form, FormStateInterface $form_state) {
if (!$form_state->isValueEmpty('company_name')) {
if (strlen($form_state->getValue('company_name')) <= 5) {
$form_state->setErrorByName('company_name', t('Company name is less than 5 characters'));
}
}
}
We can place the setErrorByName method in our strlen logic check. If the string is fewer than five characters, an error is set on the element. The first parameter is the element's key, and the second parameter is the message to be presented to the user.
Before the form builder service invokes the form object's submitForm method, it invokes the object's validateForm method. In the validation method, the form state can be used to check values and perform logic checks. In the event that an item is deemed invalid and an error is set on an element, the form cannot be submitted and will show errors to the user.
When an error is added to an element, an overall counter for the number of errors on the form is incremented. If the form has any errors, the form builder service will not execute the submit method.
This process is executed through the \Drupal\Core\Form\FormValidator class, which is run through the form builder service.
Form validation can be done through multiple handlers and at the element level. The following sections will cover those.
A form can have multiple validation handlers. By default, all forms come with at least one validator, which is its own validateForm method. There is more that can be added. However, by default, the form will merely execute ::validateForm and all element validators. This allows you to invoke methods on other classes or other forms.
If a class provides method1 and method2, which it would like to execute as well, the following code can be added to the buildForm method:
$form_state->setValidateHandlers([ ['::validateForm'], ['::method1'], [$this, 'method2'], ]);
This sets the validator array to execute the default validateForm method and the two additional methods. You can reference a method in the current class using two colons (::) and the method name. Alternatively, you can use an array that consists of a class instance and the method to be invoked.
Forms support nested form elements in the form array. The default \Drupal\Core\Form\FormStateInterface implementation, \Drupal\Core\Form\FormState, supports accessing multidimensional array values. Instead of passing a string, you can pass an array that represents the parent array structure in the form array.
If the element is defined as in $form['company']['company_name'], then we will pass ['company', 'company_name'] to the form state's methods.
Form elements can have their own validators. The form state will aggregate all of the element validation methods and pass them to the form validation service. This will run with the form's validation.
There is a limit_validation_errors option, which can be set to allow selected invalid errors to be passed. This option allows you to bypass validation on specific elements in your form. This is useful if a form has two submit buttons and each intends to validate and submit specific data. This attribute is defined in the submit button, also known as the triggering element in the form state. It is an array value consisting of form element keys.
A form's purpose is to collect data and do something with the data that was submitted. All forms need to implement the \Drupal\Core\Form\FormInterface interface. The interface defines a submit method. Once the Form API has invoked the class's validation method, the submit method can be run.
This recipe will be based on the custom module and form created in the Creating a form recipe of this chapter. We will convert the form to \Drupal\Core\FormConfigBaseForm, allowing us to save our configuration and reuse code provided by Drupal core.
In this recipe, we will use the module and custom form created in the first Creating a form recipe.
drupalform.company:
type: config_object
label: 'Drupal form settings'
mapping:
company_name:
type: string
label: 'A company name'
This tells Drupal that we have the configuration with the name drupalform.company, and it has a valid option of company_name. We will cover this in more detail in Chapter 9, Configuration Management - Deploying in Drupal 8.
<?php namespace Drupal\drupalform\Form; use Drupal\Core\Form\ConfigFormBase; use Drupal\Core\Form\FormStateInterface;
<?php
namespace Drupal\drupalform\Form;
use Drupal\Core\Form\ConfigFormBase;
use Drupal\Core\Form\FormStateInterface;
class ExampleForm extends ConfigFormBase {
...
}
This allows us to reuse methods from the ConfigFormBase class and write less about our own implementation.
<?php
namespace Drupal\drupalform\Form;
use Drupal\Core\Form\ConfigFormBase;
use Drupal\Core\Form\FormStateInterface;
class ExampleForm extends ConfigFormBase {
...
/**
* {@inheritdoc}
*/
protected function getEditableConfigNames() {
return ['drupalform.company'];
}
...
}
This function defines the configuration names, which will be editable by the form. This brings all the attributes under the drupalform.company object to be editable when accessed through the form with the config method provided by ConfigFormBaseTrait.
/**
* {@inheritdoc}
*/
public function buildForm(array $form, FormStateInterface $form_state) {
$form['company_name'] = [
'#type' => 'textfield',
'#title' => $this->t('Company name'),
'#default_value' => $this->config('drupalform.company')->get('company_name'),
];
return parent::buildForm($form, $form_state);
}
The ConfigFormBase class implements the buildForm method to provide a reusable submit button. It also unifies the presentation across Drupal configuration forms:
/**
* {@inheritdoc}
*/
public function buildForm(array $form, FormStateInterface $form_state) {
$form['company_name'] = [
'#type' => 'textfield',
'#title' => $this->t('Company name'),
'#default_value' => $this->config('drupalform.company')->get('name'),
];
return parent::buildForm($form, $form_state);
}
The #default_value key is added to the element's definition. It invokes the config method provided by ConfigFormBaseTrait to load our configuration group and access a specific configuration value.
/**
* {@inheritdoc}
*/
public function submitForm(array &$form, FormStateInterface $form_state) {
parent::submitForm($form, $form_state);
$this->config('drupalform.company')->set('name', $form_state->getValue('company_name'));
}
The config method is invoked by specifying our configuration group. We will then use the set method to define the name as the value of the company name text field.
<?php
namespace Drupal\drupalform\Form;
use Drupal\Core\Form\ConfigFormBase;
use Drupal\Core\Form\FormStateInterface;
class ExampleForm extends ConfigFormBase {
/**
* {@inheritdoc}
*/
protected function getEditableConfigNames() {
return ['drupalform.company'];
}
/**
* {@inheritdoc}
*/
public function getFormId() {
return 'drupalform_example_form';
}
/**
* {@inheritdoc}
*/
public function buildForm(array $form, FormStateInterface $form_state) {
$form['company_name'] = array(
'#type' => 'textfield',
'#title' => t('Company name'),
'#default_value' => $this->config('drupalform.company')->get('name'),
);
return parent::buildForm($form, $form_state);
}
/**
* {@inheritdoc}
*/
public function validateForm(array &$form, FormStateInterface $form_state) {
if (!$form_state->isValueEmpty('company_name')) {
if (strlen($form_state->getValue('company_name')) <= 5) {
$form_state->setErrorByName('company_name', t('Company name is less than 5 characters'));
}
}
}
/**
* {@inheritdoc}
*/
public function submitForm(array &$form, FormStateInterface $form_state) {
parent::submitForm($form, $form_state);
$this->config('drupalform.company')->set('name', $form_state->getValue('company_name'));
}
}
The ConfigFormBase utilizes the ConfigFormBaseTrait to provide easy access to a configuration factory. The class's implementation of buildForm also adds a submit button and theme styling to forms. The submit handler displays a configuration saved message, but relies on implementing a module to save the configuration.
The form saves its data under the drupalform.company namespace. The company name value is stored as name and can be accessed as drupalform.company.name. Note that the configuration name does not have to match the form element's key.
In the next section, we will cover how to handle multiple submit callbacks.
A form can have multiple submit handlers. By default, all forms implement a submit handler, which is its own submitForm method. The form will execute ::submitForm automatically and any other methods defined on the triggering element. There is more that can be added. However, this allows you to invoke static methods on other classes or other forms.
If a class provides method1 and method2, which it would like to execute as well, the following code can be added to the buildForm method:
$form_state->setSubmitHandlers([ ['::submitForm'], ['::method1'], [$this, 'method2'] ]);
This sets the submit handler array to execute the default submitForm method and two additional methods. You can reference a method in the current class using two colons (::) and the method name. Alternatively, you can use an array consisting of a class instance and the method to be invoked.
Drupal's Form API does not just provide a way to create forms. There are ways to alter forms through a custom module that allows you to manipulate the core and contributed forms. Using this technique, new elements can be added, default values can be changed, or elements can even be hidden from view to simplify the user experience.
The altering of a form does not happen in a custom class; this is a hook defined in the module file. In this recipe, we will use the hook_form_FORM_ID_alter() hook to add a telephone field to the site's configuration form.
This recipe assumes that you have a custom module to add the code to.
name: My module description: Custom module that uses a form alter type: module core: 8.x
<?php
/** * @file * Custom module that alters forms. */
/**
* Implements hook_form_FORM_ID_alter().
*/
function mymodule_form_system_site_information_settings_alter(&$form, \Drupal\Core\Form\FormStateInterface $form_state) {
// Code to alter form or form state here
}
Drupal will call this hook and pass the current form array and its form state object. The form array is passed by reference, allowing our hook to modify the array without returning any values. This is why the $form parameter has the ampersand (&) before it. In PHP, all objects are passed by reference, which is why we have no ampersand (&) before $form_state.
/**
* Implements hook_form_FORM_ID_alter().
*/
function mymodule_form_system_site_information_settings_alter(&$form, \Drupal\Core\Form\FormStateInterface $form_state) {
$form['site_phone'] = [
'#type' => 'tel',
'#title' => t('Site phone'),
'#default_value' => Drupal::config('system.site')->get('phone'),
];
}
We retrieve the current phone value from system.site so that it can be modified if already set.
/**
* Implements hook_form_FORM_ID_alter().
*/
function mymodule_form_system_site_information_settings_alter(&$form, \Drupal\Core\Form\FormStateInterface $form_state) {
$form['site_phone'] = [
'#type' => 'tel',
'#title' => t('Site phone'),
'#default_value' => Drupal::config('system.site')->get('phone'),
];
$form['#submit'][] = 'mymodule_system_site_information_phone_submit';
}
/**
* Form callback to save site_phone
* @param array $form
* @param \Drupal\Core\Form\FormStateInterface $form_state
*/
function mymodule_system_site_information_phone_submit(array &$form, \Drupal\Core\Form\FormStateInterface $form_state) {
$config = Drupal::configFactory()->getEditable('system.site');
$config
->set('phone', $form_state->getValue('site_phone'))
->save();
}
The $form['#submit'] modification adds our callback to the form's submit handlers. This allows our module to interact with the form once it has been submitted.
The mymodule_system_site_information_phone_submit callback is passed the form array and form state. We load the current configuration factory to receive the configuration that can be edited. We then load system.site and save phone based on the value from the form state.
The \Drupal\system\Form\SiteInformationForm class extends \Drupal\Core\Form\ConfigFormBase to handle the writing of form elements as individual configuration values. However, it does not write the values automatically to the form state. In this recipe, we needed to add a submit handler to manually save our added field via a procedural function in our mymodule.module file.
The form array is passed by reference, allowing modifications to be made in the hook to alter the original data. This allows us to add an element or even modify existing items, such as titles or descriptions.
We will discuss how to add additional handlers to other forms using form alters.
Using a form alter hook, we can add additional validators to a form. The proper way to do this is to load the current validators and add the new one to the array and reset the validators in the form state:
$validators = $form_state->getValidateHandlers(); $validators[] = 'mymodule_form_validate'; $form_state->setValidateHandlers($validators);
First, we will receive all of the currently set validators from the form state as the $validators variable. We then append a new callback to the end of the array. Once the $validators variable has been modified, we will override the form state's validator array by executing the setValidateHandlers method.
Using a form alter hook, we can add additional submit handlers to a form. The proper way to do this is to load the current submit handlers, add the new one to the array, and reset the validators in the form state:
$submit_handlers = $form_state->getSubmitHandlers(); $submit_handlers[] = 'mymodule_form_submit'; $form_state->setSubmitHandlers($submit_handlers );
First, we will receive all of the currently set submit handlers from the form state as the $submit_handlers variable. We then append a new callback to the end of the array.
Once the $submit_handlers variable has been modified, we will override the form state's submit handler array by executing the setSubmitHandlers method.
In this chapter, we will dive into the new Plugin API provided in Drupal 8:
Drupal 8 introduces plugins. Plugins power many items in Drupal, such as blocks, field types, and field formatters. Plugins and plugin types are provided by modules. They provide a swappable and specific functionality. Breakpoints, as discussed in Chapter 5, Front End for the Win, are plugins. In this chapter, we will discuss how plugins work in Drupal 8 and show you how to create blocks, fields, and custom plugin types.
Each version of Drupal has subsystems, which provided pluggable components and contributed modules. However, the implementation and management of these subsystems presented a problem. Blocks, fields, and image styles each had an entirely different system to be learned and understood. The Plugin API exists in Drupal 8 to mitigate this problem and provide a base API to implement pluggable components. This has greatly improved the developer experience when working with Drupal core's subsystems. In this chapter, we will implement a block plugin. We will use the Plugin API to provide a custom field type along with a widget and formatter for the field. The last recipe will show you how to create and use a custom plugin type.
In Drupal, a block is a piece of content that can be placed in a region provided by a theme. Blocks are used to present specific kinds of content, such as a user login form, a snippet of text, and many more.
Blocks are annotated plugins. Annotated plugins use documentation blocks to provide details of the plugin. They are discovered in the module's Plugin class namespace. Each class in the Plugin/Block namespace will be discovered by the Block module's plugin manager.
In this recipe, we will define a block that will display a copyright snippet and the current year and place it in the footer region.
Create a new module like the one shown in this recipe, with a defined info.yml so that it can be discovered by Drupal. We will refer to the module as mymodule throughout the recipe. Use your module's appropriate name.
<?php
namespace Drupal\mymodule\Plugin\Block;
use Drupal\Core\Block\BlockBase;
class Copyright extends BlockBase {
}
We will extend the BlockBase class, which implements \Drupal\Core\Block\BlockPluginInterface and provides us with an implementation of nearly all of the interface's methods.
<?php
namespace Drupal\mymodule\Plugin\Block;
use Drupal\Core\Block\BlockBase;
/**
* @Block(
* id = "copyright_block",
* admin_label = @Translation("Copyright"),
* category = @Translation("Custom")
* )
*/
class Copyright extends BlockBase {
}
The annotation document block of the class identifies the type of plugin through @Block. Drupal will parse this and initiate the plugin with the properties defined inside it. The id is the internal machine name, the admin_label is displayed on the block listing page, and category shows up in the block select list.
<?php
namespace Drupal\mymodule\Plugin\Block;
use Drupal\Core\Block\BlockBase;
/**
* @Block(
* id = "copyright_block",
* admin_label = @Translation("Copyright"),
* category = @Translation("Custom")
* )
*/
class Copyright extends BlockBase {
/**
* {@inheritdoc}
*/
public function build() {
$date = new \DateTime();
return [
'#markup' => t('Copyright @year© My Company', [
'@year' => $date->format('Y'),
]),
];
}
}
The build method returns a render array that uses Drupal's t function to substitute @year for the \DateTime object's output that is formatted as a full year.
The plugin system works through plugin definitions and plugin managers for those definitions. The \Drupal\Core\Block\BlockManager class defines the block plugins that need be located in the Plugin/Block namespace. It also defines the base interface that needs to be implemented along with the Annotation class, which is to be used when parsing the class's document block.
When Drupal's cache is rebuilt, all available namespaces are scanned to check whether classes exist in the given plugin namespace. The definitions, via annotation, will be processed, and the information will be cached.
Blocks are then retrieved from the manager, manipulated, and their methods are invoked. When viewing the Block layout page to manage blocks, the \Drupal\Core\Block\BlockBase class's label method is invoked to display the human-readable name. When a block is displayed on a rendered page, the build method is invoked and passed to the theming layer to be output.
There are more in-depth items that can be used when creating a block plugin. We will cover those in the following sections.
Blocks can be altered in three different ways: the plugin definition can be altered, the build array, or the view array out.
A module can implement hook_block_alter in its .module file and modify the annotation definitions of all the discovered blocks. This will allow a module to change the default user_login_block from user login to Login:
/**
* Implements hook_block_alter().
*/
function mymodule_block_alter(&$definitions) {
$definitions['user_login_block']['admin_label'] = t('Login');
}
A module can implement hook_block_build_alter and modify the build information of a block. The hook is passed through the build array and the \Drupal\Core\Block\BlockPluginInterface instance for the current block. Module developers can use this to add cache contexts or alter the cache ability of the metadata:
/**
* Implements hook_block_build_alter().
*/
function hook_block_build_alter(array &$build, \Drupal\Core\Block\BlockPluginInterface $block) {
// Add the 'url' cache the block per URL.
if ($block->getBaseId() == 'myblock') {
$build['#contexts'][] = 'url';
}
}
Finally, a module can implement hook_block_view_alter in order to modify the output to be rendered. A module can add content to be rendered or removed. This can be used to remove the contextual_links item, which allows inline editing on the front page of a site:
/**
* Implements hook_block_view_alter().
*/
function hook_block_view_alter(array &$build, \Drupal\Core\Block\BlockPluginInterface $block) {
// Remove the contextual links on all blocks that provide them.
if (isset($build['#contextual_links'])) {
unset($build['#contextual_links']);
}
}
Blocks can provide a setting form. This recipe provides the text My Company for the copyright text. Instead, this can be defined through a text field in the block's setting form.
Let's readdress the Copyright.php file that holds our block's class. We will override methods provided by our base class. The following methods will be added to the class written in this recipe.
A block can override the default defaultConfiguration method, which returns an array of setting keys and their default values. The blockForm method can then override the \Drupal\Core\Block\BlockBase empty array implementation to return a Form API array to represent the settings form:
/**
* {@inheritdoc}
*/
public function defaultConfiguration() {
return [
'company_name' => '',
];
}
/**
* {@inheritdoc}
*/
public function blockForm($form, \Drupal\Core\Form\FormStateInterface $form_state) {
$form['company_name'] = [
'#type' => 'textfield',
'#title' => t('Company name'),
'#default_value' => $this->configuration['company_name'],
];
return $form;
}
The blockSubmit method must then be implemented, which updates the block's configuration:
/**
* {@inheritdoc}
*/
public function blockSubmit($form, \Drupal\Core\Form\FormStateInterface $form_state) {
$this->configuration['company_name'] = $form_state->getValue('company_name');
}
Finally, the build method can be updated to use the new configuration item:
/**
* {@inheritdoc}
*/
public function build() {
$date = new \DateTime();
return [
'#markup' => t('Copyright @year© @company', [
'@year' => $date->format('Y'),
'@company' => $this->configuration['company_name'],
]),
];
}
You can now return to the Block layout form, and click on Configure in the Copyright block. The new setting will be available in the block instance's configuration form.
Blocks, by default, are rendered for all users. The default access method can be overridden. This allows a block to only be displayed to authenticated users or based on a specific permission:
/**
* {@inheritdoc}
*/
protected function blockAccess(AccountInterface $account) {
$route_name = $this->routeMatch->getRouteName();
if ($account->isAnonymous() && !in_array($route_name,
array('user.login', 'user.logout'))) {
return AccessResult::allowed()
->addCacheContexts(['route.name',
'user.roles:anonymous']);
}
return AccessResult::forbidden();
}
The preceding code is taken from the user_login_block. It allows access to the block if the user is logged out and is not in the login or logout page. The access is cached based on the current route name and the user's current role being anonymous. If these are not passed, the access returned is forbidden and the block is not built.
Other modules can implement hook_block_access to override the access of a block:
/**
* Implements hook_block_access().
*/
function mymodule_block_access(\Drupal\block\Entity\Block $block, $operation, \Drupal\Core\Session\AccountInterface $account) {
// Example code that would prevent displaying the Copyright' block in
// a region different than the footer.
if ($operation == 'view' && $block->getPluginId() == 'copyright') {
return \Drupal\Core\Access\AccessResult::forbiddenIf($block->getRegion() != 'footer');
}
// No opinion.
return \Drupal\Core\Access\AccessResult::neutral();
}
A module implementing the preceding hook will deny access to our Copyright block if it is not placed in the footer region.
Field types are defined using the plugin system. Each field type has its own class and definition. A new field type can be defined through a custom class that will provide schema and property information.
In this example, we will create a simple field type called real name to store the first and last names.
Create a new module like the one shown in this recipe, with a defined info.yml so that it can be discovered by Drupal. We will refer to the module as mymodule throughout the recipe. Use your module's appropriate name.
<?php
namespace Drupal\mymodule\Plugin\Field\FieldType;
use Drupal\Core\Field\FieldItemBase;
use Drupal\Core\Field\FieldStorageDefinitionInterface;
use Drupal\Core\TypedData\DataDefinition;
class RealName extends FieldItemBase {
}
The \Drupal\Core\Field\FieldItemBase satisfies methods defined by inherited interfaces, except for schema and propertyDefinitions.
<?php
namespace Drupal\mymodule\Plugin\Field\FieldType;
use Drupal\Core\Field\FieldItemBase;
use Drupal\Core\Field\FieldStorageDefinitionInterface;
use Drupal\Core\TypedData\DataDefinition;
/**
* Plugin implementation of the 'realname' field type.
*
* @FieldType(
* id = "realname",
* label = @Translation("Real name"),
* description = @Translation("This field stores a first and last name."),
* category = @Translation("General"),
* default_widget = "string_textfield",
* default_formatter = "string"
* )
*/
class RealName extends FieldItemBase {
}
The @FieldType tells Drupal that this is a FieldType plugin. The following properties are defined:
/**
* {@inheritdoc}
*/
public static function schema(\Drupal\Core\Field\FieldStorageDefinitionInterface $field_definition) {
return [
'columns' => [
'first_name' => [
'description' => 'First name.',
'type' => 'varchar',
'length' => '255',
'not null' => TRUE,
'default' => '',
],
'last_name' => [
'description' => 'Last name.',
'type' => 'varchar',
'length' => '255',
'not null' => TRUE,
'default' => '',
],
],
'indexes' => [
'first_name' => ['first_name'],
'last_name' => ['last_name'],
],
];
}
The schema method defines the columns in the field's data table. We will define a column to hold the first_name and last_name values.
/**
* {@inheritdoc}
*/
public static function propertyDefinitions(\Drupal\Core\Field\FieldStorageDefinitionInterface $field_definition) {
$properties['first_name'] = \Drupal\Core\TypedData\DataDefinition::create('string')
->setLabel(t('First name'));
$properties['last_name'] = \Drupal\Core\TypedData\DataDefinition::create('string')
->setLabel(t('Last name'));
return $properties;
}
This method returns an array that is keyed with the same column names provided in schema. It returns a typed data definition to handle the field type's values.
Drupal core defines a plugin.manager.field.field_type service. By default, this is handled through the \Drupal\Core\Field\FieldTypePluginManager class. This plugin manager defines the field type plugins that should be in the Plugin/Field/FieldType namespace, and all the classes in this namespace will be loaded and assumed to be field type plugins.
The manager's definition also sets \Drupal\Core\Field\FieldItemInterface as the expected interface that all the field type plugins will implement. This is why most field types extend \Drupal\Core\Field\FieldItemBase to meet these method requirements.
As field types are annotated plugins, the manager provides \Drupal\Core\Field\Annotation\FieldType as the class that fulfills the annotation definition.
When the user interface defines the available fields, the plugin.manager.field.field_type service is invoked to retrieve a list of available field types.
Existing field types can be altered to modify their definitions, and custom field types can implement a method to define whether the value is empty or not. We will cover these in the next sections.
The \Drupal\Core\Field\FieldTypePluginManager class defines the alter method as field_info. Modules that implement hook_field_info_alter in their .module files have the ability to modify field type definitions discovered by the manager:
/**
* Implements hook_field_info_alter().
*/
function mymodule_field_info_alter(&$info) {
$info['email']['label'] = t('E-mail address');
}
The preceding alter method will change the human-readable label for the email field to E-mail address when selecting the field in the user interface.
The \Drupal\Core\TypedDate\ComplexDataInterface interface provides an isEmpty method. This method is used to check whether the field's value is empty, for example, when verifying that the required field has data. The \Drupal\Core\TypedData\Plugin\DataType\Map class implements the method. By default, the method ensures that the values are not empty.
Field types can provide their own implementations to provide a more robust verification. For instance, the field can validate that the first name can be entered but not the last name, or the field can require both the first and the last name.
Field widgets provide the form interface to edit a field. These integrate with the Form API to define how a field can be edited and the way in which the data can be formatted before it is saved. Field widgets are chosen and customized through the form display interface.
In this recipe, we will create a widget for the field created in the Creating a custom field type recipe in this chapter. The field widget will provide two text fields for entering the first and last name items.
Create a new module, such as the one from the Creating a custom field type recipe. We will refer to the module as mymodule throughout the recipe. Use your module's appropriate name.
<?php
namespace Drupal\mymodule\Plugin\Field\FieldWidget;
use Drupal\Core\Field\WidgetBase;
class RealNameDefaultWidget extends WidgetBase {
}
<?php
namespace Drupal\mymodule\Plugin\Field\FieldWidget;
use Drupal\Core\Field\WidgetBase;
use Drupal\Core\Field\FieldItemListInterface;
use Drupal\Core\Form\FormStateInterface;
/**
* Plugin implementation of the 'realname_default' widget.
*
* @FieldWidget(
* id = "realname_default",
* label = @Translation("Real name"),
* field_types = {
* "realname"
* }
* )
*/
class RealNameDefaultWidget extends WidgetBase {
}
The @FieldWidget tells Drupal that this is a field widget plugin. It defines id to represent the machine name, the human-readable name as label, and the field types that the widget interacts with.
/**
* {@inheritdoc}
*/
public function formElement(FieldItemListInterface $items, $delta, array $element, array &$form, FormStateInterface $form_state) {
$element['first_name'] = [
'#type' => 'textfield',
'#title' => t('First name'),
'#default_value' => '',
'#size' => 25,
'#required' => $element['#required'],
];
$element['last_name'] = [
'#type' => 'textfield',
'#title' => t('Last name'),
'#default_value' => '',
'#size' => 25,
'#required' => $element['#required'],
];
return $element;
}
The formElement method returns a Form API array that represents the widget to be set and edits the field data.
/**
* Plugin implementation of the 'realname' field type.
*
* @FieldType(
* id = "realname",
* label = @Translation("Real name"),
* description = @Translation("This field stores a first and last name."),
* category = @Translation("General"),
* default_widget = "realname_default",
* default_formatter = "string"
* )
*/
class RealName extends FieldItemBase {
Drupal core defines a plugin.manager.field.widget service. By default, this is handled through the \Drupal\Core\Field\FieldWidgetPluginManager class. This plugin manager defines the field widget plugins that should be in the Plugin/Field/FieldWidget namespace, and all the classes in this namespace will be loaded and assumed to be field widget plugins.
The manager's definition also sets \Drupal\Core\Field\FieldWidgetInterface as the expected interface that all the field widget plugins will implement. This is why most field types extend \Drupal\Core\Field\WidgetBase to meet these method requirements.
As field widgets are annotated plugins, the manager provides \Drupal\Core\Field\Annotation\FieldWidget as the class that fulfills the annotation definition.
The entity form display system uses the plugin.manager.field.widget service to load field definitions and add the field's element returned from the formElement method to the entity form.
Field widgets have additional methods to provide more information; they are covered in the next section.
The \Drupal\Core\Field\WidgetInterface interface defines three methods that can be overridden to provide a settings form and a summary of the current settings:
Widget settings can be used to alter the form presented to the user. A setting can be created that allows the field element to be limited to only enter the first or last name with one text field.
Field formatters define the way in which a field type will be presented. These formatters return the render array information to be processed by the theming layer. Field formatters are configured on the display mode interfaces.
In this recipe, we will create a formatter for the field created in the Creating a custom field type recipe in this chapter. The field formatter will display the first and last names with some settings.
Create a new module like the one existing in the first recipe. We will refer to the module as mymodule throughout the recipe. Use your module's appropriate name.
<?php
namespace Drupal\mymodule\Plugin\Field\FieldFormatter;
use Drupal\Core\Field\FormatterBase;
use Drupal\Core\Field\FieldItemListInterface;
class RealNameFormatter extends FormatterBase {
}
<?php
namespace Drupal\mymodule\Plugin\Field\FieldFormatter;
use Drupal\Core\Field\FormatterBase;
use Drupal\Core\Field\FieldItemListInterface;
/**
* Plugin implementation of the 'realname_one_line' formatter.
*
* @FieldFormatter(
* id = "realname_one_line",
* label = @Translation("Real name (one line)"),
* field_types = {
* "realname"
* }
* )
*/
class RealNameFormatter extends FormatterBase {
}
/**
{@inheritdoc}
*/
public function viewElements(FieldItemListInterface $items, $langcode) {
$element = [];
foreach ($items as $delta => $item) {
$element[$delta] = [
'#markup' => $this->t('@first @last', [
'@first' => $item->first_name,
'@last' => $item->last_name,
]),
];
}
return $element;
}
/**
* Plugin implementation of the 'realname' field type.
*
* @FieldType(
* id = "realname",
* label = @Translation("Real name"),
* description = @Translation("This field stores a first and last name."),
* category = @Translation("General"),
* default_widget = " string_textfield ",
* default_formatter = "realname_one_line"
* )
*/
Drupal core defines a plugin.manager.field.formatter service. By default, this is handled through the \Drupal\Core\Field\FormatterPluginManager class. This plugin manager defines the field formatter plugins that should be in the Plugin/Field/FieldFormatter namespace, and all the classes in this namespace will be loaded and assumed to be field formatter plugins.
The manager's definition also sets \Drupal\Core\Field\FormatterInterface as the expected interface that all field formatter plugins will implement. This is why most field formatters extend \Drupal\Core\Field\FormatterBase to meet these method requirements.
As field formatters are annotated plugins, the manager provides \Drupal\Core\Field\Annotation\FieldFormatter as the class that fulfills the annotation definition.
The entity view display system uses the plugin.manager.field.formatter service to load field definitions and add the field's render array, returned from the viewElements method, to the entity view render array.
Field formatters have additional methods to provide more information; they are covered in the next section.
The \Drupal\Core\Field\FormatterInterface interface defines three methods that can be overridden to provide a settings form and a summary of the current settings:
Settings can be used to alter how the formatter displays information. For example, these methods can be implemented to provide settings to hide or display the first or last name.
The plugin system provides a means to create specialized objects in Drupal that do not require the data storage features of the entity system.
This recipe is based on the GeoIP API module port to Drupal 8 that was started by the author. The GeoIP API module provides a way to get the country from a website visitor's IP address.
In this recipe, we will create a new plugin type called GeoLocator that will return the country code for a given IP address. We will create a plugin manager, a default plugin interface, a plugin annotation definition, and provide a default plugin to find the country via the website's CDN.
We will use the geoip namespace and module name in this recipe.
<?php
namespace Drupal\geoip;
use Drupal\Core\Plugin\DefaultPluginManager;
use Drupal\Core\Cache\CacheBackendInterface;
use Drupal\Core\Extension\ModuleHandlerInterface;
class GeoLocatorManager extends DefaultPluginManager {
}
<?php
namespace Drupal\geoip;
use Drupal\Core\Plugin\DefaultPluginManager;
use Drupal\Core\Cache\CacheBackendInterface;
use Drupal\Core\Extension\ModuleHandlerInterface;
class GeoLocatorManager extends DefaultPluginManager {
/**
* Default values for each plugin.
*
* @var array
*/
protected $defaults = [
'label' => '',
'description' => '',
'weight' => 0,
];
}
<?php
namespace Drupal\geoip;
use Drupal\Core\Plugin\DefaultPluginManager;
use Drupal\Core\Cache\CacheBackendInterface;
use Drupal\Core\Extension\ModuleHandlerInterface;
class GeoLocatorManager extends DefaultPluginManager {
/**
* Default values for each plugin.
*
* @var array
* /
protected $defaults = [
'label' => '',
'description' => '',
'weight' => 0,
];
/**
* Constructs a new GeoLocatorManager object.
*
* @param \Traversable $namespaces
* An object that implements \Traversable which contains the root paths
* keyed by the corresponding namespace to look for plugin implementations.
* @param \Drupal\Core\Cache\CacheBackendInterface $cache_backend
* Cache backend instance to use.
* @param \Drupal\Core\Extension\ModuleHandlerInterface $module_handler
* The module handler.
*/
public function __construct(\Traversable $namespaces, CacheBackendInterface $cache_backend, ModuleHandlerInterface $module_handler) {
parent::__construct(
'Plugin/GeoLocator',
$namespaces,
$module_handler,
'Drupal\geoip\Plugin\GeoLocator\GeoLocatorInterface',
'Drupal\geoip\Annotation\GeoLocator'
);
$this->setCacheBackend($cache_backend, 'geolocator_plugins');
}
}
We override the constructor so that we can specify a specific cache key. This allows plugin definitions to be cached and cleared properly; otherwise, our plugin manager will continuously read the disk to find plugins.
services:
plugin.manager.geolocator:
class: Drupal\geoip\GeoLocatorManager
parent: default_plugin_manager
Drupal utilizes services and dependency injection. By defining our class as a service, we are telling the application container how to initiate our class. We can use the parent definition to tell the container to use the same arguments as the default_plugin_manager definition.
<?php
namespace Drupal\geoip\Annotation;
use Drupal\Component\Annotation\Plugin;
/**
* Defines a GeoLocator annotation object.
*
* @Annotation
*/
class GeoLocator extends Plugin {
/**
* The human-readable name.
*
* @var \Drupal\Core\Annotation\Translation
*
* @ingroup plugin_translatable
*/
public $label;
/**
* A description of the plugin.
*
* @var \Drupal\Core\Annotation\Translation
*
* @ingroup plugin_translatable
*/
public $description;
}
Each property is an item that can be defined in the plugin's annotation. The annotated definition will start with @GeoLocator for our plugins.
<?php
namespace Drupal\geoip\Plugin\GeoLocator;
/**
* Interface GeoLocatorInterface.
*/
interface GeoLocatorInterface {
/**
* Get the plugin's label.
*
* @return string
* The geolocator label
*/
public function label();
/**
* Get the plugin's description.
*
* @return string
* The geolocator description
*/
public function description();
/**
* Performs geolocation on an address.
*
* @param string $ip_address
* The IP address to geolocate.
*
* @return string|NULL
* The geolocated country code, or NULL if not found.
*/
public function geolocate($ip_address);
}
We provide an interface so that we can guarantee that we have these expected methods when working with a GeoLocator plugin, and that we have an output, regardless of the logic behind each method.
<?php
namespace Drupal\geoip\Plugin\GeoLocator;
use Drupal\Core\Plugin\PluginBase;
/**
* CDN geolocation provider.
*
* @GeoLocator(
* id = "cdn",
* label = "CDN",
* description = "Checks for geolocation headers sent by CDN services",
* weight = -10
* )
*/
class Cdn extends PluginBase implements GeoLocatorInterface {
/**
* {@inheritdoc}
*/
public function label() {
return $this->pluginDefinition['label'];
}
/**
* {@inheritdoc}
*/
public function description() {
return $this->pluginDefinition['description'];
}
/**
* {@inheritdoc}
*/
public function geolocate($ip_address) {
// Check if CloudFlare headers present.
if (!empty($_SERVER['HTTP_CF_IPCOUNTRY'])) {
$country_code = $_SERVER['HTTP_CF_IPCOUNTRY'];
}
// Check if CloudFront headers present.
elseif (!empty($_SERVER['HTTP_CLOUDFRONT_VIEWER_COUNTRY'])) {
$country_code = $_SERVER['HTTP_CLOUDFRONT_VIEWER_COUNTRY'];
}
else {
$country_code = NULL;
}
return $country_code;
}
}
Drupal 8 implements a service container, a concept adopted from the Symfony framework. In order to implement a plugin, there needs to be a manager who can discover and process plugin definitions. This manager is defined as a service in a module's services.yml with its required constructor parameters. This allows the service container to initiate the class when it is required.
In our example, the GeoLocatorManager plugin manager discovers the GeoLocator plugin definitions through annotated plugin discovery. After the first discovery, all the known plugin definitions are then cached under the geolocator_plugins cache key.
Plugin managers also provide a method to return these definitions or create an object instance based on an available definition. For the CDN plugin, this would be a full instantiated Cdn class object.
Let's consider the following example:
// Load the manager service.
$geolocator_manager = \Drupal::service('plugin.manager.geolocator');
// Create a class instance through the manager.
$cdn_instance = $unit_manager->createInstance('cdn');
// Get country code.
$country_code = $cdn_instance->geolocate('127.0.0.1');
There are many additional items for creating a custom plugin type; we will discuss some of them in the following sections.
Plugin managers have the ability to define an alter hook. The following line of code will be added to the GeoLocatorManager class's constructor to provide hook_geolocator_plugins_alter. This is passed to the module handler service for invocations:
/**
* Constructs a new GeoLocatorManager object.
*
* @param \Traversable $namespaces
* An object that implements \Traversable which contains the root paths
* keyed by the corresponding namespace to look for plugin implementations.
* @param \Drupal\Core\Cache\CacheBackendInterface $cache_backend
* Cache backend instance to use.
* @param \Drupal\Core\Extension\ModuleHandlerInterface $module_handler
* The module handler.
*/
public function __construct(\Traversable $namespaces, CacheBackendInterface $cache_backend, ModuleHandlerInterface $module_handler) {
parent::__construct(
'Plugin/GeoLocator',
$namespaces,
$module_handler,
'Drupal\geoip\Plugin\GeoLocator\GeoLocatorInterface',
'Drupal\geoip\Annotation\GeoLocator'
);
$this->alterInfo('geolocator_info');
$this->setCacheBackend($cache_backend, 'geolocator_plugins');
}
Modules implementing hook_geolocator_plugins_alter in the .module file have the ability to modify all the discovered plugin definitions. They also have the ability to remove defined plugin entries or alter any information provided for the annotation definition.
Plugins can use a cache backend to improve performance. This can be done by specifying a cache backend with the setCacheBackend method in the manager's constructor. The following line of code will allow the Unit plugins to be cached and only discovered on a cache rebuild.
The $cache_backend variable is passed to the constructor. The second parameter provides the cache key. The cache key will have the current language code added as a suffix.
There is an optional third parameter that takes an array of strings to represent cache tags that will cause the plugin definitions to be cleared. This is an advanced feature, and plugin definitions should normally be cleared through the manager's clearCachedDefinitions method. The cache tags allow the plugin definitions to be cleared when a relevant cache is cleared as well.
Plugins are loaded through the manager service, which should always be accessed through the service container. The following line of code will be used in your module's hooks or classes to access the plugin manager:
$geolocator_manager = \Drupal::service('plugin.manager.geolocator');
Plugin managers have various methods for retrieving plugin definitions, which are as follows:
In this chapter, we will cover the following recipes to make sure that your site is multilingual and internationalized:
This chapter will cover the multilingual and internationalization features of Drupal 8, which have been greatly enhanced since Drupal 7. The preceding version of Drupal required many extra modules to provide internationalization efforts, but now the majority is provided by Drupal core.
Drupal core provides the following multilingual modules:
Each module serves a specific purpose in creating the multilingual experience for your Drupal site. Behind the scenes, Drupal supports the language code for all entities and cache contexts. These modules expose the interfaces to implement and deliver internationalized experiences.
The interface translation module provides a method to translate strings found in the Drupal user interface. Harnessing the Language module, interface translations are automatically downloaded from the Drupal translation server. By default, the interface language is loaded through the language code as a path prefix. With the default Language configuration, paths will be prefixed with the default language.
Interface translations are based on strings provided in the code that are passed through the internal translation functions.
In this recipe, we will enable Spanish, import the language files, and review the translated interface strings to provide missing or custom translations.
Drupal 8 provides an automated installation process of translation files. For this to work, your web server must be able to communicate with https://localize.drupal.org/. If your web server cannot automatically download the files from the translation server, you can refer to the manual installation instructions, which will be covered in the There's more... section of this recipe.
The interface translation module provides \Drupal\locale\LocaleTranslation, which implements \Drupal\Core\StringTranslation\Translator\TranslatorInterface. This class is registered under the string_translation service as an available lookup method.
When the t function or the \Drupal\Core\StringTranslation\StringTranslationTrait::t method is invoked, the string_translation service is called to provide a translated string. The string_translation service will iterate through the available translators and return a translated string, if possible.
The translator provided in the interface translation will then attempt to resolve the provided string against known translations for the current language. If a translation has been saved, it will be returned.
We will explore ways to install other languages, check translation statuses, and do much more in the following sections.
Translation files can be manually installed by downloading them from the Drupal.org translation server and uploading them through the language interface. You can also use the import interface to upload custom gettext portable object (.po) files.
Drupal core and most contributed projects have .po files available at the Drupal translations site, https://localize.drupal.org. On the site, click on Download to download a .po file for Drupal core in all available languages. Additionally, clicking on a language will provide more translations for a specific language across projects, as follows:
You can import a .po file by going to the User interface translation form and selecting the Import tab. You will need to select the .po file and then the appropriate language. You can treat the uploaded files as custom-created translations. This is recommended if you are providing a custom translation file that was not provided by Drupal.org. If you are updating Drupal.org translations manually, make sure that you check the box that overwrites existing noncustom translations. The final option allows you to replace customized translations if the .po file provides them. This can be useful if you have translated missing strings that might now be provided by the official translation file.
As you add new modules, the available translations will grow. The Interface translation module provides a translation status report that is accessible from the Reports page. This will check the default translation server for the project and check whether there is a .po available or if it has changed. In the event of a custom module, you can provide a custom translation server, which is covered in Providing translations for a custom module.
If an update is available, you will be alerted. You can then import the translation file updates automatically or download and manually import them.
In the User interface translation form, there is an Export tab. This form will provide a Gettext Portable Object (.po) file. You can export all the available source text that is discovered in your current Drupal site without translations. This will provide a base .po for translators to work on.
Additionally, you can download a specific language. Specific language downloads can include uncustomized translations, customized translations, and missing translations. Downloading customized translations can be used to help make contributions to the multilingual and internationalization efforts of the Drupal community.
The interface translation module provides a single permission called Translate interface text. This permission grants users the permission to interact with all the module's capabilities. It is flagged with a security warning, as it allows users with this permission to customize all the output text presented to them.
However, it does allow you to provide a role for translators and limits their access to just translation interfaces.
The interface translation module is useful beyond its typical multilingual purposes. You can use it to customize strings in the interface that are not available to be modified through typical hook methods, or if you are not a developer.
Firstly, you will need to edit the English language from the Languages screen. Check the checkbox for Enable interface translation for English and click on Save language. You will now have the ability to customize existing interface strings.
The Language module provides detection and selection rules. By default, the module will detect the current language based on the URL, with the language code acting as a prefix to the current path. For example, /es/node will display the node listing page in Spanish, as seen in the following screenshot:
You can have multiple detection options enabled at once and use the ordering to decide which takes precedence. This can allow you to use the language code in the URL first, but, if they are missing, a fallback to the language is specified by the user's browser.
Some detection methods have settings. For instance, the URL detection method can be based on the default path prefix or subdomains.
Modules can provide custom translations in their directories or point to a remote file. These definitions are added to the module's info.yml file. First, you will need to specify the interface translation project key if it differs from the project's machine name.
You will then need to specify a server pattern through the interface translation server pattern key. This can be a relative path to Drupal's root, such as modules/custom/mymodule/translation.po, or a remote file URL at http://example.com/files/translations/mymodule/translation.po.
Distributions (or other modules) can implement hook_locale_translation_projects_alter to provide this information on behalf of modules or to alter defaults.
The server pattern accepts the following different tokens:
More information on the interface translation keys and variables can be found in the local.api.php document file located in the interface translation module's base folder.
The Configuration translation module provides an interface to translate configurations with interface translation and language as dependencies. This module allows us to translate configuration entities. The ability to translate configuration entities adds an extra level of internationalization.
Interface translation allows us to translate strings provided in our Drupal site's code base. Configuration translation allows us to translate importable and exportable configuration items that we created, such as site title or date formats.
In this recipe, we will translate date format configuration entities. We will provide localized date formats for Danish to provide a more internationalized experience.
Your Drupal site needs to have two languages enabled in order to use Configuration Translation. Install Danish from the Languages interface.
The Configuration Translation module requires Interface Translation; however, it does not work in the same fashion. The module modifies all entity types that extend the \Drupal\Core\Config\Entity\ConfigEntityInterface interface. It adds a new handler under the config_translation_list key. This is used to build a list of available configuration entities and their bundles.
The module alters the configuration schema in Drupal, and updates the default configuration element definitions to use a specified class under \Drupal\config_translation\Form. This allows \Drupal\config_translation\Form\ConfigTranslationFormBase and its child classes to properly save translated configuration data, which can then be modified through the configuration translation screens.
When the configuration is saved, it is identified as being part of a collection. The collection is identified as language.LANGCODE, and all translated configuration entities are saved and loaded by this identifier. The following is an example of how the configuration items are stored in the database:
When browsing the site in the es language code, the appropriate block.block.bartik_account_menu configuration entity will be loaded. If you are using the default site, or no language code, the configuration entity with an empty collection will be used.
Configuration entities and the ability to translate them are a big part of Drupal 8's multilingual capabilities. We'll explore them in detail in the next recipe.
Modules can invoke the hook_config_translation_info_alter hook to alter discovered configuration mappers. For instance, the Node module does this to modify the node_type configuration entity:
/**
* Implements hook_config_translation_info_alter().
*/
function node_config_translation_info_alter(&$info) {
$info['node_type']['class'] = 'Drupal\node\ConfigTranslation\NodeTypeMapper';
}
This updates the node_type definition to use the \Drupal\node\ConfigTranslation\NodeTypeMapper custom mapper class. This class adds the node type's title as a configurable translation item.
Views are configuration entities. When the Configuration translation module is enabled, it is possible to translate Views. This will allow you to translate display titles, exposed form labels, and other items. Refer to the Creating a multilingual view recipe in this chapter for more information.
The content translation module provides a method to translate content entities, such as nodes and blocks. Each content entity needs to have translation enabled, which allows you to granularly decide what properties and fields are translated.
Content translations are duplications of the existing entity, but are flagged with a proper language code. When a visitor uses a language code, Drupal attempts to load content entities using that language code. If a translation is not present, Drupal will render the default untranslated entity.
Your Drupal site needs to have two languages enabled to use Content translation. Install Spanish from the Languages interface.
The Content translation module works by utilizing language code flags. All content entities and field definitions have a language code key. A content entity has a language code column, which specifies what language the content entity is for. Field definitions also have a language code column, which is used to identify the translation for the content entity. Content entities can provide handler definitions to handle translations, or else the Content translation module will provide its own.
Each entity and field record is saved with the proper language code to use. When an entity is loaded, the current language code is taken into consideration to ensure that the proper entity is loaded.
There are additional operations to translate content; we will cover them in the next sections.
The Content translation module provides a mechanism to flag translated entities as possibly being outdated. The Flag other translations as outdated flag provides a way to make a note of entities that will need updated translations:
This flag does not change any data, but rather provides a moderation tool. This makes it easy for translators to identify content, which has been changed and requires updating. The translation tab for the content entity will highlight all translations, which are still marked as outdated. As they are changed, the editor can uncheck the flag.
Mostly, Drupal menus contain links to nodes. Menu links are not translated by default, and the Custom menu links option must be enabled under Content translation. You will need to translate node links manually from the menu administration interface.
Enabling a menu link from the node create and edit form will not work with translations. If you edit the menu settings from a translation, it will edit the untranslated menu link.
The Content translation module requires entity definitions to provide information about translation handlers. If this information is missing, it will provide its own defaults. The Entity API is covered in Chapter 10, The Entity API, but we will quickly discuss how the content translation module interacts with the Entity API.
Content entity definitions can provide a translation handler. If not provided, it will default to \Drupal\content_translation\ContentTranslationHandler. A node provides this definition and uses it to place the content translation information into the vertical tabs.
The content_translation_metadata key defines how to interact with translation metadata information, such as flagging other entities as outdated. The content_translation_deletion key provides a form class to handle entity translation deletion.
Currently, as of 8.0.1, no core modules provide implementations that override the default content_translation_metadata or content_translation_deletion.
Views, being configuration entities, are available for translation. However, the power of multilingual views does not lie just in configuration translation. Views allow you to build filters that react to the current language code. This ensures that the content, which has been translated into the user's language, is displayed.
In this recipe, we will create a multilingual view that provides a block showing recent articles. If there is no content, we will display a translated no results message.
Your Drupal site needs to have two languages enabled in order to use Content Translation. Install Spanish from the Languages interface. Enable content translation for Articles. You will also need to have some translated content.
Views provide the Translation language filter that builds off this element. The Views plugin systems provide a mechanism to gather and display all available languages. These will be saved as a token internally and then substituted with the actual language code when the query is executed. If a language code is no longer available, the Content language for selected page and views will fall back to the current language when viewed.
The filter tells Views to query based on the language code of the entity and its fields.
Views are configuration entities. The Configuration translation module allows you to translate views. Views can be translated from the main Configuration translation screens from the Configuration area or by editing individual views.
Most translation items will be under the Master display settings tab unless overridden in specific displays. Each display type will also have its own specific settings.
Even more can be done to translate your views; we will discuss in the following section.
Each view can translate the exposed form from the Exposed Form section. This does not translate the labels on the form but the form elements. You can translate the submit button text, reset button label, sort label, and ascending or descending .
You can translate the labels for exposed filters from the Filters section. Each exposed filter will show up as a collapsible fieldset, allowing you to configure the administrative label and front-facing label.
By default, available translations need to be imported through the global interface translation context.
Some display formats have translatable items. These can be translated in each display mode's section. For example, the following items can be translated with their display format:
Custom menu links can be translated through the Content translation module. Views which use a page display do not create custom menu link entities. So it must be translated through the View itself. The Views module takes all views with a page display and registers their paths into the routing system directly as if defined in a module's routing.yml file:
For example, the People view that lists all users can be translated to have an updated tab name and link description.
In this chapter, we will explore the configuration management system and deployment of the configuration changes. The following is a list of the recipes covered in this chapter:
Drupal 8 provides a new, unified system to manage configurations. In Drupal 8, all configurations are saved in configuration entities that match a defined configuration schema. This system provides a standard way of deploying the configuration between Drupal site environments and updating the site configuration.
Once the configuration is created, or imported, it goes into an immutable state. If a module tries to install the configuration that exists, it will throw an exception and be prevented. Outside the typical user interface, the configuration can only be modified through the configuration management system.
The configuration management system can be manipulated through a user interface provided by the Configuration management module or through the command-line interface tools. These tools allow you to follow the development paradigm of utilizing a production site and a development site, where changes are made to the development site and then pushed to production.
Configuration management in Drupal 8 provides a solution to common problems when working with a website across multiple environments. No matter what the workflow pattern is, at some point, the configuration needs to move from one place to another, such as from production to a local environment. When pushing the development work to production, you will need to have some way to put the configuration in place.
Drupal 8's user interface provides a way to import and export configuration entities via the YAML format. In this recipe, we will create a content type, export its configuration, and then import it into another Drupal site. The configuration YAML export will be imported into the production site to update its configuration.
You will need a base Drupal site to act as the development site. Another Drupal site, which is a clone of the development site, must be available to act as a production Drupal site.
At the most basic level, configurations are just a mapping of keys and values, which can be represented as a PHP array and translated into the YAML format.
Configuration management uses schema definitions for configuration entities. The schema definition provides a configuration namespace and the available keys and data types. The schema definition provides a typed data definition for each option that allows validation of the individual values and configuration.
The export process reads the configuration data and translates it into the YAML format. The configuration manager then receives the configuration in the form of YAML and converts it back to a PHP array. The data is then updated in the database.
When importing the configuration, Drupal checks the value of the configuration YAML's uuid key, if present, against any current configuration with the same Universally Unique Identifier (UUID). A UUID is a pattern used in software to provide a method of identifying an object across different environments. This allows Drupal to correlate a piece of data from its UUID since the database identifier can differ across environments. If the configuration item has a matching machine name, but a mismatching UUID, an error will be thrown.
We will discuss importing and exporting configuration within your Drupal site more in depth in a later section.
Configuration entities define dependencies when they are exported. The dependency definitions ensure that the configuration entity's schema and other module functionalities are available.
When you review the configuration export for field.storage.node.body.yml, it defines node and text as dependencies:
dependencies:
module:
- node
- text
If the node or text module is not enabled, the import will fail and throw an error.
The Providing configuration on install or update recipe of Chapter 6, Creating Forms with the Form API, discusses how to use a module to provide configurations on the module's installation. Instead of manually writing configuration YAML files for installation, the Configuration management module can be used to export configurations and save them in your module's config/install directory.
Any item exported through the user interface can be used. The only requirement is that you will need to remove the uuid key, as it denotes the site's UUID value and invalidates the configuration when it tries to install it.
The configuration management system in Drupal 8 utilizes the configuration schema to describe configurations that can exist. Why is this important? It allows Drupal to properly implement typed data on stored configuration values and validate them, providing a standardized way of handling configurations for translation and configuration items.
When a module uses the configuration system to store data, it needs to provide a schema for each configuration definition it wishes to store. The schema definition is used to validate and provide typed data definitions for its values.
The following code defines the configuration schema for the navbar_awesome module, which holds two different Boolean configuration values:
navbar_awesome.toolbar:
type: config_object
label: 'Navbar Awesome toolbar settings'
mapping:
cdn:
type: boolean
label: 'Use the FontAwesome CDN library'
roboto:
type: boolean
label: 'Include Roboto from Google Fonts CDN'
This defines the navbar_awesome.toolbar configuration namespace; it belongs to the navbar_awesome module and has the toolbar configuration. We will then need two cdn and roboto subvalues that represent typed data values. A configuration YAML for this schema will be named navbar_awesome.toolbar.yml after the namespace, and it contains the following code:
cdn: true roboto: true
In turn, this is what the values will look like when represented as a PHP array:
[
'navbar_awesome' => [
'cdn' => TRUE,
'roboto' => TRUE,
]
]
The configuration factory classes then provide an object-based wrapper around these configuration definitions and provide validation of their values against the schema. For instance, if you try to save the cdn value as a string, a validation exception will be thrown.
A key component for managing a Drupal website is configuration integrity. A key part of maintaining this integrity is ensuring that your configuration changes made in development are pushed upstream to your production environments. Maintaining configuration changes by manually exporting and importing through the user interface can be tedious and does not provide a way to track what has or has not been exported or imported. At the same time, manually writing module hooks to manipulate the configuration can be time-consuming. Luckily, the configuration management solution provides you with the ability to export and import the entire site's configuration.
A site export can only be imported into another copy of itself. Each site must have the same UUID, which is set during its installation. This allows you to export your local development environment's configuration and bring it to staging or production, without modifying the content or the database directly.
In this recipe, we will export the development site's complete configuration entities' definitions. We will then take the exported configuration and import it into the production site. This will simulate a typical deployment of a Drupal site with changes created in development that is ready to be released in production.
You will need a base Drupal site to act as the development site. Another Drupal site, which is a duplicate of the development site's database, must be available to act as the production Drupal site.
You will need to have the Configuration management module installed if it is not already.
The Configuration synchronization form provides a way to interface with the config database table for your Drupal site. When you go to the Export page and create the tarball, Drupal effectively dumps the contents of the config table. Each row represents a configuration entity and will become its own YAML file. The contents of the YAML file represent its database value.
When you import the tarball, Drupal extracts its content. The files are placed in the available CONFIG_SYNC_DIRECTORY directory. The synchronization page parses the configuration entity YAML and provides a difference check against the current site's configuration. Each configuration item can be reviewed, and then all the items can be imported. You cannot choose to selectively import individual items.
We will now discuss things that are required for site configuration synchronization.
When a Drupal site is installed, the UUID is set. This UUID is added to the exported configuration entities and is represented by the uuid key. Drupal uses this key to identify the source of the configuration. Drupal will not synchronize configurations that do not have a matching UUID in their YAML definition.
You can review the site's current UUID value by reviewing the system.site configuration object. This can also be done using the Drush or Drupal Console command-line tool.
Using Drush, type the following command:
$ drush config-get system.site
Using Drupal Console, type the following command:
$ drupal debug:config system.site
Drupal uses a synchronization folder to hold the configuration YAML files that are to be imported into the current site. This folder is represented by the CONFIG_SYNC_DIRECTORY constant. If you have not defined this in the global $config_directories variable in your site's settings.php, then it will be a randomly named directory in your site's file directory.
The synchronization form will use the configuration management discovery service to look for configuration changes that need to be imported from this folder.
Drupal's configuration management system will not allow the import of configuration entities that originated at a different Drupal site. When a Drupal site is installed, the system.site configuration entity saves a UUID for the current site instance. Only cloned versions of this site's database can accept configuration imports from it.
The configuration installer profile is a custom distribution, that will allow you to import the configuration despite the configuration's site UUID. The profile doesn't install itself. When you use the profile, it will provide an interface to upload a configuration export that will then be imported, as shown in the following screenshot:
The distribution can be found at https://www.drupal.org/project/config_installer.
Drupal 8's configuration systems solve many problems encountered when exporting and deploying configurations in Drupal 7. However, the task of synchronizing the configuration is still a user interface task and requires the manipulation of archive files that contain the configuration exports for a Drupal 8 site.
Configuration management can be done on the command line through Drush, without requiring it to be installed. This mitigates any requirement to log in to the production website to import changes. It also opens the ability for more advanced workflows that place the configuration in version control.
In this recipe, we will use Drush to export the development site's configuration to the filesystem. The exported configuration files will then be copied to the production site's configuration directory. Using Drush, the configuration will be imported into production to complete the deployment.
You will need a base Drupal site to act as the development site. Another Drupal site, which is a clone of the development site, must be available to act as the production Drupal site.
This recipe uses Drush. If you have not installed Drush, instructions can be found at http://docs.drush.org/en/master/install/. Drush needs to be installed at the locations of both your Drupal sites.
The Drush command-line tool can utilize the code found in Drupal to interact with it. The config-export command replicates the functionality provided by the Configuration management module's full site export. However, you do not need the Configuration management module enabled for the command to work. The command will extract the available site configuration and write it to a directory, which is unarchived.
The config-import command parses the files in a directory. It will make an attempt to run a difference check against the YAML files like the Configuration management module's synchronize overview form does. It will then import all the changes.
There are additional ways to work with the configuration management system in Drupal. We will explore those options in the next section.
Drush provides a way to simplify the transportation of configuration between sites. The config-pull command allows you to specify two Drupal sites and move the export configuration between them. You can either specify a name of a subdirectory under the /sites directory or a Drush alias.
The following command will copy a development site's configuration and import it into the staging server's site:
drush config-pull @mysite.local @mysite.staging
Additionally, you can specify the --label option. This represents a folder key in the $config_directories setting. The option defaults to sync automatically. Alternatively, you can use the --destination parameter to specify an arbitrary folder that is not specified in the setting of $config_directories.
Drush has been part of the Drupal community since Drupal 4.7 and is a custom-built command-line tool. The Drupal Console is a Symfony Console-based application used to interact with Drupal. The Drupal Console project provides a means for configuration management over the command line.
The workflow is the same, except the naming of the command. The configuration export command is config:export, and it is automatically exported to your system's temporary folder until a directory is passed. You can then import the configuration using the config:import command.
Both Drush and Drupal Console support the ability to edit the configuration through the command line in YAML format. Both the tools operate in the same fashion and have similar command names:
The difference is that Drush will list all the available options to be edited if you do not pass a name, while Console allows you to search.
When you edit a configuration item, your default terminal-based text editor will open. You will be presented with a YAML file that can be edited. Once you save your changes, the configuration is then saved on your Drupal site:
Both Drush and Console provide their own mechanisms for exporting a single configuration entity:
Drush will print the configuration's output to the terminal, whereas Console's default behavior is to write the output to the file disk. For example, the following commands will output the values from system.site in the YAML format:
$ drush config-get system.site $ drupal debug:config system.site
A benefit of having the configuration exportable to YAML files is the fact that the configuration can be kept in version control. The Drupal site's CONFIG_SYNC_DIRECTORY directory can be committed to version control to ensure that it is transported across environments and properly updated. Deployment tools can then use Drush or Console to automatically import changes.
The config-export command provided by Drush provides the Git integration:
drush config-export --add
Appending the --add option will run git add -p for an interactive staging of the changed configuration files:
drush config-export --commit --message="Updating configuration "
The --commit and optional --message options will stage all configuration file changes and commit them with your message:
drush config-export --push --message="Updating configuration "
Finally, you can also specify --push to make a commit and push it to the remote repository.
Modules in Drupal 8 provide configuration YAML files inside their config/install directory. A consequence of the site controlling configuration is that a new configuration in a module's config/install directory is not automatically installed. Module developers must write update functions, which will import the new configuration as it is added. While this is a practice contributed modules should follow, this process can be cumbersome for private projects.
Luckily, the Drupal community has come up with a solution that provides a configuration management flow that allows updating of a module's provided default configuration. The module Configuration Update Manager allows you to import a new configuration from a module or revert it to the original configuration if modified. In fact, the module is a dependency for the Features module discussed in Chapter 4, Extending Drupal.
In this recipe, we will use Configuration Update Manager to review configuration differences to a module and revert the modified configuration.
$ cd /path/to/drupal8
$ composer require drupal/config_update
The Configuration Update Manager provides two modules: Configuration Update Base and Configuration Update Reports. The base module provides an underlying API for listing a configuration, reverting a configuration, and running difference checks with results. It extends Drupal core's configuration operations. The reports module provides a user interface on top of the base module. The Features module uses the base module to provide difference review and automatic reverting of a configuration.
When reverting a configuration, the raw values are collected and then used to overwrite what currently exists in the system. The reports also allow importing a new configuration added to a module.
There are other contributed projects and methods for handling a configuration within modules.
For module developers, there is the Configuration Development module. The Configuration Development module provides a command-line method for importing and exporting a configuration. This is useful for contributed module developers. It eases the exporting and update of a configuration intended for the config/install directory.
The module looks for a config_devel entry in the module's info.yml file. An example is taken from the Commerce Store submodule from Drupal Commerce module:
config_devel:
install:
- commerce_store.commerce_store_type.online
- commerce_store.settings
- core.entity_view_display.commerce_store.online.default
- views.view.commerce_stores
- system.action.commerce_delete_store_action
Using Drush, commands provided by the Configuration Development can then be used to export and import the data. The following command will export the listed configuration to the config/install directory:
$ drush config-devel-export commerce_store
In this chapter, we will explore the Entity API to create custom entities and see how they are handled and cover the following recipes:
In Drupal, entities are a representation of data that has a specific structure. There are specific entity types, which have different bundles and fields attached to those bundles. Bundles are implementations of entities that can have fields attached to themselves. In terms of programming, you can consider an entity that supports bundles as an abstract class and each bundle as a class that extends that abstract class. The fields are added to bundles. This is part of the reasoning for the terminology: an entity type can contain a bundle of fields.
An entity is an instance of an entity type defined in Drupal. Drupal 8 provides two entity types: configuration and content. Configuration entities are not fieldable and represent a configuration within a site. Content entities are fieldable and can have bundles. Bundles are, most commonly, controlled through configuration entities.
In Drupal 8, there is an Entity API module. It was created in Drupal 7 to expand the entity subsystem; most of its functionalities from Drupal 7 are now in its core. The goal of the module is to develop improvements for the developer experience around entities by merging more functionalities into the Drupal core during each minor release cycle (8.1.x, 8.2.x, and so on). There will be a There's more... section in each recipe that relates to how the Entity API module can simplify the recipe.
Drupal 8 harnesses the entity API for configuration to provide configuration validation and extended functionality. Using the underlying entity structure, the configuration has a proper Create, Read, Update, and Delete (CRUD) process that can be managed. Configuration entities are not fieldable. All the attributes of a configuration entity are defined in its configuration schema definition.
Most common configuration entities interact with Drupal core's config_object type, as discussed in Chapter 4, Extending Drupal, and Chapter 9, Configuration Management - Deploying in Drupal 8, to store and manage a site's configuration. There are other uses of configuration entities, such as menus, view displays, form displays, and contact forms, which are all configuration entities.
In this recipe, we will create a new configuration entity type called SiteAnnouncement. This will provide a simple configuration entity that allows you to create, edit, and delete simple messages that can be displayed on the site for important announcements.
You will need a custom module to place code into to implement a configuration entity type. Let's create an src directory for your classes. Refer to the Creating a module recipe of Chapter 4, Extending Drupal, for information on creating a custom module.
Do not use a module that is currently installed, otherwise Drupal will not install your new entity type.
# Schema for the configuration files of the Site Announcement.
mymodule.announcement.*:
type: config_entity
label: 'Site announcement'
mapping:
id:
type: string
label: 'ID'
label:
type: label
label: 'Label'
message:
type: text
label: 'Text'
We will define the configuration entity's namespace as an announcement, which we will provide to Drupal in the entity's annotation block. We will then tell Drupal that this is a config_entity and provide a label for the schema.
Using the mapping array, we will provide the attributes that make up our entity and the data that will be stored.
<?php
namespace Drupal\mymodule\Entity;
use Drupal\Core\Config\Entity\ConfigEntityInterface;
interface SiteAnnouncementInterface extends ConfigEntityInterface {
/**
* Gets the message value.
*
* @return string
*/
public function getMessage();
}
This will be implemented by our entity, and will provide the method requirements. It is best practice to provide an interface for entities. This allows you to provide the required methods if another developer extends your entity or if you are doing advanced testing and need to mock an object. We also provide a method to return our custom attribute.
<?php
namespace Drupal\mymodule\Entity;
use Drupal\Core\Config\Entity\ConfigEntityBase;
class SiteAnnouncement extends ConfigEntityBase implements SiteAnnouncementInterface {
/**
* The announcement's message.
*
* @var string
*/
protected $message;
/**
* {@inheritdoc}
*/
public function getMessage() {
return $this->message;
}
}
In the preceding code, we added the message property defined in our schema as a class property. Our method defined in the entity's interface is used to return that value and interact with our configuration entity.
<?php
namespace Drupal\mymodule\Entity;
use Drupal\Core\Config\Entity\ConfigEntityBase;
/**
* @ConfigEntityType(
* id ="announcement",
* label = @Translation("Site Announcement"),
* config_prefix = "announcement",
* entity_keys = {
* "id" = "id",
* "label" = "label"
* },
* config_export = {
* "id",
* "label",
* "message",
* }
* )
*/
class SiteAnnouncement extends ConfigEntityBase implements SiteAnnouncementInterface {
/**
* The announcement's message.
*
* @var string
*/
protected $message;
/**
* {@inheritdoc}
*/
public function getMessage() {
return $this->message;
}
}
The annotation document block tells Drupal that this is an instance of the ConfigEntityType plugin. The id is the internal machine name identifier for the entity type, and the label is its human-readable version. The config_prefix matches how we defined our schema with mymodule.announcement. The entity keys definition tells Drupal the attributes that represent our identifiers and labels.
When specifying config_export, we are telling the configuration management system what properties are exportable when exporting our entity.
/**
* @ConfigEntityType(
* id ="announcement",
* label = @Translation("Site Announcement"),
* handlers = {
* "list_builder" = "Drupal\mymodule\SiteAnnouncementListBuilder",
* "form" = {
* "default" = "Drupal\mymodule\SiteAnnouncementForm",
* "add" = "Drupal\mymodule\SiteAnnouncementForm",
* "edit" = "Drupal\mymodule\SiteAnnouncementForm",
* "delete" = "Drupal\Core\Entity\EntityDeleteForm"
* }
* },
* config_prefix = "announcement",
* entity_keys = {
* "id" = "id",
* "label" = "label"
* },
* config_export = {
* "id",
* "label",
* "message",
* }
* )
*/
The handlers array specifies classes that provide the interaction functionality with our entity. The list_builder class will be created to show you a table of our entities. The form array provides classes for forms to be used when creating, editing, or deleting our configuration entity.
/**
* @ConfigEntityType(
* id ="announcement",
* label = @Translation("Site Announcement"),
* handlers = {
* "list_builder" = "Drupal\mymodule\SiteAnnouncementListBuilder",
* "form" = {
* "default" = "Drupal\mymodule\SiteAnnouncementForm",
* "add" = "Drupal\mymodule\SiteAnnouncementForm",
* "edit" = "Drupal\mymodule\SiteAnnouncementForm",
* "delete" = "Drupal\Core\Entity\EntityDeleteForm"
* }
* },
* config_prefix = "announcement",
* entity_keys = {
* "id" = "id",
* "label" = "label"
* },
* links = {
* "delete-form" = "/admin/config/system/site-announcements/manage/{announcement}/delete",
* "edit-form" = "/admin/config/system/site-announcements/manage/{announcement}",
* "collection" = "/admin/config/system/site-announcements",
* },
* config_export = {
* "id",
* "label",
* "message",
* }
* )
*/
There is a routing service for entities that will automatically provide Drupal a route with the proper controllers based on this annotation.
<?php
namespace Drupal\mymodule;
use Drupal\Core\Config\Entity\ConfigEntityListBuilder;
use Drupal\mymodule\Entity\SiteAnnouncementInterface;
class SiteAnnouncementListBuilder extends ConfigEntityListBuilder {
/**
* {@inheritdoc}
*/
public function buildHeader() {
$header['label'] = t('Label');
return $header + parent::buildHeader();
}
/**
* {@inheritdoc}
*/
public function buildRow(SiteAnnouncementInterface $entity) {
$row['label'] = $entity->label();
return $row + parent::buildRow($entity);
}
}
In our list builder handler, we override the buildHeader and builderRow methods so that we can add our configuration entity's properties to the table.
<?php
namespace Drupal\mymodule;
use Drupal\Component\Utility\Unicode;
use Drupal\Core\Entity\EntityForm;
use Drupal\Core\Form\FormStateInterface;
use Drupal\Core\Language\LanguageInterface;
class SiteAnnouncementForm extends EntityForm {
/**
* {@inheritdoc}
*/
public function form(array $form, FormStateInterface $form_state) {
$form = parent::form($form, $form_state);
$form['label'] = [
'#type' => 'textfield',
'#title' => t('Label'),
'#required' => TRUE,
'#default_value' => $entity->label(),
];
$form['message'] = [
'#type' => 'textarea',
'#title' => t('Message'),
'#required' => TRUE,
'#default_value' => $entity->getMessage(),
];
return $form;
}
/**
* {@inheritdoc}
*/
public function save(array $form, FormStateInterface $form_state) {
$entity = $this->entity;
$is_new = !$entity->getOriginalId();
if ($is_new) {
// Configuration entities need an ID manually set.
$machine_name = \Drupal::transliteration()
->transliterate($entity->label(), LanguageInterface::LANGCODE_DEFAULT, '_');
$entity->set('id', Unicode::strtolower($machine_name));
drupal_set_message(t('The %label announcement has been created.', array('%label' => $entity->label())));
}
else {
drupal_set_message(t('Updated the %label announcement.', array('%label' => $entity->label())));
}
$entity->save();
// Redirect to edit form so we can populate colors.
$form_state->setRedirectUrl($this->entity->toUrl('collection'));
}
}
We override the form method to add Form API elements to our label and message properties. We also override the save method to provide user messages about the changes that are made. We utilize the entity's toUrl method to redirect it to the collection (list) page. We use the transliteration service to generate a machine name based on the label for our entity's identifier.
announcement.add:
route_name: entity.announcement.add_form
title: 'Add announcement'
appears_on:
- entity.announcement.collection
This will instruct Drupal to render the entity.announcement.add_form link on the specified routes in the appears_on value.
mymodule.site_announcements:
title: 'Site announcements'
parent: system.admin_config_system
description: 'Manage site announcements.'
route_name: entity.announcement.collection
When creating a configuration schema definition, one of the first properties used for the configuration namespace is type. This value can be config_object or config_entity. When the type is config_entity, the definition will be used to create a database table rather than to structure the serialized data for the config table.
Entities are powered by the plugin system in Drupal, which means that there is a plugin manager. The default \Drupal\Core\Entity\EntityTypeManager provides discovery and handling of entities. The ConfigEntityType class for the entity type's plugin class will force the setting of the uuid and langcode in the entity_keys definition. The storage handler for configuration entities defaults to \Drupal\Core\Config\Entity\ConfigEntityStorage. The ConfigEntityStorage class interacts with the configuration management system to load, save, and delete custom configuration entities.
Drupal 8 introduces a typed data system that configuration entities and fields use.
Drupal core provides its own configuration information. There is a core.data_types.schema.yml file located at core/config/schema. These are the base types of data that the core provides and can be used when making configuration schema. The file contains YAML definitions of data types and the class that represents them:
boolean: label: 'Boolean' class: '\Drupal\Core\TypedData\Plugin\DataType\BooleanData' email: label: 'Email' class: '\Drupal\Core\TypedData\Plugin\DataType\Email' string: label: 'String' class: '\Drupal\Core\TypedData\Plugin\DataType\StringData'
When a configuration schema definition specifies an attribute that has an email for its type, that value is then handled by the \Drupal\Core\TypedData\Plugin\DataType\Email class. Data types are a form of plugins, and each plugin's annotation specifies constraints for validation. This is built around the Symfony Validator component.
Content entities provide base field definitions and configurable fields through the Field module. There is also support for revisions and translations with content entities. Display modes, both form and view, are available for content entities to control how the fields are edited and displayed. When an entity does not specify bundles, there is automatically one bundle instance with the same name as the entity.
In this recipe, we will create a custom content entity that does not specify a bundle. We will create a Message entity that can serve as a content entity for generic messages.
You will need a custom module to place code into to implement a configuration entity type. Create an src directory for your classes. Refer to the Creating a module recipe of Chapter 4, Extending Drupal, for information on creating a custom module.
Do not use a module which is currently installed, otherwise Drupal will not install your new entity type.
<?php
namespace Drupal\mymodule\Entity;
use Drupal\Core\Entity\ContentEntityInterface;
interface MessageInterface extends ContentEntityInterface {
/**
* Gets the message value.
*
* @return string
*/
public function getMessage();
}
This will be implemented by our entity and will provide the method requirements. It is best practice to provide an interface for entities. This allows you to provide required methods if another developer extends your entity or if you are doing advanced testing and need to mock an object. We also provide a method to return our main base field definition (to be defined).
<?php
namespace Drupal\mymodule\Entity;
use Drupal\Core\Entity\ContentEntityBase;
class Message extends ContentEntityBase implements MessageInterface {
}
<?php
namespace Drupal\mymodule\Entity;
use Drupal\Core\Entity\ContentEntityBase;
/**
* Defines the message entity class.
*
* @ContentEntityType(
* id = "message",
* label = @Translation("Message"),
* base_table = "message",
* fieldable = TRUE,
* entity_keys = {
* "id" = "message_id",
* "label" = "title",
* "langcode" = "langcode",
* "uuid" = "uuid"
* },
* )
*/
class Message extends ContentEntityBase implements MessageInterface {
}
The id is the internal machine name identifier for the entity type, and the label is its human-readable version. The entity keys definition tells Drupal the attributes that represent our identifier and label.
The base_table defines the database table in which the entity will be stored, and fieldable allows custom fields to be configured through the Field UI module.
/**
* Defines the message entity class.
*
* @ContentEntityType(
* id = "message",
* label = @Translation("Message"),
* handlers = {
* "list_builder" = "Drupal\mymodule\MessageListBuilder",
* "form" = {
* "default" = "Drupal\Core\Entity\EntityForm",
* "add" = "Drupal\Core\Entity\EntityForm",
* "edit" = "Drupal\Core\Entity\EntityForm",
* "delete" = "Drupal\Core\Entity\ContentEntityDeleteForm",
* },
* },
* base_table = "message",
* fieldable = TRUE,
* entity_keys = {
* "id" = "message_id",
* "label" = "title",
* "langcode" = "langcode",
* "uuid" = "uuid"
* },
* )
*/
The handlers array specifies classes that provide the interaction functionality with our entity. The list builder class will be created to show you a table of our entities. The form array provides classes for forms to be used when creating, editing, or deleting our content entity.
/**
* Defines the message entity class.
*
* @ContentEntityType(
* id = "message",
* label = @Translation("Message"),
* handlers = {
* "list_builder" = "Drupal\mymodule\MessageListBuilder",
* "form" = {
* "default" = "Drupal\Core\Entity\EntityForm",
* "add" = "Drupal\Core\Entity\EntityForm",
* "edit" = "Drupal\Core\Entity\EntityForm",
* "delete" = "Drupal\Core\Entity\ContentEntityDeleteForm",
* },
* "route_provider" = {
* "html" = "Drupal\Core\Entity\Routing\DefaultHtmlRouteProvider",
* },
* },
* base_table = "message",
* fieldable = TRUE,
* entity_keys = {
* "id" = "message_id",
* "label" = "title",
* "langcode" = "langcode",
* "uuid" = "uuid"
* },
* links = {
* "canonical" = "/messages/{message}",
* "edit-form" = "/messages/{message}/edit",
* "delete-form" = "/messages/{message}/delete",
* "collection" = "/admin/content/messages"
* },
* )
*/
There is a routing service for entities that will automatically provide Drupal a route with the proper controllers based on this annotation.
/**
* Defines the message entity class.
*
* @ContentEntityType(
* id = "message",
* label = @Translation("Message"),
* handlers = {
* "list_builder" = "Drupal\mymodule\MessageListBuilder",
* "form" = {
* "default" = "Drupal\Core\Entity\EntityForm",
* "add" = "Drupal\Core\Entity\EntityForm",
* "edit" = "Drupal\Core\Entity\EntityForm",
* "delete" = "Drupal\Core\Entity\ContentEntityDeleteForm",
* },
* "route_provider" = {
* "html" = "Drupal\Core\Entity\Routing\DefaultHtmlRouteProvider",
* },
* },
* admin_permission = "administer message",
* base_table = "message",
* fieldable = TRUE,
* entity_keys = {
* "id" = "message_id",
* "label" = "title",
* "langcode" = "langcode",
* "uuid" = "uuid"
* },
* links = {
* "canonical" = "/messages/{message}",
* "add-form" = "/messages/add",
* "edit-form" = "/messages/{message}/edit",
* "delete-form" = "/messages/{message}/delete",
* "collection" = "/admin/content/messages"
* },
* )
*/
/**
* {@inheritdoc}
*/
public static function baseFieldDefinitions(EntityTypeInterface $entity_type) {
$fields = parent::baseFieldDefinitions($entity_type);
$fields['title'] = BaseFieldDefinition::create('string')
->setLabel(t('Title'))
->setRequired(TRUE)
->setTranslatable(TRUE)
->setRevisionable(TRUE)
->setSetting('max_length', 255)
->setDisplayOptions('view', array(
'label' => 'hidden',
'type' => 'string',
'weight' => -5,
))
->setDisplayOptions('form', array(
'type' => 'string_textfield',
'weight' => -5,
))
->setDisplayConfigurable('form', TRUE);
$fields['content'] = BaseFieldDefinition::create('text_long')
->setLabel(t('Content'))
->setDescription(t('Content of the message'))
->setTranslatable(TRUE)
->setDisplayOptions('view', array(
'label' => 'hidden',
'type' => 'text_default',
'weight' => 0,
))
->setDisplayConfigurable('view', TRUE)
->setDisplayOptions('form', array(
'type' => 'text_textfield',
'weight' => 0,
))
->setDisplayConfigurable('form', TRUE);
return $fields;
}
The FieldableEntityInterface is implemented by the ContentEntityBase class using the ContentEntityInterface. The method needs to return an array of BaseFieldDefinitions for typed data definitions. The parent class provides field definitions for most of the entity_keys value in our entity's annotation. We must provide the label field and any specific fields for our implementation.
The content base field definition will hold the actual text of the message.
/**
* {@inheritdoc}
*/
public function getMessage() {
return $this->get('content')->value;
}
This method provides a wrapper around the defined base field's value and returns it.
<?php
namespace Drupal\mymodule;
use Drupal\Core\Entity\EntityInterface;
use Drupal\Core\Entity\EntityListBuilder;
class MessageListBuilder extends EntityListBuilder {
public function buildHeader() {
$header['title'] = t('Title');
return $header + parent::buildHeader();
}
public function buildRow(EntityInterface $entity) {
$row['title'] = $entity->label();
return $row + parent::buildRow($entity);
}
}
In our list builder handler, we override the buildHeader and builderRow methods so that we can add our configuration entity's properties to the table.
administer message:
title: 'Administer messages'
Content entities are a version of the EntityType plugin. When you define a content entity type, the annotation block begins with @ContentEntityType. This declaration and the properties in it represent the definition to initiate an instance of the \Drupal\Core\Entity\ContentEntityType, class just like all other plugin annotations. The ContentEntityType plugin class implements a constructor to provide default storage and view_builder handlers, forcing us to implement the list_builder and form handler arrays.
The plugin manager for entity types lives under the entity_type.manager service name and is provided through \Drupal\Core\Entity\EntityTypeManager by default. However, while the annotation defines the plugin information, our Message class that extends ContentEntityBase provides a means to manipulate the data it represents.
We will discuss how to add an additional functionality to your entity and use the Entity module to simplify the developer expedience.
Our Message entity type implements the DefaultHtmlRouteProvider class. There is also the \Drupal\Core\Entity\Routing\AdminHtmlRouteProvider class. This overrides the getEditFormRoute and getDeleteFormRoute and marks them with _admin_route. This will cause these forms to be rendered in the administration theme.
In this recipe, we specified the message collection route as /admin/content/messages. Without implementing this route as a local task under the /admin/content route, it will not show up as a tab. This can be done by creating a links.task.yml file for the module.
In mymodule.links.task.yml, add the following YAML content:
entity.message.collection_tab: route_name: entity.message.collection base_route: system.admin_content title: 'Messages'
This instructs Drupal to use the entity.message.collection route, defined in our routing.yml file, to be based under the system.admin_content route:
Bundles allow you to have different variations of a content entity. All bundles share the same base field definitions but not configured fields. This allows each bundle to have its own custom fields. Display modes are also dependent on a specific bundle. This allows each bundle to have its own configuration for the form mode and view mode.
Using the custom entity from the preceding recipe, we will add a configuration entity to act as the bundle. This will allow you to have different message types for multiple custom field configurations.
We will need a custom module to place the code into to implement a configuration entity type. Create an src directory for your classes. We need a custom content entity type to be implemented, such as the one in the Creating a content entity type recipe of this chapter.
mymodule.message_type.*:
type: config_entity
label: 'Message type settings'
mapping:
id:
type: string
label: 'Machine-readable name'
uuid:
type: string
label: 'UUID'
label:
type: label
label: 'Label'
langcode:
type: string
label: 'Default language'
We will define the configuration entity's config prefix as message_type, which we will provide to Drupal in the entity's annotation block. We will tell Drupal that this is a config_entity and provide a label for the schema.
With the mapping array, we provide the attributes that make up our entity and the data that will be stored.
<?php
namespace Drupal\mymodule\Entity;
use Drupal\Core\Config\Entity\ConfigEntityInterface;
interface MessageTypeInterface extends ConfigEntityInterface {
// Empty for future enhancements.
}
This will be implemented by our entity and will provide the method requirements. It is best practice to provide an interface for entities. This allows you to provide required methods if another developer extends your entity or if you are doing advanced testing and need to mock an object.
We will be implementing a very basic bundle. It is still wise to provide an interface in the event of future enhancements and mocking ability in tests.
<?php
namespace Drupal\mymodule\Entity;
use Drupal\Core\Config\Entity\ConfigEntityBundleBase;
class MessageType extends ConfigEntityBundleBase implements MessageTypeInterface {
}
In most use cases, the bundle entity class can be an empty class that does not provide any properties or methods. If a bundle provides additional attributes in its schema definition, they would also be provided here, like any other configuration entity.
<?php
namespace Drupal\mymodule\Entity;
use Drupal\Core\Config\Entity\ConfigEntityBundleBase;
/**
* Defines the message type entity class.
*
* @ConfigEntityType(
* id = "message_type",
* label = @Translation("Message type"),
* config_prefix = "message_type",
* bundle_of = "message",
* entity_keys = {
* "id" = "id",
* "label" = "label"
* },
* config_export = {
* "id",
* "label",
* },
* )
*/
class MessageType extends ConfigEntityBundleBase implements MessageTypeInterface {
}
The annotation document block tells Drupal that this is an instance of the ConfigEntityType plugin. The id is the internal machine name identifier for the entity type and the label is its human-readable version. The config_prefix matches how we defined our schema using mymodule.message_type. The entity keys definition tells Drupal which attributes represent our identifiers and labels.
When specifying config_export, we are telling the configuration management system what properties are to be exported when exporting our entity.
/**
* Defines the message type entity class.
*
* @ConfigEntityType(
* id = "message_type",
* label = @Translation("Message type"),
* handlers = {
* "list_builder" = "Drupal\mymodule\MessageTypeListBuilder",
* "form" = {
* "default" = "Drupal\Core\Entity\EntityForm",
* "add" = "Drupal\Core\Entity\EntityForm",
* "edit" = "Drupal\Core\Entity\EntityForm",
* "delete" = "Drupal\Core\Entity\EntityDeleteForm"
* },
* },
* config_prefix = "message_type",
* bundle_of = "message",
* entity_keys = {
* "id" = "id",
* "label" = "label"
* },
* config_export = {
* "id",
* "label",
* },
* )
*/
The handlers array specifies classes that provide the interaction functionality with our entity. The list builder class will be created to show you a table of our entities. The form array provides classes for forms to be used when creating, editing, or deleting our configuration entity.
/**
* Defines the message type entity class.
*
* @ConfigEntityType(
* id = "message_type",
* label = @Translation("Message type"),
* handlers = {
* "list_builder" = "Drupal\mymodule\MessageTypeListBuilder",
* "form" = {
* "default" = "Drupal\Core\Entity\EntityForm",
* "add" = "Drupal\Core\Entity\EntityForm",
* "edit" = "Drupal\Core\Entity\EntityForm",
* "delete" = "Drupal\Core\Entity\EntityDeleteForm"
* },
* "route_provider" = {
* "html" = "Drupal\Core\Entity\Routing\DefaultHtmlRouteProvider",
* },
* },
* config_prefix = "message_type",
* bundle_of = "message",
* entity_keys = {
* "id" = "id",
* "label" = "label"
* },
* config_export = {
* "id",
* "label",
* },
* links = {
* "add-form" = "/admin/structure/message-types/add",
* "delete-form" = "/admin/structure/message-types/{message_type}/delete",
* "edit-form" = "/admin/structure/message-types/{message_type}",
* "admin-form" = "/admin/structure/message-types/{message_type}",
* "collection" = "/admin/structure/message-types"
* }
* )
*/
There is a routing service for entities that will automatically provide Drupal a route with the proper controllers based on this annotation. The add form route is not yet supported and needs to be manually added.
/**
* Defines the message entity class.
*
* @ContentEntityType(
* id = "message",
* label = @Translation("Message"),
* handlers = {...},
* base_table = "message",
* fieldable = TRUE,
* bundle_entity_type = "message_type",
* field_ui_base_route = "entity.message_type.edit_form",
* entity_keys = {
* "id" = "message_id",
* "label" = "title",
* "langcode" = "langcode",
* "bundle" = "type",
* "uuid" = "uuid"
* },
* links = {...},
* )
*/
The bundle_entity_type key specifies the entity type used as the bundle. The plugin validates this as an actual entity type and marks it for configuration dependencies. With the field_ui_base_route key pointed to the bundle's main edit form, it will generate the Manage Fields, Manage Form Display, and Manage Display tabs on the bundles. Finally, the bundle entity key instructs Drupal on the field definition to be used to identify the entity's bundle, which is created in the next step.
With the bundle entity key added, the ContentEntityBase class will automatically add an entity reference base field called type to our entity, referencing the bundle configuration entity type.
<?php
namespace Drupal\mymodule;
use Drupal\Core\Entity\EntityInterface;
use Drupal\Core\Config\Entity\ConfigEntityListBuilder;
class MessageTypeListBuilder extends EntityListBuilder {
public function buildHeader() {
$header['label'] = t('Label');
return $header + parent::buildHeader();
}
public function buildRow(EntityInterface $entity) {
$row['label'] = $entity->label();
return $row + parent::buildRow($entity);
}
}
Bundles are most utilized in the configured field levels via the Field and Field UI modules. When you create a new field, it has a base storage item for its global settings. Once a field is added to a bundle, there is a new field configuration that is created and assigned to the bundle. Fields can then have their own settings for a specific bundle along with form and view display configurations.
Content entity bundles work just like any other configuration entity implementation, but they extend the usability of the Field API for your content entity types.
We will discuss how to add additional functionality to our entity bundle and use the Entity module to simplify the developer expedience.
There are special links called action links in Drupal. These appear at the top of the page and are generally used for links that allow the creation of an item by creating a links.action.yml file.
In your mymodule.links.action.yml, each action link defines the route it will link to, titles, and the routes it appears on:
message_type_add:
route_name: entity.message_type.add_form
title: 'Add message type'
appears_on:
- entity.message_type.collection
The appears_on key accepts multiple values that will allow this route link to appear on multiple pages:
All entities have a set of handlers that control specific pieces of functionalities. One handler handles access control. When the access handler is not specified, the base \Drupal\Core\Entity\EntityType module will implement \Drupal\Core\Entity\EntityAccessControlHandler as the access handler. By default, this will check whether any modules have implemented hook_entity_create_access or hook_entity_type_create_access and use their opinions. Otherwise, it defaults to the admin permission for the entity type, if implemented.
In this recipe, we will provide an admin permission for our entity and implement the access handler and permission provider available through the Entity API module. We will base this on an entity called Message.
We will need a custom module to place the code into to implement a configuration entity type. Let's create an src directory for our PSR-4 style classes. We will need to implement a custom content entity type, such as the one in the Creating a content entity type recipe of this chapter.
/**
* Defines the message entity class.
*
* @ContentEntityType(
* id = "message",
* label = @Translation("Message"),
* handlers = {...},
* base_table = "message",
* fieldable = TRUE,
* admin_permission = "administer messages",
* entity_keys = {
* "id" = "message_id",
* "label" = "title",
* "langcode" = "langcode",
* "uuid" = "uuid"
* },
* links = {...},
* )
*/
The entity access handler provided by the core will check whether entities implement this option. If it is provided, it will be used as the basis for access checks.
/**
* Defines the message entity class.
*
* @ContentEntityType(
* id = "message",
* label = @Translation("Message"),
* handlers = {...},
* base_table = "message",
* fieldable = TRUE,
* admin_permission = "administer messages",
* permission_granularity = "bundle",
* bundle_entity_type = "message_type",
* field_ui_base_route = "entity.message_type.edit_form",
* entity_keys = {
* "id" = "message_id",
* "label" = "title",
* "langcode" = "langcode",
* "bundle" = "type",
* "uuid" = "uuid"
* },
* links = {...},
* )
*/
The permission_granularity key will tell the system what permissions should be generated and how the access should be checked. This way, one user could create Announcement messages but not Bulletin messages.
/**
* Defines the message entity class.
*
* @ContentEntityType(
* id = "message",
* label = @Translation("Message"),
* handlers = {
* "list_builder" = "Drupal\mymodule\MessageListBuilder",
* "permission_provider" = "\Drupal\entity\EntityPermissionProvider",
* "form" = {...},
* "route_provider" = {...},
* },
* base_table = "message",
* fieldable = TRUE,
* admin_permission = "administer messages",
* permission_granularity = "bundle",
* bundle_entity_type = "message_type",
* field_ui_base_route = "entity.message_type.edit_form",
* entity_keys = {...},
* links = {...},
* )
*/
/**
* Defines the message entity class.
*
* @ContentEntityType(
* id = "message",
* label = @Translation("Message"),
* handlers = {
* "list_builder" = "Drupal\mymodule\MessageListBuilder",
* "access" = "\Drupal\entity\EntityAccessControlHandler",
* "permission_provider" = "\Drupal\entity\EntityPermissionProvider",
* "form" = {...},
* "route_provider" = {...},
* },
* base_table = "message",
* fieldable = TRUE,
* admin_permission = "administer messages",
* permission_granularity = "bundle",
* bundle_entity_type = "message_type",
* field_ui_base_route = "entity.message_type.edit_form",
* entity_keys = {...},
* links = {...},
* )
*/
Entities are powered by the plugin system in Drupal, which means that there is a plugin manager. The default \Drupal\Core\Entity\EntityTypeManager provides the discovery and handling of entities. Both the ContentEntityType and ConfigEntityType entity types and classes extend the base \Drupal\Core\Entity\EntityType class.
The EntityType class constructor provides a default access handler if it is not provided through the \Drupal\Core\Entity\EntityAccessControlHandler class. Every core module that provides an entity type implements this to override at least checkAccess and checkCreateAccess. Meanwhile, the Entity API access handler extends this to support bundle granular permissions and owner-based permissions if an entity implements EntityOwnerInterface in a reusable fashion.
The \Drupal\Core\Access\AccessibleInterface defines an access method, and all the entities inherit this interface. The default implementation in \Drupal\Core\Entity\Entity will invoke checkCreateAccess if the operation is create; otherwise, it invokes the generic access method of the access controller, which will invoke entity access hooks and the class' checkAccess method.
When Drupal generates available permissions, the Entity API module finds entity definitions that define the permission_provider handler and then invokes that class to generate permissions.
We will discuss how to implement custom access control for an entity and use the Entity to simplify the controlling access.
The checkFieldAccess method in the core's entity access control handler can be overridden to control access to specific entity fields when modifying an entity. Without being overridden by a child class, the \Drupal\Core\Entity\EntityAccessControlHandler::checkFieldAccess will always return an allowed access result. The method receives the following parameters:
Entity types can implement their own access control handlers and override this method to provide granular control over the modification of their base fields. A good example would be the User module and its \Drupal\user\UserAccessControlHandler.
User entities have a pass field that is used for the user's current password. There is also a created field that records when the user was added to the site.
For the pass field, it returns denied if the operation is view, but allows access if the operation is edit:
case 'pass': // Allow editing the password, but not viewing it. return ($operation == 'edit') ? AccessResult::allowed() : AccessResult::forbidden();
The created field uses the opposite logic. When a user logs in, the site can be viewed but cannot be edited:
case 'created': // Allow viewing the created date, but not editing it. return ($operation == 'view') ? AccessResult::allowed() : AccessResult::forbidden();
Storage handlers control the loading, saving, and deleting of an entity. The \Drupal\Core\Entity\ContentEntityType provides the base entity type definition for all content entity types. If it is not specified, then the default storage handler is \Drupal\Core\Entity\Sql\SqlContentEntityStorage. This class can be extended to implement alternative load methods or adjustments on saving.
In this recipe, we will implement a method that supports loading an entity by a specific property instead of having to write a specific loadByProperties method call.
You will need a custom module to place the code into to implement a configuration entity type. Create an src directory for your PSR-4 style classes. A custom content entity type needs to be implemented, such as the one in the Creating a content entity type recipe of this chapter.
<?php
namespace Drupal\mymodule;
use Drupal\Core\Entity\Sql\SqlContentEntityStorage;
/**
* Defines the entity storage for messages.
*/
class MessageStorage extends SqlContentEntityStorage {
}
By extending the default storage class for our entity type, we can simply add new methods that are relevant to our requirements rather than implementing the extra business logic.
/**
* Load multiple messages by bundle type.
*
* @param string $message_type
* The message type.
*
* @return array|\Drupal\Core\Entity\EntityInterface[]
* An array of loaded message entities.
*/
public function loadMultipleByType($message_type) {
return $this->loadByProperties([
'type' => $message_type,
]);
}
We pass the type property so that we can query it based on the message bundle and return all matching message entities.
handlers = {
"list_builder" = "Drupal\mymodule\MessageListBuilder",
"access" = "\Drupal\entity\EntityAccessControlHandler",
"permission_provider" = "\Drupal\entity\EntityPermissionProvider",
"storage" = "Drupal\mymodule\MessageStorage",
"form" = {
"default" = "Drupal\Core\Entity\EntityForm",
"add" = "Drupal\Core\Entity\EntityForm",
"edit" = "Drupal\Core\Entity\EntityForm",
"delete" = "Drupal\Core\Entity\EntityDeleteForm"
},
"route_provider" = {
"html" = "Drupal\Core\Entity\Routing\DefaultHtmlRouteProvider",
},
},
// Get the entity type manager from the container.
\Drupal::entityTypeManager()
// Access the storage handler.
->getStorage('message')
// Invoke the new method on custom storage class.
->loadMultipleByType('message');
When defining a content entity type, the annotation block begins with @ContentEntityType. This declaration, and the properties in it represents the definition to initiate an instance of the
\Drupal\Core\Entity\ContentEntityType class just like all other plugin annotations.
In the class constructor, there is a merge to provide default handlers for the storage handler if it is not provided. This will always default to \Drupal\Core\Entity\Sql\SqlContentEntityStorage, as it provides methods and logic to help its parent class, ContentEntityStorageBase, interact with the SQL-based storage.
Extending SqlContentEntityStorage reuses methods required for default Drupal implementations and provides an easy method to create custom methods to interact with loading, saving, and so on.
We will discuss the custom storage handler and utilization of different storage backends.
Drupal provides mechanisms to support different database storage backends that are not provided by the Drupal core, such as MongoDB. Although it is not stable for Drupal 8 at the time of writing this book, there is a MongoDB module that provides storage interaction.
The module provides \Drupal\mongodb\Entity\ContentEntityStorage, which extends \Drupal\Core\Entity\ContentEntityStorageBase. This class overrides the methods used to create, save, and delete, to write them to a MongoDB collection.
The project can be found at https://www.drupal.org/project/mongodb.
While there are much more steps to provide a custom storage backend for content entities and their fields, this serves as an example for how you can choose to place a custom entity in different storage backends.
Entities can implement a route provider that will create the route definitions for the entity's canonical (view), edit, delete, and collection (list) routes. As of Drupal 8.3.0, all the normally required routes are generated (this was not the case in 8.0.0). The provider takes the path for a specific link definition and turns that into a route and accessible path.
In this recipe, we will extend the default \Drupal\Core\Entity\Routing\DefaultHtmlRouteProvider and override the canonical route to be the same as the edit route, because we assume that messages will always be embedded.
You will need a custom module to place the code into to implement a configuration entity type. Create an src directory for your classes. A custom content entity type needs to be implemented, such as the one in the Creating a content entity type recipe of this chapter.
<?php
namespace Drupal\mymodule;
use Drupal\Core\Entity\Routing\DefaultHtmlRouteProvider;
/**
* Provides HTML routes for the message entity type.
*/
class MessageHtmlRouteProvider extends DefaultHtmlRouteProvider {
}
<?php
namespace Drupal\mymodule;
use Drupal\Core\Entity\EntityTypeInterface;
use Drupal\Core\Entity\Routing\DefaultHtmlRouteProvider;
/**
* Provides HTML routes for the message entity type.
*/
class MessageHtmlRouteProvider extends DefaultHtmlRouteProvider {
/**
* {@inheritdoc}
*/
protected function getCanonicalRoute(EntityTypeInterface $entity_type) {
// Messages use the edit-form route as the canonical route.
// @todo Remove this when #2479377 gets fixed.
return $this->getEditFormRoute($entity_type);
}
}
Entities are powered by the plugin system in Drupal, which means that there is a plugin manager. The default \Drupal\Core\Entity\EntityTypeManager provides discovery and handling of entities. The \Drupal\Core\Entity\EntityTypeManagerInterface specifies a getRouteProviders method that is expected to return an array of strings that provide the fully qualified class name of an implementation of the \Drupal\Core\Entity\Routing\EntityRouteProviderInterface interface.
There is an event subscriber defined in core.services.yml called the entity_route_subscriber. This service subscribes to the dynamic route event. When this happens, it uses the entity type manager to retrieve all entity type implementations, which provide route subscribers. It then aggregates all the \Symfony\Component\Routing\RouteCollection instances received and merges them into the main route collection for the system.
Drupal 8 introduces router types and provide the add routes for our entity.
The Entity module provides two new route providers aimed specifically for entities that support revisions and a bulk delete form option.
If you have an entity that implements the RevisionLogInterface interface, the revision route provider generates a user interface for managing revisions. You then add a revision entry for the router_providers array pointing to the new route provider:
* "route_provider" = {
* "html" = "Drupal\Core\Entity\Routing\DefaultHtmlRouteProvider",
* "revision" = "Drupal\entity\Routing\RevisionRouteProvider",
* },
Then, you just need to define additional items in your entity's links definition:
* links = {
* "revision" = "/messages/{message}/revisions/{message_revision}/view",
* "revision-revert-form" = "/messages/{message_enhanced}/revisions/{message_revision}/revert",
* "version-history" = "/messages/{message}/revisions",
* "canonical" = "/messages/{message}",
* "edit-form" = "/messages/{message}/edit",
* "delete-form" = "/messages/{message}/delete",
* "collection" = "/admin/content/messages"
* }
This reduces the amount of boilerplate code required to implement an Entity. For an implementation example, refer to the EnhancedEntity class in the Entity API's test module entity_module_test.
In this chapter, we will see how to use third-party libraries, such as JavaScript, CSS, and PHP in detail:
Drupal 8 comes with a Proudly Built Elsewhere attitude. There has been an effort made to use more components created by the PHP community at large and other communities. Drupal 8 is built with Symfony. It includes Twig as its templating system, the provided WYSIWYG editor as its CKEditor, and PHPUnit for testing.
How does Drupal 8 promote using libraries made elsewhere? The new asset management system in Drupal 8 makes it easier to use frontend libraries. Drupal implements PSR-0 and PSR-4 from the PHP Framework Interoperability Group (PHP-FIG), and PHP Standards Recommendations (PSRs) are suggested standards used to increase interoperability between PHP applications. This has streamlined integrating third-party PHP libraries.
Both areas will be constantly improved with each minor release of Drupal 8. These areas will be mentioned throughout the chapter.
In the past, Drupal has only shipped with jQuery and a few jQuery plugins used by Drupal core for the JavaScript API. This has changed with Drupal 8. Underscore.js and Backbone.js are now included in Drupal, bringing two popular JavaScript frameworks to its developers.
However, there are many JavaScript frameworks that can be used. In Chapter 5, Frontend for the Win, we covered the asset management system and libraries. In this recipe, we will create a module that provides Angular.js as a library and a custom Angular application; the demo is available on the AngularJS home page.
In this example, we will use Bower to manage our third-party Angular.js library components. If you are not familiar with Bower, it is simply a package manager for frontend components. Instead of using Bower, you can just manually download and place the required files.
If you do not have Bower, you can follow the instructions to install it from bower.io at
http://bower.io/#install-bower. If you do not want to install Bower, we will provide links to manually download libraries.
Having a background in AngularJS is not required but is beneficial. This recipe implements the example from the home page of the library.
name: My Module! type: module description: Provides an AngularJS app. core: 8.x
$ bower init
? name mymodule
? description Example module with AngularJS
? main file
? what types of modules does this package expose?
? keywords
? authors Matt Glaman <nmd.matt@gmail.com>
? license GPL
? homepage
? set currently installed components as dependencies? Yes
? would you like to mark this package as private which prevents it from being accidentally published to the registry? No
{
name: 'mymodule',
authors: [
'Matt Glaman <nmd.matt@gmail.com>'
],
description: 'Example module with AngularJS',
main: '',
moduleType: [],
license: 'GPL',
homepage: '',
ignore: [
'**/.*',
'node_modules',
'bower_components',
'test',
'tests'
]
}
? Looks good? Yes
$ bower install --save angular bower angular#* cached git://github.com/angular/bower-angular.git#1.5.0 bower angular#* validate 1.5.0 against git://github.com/angular/bower-angular.git#* bower angular#^1.5.0 install angular#1.5.0 angular#1.5.0 bower_components/angular
The --save option will ensure that the package's dependency is saved in the created bower.json. If you do not have Bower, you can download AngularJS from https://angularjs.org/ and place it in the bower_components folder.
angular:
js:
'bower_components/angular/angular.js: {}
css:
component:
'bower_components/angular/angular-csp.css': {}
When the angular library is attached, it will add the AngularJS library file and attach the CSS style sheet.
<?php
/**
* Implements hook_preprocess_html().
*/
function mymodule_preprocess_html(&$variables) {
$variables['html_attributes']['ng-app'] = '';
}
AngularJS uses the ng-app attribute as a directive for bootstrapping an AngularJS application. It marks the root of the application.
<?php
namespace Drupal\mymodule\Plugin\Block;
use Drupal\Core\Block\BlockBase;
/**
* Provides a block for AngularJS example.
*
* @Block(
* id = "mymodule_angular_block",
* admin_label = @Translation("AngularJS Block")
* )
*/
class AngularBlock extends BlockBase {
public function build() {
return [
'input' => [
'#type' => 'textfield',
'#title' => $this->t('Name'),
'#placeholder' => $this->t('Enter a name here'),
'#attributes' => [
'ng-model' => 'yourName',
],
],
'name' => [
'#markup' => '<hr><h1>Hello {{yourName}}!</h1>',
],
'#attached' => [
'library' => [
'mymodule/angular',
],
],
];
}
}
We return a render array that contains the input, name, and our library attachments. The input array returns the Form API render information for a text field. The name returns a regular markup that will bind Angular's changes to the yourName scope variable.
The simplicity of integrating with a JavaScript framework is provided by the new asset management system in Drupal 8. The usage of Bower is optional, but it is usually a preferred method used to manage frontend dependencies. Using Bower, we can place bower_components in an ignore file that can be used to keep third-party libraries out of version control.
Drupal 8 uses Composer for handling PHP dependencies, but frontend libraries are still being sorted out for best practices.
In our recipe, we added the third-party library through a local copy of the code, inside the module. This approach, however, makes it difficult to reuse the same library in another module. The other module would have to declare a dependency on the module providing the library or define its own copy, and two versions of AngularJS would have been loaded on the page.
A leading practice is to place a libraries directory in the Drupal docroot (alongside modules and themes.) An example can be found in the DropzoneJS integration module:
dropzonejs:
title: 'Dropzonejs'
website: http://www.dropzonejs.com
version: 4.0.1
license:
name: MIT
url: https://github.com/enyo/dropzone/blob/master/LICENSE
gpl-compatible: true
js:
/libraries/dropzone/dist/min/dropzone.min.js: {}
css:
component:
/libraries/dropzone/dist/min/dropzone.min.css: {}
This pattern would allow any module to load the library through this path. Its author recommends that you have a base module that defines the library and simple integration and always make that a dependency.
Drupal provides many things. However, one thing that it does not provide is any kind of CSS component library. In the Using the new asset management system recipe of Chapter 5, Frontend for the Win, we added FontAwesome as a library. CSS frameworks implement robust user interface design components, and they can be quite large if you use a compiled version with everything bundled. The asset management system can be used to define each component as its own library to only deliver the exact files required for a strong frontend performance.
In this recipe, we will implement the Semantic UI framework, using the CSS-only distribution, which provides each individual component's CSS file. We will register the form, button, label, and input components as libraries. Our custom theme will then alter the Drupal elements for buttons, labels, and inputs to have the Semantic UI classes and load the proper library.
In this example, we will use Bower to manage our third-party components. If you are not familiar with Bower, it is simply a package manager used for frontend components. Instead of using Bower, you can just manually download and place the required files.
$ bower init
? name mytheme
? description Example theme with Semantic UI
? main file
? what types of modules does this package expose?
? keywords
? authors Matt Glaman <nmd.matt@gmail.com>
? license GPL
? homepage
? set currently installed components as dependencies? Yes
? would you like to mark this package as private which prevents it from being accidentally published to the registry? No
{
name: 'mytheme',
authors: [
'Matt Glaman <nmd.matt@gmail.com>'
],
description: 'Example theme with Semantic UI,
main: '',
moduleType: [],
license: 'GPL',
homepage: '',
ignore: [
'**/.*',
'node_modules',
'bower_components',
'test',
'tests'
]
}
? Looks good? Yes
$ bower install --save semantic-ui bower semantic-ui#* not-cached git://github.com/Semantic-Org/Semantic-UI.git#* bower semantic-ui#* resolve git://github.com/Semantic-Org/Semantic-UI.git#* bower semantic-ui#* download https://github.com/Semantic-Org/Semantic-UI/archive/2.1.8.tar.gz bower semantic-ui#* extract archive.tar.gz bower semantic-ui#* resolved git://github.com/Semantic-Org/Semantic-UI.git#2.1.8 bower jquery#>=1.8 not-cached git://github.com/jquery/jquery-dist.git#>=1.8 bower jquery#>=1.8 resolve git://github.com/jquery/jquery-dist.git#>=1.8 bower jquery#>=1.8 download https://github.com/jquery/jquery-dist/archive/2.2.0.tar.gz bower jquery#>=1.8 extract archive.tar.gz bower jquery#>=1.8 resolved git://github.com/jquery/jquery-dist.git#2.2.0 bower semantic#^2.1.8 install semantic#2.1.8 bower jquery#>=1.8 install jquery#2.2.0
The --save option will ensure that the package's dependency is saved in the created bower.json. If you do not have Bower, you can download Semantic UI from https://github.com/semantic-org/semantic-ui/ and place it in a bower_components folder.
semantic_ui.form:
js:
bower_components/semantic/dist/components/form.js: {}
css:
component:
bower_components/semantic/dist/components/form.css: {}
The form component for Semantic UI has a style sheet and JavaScript file. Your library ensures that both are loaded when the library is attached.
semantic_ui.button:
css:
component:
bower_components/semantic/dist/components/button.css: {}
semantic_ui.input:
css:
component:
bower_components/semantic/dist/components/input.css: {}
semantic_ui.label:
css:
component:
bower_components/semantic/dist/components/label.css: {}
{{ attach_library('mytheme/semantic_ui.form') }}
<form{{ attributes.addClass(['ui', 'form']) }}>
{{ children }}
</form>
The attach_library function will attach the specified library. Use the addClass method from Twig to add the ui and form classes. Semantic UI requires all elements to have the matching ui class.
{{ attach_library('mytheme/semantic_ui.input') }}
<input{{ attributes.addClass(['ui', 'input']) }} />{{ children }}
{{ attach_library('mytheme/semantic_ui.button') }}
<input{{ attributes.addClass(['ui', 'button', 'primary']) }} />{{ children }}
{{ attach_library('mytheme/semantic_ui.label') }}
{%
set classes = [
title_display == 'after' ? 'option',
title_display == 'invisible' ? 'visually-hidden',
required ? 'js-form-required',
required ? 'form-required',
'ui',
'label',
]
%}
{% if title is not empty or required -%}
<label{{ attributes.addClass(classes) }}>{{ title }}</label>
{%- endif %}
The simplicity of integrating with a CSS framework is provided by the new template system, Twig, and the asset management system in Drupal 8. The usage of Bower is optional, but it is usually a preferred method for managing frontend dependencies and can be used to keep third-party libraries out of version control.
Although it may be a task to add each component as its own library and attach when specifically needed, it ensures optimal asset delivery. With CSS and JavaScript aggregation enabled, each page will only have the minimal resources that are needed. This is an advantage when the entire Semantic UI minified is still 524 KB.
Drupal 8 uses Composer for package dependencies and autoloading classes based on PSR standards. This allows us to use any available PHP library much more easily than in previous versions of Drupal.
In this recipe, we will add the IpRestrict Stack Middleware library to add the functionality to whitelist access to the Drupal site based on allowed IP addresses.
You need to have Composer installed in order to use the Composer manager workflow. You can follow the Getting Started documentation at https://getcomposer.org/doc/00-intro.md. We will add the alsar/stack-ip-restrict library as a dependency to our Drupal installation.
composer require alsar/stack-ip-restrict
name: IP Restrict type: module description: Restricts access to the Drupal site based on allowed IP addresses core: 8.x
parameters:
ip_restrict:
enabled: true
ipAddresses: ['127.0.0.1', 'fe80::1', '::1']
services:
ip_restrict.middleware:
class: Alsar\Stack\IpRestrict
arguments: ['%ip_restrict%']
tags:
- { name: http_middleware }
The parameters section defines configuration values, which can be overridden in the site's services.yml file. The services section defines the service's machine name, class file, its constructor arguments, and any tags.
<?php
namespace Drupal\ip_restrict\Compiler;
use Symfony\Component\DependencyInjection\ContainerBuilder;
use Symfony\Component\DependencyInjection\Compiler\CompilerPassInterface;
/**
* Adds the IP Restrict middleware if enabled.
*/
class IpRestrictPass implements CompilerPassInterface {
/**
* {@inheritdoc}
*/
public function process(ContainerBuilder $container) {
if (FALSE === $container->hasDefinition('ip_restrict.middleware')) {
return;
}
$ip_restrict_config = $container->getParameter('ip_restrict');
if (!$ip_restrict_config['enabled']) {
$container->removeDefinition('ip_restrict.middleware');
}
}
}
In our compiler pass, we check the enabled parameter and remove our middleware if it has been disabled (so that it does not restrict allowed IPs).
Drupal 8 utilizes Symfony components. One of them is the service container and the services it has registered. During the building of the container, there is a compiler pass process that allows alterations of the container's services.
First, we will need to register the service in the module's services.yml file. The \Drupal\Core\DependencyInjection\Compiler\StackedKernelPass class provided by the core will automatically load all the services tagged with http_middleware, such as our ip_restrict.middleware service.
Our arguments definition loads items defined in the parameters.ip_restrict that are used for the class's constructor.
With our provided IpRestrictPass class, we are also tapping into the container's compile cycle. We will take a look at the parameter values for the ip_restrict section to check whether they are enabled. If the enabled setting is set to false, we remove our service from the container.
Drupal 8 ships with the RESTful web servers functionality to implement web services to interact with your application. This chapter shows you how to enable these features and build your API, covering the following topics:
There are several modules provided by Drupal 8 that enable the ability to turn it into a web service provider. The Serialization module provides a means of serializing data to or deserializing from formats such as JSON and XML. The RESTful web services module then exposes entities and other APIs through Web APIs. Operations done through RESTful resource endpoints use the same create, edit, delete, and view permissions that would be used in a non-API format.
The HAL module serializes entities using the Hypertext Application Language (HAL) format. HAL is an Internet Draft standard convention used to hyperlink between resources in an API. HAL+JSON is required when working with POST and PATCH methods. For authentication, the HTTP Basic Authentication module provides a simple authentication via HTTP headers.
There is a community-lead effort to implement the JSON API specification with Drupal, using the JSON API module, covered in the Using JSON API recipe of this chapter. Like HAL, it provides specifications not only on how data should be represented, but also on how it should be sorted and filtered via request parameters.
This chapter covers how to work with the RESTful Web Services module and the supporting modules around developing a RESTful API powered by Drupal 8. We will cover how to use the GET, POST, and PATCH HTTP methods to manipulate content on the website. Additionally, we will cover how to use views to provide custom content that lists endpoints. Finally, we will cover how to handle custom authentication for our API.
The RESTful Web Services module provides routes that expose endpoints for your RESTful API. It utilizes the Serialization module to handle the normalization to a response and denormalization of data from requests. Endpoints support specific formats and authentication providers. Upon installation, the RESTful Web Services module does not provide any default configured endpoints.
There is one caveat: RESTful Web Services does not provide a user interface to configure available endpoints. Enabling resource endpoints can be done by manually editing configuration or the REST UI module. We will use the REST UI module in this recipe.
In this recipe, we will install RESTful Web Services and enable the proper permissions to allow the retrieval of nodes via REST to receive our formatted JSON.
There is a configuration change that might be required if you are running PHP 5.6: the always_populate_raw_post_data setting. If you try to enable the RESTful Web Services module without changing the default setting, you will see the following error message on installation:
The always_populate_raw_post_data PHP setting should be set to -1 in PHP version 5.6. Please check the PHP manual for information on how to correct this. (Currently using always_populate_raw_post_data PHP setting version not set to -1.)
cd /path/to/drupal8
composer require drupal/restui
curl http://127.0.0.1:8888/node/1?_format=json
{"nid":[{"value":1}],"uuid":[{"value":"9a473f09-fa61-42c9-b4ad-f24b857d04f6"}],"vid":[{"value":51}],"langcode":[{"value":"en"}],"type":[{"target_id":"page","target_type":"node_type","target_uuid":"8a8ad160-69dc-453f-bc11-86775040465e"}],"status":[{"value":true}],"title":[{"value":"Example node"}],"uid":[{"target_id":0,"target_type":"user","target_uuid":"e31b3de2-2195-48c6-9a5e-ab0553461c93","url":"\/user\/0"}],"created":[{"value":1500650071}],"changed":[{"value":1500650374}],"promote":[{"value":true}],"sticky":[{"value":false}],"revision_timestamp":[{"value":1500650374}],"revision_uid":[{"target_id":1,"target_type":"user","target_uuid":"2d7ee3ef-6f8a-4feb-a99a-4af8cfd24402","url":"\/user\/1"}],"revision_log":[],"revision_translation_affected":[{"value":true}],"default_langcode":[{"value":true}],"path":[],"body":[{"value":"Defui dolor elit jus luptatum. Ad augue causa hos loquor luctus minim singularis sino utinam. ","format":"plain_text","summary":""}]}
The RESTful Web Services module works by implementing an event subscriber service, rest.resource_routes, that adds routes to Drupal based on implementations of its RestResource plugin. Each plugin returns the available routes based on HTTP methods that are enabled for the resource.
When routes are built, the \Drupal\rest\Routing\ResourceRoutes class uses the RestResource plugin manager to retrieve all the available definitions. The endpoint configuration objects are loaded and inspected. If the resource plugin provides an HTTP method that is enabled in the configuration definitions, it begins to build a new route. Verification is done against the defined supported formats and supported auth definitions. If the basic validation passes, the new route is added to the RouteCollection and returned.
If you provide a supported_formats or supported_auth value that is not available, the endpoint will still be created. There will be an error, however, if you attempt to use the route with the invalid plugin. This cannot occur when using the REST UI module, but manually providing and managing the configuration.
The default routes provided by the base class for resource plugins, \Drupal\rest\Plugin\ResourceBase class, set \Drupal\rest\RequestHandler::handle as the controller and method for the route. This method checks the passed _format parameter against the configured plugin. If the format is valid, the data is passed to the appropriate serializer. The serialized data is then returned in the request with appropriate content headers.
The RESTful Web Services module provides a robust API that has some additional items to make a note of. We will explore these in the next recipe.
Earlier in the Drupal 8 life cycle, up until 8.0.0-beta12, Drupal supported the use of the Accept header instead of the _format parameter. Unfortunately, there were issues with external caches. Drupal was serving HTML and other formats on the same path, only using different Accept headers. CDNs and reverse proxies do not invalidate cache based on this header alone. The only solution to prevent cache poisoning on these external caches, such as Varnish, was to ensure the implementation of the Vary: Accept header. There were, however, too many issues regarding CDNs and variance of implementation, so the _format parameter was introduced instead of appending extensions (.json and .xml) to paths.
A detail of the problem can be found on the following core issues:
The RESTful Web Services module defines a RestResource plugin. This plugin is used to define resource endpoints. They are discovered in a module's Plugin/rest/resource namespace and need to implement the \Drupal\rest\Plugin\ResourceInterface interface. Drupal 8 provides two implementations of the RestResource plugin. The first is the EntityResource class that is provided by the RESTful Web Services module. It implements a driver class that allows it to represent each entity type. The second is the Database Logging module that provides its own RestResource plugin, as well. It allows you to retrieve logged messages by IDs. The \Drupal\rest\Plugin\ResourceBase class provides an abstract base class that can be extended for the RestResource plugin implementations. If the child class provides a method that matches the available HTTP methods, it will support them. For example, if a class has only a GET method, you can only interact with that endpoint through HTTP GET requests. On the other hand, you can provide a trace method that allows an endpoint to support HTTP TRACE requests.
Drupal 8 provides two implementations of the RestResource plugin. The first is the EntityResource class that is provided by the RESTful Web Services module. It implements a deriver class that allows it to represent each entity type. The second is the Database Logging module that provides its own RestResource plugin. It allows you to retrieve logged messages by IDs.
Many APIs implement a rate limit to prevent abuse of public APIs. When you have publicly exposed APIs, you will need to control the amount of traffic hitting the service and prevent abusers from slowing down or stopping your service.
The Rate Limiter module implements multiple ways to control access to your public APIs. There is an option to control the rate limit on specific requests, IP address-based limiting, and IP whitelisting.
You can find the Rate Limiter module at https://www.drupal.org/project/rate_limiter.
When installed, the HAL module can format the entity returned to provide links to related entities, such as the user or revision or any other entity reference field. When the HAL module is installed, you can add it as a supported format, then do a request with _format=hal_json. The response from the recipe would come back with a _links parameter:
"_links" : {
"http://127.0.0.1:8888/rest/relation/node/page/revision_uid" : [
{
"href" : "http://127.0.0.1:8888/user/1?_format=hal_json"
}
],
"self" : {
"href" : "http://127.0.0.1:8888/node/1?_format=hal_json"
},
"http://127.0.0.1:8888/rest/relation/node/page/uid" : [
{
"lang" : "en",
"href" : "http://127.0.0.1:8888/user/0?_format=hal_json"
}
],
"type" : {
"href" : "http://127.0.0.1:8888/rest/type/node/page"
}
},
When working with RESTful Web Services, the HTTP POST method is used to create new entities. We will use the HTTP Basic Authentication to authenticate a user and create a new node.
In this recipe, we will use the exposed node endpoint to create a new piece of article content through the RESTful Web Services module. We will use the json format. In the There's more... section, we will discuss how to use the HAL module for the hal_json format.
You will use the Article content type provided by the standard installation. Following the preceding recipe, Enabling RESTful interfaces, you should have the REST UI module added to your Drupal installation using Composer. This can be done with the following command:
cd /path/to/drupal8
composer require drupal/restui
In this recipe, the Drupal 8 installation is accessible through http://127.0.0.1:8888. Use the appropriate URL for your Drupal 8 site.
{
"type": "article",
"status": {"value": true},
"title": {"value": "Testing via REST!"},
"body": {"value": "This article was created using a RESTful endpoint"}
}
curl -X GET http://127.0.0.1:8888/session/token
curl -X POST \
'http://127.0.0.1:8888/entity/node?_format=json' \
-u admin:admin \
-H 'content-type: application/json' \
-H 'x-csrf-token: K5UW756_nWJxjX8Lt5NXXrE0xYSAqCn8MPKLbgE6Gps' \
-d '{
"type": "article",
"status": {"value": true},
"title": {"value": "Testing via REST!"},
"body": {"value": "This article was created using a RESTful endpoint"}
}
'
When working with content entities and the POST method, the endpoint is different to the one used for GET requests. The \Drupal\rest\Plugin\rest\resource\EntityResource class extends the \Drupal\rest\Plugin\ResourceBase base class, which provides a route method. If a resource plugin provides an https://www.drupal.org/link-relations/create link template, then that path will be used for the POST path.
The EntityResource class defines /entity/{entity_type} as the create link template. It then overrides the getBaseRoute method to ensure that the entity_type parameter is properly populated from the definition.
The EntityResource class will run a set of conditions for the request. First, it will validate the POST request by checking whether the entity is null. Then, the current user is authorized to create the entity type if the current user also has access to edit all fields provided, and finally, it checks whether an identifier was passed or not. The last condition is important, as updates are only to be made through a PATCH request.
If the entity is validated, it will be saved. On a successful save, an empty HTTP 201 response will be returned.
Working with POST requests requires some specific formatting that will be explained in the next recipe.
When using the HAL module and the hal_json format, you must provide relationships for the entity. This is done through the _links parameter in the request. This is done to ensure that the entity is properly created with any relationships it requires, such as the entity type for a content entities bundle. Another example will be to create a comment over a RESTful interface. You will need to provide a _links entry for the user owning the comment.
The rest.link_manager service uses the rest.link_manager.type and rest.link_manager.relation and is responsible for returning the URIs for types and relations. By default, a bundle will have a path that resembles /rest/type/{entity_type}/{bundle} and its relations will resemble /rest/relation/{entity_type}/{bundle}/{field_name}.
Taking a user reference as an example, we will have to populate a uid field, as follows:
{
"_links": {
"type": {
"href": "http://127.0.0.1:8888/rest/type/node/page"
},
"http://127.0.0.1:8888/rest/relation/node/article/uid": [
{
"href": "http://127.0.0.1:8888/user/1?_format=hal_json",
"lang": "en"
}
]
}
}
Unfortunately, the documentation is sparse, and the best way to learn what _links are required is to perform a GET request and study the returned _links from the HAL JSON.
Most RESTful APIs utilize base64 encoding of files to support POST operations to upload an image. Unfortunately, this is not supported in the Drupal core. Although there is a serializer.normalizer.file_entity.hal service that serializes file entities into HAL JSON, it does not currently work as of 8.3, but is hopefully slated for 8.4.
The \Drupal\hal\Normalizer\FileEntityNormalizer class supports denormalization; however, it does not handle base64 and expects binary data.
There is a Drupal core issue for this problem, which is available at https://www.drupal.org/node/1927648.
When working with a POST request, you will need to pass a Cross-Site Request Forgery (CSRF) token if you are authenticating with a session cookie. The X-CSRF-Token header is required when using a session cookie to prevent accidental API requests.
If you are using the cookie provider for authentication, you will need to request a CSRF token from the /session/token route:
curl -X GET http://127.0.0.1:8888/session/token
When working with RESTful Web Services, the HTTP PATCH method is used to update entities. We will use the HTTP Basic Authentication to authenticate our user and update a node.
In this recipe, we will use the exposed node endpoint to create a new piece of article content through the RESTful Web Services module.
We will use the Article content type provided by the standard installation. Following the Enabling RESTful interfaces recipe, you should have the REST UI module added to your Drupal installation using Composer. This can be done with the following command:
cd /path/to/drupal8
composer require drupal/restui
{
"nid" : {
"value" : 4
},
"body" : {
"value" : "This article was updated using the RESTful API endpoint!"
},
"type" : "article"
}
curl -X GET http://127.0.0.1:8888/session/token
curl -X PATCH \
'http://127.0.0.1:8888/node/4?_format=json' \
-u admin:admin \
-H 'x-csrf-token: MAjbBsIUmzrwHQGNlXxvGMZQJzQCDZbmtecstzbk5UQ' \
-d '{
"type": "article",
"nid": {"value": 4},
"body": {"value": "This article was updated using the RESTful API endpoint!!"}
}
'
When working with content entities and the PATCH method, the endpoint is the same as the GET method path. The current user's access is checked to see whether they have the permission to update the entity type and each of the submitted fields provided in the request body.
Each field provided will be updated on the entity and then validated. If the entity is validated, it will be saved. On a successful save, an HTTP 200 response will be returned with the entire updated entity's content.
The RESTful Web Services module provides Views plugins that allow you to expose data over Views for your RESTful API. This allows you to create a view that has a path and outputs data using a serializer plugin. You can use this to output entities, such as JSON, HAL JSON, or XML, and it can be sent with appropriate headers.
In this recipe, we will create a view that outputs the users of the Drupal site, providing their username, email, and picture if provided.
[
{
"name": "spuvest",
"mail": "spuvest@example.com",
"user_picture": "\/sites\/default\/files\/pictures\/2017-07\/generateImage_xIQkfx.jpg"
},
{
"name": "crepathuslus",
"mail": "crepathuslus@example.com",
"user_picture": "\/sites\/default\/files\/pictures\/2017-07\/generateImage_eauTko.gif"
},
{
"name": "veradabufrup",
"mail": "veradabufrup@example.com",
"user_picture": "\/sites\/default\/files\/pictures\/2017-07\/generateImage_HsEjKW.png"
}
]
The RESTful Web Services module provides display, row, and format plugins that allows you to export content entities to a serialized format. The REST Export display plugin allows you to specify a path to access the RESTful endpoint and properly assigns the Content-Type header for the requested format.
The Serializer style is provided as the only supported style plugin for the REST export display. This style plugin only supports row plugins that identify themselves as data display types. It expects data from the row plugin to be raw so that it can be passed to the appropriate serializer.
You then have the option of using the data entity or data field row plugins. Instead of returning a render array from their render method, they return raw data that will be serialized into the proper format.
With the row plugins returning raw format data and the data serialized by the style plugin, the display plugin will then return the response that is converted into the proper format via the Serialization module.
Views provide a way to deliver specific RESTful endpoints. We will explore some additional features in the next recipe.
The Data fields row plugin allows you to configure field aliases. When the data is returned to the view, it will have Drupal's machine names. This means that custom fields will look something like field_my_field, which may not make sense to the consumer.
By clicking on Settings next to Fields, you can set aliases in the modal form:
When you provide an alias, the fields will match. For example, user_picture can be changed to avatar and the mail key can be changed to email:
[{
"name": "veradabufrup",
"email": "veradabufrup@example.com",
"avatar": "\/sites\/default\/files\/pictures\/2017-07\/generateImage_HsEjKW.png"
}]
When you create a RESTful endpoint with Views, you are not using the same permissions created by the RESTful Web Services module. You will need to define the route permissions within the view, allowing you to specify specific roles or permissions for the request.
The default GET method provided by the EntityResource plugin does not provide a way to list entities and allows any entity to be retrieved by an ID. Using Views, you can provide a list of entities, limiting them to specific bundles.
Using Views, you can even provide a new endpoint to retrieve a specific entity. Using Contextual filters, you can add route parameters and filters to limit and validate entity IDs. For example, you may want to expose the article content over the API, but not pages.
Using the RESTful Web Services module, we define specific supported authentication providers for an endpoint. The Drupal core provides a cookie provider, which authenticates through a valid cookie, such as your regular login experience. Then, there is the HTTP Basic Authentication module to support HTTP authentication headers.
There are alternatives that provide more robust authentication methods. With cookie-based authentication, you will need to use CSRF tokens to prevent unrequested page loads by an unauthorized party. When you use the HTTP authentication, you are sending a password for each request in the request header.
OAuth is a popular and open authorization framework. It is a proper authentication method that uses tokens and not passwords. In this recipe, we will implement the Simple OAuth module to provide OAuth 2.0 authentication for GET and POST requests.
If you are not familiar with OAuth or OAuth 2.0, it is a standard for authorization. The implementation of OAuth revolves around the usage of tokens sent in HTTP headers. Refer to the OAuth home page for more information at http://oauth.net/.
By following the Enabling RESTful interfaces recipe, you should have the REST UI module added to your Drupal installation using Composer. This can be done with the following command:
cd /path/to/drupal8
composer require drupal/restui
cd /path/to/drupal8
composer require drupal/simple_oauth
openssl genrsa -out private.key 2048
openssl rsa -in private.key -pubout > public.key
curl -X POST \
http://127.0.0.1:8888/oauth/token \
-H 'content-type: application/x-www-form-urlencoded' \
-d 'grant_type=password&client_id=3ec55f70-18cd-422f-9abd-2223f6ca3636&username=admin&password=admin'
curl -X GET \
'http://127.0.0.1:8888/node/1?_format=json' \
-H 'accept: application/json' \
-H 'authorization: Bearer JT9zgBgMEDlk2QIF0ecpZEOcsYC7-x649Bovo83HXQM'
The Simple OAuth module is built using the League\OAuth2 PHP library, a community de facto library for OAuth2 implementation.
In a typical authentication request, there is an authentication manager that uses the authentication_collector service to collect all the tagged authentication provider servers. Based on the provider's set priority, each service is invoked to check whether it applies to the current request. Each applied authentication provider then gets invoked to see whether the authentication is invalid.
For the RESTful Web Services module, the process is more explicit. The providers identified in the supported_auth definition for the endpoint are the only services that run through the applies and authenticates process.
We will explore more information on working with authentication providers and the RESTful Web Services module in the next section.
When working with the RESTful Web Services module endpoints, the supported_auth values reference services tagged with authentication_provider. Out of the box, Drupal supports cookie authentication. The following code is provided by the basic_auth module to support the HTTP header authentication:
services:
basic_auth.authentication.basic_auth:
class: Drupal\basic_auth\Authentication\Provider\BasicAuth
arguments: ['@config.factory', '@user.auth', '@flood', '@entity.manager']
tags:
- { name: authentication_provider, provider_id: 'basic_auth', priority: 100 }
An authentication provider can be created by creating a class in your module's Authentication\Provider namespace and implementing the \Drupal\Core\Authentication\AuthenticationProviderInterface interface. Then, register the class as a service in your module's services.yml.
When working with data that expects authenticated users, the authentication service provider should also provide a page cache service handler. Services that are tagged with page_cache_request_policy have the ability to check whether the content is cached or not. This prevents authorization requests from being cached.
The following code is taken from the basic_auth module:
basic_auth.page_cache_request_policy.disallow_basic_auth_requests:
class: Drupal\basic_auth\PageCache\DisallowBasicAuthRequests
public: false
tags:
- { name: page_cache_request_policy }
The \Drupal\basic_auth\PageCache\DisallowBasicAuthRequests class implements the \Drupal\Core\PageCache\RequestPolicyInterface interface. The check method allows the page cache policy to explicitly deny or remain neutral on a page's ability to be cached. The basic_auth module checks whether the default authentication headers are present. For the simple_oauth module, it checks whether a valid token is present.
This is an important security measure if you are implementing your own authentication services.
A page cache policy service can be implemented by creating a class in your module's PageCache namespace and implementing the \Drupal\Core\PageCache\ResponsePolicyInterface interface. Then, we need to register the class as a service in your module's services.yml.
Some APIs that implement server-to-server communication will authenticate using IP address whitelists. For this use case, we have the IP Consumer Auth module. Whitelisted IP addresses are controlled by a form that saves a configuration value.
If an IP address is whitelisted, the user is authenticated as an anonymous user. While this may not be recommended for POST, PATCH, and DELETE requests, it can provide a simple way to control specific GET endpoints in a private network.
You can download IP Consumer Auth from its project page at https://www.drupal.org/project/ip_consumer_auth.
When developing a backend API for frontend consumers, there is often much debate on naming conventions and returned value structures. In comes {json:api}, an open source specification set to standardize and simplify the building of APIs, which consume and return JSON payloads. The specification and documentation can be found at http://jsonapi.org/.
For Drupal, there is a community-lead effort to provide a robust JSON API specification implementation to turn Drupal into a streamlined API server. This recipe will install the JSON API module and show how to enable resources.
Just like the RESTful Web Services module provided by Drupal core, the JSON API module does not provide a user interface. It also enables all content to be available over the API automatically (given that users have permissions configured to access the endpoint.) The JSON API Extra module changes that, and this will be covered in the There's more... section of this recipe.
The JSON API module can be found at https://www.drupal.org/project/jsonapi
Create sample content using the Article content type provided by the standard Drupal installation. This will make testing the GET methods much easier.
When making requests, all endpoint paths are prefixed with jsonapi.
cd /path/to/drupal8
composer require drupal/jsonapi
http://127.0.0.1:8888/jsonapi/node/article
curl -X GET \
http://127.0.0.1:8888/jsonapi/node/article \
-H 'accept: application/vnd.api+json'
{
"data": [
{
"type": "node--article",
"id": "c897acba-eb81-454a-94ed-13107fd205cf",
"attributes": {...},
"relationships": {...},
"links": {
"self": "http://127.0.0.1:8888/jsonapi/node/article/c897acba-eb81-454a-94ed-13107fd205cf"
}
}
],
"links": {
"self": "http://127.0.0.1:8888/jsonapi/node/article",
}
}
The JSON API module implements the {json:api} specification. Like the RESTful Web Services module provided by Drupal core, it exposes data over various endpoints. It builds on top of Drupal's existing routing system to work with non-HTML formats. The major difference is it follows a community-driven specification on how the data should be formatted, linked, filtered, sorted, and more.
Next, we'll cover filtering, paging, sorting, and the JSON API Extras module.
The request in the recipe will return all available Article nodes in the system. These can be paginated, filtered, and sorted. Each of these operations is done through query parameters, which contain an array of values.
Pagination is done by appending a page query parameter. To limit the request to 10 nodes, we would append ?page[limit]=10. To access the next set of results, we would also pass page[offset]=10.
The following is an example of returning the first and second pages of results:
http://127.0.0.1:8888/jsonapi/node/article?page[limit]=10
http://127.0.0.1:8888/jsonapi/node/article?page[offset]=10&page[limit]=10
Each request contains a links property; this will also contain the next and previous links when using a paginated result.
Filtering is done by appending a filter query parameter. The following is an example for requesting all nodes that have been promoted to the front page:
http://127.0.0.1:8888/jsonapi/node/article?filter[promoted][path]=promote&filter[promoted][value]=1&filter[promoted][operator]==
Each filter is defined by a name--in the preceding example, it is promoted. The filter then takes path, which is the field to filter on. The value and operator decide how to filter.
Sorting is the simplest operation. A sort query parameter is added. The field name value is the field to sort by, and to sort in descending order, you add a minute symbol in front of the field name. The following examples show how to sort by the nid in ascending and descending order, respectively:
http://127.0.0.1:8888/jsonapi/node/article?sort=nid
http://127.0.0.1:8888/jsonapi/node/article?sort=-nid
The JSON API Extras module provides a user interface for additional customization. The JSON API Extras module should be added to your Drupal installation like all other modules, using Composer:
cd /path/to/drupal8
composer require drupal/jsonapi_extras
Once the module is installed in Drupal, you will have the ability to enable or disable endpoints, change resource names, alter resource paths, disable fields, alias field names, and enhance field outputs.
The API path prefix can be changed from jsonapi to api or any other prefix using the extras module.
From the administrative toolbar, navigate to Configuration. Under the Web services section, click on JSON API Overwrites to customize the JSON API implementation. The Settings tab allows modification of the API path prefix:
The JSON API Extras module allows overwriting endpoints automatically exposed by the JSON API module. This allows disabling fields from being returned. It also allows using enhancers to simplify the structure of a field property.
From the administrative toolbar, go to Configuration. Under the Web services section, click on JSON API Overwrites to customize the JSON API implementation.
To disable an endpoint, click on Overwrite on any endpoint. Check the Disabled checkbox to turn off that specific endpoint:
To disable, alias, or use an enhancer, click on Overwrite on any endpoint. The checkbox will allow you to prevent a field from being used in the API. The enhancers allow you to simplify fields when returned or used in POST/PATCH requests:
In this example, the created and changed fields will no longer return Unix timestamps, but RFC ISO8601-formatted timestamps. The promote and sticky fields will return their value directly, not nested under a value property. Finally, no revision information fields will be returned.
Contenta CMS is a decoupled, API-driven Drupal distribution built using the JSON API. It is being built through the same community initiative pushing forward the JSON API module. The project's home page can be found at http://www.contentacms.org/.
It provides many preconfigured options, including customizations to default endpoints. It also provides Simple OAuth to set up decoupled authentication with your frontend consumer and the API backend.
On top of delivering a distribution, the community contributors have developed various frontend consumers as examples:
There are two command-line tools for Drupal 8: Drupal Console and Drush. In this chapter, we will discuss how they make working with Drupal easier by covering the following recipes:
In the previous chapters of this book, there have been recipes that provide ways of using command-line tools to simplify working with Drupal. There are two contributed projects that provide Drupal with a command-line interface experience.
First, there is Drush. Drush was first created for Drupal 4.7 and has become an integral tool used for day-to-day Drupal operations. However, with Drupal 8 and its integration with Symfony, there came Drupal Console. Drupal Console is a Symfony Console-based application that allows it to reuse more components and integrate more easily with contributed modules.
This chapter contains recipes that will highlight operations that can be simplified using Drush or Console. By the end of this chapter, you will be able to work with your Drupal sites through the command line.
At the time of writing this book, Drush was still the primary tool of choice for Drupal 8; however, Drupal Console is earning more market share. Drupal Console is rapidly being developed. Due to this rapid development, the commands will still exist, but the output may differ.
Both Drush and Drupal Console support global installation, but both projects are migrating to per-project installation using Composer. To get started, refer to the following installation guides for each tool for up-to-date installation information:
Drupal utilizes caching to store plugin definitions, routes, and so on. When you add a new plugin definition or a new route, you need to rebuild Drupal's cache for it to be recognized.
Rebuilding the cache over the command line is also more performant than using the user interface since it does not use web server resources to execute the cache rebuild.
In this recipe, we will walk you through using both Drush and Drupal Console to clear various cache bins in Drupal. It is important to know how to clear specific cache bins so that you do not need to rebuild everything, if possible.
$ drush cache-rebuild
Cache rebuild complete.
$ drupal cache:rebuild all
Select cache. [all]:
> render
Rebuilding cache(s), wait a moment please.
[OK] Done clearing cache(s).
$ drupal router:rebuild
Rebuilding routes, wait a moment please
[OK] Done rebuilding route(s).
$ drush twig-compile --verbose
Both Drush and Drupal Console will load files from the Drupal installation and bootstrap the application. This allows the commands to invoke functions and methods found in Drupal.
For Drush 8.x, Drush does not implement the dependency injection container and still needs to rely on procedural functions in Drupal.
Drupal Console, however, harnesses the dependency injection container, allowing it to reuse Drupal's container and services.
The Making a Drush command and Making a Drupal Console command recipes will describe the differences in more detail.
When working with any application that utilizes a database, there are times when you will need to export a database and import it elsewhere. Most often, you would do this with a production site to work on it locally. This way, you can create a new configuration that can be exported and pushed to production, as discussed in Chapter 9, Configuration Management – Deploying in Drupal 8.
In this recipe, we will export a database dump from a production site in order to set up the local development. The database dump will be imported over the command line and sanitized. We will then execute an SQL query through Drush to verify sanitization.
Drush has the ability to use site aliases. Site aliases are configuration items that allow you to interact with a remote Drupal site. In this recipe, we will use the following alias to interact with a fictional remote site to show how a typical workflow will go to fetch a remote database.
Note that you do not need to use a Drush alias to download the database dump created in the recipe; you can use any method you are familiar with (manually from the command line with mysqldump or phpMyAdmin):
$aliases['drupal.production'] = [
'uri' => 'example.com',
'remote-host' => 'example.com',
'remote-user' => 'someuser',
'ssh-options' => '-p 2222',
];
Read the Drush documentation for more information on site aliases at http://docs.drush.org/en/master/usage/#site-aliases. Site aliases allow you to interact with remote Drupal installations.
We will also assume that the local development site has not yet been configured to connect it to the database.
$ drush @drupal.production sql-dump > ~/prod-dump.sql
// Database configuration.
$databases['default']['default'] = [
'driver' => 'mysql',
'host' => 'localhost',
'username' => 'mysql',
'password' => 'mysql',
'database' => 'data',
'prefix' => '',
'port' => 3306,
'namespace' => 'Drupal\\Core\\Database\\Driver\\mysql',
];
$ drush sql-cli < ~/prod-dump.sql
$ drush sql-sanitize
$ drush sql-query "SELECT uid, name, mail FROM users_field_data;"
When working with Drush, we have the ability to use Drush aliases. A Drush alias contains a configuration that allows the tool to connect to a remote server and interact with that server's installation of Drush.
You need to have Drush installed on your remote server in order to use a site alias for it.
The sql-dump command executes the proper dump command for the database driver, which is typically MySQL and the mysqldump command. It streams to the terminal and must be piped to a destination. When piped to a local SQL file, we can import it and execute the create commands to import our database schema and data.
With the sql-cli command, we will be able to execute SQL commands to the database through Drush. This allows us to redirect the file contents to the sql-cli command and run the set of SQL commands. With the data imported, the sql-sanitize command replaces usernames and passwords.
Finally, the sql-query command allows us to pass an SQL command directly to the database and return its results. In our recipe, we will query the users_field_data to verify that we imported our users and that emails have been sanitized.
Working with Drupal over the command line simplifies working with the database. We will explore this in more detail in the following sections.
Sometimes, databases can be quite large. The sql-dump command has a gzip option that will output the SQL dump using the gzip command. In order to run the command, you would simply:
$ drush sql-dump –-gzip dump.sql.gz
The end result provides a reduction in the dump file:
-rw-r--r-- 1 user group 3058522 Jan 14 16:10 dump.sql
-rw-r--r-- 1 user group 285880 Jan 14 16:10 dump.sql.gz
If you create a gzipped database dump, ensure that you unarchive it before attempting an import with the sql-cli command.
At the time of writing this book, Console does not provide a command for sanitizing the database. The feature is currently documented in this issue; refer to https://github.com/hechoendrupal/drupal-console/issues/3192.
The database:connect and database:client commands will launch a database client. This allows you to be logged into the database's command-line interface:
$ drupal database:client
$ drupal database:connect
These commands are similar to the sql-cli and sql-connect commands from Drush. The client command will bring you to the database's command-line tool, where connect shows the connection string.
Drupal Console also provides the database:dump command. Unlike Drush, this will write the database dump for you in the Drupal directory:
$ drupal database:dump
[OK] Database exported to: /path/to/drupal/www/data.sql
When you need to add an account to Drupal, you will visit the People page and manually add a new user. Drush provides the complete user management for Drupal, from creation to role assignment, password recovery, and deletion. This workflow allows you to create users easily and provides them with a login without having to enter your Drupal site.
In this recipe, we will create a staff role with a staffmember user and log in as that user through Drush.
$ drush role-create staff
Created "staff"
$ drush role-list
ID Role Label
anonymous Anonymous user
authenticated Authenticated user
administrator Administrator
staff Staff
$ drush user-create staffmember
User ID : 2
User name : staffmember
User roles : authenticated
User status : 1
$ drush user-add-role staff staffmember
Added role staff role to staffmember
$ drush user-login staffmember --uri=http://example.com
http://example.com/user/reset/2/1452810532/Ia1nJvbr2UQ3Pi_QnmITlVgcCWzDtnKmHxf-I2eAqPE
When you reset a password in Drupal, a special one-time login link is generated. The login link is based on a generated hash. The Drush command validates the given user, which exists in the Drupal site, and then passes it to the user_pass_reset_url function from the User module.
The URL is made up of the user's ID, the timestamp when the link was generated, and a hash based on the user's last login time, link generation, and email. When the link is loaded, this hash is rebuilt and verified. For example, if the user has logged in since the time it was generated, the link will become invalid.
When used on a machine that has a web browser installed, Drush will make an attempt to launch the link in a web browser for you. The browser option allows you to specify which browser should be launched. Additionally, you can use no-browser to prevent one from being launched.
The command line offers the ability to simplify user management and user administration. Next, we will explore more on this topic in detail.
The user-login command is a useful tool that allows some advanced use cases. For instance, you can append a path after the username and be launched to that path. You can pass a UID or email instead of a username in order to log in as a user.
You can use the user-login to secure your admin user account. In Drupal, the user with the identifier of 1 is treated as the root and can bypass all permissions. Many times, this is the default maintenance account used to work on the Drupal site. Instead of logging in manually, you can set the account to a very robust passphrase and use the user-login command when you need to access your site. With this, the only users who should be able to log in as the administrator account are those with access to run the Drush commands on the website.
Drupal Console also provide commands to interact with users. Although they do not allow the creation of users or roles, they provide a basic user management.
The user:login:url command will generate a one-time login link for the specified user ID. This uses the same methods as the Drush command:
$ drupal user:login:url 2
The user:password:reset command allows you to reset a user's password to the new provided password. You can provide the user ID and new password as arguments, but if missing, the values will be prompted for interactively:
$ drupal user:password:reset 2 newpassword
The create:users command provides an interactive way to generate bulk users, which are useful for debugging. However, it cannot create individual users with specific passwords like Drush.
When Drupal Console was first introduced, one of the biggest highlights was its ability to scaffold code. The project has turned into a much larger Drupal runner over the command-line interface, but much of its resourcefulness is code generation.
As you may have noted in the previous chapters and recipes, there can be a few mundane tasks and a bit of boilerplate code. Drupal Console enables Drupal developers to create various components without having to write all of the boilerplate code.
In Chapter 10, The Entity API, we covered the creation of a custom entity type. In this recipe, we will automate most of that process using Drupal Console to generate our content entity.
For this recipe, you will need to have Drupal Console installed. The tool will generate everything else for us. You will need to have a Drupal 8 site installed. Many of Console's commands will not work (or be listed) unless they can access an installed Drupal site. This is because of the way it interacts with Drupal's service container.
$ drupal generate:module
// Welcome to the Drupal module generator
Enter the new module name:
> Content Entity Provider
Enter the module machine name [content_entity_provider]:
>
Enter the module Path [/modules/custom]:
>
Enter module description [My Awesome Module]:
>
Enter package name [Custom]:
>
Enter Drupal Core version [8.x]:
>
Do you want to generate a .module file (yes/no) [yes]:
>
Define module as feature (yes/no) [no]:
>
Do you want to add a composer.json file to your module (yes/no) [yes]:
>
Would you like to add module dependencies (yes/no) [no]:
>
Do you want to generate a unit test class (yes/no) [yes]:
>
Do you want to generate a themeable template (yes/no) [yes]:
>
Do you confirm generation? (yes/no) [yes]:
>
Generated or updated files
1 - modules/custom/content_entity_provider/content_entity_provider.info.yml
2 - modules/custom/content_entity_provider/content_entity_provider.module
3 - modules/custom/content_entity_provider/composer.json
4 - modules/custom/content_entity_provider/tests/src/Functional/LoadTest.php
5 - modules/custom/content_entity_provider/content_entity_provider.module
6 - modules/custom/content_entity_provider/templates/content-entity-provider.html.twig
$ drupal generate:entity:content
Enter the module name [devel]:
> content_entity_provider
Enter the class of your new content entity [DefaultEntity]:
> CustomContentEntity
Enter the machine name of your new content entity [custom_content_entity]:
>
Enter the label of your new content entity [Custom content entity]:
>
Enter the base-path for the content entity routes [/admin/structure]:
>
Do you want this (content) entity to have bundles (yes/no) [no]:
>
Is your entity translatable (yes/no) [yes]:
>
Is your entity revisionable (yes/no) [yes]:
>
Generated or updated files
1 - modules/custom/content_entity_provider/content_entity_provider.permissions.yml
2 - modules/custom/content_entity_provider/content_entity_provider.links.menu.yml
3 - modules/custom/content_entity_provider/content_entity_provider.links.task.yml
4 - modules/custom/content_entity_provider/content_entity_provider.links.action.yml
5 - modules/custom/content_entity_provider/src/CustomContentEntityAccessControlHandler.php
6 - modules/custom/content_entity_provider/src/CustomContentEntityTranslationHandler.php
7 - modules/custom/content_entity_provider/src/Entity/CustomContentEntityInterface.php
8 - modules/custom/content_entity_provider/src/Entity/CustomContentEntity.php
9 - modules/custom/content_entity_provider/src/CustomContentEntityHtmlRouteProvider.php
10 - modules/custom/content_entity_provider/src/Entity/CustomContentEntityViewsData.php
11 - modules/custom/content_entity_provider/src/CustomContentEntityListBuilder.php
12 - modules/custom/content_entity_provider/src/Form/CustomContentEntitySettingsForm.php
13 - modules/custom/content_entity_provider/src/Form/CustomContentEntityForm.php
14 - modules/custom/content_entity_provider/src/Form/CustomContentEntityDeleteForm.php
15 - modules/custom/content_entity_provider/custom_content_entity.page.inc
16 - modules/custom/content_entity_provider/templates/custom_content_entity.html.twig
17 - modules/custom/content_entity_provider/src/Form/CustomContentEntityRevisionDeleteForm.php
18 - modules/custom/content_entity_provider/src/Form/CustomContentEntityRevisionRevertTranslationForm.php
19 - modules/custom/content_entity_provider/src/Form/CustomContentEntityRevisionRevertForm.php
20 - modules/custom/content_entity_provider/src/CustomContentEntityStorage.php
21 - modules/custom/content_entity_provider/src/CustomContentEntityStorageInterface.php
22 - modules/custom/content_entity_provider/src/Controller/CustomContentEntityController.php
$ drupal module:install content_entity_provider
Installing module(s) "content_entity_provider"
[OK] The following module(s) were installed successfully: "content_entity_provider"
// cache:rebuild
Rebuilding cache(s), wait a moment please.
[OK] Done clearing cache(s).
One of the biggest features of Console is its ability to reduce the time spent by developers to create code for Drupal 8. Console utilizes the Twig templating engine to provide code generation. These Twig templates contain variables and logic that are compiled into the end result code.
A set of generator classes receives specific parameters, which are received through the appropriate command, and pass them to Twig for rendering. This allows Console to easily stay up to date with changes in Drupal core and still provide valuable code generation.
Drush provides an API that allows developers to write their own commands. These commands can be part of a module and loaded through a Drupal installation, or they can be placed in the local user's Drush folder for general purposes.
Often, contributed modules create commands to automate user interface operations. However, creating a custom Drush command can be useful for specific operations. In this recipe, we will create a command that loads all the users who have not logged in in the last 10 days and resets their password.
For this recipe, you will need Drush available. We will be creating a command in a local user directory.
<?php
/**
* @file
* Loads all users who have not logged in within 10 days and disables them.
*/
/**
* Implements hook_drush_command().
*/
function disable_users_drush_command() {
$items = [];
$items['disable-users'] = [
'description' => 'Disables users after 10 days of inactivity',
];
return $items;
}
/**
* Implements drush_hook_COMMAND().
*/
function drush_disable_users_disable_users() {
}
/**
* Implements drush_hook_COMMAND().
*/
function drush_disable_users_disable_users() {
// Get the default timezone and make a DateTime object for 10 days ago.
$system_date = \Drupal::config('system.date');
$default_timezone = $system_date->get('timezone.default') ?: date_default_timezone_get();
$now = new DateTime('now', new DateTimeZone($default_timezone));
$now->modify('-10 days');
}
/**
* Implements drush_hook_COMMAND().
*/
function drush_disable_users_disable_users() {
// Get the default timezone and make a DateTime object for 10 days ago.
$system_date = \Drupal::config('system.date');
$default_timezone = $system_date->get('timezone.default') ?: date_default_timezone_get();
$now = new DateTime('now', new DateTimeZone($default_timezone));
$now->modify('-10 days');
$query = \Drupal::entityQuery('user')->condition('login', $now->getTimestamp(), '>');
$results = $query->execute();
if (empty($results)) {
drush_print('No users to disable!');
}
}
/**
* Implements drush_hook_COMMAND().
*/
function drush_disable_users_disable_users() {
// Get the default timezone and make a DateTime object for 10 days ago.
$system_date = \Drupal::config('system.date');
$default_timezone = $system_date->get('timezone.default') ?: date_default_timezone_get();
$now = new DateTime('now', new DateTimeZone($default_timezone));
$now->modify('-10 days');
$query = \Drupal::entityQuery('user')->condition('login', $now->getTimestamp(), '>');
$results = $query->execute();
if (empty($results)) {
drush_print('No users to disable!');
}
foreach ($results as $uid) {
/** @var \Drupal\user\Entity\User $user */
$user = \Drupal\user\Entity\User::load($uid);
$user->block();
$user->save();
}
drush_print(dt('Disabled !count users', ['!count' => count($results)]));
}
$ drush cache-clear drush
$ drush disable-users --help
Disables users after 10 days of inactivity
Drush works by scanning specific directories for files that follow the COMMANDFILE.drush.inc pattern. You can think of COMMANDFILE for Drush as a representation of a module name in Drupal's hook system. When implementing a Drush hook, in the HOOK_drush format, you will need to replace HOOK with your COMMANDFILE name, just as you would do in Drupal with a module name.
In this recipe, we created a disable_users.drush.inc file. This means that all hooks and commands in the file need to use disable_users for hook invocations. Drush uses this to load the hook_drush_command hook that returns our command information.
We then provided the functionality of our logic in the drush_hook_command hook. For this hook, we replaced hook with our COMMANDFILE name, which was disable_users, giving us drush_disable_users_command. We replaced command with the command that we defined in hook_drush_command, which was disable-users. We then had our final drush_disable_users_disable_users hook.
Drush commands have additional options that can be specified in their definitions. We explore their abilities to control the required level of Drupal integration for a command.
Drush commands have the ability to specify the level of Drupal's bootstrap before being executed. Drupal has several bootstrap levels in which only specific parts of the system are loaded. By default, a command's bootstrap is at DRUSH_BOOTSTRAP_DRUPAL_LOGIN, which is at the same level as accessing Drupal over the Web.
Commands, depending on their purpose, can choose to avoid bootstrapping Drupal at all or only until the database system is loaded. Drush commands that are utilities, such as the Git release notes module, provide a Drush command that does not interact with Drupal. It specifies a bootstrap of DRUSH_BOOTSTRAP_DRUSH, as it only interacts with repositories to generate change logs based on Git tags and commits.
Drupal Console makes use of the Symfony Console project and other third-party libraries to utilize modern PHP best practices. In doing so, it follows Drupal 8 practices as well. This allows Console to use namespaces for the command detection and interaction with Drupal by reading its class loader.
This allows developers to easily create a Console command by implementing a custom class in a module.
In this recipe, we will create a command that loads all the users who have not logged in in the last 10 days and resets their password. We will generate the base of our command using the scaffolding commands.
For this recipe, you will need to have Drupal Console installed. The tool will generate everything else for us. You will need to have a Drupal 8 site installed.
drupal generate:module
// Welcome to the Drupal module generator
Enter the new module name:
> Console Commands
Enter the module machine name [console_commands]:
>
Enter the module Path [/modules/custom]:
>
Enter module description [My Awesome Module]:
>
Enter package name [Custom]:
>
Enter Drupal Core version [8.x]:
>
Do you want to generate a .module file (yes/no) [yes]:
>
Define module as feature (yes/no) [no]:
>
Do you want to add a composer.json file to your module (yes/no) [yes]:
>
Would you like to add module dependencies (yes/no) [no]:
>
Do you want to generate a unit test class (yes/no) [yes]:
>
Do you want to generate a themeable template (yes/no) [yes]:
>
Do you confirm generation? (yes/no) [yes]:
>
Generated or updated files
1 - modules/custom/console_commands/console_commands.info.yml
2 - modules/custom/console_commands/console_commands.module
3 - modules/custom/console_commands/composer.json
4 modules/custom/console_commands/tests/src/Functional/LoadTest.php
5 - modules/custom/console_commands/console_commands.module
6 - modules/custom/console_commands/templates/console-commands.html.twig
drupal generate:command
// Welcome to the Drupal Command generator
Enter the extension name [devel]:
> console_commands
Enter the Command name. [console_commands:default]:
> console_commands:disable_users
Enter the Command Class. (Must end with the word 'Command'). [DefaultCommand]:
> DisableUsersCommand
Is the command aware of the drupal site installation when executed?. (yes/no) [no]:
> yes
Do you confirm generation? (yes/no) [yes]:
>
Generated or updated files
1 - modules/custom/console_commands/src/Command/DisableUsersCommand.php
2 - modules/custom/console_commands/console.services.yml
3 - modules/custom/console_commands/console/translations/en/console_commands.disable_users.yml
/**
* {@inheritdoc}
*/
protected function execute(InputInterface $input, OutputInterface $output) {
}
/**
* {@inheritdoc}
*/
protected function execute(InputInterface $input, OutputInterface $output) {
// Get the default timezone and make a DateTime object for 10 days ago.
$system_date = \Drupal::config('system.date');
$default_timezone = $system_date->get('timezone.default') ?: date_default_timezone_get();
$now = new \DateTime('now', new \DateTimeZone($default_timezone));
$now->modify('-10 days');
}
/**
* {@inheritdoc}
*/
protected function execute(InputInterface $input, OutputInterface $output) {
// Get the default timezone and make a DateTime object for 10 days ago.
$system_date = \Drupal::config('system.date');
$default_timezone = $system_date->get('timezone.default') ?: date_default_timezone_get();
$now = new \DateTime('now', new \DateTimeZone($default_timezone));
$now->modify('-10 days');
$query = \Drupal::entityQuery('user')->condition('login', $now->getTimestamp(), '>');
$results = $query->execute();
if (empty($results)) {
$output->writeln('<info>No users to disable!</info>');
}
}
/**
* {@inheritdoc}
*/
protected function execute(InputInterface $input, OutputInterface $output) {
// Get the default timezone and make a DateTime object for 10 days ago.
$system_date = \Drupal::config('system.date');
$default_timezone = $system_date->get('timezone.default') ?: date_default_timezone_get();
$now = new \DateTime('now', new \DateTimeZone($default_timezone));
$now->modify('-10 days');
$query = \Drupal::entityQuery('user')->condition('login', $now->getTimestamp(), '>');
$results = $query->execute();
if (empty($results)) {
$output->writeln('<info>No users to disable!</info>');
}
foreach ($results as $uid) {
/** @var \Drupal\user\Entity\User $user */
$user = \Drupal\user\Entity\User::load($uid);
$user->block();
$user->save();
}
$total = count($results);
$output->writeln("Disabled $total users");
}
$ drupal module:install console_commands
Drupal Console provides integration with modules using namespace discovery methods. When Console is run in a Drupal installation, it will discover all the available projects. It then discovers any files in the \Drupal\{ a module }\Command namespace that implements \Drupal\Console\Command\Command.
Drupal Console will rescan the Drupal directory for available commands every time it is invoked, as it does not keep a cache of available commands.
Drupal Console provides a much more intuitive developer experience as it follows Drupal core's coding formats. We will touch on how Console can be used to create entities.
A benefit of Console is its ability to utilize Symfony Console's question helpers for a robust interactive experience. Drupal Commerce utilizes Console to provide a commerce:create:store command to generate stores. The purpose of the command is to simplify the creation of a specific entity.
The \Drupal\commerce_store\Command\CreateStoreCommand class overrides the default interact method that is executed to prompt data from the user. It will prompt users to enter the store's name, email, country, and currency.
Developers can implement similar commands to give advanced users a simpler way to work with modules and configuration.