Table of Contents for
Gaming Hacks
 Gaming Hacks
Published by
O'Reilly Media, Inc., 2004
Gaming Hacks
Published by
O'Reilly Media, Inc., 2004
- Cover
- Gaming Hacks
- Credits
- Contributors
- Acknowledgments
- Foreword
- Preface
- How to Use This Book
- How This Book Is Organized
- Conventions Used in This Book
- Using Code Examples
- Comments and Questions
- Got a Hack?
- 1. Playing Classic Games
- Legal Emulation
- Play Commodore 64 Games Without the C-64
- Play Atari ROMs Without the Atari
- Use Atari Paddles with Your PC
- Run Homebrew Games on the Atari 2600
- Create Your Own Atari 2600 Homebrew Games
- Play Classic PC Graphic Adventures
- Play Old Games Through DOSBox
- Play Reissued All-in-One Joystick Games
- Play Arcade Games Without the Arcade
- Add and Manipulate a MAME Frontend
- Keep Your ROMs Tidy and Organized
- Learn Game-Specific MAME Controls
- Filter Inappropriate MAME ROMs
- Autoboot into MAME Heaven
- Play Emulated Arcade Games Online
- Play Classic Pinball Without the Table
- Emulate the SNES on the Dreamcast
- 2. Playing Portably
- Play Games on Your iPod
- Mod Your Game Boy
- Take and Print Photos with Your Game Boy
- Compose Music on Your Game Boy
- Explore the GP32 Handheld Gaming System
- Take Your Console with You
- Explore the Bandai WonderSwan
- Play Real Games on Your PDA
- Install a PlayStation 2 in Your Car
- 3. Playing Well with Others
- Practice Proper MMORPG Etiquette
- Understand MMORPG Lingo
- Grind Without Going Crazy
- Make a Profit in Vana’diel
- Write MMORPG Macros
- Build an Effective Group
- Catch Half-Life FPS Cheaters Redhanded
- 4. Playing with Hardware
- Build a Quiet, Killer Gaming Rig
- Find and Configure the Best FPS Peripherals
- Adapt Old Video Game Controllers to the PC
- Choose the Right Audio/Video Receiver
- Place Your Speakers Properly
- Connect Your Console to Your Home Theater
- Tune Console Video Output
- Tune Your TV for Console Video
- PC Audio Hacking
- Optimize PC Video Performance
- Build a Dedicated Multimedia PC
- Use a Multimedia Projector for Gaming
- 5. Playing with Console and Arcade Hardware
- Play LAN-Only Console Games Online
- Hack the Nuon DVD Player/Gaming System
- Play Import Games on American Consoles
- Find a Hackable Dreamcast
- Play Movies and Music on Your Dreamcast
- Hack the Dreamcast Visual Memory Unit
- Unblur Your Dreamcast Video
- Use Your Dreamcast Online
- Host Dreamcast Games Online
- Burn Dreamcast-Compatible Discs on Your PC
- Burn Dreamcast Homebrew Discs
- Buy Your Own Arcade Hardware
- Configure Your Arcade Controls, Connectors, and Cartridges
- Reorient and Align Your Arcade Monitor
- Buy Cart-Based JAMMA Boards
- Programming Music for the Nintendo Entertainment System
- 6. Playing Around the Game Engine
- Explore Machinima
- Choose a Machinima Engine
- Film Your First Machinima Movie
- Improve Your Camera Control
- Record Game Footage to Video
- Speedrun Your Way Through Metroid Prime
- Sequence-Break Quake
- Run Classic Game ROM Translations
- Change Games with ROM Hacks
- Apply ROM Hacks and Patches
- Create PS2 Cheat Codes
- Hack Xbox Game Saves
- Cheat on Other Consoles
- Modify PC Game Saves and Settings
- Buff Your Saved Characters
- Create Console Game Levels
- 7. Playing Your Own Games
- Adventure Game Studio Editing Tips
- Create and Play Pinball Tables
- Put Your Face in DOOM
- Create a Vehicle Model for Unreal Tournament 2004
- Add a Vehicle to Unreal Tournament 2004
- Modify the Behavior of a UT2004 Model
- Download, Compile, and Create an Inform Adventure
- Decorate Your IF Rooms
- Add Puzzles to Your IF Games
- Add Nonplayer Characters to IF Adventures
- Make Your IF NPCs Move
- Make Your IF NPCs Talk
- Create Your Own Animations
- Add Interactivity to Your Animations
- Write a Game in an Afternoon
- 8. Playing Everything Else
- Tweak Your Tactics for FPS Glory
- Beat Any Shoot-Em-Up
- Drive a Physics-Crazed Motorcycle
- Play Japanese Games Without Speaking Japanese
- Back Up, Modify, and Restore PlayStation Saved Games
- Access Your Console’s Memory Card Offline
- Overclock Your Console
- Index
- Colophon
Add a new object type to an existing game, for standalone play or as part of new content.
Earlier, we created and imported a car model into UnrealEd to use in
Unreal
Tournament 2004 (
[Hack #82]
). Now
it’s time to take that model (the 1969 Plymouth
Barracuda from Clone Bandits, http://www.demiurgestudios.com/CloneBandits/)
and turn it into an Actor that can be placed in a
map, driven around, and used in game types such as Onslaught. The
obvious next step is to enhance the ‘Cuda by adding
nitrous-style speed boosts (
[Hack #84]
).
Tip
You can download the source code mentioned in this hack as well as the art packages necessary to use this example from http://www.demiurgestudios.com/CudaExample/.
To make the ‘Cuda its own object or
Actor in the world of Unreal, you need to create a
class for it in UnrealScript. UnrealScript is a full-featured
programming language “created to provide the
development team and the third-party Unreal developers with a
powerful, built-in programming language that maps naturally onto the
needs and nuances of game programming.”[18] You can find many UnrealScript references on the Web. Two
good ones are http://udn.epicgames.com/Two/UnrealScriptReference
and http://udn.epicgames.com/Two/MyFirstCode.
To create a new class, you first need to create a new UnrealScript
package. From your Unreal Tournament 2004 directory (generally
C:\UT2004), create a new directory. The name of
this directory will be the name of your package; for this example,
let’s call it CudaExample. In
the CudaExample directory, create a subdirectory
called Classes, and in
Classes, create a text file called
CudaCar.uc.
You can use any text editor to create and edit this file. Notepad will work, but you might consider an editor geared toward editing code. Microsoft Visual Studio works well, especially since it can do syntax highlighting on UnrealScript files if you tell it to treat them like C++ files. You might also consider using the Epic’s free Unreal Development Environment (UDE).
Tip
At the time of writing, UDE was still in beta and lacked its own web site. Find a download by performing a quick web search.
Once you’ve created CudaCar.uc,
open it up, and declare the CudaCar class like so:
class CudaCar extends ONSRV;
This line means that your CudaCar example is based
on the ONSRV class, the preexisting Scorpion
vehicle in Unreal Tournament 2004. For now, the example car will
behave and look exactly like the Scorpion. Later,
you’ll make your class use the
‘Cuda model, but that’s the only
line you need to define the class.
For the CudaCar example to work, you also need a
factory to produce instances of your CudaCar.
Vehicle factories create vehicles at the beginning of a game and when
old vehicles are destroyed. In the same way you created
CudaCar.uc, create
CudaCarFactory.uc as follows:
class CudaCarFactory extends ONSVehicleFactory;

defaultproperties
{
    // mesh for factory (only seen in the Editor)
    VehicleClass=Class'CudaExample.CudaCar'

    // type of vehicle this factory spawns
    Mesh=SkeletalMesh'CloneBanditsVehicles_K.HotRod'
}
Now open up UT2004.ini in the
System subdirectory of your UT2004 directory.
Search for the text EditPackages, and add the
line:
EditPackages=CudaExampleto the bottom of the list. Now you can compile the
CudaExample package.
Open a command prompt in the System
subdirectory, and type ucc
make. This command compiles any package in the
EditPackages list that doesn’t
have a *.u UnrealScript package file. If
everything works, you’ll end up with a new
CudaExample.u file. If you make changes to
CudaCar.uc (or any other UnrealScript file in
your package), you can recompile your code by deleting the existing
CudaExample.u file and running ucc make again.
Now you have two cars that act exactly the same.
Let’s justify this work by making the new car class
use the ‘Cuda model. Edit the
defaultproperties of the
CudaCar to add the following to your
CudaCar.uc file:
defaultproperties
{
    // Barracuda Mesh
    Mesh=SkeletalMesh'CloneBanditsVehicles_K.HotRod'

    // Don't use team skins
    RedSkin=None
    BlueSkin=None

    // Weapon
    DriverWeapons(0)=(WeaponBone="gunRTmount")

    // Vehicle Name
    VehicleNameString="Barracuda"
    VehiclePositionString="in a Barracuda"

    // Driver Position
    DrivePos=(X=0.0,Y=-30.0,Z=35.0)

    // Lights
    HeadlightProjectorOffset=(X=139,Y=0,Z=6)     // headlight projector
    HeadlightCoronaOffset(0)=(X=135,Y=44,Z=0)    // headlights
    HeadlightCoronaOffset(1)=(X=135,Y=-44,Z=0)
    HeadlightCoronaOffset(2)=(X=10,Y=33.5,Z=40)  // roof lights
    HeadlightCoronaOffset(3)=(X=12,Y=25,Z=42)
    HeadlightCoronaOffset(4)=(X=11,Y=14.5,Z=40)
    BrakeLightOffset(0)=(X=-134,Y=39,Z=6)        // tail lights
    BrakeLightOffset(1)=(X=-134,Y=-39,Z=6)

    // Wheel and wheel bones info

    // right rear tire
    Begin Object Class=SVehicleWheel Name=RRWheel
        bPoweredWheel=True
        bHandbrakeWheel=True
        BoneName="tire02"
        BoneRollAxis=AXIS_Y
        BoneOffset=(Y=20.000000)
        WheelRadius=24.2000000
    End Object
    Wheels(0)=SVehicleWheel'RRWheel'

    // left rear tire
    Begin Object Class=SVehicleWheel Name=LRWheel
        bPoweredWheel=True
        bHandbrakeWheel=True
        BoneName="tire04"
        BoneRollAxis=AXIS_Y
        BoneOffset=(Y=-20.000000)
        WheelRadius=24.200000
    End Object
    Wheels(1)=SVehicleWheel'LRWheel'

    // right front tire
    Begin Object Class=SVehicleWheel Name=RFWheel
        bPoweredWheel=True
        SteerType=VST_Steered
        BoneName="tire"
        BoneRollAxis=AXIS_Y
        BoneOffset=(Y=20.000000)
        WheelRadius=20.000000
    End Object
    Wheels(2)=SVehicleWheel'RFWheel'

    // left front tire
    Begin Object Class=SVehicleWheel Name=LFWheel
        bPoweredWheel=True
        SteerType=VST_Steered
        BoneName="tire03"
        BoneRollAxis=AXIS_Y
        BoneOffset=(Y=-20.000000)
        WheelRadius=20.000000
    End Object
    Wheels(3)=SVehicleWheel'LFWheel'
}
The
Mesh=SkeletalMesh'CloneBanditsVehicles_K.HotRod'
line sets the mesh of the vehicle to that of your
‘Cuda model instead of the Scorpion model. Given
that you’ve changed models, you need to change a few
other things, too. First off, you need to prevent the red and blue
team skins from applying to this model, because those textures are
entirely different. Do this by setting the RedSkin
and BlueSkin to NONE. Next,
given that all the bone names are different, you need to reassign
things to use valid bone names. The gun, for example, attaches to the
bone named gunRTmount. The same reassignment goes
for the wheels, done with the Wheels array at the
bottom of defaultproperties.
Tip
Due to the way UnrealScript handles subobjects in
defaultproperties, you have to assign all the
relevant wheel properties, even if they didn’t
change from the parent object.
It is helpful to change several other properties such as the name of
the vehicle (VehicleNameString and
VehiclePositionString) and where the driver sits
(DrivePos). Consider also adjusting the position
of the headlights, taillights, and headlight projector in the
Lights block in
defaultproperties. The CudaCar
will still work without these changes, but these adjustments are more
aesthetically pleasing. Finally, the Scorpion blades will not exist
on the CudaCar, because there are no blades on the
‘Cuda model. However, the blades will still make
noise.
Now that you’ve created your own class and set it to
use the new model, use UnrealEd to place the car in a map. Run
UnrealEd by typing UnrealEd at a command
prompt in the System directory, double-clicking
on the UnrealEd icon, or selecting UnrealEd from the start menu. Once
in UnrealEd, open up any Onslaught map. (These maps all start with
ONS- and work with the vehicle-focused Onslaught
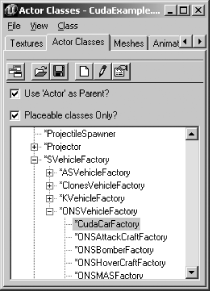
game in Unreal Tournament 2004.) Open the Actor Classes browser, and
select CudaCarFactory, as shown in Figure 7-10.
Right-click somewhere on the terrain in the map, and select Add CudaCarFactory Here, as seen in Figure 7-11.

This action places a factory for your new car class in the map. At
this point, save your map. Go to the file menu and select Save As....
Now, enter your map name, making sure to start it with the prefix
ONS- (for example,
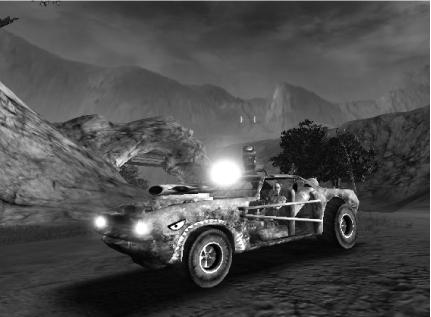
ONS-CudaExample), and click Save.
Now your map will appear in the map list in Unreal Tournament 2004 when you select the Onslaught game type from either the Host Game or Instant Action main menu options. You can also test your map by clicking the Play Map! button in UnrealEd to launch the map. Once in the map, make your way to where you placed the car, get in, and drive! You should look as cool as Figure 7-12.