Table of Contents for
Gaming Hacks
 Gaming Hacks
Published by
O'Reilly Media, Inc., 2004
Gaming Hacks
Published by
O'Reilly Media, Inc., 2004
- Cover
- Gaming Hacks
- Credits
- Contributors
- Acknowledgments
- Foreword
- Preface
- How to Use This Book
- How This Book Is Organized
- Conventions Used in This Book
- Using Code Examples
- Comments and Questions
- Got a Hack?
- 1. Playing Classic Games
- Legal Emulation
- Play Commodore 64 Games Without the C-64
- Play Atari ROMs Without the Atari
- Use Atari Paddles with Your PC
- Run Homebrew Games on the Atari 2600
- Create Your Own Atari 2600 Homebrew Games
- Play Classic PC Graphic Adventures
- Play Old Games Through DOSBox
- Play Reissued All-in-One Joystick Games
- Play Arcade Games Without the Arcade
- Add and Manipulate a MAME Frontend
- Keep Your ROMs Tidy and Organized
- Learn Game-Specific MAME Controls
- Filter Inappropriate MAME ROMs
- Autoboot into MAME Heaven
- Play Emulated Arcade Games Online
- Play Classic Pinball Without the Table
- Emulate the SNES on the Dreamcast
- 2. Playing Portably
- Play Games on Your iPod
- Mod Your Game Boy
- Take and Print Photos with Your Game Boy
- Compose Music on Your Game Boy
- Explore the GP32 Handheld Gaming System
- Take Your Console with You
- Explore the Bandai WonderSwan
- Play Real Games on Your PDA
- Install a PlayStation 2 in Your Car
- 3. Playing Well with Others
- Practice Proper MMORPG Etiquette
- Understand MMORPG Lingo
- Grind Without Going Crazy
- Make a Profit in Vana’diel
- Write MMORPG Macros
- Build an Effective Group
- Catch Half-Life FPS Cheaters Redhanded
- 4. Playing with Hardware
- Build a Quiet, Killer Gaming Rig
- Find and Configure the Best FPS Peripherals
- Adapt Old Video Game Controllers to the PC
- Choose the Right Audio/Video Receiver
- Place Your Speakers Properly
- Connect Your Console to Your Home Theater
- Tune Console Video Output
- Tune Your TV for Console Video
- PC Audio Hacking
- Optimize PC Video Performance
- Build a Dedicated Multimedia PC
- Use a Multimedia Projector for Gaming
- 5. Playing with Console and Arcade Hardware
- Play LAN-Only Console Games Online
- Hack the Nuon DVD Player/Gaming System
- Play Import Games on American Consoles
- Find a Hackable Dreamcast
- Play Movies and Music on Your Dreamcast
- Hack the Dreamcast Visual Memory Unit
- Unblur Your Dreamcast Video
- Use Your Dreamcast Online
- Host Dreamcast Games Online
- Burn Dreamcast-Compatible Discs on Your PC
- Burn Dreamcast Homebrew Discs
- Buy Your Own Arcade Hardware
- Configure Your Arcade Controls, Connectors, and Cartridges
- Reorient and Align Your Arcade Monitor
- Buy Cart-Based JAMMA Boards
- Programming Music for the Nintendo Entertainment System
- 6. Playing Around the Game Engine
- Explore Machinima
- Choose a Machinima Engine
- Film Your First Machinima Movie
- Improve Your Camera Control
- Record Game Footage to Video
- Speedrun Your Way Through Metroid Prime
- Sequence-Break Quake
- Run Classic Game ROM Translations
- Change Games with ROM Hacks
- Apply ROM Hacks and Patches
- Create PS2 Cheat Codes
- Hack Xbox Game Saves
- Cheat on Other Consoles
- Modify PC Game Saves and Settings
- Buff Your Saved Characters
- Create Console Game Levels
- 7. Playing Your Own Games
- Adventure Game Studio Editing Tips
- Create and Play Pinball Tables
- Put Your Face in DOOM
- Create a Vehicle Model for Unreal Tournament 2004
- Add a Vehicle to Unreal Tournament 2004
- Modify the Behavior of a UT2004 Model
- Download, Compile, and Create an Inform Adventure
- Decorate Your IF Rooms
- Add Puzzles to Your IF Games
- Add Nonplayer Characters to IF Adventures
- Make Your IF NPCs Move
- Make Your IF NPCs Talk
- Create Your Own Animations
- Add Interactivity to Your Animations
- Write a Game in an Afternoon
- 8. Playing Everything Else
- Tweak Your Tactics for FPS Glory
- Beat Any Shoot-Em-Up
- Drive a Physics-Crazed Motorcycle
- Play Japanese Games Without Speaking Japanese
- Back Up, Modify, and Restore PlayStation Saved Games
- Access Your Console’s Memory Card Offline
- Overclock Your Console
- Index
- Colophon
Burn your own special, personal Dreamcast CD-Rs.
In order to burn standalone self-booting Dreamcast discs on your PC, you need the ability to burn relatively complex CD images. The BIN, CUE, and ISO formats generally lack sufficient disc information. Therefore, most Dreamcast-disc images come in NRG or the more popular CDI format.
As for the media itself, normal CD-Rs will work. There’s no possible way to burn GD-ROMs, the Dreamcast’s proprietary format, unless you have a special Dreamcast-specific burner and a Dreamcast developer’s kit. Unless you’ve done some very pricey eBay shopping, it’s doubtful that you do.
The CDI format originated with Padus Discjuggler (http://www.padus.com/products/discjuggler.php). It’s now also available in the $50 utility Alcohol 120% (http://www.alcohol-soft.com/). Fortunately, there’s a 30-day full-featured demo version. This is one of the best products with which to try Dreamcast CD burning.
NRG, the less common alternative, is a custom format created by the Windows program Nero Burning ROM, more often just called Nero. There’s a demo version of Nero available on the official site (http://www.nero.com/) that is limited to single-speed burning. The full version costs around $80.
Here’s the step-by-step version of burning a CDI image using the trial version of Alcohol 120%:
Download the trial Windows version of Alcohol 120% (http://trial.alcohol-soft.com/en/download_120.php) and install it to a sensible location on your machine. Launch it. It will configure its virtual drives and should autodetect your CD burner.
Prepare your disc image. Use the self-booting CDI image of Great Giana Sisters (http://www.gianas-return.de/downloads.php), a sideways-scrolling platformer originally released in the ’80s that draws absolutely no inspiration from a certain pair of plumbers. Unzip the file to somewhere obvious. From the File/Open menu in Alcohol 120%, load the image. You’ll see support for plenty of other formats mentioned in the file window, including the sometimes-alternative Nero image (.NRG) format.
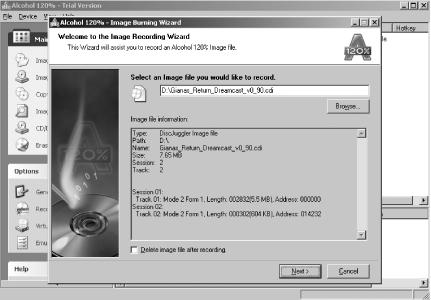
Hit the Image Burning Wizard link on the main screen of Alcohol 120% (or from the File menu), as shown in Figure 5-5. Review your file selection and ensure that it has two sessions, each with a track. This is the special data structure necessary to make self-booting CDs work reliably. Hit Next, and make sure your CD recorder data is set up properly; then hit Burn. Follow the usual caveats for burning CDs. If your machine is a little sluggish, for example, you might want to reduce the burning speed.
Pop the finished CD into your Dreamcast, boot it, and prepare for a little Giana sibling fun and shenanigans.
Various other lesser-known programs use both the NRG and CDI formats, but bear in mind that some may try to convert the original formats to the ISO or BIN standards before burning. This can interfere with the complex CD formatting required for self-booting CDs. Burning coasters may be useful at first, but it’s a tad annoying when the number of coasters outpaces the amount of people who drink beverages in your house.
Tip
Unfortunately, Mac or Linux burning software doesn’t often work well with these exotic formats, so you’ll have an easier time using a Windows machine to burn these particular hacks. Fortunately, Curmudgeon Gamer has been experimenting with methods of burning on Linux that seem promising (check out http://curmudgeongamer.com/article.php?story=20040105232756356).
As well as the simpler, standalone CDI files, you can also burn multiple small homebrew Dreamcast programs onto one disc and then use a self-booting menu to switch between them. Obviously, this doesn’t always use a CDI format, because you can select the executables you want to add, which adds some multisession weirdness. This deserves a separate hack of its own ( [Hack #57] ).